Five ways to save money on plants and flowers this planting season.
Gardening is one of my favorite pastimes, but also one of the most expensive! Over the years I've come up with quite a few ways to save on both annual and perennial plants this time of year.
Sometimes I will still splurge on a plant or tree, but for the most part these methods will save me a TON on flowers, bushes and trees for our gardens and yard.
I've planted or replanted a TON of plants this spring (most were small, individual flowers) and have loved watching them thrive.
I gathered my top five ways to save on plants this spring and summer!
1. Pick spreading plants
I love our window boxes, but they can be expensive to fill every spring. I learned years ago that using flowers that spread will make my money go a lot further.
My favorite has always been the wave petunias because they multiply like crazy and cascade out of boxes or containers:

These are the only annual flowers I plant each year because they spread and fill in so beautifully.
Annuals only last one season, perennials will come back year after year.
For your landscaping, look for ground cover or flowers that spread, like this awesome sedum plant I showed you years ago:
Read the full post
Via https://www.thriftydecorchick.com/2023/05/five-tips-to-save-ton-on-flowers-and.html
0 Comments
Delicious red wine fruity sangria recipe, the perfect summer drink!
This fruity sangria is one of my favorite sweet summer drinks. It's slightly fizzy and so refreshing.
My red wine sangria is easy to make and is a lighter beverage perfect for warmer days. (But it's a favorite of mine year round!)
A lovely reader shared this sangria recipe YEARS ago...probably nearly 15 years now. I needed a good one for an event coming up and sent out the call on the blog.
I’ve tried a lot of sangria in my day (well not a LOT, but a few…you know. Whatever.) and it’s hard to find one that has the right amount of sweet fruitiness, but isn't overwhelming.
Here’s what you’ll need for this delicious red sangria: 
Now the first time I read the recipe, it felt like there were SO MANY ingredients.
But 1.) we usually have most if not all of the ingredients on hand and 2.) it's worth it:

The only ingredient I usually need to pick up when I make it is the cheap fruity wine.
Here are the measurements for the sangria ingredients:
Read the full post
Via https://www.thriftydecorchick.com/2013/06/best-sangria-ever.html Twenty big and small DIY projects to help organize all around the house.I've gathered 20 helpful and cute organization ideas that will help corral your clutter! Now before you start organizing, I recommend decluttering first. I shared the decrapifying process I used years ago that still works for me today. I found that method to be the first that really helped to change my mindset when it came to the clutter in our house. Now onto these great organizing ideas and DIY projects! I pulled together some of my favorites from a bunch from talented bloggers. I hope these inspire you to tackle any problem areas in your home! 1. Carli hit it out of the park with this SMART and pretty coat closet makeover. It's a total command station and I love how she utilized the back of the door: 
You have to go see how the inside looks too -- love it! 2. Danielle at Storypiece shared how she put together some cute wood and chalkboard bin labels:
A stained wood and black combo always looks good!
3. Stacy's IKEA master closet redo made so much better use of her closet space:

Literally every single thing has a spot -- dreamy!
4. I tore out the wire shelves in my closet a couple years ago and did a similar IKEA closet makeover:
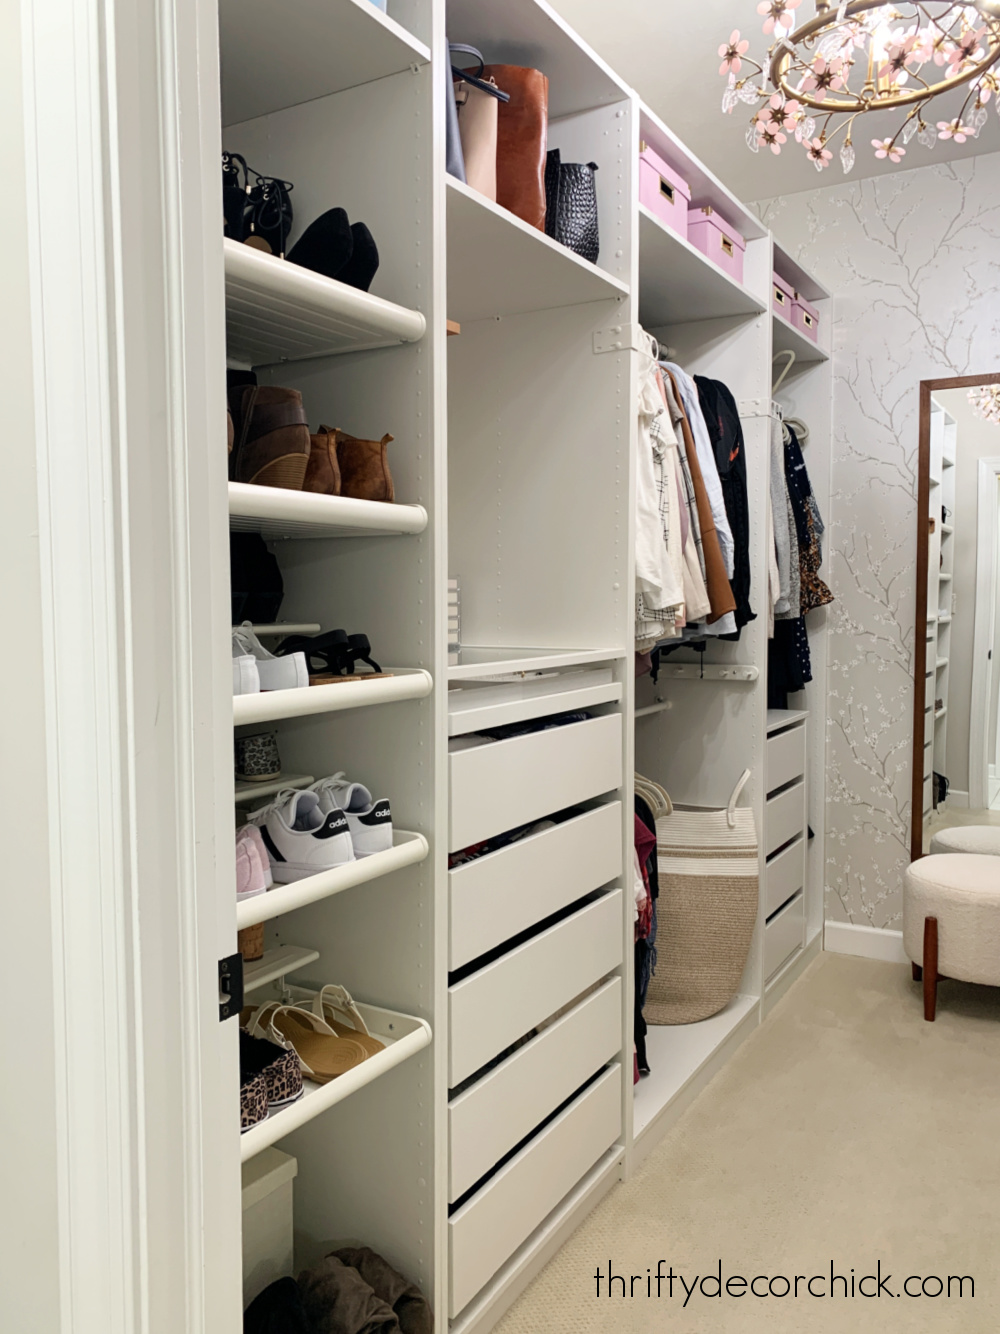
This has been one of my best projects EVER. It makes such a big difference in my day!
5. This is such a simple idea to organize keepsakes and papers for all the whole family:

I find the simplest solutions are usually the best!
6. We have a few bins for bigger baby and childhood items, but I wanted the childhood papers and school photos to be organized in a way we could enjoy them.
See my method for organizing mementos and photos here:

7. Angela shared how they created some great toy storage in an awkward spot by their stairs:

I loved that it's tiered to fit in with the stairs but offers as much storage as possible for that spot.
8. Figuring out how to best use an awkward space is one of my favorite things to do.
If your bathroom vanity doesn't have much space (like ours), these under sink sliding drawers are a game changer!:

We can store SO much more in our vanities (and easily access them) now.
9. Haeley's fabulously organized craft closet just calms my mind:

Organized bins and labels make me happy. And I love that you can still see what's inside each one!
10. You have to check out this amazing closet that Samantha organized:

Wow, it is gorgeous! She gives some great organizing tips in that post as well.
11. I adore Kim's DIY pegboard solution for a bunch of the kid stuff in her son's room:
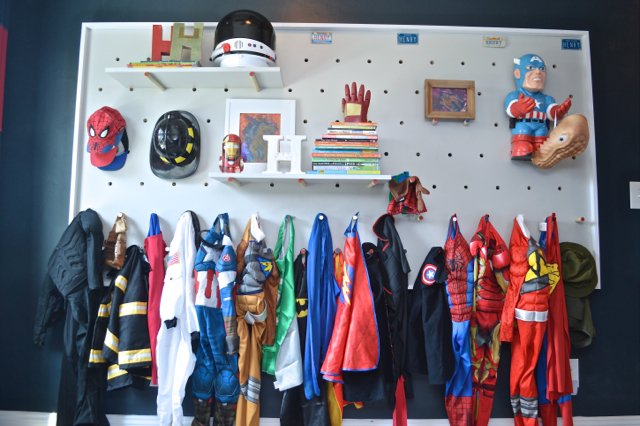 This giant pegboard is SO cute (I miss all of those little costumes!) and holds a ton of stuff! I LOVE that it looks like art.
12. My pegboard Nerf storage isn't as cute as Kim's, but is such a great storage solution!:

13. Jaime's brilliant slide out water bottle drawer is a must see -- you could use the same concept for any kitchen or bathroom needs:

14. When I made over our pantry, I built similar DIY pull out cabinet drawers: 
These make SO MUCH better use of the space inside traditional cabinets!
15. Cristina hit it out of the park with this custom closet makeover. It's definitely one of the best I've seen:

16. You MUST go check out Tiffany’s custom built in pantry. It is fantastic:
Drawers people. I want drawers everywhere. (And there’s a little surprise on the sides.) 17. Jennifer turned an awkward storage closet into a multi-purpose room under the stairs:
It’s a mud room, a storage room, a pantry -- and it looks so good! Beadboard makes just about any space feel fresh and clean. 18. I made the most of an under utilized space in our home when I transformed our mud room closet into a cleaning and cat supply/litter closet with a cute custom door for the cats: 
This cat closet is another project that made a BIG difference in our home! We all love it. :) 19. At first glance Chelsea’s cute pantry may look like just another organizing project: 20. And finally, Roeshel knocked this out. of. the. park. with her wood and pipe industrial pantry:
This project of hers is one of my all time favorite ways to make the most of a space. I love the walls, the rug, the lights (!) and of course the shelving. Just fantastic. There you go -- from big to small, some awesome organization ideas that may give you ideas for your home!
Never miss a post by signing up to get posts via email.
Via https://www.thriftydecorchick.com/2023/05/twenty-awesome-organization-projects-to.html How to make a customizable pet food tray that will hold up to water and messes!
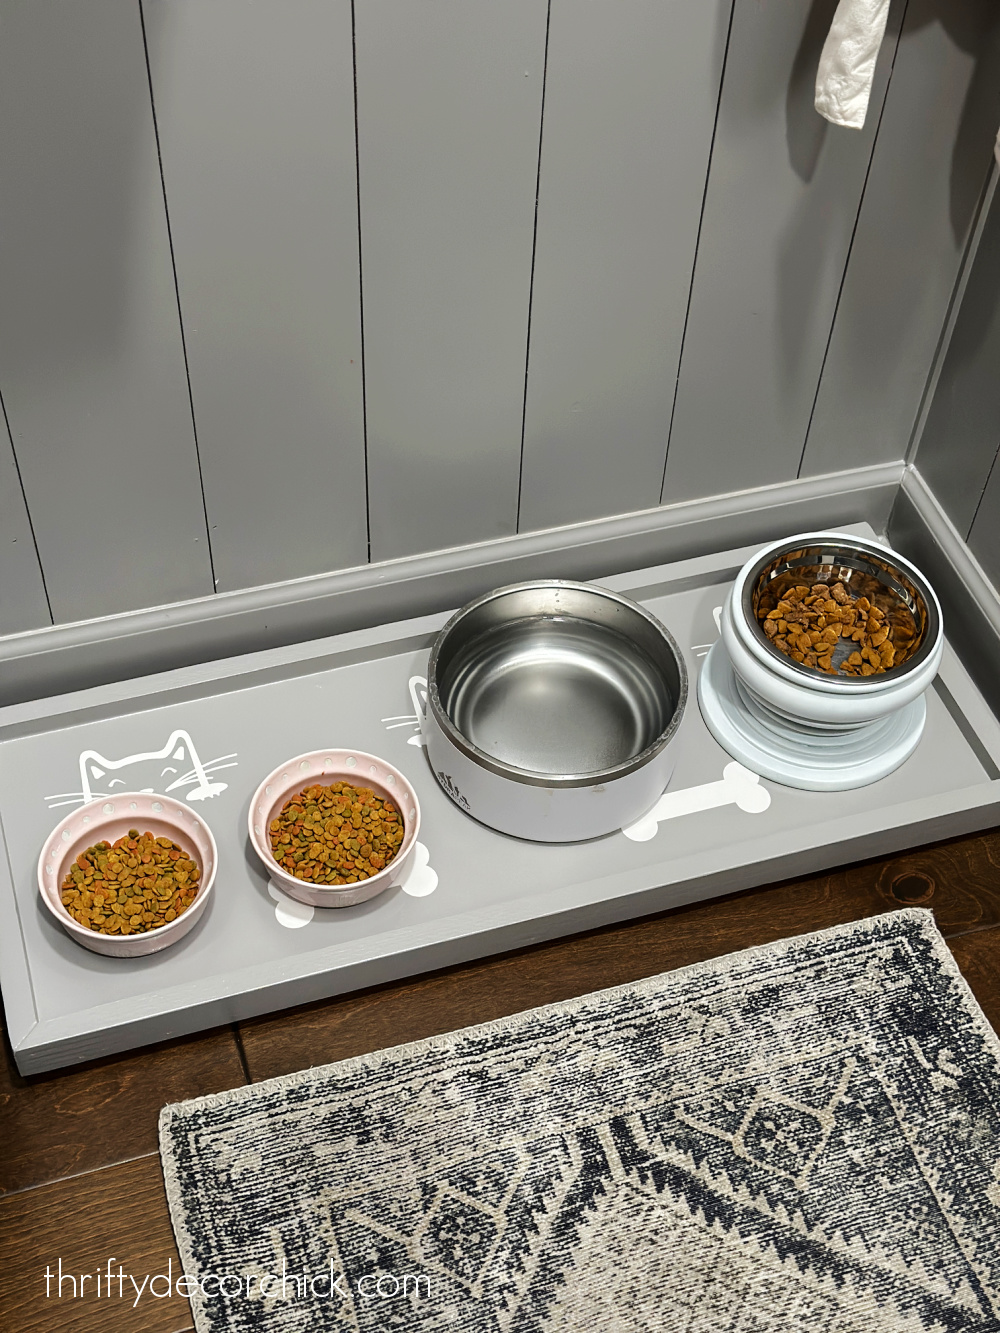
I made an adorable, washable feeding station using scrap wood and paint we had on hand and we LOVE it! It turned out so cute.
This is the second time I've made a custom DIY pet food tray. I'll show you my first version at the end of this post!
I think figuring out the best spot for pet food bowls is hard -- you want it out of the way, but still easily accessible. I shared some of my favorite pet food station ideas for animals years ago -- there are so many great ideas! Although I don’t have anything that cool, we did need something to corral the dog and cat food bowls.
We kept them in our pantry before I did the huge makeover last year. When that was finished, we tried keeping them in the mud room for awhile, but it felt like we were always bugging the animals when they were eating since it was near a walkway.
Sooo we decided to move them back into the pantry at the end of the room, but I wanted to build a new pet food tray to coral their messes a bit. Our dog seems to get more water out of the bowl than actually drink it, and our cats drop their food all around their bowls. We needed something that could be washed and hold up to standing water over time. Thankfully I had most of the materials needed for this cute tray already, so this was a super inexpensive project! I started with a piece of scrap wood for the bottom of the tray, and then mitered the ends of a 1x2 to make a "frame" around the bottom: 
This post may contain affiliate links for your convenience.
I may earn a small commission when you make a purchase through links.
See my policies and disclosure page for more information.
This tray is a great beginner project if you're just starting out with tools and DIYing! I measured the food bowls to see what size I needed and I ended up with 30 inches for the base of the tray. I cut down my 1x2s for the lip on my miter saw. To attach the trim, I added a bead of wood glue before nailing them into the sides of the base with my nail gun: 
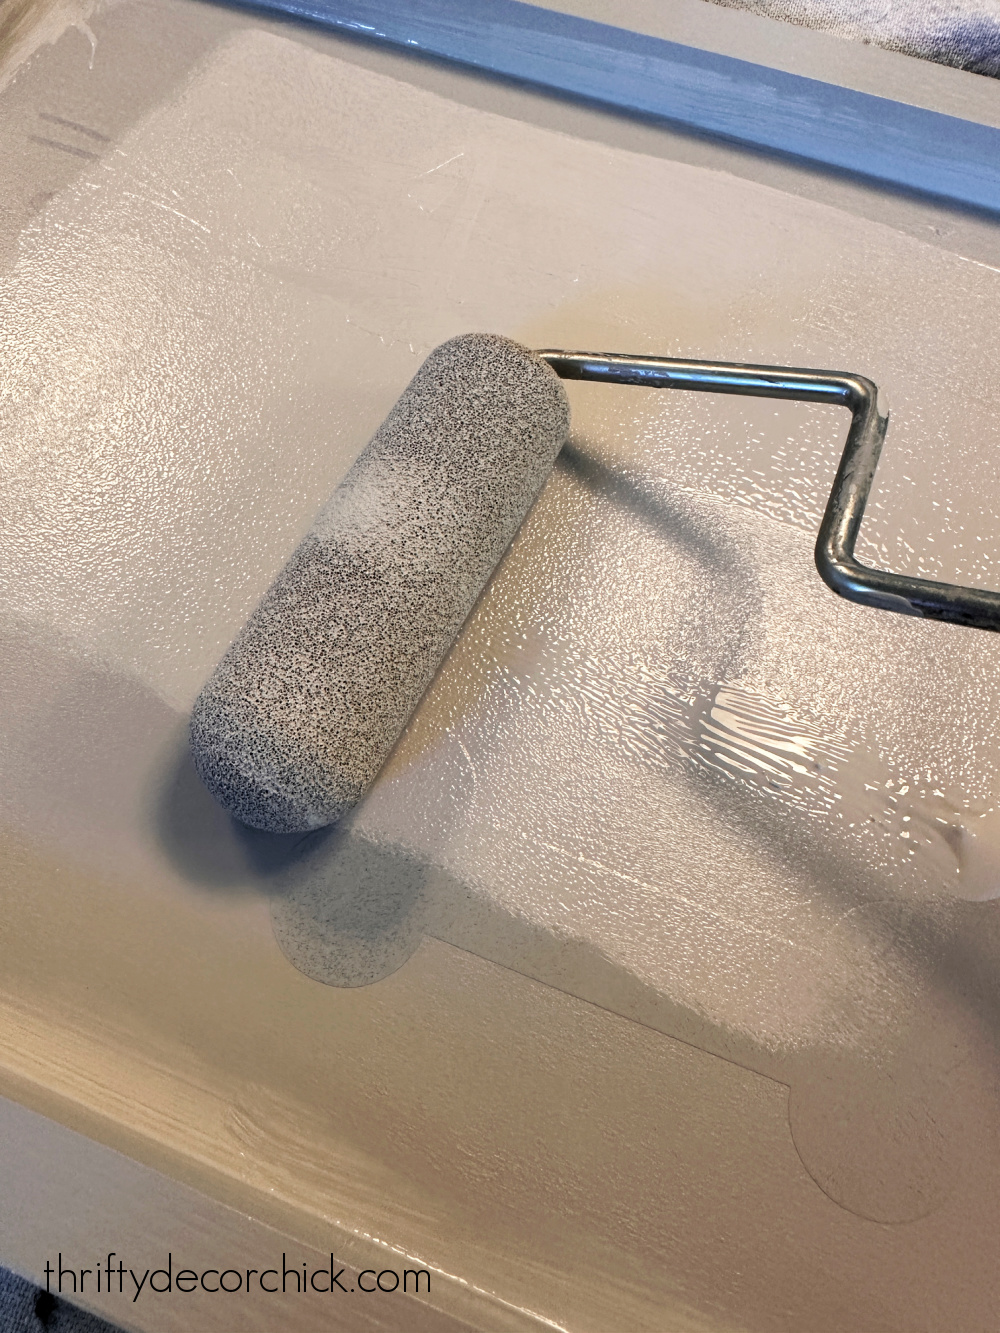
If you don't have a nail gun, wood glue would be sufficient -- you'll just need to let it dry before moving on. And then because I wanted this to be water tight I caulked the gaps between the base and the trim. This is super important to keep any water from getting into the crevices! I had this wood primer from Sherwin-Williams on hand and it was perfect for this project since it's made to protect exterior surfaces that get rain: 
Any primer will work, but this version just gives a bit more protection.
Wood surfaces can hold up to a lot of moisture with caulk and paint!
A few coats of good paint will prevent even MDF from absorbing water.
After two coats of primer, I put a quick coat of white paint on just the base of the tray and then let that dry for day before moving on to the adorable part of this DIY. :)
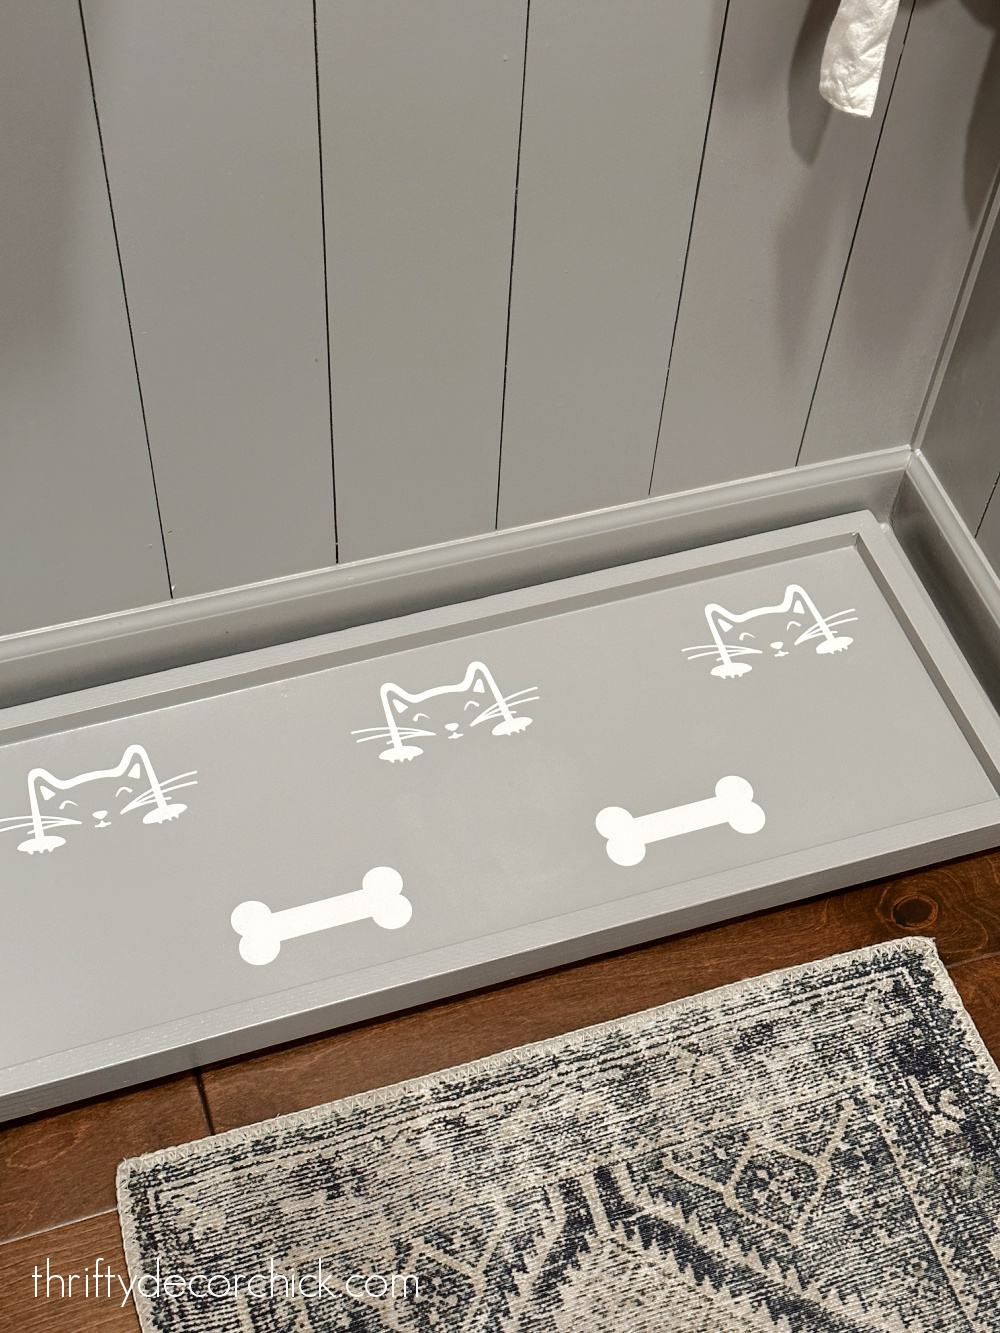
I got some pet wall vinyls last year for another project, and thought this tray would be another cute way to use them! I put a few on the bottom over the white paint:

You can find the cat face vinyls here and the dog bones here.
Keeping the vinyls on, I painted a couple coats a light gray over the entire thing:
I color matched our pantry cabinets to get this color, here's the formula you can take to the paint store:

It's such a lovely gray color -- no weird undertones at all!
Next, I wanted to add some feet to get the tray up off the floor. I wanted it to be open a bit underneath in case water spilled out.
I found these cute little wood toy wheels at the craft store and painted four in that same gray paint:

I screwed these into each corner underneath the tray.
After the paint was fully dry, I used some tweezers to pull up the dog and cat vinyl designs:

The last step was to add a protective coating using this Krylon clear coat spray I already had.
I let everything dry for a full day before putting the food bowls on the tray. It turned out SO cute!!:
Adoyable as my neice would say! :)
I kept walking around with it, showing my family how stinking cute it was. ?

We don't walk down that far since that end cabinet opens out towards us, so it's plenty out of the way.
I like having their food back in here so they have a bit more of a calm space to eat. It's also great because their food is in that cabinet and easily accessible.
The animals seem to like it. Ha! SO cute:
It's out of the way and gives them plenty of room.
We rarely close the pantry door, but we keep extra food and water out in our basement kitchenette in case they need it.
I put this simple project off forever, and finally got it done for around $10 in materials!:

Years ago I made a very similar tray at our old house. I used some painter's tape to create a simple striped design on that one:
I think the size was the exact same! I don't know what happened to this one -- I can't remember what we did with it. We had SO many things go missing in our move, maybe it was one of those. It turned out really cute as well -- you can customize these so many ways when you make your own pet food tray:
I’ve made quite a few decorative trays in my day, including this tray with leather handles, and this Lego hideaway tray. You can change these up so many ways -- add some handles, use a stencil on the base, whatever you want – the possibilities are endless! :)
Never miss a post by signing up to get posts via email.
Via https://www.thriftydecorchick.com/2014/03/diy-pet-food-tray.html This secret ingredient takes box brownie mix to the next level!
I have a quick and AMAZING brownie recipe for you! A good friend of mine shared this easy addition with me a few years back and it makes for an even more delicious brownie.
Now I like a good brownie...it's just not always my pick for a dessert. If you offer me one, duh, I'm going to take it. But it's not one I'd pick to make on a whim.
Until now. :)
I must introduce you to the most amazing brownie...EVER. There is a special, secret ingredient that will rock your world. I asked my friend for the recipe, thinking it was some super special family tradition passed down through the generations -- and had to laugh when she told me she made them with a box mix.
First of all, I didn't even KNOW about dark chocolate brownies. Um, hello. I didn't like dark chocolate till a few years ago and now it's my favorite.
There's actually two secret ingredients but one didn't surprise me as much as the other...can you guess?:

The cinnamon wasn't a big shock, I mean, have you had chili with cinnamon? Next level stuff.
But the kicker (literally) was the chili powder. Man oh man...these are DELISH. Hands down the best brownie I've ever tasted.
Read the full post
Via https://www.thriftydecorchick.com/2016/11/the-secret-ingredient-for-best-brownies.html My ten favorite practical and pretty items for spring!
I love spring almost as much as I love the fall season. SO close. I really enjoy the process of prepping our outside spaces and gardens for the upcoming year.
Nearly every day I walk around and marvel at how quickly our flowers and plants grow at this time of year. I swear sometimes I could watch them grow!
These items have been so nice to have around as the weather has warmed up and I've been working outside again.
Some are cute, some are practical, and I highly recommend ALL of them! :)
Many of these would make wonderful Mother's Day gifts for the Mom in your life who enjoys the outdoors. ?
This post may contain affiliate links for your convenience.
I may earn a small commission when you make a purchase through links.
See my policies and disclosure page for more information.
1. Affordable outdoor rug
First up, this SUPER affordable striped rug for outside! I first purchased this Novogratz blue and white outdoor rug a couple years ago.
You may have seen it under the dining table on our patio:
The rug we've had on our covered patio was starting to fall apart, so I took a look into this one again and couldn't believe the price!
A 6.5 by 9.5 foot size is SO affordable -- and is $50 less than when I bought the first one years ago. It's great quality, easy to clean and the design will work beautifully just about anywhere.
2. Inexpensive (and washable!) outdoor ottomans
Here's that rug close up on our covered area, with the new outdoor ottomans I grabbed recently:
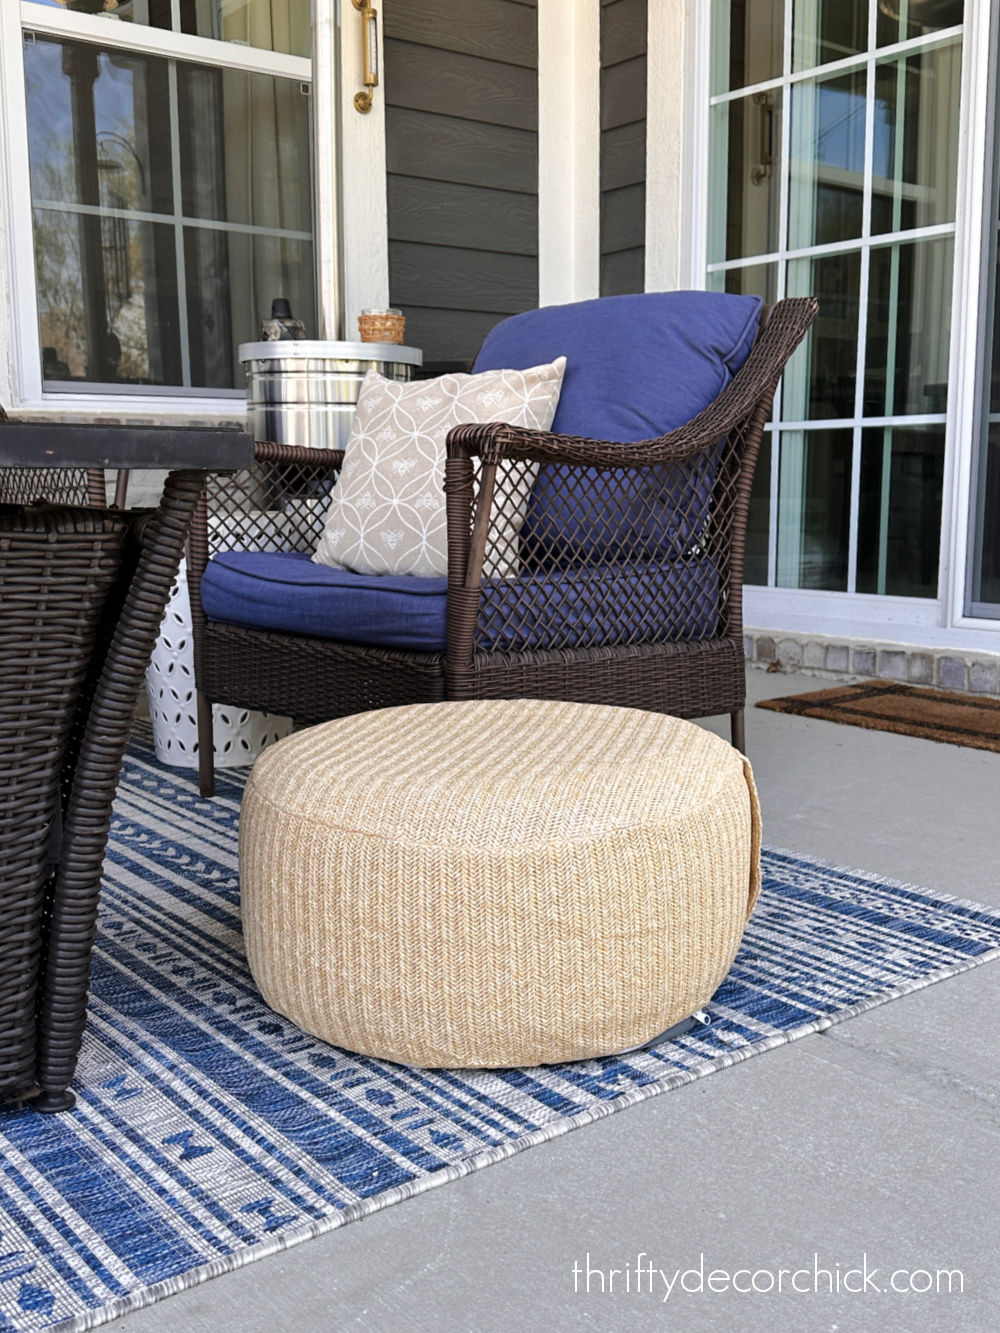
Looks like a regular pouf right? Well...it's actually just filled with air. ;) This is a blow-up ottoman and is perfect for outside!
We had fabric ones before that were supposed to hold up to the elements, but they literally fell apart. They were so hard to keep clean because I couldn't take the covers off to wash them.
This affordable option has a washable cover that's easy to remove, and the insert can be blown up. It even comes with a foot air pump to fill it.
So far I love them -- I'll be sure to keep you updated on how well these hold up. The only precaution we have to take is to make sure they don't blow away in storms or high winds. ?
*These inflatable ottomans are the same, but come in 39 different design options!
3. Beautiful wicker citronella candle
This is one of the prettiest citronella candles I've seen! It comes in three wick and one wick versions. I just love the rattan around the glass:
Read the full post
Via https://www.thriftydecorchick.com/2023/04/sprucing-up-for-spring-my-ten-favorites.html I tested three ways to clean filthy door and window tracks. See my favorite method here!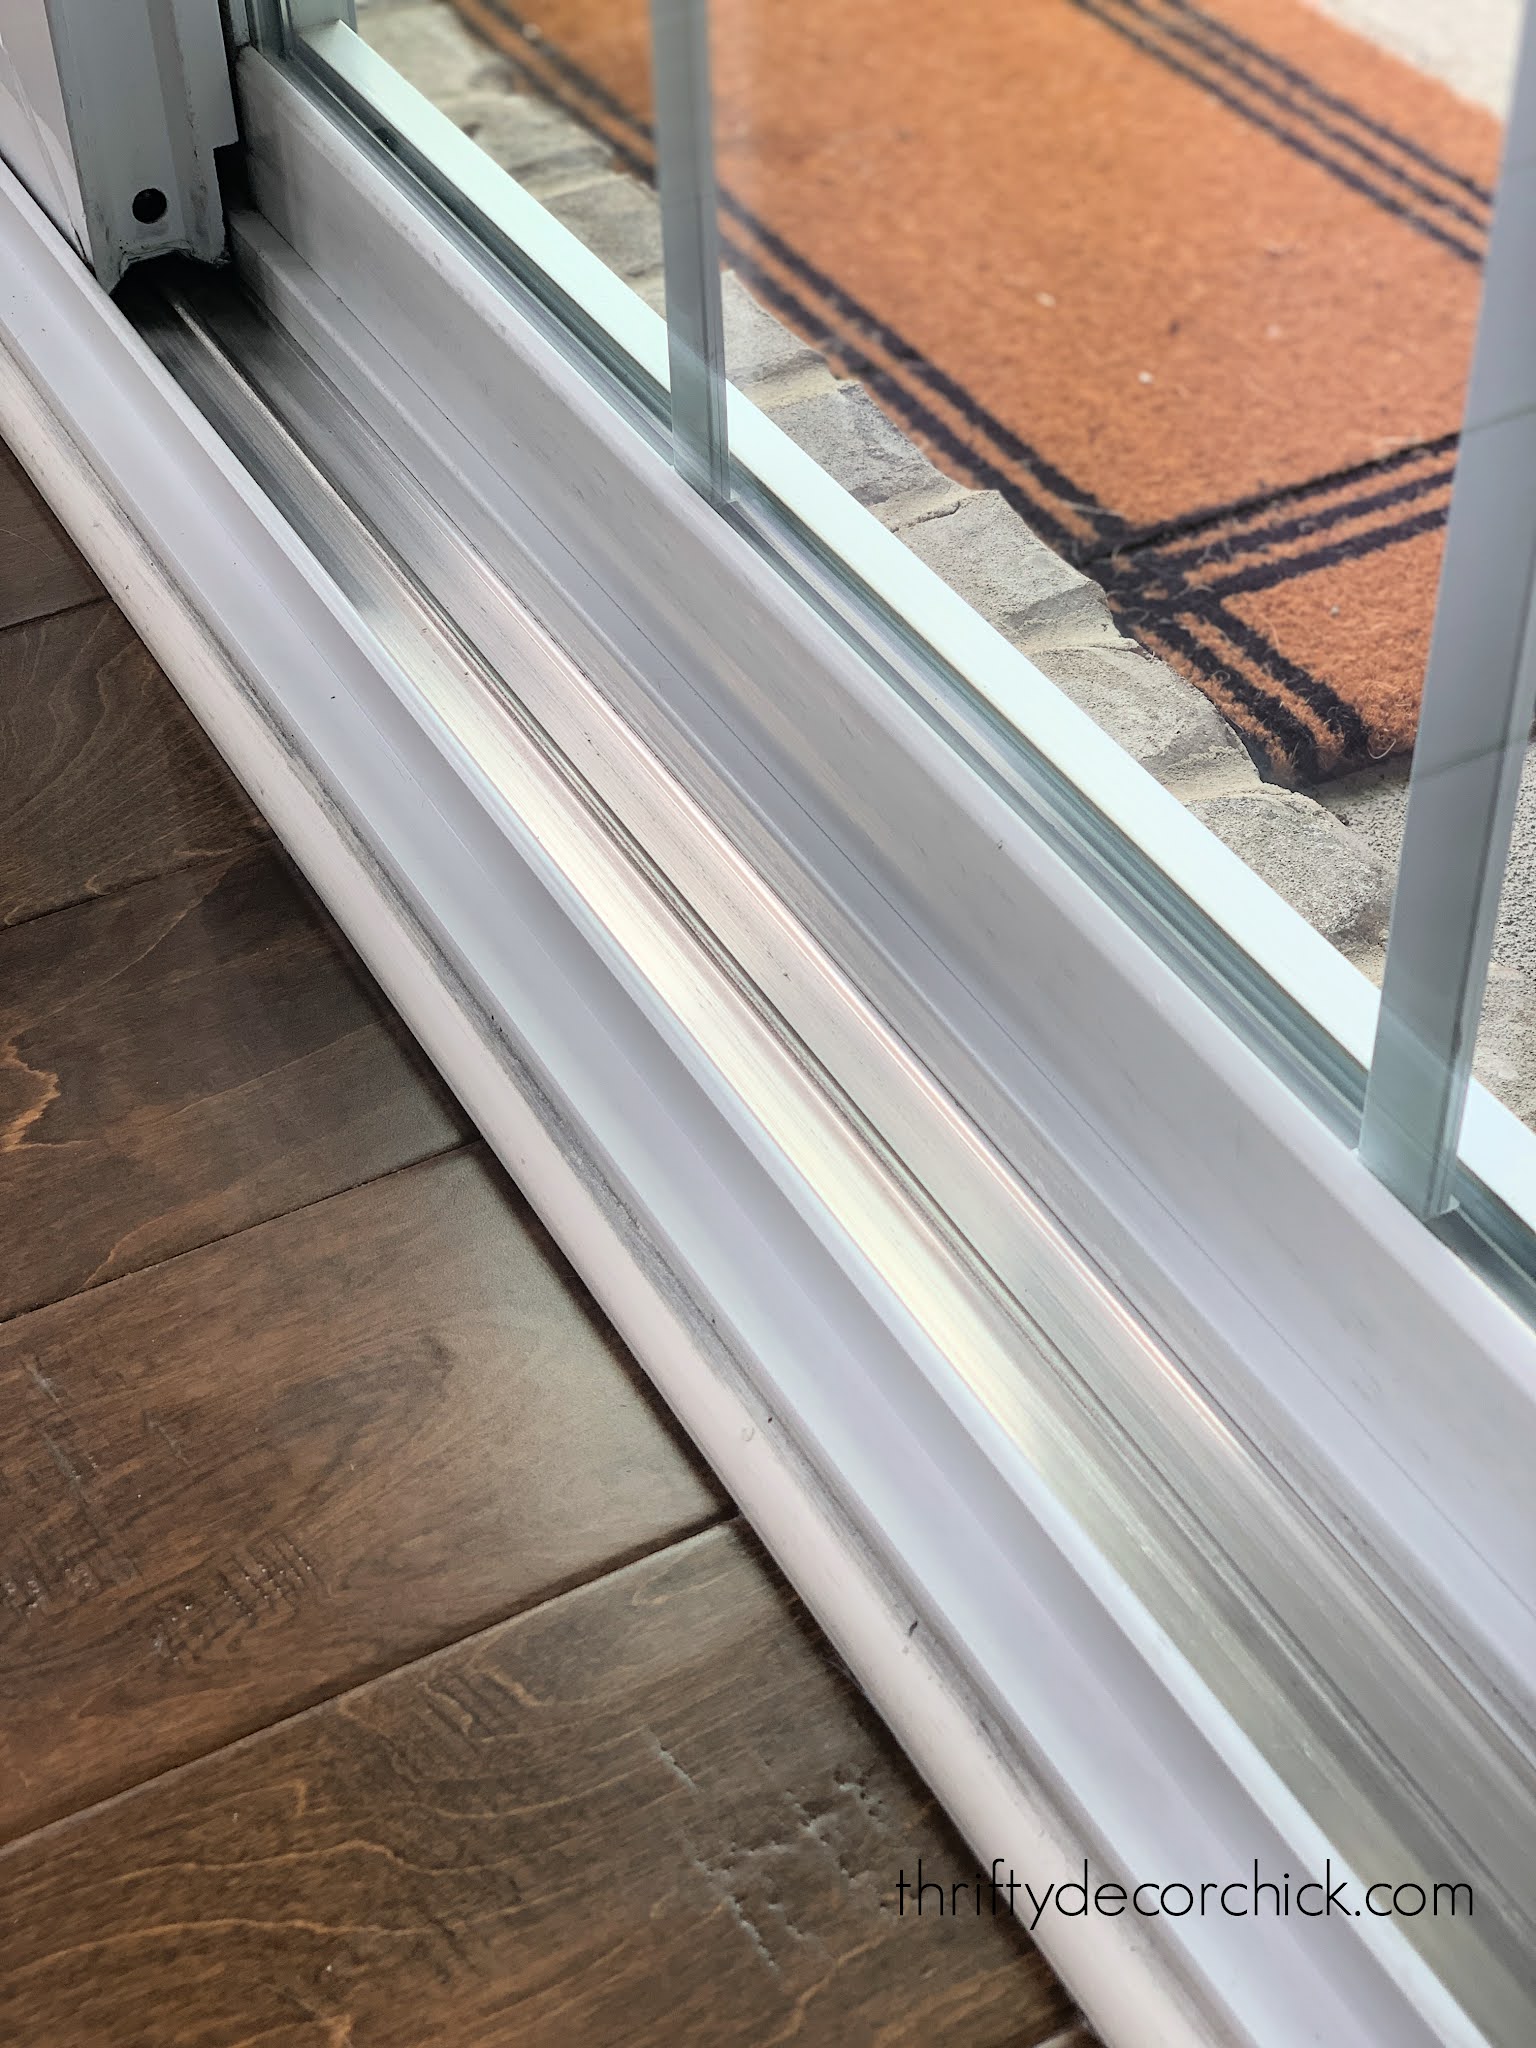
Our window sills and door tracks were GROSS and desperately needed to be cleaned. Our sliding back door track was by far the worst spot. YUCK.
I can't believe I forgot to take a photo of the full before, but don't you worry, you'll get to see plenty of the nastiness as we go.
Before tackling these fithy spots, I wanted to figure out the best way to clean the sills and tracks. Otherwise I knew it would take forever to get all of the grime out of the little crevices.
I did some research and found three hacks/tools for cleaning out your dirty window sills and door tracks. I tested all three for you and am sharing my results!
This post may contain affiliate links for your convenience.
I may earn a small commission when you make a purchase through links.
See my policies and disclosure page for more information.
Sill and track brush cleaning set
I found this window sill brush cleaning set that also has a few other handy cleaning doodads. They are all great for smaller spaces and hard to reach areas:
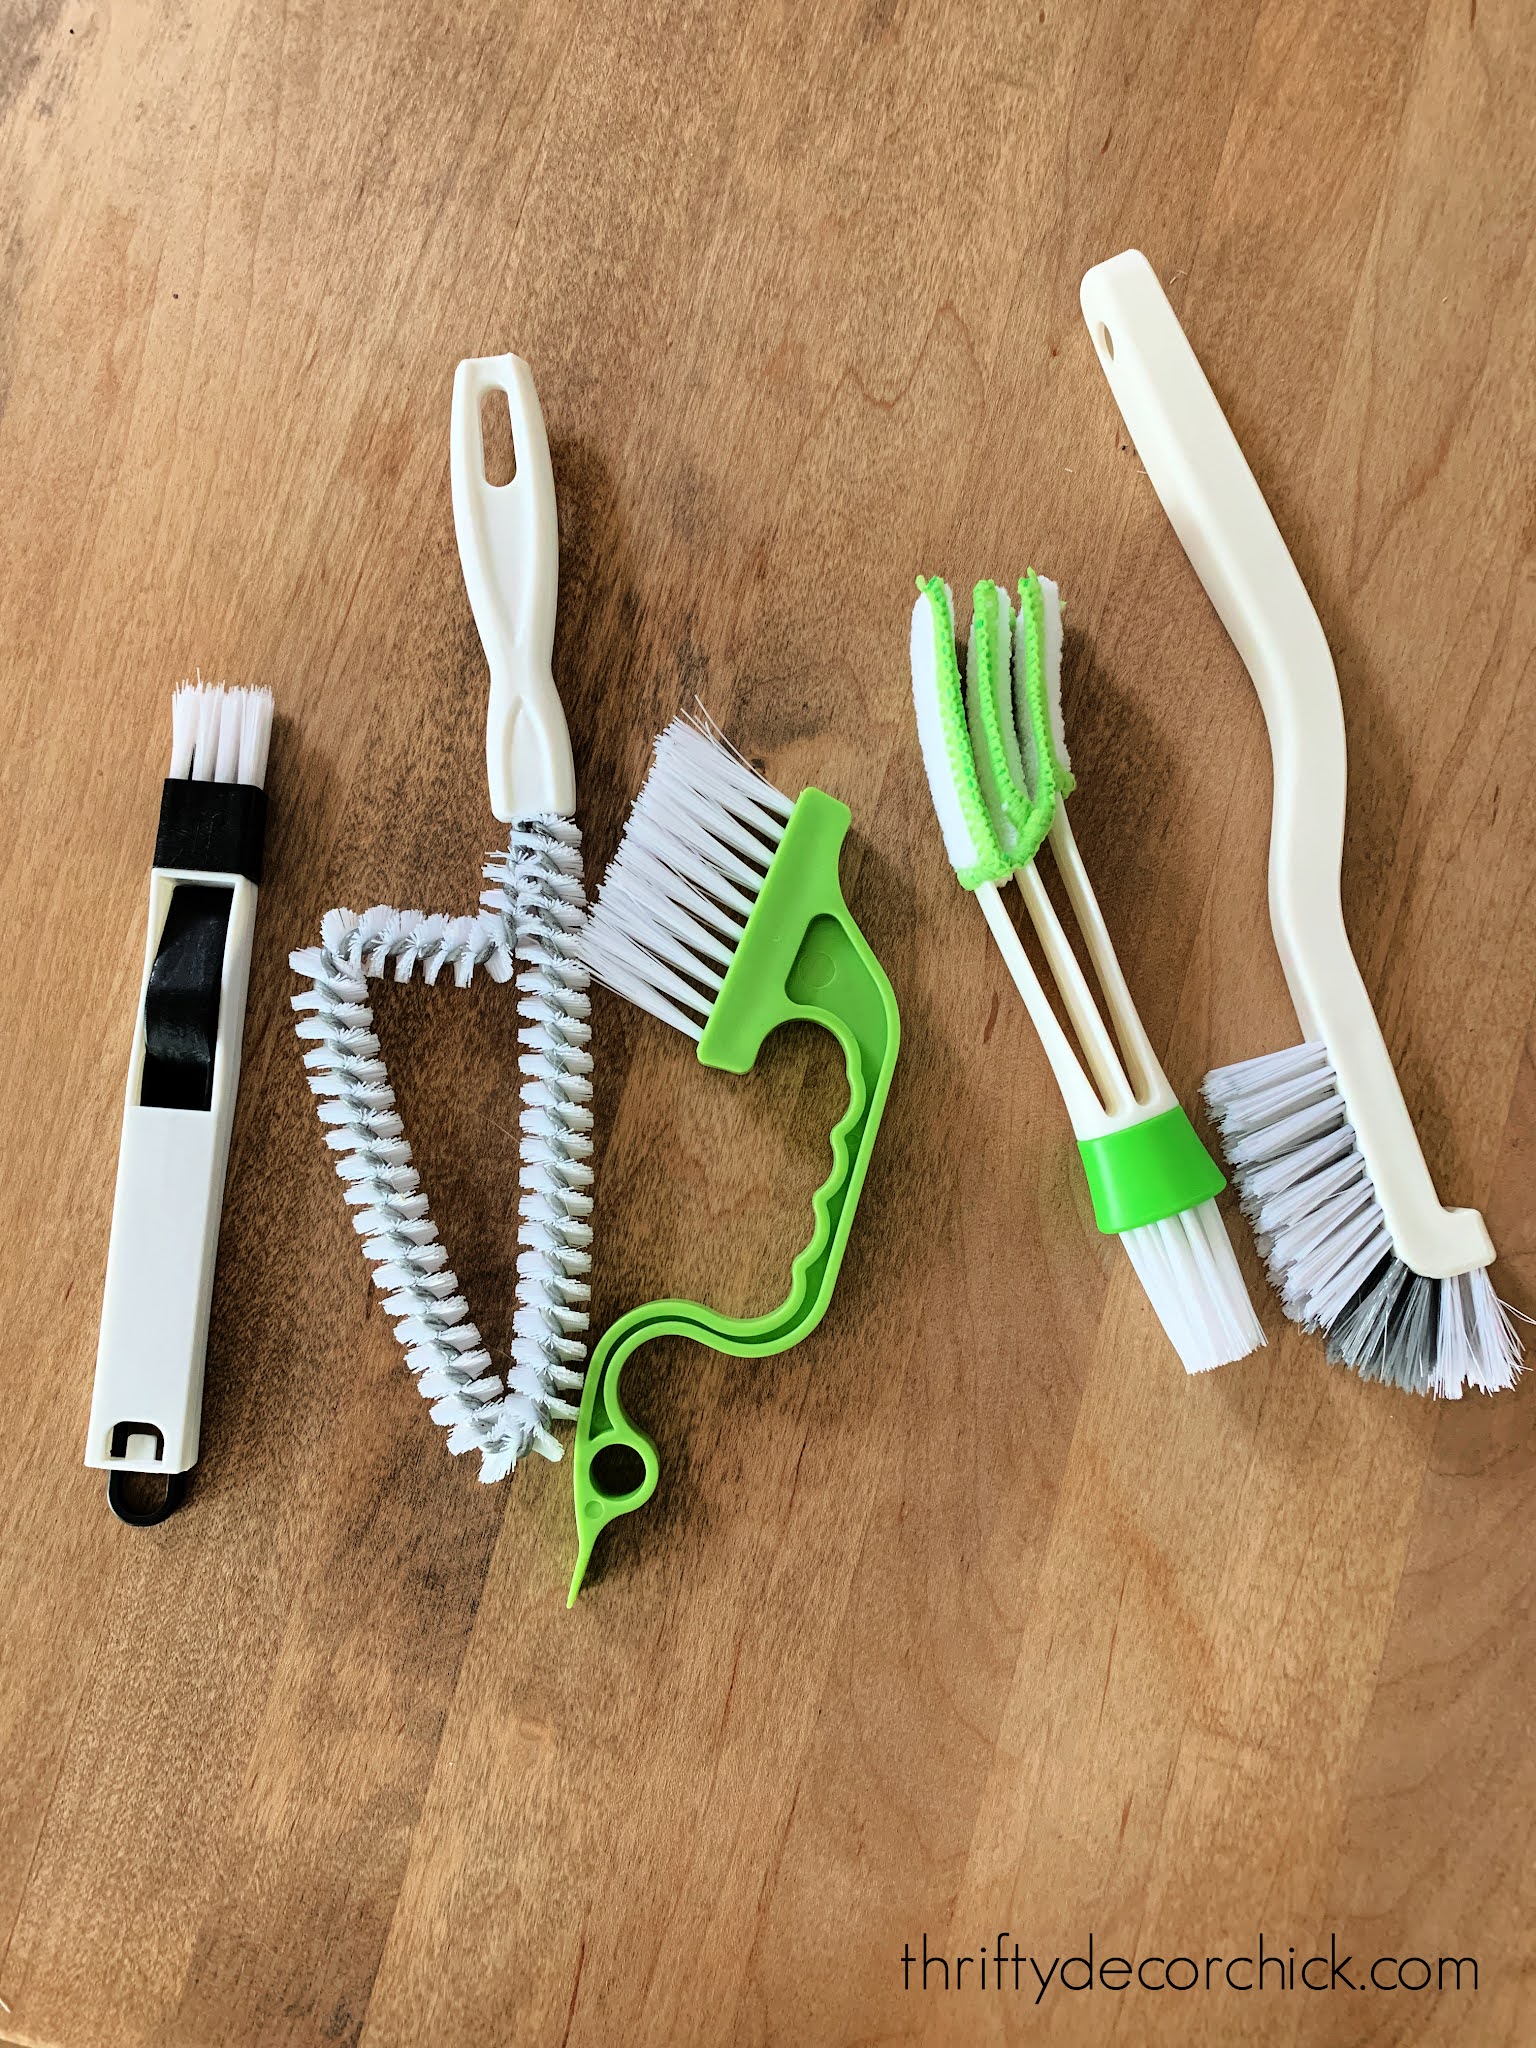
I figured this hard bristle brush would do best job of cleaning the goo out of our door track:
Read the full post
Via https://www.thriftydecorchick.com/2021/08/how-to-clean-filthy-window-tracks-and.html FORTY awesome DIY outdoor projects for your home exterior and backyard!
I'm back with 40 more awesome outdoor DIY projects today. I put the call out to my blog friends and they answered with a TON of great ideas for outside.
You can find the first 20 DIY outside project ideas here if you missed them! Both lists include tons of ideas for do-it-yourself outdoor decor, lighting tutorials, gardening ideas, exterior furniture builds and a bunch more easy outdoor projects.
The weather is warming up and I have a BIG list of outdoor projects I want to tackle this year. Until then, I mixed in some of my favorite past exterior projects in this list as well.
This cute A-frame plant stand would be a pretty addition to the front porch:
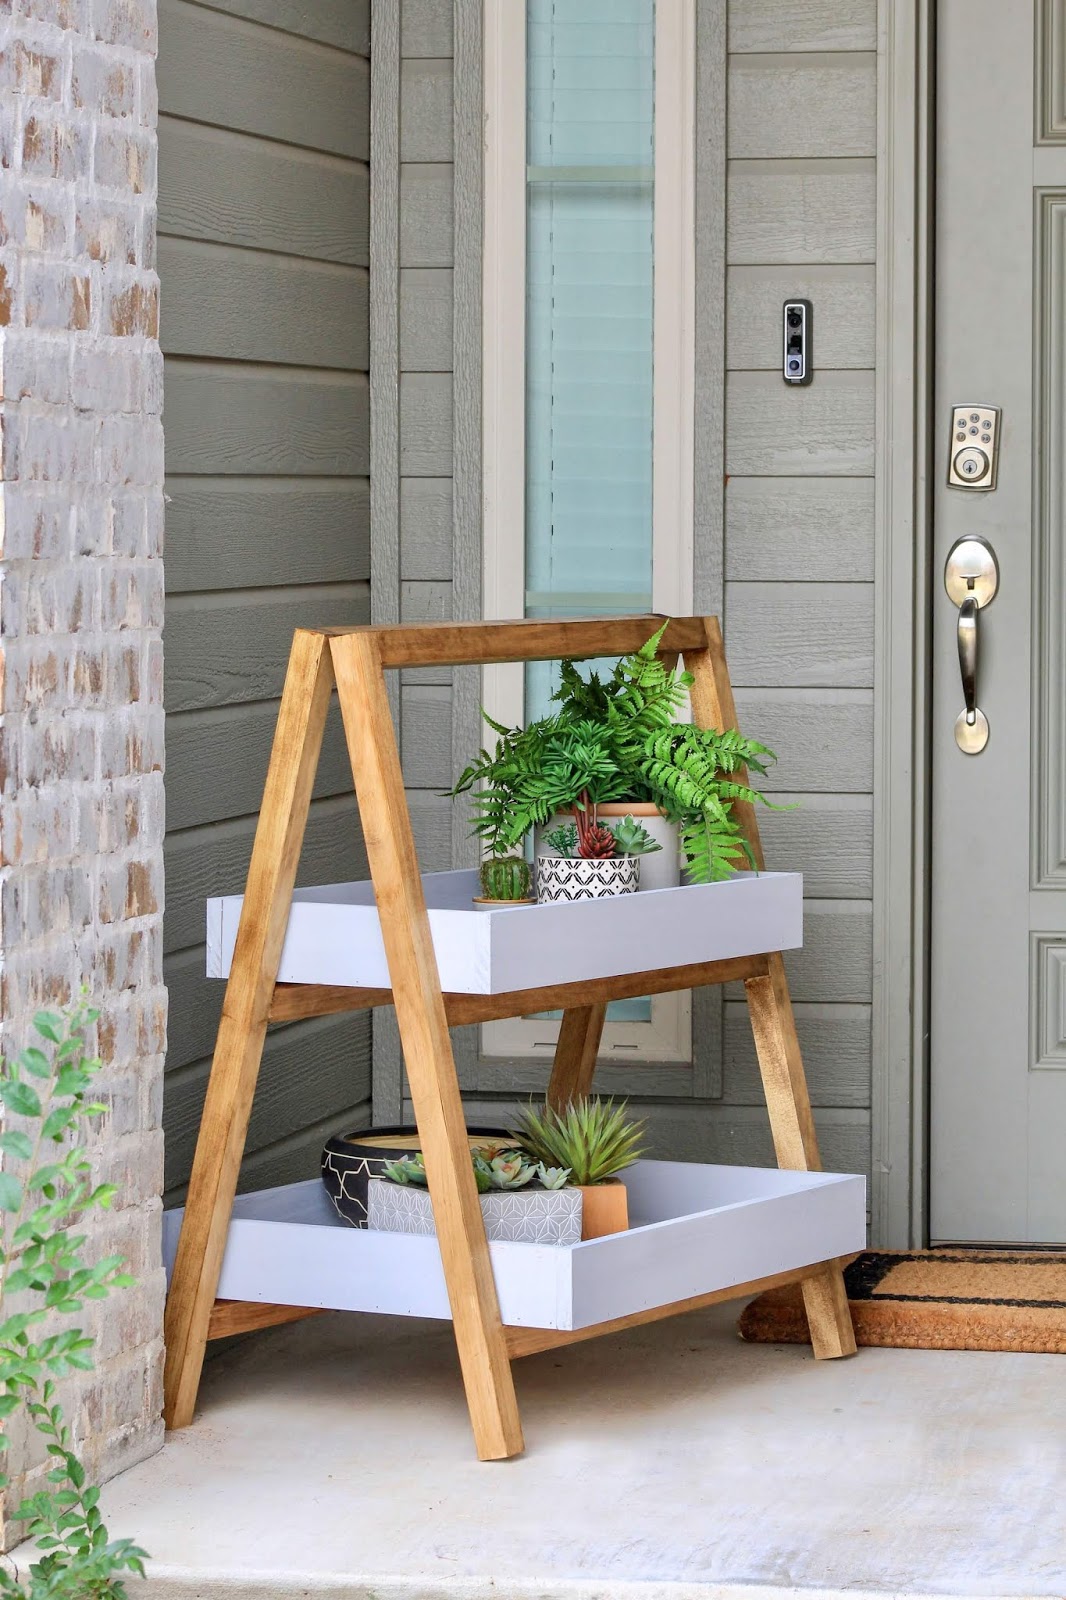
But it would also look great out back -- it could double as a drink or food holder as well. Or even a side table or nightstand inside!
Rachel’s home was beautiful before but now it’s simply stunning with the painted brick:
 I don't always love a painted brick makeover, but this one is a stunner and made such a big difference.
I've had small raised gardens in the past, but eventually I'd like to make a permanent spot with a lot more planting space. I loved these raised planters surrounded by pea gravel:
Via https://www.thriftydecorchick.com/2020/06/twenty-more-beautiful-exterior-diy.html No green thumb? These quick tips will make your fake plants look real!
A great faux plant or tree can be a great addition to your home! Don't let the old dusty versions from your childhood deter you -- artificial plants have come a long way over the years and look more realistic than ever!
Our home is full of live plants and I really enjoy the life they bring to our home. But sometimes a fake tree or plant is a great alternative -- you don't have to worry about placement and if they'll thrive without direct sunlight.
I love our real plants, but they do NOT like to be moved around!
Plus, they're easier to work with if you have young kids, pets (I always search online before bringing a new plant home) or allergies. No fuss!
Faux decorative trees can get expensive, so before before buying make sure to read reviews (if purchasing online), or inspect the plant close up.
A high-quality artificial plant will have:
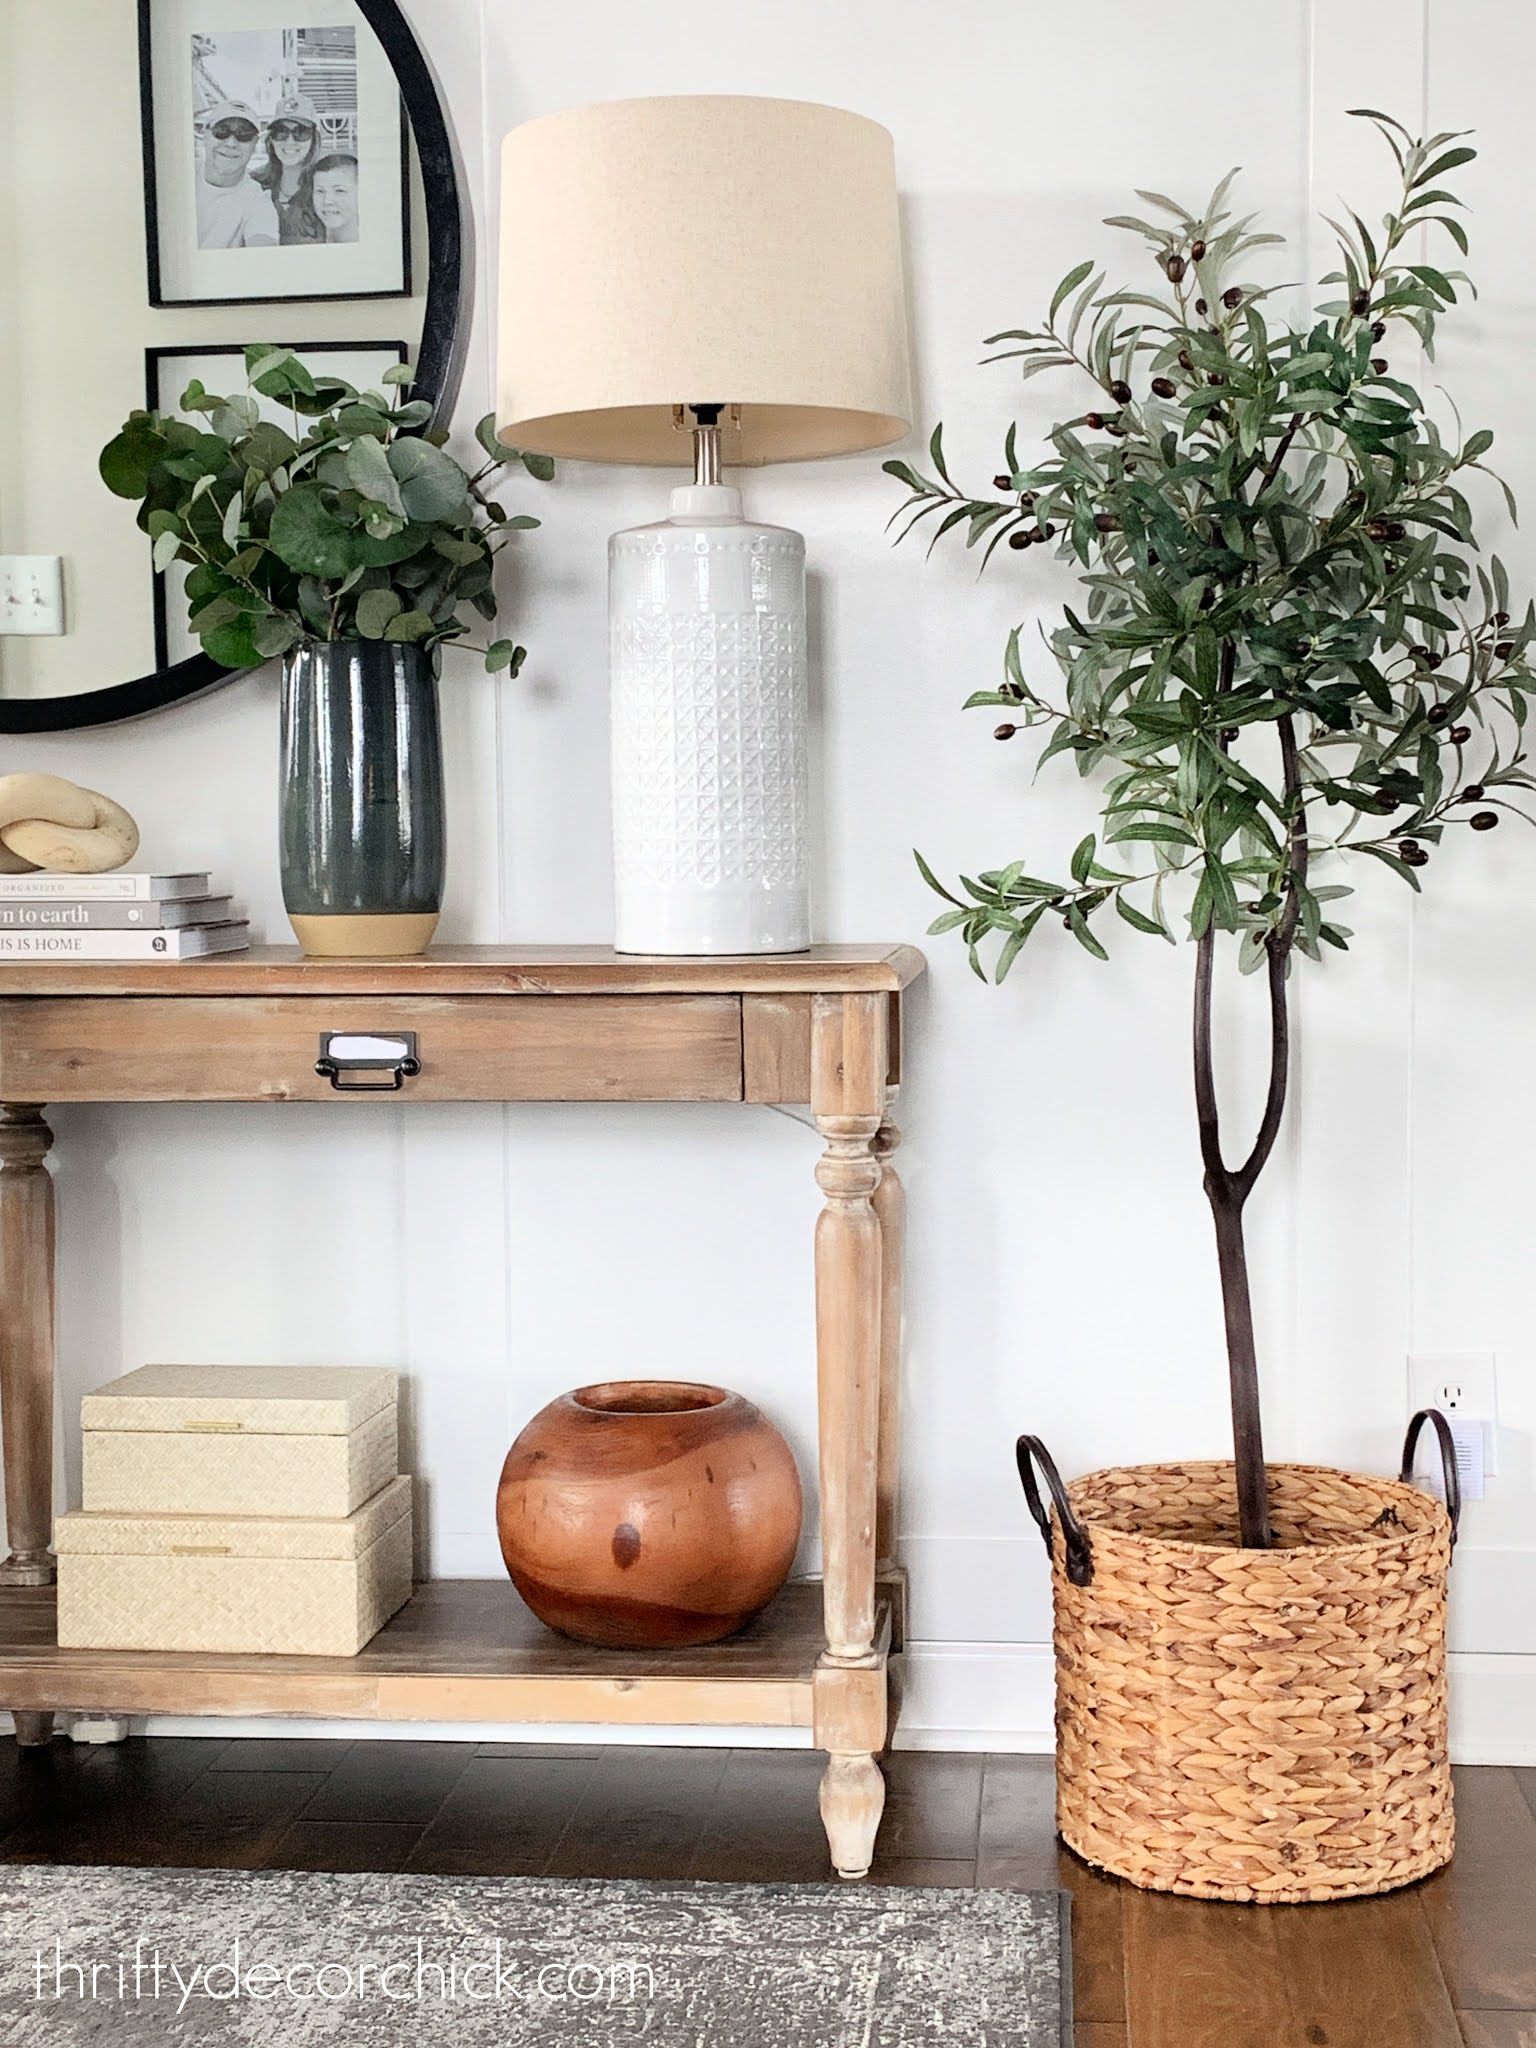
Did you know you can DIY a decorative fake tree yourself? I shared how I made my own olive tree here -- it's much easier than you'd think!:
This post may contain affiliate links for your convenience.
I may earn a small commission when you make a purchase through links.
See my policies and disclosure page for more information.
We have a spot in our living room that needed some life, but I wasn't sure a real tree would do well in that spot. Plus, the price of a real tree the size I needed was more than I wanted to spend.
I had two gift cards burning a hole in my pocket when I found this realistic faux maple tree at Target a couple months ago:
Via https://www.thriftydecorchick.com/2023/04/three-easy-ways-to-make-fake-plants.html The cutest bird feeders and accessories for bird watching!Since we moved into this house I've become an avid bird watcher. I think it's because we have such big picture windows and we can easily see right out to the back patio
I find great joy in watching them and keep adding to their accommodations around our backyard. I've officially turned into my father. :)
Is this what happens when you get older? Ha! Or maybe I'm just enjoying the simple things more as I age. Let's go with that. I wanted to show you a few of the things I've picked up for the birds lately and then some favorite items I've used for years. You know, in case you want to become a bird geek like me. Our patio is our absolute favorite place to be on nice days. I love sitting out here, watching and listening to the birds in the backyard: 
This post may contain affiliate links for your convenience.
I may earn a small commission when you make a purchase through links.
See my policies and disclosure page for more information.
The birds LOVE this bird bath I found it at Lowe's -- it's a bird bath with a planter underneath:

I thought the combo of the two was such a good idea. It's pretty shallow so I do have to keep up with adding water every few days.
I found this solar fountain for the bath and was super impressed with how well it works!:

It just floats around -- if it's in full sun it works great. It does not hold any kind of charge, so as soon as it hits any shade it will stop working.
See how high it throws out the water?:
Via https://www.thriftydecorchick.com/2020/06/im-officially-bird-nerd-my-favorites.html |


