|
Hello all! The massive built in entertainment center project is moving right along! I just finished up one of the "pretty" additions -- the cabinet hardware. I love getting to this point -- it means I'm near the finish line! Installing cabinet hardware used to be one of my least favorite DIY projects.
** If you get my posts via email, you may have noticed the link hasn't worked well lately. I've been told it is now fixed -- please let me know if it doesn't work for you!
Installing cabinet pulls and knobs used to drive me NUTS. It was hard to get the knobs in the exact same spot on every cabinet, and pulls were the woooorst. It seemed even though I measured the holes perfectly, they never went on just right.
I can build a wall of built ins no problem, but installing the hardware was always the hardest part. Makes total sense. :) No more my friends! Years ago I found a solution that makes this process much easier.
This hardware template will prevent a LOT of frustration:

This post may contain affiliate links for your convenience.
See my policies and disclosure page for more information.
I've had mine for years and now they are updated a bit -- more on that in a minute.
You just hold it up to your door or drawer and figure out where you want to put your holes. It has tons of different widths for pulls and different heights for knobs:

Mark with a marker or a pencil -- nothing permanent in case you need to make adjustment. I measured the width of the spot I wanted to install on, and placed my dot there. These are clear, so you can see where you've marked something underneath.
Your cat will be very helpful:

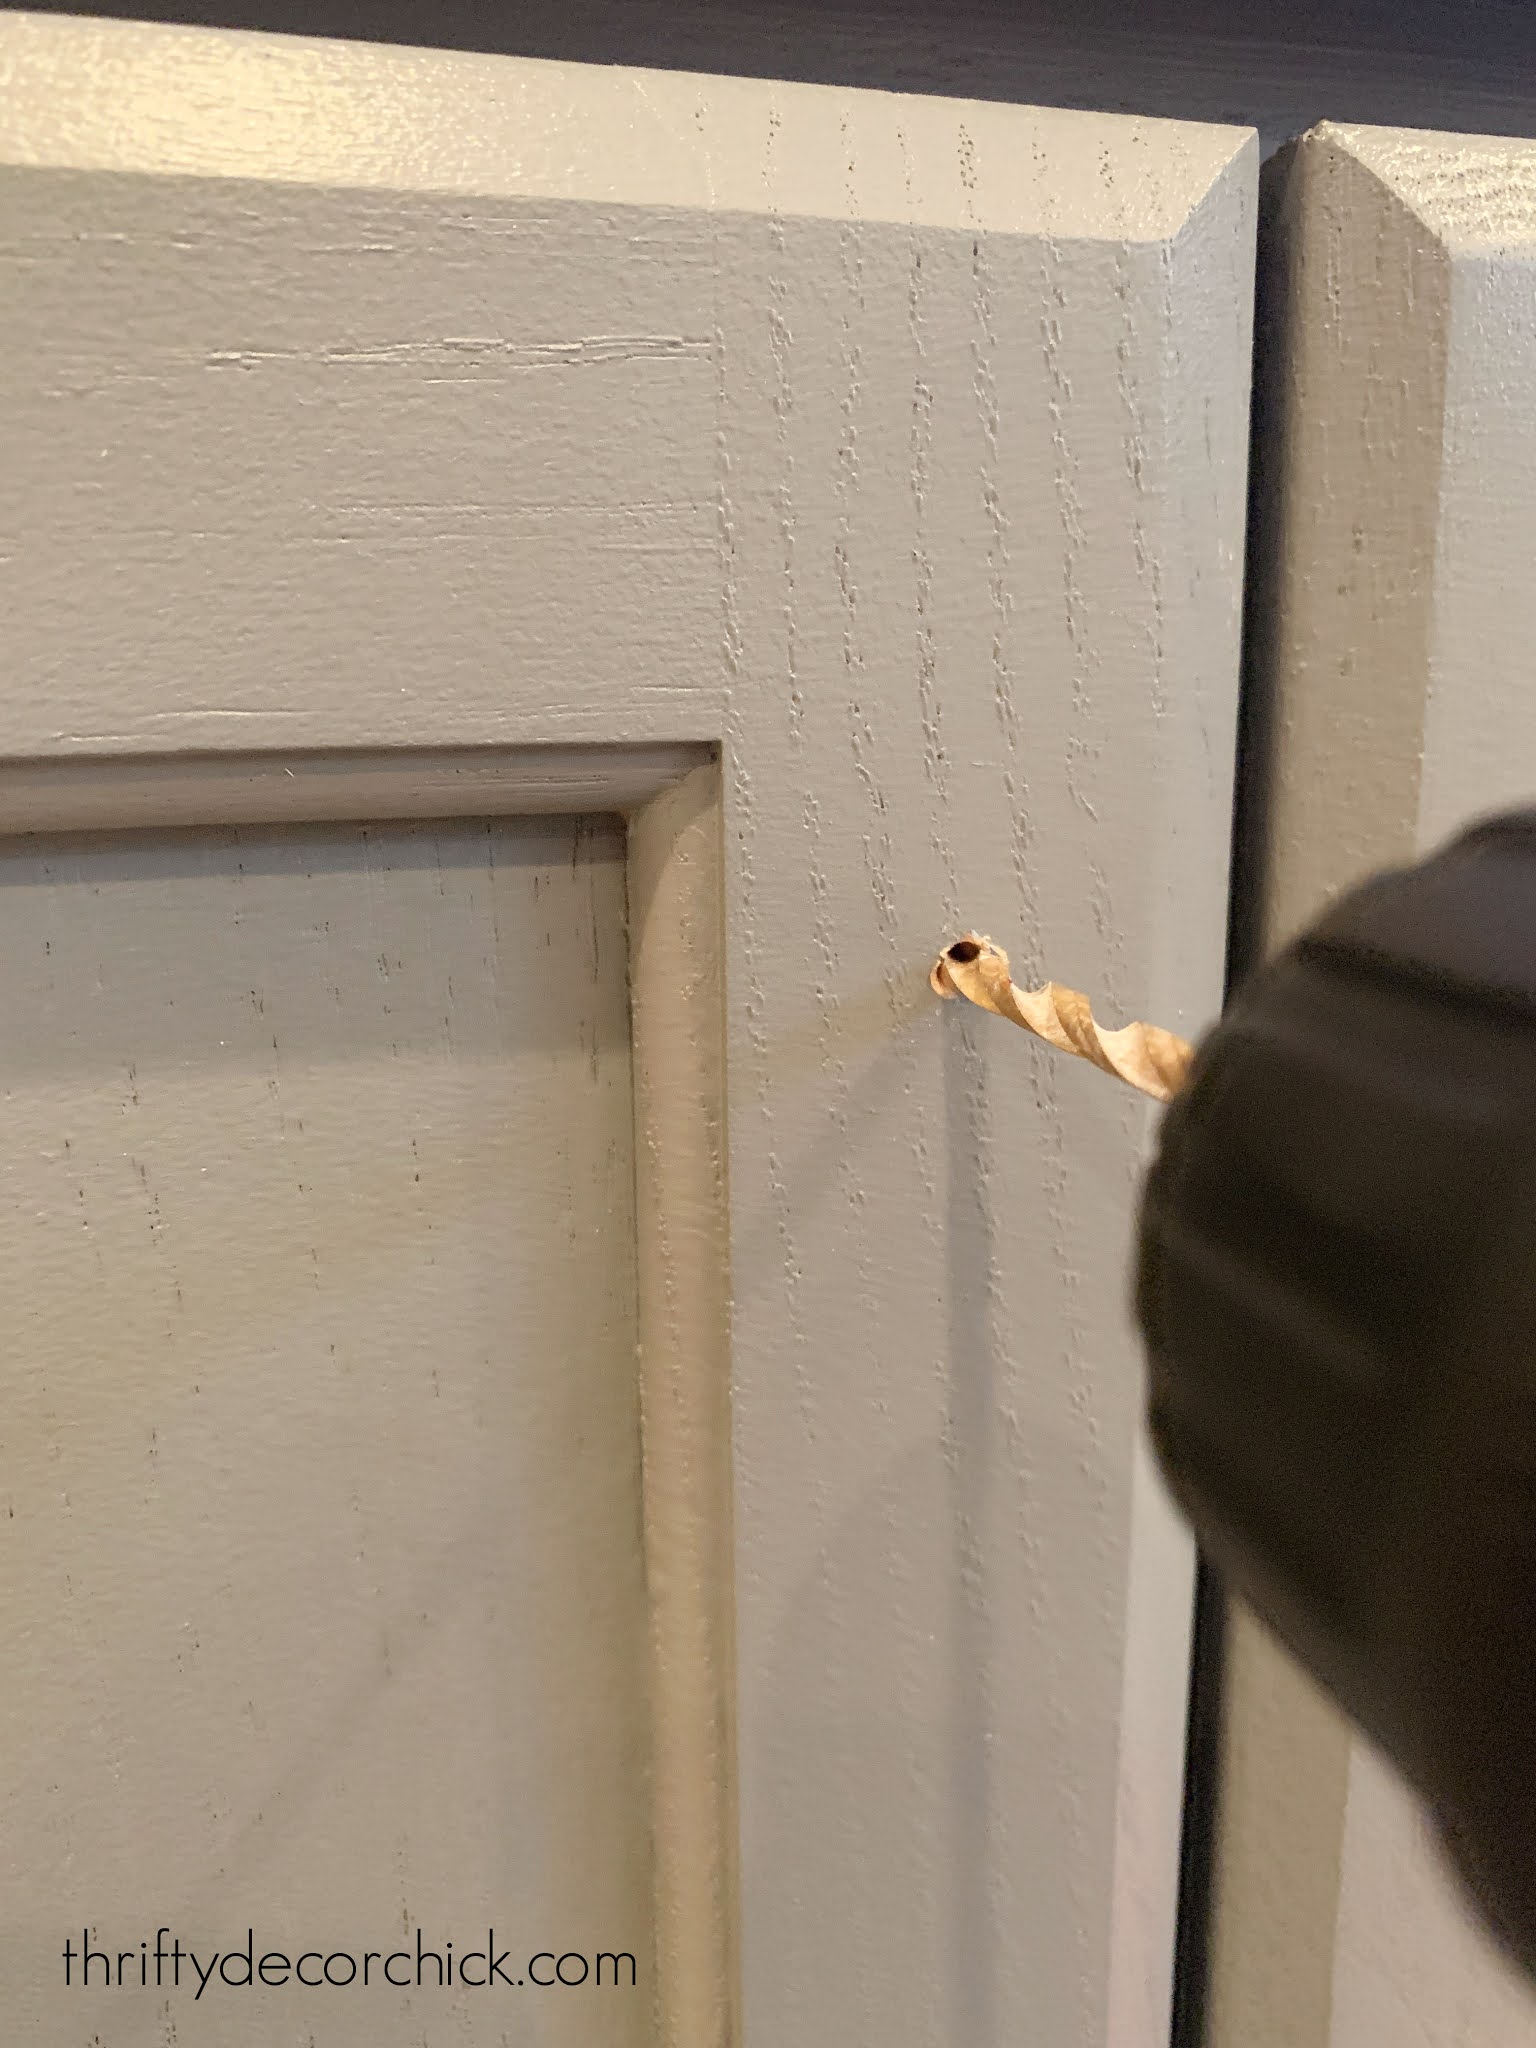
Use a drill bit to drill a hole first -- the screws are flat at the end so they will not go in on their own:
If I'm adding numerous knobs, I'll mark my spot on the template as well:

This hardware template is similar to mine, but wider. And this one has an edge on both sides so keeps the template extra secure.
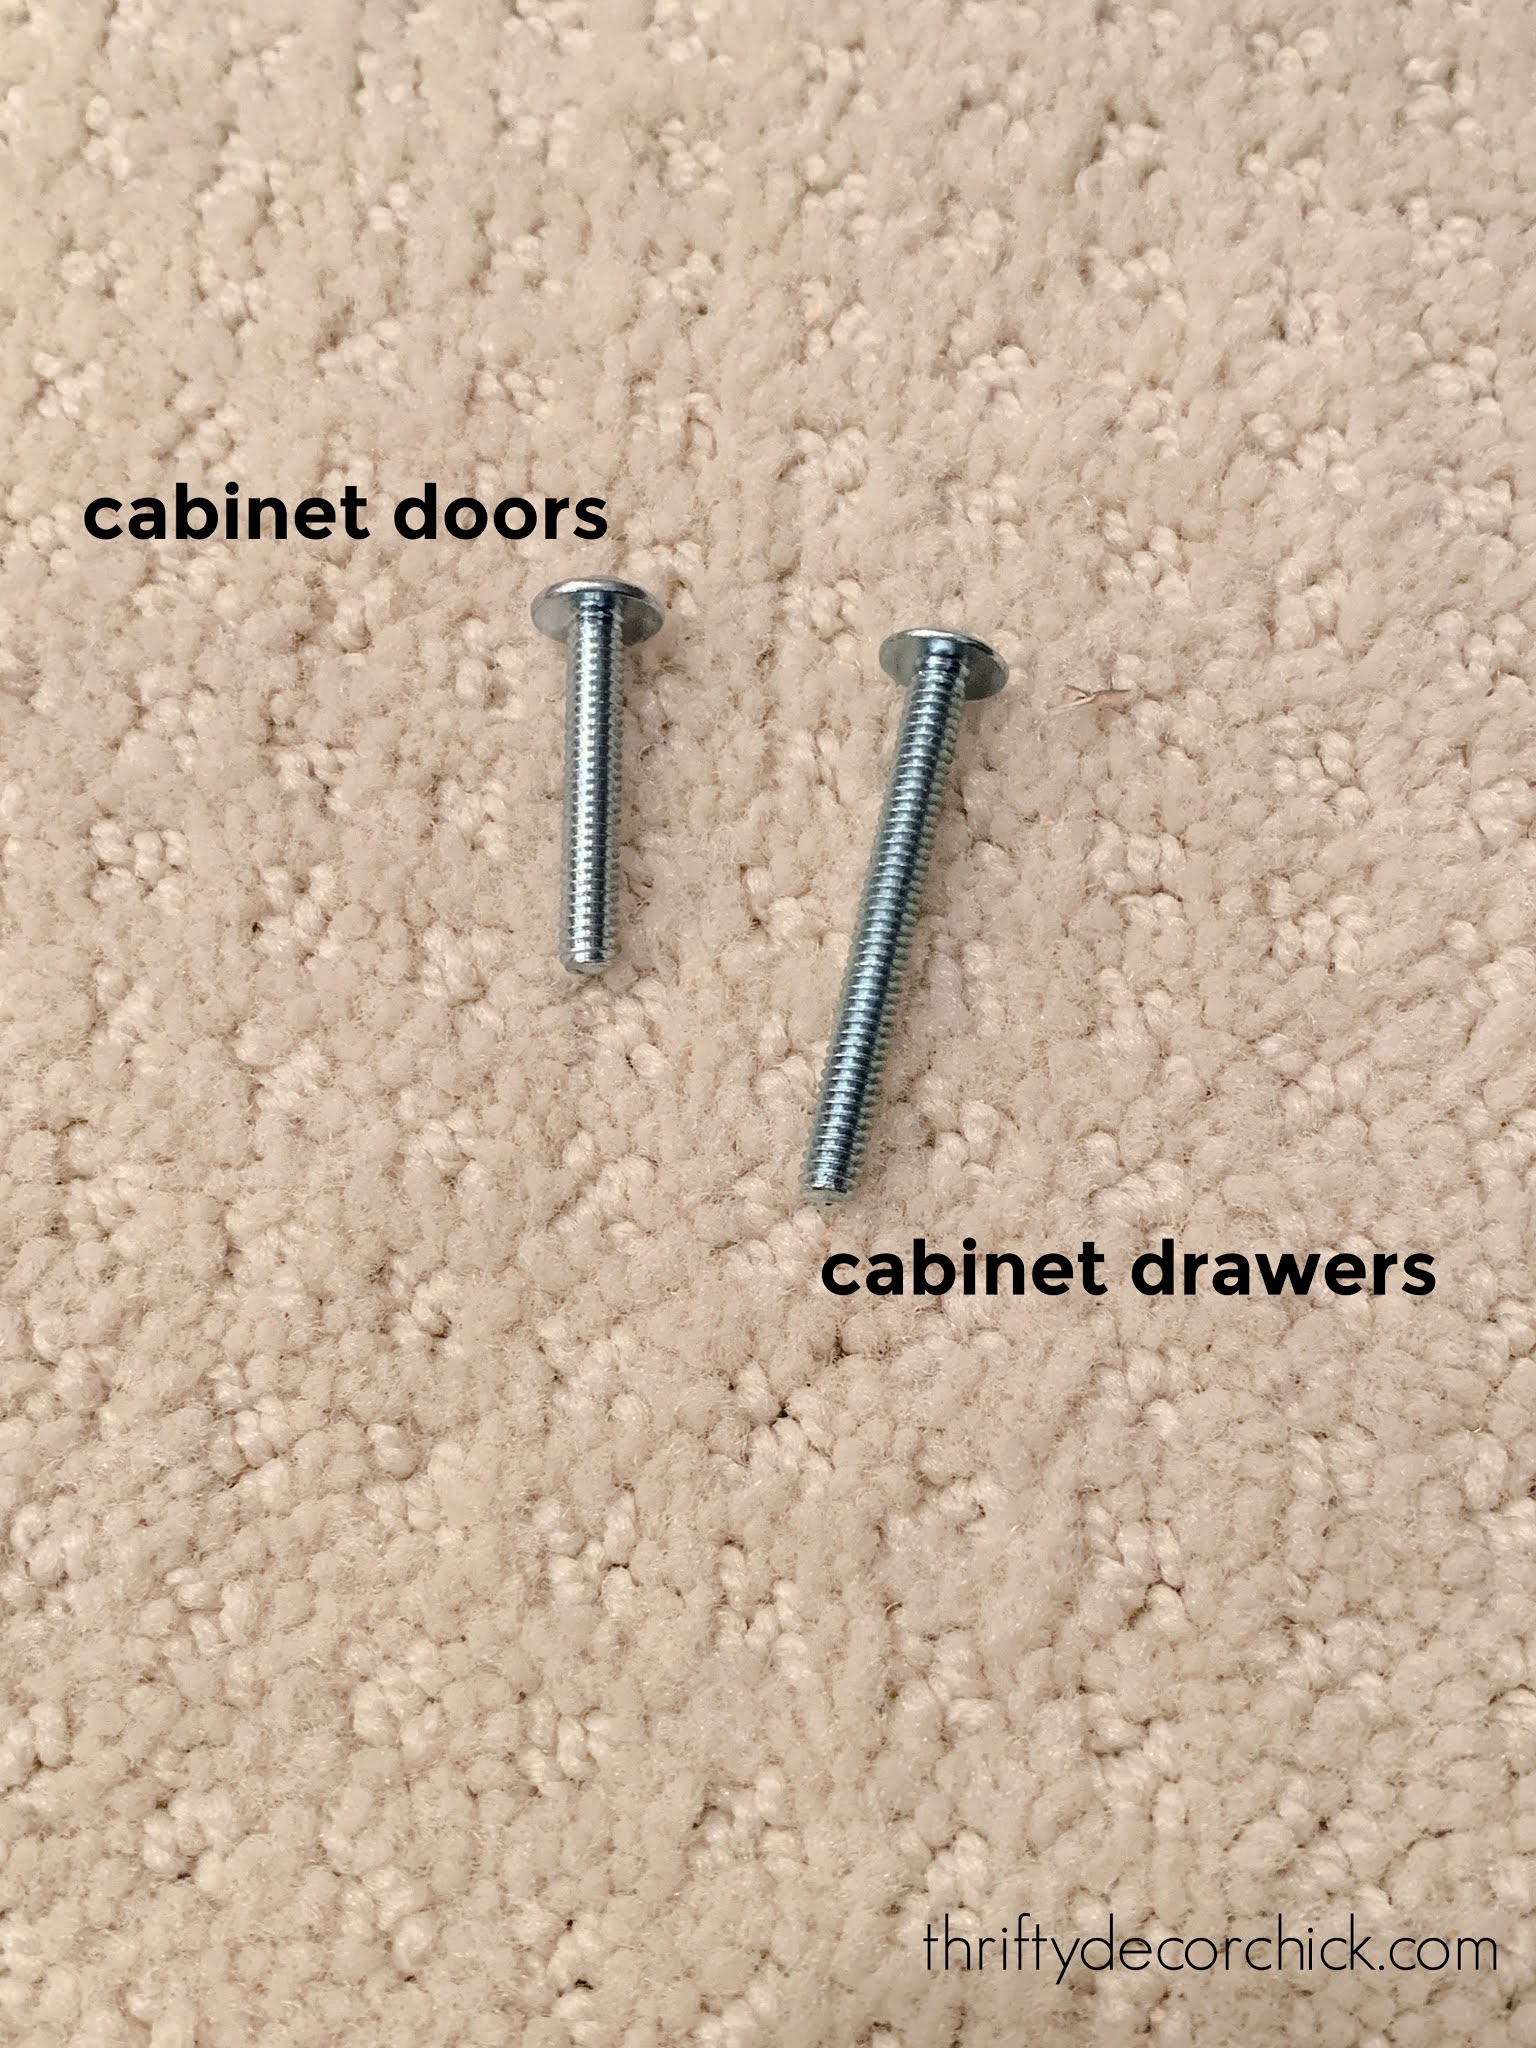
The hardware will come with screws in two lengths. Usually the shorter one will work for cabinet doors and the longer one is for drawers:
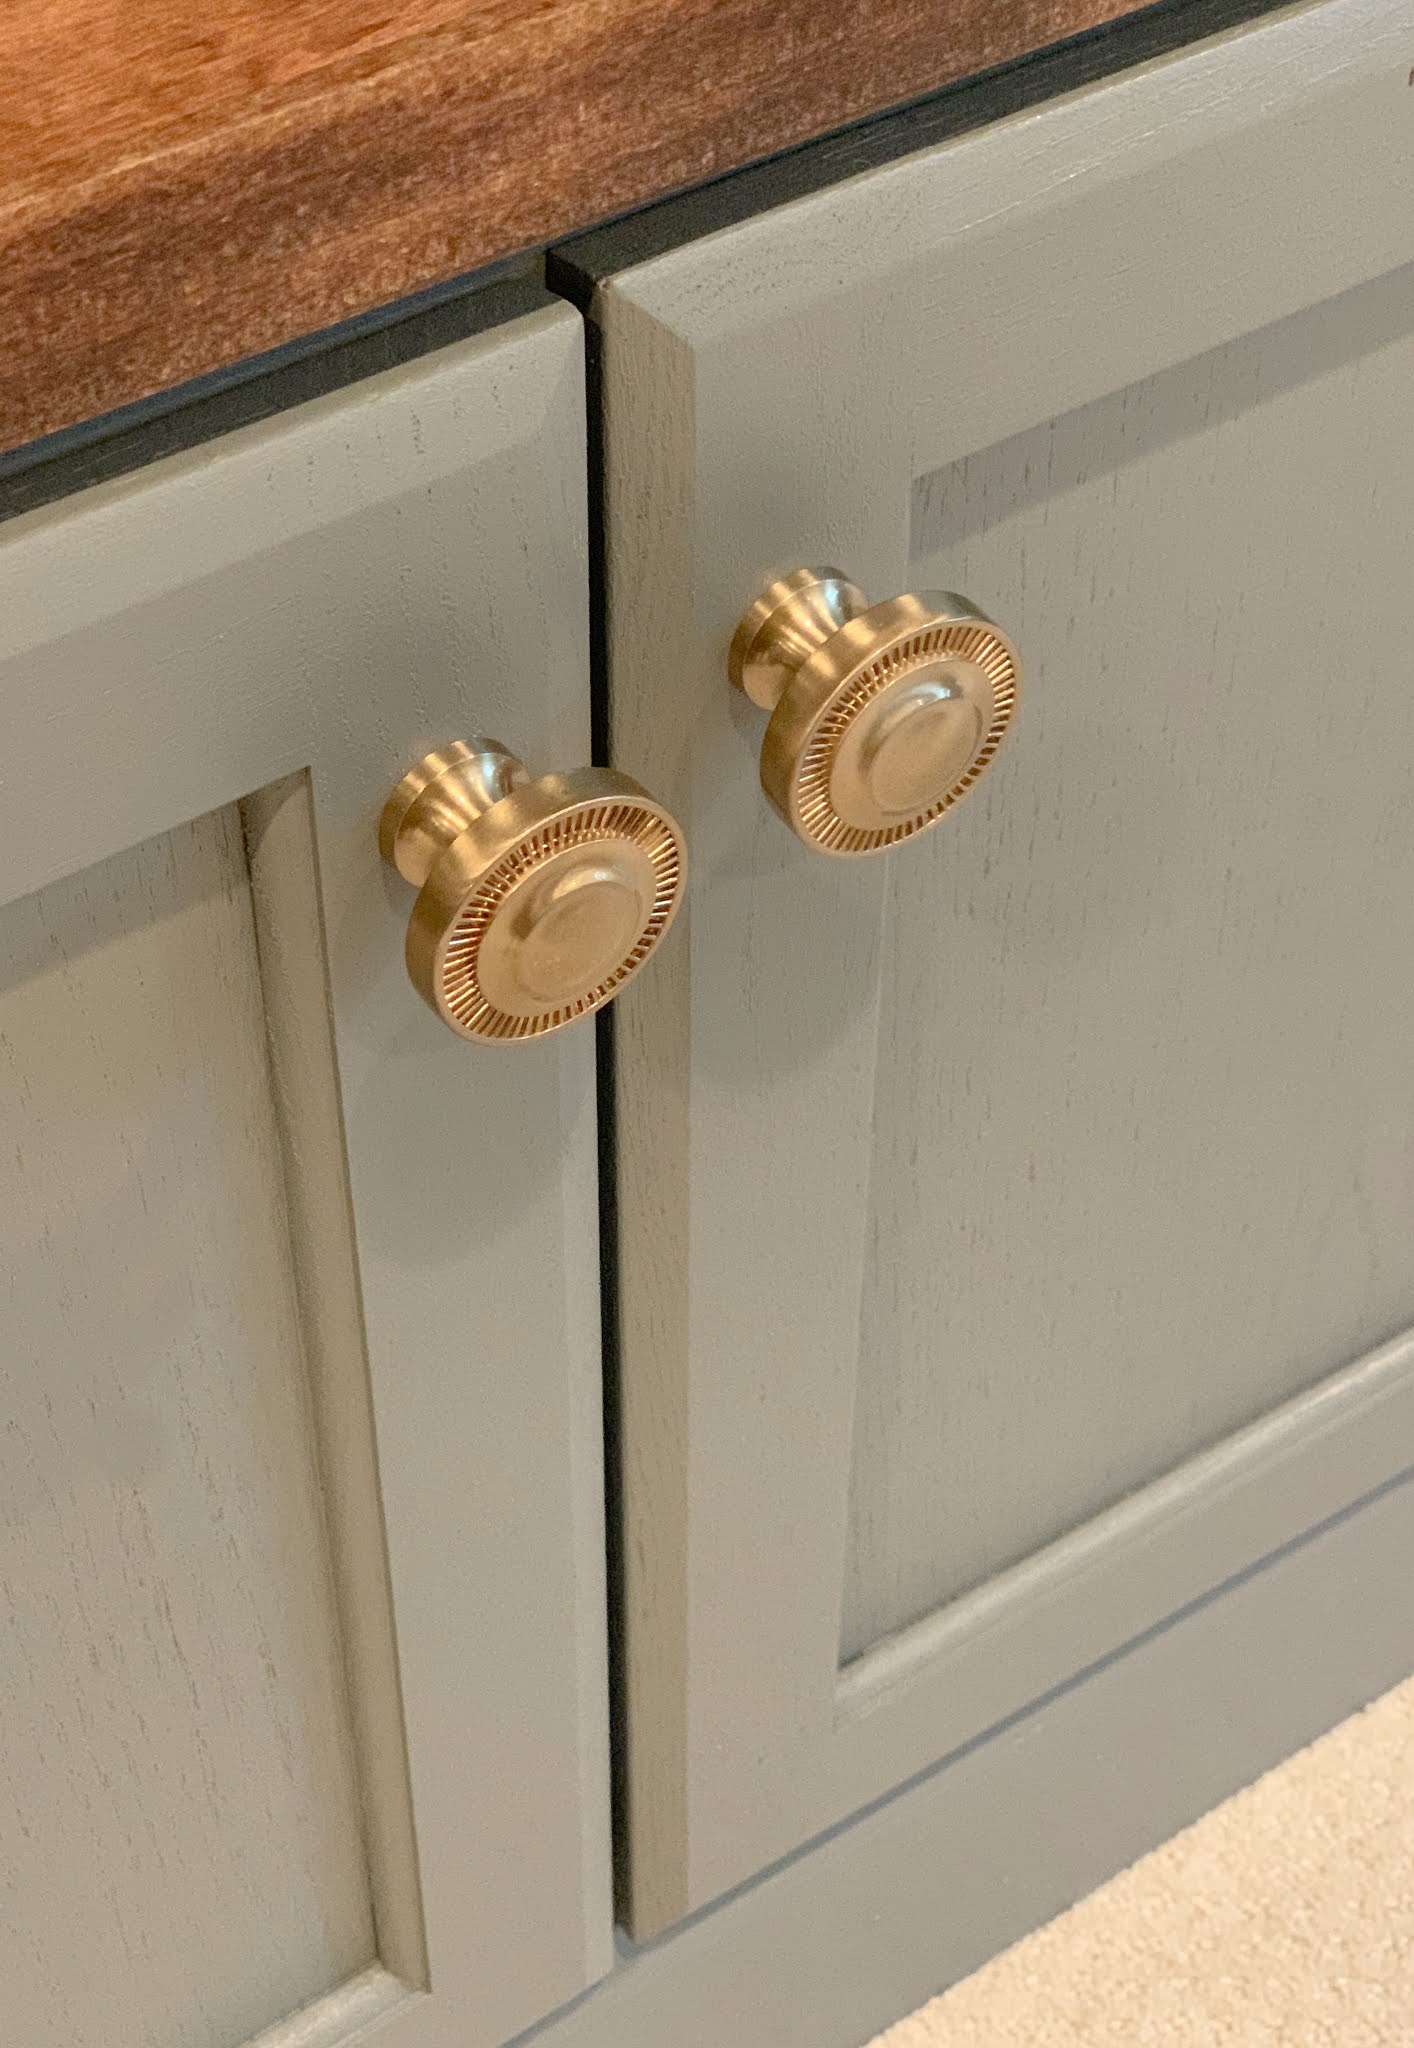
I LOVE the hardware I picked out! The brass looks so good against the dark gray (Westchester Gray):
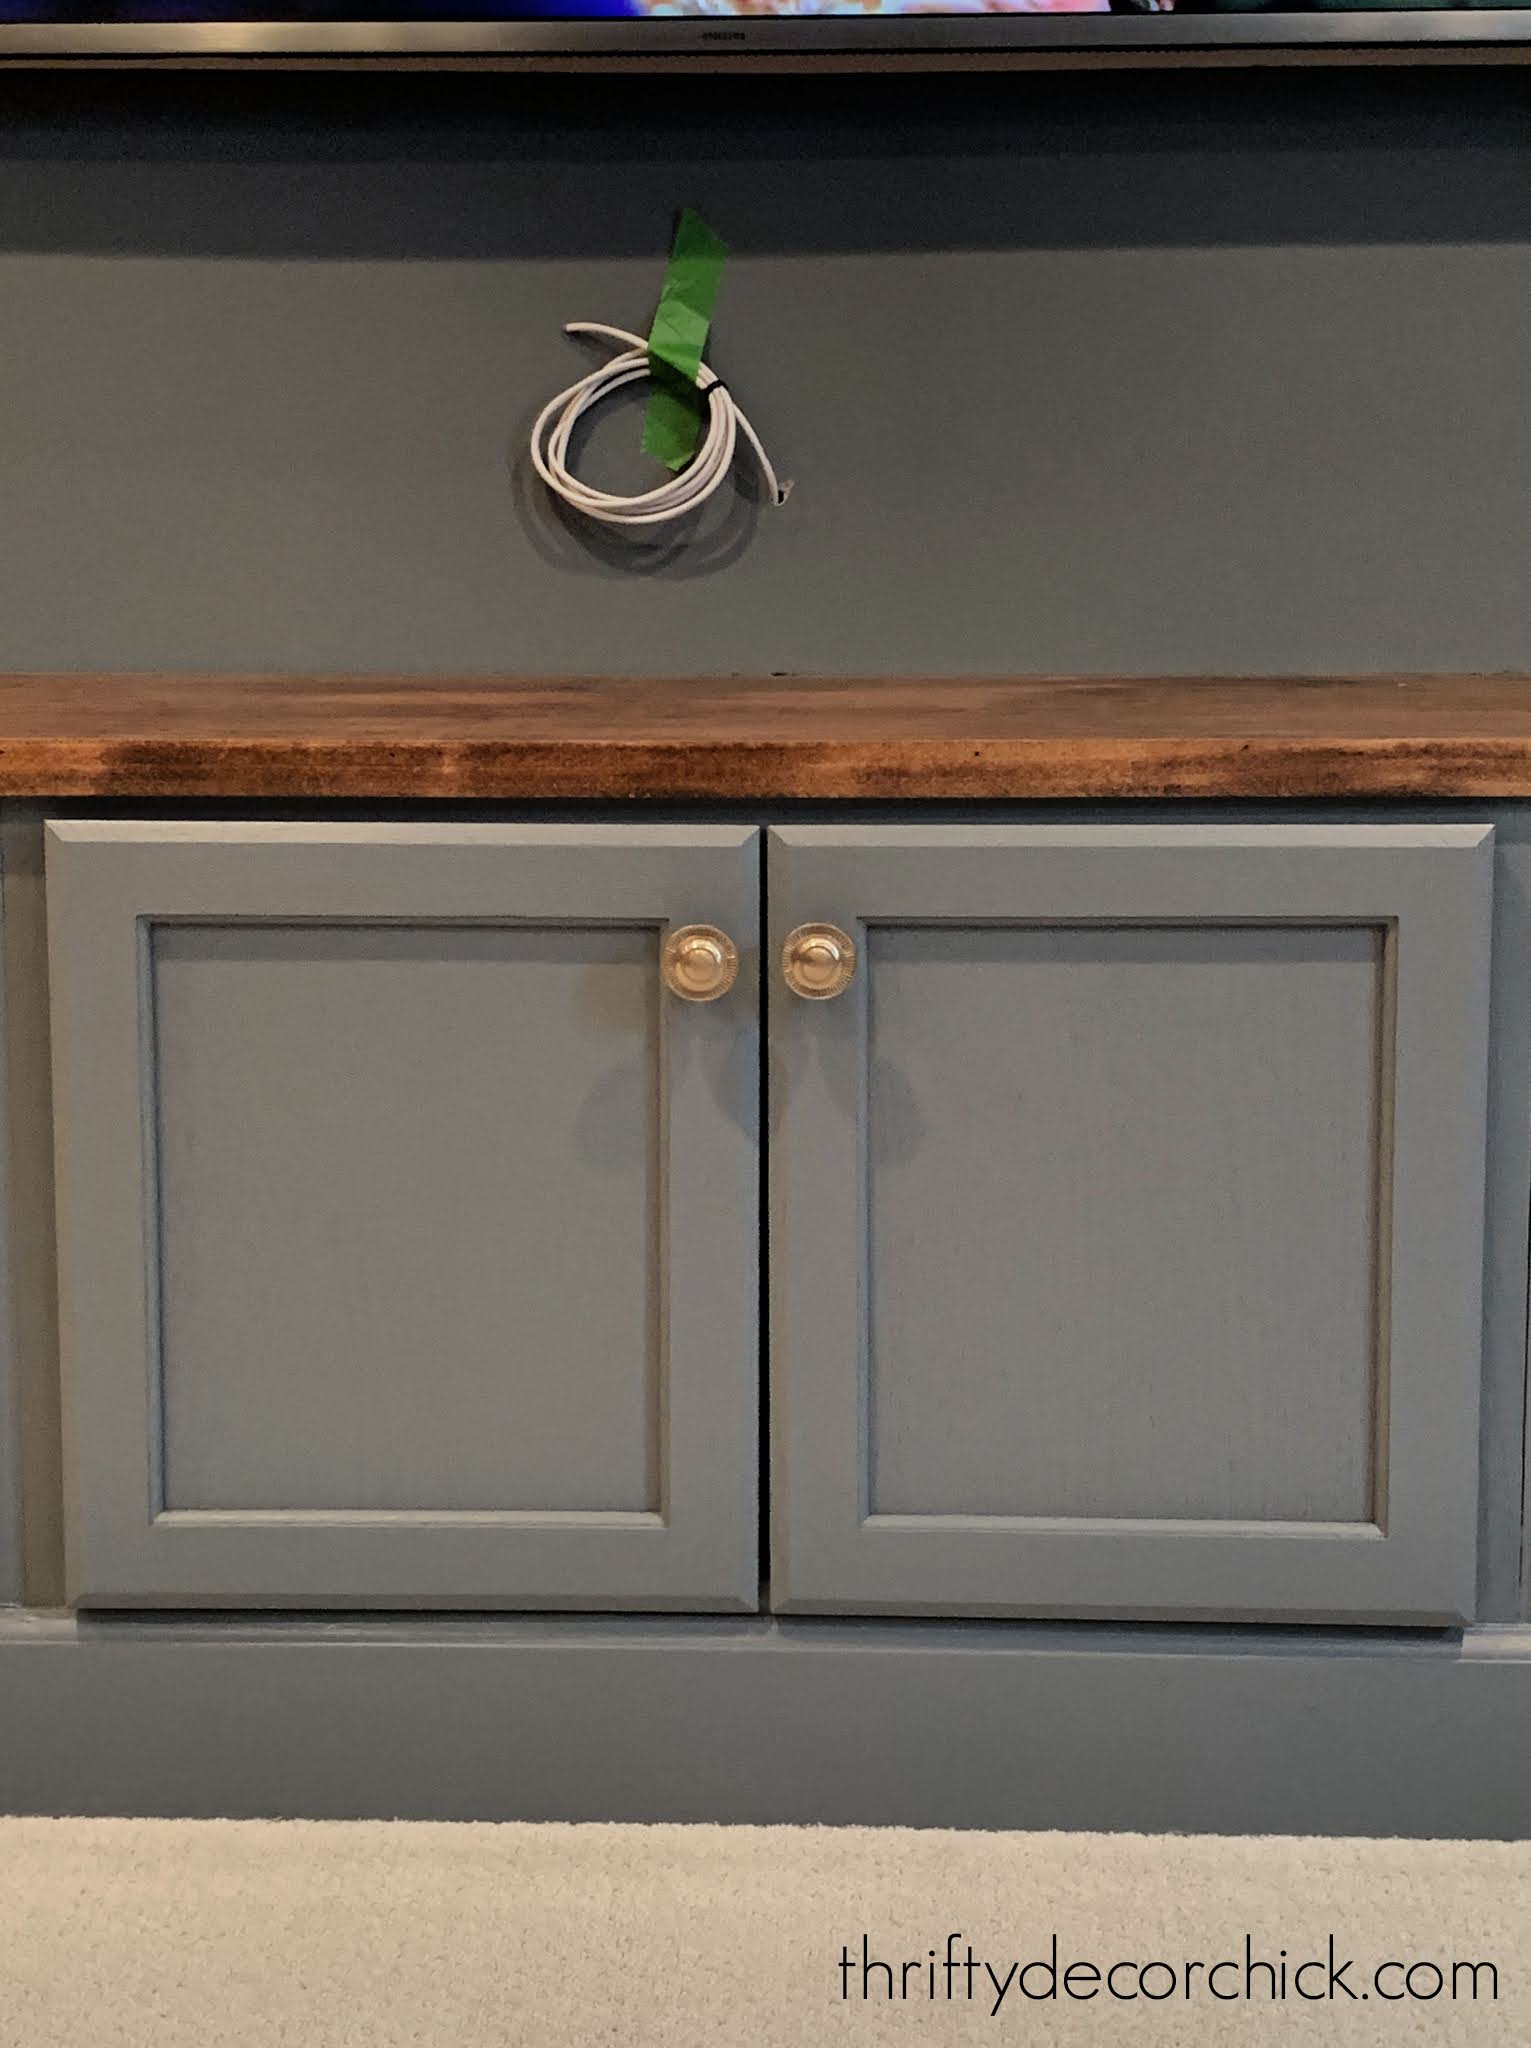
That's a speaker wire by the way, not electrical. :)
These are the Minted knobs from Sumner Street Home Hardware:
When I went to install the pulls I realized my templates were a little out of date -- the hardware holes were five inches apart and the template only goes to four inches. So I had to do those the old fashioned way.
I used the template to mark the top hole and measured five inches down for the second. They look GOOD!:

Those are the Minted pulls from Sumner Street. They come in a variety of lengths. So pretty!
Here are a few more hardware installation tips:
This template will cut a ton of time and makes installing cabinet hardware MUCH easier. Now I just need to get a bigger one!
I think I'll be able to finish up these built ins this weekend! WHAT. This time it took me less than two weeks to finish it up! I have some finishing touches I want to add that will take a few more days, but overall I got it done fast. I can't wait to show you!
Speaking of hardware, you can find the BEST section of cabinet hardware here!:

And if you're hanging art or mirrors with two screws or nails, this little hack makes hanging items level much easier:

Via https://www.thriftydecorchick.com/2021/01/how-install-cabinet-hardware-easy-way.html
0 Comments
Hello there! The huge built ins in the basement are moving along quicker than I thought! I've become quite efficient at this build over the years. :)
The first time I tackled this project I used IKEA butcher block for the counters under the bookcases. It always looks great! But from what I hear, IKEA doesn't carry the true butcher block anymore -- the kind that is wood all the way through. (If I'm wrong please let me know!)
They had the best price I found anywhere for basic butcher I could cut and stain. The last few times I've built built ins I've used a different tactic for the counter. I first tried this on the half wall bookcase I made in our last house:

This is a little trick that costs WAY less than "real" wood counters, and it's super easy to create. Because I needed to cover so much surface on this current project, I knew this version would save us a ton of money.
Instead of thick countertops, I just have a 4x8 panel of wood cut down to the sizes I need:

This post may contain affiliate links for your convenience.
See my policies and disclosure page for more information.
They will cut this down for you at most larger hardware stores. I picked birch because it's one of the most inexpensive options, but still looks good.
Unlike true butcher, the edges on these panels aren't pretty -- the "nice" wood is just on the top, not all the way through:

If you are OK with a thinner look for the counters on your built ins, you can get banding for the edges. You just iron it on and then paint or stain it to match the counters.
But I prefer something a little thicker! My easy fix is to add this simple "lattice" trim to the edges instead:

I just cut it down to fit around the countertop:

Make sure it's level with the top of the counters while installing. Then I sand down the corners a bit and then where the counters and trim meet.
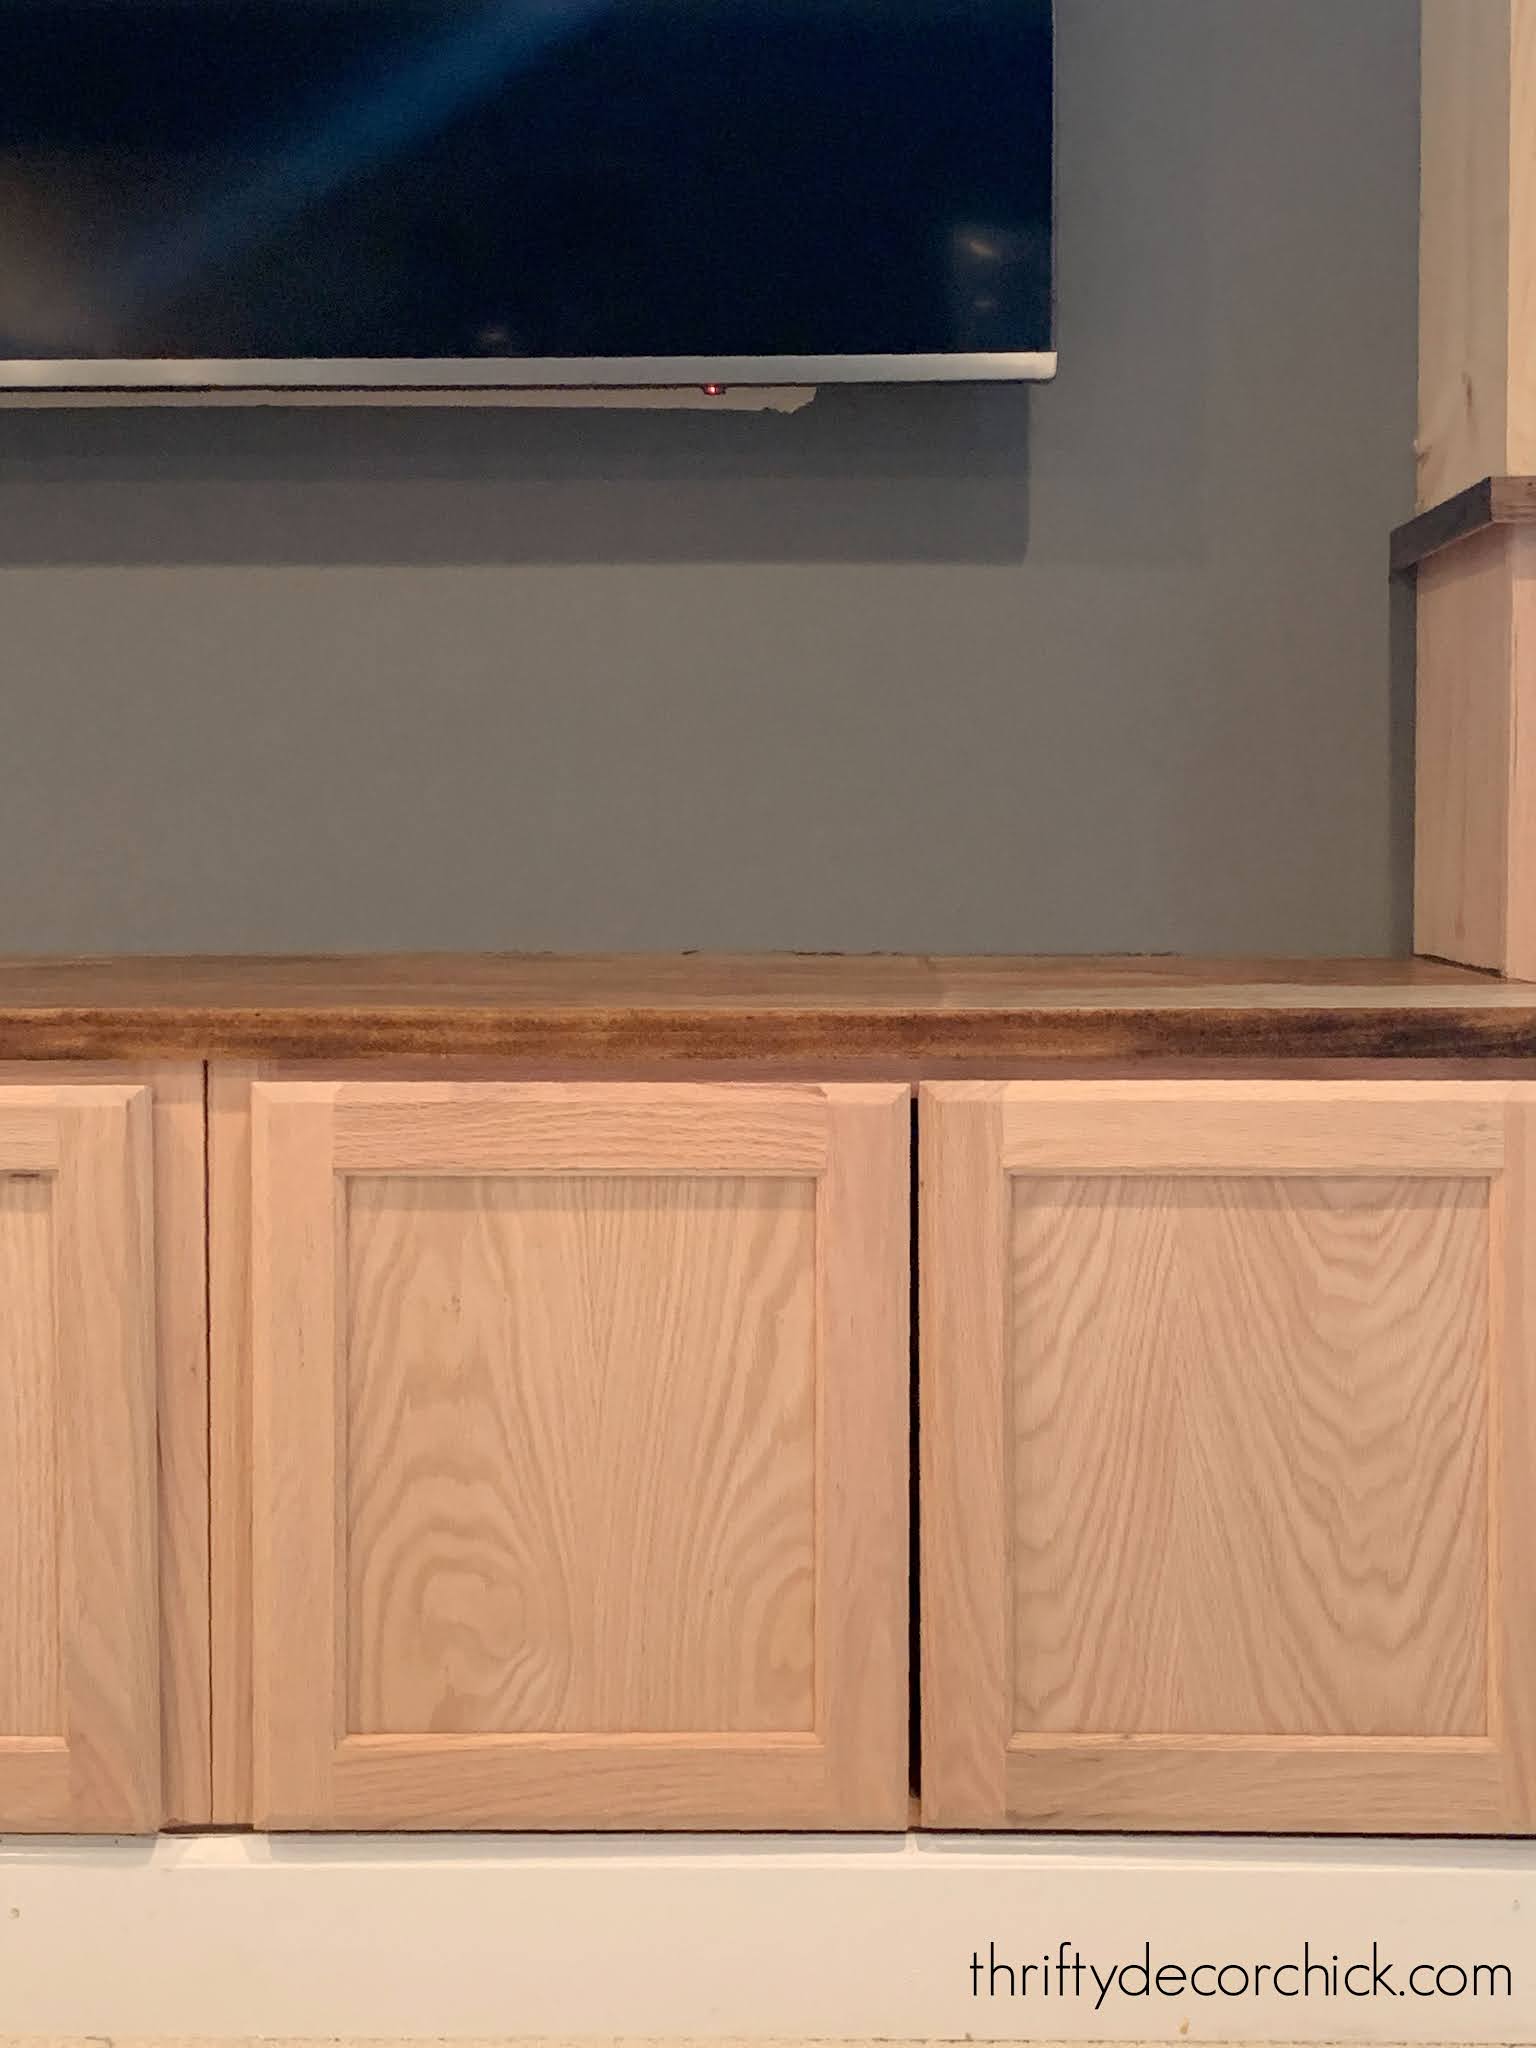
You can add stainable filler in between the two, but I don't think it's necessary. After that you can treat the counters however you'd like -- paint or stain. I used my favorite stain color, Provincial by Minwax:
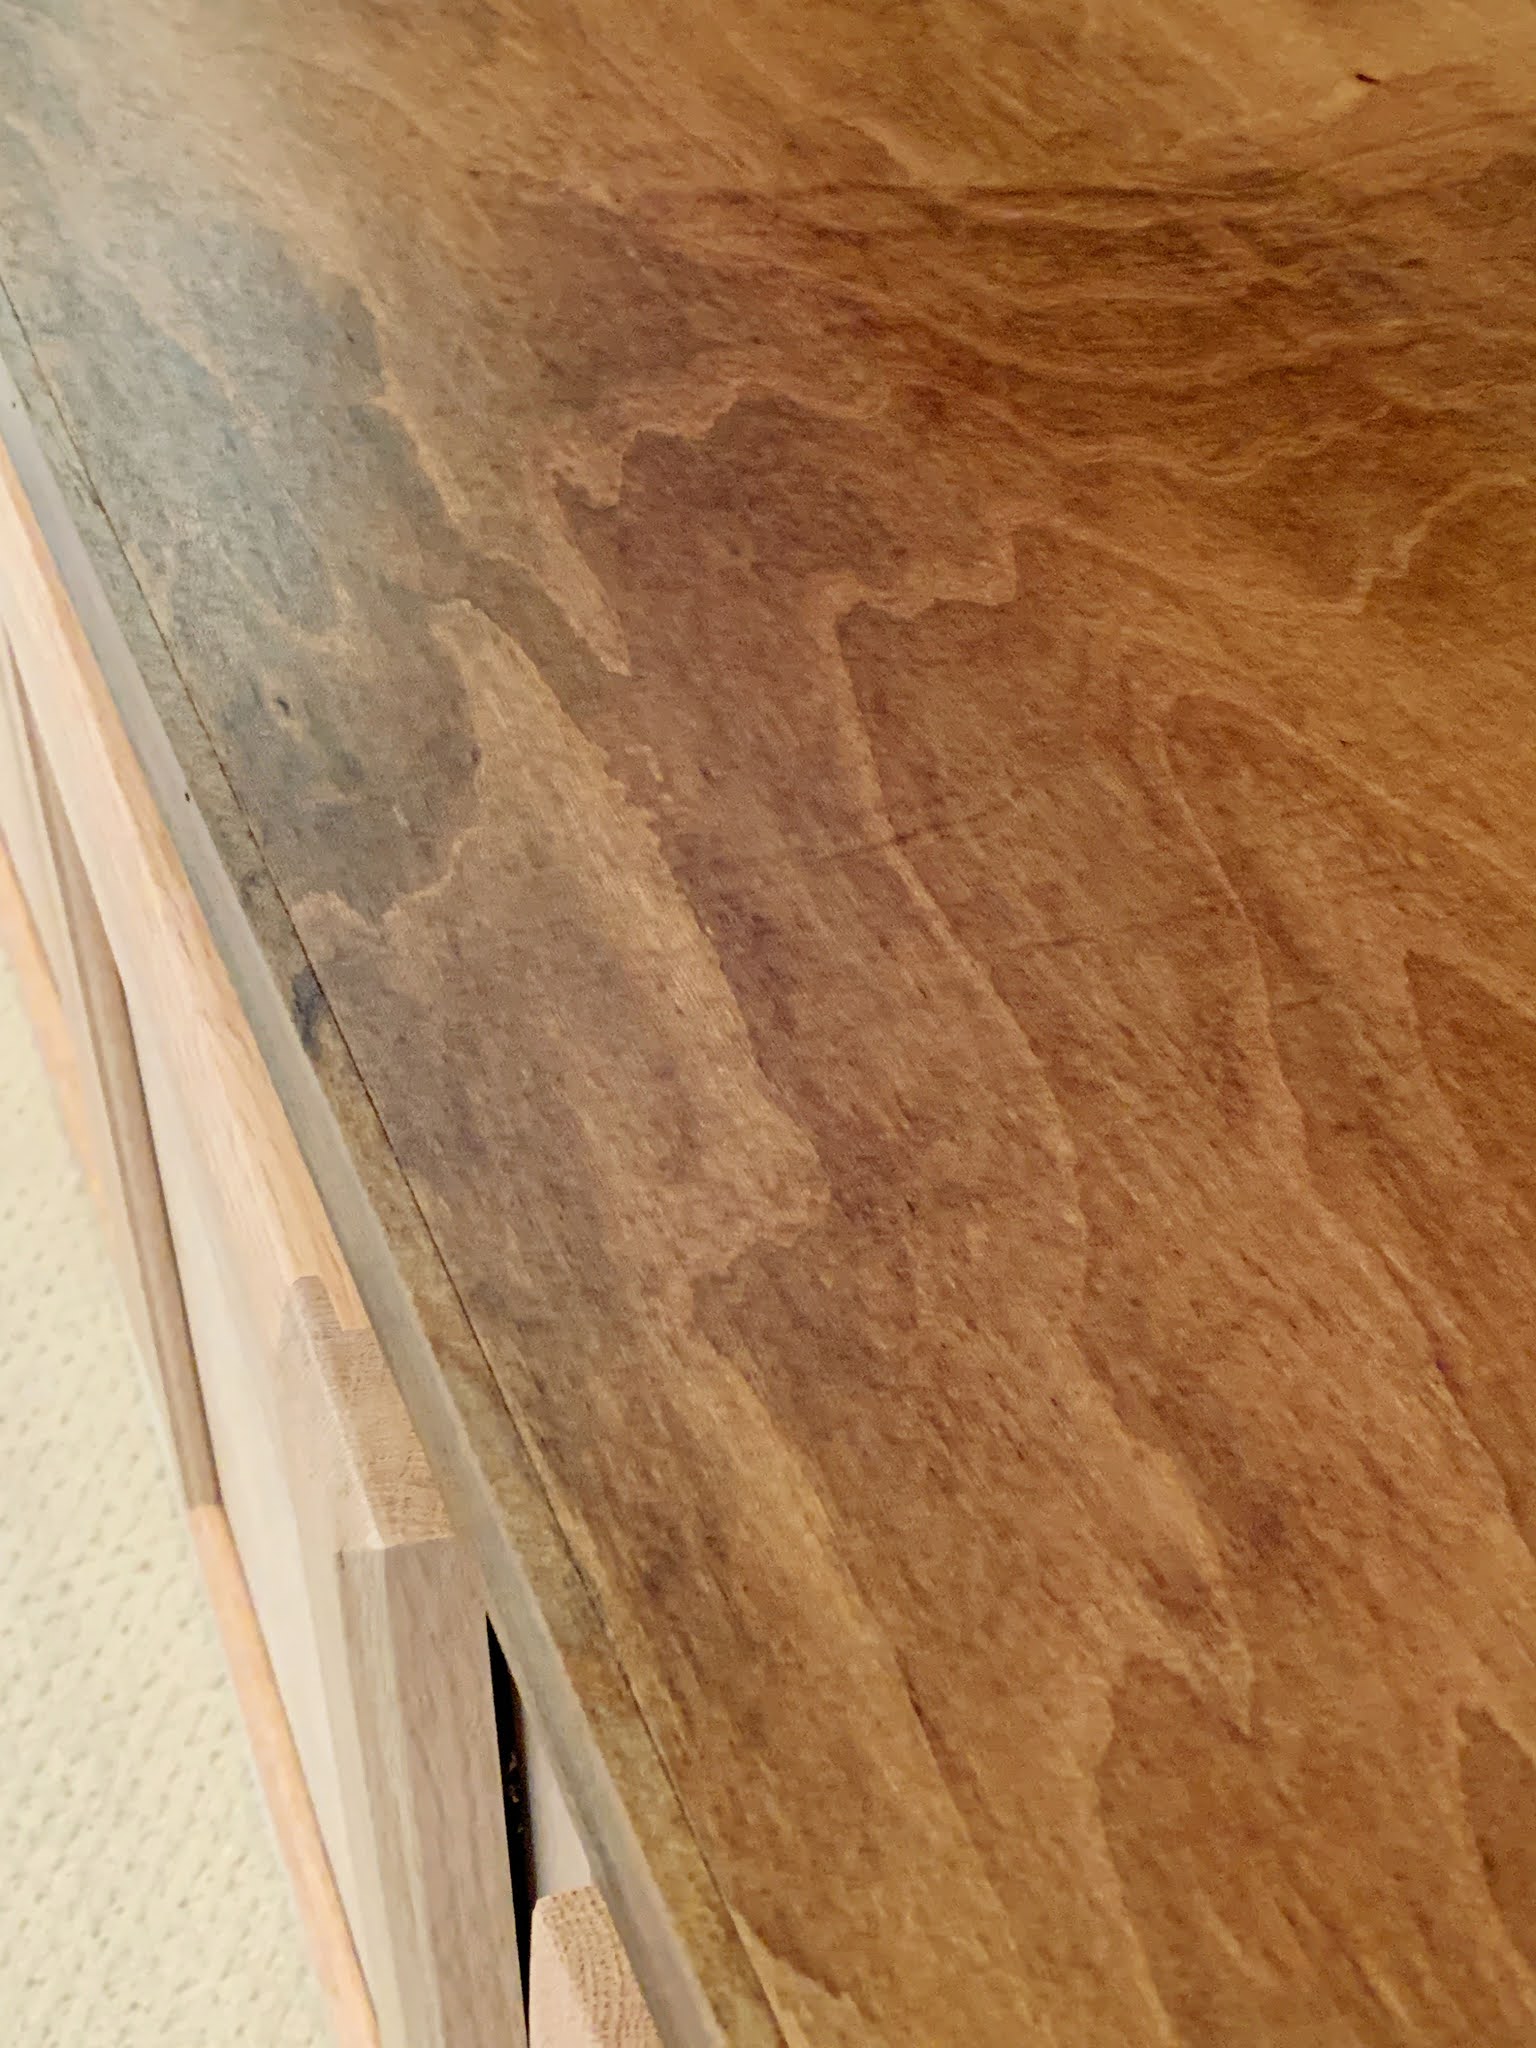
You can barely tell there's trim on the front! Someone would really have to look for it to notice. I promise -- most people would never know you spent a fraction of the money!
One thing you'll want to consider is that different types of wood will stain differently -- I used birch for the counters and my trim was pine, so they matched up well. Some species won't match perfectly when stained.
Here's a quick tip if you're staining or protecting wood with polyurethane. If I don't have steel wool on hand, I'll use a scrap piece of paper bag to get the wood perfectly smooth instead:

It works so well! You can use this in between coats and at the end -- it won't mess up your finish at all.
The little countertop trick will give you the look of thicker wood counters for WAY less:
I would have spent at least $400 on birch butcher block counters for the built ins. Instead I spent around $70 with this option.
My advice would be to use this for areas that won't get a lot of water, just because of that tiny gap in between the counter and trim.
It's perfect for built ins! I did this on my office bookcases as well:

I'm truckin' right along on these! Here's a sneak peek at the wallpaper I'm using behind the bookcases:

It's a tweed peel and stick wallpaper and we LOVE it! I wasn't so sure about it when it was in the packaging, but once I got one panel up I was sold. You can see how to install peel and stick wallpaper here.
I'll be back soon with another update on this big project! I'm SO DANG EXCITED about it!
See more of our home here. To shop items in our home, click here! Never miss a post by signing up to get posts via email.
Via https://www.thriftydecorchick.com/2021/01/wood-counters-for-less-DIY.html
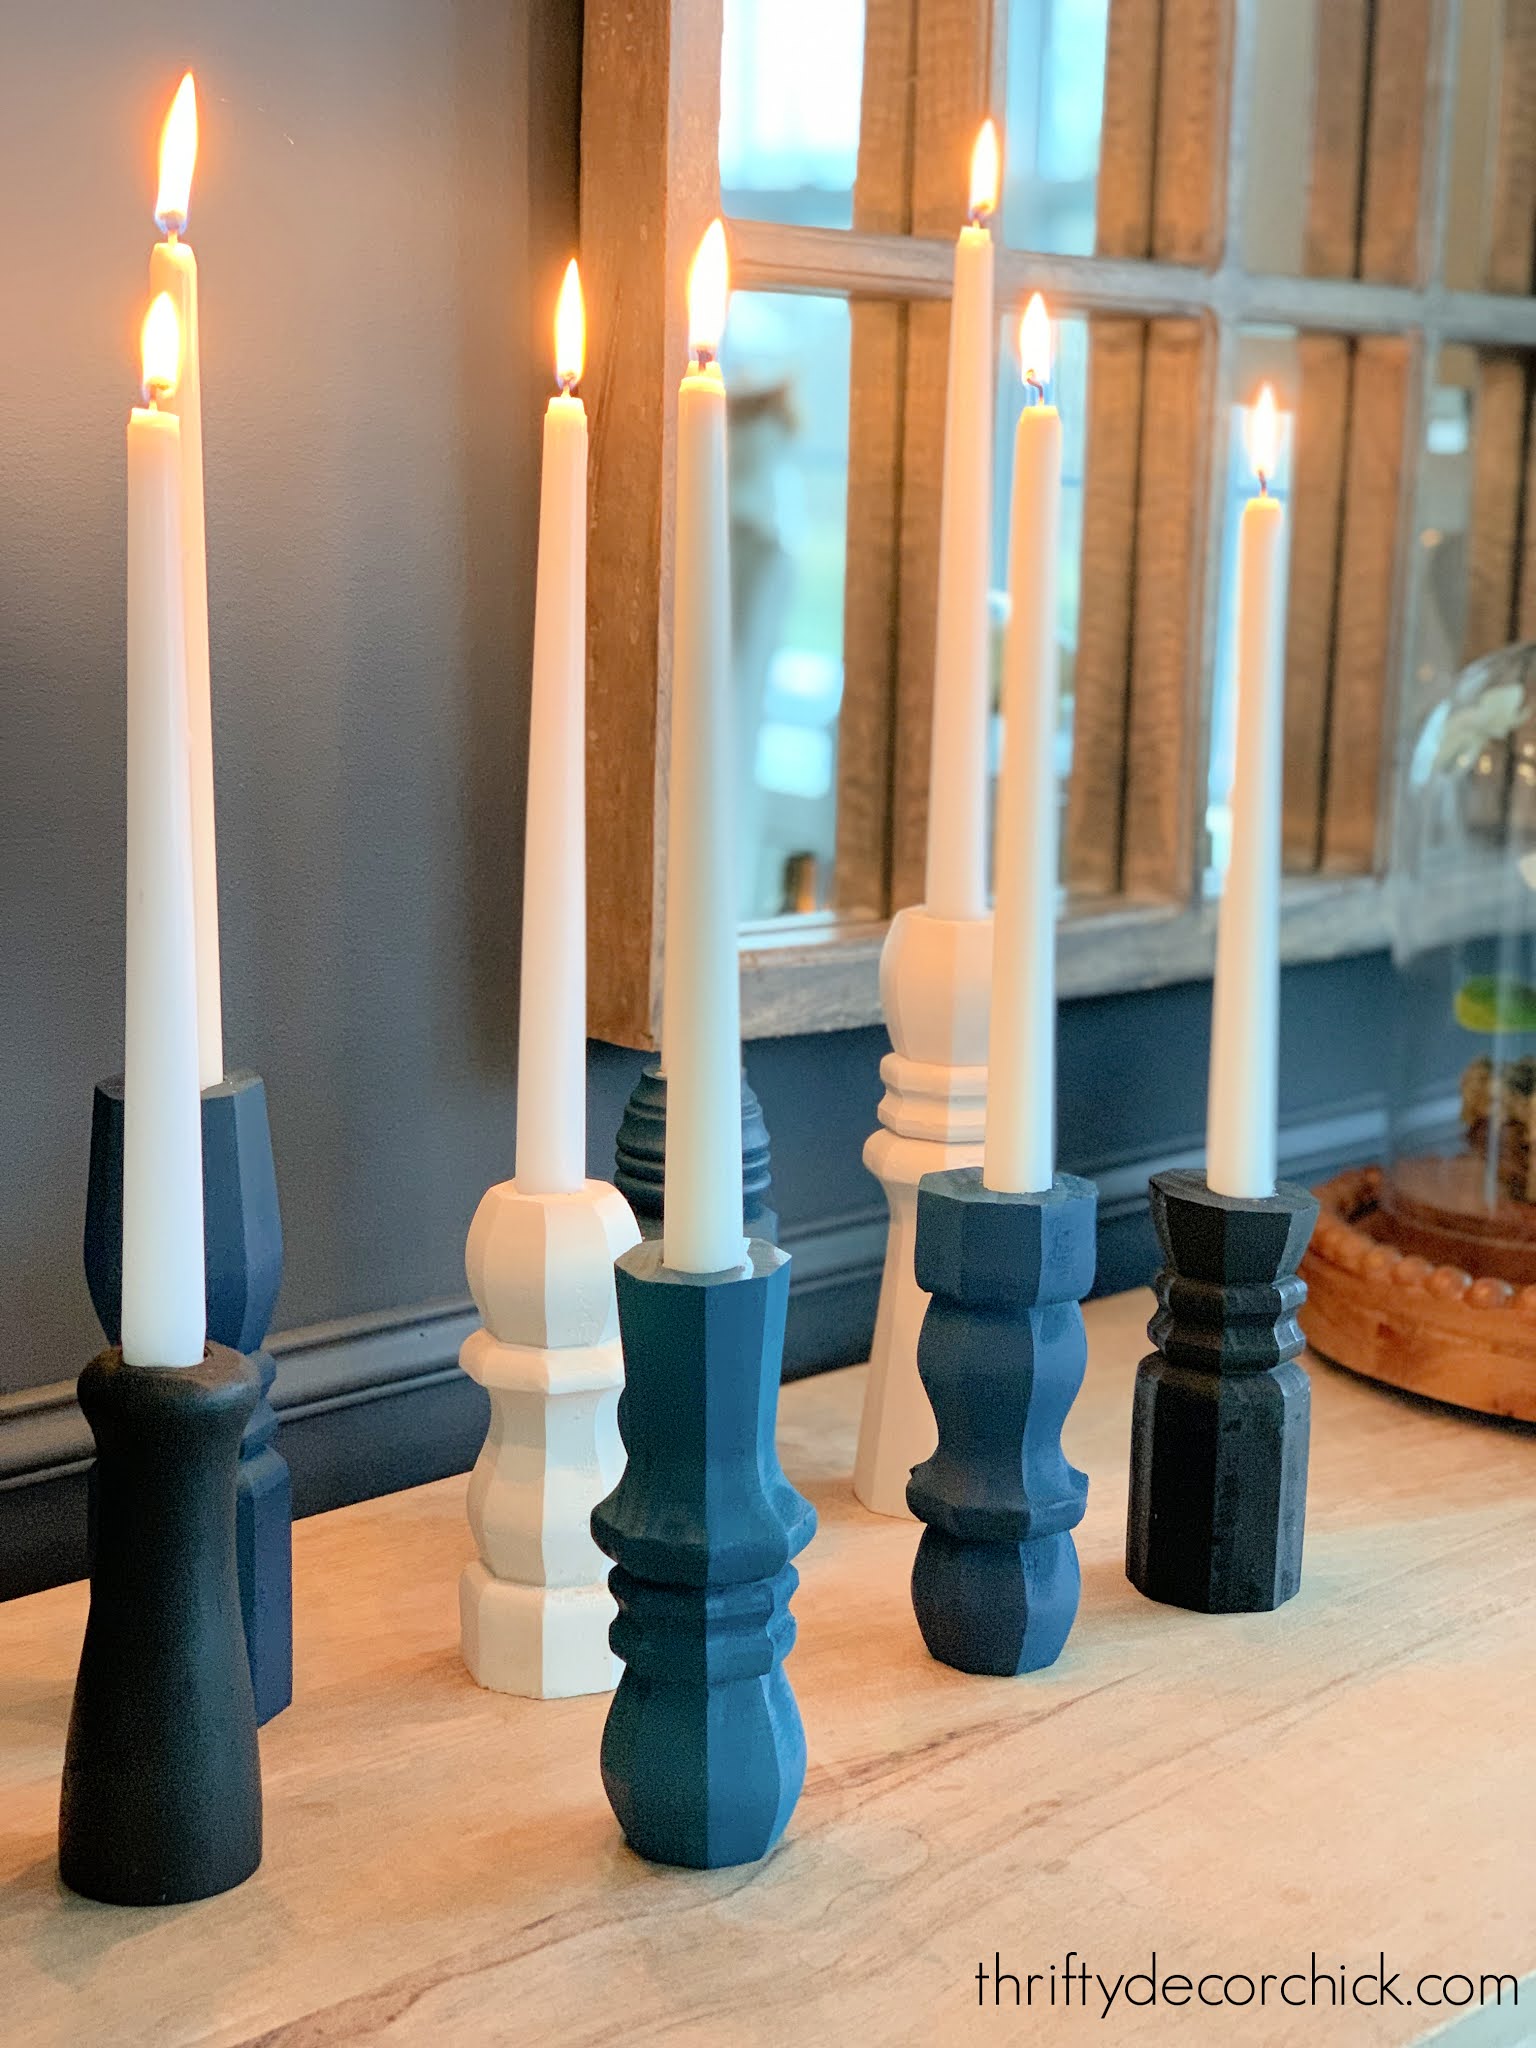
Hey there! I have a fun table leg-turned-candlestick DIY for you today! I've seen this idea done all over, but my friend Kate recently did a more modern version that I was digging big time. I'm joining Krylon to share one of their gorgeous Color of the Year spray paint palettes for the new year!
I LOVED this "New Heritage" palette Krylon put together because it fits in so well in our home. I use a lot of deep accent colors so it was perfect. They have a few different color combinations for the new year, but the one I chose is a beautiful moody palette with their Fusion All-in-One Matte Black, Fusion All-in-One Satin Peacock Blue, Fusion All-in-One Matte Blue and their Chalky Finish paint in classic white:

You can find the pine table legs at most hardware stores -- they come in varying designs and heights.
Before you start the project, use a wrench to remove the screw from each leg:

This post may contain affiliate links for your convenience.
See my policies and disclosure page for more information.
Then figure out where you want to cut each one. I wanted to make sure the heights varied, so I marked where I wanted to cut:

You'll need to brace your sticks so you can drill into them for the taper candle. Do NOT try to hold them to do this!
I found the metal clamp on my saw worked great, but you can also use clamps to secure them to a table:

I couldn't find my 7/8 inch paddle drill bit, so I had to use a couple to get the holes in there. I started with the 1/2 inch paddle drill bit -- these are so much easier to use in my opinion! They drill into the pine so easily:

And then I used a 7/8 inch boring drill bit I had:

If you just start with just the boring bit it will catch and doesn't cut as smoothly. Using the paddle bit first (or just a 7/8 paddle) works so much better!
I gave all of the candlesticks a few coats of the four colors (two in each color) and then stuck the candles in!:
If your taper candles don't fit perfectly, drip a bit of wax in first and they will stick! Hot glue also works.
All of these Krylon spray paints are either matte or satin finish, so they will give you a more subdued finish that I love.
I ended up purchasing a couple more smaller legs that didn't need to be cut down at all. They were already the perfect height and shape. They are a fun accent and work so well with our deep gray/blue paint color (cyberspace by Sherwin-Williams):

The colors work so well together and as always, the Krylon spray paint was incredibly easy to use. It goes on so easily and covers great! As a reminder, I used Fusion All-in-One Matte Black, Fusion All-in-One Satin Peacock Blue, Fusion All-in-One Matte Blue and their Chalky Finish paint in classic white.
This was a quick DIY and the possibilities are endless! You can use a simpler table leg for a more modern look, or use wood bases from the craft store for the top and bottom to make them more traditional.
Krylon has more Color of the Year trend palettes that you can see here.
See more of our home here. To shop items in our home, click here! Never miss a post by signing up to get posts via email.
Via https://www.thriftydecorchick.com/2021/01/diy-table-leg-candlesticks.html
Soooo, remember last week when I shared the projects I was hoping to tackle this year and I didn't mention this big one? Yeah. ? I planned to start this HUGE built in project later in the year, but then I realized we spend more time in the basement in the winter...so why not get it done now?
And when I started figuring out materials I discovered we had money in the budget to at least get this project going. It helped that the cabinets I needed were on sale!
**Quick note: If you are reading this post via email, you will now have to click through to read my posts. I had no choice but to change it when one of my affiliate companies made it a requirement. Just click the "read the whole post here" link!
If you would like to get my posts via email you can sign up here.
I've built a few versions of these built ins using kitchen cabinets many times before. I'm telling you...using cabinets makes this SO much easier (and quicker) than if you were to build those yourself. They are awesome!
This side of our basement family room has looked great for awhile:
I think I've only shared the other side of the room once because it's just a loooong wall:

This post may contain affiliate links for your convenience.
See my policies and disclosure page for more information.
I just hung a few things up there two weeks ago...and now I'm going to take them down. Sometimes I really plan out when I'll start a project and sometimes I jump right in. This one is the latter. :)
The wall is SO long, so I've known since we moved in what I wanted to do. Sorry for the bad quality, I didn't have great light when I took these:

The ginormous television is courtesy of my husband. I would not have picked it, but I do secretly love it. :)
When I got a bug to start this project the other day, I sat down with my old school graph paper to sketch out my plans (trying to keep things proportional):

Oh, how I LOVE doing this! It's one of my favorite parts of DIY projects. I love sitting with a pad of paper and mapping out my ideas. This will be my biggest build yet! Before now the longest I've done is 12 feet.
Before I could start the build process, I had to remove the baseboards:

You can see how I remove baseboards without damaging the wall here.
I'll be using these again, so I removed all of the nails and caulk:

To make these more custom looking, you'll want to get the cabinets off the ground a bit. You can do a toe kick like in the kitchen, but instead I like to wrap the fronts with the baseboard and tie them into the rest of the room (this is why you want to save the base) so it looks like a custom built in.
To do this, you'll need add wood braces under each cabinet. I always use the most basic pine for this part of the project.
Just wrap the inside of the base to raise up it up a bit -- I nail them into the front, sides and back of the cabinet. The size of the wood will depend on the height of your baseboards. I want the baseboards to sit on the front of the cabinets instead of underneath:


I used 1x5 boards for that part and it works great! Btw, the only place I've found the five inch height (which is really around 4.5 inches) is at Home Depot, but again, your size will depend on your baseboards.
You can find these unfinished cabinets at almost any big hardware store. It's SO great that you can order online now and they will bring them out to you! Are these the BEST quality? No. But they've always worked wonderfully for us and they are easy to dress up with paint and hardware. I may make new doors for this project...I'll decide on that later.
After the braces are done on the bottom, it's time to start placing your cabinets! After you get them set in place you can figure out where you need to make access to the plugs. Measure where your outlet is on the wall and then mark those measurements on the back of the cabinet to cut it out:

I still have to drill a few more holes and cut the back off of one cabinet (more on that later), but they are ready to be installed into the wall!:
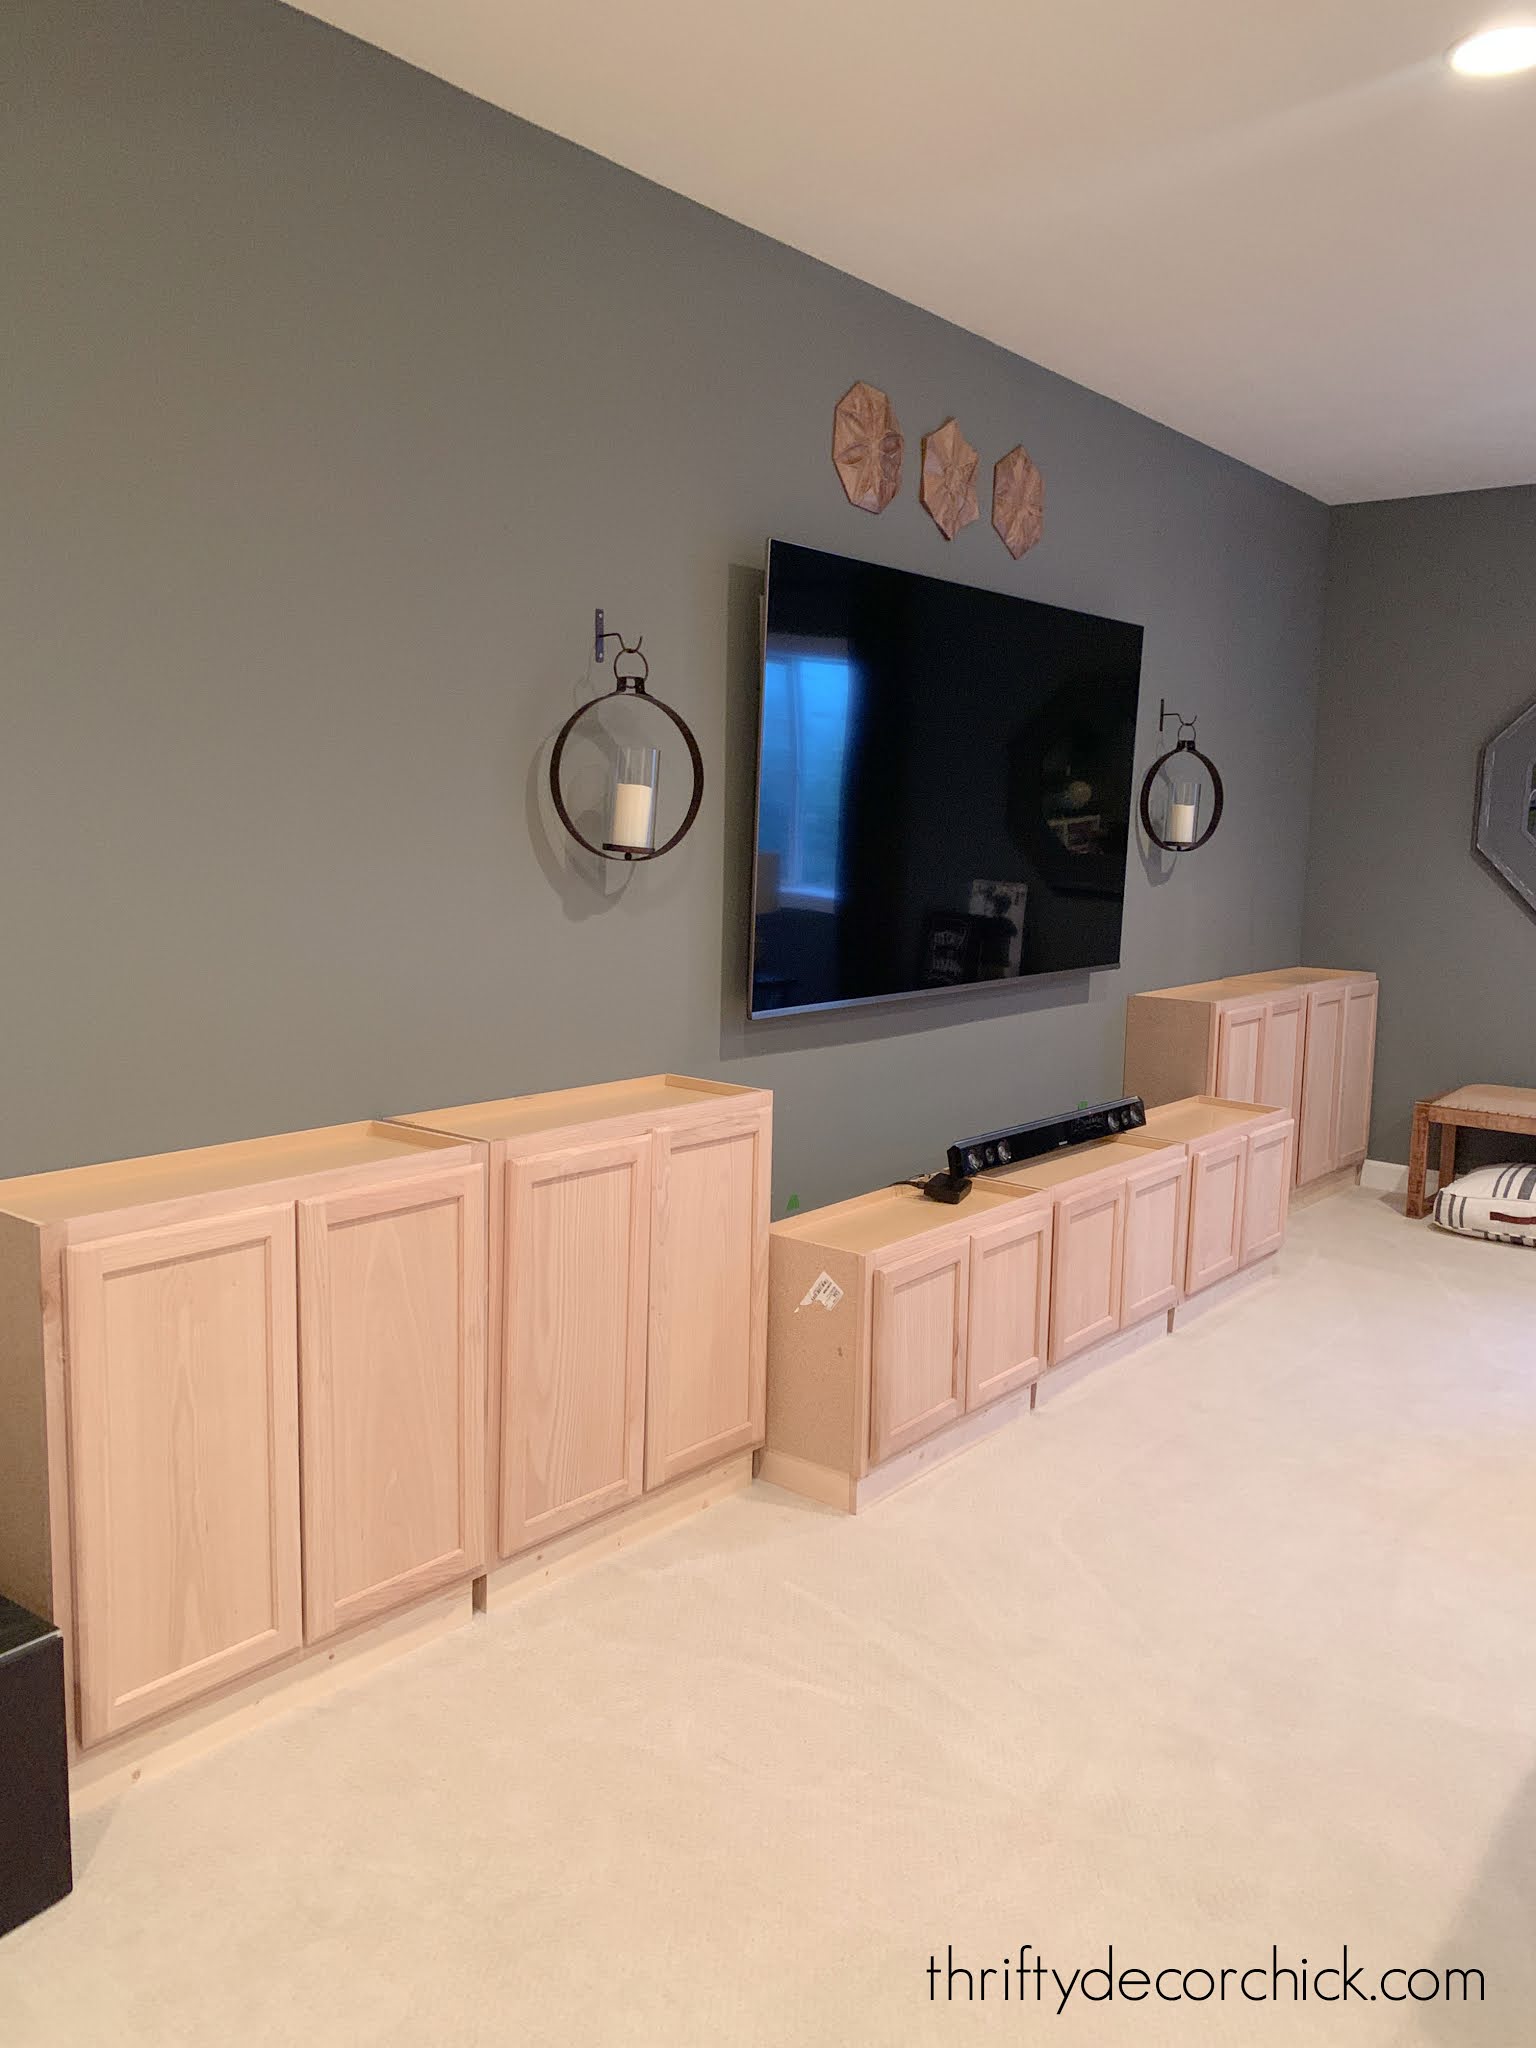
It's a BEAST! But this wall is long so it needs something substantial. You can see how I'm pulling the middle cabinets out a bit to make a bench -- those are the 18x30x12 cabinets. The others are the 30x30x12 size.
I would have these installed and counters on by now, but we have to wait to have sconces wired. They will be at the top of built ins like I usually do. I could do the non-electrical lights like I did in my office, but I'd like to have something a little brighter that we can also dim while watching TV. If you have an outlet below, it's almost always possibly to add sconces above!
As soon as those are wired I can install the cabinets, get the countertops and baseboards on and then start painting. Then this part at least will be usable:
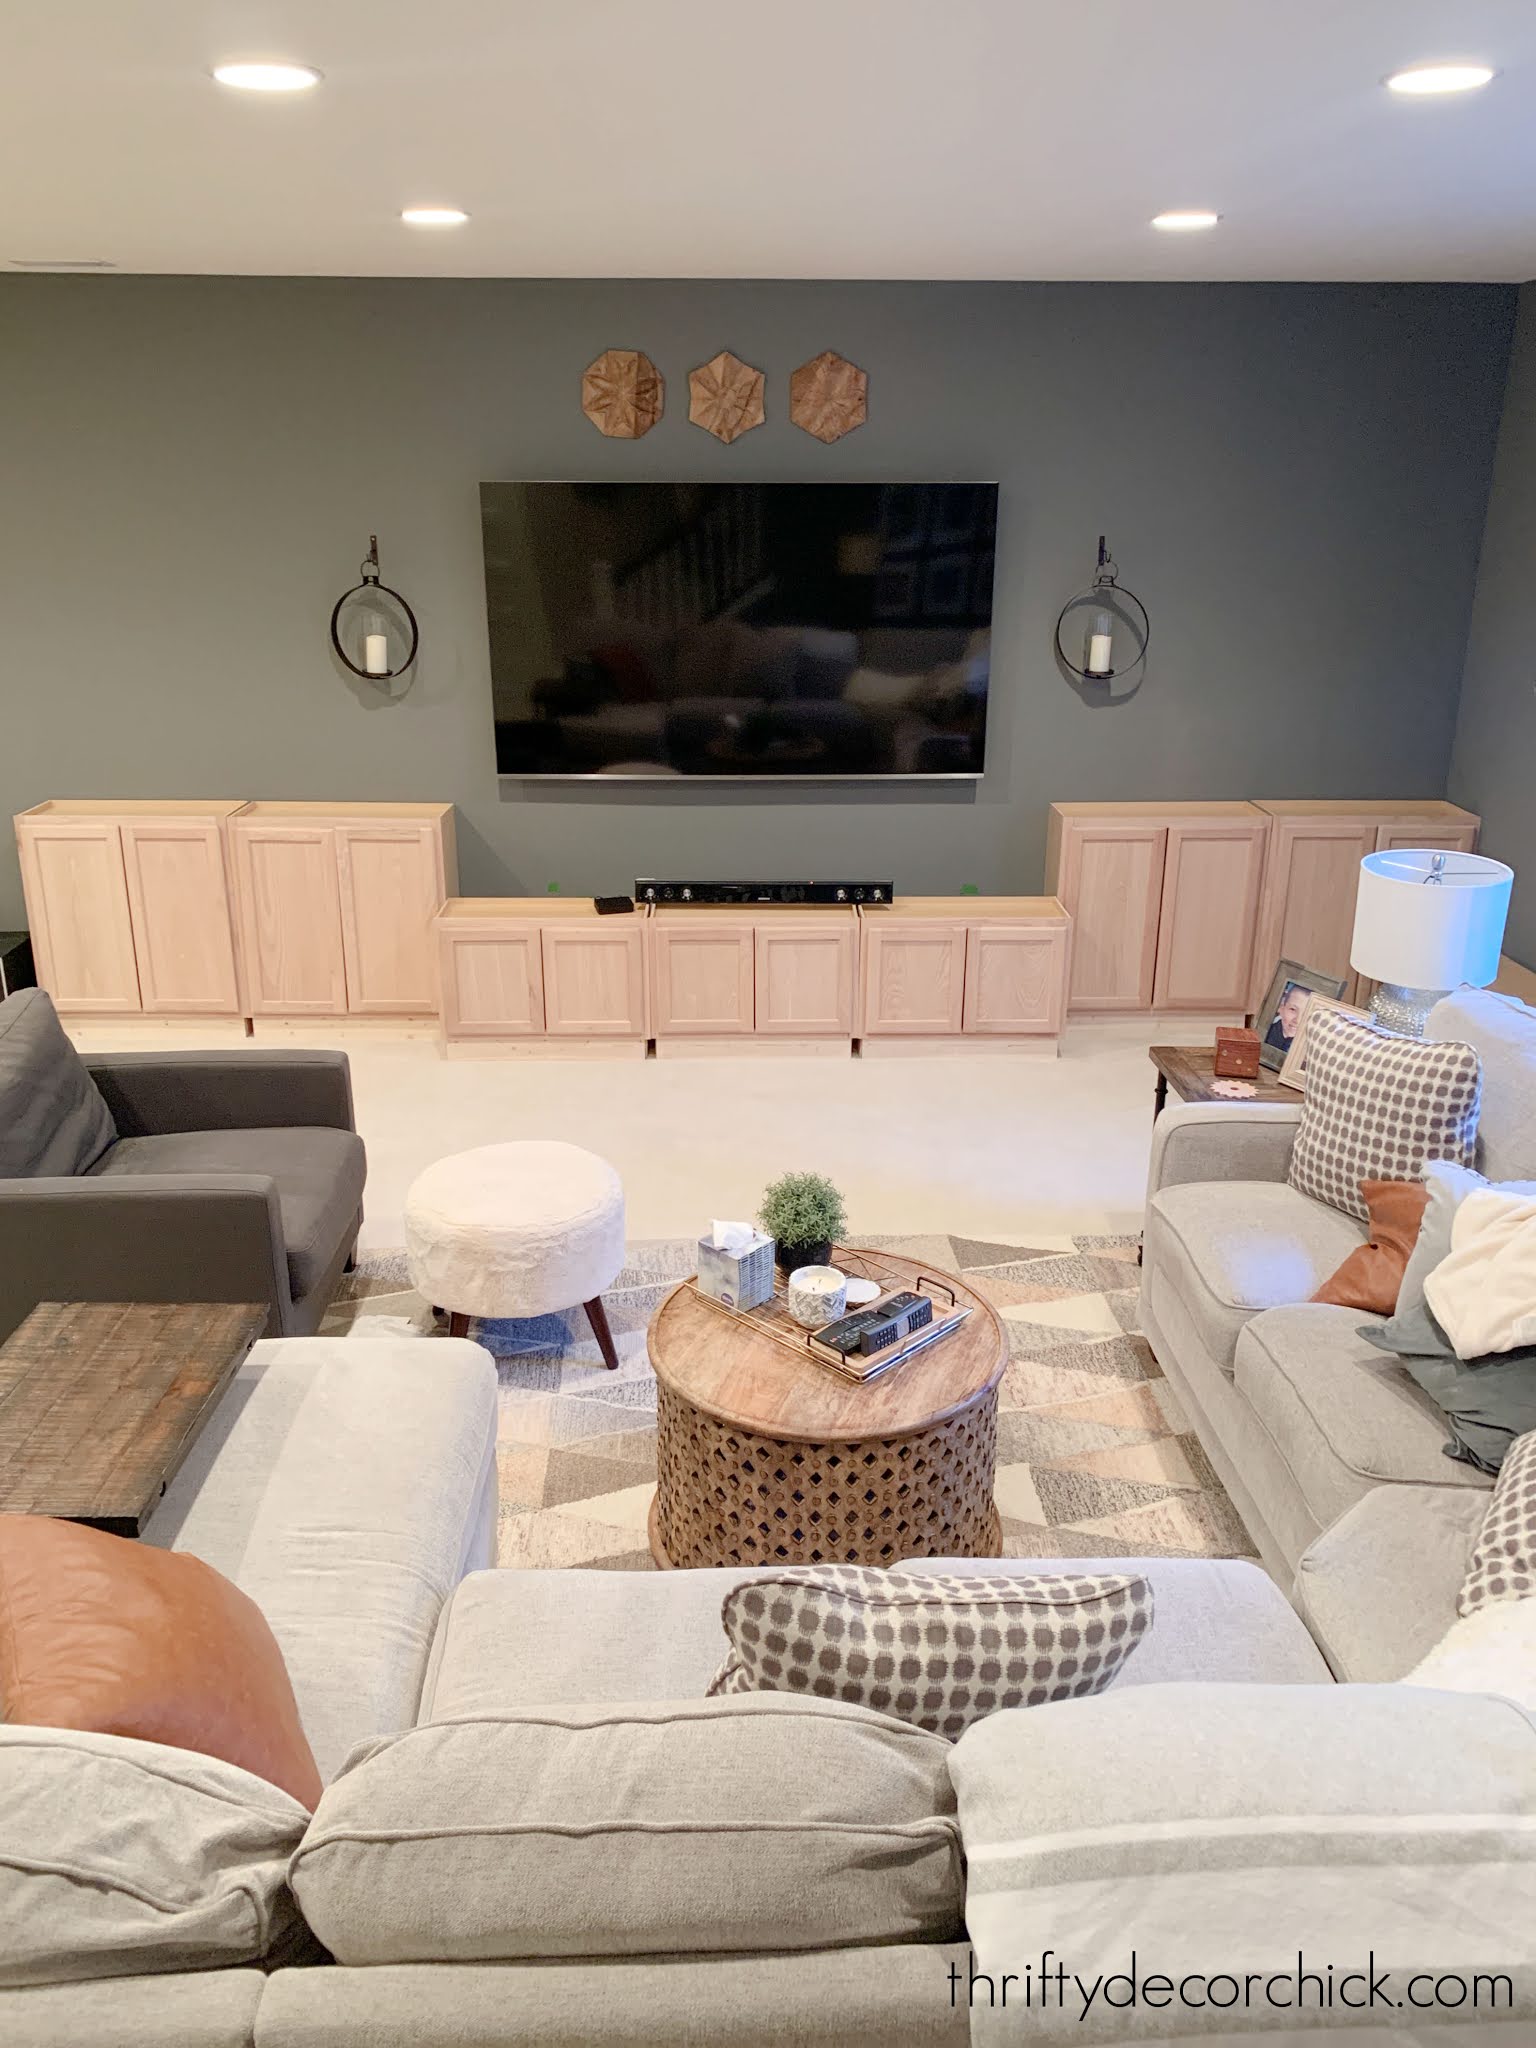
I've already had to switch gears on a couple things since I drew out my plan. You may notice that I had a fireplace that was supposed to be installed under the TV. We thought we'd have room, but with the TV speaker it just won't work.
So I was able to use taller cabinets for the bench in the middle instead of the 12 inch versions I planned to use. This is a much more comfortable height for a bench and the proportions just look better. We think we found a new spot to do the fireplace someday, so I hope to share more about that soon!
I'm getting good at this project! If I didn't have to wait for electrical work to be done I could finish this up (except paint) in a week! But I am forced to be patient, which is better for our bank account anyway. ;)
My first DIY bookcase took me about eight months and my Dad helped with most of it. My office took about six weeks...and this one I think will take about half of that. I'll share a few of my past built in projects below! Hopefully I'll have more progress to share with you soon.
You can read all about the dining room turned library bookcases here:
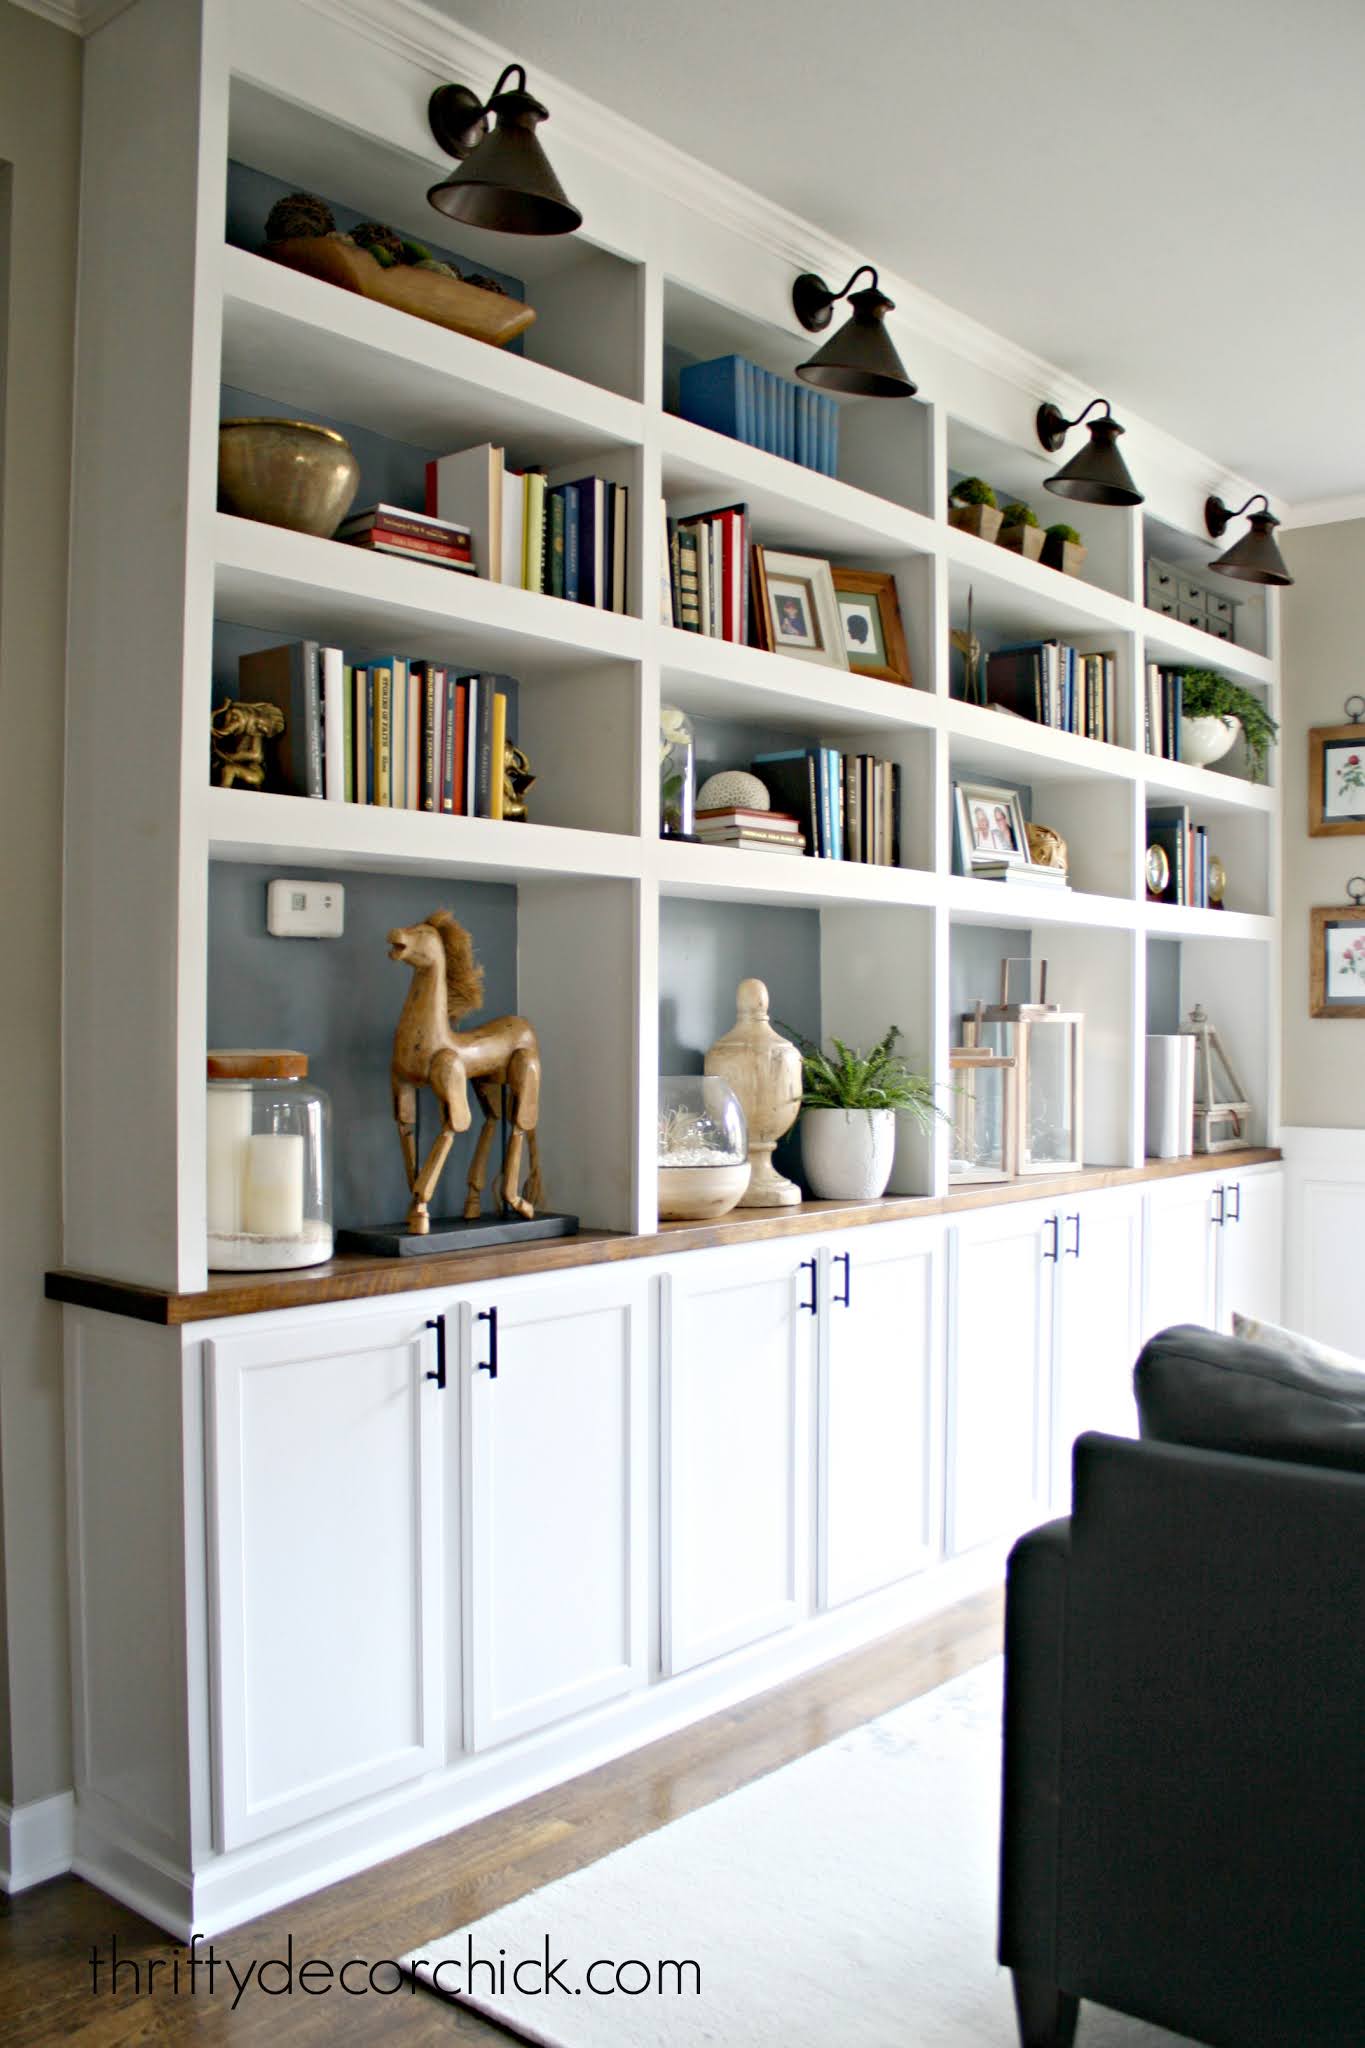

We used them to hold sound system stuff here:

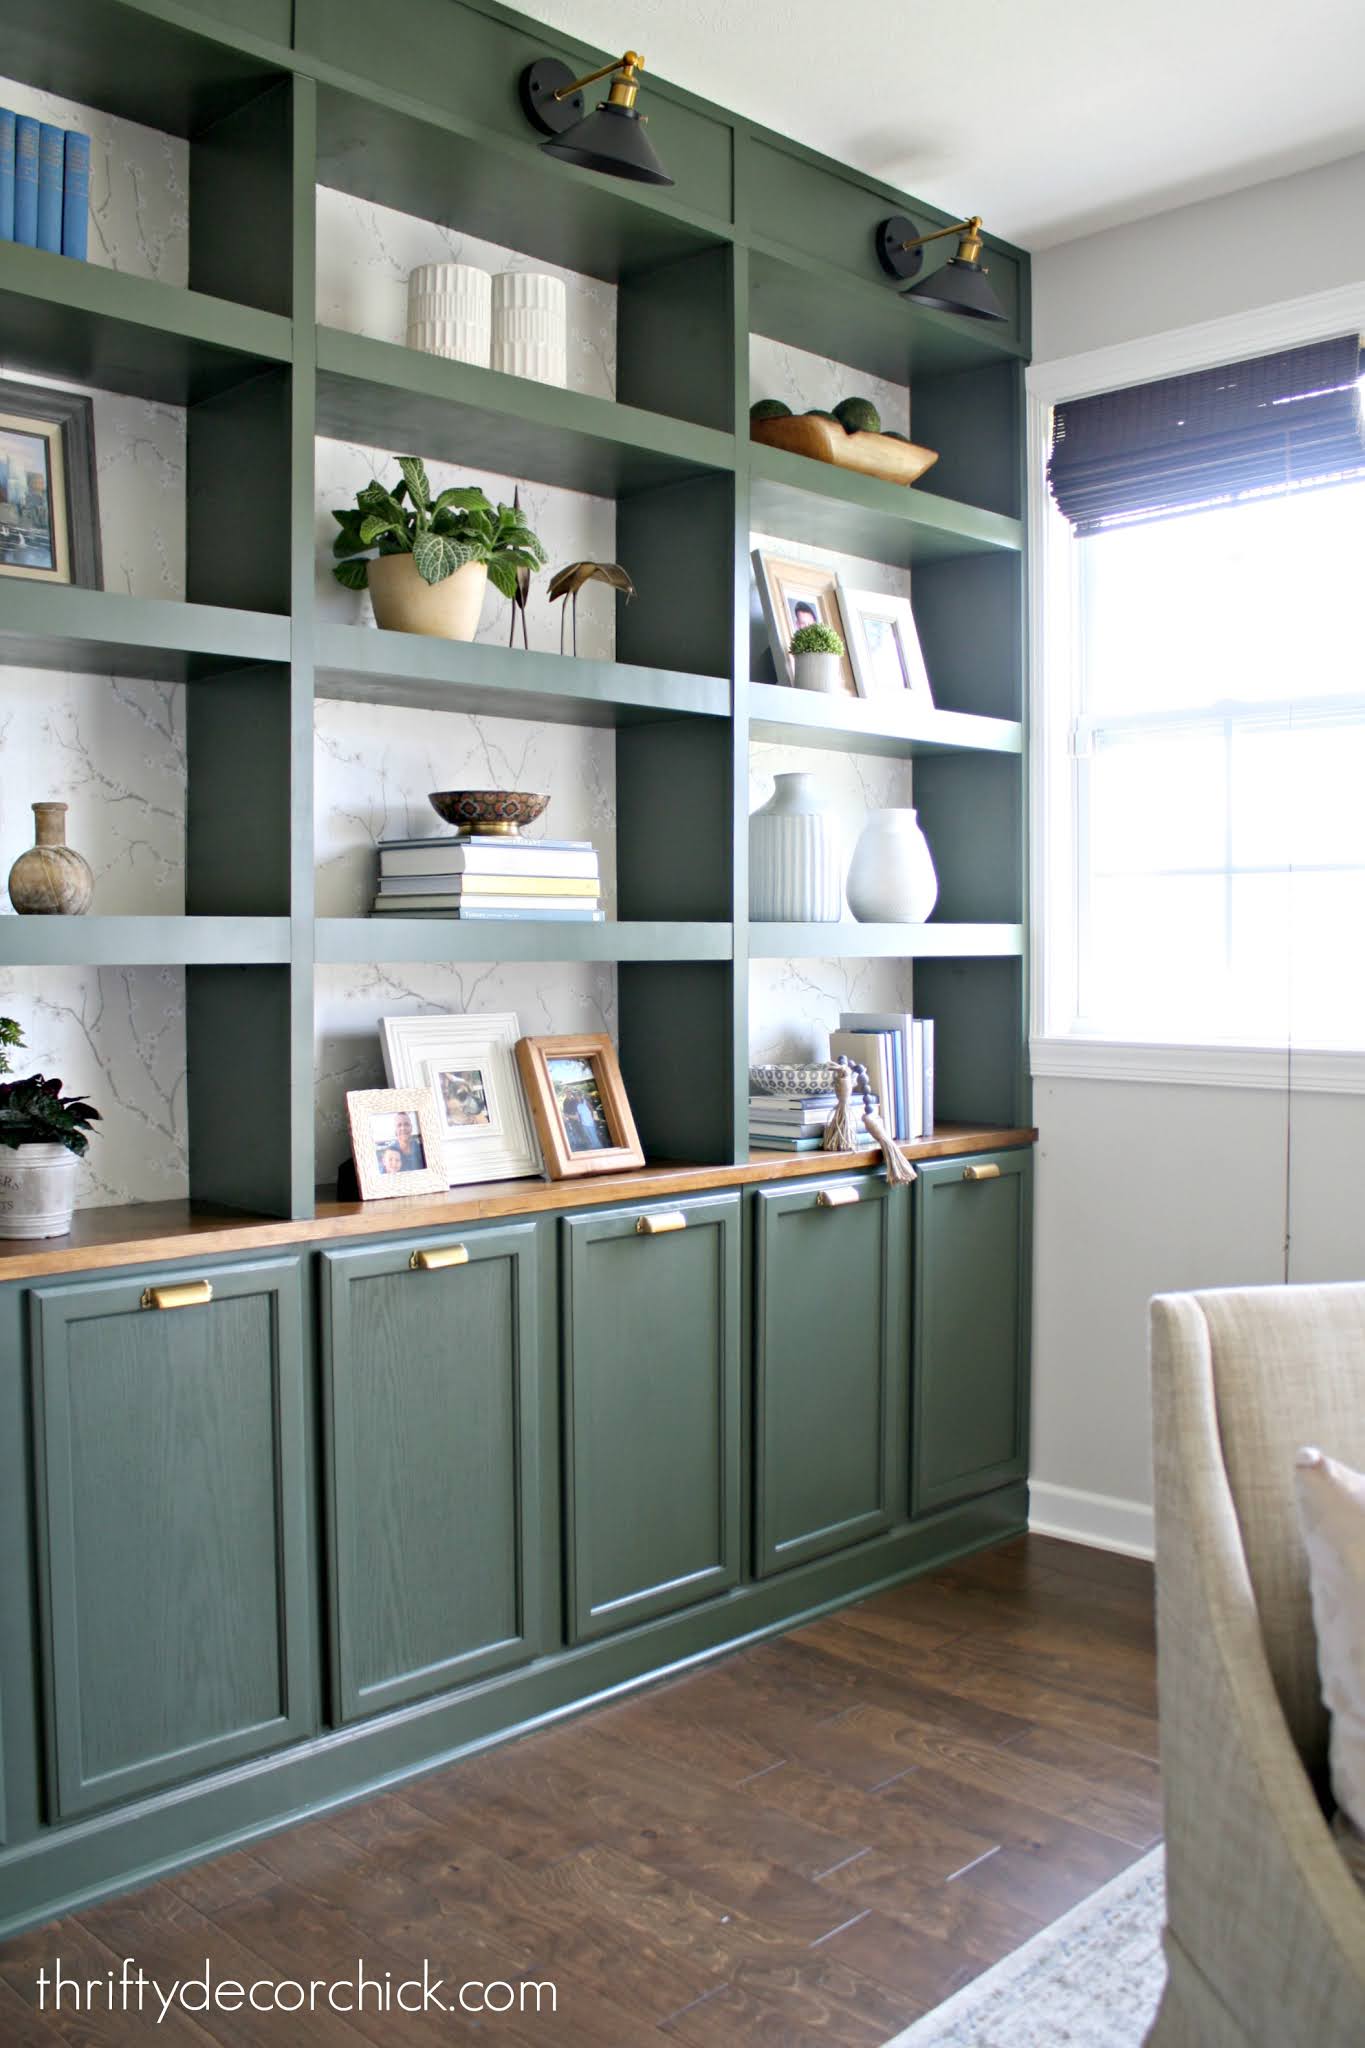
And finally my office built in bookcases here:
See more of our home here. To shop items in our home, click here! Never miss a post by signing up to get posts via email.
Via https://www.thriftydecorchick.com/2021/01/huge-DIY-entertainment-wall-basement.html
Hello there! This is always one of my favorite posts of the year because I see how productive I am...even when I don't feel like it! I don't feel like a total sloth after pulling this post together. Especially after this last crazy year!
**Quick note: If you are reading this post via email, you will now have to click through to read my posts. I had no choice but to change it when one of my affiliate companies made it a requirement. Just click the "read the whole post here" link!
If you would like to get my posts via email you can sign up here.
I didn't think I'd have much to share, but I did plenty last year. They weren't all huge before and after makeovers...but I think I like these even better! Most of the projects are easy to accomplish in a day or two with little money.
You can see the projects I finished in 2019 and my plans for 2020 here! More on those in a bit.
Remember that projects around the house are my job...and I love it! I love to wrap up the previous year and hopefully inspire you for your own home.
My most recent project was a mini-room makeover. I painted the ceiling, added a pendant light and wallpapered the little hallway off our foyer:
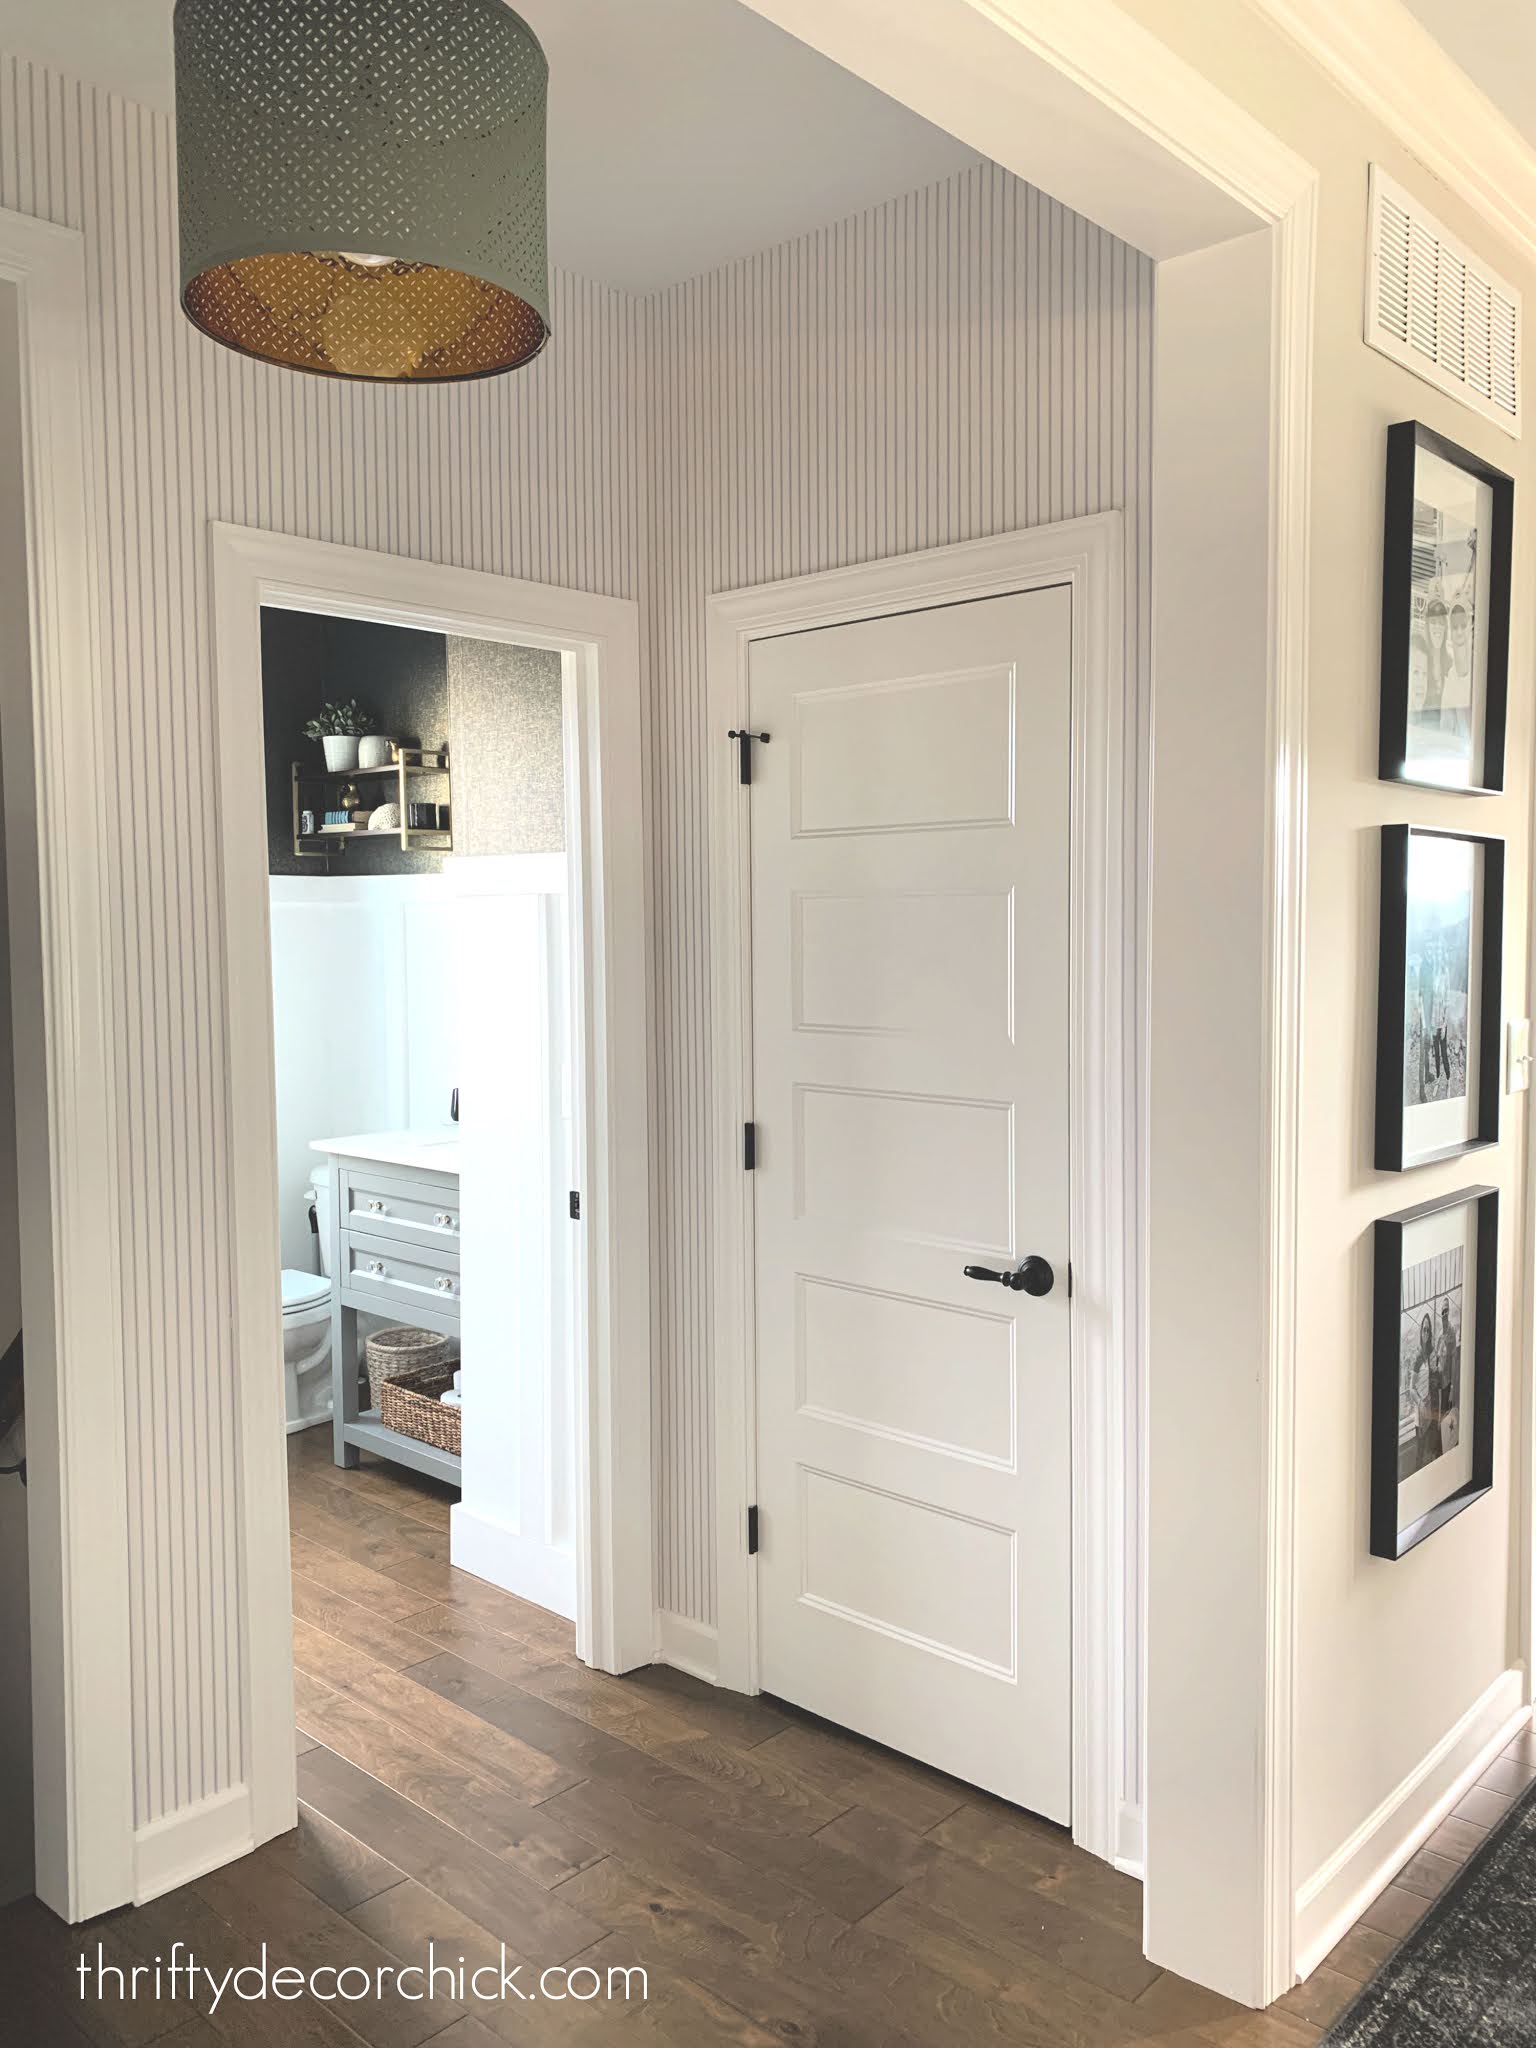
The updates make this little spot so fresh and clean -- love it!
Last year I added a thin and simple board and batten treatment to one of the walls on our staircase:

My plan year was to continue this on the other two stair walls...but I got distracted. ;) I plan to do that this soon.
I built some simple sliding shoe storage bins for the mud room:
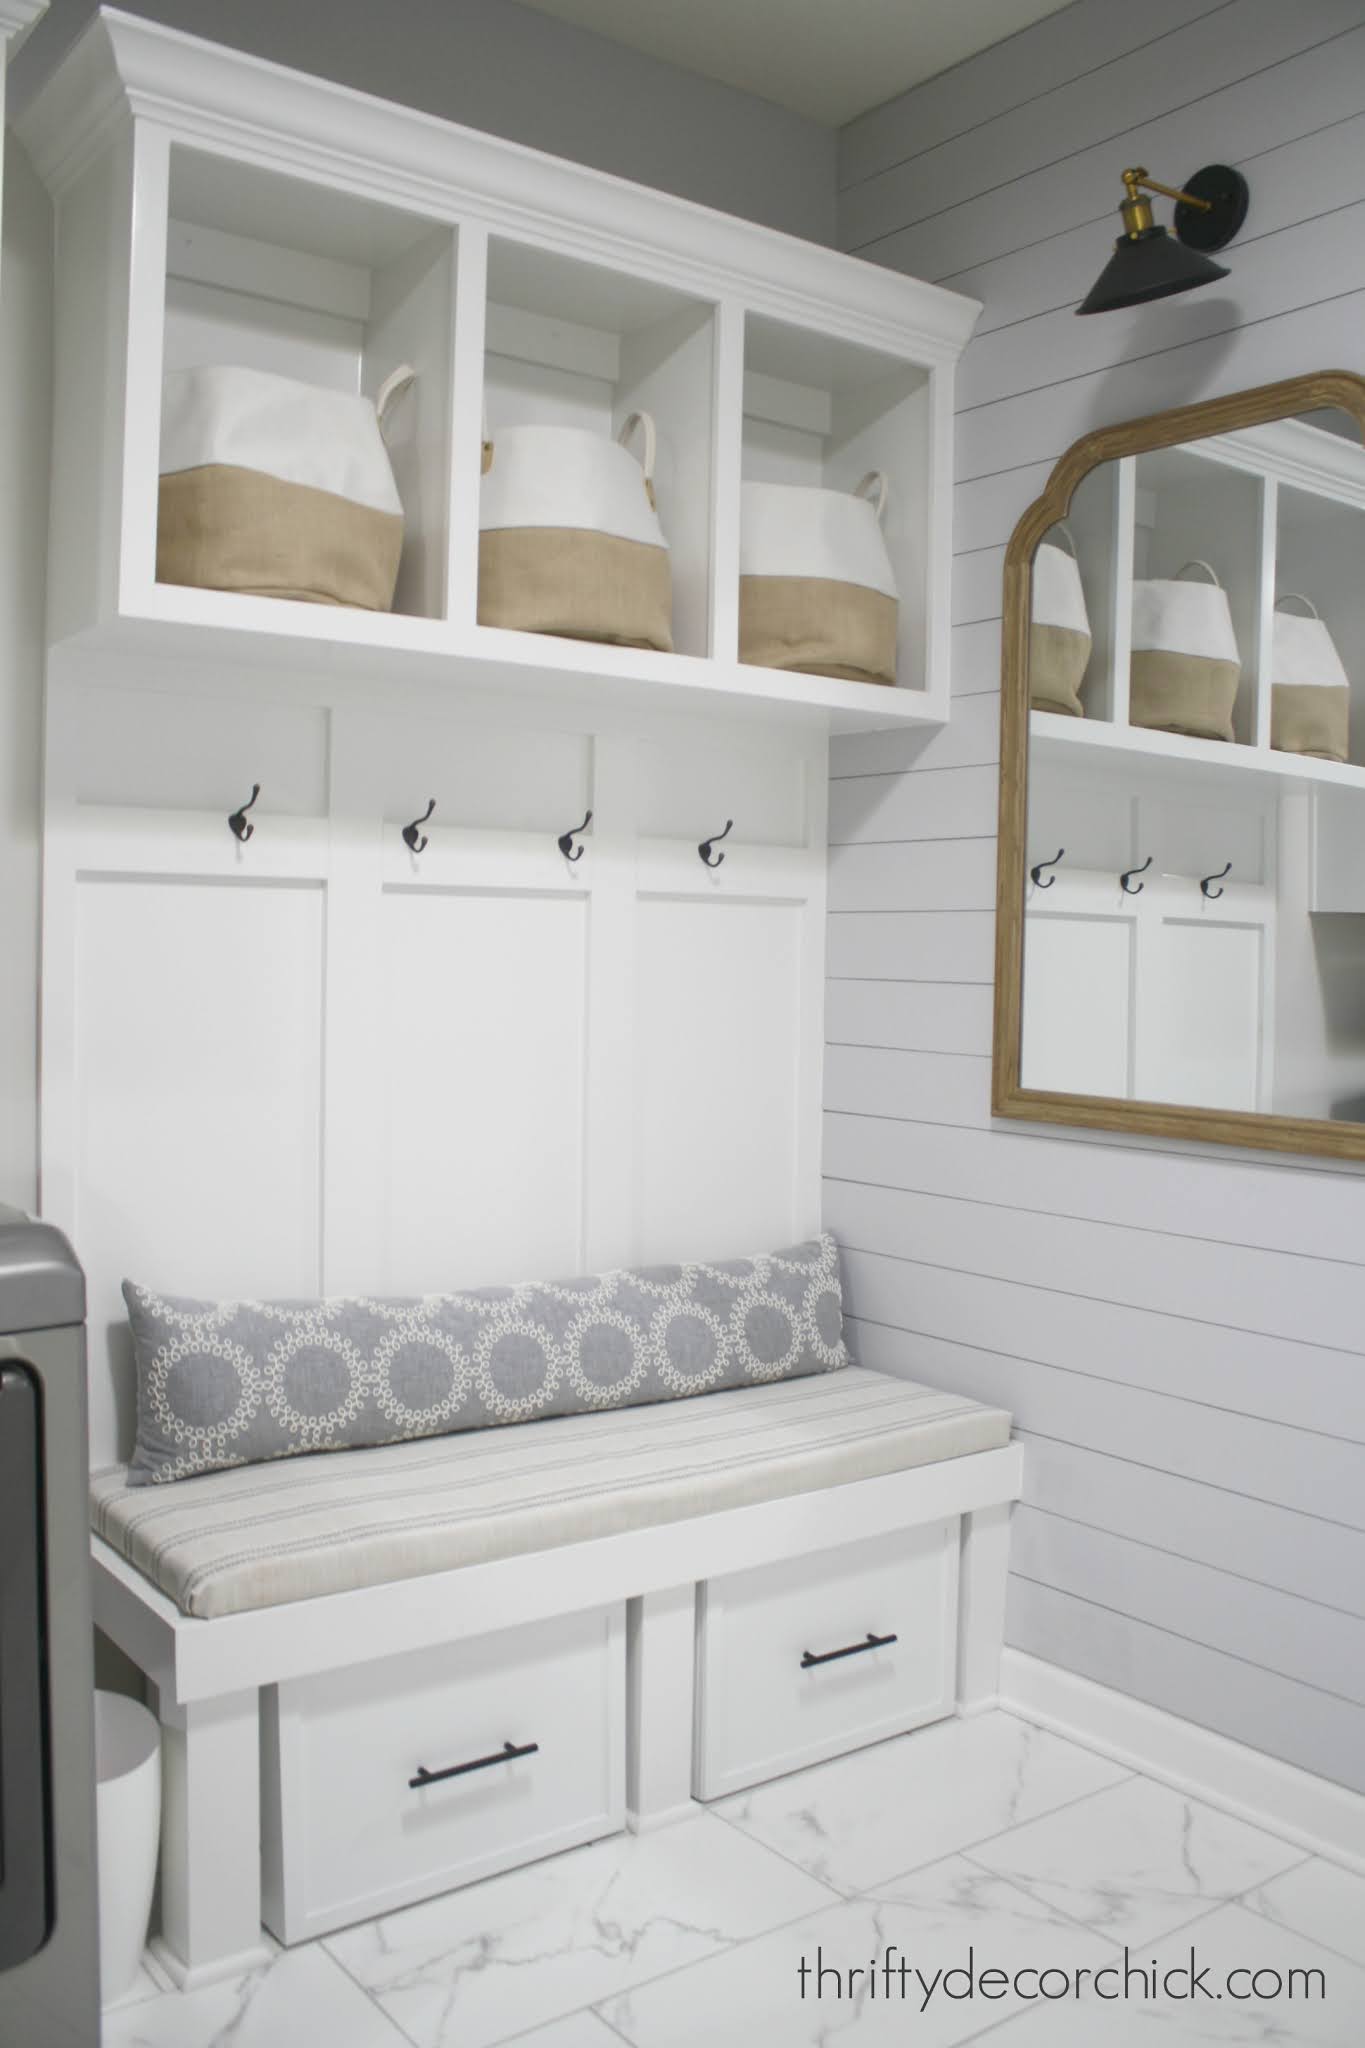
Then I finally finished painting the mud room -- you can see the whole tour here!
We use our outdoor spaces more than ever this year! I always wanted to string pretty cafe lights out here and we finally got that project done. See how we hung the outdoor lights without trees here!:

Ahhh...I love them so much! They have held up beautifully through storms and snow!
Later in the year we added these beautiful Adirondack chairs around our fire pit:

I'm already looking forward to some spring nights there.
I finished up our master bedroom makeover:

Early last year I made a huge upholstered bulletin board for my office:

It's the perfect mix of form and function! I'm so glad I went with that fun fabric.
These floating shelves above our toilet were a quick and easy DIY:

I shared the first look at our guest room -- a few little touches made a big difference:

Our kitchen didn't see as many projects as last year, but I made a couple changes that I think made a big difference! I added a DIY wood vent hood and painted the hardware black:

Our basement saw a few projects that warmed it up even more. I finished painting most of the walls the dark gray:

Those are just a few of my favorite projects of 2020! Did you miss any of them?
I didn't accomplish much from my to do list for last year -- our finances have been hit hard with schools not being 100 percent most places so we nixed most of them.
We are hopeful for a better 2021 for so many reasons! Our hope is to address the same spots I wanted to tackle last year and maybe more?
We are SO SO excited about finishing our basement kitchenette. I purged and organized this spot last summer and now it's a clean slate:

It's huge for a basement kitchenette! I have started planning out the layout and we are all coming up with fun ideas for this space. I'll share my plans with you soon!
I wanted to tackle our son's bathroom last year but got distracted. I hope to take down a wall in here and add some fun tile to this wall:

I would also LOVE to wall off a space in our basement storage room -- we've made it into a workout space and I have dreamed of closing it up since we moved in. That would be a BIG project so I'm not sure it will happen.
Heck, I'm not sure any of it will happen...crossing my fingers! I would be perfectly happy with another year of smaller projects -- we're just so thankful we were able to do anything to our house last year!
Do you have any fun DIY projects or makeovers planned for this year?
See more of our home here. To shop items in our home, click here! Never miss a post by signing up to get posts via email.
Via https://www.thriftydecorchick.com/2021/01/best-2020-thrifty-decor-chick.html
You know how great it is to find a solution for an organization issue that's bugged you for years? That's how I feel about this under cabinet organization fix I recently found. I just can't believe it took me this long to find it!
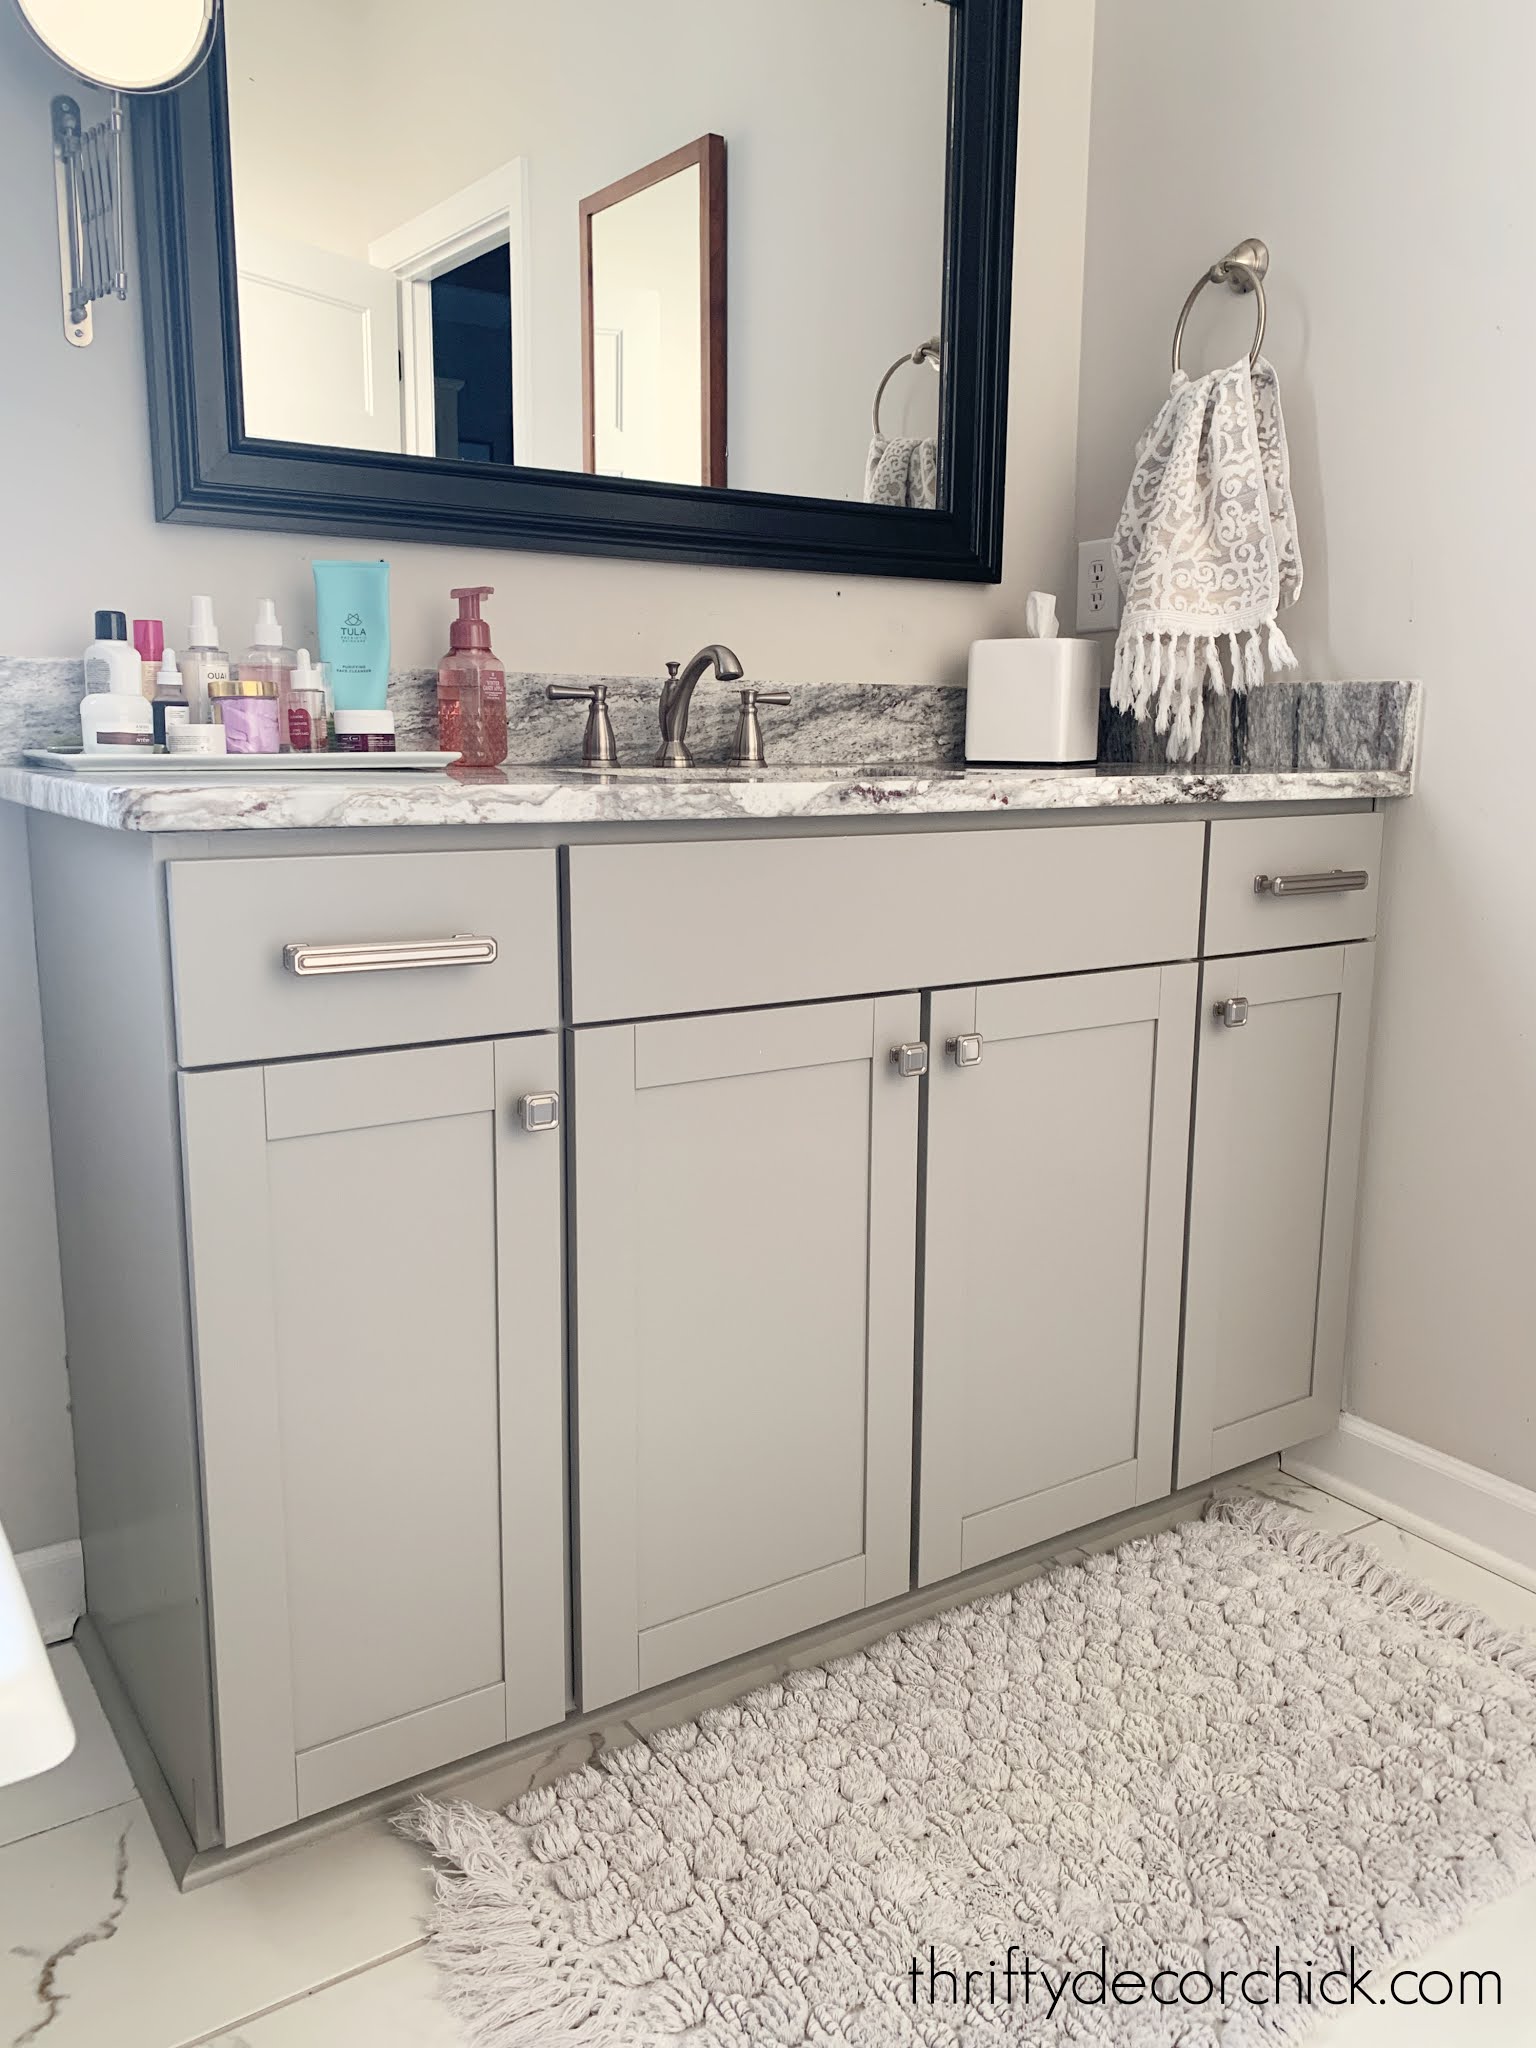
We had to make quick design decisions when finishing this house since we took over a spec build that had already started. We're thrilled with most of the design decisions I made, but there are a few things I wish I could change.
Our builder suggested this option, and I approved them without really looking at the detail. Having all cabinets and no lower drawers is the woooorst:
This post may contain affiliate links for your convenience.
See my policies and disclosure page for more information.
I have cursed and raised my fist in the air many times standing at that vanity. Maybe it wouldn't bother me as much if we didn't have drawers on the vanity at our last house? All I know is it drives me nutty.
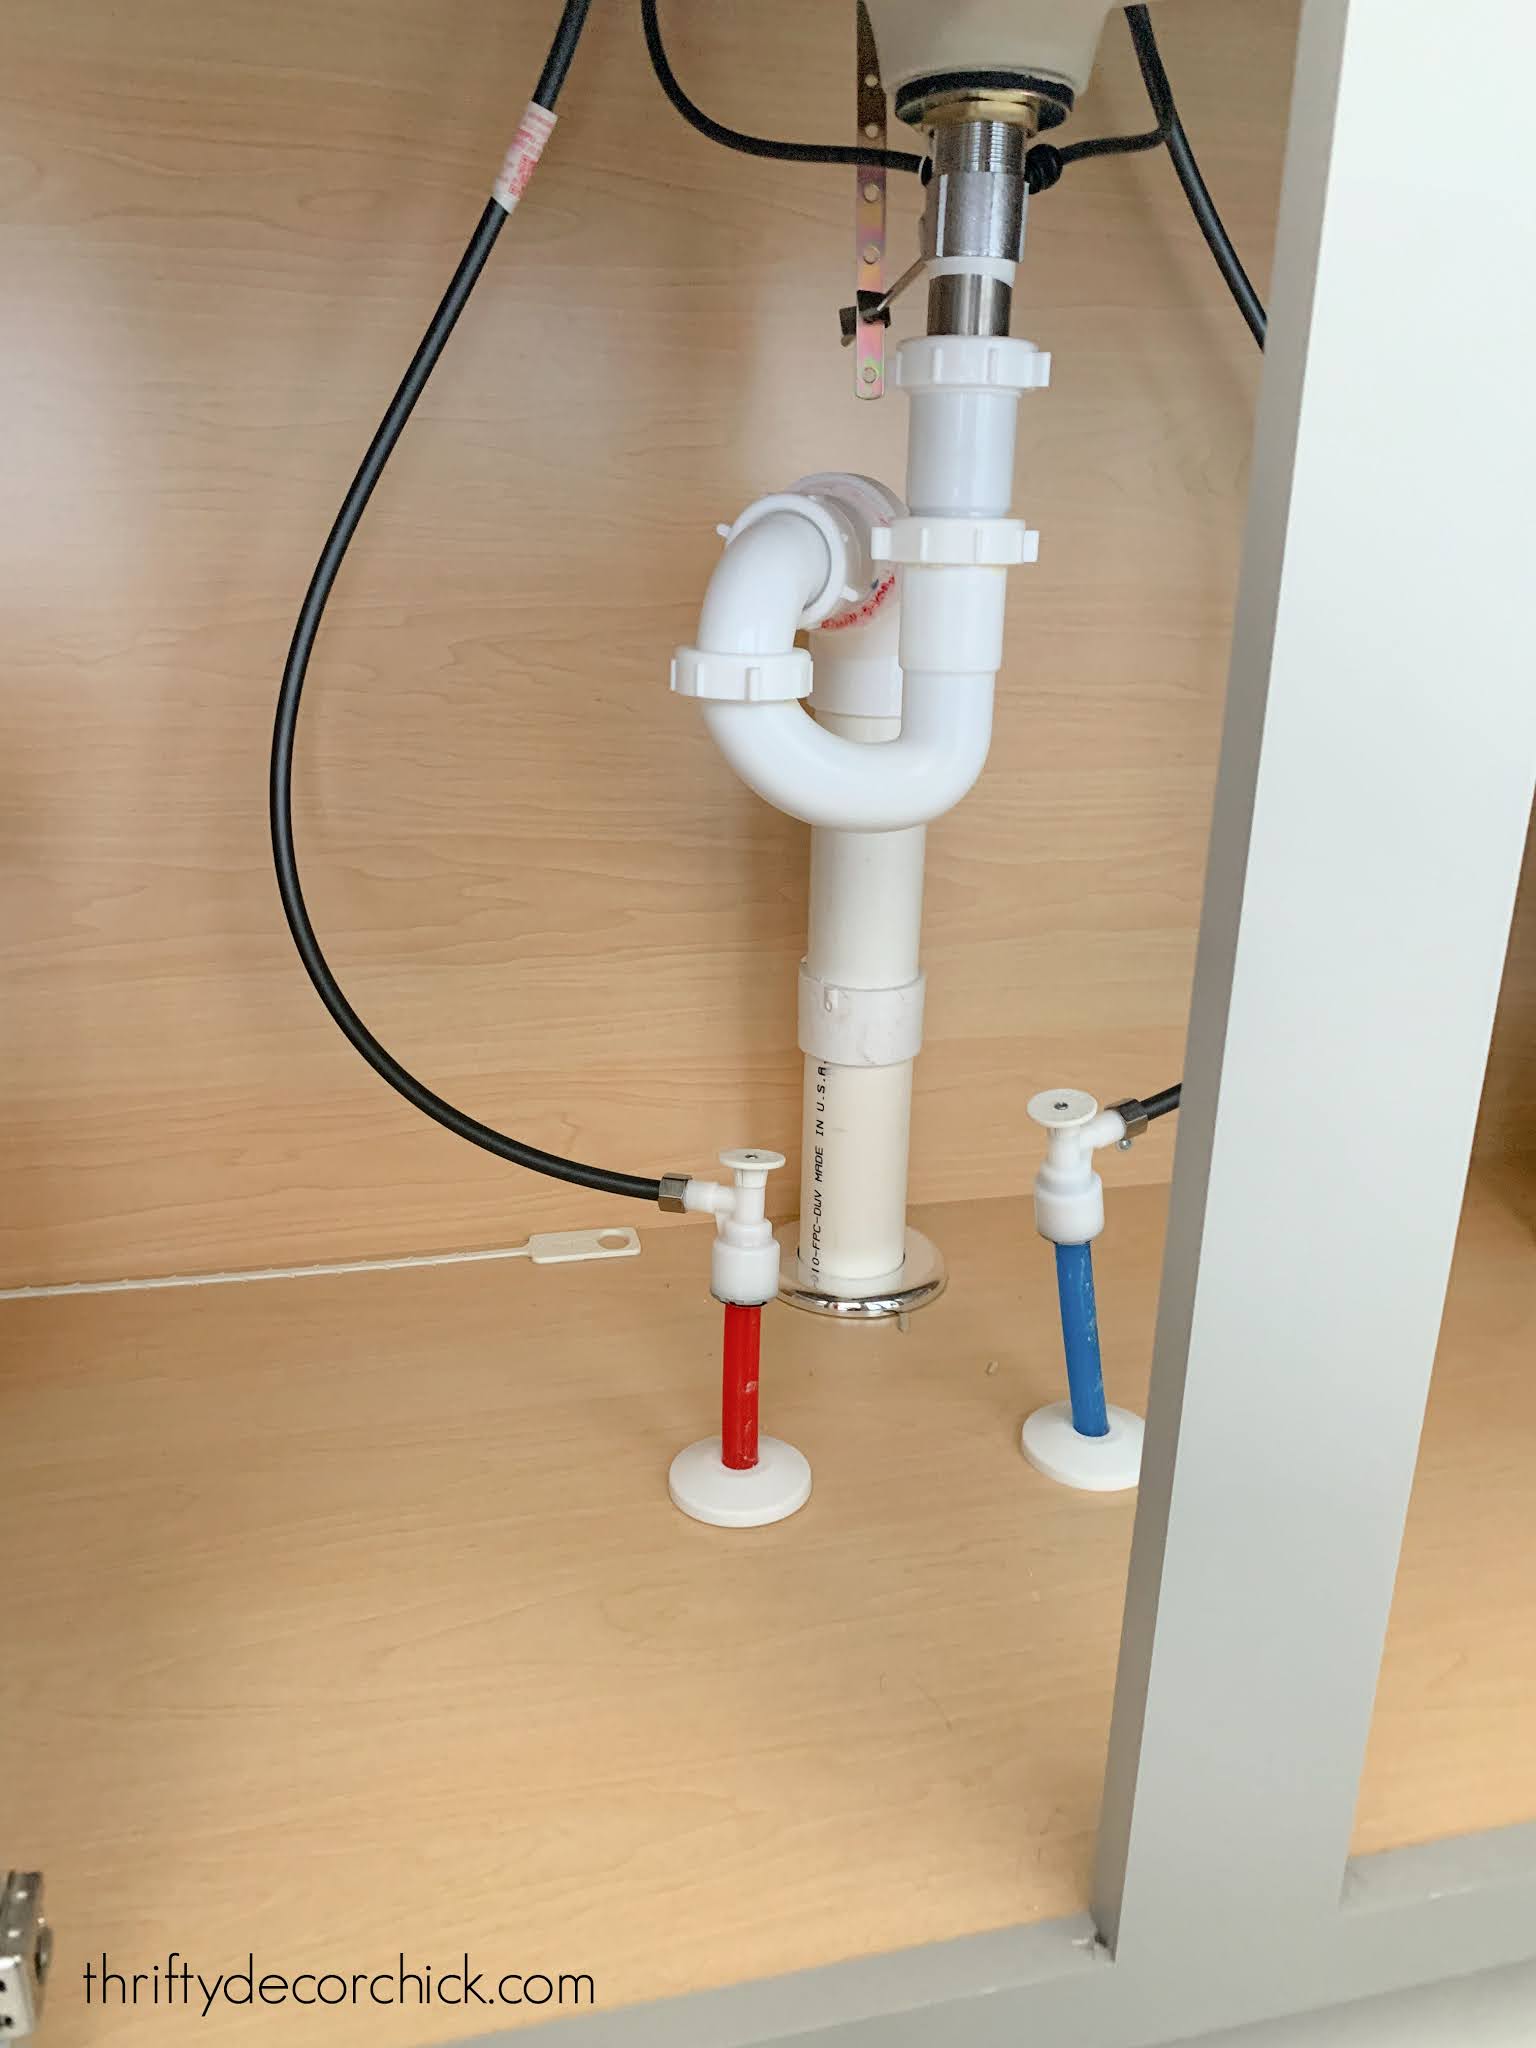
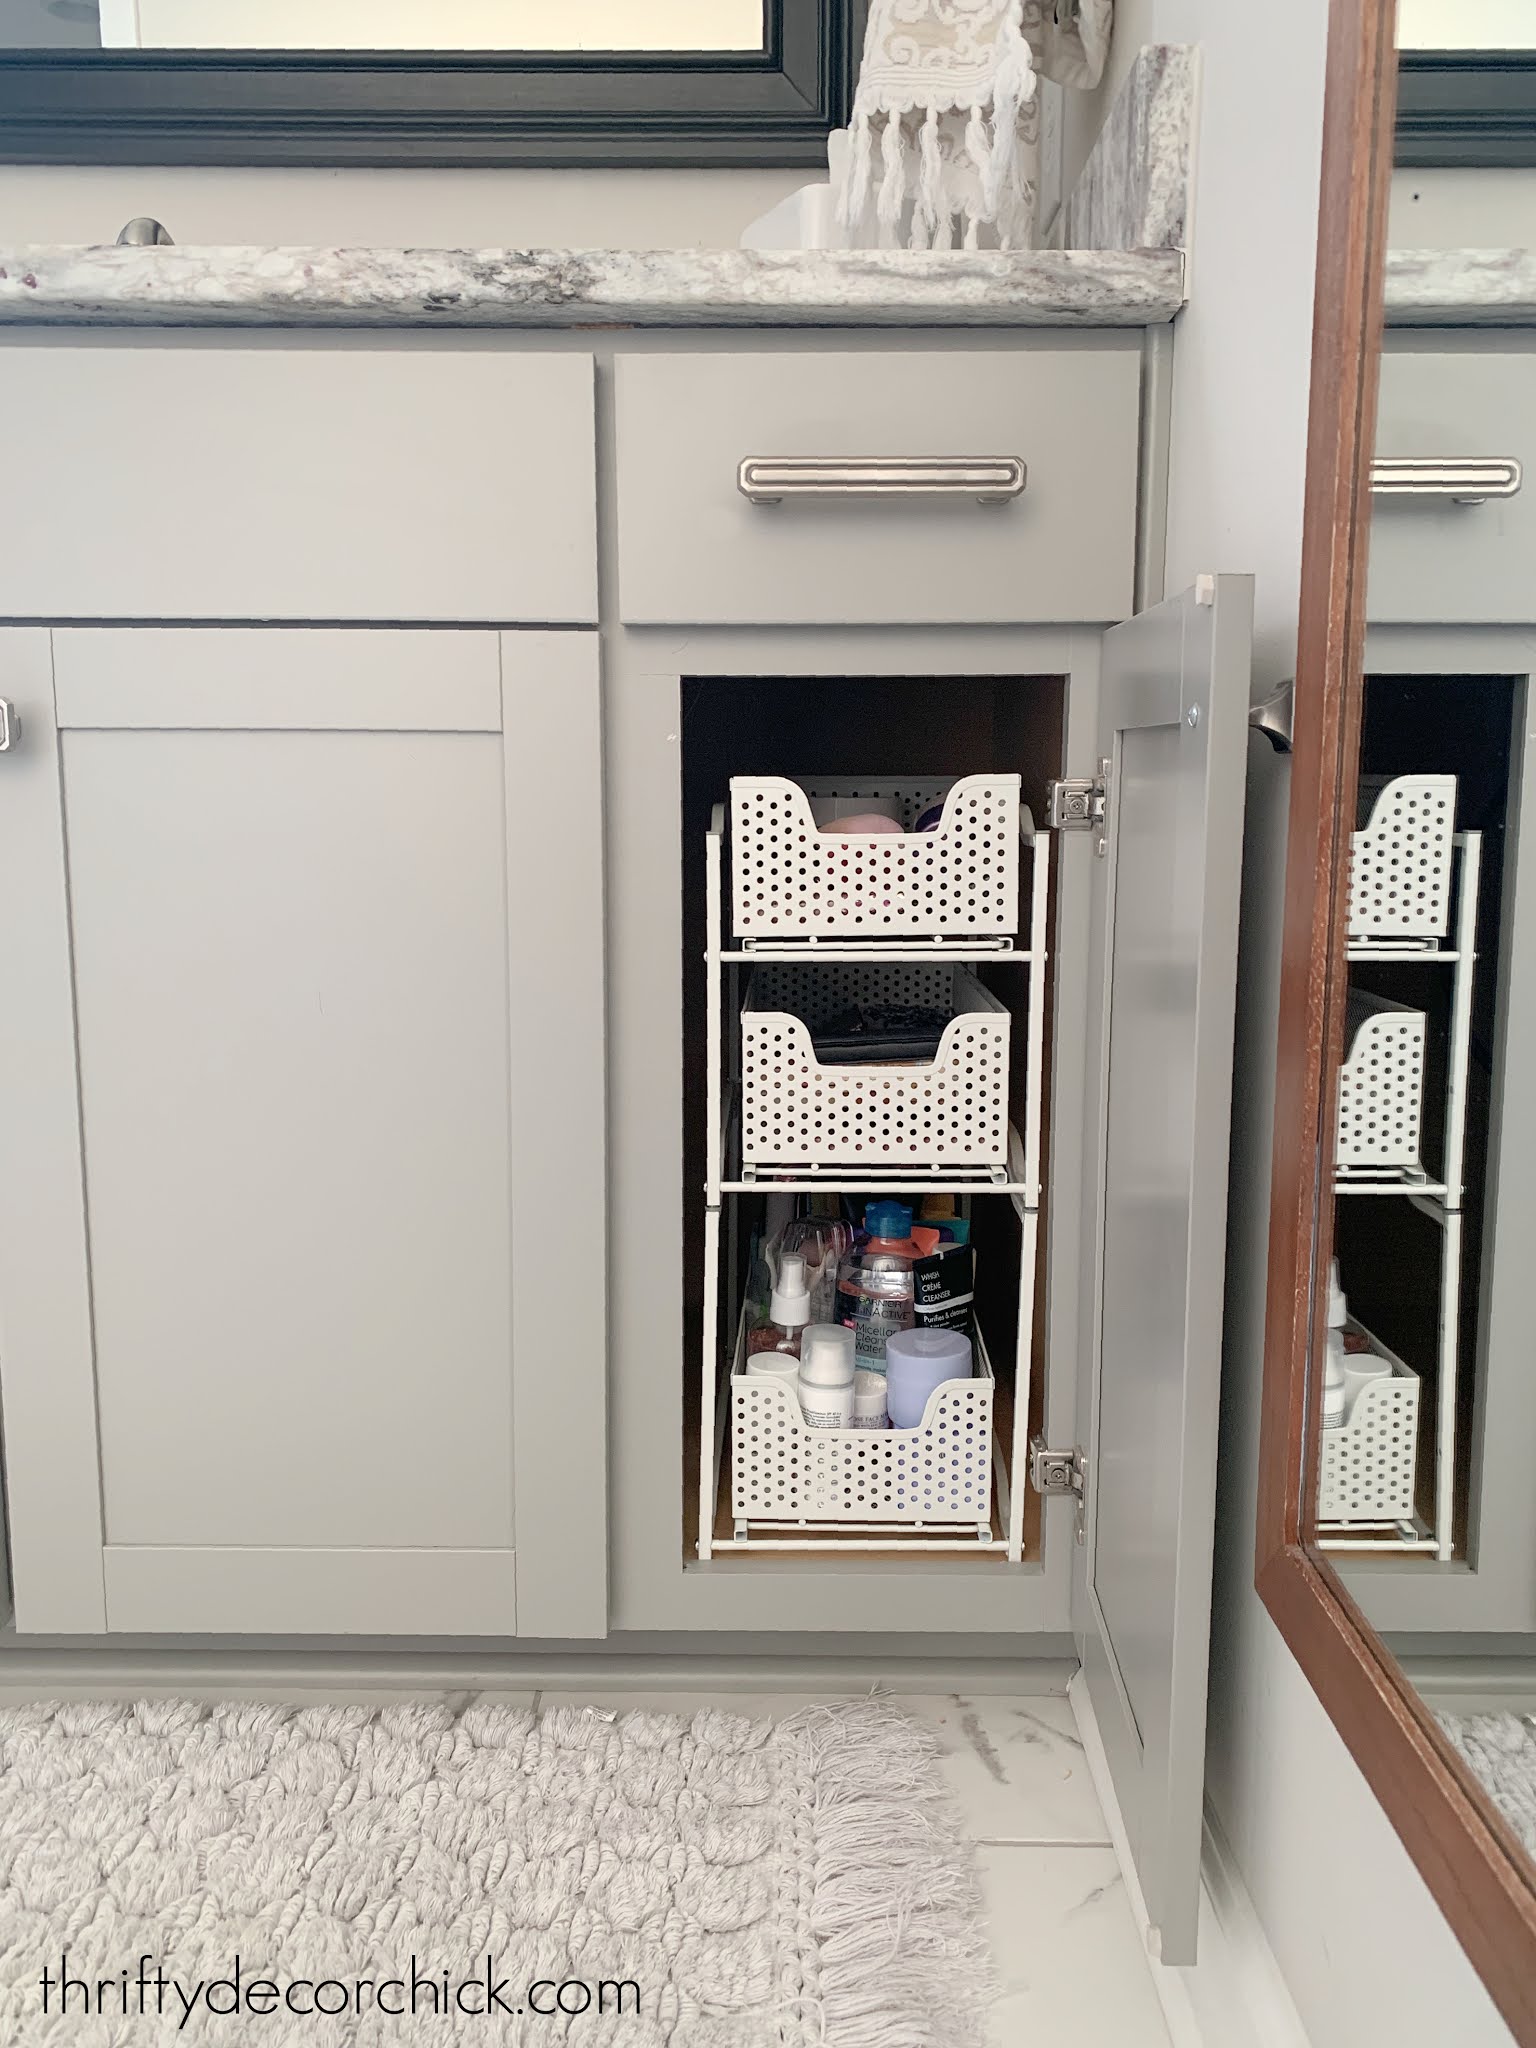
The two sides are so skinny you can't fit much underneath. And under the sink is almost unusable because of where they placed the plumbing fixtures:
Because of that we have very little space at all in the vanity for storage.
Someday we will get new vanities, but that's an expense I just can't justify a few years after moving in! So I've been researching under cabinet shelving. The options were either too expensive or too wide for the skinny end cabinets.
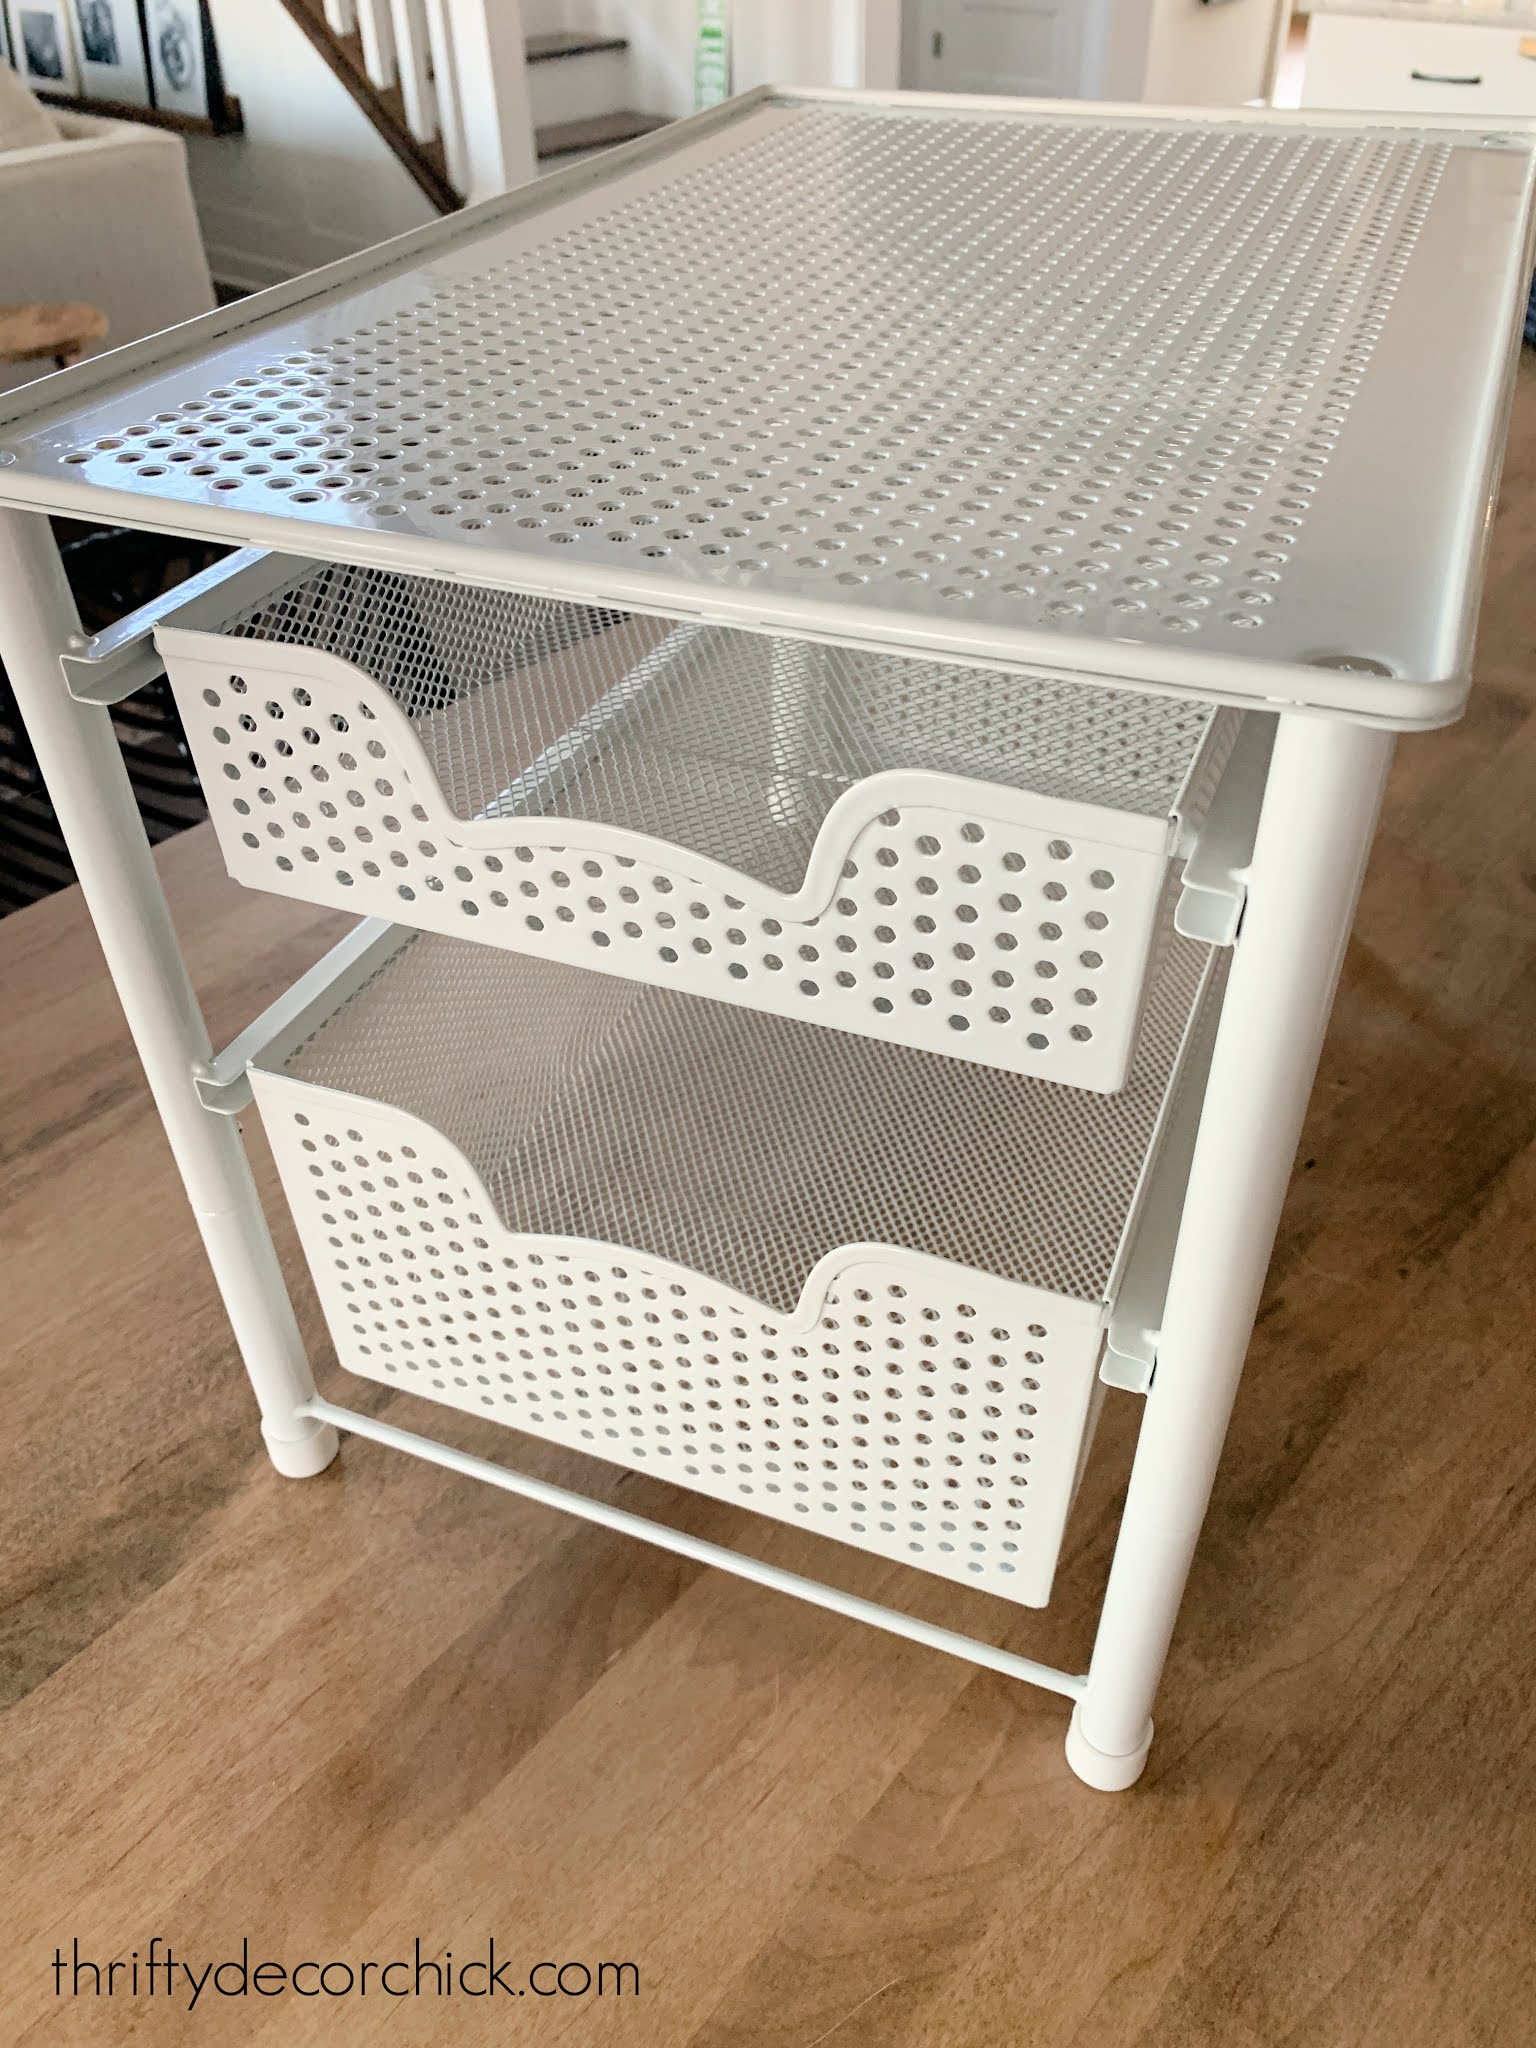
Then one day recently my friend Courtney shared some metal units that I thought would work. I ordered one to try it out...and they are perfect!!:
These stackable tiered metal under the sink organizers work so well I ended up getting one more -- I was hoping to stack two on each side of the cabinet (for four drawers on each side), but adding the fourth drawer made it too tall by millimeters. Ugh! So close!
So instead I did three on this side and two on the other. They work SO well! The units stack really easily.
The drawers are super easy to pull in and out -- I like that you can pull them out and use them on the countertop if you want. You can adjust the height for each drawer so taller items can go in one, shorter in another.
I wanted to see if a wider version of this would work under the sink. I found this option:
I should have known better -- it didn't fit around the plumbing. :( I need something wide but shallow for the middle, and I doubt I'll find that. I'll try this one in another bathroom instead.
But at least we have more accessible storage than we did before! Now my husband wants the skinny shelves for his vanity, I want a set for under the kitchen sink...I want them everywhere! I really like that they are perfectly upright -- so many are angled and I feel like they waste space.
These fit perfectly into those skinny vanity cabinets:
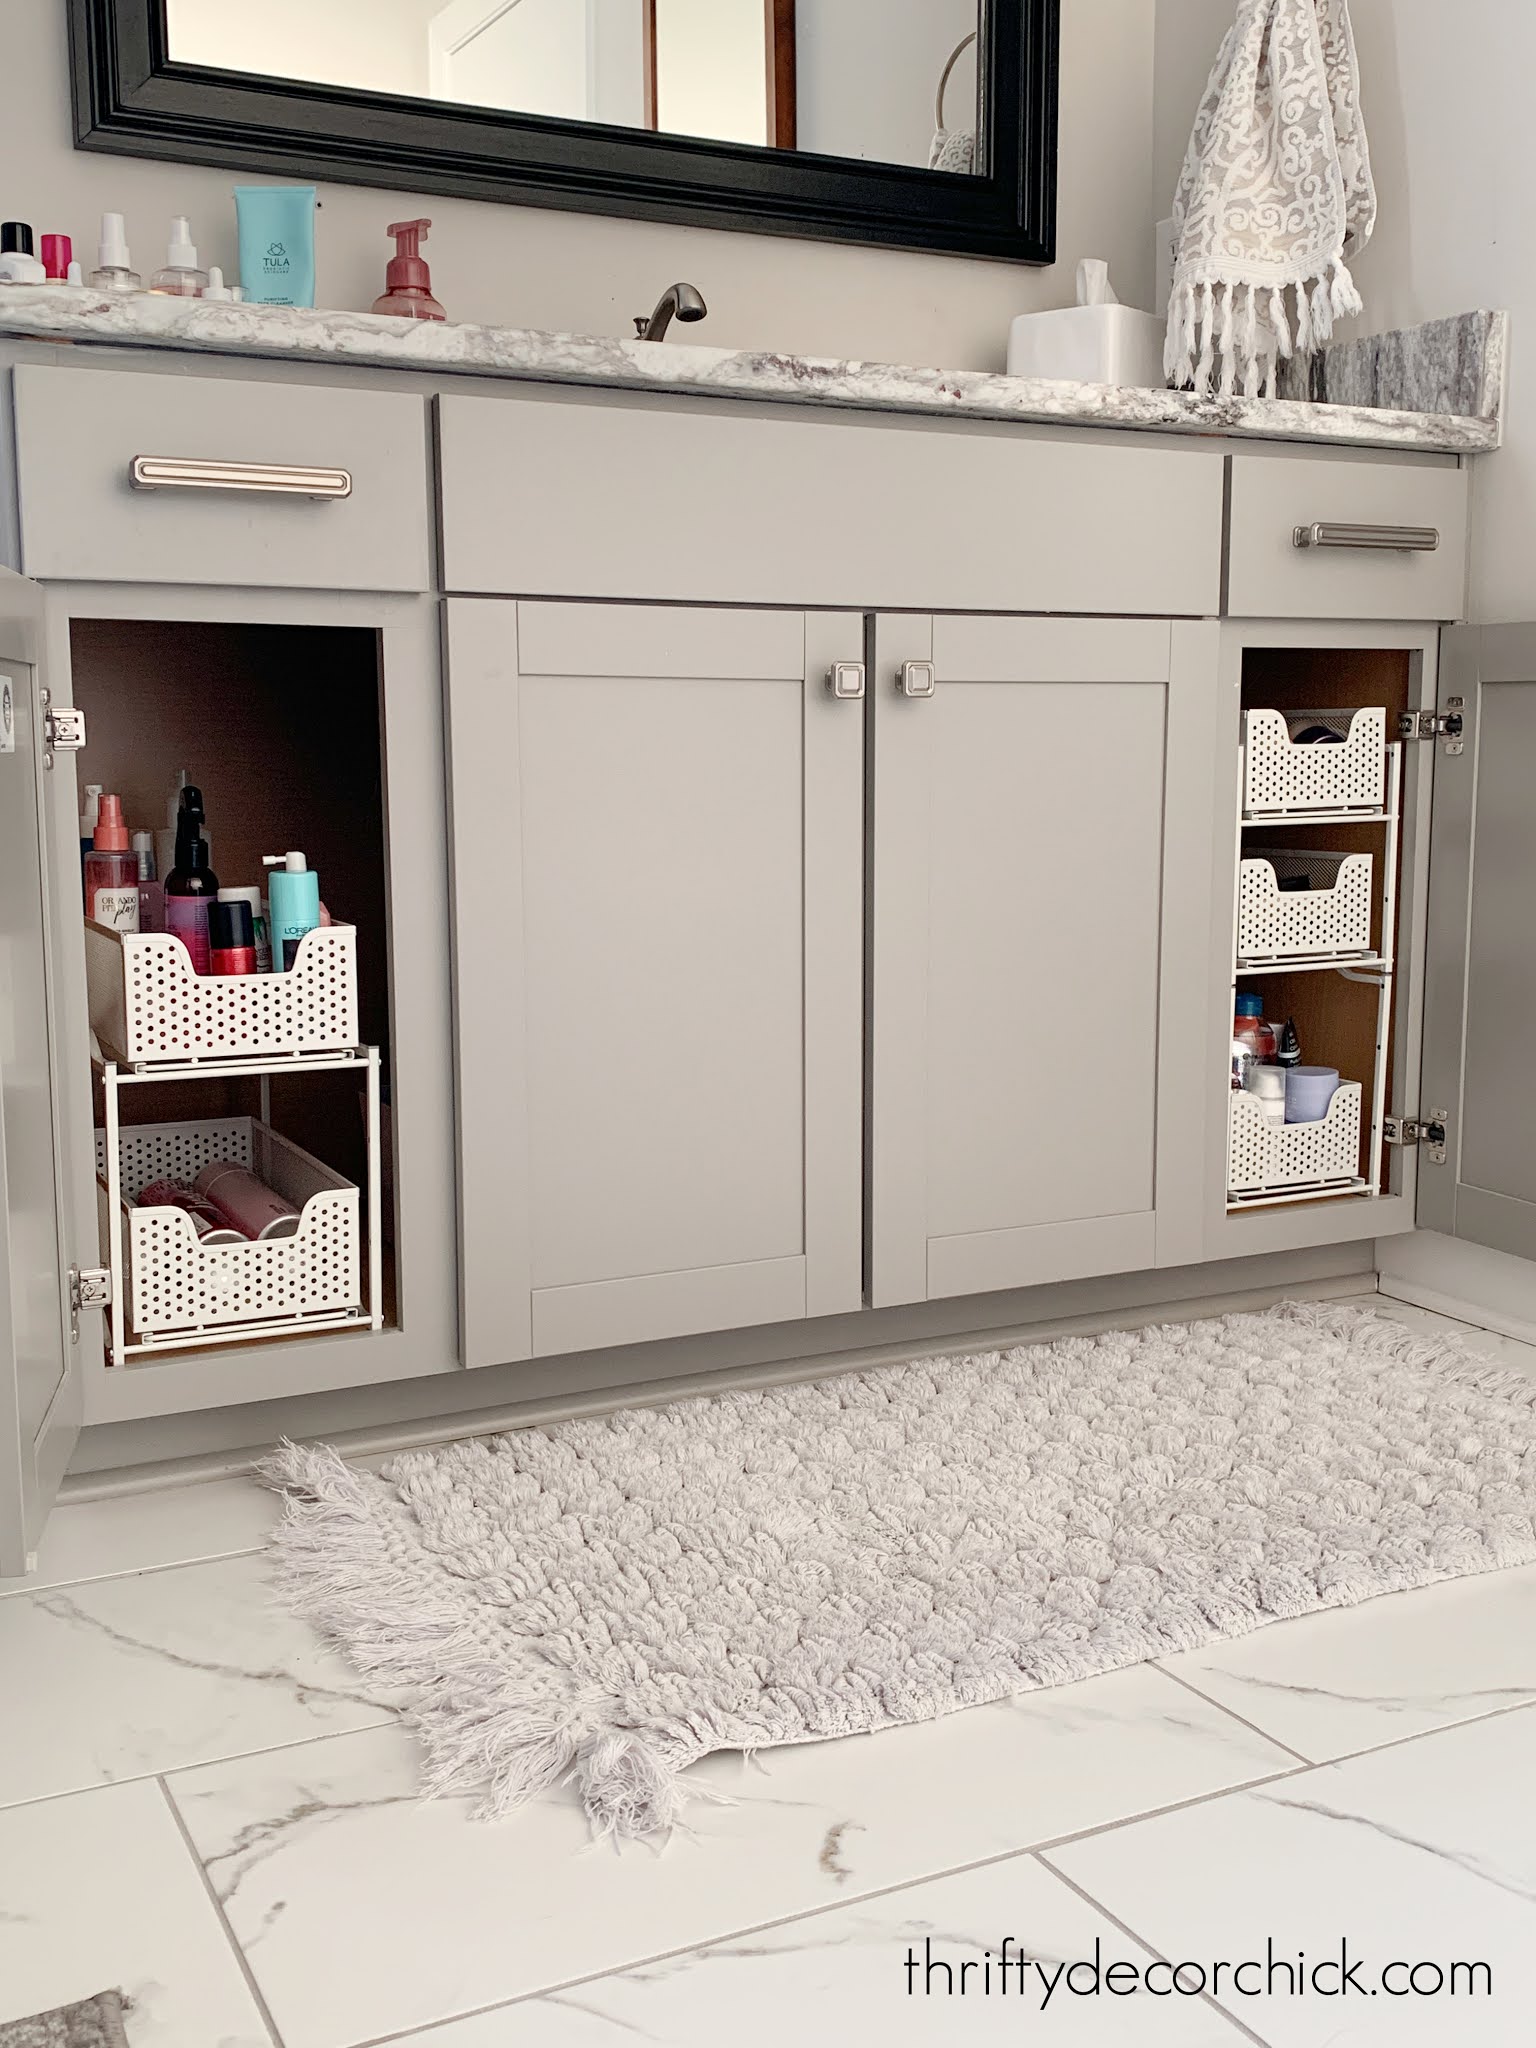
You can also screw these into the vanity bottom, which makes them super secure. They hold a TON of stuff too. Way more than I thought they would.
You can find the single version here, but they also sell two under the sink organizers for better deal here. The wider option I tried under the sink can be found here.
Next time we are going with as many drawers as possible in the vanities...but for now these organizers have helped tremendously! Do you have drawers or cabinets in your bathroom vanities? I'm jealous of your drawers! :)
By the way, I keep all of my hair tools and accessories in this tall black cabinet:
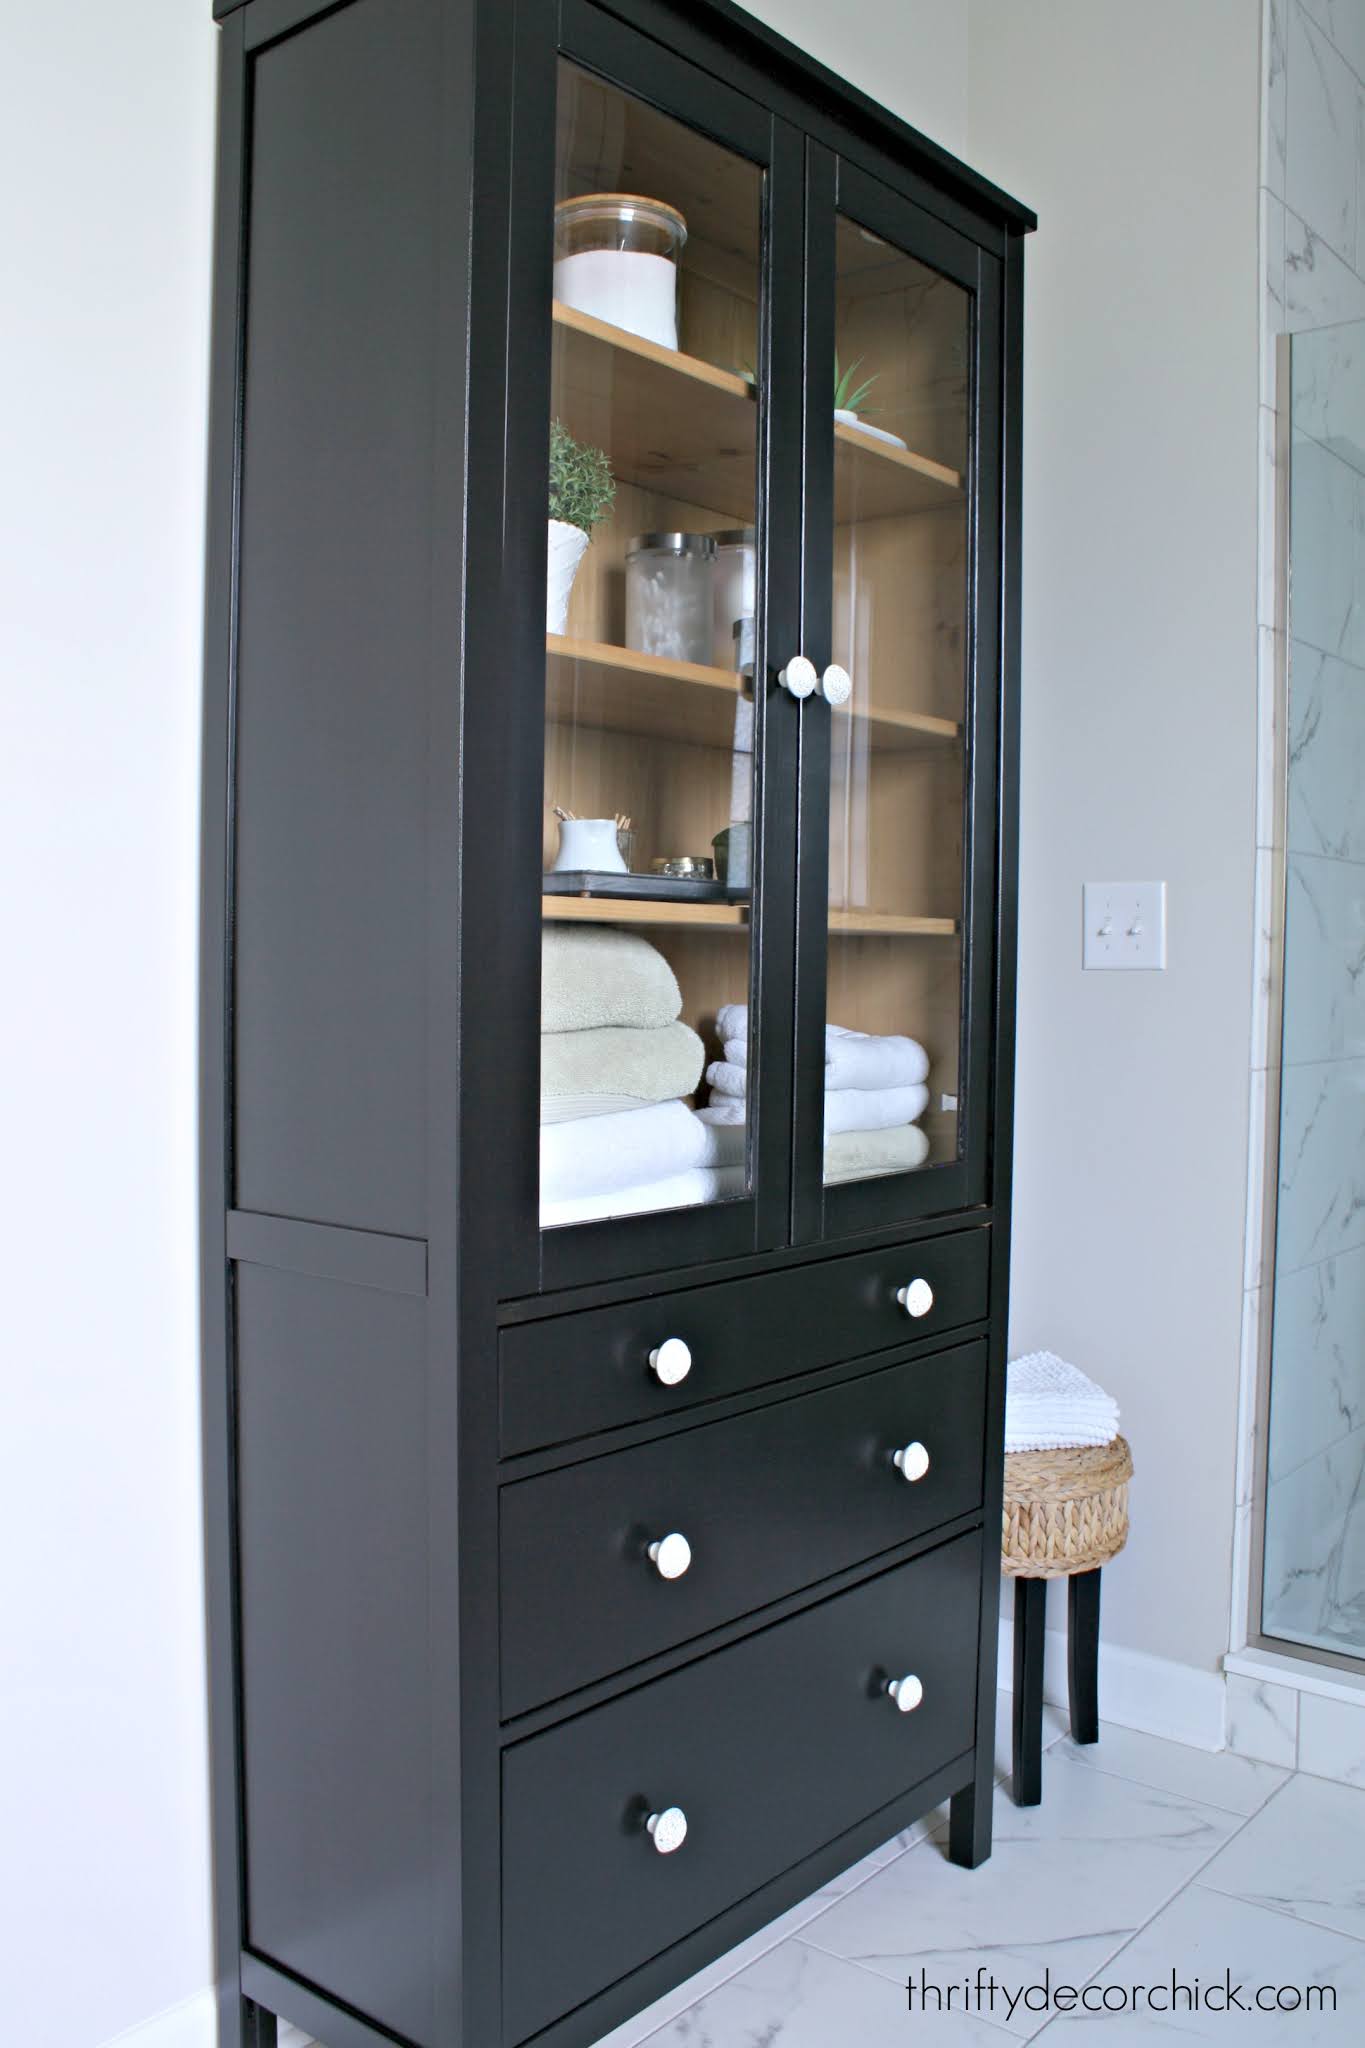
You can see how I organized those drawers with the perfect drawer inserts here!
See more of our home here. To shop items in our home, click here! Never miss a post by signing up to get posts via email.
Via https://www.thriftydecorchick.com/2021/01/under-bathroom-vanity-storage-solution.html
We just finished up one of our biggest projects so far in this house...and I didn't take ANY progress pictures! WHAT. We hired most of it out and even though it took almost two months to complete, I didn't take any pics along the way.
I guess because it's just a wall? But it's made a big difference in our basement! I have plenty of after pics to share with you at least.
We have a large basement in this house -- it's one of the main reasons we decided to buy and finish this home! This floor plan is really everything we ever wanted or needed! We have so much space to work with in our basement, and it's been FUN to figure out how to use and build out those spaces.
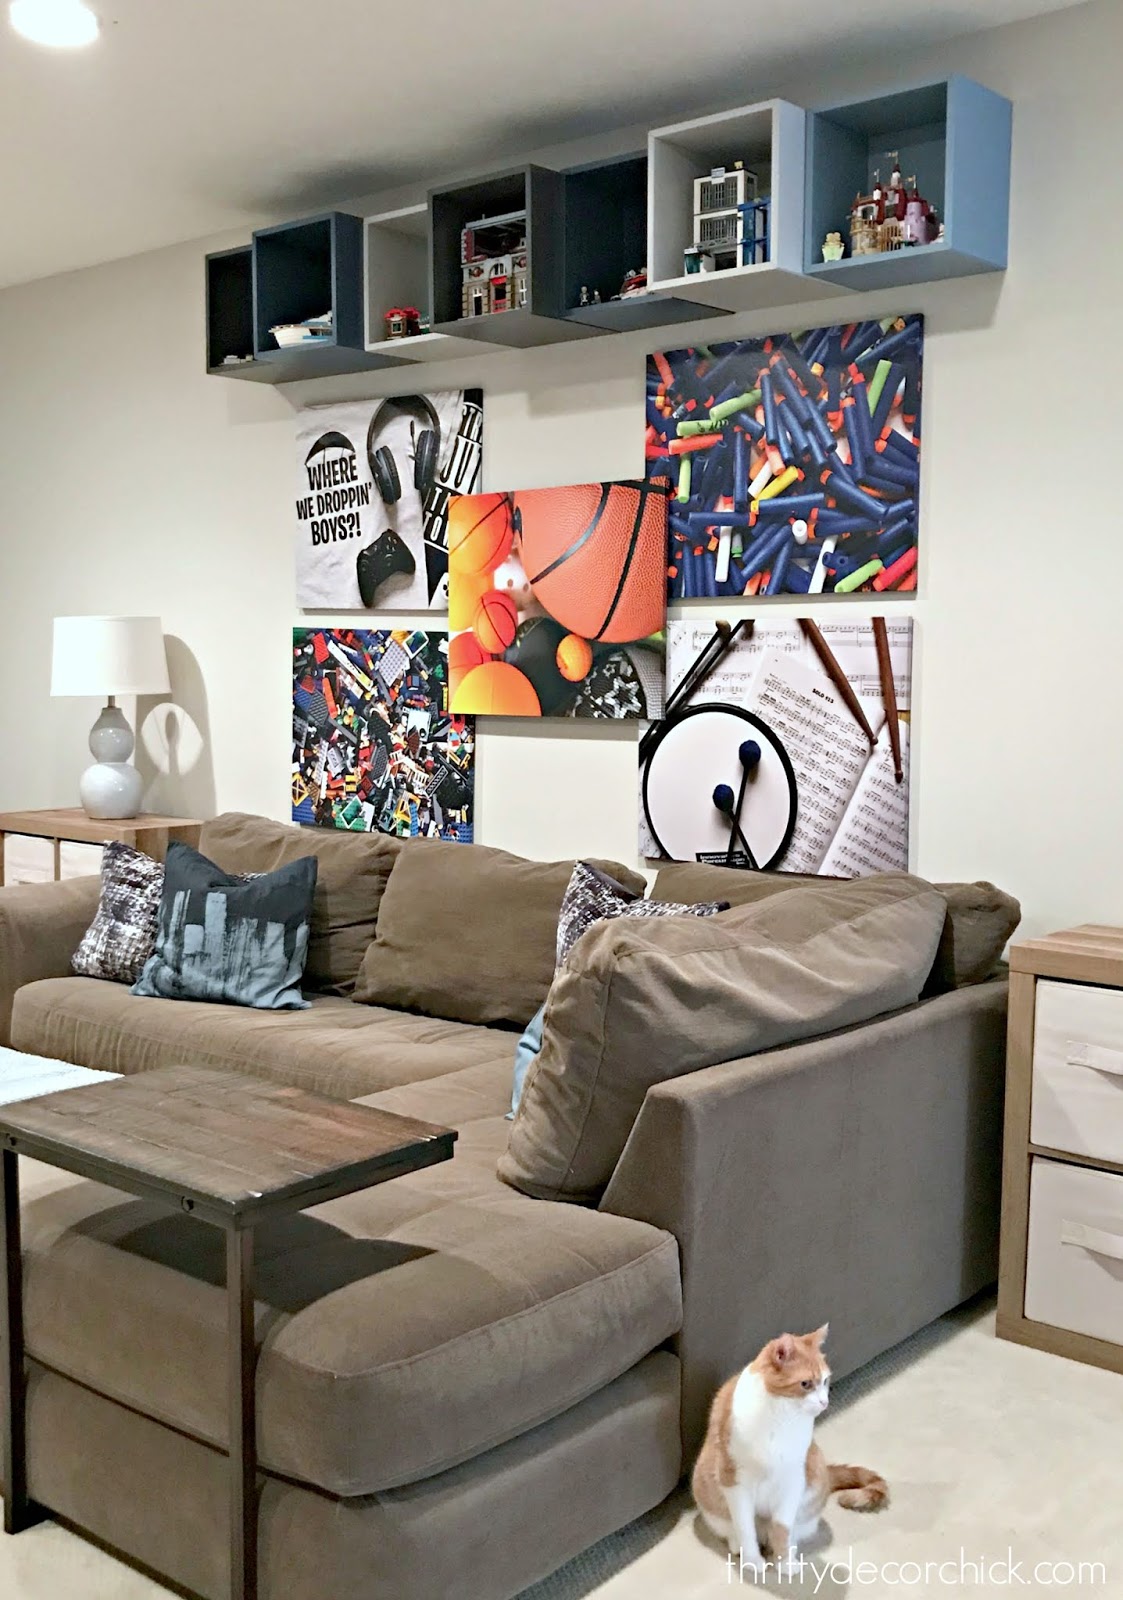
There's a spot down there that we've deemed the "game room" -- mostly for the kids to play or play video games. I shared some of this space a couple years ago when I had this fun art made for our son:
This space not far from our family room down there though, so as soon as we moved in we wondered if we should have had that walled off. You know...a space for the kids and a space for the adults?
We decided to live with it for awhile to see if it was something we wanted to do. In November we decided to go ahead with it and we are THRILLED with how it turned out.
Remember this wall of game and toy storage I created a couple years ago?:


This post may contain affiliate links for your convenience.
See my policies and disclosure page for more information.
It functions so well and looks great!
To the right of that wall is where we put the new one up to close things off a bit. We ordered double glass doors that open into our son's space:

They ended up frosting them by accident (we were going to see if we wanted them to stay glass or I was going to frost them using this method) but we love how it looks.
We had the wall built and then drywalled. I primed and painted the walls and the doors. I had planned to paint the doors black, but we like them in white for now. I still have to caulk the trim and do a few paint touch ups, but otherwise it's done!
It took a couple months to get this done -- contractors are always crazy busy at the end of the year. And anything to do with drywall takes a bit because of the taping, mudding and sanding.

We are so pleased with it! It's not solid wood, but looks like it. It really is beautiful.
We're going for a more modern vibe down here compared to the rest of the house, and this is a perfect transitional/modern design if you're looking for that.
Bonus was that it was incredibly easy to put together:

It's the largest piece of furniture we've purchased from Ikea and the quickest assembly!
I've wanted these Studio McGee ottomans for at least a year...and they had two in stock the other day. I used my Christmas gift cards to grab them up:

I picked out chairs from IKEA for the table, but our son really wanted these from At Home instead. He's been super into this little makeover so we went with his choice. They are SO much more comfortable (the seat is cushioned):

It was actually a smart choice! The closed backs are a great balance to the open table. He's good. ;)
I plan to add some fun vinyl "game room" lettering for the doors soon. I tried three different art pieces on both sides of the doors, but we all agreed it was too busy. So those walls will be empty for now. I love the simple decor here!

Here's a similar angle now: 
Our son wants me to show you his "new" space behind those doors sometime. :) I can tell he's getting more into the design of things and it makes me happy!
You can see how I made those long picture ledges here. They are such an easy and inexpensive way to fill a wall!:

Our son wants me to show you his "new" space behind those doors sometime. :) I can tell he's getting more into the design of things and it makes me happy!
You can find that blue and cream rug here! I'll link to the rest of the items at the bottom of the post.
I almost painted the base of the table black, but I think the chairs are plenty. We've already used this table a TON in just a few weeks for pizza nights, Lego assembly and puzzles.
It's such a wonderful addition down here:

Here's a before of the wall with just the cubbies:

And here's that view now!:

This was the first big "construction" project we've added in this house and it feels like it should have always been like this. I love open floor plans, but this one was a little too open. I never regret waiting things out to see how we use a space! Have you added a wall in your home?
Here are the sources if you're interested:
Morbylanga table from Ikea
Sally black chairs from At Home
Globes are mostly vintage finds
Art is a mix of personal photos, Hobby Lobby and Etsy prints
Sconces are from Ikea
See more of our home here. To shop items in our home, click here! Never miss a post by signing up to get posts via email.
Via https://www.thriftydecorchick.com/2021/01/new-wall-in-basement-to-create-game.html
Hello there and happy new year! I hope you had a lovely holiday season! I didn't mean to take two weeks away, but I've been busy getting the Christmas decor put away and it took longer than I thought.
I forgot when I was putting it up that I have to put it allll away. ;) Although in general I find putting holiday decor away is much faster and easier than setting it up. This year I bought new storage bins, so I reorganized and the whole process took longer than usual.
I'm sharing my Christmas decor organization methods and a few tips I've figured out along the way!
I will tell you off the bat that this won't be one of my thriftiest organization posts. I spend a little extra to make things easier and more efficient when I pull things out for the next year. (But they will last from year to year!) These little tips save my sanity each November when the holiday decor comes back out!
-- Label your decor for next year --
My first tip is to label as much as you can -- especially the stuff you put up in the same spot every year. I have found over the years that labeling light strands I use for specific areas helps a TON!:

This post may contain affiliate links for your convenience.
See my policies and disclosure page for more information.
You can find my awesome label maker here! This smaller version works great too -- it's just a little more basic. Both are super easy to use.
I label any spot that uses more than one strand of lights -- both inside and outside. So when I get them out I know exactly how many bushes or trees are covered by that group of lights. I also label them inside, like the strands on our stair garland. That way I'm not trying to figure out how many I used the year before.
I use a LOT of these remote plugs and switches for our indoor lights -- I store them away with the lights that need a remote, like on our stairs. I just keep them plugged into the light strand.
If you have more than one set of these remotes, you know the joy of trying to figure out which one goes with which remote. ;) I label the matching sets so we know what goes with what:

-- Store your trees upright! --
Next up is the trees! We have...uhhh, quite a few. ;) My dream my whole adult life has been to store our Christmas trees upright -- and not take ONE thing off of them each year. Yes...this is the stuff that makes me giddy.
Well in this house, my dreams were realized, at least for some of our trees! We have a storage room in the basement with plenty of room to store our two basement trees upright.
I found this stand up Christmas tree bag years ago and it works GREAT! You just place it over the tree and tuck the branches in here and there -- it zips up and then cinches as well:
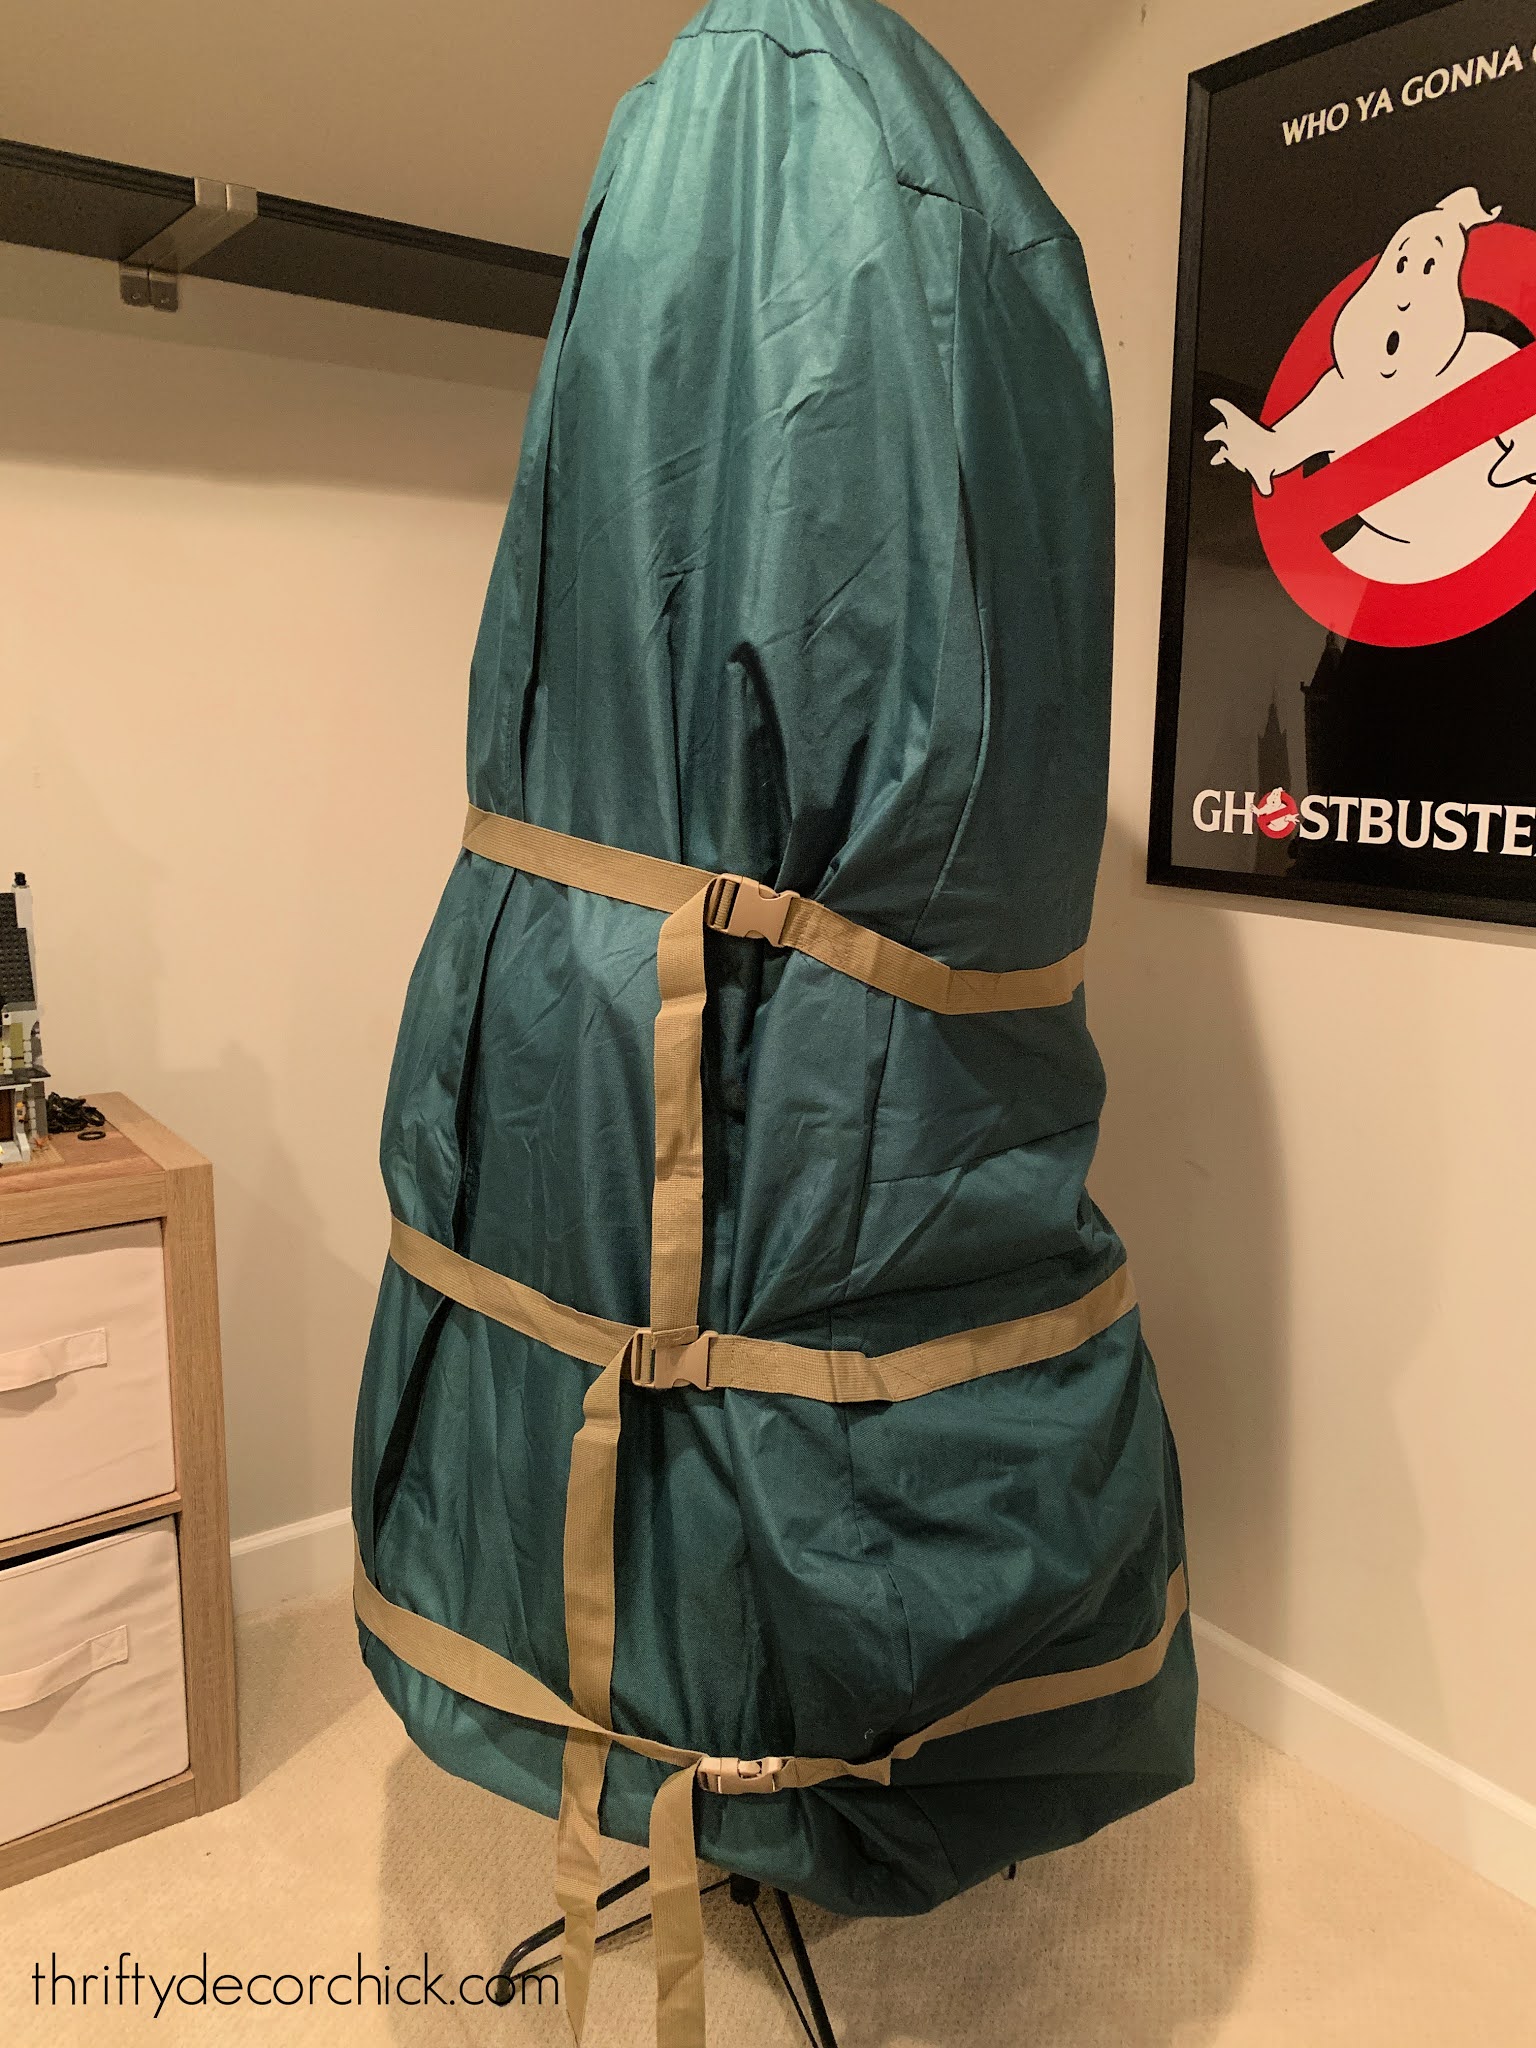
You may have to fluff a little the next year, but otherwise everything stays put!
I loved that cover so much, I went to buy another one -- but they were sold out. I looked around some more online and ended up with these plastic tree covers and they work just as well:
They are made for nine foot trees so are plenty big for our seven to eight foot trees. It's so roomy that it's easy to grab up the extra and tie it at the bottom. To carry them around, one of us grabs the top and one the bottom. You'll be surprised at how much stays put!
We've stored a couple of our trees like this for years and they look almost perfect when we uncover them the next holiday season. It saves a TON of time -- you just need to have the space. And really, they don't take up much more space than the horizontal bags, you just have to have the vertical storage space.
-- Designated spot for Christmas decor --
For years we stored all of the Christmas decor in our basement, but I realized a few years in that it was a major chore to get it all upstairs (sometimes two flights). Since then I've stored everything in our garages.
This year I treated myself to new, clear storage bins for our Christmas decor. I'm a geek -- it made me so happy! Our old bins were covered with paint or busted up. I wasn't sure how I'd feel about seeing everything inside -- I was worried it would feel too messy.
But I LOVE IT:
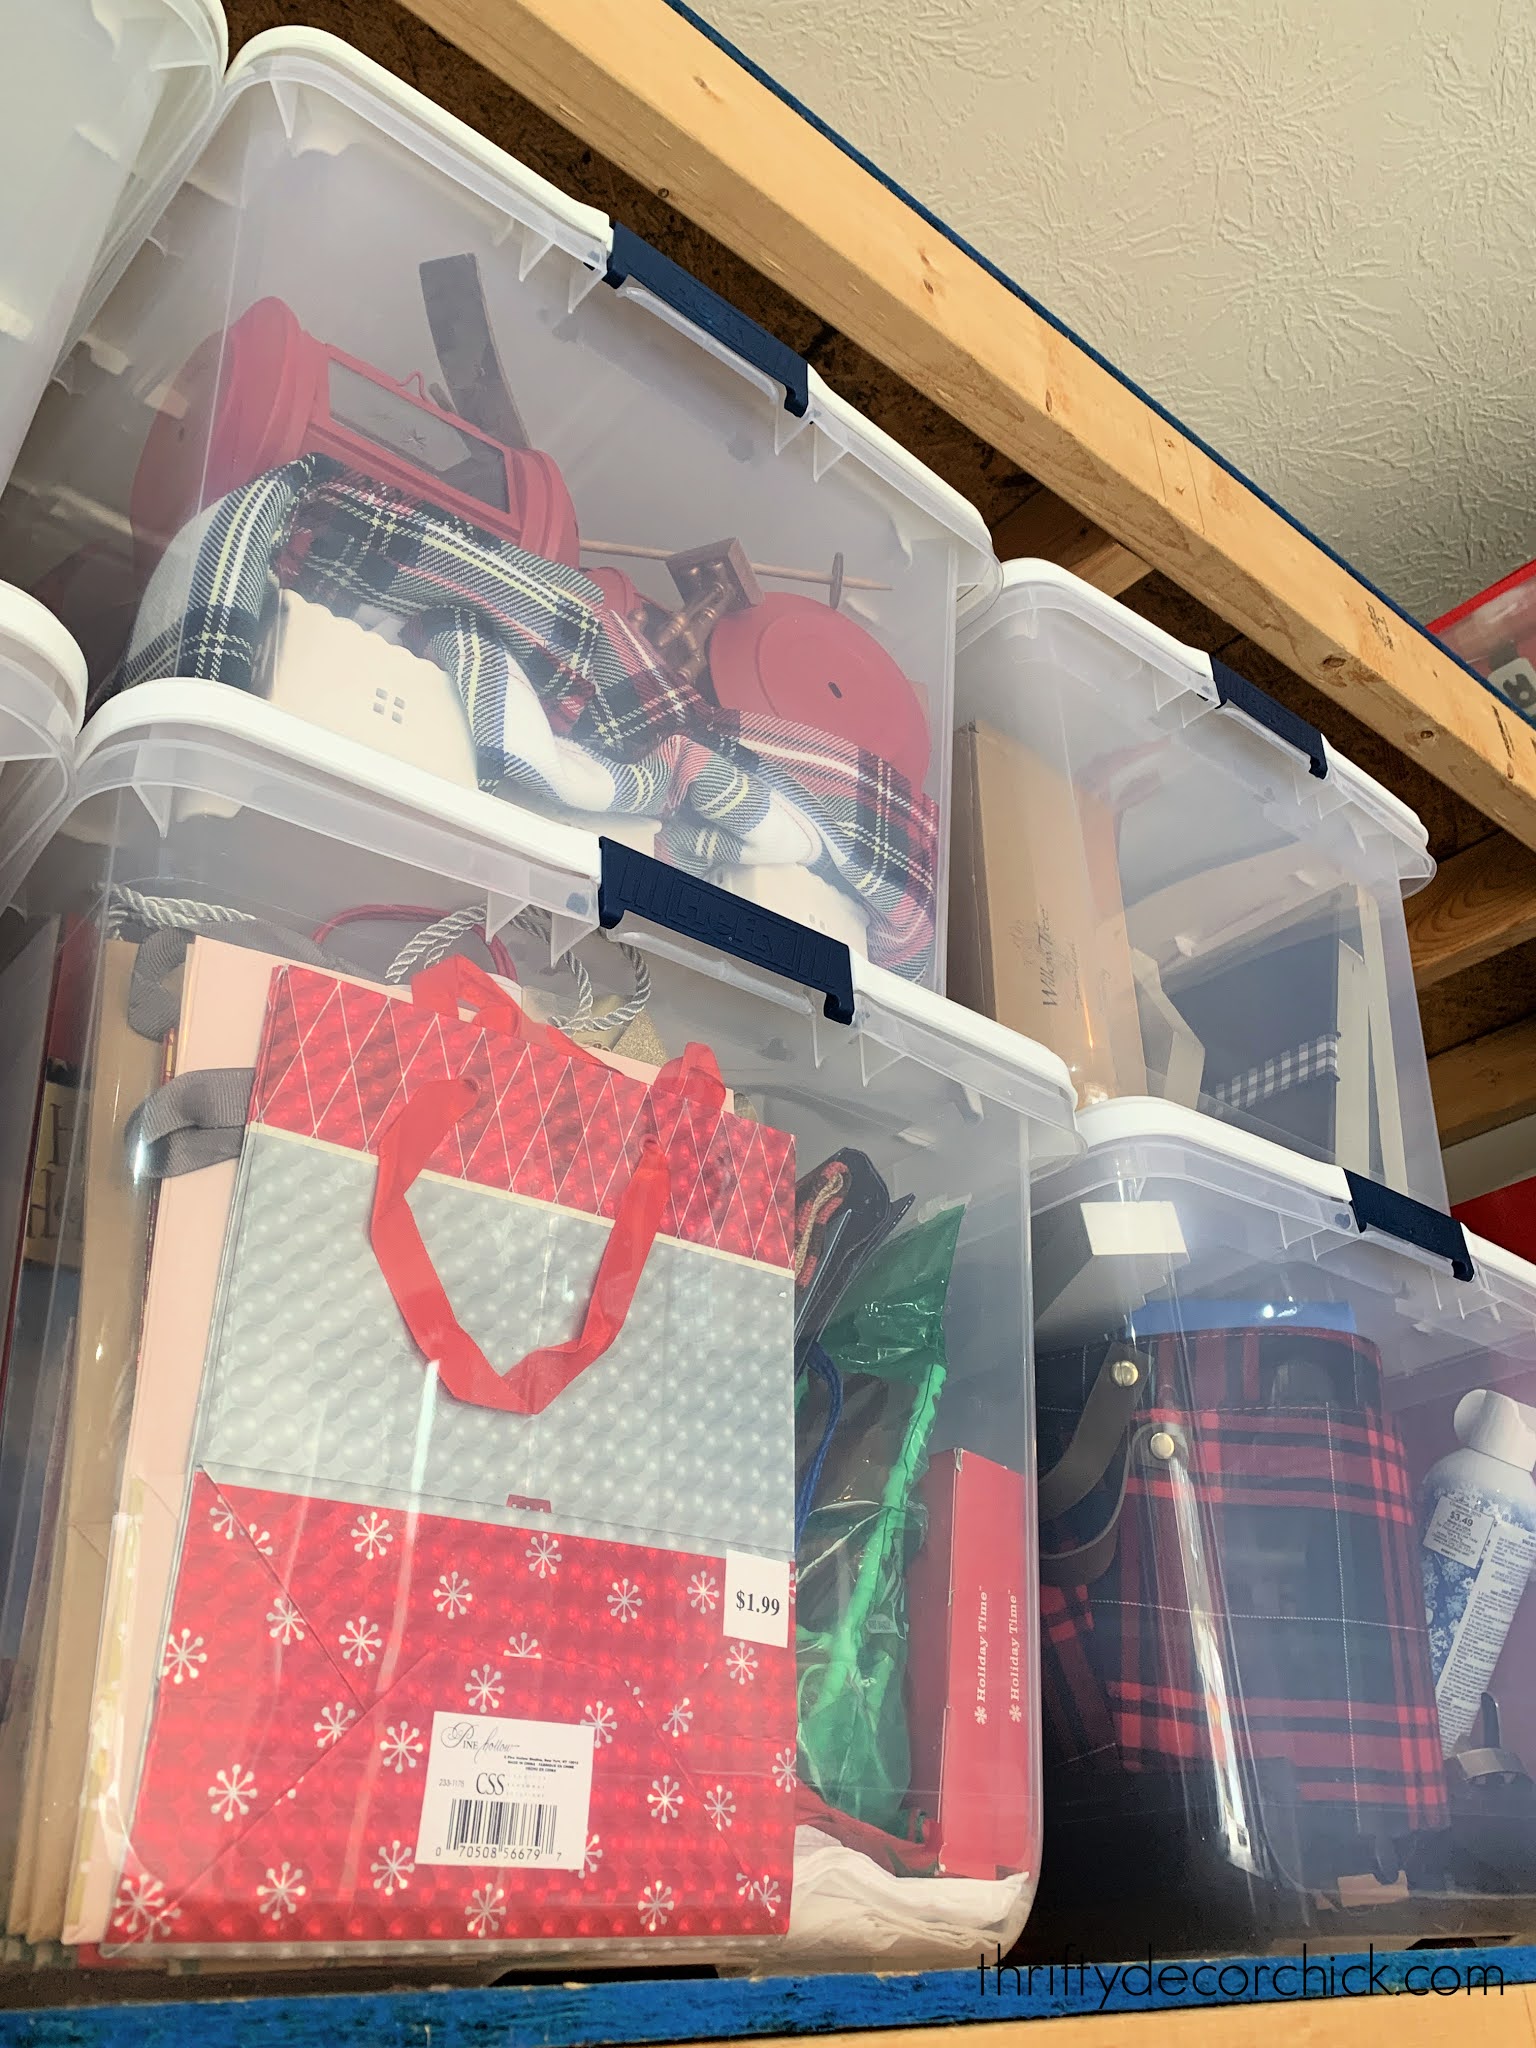
Ahhhh I can't even tell you how NICE it is to see everything! I was going to label each bin, but decided against it once I got everything in there. There's no need really.
I did a serious purge of all our decor before putting everything back. I haven't really gone through the Christmas decor in years. I chose to use more smaller bins instead of larger ones we had in the past.
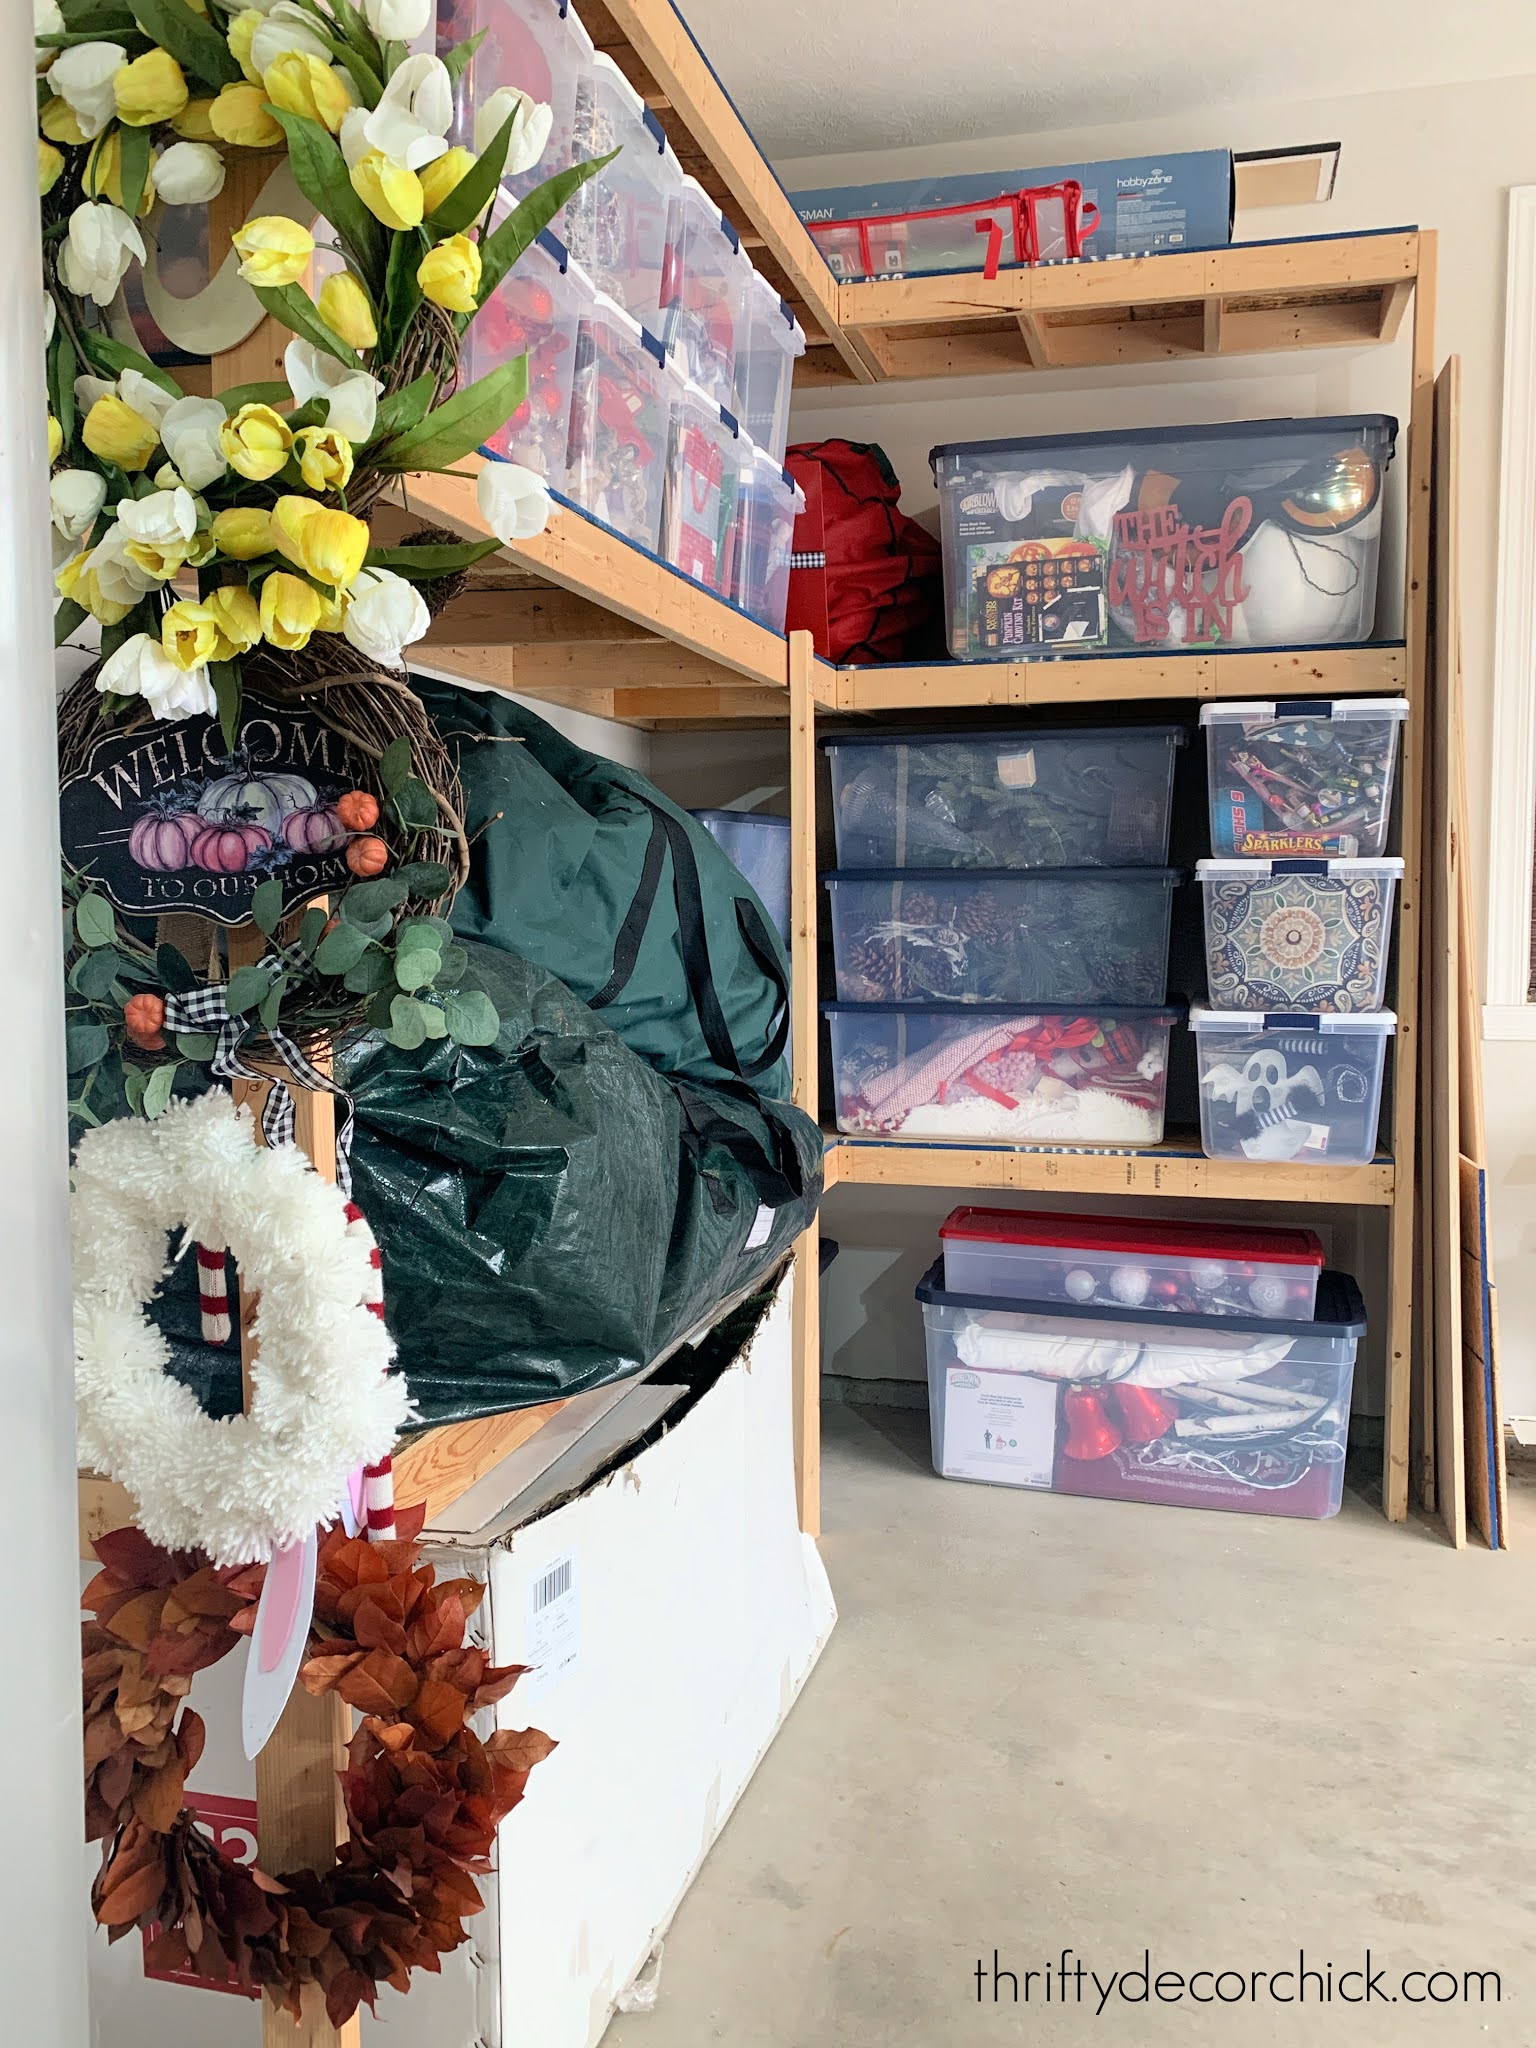
We had similar wood shelves built up to the ceiling in our last garage, and we loved it so much we had them built again in just the second day in this house!
Up till now this corner has had a mix of holiday and other random stuff, but I decided to make it all seasonal this year. It's mostly Christmas, but I have Halloween and Fourth of July stuff here too.
By the way, I organize my seasonal decor by item, not room. I put all garland in one bin, extras for the tree in another, soft stuff like towels and pillow covers are all together and general decor is in its own bin. This makes it easy for me to switch things up room to room every year!
These are the bins I used -- all of them have latching handles. I used this small clear bin for most of the decor:

This medium storage bin is the perfect size:
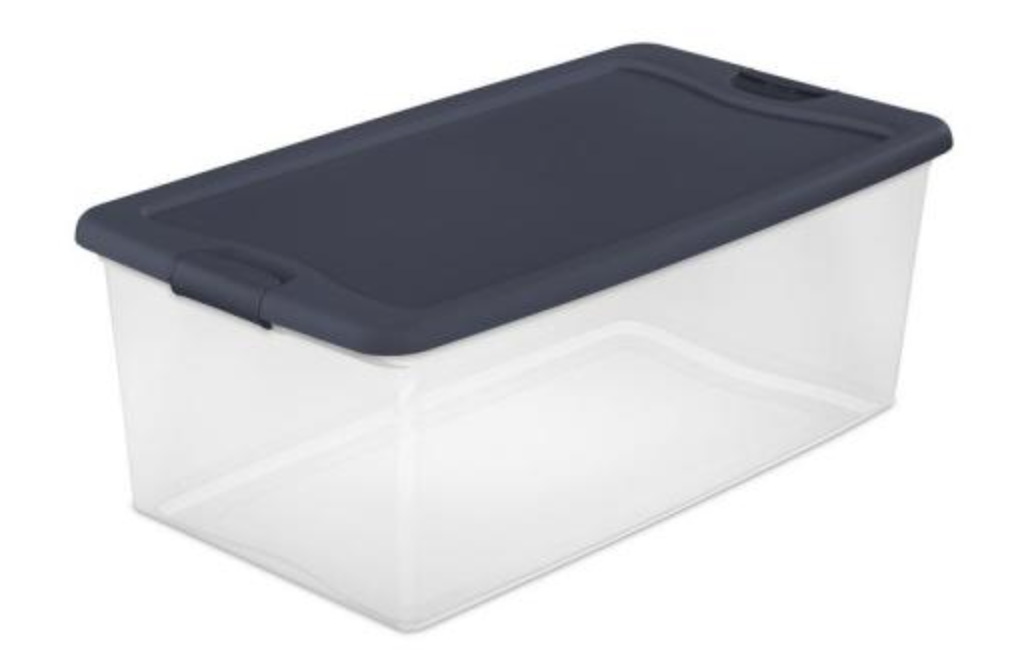
And this bigger one is great for bigger stuff like our outdoor decor:

Somehow I ended up with way more room than we had before! I am determined to NOT fill that!: 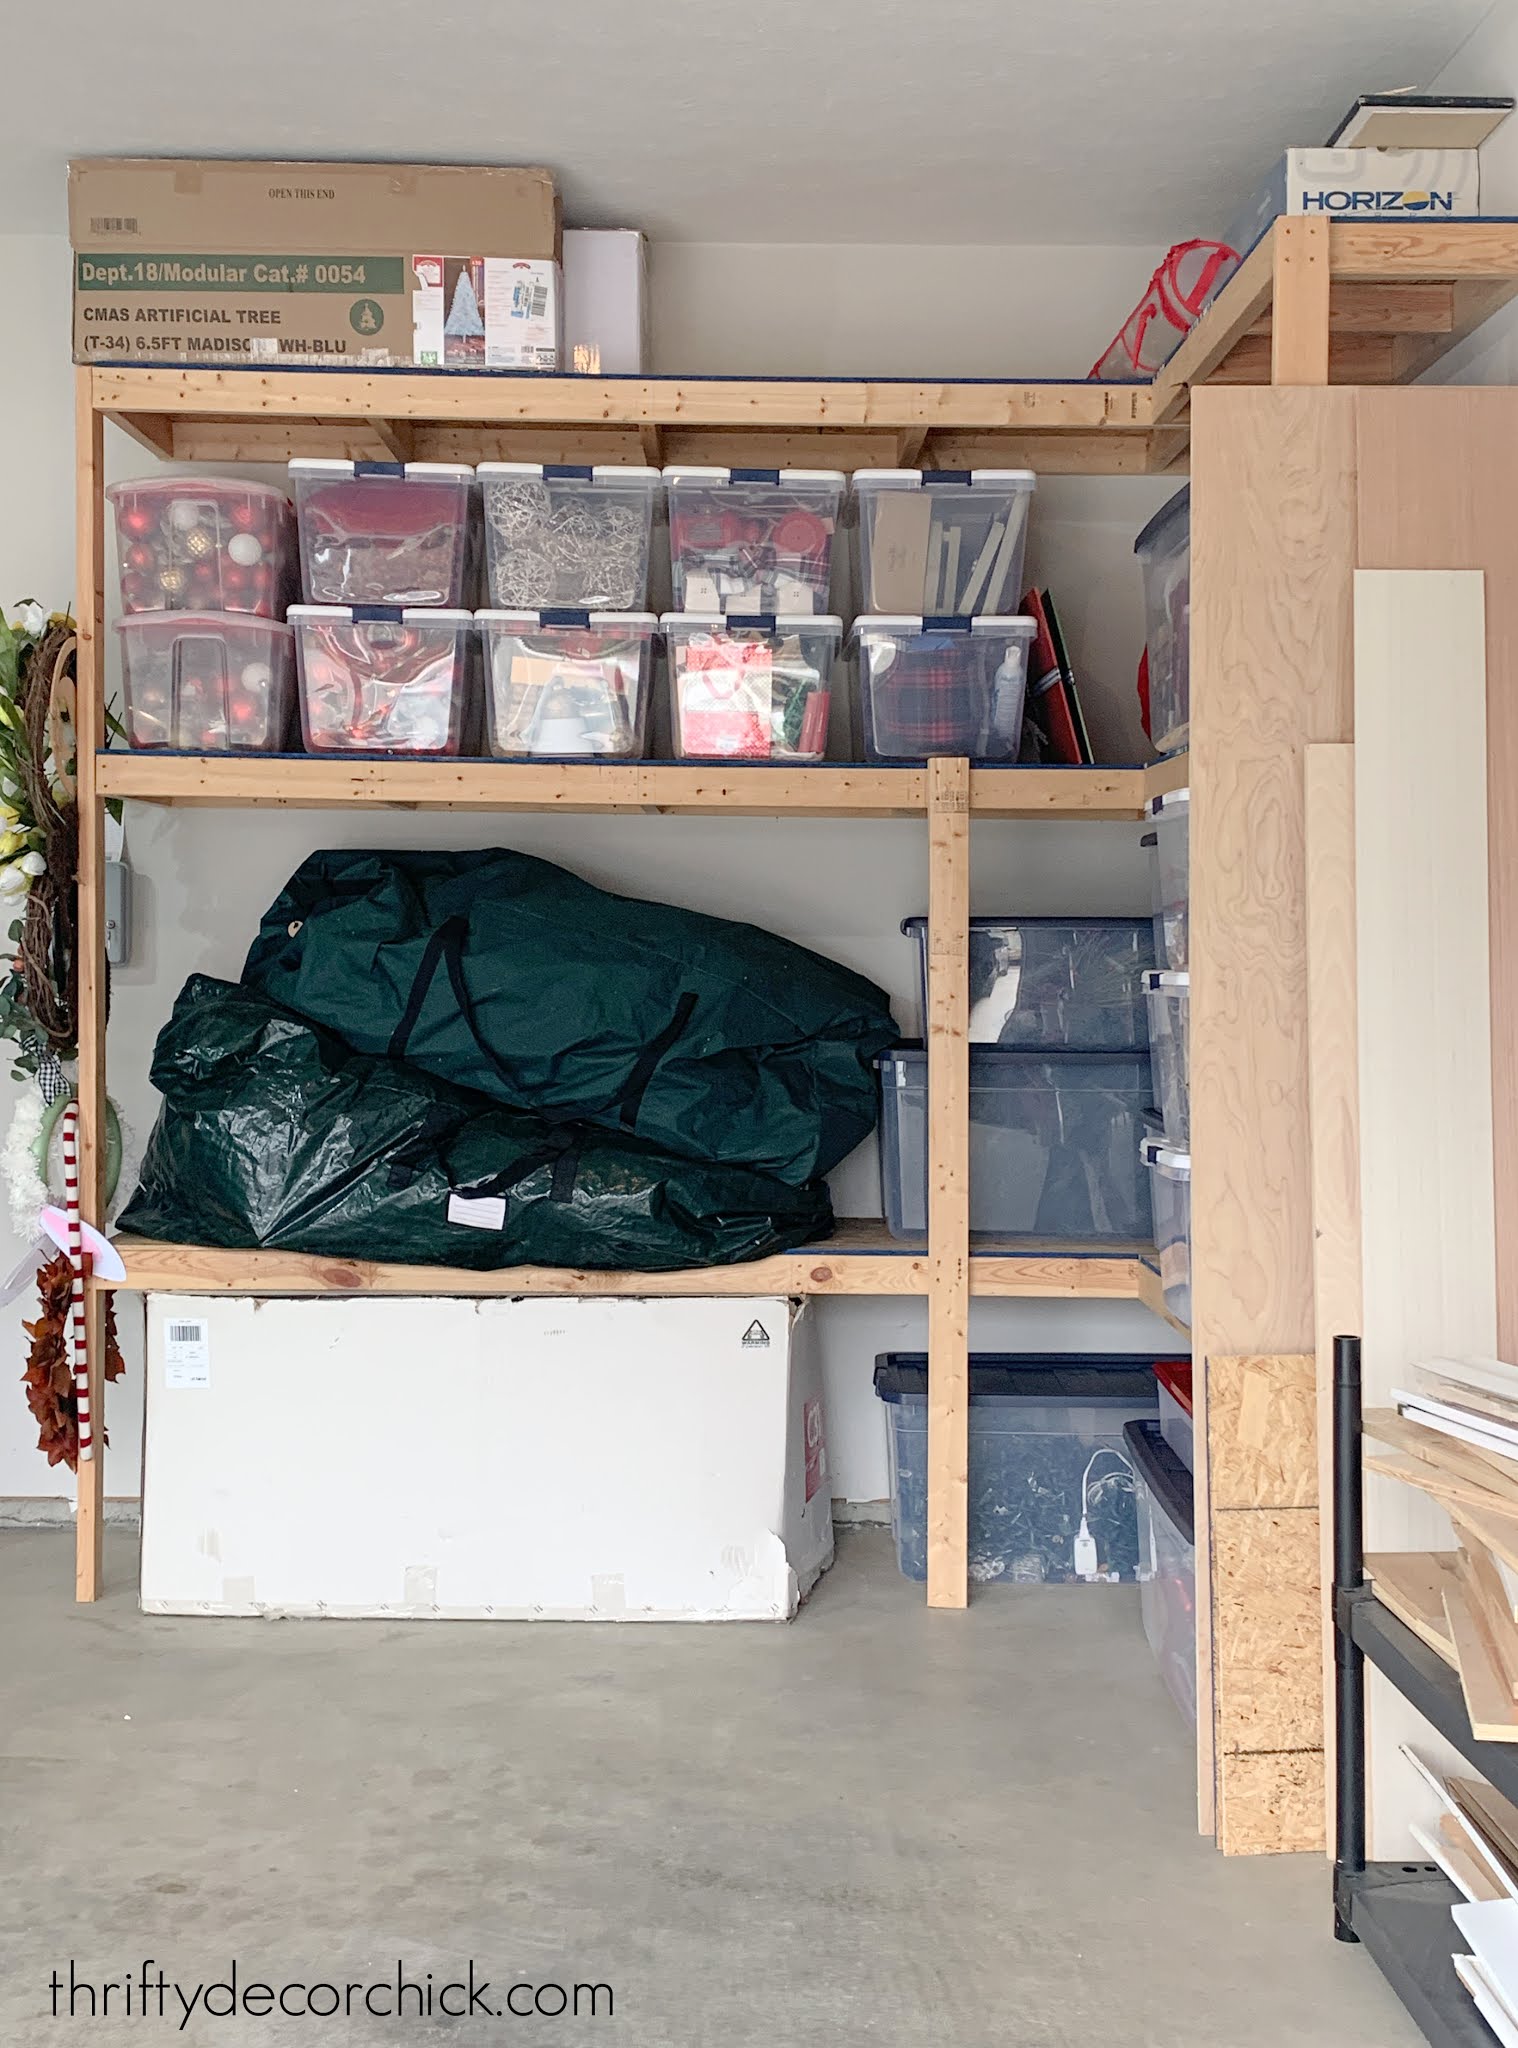
It's killing me a little that those two bins on the left are different. Ha!! We already had those so I didn't want to replace them for basically the same thing. But...
We had these shelves built to fit the big parts of our giant family room tree -- if you build something similar, make sure to measure your bins and then build your shelves so you can stack numerous bins on each one.
Do you do anything specific with your holiday storage that makes the next year easier for you? These tips help me a ton -- especially the stand up tree covers!
See more of our home here. To shop items in our home, click here! Never miss a post by signing up to get posts via email.
Via https://www.thriftydecorchick.com/2021/01/great-tips-for-holiday-storage-that.html |

