|
I've noticed a trend over the past year or so and I'm kind of loving it!
It seems faux plants are BACK! Were they ever even gone? I think so, for awhile. Trends come and go, and a trend a years back in the design world was a general disdain for any kind of faux plant in decor.
I've always said to each their own -- if it's not trendy and you love it, do it! I actually appreciate decor that isn't on trend even more. Although I have to admit I pulled back on the faux a little bit over the years.
But they are definitely back! Flowers, greenery...I've seen it all lately. I've always had some in our decor, but I've been adding a little more in over the past few months.
I'm especially in love with the faux olive stems I found:

This post may contain affiliate links for your convenience.
See my policies and disclosure page for more information.
I found them at Michael's and almost passed on them. They have a lighter shade on the underside of each leaf that looked a little too fake to me at first. But then I thought about how the olive trees shimmered in the wind on our trip to Italy and realized that's how they look in real life.
I grabbed some (40 percent off) for our kitchen table:

And for the entry table:

They are SO lovely for fall! I'll probably use them year-round but I especially love them this season. I can't find them on the Michael's site but these are very similar.
I shared my absolute favorite place for faux plants here -- I use them all over! They are the most realistic I've found. I love them for spots like our powder room that don't get a ton of natural light:

They're also great for areas where you just completely forget you have a real plant and NEVER water them. That may have happened in the bathroom. ;)
There are three variations in that size and I use each one in our decor. They are full, real looking and super cheap!:

I also love these little pots with faux greenery I found at At Home:

You can see more examples of how I use them under glass like that cloche above in this post!
Our bathroom is another spot that gets decent light, but I ALWAYS forget to water real plants in there. Instead I added a few faux plants to the two-toned cabinet:

I don't use a ton of fake florals, but I found these faux cherry blossoms on Amazon and they are so realistic looking. I was quite impressed with them:

I also found this simple peony arrangement at HomeGoods and I LOVE it!:

It's light and fluffy and the pretty hobnail glass vase makes it look even better!
See more of our home here. To shop items in our home, click here! Never miss a post by signing up to get posts via email. Via https://www.thriftydecorchick.com/2019/09/faux-plants-are-back-yay-or-nay.html
0 Comments
I hope you had a great weekend and a start to your week! I am finishing up the fall touches around the house and thought it would be fun to share the fall decor I've added to our kitchen, along with some before and after pics.
This year I worked on a bunch of little projects in the kitchen that made a big difference. I don't think any of them were over $100 (pretty sure) and overall they added some detail to the space that I love.
I like to add character any way I can, and these custom touches are affordable ways to set your kitchen apart from others!
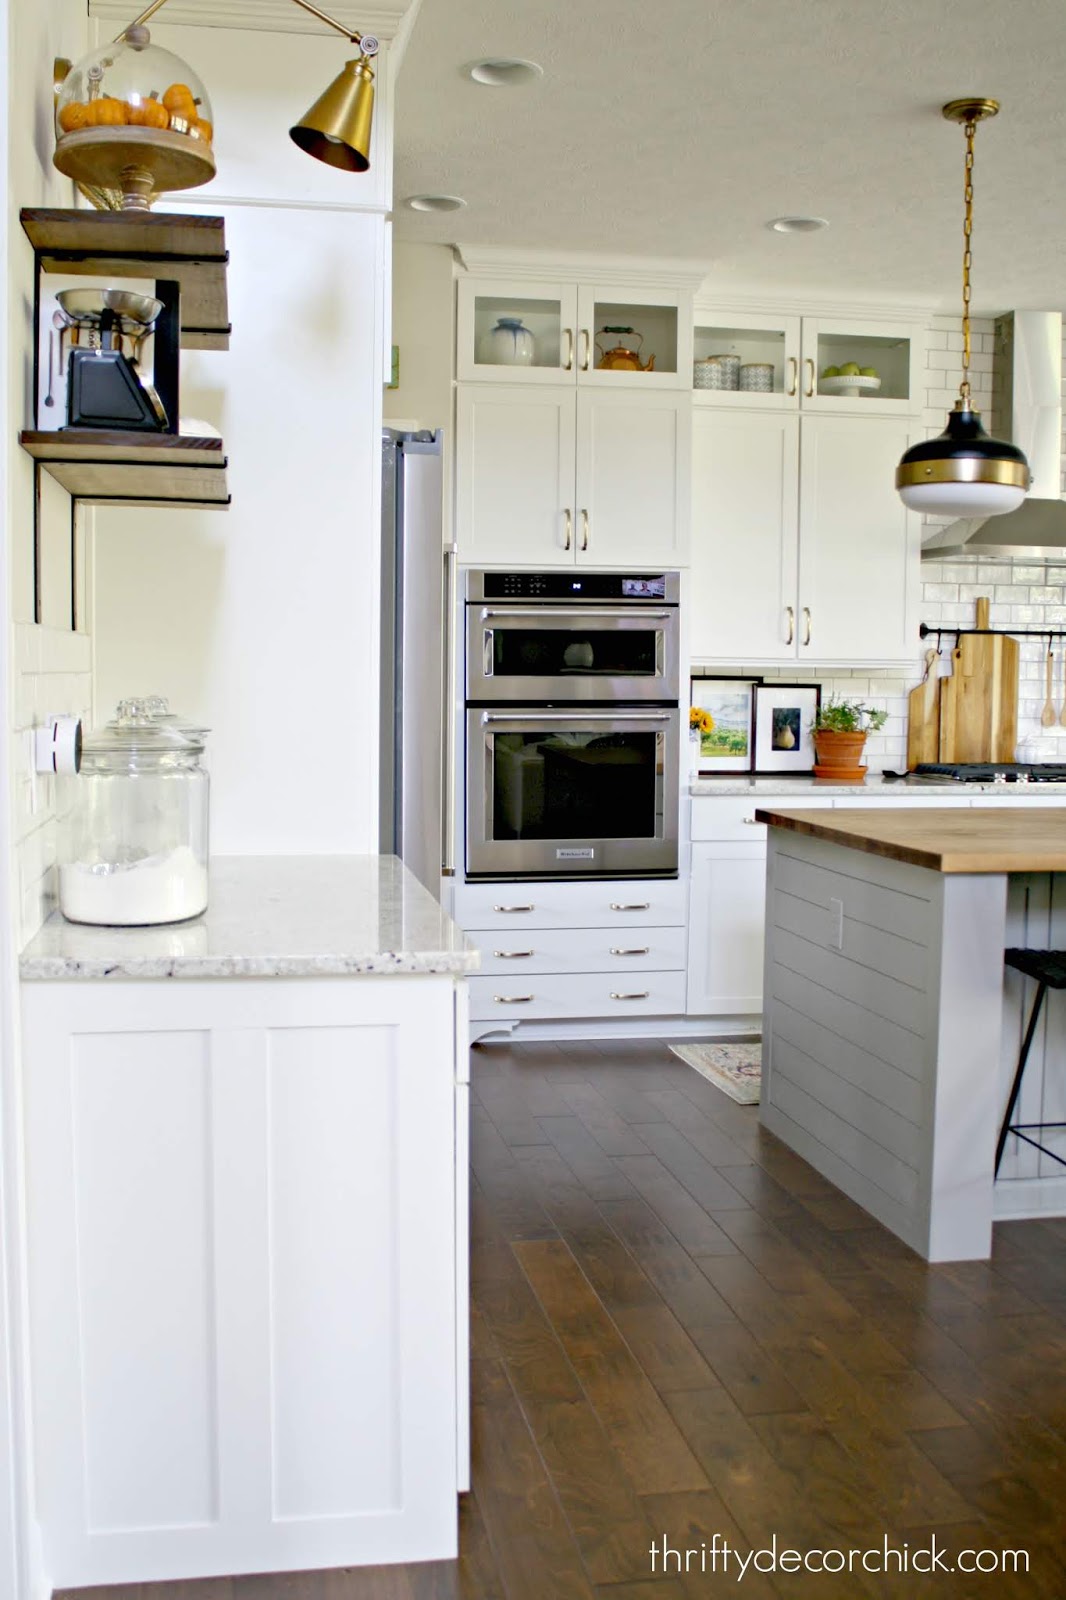
Let's start with the panels I added to the ends of the kitchen cabinets. Here's a look at how they looked before -- pretty standard:

I added the custom end panels to the cabinets with some wood and I LOVE the result. They look more high end and different than most:
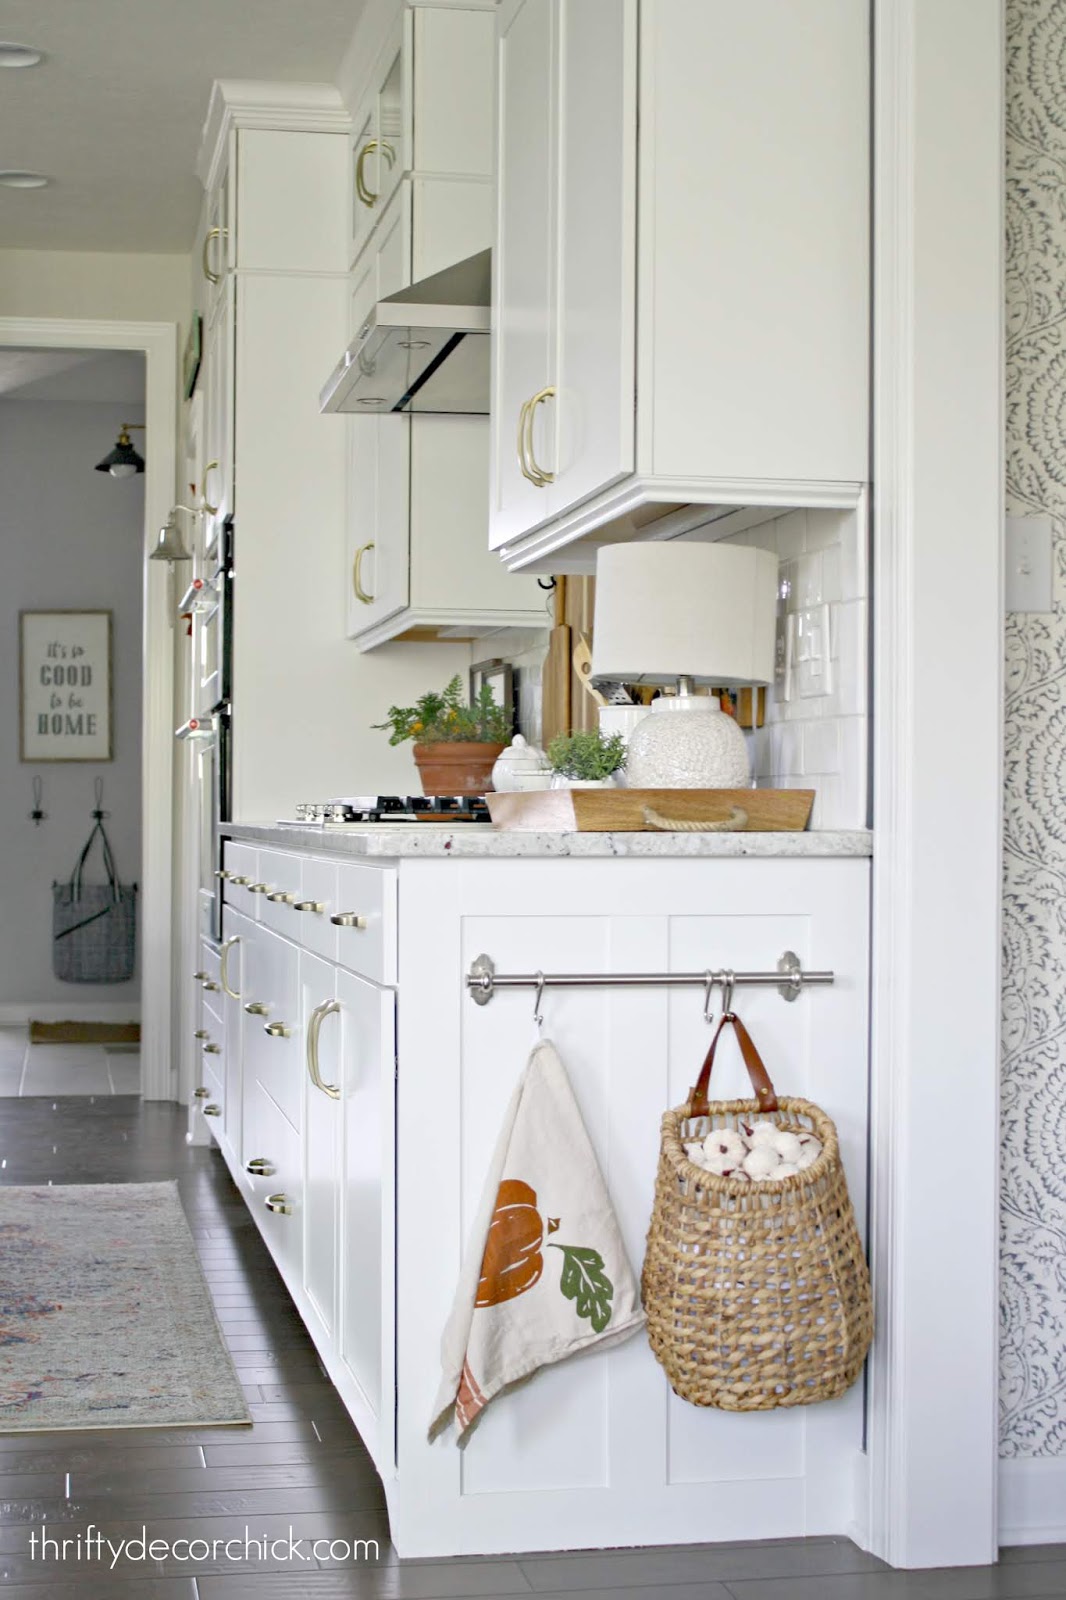
Like my basket full of pumpkins? ;) I filled the basket almost full with kitchen towels and then added some little pumpkins to the top.
I always get asked about my rods over the stove top and on the end -- both are from IKEA!
Because I added that detail to the sides, I was able to work on another project -- adding feet to the bottom of the cabinets:
You can see how I added the DIY cabinet feet here -- it's such a little thing but I love the added detail:

I recently corralled most of the items I use when cooking (like spoons, butter dish, salt and pepper, oils) onto a tray on the counter. I LOVE having it all in one spot and it looks great too!:


This post may contain affiliate links for your convenience.
See my policies and disclosure page for more information.

This next one is something you won't notice in these photos, but I'm so pleased with how it turned out!
I took the side of our fridge that was plain before:

And added some fun storage for our big cutting boards and platters:

Goodness I love it!!
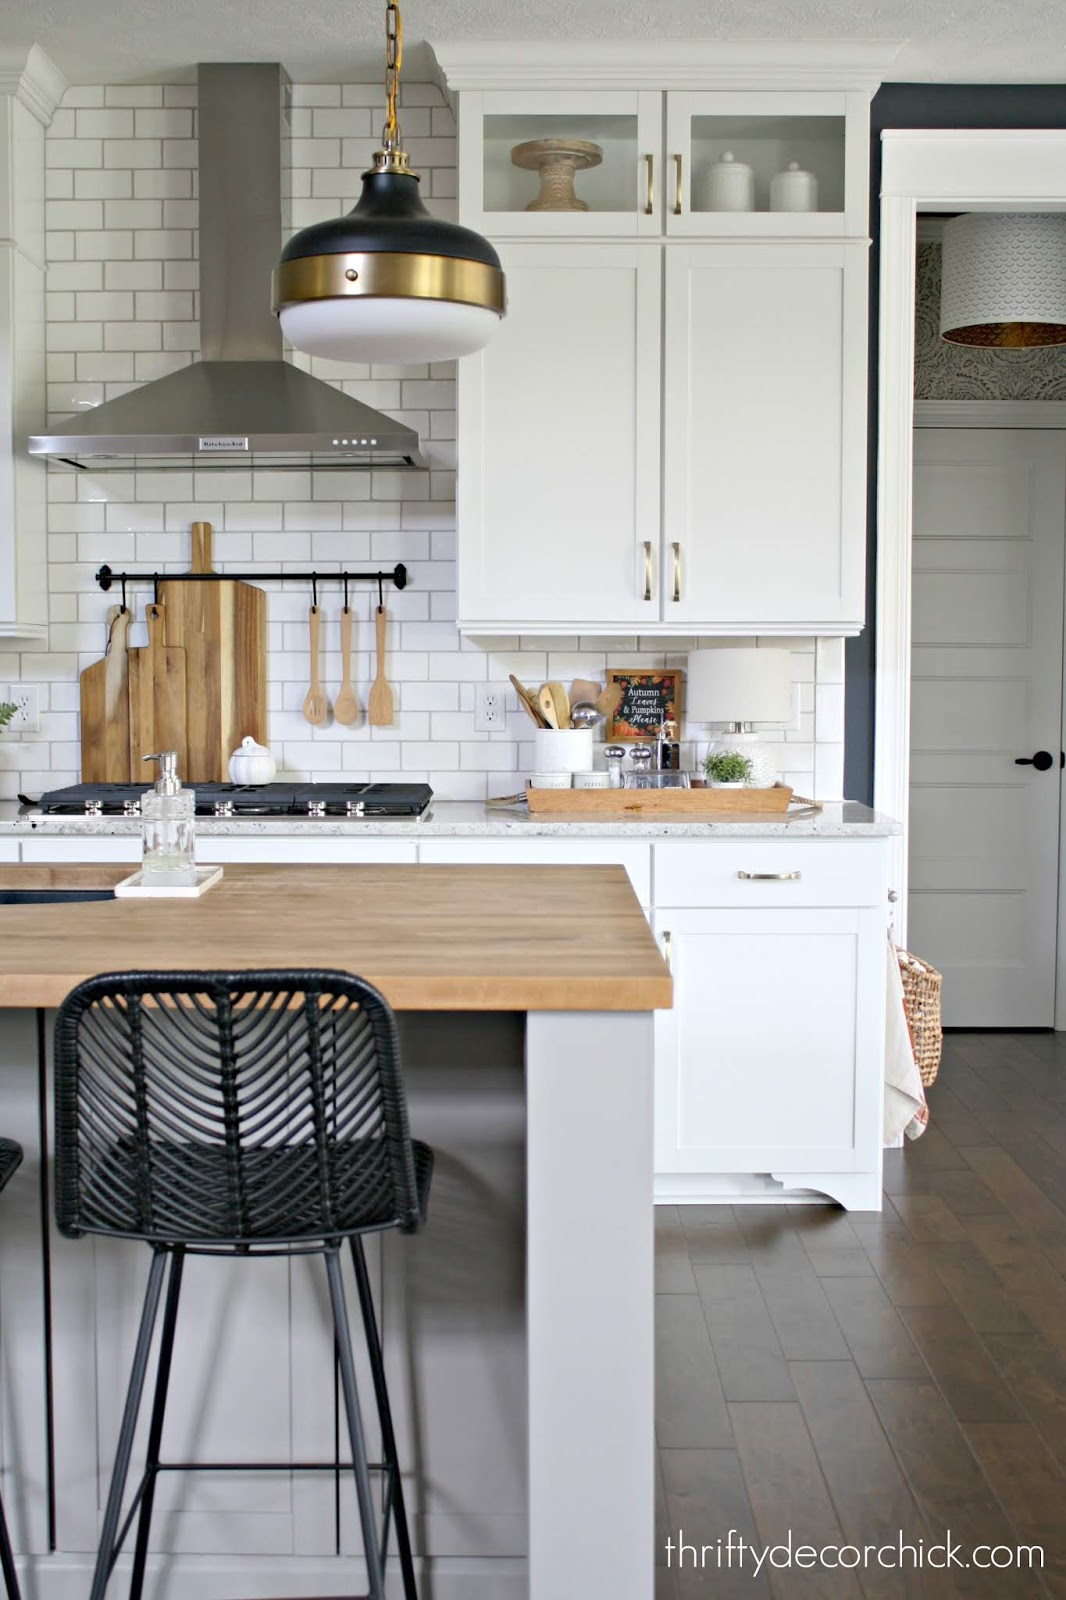
The biggest project I completed was adding on to the kitchen island. It's one of my favorite projects I've done at this house because I prefer a big, chunky island. I took it from this:

To this -- it feels so much more substantial:

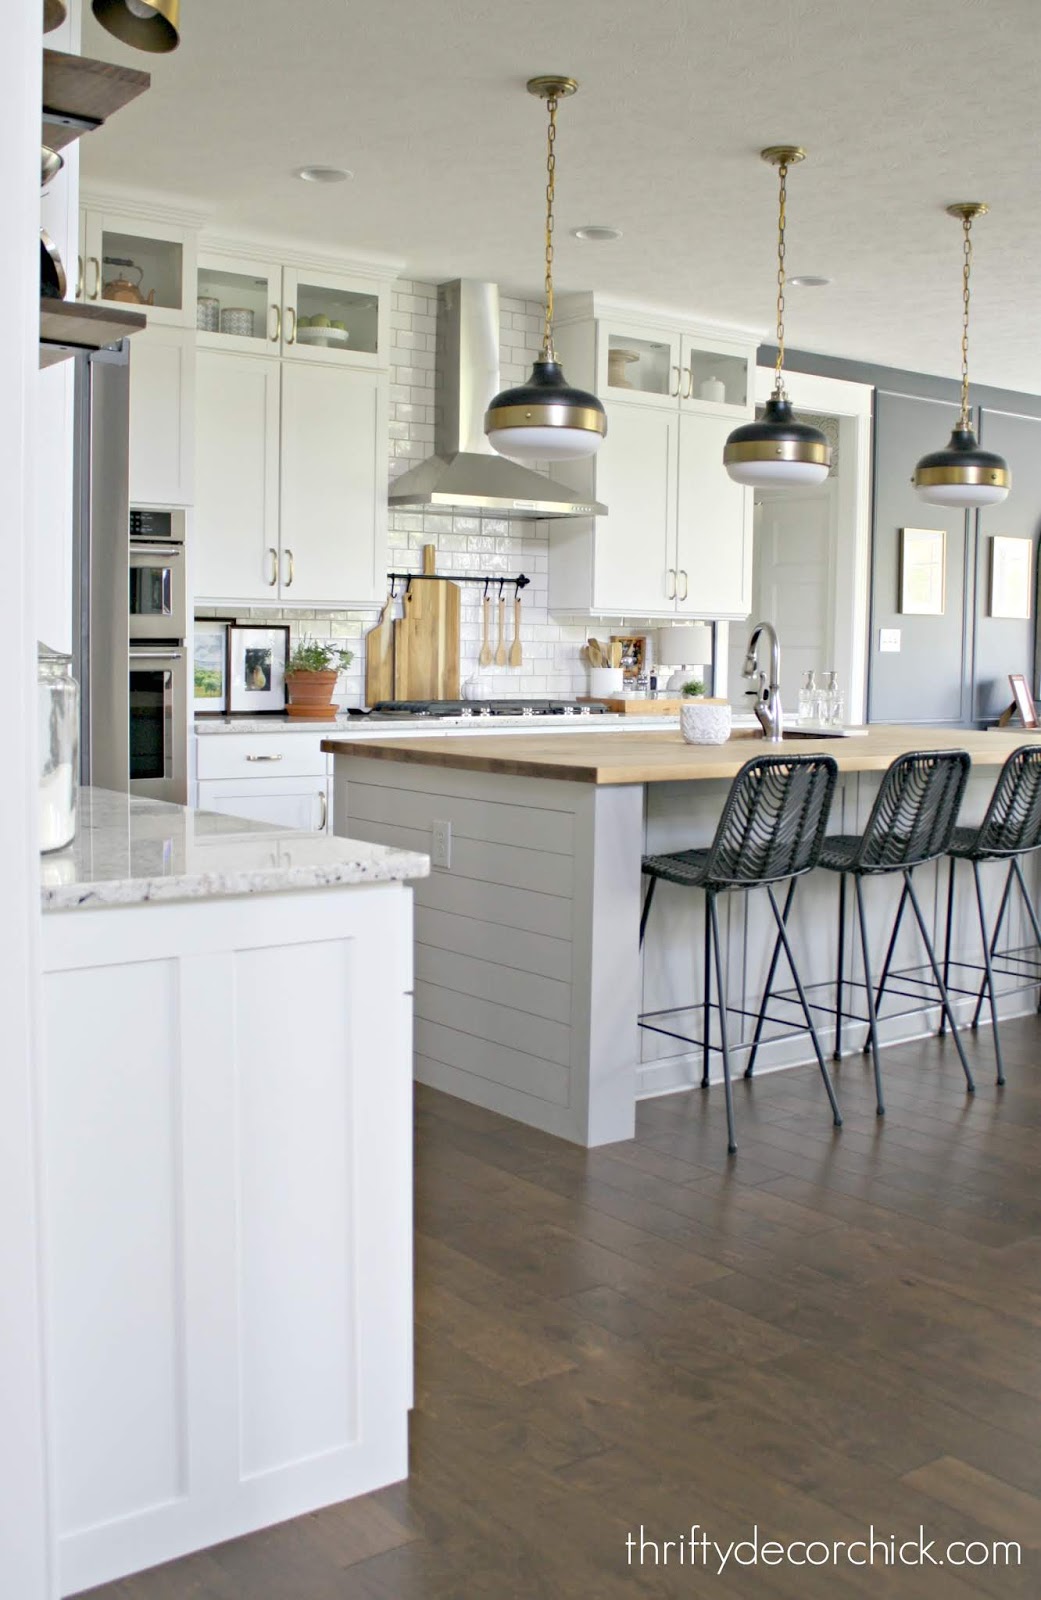
This one was a bit tricky because we have cabinets that open up underneath. I wanted to make sure we still had full access to all of them, even after adding the sides that span the width of the island. It worked GREAT and was less than $100. You can see how I completed the extension of the kitchen island here.
I got new chairs (the cats were tearing up the upholstered chairs) and it feels so much more like "us" now:
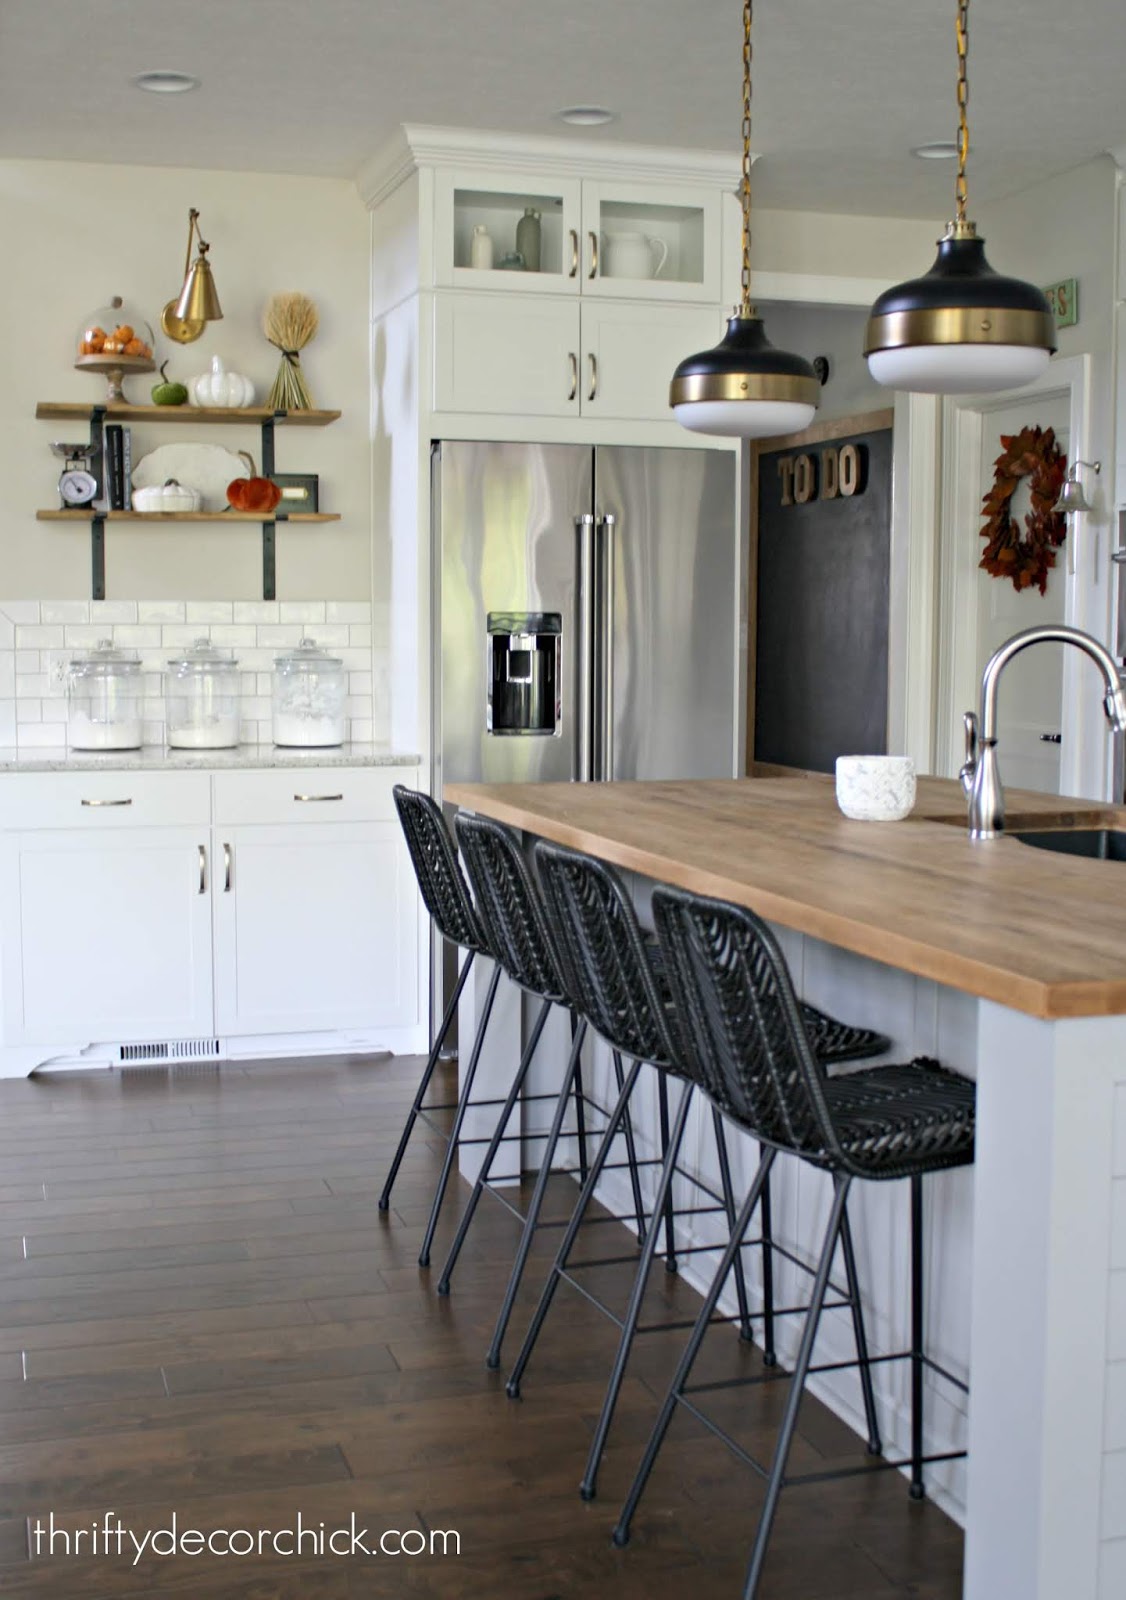
I have big plans for this wall, but for now I've had fun decorating these DIY shelves!:


It was something that bugged me at our old house too, so I did this there but never blogged about it.
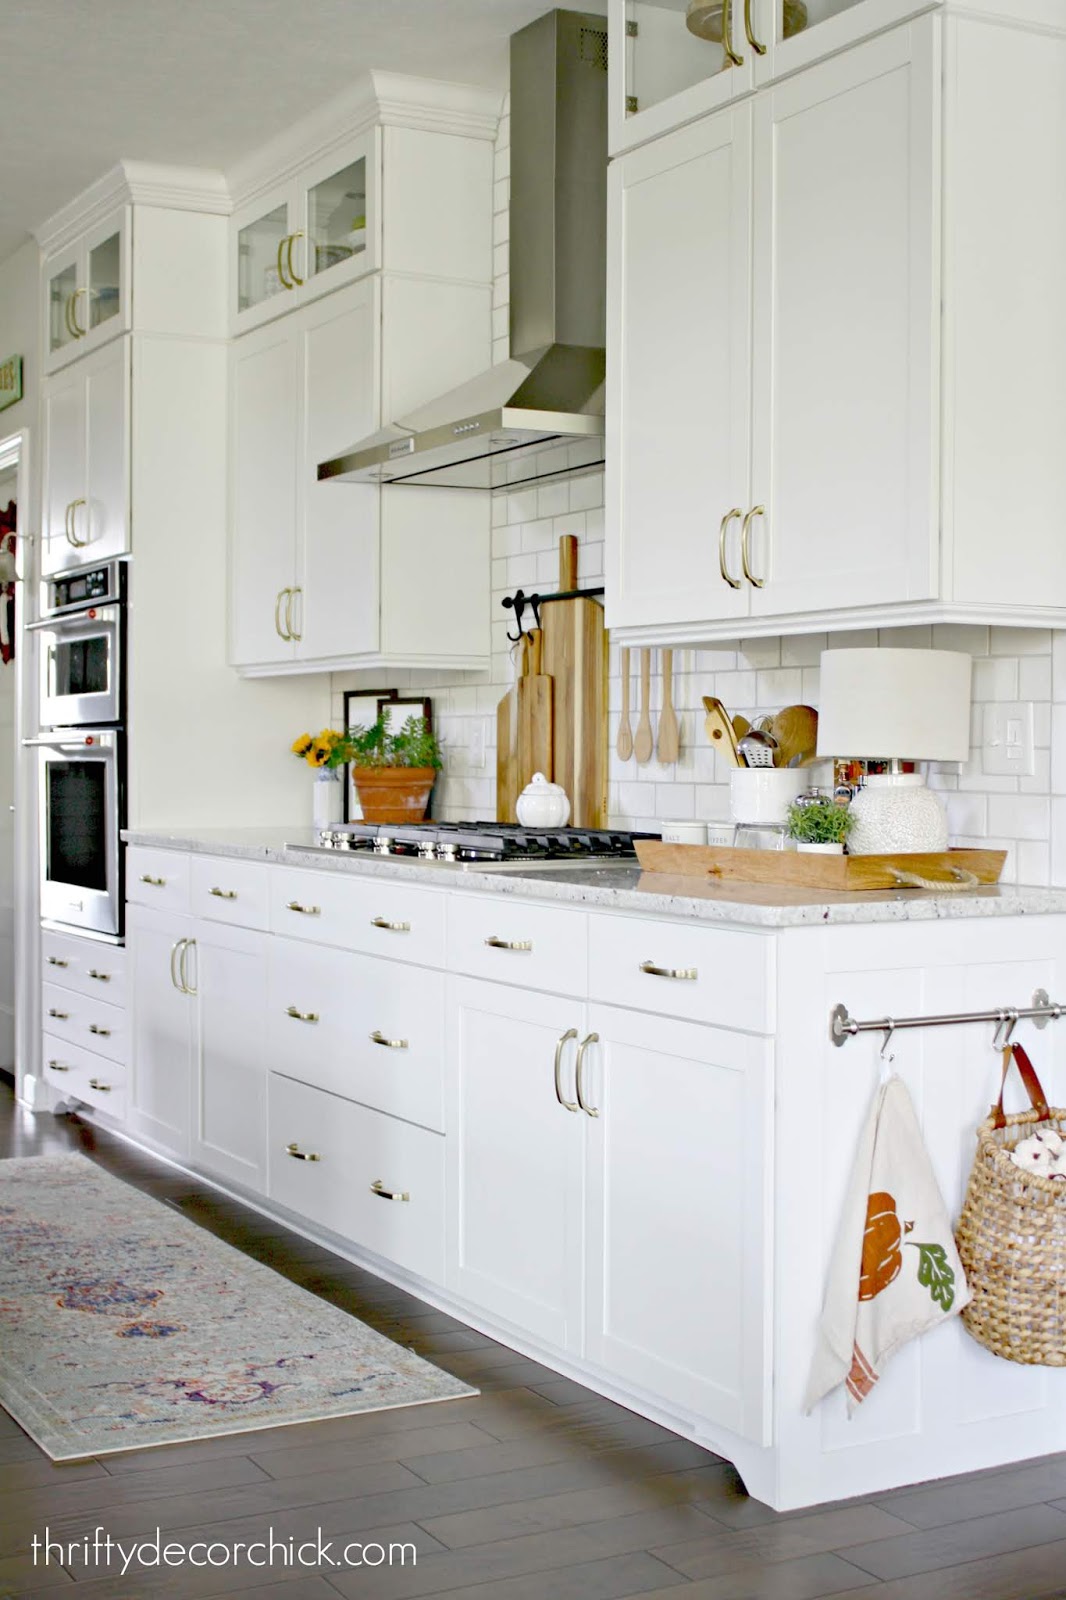
You can purchase light rails (what these are technically called) for cabinets, but it's WAY cheaper to do it yourself!:

They make such a big difference! (I've always wonder why the underside of cabinets aren't painted to match.) The DIY light rails on the bottom of the cabinets make it so you can't see them or the under cabinet lighting: 
Here's a look at the kitchen not long after we moved in: 
And here it is now with the DIY projects, big and small!:

It looks bigger, right? I love that island project so much. :) Stay tuned to see what I have planned next! Have you done small projects like this that made a big difference in your kitchen? They are the most satisfying for me because they don't break the bank and didn't take long to do. If you're wondering about any of the items in the kitchen, you can click on the photos below to get to the same or similar items!:  See more of our home here. To shop items in our home, click here! Never miss a post by signing up to get posts via email. Via https://www.thriftydecorchick.com/2019/09/fall-in-kitchen-and-diy-projects-that.html
OK, so I had a different post planned for today, but after discovering this, I HAD to share it with you.
I want YOU to have the cleanest carpets ever as well. ;) This gadget is right up there with my $35 vacuum that is the BOMB. (It's on sale right now, go grab it!!) We had a big, clunky carpet cleaner at our old house that I got rid of when we got hardwoods. I wasn't using it as much and it just didn't work great. It was kind of a pain to get out and set up as well. Since then I have either had someone come in and clean them (every couple years or so), or I'd rent a cleaner from the grocery store. It did the job pretty well. Yesterday I rented one, got it home and all ready...and it didn't turn on. Took it back, got another, got it home, turned it on, and it wasn't spraying the water/cleaning solution. Took it back, got my money back, and in my frustration went straight to Target to just buy one. I stood in front of the carpet cleaners trying to decide on this very impulsive purchase (because I JUST WANTED TO CLEAN MY CARPETS) and just grabbed the one that was the most on sale. (Eeny meeny miny moe would have been a close second as far as smart decision making goes.) It was on sale for $70 off and I grabbed it up. It was super easy to set up and I had it running within minutes of getting home: 
This post may contain affiliate links for your convenience.
See my policies and disclosure page for more information.
And that's when I feel in loooove. ?
This thing. It simultaneously made me so happy and SO disgusted. Let's talk about how it works first. I loved that the water and solution go in separate containers -- no figuring out the right amount of cleaning solution.
You don't push anything to release the water/solution -- you just push the machine forward for "wash" and pull it back to dry. This took some getting used to. For tough spots I went very slowly over the spot in the forward, washing motion. It works GREAT.
I'd go over most spots a couple times, and then there's a dry only option to get any excess water up:

I LOVE the way it operates because not only does it clean the carpets really well, but it doesn't leave them soaking wet. I was surprised at how quickly they dried.
I cleaned a rug, worked out, made dinner and then checked the carpet. Three hours later and it was completely dry. I've never had them dry that fast! I did our bedroom carpet this morning and it is nearly dry about three hours later.
Now to the good/disgusting part. The part I hesitate to show because you'll think we live in filth but I can't wait to show you because it's AWESOME. This is the water after cleaning one rug:

Do you see that? Nearly black!! Oh geesh. I swear we don't live like pigs.
I was so hooked on it, I did two large rugs, two medium rugs, a runner and our master bedroom in about four hours. It's addictive.
I told my husband today, "This is so disgusting and I LOVE IT!" It's soooo satisfying.
Here are some before and after pics of our dining room rug that I haven't cleaned in a year. Thankfully the design of the rug masked all of this well (if you didn't look too close):


I was also impressed with how much fur and hair it picked up (I cleaned out the nozzle afterwards and threw up in my mouth a little. I'm not showing you that.) Everything had just been vacuumed the day before!
Our rugs and carpet look brand new!:

I'm very impressed with it so I wanted to share it with you as well! Next up is the upstairs, then the basement. Yessssss. I found this awesome carpet cleaner at Target where it's on sale right now, but you can find it here and here for a dollar less all of the time. Have you tried this Hoover carpet cleaner? I'm in love. ? See more of our home here. To shop items in our home, click here! Never miss a post by signing up to get posts via email. Via https://www.thriftydecorchick.com/2019/09/my-favorite-new-cleaning-machine-so.html
I love to share cool ways to create art at home. A lot of times I'll use photos in our home instead of buying art. It's more personal and a lot cheaper! I shared the Waterlogue app for your phone years ago and it's such a cool option.
I wanted to print out a trip from our recent Italy trip, but wanted to soften it a bit instead of using the actual photo. The Waterlogue image was too washed out for what I wanted. I started searching ways to turn photos into watercolor art and this site came up. (This is not sponsored.)
I had so much fun playing around with it! You upload your photo and then pick from at TON of options along the top to edit them the way you want. There are way too many to show you here, but these were a few of my favorites.
I changed up the door image I shared in our trip post into this colorful sketch:

This one was another sketch option and is much darker:
They even have a Lego option! Isn't that fun? That would be a cool idea for a kid space:

Ha! I love it.
I wanted to use one of the landscape photos from our trip, and this was the watercolor edit:

I wanted it to be a little more defined, so I went with the landscape edit instead:

How cool is that? Of course just regular photos always look great, but if you're looking for a little something extra, this is a fun site to try out! (I just right clicked and saved the image.)
I printed it out for our kitchen and absolutely LOVE it!:
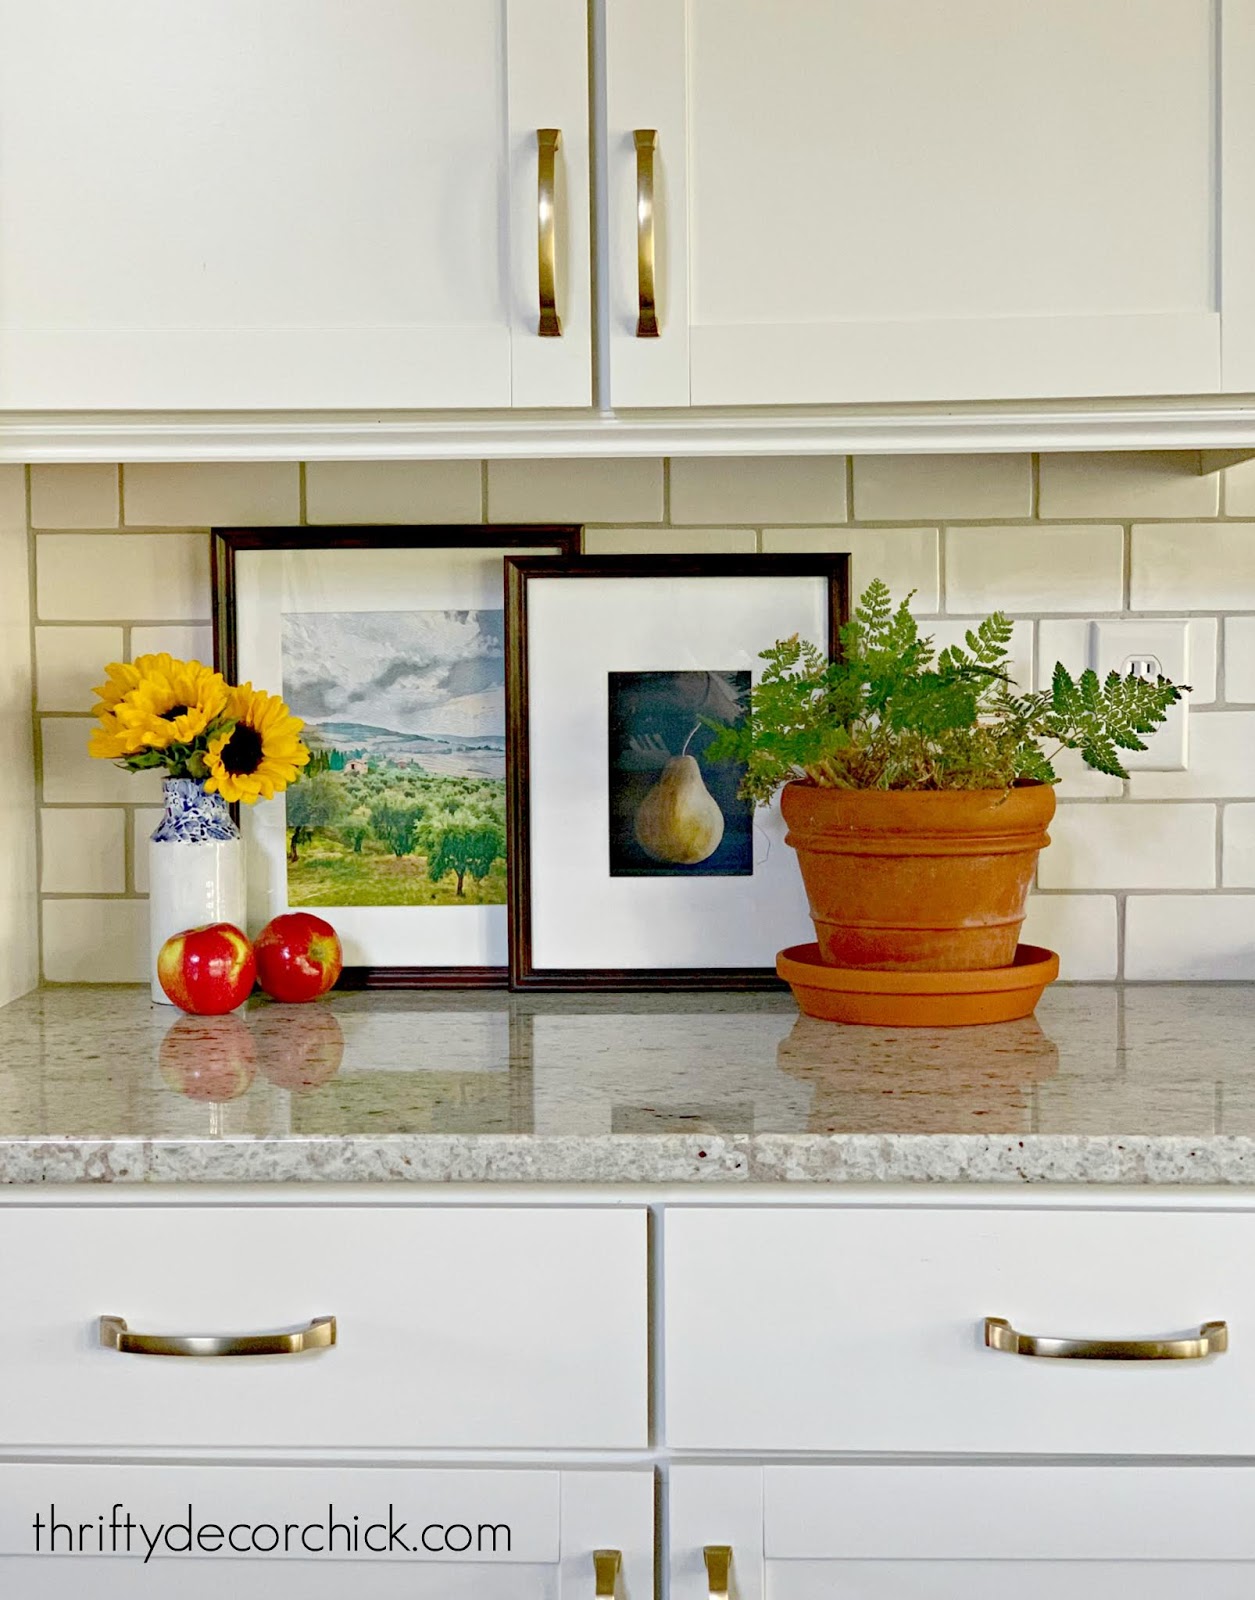
You can find that free pear print here.
I love to share these free sites and hope you can use it for some art in your home! :) Have you tried something like this? Check out these free fall printables for more ideas!: 
See more of our home here. To shop items in our home, click here! Never miss a post by signing up to get posts via email. Via https://www.thriftydecorchick.com/2019/09/turn-any-photo-into-watercolor-art.html  I will share this post every year because it's important to me that we have a visual reminder of this day, now 18 years ago. As many of you know, New York is near and dear to us. It's a city we love so very much. I always knew I'd love it, and when my husband took me on my first trip days before September 11, I found out I was right. I was obsessed. This photo always gives me chills. We're at the top of the Statue of Liberty and you can barely see the towers behind me: 
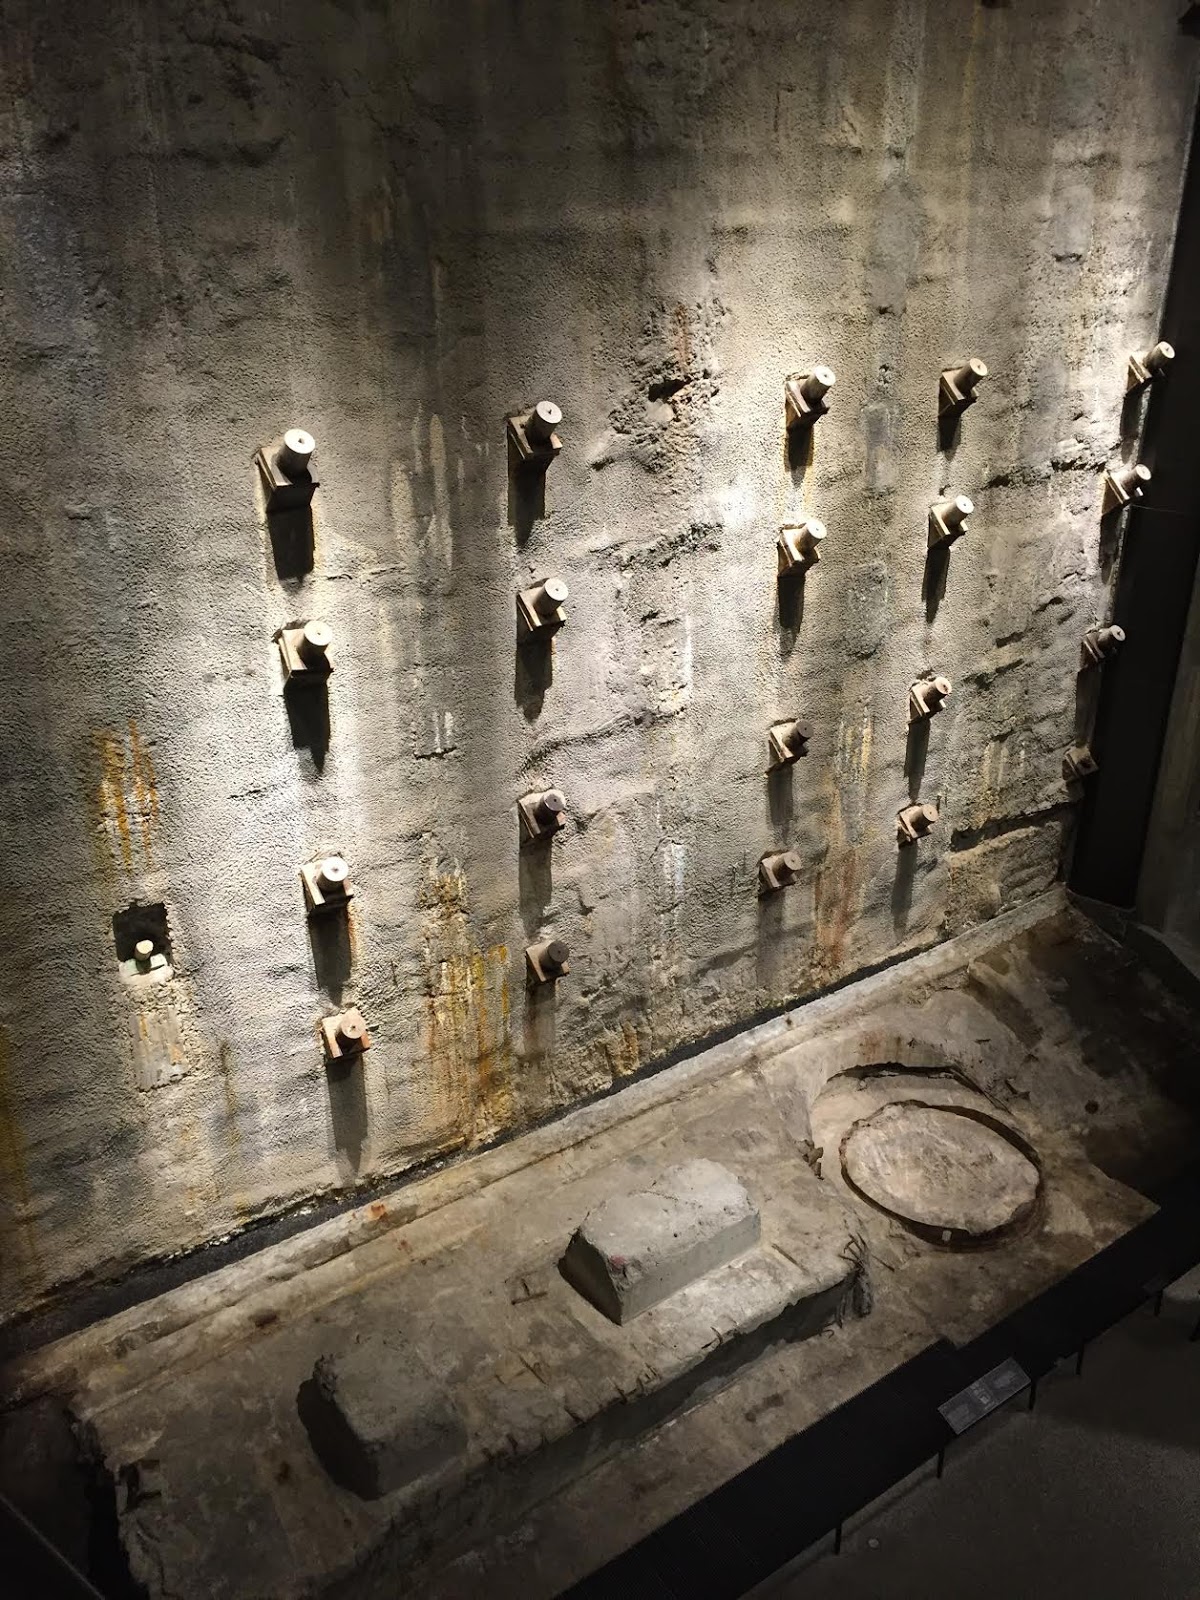
I think it was nine days before 9/11. Nine days later and the towers were gone. My husband was a band director at the time -- a few months after we were supposed to travel to Japan for a band trip. He canceled that trip and instead we took the kids to NYC. We've seen Ground Zero at it's best and worst. New Yorkers stopped us numerous times and thanked the kids for visiting. These first photos are from the Ground Zero Museum and tell the story of that day. This location is separate from the new museum – it used to be closer to Ground Zero but it looks like it’s moved to 14th street. If you visit the city I highly recommend visiting both. I let the photos do the talking (forgive the quality, all were taken with a phone over the years):  
      ![117_thumb[1]_thumb[5]](https://lh6.ggpht.com/-Q-Wi0Q5JSiY/VBGtTPy0sVI/AAAAAAAAqzE/ikGgk1KdkR8/s1600-h/117_thumb%25255B1%25255D_thumb%25255B5%25255D%25255B2%25255D.jpg "117_thumb[1]_thumb[5]")            
The new 9/11 Museum looks so small from the outside, and you think it will only take an hour or so get through. Plan accordingly because this museum literally goes deep into the Earth and you can spend hours in there.
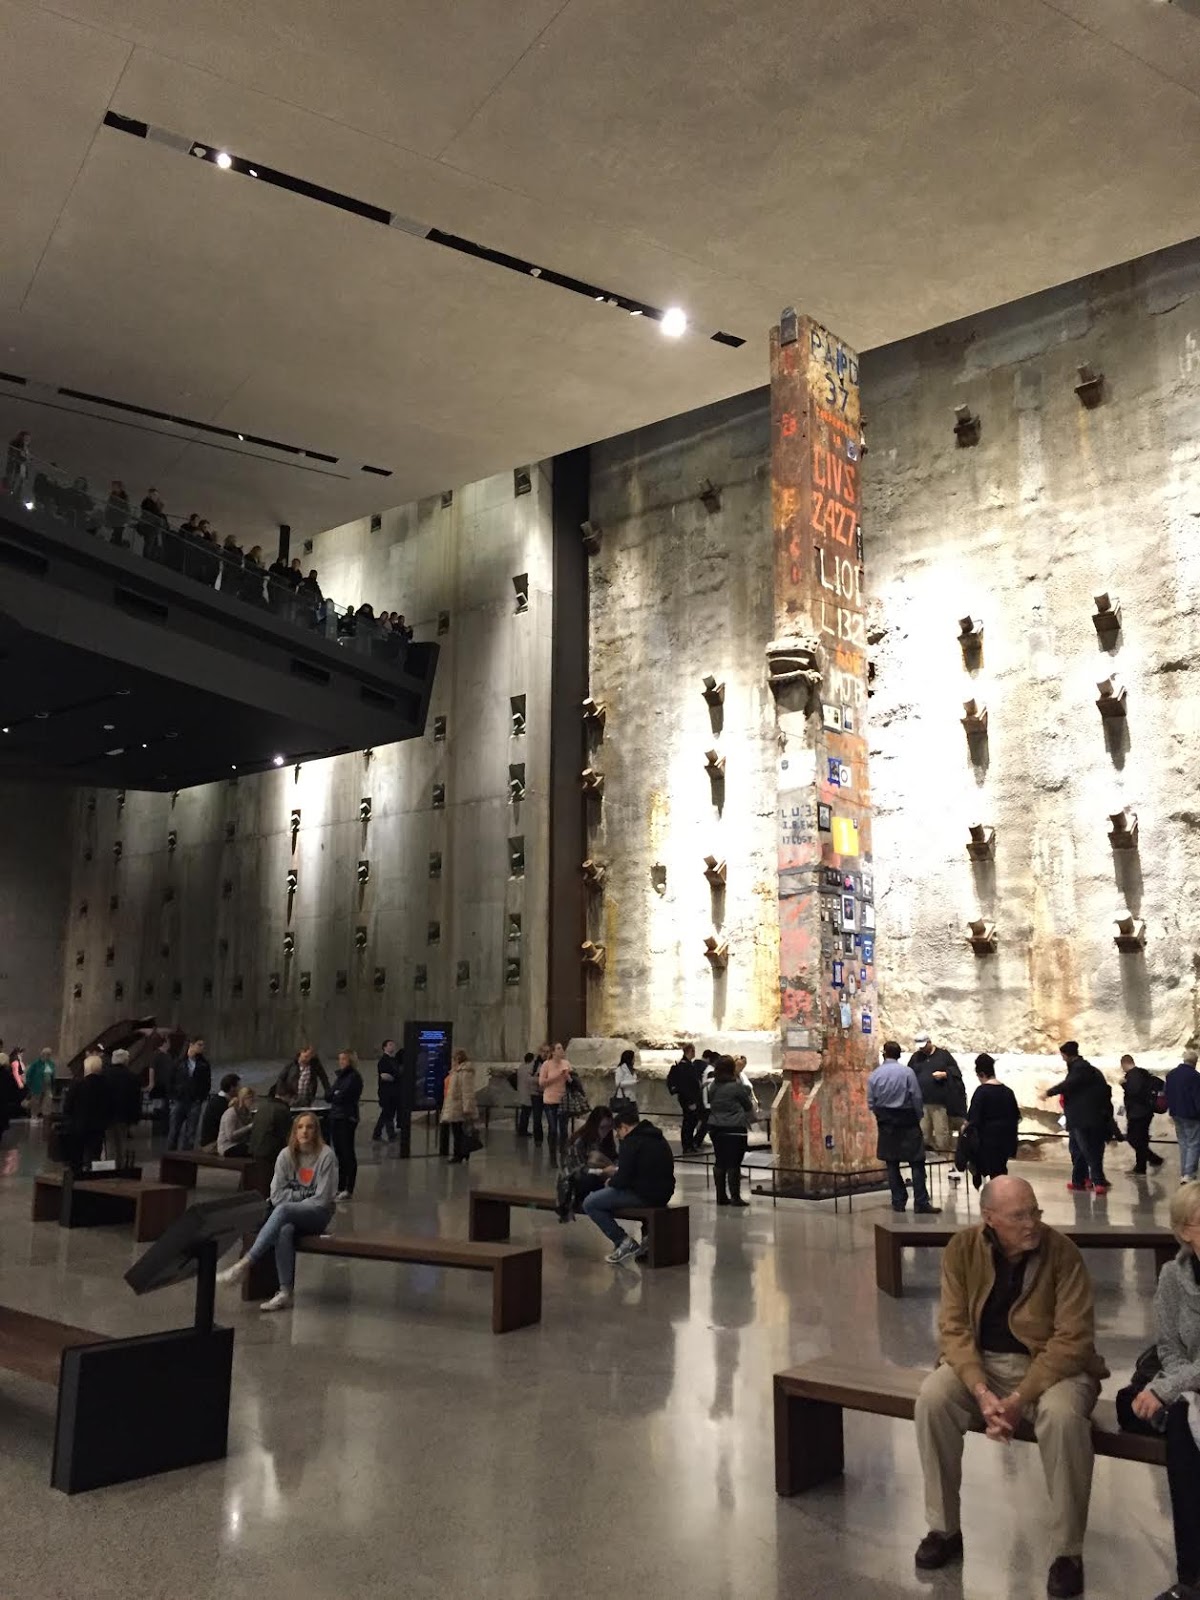
It is one of the most well done museums I've ever visited, especially considering the content. The beginning is a tour of the footings and walls of the towers (this wall below was one of the towers). Don't miss the room in the middle in this part of the museum -- it holds photos of each of the victims as well as video about each one. There are no cameras allowed in this space -- it is most definitely a memorial. There is a separate room at the end of the main part of the museum and it can be easy to miss -- but it holds most of the photos, artifacts and videos. It may not be suitable for younger kids but our (then) nine-year-old did fine. (There are parts of this room we steered him away from.) There are no cameras allowed in that area as well.
If you go give yourself plenty of time and be prepared for the heaviness in your heart that you will feel as you walk through and when you leave. It is overwhelming and unavoidable. I think every person that visits New York City should visit at least once.


This artwork signifies the color of the beautiful blue sky on that morning. There are 2,983 squares -- one for each person lost on September 11th and at the 1993 bombing.
God bless all those we lost on that day and their families. God Bless America.
  
(Freedom Tower)

If you have plans to visit NYC, be sure to check out my guide for the must-sees on a quick trip. This is especially helpful if it's your first time there.
See more of our home here. To shop items in our home, click here! Never miss a post by signing up to get posts via email. Via https://www.thriftydecorchick.com/2019/09/eighteen.html
Hello all! I'm back today to share another blogger I greatly admire for awesome style (and just being an all around nice person). I love introducing you to bloggers you may not know -- you can see TONS of home tours from over the years here. I promise you'll find some inspiring spaces and blogs to follow.
Today I'm sharing Alma from Almafied. Her style is one I'm ALWAYS drawn to -- when I see a photo of her home I'm instantly attracted to it. Her home is full of wood tones, white walls and yummy texture.
Let's take a tour, shall we? I'm sharing pics from her current house and the last one as well. I loved this little office nook so much:

Such great use of space!
She has much more room in her current house, and I love all of the storage on those shelves:

You can see the whole office tour here!
EVERY time I see those white and blue ottomans, I drool. I just love them. This living room is so fresh and pretty:

Did you see that rattan cabinet? Can you believe that was from IKEA? IKEA, hear my plea -- bring it back! :) You really need to see the before pictures of this space! Check out this fresh global-inspired living room tour here.
Alma and her husband are finishing up a big renovation -- this TV wall in their media room is perfection:

She is the queen of accessorizing, am I right? Everything always looks so effortless.
It's such a cozy, lovely space:

Check out Alma's media room tour here.
The kitchen is getting a big makeover and it's come a LONG way. Here's a peek from her Instagram page that shows some of the progress:

You can see how the room started and more plans for the space here.
They've moved some things around during the renovation, and moved the dining table into a living space. How lovely would a fireplace be in the dining room? ?


Check out her pretty fall dining room here!
Alma recently finished up their guest house -- I'm not sure she knows I'll be coming over to stay :)


You have to see the before of this room -- she's took a very basic space and made it so pretty and welcoming. Alma is so talented!
And last but not least, I love her serene master bedroom. That light fixture is stunning!:

Every space is so calming and simple, but layered perfectly. Not overly fussy but still warm and welcoming. I think you'll enjoy checking her out! Her Instagram is where she shares a lot of updated pics, so check her out there as well! If you've missed any of the other blogger home tours I've highlighted over the years, be sure to check them out at that link! See more of our home here. To shop items in our home, click here! Never miss a post by signing up to get posts via email. Via https://www.thriftydecorchick.com/2019/09/showing-off-almas-beautiful-home.html
I've been so excited to share these photos with you! I told you I'd have to break our Tuscan trip into a few posts, and this one is right up my alley.
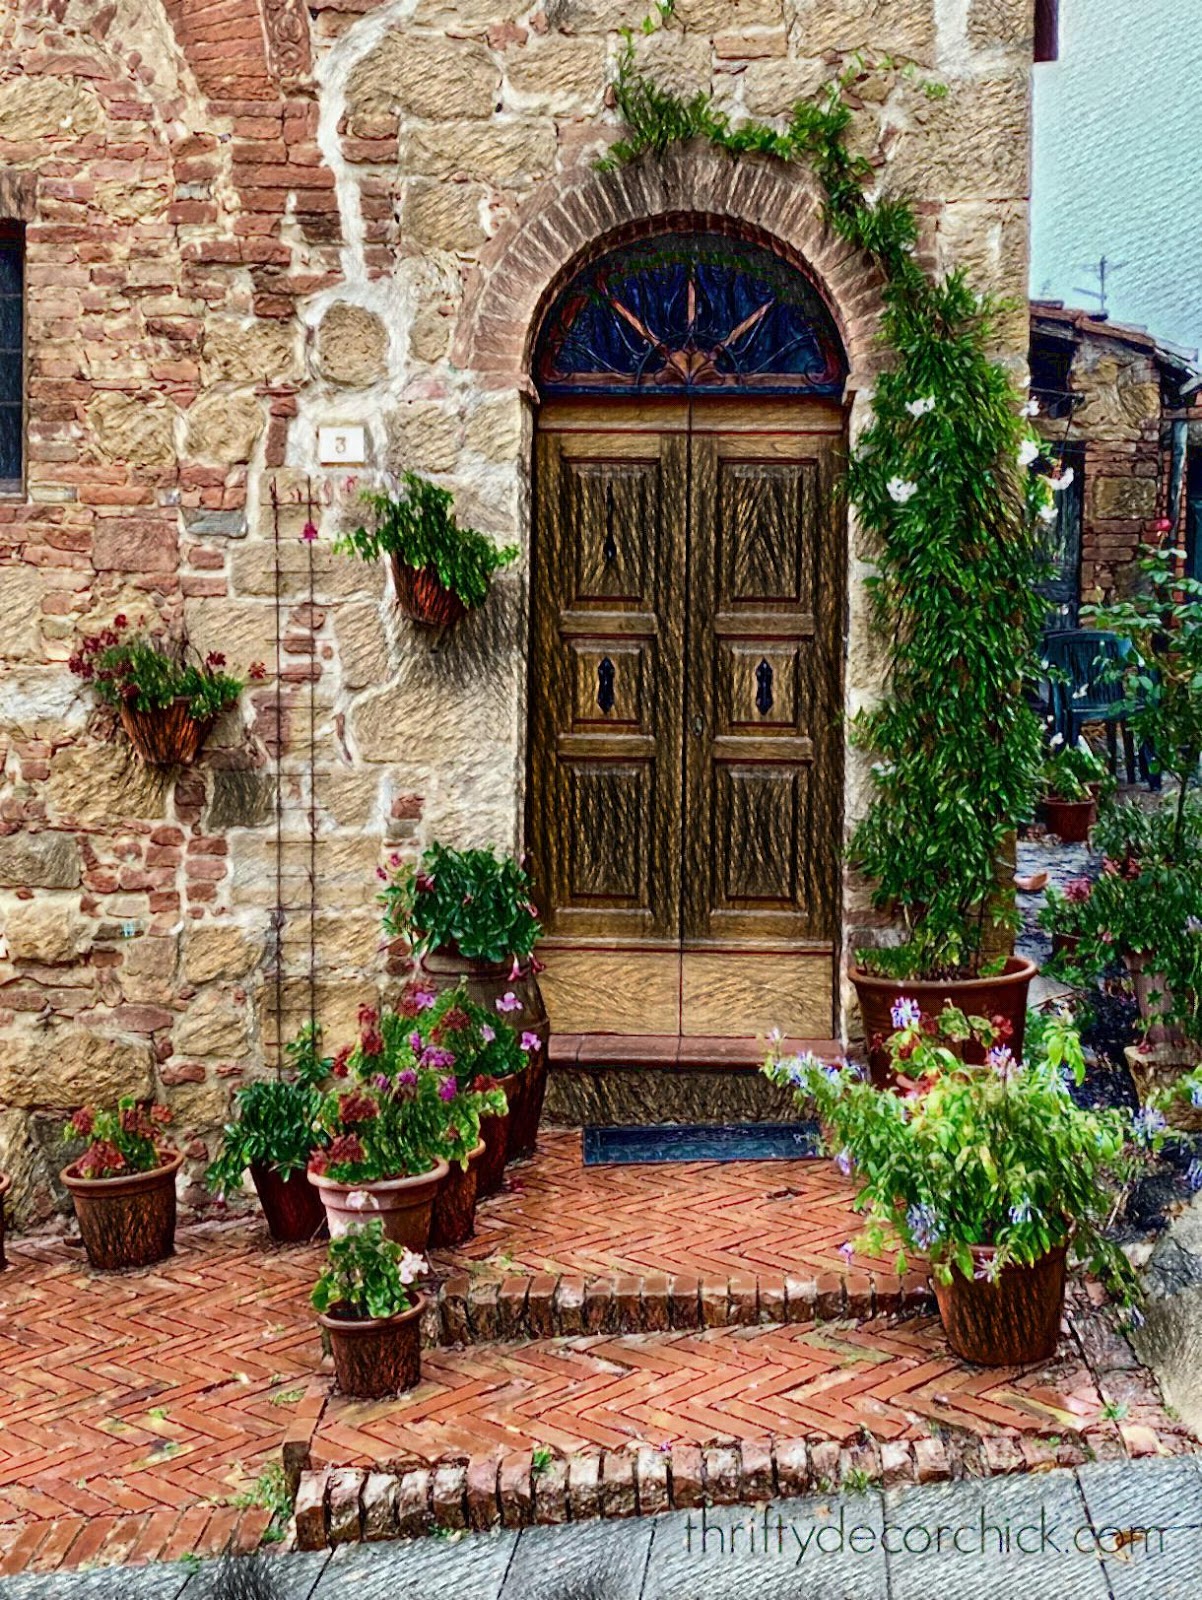
I've always loved Tuscan style -- but since visiting Napa Valley over the years (that leans heavily this way) and now Italy -- I've fallen in love with it all over again. Back in the day I mimicked the Tuscan look, but then it was a lot of golds, reds and ornate wrought iron. I don't know if the style there has changed over the years, or if that was just our American take on it. ;) Either way...I have a whole new appreciation for this decor style. I noticed quite a bit of symmetry in the spaces. You know me...symmetry in design makes me crazy happy, so I think that's one of the reasons I was so taken with it. I'll start with exteriors -- outside the themes are a lot of florals, stone, pottery and GREEN. You can't talk about Italian exteriors without mentioning the doors! I swear every door in every village/town we visited was unique and gorgeous. Solid wood of course...with some detail but not too much. I shared this entry last week because it's a favorite: 
It's something that would hard to repeat -- and I think that's the beauty of it. You can't DIY that kind of patina created by time:

Well...you CAN. But it won't look as authentic as this. :)


One of the restaurants in the village where we stayed had the prettiest entry:

The stone pots are repeated often. They stand on their own! Check out that ladder with the herbs in baskets! If our storms wouldn't knock those right off, I'd so do this.
I noticed the planters make a statement -- you don't need a ton of flowers. Simple green plants in stone on repeat make for a beautiful outdoor display:

I gasped when we turned the corner at this winery -- symmetry at it's best!:

The trend both inside and out was surprisingly simple. Not fussy at all -- the beauty in the sparse finishes make it feel cozy, but elegant at the same time. It just made me feel GOOD. The interior decor overall was a mix of creamy walls (very little bright white), stone on the floors and ceilings, mixed wood tones (yes, you can), soft accent colors and lots of texture. Our favorite winery was one of the most beautiful I've ever seen, even their barrel room!: 
I want those brick floors somewhere. Anywhere!
They had a room with walls covered in wine boxes. It was so simple and stunning. I'm trying to figure out how I can replicate this look:

The Tuscan style is very "fall" feeling to me -- I think that's why I love it so. So warm and cozy but not overly fussy:

Those sconces, right?? I may have to email our contact there and see where they got them. ;) I'm sure they're super affordable. Ha!
The color was soft and mixed with wood: 
Notice the uplighting on top of the cabinet? That's why I love adding lighting to soften spaces. It's such a small detail but makes a big difference.
And the beams! Can we talk about the beams? I just loved them!:

The colors were so soothing -- again, no bright white walls anywhere that I can remember. Do you see the pale gray doors? They make me want to start painting all of the doors in this house.
Even the tile in this bathroom was gorgeous:

This room is in a winery is for wine club members. We walked down the steps into this space and I gasped out loud (again). I was in heaven!:


We visited the duomo in Siena and I'll share more of that later, but the floors in the library were just gorgeous:

One of the restaurants we visited was just a dream. I literally felt like every time I turned around on the trip I was squealing or gasping at the decor or views. ?
My favorite part was the lighting -- can you see what they did?:

The spot lights shine through the baskets, so the light is diffused. The result was SO lovely!
Can you tell what the back wall is made of?:

Egg crates! I mean, come on!!
We dined at a farm restaurant at the top of a hill one night, and it was so quaint and beautiful. It really struck me how uncomplicated the Tuscan style is:

A wood table, simple linens and black vases with flowers cut from the garden. Add in some candlelight and the look was complete.
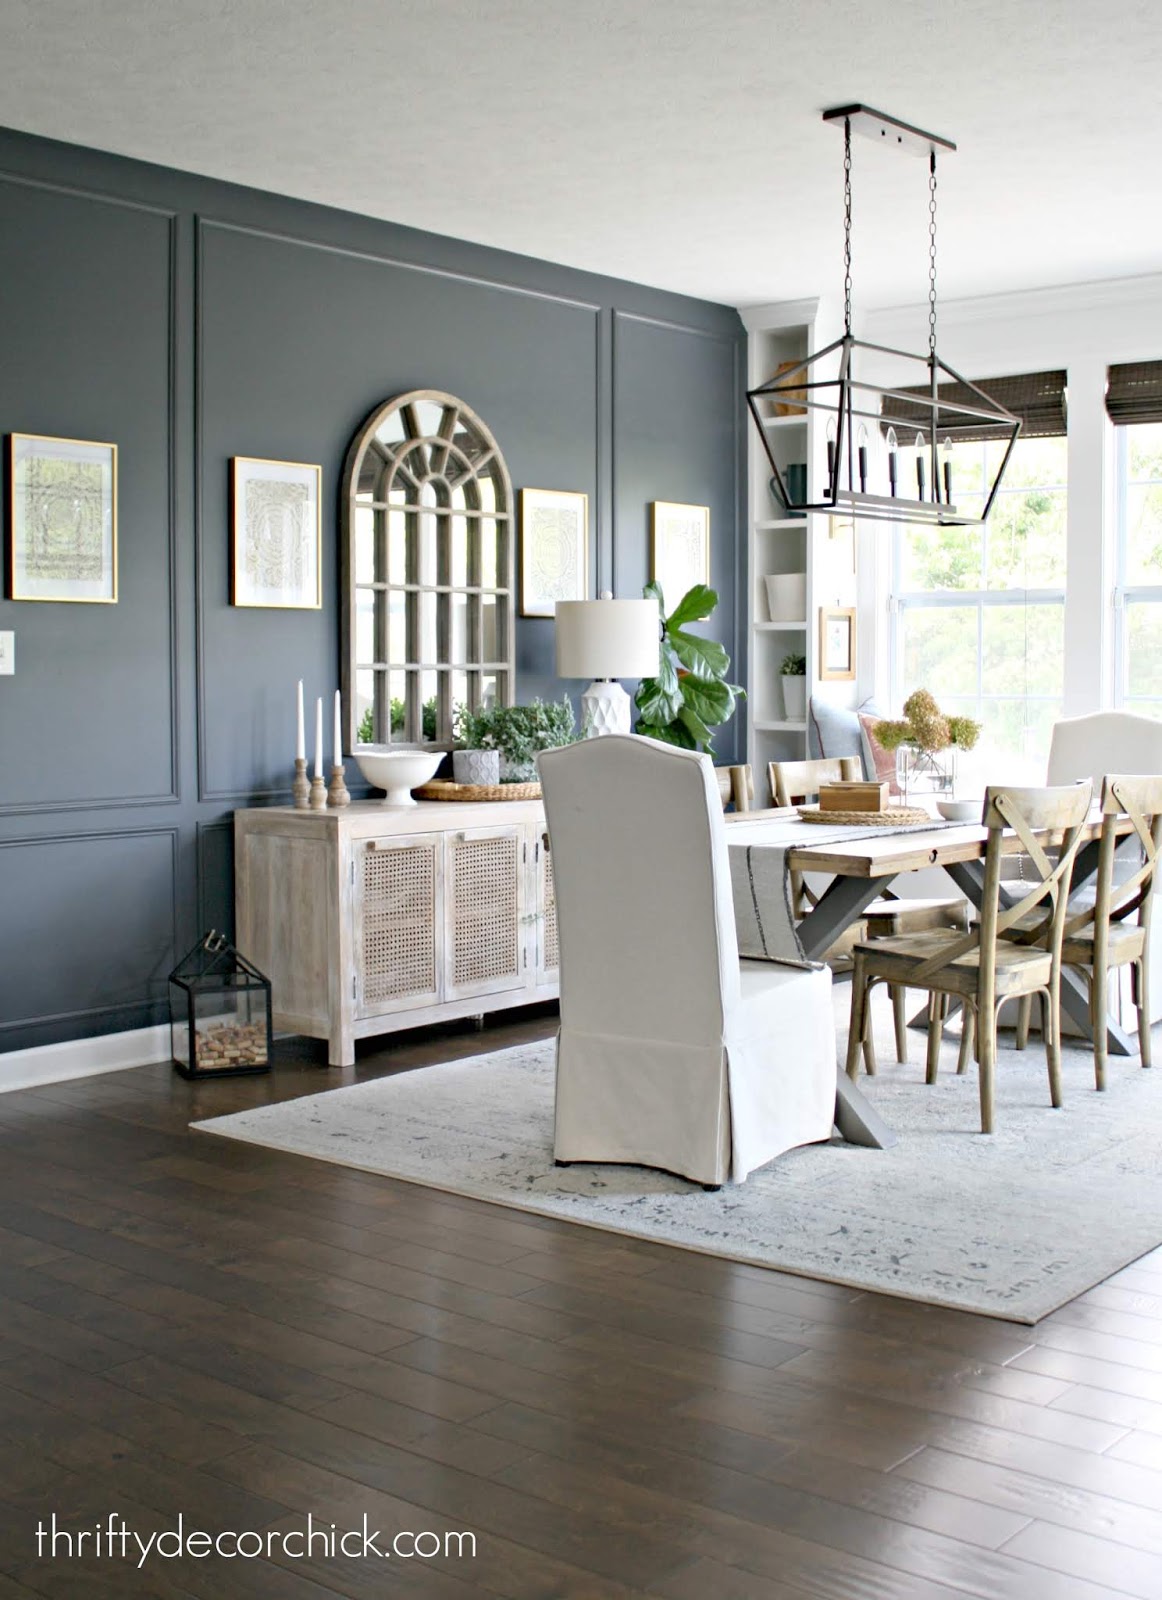
It really is about creating a feeling and experience, and not overdecorating and filling every space. This is what I strive to create in our home as well. (But they seem to do it without even trying!) I think the decorating trend lately is to fill ALL the empty spots -- and if that's what you love, DO it! But I am learning more of the joy and beauty of simpler spaces. I hope you enjoyed this post as much as I did! :) Are you a fan of the Tuscan style? See more of our home here. To shop items in our home, click here! Never miss a post by signing up to get posts via email. Via https://www.thriftydecorchick.com/2019/09/the-elements-or-elegant-cozy-tuscan.html Remember that list of DIY projects I wanted to complete before the holidays? Well...I forgot about one. I've wanted to do this forever, but I wanted to hold off until I knew exactly how I wanted it to look. I figured it out recently and knocked a project of the list...that I didn't put on my list. ? Remember when I painted our morning/dining room walls a deep, moody blue? We still love it!: 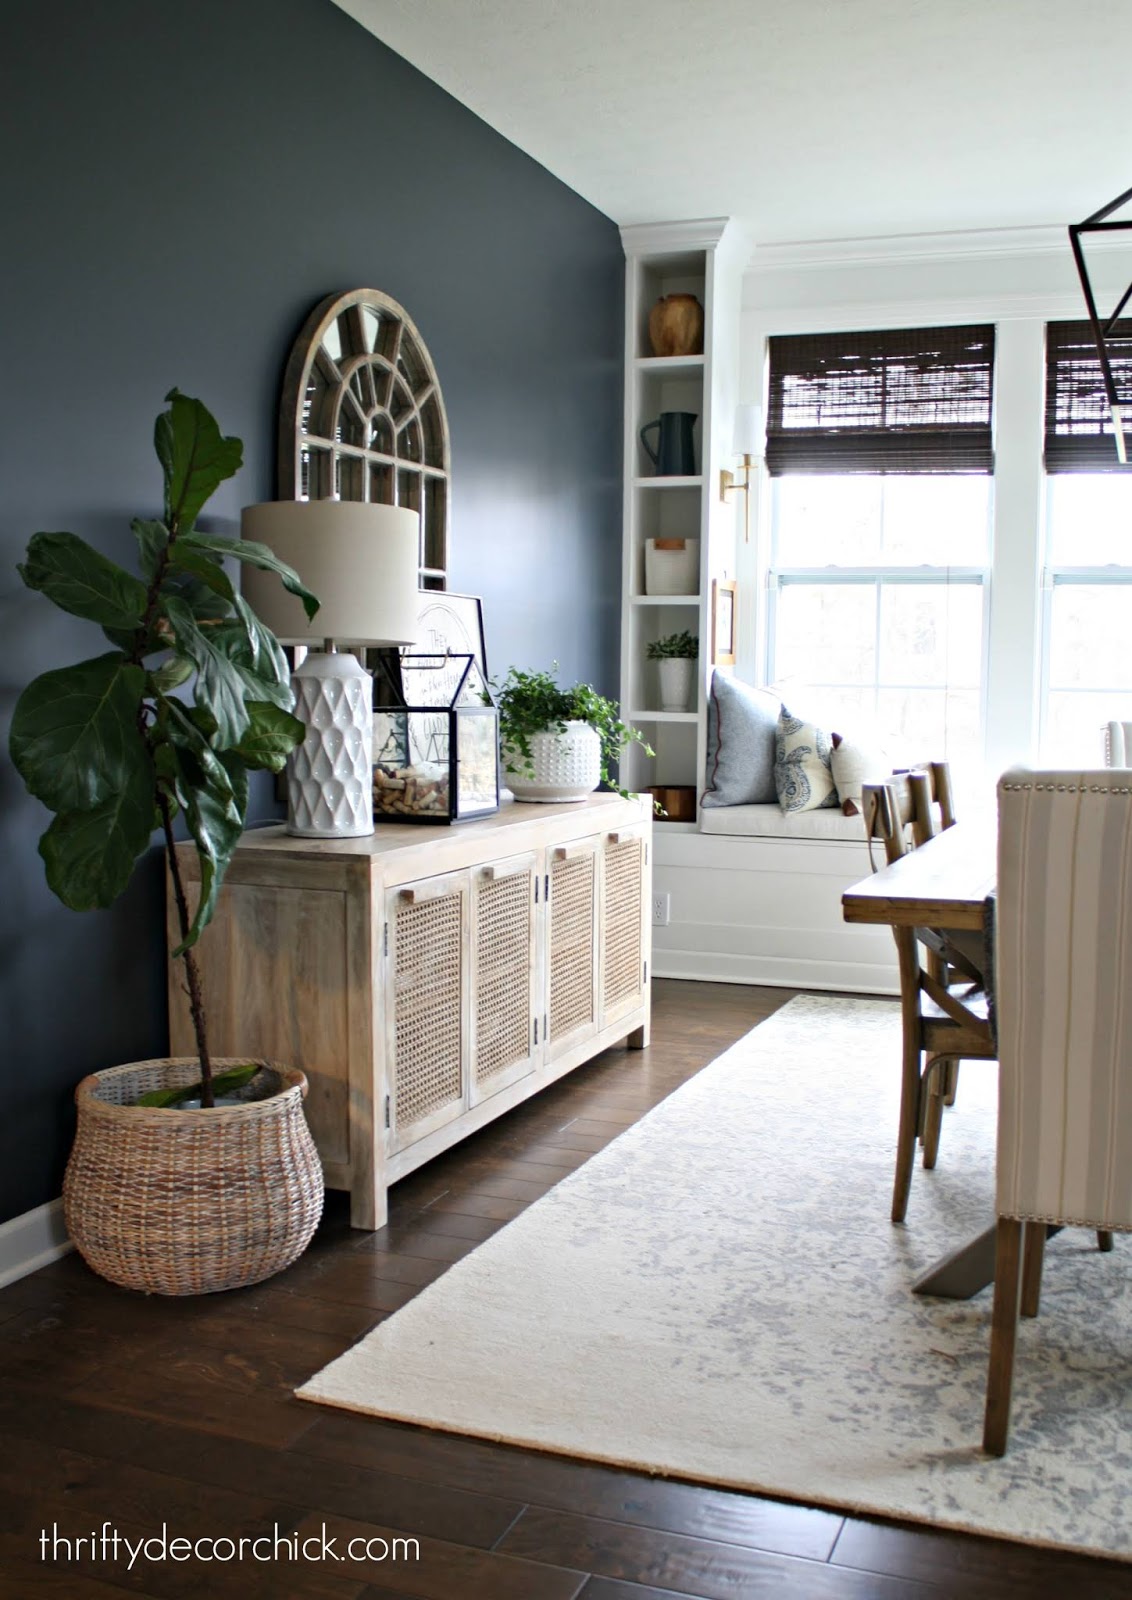
When I painted and built the bookcases, I planned to add trim of some kind to this wall. I liked it as it was so held off on installing anything.
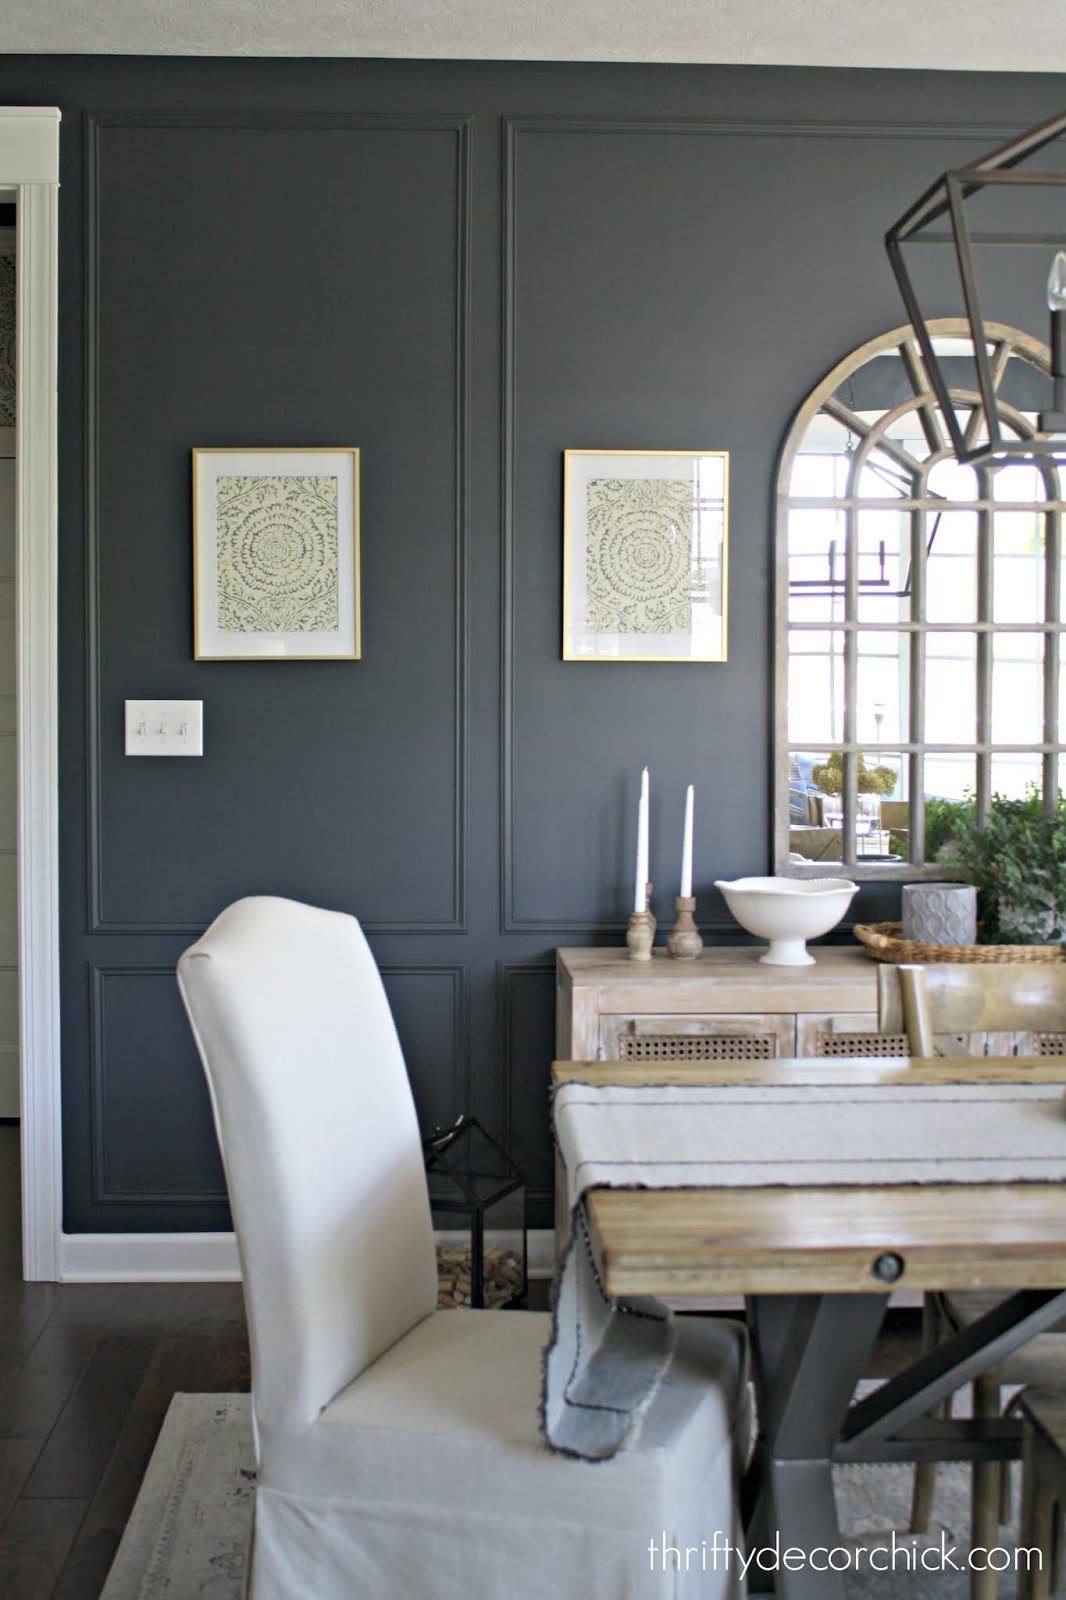
After time I realized I wanted to give it a bit of interest -- it's such a big wall! I ended up going with a very traditional but simple design using the same wood trim I've used in the past (at the old house) many times.
It's simple decorative molding from Lowe's that runs about $6 for an eight foot piece. I'm not sharing a photo step-by-step here because I've shared this wainscoting tutorial before -- it's actually a GREAT way to dip your toe into DIY projects.
You'll need to cut the molding at a 45 angle to make boxes on the wall. This time I went with a set of longer ones on top and smaller boxes below:
I painted them before I put them up this time and did a final coat after I filled the gaps and holes.
It's the same satin sheen as the walls. I am thrilled with the bit of elegance it adds to the room!:

This post may contain affiliate links for your convenience.
See my policies and disclosure page for more information.
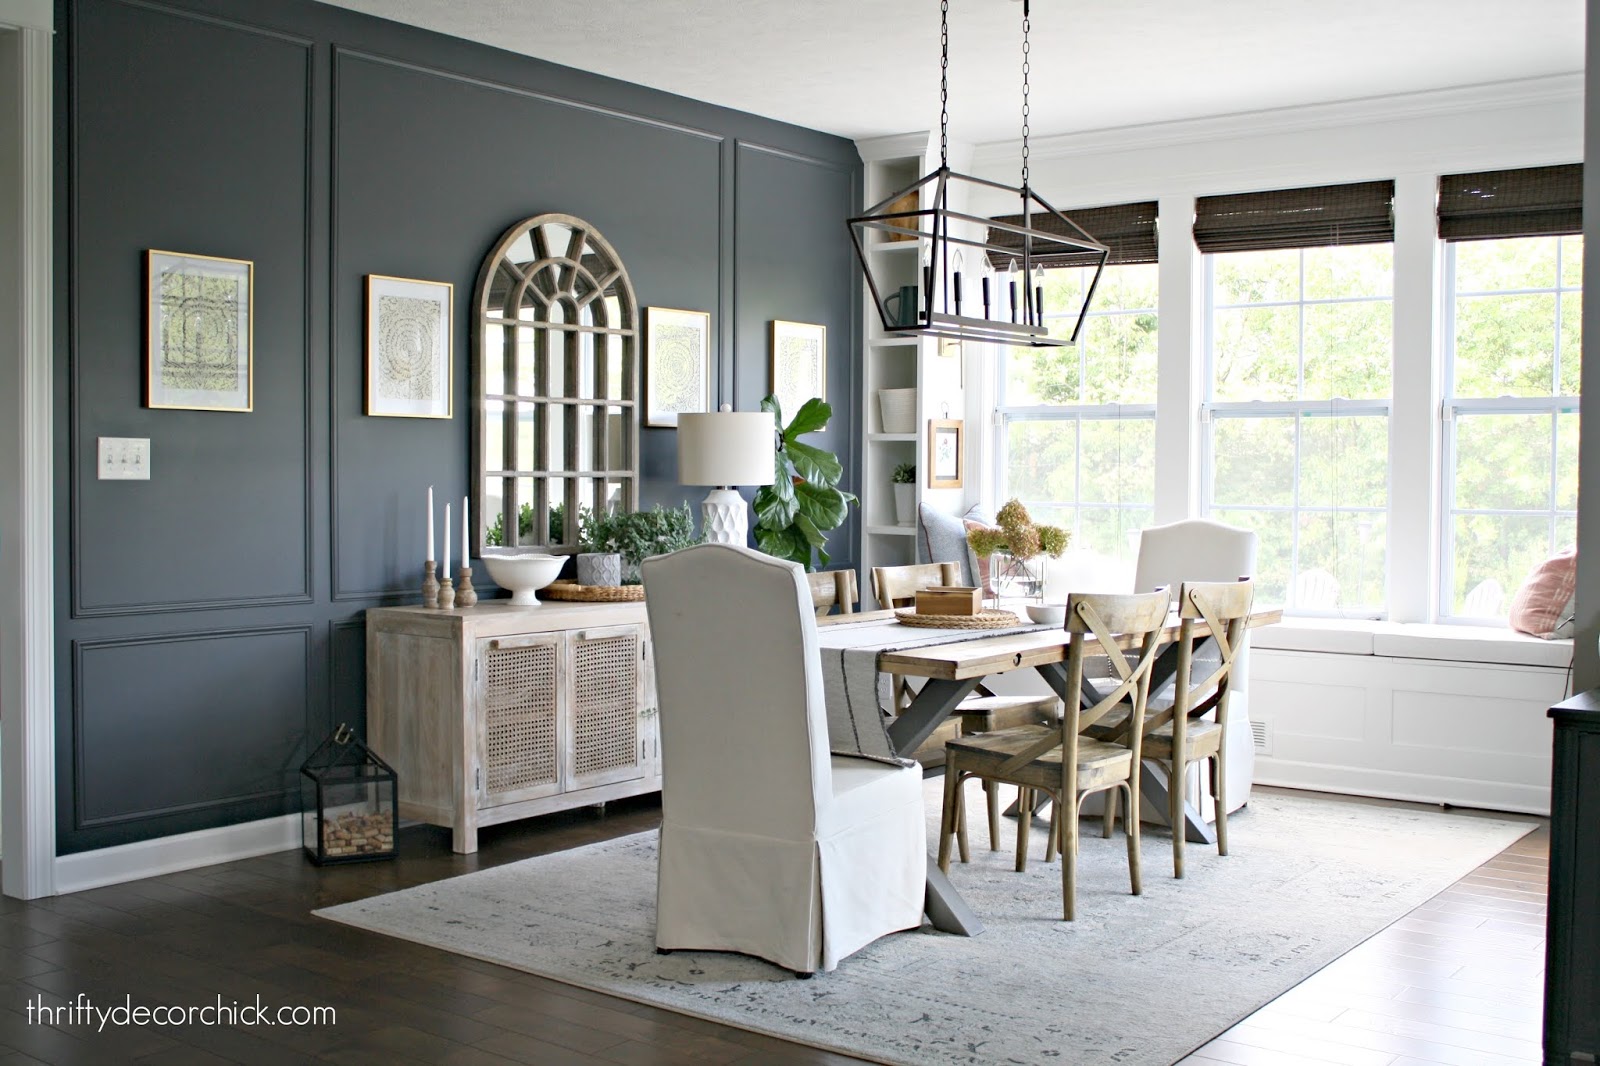
I went with three large sets -- the sections on the ends are the same size (around three feet wide) and the middle section is the largest. It works great with the long buffet we have in the room:

Be sure to check out this post on how to do your own wainscoting, but here's a quick list of steps and tips!
The final result is a subtle but beautiful detail that amps up the look of any room!:
It isn't a hard DIY, it just takes a lot of time. Painting takes the majority of the time for sure. I've tried it both ways -- painting before I install and painting after. Neither one is better than the other. I didn't want any brush marks along the trim so I opted for painting before this time.

Total cost was around $85 for the trim. I think it makes a BIG difference in here! It's definitely a traditional look, but the dark color makes it feel more modern.
As far as I'm concerned, you just can't go wrong with this stuff! Let's look back at how this room looked almost two years ago and compare it to now:


It looked pretty back then too -- but now it feels more like us, with the contrast and trim (and that window seat!):

You can see the sources for many of the items in this room below (just click on the picture):
//  JavaScript is currently disabled in this browser. Reactivate it to view this content. JavaScript is currently disabled in this browser. Reactivate it to view this content.
See more of our home here. To shop items in our home, click here! Never miss a post by signing up to get posts via email. Via https://www.thriftydecorchick.com/2019/09/adding-character-to-big-wall-for-under.html |

