|
I've always loved the look of simple, black candle sconces. You know -- the classic and elegant metal sconce with a pillar or taper candle. I just think they are lovely! Plus, I'm a sucker for a pop of black (I try to add a touch of black to every room), especially on a crisp, white wall.
Everything I found online was way too expensive, so I figured out how to give a rustic sconce the modern look I wanted!
I was SO pleased with how everything had come together after I hung the pinstripe wallpaper in the little vestibule off our foyer last year. The only little detail I was craving was adding a couple sconces on the trimmed out white wall:

This post may contain affiliate links for your convenience.
See my policies and disclosure page for more information.
I've loved the Pottery Barn versions I've seen over the years...I mean, of course! PB has always had that classic design that I gravitate towards.
The problem is, the ones I loved were lovely, but more than I wanted to spend. I love these Parker candle sconces:

I liked this size (about two feet tall) and the design was just what I was looking for, but $80 was way way more than I was willing to spend for this look.
This pillar sconce isn't a bad deal really, you can get both for $60:

But they were a bit more rustic than I wanted and a little short for what I envisioned.
I had an idea in mind that would cost even less! As I was walking through Hobby Lobby one day I came walked down an aisle that had my wheels turning. I found a bunch of wood and metal sconces and as soon as I saw this one I knew it was the one:
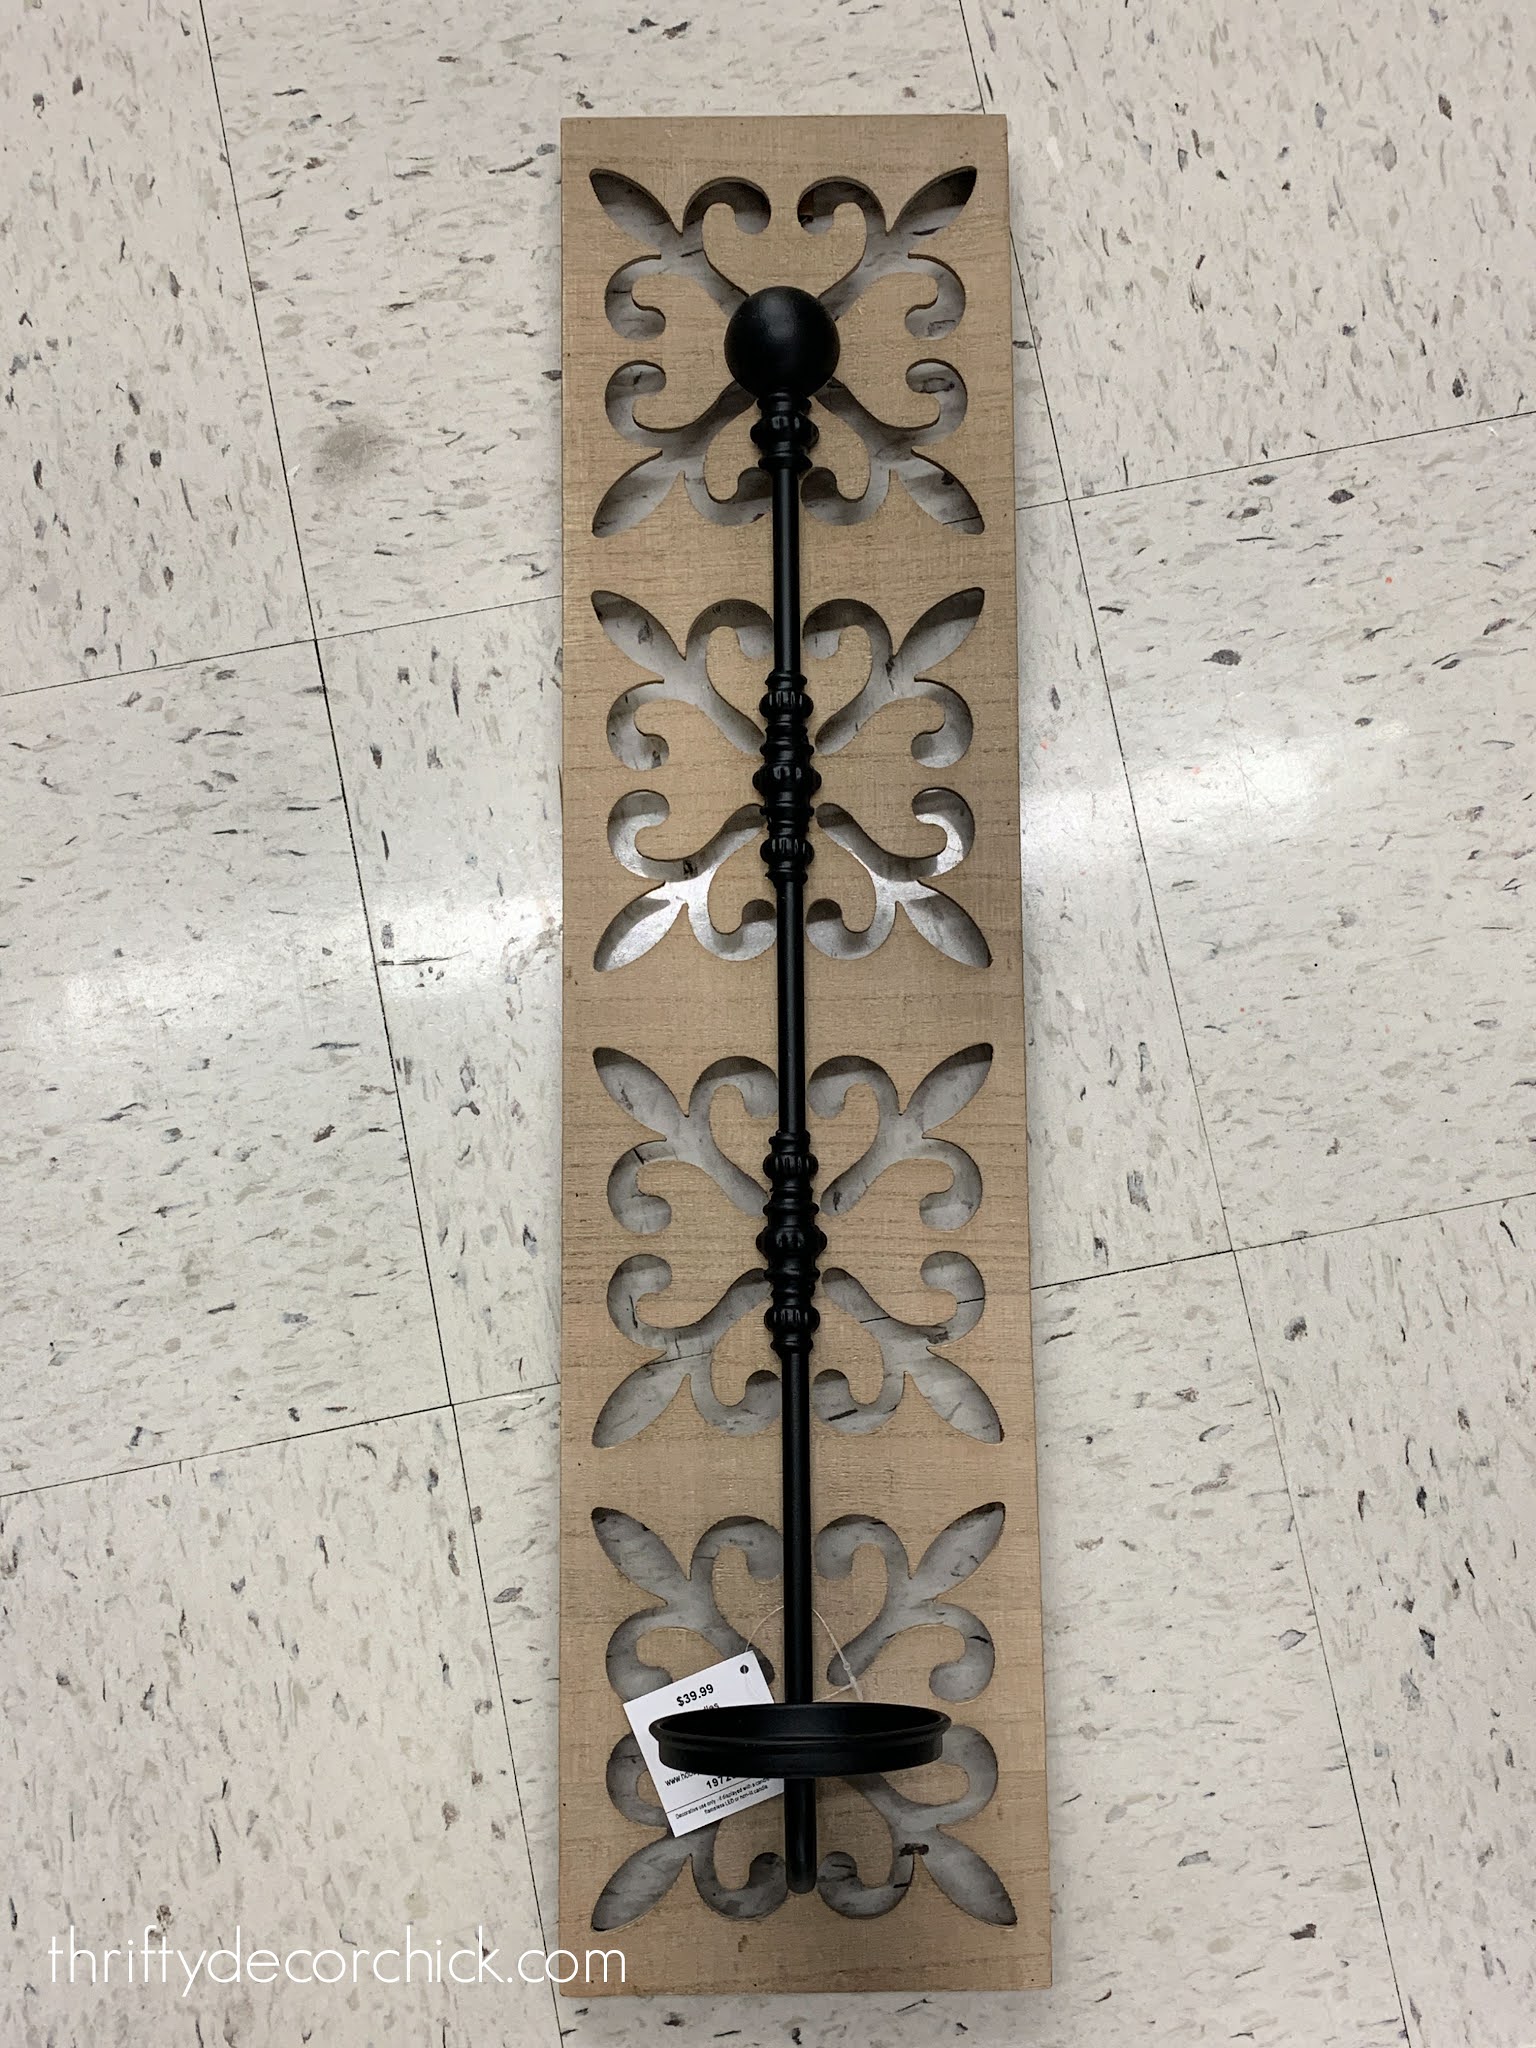
I thought the wood backing was cute and almost just used it as it was, but I really had my heart set on the simple black sconces.
They were half off ($20), so the price wasn't bad. I looked on the back and saw that there was a screw and a nut, so I figured it would be easy to separate them:

When I got it home I realized that the "screw" was really attached to the back of the metal part and held to the wood with the nut. So the screw ends were sticking out of the back of the metal piece. I was about to just push them into the wall (they are really small), when I remembered my Dad had a grinder bit for his drill.
It worked awesome and got it right off!
Then I used a regular drill bit (if the metal is thin the bit will go through fine) to make a hole. I hung the sconces with a screw into the wall (and an anchor) behind the sconce:

Obviously you can see the screw when you're right up on them, but it disappears a couple feet away.
I liked the wood mount, but didn't know where I would put them. My sister took them and is hanging them as art. Two for one!
They have a bunch of options you could do this with! The metal sconce on this one would look great all by itself!:

And I love the soft lines of this one. I think it would be so lovely on it's own!:

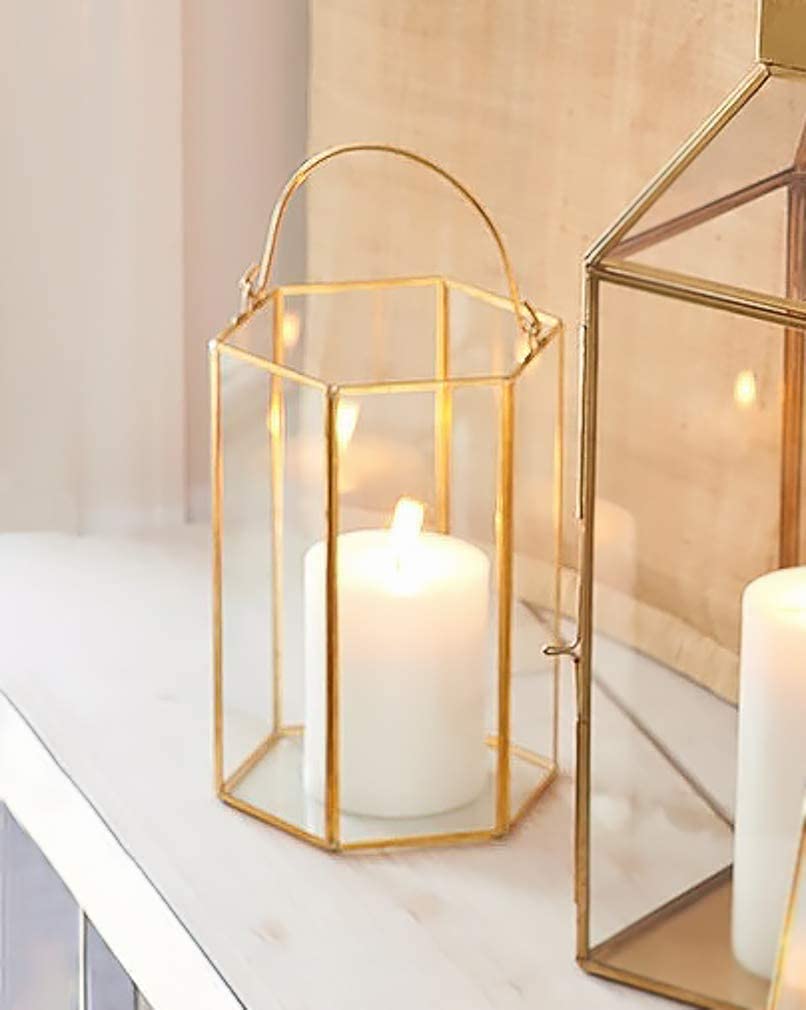
If you prefer to have a glass sleeve around your candle, you can find them in various sizes here. They do add a nice finishing touch -- I'm not sure if I'll add the glass or not.
It was exactly what I wanted for this space:

It's just the little something I was looking for:

LOVE them!
I've done a similar little hack in our family room. I can't even tell you how many times I've been asked about these brass candle sconces hanging on our fireplace:


This is even easier than the black version! As long as your lanterns have a handle, you can remove the handles and then hang the candle holders from the holes for the handles.
You may need to use some needle nose pliers to pry the handle off, but it won't be difficult. So simple!
These are almost an exact match to what I have on our fireplace, and I like that they are available in small, medium and large:

If your sconces will hang lower where you can reach, you can use real candles. For these I use battery operated versions that run on a timer -- they go forever!
I also loved this skinny brass version:

And these hexagon lanterns would be beautiful on a wall as a sconce!:
It's such a simple little hack! Hanging them gives them a whole new look!
I love when I can figure out a way to make what I want (for less) by tweaking something else! Have you ever done something like this in your home?
Here are the pretty options I found for you again:
Walmart brass lantern (small to large)
See more of our home here.
To shop items in our home, click here!
Never miss a post by signing up to get posts via email.
Via https://www.thriftydecorchick.com/2021/06/easy-rustic-to-modern-sconce.html
0 Comments
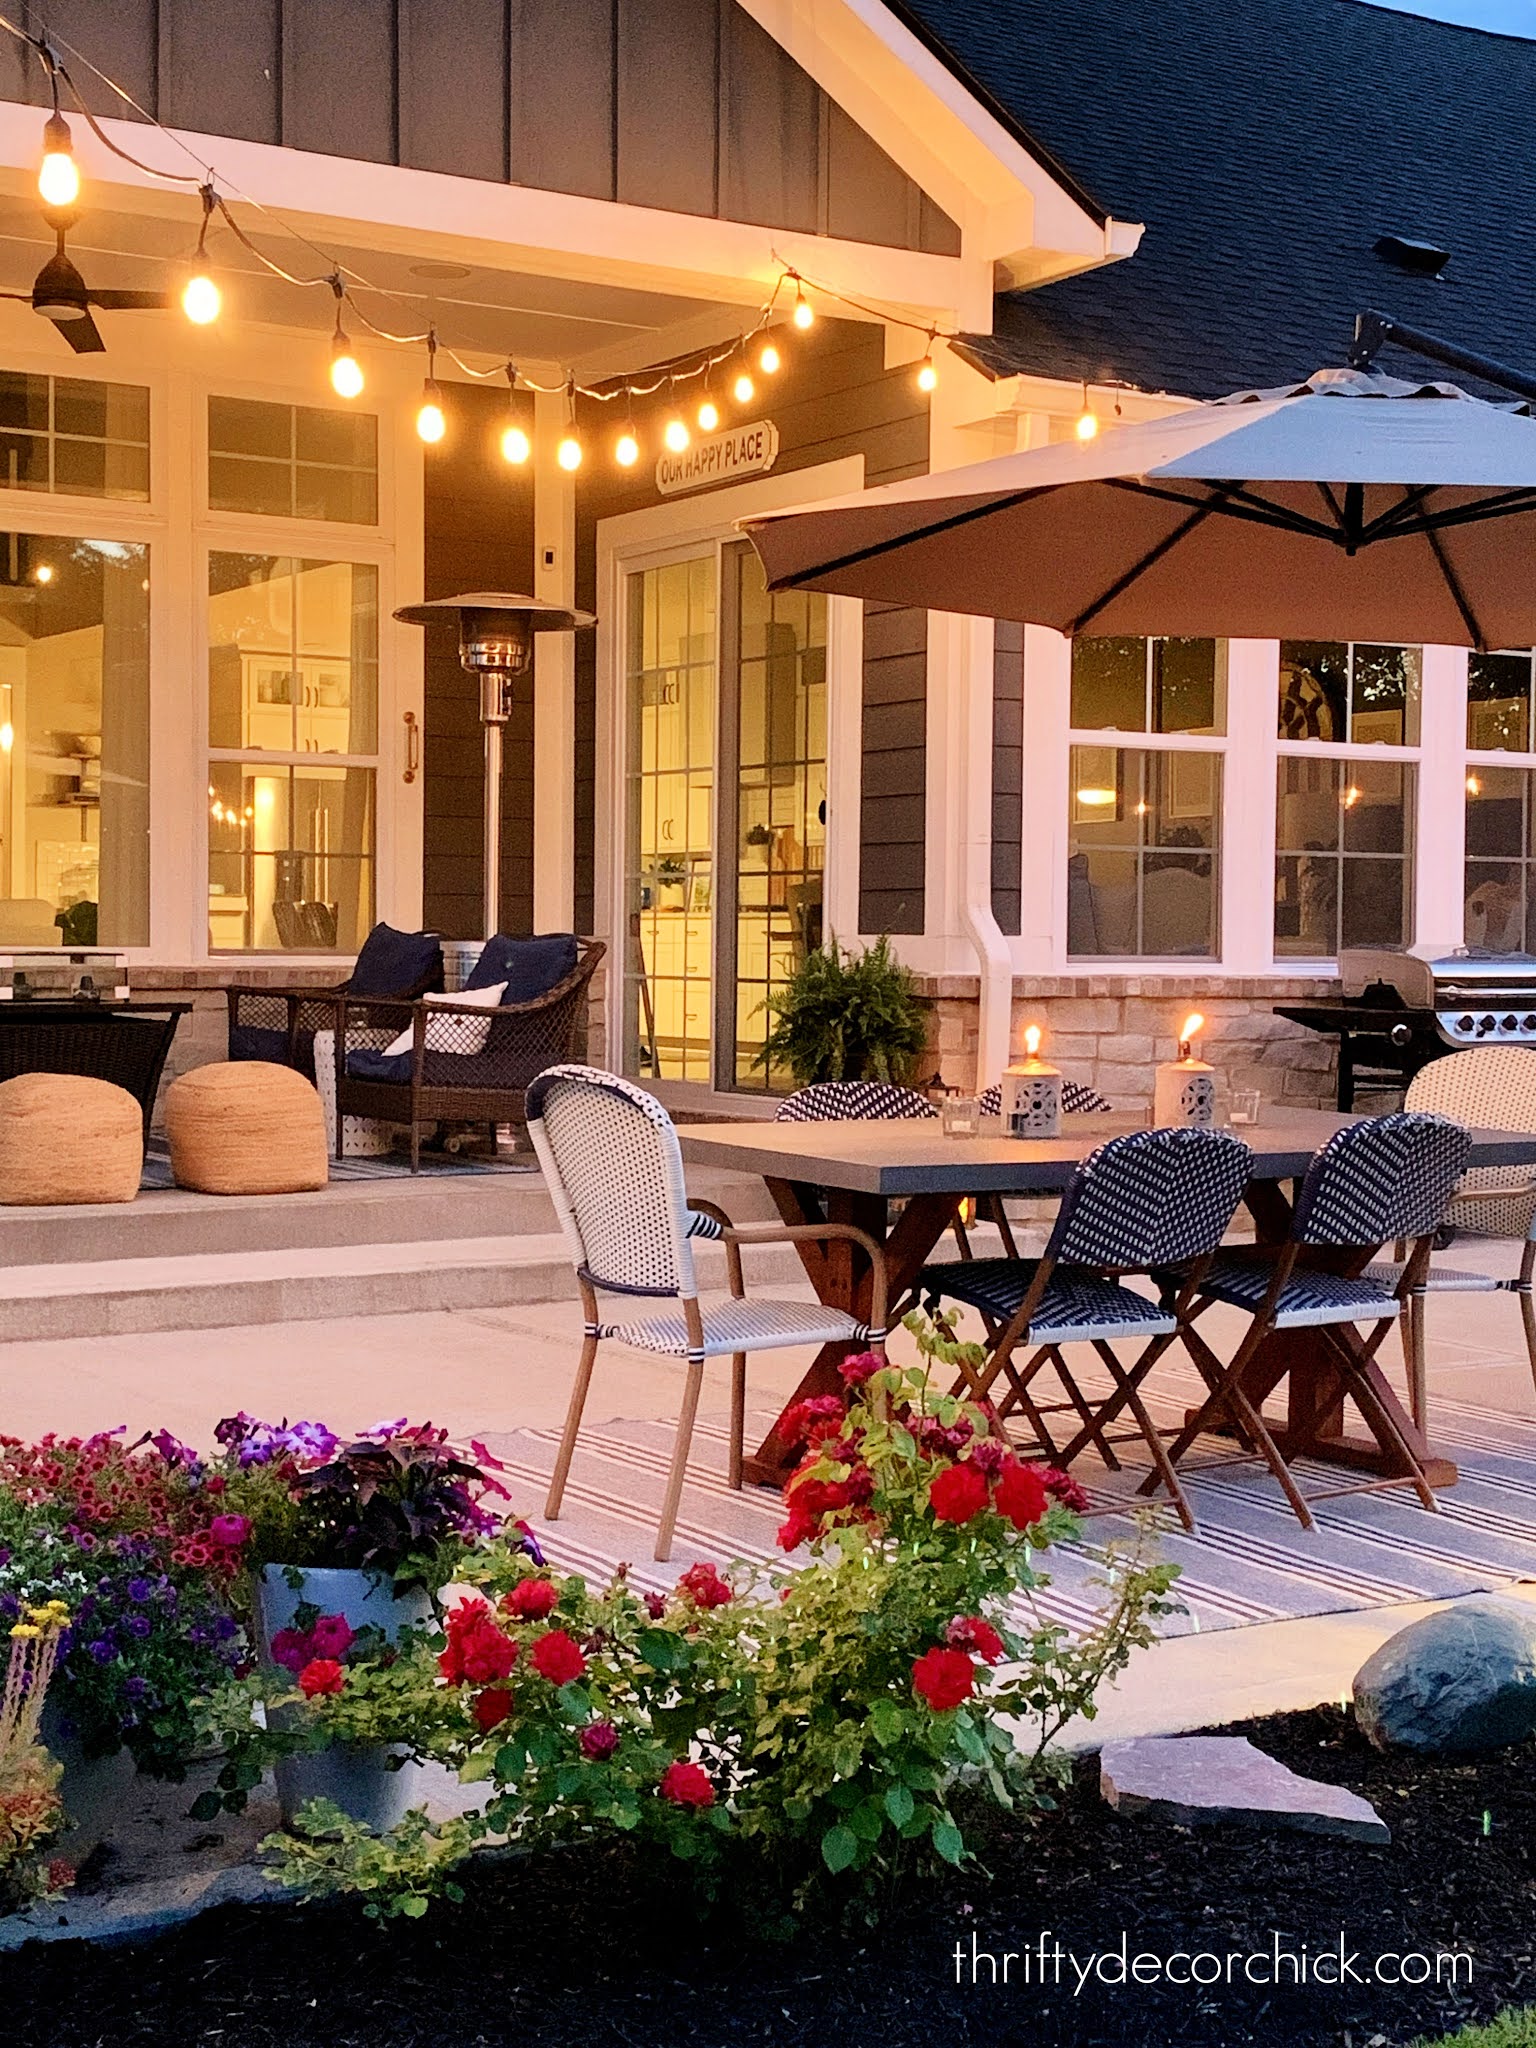
When we had a large concrete patio installed in the backyard years ago, I was determined to create an outdoor space that was as low maintenance as possible. We adored our backyard set up at the old house, but the wood deck and paver patio were more work than we realized they'd be.
We have a covered patio that we used ALL of the time (and still do), but we wanted to stretch out a bit back here. I came up with this concrete patio design that allows for plenty of open space, as well as an outdoor dinging area, my potting bench that I love, our grill and the best part...the round fire pit section that we had dreamed of since moving in.
You can see a tour of the patio last summer -- the plants we've added have made such a difference!
I can't believe I didn't take before photos before we started...but here's a look at the cement patio with the circular fire pit area right after it was poured:

This post may contain affiliate links for your convenience.
See my policies and disclosure page for more information.
Did I mention no maintenance? :) That was KEY. All we have to do with the basic concrete patio is have it sealed every year or two. Plus, it was way cheaper. SOLD!
For the past couple of years we've been adding to the landscaping slow but sure. Last fall we added a few evergreens around the fire pit area:

We were able to replace those plus a few more (with credit for the old ones) with arborvitaes that will grow MUCH faster. We have tons of privacy spring through fall, but in the winters we lose most of it. My goal is to plant as many evergreens around our yard as is humanly possible. :)
We had these same Thuja arborvitaes planted in our old back yard and they got huge quick!:

In a few years we'll have a lot more privacy around the fire pit. I plan to layer more bushes and plants in this mulched area as well.
We made one purchase for the patio this spring -- a pretty, "X" base outdoor dining table:

So far we LOVE it! The old one had a wood top and even though I was able to refinish it last year, by the end of the summer it was a complete mess again. Remember that no maintenance thing? :)
This one has a substantial faux concrete top that so far has held up great to the elements. They recommend oiling the wood base, which I will do soon. It is so pretty, I just love it! Very much a Pottery Barnish look.
Of course flowers are the detail that finish off an outdoor space beautifully. Because I have so many planters (I get most of mine buy one get one half off at At Home), I like to use flowers that will spread to fill them.
Petunia varieties are my favorite:

Any trailing plant like potato vine or asparagus fern are great for filling in dead spots and draping over the sides:

Remember my favorite plant I shared with you a few weeks ago? The one that is crazy hard to kill and fills in beautifully? Look at it now!:

I planted those in our cement containers that hold our poles the patio string lights. This stuff is amazing -- and it keeps it's blooms all through the winter too!
Look for perennial plants (that come back year after year) for the landscape in late summer/early fall. Prices will drop the closer you get to the winter. And plants usually fair much better if planted in the spring or fall. I purchased almost every flowering bush in our landscape for less than $20.
Last fall we replaced our plastic Adirondack chairs around the fire pit (that flew away into the woods during every storm) with these amazing Polywood chairs:

They are absolutely the best. Hands down. They've been out for nearly a year exposed to rain, sun, wind and snow...and still look perfect. They are an investment but 100 percent worth it if you have the budget for them. (Go to POLYWOOD, there are a lot of imposters.)
I dreamed of a round fire pit area in our backyard since we decided to move, and it is one of our favorite parts of our whole house:


This year we've been focused on adding as many trees as our budget will allow. We LOVE our big backyard so much, but have missed the private feeling of our old patio and deck.
Trees not only add privacy, they soften things a bit and make the whole space feel cozier. So far we've focused on near the patio, but we hope to add more in the backyard this fall.
I always talk about taking your time when designing a space, and the same goes for outdoor spaces. Especially when you're plantings larger ticket items like trees -- think about future plans before planting. They can be moved, but smaller bushes and flowers are much easier to transplant!
It's only been a couple years but our patio has come a long way! We have so many plans for the landscaping and more, but half of the fun is dreaming up what you'd like to do, right? This outdoor space is our sanctuary and our favorite place to host family and friends:

Enjoy some before pics and a few afters (my favorites are at night!):


See more of our home here. To shop items in our home, click here! Never miss a post by signing up to get posts via email.
Via https://www.thriftydecorchick.com/2021/06/concrete-crafstman-back patio-tour.html
Woohoo, it's Prime Day(s) on Amazon! Now that they've extended it to two days, there's more time to check out all of the fantastic deals. (This year it runs June 21 (Monday) and June 22 (Tuesday). You can see my favorite finds from last year here.
I always look forward to this sale to start my Christmas shopping. I know, I know...it's early. But it sure is nice to have so many items crossed off my list!
Like I do every year, I've gathered some of my favorite home decor items from Amazon to share with you here. Then at the end of the post I'll share a few more of my recent finds and the best Prime Day deals I've found as well.
**You can visit my Amazon storefront here! I try to keep the decor I've used updated there.
Let's get started, shall we? My first items are a couple I found for our pretty mud/laundry makeover I completed earlier this year:

This post may contain affiliate links for your convenience.
See my policies and disclosure page for more information.
Our cats love their new cat shaped door as much as we do:

You can see how we hid the cat litter in that closet here.
One of my all time favorite Amazon finds is this skinny under cabinet sliding drawer that fits perfectly in our bathroom vanities:

I looked for years for a better way to use this awkward space! These are awesome. You can see them in action on my most recent Amazon Live video as well.
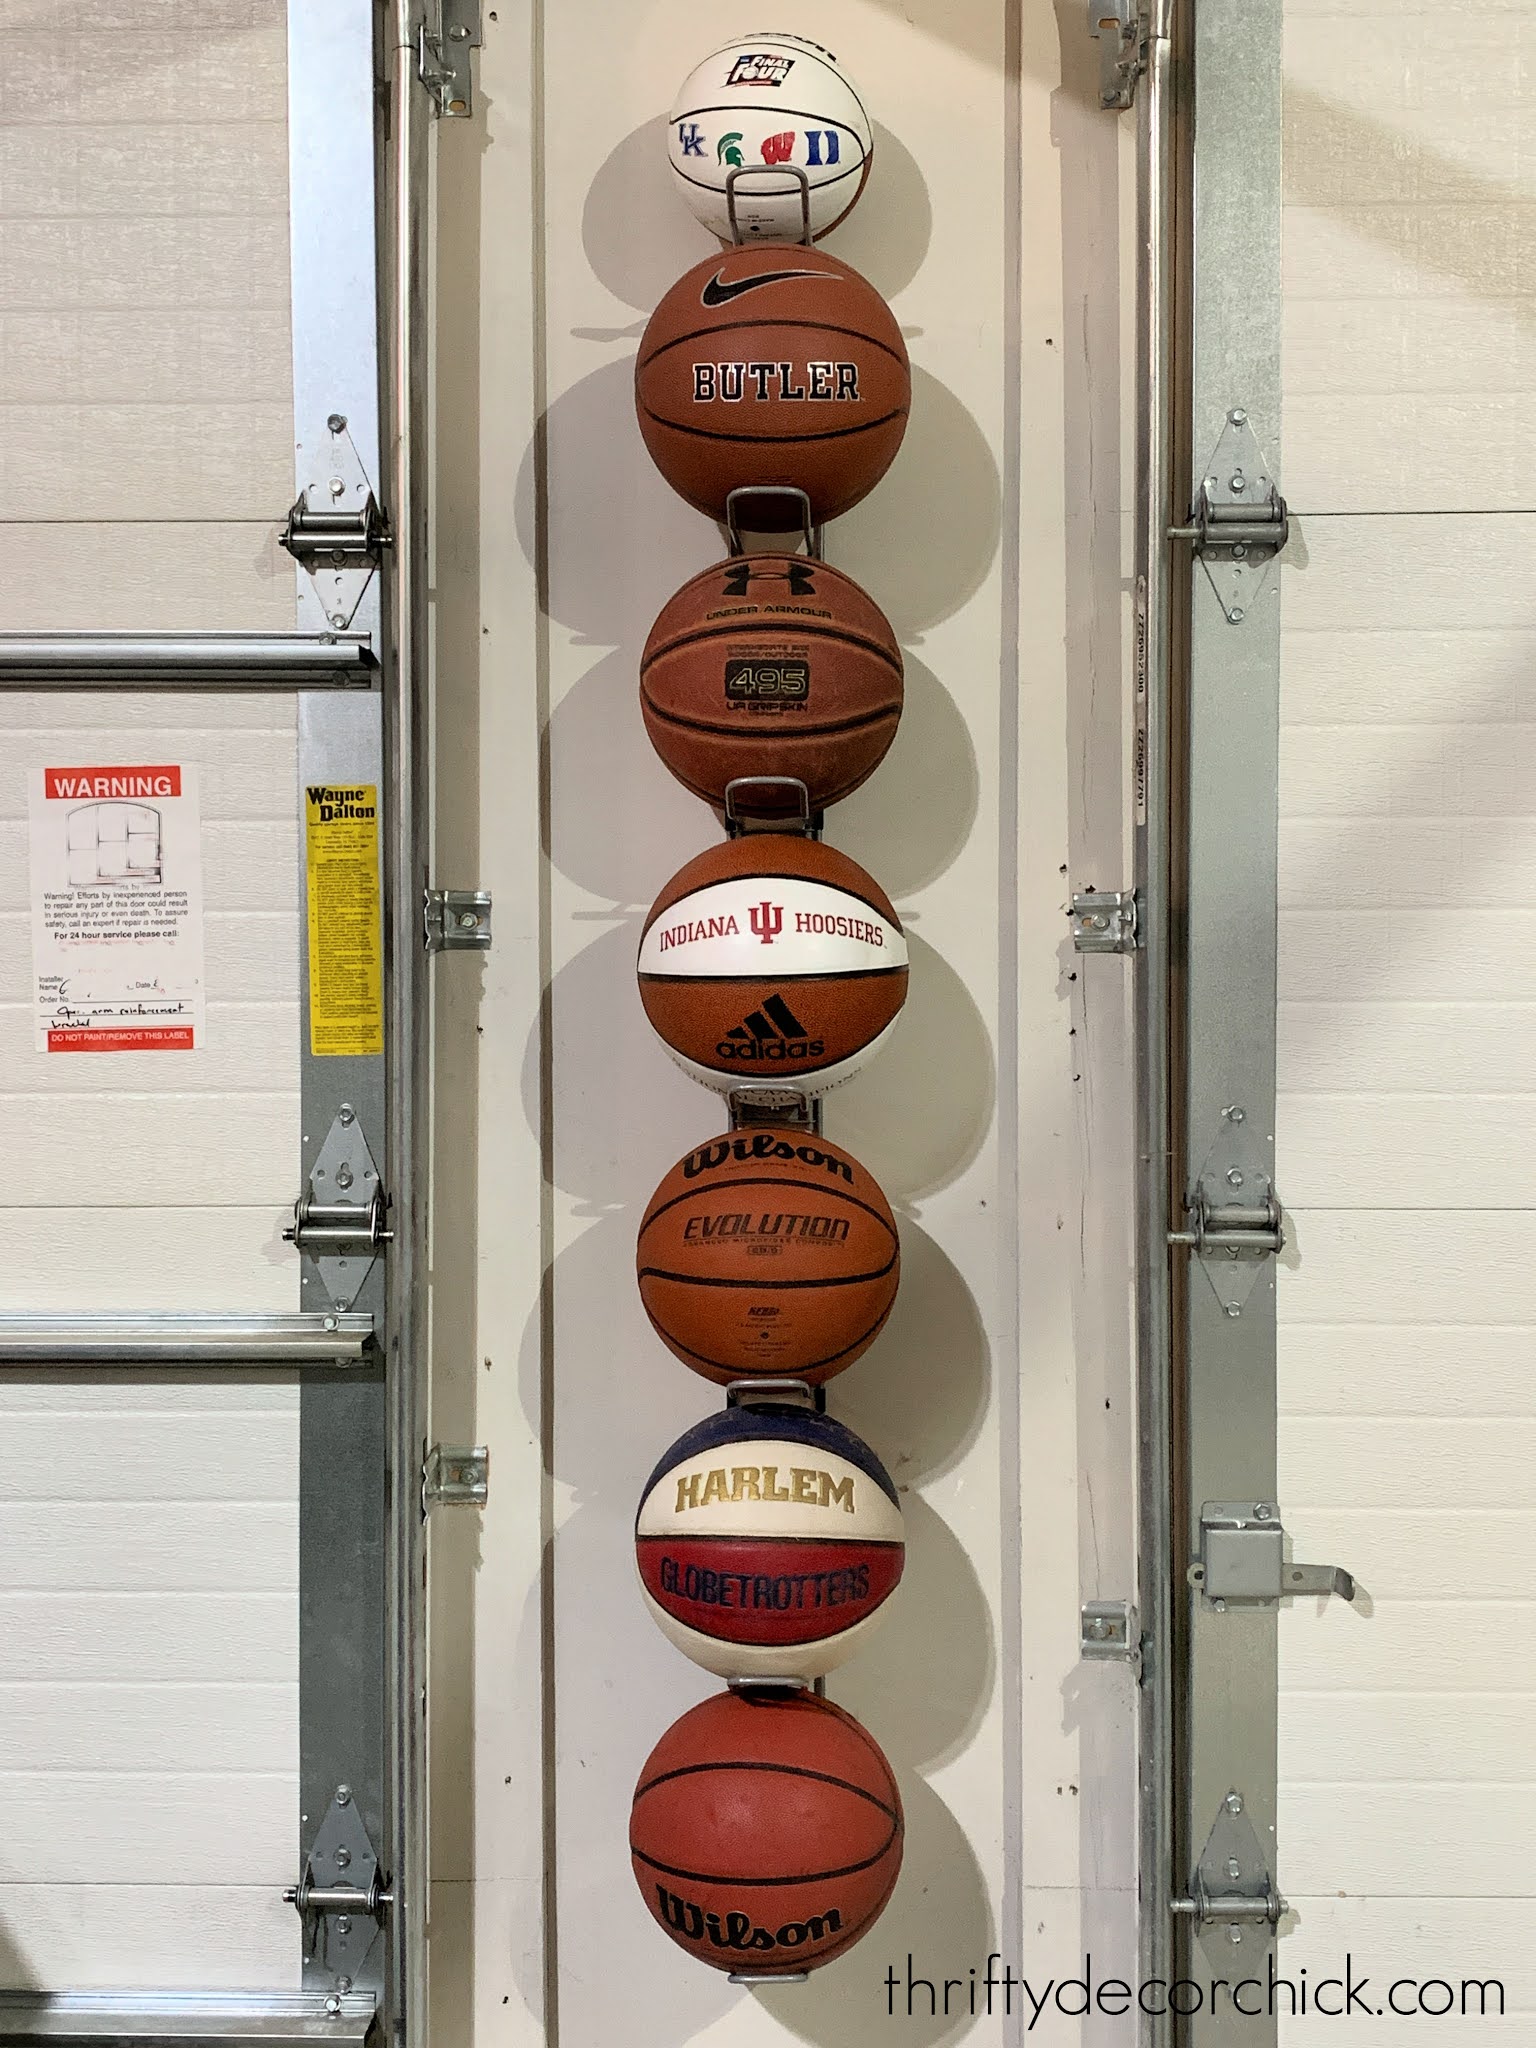
I reorganized our garage from top to bottom earlier this year and these Velcro extension cord holders are a HUGE help:

I also LOVE love love this skinny wall basketball holder -- it saves so much space:
I recently shared more about this cool contraption that allows you to move your outdoor spigot to wherever you want in the yard:

No more practically getting down on the ground to turn on the bib every time! This has been SO helpful.
I shared my favorite easy garage update with magnetic or attached carriage garage hardware here:

These portfolios come in small to large sizes and have been a HUGE help to corral our large family photos and kid artwork:

They are the solution I've been looking for for years!
Some of my favorite decorative pillow covers and inexpensive inserts can be found on Amazon. I shared all about them here:

Have you grabbed any of my favorites lately?
Here are a few more of my favorite recent finds. I'll be sharing more of the decorative items with you soon!:
More GREAT Prime Day deals running today and tomorrow!
See more of our home here.
To shop items in our home, click here!
Never miss a post by signing up to get posts via email.
Via https://www.thriftydecorchick.com/2021/06/amazon-home-favorites-and-more-its.html
Natural light is one of the easiest ways to make a room look it's best! It shows off the true colors of everything and feels fresh and clean. For years I'd want to recreate that feel in our smaller spaces or rooms without windows, but the yellow tint of our light bulbs made everything feel drab.
Regular warm light bulbs cast a tint on everything that changes the color. Incandescents were the worst offenders, but even some of the energy efficient bulbs nowadays give off that yellow hue that changes the color of the room.
Years ago I found the easy the solution that is (literally) as easy as replacing the light bulb! Enter the daylight bulb...the easiest change you can make to make a room feel fresh and bright! I've been adding these all over since I discovered them years ago. I still find spots in our home that would look better with the daylight bulb.
I added this inexpensive wood planked wall on our stair landing soon after we moved in, but the yellow tint of the bulb has bugged me:
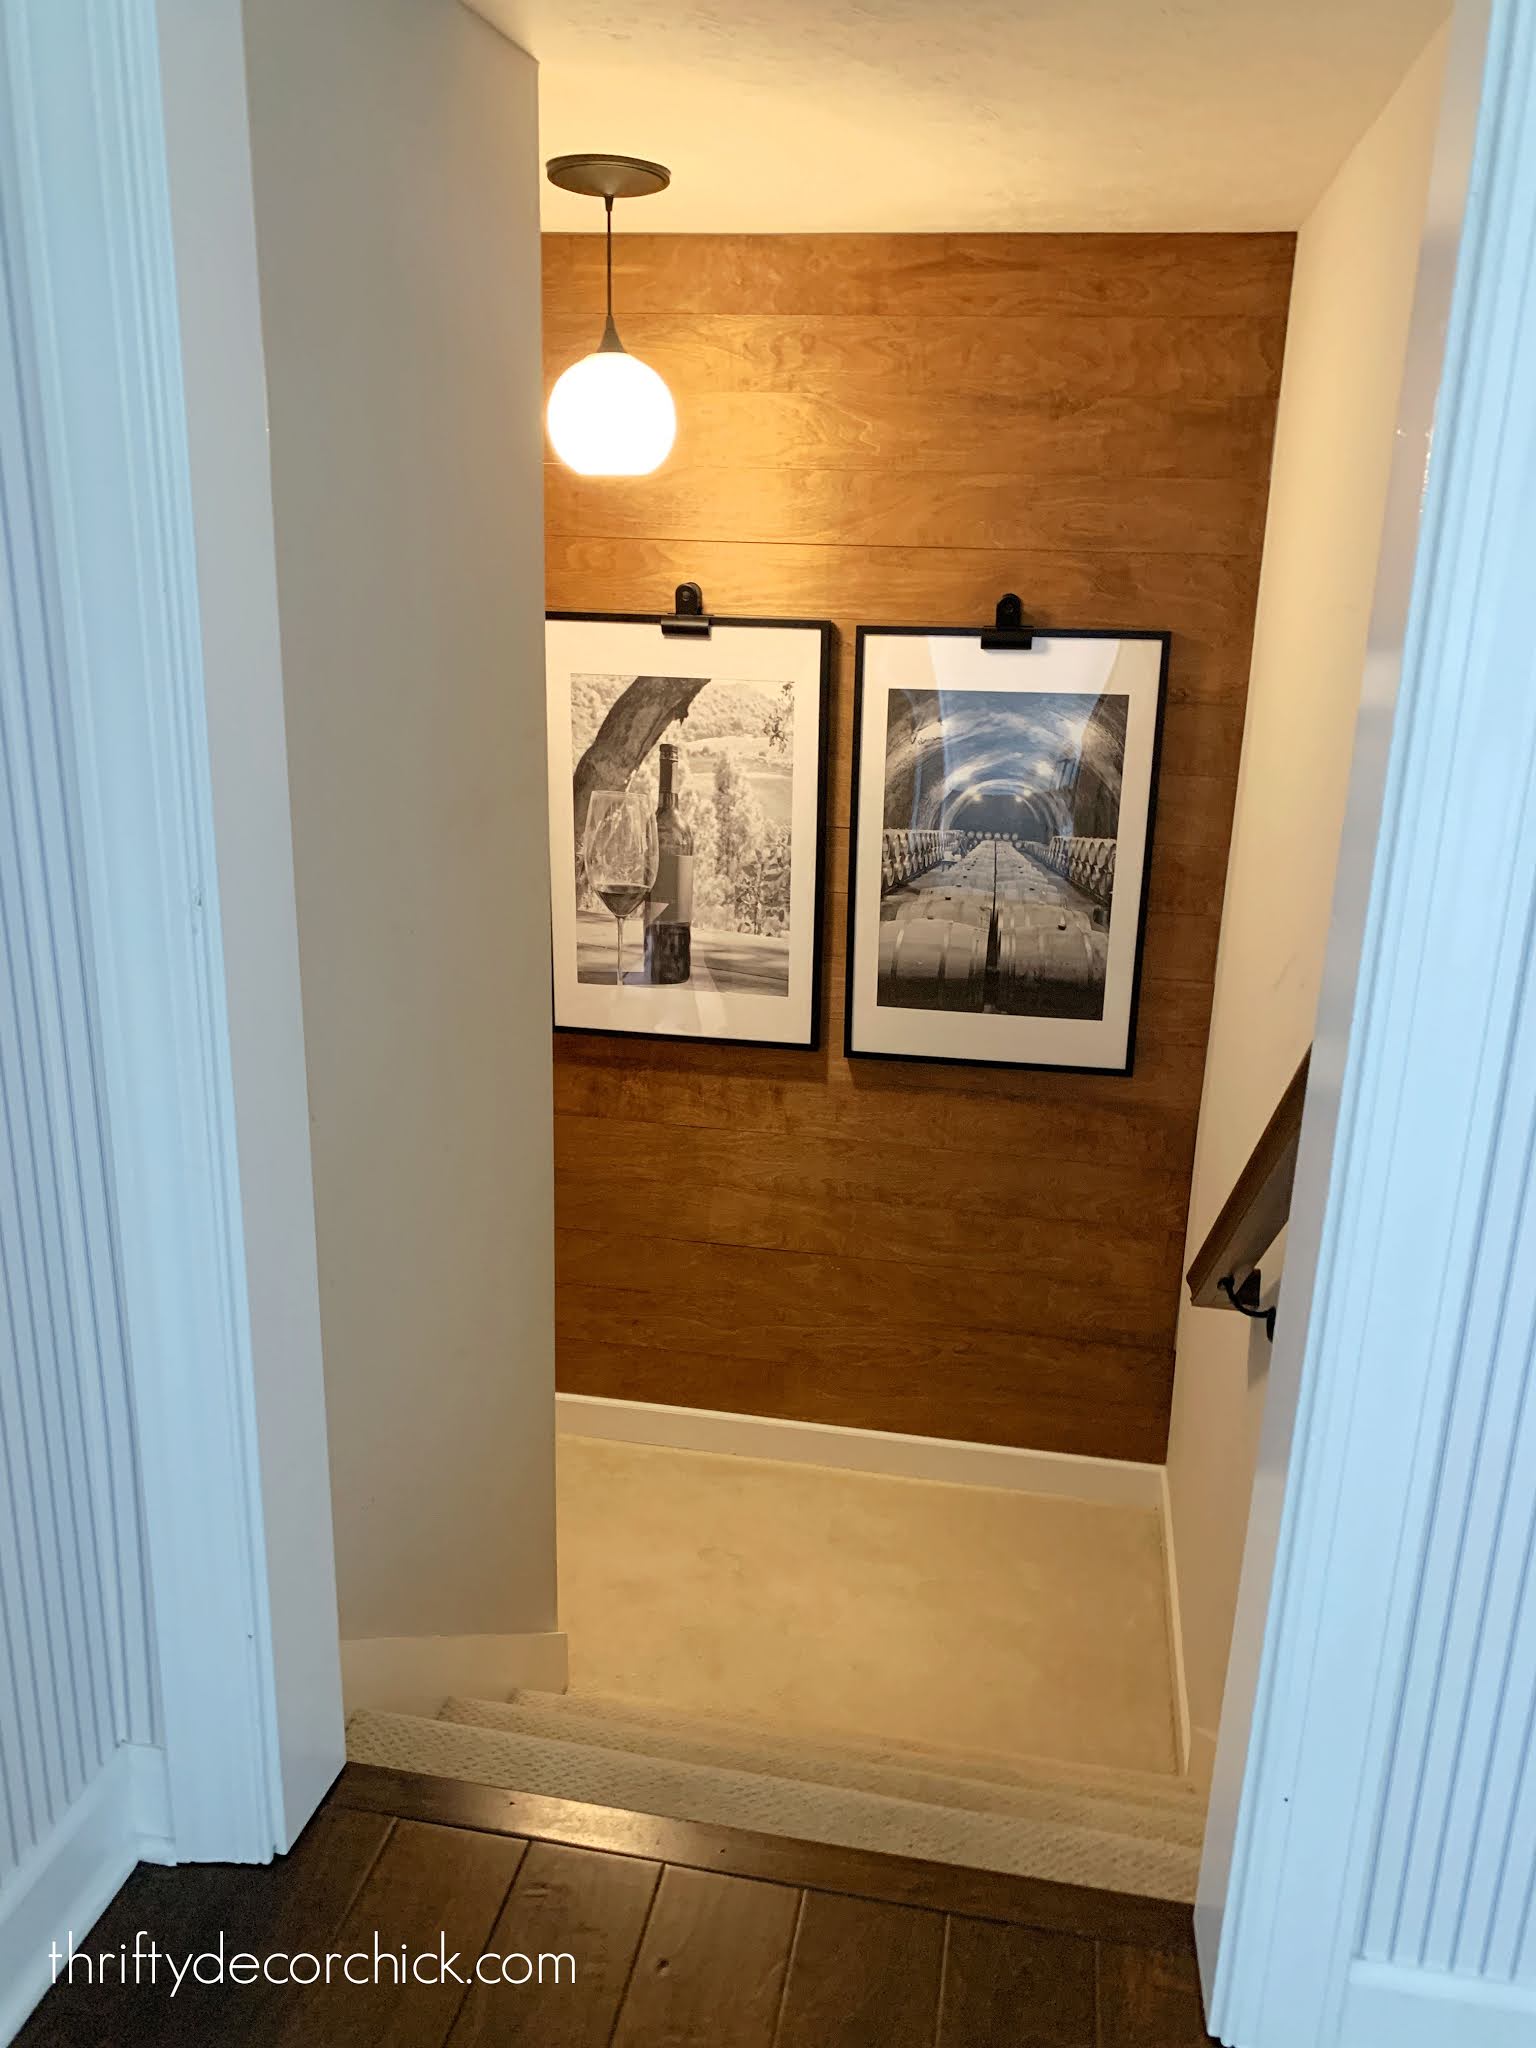
This little alcove upstairs gets tons of natural light, so the warm light felt really out of place.
Look at the difference in just a quick change of the bulb!:

This post may contain affiliate links for your convenience.
See my policies and disclosure page for more information.

That's the actual color of our carpet! :) I've done this tons of times and it never fails to amaze me how great everything looks!
I don't use daylight bulbs in every room -- I prefer warmer light in our living spaces and bedrooms. But in bathrooms, storage rooms, hallways, closets, laundry rooms...it makes a HUGE difference.
I install them in bathrooms no matter how much natural light the room gets. Our basement bathroom was feeling super dingy with the warm halogen bulbs our builder installed. I replaced those (left side) with the daylight (right), and what a difference!:
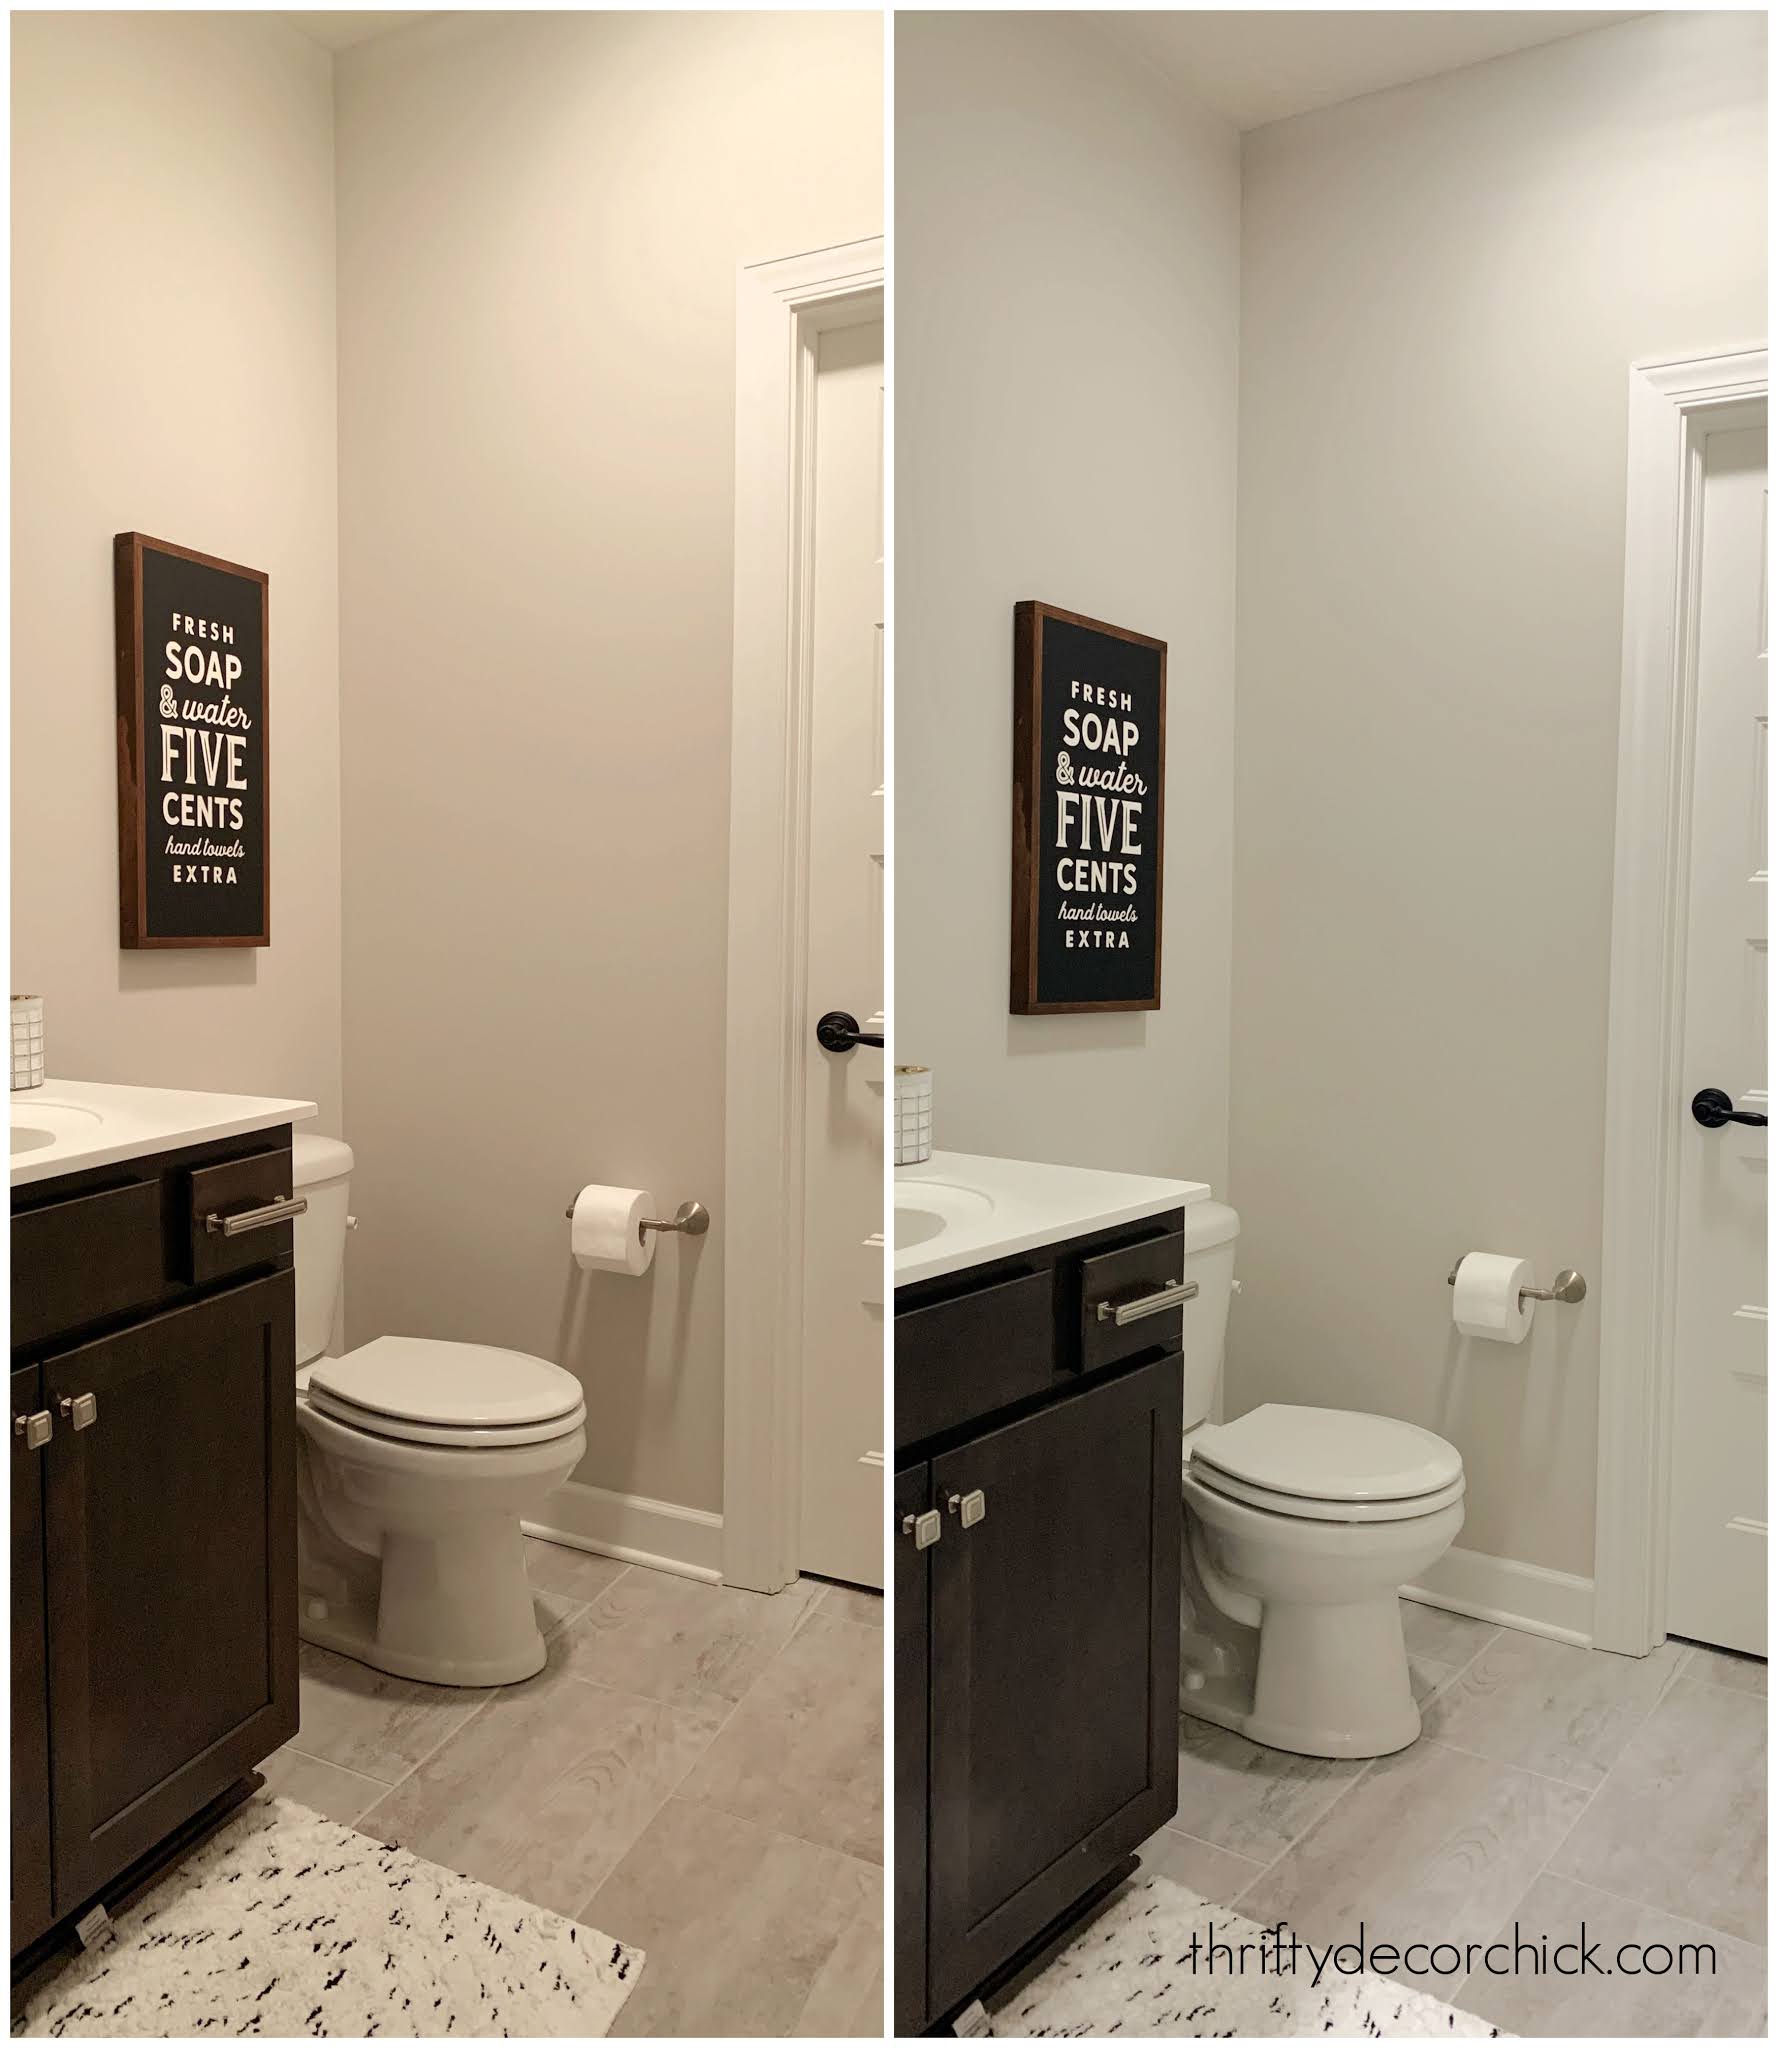
If you use these you'll notice that anything white looks MUCH better with a daylight bulb. And you can see the actual color of the Agreeable Gray paint on the walls.
By the way, in the before the bulb was 100 watts. The daylight was only 60, and still looks brighter!
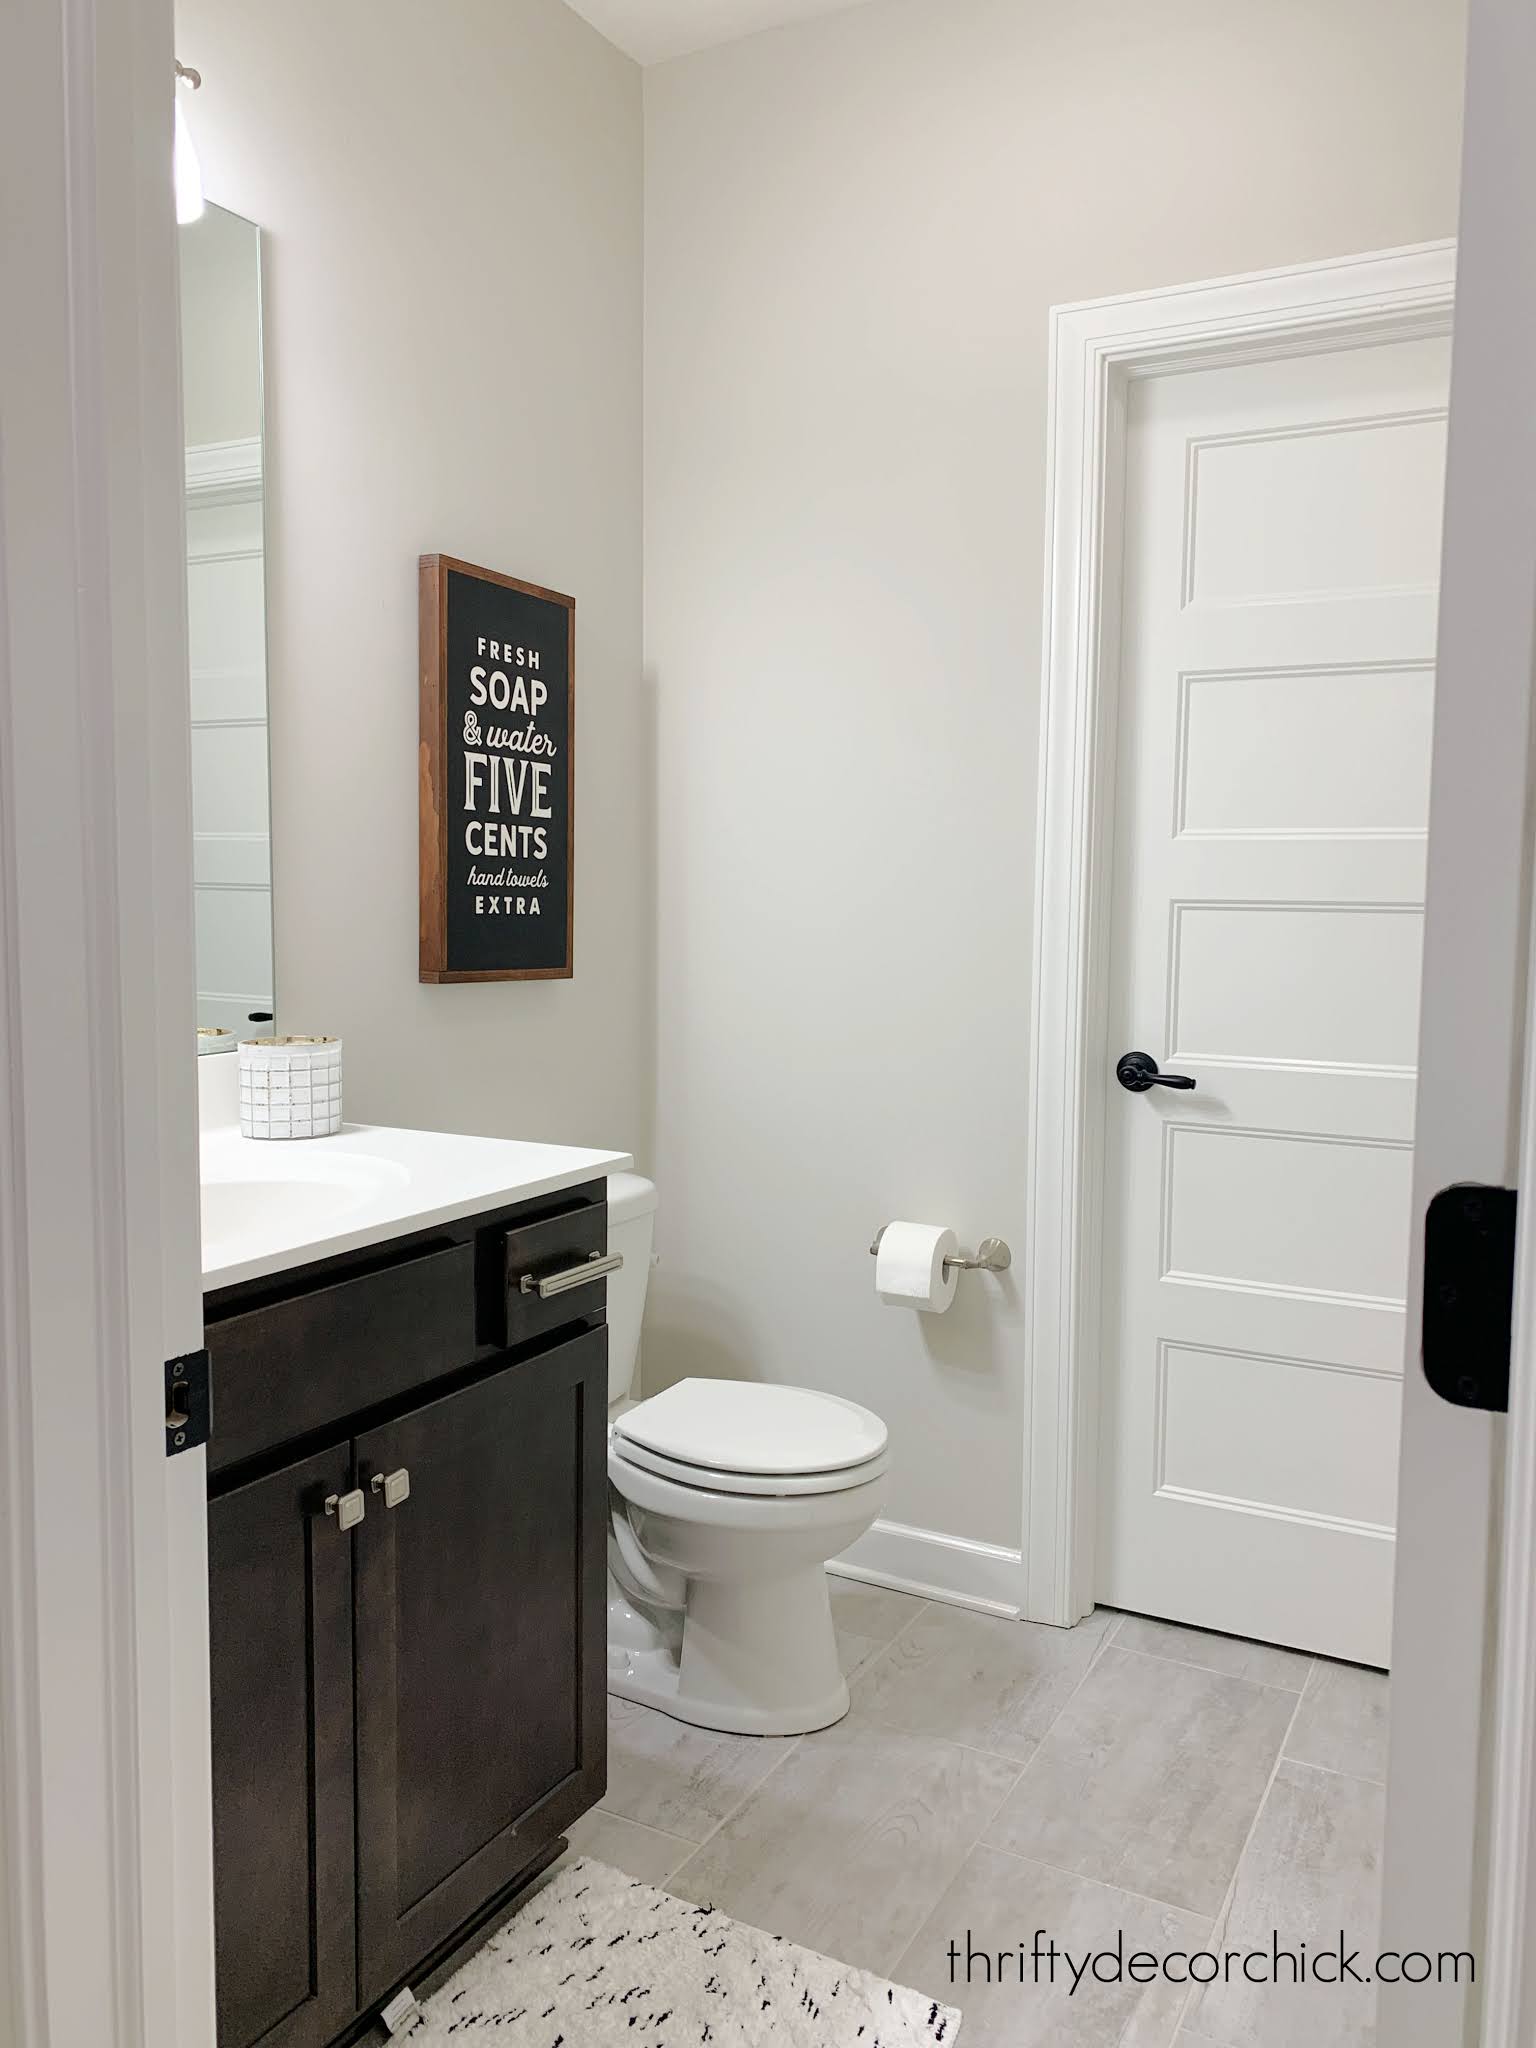
With both the fan and vanity lights changed out, the difference is huge:
I prefer daylight bulbs that have more bulb and less plastic, like these:
Some LED lights have the plastic base that covers half of the bulb and I feel like those don't let off as much light. I get a lot of ours at Home Depot (they have a big selection) but you can find them here as well.
I first found these when I did a small makeover on our son's old bathroom. This is the difference the daylight bulbs made with the old vanity light:
Isn't that crazy? I didn't care for the old glass, even though the new bulb really did help.
Here's the difference with the new bulb and the new brighter glass as well:

We couldn't even believe how different it felt in here! It was like there was a window opened and letting the sun in.
After I installed these I left the light on, came upstairs and for a split second thought daylight was streaming in the bathroom. I knew there wasn't a window but my mind was tricked for sure.
The daylight bulbs make everything their true color. This was with incandescents:

Here's the after:

This is what I mean by the real color of the room. It's amazing! Daylight bulbs really let your rooms shine the way they should!
They come in different wattages, but overall they are brighter no matter what. In this room I immediately installed a dimmer because first thing on a dark morning they would be way too much. (Most are fine to use with a dimmer, but double check.)
I tell you what -- you see a lot more with the daylight bulbs. You know how you think you look pretty good in your bathroom and then sometimes you go out and you're like, whaaa? Yeah. These show you all of that before you go out. :)
Have you tried these "natural light" bulbs in your home? You can see all of my lighting tricks and tips here!
P.S. See that bathroom after I remodeled the whole thing here!:

To shop items in our home, click here!
Never miss a post by signing up to get posts via email.
Via https://www.thriftydecorchick.com/2016/02/the-daylight-bulb-amazing.html
I've shared my goal to better organize our (thousands) of photos and school moments and projects a few times over the years. It's one of my biggest organizational thorns in my side! I've never found a great way to store photos, especially in a way that we can really enjoy them.
I'm sure many of you are asking why I haven't just used photo albums, and I do plan to add them to albums eventually. I haven't done that yet because we had WAY too many photos to even begin adding them to albums. And so many of them are too big to fit into the albums we have.
You can see how many boxes of photos I had when I shared our organized linen closet a few years ago:

You can see how that started as my "Monica closet" here. :) That didn't include the larger boxes full of bigger photos as well.
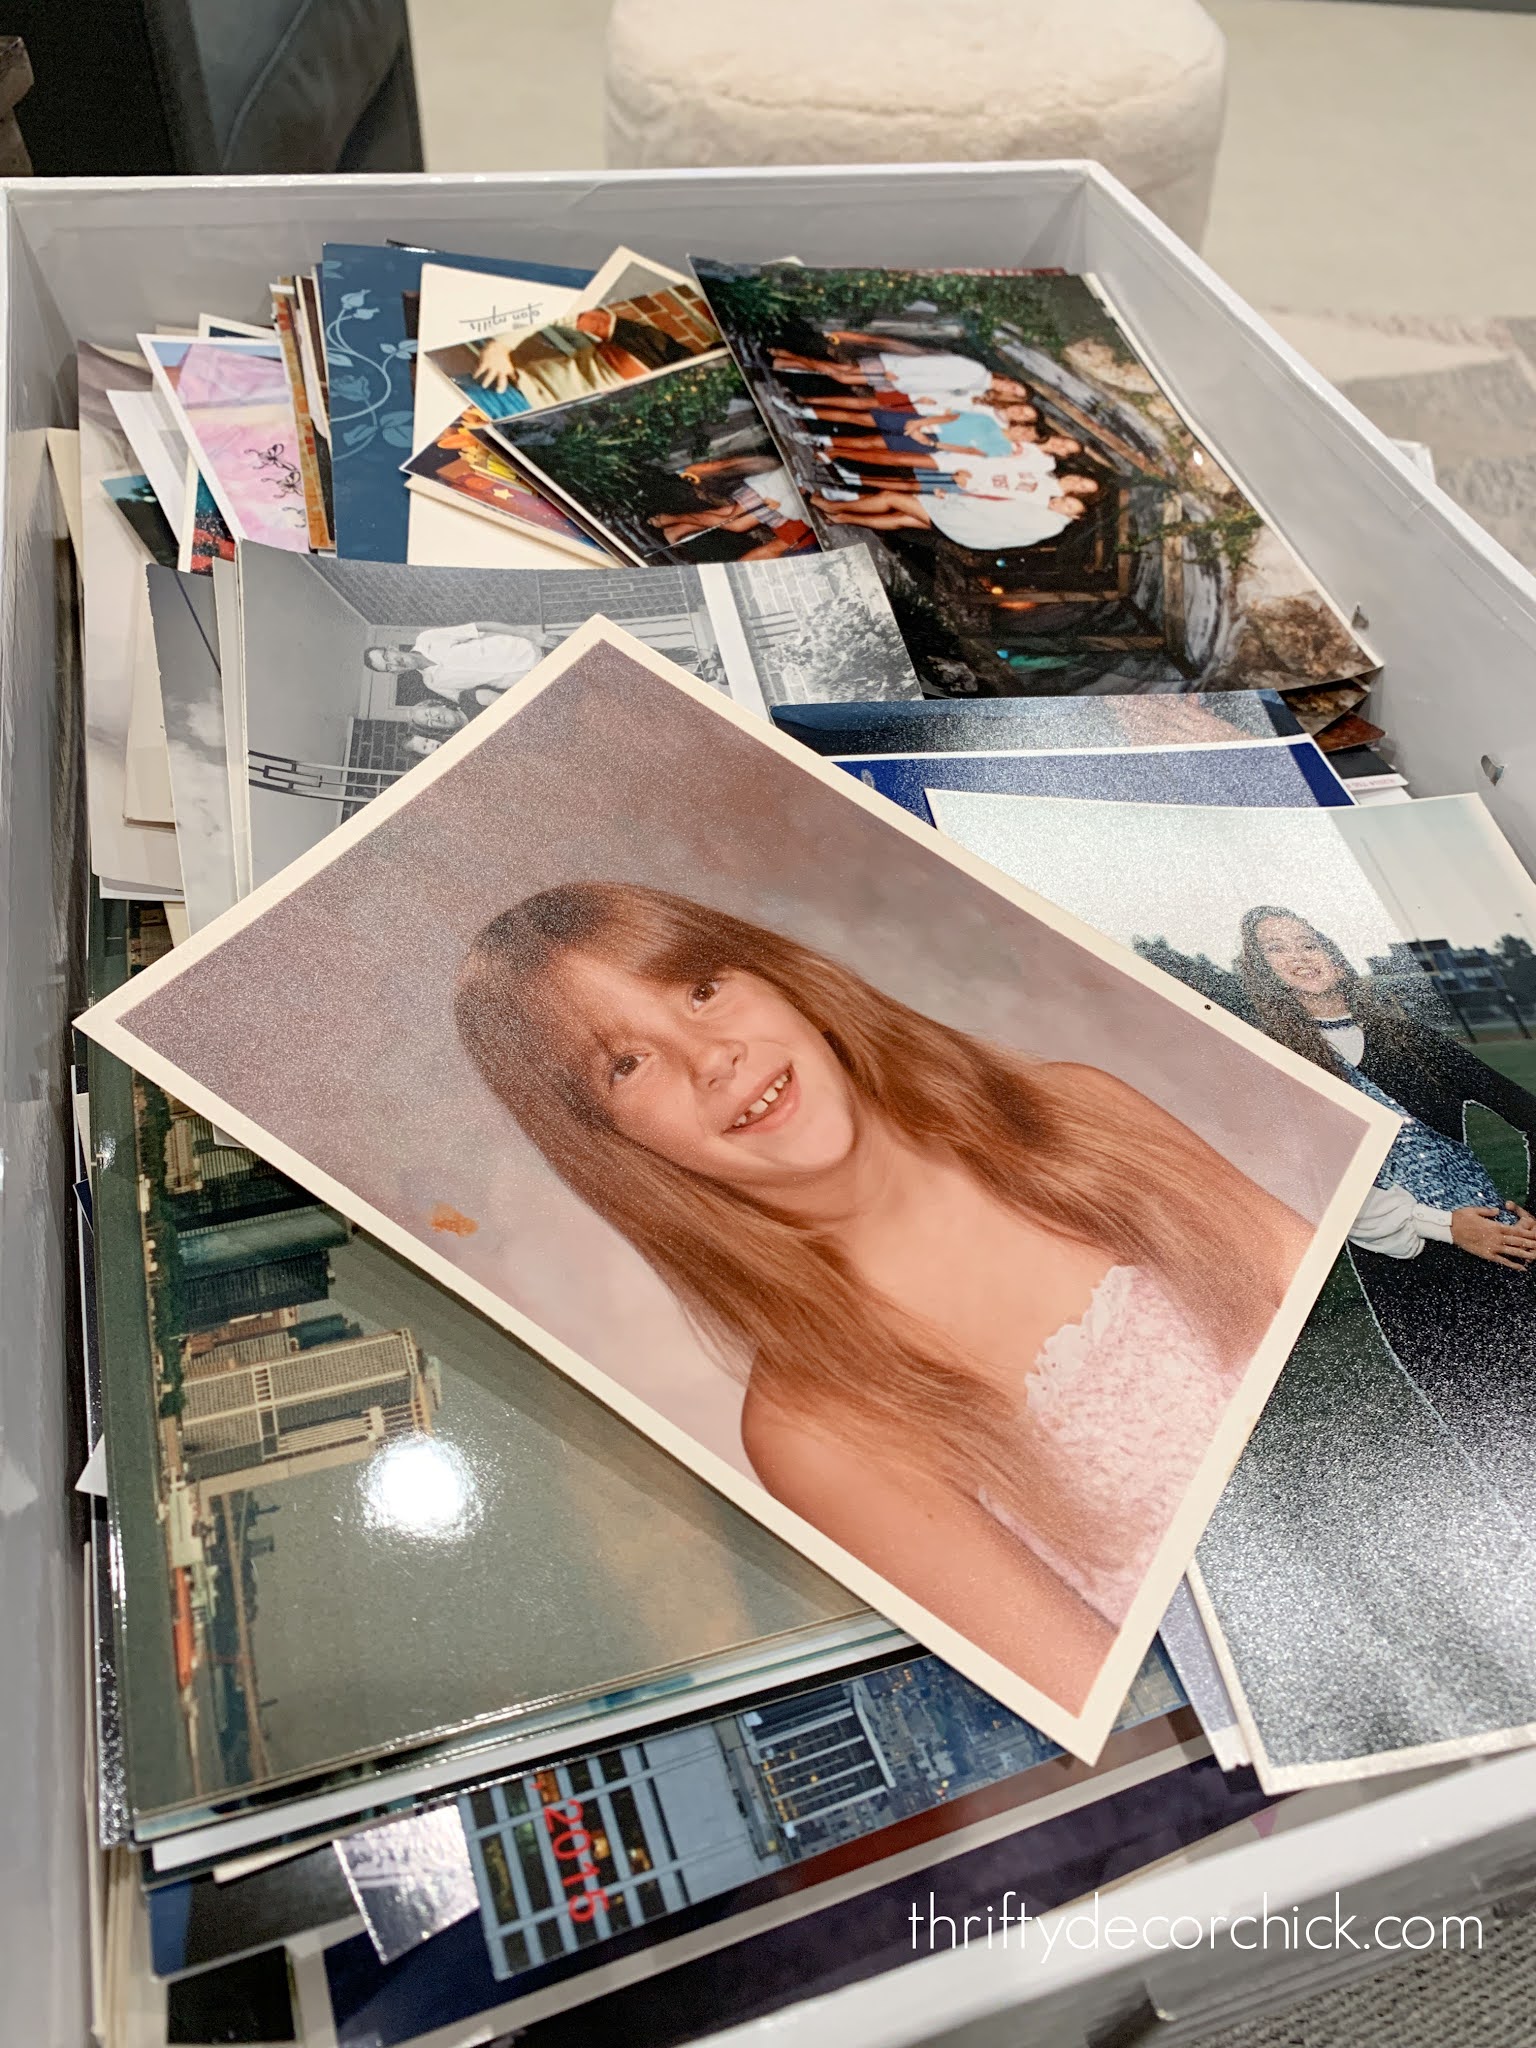
I'm so thankful to have all of these pictures! Most of them are from my childhood and older family photos. Unfortunately I have very little as far as mementos from my youth so these photos are a real treasure!
Earlier last year when the world slowed down, I vowed to take the time to sort through ALL of the photos. I spent many nights going through each box, sorting and decluttering. We had SO many double photos (you youngins won't even know what I'm talking about!). Remember when you could get two of each photo developed?
I tossed ALL of the doubles and also tossed photos of people I didn't know. I'm not talking about long lost family members, but childhood friends I don't remember, or photos my parents took of people I don't remember at all. (My mother passed away last year and my Dad didn't want them.)
I decluttered our photos before a few years ago, but it's definitely easier to let go of more as I get older. ?
I sorted what I had left into decades and organized them in the photo boxes that way. I cut the boxes down from eight to four!
I still had the issue of organizing a TON of large photos -- sized 5x7 and up. I threw all of them into larger boxes like this one so they were all in one spot:
This post may contain affiliate links for your convenience.
See my policies and disclosure page for more information.
It's bugged me that these have been piled up in here instead of organized so we can enjoy them. A few weeks ago I came across the answer to my problems!
I'm not sure if I can adequately describe my love for these simple art portfolios. They are the answer to so many of my paper organization woes! They come in a bunch of different sizes:
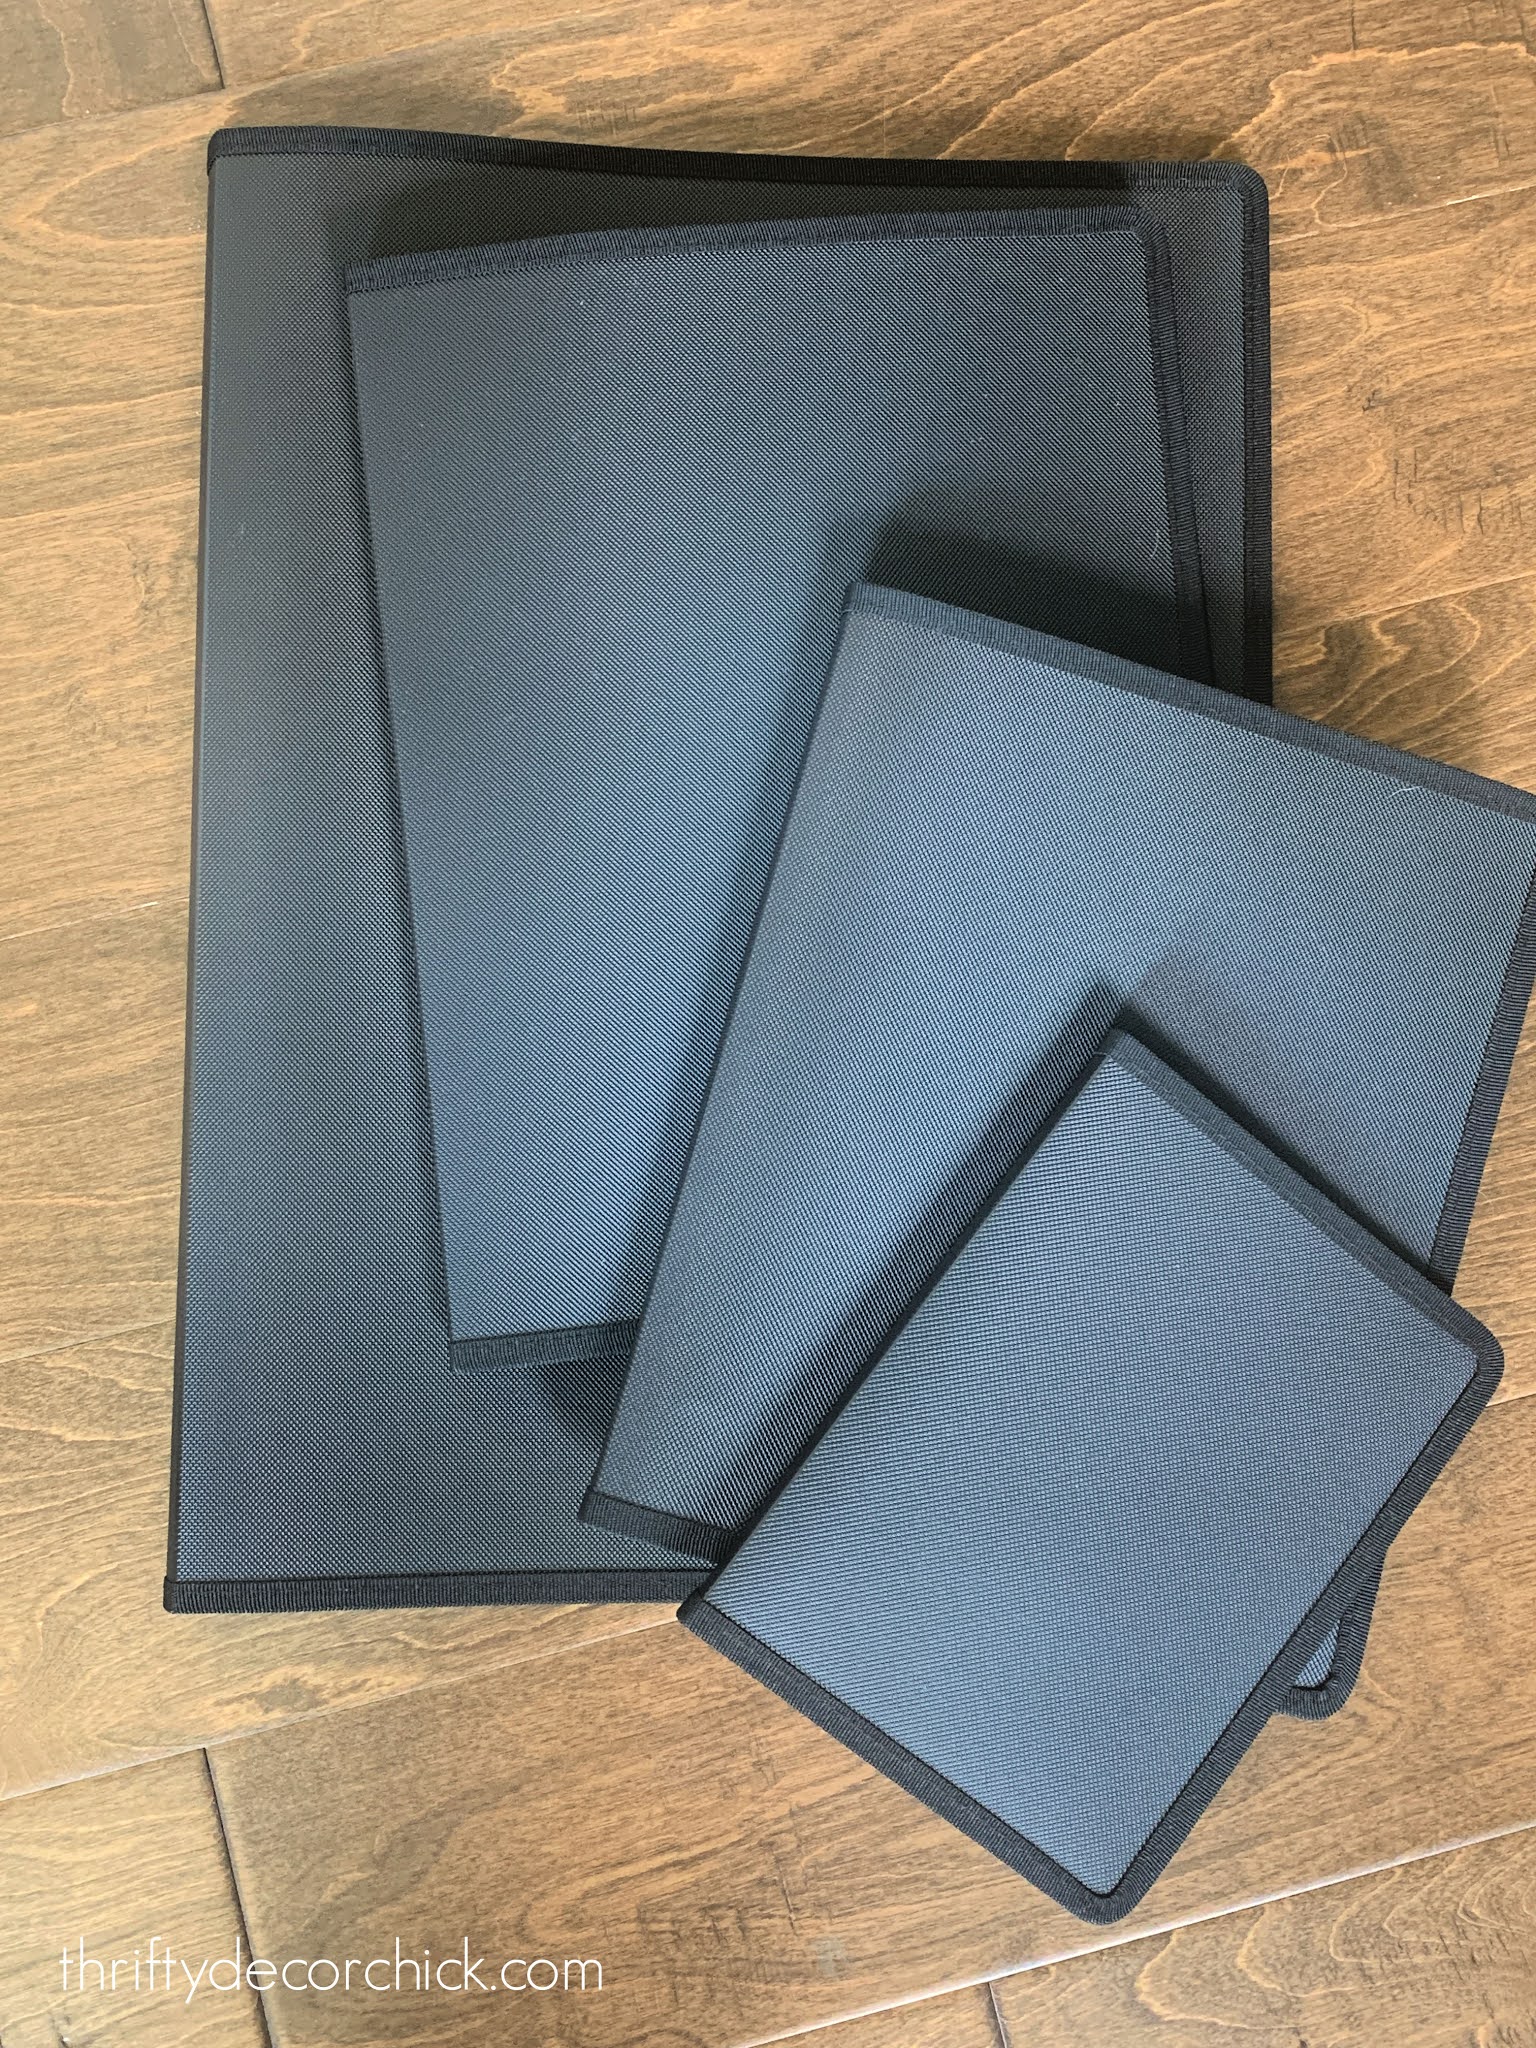
When I got them I knew they would work really well to organize paper items as well. School papers, cards, mementos -- anything paper! I have books in the following sizes:
Each one has 24 pages, room for nearly 50 photos or sheets in each album.
So far I am thrilled with these portfolios! They are super simple and clean atheistically -- easy to wipe off and plenty sturdy:

But they also give enough that you can fit a TON inside and they still close nicely. They have held the bulkier kindergarten art projects beautifully. There is a small spine that you could label as well.
I am so very happy with these books. I started with the 8x10 size for my parent's old photos and pics of my grandparents:

Aren't they a beautiful couple?
**As I was filling these albums, I realized how sad it would be to have them closed away in these forever. I'm determined to create a wall display somewhere in our house. There's truly nothing like these vintage photographs and I'm looking forward to showing a few off!
I'll update you when I figure out where and how I'm going to do that. :)
It really is such a relief to have them nicely stored away where they will be protected. AND we can turn the pages like a book and enjoy looking through them now. It's a huge upgrade from having them piled in a box!
Speaking of boxes...I shared years ago how I had been storing our son's school art and papers in these large boxes:

It actually worked GREAT while he was young (after elementary I didn't keep nearly as much) because I would start a new box every school year. I had it out in our kitchen and would throw in papers I wanted to keep as he brought them home.
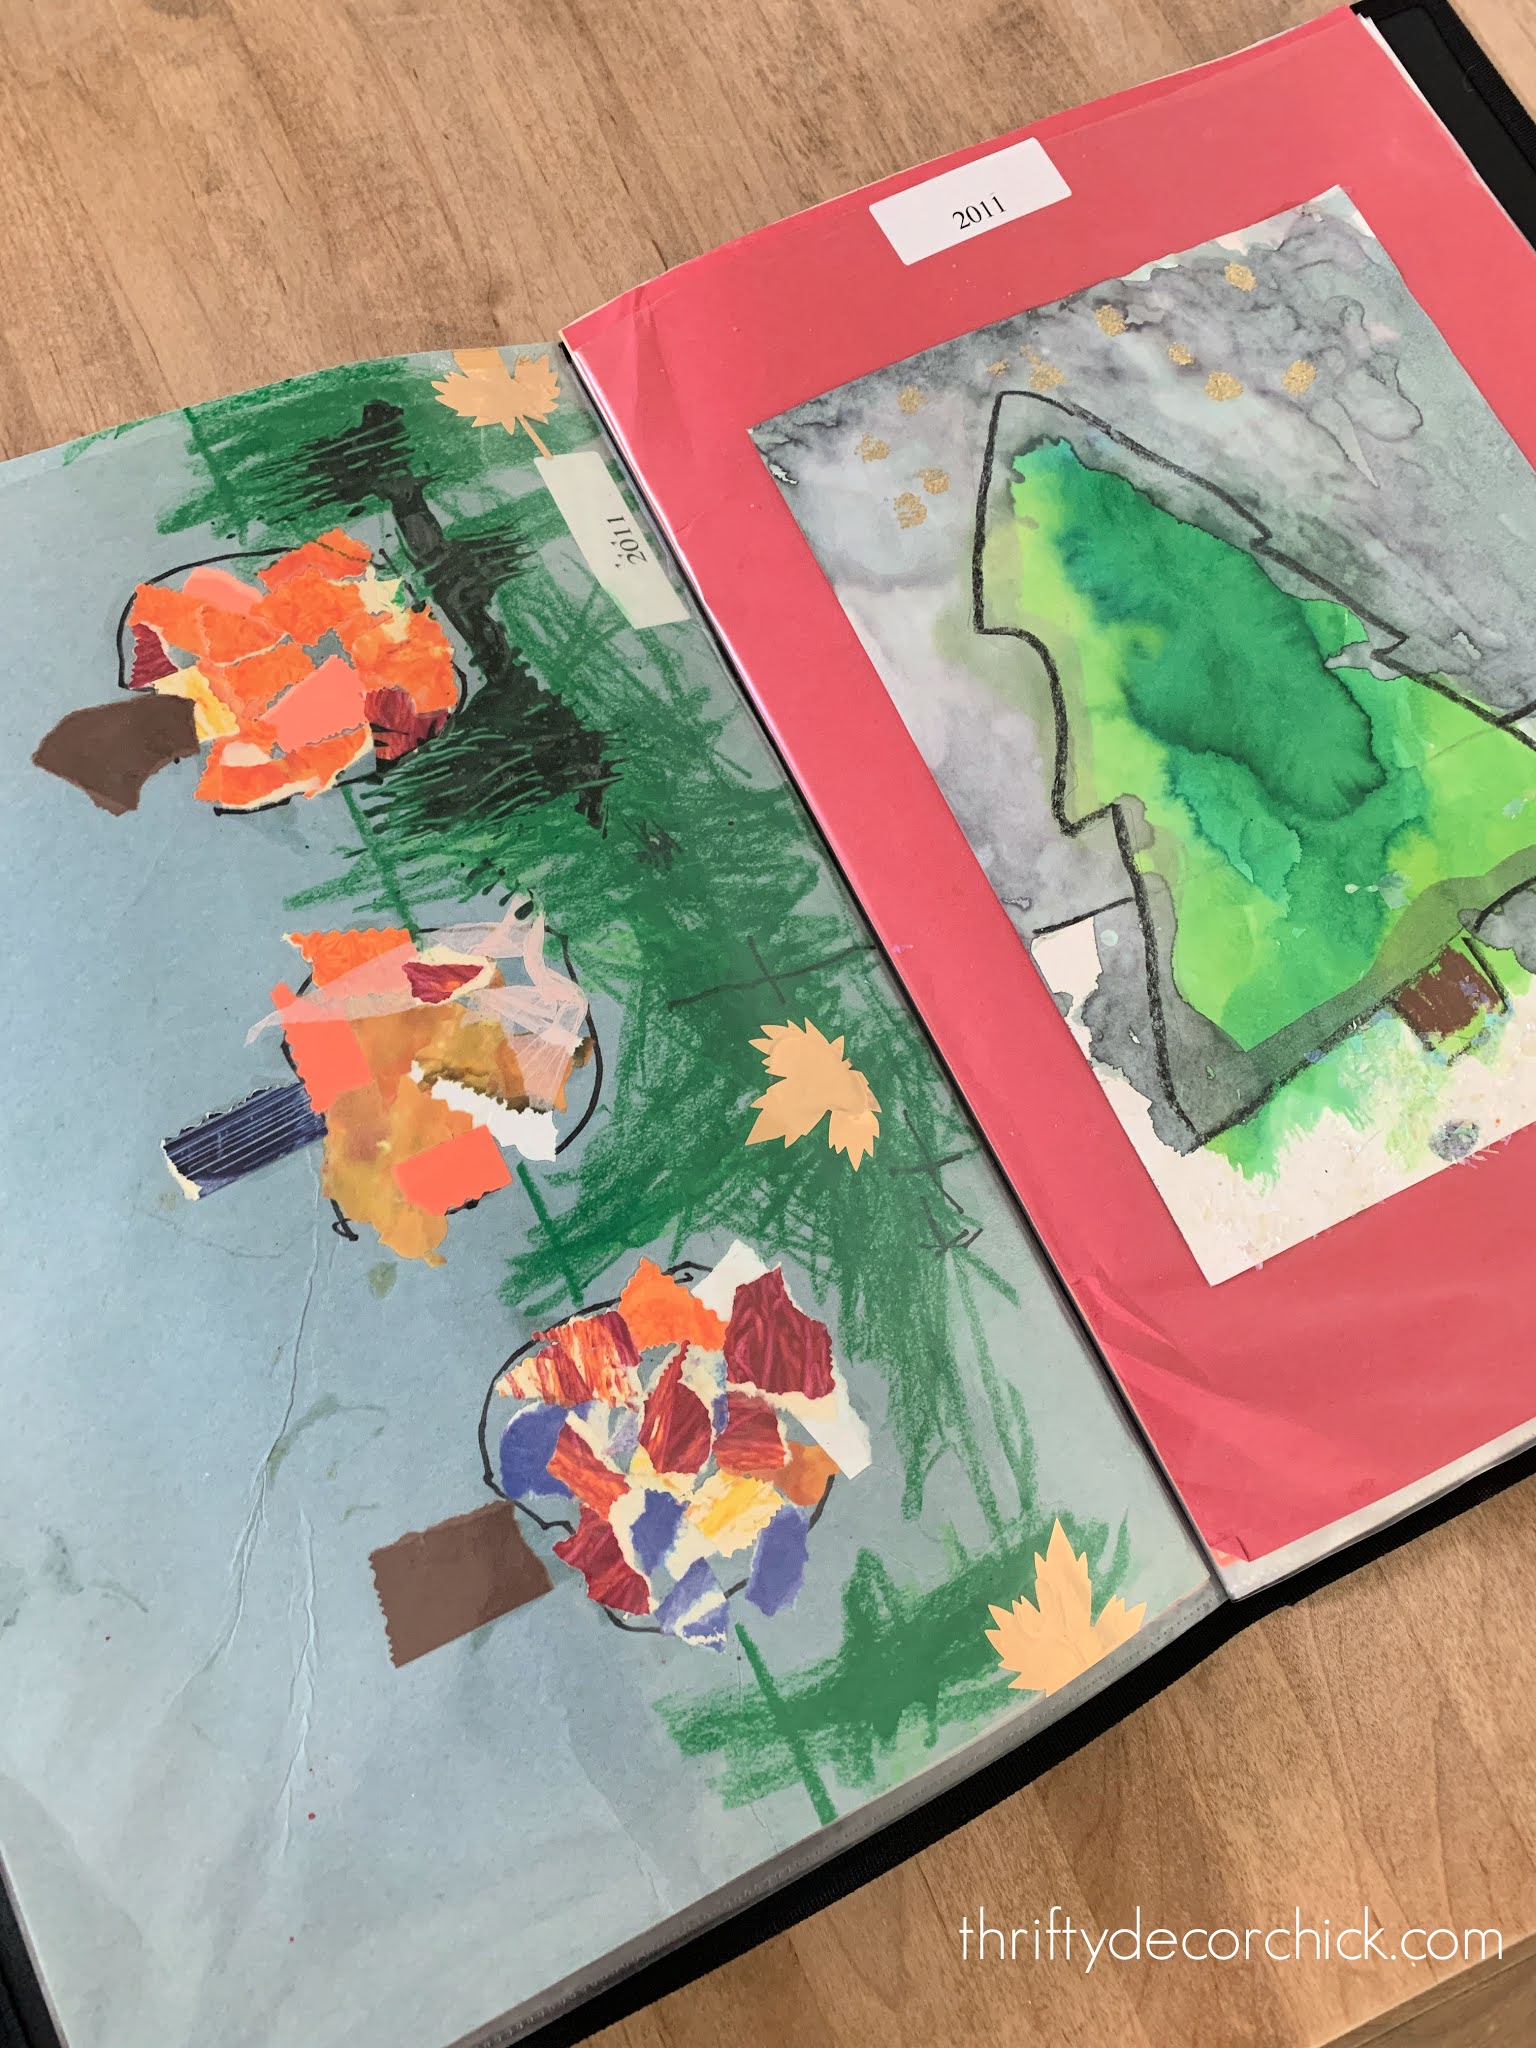
But years later...I've realized that yet again, they are just sitting there piled up. We never, ever look at them! I wanted to be able to look through them like our photos, so I've been using the larger sized portfolios for his artwork:
Something else occurred to me as I've been sorting through these papers...I've kept them for ME most of all. I do want our son to have some of these pieces of his childhood, but I don't have any expectations that he'll be dying to take them one day when he moves out. ;)
I think when he gets married and has children, he may want them. But for now, this is for me! And that's OK. With that in mind, I've started getting harder on myself to only keep the really cute stuff. I realized after filling one 9x12 book with papers from just kindergarten that perhaps I should let go of just a BIT more. Ha!
These portfolios are such a simple thing, but are a solution I was desperately searching for! I love that the photos and paper are nicely organized and protected, but we can easily access them and enjoy those memories.
I'm not done yet -- it will probably take me a couple weeks to get through everything and organize it how I want. But it will be SO worth it!! Then...I'll just need to get the thousands of photos off my phone so we can enjoy those!
**By the way, I'll be sharing these and some of my other organization favorites on Amazon Live tonight (Tuesday)! Come watch at 8 p.m. EST and say hello. :) You can see the live here.

See more of our home here. To shop items in our home, click here! Never miss a post by signing up to get posts via email.
Via https://www.thriftydecorchick.com/2021/06/store-protect-sphotos-art.html
It's strawberry season! This crunchy and sweet strawberry dessert is a hit EVERY time I make it! It's one of my favorite desserts ever. I'm not a big cook so when I share something here you know it's going to be good and easy. This is so yummy! It's a perfect combination of sweet and salty, my favorite.
A friend of mine used to make this every time we got together and it got to the point where I would request it. I finally asked her for the recipe and now it's my go-to for summer get togethers. (But it works ALL year round!)

Here's what you'll need to make this Strawberry Pretzel Dessert:
To make the "crust" take your pretzels and smash them -- I put them in a baggie and pound them:

This post may contain affiliate links for your convenience.
See my policies and disclosure page for more information.
Then mix the pretzels, melted butter and three tablespoons sugar:

Spread them into the bottom of a 9 by 13 pan till covered. (This is the pan I use -- there's also a cover that makes it really easy to transport.)
Bake at 400 degrees for eight to ten minutes and then set aside to cool:

You'll want this to cool down before adding the next layer so I wait until this is out of the oven before continuing.
Mix softened cream cheese and one cup sugar:

Make sure your cream cheese is softened (place in microwave for 10 second increments) to ensure you don't have chunks.
Fold in the container of Cool Whip:

Try with all your might not to eat it right then. :) Little fact about me -- I could (and do) eat Cool Whip with a spoon. Delish.
Spread this mixture onto the pretzels:

Important tip -- make sure to spread the cream cheese mixture to the edges and don't leave any holes. This will keep your pretzels nice and crunchy.
Next is the gelatin -- prepare in two cups of boiling water (according to the box instructions, just leave out the cold water at the end). Then add the package of frozen berries:

You'll want this to set up for a bit -- the recipe calls for it to be a egg white consistency. I usually put it in the fridge for five to seven minutes and stir. You'll be able to tell when the gelatin is starting to set up.
Spread the strawberries over the cream cheese mixture. Let set up even more in the fridge -- even an hour is fine.
I'm telling you -- this is SO good. I warn you though, it's addicting. You'll have some and then need more:

Have you tried this dessert? Any twists on it that are worth trying? You can even add some blueberries on top for a patriotic look. :)
Pin and save this one for later with this image:

Check out all of my recipes here! These are a few of my most popular...


See more of our home here.
To shop items in our home, click here!
Never miss a post by signing up to get posts via email.
Via https://www.thriftydecorchick.com/2016/05/the-perfect-summer-dessert.html
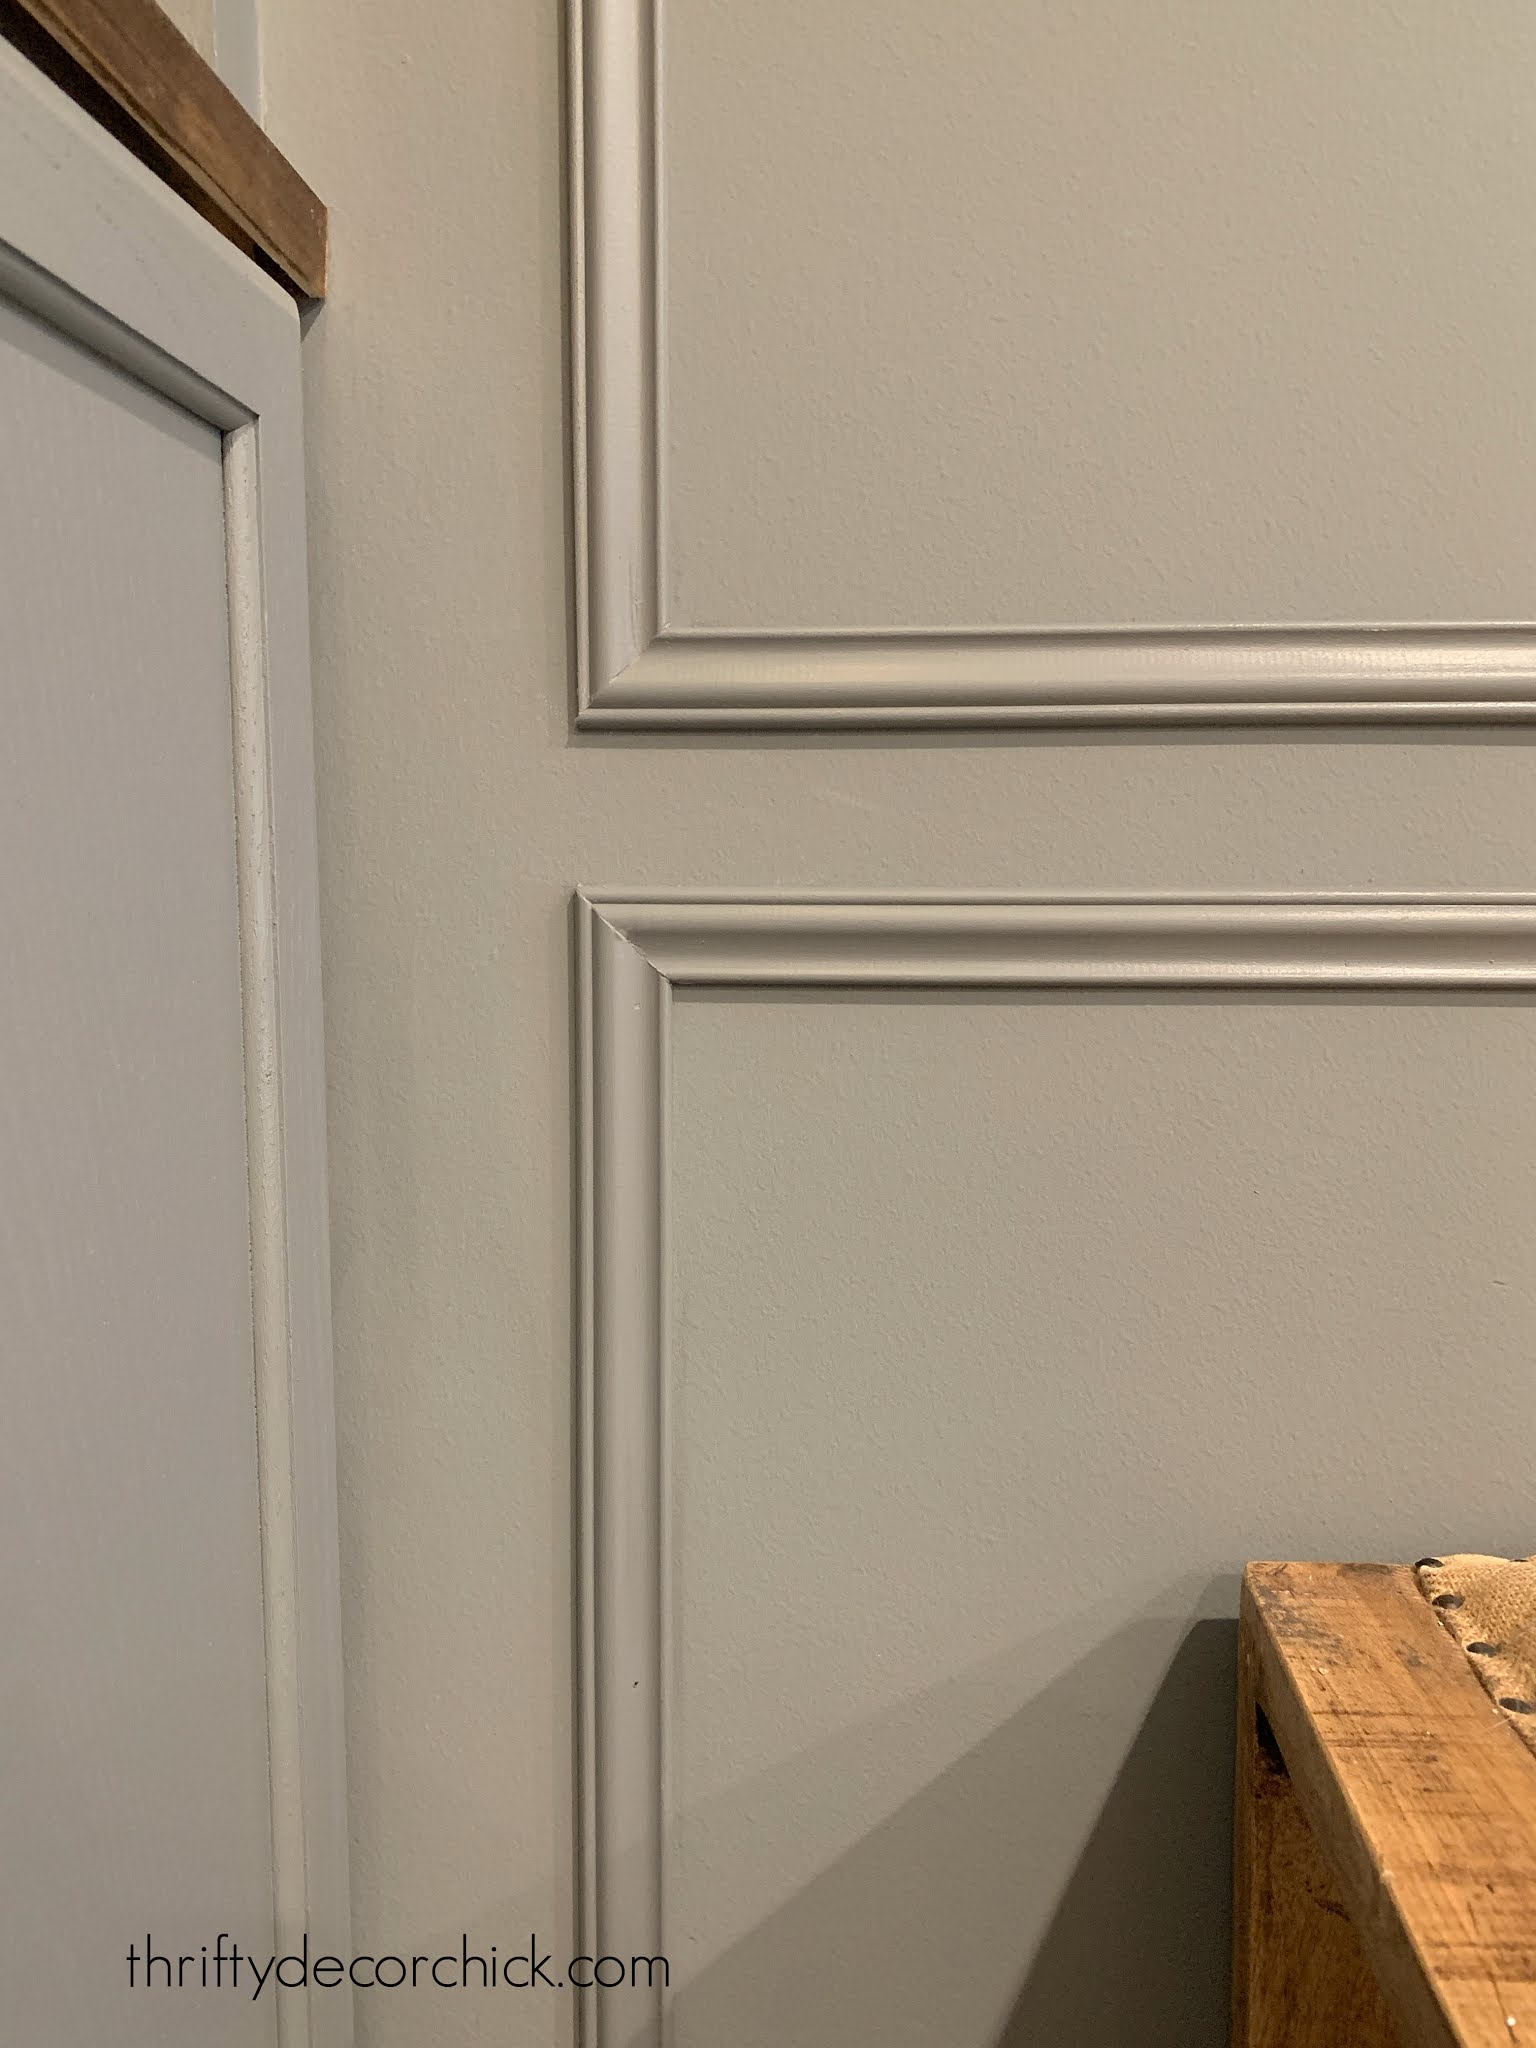
I've been working on this wall molding project for almost four months and it's finally done!! Geesh. I started it right after I finished the HUGE wall of bookcases in the basement but I kept getting distracted by other projects that were brighter and shinier. ;)
The mud/laundry makeover and the garage clean out and organization took up a couple of those months. And then I was just...well, tired from all of that. A couple of weeks ago I finally started up this panel molding project again.
It took longer than expected because when do a project like this, one thing always snowballs into a million other smaller projects. Every. time. But I'm REALLY loving how it turned out and I'm also really happy I added all of the smaller projects.
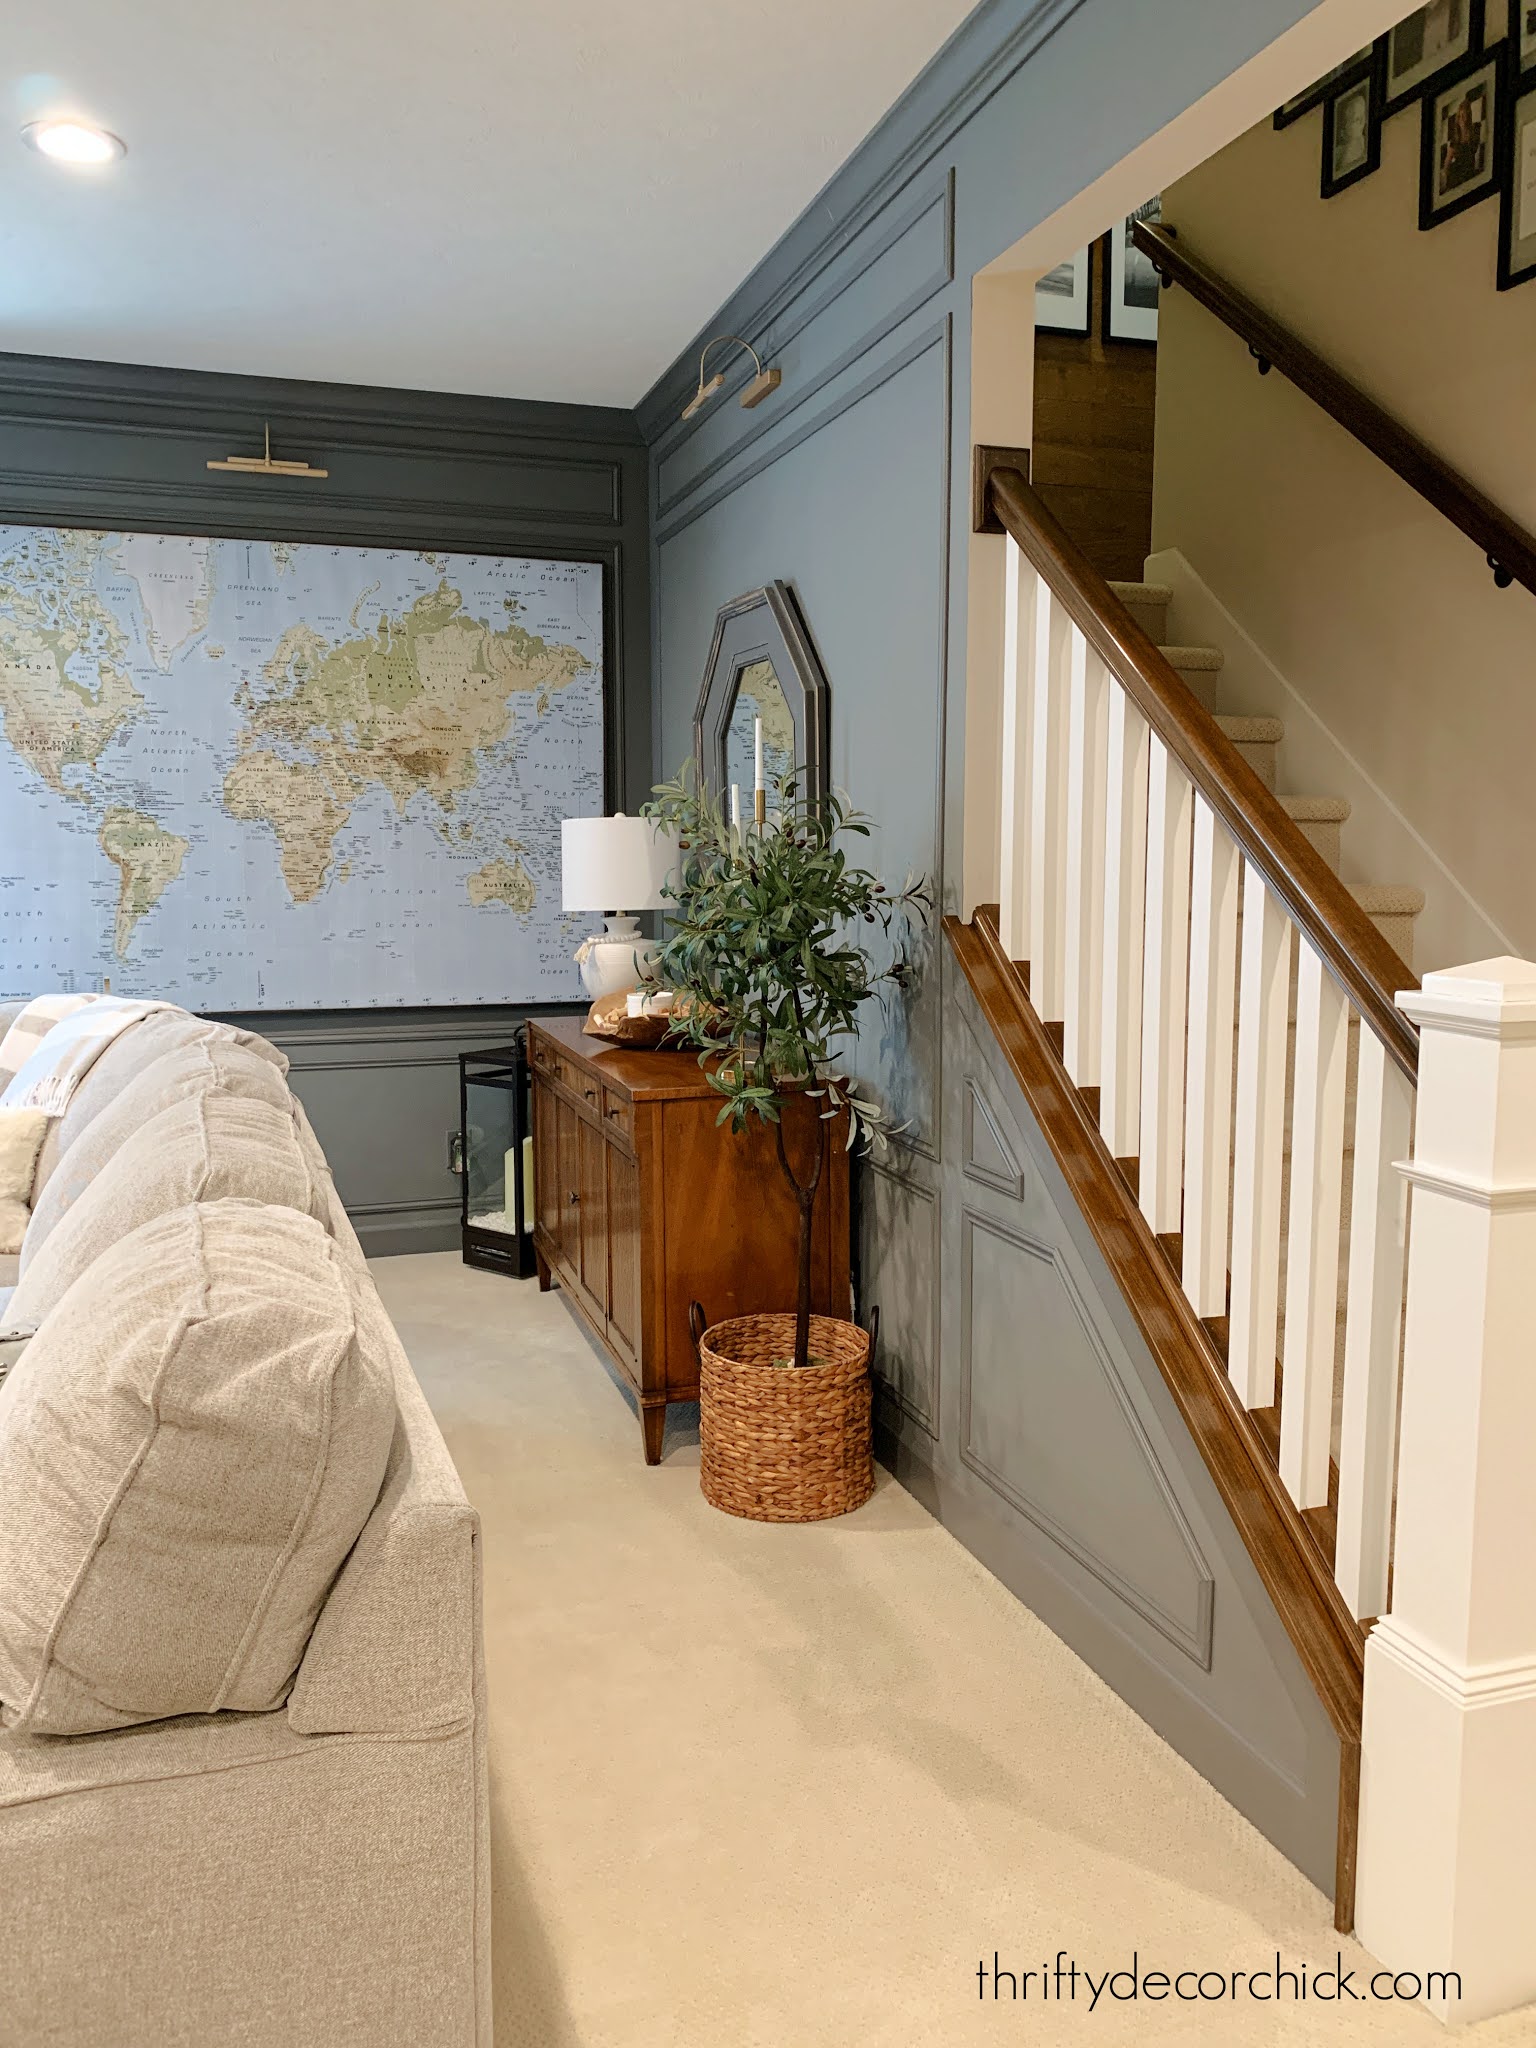
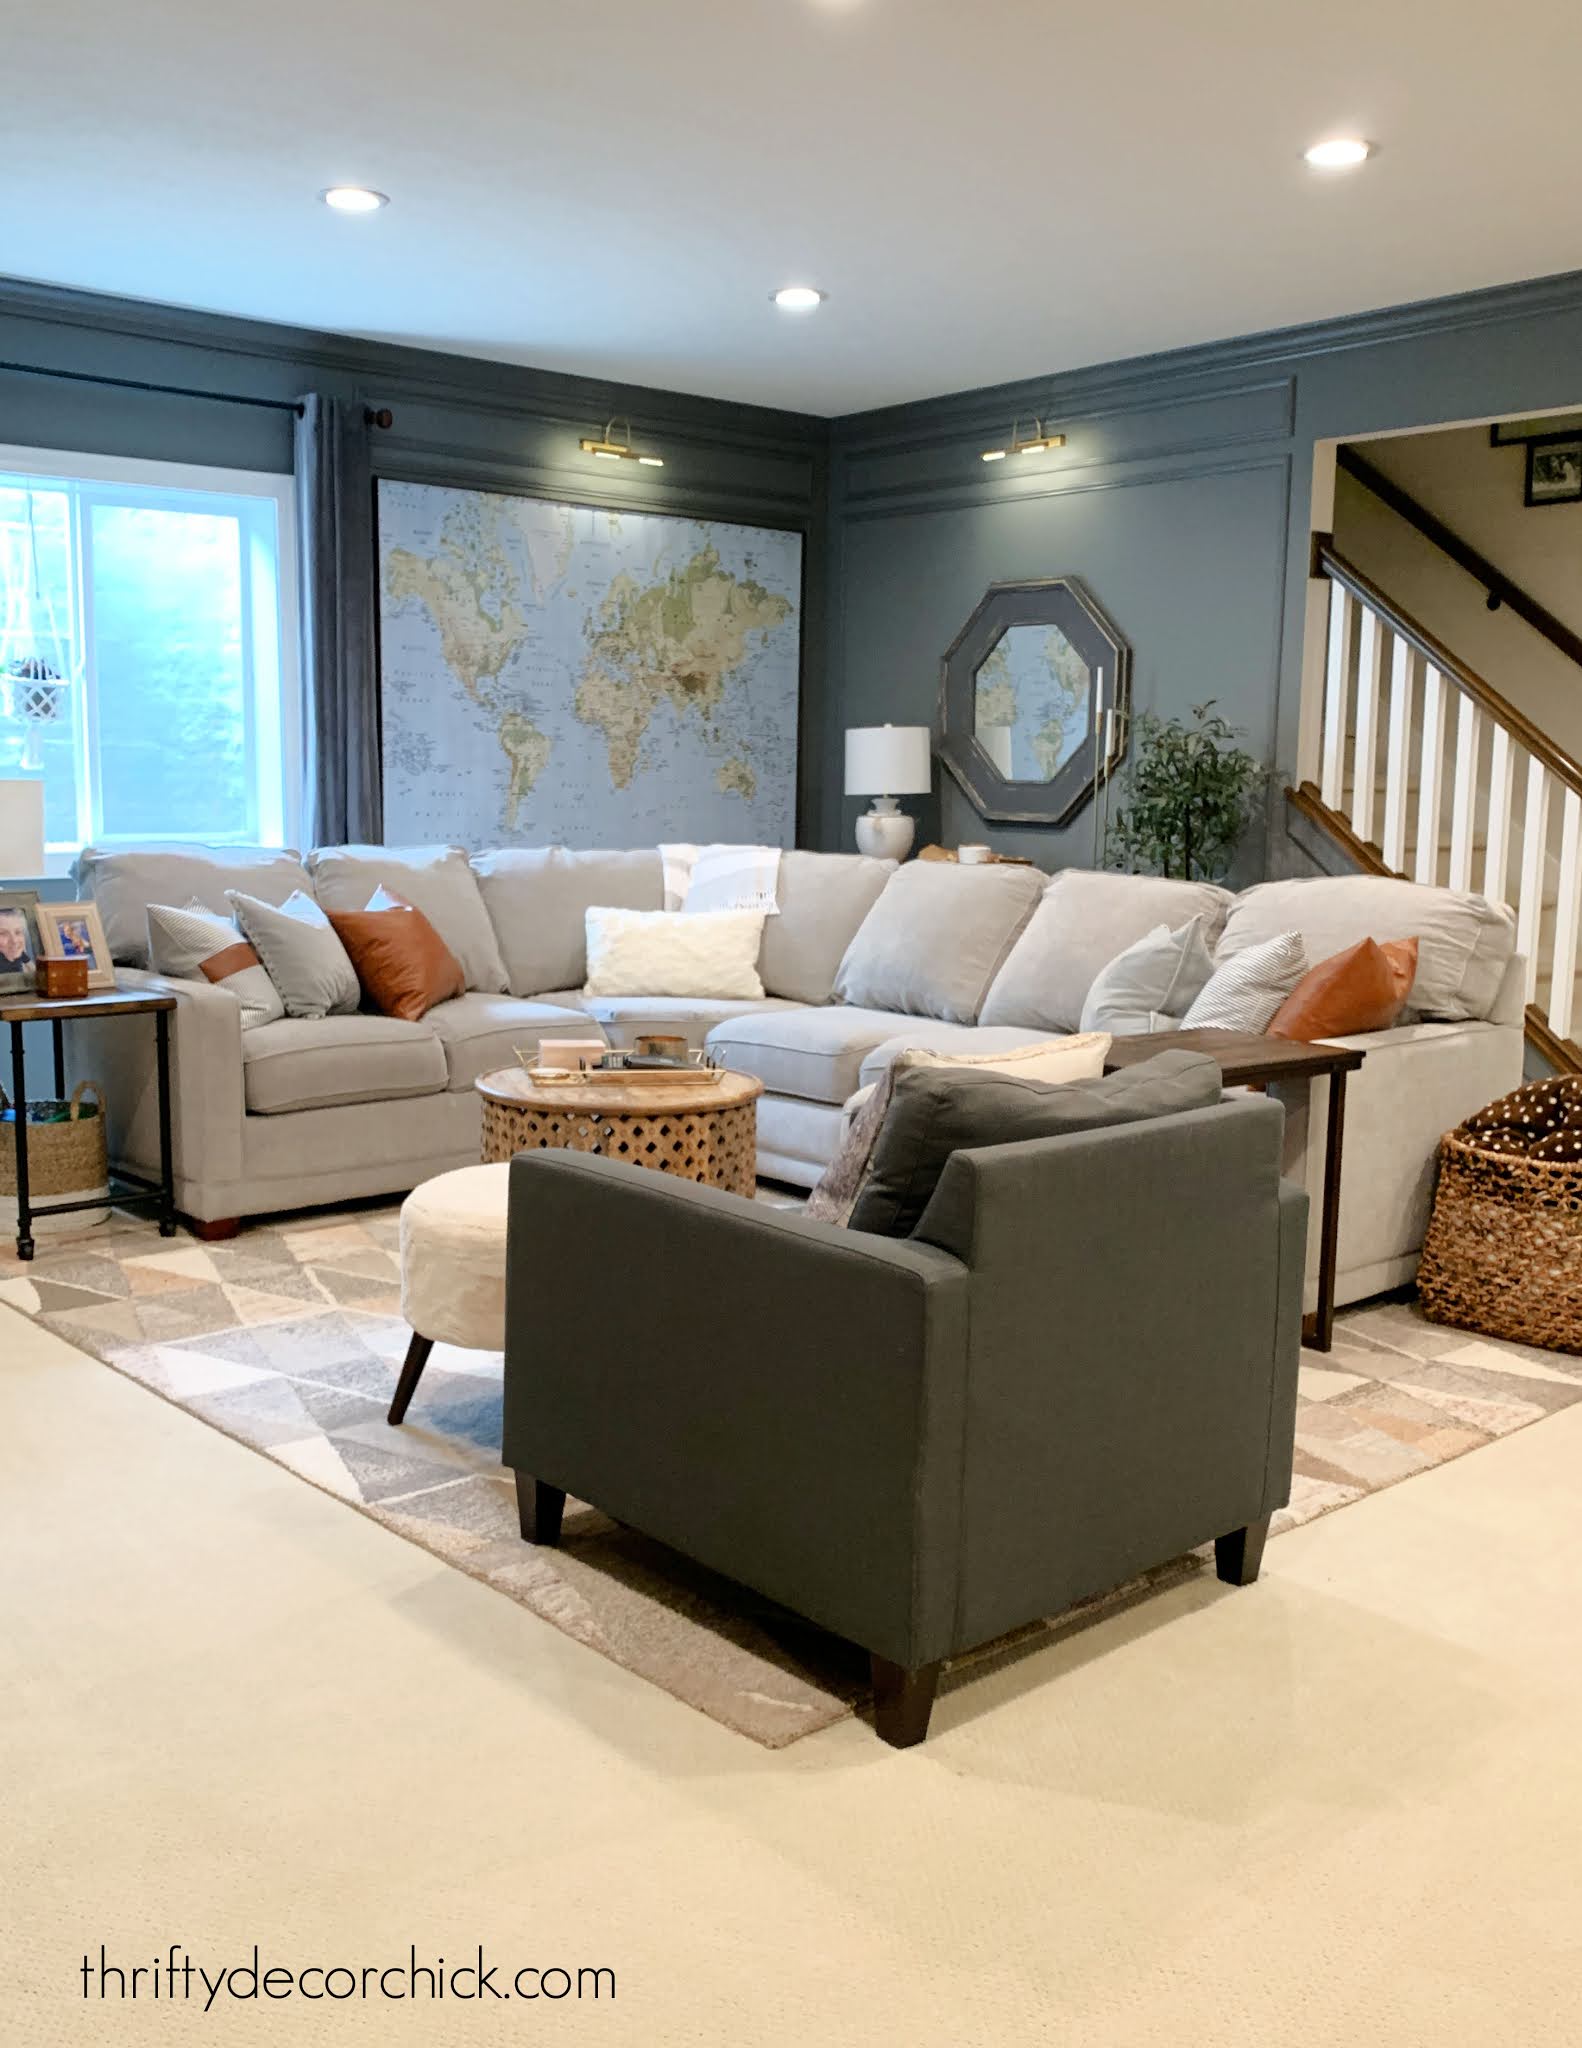
When I finished the wall of built ins down here, I knew right away that the other walls needed something:
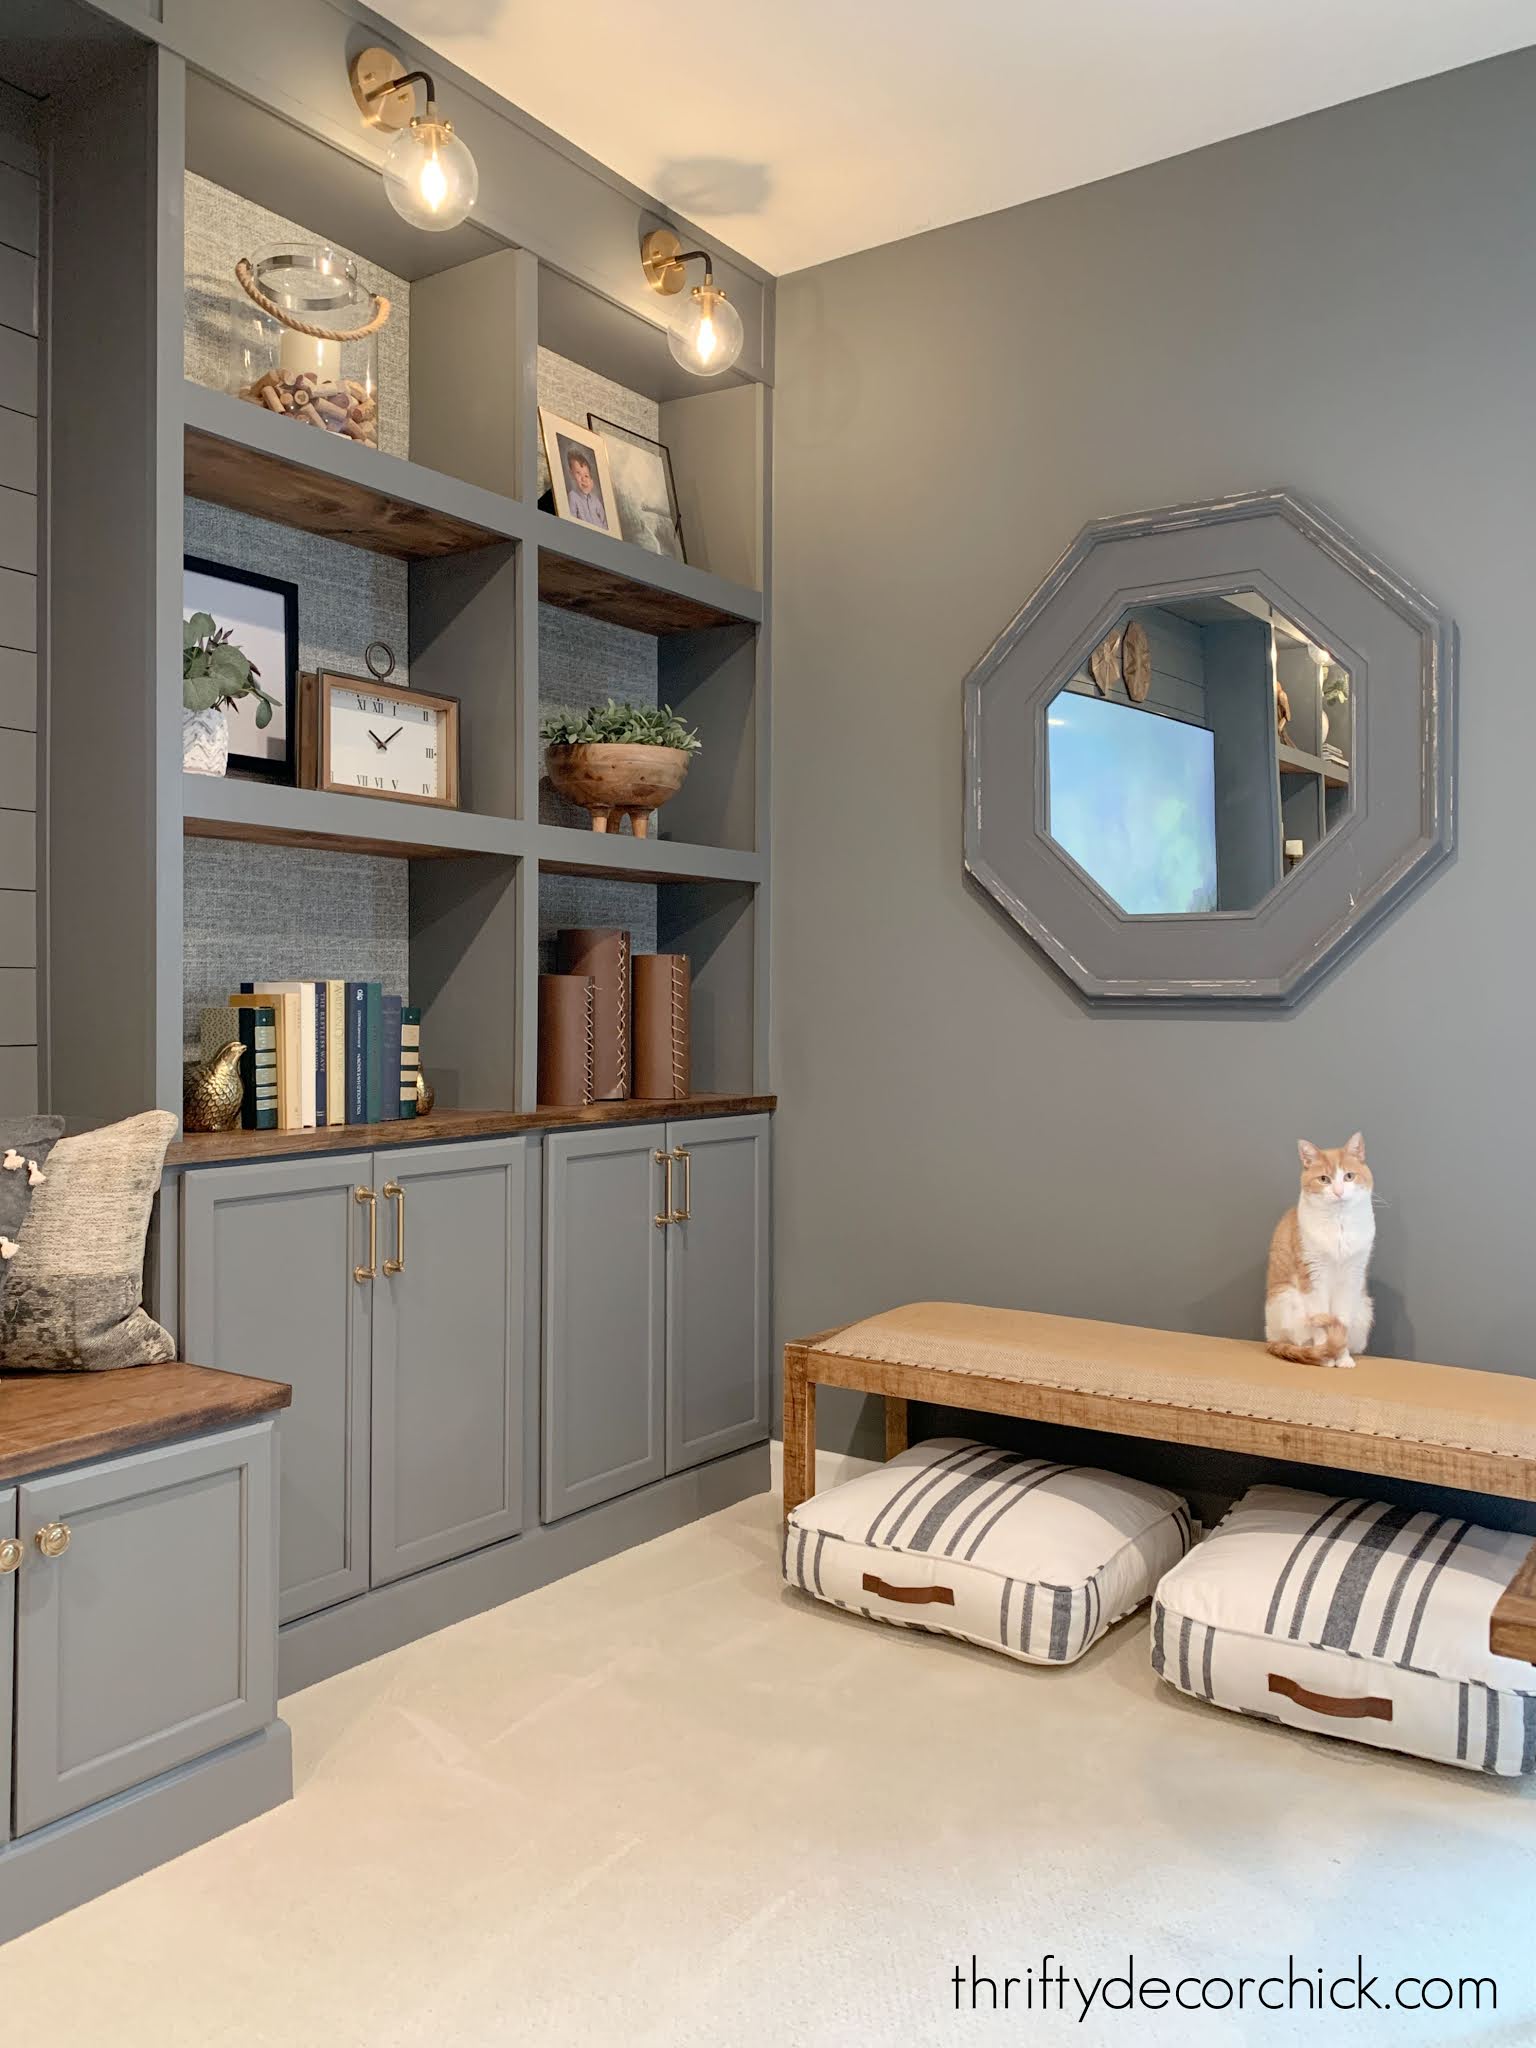
I've planned to do these molding boxes for a long time, but knew I needed to wait until after the built ins were done to determine the size.
We LOVE the dark, moody gray we have down here (Westchester Gray), but painting the walls made me even more sure that the wainscoting would look REALLY good:

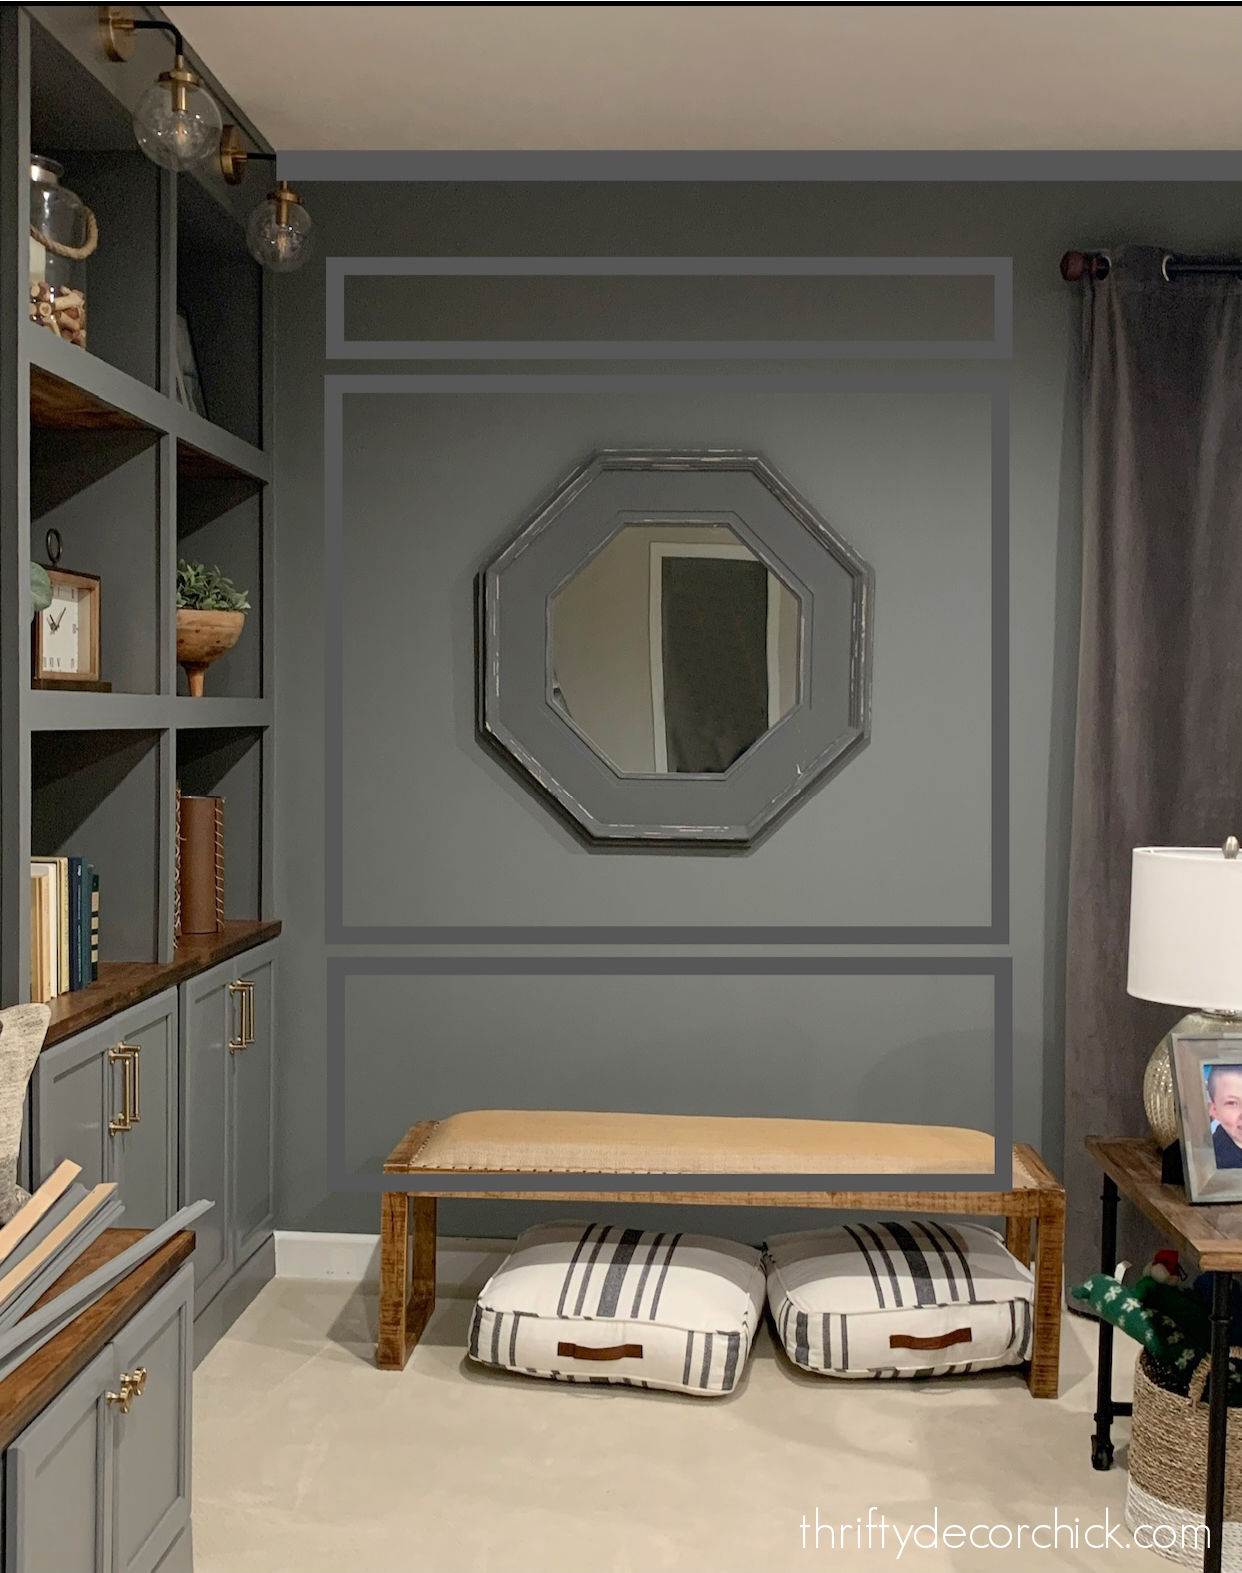
I had to decide on the design first -- I only had three wall sections that I wanted to add trim to. I took a photo of one wall and then added lines using my phone editing.
The traditional two boxes was what I initially wanted to do:
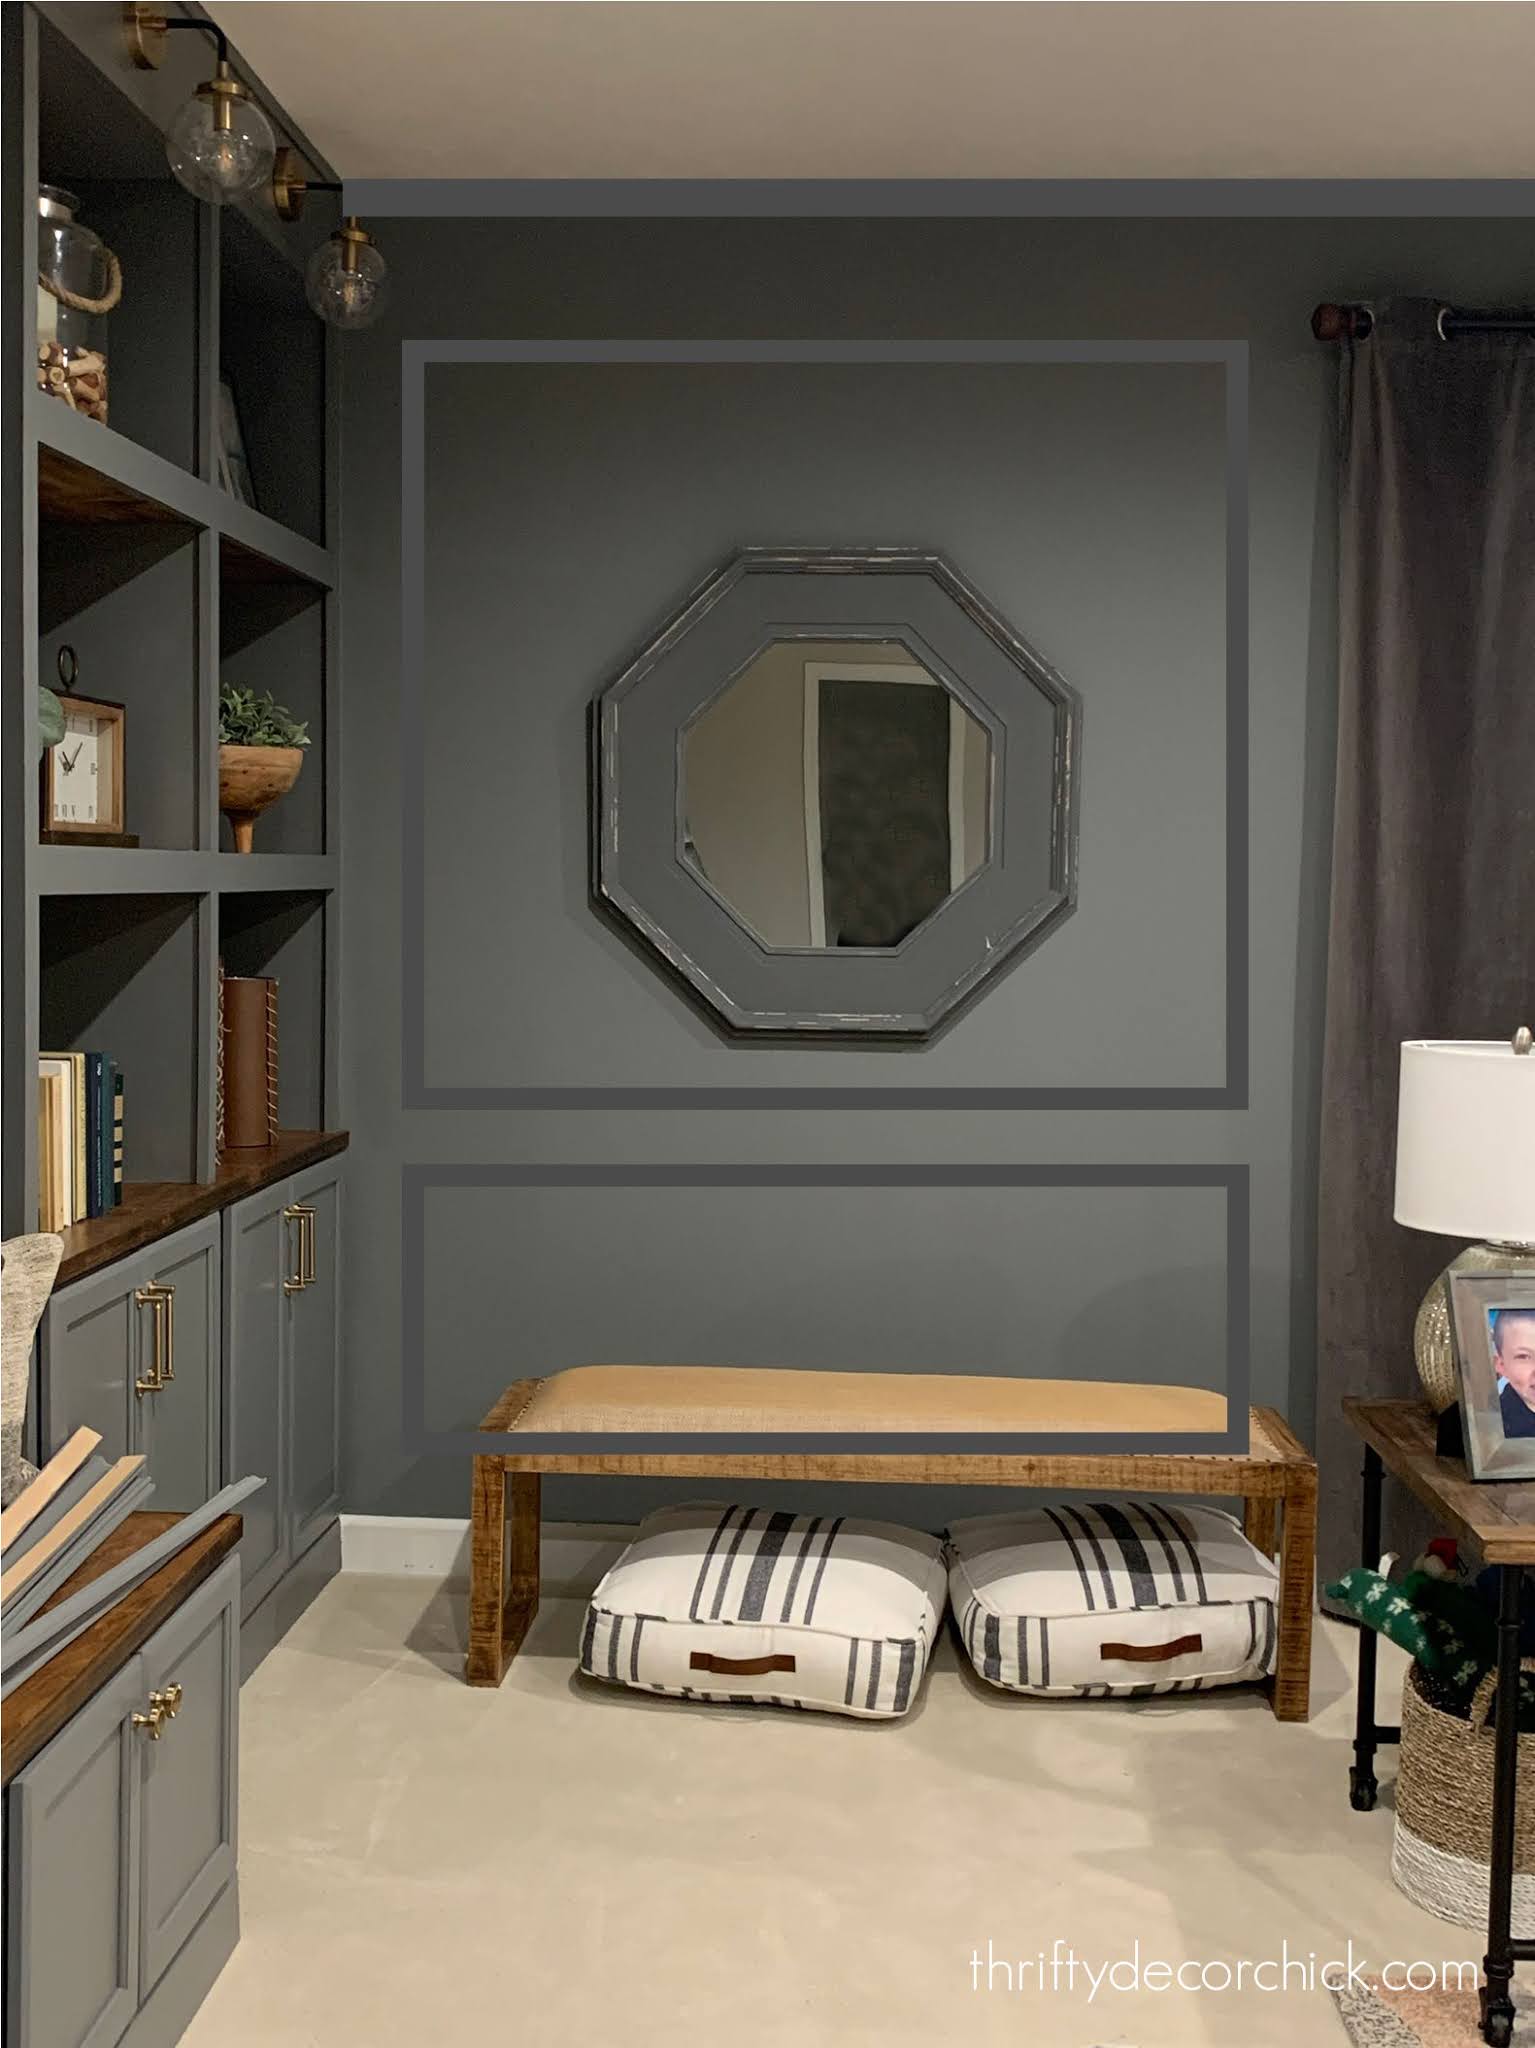
But I thought I'd try out adding one more at the top and loved it:
This post may contain affiliate links for your convenience.
See my policies and disclosure page for more information.
I used the simple decorative trim I used in our dining room as well. It's simple but elegant, and not crazy expensive:
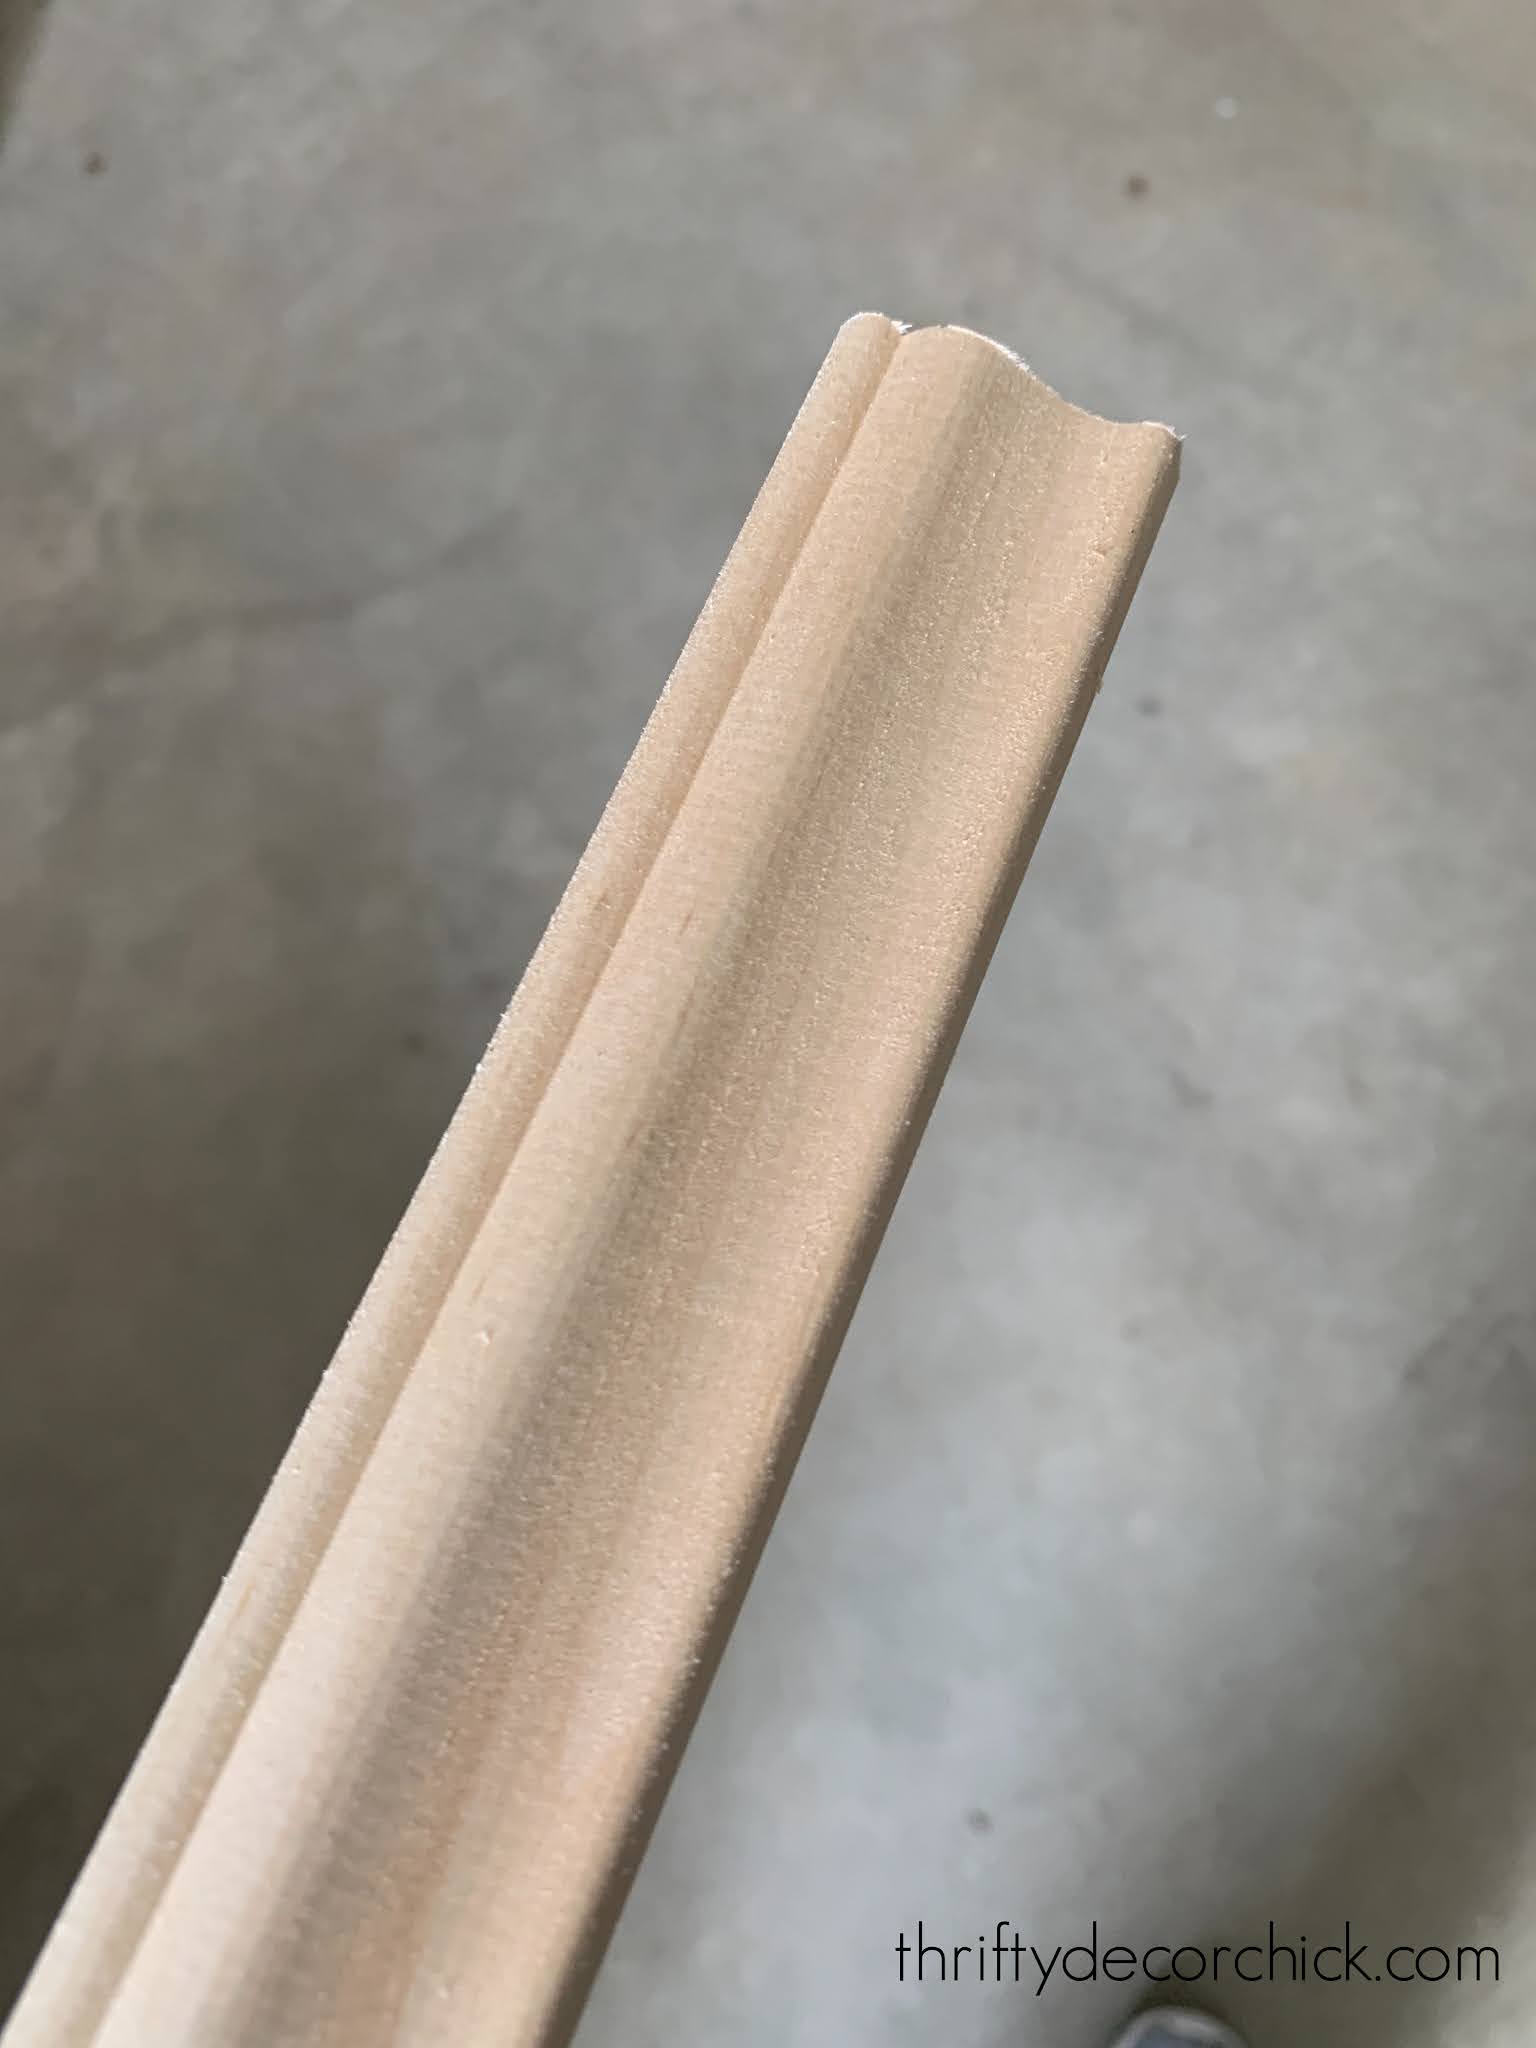
You can find it at Menard's, Home Depot and Lowe's. It was harder to find this time though! It feels like everyone in the world is working on DIY projects right now. :)
I painted our walls in a flat sheen, but I always use semi-gloss on trim. I painted so many of these eight foot pieces...with brushes, rollers, and then with my favorite find, this little paint pad:

It was great because I could just dunk it in the paint in the can -- no need to pour into a tray. It got into the little groves easily and made quick work of the painting. I think I got mine at the dollar store, but this is a whole set! I usually wait until the trim is on the wall to paint, but since I was doing a different sheen I painted before.
I installed the crown molding and then cut scrap pieces of wood in the sizes I needed to space out my boxes. Each box was 3.5 inches away from the nearest wall (except for around the window where I did twice that to accommodate for the drapes).
I spaced each panel two inches from the top, bottom and between each box:

Having those cut helps tremendously...you can easily check to see that everything is spaced out the way they should be. I also checked for level as I was installing them as well.
I finally bit the bullet a few months ago and bought this battery-powered nail gun and it is a game changer! I've been carrying around a compressor and fighting the air tubing for 15 years. The cordless nailer is SO much more convenient, but definitely heavier.
The molding needs to be cut at a 45 degree angle because of the detail:
This is why I usually paint after the trim is on the wall -- after caulking and filling holes, you have to do more coats anyway:

Although I didn't caulk at all with this trim. It fits pretty flat against the wall. Get the nails into studs where possible, and for other spots you can nail at an angle to secure it well.
When I was done I knew there were some more things I wanted to tackle. Those skinny molding boxes at the top were crying out for some lighting! I so wish I had all of these ideas in my head when we were building, because I would have added electricity then.
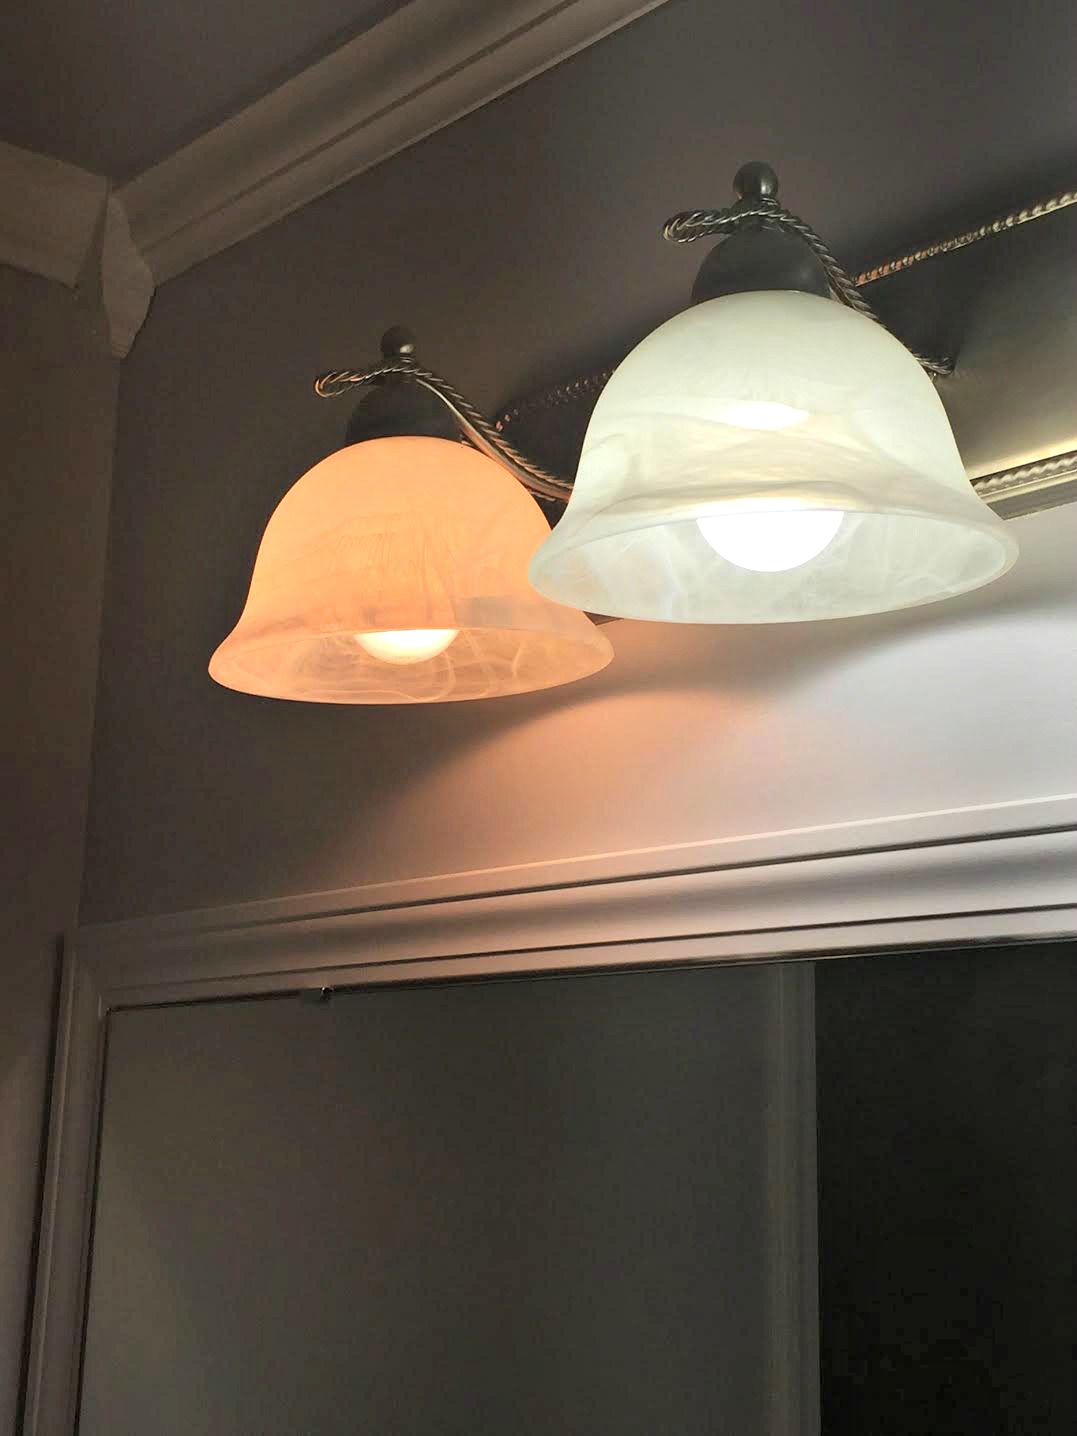
But I didn't, so I went with my go-to, the battery operated sconces I used in our wallpapered foyer upstairs:

I shared how to add sconces without electricity as well here! It's such a great hack. These art lights are great -- I just don't love the brass tone. So like last time, I sprayed them a more consistent brass color.
I moved some of the art around, changed up some of the decor and painted the baseboards to match the rest of the walls. At the last minute I also added some additional trim in the angled part under the stairs:
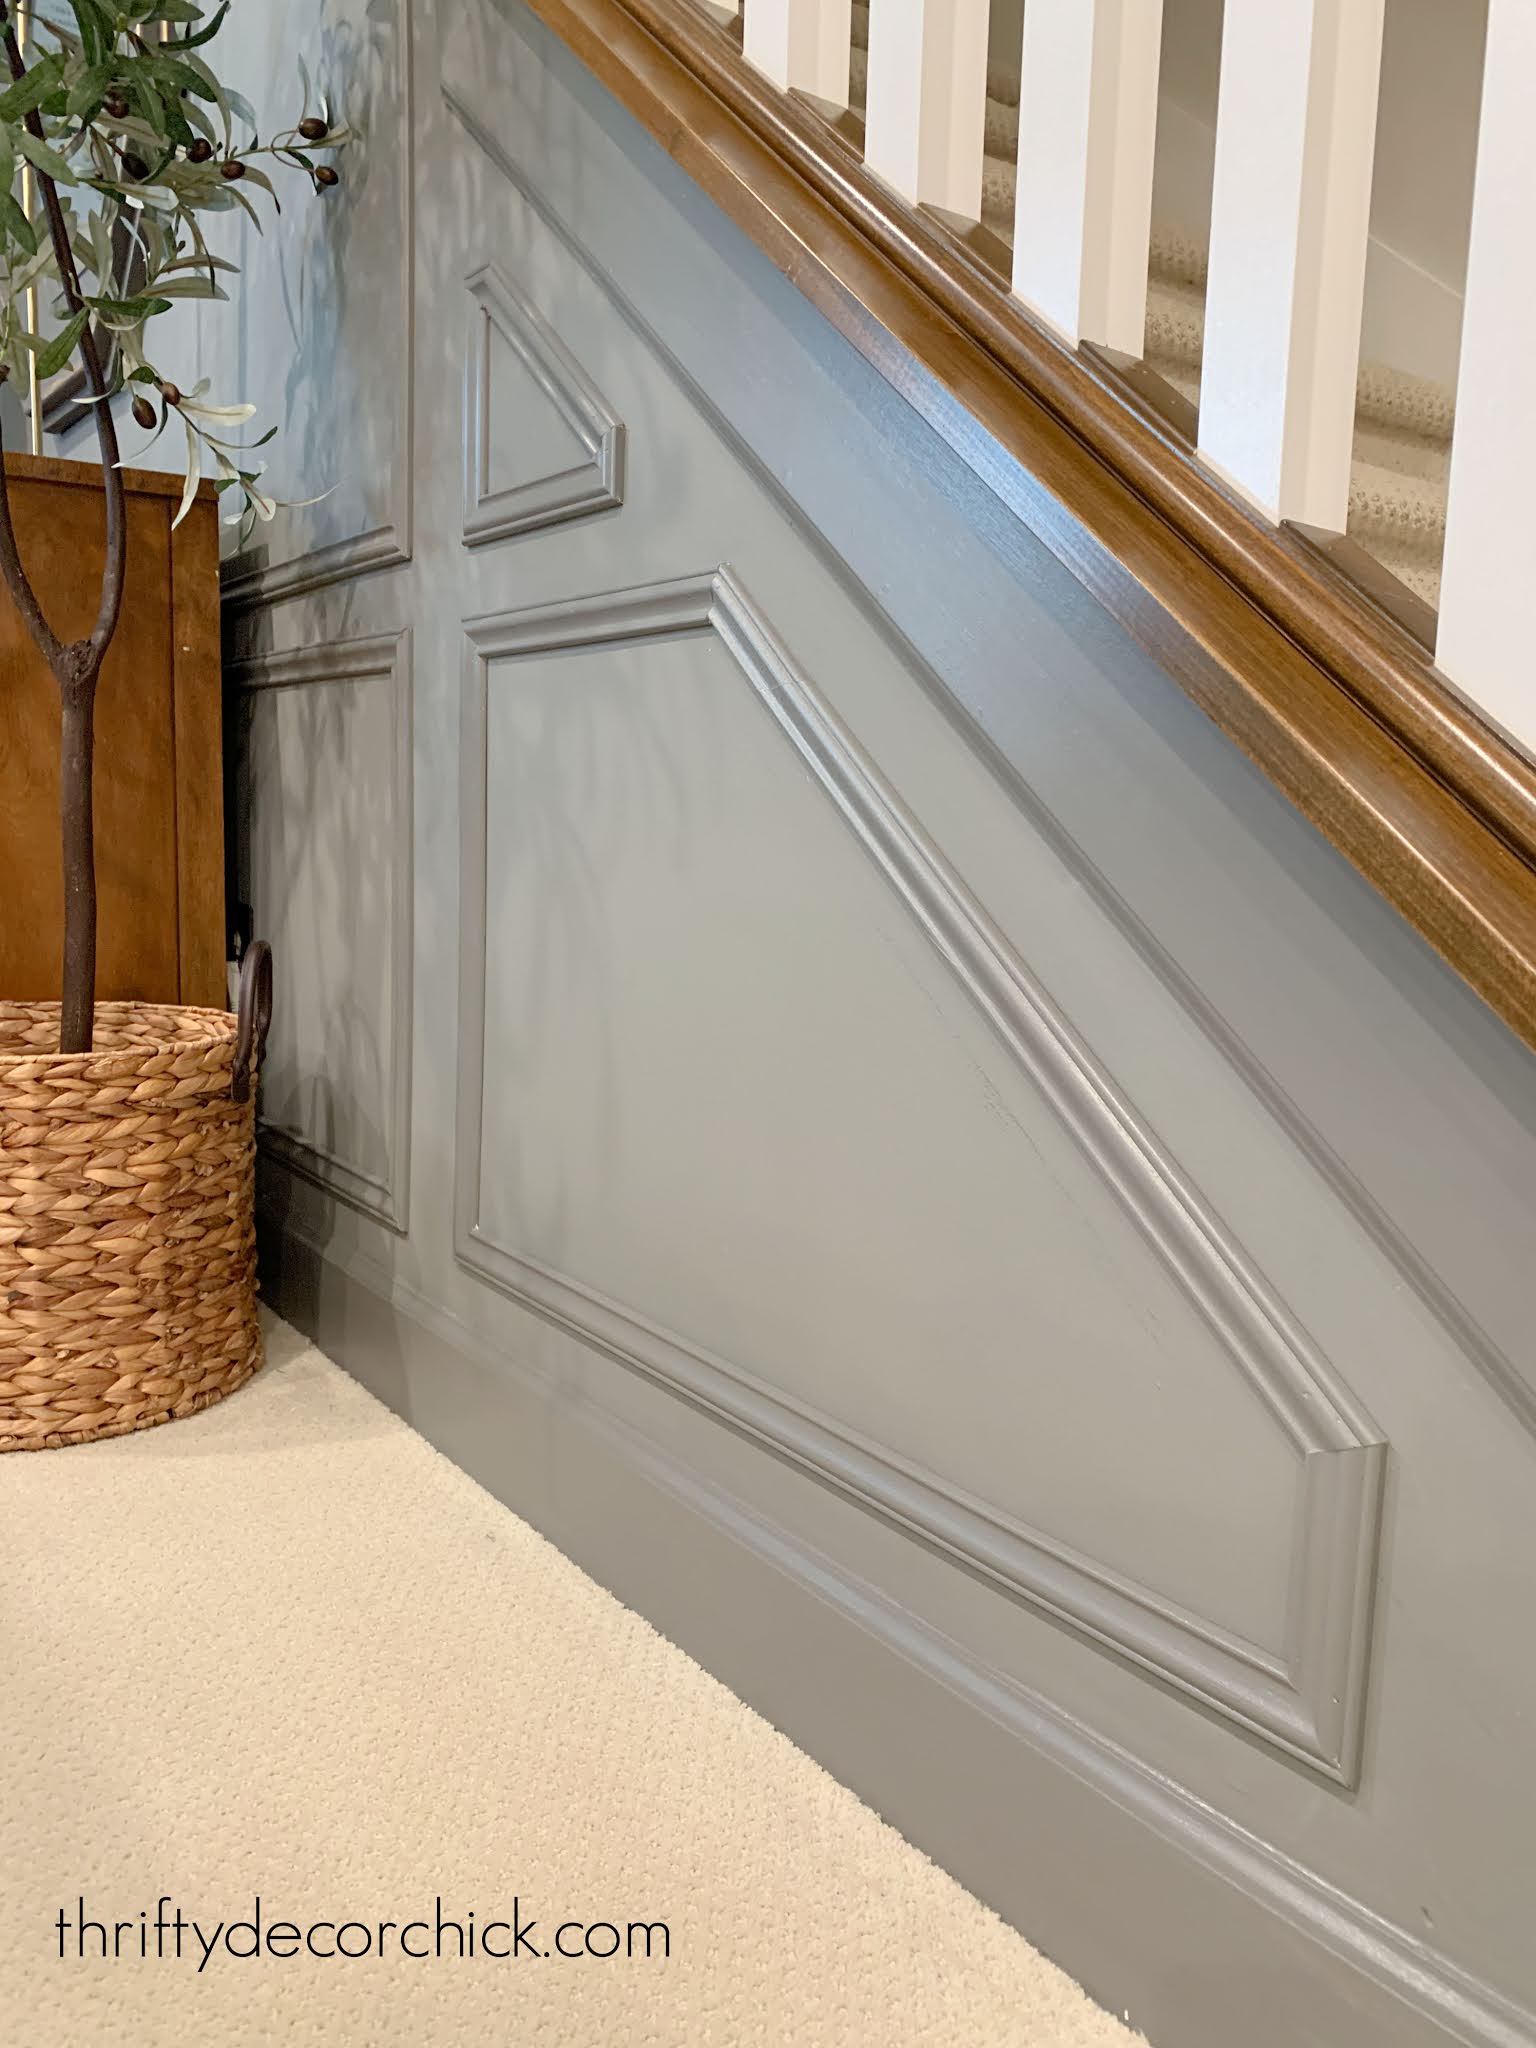
That took me forEVER. The angles were not computing in my head and it was a couple hours of checking angles and going up and down the stairs to the garage to cut. Twenty-five times or so.
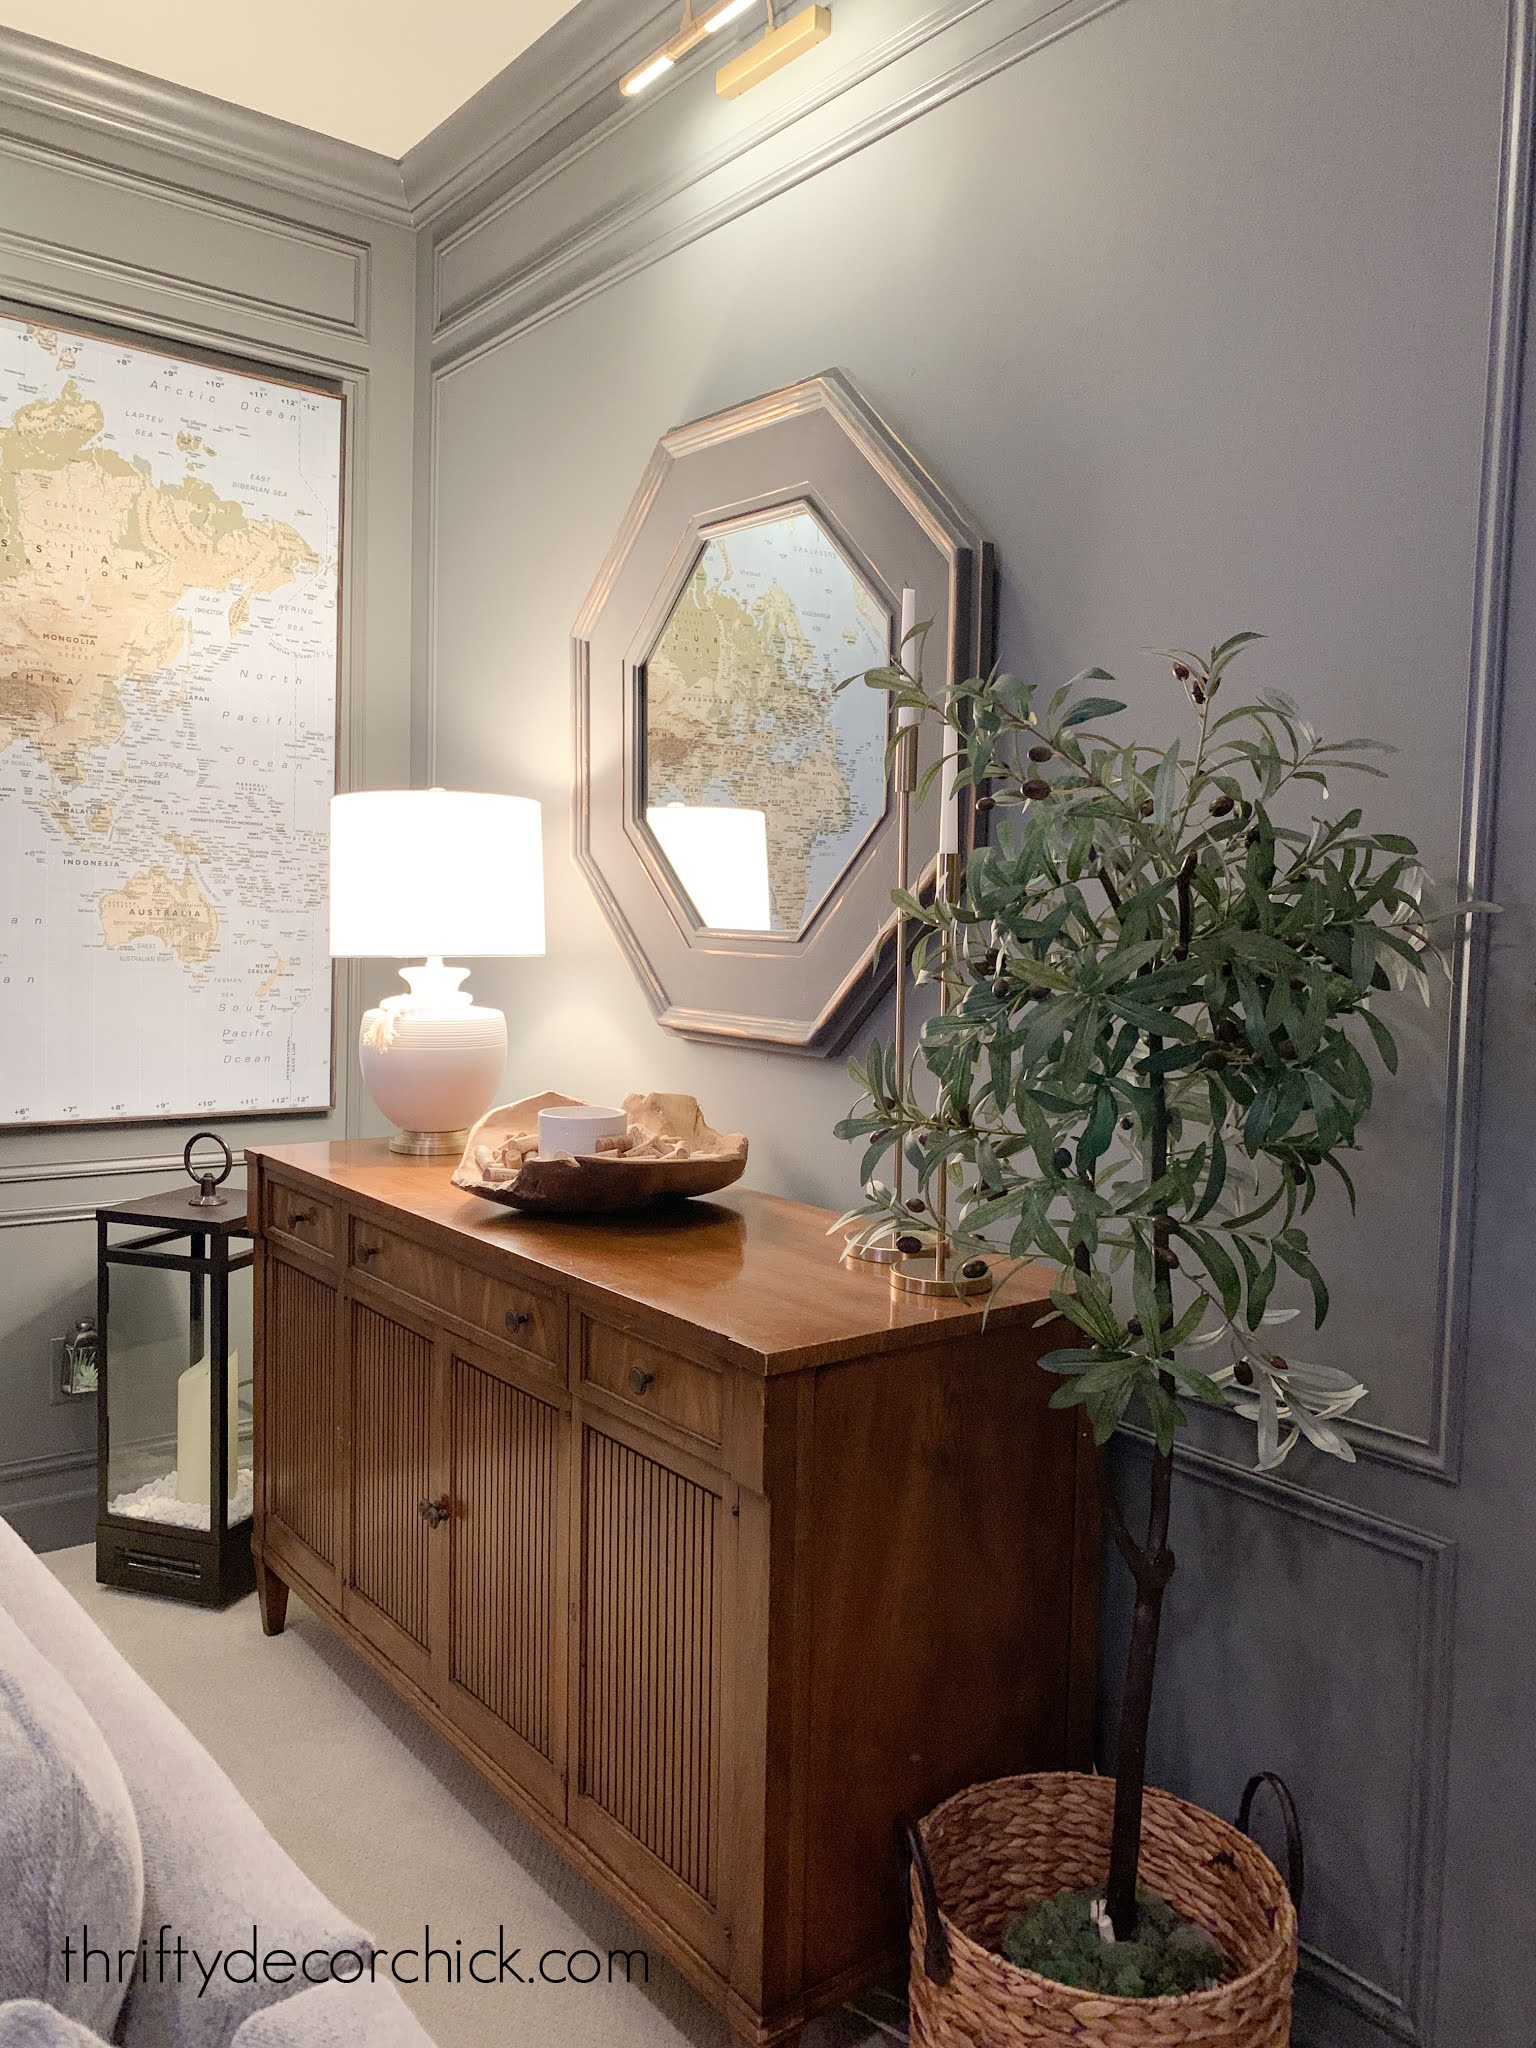
I moved the mirror that was here and replaced it with these AWESOME round whicker wall hangings:

Holy cats, I love them so much. So, so much. I want to hang them all over the house! They look so good and you get the whole (huge!) set for under $100.
All of the projects were SO worth it...it looks so good!!:


I always love crown molding in a room too. It's a traditional touch that adds so much character.
I love this space most at night when we have the recessed and bookcase lights dimmed and the art lights turned on:


The molding is the perfect finishing touch down here. If I've said it once I've said it a million times...trim work makes SUCH a big difference for not a lot of money. I spent about $150 for the molding, but it usually costs less than that. (The trim has gone up $2 each since I bought it a few months ago!)
I used a lot because of the three sections and large size, so this project could easily be done for under $100!
Here are a few before and after pics...this space has seen so many DIY projects over the past four years!:


We are spending more time down here than ever! It's definitely our favorite spot in the house lately:

I'm so happy to have another project crossed off the list. Now onto easier items like some organizing!
Questions? Here are the projects and items in our basement family room:
Built in bookcase how-to
Changing out the recessed lighting to brighter/more efficient fixtures
Drapes and giant map are from IKEA
Dresser is vintage
Rug was a HomeGoods find years ago
See how I added this panel trim to our dining space here:

And ALL of my wall molding projects over the years here!
See more of our home here.
To shop items in our home, click here!
Never miss a post by signing up to get posts via email.
Via https://www.thriftydecorchick.com/2021/06/how-to-install-molding-and-add-interest.html
I have found (literally) the easiest plant/flower EVER. It's inexpensive, grows like crazy, doesn't even need to be truly "planted"...and you can complete ignore it and it will thrive. Yesss!
I found these easy garden tiles last year and can't even believe how well they are doing. I had to share them with you! Oh, and they are perennials (which means it stays alive over the winter or come back after) and even look great in the colder months. I only wish I had known about them sooner. :)
I discovered this easy to grow plant when I installed our cafe lights on the back patio last year:

Our lights are industrial grade and heavy so we needed a way to secure the planters so they would hold the weight.
You can see how we installed the cement filled planters for the outdoor lights here. I left some room at the top so I could plant some flowers each year. Last year I found this cool "garden tile" and decided to try it out:

This post may contain affiliate links for your convenience.
See my policies and disclosure page for more information.
I told you then how I used one of these sedum tiles to fill both planters. I figured they would just last through the fall, but to my surprise they were still looking beautiful in the middle of winter!
I went out one snowy day and couldn't believe these were still looking amazing in the frigid temps with snow all over them -- full of color and not dying off one bit. I thought for sure they would eventually fade, but nope.
They look absolutely amazing now:

Technically sedums are succulents, so it's surprising (to me) that they are basically evergreen (in up to zones 6 and 7!). Huh. You learn something new every day!
That planter has more of the green and yellow blooms, but the other one has more red and orange:

They really are beautiful, right? So intricate and delicate, they are stronger than they look! The sparse blooms in that before pic have grown like crazy and are spilling over the edges of the planters.
I wonder if the difference in colors is because one may get more sun than the other?:

I need to move that hydrangea to a new spot. The sedum has taken over!
I was excited when I saw them again the other day (I found mine at Lowe's but you can find them online as well) and grabbed one for under our mailbox:

They would look great in between pavers on a patio or a walkway, along plant beds or in containers like we have in the back.
The best part -- you literally just put them on the dirt. No digging, no moving dirt around. Just lay them down, water occasionally the first couple of weeks and then start ignoring them like I did. ?
I easily tore them into pieces for the patio planters last year, but this time the bottom was thicker:

I just took scissors to get it started and then I was able to tear parts off.
Now I'm thinking about putting them in our front porch planters as well -- it would be so nice to leave the planters as is for all of the seasons!
I love gardening and I've never found anything this easy to plant, that grows so easily, that looks so good. Oh, and the price is GREAT because you need very little to get a spot started. Within weeks it will be start spreading and fill in nicely.
Heck...these would be great for window boxes as well! I'm a little obsessed. Have you tried these easy plants? So easy and they look so good! Was anyone else surprised these are evergreen?
Check out how easy it is to light up your garden and exterior here:

You can see all of my other gardening tips here!
See more of our home here. To shop items in our home, click here! Never miss a post by signing up to get posts via email.
Via https://www.thriftydecorchick.com/2021/06/the-easiest-plant-for-your-garden-ever.html |


