|
Hello there! I'm back with a project I've been planning for a few months! I was finally able to get to it last week. I've been holding off on starting until I could get a sconce installed on the wall first.
I've only shared this side of my office once because it's hasn't been much to look at. I showed you this wall early last year: 
It certainly wasn't awful, but it wasn't nearly as cool as the other side of the room!:

You can see how I built that wall of office built ins here.
Since that before picture I've changed out the TV for a slightly larger one and moved the dresser to another room. The bookcases gave me plenty of storage. (I replaced the dresser with a smaller table for the printer.)
I've had an idea for a big bulletin board in my head for a long time, but as I mentioned, I wanted to get a sconce installed first. If you have an outlet it's pretty easy for an electrician to run wiring for a sconce and switch. I've done it many times over the years!
I taped out the size for the board before starting:

I use painter's tape all of the time to figure out the placement and sizing of things -- it's great for figuring out furniture layouts too!
This post may contain affiliate links for your convenience.
See my policies and disclosure page for more information.
Step one: Hang particle boardI had to give my bulletin board a base on the wall -- otherwise I would be gluing the foam directly to the wall. I learned a long time ago avoid glue on the wall at all costs. :) My bulletin board size is four by six feet so three 2x4 boards were enough: 
I think they were $7 each. (It would be slightly cheaper to get a 4x8 piece cut down, but I get impatient sometimes.) As you can see, the TV was staying. I left it up as I worked because I wanted the bulletin board to surround the TV mount as closely as possible.
At the bottom I cut the boards short so the cords could go through that channel:

I don't have a pic, but I later put my favorite cord hider down the middle with the cords inside. If I have to remove the TV I can still take it off the wall and pull the cords through the bottom.
Step two: Install foam boards over the particle board
I've used the large 4x8 insulation boards you can find at the hardware store for bulletin boards before, but they are bulky and hard to get home. (I'd have to score and cut it there to get it in my car.)
So instead I used this insulation kit I found at Home Depot:

I can't remember the exact price because I bought it so long ago, but it wasn't bad!
It comes with six sheets and they are about 3/4 inch I believe. One kit was plenty!:

I used Liquid Nails (in a caulk gun) on the back of each piece of foam to secure it to the wood:

As you can see I just pieced it together as well as I went. Cutting it down is easy, it's just MESSY. I used a razor to score the foam and it popped off with a pretty clean edge.
It looked like it had snowed in my office after I was done, but it worked!
Step three: Attach the fabric
This is where I made a little misstep, so learn from my mistake! It ended up working out much better in the end thankfully!
I used a staple gun to attach my fabric at the top and then started working my way down. You'll need to be patient with this part! To make sure the fabric stayed against the foam, I used this spray glue as I worked. Just spray over the foam and then smooth your fabric down as you staple it around the boards.
I removed the TV for the middle part and just cut through the fabric:

Trim the fabric and staple around the hole like so:

I could have taken the TV mount off and installed it over the particle board, but that seemed like extra work to me. Either way would work -- I'd just be careful not to put the foam and fabric right up against the vents of your TV so it can "breathe."
The spray glue method worked GREAT! Almost too well -- the problem was, after I was done I could see the minor imperfections in the foam (because the fabric adhered so well). I wish I would have taken a photo to show you. It wasn't crazy noticeable, but enough that I knew it would bug me.
Thing is, I bought a fabric for this project months ago, but when it came time to install it, I chickened out. It was out of my comfort zone a bit, so I went with a basic cream tweed fabric instead -- trying to play it safe. But when I got it up, not only could I see the imperfections...but it was BORING. ?
Sooooo...I went back with my original fabric and LOVED it. I should have stuck with my gut, but it ended up being a good mistake because the first layer of fabric hid the imperfections. (I installed the final fabric over the first.) After I got my fabric up, I painted and installed trim around the whole thing to frame it out: 
I carried the beautiful green (called Vintage Vogue) on the built ins over to this side of the room and I absolutely love it against the fabric.
The fabric makes a statement but isn't busy. A larger print (like a floral) would look great, but I was worried it would get super busy with the photos/notes I want to put on here. Here's a closer view of the art light: 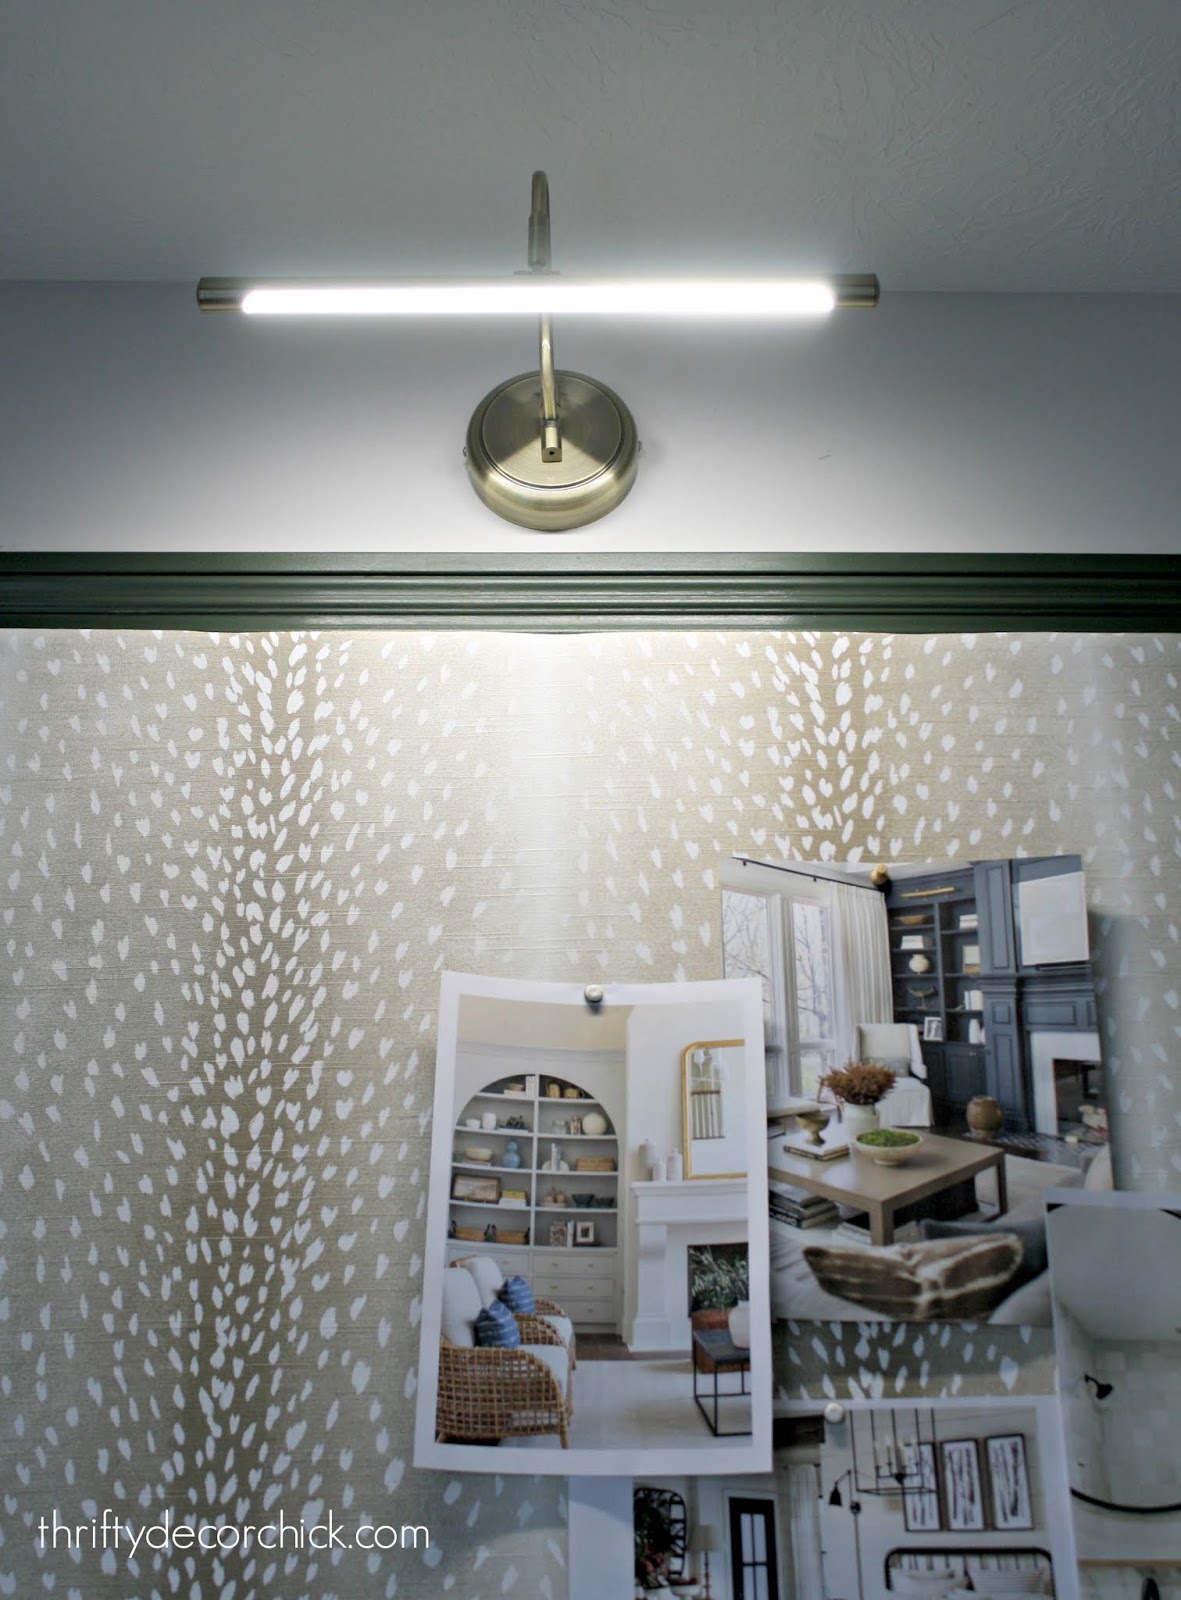
You can see how bright the LED light is!
I am SO in love with how this turned out!! I found my antelope (faux) fabric at Hobby Lobby for 40 percent off, but you can also find it here online:

The little console was from At Home and it's perfect for extra printer paper and ink.
I've already started filling up the board with things I've wanted to display for awhile -- some inspiration pics, mementos and recent magazine spreads:

Aren't those huge letters fun? I found those at Hobby Lobby too. I think they still have them!
It turned out just as I had envisioned all these months. I love that I have a spot to display these in a "neat" way:

Here are a few things to think about if you tackle this project:
Here's a look at the before of this wall again: 
And how it looks now!:

I have plans for one more big project in this room! But after wanting to do this big bulletin board for so long, it feels complete to me for now. Have you created a big bulletin board like this for your home?
------------------------------------------------------
Here are a couple of other ideas for office organization! You can also make a HUGE chalkboard using my tutorial here: 
Or use an old frame to create a bulletin board as well:

(I later changed it out to a magnetic board instead of using pins!) See more of our home here. To shop items in our home, click here! Never miss a post by signing up to get posts via email. Via https://www.thriftydecorchick.com/2020/01/how-to-make-huge-upholstered-bulletin.html
0 Comments
Hello there! Thanks so much for the kind comments on my latest molding project I shared earlier this week!:

I've created many "board and batten" looks over the years and for the money and effort it's one of the biggest bangs for your buck. And with just a bit of tweaking it works in both modern and traditional homes.
My version above is the cheapest way I've done it, but it's not a budget breaker to do it with thicker trim like I did in our powder room:

I did that same look throughout our old family room and kitchen as well:

I've gathered 20 examples of board and batten too share with you so you can gather some inspiration for your own home! These are variations on the treatment and you'll see how well it works for all kinds of design aesthetics.
There are also some tutorials for textured walls (my biggest question about this look!) and tricks to install without having to remove your baseboards.
First up is one of the prettiest makeovers I've seen in a long time, and it's mostly due to the board and batten look Laura added throughout this room:

Add a few horizontal lines and you have more of a grid pattern like I did in our last master bedroom. Sarah's version in white adds a subtle but beautiful detail:
Ashley shares an awesome way to keep your baseboards intact in her tutorial:

If you leave out the horizontal lines you'll get a much more modern look, especially with skinnier trim:
You can go all the way up the wall or at any height you want. I love the addition of wallpaper at the top of this one. And of course, the navy is a classic color that always works!:

Remember when I was thinking of using lattice for that wall above? You can see how it look a bit more modern when placed closer together (and only using vertical pieces):

I especially love the board and batten look in a mud room. The lines give you the separation for different "cubbies" with the addition of hooks:

And how cute is it with the names too?

I'm a lover of contrast but Shannon's room with this wall treatment is so pretty and calming:

The number one question I get when it comes to any trim work on walls is how it would work with textured walls. This board and batten was done on slightly textured walls and looks GREAT!:

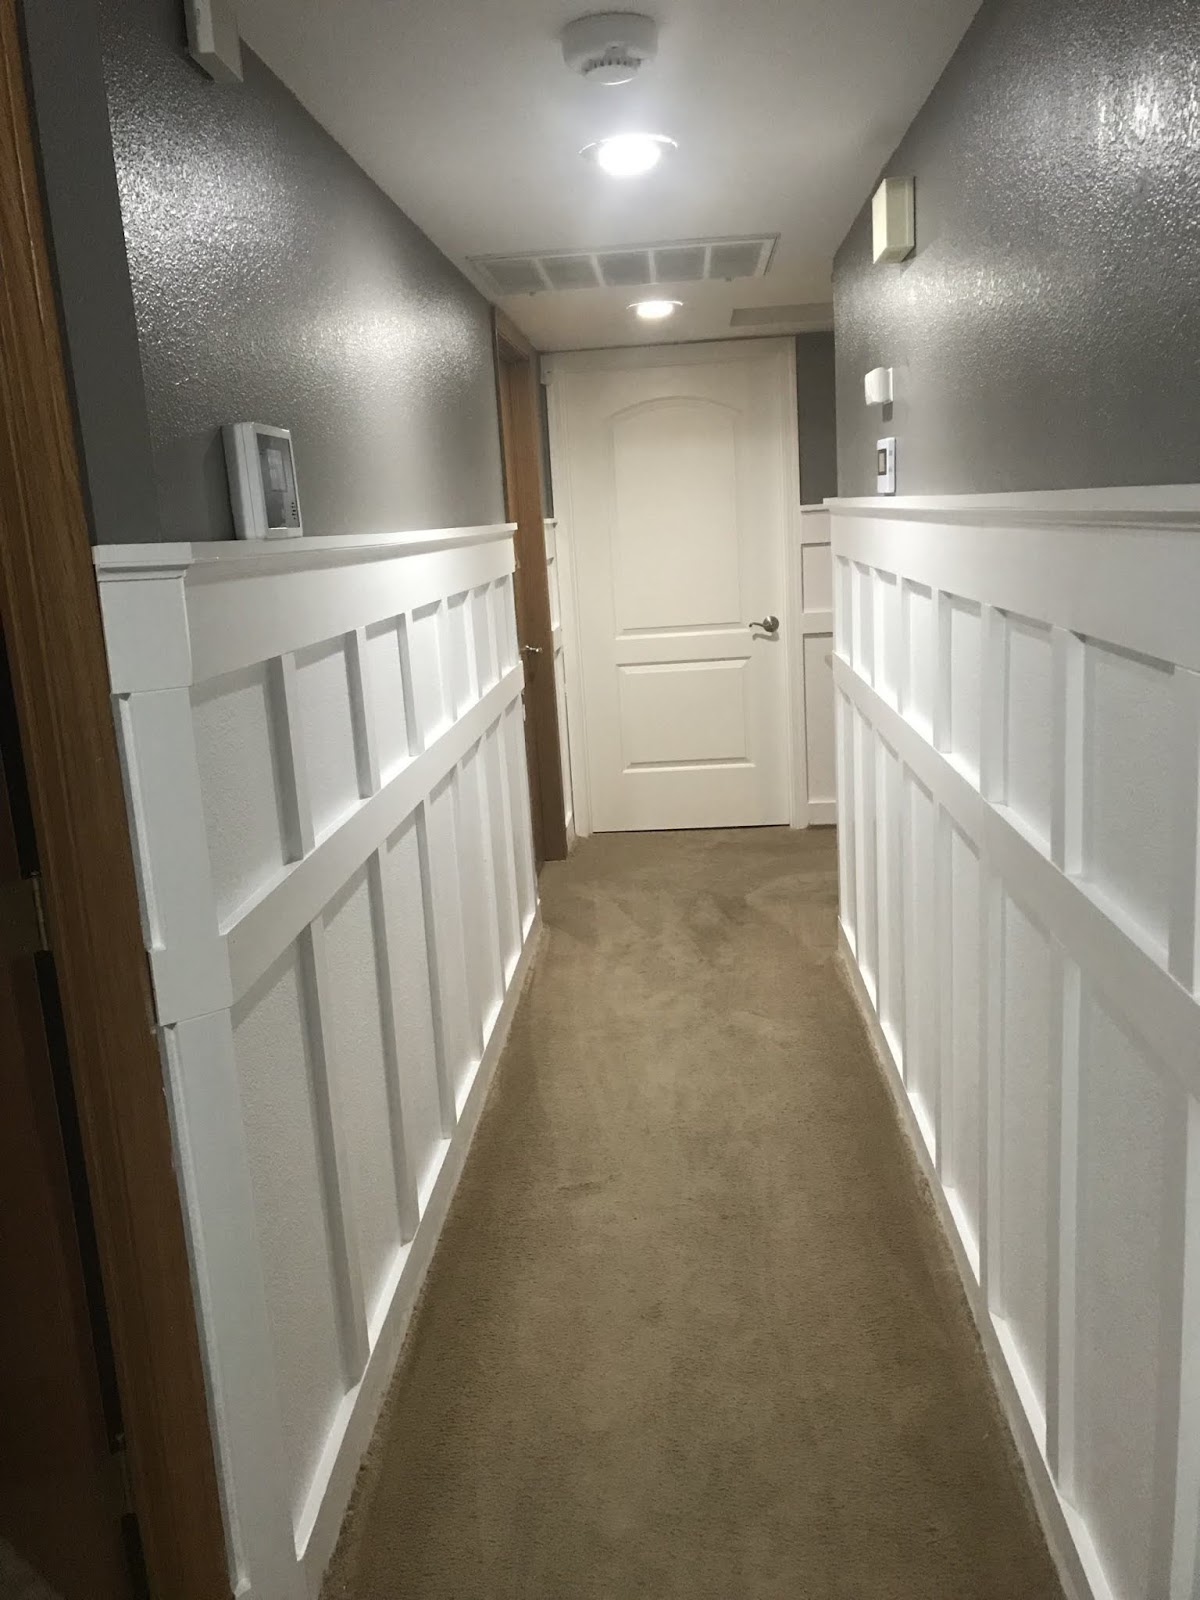
I LOVE how it can brighten up dark spaces. You really have to see Jenny's hallway before to see what a difference it makes:
Kim shares another way to make B&B work without removing your baseboards:

If you're renting you can absolutely do this in your home! Paint your trim and wall BEFORE installing and don't caulk your seams. Julie shares how she did it here:

If you prefer a more modern design, go horizontal only with your boards like Chelsea did:

If you don't do the whole wall it can be tricky to hang art after it's done. Rachel shares how to do just that (this is the way I've done it too):

I LOVE board and batten in color and white walls. It's unexpected and just lovely. I love it in pink!:

And it's just dead sexy in black!:

And how pretty is it in this minty/aqua color? SO lovely!:

As you can see, there are SO many beautiful ways to incorporate this look into any home! I hope you found some inspiration! Maybe this will be your weekend project? ;) Have you added this to your home? It's a timeless look that works in so many spaces. See more of our home here. To shop items in our home, click here! Never miss a post by signing up to get posts via email. Via https://www.thriftydecorchick.com/2020/01/twenty-gorgeous-ways-to-incorporate.html
Hey there! I'm back with the first completed wall of trim work on our stairs! I have three walls to do and this one was the smallest. As you'll see I have quite a bit of work ahead of me, but we LOVE it so far!!
If you missed the how-to, check out this board and batten how-to post to see how inexpensively I did this project (this is only $15 worth of trim!): 
This post may contain affiliate links for your convenience.
See my policies and disclosure page for more information.
Remember how I said it's hard to envision the end result sometimes? With all those angles and without the paint on, it can feel busy.
Trust my friends! Paint saves the day, yet again!
First, I had to fill the nail holes (I use a nail gun to install all of the strips). I have just recently started using this spackling compound and I'm loving it:

It's super easy to apply with both your finger (my preference most of the time) or a putty knife.
Make sure to get all of the seams and nail holes and then let dry:

You can hand sand this down after it dries, but I prefer my hand sander because it's so quick.
I hate sanding, but it only took maybe four or five minutes to sand down everything:

Painting is always the longest step -- it took three good coats of paint and a few touch ups all over (OK, let's just say it was four coats) and it was DONE!:

I caulked up a few spots along the stairs and wall as well.
I still need to address the stained area under the stair trim -- there are some unstained spots showing since I changed out the trim. You can't even tell just looking though:

I've noticed when working on trim work projects in our home that the white paint color I've been using, Pure White, hasn't been matching exactly.
I checked our records and it says they used Pure White but there's no way. Pure White is brighter and whiter than our trim. So I took a piece of old base into get color matched and this is a much closer match! I like both white colors -- you can't go wrong with either.
Ours is a slightly creamier white:

I went to share the paint formula with you but they didn't attach the sticker to the can. I'll see if I can get it from them. (I use Sherwin Williams paint.)
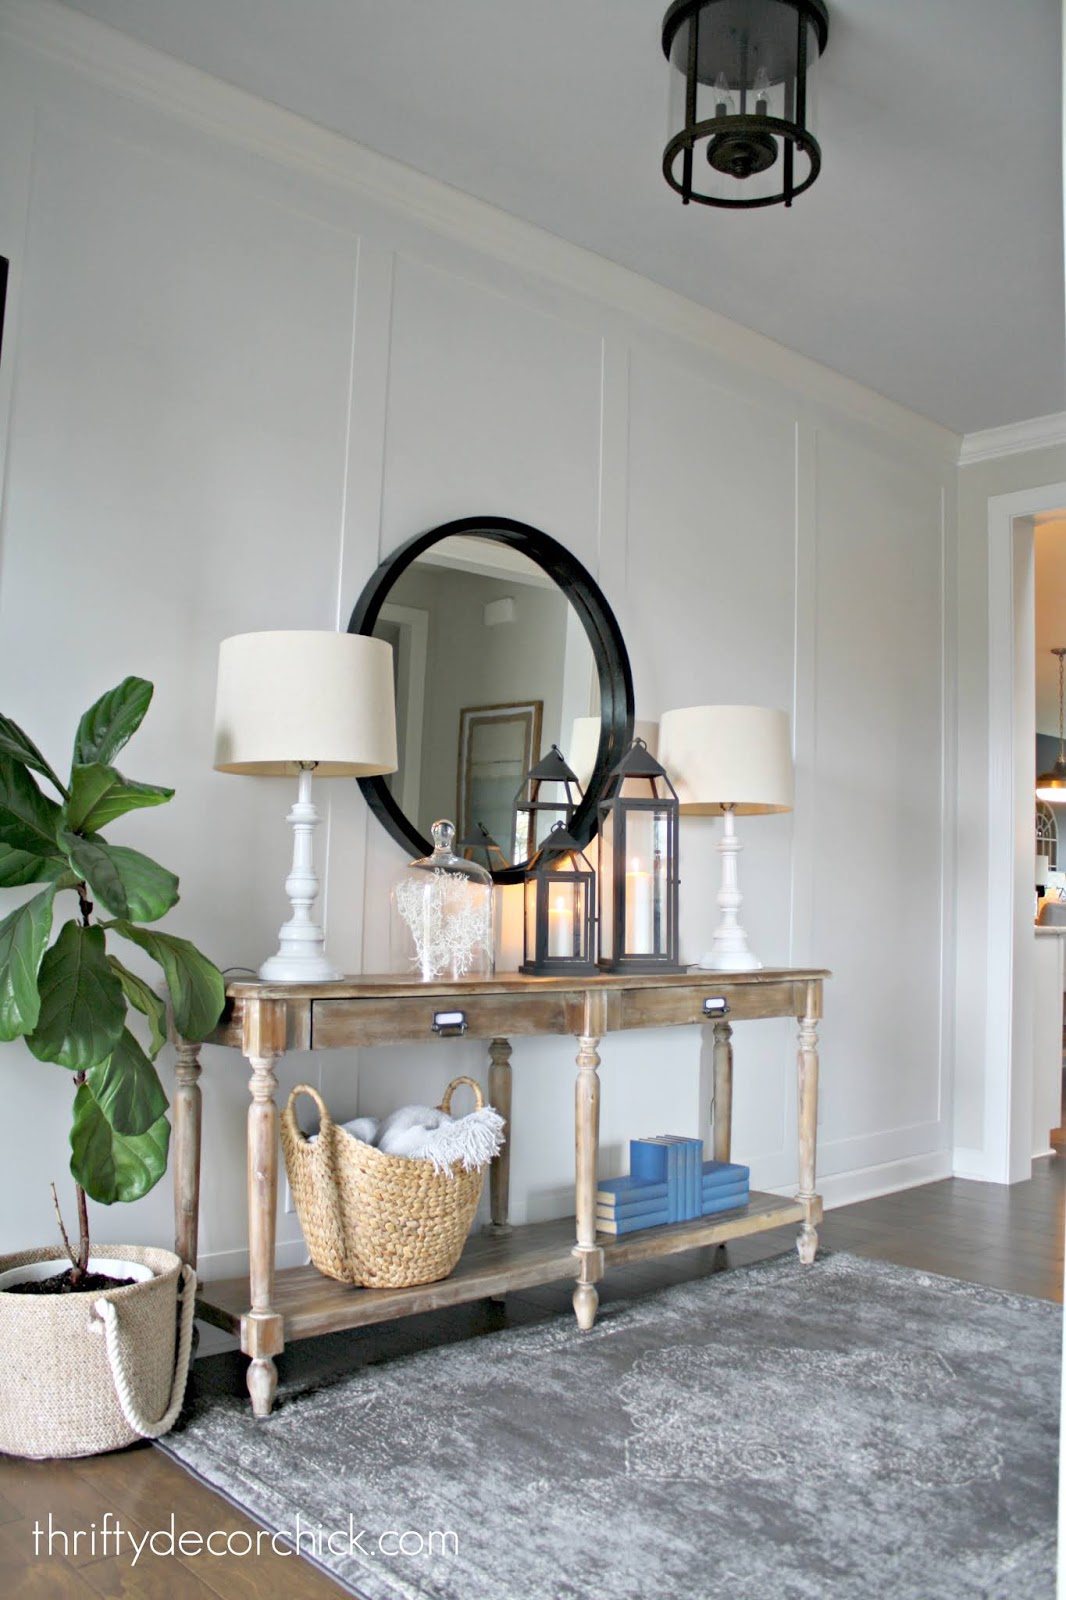
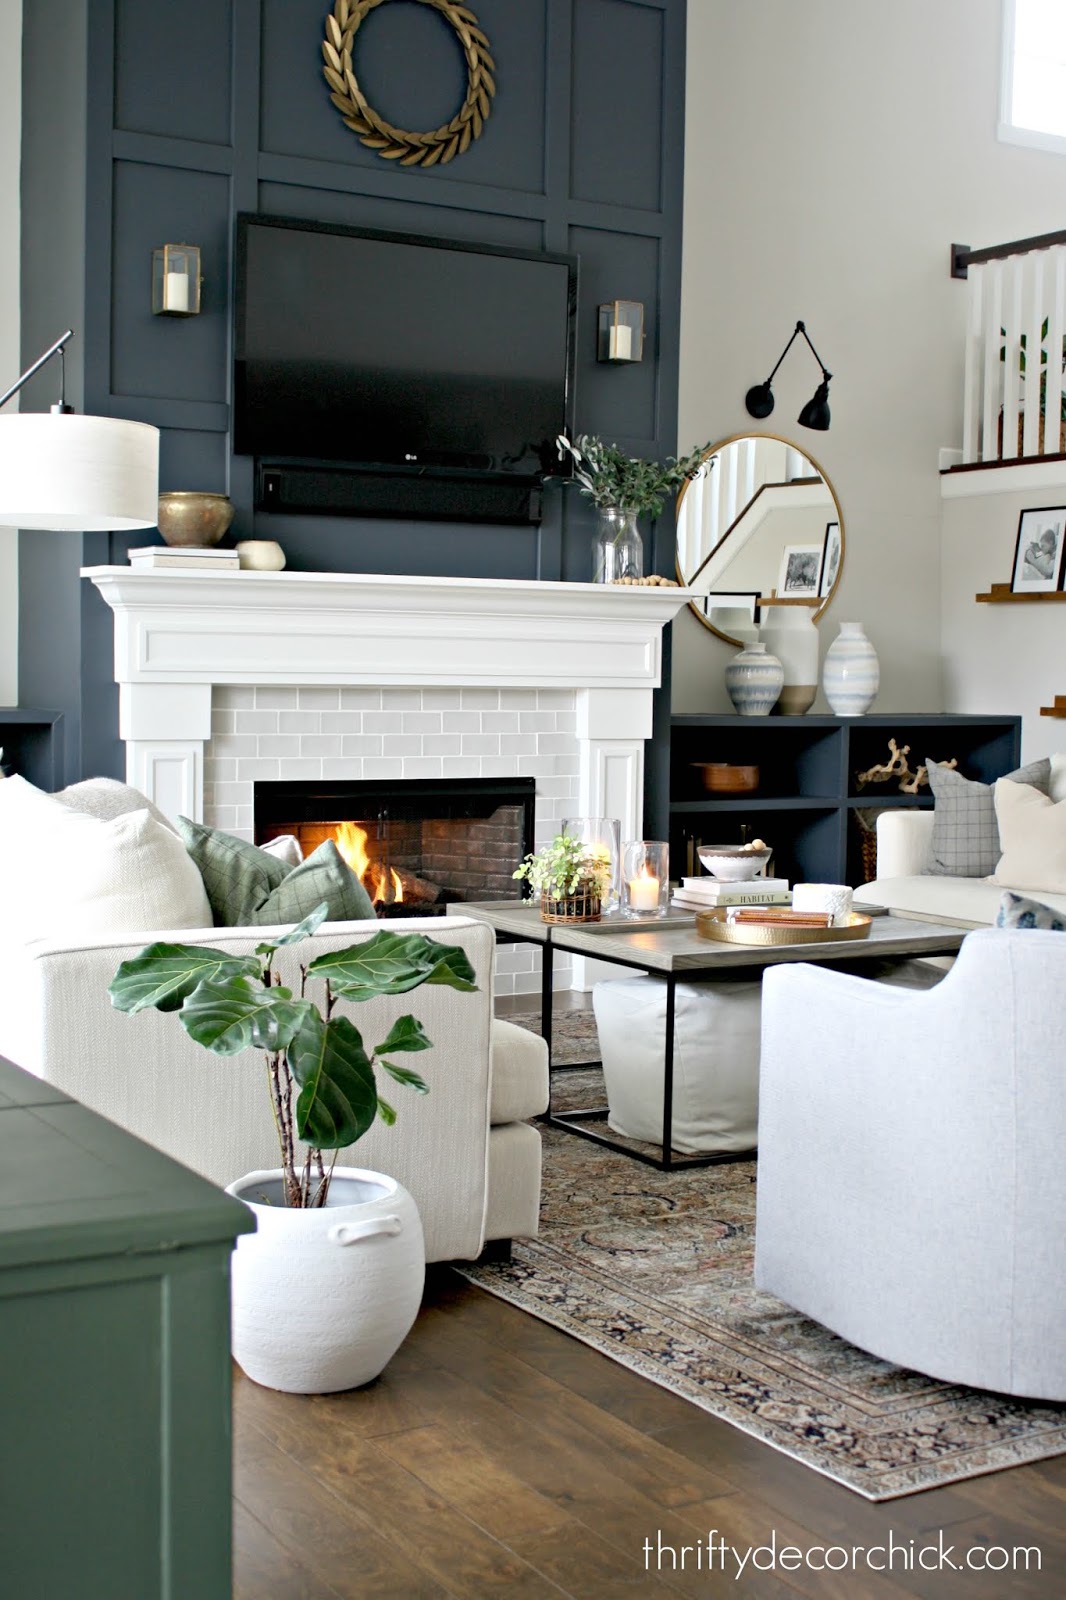
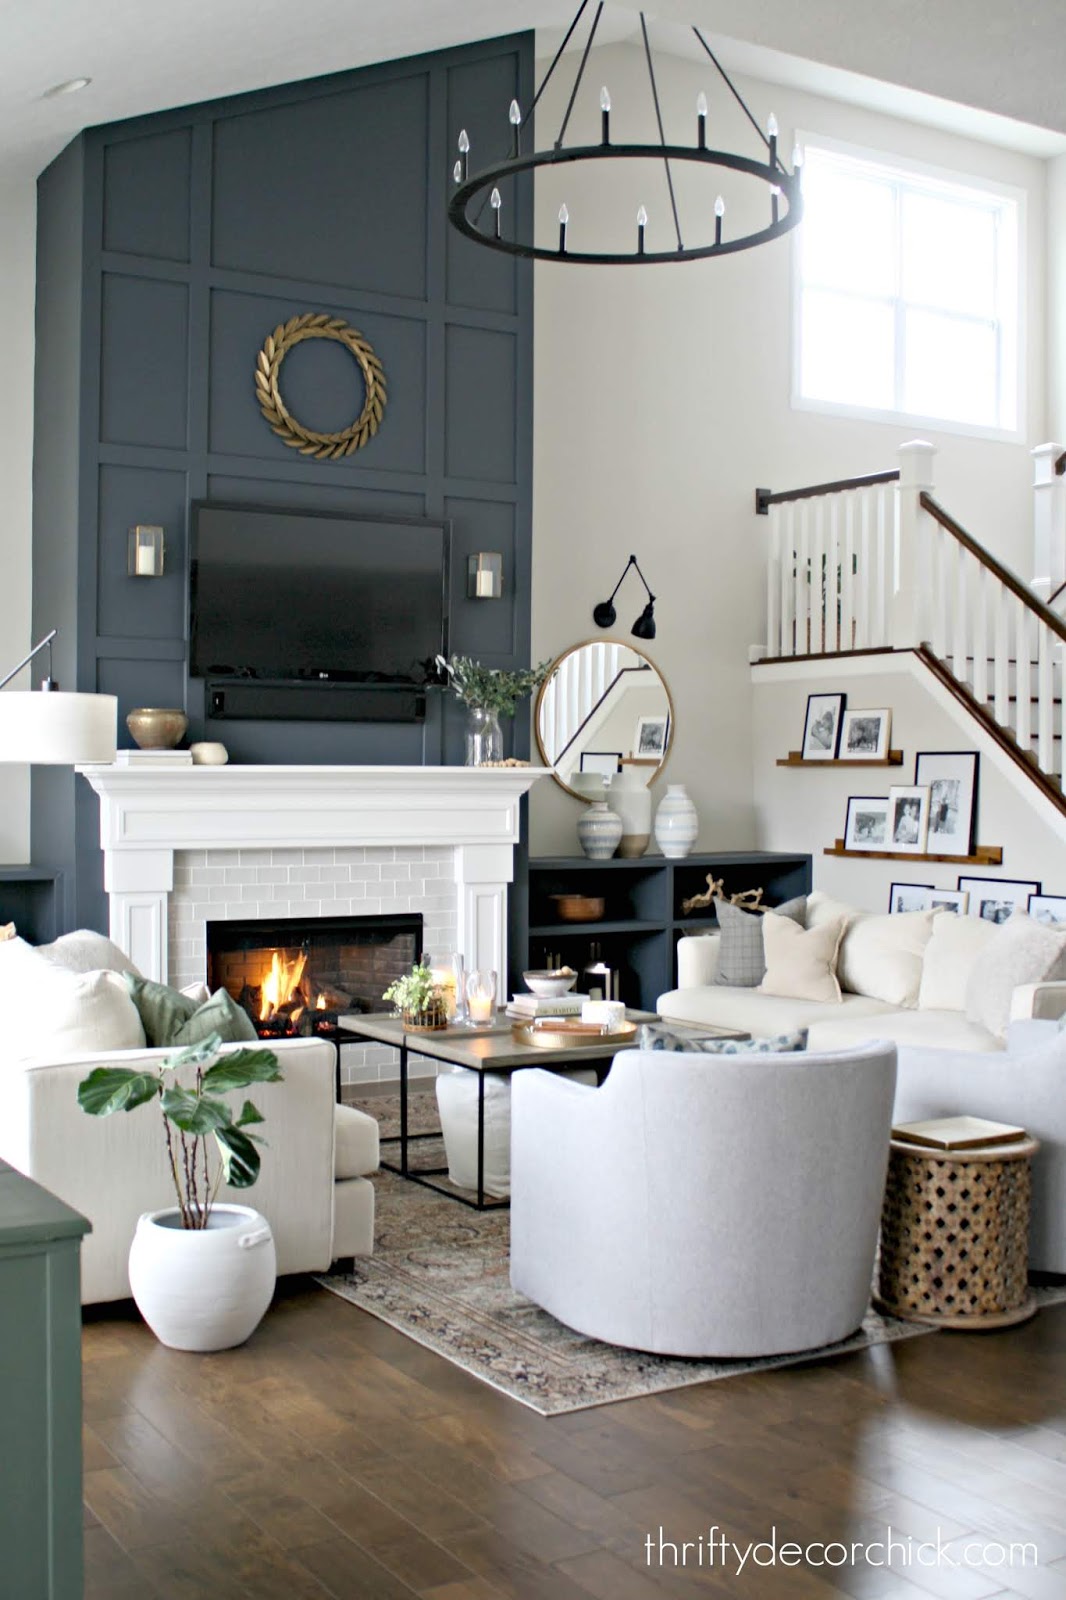
Anyway...we love it!! It's exactly what I wanted for these walls. As I mentioned last week...all three of the stairway walls will get this treatment:

And it's perfect. It's a beautiful accent that adds character to the room but it doesn't take over the space.
I was a little worried it would compete with the big fireplace wall with trim that I did last year, but it actually ties the two together beautifully! I couldn't be more pleased!
Here's a before photo from right after I finished up the built ins by the fireplace:

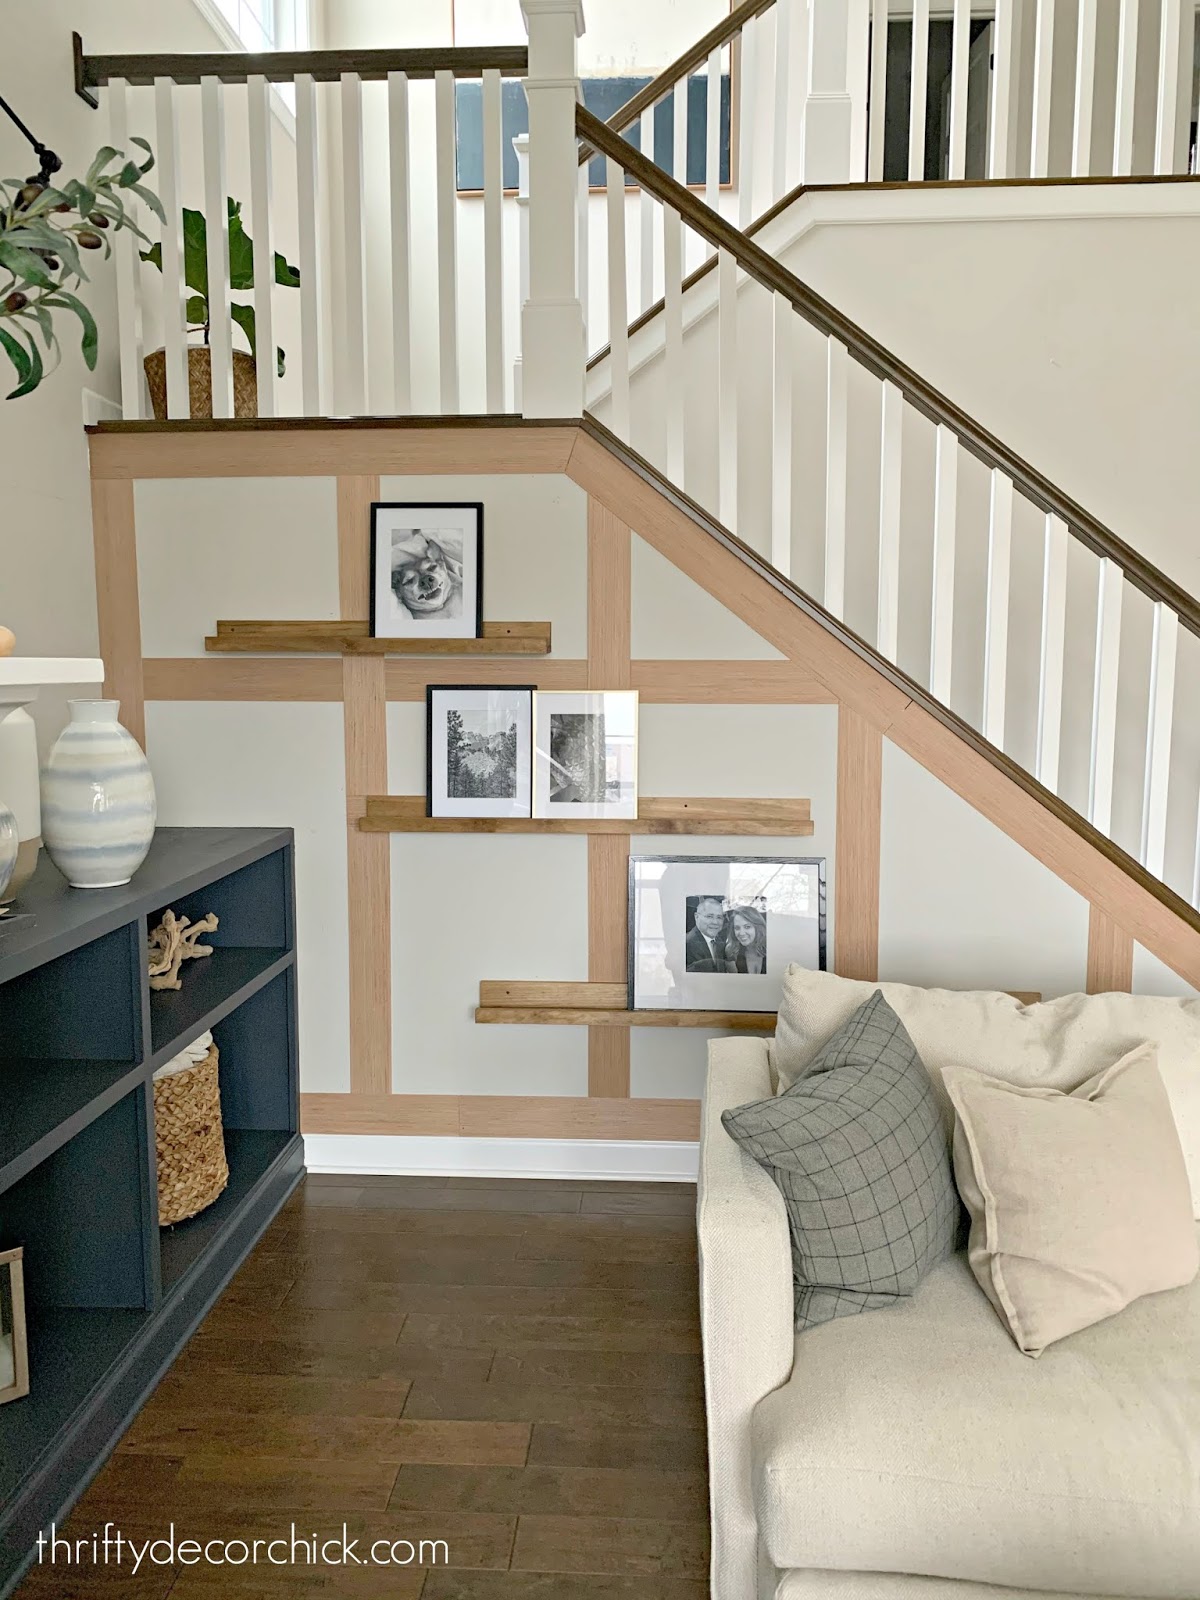
And here's that wall with the DIY picture ledges (so cheap to make on your own!!) and this first board and batten accent wall:

I really love the combo of the crisp white, stained wood and black frame accents! It's my jam. :)
Now I can't WAIT to get all the walls done! It's going to be so lovely when it's finished! I think I'll tackle the long wall on the landing next, since it's the easiest. (As long as my ladder will reach. ?)
Here's another look at the wall last week:

See more of our home here. To shop items in our home, click here! Never miss a post by signing up to get posts via email. Via https://www.thriftydecorchick.com/2020/01/finished-board-and-batten-accent.html
Hey there! I've FINALLY started the stairway wall project I've talked about forever!
After going back and forth on what I wanted for at least a year, I just went for it. I hit a snag along the way and redirected...I'll share that in a minute!
I started with the lowest wall because it was the easiest to reach. ;) Here's how it's looked for awhile after I built and installed my picture ledges/shelves:

I decided on a super simple look that won't compete too much with the fireplace design I did late last year.
I started by removing the trim under the stairs -- it's pretty standard for builders to use baseboard (didn't get a before pic so this is another spot on the stairs):

The trim I was planning to use is 1/4 inch thick and if you butt it up against the smaller side of the base, it didn't meet up to my liking. I wanted them to be as flush as possible.
This post may contain affiliate links for your convenience.
See my policies and disclosure page for more information.
I don't LOVE the baseboards used as trim anyway, so I wanted to change it up. I wanted something a little cleaner, so I was planning to use these thin lattice strips from the hardware store:

Here's the thing that sometimes bites me in the butt. Once and awhile I'm impatient and just want to get after a project. Normally I'd have the luan I usually use cut down instead of buying the lattice. Luan is only $15 for a 4x8 piece and it gives you ten or so strips (depends on how wide you have them cut).
Thing is, I was being lazy and didn't want to go grab the wood and have it cut down at the store. And the cuts aren't always GREAT -- it's a free (or very low charge) service and I'm so thankful they do that at our local hardware stores. But sometimes they aren't cut well and you're left with a lot you can't use. It just depends on who cuts it! I wanted to go the easy route this time and I should learn by now that that doesn't usually end well. ;)
Soooo...when I took the base off below the stairs, the gap between the stained wood and the drywall was too large for me to use the lattice. For all the parts farming the wall, I was going to have to use something wider.
I didn't even realize I had scrap strips of luan already cut down in our garage from another project. Score!! I was able to take all of the base off (except at the bottom) and replace it with luan:

This part was pretty easy because I just held the old base up to the new trim and marked the length and angle it needed to be cut.
Now my trim had something it would fit perfectly flush against. You can see I also added some along the left side so the whole thing was trimmed out.
I thought maybe I could still use the thin lattice for the rest of the wall so I started installing:

And I hated it. It looked all wrong.
I do have to say -- until it's painted it's really hard to envision how it will look. Keep that in mind as you work on projects like this. A coat of white paint (or whatever color) will unify everything and make it look better 100 percent of the time.
I could just tell immediately that the thin strips were off with the thicker stuff framing it.
So I dug around more in the garage and found enough of the luan strips to finish the whole wall. DUH. I could have saved so much time!
Here's a little trick when you're installing trim up against an angled wall or trim -- hold the end of the piece you're installing up against the angle (use a level to make sure it's perfectly horizontal or vertical):

Mark the top and bottom (and then draw a line if your saw doesn't have a laser line). Place your trim on the saw and move the saw angle till it matches up. It will get you an exact match!
Figuring out the spacing for board and batten is a math game. I figure the space between the two end pieces of trim on each side of the wall. That was 129 inches. My strips are 4.5 inches wide, so I figured out how many I wanted (four) and subtracted that total:
129 inches - 18 (4.5x4) = 111
Then I divided 111 by how many "open" spaces I'd have vertically. Four pieces of trim means five spaces so...
111 inches ÷ 5 = 22.2
I ended up doing 22 inches to give myself a little wiggle room.
I added a horizontal piece across the top (placement is wherever looks best) and I was done!:

Well not done done. Next up: filling holes, light sanding and then at least two coats of paint, probably three.
I went with one line across horizontally instead of a few because I didn't want it to get too busy. It's easy to take away or add more if I want to change it up. I want this to be an accent that adds character to the room, but I don't necessarily want it to be the main focal point.
I should have known that I'd like the thicker trim much better anyway! That lattice was going to be way too wimpy.
I know it's hard to envision this in it's unfinished state, but bare with me. When it is all white it will look sophisticated, but won't overpower the space. It will be very pretty when I'm done...that's the plan. ;)
Oh, and I never plan to remove those picture ledges so I trimmed around them.
It's been awhile since I've shown you how to do basic wall trim with this cheap stuff. You can do so much with just one 4x8 sheet! Stay tuned to see that first wall finished up.
See below to see just a couple of the projects I've done with these luan boards. It's easy to use and looks great when painted!


See more of our home here. To shop items in our home, click here! Never miss a post by signing up to get posts via email. Via https://www.thriftydecorchick.com/2020/01/how-to-install-board-and-batten-wall.html
It's that time of the year! Are you decluttering? Or as I like to call it, decrapifying? It's a GREAT feeling, right?
I don't do a massive purge every year anymore because I keep up with it throughout the year much better than I used to. I don't bring nearly as much into the house either. This decluttering method I shared with you years ago has really changed how I deal with stuff.
But I still like to lighten things around here around this time! Getting rid of crap is pretty much one of my favorite things to do.
THIS post is more about organizing what you do have though! I've gathered some of my absolute favorite organization DIY projects from over the years -- from both our old house and this home. I hope you'll find them as helpful as they have been for us!
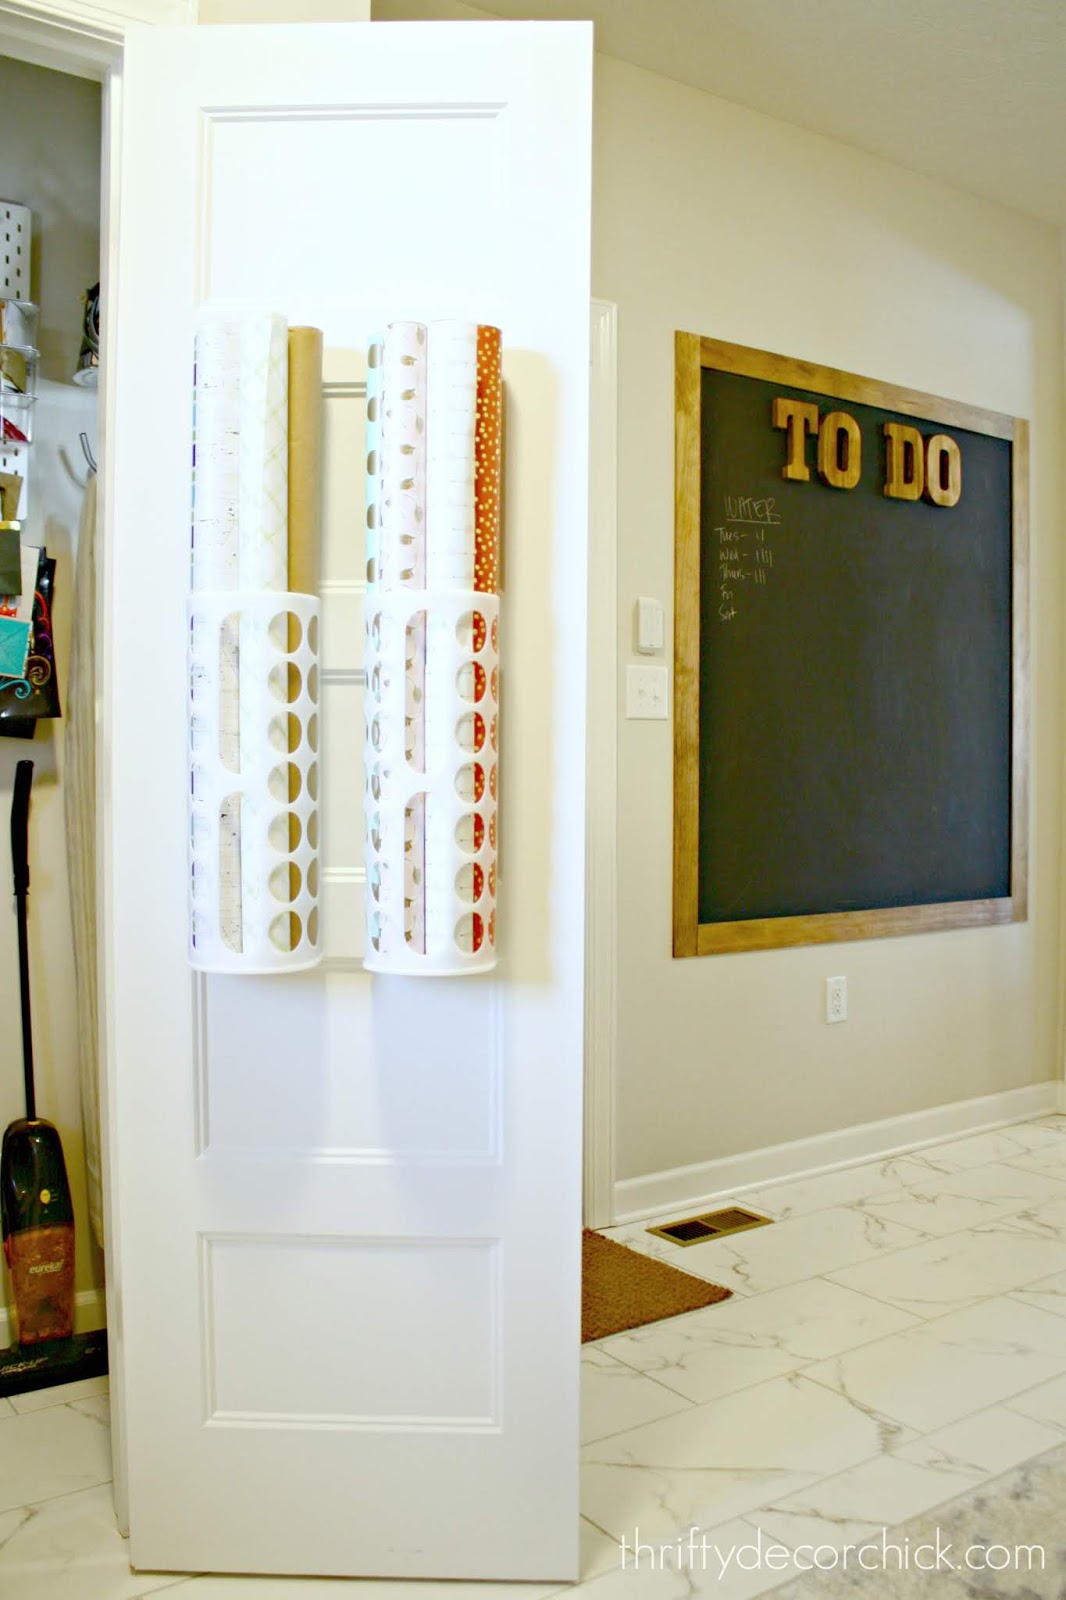
Gift wrap and party supply storage
First up, a spot for the wrapping paper/party supplies. I utilized the wall space in our mud/laundry room closet for this:
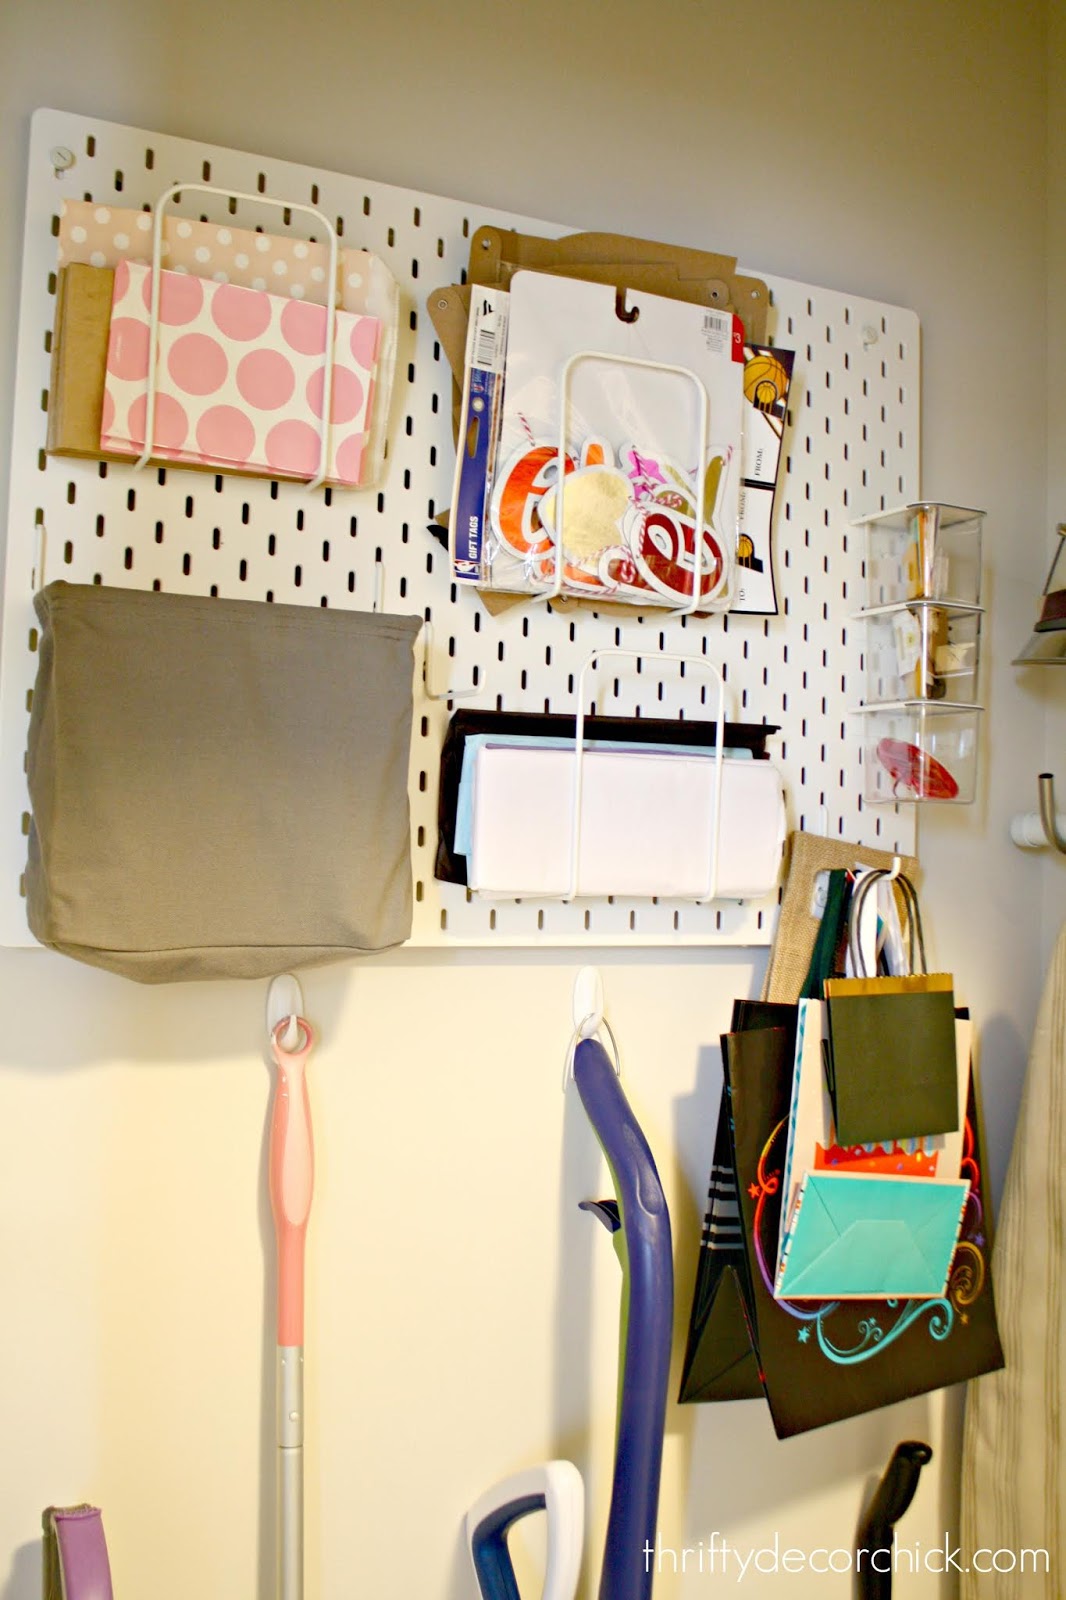
You can see the sources for everything in that post, so check that out for more! I find, when in doubt it helps to go vertical with your storage. Utilizing wall space is so smart!
I used what are supposed to be plastic bag holders to store our wrapping paper:
This post may contain affiliate links for your convenience.
See my policies and disclosure page for more information.
You can see that whole, beautiful ? organized mud room closet here. It's my favorite. Photo and kid art storageThis linen closet is another favorite -- it holds all kinds of random stuff. Tissues, candles and plug ins, toilet paper...stuff we reach for often. I use those basic boxes for photo storage: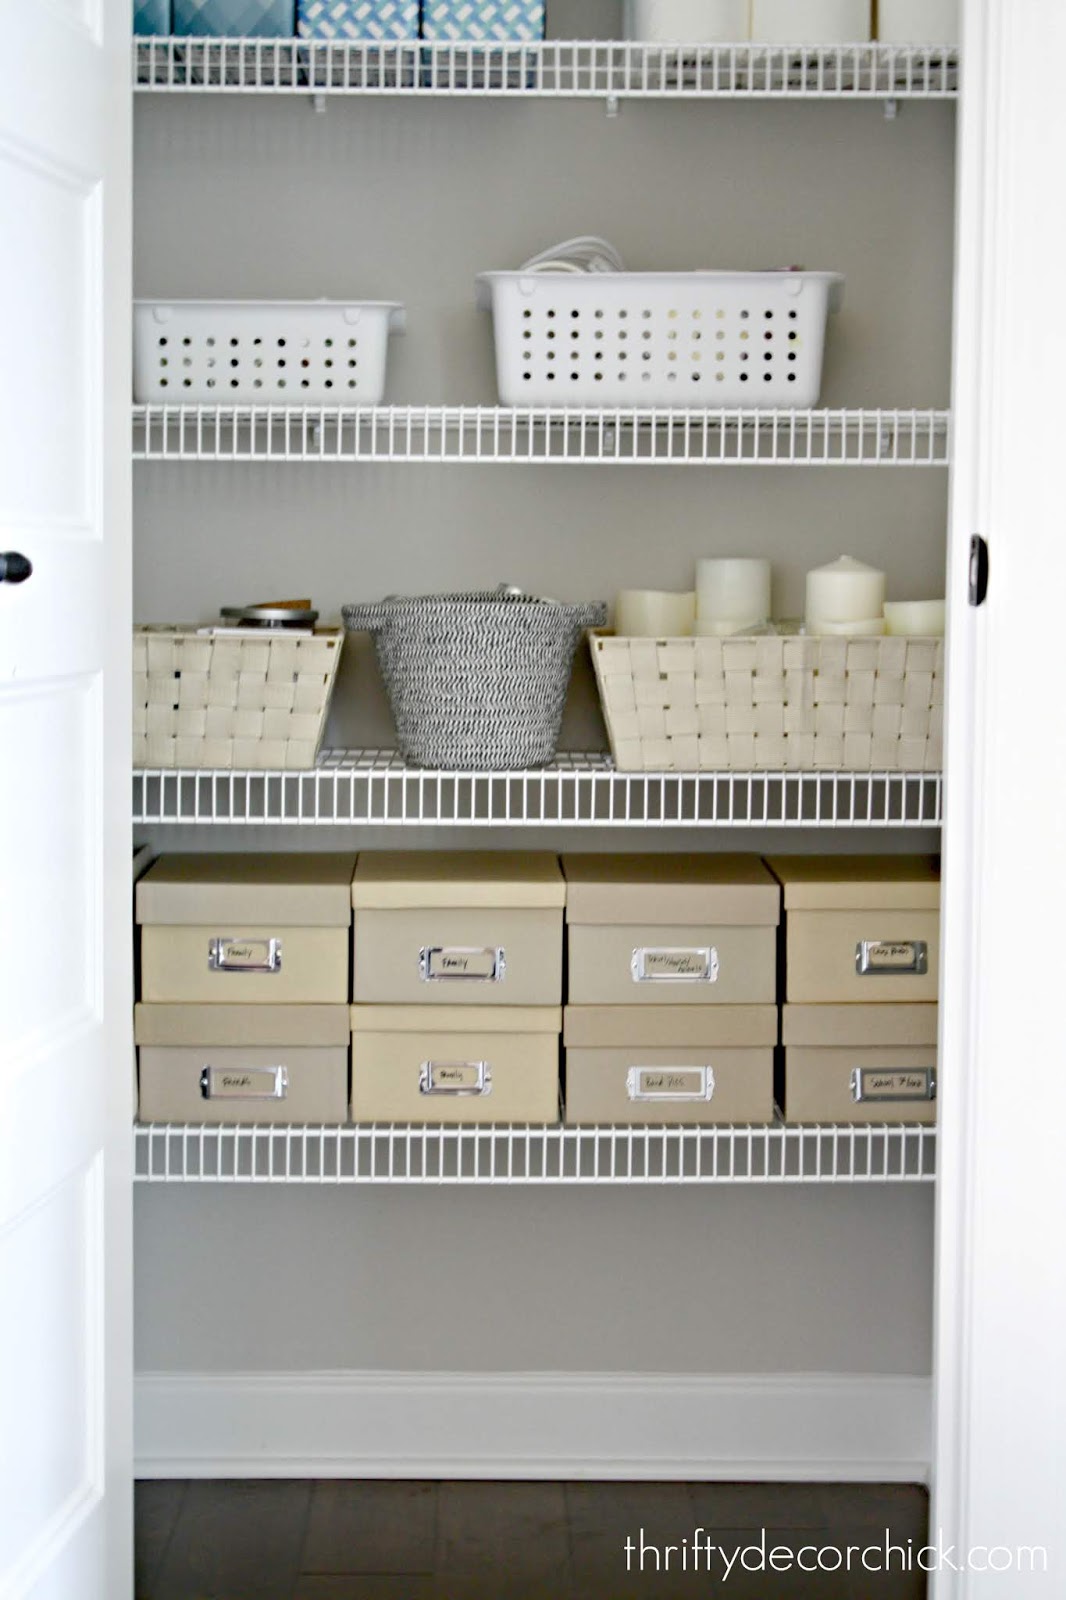
You can see my whole post on how I store printed photos of all sizes here. I'd like to move those to a new location, but I haven't found the perfect spot for them just yet.
Another favorite for big photos or kid's art are these long, flat boxes I get from the Container Store:
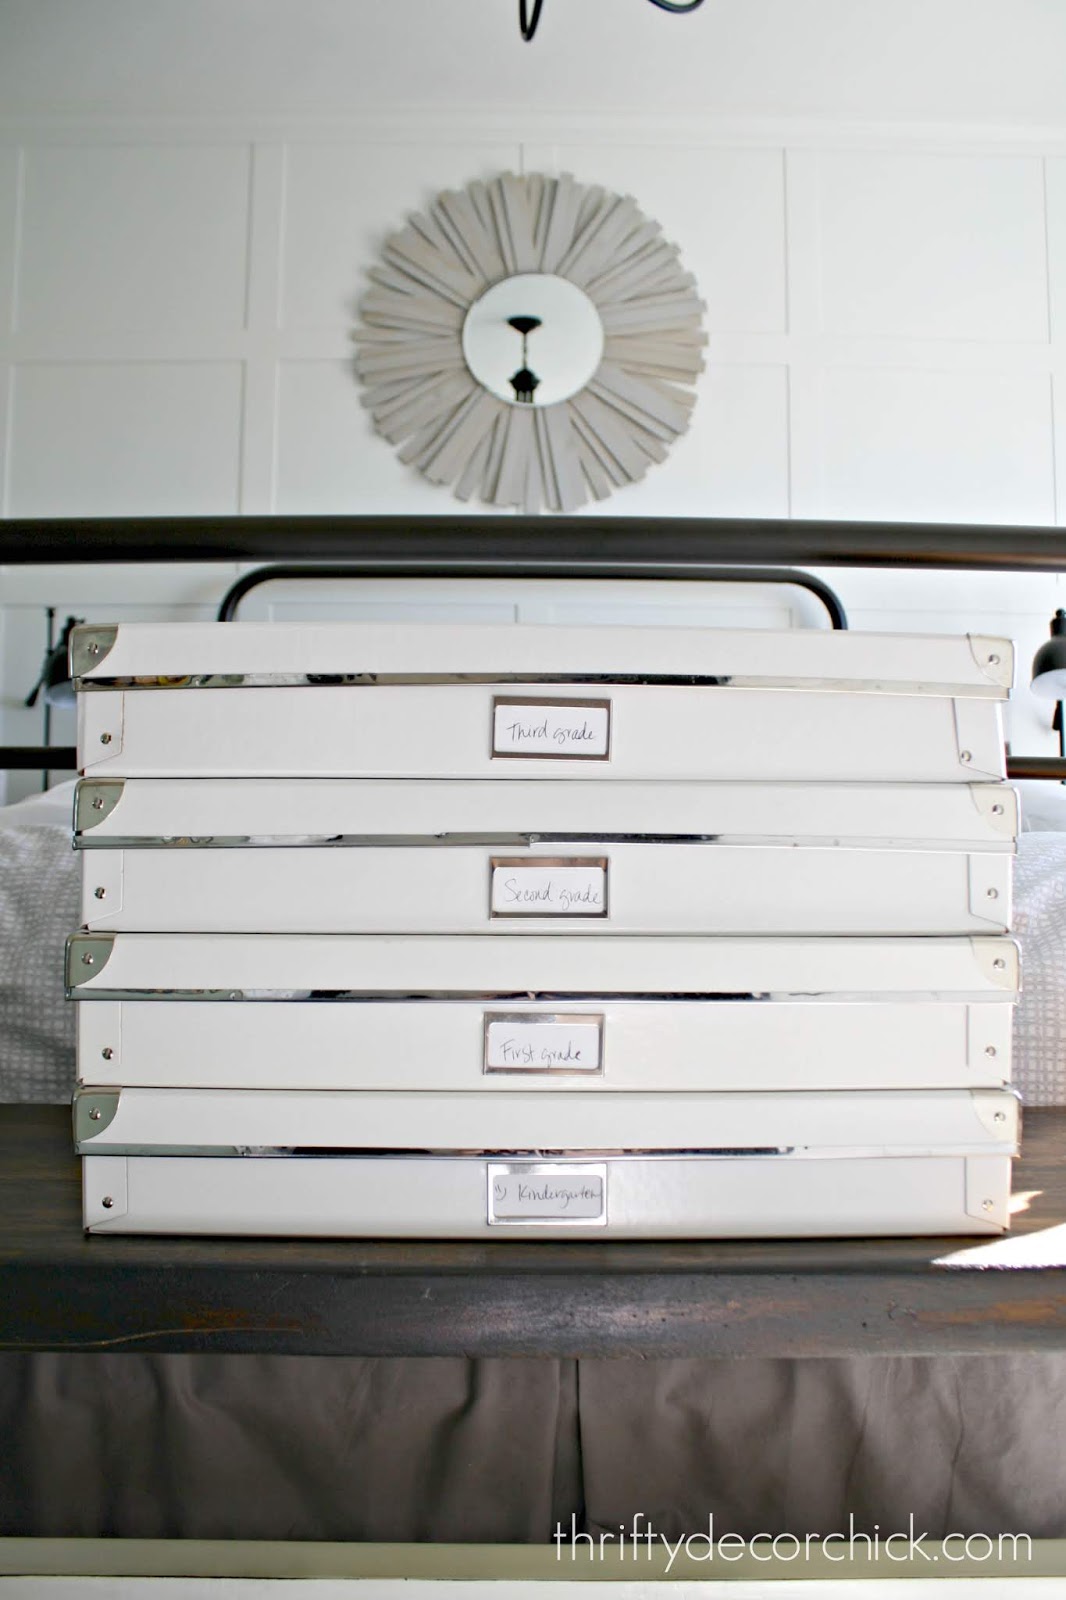
I would buy one for every school year (sadly they aren't needed as much anymore as he gets older!) and would only allow myself what would fit in there. They are super sturdy and long enough to hold big art.
Hidden magnetic storage inside cabinets
This is one of my favorite little DIY hacks I came up with years ago. A project that went wrong turned into this hidden memo board and worked so well for us!:
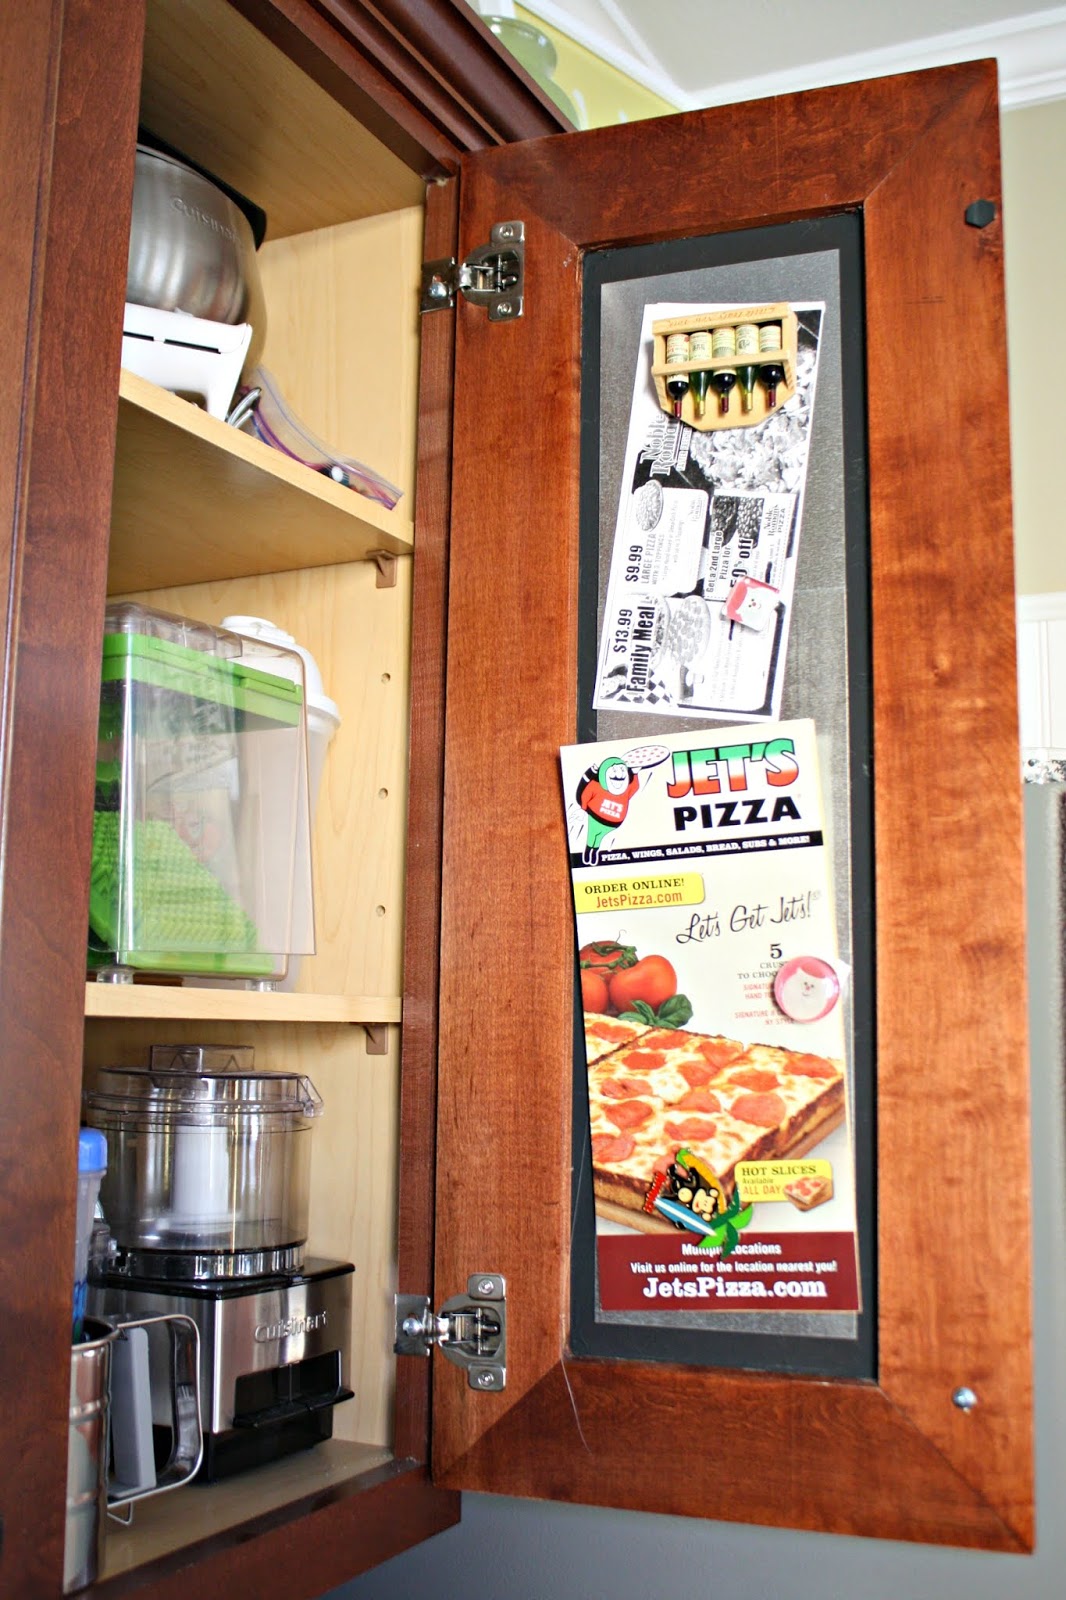
I loved that they were easily accessible but also hidden away. It would also be a great spot to hold measuring spoons and cups if you use these little magnetic hooks!
CD/DVD/video game storage without cases
OK, OK. We're living in the Stone Age that we even still have these, I know. Maybe you'll completely gone digital with your music and movies, but I can't part with them!
I learned years ago that we could save SO MUCH space if I took them out of their cases to store them. These soft DVD cases hold a ton and will save you a crazy amount of space:

We use them for computer disks, movies, CDs and video games. (Back in the day I donated all of my plastic cases to a photographer but I'm not sure if they use them anymore or not?)
How to store little trinkets and tools
This tool storage with all of it's little drawers for tiny hardware has been SUCH a great storage system for my smaller items that used to be everywhere:
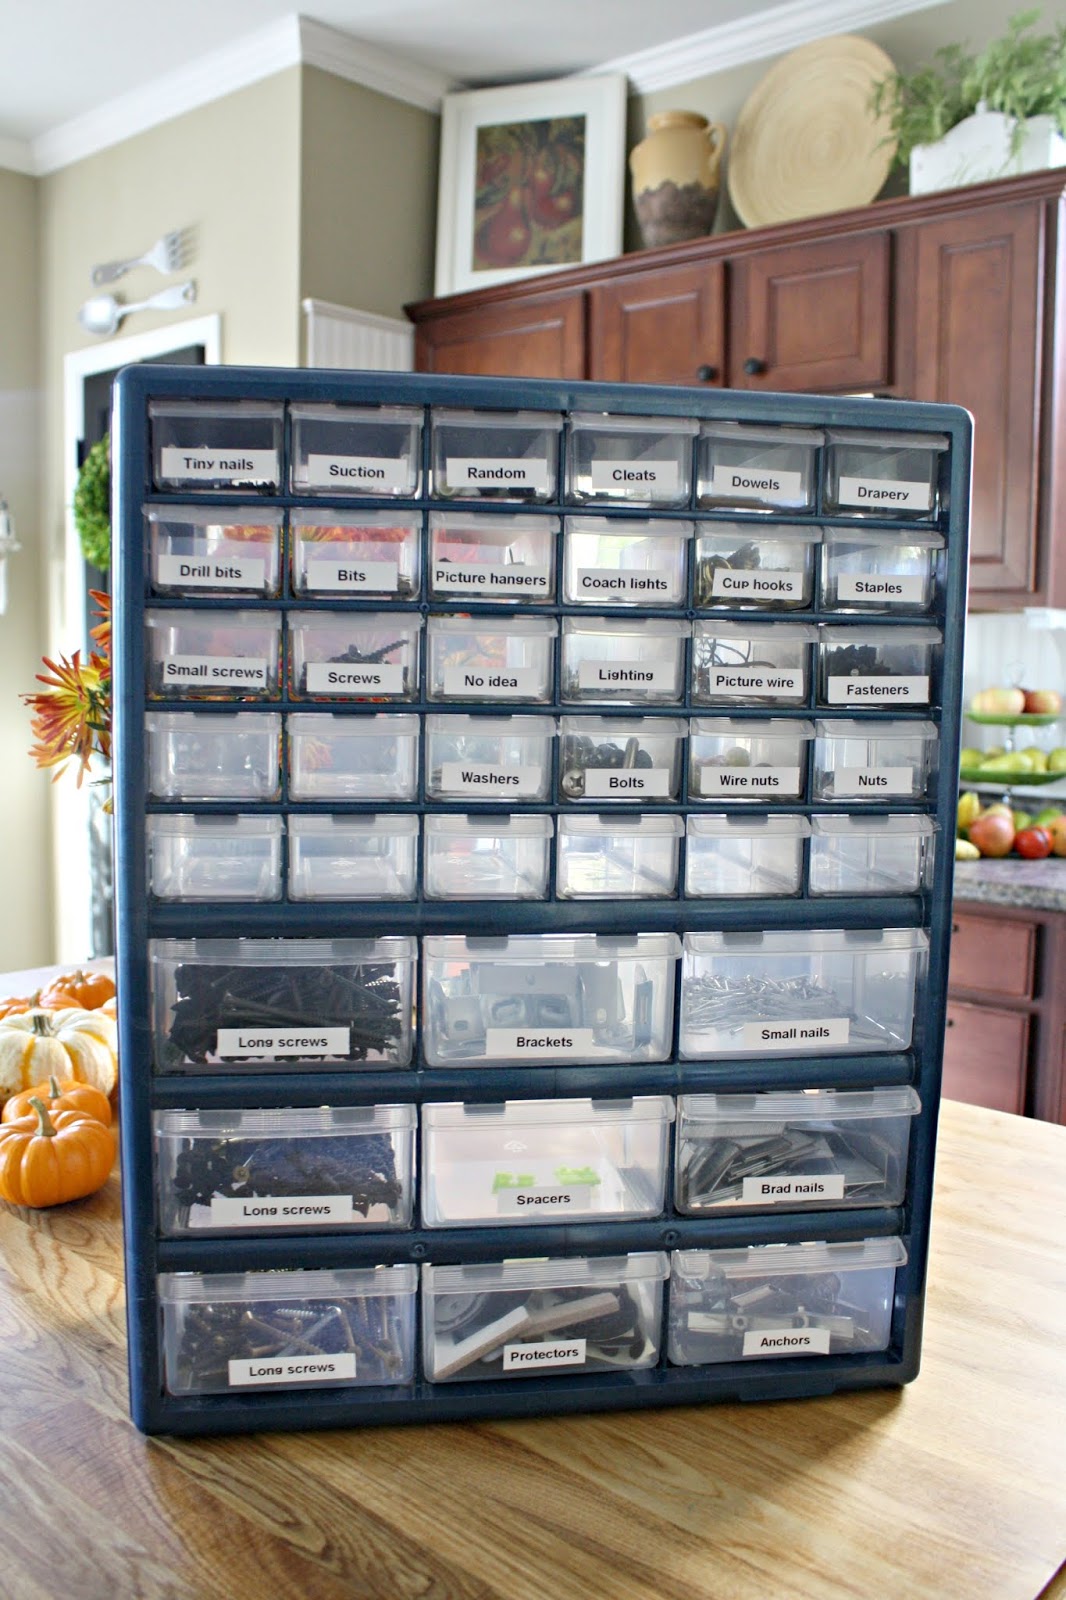
I used my trusty label maker to label everything. I couldn't live without this set of little drawers! I've had it for years and it's held up beautifully. The only issue I have is it's so heavy I can't hang it. I still need to find a good spot for it!
Organizing jewelry and shoes (in a pretty way!)
I shared how I switched my jewelry to these beautiful linen storage pieces here. These are still serving me really well and I've been really good about keeping things put away:

I don't think pretty organization is necessary by any means...but it does help, right? I find I just keep up with it more when it looks good!
You can see how I organize my short and long necklaces here as well:
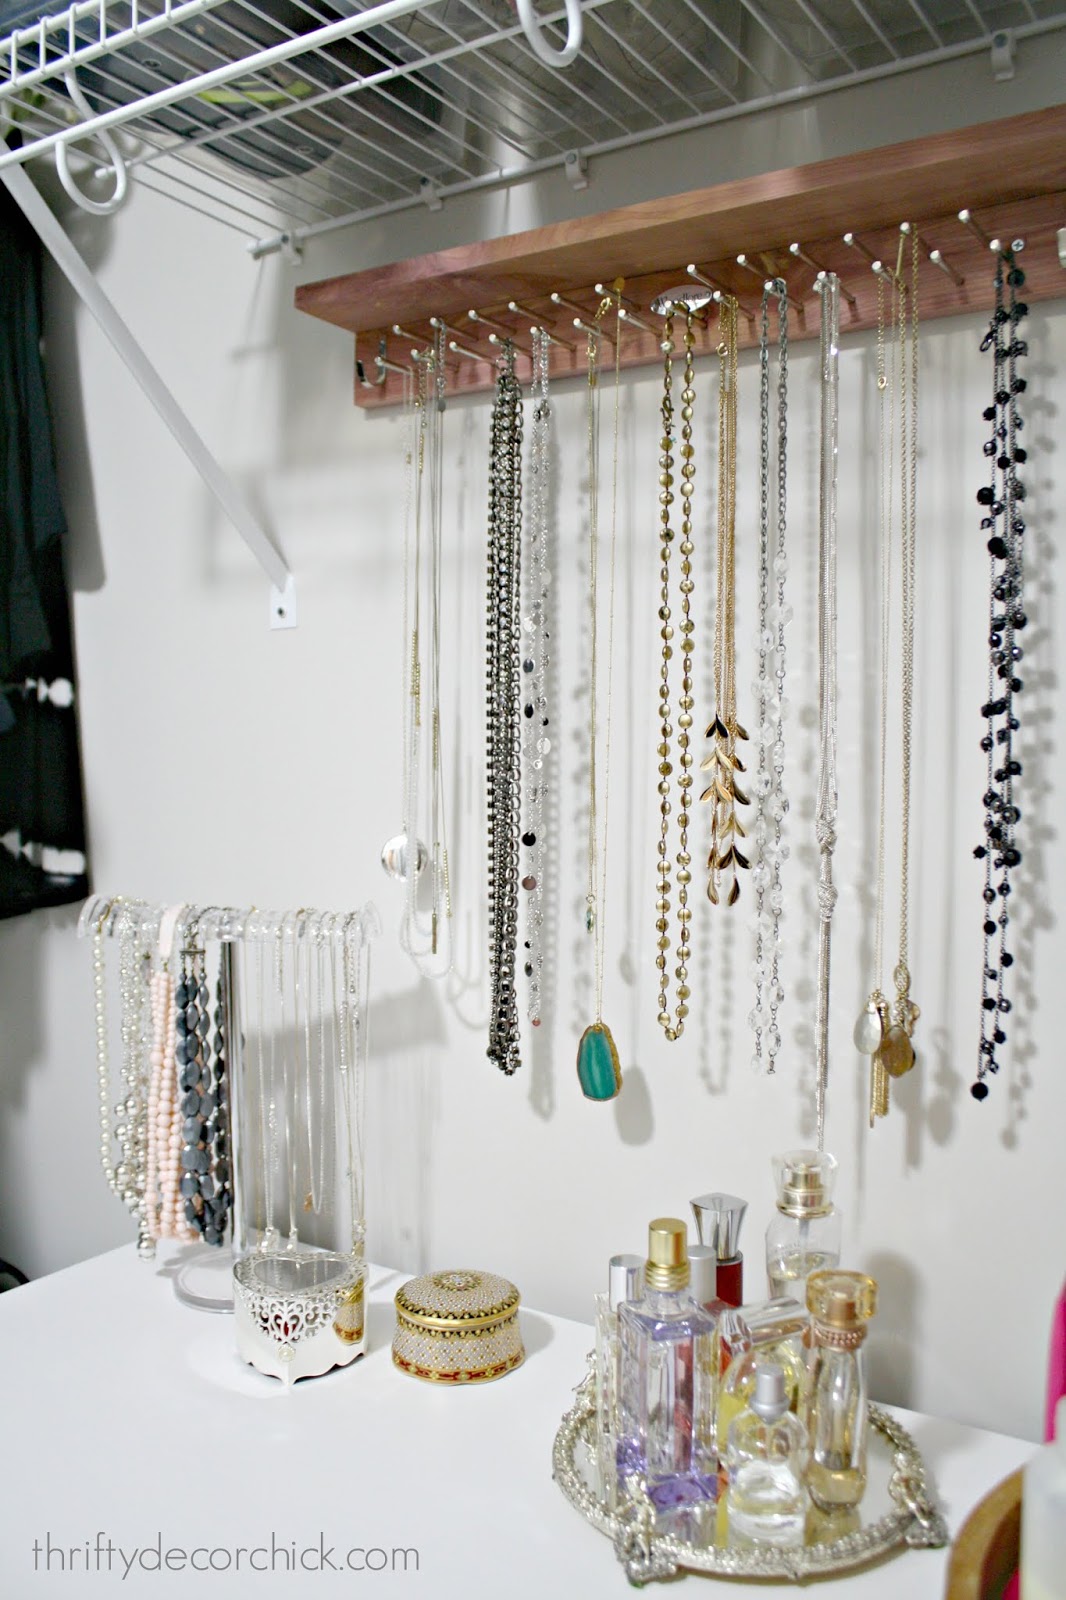
That piece isn't made for necklaces but works so well!
You can also see how I organize our shoes in that post:
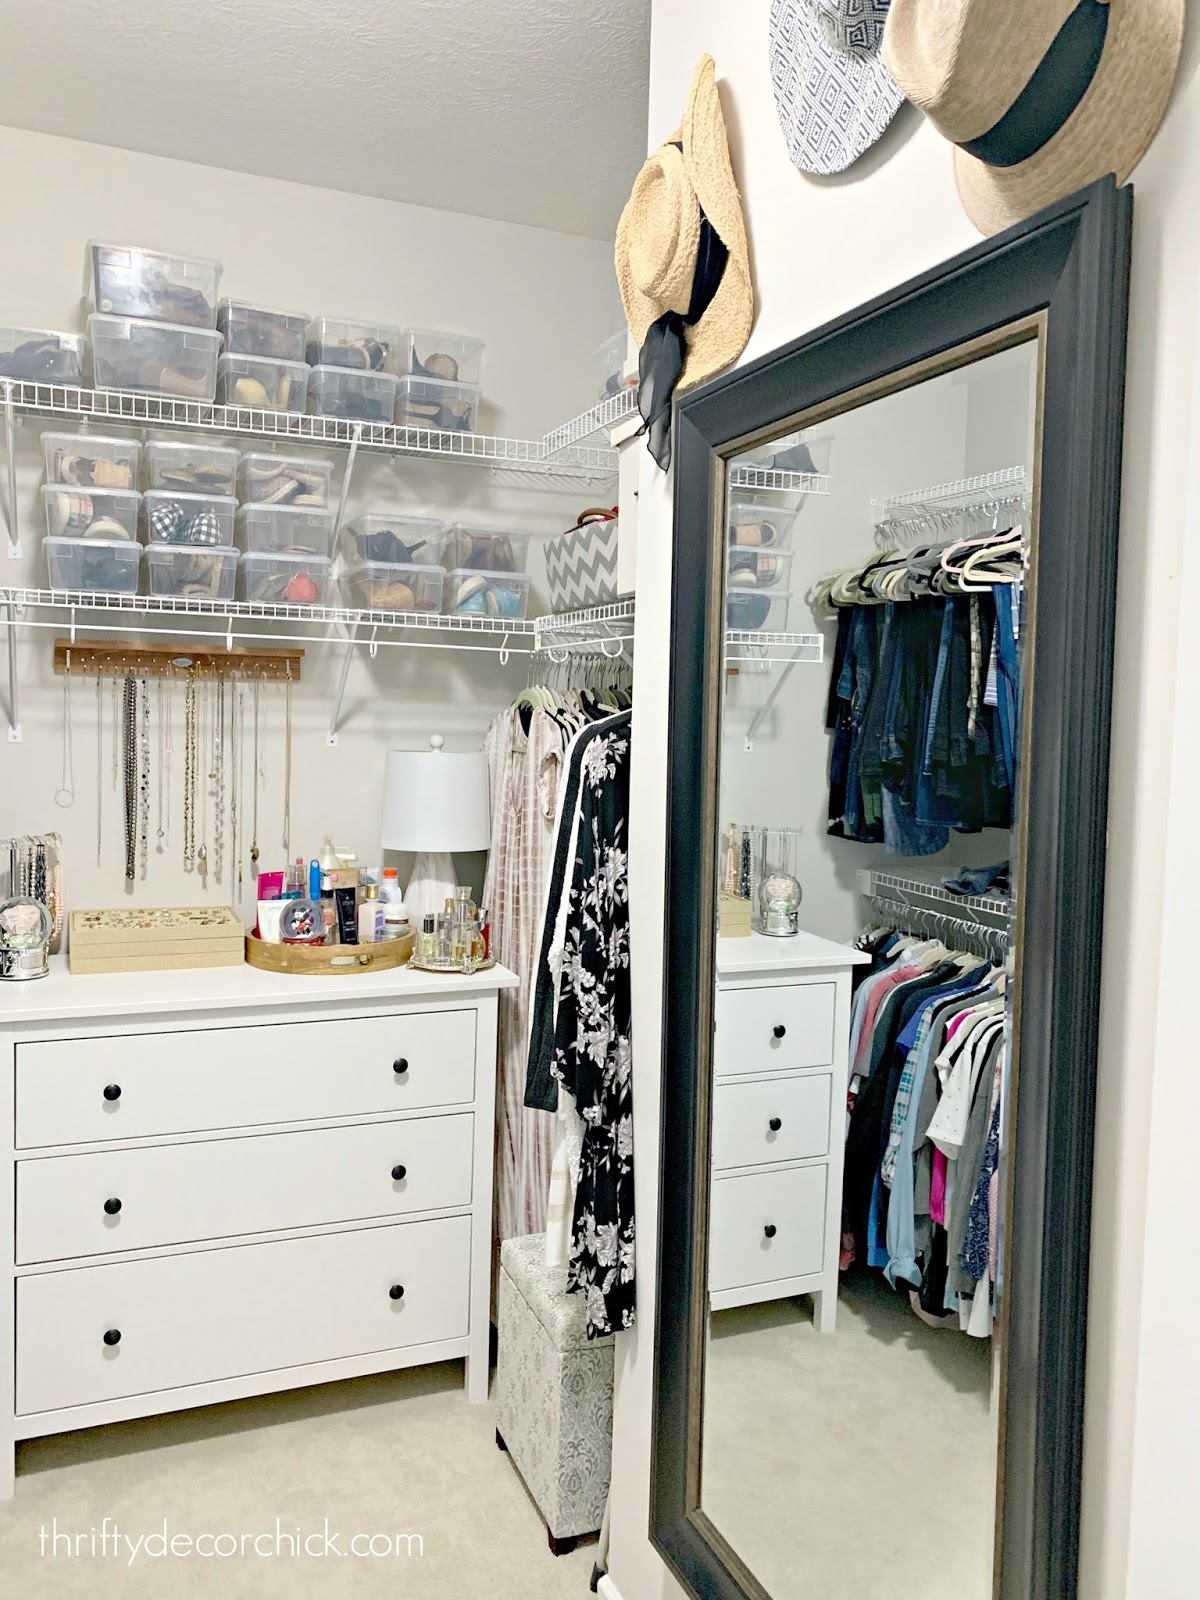
If you're lucky enough to have built ins in your closet, you probably don't need these see-through shoe boxes. But until I redo this closet and customize every inch, I love these plastic bins for shoes. I can see exactly what I'm looking for and they keep the shoes dust-free. Plus they stack and allow me to go vertical with my storage.
Actually, I'll probably keep them even when I do have beautiful shoe shelves someday! ;)
DIY Nerf gun storage
This is a random one, but an organizing project that saved my sanity! See how I created a Nerf gun storage wall here:
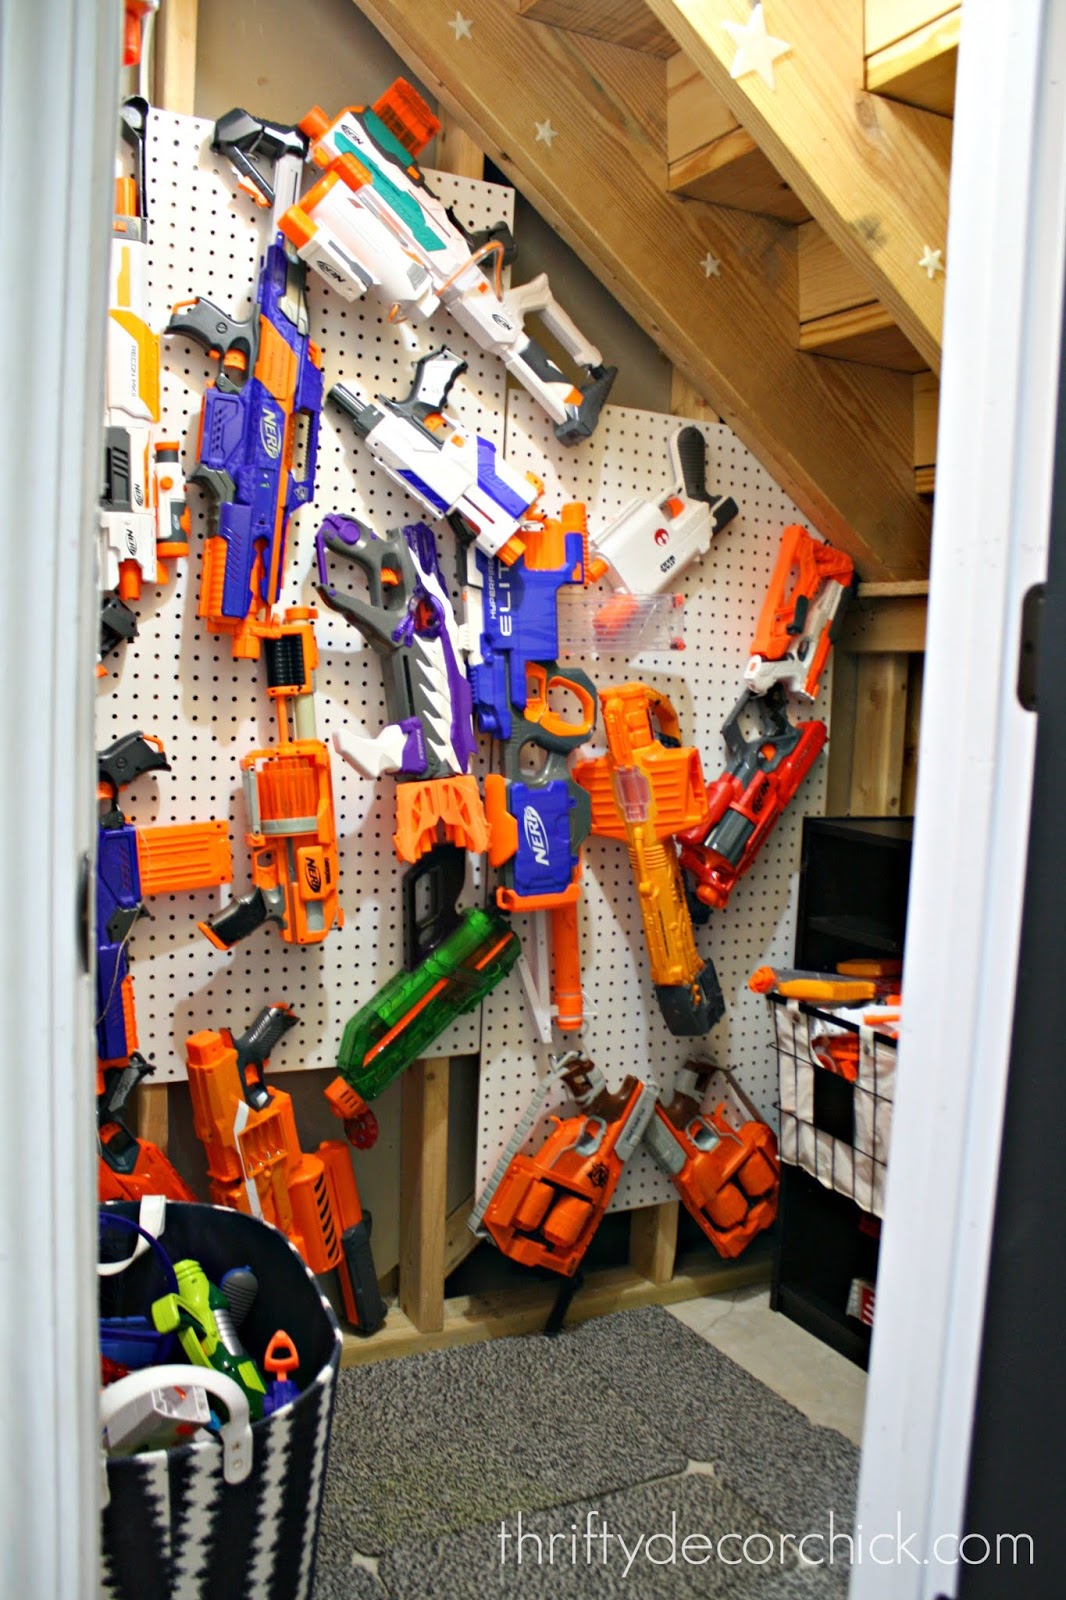
I recreated this in our new house, it worked so well! Although our boy is starting to grow out of them now. (I'm kinda sad but will NOT MISS THE BULLETS. ?)
Utilizing storage space under kitchen cabinets
I have a couple of organizing tricks I use under the kitchen cabinets -- especially those with doors that become a deep abyss because you can't get to the back as well:

I've done the whole scrap wood shelf thing for years -- it allows me to use the whole space vertically. It works every time! I also try to store pans and cutting boards...basically anything long and flat, vertically. You can see how I used the awkward space above our fridge like I did here.
How to create storage space in closet corners
This is one of my favorite organization projects because it was so cheap and gave me SO much more usable space! If you have a standard, long closet -- take advantage of those back corners!:
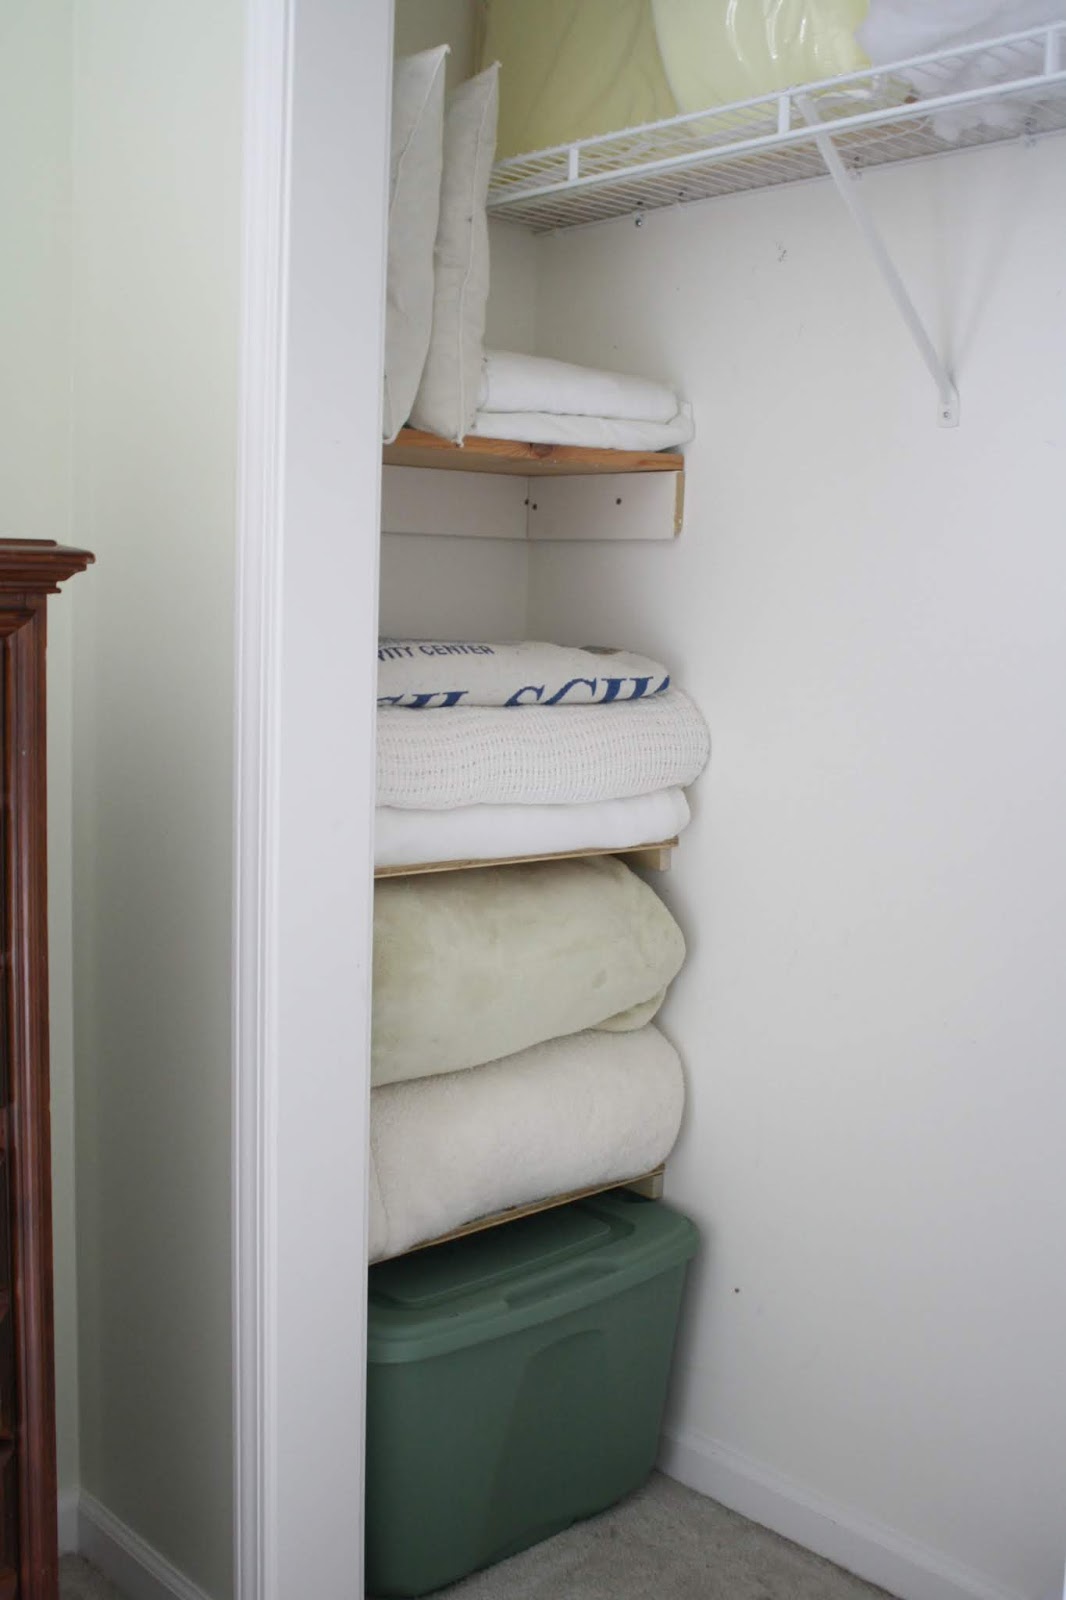
You can see how easily I created this storage in the closet corners here. It really is an easy project, even for a beginner!
Coat closet organization hacks
And finally, my favorite coat closet organization tricks that I need to repeat in this house! This is a spot I haven't tackled yet in our new home and need to do. I did a few things in our old closet, including adding a shoe shelf, bag storage behind the door, and cubby organizers for winter gear:

These allowed me to take full advantage of the space in that closet and keep it organized! I plan to repeat a couple of these in our current coat closet.
There you go -- ten of my favorite DIY organization projects/hacks from over the years. They've all served us well! Most of them are super inexpensive and the do-it-yourself aspect is pretty easy.
Have you tried any of these after seeing them here? Do you have a favorite organization trick you use in your home?
See more of our home here. To shop items in our home, click here! Never miss a post by signing up to get posts via email. Via https://www.thriftydecorchick.com/2020/01/my-top-ten-best-organizing-hacks-and.html
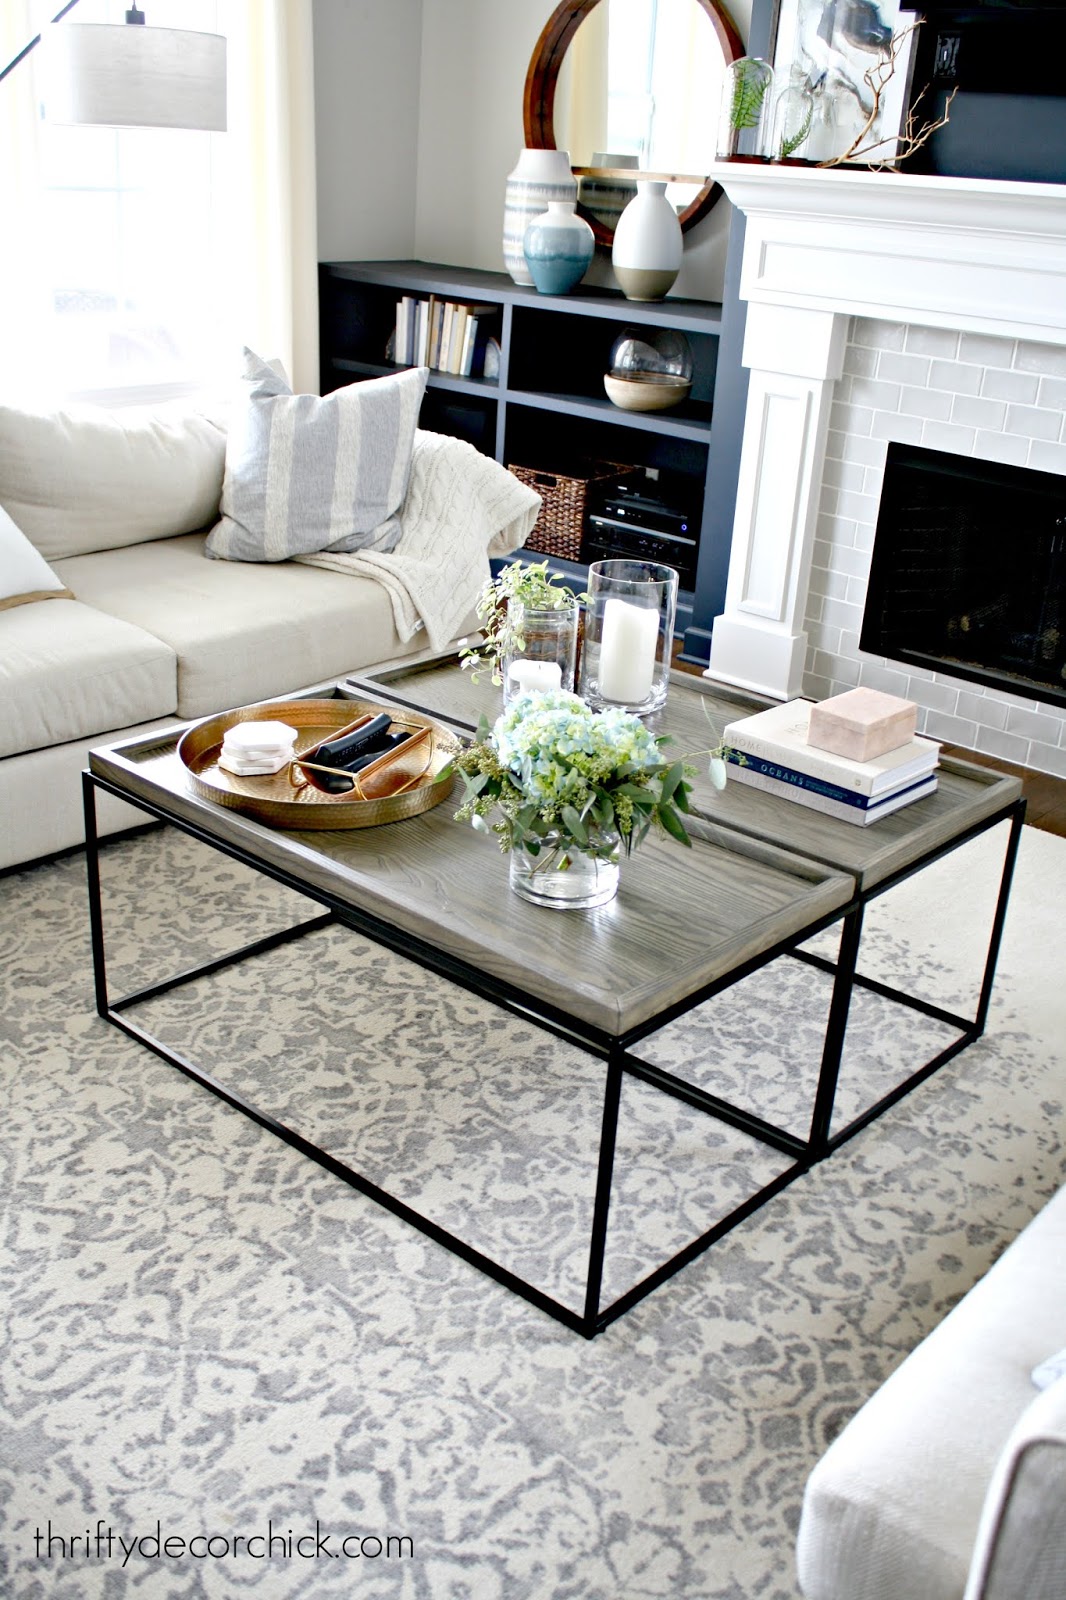
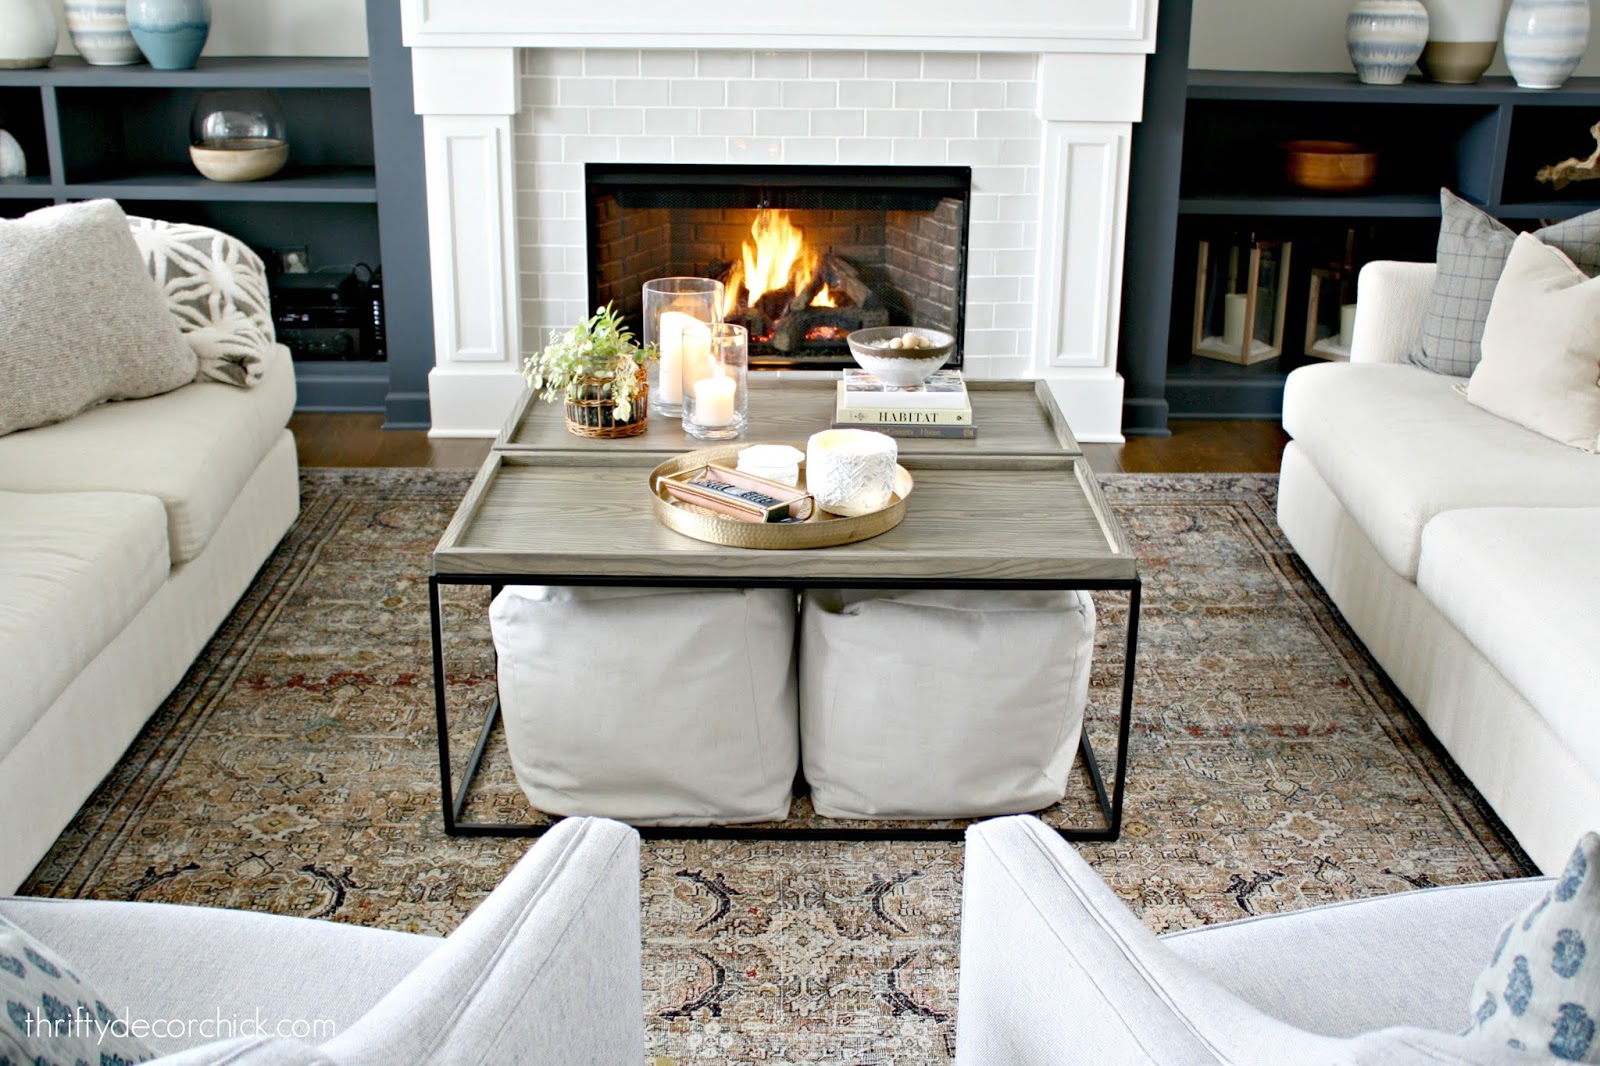
I feel like I've shared our family room a ton lately -- and I wasn't planning to again today. BUT I'm so thrilled with how it's looking with some recent additions. I wanted to show you how much changing out (or just adding!) a rug can really cozy up a space.
The chairs and rug (from the old house) we've had in our family room have worked well since we moved in. The chairs are four years old and have seen a ton of use. They were super comfy (you'll see them in the pics below), and really spacious. We really do love them. (They are in the basement now).
But the sun did a number on them at our old house and they were faded badly. Our dog did some damage years ago as well by "digging" into the cushions. Do your dogs do that? :) Thankfully he doesn't do it much anymore.
Anyway, we've been looking to replace them for at least a year now. We've flipped the cushions as much as we can. :) I was going to purchase the exact same ones, but they aren't sold anymore. (I even looked into having them reupholstered, but the first quote I got was more than I wanted to spend.) Finding two identical chairs that aren't a fortune (AND are comfy) is nearly impossible. You know how it goes -- either you find something that might work when you have no money, or you have the money and you can't find anything.
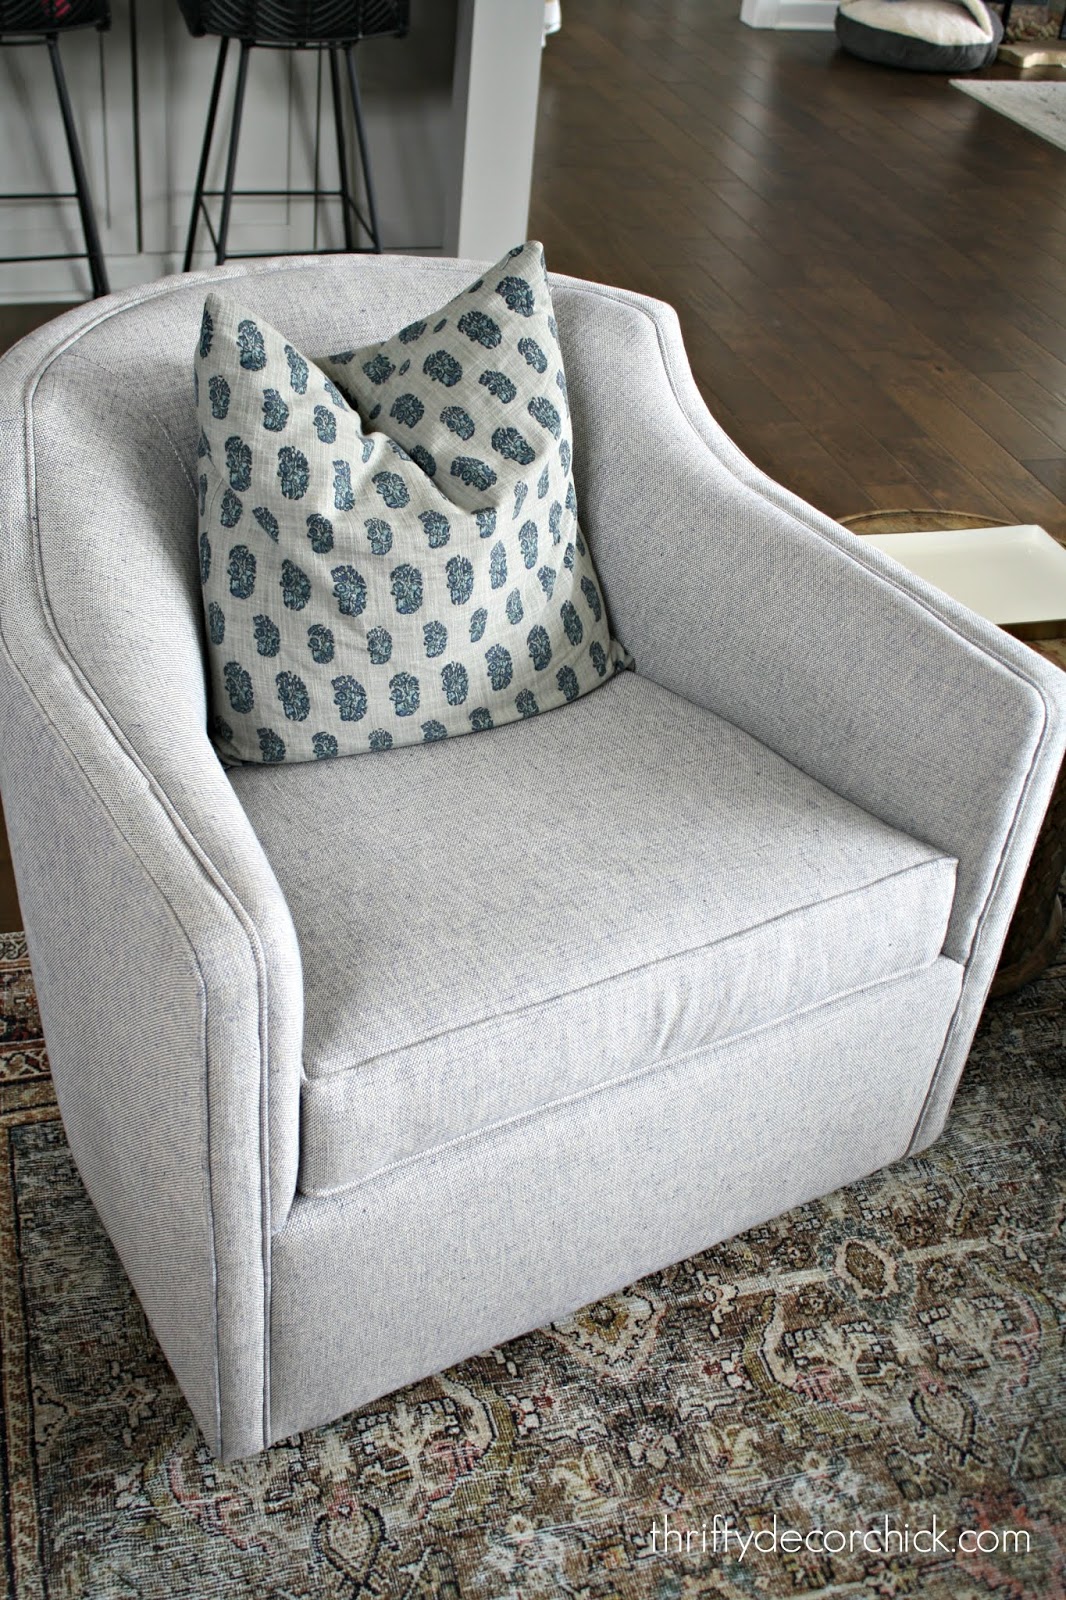
The other night I ran into a HomeGoods for the first time in forever and they were right. there. when I walked in. And to my surprise, so comfortable! I texted a pic to my husband and we decided to go for it.
They fit perfectly in there! And they swivel...basically the best thing ever. That's been our favorite part so far:
Can you see the rug? ?? More on that in a minute.
The rounded shape of the new chairs definitely softens the room too -- it wasn't until I put these in place that I realized how boxy everything was before.
Funny thing is, our dog is NOT happy with these. Ha! He can't nestle in on the back/cushion and be on the lookout. He sits on the chair now instead but it's just not the same for the poor nugget. The cats on the other hand, still love them:

Now onto the other big change in here! I purchased the rug weeks ago after going back and forth for what was probably two months. I wasn't sure I wanted a larger size and that the darker tones would work well.
This post may contain affiliate links for your convenience.
See my policies and disclosure page for more information.
I shouldn't have worried. It's an absolutely stunning rug!! I'm so so so thrilled with it. It's the Loloi Layla Collection rug in olive and charcoal. It has a ton of colors in it:
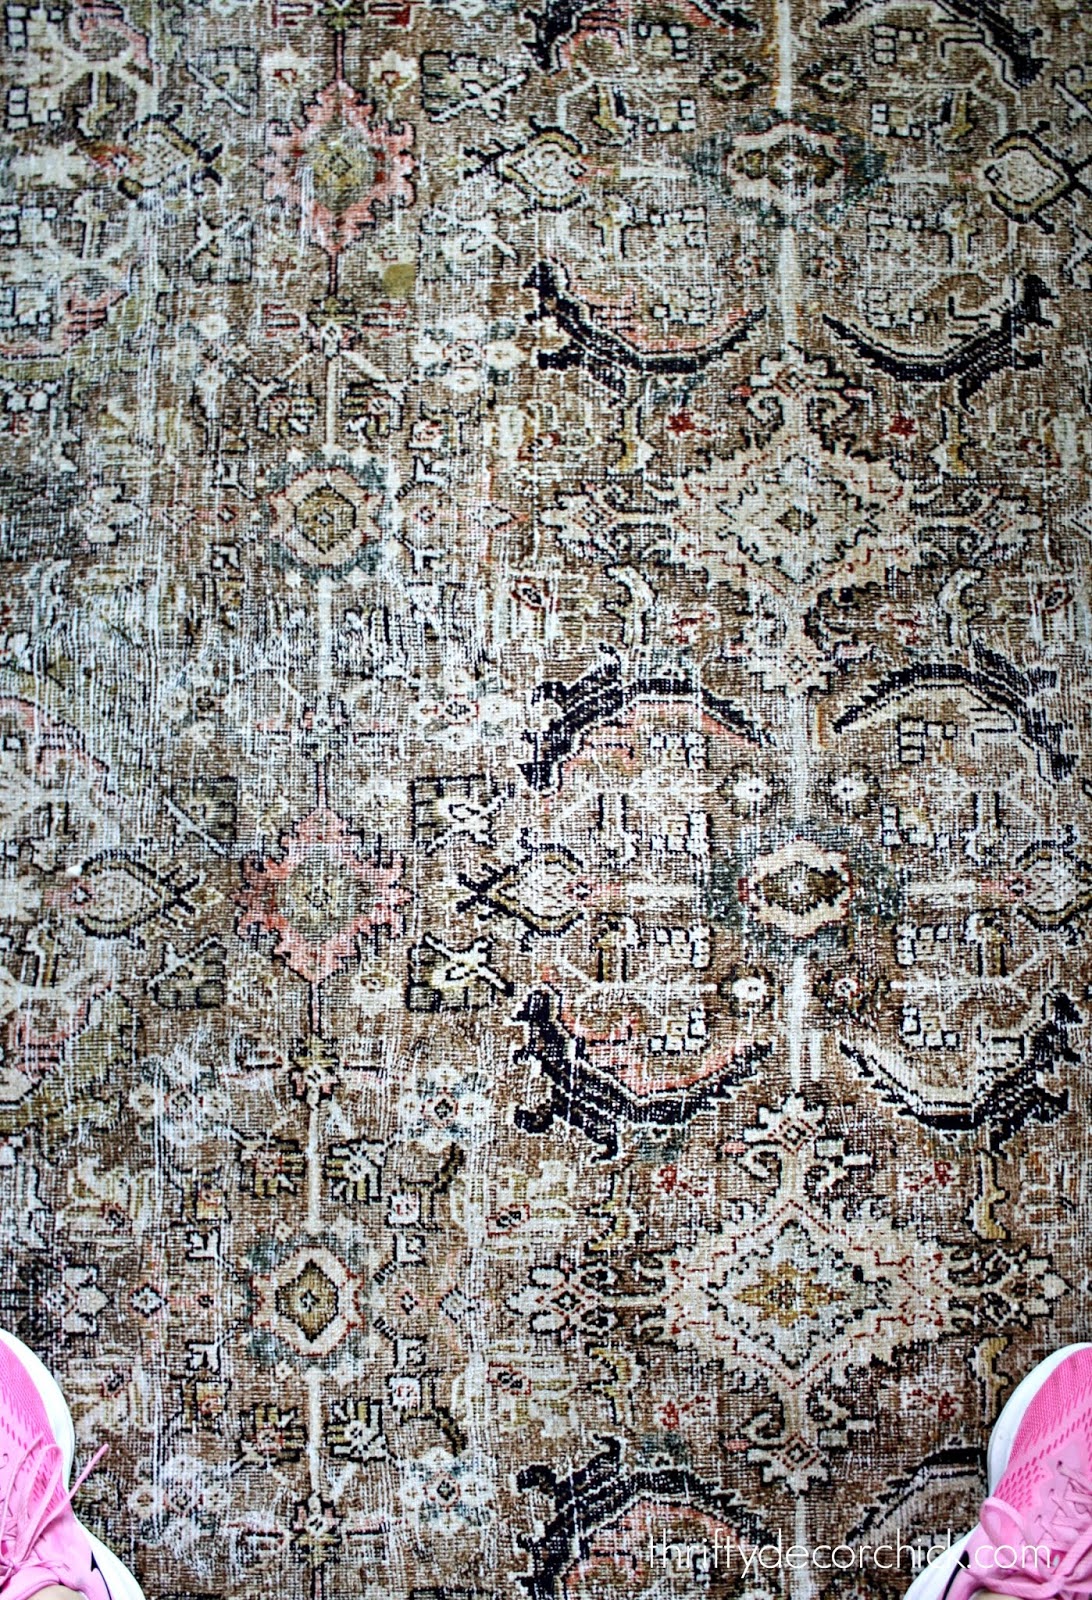
Pinks, greens, maroon, even a little bit of aqua? It's gorgeous.
(By the way, the price on these rugs change often, so keep a lookout. Ours has already gone up considerably since we bought it, but it was even less when I first started looking.)
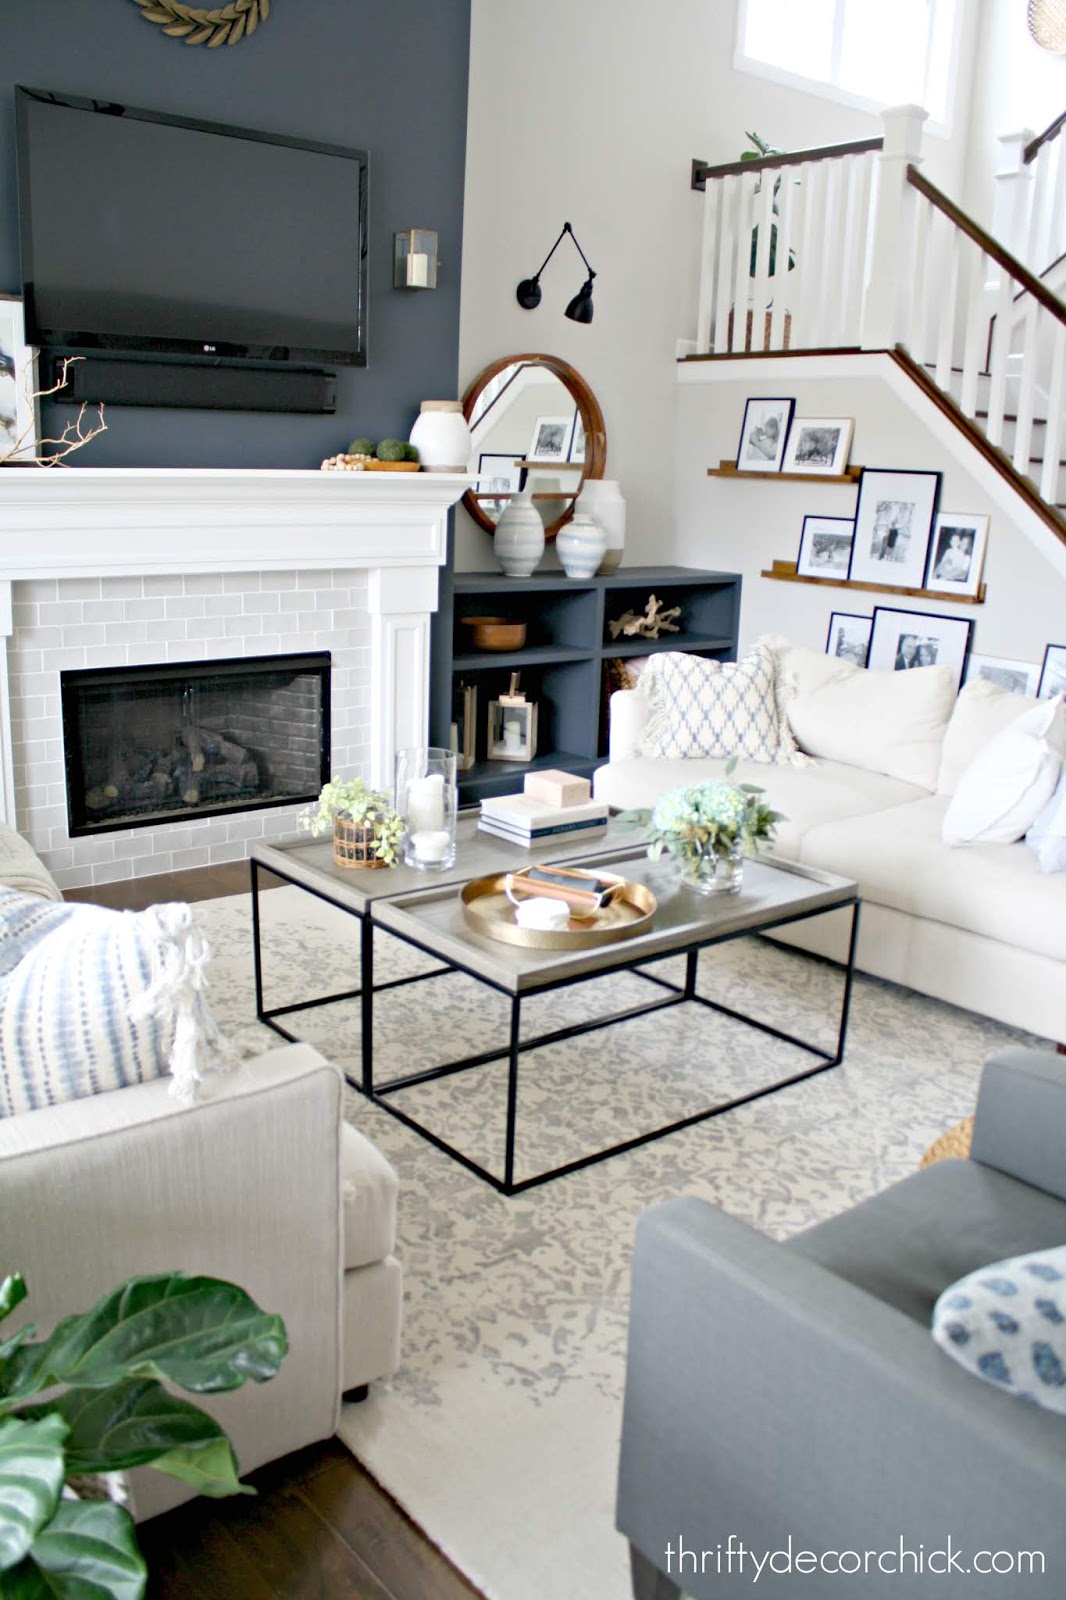
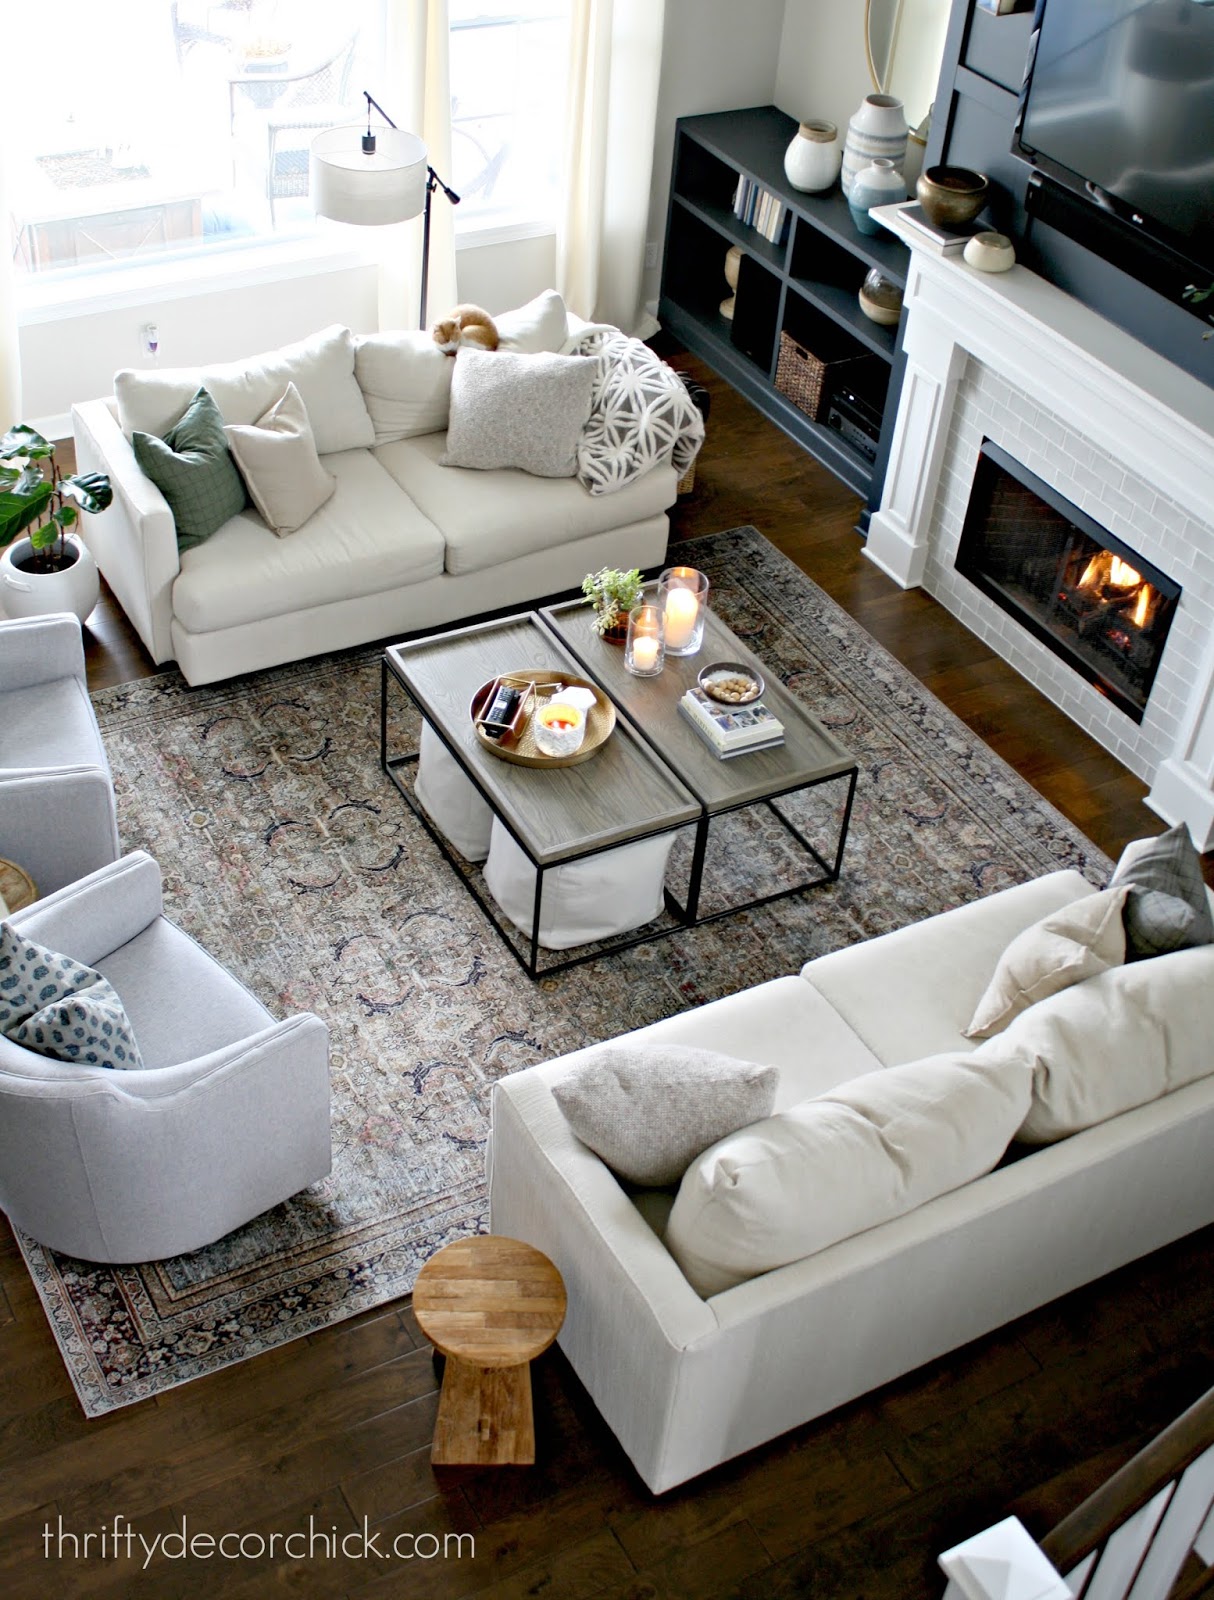
Because it's a little bigger than what we had before, I was able to pull the sofas further out and push the chairs in more. We have a bit more walking room behind the chairs now:
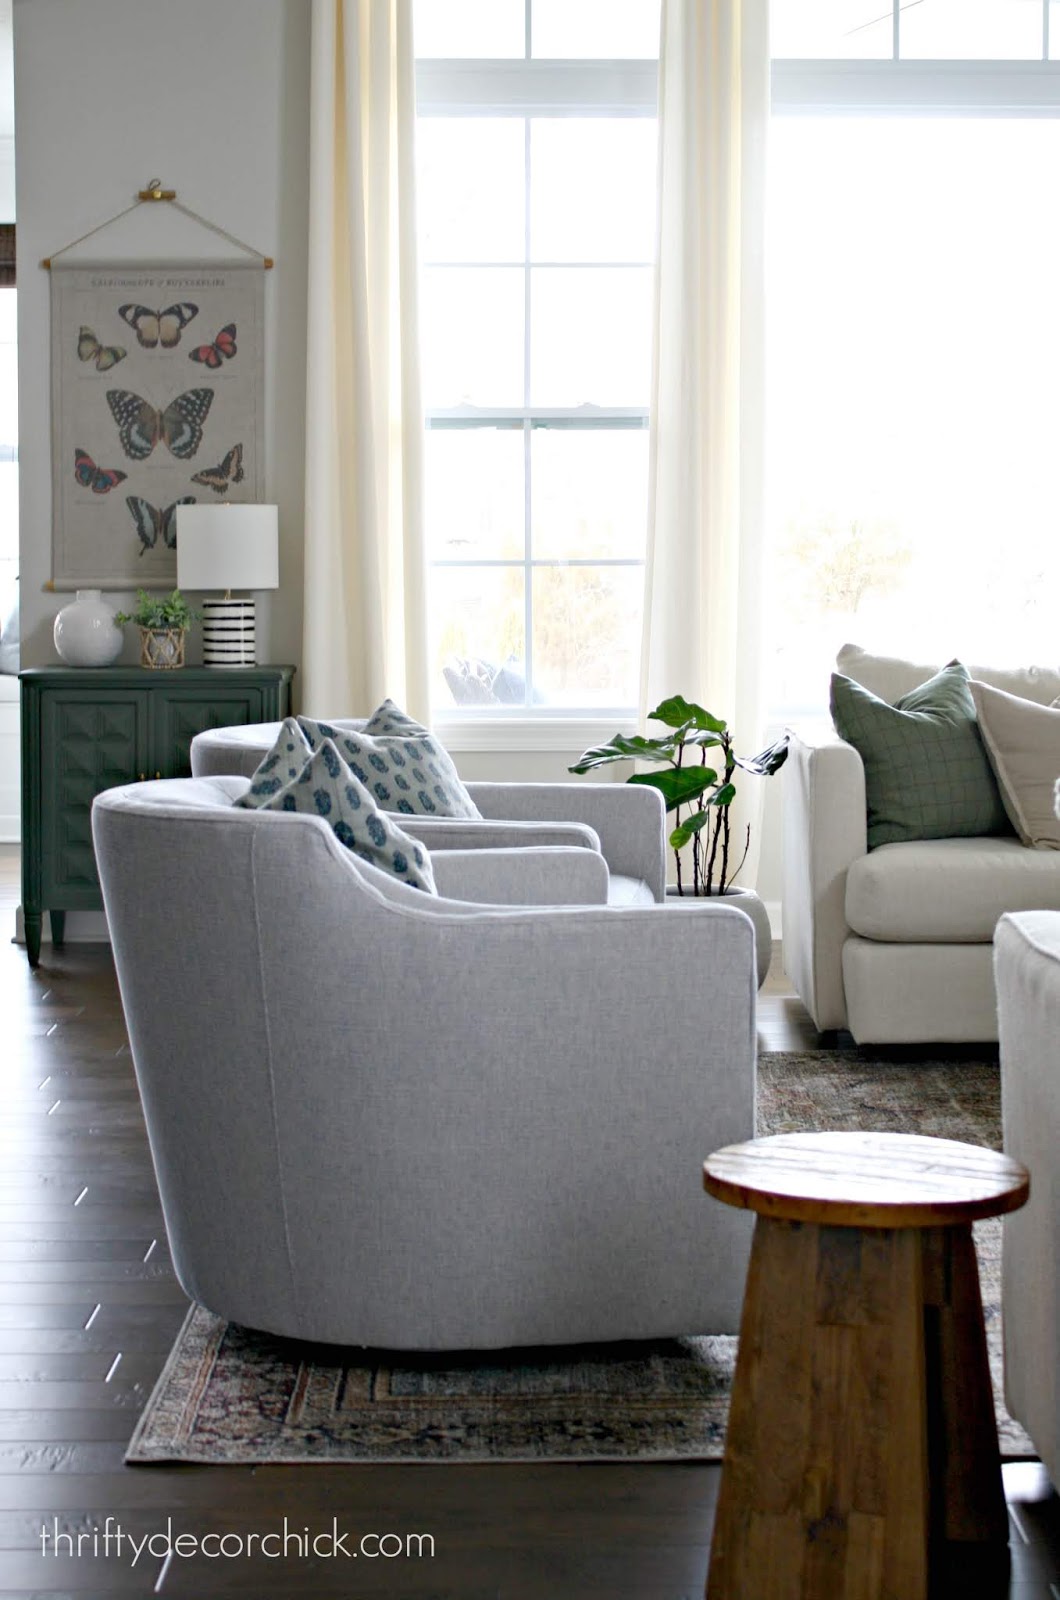
It helps we can kind of turn the chairs into the space -- that gives us more room as well. We love that we can turn them to put our feet up on the sofas or whatever.

Our other rug was much thicker -- this one is very thin. So if you prefer some cush in your rug this won't work well for you. But if you have kids or animals I highly recommend it! It will hide EVERYTHING. ?
Here are a few before and afters -- with our old rug from the old house (I believe this was from HomeGoods):
And that same space with the new, darker rug:

Both are beautiful (in my opinion) but WOW, this new one warms up the space so much.
I could see changing them out with the seasons -- maybe I'll want the light back for spring and summer? I'm not big on changing out bigger items for the seasons, but we still have the lighter rug so we'll see!
I love how it grounds the space. It ties in the dark fireplace wall and built ins beautifully:

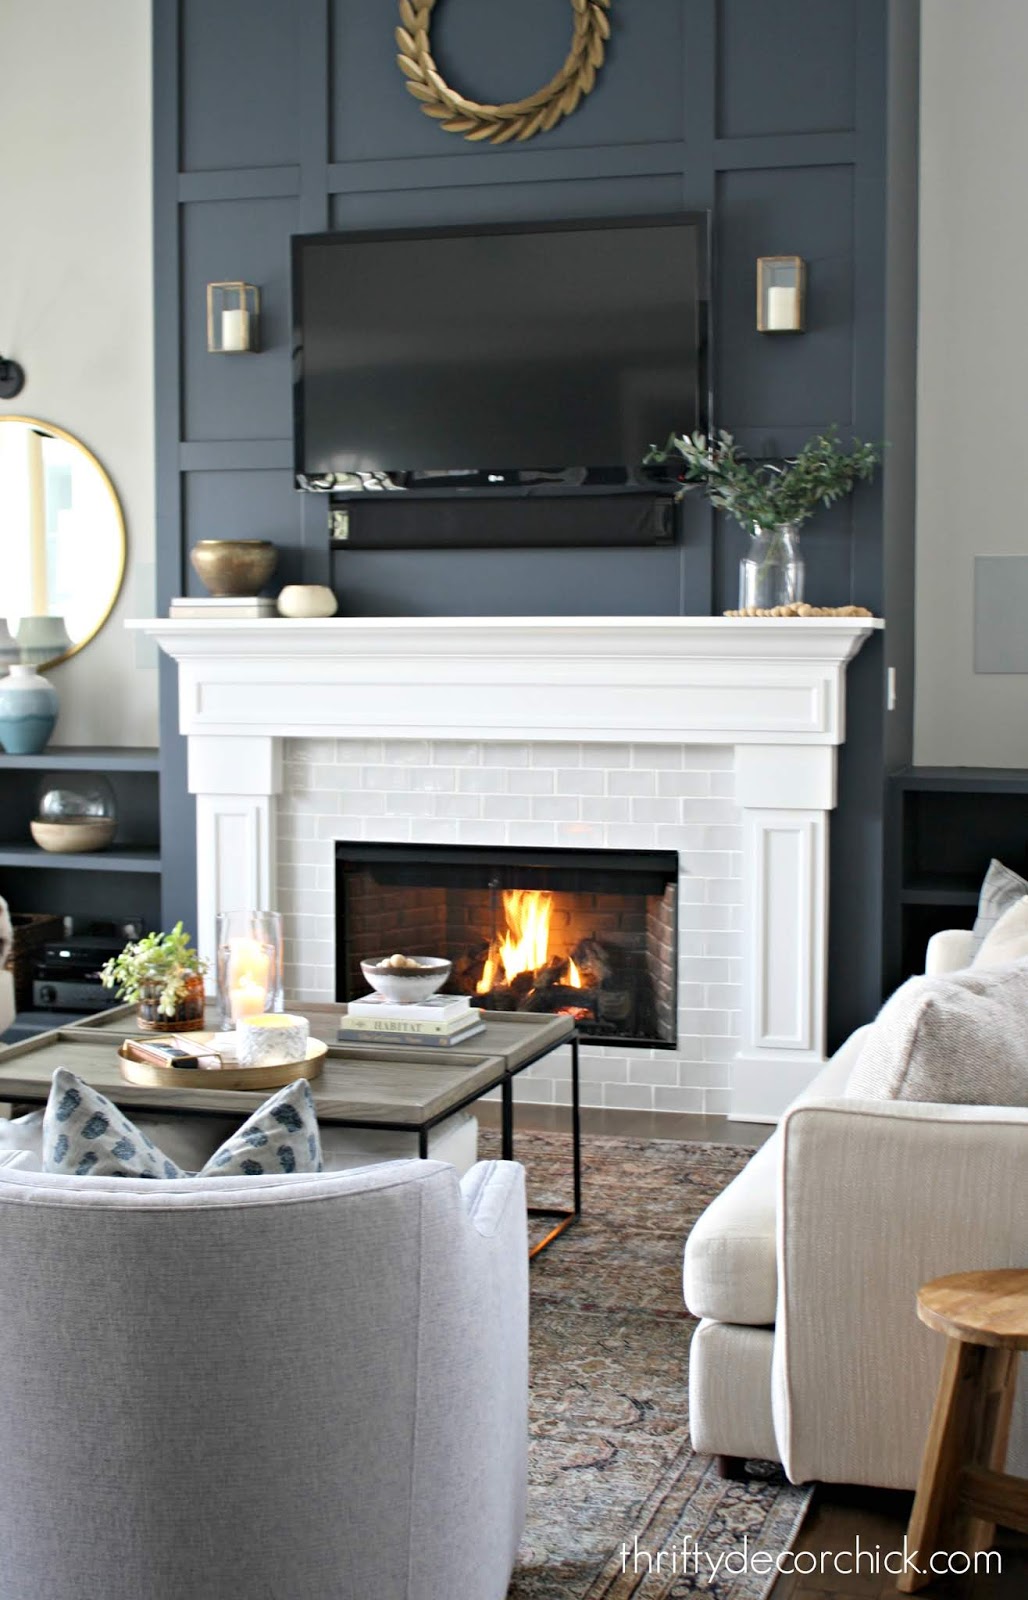
And I call it "dark" but it's not overly so. I'd still call it a neutral piece because it works with just about any color.
Here are a couple more before and after shots:
I'll have to add an evening pic at some point, because that's when it's coziest in here. I'm SO happy with how warm it feels in this space.
From the other side as well:


The new chairs brighten up the room and the new rug grounds it. A great combination!
A rug makes a BIG statement and can really change the whole feel of a room. It can also be one of the most expensive purchases. My favorite affordable spots for larger rugs are Rugs USA, HomeGoods and this one is from Amazon -- I've never purchased one from there before! (You can also find this rug here and here!
Here's a better view of the rug from upstairs:
I never regret waiting for the perfect item at the perfect time. :) You can find links to a lot of the items in this room below -- just click on the picture! **Sofas are from a local Indy store called Urban Styles.  See more of our home here. To shop items in our home, click here! Never miss a post by signing up to get posts via email. Via https://www.thriftydecorchick.com/2020/01/two-additions-that-upped-cozy-factor-in.html
Hey hey! Let's talk about house projects for 2020, shall we? I'm always ready to getting back to cutting, nailing and (yes, even) painting about this time. I'm missing the creativity involved in do-it-yourself projects!
I like to share this list every year because it keeps me on task. Kind of. ;) You can see my list from last year here -- I accomplished most of what I had planned! This year I have a bigger list and I doubt I'll get to all of it, but it's fun to dream about the plans. First up, I'd like to make some changes to our son's bathroom: 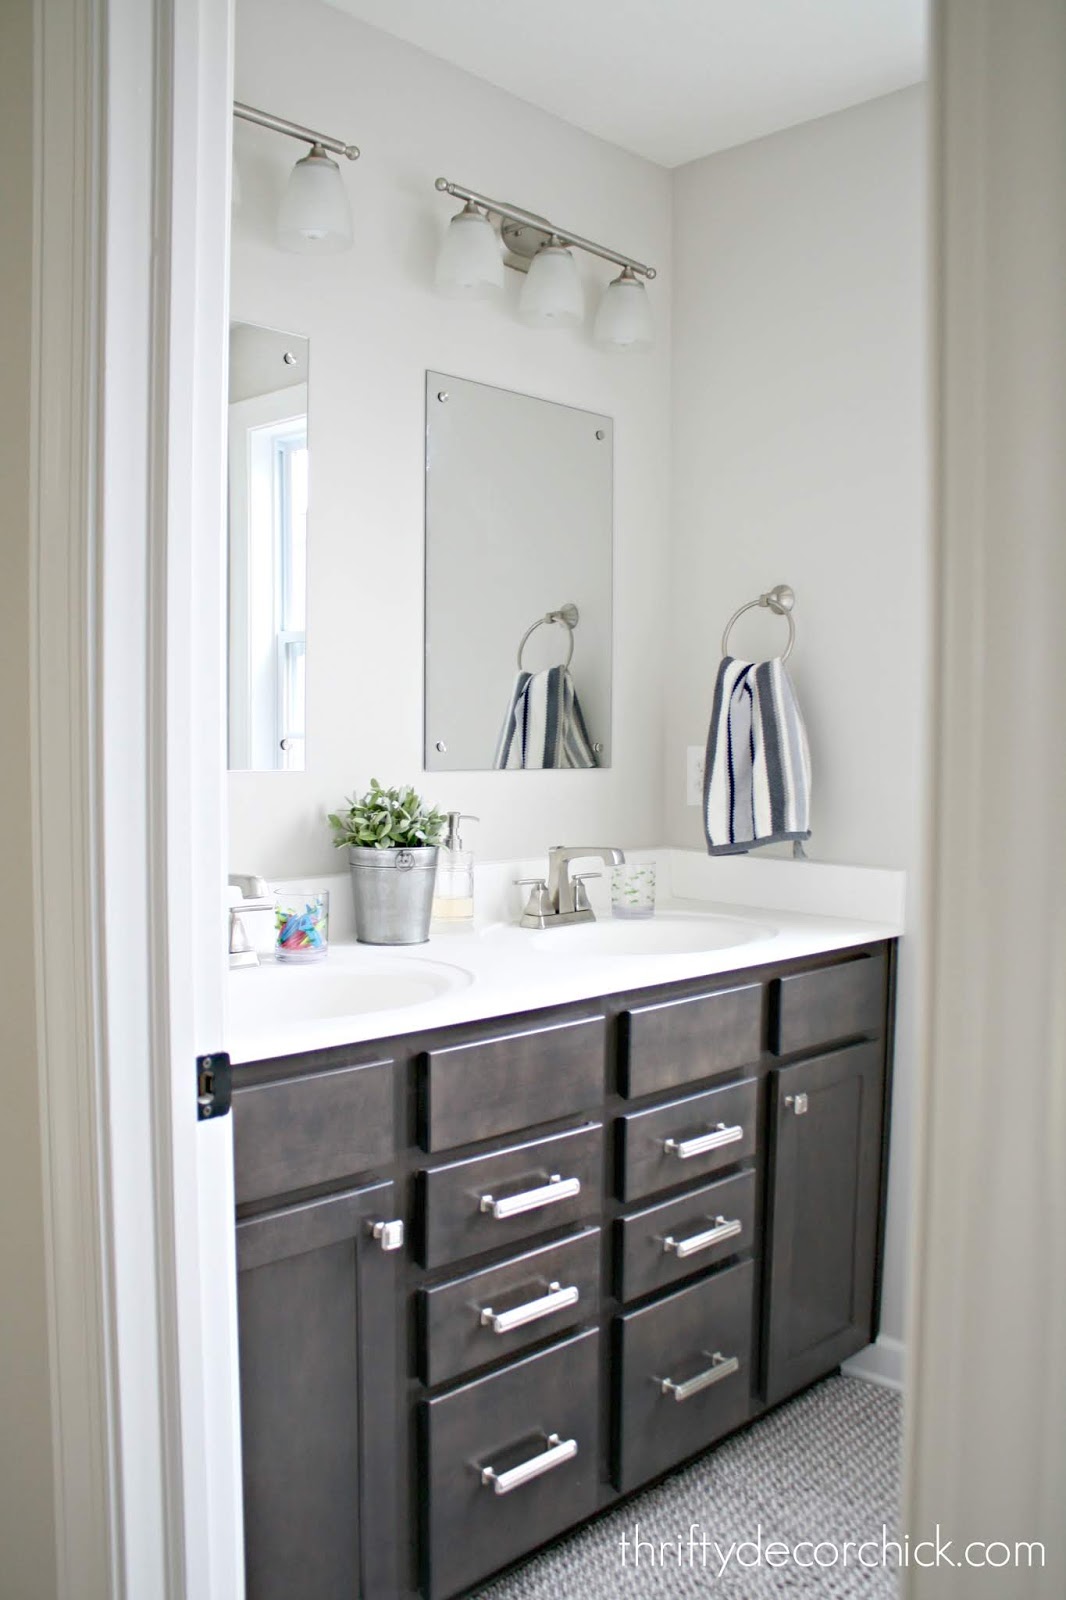
This is only half of the room -- it's set up similarly to his old bathroom that I completely remodeled a few years ago. The original plan for this bathroom was two rooms (vanity in one, toilet and shower in the other, like the old house) and I modified it a bit and had them remove the door and just do a cased opening.
I'm KICKING myself for not just having them make it one big room. That would have saved me a ton of work. But I quite enjoyed knocking down that wall years ago so...

I'll just have to do it again. :) We have no need for a separated bathroom space since we only have one child at home. His bathroom here is smaller than the last one and this will go a LONG way to making it feel more spacious.
I'll be back with the to do list on that project, but I'll be incorporating a few things from his old bathroom makeover:

Stay tuned for that update!
Next up -- finishing the master bedroom makeover! I hung the wallpaper and added trim last fall and then stopped because of the holiday mayhem:


I need to paint everything under the trim and may to a couple more projects as well. It seems like no big deal, but painting the walls and trim is going to take a good bit of time.
I think it's going to be SO great when it's done!!
As long as I'm finishing that room, I may as well continue with our mud/laundry room combo. If you've read for awhile you know sometimes I'm a butterfly with projects, flitting from one to the next. Whichever is shinier.
This side of the room looks great with the built in mud room bench and cubbies!:

This side doesn't look too bad either -- but as I type this, that wall is painted half in the original color and half in the new color. It's looked like that for months. :)

I really need to at least finish painting the room. Maybe.
My bigger plan for this space is doing something with the other side of the room! I'm SO excited about this because it will give us additional storage space for stuff we keep in the garage like extension cords, batteries, random stuff like that.
We went with the basic "folding" table in here, without cabinets:

I later added the DIY skirt around the bottom to hide the kitty litter. But I've always wanted cabinets here -- more specifically DRAWERS -- for more storage.
I have other plans for that wall as well, but the cabinets have to happen first. Before that, we have to figure out where we're moving the cat litter. ;)
Next up, a project I've been talking about doing since soon after we moved in! I plan to replace those open shelves with skinny cabinets on either side with shelves in the middle:

Maybe if I keep talking about it, it will happen. ;) Ha!! You can see the beautiful inspiration photo for that wall and more of my plans here. It's not a cheap project so I've been putting it off, but I know it will really finish off our kitchen beautifully!
Another project I hope to complete this year that I've been thinking about forever is adding some kind of wall treatment to the walls on our open staircase:

That wall to the right is a real focal point, but every time I think I know what I want to do, I change my mind.
And when I do that wall I'm guessing I'll want to do it with the other two open walls as well:

I don't want it to be too busy, especially if I decide to do all three walls. I'll probably have invest in a special ladder to get to the spots above the stairs.
Finally, the biggest project! This one will be pricey so I don't expect to finish the whole thing (we do all projects with cash so they all depend on the budget). We had an awesome little basement kitchenette in our old house that we really loved:

We are super fortunate to have a dedicated space (that is much bigger) in this house, but it will take a lot more work and money!
Right now it's basically just a Lego station:

(I didn't have this spot carpeted when we built because we knew we'd put down new flooring eventually.)
We have electrical done (some will have to be moved up to counter height) and the plumbing roughed in, so the hardest part is done! I would be thrilled if we could just get cabinets and flooring done this year to make it somewhat functional. I have fun plans for this space and can't wait to start working on it!!
Whew. That's it, no big deal right? Sure. I can't wait to get my hands dirty again! Any guesses on what I'll start working on first? Honestly I don't even know. ? Have you tackled any similar projects?
See more of our home here. To shop items in our home, click here! Never miss a post by signing up to get posts via email. Via https://www.thriftydecorchick.com/2020/01/my-big-diy-project-list-for-2020.html |
