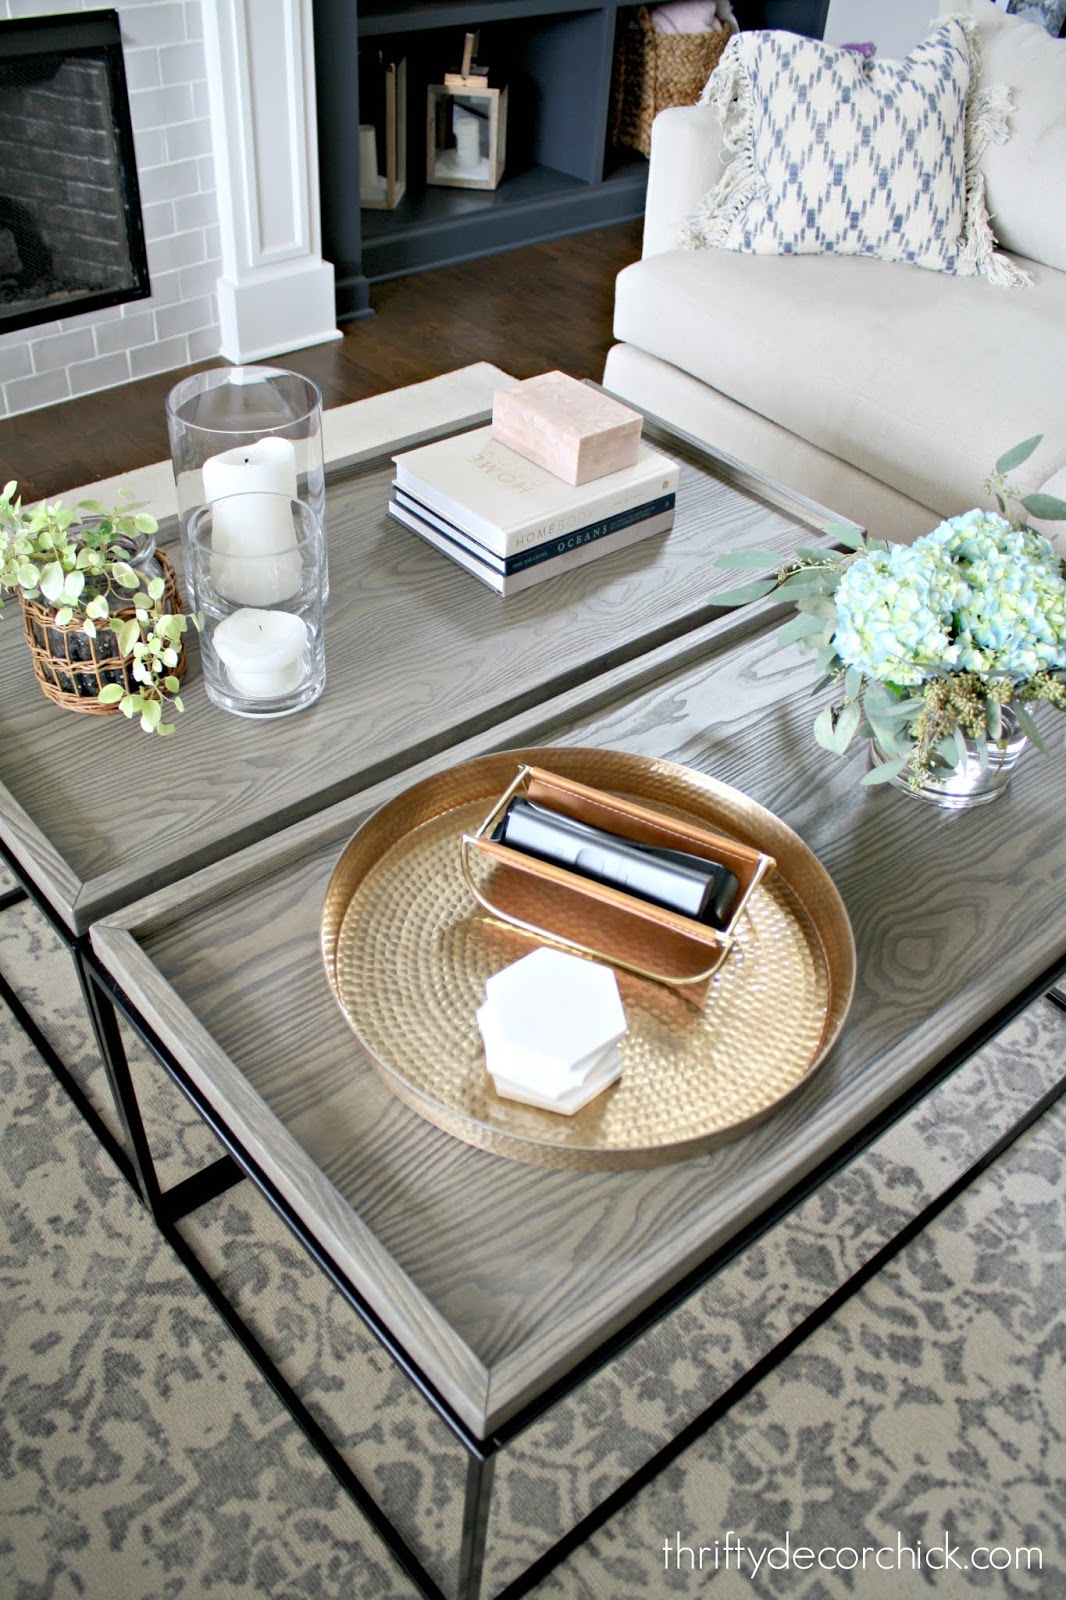
Reusing metal table bases to create a HUGE square wood coffee table.
I built a large wood table using the black metal bases from the ones we already had!
Remember years ago when I was looking for a large, affordable coffee table? I wanted something around four by four feet for our family room -- the space is big and the tiny table we had there was getting swallowed up.
I ended up going with two inexpensive tables that I pushed together to make a big one:
It worked perfectly! We got the size we wanted for only around $200 -- WAY less than anything I found online.
Each table had a faux wood top that was surrounded with trim:

This post may contain affiliate links for your convenience.
I may earn a small commission when you make a purchase through links.
See my policies and disclosure page for more information.
I'd been thinking recently about changing this up a bit and making a new tabletop...something in one solid piece that would look a little more custom.
We didn't mind the two tables, but I knew it would be easier to have everything on an even surface. The faux wood has seen a little bit of wear over the years as well.
And I could just see the big wood top in my mind and knew it would look GREAT in our family room.
So I finally got to it last week. I took the two tops off the existing table legs (you know I kept those for a future project!) and got to work on the new top.
1. Measure and cut
I determined the size I needed for the new wood table first. I made sure to measure the width of the metal bases together, not the tops that was already on the tables, because I wanted my new tabletop to be flush with the metal frames.
My plan was to add some wood trim around the edges for a traditional look. The size of your top is totally up to you -- have it extent out a big from the metal to make an even bigger coffee table!
My final size was 44x44 inches, so I had a big 4x8 sheet of birch plywood cut down at the hardware store. Most large stores will cut wood down for you -- it is such a great service that I have relied on numerous times over the years!
2. Prep and stain
There's usually a "good" side of the wood (most often the side that doesn't have a sticker). It's normally pretty apparent from the look of the wood too.
If you're new to DIY or staining, I suggest trying out your process on the "wrong" side or a scrap piece first. This will help to perfect the process and you'll be able to see what your stain will look like on the wood.
I laid my 44" square down in our garage and did a light sanding of the edges and top first. Nothing crazy...you just want to knock down any texture or splintering.
If you are staining, this step is by far the most important. Using a preconditioner on your wood before staining will make the whole process go SO much easier!:

It goes on clear and is super easy to apply -- literally just slap it on. :)
The conditioner penetrates the wood so that the stain will go on evenly.
When you apply stain without conditioner, you need to work pretty quickly to ensure that there are no 'stop and start' spots. This will give you a good idea of what I'm talking about:

If I had applied the stain like that without the conditioner, the heavier overlapped parts would show on the final project.
It's OK to stain a piece just fine without the conditioner (I did for years before I discovered it!)...but you do have to work quicker and be sure to keep things smooth and even as you apply.
See how the uneven appearance disappears when I wiped the excess stain away?:

The conditioner only adds a few minutes to the project and you can stain almost immediately.
Make sure to let the stain dry well before adding a protective coat. I like a semi-gloss polyurethane:

This was actually my second coat. At first I thought I had grabbed my wipe on poly that you can apply with a clean rag. Turns out it was a traditional version that needs to be brushed on.
I quickly realized my mistake because it was not going on well at all. But I still had to let it dry and then sand down the messy parts before I added a final coat of brush on polyurethane.
I've done staining and DIY projects for years and still mess up plenty! :) 3. Attach to the metal basesAfter the poly was dry, I brought the tabletop into the family room and laid it face down on the floor. I placed the original table frames on the back and made sure they were as even as possible before attaching them:
Always predrill your screw holes to ensure there is no splitting in the wood. I like to mark where to stop with painter's tape so I don't drill all the way through the wood:

Also, make sure to use screws that are shallow enough that they won't penetrate the finished side of the tabletop! (The screws that came with the original tops were too long, so I used some out of my stash).
After all the screws were in, I flipped it over and was already SO thrilled with how it looked!:

4. Finish up the details
If you like a simpler, more modern look, you can iron on veneer edging to unfinished sides of the wood. Make sure it is in the same wood finish as your tabletop!
You can sand or paint that edging to match the rest of the wood.
I prefer a traditional detail, so I cut down 1x2s to wrap the edges of the wood top:

I used a little bit of wood glue and nailed them in as well. Take care as you attach so that your nails don't come through the top or bottom of your table!
Don't use excessively long nails and be sure to hold the nailer straight and level as you go.
These 1x2s have a very sharp corner, so I like to soften them up a bit. If you haven't stained yet, you can use a sander to knock down the corners a bit, but I prefer to just take something round like a screwdriver and pull it along the edges:

By the way, my 1x2s for the frame around the tabletop were pine, the top was birch. I gave the pine two coats of stain (one coat on the birch table) and they matched up really well.
I did take a sander to where the mitered cuts met up at the corners. Just a light sanding is all they needed to cut down that sharp edge.
Make sure to reapply the stain conditioner before you touch up your stain on any sanded parts! If you don't you'll have a slightly uneven stain application.
Not the end of the world if you forget. I've done that plenty and I like to say that it adds to the character. ;)
Here's my dirty little secret -- I rarely fill my nail holes. I've tried a bunch of stainable fillers and they just don't take stain how I'd like. If you have one you like please let me know!:

I find the nail holes are not that noticeable in the end...with a filler they are more pronounced.
After all the touch ups were done and dry, I applied a coat of poly to the 1x2s around the edges as well. Let it all dry fully before putting any items on the wood:

Other than my little mess up with the first polyurethane coat, this was a really quick and easy project!
We LOVE it! I know it's a great project when the family comments on much they love something!:

The wood adds so much warmth to our family room. I just LOVE that lovely Provincial stain.
The two tables together were great, this just makes more of a statement. Our great room is pretty spacious and can take large furniture:
I hesitated for months on this project because the price of wood has gone up so much. The 4x8 sheet of plywood was $80...I think that's double what I used to pay!
But I came in under $100 for all the materials and I have some leftover for future projects. It was totally worth it in the end! I feel like it upped the cozy factor in here big time:

The stain color ties in so nicely with the frame on the Target mirrors by the fireplace and the DIY picture ledges on the staircase wall.
Since I got the two coffee tables on sale (they are on sale again now!), overall the whole coffee table was $300...but that's still way less than any I found for this size.
This 43x43 square coffee table is the closest I could find and it's double what I spent!
Now we have a much bigger surface for games, food...whatever. I'm so glad I finally tackled this quick project:

Never miss a post by signing up to get posts via email.
Via https://www.thriftydecorchick.com/2022/08/blog-post.html
0 Comments
Twenty FREE fall printable wall art options for your home!
The ways to incorporate into your home decor are endless! Each year new printable art is created by incredibly talented bloggers. And they are FREE, other than the paper used to print them. :) You can use your printer or send them off to be printed for a few bucks.
Printables are an easy way add some seasonal home decor without a lot of effort. Framed prints are such a lovely little addition to vignettes in your home!

This post may contain affiliate links for your convenience.
I may earn a small commission when you make a purchase through links.
See my policies and disclosure page for more information.
I'm sharing 25 of my favorites today! Please visit each respective blog to find the full high res download. (Click on the link below each photo for a downloadable PDF file.)
A few tips for printing these images at home:
1. Thankful wreath
I'm always drawn to art with wreaths. They get me every time!:

2. Watercolor pumpkins
I've already printed this one out -- I love the subtle colors:

3. U-Pick ApplesThis apple print is so cute! I have to figure out where I want to put it in the kitchen:
4. Pumpkin Spice
Of COURSE we can't leave out the pumpkin spice latte lovers:

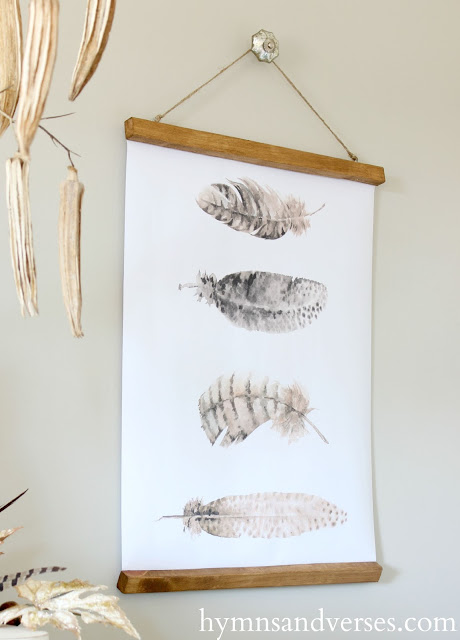
5. Feather wreath
These feathers are perfect for neutral decor lovers. There are two versions available:
7. Hello fall pumpkins
So simple and sweet! I'm always drawn to watercolor art:

8. Harvest wreath
This is one of four beautiful options with this watercolor leaves autumn wreath:

9. Autumn text
Kellie never disappoints with her pretty printables every season:

10. Chalkboard wreath
The chalkboard art printables are always a favorite too. Those colors are so beautiful against the dark backdrop: The Ball jar makes this one!:
11. Mason jar grateful
12. Glorious fallAnother great one from my friend Kellie:
13. Life starts again
This simple quote would be beautiful in a natural wood frame:

14. Autumn wreath trio
I loved all of these wreaths -- you can print them individually if you only want one:

15. Blue door with wreath
So this isn't a typical fall printable but it was so lovely I had to include it. Rachel offers her fall artwork as a free download:

16. Autumn banner
This autumn banner is adorable, there are so many pretty details. The hardest part for you will be cutting them out:
Of course that’s just the first two letters -- there are more at the link. :) 17. Thankful gift tagsI thought these tags were really sweet! They would be a great addition to a little something for a neighbor or a friend this Thanksgiving:
She Wears Many Hats/Thankful tags 18. Autumn is a second springI shared this "autumn is a second spring" printable years ago:
I added some bling but I think it would be pretty all on it’s own too. :) 19. Staying home quoteI loved this one because it’s neutral and could really be used any time of year:
Finding Silver Pennies/Chalkboard But it sure does feel fall, right? 20. Give thanks wreathAnother gorgeous wreath print from Lucy. This is one of my favorites!:
21. Vintage leaf art
These large leaf prints have a vintage look that would fit into any decor:

22. Apple cider
There are five options in this pretty watercolor design:

23. Thankful napkin wrap
How cute are these to wrap up your napkins and cutlery?:

24. Thanksgiving conversation starters
I adore printable leaves and will be printing some out for our Thanksgiving dinner:

25. Summer to fall quote
This beautiful print is perfect for late summer/early fall:

There you go! Twenty-five of my favorite FREE printables for your fall decor! Aren't these folks so lovely for sharing their talents? I hope you found one you love and will use in your home. Make sure to visit each site to get the high resolution versions. Remember these are all for personal use only! If you save to Pinterest, please pin from their respective sites.
Planning for the holidays? Check out 20 of my favorite free Christmas printables here:

Via https://www.thriftydecorchick.com/2015/09/ten-free-fall-printables.html Tips for decluttering and organizing to get ready for the new school year.
The start of the school year is always bittersweet for us. We love the slower summer days and sleeping in, but it's always nice getting into a schedule again too!
I also love the anticipation and prep for the second half of the year. Fall and the holidays are definitely my favorite, and my energy ramps up as the temps cool down.
Because of that, I find that I tend to get the urge to declutter and organize now more than earlier in the year. I love a calmer, organized house -- I find it helps when the busyness of school and extracurricular activities schedule start up.
I've been tackling a few spots in particular, and I thought they may inspire you to work on some of your problem areas too!
The last month of the summer is always busiest for us, so I tend to let things pile up. I'll see the mountains of stuff growing and just say to myself "I'll tackle it when 'X' is done." Whatever 'X' is at the time. ?
I give myself that grace when our lives are busy, and I think it's important we all do that!
Years ago I shared these awesome metal pull out shelves for our bathroom vanities:

They have been SO helpful because we have dumb vanities that have doors instead of drawers (and it was totally my fault for not catching this).
This side had become cluttered and full over the past few months, so I finally sat down to go through all of my makeup and toiletries.
I took everything out, sorted through old stuff and things I don't use, and then cleaned all of the items and washed the metal drawers.
Now everything has room to breathe and I have plenty of space!
I also pulled out the two small drawers on my vanity and did the same for those. Since these are the only built in drawers in the cabinet, I have to use the space well.
I used a few of my favorite drawer bins for the smaller stuff and made sure to only include things I use every day:
Read the full post
Via https://www.thriftydecorchick.com/2022/08/organizing-decluttering-for-school-year-and-holidays.html Three simple and delicious recipes made with basil!
Basil is one of my favorite herbs, and is so easy to grow at home! I usually have WAY too much and am always looking for ways to use it up.
I found these basil recipes years ago and they are still staples around here.
If you're looking for ways to use up your crop or just love basil like me, you'll enjoy these three recipes made with this delicious herb. I included my favorite snack idea, a pasta dish and even a delicious drink to finish it all off! ;)
First up, one that works for a quick snack or as a great dip for parties. It’s SO simple to throw together! Easy basil pestoPesto is a great way to use up a lot of basil and it's easy to make!
Bear with me because I usually make a small amount, so this is for a snack sized version. Perfect for just a few people!
The great thing about this recipe is you can easily customize the taste to how you like it.

EASY BASIL PESTO
Grated Parmesan cheese
Extra-virgin olive oil One clove of garlic (or about 1/2 teaspoon minced) Basil leaves
Salt to taste
Optional: Pine nuts (these are expensive and I think it tastes just as good without!)
There's no preparation needed, other than washing your basil leaves and patting them dry.
Just throw everything in a small processor or chopper:

This post may contain affiliate links for your convenience.
I may earn a small commission when you make a purchase through links.
See my policies and disclosure page for more information.
Mix to to the consistency you desire. My mini food processor is perfect for small recipes like this!
Taste test it to see if you'd like more of any ingredient. If it's too thick, add a splash of olive oil. Too bland? Add more garlic or salt.
I LOVE basil, so I do a lot of basil, a lot of cheese, a little olive oil, and a smaller amount of garlic.
Taste and mix till it’s where you want it. I like to eat it with crackers or cut up veggies:  You can also add it to pasta -- so good! Most pesto recipes will be thinner, but I like a thicker consistency.
By the way, yes, you can freeze pesto. Make a bunch and save some!
Spoon it into ice cube trays and freeze to add to recipes or thaw for later. Now that we have an appetizer, let’s move on to the main course. :) Easy Tomato and Basil Pasta
This pasta has basil as a main ingredient and is SO simple and good:

FRESH TOMATO AND BASIL PASTA
3 medium tomatoes, chopped (or one canned)
1/3 cup chopped basil leaves 1 tablespoon olive oil 1 clove garlic or 1/2 teaspoon minced (add more if you like garlic) 1/2 teaspoon salt 1/4 teaspoon pepper 8 ounces rotini pasta, uncooked (I used about one and a half cups) 3/4 to 1 cup grated Parmesan cheese  I had two cans of tomatoes in the pic, but you only need one. It’s more than enough!
But again, this is another recipe that you can tweak to meet your tastes.
Then mix with the cooked pasta, and top with some more parmesan:  This pasta dish is SO GOOD!! Oh my -- it’s light, fresh, and pretty darn healthy. I use whole wheat pasta, so that helps even more. You can also make it as a pasta salad by rinsing the pasta after cooking then refrigerating it.
I have yet to try it cold, but that sounds delicious too.
Dragon Berry Strawberry Basil Lemonade cocktail
Let's finish off this trio with a yummy drink, shall we?
This fresh basil cocktail has become one of my favorites. Yes, basil...in a drink. I promise you, it's good!
There's just a hint of basil in this Bacardi Dragon Berry Strawberry Basil Lemonade drink:  I just call it Strawberry Basil Lemonade for short. :)
STRAWBERRY BASIL LEMONADE COCKTAIL
2 parts Bacardi Dragonberry Rum
1 part lemon juice 1 part simple syrup or sweet lime juice 3 basil leaves 3 strawberries (hulled and chopped) 2 parts Sprite or other clear fizzy soda
Then add those to the fresh lemon juice, simple syrup and Bacardi rum in a shaker with a bunch of ice.
Once mixed, add the clear soda and you’re done:
 This is SO good and is one of my favorite summer cocktails. (But I would gladly have it all year!)
Of course, this could be made none alcoholic by omitting the rum. It would be a pretty punch for a shower or party!
Again, if you don’t like basil, this may not be for you. But don't count it out if you're not a basil fan! The basil gives it just a little kick that is so different and fresh. So there you go...a plethora of basil recipes, all easy and sooooo good. All perfect if you grow your own – it’s such a joy to go outside to pick my own food. Love it!
**Check out my simple summer beer margarita recipe for another warm weather favorite (at the end of the post) and this amazing sausage and spinach pasta is so fresh and delicious!:

Never miss a post by signing up to get posts via email.
Via https://www.thriftydecorchick.com/2011/05/for-love-of-basil.html These are ten of my favorite ways to elevate the look of your home, both inside and out!
Over the years I've discovered some easy decor and DIY changes that make a big difference in our home.
I could make an endless list of ways to do this with more involved projects like wall trim and built ins, but these examples are much simpler and less involved.
Most of these can be done in a few minutes. A few of them are smaller projects that will take a little more time, but thankfully I have tutorials that will help you out if you decide to tackle them. ;)
I've always thought that some of the more subtle changes make a big difference in a house, especially when repeated throughout.
They are the little touches that elevate the look of a home!
A few of these are splurges, so when I update multiple like items all over the house, I do it over time. I'll grab one or two on trips to the store as the budget allows.
Some of these have taken me a year to finish, some aren't done and some I've just started!
ALL are little details that I think give our home that extra little something. :)
1. Replace or paint floor HVAC grates
For years I've spray painted our inexpensive floor grates to a darker color that flows with our floors better:

This post may contain affiliate links for your convenience.
I may earn a small commission when you make a purchase through links.
See my policies and disclosure page for more information.
I've done that with all of the basic tan floor grates that we've had in both of our houses over the years. They hold up surprisingly well!
Last year I was strolling down an aisle at Lowe's when I noticed how many pretty floor vent options were available. I tried one of these cast iron metal grates in a room that day and fell in love:

Over the past year I've been grabbing one on trips to the hardware store here and there. Since we only have the floor vents on the main floor, I didn't have as many to replace as I thought.
I love the pretty Marquis design that fits in well with our modern Craftsman home details:

There are a ton of designs available, in both metal and the heavier duty iron versions I've used.
These are still operational like the previous grates -- we can adjust the air flow no problem.
I plan to tackle our wall air intake grates on the walls eventually too!
2. Change out your light bulbs
Now this one may seem trivial at first (and honestly, in the scheme of things, all this stuff is!), but over the years as we've had to change out light bulbs, I've replaced some with these round bulbs instead:

If you have exposed bulbs or clear glass, they just give the whole light fixture a higher end look:

Overall I prefer the white bulbs over clear ones, and the white ones soften the cast a bit, which is nice.
I've only added these on a few lights so far, but they really do elevate the look of the light fixture! They don't cost that much more than regular LED light bulbs, so this one won't break the bank.
I like these round LED bulbs because they don't have the white plastic base that so many have:

They look better, and let off a bit more light.
Of course, if you know the basics of electrical, replacing your regular switches with dimmers allows for softer, dimmed light in the evening that is just lovely!
3. Paint a (interior or exterior!) door
The first time I painted a door in our home black, I was HOOKED. At our last house I got all of the doors in our basement and main floor painted:

That was probably 15 years ago and I haven't looked back. :)
No, you don't have to paint them all at once!
It took me years to paint all of our white doors black, and I didn't even touch the upstairs doors.
I've started the process in this home, but it's gone much slower since I've been so focused on bigger projects:
This DIY takes some time but isn't difficult. I shared my tips for painting interior doors black -- using this tutorial will give you a super smooth finish that looks like it was sprayed on!
AND, did you know that painting your front door is one of the easiest ways to improve your curb appeal?

4. Dress up the base of your indoor plants
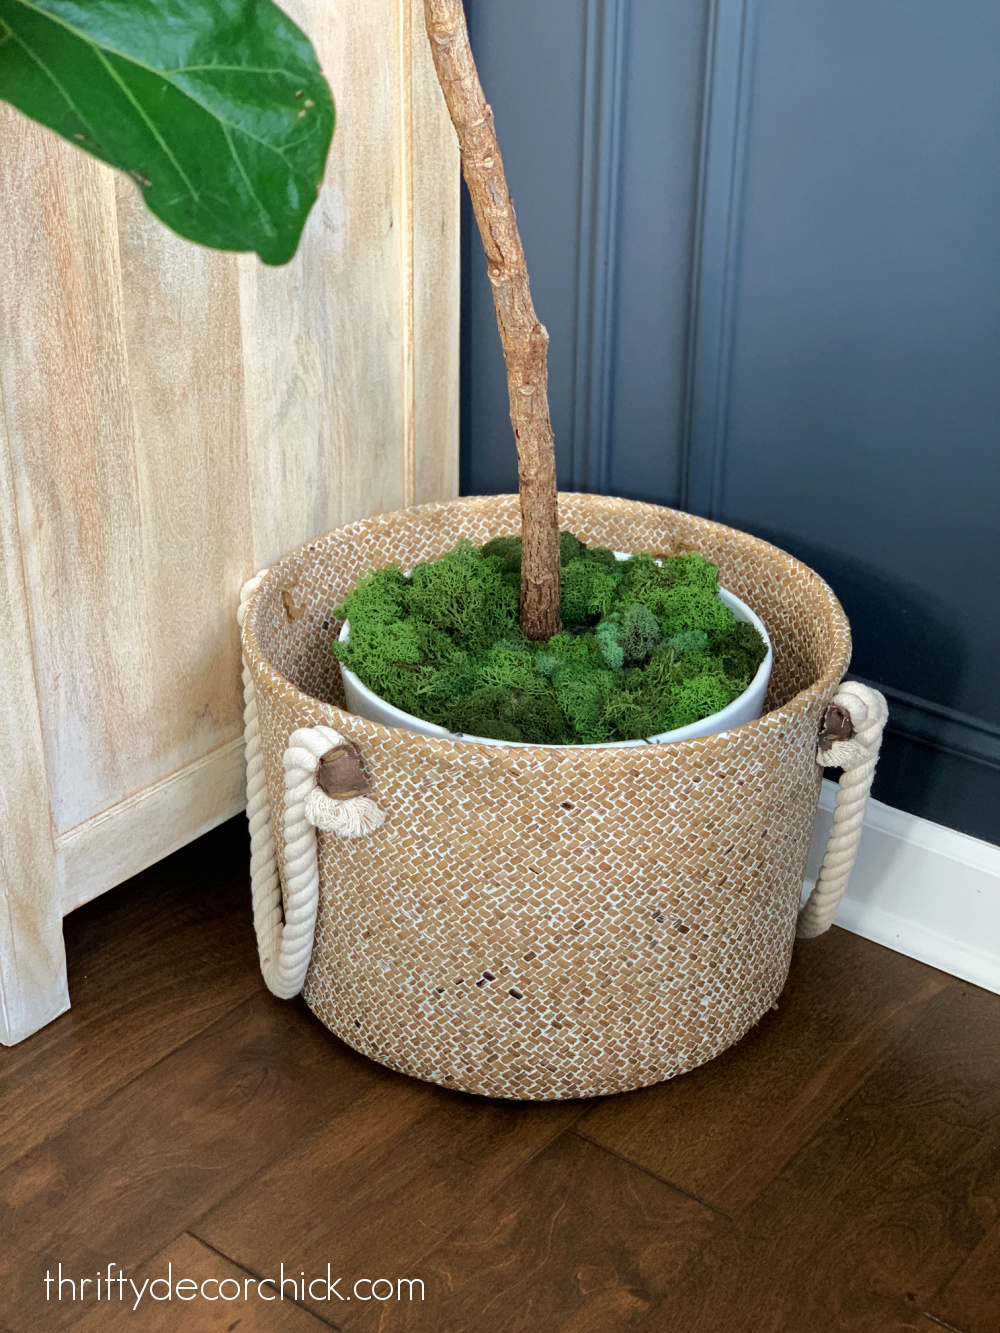
This small change is one of the easiest! I have a ton of plants around the house (mostly these fiddle leaf figs):

Plants like this come with small containers that can look a little wimpy. I suggest replanting into a large pot and placing that in a simple basket or pretty vessel. This adds some texture and weight to the plant.
I use large, cheap plastic pots all the time! You don't even notice when they're placed in basket.
The added width at the bottom makes the whole thing look bigger...which is especially helpful if you don't have a green thumb!:

And it's just a nice decorative touch that adds a little something throughout the house.
I used to place rocks on top of the plant soil (we have a cat that used to love peeing on the plant bases and the rocks deterred her), but over the years as I've replanted, I left those out.
Recently I've been adding something different at the base of the plant. I had a ton of this pretty, soft moss in my craft stash and tried laying it out over the dirt:
LOVED it. Such a simple thing, but it makes the plant look even more lovely!

I love this deep green reindeer moss -- it's super soft and easy to spread, but stays put.
I swear this has helped our plants! It seems to help retain water and prevent them from drying out. I could be imagining that, but I think it makes a difference.
5. Adding exterior and landscape lighting
I will stand on my hill of landscape lighting forever! Ha! It's always been that one exterior detail that I've noticed about really lovely (and expensive!) houses.
Years ago I was determined to add some to our house, and discovered how easy it was to add landscape lighting on my own.
There's no electrical knowledge needed!:

I'm telling you, it will make your house look AMAZING at night. I hear from readers all the time who are shocked at how easy it is to install.
It takes some time, but it's not a difficult DIY!
I've also fallen in love with pretty cafe lights that hang over a patio or deck:

I've shared how to hang patio lights when you don't have trees to attach them to (like above), and showed you how we hung them over our old patio and under the pergola:

We know what a difference the right lighting inside makes, and think it goes double for outside!
6. Replace switch/outlet covers
This is another small detail that on the whole makes a bigger impact than you'd think!
I shared how I updated some of our switch and outlet covers at our last house:

You'll need a flathead screwdriver and about a minute to change out each one.
In our current home I've replaced most of our switch covers on the main floor to these new plates with a slight molding design around the edge:

And the outlets on our kitchen backsplash as well:

I haven't done many of the other outlet covers yet, just because they're not as noticeable. You can definitely take your time with these small updates!
The covers I used have an insulated backing that helps to retain both heat and cool air. Have you ever felt how much cold air comes through outlets in the winter? It's crazy.
There are a TON of decorative switch plates at most hardware stores, and most come in all of the configurations you will need. Ours come in multiple switches options, GFI outlet/switch combos, etc.
7. Change out door knobs
Updating your door knobs is a great way to update your home! If you have basic door knobs, they are easier than you'd think to change them out.
I updated ALL of the knobs in our last house and replaced the shiny brass knobs with lovely dark bronze hardware:

I had to cut out (or mortise) where the door latch goes on EVERY DOOR. But it was worth it!:

If you don't have to do that, this is a much quicker job! Once you get the hang of it, each one should only take about five minutes.
When we picked all of the details for our current home, I chose these simple black handles instead of knobs:

I've loved having handles instead of knobs -- they are especially helpful when your hands are full. :) You can push them down or up to open so it's a little easier to maneuver.
Not only do the newer door knobs look better, but they feel more substantial as well. It's an easy change that definitely makes a home feel higher end.
8. Update or add cabinet hardware
This is one of the easiest upgrades in the kitchen! If you don't have hardware on your cabinets, adding knobs or pulls will elevate the space quite a bit:

Hardware will reduce the wear and tear on your cabinets as well!
This can get expensive if you're starting from scratch, but there are so many great options at great prices now! You can buy them in bulk for less too.
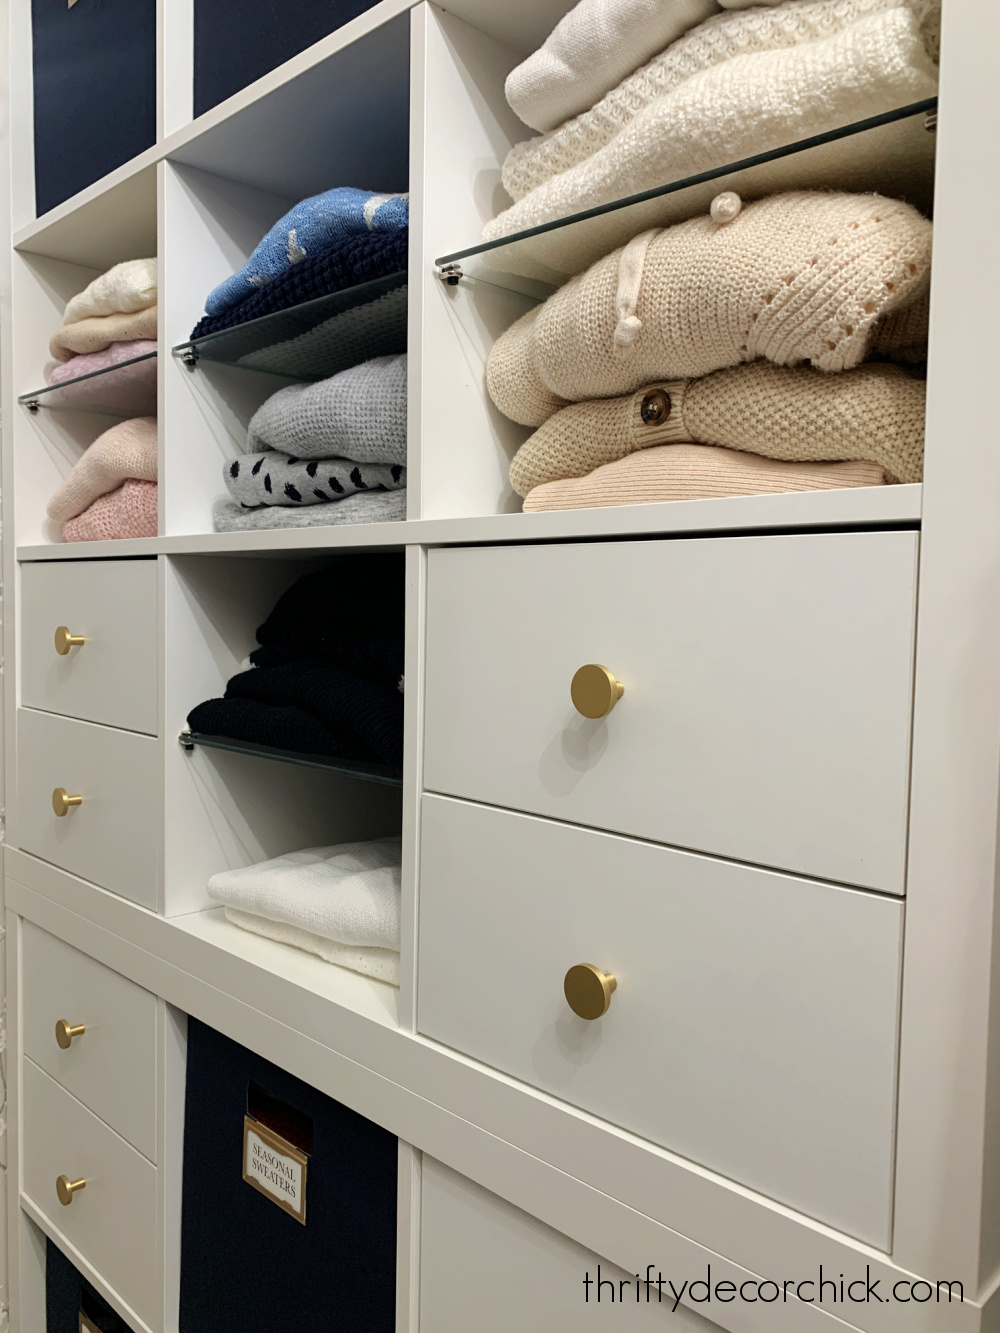
I love these simple brass knobs I used in my closet redo:
As with many finishes in your home -- spray paint will give you a quick cabinet hardware update for WAY less! If you like your hardware design but not the color, spray paint is a great solution.
See how to paint your cabinet hardware for an easy refresh:

9. Updating drapery rods and adding pleats
Window treatments are huge! Hanging them a bit higher and wider than the window frame will make the windows feel grander.
Last year I tried a new window treatment update that made my store bought curtains look SO much more expensive:

I shared how to add pleating tape to the back of the drapes -- the difference is truly amazing!
They went from messy and floppy to perfectly spaced and pretty:

I still have one more room I'd like to add this pleating tape to. I LOVE the look!
But the drapery hardware makes a big difference too. When we moved in, I bought the cheapest, skinniest drapery rods I could find.
We've had those up since then, but I've replaced a couple over the years. I've used this pretty brass rod with the faux leather detail in both my office and our basement family room:

Not only is it a little thicker, but that leather finial at the end just gives it a unique little detail.
By the way, I don't think your drapery hardware needs to match throughout the house! I shared where I found really long curtain rods for a great price a few years ago. The IKEA drapery hardware is excellent!
10. Add fixture to recessed lights
There are two ways to replace a canned or recessed light with a hanging fixture. The simplest is to use a simple screw in kit and a large shade like I did in this small hallway:

You don't even need to turn off the breaker -- this is almost as easy as replacing a light bulb!
Those kits allow you adjust the length of the cord and everything.
If you want to install an actual wired fixture in a recessed light spot, that's possible too! It takes a little more work, but isn't a hard job if you know how to change out a light fixture:

I had a horrible time with one brand, so be sure to check out that post before trying this DIY.
Both options allow you to hang a pretty light where there was none!
We later added a long pendant light in our tall stairway too:

Notice those pretty round bulbs? ? I love them!
Have you added any of these decor and DIY updates to your home? Remember, it doesn't all have to be done at once. Take your time as your budget allows.
I promise no one will notice that your switch covers don't match in every room. :)
Never miss a post by signing up to get posts via email.
Via https://www.thriftydecorchick.com/2022/08/ten-easy-ways-to-make-your-home-look-expensive.html |


