|
This quick "hack" opens up your spaces and makes them feel so much bigger! I realized years ago that there were plenty of doors in our house that we never closed. I started to ask myself, can I just...remove them? Am I even allowed to do that?
The answer is yes...yes you are. ;) This is a great trick that will give you more space even if you're renting a home. Just take care when removing the door and store it under a bed so it won't get damaged.
**I recommend keeping bedroom doors up for safety reasons. This is why we sleep with our doors closed.
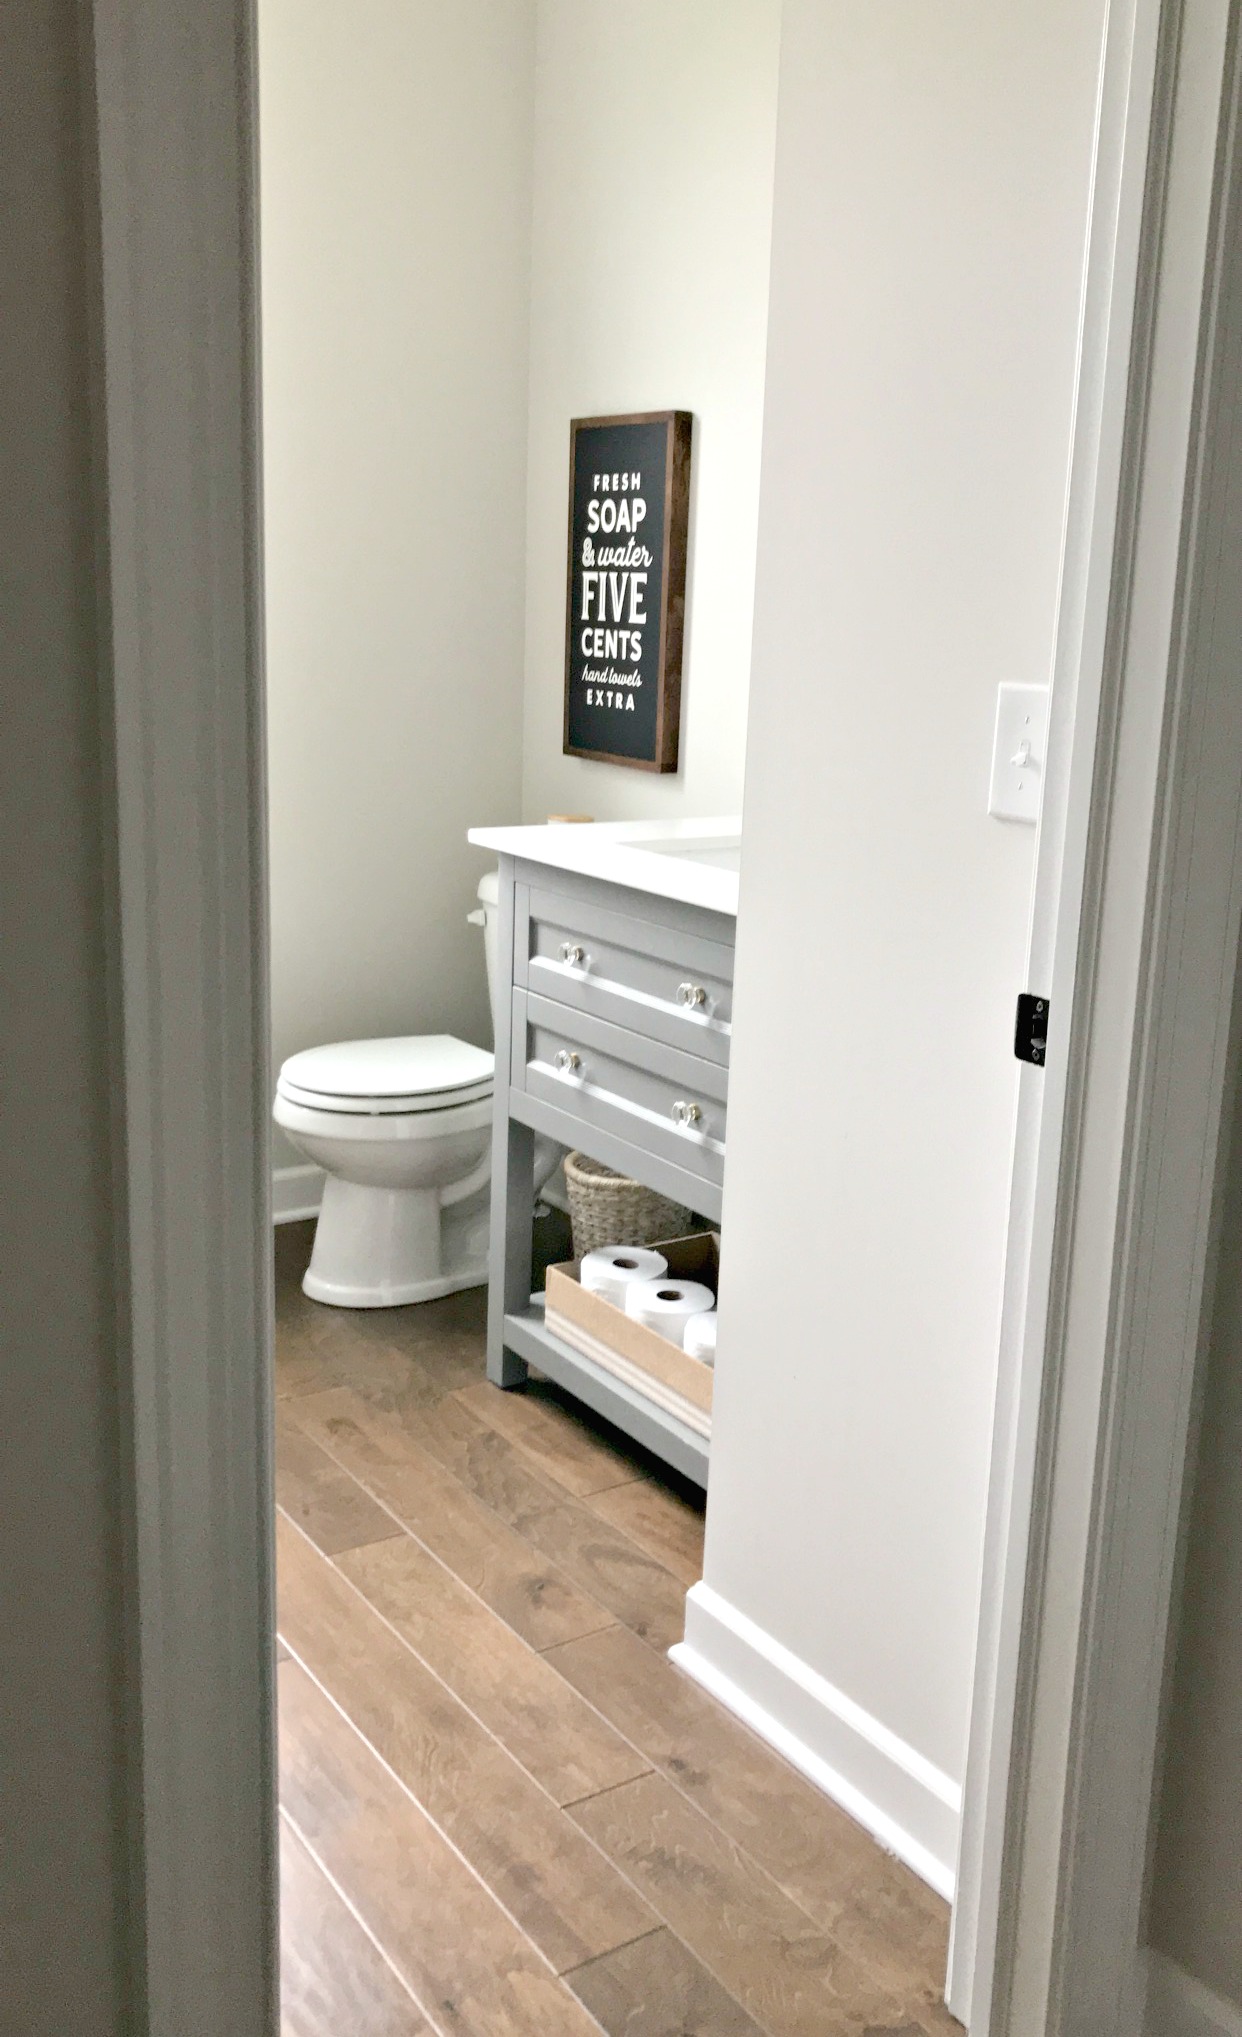
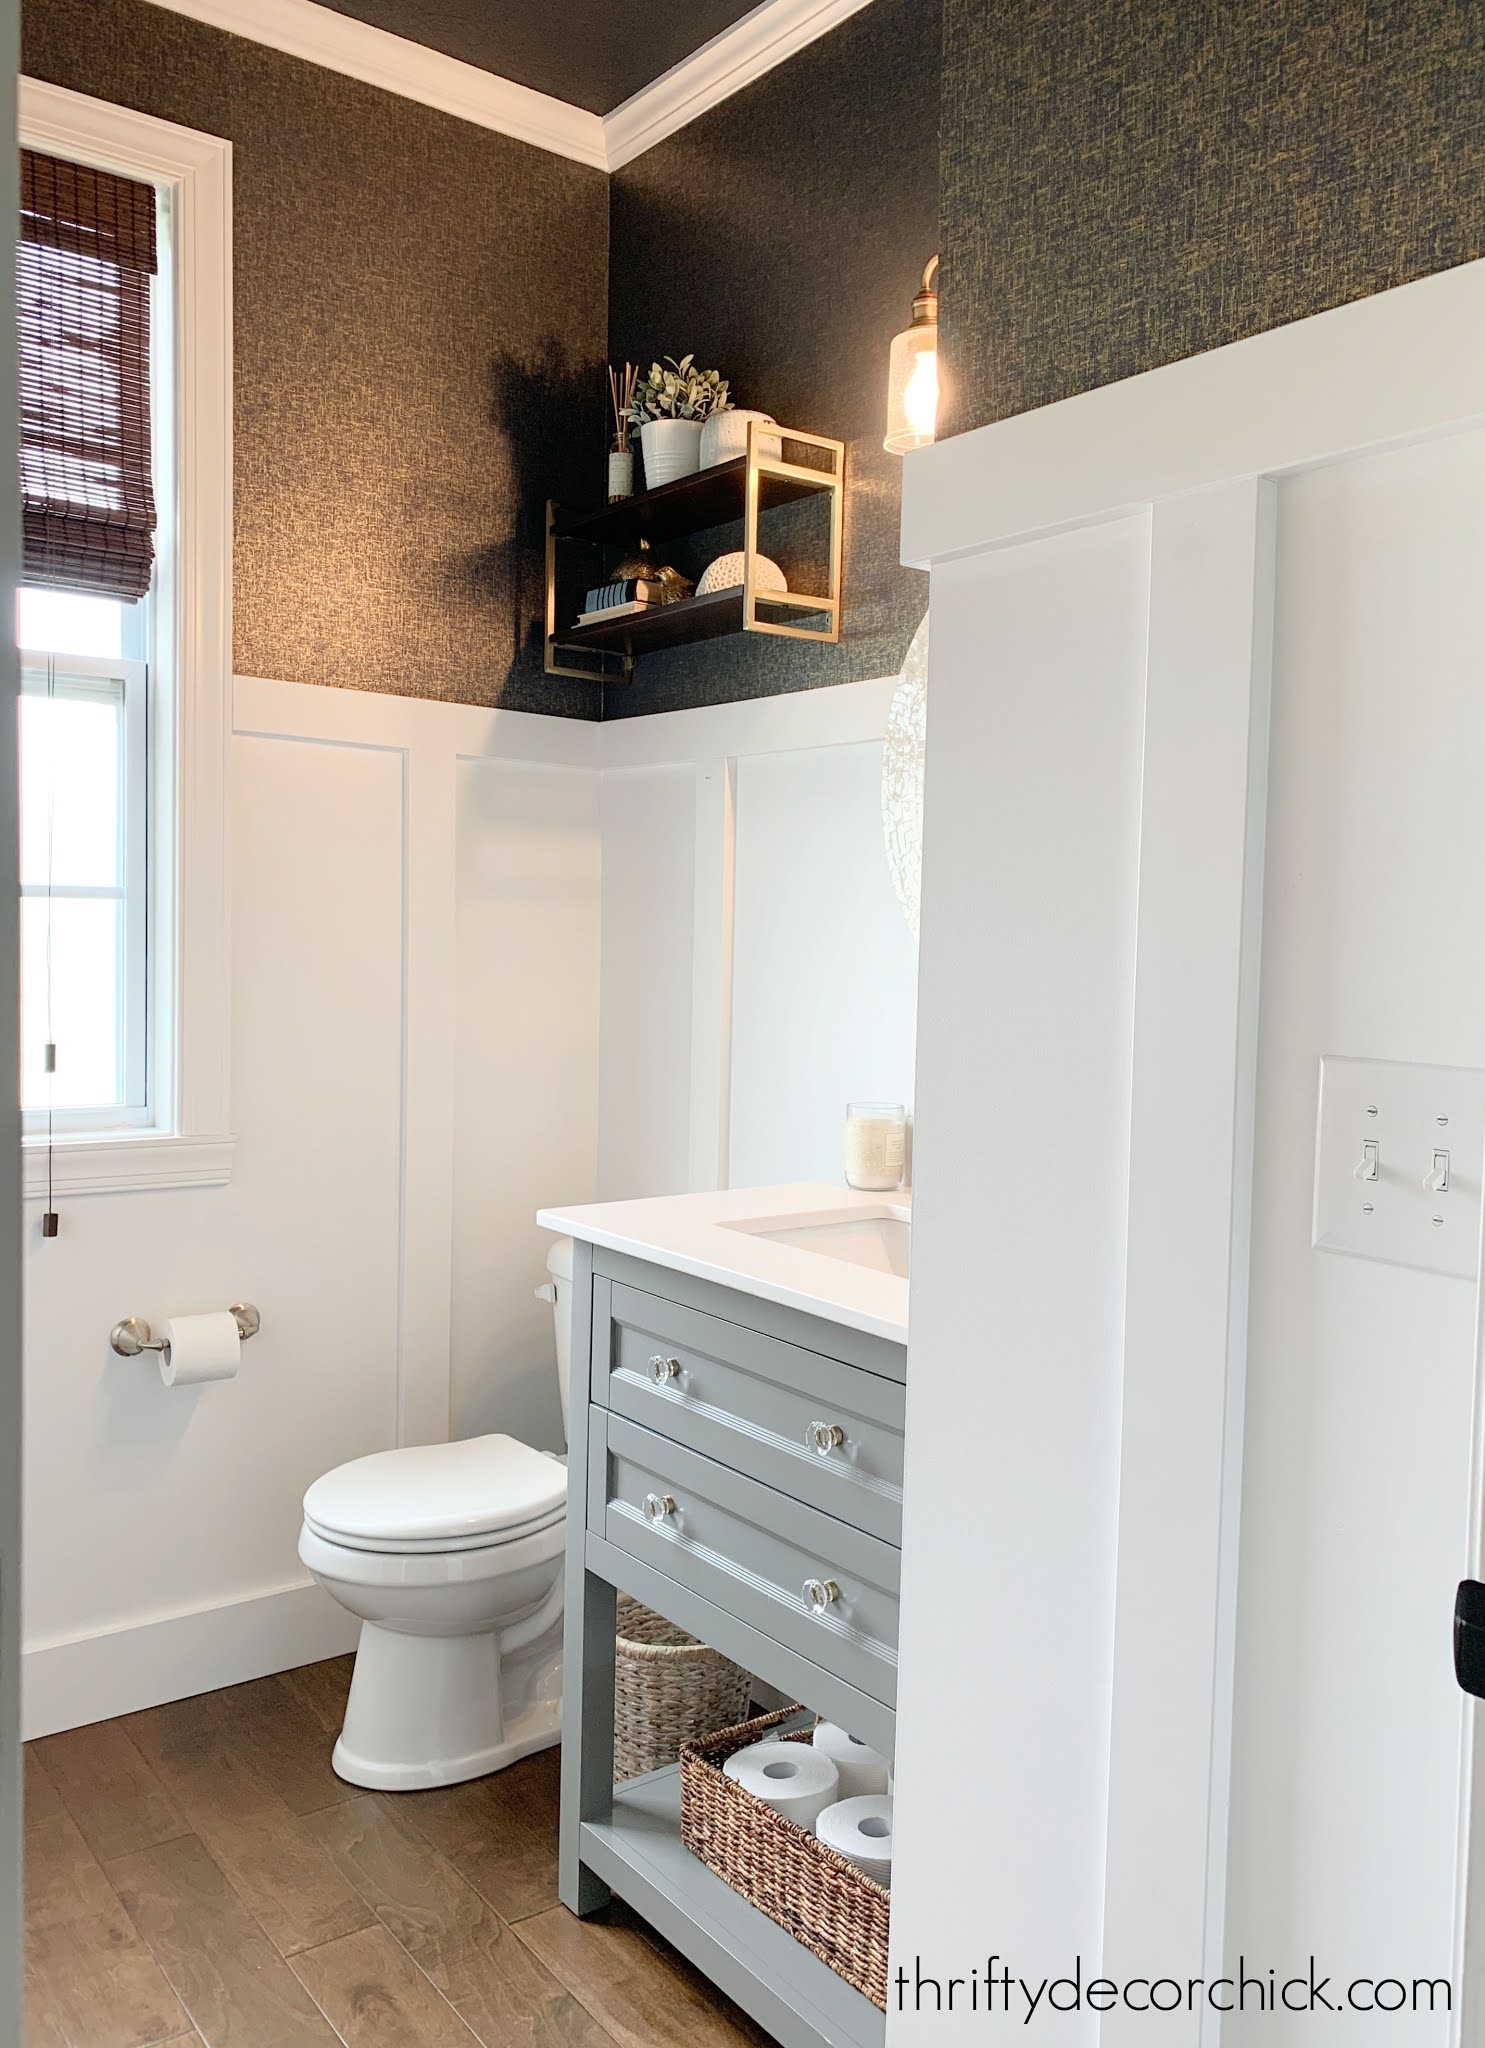
I've done this so many times over the years, I even had a few doors removed when we built our house. There's only one door I've taken down since we moved in -- on the water closet in our master bath:
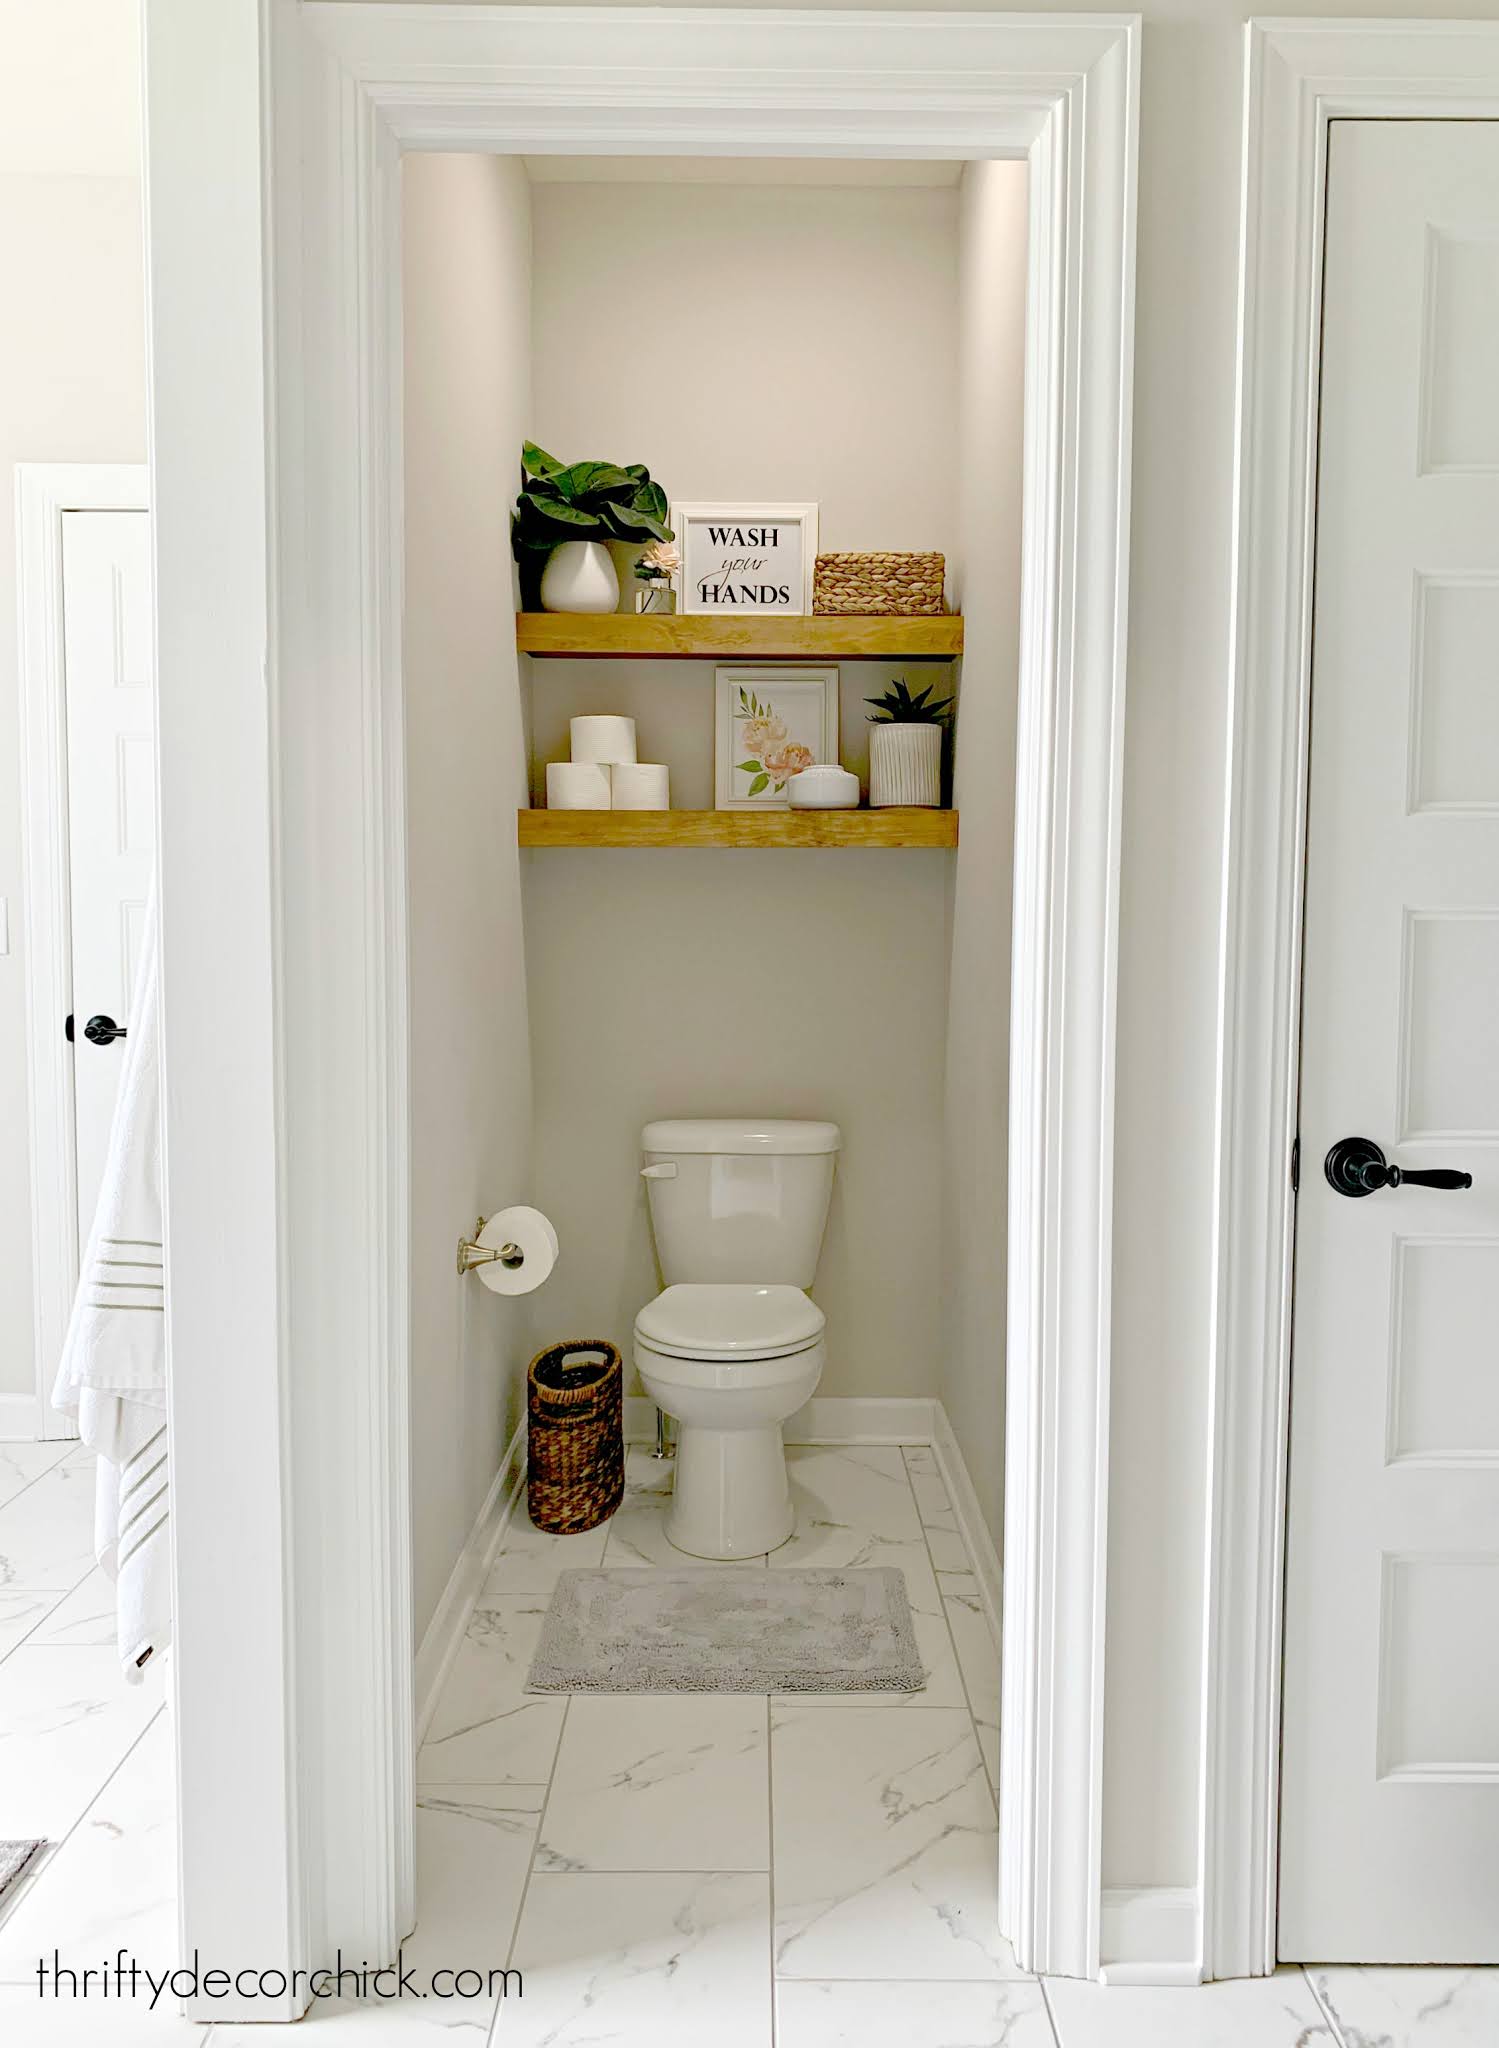
It's not a big space to begin with, so taking the door down made a HUGE difference.
I don't have a full before pic but this gives you an idea how much space it took up:

Since we have a door to the main bath, we didn't feel it was necessary to keep this one. We haven't missed it once!
I removed the door from our old mud room to the rest of the house and it made a HUGE difference in there:
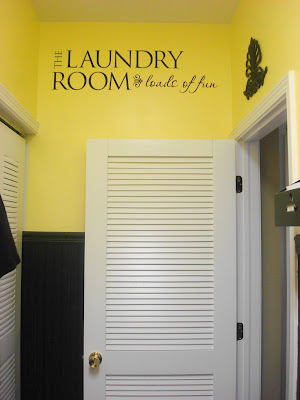
This was a door we didn't close once...so it was an easy decision.
Obviously a lot more than that happened in this room over the years, but you can see that the line of sight is so much nicer!:

I feel like I gain ten square feet of space in our house every time I do it!
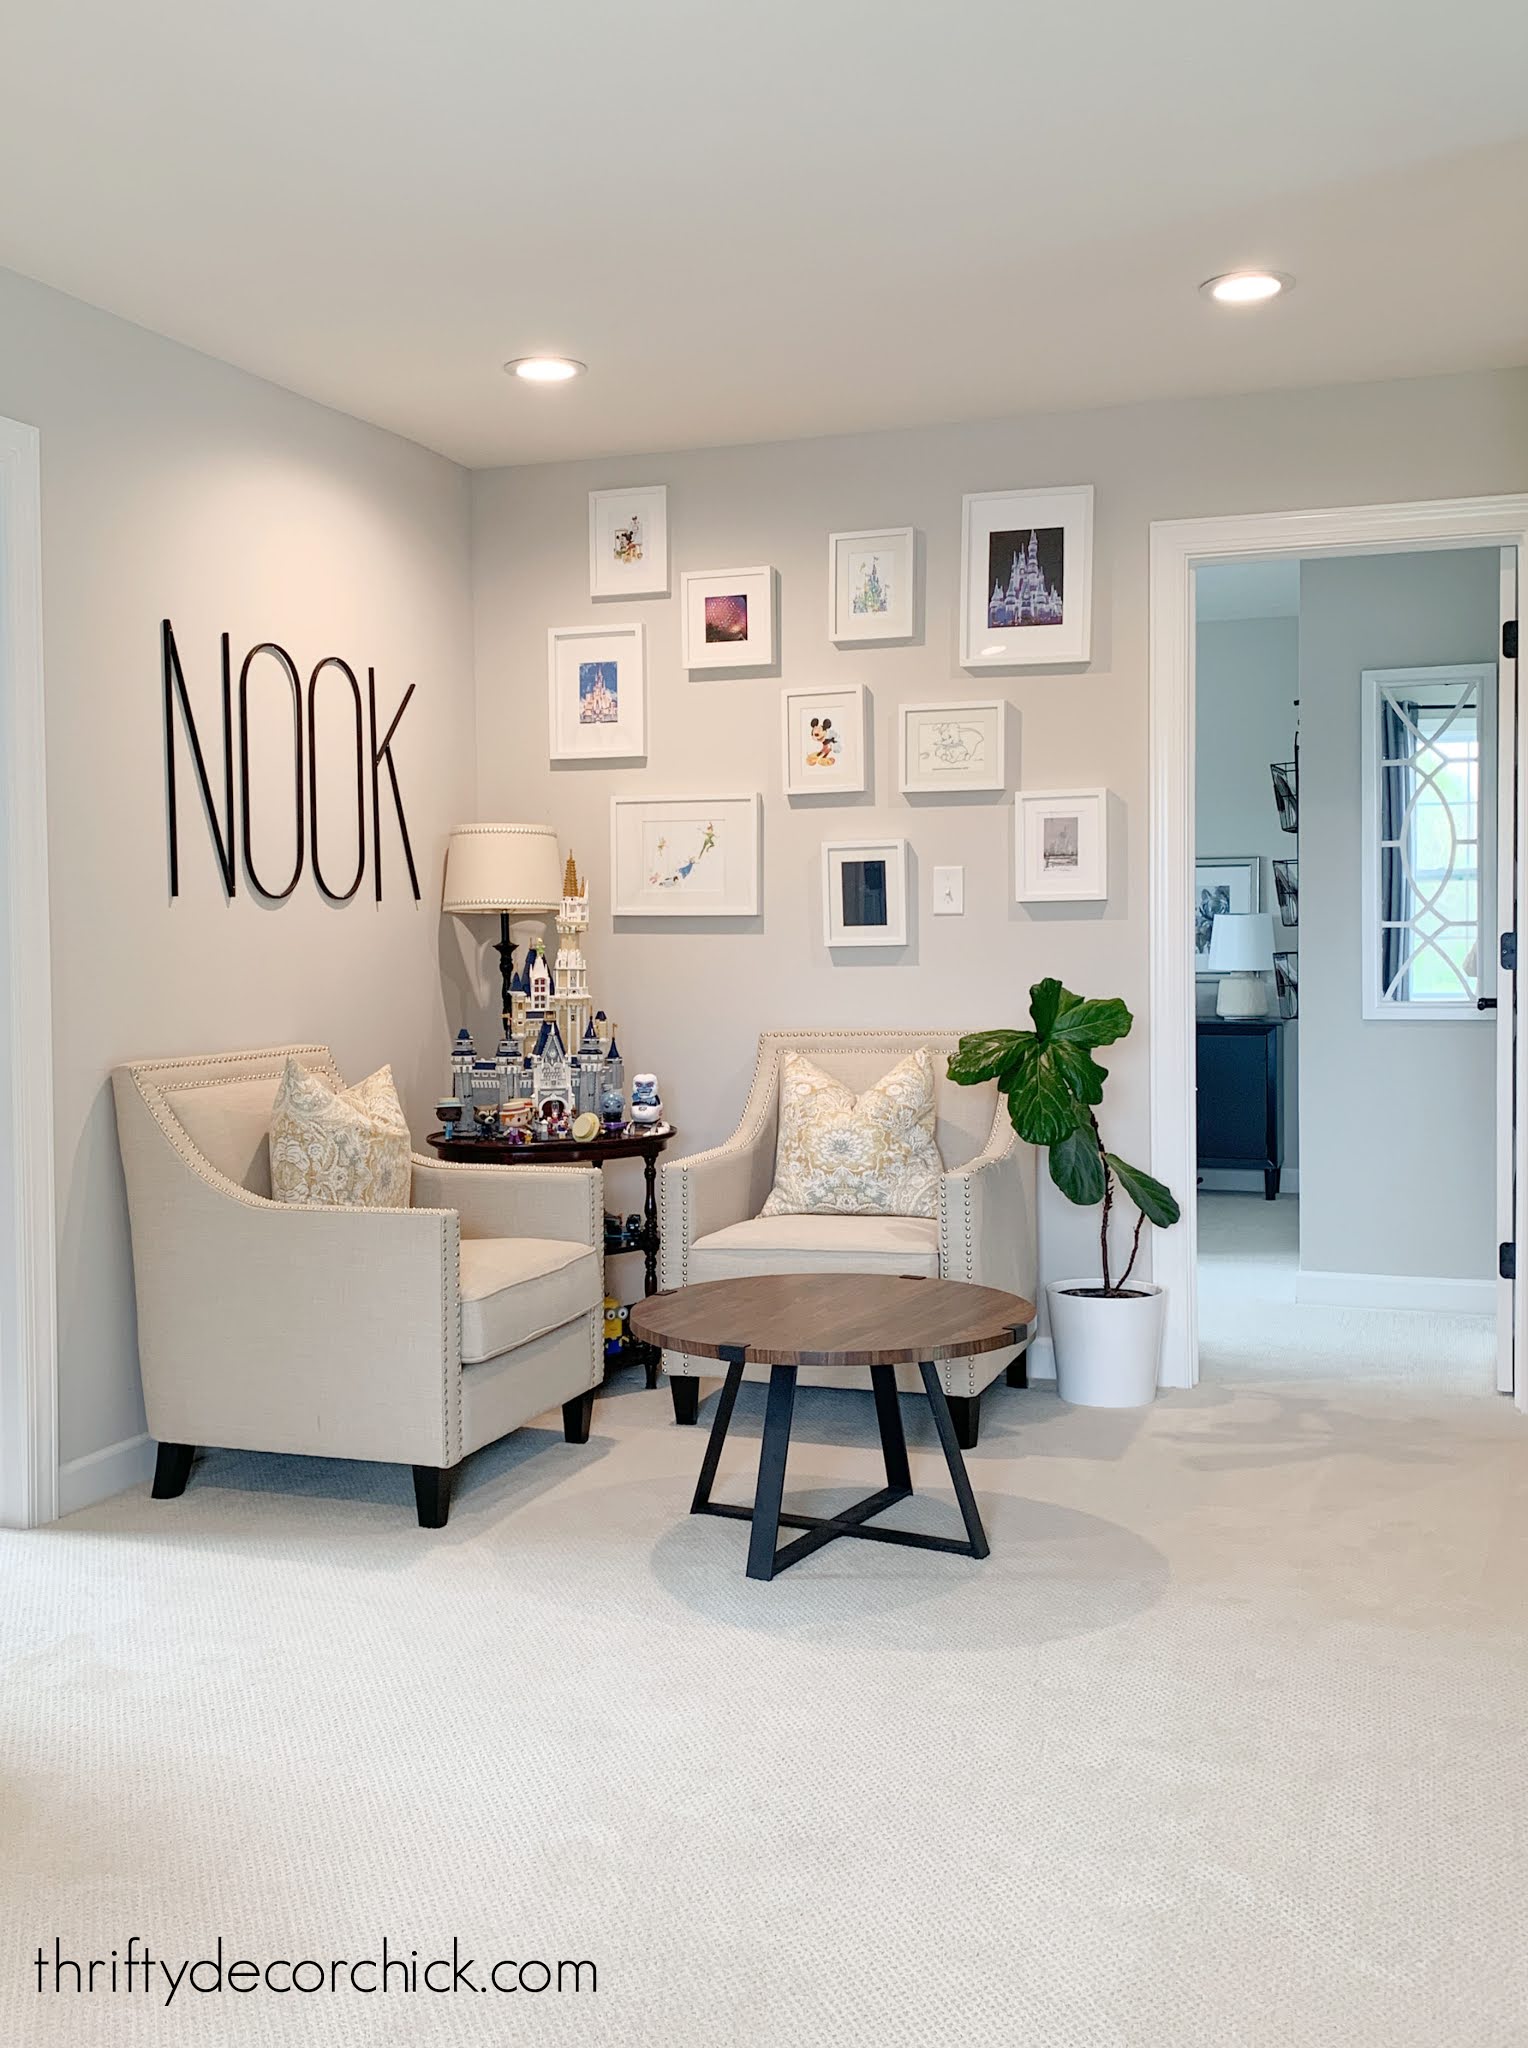
Removing the door was a given on the book nook I created as well:

Bedroom closets are a great place to remove a door -- especially if you can only access them through a bathroom. (They won't be seen by anyone but you!)
I removed the door on our old closet and we loved it:


You don't physically gain that much space, but visually it makes all the difference in the world!
We removed the door to the basement in our last house just a few years after moving in:

I don't have a before picture, but just imagine the door swinging open to the right...after I took it down we really did gain space in the family room.
I remembered that for our new home and didn't have one added to our basement stairs:

I also kept the doorway between our mud room and the kitchen open as well:

See how to use the empty space on the side of your fridge here!
It's all up to your preference and how you live in your spaces!
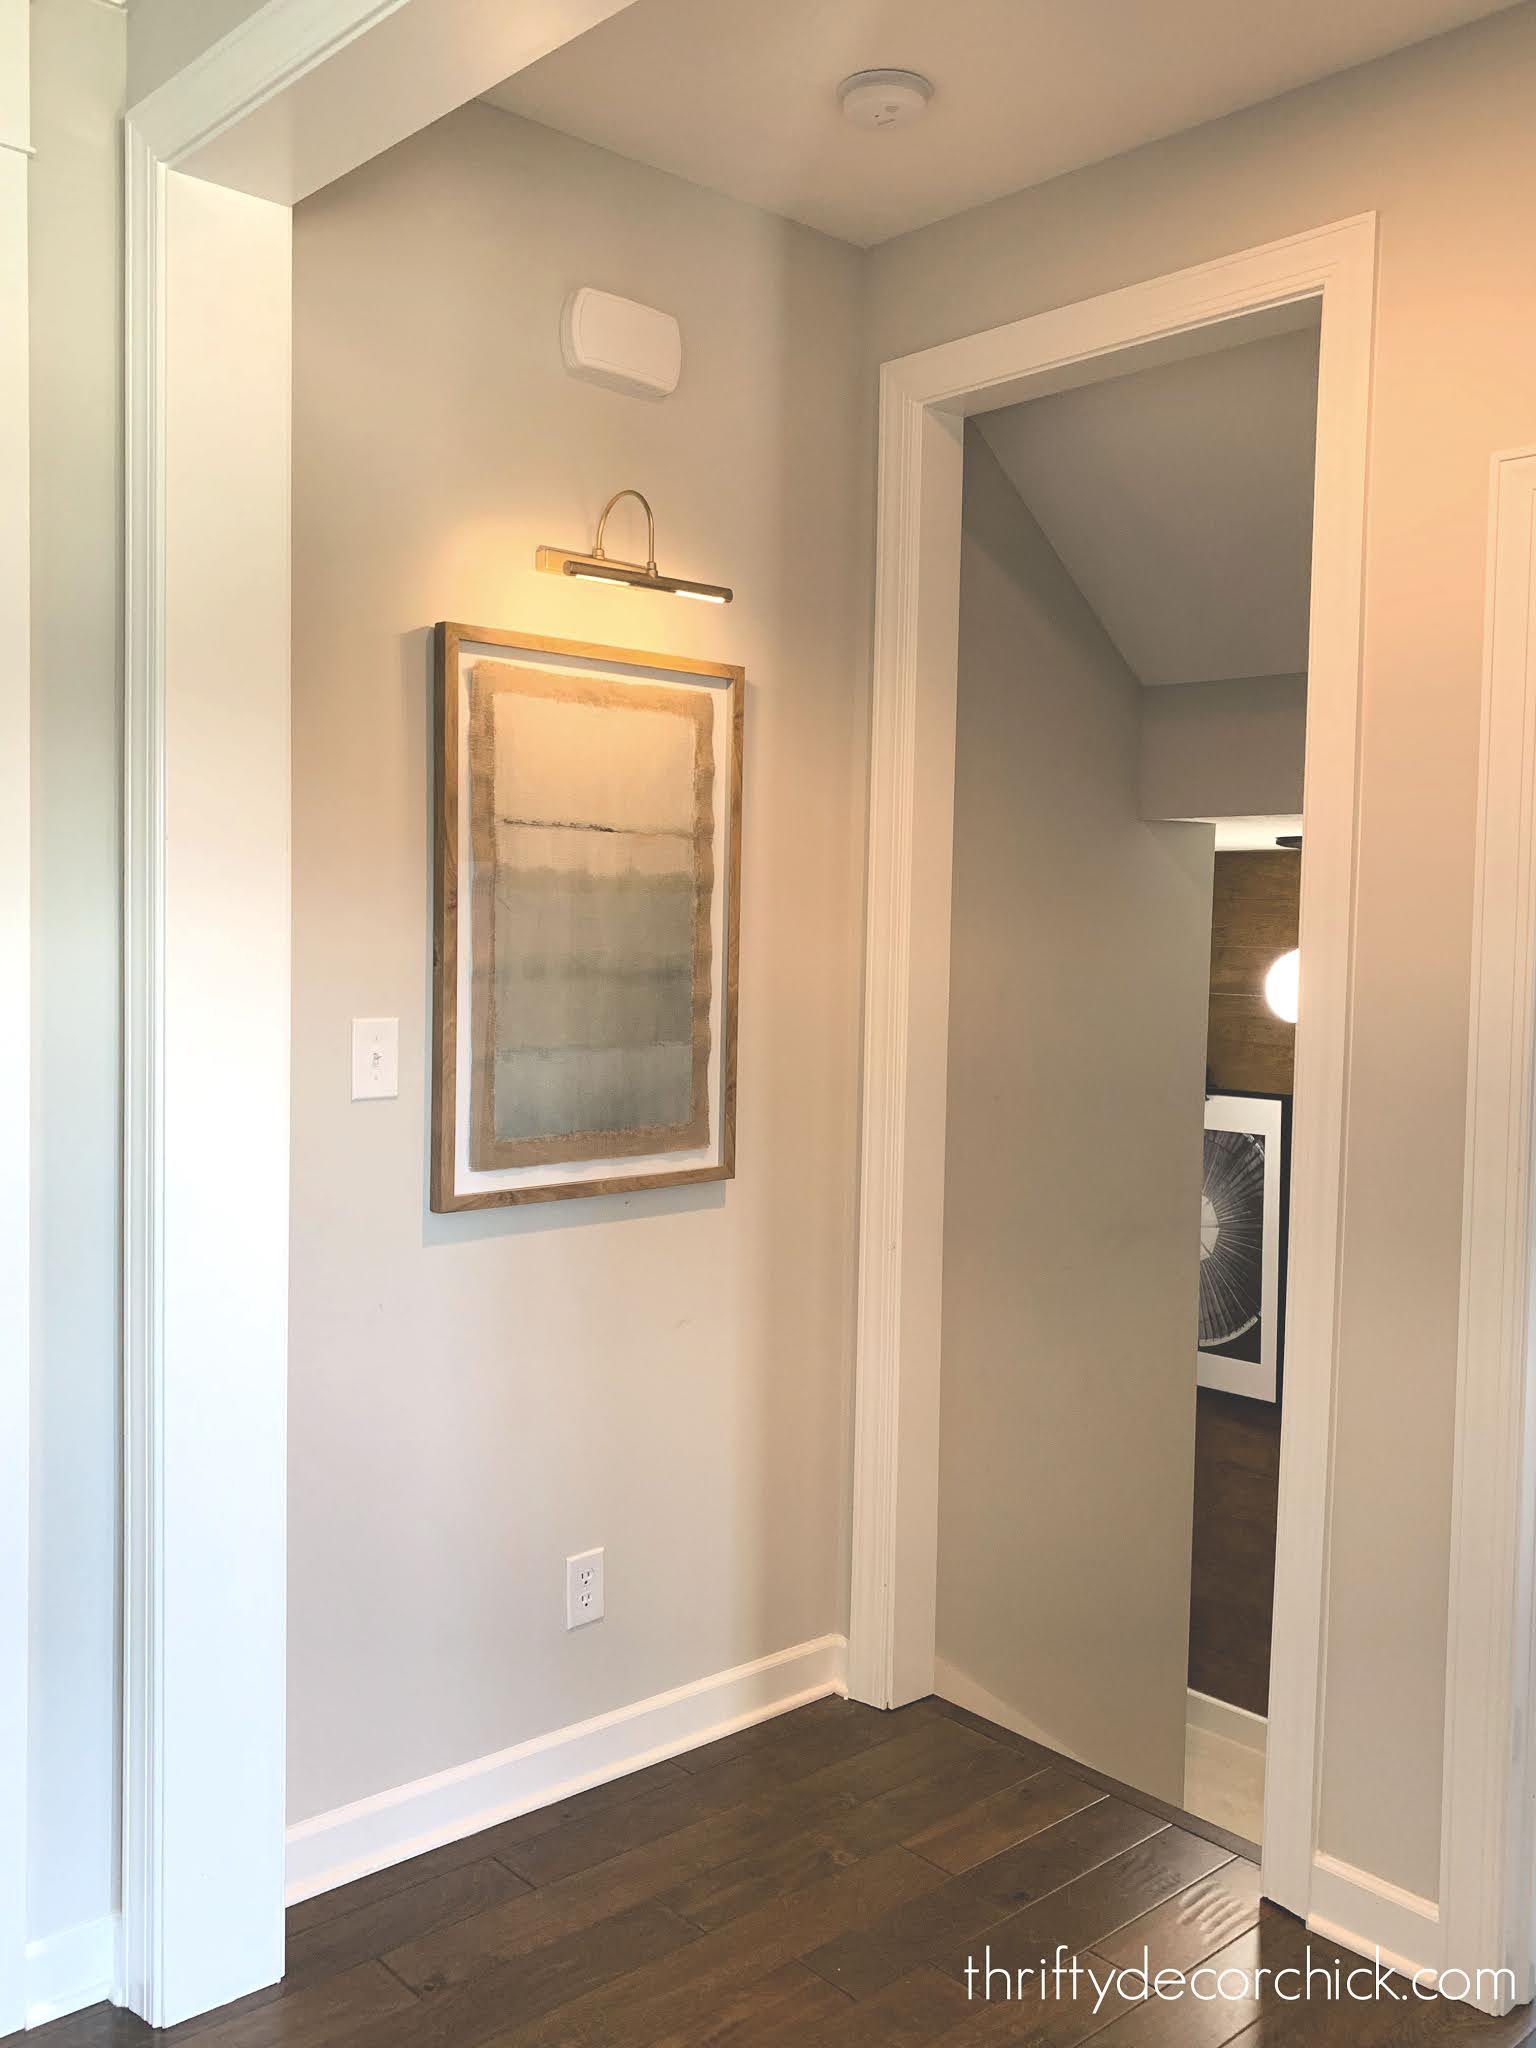
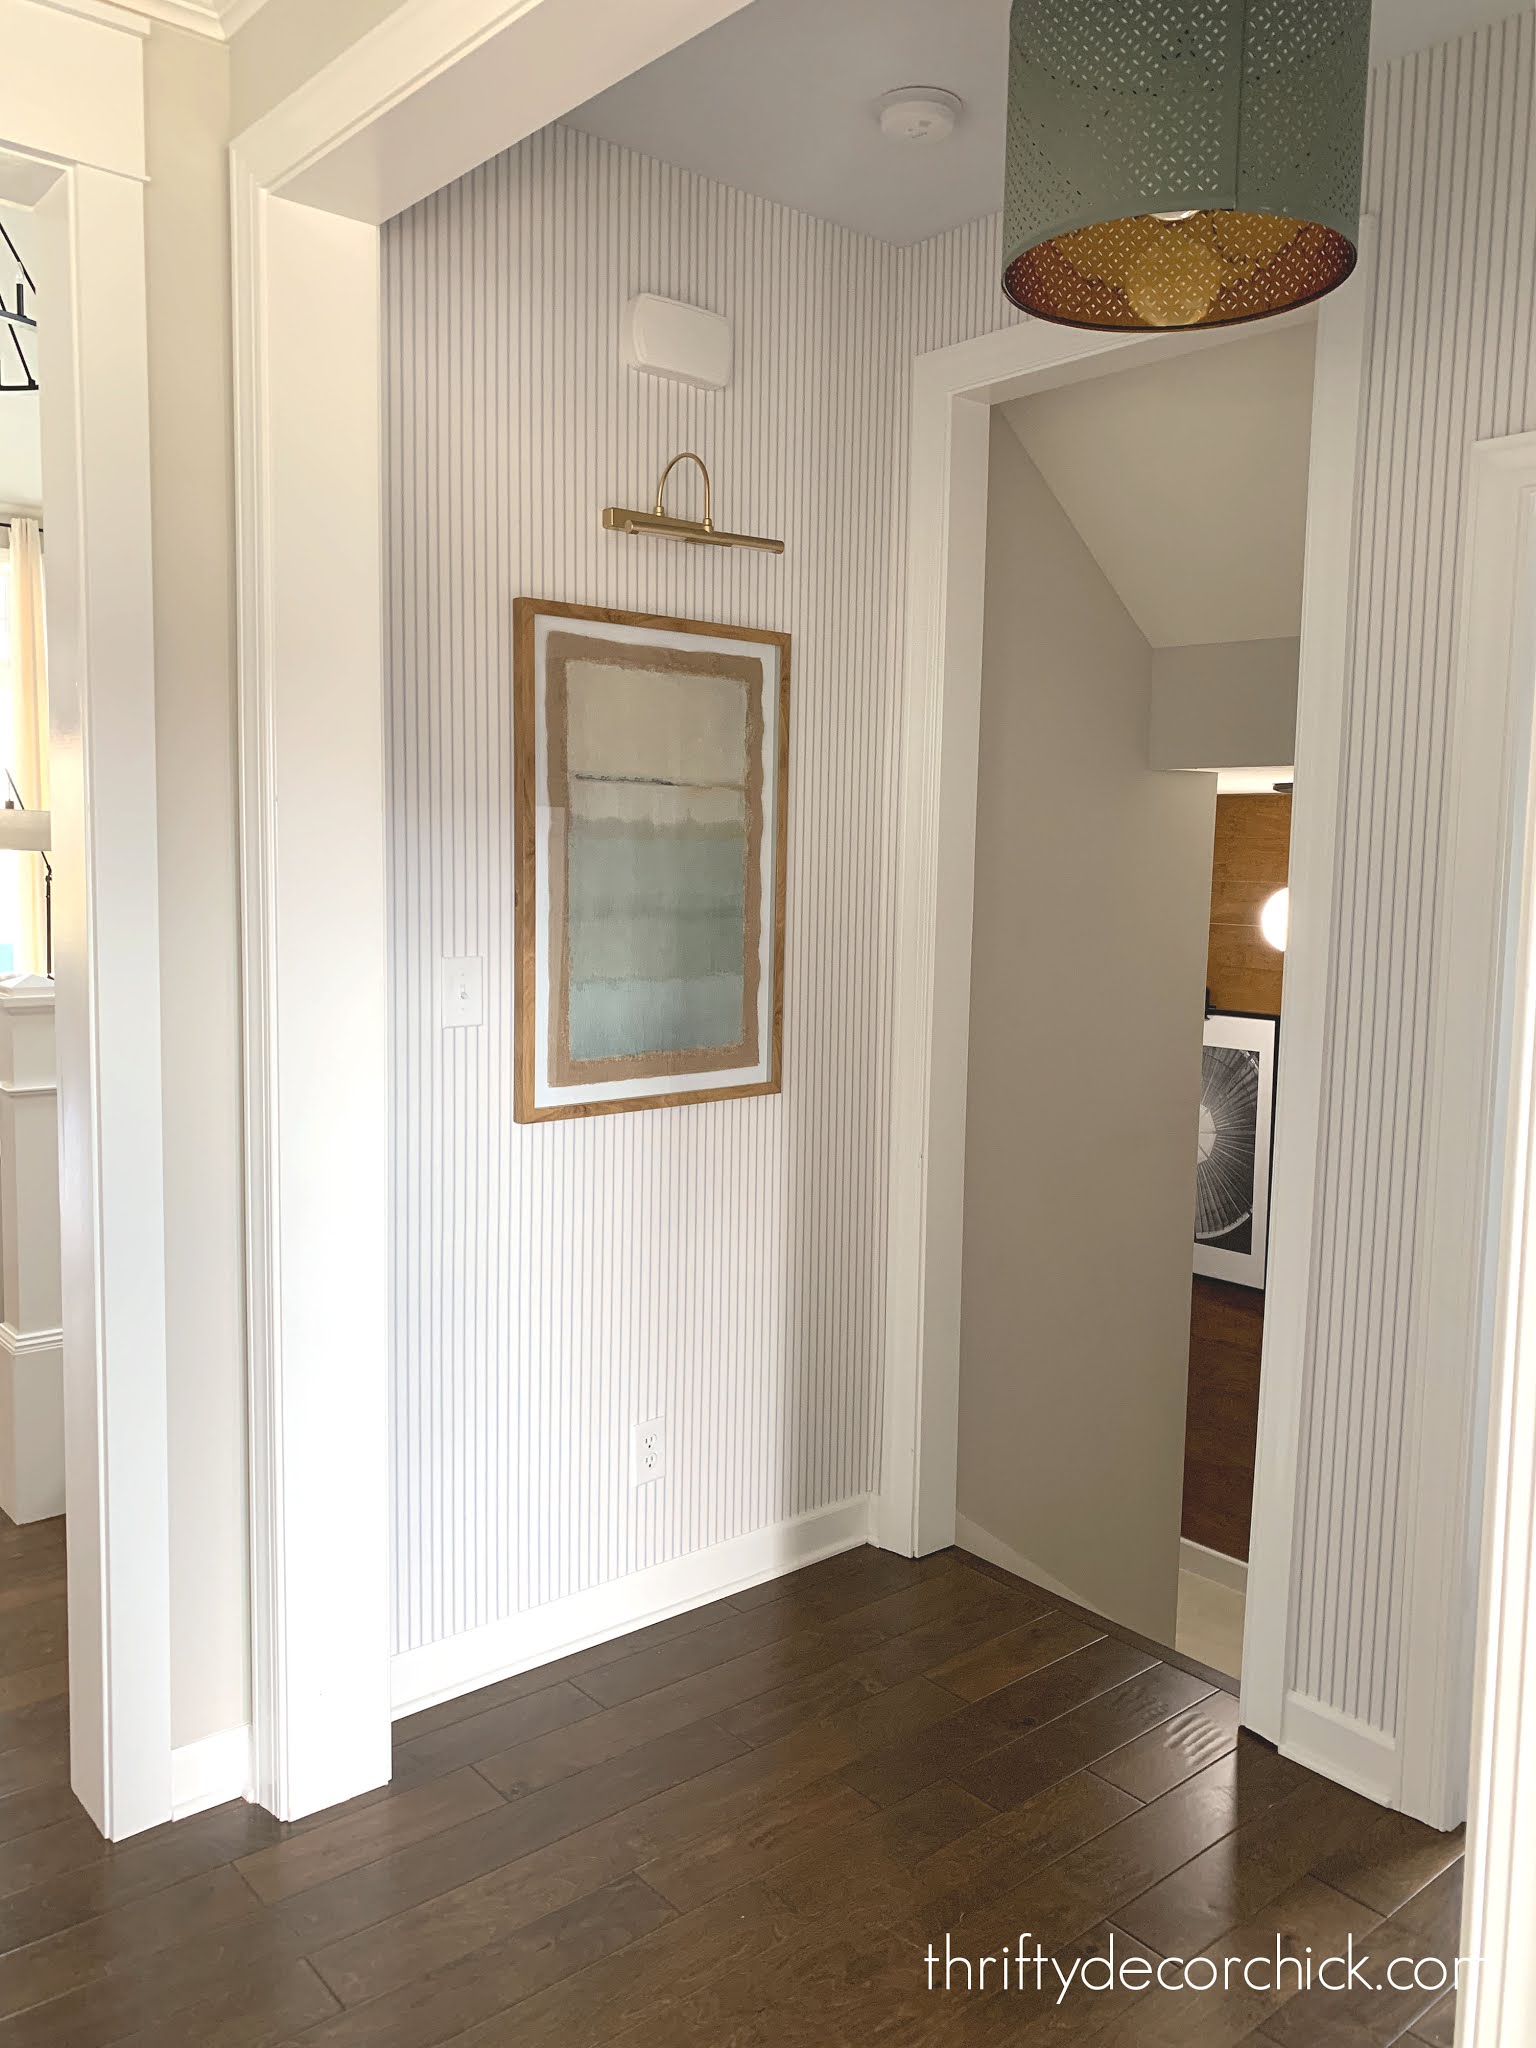
Our upstairs bath is segmented into two smaller rooms, so I had the door removed and the opening framed out instead. Otherwise the door would have been open all of the time and blocking the natural light from a window.
**If you are building a home, keep in mind you can have pocket doors installed instead! Those require structural changes you need to make early in the process, so they are difficult to add after the fact.
I know you're thinking...what do I do with the holes after the door is down? You can just live with them if they don't bother you. (I still haven't covered the frame in our master bathroom!)
Or you can use inexpensive trim to cover where the door hung:

See more of our home here.
To shop items in our home, click here!
Never miss a post by signing up to get posts via email.
Via https://www.thriftydecorchick.com/2009/05/take-it-off.html
0 Comments
Hello my friends! Sometimes I find a product I love so much, it deserves it's own blog post. Whether it's a cleaning product like this super inexpensive vacuum that I LOVE, or the gorgeous cooking set I found (that still looks great by the way), or even furniture like my most favorite sofa ever.
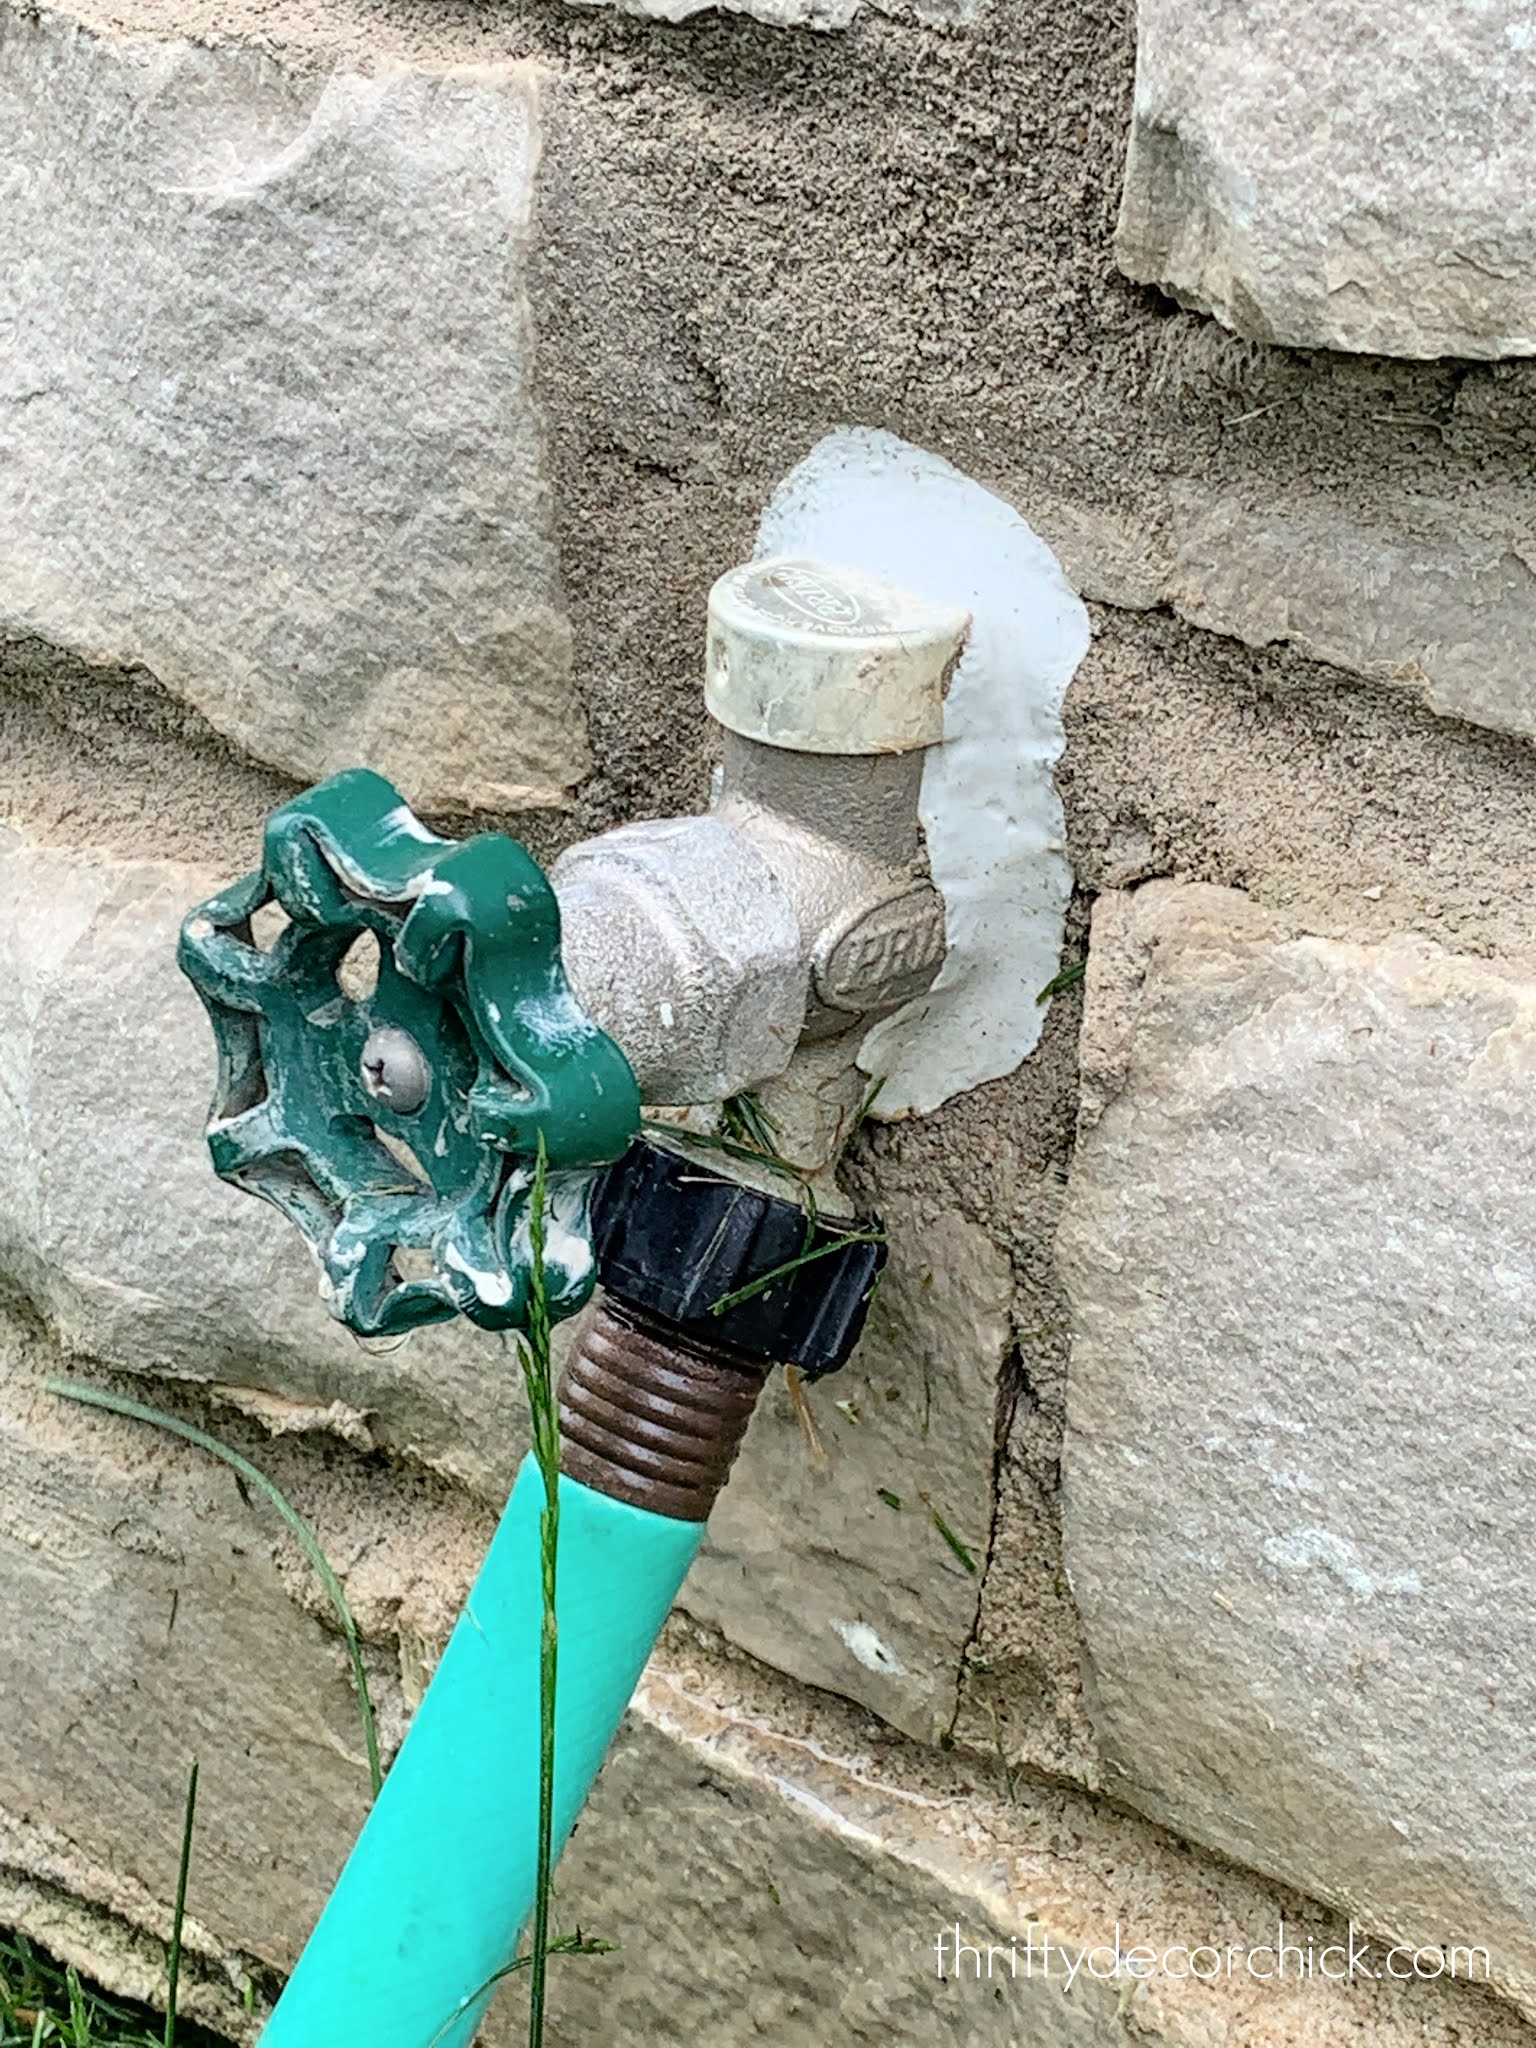
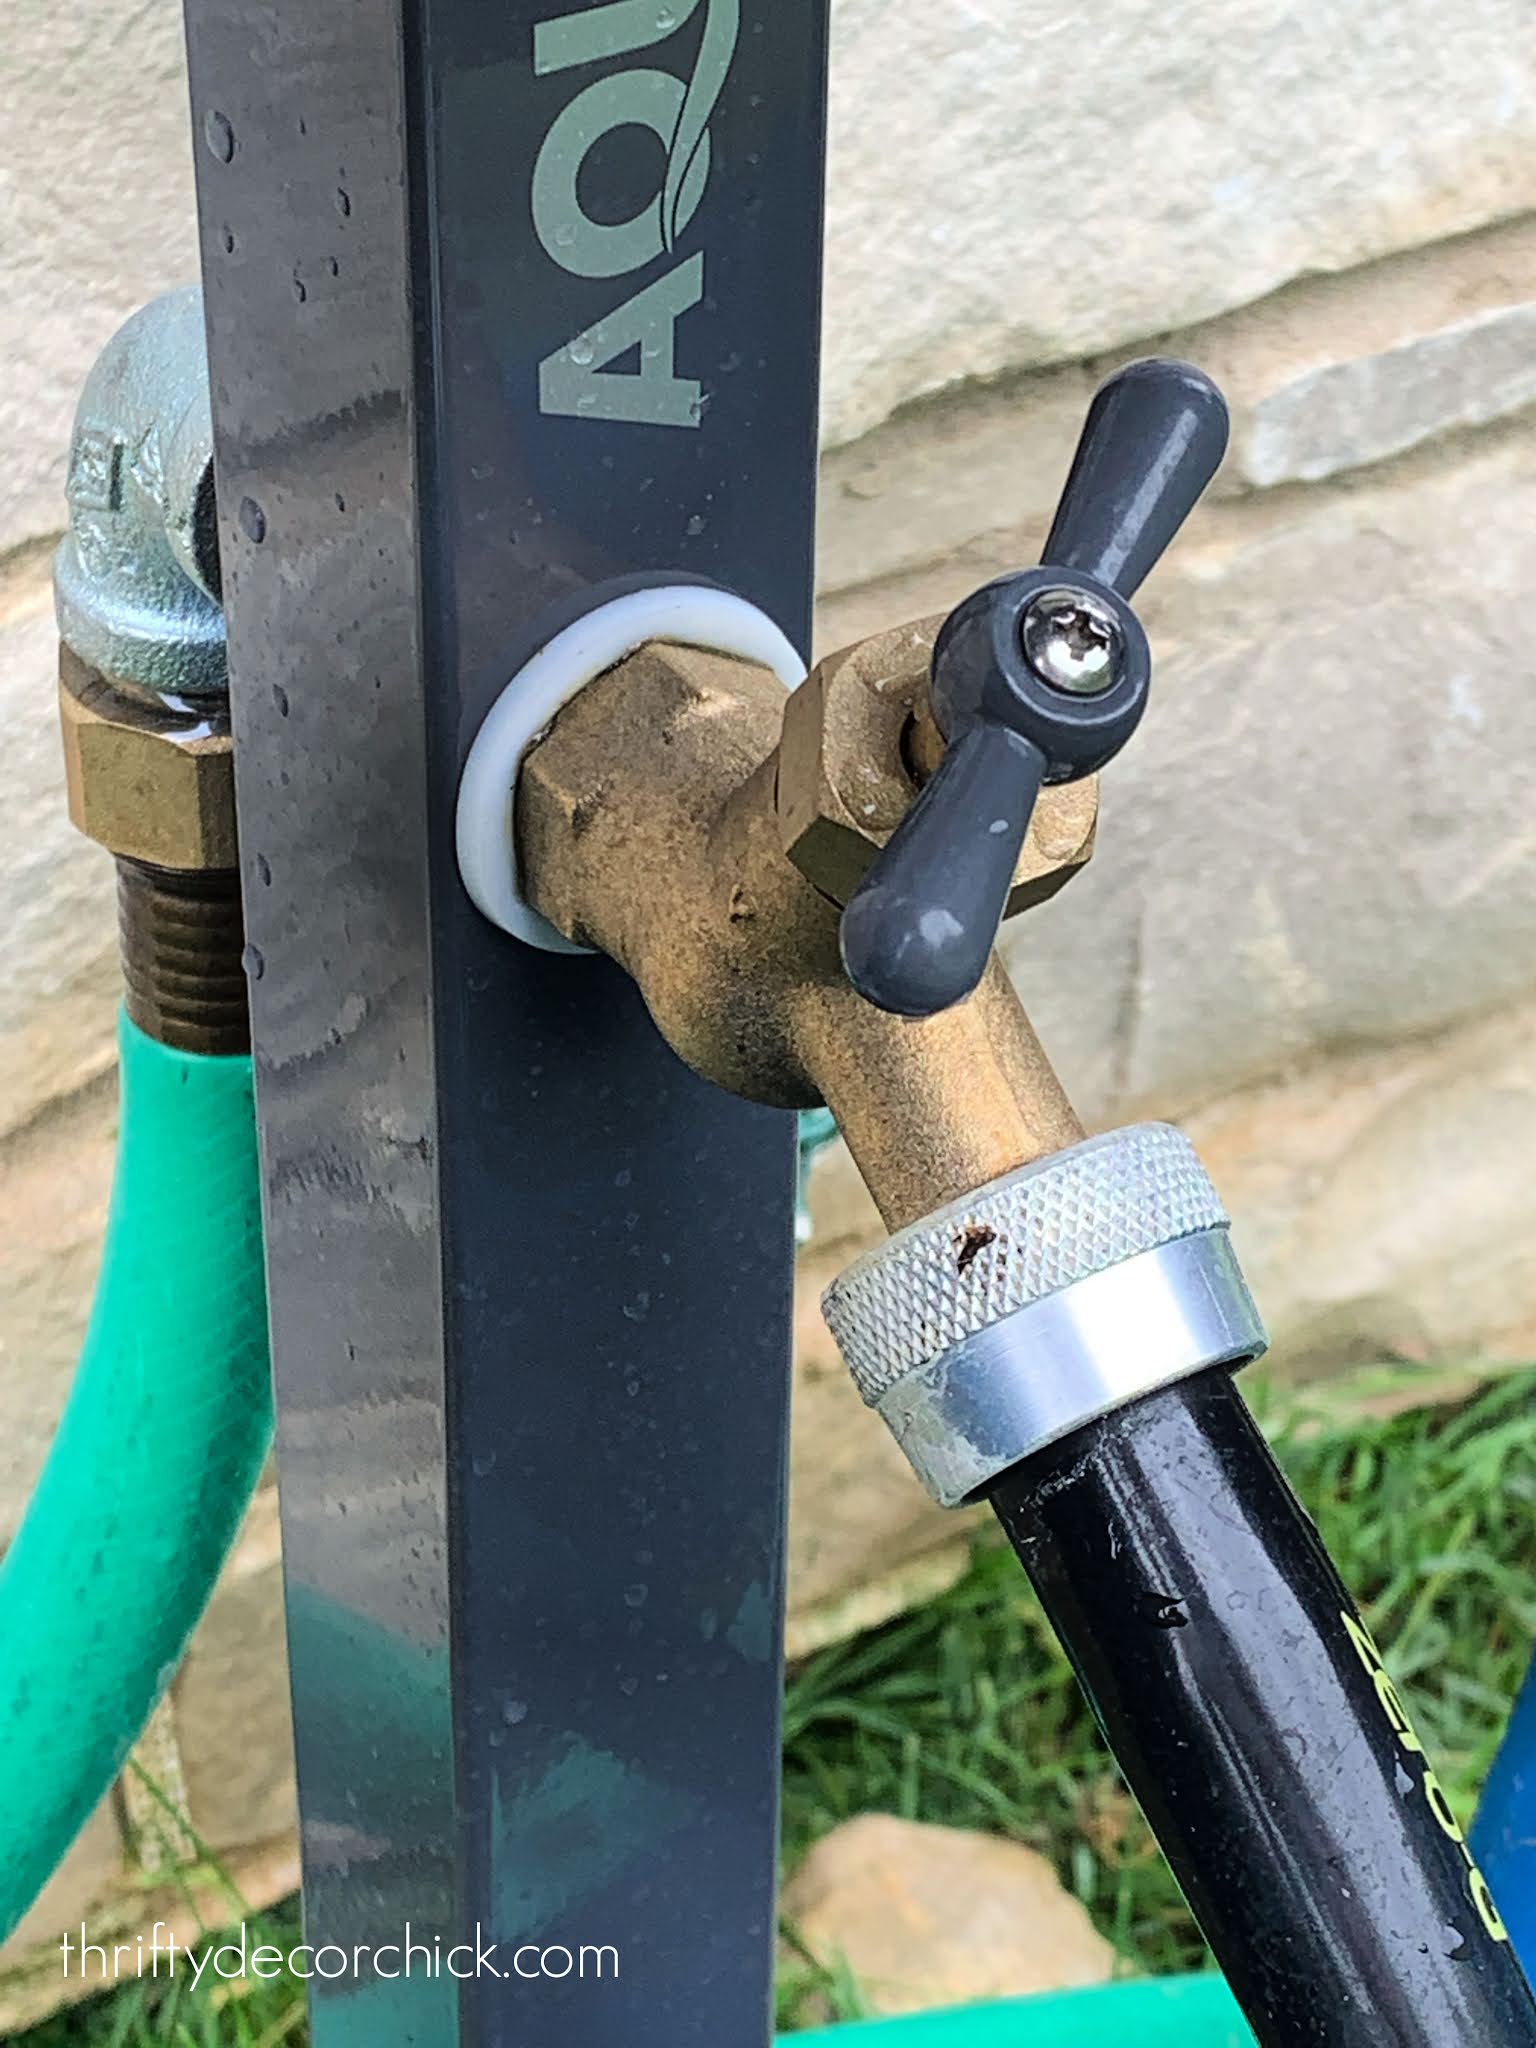
This time we're heading outside for an item I got a few weeks ago but just recently assembled. There are many little details that I wish we had thought of while finishing this house (that started as a spec house). One of those little things that has always bugged me is how low and shallow our outdoor spigots are.
I wish I would have had them installed higher for easier reach. They are SO low and so close to the stone, it's difficult to get a hose attached. And as we get older, we avoid struggling with anything that requires crouching. Ha!
We've always used hose holders that sit on the ground. You may remember that I spray painted them last year:

This post may contain affiliate links for your convenience.
See my policies and disclosure page for more information.
They've held up GREAT (I'll show you in a minute), and I love the look of them, but we wanted something taller. Also, the clippings from the yard are always all over the place and stick like glue.
I did some looking around online to see if there was a solution that would raise everything (including the spigot) up off the ground. I found the solution!
This garden hose holder has a faucet that connects to the bib on the house:

When the package arrived and I opened it up, it looked like a lot of pieces. I put it to the side for a few weeks till I had some extra time to sit down with it. And then when I did, it took about two minutes to assemble. That's always the way...what I think will be easy takes 45 minutes and what I think will be difficult takes a couple.
It's really just three parts that snap together. It was also super easy to get staked into the ground. (Dampen the soil if yours won't go in.)
We have a very long expandable hose that I love and I wasn't so sure it would fit on the holder without pulling it over when filled up. It didn't even budge!:
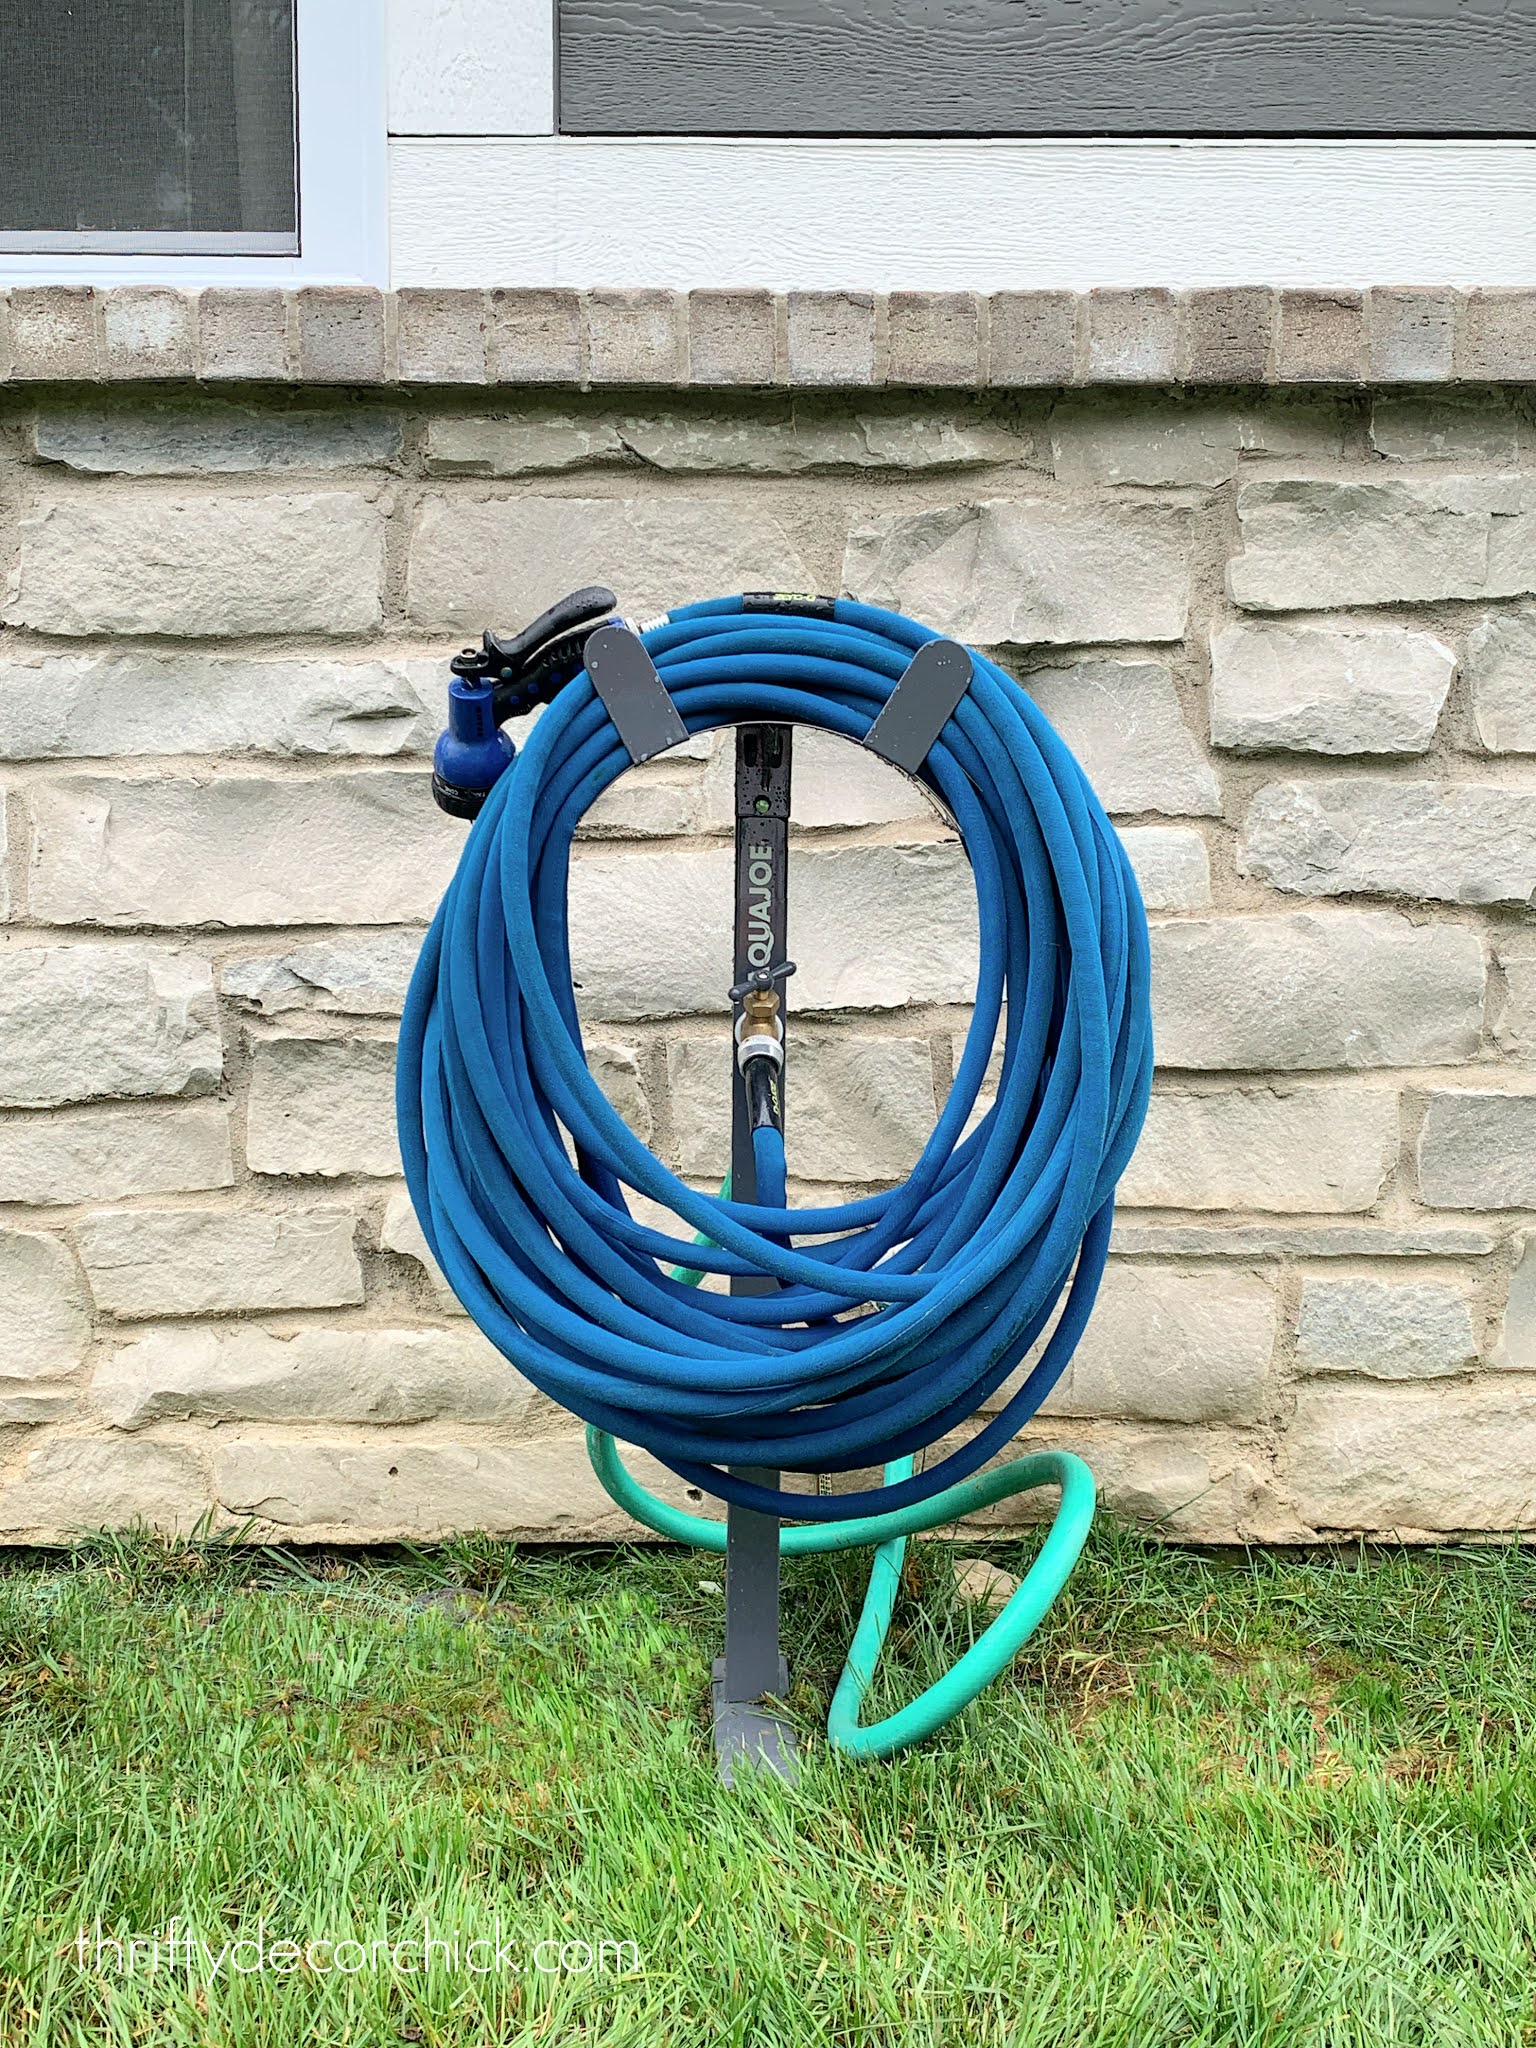
I also LOVE that you don't have to crouch to get the hose or to turn it on. It is so easy to use!:
We liked it so much I immediately ordered another one for the other side of the house.
They aren't the most beautiful holders, but they are streamlined enough that you don't really notice them. The great part is you can easily hide them behind bushes for or trees too. I'll probably bury the lead hose in the mulch so you don't see it.
I think this is thing is brilliant! It comes with a two year warranty as well. I thought it may solve the same issues you too! You can find the standing hose holder here and the long expandable hose we love.
Oh and here's how the metal hose holders have held up after spray painting them last fall:

They look great! I've figured out a way to reuse them outside, I'll share that soon.
See all of my outdoor projects at our home here and those from our first house here:

See more of our home here.
To shop items in our home, click here!
Never miss a post by signing up to get posts via email.
Via https://www.thriftydecorchick.com/2021/05/how-to-extend-raise-outdoor-spigot.html
I don’t share recipes around here often but when I do you know it’s going to be either really easy or really good or really easy and good. This two ingredient dessert is both!
I don’t have a source for this, (a friend reposted it on Facebook) so I don’t even know what to call it. Pineapple angel food cake? Pineangel food cake? Pineapple fluffy goodness? 
I'd dare say that even if you don't love pineapple, you'll probably like this one. It's light and sweet and easy to dress up with simple additions.
It’s also stupid easy to make. You just take a box of angel food cake and a 20 ounce can of pineapple: 
This post may contain affiliate links for your convenience.
See my policies and disclosure page for more information.
I’m sure you could use fresh pineapple (just keep the juices!) but wow…this is supposed to be easy remember? ;) You just dump the pineapple in with the cake mix:  And that’s the only ingredients! When I first saw this I thought, wow, that’s crazy easy! And then I remembered you only need water with the angel food cake mix anyway, but I digress…it’s still easy.
**Do not add water to the mix per the directions.
The pineapple juice will react with the mix and make it super frothy and fluffy – it was fun to watch:  The more you mix it the bigger it will get! Then you just pour it into a pan and bake for 30 minutes at 350 degrees, (follow the directions on the box for the pan you're using!) That’s it! (I ended up using a 9 by 13 glass pan the first time but since I've used an angel food cake pan like this.) I starting eating it right out of the pan and it was SO GOOD warm. Wow. YUMMO. I soon realized I could make a little parfait: 
OK, if you add whipped cream or fruit, it's more than two ingredients. But I promise it's delicious on it's own. (Find similar mini trifle bowls here!)
I layered the pineapple goodness and whipped topping and it was SO. good. The cake was just fine at room temp but like I said, I loved it heated up a little. So there you go – a super easy, really yummy dessert. It's perfect for this time of year with the pineapple and great for when you have people coming by and need something fast:  Or when you’re home alone in the middle of the day. Whatever. ;) Have you tried this easy dessert? Any other simple sweet recipes you’ve tried? (Some readers on Facebook said they have tried it with cherry filling too – doing that next!)
This strawberry pretzel dessert is always a hit! Absolutely delicious:

To shop items in our home, click here!
Never miss a post by signing up to get posts via email.
Via https://www.thriftydecorchick.com/2013/05/easiest-dessert-ever.html
I don't know what came over me when we moved into this house 3 1/2 years ago, but I've added wallpaper to almost every room makeover so far! Wallpaper is back in a big way, but I never really had any desire to use it until we moved here.
Maybe I've fallen in love with wallpaper because I've had an empty slate, or maybe it's because once you add it once you just want to keep going. It's addictive!
I'm rounding up all of the ways I've used wallpaper so far -- from little accents to entire rooms covered in it! If you've ever wondered about the different designs I've used, this will be a good resource. These examples show the difference it can make in a space!
I've used both pasted and peel and stick wallpaper throughout the house. The pasted wallpaper is supposed to be easier to remove if you ever grow tired of it. But I don't put much faith in that. ;) If you use the pasted kind (I'll share how to install it later in the post), I would make sure it's one you really love! I wouldn't do anything too trendy that you may tire of a few years later.
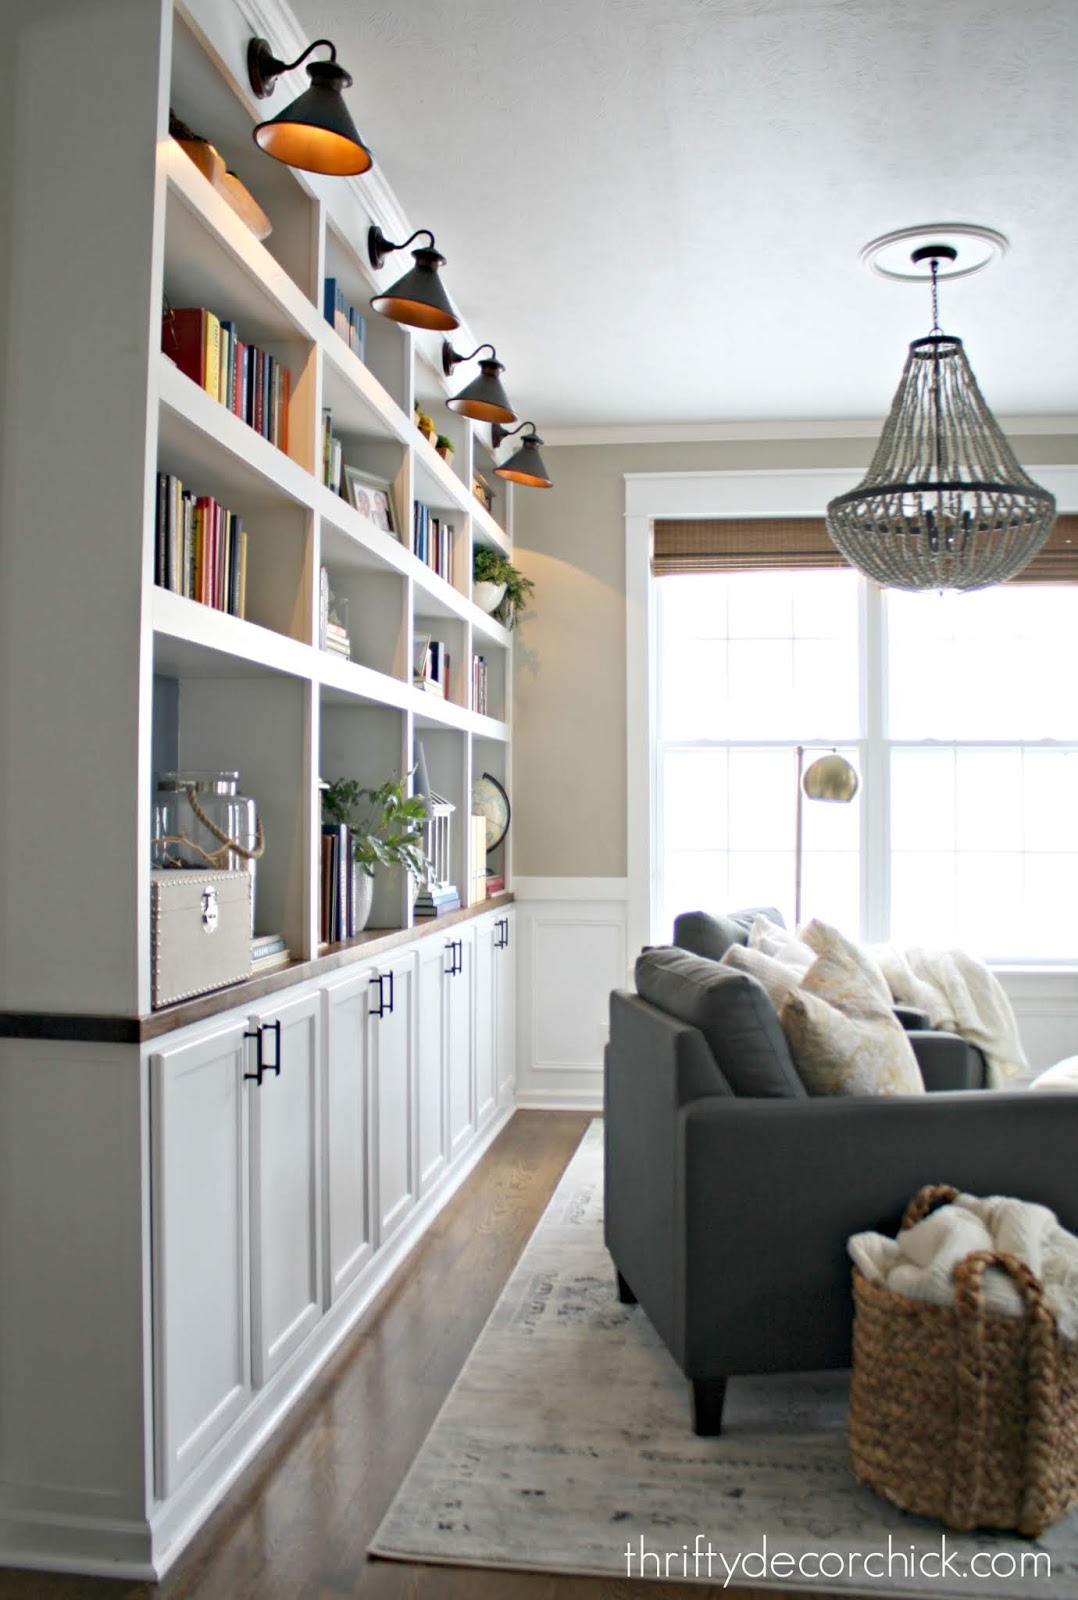
I used peel and stick on the built in bookcase wall in my office. Here's how it looked before, with the blank wall:
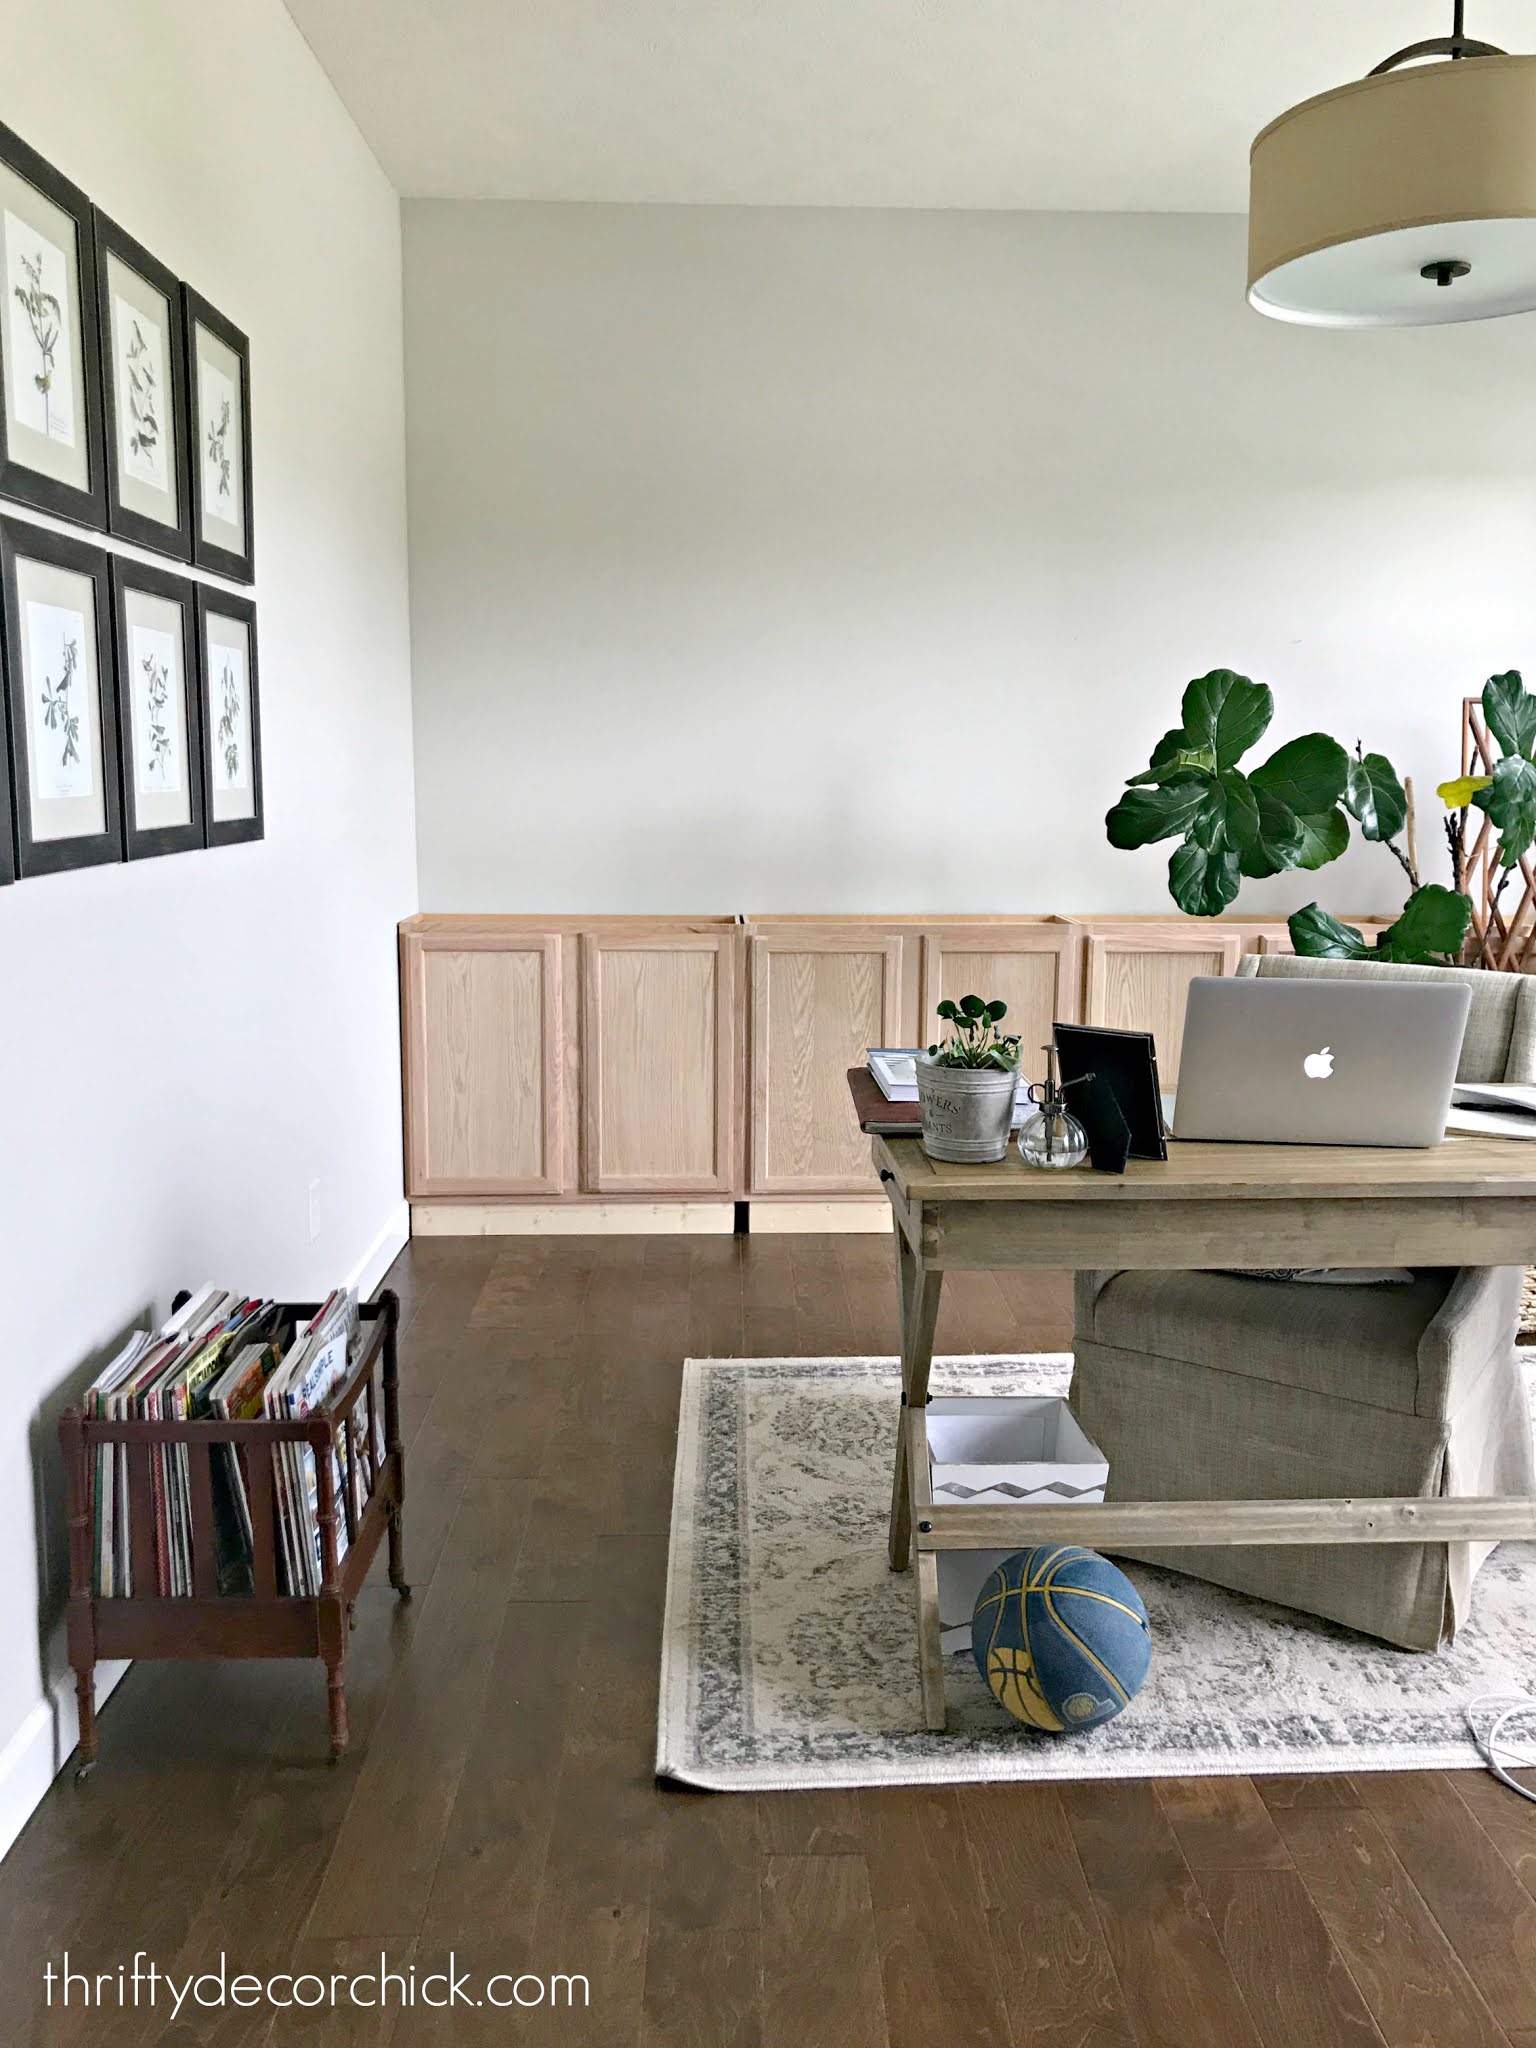
I used this peel and stick cherry blossom design on the backs of the bookcase shelves:
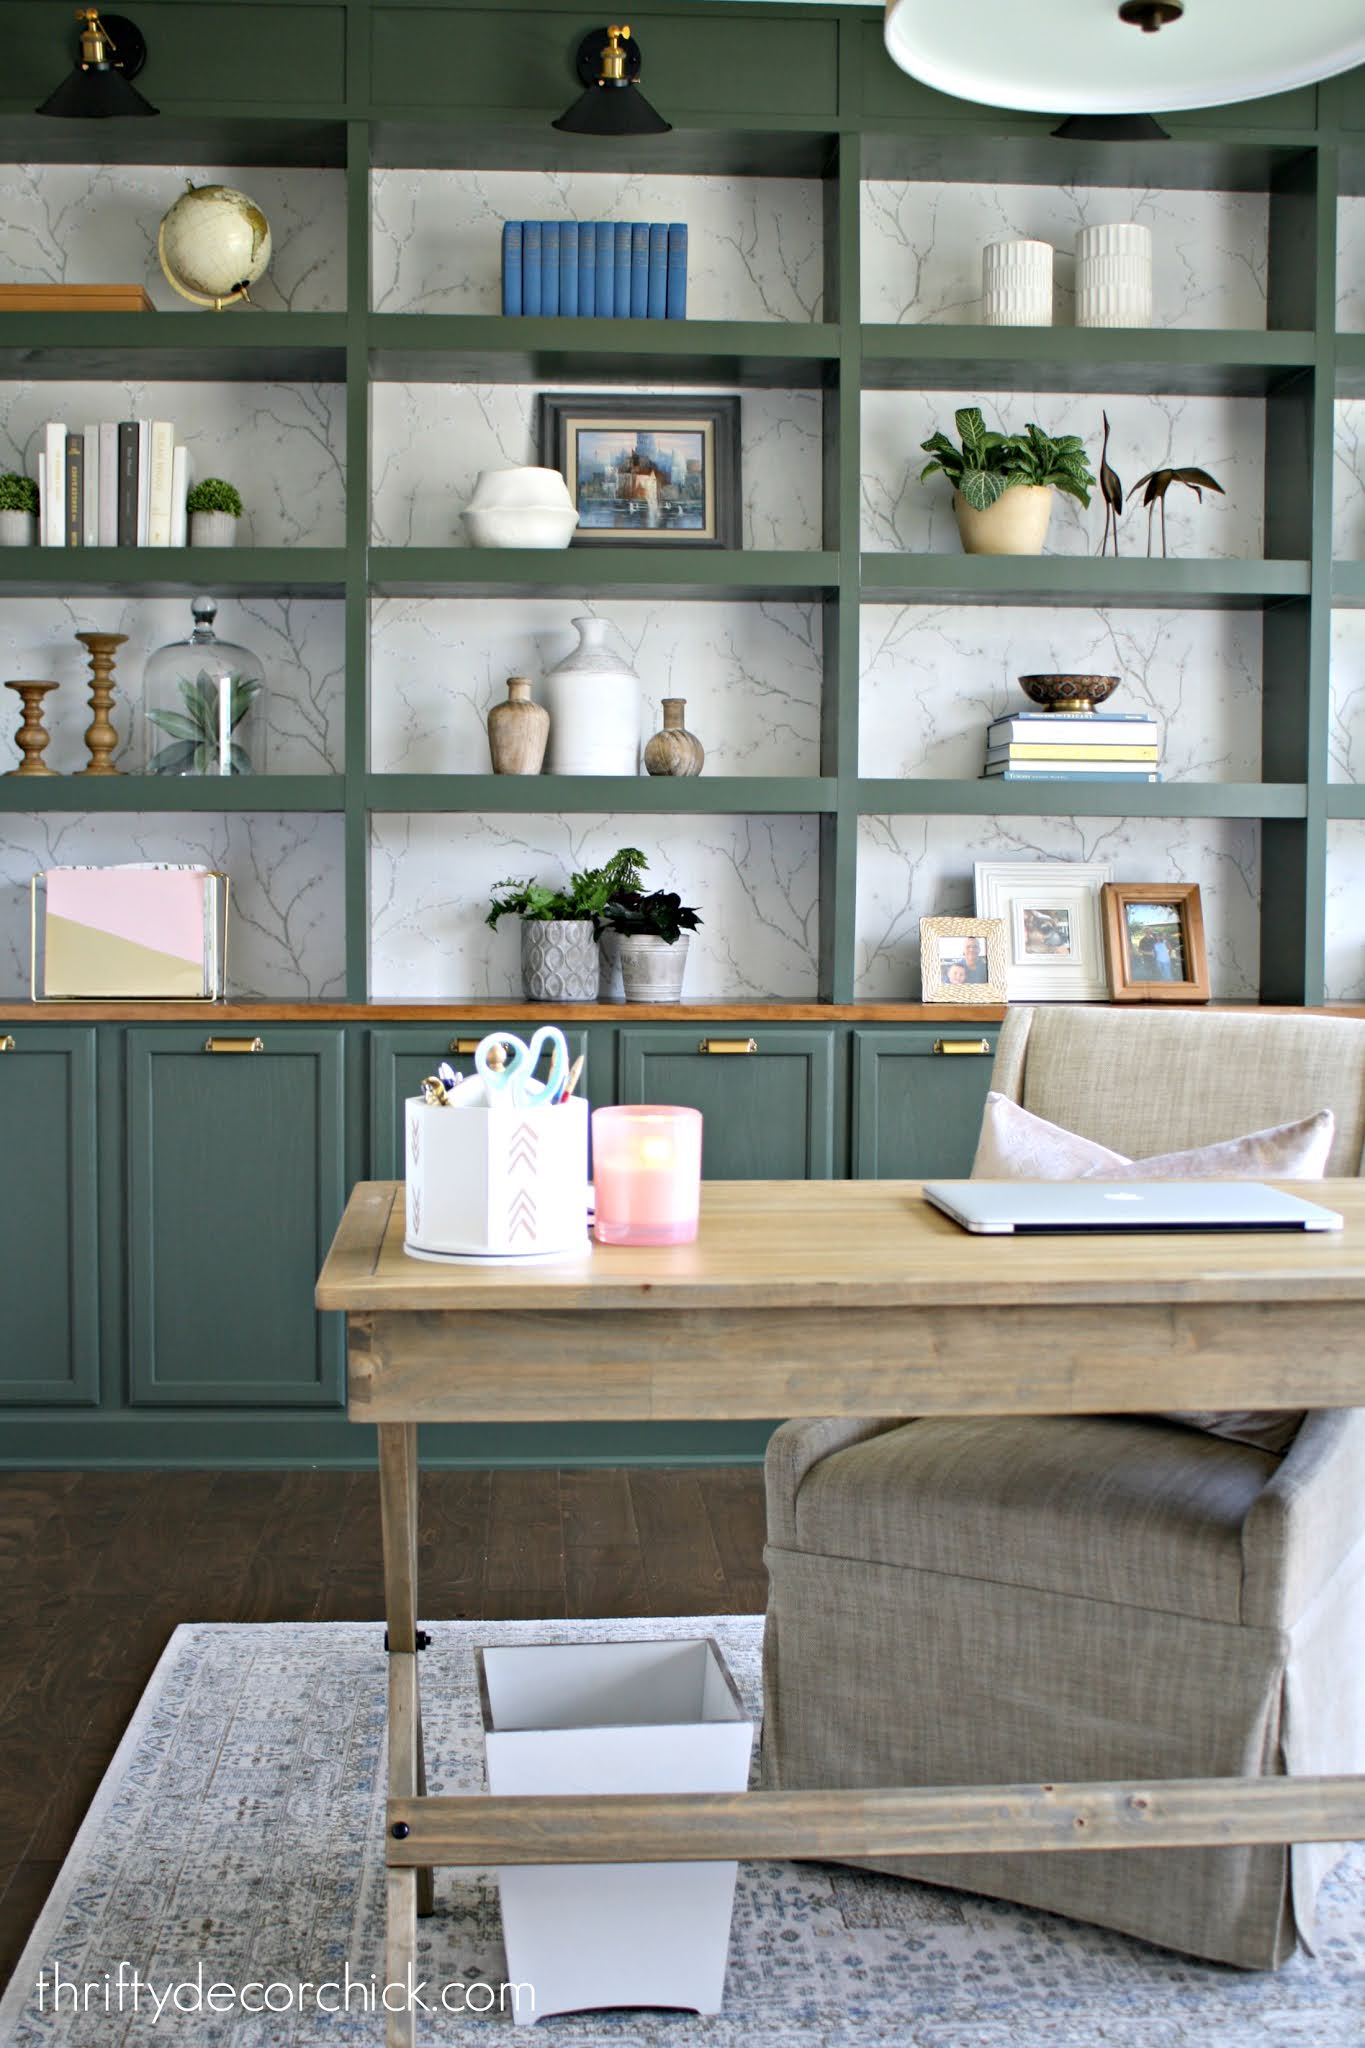
It's a beautiful, understated accent that gives the room a little extra something. You won't even spend $50 to add this detail!
I did the same in the basement with a gray tweed looking peel and stick wallpaper:
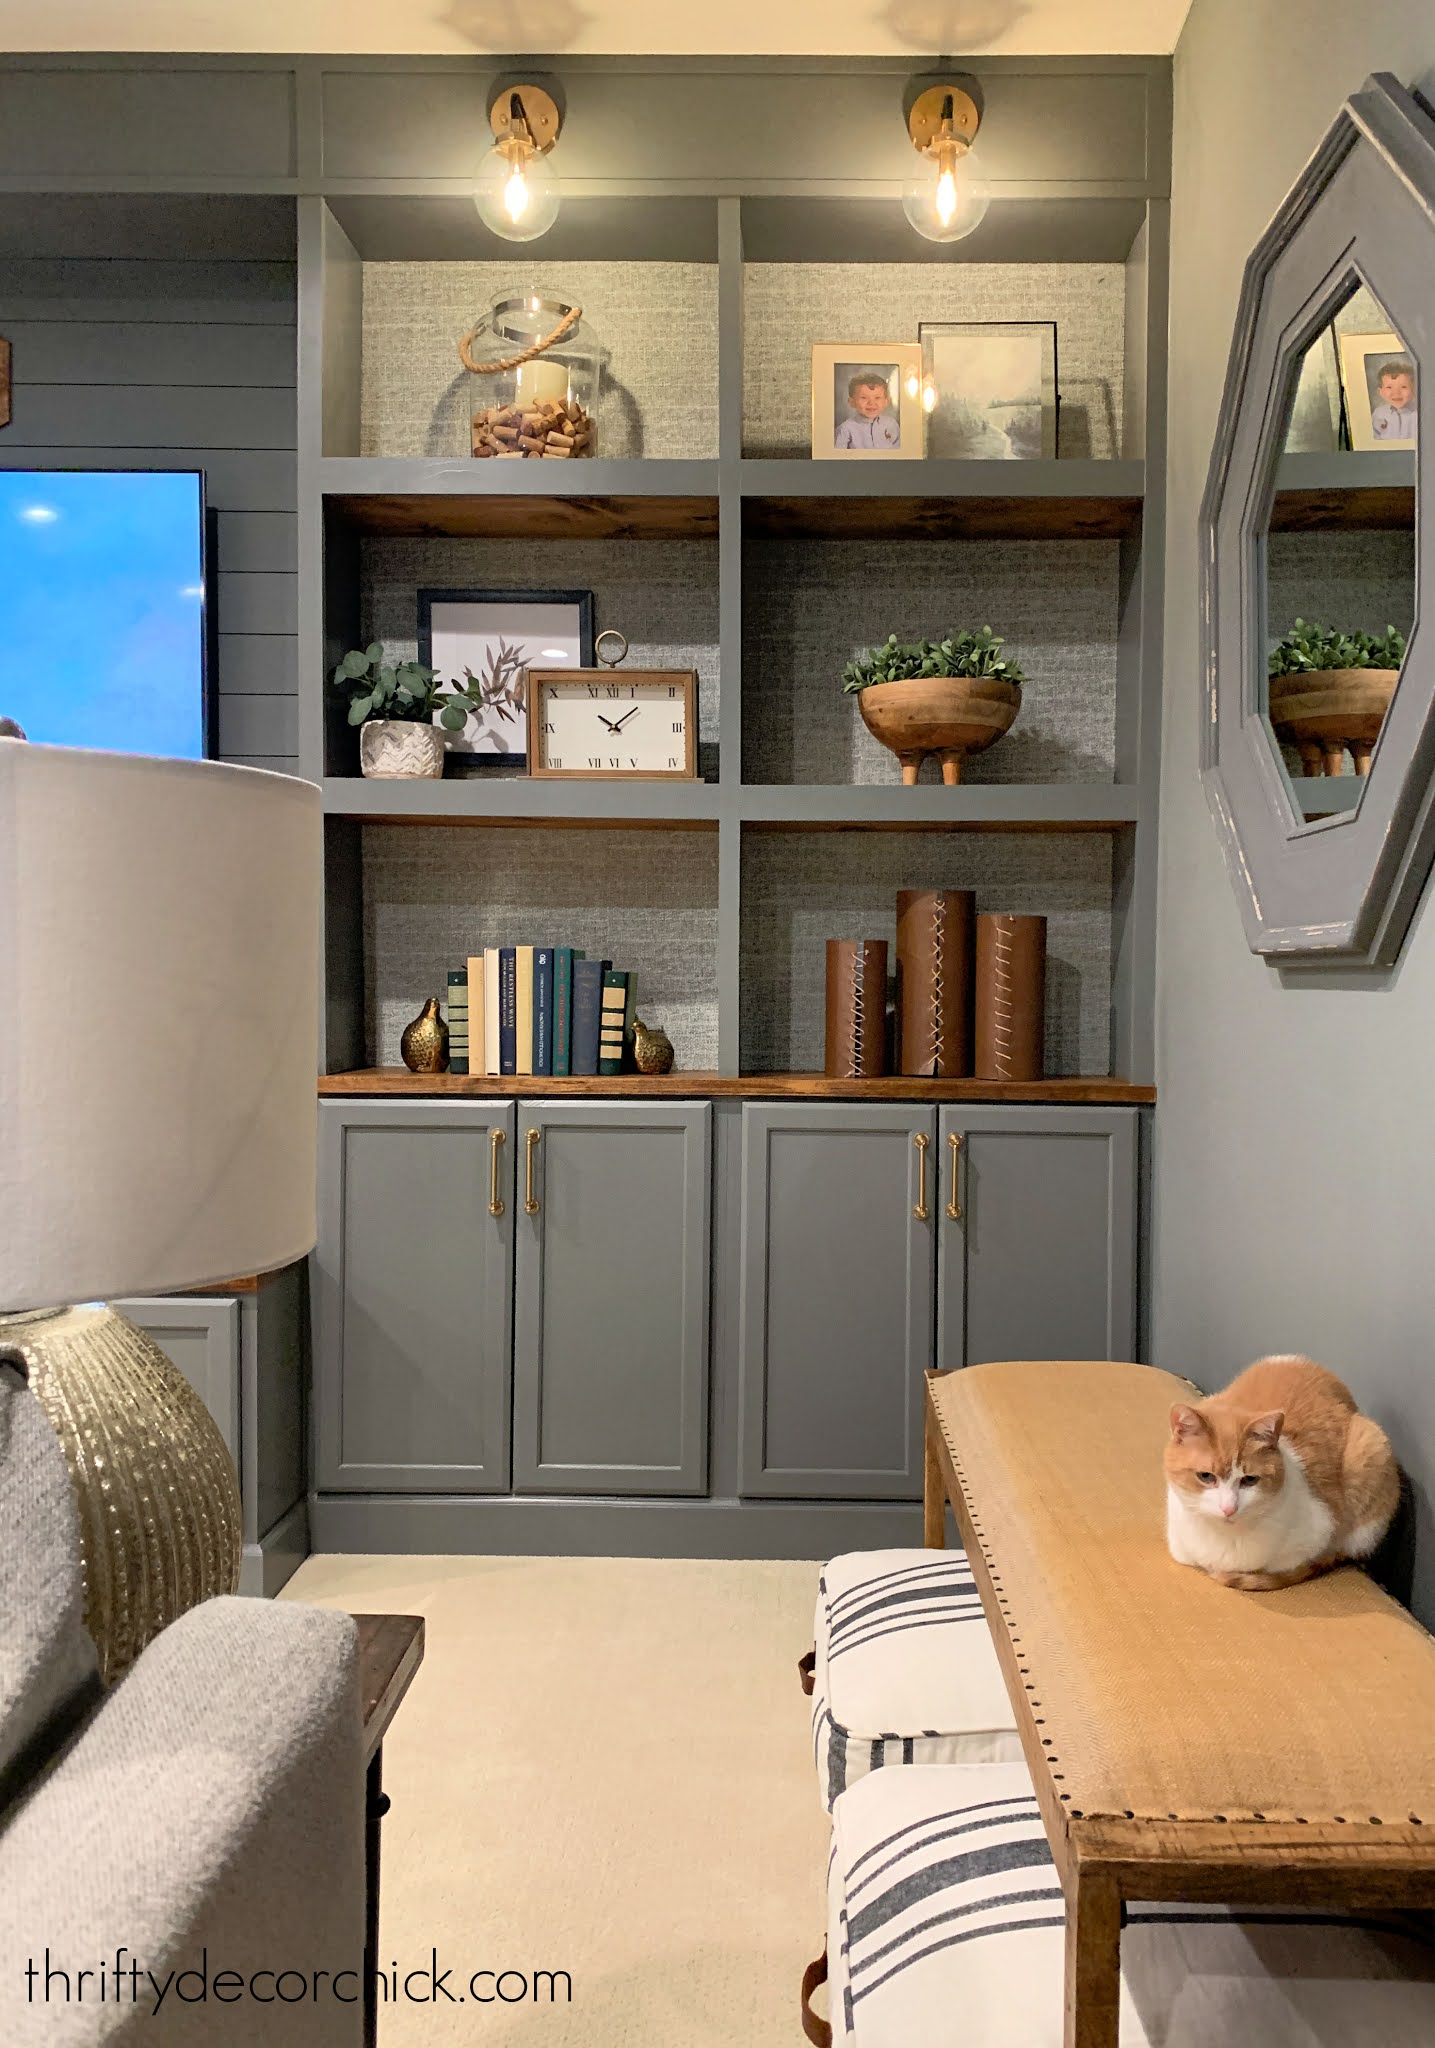
I wasn't sure about that one when it arrived -- but once it was out of the package and I held it up to the wall, I fell in love.
Wallpaper tip #1: Don't judge it while it's rolled up! Take it out and hold it up to the wall. Take a picture of it against the wall, it will help you visualize the space.
My first go at peel and stick wallpaper was in our powder room. It was pretty bland before:
Since I was adding the board and batten wall treatment I only had to cover the top part of the wall, so it was a good beginner project.
I used a pretty navy and gold design that adds drama in this little space:
This post may contain affiliate links for your convenience.
See my policies and disclosure page for more information.
Wallpaper install tip #2: If you are installing trim and wallpaper, I find it easiest to hang the wallpaper first and then the trim. That way you can slightly cover the edge of the wallpaper with your trim. Same goes for installing it behind shelves -- I always hang the wallpaper before building the shelves.
If ever want to remove it, you can use a razor to score the wallpaper along the trim.
We have a small little vestibule off our foyer that was calling out for a little something:
I found the wallpaper I wanted, but because it was the pasted kind, I waited it out to make SURE I really wanted to move forward.
Thankfully the pretty pinstripe design will stand the test of time. I LOVE how this little hallway turned out!:


It's so fresh, clean and classic.
Wallpaper tip #3: Avoid stripes. At all costs. ? Vertical or horizontal, it doesn't matter. (There's a popular shiplap look that I think would be a nightmare to install.) These stripes weren't horrible, but that's because I have a decent amount of experience installing wallpaper. But it was the most difficult one I've hung.
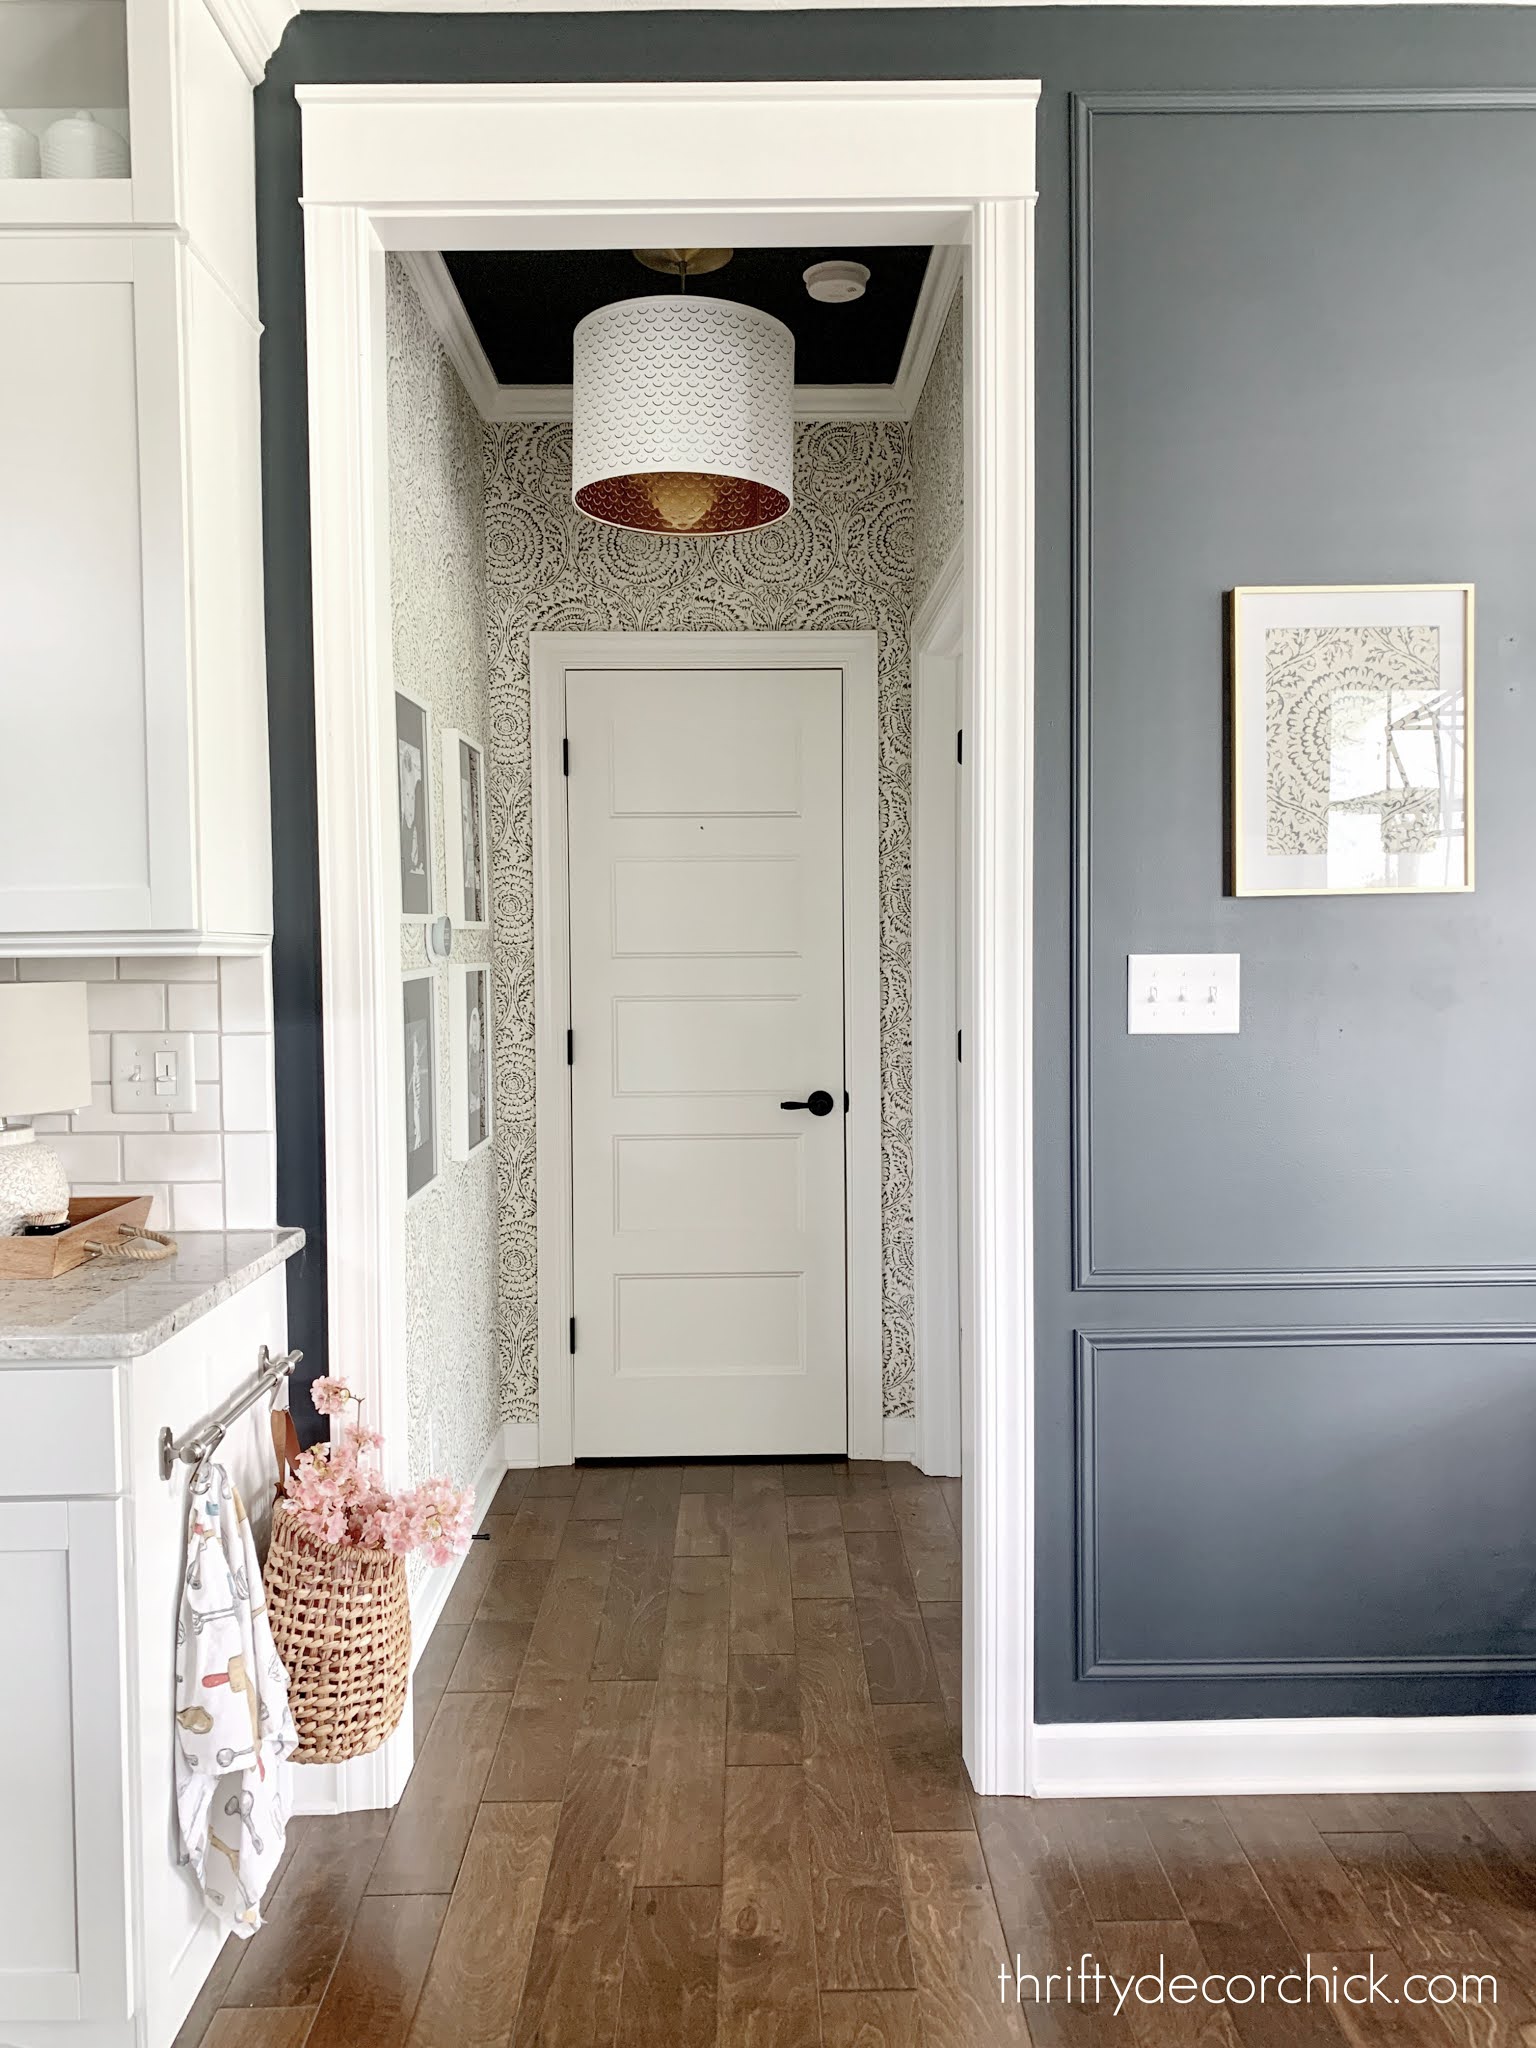
I love dressing up small spaces like powder rooms and hallways! They are the perfect spot to go a little more dramatic, since they are so small. I did just that in this little hallway off our kitchen:

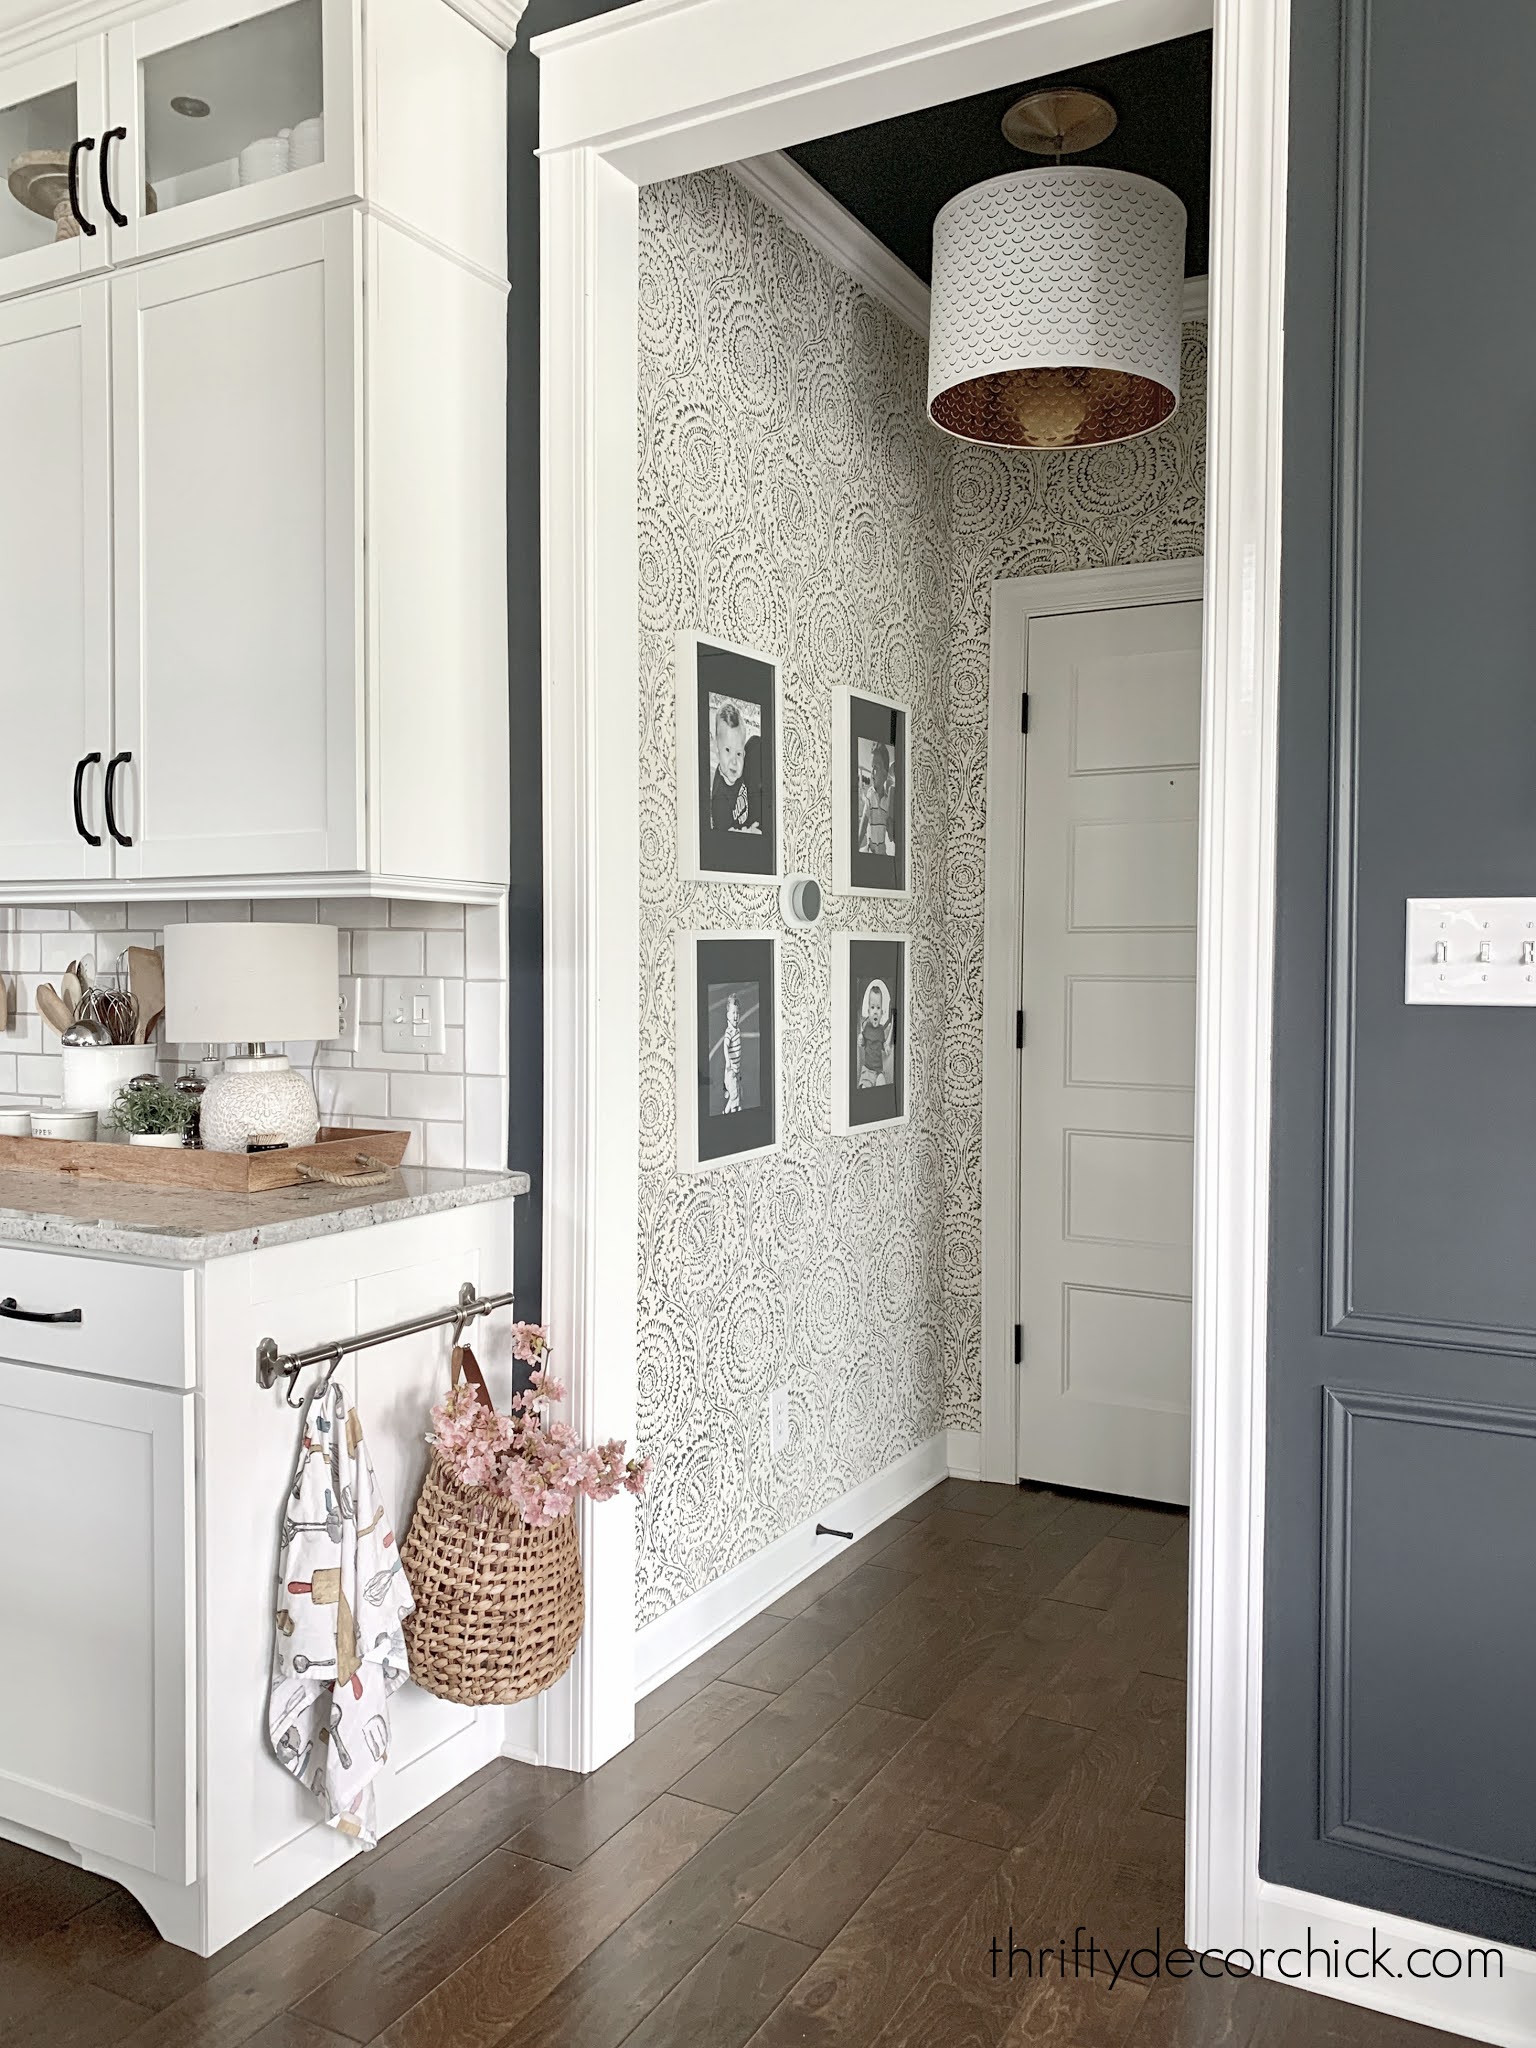
I thought the only place to buy this blue and white floral wallpaper was at Anthropologie, and it was seriously expensive! Thankfully I was able to find it under a different name online for much less.
This is my favorite wallpaper project to date! I adore this one:
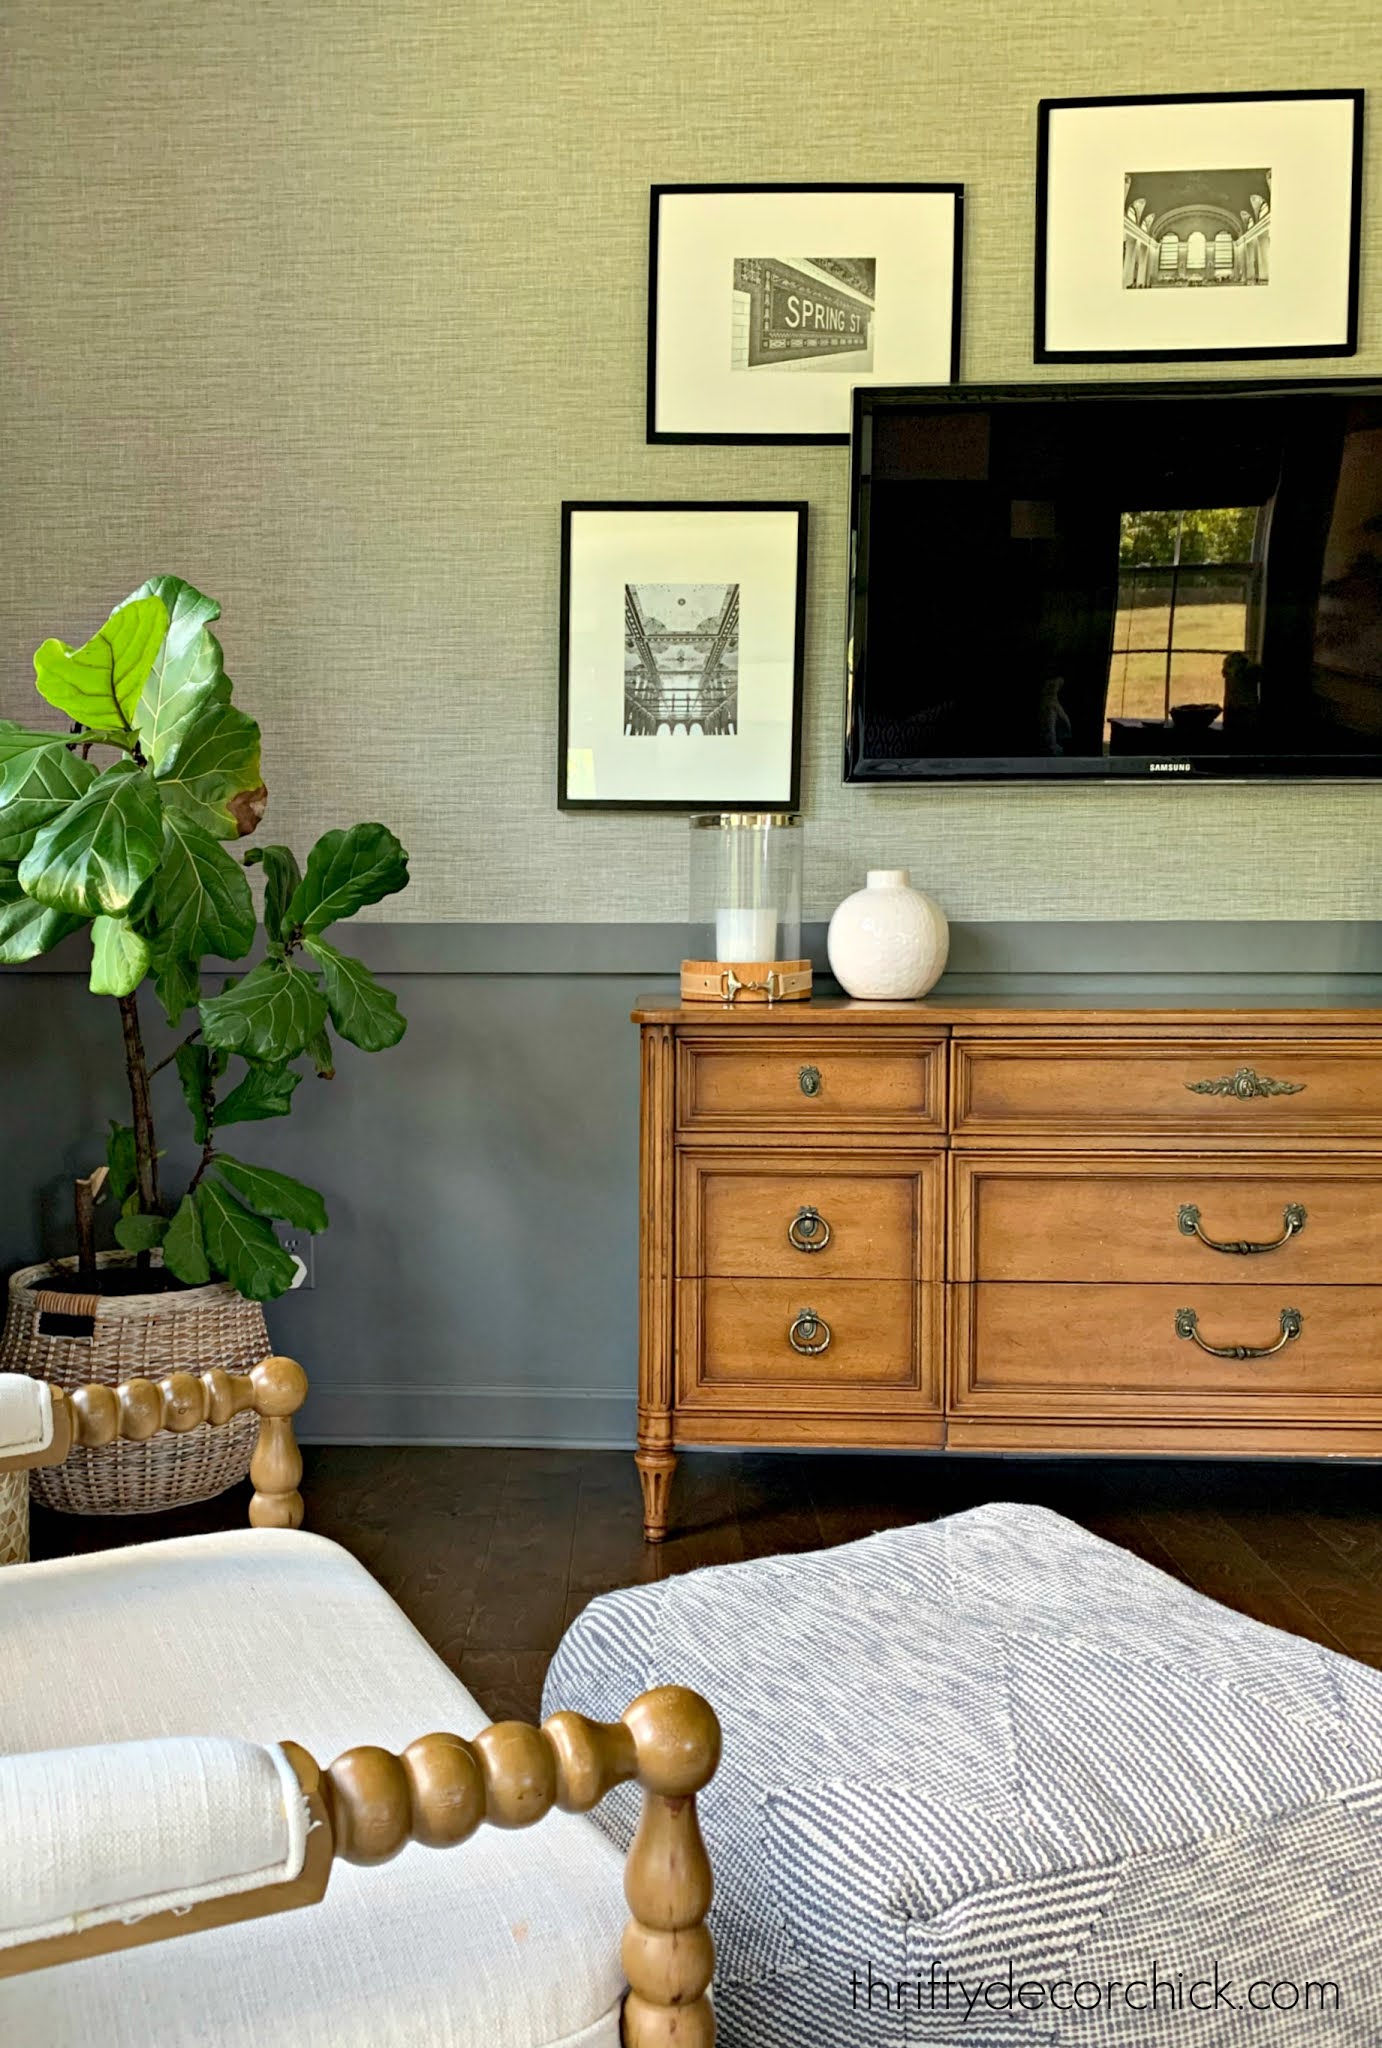
Wallpaper is a great way to "fill" up walls...it just flows! Our bedroom walls were pretty basic before I added wallpaper:
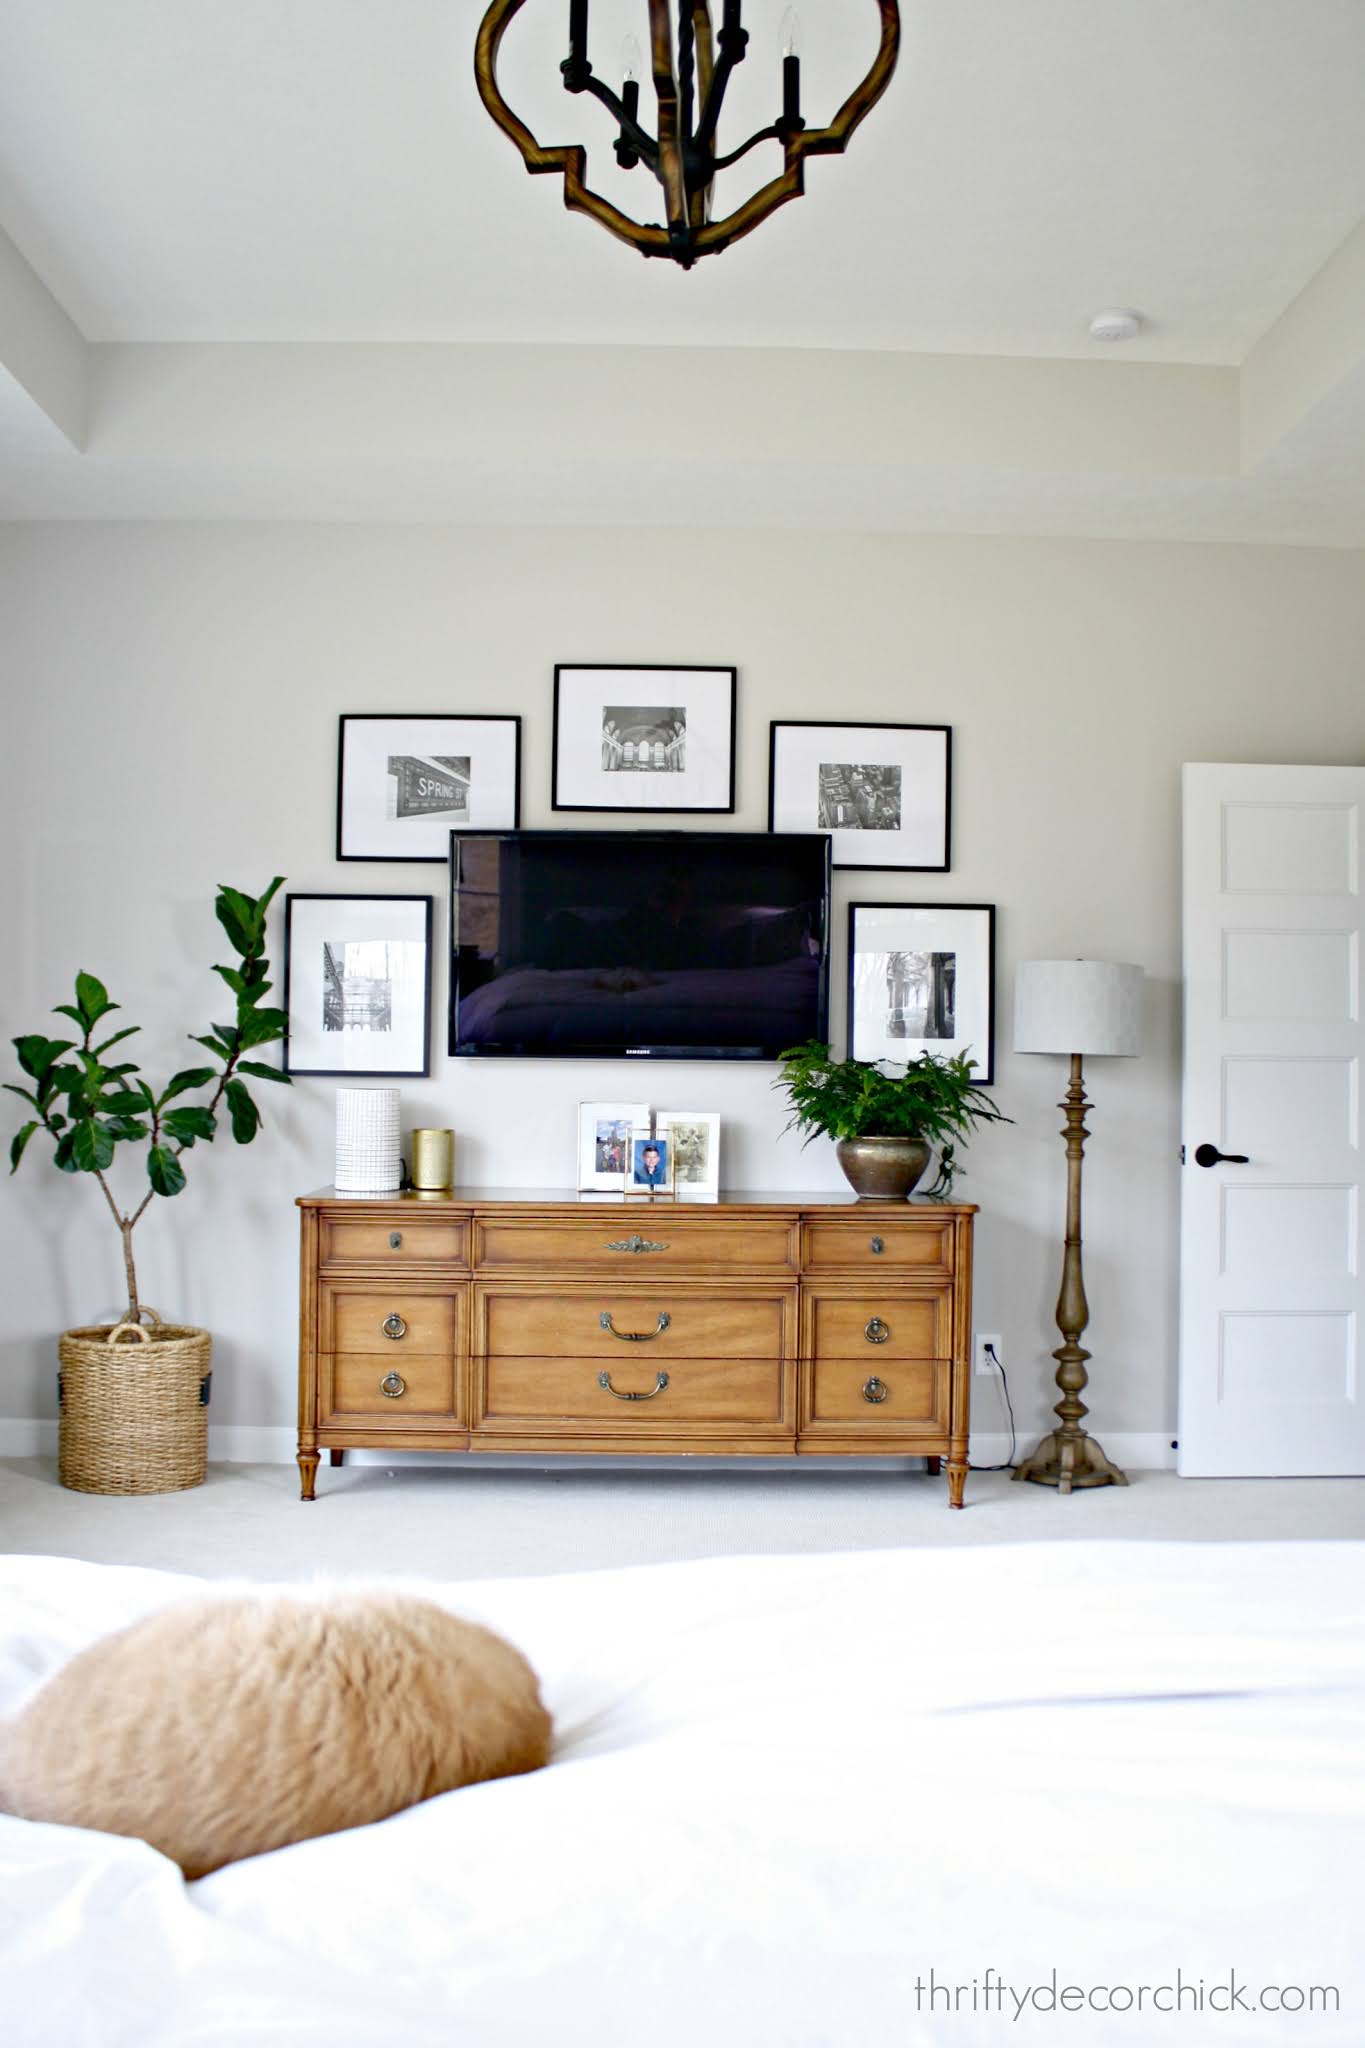
The peel and stick grasscloth wallpaper went a LONG way to cozying up this space! It feels like a hug when you walk in here:
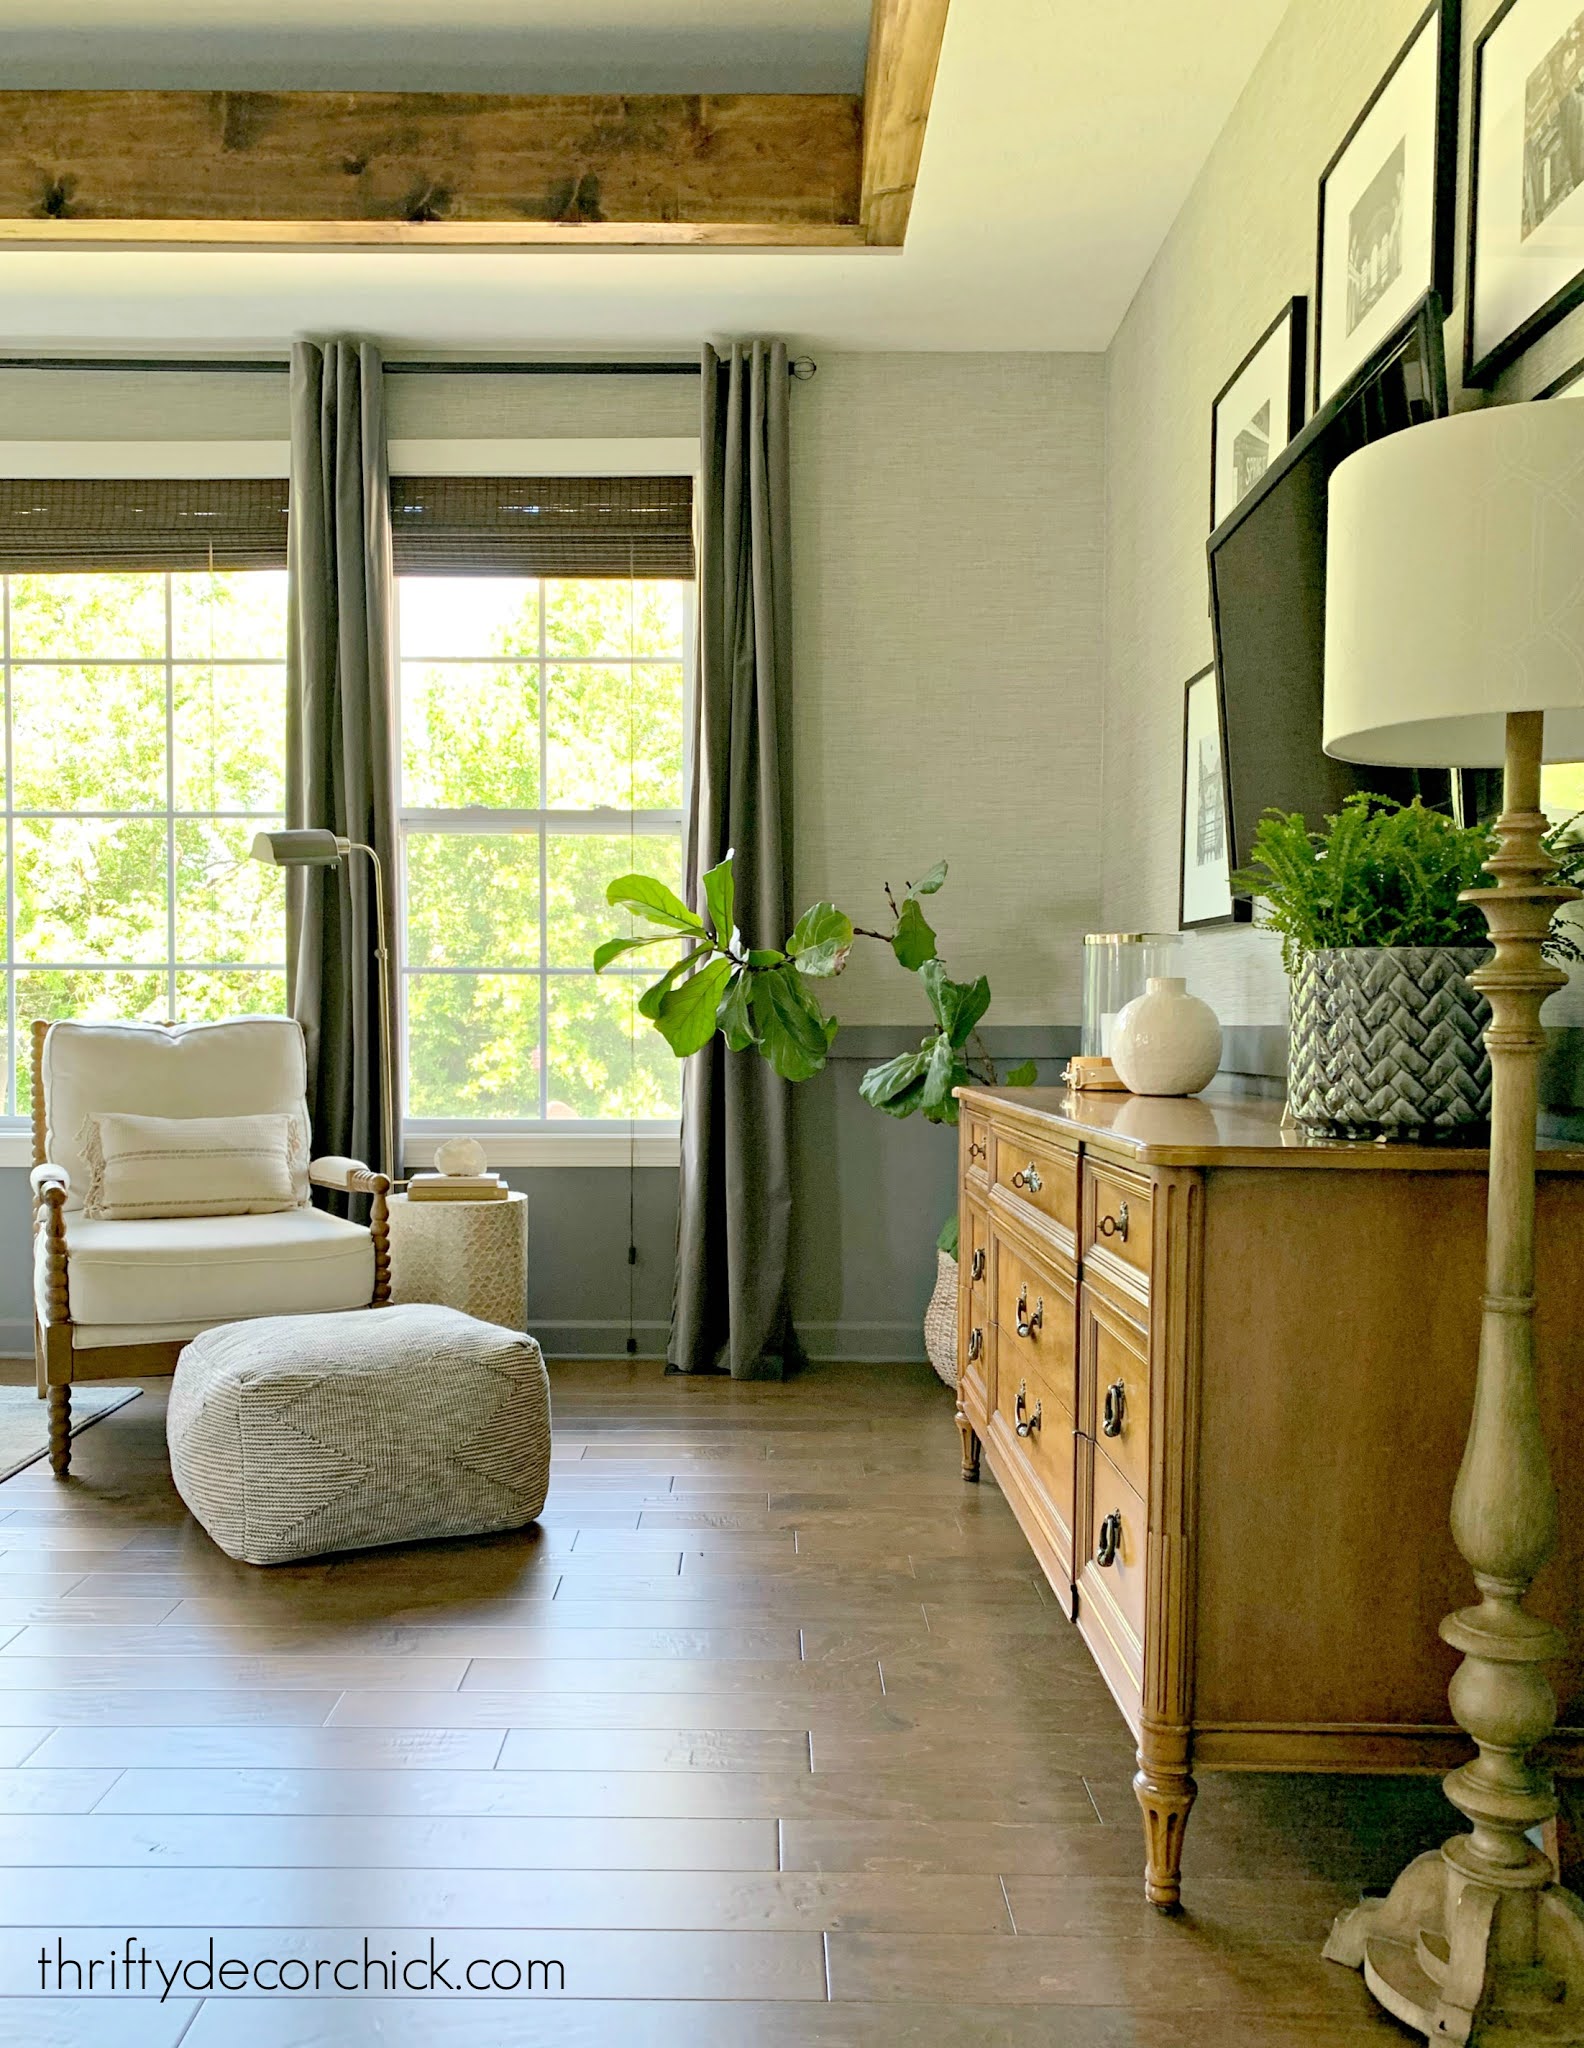
Grasscloth is one of my favorites and this version is super inexpensive.
It doesn't have the feel of true grasscloth, but it does have some texture to it. And it looks authentic from just a few feet away:
The grasscloth look is more subtle, but sometimes you just want to make a BIG impact. ?
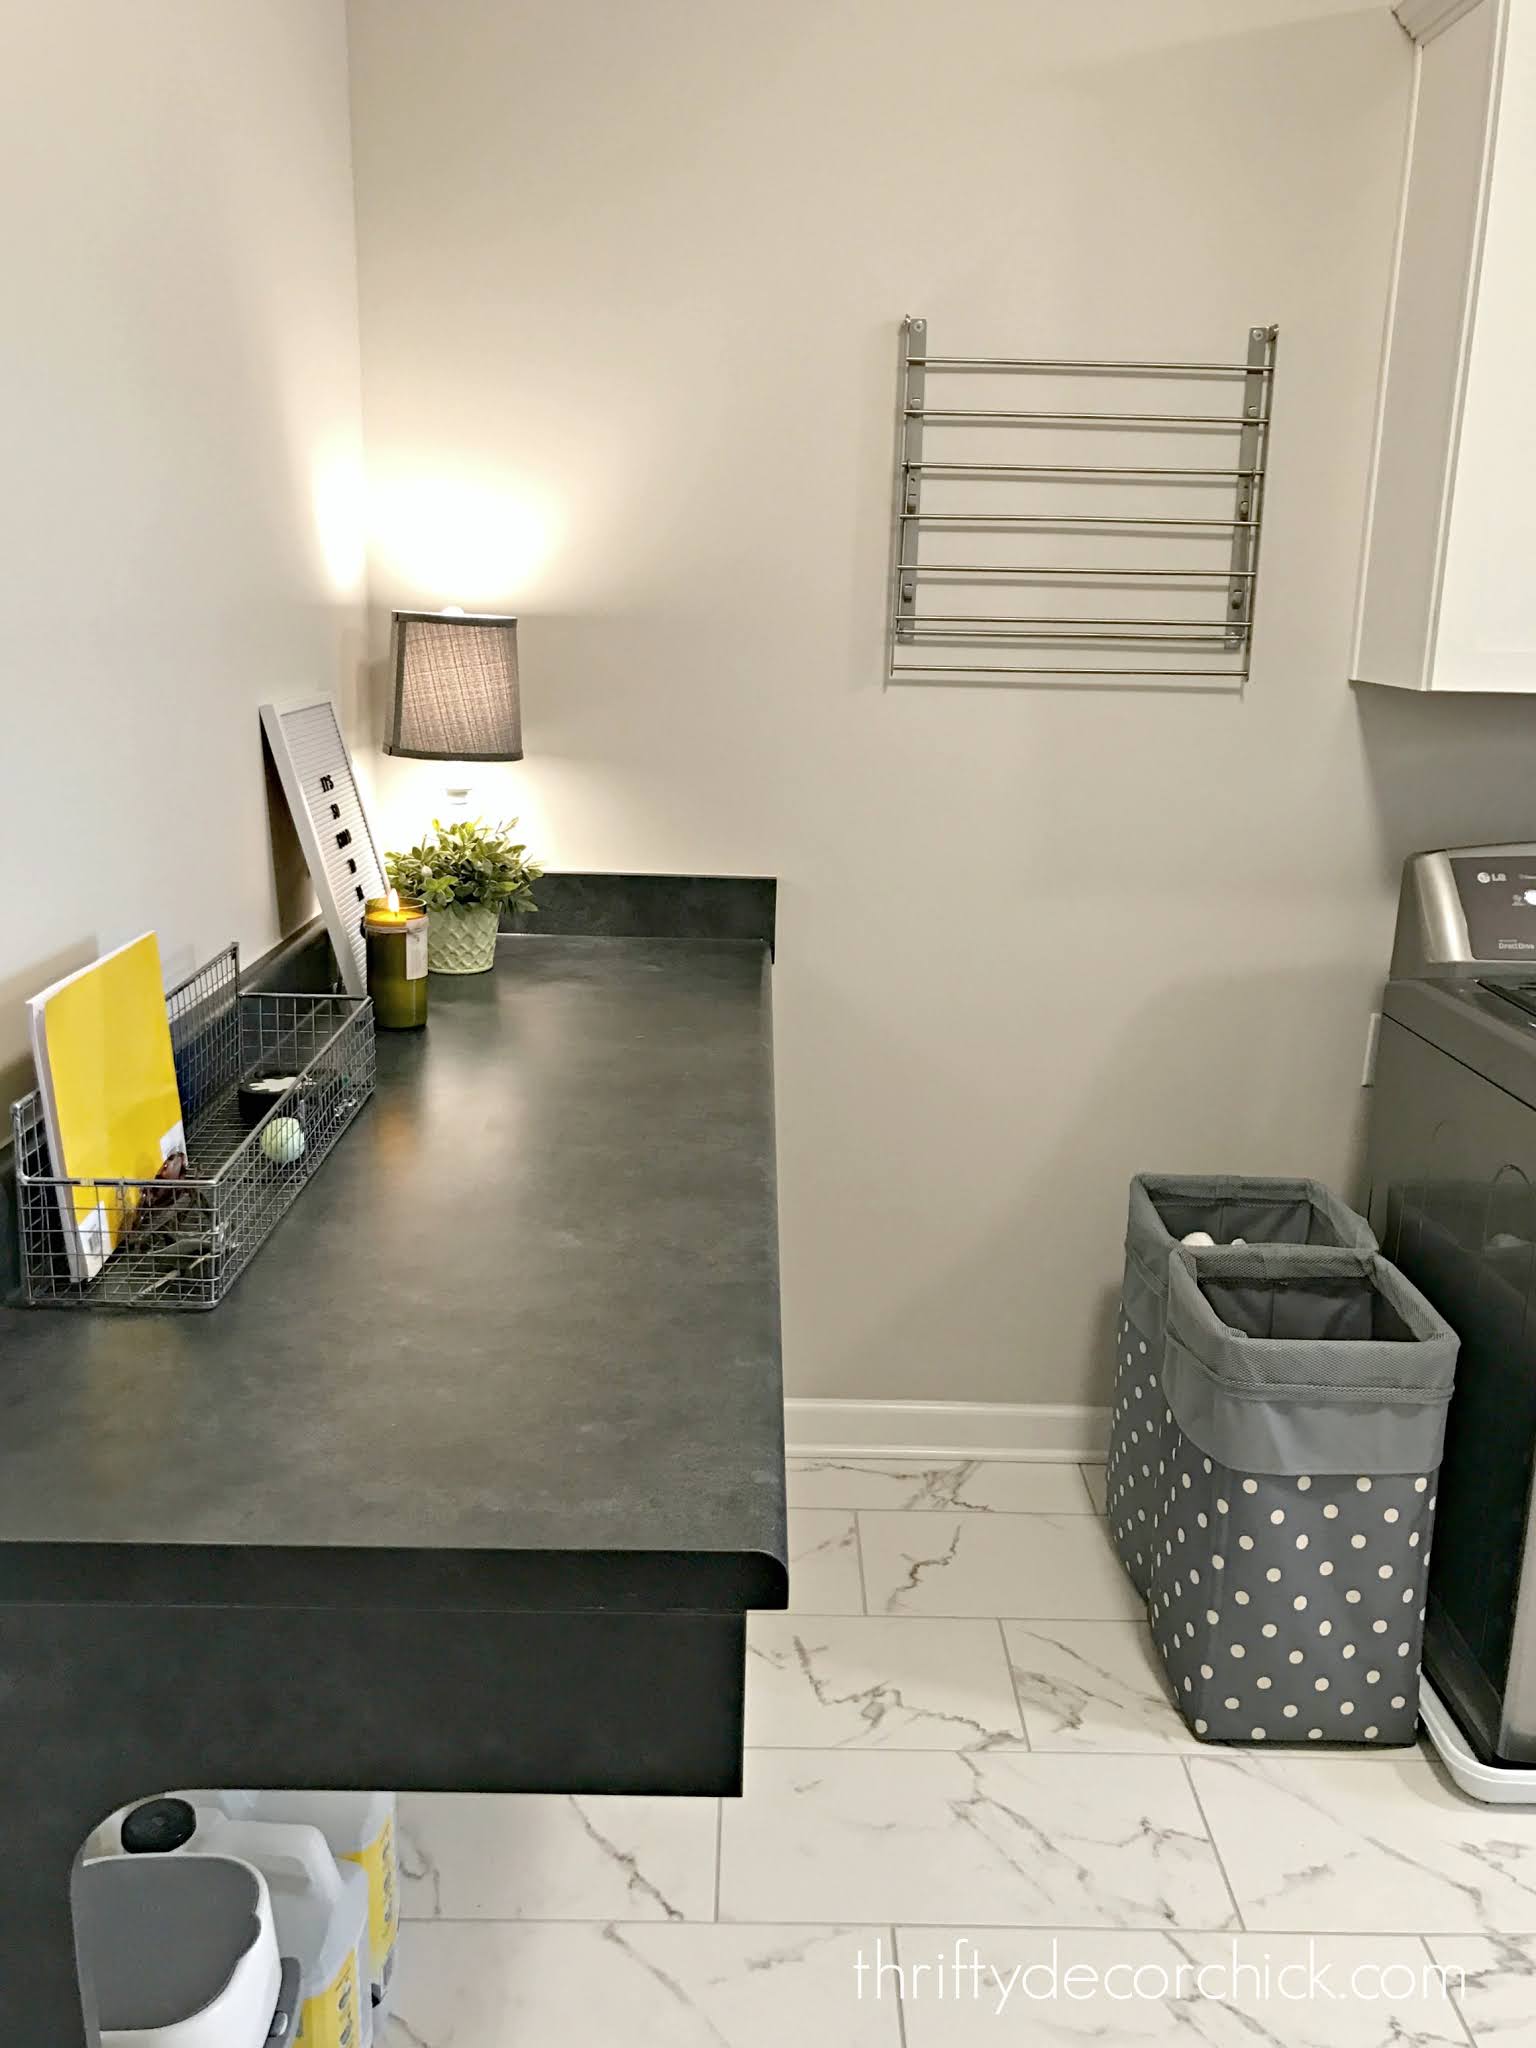
That's just what I wanted to do in our mud/laundry room. This wall with the drying rack is loooong...it needed something:
OK, OK -- I know a lot of other stuff happened in here, but just look at that beautiful floral paper! What a HUGE impact!:
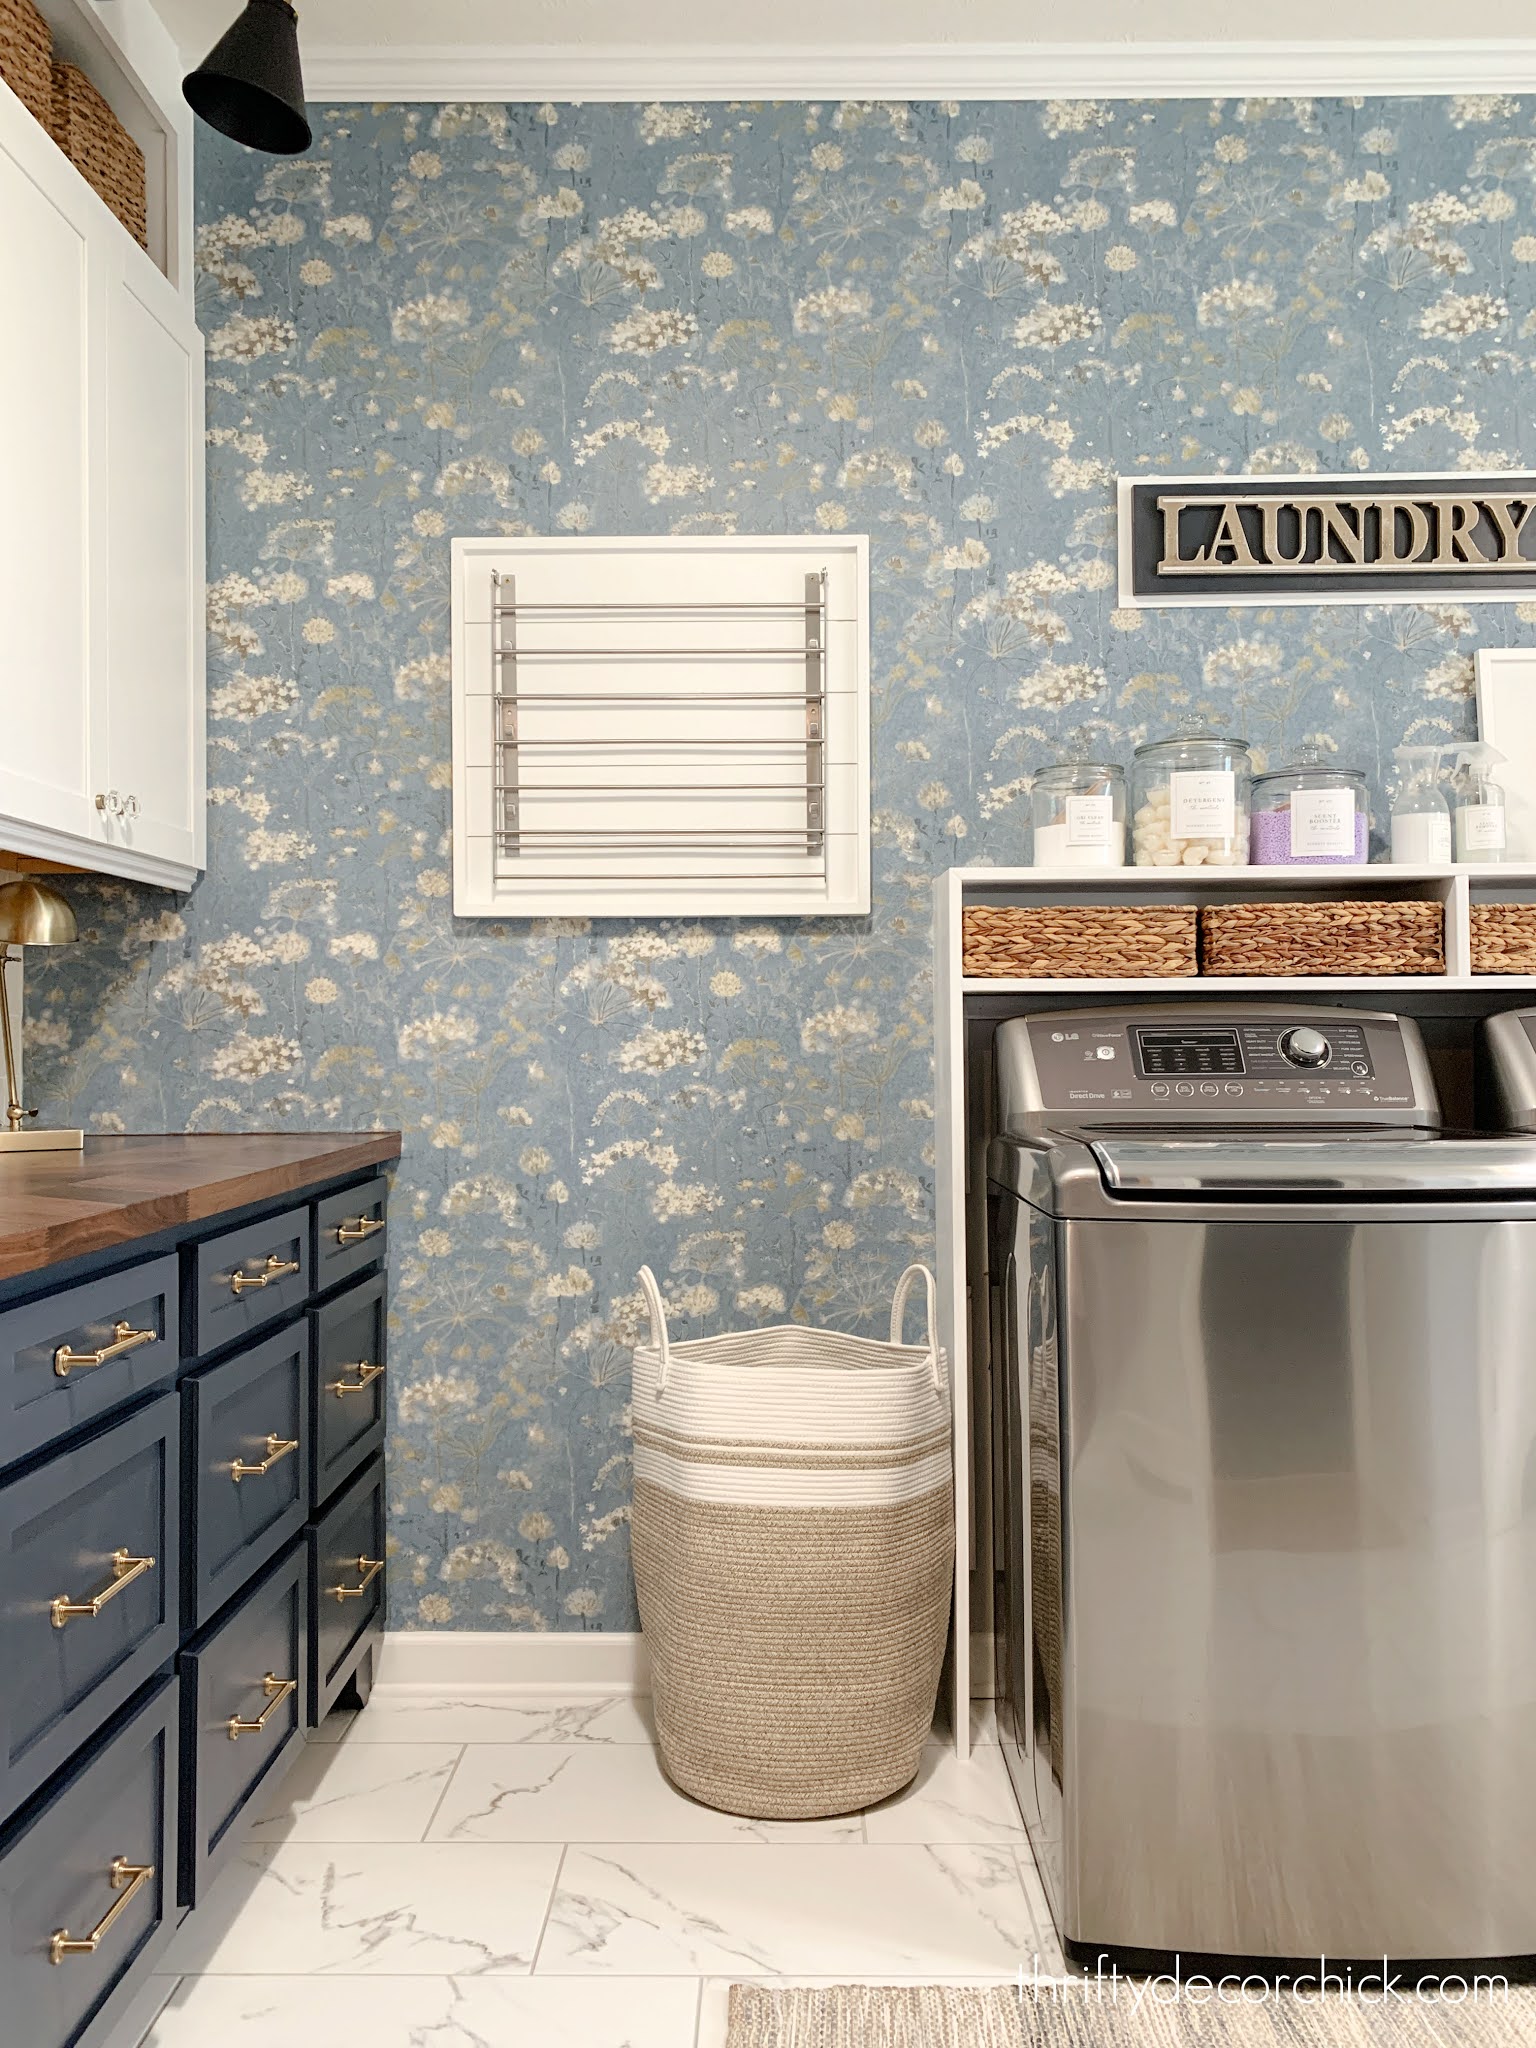
I think I love wallpaper so much because it solves that problem of, "What can I do with this big empty wall for not much money?" It has become my go-to solution. ;)
I actually kind of enjoy installing it -- it's like a puzzle to me. If you've never hung wallpaper I recommend starting with a small accent wall and using a peel and stick option. (See my tips for hanging peel and stick wallpaper here). That version allows you to remove and restart over and over (believe me, I know).
Have I convinced you to add wallpaper somewhere in your home yet? I grew up with the old borders in our houses too, but never had to remove them. I know those bad memories have prevented many of you from trying it. :)
I have not removed any of ours yet, but when I do I'll be sure to let you know how it goes!
Direct links to all of the wallpaper I used here:
Cherry blossom wallpaper in my office
Similar blue and gold peel and stick in the powder room (our version is no longer available)
Indigo and white floral in small hallway
Similar gray grasscloth in our bedroom here and here (ours is sold out)
See more of our home here.
To shop items in our home, click here!
Never miss a post by signing up to get posts via email.
Via https://www.thriftydecorchick.com/2021/05/the-power-of-wallpaper-dont-be-afraid.html
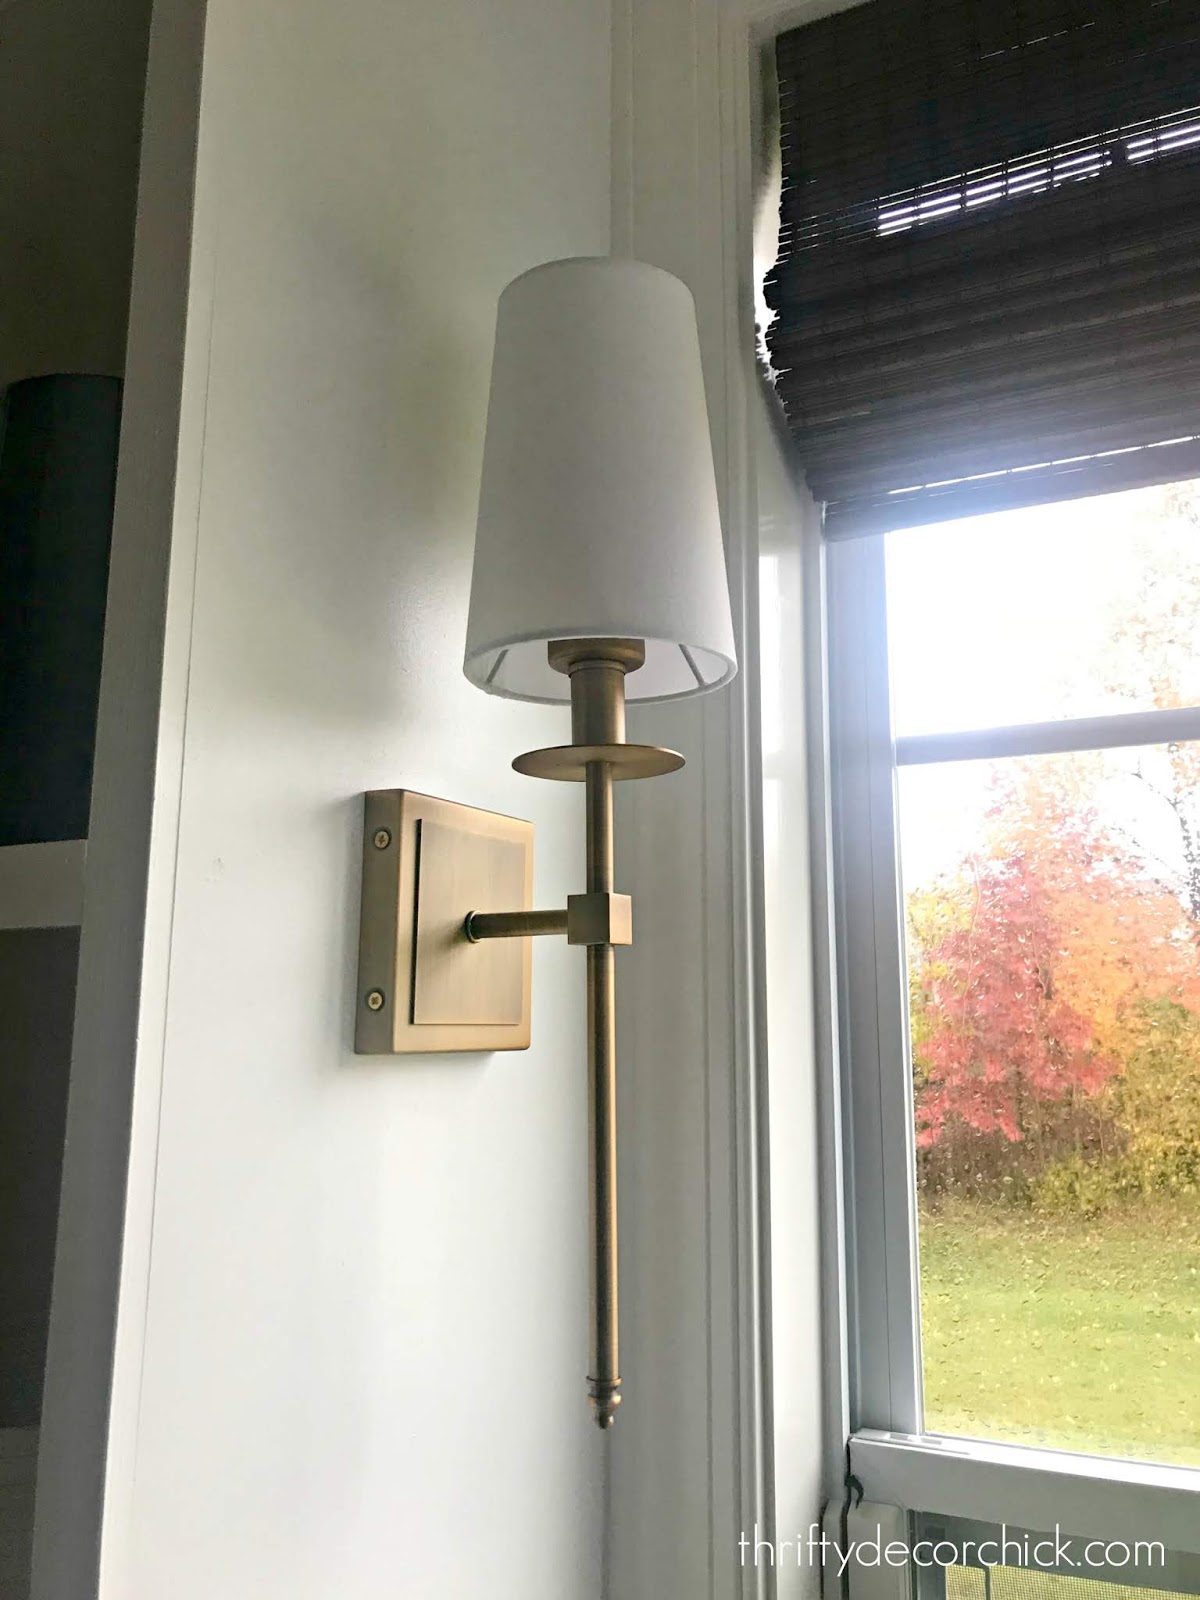
This post is all about adding lighting...where you didn't think you could! I used this easy hack on my wall of office built ins.
If you remember, in our old house it took me forEVER to find the lights I wanted. I finally went with outdoor lights because everything else was crazy expensive:
They worked perfectly!
Thankfully now that sconces have become more popular, they are much more affordable. There are a ton more options now too.
This post may contain affiliate links for your convenience.
See my policies and disclosure page for more information.
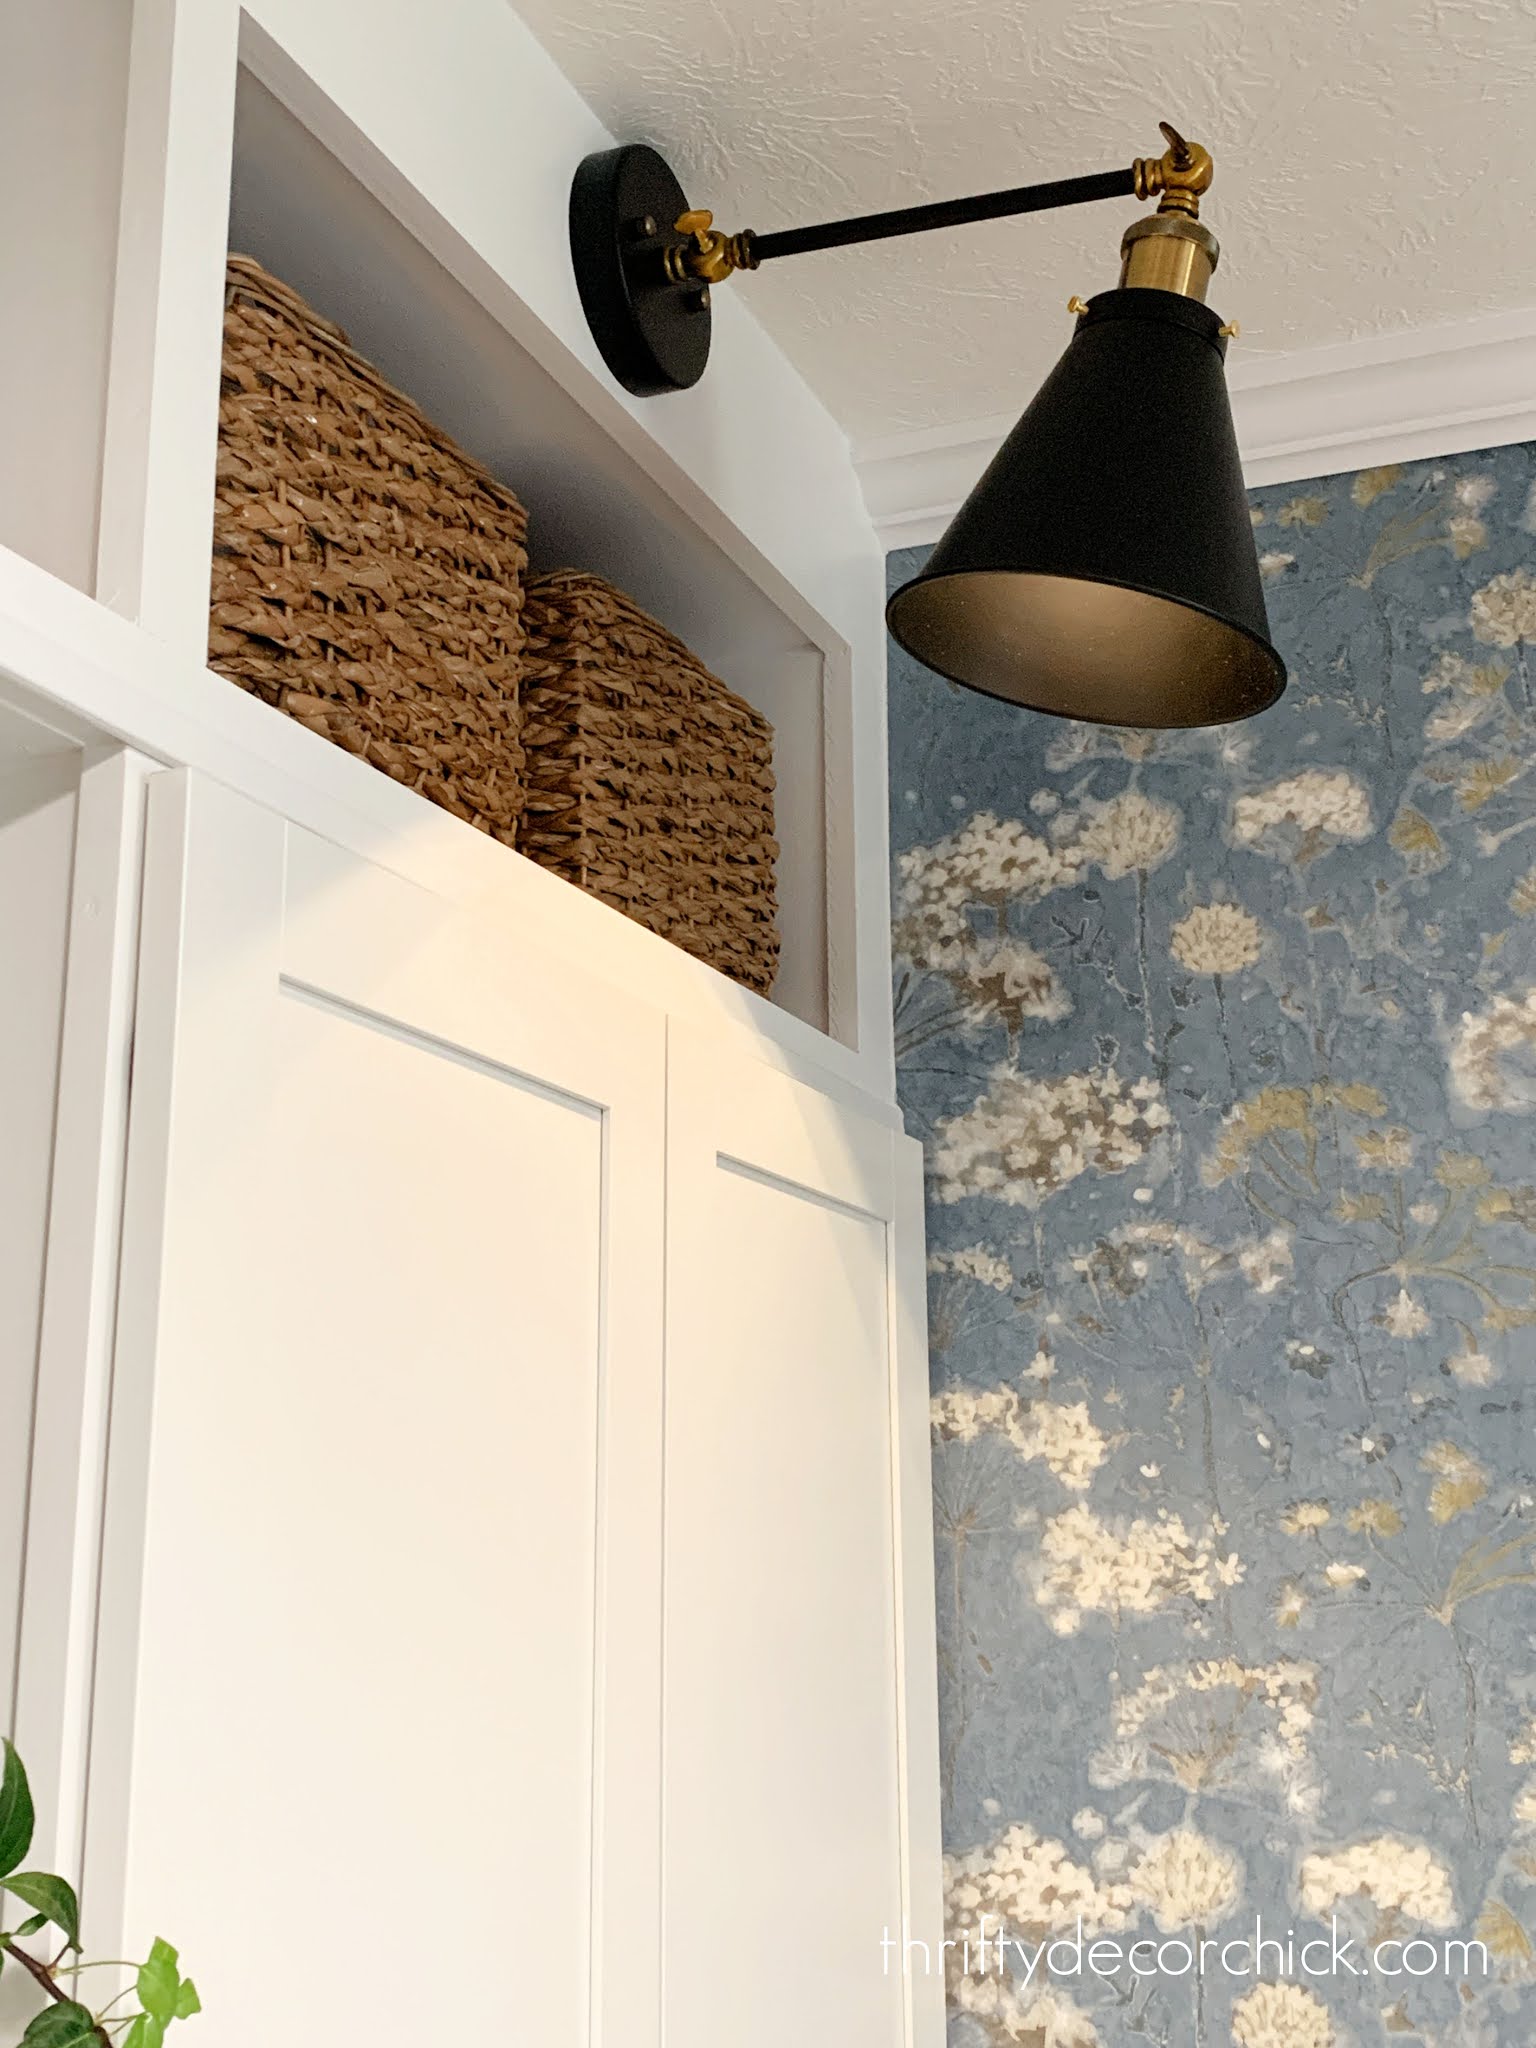
I wanted that look again, and found a brass and black sconce I love that I've used before -- you can see it here in our mud/laundry room:

I used this little hack on that light too! You can find the black sconces here -- they are affordable and you get two in the order.
Usually when I build bookcases, I have electrical run to the lights to the header. This time, because I know of this lighting trick...I didn't pay for that part. There are pros and cons to this trick so stay tuned for those!
The trick is using these puck lights inside the fixtures:

I used this little hack in our dining area as well -- it's a way to add soft lighting without running electrical:
It would have been really difficult to wire them on these skinny shelves, so this trick worked great! Make sure to check out the post to see how I made those specific sconces work! (Hint: it was even easier than what I'm sharing today.)
This time, I needed to secure them to the sconce because it was facing down. ** I've found an even easier and more secure way to do this so I'll share that option first!
I discovered this little hack when working on our laundry and mud room makeover. When we had the cabinets moved, I later noticed that some task lighting would be nice on the new counter. I would have run electrical before I started this project, but I hadn't planned on adding sconces.
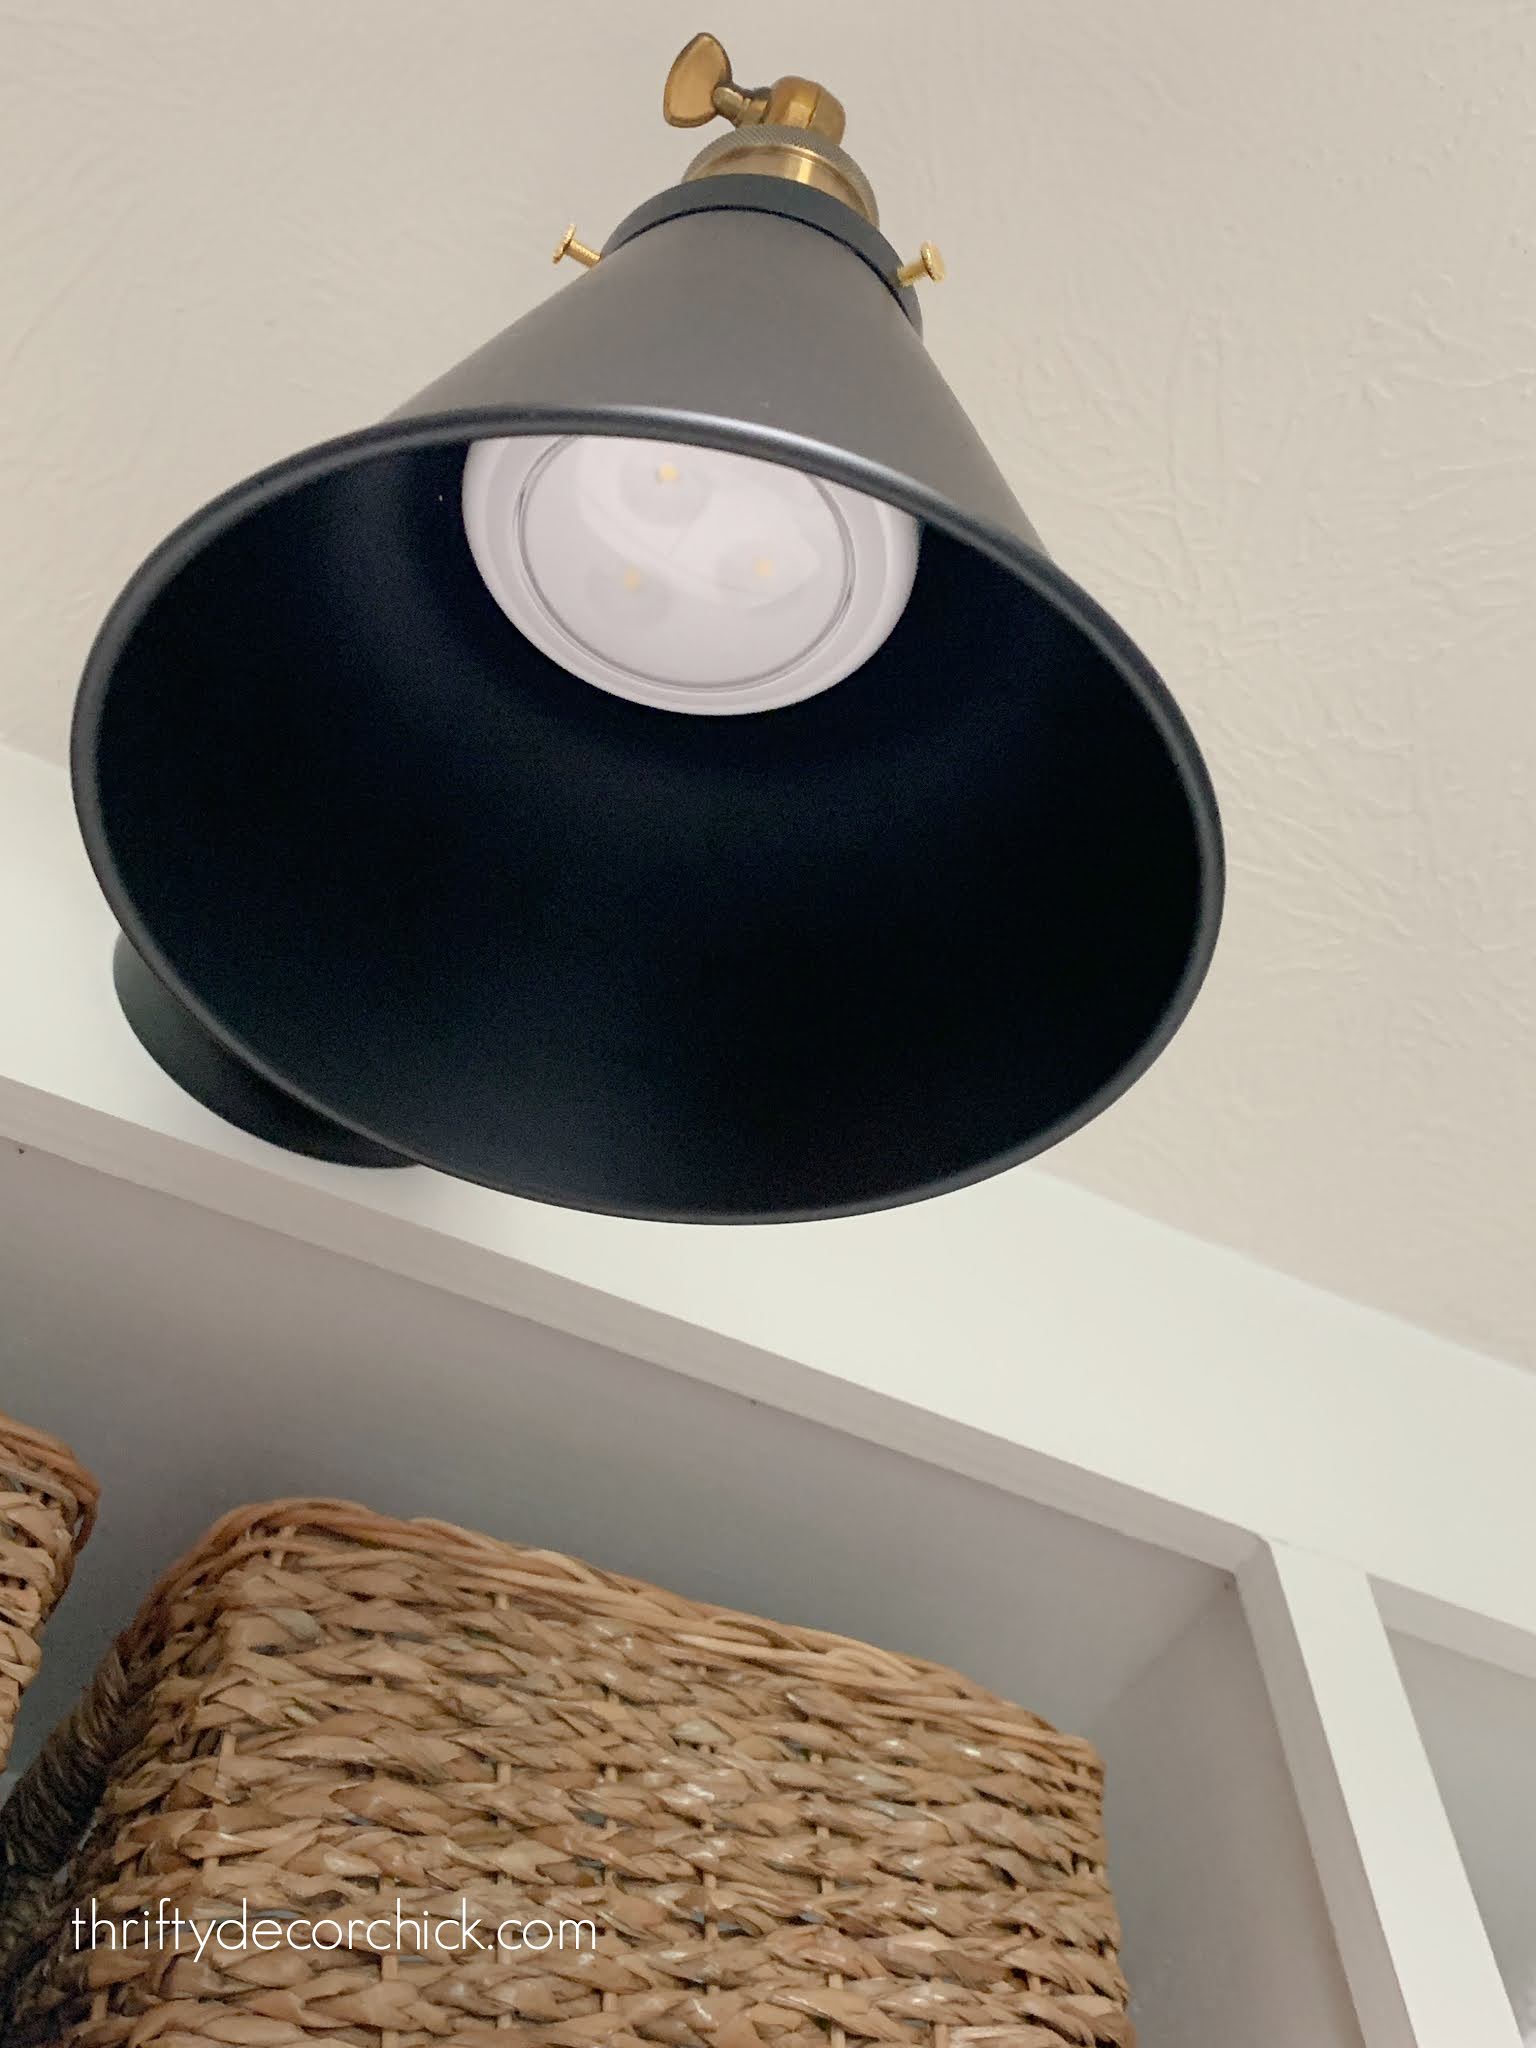
Enter these pretty sconces with the puck lights!:
This time though, the sconces had a shade that narrowed a bit too much at the top, so I knew the pucks would probably not fit.
I noticed something when I was ordering the lights -- as a suggested item at the bottom, it showed these handy outlet adapters:

These are great if you don't have outlets outside, especially for something like holiday lights. You can screw this into your outdoor lights and use them as an outlet instead. Cool, right?
I decided to use them to make it easier to change out or charge the batteries in our non-electrical light fixtures. And I knew I needed to bridge the gap between where you screw in the bulb and where the shade gets too narrow on our sconces.
I took some scrap dowel rod, cut it down and spray painted it to match the light. Then glued it on to the adapter:

The spray painting is really not necessary -- I thought we'd be able to see it in there but you can't at all. You'll need to figure out how long you want to cut your dowel, this will depend on your light fixture.
I glued the parts together with Gorilla Glue, and it's held up awesome! Once it's cured it's SUPER strong. I also used it to attach the bottom of the puck to my little contraption:

As you can see, I drilled a hole through the wood to run wire through (stay tuned for that in a minute), just for added security. It is not needed though, so if you choose this option you can forego the wire.
This option makes it super easy to screw in and out, just like a light bulb!:
It has worked so well -- I'm planning on making this change to the sconces in my office. You can see how I first attached them with wire below...
If you don't want to use glue or the adapters, all you'll need is this 24 gauge wire:

The sconces have a part inside that has a small hole. I ran the wire through that:


When it's secure, twist the puck light (with batteries) back on:

And that's it! I use the bracket that comes with the light to hang -- just screw it into the wall and hang your light:
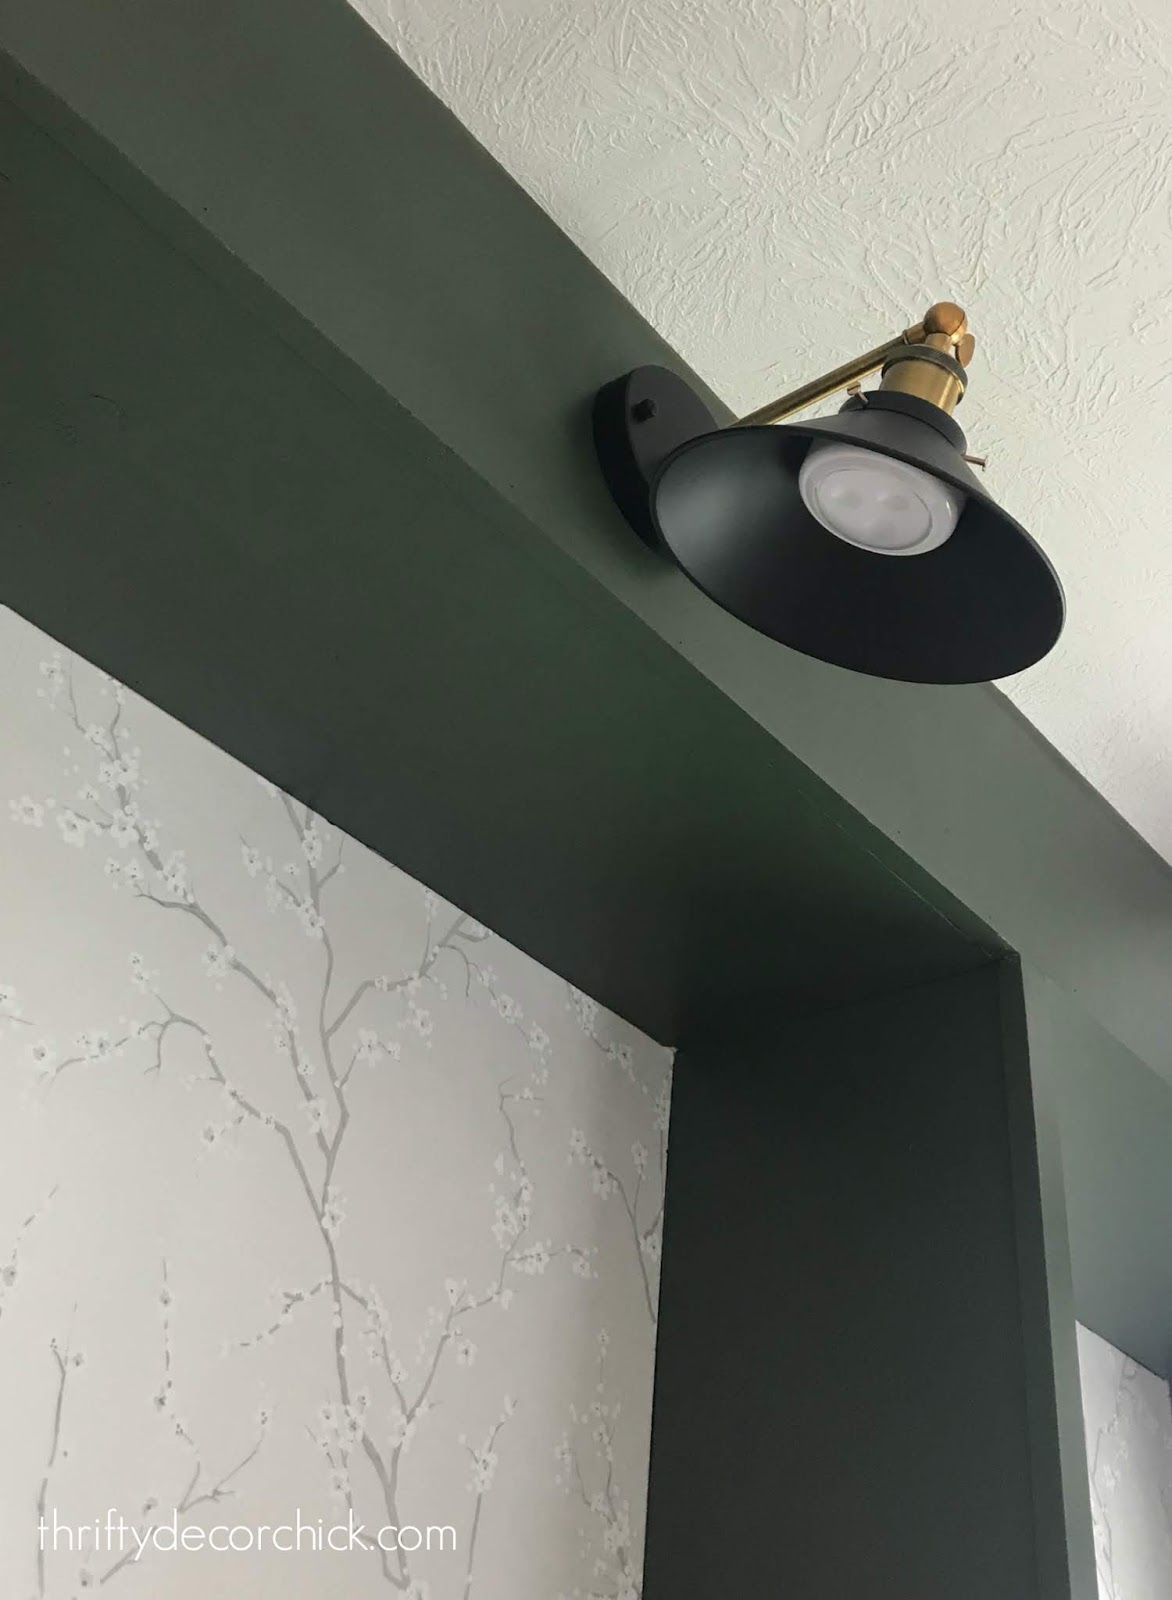
They look GREAT! I wanted something simple that I could aim toward the shelves, and these work perfectly.
As you can see here, I angled them so you can't see the light unless you're right under them. The scones have adjustable arms:

Check out this post to see the steps of the DIY bookcases to this point!
I almost forgot to mention, that little remote in the photo above allows you to operate these without touching them. It has a timer and dimmer option which is great. The timer is key because when I've used puck lighting in the past, we would turn them on and ALWAYS forget to turn them off. The battery ran out quickly because of that. I purchased another puck light remote for this room.
There are pros and cons to these little puck lights:
Pros
Cons
The items I used for this lighting hack:
Long arm black and brass sconces (in laundry)
**The next step in this bookcase project (building the shelves) is here **See this whole finished project here! See more of our home here.
To shop items in our home, click here!
Never miss a post by signing up to get posts via email.
Via https://www.thriftydecorchick.com/2019/07/how-to-add-light-fixture-anywhere.html
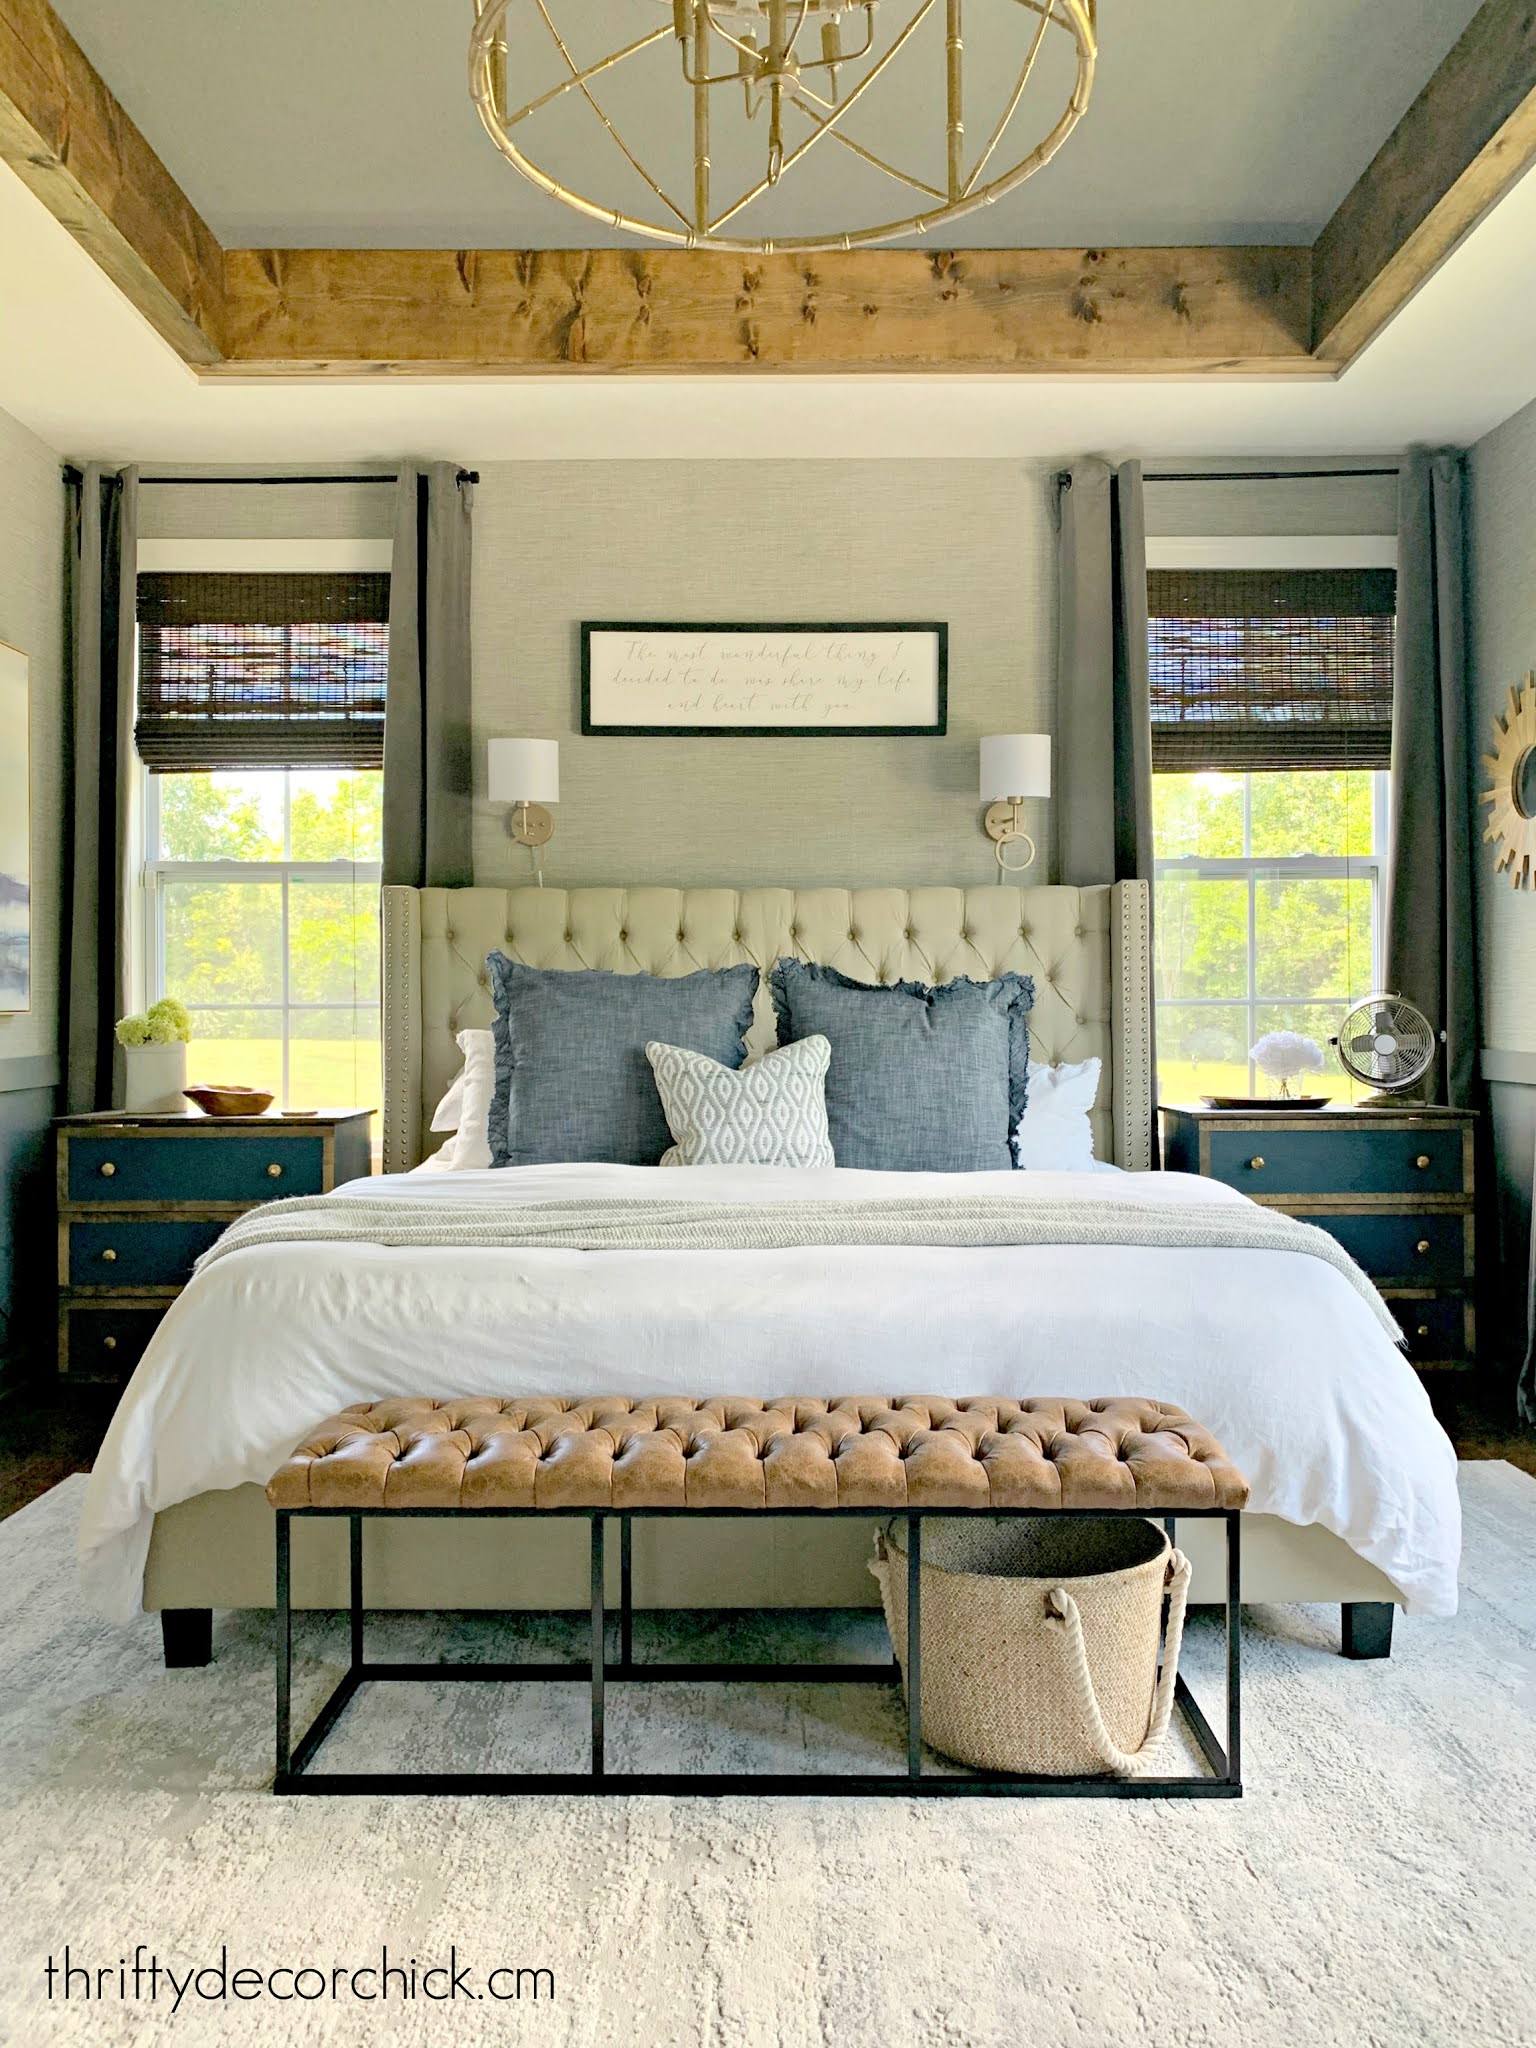
Hello my friends! I've always said paint is the number one way to make a big impact in a room for the least amount of money, but fabric or textiles are a very close second. Drapes, bedding and rugs can add color or texture and will go a long way to making a room look a lot different.
My latest addition to our bedroom did just that! Last summer I added some finishing touches to our master that really lightened it up, but still left it feeling super cozy:
This post may contain affiliate links for your convenience.
See my policies and disclosure page for more information.
We love the dark gray walls combined with the lighter grasscloth wallpaper -- it's such a cozy space!
The bedding helped to lighten things up, but lately I've been craving some more color in here. Plus, even though we don't wear shoes in the house much, the rug got dirty so easily.
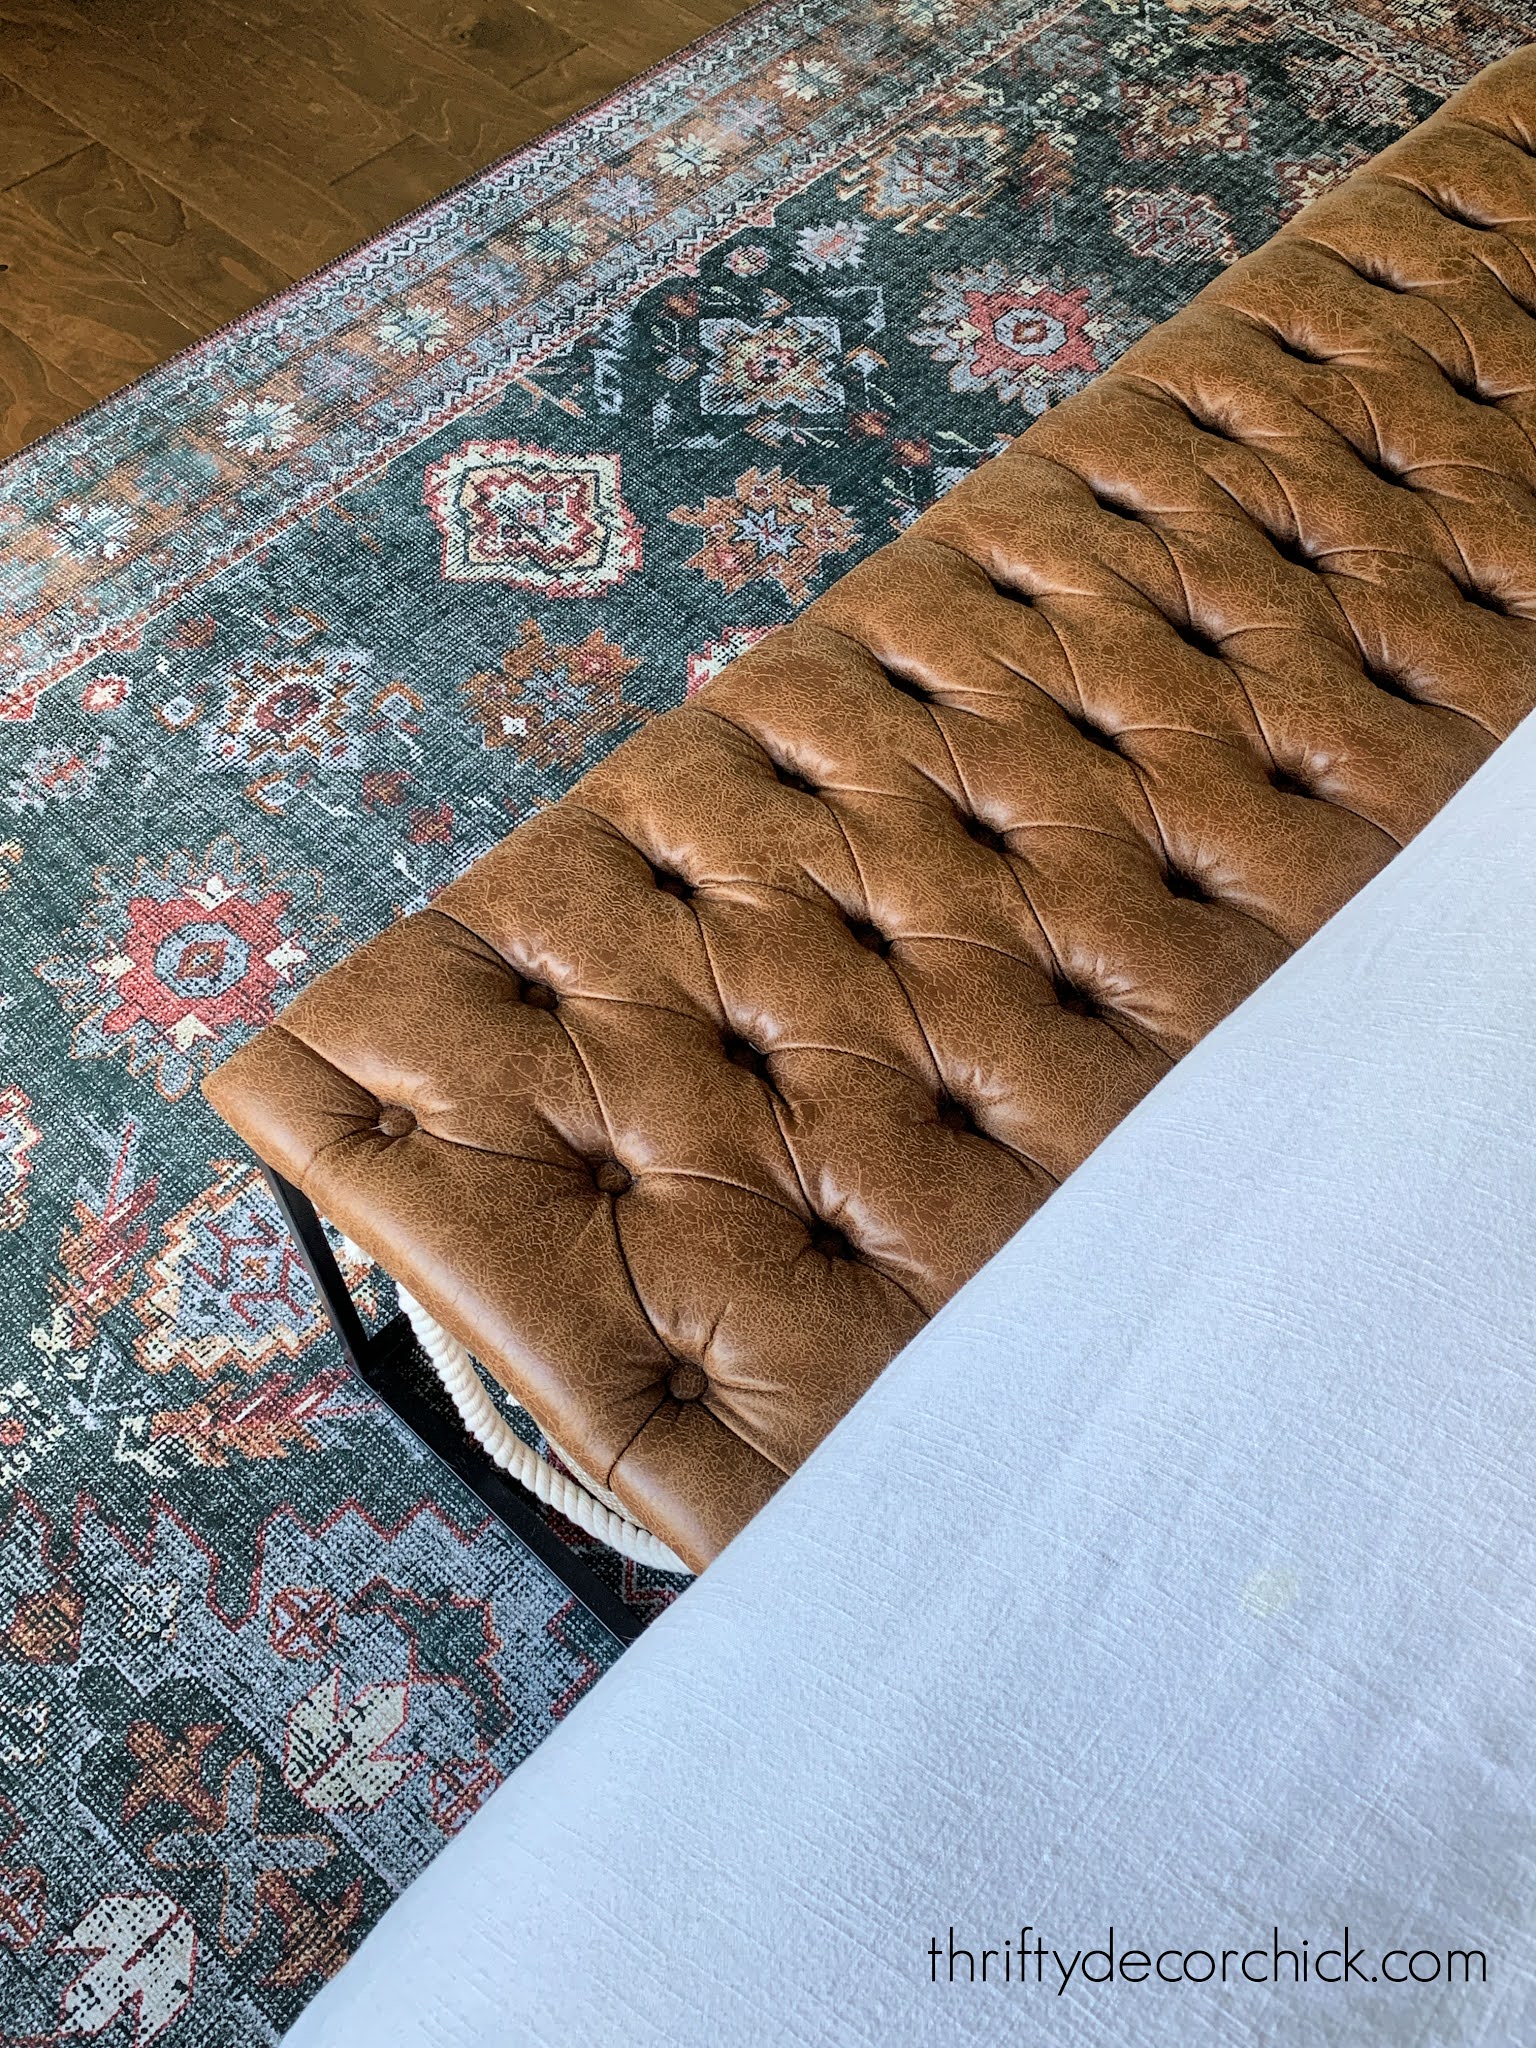
I knew pink or coral tones would look so good with the darker accents in here, so I did some looking around online and found this colorful option (the Loloi Skye in sea/rust) that looked perfect:

But I kept hesitating -- it was a lot of color for me! I kept going back to it over and over though.
This is the same brand as our family room rug. Loloi is a higher end brand and usually expensive, but these are from their Loloi II line and are much less. There's a reason they're so inexpensive, and I'll touch on that in just a bit.
After going back to this one over and over, I finally ordered it late last year. When it was delivered it was even more colorful in person...and I hesitated again. ? It sat wrapped up for a couple weeks before I rolled it out.
Thankfully I absolutely LOVED it once it was unrolled in the room. The design, the colors, it's all so lovely:

You can see it's definitely more vibrant in person.
The one caveat with this rug is that it doesn't have any fibers or texture like a traditional rug. It's really just printed, kind of like a mat:

I wasn't sure how I felt about that at first, but once we got it down I REALLY loved it. You have to get really close to it to see that it's not a woven rug.
It's really not much different than the rug we have in the family room:

So far it wears as well or better than a regular rug:
I got the 7x9 size and it was a bit smaller than our last one. Turns out it's the perfect size for our bed (king sized) and the room:

The rug itself is soft, but thin. It doesn't feel thick underfoot like a regular one. A rug pad would help that a lot! We don't mind that it's not cushy.
It hides everything though, and has held up really well. We have one of these rugs in our kitchen and I've even thrown it in the washer to clean it! ? I wouldn't recommend doing that often, but it held up great!
There are a TON of different colorways and designs available -- from more neutral to colorful.
You can shop this room by clicking on any of the photos below:

See more of our home here.
To shop items in our home, click here!
Never miss a post by signing up to get posts via email.
Via https://www.thriftydecorchick.com/2021/05/colorful-master-bedroom-refresh-with.html
A tutorial on how to easily change your energy sucking recessed lights with LED versions!
I've been working on this lighting project (that has already saved us a ton of money!) slow but sure since early this year. It makes a BIG difference in both how your rooms look and your electrical bill!
When we were having some electrical work done for the new basement built ins, the electrician noted how many recessed lights we have in the basement -- a ton! He recommended looking into replacing the standard can lights with an LED version that would save a us a lot of money.
He told us it was easy to change them out, so I started doing some research. It's a quick change and you don't need any electrical experience! Turning off your lights at the breaker is all the electrical knowledge you'll need.
Even though we have plenty of light down in the basement, my photos were usually dark. You can see how grainy the wall and ceiling are in this "before" photo I took:

While I worked on that build I started changing out the lights as well -- what a difference!:

This post may contain affiliate links for your convenience.
See my policies and disclosure page for more information.
I found my LED lights at Lowe's, but you can find them at any hardware store or online. I'll share links for a few versions at the end of the post:

You'll want to look for this specific version that has the base that you screw in like a light bulb. Any other version takes electrical know how and isn't really necessary.
We loved that you can change the warmth of the lights with these:

You have to pick what warmth you want before installing, but it's very easy to change them to a different "color" after they are in the ceiling.
Before you start, if you have the adjustable option, decide on the warmth you want first. Well, you may want to install one and see how it looks to decide. But after picking, I highly recommend going through the lights before installation and moving them to the right spot. Otherwise you'll forget and turn them all on and only one will be right. Speaking from experience. ;)
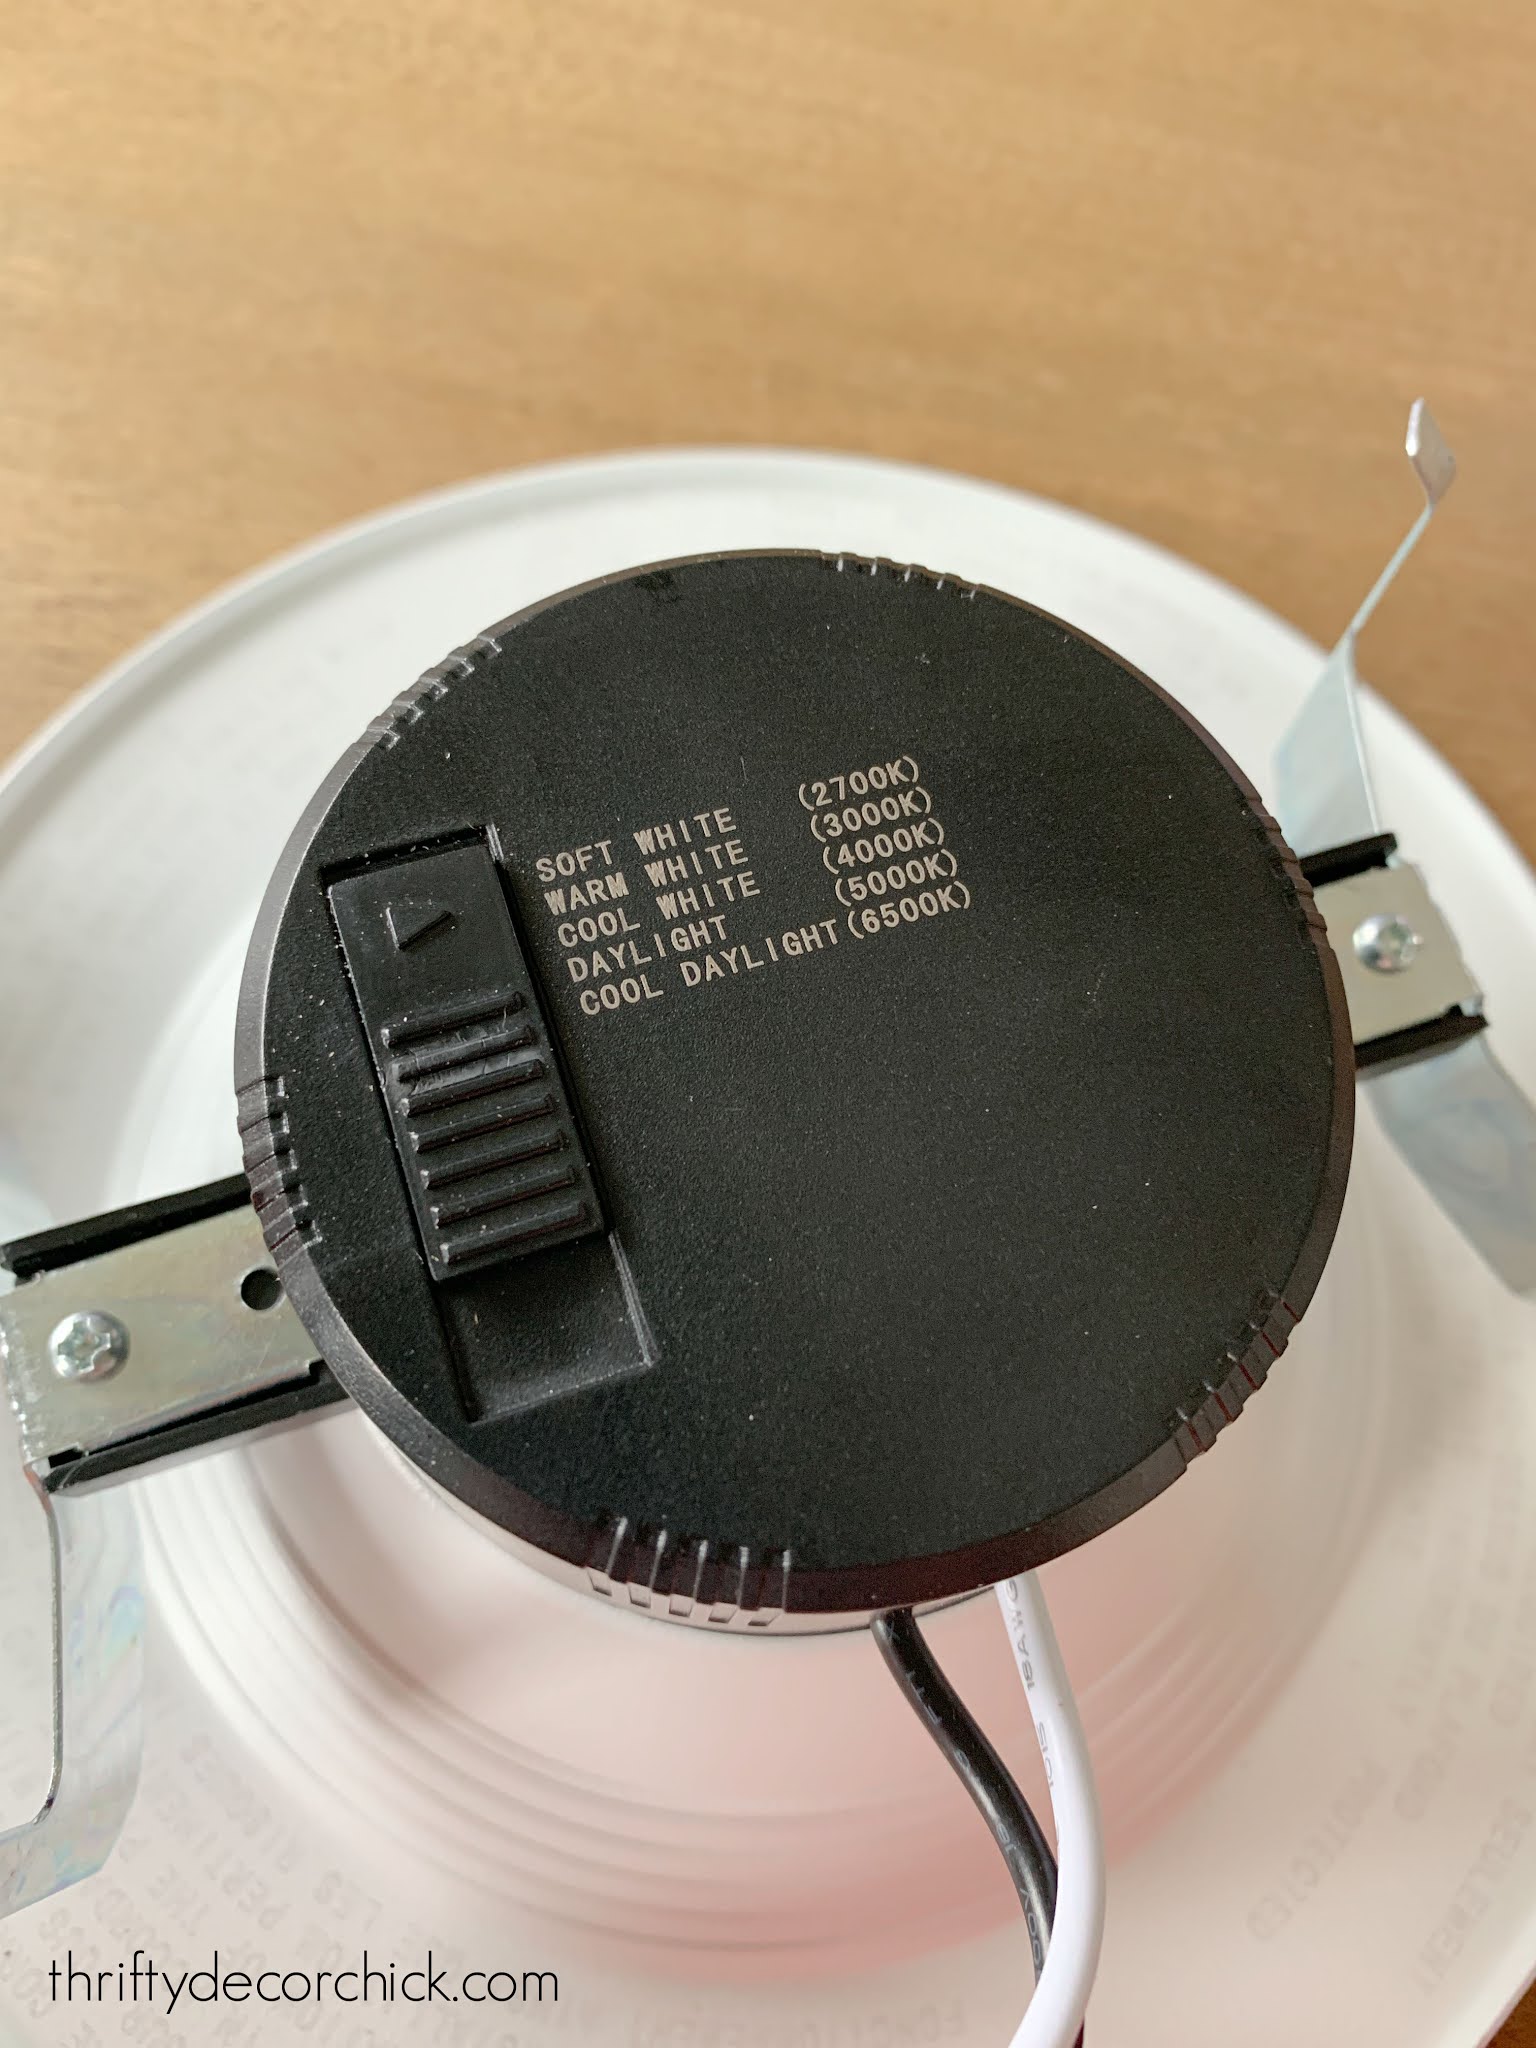
Soft white is the most "yellow" or warmest version, and the least bright. Cool daylight is a more white look and much brighter. Daylight or cool daylight are what I prefer for bathrooms or spaces without natural light.
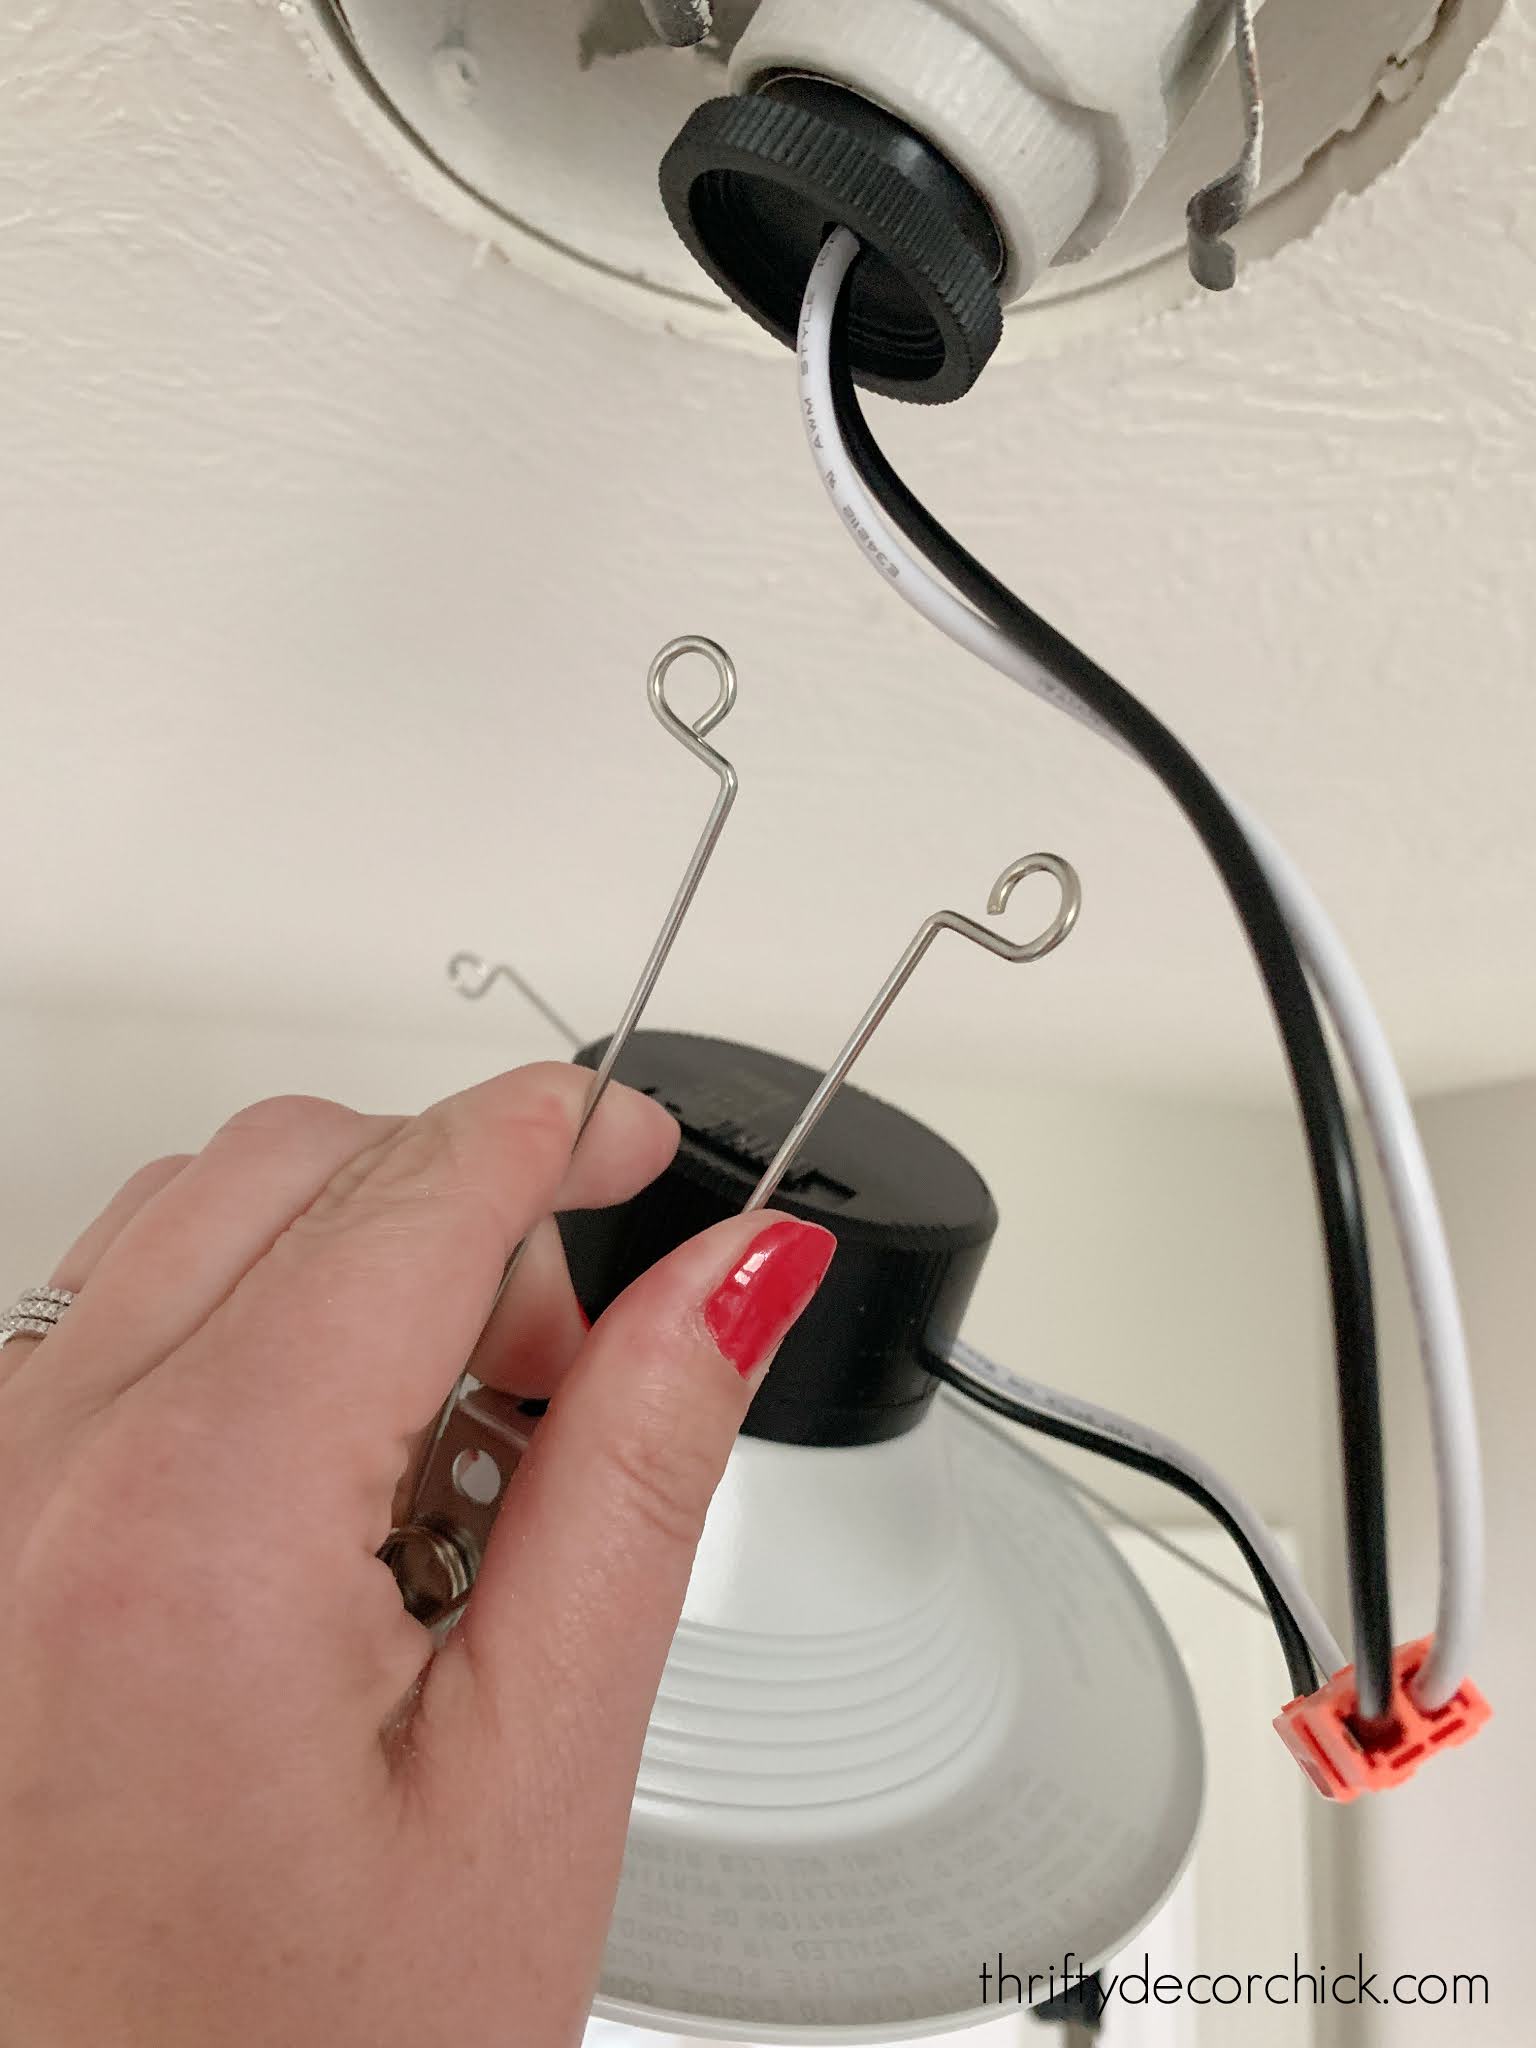
Mine came with a bracket that didn't work for our fixtures, so I had to remove them:

And replace them with the wire clips that come with the lights:

See how I have the clips pulled all the way out? Our ceiling holes are six inches. For five inches you want to install them closer to the fixture. Smaller options are available as well.
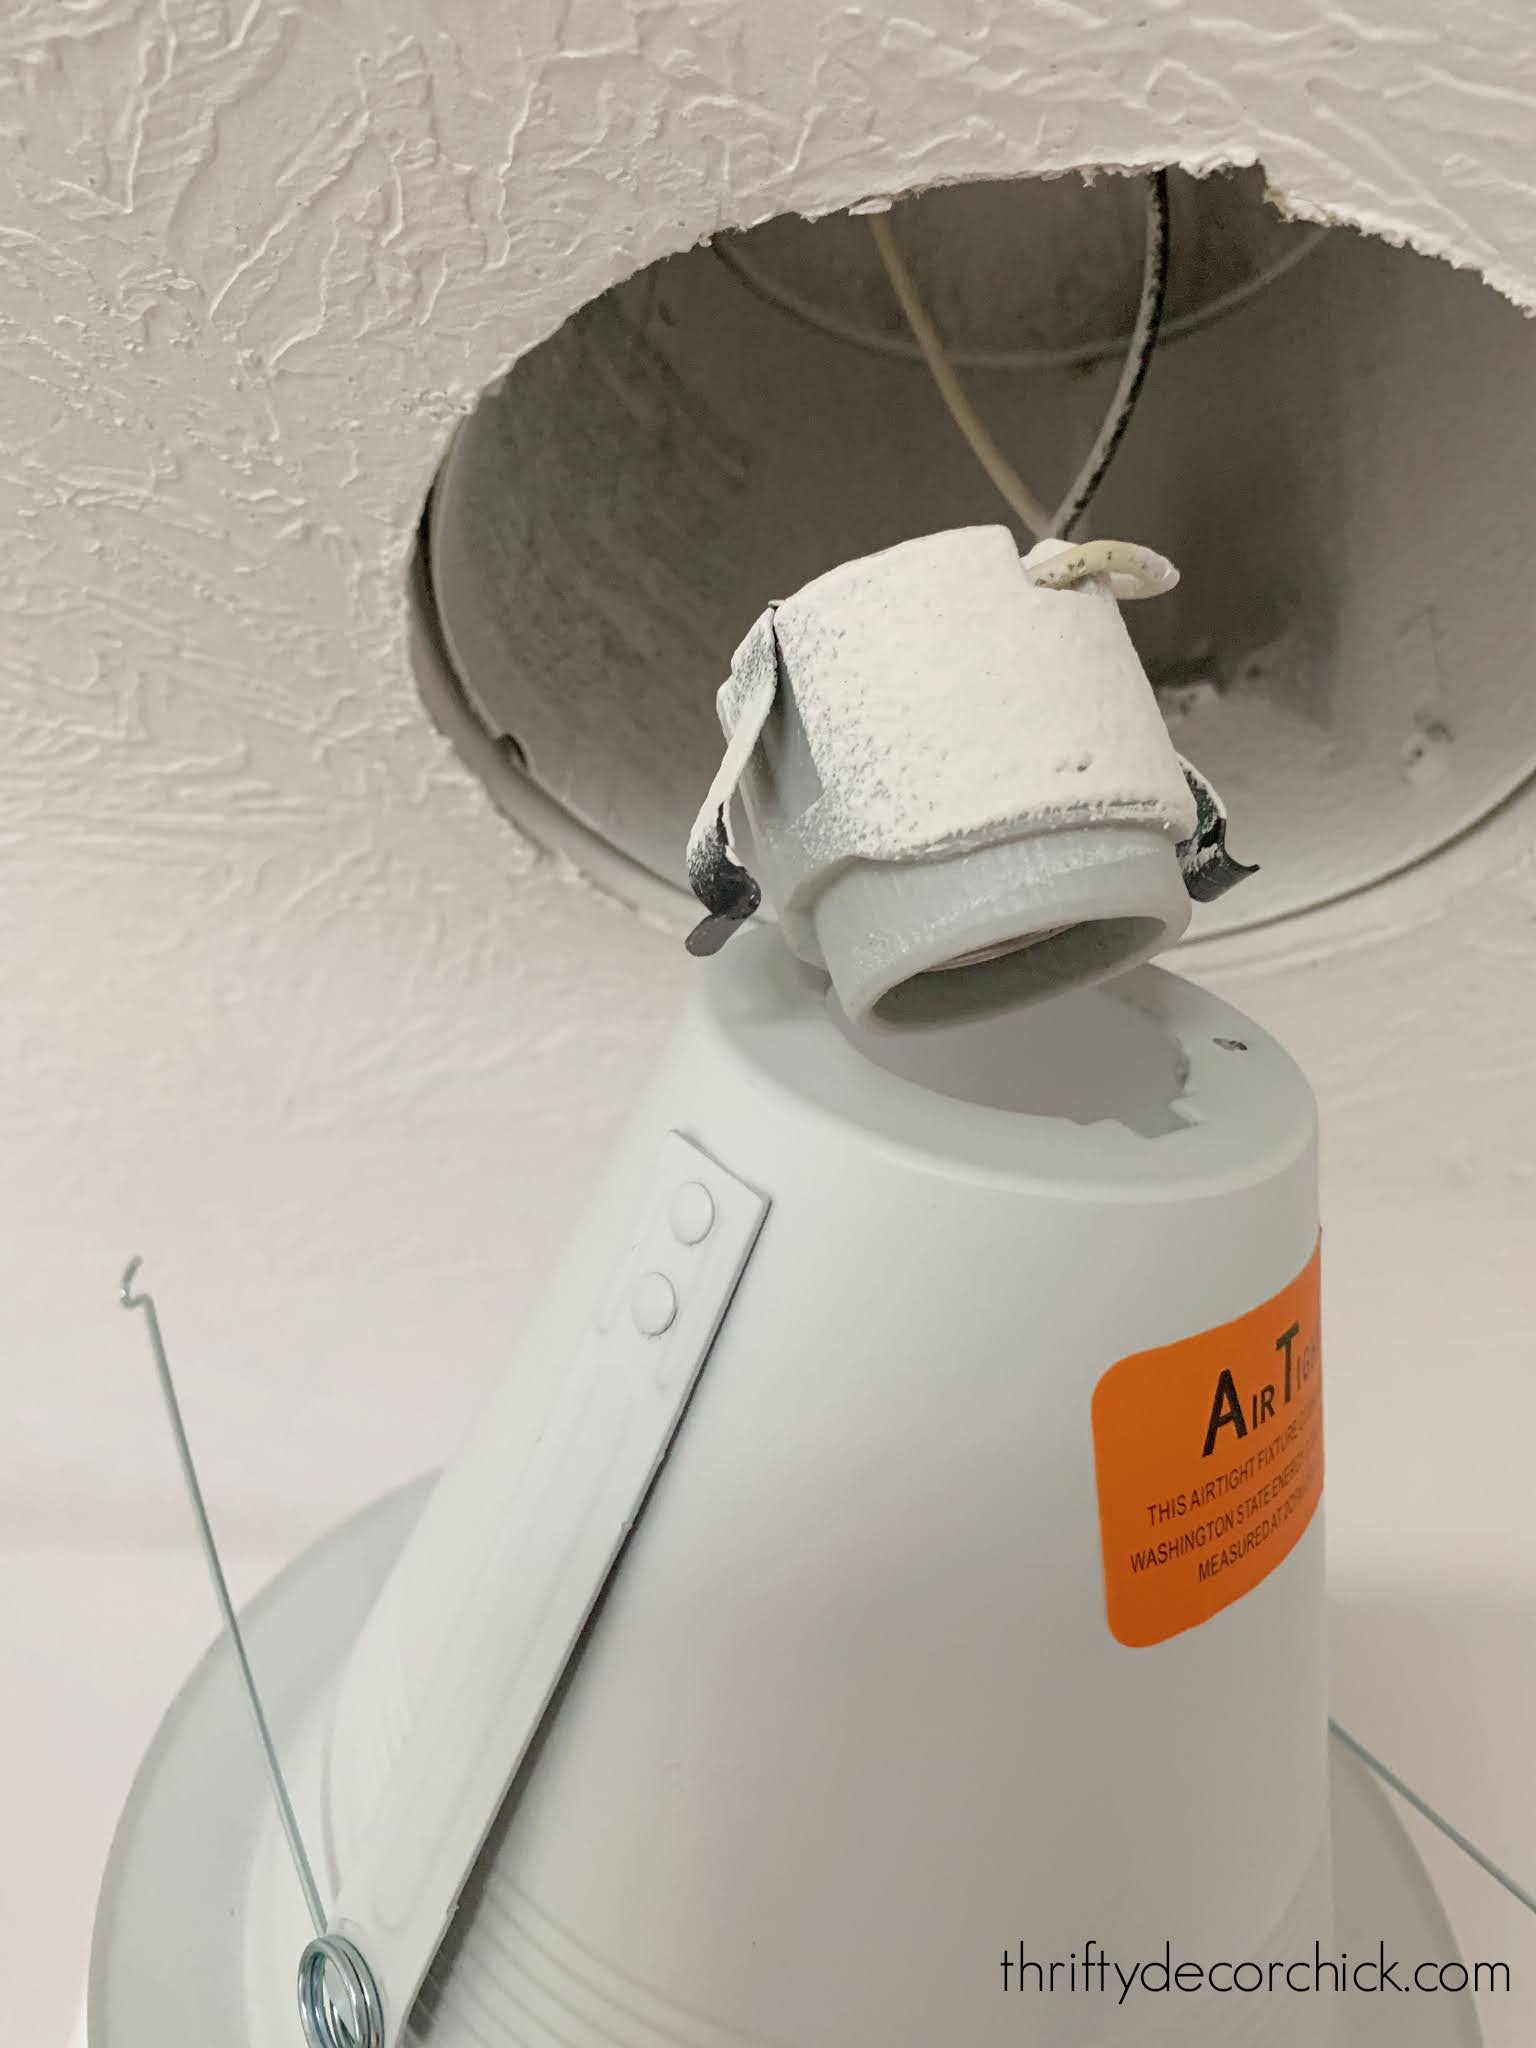
That's the only prep to get them ready for installation! To replace your old fixtures, first TURN OFF THE POWER at the breaker box. This process is almost as easy as replacing a light bulb, but you will be up inside the fixture where there are wires. Always better safe than sorry.
Remove the light bulb and then just pull down on the metal trim:

Grab the metal clips and squeeze to remove them from the ceiling fixture:
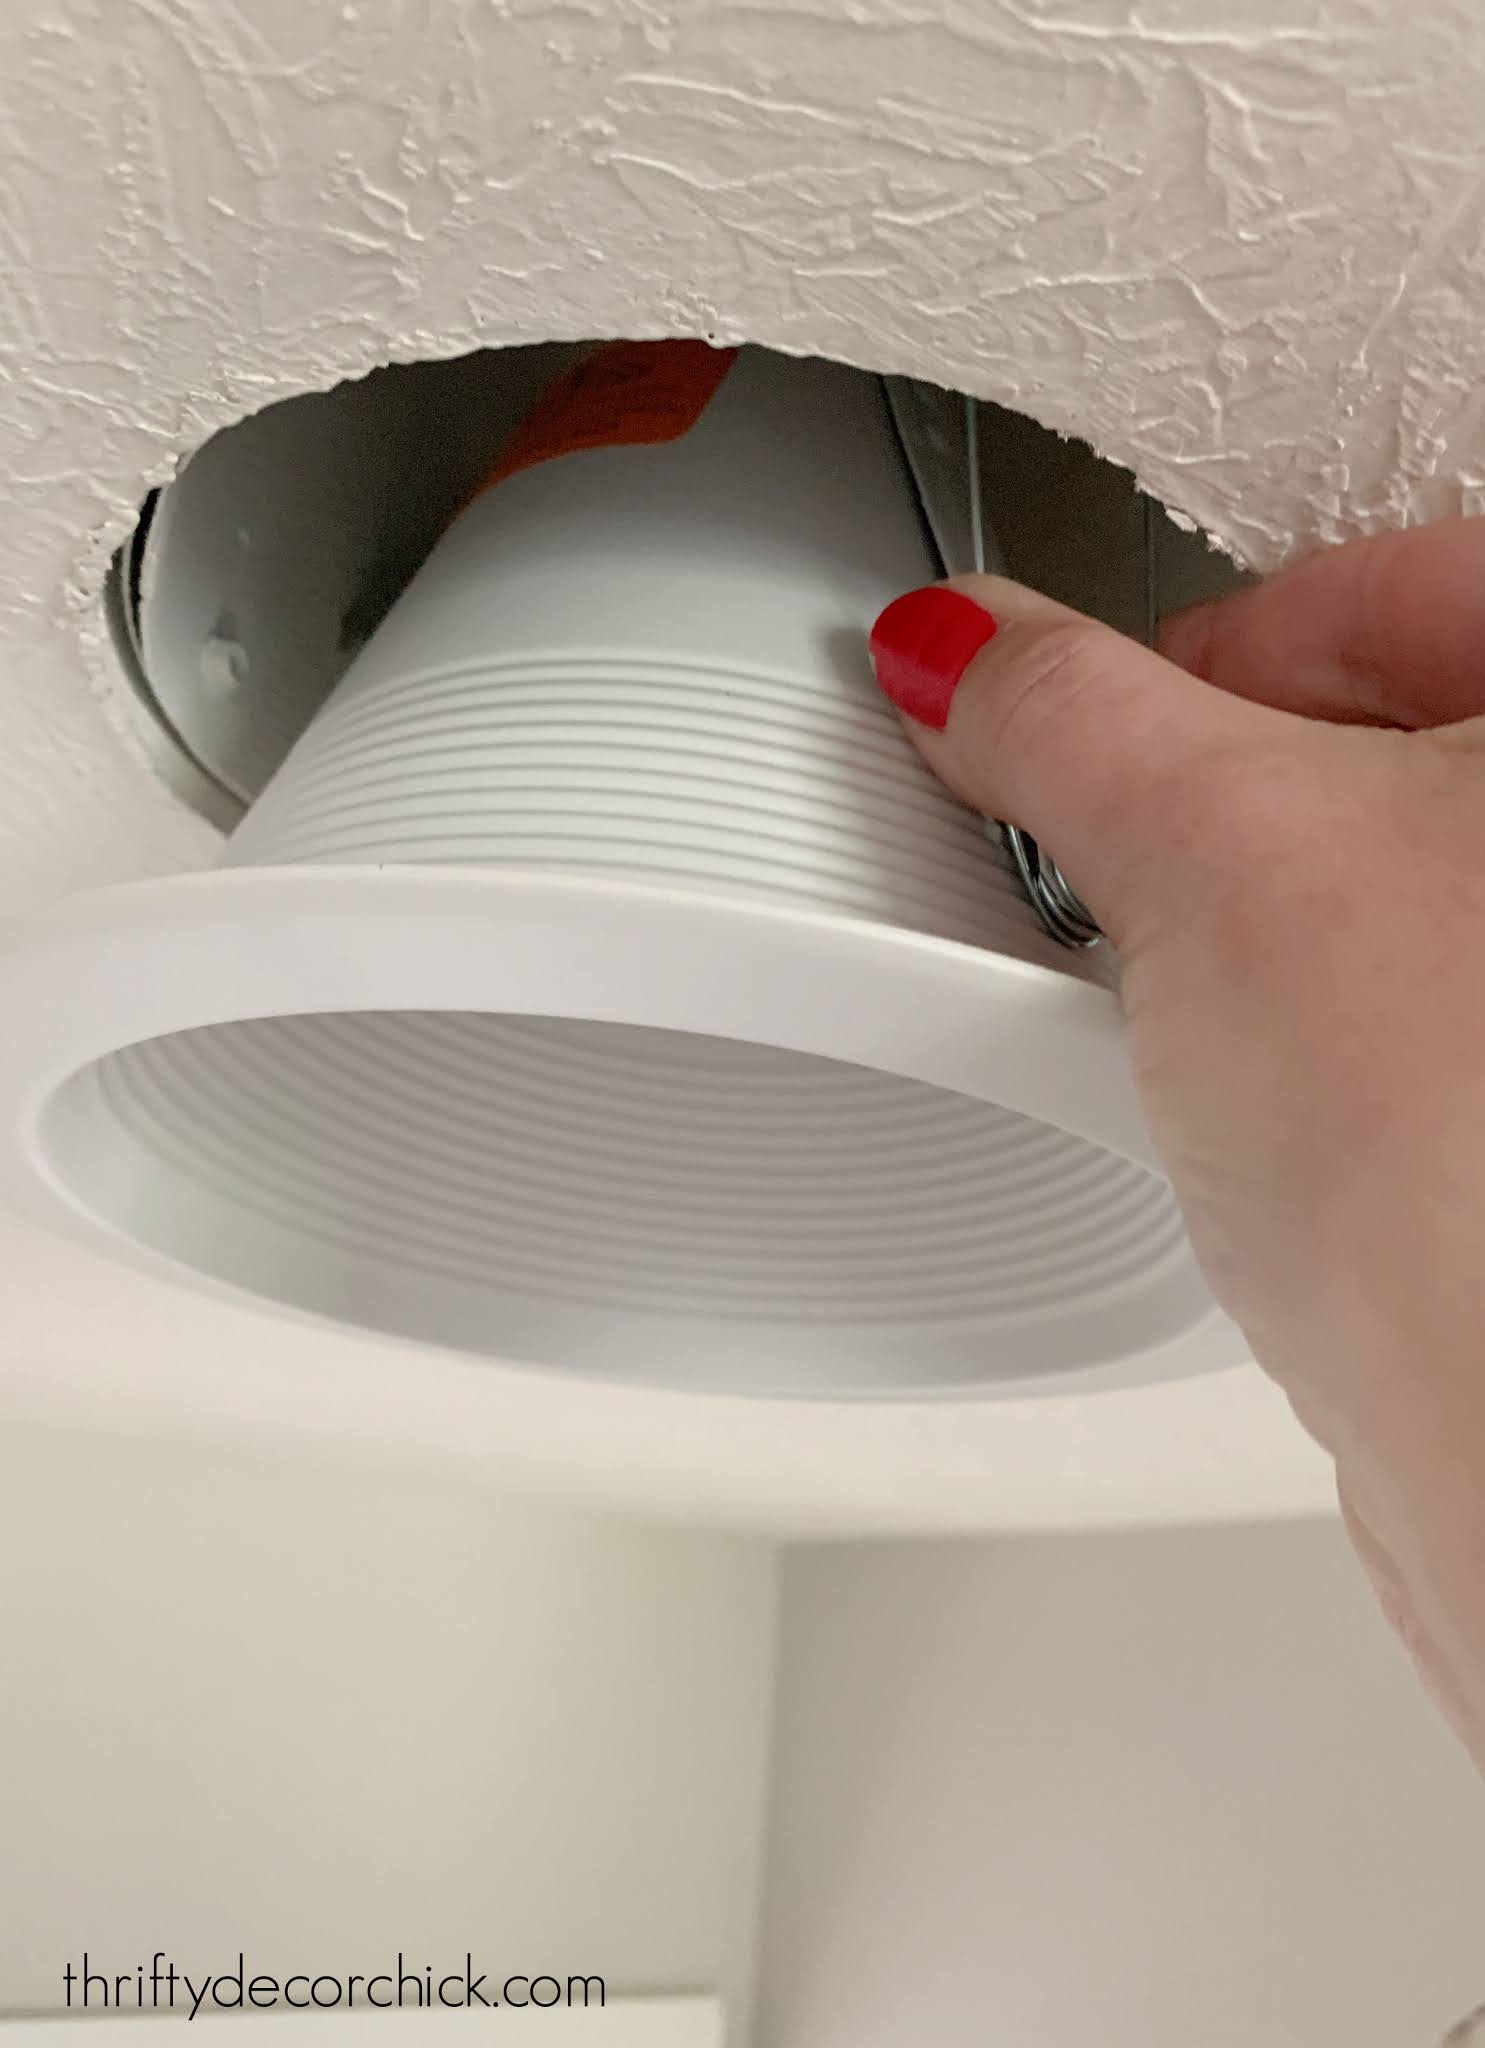
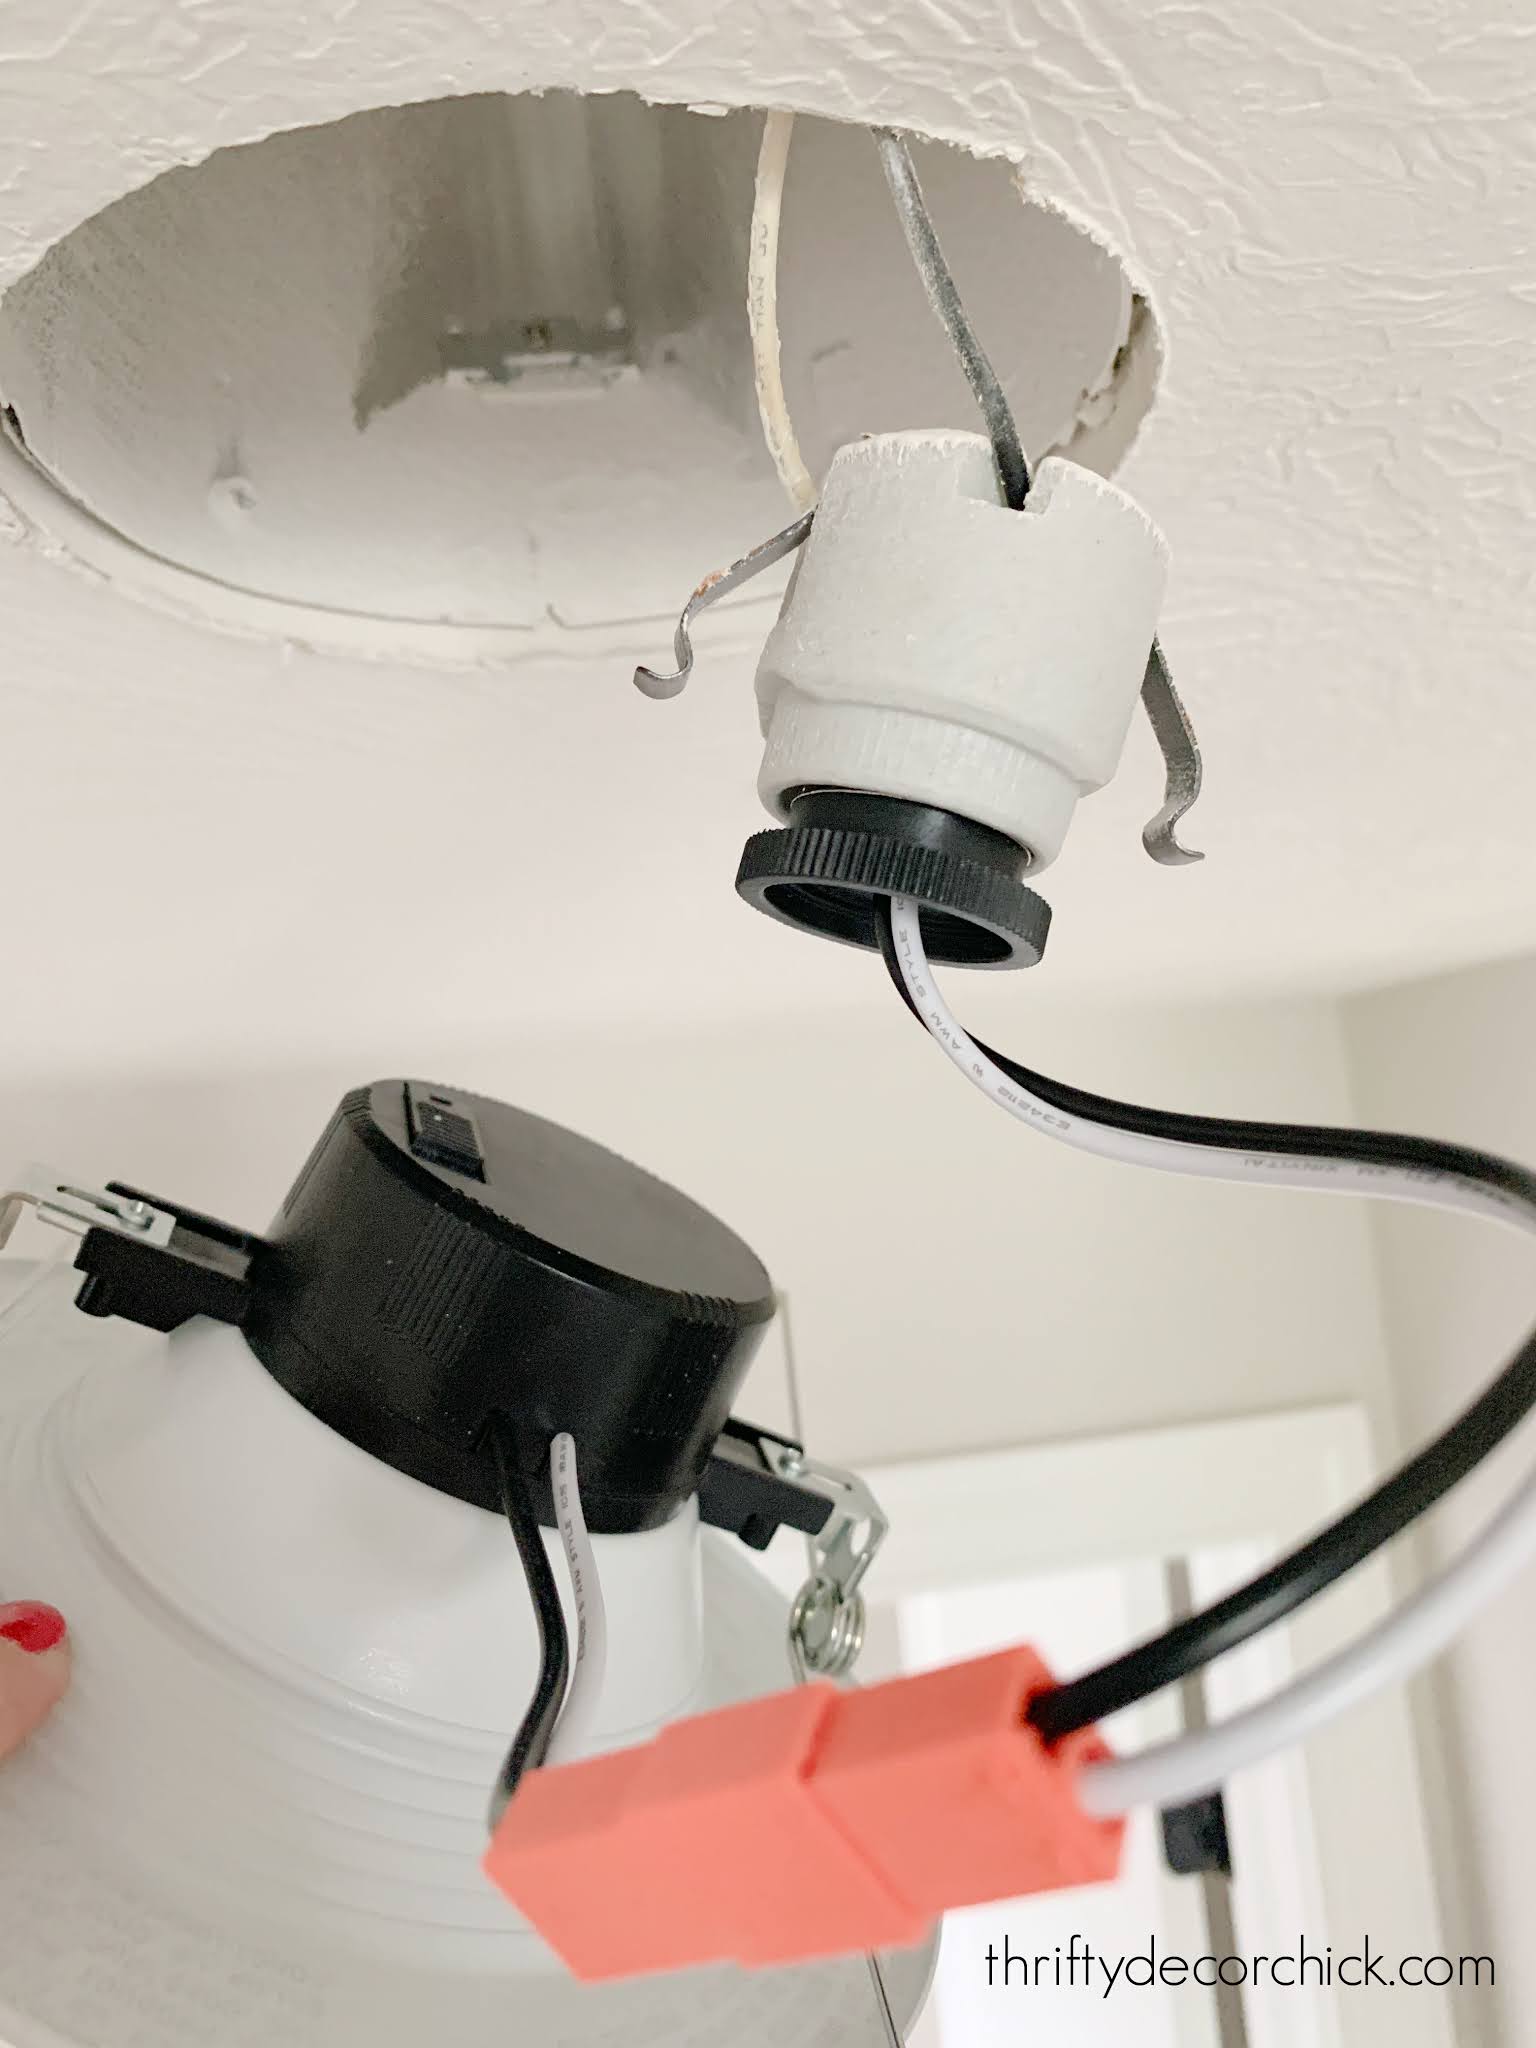
Then grab the part where the bulb screws in and squeeze the two metal brackets on the side to remove it from the metal can:
Now you're ready to install the new one!
Take your LED light and screw it in like a light bulb:
Grab the metal clips and squeeze them into the brackets inside the ceiling fixture:

Make sure the wires are tucked in above the fixture and then push it up into the ceiling. That's it!
Attaching the new light with the metal clips is the hardest part, and even that isn't bad. I found it helpful to wear rubber garden gloves when I was installing a bunch of cans at a time.
These lights aren't just money savers, they look much better (in my opinion) than the standard recessed trim kit. The new ones don't create a dark hole in the ceiling when the lights are off:
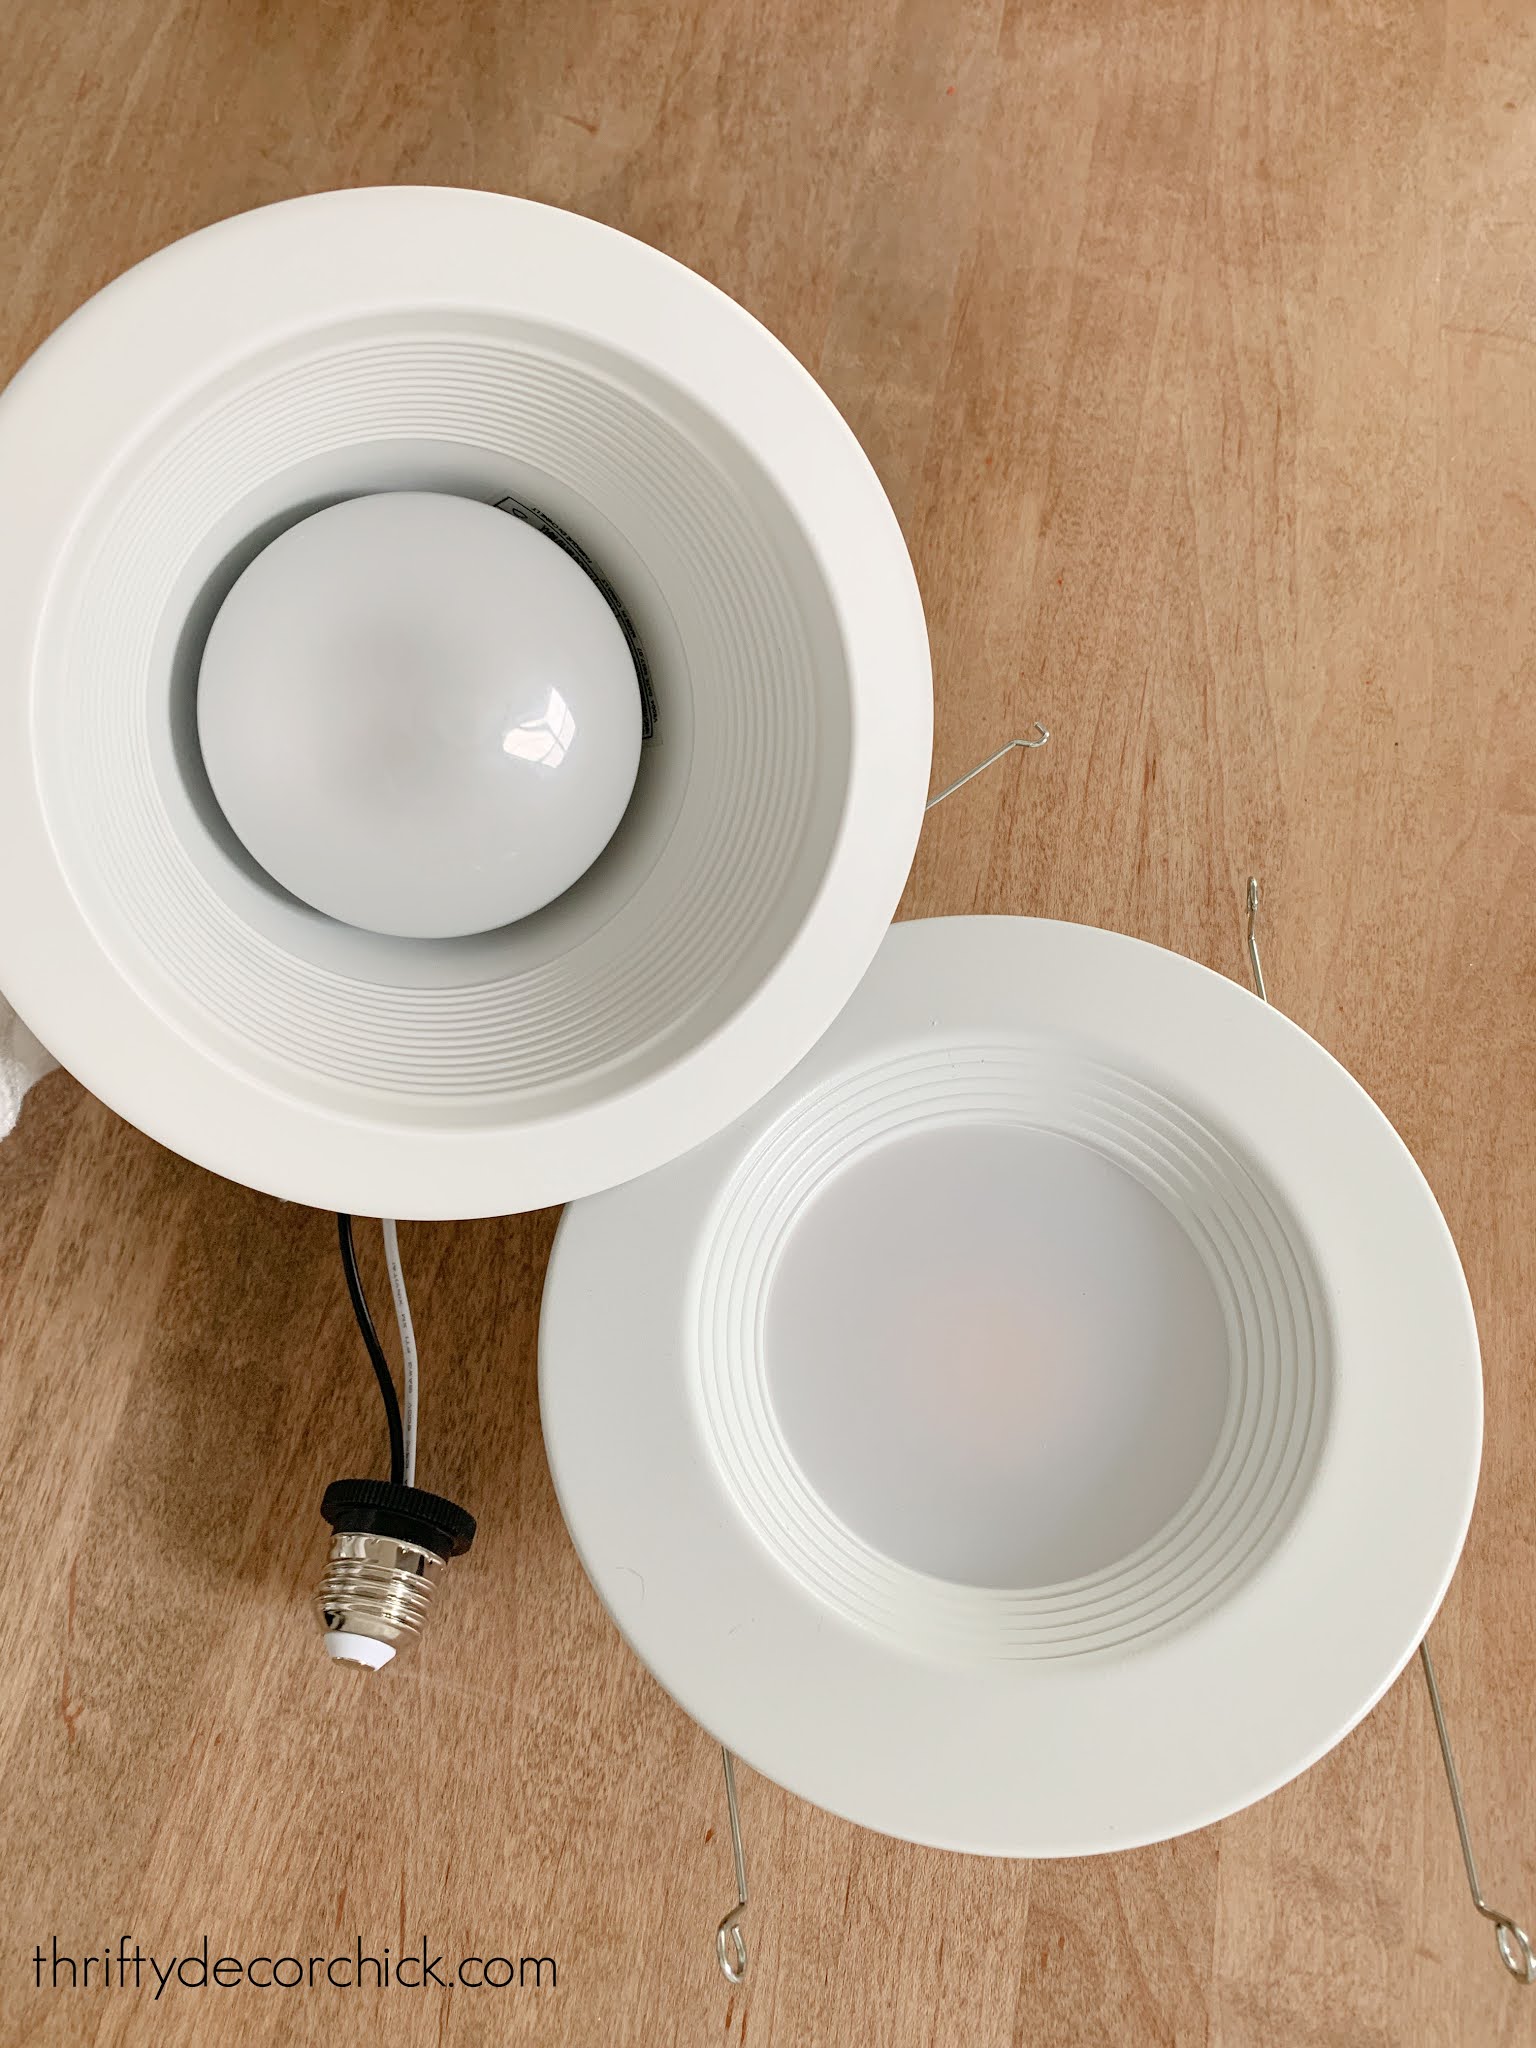
You can get LED can lights that are completely flush with the ceiling as well.
I've replaced all but a couple recessed lights in our house -- and it was a lot! But once you get the hang of it, it only takes a couple minutes each.
I finished up our loft this week. It's hard to capture the huge difference in photos, especially if you are keeping the warmth at a softer level like the originals.
The LED versions have 70 more lumens than the incandescent bulbs we had before. So at the very least, even at the warmest light, they are still brighter! Here's the before:

And here's the after!:

I used the warm white setting and it's much brighter and way less yellow!
I've talked about changing your bulbs to cooler tones in some rooms for years now. The slightly cooler lights take all of the yellow out of the space and let you see the real colors in the room!
Here's another view before:

And after -- see how the lights wash the walls with more light?:
You can't beat it -- brighter, cleaner light for less money!
Have you changed out your old recessed can lights with brighter, energy saving LED versions? I've finally embraced the LED -- I used to hoard incandescent bulbs. ? Now I appreciate how far the LED options have come!
Here are a few LED can light options. You'll save money by buying a set:
Read more about replacing incandescent bulbs with daylight versions here:

Did you know you can easily change out a recessed light to hang a pendant?:

See more of our home here.
To shop items in our home, click here!
Never miss a post by signing up to get posts via email.
Via https://www.thriftydecorchick.com/2021/05/easily-update-old-recessed-lights-with-LED.html |
