|
Hello friends! Thanks so much for you kind words on the large coffee table "hack" I shared last week! We just love it!
For the most part I've felt like this house is getting organized nicely. No one tells you quite how long it takes to get settled when you move into a new house. Unpacking is the first hurdle...organizing the drawers that you threw crap into while unpacking is another. Ha! My office and my husband's (his is in the basement) are my final frontiers. I feel like the rest of the house is sorted and organized really well. My husband's space is going to take a week or two (just because of the years of teaching we still have boxed up) but I figured mine would just take an hour or so. I finished building my last office in our loft the year before we moved out of our old house: 
I built it from the ground up to serve my needs as an office, but it also functioned as a craft space and an area where we could all get work done. It had the perfect amount of storage (window seat, bookcase and all those cabinets!) for all of my craft and office supplies.
Fast forward to moving into this house, and I have a lovely space -- it's plenty big and I just love it! But there's not much storage yet so most of the stuff is still in the basement. The dresser is the only spot I have to keep office supplies and EVERY time we looked for something in there it drove me crazy.
The first few months we lived here I stuffed things in wherever they would fit. Or...not fit. I made them go in there:

Even though closing the doors was a challenge. ;) It was a disaster. Even so I didn't think it would take that long to sort through.
That is until I took everything out:

This isn't even all of it! I started the day before this picture and had already tossed a bunch of stuff.
This isn't a big dresser...I can't believe how much I had stuffed in there! I like purging and organizing but this kind of stuff -- the random things like cords, office supplies, papers...I do not enjoy. It's SO tedious.
THREE hours later I had an cleaned out and organized dresser -- finally! It only took me 16 months. And three hours:

I didn't use anything new to organize -- in fact I got rid of so much stuff I didn't even need all the bins we had in there.
I found these organizers years ago at HomeGoods and still love them for little stuff:

I've said it a million times...when spaces aren't organized, we overspend on stuff we already had. I notice it over and over and over in our own home.
We have at least 15 notepads...

And that doesn't include the ones I got rid of! OH, and did you see all the tape in the office supply drawer? We have at least ten rolls in there. ?
I got rid of so much (and moved some things to files in the basement) that most of the drawers are only halfway full. Just the way I like it!:

I put this off for so long and now I'm SO HAPPY to have it done! Yay!
I keep things I need handy on my desk in a tray:

Tray are the best right?? What would we do with all the little junk without trays? :)
I went with a floating desk in my office and so far it's been plenty of space for working:

I'll share a source list at the bottom if you're interested in anything!
I can't remember the name of this plant but it's so fun! I almost killed it but it came back nicely:

I haven't done much with the walls because I have big plans in here -- the back wall will be built in bookcases:

I get asked about those grids a lot -- I found them at Goodwill years ago and still love them. They were window grids from an old house:


They fill in that big wall a bit until I get those bookcases built.
The next big project we've been budgeting for is hardwoods in here -- the dog has destroyed the carpet in a couple spots (thankfully you can't tell in these photos) and I can't wait to pull this up!: 
I can't start the built ins until I get the floors down, so once the floors are in I'll be rolling on those! Can't wait to get started.
I have a big project planned for the wall over the dresser in the meantime and I hope to share that with you soon. I'm really excited about it!
Until then, I'm enjoying this newly organized space:

It's a simple space but I love this room! The natural light is wonderful. :)
Sources for this space (affiliate links included):
Wall color: Agreeable Gray
Chairs, pinboard, drapes and butterfly tapestry: HomeGoods
Grids, desk tray and magazine holder: Goodwill
//
!function(d,s,id){var e, p = /^http:/.test(d.location) ? 'http' : 'https';if(!d.getElementById(id)) {e = d.createElement(s);e.id = id;e.src = p + '://' + 'widgets.rewardstyle.com' + '/js/shopthepost.js';d.body.appendChild(e);}if(typeof window.__stp === 'object') if(d.readyState === 'complete') {window.__stp.init();}}(document, 'script', 'shopthepost-script');
//  JavaScript is currently disabled in this browser. Reactivate it to view this content. JavaScript is currently disabled in this browser. Reactivate it to view this content.
See more of our home here. To shop items in our home, click here! Never miss a post by signing up to get posts via email. Via https://www.thriftydecorchick.com/2019/02/my-home-office-organization-when-there.html
0 Comments
Hey hey! Happy weekend!
I've done a lot of online shopping over the past two weeks -- really not so much actual shopping as just looking. I was checking out all of the great President's day sales last weekend and starting looking into coffee tables.
I've been looking for a new one for more than a year. We placed this round glass table in our family room when we moved in, because it was the biggest option we had:

As you can tell, because of the size of the room, it was looking a little teeny. (The aerial shot emphasizes it a bit.) The glass and thin lines of the table didn't help that. I've wanted something more substantial for a long time.
Problem is, everything big enough is BIG in price too. I don't even know how many times I found something I liked and then looked up the price. They all varied from $500 to more than $1000. Nope.
I even started looking into finding a welder to make a base, because I knew what I wanted -- a very simple black metal base with a wood top. Not hard! But anything in the size I wanted was crazy expensive.
So last weekend I was laying in bed, browsing online when I found some pretty options...but again they were too small. I started doing some thinking...because the price was so good, I could purchase two tables. I did some searching online for photos showing just that and found many lovely examples of double coffee tables.
I was sold! And super excited I had figured out something that would work for a MUCH better price! I went back and forth on three options from Target...
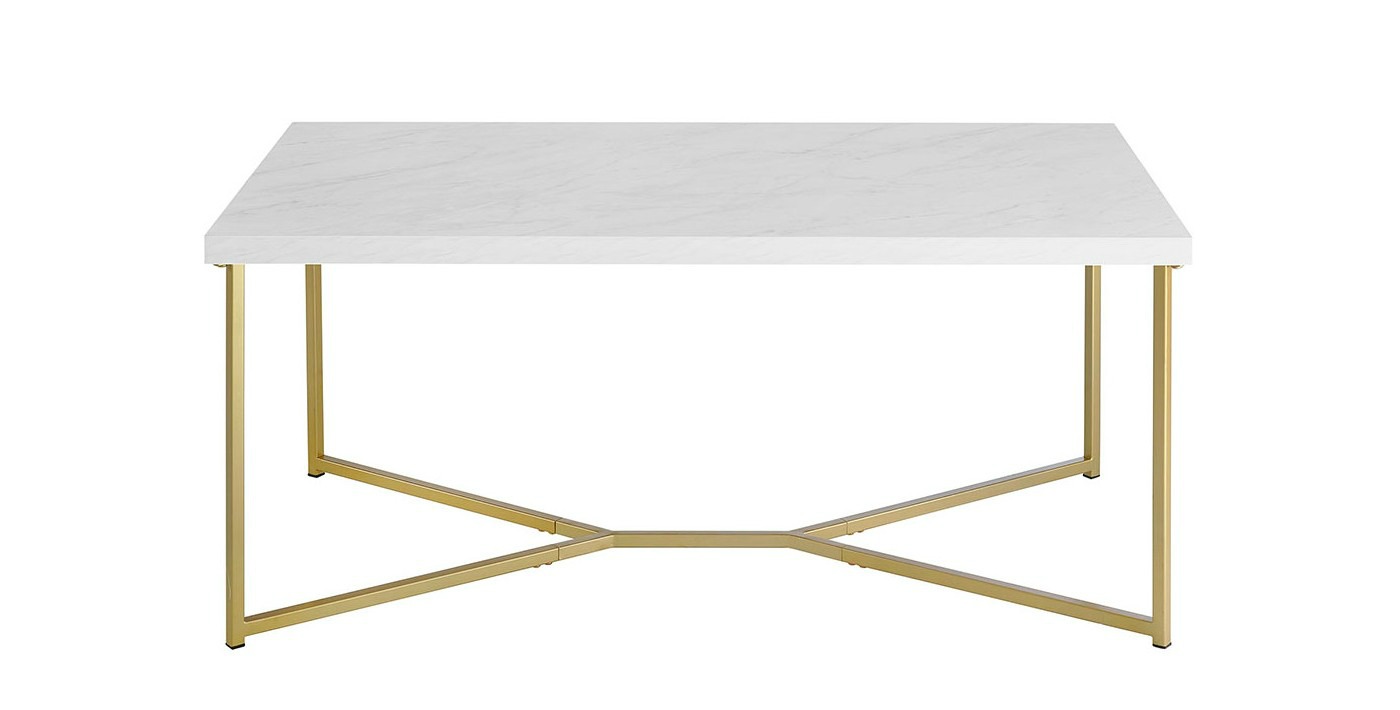
This mid-century coffee table with a faux marble top (affiliate) was lovely and the legs come in a chrome color as well.
This open base coffee table has a similar top and had the base I really wanted:
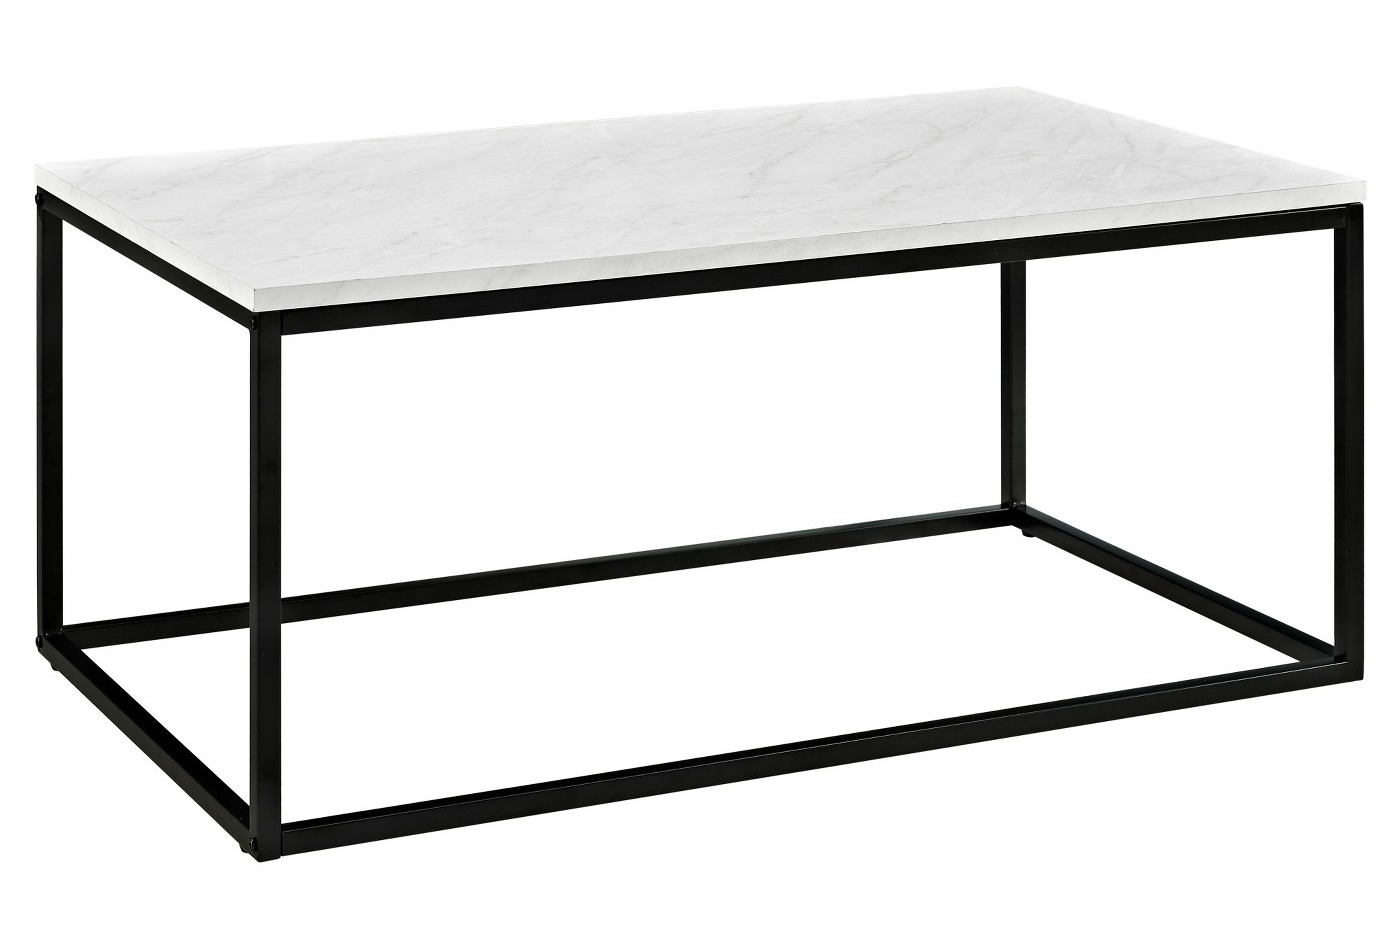
It comes in three different options for the top -- the faux marble, a faux concrete and a wood. I wanted the wood but it was out of stock. (It's back in stock now though!)
I wasn't sure the marble would look right in our family room -- with our light rug and sofas, I wanted some contrast in the room. So this coffee table with the lipped edge was juuuust right:
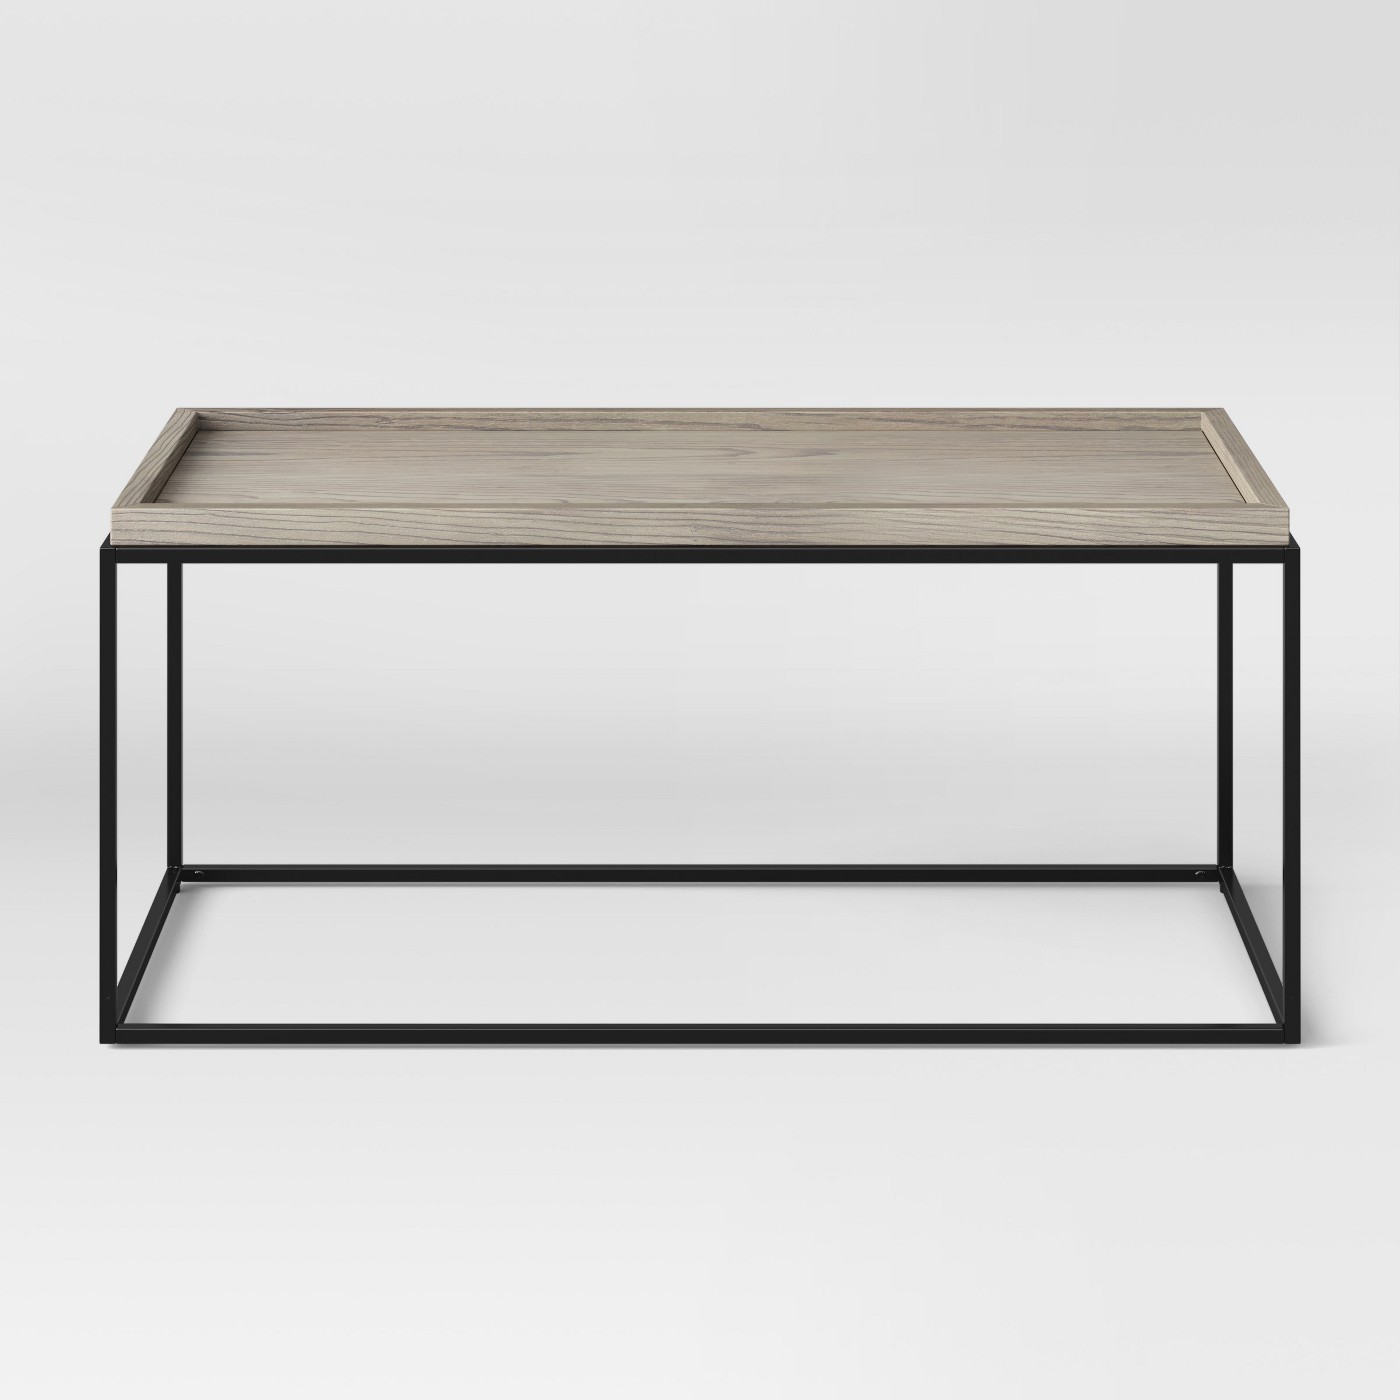
It was the three bears of coffee tables! ? This one had the wood top, the open black base that I wanted, and the price was GREAT! It was just over $100 for one, so getting two didn't hurt too bad.
The tables came within three days, and I set them up right away. The assembly was easy and quick. They immediately felt right in the room:

I'm actually glad the other wood table option wasn't in stock at the time, because that wood tone would have been dark. This one has some gray tones in it that keeps it from getting too heavy.
The size of these fit the room SO much better than our round table! My goodness...it only took me a year to figure out the two table thing:

I've never had a coffee table this big in my 40+ (ahem) years so I was excited to decorate it! I stole some items from other rooms and love how it came together.
I don't care for perfectly curated coffee tables that 1. aren't functional and 2. don't leave any room for a book, a remote, a drink...whatever. So I kept it pretty simple.
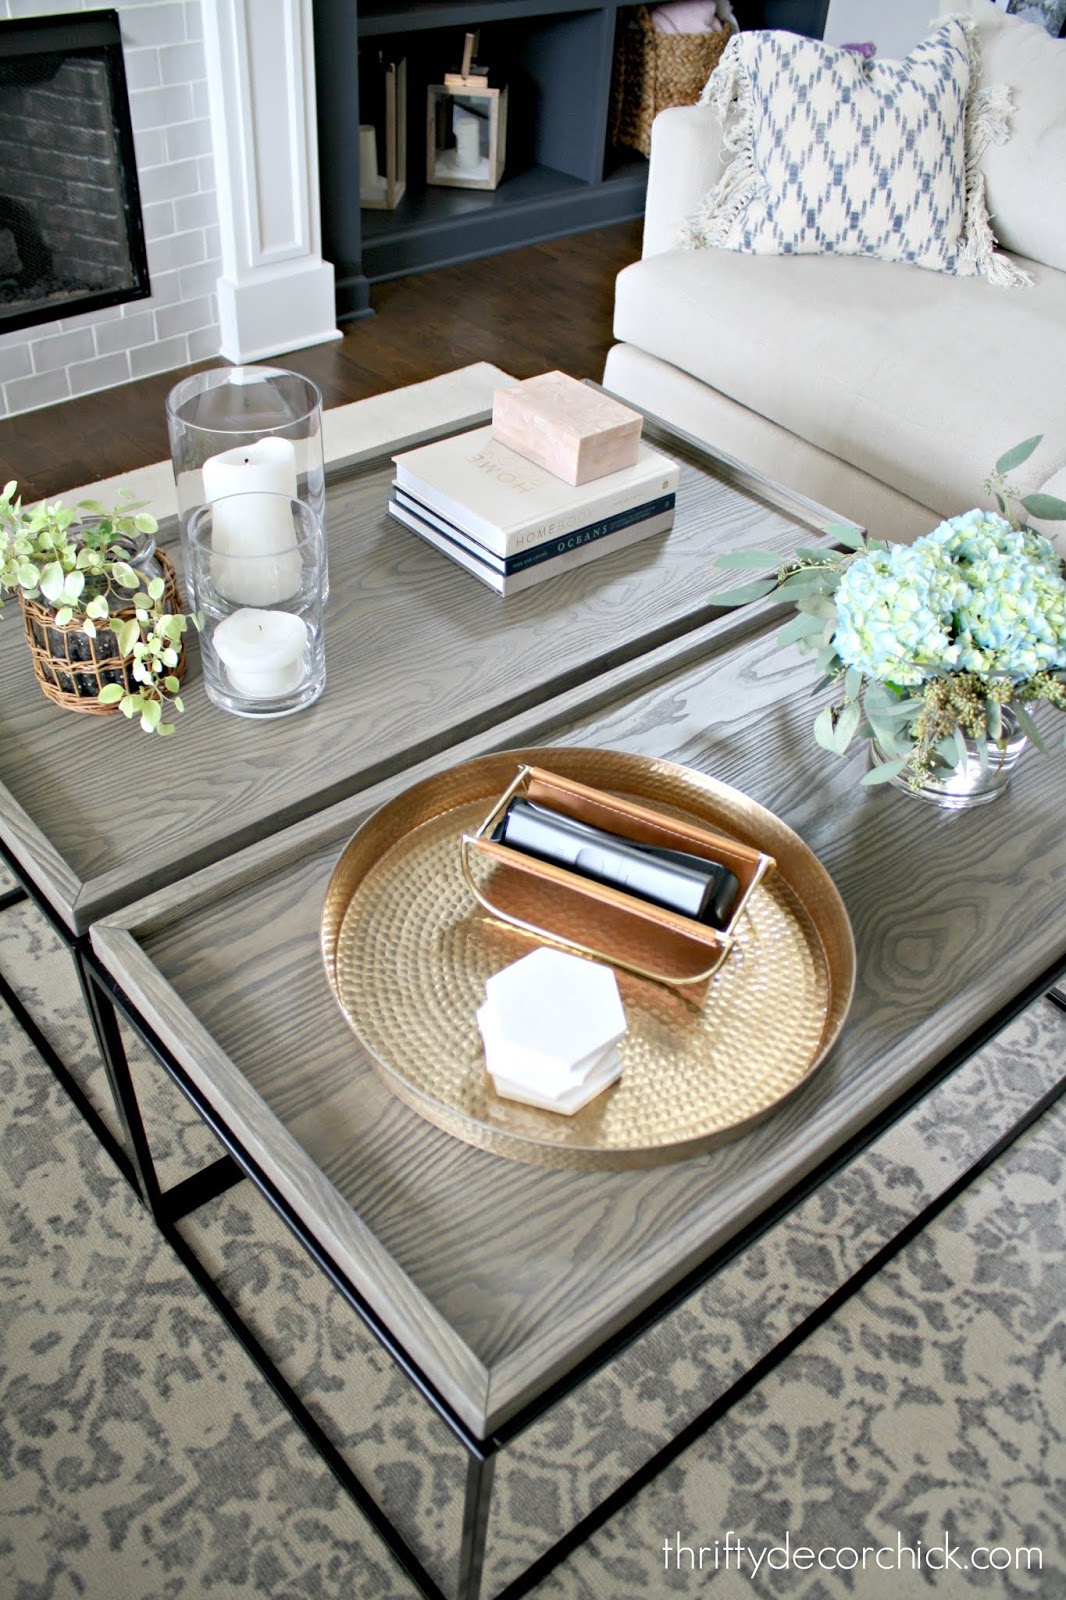
And you know those flowers won't be on there all the time (I'm just waiting for the cats to find them), so it will be simpler most of the time. But we love having all this space!
Here's a close up of the wood tone:

The best part -- we can reach the tables from the sofas! Yay! The other table was too small. I'm so glad I thought outside the box and went with two:

This is a BIG room (in size and height) so we needed something substantial there. This one just fits this space so much better: 
The bonus is we can easily fit baskets under the tables if we want to add those later. I have been storing our small ottoman under there because there's plenty of space underneath.
I always say it pays off when you wait to fill a space. It's tempting to buy whatever works or to overspend just to get things in there. But even I (a person who writes a blog about decorating) refuse to do that.
I use what I have and/or wait until I find just the right thing! I've never regretted it:
Have you ever tried the double coffee table trick? It's crazy but I spent hundreds less buying TWO tables than I would have spent on one table this size. All of these coffee tables are still on sale for great prices. :) Have a great weekend friends! Hope it's a great one! Affiliate links included for your convenience! See more of our home here. To shop items in our home, click here! Never miss a post by signing up to get posts via email. Via https://www.thriftydecorchick.com/2019/02/a-large-coffee-table-for-fraction-of.html
Hey there! I've been hard at work finishing up some last minute details on the little hallway transformation. It's been awhile since I've poured so much effort into such a small space -- last time was the little book nook I created from a closet in our loft at the last house.
I think these are some of my favorite makeovers -- the small areas that are unexpected and full of detail. It adds a lot of character and charm to a home. I love it! The first detail I wanted to finish up was the trim around the door to the hallway. I started changing some of the trim in this house to the chunky Craftsman trim we had in our last home. I shared how I added the trim to this large doorway here: 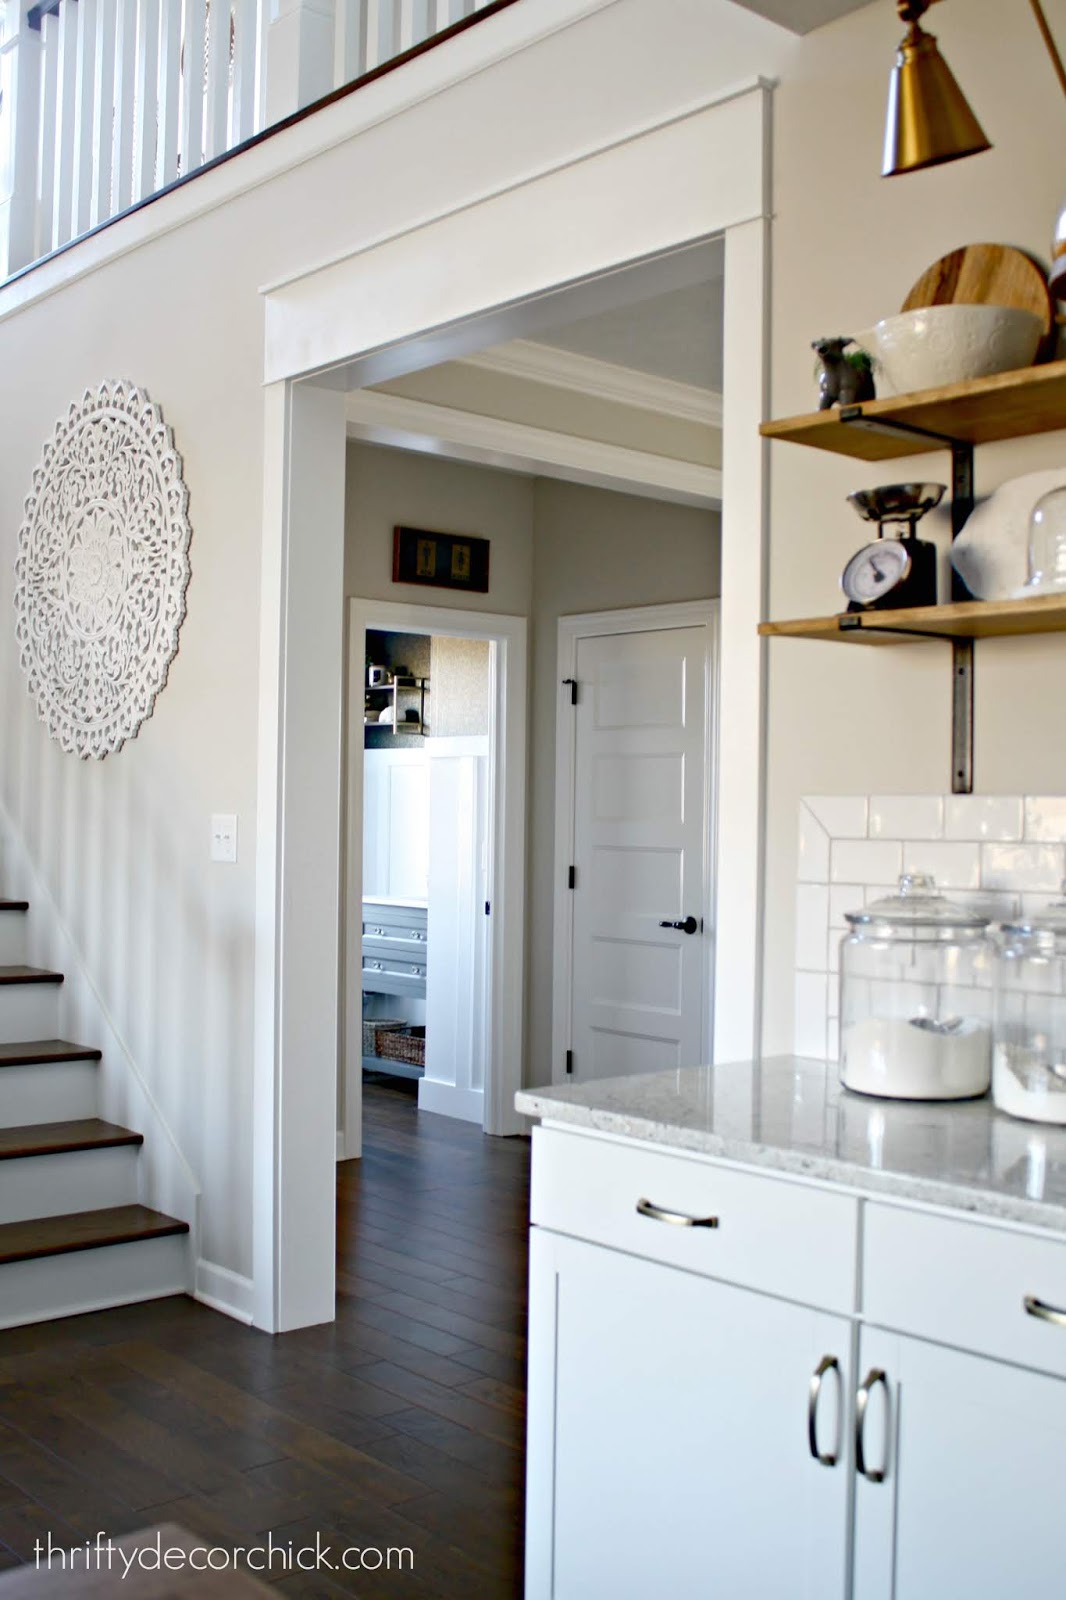
I've decided I'm not going to do every doorway -- at least not yet. This house has waaaay more doors than our last one. I think too much trim may get overwhelming in spots. But I am going to continue to work on the larger areas like this pass through above (the other side) and the taller areas like to our basement, the back door, and the entrance to the little hallway I've been working on.
This time though, just because I was being a little lazy, I wanted to try something different. I don't mind our door trim -- it's nice! It's not quite as wide as the stuff I used on the doorway above, but close enough.
I tried cutting down the side trim at the top, instead of taking it down and replacing it. I marked a level line across the trim, then used my Dremel cutting tool to saw through it:
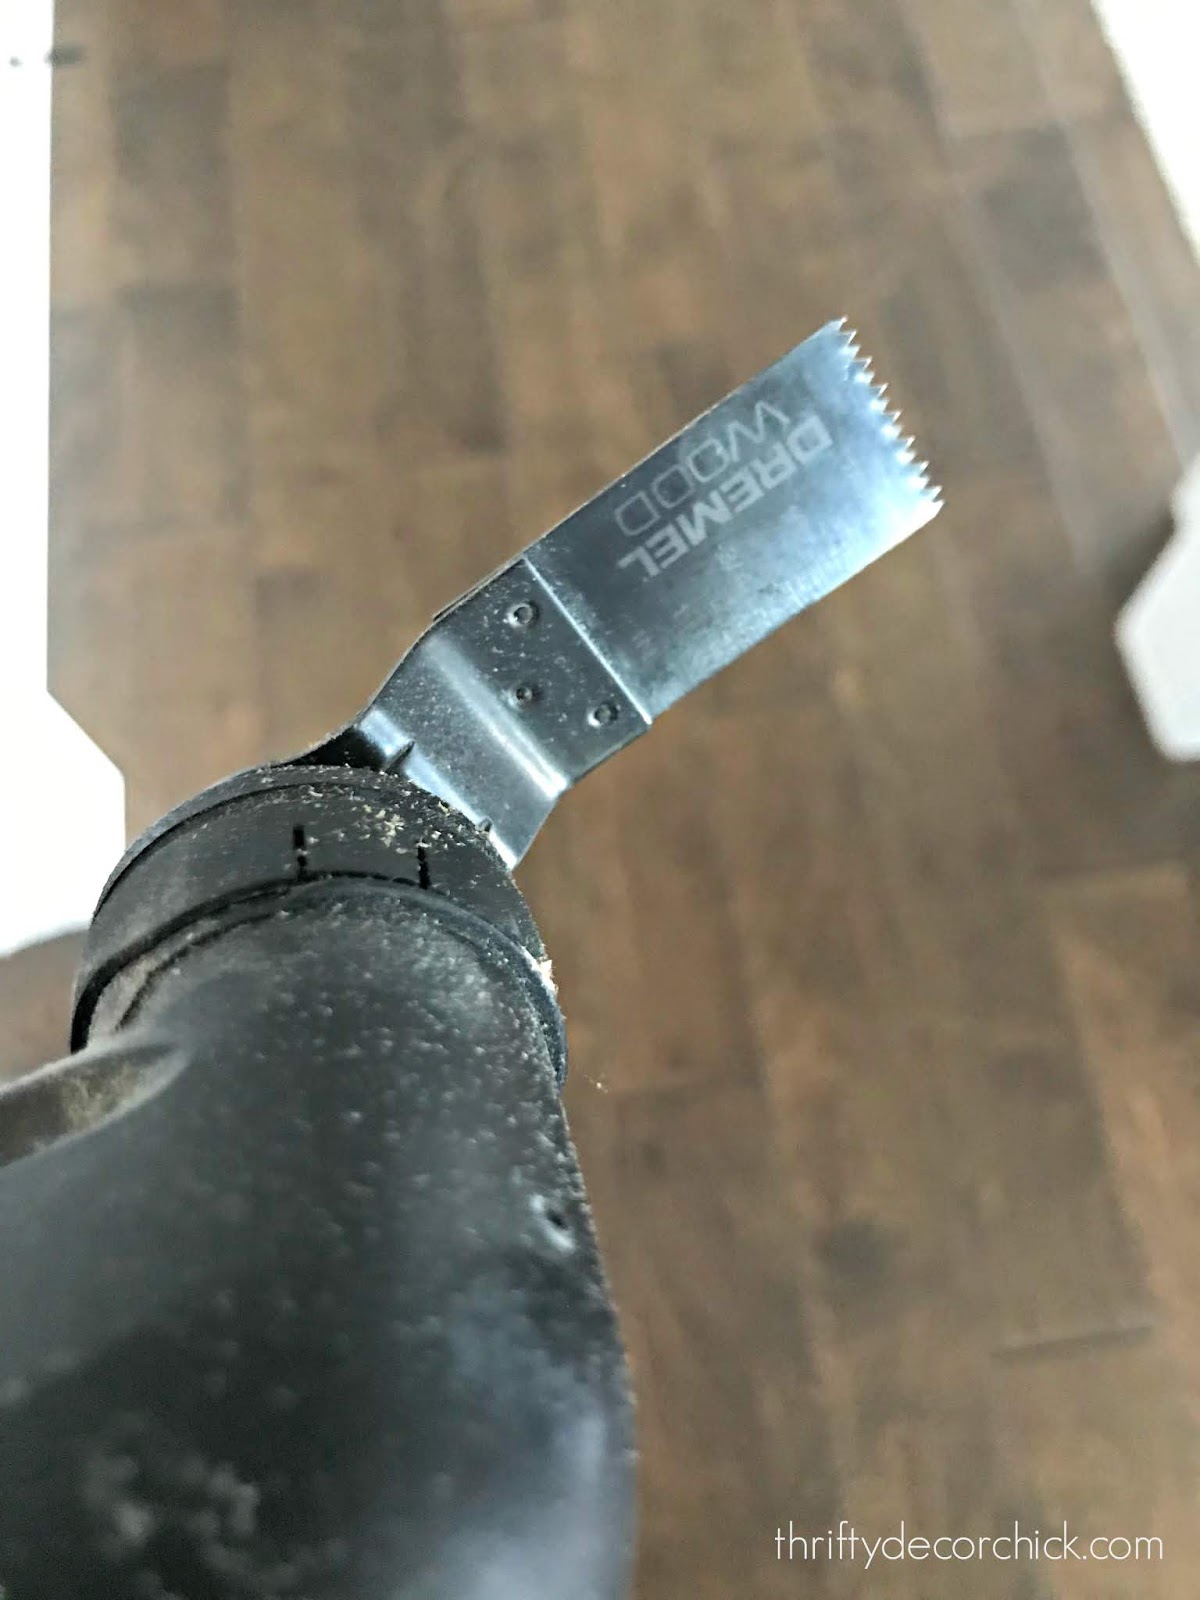
It worked great! That left me with just a small triangle-shaped, mitered cut to take off the top, as well as the top piece of trim. I held up my header pieces to see how I like it with the trim we already have and loved it! So that saved me a ton of time. You can see what I did here -- the old side trim butts up to the new header: 
It looks great! There are a few spots I plan to match the ones I've already done and replace the side pieces, but many of them I'll do like this. It saved SO MUCH time!
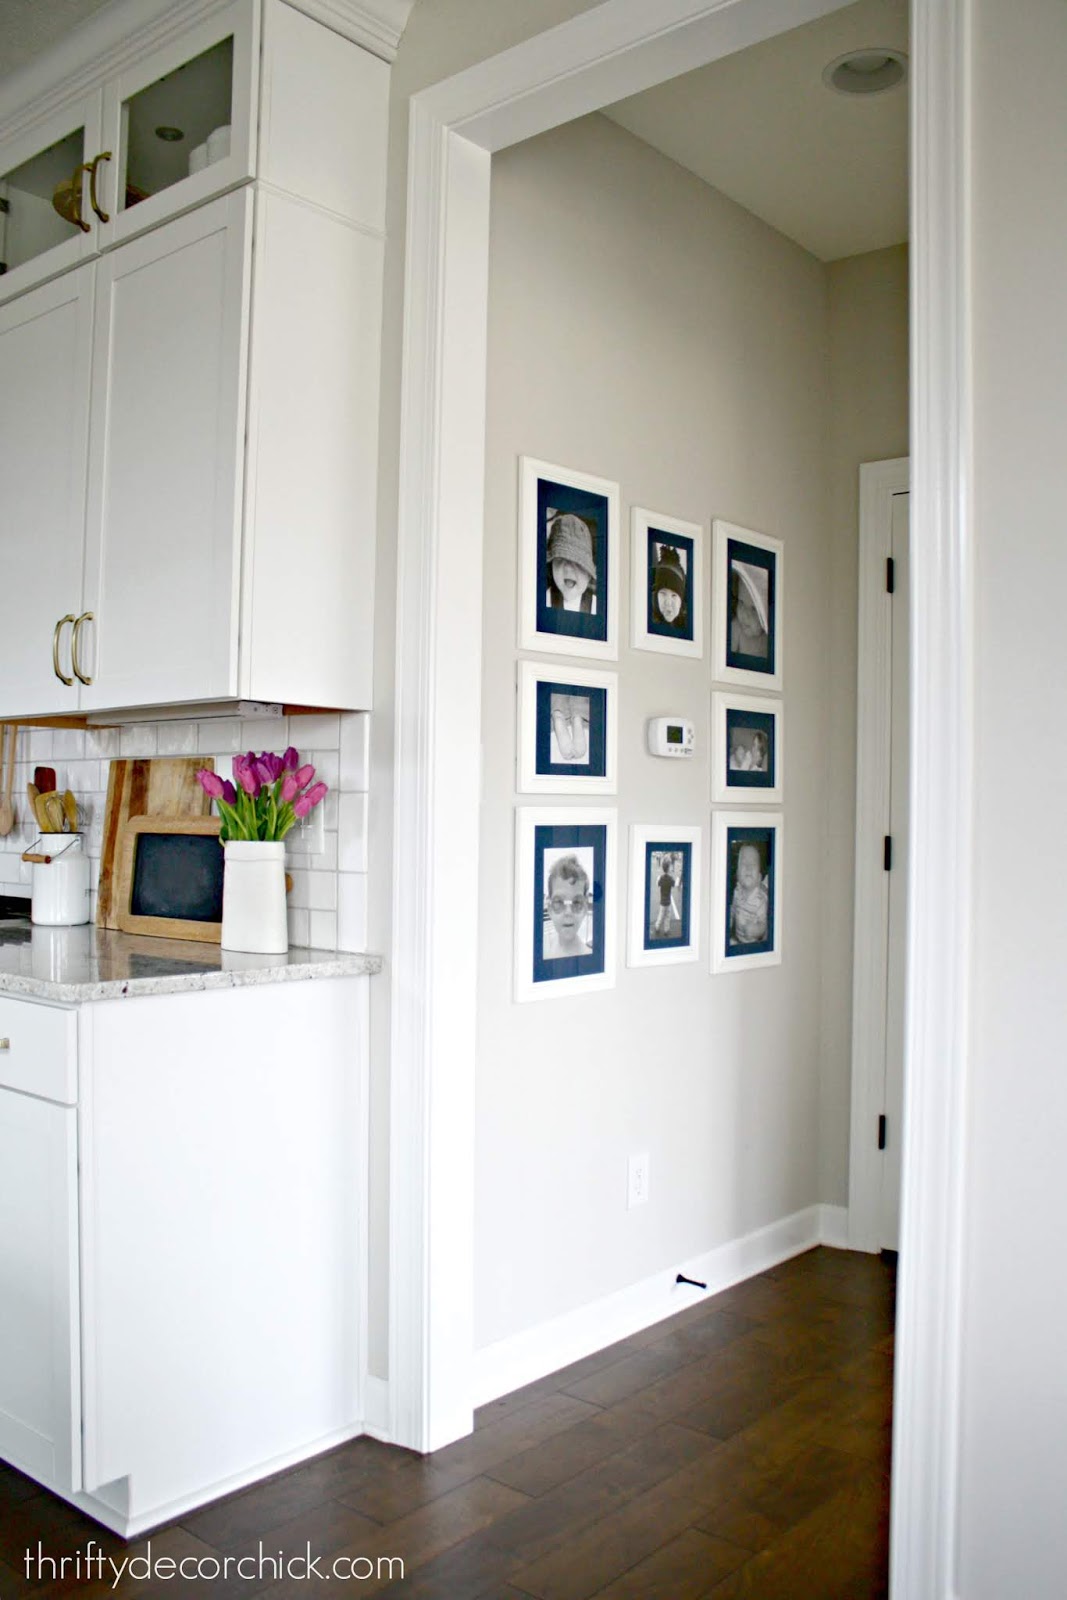
I also simplified the gallery wall hanging on that wall -- more on that in a bit. I went with simpler, but bigger frames instead:

They are the Ribba frames from IKEA -- the best frames ever. Simple and cheap! I painted the mats of the frames the same color as the ceiling and the dining area -- Cyberspace by Sherwin-Williams.
I only did four to start, but we're thinking of adding more:

I don't want to cover too much of the wall...but I think this spot needs a bit more of a statement. I'll either add one centered at the bottom and top, or add two more lined up at the top and bottom. Not sure what I'm doing just yet. (By the way, look at our baby! He was the CUTEST!!)
For now I'm just going to enjoy this spot! I haven't received the wallpaper to finish up the small little spot on the opposite wall, but that will take ten minutes to finish up. I'm going to call it done for the time being!
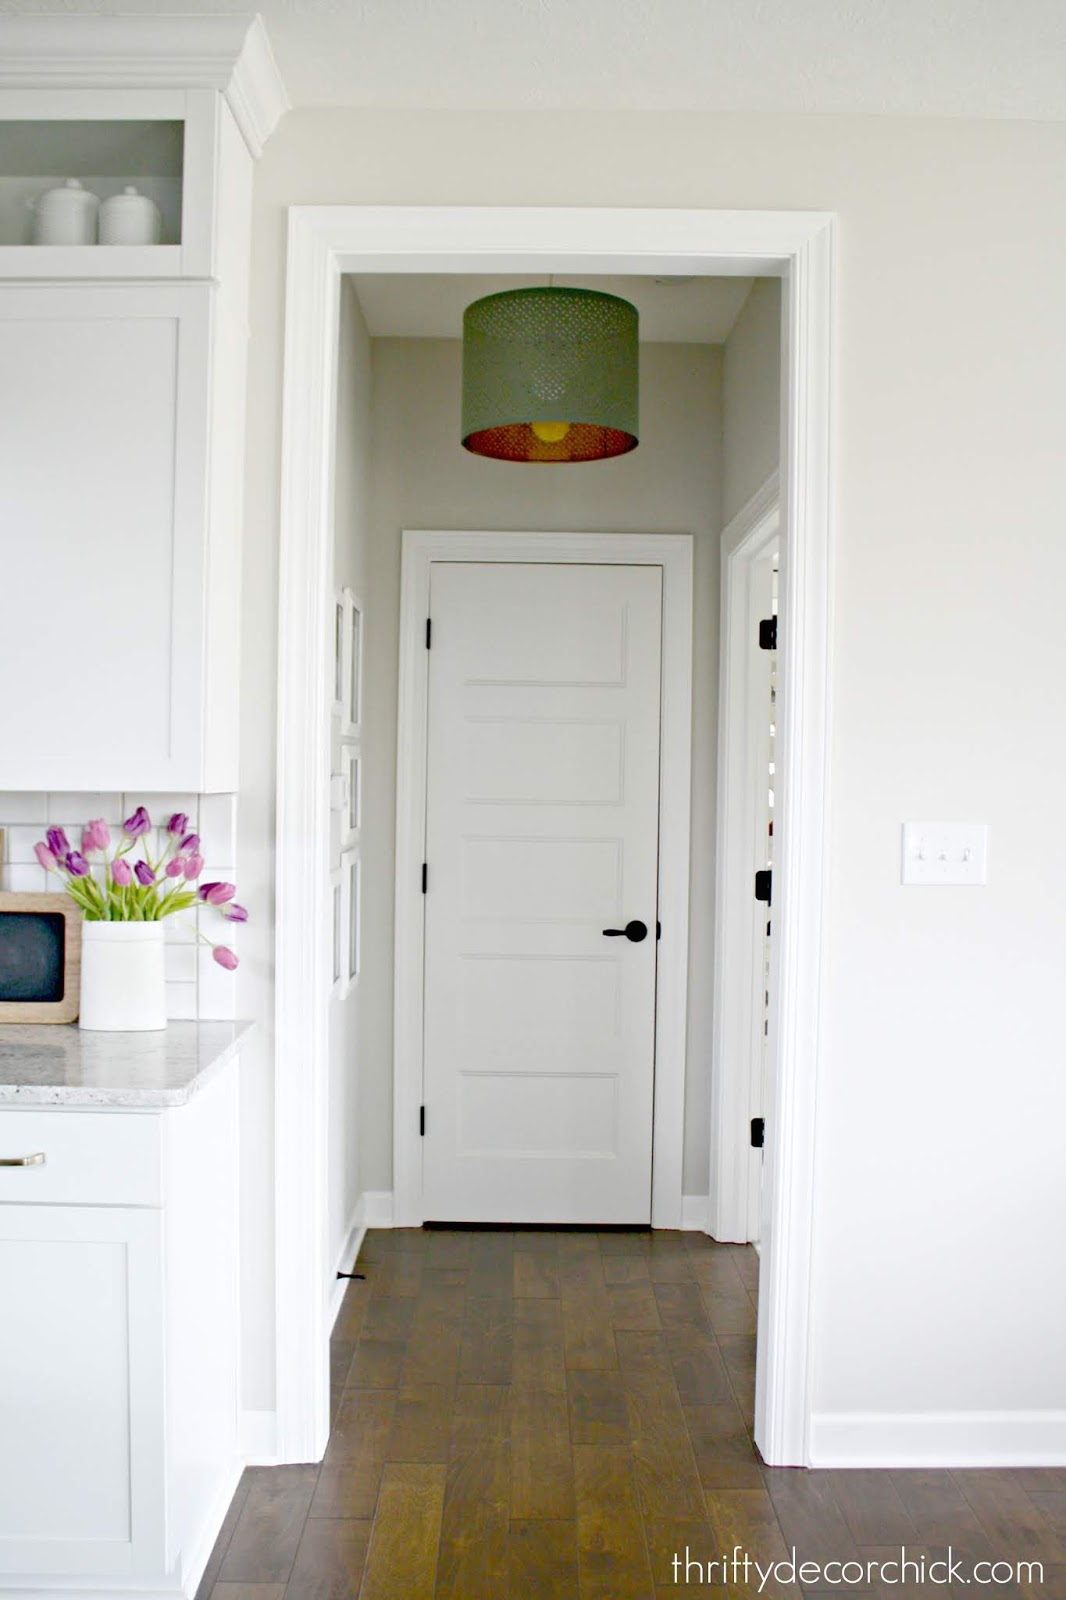
Here's a look at a before photo of this little spot:
And how it looks now!:
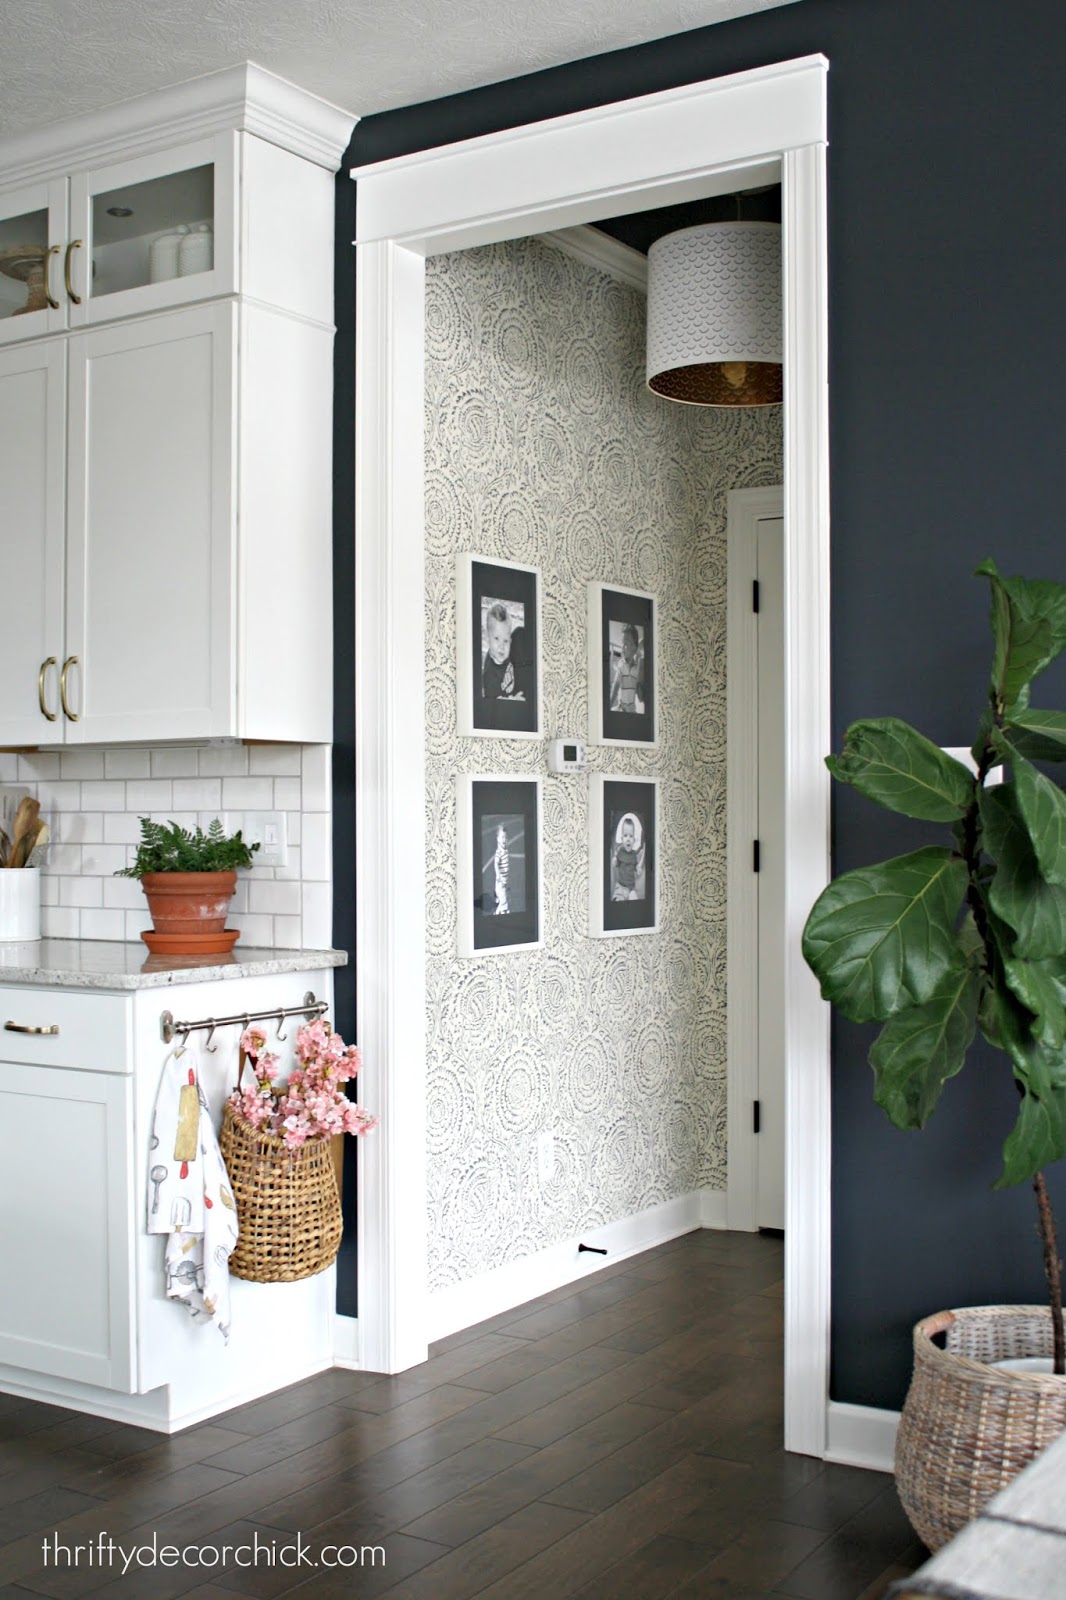
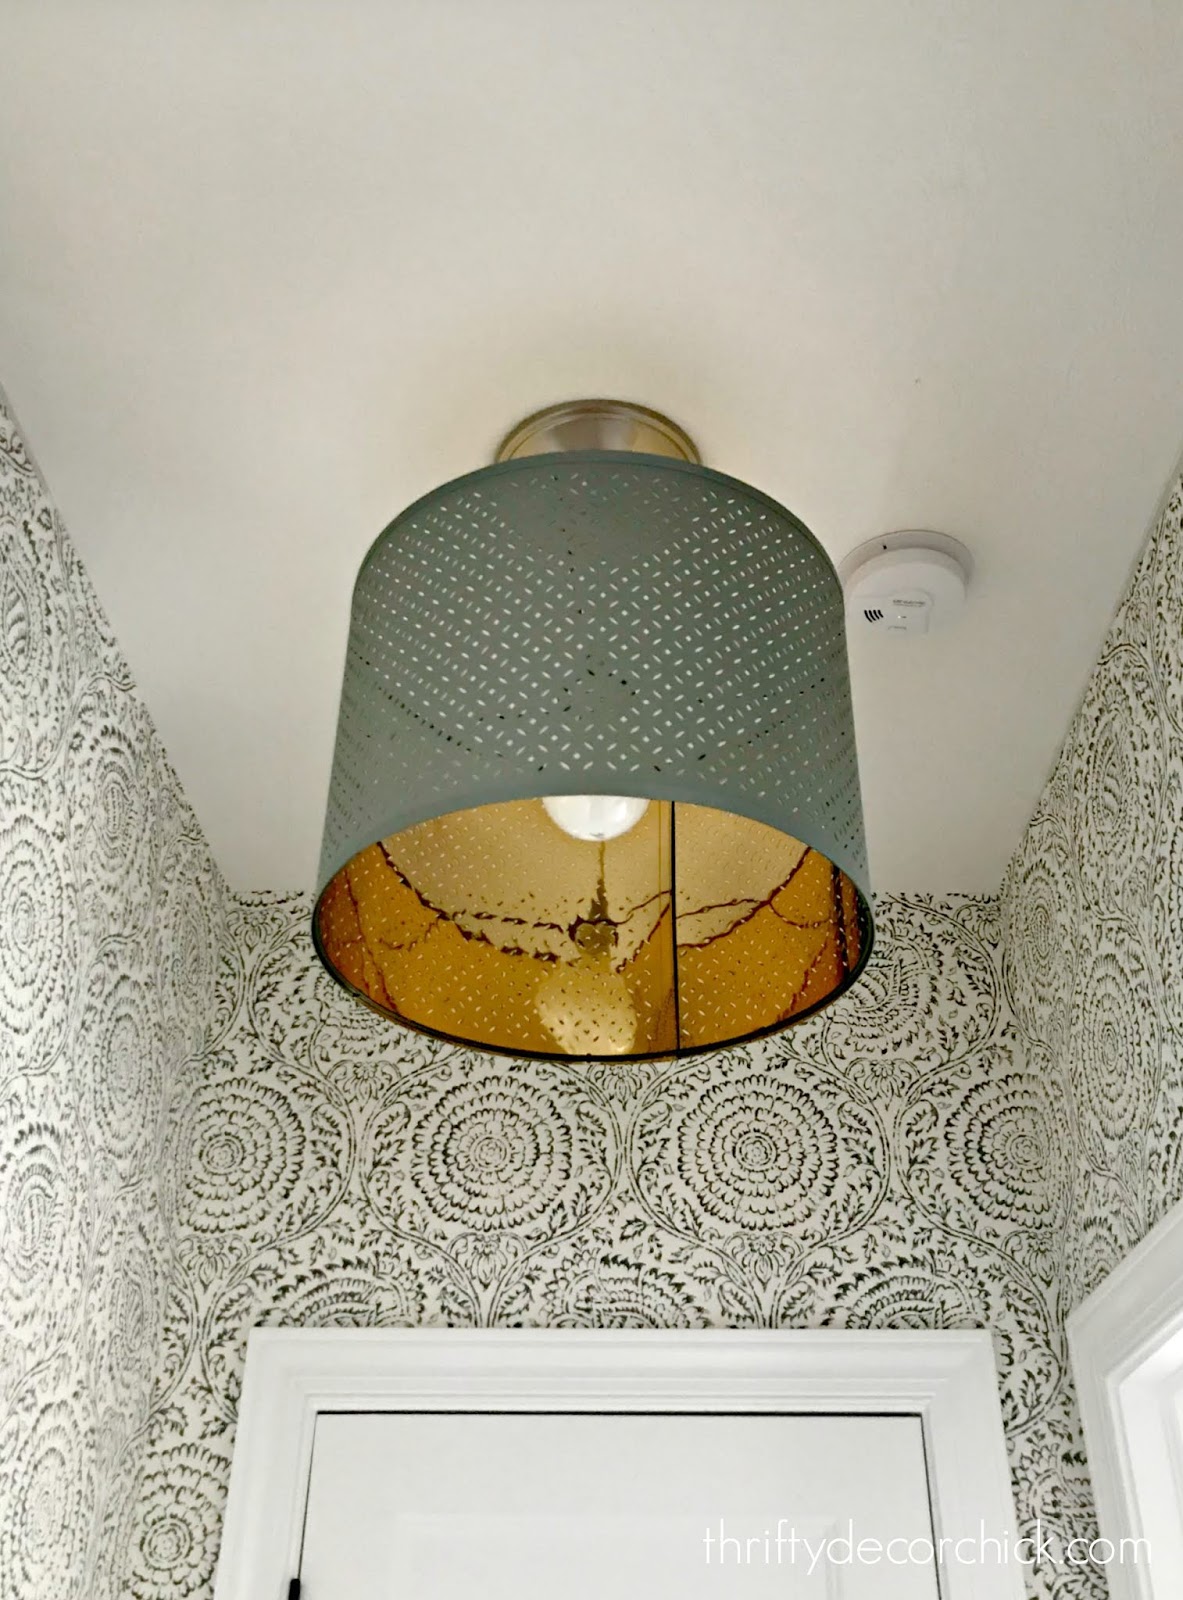
In this little spot I hung the wallpaper, painted the ceiling, changed out the light fixture, installed crown molding, added the chunky header to the doorway and painted and hung the frames. We absolutely love it and I am definitely using this wallpaper elsewhere in the house -- not a ton...but some. It's just SO beautiful! The pretty gold lining on the light shade is lovely when the light is on: 

The wallpaper has been up for a couple weeks and still smile when I walk into this hall every day -- it makes me very happy!: 
Here's one more before and after just because they are so fun. This was after I changed the recessed light into a pendant light:

And here it is all "finished" (still have to fix the wallpaper to the area over the doors to the right!):

Many of you have asked about the room with the dark wall color. You can read all about that here! I learned through this particular project that I sometimes make things much bigger and harder in my head than they really are. Hanging the wallpaper wasn't bad at all. I'd do it again in a heartbeat (and will!). I hope you've enjoyed this little transformation! As always, thanks for joining me along the way! If you'd like to see the book nook transformation, check it out here!: 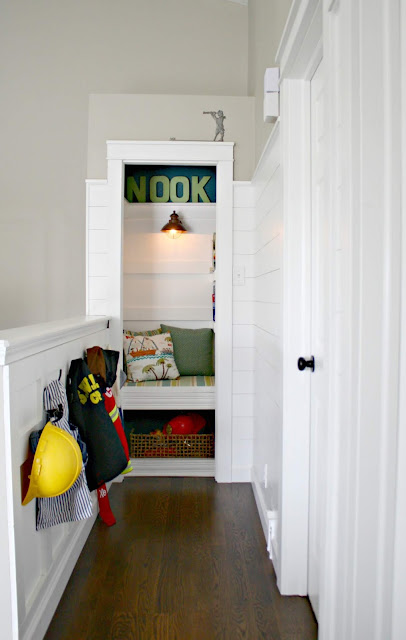
See more of our home here. To shop items in our home, click here! Never miss a post by signing up to get posts via email. Via https://www.thriftydecorchick.com/2019/02/the-little-hallway-that-could-with.html
I can't remember what I was looking for, but I fell down the online shopping rabbit hole the other day and was incredibly impressed with so many of the items I found at Walmart! I've bought many home decor items there over the years, but they leaned more of a farmhouse style.
Most of these items can fit into any home, but many of them are more modern and less "country" than we've seen in the past. (And no, this is not sponsored, I just like to share good finds!) First up, all of the pillows! I just kept finding more and more I loved, so I created a quick collage for you (affiliate links included!): 
If you love farmhouse style, most of these will work, but they will also fit in with more transitional decor as well. So fun right? I'd use any of these in our home!
I want this pretty table bad! I was going through our house in my head trying to figure out where I could make it work. I can't think of a spot just yet but I'm working on it! ;) Especially for that price!:

This is a matching, taller shelf that is just as lovely. Love the lines and the brass tone:

This wood table leans a little rustic but the design makes it lean a little more modern. This is another one I'd use in our house in a heartbeat!:

I found some simple candle holders that would be so easy to dress up or down in any space. I love these simple gold ones:

Those would look lovely hanging as lanterns too. This one looks SO Pottery Barn, right? Put some candles in with sand or pretty rocks and you're set: 
Their light fixture game has been upped as well. This lantern pendant would be perfect in a foyer -- the classic design will never go out of style: 
That one is available in four different finishes as well. I love the masculine feel of this drum shade pendant -- I'm considering this for our son's room. I purchased a similar light when we moved in but it was smaller than I thought. This would fit so much better: 
This lamp is more than I would normally spend but I LOVE it. They have a new modern line that this one is a part of -- you can't go wrong with marble: 
This pretty rug is part of that new line as well -- again, it would fit in well with most decor styles: 
These are just a few of my favorite that I found! I loved all of these so had to share -- they are definitely upping their game, right? Have you seen any of these items in the stores? Have a great weekend my friends! See more of our home here. To shop items in our home, click here! Never miss a post by signing up to get posts via email. Via https://www.thriftydecorchick.com/2019/02/wait-thats-from-walmart.html
Hey hey! We've had a sick kiddo this week...it seems he's on the mend finally, thank goodness! We were stuck at home for a few days straight so I worked on a really quick DIY that turned out really cute.
You may remember the DIY picture ledges I built for our family room:

You can buy these but they are SOOOO much cheaper to build. And I haven't found them for purchase in the long lengths I made.
I plan to add a few of them to another spot in our house, and I've wanted to build one for our master bath for awhile. These shelves are so versatile -- I love them!
I'll direct you to my last post about these DIY ledges for the full tutorial, but this is how they are put together:
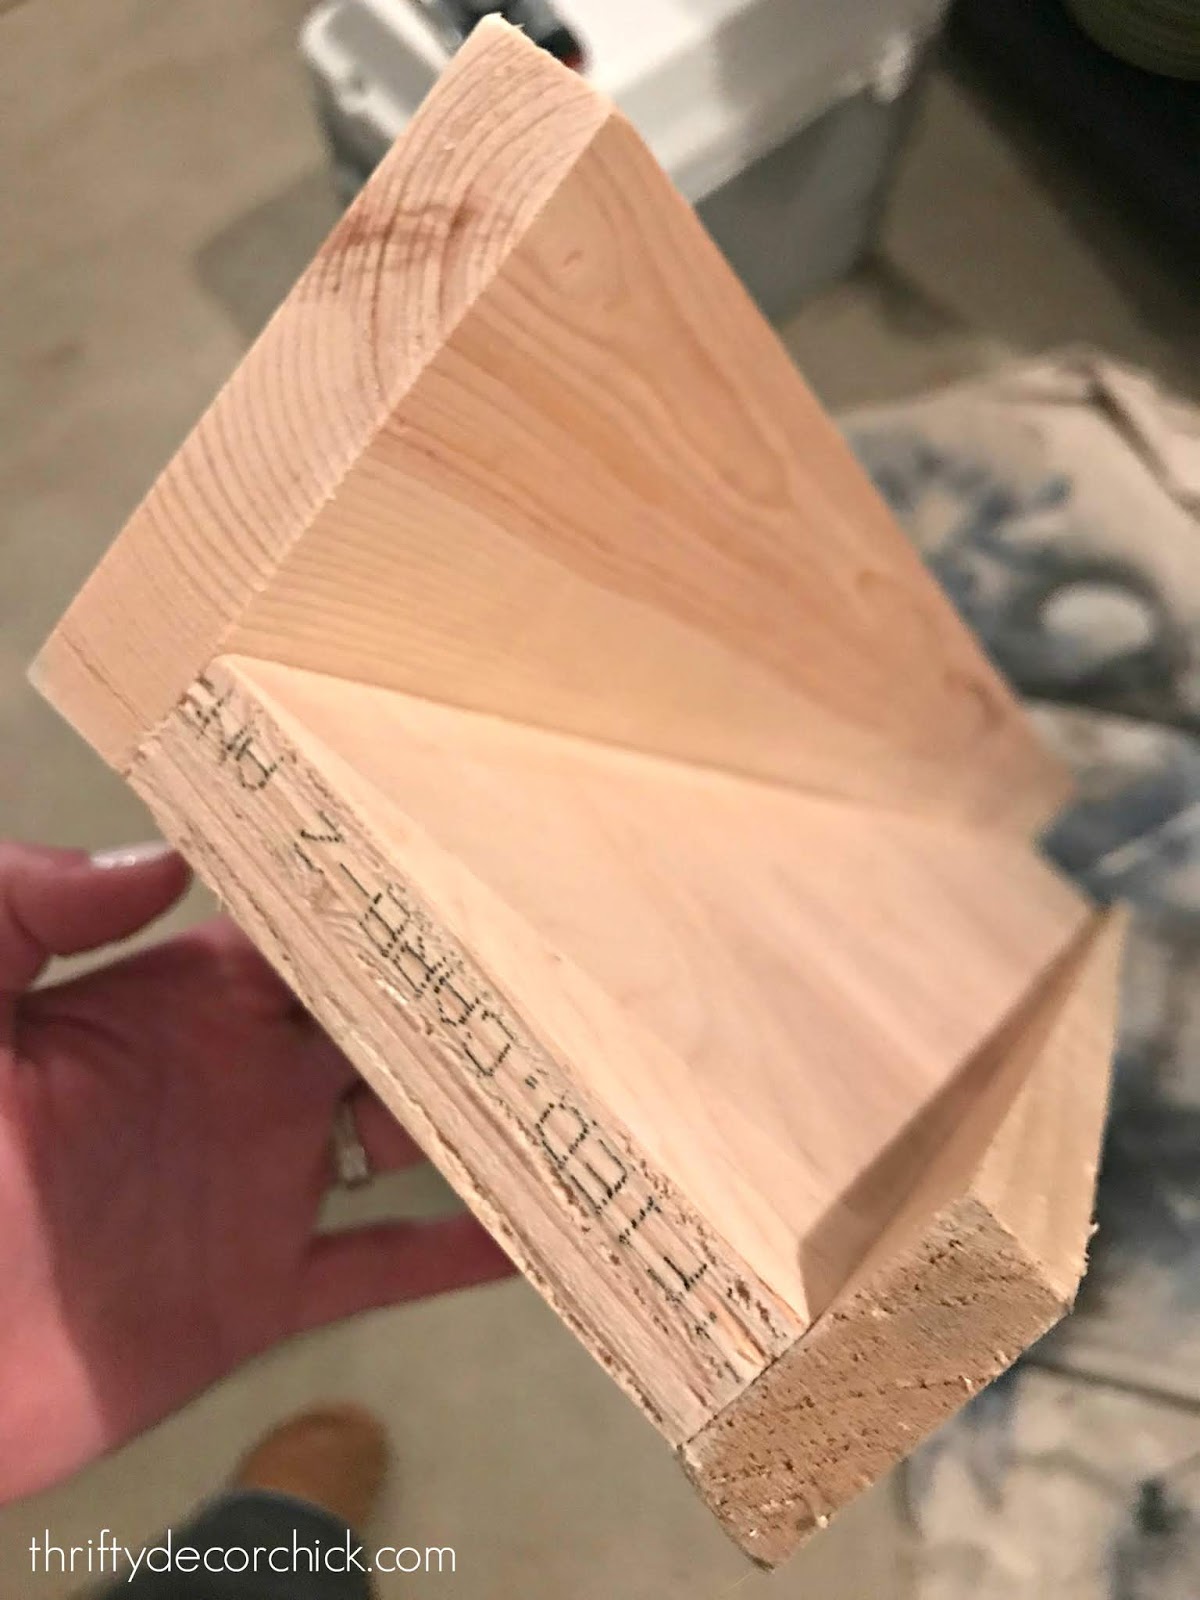
This one is made from all scrap wood -- I knew I was painting it so the woods didn't have to match. (I stained my other set.)
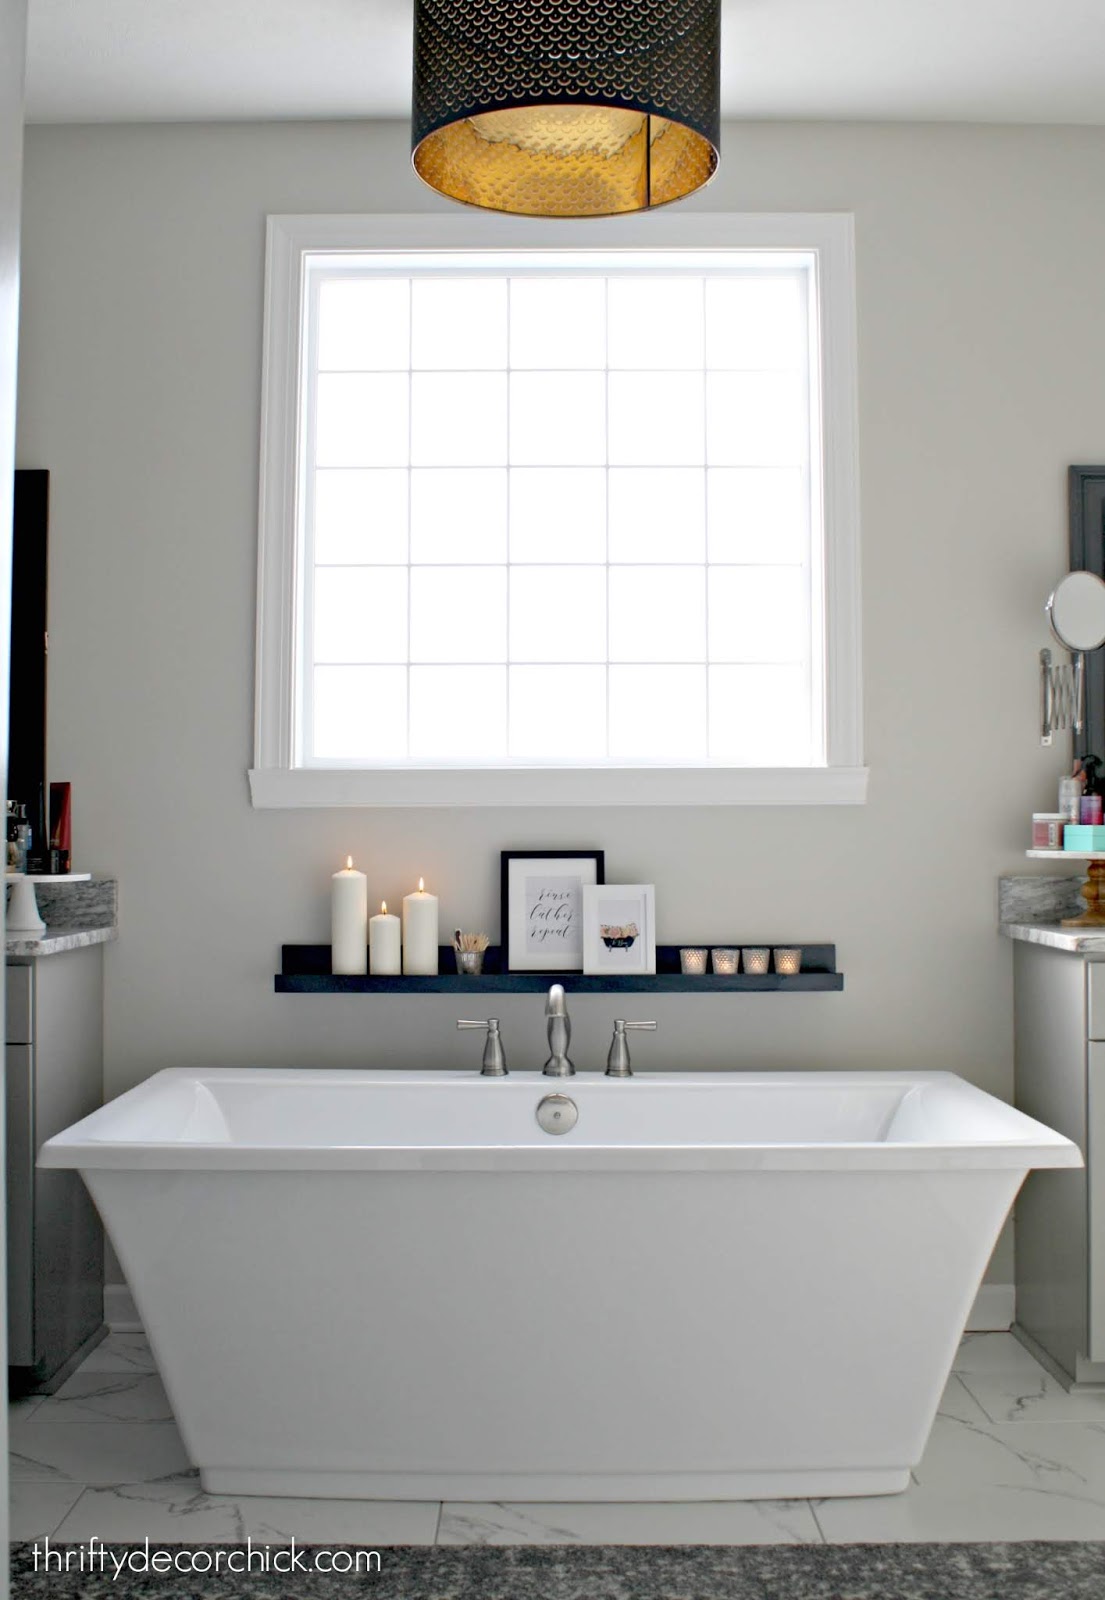
I assembled the ledge and then spray painted it black. Then hung it on the wall next to our tub:
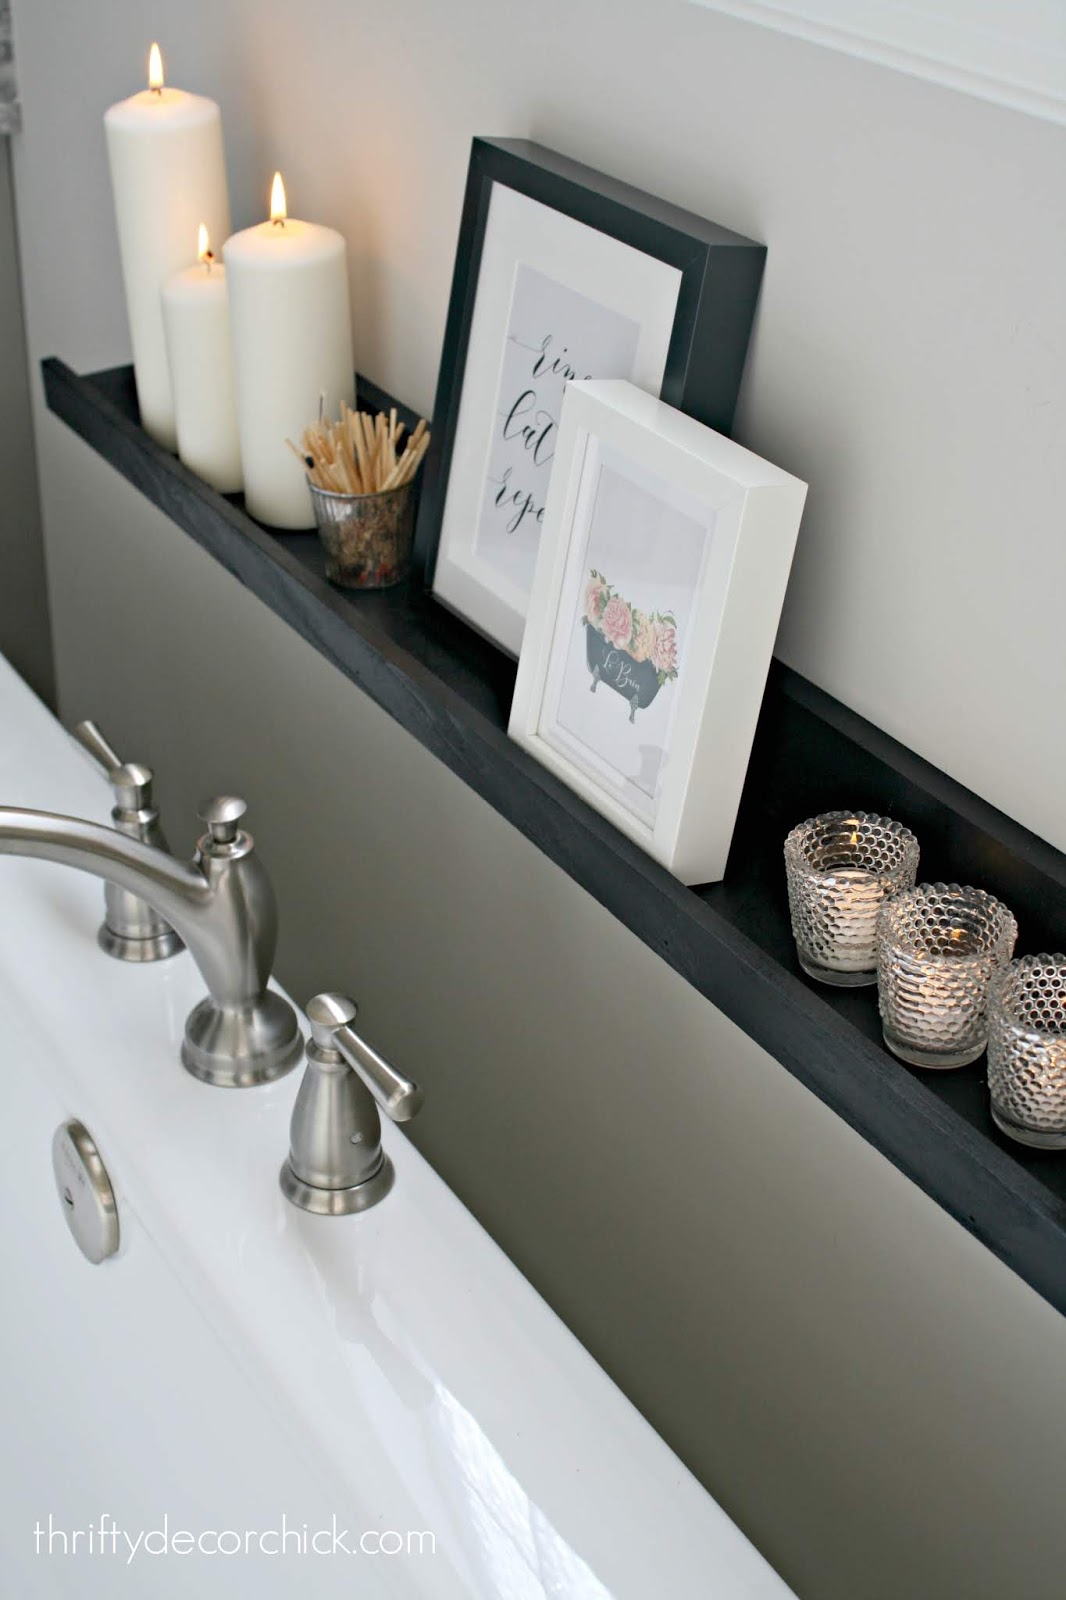
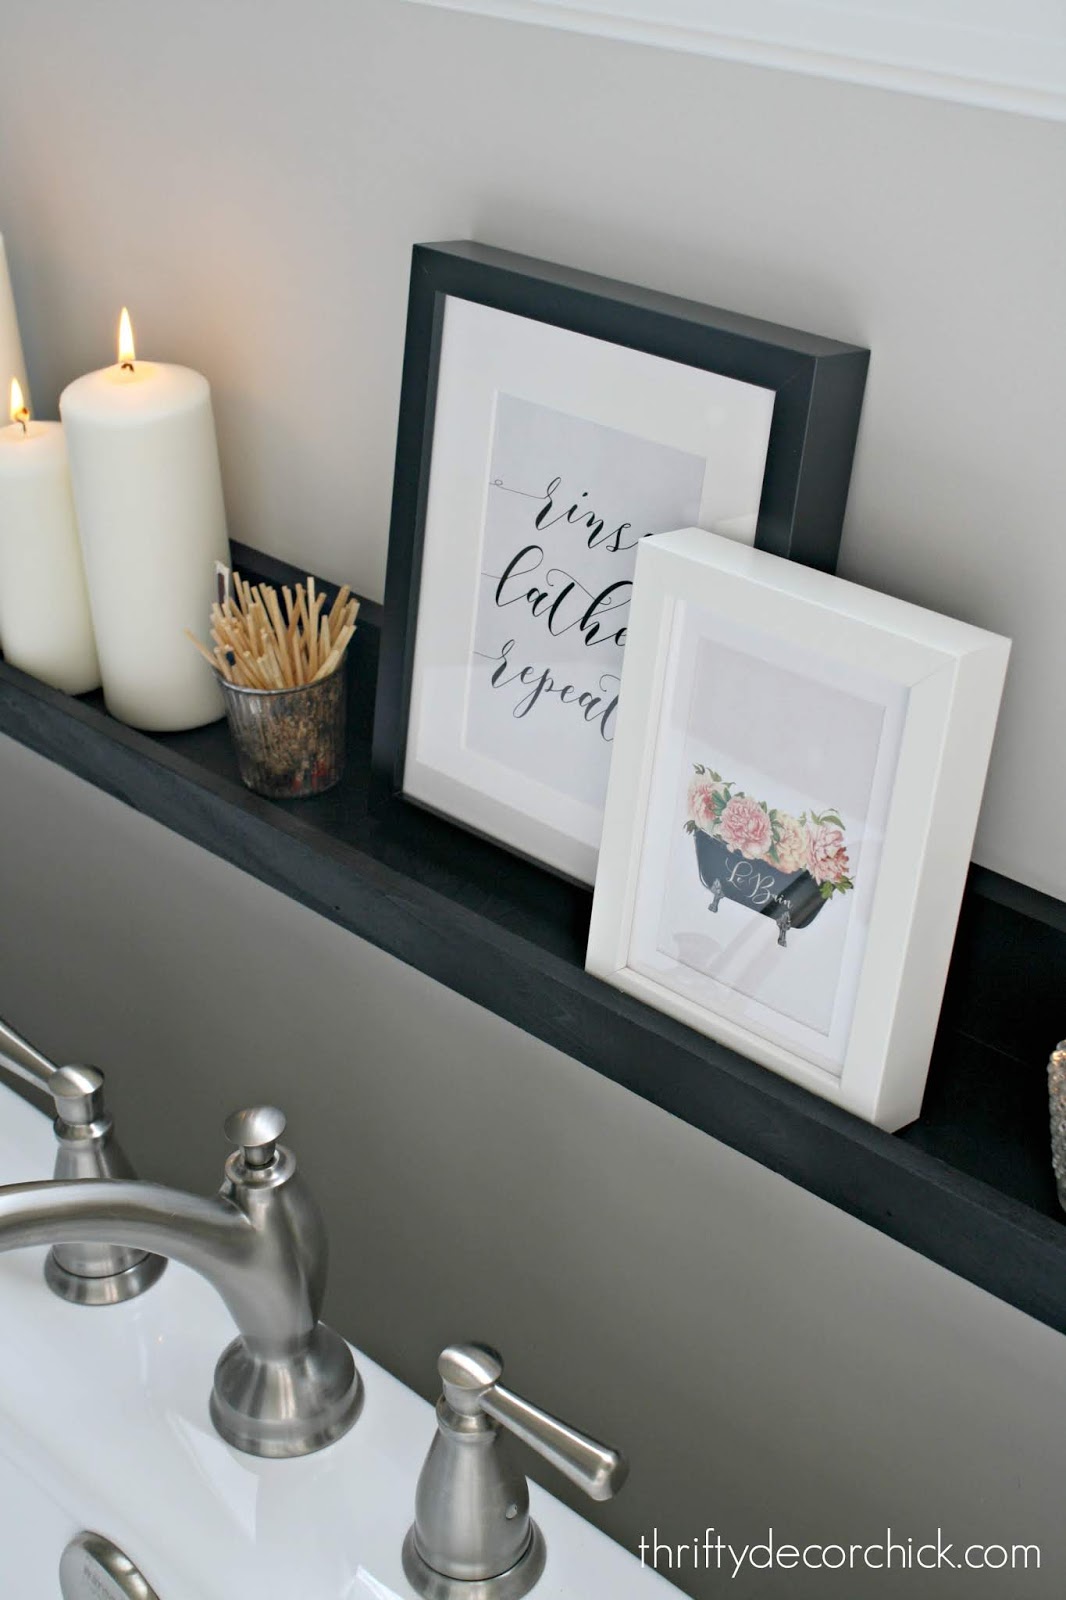
I figured it would look great there and I was right! :) I have my (affiliate) tub tray/caddy that I love, but I wanted something that we could keep candles on and that would be pretty addition all of the time.
We can also use it to hold the iPad while in the tub...perfect!:

The candles are from IKEA and the votives are some of my favorite Goodwill finds. I found the "lather" printable for free (I went back to find the link and it's gone from the site -- it looks spammy so I hesitate to link) and the bathtub printable here:
I have BIG plans for this bathroom but this is a fun little addition that only took a few minutes to build:

I found the studs in the wall and used long screws to attach the shelf to the wall and into the studs. You can see the screw heads if you look, but they're easy to hide:

If you search "lather, rinse, repeat" you can find similar free printables! I realized afterwards that this one technically says rinse, lather, repeat -- I'm not picky. ? The bathtub printable from Etsy came with another similar version that I plan to hang in the bathroom. So cute.
I didn't spend anything on this one since I had all of the materials. But even for longer ones it's so much cheaper to make them yourself!
This shelf is four feet long -- while I was at IKEA I saw they have a similar one for $13 (it's not quite four feet). That's a good price! But not as good as free:
These little shelves can serve so many purposes! I can't wait to show you what I have planned in our basement. :) Have you tried building one of these ledges? If you get the wood cut at the hardware store, all you need is a drill and a nail gun and/or nails and a hammer. You can read more about the two-toned IKEA cabinet makeover in this room here: 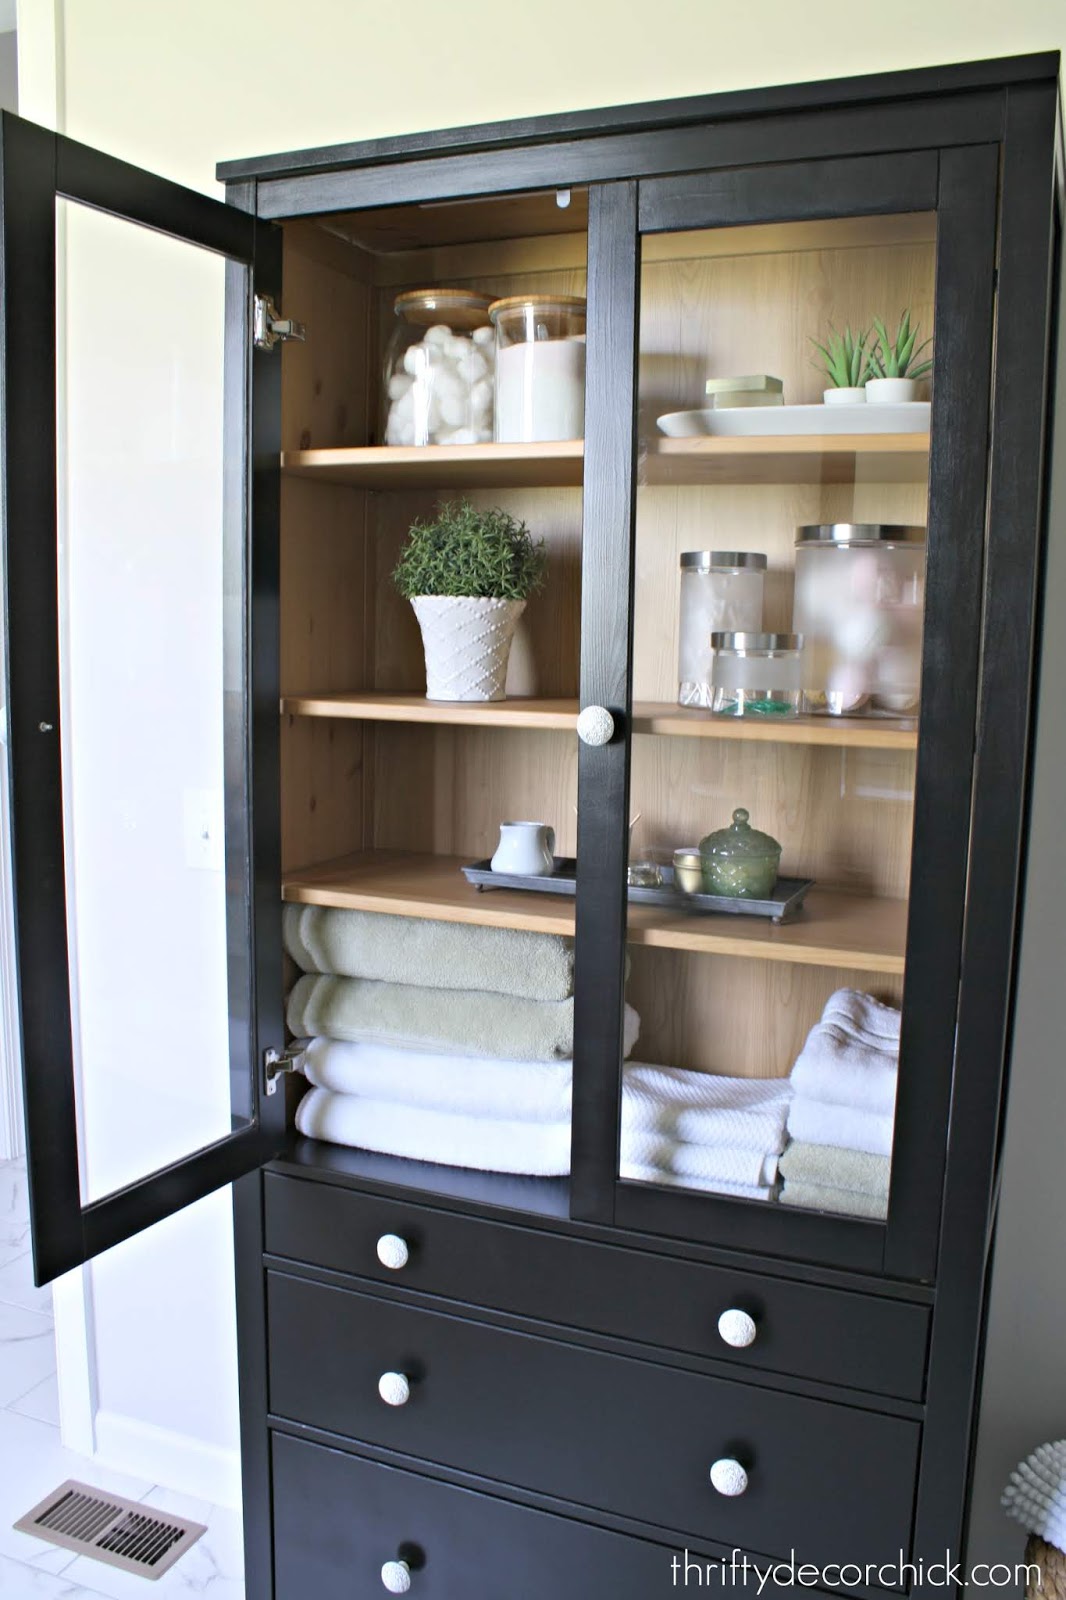
And see how I hung the faux pendant light here: 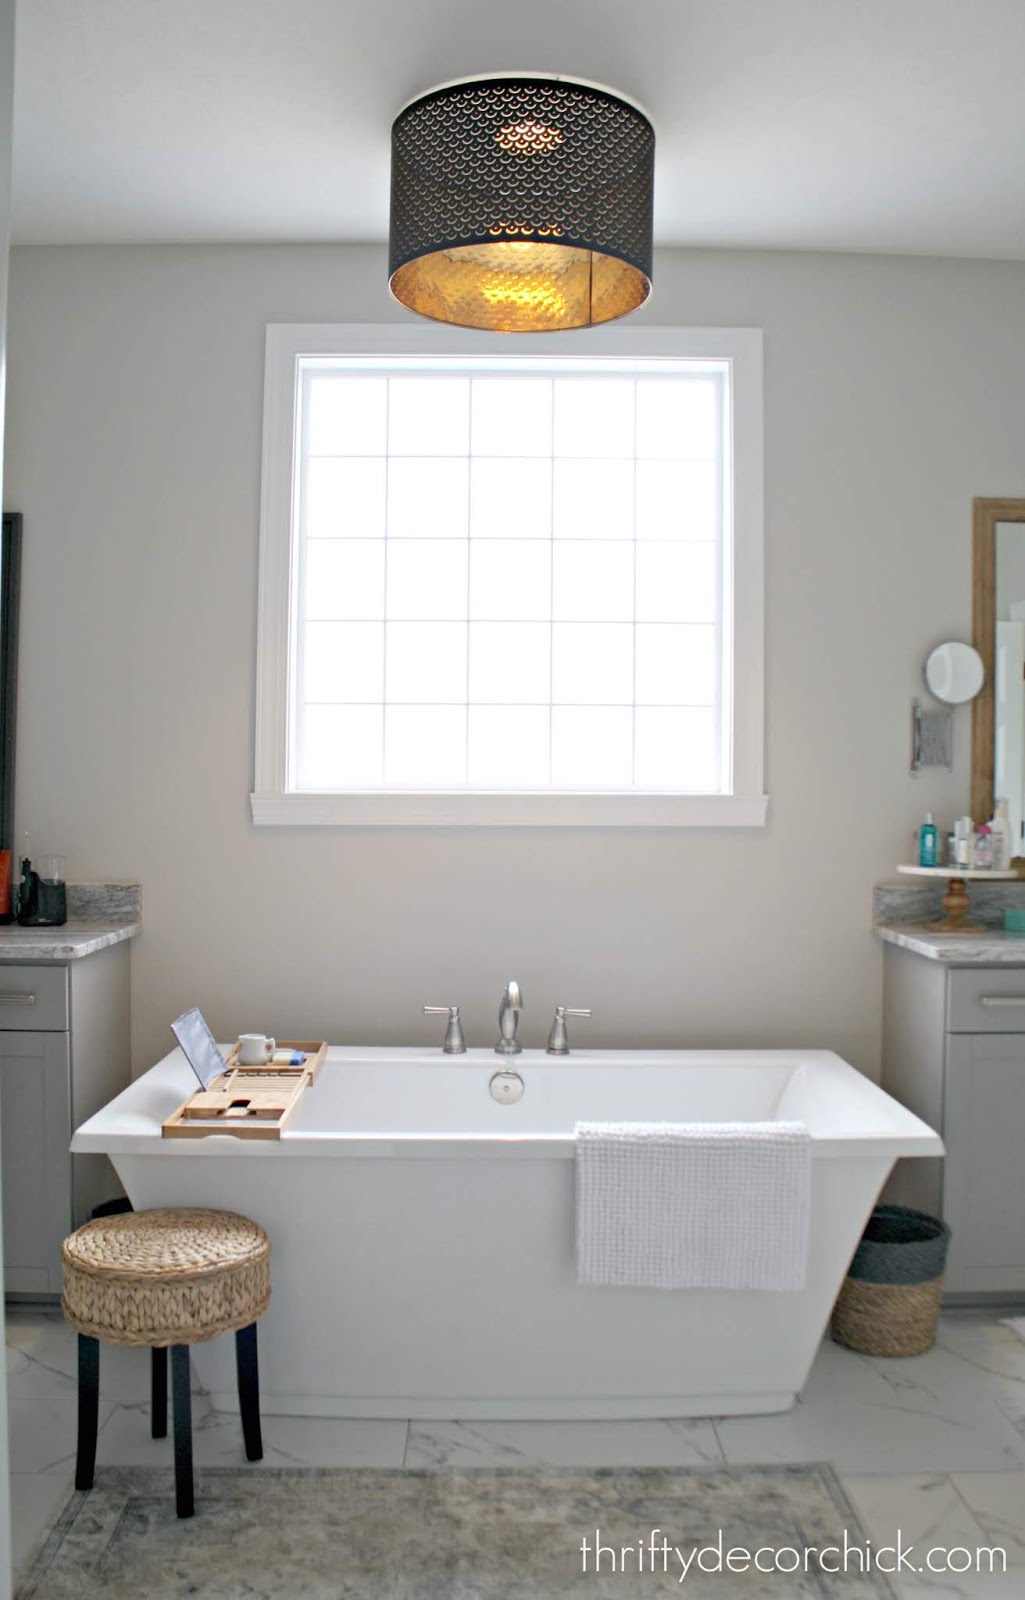
Some affiliate links included for your convenience! See more of our home here. To shop items in our home, click here! Never miss a post by signing up to get posts via email. Via https://www.thriftydecorchick.com/2019/02/diy-display-ledge-for-spa-feel-in.html
Hey there! I've been hard at work on this little hallway -- it's probably the smallest "rooms" I've done but because of all of the small projects, it's been a lot of work! ? It is currently my very favorite spot in our house though, so it's been worth it. ;)
Last I left you, I shared the wallpaper that was almost done. You can read why it's not quite done in that post. I've completed a few more updates so I wanted to show you the progress! This is how the little hallway looked when I shared it last week:

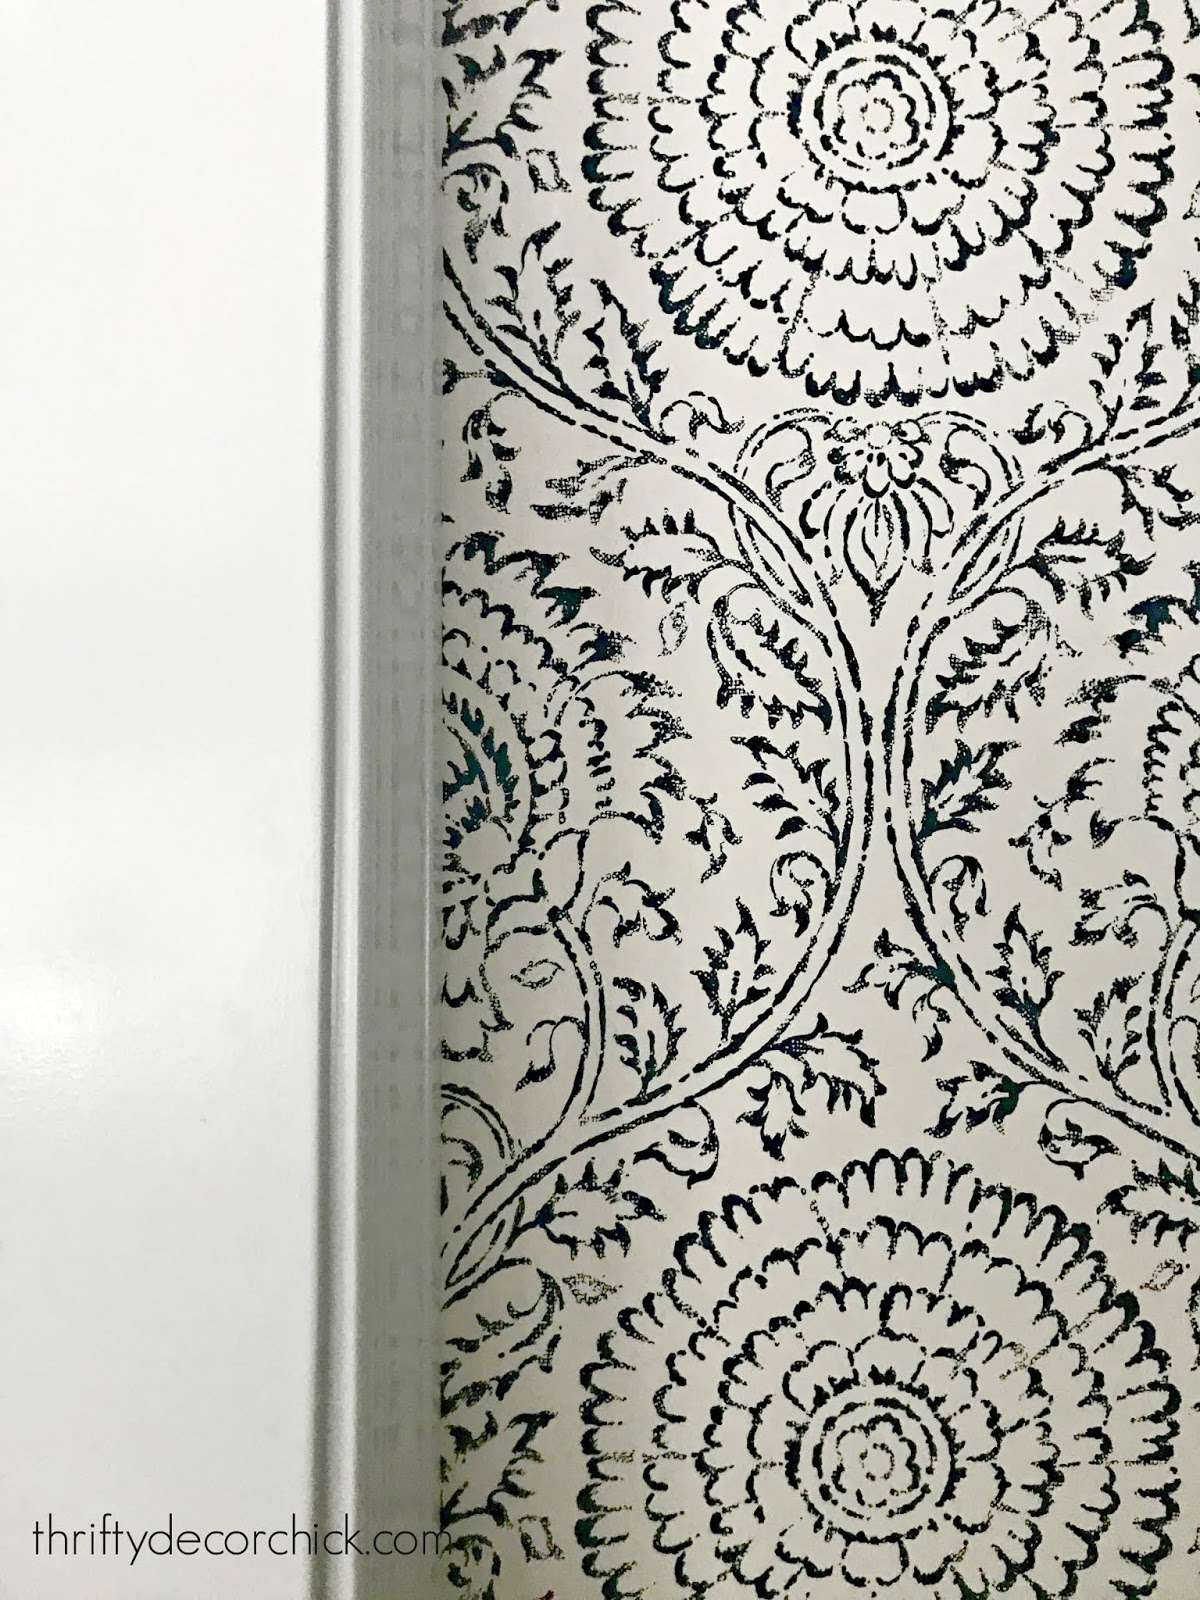
Many of you wanted to see it closer and had questions about the color. It's a navy blue (but it comes in a couple different color ways as well):
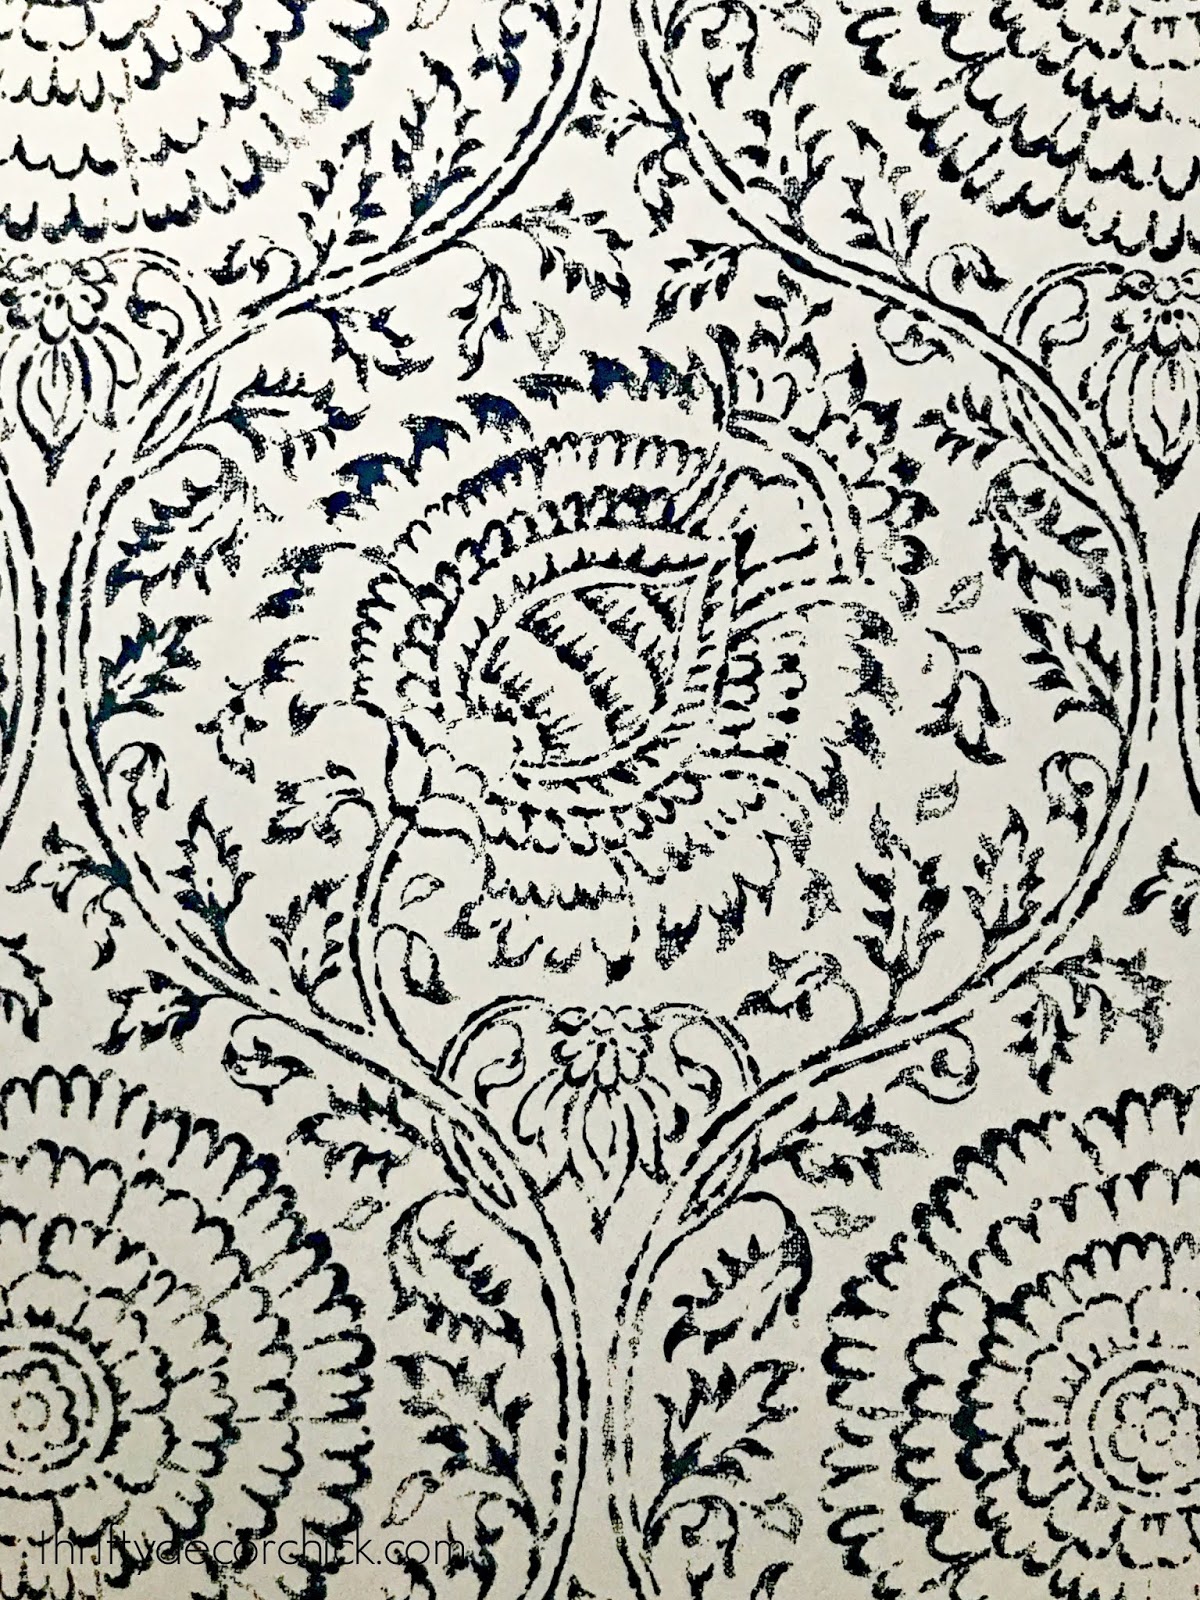
It's not a bright white like it sometimes looks in photos, it's definitely an off white -- here it is against our bright white trim:
I painted the ceiling the same color as the morning room -- Cyberspace by Sherwin-Williams. I loooove painted ceilings! It always adds a little something to a space:

I used that same color for the ceiling in our powder room as well. (That room also has wallpaper -- the peel and stick kind!) I also added crown -- I cut the wallpaper at the ceiling pretty well, but wanted to add that detail anyway.
I also changed out the lamp shade -- both are from IKEA. I love the brass tone inside and the pretty cutout detail. I originally wanted a basket-type light, but I haven't found anything I like just yet.
This is the prettiest little hallway I've ever seen!:

I'm using the green shade in another hallway. ;)
Here's how it looked before I started...what a difference so far, right?

I have a couple more projects up my sleeve, and I'll share the final result soon! Wish this space was big enough for a chair or something cause I'd just sit and admire it. ;)

Have I convinced any of you to try wallpaper yet? I heard from a few of you who have used this same pretty paper! I just adore it. See more of our home here. To shop items in our home, click here! Never miss a post by signing up to get posts via email. Via https://www.thriftydecorchick.com/2019/02/more-pretty-hallway-updates.html
Hey hey! I'm so excited to show you what I've been up to this week!
Remember this little hallway off our great room and kitchen?: 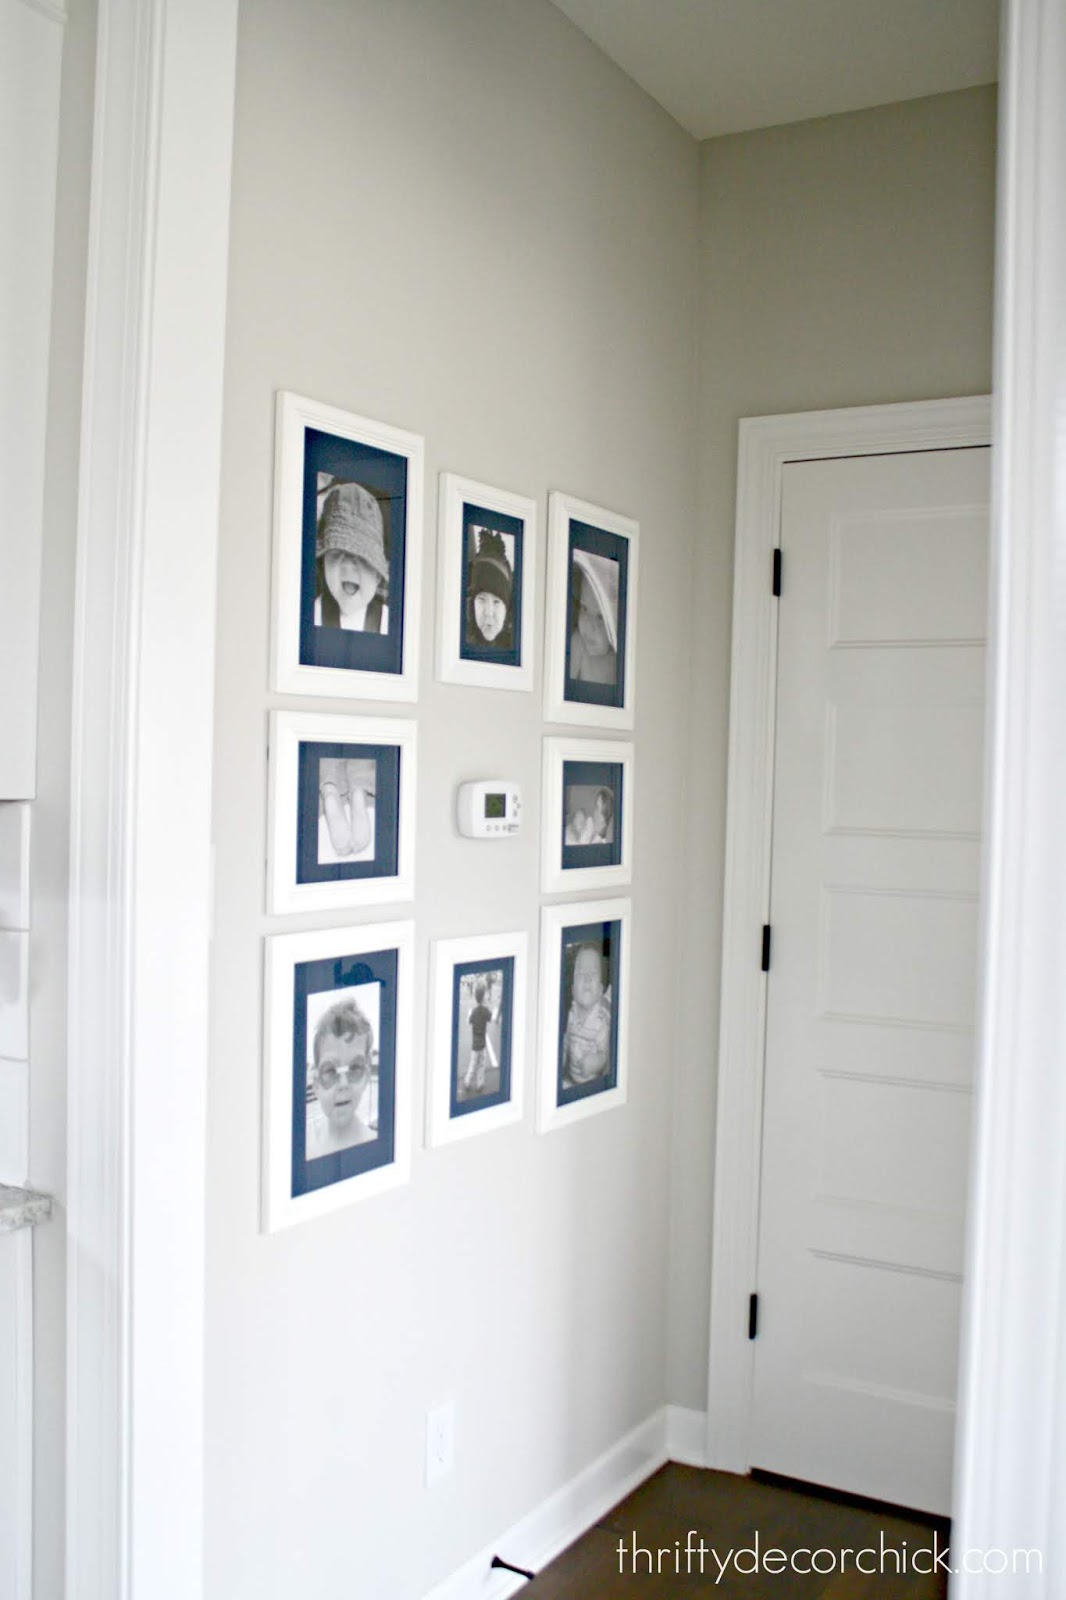
I shared more about that little gallery wall and my hanging trick here.
Later I showed you how to change out a recessed light for a hanging light:
I've had big plans for this little hallway and that involved wallpaper. The real stuff -- not peel and stick wallpaper like I used in the powder room. I've only done smaller projects with it, like this wallpaper art I made YEARS ago.
Back then you had to soak it in water (I used the tub), then do the folding technique before hanging. It wasn't difficult, but it was messy.
Well, I've been eyeing a wallpaper forever and a few months ago I started the process if figuring out where to get it. I asked on Instagram if anyone knew what it was called or where I could get it, and people were SO helpful!! That was the good news -- the bad news is it was sold at Anthropologie for nearly $300 a roll. Three hundred! A roll! I'm willing to splurge occasionally, but that was pushing it.
Some of you helpful folks gave me the name of the wallpaper and other places to purchase it. I did some more research and found it for more than half off at an online store. I bit the bullet and bought a roll because that was the best price I found by far. If you purchase from Anthro, it's called Pergola, but the official name is Kamala Indigo Baker Lifestyle. Search the latter online. (BTW, the Anthro price has dropped!)
I really wanted to get it up before the holidays, but thought better of trying to tackle it at that time. And then I just psyched myself out. I thought it was going to be a real pain to install, so I waited on it. (This waiting will bite me in the butt, I'll explain more about that in a minute.)
Finally this week decided, I'm just gonna do it! I actually read the directions (always helpful) and realized it wasn't even pasted. Then I talked to my friend Beth who had recently wallpapered this beautiful room, and she explained that you roll the glue on the wall instead of getting the paper wet. SO MUCH EASIER.
Here's a quick run down of how to install wallpaper...
You'll need wallpaper paste and a roller and/or brush, then a very sharp utility knife and a wallpaper smoothing tool:

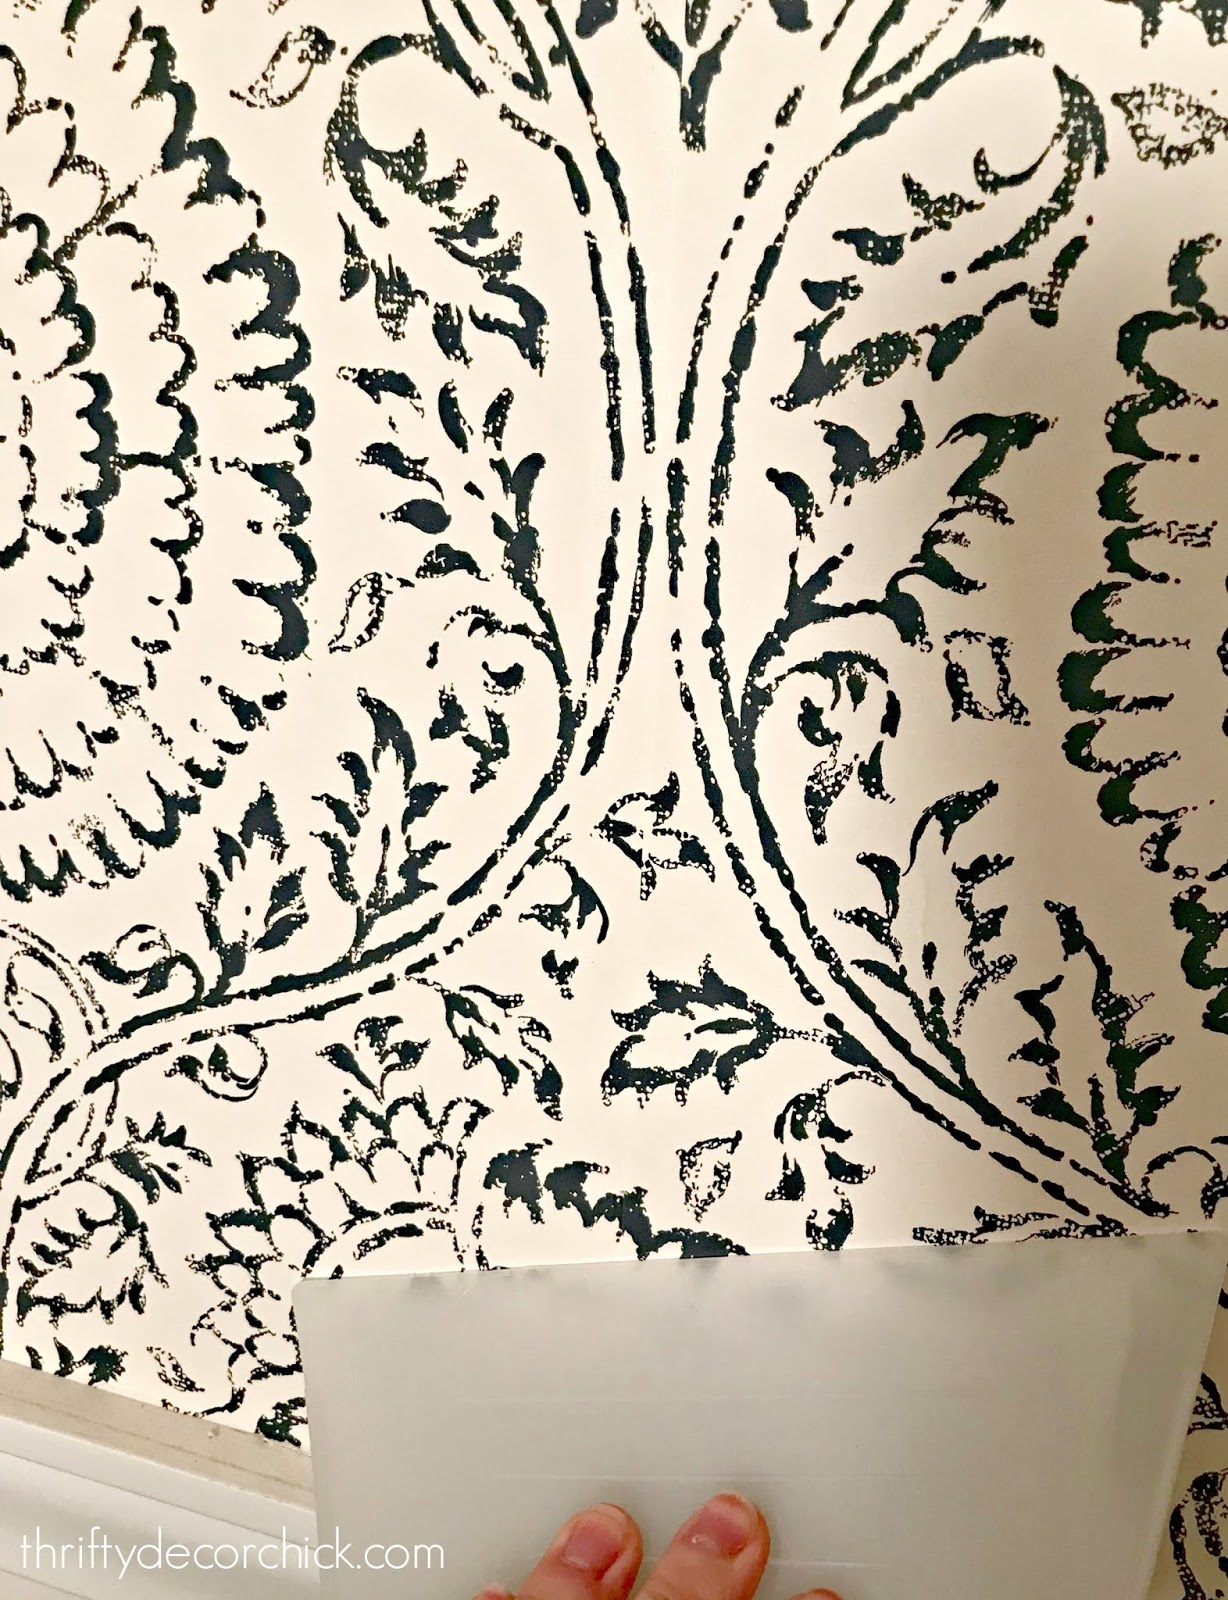
That's the pretty paper -- isn't it lovely? This process was MUCH easier than I thought it would be. Much. 1. I measured the length of the wall and laid the paper on the floor to measure. I would draw a line where it needed to be cut: 
2. Then I cut with scissors. I found that you don't have to have super straight lines because you'll be trimming the wallpaper at the top and bottom (and some sides -- especially for a smaller space):

3. You'll pour your paste into a paint tray, then roll it on just like paint. Makes sure to use a brush to get into tight areas like around doors, the ceiling and the baseboards. Don't skimp on the glue! I had to go back over some areas because I didn't use enough.
4. The glue has some give, so you can adjust the paper. I slightly overlapped the pieces, just like I did with the peel and stick in the bathroom. I do this just in case over time it expands or contracts for some reason. You'll want to make sure you match up the design with each new piece.
5. Use your smoothing tool to work out any bubbles. There were waaaay less bubbles to worry about with this compared to the peel and stick. The tool also gets the wallpaper to stick well to the wall:
6. You'll also use that tool to trim your wallpaper. Push the wallpaper to where you need to cut (the ceiling, door trim, baseboards) and use your razor to trim it down:
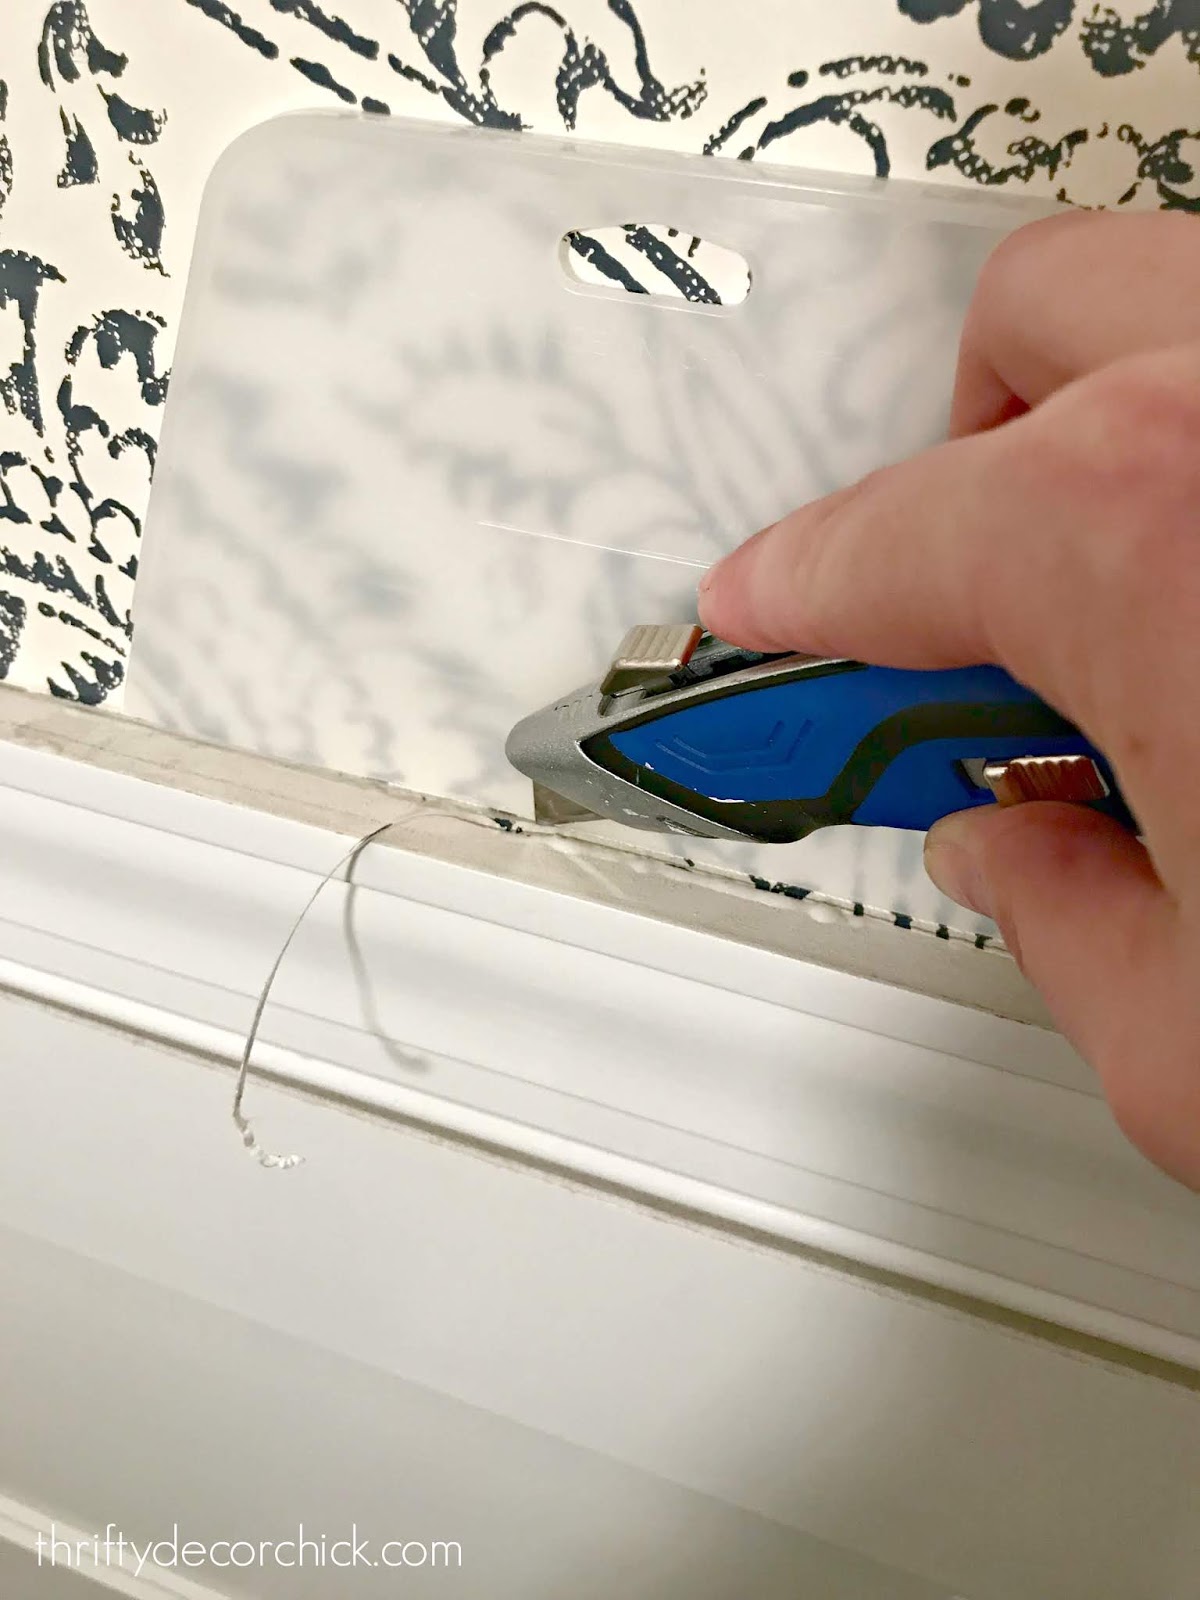
That little took makes this super easy! I would hold it against the wall and drag the razor as I moved it. You definitely need a sharp razor though.
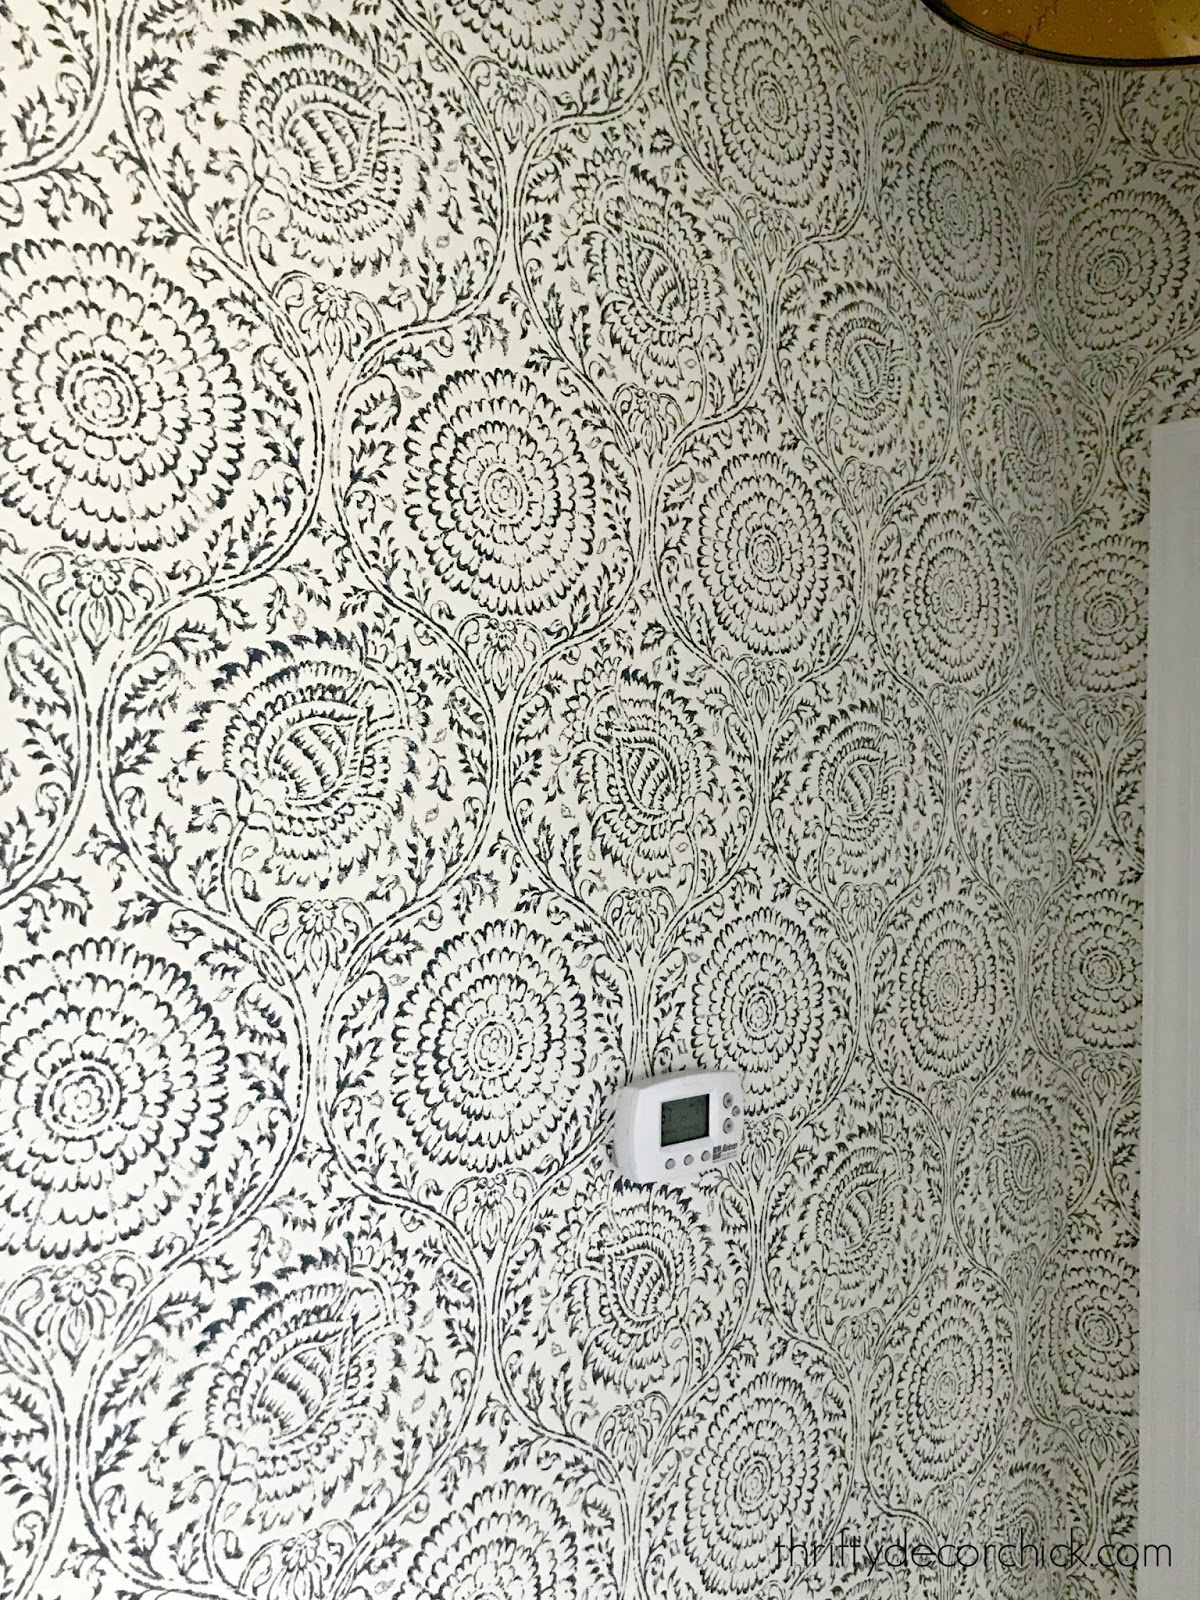
7. Because of the repeat of the wallpaper (repeat is the size of the design that repeats throughout the wallpaper -- similar to fabric) you need to make sure to match that as you go. That means you'll have plenty of excess paper and why you need to make sure you order enough!
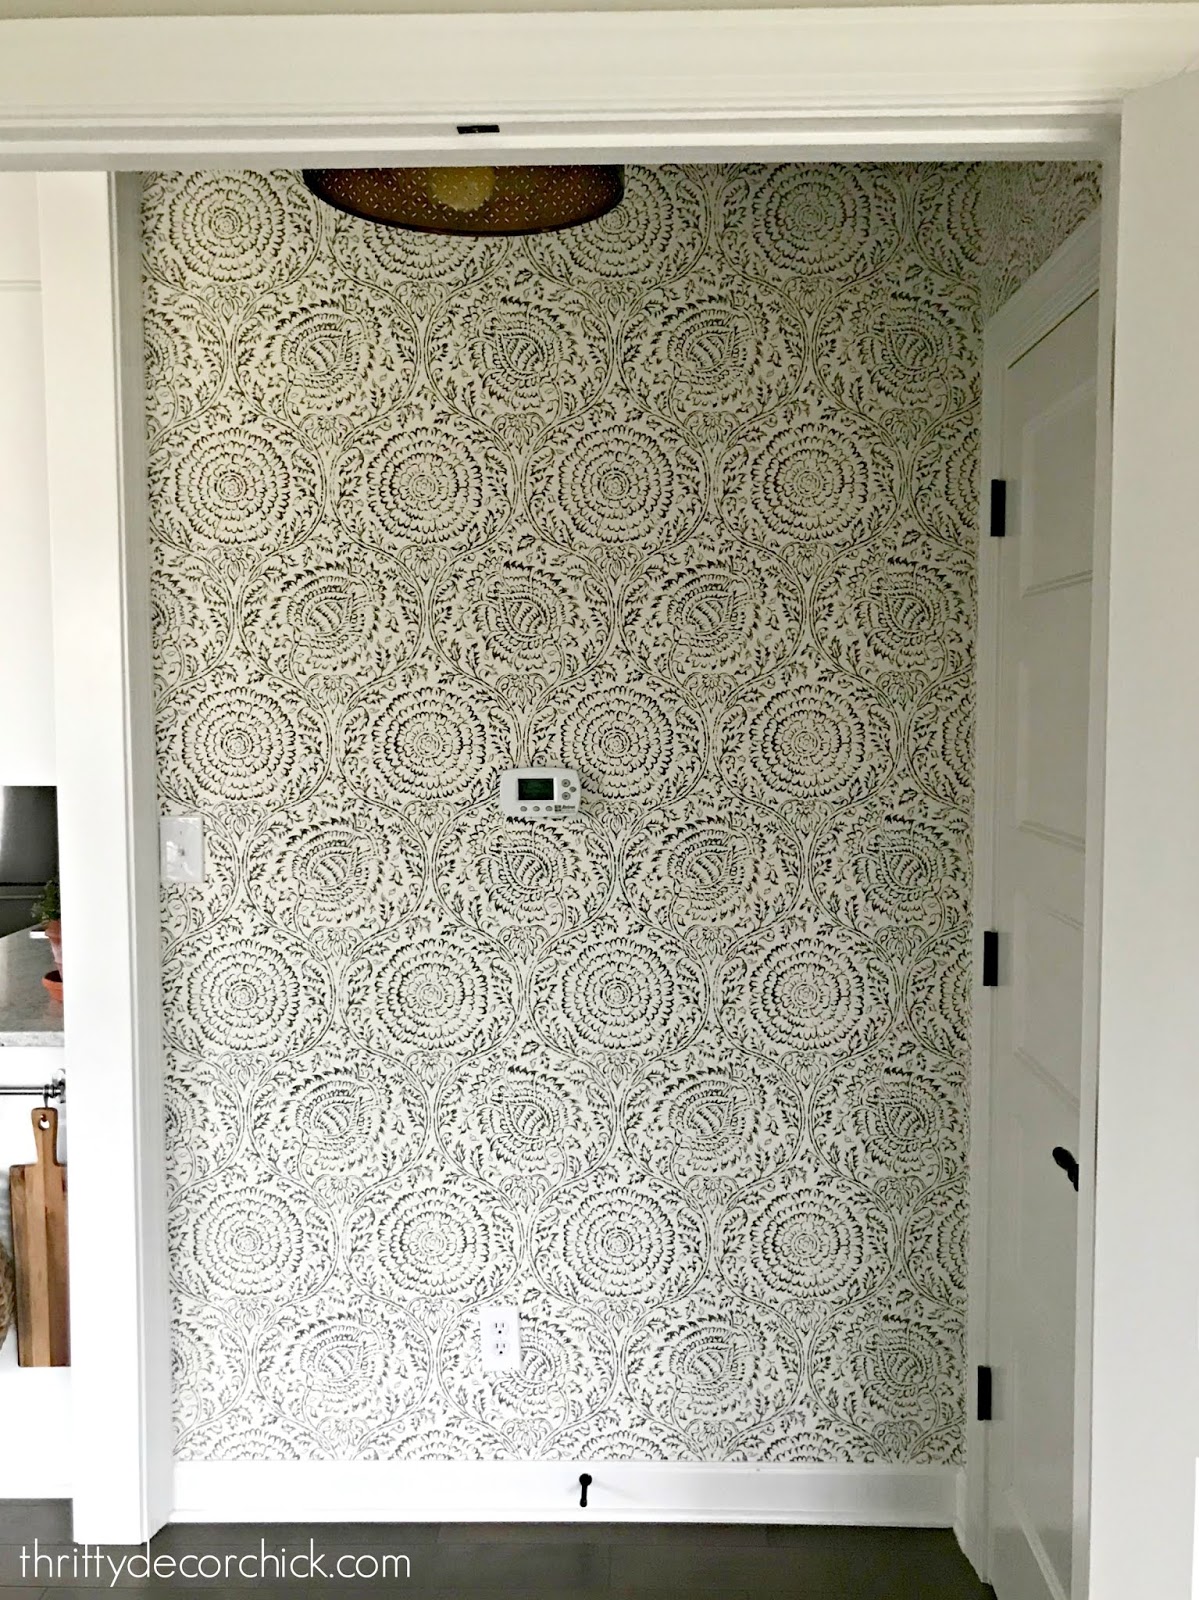
As soon as I got one piece up I knew it was going to be good!!:

Ignore our crazy cat. It was addicting, and dare I say...kind of fun. You know I'm weird and I enjoy DIY projects...but it was satisfying to see the progress.
We all absolutely positively LOVE it:
I want it everywhere!! In every room. On the ceilings. Ever.y.where.
This is where I tell you to do as I say, not as I do. I thought for SURE one roll would be plenty for this small space. The repeat on this isn't that big so with that and the small amount of wall space, I thought I would be good for sure.
Nope. This view is cropped:
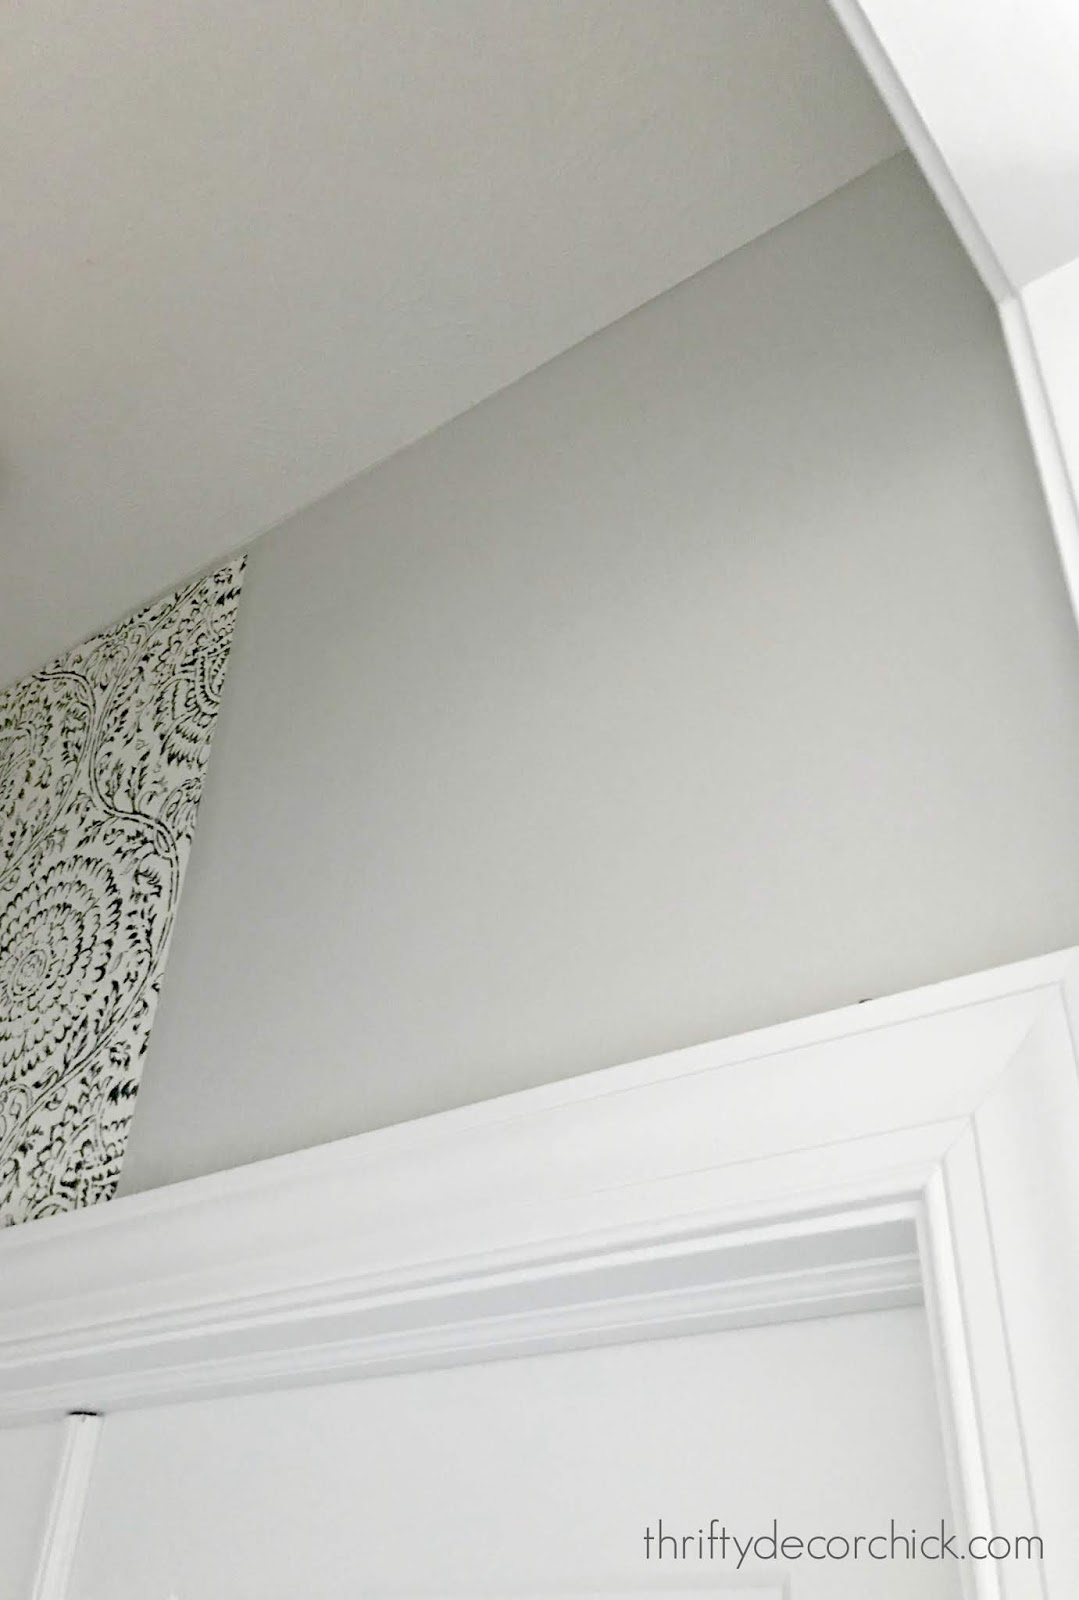
I'm short two small pieces. SO frustrating. It's because of the two doorways -- those long skinny pieces make a lot of the paper unusable because the remaining pattern doesn't match up. So I have plenty left, I just can't use it. Poop:
Bad news is I have to order more, the good news is I love this paper so much I'm going to use it somewhere else...so I'll definitely use it!
Here's a view from the finished side. ;)

It's wild how it makes the ceiling seem so much taller -- it feels ten feet tall here! (It's not.) Overall it makes this tiny little space feel so grand. I'm 100 percent obsessed with it. Lurve.
I couldn't have found a more complicated space to wallpaper -- three doorways, an outlet, a light switch and the thermostat. I'll share more tips at the end of the post so be sure to check those out!:

Of course this one change has turned into a few more that I want to make -- I'm so excited about the additional details I'm hoping to finish up this week! One of those is a new shade on the light. Stay tuned for the rest!
The photos will go back up too, but I'm hoping to make some slight changes:
The online store that I bought the wallpaper from doesn't carry this one anymore. I'm praying the new roll (from a different batch) matches well enough. Gah! That's another reason to make sure you get enough!
Here are some additional tips if you plan to install wallpaper in your home:
I find that that more I work up a DIY project in my head, the less difficult it really is. Do you ever notice that? The ones I think are going to be the hardest end up being way easier than I thought. Maybe it's just because I'm comparing them to how hard I think it's going to be. ;)
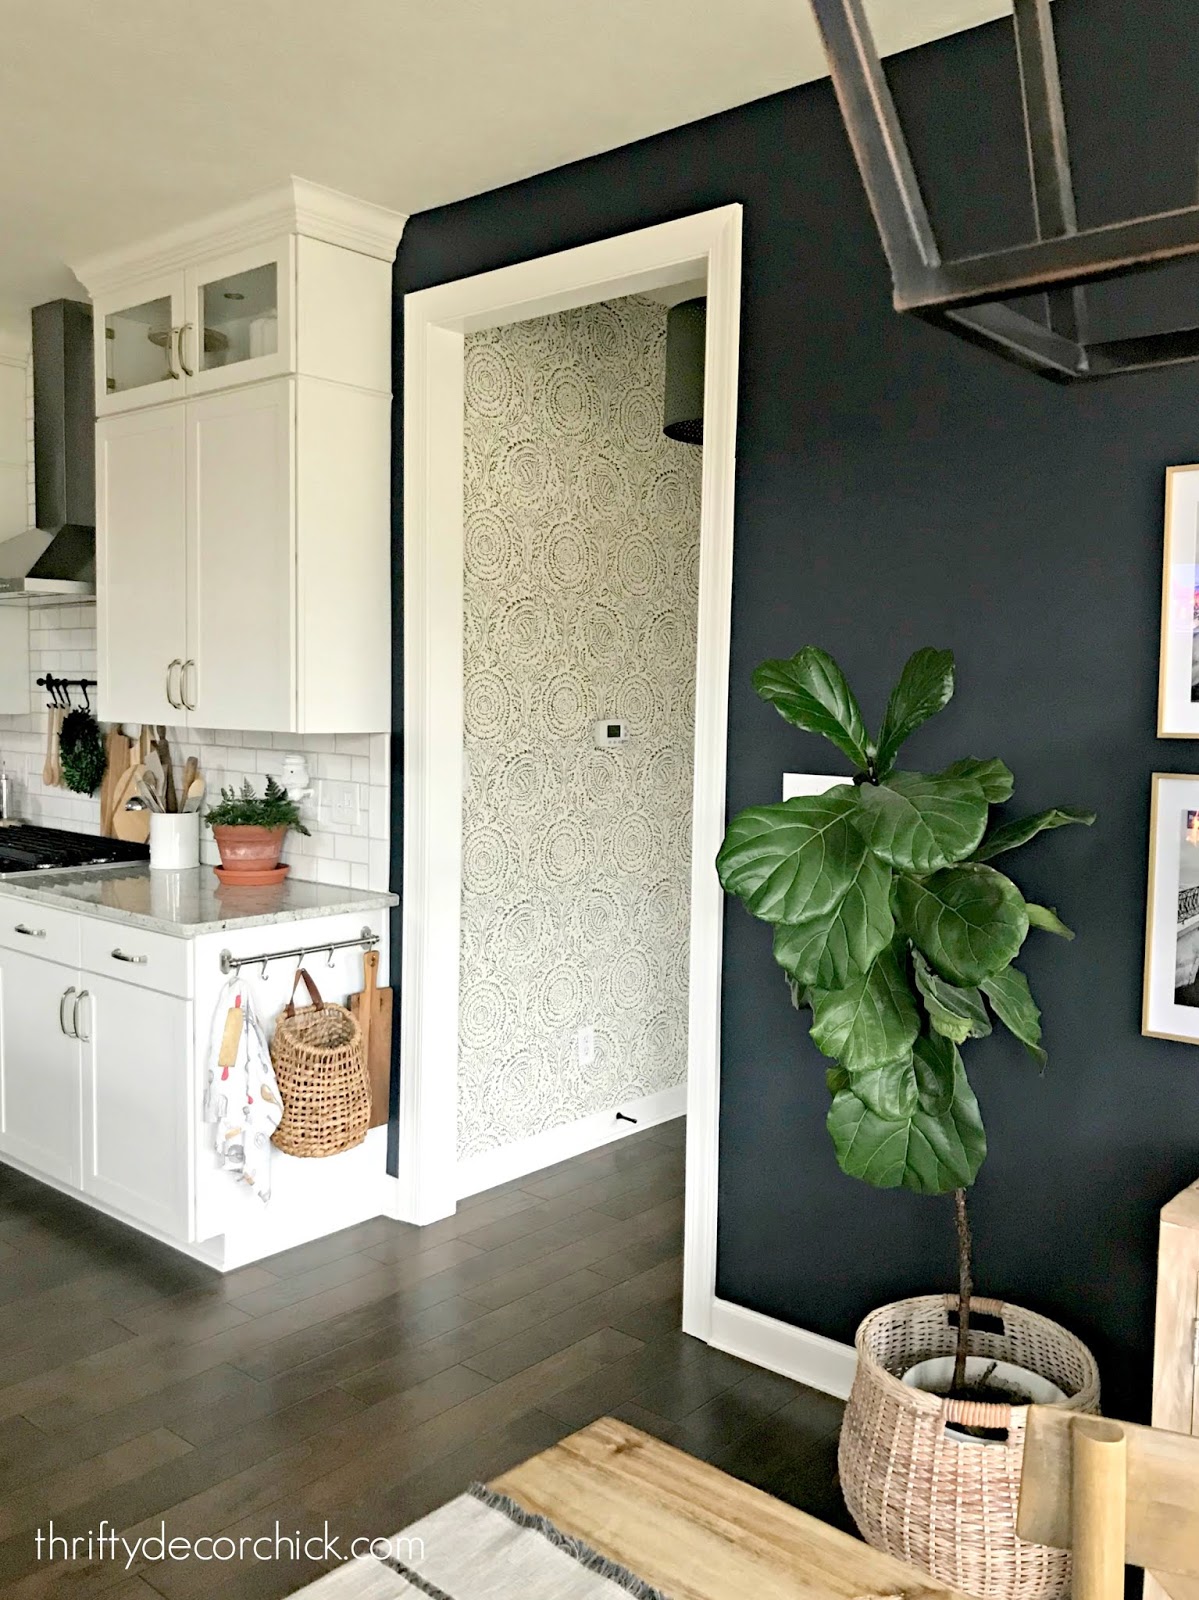
This is my favorite spot in our house right now!
Have you installed wallpaper in your home? It is back with a vengeance and now I know why. ;) I am head over heels in love. I could see myself adding it all over but need to watch it -- I've heard it is NOT fun to remove!
If you have any questions about the process feel free to ask in the comments! Now I need to go order more of paper so I can finish that dang spot. ?
Affiliate links included for your convenience. See more of our home here. To shop items in our home, click here! Never miss a post by signing up to get posts via email. Via https://www.thriftydecorchick.com/2019/02/i-hung-wallpaper-and-survived.html |
