Easy ways to stop junk mail from filling your mailbox (AND reduce your paper clutter!)
Did you know you can control how much junk mail is delivered to your mailbox? These helpful tips that have drastically cut down on the amount of paper and junk mail we bring into the house.
Is it me, or does the junk mail seem to be increasing lately? It's frustrating when our entire stack of mail goes right into the shredding pile or recycling bin.
Some of these solutions time out eventually, so I like to readdress them every few years. It is SO worth it!
And if you have moved recently, your new address may be on lists that you can opt out of.
You probably don't want to get the previous resident's junk mail, right? :)
Paper clutter has always been the thorn in my side, the pain in my neck, the fly in my ointment...and of course the majority of it comes from the mail:

This post may contain affiliate links for your convenience.
See my policies and disclosure page for more information.
But over time I've conquered the paper clutter -- by stopping it from coming into the house in the first place.
I'm sharing all of the easy ways I've reduced our junk mailings, unwanted catalogs and general paper STUFF over the years. These tips work and I promise your load will lighten if you try them yourself!
Read the full post
Via https://www.thriftydecorchick.com/2016/06/how-to-stop-unwanted-junk-mail-in-three.html
0 Comments
Five ways to decorate with leftover wine corks.
Don't throw your old wine corks away! You can use them for so many crafts and decor ideas! I've gathered a bunch of DIY projects and ways to put corks to good use around the house.
If you're a wine lover like us, then you probably have a pile of corks sitting around. I find it hard to throw them away! I've always loved the organic texture and look of cork -- especially when they are stained with the deep red colors of the wine.
They fit in year round, but I think they are especially pretty home decor additions in the fall and winter months. Perfect timing as we head into that season!
These crafts, decor and gift ideas work for champagne corks as well! Wine cork crafts and gifts
I loved this idea for using wine corks around a vase for a pretty floral display. Kristen at Upcycle My Stuff shares how she made these lovely wine cork vases:
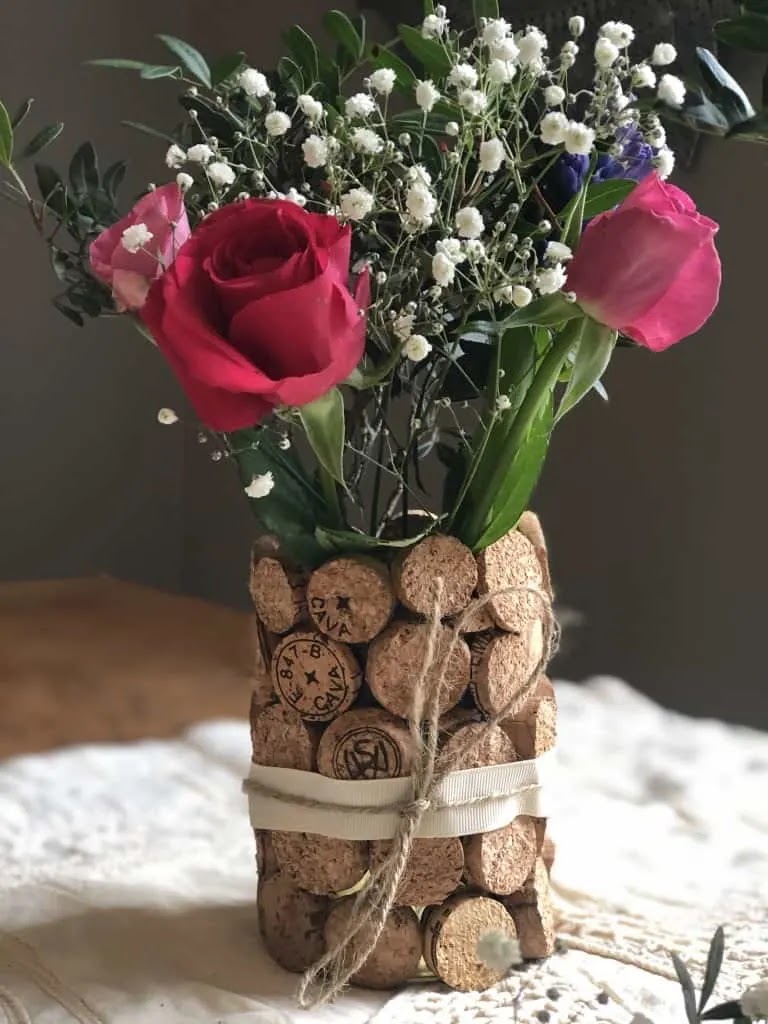
These would be a great for a fall flower display, and how pretty would something like this be as a wedding centerpiece?
Beth at Home Stories A to Z shares how to make a DIY wine cork trivet. I love this idea!

This post may contain affiliate links for your convenience.
I may earn a small commission when you make a purchase through links.
See my policies and disclosure page for more information.
This one would be a great project if you don't have a ton of corks to use up.
These easy cork garden markers are another good idea if you don't have a lot of corks. Artsy Pretty Plants shares how to make these in just a few minutes:

I've used this idea for gardens in the past, and they hold up surprisingly well! Spray them with a protective clear coat if you want to keep them year to year.
I thought this DIY wine bottle stopper would be a sweet idea for neighbors or friends at the holidays! Two Bees in a Pod shares their tutorial using pretty cabinet hardware:

You could wrap one up with a bottle of wine in a pretty tea towel for a lovely gift idea.
Wine cork bulletin boards
Using wine corks to make bulletin boards is a smart way to use up your collection! This is a great one if you have a lot of them laying around. :)
All you'll need is a frame or tray and a hot glue gun!
Toni at Girl Just DIY shared how she made this round wine cork bulletin board:
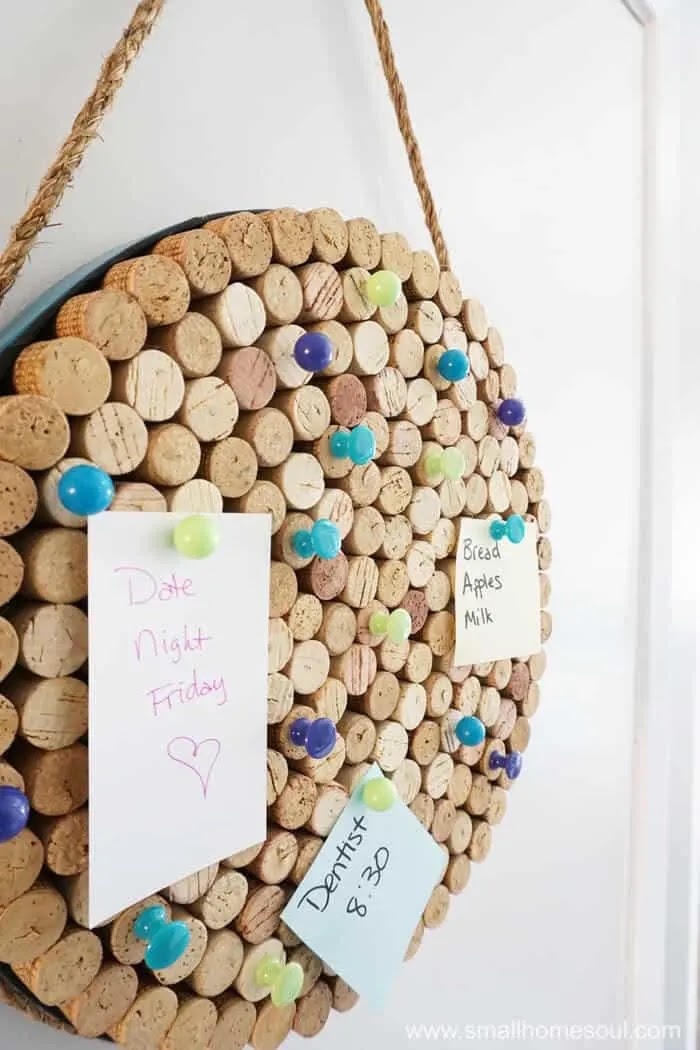
She placed them on their ends for this board. I bet having the wine stained ends out would be pretty as well!
And Hearth and Vine made hers with the corks on their sides and a ready-made frame from the craft store:

I like how she changed directions throughout this board. You could do any design -- herringbone, stripes, whatever!
This one would easily transition to a wine cork tray by taking off the hanger and adding handles to the sides.
Placing them on their sides will give you more coverage -- keep that in mind if you don't have a lot of corks to work with.
These bulletin boards would make great wall art in a kitchen or a bar area! Wine cork holiday and seasonal decor
Oh my goodness...there are so many cute ideas for holiday crafts! Here are a few seasonal wine cork craft ideas.
Kristin at Uncommon Slice of Suburbia shared how to make this cute Valentine wine cork heart:

This would be another cute idea for a wedding! I envision a huge heart in the natural cork color with the seating assignments stuck to it with push pins.
Talking about cute...these adorable little Halloween figurines from Pillar Box Blue would be a fun craft with the kids:

She used little screw in hooks to make them into a Halloween garland, but they would be sweet anywhere! How cute are those?
The warmth of the wine stained ends of corks are perfect for this cork pumpkin from Love Our Real Life:
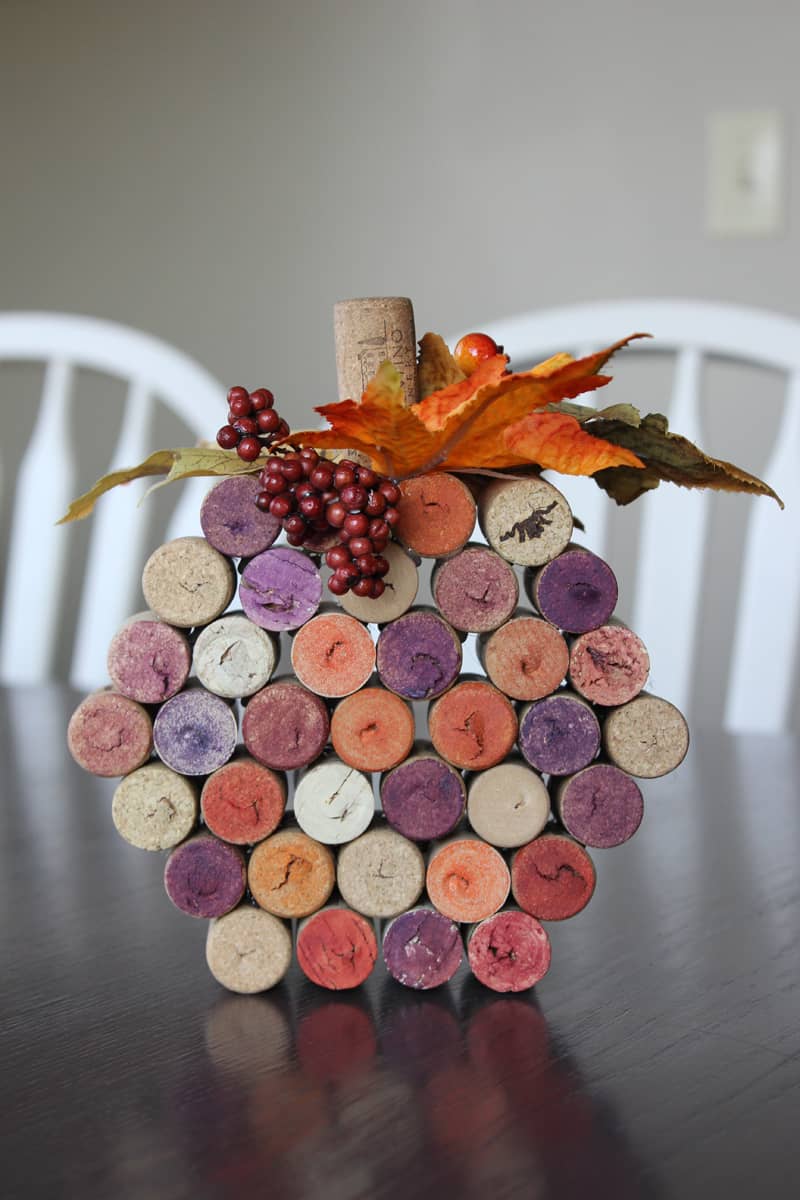
You can use a touch of paint to add orange and brown tones. I love the cork stem on this too! :)
Meg at Green with Decor shared how to make this fun wine cork snowman:

Yet another fun project with the kids! So cute!!
Wine cork decorative filler
It really doesn't get easier than this folks! Corks look so lovely just on their own -- it's hard to find affordable decorative filler that doesn't look fake or plastic.
I love the contrast of the simple, natural coloring of the corks with this creamy white bowl:
I find it's nice to have something open like this where you entertain so you can just toss the corks inside.
I LOVE how Angie from Postcards from the Ridge used a vintage bird cage to display her wine corks:

That is beautiful! And there's plenty of room to add more. ;)
Wine cork candle holders
Wine corks make great filler around a candle display as well!
Although cork is a slow combustion material, I recommend only using LED candles or a wick candle in a thick container that will prevent it from getting too hot.
If you use real candles, make sure they are secure and you are present at all times while they are lit!
I have a couple versions of this in our basement. I used an LED candle that operates on a timer and put it in a tall glass container on our built in bookcase shelves:

Wine corks look great in wood trays as well. I found this gorgeous wood bowl at a local store called Hoosier Sister, and the candle is from my friend's shop, Unplug Soy Candles:

I love the look of corks piled up inside a beautiful tray or bowl! It's simple but elegant.
I have to laugh when I think back to when I first wanted to use these in our decor. It was about 15 years ago and we didn't have enough for me to do much with, so I ordered a bunch from Etsy.
We still have those, but now we have no problem building up a collection of our own. ? I'm trying to decide what project I'll tackle with our extras! I recently found this large metal initial that you can fill with wine corks -- love that idea too.
Have you tried any of these pretty DIY wine cork crafts?
Never miss a post by signing up to get posts via email.
Via https://www.thriftydecorchick.com/2022/07/DIY-wine-cork-home-decor-gift-ideas.html How to quickly fix saggy or broken bamboo roman shades.
Don't throw out your sagging roman shades! If yours aren't rolling up perfectly anymore or are uneven when you pull them up, I have an easy fix!
I love our bamboo roman shades and have had them on our windows at both our last house and our current one. I love the texture and the organic look they add to our home. They've always been my go-to when it comes to window coverings.
Read more about why I love these bamboo shades (and some of the cons).
Like most window treatments, they're not exactly cheap! And our bamboo shades are corded, (I bought them nearly five years ago) which is very hard to find nowadays.
Understandably so, but the newer cordless versions aren't going to work for our tall windows. So I'm doing my best to make these last as long as I possibly can!
We close our shades every night and open them every morning, so they get a lot of wear and tear. In new or good condition, they will fold up nicely as you pull them up:

Even with constant use, ours have lasted us for years and years. Though there are a few minor issues that occur sometimes.
If you have roman shades and one side hangs down like so:

This post may contain affiliate links for your convenience.
I may earn a small commission when you make a purchase through links.
See my policies and disclosure page for more information.
Or if they don't fold up like normal, and have a long "flap" that hangs down like this:

It means the rings on the back have come loose -- but it's an easy fix!
This isn't a big thing, but over time as more rings detach along the back, it will become more noticeable. Also, when these don't fold properly, the parts that hang down will cause the shade to get longer and longer...so it becomes messy over time.
After a few of ours get a little saggy, I take them down to fix them up real quick.
By the way, I purchased all of our dark bamboo roman shades here!
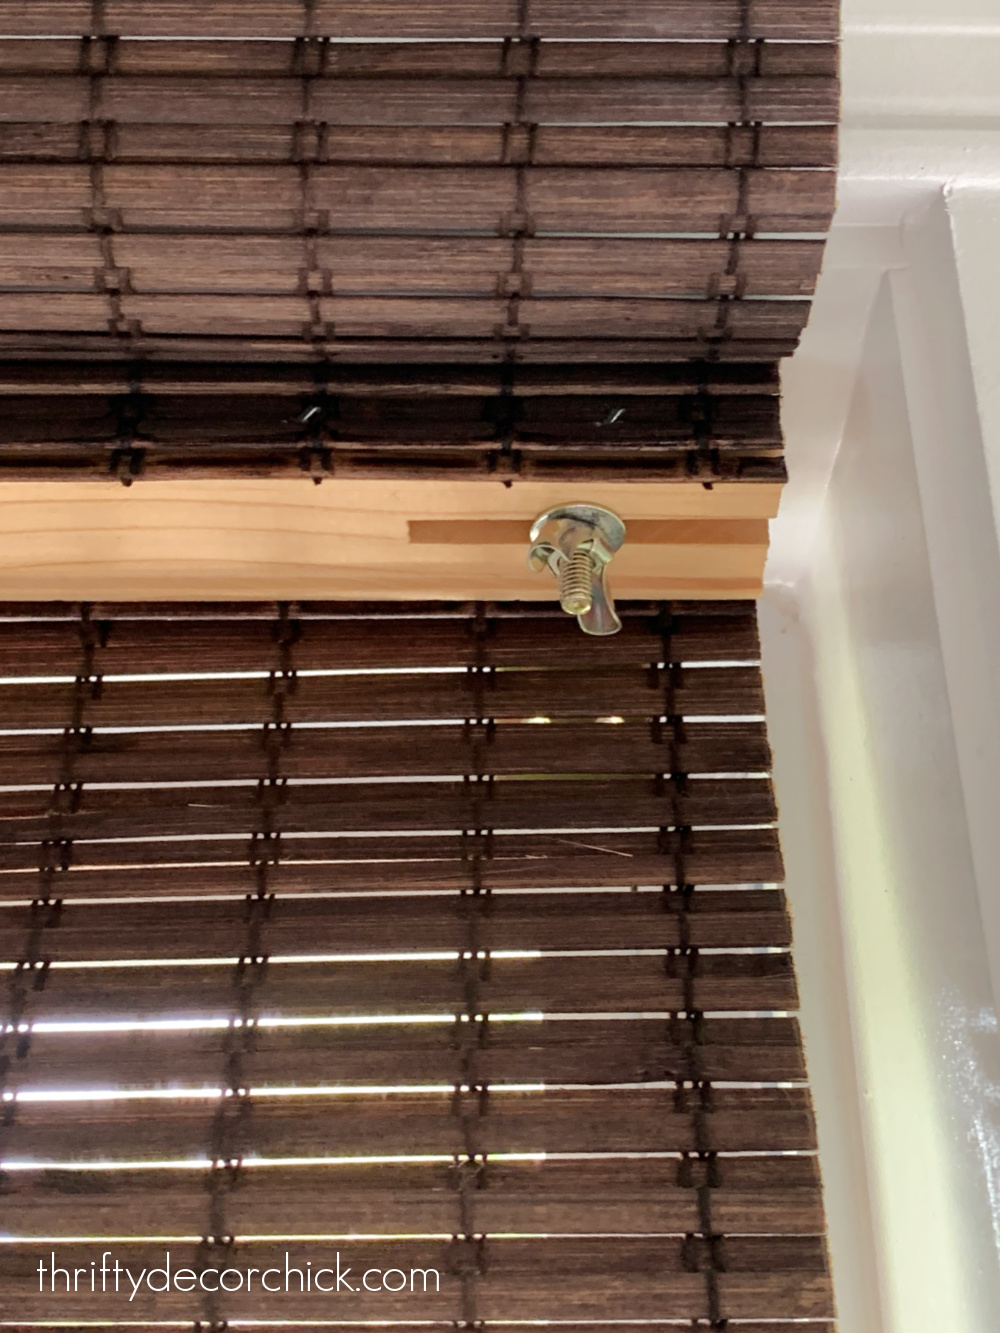
These bamboo shades are really easy to remove -- you just unscrew the wing nuts on both sides:
You can repair these shades while they're still on the window, but it's a bit awkward to get behind them just right to do this fix while they're hanging.
I lay the shades face down on the floor or a table to find the problem. The pulley system on the back should look like this:

With a ring attached to both the bamboo and the string cover.
But as you can see, it's just thread holding those together. Over time that breaks, and that is why they sag to one side or loosen up over time.
There are two breaks that happen -- either the rings have detached from the bamboo shade:

If you have a lot of patience and very tiny hands, you can just attach the ring back onto the string around the bamboo (if it's not broken). I have neither. :)
Another issue is the string/pulley mechanism has broken off the ring attached to the back of the shade:

I would not recommend trying to run the ring around the skinny bamboo piece -- there's not a lot of give to this wood and it will most likely break. You can also use string or thread to reattach and tie it off, but those will eventually wear again.
Instead I use these small, thin zip ties:

They make quick work of fixing these up!
Depending on your issue, there are a number of ways to fix the problem. You can glide the small zip tie through one of the bamboo pieces:

And then run the tie through the ring if it's well connected to the fabric cover:

Pull the tie tight and then clip off the excess plastic.
If your ring has come loose from the string cover along the back, you can use the zip tie to reattach it:

Again, thread would do the trick as well, but the zip ties are faster and stronger.
The string that pulls the shades up on both sides runs through that cover, so don't tighten your zip tie around it. The shades won't operate correctly if you do this.
Once the excess is cut off, you barely even see the fix:

Take care while pushing the tie through, but don't worry about the zip tie being around the bamboo -- when all is said and done everything will be evenly distributed again, so the weight on each one is minimal.
If you have two rings that have detached on both sides, make sure you reattach them to the same bamboo strip so the fold is even when you pull the shades up.
You won't even notice the zip tie from the front when you hang them back up!:

If anyone does notice...they get a cookie. :)
I've repaired numerous shades and reattached SO many rings -- and you can't even tell. It's not even noticeable from the back!
I went around the house and fixed six of our shades -- and now they are perfectly folded again!:

I don't have to do this often -- I'm surprised they don't break more than they do! But a few minutes of my time makes them work and look like brand new again, so it's worth it every few years!
While I was at it, I used some silicone lubricant spray to quiet any squeaky gears:

Where I can, I like to be able to tie the cords up out of reach. For me it's a visual thing, but if you have young children and corded window treatments, I highly recommend it.
I also like to get them up and away from the animals in spots where there's a bench or a chair under the window.
I attach these metal cord cleats to the inside of the window casing and wrap the cord around and out of the way:
These are all quick fixes that will give us quite a few more years out of these bamboo roman shades! And they're all even and looking good again! :)

From what I've seen of professionally made fabric roman shades, this repair would probably work on those too.
Don't replace your shades if they have started to look a little wonky! This easy fix will keep them looking great and operating perfectly for years to come. :)
Never miss a post by signing up to get posts via email.
Via https://www.thriftydecorchick.com/2022/07/how-to-fix-uneven-roman-shades.html Four easy and quick ways to add unique decor around the house.
These are super simple decorative touches I've added to our home that are easy to implement and don't cost much at all!
Read the full post
Tip one: Put it under glassI like to add a bit of interest to faux greenery by putting it under glass: 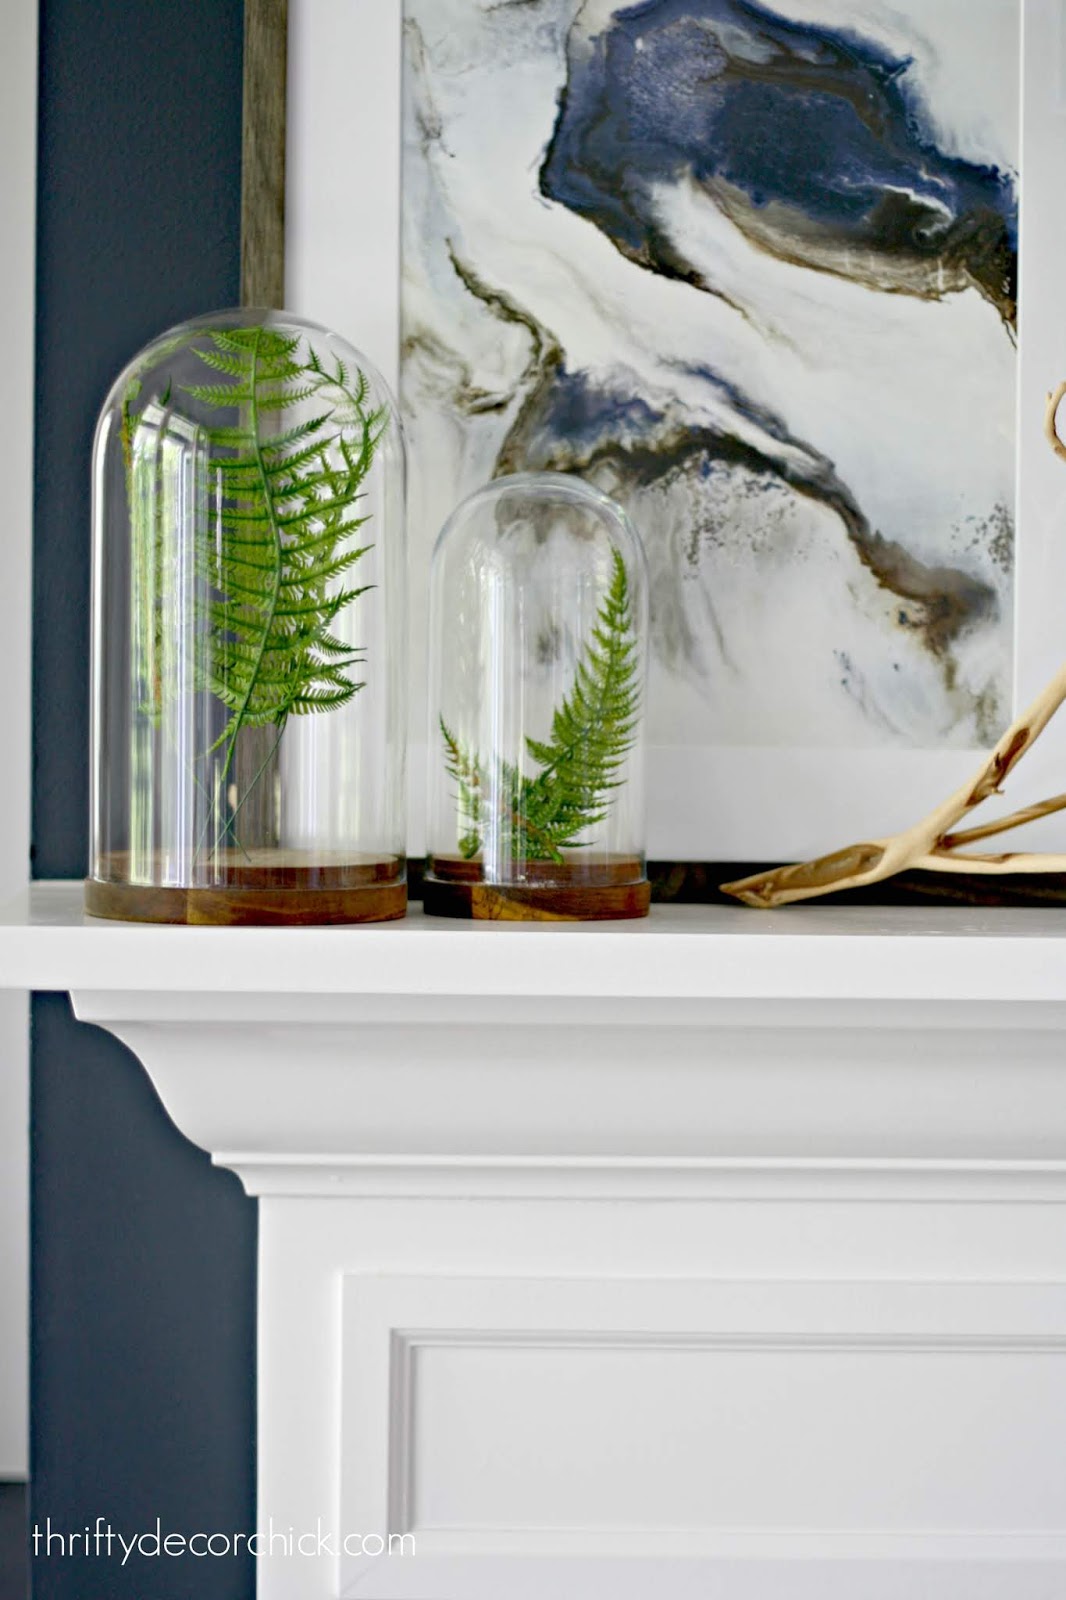
Those cloches are from IKEA and I just took a few fern sprigs off of a bundle I have. I love the look of them under the glass!
Sometimes little faux plants can look a little wimpy on their own, and adding the glass makes them feel a bit more substantial, but not busy.
I had a big fake succulent I loved for my green office bookcases, but it needed a little something. A large glass cloche made for a pretty display:
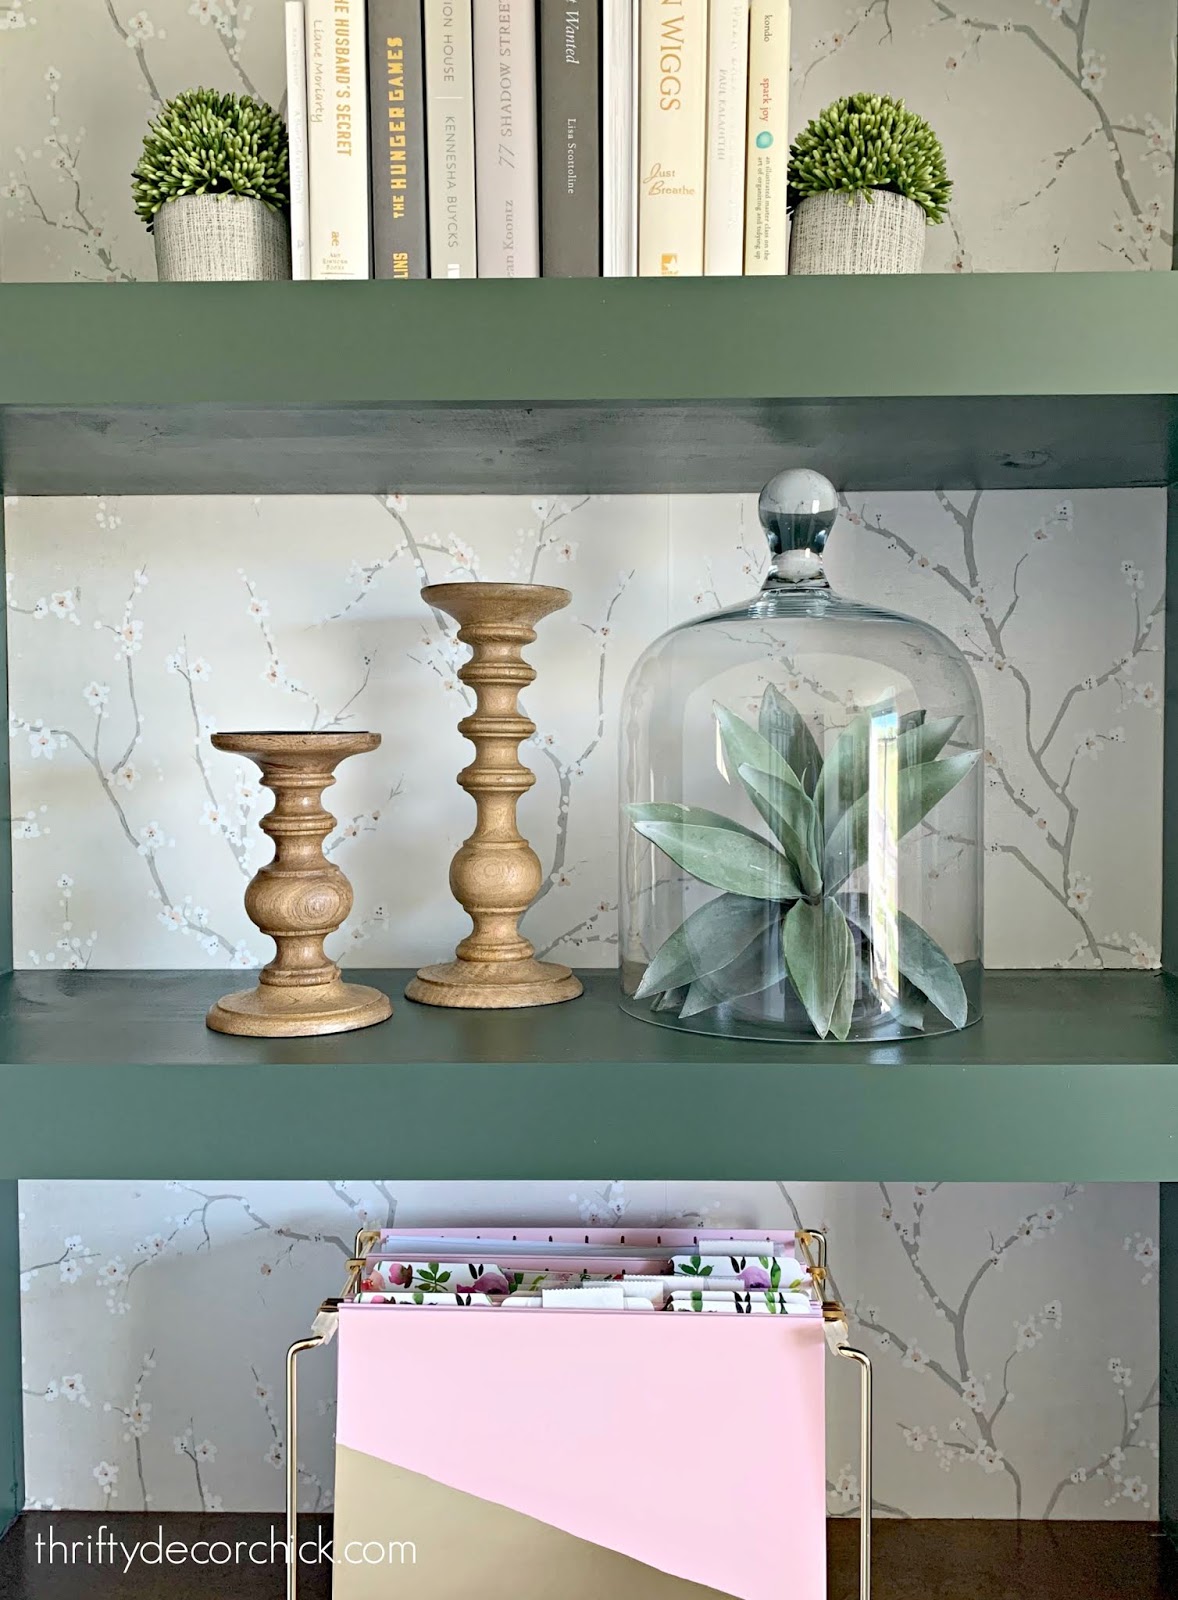
The glass gives it weight without it feeling visually heavy...love it!
Tip two: Add knobs where there aren't anyWe have a few furniture pieces in our home that I love, but they are so affordable and versatile, a LOT of other people love them too. ;) I see them all over social media and on blogs.
This post may contain affiliate links for your convenience.
See my policies and disclosure page for more information.
Adding hardware is an inexpensive way to make them look just a bit different, and it's super easy to do (check out this simple tool I use to make installing hardware even easier!): Via https://www.thriftydecorchick.com/2019/08/four-easy-and-inexpensive-decorating.html My 25 Amazon favorites under $25!
It's Amazon Prime Day(s) yet again! There are always a ton of awesome deals, but I prefer to share our favorites that we love and use ALL the time.
This time I've kept everything on my list to under $25 -- and the majority are well under that.
I can speak to the quality and performance of ALL of these products. Some I've written about in more detail, so I'll be sure to include links to those blog posts.
I love finding new items that make our lives easier or a little more fun...and I usually grab some very early Christmas gifts over these two days as well. By December I'm always SO thankful I started early! :)
This post may contain affiliate links for your convenience.
See my policies and disclosure page for more information.
I've broken these down into $10, $15, $20 and $25 and under categories. If you don't have an Amazon Prime membership, you can try it out for 30 days free here.
Alrighty, let's get started with my favorites under ten bucks!
Amazon favorites $10 and under
1. These rubber grip pads are awesome for opening jars or containers. I also use them when I'm trying to get a good grip with my pliers. I keep some in the kitchen and some in my tool bench:

I used our old ones so much we recently bought the new set I linked above. They are super helpful!
2. I shared this absolutely AMAZING wine stain remover last week:

I've used it numerous times to remove wine stains from our white couches and carpet. It's a miracle worker (for more than just wine!)
You don't need much, so a little bit goes a long way.
3. If you're a list maker like me, you're always looking for a pen. I love this elastic pen holder for notebooks or journals:
Read the full post
Via https://www.thriftydecorchick.com/2022/07/my-25-amazon-favorites-under-25.html How I keep my white sofa cushions white and bright with little effort!
I'm sharing how I've kept our creamy white sofas clean...and one of the ways may surprise you!
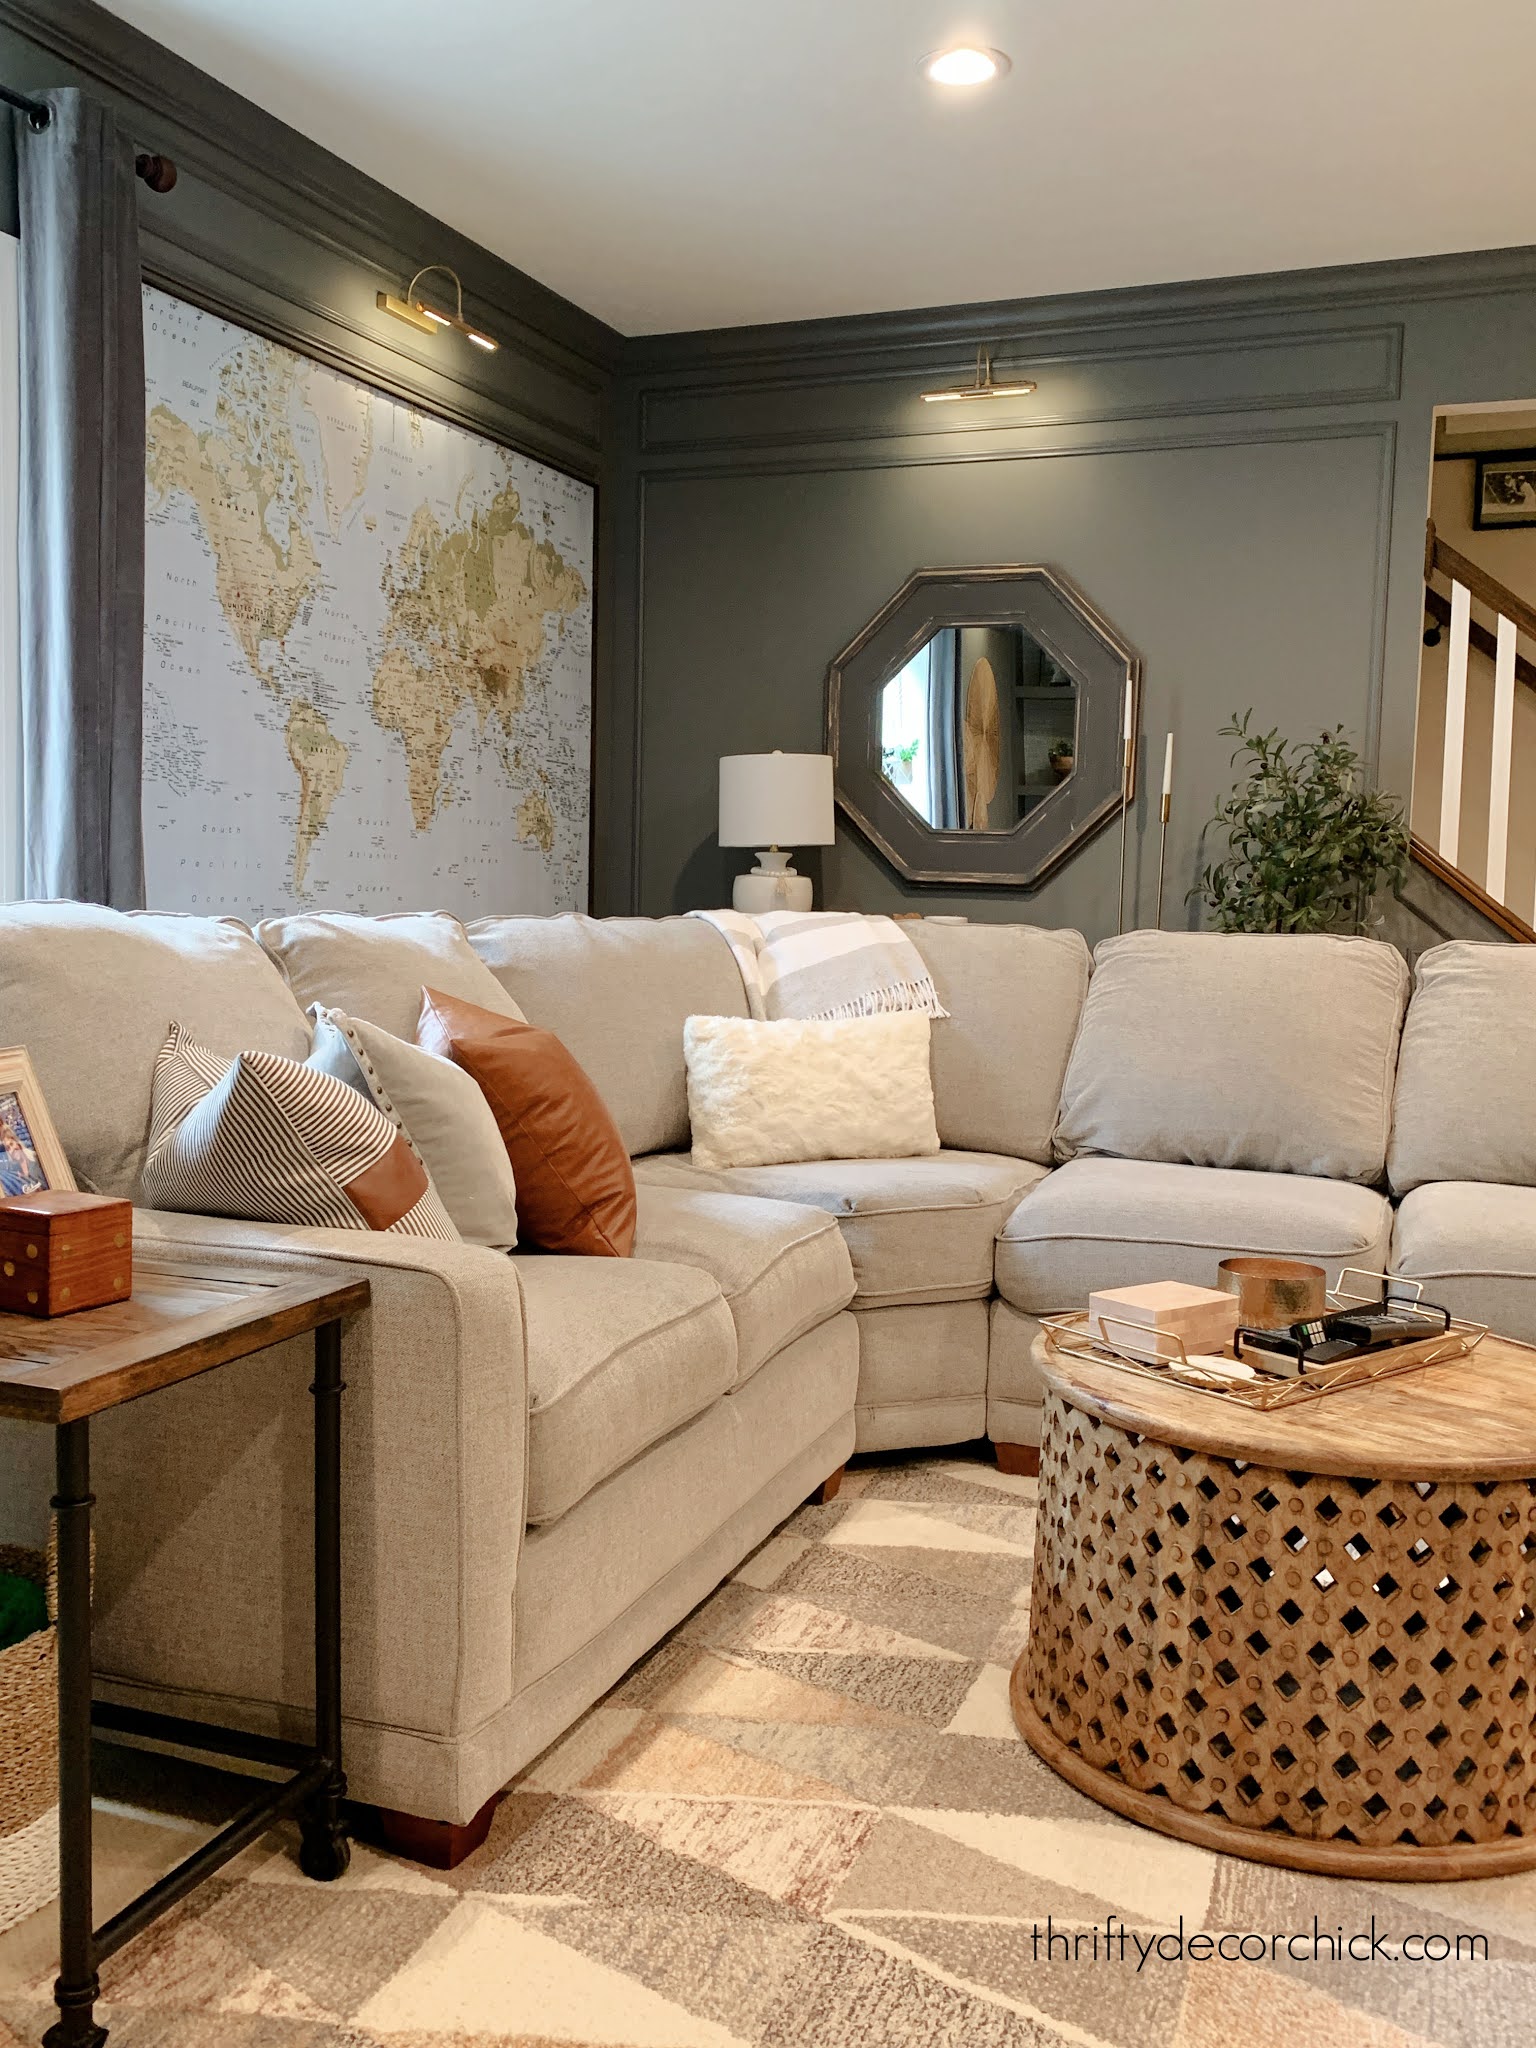
It's been over a year since our two Macy's Radley sofas arrived, and I still love them! We purchased one of these sofas years ago in our first house, and loved it so much we eventually did the same for our family room here.
**That sofa is still going strong at that house!
I spent a ton of time researching sofas after our Arhaus sectional did not hold up like I had hoped. I was determined to find a more affordable option that was easy to clean.
Not only are these sofas and sectionals from Macy's incredibly comfy, but they are easier to keep clean than any other sofa I've had:
This post may contain affiliate links for your convenience.
See my policies and disclosure page for more information.
Now, keeping it looking pristine was a little easier with our first Radley sofa that was a light gray, (probably because we didn't notice as much) but even I'm a little surprised at how well these lighter ones have held up!:
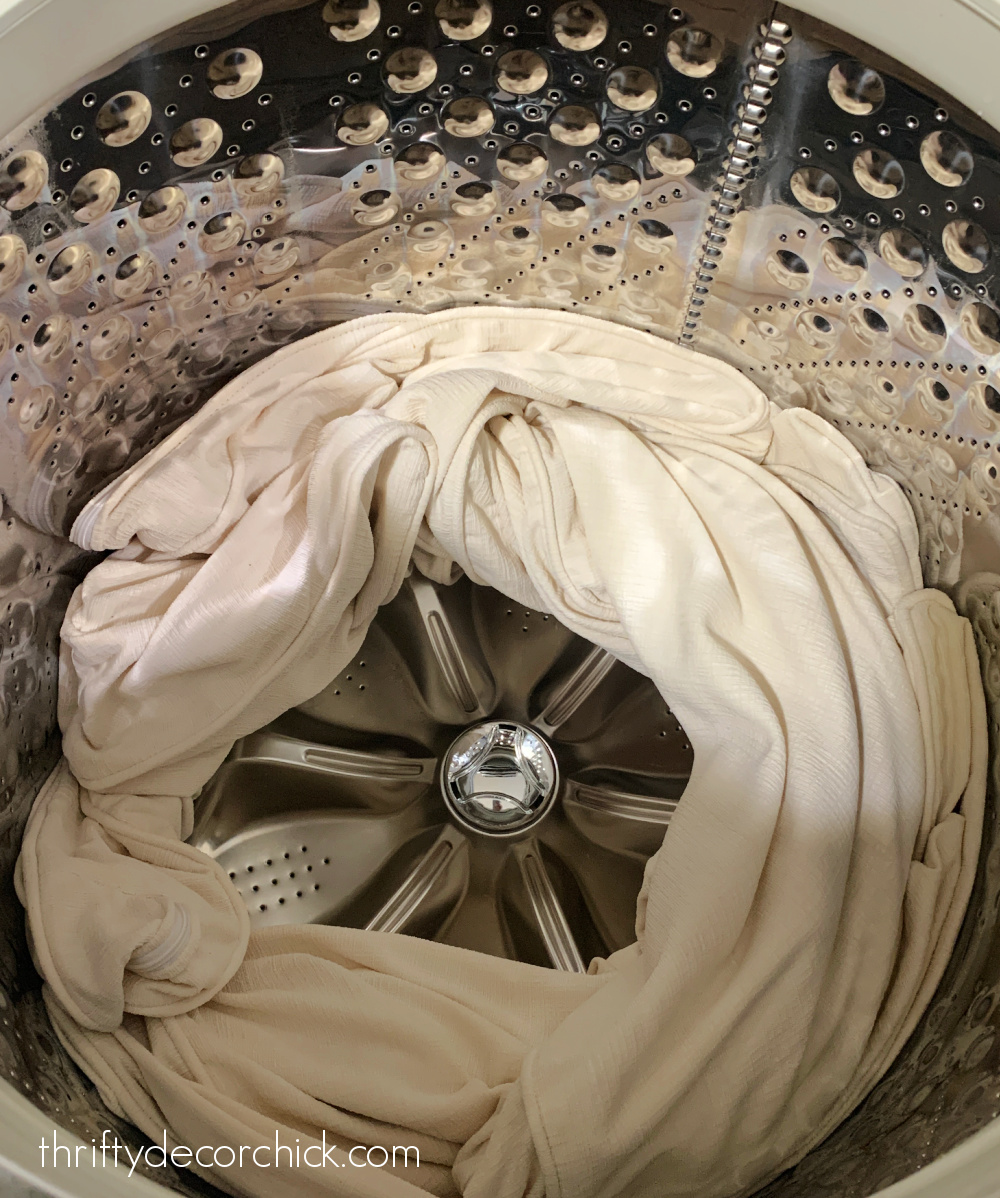
Washing cushion covers in the washing machine
One of the reasons I love this sofa is because the cushions are not attached -- so you can move them around and flip them if needed. The Radley sofas from Macy's have zippers on all of the cushions, both the seat and back:
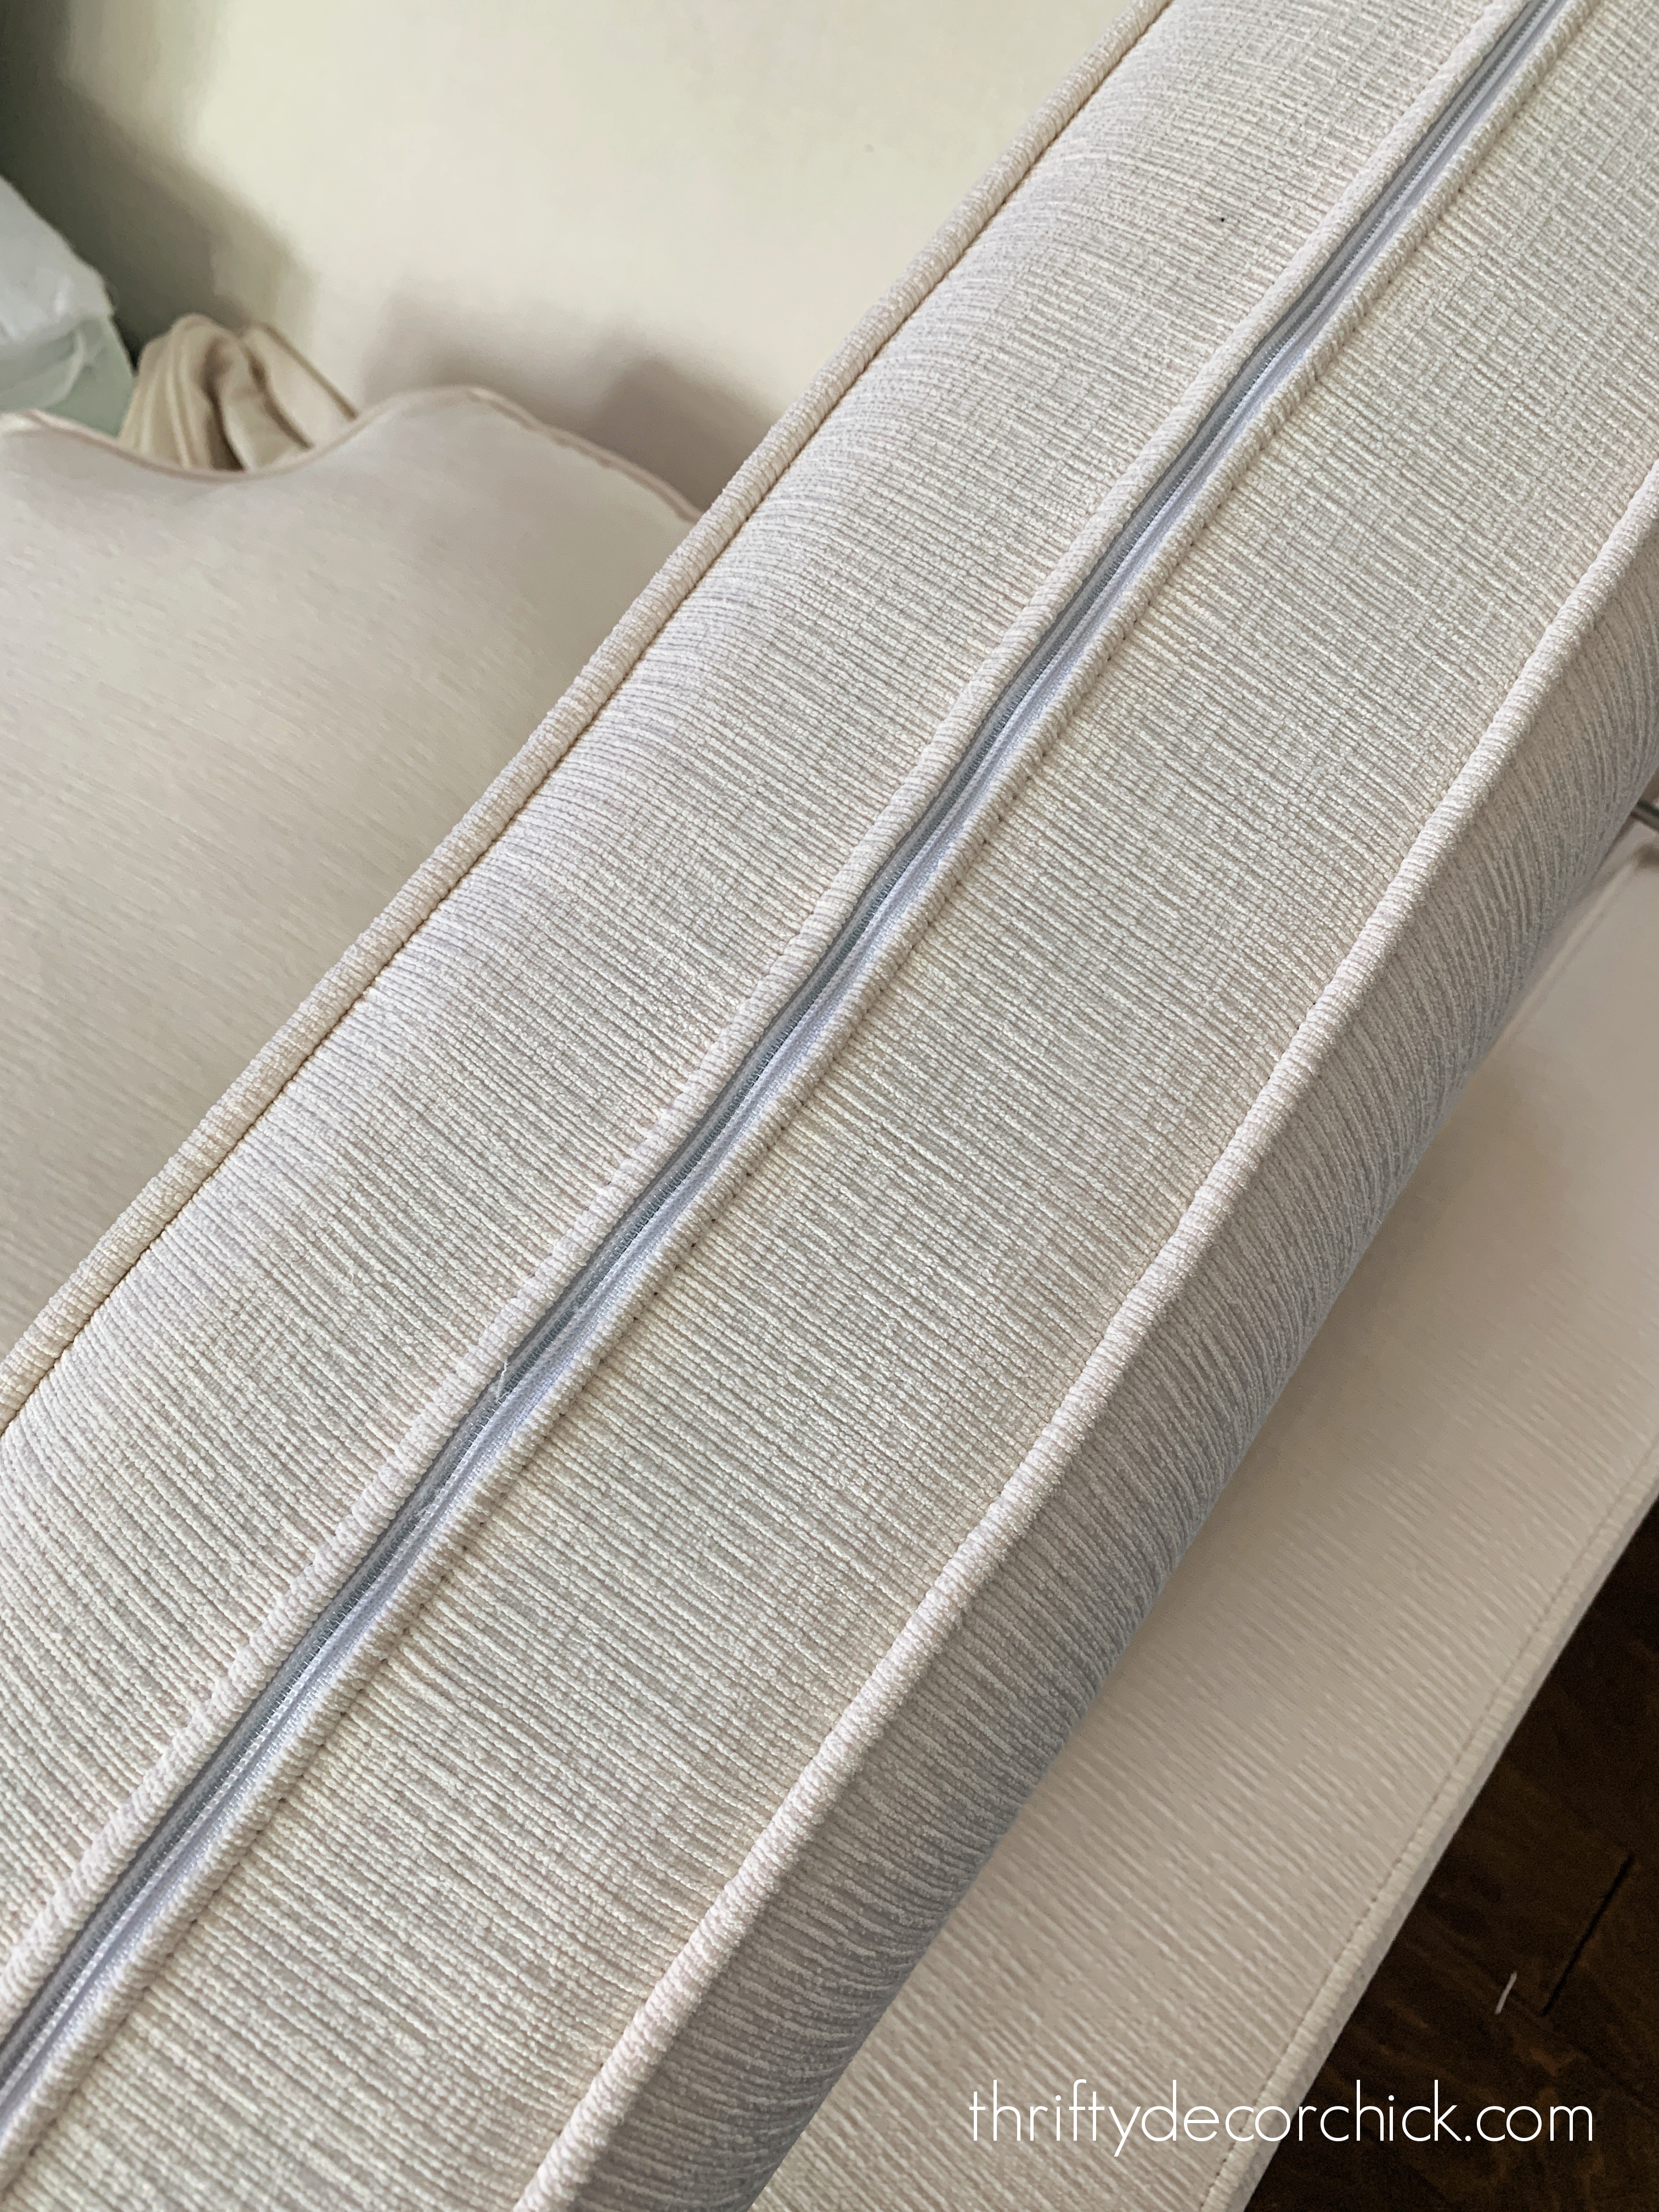
And, YES, I have washed them in the washer with much success!
I thought this was crazy...until I tried it. ;)
Keep in mind some sofa fabrics are made of materials that should not be cleaned with water. We had a couch like that years ago and every time liquid would touch the fabric, it would change the color and sheen of it.
I vowed then, never again!
The upholstery on the Radley sofas can be cleaned with water-based cleaners, so about once a year, I wash them in the washing machine:
A few tips to consider if you machine wash your couch cushions:

I've machine washed the covers on many upholstered chairs and sofas over the years, and they've all come out perfectly! ? The hard part is getting them back on over the seat inserts.
My trick to get the covers over the inserts with ease is to use trash bags -- put the bag over the insert and then slide on the fabric cover.
Place the trash bag on the back (zipper) side of the insert first, then pull up:

That way you can pull the trash bag out as you go. When the insert is at least half way in, you can remove the trash bag and reuse it for the next one:
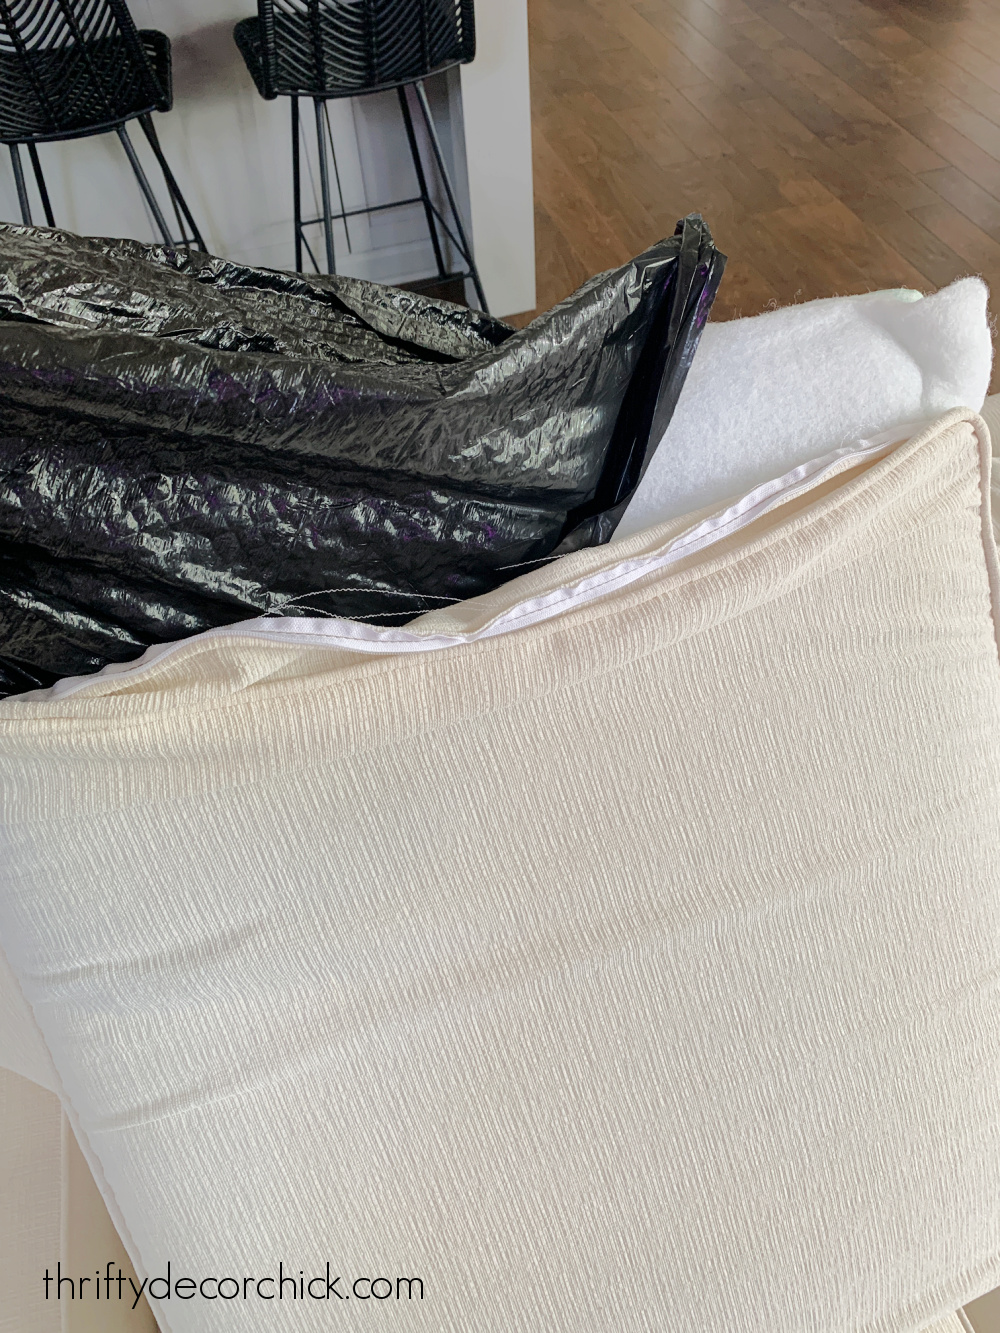
The slippery bag allows you to adjust and line up the seams of the covers too -- without it it's nearly impossible to get the cover back on the insert just right.
I only have to do this on the seat cushions, since the back ones are just loose fill and much easier to reinsert. This trick will save you time and makes it so much easier to put the couch covers back on!
Spot cleaning with water or fabric cleaners
Of course a soft cloth and mild fabric cleaner is the easiest way to clean upholstery. This soft polyester fabric holds up well to cleaning -- there are no worn spots or pilling at all.
I use a soft rag or microfiber cloth and nearly all of our marks come out with just water:
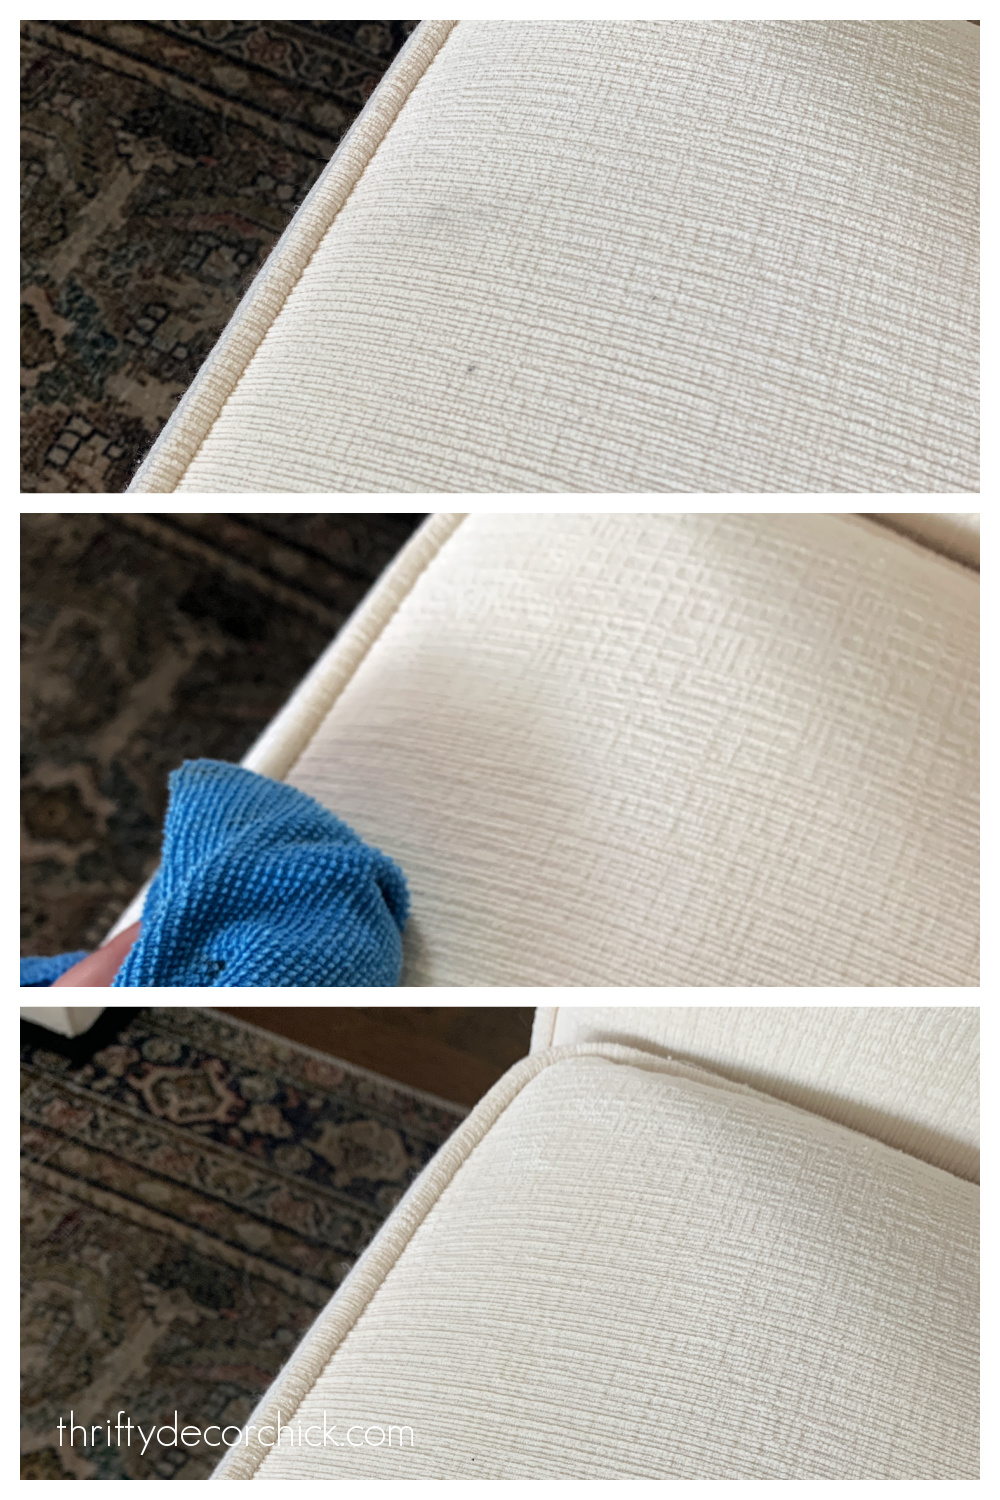
Be sure to check your fabric specifications before attempting to clean with water or solutions!
A handheld upholstery cleaner or the attachment on a carpet cleaner work to clean upholstery as well. Both are a great option if you don't want to attempt washing your covers. It's more physical work, but gets the job done!
I find those are helpful to touch up the fabric on the actual sofa, like the sides and back (that obviously can't be removed).
For more stubborn stains I use a basic fabric cleaner like Resolve. And I found the most amazing wine stain remover for the really difficult stuff:

We've had quite a few RED wine stains on these light sofas, and this gets it all out!
I may write an entire blog post about this incredible fabric cleaner...it is THAT GOOD. It makes red wine stains disappear before your eyes, and I've found it also works on other "berry" based stains and chocolate.
Honestly...I think it would get almost anything out!
We've used it on upholstery both inside and out, and on light carpet. It erases wine stains from all of them. Here's a look at a BIG stain that completely disappeared with this Chateau Red Wine Remover:

Can you believe it?! There's absolutely no sign of it:

There you go...nothing earth shattering, and it does help that our upholstery fabric is so forgiving and easy to clean. If you choose to go with a light fabric on furniture, make SURE it can be cleaned with water-based solutions. It really makes all the difference!
We have two cats, a dog and a teenage boy at home...so there are plenty of messes. Thankfully it's been easy to keep our light sofas looking great with these tips.
Would I attempt it with young kids? Probably not...just because I wouldn't want to worry about it. But it's worked for our family now! Thankfully these sofas come in a ton of colors. :)
Read more about our light gray basement sectional here (I love this one too!):
And see this quick hack to keep your couch cushions from sliding around:

Never miss a post by signing up to get posts via email.
Via https://www.thriftydecorchick.com/2022/07/tips-to-keep-white-couches-white.html |


