|
Hello from the tundra!! Wow it's cold here in Indiana, yikes! I'm a weirdo -- I actually enjoy being holed up in our house (for a couple days). It's so cozy and I love having the whole family home (no school). And this time things are going to warm up quick -- we'll have spring-like weather this weekend. Indiana weather is crazy.
A good friend of mine is building an AMAZING house. (I hope to show some of it to you soon.) :) I love meeting her out there to see the progress, and the other day I noticed their pretty Craftsman door trim. It hit me how much I missed it in this house.
You may remember my journey in our old house to rid the house of the tiny skinny trim, slow but sure...it took years but I got all of the windows (they had no trim at all) and the doors done. It made a BIG difference in that house. HUGE!
Here's the how-to for the Craftsman window trim:

And here's the tutorial for the Craftsman door trim:
I almost had the builder price out similar trim for this house, but we were at the point where I was getting the shakes every time we added something...I just couldn't change anything else. Also, I wanted to make sure I actually wanted it in this house. Unlike our first house, all of the windows are trimmed out. The doors have decent trim and the pass through areas aren't drywall, but wood all the way around. So those were upgrades.
But the exterior of our home is a modern Craftsman look, and it's just a classic design. I knew it would look great in this house after I saw it at my friend's new place. I gathered some supplies for this project ahead of time, knowing that I wouldn't want to leave the house for a couple days.
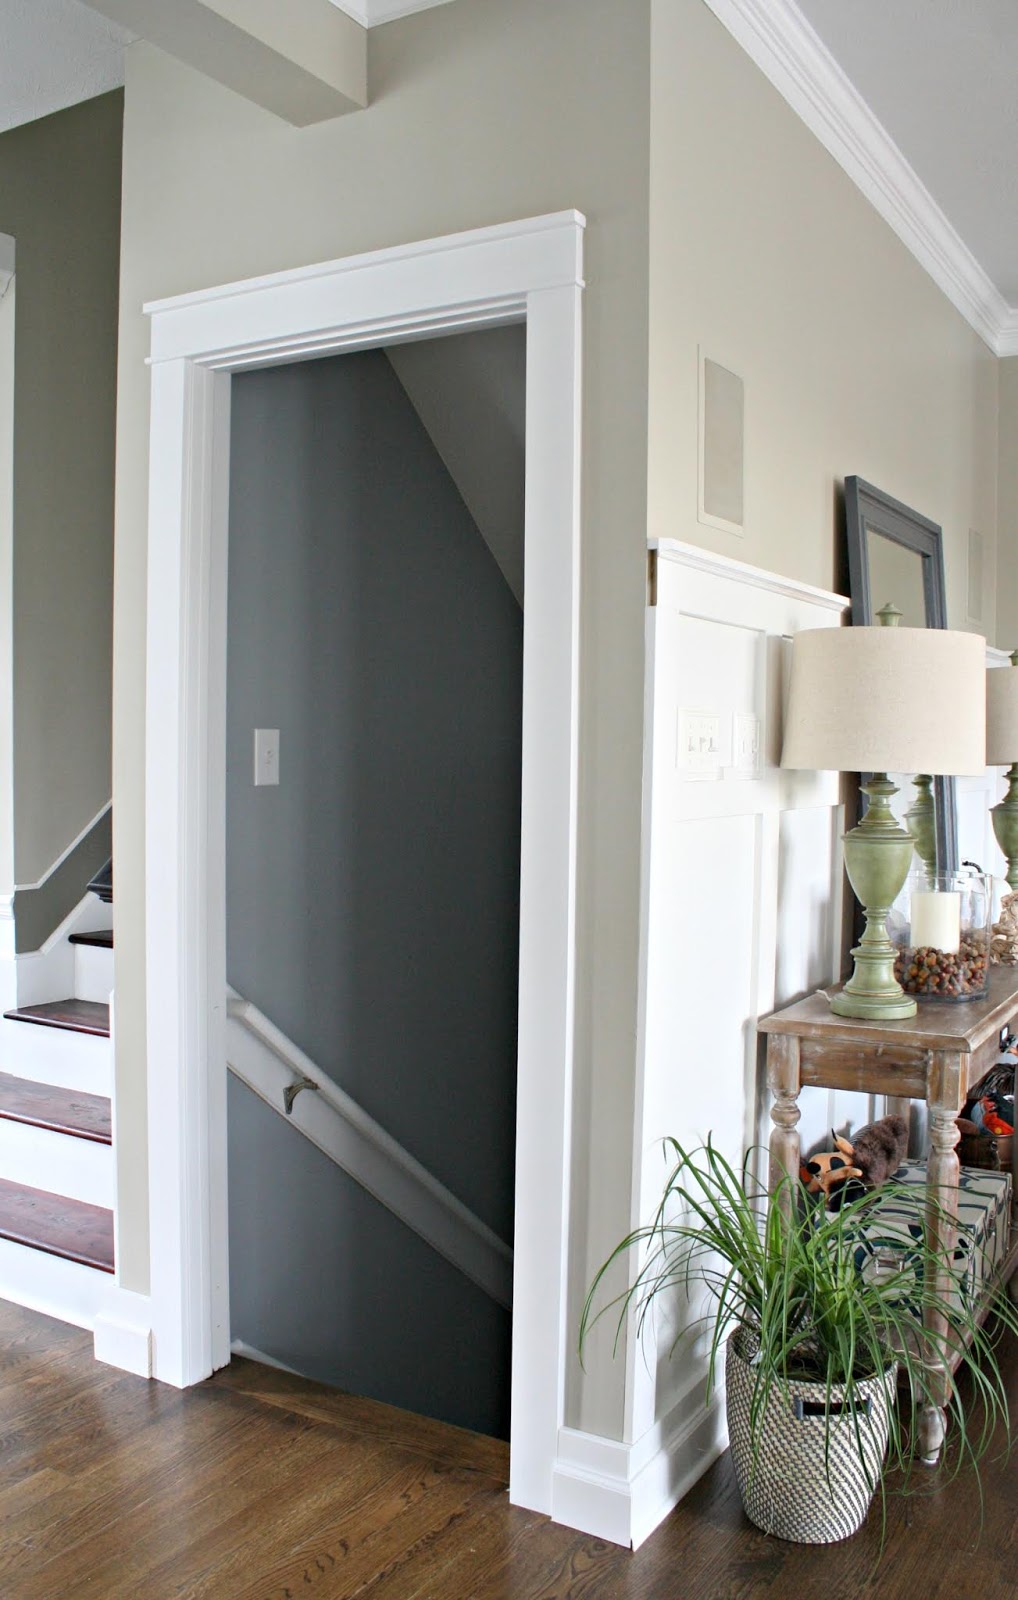
This is the area I wanted to tackle first -- it's the opening we look at most often:
This time I went with mdf for the side peices, instead of wood. If you have high traffic doorway, or young kiddos who may be running things into the trim, I'd stick with wood. We don't need to worry about that anymore, so the mdf holds up fine.
It was the same price as the select pine and it saved me a couple coats of paint and sanding on the corners (I always do that because the corners on the 1x4s are SO sharp):

Because they were the same price, I also got the 1x2 in the mdf as well.
For this project I used:
Refer to the links above for step-by-step instructions for the Craftsman trim! I give detailed instructions in each one. :)
I went with the taller, eight inch board for the header because this room is so grand. It can definitely handle the taller trim. I'm SO glad I did. It looks GREAT!!:
The paint was still wet when I took these, so it may look a little splotchy.
What a difference! Like it always should have looked this way! I'm so, so happy I decided to tackle this project:

The thicker trim gives a room instant charm and character. The front door is next -- I think it will make that much grander as well. Check out the recent foyer redo here!
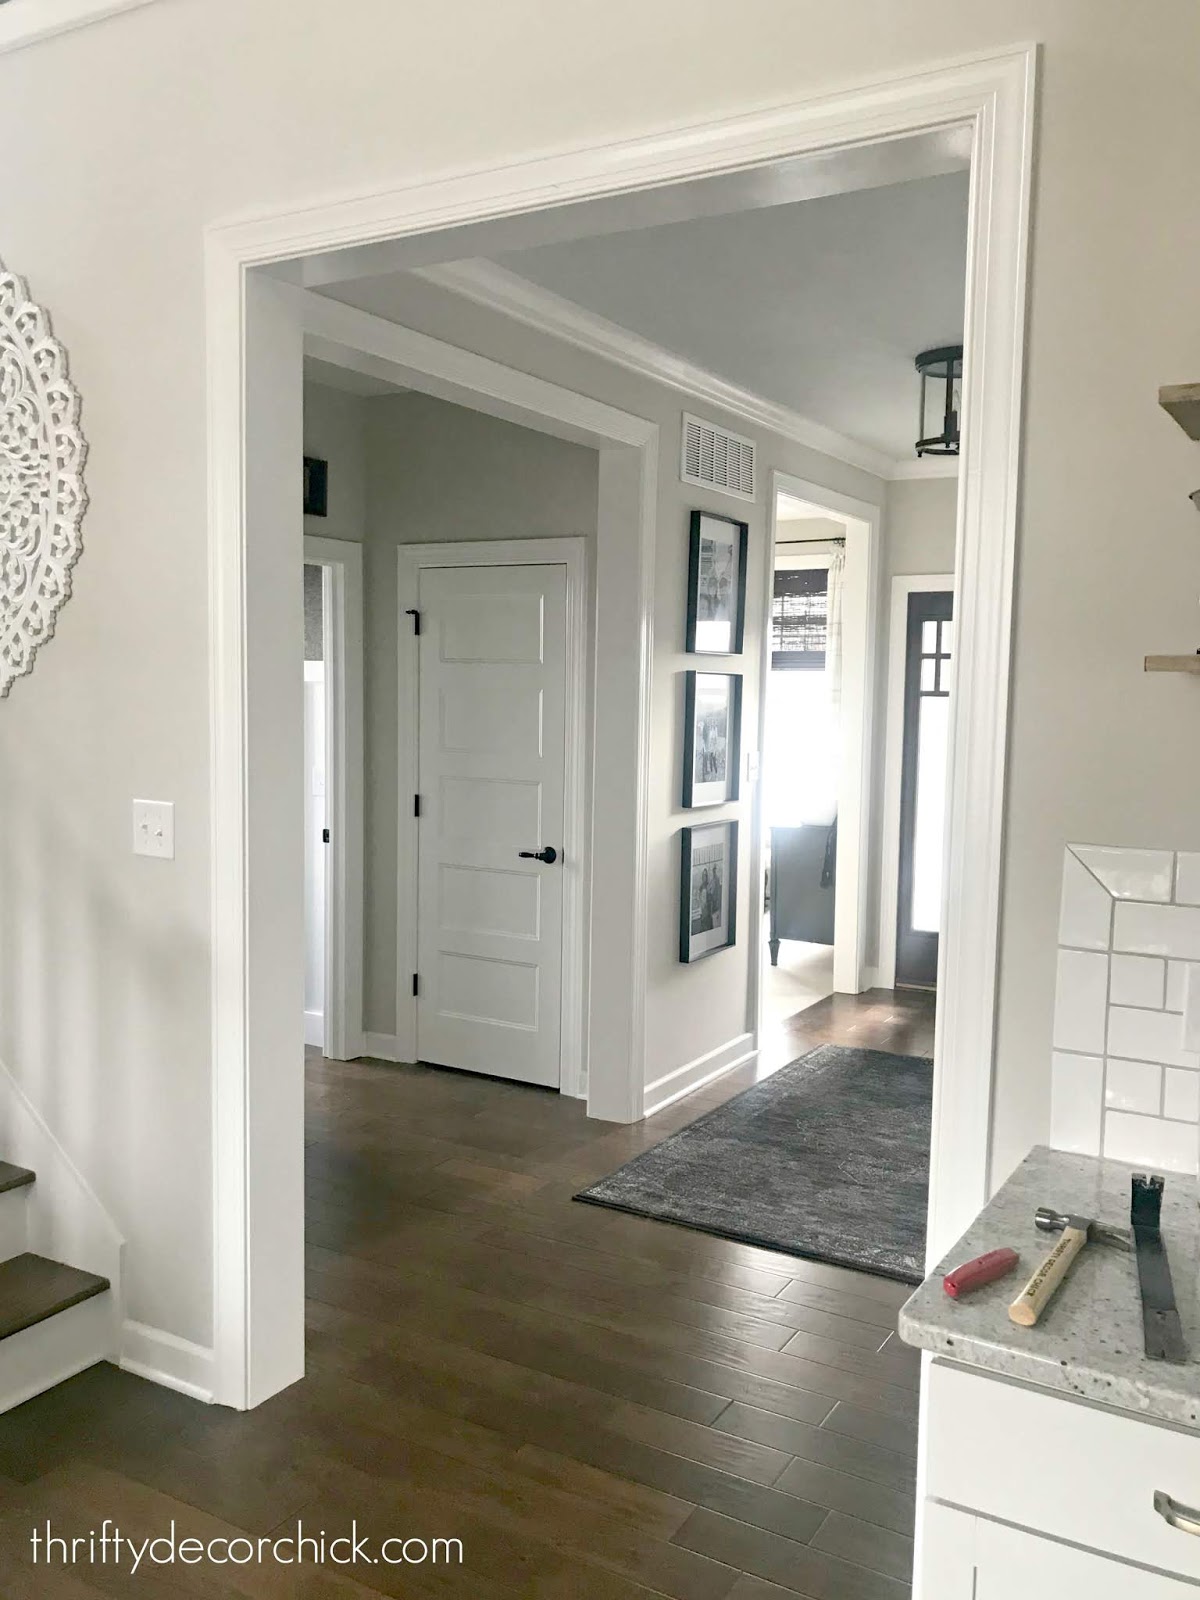
I've decided I'm going to focus on the larger, taller doorways first. I don't know for sure that I'll do all of the regular doors. Time will tell. For now, adding the trim to these areas will make a big difference!
Here's a reminder of the before with regular trim:

And here it is beefed up! So glad I decided to tackle this project again!:

You know it was a good decision when it looks like it always should have been that way! If you have any questions that aren't covered in the tutorials, be sure to let me know. Now I can't wait to get started on the front door. :) I hope to get it done this week. Stay warm friends! See more of our home here. To shop items in our home, click here! Never miss a post by signing up to get posts via email. Via https://www.thriftydecorchick.com/2019/01/another-repeat-diy-from-our-first-house.html
0 Comments
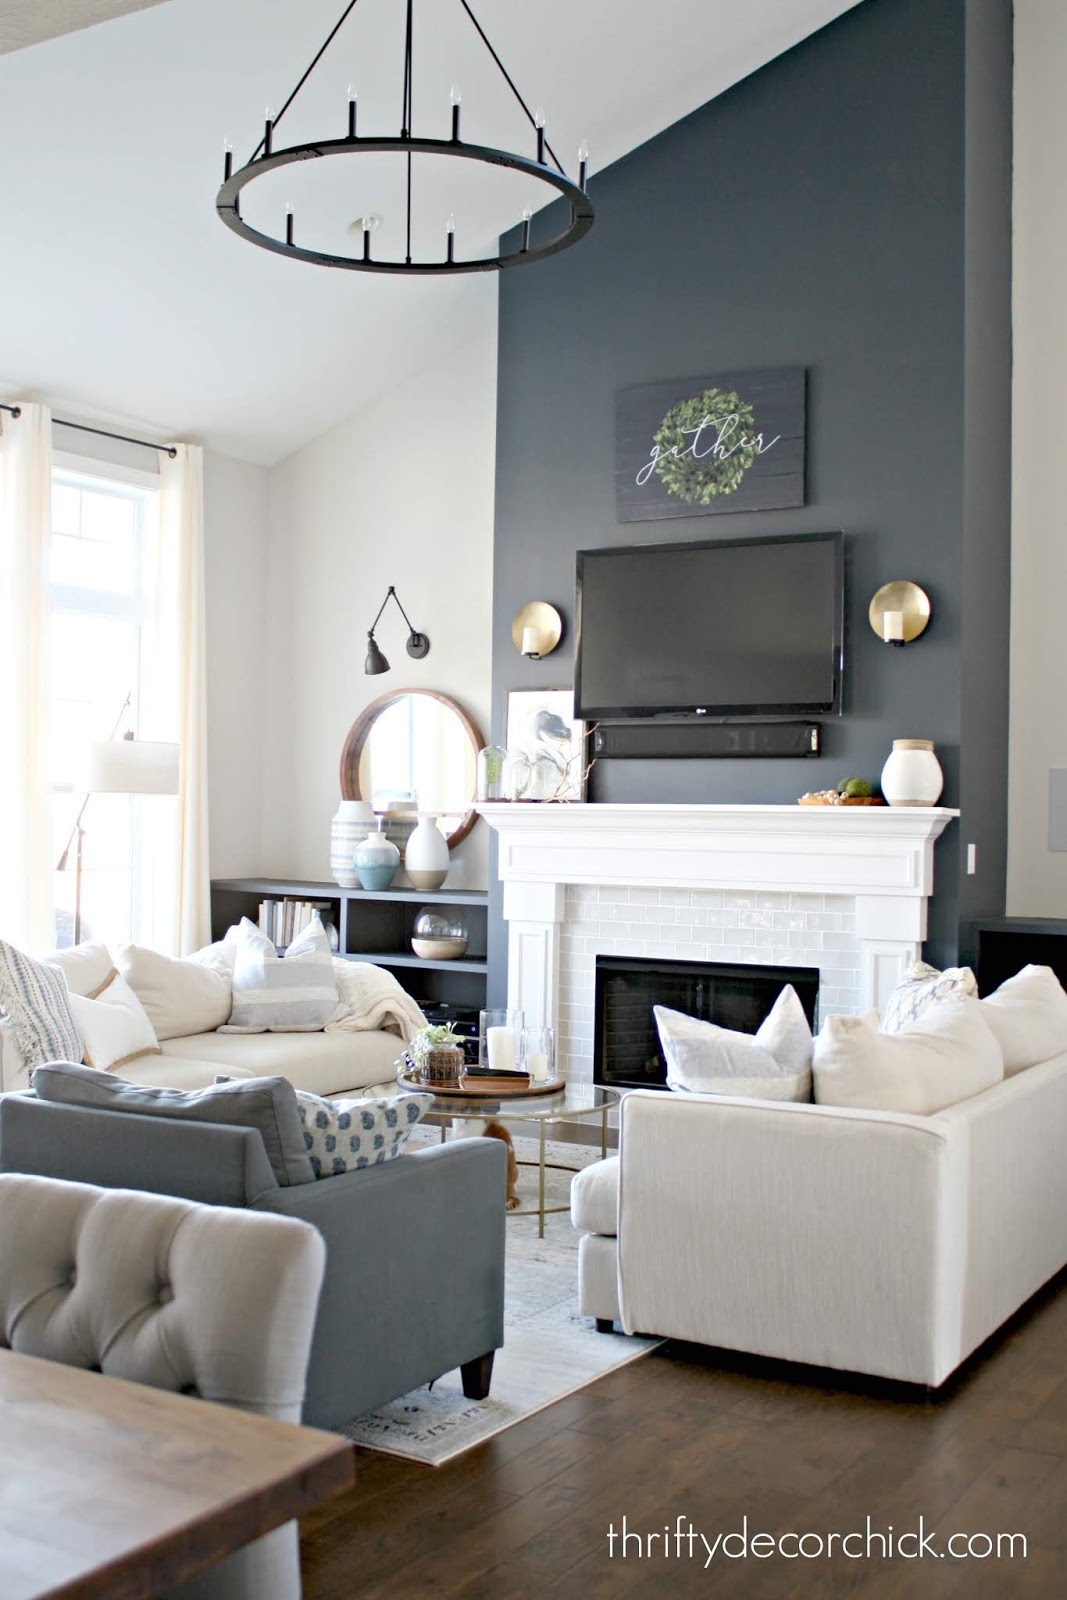
My last post was about giving our foyer a little makeover by using what we have and therefore using very little cash. Love how it turned out! I've done a little decorating in the family room recently that was mostly the opposite. ;)
I spent some money because I FINALLY found something I love for tops of the bookcases I built on either side of the fireplace. I've been searching for just the right thing for nine months! I don't even know how many times I purchased something, brought it home and it was never right.
I was patient though...I've learned over the years that I'm not spending on something until I really love it. It pays to leave it bare for awhile because the right thing comes along...eventually! I was in HomeGoods a couple weeks ago for the first time in forever and I finally found them! There was an end cap that had a bunch of large vases and I knew they'd be perfect.
I started grabbing some and mixing and matching. I walked through a few more aisles to find more options and ended up combining a few for each side of the fireplace:
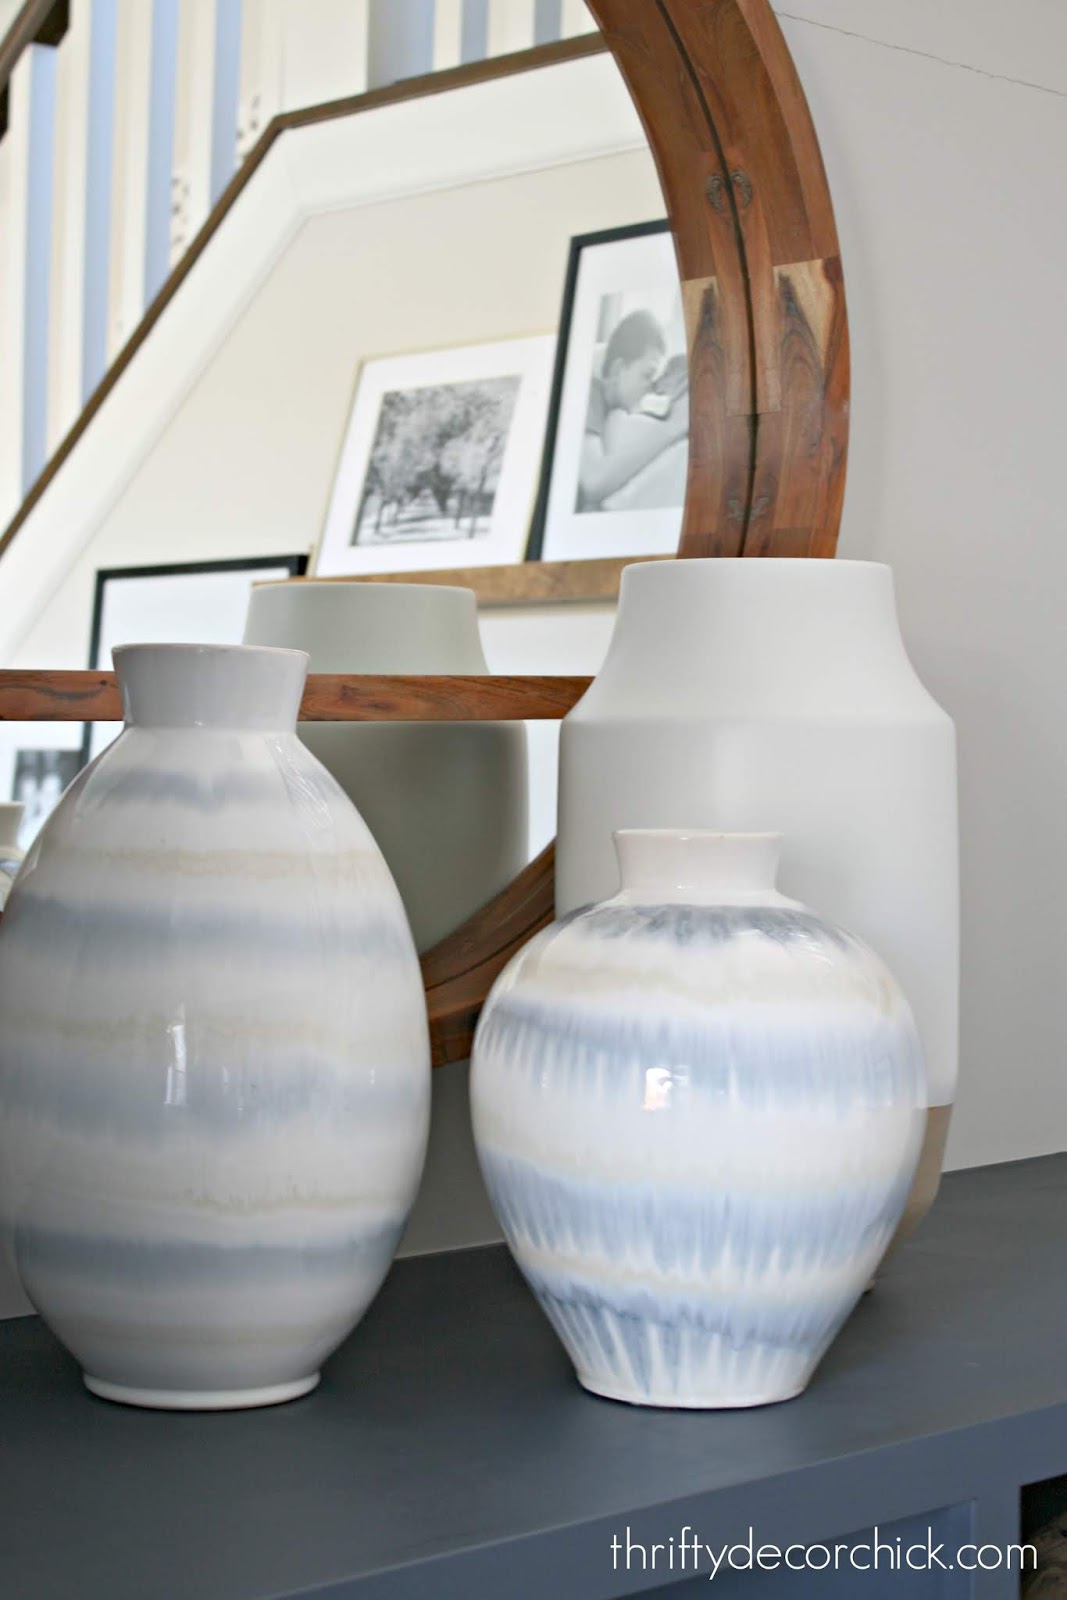
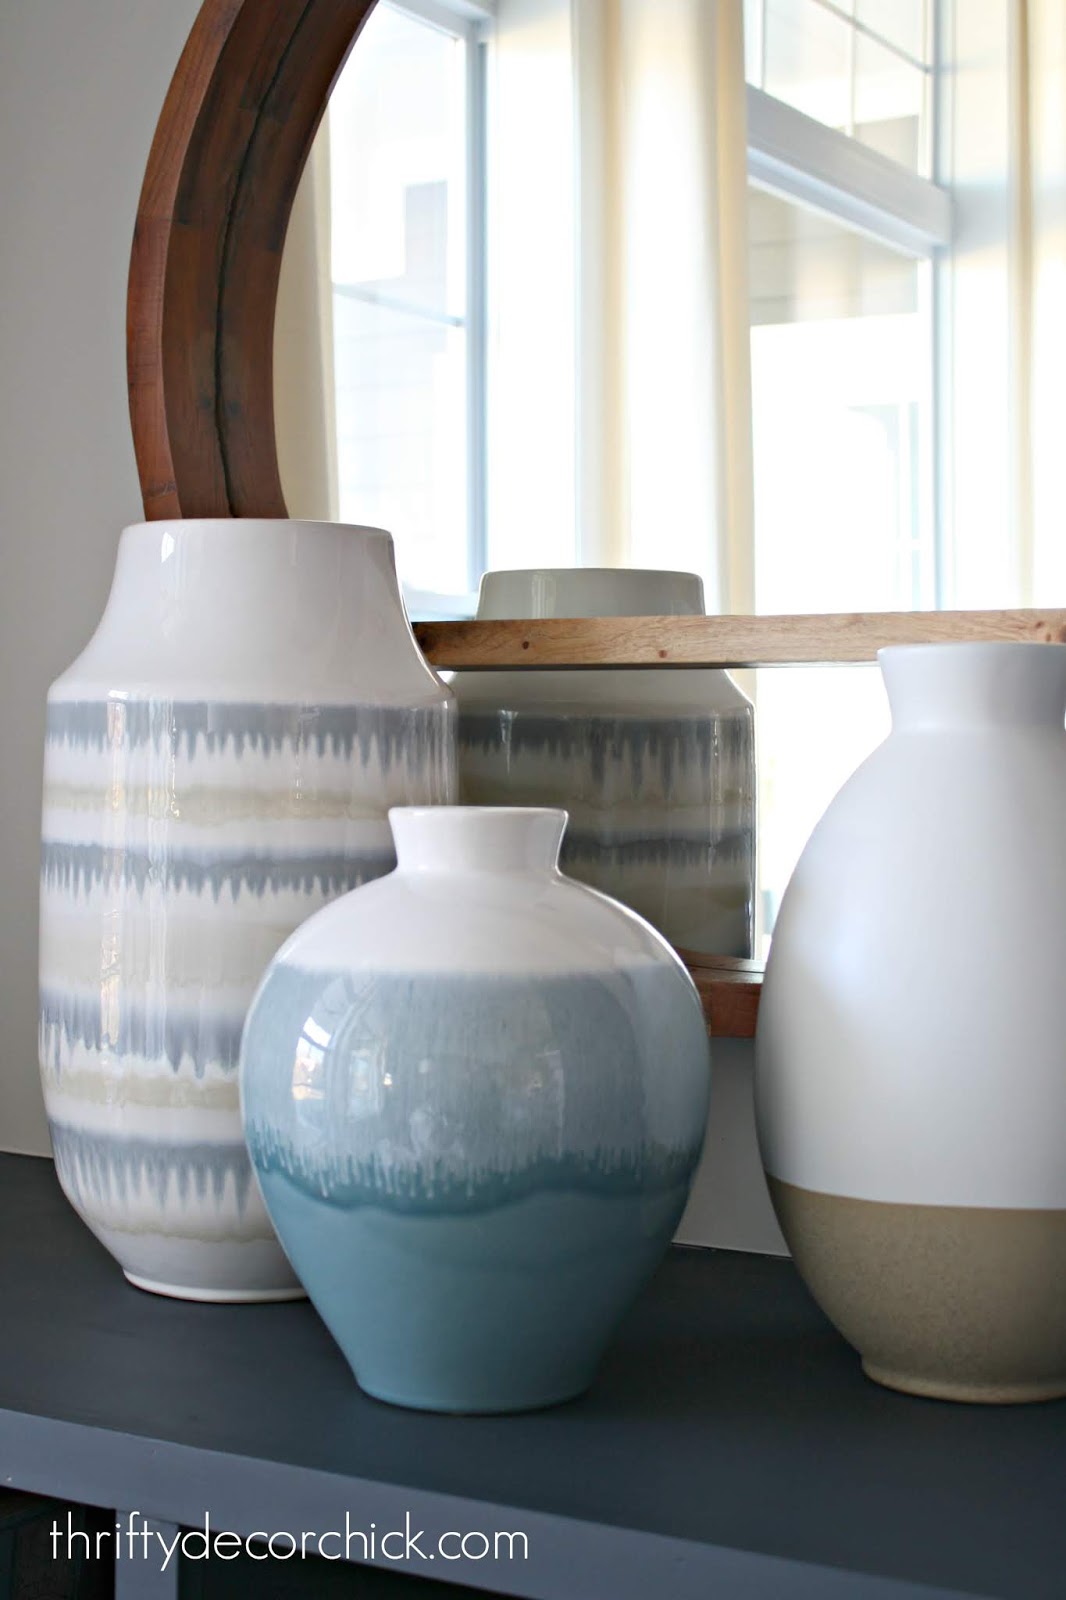
They are SOOO pretty and just look like they belong in our house...I was so thrilled! I wanted something large to fit the scale of this room and they are perfect.
I spent 10 minutes trying to fit them all in my cart and gingerly steered right to the check out. I had finally found what was going to work and I was so worried I'd break one. ;) The sweet girl who checked me out wrapped them up so well. I was so excited when I got home and tried them out and FINALLY...loved it!

I know, I know...the mirrors need to be raised up. Those things are absolute beasts -- they weigh a ton and I keep forgetting to do it when hubby is home. It takes two people to get them up and down.
They look so lovely with the blues in the room! I just love love love the vases:

You may notice I changed up the pillows too -- I used a mix of what we had and some new ones that I found weeks ago.
You'll be proud of me! They aren't matchy matchy and aren't perfectly symmetrical on each sofa. ;) You know how I love my symmetry! I really love the look of the larger pillows and that they don't all match. I'm getting there people!:
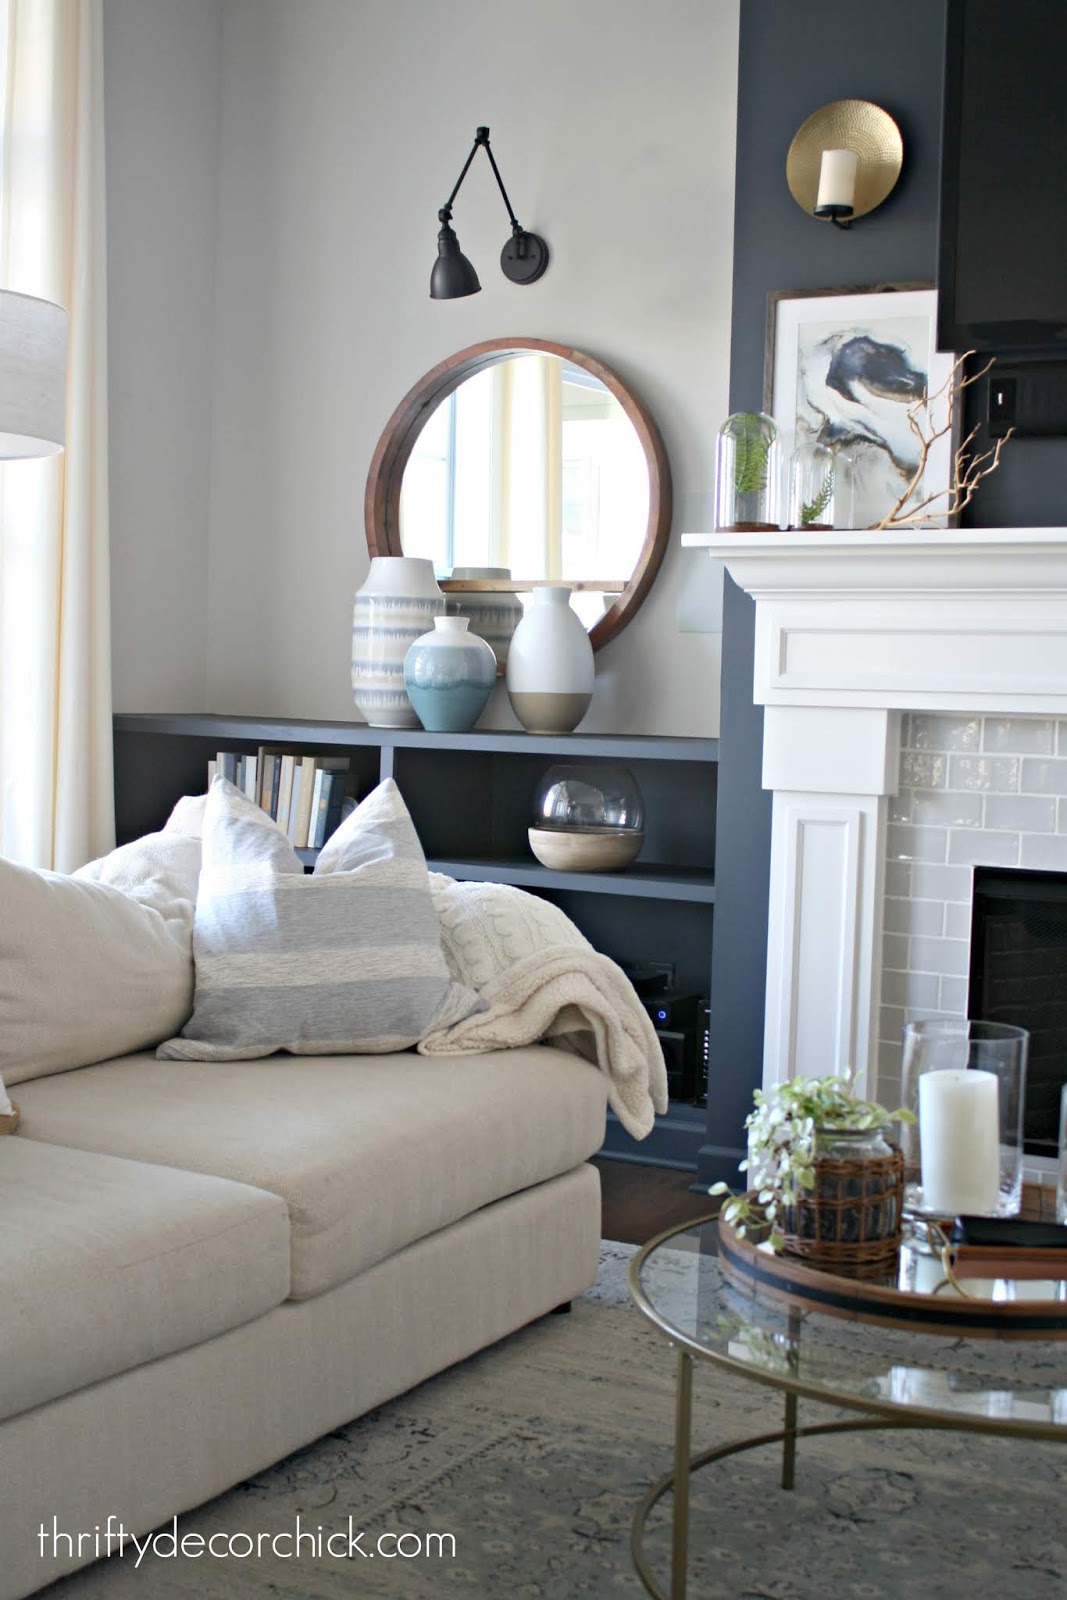
I think surfaces are hard to decorate and it always takes some trial and error when I'm working on them. Mantels included -- once I get them the way I like them they tend to stay that way for a long time.
I found an abstract watercolor I liked and then used some other random stuff to decorate the mantel:

I've had those cloches from IKEA forever and they've survived my decrapifying many times because I knew I'd find a way to use them eventually. I pulled some ferns off of a faux plant and put them under the glass -- I love how pretty and simple it is. I mentioned in my last post that I've enjoyed a simpler look as far as decor in this house. I didn't want a bunch of tchotchkes on the built ins -- I wanted it to feel easy but fill in the space nicely. The big urns are a perfect solution!: 
I spent some money on the pillows and vases, but they are items I LOVE and work beautifully in the space. I usually don't I find what I like and have the money budgeted for it at the same time...have you ever noticed how that happens? You always see the perfect item when you don't have the cash, and when you have it and are on a mission...nothin'!
The stars aligned for me this time. I only had to wait nearly a year. ;)
I'm learning how long it takes to get rooms right after moving! I expected that but it's taken a good 14 months to get this room how I want it. I'd love to find a larger coffee table for this room eventually, but that's another thing I'm waiting on. Now our dream is to add wood ceiling beams in here someday...we've been planning that since we moved in. It will be the perfect addition in this room! Have you waited for the perfect item to complete a space? Have a great weekend friends! **You can read my tips on how to decorate bookcases and surfaces here! See more of our home here. To shop items in our home, click here! Never miss a post by signing up to get posts via email. Via https://www.thriftydecorchick.com/2019/01/decorating-family-room-built-insfinally.html
Hello all! How is your week going? After a few weeks of organizing, I'm feeling settled and ready to tackle some DIY projects. All of the sudden I want to start on 20 different things and I'm having to slow my roll a bit. ;)
This little makeover is something that snowballed from one small project to a bunch of little ones. I've been wanting to paint the ceiling in our foyer for some time now. I loooove a pretty, light blue ceiling. It adds some beautiful contrast against the crown and is a nice way to add a bit of interest and character to a space.
I ended up using a color called Upward (lightened 50 percent) -- the same color I used in our son's old bedroom. I painted the ceiling and backs of his built ins with this color and loved it:
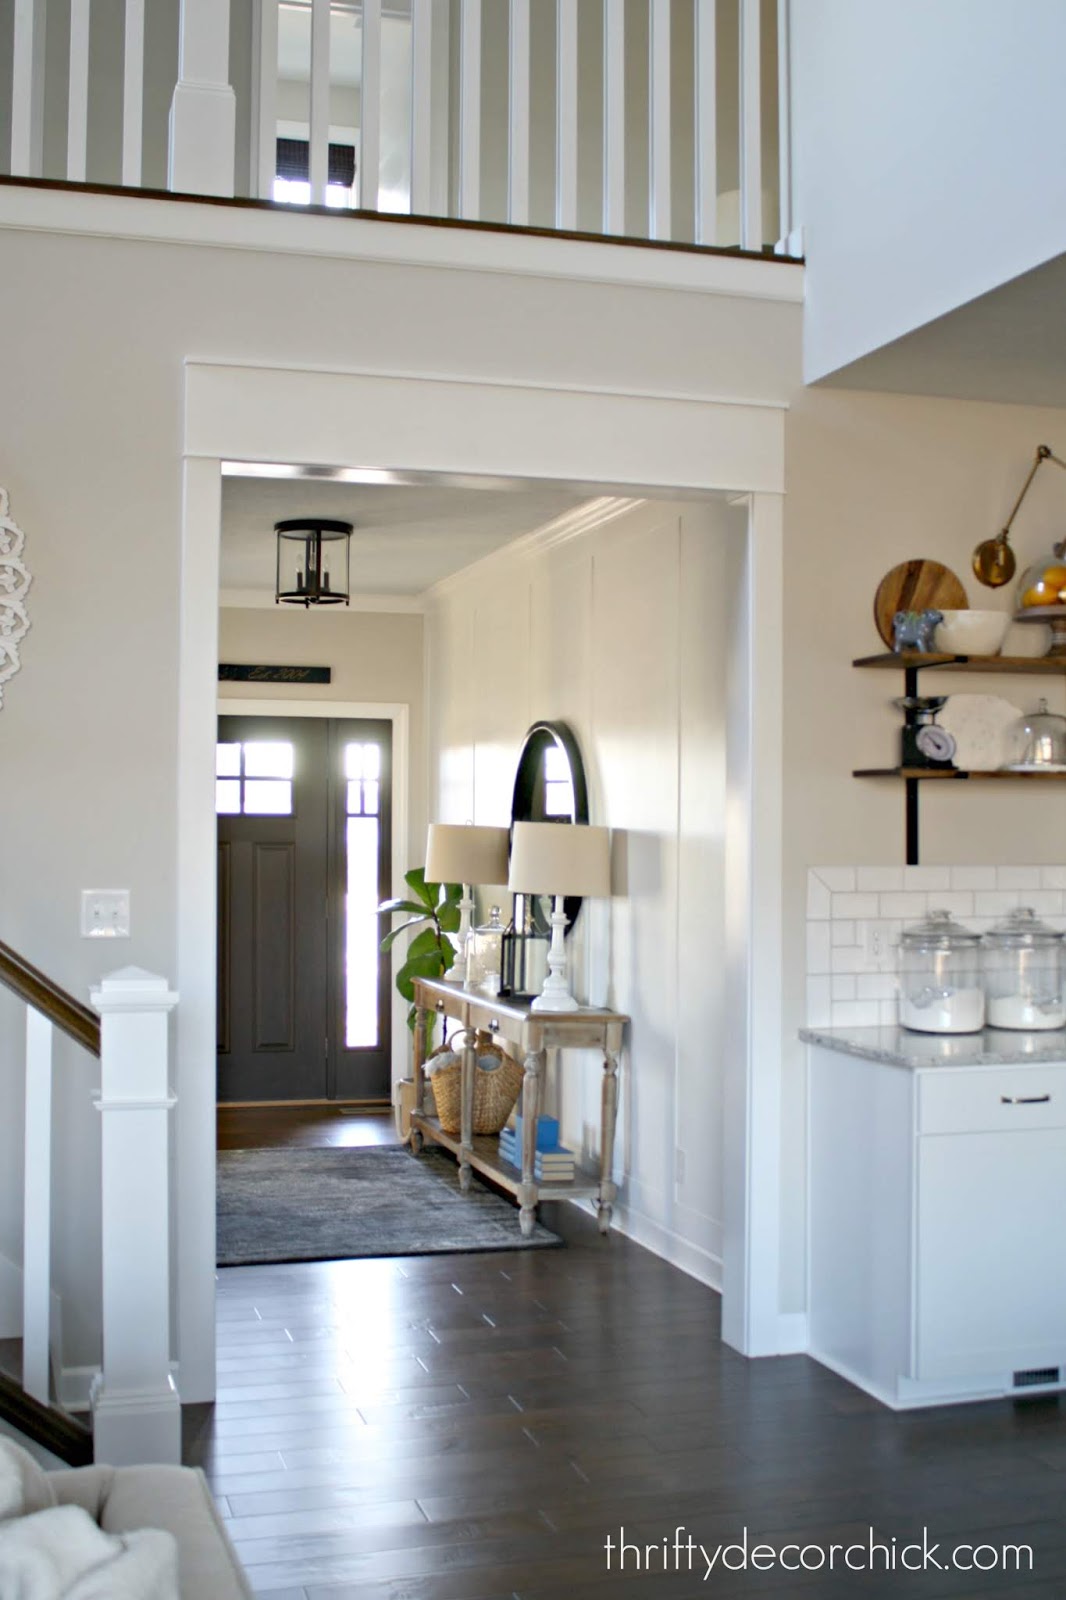
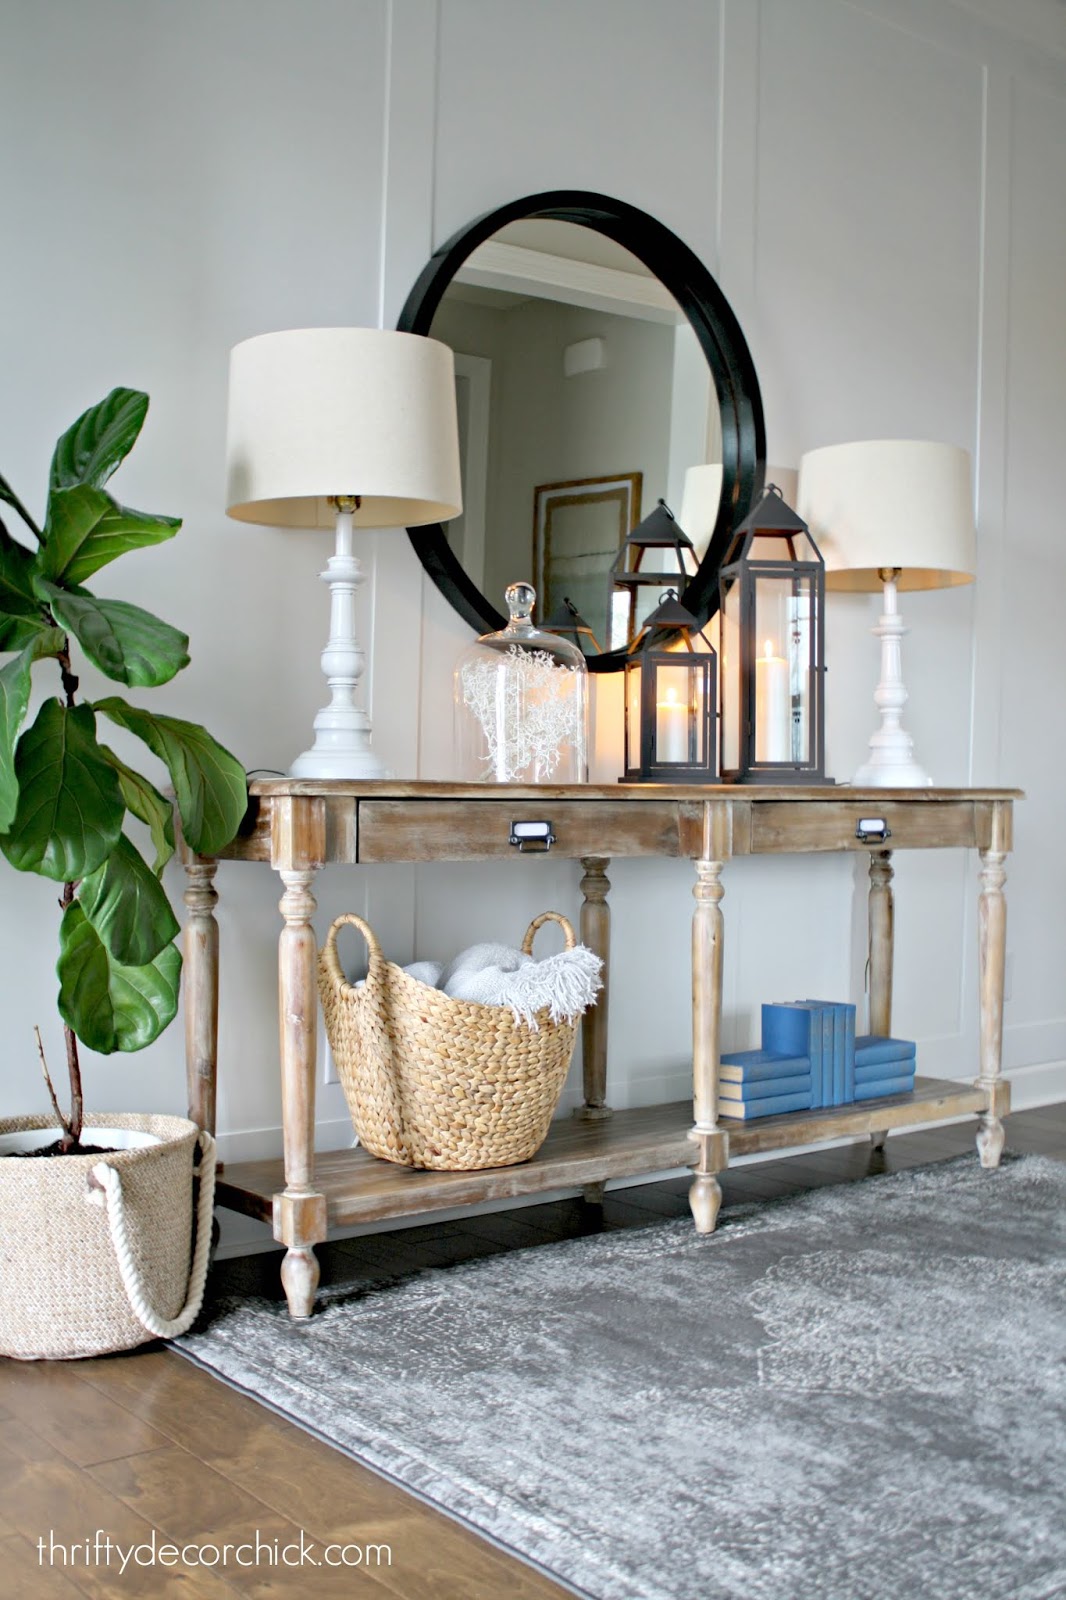
That was the cookie that caused the mouse (ME) to start changing other things. ;) I've wanted to try our long Everett hall table (affiliate) in the foyer for awhile. We had it in our family room in the old house, then we moved it to the basement family room in this house. I love the piece and thought it would look great in the foyer.
I really love the blue dresser we've had there, but over the past year I've realized when we moved into this house I placed things where I had them in the old house...and that it's OK not to keep things the same house to house.
The blue dresser is lovely but I wanted something longer to fill the space, and something with a slightly more modern look. The Everett table fit the bill. After I convinced the hubs to lug it back upstairs (his comment -- "Didn't we just take this down here?" Yes...yes we did) we all LOVED it in the foyer.
Then everything snowballed more from there. The wood tone on the mirror didn't work with the table...so I taped it off and spray painted it black. Taping it off takes longer than painting it!:

You can easily scrape paint off of a mirror with a razor, but trust me...cover as much as you can. You'll be scraping for hours if you don't cover most of it.
Then I switched out some lamp shades from some other lamps -- these are bigger and just look better here. I used items from around the house for the decor, so I didn't spend a dime on that:
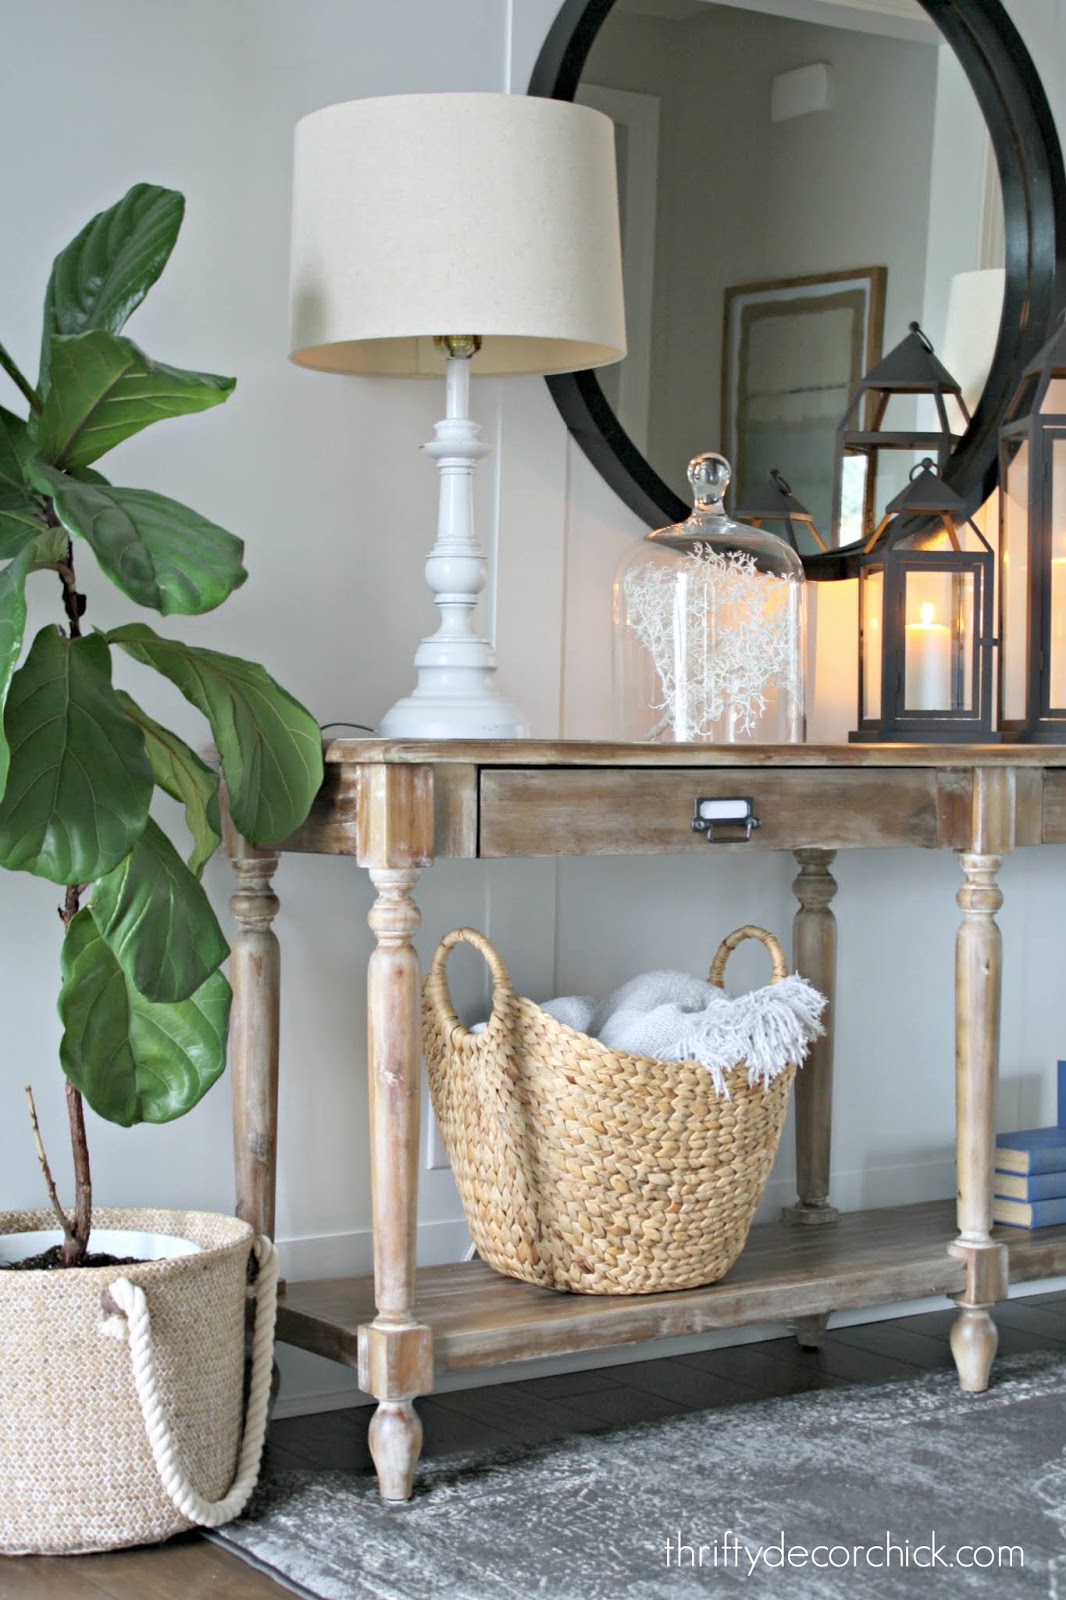
I kept the decor pretty simple. The cloche has a faux corral piece underneath. The lanterns used to sit next to the dresser -- we've already have had them lit more often now because I don't worry about someone knocking into them anymore:

The basket was in my office, the books were Goodwill finds years ago. And the lamps were brass thrift finds that I spray painted years back. They got a bit scuffed up in the move so I still need to touch them up.
The only money I spent was on the rug -- but even that I got for a steal because I had an At Home gift card from Christmas. (Thanks Dad and LA!) It was $60 and I only had to pay $20 of that:

I LOVE the darker rug here! The one we had here before was also from At Home as well (even cheaper for $40), but it's pretty worn out. (It's in the laundry room now.)
The rug is MUCH darker in person than it is in these pics. I had to edit because it's a super dark, gloomy day here. It's a very dark gray with a very light blue mixed in. That lighter color ties in beautifully with the new light blue ceiling:
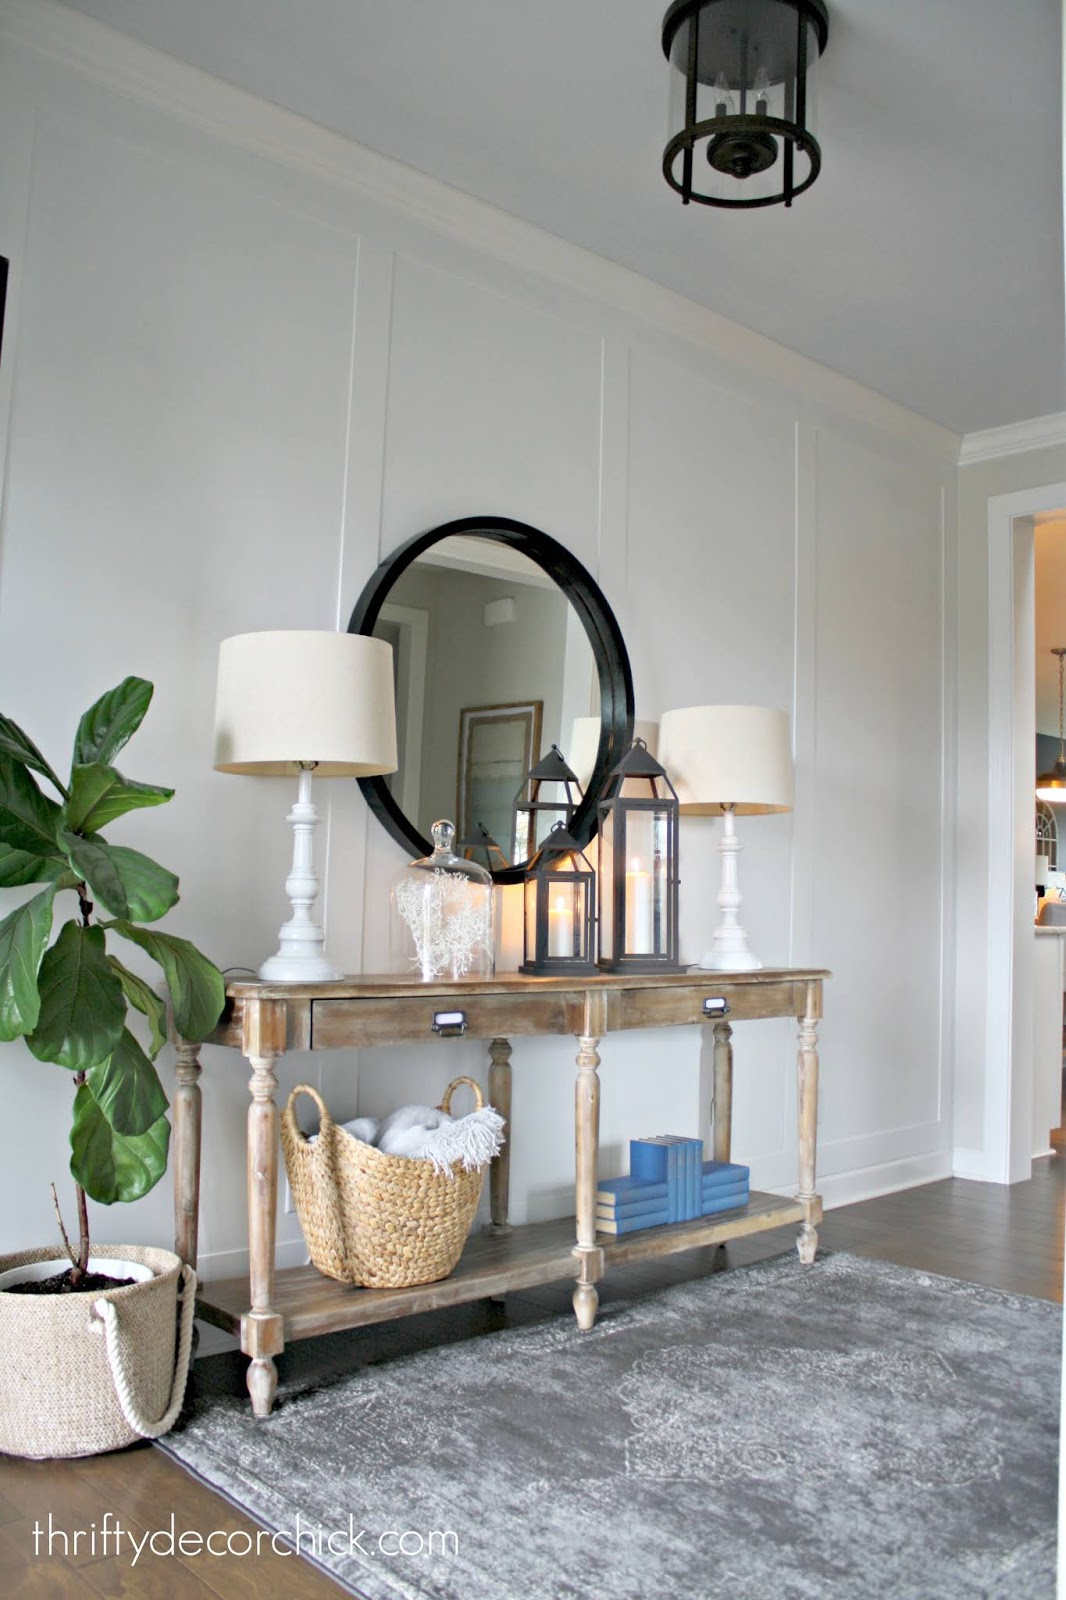
I love how the black pendant now plays off of the mirror and other dark accents. It came together so well!
It's still a bright space, but modernized just a tick. And it has a touch of moody with the dark rug that I just love:

I always get asked about the lamp cords when I write about this table. I wrote about my loathing for cords and the way I hide them. You can see my trick when you see the back:

Those covers work great!
I kept the decor pretty simple. I'm definitely much more of a "less is more" person in this house!:
It all started with the pretty blue ceiling -- I'll use that paint for more projects too. It spiraled into a few more projects but considering I only spent $20 on all of those, I'm thrilled!
I'm not done in this area just yet -- I'm pretty sure I'm going to go ahead and paint the rest of the walls white in here to go with the $15 accent wall. I also have a couple more trim projects I'm going to work on -- I'm excited to get working on those! I'll be sharing it all soon:

I loved the before. :) The after just fits in much better with the rest of this house. It's taking some trial and error to figure out all of these newish spaces (but it's been tons of fun)! I'll be figuring it out for years to come I'm sure.
I've always been a little jealous of people that can move furniture around a lot. Both of our houses have had layouts that don't really allow for that. So when I can switch something up for free, it always makes me happy!
Do you move furniture around often? It's such an easy way to change up a space!
See more of our home here. To shop items in our home, click here!
Via https://www.thriftydecorchick.com/2019/01/nearly-free-mini-foyer-makeover.html
About a year ago I organized our new pantry for the first time. For months we had let it go and were just throwing stuff on shelves, so it was nice to get it organized. We're SO lucky to have such a large pantry in this house!! Be sure to check out the link to see the tips I shared for organizing items.
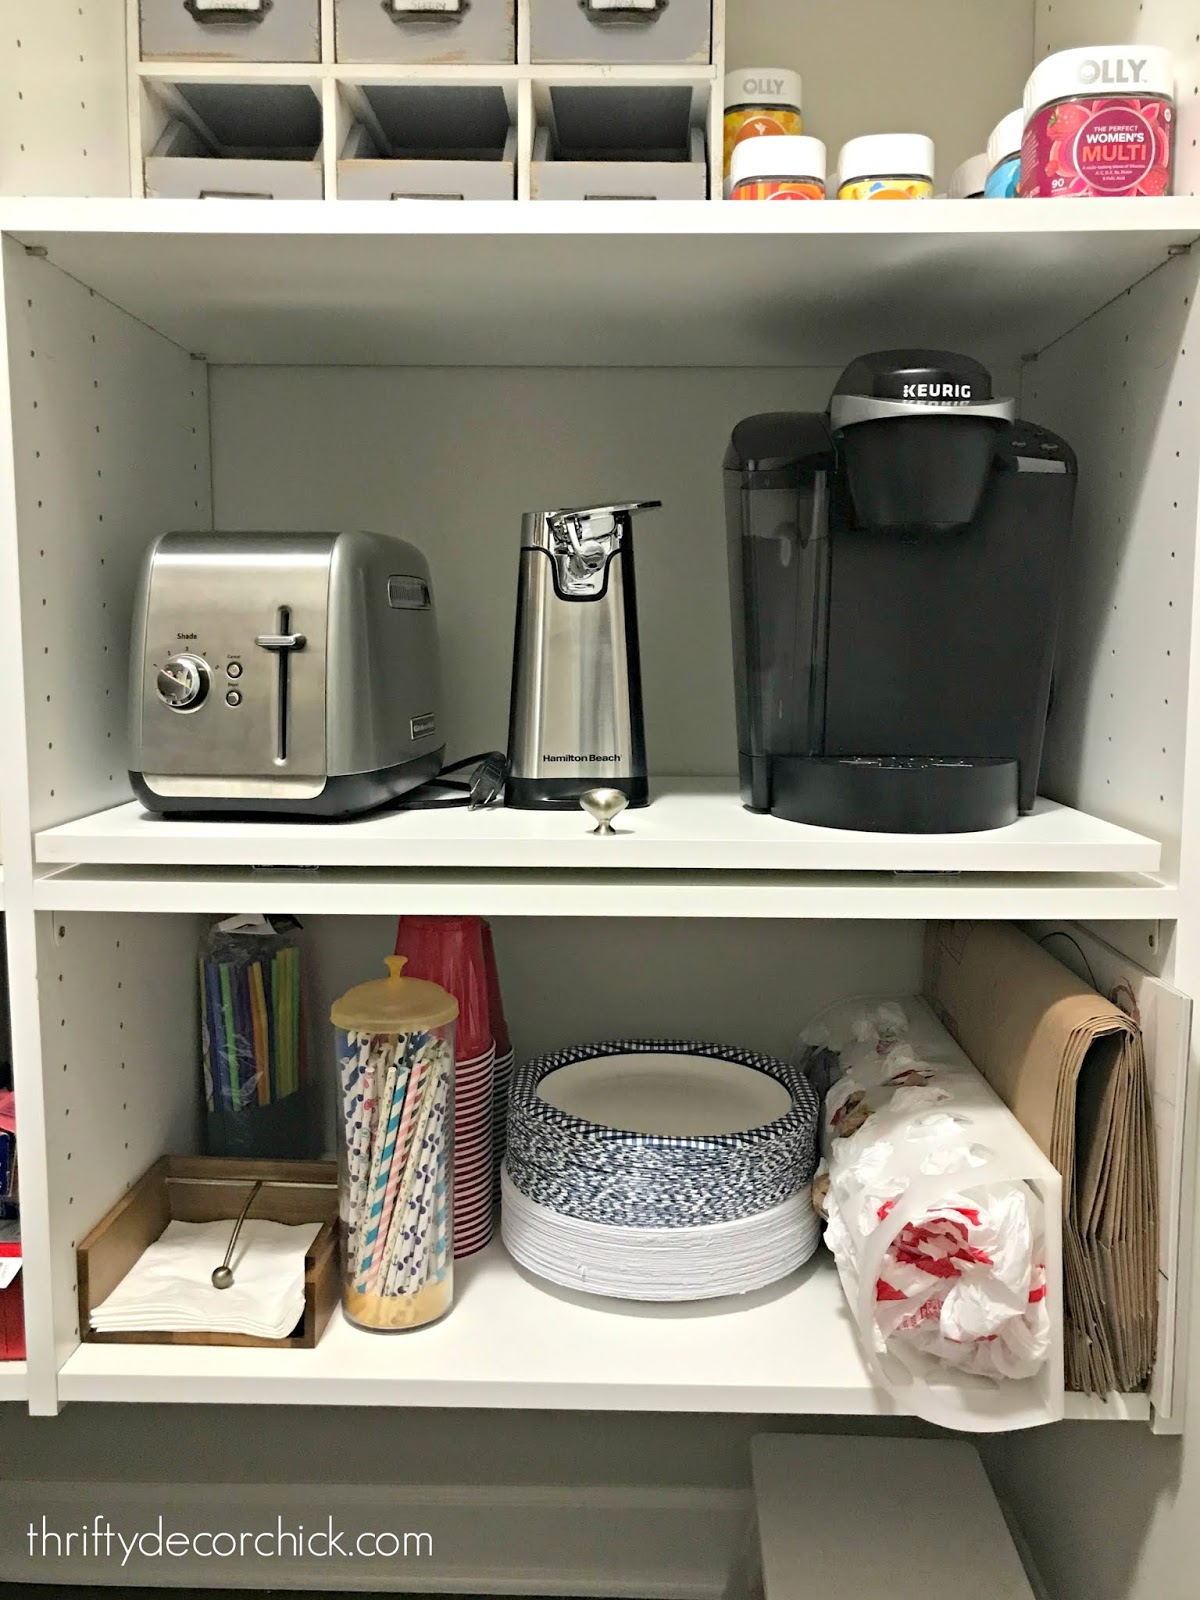
One of my favorite spots is this shelf that we use for a few of the appliances we use more often. I had an outlet installed in the pantry so we could keep things in here instead of on the kitchen counters:
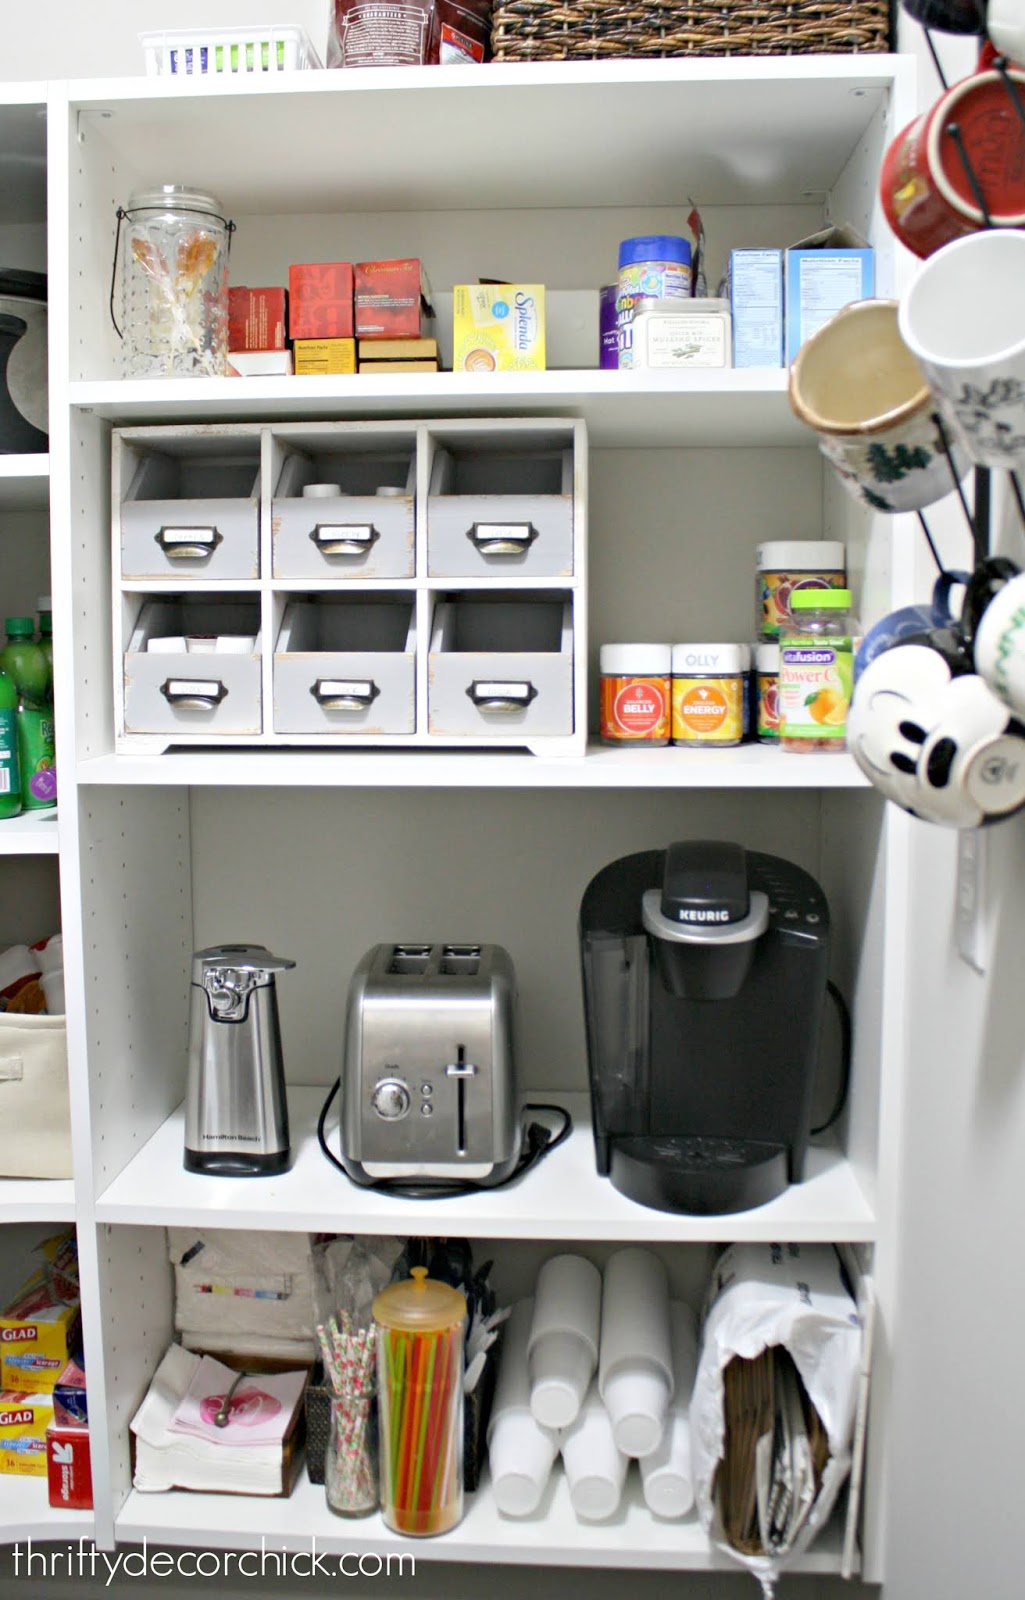
See the outlet under the mug rack? When I specified where I wanted the outlet, I didn't think to ask how the pantry shelves were going to be installed. Duh! It has still worked out just fine.
I think I mentioned when I shared the pantry that I wanted to add a little something to that shelf to make it even more functional. It took me nearly a year but I finally did it! :)
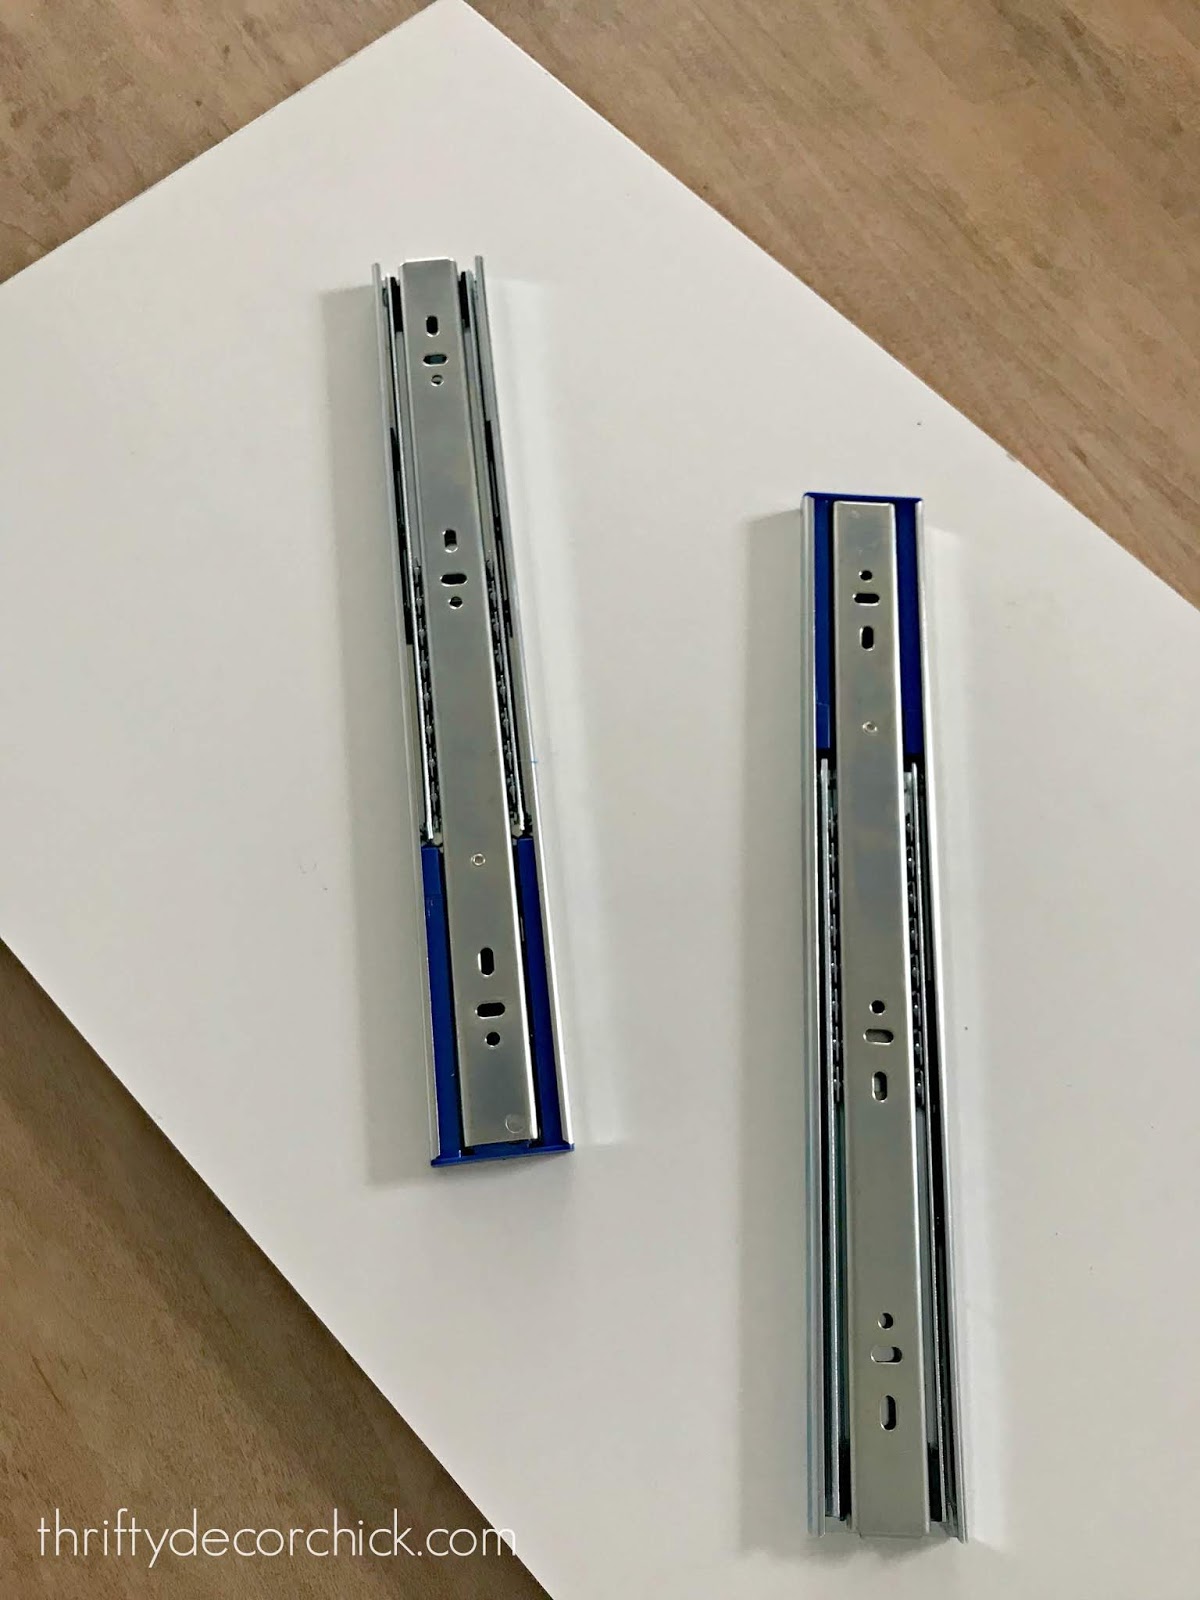
I grabbed a piece of melamine from Home Depot (for $8), and then some drawer slides ($13) as well:
This project is very similar to a DIY pull out drawer I did in our old house. It's the same concept!
The melamine shelf was too long for the project, so I cut it down to the size I needed:
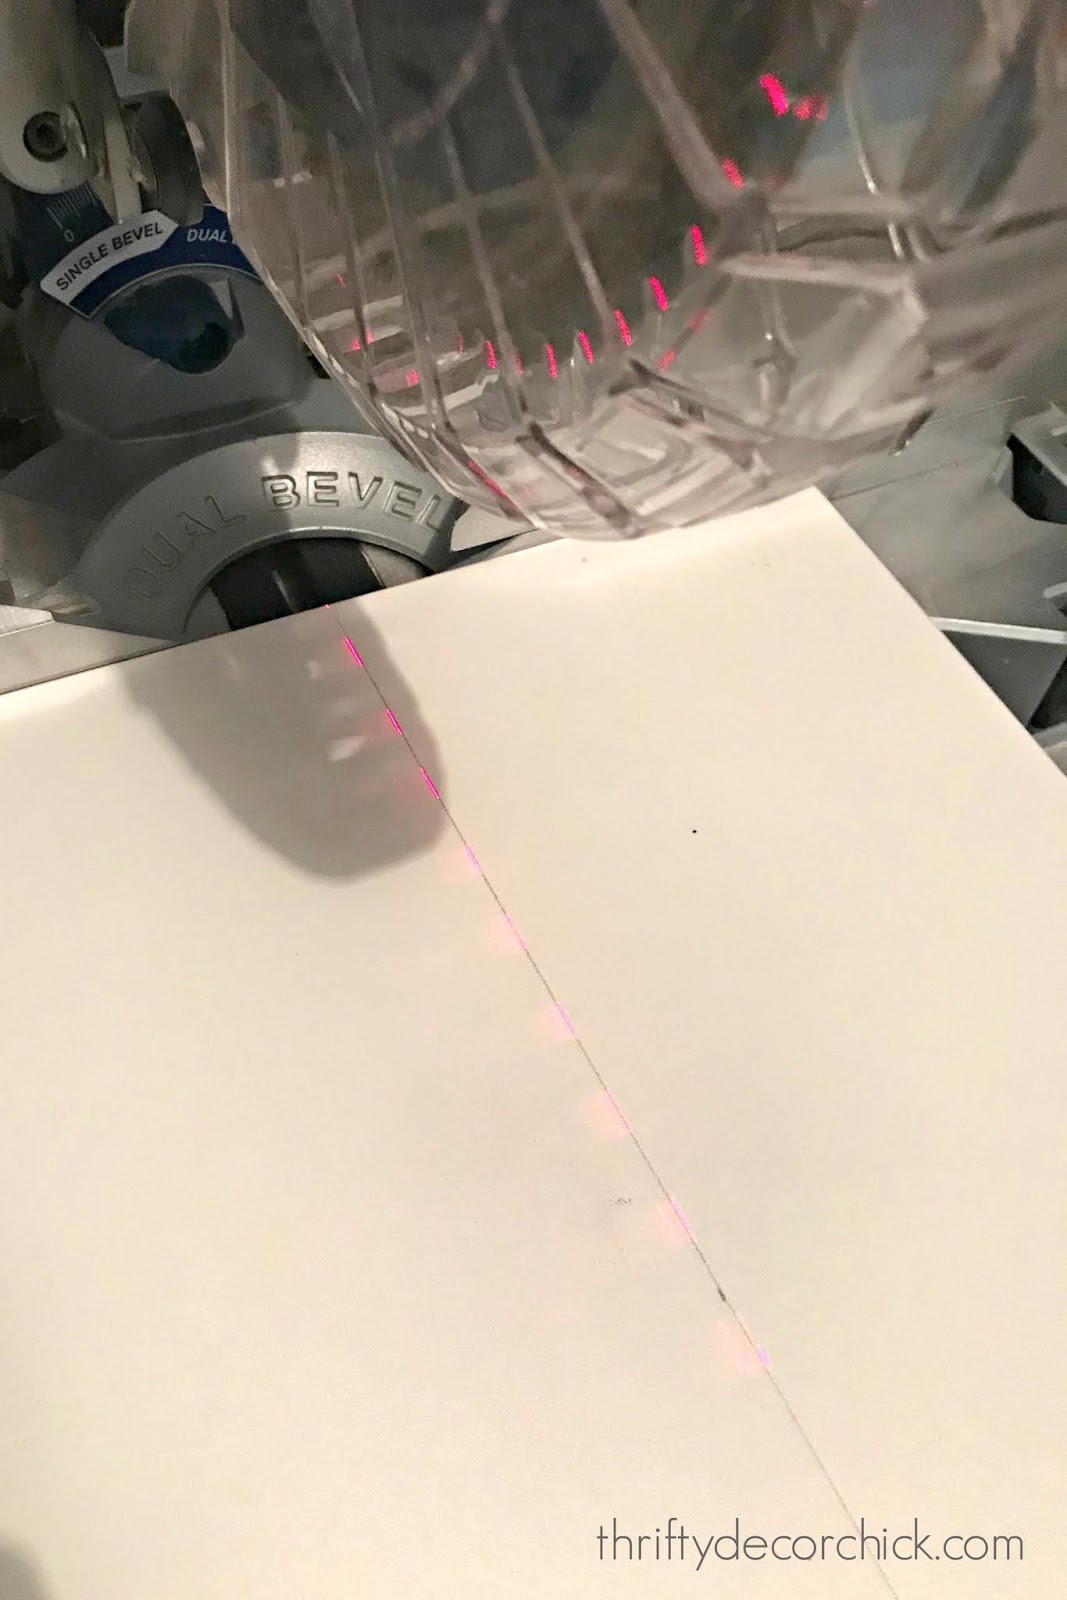
It's been awhile since I've used the saw -- I missed using it!
You can take the slides apart to install this, but I found it easier to keep them intact for installation. I started by marking the same distance from either side of the shelf so I could keep them as straight as possible:

This is important because I was using two of them -- they needed to be lined up perfectly straight so the shelf could easily be pushed back.
I extended the slides out as far as possible, then lined them up on my marks, then marked where I needed to pre-drill:
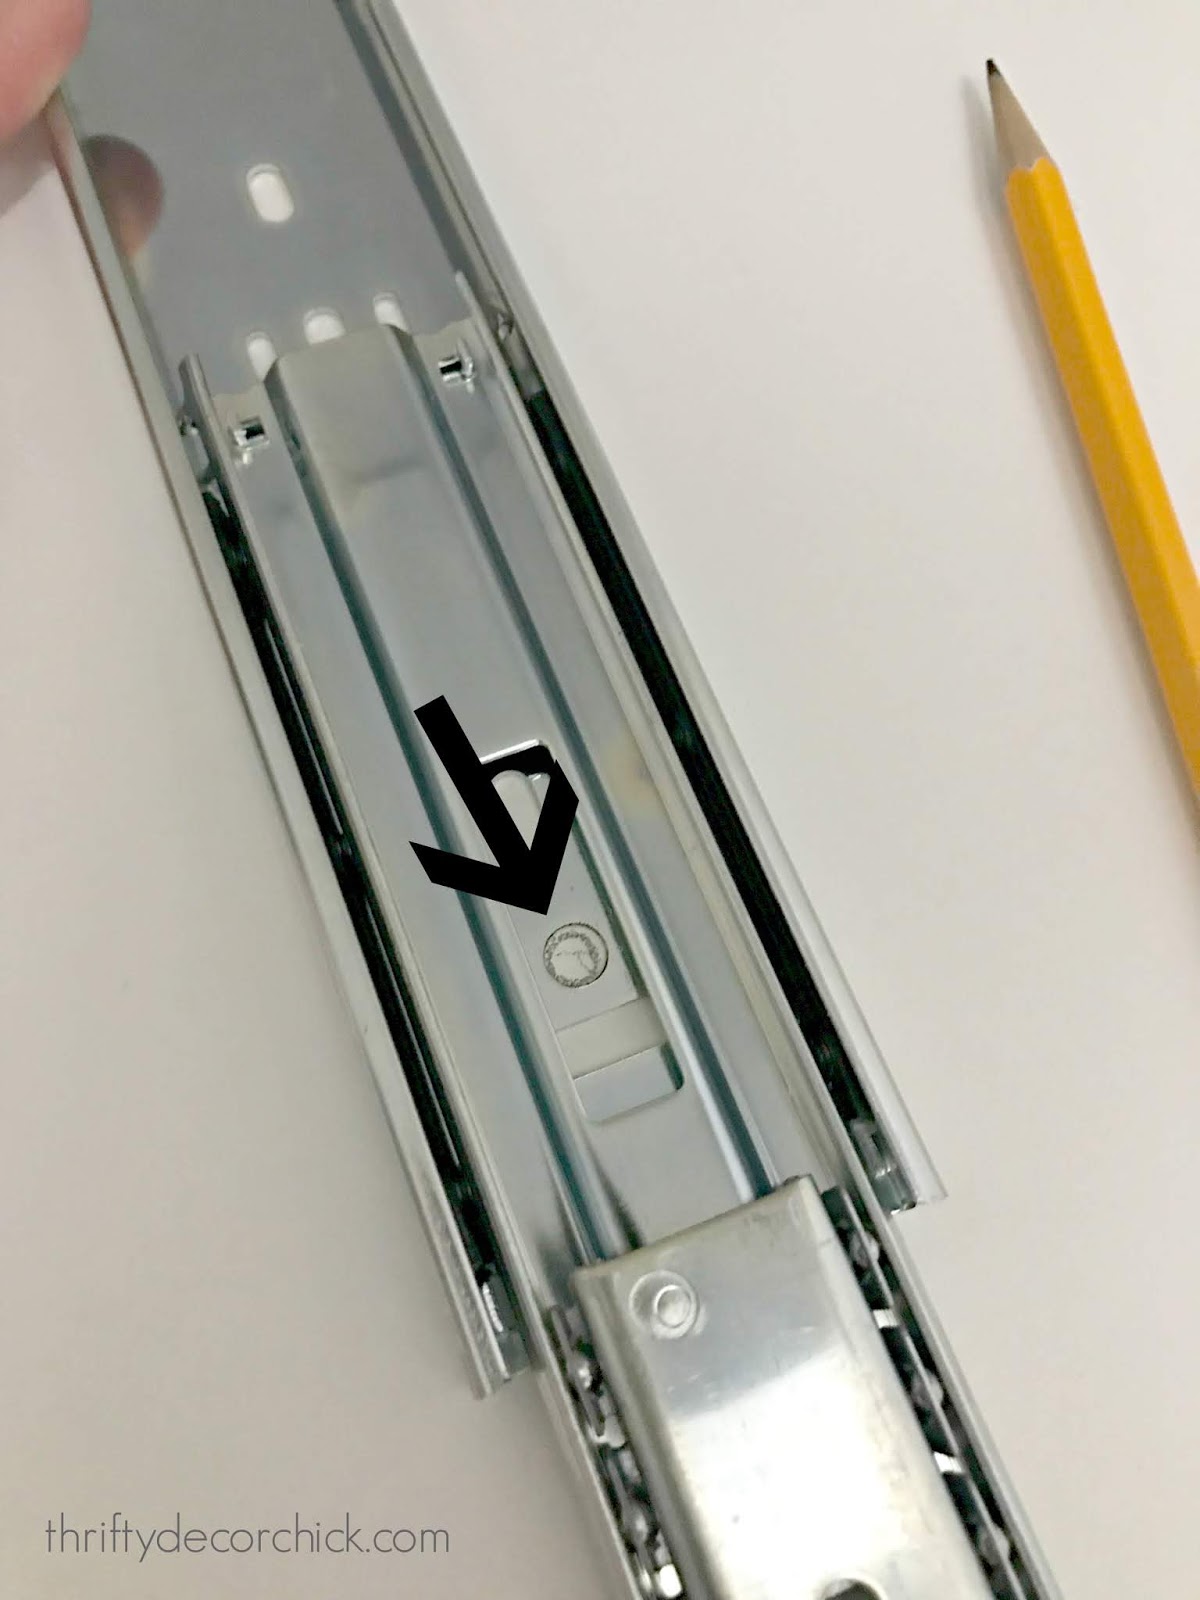
You'll want to use a drill bit to start your hole for the screw -- otherwise the wood could buckle or crack. It also makes it much easier to get your screw in:

I made sure the slides were all the way extended and laid the cut melamine on top. I sat underneath it and did the same steps again -- marking where to pre-drill and then attaching the slide to the underside of the shelf.
Make sure as you go you test your shelf -- just to make sure things are still straight. I put one screw in one slide and tested, then one more, tested, etc. Just to ensure a smooth operation.
I added a cabinet knob to the front that we can use to pull it out and close:

It works like a dream!! So awesome. Now we can easily pull it out and use the appliances without having to work in the small space.
It's so nice to be able to access the top of the Keurig without awkwardly pulling it out while we're using it:
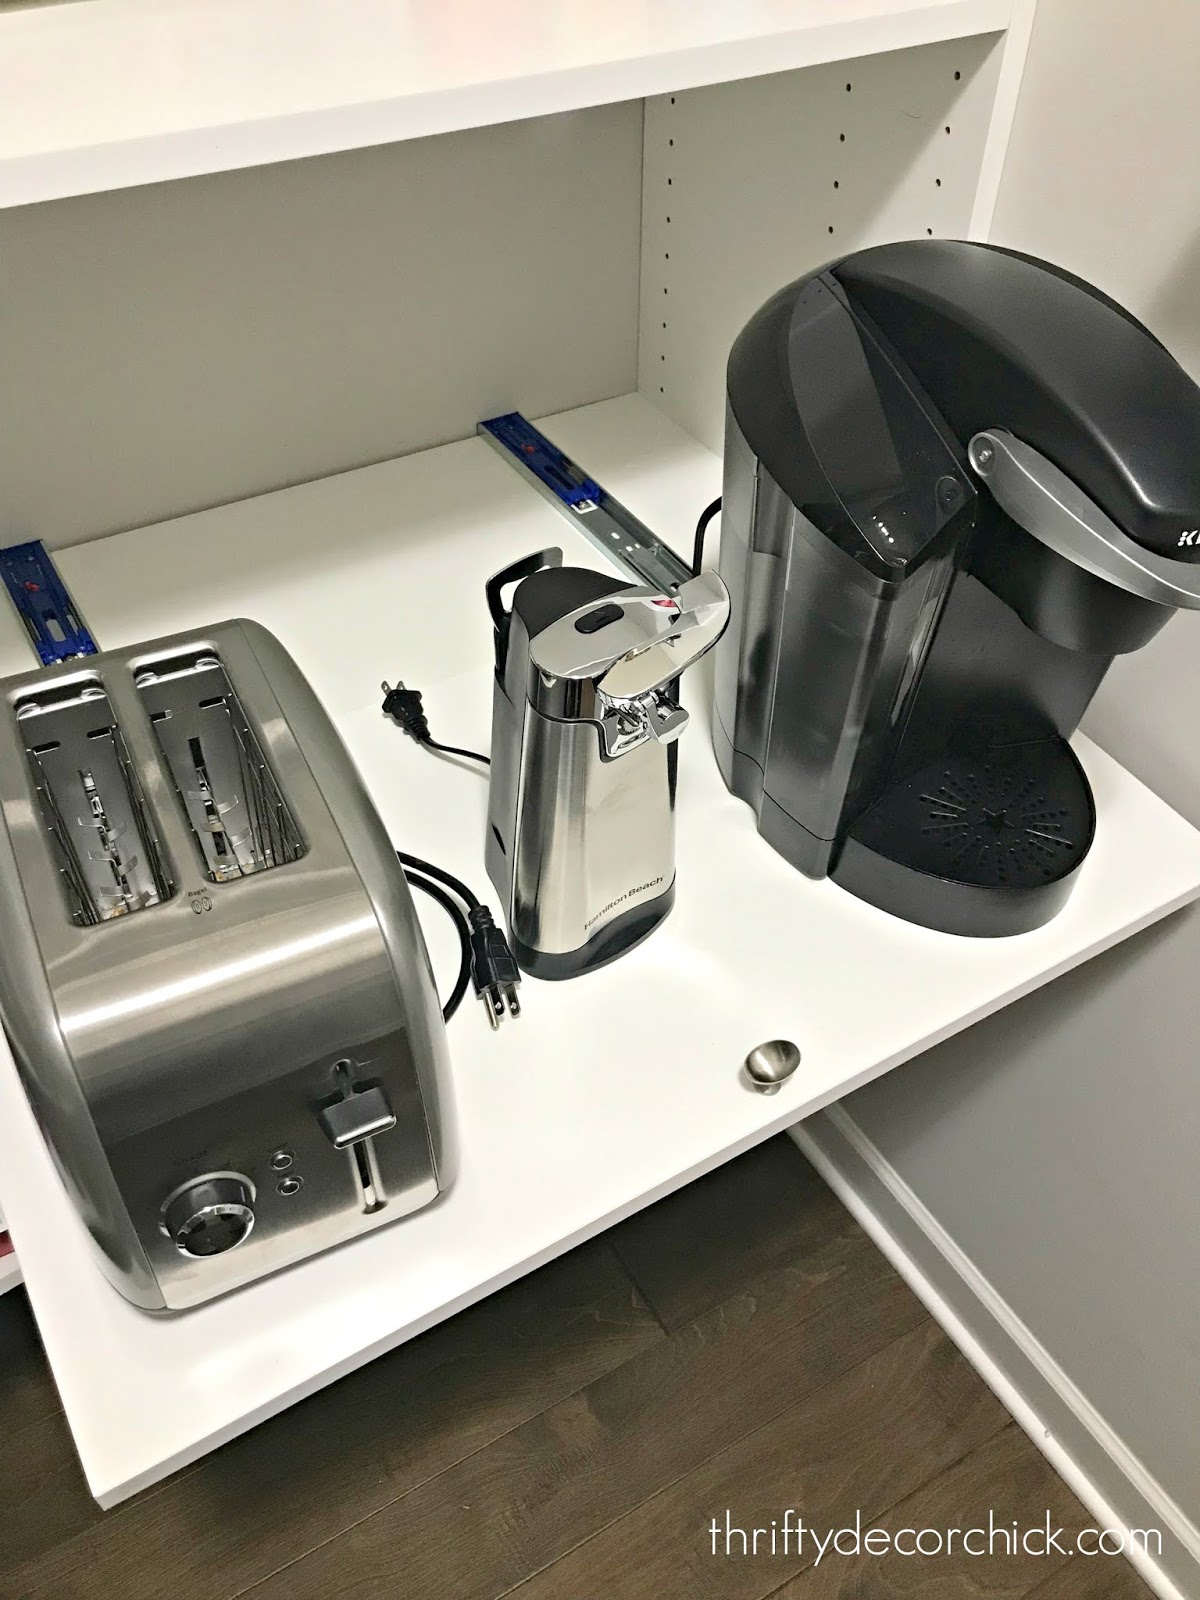
Ideally the outlet would be behind there, maybe one day we'll move it. Until then it works great!
I am so pleased with this quick project. Just a little thing that makes our lives a bit easier. :)
Those pull out drawers you buy at the store are CRAZY expensive, so this is a great option to do it for much cheaper! You could attach baskets to the shelf as well if you want to use it for food or paper items!
Have a great weekend my friends! We're supposed to get snowed in again. We're stocked up on groceries and ready! Are you supposed to get the snow too?
Via https://www.thriftydecorchick.com/2019/01/do-it-yourself-pull-out-shelf-for.html
Hey there! I'm getting ready to tackle some DIY projects, but first I wanted to finish up a little more decrapifying and a couple organizational projects. I shared this quick tip on my Instagram stories a week or so ago, and I got so many questions I thought it deserved it's own post!
I use a lot of "soft" stuff when decorating for fall and Christmas. Lots of blankets and pillows -- and goodNESS they take up a lot of space!! We have a lot of storage space in this house, but I still want to be smart about it. I really hate to buy big storage bins for stuff like that because of the cost and they just take up so much room.
So last year I decided to try these (affiliate) Ziploc vacuum bags:

I remember trying them a LONG time ago, probably soon after they were first created. They didn't work well then, so I hesitated to buy again. I read a bunch of reviews online and they were either glowing -- they worked great and people loved them! Or they didn't work at all. I decided to give them a try and figured I could return if they didn't work.
I was SO pleasantly surprised last year! I used a few to store holiday stuff and they stayed just as I left them for a full year. Awesome!!
I'll share a few tips at the end of the post, but just in case you haven't seen these I took some pics of the process. I use the jumbo bags for my items because they are so large. They also sell smaller sizes that would work well for sheets or seasonal clothing:

You seal the end up and then you can start sucking the air -- which is extremely satisfying to watch:

The bag ends up a fraction of the original size. This one has six large pillows inside:

This one has seven fall pillows and a couple light throws:

It's pretty amazing how much they squish the pillows.
Someone on Instagram asked to see them next to something for reference on how they end up size-wise. These four would be much taller than (my favorite!) vacuum if they were opened up:

Inside the four bags pictured, there's a king-sized comforter and shams, 18 pillows, three throw blankets and a few pillow covers. WHAT. I love them.
I heard from many who said they didn't work for them and I have a few tips that may help!:
Many asked how the items come out after being squished for all that time. They are definitely wrinkled, but everything puffs up to it's original size immediately after you remove them from the bag. I just went over the fronts of the pillows real quick with my favorite steamer and they looked good as new!
I reused all of them from last year and all but one have been suctioned up perfectly again for a few weeks now. Only one bag didn't stay and I tried it again just in case. It still didn't keep the air out so I purchased a new one to replace it. I'm going to watch that one to see if maybe I just put too much inside.
Overall I LOVE this product! I'm pleasantly surprised at how well they've worked. I'll let you know how they do later this year. ;) Have you tried these space bags? If you are short on storage space, or just don't want to spend on large bins, these are a great option! I keep ours in our basement storage space, but they would easily fit under beds as well. I actually think I'll move the comforter bag up to under our bed so I have it right there this Christmas.
I hear these are very hit and miss -- have you had luck with them?
Affiliate links included for your convenience!
Via https://www.thriftydecorchick.com/2019/01/perfect-storage-solution-for-bulky.html
I've been working on a organizational project in our basement that has escalated into a much bigger DIY project...per usual with me. :)
We needed a good solution for our games in the basement and I went with an easier version of the built in cubby storage in our old basement:

We didn't need nearly the storage we used to (not many toys left in this house, sniff!!), and I didn't want to do anything permanent just yet. As our kiddo gets older the way we use this space may change over time.
Instead, I used the IKEA Kallax cubby units and they're working great!:
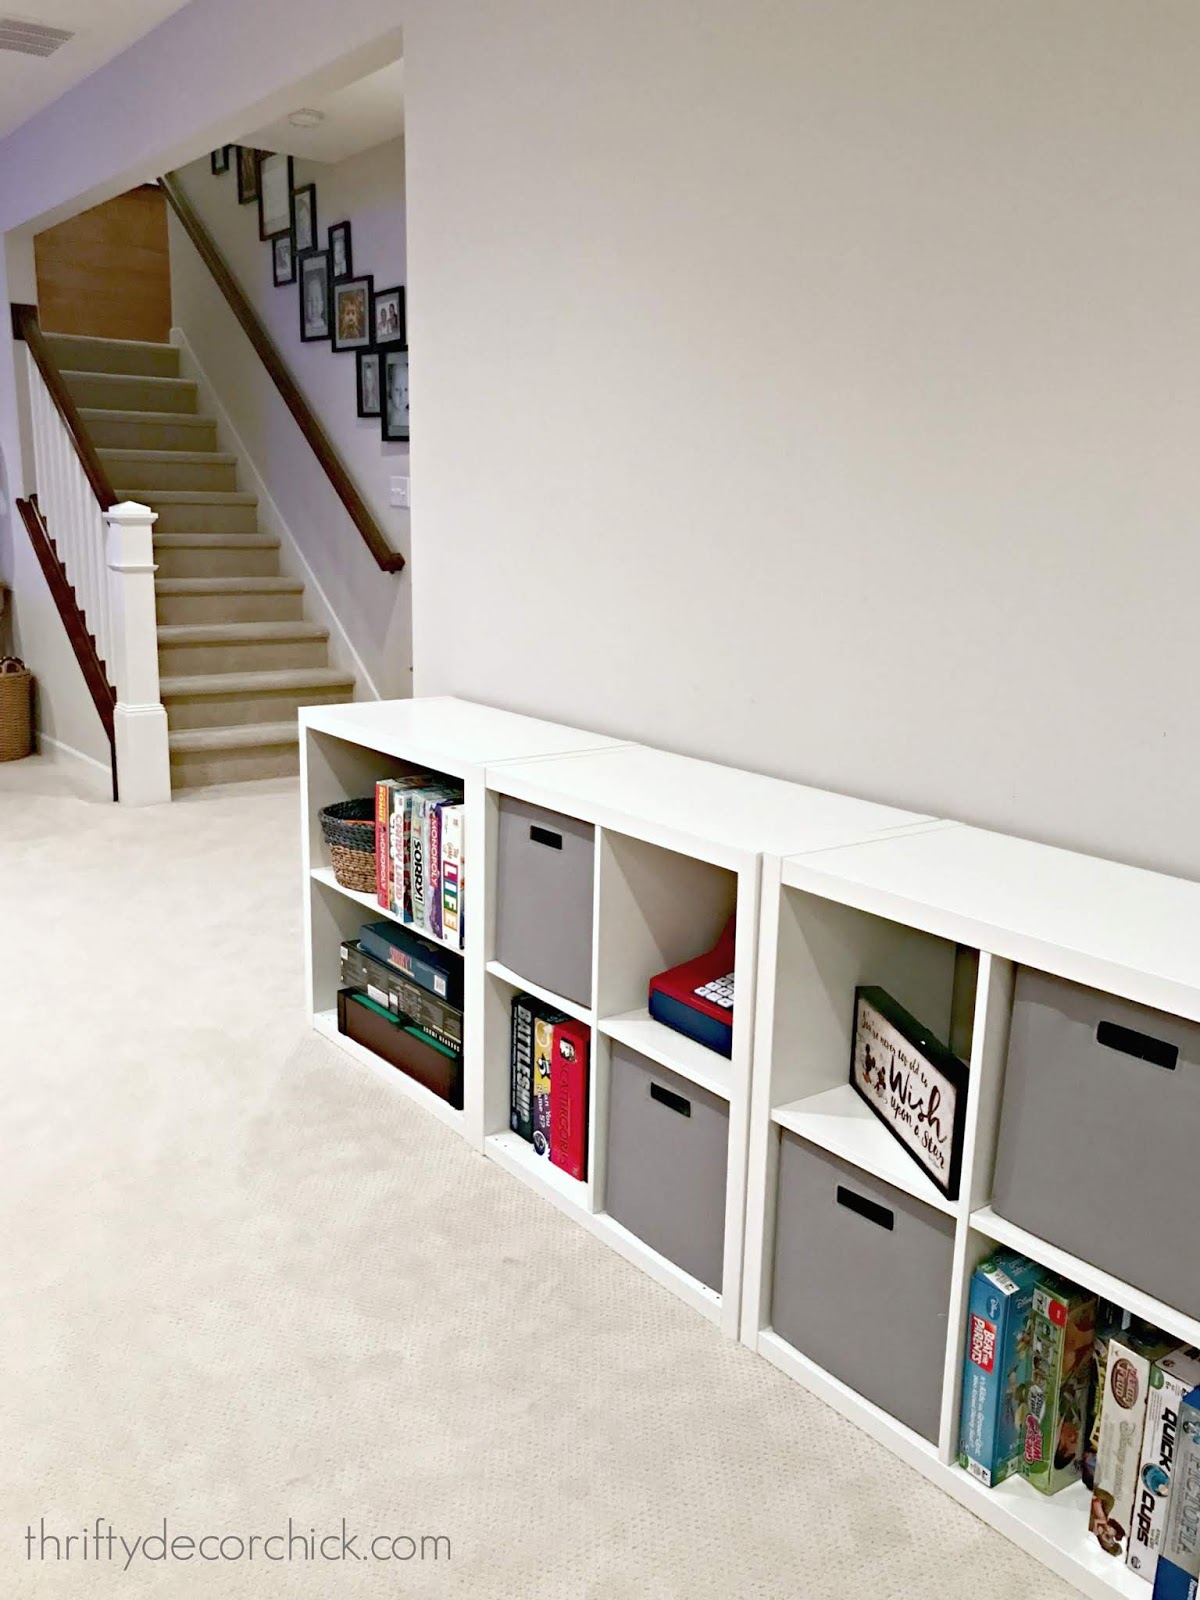
These are supposed to have four cubbies, but on the two end units I didn't add the smaller shelves that create the four spaces. Instead it's just a more basic bookcase so the longer games fit perfectly!
More to come on this if you give a mouse a cookie project soon. :)
Before we had an IKEA nearby, we'd stop in on the way to or from Kings Island and it was usually a quick walk through to grab what I wanted. Since the one here in Indy opened I've been able to really explore the store and I love it even more than before!
Years back I wasn't so sure about the quality of their pieces, but over time I've come to trust that everything I get there is going to hold up and function well. I'm super pleased with EVERY item we've purchased from IKEA over the years.
One purchase I can't really speak to are their upholstered pieces. I think I'm in the minority, but I don't find their sofas and chairs to be very comfy. I hear they get more comfortable over time, but that's one thing I don't see myself purchasing.
But pretty much everything else -- I love! I've rounded up the best IKEA pieces I've used in our two homes.
First up, one of my favorite rooms EVER...our son's bathroom in the old house:

Those round Stockholm mirrors were the perfect finishing touch to the tile wall. I SO wished I could use them again in his new bathroom, but the vanity isn't as wide. These mirrors are big! The frame comes out on the bottom a bit, so you can use it as a little shelf. :)
Next up -- their butcher block. I used it in a few places in our old house, including the DIY built in bench in our white and blue mud room makeover:

It's very inexpensive as far as butcher is concerned, and warms up a space beautifully. It always stained nicely and held up great!
Next up -- their dressers. I showed you the one in my closet when I shared how I organized my jewelry and shoes:

We also have one in my husband's closet too. People fear the IKEA assembly instructions, I know. When you pull everything out of the box it can be intimidating, but it's not that bad. I'm a nerd that kind of enjoys putting furniture together though. ;)
I particularly like the Hemnes line of dressers and furniture (the dresser above is one). They have a simple, classic design that goes well with nearly every style. I used the tall Hemnes cabinet with glass doors for our master bathroom. It provides so much storage!:
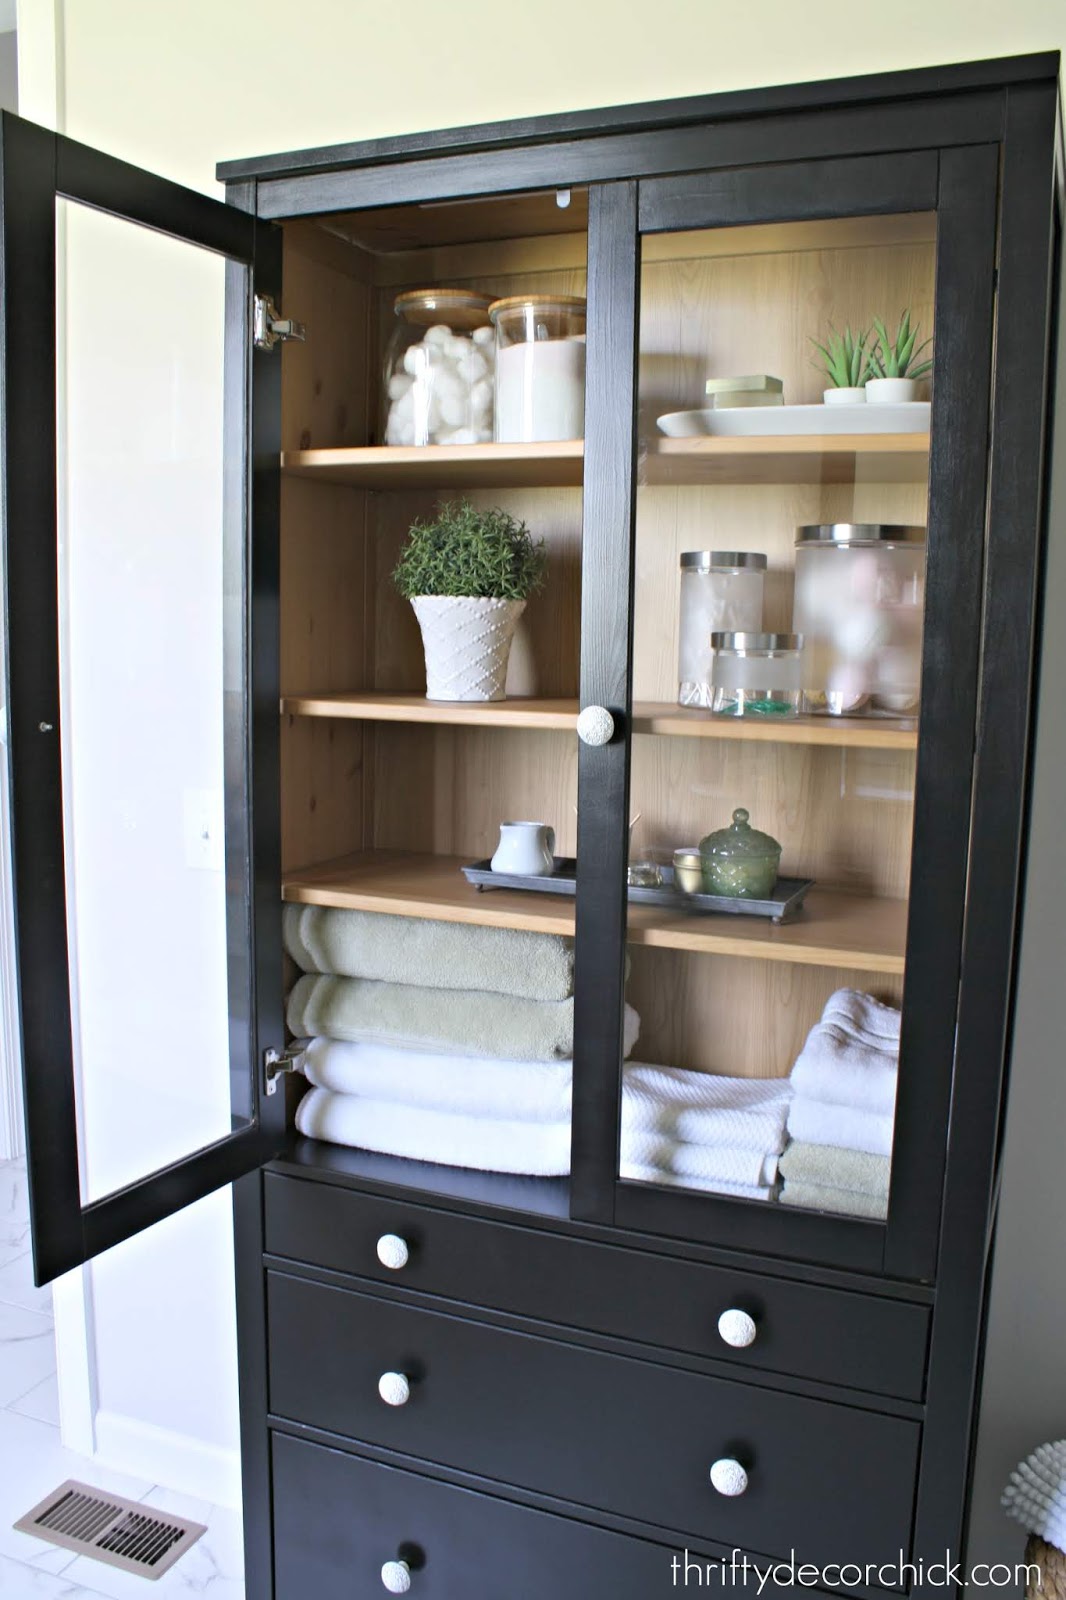
Mine didn't look like this when I got it -- see how I transformed it here!
What I really love about IKEA furniture is how easily you can add your own touches to make it work perfectly in your home. Because so many of their pieces are a simpler design, they are easily dressed up. You can see how I did just that with the Tarva dressers I turned into nightstands:
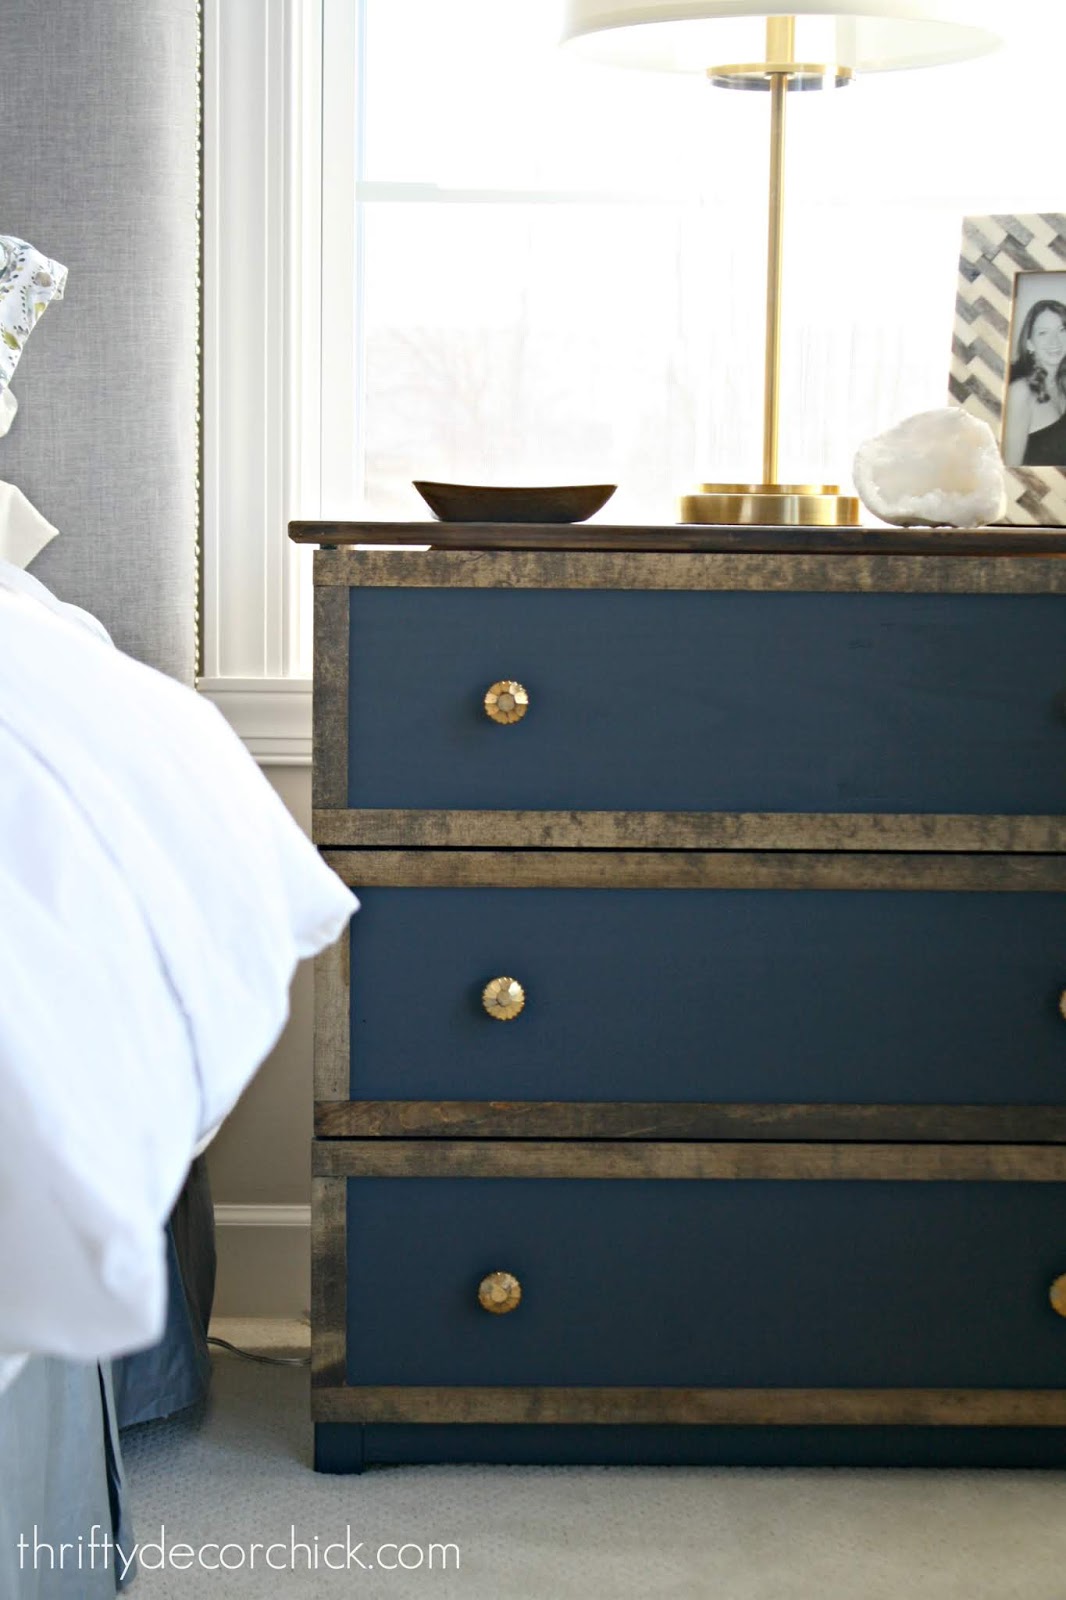
The possibilities with their unfinished items are endless! There is a ton of storage space in these too.
I have SO many smaller favorites too, but I'll save that for a future post. I did share a round up of my IKEA faves $10 and under here:

I wrote that years ago and I still use ALL of these items! Love them.
I'm sure I'm forgetting something! But this is a good list -- do you have any of these? Have you had good luck with IKEA furniture? Do you have a favorite product? I've been very pleased over the years. It's a fun place to explore for sure -- just make sure you have some time.
Via https://www.thriftydecorchick.com/2019/01/my-favorite-ikea-pieces-and-how-we-use.html
Hello there! The holiday decor has been packed away (most of it anyway...) and I'm dreaming up DIY plans for this year. I'm ready to get my hands on my tools again and start creating in our home. I always miss it after a few weeks "off" at the end of the year.
Today I'm sharing my plans for this year, but I wanted to look back on last year as well. We moved into this house in fall of 2017 and then I was slowed down by a back injury. It wasn't until around April of last year that I felt like myself again. Because of that, I'm especially proud of what I was able to accomplish.
The powder room makeover was the first full room redo and it was one that made this house really feel like home. It has everything I love -- wood and brass, board and batten on the walls and the lovely contrast of the peel and stick wallpaper:

I finally tackled the basic IKEA dressers/nightstands we've had for years. I used a mix of stain and paint to finish them for our master bedroom:

The simple $15 update I made in the foyer is still one of my favorites because it still feels so fresh!:

I got a ton done in our family/great room this year! I'm so happy with this space so far. I painted the tall fireplace (that was scary), built the bookcases on each side, and then built the simple picture ledges under the staircase:


So many of my favorite projects involve stain -- I just love the warmth it adds to our home! This DIY wood staircase wall was a copy from our last house, but I love this one even more!:

The warm wood accents struck again in our master bedroom when we added faux beams around the tray ceiling. The warm gray color, stained wood and brass light fixture make our ceiling a beautiful focal point in this room!:

And finally, another favorite (I know, I say that about all of them). I worked hard in the morning room later in the year to update it with dark walls, a window seat build and adding the built ins on either side of the windows:

It's such a pretty spot in our home and I just love it!
Now onto the plans for this year! I had hoped to do this first one already, but I'm determined to get it done before this fall. That back wall in my office will be covered with built ins and I cannot wait!:

I plan to copy our wall of DIY built ins in the last house very closely. I'm excited to get started on this one!!
I have a few smaller projects planned and perhaps a couple bigger ones in our kitchen:

They are all additions that will continue to warm up the space and add more character. One of the bigger projects is this one that I told you about last year. I think it will make such a big difference in here and will be functional as well.
This next one is a smaller project as far as size, but I'm hesitating because I'm so intimidated. I plan to wallpaper this small hallway with some beautiful wallpaper I bought last year:

I was going to use it in the morning room, but decided against it because it was going to get really busy. I think having it as an accent in this smaller area will be lovely! But I don't think I could have picked a harder space to wallpaper. Ha! ? (You can see how to hang a light fixture from a recessed light here.)
The BIG project this year (other than the built ins in the office) will hopefully be our kitchenette in the basement. We carved out a spot for one in our old basement and in this house we are lucky to have a dedicated space for it. To save money, we decided to hold off on it and do it ourselves. I knew I'd want more time to decide on finishes anyway:

You can see how I made that farmhouse table/IKEA hack here! It's currently covered in Lego sets. ;)
The layout is pretty much set, but I need to figure out the details as far as colors and tile -- stuff like that. As you can see, I had the builder keep the carpet out of this space to save us some work later. I'm really, really excited about this project! We use our basement a lot so this will be a wonderful addition.
I got a ton done in this newish house last year, and I have a good feeling about what I'll accomplish this year too! I'm looking forward to sharing the process with you all. Thanks so much for following along with me! :)
Via https://www.thriftydecorchick.com/2019/01/favorite-diys-of-2018-and-projects.html
Well hello!! How were the holidays for you? We've had a wonderful two weeks -- life goes back to normal next week and I'm kinda sorta ready for that. Not quite. :) These are definitely our favorite weeks of the year!
This time of year one of my posts goes crazy, and that's the one about my experience using the Konmari method to declutter our house:

I've said it a hundred times and I'll say it again -- this book absolutely changed our lives. I say "our" because it has lessened the amount of clutter in our home, so my family certainly enjoys that.
It has affected me more than anyone because I'm typically the one cleaning, washing and picking up more than anyone else. It changed our home and how we live. I cannot recommend it enough!! We used to have spots in our home that attracted clutter. The kitchen island, the area right when we walked in the door, our nightstands were a problem area, the stairs were always full of items that needed to go up or down. (Those are just the big spots.)

All of these are NORMAL by the way. It's not "wrong" to have piles or clutter -- but it sure did start to wear on me. I found that I couldn't focus as well. I was more stressed and anxious when STUFF was everywhere. We spent money on items we already had. I bought items because they were on sale (and I was afraid it would be gone), instead of knowing exactly what I wanted to do with them.
This book changed all of that. It took me around nine months to complete the whole process, but it was awesome. BUT THEN. THEN we packed up our house last year and put all of it in storage for nine weeks while we waited for this house to be finished.

Many of you have asked for an update in the three years since I decluttered the whole house. I thought I had really done it. When all our stuff arrived at this house...I couldn't believe how much I had kept that I didn't want or need. Living without it all for that long really puts things in perspective. In the year since we moved in I've donated or sold an equal amount to what I got rid of during the Konmari process. Tons of stuff!! I actually had a "sale" for family and friends right after we moved in a sold a crazy amount of decor (and made a good amount of money).
The basics of Konmari are extremely simple -- you only keep what you LOVE. What brings you joy. AND items that you actually use...I always add that in. I mean, my kitchen utensils don't exactly bring me joy. I'm not giddy when I use them. ;) But they serve a purpose and serve it often.

What I love about this method more than anything is that you choose what to keep...not what to get rid of. Everything I was "taught" about simplifying before that was about picking items to get eliminate. That creates indecision. Deciding what to KEEP is so much easier.
SO many of you have also asked me about how to involve kids and spouses. I wanted to speak to that a little more too. I did all of the decluttering by myself, and I was fine with that because I find it fun. :) I did involve my husband and kiddo at various times and I have some advice about that:
Marie Kondo (the author of the book) now has a show on Netflix. I watched the first episode and my son watched with me. We immediately went up to his room and started tackling some spots. His closet in particular has been a MESS since we moved in:

Again...give yourself some grace! I'm a Konmari method nut and most days we couldn't even see the floor in here.
We worked on this room over two days time. Our son looooves stuffed animals. But I swear they were multiplying in there -- it was too much. You can't see all of them but they were in bins on the floor and the shelves.
I went through them without him and then got his approval on the donate pile afterwards. We kept his favorites and I filled the top shelf with them for now. We also went through his clothes and random stuff I threw in here more than a year ago when I unpacked. WHAT a difference!:

The shelf of animals is actually quite adorable. ;) I still need a solution for the caps -- he got rid of some but these mean a lot to him, so they'll stay. Have you found a good storage solution for hats?:

By the way -- that long hanging organizer is for his clothes each week. We put them in here for less stressful mornings. :) I got ours at IKEA but you can find it here too (affiliate).
His closet it a great size but nothing huge -- this is what we're not keeping and I'm shocked at how much was in there:

Wow. My goodness, his whole room is like a breath of fresh air now!
When I used the Konmari method years ago I told you I won't ever have to do a massive whole-house purge again. When you have it in your head, you're always grabbing items around the house. Because of our move, I do have a couple more little spots I want to work on, but overall it's a constant (but much less intense!) process. I have a bag of donations going at all times:

Have you read The Life-Changing Magic of Tidying Up? I recommend checking out the Netflix show if not -- it's a good introduction to the process. There are parts of the book many find hokey and I get it. But like anything in life you can take or leave parts of it.
Will you be decluttering this weekend? If you have additional tips for including the family I'd love to hear them!
Via https://www.thriftydecorchick.com/2019/01/a-three-year-konmari-decluttering.html |
