|
Oh my...I'm so excited to share this project with you! It is one of my favorite DIYs in this house so far! I work with Minwax occasionally throughout the year and this project is another I accomplished with their awesome products.
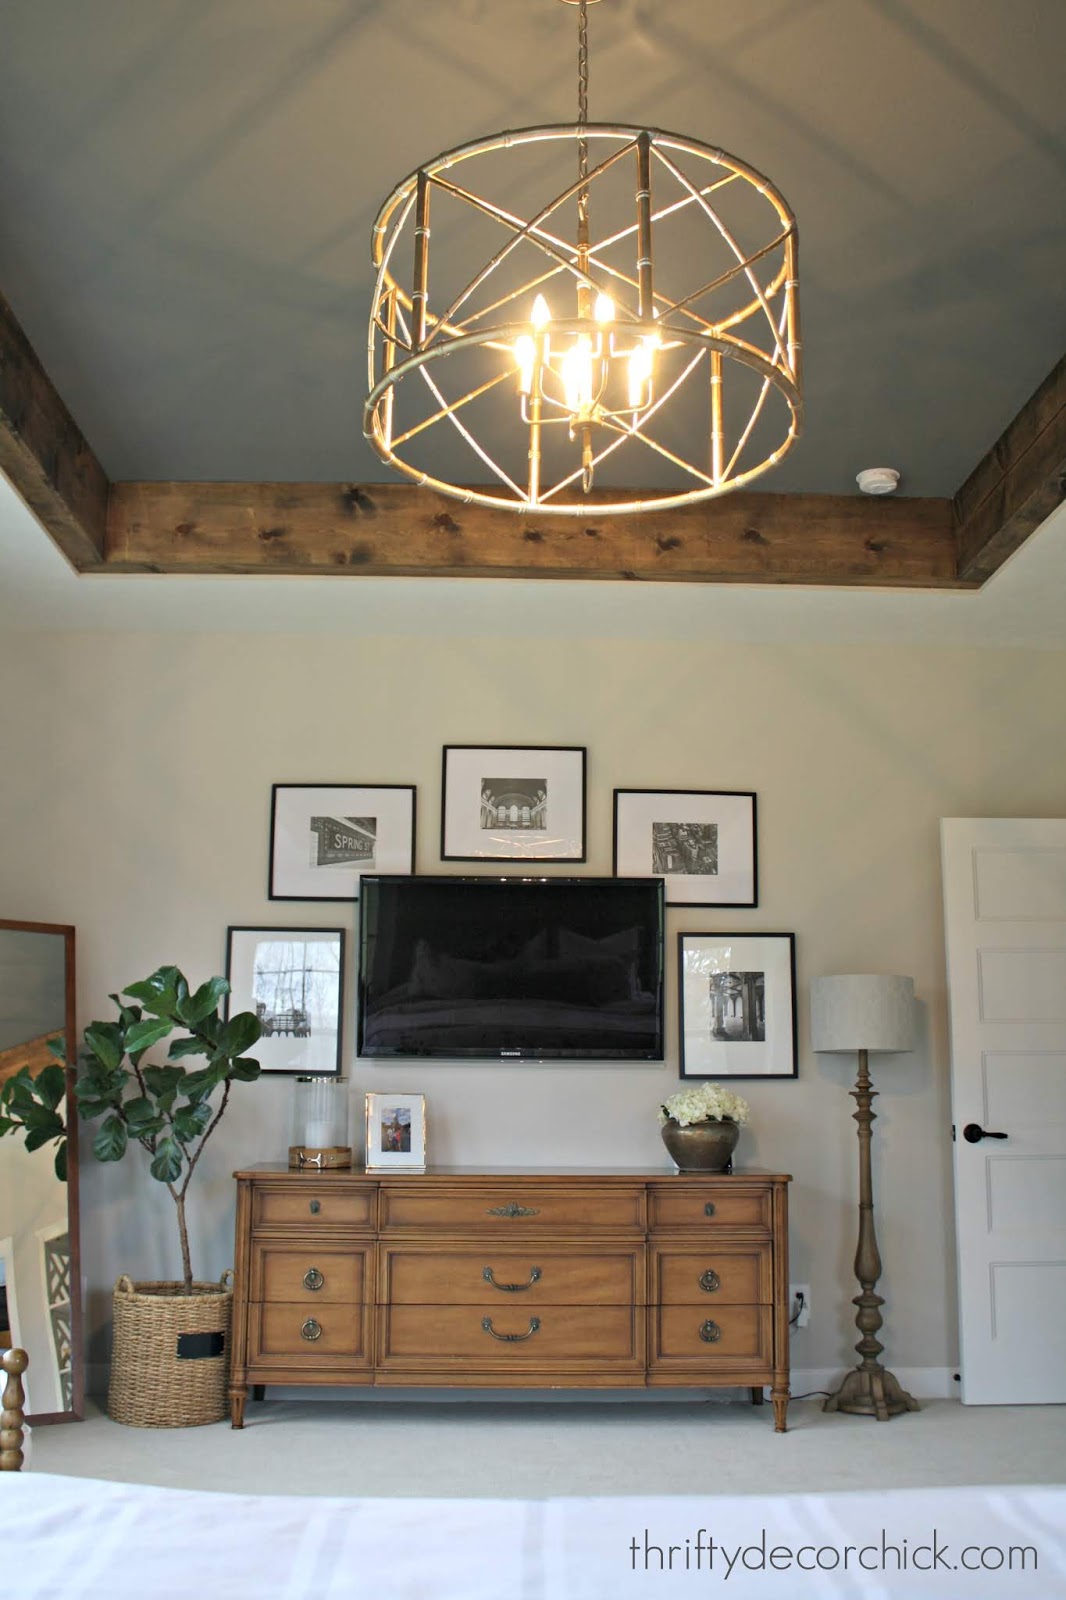
Our master has ten foot ceilings thanks to the tray ceiling. I shared the new light in this room a few months ago:

We love the tall ceilings, especially because we were so used to the tall angled ceiling in our last master. It really opens up the space nicely. But when I see a tray ceiling I see a potential project! I've seen many treatments on these types of ceilings, from adding crown to installing wood to the tray part.
I first saw my project in a model home but haven't seen it anywhere since! This was a different take on the typical tray ceiling treatment and we LOVE how it turned out!
I had help with the first part of this project and because of that I did the steps a little backwards. I would have much preferred to paint the ceiling and then stain the wood after, but because I was at the mercy of someone else's schedule, I did the steps the opposite way I would typically recommend. It wasn't a big deal though. More on that in a bit!
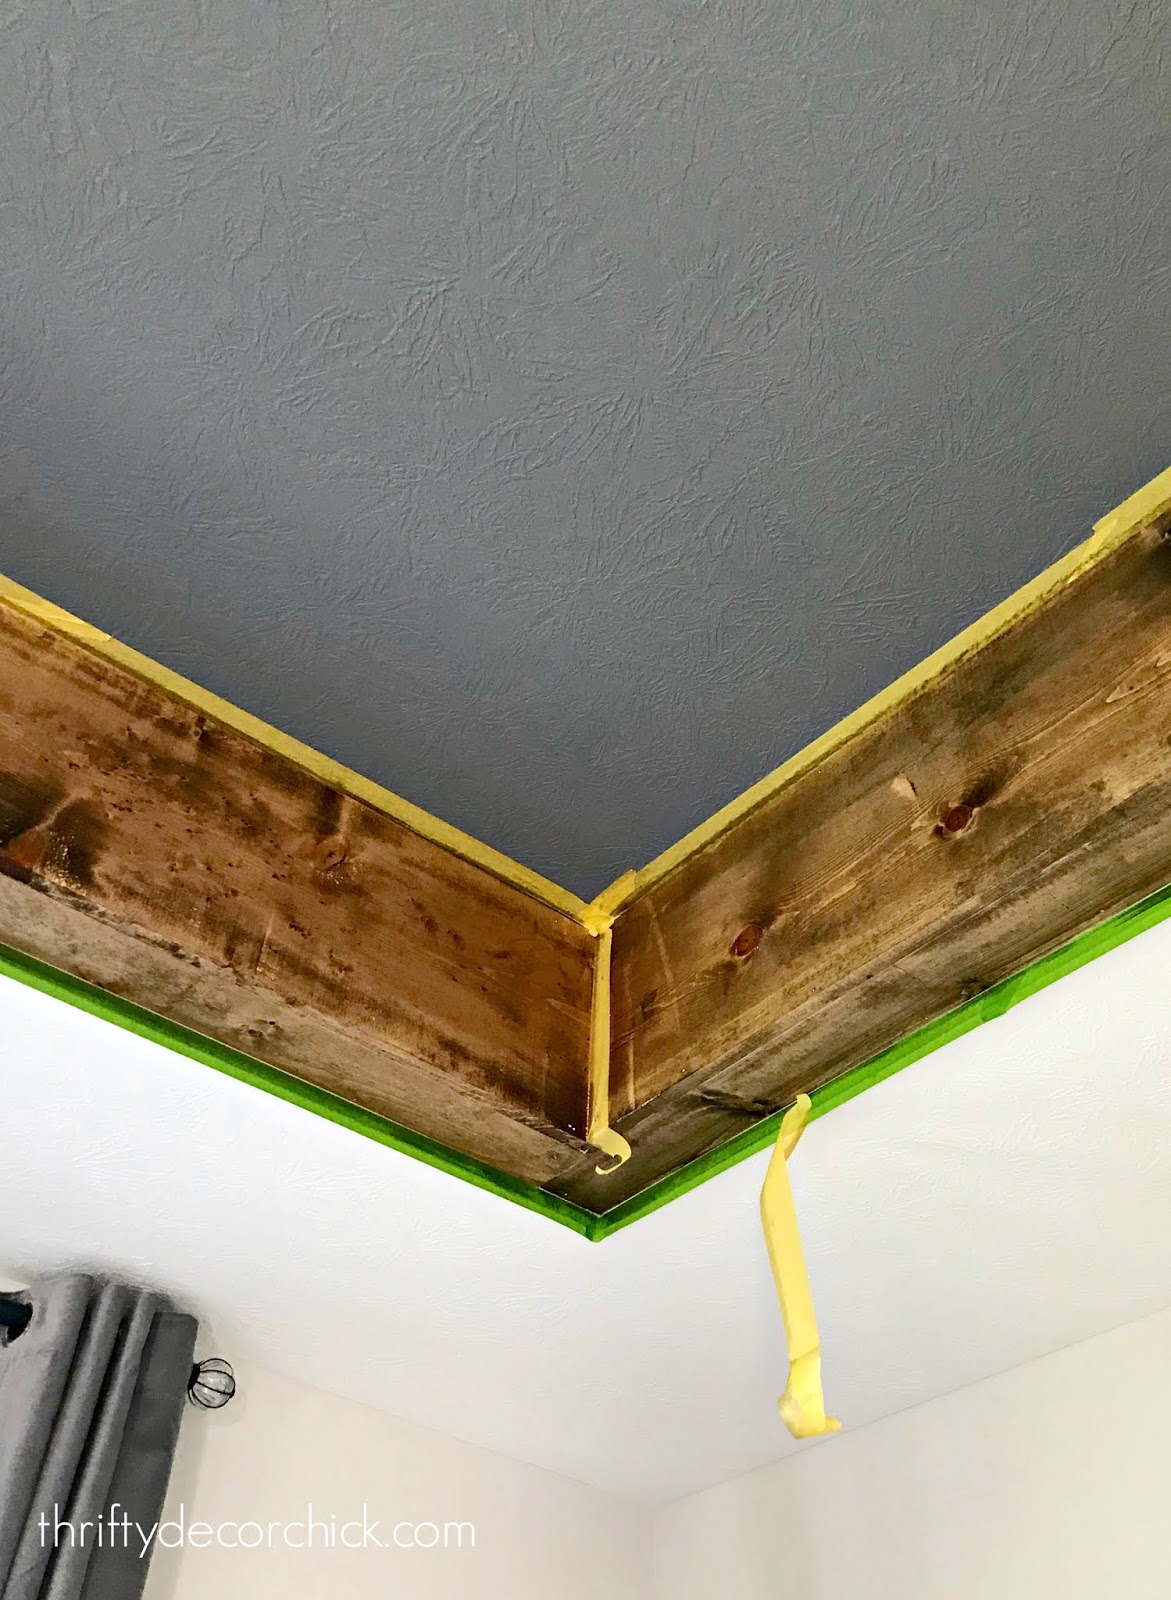
Anyway, the goal was to create "beams" around the sides of the tray ceiling. We had two options -- take the wood and 45 it on the table saw so when we nailed the side and bottom together, it would look like a true beam. Or, take the two pieces of wood and just nail them into each other to create the look of a beam. We went with the latter, mostly because we were using very long pieces of wood -- two at ten feet and two at 16 feet. I don't trust that the mitered corners would have met up perfectly for the length of all the wood.
I'm glad we didn't go that direction -- it would have been WAY more work and the final result looks great without that extra step.
To start, you'll need something to attach your wood to. The "beams" are only two sides -- the bottom and the side. So the piece on the ceiling (be sure to attach to studs) was there to stabilize the side board, and the wood attached to the side of the tray ceiling was there to hold the bottom piece in:
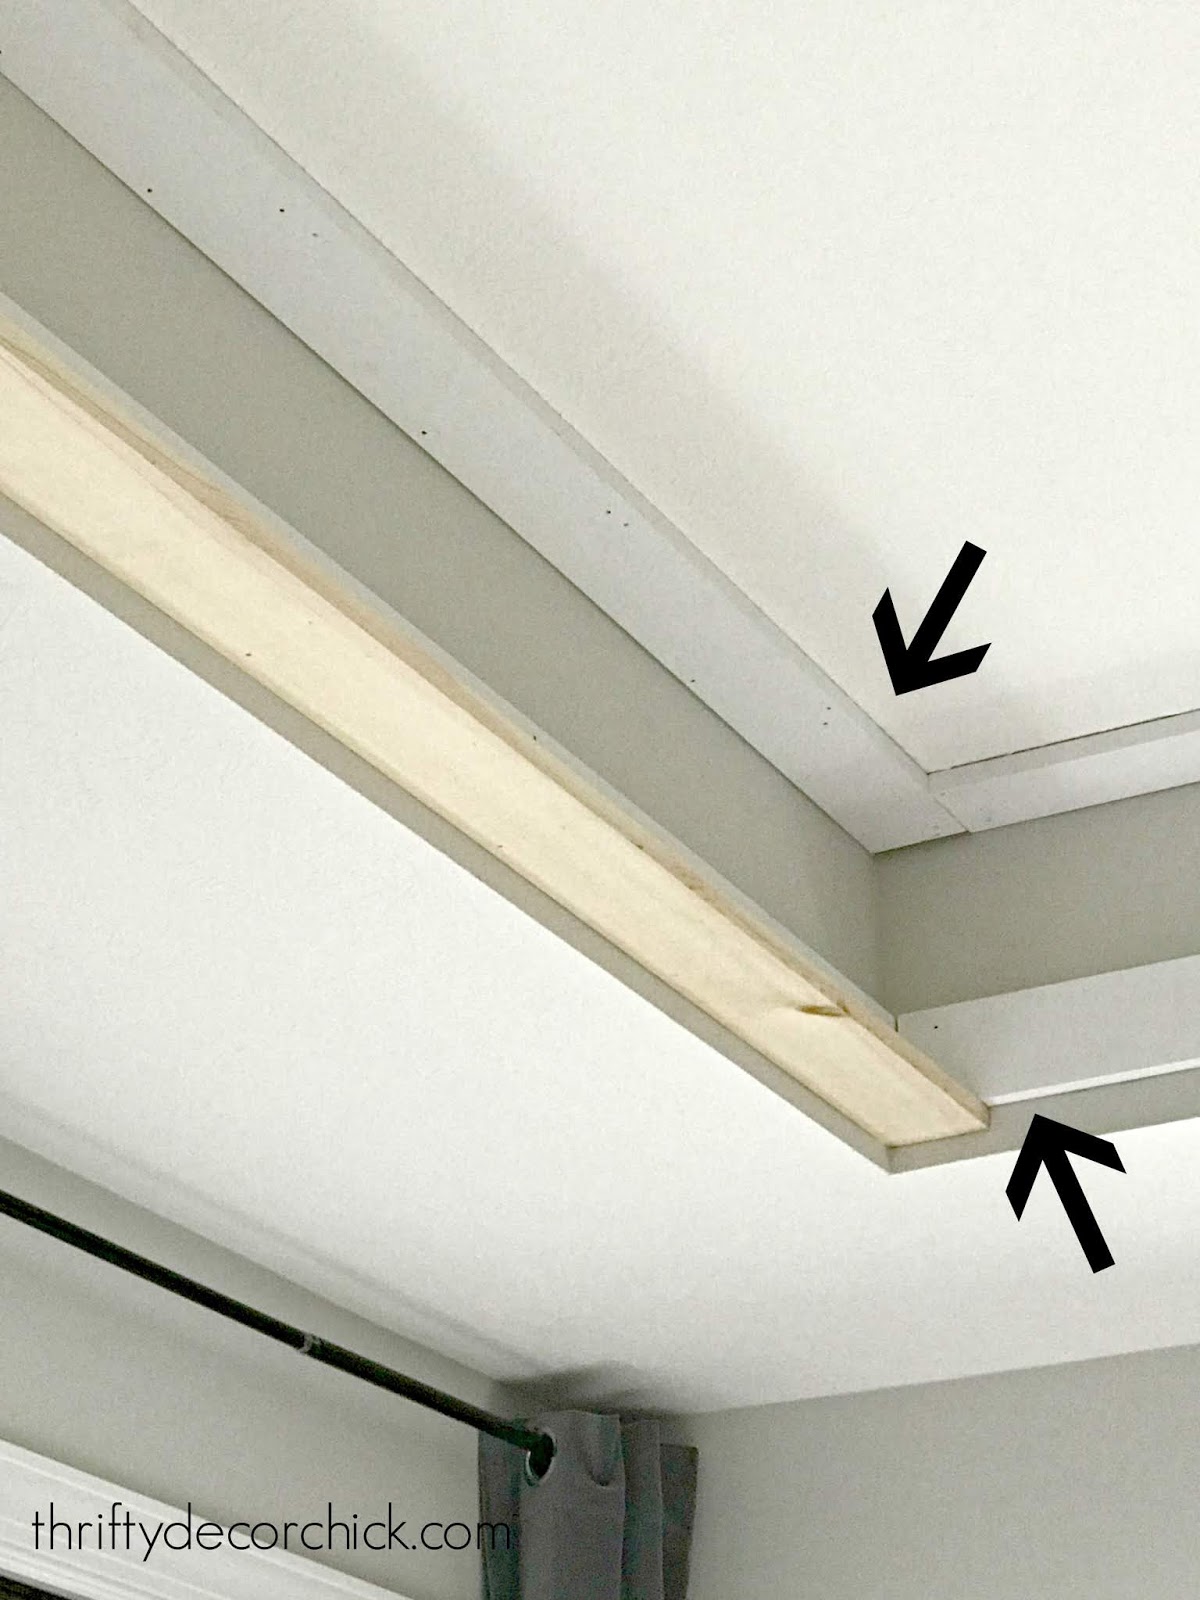
I hope that makes sense. The arrows are pointing to the pieces that the wood that makes up the beam were attached to. You can see the bottom part of the beam started in that photo above.
When the bottom pieces were up, the sides could go on -- nailed into the board attached to the ceiling and then nailed to the bottom piece. The arrows show you where to nail:
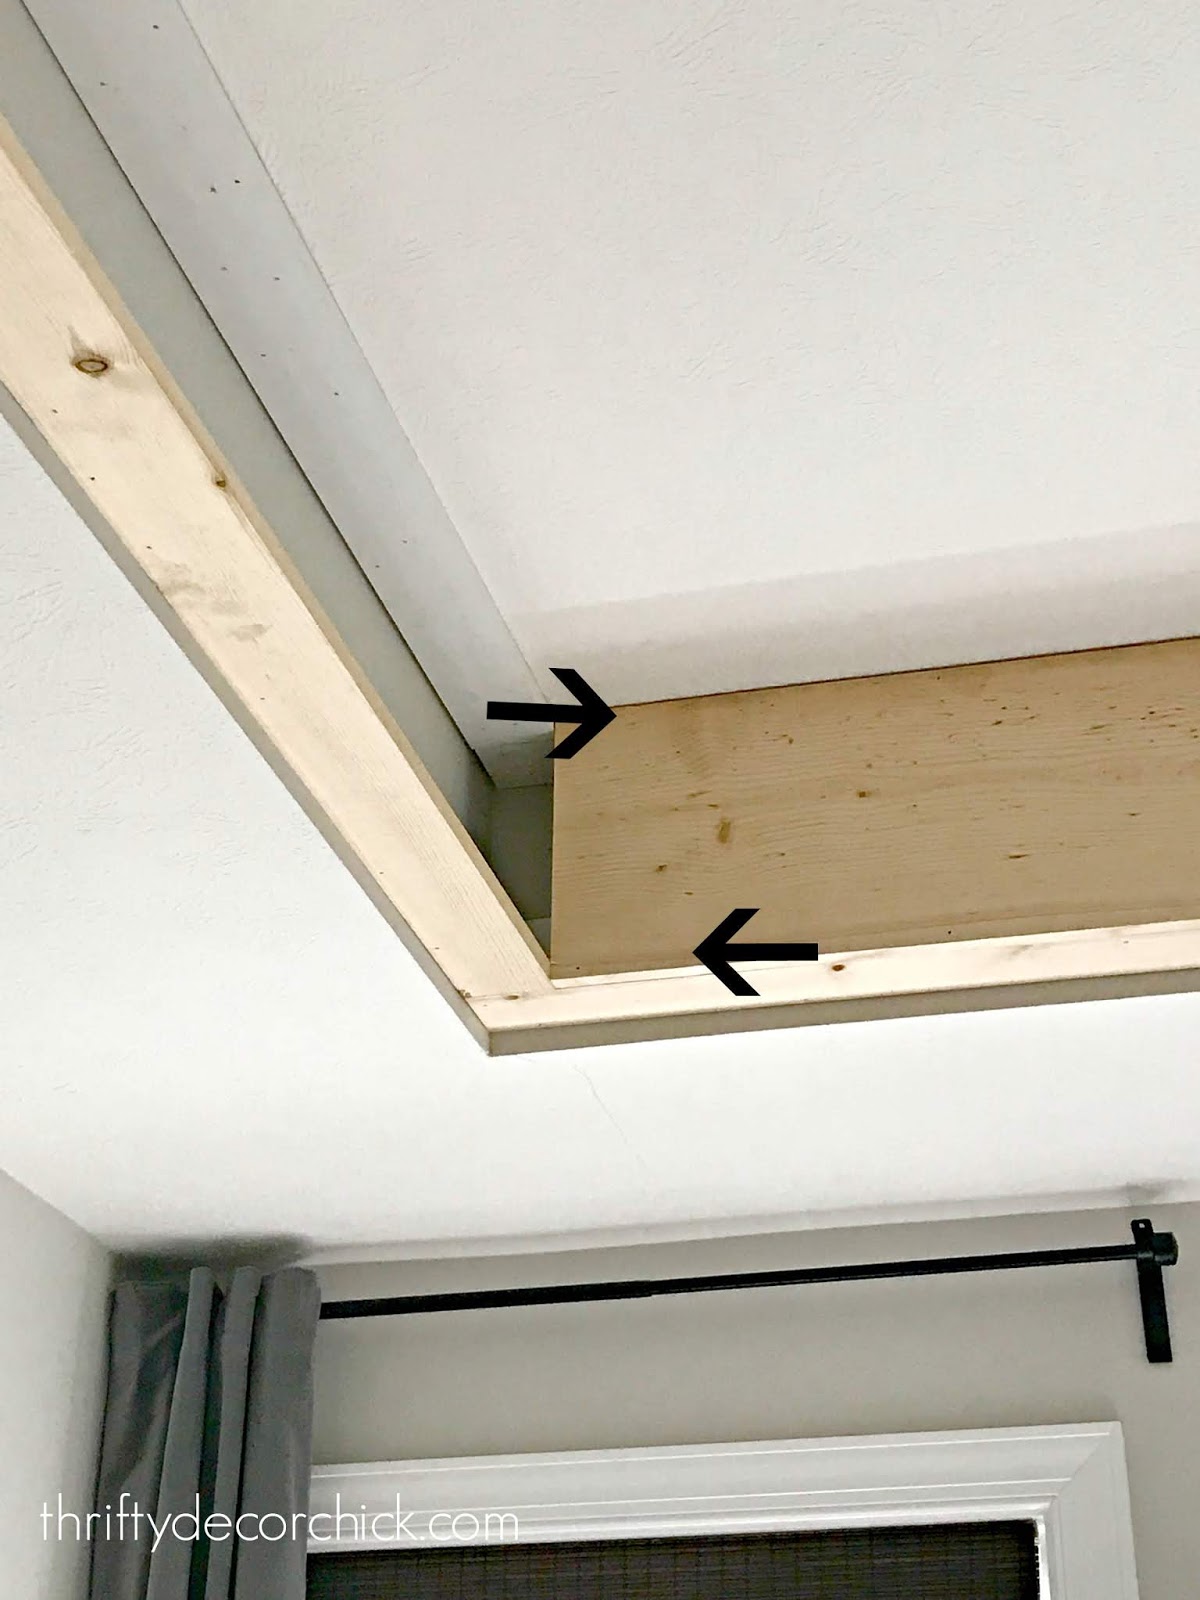
When you're done you have "beams" running around the tray ceiling.
Like I said...the ideal way to complete this project would be to prep before hanging the beams. I painted the ceiling after the wood was up. Painting a ceiling is never fun but it went quicker than I though it would. I used a long painting pole to get the two coats up.
We moved furniture and put a big painter's cloth over everything as I moved around the room. I did have to climb up and down the ladder a million times to cut in around the wood. If you paint before the wood goes it up it would be SO much easier because you wouldn't have to worry about cutting in. (The wood would be covering it.)
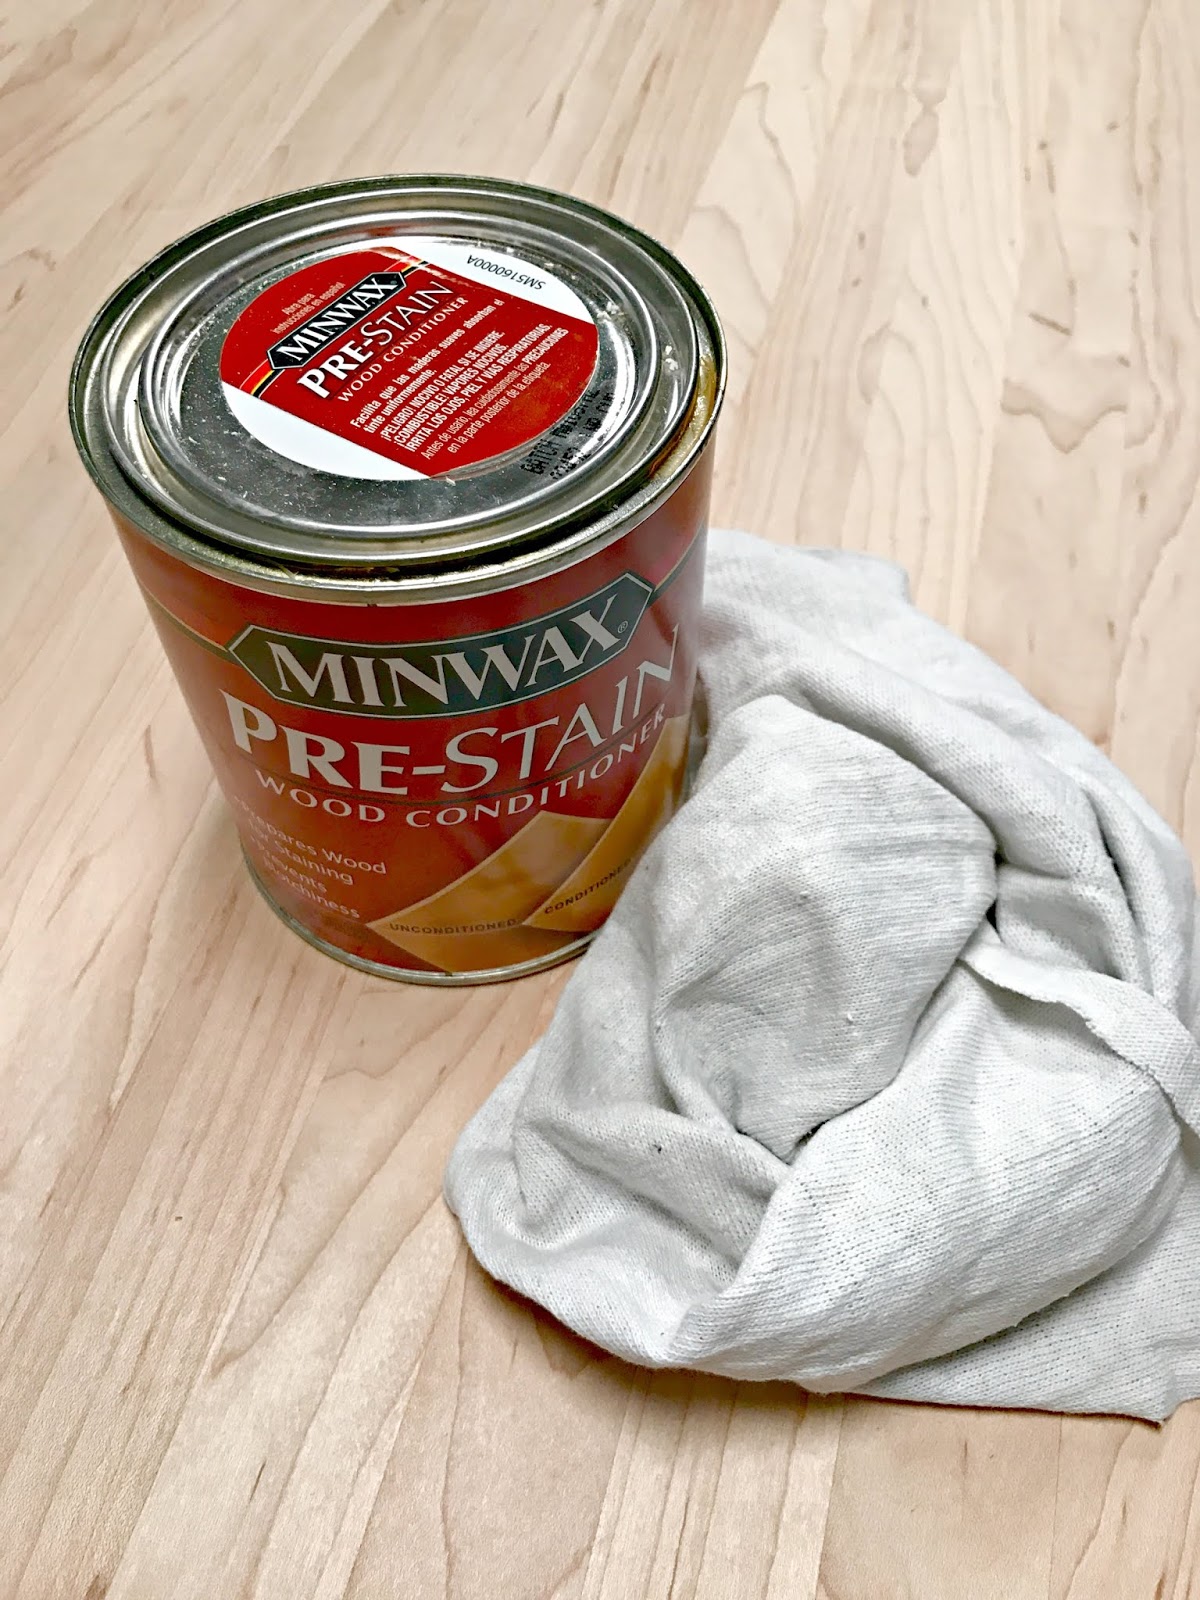
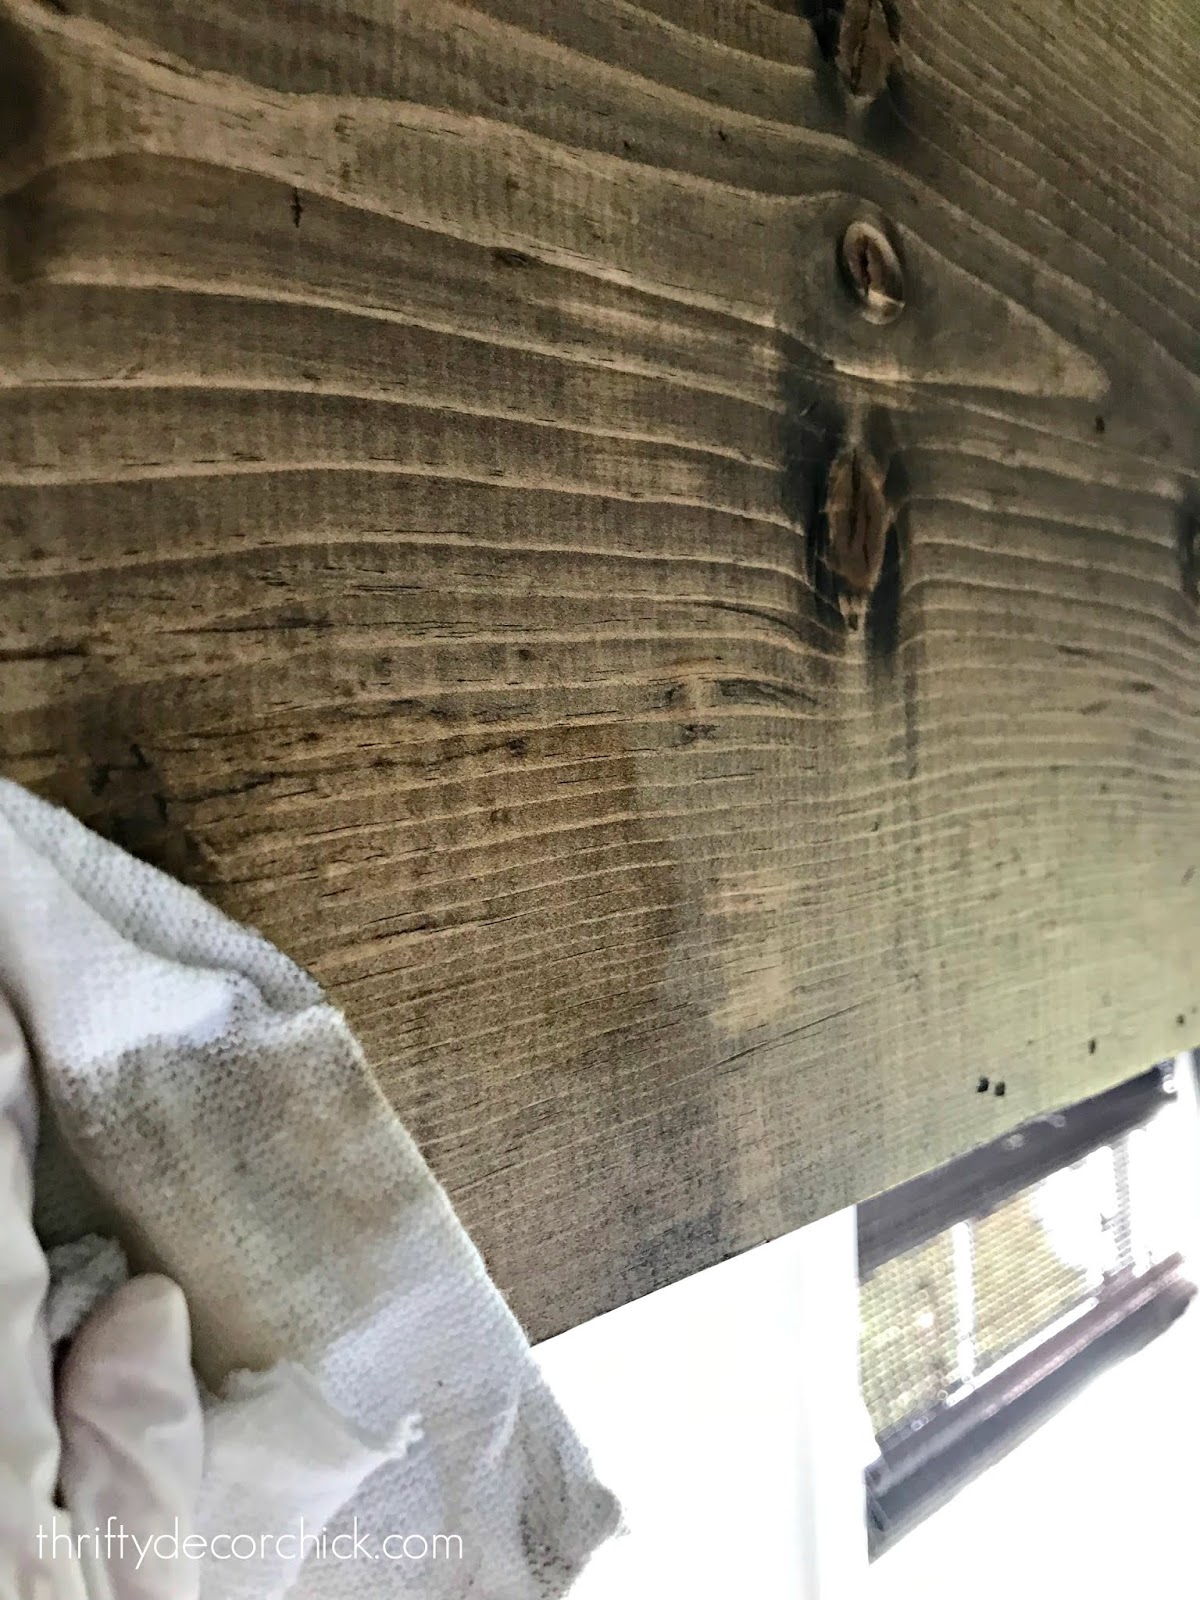
I painted the ceiling in Westchester Gray by Sherwin-Williams (flat finish!) and then it was time to start the staining process. Even with the wood already installed, it went much easier than I thought it would! I taped off the ceiling and then started with what I think is a VERY important product, especially on a project like this:
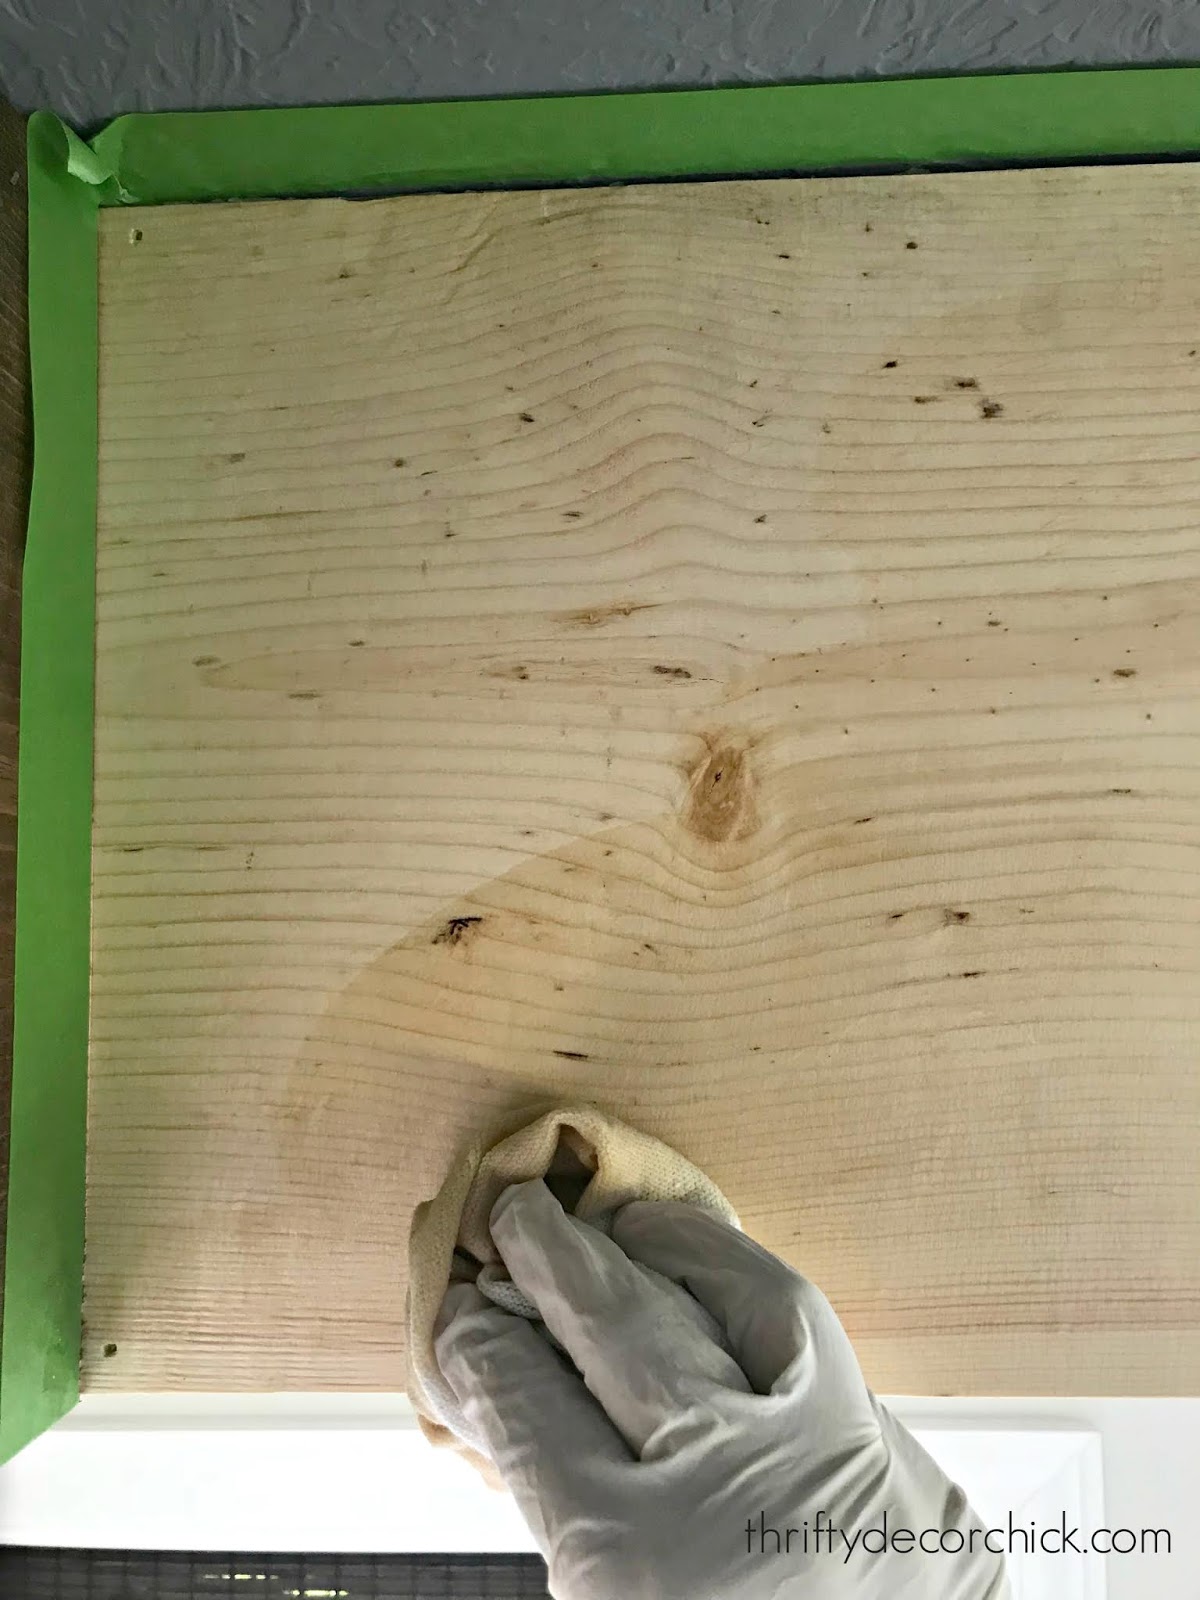
I talk about using the pre-stain wood conditioner a lot because it is SO important. Conditioning the wood preps for stain so it isn't blotchy. More importantly, it gives you time to stain the wood, which is incredibly important on a project like this that has large pieces you're working on:
It's important to keep a "wet edge" when staining -- which means you want to be sure you don't apply the stain and then let it dry at all at any point. If you do, you'll see where you stopped and started. The conditioner makes it much more forgiving so you have a lot more time to work.
Right after conditioning, I started with the stain color I thought I wanted to use -- Provincial:
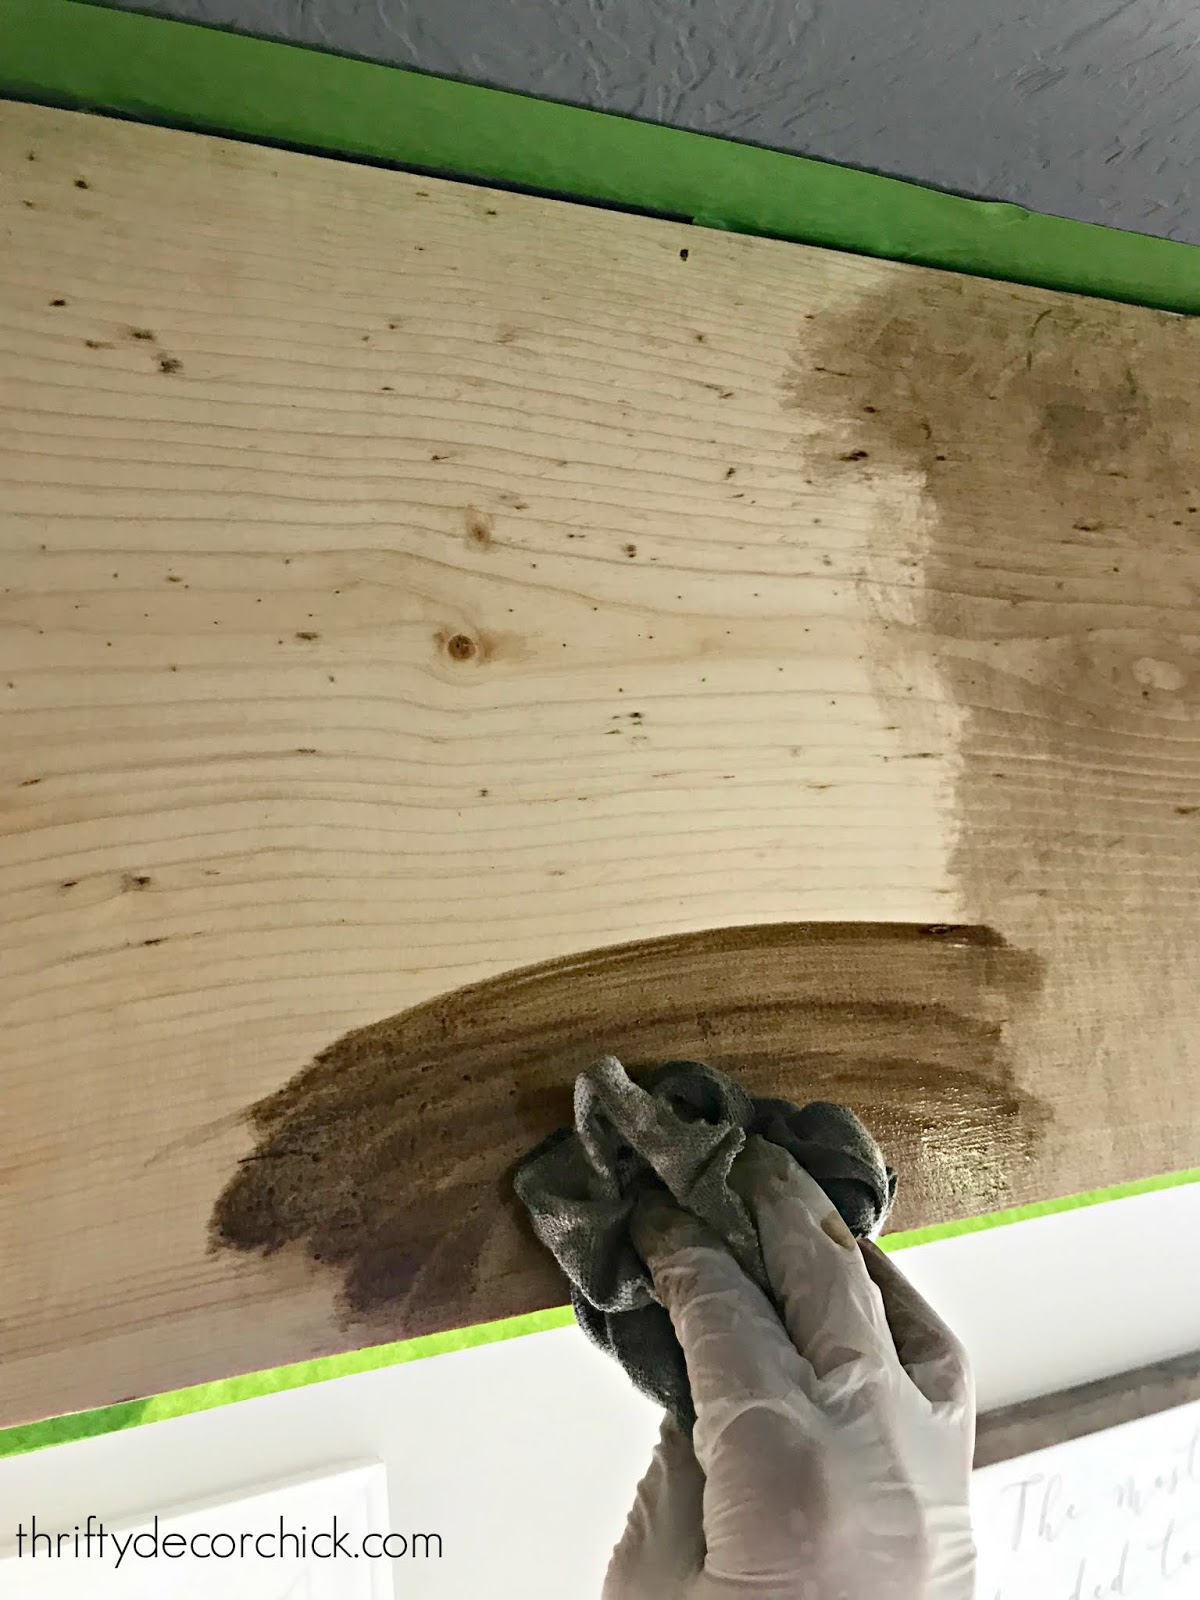
Over the years I've found the easiest way to apply stain is with a rag. Gloves are needed! You just use the rag to wipe the stain on, then rub it into the wood:
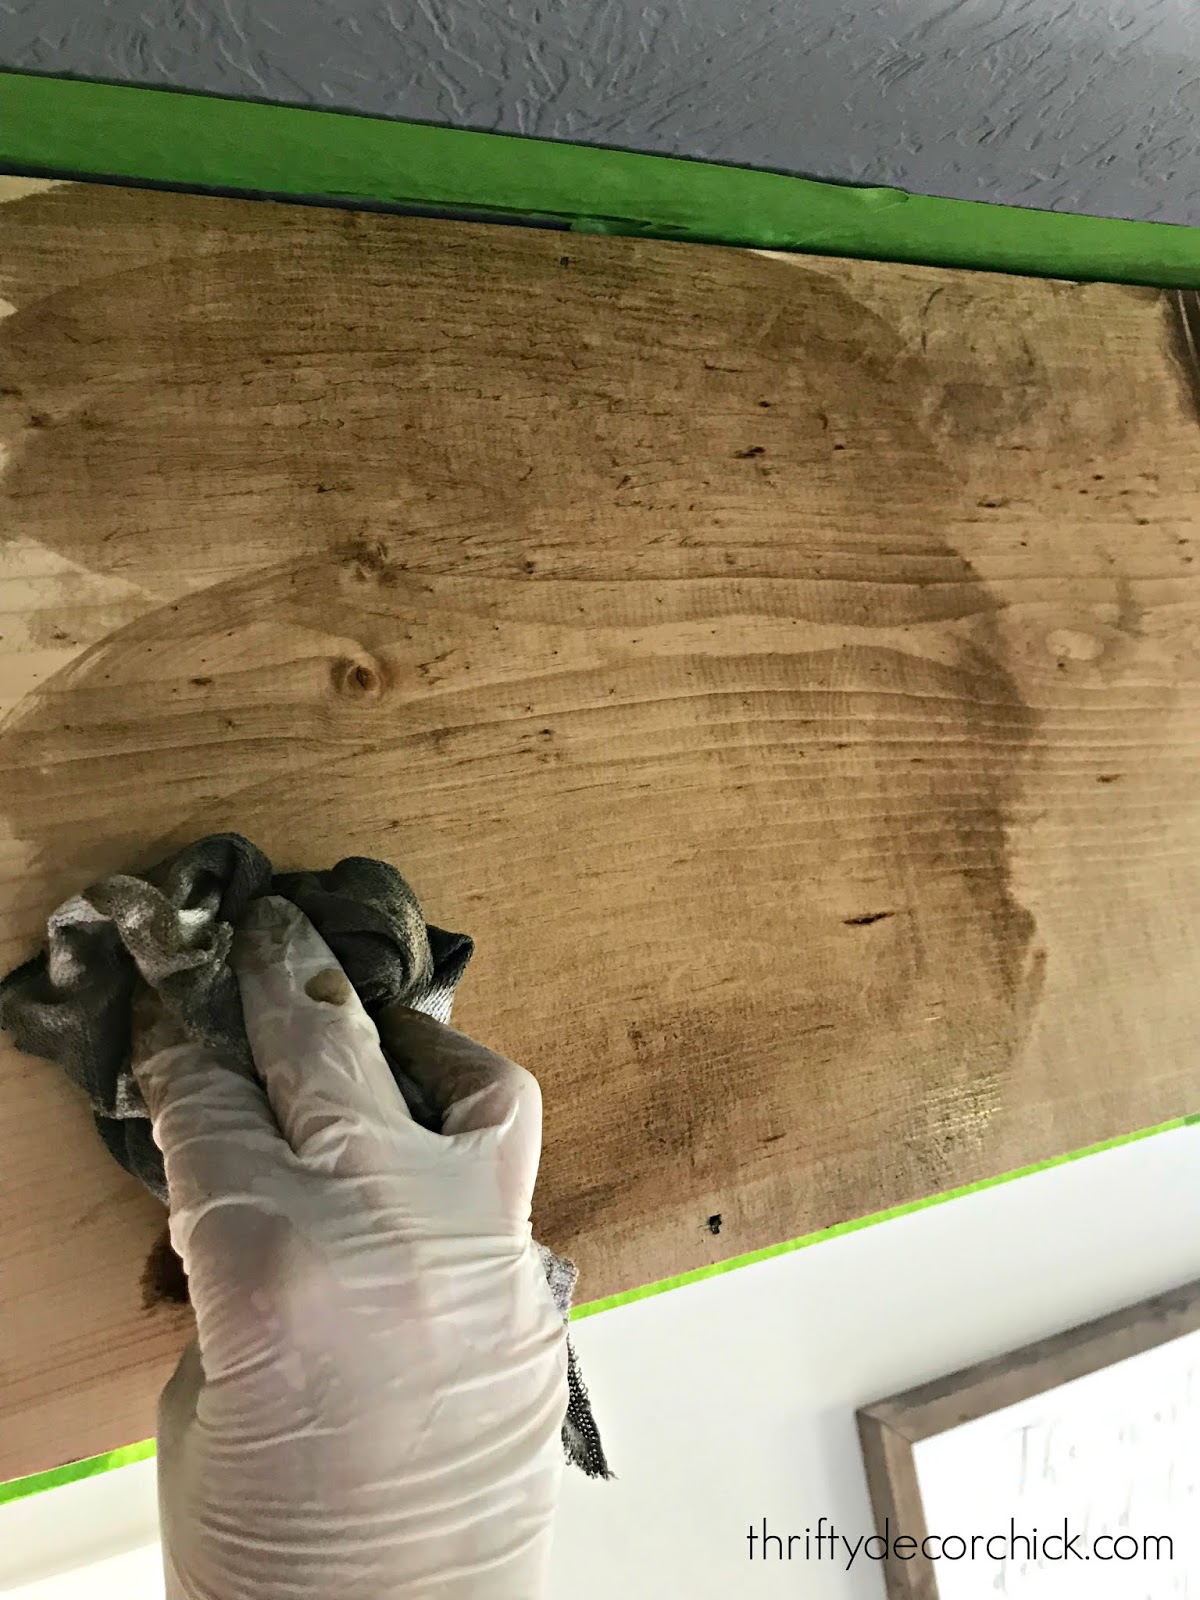
See that edge there? Where it's wet and meeting the part I had just done? (The stain to the right looks like it's dry but I had just applied it.) If the wood was not conditioned some of that line would stay -- and it doesn't look good!
Because of the pre-conditioner, it came together nicely. No line!:

On the first beam, I did the first coat and stepped down to check it out. I usually only use one coat of stain on my projects -- more coats will deepen the stain but I find it's rarely needed.
I love the Provincial color, but it was leaning a little orange on this pine. I didn't really notice it until I stepped back. Because of that, I went back with another coat of stain, but this time with another favorite, Jacobean:
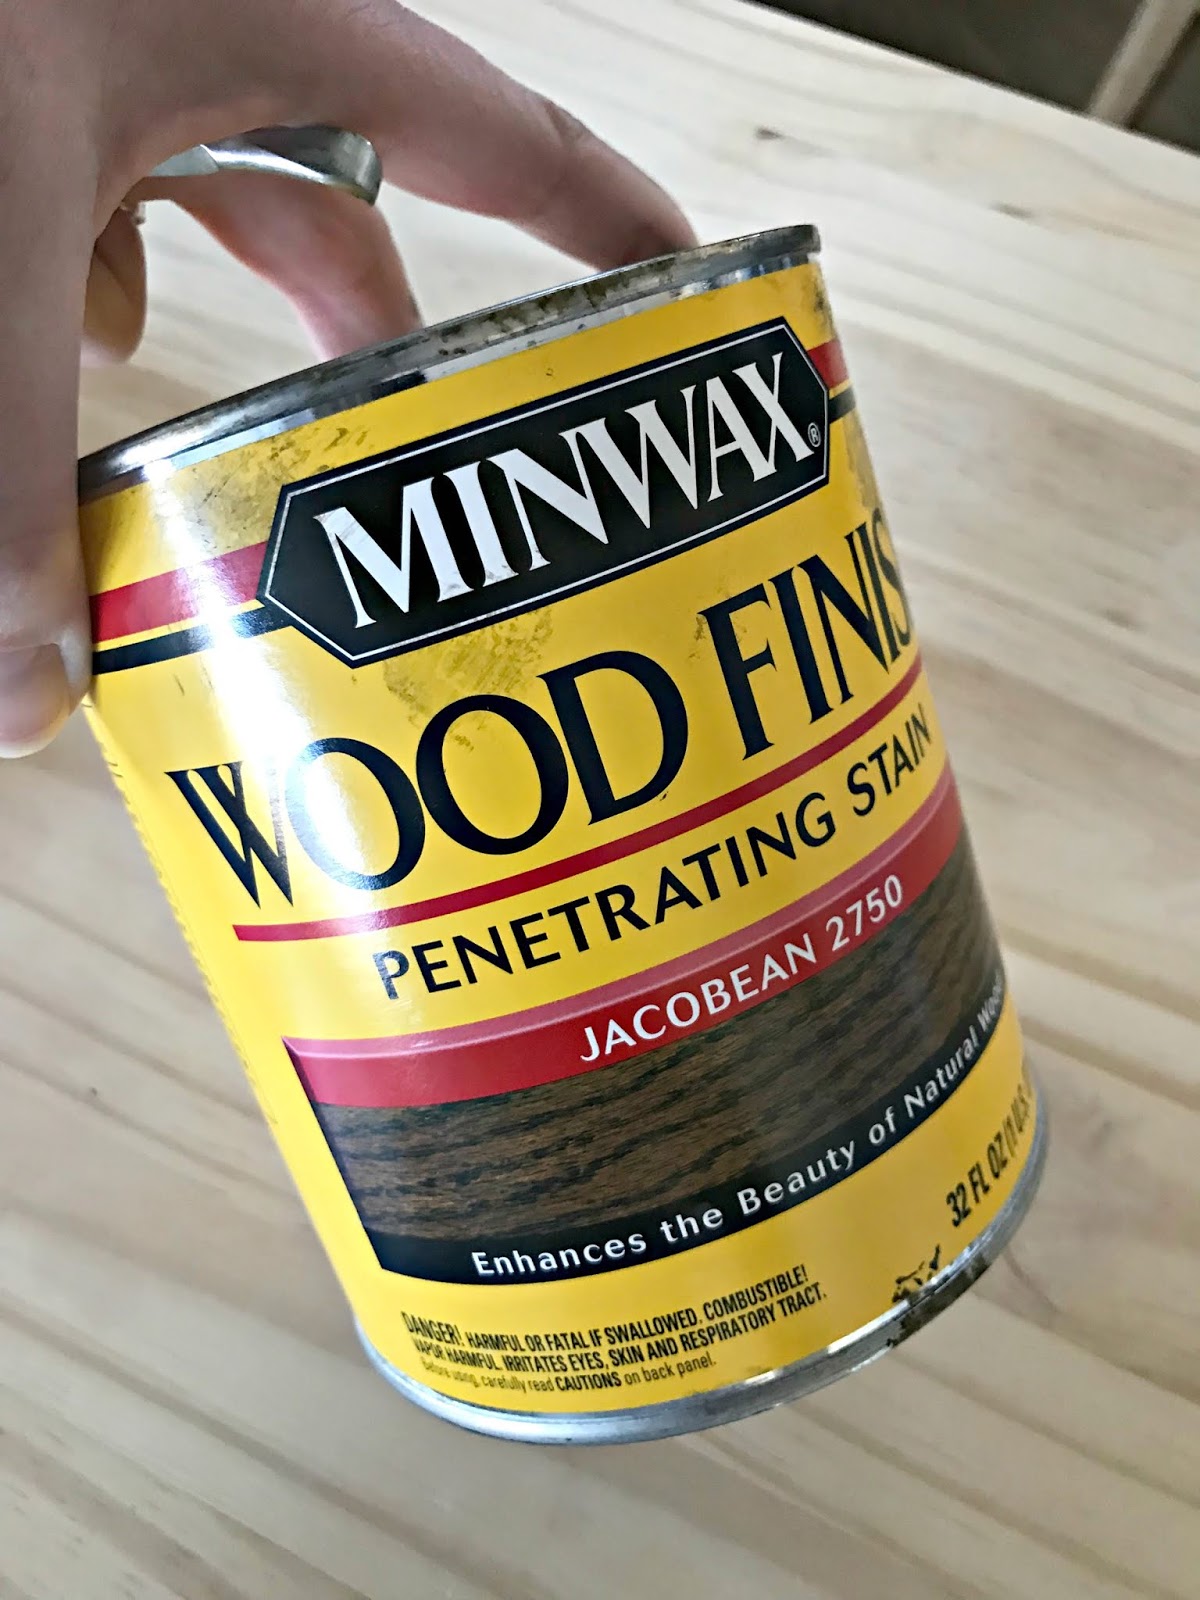
You may remember Jacobean because it's the color we used on the hardwoods in our old house.
It's a beautiful color! Definitely more brown, which is what I wanted. Here's a look at the difference -- Provincial on the left, then with a coat of Jacobean as well on the right:
This is another reason I love working with stain! You can experiment with different layers of colors and get a custom look. You can also mix stains ahead of time to find a color that's perfect for your needs.
The final step (after letting the stain dry) was to add a coat of polyurethane. I only did one coat since these will never be touched. Thankfully Minwax has a wipe-on poly that was perfect for this project!:
Again, you'll need gloves and a clean rag to apply. You can see how the poly on the left really deepens the stain and makes it look even better!
One thing to note here -- when you stain there will be fumes! I had the windows open all day each day and had a air purifier running constantly. We didn't sleep in this room for a few days.
(Side note -- if you ever have floors refinished or do a staining project and smell a burning smell coming from your dryer or another heat source, check out this post!)
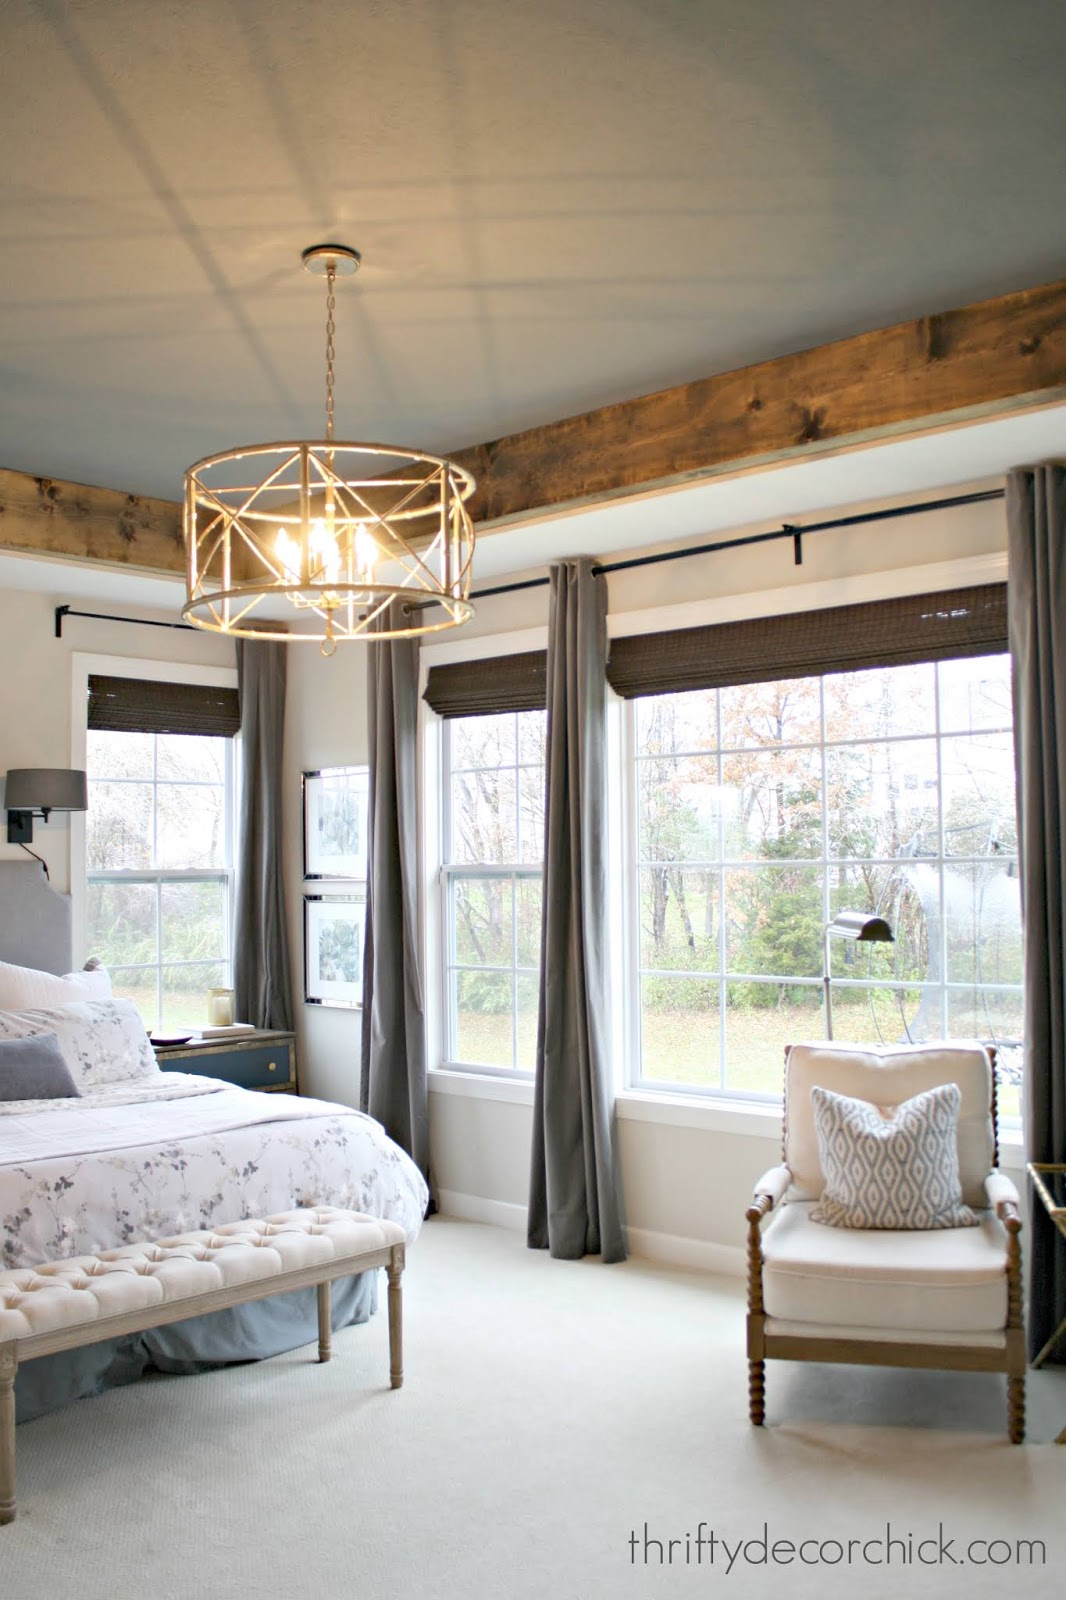
After all was dry, we were finally able to enjoy this room again...and we are obsessed with the ceiling! It looks amazing and I couldn't be happier with it:

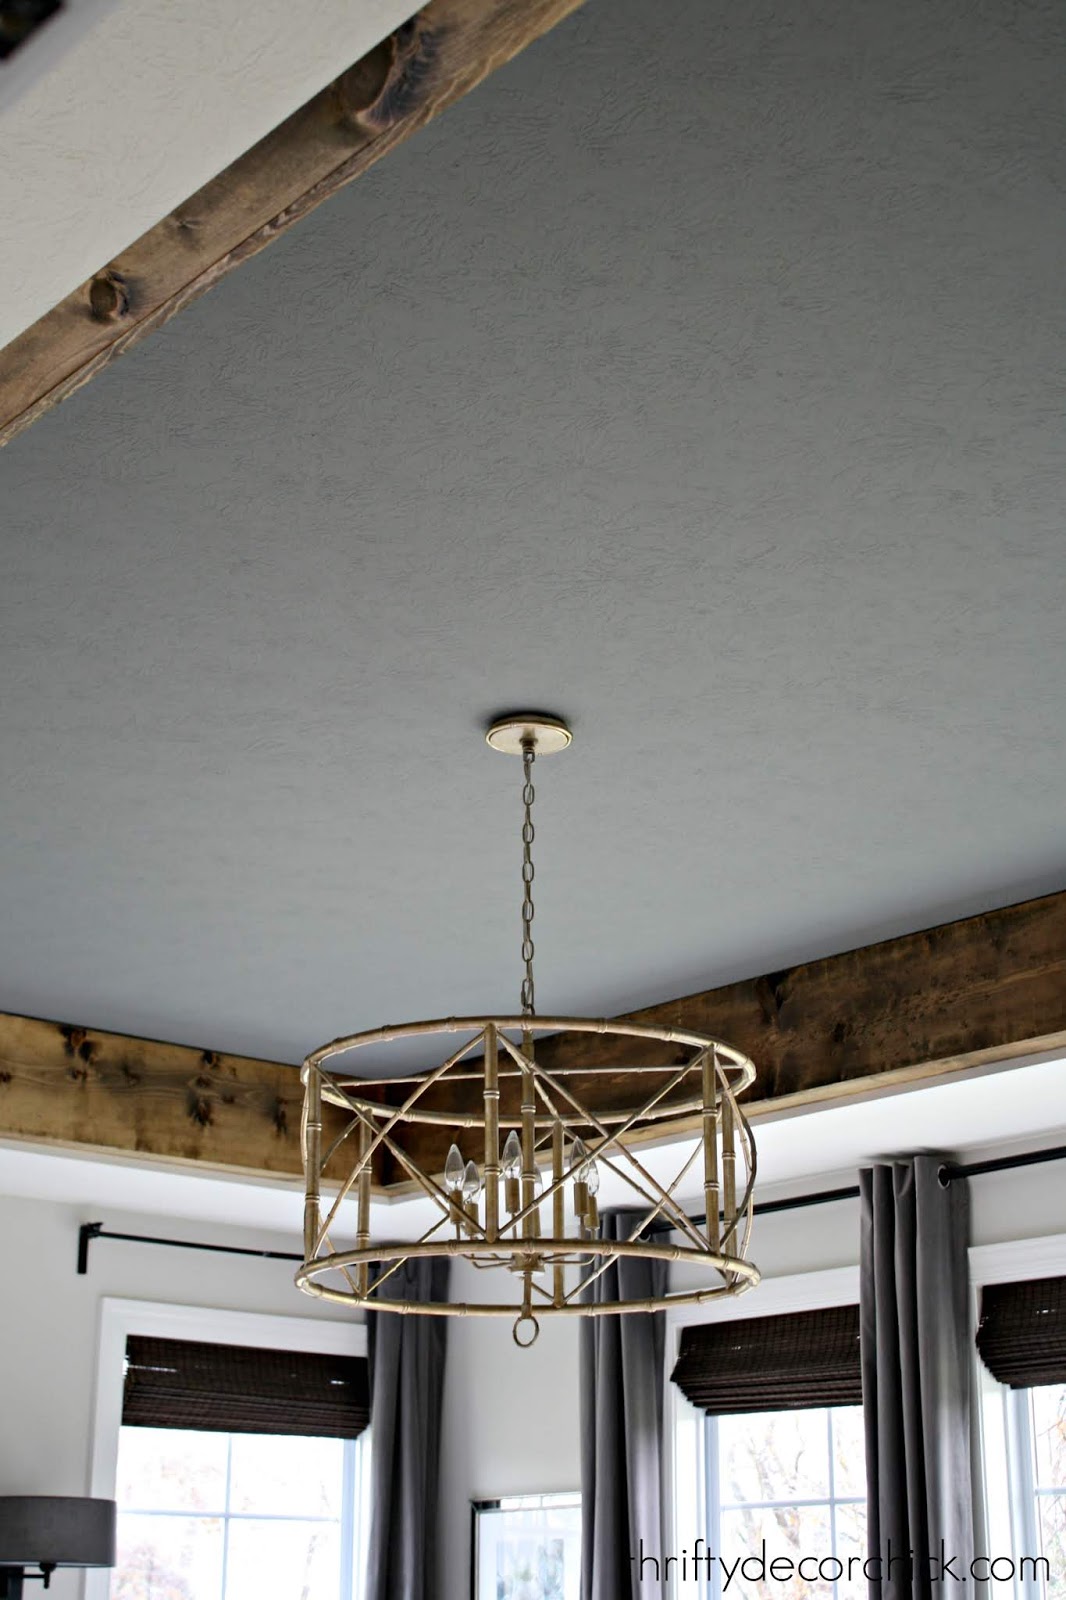
It completely changes the feel of the whole room. It doesn't darken the room at all -- just adds a warm, custom touch that I like to lay in bed and look at. ;)
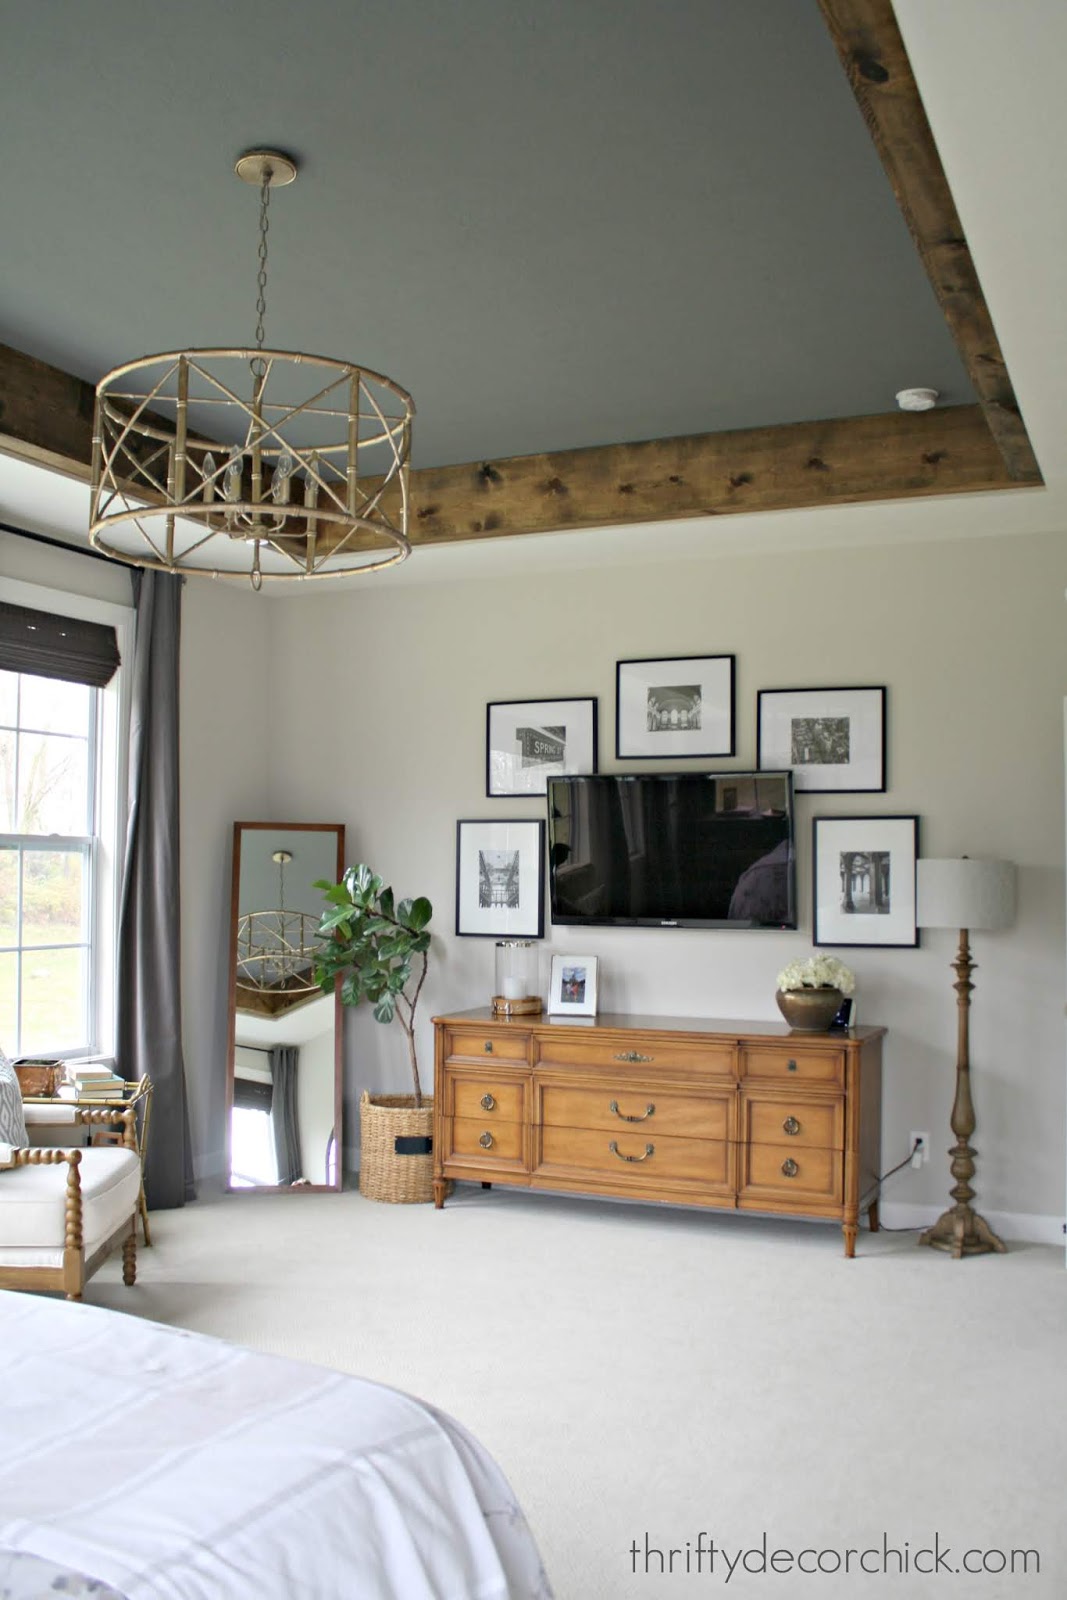
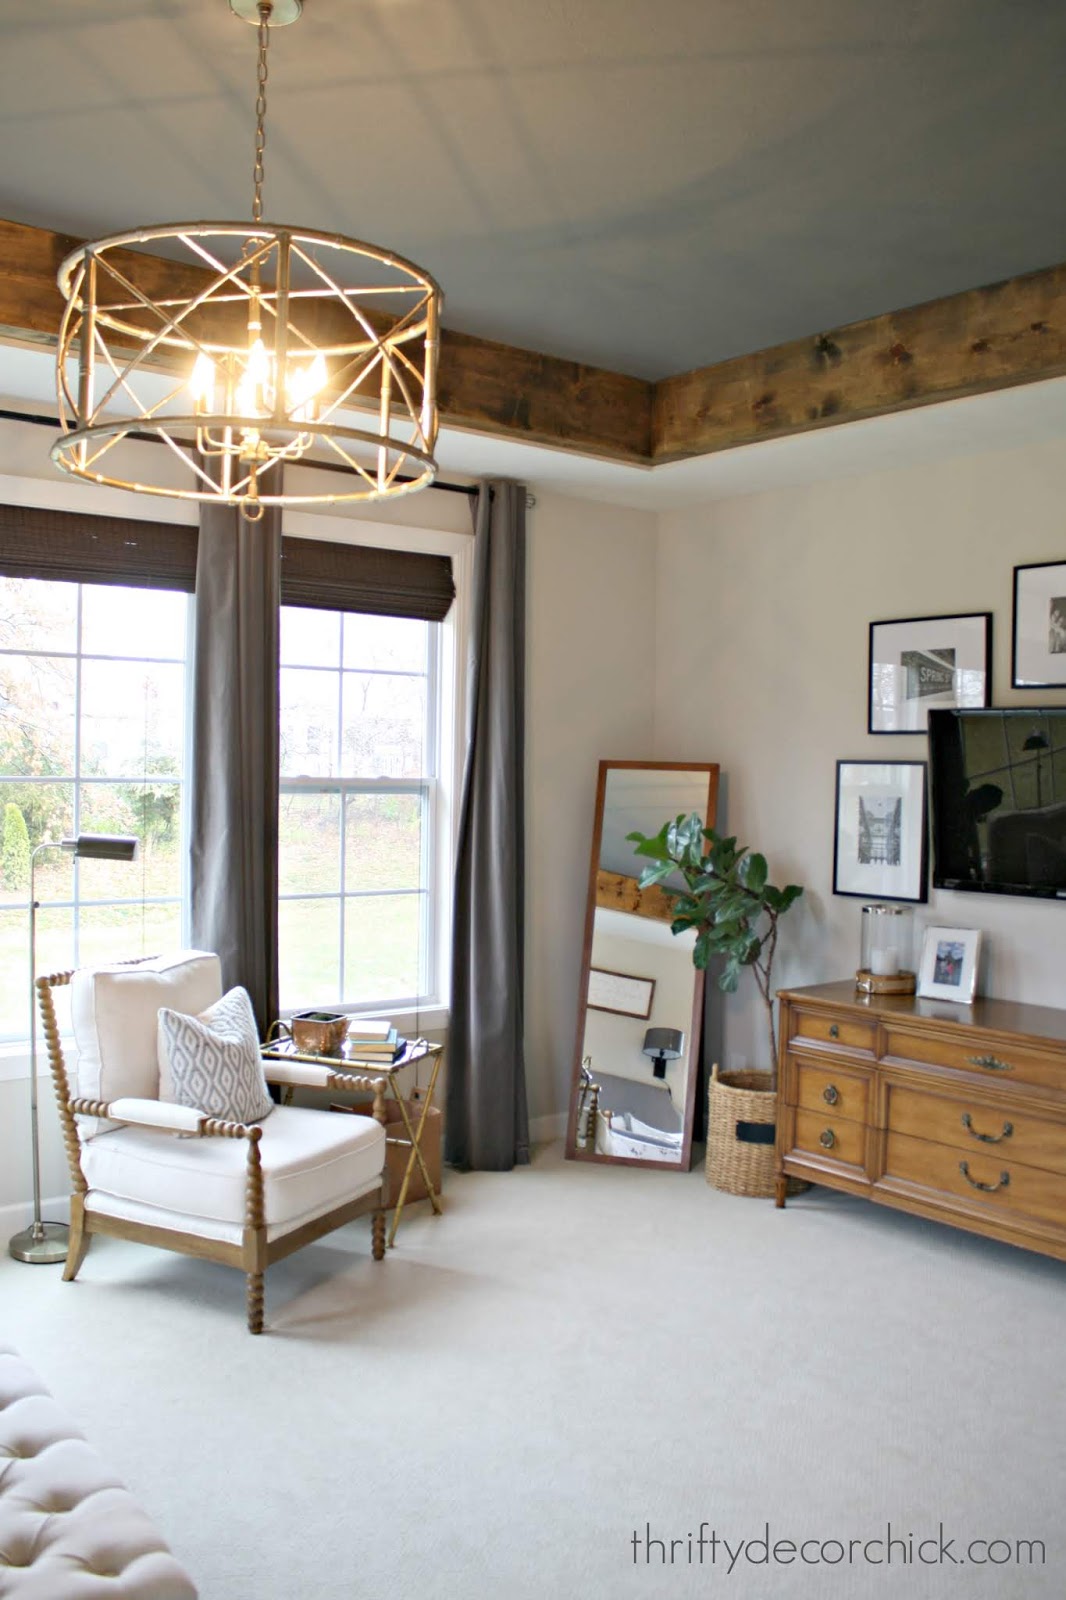
Because of the ceiling height and having a bunch of windows in here, it doesn't make it feel closed in at all. It does make it feel much more cozy and that's our favorite part:

There is a lot of gray in the room now but not for long -- this is phase one of two as far as changes to this room. Or maybe one of three...when you give a DIY blogger a cookie she wants to change a bunch of things. ;) I'm super excited about the changes coming up!
And I'm considering painting the dresser now too -- still deciding on that one. Maybe black?
My favorite part -- the before and after pics! Here's a reminder of how it looked a few weeks ago:

And this is how it looks now! Doesn't that fixture look amazing against the dark ceiling?:
There are a few things to consider if you want to try this project:
This project gives me ideas for the rest of the house! I love the power of stain! And I just love the warmth of it against both lighter and dark colors.
See another one of my favorite Minwax makeovers here!: 
This post was sponsored by Minwax. I only work with brands and products I would recommend to readers.
Via https://www.thriftydecorchick.com/2018/11/cozy-tray-ceiling-makeover-in-master.html
0 Comments
Hey hey! It's that time of year again!! I gather a group of talented bloggers (with excellent taste) every year and we share a bunch of our favorite things. They vary from home items to fashion to beauty -- and they are all great gift ideas. OR...you could just treat yoself. ;)
I will list all of the ladies joining me this week at the bottom of the post -- you can come back to check in from now until Wednesday to see their favorites.

These are all items I use a lot and LOVE. I think you'll enjoy them too! Affiliate links are included for your convenience!
First up...one that's a necessity in this house. I'm a popcorn freak...I'd make it every day if that was acceptable to my hips. We are notorious for stopping by the movie theater and just grabbing buttery popcorn...we just love it. ;)
I've tried many methods of popping it home over the years and I've finally found the BEST. I used to use a popper you placed on the stovetop -- I recommended it here for years! You crank it and it keeps the popcorn moving around. I found I was replacing it often though, because the metal burned SO easily. And you really had to watch it or the popcorn would burn.
I also tried just making it on the stove with a pot and lid. This worked OK, but I always ended up wasting so much corn because I'd pull it off the stovetop early -- otherwise it would burn as well.
A few months ago all my popcorn prayers were answered when I found THIS Dash Popcorn Popper:

*angels sing*
This thing rocks. You hardly have to do a thing -- use the measuring cup (on top) and pour your corn into the machine. Then turn it on. That's it!!
SO much easier and zero burnt popcorn. Also, it pops nearly every single kernel so very little is wasted. Another favorite detail is the measuring cup -- you put butter in it and it melts it while the machine is popping.
I LOVE this thing and we use it all the time. I'll never go back to any other way of popping. :)
My next favorite is a recent find. It has made doing my hair FUN because it is super easy and it really, really works. It's rare I find something that works so well on my hair.
One of my favorite makeup vloggers shared it and I went out that day to buy my own. It's the Bed Head Wave Artist:

It's basically a crimper, but not like the ones we used to use. ;)
It's much bigger and gives you really beautiful, full waves. It works SO well!!:

My tips -- separate your hair into sections (I do it in layers, so the lowest part of my hair first). Start near your roots and then move down your hair. You don't have to clamp down very long.
At first it won't look great...and then as you finish up the layers of hair you'll see how much volume it gives your hair! When I'm done I'll lightly brush it out. So easy and it makes my hair look so good! (You can see how it looks on my hair by visiting the Stuff I Love stories on my Instagram feed.)
This next one is an great little doodad for the house. These little SnapPower nightlights are inserted right onto your outlet (under the plate):

They only turn on when the light is low or it's dark. During the day (unless it's a gloomy day like today) they turn off on their own.
They are great for bathroom trips in the middle of the night! And they are LEDs so they amount of electricity they use is way less than a nightlight with an incandescent bulb. They say it's less than 10 cents a year!
This is another recent find and I was incredibly impressed with it. This is a Loreal hair mask -- and I couldn't even believe how soft and silky my hair felt after I used it!:

You put it in the shower and let it heat up a bit before using. There's a very fashionable head wrap (?) that you put on after shampooing. You kind of rub it around on your head so the treatment gets into your hair, then let it sit for five minutes or so.
At first I thought it was just a conditioner, but it's way better. I let my hair air dry most of the time, and that night I couldn't believe how soft it was. I kept making my husband pet my hair so he could feel it too. Ha! Also, when my hair dries it's not nearly as "wild" as usual -- it air dries softer and more manageable. Days later this is still the case. I went right back out and got more of these and plan to use them once a month.
Have you seen the toothbrush Wisps? I first saw them when John Mayer used them on Instagram. ? They are great for on the go:

You don't need water -- you "snap" the toothpaste open with your teeth and then brush. I love them! They don't leave an overwhelming toothpaste taste either. I keep these in my car and they would make a great stocking stuffer!
I'm including this one because I've already heard from so many of you who have done this little trick! I shared how I light these sconces without electricity a few weeks ago:

It's such a great trick!!
The key is these puck lights -- they come with a remote so it's super easy. And you can dim or set a timer for the lights...no forgetting and using up the batteries the first night!:

I just love this little hack and it would be a great present for yourself this holiday. ;)
Finally, I'm adding this one simply because I saw it today at the store...had to have it...and made it for lunch. ;)
These little Reese's skillet deserts are YUMMY and cute!:

I'm definitely getting some for people on my list this Christmas! They come with a cast iron skillet you can use again too. It's small, but that's good. Small is good when it comes to calories. Oh and they have a brownie version as well.
There you go!! I hope you enjoyed the list! I absolutely love every item listed here and think you would too. Now let's see what the rest of the ladies are sharing! Make sure to come back every day to see more posts!
Be sure to check out the last round up for more gift ideas!
MONDAY
Thrifty Decor Chick (that's me!)
TUESDAY
WEDNESDAY
Via https://www.thriftydecorchick.com/2018/11/2018-thrifty-decor-chick-favorite.html
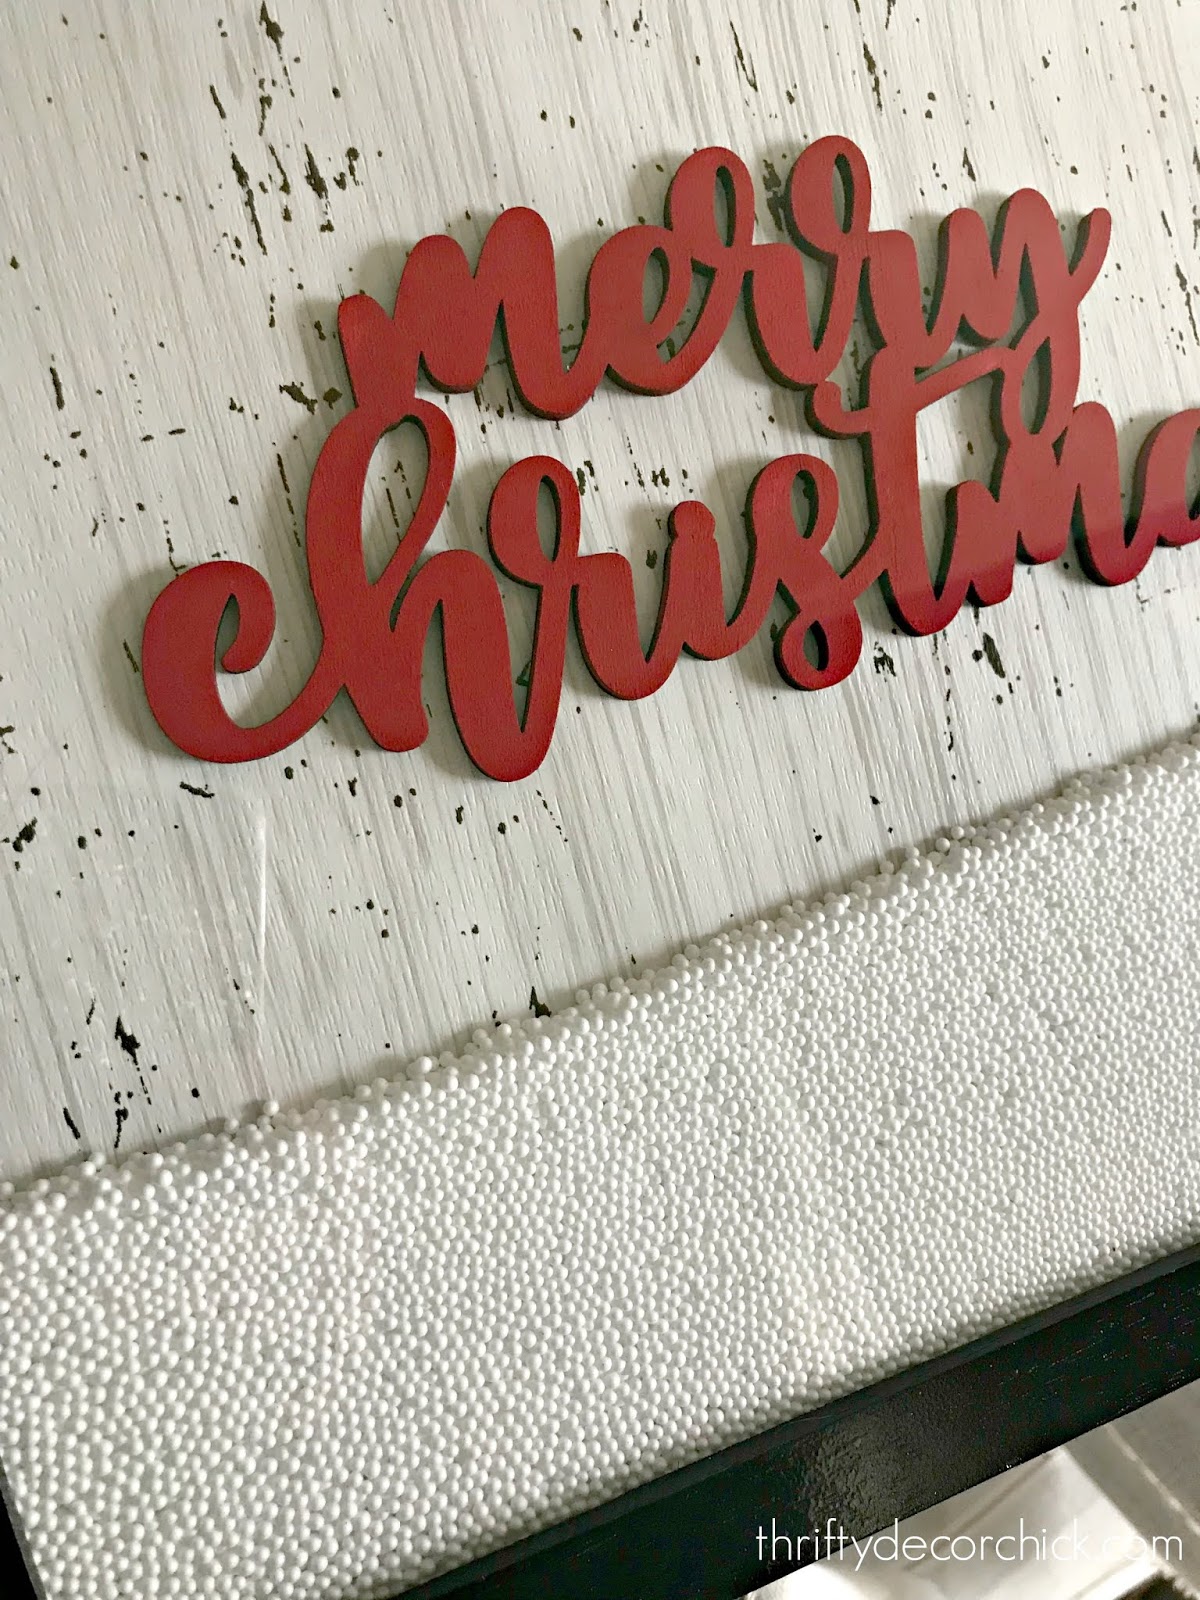
I'm back with an easy knock-off craft -- my first Christmas project of the year! I've seen some really cute framed "snow globes" at a few stores this year. It's the new decor thing for sure. Have you seen them? They're all super cute, but I knew I could do one much cheaper on my own!
I grabbed a nine by 12 frame from the basement -- you'll need one that has some space between the glass and the back of the frame. Almost like a shadow box, but you don't have to use a shadow box. I don't know where I found this one, but IKEA has similar options:

I found the Merry Christmas wood cut out at Joann's and it was $3 on sale. I'm sure most craft stores would have something similar! Joann's had tons of cute wood cut outs and I grabbed more for another frame I want to make later.
I sprayed the frame in glossy black spray paint and then did a couple quick coats of my favorite Christmasy red on the wood:

Because my frame was a bit too big for a normal piece of scrapbooking paper, I used wrapping paper to cover the back part of the frame:

I love this paper! I used it on my pretty Christmas glass candleholders last year. I just added a few dots of hot glue on the back of the wood and stuck it on. Make sure you put the words a little higher, not centered. You'll see why in a minute.
Then comes the messy part. ;) I have fake snow that I planned to use, but I saw this stuff at the dollar store and thought it would be fun too. Both fake snow and this stuff get all over the place -- you have been warned. ? It might as well be glitter. ;) I had the dust buster close by so it wasn't too bad. I just poured it into the frame:

I recommend you start with less than you think you'll need. I ended up having to remove some and that was FUN. ;)
I put the back on and we had our very own framed snow globe!:
It's super cute and so much fun! You can't help but play around with it.
My son LOVES snow globes so he's tickled with this thing:

As I mentioned, the soft, fluffy fake snow would look great too! This version is just a little more fun because you can rock it back and forth and change the shape of the "snow":
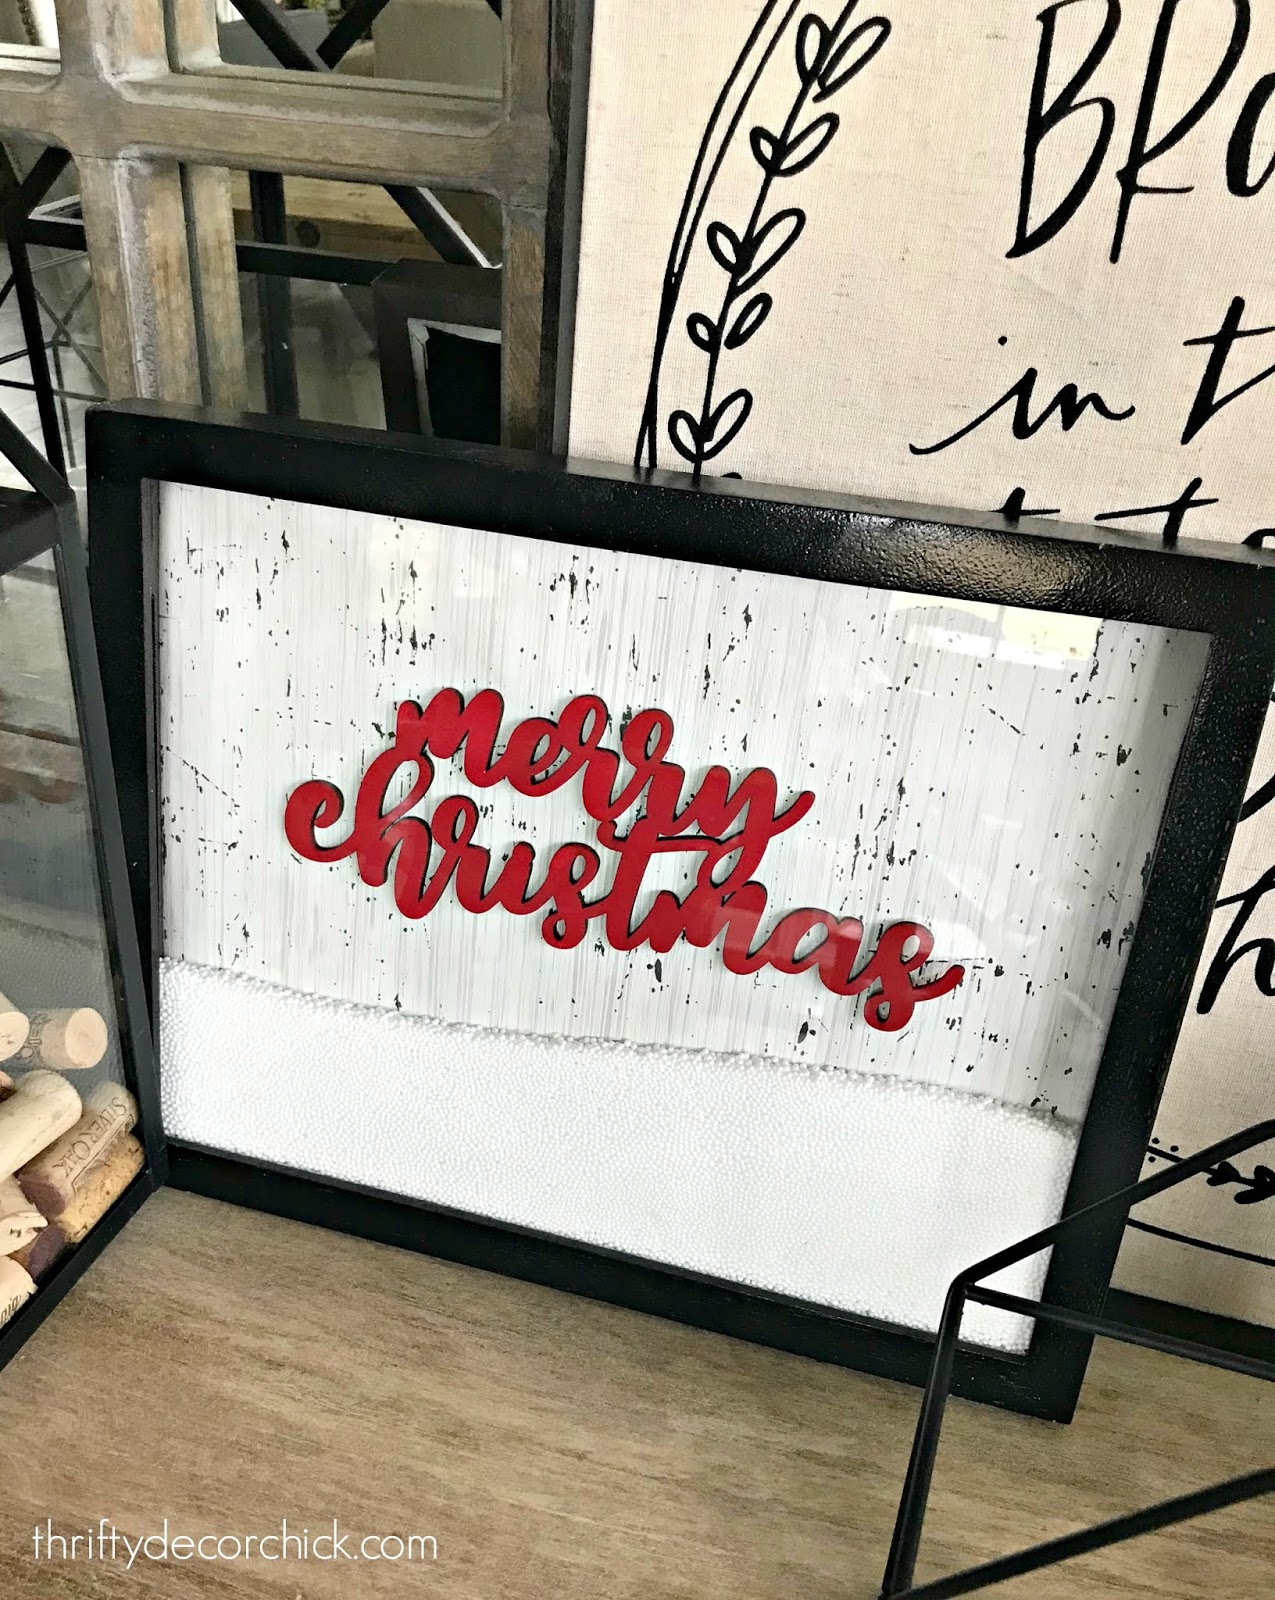
The largest version I saw in stores was $30 and was smaller than this one. I did this for $4! I call that a success!
So fun and the possibilities are ENDLESS. I plan to try at least one more these soon. There are so many fun wood cut outs you could use! You can also use vinyl wording and stick that to the glass instead.
Have a great weekend my friends! I'll be back on Monday with a fun post!
Via https://www.thriftydecorchick.com/2018/11/diy-christmas-snow-globe-art.html
Hey all! How was your weekend? I'm starting to freak out a little bit that Thanksgiving is NEXT WEEK. I cannot believe how fast the days have gone by this fall. Crazy, right?
I've been hard at work on a big DIY project I can't wait to share with you! But until then, I wanted to share this little update because it's the first time I've had this luxury in nearly four years of having window seats.
A few weeks ago I shared the dining area redo, complete with the new window seat and built ins:

If you missed it, check out how I light those sconces without electricity! So good.
I had a loooong window seat to fill, and was planning on making my own cushions. When I first showed you the seat, many of you recommended three cushions because of the length:

That was not what I wanted to hear, because I was going to attempt to DIY this. Keep in mind, I'd call myself intermediate as far as my abilities on a sewing machine. I have no problem sewing up some pillows or drapes, but this project did intimidate me.
As you can tell, I put it off. ;) I'm much more comfortable with a saw and a paint brush than the sewing machine. Ultimately I decided to do my no sew version instead of sewing these myself. Even though I really wanted a more polished cushion, it was going to be my best option. Well, it turns out I got an email from a company literally the morning I was planning to try start them, and I jumped at it! They make outdoor cushions and drapes, as well as a number of other items.
I was able to order three cushions from Patio Lane and they are covered in Sunbrella fabric, which is PERFECT for a window seat. Obviously these get a lot of sun. (Not today...or lately in general, because winter is definitely coming!):

I went very simple with the color and welting -- I kept wavering between something simple or a fun fabric and contrasting welting. But I want them to work all year, all seasons...and I know I would eventually tire of something too busy.
I ended up using a Sunbrella linen upholstery fabric (the number is PL-32309) and it's a classic light cream -- it looks lighter with the light from the windows:

I was SO excited to get these! I was stalking the UPS updates every day. They are so well made and I was thrilled when they arrived. (It took less than two weeks for them to ship.)
My favorite part (other than the fabric that should hold up to anything), is the zipper:

I can easily remove them if needed. The zipper would not have happened if I would have tried this on my own. ?
I got the firmest foam available, and that's the only thing I might change if I did them again. They don't have much give when you sit, but are still very comfortable:

I made our boy model them for me. ;)
I went with the firmer foam because I feel like they will hold up much longer. I didn't want them to wear in certain spots. And if I ever decide to recover them, I can use the inserts forever. So overall, I think the firmer foam was a good call.
The first day I laid on the seat with a blanket and I can attest it is very comfy! I just love this spot. I think it will be a popular area when we have large parties:

And on that note -- even though I know this fabric is made to hold up to the outdoors, I plan to scotch guard them as well. Our guests usually have a glass of wine in hand so you can't be too careful. :)
I feel so grown up with these, ha! I added our first window seat (in the last house) almost four years ago, and we never had a cushion on that seat. I'm thrilled to have this spot finished up and ready for the holidays!
Patio Lane graciously provided these cushions. I would 100 percent recommend them and their quality!
Via https://www.thriftydecorchick.com/2018/11/a-soft-place-to-land-on-window-seat.html
Hello hello! This is one of my favorite posts to share (nearly) every year because it reminds me that Christmas is just around the corner. I haven't pulled out any decor yet...but it's happening soon and I can't wait!
I love sharing DIY Christmas countdowns and I always share them early so you have time to tackle them well before the holidays. I've made many over the years and these little boxes were a favorite: 
We still have these and I just adore them! It was such a fun project -- I still remember working on these. ?
This knock-off Christmas countdown I made a few years ago is another one I love -- it survived the move pretty well. I was surprised! Just have to decide where it will hang this year:

The link for each project is included under the photos. This Christmas tree advent calendar is one of the cutest and most original I've seen in a long time!: 
Jaime is SO talented and always creates the greatest wood projects. This one is so simple even the youngest kiddos can move the tree:

This one is hung on a glass door (which is so pretty), but you could easily use an old window or just a large frame!:

I just think this is the cutest! Made from a cookie sheet and perfect to prop up in the kitchen: 
This one is made of scrap wood and I think it's brilliant -- if you have wood in your garage this one would be close to free!:

I love the use of a pretty old frame for this one, and it's a pretty easy project: 
These little tiny houses are the CUTEST! How adorable. Kids will love opening these up for small treats or activities: 
This one is just festive -- you can write activities on the back of each number: 
If you're looking for the prettiest option, this is it! I love that this uses a bulletin board -- no special DIY needed: 
How CUTE. The Target dollar spot is full of cute holiday socks right now... 
This is a more rustic version that I love. You could easily paint the wood to add some color:

And finally, more cute little houses! Adoyable (as my niece says). These are made out of wood:

So cute right?? I love the creativity and that they are all so unique. Not one would cost a ton of money either. I'm definitely getting the Christmas decorating bug...when do you start?
Via https://www.thriftydecorchick.com/2018/11/diy-round-up-christmas-advent-ideas.html
Hello hello! The before and after party has returned again! I was thrilled with the response from you all about bringing it back a couple months ago. I have decided it will most likely be an every other month thing, but I may change my mind. We'll see!
It was SO fun looking through your projects again. I've missed seeing them all! I'm excited to share these talented bloggers with you more often again. Let's kick this off, and then you can join in at the bottom of the post with your own project. Nancy's bright and pretty laundry room is SO good: 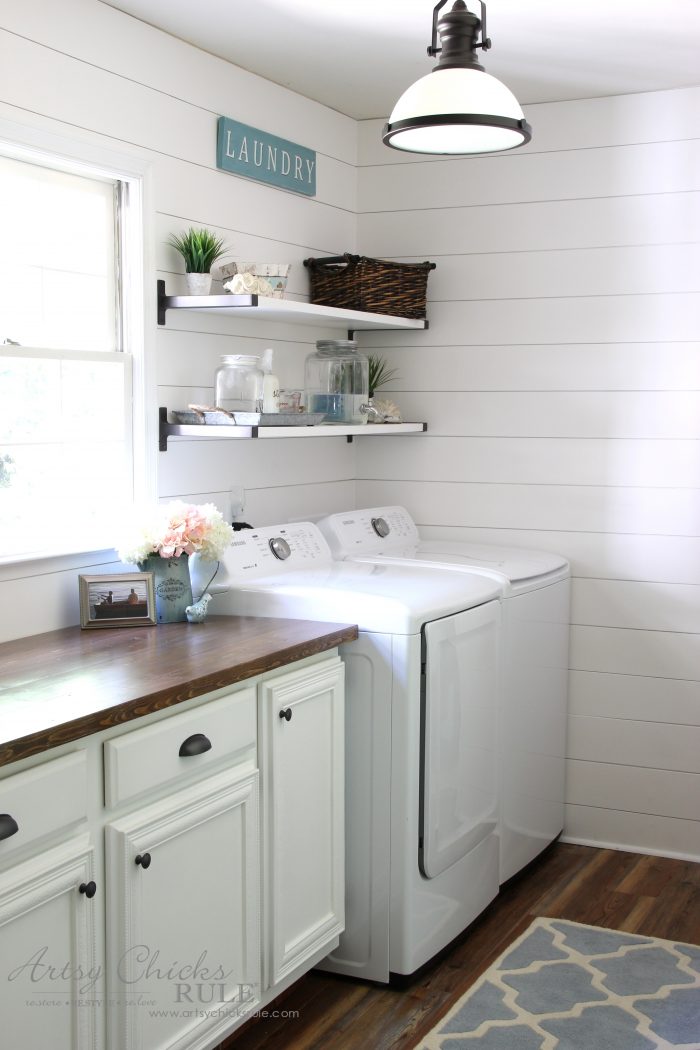
But you really have to see the before to get the FULL effect. What a transformation! I loved this pretty two-toned kitchen makeover by Jane and Sonja: 
The colors remind me of my gray and white kitchen transformation in our old house! This DIY coffered ceiling is SO good and I have no doubt it was a lot of work -- but it wasn't as difficult as I thought something like this would be: 
Morgan's husband knocked this out of the park! They covered a popcorn ceiling so this would be a great option if you have them. Jennifer's DIY picture ledges are even easier than mine -- hers just use two pieces of wood and mine use three: 
I especial love how they are tucked into the end of the hallway -- what a great use of this space. Her boy's woodland room is one of the sweetest I've seen! Just look at this bed!: 
Angela did such a great job -- what a labor of love. My friend Beth did such a lovely job on their master bedroom -- can you believe that is wall paper and not molding behind the bed? 
I love how she worked those cabinets to look like custom pieces too.
Stacy's IKEA master closet redo has my wheels turning...I want to tackle our closets next year:

Literally every single thing has a spot -- dreamy! And finally, Beth's pretty mud room made me smile. How can it not?: 
I know we're in the season of warm colors but this made me so happy. What a sweet space! OK, if you'd like to be considered for next month's round up, be sure to include a link to TDC in your post. Or you can copy and paste this code for the button (I really need to update this thing!): 
<div align="center"><a href="http://www.thriftydecorchick.blogspot.com/" title="TDC Before and After" target="_blank"><img src="http://www.homestoriesatoz.com/wp-content/uploads/2012/03/beforeAndAfterButton_thumb1.gif" alt="TDC Before and After" style="border:none;" /></a></div> Now let's see what you've been up to! I wouldn't be mad if some Christmas projects were thrown in. ;) Have fun! Via https://www.thriftydecorchick.com/2018/11/the-best-before-and-after-projects-link.html
Hey all! Thanks so much for all the love on our dining room transformation! I appreciate that you take the time to comment!
As promised, I'm back with this super easy trick that allows you to put sconces just about anywhere. It's one of those ideas that you see and you're like, DANG...how did I not think of that?? This is why I love blogland!
I first saw this idea at Nesting with Grace -- she shared how to do it on sconces that hang down. This version is even easier because of the style I got:

These fixtures come wired, but you will ignore that part. I hung them using the hardware they include:
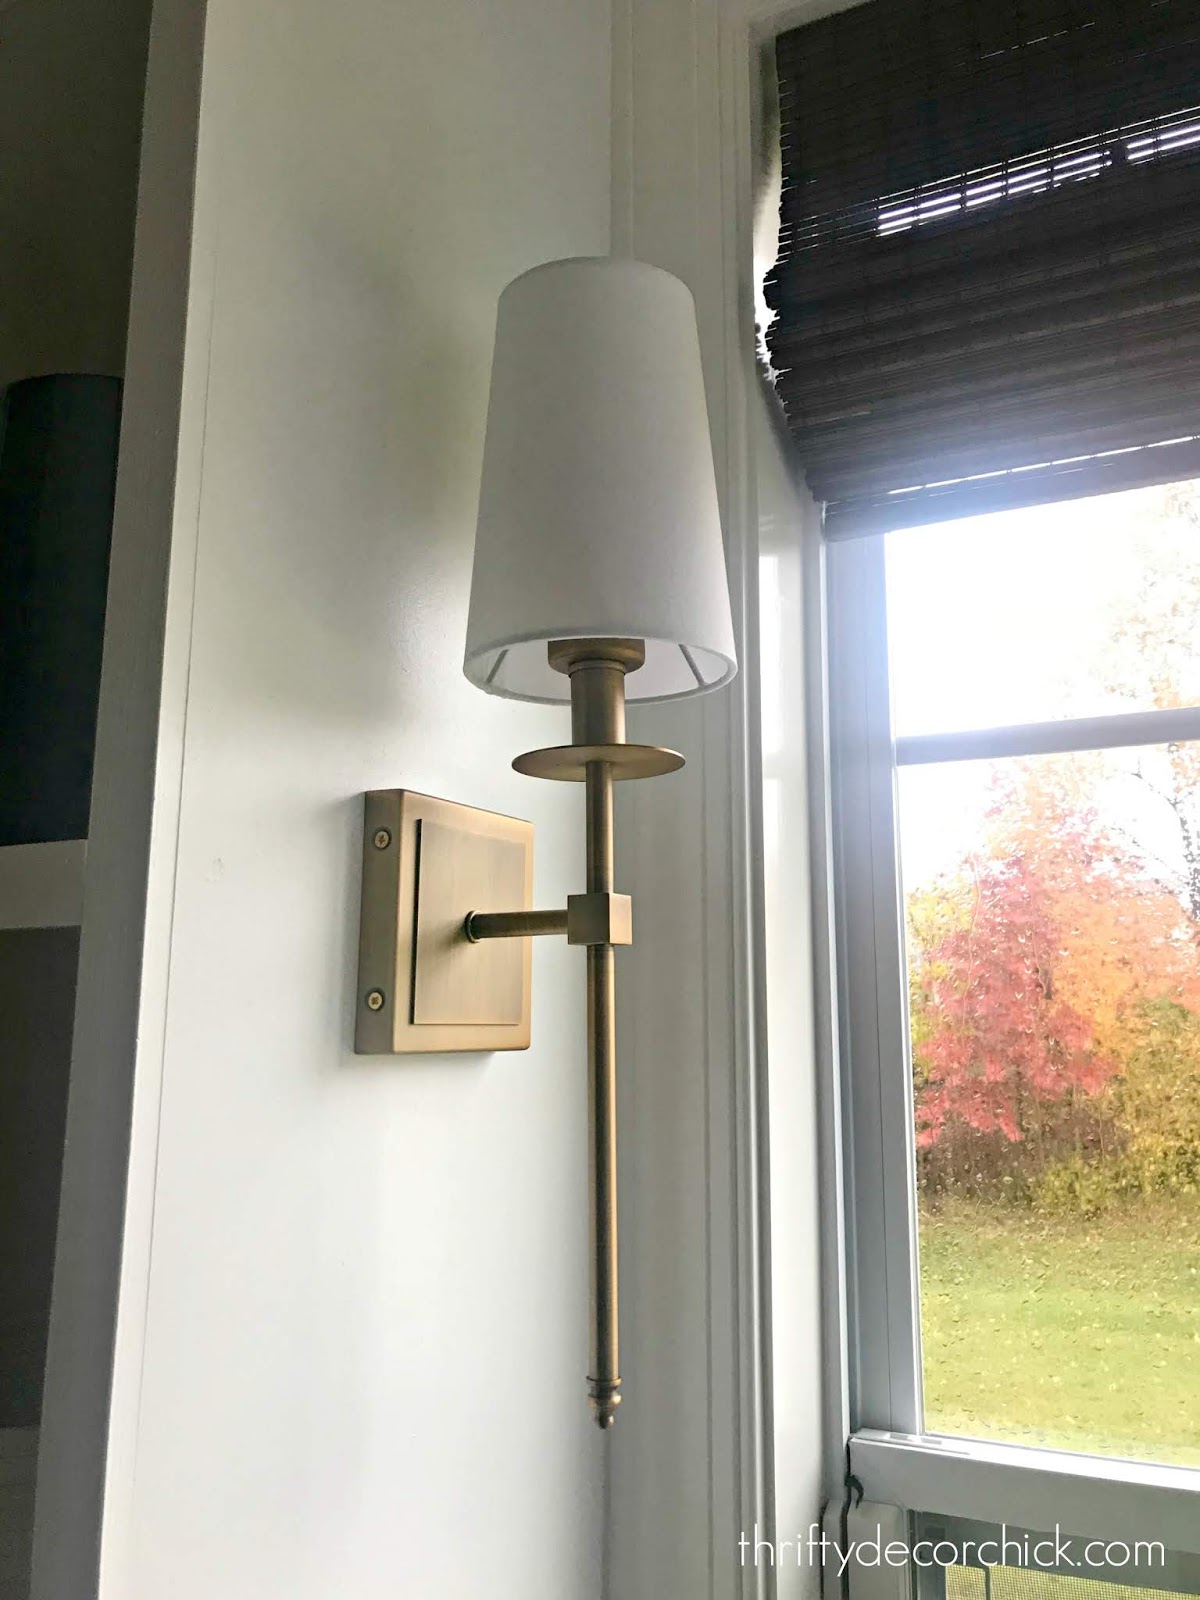
Here's where the fun starts! Instead of hard wiring them, I used puck lights. I've used these lights here and there for years, but this version comes with an awesome remote:

These are the kind (affiliate) Brooke recommends and after trying some others first, I agree that these are better.
I didn't even attach them to the fixture -- they literally just sit on top where the bulb would be screwed in (you're seeing the underside here):

I was going to use Velcro or something but there's no need -- we don't touch these so the lights stay put!
The remote is awesome -- it allows you to dim the lights, which is GREAT! You can also set a timer so they will go off on their own. That is especially nice because sometimes with things like this I forget to turn them off and the batteries are gone in a few days:

Brooke shares how she makes them work with downward facing sconces on her blog. I have another sconce I'll be trying this on as well.
I tried these puck lights first, and they work well too: 
Pay attention to the lumens number on the packaging. The version above are 20 lumens each and they were a little dim for me. The remote is more basic -- just on and off.
I do prefer the Amazon lights to these because they are double the lumens, but still a soft light. And the dimmer and timer options are worth it. (AND you pay less per light for six compared to three!) You can also buy an additional remote so you can use the lights around the house and not have to walk around using one remote. :)
It works great! If you have an outlet below where you want sconces, it's actually a fairly easy project for an electrician to run electrical for a light. But this gives you the ability to do it yourself, with any light, anywhere you want!
This a great option for renters because you can remove them easily. Such a fun project!:

There you go! Thanks for sharing this easy trick Brooke! Have you tried this in your home?
If you missed the products, here you go again!:
Affiliate links included for your convenience!
Via https://www.thriftydecorchick.com/2018/11/how-to-light-sconces-without-electricity.html |
