|
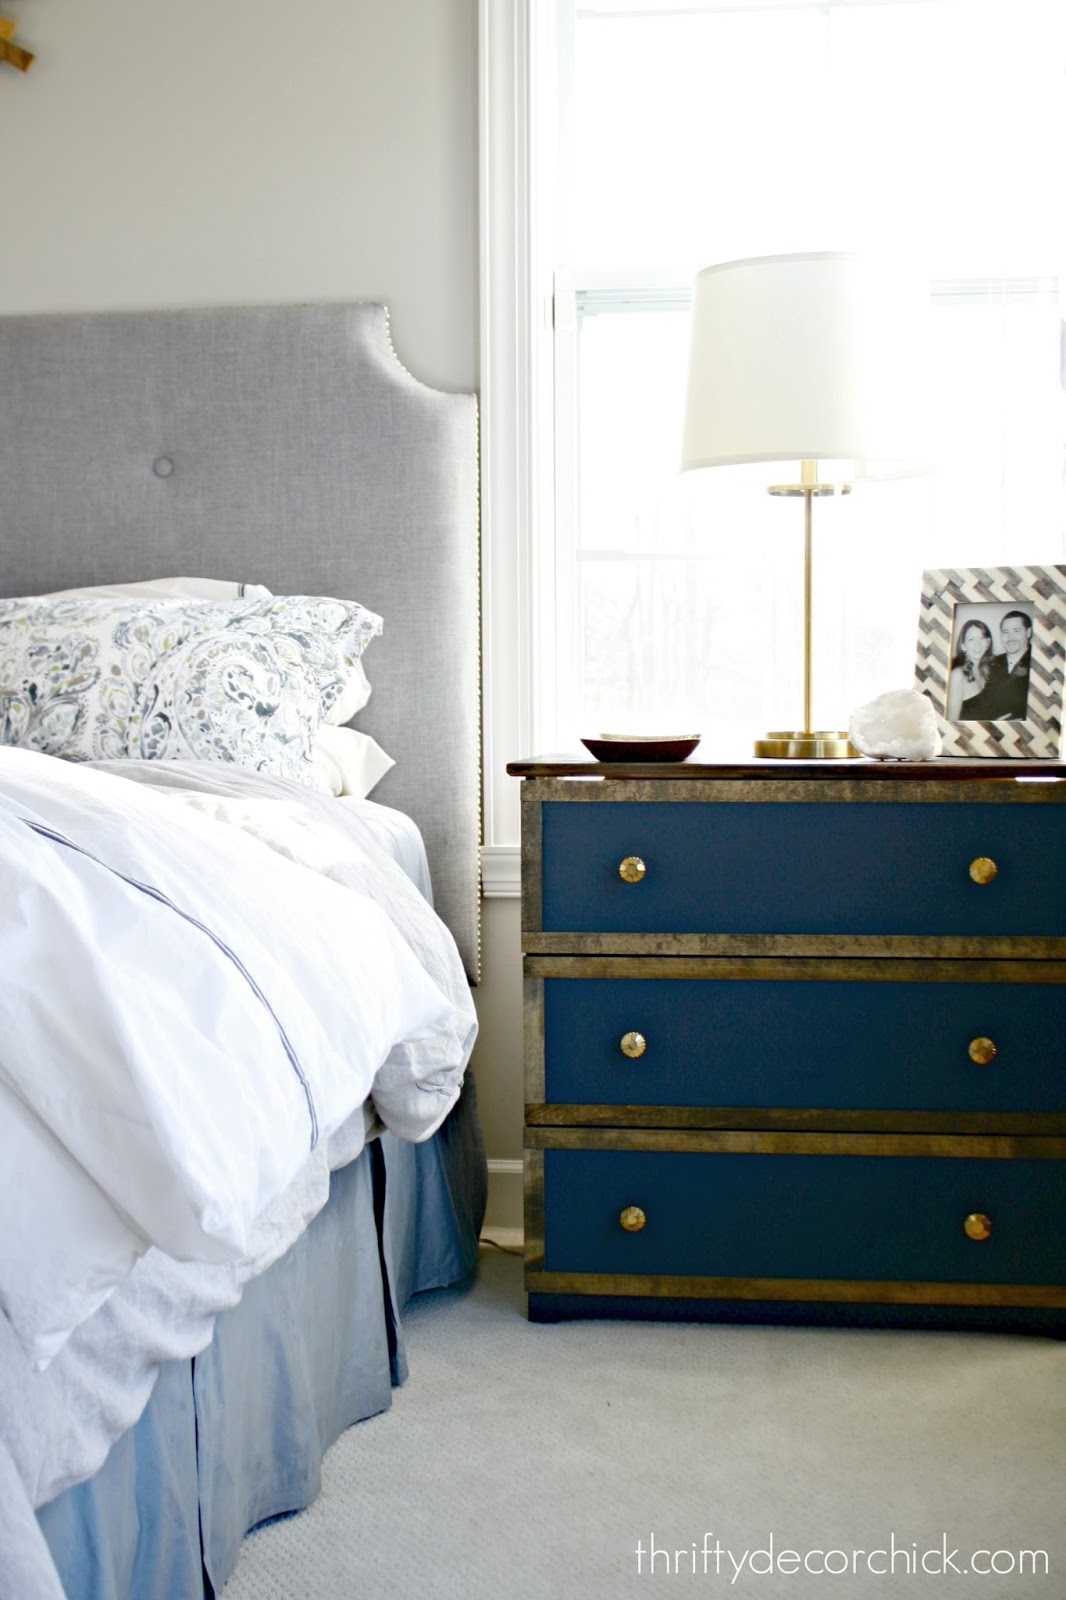
How to turn the small Tarva dresser from IKEA into a beautiful bedroom nightstand!
I searched for the perfect nightstands for our room for years! I could never find exactly what I wanted.
They had to be tall enough and have plenty of storage. (We keep a lot of books in our nightstands.) OH and the biggie -- they couldn't cost hundreds of dollars each.
I finally ended up with the Tarva dresser from IKEA after seeing all the ways you can hack the Tarva dresser to get the look you want.
This Tarva line comes in a variety of sizes, from three to six drawers. They all come unfinished, so you can customize them exactly how you want for your space.
The drawers are nice and roomy and you can cut down the legs to adjust the height of the dressers. The best part -- they're only $100 each!
This is how our Tarva nightstands started out:

When I put them together years ago I cut down the legs with my saw. It made them the perfect height for by the bed.
I went back and forth on a look for these forEVER. Here's a reminder of how they looked in our old master:

I replaced the wood knobs with random IKEA ones we already had -- not sure why cause it didn't do a whole lot to help it out. ;)
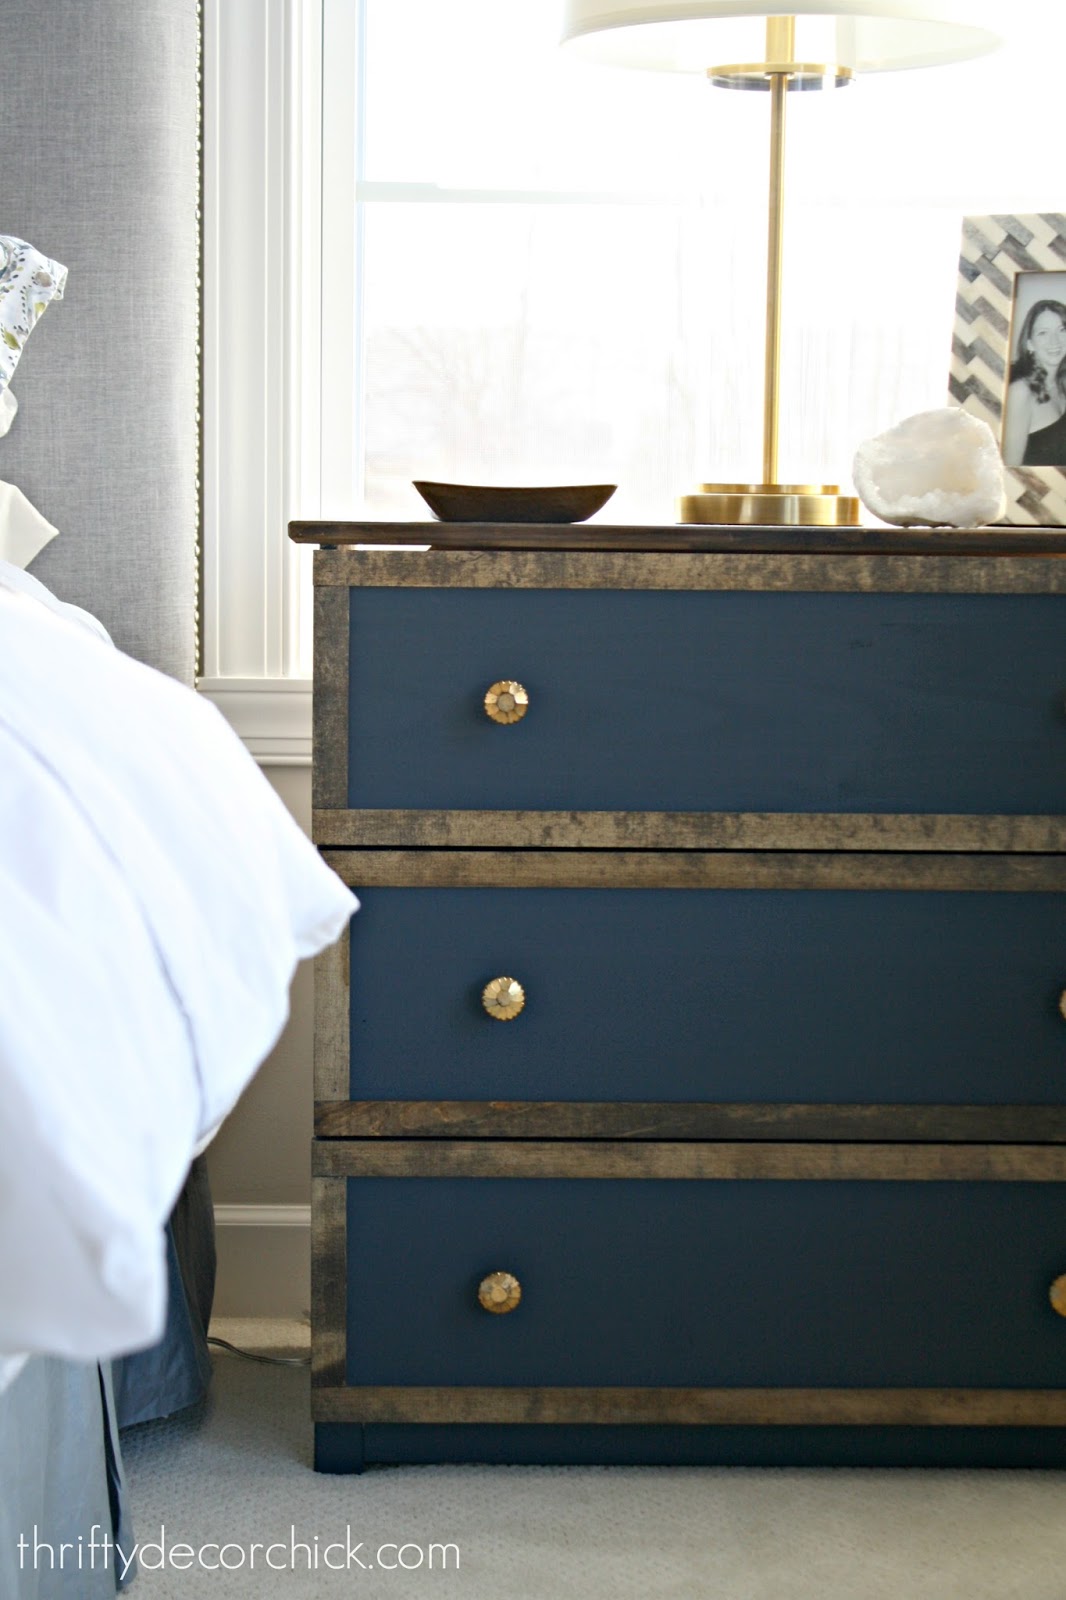
I always knew I'd use stain somehow and add some trim. The exact details I wasn't sure of. But when we moved into this house it all fell into place. I wanted to use a deep blue color and a dark stain. I went back and forth on whether I should stain the front of the drawers or stain the trim and top.
I decided on the latter mostly because the pine these are made of isn't necessarily the best. There are lots of knots I didn't want to accentuate.
I started painting with no primer -- I'm a rebel! I knew I was going to have to do multiple coats no matter what.
After the first coat it's important to do a light sanding to knock down the texture that pops up with paint:

You'll have to do that with primer as well. No need to go crazy with it -- just a light going over is fine. Wipe it down with a rag or tack cloth before moving on to your next coat! (This pretty blue is called Gale Force.)
What a difference another coat makes! The grain becomes less and less noticeable.
See the difference between the top drawer and the bottom two?:

I started on the stain to wood top of the dresser while I waited on the paint to dry.
I went for an old favorite, Jacobean by Minwax:

It's just a yummy color! I used it on our hardwoods in the old house and it's a beautiful dark brown without any red tones.
I use gloves and a rag to stain. Makes it super easy to apply and I find it quicker than using a brush:

It really gets the stain into the wood too -- you're really rubbing it in.
I only do one coat of stain but if you want to deepen the color you can do one or two more. Do be sure to wait till it's dry in between coats or you'll have a gummy mess.
Make sure your stain is dry before starting the protective coat as well. I used this fast-drying semi-gloss polyurethane because I have absolutely zero patience. ?
Never shake your poly -- it will create bubbles and bubbles are the enemy of a beautiful, smooth finish.
Always stir:

Staining is my favorite because it's immediate gratification, but poly is a close second because it really brings out the beauty of the wood:

Even though these dressers are made with inexpensive pine, which can be finicky with stain, it turned out beautifully!
You want to smooth out the poly coats as much as possible. It's helpful to use your light source and look at the item from the side to see what needs touching up. I find a few lighter coats work much better than one heavy-handed coat.
It already looked SO good! But I knew the final addition would make it even better. I used this inexpensive lattice wood trim I've shown you a million times to trim out each drawer front.
I stained the pieces first and then cut them down to the correct size:

A nail gun makes for quick work (use short nails to make sure they won't go through the back!) but you could absolutely use glue too!
You're going to have a bit of a rough edge along the side if you trim them out like I did. I could have mitered the edges (cut them at an angle) but I was still using my handheld saw and miter box since my saw was "lost" in our move.
I wanted to have my rough edges facing to the side of the drawers instead of the top, so I did a long piece along the top and bottom and then the side trim.
A bit of stain covered the raw edges right up!:

When the stain was dry, it was time to poly these as well.
See how using the light helps to see what you've covered?:

The top of the dressers stained up much prettier than I thought it would!: 
I'm impressed because we've been using these for years without any protection. I tried to stay on top of any spills and avoided leaving drinks on them, but still, I was surprised.
I used pine trim to match the top. Different woods will stain up differently and even the same may have small differences.
Pine is definitely a more rustic look, so plan accordingly:

I got the gold knobs half off weeks ago and just LOVE them against the dark blue!
My whole plan for this space is a rustic elegance design and the nightstands fit that perfectly:

The blue looks navy sometimes, sometimes a blue green. I like them both. :)
I don't know if it's just because I've been looking at the pine dressers for so long or what, but I'm smitten. They're just so pretty and...finished. ;)

Sometimes it's a good thing that I procrastinate. I didn't have a great vision of what I wanted until we moved into this house.
I had the lamps -- I thought I had returned them and went to the basement looking for something else and there they were! I must have known they'd work perfectly!:

Of course, like usual, one finished project starts a series of changes. I plan to change out the bedskirt eventually. It looked great with our old wall color but I don't like it in here with the drapes and dresser color:
But that I can deal with!
That photo above makes the dresser look really navy, but this one is the more true color. I am obsessed with it! It's such a pretty blue:
Because you know I have to do it...here's the before of this dresser:

And this is the after, with some paint, stain and beautiful hardware!:

Don't the nightstands look great with our gorgeous rug and the hardwoods?:


If you have any questions about this project let me know!
See more of our home here. To shop items in our home, click here! Never miss a post by signing up to get posts via email.
Via https://www.thriftydecorchick.com/2018/01/finally-beautiful-nightstand-makeover.html
0 Comments
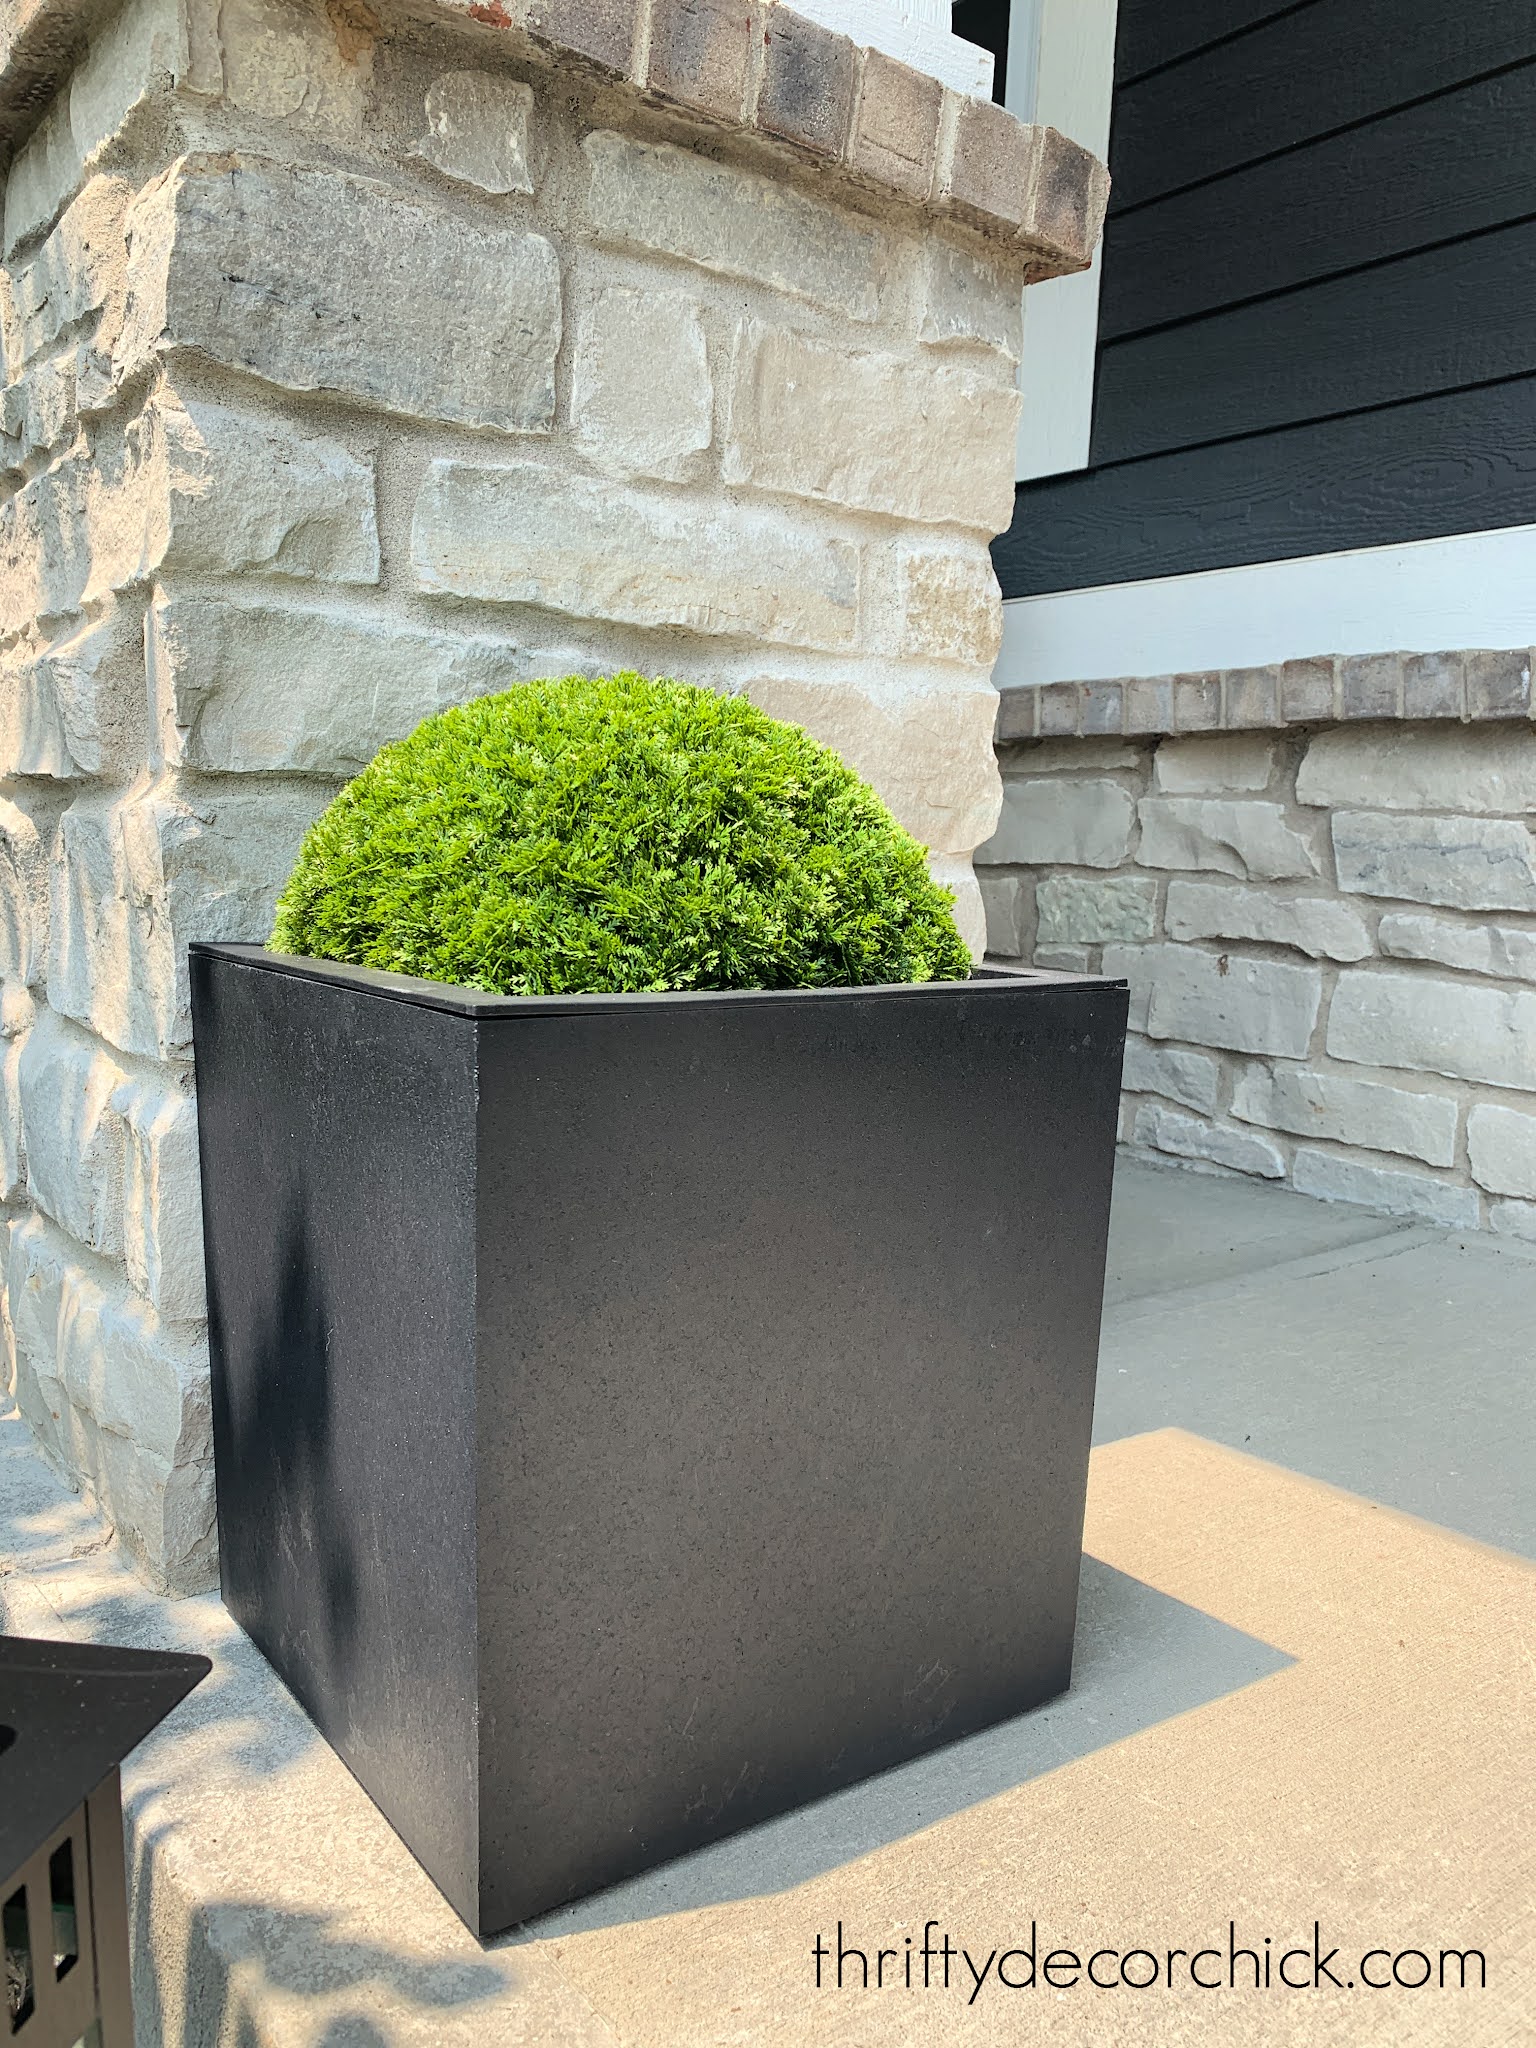
If you don't have a green thumb, these faux evergreen topiaries are perfect for your outdoor planters!
The flowers in our front porch pots are a pain to keep alive...and it could be because I always forget to water them. ;)
But mostly it's because they get a ton of sun but very little rain since they're covered on the porch.
So for awhile now I've been looking for something to plant that is low maintenance and can handle the full sun most of the day. Oh, and a decent price!
The perfect plant, basically.
I thought about using this awesome plant that you can't kill we have in the back yard:
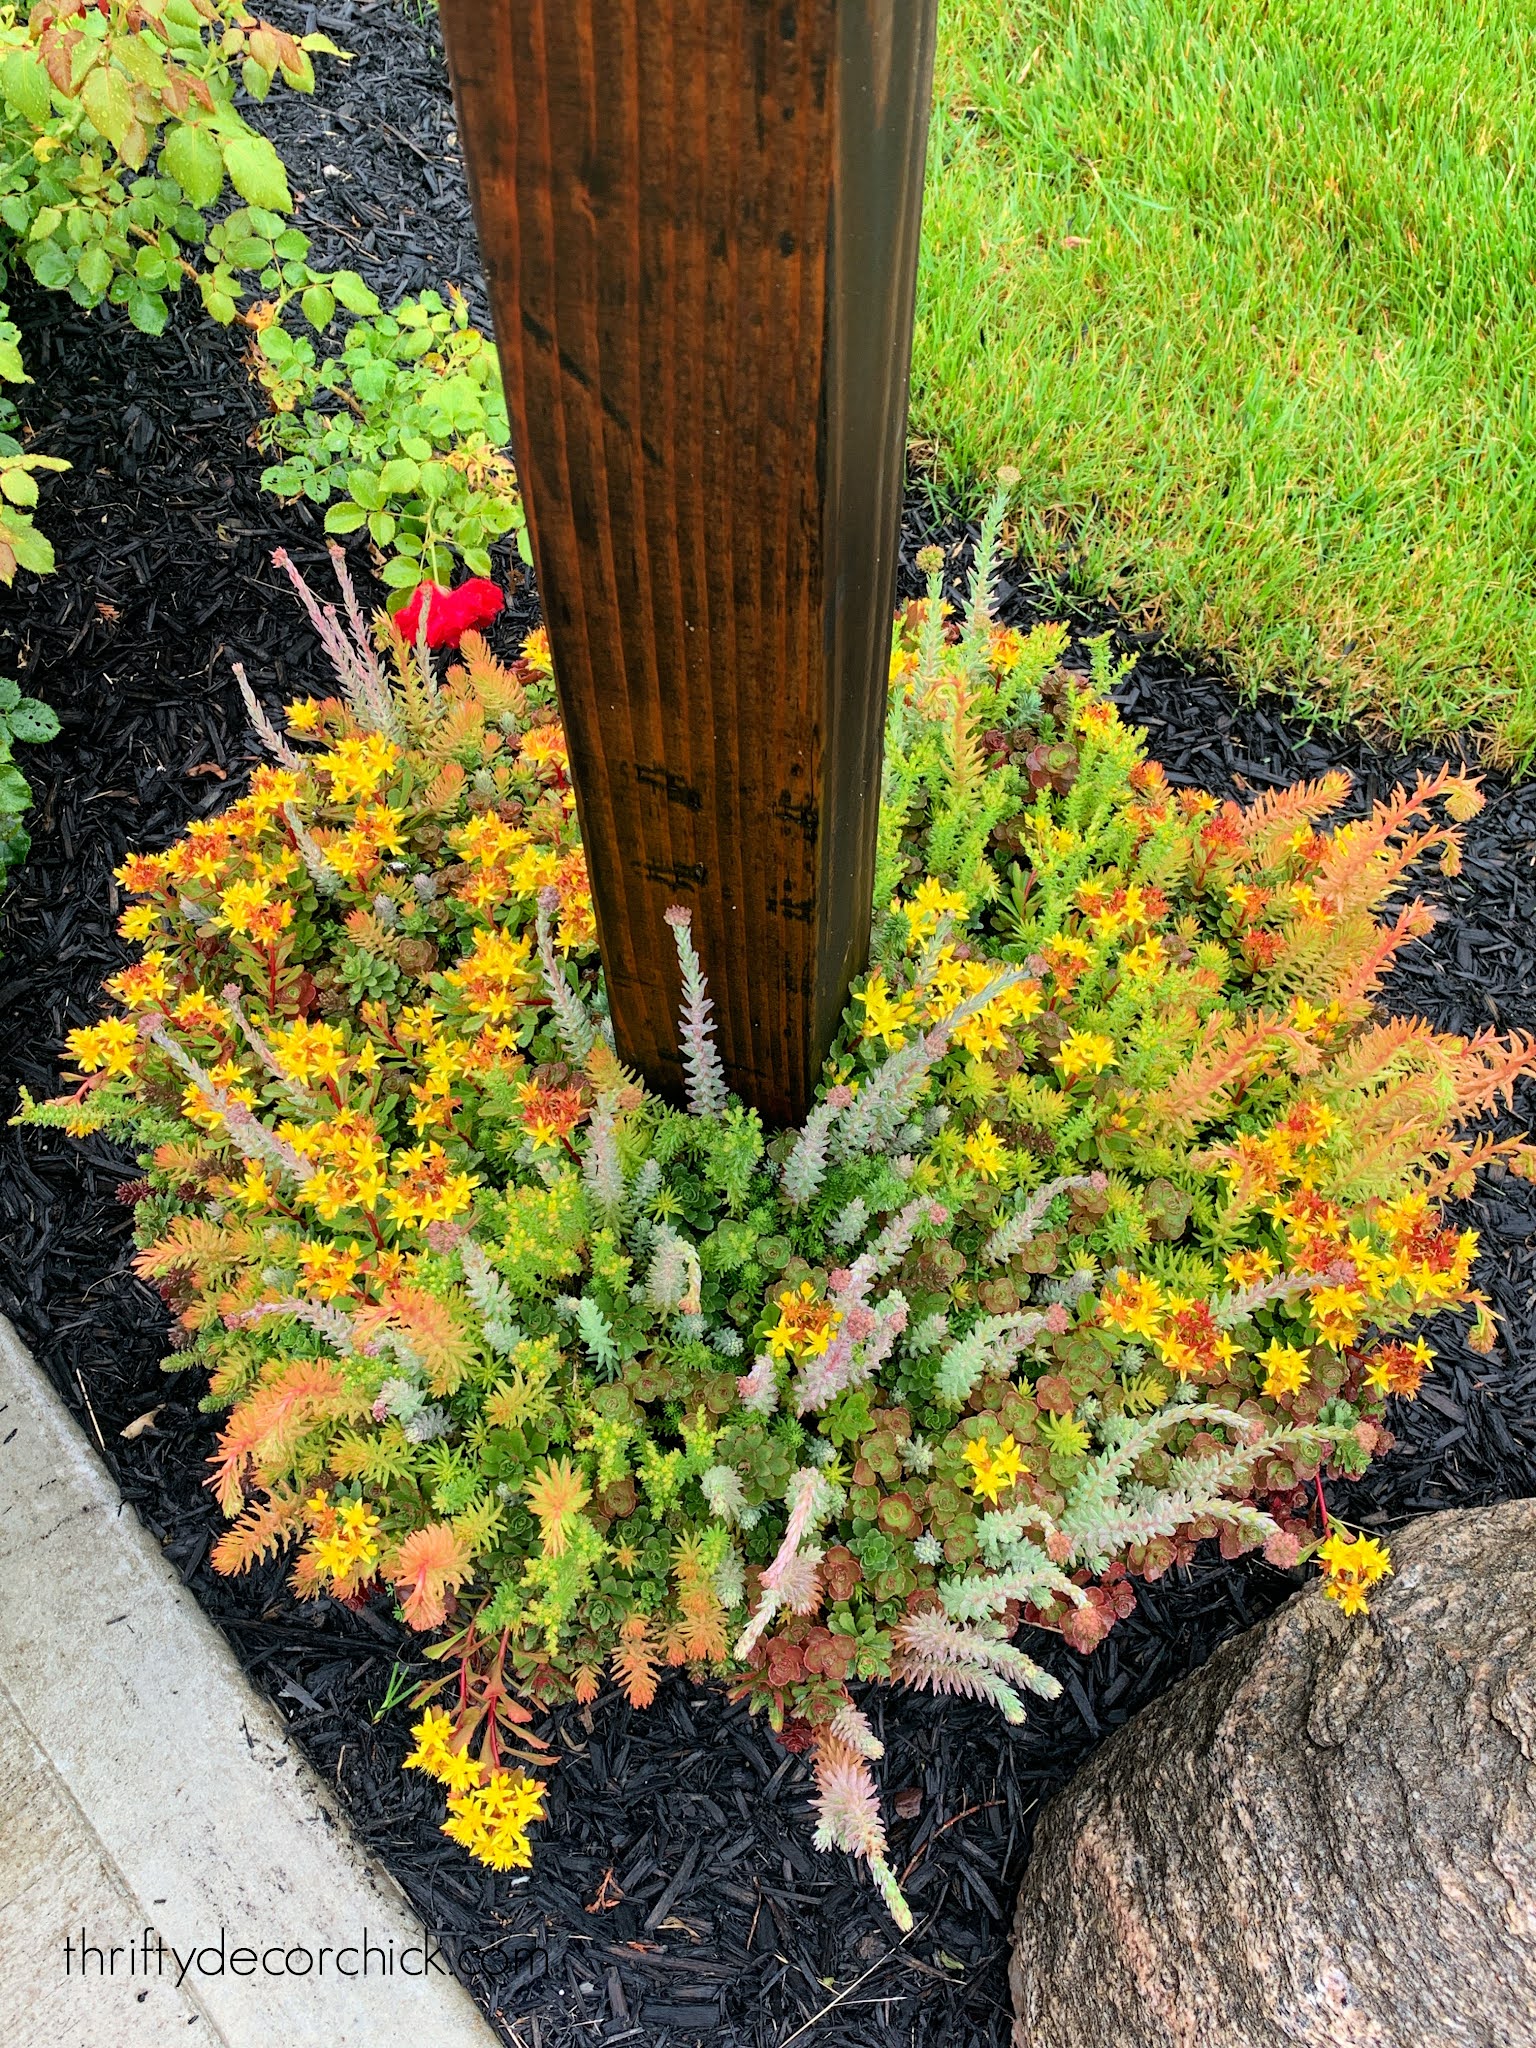
They live in the planters with poles for our DIY string lights over the patio:

Because they keep their color in the winter, I knew they'd be a great, low maintenance option for the front planters as well.
But...I really wanted something with a more classic look that would fit in well all year round. And I feel like the front containers needed something with a little more height.
I finally found the answer with these topiaries!:
This post may contain affiliate links for your convenience.
See my policies and disclosure page for more information.
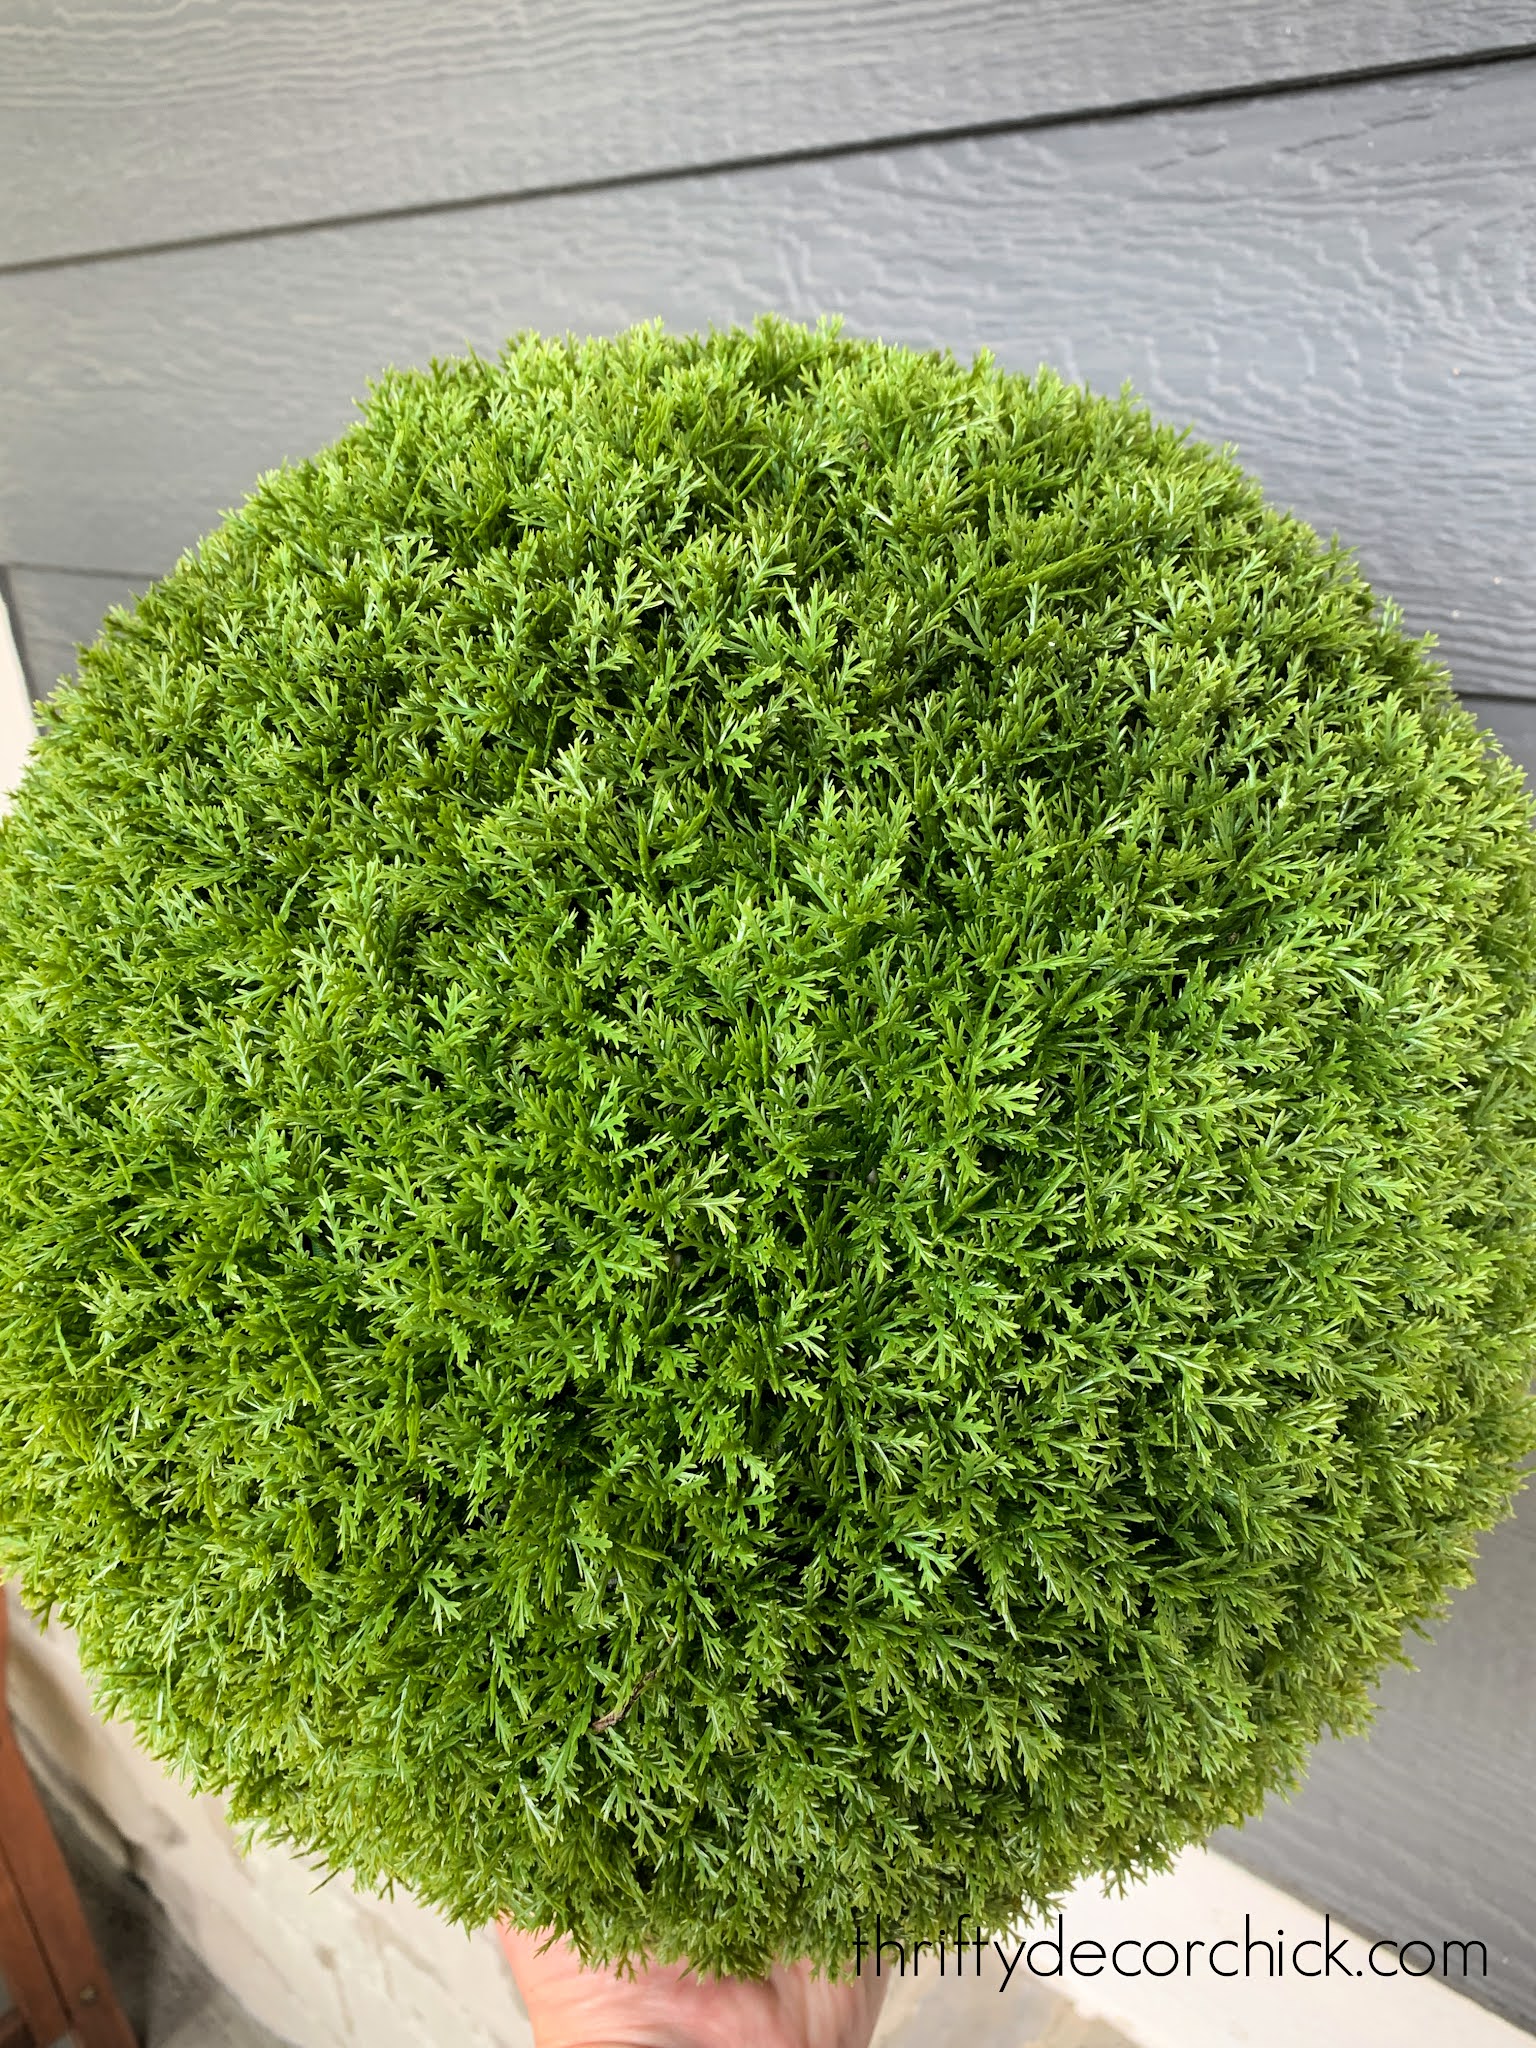
They are faux evergreen topiary balls and they can be used in a variety of ways. There are three options available, depending on the look you want -- boxwood, jasper and cypress.
Boxwood and jasper have the tight, small leaf look (jasper has a larger leaf and is really pretty). I got cypress and it is more of a standard evergreen. I figured it would be the most realistic looking of the three.
I was intrigued, but was worried they wouldn't look as great in person. I ordered one and when it arrived I was super impressed:

I can't speak to the other versions, but the cypress option would easily fool someone up close.
Best part...they won't die! :)
You can separate the sphere into two, and many folks said they only used one topiary and put the two halves into two planters:


I tried that, but didn't love it.
At least with our planters, they sunk in too much and didn't have quite the impact I was hoping for:
They don't look bad at all though! If you had a round planter that had a smaller opening, I think the halves would work beautifully.
These aren't the thriftiest purchase ever, so I really wanted to love it that way.
But I preferred them in one piece:

They make a much bigger statement, right? I love them. :)
I've already made up what I would have spent on flowers for my planters this year!
By the way...mine are the same size as these faux boxwood spheres that cost $140!
I love that I can keep them out all year -- they'll look great in the winter:

I was able to tuck ours into the pots a bit, so they don't fly away, even in high winds. But if needed, you could anchor them into soil in the planter using these garden stakes.
By the way, if you get a larger size and are able to smush them in just a bit, you won't need any soil in your planters.
A few things to consider about these easy evergreen balls:

There are so many ways you can use these!
We've had ours on the porch in full sun for six weeks now and they still look brand new. I'm very pleased with the quality so far.
These topiaries are such a great option for your planters if you don't love gardening, or aren't very good at it. OR if you can't remember to water your flowers. ?
See more of our home here.
To shop items in our home, click here!
Never miss a post by signing up to get posts via email.
Via https://www.thriftydecorchick.com/2021/07/faux-green-topiary-balls-planters.html
My four absolute favorite comfort food slow cooker meals! They are creamy, delicious and super easy.
Three of these are creamier, chicken slow cooker soup recipes, and one is a classic CHEESEY mac and cheese. I mean...how can you go wrong?
I enjoy making these crock pot meals as much in the warmer months as I do in the cooler ones. I call them all "comfort foods" -- but that goes any time of the year!
I’m sharing some of our favorites and a few changes that I make to the original recipes. First up – this truly scrumptious slow cooker chicken and dumplings recipe: Crock Pot Chicken and Dumplings
This post may contain affiliate links for your convenience.
See my policies and disclosure page for more information.
I first found this recipe ten years ago (the blog is no longer operating).
It is SOOOOO good!
I am a chicken and dumplings NUT. This one does not disappoint and you'll be surprised at how easy it us.
Crock pot chicken and dumplings
4-6 boneless skinless chicken breasts
2 tablespoons butter
2 cans cream of chicken soup 1 can chicken broth 1 onion diced (I used half of one) 1 tablespoon dried parsley 4 grands flaky refrigerator biscuits (add more if you want!)
If your soup is a bit thick, add chicken broth or chicken soup to your liking.
It is SO delicious!! And so much easier than making your own "dumplings."
This easy slow cooker mac and cheese recipe is another hit!
Crock Pot Easy Mac and Cheese
Crazy easy slow cooker mac and cheese
1/2 pound elbow macaroni
4 cups finely shredded Cheddar cheese, divided 1 (12 fluid ounce) can evaporated milk 1 1/2 cups milk 1 egg 1 teaspoon salt 1/2 teaspoon ground black pepper Dash of Worcestershire sauce
The first time I made this I used thicker shredded cheese, but I find finely shredded works better. I saved the best for last...this creamy chicken and wild rice soup is fantastic! I first found this recipe here. Crock Pot Creamy Chicken and Wild Rice Soup
This one takes a bit more work, but it’s worth it!
Crock pot creamy chicken and wild rice soup
4 cups chicken broth
2 cups water 2 boneless, skinless chicken breasts 1 package of Rice-a-Roni long grain and wild rice 1/2 tsp salt (plus more to taste) 1/2 tsp pepper 3/4 cup all purpose flour 1/2 cup butter 2 cups half and half 1 cup grated carrots 1 cup diced celery
and/or
1 small can mushrooms

Next, in a medium saucepan over low heat, melt the butter. Stir in the flour mixture a tablespoon at a time to form a roux.
A roux is a mixture used as thickener for stews, soups and gravy. 
Stir this yummy mixture into the soup in the crock pot then let it cook on low for 15 more minutes.
Then die and go to heaven cause it tastes that good.
We like our chicken and wild rice soup thicker, almost like gravy. If you prefer it thinner you can add additional chicken broth. I would wait to see how it cooks up first though.
Because...come on:

I know many of you have tried this and it's a favorite of yours as well!
Are there any easy crock pot recipes you love? Feel free to share! Here's a helpful pinnable image for you to save these recipes for later: 
This creamy chicken and noodle soup is absolutely delicious as well!:

See more of our home here.
To shop items in our home, click here!
Never miss a post by signing up to get posts via email.
Via https://www.thriftydecorchick.com/2011/09/comfort-foods.html
Welcome to the new look and feel of Thrifty Decor Chick!
It's been a long time coming!

I've always said it's a mystery that I've been successful at this blogging thing.
I don't know coding...at all. I don't pay great attention to Google when they tell us to change things. I was blissfully unaware of what SEO was for years...and even now that I do, it's rare that I follow it perfectly. ?
I just want to work on projects and write about them. :)
The new site went live last week and we've been tweaking things here and there since.
Overall the site should load much faster for you, especially on mobile devices. Also, the font is bigger and easier to read on both desktop and mobile...so much better!
When I was gathering the images for this post I found a blast from the past...has anyone been around since this blog header?:

I started my 14th (!!) year of blogging this past May, and it has been an absolute blast! I'm so incredibly thankful to do what I do.
Here's a quick virtual tour of the new site!
We added a drop down menu at the top, so you can access more information much quicker:

Home tours for our home and our first house are there with links to projects in every room, as well as a page with all of the paint colors in our home by room:
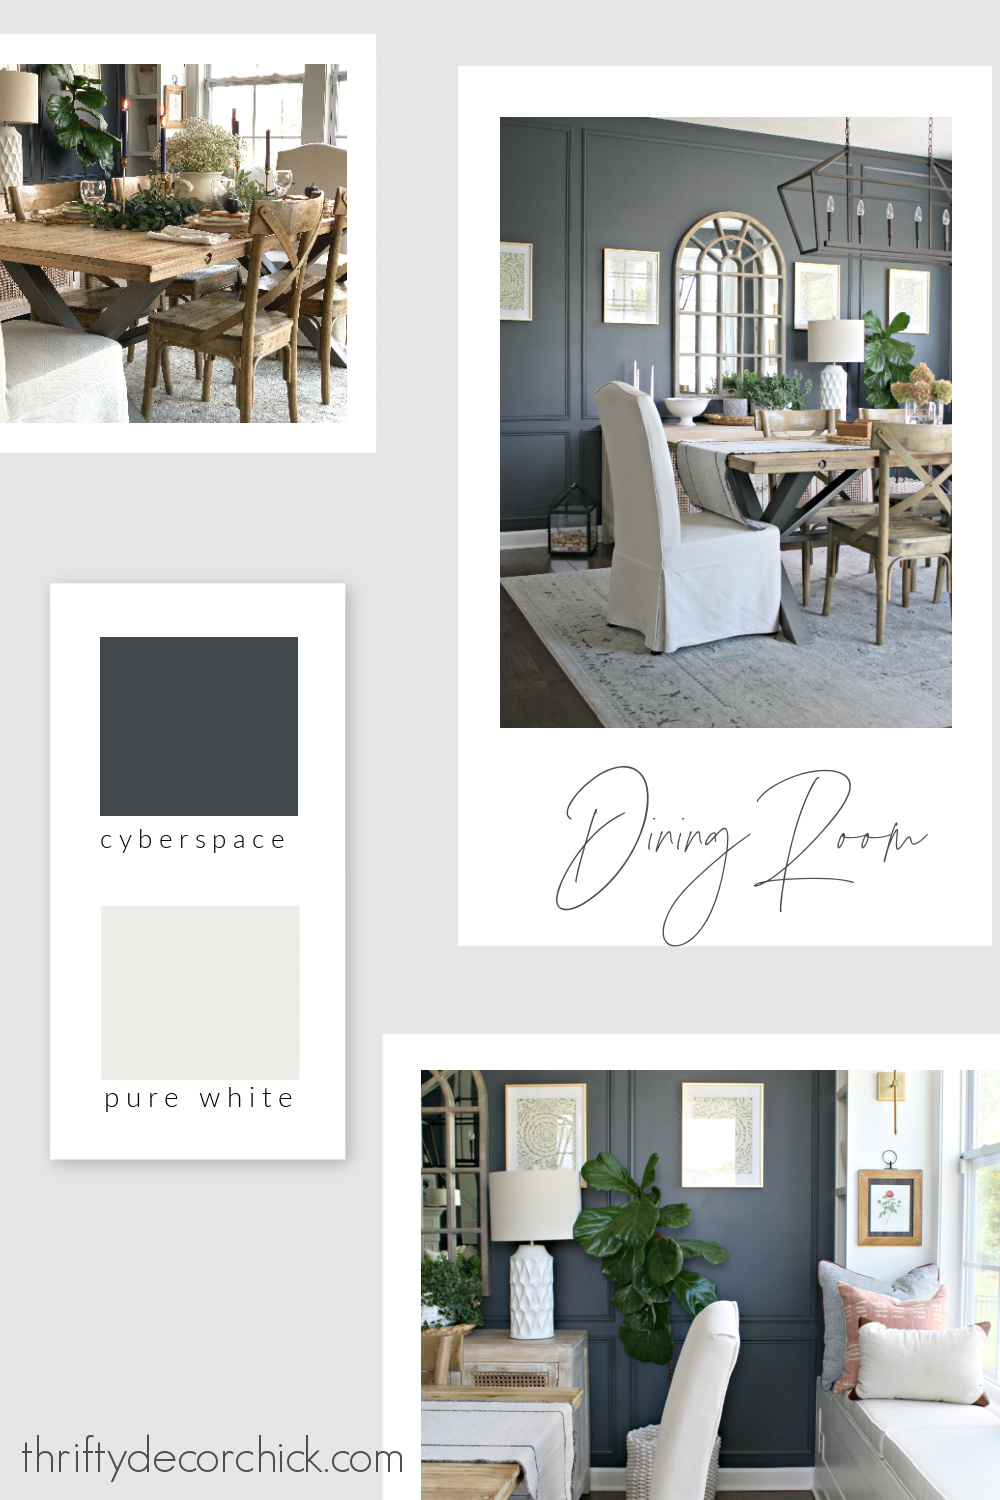
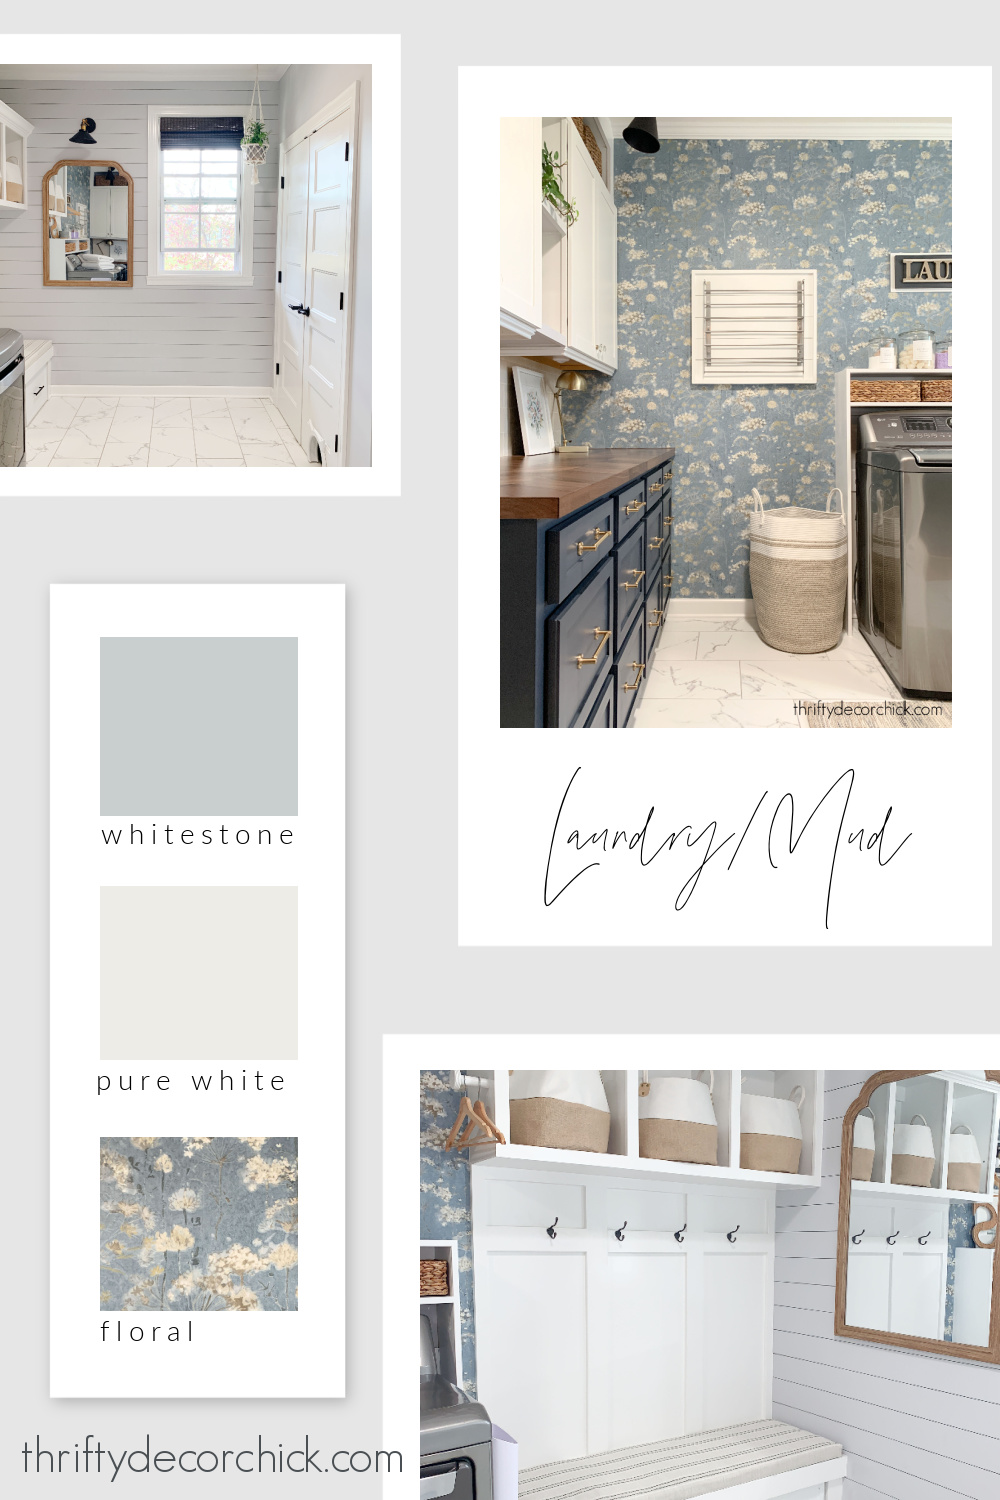
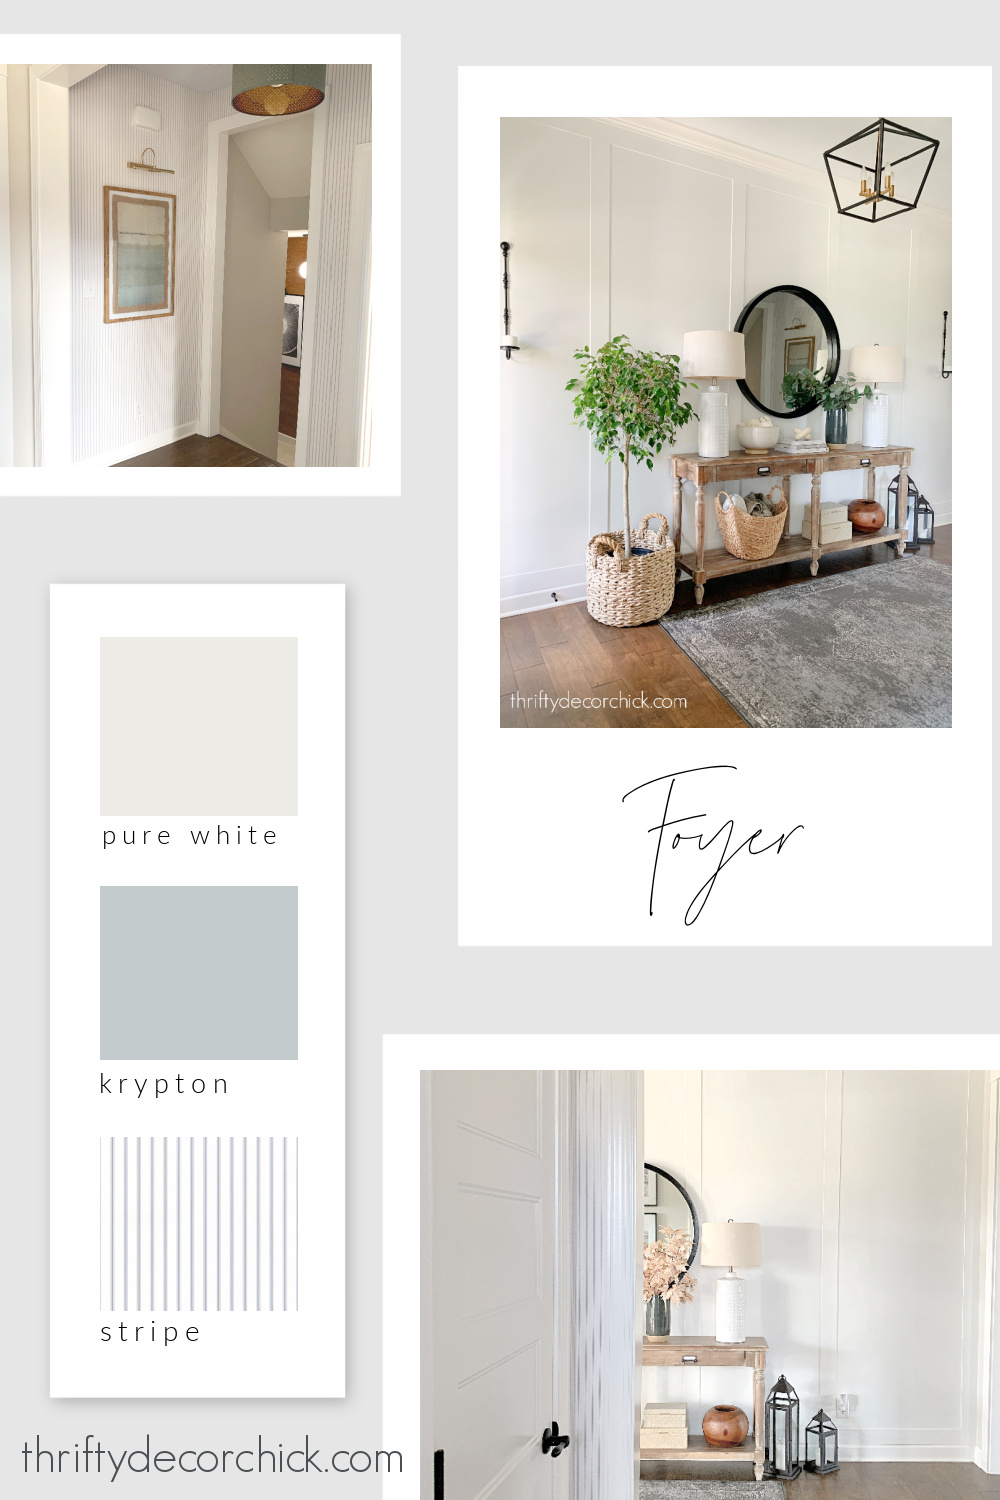
Hopefully that will make finding my paint colors easier for you!
You'll also notice that links in my blog posts are much easier to see now -- that's one of my favorite parts!
And when you see this pink highlight box, it will be something important on the topic!
We also added easy access to all DIY projects in one spot:
I plan to add more categories soon!
On the side bar, you can see links to my most popular posts. If you scroll down just a bit more, the labels I use to categorize posts are listed together.
Drop down that menu to see all of the topics I've blogged about over the past 13 years. :)
If you can't find what you're looking for in one of those places, you can use the search bar (click the little magnifying glass) on the right under my header.
Links to many of items in our home can be found by checking out my Amazon Storefront, or via the photos on my "Shop My Home" page under the SHOP tab:
And finally, if you'd like to be notified via email when I post, you can get new posts to your email by signing up here.
Or use your phone to take a photo of this QR code:

I hope you enjoy the new look and design of Thrifty Decor Chick!
If there's something missing, please let me know.
See more of our home here.
To shop items in our home, click here!
Never miss a post by signing up to get posts via email.
Via https://www.thriftydecorchick.com/2021/07/new-improved-Thrifty-Decor-Chick-site.html A detailed tutorial on how to paint your kitchen cabinets.
If you've ever considered painting your kitchen or bathroom cabinets, this tutorial will take you through every step! This particular process uses a paint sprayer, which will give you the absolute best, factory-looking finish.
If you're interested in painting your cabinets by hand, check out this cabinet painting by hand tutorial.
This post has been updated to share with you again!
This is the entire cabinet painting process, step by step to break it down for you. Painting your cabinets is NOT hard. It's a practice in patience and it can be stressful at times, but it's not hard. :)
I have to first thank my friend Jenny from Evolution of Style again -- she traveled over from Cincinnati to help me get set up and go through the process with me. She is a pro at this and her advice was SO helpful!
Check out her site to see her kitchen redo as well:

This post may contain affiliate links for your convenience.
See my policies and disclosure page for more information.
Prepping your cabinets for paint1. Remove and label all your doors and drawer fronts. Use some painter's tape to label each front with a number that corresponds to the cabinets around the room.
Keep track of your screws and hardware in separate baggies -- and label the bags well! I had bags for door screws, drawer screws, hinges and then one for random stuff like our tip out trays and the lazy Susan cabinet doors.
If there is something you'll need to remember how to put back together, take a photo of it before you take it apart. I did that with our tip out tray doors and it helped a ton:
2. Wipe down your cabinets with a wet rag, then sand lightly. I used a 220 grit sanding sponge: 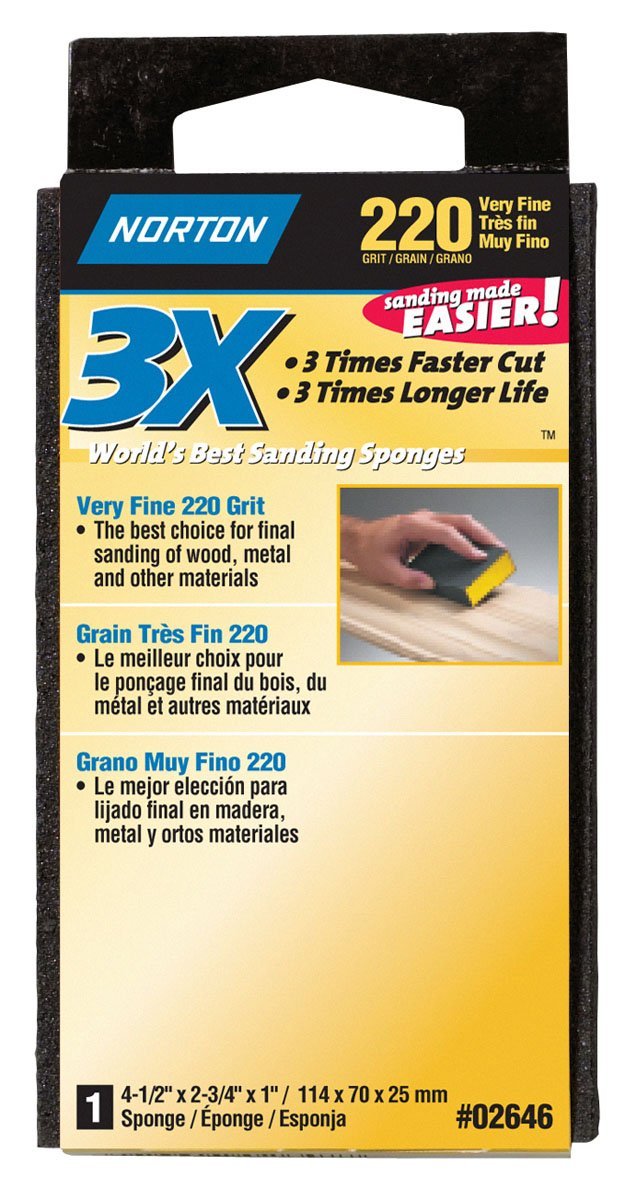
You don't have to go crazy with sanding -- more on that in a minute. But you just need to get a little bit of that shine off the cabinets. I didn't sand hard or much, just a quick pass over the fronts.
3. After sanding you need to clean them well.
The BEST product I've found that I've used over the years is TSP:

I used it in a spray bottle already mixed but I can't find that anymore. Spray it on, wipe it off and then do another wipe with a clean wet rag to make sure all of it is removed.
There are TSP substitutes but I think TSP is still the best.
This Krud Kutter is good stuff too:
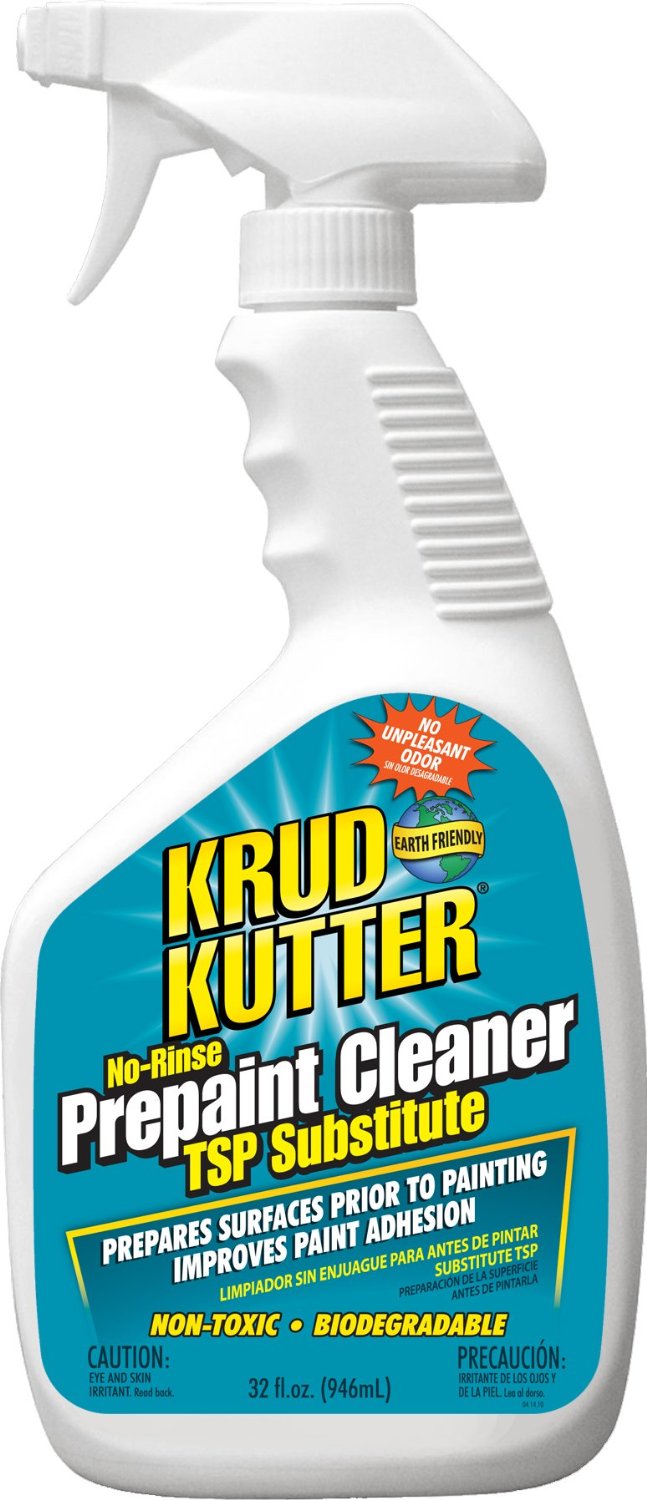
I really like that the spray version is already mixed up so if you can't find the spray TSP than this is a good option.
Here's the thing -- you really do need to sand a little bit. But in my experience the MOST important step is cleaning really well. Paint will not stick to goo. :) And if it does it will wipe off with the goo later.
Cleaning is by far the most important step. It's time to prime!
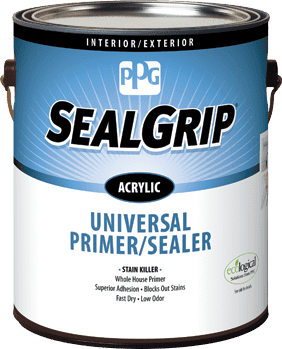
After wiping down your cabinets well and letting them dry, it's time to prime.
This is where the paint sprayer comes in. Jenny recommended this primer from Porter Paints so that's what we used:
This part went incredibly fast.
We did one coat on the backs, waited an hour for them to dry (actually a bit longer but you can after an hour) and then we flipped them and did the fronts. I could not start the topcoat (the paint color) for another 24 hours to ensure they cured well.
This is when you start to see your vision come to light!:
And it's very exciting! (More on that drying rack in a minute.)
**Please be sure to check out my post about the paint sprayer I used here. I share all of the nitty gritty details and tips on actually spraying the cabinet fronts there.
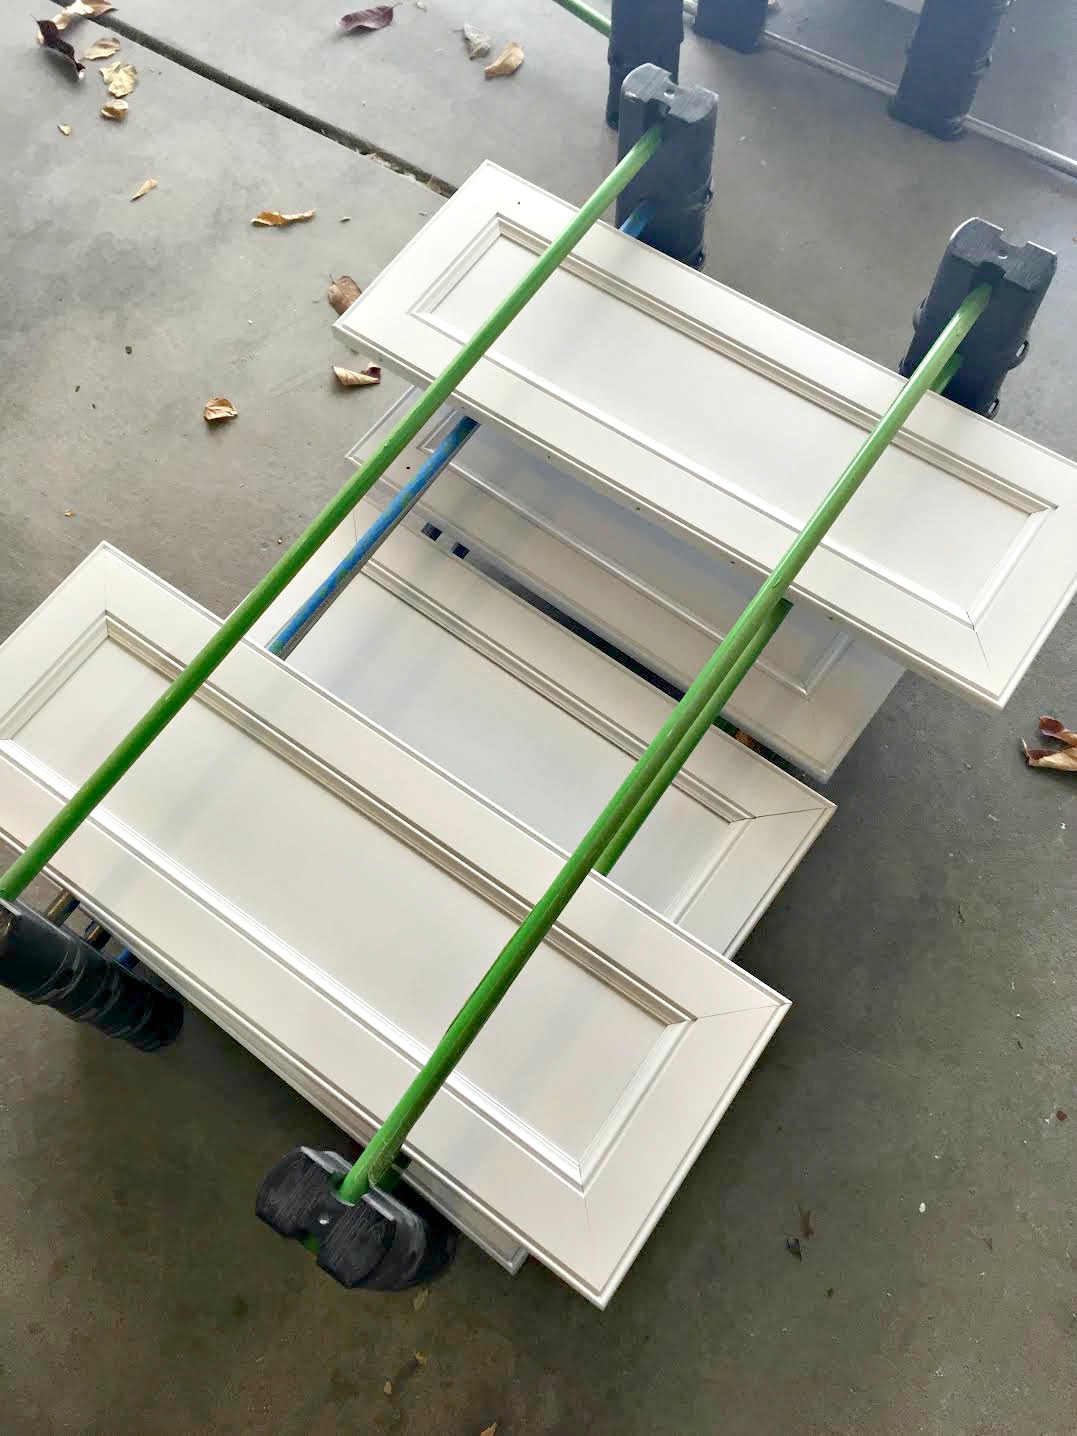
Here's our set up -- my sawhorses fell apart and I don't have new ones yet (two sawhorses would be ideal) so I dragged out two sets of Christmas bins.
We set a board across the top and then placed the cabinets on there:

I mentioned in my post about the sprayer that you'll want to be able to walk around your set up while painting. Give yourself plenty of room!
I later added a tarp so the bins wouldn't get paint on them. The spraying process goes incredibly fast! Jenny did the priming with her gun (she does this professionally now and has a very nice spray gun) and she finished up each side in about 30-40 minutes.
That's 23 cabinet doors and drawer fronts!
You definitely want to get these painter pyramid supports to get your cabinets up off the board:
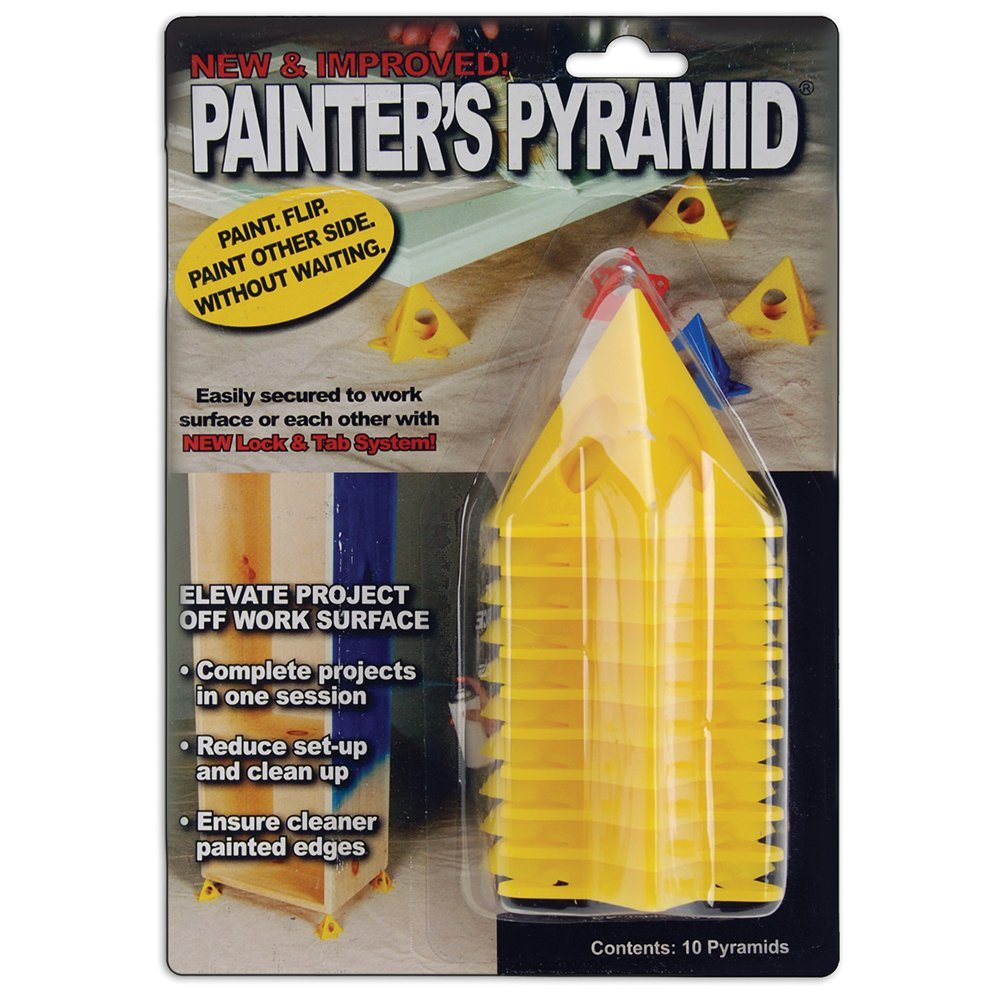
That way you can get them higher so you can spray the sides of each door. I've used these for various projects over the years and they're handy to have.
So...that drying rack. I'll tell you what -- this thing made a HUGE difference!! Jenny graciously let me borrow it and I am SO thankful to her. I can't express how nice it was to have this thing!
Hers is an Erecta Rack and you place the wet cabinets on there and stack up the railings as you go:

We would not have parked in our garage for two weeks without it. It also was nice because it kept out of the way -- I feel like it protected the drying cabinets from dust better than if they were just laying all over the floor. It also helps them to dry faster as well.
You can absolutely still paint your cabinets without this drying rack, it just makes the drying process easier. If I didn't have it I'd use boards to lay the doors and stack them. You'll want something to let the air flow through a little bit.
Painting your cabinets
After 24 hours you can start your topcoat (your paint color).
First you'll want to give the cabinets a very light sanding if they have any imperfections. I didn't go crazy with this -- I'd run my hand over them and if I felt anything I'd sand it down lightly.
Do this between all your coats! Fuzz and small debris are sure to get in there at some point and sanding them down will get rid of that.
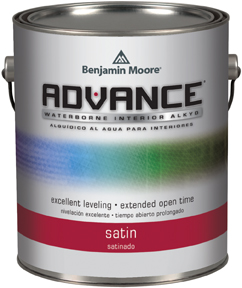
For the paint, Jenny recommended Advance by Benjamin Moore:
I've heard of this for years but had never tried it. A friend used it in their house years ago and didn't love it, so avoided trying it. Now I understand in some applications it's not great and I'll go into that more in a minute.
I used the satin finish and it is much glossier than I expected for satin -- it's perfect!
The lower cabinets were mixed in Sherwin-Williams Peppercorn, the uppers in Pure White.
This paint is crazy good when using a sprayer. The finish is fantastic!:

Things to remember about this paint -- it can go on thick and will look bumpy when it's applied with a sprayer, but just hang in there!
Your weather will affect this and drying time -- I had a bit of a freak out moment and texted Jenny the first night because they were taking forever to dry. Usually within a few minutes you can see some parts starting to dry and that first coat didn't start to lose the glossy wet finish for hours.
It was raining that night and I knew that would play a part in it, but it just looked thicker and wetter than paint I've used before.
This paint is pretty amazing at self-leveling, so it takes a long time to dry. It should be dry to the touch by six hours but you can't recoat for 16 hours. Because of the weather I started waiting even longer between coats to be safe.
Since we were doing a two toned look on the cabinets in dark gray and white, I could paint one color one day, then the next day do the other. This gave them a couple days to cure each time.
When the rain stopped the dry time got much shorter, but it's never a bad idea to let them dry a little longer if you can.
Another tip from Jenny that I didn't think of -- start on the backs. This lets you get the kinks out with your sprayer and get used to using it. This is a REALLY good idea if you've never used a sprayer before.
Sand lightly between each coat of paint and then spray again. Jenny recommended one coat of primer and two coats of paint on both sides of the cabinet fronts.
I cheated a bit on the backs -- I only did one coat. It covered so well I didn't need to do more. Considering I never even paint the backs of my cabinets I was impressed I even did that. Ha!
Painting the cabinet frames
The frames of your cabinets are a very similar prep process but I have some additional advice to offer here. You'll want to clean and sand them like you do the doors -- I noticed that our frames were dirtier than the doors. I guess I don't clean those as much?
Jenny recommends this mohair roller for larger areas like the side of the fridge:
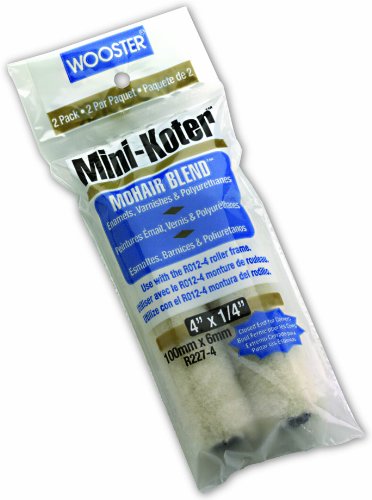
They worked great! I usually use foam rollers but I quite liked these and the finish.
Here's where I wasn't thrilled with Advance paint -- I used a brush to apply it to the upper frames (those were the first ones I painted) and I didn't like the finish at all.
It was crazy because for as long as it takes this paint to dry on the doors, it was drying super fast inside and was hard to work with. I also didn't like the finish on the frames -- you could see the brush marks very easily, even with sanding in between.
It's just the nature of the paint. What should have taken two coats of white took three and honestly I could have done a fourth.
In the end no one will even notice it. Because I did the last couple of coats with a roller that helped a bunch.
Here's the frame in the middle and the sprayed cabinets on the side:

See the brush marks?
I ended up using the mohair rollers on the bottom frames and that finish is SO MUCH BETTER. So smooth. I used a brush for corners and hard to reach spots and then rolled over it as much as possible.
One issue I ran into along the lower frames was the silicone the granite folks added during installation. I put the painting of the cabinets at the end of my list so that they wouldn't get messed up during the install of the other parts of the room.
If you do the same, ask your granite installers to hold off on the silicone underneath and you can do it after you paint.
They really piled it on ours and some of it was so low on the cabinets I had to remove it, which is a total pain in the butt:
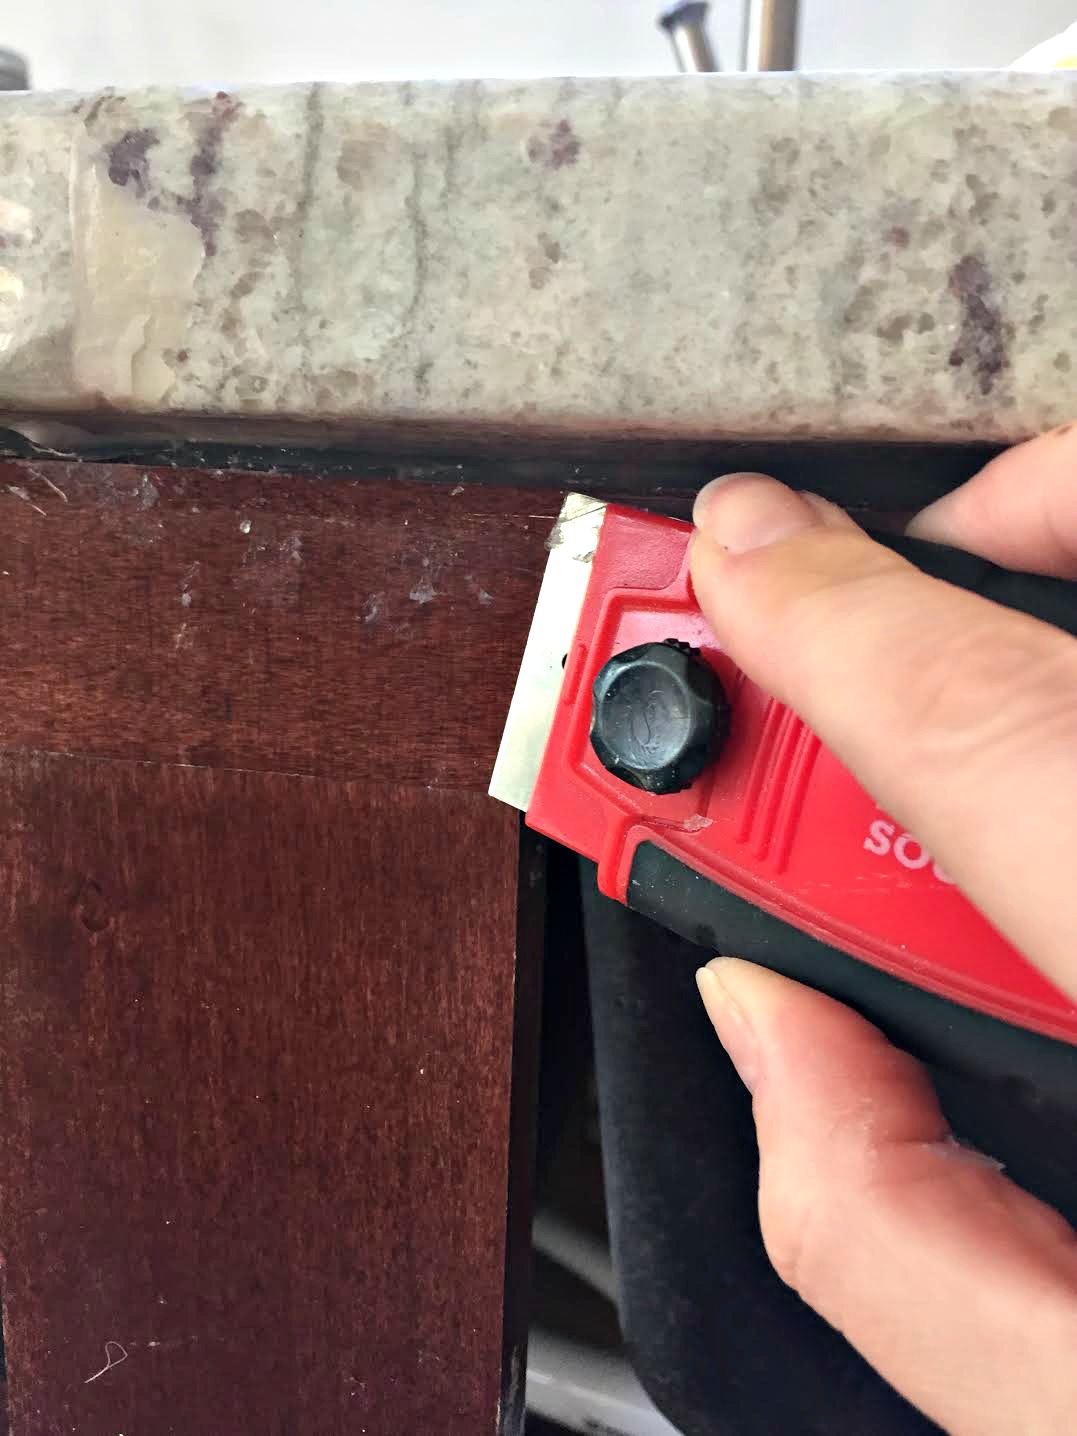
I gave up on the stuff higher under the counters. Thankfully our lowers are dark so you can't see it well. If you are going from dark cabinets to light all over and are having granite installed, be sure to remember this!
I tackled the doors first and the frames second -- I first thought I should have flipped that. The doors were sitting done and I had to wait days while I painted the frames. Now...I actually would recommend the order I did it -- it gave the doors a chance to sit and cure for awhile while everything inside dried.
This paint (any paint really) takes a good month to REALLY cure well. That means it's not super hard till then. Some say even two months. I put our new hardware on the cabinets but didn't screw them in all the way -- I'll wait for another few weeks to do that.
I thought the process would take me a week, but it would be difficult for one person to get it done that fast with the dry time needed.
It ended up taking about 12 days and I finished installing the cabinets on the 13th day. The cabinets had cured for about five days at that point, the frames a few days less.
For now I'll leave you with a couple shots -- first of the uppers:

I know it can be hard to see my vision, especially when they were two-toned for so long:

WOW! I love the white uppers!! I nearly cried when I put them up, not kidding. They are so beautiful and it was so thrilling to see what was in my head all this time come to life.
I love the white but I have to tell you I think I love the dark gray lowers even more:

I'm a contrast girl and they are absolutely stunning with our floors and with our light countertops.
Here's another pic that shows the sheen a little better:

I have a lot of touch ups to do by the stove and on the quarter round -- it's never ending. :)
I hope you found this helpful if you are interested in painting your cabinets! Remember if you have a grain on your cabinets they will not be quite as smooth. Sanding well before and between coats will help to reduce the grain but it's hard to eliminate it.
Oh and I've been asked a ton about a protective coat. No, you don't need to add one. I've painted many pieces of furniture and cabinets and if you use a good paint you will not need to do that. If you want to add one keep in mind if you are painting your cabinets white you need to use a water based poly so it doesn't yellow down the road.
See the full kitchen renovation reveal here!
See more of our home here.
To shop items in our home, click here!
Never miss a post by signing up to get posts via email.
Via https://www.thriftydecorchick.com/2015/11/the-epic-how-to-paintyour-kitchen.html
If have a decor item that needs a little something, this "paint" that comes in a tiny tube is the perfect answer for a quick and easy update!
Rub 'n Buff is this amazing metallic finish that is super easy to apply (you just use your finger or a soft cloth). The finish adds dimension and interest to basic decor like frames, mirrors and decorative objects.
It really shows off pretty detail on those items as well -- so if you have an intricate mirror or frame, Rub 'n Buff is perfect for it.
If you've never used it, you'll be shocked at the power in this little bitty tube!:

This post may contain affiliate links for your convenience.
See my policies and disclosure page for more information.
It's not really paint -- more of a wax. It goes on easily and then you can lightly buff it out to soften the look a bit.
I've used this stuff for years, and it's my go-to when there's something in our house that is looking a little bland.
How to apply Rub 'n Buff
It doesn't look like much, but this stuff goes a loooong way. It's easy to squeeze out too much -- you want to err on using too little and you can always add more or layer the finish.
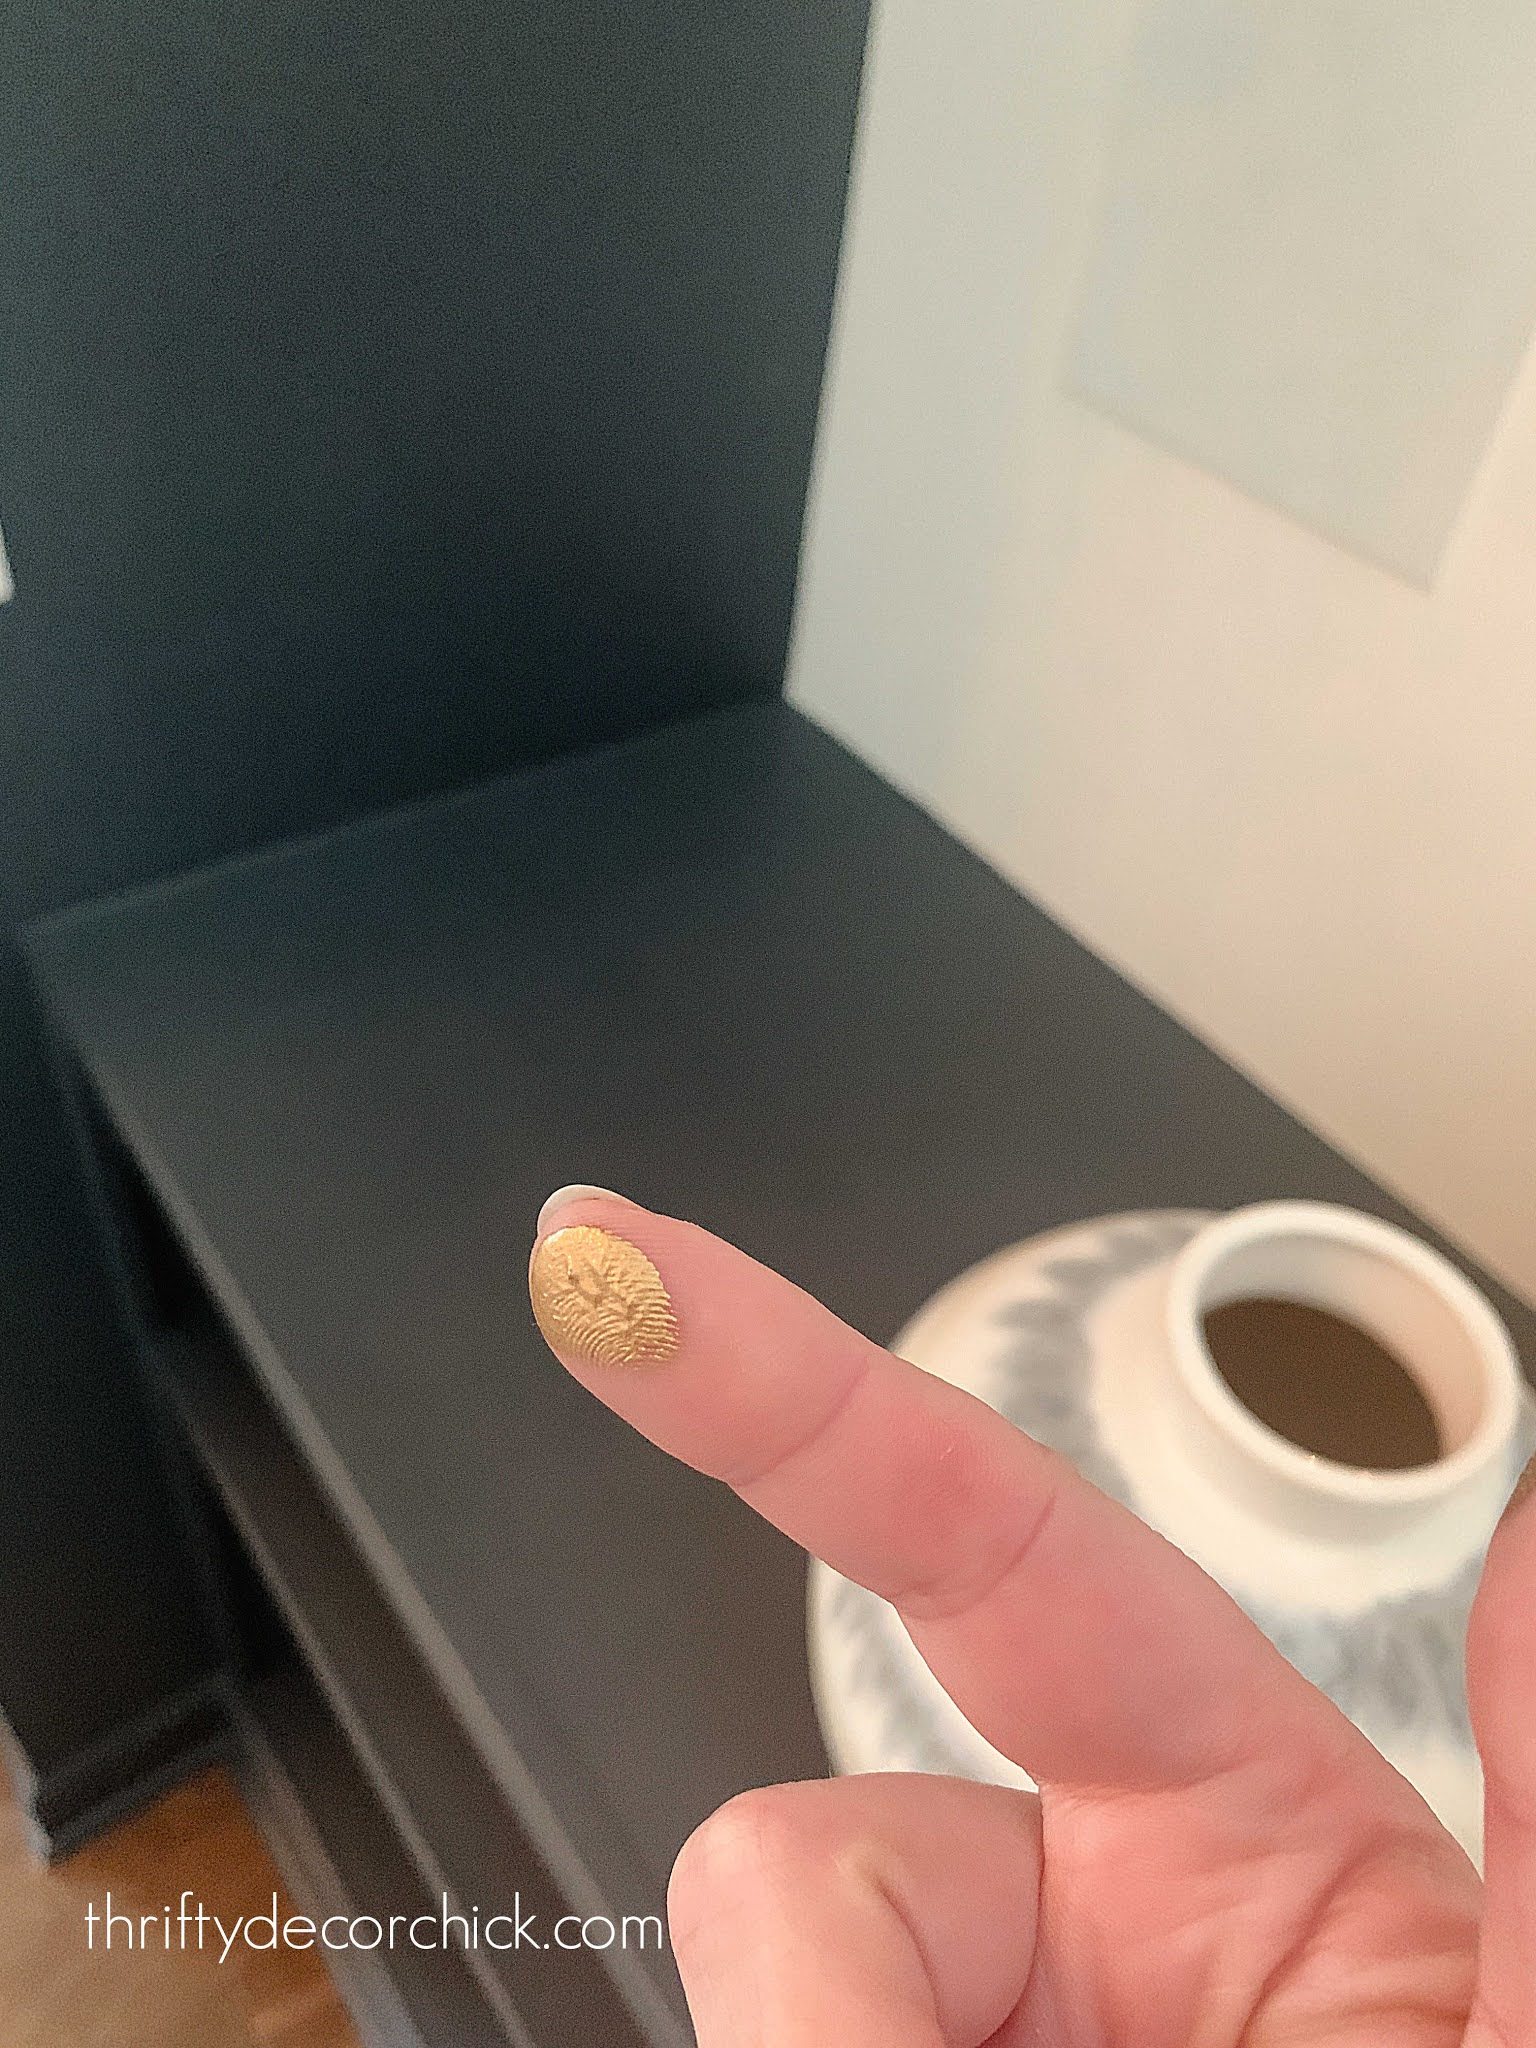
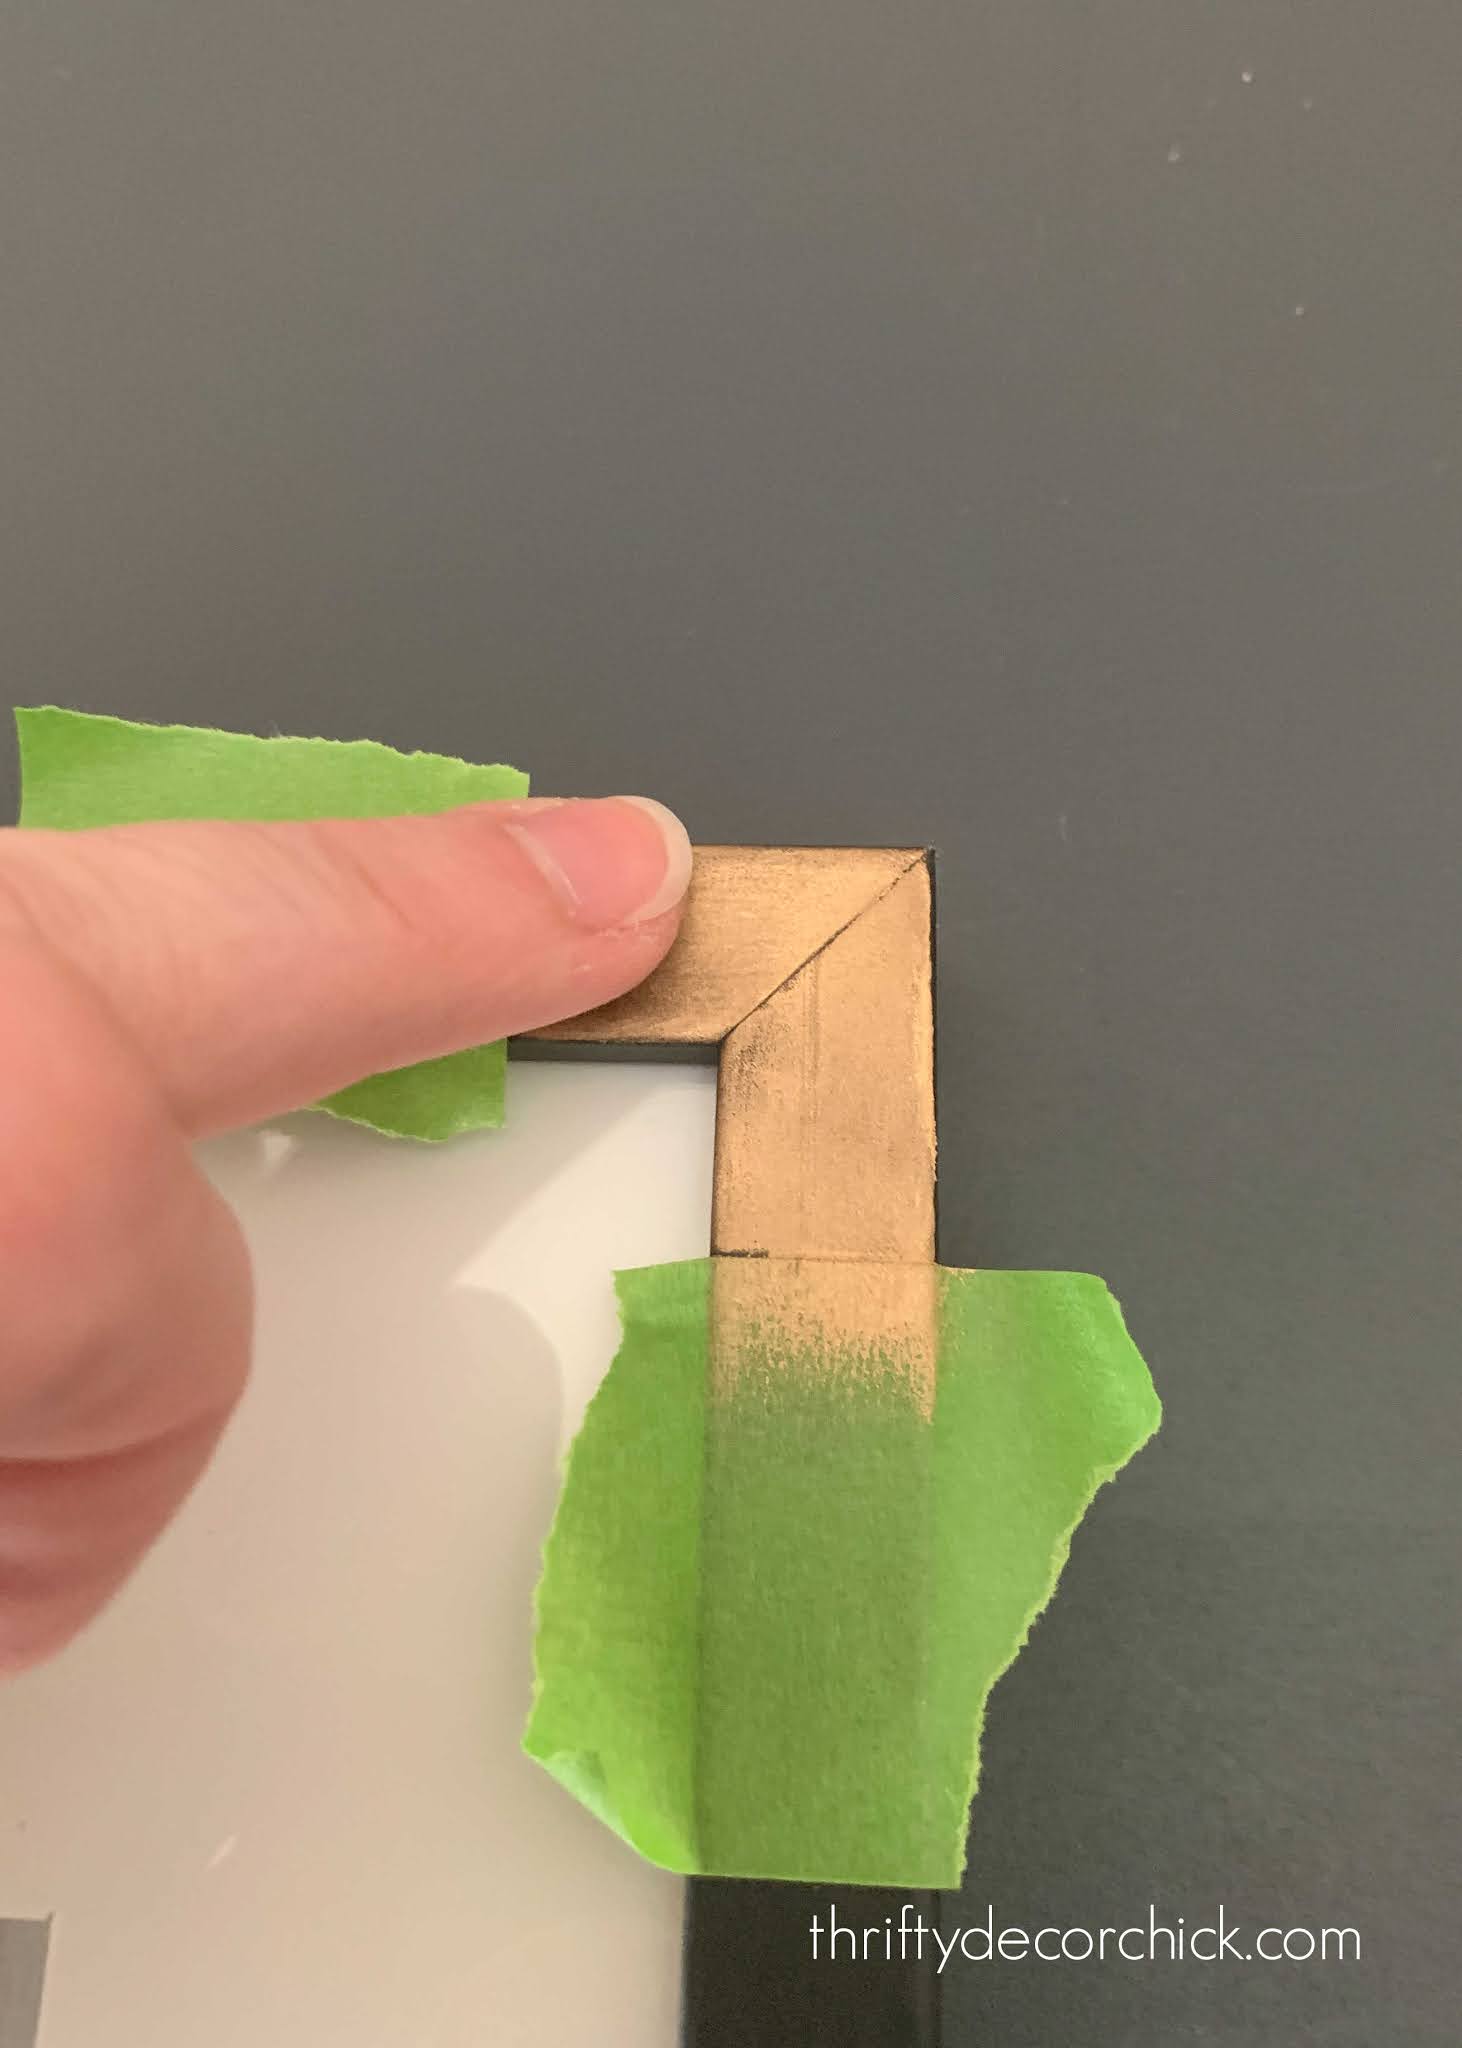
You only have to use a tiny bit for accent projects. I usually start by dabbing my finger on the opening:

I used the antique gold finish for this project.
I usually use my finger -- I feel like it's easier to do detail work with my finger. But you can also use a soft cloth to apply it:
YEARS ago I added a simple gold detail on the front of some frames near our fireplace:

From far away it gives the look of metal brackets. I loved that look so much, I did the same to some of the frames on our family room DIY picture ledges.
I used a few pieces of painter's tape to mark off the corners and then just rubbed it on:
It dries almost immediately, so you can buff it out right away.
Use either your finger or a cloth to rub it in and even out the finish:
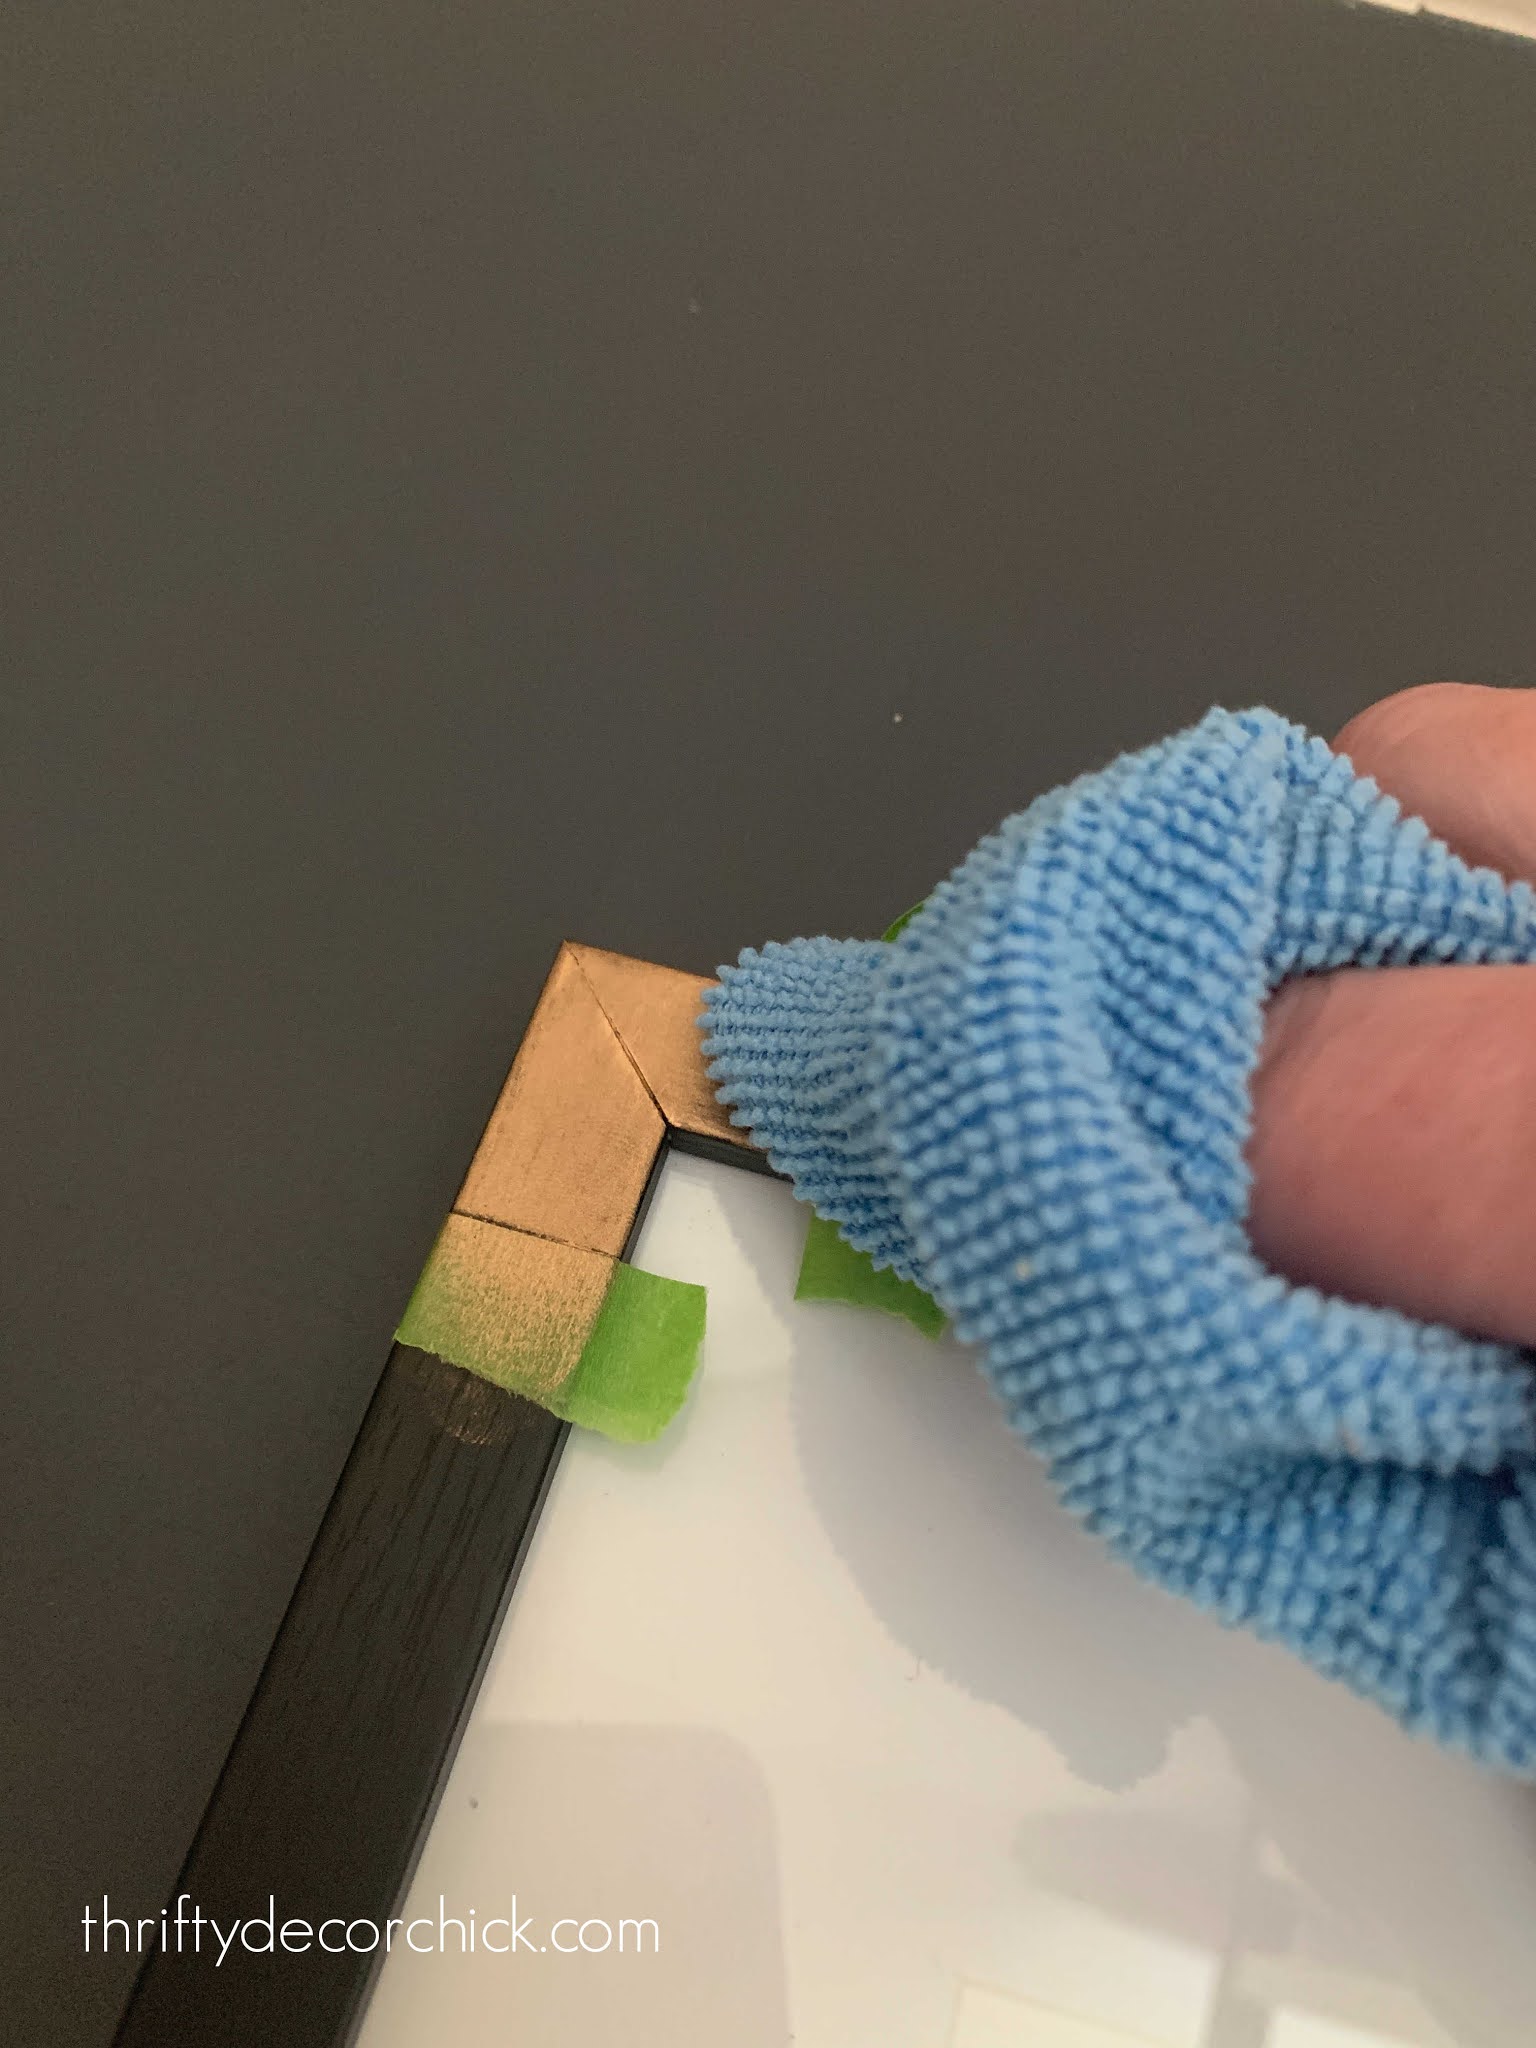
I like a finger for application and a cloth for the buffing part. You don't have to buff, but it does give it a pretty sheen and blends it nicely.
You can use Rub 'n Buff for larger projects, but I've always loved the little detail it adds in smaller doses:

See how to build those picture ledges here! More about the board and batten here.
I think I'm going to add it to the sides of the frames as well, so we can see the gold accent from the side.
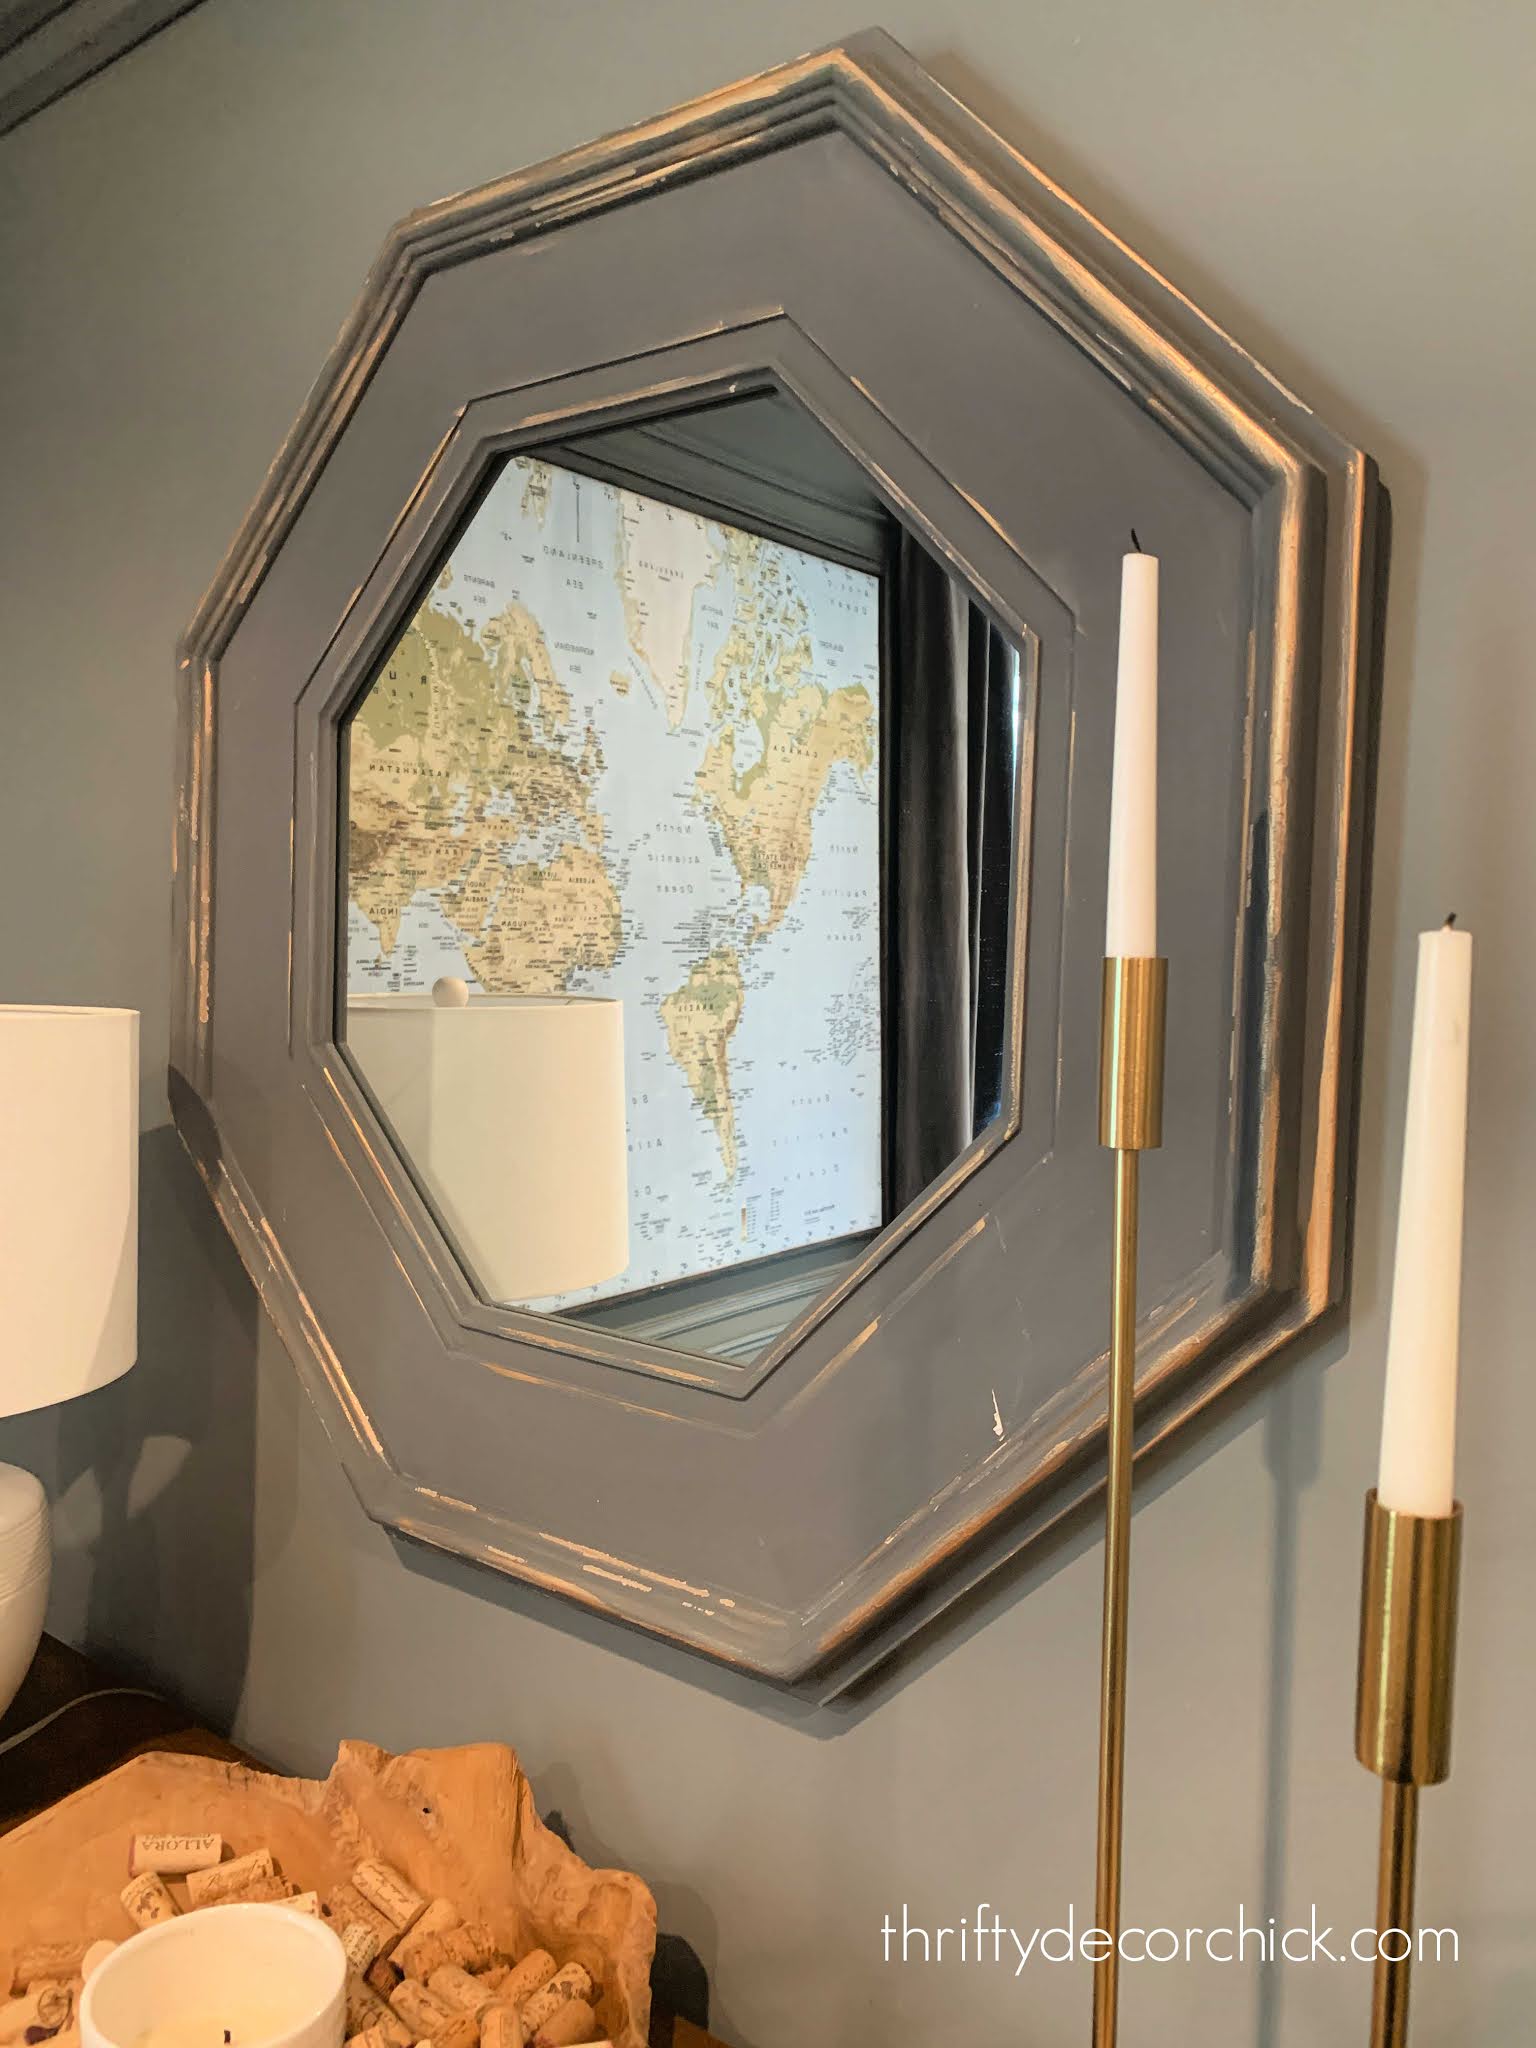
I love this mirror in our basement and that it matches the walls almost exactly:
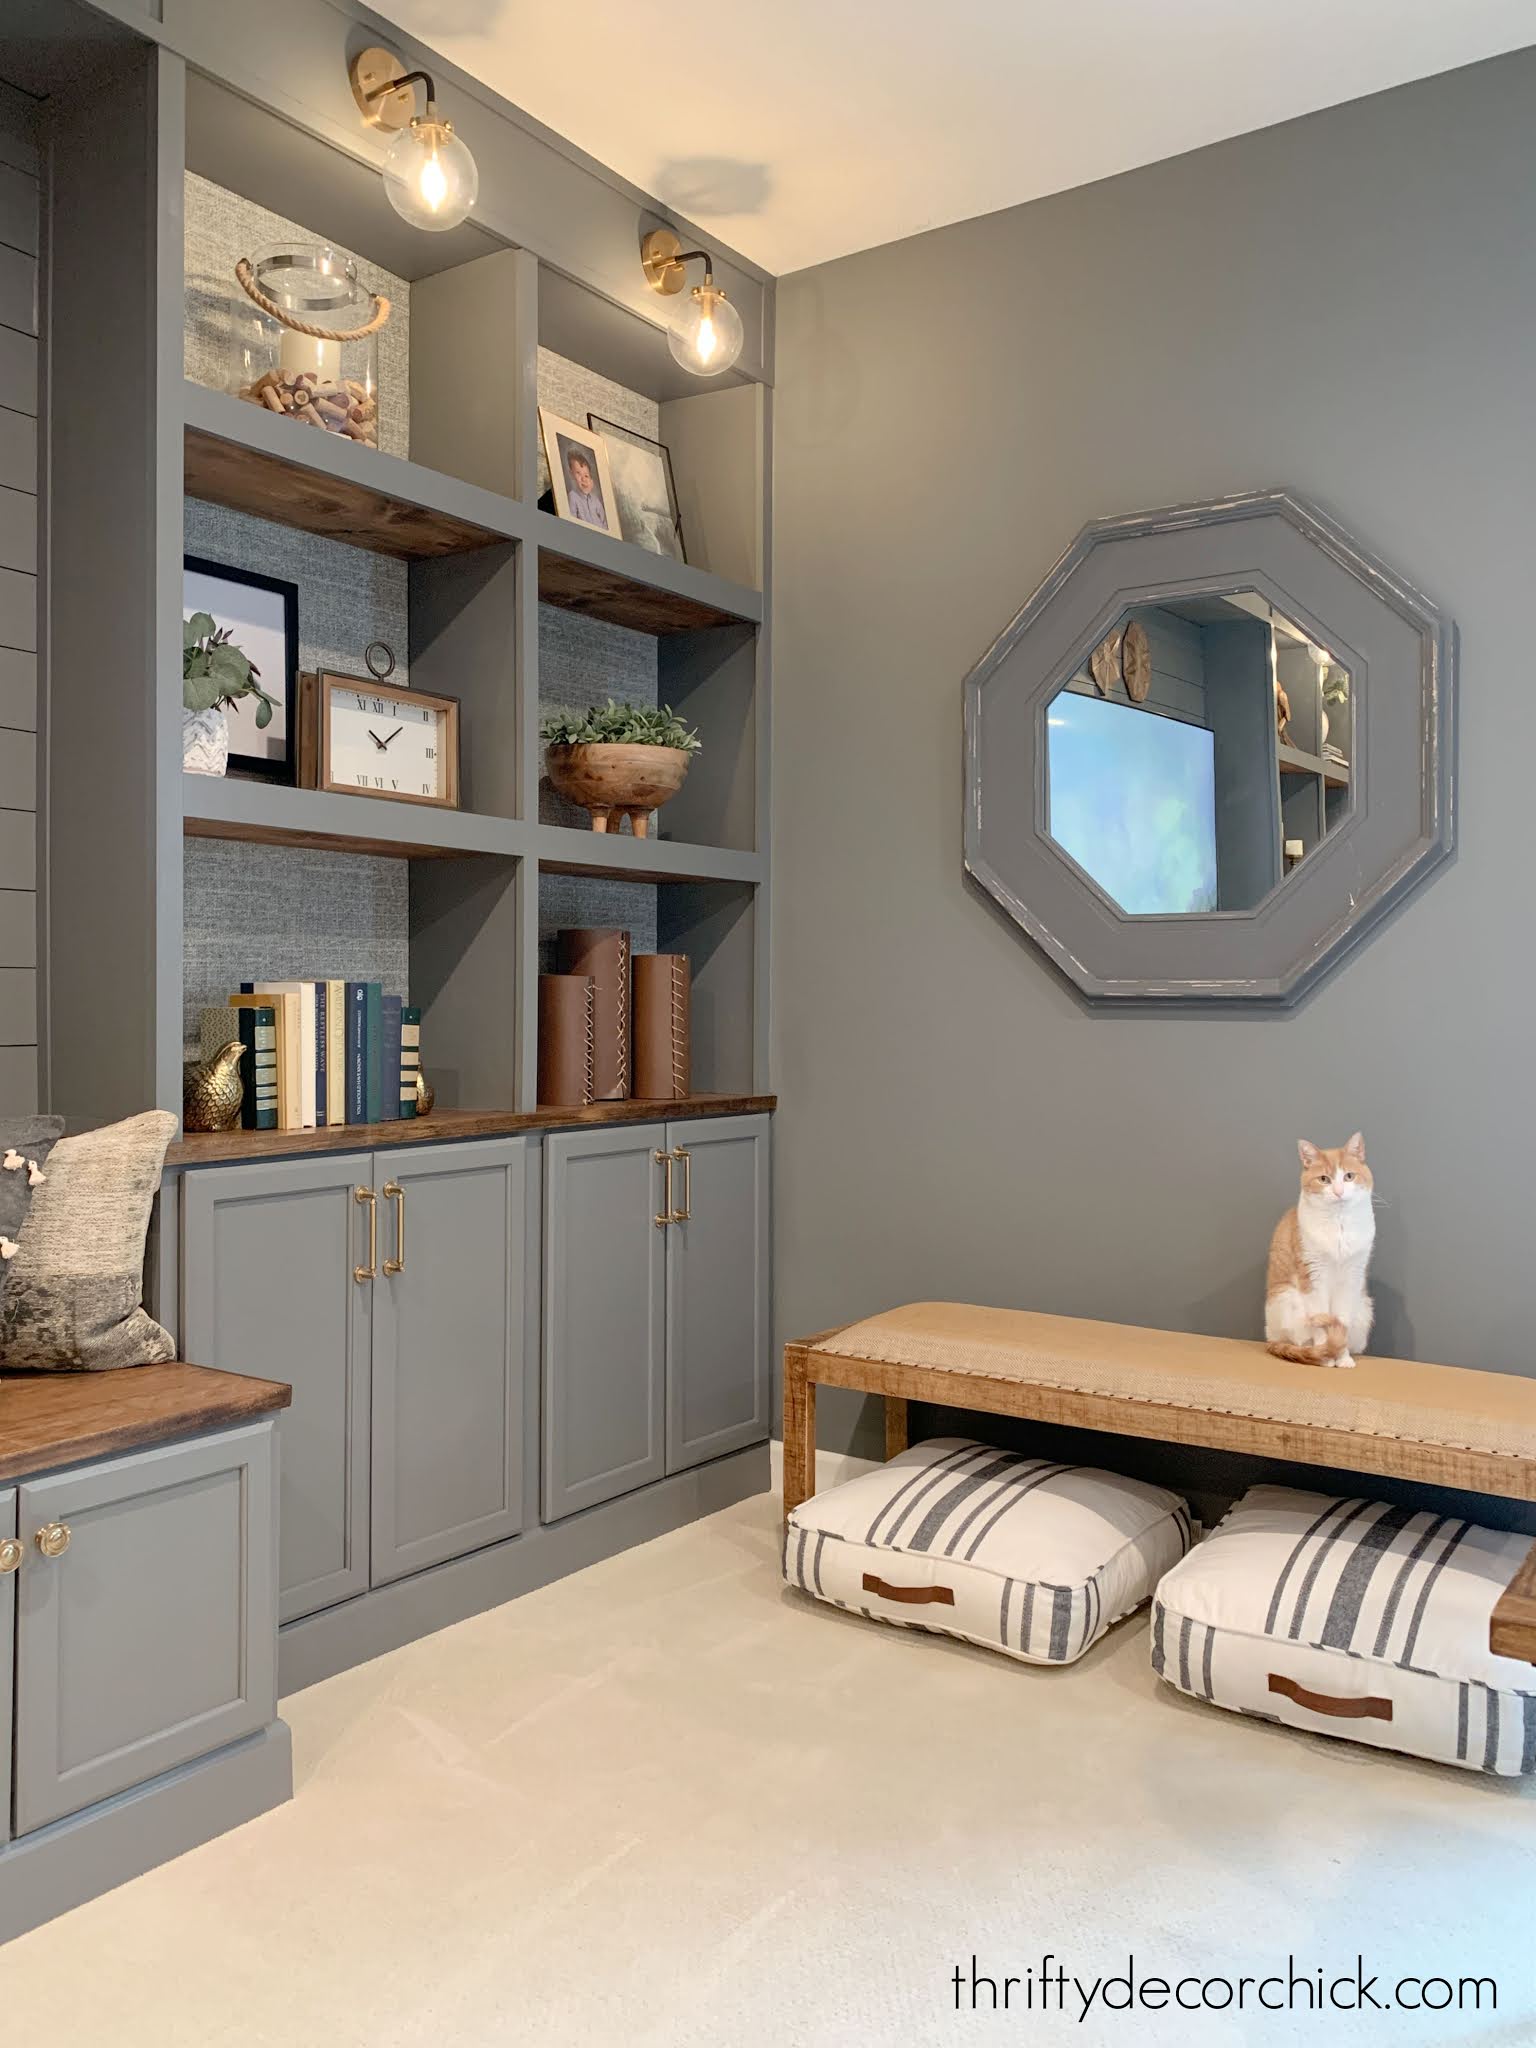
Sometimes you want contrast, sometimes a more muted look is what you're aiming for. I love how this blends in for a more modern look, but it needed something.
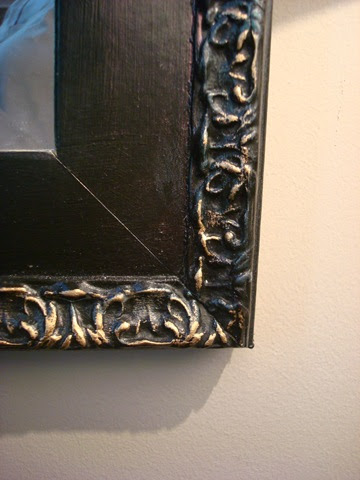
When I added the box molding on the walls down there, I moved the mirror to another wall and then added gold accents with the Rub 'n Buff:
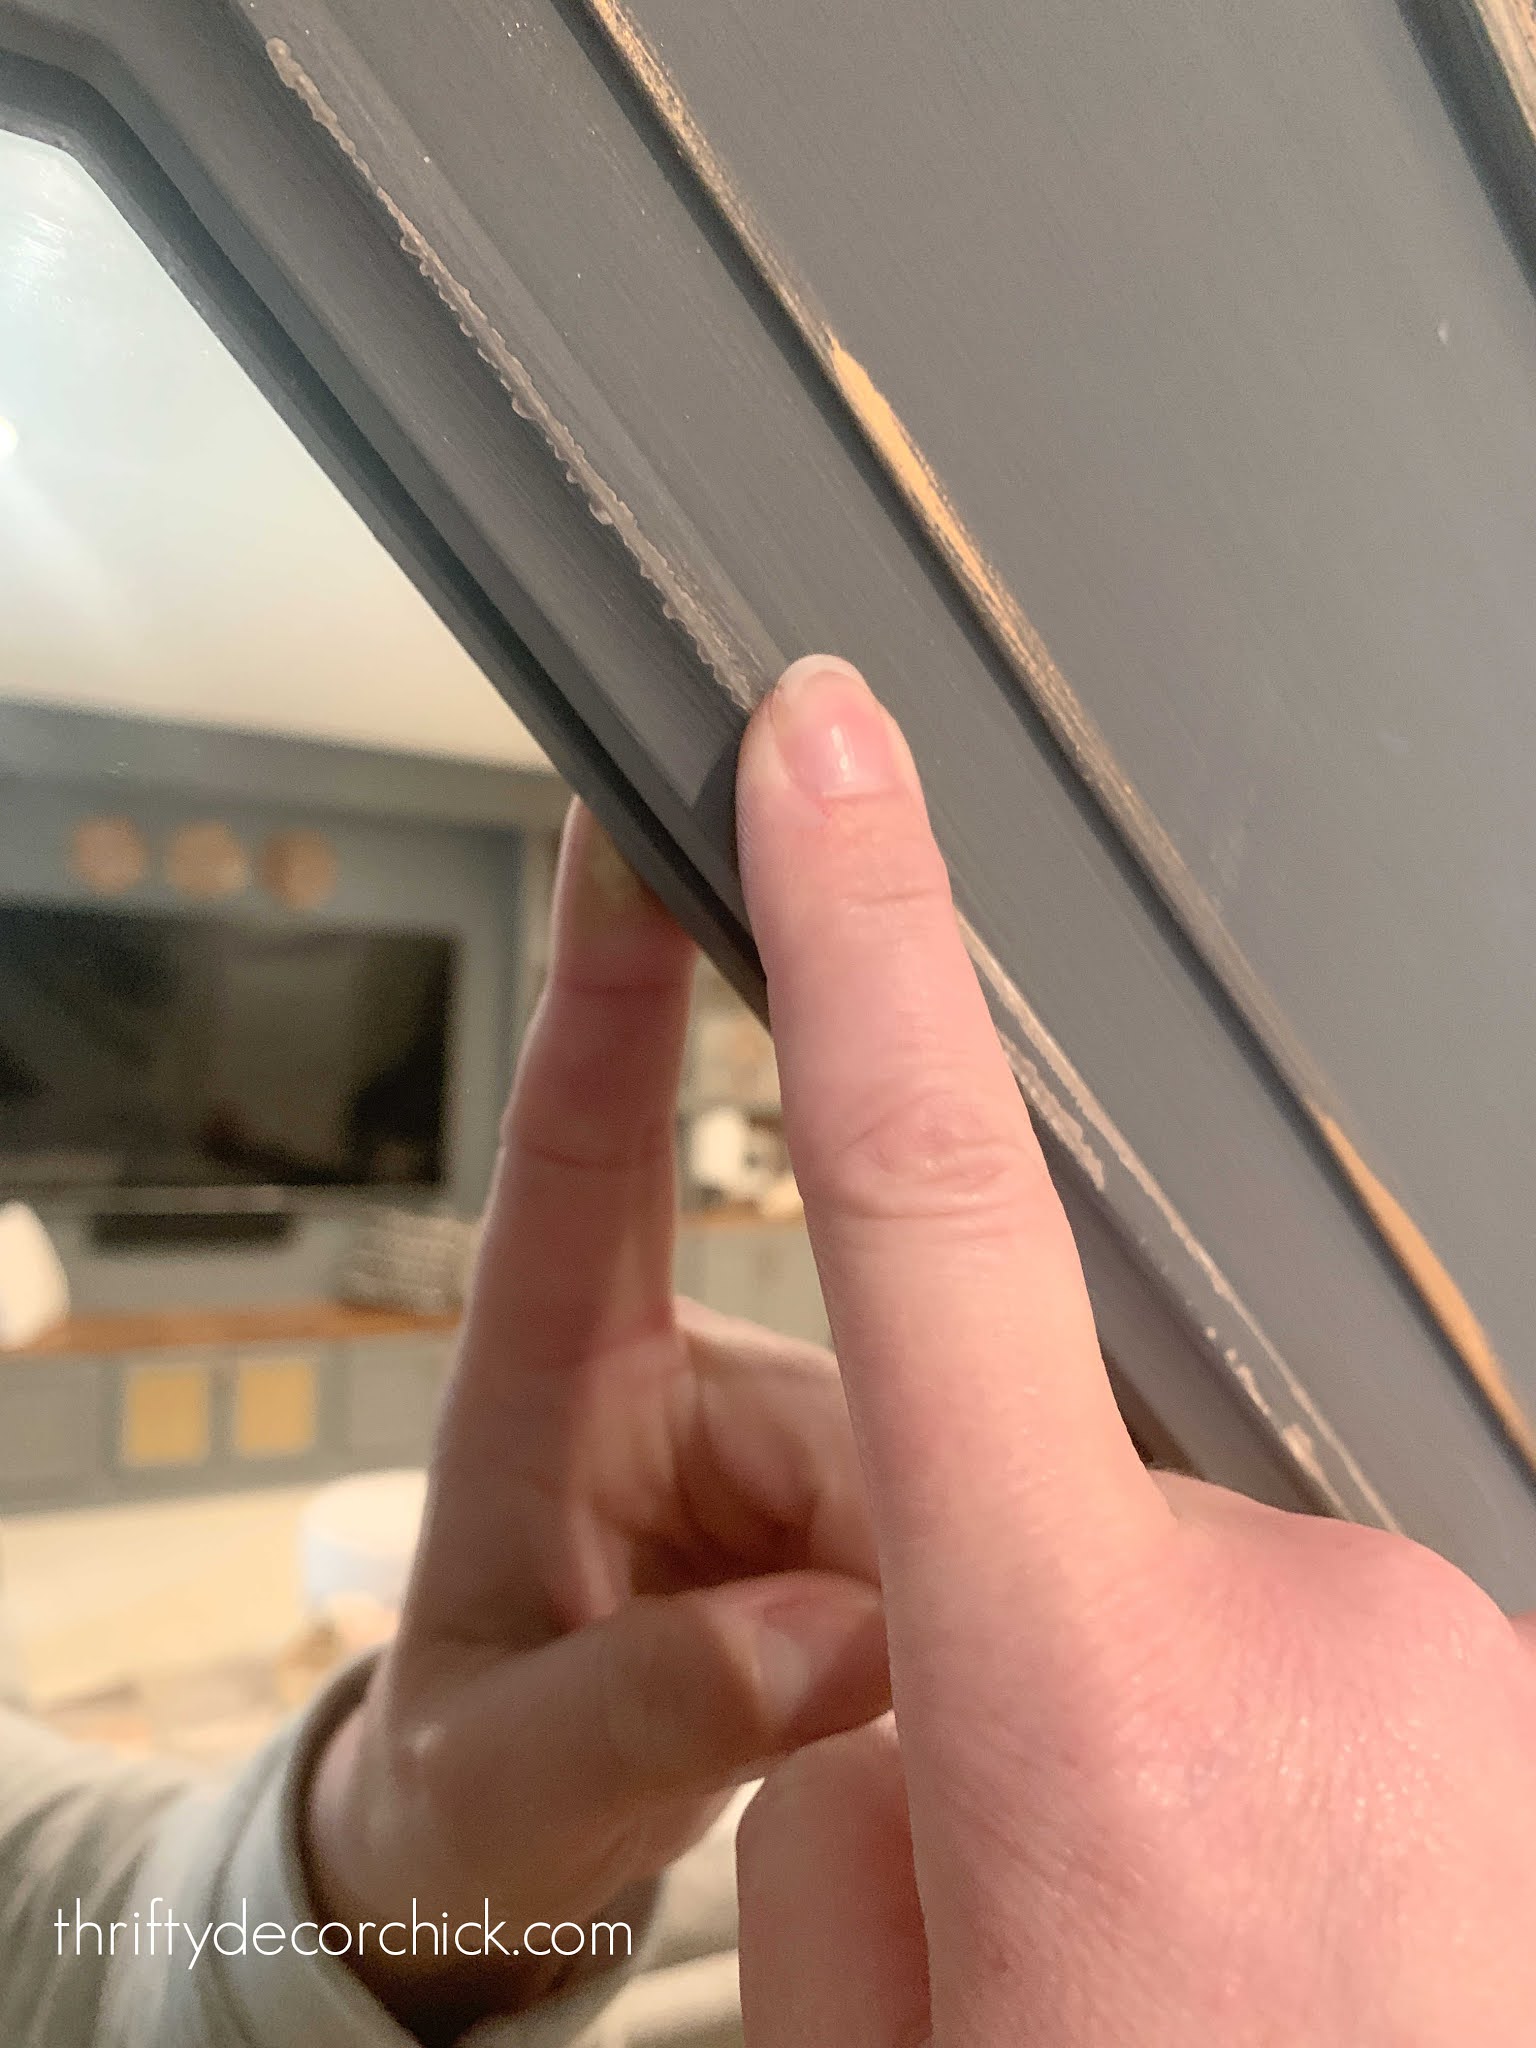
The paint on the mirror had a slightly distressed look on the edges, so I used those as my guide.
It only took a few minutes and made a big difference!:
On something like this especially, there's no perfection needed. Just swipe it on here and there until you get the look you want!
Where you can use Rub n' Buff
This stuff adheres to all kinds of surfaces -- metal and wood are easy. I haven't tried it on plastic so let me know if you have! It's an easy way to change up light fixtures, frames, art, decorative knobs...the possibilities are endless!
I've grabbed these tubes a lot over the years -- it's especially lovely when used to highlight pretty texture.
It made the raised detail on this frame pop:
You can use it instead of spray paint for smaller pieces too. I "painted" some red metal bells in our Christmas decor last year. The Rub 'n Buff gave them a vintage look with more dimension than straight spray paint would give.
If you have a large item, you can spray paint it and then add some detail with the Rub 'n Buff on top. It's so versatile!
I did just that to turn this wood terrarium to more of a metal look:

The pewter Rub 'n Buff gave it the look of metal, with some variation that straight spray paint can't add.
Tips for using Rub 'n Buff
I love that it gives pieces an older, vintage look because the finish isn't perfect, especially on textured surfaces.
It added detail so our mirror isn't so blah anymore...just enough to make it stand out!:
Have you tried this magical wax finish? It's fun and easy!
See more of our home here.
To shop items in our home, click here!
Never miss a post by signing up to get posts via email.
Via https://www.thriftydecorchick.com/2021/07/how-to-use-rub-n-buff-for-easy-updates.html EASY and inexpensive ways to clean gunk out of a drain
There are two simple and very effective ways to clean to clear gunk and hair out of your drains without using harsh chemicals. And with one method you'll have everything you need in your kitchen.
One of these drain clearing methods works better in the kitchen on built up foods and fats, and the other works well in bathroom sinks and showers where the clog culprit is most likely from hair down the drain.
We used to grab the Drano (and an even more caustic product once -- never again) every time the water started to slow in our sinks. No more! These methods work every time and it only takes a few minutes to use each drain cleaning hack.
Why you should clean your sink drains
Well I think most of us understand why. At least we know when sinks start to drain slow they need to be cleared out. But I'm guilty (and I think a lot of us are) of not doing it enough.
In a kitchen, there are fats, oils and other foods that gunk up pipes over time. (Did you know even pasta is bad for your pipes?) In the bath, it's the dreaded hair. And unless you're diligent and stay on top of it all the time, clogs happen eventually. If you're not treating your drains right, eventually you'll need to clear out the pipes.
And your sink will probably be stinky. Ever had a foul smell in the kitchen you can't place? This is probably it.
Cleaning out the food goo and gunk
This one is typically used in kitchens where you have the thick build up of fats and gooey food. I used to use the old school method of hot water, then baking soda and finally vinegar to clear a kitchen drain.
But years ago I heard of a more effective and even easier way to get it done...and I've never gone back! I try to do this every six months or so, but as we've already discussed...drains aren't usually something I think of cleaning regularly.
You'll only need a couple "ingredients" to flush the built up food and fats in your kitchen drain.
First up, boil a saucepan full of water. If your drain is already backed up or running slow, you may need to do this numerous times or boil a lot more water to start:
Stir in a few tablespoons to 1/4 cup of dish detergent into your hot water (less for smaller amount, more for larger pot) and then let the water cool just a bit.
It is not recommended to pour boiling hot water down sink drains that are backed up if you have PVC pipes -- if clogged, the boiling water can sit and start to melt the pipes.
Also, a porcelain sink can crack from boiling water.
Yet another reason to do this before your drain pipes clog up!
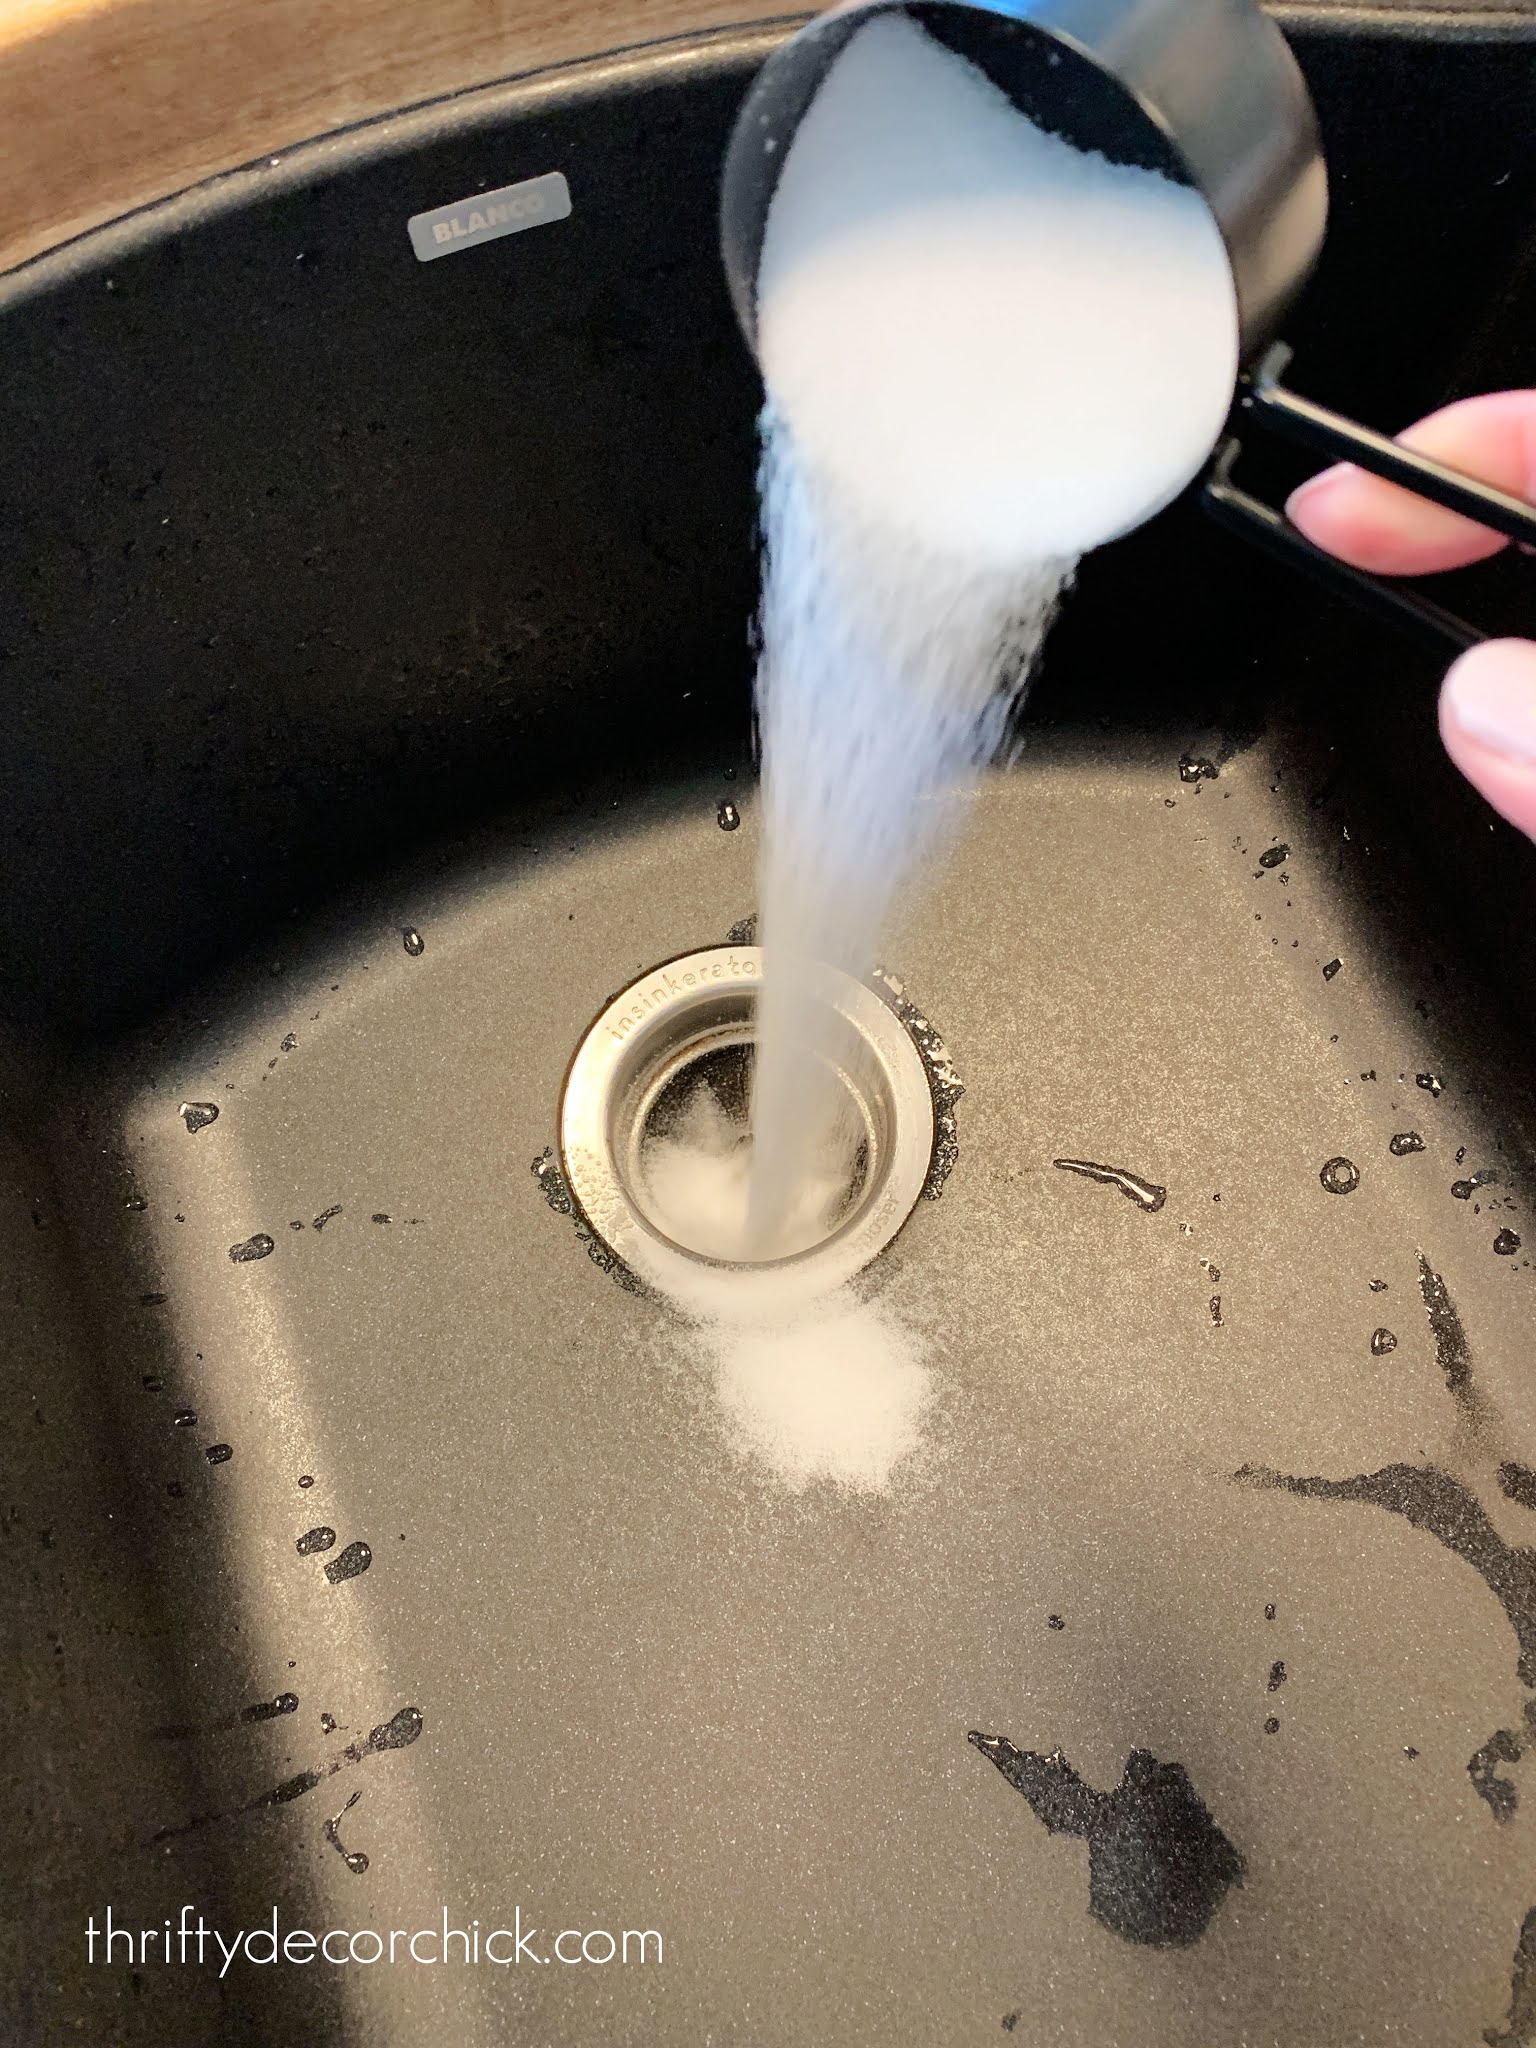
Pour about a half of cup of salt (any salt will do) down the kitchen drain:
This post may contain affiliate links for your convenience.
See my policies and disclosure page for more information.
Then wash the salt down the drain with the very hot, soapy water and then rinse with hot water from the faucet:
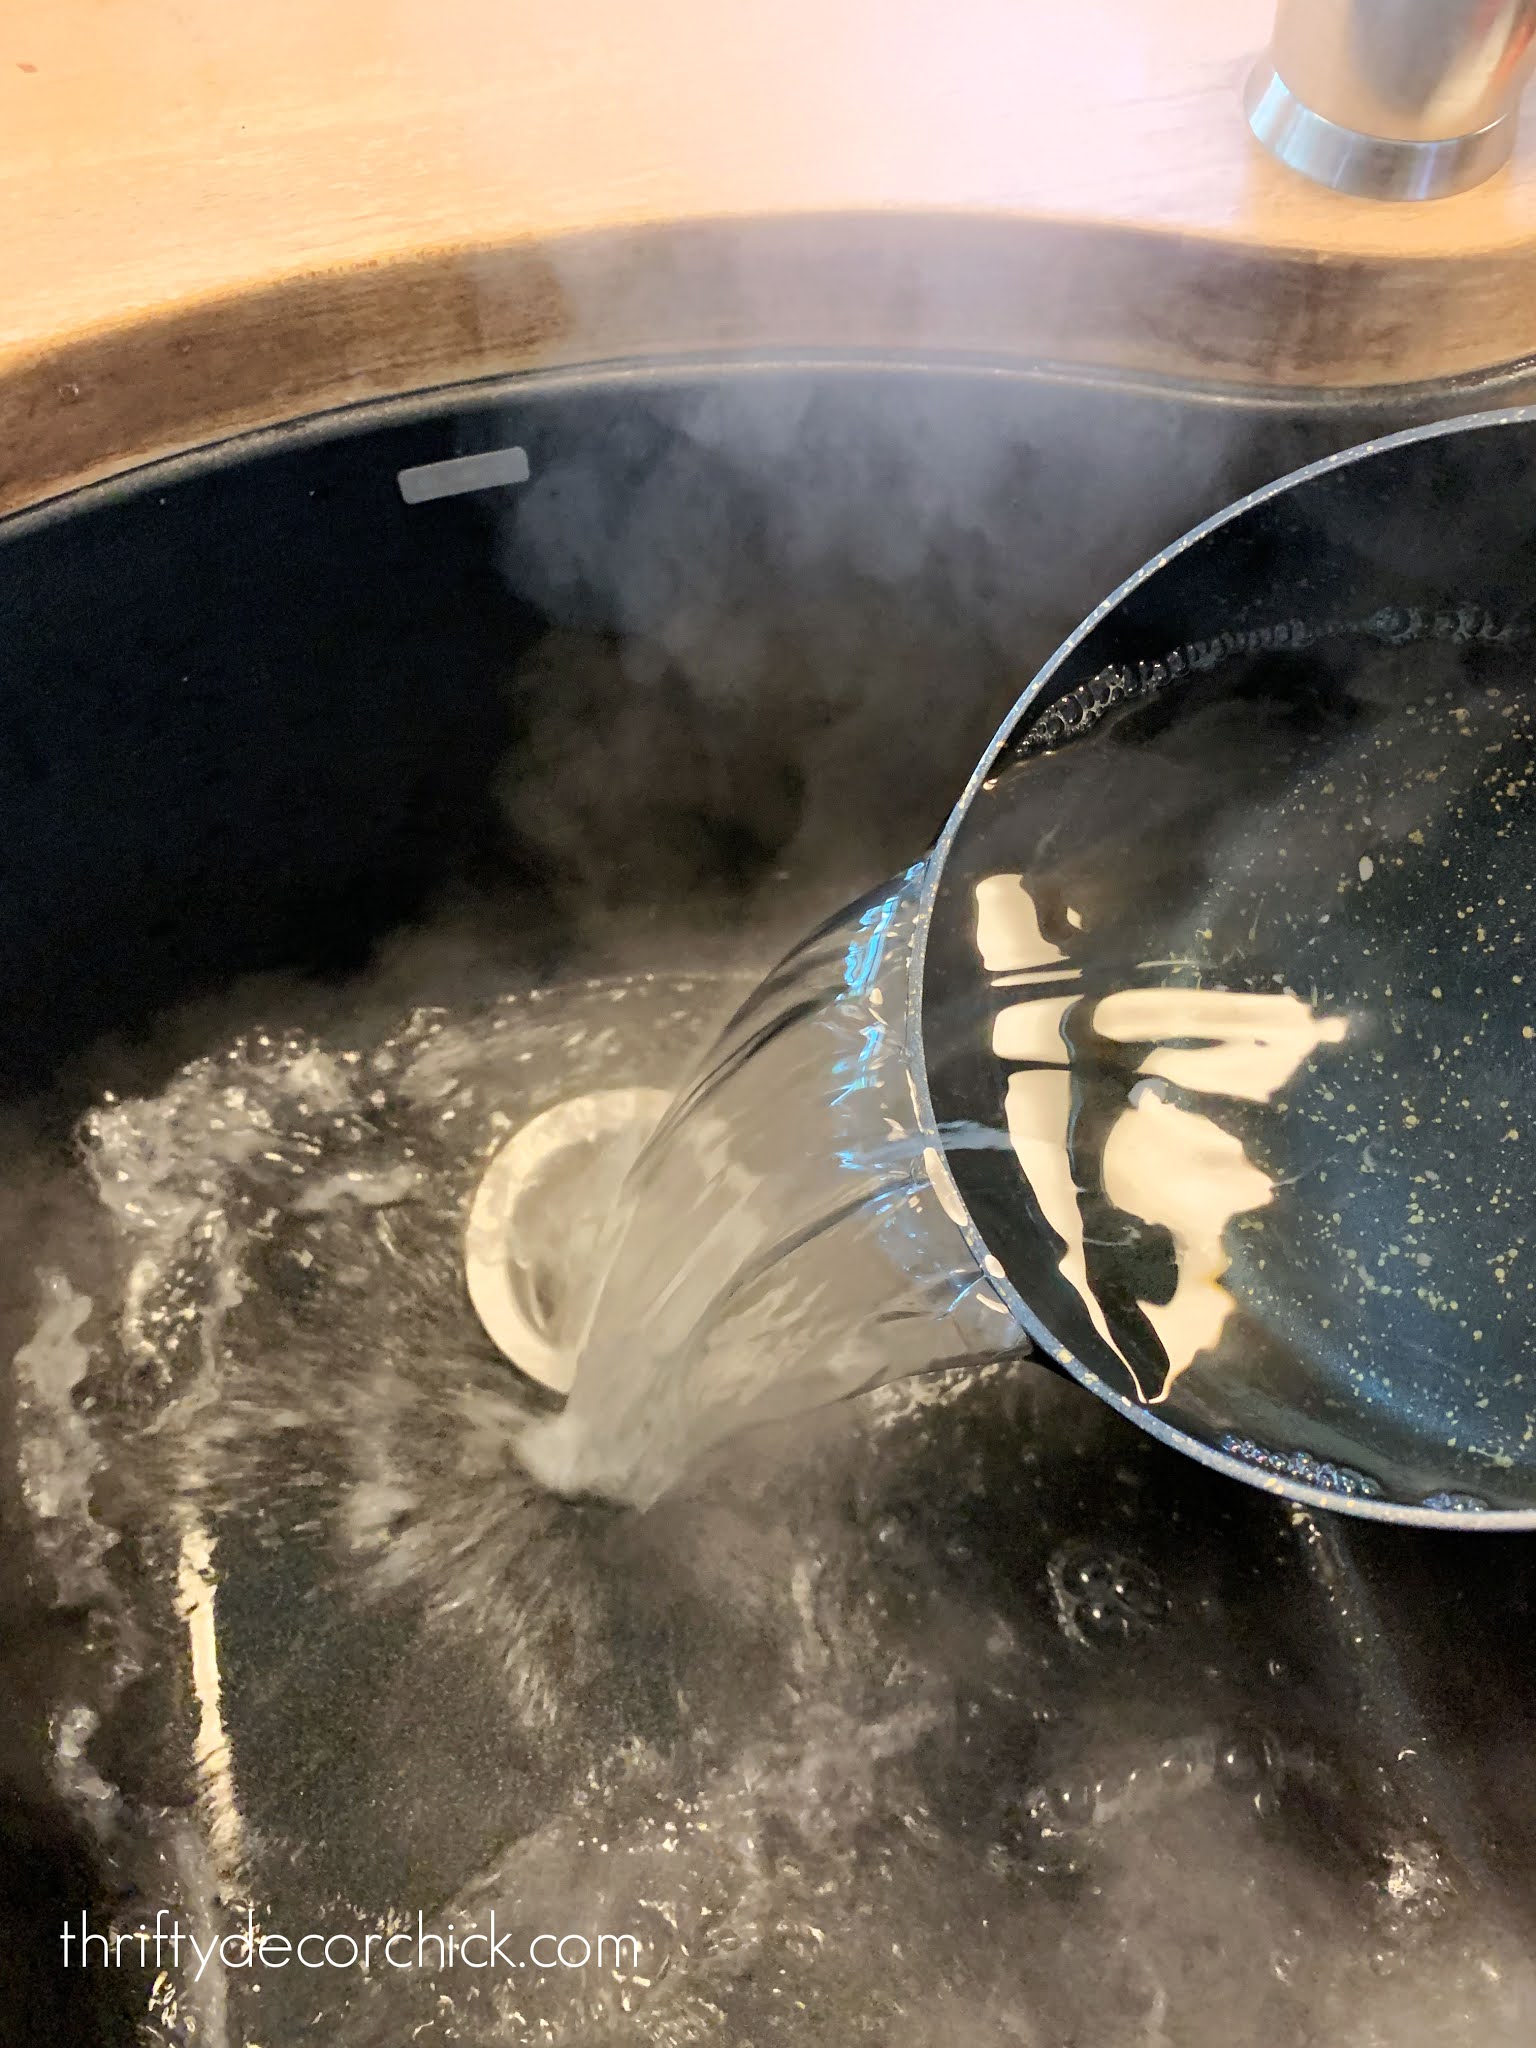
It works like a dream! It had been ahem...a while since I had last done this and this time we could hear gurgling as the pipes cleared out. They continued to gurgle for about 30 seconds after I poured the combo down the drain.
You can read all about why this works better than baking soda and vinegar for clearing drains here.
When food isn't the problem
In bathrooms the problem is rarely from food, but hair instead. Sometimes soap scum too, but hair is the usually the culprit. And then soap and goo get stuck in the hair, and well...you know.
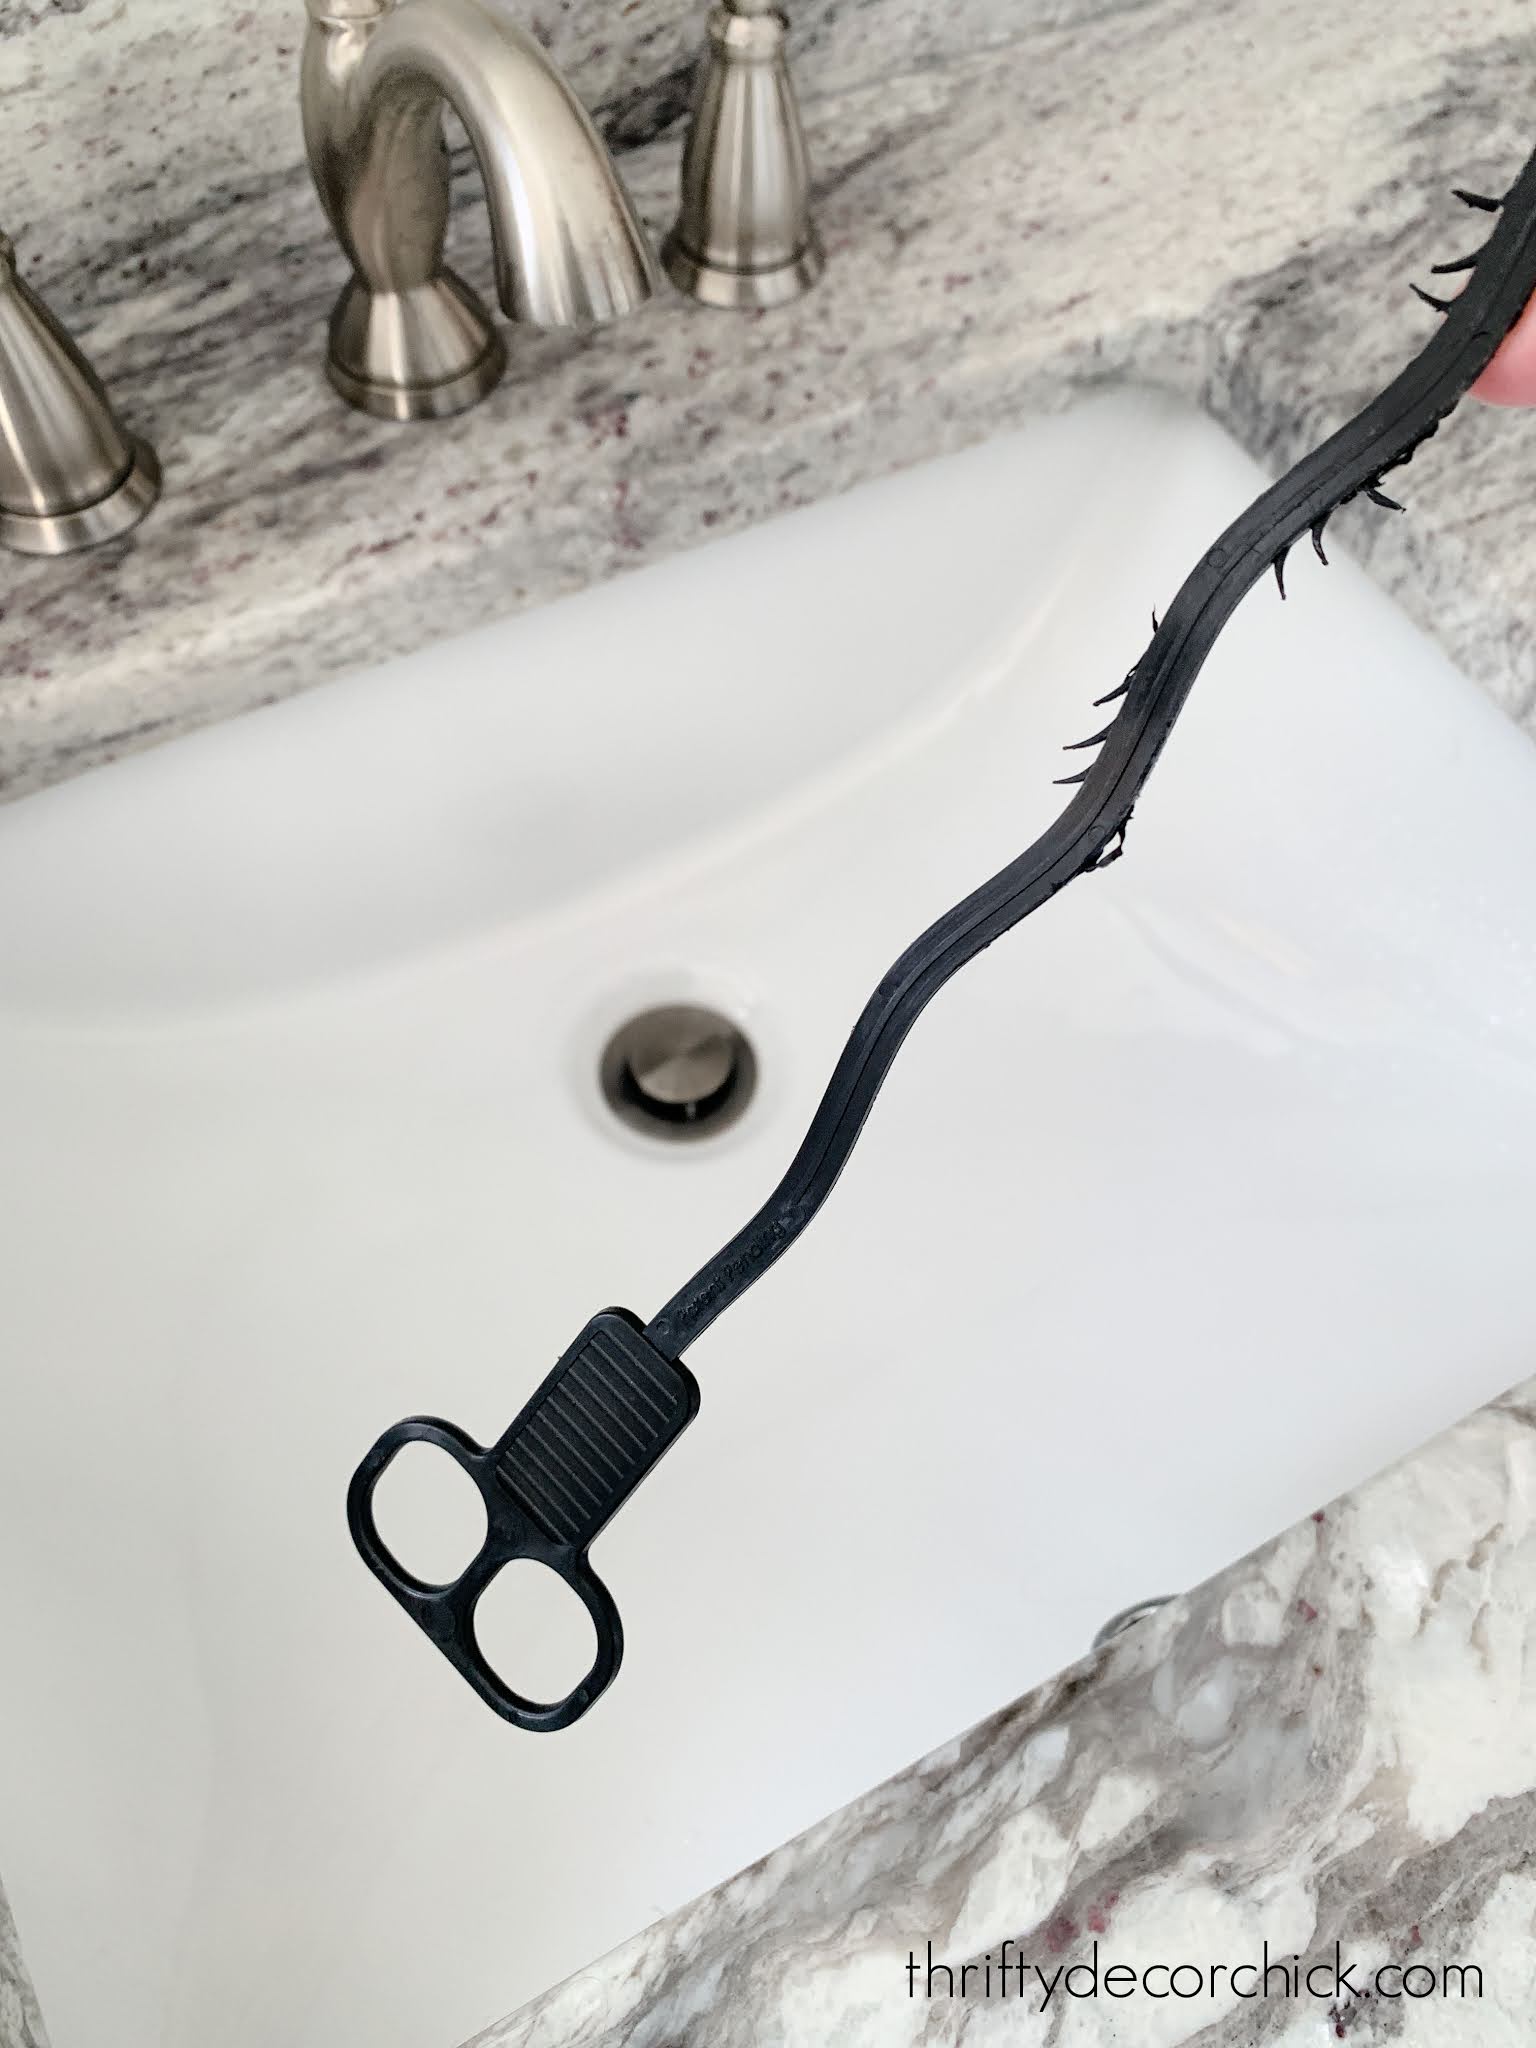
This plastic Zip it drain clearing tool makes removing the built up hair in your drain SUPER easy. It's so easy to use and they are crazy inexpensive.
Zip it is the OG of these tools and there are tons of knock offs now. I think this one is the latter:
Overall I find the Zip it brand lasts longer than others.
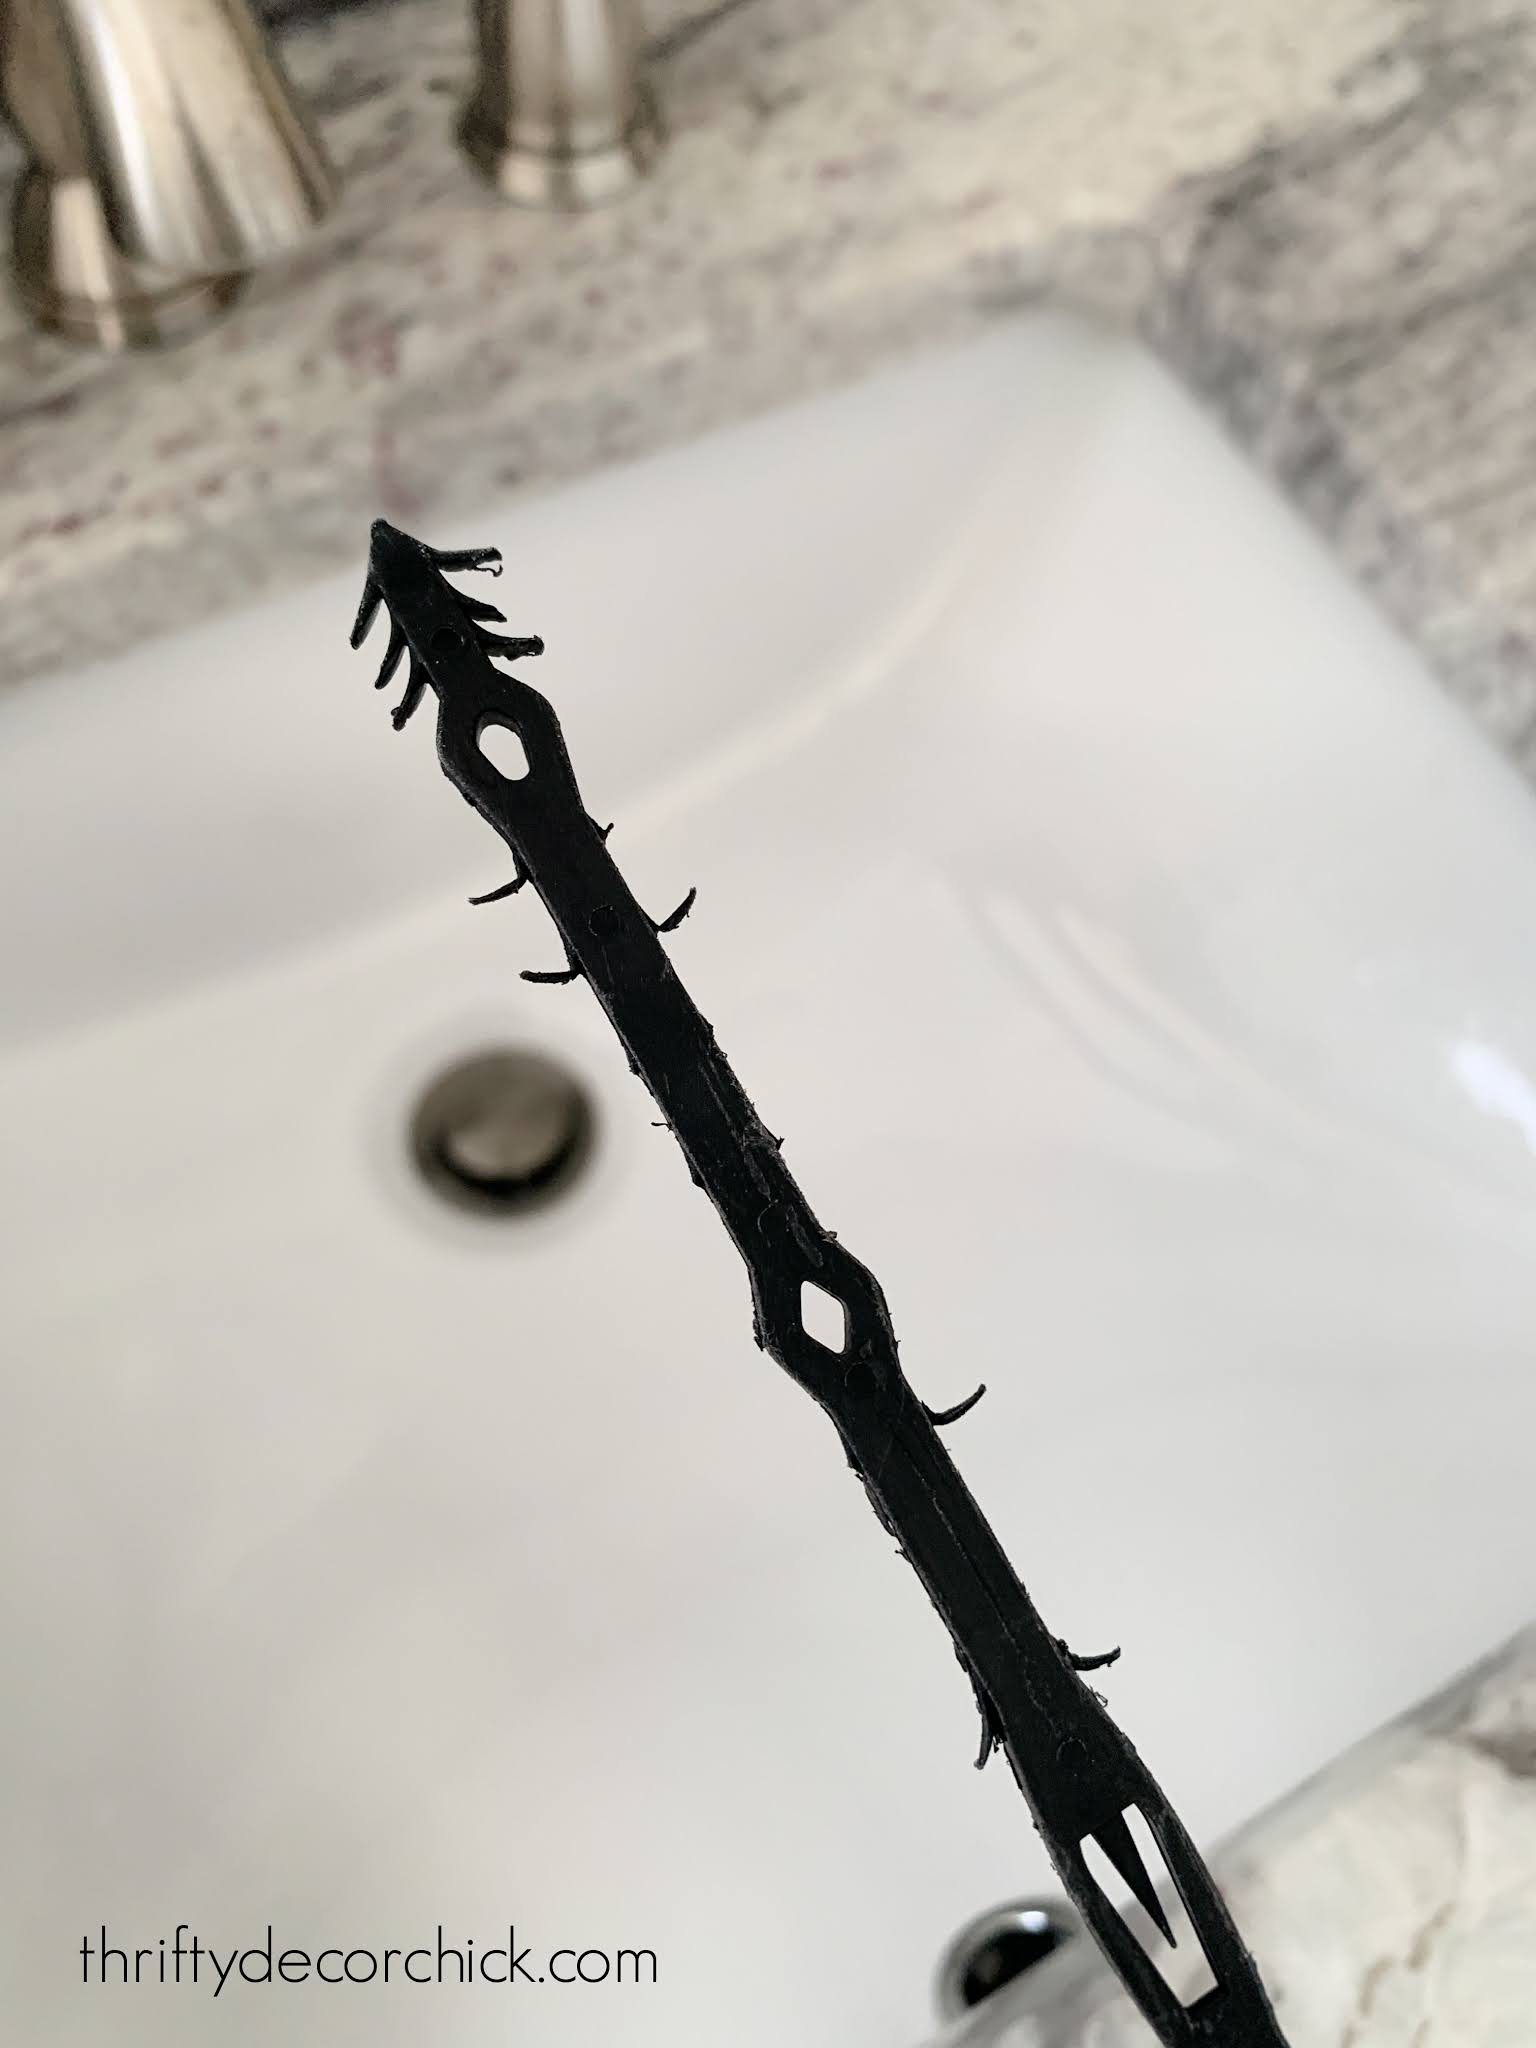
These little doodads are long plastic drain cleaners with little threads that grab all the hair on the way down and back up:
You simply thread it down your bathroom drain as far as you can. No need to remove the stopper.
If it doesn't easily slide down one side of your stopper, try again in another spot:
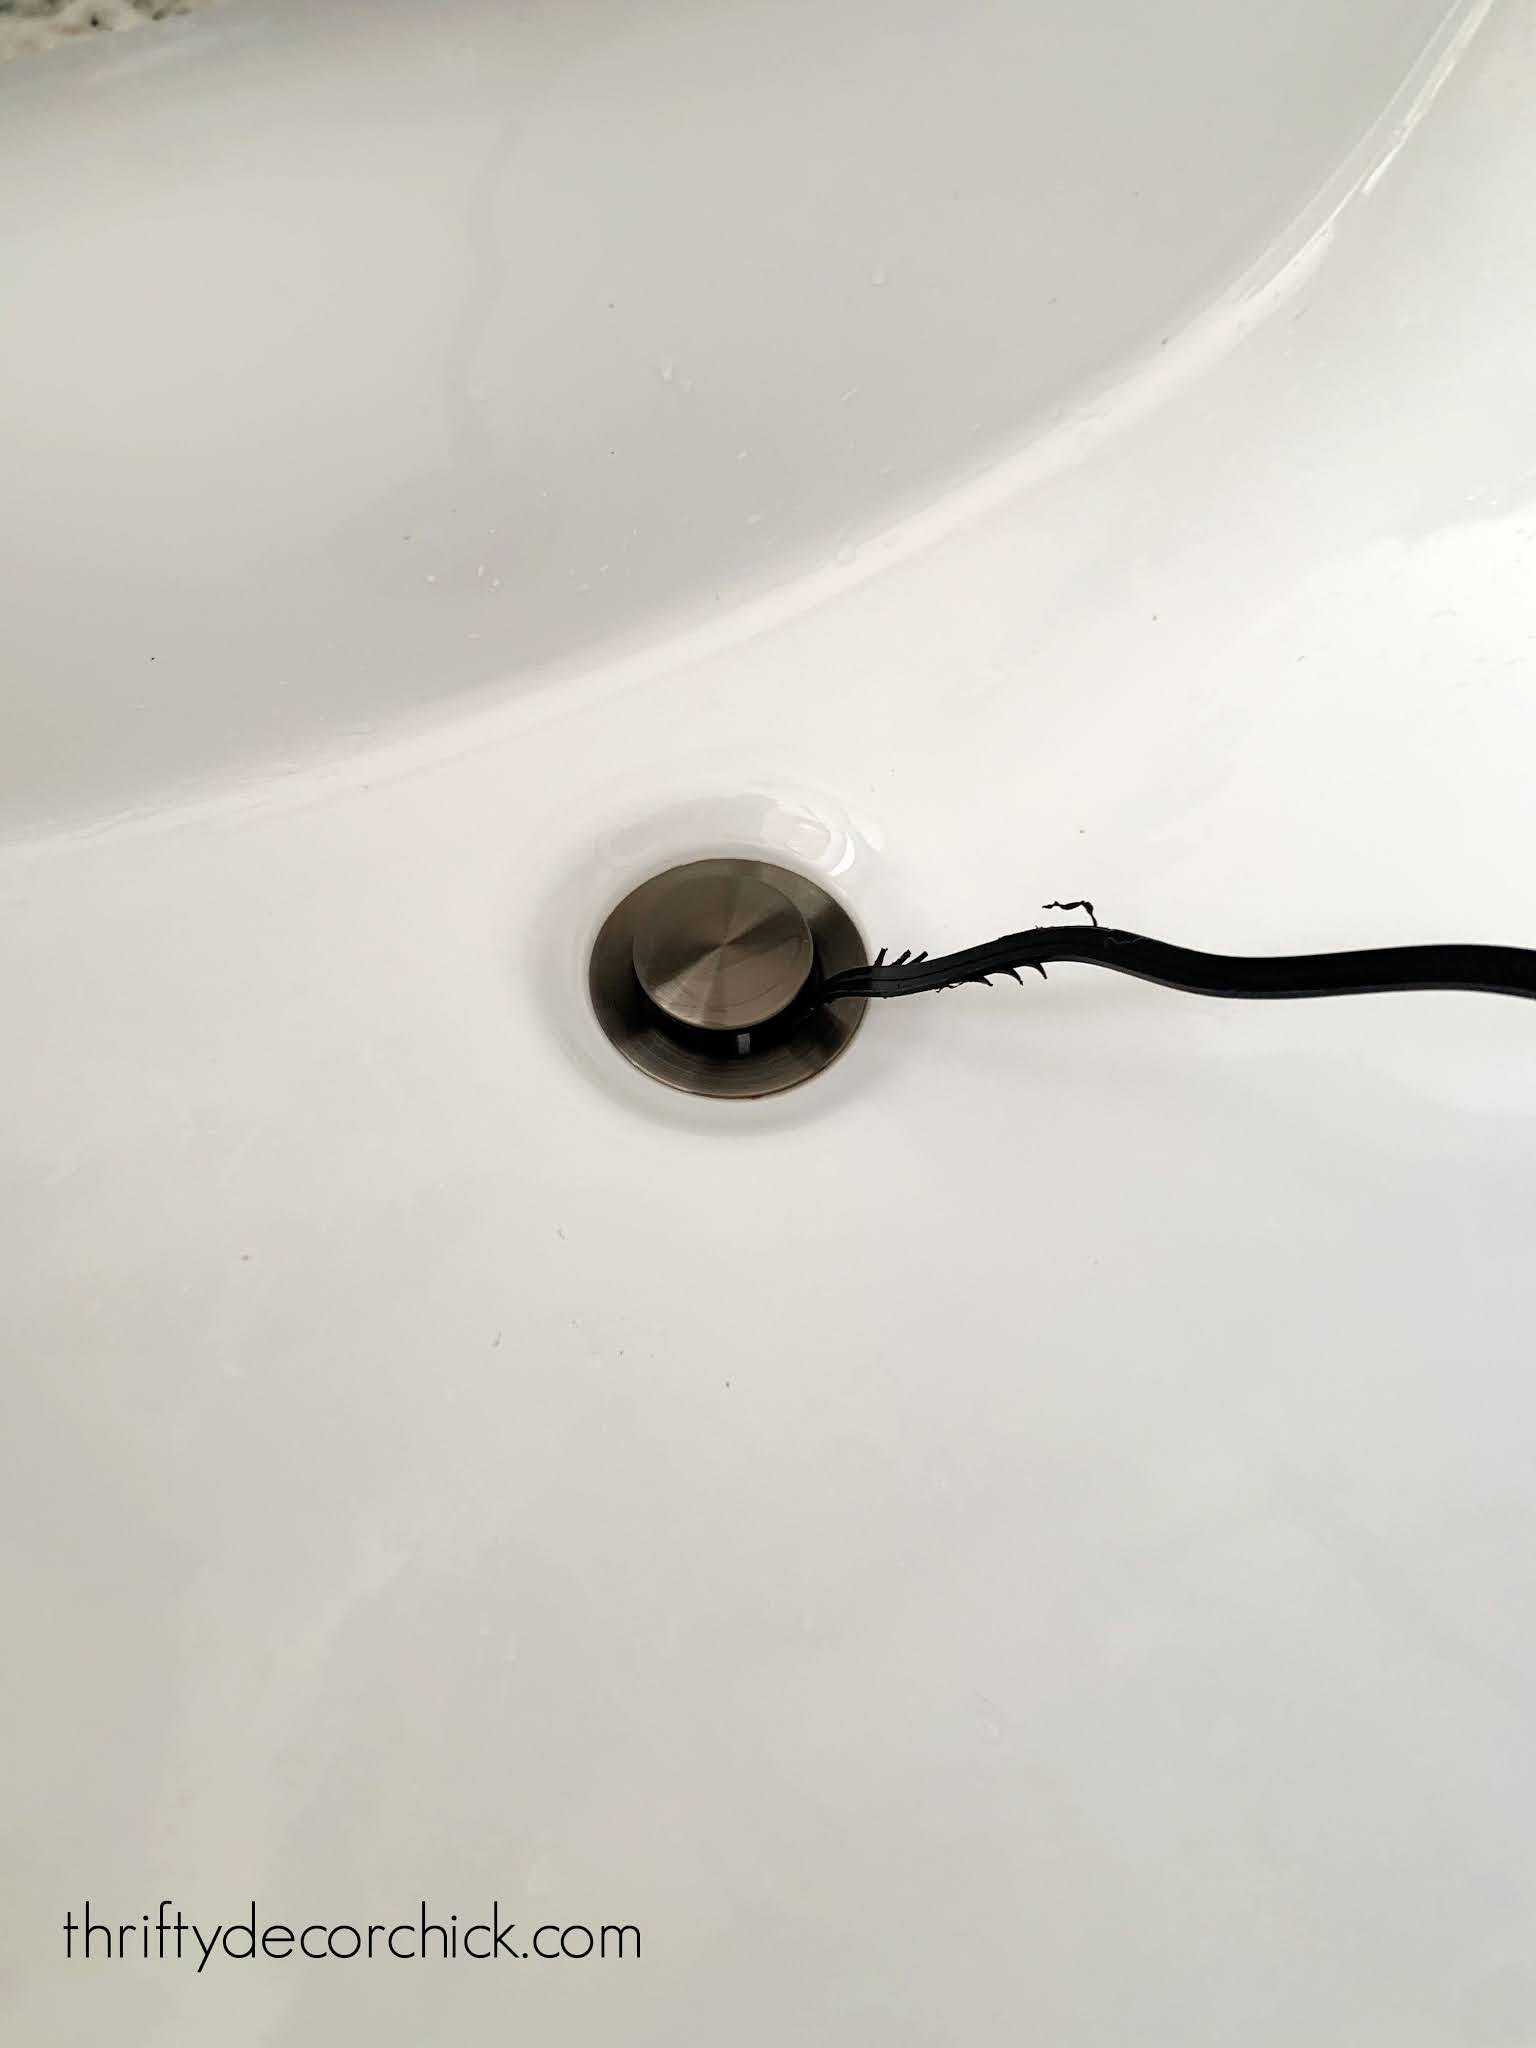
Bring it back up and then try not to hurl. If you're a decent human being who doesn't let any hair down the drain you won't notice much. But if you're like most of us, you'll need to be prepared for what will come back up the drain.
If it's been awhile I usually have do this a few times to clear all the hair from the sink. But that's IT! You'll be shocked at how much faster your water drains.
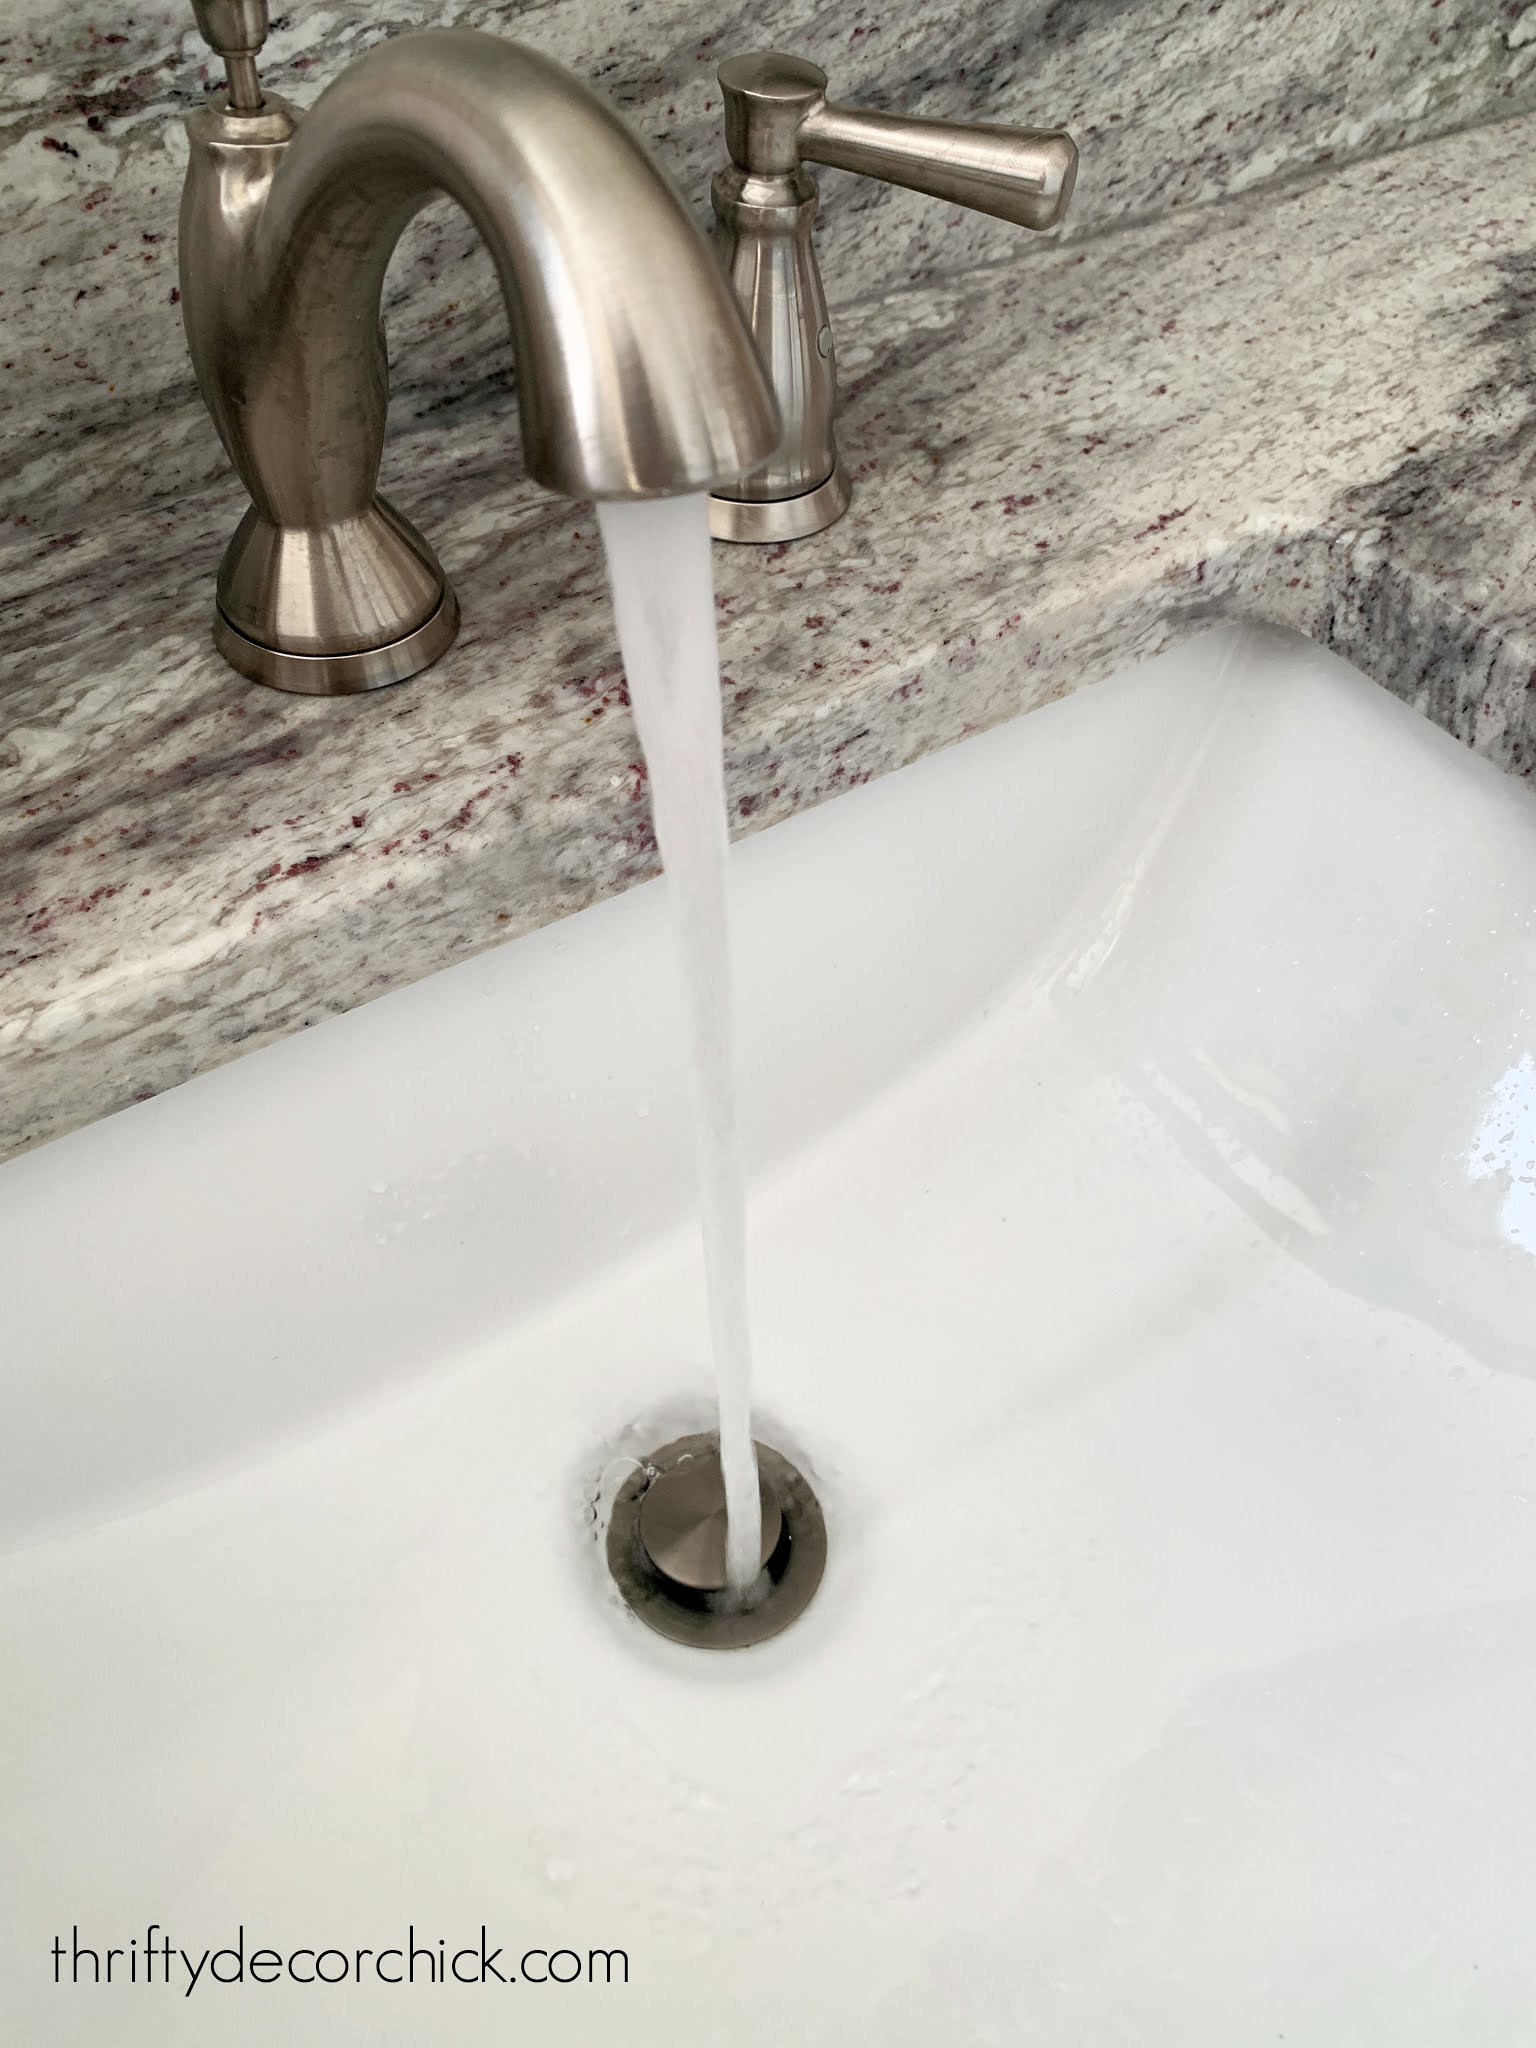
And there you go...a clean drain that lets water move freely:
This plastic tool will work on bathtub and shower drains as well.
I would not recommend using this on a kitchen sink with a disposal.
Things to consider when using either drain cleaning method:
There you go! The easiest ways to clear kitchen and bathroom drains in seconds and with very little expense! Most of the time there is no need to use harmful chemicals to clean out your sink drains and pipes.
**The Zip it brand drain tool is my favorite, but this option comes with even more -- you can keep one at each sink!
**This pop up cover prevents hair from going down tub drains and this one is great for shower drains.
Have you tried either of these methods for your clogged sinks?
See more of our home here.
To shop items in our home, click here!
Never miss a post by signing up to get posts via email.
Via https://www.thriftydecorchick.com/2021/07/two-easy-hacks-to-clear-backed-up-drains.html Easy trick for removing a broken Command strip!
I have a super quick tip to remove broken 3M Command strips that I have found very helpful over the years! I find most of the time when I go to remove a Command hook, the sticky strip breaks at just the right part so that I can't pull on it anymore. This easy fix allows you to remove the wall or window hooks without access to the tab.
I use the Command strips often, especially at the holidays. They are awesome! But when it comes to removing them from the wall, I start pulling and grimacing because I'm SURE the hook is going to break free and snap back at my face.
When I do that I end up breaking the tab. It snaps off just under the hook and then I'm left with the hook and the sticky stuff still on the wall (or window) and no way to get it off:

This post may contain affiliate links for your convenience.
See my policies and disclosure page for more information.
The thing is, you can't just pull this off -- at least on a wall. It will pull your drywall off (I tell you this from personal experience) and leave a nice little spot to repaint or patch. On a window or mirror you'll need some leverage to get it to pop off, and you risk scratching the surface.
This is my easy Command strip removal method and it works every time! I'm guessing you'll have what you need in the bathroom.
Just grab some dental floss:

I mean, we have lots of this stuff from the dentist right? Ours seem to multiply. If you need one let me know. :)
Cut off a decent length of dental floss so you can grip it well on both ends. Moving it back and forth, wedge the floss behind the plastic part -- if you can get it behind the sticky stuff, that's great! If not it will still work:

Wiggle it down behind until it reaches the bottom. Your hook will come right off!
If your hook is really stuck your floss may break -- sometimes I have to use a couple pieces, sometimes one does the trick. If you have fishing wire that also works great for removing stuck Command strips!
Sometimes the sticky part may still be left on the surface. On the wall I find it peels right off without damage when you can pull up a corner and peel it off. Work slowly and it will probably come off easily.
On this window it wasn't as easy with the heat baking it on for, ahem…a few months:

If it's SUPER stuck to mirror or glass, grab a straight razor/scraper and clean the residue off with that. Most of mine came off and I used some Goo Gone to get the rest.
It's just silly how easy it is to do this and now I am free to cringe away when I remove Command hooks around the house -- because I now know how to get them off without damage.
Here's an image to pin this and save for later if you'd like:

I love quick and easy tips like this so I like to share them with you! It is entirely possible I'm the only person with the irrational fear of the sticky tape so maybe I'm the only one who needs this. Ha! Wouldn't be the first time.
You can read all of my helpful household solutions and tips here!
To shop items in our home, click here!
Never miss a post by signing up to get posts via email.
Via https://www.thriftydecorchick.com/2015/06/quick-tip-command-strips.html |

