A modern teen boy bedroom makeover with personal touches.
These updates to our son's bedroom were a long time coming! I've been half way done with his room for years.
Our son is so easy going, he liked it as it was. But recently it hit me like a ton of bricks that he will only be here at home with us for a few more years. THREE to be exact.
HOW did that happen so quickly??
Many of you have been reading this blog since the beginning and remember our boy as a little one. He still had his apple green striped nursery when I started blogging!
It was after my mini meltdown that I moved into gear to update his space into a room fit for a teenager. We talked about what he wanted and decided a few of things needed to be updated to get rid of the little kid vibes. :)
When we moved into our home four+ years ago, we set up his room with a lot of items from our last house, including his cute red, white and blue bedding:

This post may contain affiliate links for your convenience.
See my policies and disclosure page for more information.
That was from Pottery Barn and I don't think the duvet cover or quilt set is still available.
It was time to get something a little more age appropriate for a 15-year-old. :)
The Billy bookcase shelves create plenty of storage for displaying his collectibles. We later added doors to the bottom half of the bookcases to clean it up a little.
I had a plan in mind for that space between the bookcases, and it started with a couple DIY project like this do-it-yourself dark blue tufted headboard.
Then I added some simple and inexpensive shiplap behind and a header along the top:

Via https://www.thriftydecorchick.com/2022/04/our-teen-boy-bedroom-makeover-reveal.html
0 Comments
How to make an easy and large sliding Lego or puzzle tray!
This flat DIY Lego tray also works GREAT for puzzles and games. (This is a DIY project I made years ago that we still utilize today.)
I noticed something when our son was putting Lego sets together (or playing games/toys) years ago -- he wanted to be on the floor. He rarely sat at the couch or on a chair and assembled them on large coffee tables. Since most of his sets are in the basement (and we have carpet down there), I came up with a solution that would give him a large, flat surface for Lego floor play.
(But it's also easy to place on ottomans or tables and then slid away for Lego storage later!)
I’ve made wood trays before – you just start with a base: 
This post may contain affiliate links for your convenience.
See my policies and disclosure page for more information.
I got a piece of wood from the hardware store and had them cut it down to 30 inches – I wanted it that size for a number of reasons.
A piece of mdf would work just as well, just make sure to paint or seal it before using for food or drink.
First, I wanted it HUGE so the Bub had a ton of room to play on it. I also needed the Lego tiles to fit just right and they were ten inches wide. Read the full post
I didn’t take pics of putting it together, but you can see how I made the wood tray in our last family room here: Via https://www.thriftydecorchick.com/2013/03/diy-hideaway-lego-tray.html Changing out decor and deep cleaning our pretty dining room with huge window seat.
This is the final room in my "cross it off the list" tour around our house! I've been knocking all kinds of things off my to do list over the past week -- from organizing the linen closet in our bathroom to painting a wall in our bedroom.
The lists haven't been long in each room, just little projects I've had in my head for months.
I haven't done anything major, but each room feels SO pretty and refreshed after I'm done. I've been doing a lot of deep cleaning in each space, so that probably helps. :)
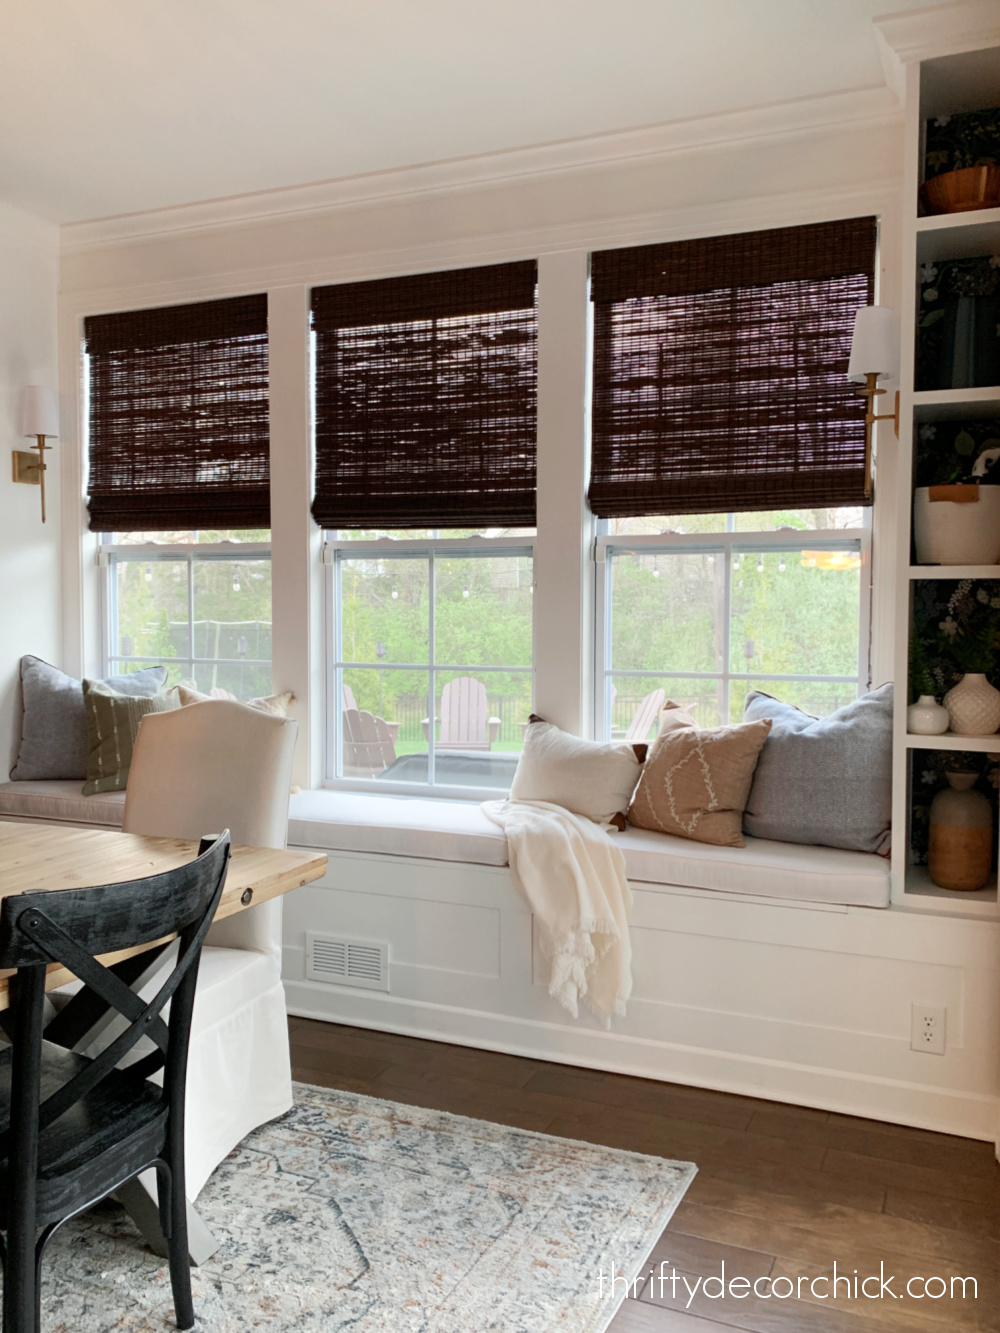
This time I worked on our dining/morning room. It's not a traditional dining room, but open to our great room and kitchen. Our builder called it a morning room and I loved that -- we have a ton of windows in there so the name is fitting:

When we built this house I had plans for a window seat in this dining area, so I had them adjust the ceiling fixture placement knowing I'd eventually add that.
When I finished it up we added simple, light covered cushions to the window seat. The covers (we did three instead of one huge one because the top of the bench opens up in two spots) are made with Sunbrella fabric. We've been super impressed with the fabric and cushions.
The best part of the Sunbrella fabric is that they are washable! I hadn't washed them since getting them a few years back, so it was time.
If you ever wash a seat or bench cushion cover, make sure to zip it up before washing, use the delicate cycle, dry on very low heat (or air dry) and then put them back on the inserts while slightly damp:

This post may contain affiliate links for your convenience.
See my policies and disclosure page for more information.
This allows some give and makes it much easier to put them back on!
If you're cover is tight, put a trash bag over the insert, then put the cover on.
The cover will slide on SO much easier. Then you can pull the trash bag out.
I got a few new pillows for the window seat -- the coral embroidered pillow, smaller floral coral one and pretty green striped pillow:
Then I moved the table and chairs off the rug and flipped it around -- I try to do this with all of our rugs at least once a year.
It evens out the wear on the rug, especially for an area like this near a door:

I love this rug! It's so pretty and holds up well to foot traffic. I think I found it at HomeGoods, but you can find this Surya Laila rug here, and another version that has the same colors here.
While I had the furniture off, I cleaned the rug as well. I told you about my awesome carpet cleaner a few years ago:

This thing is the BOMB. It's so easy to use and I love that it has a dry only option to suck all of the solution out of the rug. They dry so fast because of that!
I always feel like a disgusting slob when I clean our carpets. It's truly gross. I try to clean our rugs every six months or so, but it always looks like they haven't been cleaned in years. ?
Because this machine is so easy to set up and use, I ended up cleaning five other area rugs in our house while I was at it!
I never blogged about it, but I spray painted our dining chairs last year. I loved the wood tone of them, but we had too much of that same tone in the room and I needed some contrast!
They have held up amazingly well!:

I sprayed those with the same black paint I used on our kitchen cabinet hardware.
I gave those a good wipe down, and while I was at it, I cleaned the baseboards and wall trim as well:

Those simple trim boxes on the wall add SO much character in here!
The window pane mirror we had over the console table in here had a big crack in it (I tried to change it out, but I couldn't get the brackets off the back), so I took a large art canvas from our bedroom and tried it in that spot.
It didn't look quite right in the bedroom, but with that pretty dark blue Cyberspace walls in the dining area, it was perfect! I simplified the decor on the console table and love the "quieter" look on that wall:

I changed out the remaining framed art to these simple brass candle sconces I've had forever:

This wall could definitely handle something larger, so I'll be keeping my eye out!
Again...I didn't work on any huge projects or transformations in here, but the room feels refreshed and clean. I'm so happy with the simpler art on that wall:
The only project I didn't tackle just yet is sanding down and refinishing the wood tabletop -- I need to take the top off and do all of that outside:

I love "shopping the house" to find decor and giving things new life in different spaces!

Thanks for joining me over the past week as I shared my to do list and projects! It feels SO good to get all of these done! Have I inspired you to tackle your list? :)
Never miss a post by signing up to get posts via email.
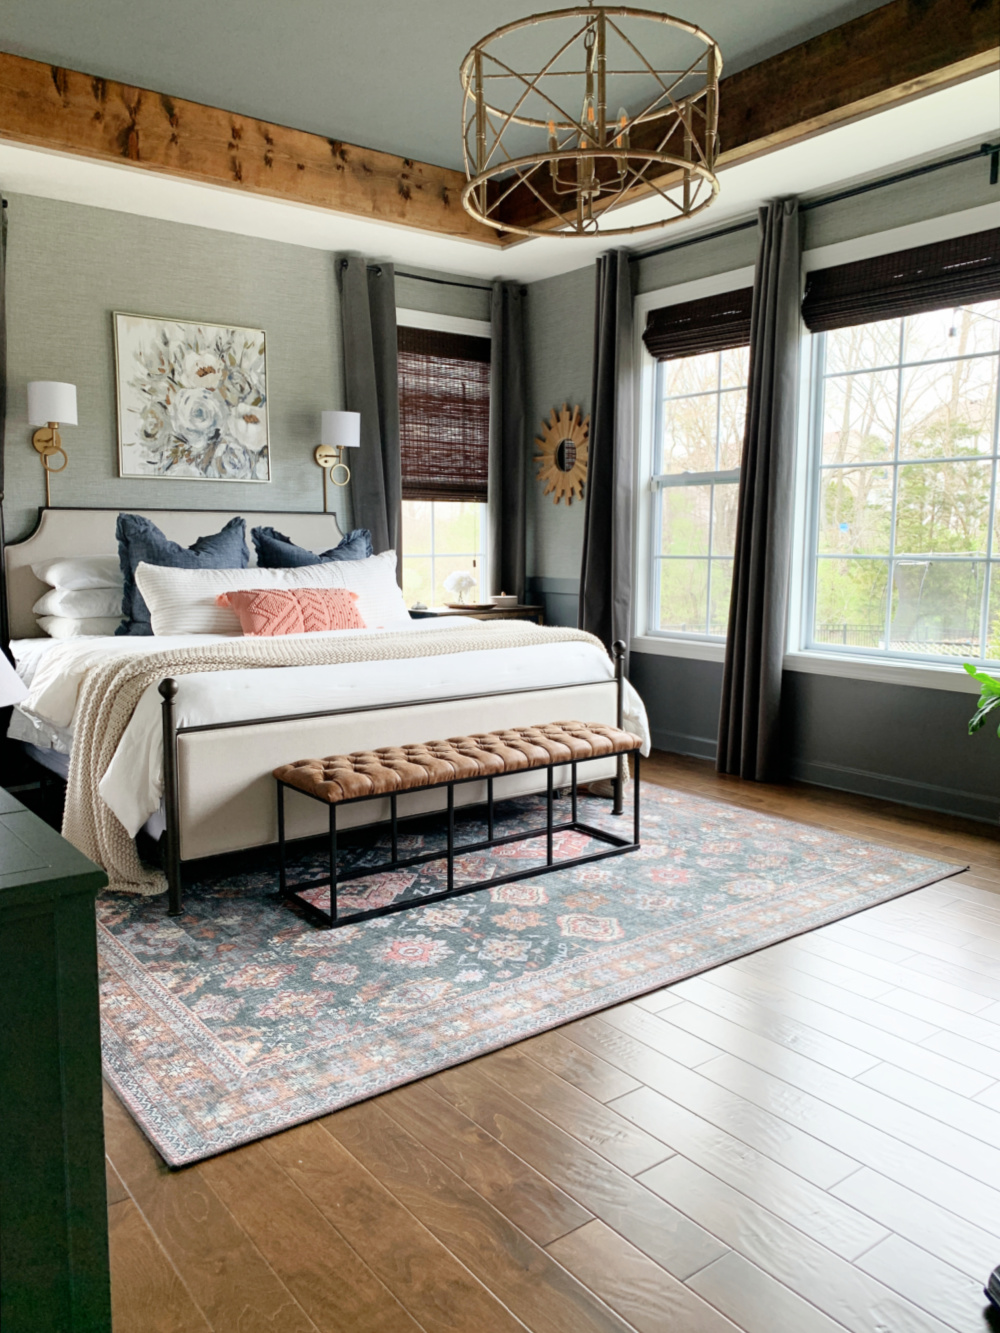
Via https://www.thriftydecorchick.com/2022/04/dining-room-with-DIY-window-seat-and-bookcases.html Crossing off the to do list in our cozy bedroom with grasscloth wallpaper and dark gray walls.
I'm continuing my get it done week -- tackling my to do lists for a bunch of rooms in the house. I shared the DIY fixes and organizing I finished in our bathroom earlier this week.
I have less than ten things on my list for each space, but I'm determined to do them well...so it's taking me forever to finish up each room. ? I thought I'd get through a room a day, but that hasn't happened yet.
Oh well...the whole point of this is to get the little things off my list that have bugged me for months (and years!), so I want to do them right.
My next project was our bedroom:
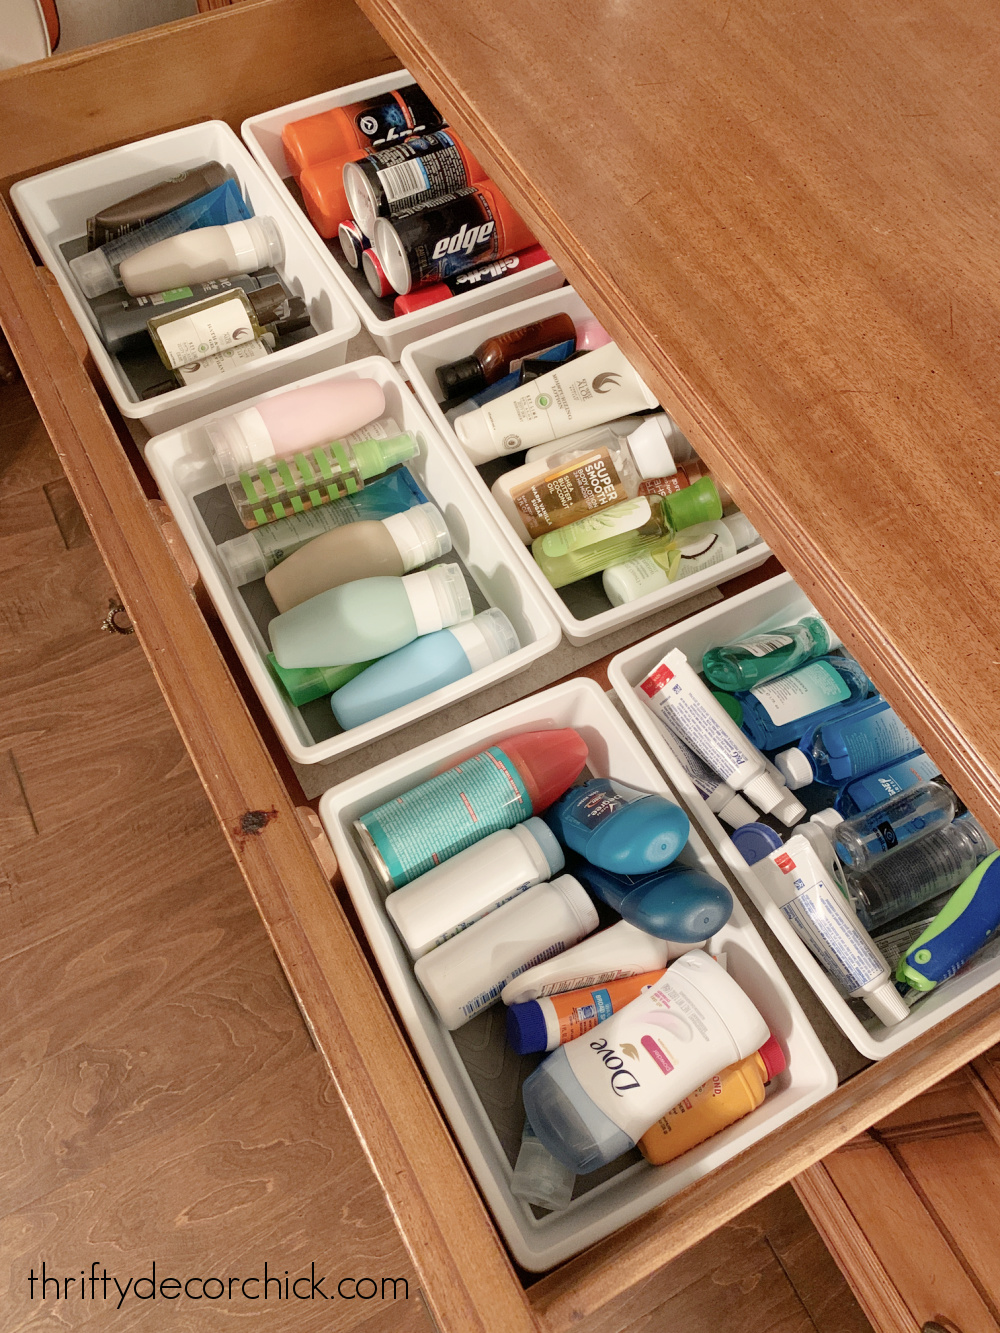
After decluttering and organizing my husband's bathroom vanity and our linen closet earlier this week, we had a ton of travel toiletries and supplies to go through. My husband used to travel a considerable amount of the year, but like so many of us, that changed for a bit!
He would go through travel items SO fast before, but then the items sat for more than a year. We had some expired stuff I tossed and a few items we don't need had piled up, so I gathered all of those to take to a local shelter.
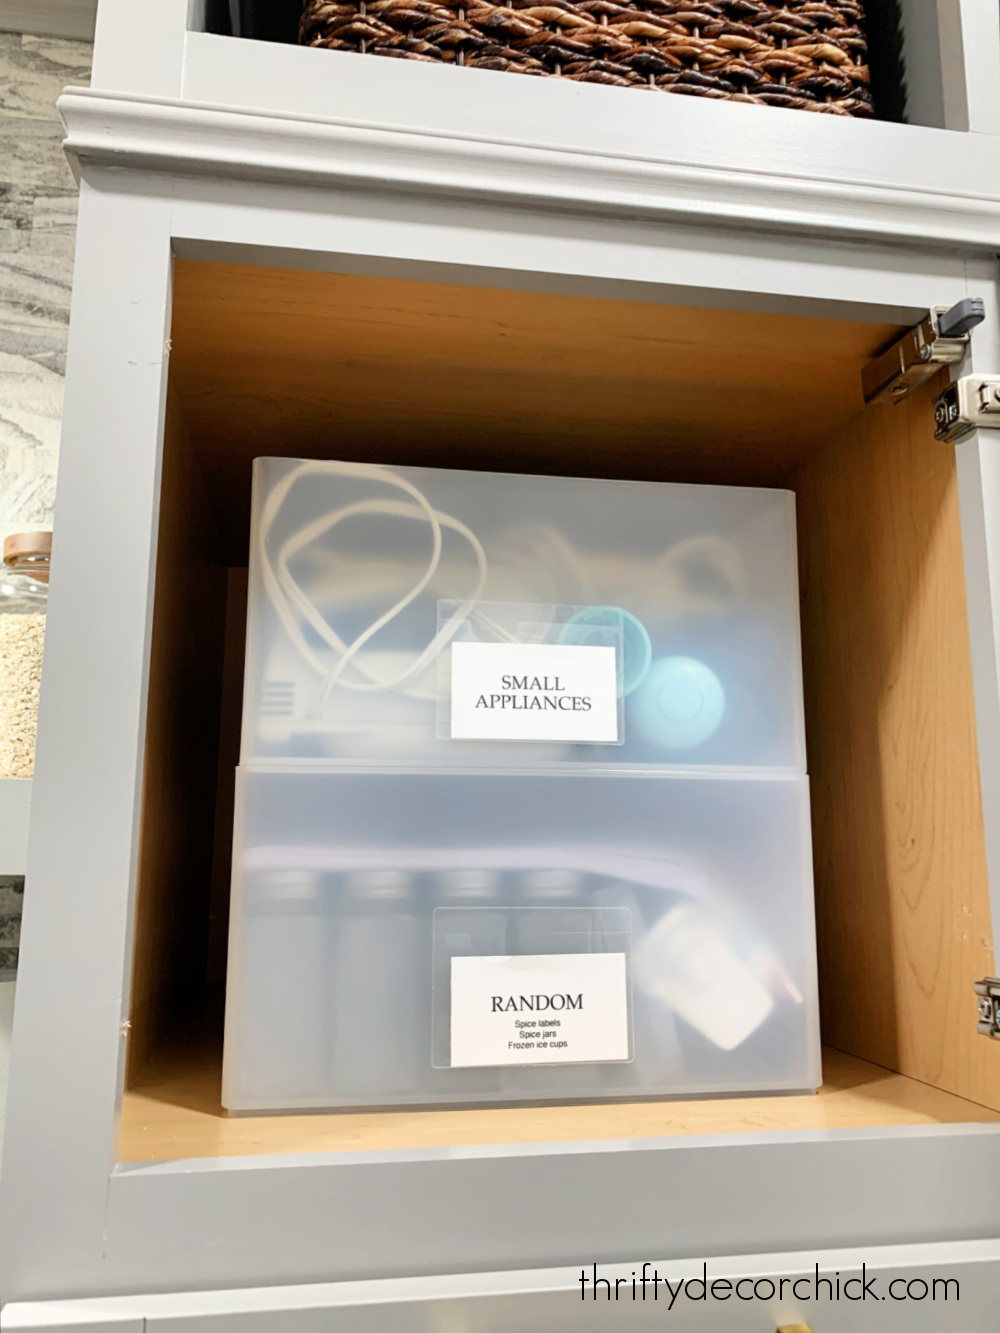
My husband is back to normal with travel now, and the drawers in our bedroom dresser hold everything he needs. I sorted like items into these plastic bins:
This post may contain affiliate links for your convenience.
See my policies and disclosure page for more information.
I sorted lotion, shampoo and conditioner, body wash, contact solution, deodorant and more in those bins. The other drawers hold all of our travel needs like bags, neck pillows and more.
It's SO nice to have everything we need in one spot! It's convenient to grab everything we need in these drawers.
I'm determined to whittle at least the lotion, shower gel and hair items down to only refillable containers. It won't take long for all of use to use these up this year.
The next couple of items on my list were DIY, and I was kicking myself for not taking care of them years ago! When I added the grasscloth wallpaper and simple chair rail in here, I forgot to finish up this one little bitty part in the corner:

That one inch piece there and then the quarter round below were a breeze to install -- it's the finishing work that takes forever. I had to lug out the nail gun, hole filler, painter's tape, caulk gun and paint to complete that little bit of molding. Sheesh!
When I "completed" the walls in this room a couple years ago, I ended at the space behind our bed. I just wanted to get the room back together and remember telling myself I'd paint behind there later...and never did:
Via https://www.thriftydecorchick.com/2022/04/cozy-grasscloth-gray-walls-bedroom.html Tackling the small do-it-yourself and decluttering projects in our bathroom!
I've deemed this the week to GET THINGS DONE.
Lately I've been tempted to start a few new DIY projects...but I've forced myself to hold off until I get some of the smaller things done that have been bugging me for months.
You know those little things you notice over time and think "I've really got to get to this" -- that's what I'm talking about!
A couple months ago I made a "punch list" of DIY projects and organization problem areas for a few of the rooms in our house. I've been checking things off here and there over the past few weeks.
But I decided THIS is the week to get as much as I can done. I'm taking you along for the process in some of the rooms -- I figure you might learn something new or get inspired to do the same!
These posts won't have the prettiest photos I've ever shared, but this is the real life stuff that all of us deal with!
The first room I tackled was our ensuite bathroom. We had a couple of cluttered areas to address and some smaller DIY projects to complete.

First up...I started under my husband's bathroom sink. Dun-dun-dunnnnn.
It was a mess. Between work and travel, he just doesn't have the time to address problem areas like I do. And he doesn't find organizing fun either...SO weird:

This post may contain affiliate links for your convenience.
See my policies and disclosure page for more information.
We hadn't touched this spot since moving in, so it just grew and grew.
Most of it was travel stuff that he would throw under between trips. The man never complains one bit about spaces like this and I knew I could make this work better for him!
I pulled everything out so we could see what we were working with. I sorted like items together and then he went through and decided what to keep (which was most of it):

As you can see, the travel pile was our biggest obstacle. The good thing is, most of this doesn't go in here. :) I'll share where we keep that later this week.
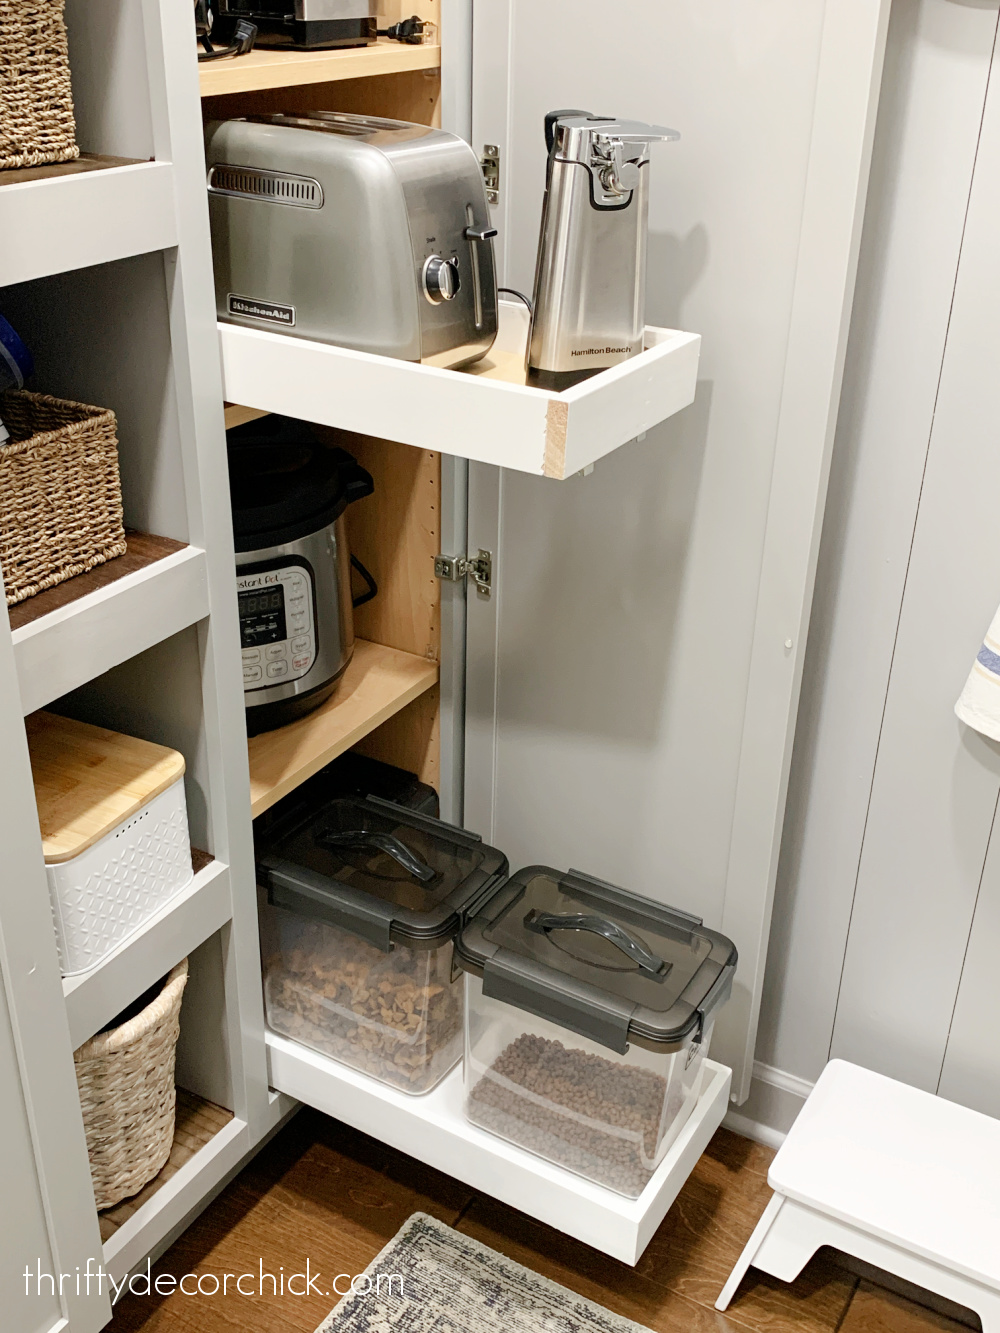
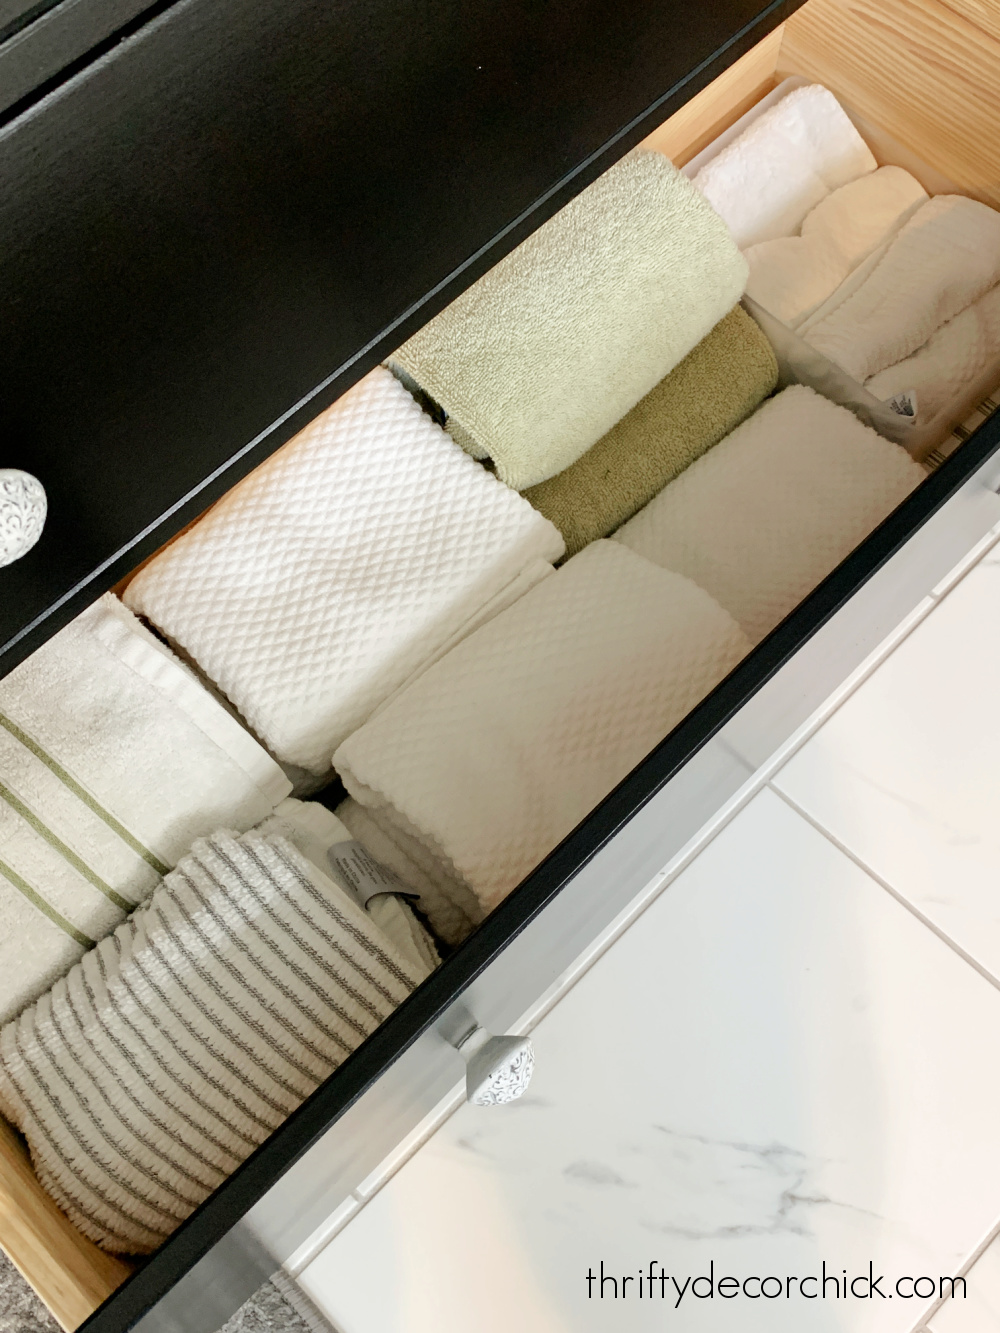
This vanity decluttering went hand and hand with a little refresh in our linen closet. I organized it a few years ago, but it was in need of some upkeep. Most of the items from under the sink went into the plastic bins in here:

Toiletries like shaving products, lotion, nail polish, contacts, makeup and more are sorted in those IKEA bins. I also keep our iron in this closet since the ironing board is tucked away in my closet.
We keep almost all of our toiletries in here since our vanities don't hold much.
After I got everything where it needed to go in the closet, I vacuumed and cleaned out under the sink and then put just a few items back that my husband wanted easy access to:
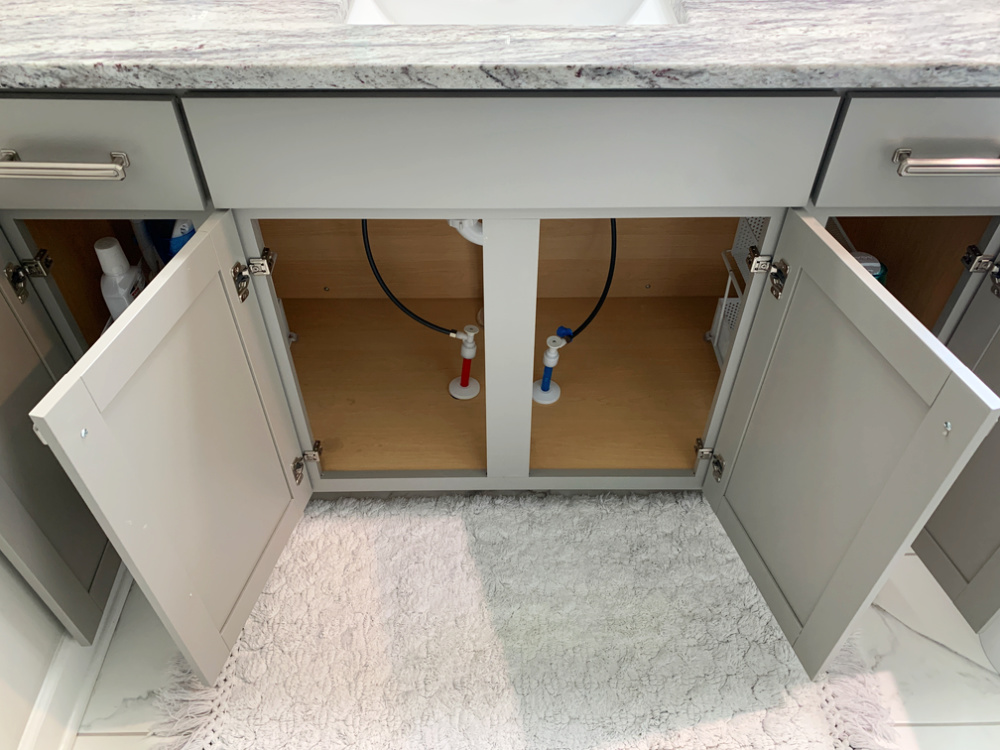
Well...you can't really see here, but on the sides we have these awesome under the sink pull out drawers I found a couple years ago. The storage in these vanities is the woooooorst and those metal units have made the under sink area so much more useful.
See how the plumbing is placed in the middle? I know they had to do that because of the exterior wall behind, but man...just a couple inches back would have been GREAT. :)
I recently shared this inexpensive IKEA under cabinet storage option as well! We use that under our kitchen sink.
While I was in the organizing mood, I worked on touching up a few things in our two-toned IKEA linen cabinet:

This is one of my favorite furniture makeovers ever...I love the wood tone inside and the pretty white knobs contrasting the black paint.
I sorted through everything and placed some items we reach for more often into these pretty rattan baskets with lids. This pretty cabinet provides tons of extra storage space -- perfect for all the towels!:
Once the decluttering was done...the tools came out! First up, I hung that art above the cabinet (that used to hang above our bed).
When I took down our towel rod shortly after moving in, I hung three hooks in it's place. (I so wish I had told our builder not to install the rods -- we prefer hooks for towels.) I didn't use anchors at the time and they just recently started to wiggle a bit
So I took those down and added anchors into the existing holes. You can see here that I placed the hooks right over the big anchors that were used for the towel rod:

No more wiggle!
Next on my DIY list was to replace the mismatched DIY rectangle mirrors we had over the vanities with round, brass versions that used to hang in our family room.
I used this great painter's tape trick to hang the mirrors:

It works so well -- perfect for art or mirrors with two hooks on the back!
Our bathroom is FULL of rectangles and hard edges...the vanities, the tile, the tub...almost everything. The soft circles and thin brass frames lightened up this room considerably:

I love them in here! They helped to warm up this whole space -- the difference was more noticeable than I thought it would be. (Our round mirrors were HomeGoods finds, but these are the same size and color.)
Throughout this whole process I cleaned up some areas I hadn't touched in a while -- the top of the IKEA cabinet (gross) and the inside, front and sides of both vanities. I also took the glass covers off the light fixtures and gave those a good cleaning.
The to do list for this space is now crossed off and it feels so good! I have big plans for our bathroom...someday. For now we love how spacious and bright our bathroom is!:

See how to make this simple spa ledge for the bathroom here:

I'll be back with more small projects I'm working on this week. I can't wait to get these done so I can start my next big one! ?
Do you have a running list of small to do items that you never get to like me?
Never miss a post by signing up to get posts via email.
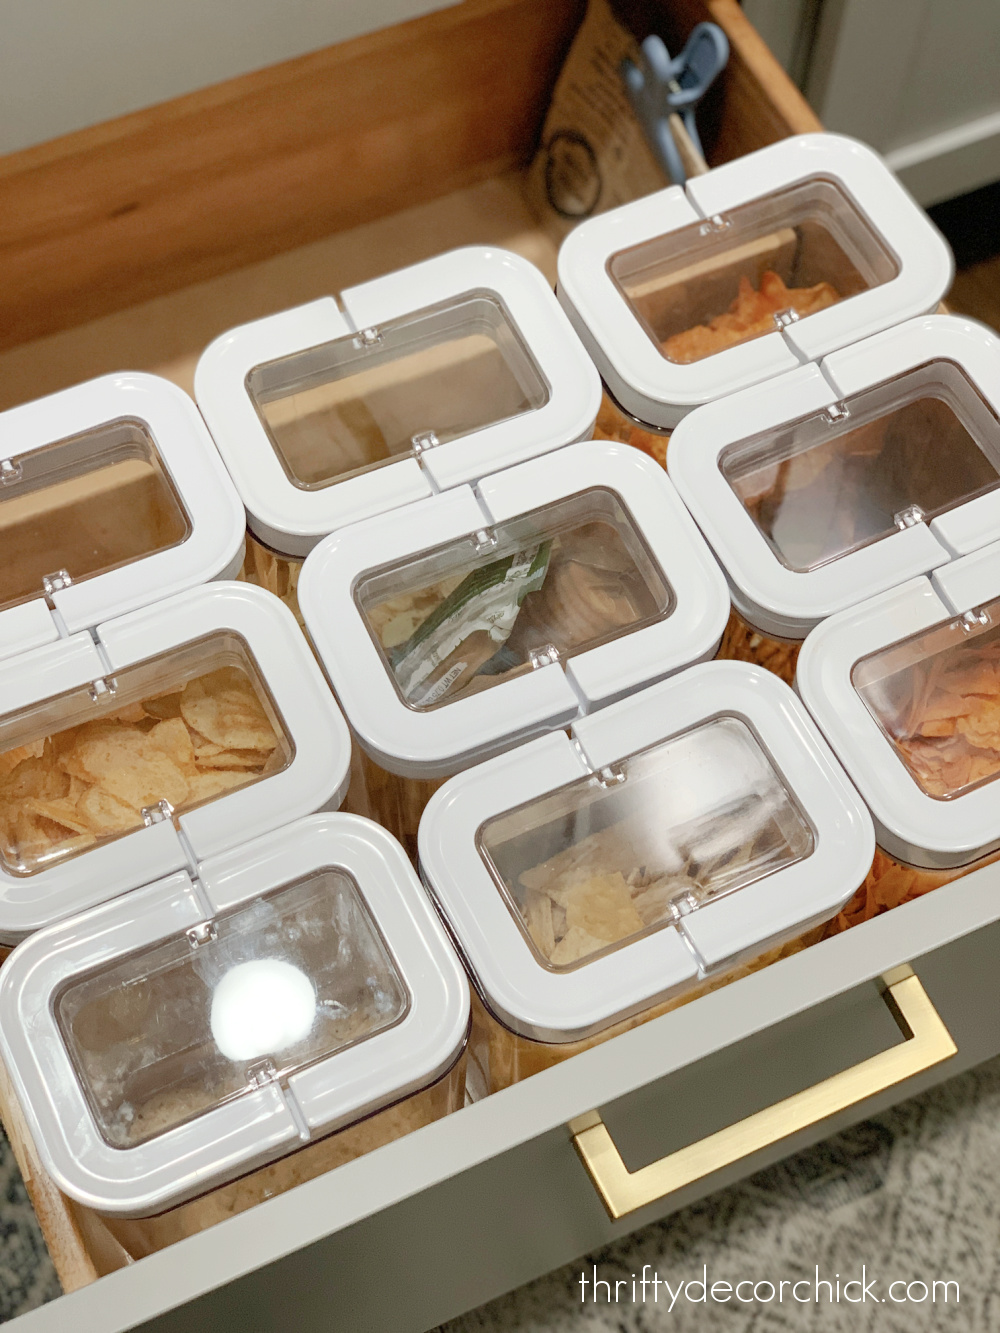
Via https://www.thriftydecorchick.com/2022/04/tackling-the-DIY-bathroom-to-do-list.html Three easy ways to use up the last little bit of SO many items in your home!
I really hate throwing away unused product or food. It's one of my things...and probably stems from the "clean plate club" mindset I still fight in my head as an adult. ;)
It just bugs me to let things go to waste...I used to tear containers apart just to get the last little bit of lotion inside. (Have you seen how much is left in there?)
Over the years I've found some really easy ways to use up every little bit of food, toiletries and even candles...and am sharing a few today!
Mini spatulas for food, condiments and toiletries.
The first item is such a great little gadget and it's helpful for ALL kinds of things! These tiny little scrapers help to get a lot more use out of so many items:

This post may contain affiliate links for your convenience.
See my policies and disclosure page for more information.
These baby spatulas are too cute and so useful! The larger one has a really long handle and a larger (mini) spatula, and is ideal for getting all of the food out of jars.
It's great for food in jars or cans...like the sticky peanut butter that holds onto the sides and deep corners:

The jars look like you licked them clean when you use this little doodad! (They also come in a gray/aqua version if pink isn't your thing.)
The smaller spatula is perfect for smaller containers like lotions and creams. One of the only beauty items I splurge on is this eye cream, because it works and a little goes a long way.
When the pumper stops working, I know there's plenty still left in there:

I use the little spatula to dig the remaining cream out of the lid and bottle. I can get another week or two out of the product. (And I use this twice a day!)
I LOVE these cute baby spatulas! They have proven to be super helpful around the house.
These can be used for digging out everything from lipstick and foundation to jelly and coconut oil.
|