|
Hello my friends! I hope you're doing well and staying healthy.
Yesterday I dug out my bin of Easter and spring decor and realized I had forgotten about some really cute stuff! I haven't decorated with themey stuff like bunnies and eggs for a few years, but if there was ever time to bring them out, this is it! I have to tell you, it made me so happy to decorate with the fun decor and colors. It brought me a lot of joy to add little touches throughout the house. :) I figured I'd share a little "spring tour" to give you some ideas as well. I used stuff I already had. Some of the things I don't consider spring really, but I brought them out because they felt light and pretty. You may remember my love of the simple grapevine wreath and all the different ways I use it throughout the year. I took off the Christmas decor and added the faux tulips back for this super easy spring wreath: 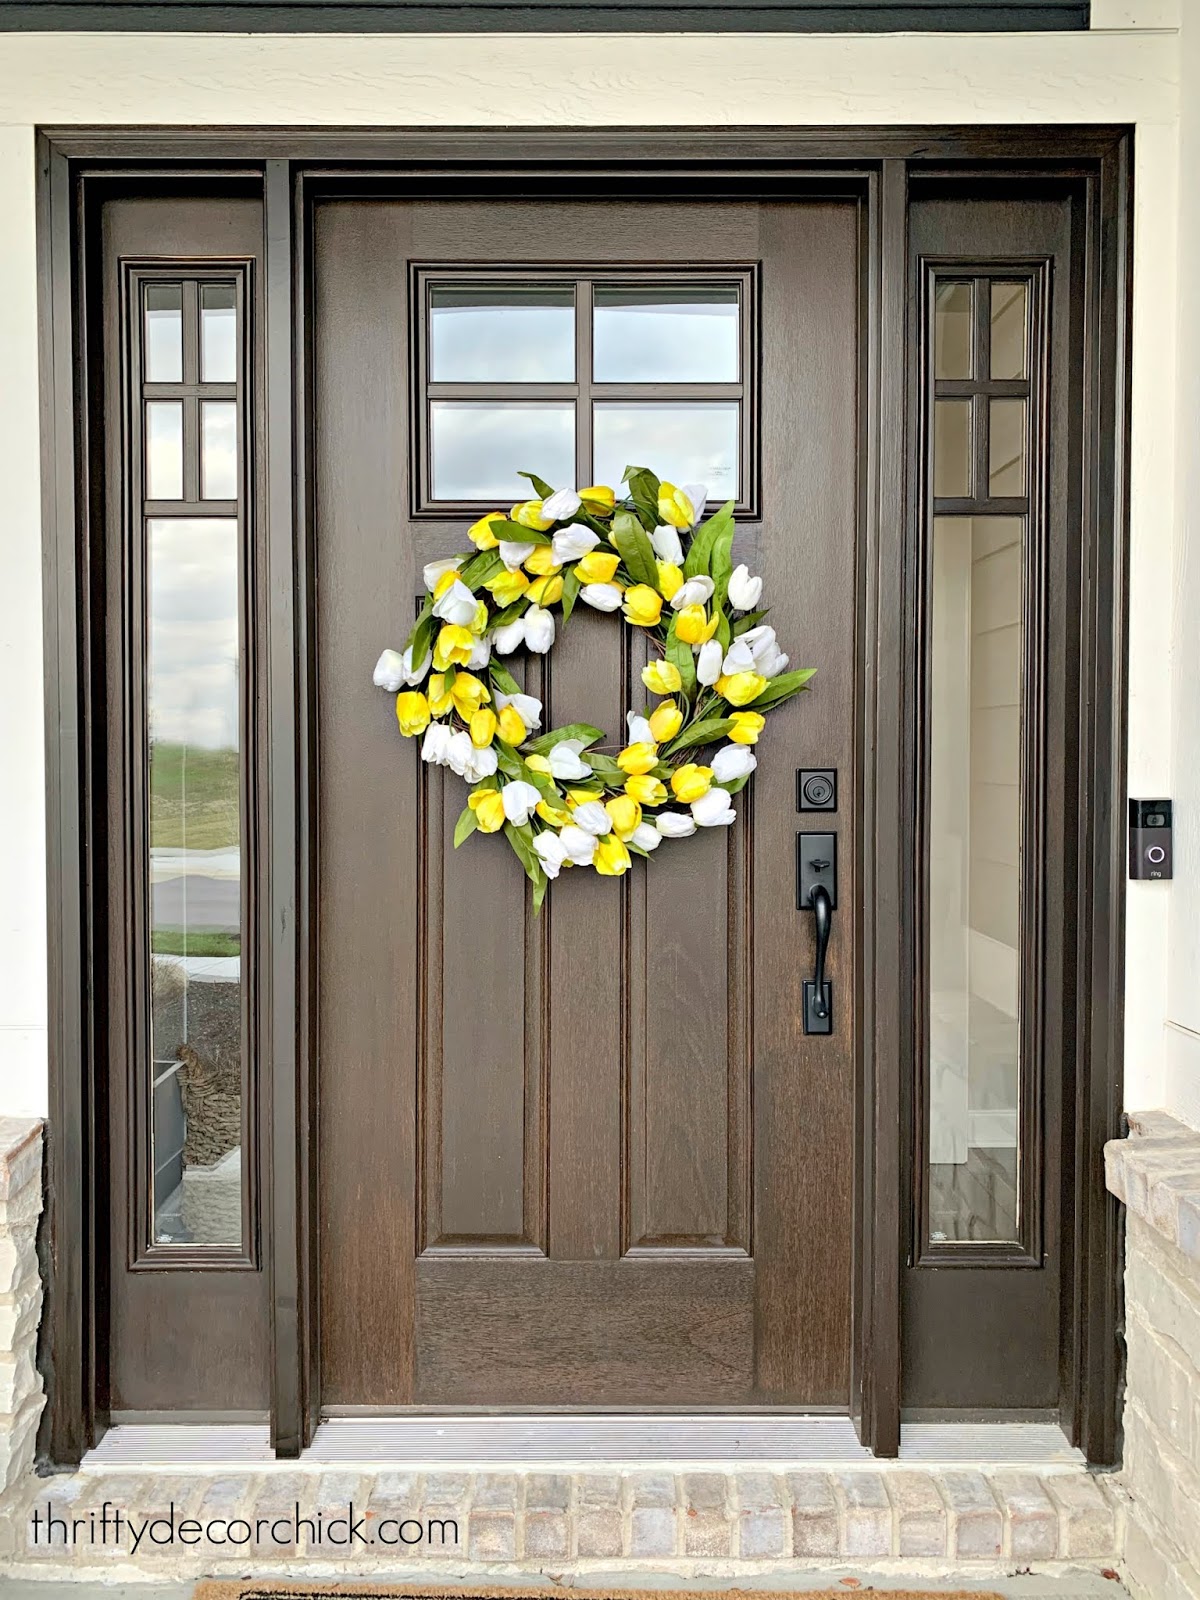
This post may contain affiliate links for your convenience.
See my policies and disclosure page for more information.
This boxwood wreath usually hangs on our pantry door, but I replaced it with an Easter version instead. I thought the boxwood would be pretty on the inside of the door and I was right: 
I think it may have to stay here! :)
I added quite a few spring touches in the kitchen -- including the open shelves:
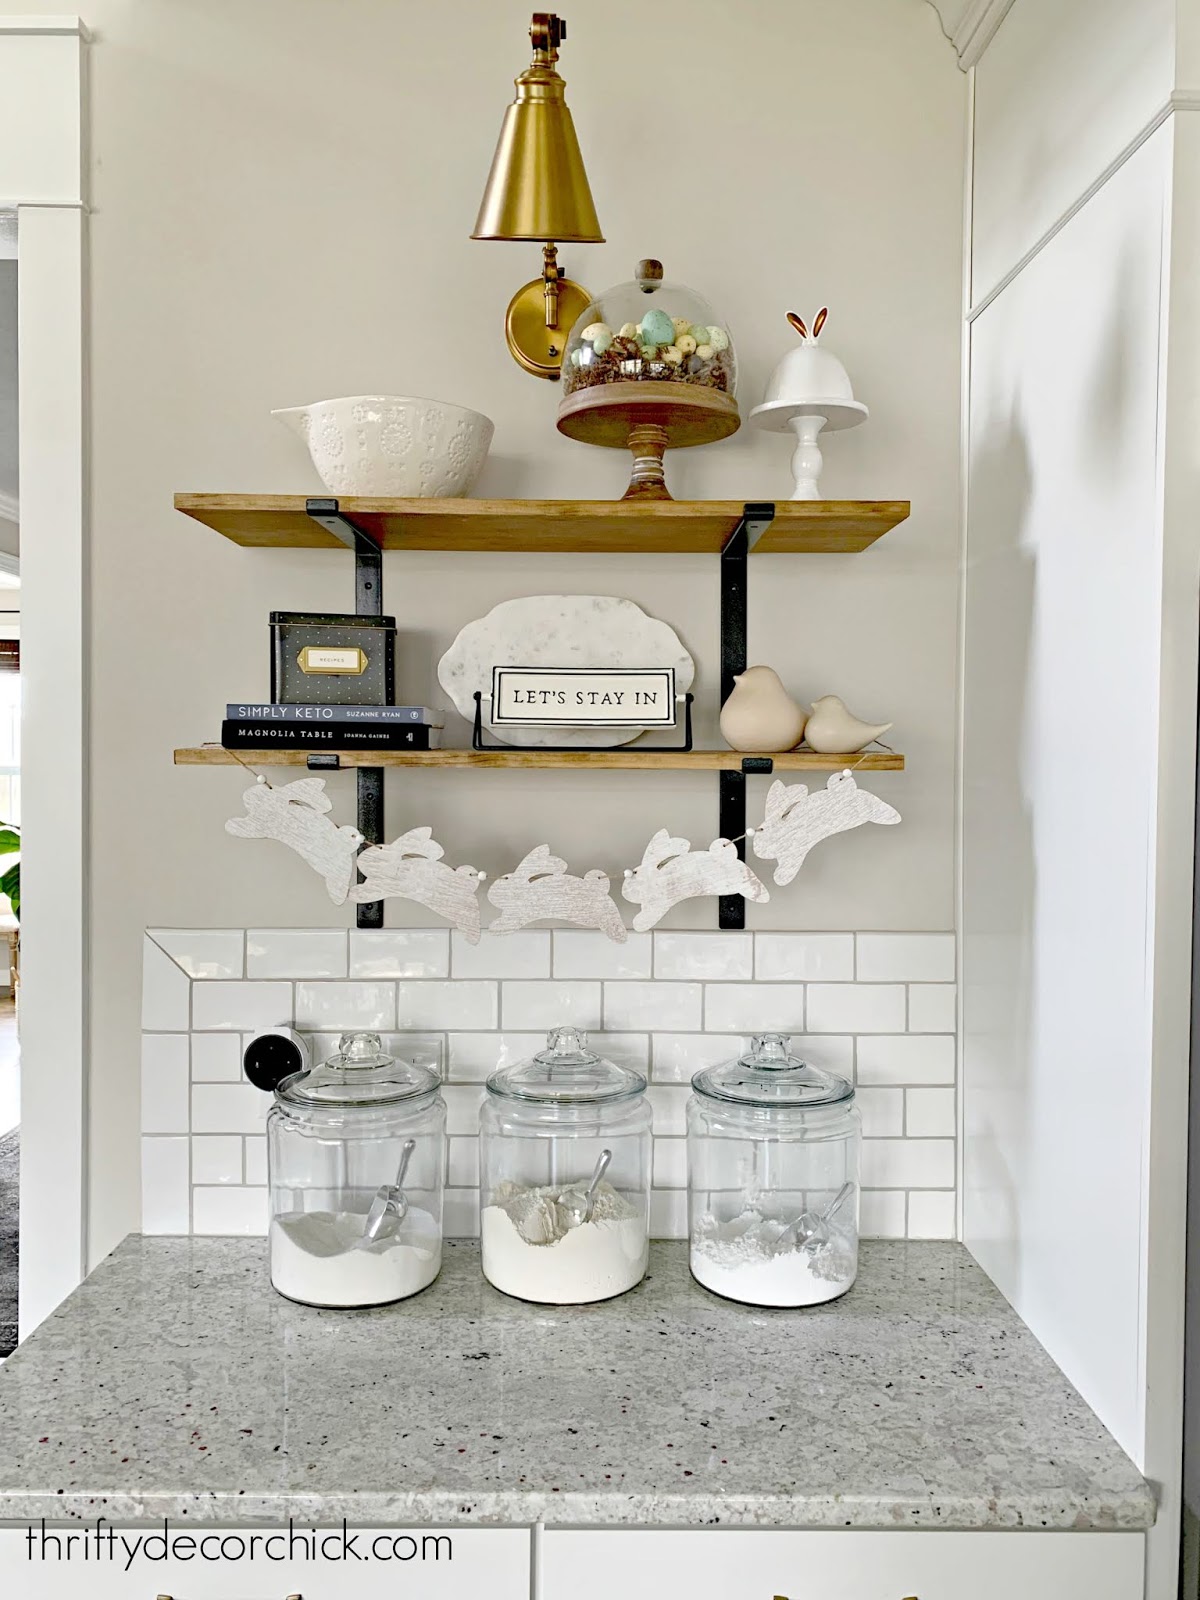
That "let's stay in" sign is perfect right now right? The other side says "let's go out" -- I wish! I had most of the spring decor, but I found the chunky ceramic birds at Joann's a couple months ago.
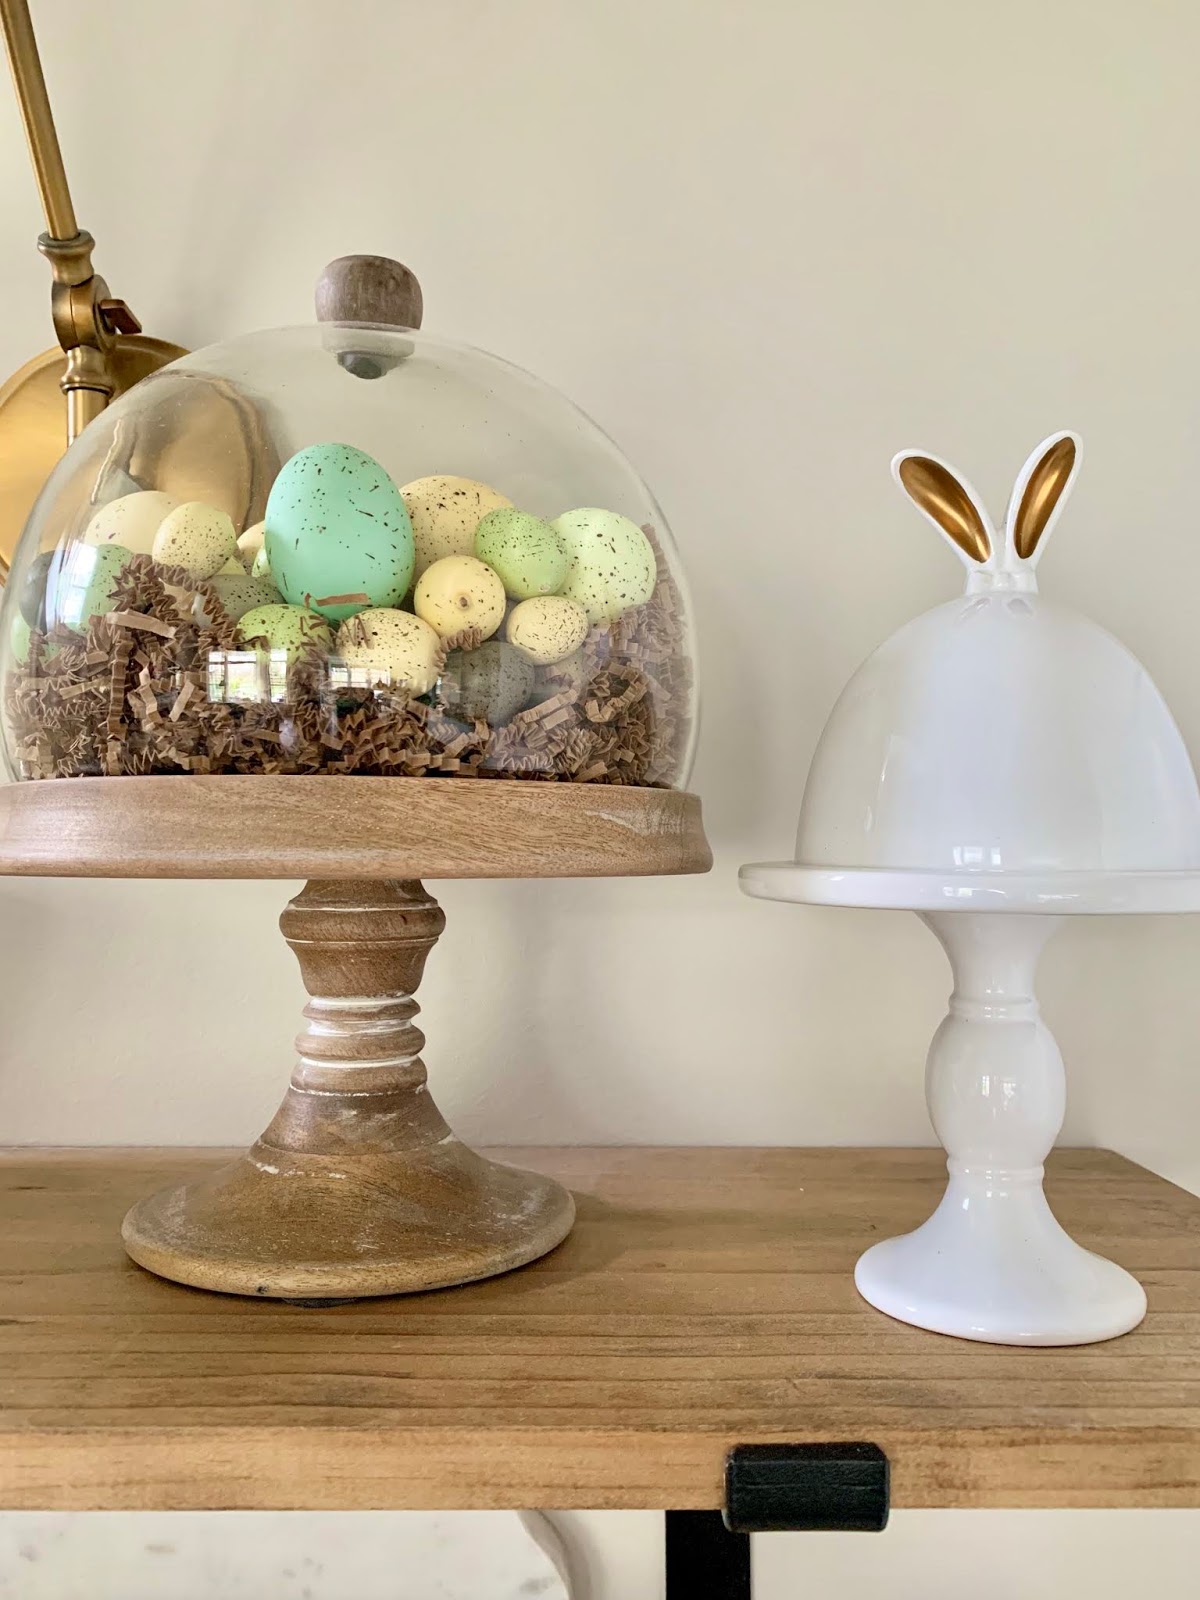
I also had the "nest" filler for the cloche, but you can use a shredder to cut up paper for the same look:
I found this hanging bunny at Joann's years ago too:

You know how I love the free printables so many lovely bloggers share for each season! I added some spring prints to my frames in the kitchen:

You can find some of my favorite free spring printables here and here.
I still love this tray that corrals all the cooking stuff on our counters:

I think that little spring sign was from the Target dollar spot. I used a 3M command hook to hang it on the tile.
I love these faux cherry blossoms I found on Amazon:
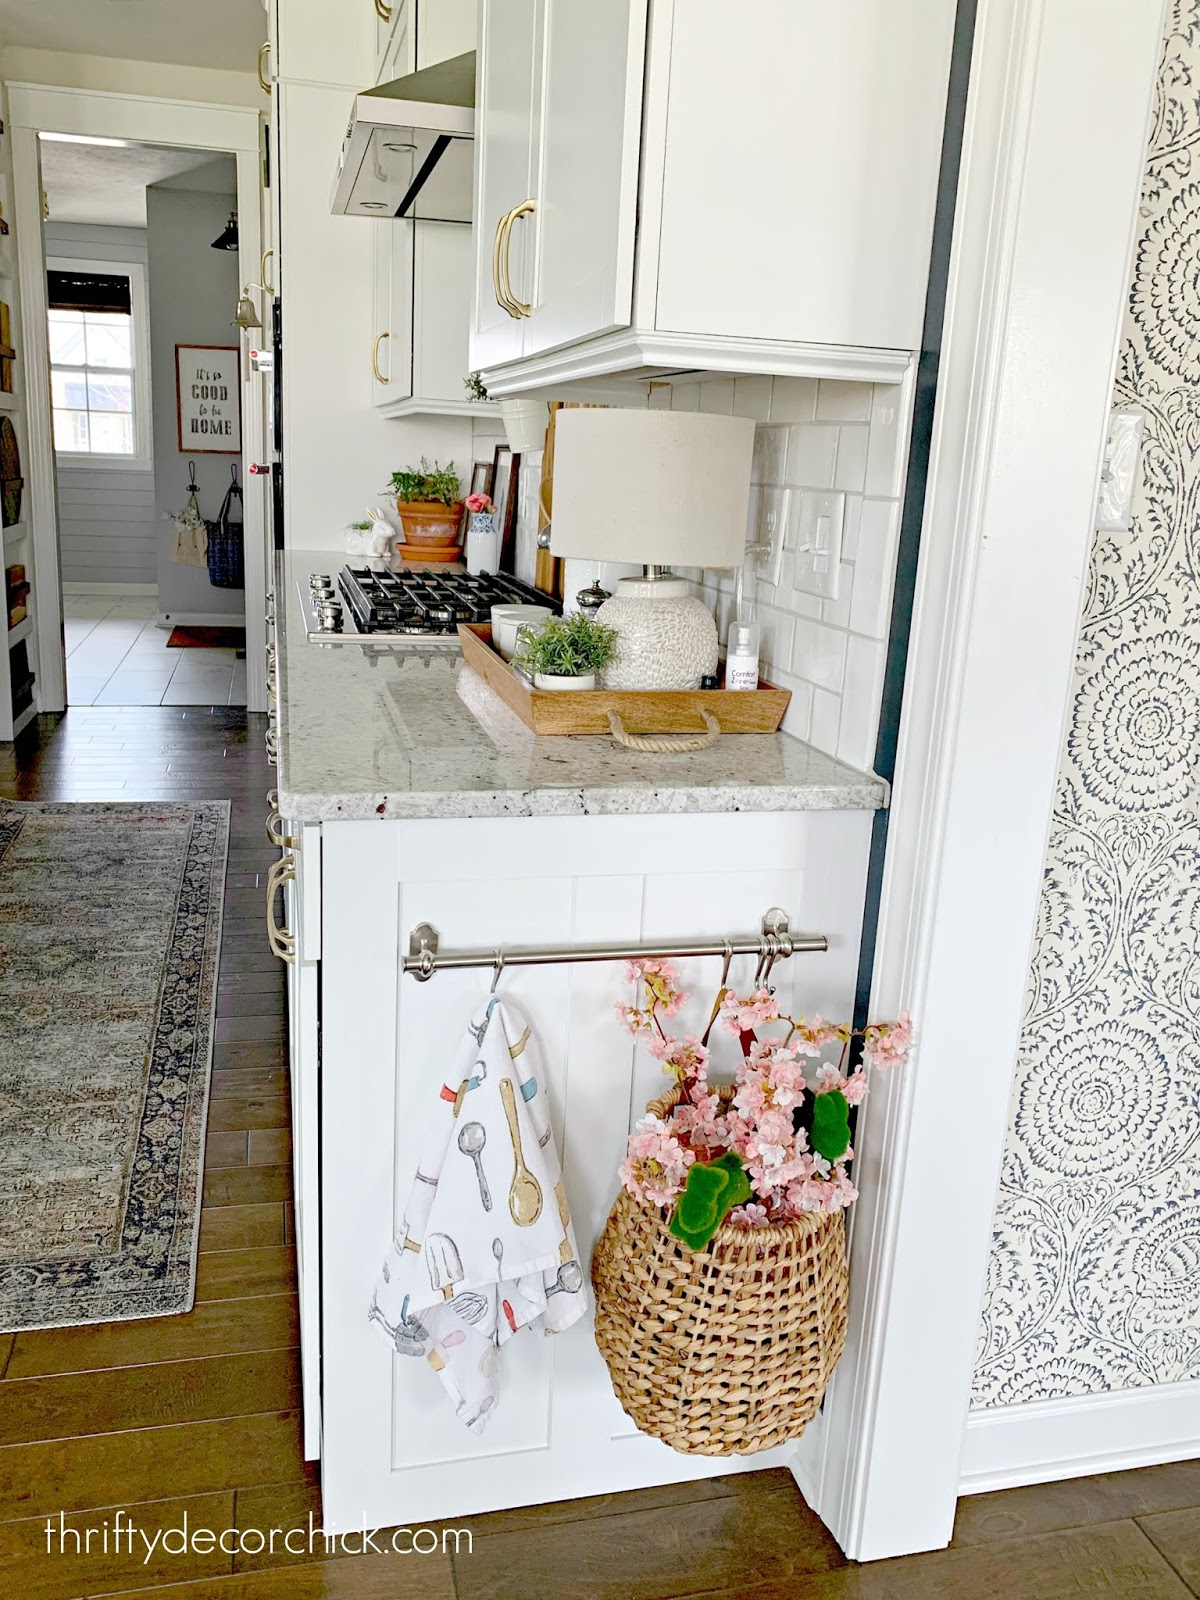
They are so full and real looking! I get asked all the time about the hanging rod and hooks -- you can find those in this finish and black at IKEA.
I got the idea of hanging this bunny bag and filling it with tulips from a friend of mine:
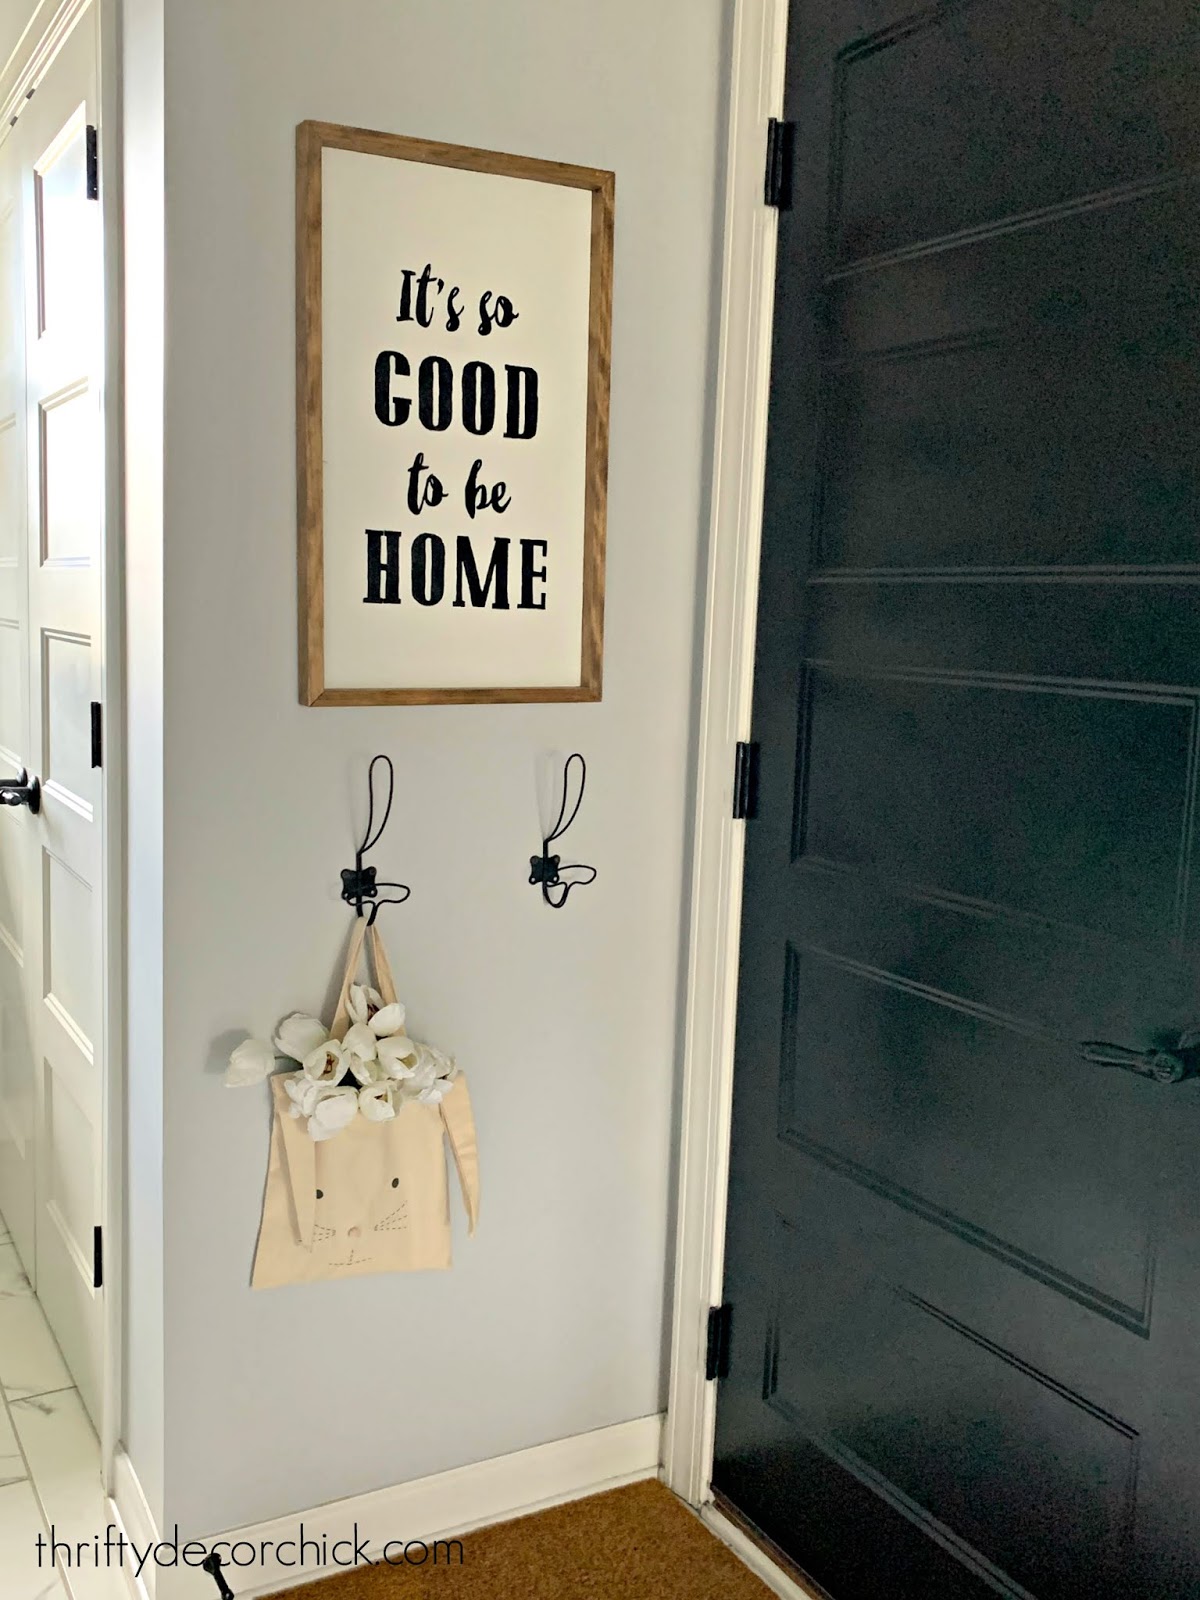
So cute! :)
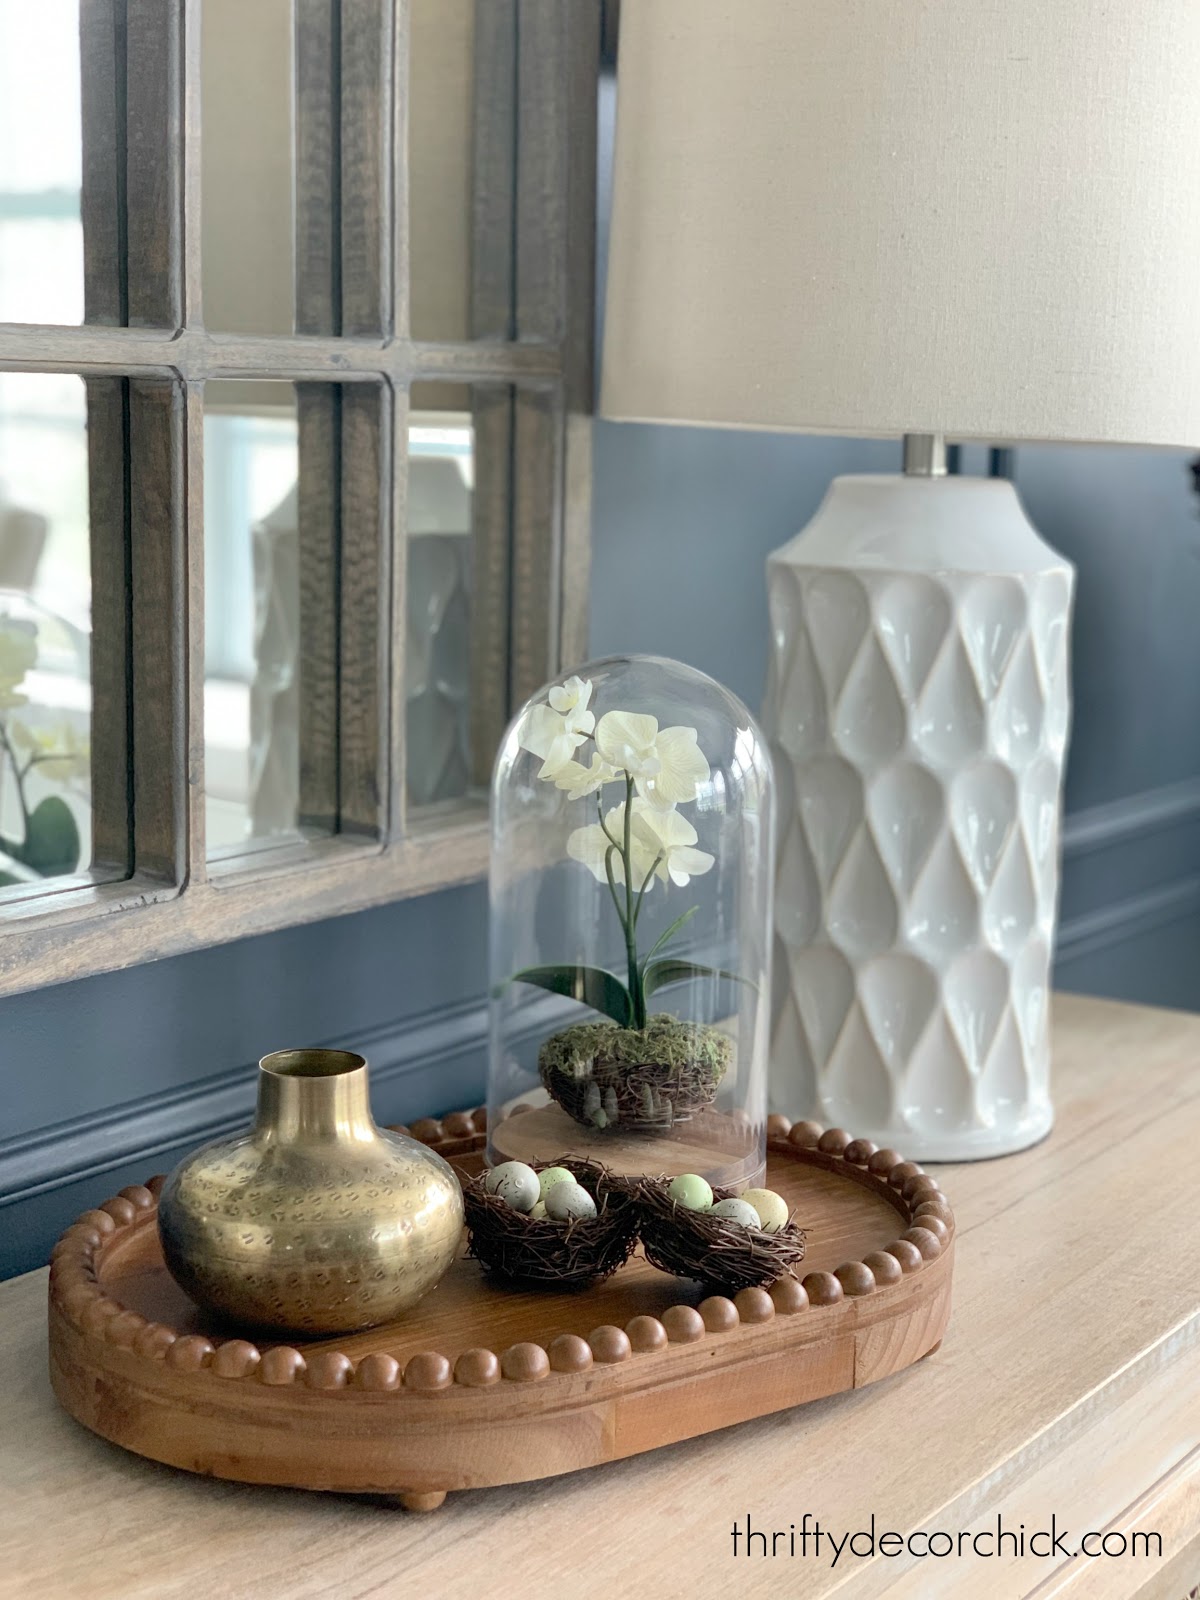
I was running out of bunny stuff ? so I started looking around my decor stash for items that felt like they fit in for spring. I've had the fake orchid for awhile and like displaying it under a cloche:
The lighter throw blankets and pillows came out as well:
You can see how I use napkins to make pillows for super cheap here.
In the family room I added the faux succulent in a little vase, along with my pretty glass beads:

And the cute bunny bunting brings some cheer to the family room:
It was so fun to pull all of this out. For some reason I haven't used a lot of it in the past few years, but as I said, this year it felt so right. Your spring decor doesn't have to be bunny rabbits...just adding in some lighter tones and flowers (real or faux) may brighten your mood like it did mine! Here are a few of the items pictured if you're wondering where to find them!:  See more of our home here. To shop items in our home, click here! Never miss a post by signing up to get posts via email. Via https://www.thriftydecorchick.com/2020/03/a-sweet-little-spring-home-tour.html
0 Comments
Hello friends! Hope you're doing well in this crazy time. My husband and I both work from home, so this hasn't changed our day routines too much! But with our son out of school, we do have a bit more free time than usual.
I've been trying to focus on completing little projects I've been putting off forever. It got me thinking of some of the DIY/home projects that could be done with what you might have at home already. If so many of us are home more than usual, so let's take advantage of it, right? I gathered a list of ten home projects to work on during this time at home all day! 1. Spray paint something OK, you may not have the big spray paint stash I do, but even if you just have the basic black and white (you can order it online), you'd be surprised at how much you can change things up! This mirror used to have a wood frame and the lamps used to be shiny brass: 
This post may contain affiliate links for your convenience.
See my policies and disclosure page for more information.
I recently shared some of my favorite things I've sprayed over the years here! You can paint almost anything.
This is by far the cheapest way to change up a space. I don't do this often -- in both of our houses I've found a set up I like and stuck to it...forever. Ha! But even a simple thing like switching out chairs or tables will freshen up a space: 
Think about different layouts and changing things up. It will feel like a brand new room!
This one is a given, right? I always feel like making our storage spaces work better this time of year. This is the perfect time to get to those spots that have always driven you crazy: 
You can see two of my favorite closets in our home here and here.
4. Printable art projects You know how much I love free printables! They are basically free art -- and spring is a lovely time to add some color around the house: 
You can find Lauren's prints (pictured above) in this free spring printable round up.
You can also see how to change any photo into pretty watercolor art here:

Don't forget printing off photos and framing them too! Get the photos off your phone and create that gallery wall. :)
5. Fabric projects Have you had fabric tucked away to make those curtains or pillows? Now is the perfect time!: 
I shared how to make pillows with zippers here. If you don't have decorative fabric, you can use any fabric -- old bedding, drapes, shower curtains even!
You can make more than pillows of course. Cover a lampshade with fabric to give it new life (that is an OLD post!). Wrap your photo mats with fabric to add some color to a gallery wall. So many fun ways to add some color around the house.
6. Declutter/edit Not sure there's a better time to address the clutter. It will free up space in your home (even more important now that most of us are home more!) and it feels SO GOOD to get rid of stuff. I promise you it will lift your mood! Do you really need 150 markers?: 
The answer is no. No, you do not. :)
The key is gathering all like things together -- it makes a HUGE difference. I used the Konmari method a few years ago and have kept up with it over the years:

Decluttering is the best feeling! Clutter stresses us and makes us more anxious than we realize.
This doesn't just work with furniture! Mix things up -- try your accessories in different spots. Change up the decor on your bookshelves: 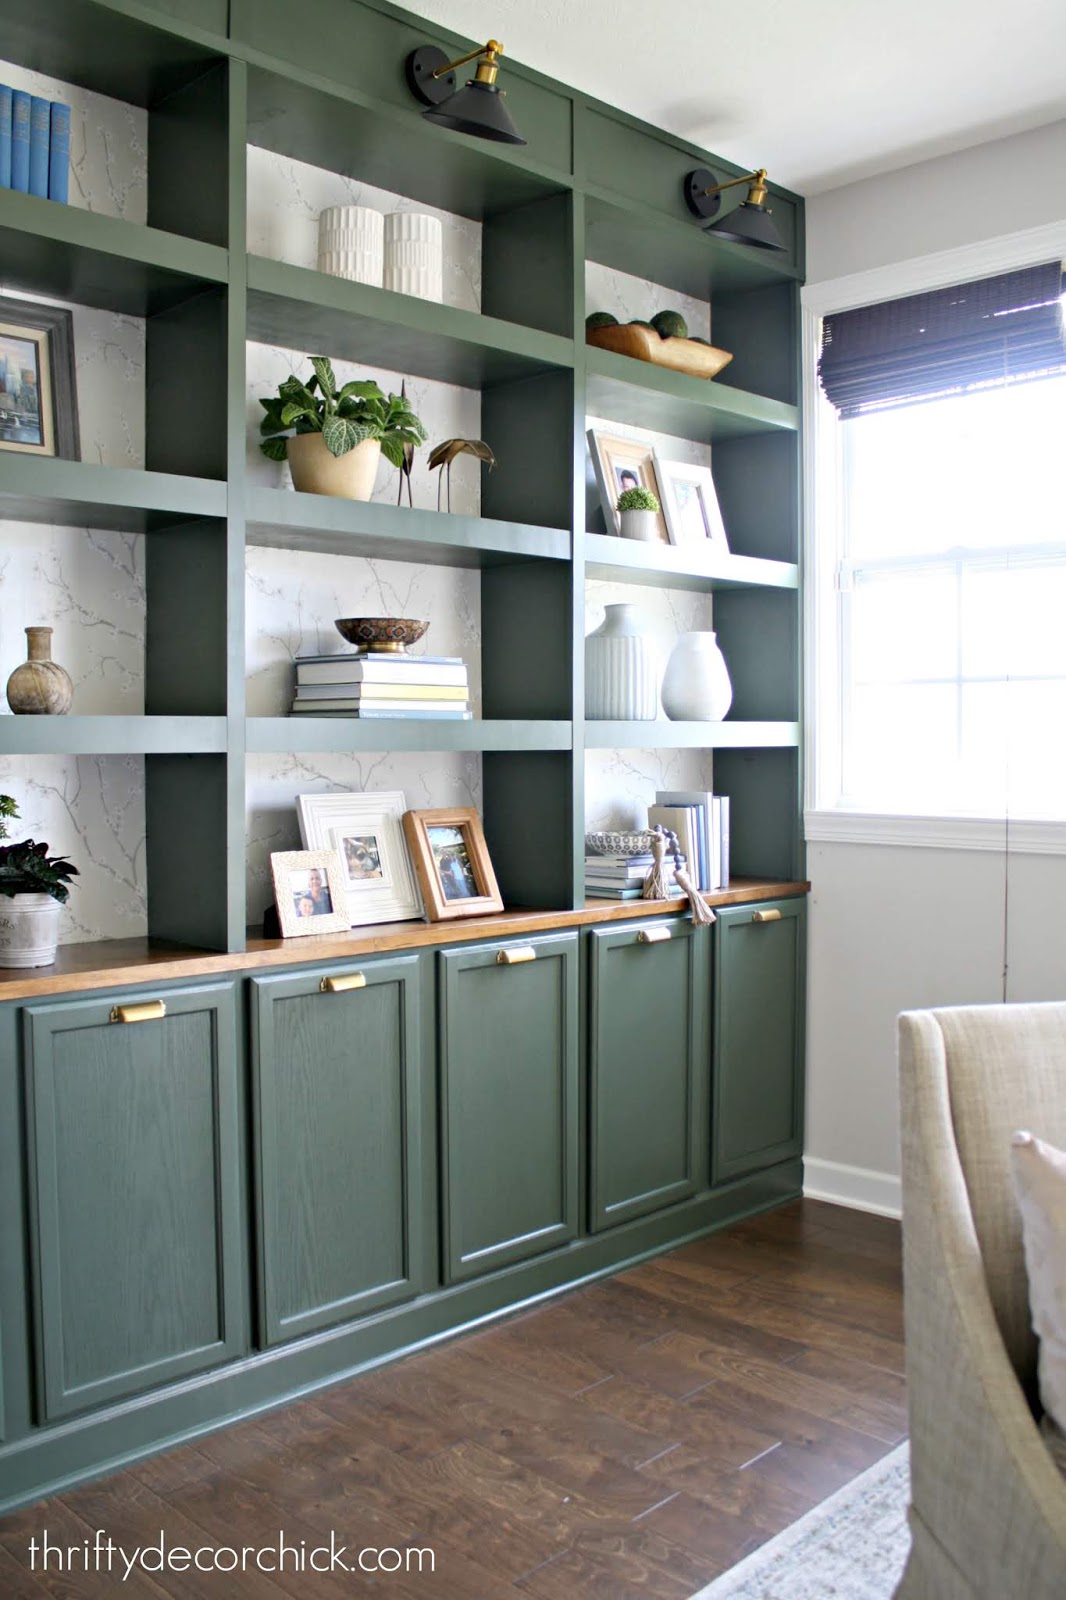
Or move art and mirrors around. Shop your house!
And don't forget that editing can make a big difference too. This is a great time to let your house "breathe" -- take a few things away and lighten things up for the spring and summer seasons. It will feel good. :)
8. Paint something Anything! Walls are a given, and make the biggest impact. But if you don't have a whole gallon of paint you can still paint your interior doors: 
Or paint a small piece of furniture! A stool, chair, bench. Whatever!:

Paint is a game changer! Add some contrast or lighten things up.
9. Deep clean Have you seen that meme going around? ? 
So true!! Well, this is the time my friends, let's get it done! Open the windows and clean the house.
I plan to deep clean every rug and carpet with the awesome carpet cleaner I showed you last fall:

It works so well it's almost...enjoyable? There is deep satisfaction seeing what it picks up. (And deep shame for how dirty our rugs are.)
10. Scrap wood projects This is one of my favorites because I keep a large scrap wood stash. It's REAL hard for me to let go of wood. Try building some easy picture ledges: 
Or a tray for the coffee table or ottoman! I made this HUGE hideaway tray for Legos years ago: 
It slides under the sofa!
We also use it for puzzles and games:

Use scrap wood and paint or pretty paper to make labels for baskets:

The perfect project after you're done decluttering and organizing. ;)
There you go -- my top ten home projects to work on when you're stuck at home. I tried to include DIYs using what I already have on hand. What would you add to this list?
Hang in there -- take it one day at a time and keep busy! See more of our home here. To shop items in our home, click here! Never miss a post by signing up to get posts via email. Via https://www.thriftydecorchick.com/2020/03/ten-diyhome-projects-to-keep-you-busy.html  I’m back today with a very quick, YUMMY, very easy banana bread recipe – and I just had to share it because for years I thought it was way harder than this. I love when I think something is difficult for so long and then do a quick search on the net and realize it’s not hard at all. Or maybe I hate when that happens, because I’ve denied myself the goodness all that time. I found this recipe on Simply Recipes and I love it because you probably already all of the ingredients in your pantry. It seriously took five minutes to mix everything: 
This post may contain affiliate links for your convenience.
See my policies and disclosure page for more information.
(I took this after I had already mashed the bananas, these are not quite ripe yet.) Preheat your oven to 350 degrees before starting. Easiest banana bread recipe
3 or 4 ripe bananas, smashed (I used four but three are plenty)
1/3 cup melted butter
3/4 to 1 cup sugar
1 egg, beaten
1 teaspoon vanilla
1 teaspoon baking soda
Pinch of salt
1 1/2 cups of all-purpose flour
Cinnamon, nuts, raisins, per your tastes
First mash up the bananas (I used a potato masher), and then add the melted butter:  
YUM, banana goo! Then mix in the sugar, egg, and vanilla:  Add the baking soda and salt and mix:  Add the flour last, bake at 350 in a preheated oven for one hour and you’re done! I added a bit of cinnamon at the end too, just because cinnamon is good in just about any baked item. In my opinion. I don’t care for nuts in banana bread, so this recipe was perfect for me. If you like them in your nanner bread, I’m guessing about half a cup would be perfect. The recipe specifies an 8” by 4” loaf pan, but all we have is a 9 by 5. Because of that I baked it for about 50 minutes instead of an hour. It came out perfect:  I may or may not have eaten It is SO good. Especially yummy warm from the oven, with a little butter…um, what was I saying? I may add a few raisins in my next loaf – I think that would be amazing. Now go forth and bake! **Check out my other easy recipes here, including three of my very favorite crock pot soups, yummy peanut butter pie and super easy crockpot applesauce. See more of our home here. To shop items in our home, click here! Never miss a post by signing up to get posts via email. Via https://www.thriftydecorchick.com/2012/05/easy-peasy-banana-bread.html
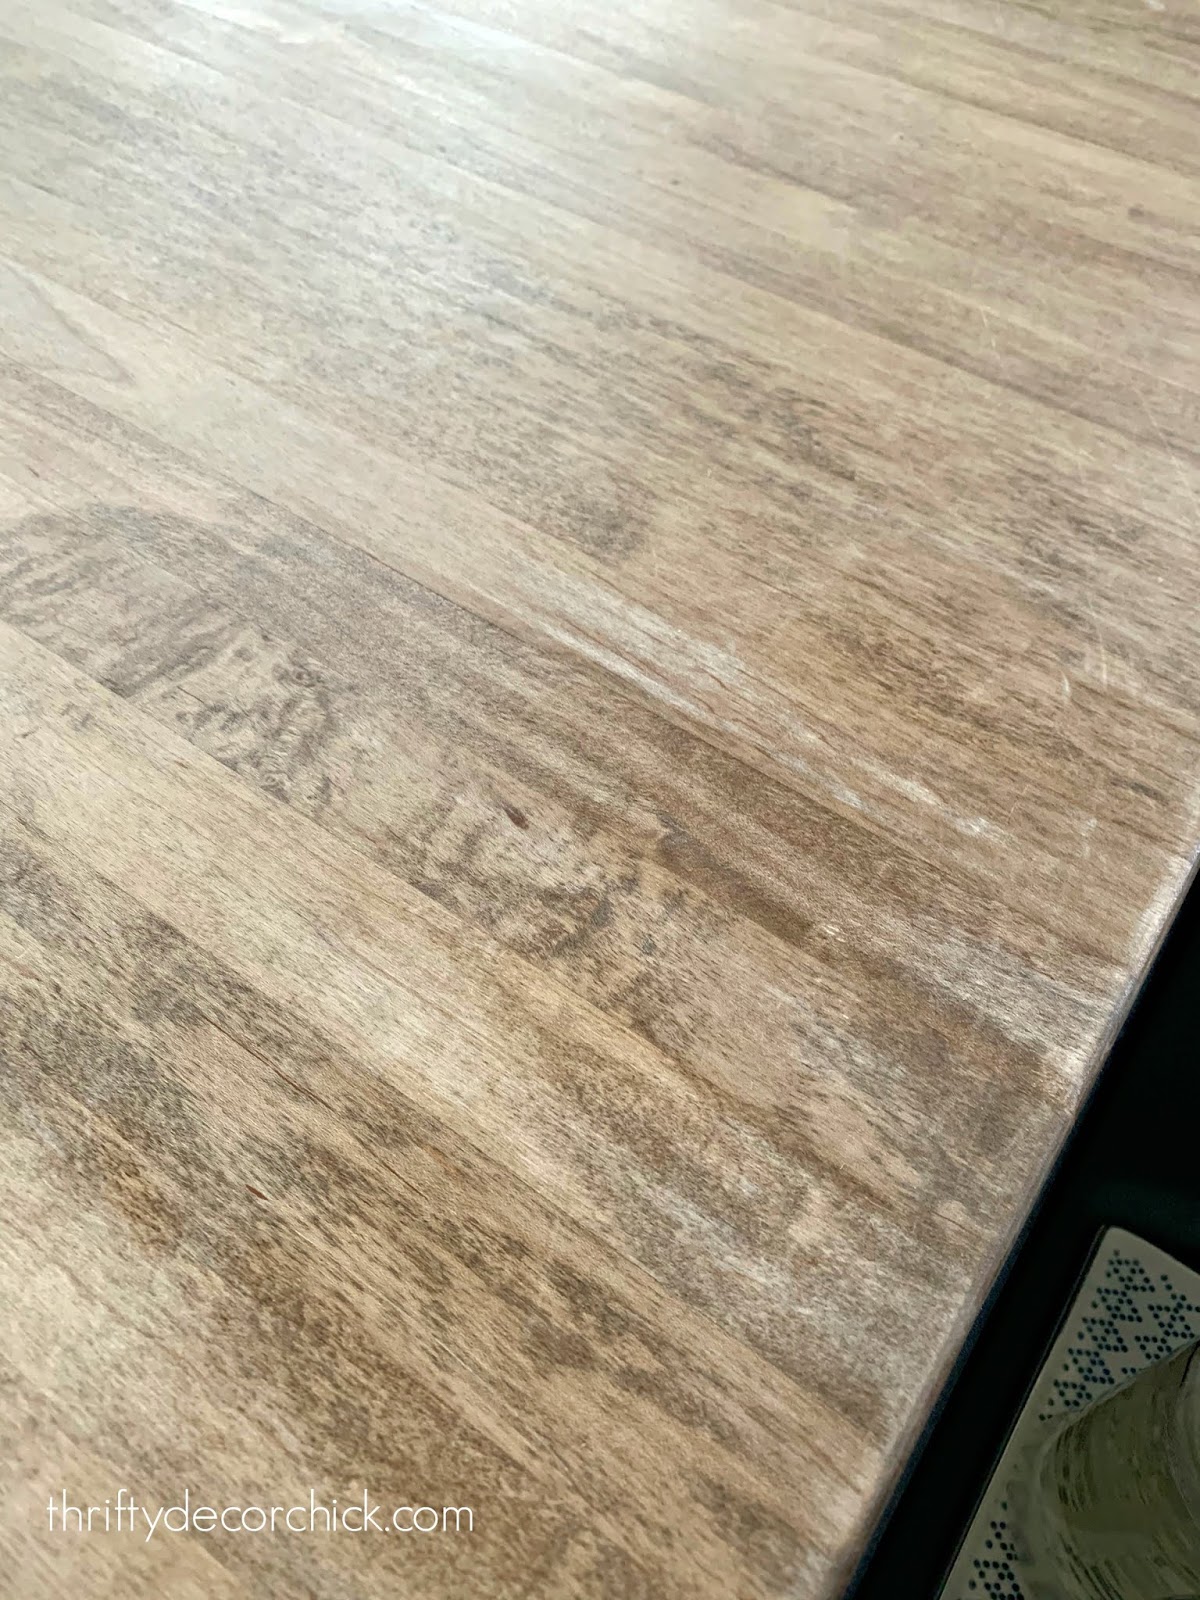
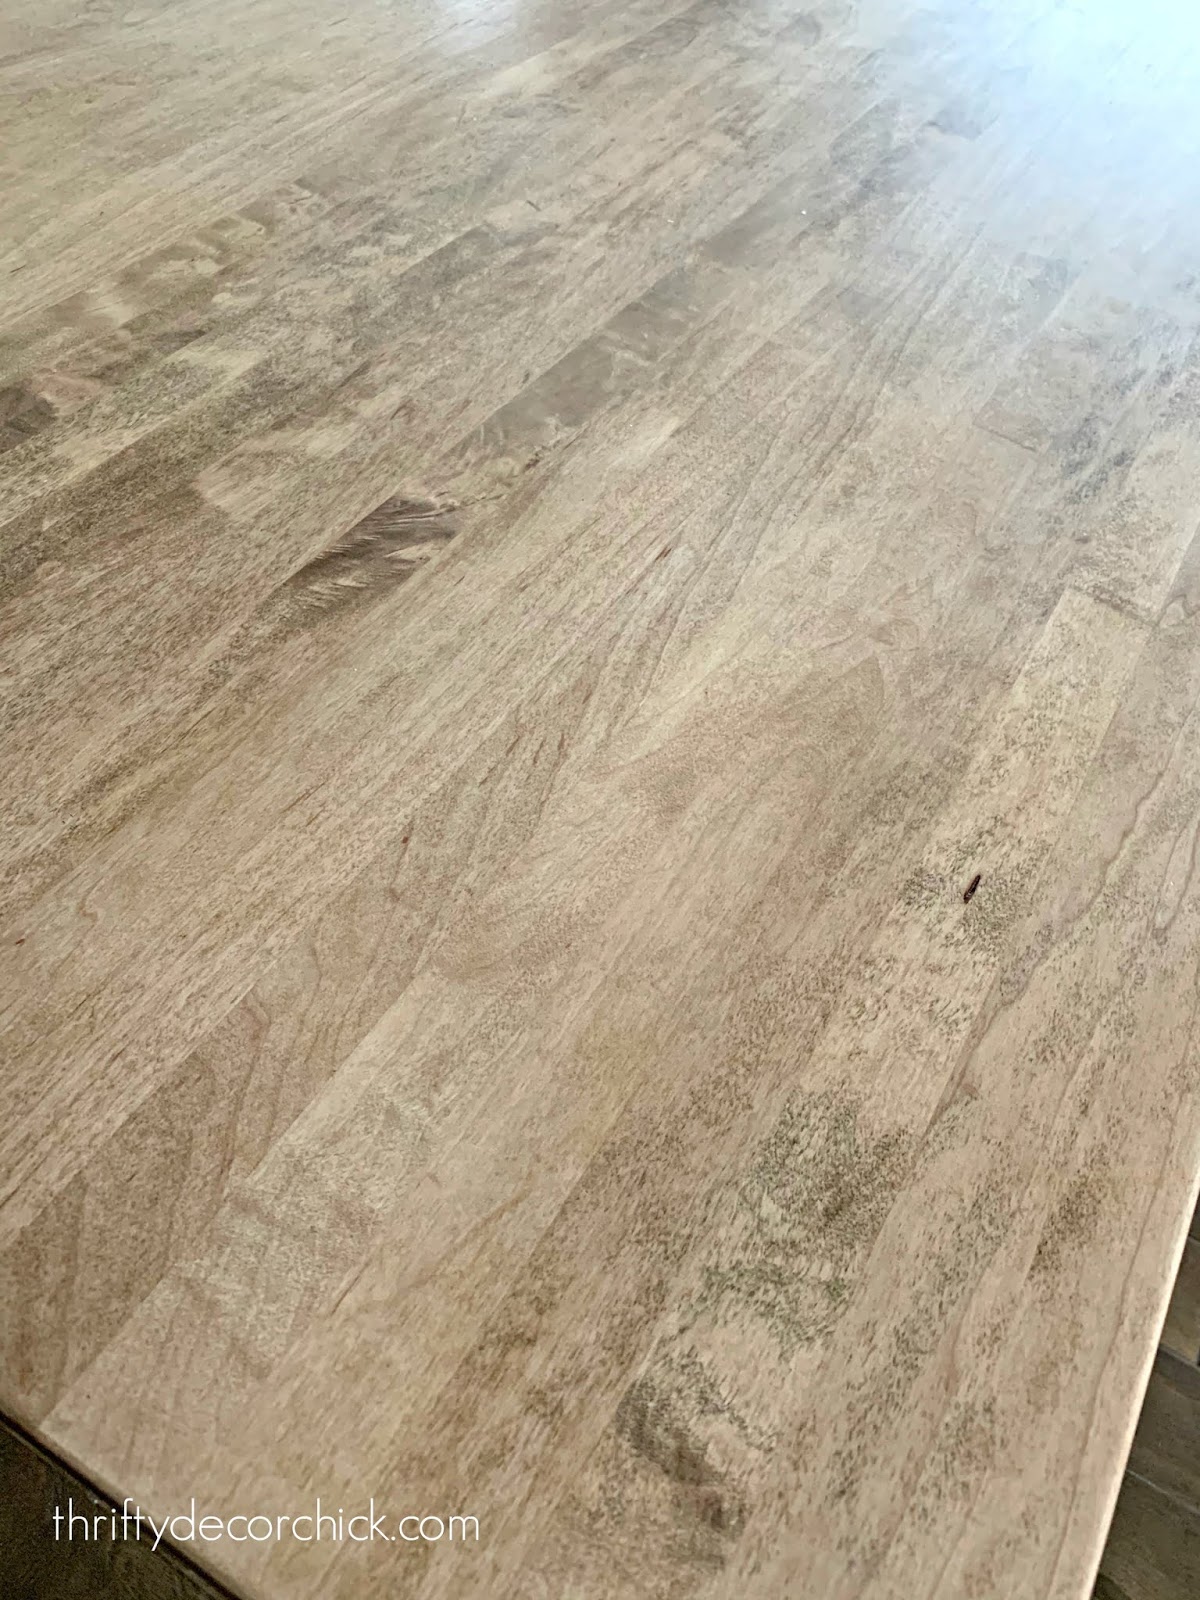
One of the top five questions I get about our house (and our old one!) is about our wood countertops. We've had butcher block counters on our islands for ten years now. Thanks to my Dad I know the best way to treat them and keep them beautiful for years!
I shared how to protect bare wood counters a couple years ago, so check out that post to see more detail. I also share how I stained the butcher block in that post. This time I wanted to show you how well they have held up over nearly two and half years: 
It's really best to reapply this every six months or so...but as you'll see, it's not absolutely necessary. Ours have held up beautifully all this time.
Overall, the whole island counter has lightened from use, and it was uniform. The only part that was slightly darker was under the tray that I use for hand and dish soap:
This post may contain affiliate links for your convenience.
See my policies and disclosure page for more information.
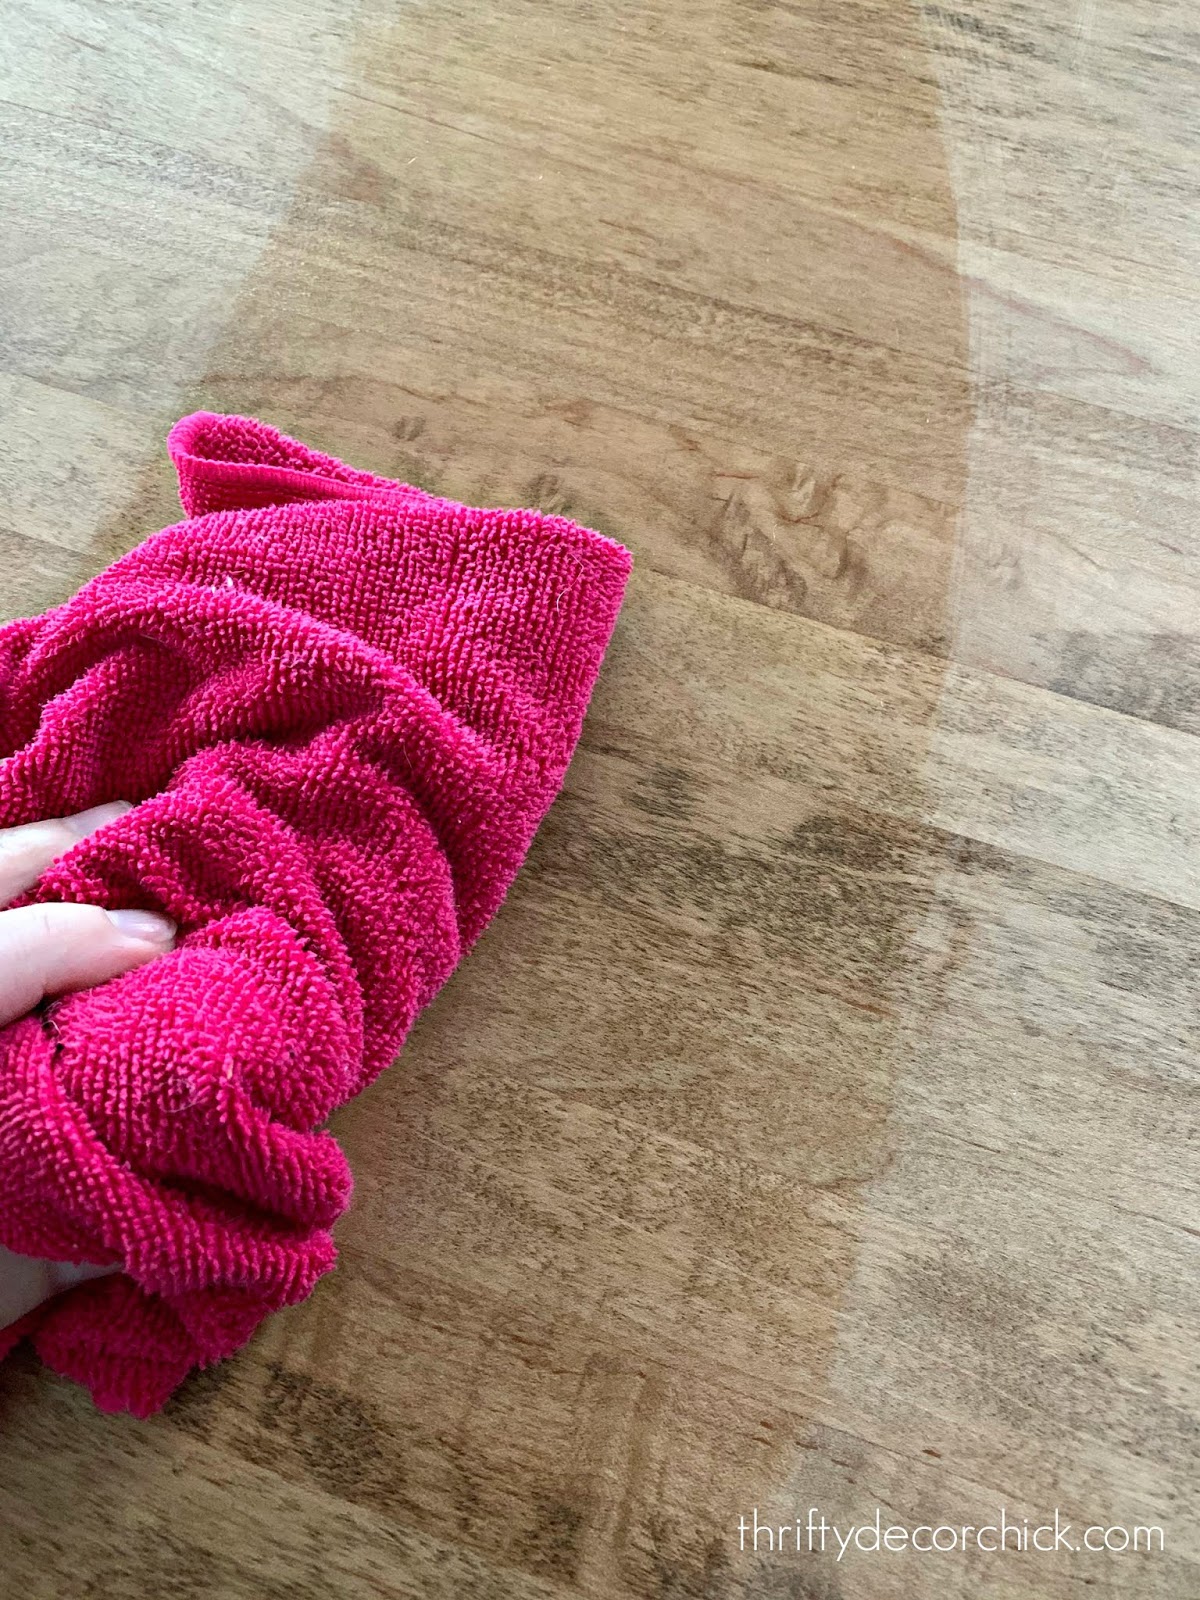
Nearly EVERYTHING is easily cleaned off of the wood counters. We've had water condensation sit for hours, water spills, wine, cat vomit ? -- all of it. If you treat them well like I'll show you, you won't have any issues keeping them clean.
The only thing that I haven't been able to remove is permanent marker:
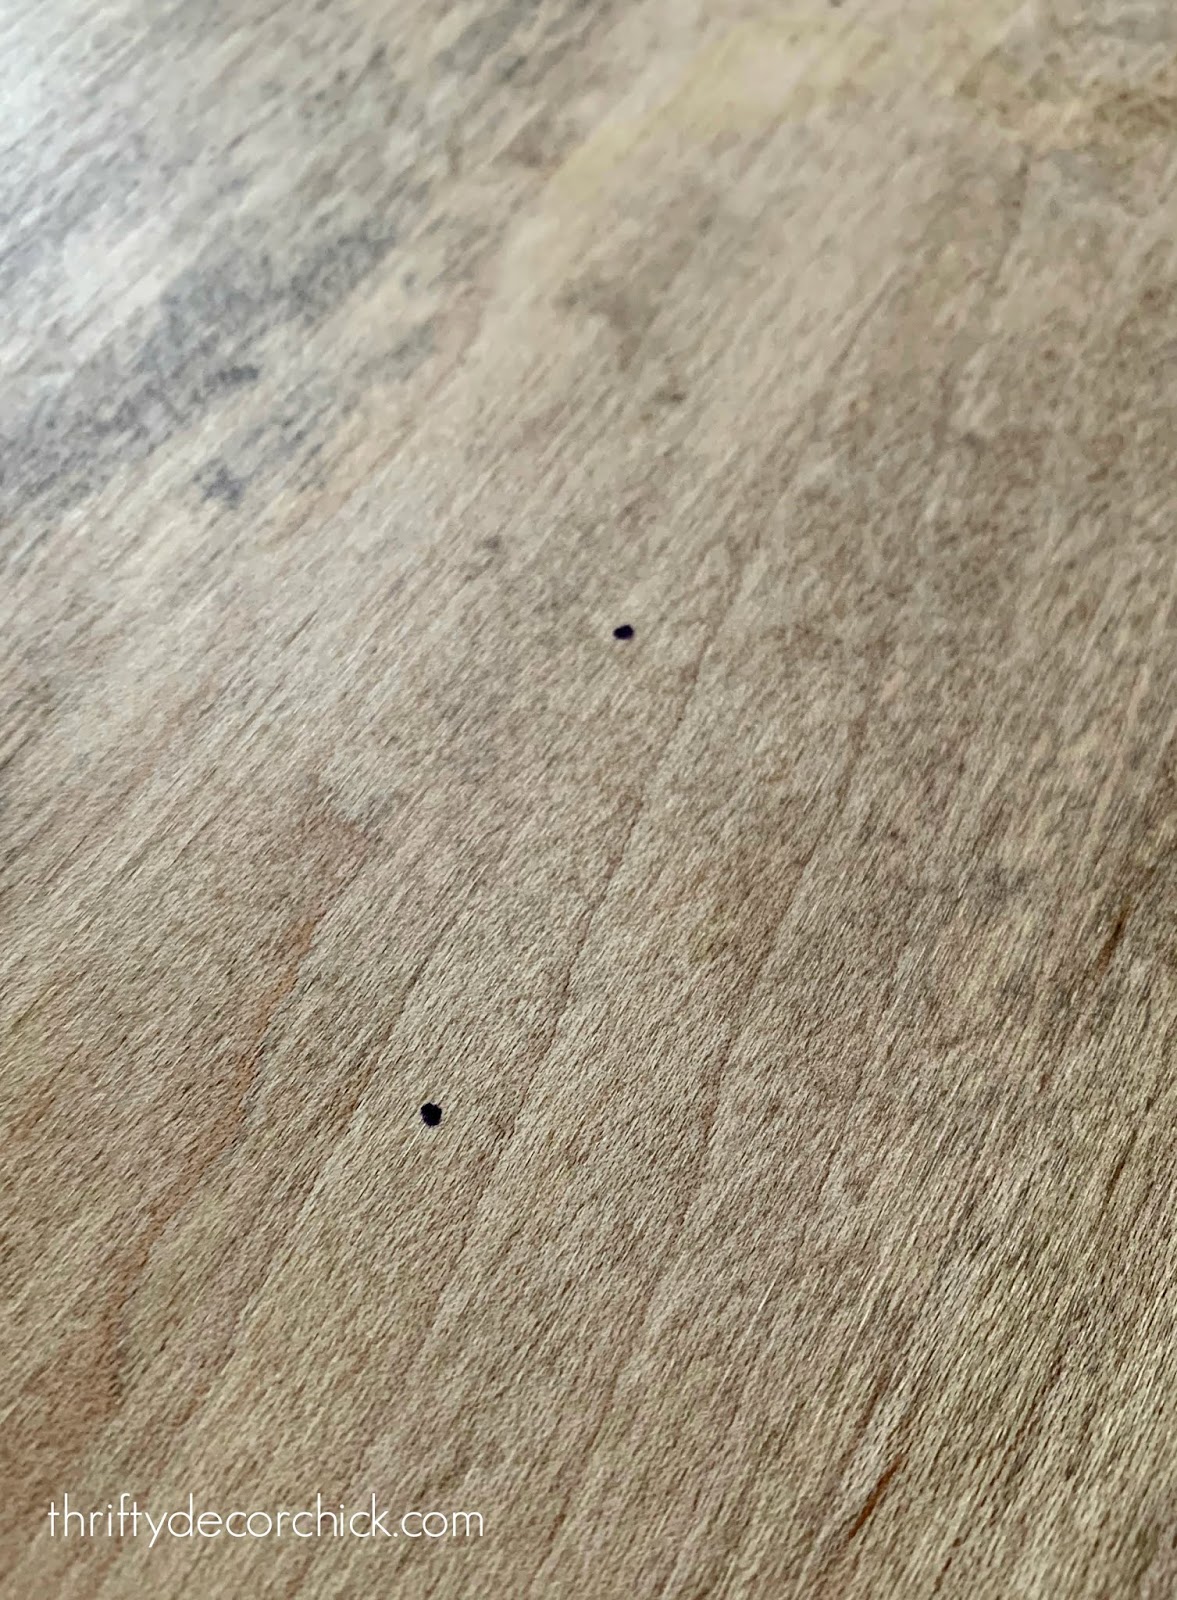
The great thing is, you can sand that down and get rid of it. I choose to leave it because it's so small and it adds character. ;)
Because I've already protected the counters, the reapplication process is super easy and quick. Not sure why I've waited so long to do this!
You'll just want to wipe them down well -- I used water:
This is the brand I've used for years: 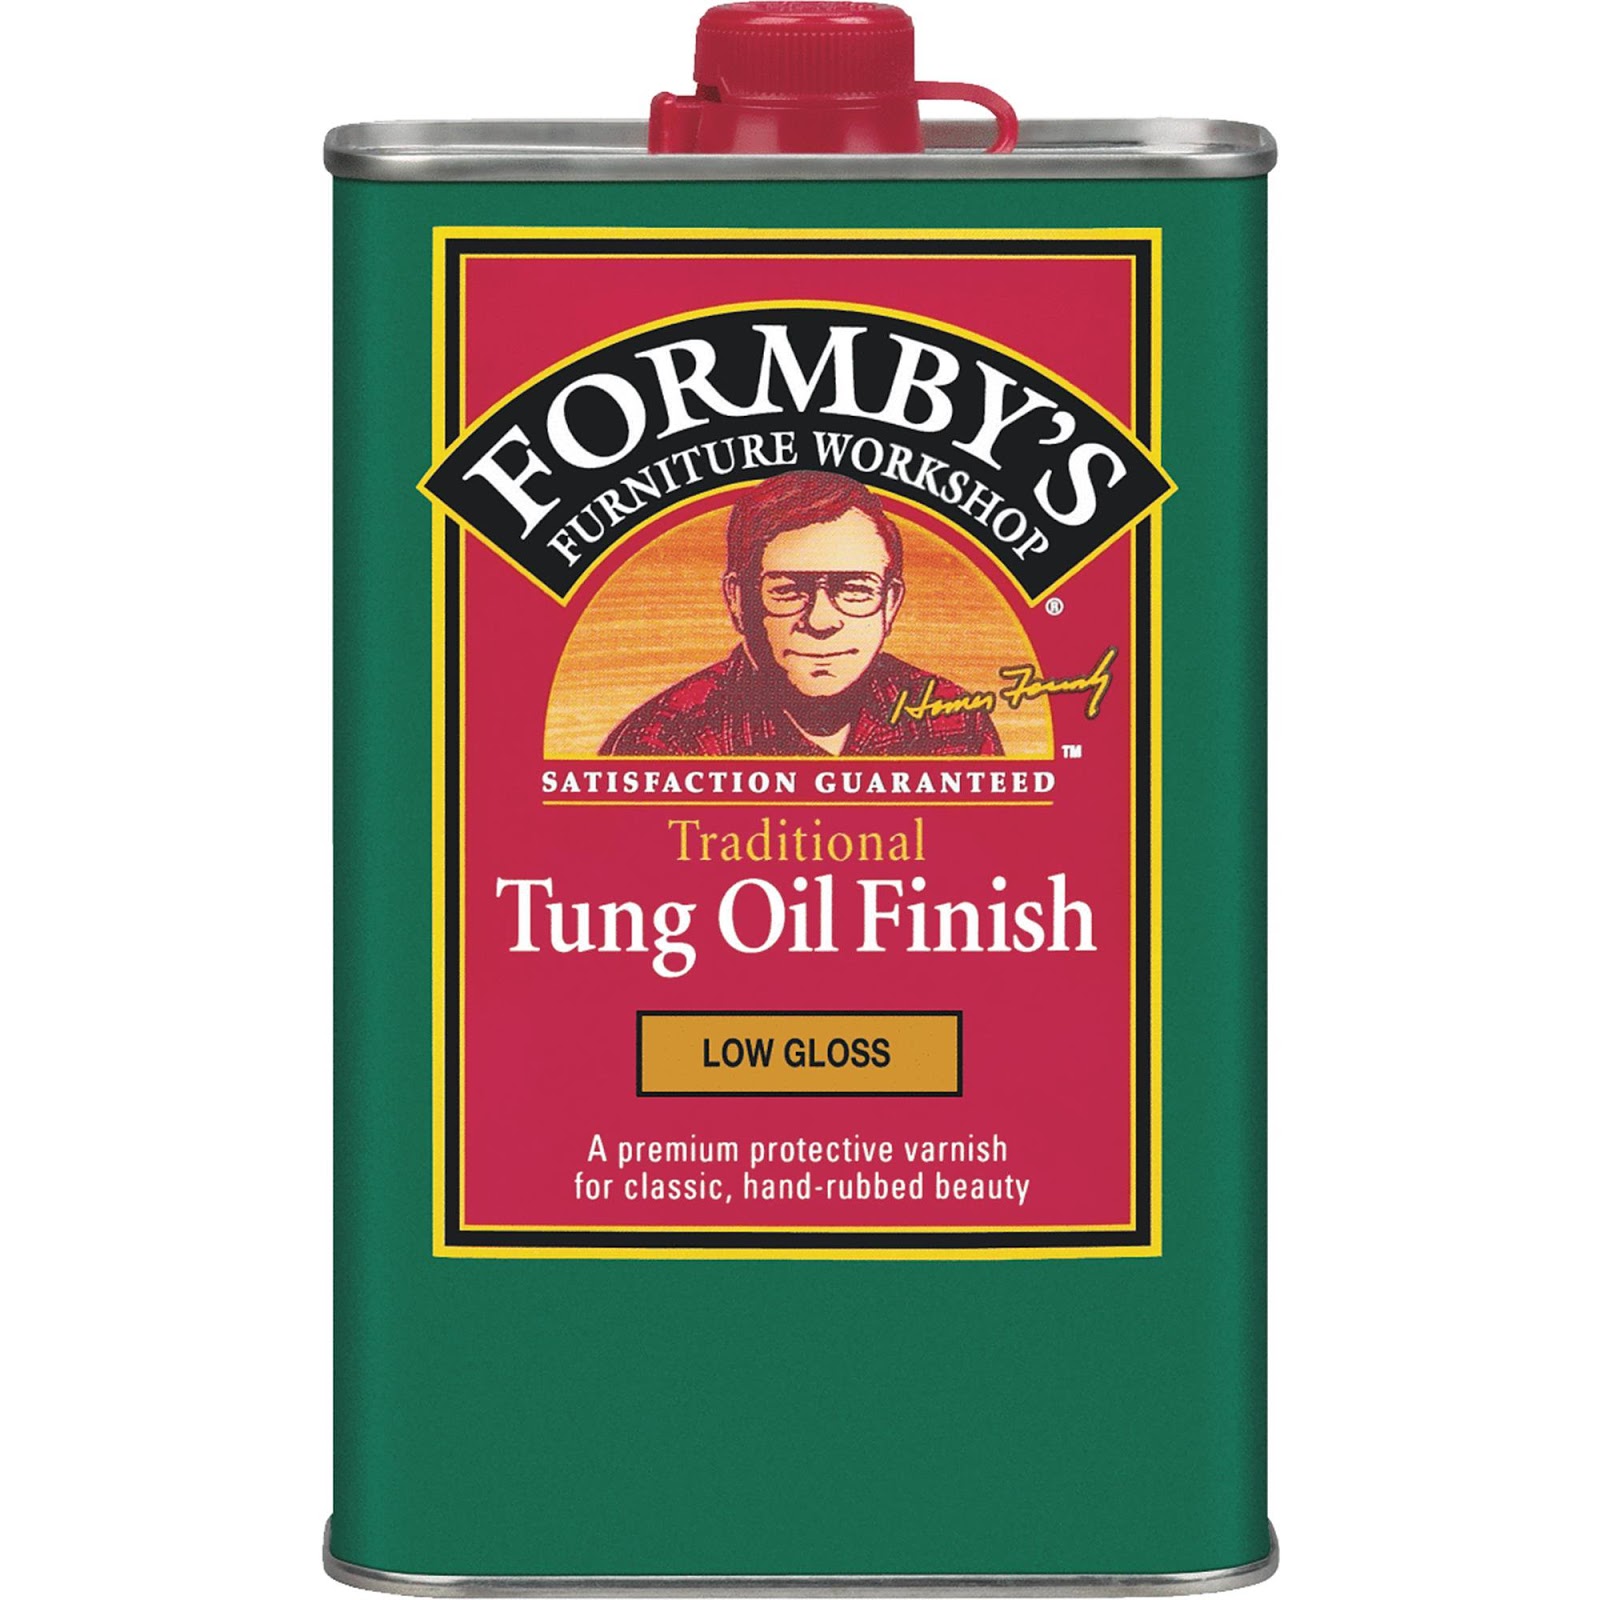
I've also used the Minwax brand and that works well. (It looks like Minwax now owns Formby's.) To apply you'll want a glove to protect your hands and a low lint rag. I just pour the oil out and start spreading: 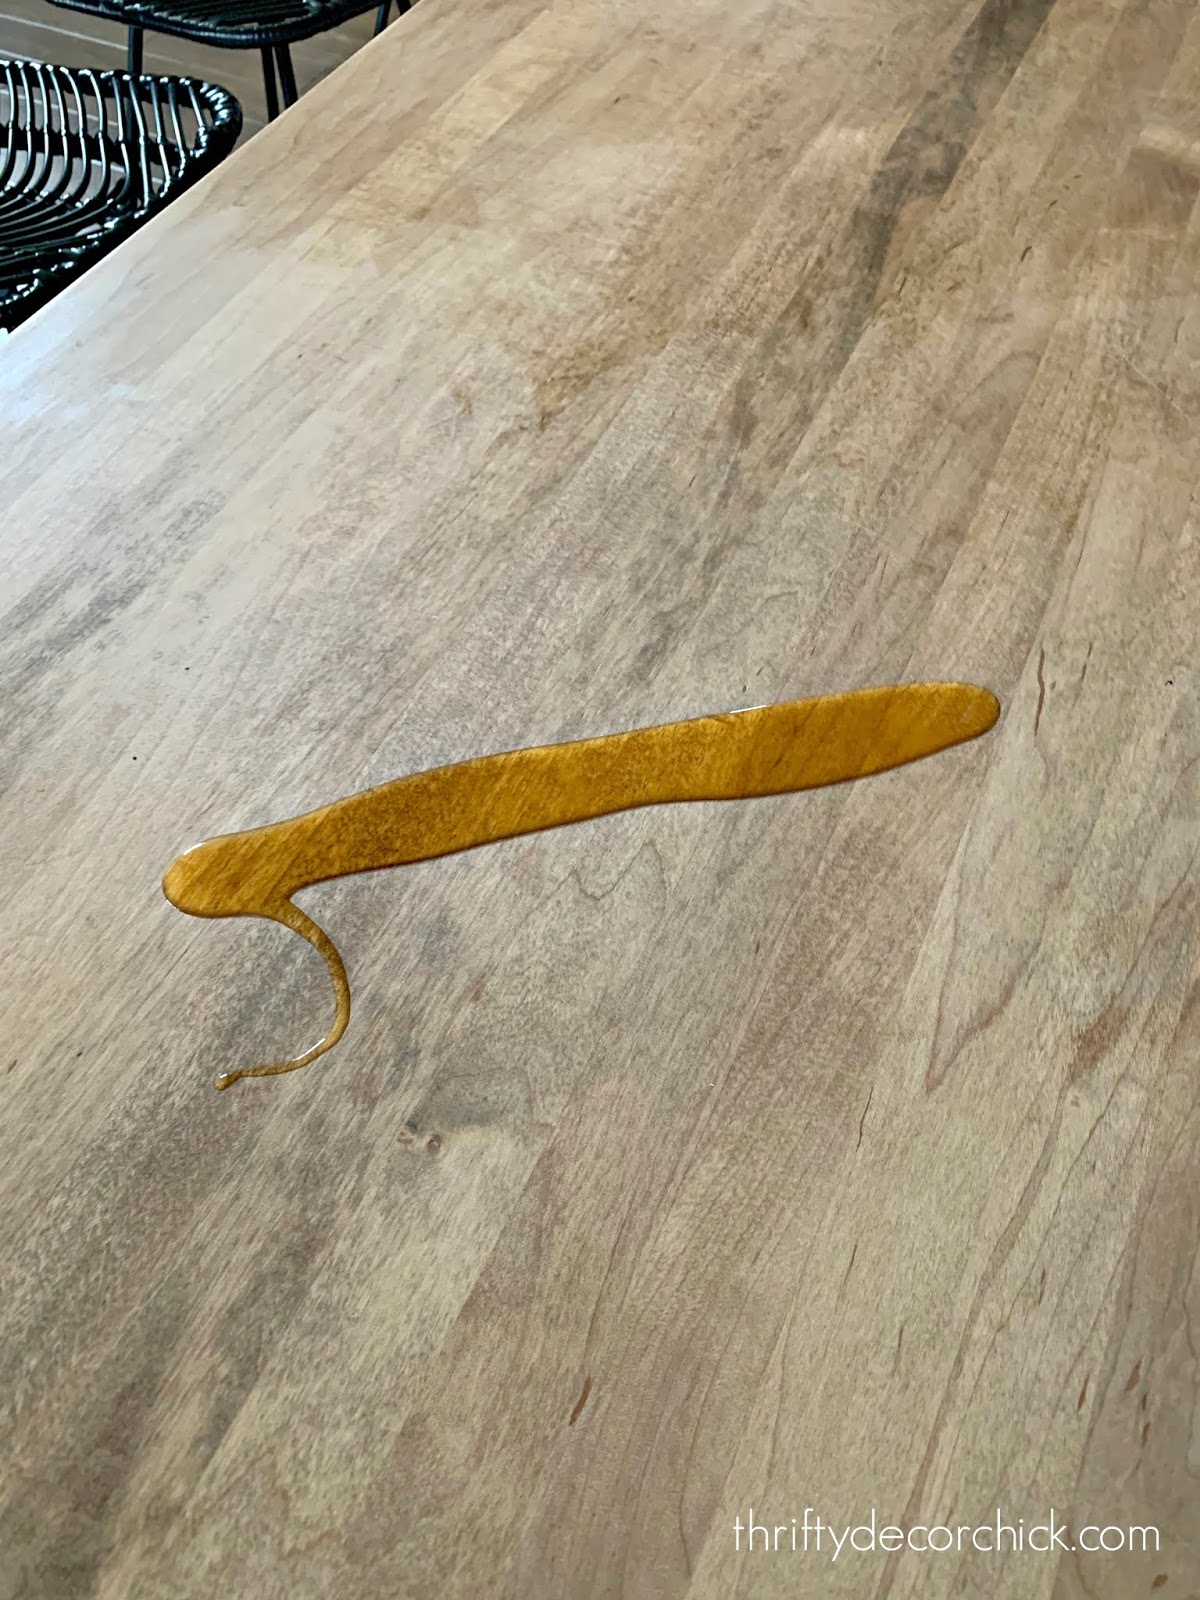
It instantly warms up the wood! If anything, this is why I will start reapplying more often -- it brings back that deeper, beautiful wood tone:
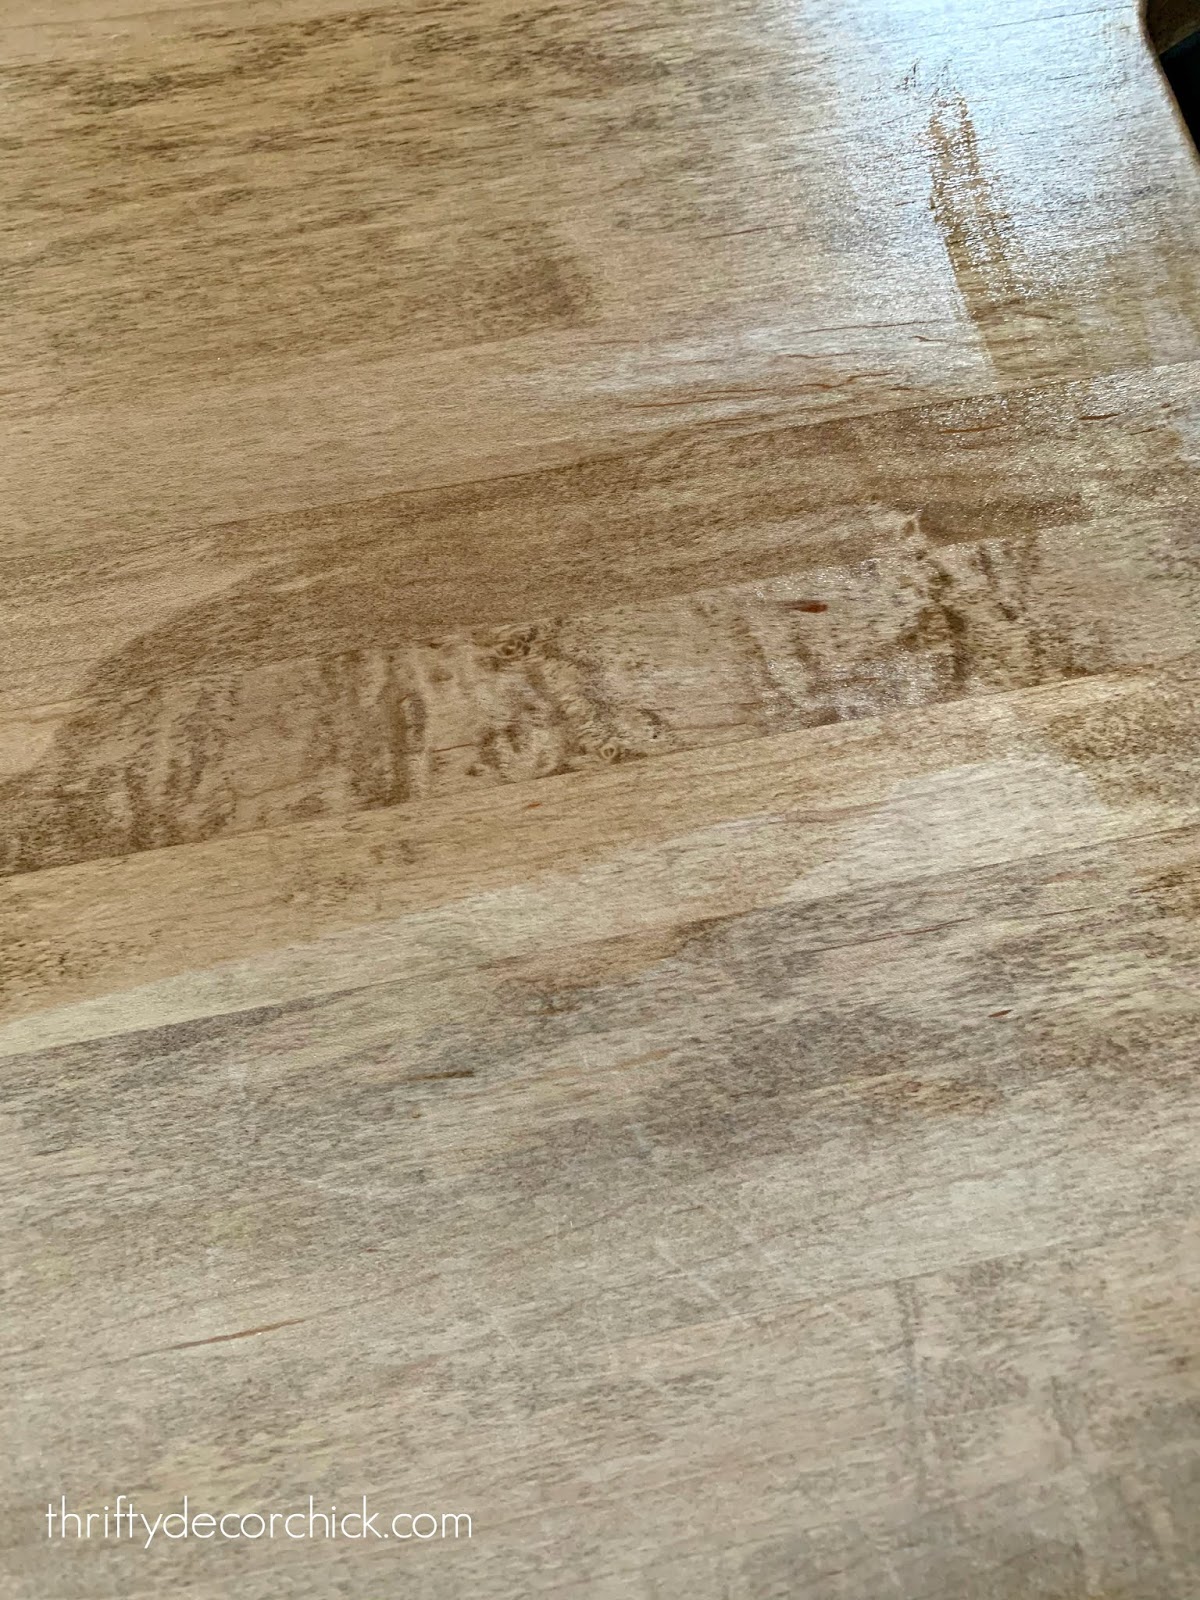
Rub it in well, then go over it again with a new or clean side of the rag. I use the sheen of the lights to look for spots that I may not have covered well.
Continue to rub it in until you get a uniform finish:
For first application I would do this at night, so you can let it fully dry without touching. This coat was dry in a few hours.
Be sure to check out this post for more information on the process from bare wood. You can also see there how liquids bead up on the surface once dry.
Tung oil is truly the easiest and best way to protect wood countertops:
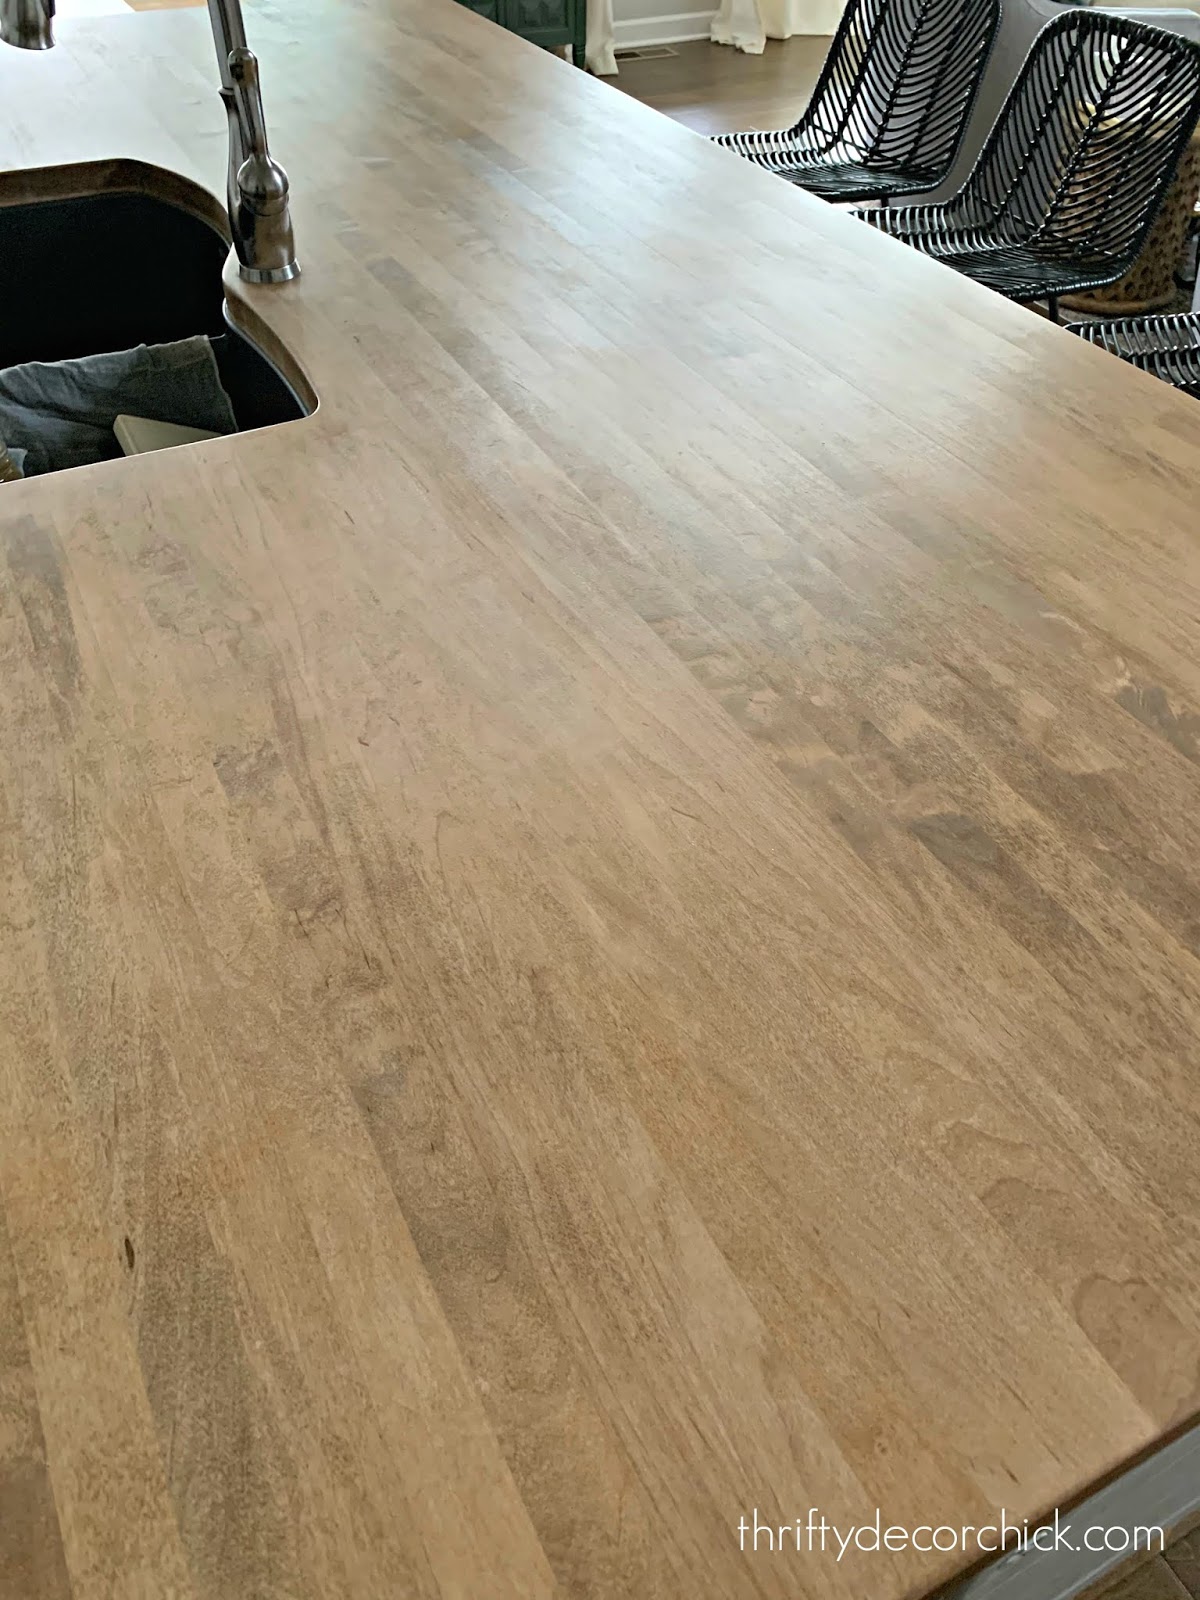
I've been planning to move our faucet handle to the front, because water drips onto the counter when we turn it off. We're pretty good about wiping it up, but not all the time. Even so, that area still looks as good as new!
LOVE this stuff and LOVE the warmth and character of wood counters! I've heard from many readers over the years who have been warned off of them by contractors. Are they completely maintenance free? Nope. But if you protect them well they will hold up beautifully with minimal effort.
If you have any questions about wood counters please let me know! :)
Via https://www.thriftydecorchick.com/2020/03/how-our-butcher-block-counters-have.html
Well goodness. How are you all doing? We're staying calm and trying to make the best of this crazy time. I'm focusing on cleaning and working on projects large and small.
Basically trying to keep busy so I don't worry/freak out/stress. ??
This quick project ties into the one I shared last week. If you missed it, check out the dark, cozy color I've been painting our basement. We are loving it:

See that layered gallery wall above the table? I shared how to make your own a few months ago -- it's really easy! I was using stuff we had hanging in the basement at the old house, but that has been changed out with this project. :)
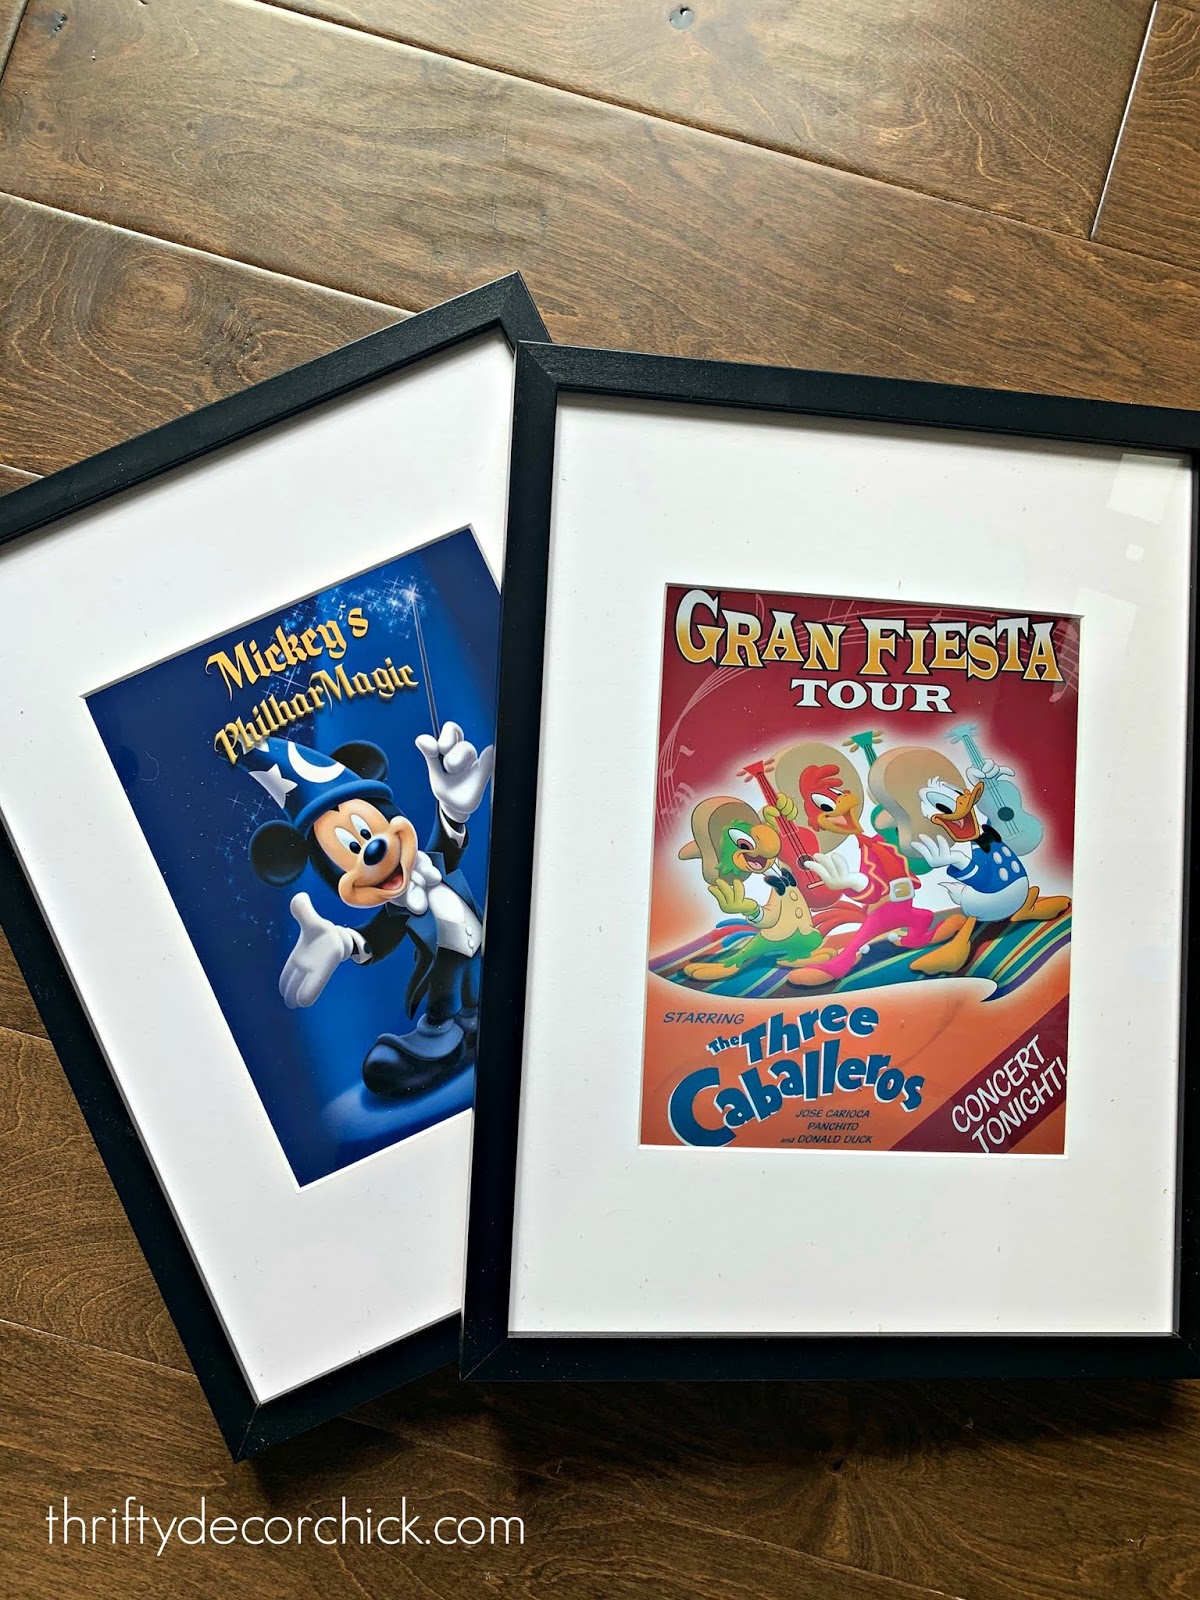
This was my son's idea actually -- he found some awesome vintage-y looking Disney prints online and was begging to use some in our house.
We have a small Disney-inspired wall in our loft, but these were so unique, I wanted to create more of a focal point. So I decided to put them above this table instead.
My son and I picked out nine prints to use on this wall and I grabbed the inexpensive Ribba frames from Ikea. They looked SO good!:
This post may contain affiliate links for your convenience.
See my policies and disclosure page for more information.
They have a ton of color but the vintage vibe of most of them ties them together well. We chose rides/experiences that we LOVE at Disney, including Tower of Terror, the Monorail and Splash Mountain. :)
We're still waiting on two prints, so I filled those frames with a free Peter Pan print one shop sent us and an Epcot print. When I got them all hung up our son was SO thrilled! We all love it:
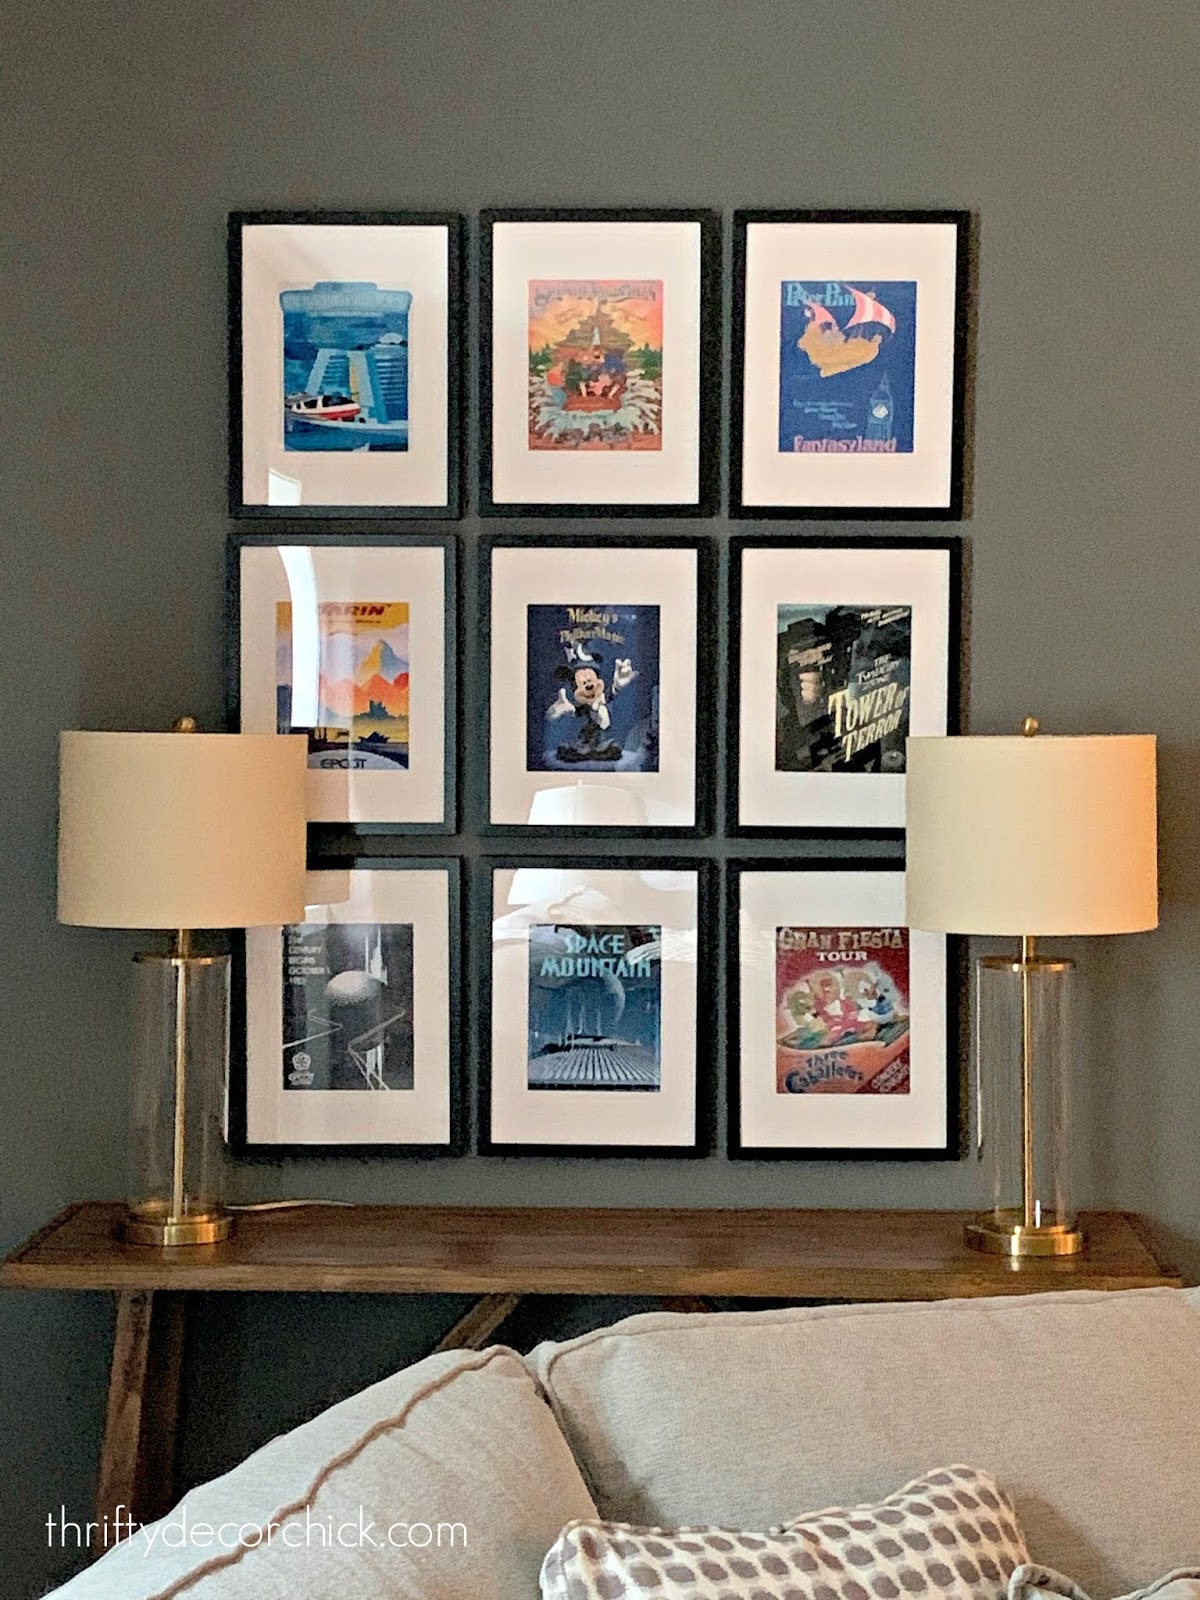
I may eventually add an art light like in my office to shine down on these! I just love them. I've been wanting to add a bit of color to this space and this is the perfect way to do it.
It can be hard to add whimsical touches like this without it feeling too themed...but there are ways to tie in the places and things your family loves. Even if they are a Mouse and all of his friends. ;)
Here are all of the prints we are using on this wall:
How many of you are Disney nuts like us? I love adding touches of it around the house! If you like these prints you'll love my DIY Disney pin art. :)
I've had such great luck with Etsy and art prints. I usually purchase options I can print at home, but they are all pretty inexpensive. Check out the other art I've used from Etsy shops:


See more of our home here. To shop items in our home, click here! Never miss a post by signing up to get posts via email. Via https://www.thriftydecorchick.com/2020/03/a-grown-up-way-to-add-disney-decor.html
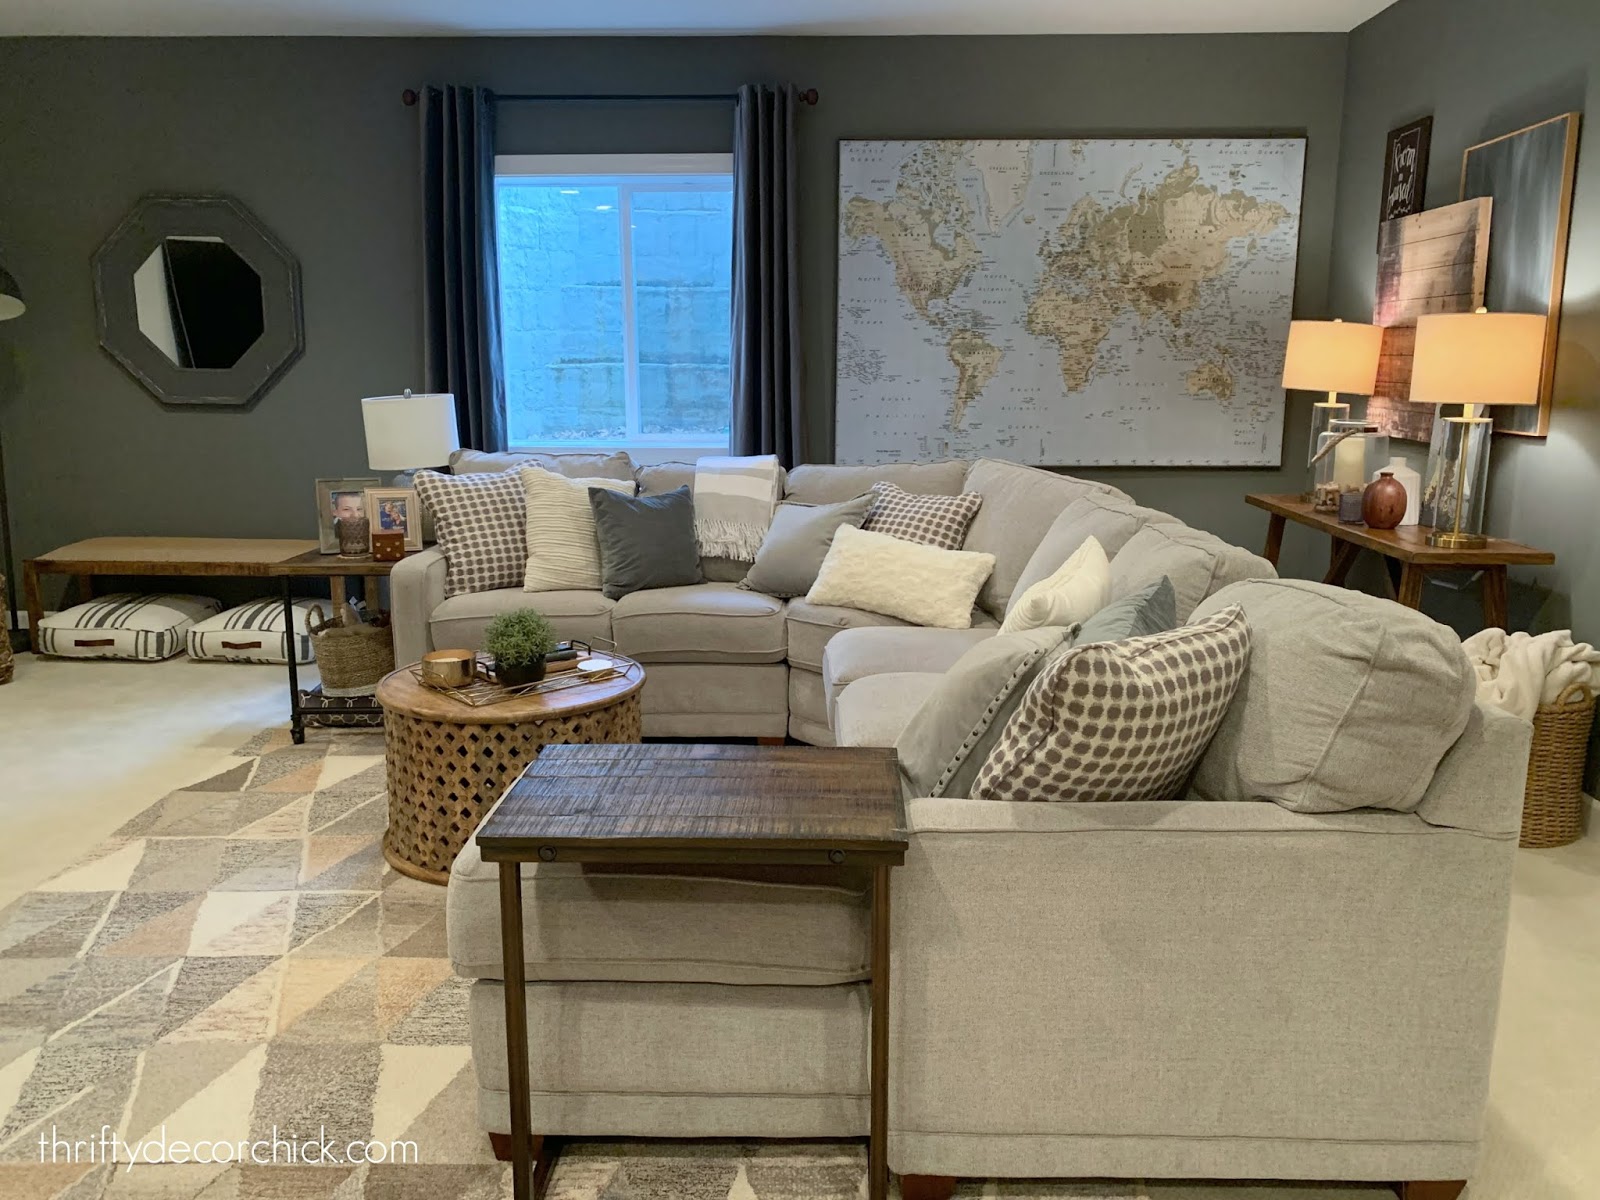
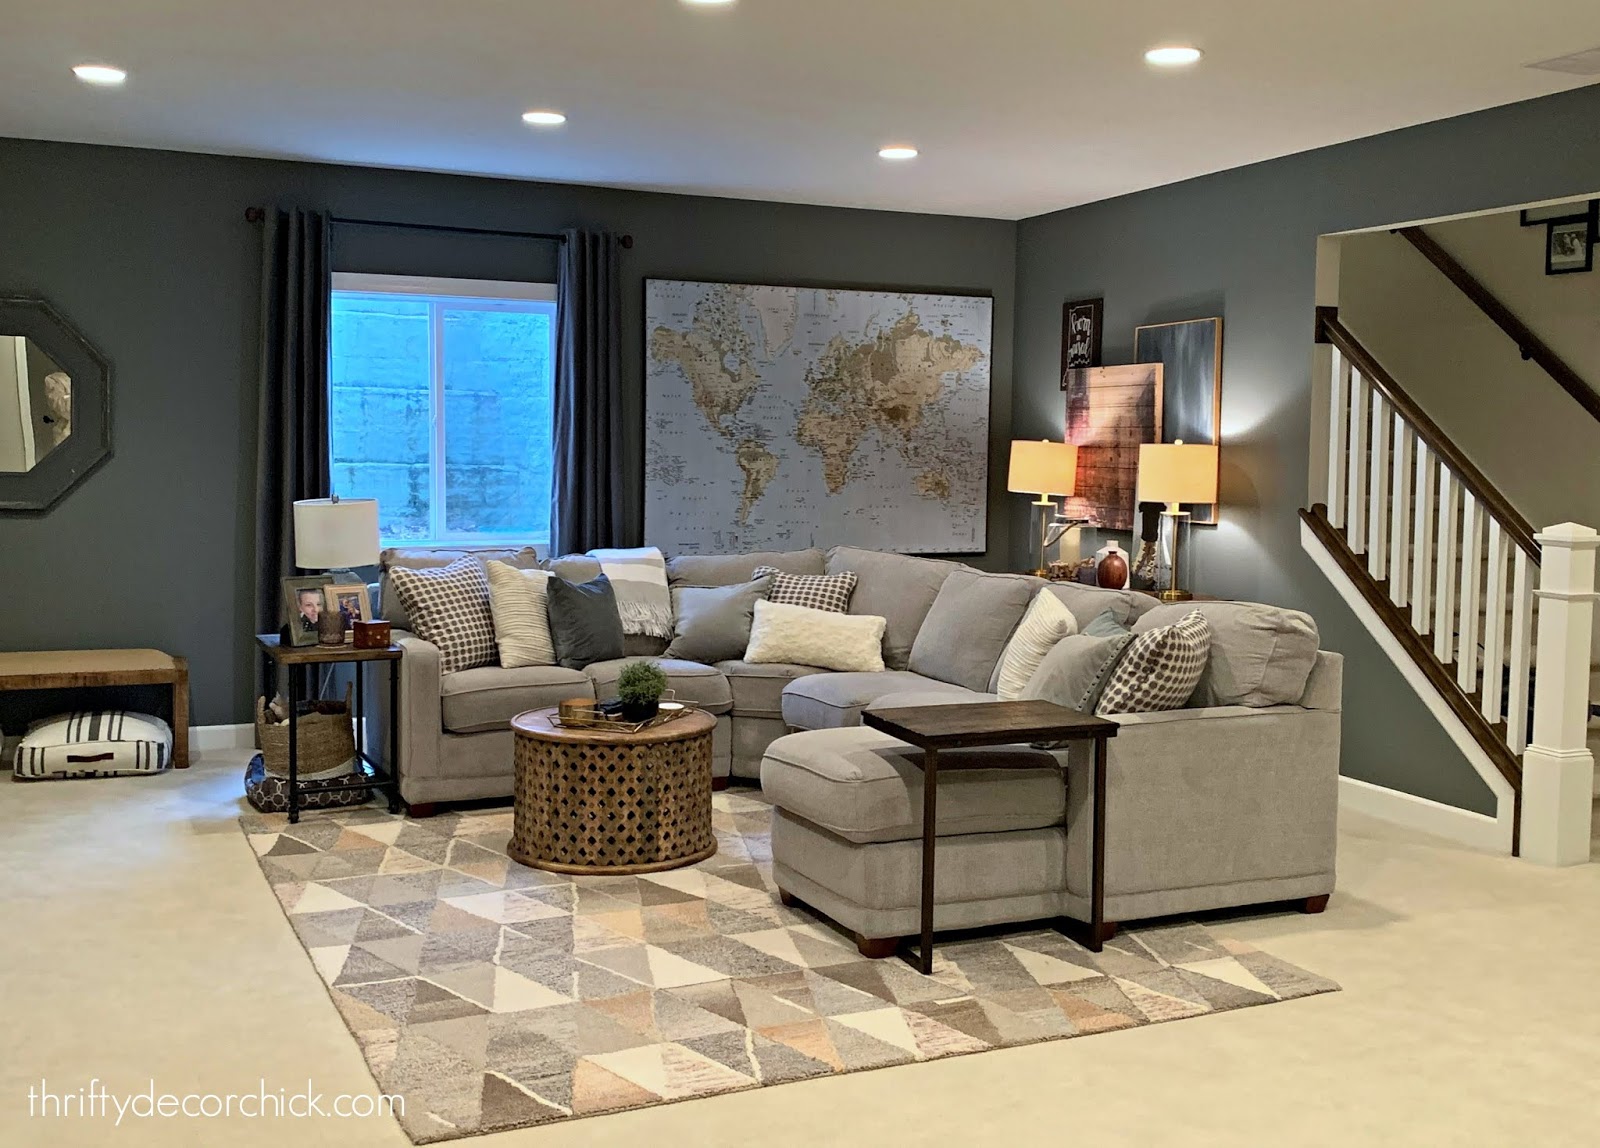
Hey there! I've been hard at work on a plan to cozy up our basement...and it's already pretty darn cozy. :)
I've had an idea for the walls down here for awhile and got started this week. This another instance of the difference simply painting a wall can make in a space. After all these years the transformations still surprise me!
Remember when I painted a long wall in the basement this dark gray?:

You can see more about that wall of game storage and display shelves here.
That dark gray is the same color I used on our bedroom tray ceiling. It's called Westchester Gray and is the perfect gray -- no purpley undertones. If anything, it leans slightly green in some light, which I love.
I took that color down the wall to our family space last year:

I LOVE an accent wall! But I've always felt like this room should all be that warm color.
So I continued it! And it's SO SO comfy and cozy. We love it!:

This post may contain affiliate links for your convenience.
See my policies and disclosure page for more information.
I will always be a dark wall fan. It makes the rest of the room pop!
It's absolutely perfect down here...I'm kicking myself for not doing it sooner:
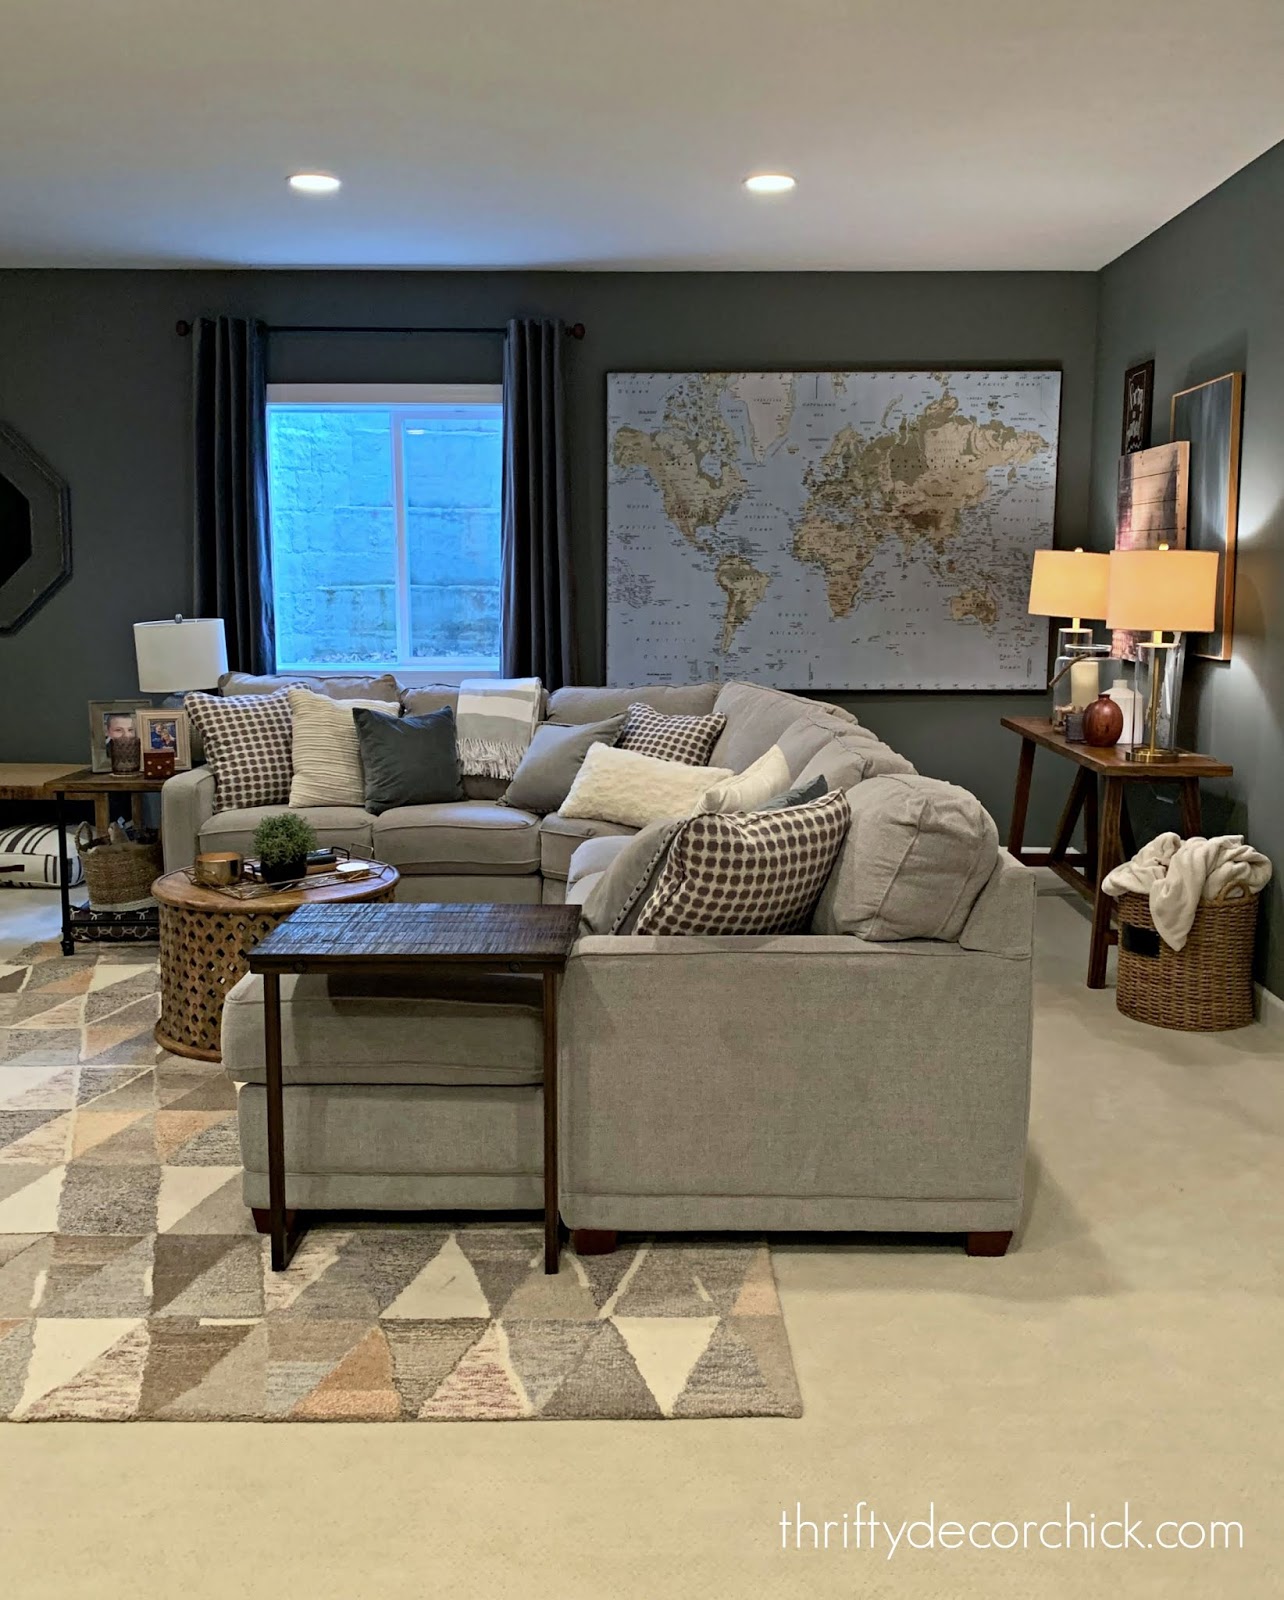
I get asked about that large map every time I share this space. It's from IKEA and I later framed it myself. I hear they don't have this exact one anymore, but they do have a similar option.
We're lucky to have some natural light in here, but I'd do this dark color even if we didn't. It feels lux but not stuffy. Warm and cozy but not too dark:

My next step is to add some molding, similar to what I did in our dining room:

I plan to add a chair rail down there too. I have to play around with placement a bit.
I love the feel of old bars with tons of molding and moody walls...that's the feeling I'm going for down here. But I plan to keep the accessories light:
Yes, we really need to clean our window wells! Any tips on what to use?
This mirror will be replaced when I start the built ins along that wall to the left (yet to be painted):

I can't wait to show you my plans for that HUGE wall! I wasn't planning on tackling it this year, but now that I kept the gray going around the room, I kind of want to get it started.
I can see how it will all look in my head and I'm excited! We'll see -- I have more details to iron out first. You know me -- it could end up being next year. :)
For now, this view is so warm...it feels like a hug when we walk down here! I just LOVE it:
I get asked about the sources in this room more than any other!:
And you should be able to scroll through these photos and click on them for sources as well:  See more of our home here. To shop items in our home, click here! Never miss a post by signing up to get posts via email. Via https://www.thriftydecorchick.com/2020/03/going-super-cozy-and-comfy-in-basement.html
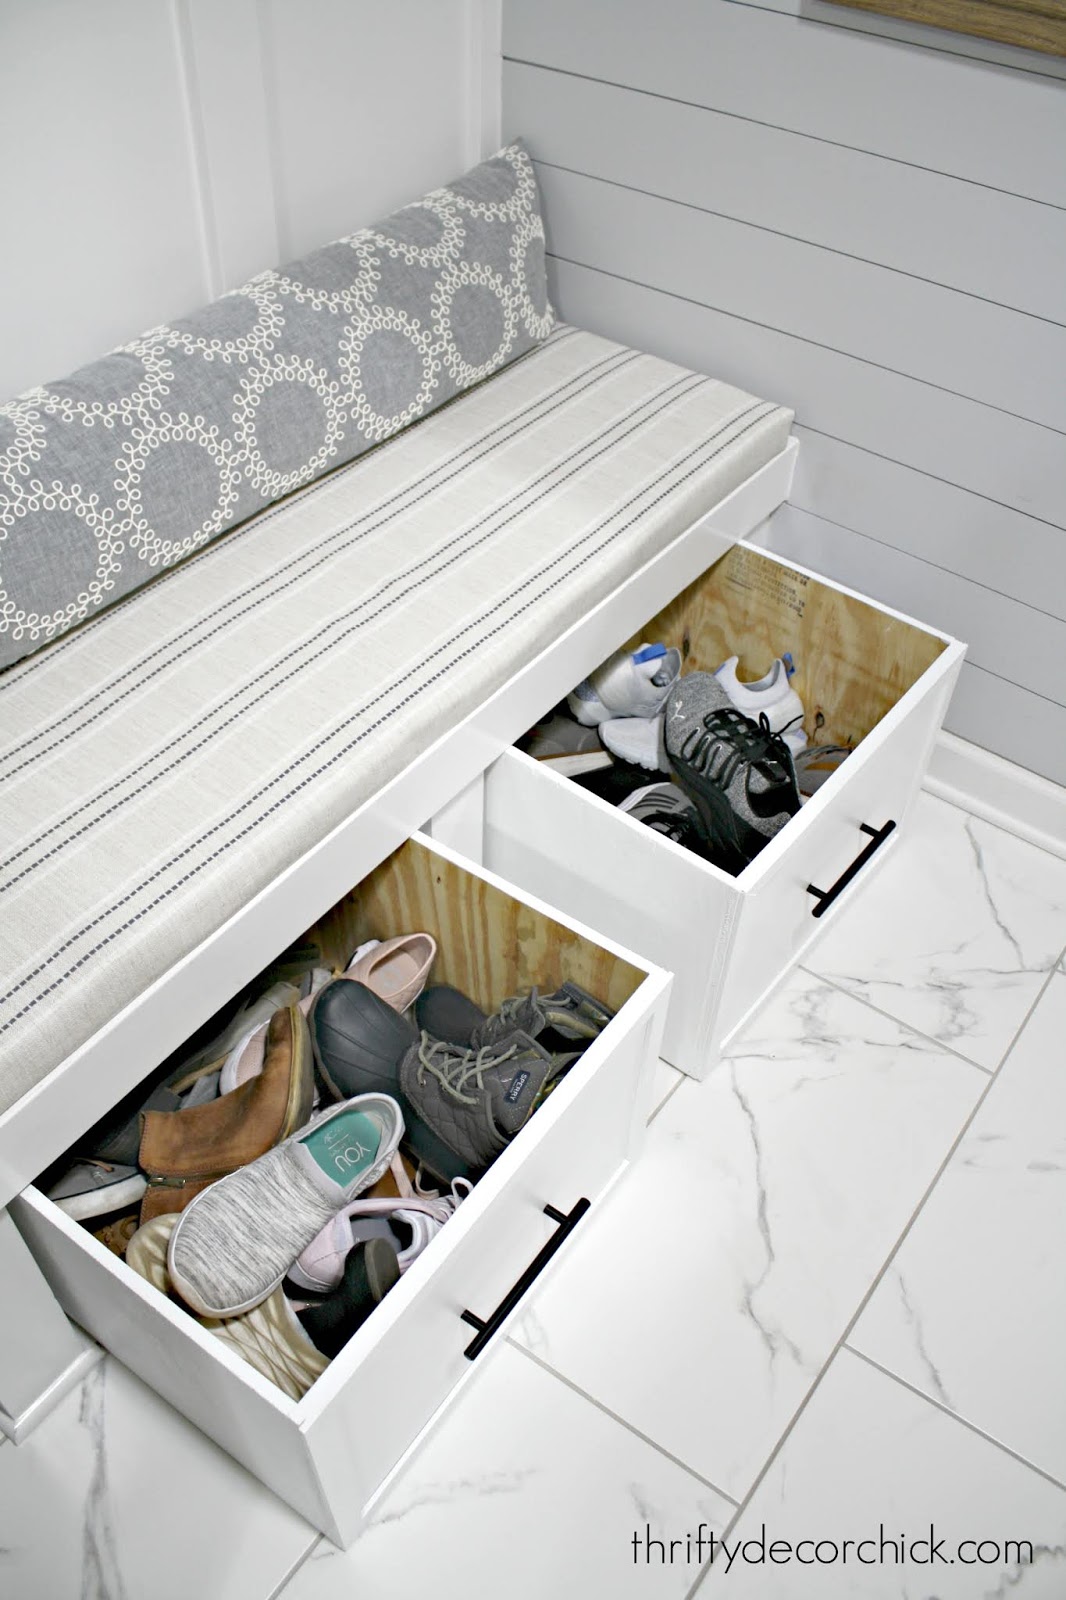
Hello my friends! I finally completed a DIY project I've had in mind for a long time. We've really needed some functional shoe storage for the mud room.
It's a spot that's bugged me since we moved in a couple years ago:
I started some mud room updates last year and added the shiplap wall, no sew cushion and long pillow. It made a huge difference in here and I LOVE this half of the room!
The only part that bugged me were the baskets underneath the bench. I used what we had when we moved in, but they drove me absolutely crazy. They shed everywhere and were super wonky. I knew I'd build something eventually to replace them.
I finally did it!! And they turned out perfectly! It's pretty complex though...get ready for this super elaborate DIY.
I built...a BOX:

Ha! Well, two boxes.
Once you get the measurements figured out, building one is super easy. It's figuring out the exact dimensions that takes the longest.
I had my wood cut down at Lowe's and that made this go super quick. You'll notice I used plywood for most of it -- it holds shoes. Dirty shoes. I don't need the inside to be pretty. :)
I didn't use jigs or anything -- just nailed it together with my nail gun and it's super sturdy. You can see how I constructed it if you look at that pic above. I laid the bottom piece down, then surrounded it with the sides. I made the front and back longer so there wouldn't be a rough edge showing on the front.
I used a nicer wood for the fronts so it would paint up nicely. After a few coats I put them in place and realized they definitely needed a little something:

They were functional but super boring. :)
My thin lattice trim to the rescue! I painted some scrap that I had in the garage and did a simple frame around the front. Be sure to check out all the ways I've used that lattice trim over the years!
After that I added a long, heavy duty handle...and they were done!:

This post may contain affiliate links for your convenience.
See my policies and disclosure page for more information.
I wanted them to look as built in as possible, so instead of wheels I put a bunch of felt pads on the bottom:

They slide in and out super easy because our tile is so smooth. (I tested that out before building them -- if you use wheels remember you'll have to adjust the height of your boxes!)
At first I was worried they wouldn't hold as many shoes, because we could stuff so much in the baskets. Turns out these are HUGE and hold plenty!:
No, I didn't paint the inside. We're the only ones that will see in there. Pick your DIY battles my friends! :)
They turned out even better than I had envisioned! And they are SO super functional, I'm so happy to have those baskets out of here!:
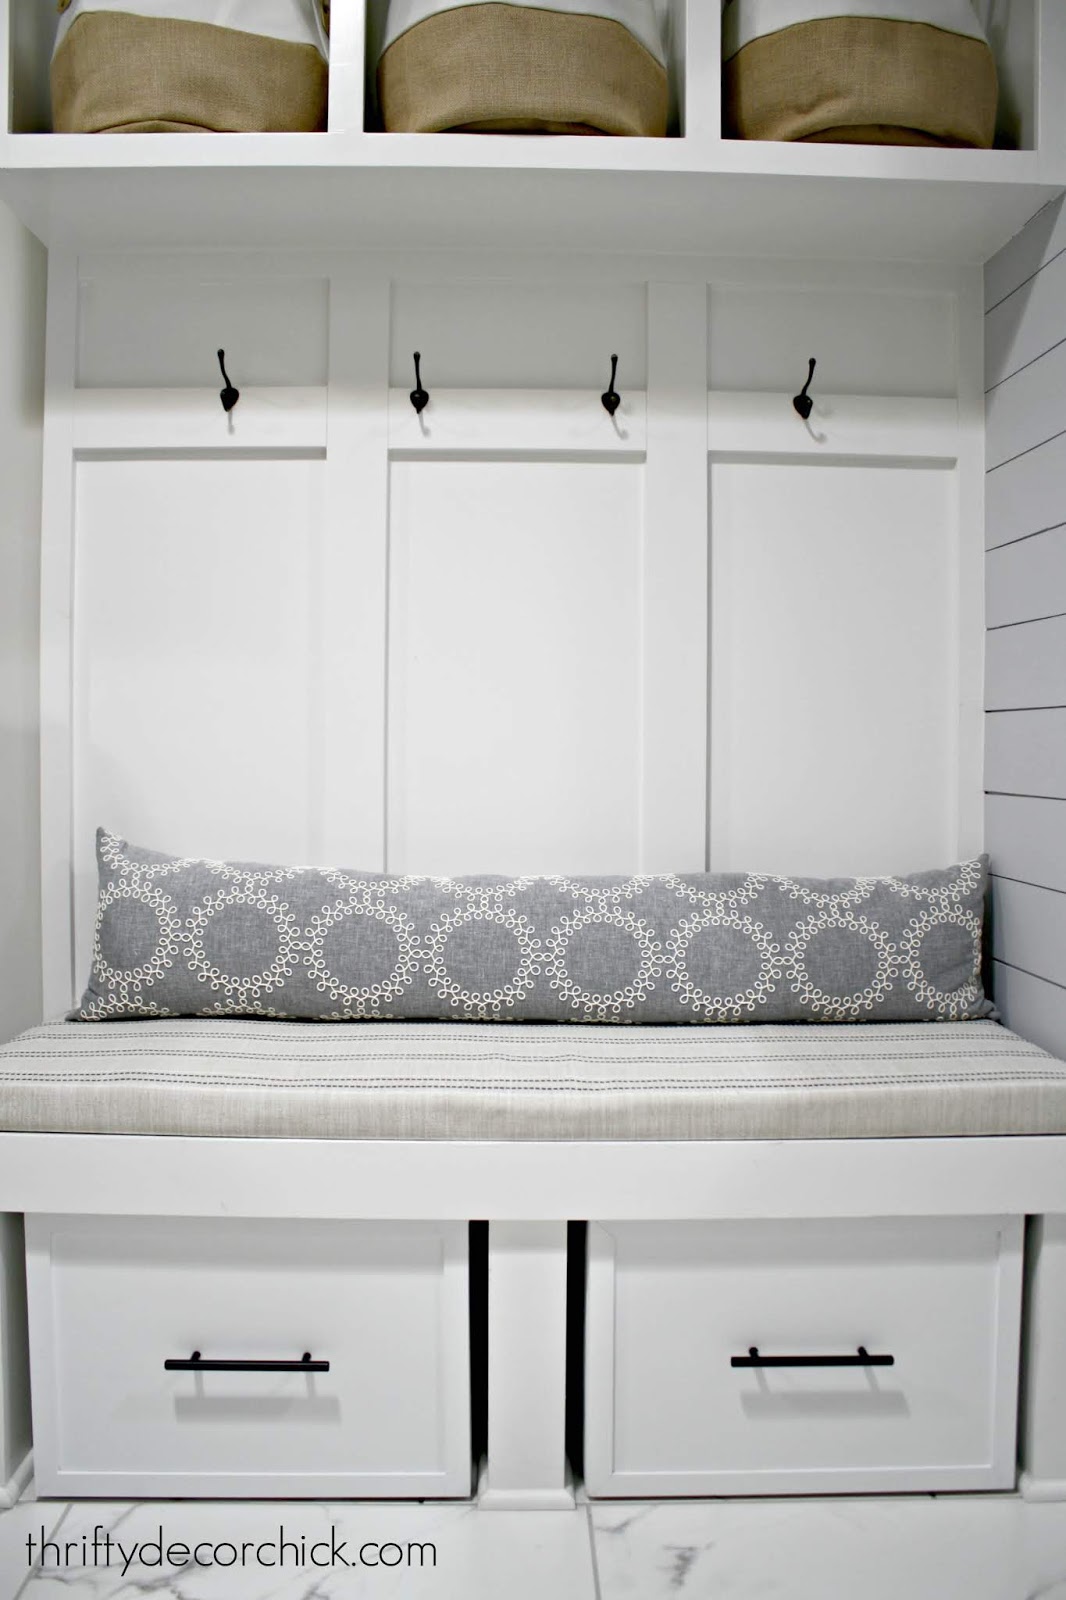
SO. much. cleaner. Achieving both form and function always makes me happy!:

I've been meaning to build these since I started this room makeover almost a year ago! They only took me a few hours total -- I wish I would tackled this way sooner. These would also be a great option for under the bed storage! Just use carpet sliders underneath instead of the felt. :) Here are more details about this room if you're interested:
See more of our home here. To shop items in our home, click here! Never miss a post by signing up to get posts via email. Via https://www.thriftydecorchick.com/2020/03/diy-shoe-storage-solution-for-mud-room.html
We've had some beautiful weather lately -- spring IS on the way! This time of year I always get the urge to spray paint something after months of not getting outdoors much.
I've talked about the joy of spray paint many, many times over the years. It's such a cheap way to update so many items! I gathered some of my favorites to show you just how dramatic the change can be.
I'm also sharing a big fail...but more on that in a minute.
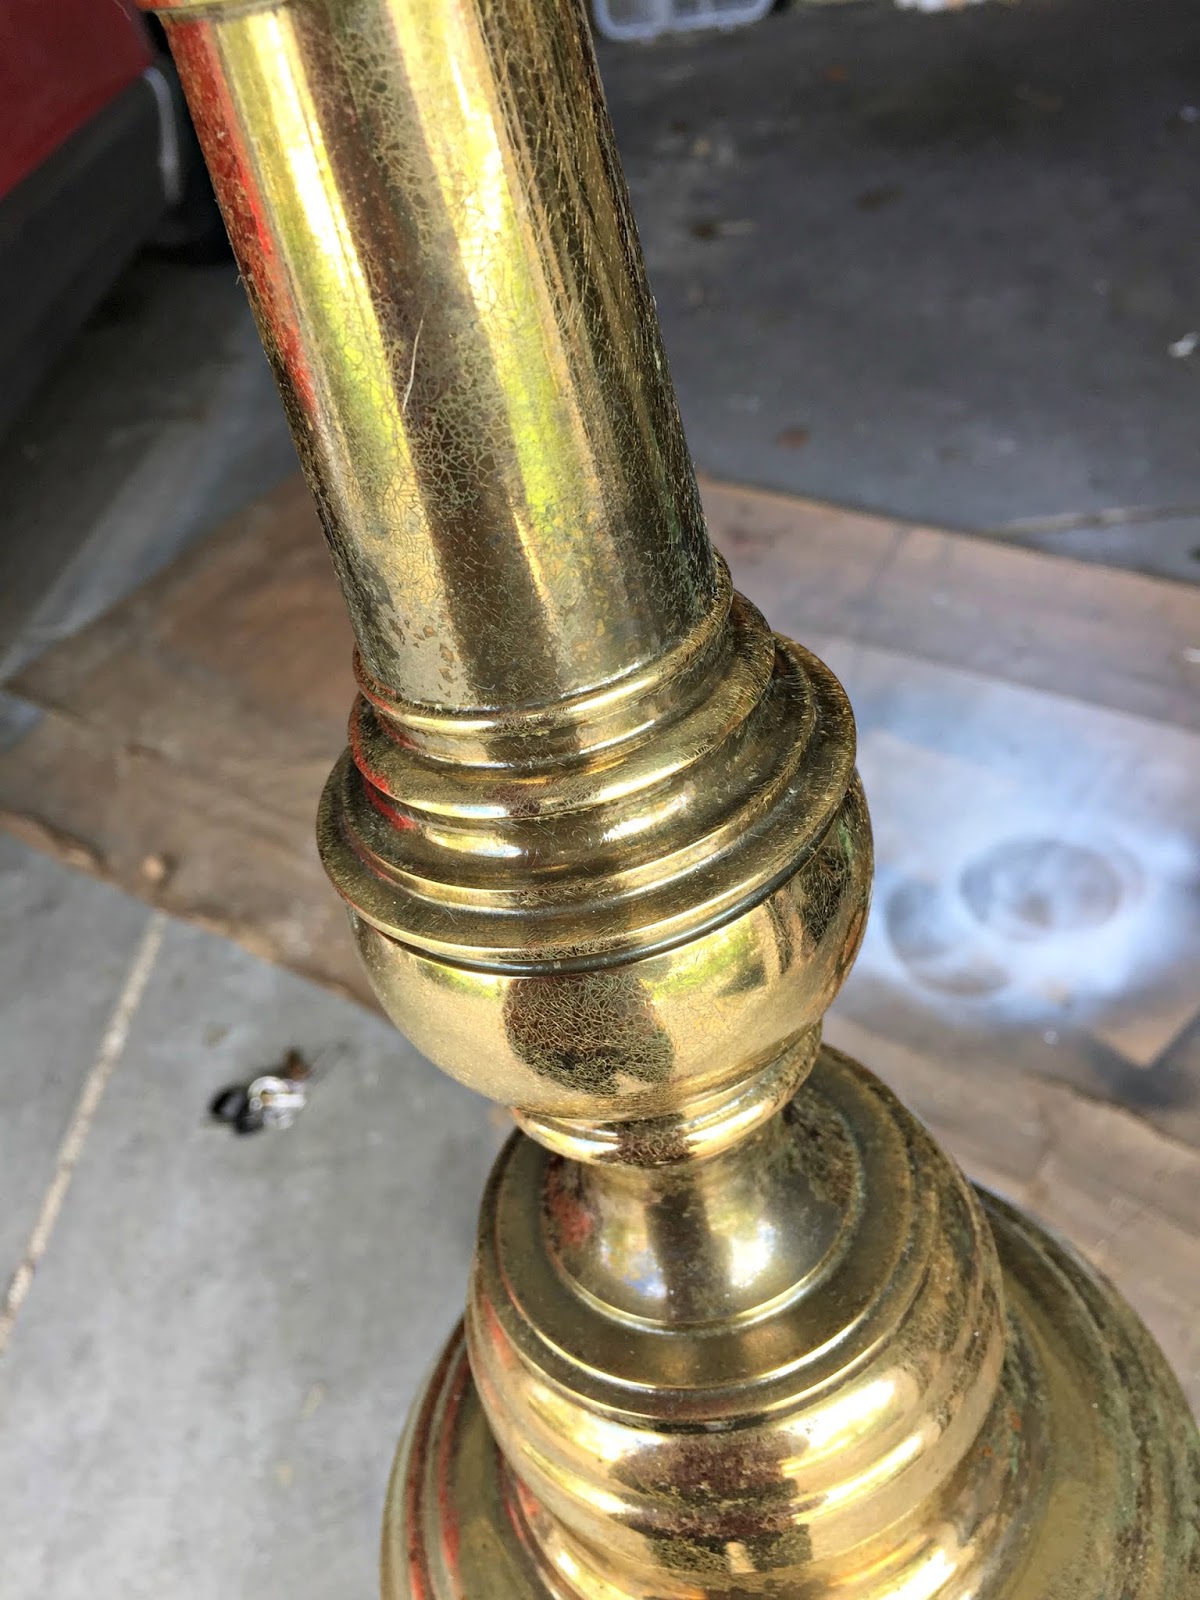
My favorite spray painting project to date (and that's a long time) is our coach light redo at the old house. They were looking really worn (they were MUCH darker than this when I installed them):
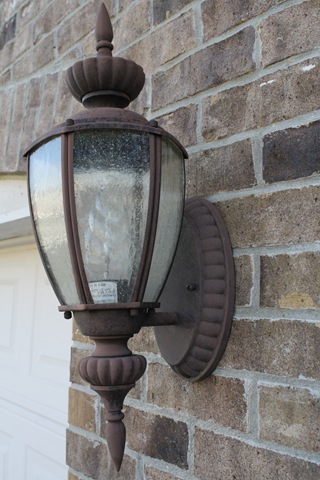
And after cleaning the glass and giving them a shiny new coat of paint, they looked amazing!:
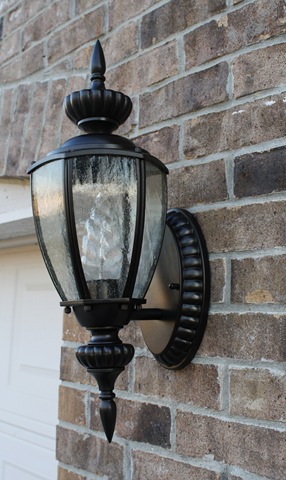
You can see the whole tutorial on how to spray paint outdoor light fixtures here.
They held up beautifully -- even I was shocked. They still looked pretty darn great when we moved seven years later.
I've sprayed many outdoor items over the years since -- these hose guides were looking pretty rough:
As you can see, oil-rubbed bronze (or, ORB as we called it back in the day) was my go-to:
I've spray painted SO MANY light fixtures over the years. It's such an easy way to update a light from the 80's. Check out that amazing taping job! (See how I did that at the link.):

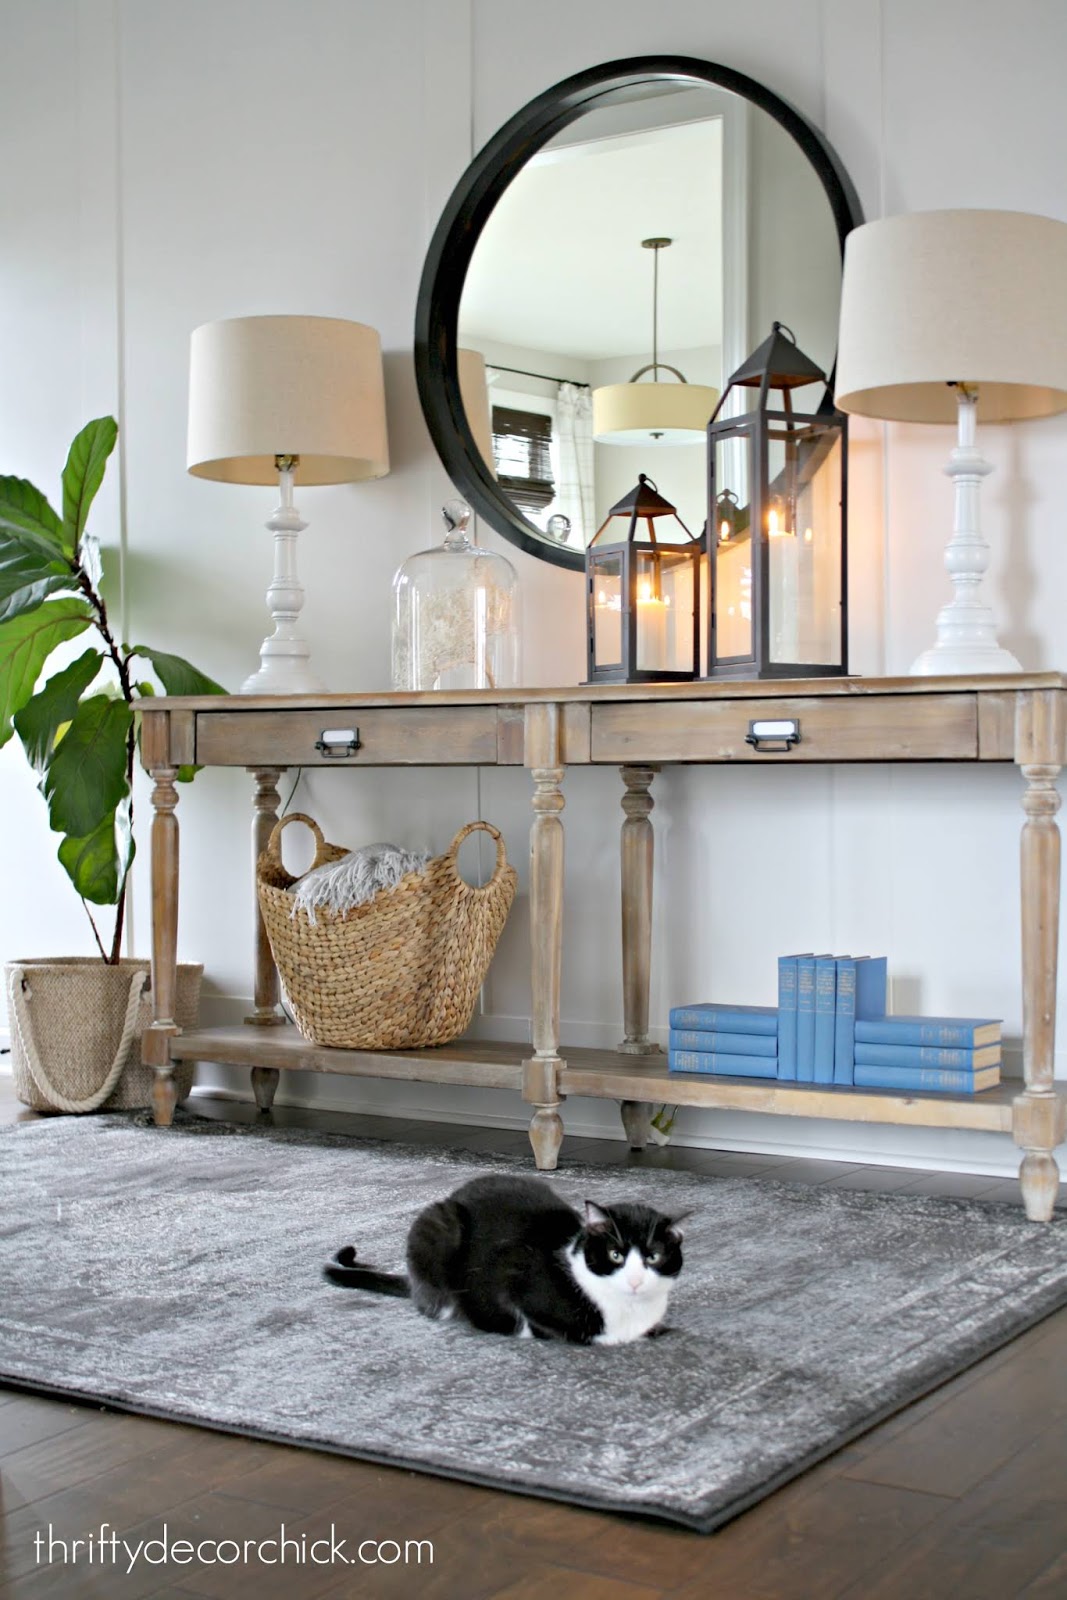
I later painted that wood mirror when I changed up the foyer -- there was too much wood going on. I love the pop of black!:
I found this bath caddy on clearance years ago -- spray paint and some stenciled numbers completely transformed it!:

You can see how I painted, distressed and later added wheels here. That little table and chair set was my sister-in-law's growing up. I gave it new life with spray paint as well. :)
I'll literally try spray paint on anything! I've even spray painted bamboo roman shades and it worked so well.
I've shared tutorials on getting the best finish many times over the years. You can see my spray paint test comparing different brands for coverage here: 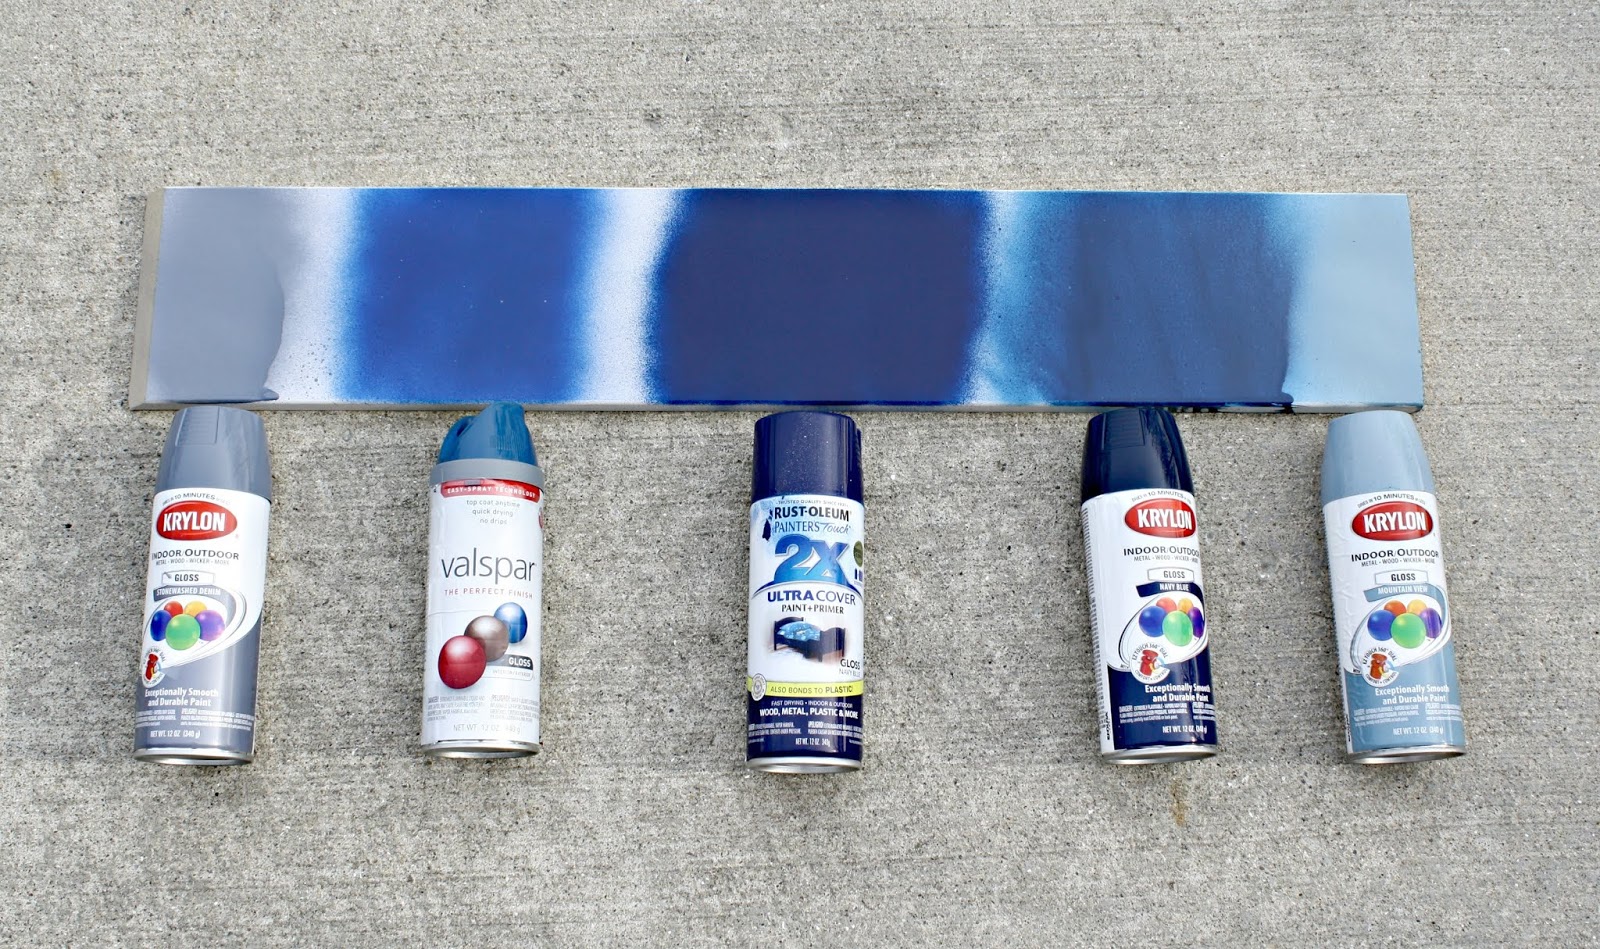
I wrote this post all about spray paint (and answered many questions) years back, but it's still good info. Enjoy the blast from the past photos in that one!
This week I got out in the beautiful weather and sprayed one of my favorites -- floor vents!:
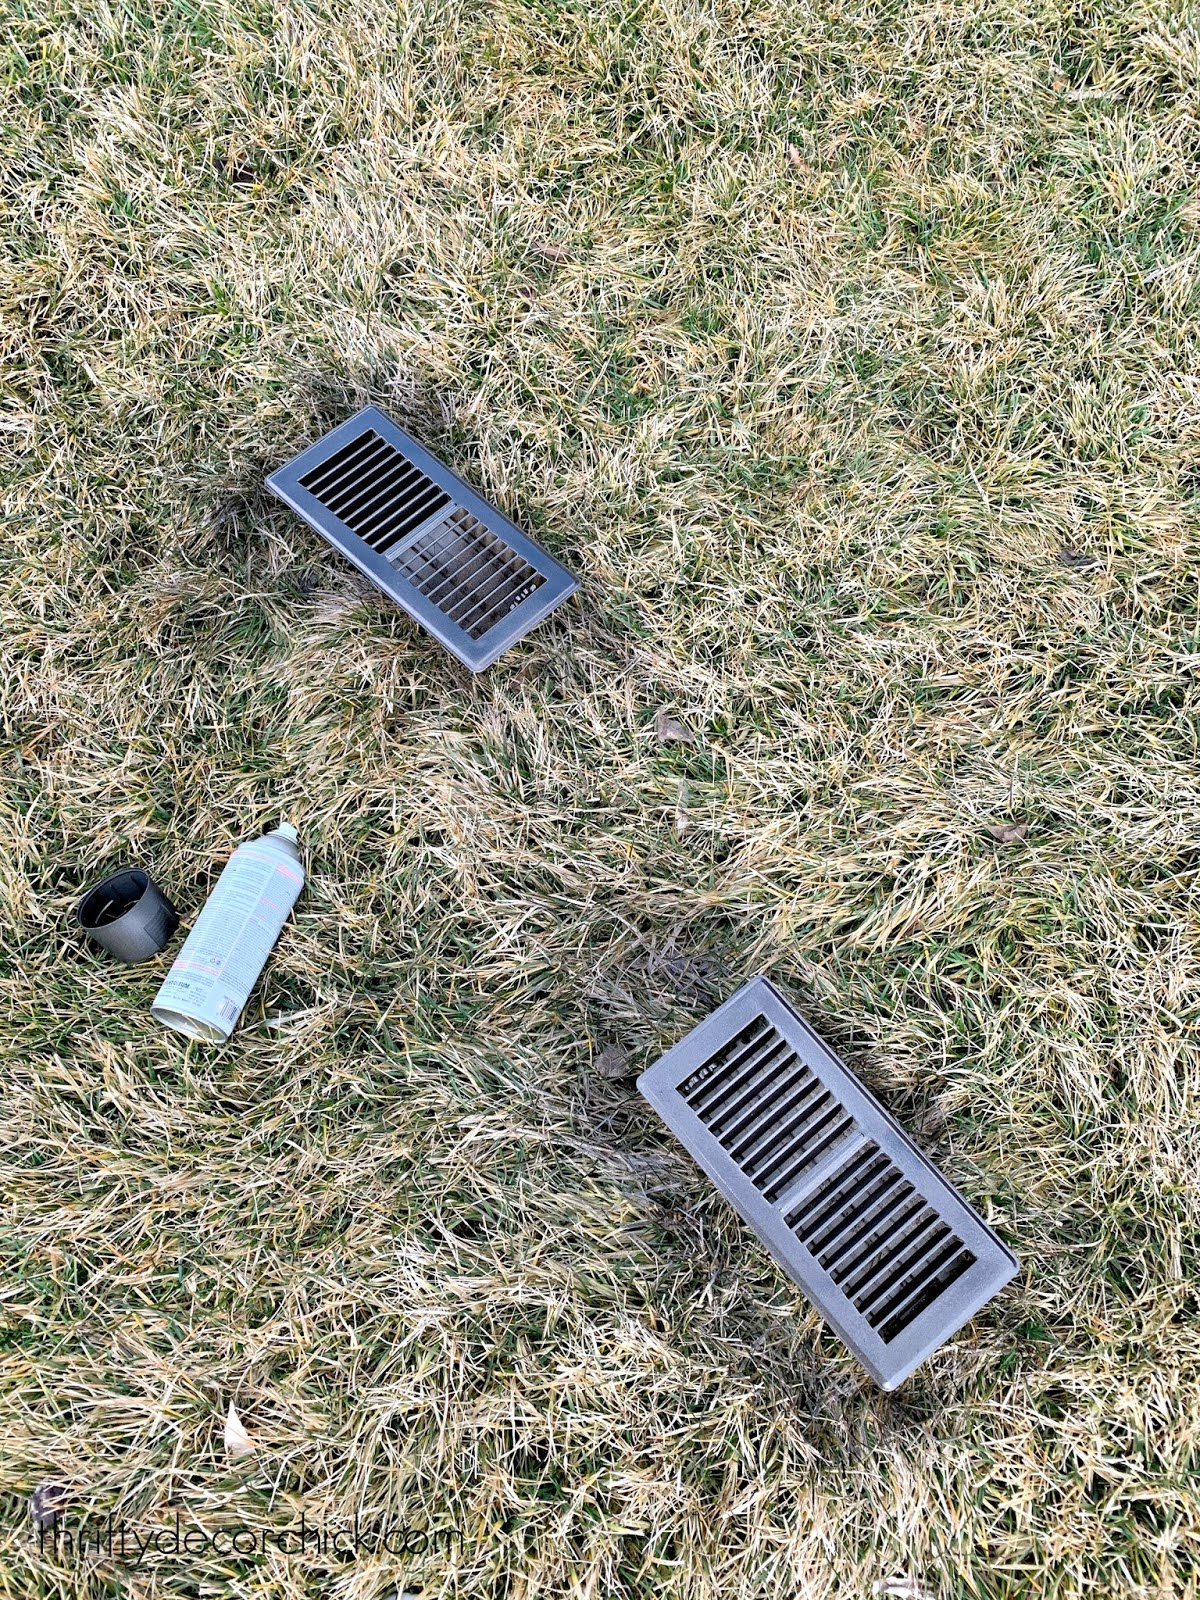
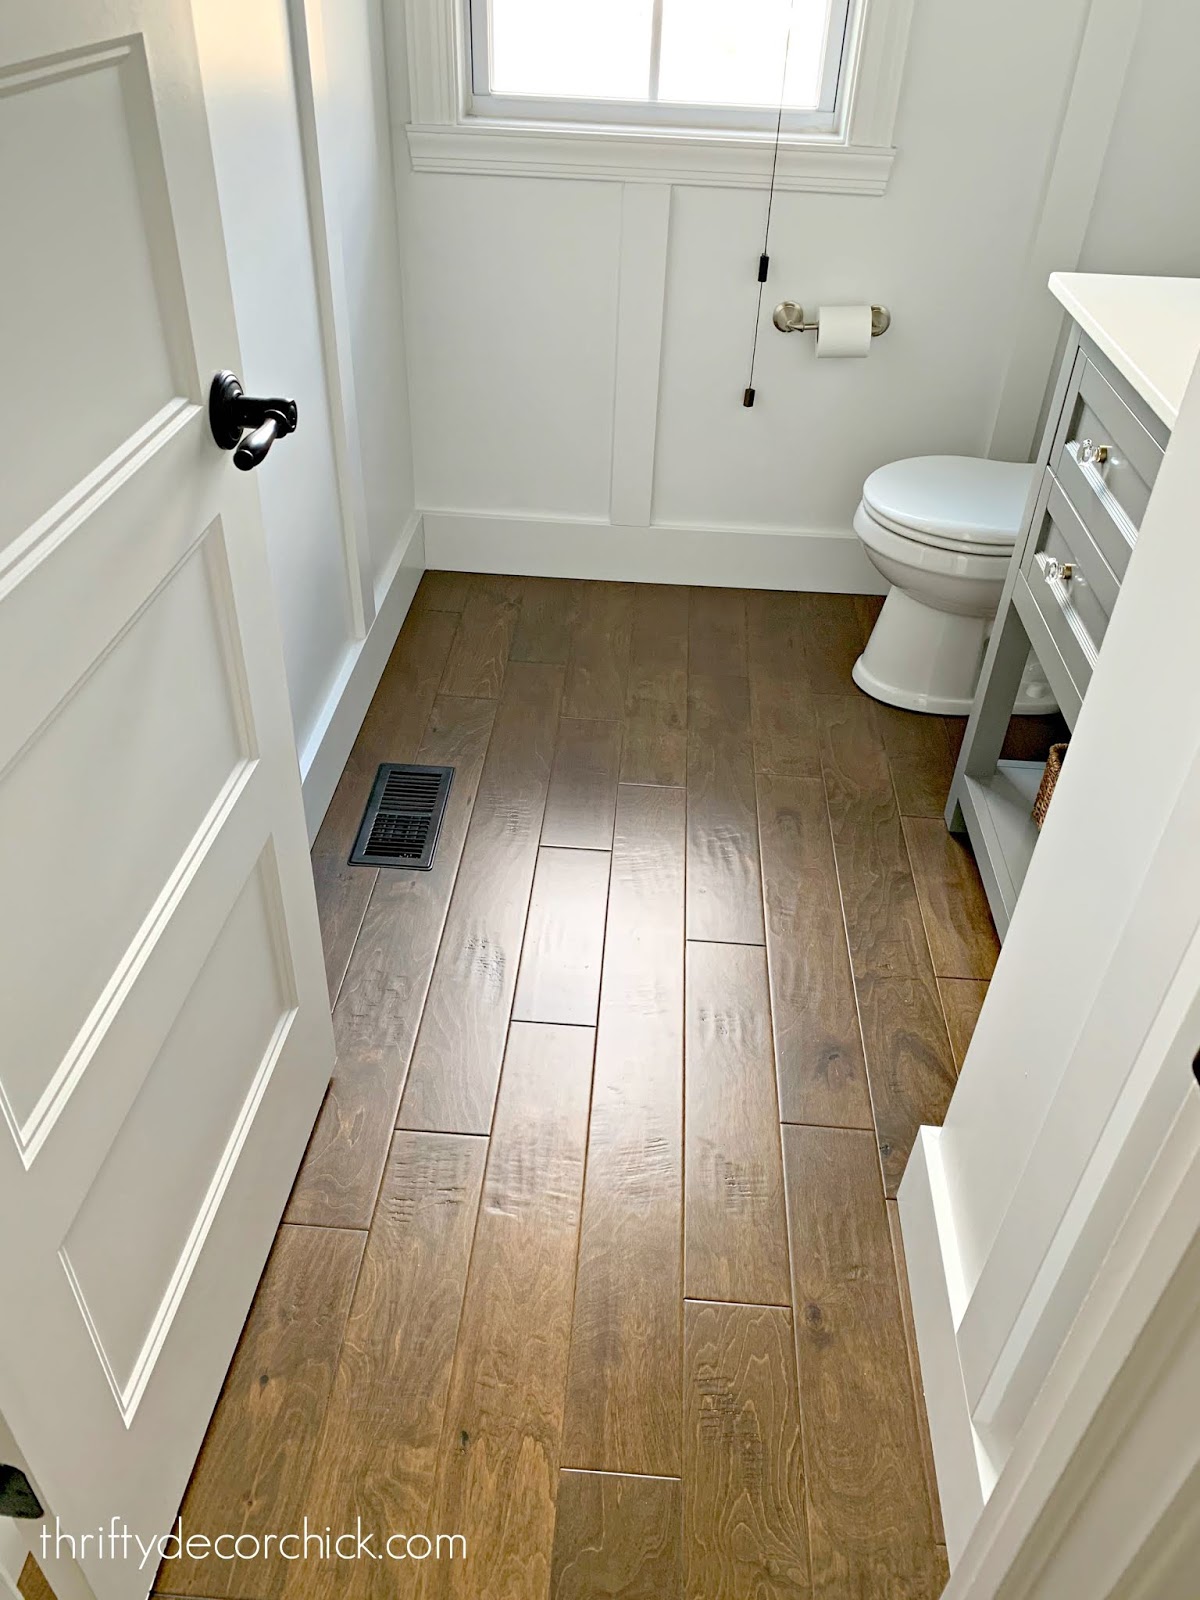
Yep, you can even spray paint floor vents. They hold up pretty darn well. Our original vents are a light color that really pops off the hardwoods -- a coat of "ORB" and they are good to go!:
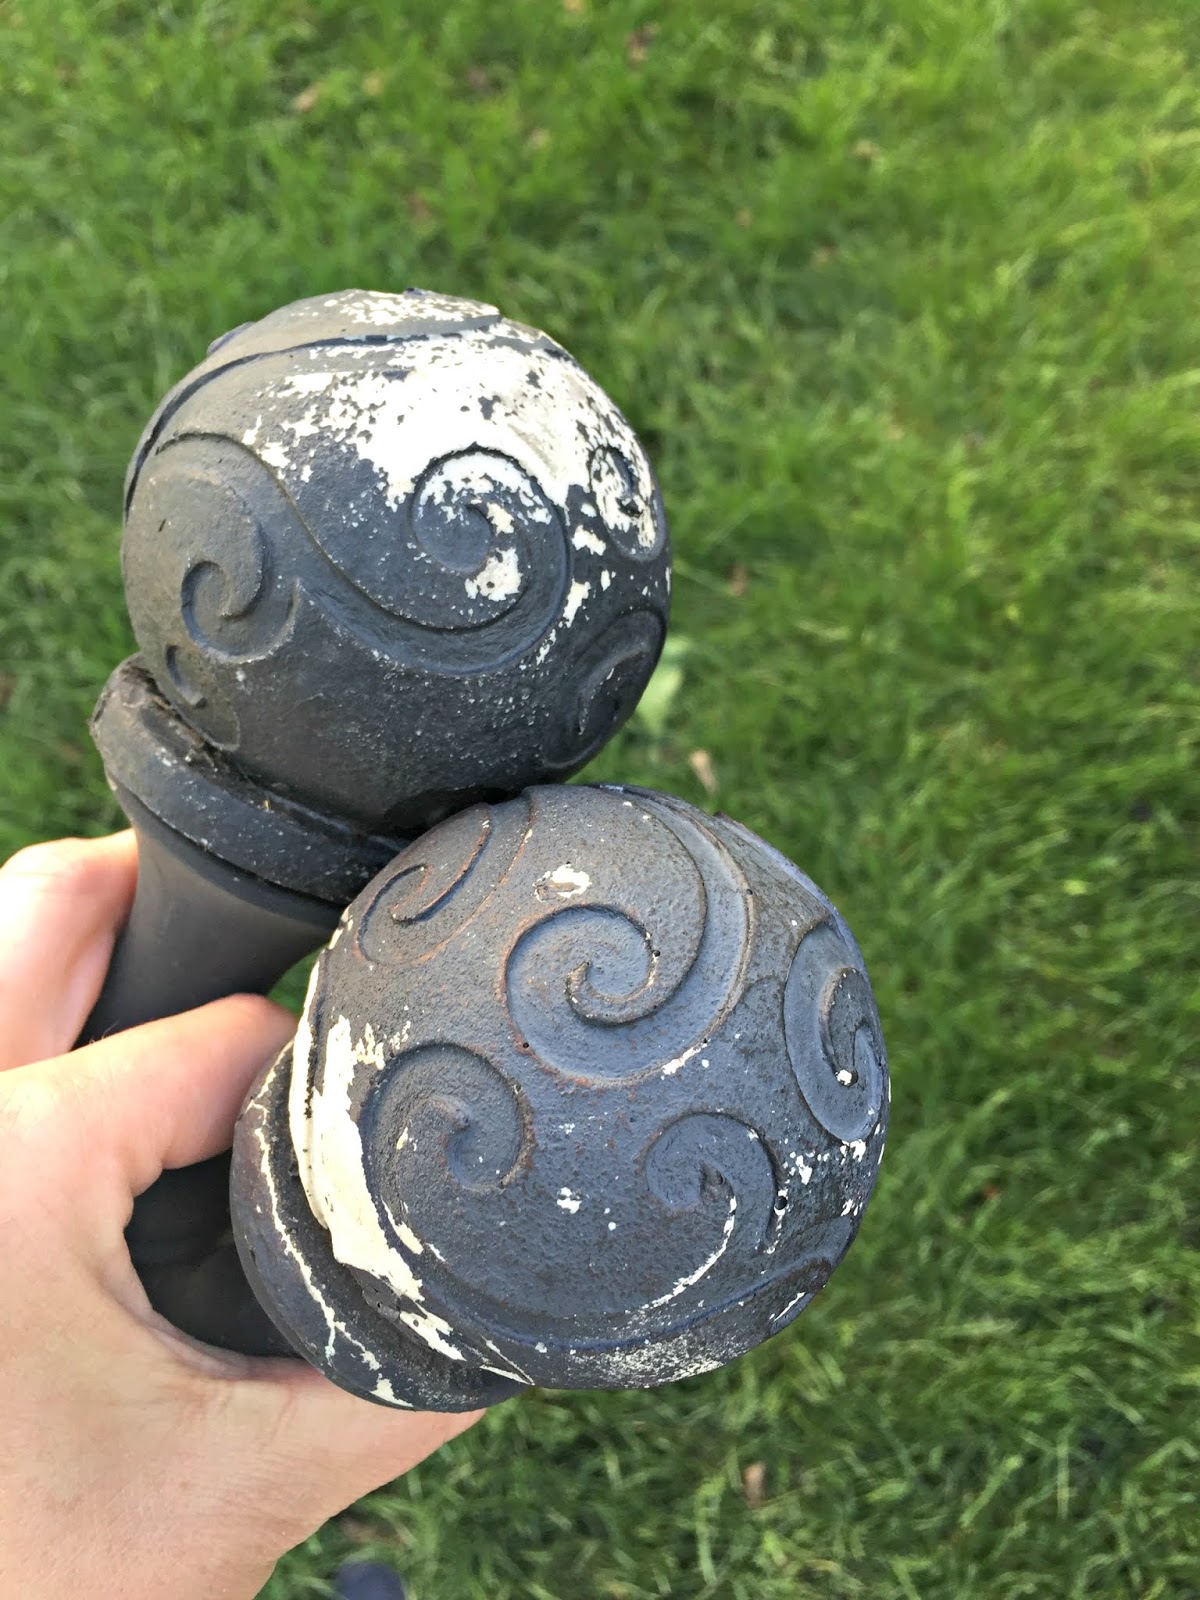
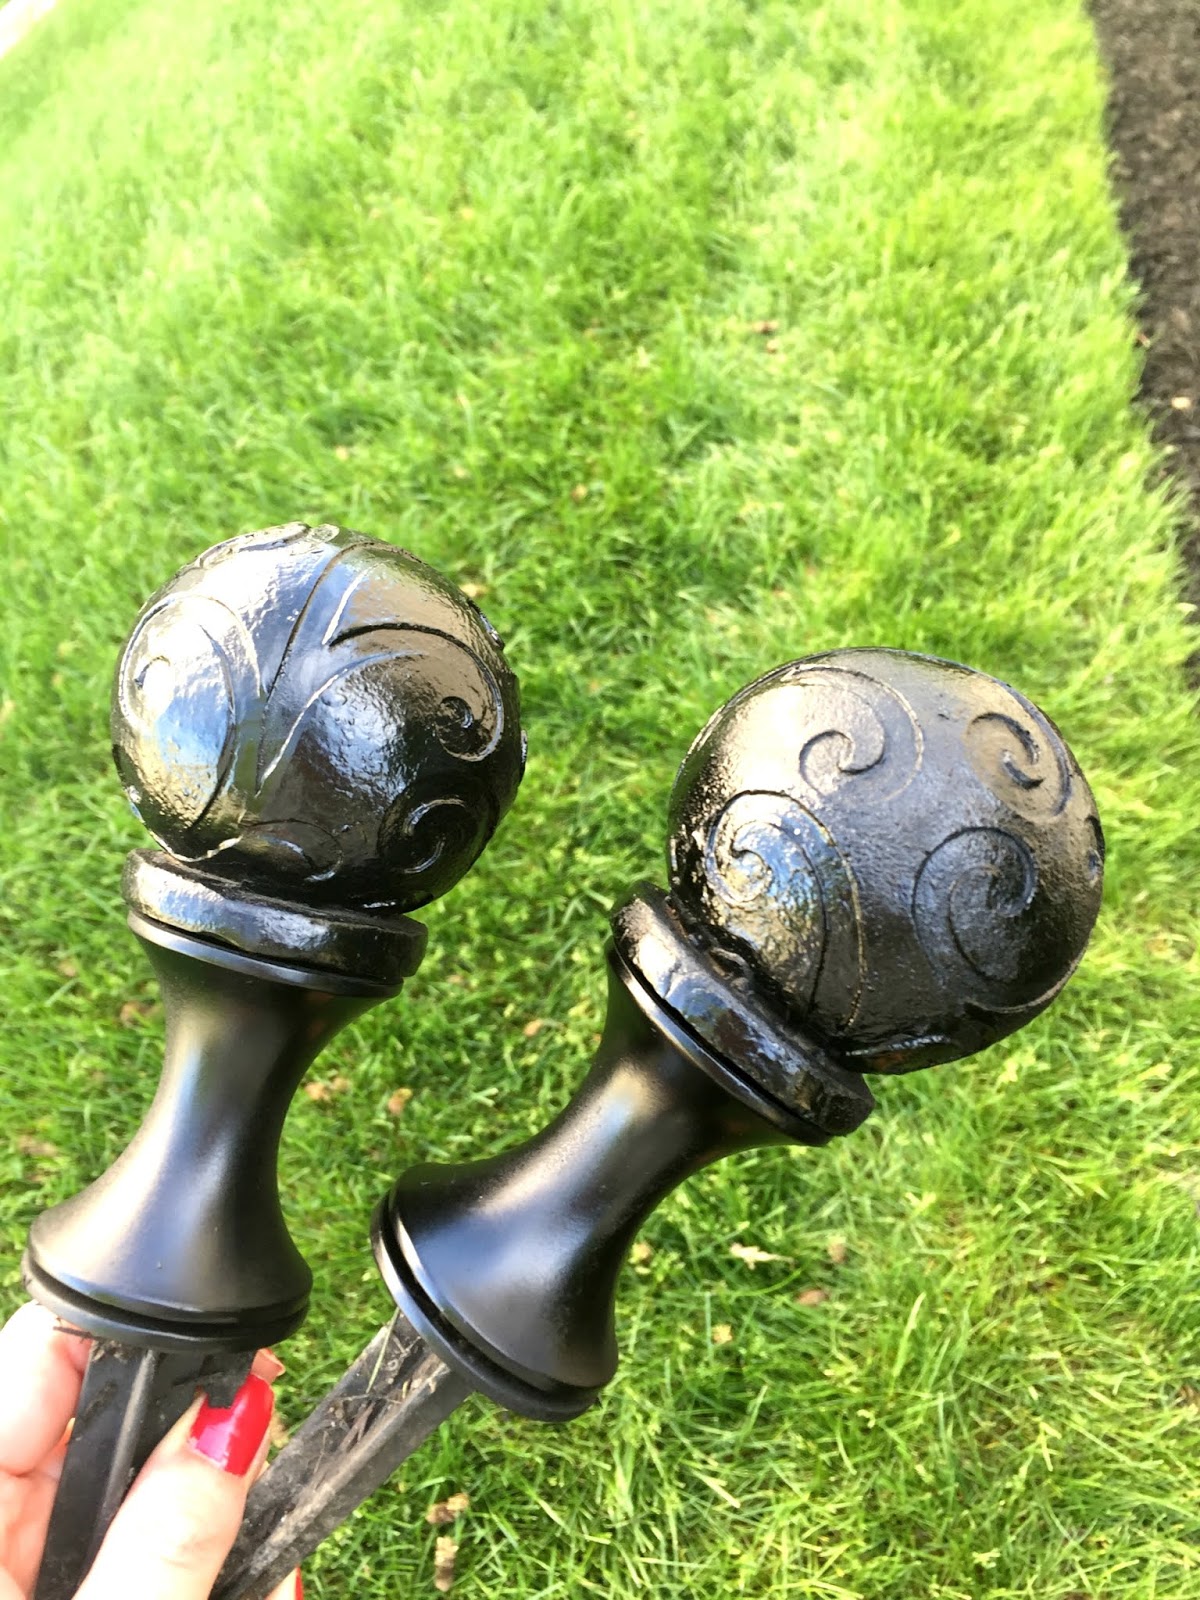
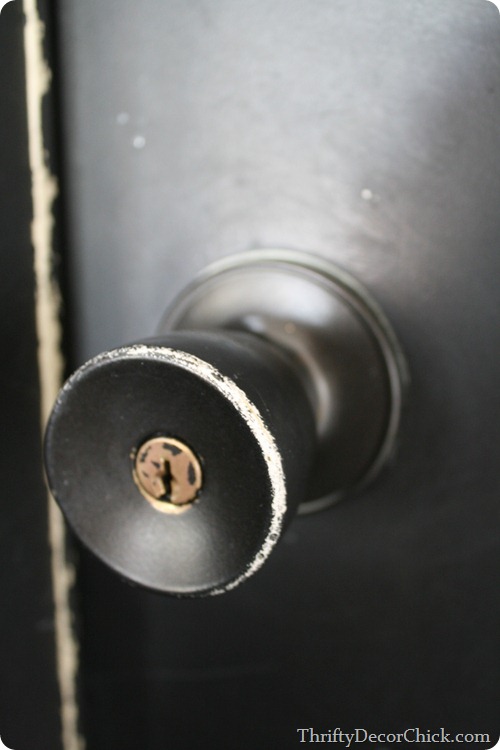
Now...one of the items that did not fare well, and it's one I get asked about a lot.
I shared how I spray painted our brass door knobs at the old house and then how they turned out after a few months of use:
Have I convinced you to try spray paint over the years? Any hits or misses you've encountered? See more of our home here. To shop items in our home, click here! Never miss a post by signing up to get posts via email. Via https://www.thriftydecorchick.com/2020/03/spray-paint-easiest-way-to-update-just.html |
