How to easily make cabinets doors soft close in just a few minutes.Tired of your drawers slamming shut when the kids are using them? Do your drawers become a mess every time the drawer slams because stuff moves around inside? There's an EASY fix for this that only takes a few minutes to install. I share a video on the installation in this post! Did you know you can add soft close dampers to your bathroom or kitchen cabinet doors? This is a great way to update basic stock cabinets. Every time we used to walk through IKEA I would open and shut the cabinet doors to see the magic of the soft close door. I never thought I would have them in our house, because replacing each and every hinge in our home wasn't going to happen.
This post may contain affiliate links for your convenience.
See my policies and disclosure page for more information.
You CAN replace all of your cabinet door hinges with these soft close options instead. As long as you know how to use a screwdriver or drill, this is a really easy update: They come with a tiny damper installed inside. Typically these are a little spendy (although the price really has dropped over the years). You'll need to adjust these to make your door spacing/opening the same as how you had it before. See those little screws on the left side of the hinge? You can tighten or loosen those to change the following:
It's not difficult to make these adjustments, just a little time consuming and tedious. If your cabinet doors aren't level, or are hitting each other, try adjusting those screws! Thankfully there's an easier answer for soft close doors at the hardware store. I was GIDDY the day I first time I came across these years ago! These are soft close dampers you can buy in a package or individually. This is what they look like: 
They run around $3 each but you can get them in multiples and they cost even less.
The great thing is, you only need one per door, unlike the door hinges. The installation is SUPER easy. They go inside the cabinet like so, with a bit of the edge hanging over: 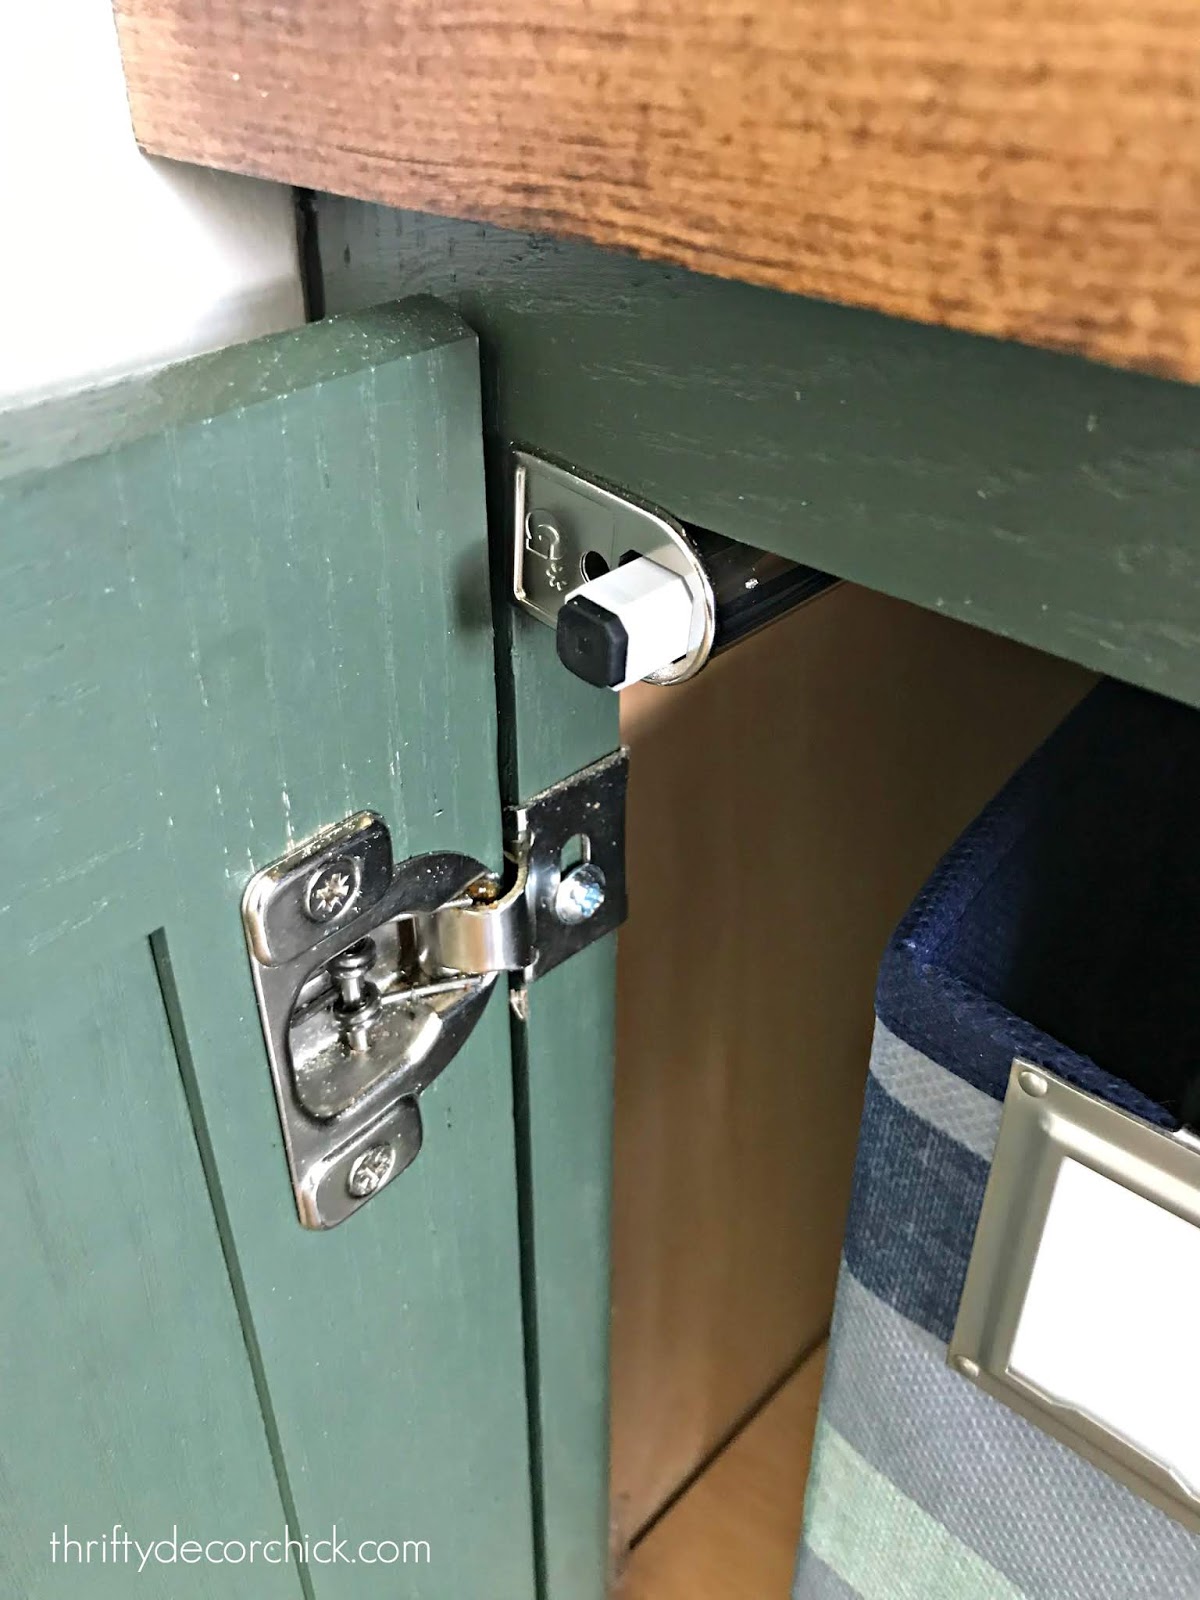
There's a hole in the side of the damper to slide the screw through for installation. I recommend predrilling the hole for your screw first. This makes installation a lot easier and makes sure the frame doesn’t split. Each damper only needs one screw. That's it for the install! One more thing though, try out your door to see how it closes. If it doesn't close soft enough for your liking, you can move the damper by adjusting the back screw: 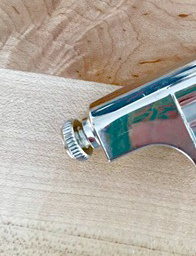
You can extend it for heavier doors or make it shorter for lighter doors that need less "damping." That's the technical term you know. ;) This soft close option have been especially helpful for us because I use stock cabinets for so many of my bookcase builds:
They are inexpensive and don't come with any of the cool options that more expensive cabinets have. For my recent pantry project, I used an option from the Rockler store just because I was impatient and didn't want to wait the day for a delivery. ? Here’s a quick video on how to install, and you can see how the doors close after installation:
Those pantry doors are tall and heavy, so I may add one more damper at the bottom of each one. But on standard doors, one is more than enough to create that slow motion.
When you do this it feels so luxurious…all fancy-like. It does take some getting used to – for awhile you'll try to shut the doors. We had to remind ourselves to chilllll and let the damper do it’s job. :) It's nice because the little pads on our doors are constantly falling off -- I’m always gluing them back on and now there is no need. The directions just show these for cabinet doors but I’m going to try them out on a drawer to see if it works. If not…there’s always those full extending drawer slides with soft close…someday. ;) **I tried these dampers on drawers and they do NOT work! I love sharing little finds like this that work well – have you tried these door dampers in your home?
Never miss a post by signing up to get posts via email.
Via https://www.thriftydecorchick.com/2015/03/diy-soft-close-doors.html
0 Comments
How to make these easy and fun floating witch hats for your front porch or inside!
I've wanted to make these cute DIY "floating" luminary witch hats for our porch for years! They turned out to be a really easy way to add some cute Halloween decorations to our front porch, but you could hang them anywhere for easy decor.
I tried a couple methods of creating these hanging hats with two lighting options, and I'll share both here. Both are very simple, but one is so simple it only take a couple minutes to create each witch hat luminary.
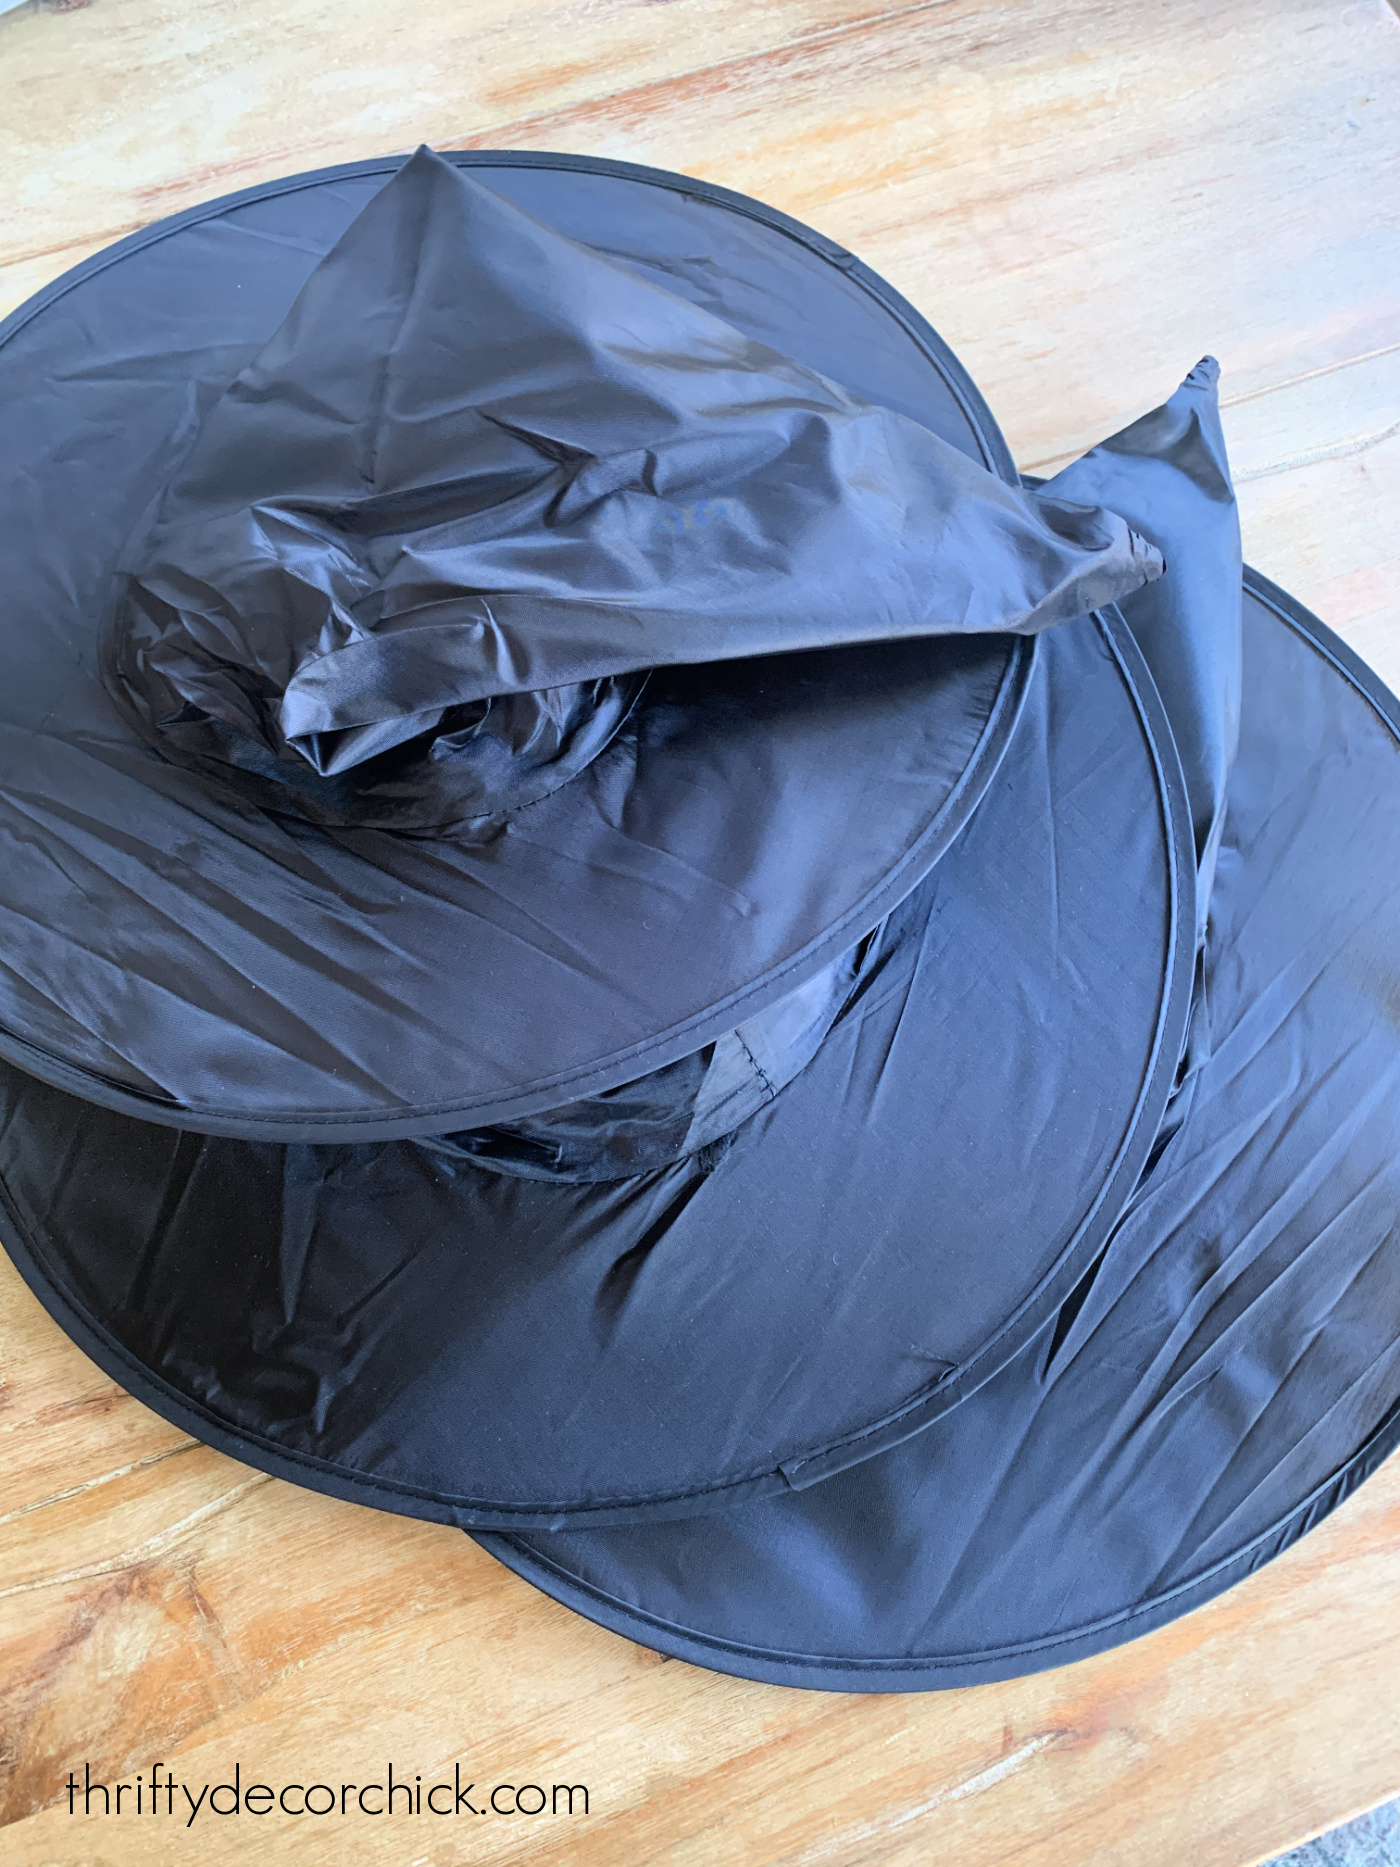
I started with these inexpensive black witch hats:
This post may contain affiliate links for your convenience.
See my policies and disclosure page for more information.
This witch hat set came with 12 hats and a bunch of cute plastic bat cutouts as well. (This set has six hats if you don't need as many.)
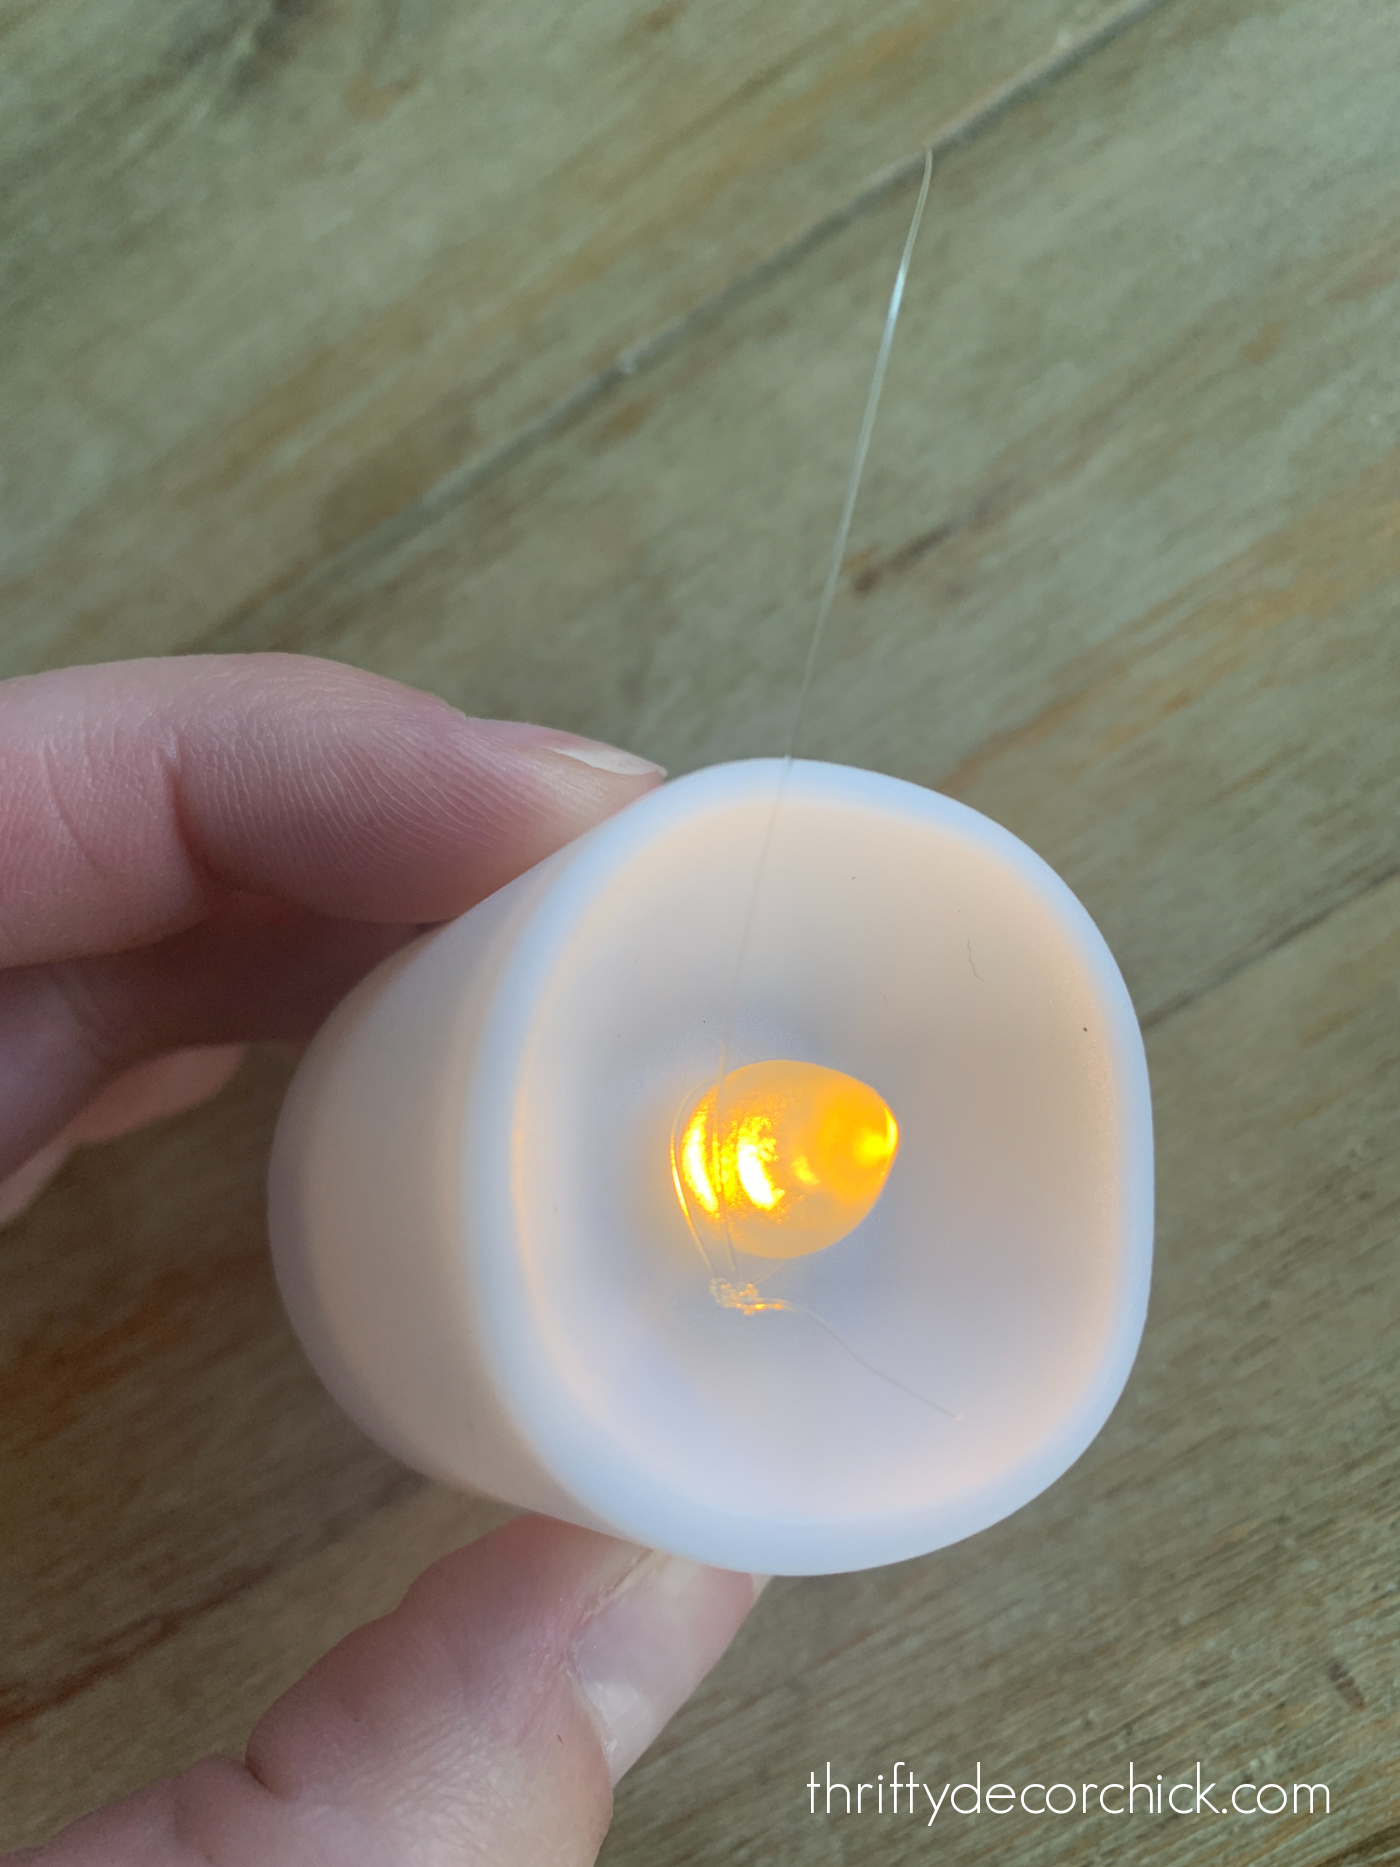
My first tutorial uses LED votives that operate on a timer -- once you turn them on, they'll run for a certain amount of time. So turn them on in the evening and they'll operate every evening after.
I used fishing line for this project because you want the hats to look as though they're floating around on your porch. :)
How to make your witch hats glow
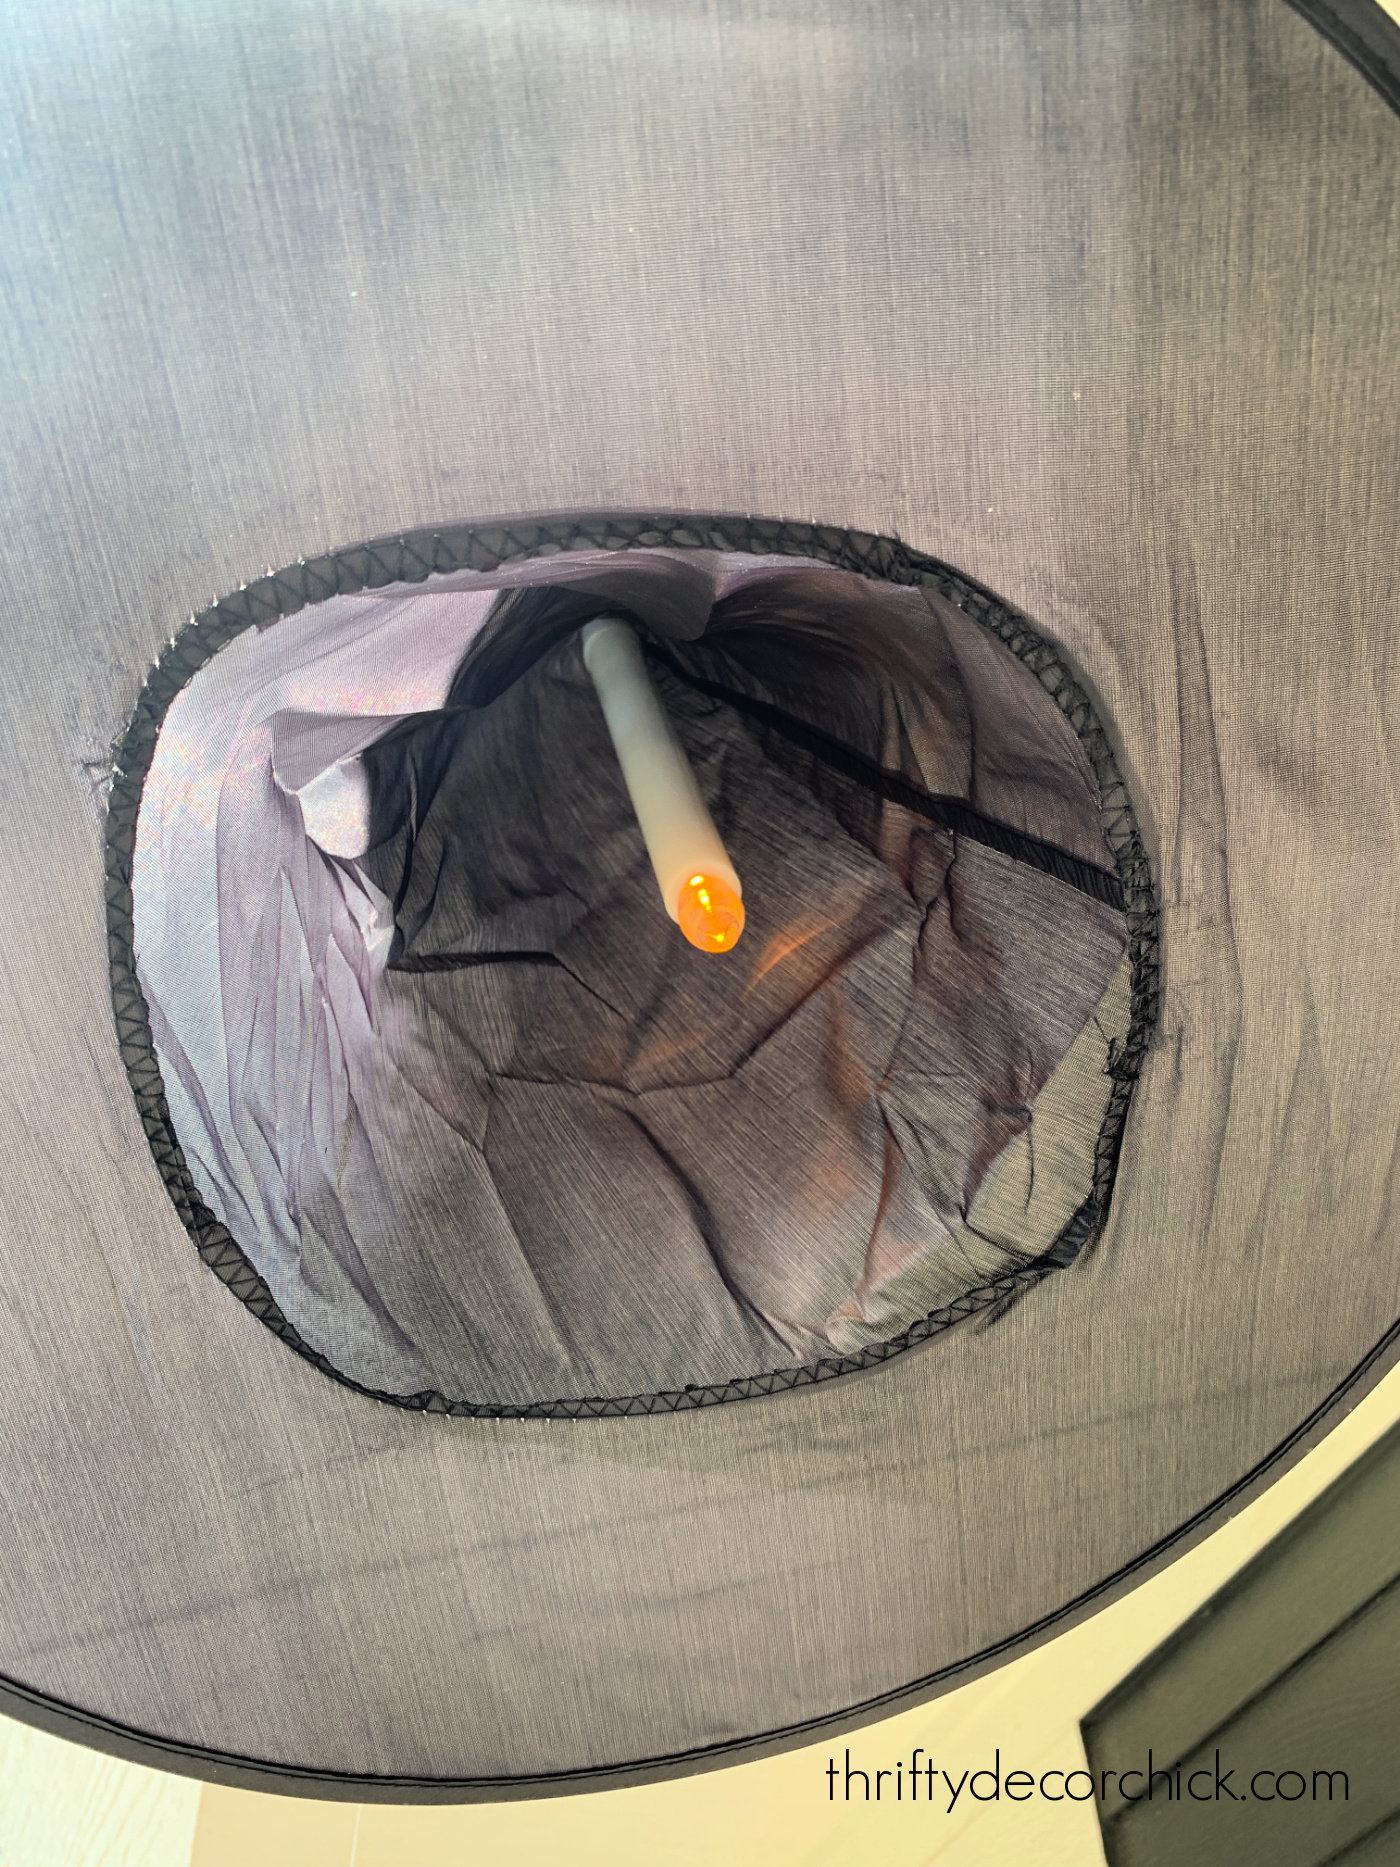
I tied the line around the "flame" of the votives:
You could also use smaller tea lights that are battery-operated as well.
Because I didn't want the votive to hang in the top of the witch hat, I knew I'd need to prevent the fish line from pulling all the way up.
You'll want your candle to hang down inside the hat, not sit up at the very tip.
To allow for this, I grabbed some spacers and washers I had in my stash. I determined the space I wanted between the top of the hat and where I wanted the candle to hang.
Then I wrapped the fishing line around the spacers:

This allows the washer to pull up into the tip of the hat instead of the candle!
Anything this size will work! The only purpose is to prevent the candle from pulling all the way up in the witch hat.
Next up, the even simpler version!
The votives would be perfect for inside, but for our porch I wanted something that was a bit brighter. I thought about what I had on hand and realized our Christmas window candles would be perfect!
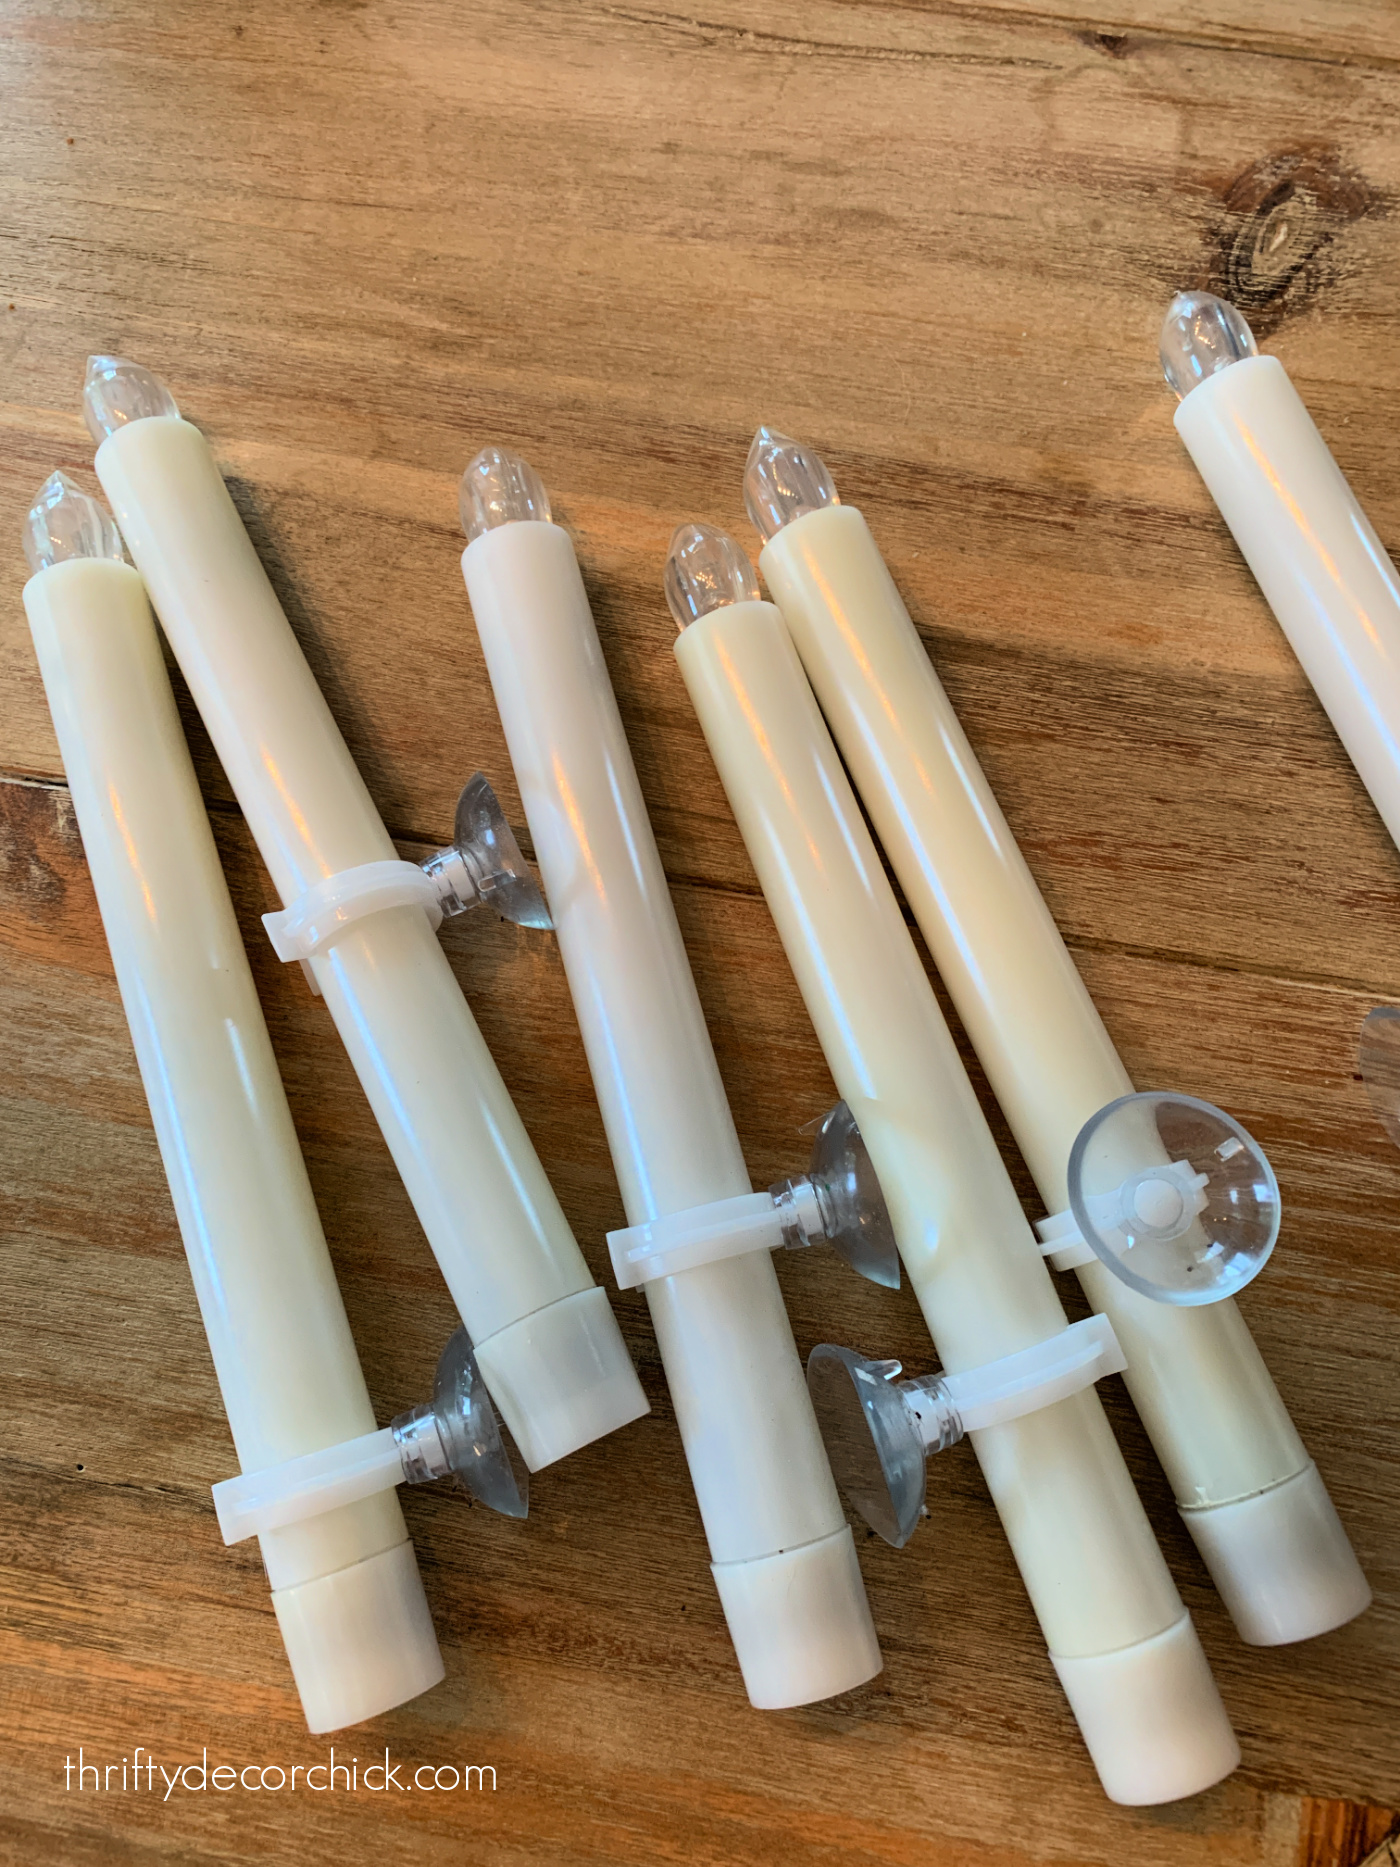
Our particular candles aren't available anymore, but these window candles are very similar. They come with a remote and work on a timer like ours do.
You use the remote to set amount of hours you want them to stay on. They will turn on at the same time every day after that, so you can hang these up high and forget about them!
I was able to tie the fishing line around where the cap at the bottom screws on -- so easy:

Because the candles were hanging upside down, the lit "flame" part was in the middle of the hat already:
So no need to add a washer! If the line pulled the candle up to the top of the hat, that was fine!
How to hang floating witch hats
With either method, you'll want to take a sewing needle and feed your fishing wire through so you can poke the needle through the top of the witch hat:

It goes through the material easily!
Then figure out the height you want the hat to hang and tie a loop at the end of your fishing wire so you can hang your hats. Make sure to knot it a few times so the line doesn't slip.
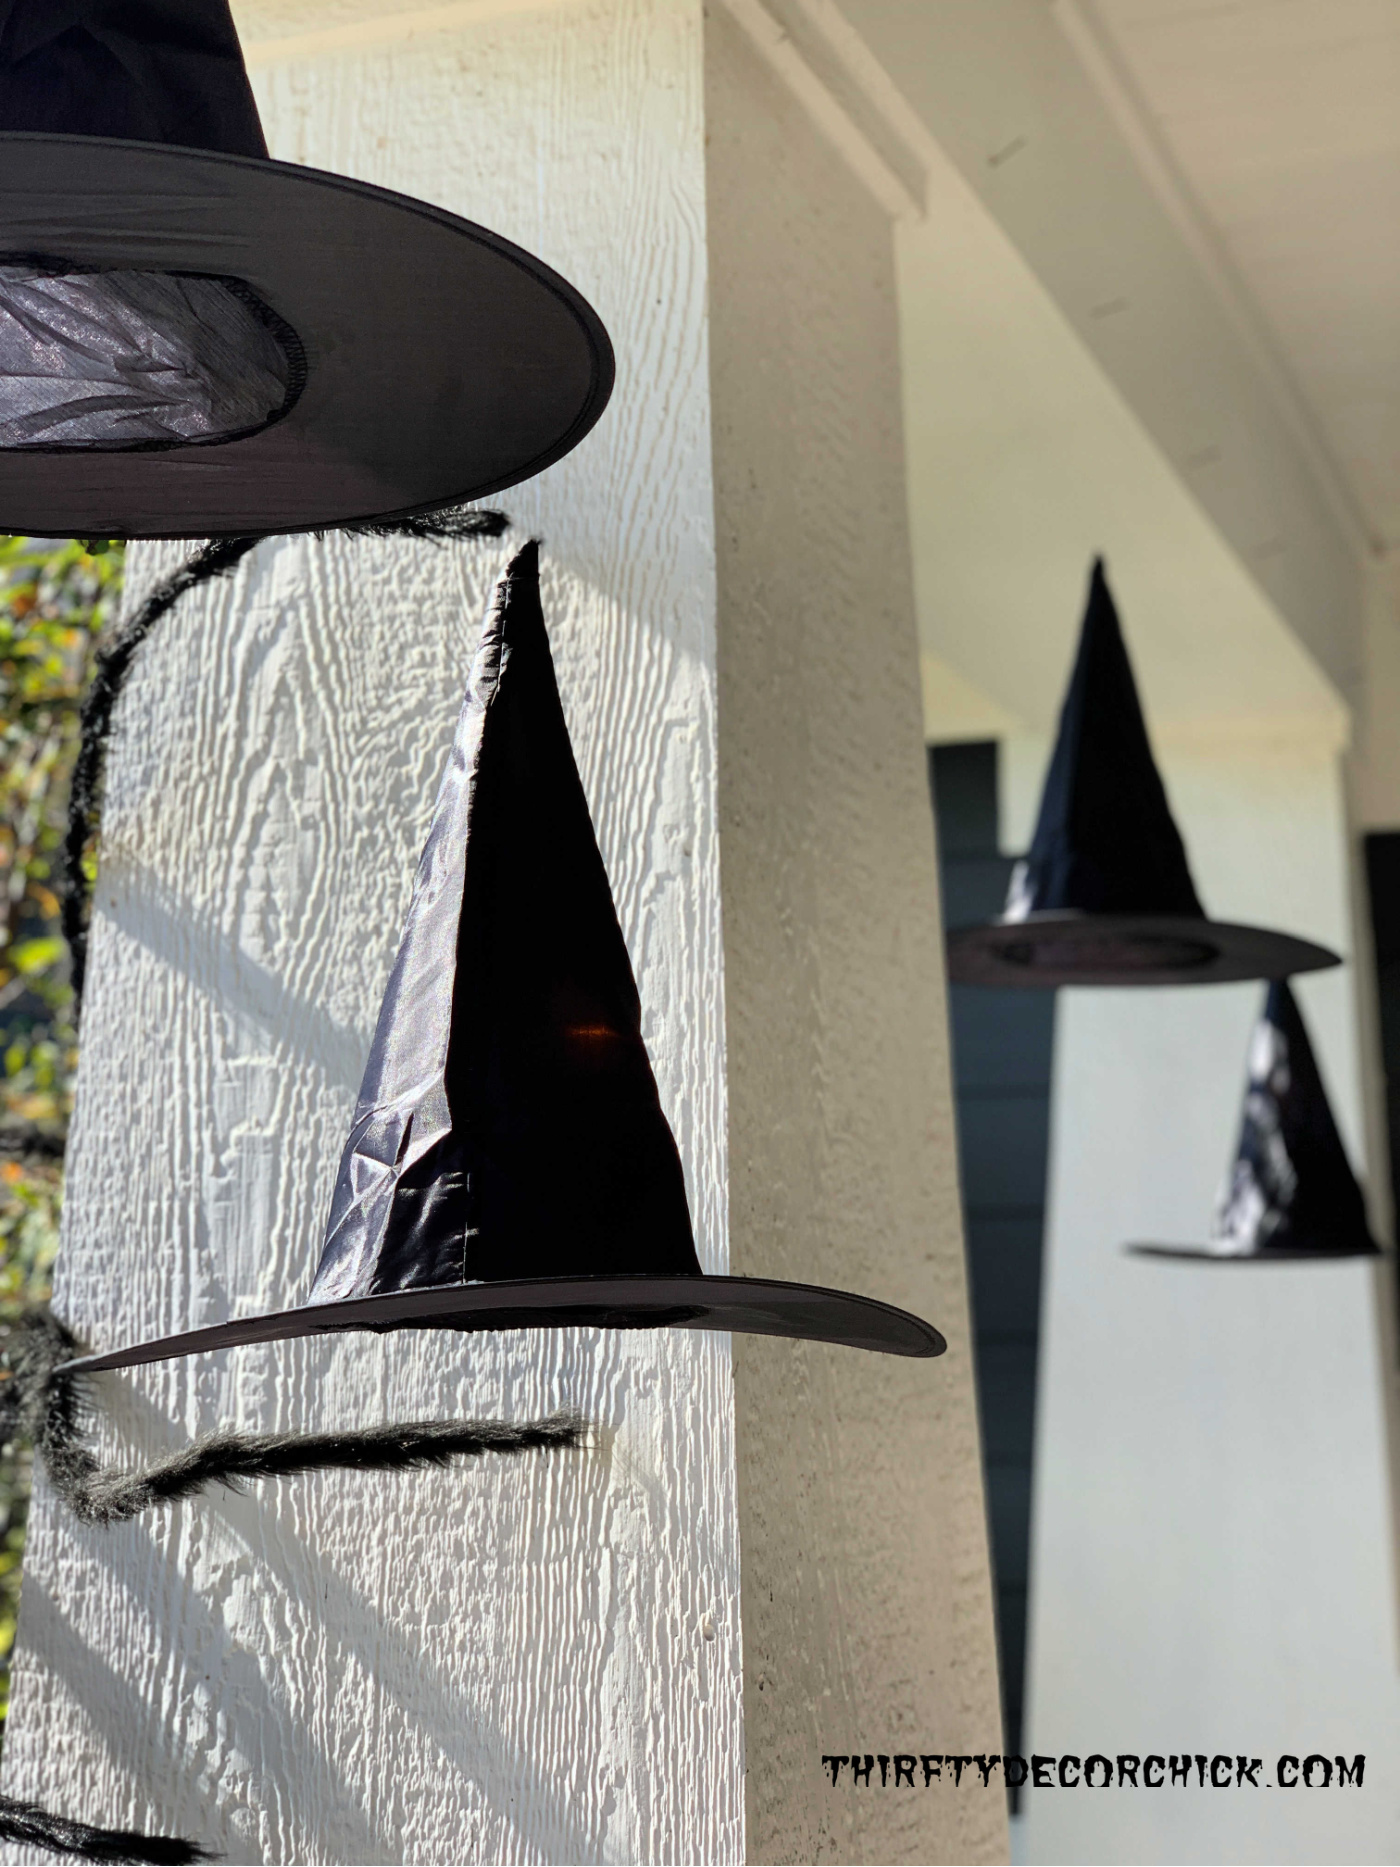
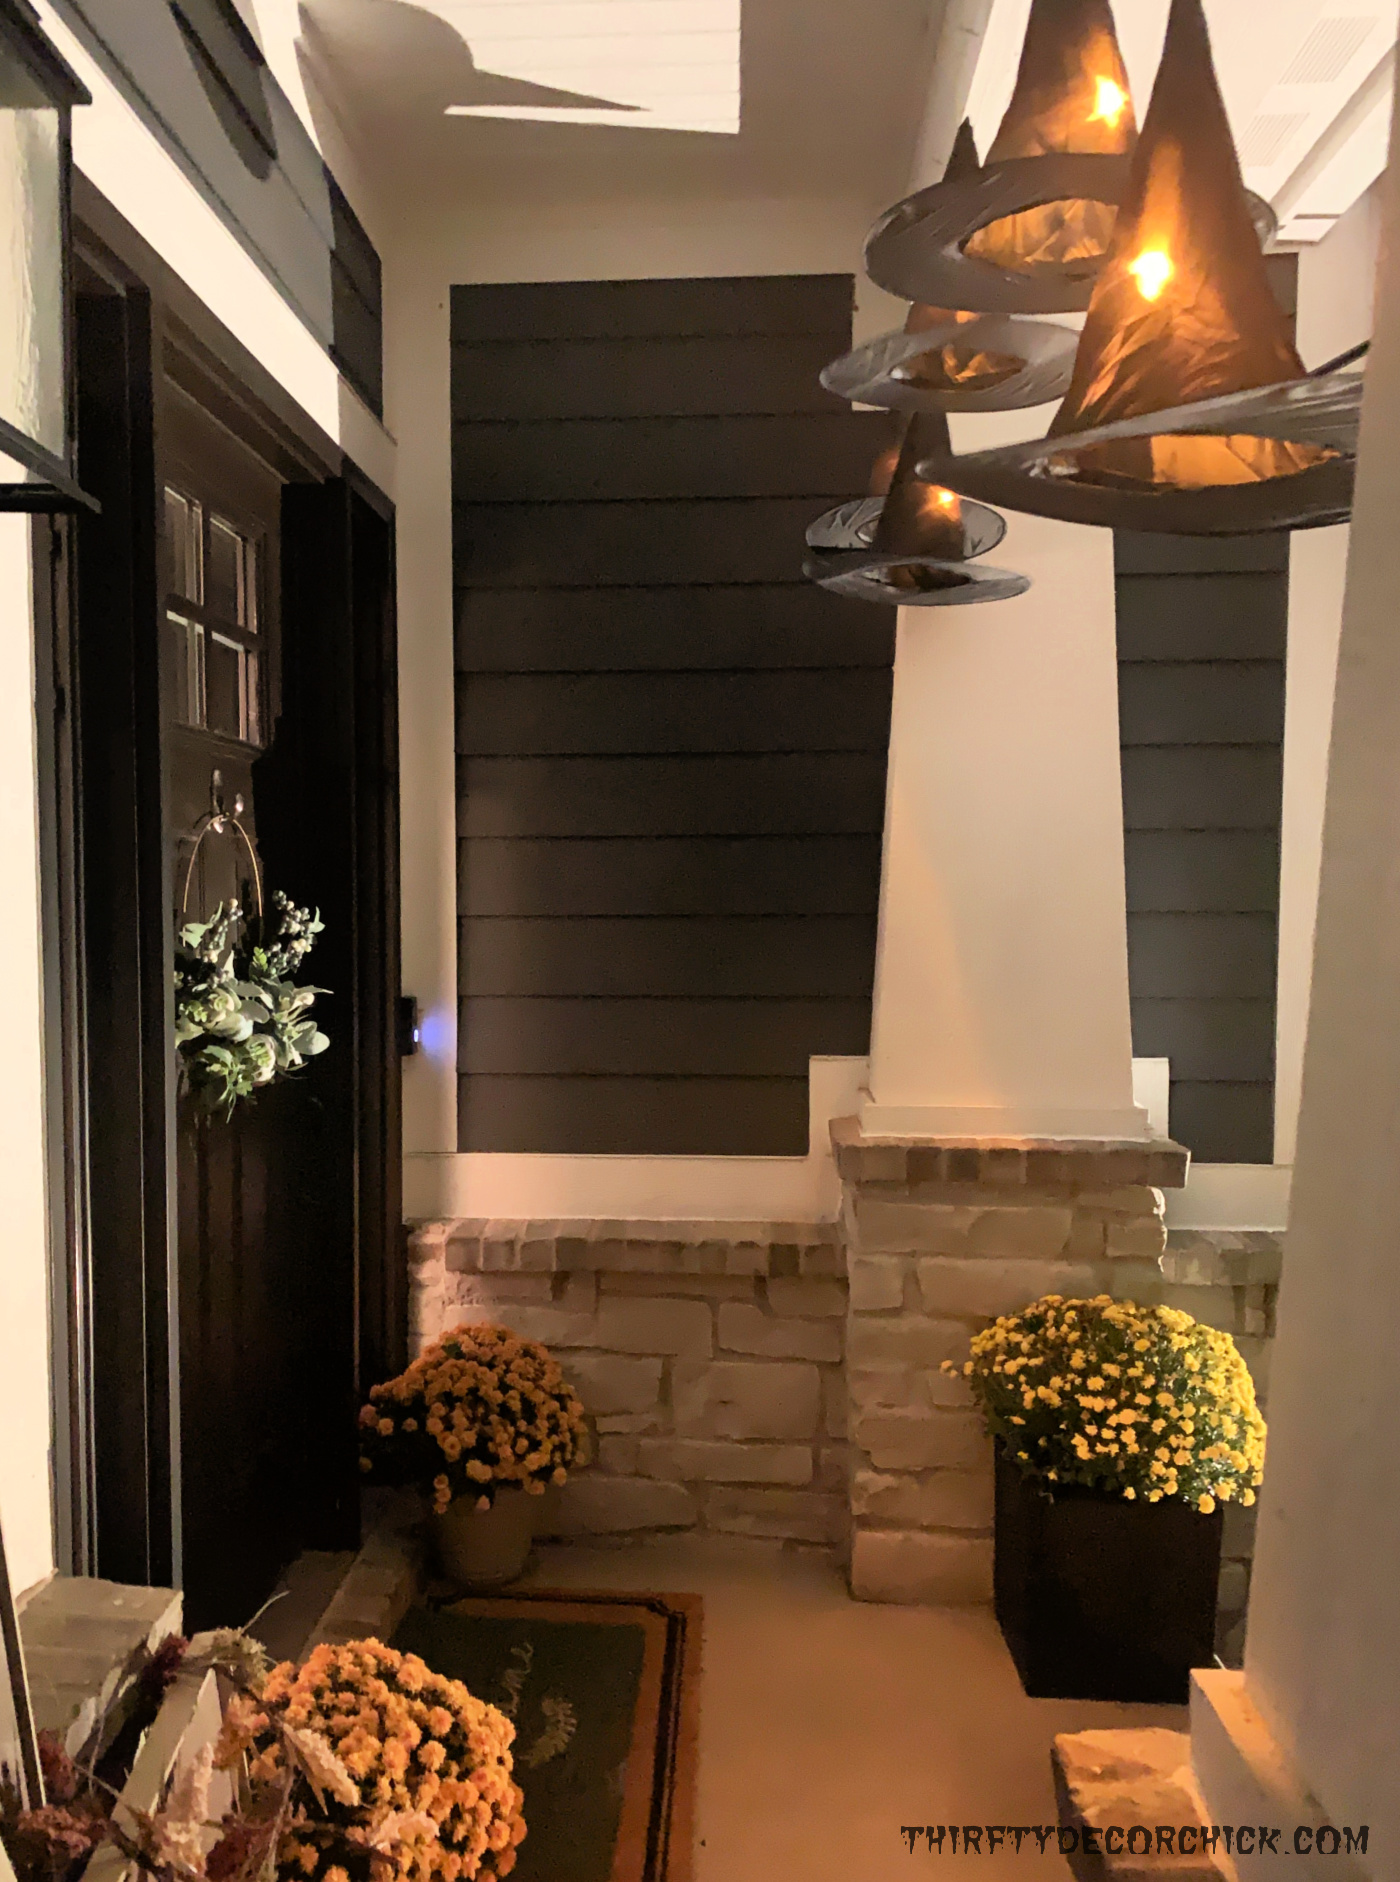
You can hang them in varying heights from your front porch ceiling, around your front door, or like I did, along the back of the porch beam:
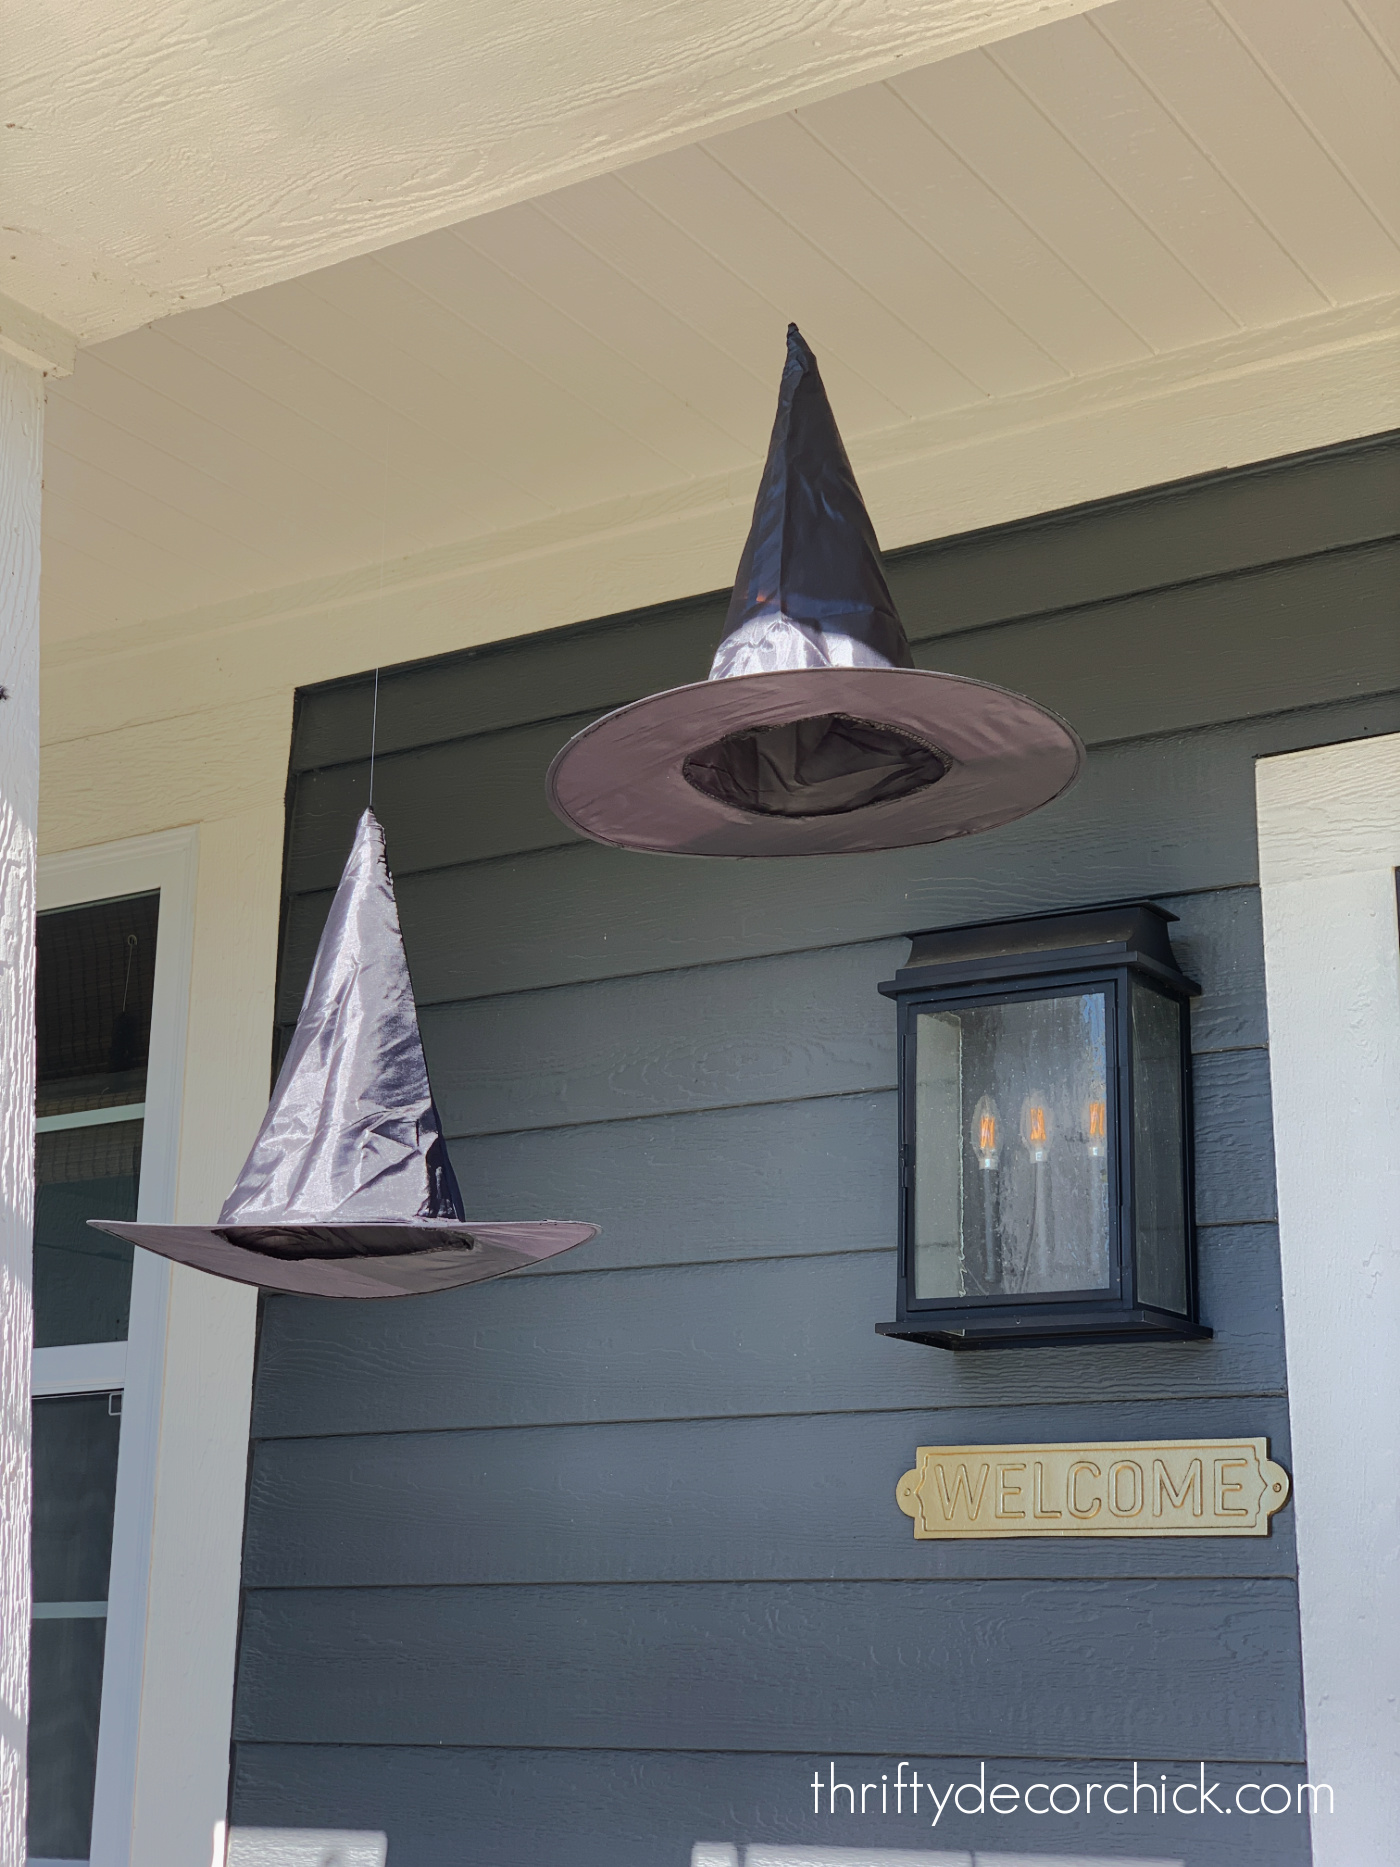
I hung mine from nails I have up for Christmas lights, but you can use small cup hooks to secure them to the ceiling as well.
Using the Christmas candles was the perfect solution! They have the perfect amount of light and operate on a timer or with a remote control.

And when I take these down they will transition to the front windows for the holiday season. :)
I love how the candles sway around inside the hats...it's the exact look I was going for!
These are so fun!! Since I had most of what I needed already, I only spent money on the hats, which I will reuse every year.
Here are some other options for making this easy witch hat decor:
I love that our landscape lighting casts witch hat shadows all over our front porch:

If you missed it, check out our fall porch here!
What are some of your favorite Halloween porch decor ideas?
Check out a few of my favorite DIY Halloween decor projects from over the years below:
Never miss a post by signing up to get posts via email.
Via https://www.thriftydecorchick.com/2021/10/DIY-floating-witch-hat-luminaries.html My colorful fall porch decor with both DIY and store-bought finds. Easy fall front porch ideas you can add today!
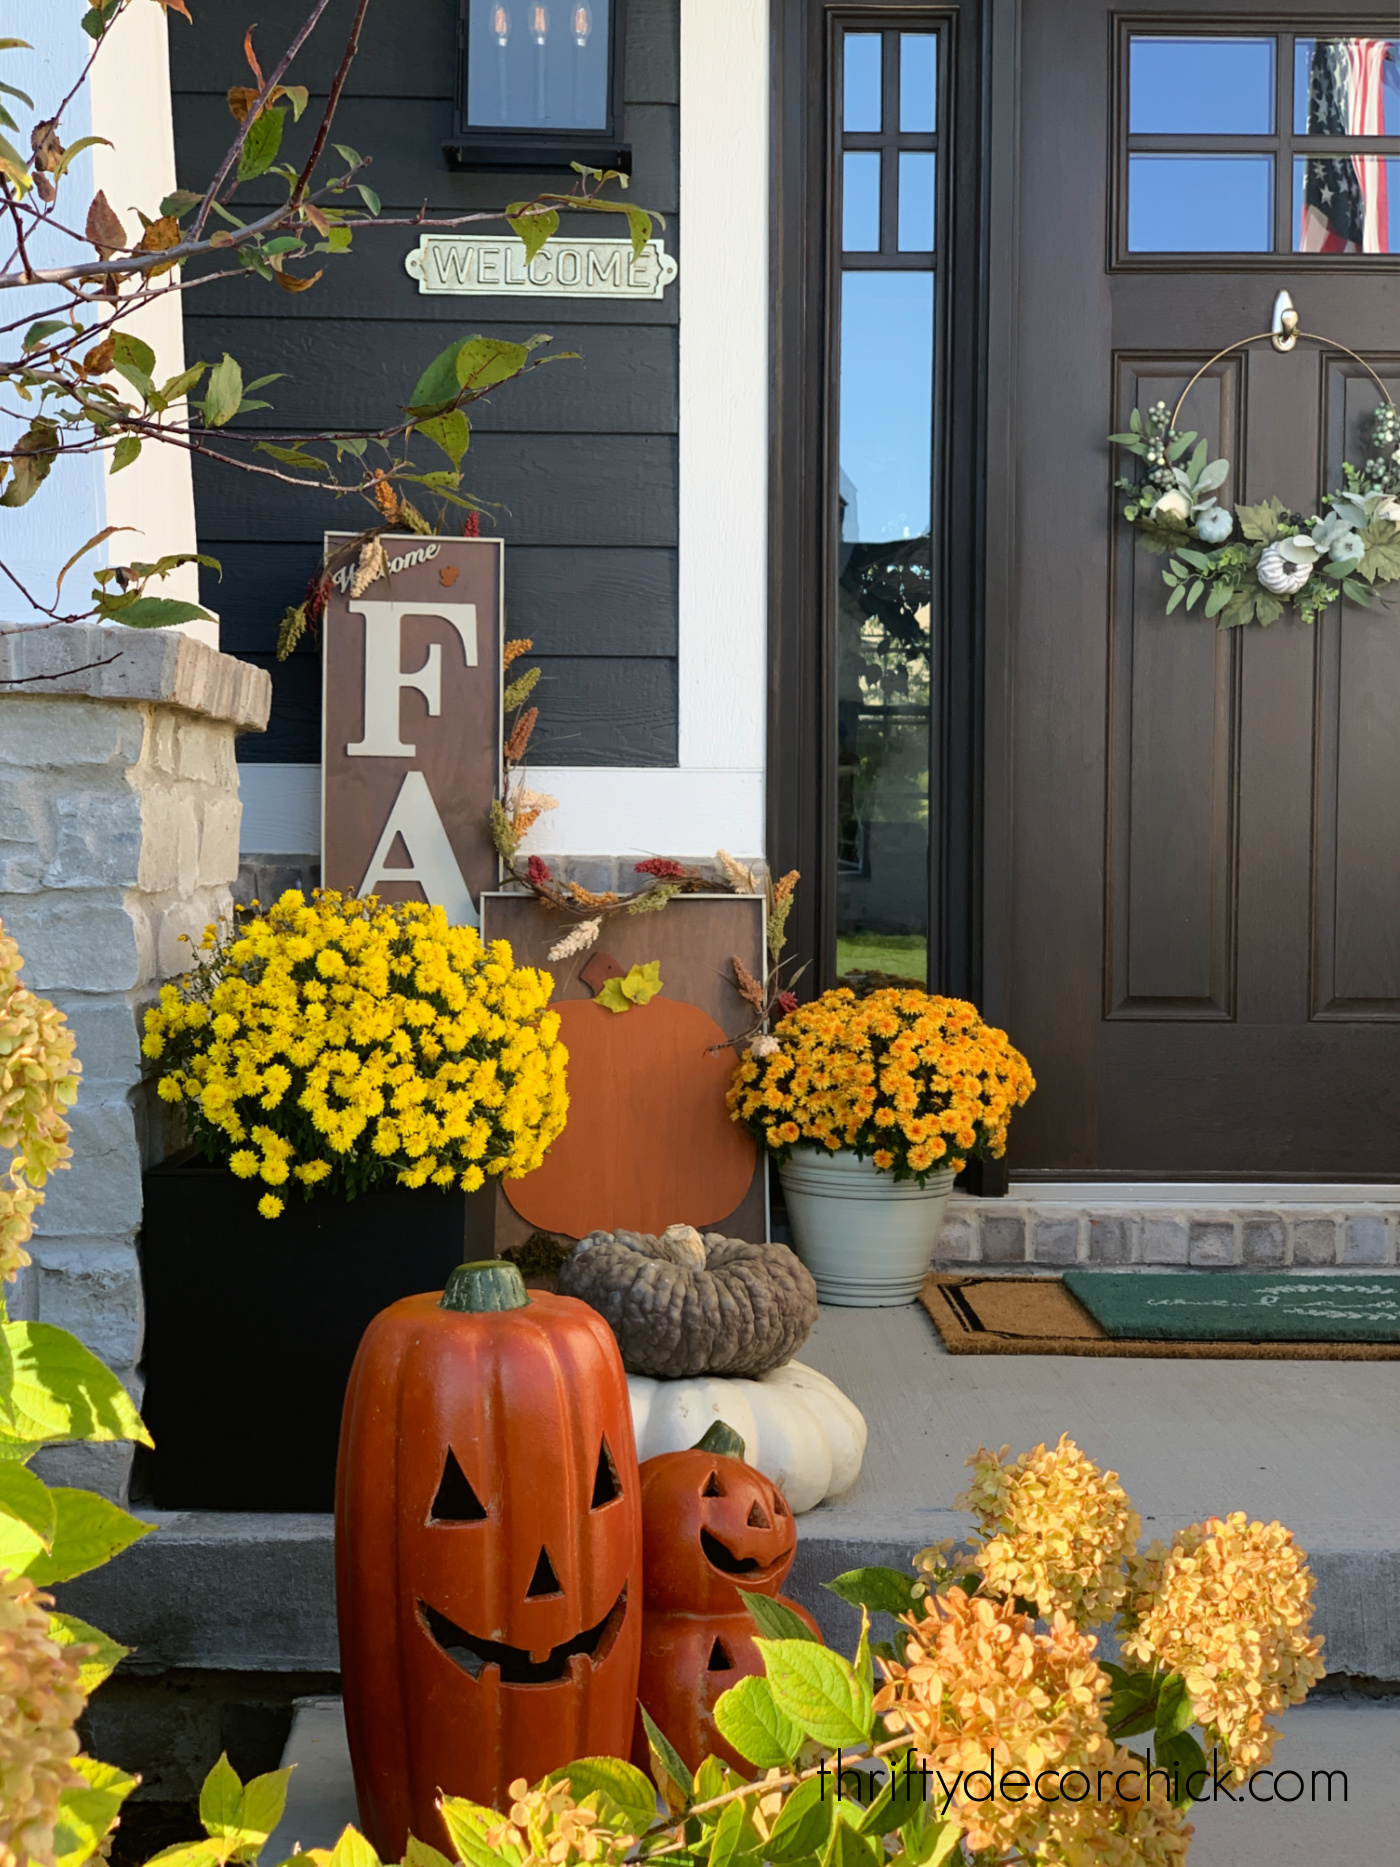
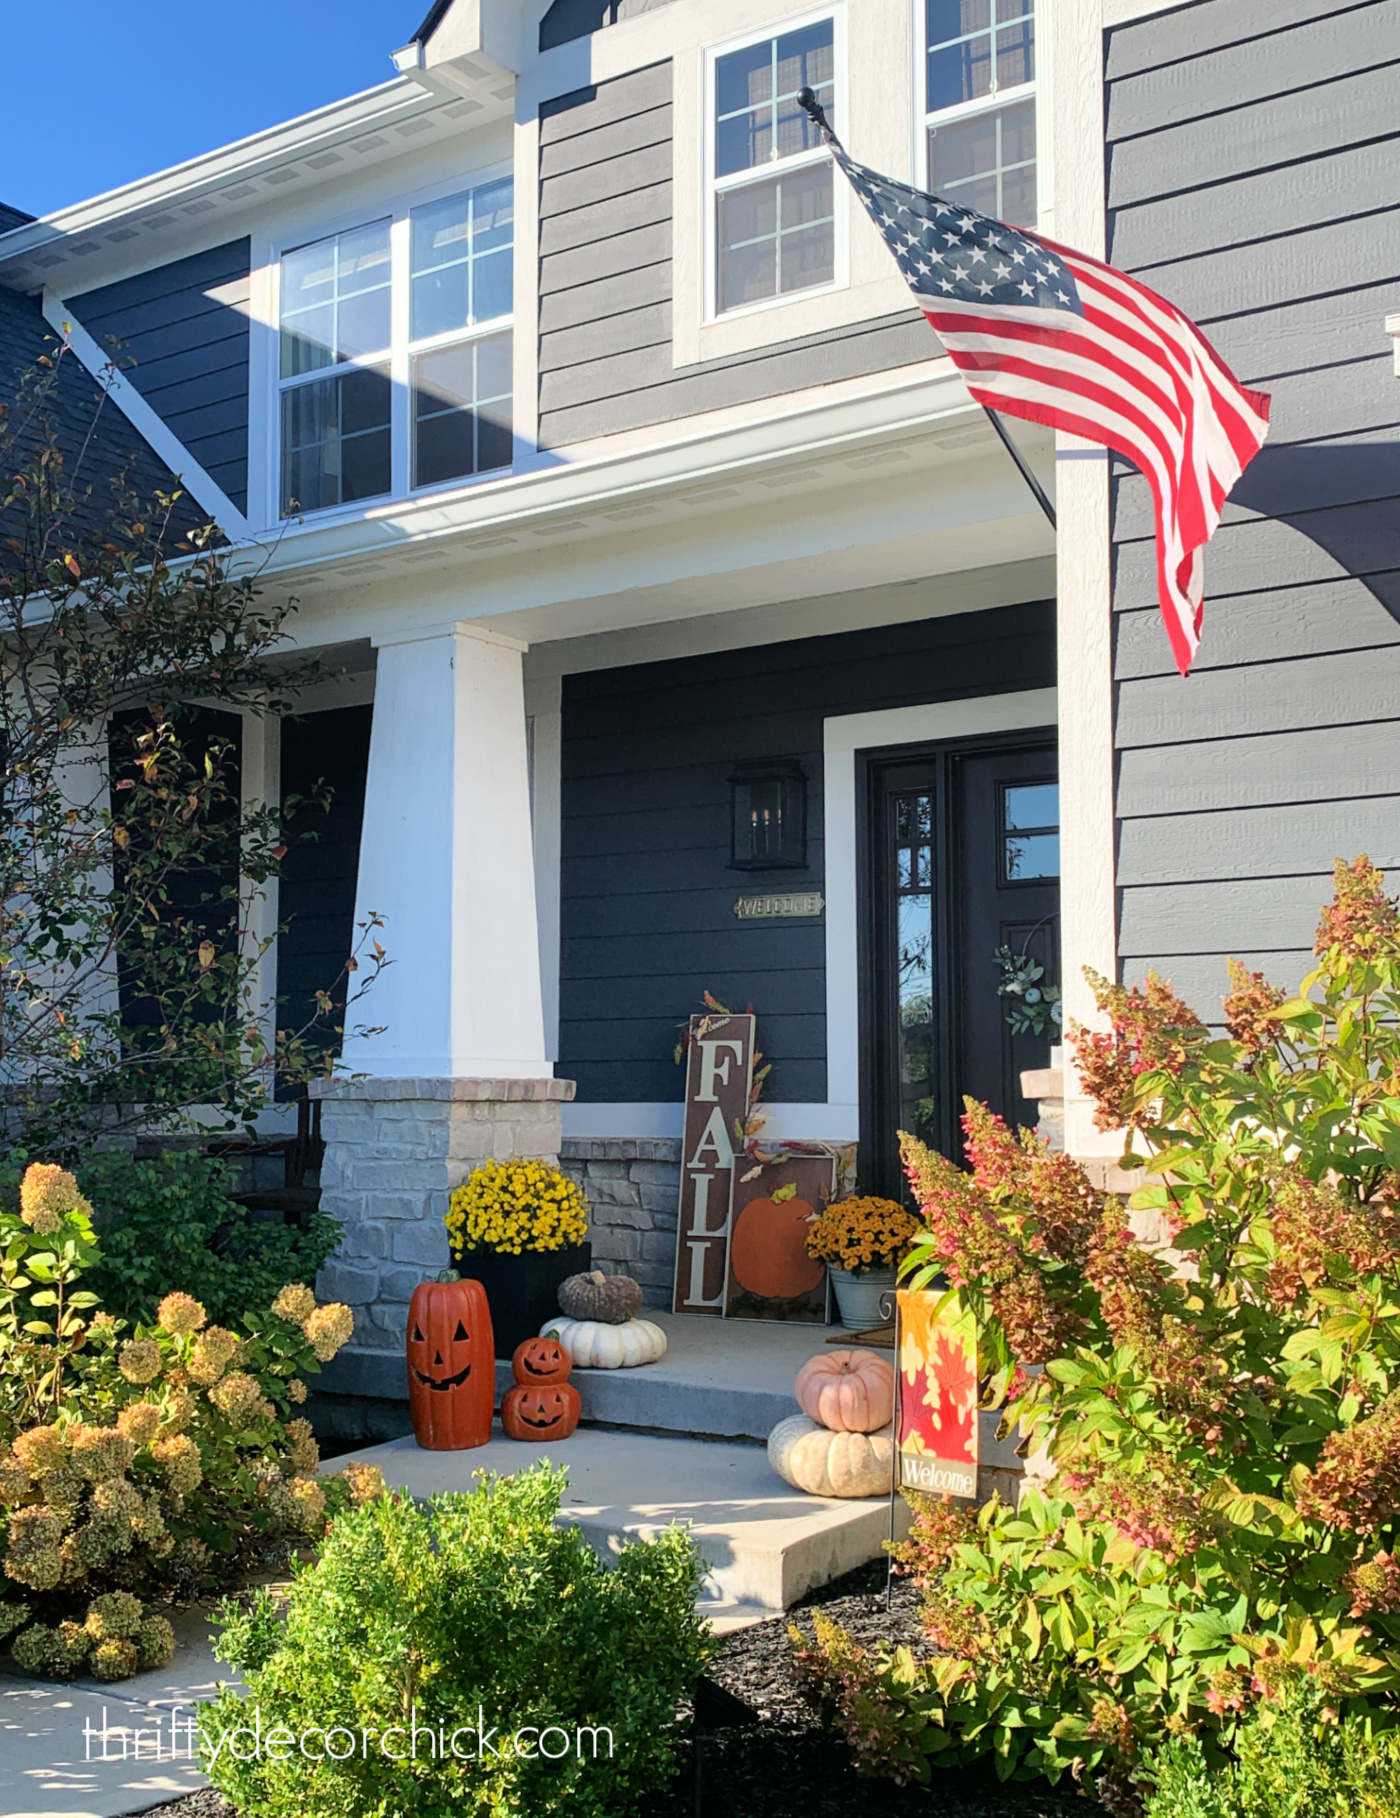
We never had much of a front porch until we moved into this home, and I've had a blast dressing it up for the different seasons! It's not huge, but just big enough to add some fun touches.
I think fall decor looks particularly cute on our front porch. :) Decorating for autumn out front always seems to up our curb appeal...it's so welcoming.
I usually go nuts with mums this time of year, but I missed the local sale where I get them for super cheap. So I scaled back on those and added some fun autumn finds from Big Lots instead.
I've been lucky enough to work with Big Lots this year and will continue to share some of their decor items throughout the year. (You can see how I organized our messy coat closet here!)
I tried to pull in more colors beyond the traditional orange and brown this year. I'm loving the green accents I added the fall porch palette. :)
First up, the front door!...
Big Lots had this adorable green and blue pumpkin fall wreath that I thought looked so good on our front door:

It's so pretty! I love that it's a little different from my typical grapevine wreath because it hangs on a brass metal ring. This wreath has the same green and blue tones.
The green coir welcome mat works perfectly with the colors in the wreath:
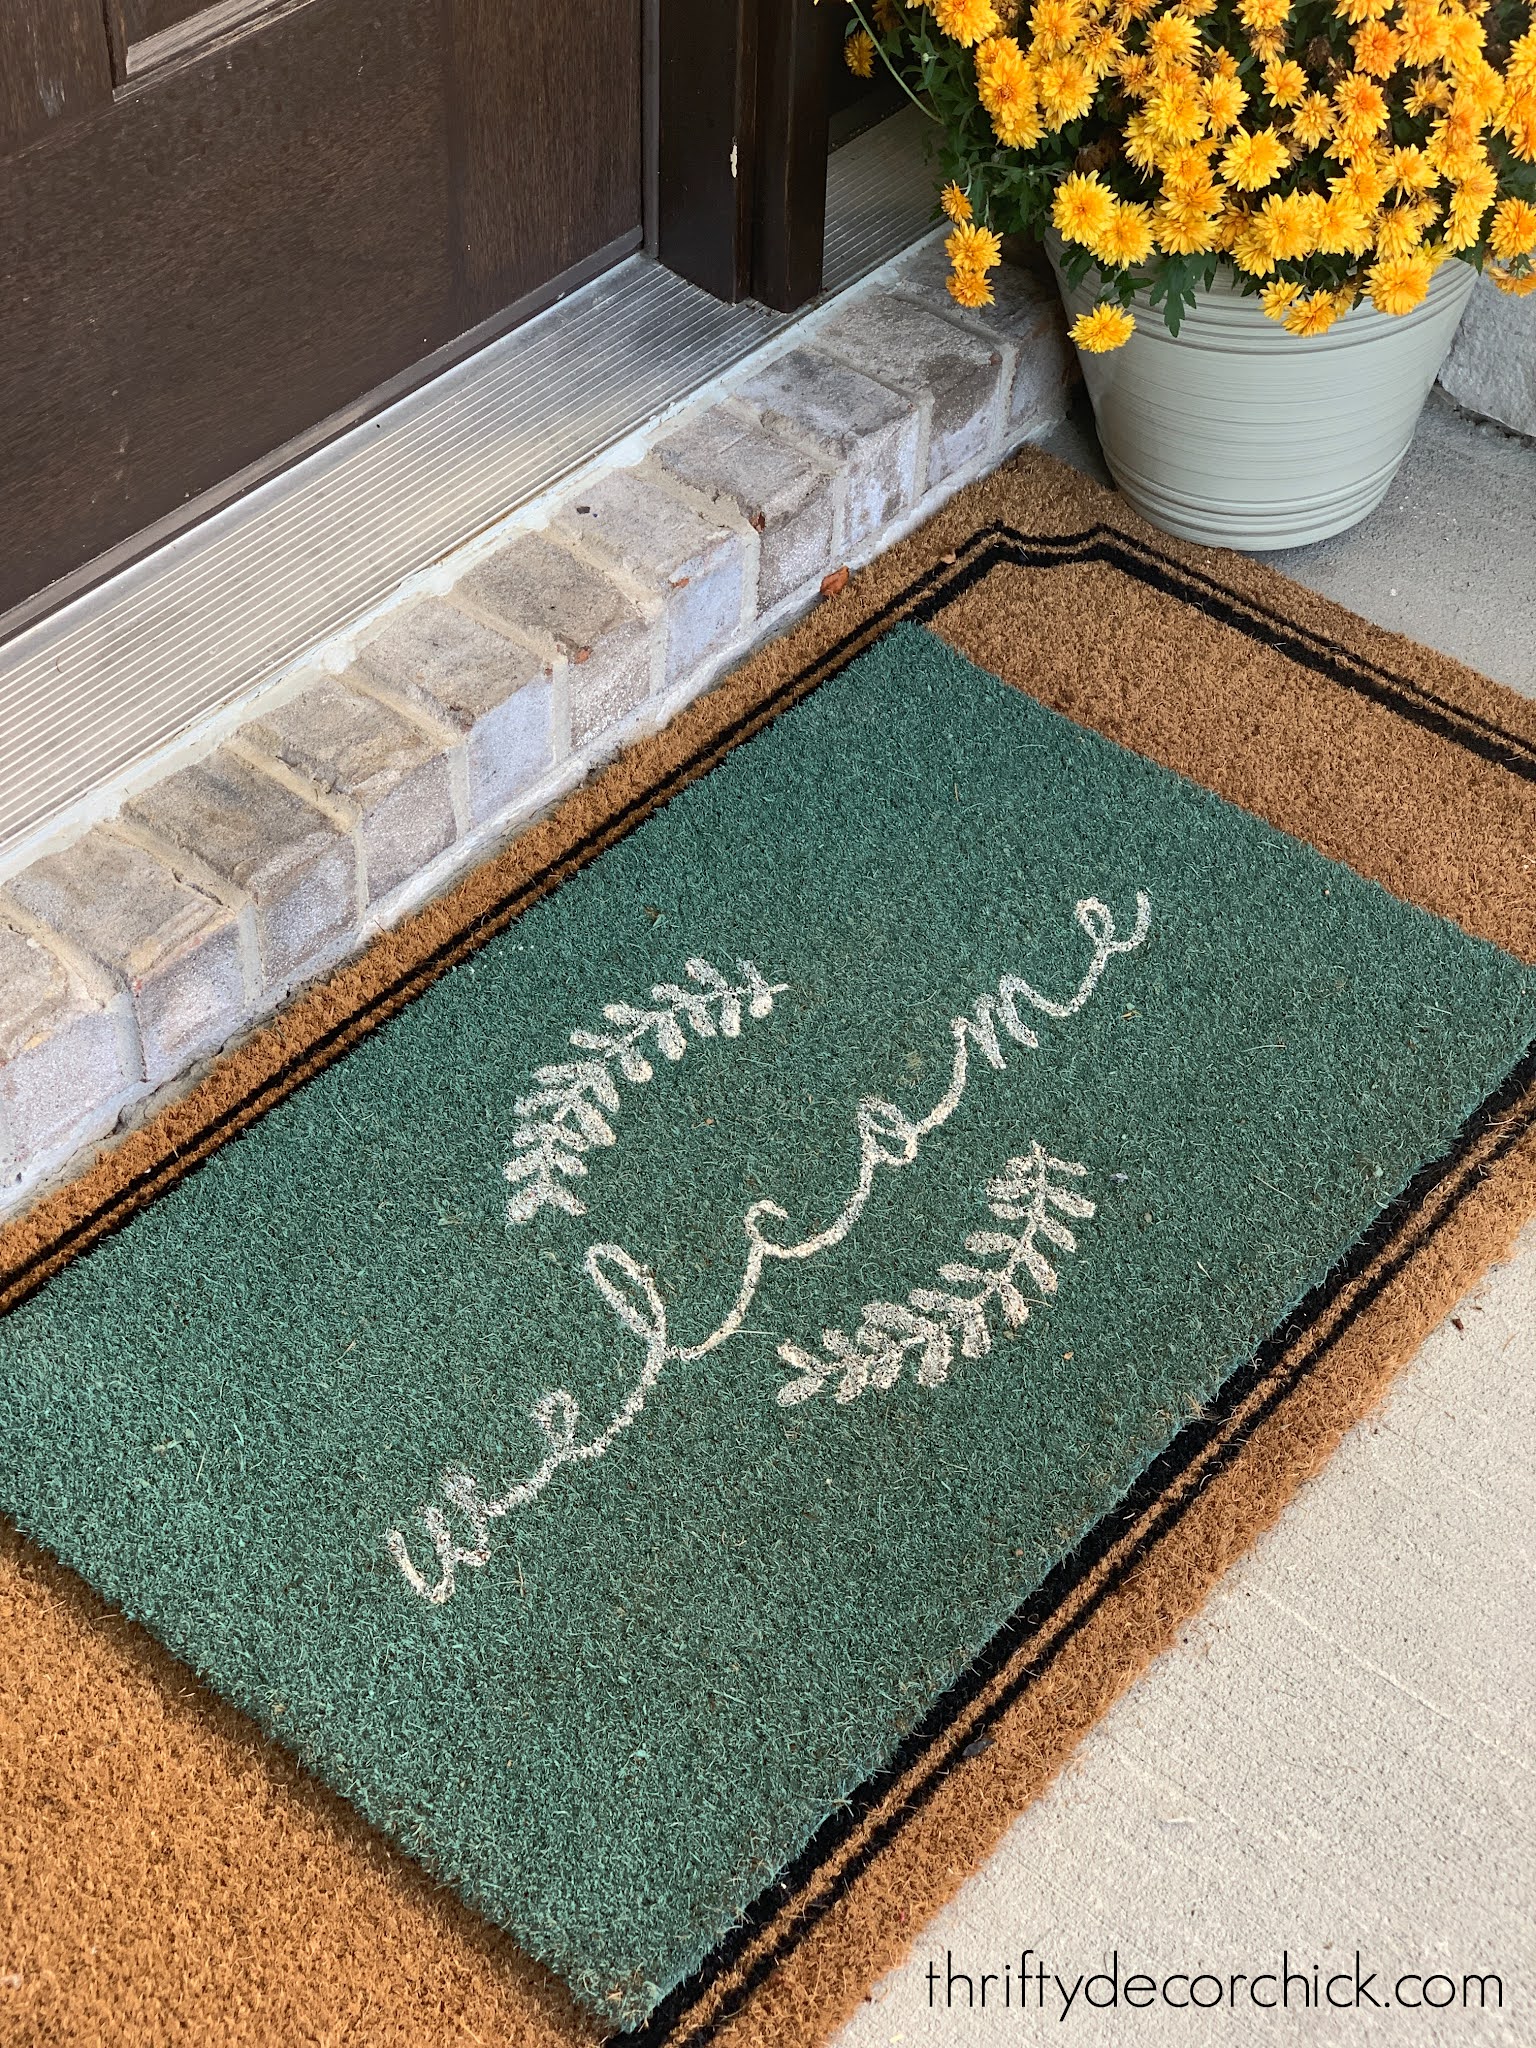
This mat is only $10, can you believe it? I just plopped it on top of our large welcome mat for a layered look.
The green rug could stay out all year no problem since it doesn't have a specific fall design!
I made these large DIY fall porch signs a few years ago and they still look great!:

We don't get much of the elements on our porch, so if yours is the same these will hold up well. Of course they would look great inside as well!
Big Lots has a TON of cute fall signs, big and small, for your front door or porch.
I LOVED this pretty garland and draped it around the signs.
It is six feet long and I love that it has all of the colors I used in our porch decor. That garland would look SO pretty draped along a fireplace mantel, or in a fall table centerpiece.
My favorite Big Lots finds were these cute ceramic pumpkins lanterns! They are substantial! These guys will hold up well in wind or rain:
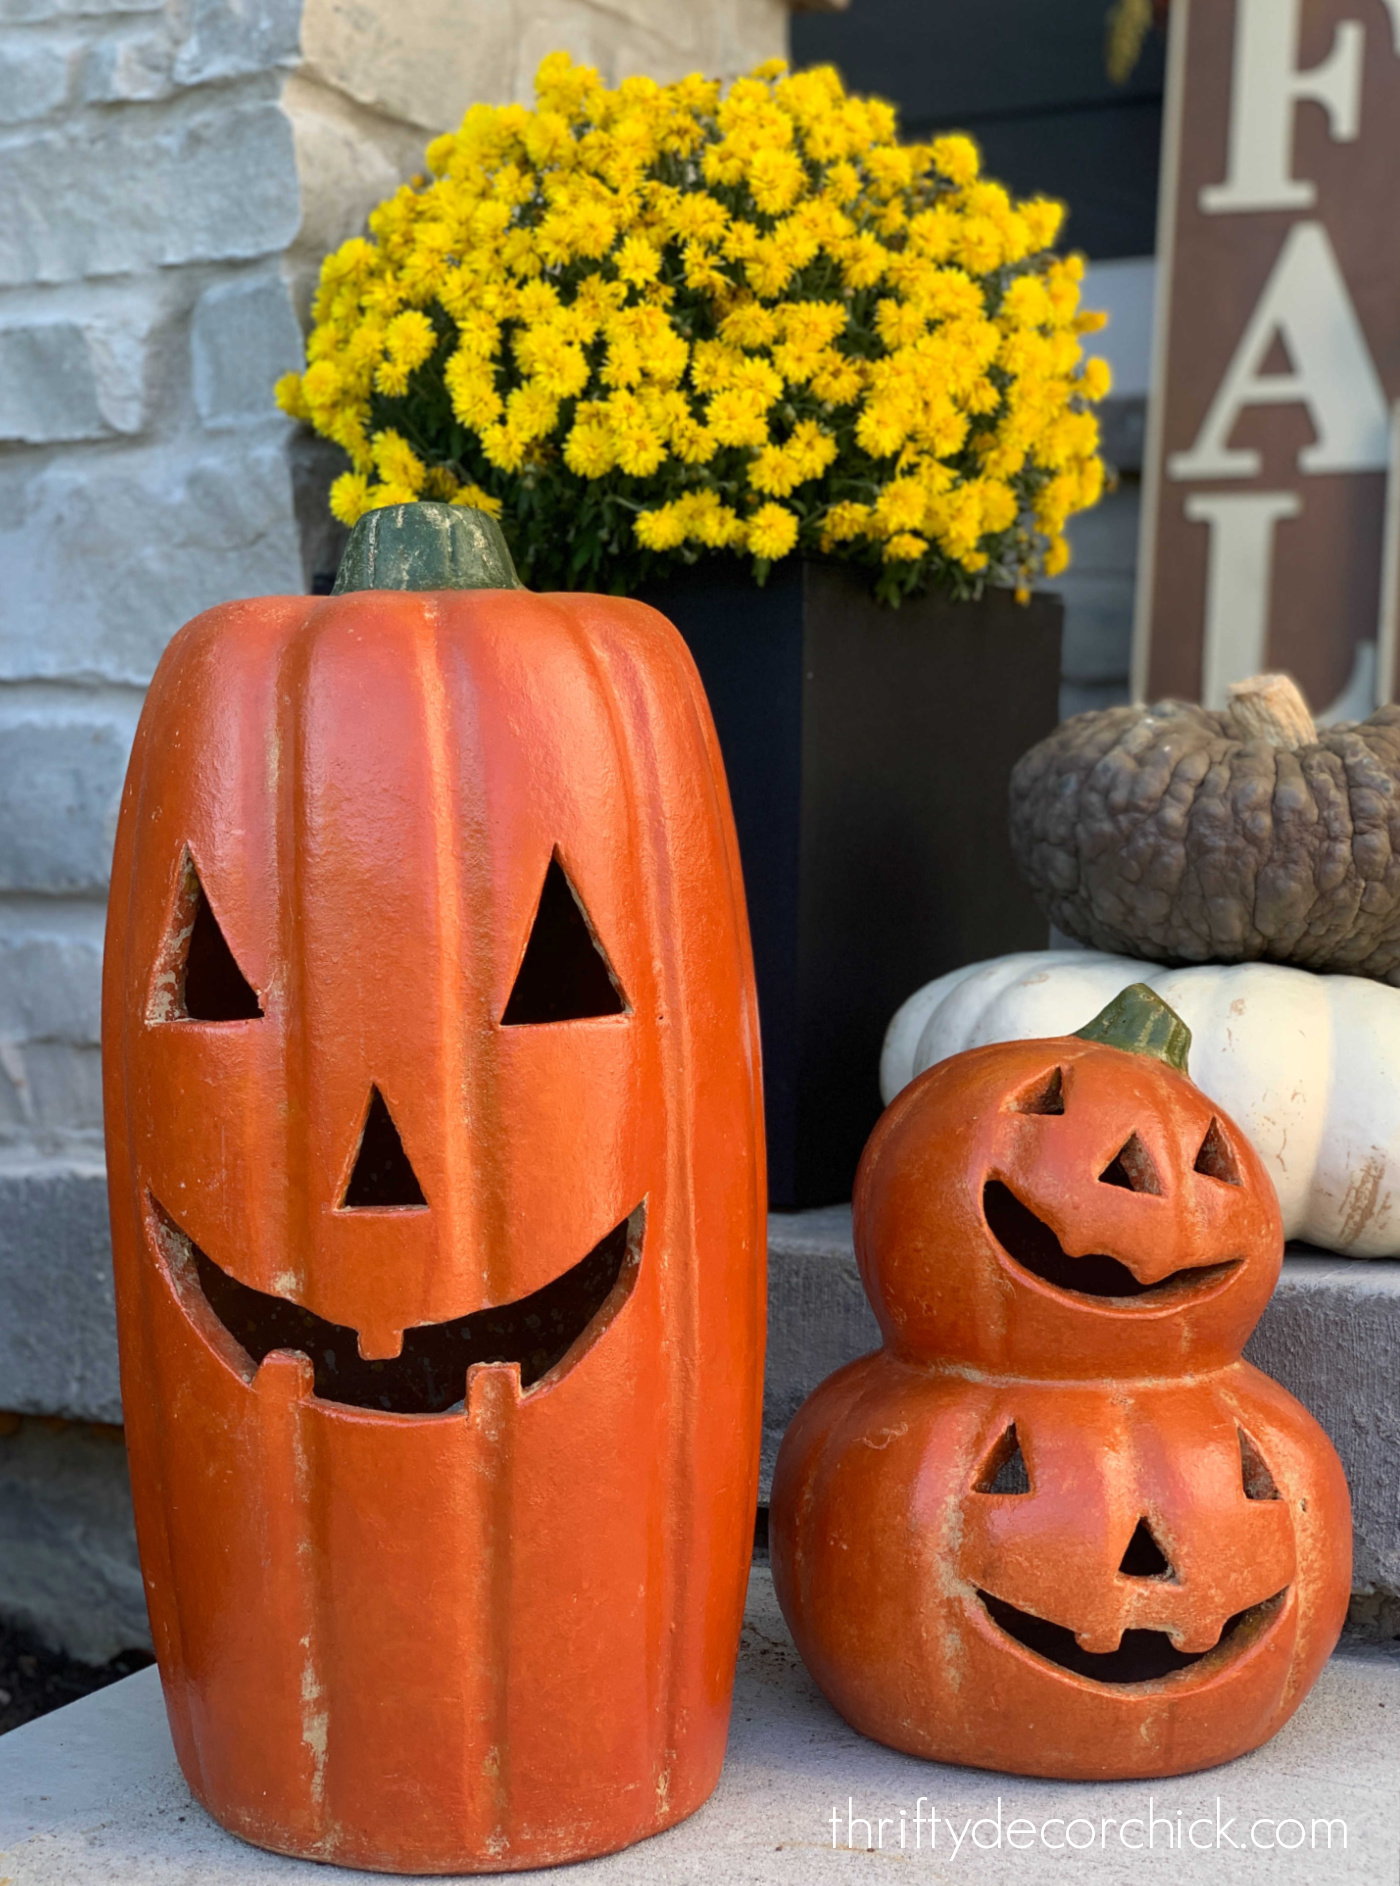
They are great quality and I loved that we can put a candle inside to make them glow at night!
As I mentioned, I usually get a ton of mums for $5 at a local nursery, but I missed the sale this year. I went with a few less than usual in the traditional orange and yellow colors.
I thought those colors would look great against our dark gray house -- I love how they pop!
I have inexpensive planters I put them in every year so they don't dry out.
My best buddy came to visit while I was taking pictures:
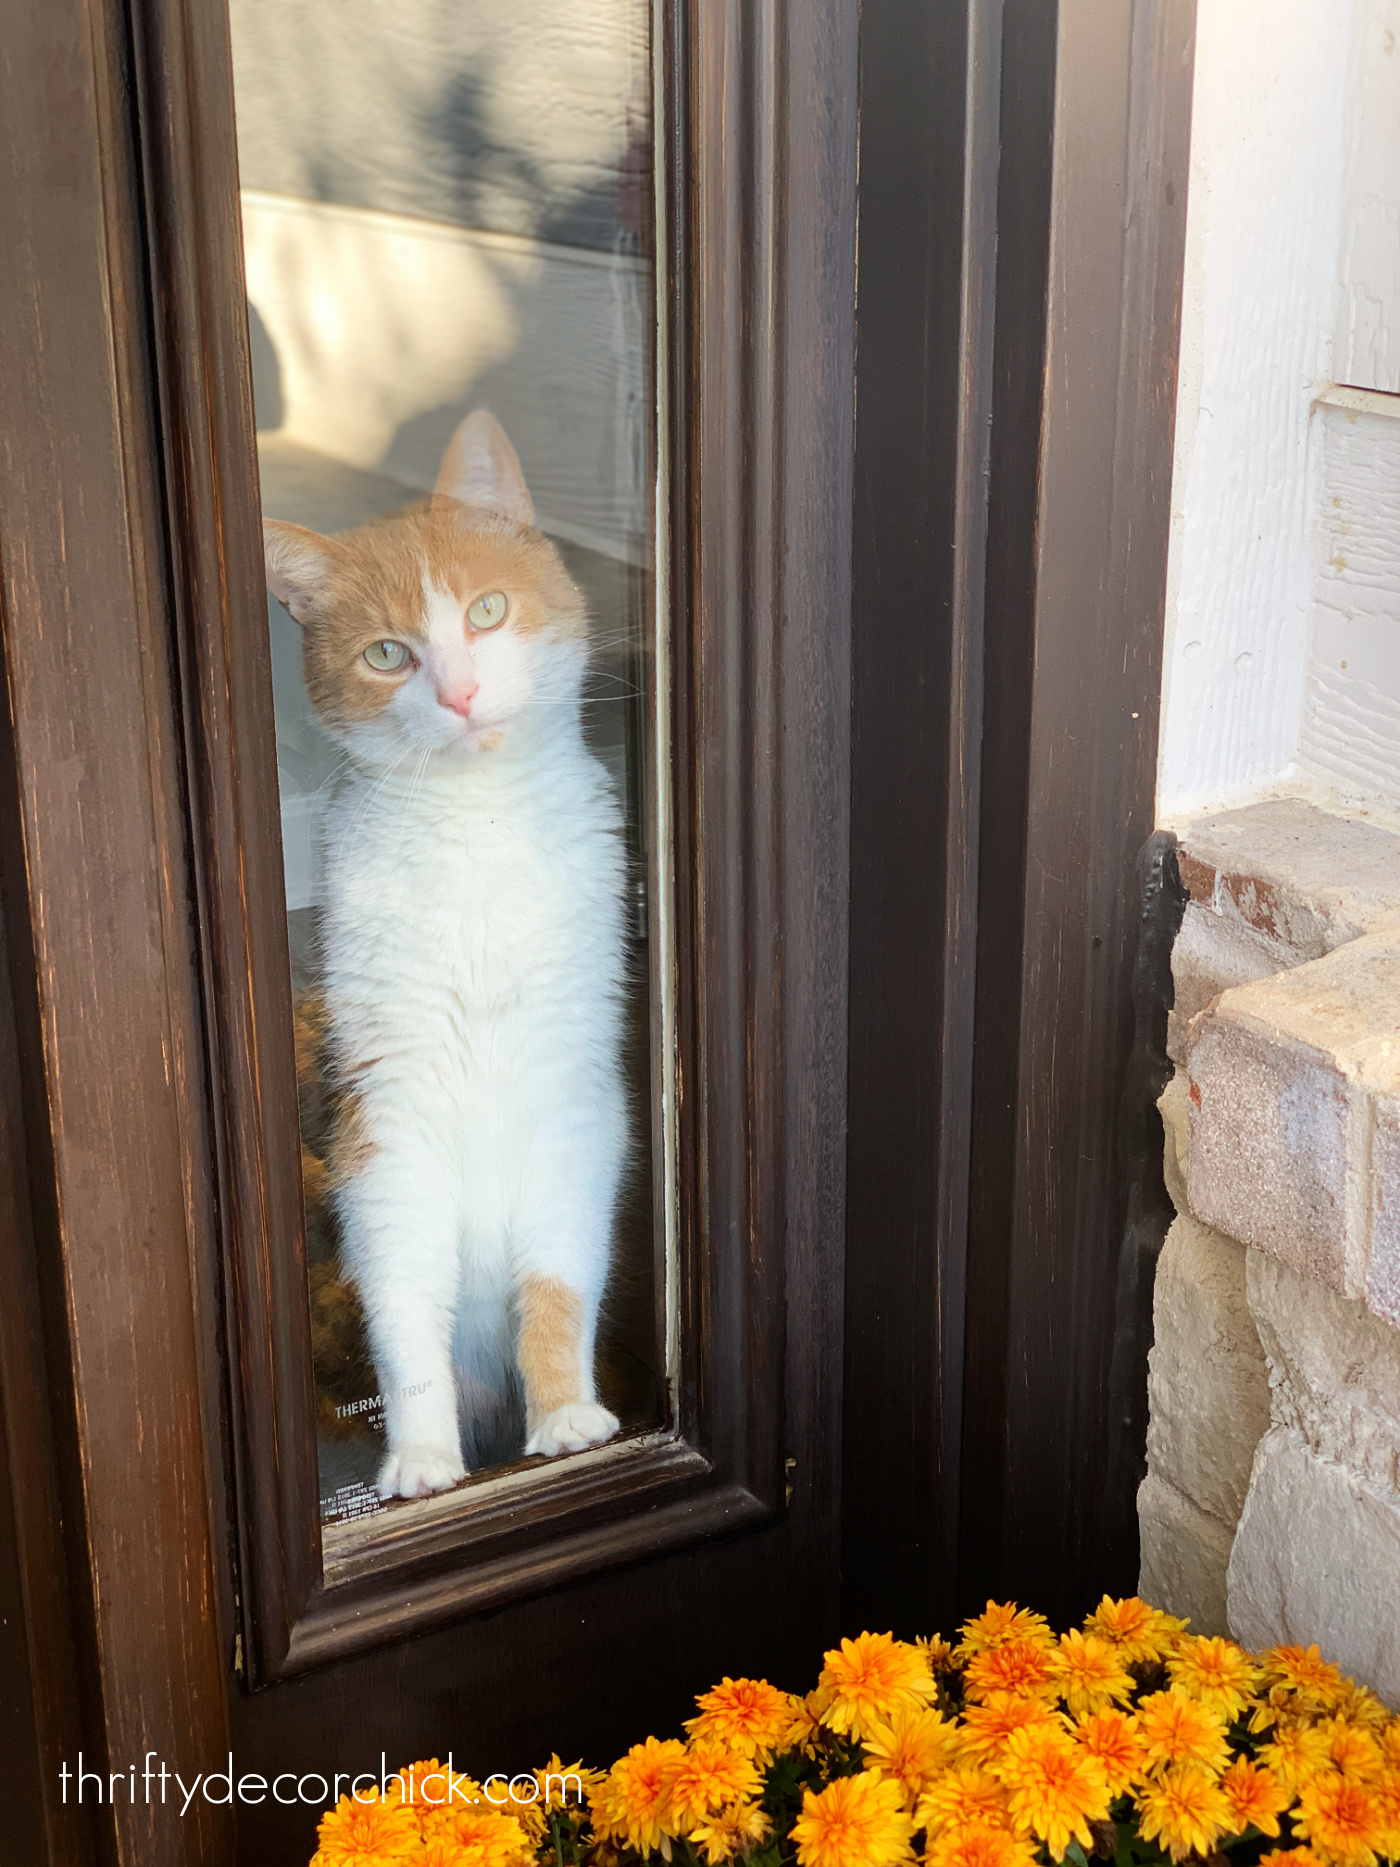
And I didn't realize till just now that he's in a few more ?:
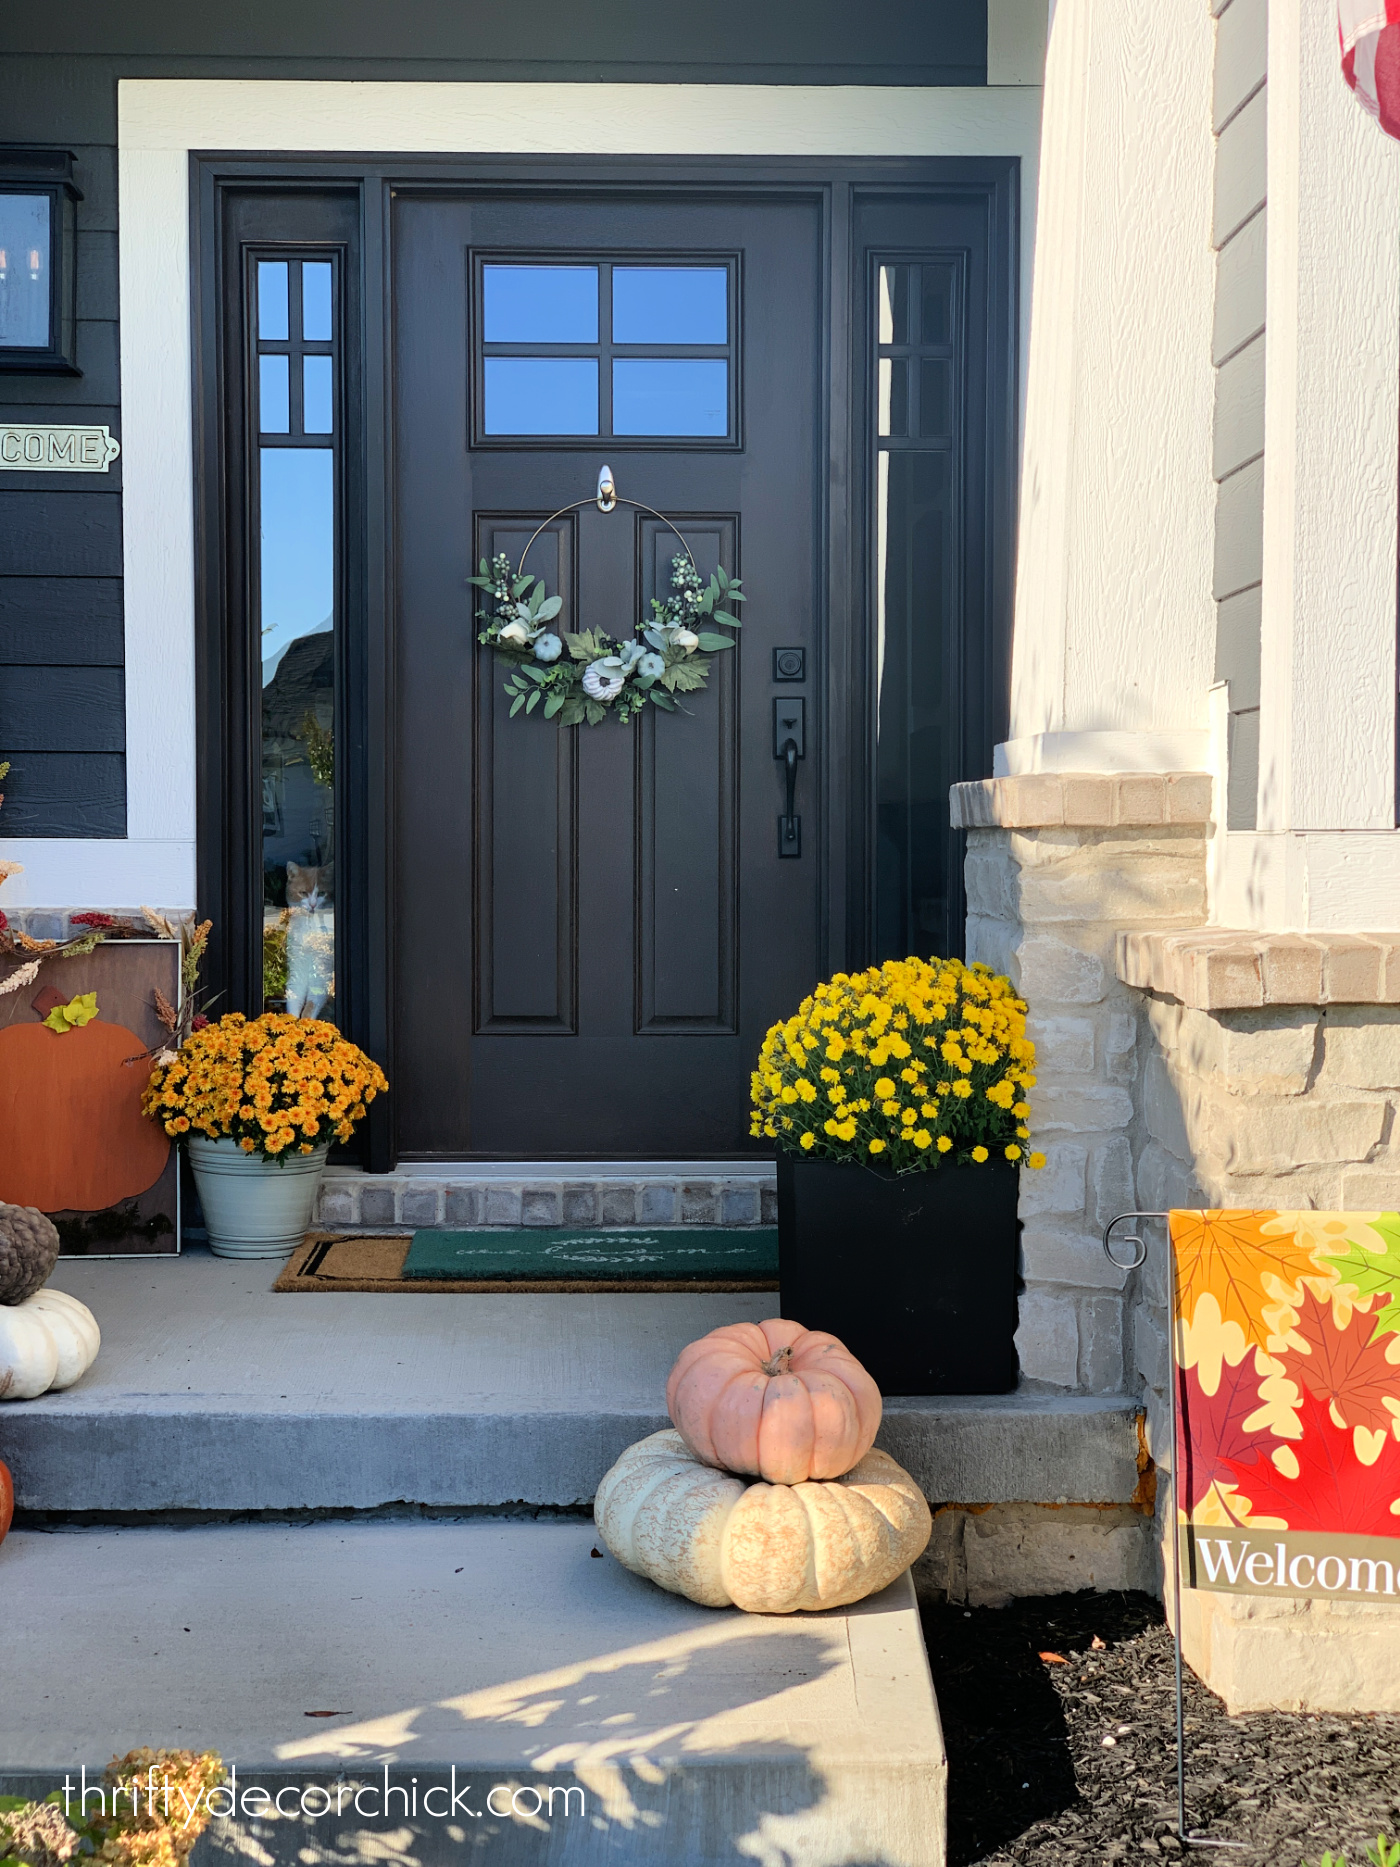
I love the colorful heirloom pumpkins! Since they're flatter than the typical pumpkin, it's easy to stack them to create pumpkin topiaries.
I like to change out my little yard flag for the seasons too -- this fall garden flag was perfect!
It all came together to create a cozy and colorful fall front porch:
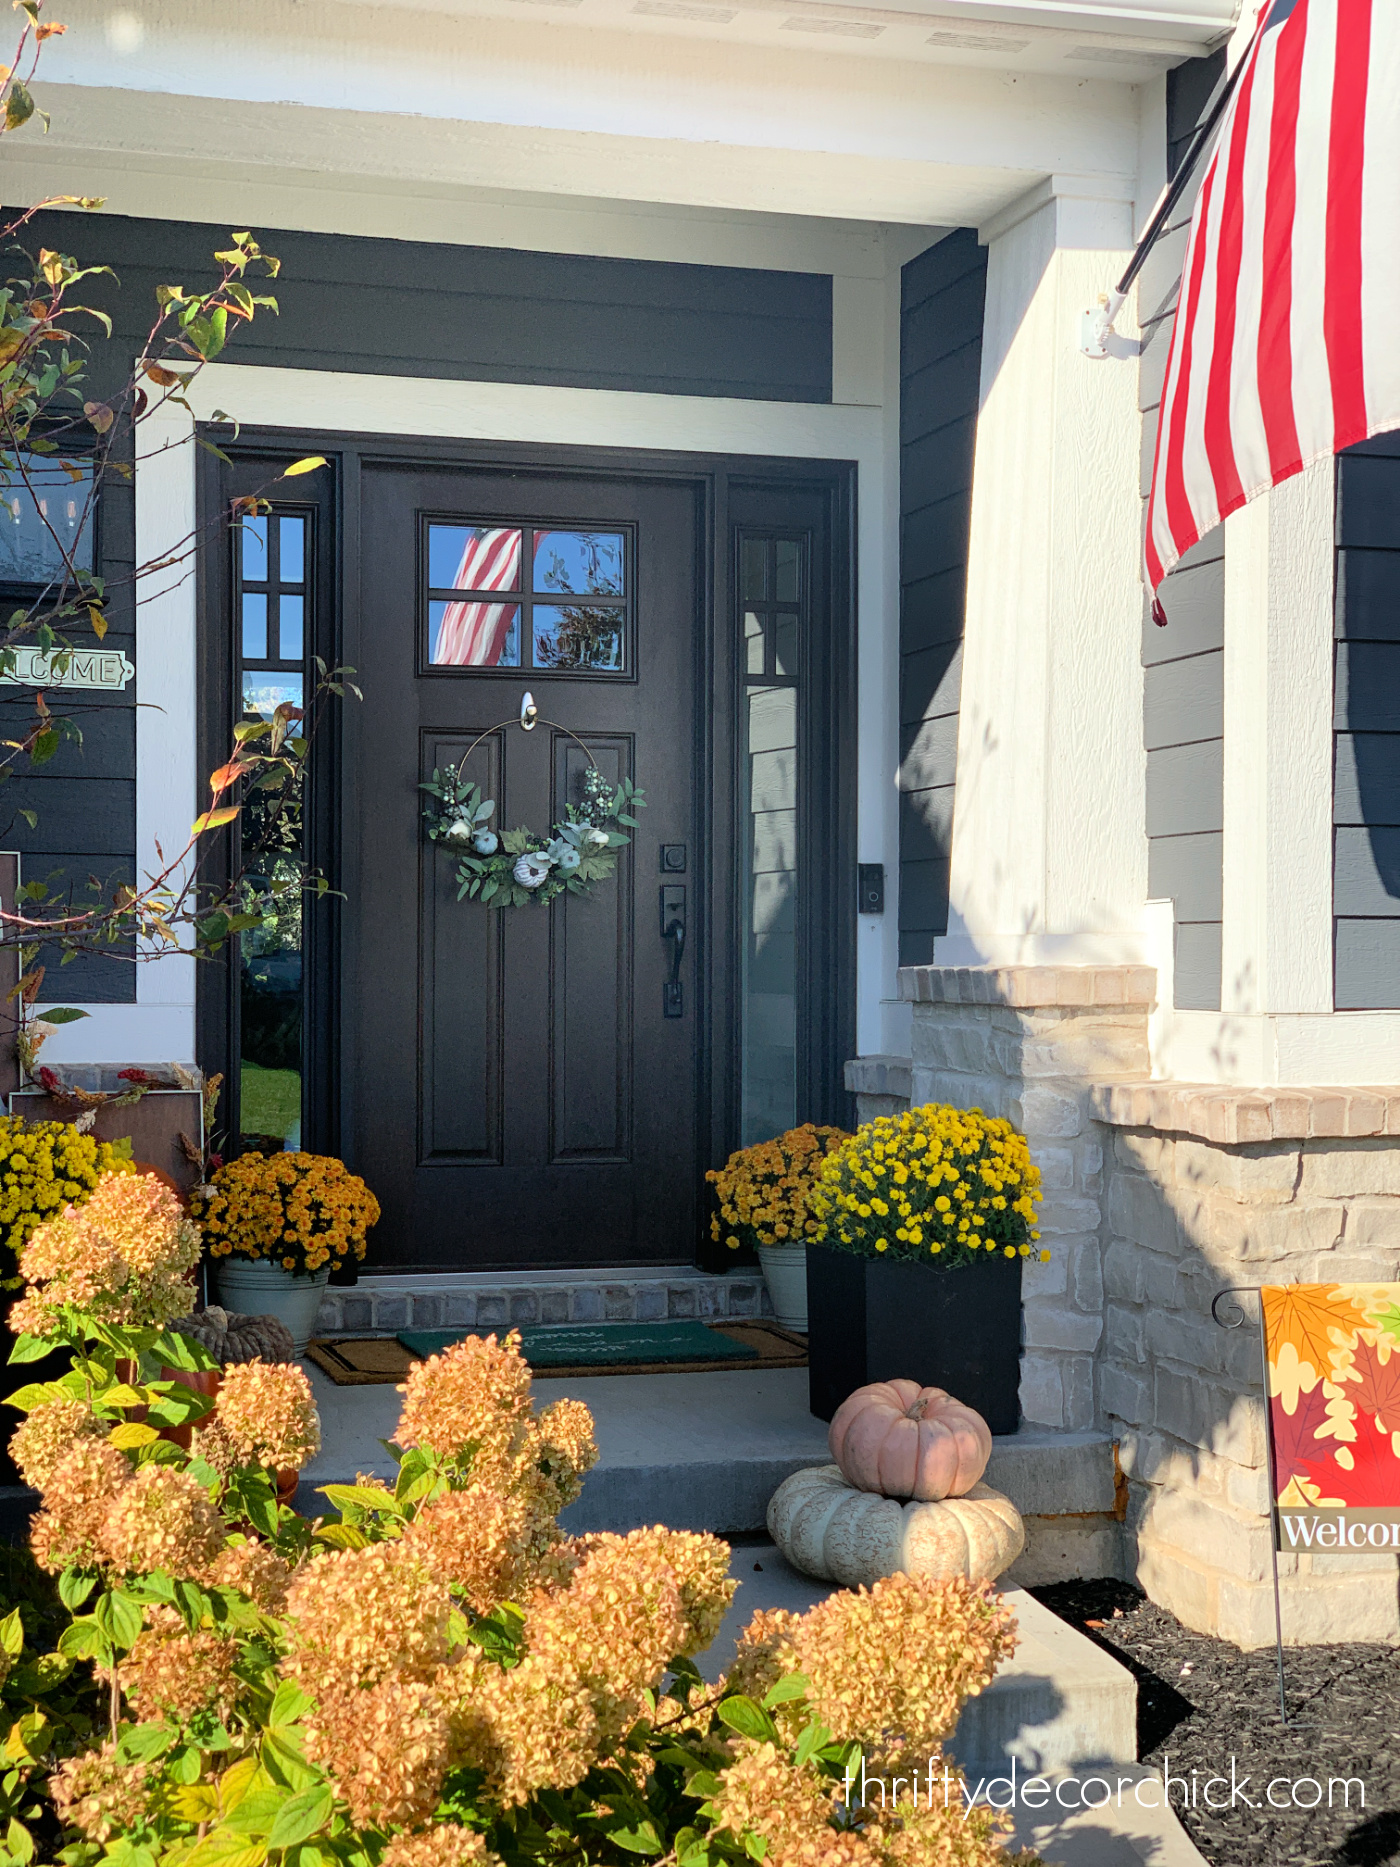
Most of the year I crave simpler decor, but during fall and the holiday season all that goes out the window!
Believe it or not, this is pretty simple for my typical fall porch. :) I usually add some hay bales and corn stalks, but I went with a little less this year.
But come on...it's FALL. So it's still full of plenty of autumn goodness.
I LOVE all of the textures and color fall decor adds to our home!:
You can see last year's fall porch for more front porch decor ideas! I share our fall window boxes in that post as well.
You can see all of the Big Lots fall decor finds here and their cute Halloween items.
Do you go crazy with the fall decor or keep it minimal? Now we need to add our Halloween touches!
This post sponsored by Big Lots but all opinions are my own.
I only work with companies and products I know, love and would recommend to you.
Never miss a post by signing up to get posts via email.
Via https://www.thriftydecorchick.com/2021/10/colorful-fall-front-porch-decor-ideas.html Expandable drawer dividers to easily organize your kitchen and clothing drawers!
This adjustable drawer organizer makes it SUPER easy to organize messy drawers and make the most of your storage space. Use them to create custom organizers in a matter of minutes!
As soon as I got these cool little gadgets, I knew I had to share them with you. I've been reorganizing a few spaces in our kitchen as I work on the new pantry, and I'm loving how much more functional they've become!
I was working on a spice drawer that I'll share in a minute, but noticed that every time I shut the drawer, the organized containers slid all over and got out of order.
YES, I alphabetized them. :)
I thought about using a liner to keep them from moving around, but I've found that it still slides around inside the drawer.
I also wanted to separate some of the spices into sections, so I needed a different solution.
I recently shared a few ways to keep things from sliding around both vertically and horizontally, but none of those worked well for these smaller items.
I was thisclose to making my DIY drawer dividers like I did years ago...but then realized I wanted something adjustable so I could add more to the drawer later.
The perfect solution came to me during an online search for something else. I wasn't even looking for it, and there. it. was.:
This post may contain affiliate links for your convenience.
See my policies and disclosure page for more information.
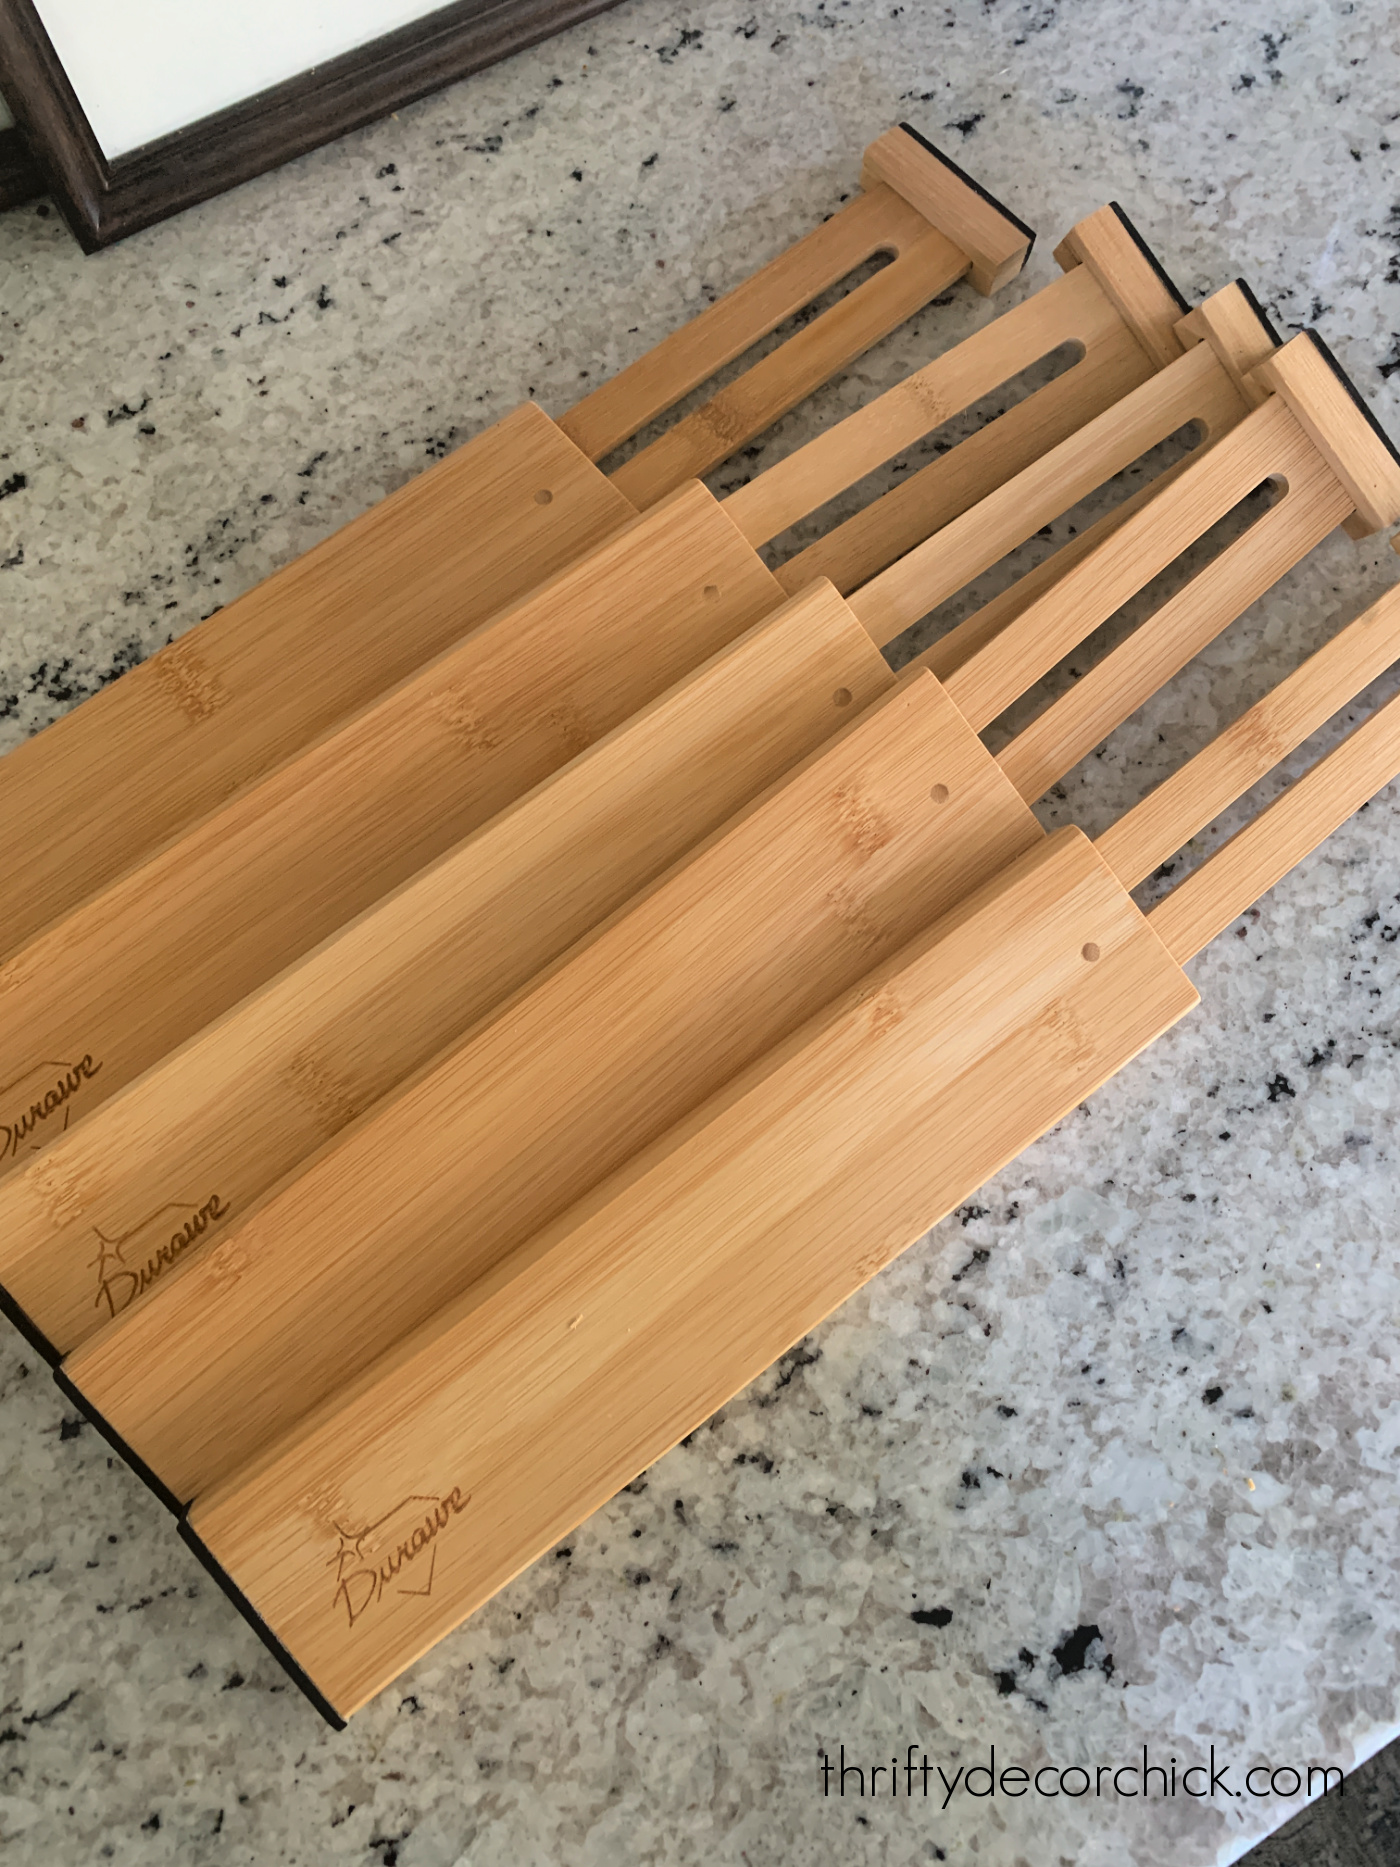
These adjustable drawer dividers are expandable! They're made of bamboo and are spring loaded so they fit tightly inside your drawers.
The ends are soft so they won't scratch anything, and the rubber feet grip to the sides so they don't move around:
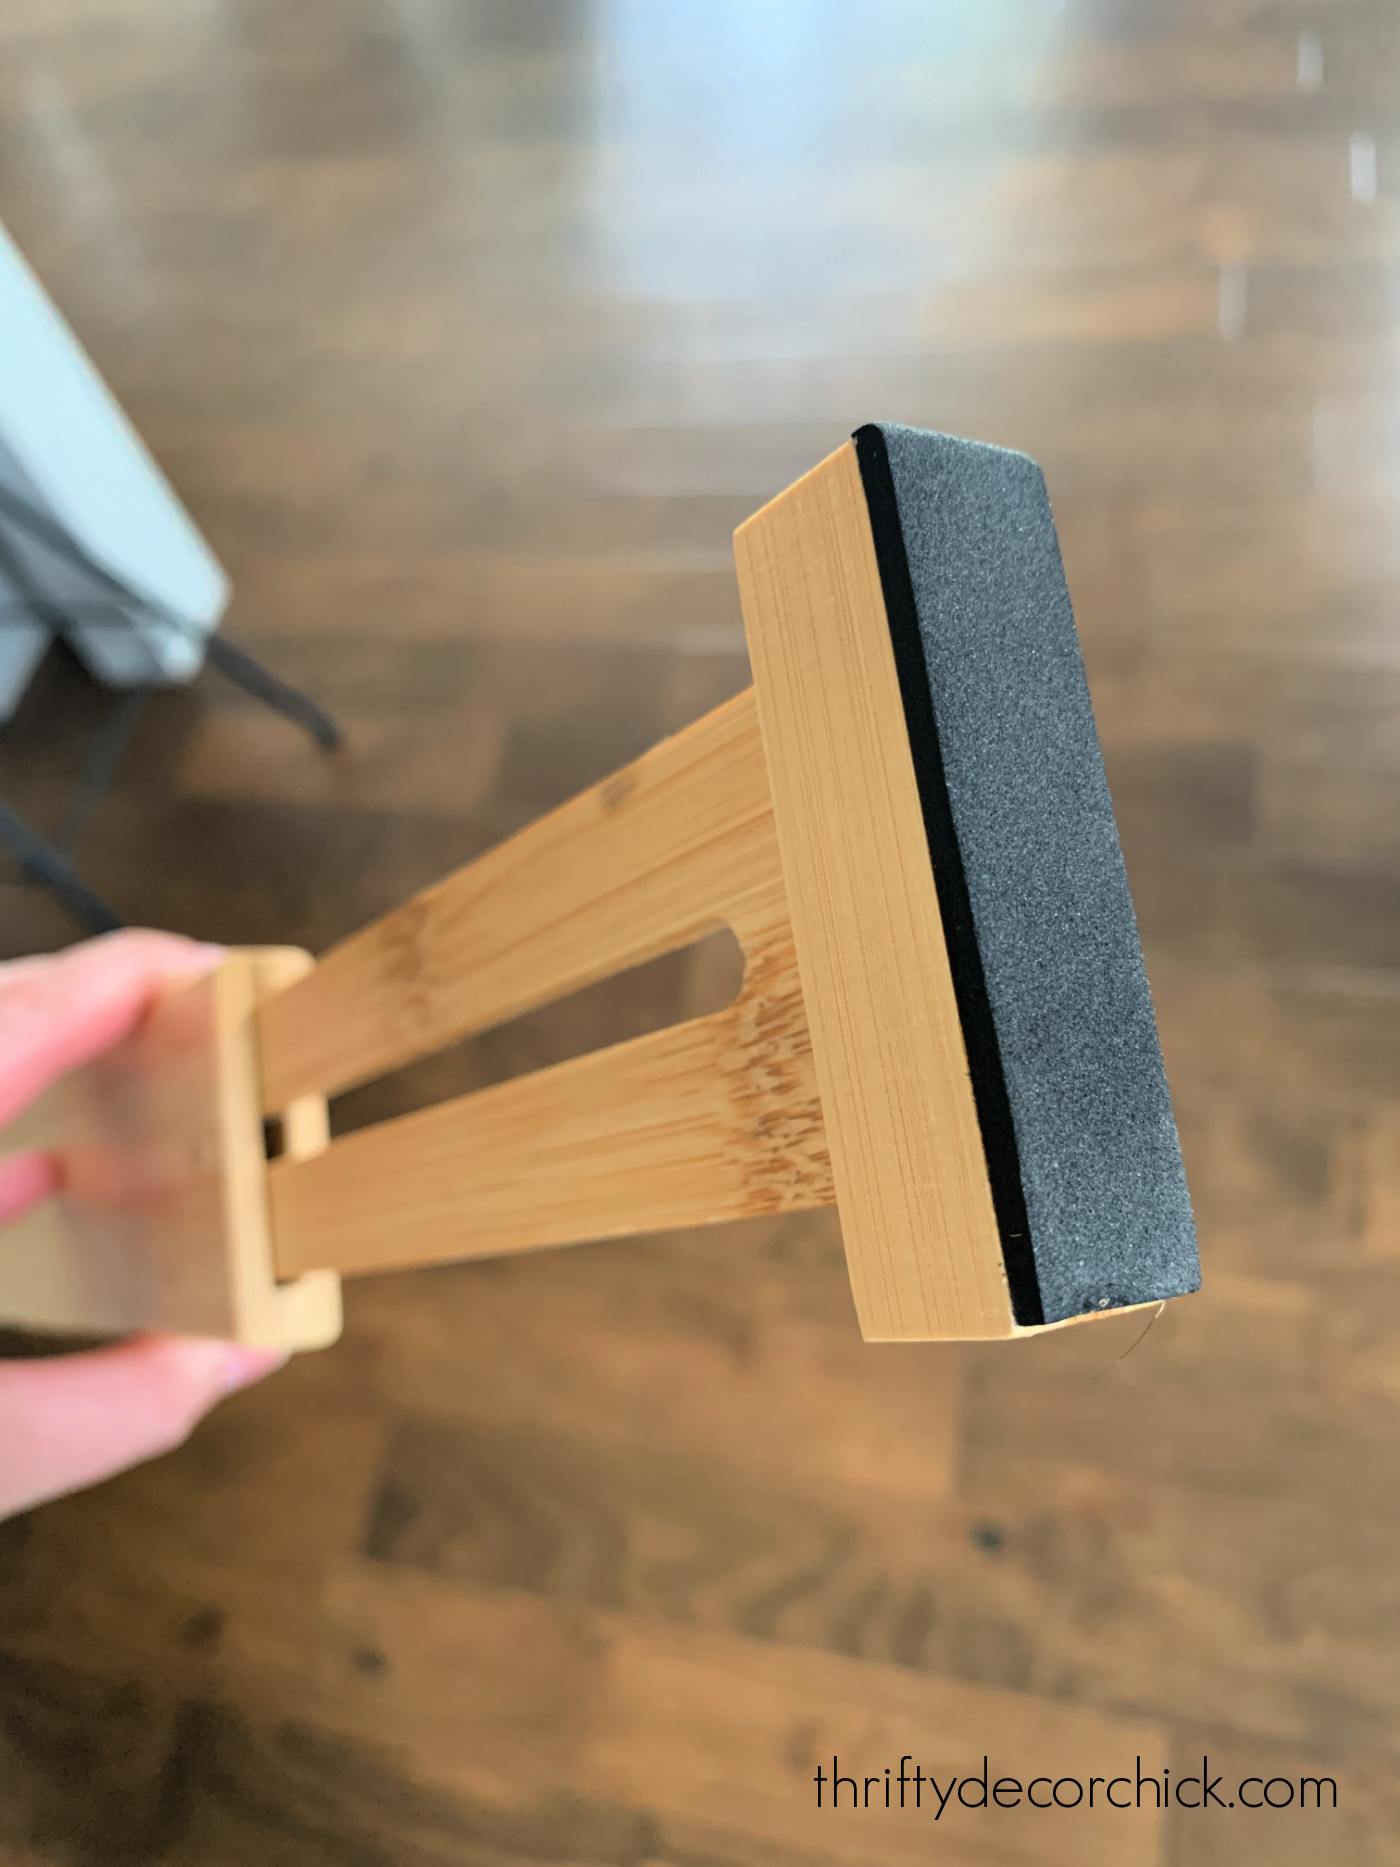
These dividers come in different sizes -- these are the 12 to 17 inch versions that would be best for smaller drawers. There's also a 17 to 21 inch option for larger drawers.
If you don't have fully extending drawers, you can use the longer dividers and place them from front to back.
I used them in my problem drawer but also wanted to tackle an even bigger problem spot -- our utensils are always an absolute mess:

I pulled everything out, got rid of a few things we don't use, sorted what was left and then started putting things back in with the inserts.
These adjustable dividers are AWESOME!!:

Installation is easy -- just pull back the skinny side and place it where you want in the drawer. You can create whatever size compartment you want and can easily adjust them.
I think I'm going to order the larger size for our kitchen drawers so they will have a tighter fit. These have worked well so far, but because they're almost fully extended, they don't grip the sides quite as much.
These expandable dividers would be useful for so many things!:
The reason I got these in the first place was for our spice drawer in the pantry.
I started out with our spices all over the place:

I found these adorable glass spice jars that were the perfect height:

All of the other options I found were too tall. The jars include shaker lids so you can easily shake or pour the spices out!
A TON of printed labels come with them as well, plus a bunch you can write on yourself:


There's even a white marker included! :)
Anyway, they're adorable and perfect and when alphabetized, they make it SO much easier to find what we need!:
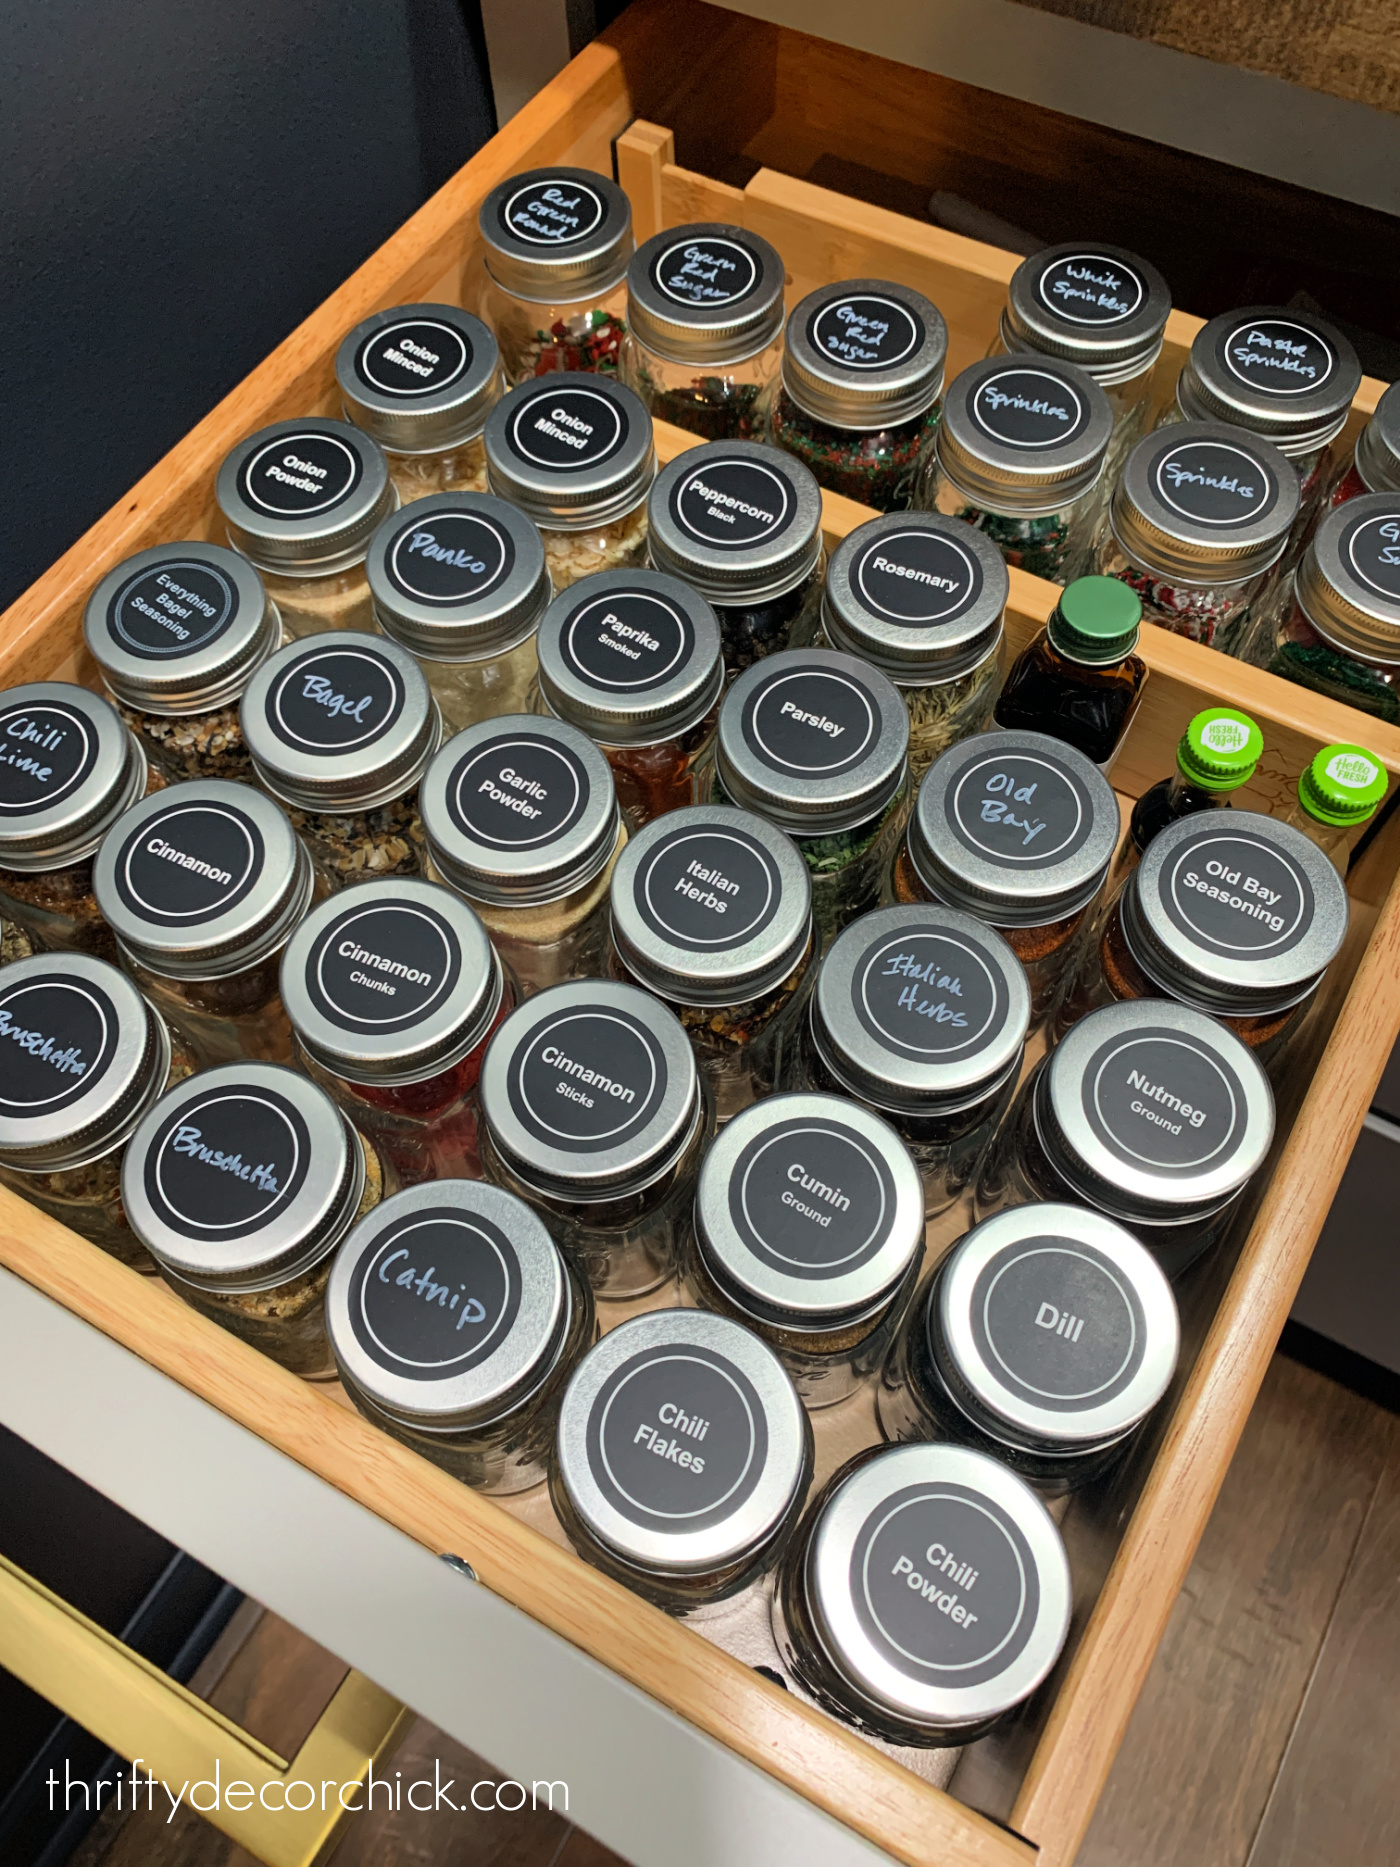
The drawer dividers keep the glass jars from sliding all over and also allowed me to separate the spices from my baking toppings as well.
Now they all stay put and I can find what I need quickly. Both the jars and the dividers make me happy. ?
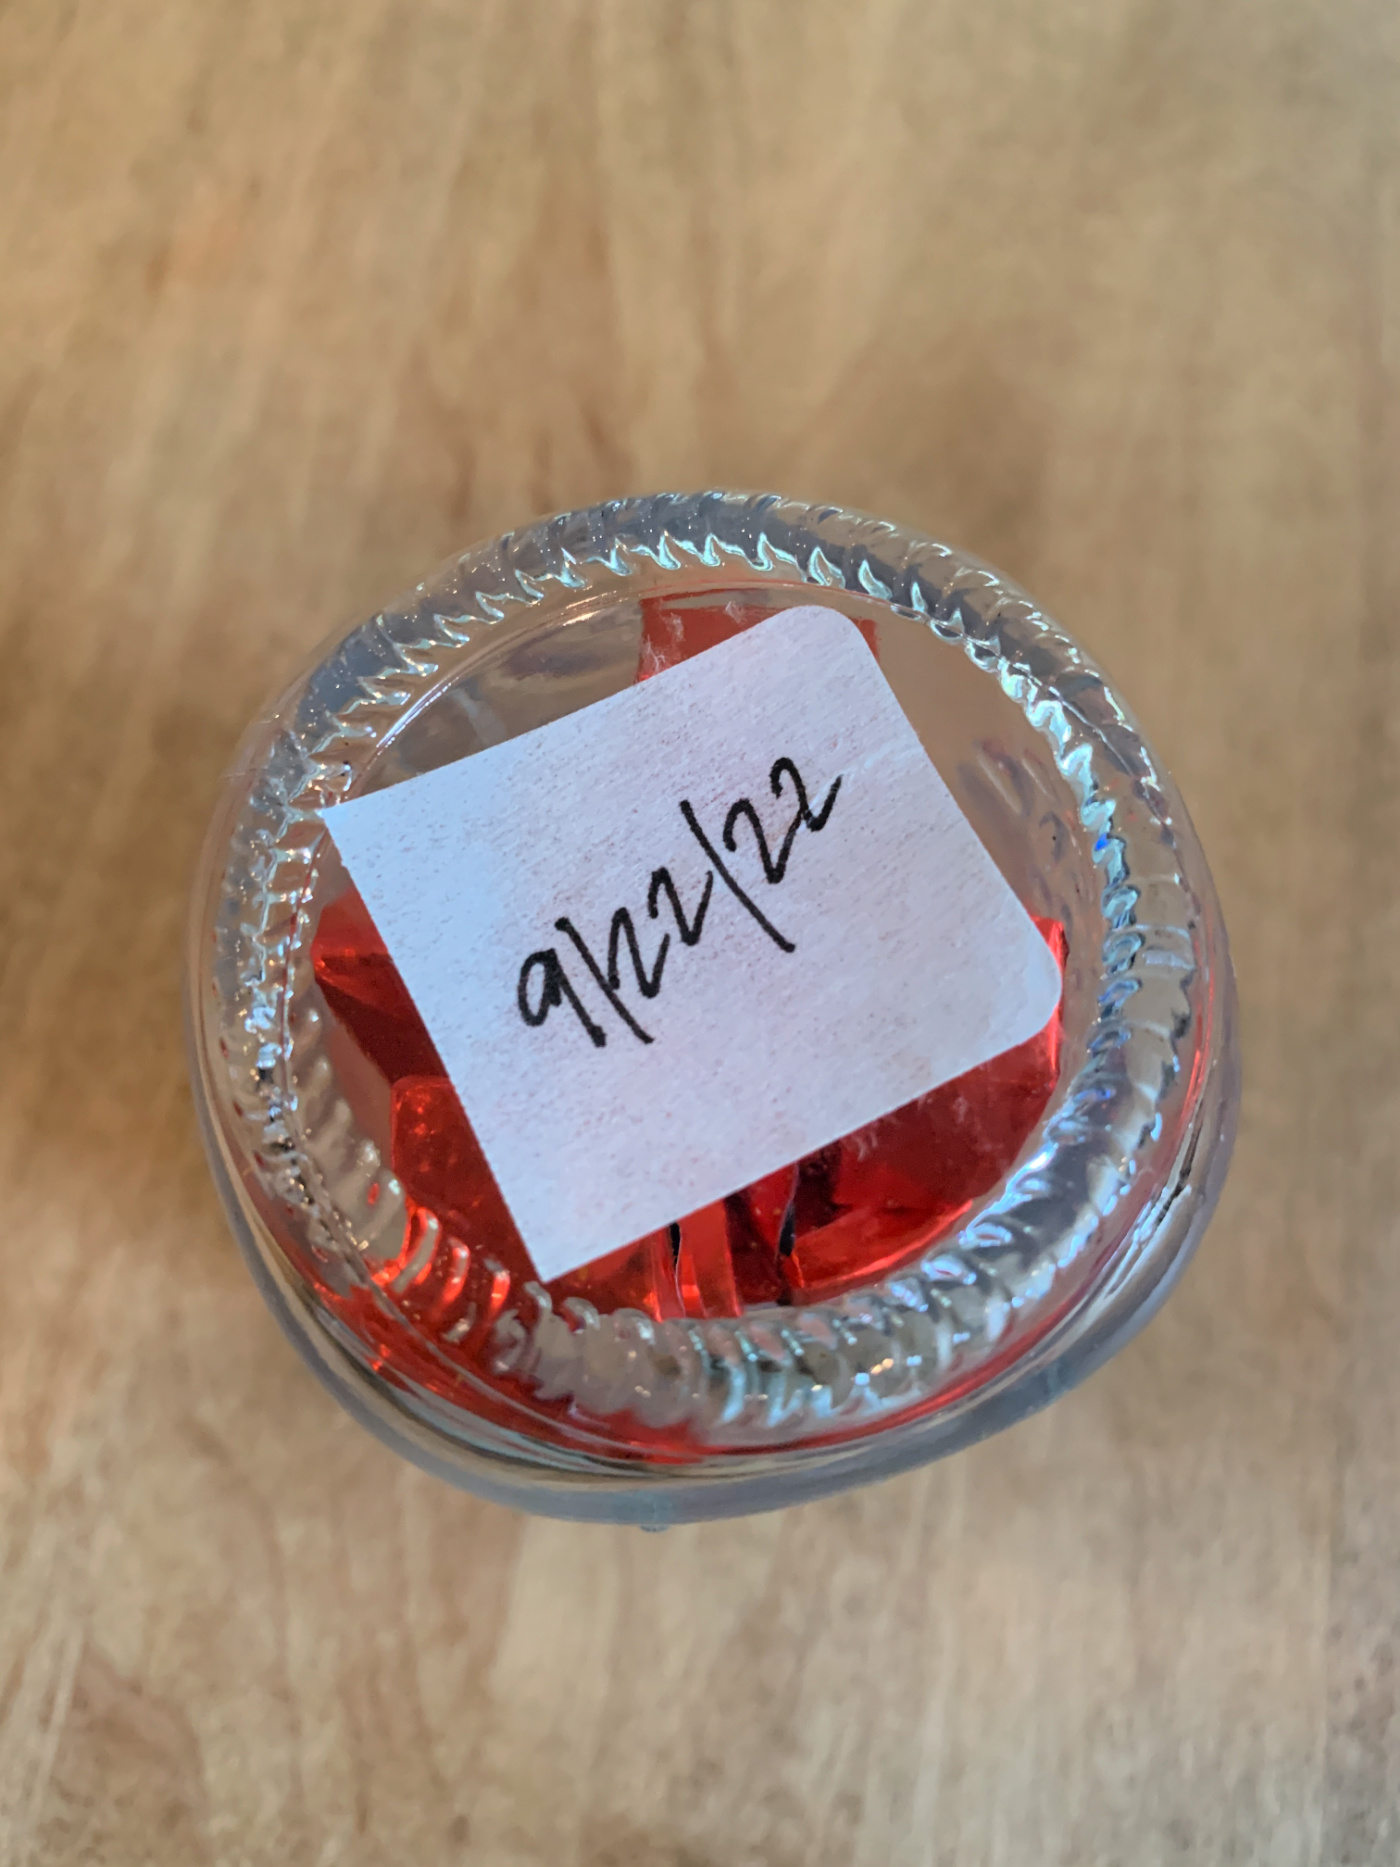
Oh, and I found these dissolvable labels so I can write expiration dates on the bottom of my jars:
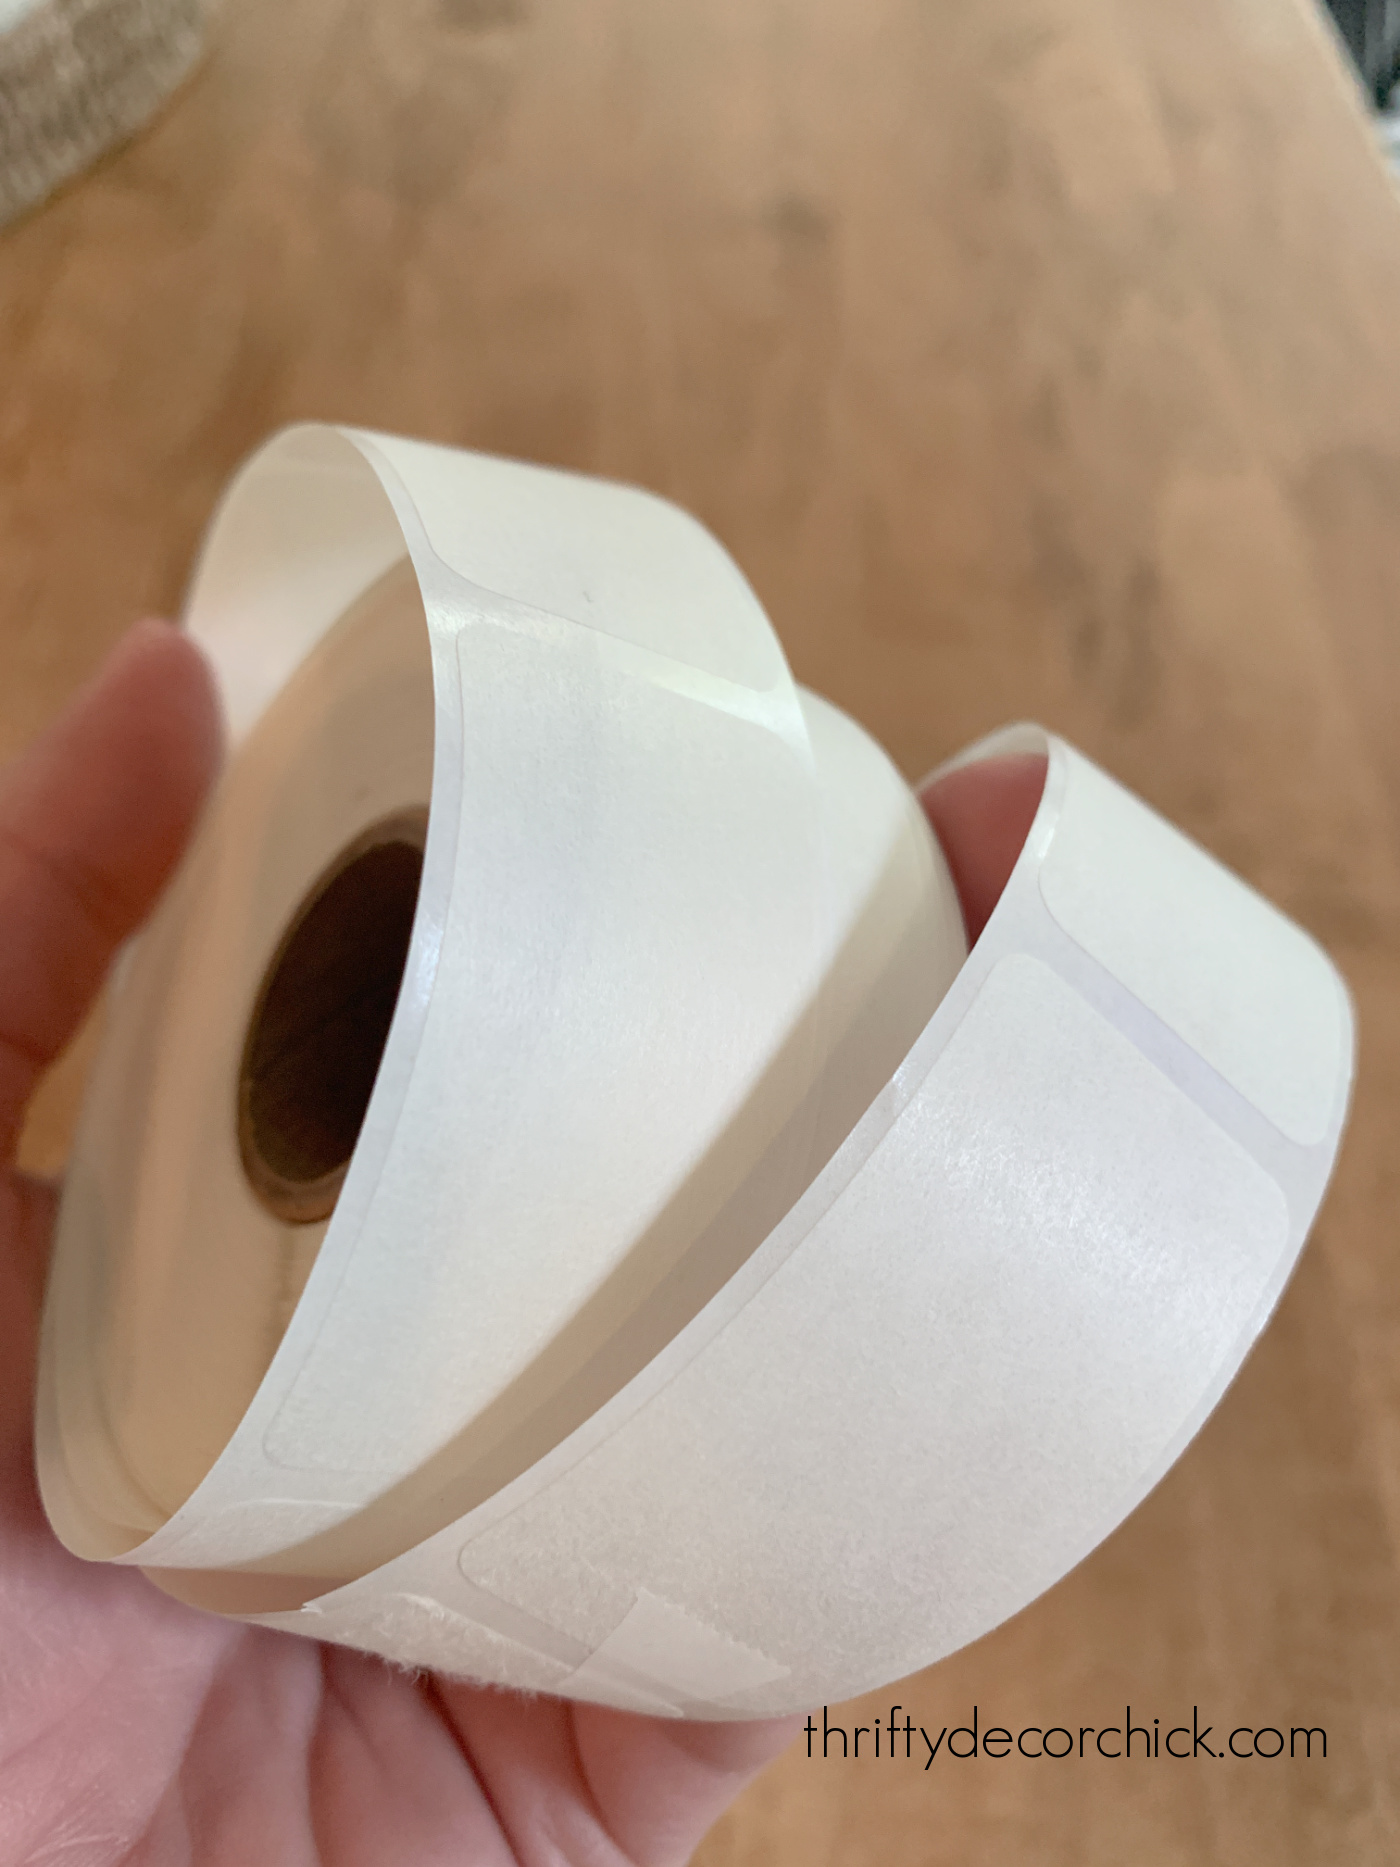
They quickly dissolve in water and and don't leave any adhesive on the surface. I've been using them for all of our containers!
They are GREAT -- I had been looking for something like this forever:
All of these items have helped make our kitchen and pantry more functional (while still looking good!).
The DIY dividers are great if you don't need to adjust them later on, but these work great if you'll be adding or removing things over time that will change how you use the storage space.
They'd also be great for renters who don't want to do anything semi-permanent. :)
**These dividers are available in plastic as well!
Never miss a post by signing up to get posts via email.
Via https://www.thriftydecorchick.com/2021/10/adjustable-drawer-dividers-kitchen-organization.html Tips for installing a DIY peel and stick tile backsplash. No mortar or grout needed with this easy installation method!
You can get a fresh look anywhere you want a tile accent with this easy DIY project!
These peel and stick wall tiles I used on our pantry backsplash was a HUGE timesaver. The adhesive on the back of these faux stone tiles make it easy and quick to install.
I've been moving along on the pantry turned "butler's" pantry makeover I shared with you last week! I was annoyed with the piles of stuff from the pantry laying all over our mud/laundry room, so I've been motivated to get this done quicker than usual. :)
I got the cabinets installed first (check out my tips on installing cabinets here) and then installed the butcher block countertop before starting the tile.
You'll want to know where your counter stops before installing the tile, no matter what kind of tile you're using.
If you read my pantry plan post (say that three times fast), you saw that I was going back and forth between two tile options.
The first were traditional ceramic tiles that I'd have to mortar and grout (or use these awesome sticky tile sheets I showed you!) and one was this peel and stick backsplash tile from SimplInstall:

This post may contain affiliate links for your convenience.
See my policies and disclosure page for more information.
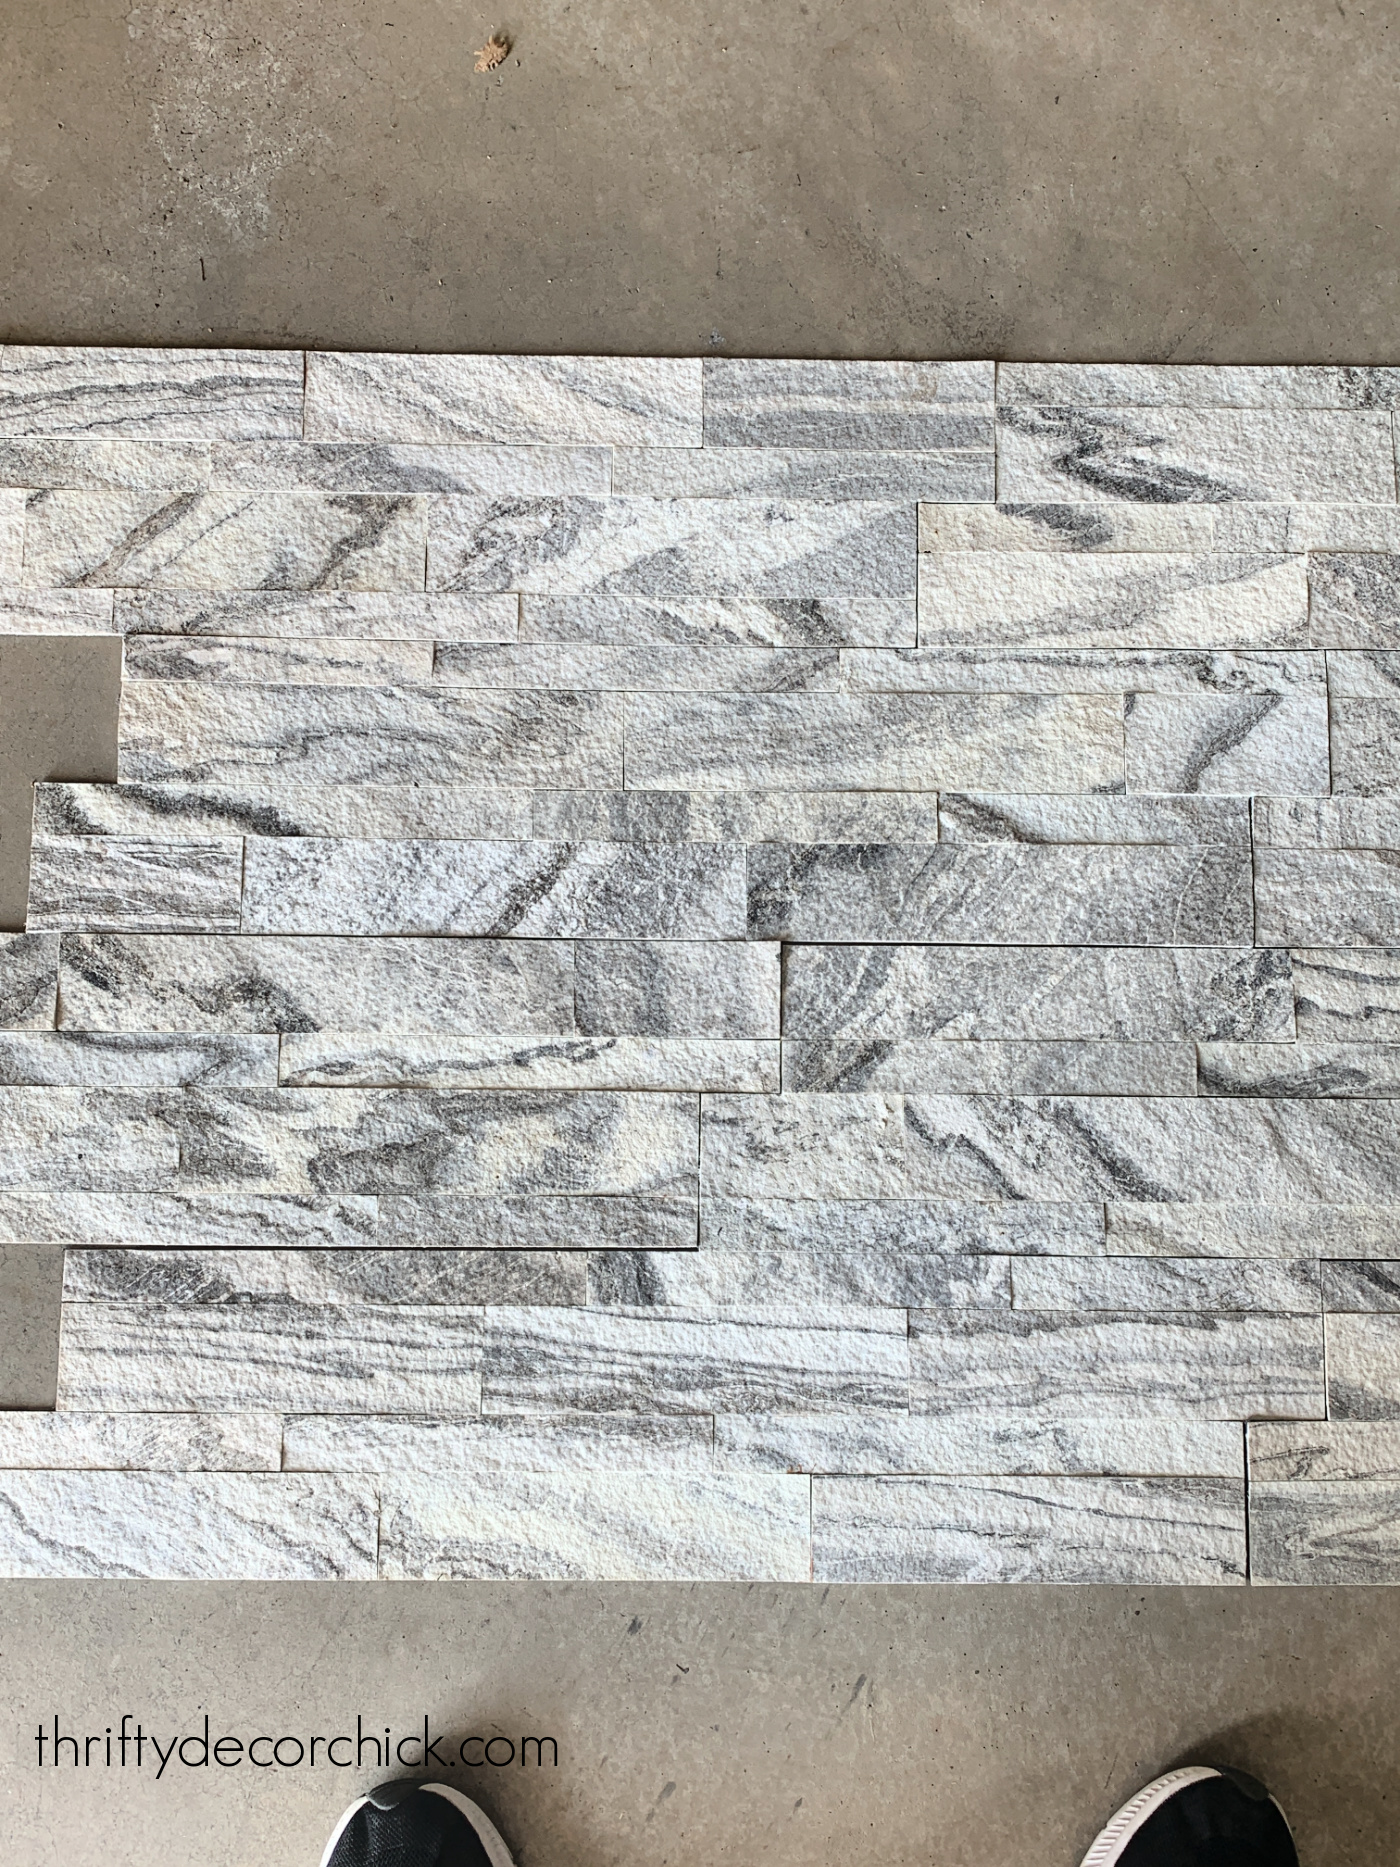
This particular one is called Aspen White Marble and I found it at Floor and Decor. I liked that it had the look of natural stones.
I decided on this one for a few reasons -- the biggest was that the rest of my family HATED the other tile option that I loved. ? Whatever.
I love the look of the star tile, but I can see it may look outdated in a few years. This marble/stone looking option will stand the test of time.
It's a little more modern than I usually go, so I was surprised I liked it so much. But I'm so happy I went with it! It's really beautiful, especially when it's all installed.
Of course, another big reason I went with this stuff is the ease of installation. I knew it would be quicker, and NO grout is needed after installation.
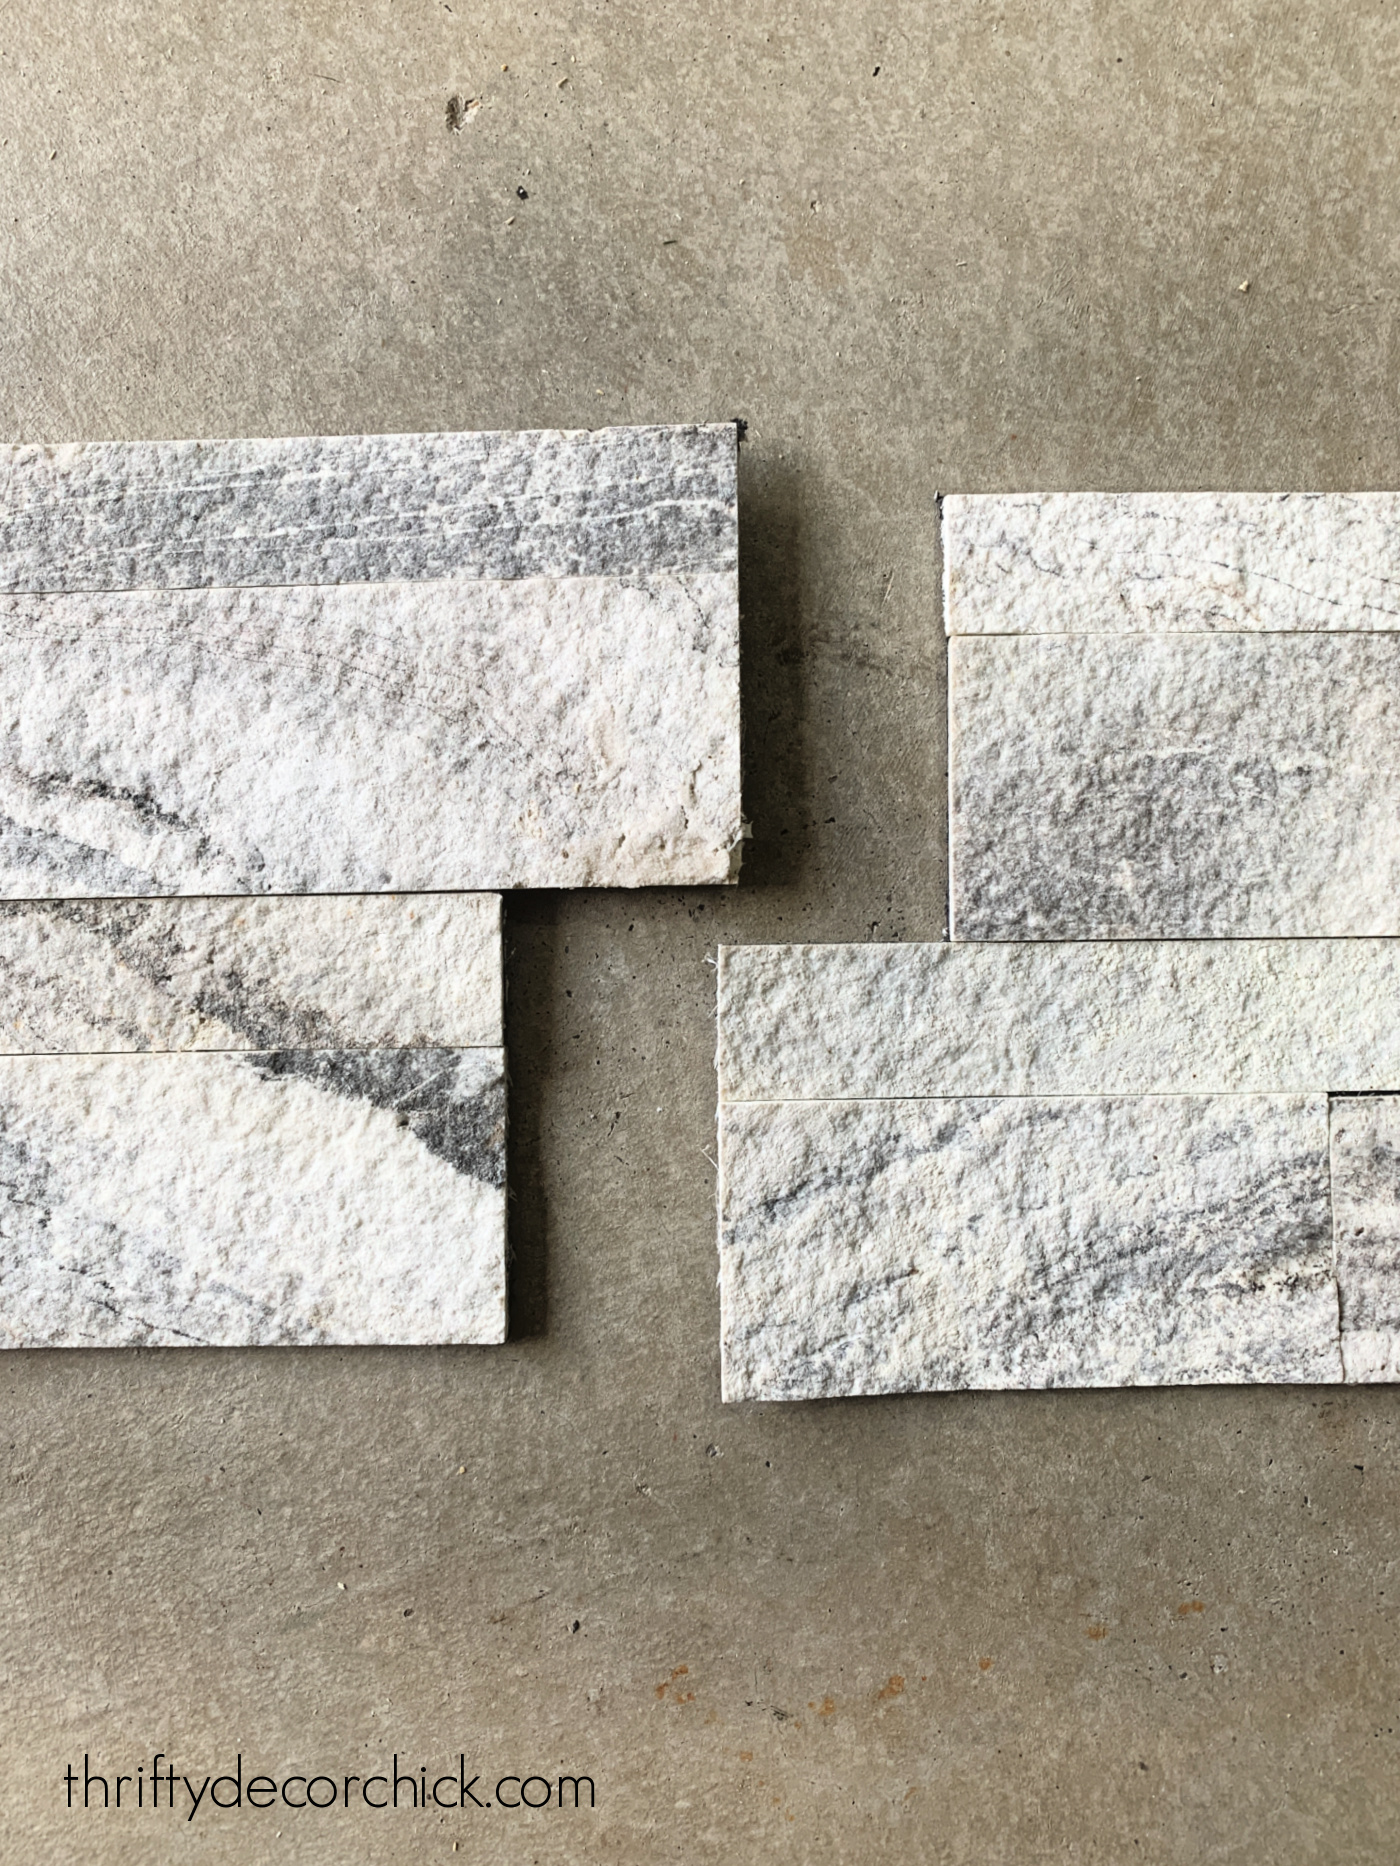
The shape of these make them even easier to install, since they fit together like puzzle pieces:
Before you install peel and stick tile
Start with a clean, dust free wall before installation. If you're starting with bare drywall and it needs to be primed or painted first, I would let it cure for a few days at the least.
When you start out, use a level to make a straight line on the wall above your first tile. Use this as your guide as you start your first line of tile.
If you're working on a large space, it would be helpful to use a laser level or chalk line to mark your level.
Mark the middle of your wall and start your first tile centered on that spot.
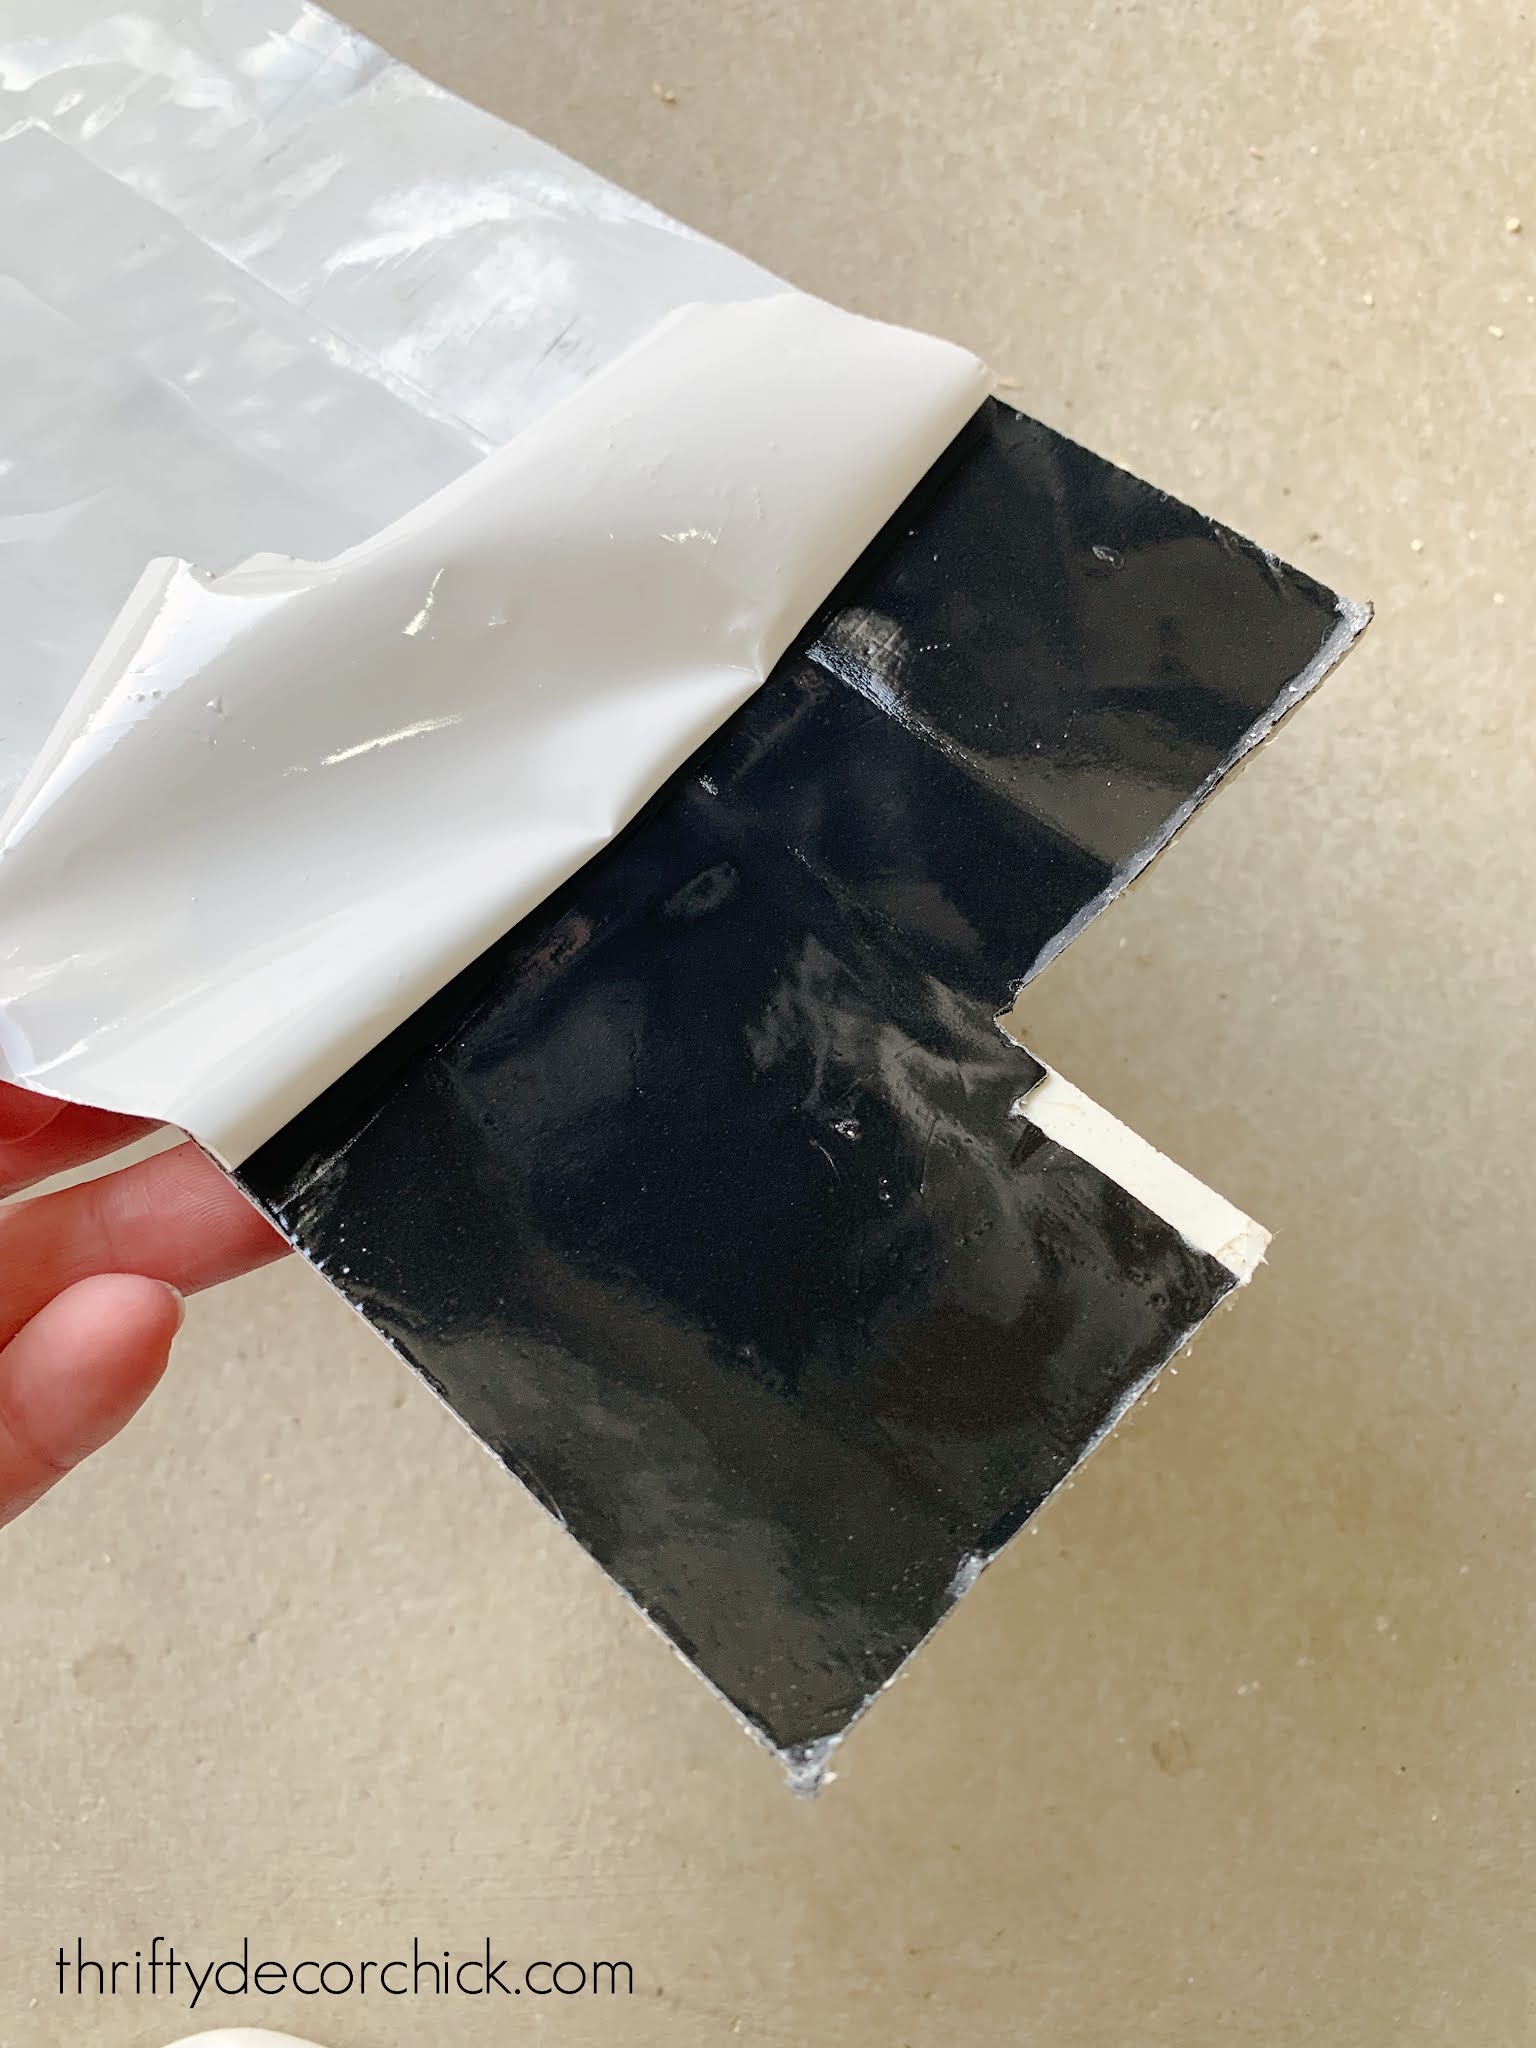
This product has a sticky adhesive back -- hold your tile up and determine placement and cuts before peeling the plastic off the back:
How to cut peel and stick tile
There are vinyl "tiles" that are SUPER easy to cut -- just use a utility knife or strong pair of scissors.
This tile has a stone texture, so scissors won't work, but you can use a few options. I used my miter saw for the regular straight cuts:

If you need a skinnier piece to finish off a spot, just use scissors to cut in between the tiles:

For areas around light fixtures where you'll need more detailed or rounded cuts, you can use tin snips or a chisel to make those:

How to install peel and stick tile
When I used the sticky tile mats to install the tile in our mud room, there was a little bit of give once I stuck the tile on. If I was quick, I could pull it off or push it around just a bit.
You will not be able to adjust this stuff -- once it's on, it's on! It's scarier than it sounds though. As long as you take your time figure the placement before peeling off the back, you'll be fine.
The great thing about this particular peel and stick tile is you can't tell where one piece starts and the other begins, so you don't really have to have a specific layout as you install.
It's super forgiving and would be a great one to use if you're new at tiling! Even if you're cuts aren't perfect, you won't notice the imperfections:

After sticking each piece to the wall, use your hands and press firmly along the whole piece to make sure it's flat against the wall.
If you have a handheld roller that would work well too, but don't get one just for this project.
If I could do it over I would have started each "tile" on the left, flush against the wall, so there were no gaps at all:

But it's not a big deal, a line of caulk will easily clean that up! You can also install small trim to cover any imperfections.
I marked the line on the right where I wanted the tiles to end -- this is where I'll be building up the pantry cabinets eventually:

Because of the design, you can use scrap pieces to fill in almost anywhere. So you don't need much to fill a space. I used exactly two boxes and they were $60 each.
After installing peel and stick tile
If you will be prepping food or cooking near any tile backsplash, sealing is recommended. It doesn't take long and will prevent the tile or grout from staining.
I'm not sure if I'm going to seal this or not -- it can change the look of the tile so I'll probably test a scrap piece to see how it looks.
One of my readers mentioned that since this is stacked dimensional tile, it can be difficult to get switch plates flush.
I have found the same to be true overall, but not with this product:

The covers went back on the wall nice and flush -- no issues there!
I LOVE the look of this stuff. It's not smooth -- it has a rough, stone-like texture. I loved the movement in the design and the colors inspired me to paint the walls in here my favorite deep navy, Cyberspace.
I've used it in our dining room and family room as well, so it ties in nicely here:

This is just a peek at the progress! The sticky tile made for an easy makeover in this spot.
By the way, I tiled to where I wanted to add a shelf, then added the shelf supports to the wall and continued the tile. (Check out the outlet photo above to see what I'm talking about.) You can find my floating wood shelf tutorial here.
That view looked like this until last week:

I loooove how it's all coming together! I'll share more pantry progress soon.
Benefits of peel and stick tile:
Cons of this peel and stick tile:
If you love the look of stacked stone and want to use the real thing, check out my tutorial on how to install stacked stone around a fireplace:

Never miss a post by signing up to get posts via email.
Via https://www.thriftydecorchick.com/2021/10/how-to-install-peel-stick-tile-backsplash.html Comparing six metallic brass and brass spray paints to find the perfect brass finish and my top three picks!
Brass and gold finishes have been back in style in a big way for years. They aren't going anywhere soon!
I'm talking about the warmer, more varied brass tones that look great on light fixtures and accessories by the way, not the super shiny brass that many of us have had on our door knobs or light fixtures over the years. :)
I was on a rampage in our last house to get rid of the shiny brass fixtures. I actually don't mind that look as much now, but the warmer brass tones feel more realistic for sure.
I've wanted to compare some brass and gold spray paints for awhile, so over the past couple of months I've gathered six metallic spray paint options:

From left to right we have:
I thought there would be a much bigger selection -- but these were the six I found after numerous trips to a few hardware stores. Both Rust-oleum and Krylon are good quality spray paints with great durability!
Many of these have "gold" in the name, but have what I consider to be more of a brass tone. But I find gold and brass spray paints are pretty interchangeable.
I decided to test them out in a way so you can see the paints next to each other. I think this really shows the slight variation between each spay paint.
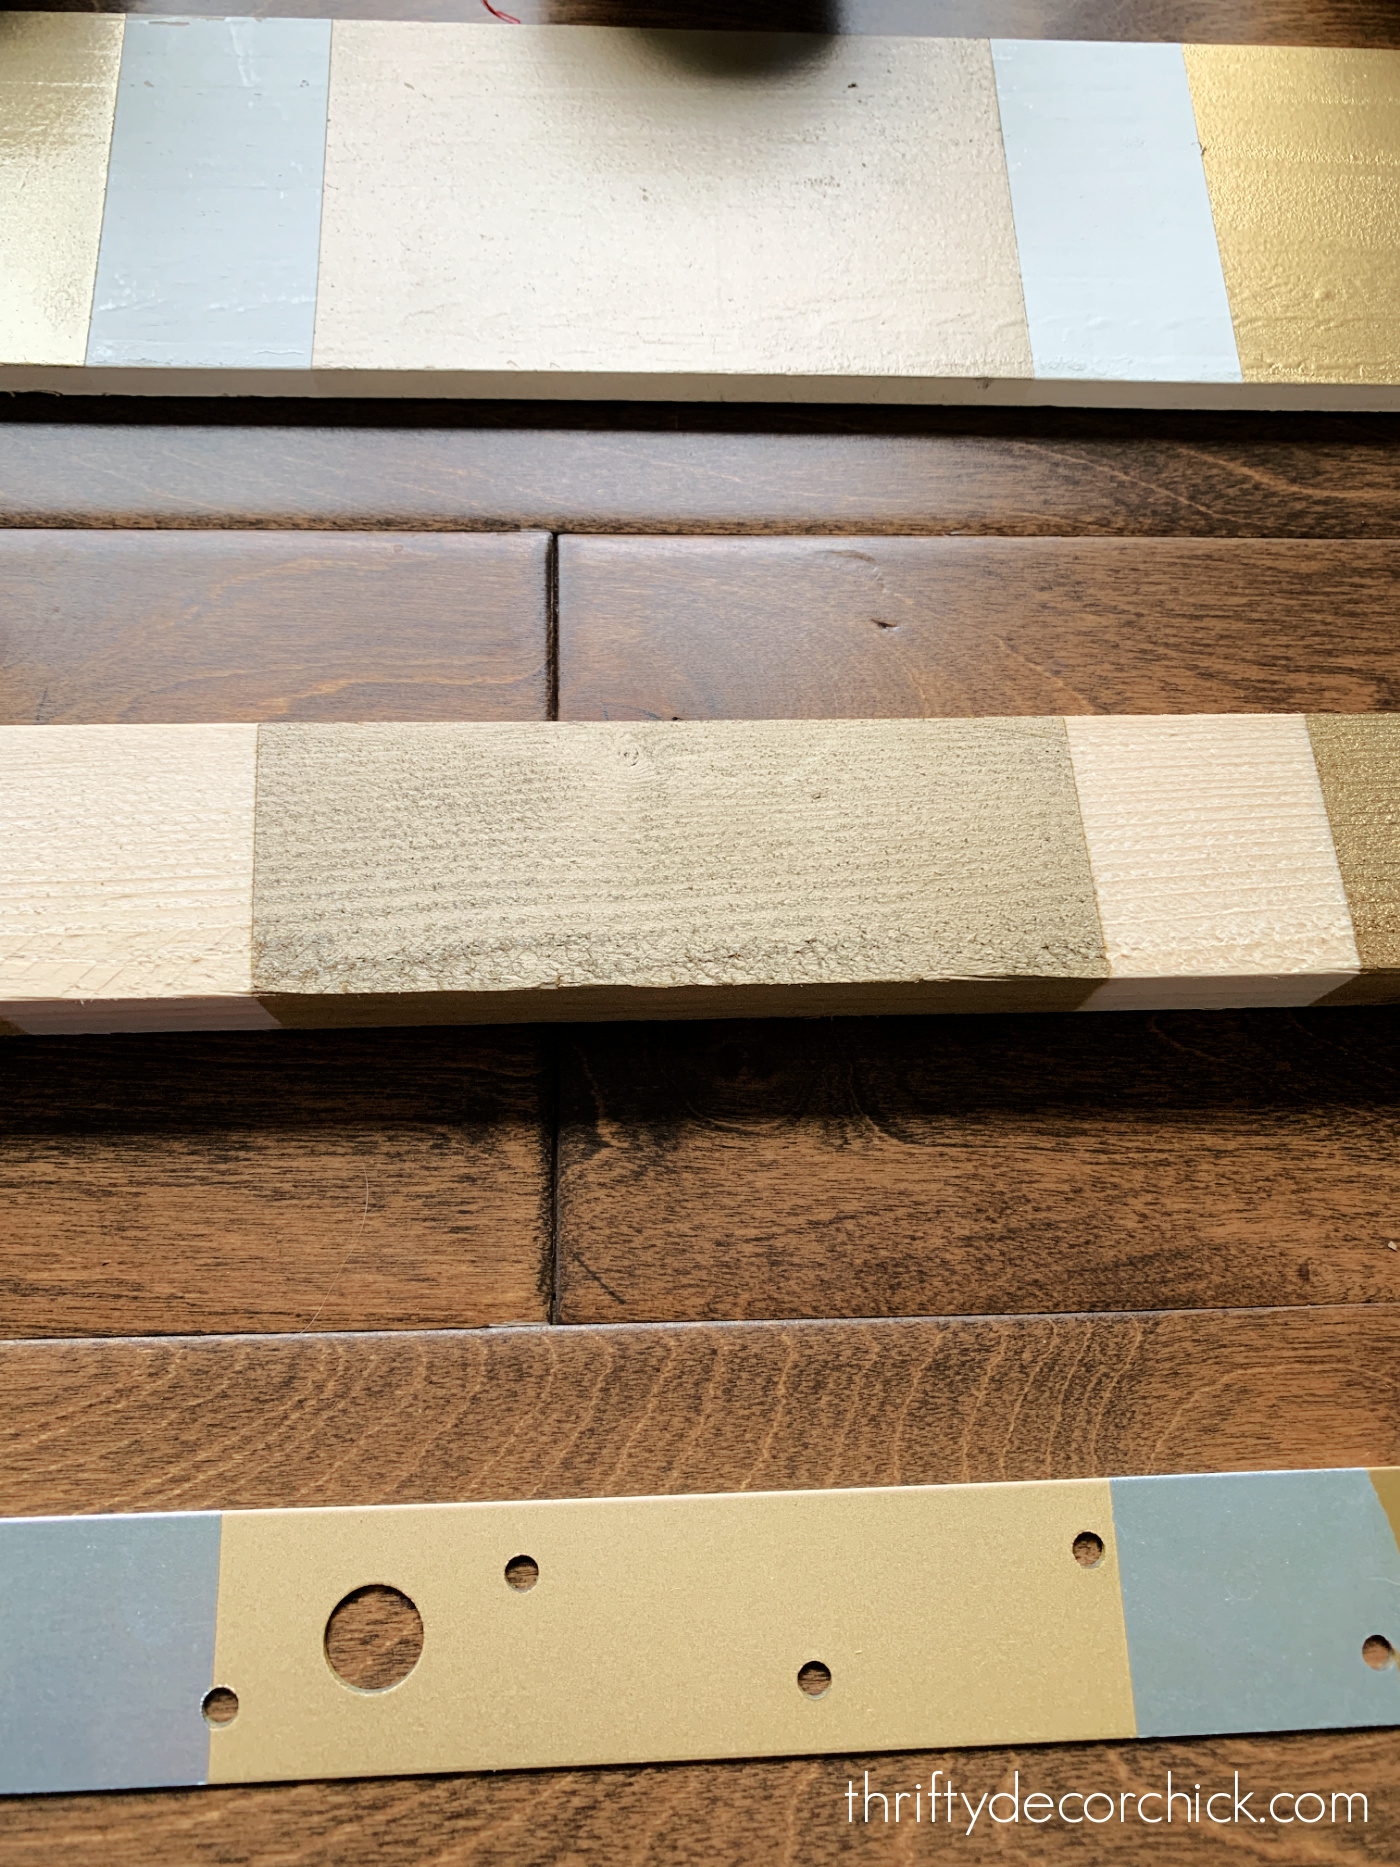
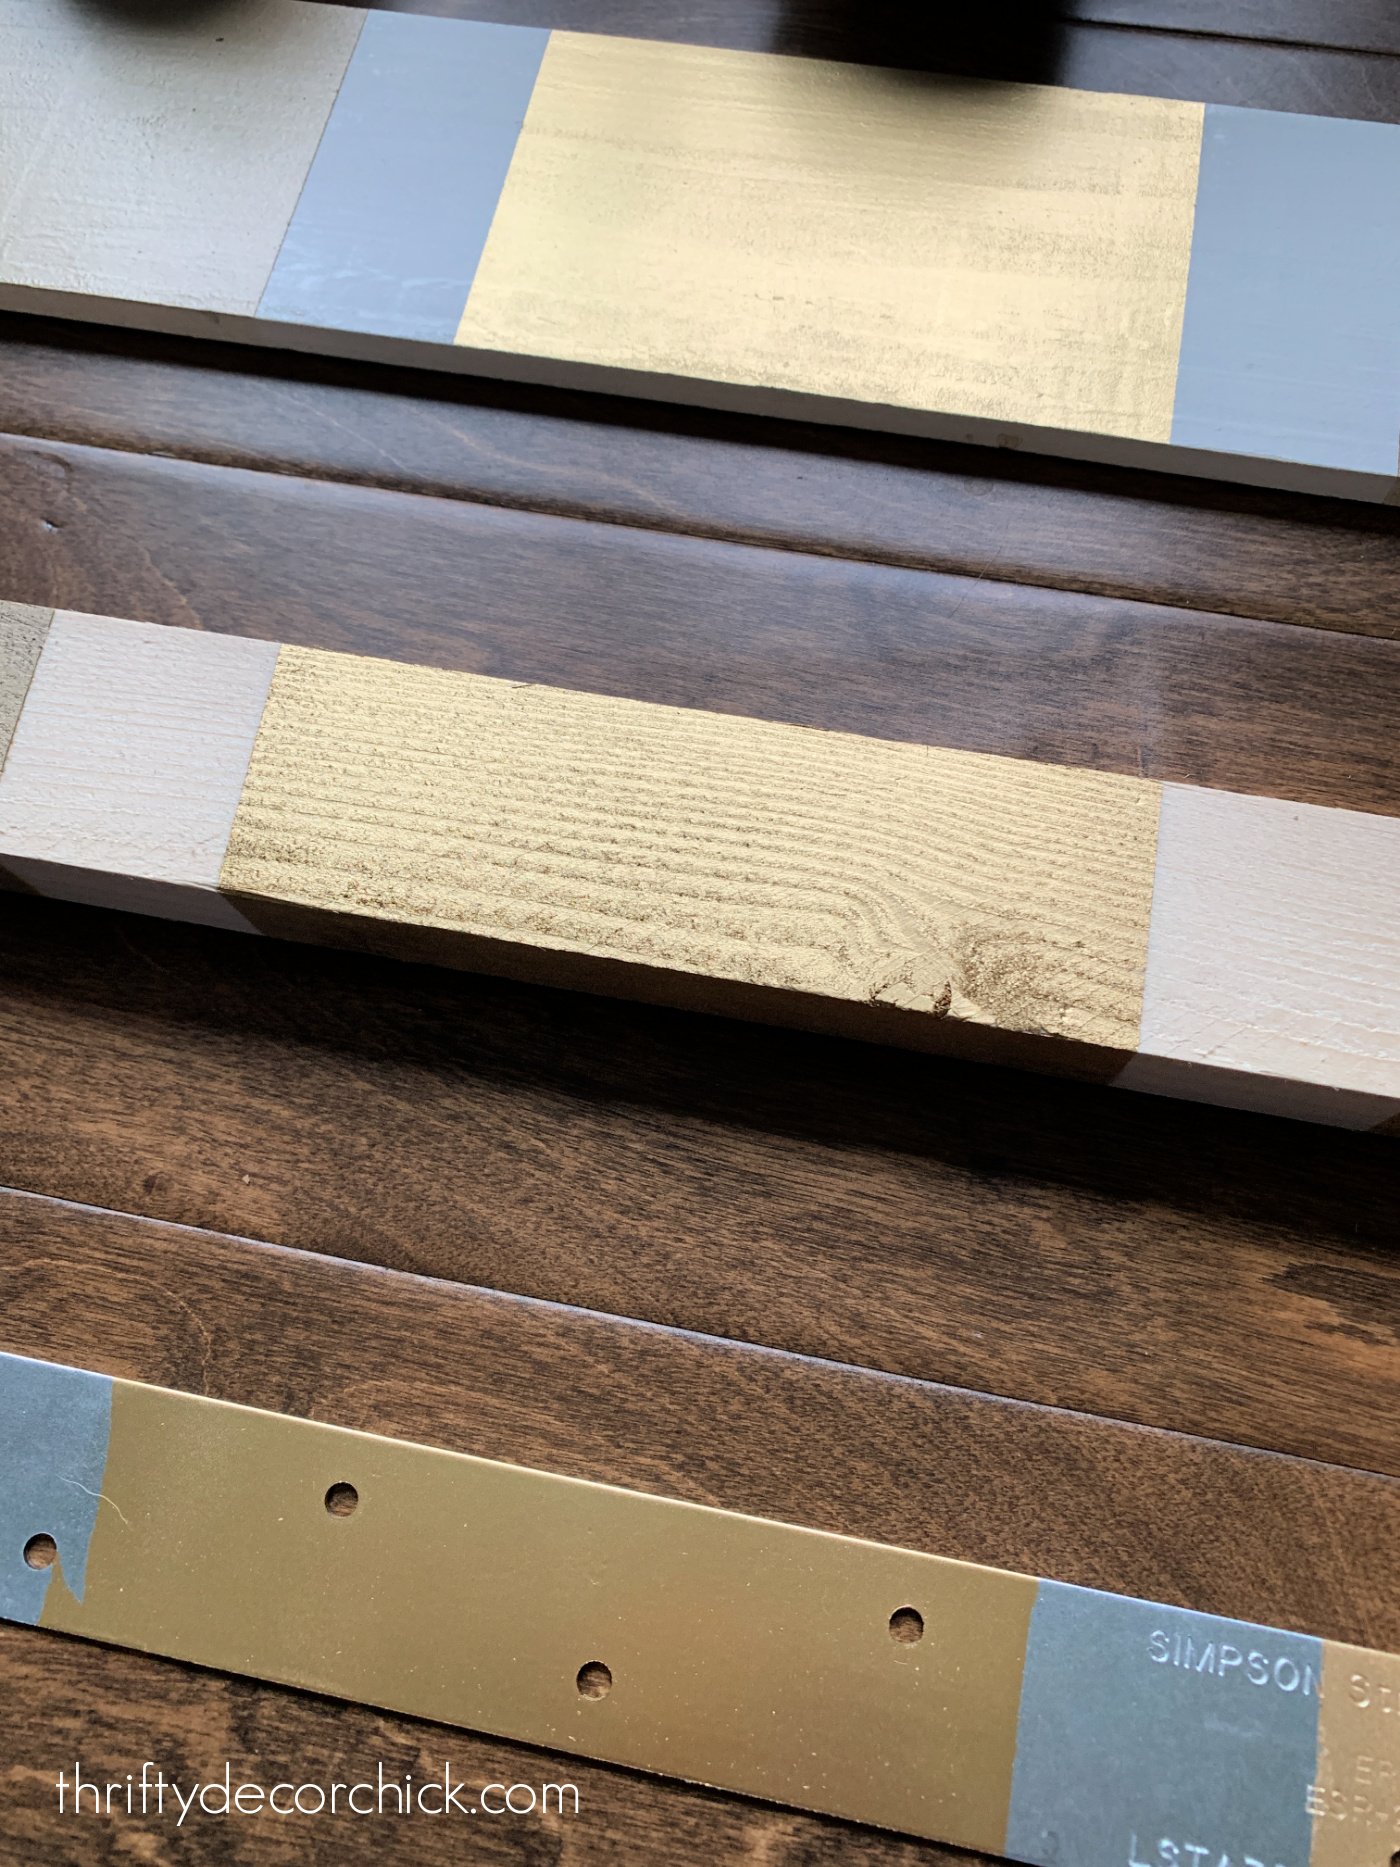
I grabbed three types of surfaces -- scrap bare wood, primed wood and metal and taped them off into sections. I didn't use a primer on the bare wood or the metal.
Here are some quick spray paint tips before we get started!
I wanted to show you the results in both daylight and inside -- remember that your light source will change the colors! Incandescent (regular yellowish color) bulbs will also change the look of the spray paint, just like wall paint.
I sprayed two coats of each paint on the sections.
Here's a look at the spray paints in the same order as above in daylight:

This post may contain affiliate links for your convenience.
See my policies and disclosure page for more information.
Wow, look how different these are!
Here's the thing, there's obviously many tones of this metallic color, as there are in real life. For this experiment, I was on the lookout for the most "classic" brass tone.
Look at the difference when I brought them inside, still in natural light:

I found the primed wood showed the variances the best:
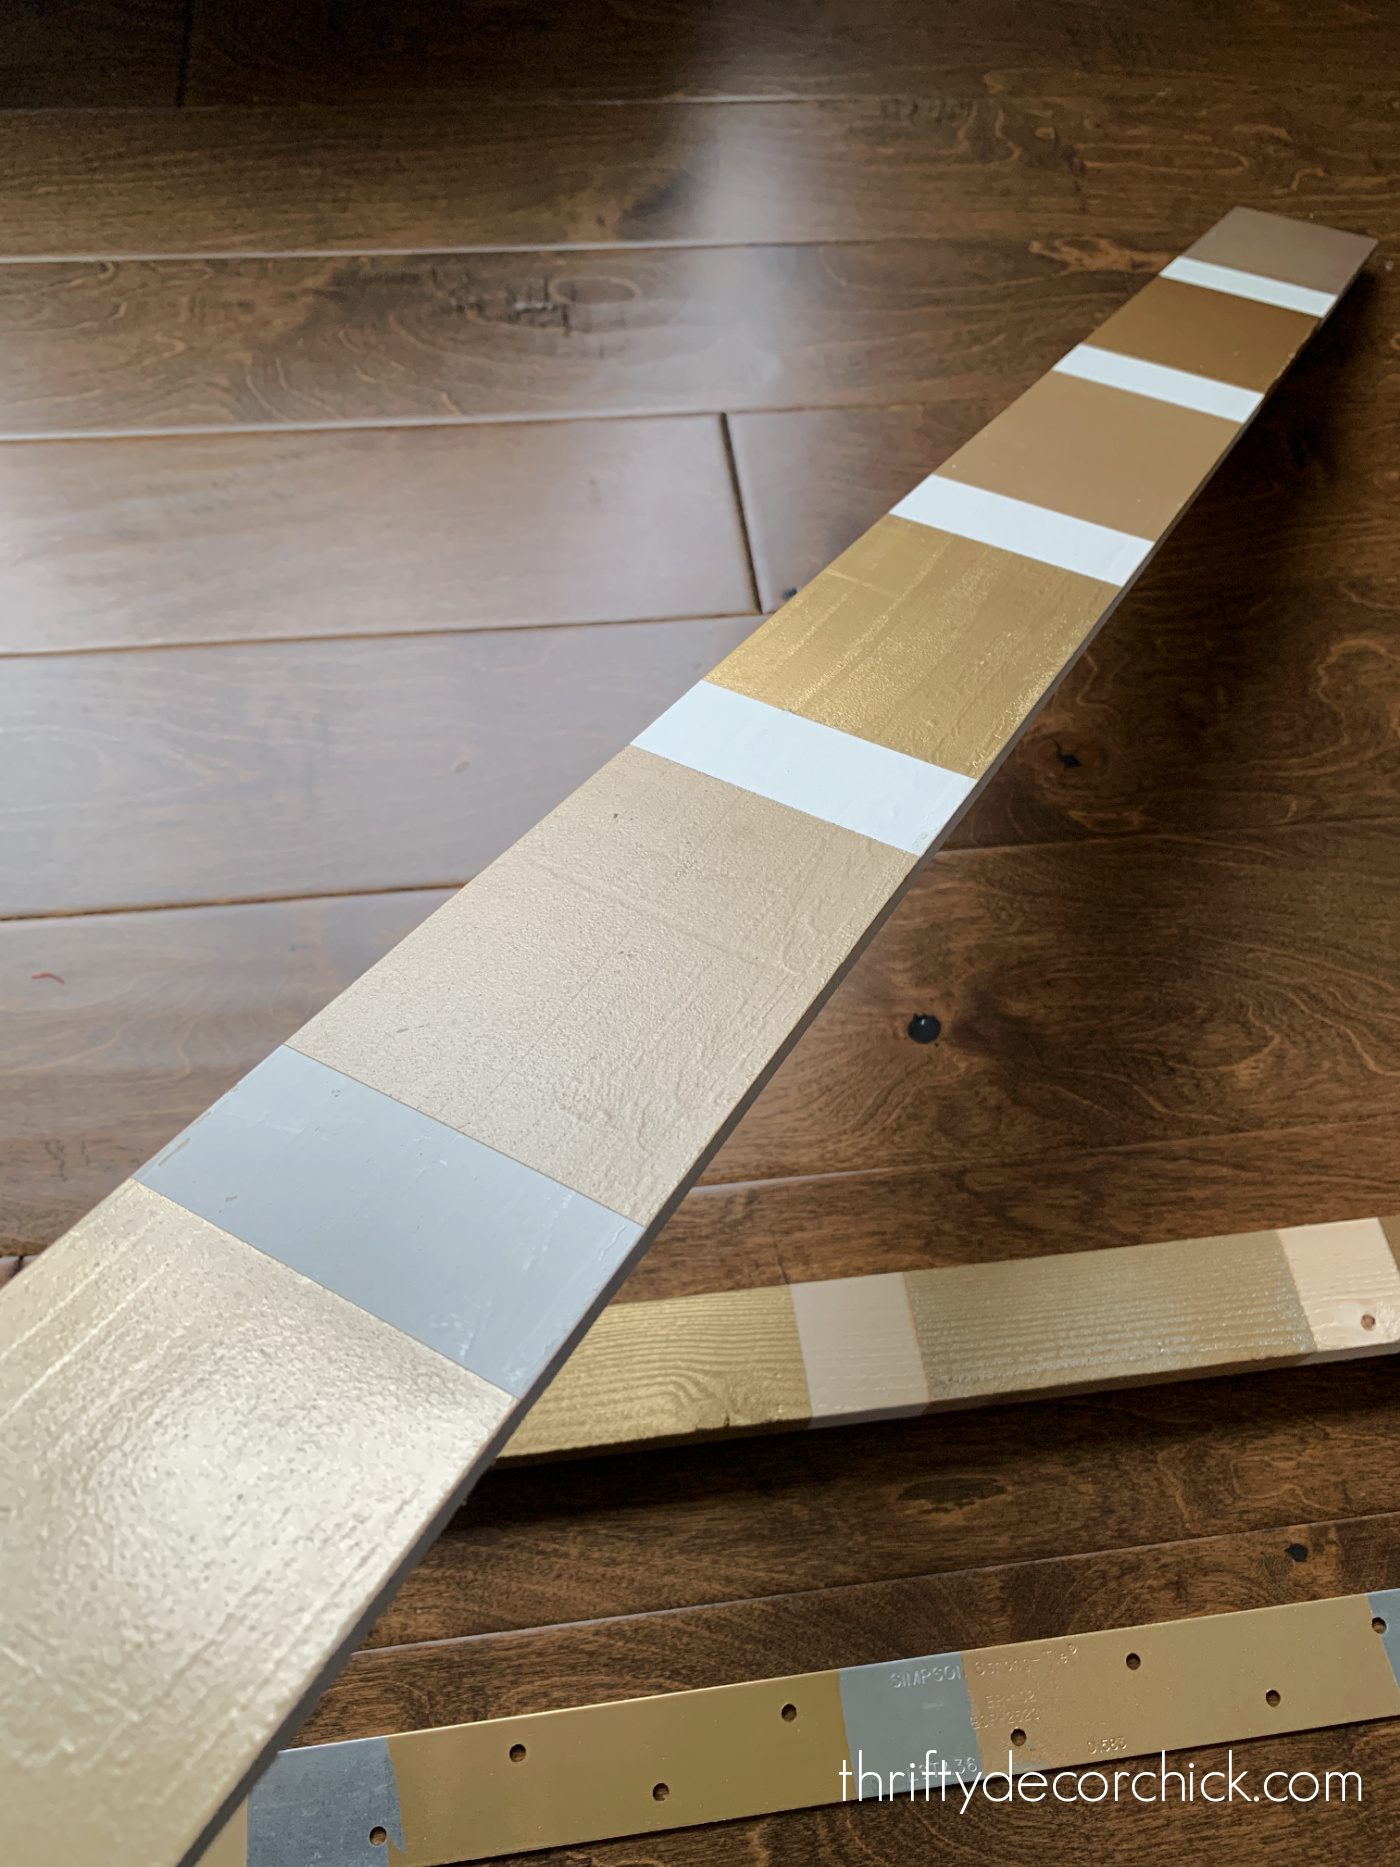
Let's start from the left and talk about the colors!
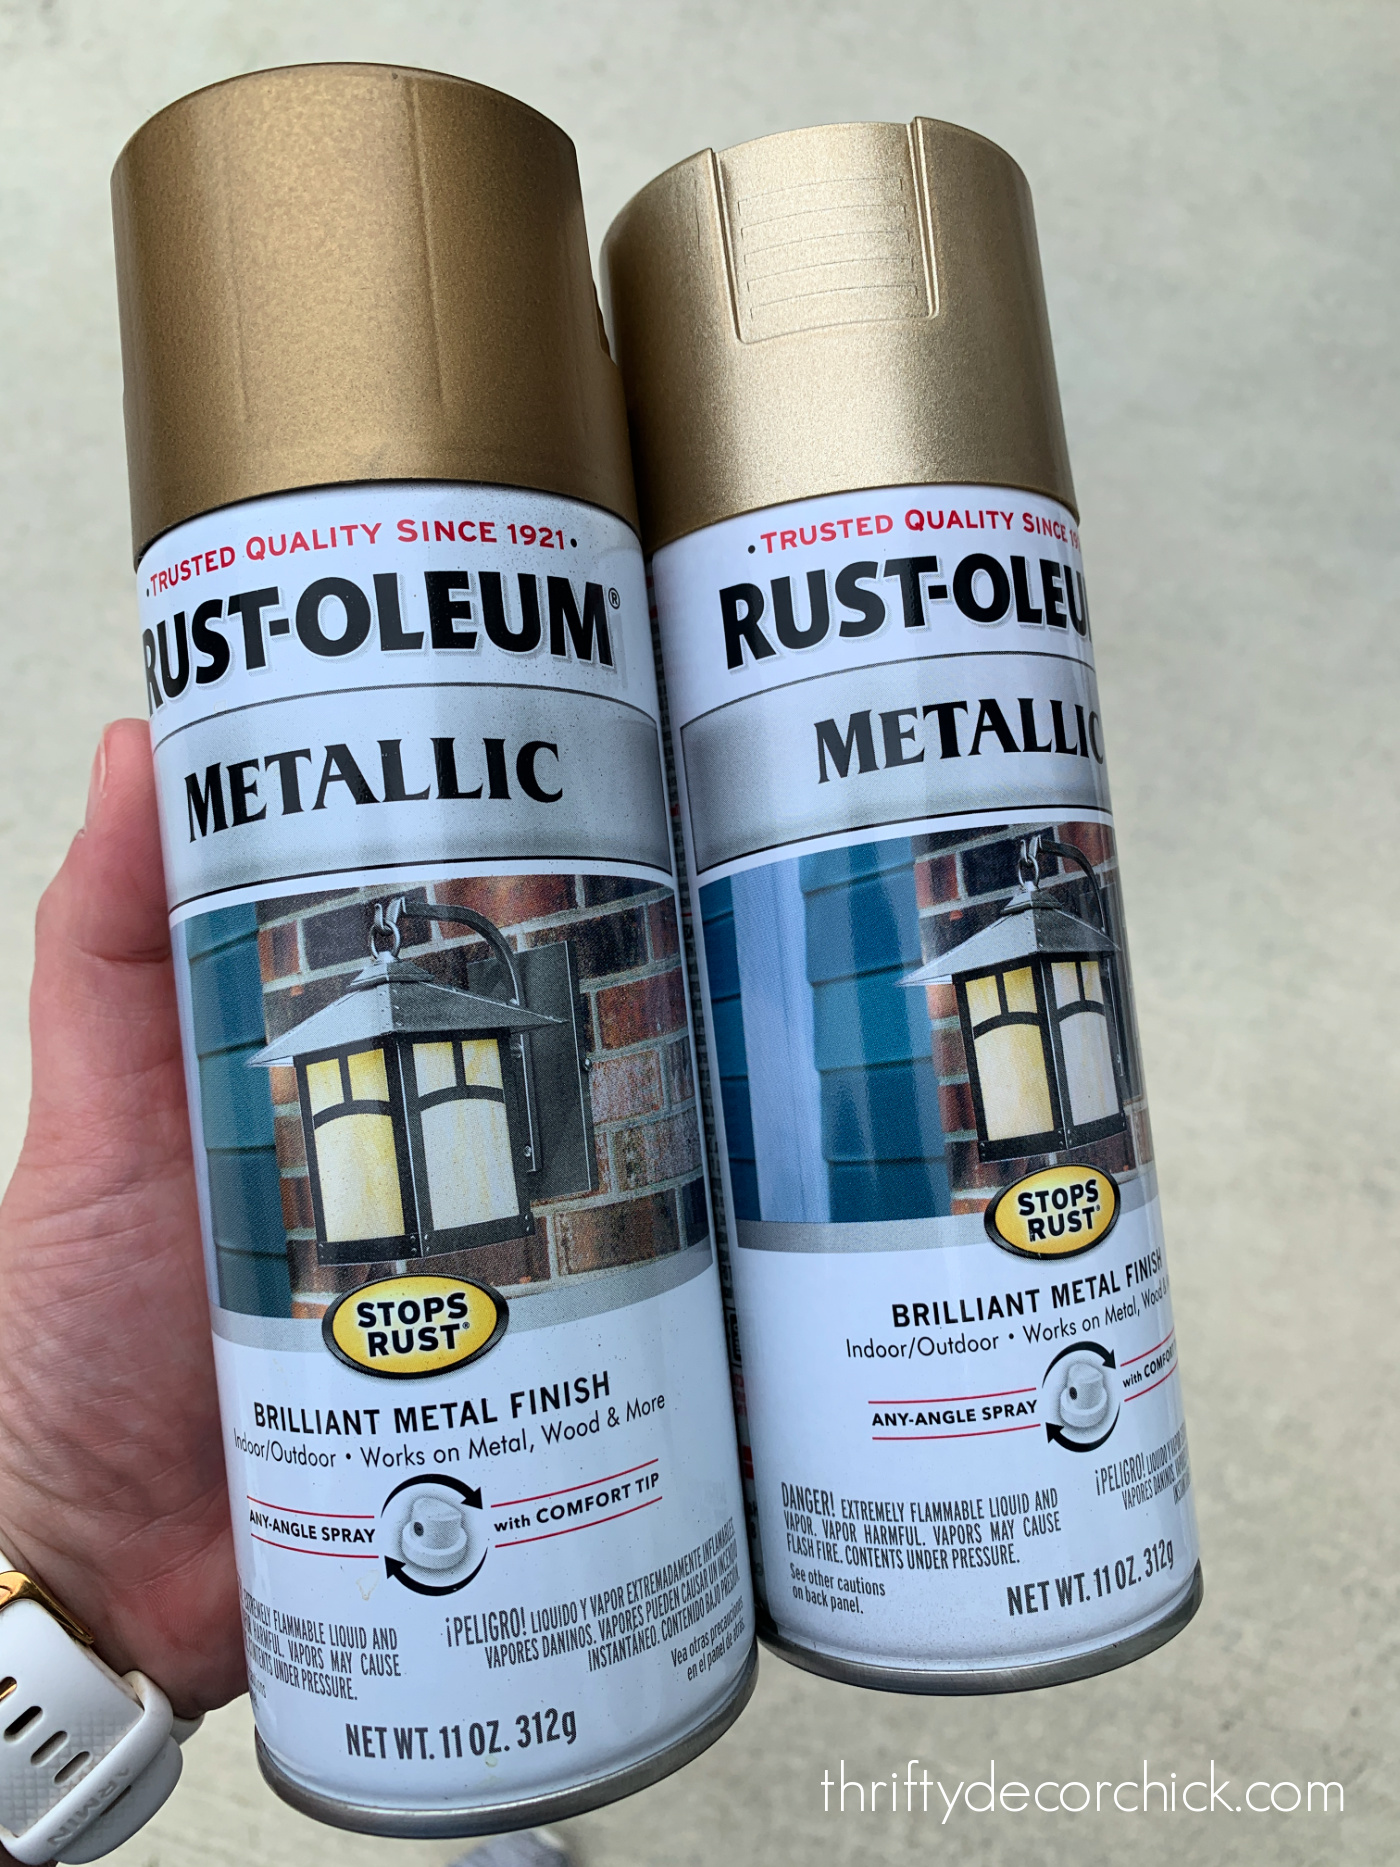
This one is Rust-oleum Universal Metallic Pure Gold and was a lovely, warmer brass/gold tone:

The other Rust-oleum Universal spray paint, Metallic Sunlit Brass, was next and it was more of the traditional brass look, but a bit light:
Side note -- I hate this kind of spray can. I've always found that the nozzle doesn't spray as well, and it's not as comfortable to use.
I also find it more difficult to get a consistent finish with this kind of spray paint.
Next up, the Rust-oleum Metallic Gold in bright and shiny finish was a gorgeous paint that leans more of a brilliant gold finish:
It was a little too bright for the look I was going for, but I loved the color.
Next, one of my favorites! This Rust-oleum Metallic Warm Gold spray paint was a perfect, medium-toned brass finish across all the mediums:

It also went on soooo easily. This nozzle is so much better and the spray paint coated so well.
This next color, Rust-oleum Metallic Champagne Bronze, was another favorite. It leaned to more of a deeper brass tone:

This is a more traditional, darker brass color in my opinion.
And finally, the Krylon Fusion Metallic Gold spray paint was my least favorite:

I loved the nozzle -- the application was super easy! I didn't love how it covered though, and the color was not a gold or brass tone, at least compared to the others.
On it's own it may look great! It's just more of a champagne color in my opinion.
I wanted to test out my top three favorites with a few hanging metal birds I've had laying around forever. I may use them somewhere in my closet redo.
The first was the Metallic Pure Gold all the way on the left:
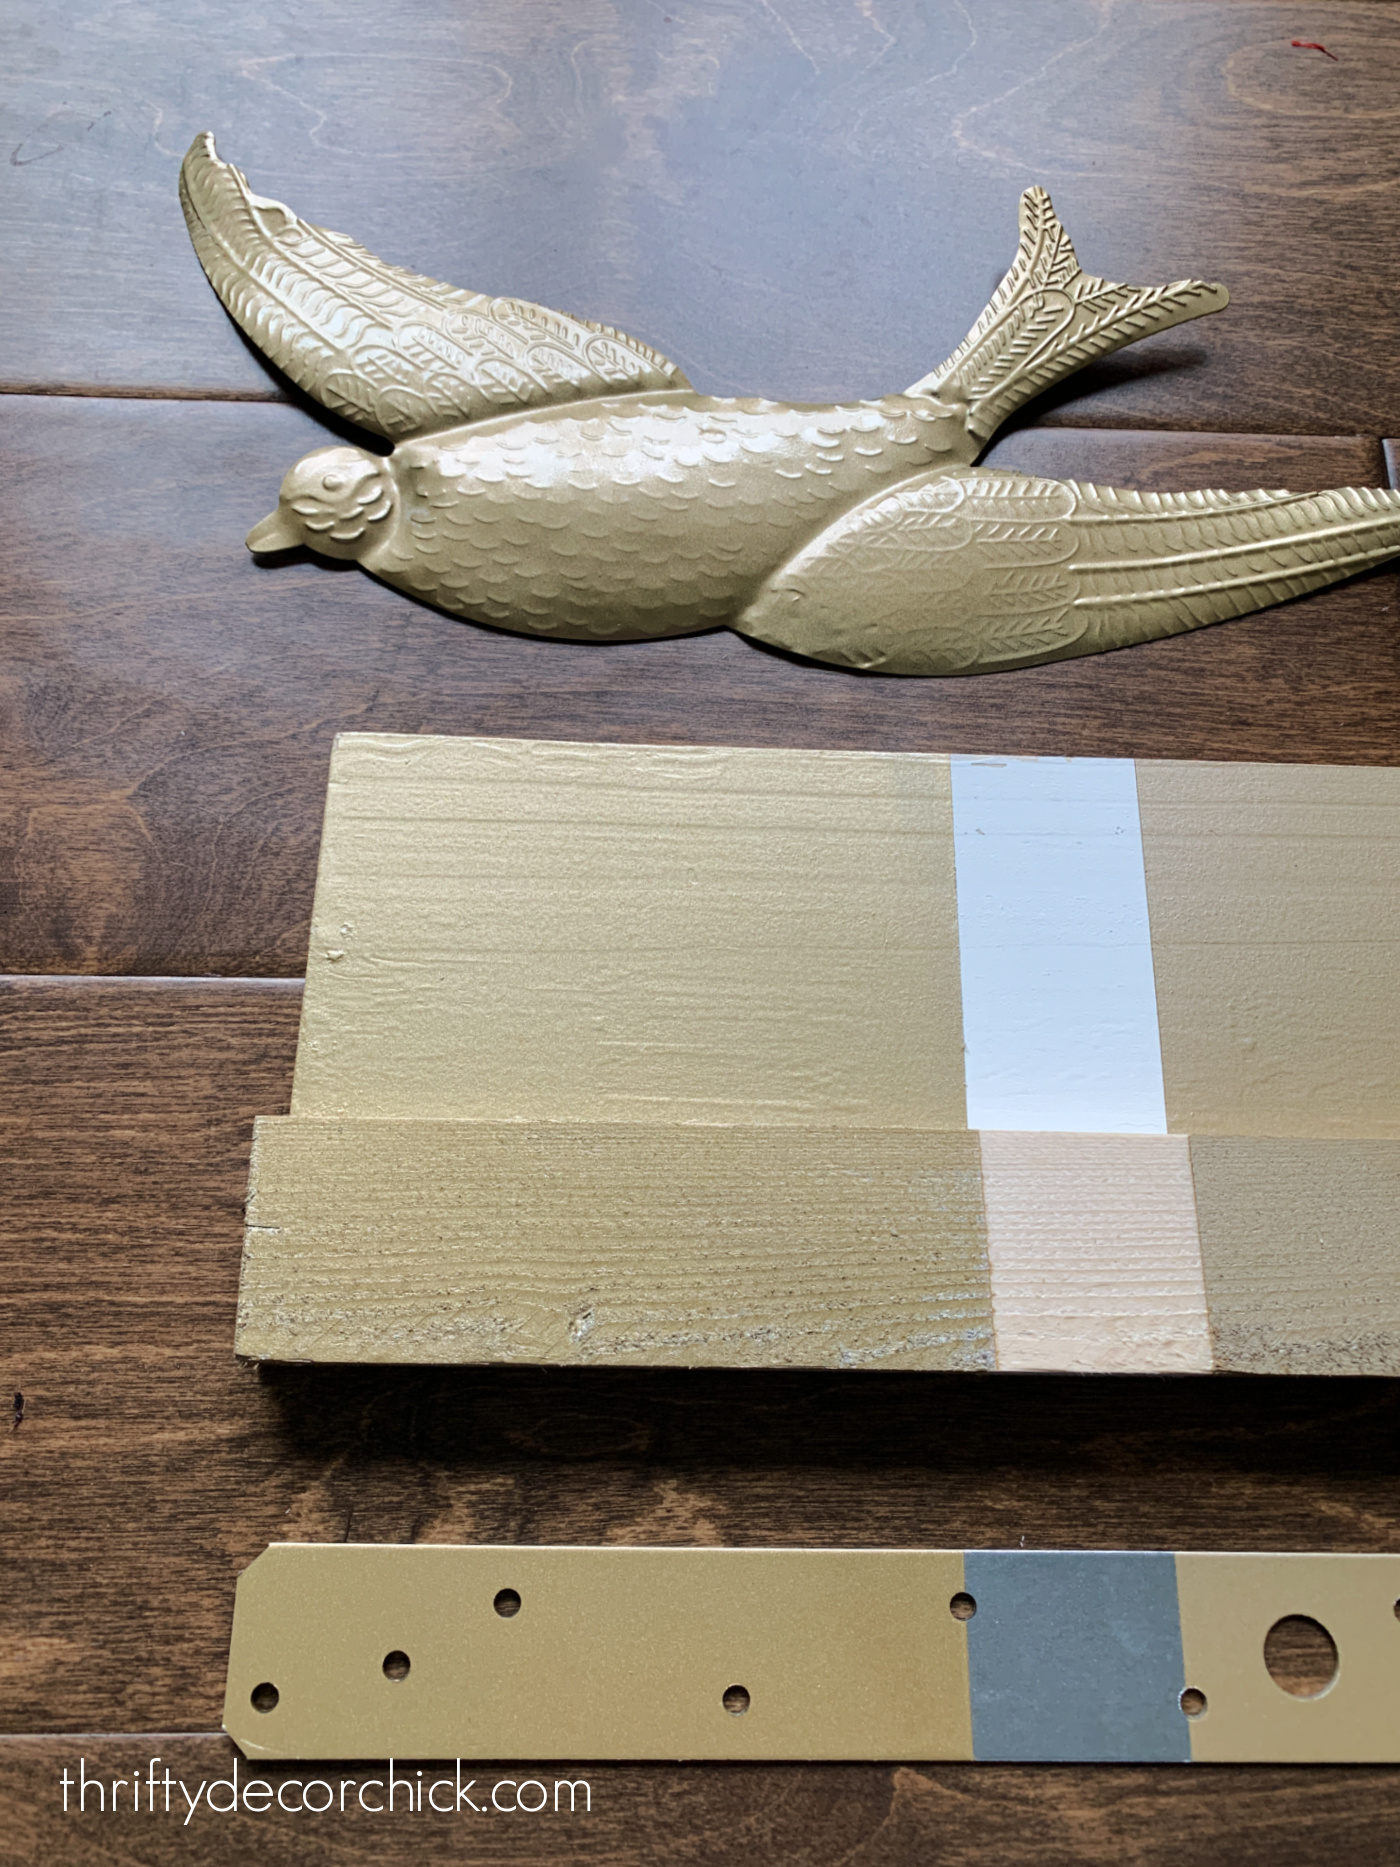
And the Metallic Warm Gold and Rust-oleum Metallic Champagne Bronze colors were my other two favorites:

Here's a look at the three next to each other:

I liked the pure gold at the bottom, it's my third place finisher. ?
My two favorites were the two basic metallic colors -- both the champagne bronze and the warm gold:

I think the names are interesting -- I would flip them. :) The champagne name fits the lighter color much better, and the warm gold goes with the darker brass/gold color. It looks more like an antique brass color to me.
My ONE favorite of all six spray paints?
For sure the Rust-oleum Metallic Warm Gold, the spray paint can third from the right in the line of six:

If you look closet, you can see it had variations to it that the others didn't:
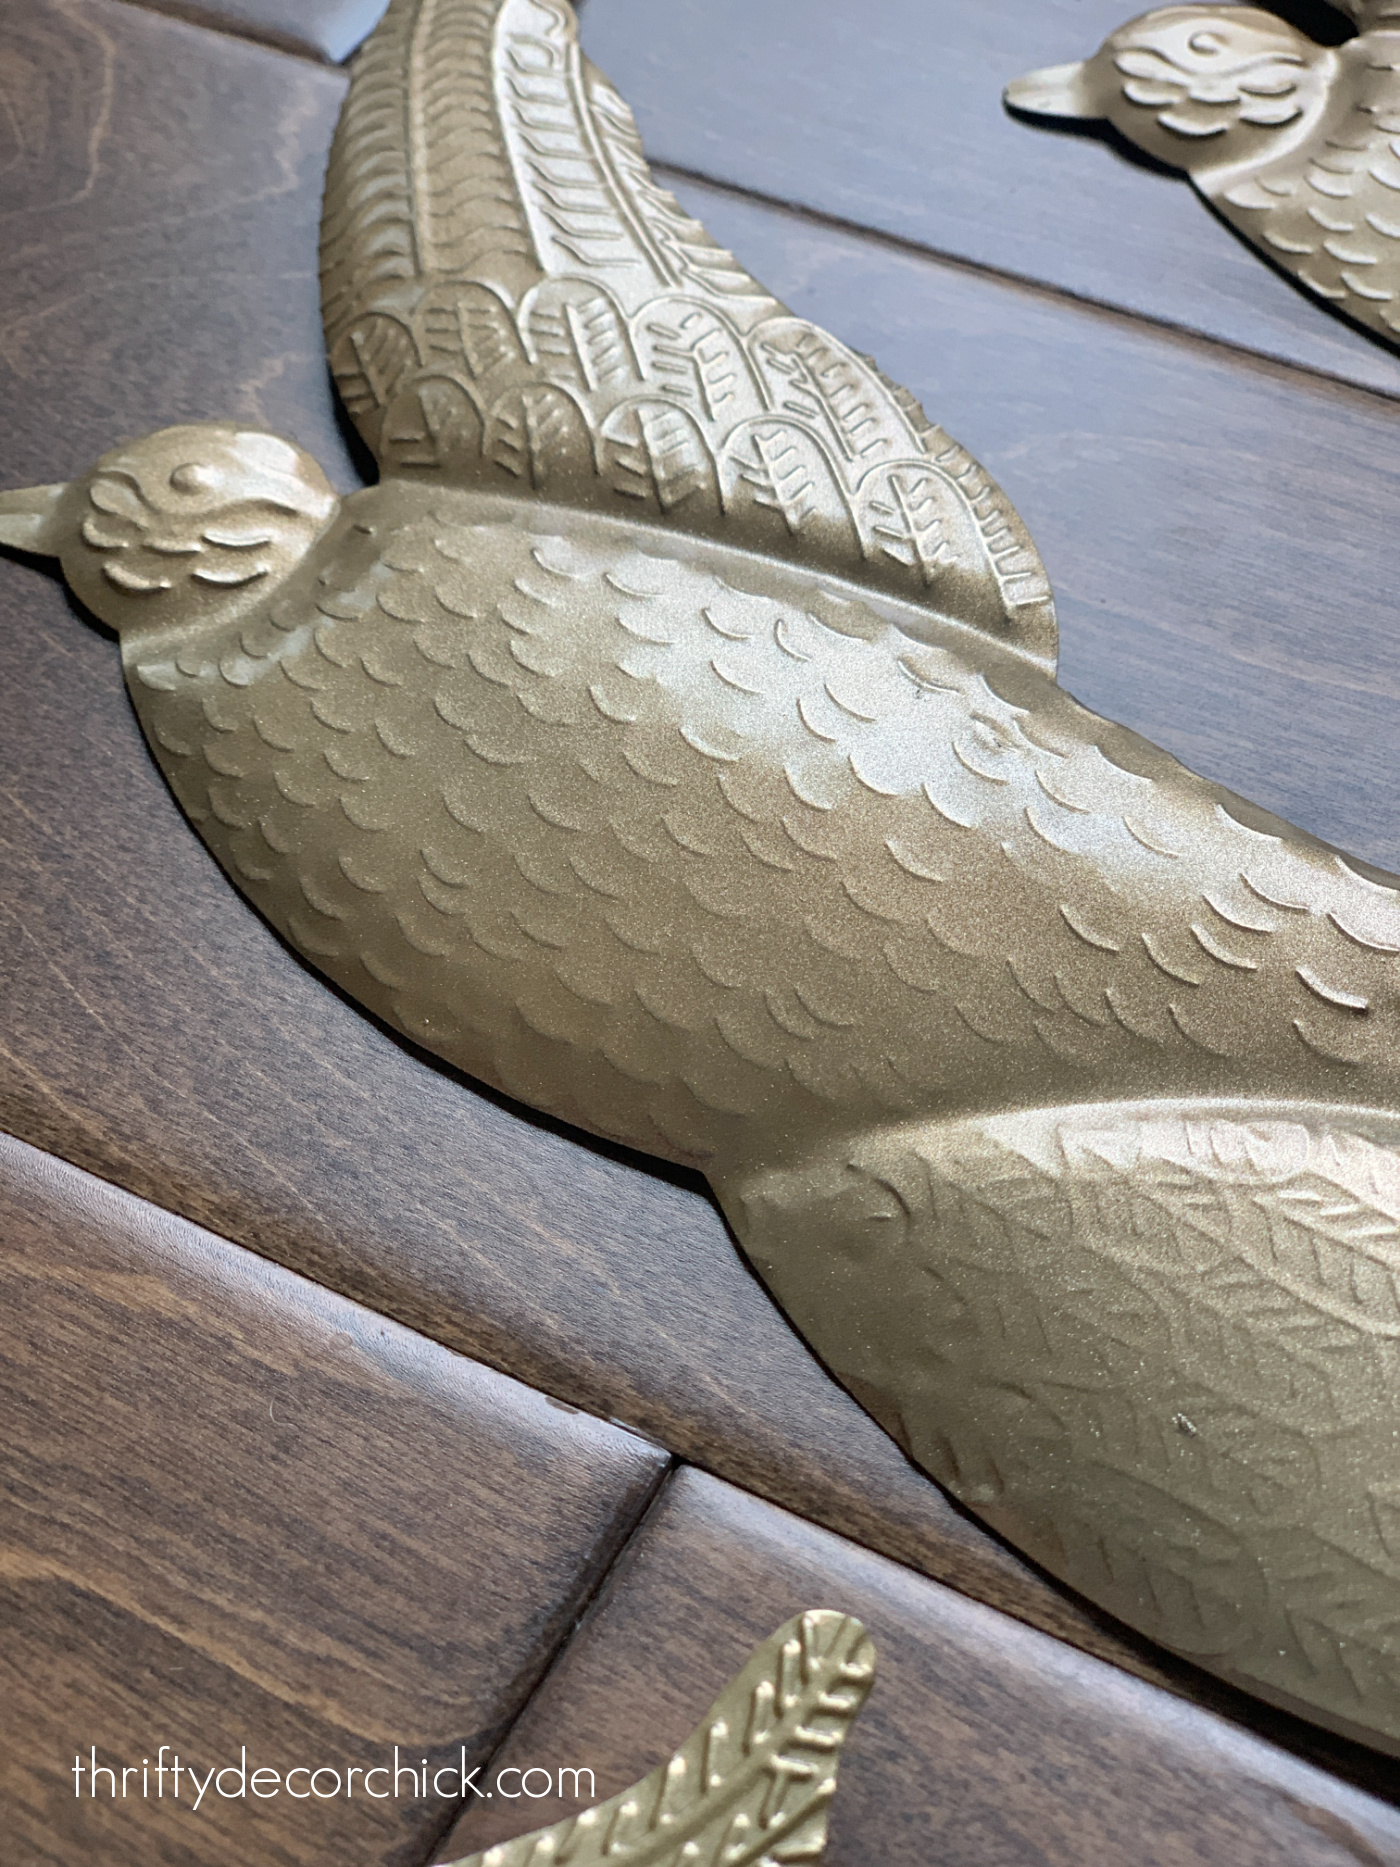
It wasn't a flat tone, but instead had some sparkle and nuance that the other two didn't have. It's a gorgeous brass paint color!
This was fun! I hope you found it helpful. Here are the colors I used from left to right if you're interested:
Have you found a brass/gold spray paint that you use and love? I'd love to hear about it! I found my go-to in this pretty warm gold.
If you want more of an accent on a piece instead of full coverage, check out my post on how to use Rub 'n Buff:
You can use it to transform large objects, but it's great way to add depth or detail to all kinds of items!
Never miss a post by signing up to get posts via email.
Via https://www.thriftydecorchick.com/2021/10/three-best-brass-gold-spray-paints.html Transforming a basic pantry into a butler's pantry with cabinets and tons of storage!
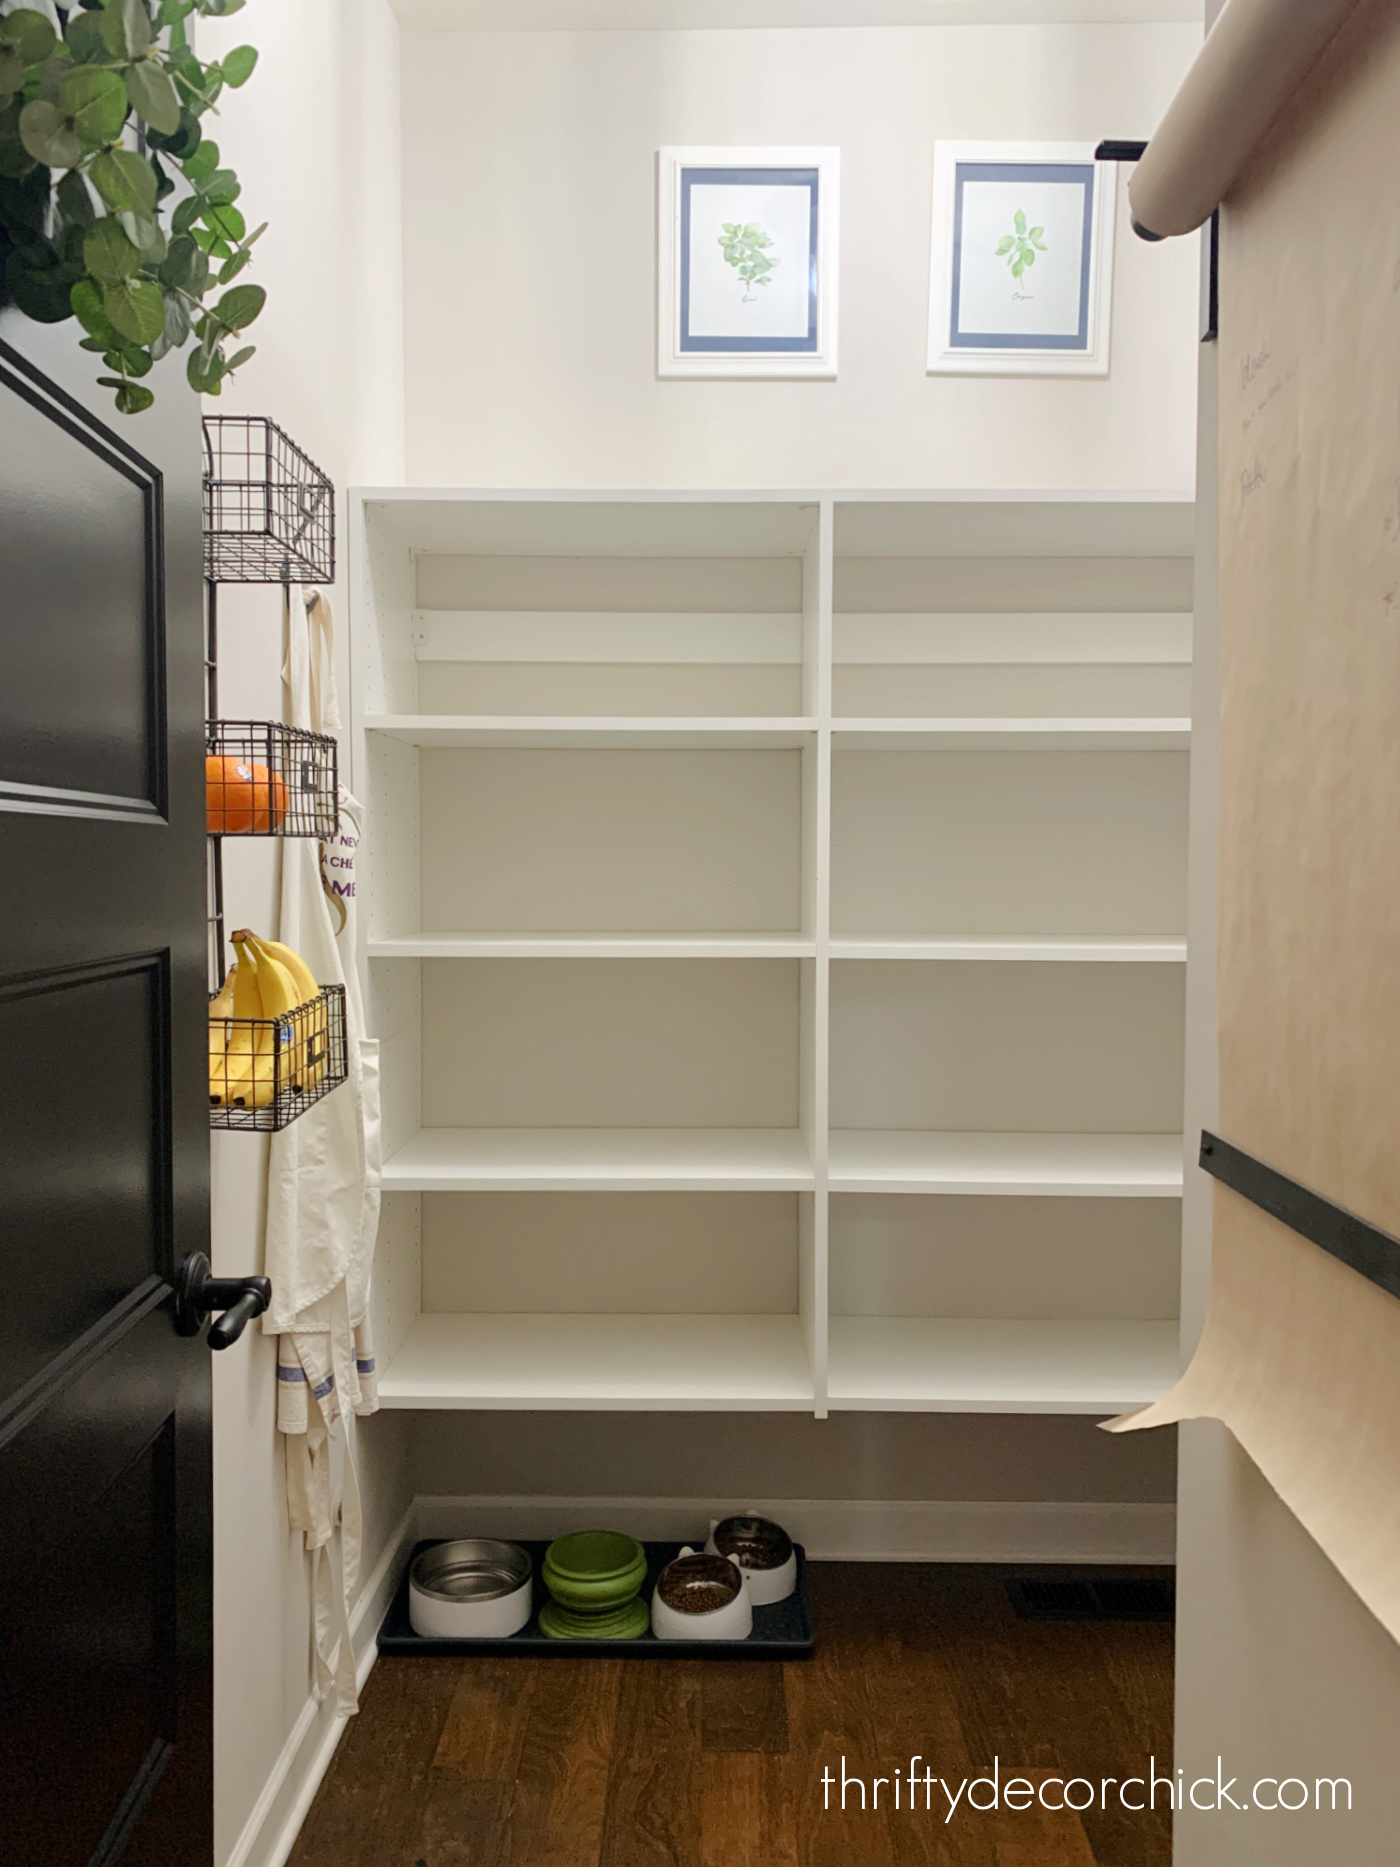
We have a large pantry that I LOVE...the space is a dream after having a tiny pantry for so many years at our old house. Because of the size, we store more than just food in there -- lots of appliance, kitchen towels, paper goods, etc.
Shortly after we moved in a few years ago, I shared how I organized the melamine shelving in our pantry:
You should see how it looked before! Yikes.
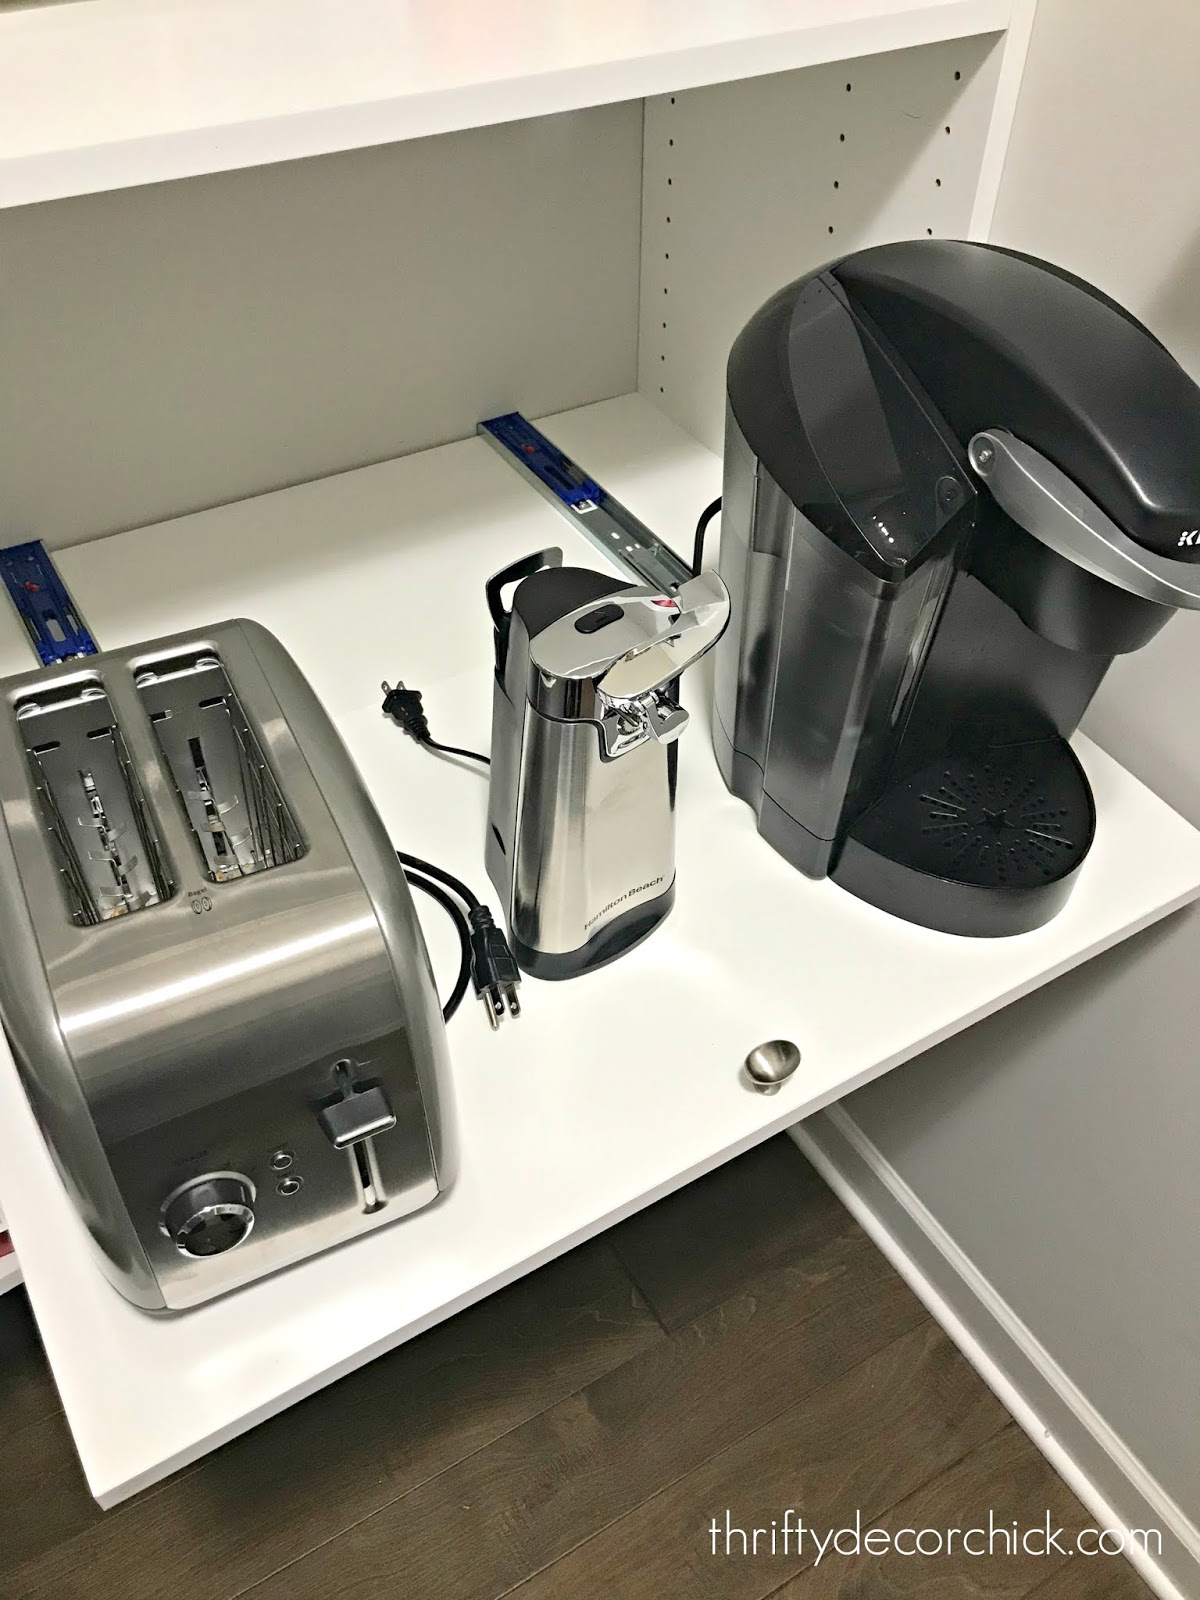
I later added a DIY pull out drawer with soft close slides for some of the everyday appliances we use in here:
This post may contain affiliate links for your convenience.
See my policies and disclosure page for more information.
We LOVE that thing -- it is so useful and I will be repeating it in this redo!
I've dreamed for years about turning our pantry into more of a butler's pantry -- where most of the food is hidden in the cabinets. We keep the pantry door open 24/7 because our animal's food is in there, and we are in and out all day long.
I have been craving a prettier space, but more importantly, more function! I felt like there was so much wasted with the open bottom under the shelves, and there was a good three feet above the top of them.
This is why I like to live with a room before I spend money or time on it. I think it's so important to live in a space before you make any major renovation or decor decisions.
SO...while I wait on pieces to come back in stock for my closet makeover, I decided to tackle this pantry! And so far I LOVE IT!
I am so excited about this redo. It's turning out so well, but I want to share my renovation plan with you first.
I figured I'd go with IKEA cabinets, since I've been using their products in my closet. I thought they would be less expensive and be easier to find in stock.
I used their layout plan tool, which is awesome! I entered the measurements of our space and started adding the cabinets:
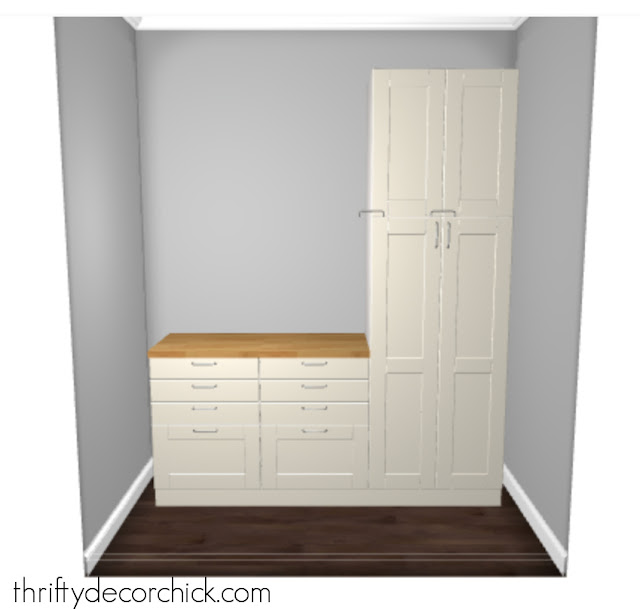
It wasn't exact, because I had about 10 inches of space to fill (more on that in a bit), but it really helped me visualize the layout.
As you can see, I'm only adding cabinets along the back wall, not around the corner like the melamine shelf layout. Since the cabinets are deeper (24"), it was awkward adding a corner cabinet -- it took up way too much space.
On the IKEA site you can click a button and it lists all of the parts and the cost after you're done designing. Turns out it was WAY more than I wanted to spend, and when I saw all of the pieces I'd have to order just to assemble the cabinets, I decided to look elsewhere. :)
Pre-assembled cabinetry it is! Ha!
First I looked into inexpensive, unfinished cabinets like I used in the mud/laundry room:
You can customize these in so many ways!
But I wanted something I could install and it would look good immediately, without much work on the drawer fronts. The pantry redo as a whole is enough work for now. ?
I ended up ordering in stock cabinets from Home Depot. I chose a light gray option since it would tie in nicely with our kitchen island and vent hood.
I had to play around with my layout, and ended up going with two lower base cabinets, one 18 inch and one 24:
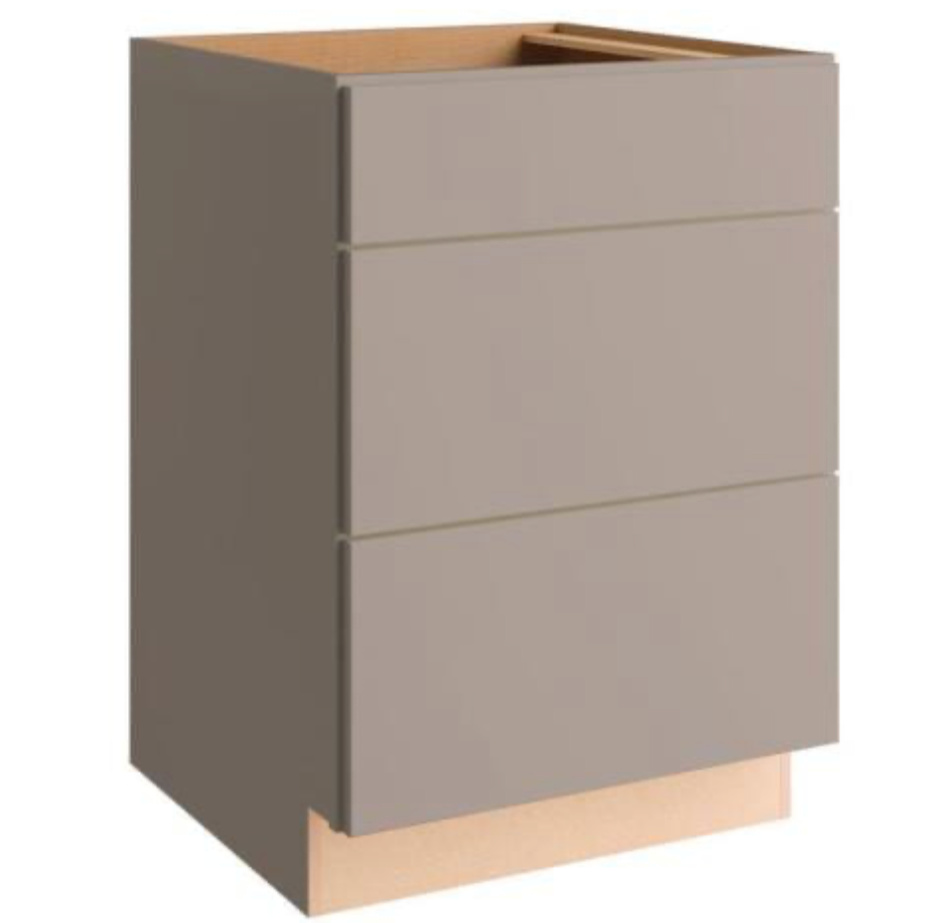
Just like in the mud room, the drawers were a must! I would have a whole kitchen with just drawers if I could do it all over again. They function SO MUCH better in my opinion.
I may add some detail to those cabinet doors later, but for now I'm digging the simpler look.
Because we have plenty of large appliances and bigger stuff like pet food bins, I thought these tall pantry cabinets were the perfect solution:
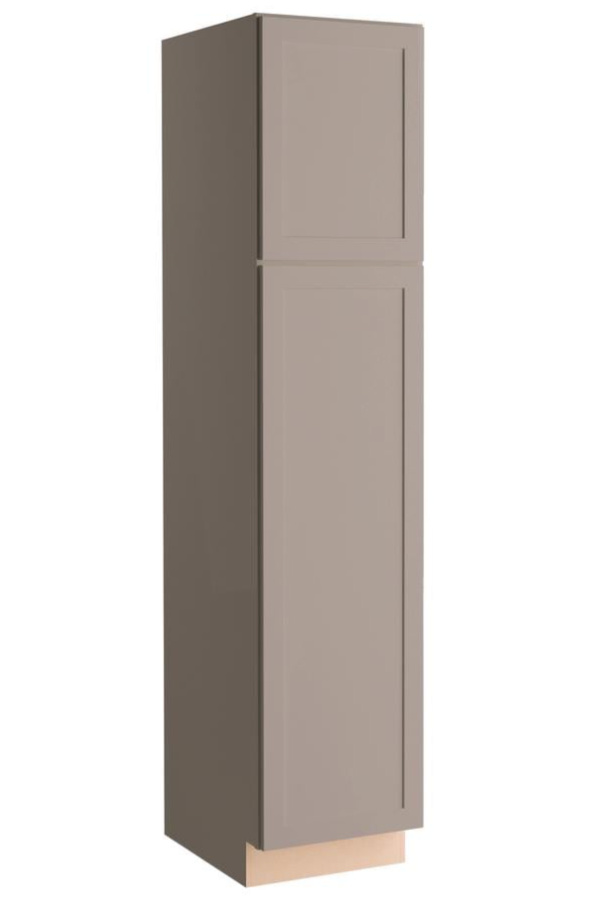
Overall the only cabinetry I'm using is two base cabinets and two tall pantries.
Here are some of my ideas to add plenty of storage in this small space:
We moved on this redo sooner than planned because the electrician could get us in much faster than I thought. If you've ever hired a contractor to work on your house at the end of the year, you know how difficult it is to secure a spot!
The last quarter is always nuts...people (me) want to get projects done before the holidays. :)
To get this space ready for the electrician, I needed to clear out all of the food. I sorted through every single thing and tossed anything that had expired.
I piled the food and items into our mud room and was left with the empty shelves:
They were pretty easy to remove -- I started with all of the shelves, then removed the top and bottom pieces, then the side parts and the wall supports:
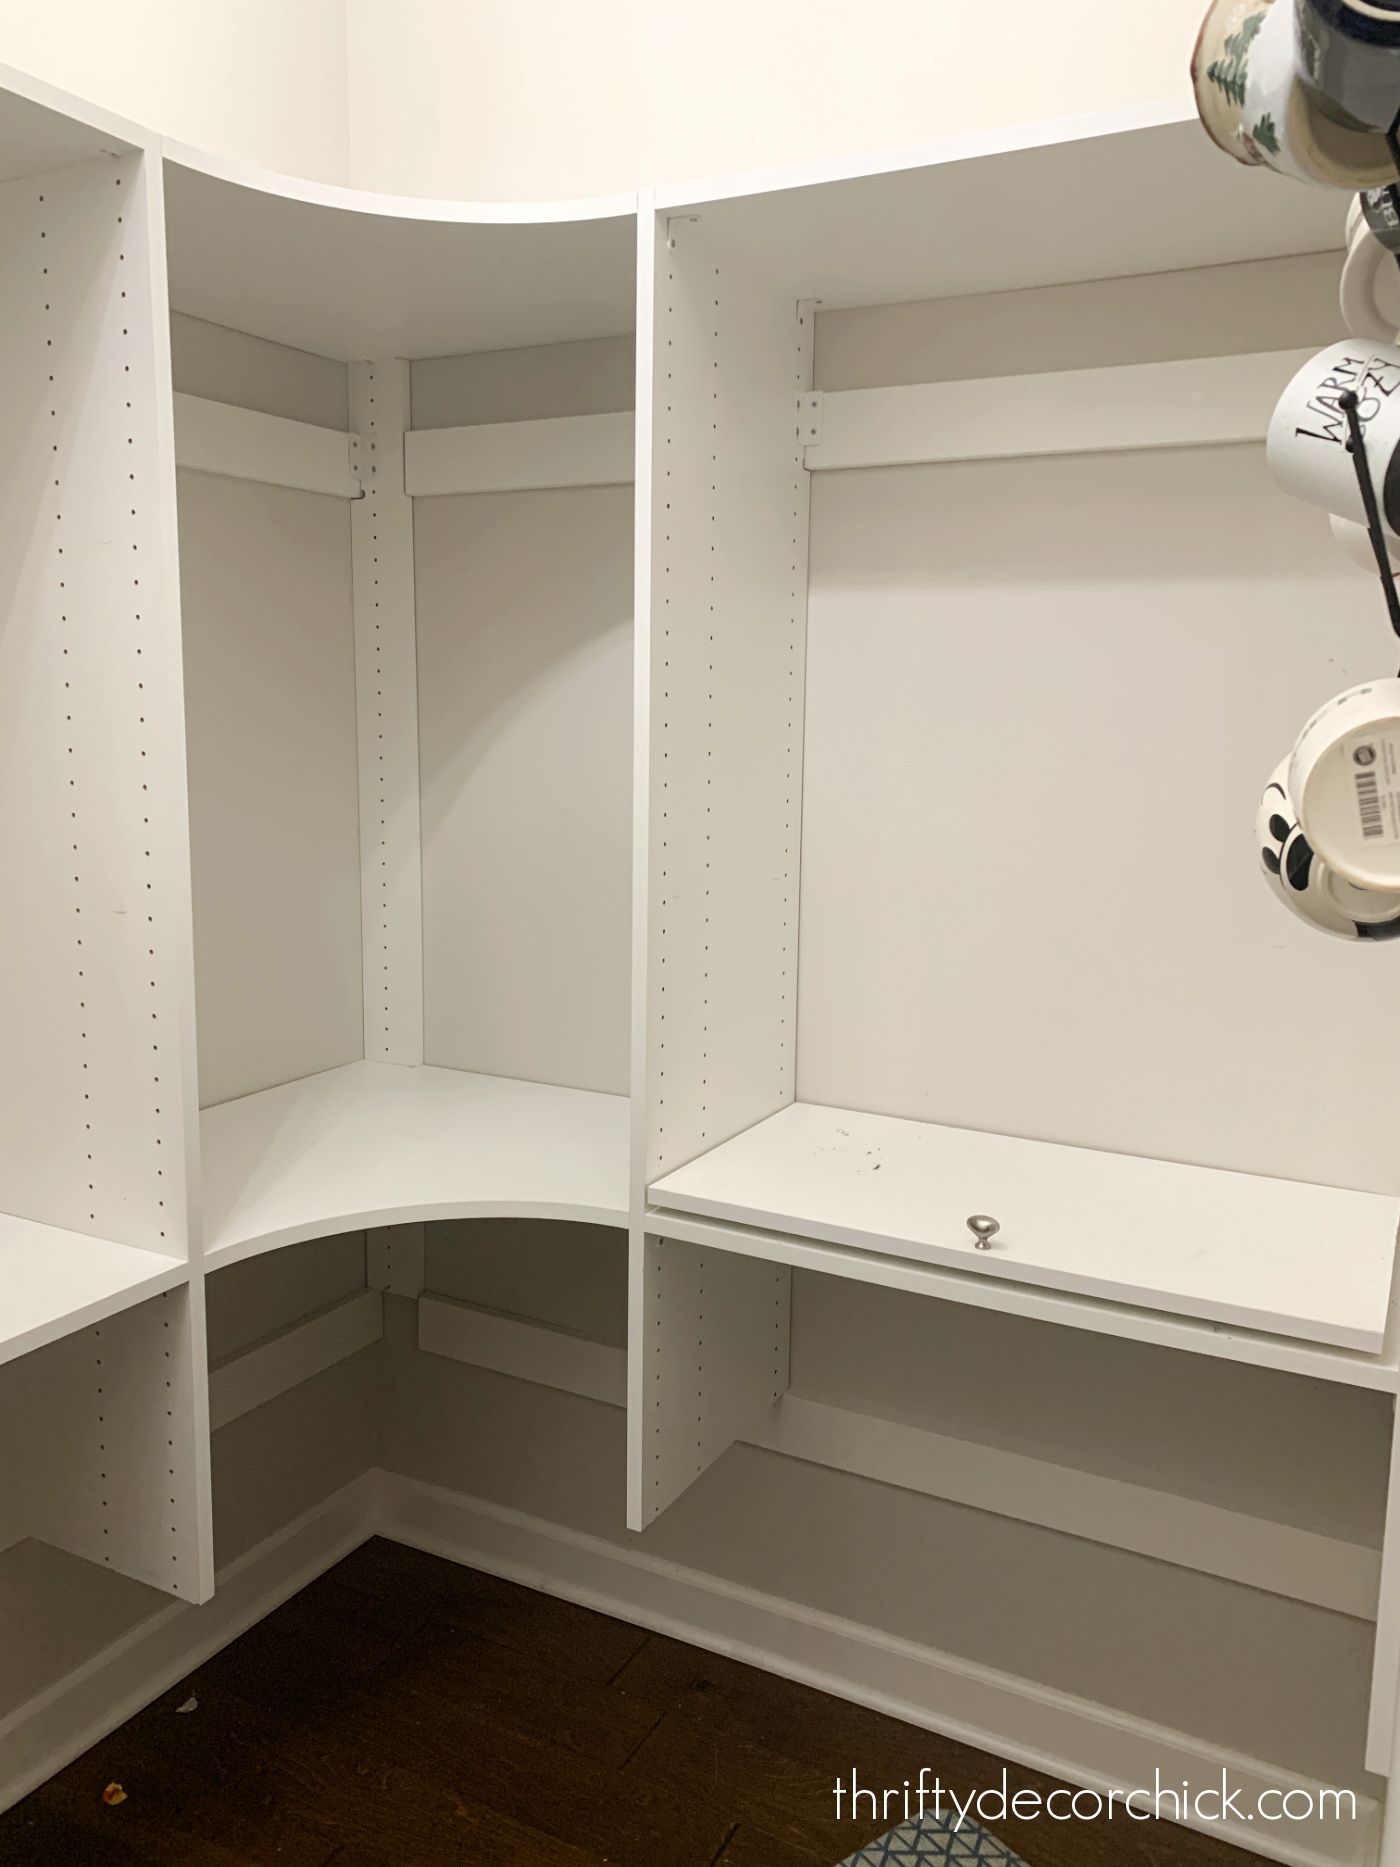
I'm reusing the whole melamine system for two projects -- most of it will go to create a closet built in unit for our son.
The rest will be used to create some pull out shelves for our tall pantry cabinets, so no waste!
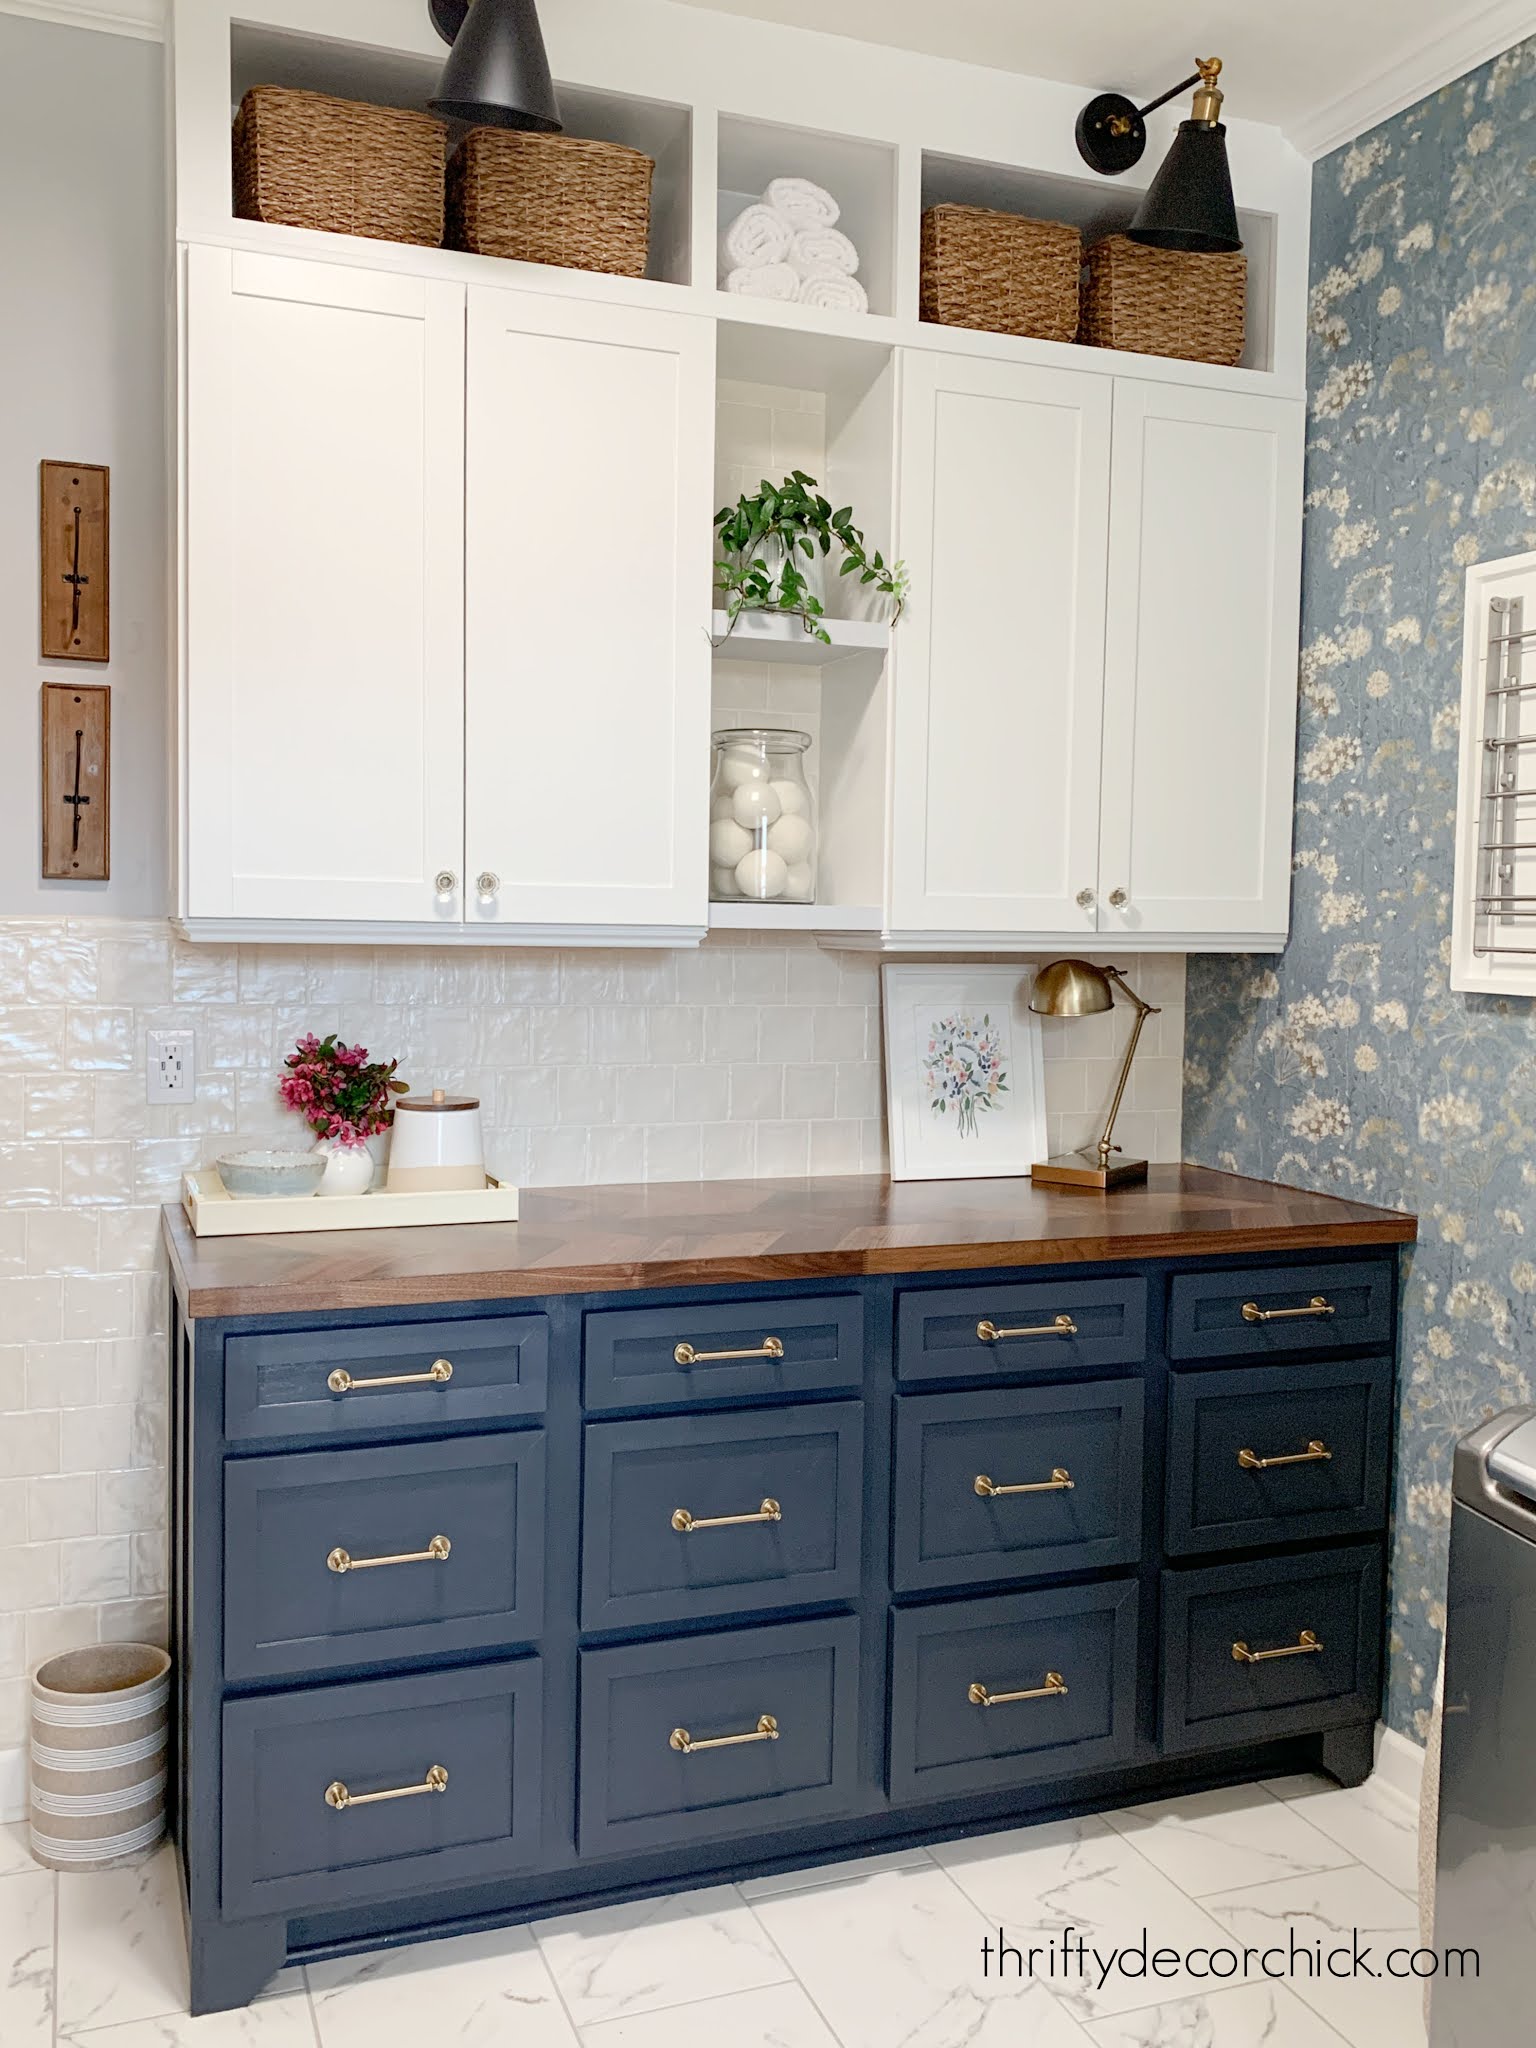
It's been fun to pick out all of the prettier details for this little space. I picked this brass sconce for above the base cabinets, these butcher block counters (so easy and inexpensive!), and some pretty food storage like these glass jars:
I'm super impressed with them -- the glass is plenty thick and the lid keeps it airtight.
For the tile backsplash above the countertops, I'm trying to decide between two VERY different options.
I absolutely LOVE this blue and gray star tile:
I found this exact tile at Floor and Decor. It's called Adessi Atlas porcelain tile. The links under the photo are similar versions in different colorways.
Since it's such a small space, the price is really good! I love the colors in this and the bold design.
But I also love this peel and stick tile, which surprises me:

This is the SimplInstall Aspen White Marble peel and stick, also from Floor and Decor.
It's been a long time since I've installed peel and stick tile, and that time it was on the floor. It held up beautifully!
I love that it would be easier to install. No grout, no mortar.
My family prefers the more modern faux stone peel and stick, and I'm really drawn to it. But I also love the bold look of the tile. I can't decide!
I purchased both options, so I'll have to get everything installed and put them up against the wall to help me make a decision.
Are you with me? I'm so excited about this pantry redo! When I'm done it will have WAY more storage, but it will be behind closed doors and easily accessible. I'm thrilled about that!
I'll share more of this butler's pantry makeover soon! Planning and decorating small spaces like this is my favorite -- it takes a lot of problem solving but that's fun for me. :)
Never miss a post by signing up to get posts via email.
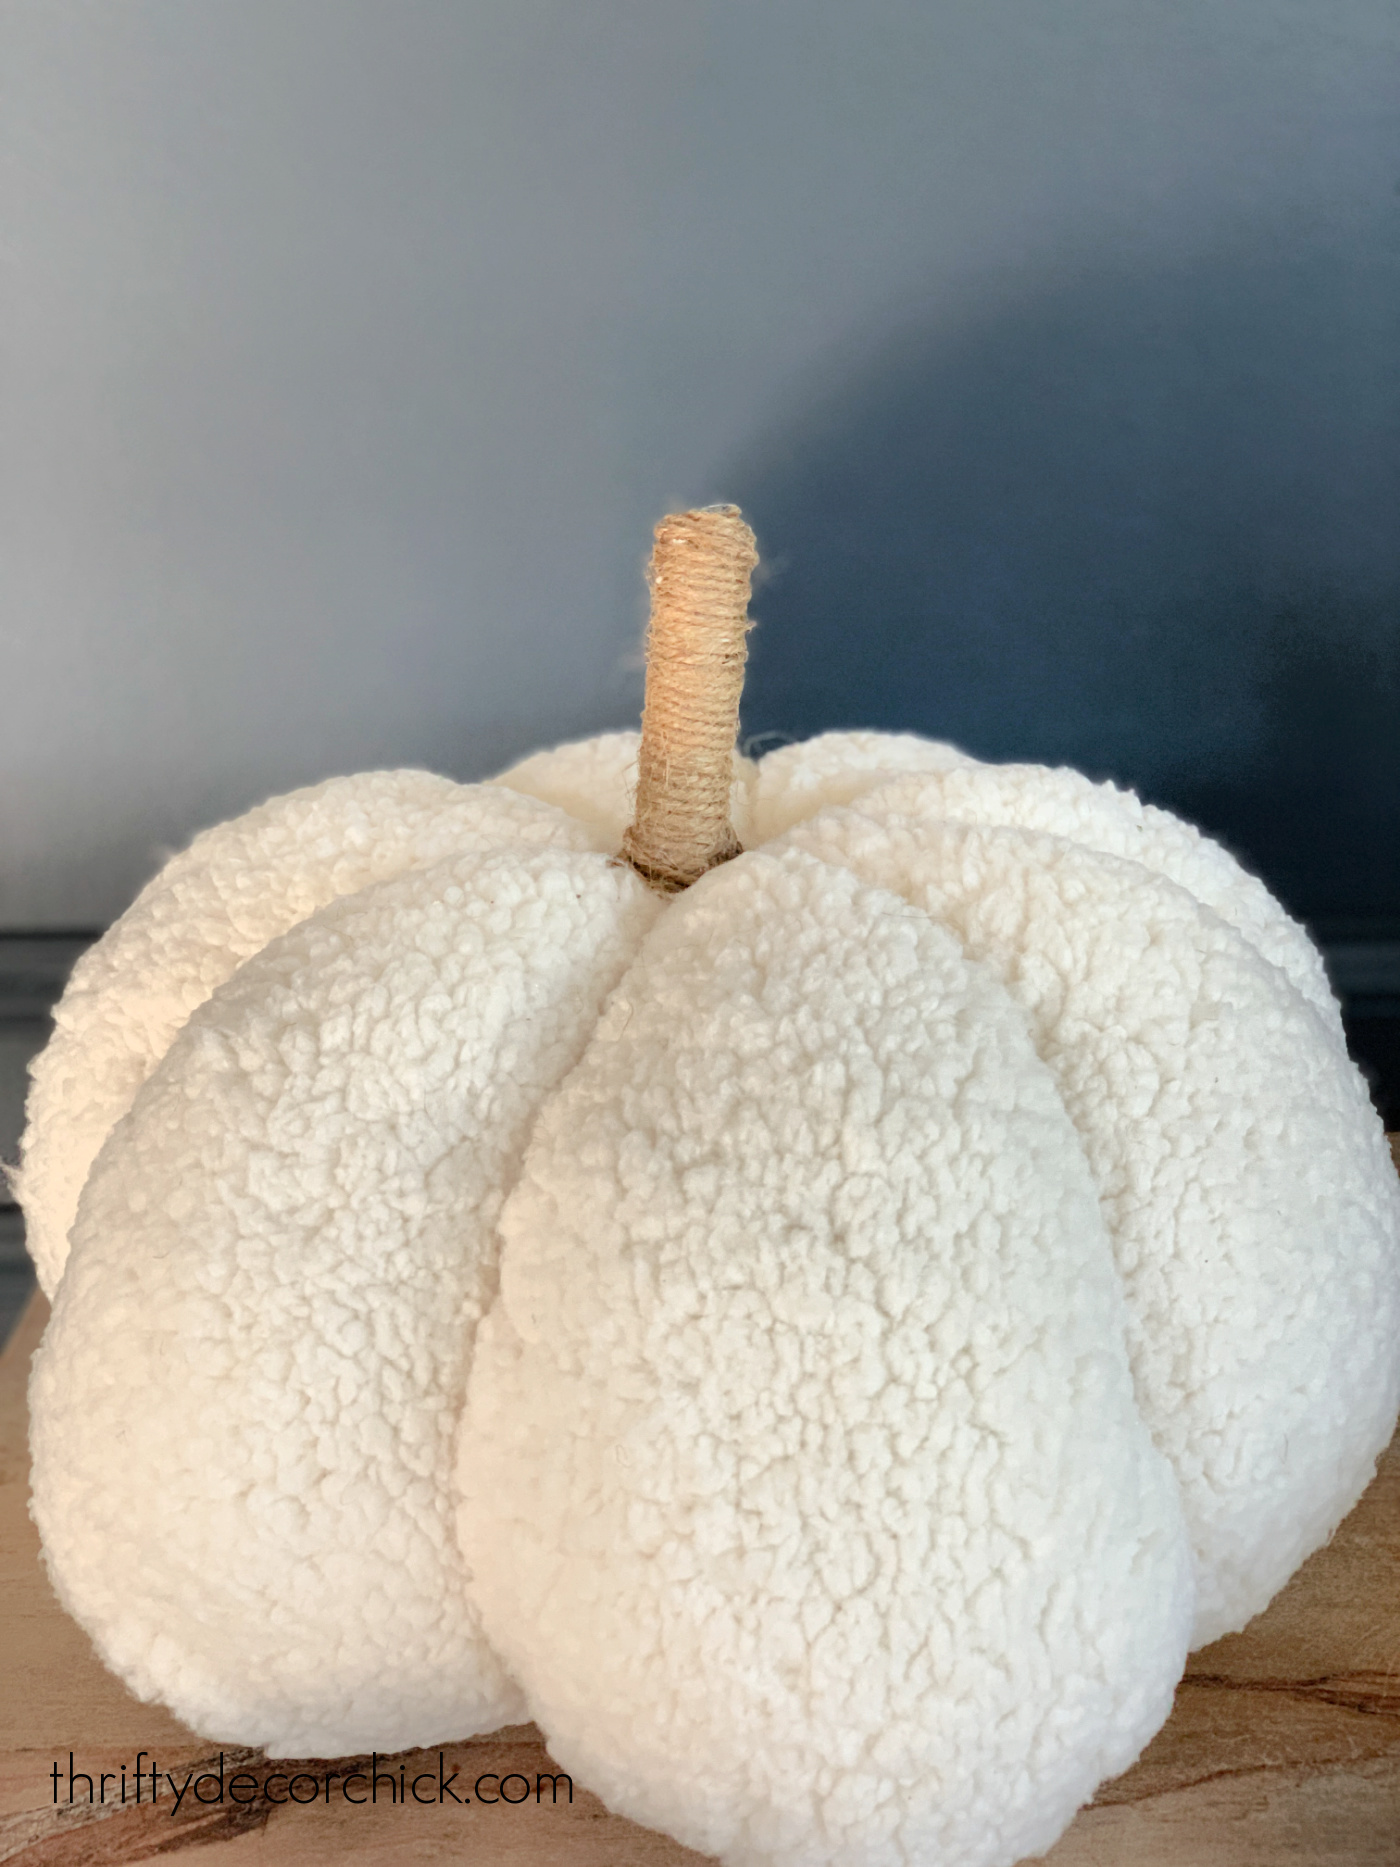
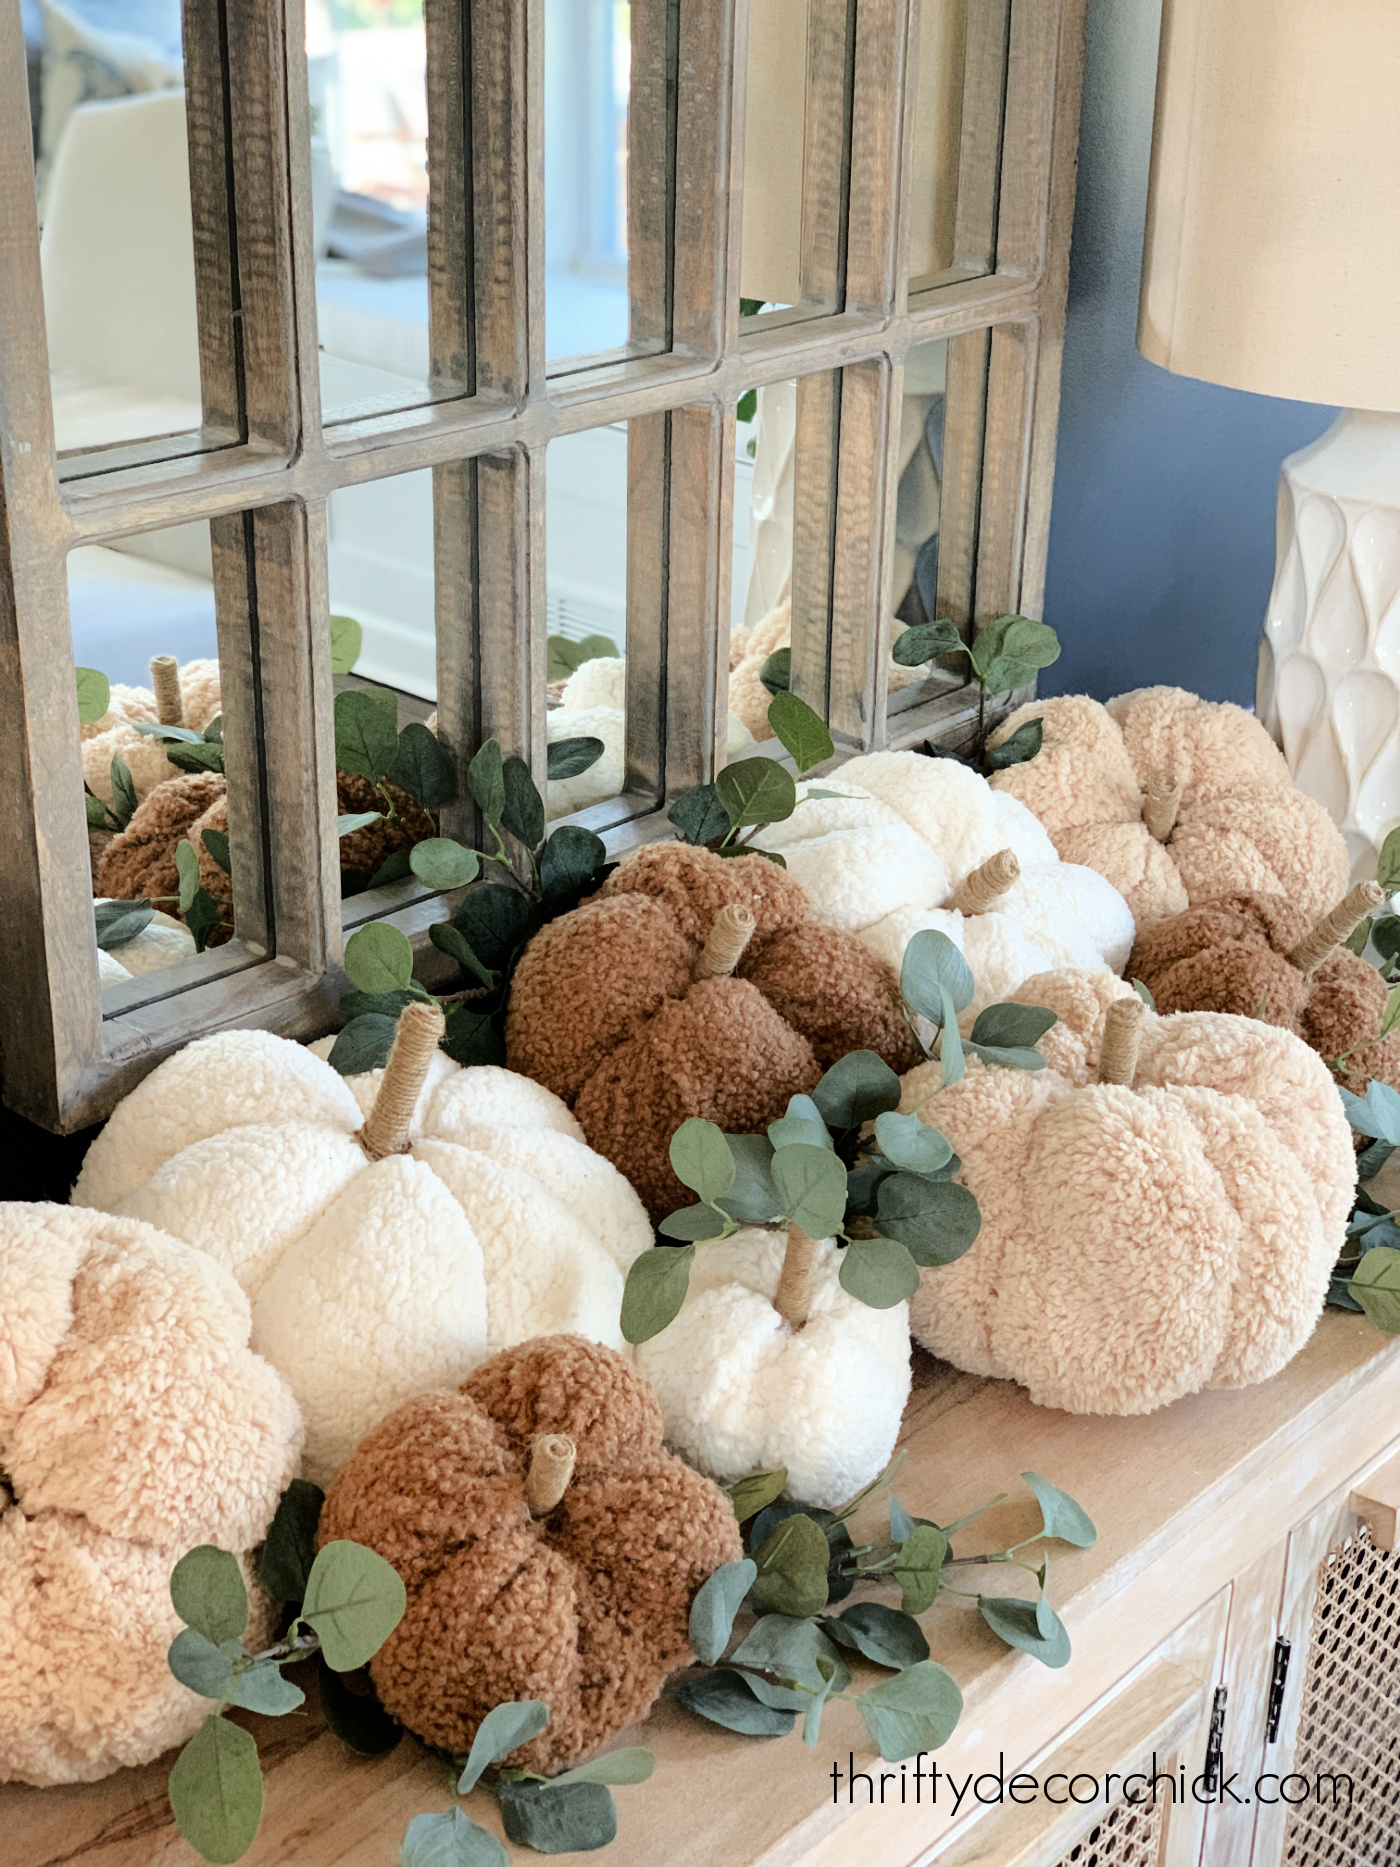
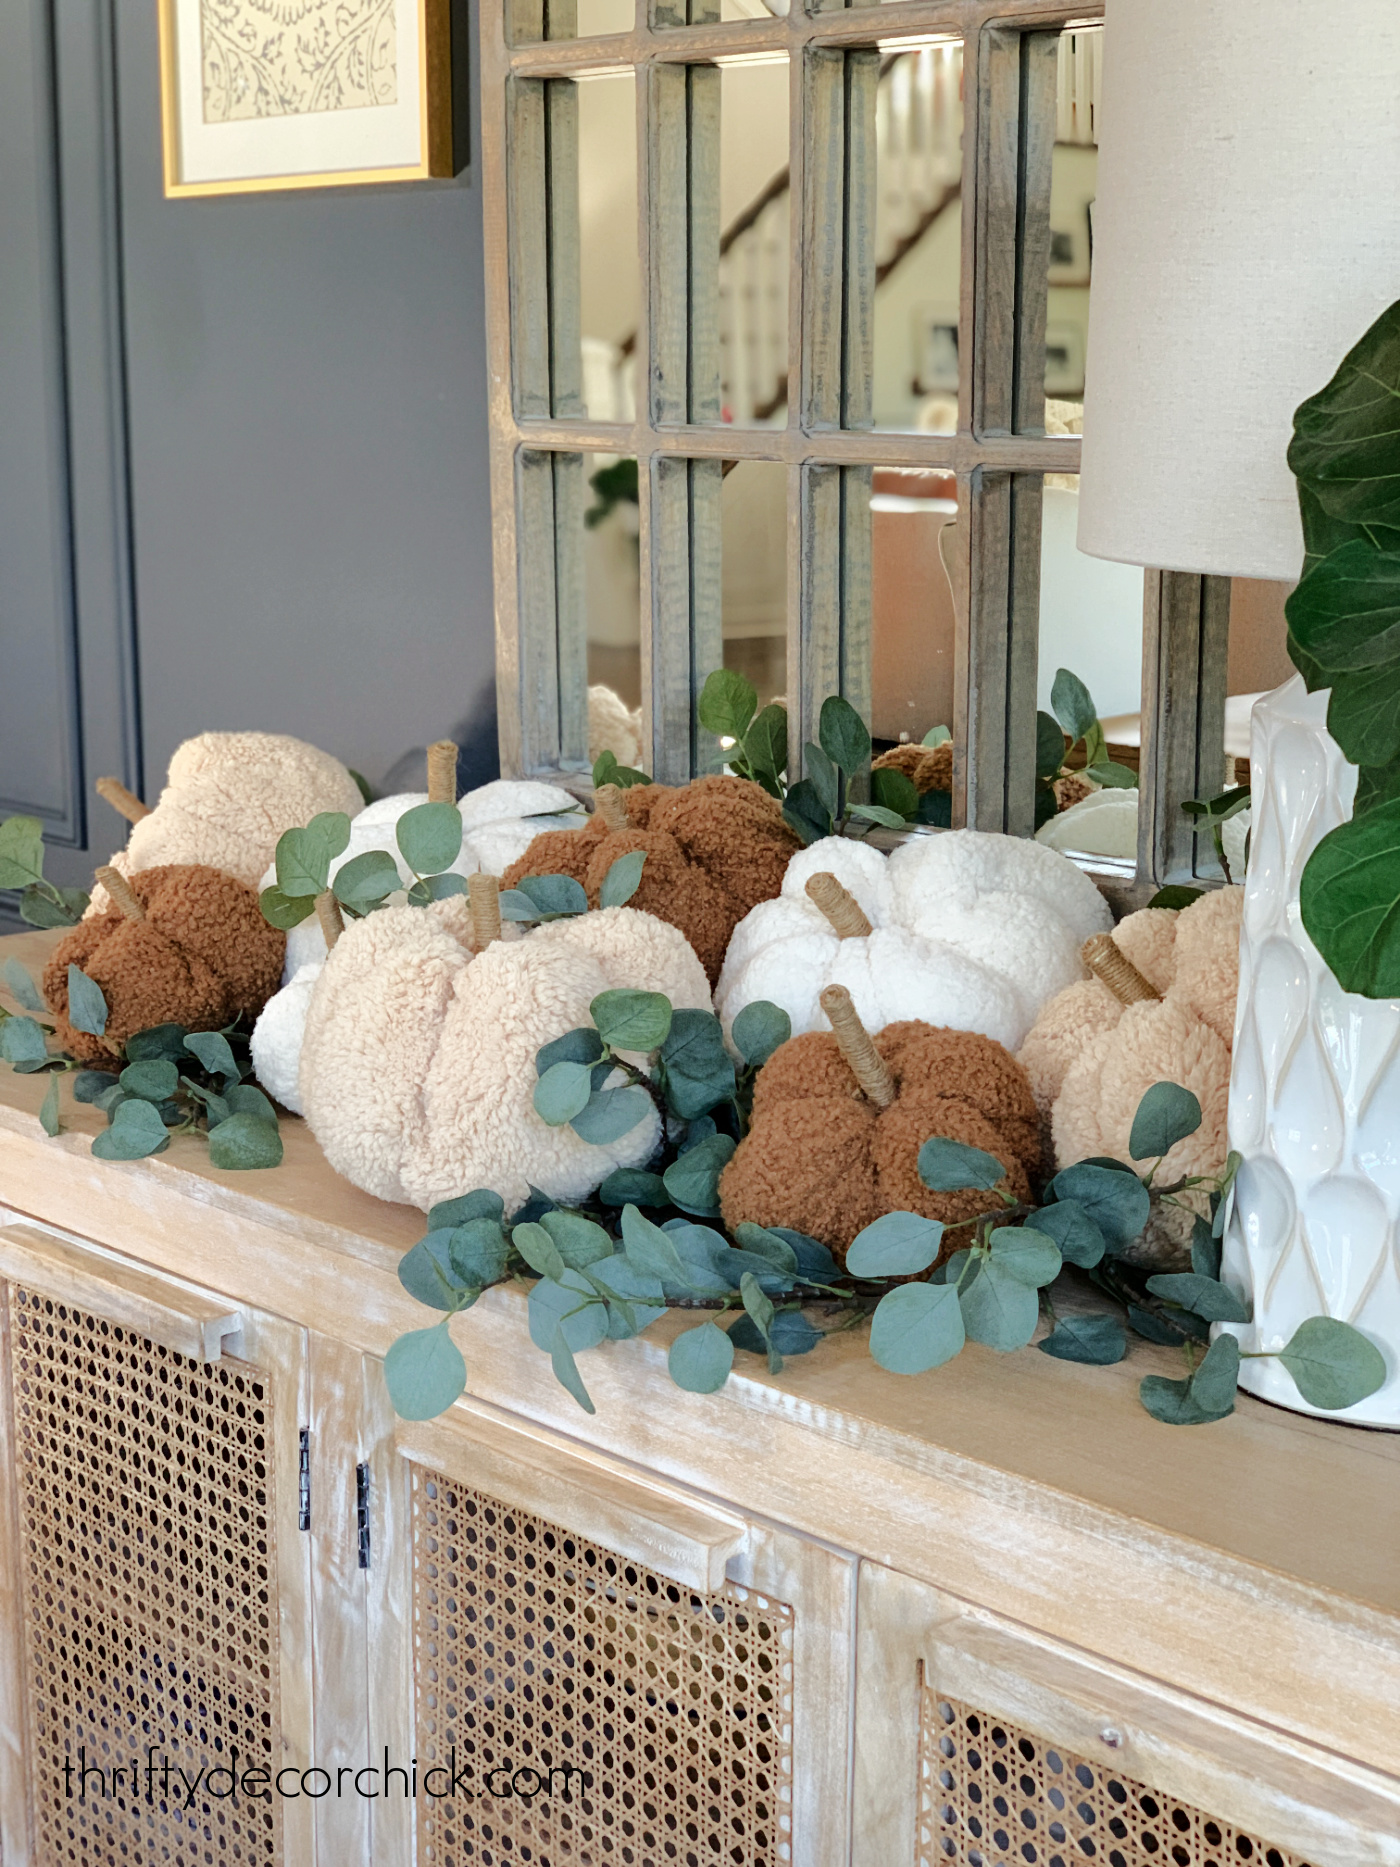
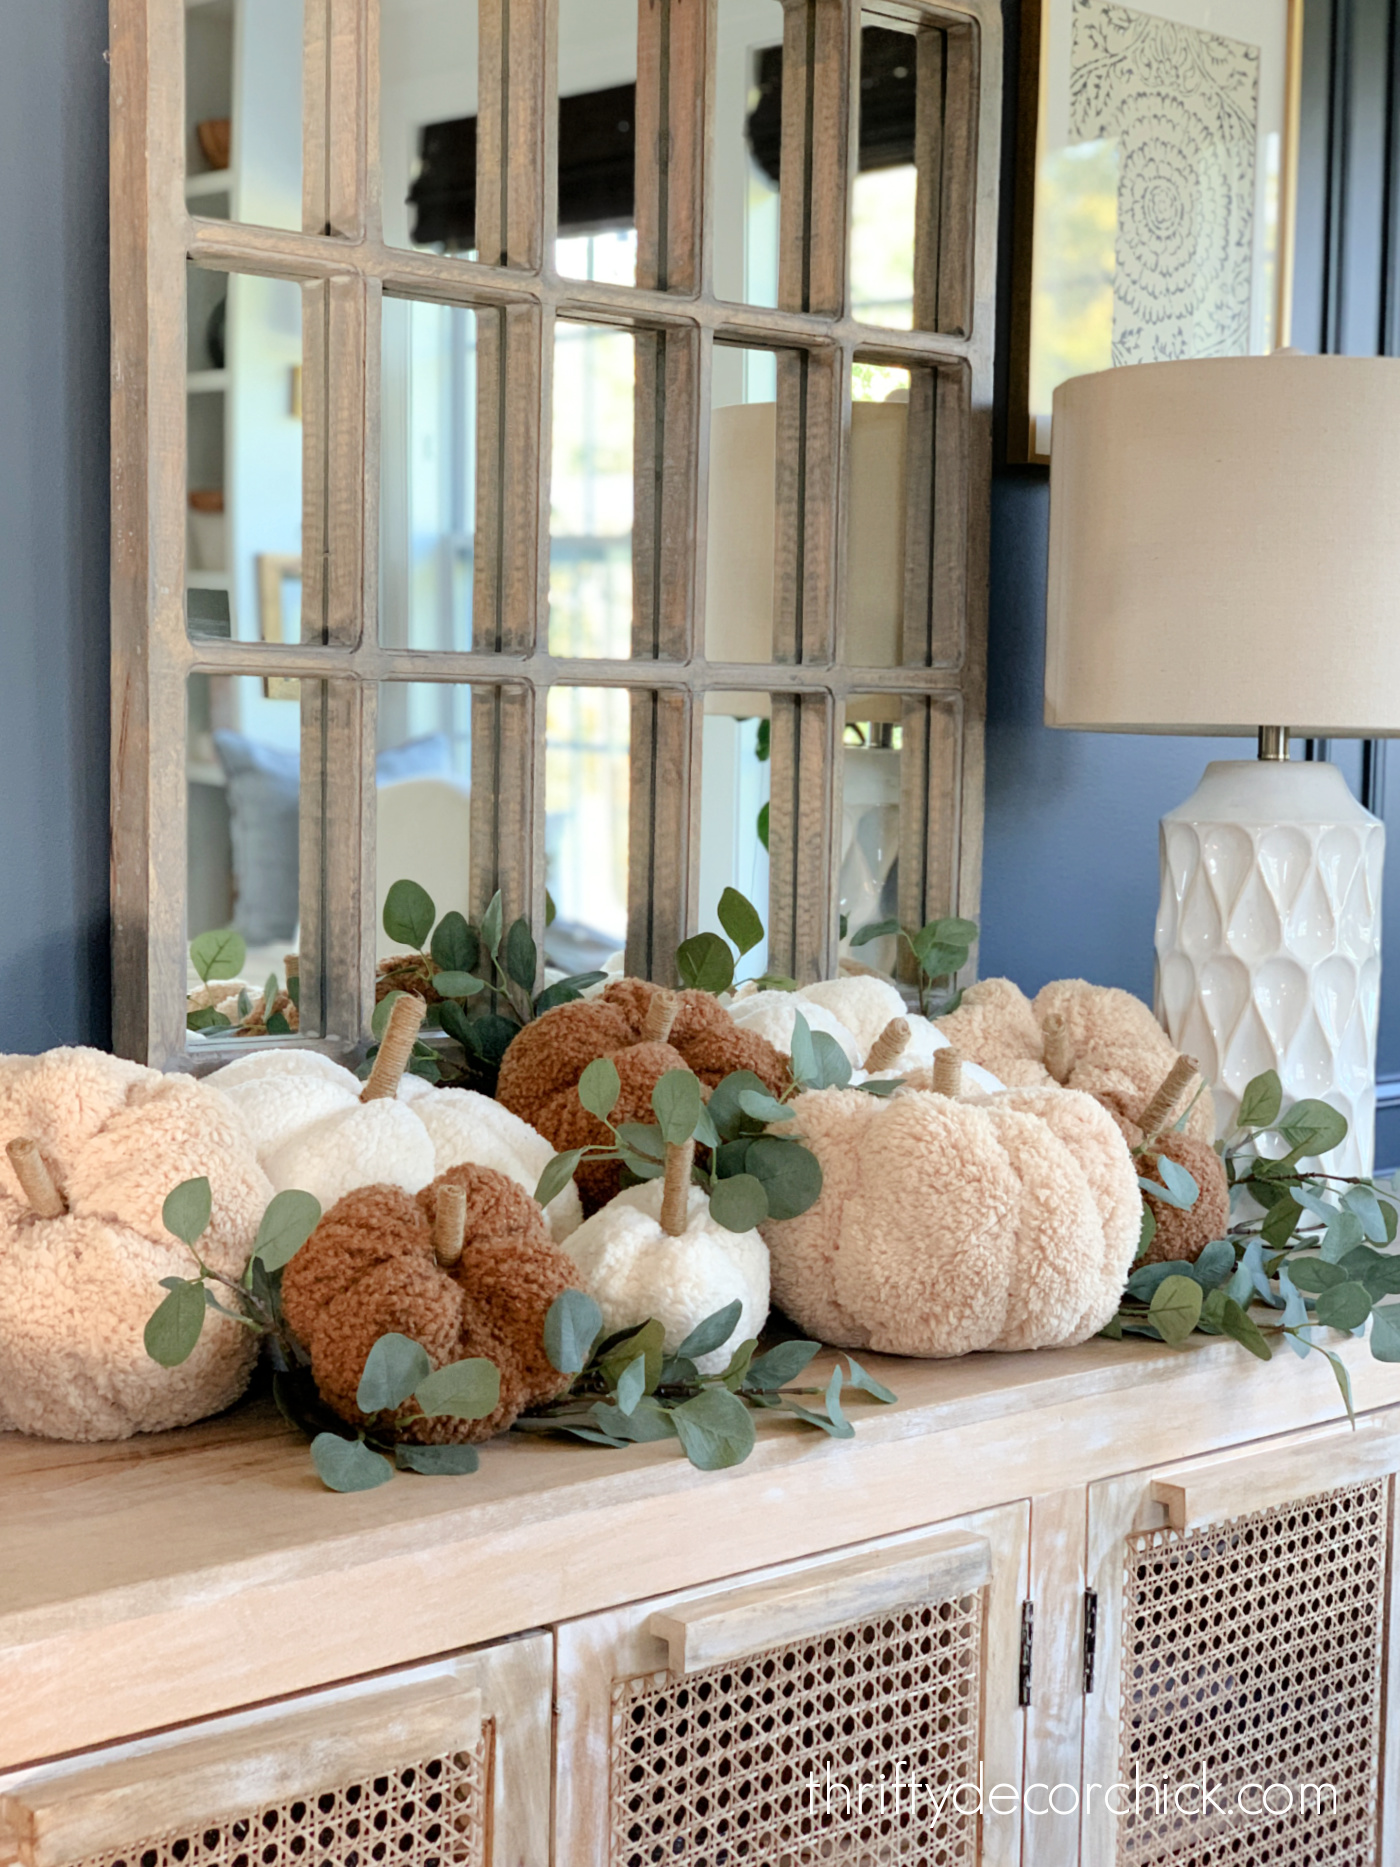
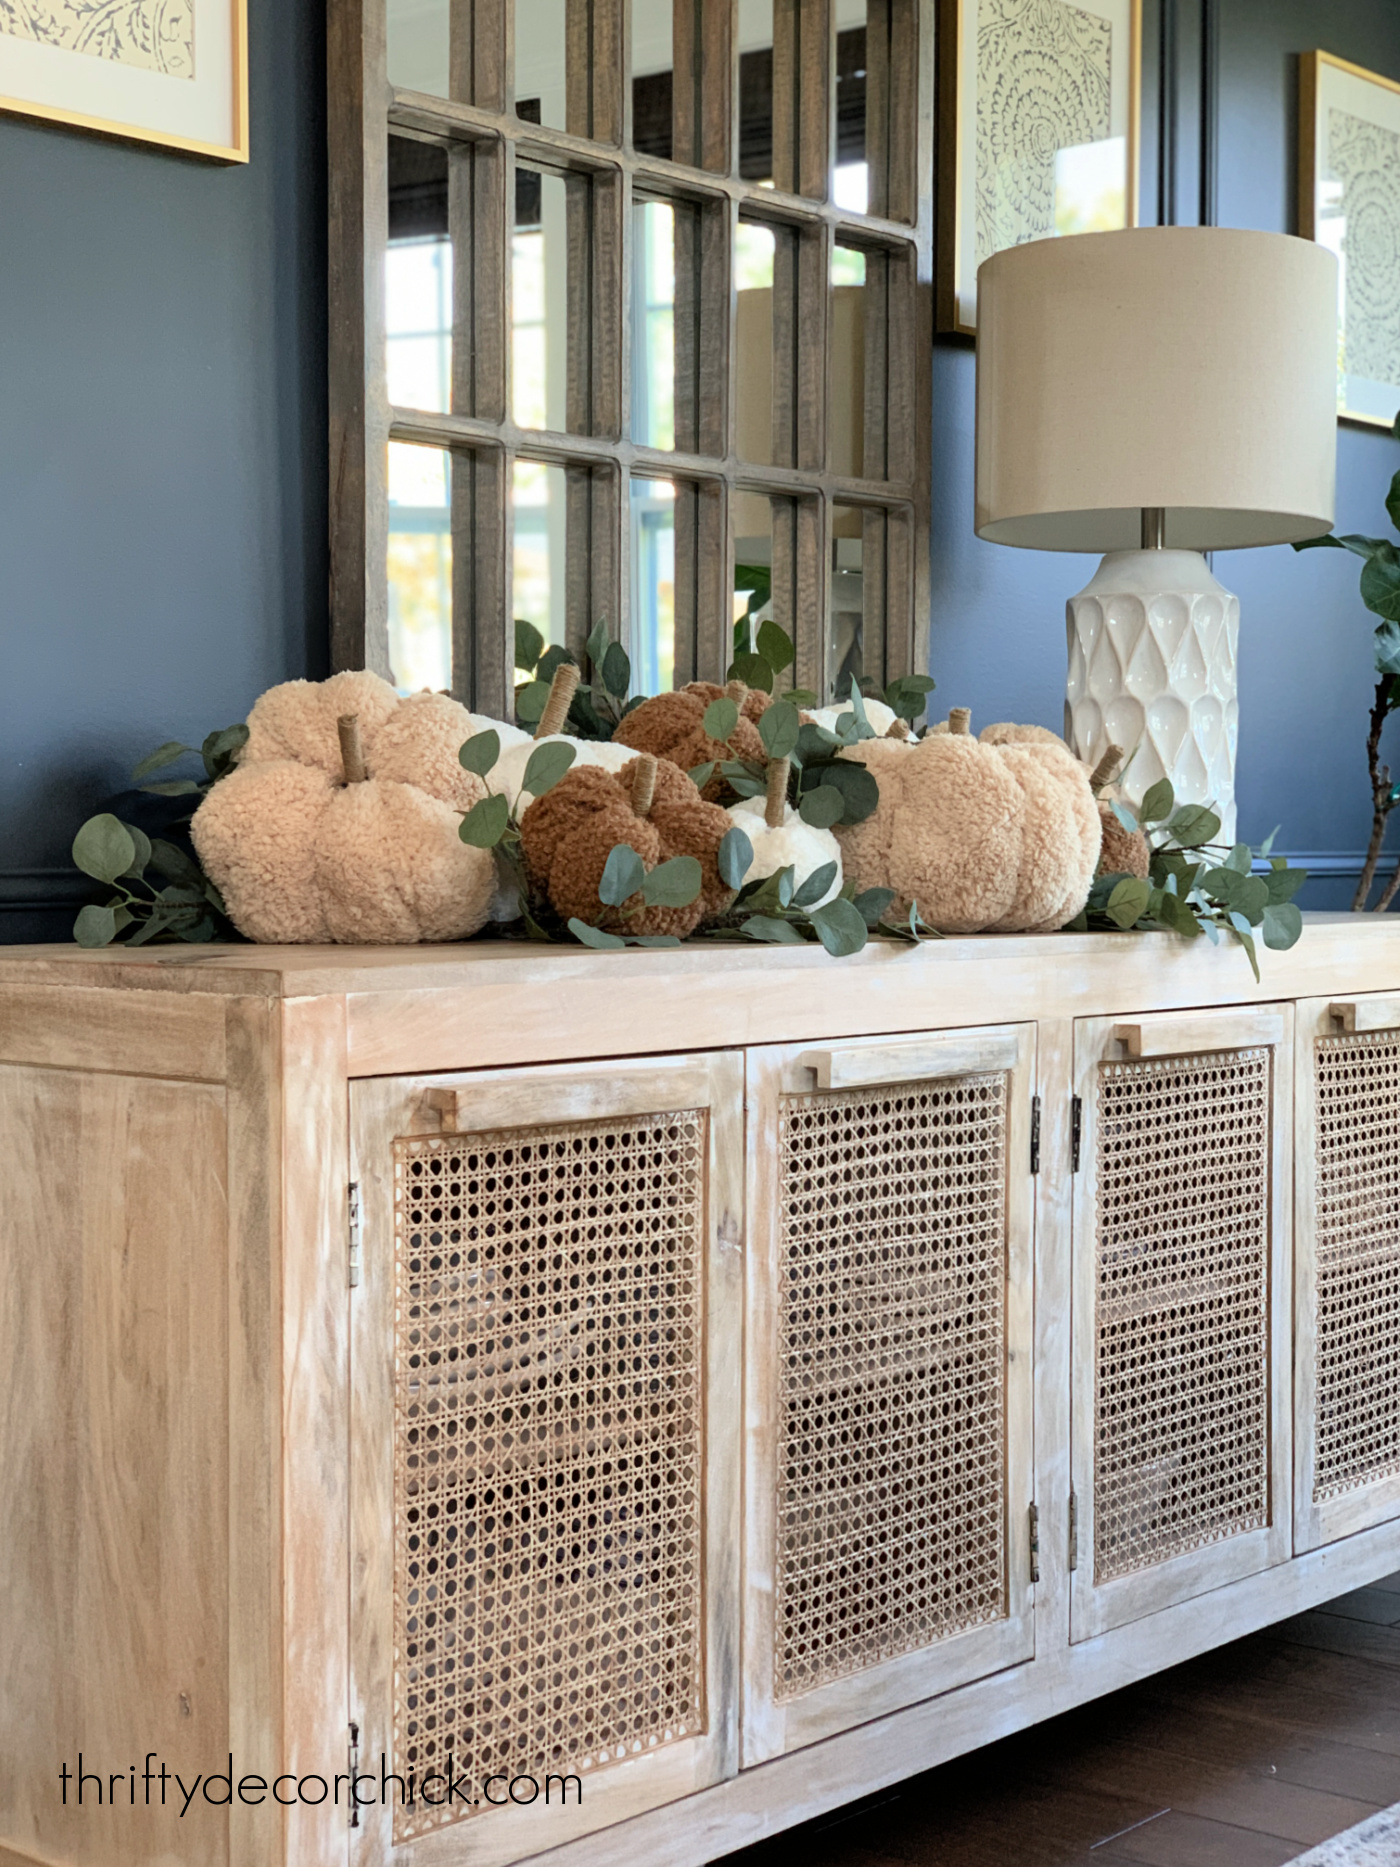
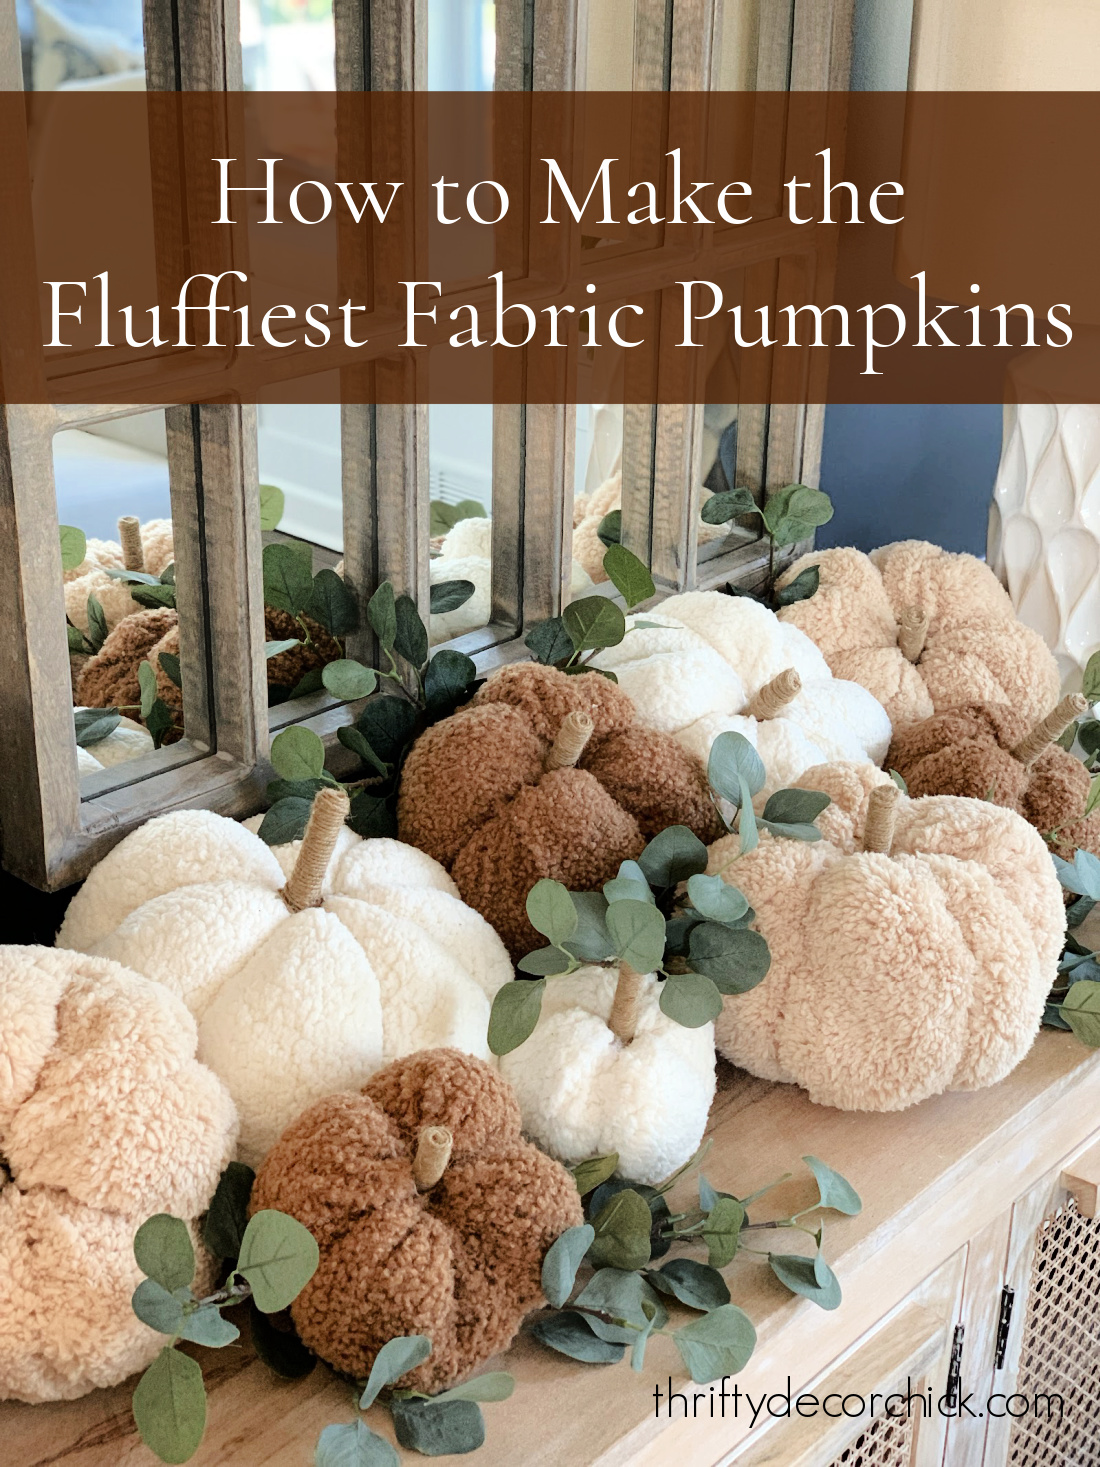
Via https://www.thriftydecorchick.com/2021/10/basic-pantry-turned-butlers-pantry.html How to make the softest fabric pumpkin pillows without a sewing machine.An easy knock off of the Pottery Barn teddy bear pumpkins!
These cute stuffed pumpkins are SO soft and will look great in your fall decor, or would work as cute pillows on chairs or sofas. It's easy to make fabric pumpkins and no sewing machine or experience is needed.
I know I just shared how to decorate for fall without using pumpkins, but I do love them in our home this time of year! I can't not have pumpkins anywhere in our home right now.
I came across the most adorable stuffed pumpkins online a couple months ago and knew I had to make some of my own.
This post may contain affiliate links for your convenience.
See my policies and disclosure page for more information.
These fluffy "teddy bear" fabric pumpkins were my inspiration for this project. I thought they were the cutest pumpkins/pillows -- so soft and fluffy!
But the price...nope. At least when I knew I could recreate them for a fraction of what they are charging.
I went to the craft store in search of the softest, fluffiest fabric I could find. I got three colors in very similar fabrics -- one light cream, one medium brown and one dark brown.
They are all SO SOFT and cozy. I just loved all three. The dark fabric is what I think is considered the true "teddy bear" fabric, but they all worked beautifully for this project.
I've never made my own fabric pumpkins, but I figured it out along the way. My first method worked OK, but then I did a little research and will be sharing the instructions I ended up using for the rest of the pumpkins.
First up, cut a rounded square or circle out of your fabric in the size you want:

The width of your fabric will depend on the size you want for your pumpkin. I made my large pumpkin with a size about 16-18 inches across.
I highly recommend fabric scissors if you work on projects like this often -- they make it way easier to cut, especially fluffy stuff like this!
It turns out you really don't have to cut down your fabric corners -- I found it actually worked fine to leave it a square shape. The corners help fill in the middle part where your stem will go later.
On my first try, I just simply gathered all of the fabric at the top, wrapped it with twine to secure and then cut off of the excess.
I was left with this part:

I flipped it over and added my "stem" at the top. It was a little difficult to wrangle all of the fabric together and tie it, and the stem wasn't secured well when I was done.
So I switched to this method, which was really easy with this fabric.
Take a long sewing needle and strong embroidery thread and weave it around the edges of your fabric:
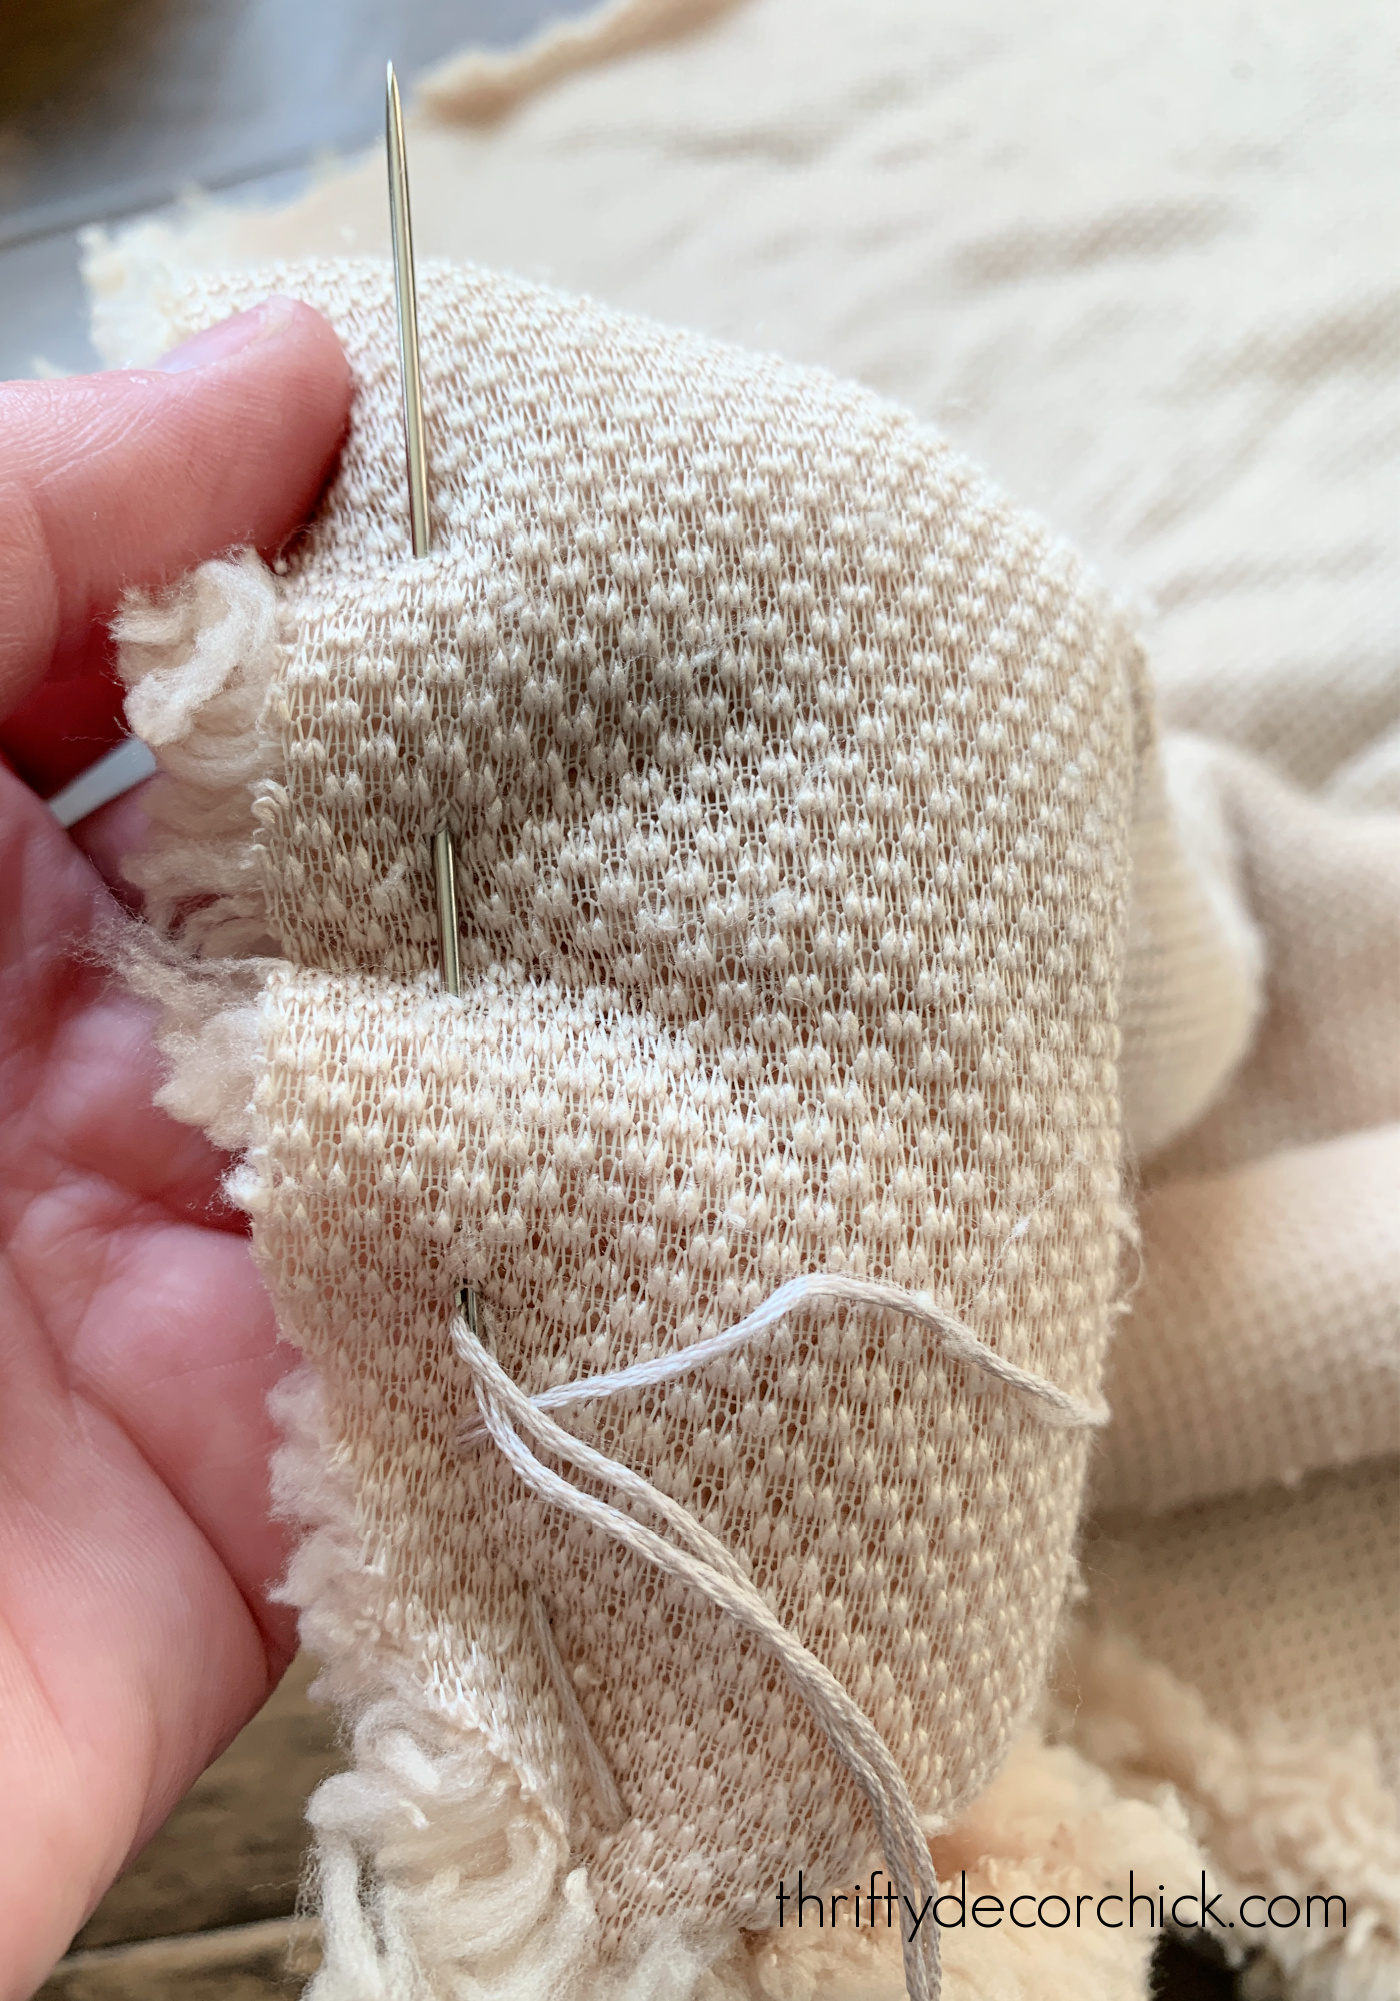
This goes super fast and I promise you don't need to know any sewing experience to do this. Just weave it in and out like I did above.
It doesn't need to be perfect -- you won't even see the thread when you're done!
Once you've got it around the circumference of the fabric, you can take each end of the embroidery thread and pull them together to start closing the pumpkin like so:
Before you close it all the way up, you'll want to start filling it with fiber fill. I used about two and a half one pound bags to do nine stuffed pumpkins.
I always recommend pulling the fill apart a few times to fluff it up before inserting:
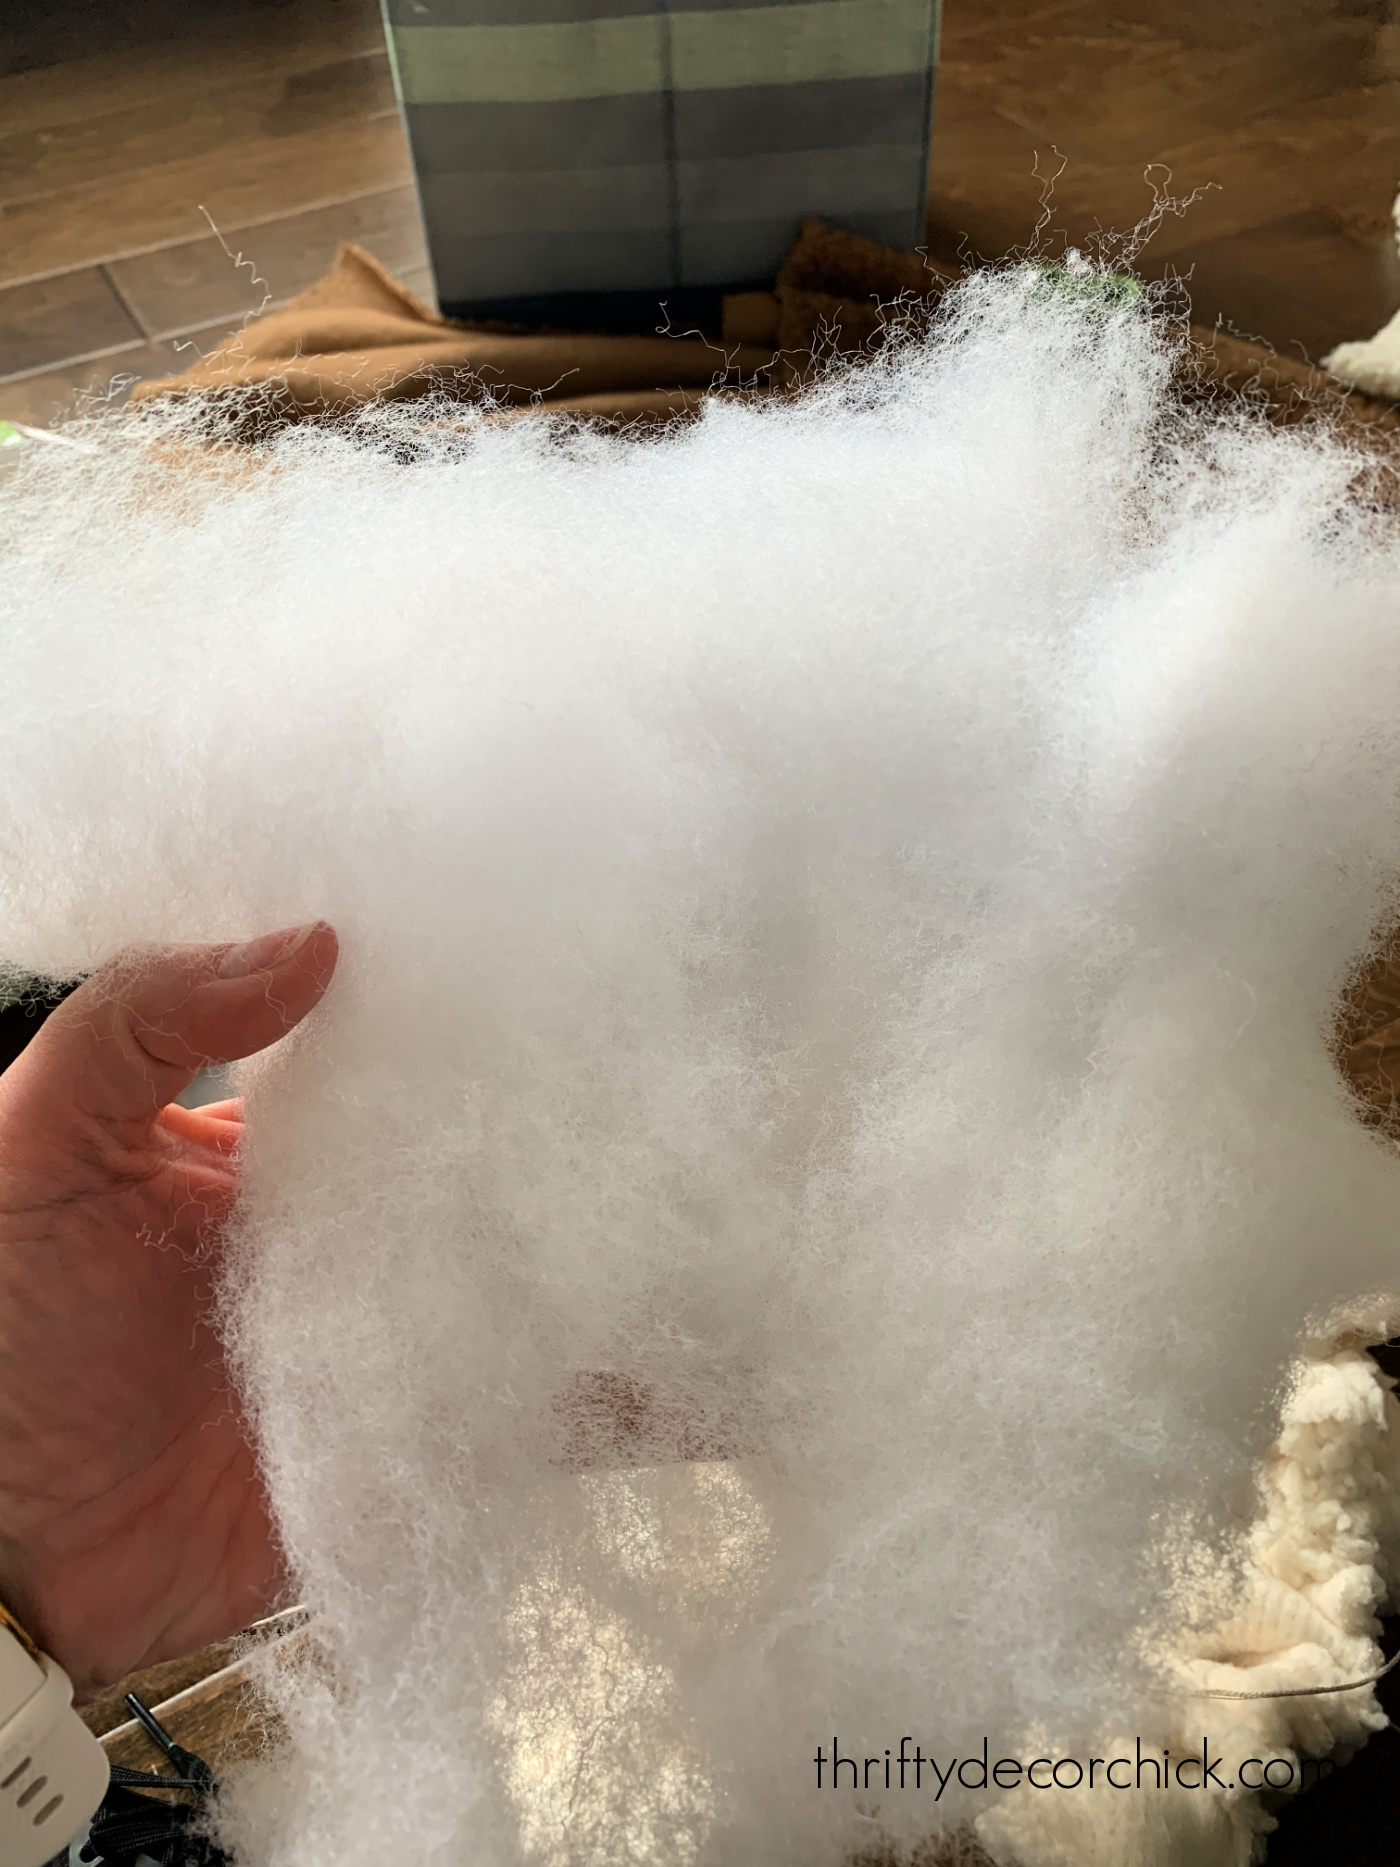
It will go a lot further if you do this first!
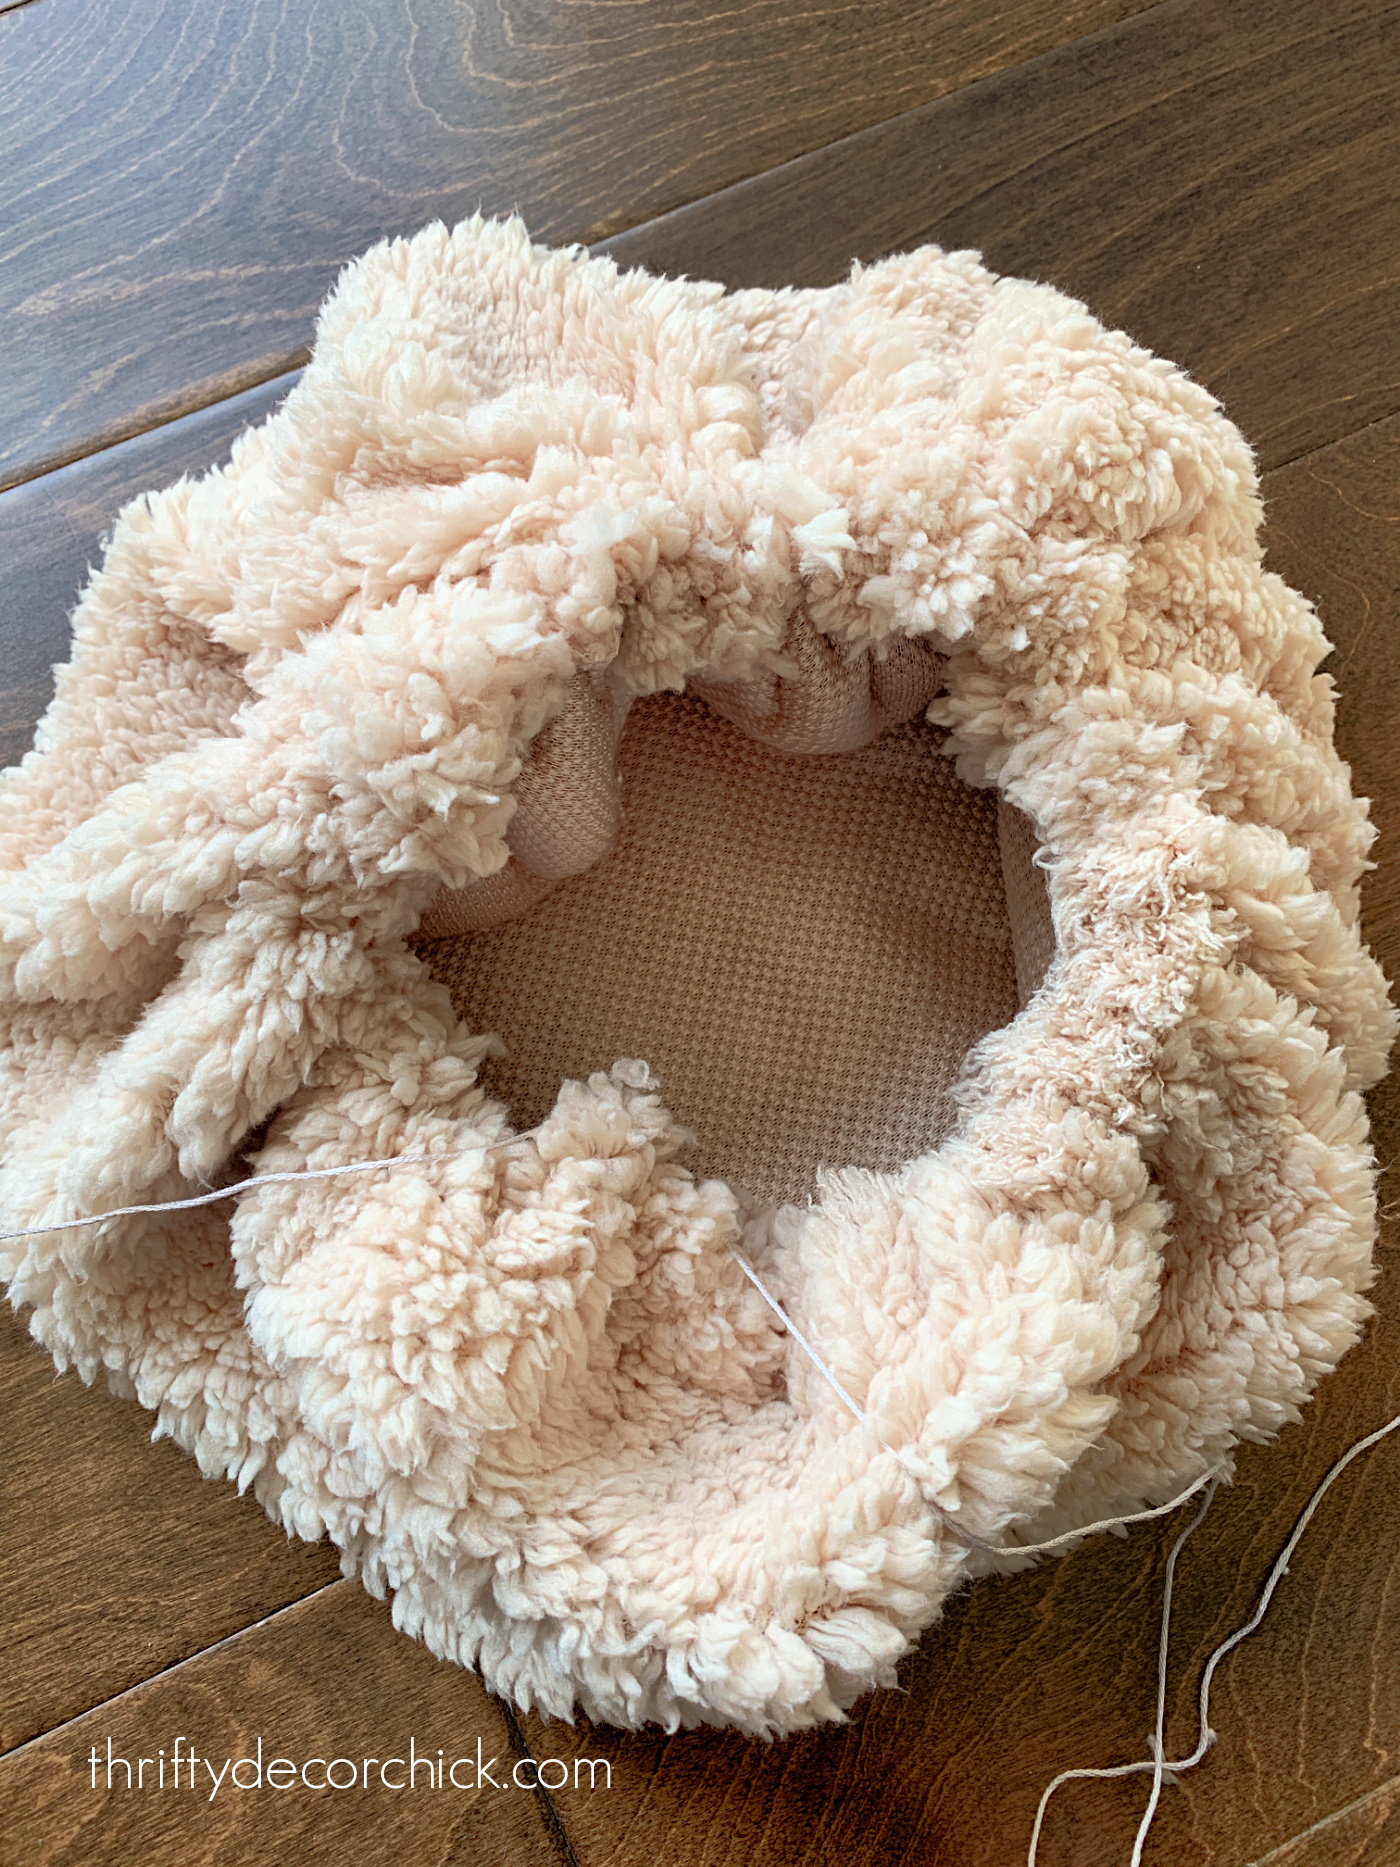
I don't recommend stuffing it completely full at this point, as it's harder to close if overstuffed. You'll want to add some additional stuffing to fill up parts later.
Once you've got it filled up to your liking (pull your thread together at the top to see how full it is), you can tie it up, but leave some some space for your stem and for a little final stuffing!
At this point you can add your stem and be done if you want -- the "pillow" will have a shape that already resembles a pumpkin.
But I wanted the defined sections like the inspiration pillows, and I think they just look more like a real pumpkin anyway. :)
I grabbed my jute twine and started at the top by the hole for the stem, then wrapped the twine tightly around the pumpkin back to the top.
Here's a view of the bottom of the pumpkin so you can see how I was wrapping the twine around:
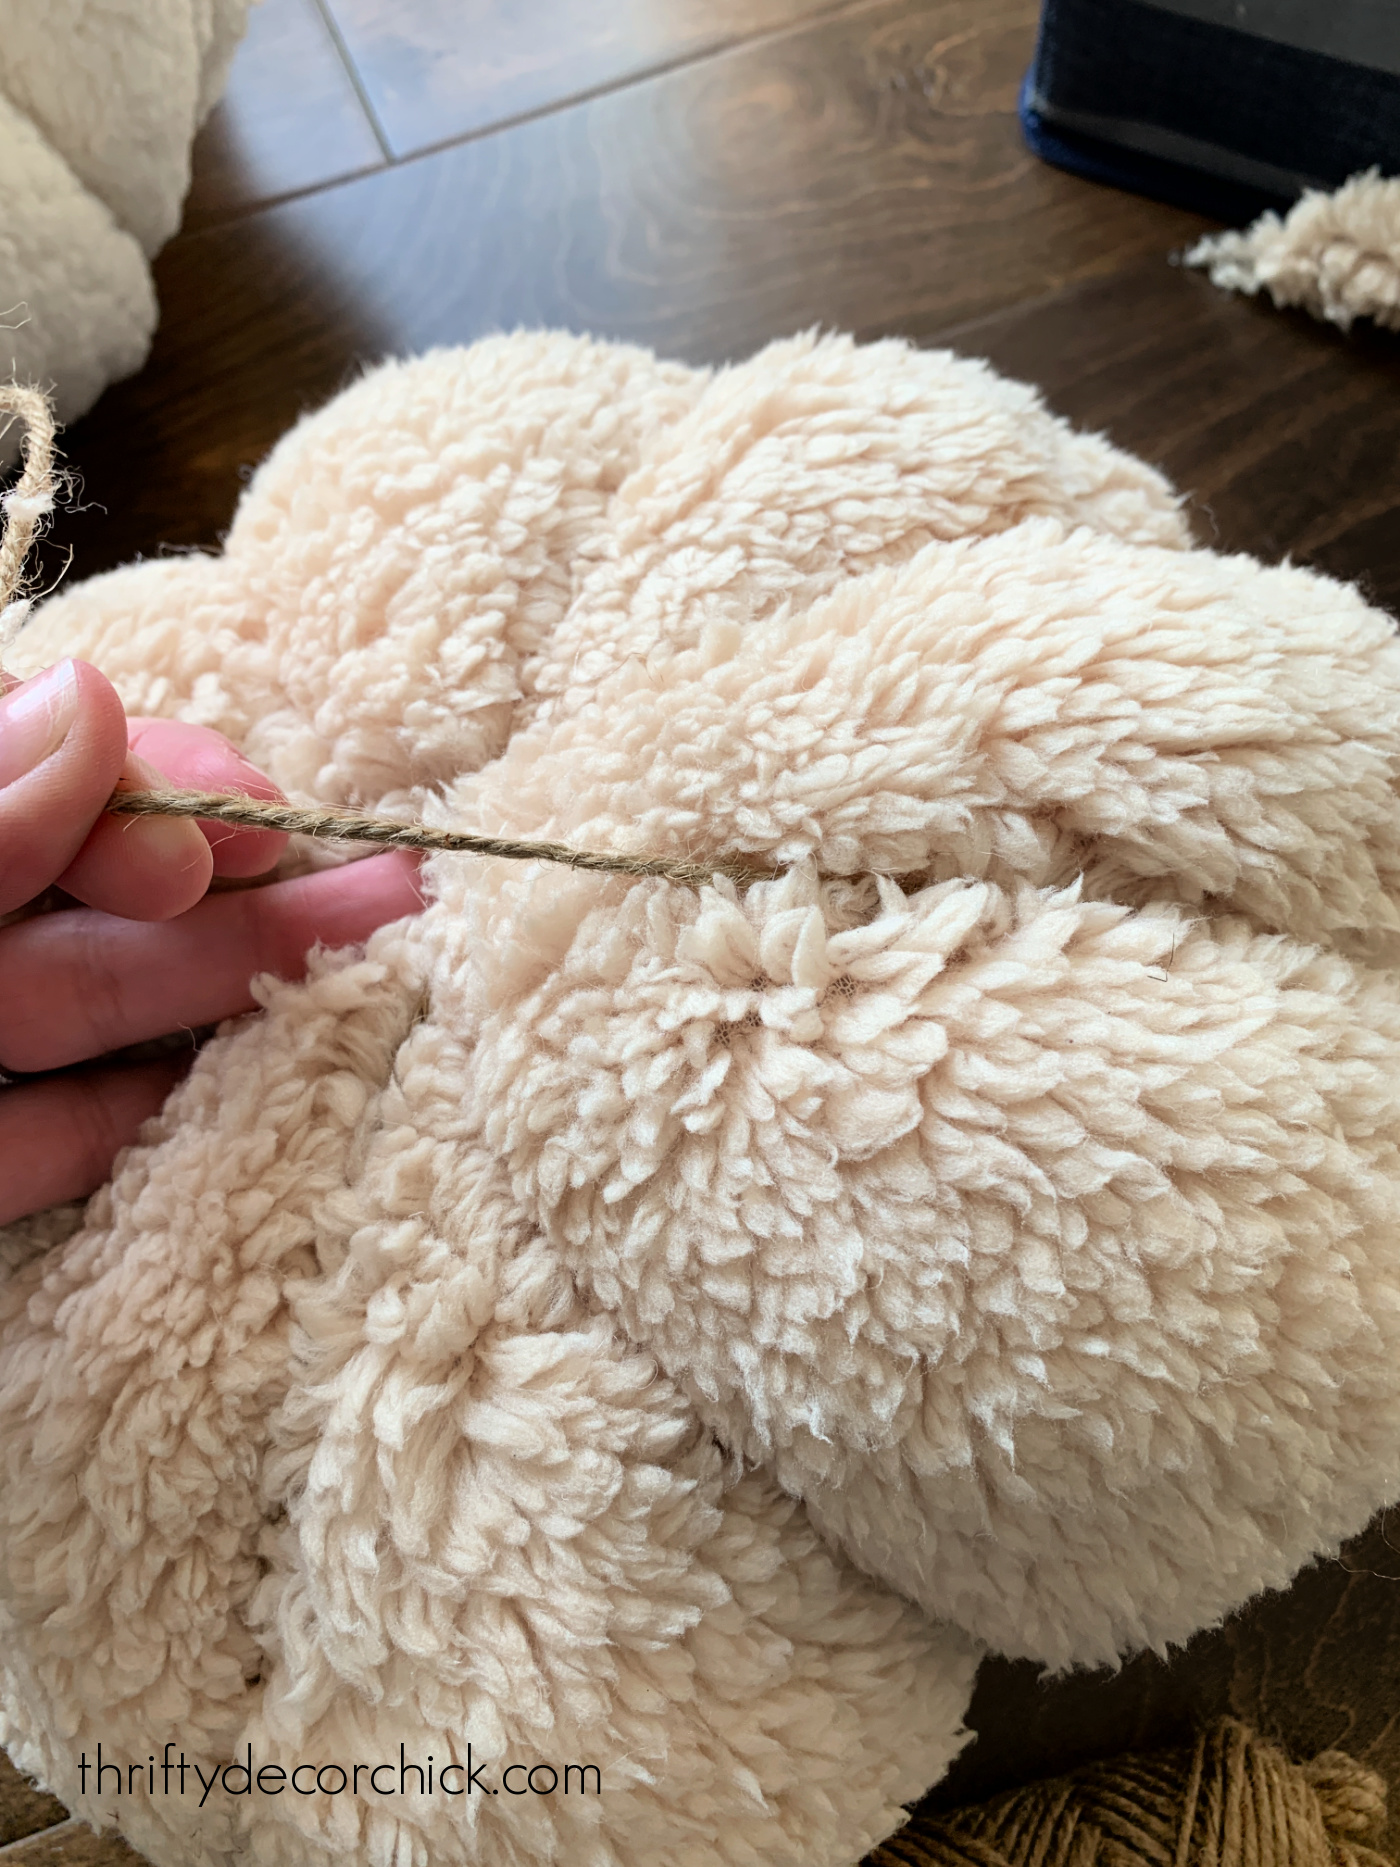
Leave some excess twine at the top that you can tie each pass around the pumpkin to.
Each time you wrap the pumpkin, tie it off in a knot on top of the pumpkin to keep the jute as tight as possible:
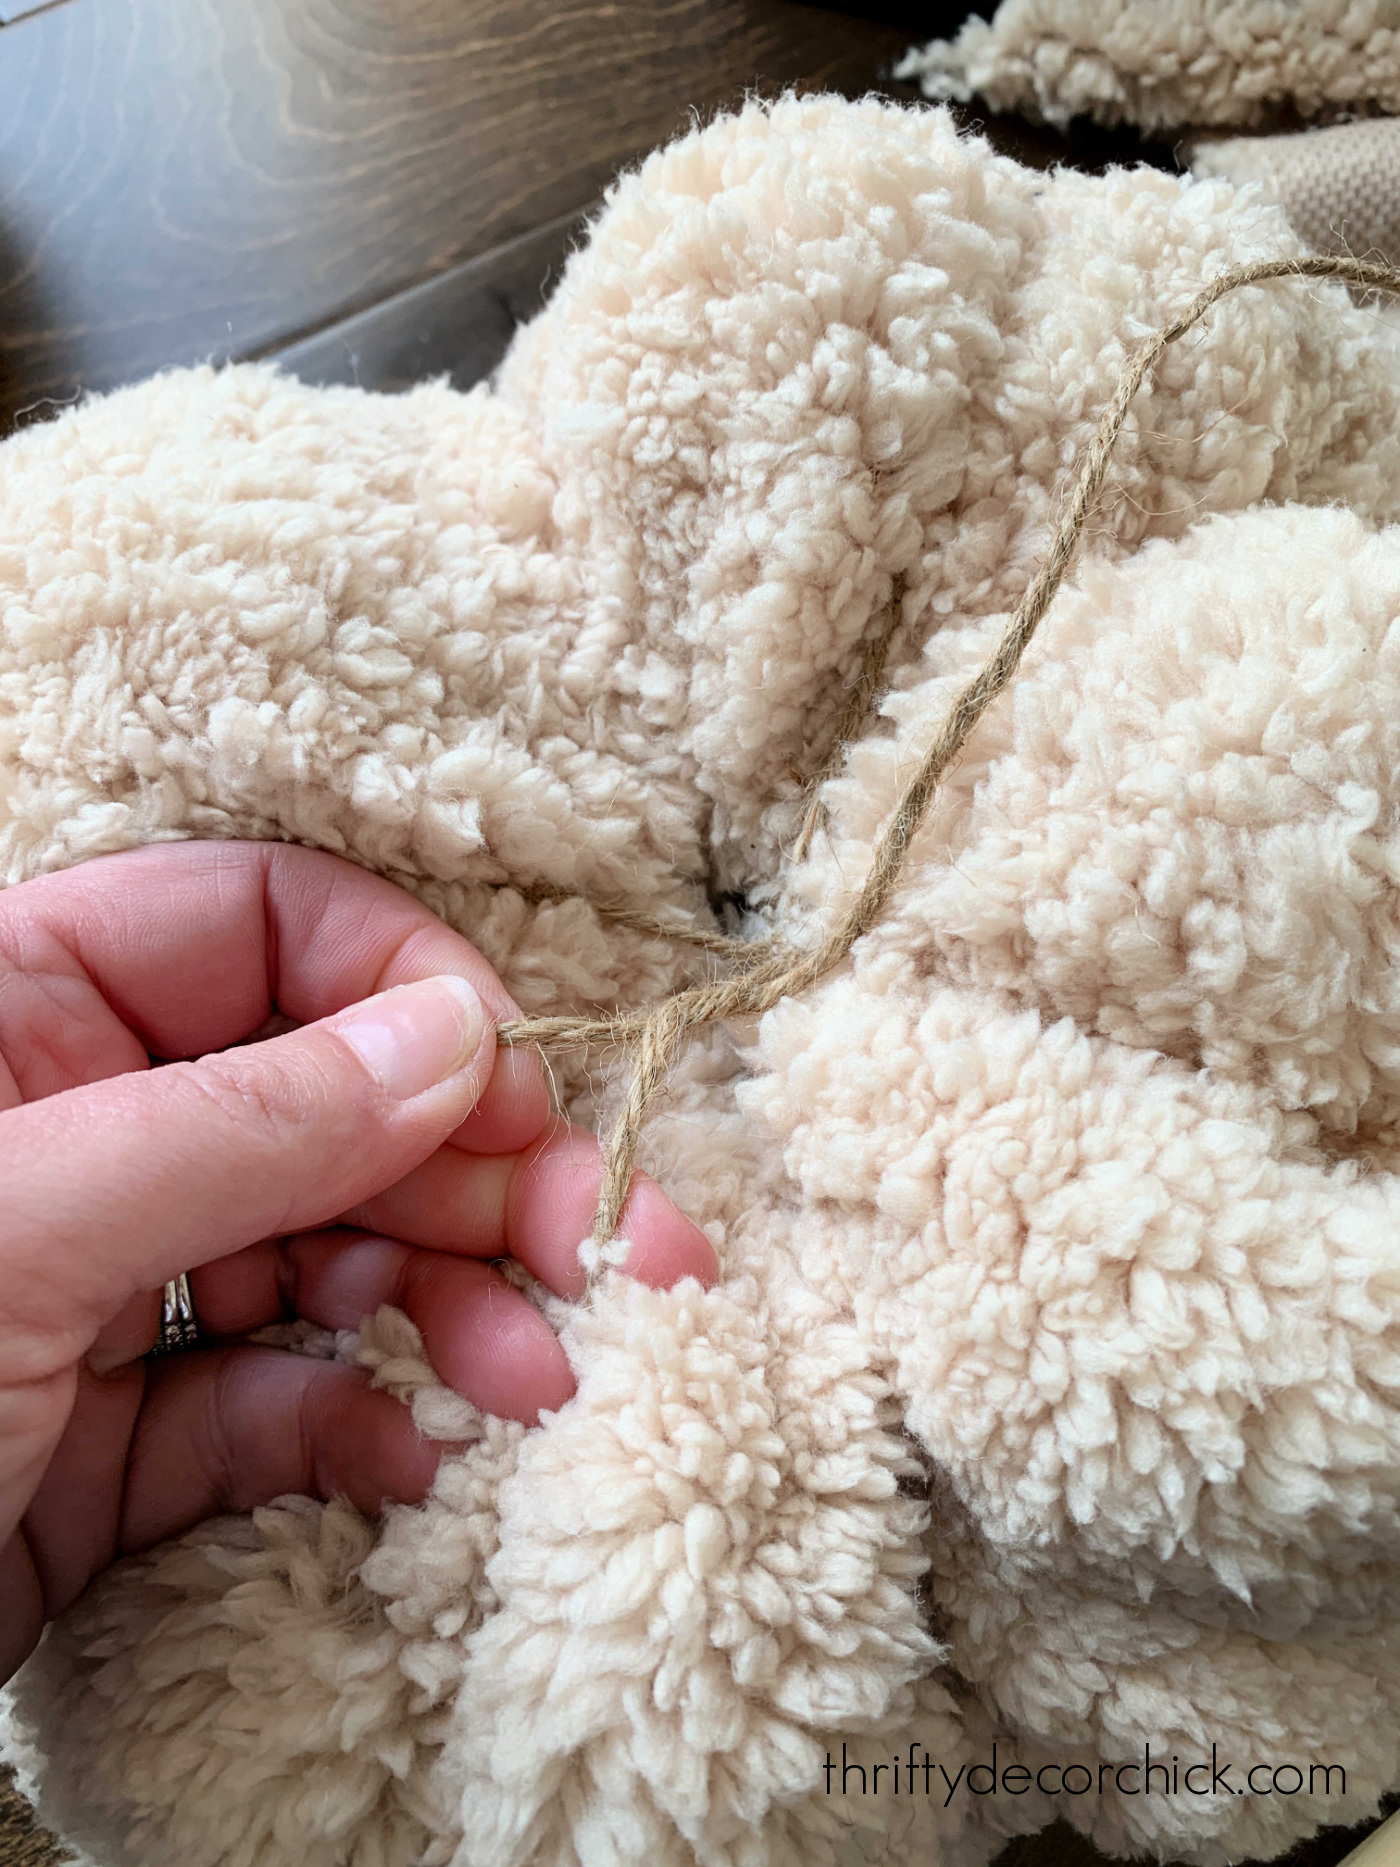
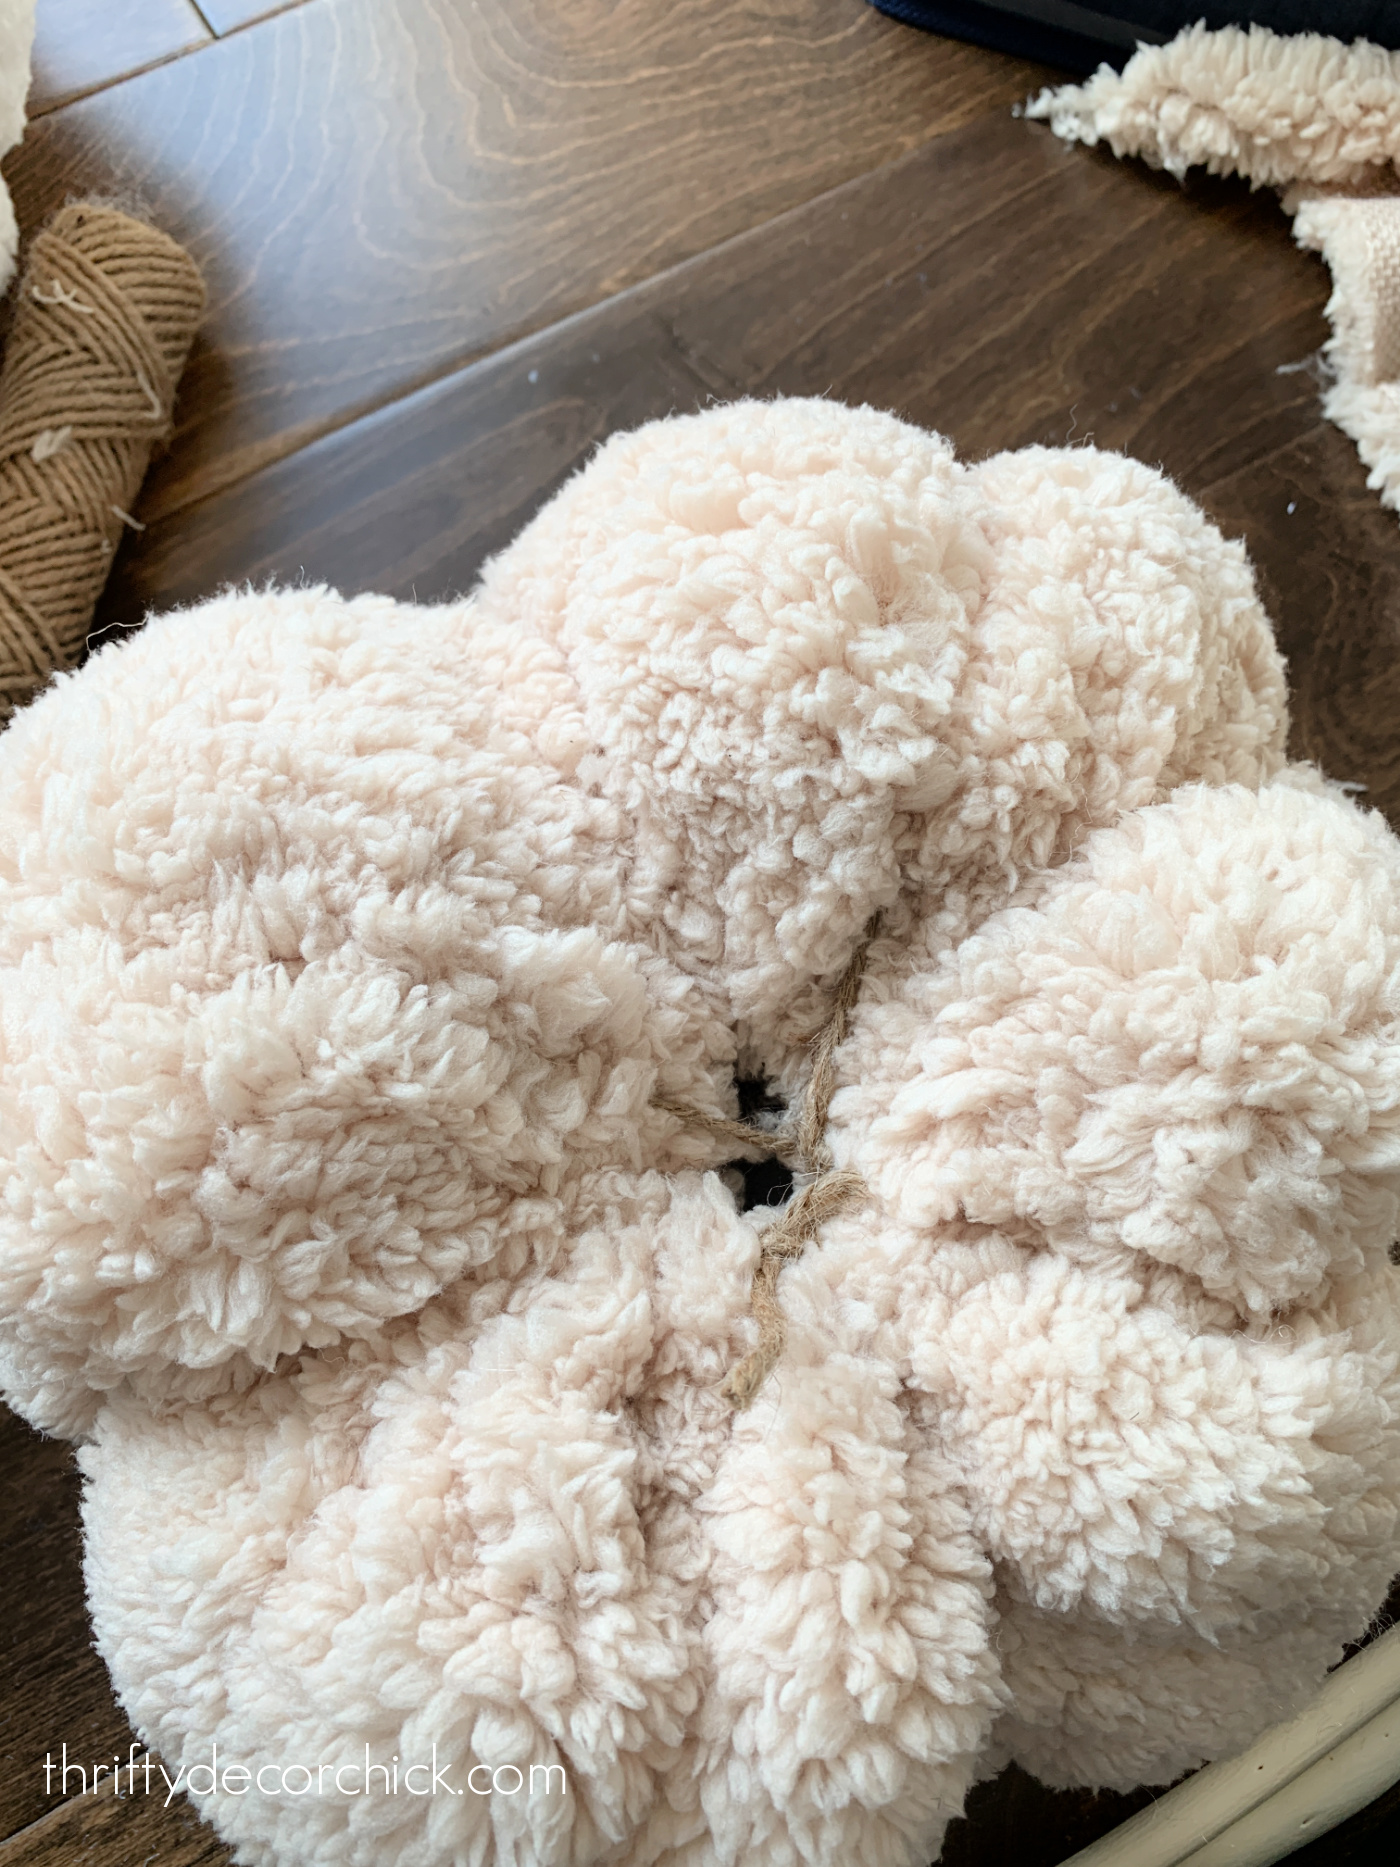
I would wrap with twine, knot it at the top to secure, then take the twine around in another direction, knot, and repeat until I had all the "sections" I wanted.
You'll be left with a hole that you can still fit a stem into:
By the way, I have no clue if this is how it's "supposed" to be done. I was winging this for the most part. :) But it worked well and went fast!
Before you add the stem, you'll want to fluff up the pumpkin a bit more. Take more fiber fill and tuck it inside and up into to top of the pillow to fill in any flat parts. The fluffier the better!
For the stem you can use just about anything that resembles the shape. Cut branches from outside would work without any additional steps.
I wanted ours to be a bit thicker, so I used the extra stems I used for the trunk of my DIY olive tree.
I cut them down and then wrapped with jute using my hot glue gun:

This process seems tedious but it actually goes super quick -- each one only took a minute or two.
If I needed my stem to be thicker to fill the center hole a bit more, I just wrapped it with twine twice to make it a bit wider.
I loaded up the bottom of the stems with hot glue and stuck them into the middle of the pumpkins. They aren't crazy secure -- plenty enough, but I won't be grabbing them by the stem to carry them around.
(If you know of a more secure way to add the stem, please share!)
I was planning to make three, but I loved these cute stuffed pumpkin SO much, I kept going.
They are SO CUTE!:

The fabric went a long way -- I got less than a half of a yard in each color and was able to make nine pillows. I even have a little extra fabric leftover.
Aren't they adoyable?? (As my niece says.):
They are so incredibly soft and I just love them.
The best part? I made all of mine with $30 worth of fabric and fill -- and the smallest Pottery Barn teddy bear pumpkin is $29.
Soooo I got nine for the price of ONE:
You can't beat nine for the price of one!
This would be such a fun craft project to do with friends or older kids for a craft night.
Try using old sweaters or blankets to make these as well!
Have you tried making your own stuffed pumpkins? Can you believe I've never attempted this DIY till now?
You can pin this tutorial for later using this image:
Never miss a post by signing up to get posts via email.
Via https://www.thriftydecorchick.com/2021/10/how-to-make-fluffy-fabric-stuffed-pumpkins.html |