|
I'm back with an update on the master bedroom makeover! I'm SO so pleased with how it's coming together.
I shared the wallpaper I'm using in my last update. It's peel and stick and I find them very easy to apply. You can see all my tips on hanging peel and stick wallpaper in this post!
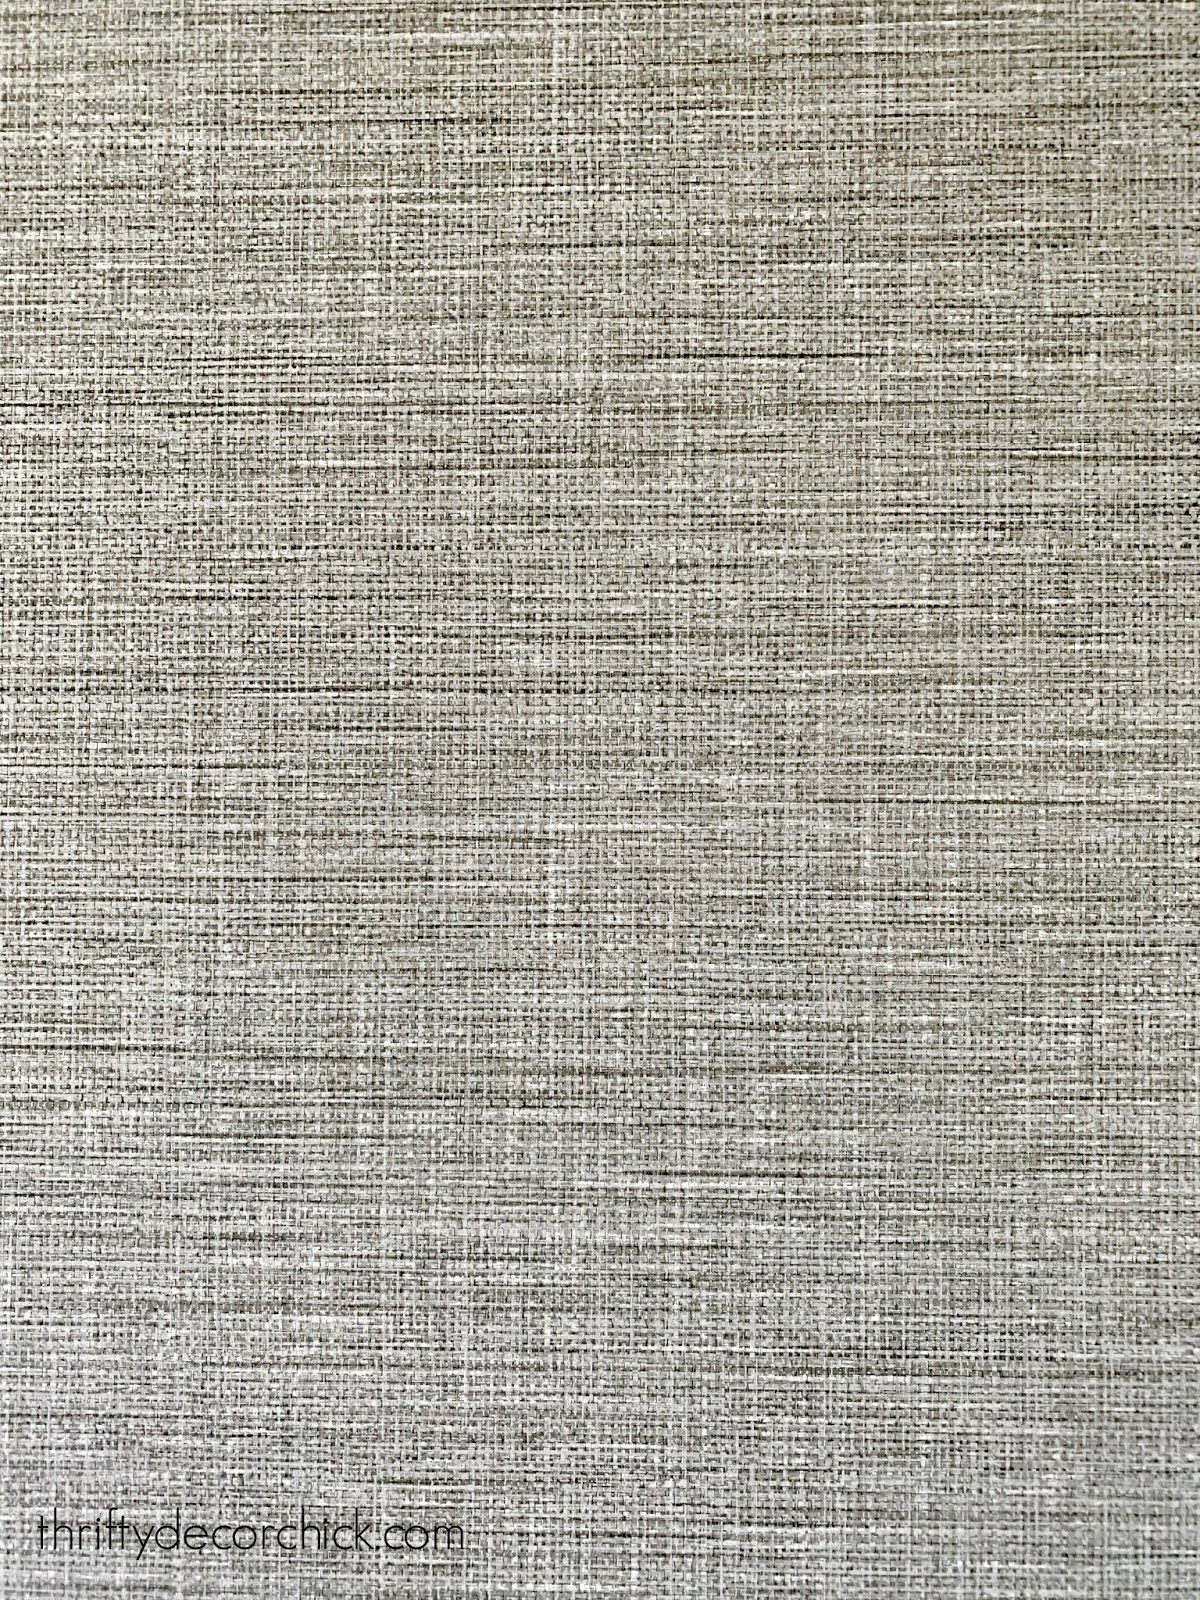
Here's a closer look at it -- I've been REALLY impressed with the quality:
This post may contain affiliate links for your convenience.
See my policies and disclosure page for more information.
Here's the paper (it's half off online! Such a good deal.) I ended up getting the difference back in the store, thankfully! I really don't think I could love it more: 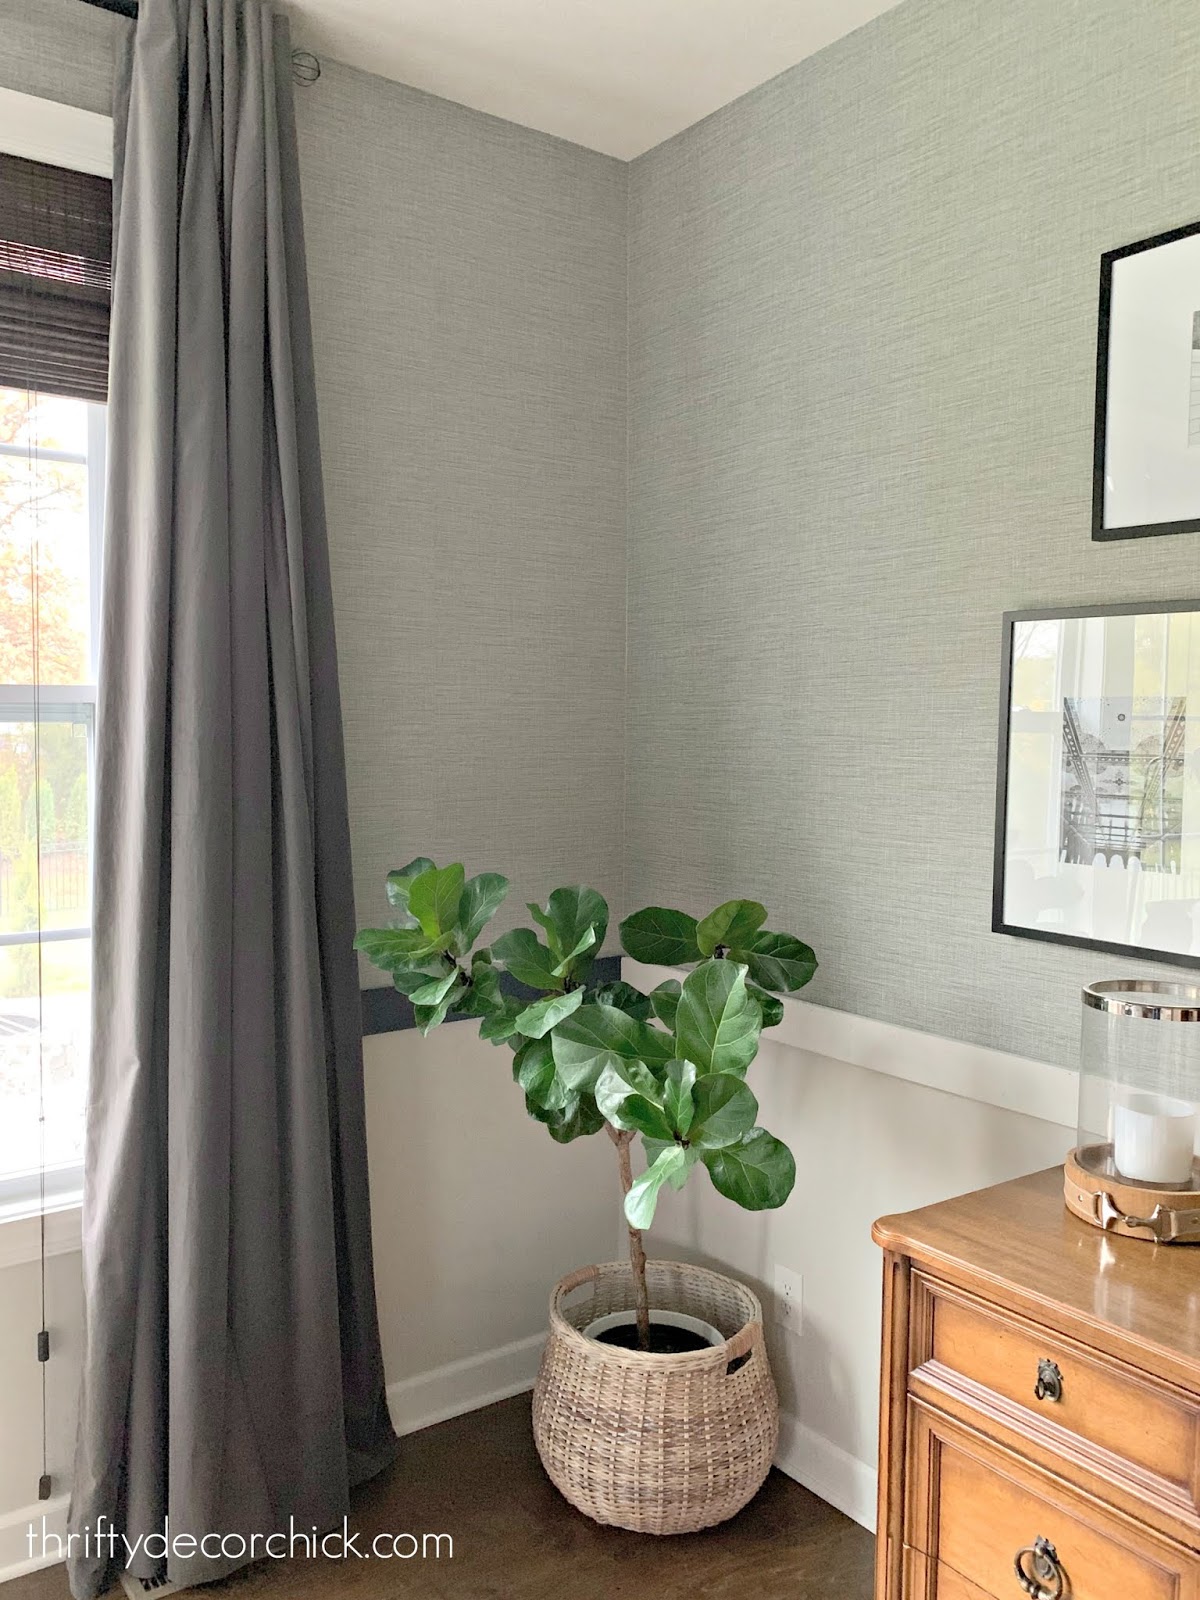
I used scrap wood for chair rail (happy accident) so that's why one piece is painted dark blue. (It's leftover from my big fireplace grid project.)
I noticed when I used that blue trim that this wallpaper would look great with dark blue, gray or white. Any guesses what color I'll be using?:
As I mentioned in my last post, grasscloth doesn't have a repeat, so you can see where the individual panels run down the wall. It's a look you either like or don't. I do. :)

I will say this stuff doesn't show as much as real grasscloth -- it's much more noticeable with that.
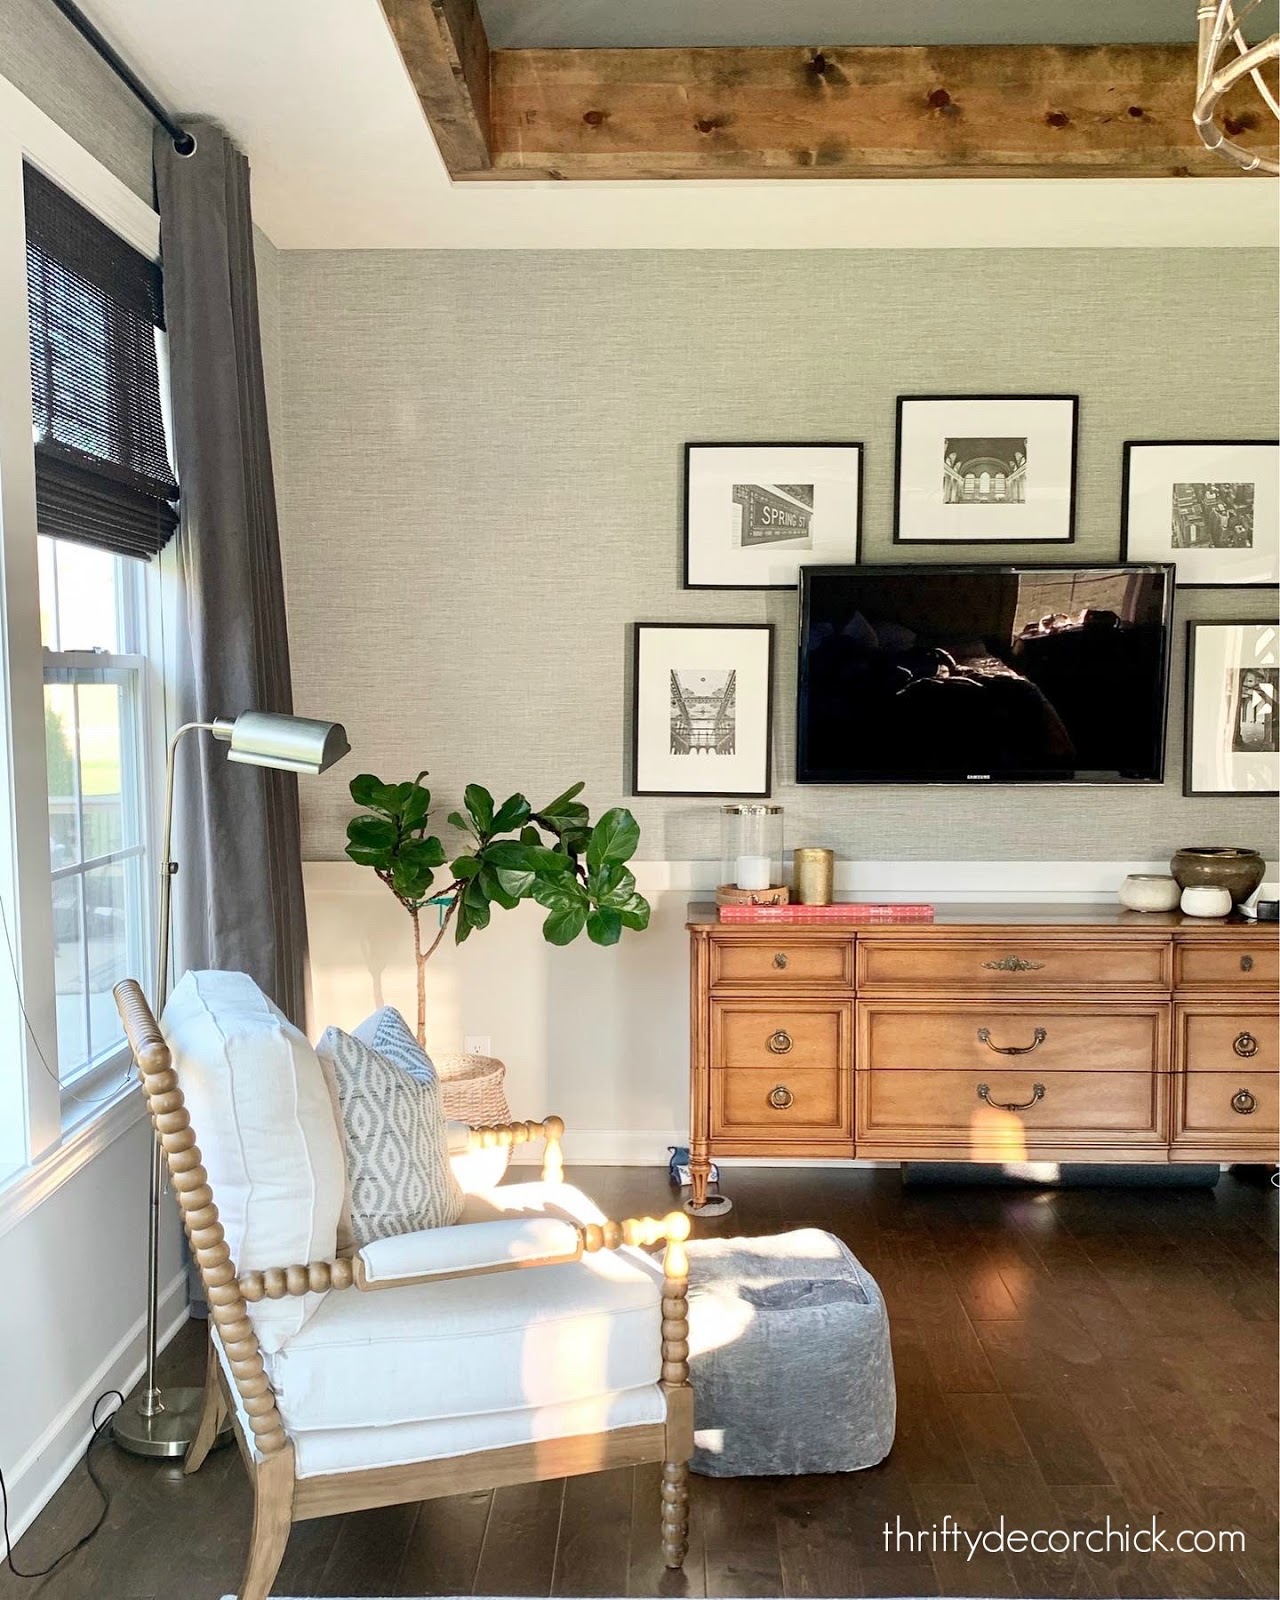
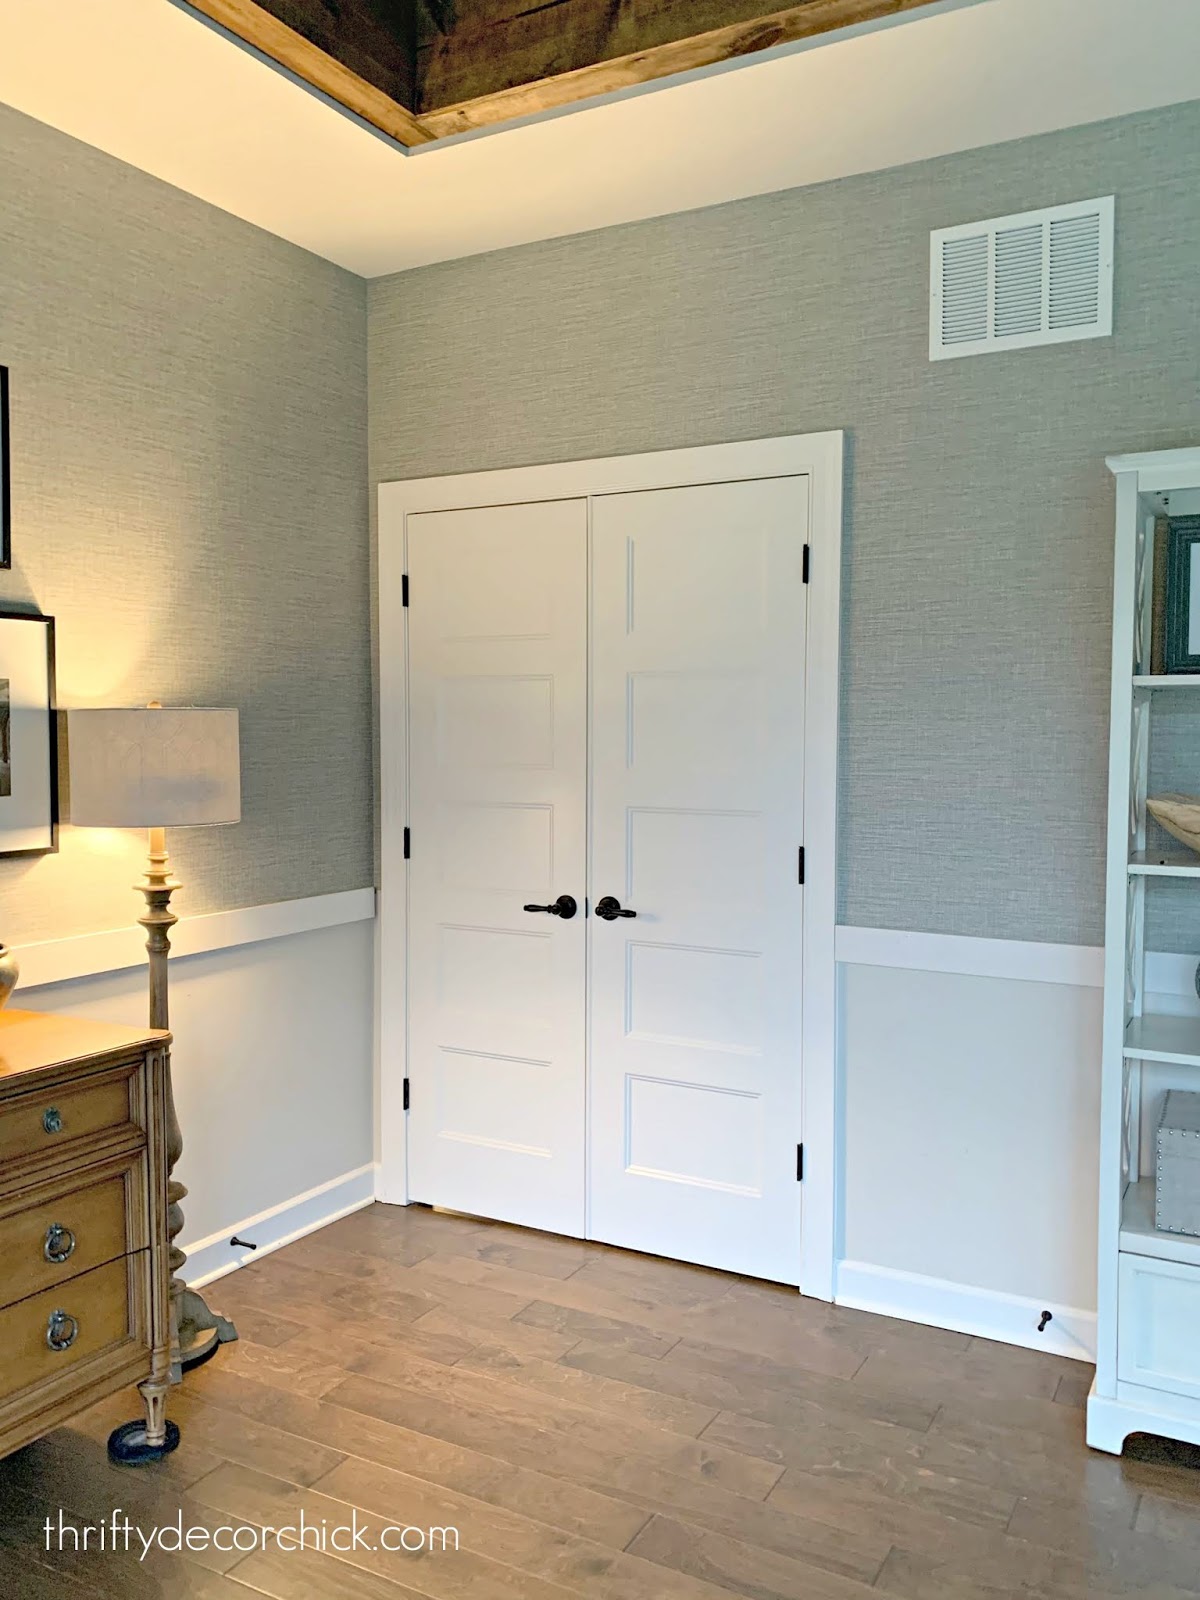
We really love it. It's so fresh but classic at the same time. And yes, I'll be painting that vent to match:
Here's a look at this view after the floors went in:

And how that looks now with the wallpaper!:
I used eight rolls -- at the discounted price this project cost me $120 and a few days of work. Not bad at all!
I wanted to mention this stuff is VERY forgiving -- as is most wallpaper from my experience. But because there is no repeat on this you'll use a lot less. I was able to put pieces together in smaller areas and you'd never be able to tell.
Next up, painting under the chair rail! Can't wait to get this finished up! :)
Have you dipped your toe into wallpaper yet? It's back in a big way and I'm loving it! (See how I've used it in our home here.)
See more of our home here. To shop items in our home, click here! Never miss a post by signing up to get posts via email. Via https://www.thriftydecorchick.com/2019/10/the-master-wallpaper-is-done.html
0 Comments
Hey there! I'm back with a quick tip to make any bathroom feel MUCH bigger. At least one with a shower curtain. :) I'll share an additional tip that I think helps a lot too!
It's something I've noticed for years -- this simple trick makes the eye go up and makes the room feel larger. Remember the huge makeover I did on our son's bathroom a couple years ago? It was one of my favorite transformations ever. We ended up moving right after I finished it!:

I plan to do some similar updates to our son's current bathroom someday. :)
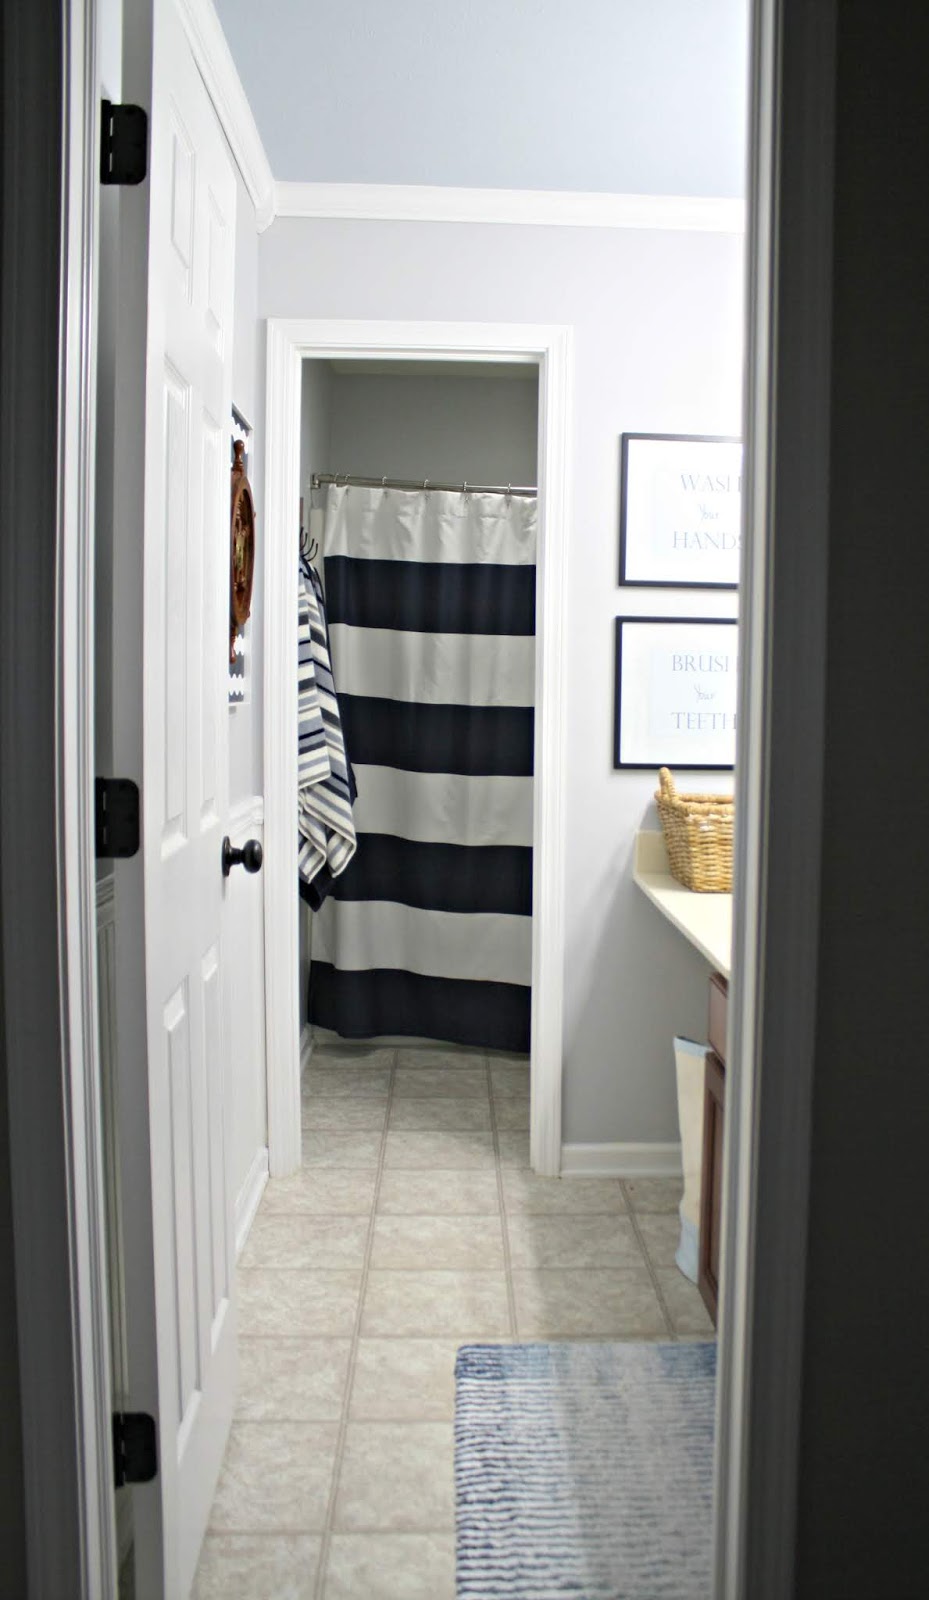
This tip has to do with the height of the shower curtain. You can see in this before photo how his shower curtain used to hang:
Now I know that some of these example photos have before and afters that involve other updates as well, but focus on the curtains, OK? ;)
This is actually a better before because you can see the whole shower:

That was a FUN day. I just started knocking down that stupid wall on a whim (although I had thought about doing it for years). Best decision ever. I hated that wall!
Here's the tip (well, two) -- they are earth shattering. Get ready. Raise your shower curtain rod, and raise it as high as you can!: 
The short curtain had always bugged me, but I didn't know how to make a taller one work until I found out there's such a thing as really long shower curtain liners. That was a game changer.
This post may contain affiliate links for your convenience.
See my policies and disclosure page for more information.
Here's that before again:
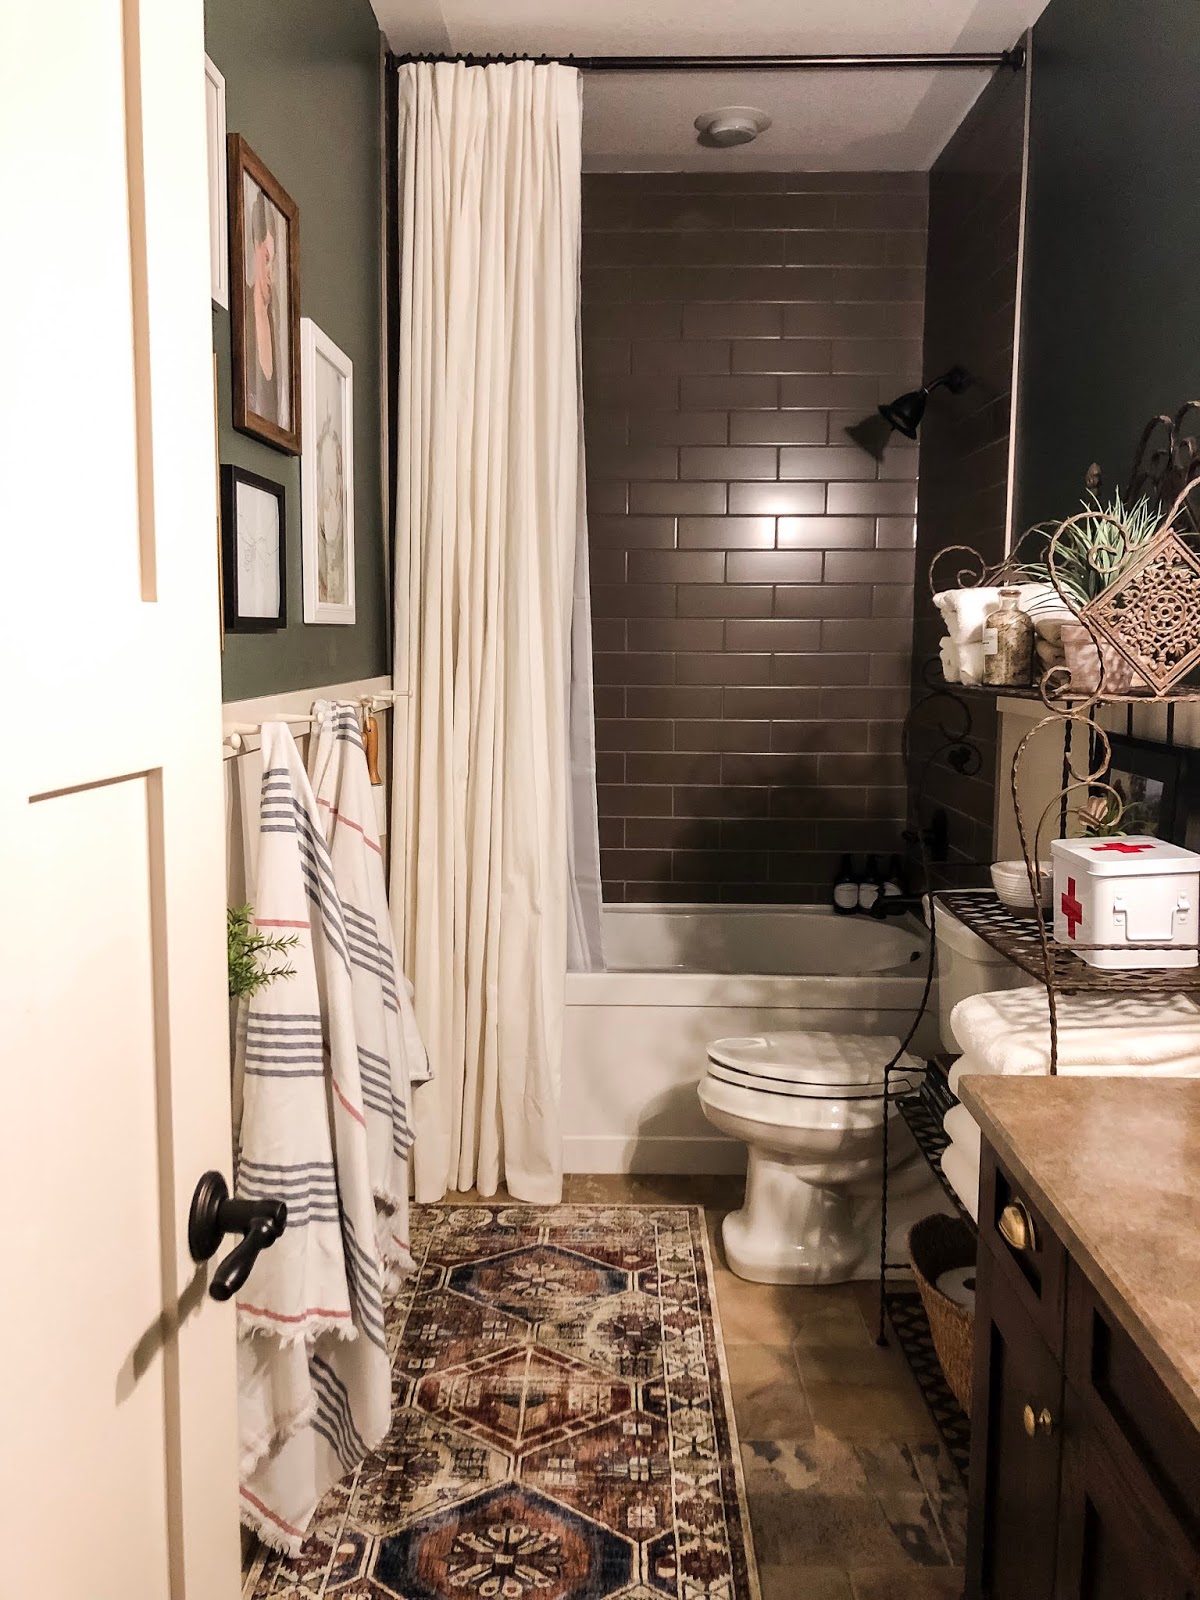
And the after, with a much higher curtain:

I know, I know. Lots of other changes too. But it instantly makes the room feel bigger. Taller. Grander. It tricks the eye big time and makes a big difference!
Here's my other tip -- and if you have a decent shower it doesn't cost a dime. Keep your shower curtain open instead of pulled across. This goes a long way to opening up the room as well.
If you have a nice shower, show it off. I know if you have little ones your view may not be as pretty with all the bath toys. ;) But if you like your shower, pull that curtain open! This is especially nice is you have a window in the shower that lets in natural light.
I gathered a couple examples that show the difference both of these little tips make. First up, Erin's bathroom with the pretty gray subway tile before:

Even with the other updates she made, my eye immediately went to that shower curtain! It makes a HUGE difference:
And she's showing off that beautiful shower by keeping the curtain open. :) The lower curtain rod cuts the room in two vertically. Bringing it all the way up makes the room feel so much taller. Same concept as windows -- installing your drapery hardware higher does the same thing.
Jen's bathroom underwent a big renovation, and her curtain was hanging high before:

But it makes the room feel grander when it goes from floor to ceiling:

Here's what you'll need if you want to do this in your bathroom!
If you love your shower curtain but still want the height, consider a little DIY action to make it longer. You can either sew it or using hemming tape -- this is a great example:

They found a curtain they loved, but it was going to be a bit busy with the rest of the room. Instead, she sewed a strip of the fabric onto another shower curtain to give it length and keep that pop of color. I love how she used the rest of it as a shade for the window! There you go -- a super easy way to make your bathroom feel bigger. Raise up those curtains and open them up! Have you tried this trick in your home? You can use the same shower rod -- no need to replace that part. Pin this idea for later!: 
See more of our home here. To shop items in our home, click here! Never miss a post by signing up to get posts via email. Via https://www.thriftydecorchick.com/2019/10/this-simple-trick-will-make-your.html
Hello there! Sometimes I plan rooms well in advance, and sometimes they come together much faster. This room redo is the latter -- I wasn't planning on tackling all of this just yet, but it's falling into place so beautifully!
We had hoped to put hardwoods in our master (it's on my list of projects I wanted to finish by November -- I got half of them done!), but we weren't sure it would work out with our contractors and the budget at the same time.
The contractor guys called a couple weeks ago saying they had some free days to work on it, so we decided to go ahead since the budget matched up with their work schedule. It took them a few days and they finished yesterday. It looks SO GOOD!
I always get asked why we didn't have the builder do the floors (we waited on the floors in my office too). There are two reasons -- during the building process you tend to add a lot to the bottom line. As time goes on (both times we've built), I start to hyperventilate a bit seeing the dollar amount inch up.
So some things aren't done, and the floors in those rooms were two of them. Also, we liked the carpet at first and thought we may keep them.
I forgot we have animals. ;) And the slight pattern in our carpet was really showing wear in the high traffic areas. It still looks good in bigger spaces like our upstairs and basement though.
SO anywhoo...the floors spurred me on and I decided to tackle a project in here I'd been thinking about for awhile. I'll show you some peeks at that in a bit! First, here's a look at the master with the carpet:


This post may contain affiliate links for your convenience.
See my policies and disclosure page for more information.
I installed the quarter round today and we got the furniture back in:

Every time we add hardwoods to a room, it looks bigger. Always! You'd think a darker floor would make it feel smaller, but not so! It flows so much nicer with the rest of the house:

Our floors are engineered hardwoods by Diamond Living, but they have been discontinued. Thankfully we were able to find just enough for the office and our bedroom! (We have almost one box left, that's it!) I was so nervous we wouldn't have enough.
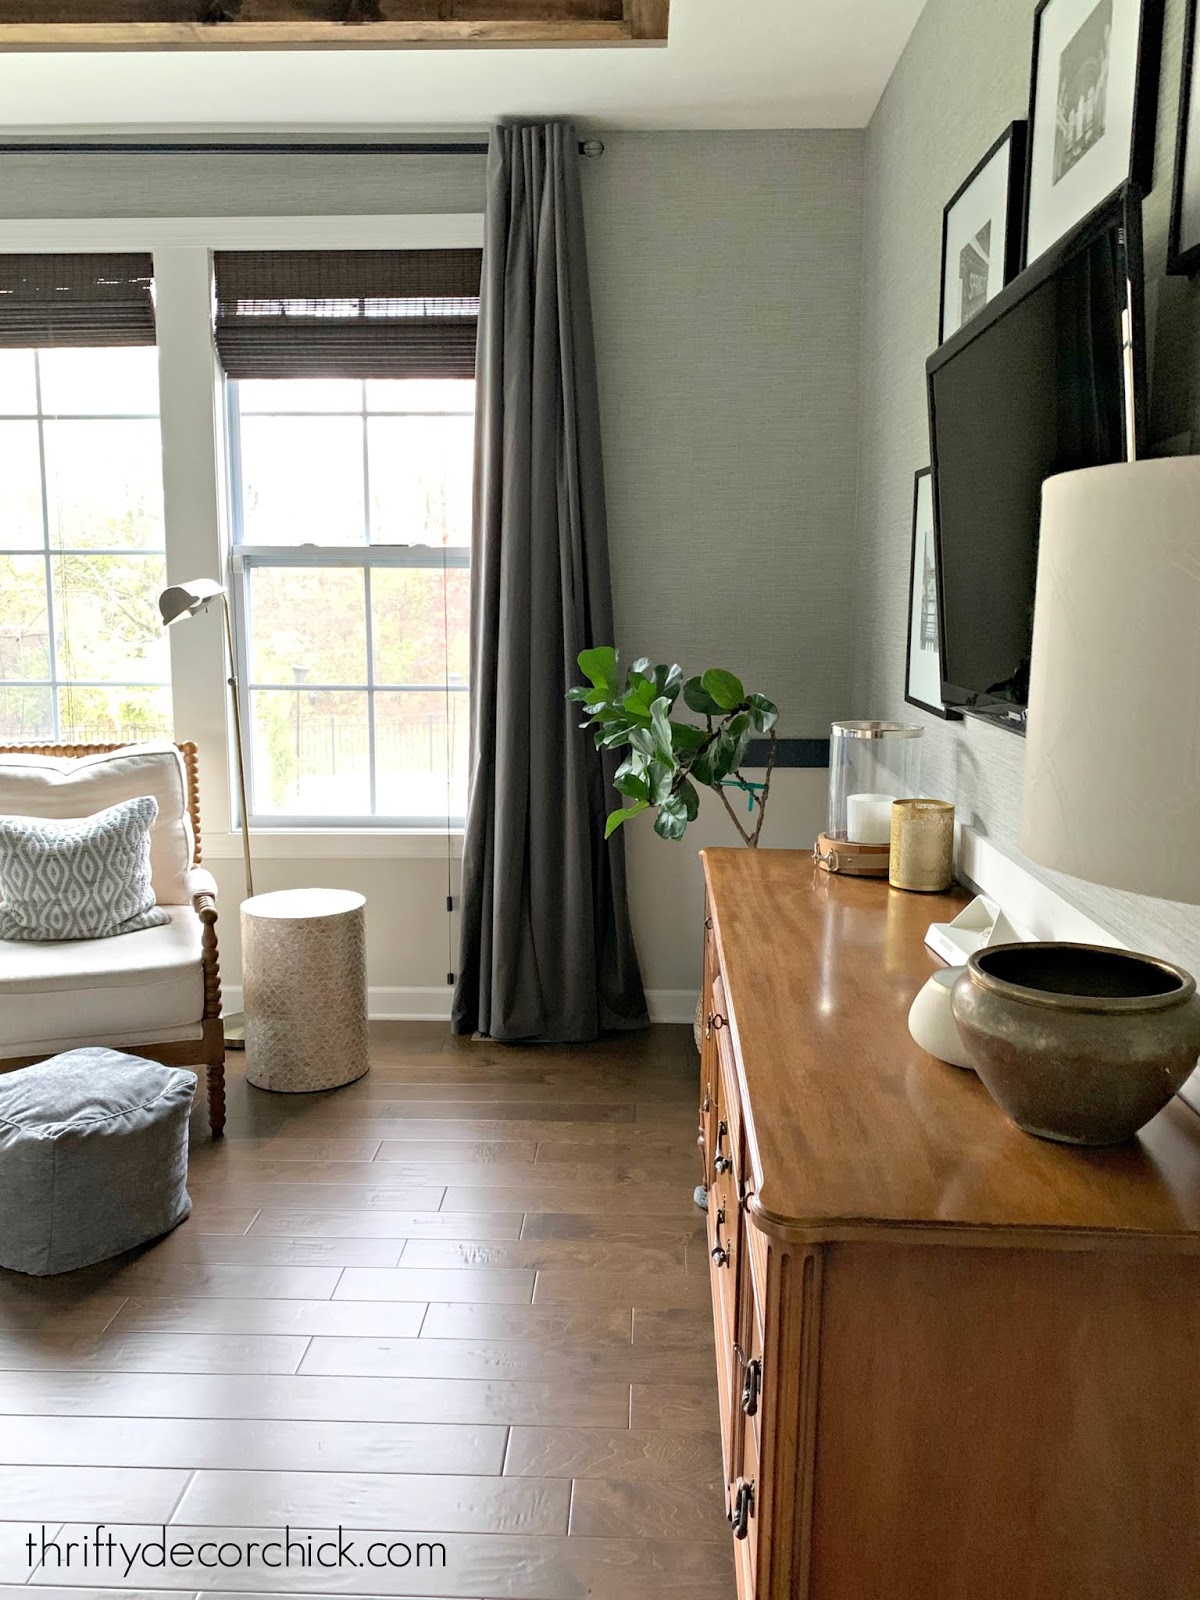
Since they had the bed pulled out, I was able to add the detail to the bed wall that I've been thinking about for a long time now:

It's peel and stick wallpaper (again! I love it!). I've used similar stuff in our powder room and my office and I'm always so pleased with it!
This is a faux grasscloth in a light gray and you can find it here. (It's half off online!!) It went up beautifully and I am LOVING it!
I made a series of videos on Instagram stories and put them into video format so I could share it here too. Check this short video out for a close up and more details about this wallpaper!

And here's a closer look at the wallpaper:

Do you plan out changes in your spaces or do you just go for it on a whim? I find I'm a little more motivated when I do it on a whim, usually because I'm so happy with how the room is turning out. :) If you're interested in anything in our master, you can shop them (or similar items) by clicking on the pictures below:  See more of our home here. To shop items in our home, click here! Never miss a post by signing up to get posts via email. Via https://www.thriftydecorchick.com/2019/10/our-impromptu-master-bedroom-makeover.html
Hello there! I was away at a blogging conference last week and I came home energized to tackle a bunch of projects both in the house and on the blog. I'm excited to get to work!
But first, our two year anniversary in this house! It was just a few days ago and I can't let it pass by without a before and after recap from the past couple of years. I LOVE these posts because I see how I've made this house our home and can see proof that I'm a lot more productive than I feel at times. I hope you love before and after photos as much as I do! It's so much fun to look back. This time I'm using TRUE before shots -- taken before we moved in. Keep in mind the before pics look much bigger because there's nothing in them. :) I'll talk about what I completed in each space and link to the big projects as well. Let's start our tour in the foyer -- here's how it looked before we moved in: 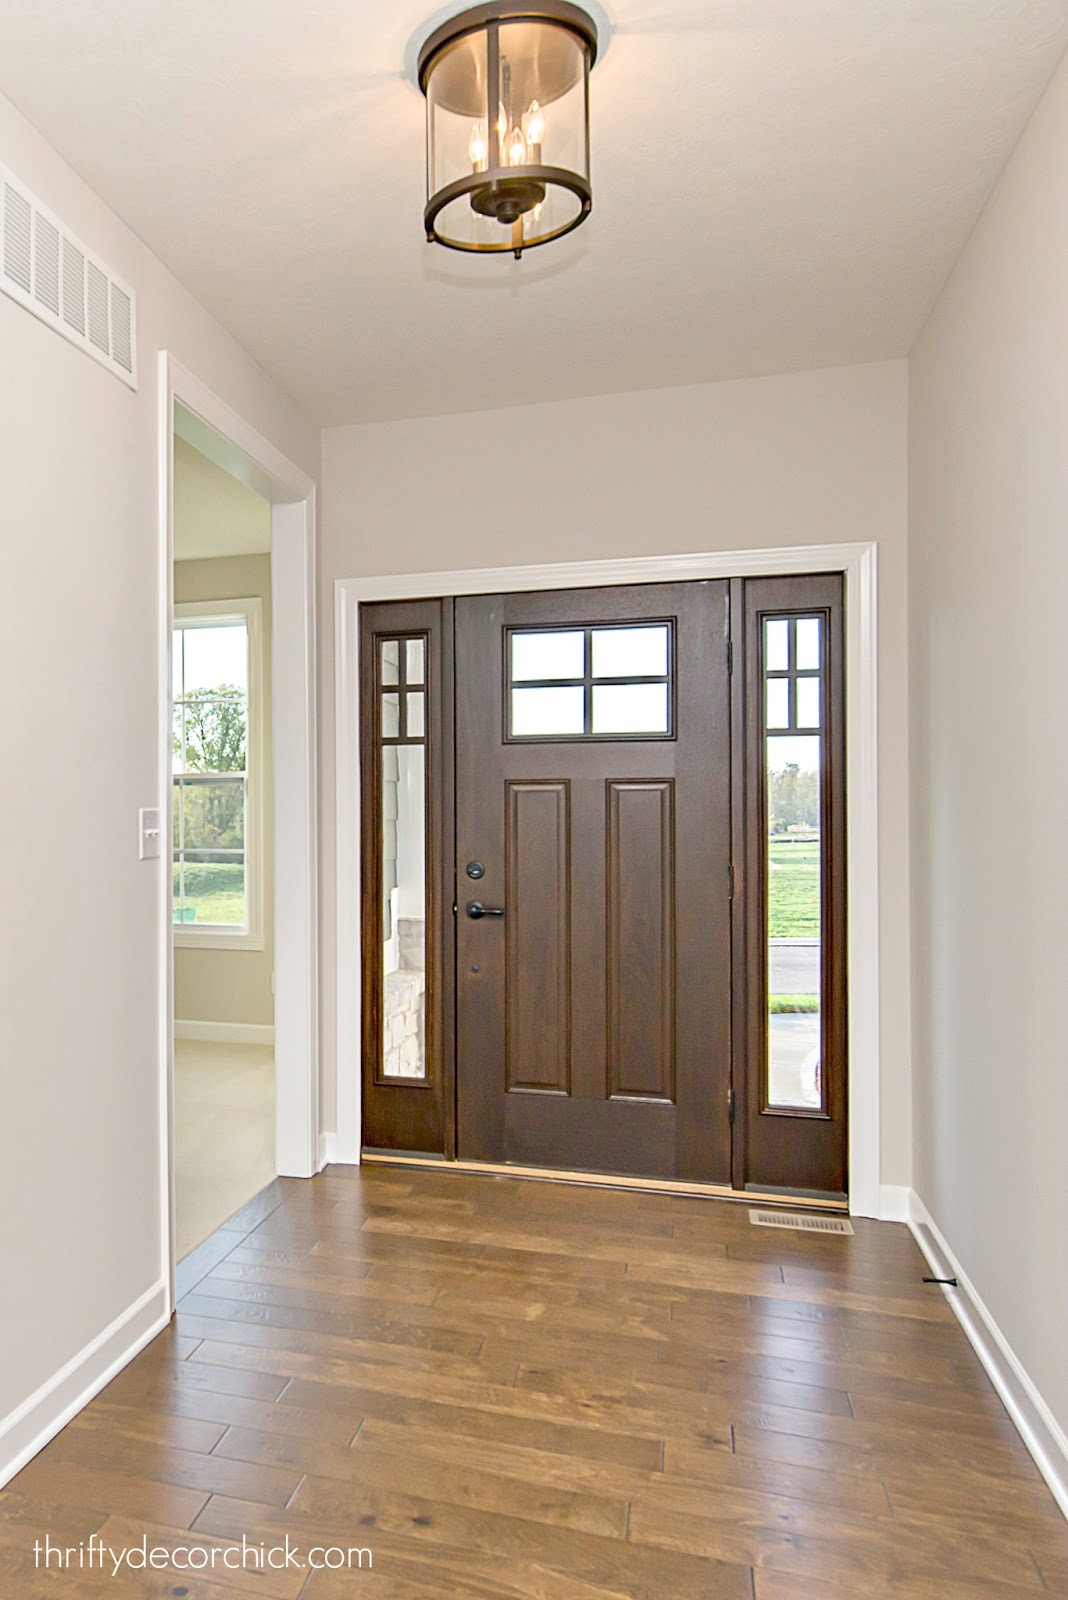
And here's that space now:


I painted the ceiling a pretty blue (I love to paint ceilings!), changed out the light fixture (that one went to the pantry) and completed these projects:
Our powder room was the first room I tackled after moving in, and I haven't changed one thing about it since:

If your basics are in good shape you can make a big difference with a little elbow grease!:

The big stuff stayed the same in here -- additions like a wall treatment, the mirror and wallpaper helped to transform the room:
This is one of my favorite projects ever! Here's a before of my office:

A new light and DIY bookcases made a big difference!:

Our family room is another favorite. This is the room that made us fall in LOVE with this house:


Our kitchen hasn't undergone any huge projects, but the little ones have made a big difference. Here's how it looked before we moved in:

And this view now:

I don't think any of these projects cost more than $100:
Our morning room has undergone the most dramatic transformation: 


I LOOOOVE the custom touches I've added in here!
Our master bedroom is slowly but surely becoming a cozy cocoon of a space and I love it! Big updates are happening in here this week -- check out my stories on Instagram to follow along!


The wood beams and dark tray ceiling have made a huge difference in here. I just love it.
Our basement hasn't seen as quite as much DIY action, but I've still accomplished a lot down here. Here's a before:

Here's that back corner now:

I added game storage and fun kid shelves as well:

Check out the wood wall on the stair landing and the gallery wall down the stairs here.

But I've had a lot of fun adding my own touches to it!


And last but not least, our backyard looked like this when we moved in:

And this summer we were able to add a large patio with a DIY fire pit. We absolutely LOVE it!!:

There are some rooms I didn't share because the projects aren't as dramatic -- but this shows how different the house looks in just two years. I can't wait to see what happens in the next year! :)
Did you miss any projects I shared here?
Keep in mind house projects are my JOB and my passion, so things happen at a quicker pace around here. It's been an absolute blast and I've had so much fun sharing it with you! We still pinch ourselves every day that we get to call this house our home.
Want to see more of the in between? You can see the one year tour here as well as the 18 month tour here.
See more of our home here. To shop items in our home, click here! Never miss a post by signing up to get posts via email. Via https://www.thriftydecorchick.com/2019/10/two-year-before-and-after-house-tour.html How to make a fall wreath with dollar store materials Hellooo there! I’m finally pulling out the fall decor this week! This is SO late for me -- usually I’m itching to get it out in August! This year I wanted to make sure I was completely done going through the basement before I started lugging the (cough. numerous.) bins up. One of the projects I wanted to tackle this year was a DIY fall wreath. I was inspired by this one last year:  So this year, I was determined to make a large, square, fluffy fall wreath. I started with some thick foam core board from Hobby Lobby for $5 – it was half an inch thick and it was already 20 inches wide, so I cut it down to 20 inches in length as well:  Btw -- you can easily use foam core from the dollar store, this is just thicker. I wanted it to be four inches thick, so I marked a square in the middle accordingly:  I used my jigsaw to cut it out (it cut like butta!), but you could probably get away with cutting it with something else (especially if you use a thinner foam board – I use scissors.) Remember it does not have to be perfect – you won’t see the exact shape when you’re done! I did a really quick spray of the edges, (with red because it was the closest I found) just in case they'd show through at all:  They don’t, so you can save the two minutes and skip this step. You’re welcome. :) Last week I bought four swags of leaves from Hobby Lobby to use for this project, and they were half off, at $5 each. But the $25 price tag for all the supplies was getting a little expensive for something that may not even turn out how I envisioned. I was trying to think of a cheaper way to do it, and remembered some packets of leaves I bought at the Dollar Tree a few weeks ago for another project. I absolutely loved the colors, the texture, and they were large – perfect for this project! WHOO!! I started laying them out to see what I liked:  Hmmm – it wasn’t random enough for me. So I tried a willy nilly way:  MUCH better, but the leaves were a bit flat for my liking. I wanted some POOF. Because they’re made with wire, that was an easy fix – I crumpled up a few at a time (gently) and gave them some dimension:  (I ended up snipping off the wire stems.) I fired up the hot glue gun and started placing them here and there, filling in any empty spots:  There was no rhyme or reason to it – just stick ‘em on! And less than an hour later, I had just what I was looking for!:  (Our door always photographs blue, but it’s a dark brown.) I love love LOVE these leaves! They look so real! They are made of a material that reminds me of crepe paper – but not nearly as delicate:  You do have to be gentle with them though – they tear if you’re not careful. I didn’t mind though – it made them look more real. ;) If you have a door that’s exposed to the wind, you’ll want to add weights to the “frame” because it is very lightweight. We don’t have that problem, but I may add some sticky tack to the back just to make sure it stays put. And I’m not sure how these leaves would hold up to the elements – so you may want to test out a leaf or two. Last year some of you suggested using a large frame as the base, and I thought that was a great idea – it would be heavy enough too! I absolutely LOVE it – lots of color, texture and it’s simple. The best part is that it only cost $11 total! (Five for foam and six packages of the leaves at a dollar each.) And that’s only because I got the thicker foam – if you got a thinner piece from the dollar store, you’d get this done for well under ten bucks!:  It's gonna look FAB with the rest of the fall decor on our porch! I’ll share that with you next week! (Click here for our fall porch tour!) It’s getting just a bit cooler here…slowly but surely. It was in the 80’s today but there was so little humidity, it felt pretty fantastic! Yay…it’s coming!! :) Via https://www.thriftydecorchick.com/2010/09/dollar-store-fall-wreath.html
Hello there! I'm back with another home tour from our local Home-A-Rama in Indy. This home was one of my very favorites!
I took a ton of photos of this one (didn't realize till I started going through them all) so I'm dedicating this post to one house. I'll finish it up the tours with the last two houses in the next week or so.
I shared the decor trends I noticed at this year's event in my last post -- see the first two luxury house tours here! Those trends definitely carried through this home too. I had two favorites on the tour (one I shared in the last post) and this one!:

The builder of this home is Executive Homes.
When you walk in the staircase was a stunner:

I love the windows in the stairway!
The basement was very cool, but I especially loved this TV. How cool is that? You can watch numerous shows at one time:

This kid space in the basement was fun too:

Remember how I mentioned there was a ton of wallpaper? It was used a lot on accent walls behind beds:

I loved this little nook they turned into a homework area with doors:

Not sure it would be used much -- but it would be a quiet, designated spot closed off for concentration!
I also mentioned last time how much gray was used -- I know many want of you don't love it, but I think it's going to be trendy in some form or fashion for a long time.
It was used in the textiles throughout this bedroom:

I thought this was a brilliant idea -- if you have a big closet but still don't have a ton of room in the middle for a table, using a skinny sofa table instead is super smart:

I loved the gray walls in the bedrooms -- they all felt so cozy!:

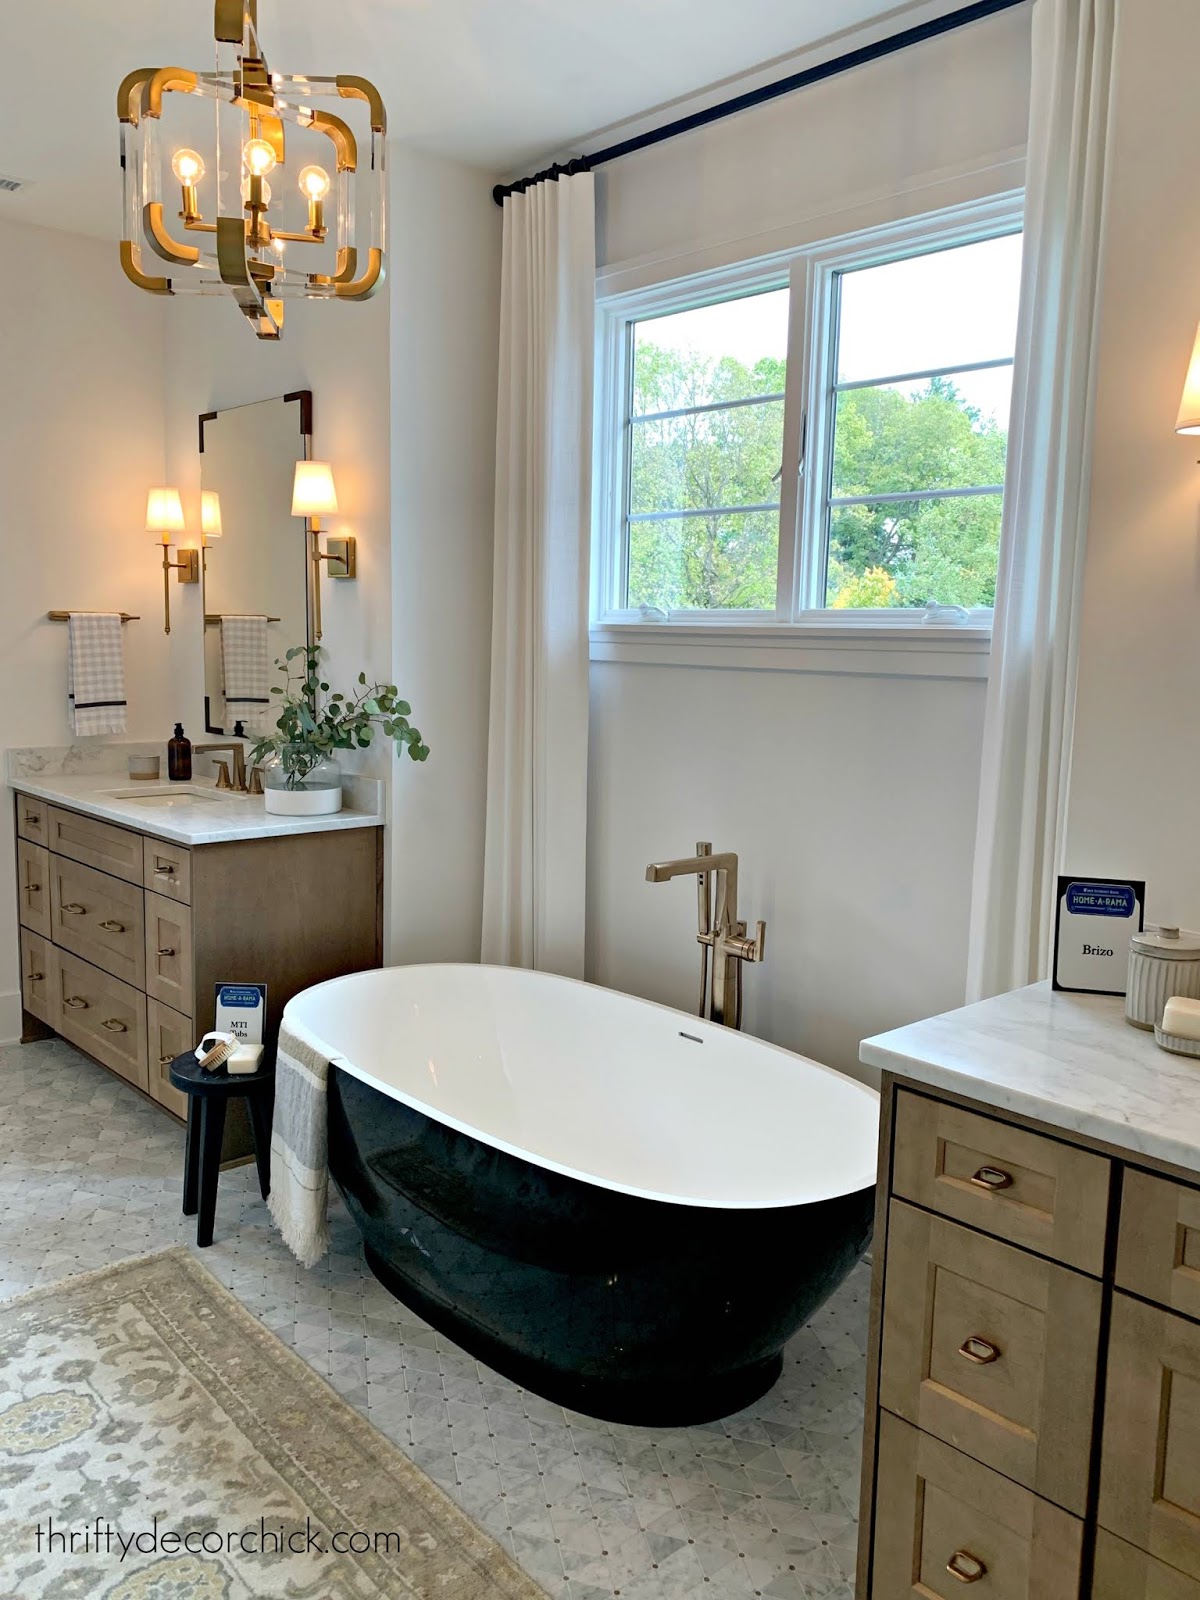
This bathroom tile was so pretty! I loved it with the dark gray vanity:

This bathroom layout reminded me of ours -- if only there was a way to paint our tub black. ;)
This plaid tile was so fun too! I don't usually love the stacked subway tile, but I quite liked it in a couple houses on this tour. I think it was because they were combined with more traditional accents:

I don't think I'll ever fall out of love with a light gray and wood tones. They are a lovely combination!:

The trim in this room was so simple, but I loved it. I broke up the walls just enough:

This was one side of the office on the main level -- you guessed it! More gray! ? I love how the trim is the same color as the walls:

Remember my DIY photo shelves? That's basically what they did here, but keeping them the same paint color keeps it soothing. And now that I see all of these spaces all together, I realize there was a TON of gray in this house. ? It really didn't feel like that as I walked through though. (I'm not sharing a lot of the house, there were plenty of rooms without it.)
The family room and kitchen in this house were my favorites. The family room was SO pretty and serene, but also cozy feeling:


I just loved the neutral, pretty touches in these rooms. It all worked together so beautifully:


The kitchen was an absolute stunner. That wood vent hood!:

I loved the stone on the backsplash. The more I see this done the more I love it:

The cabinets look gray in some of these photos, but in real life they were a light taupe color. It is a very trendy cabinet color right now:


Gorgeous right? It was one of my favorite kitchens by far!
The outdoor spaces weren't quite as elaborate this year, but I did take a picture of this because I thought it was so doable:

It was just pea gravel with pavers around the edge -- the square shape gives it a more modern feel. You could easily add a DIY fire pit like we did on the patio! :)
There you go! My second favorite house! Do you have a favorite room in this home? I'll share the remaining homes soon! Don't forget to visit the first home tours if you missed them.
See more of our home here. To shop items in our home, click here! Never miss a post by signing up to get posts via email. Via https://www.thriftydecorchick.com/2019/10/modern-home-tour-with-beautiful-neutral.html
OK my friends! You KNOW how I love a good crock pot meal. Many of you have tried the chicken and dumpling, creamy chicken and wild rice and mac and cheese crock pot recipes and love them as much as I do.
Be prepared for a new favorite. This one may inch out my chicken and wild rice. It's that good. I found this recipe floating around on Facebook, but there was no source. And I could tell from the photo that there was more to it than the few ingredients listed. So I added a few and it was absolutely delicious. If you're looking for a yummy, cozy fall meal, this is for you. Pair it with some warm bread and you're set!: 
This post may contain affiliate links for your convenience.
See my policies and disclosure page for more information.
Here are the ingredients for this delicious crock pot creamy chicken and noodle soup:
One pound chicken breast (more or less depending on your preference)
Two cans cream of chicken soup
Two cups chicken broth (I added slightly less than that for a creamier base -- again, your preference)
One stick butter
One 24 ounce package frozen egg noodles (I used Reames brand)
One teaspoon parsley
One teaspoon onion
One teaspoon pepper
It really couldn't be much easier. I combined all ingredients but the noodles and cooked on high in the crock pot for 2.5 hours. I removed the chicken to shred it, then put it back in along with the frozen egg noodles.
Let it cook for about 30-45 more minutes (taste your noodles to see if they're done to your liking) and that's it! SO DELICIOUS!!
It turned out perfectly with this recipe. Usually I salt my food and there was no need, so next time I may change it up a bit by using low sodium chicken broth. Then I can add salt to taste. Also, I think I could get away with less butter as well. Make sure you use the thicker egg noodles -- the regular thin ones in the pasta aisle would fall apart. The frozen noodles are what make this so hearty. You know I wouldn't steer you wrong when it comes to food. This recipe is absolutely delicious and was a breeze to make. Let me know if you try it! **P.S. You can find my pretty dinnerware here -- I bought the bowls almost ten years ago and they've held up beautifully. I recently treated myself to more of the dishes for my birthday. They were on sale and may still be! PIN THIS FOR LATER: 
See more of our home here. To shop items in our home, click here! Never miss a post by signing up to get posts via email. Via https://www.thriftydecorchick.com/2019/10/delicious-and-easy-slow-cooker-chicken.html
Hey hey! I'm back with a project I've shared before a few times...but I like to repeat it because it's such a GOOD one. Especially for seasonal decorating on the cheap!
Though I've shared this before, I don't think I've ever shared a full step-by-step tutorial, so I'm doing that today. I also learned a new trick that I'll share (along with a video with the best how-to I've found).
I love to use napkins to make pillows, especially when it comes to a certain look -- I really love to do it with Pottery Barn napkins to recreate their pillows that are WAY more expensive. I shared how I make pillows with napkins and runners here.
I've always wanted to learn how to sew in a zipper, and finally bit the bullet. I am far from perfect on both pillows and the zipper (especially on the zipper ?), but this is one of those projects that really doesn't need perfection. Most of my projects don't, thank goodness.
Let's do this step-by-step, shall we? I finished most of these pillows years ago, but decided to deconstruct those I had finished to add the zippers and then I finished the rest.
Cut your fabric to size
I use very basic (AKA cheap) muslin for the backs of my pillows. It's not the strongest fabric in the world but it always holds up fine for me. If you have kiddos that enjoy pillow fights, you'll want to use something a little thicker:
This post may contain affiliate links for your convenience.
See my policies and disclosure page for more information.
**I link to my fall napkins at the end of the post!
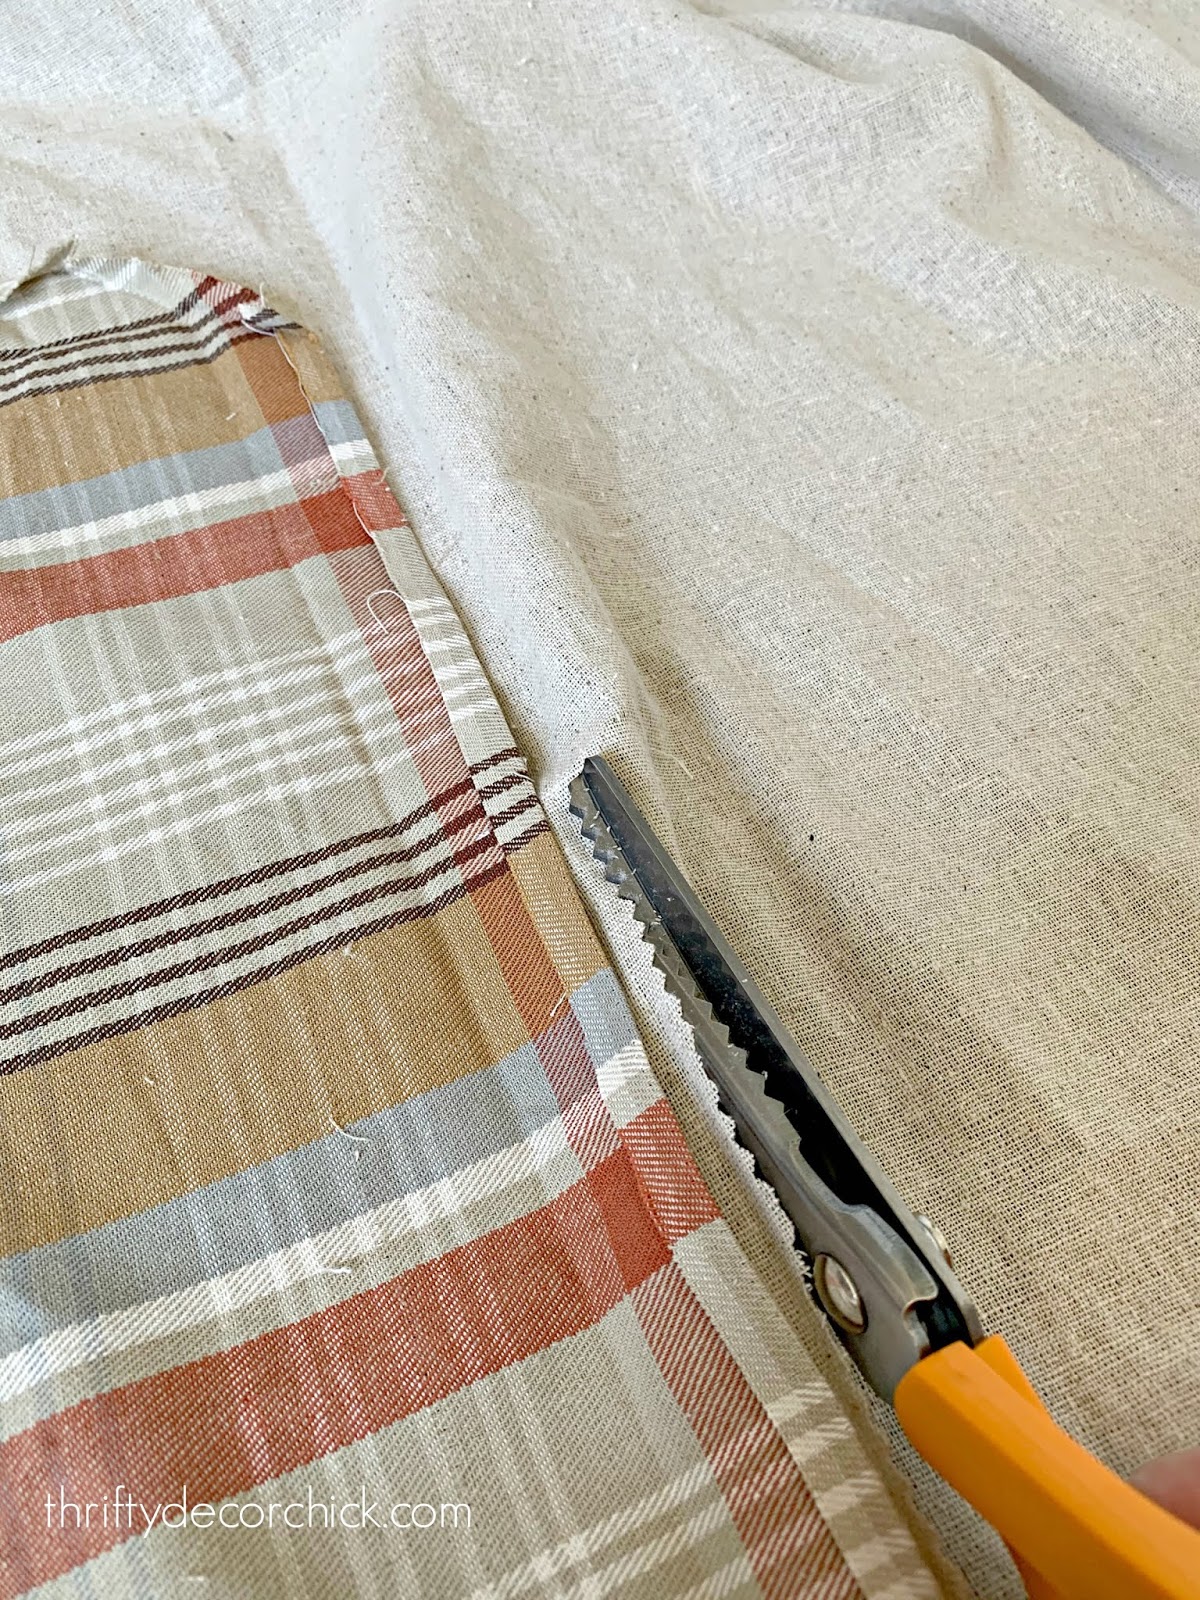
I just laid my napkin on the muslin to figure out the size I needed. You'll notice I used pinking shears here, just because they help prevent the fabric from fraying. I've done it with fabric scissors (I recommend using those for ease of cutting) and they still do fine. (If you plan to wash the cover often I'd hem or use the pinking shears.)
After your two pieces are cut, lay them wrong sides against each other. With a solid fabric this won't matter as much: 
Sew in your zipper
I found an awesome video tutorial for this that I'll share in a minute. But these are the basic steps. Lay your zipper down on one edge (make sure if you have any kind of design that has a top and bottom to put the zipper on the bottom!):

Mark where the zipper needs to be sewn on -- keep in mind you don't want to cover the ends of the zipper too much. I marked this with a pencil.
Sew to both pencil marks (on either side) and don't go any further:

You'll be left with two pieces of fabric with just the ends of one side sewn together. There will be a long hole in the middle for your zipper.
I found it easier if I ironed the "seam" before working on the rest of the zipper:

Lay your zipper on the fabric where you marked with the pencil so it matches to where you ended sewing up the ends. Then sew back and forth over each side of the zipper:

Make sure the zipper is facing out! This is where it got a little hairy for me. I wasn't a perfectionist on this part and it's obvious. ;)
I left the zipper closed and sewed down one side first:

I don't have it pictured here, but I highly recommend pinning your zipper to each side before sewing. Otherwise your line gets a bit wonky. Just pin along the length of the zipper so it results in a clean hem along the zipper.
To do the other side, I undid the zipper and then pinned that other side of the zipper before sewing it in. This will help later because when you close up the pillow you'll want it open.
Close up your pillow
This is by far the easiest part! If you aren't using a zipper, making a pillow is one of the easiest DIYs ever. I know many of you are intimidated when using a sewing machine, but if you can get help setting it up (the directions are very helpful too), it's VERY easy.
If I'm sewing up a pillow without a zipper it only takes a few minutes. Is is usually perfect? Would I want anyone inspecting my lines? NOPE. Do I care? NOPE. ?
Sometimes fabric with stripes are harder because you need to go fairly straight with your sewing. Once you get the hang of it, they are actually a little easier because they give you a guide on keeping that straight line:

You'll need to sew up the remaining three sides and you're almost done!
Finish up small details
Before turning it right side out, I like to trim down the extra fabric and the corners. This just makes it less bulky:

Turn it right side out and poke the corners out. Trim any random strings (I had a lot when doing the zippers!)
Add your insert (you can see my favorite inserts for a crazy good price here!) and zip it up! I was so pleased with myself, I had to show the whole family. They were very impressed. (Not really.)

Now that I know how to add a zipper, it will help my insert hoarding problem big time! I'll only need a few inserts for my seasonal pillows. I LOVE that I can take these off to clean them now.
I hope my zipper tutorial made sense. If not, be sure to check out this awesome video -- it's by far the best I've found.
I bought these Pottery Barn napkins years ago (eight of them) for around $45 I think? You can find the fall plaid napkins here and the pumpkin napkins here. I made eight "Pottery Barn" pillows for less than $15 each. Not bad when their most basic pillows sell for $40 and up! (This plaid one similar to mine is $27 on sale.)
I added a couple of these rust colored pillows from Pier 1 to finish off the sofas: 
Have you ever made your own pillows? I encourage you to try it out and forget about perfection! You know me -- if anyone is ever going to plop down on my couch and find the imperfections in my DIY pillows, they get a cookie. ;) Of course this napkin trick works well year round -- not just for seasonal decorating! If you have any questions, let me know. **If your couch cushions slide of the sofa and don't stay put, check out this easy hack that will fix it immediately! ;) See more of our home here. To shop items in our home, click here! Never miss a post by signing up to get posts via email. Via https://www.thriftydecorchick.com/2019/10/step-by-step-diy-pillow-tutorial-i.html
Hello there! It's that time again -- time to share some beautiful houses at our local Home-A-Rama in Indy. I finally got to the show yesterday (it's going through this weekend) and the homes did not disappoint!
As always, I'm sharing some of my favorite spaces in the homes with you. There were five houses in the tour and I'm sharing the first two today. One of my favorites was in this group, and another favorite I'll share next week.
I noticed a few trends overall in the decor and design worth noting (for my fellow decor nuts):
Let's take a tour, shall we? The first home was one of my top two favorites!:

Built by: Wedgewood Building Company
What I loved about this home:


It's hard to tell it here, but that metal sheeting in the cabinets looks like bamboo -- it was SO SO pretty and I'm obsessed with it.


Beautiful right? The staircase was awesome too -- you can see a bit of it in the photo above. (Similar design as my fireplace reveal this week -- thanks for your kind comments!)
The second home on the tour had a pretty Cape Cod feel on the exterior:

Built by: Viewegh and Associates
This one had some funkier touches here and there and I wasn't a big fan of the kitchen, but there were many spaces that I really loved!
My favorites in this home:


What do you think? What was your favorite space in these two homes? I can't wait to show you my other favorite! If you are local to Indy the show runs through this Sunday. You'll find tons of inspiration! See more of our home here. To shop items in our home, click here! Never miss a post by signing up to get posts via email. Via https://www.thriftydecorchick.com/2019/10/luxury-home-tour-part-one-and-one-of-my.html
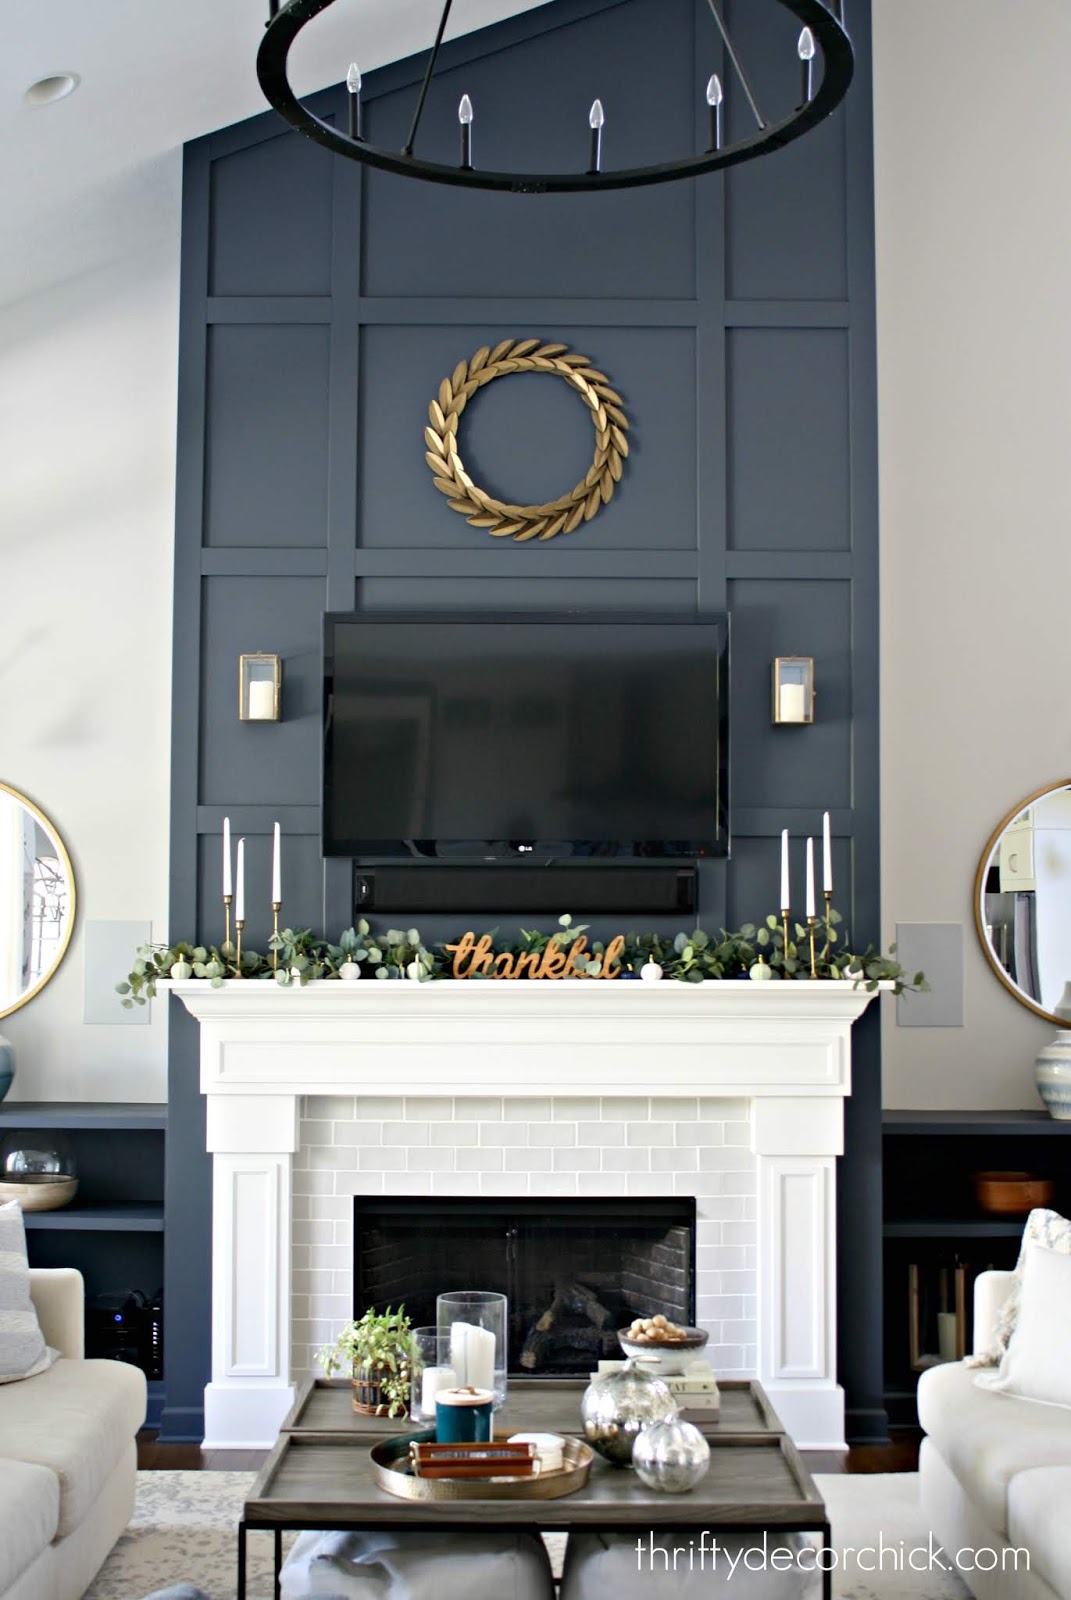
Hey there! I'm back with a project I've been planning for years now! I've always known I wanted to add something to the wall over our fireplace, but it took me awhile to figure out exactly what I wanted to do.
Remember my list of DIY projects I wanted to complete before the end of the year? Well this was one of them and I'm so thrilled it's done! It looks soooo good.
Not long after moving in I painted the fireplace this pretty Cyberspace color, and later added built ins on each side of the fireplace:

I LOVE the dark color. I knew I'd eventually add some trim -- you know how I love it! But it wasn't until I came across this photo from Clark and Co Homes that I found my inspiration: 
This post may contain affiliate links for your convenience.
See my policies and disclosure page for more information.
Isn't that a gorgeous space? I couldn't believe how similar it was to our room. I loved the simple grid pattern. I've done this look many times before (see how I did it in our old master bedroom here), but when I saw it on a fireplace so similar to ours that I knew for sure it was what I wanted to do. This project cost me less than $45 in materials. I bought mdf boards in eight foot lengths and laid them out on our kitchen island to paint: 
It's been super hot here lately so it was much more enjoyable to do it inside (and they dry quicker out of the humidity!). Because I 1. don't have a ladder tall enough 2. needed two people to start this and 3. am terrified of heights -- I hired out the top of the wall. I had them install the painted boards vertically and then spanning the width at the top first. I finished the bottom sections off myself at a safe distance from the ground. (Kinda. I still had to climb to the top of my ladder and was sweating.) After filling the seams and holes and doing another coat of paint on the boards, it was done! 
There wasn't much rhyme or reason to the design -- I started with the top piece and then went an equal distance from the bottom. Then I split the middle section that was left and added one more row horizontally: 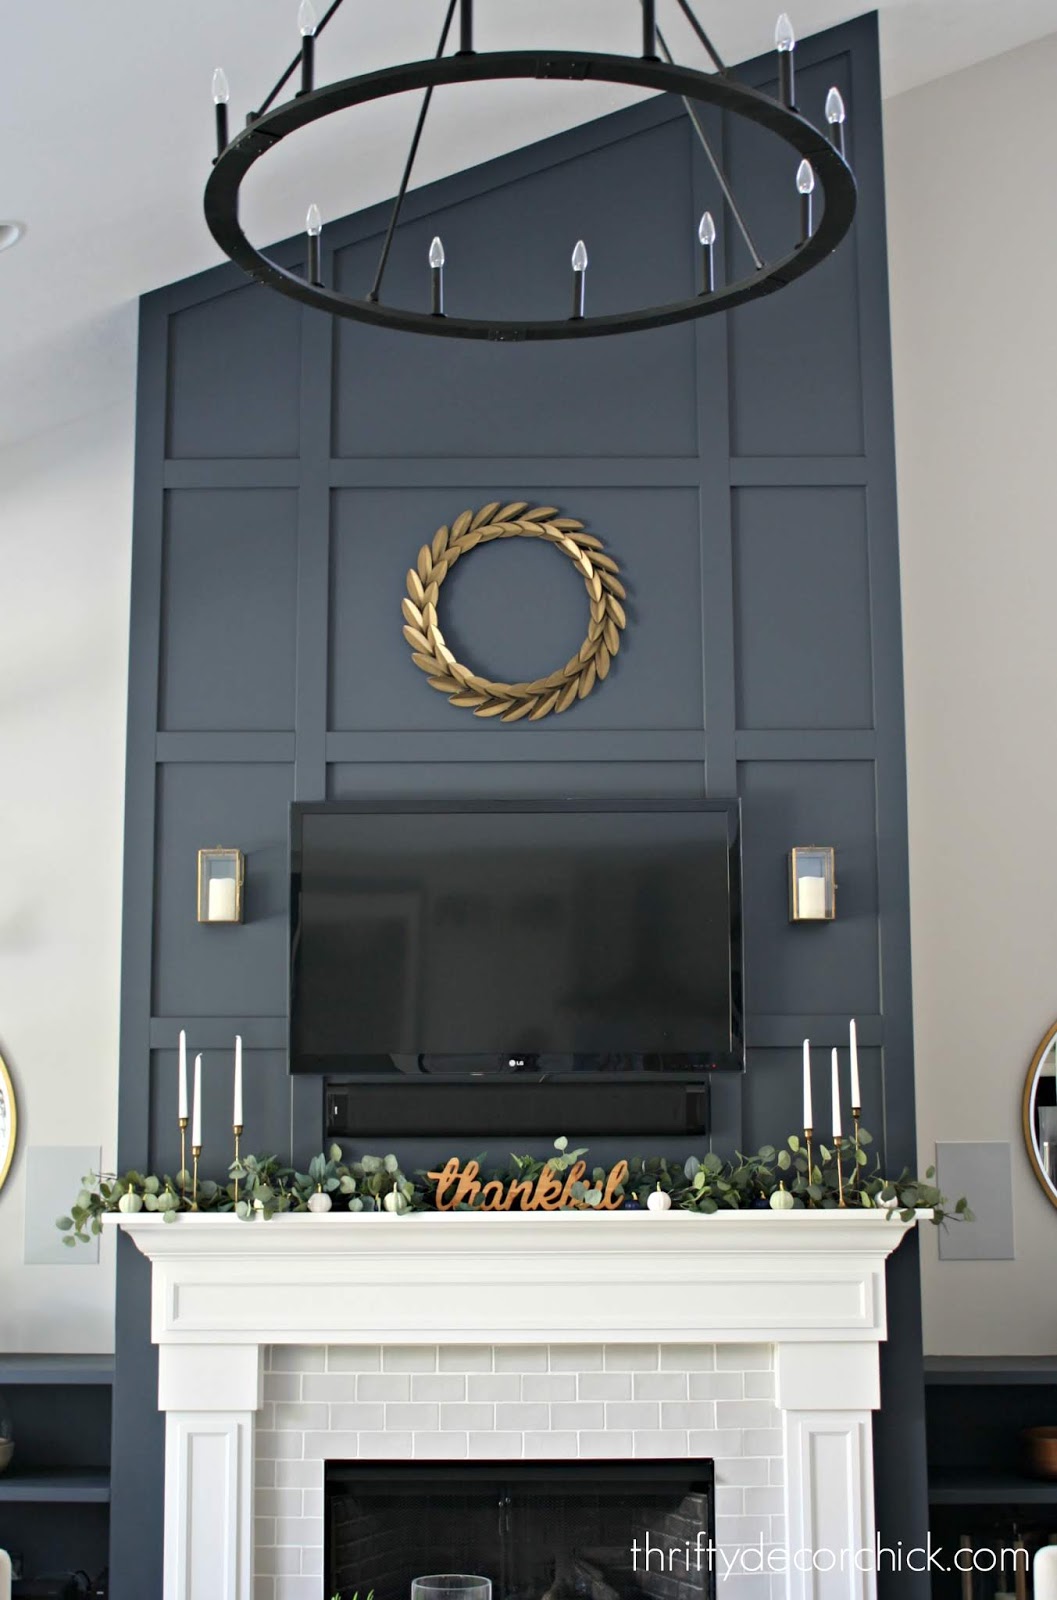
I wanted to be able to center that metal laurel piece inside the trim.

Did you notice the mirrors are different? Unfortunately one of the wood ones broke a couple months ago when we were moving it. I've looked EVERYWHERE for an identical one and no dice. It took forever to even find a similar size -- thankfully I found these at HomeGoods this week: 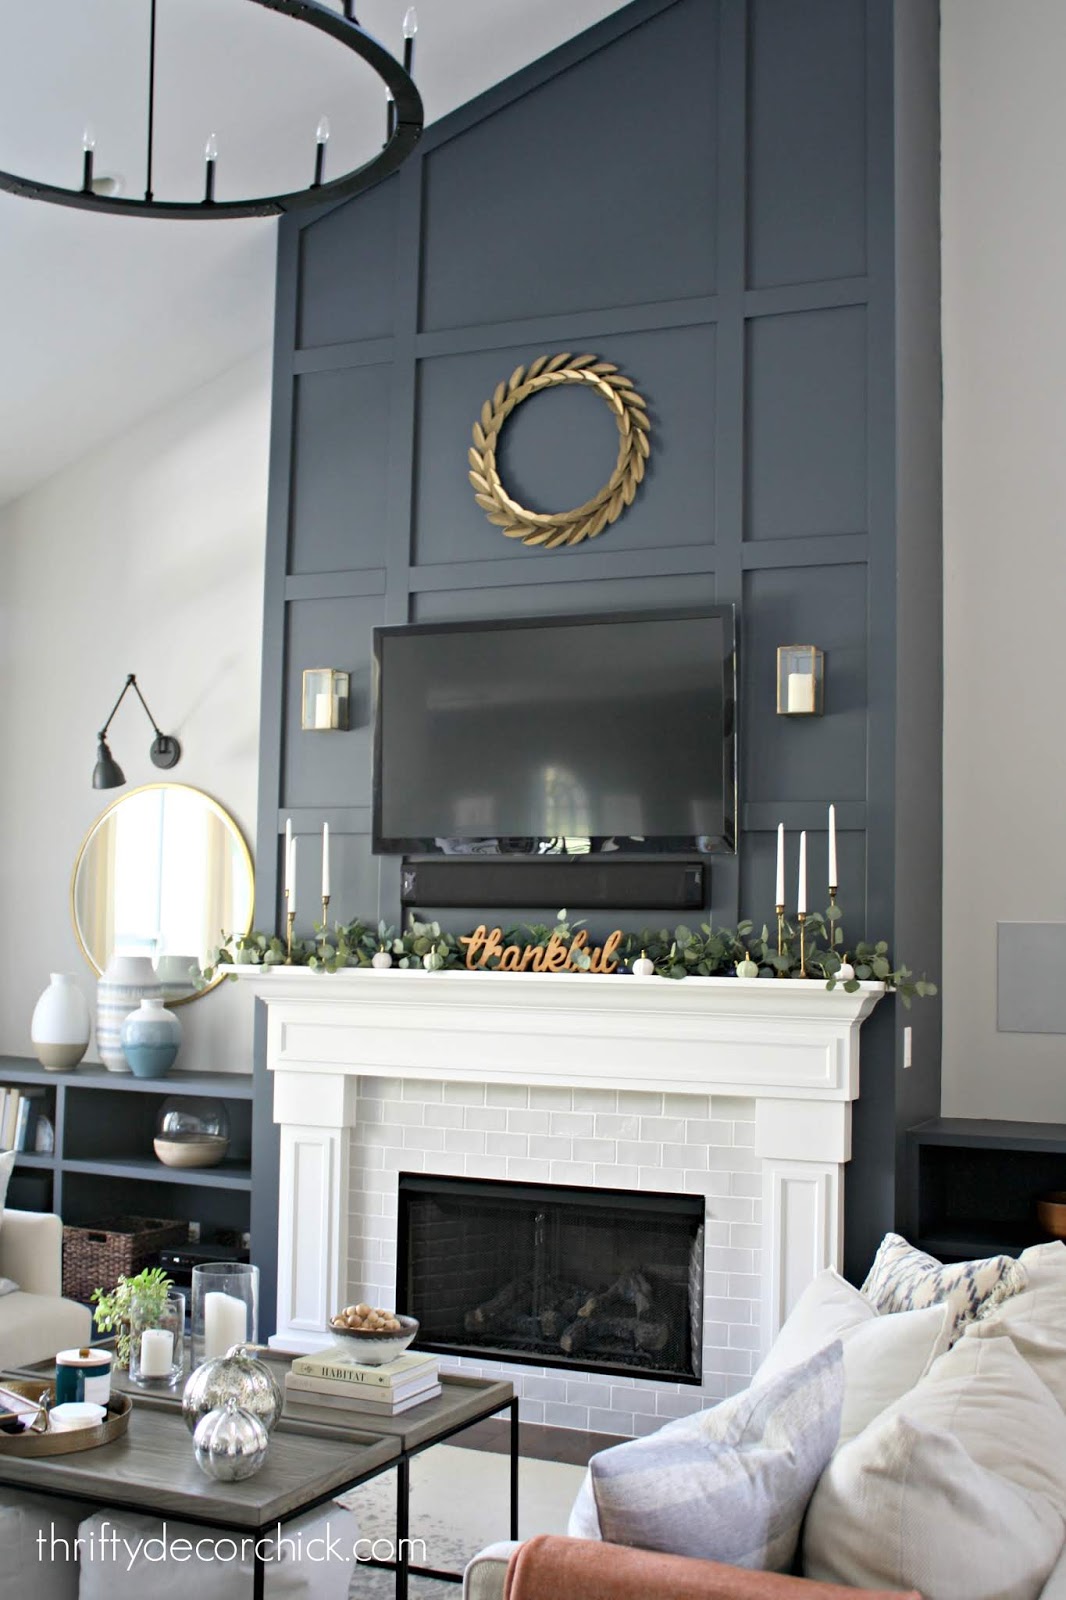

We absolutely LOVE it! It was just what this wall needed! My original plan was to finish off the sides of the boards with smaller, decorative trim -- but at least for now I'm going to wait. It doesn't need it and I don't It looks like it should have always been this way, and that's always a sign of a successful DIY project: 
Let's look back at a before photo from two years ago, shall we? We had just moved in:

And now, wow! What a difference!:
And guess what? This whole transformation was only $100 for paint and mdf boards. That's it! I'm telling you -- if you want a big impact for little money, those two are the way to go. :) If you have any questions about this project feel free to ask! I'm so happy with how it turned out. Now onto to the rest of the projects on my list. I want them all done in the next six weeks. Wish me luck! If you'd like to shop this space, click on any of the photos below for a link directly to the product:  See more of our home here. To shop items in our home, click here! Never miss a post by signing up to get posts via email. Via https://www.thriftydecorchick.com/2019/10/dramatic-fireplace-wall-makeover.html |
