Ten fun ways to use leftover wallpaper scraps!
I hate wasting anything...especially something as beautiful as wallpaper. Thankfully there are so many fun home decor ideas that will use up your scraps.
Wallpaper remnants (at least the peel and stick versions) are thick enough to stand up to some wear and tear and are easy to work with.
When you hang wallpaper with a repeat (which most have), you'll have a lot of excess leftover when you're done with your project.
The repeat is the the distance between where the design matches up on each roll of wallpaper.
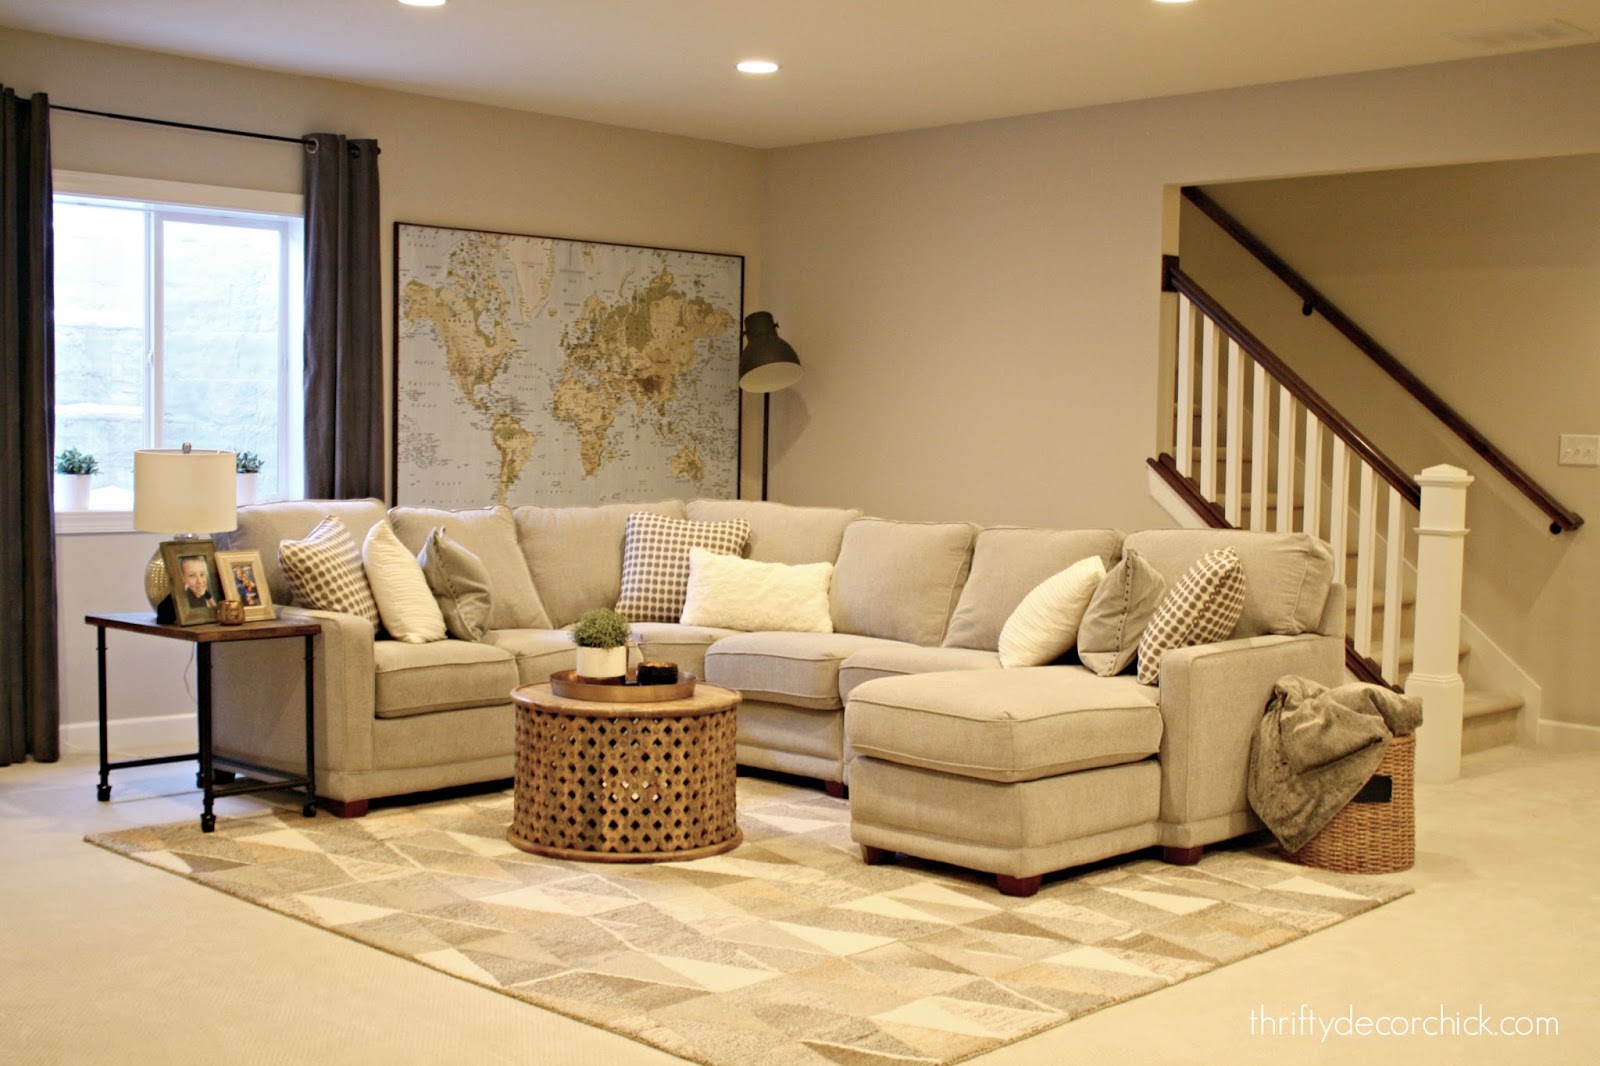
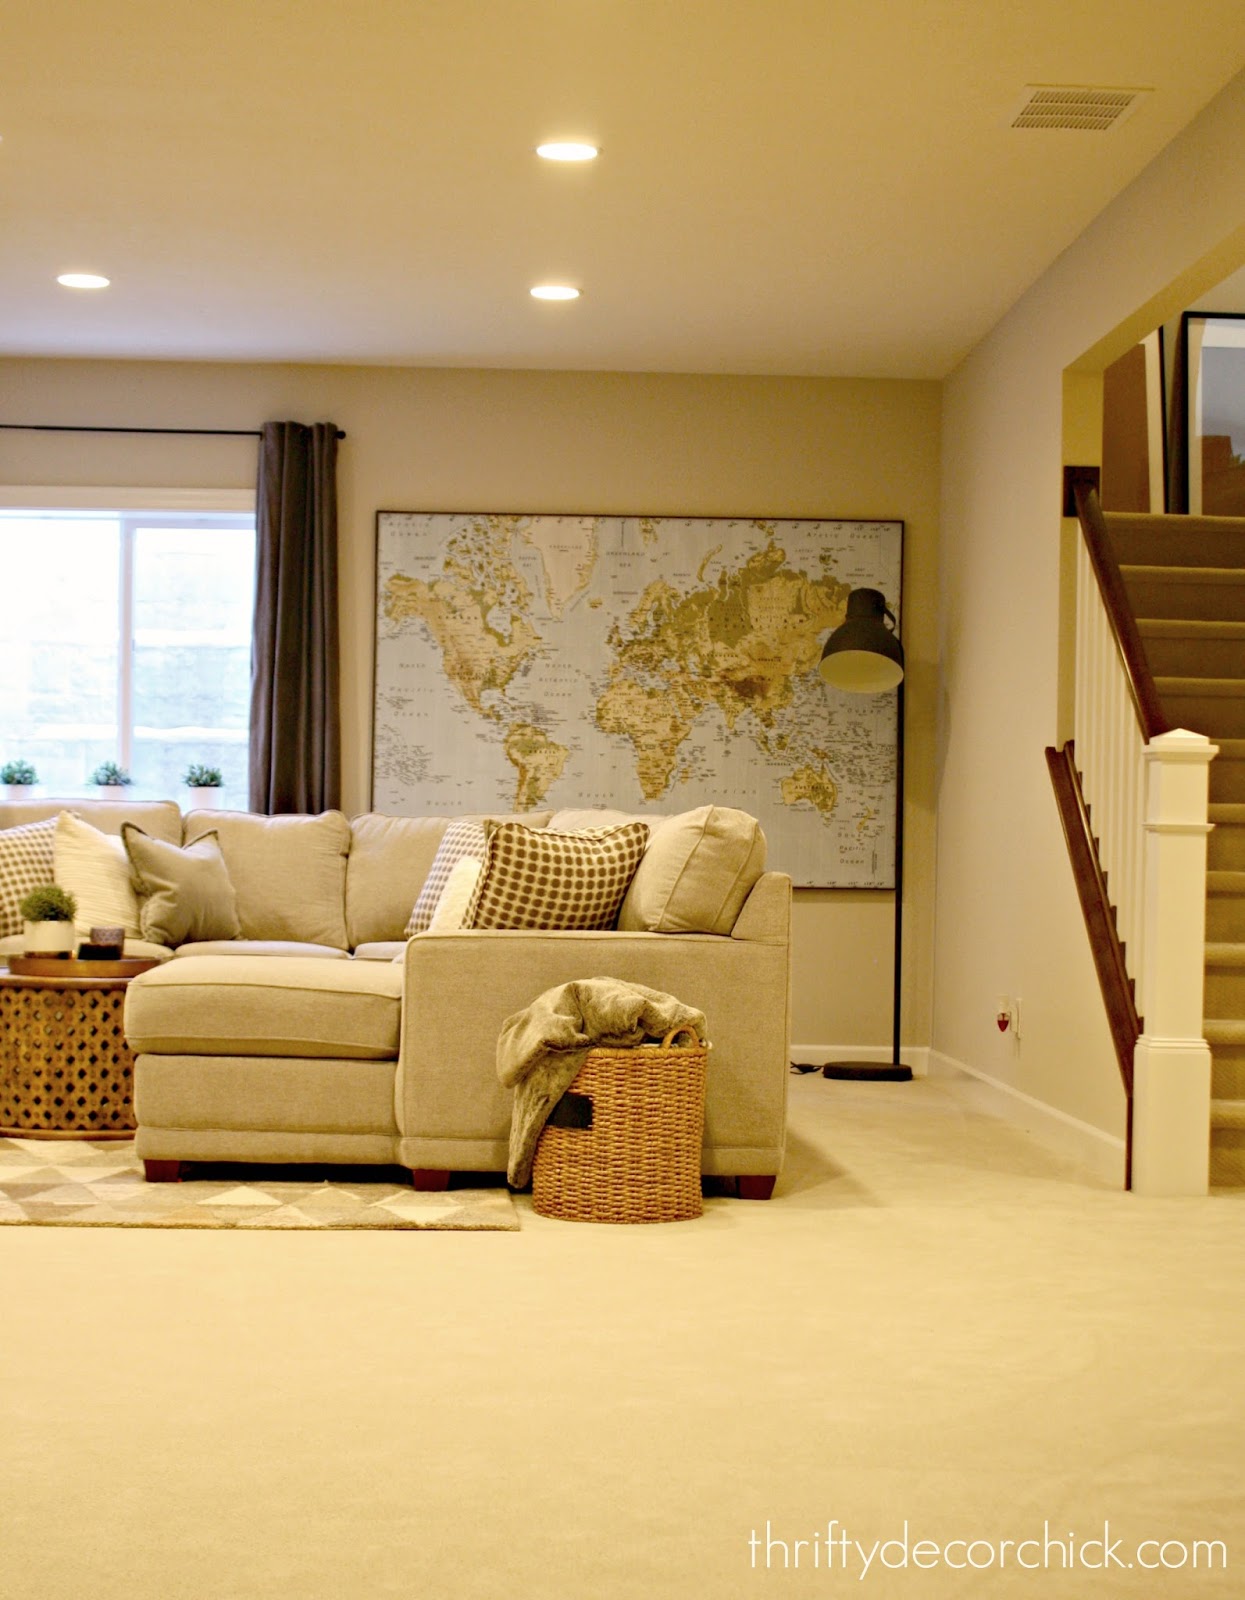
Because the repeat on the wallpaper I used in our powder room (thank you for all of the lovely comments!) was 24 inches, I had numerous scrap pieces that were around two feet long:
I always keep that excess just in case I need to patch up a spot sometime, but also because it's just too pretty to throw away!
I walked around our house with this floral paper in my hands, looking for a spot that would make sense.
I mentioned earlier this week that it has all of the colors we use in our home, so it wasn't long before I found a spot in our dining room.
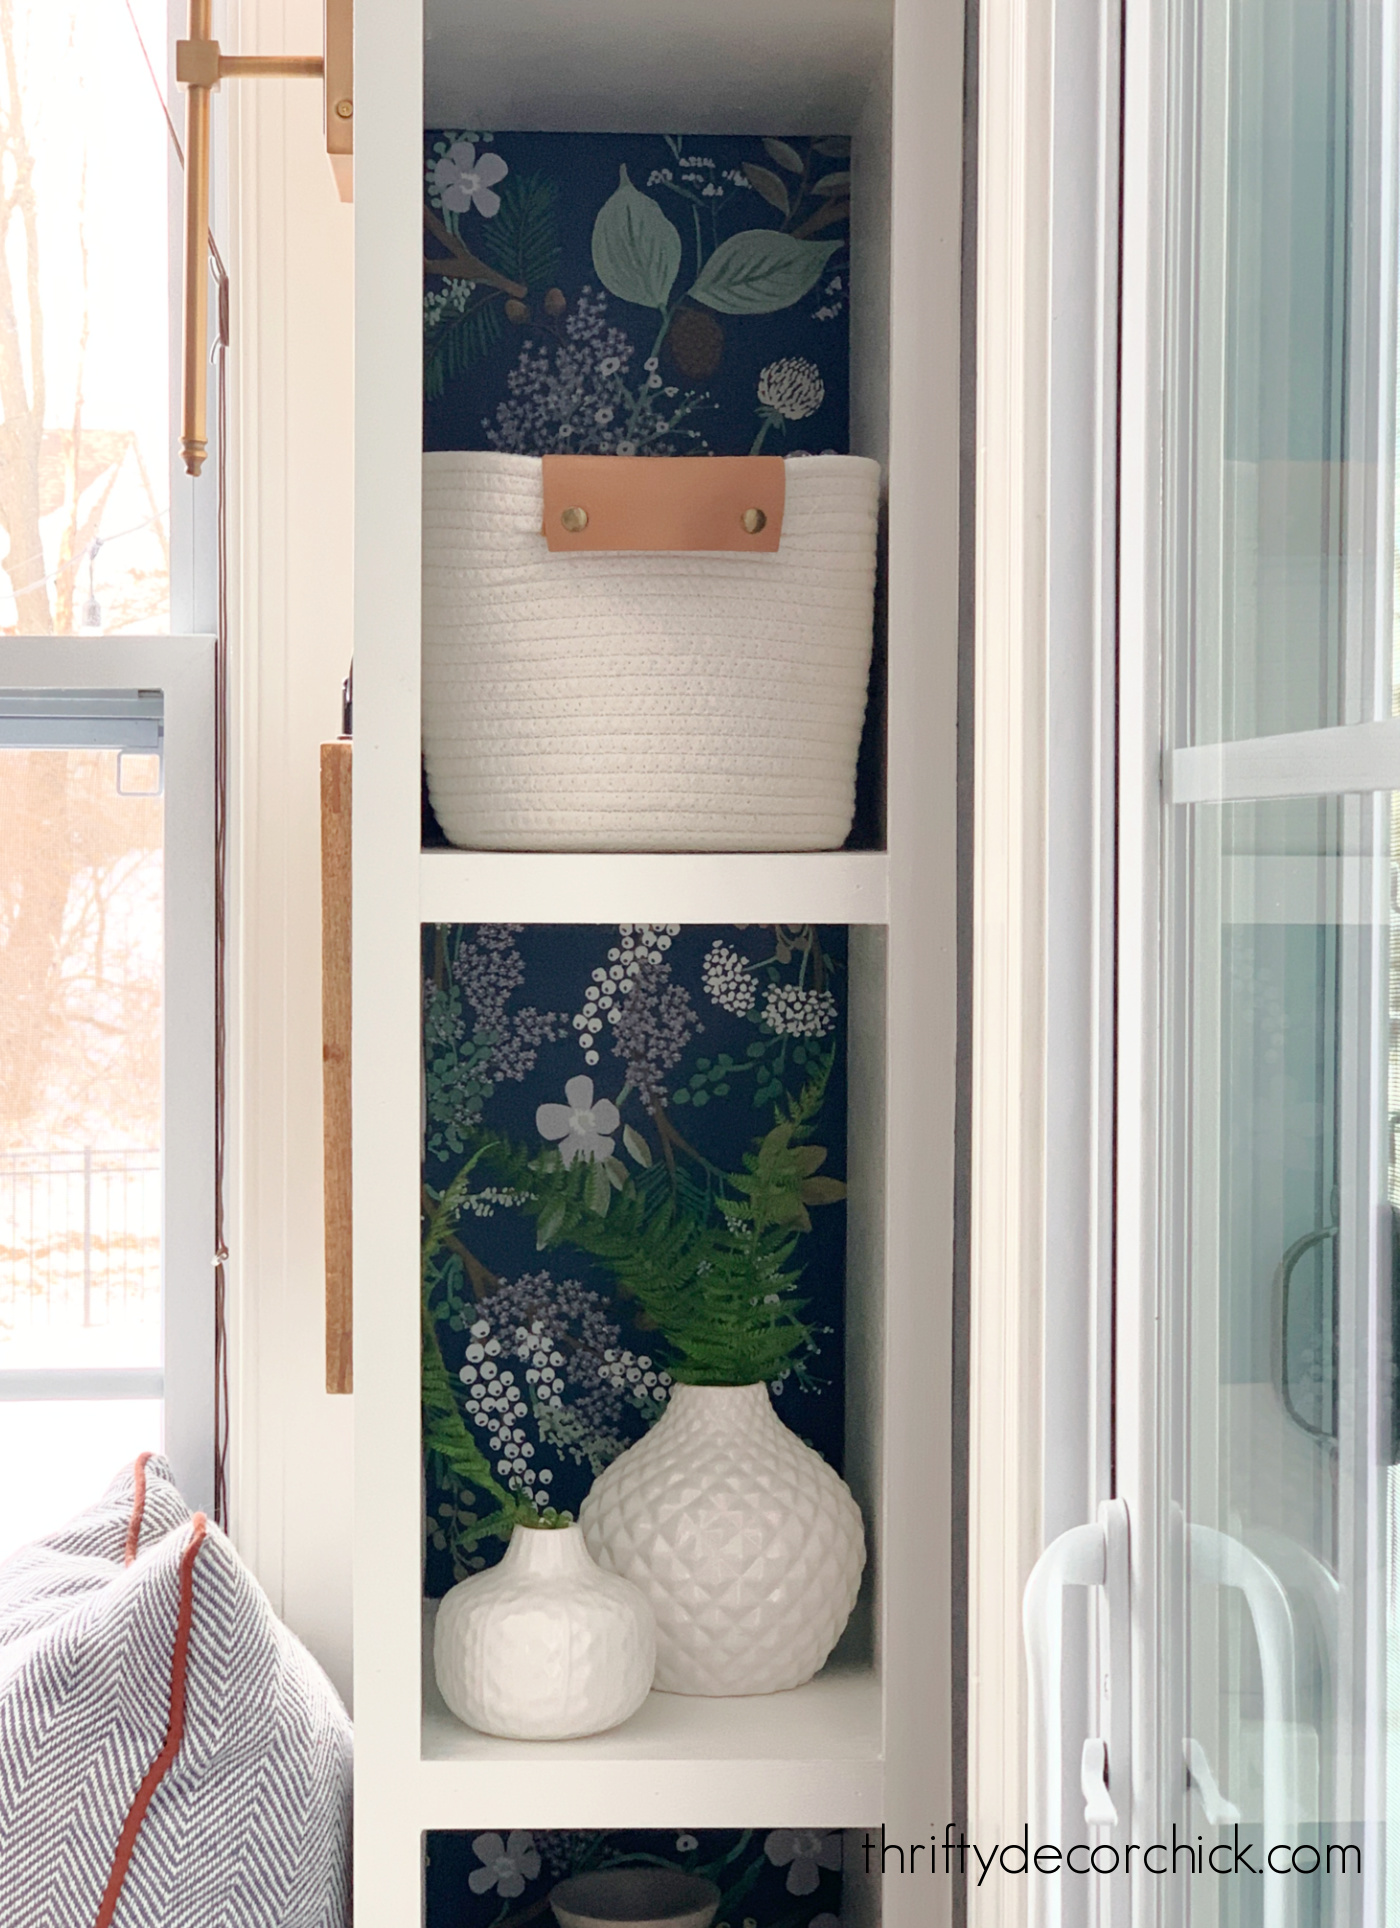
I've always loved painting or treating the backs of our bookcases for a pretty accent. Paint is the easiest choice of course!
But I've also used fabric, wallpaper and even wrapping paper in the past.
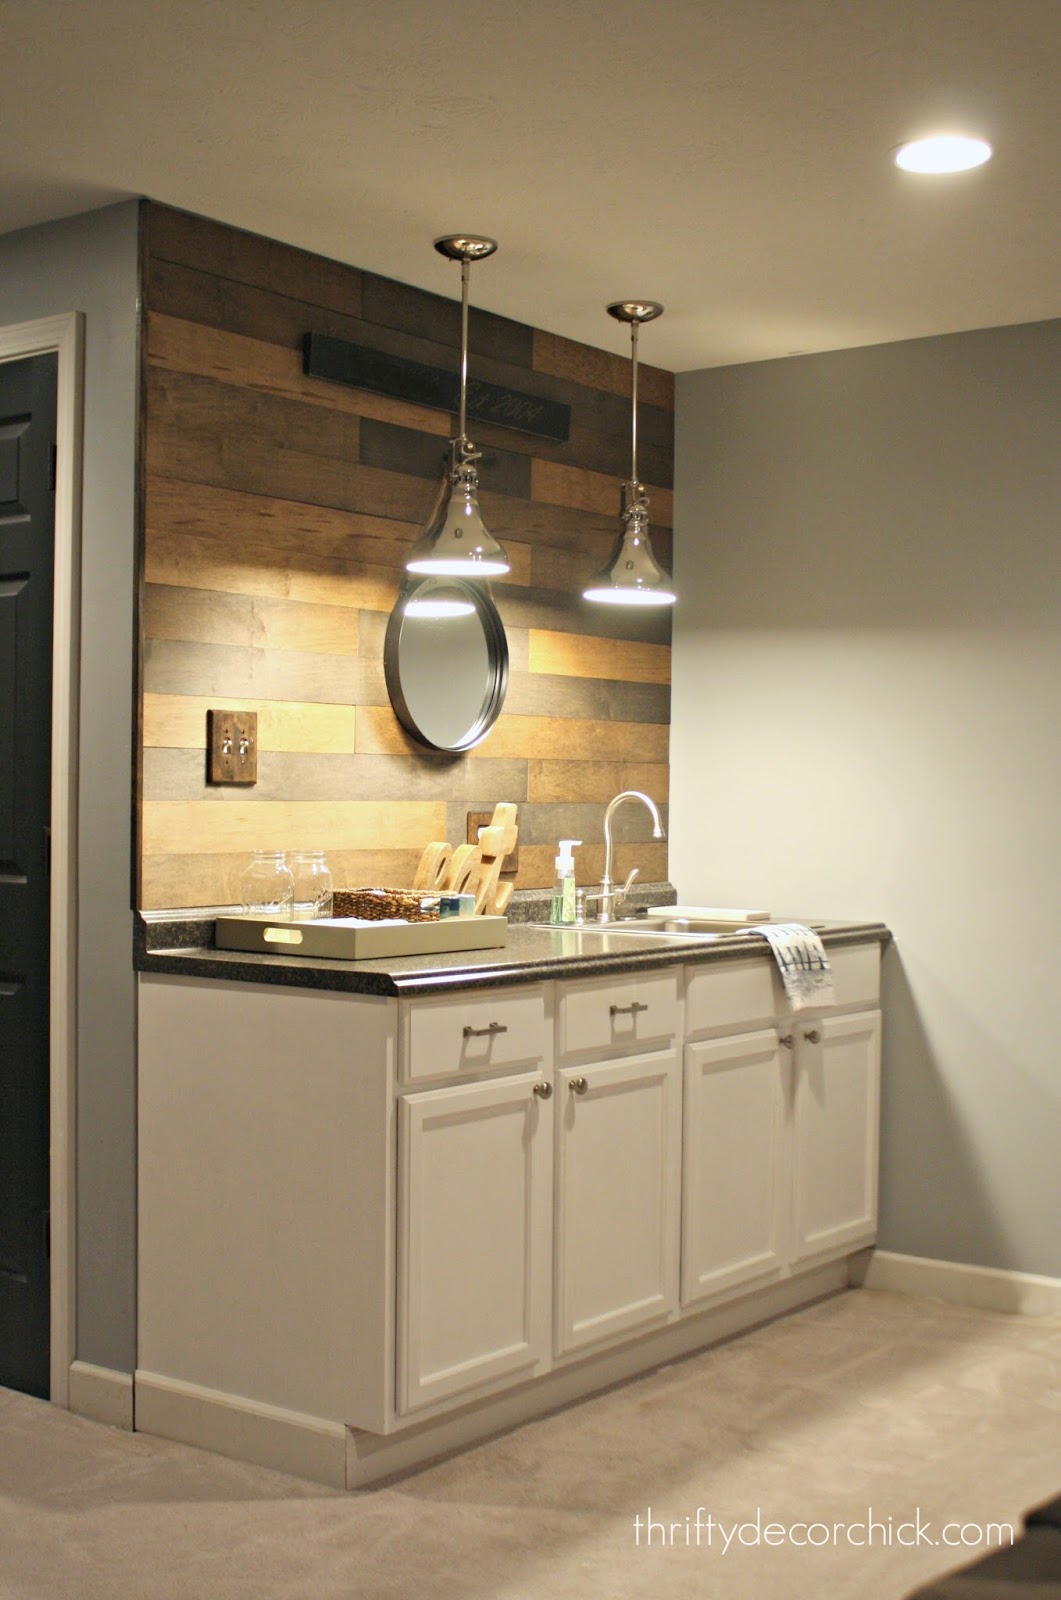
I installed the wallpaper before I built the shelves on our basement built ins and my office bookcases, but there's an easy way to add it after the fact as well.
The key is mounting it to something -- that way you don't have to try to awkwardly reach back and get the wallpaper just right in those tight spaces.
I use cardboard or foam core boards as my "mount" -- delivery boxes are perfect for this!:

This post may contain affiliate links for your convenience.
See my policies and disclosure page for more information.
You'll want a straight edge like a level or ruler, a measuring tape and a sharp craft X-Acto knife or utility knife to cut with.
I measured the wall on back of each shelf and then transferred that onto the cardboard or foam board, then used the knife to cut:
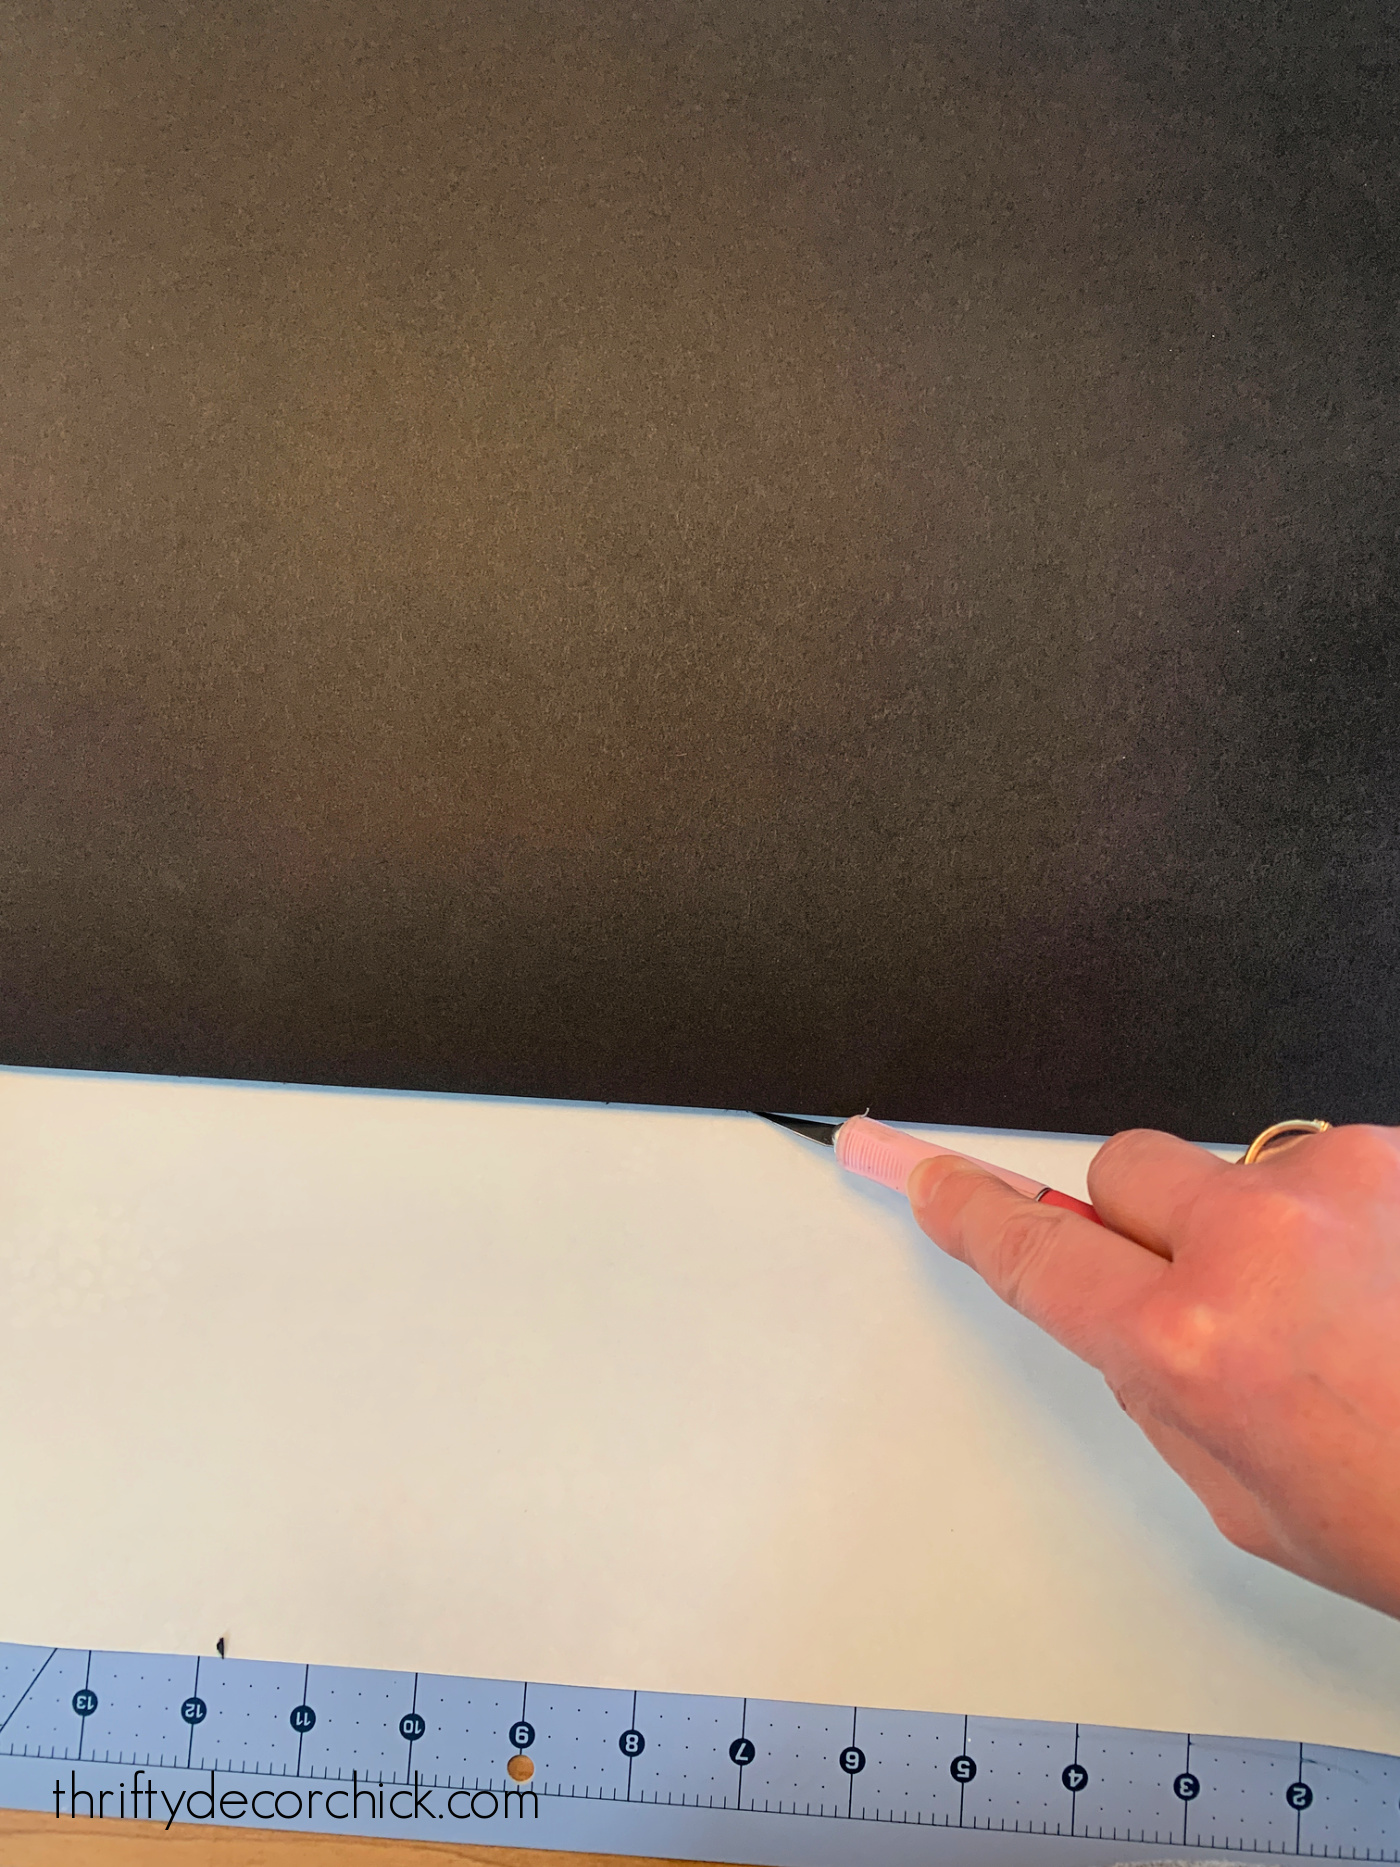
Using a cutting mat like this one makes this process super easy!
If you don't have a mat, make sure you score it on something that won't get damaged, like a cement floor.
After my foam board was cut to size, I found the easiest way to attach the peel and stick wallpaper was to lay it down on the sticky back:
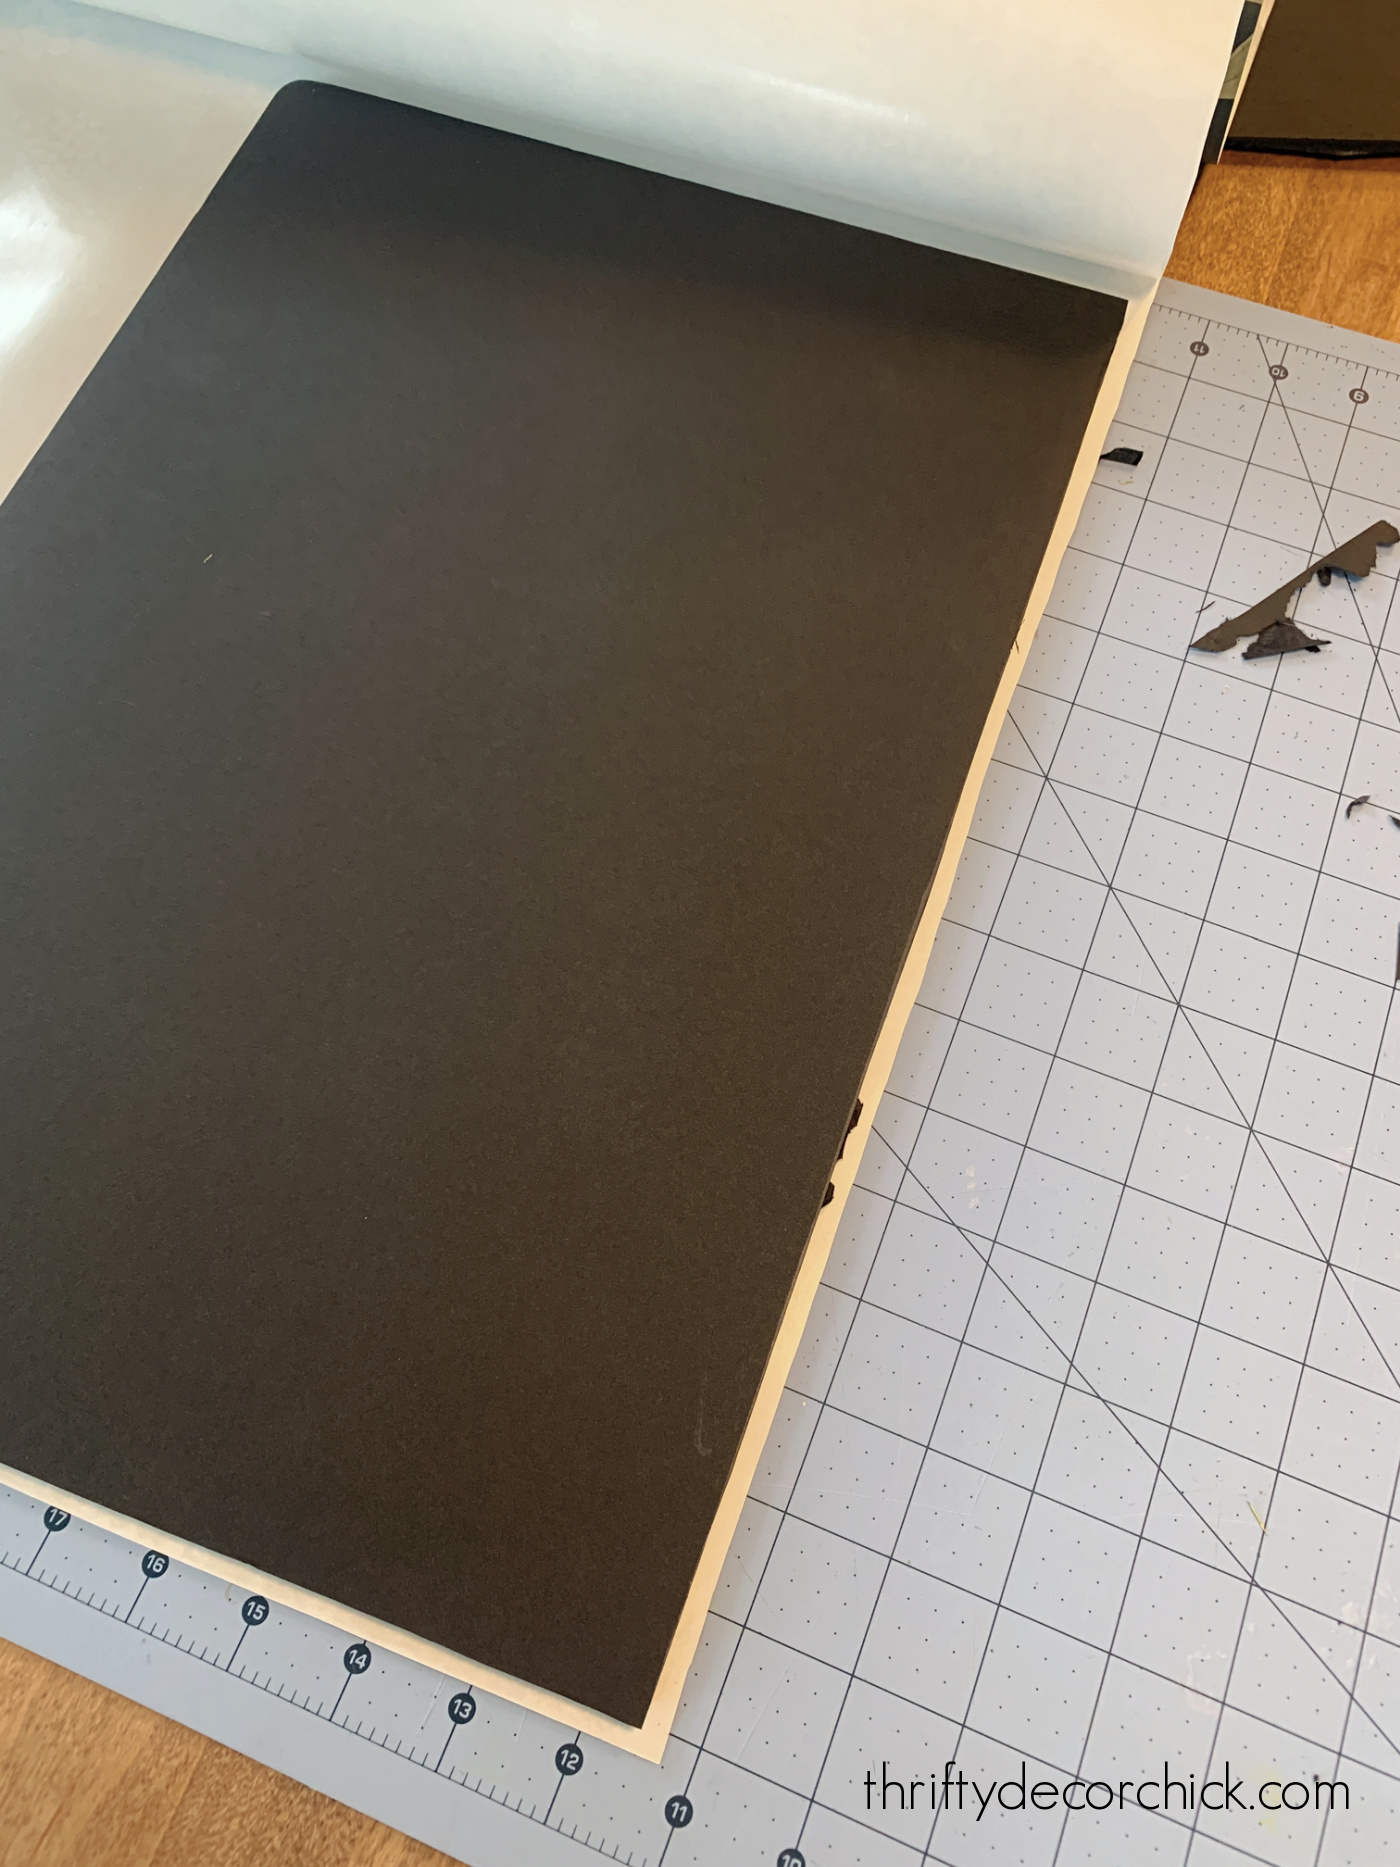
Because these shelves are so skinny, I didn't worry about the pattern matching up. That's the beauty of this project -- it doesn't need to be perfect!
The board doesn't have to be the exact right size either -- you won't notice minor imperfections.
I smoothed out my wallpaper (the peel and stick was easy to remove from the foam board and readjust), and then flipped it back like pictured above so I cut the excess off the sides with my knife.
These mounts make them so much easier to install, and you also don't have to worry about the wallpaper damaging the walls on your bookshelves.
This colorful pattern makes for such a pretty, unexpected surprise!:
If you tire of one design, you can reuse the boards to apply a new fabric or wallpaper.
Love this little hack and the pop of color it adds behind the accessories:
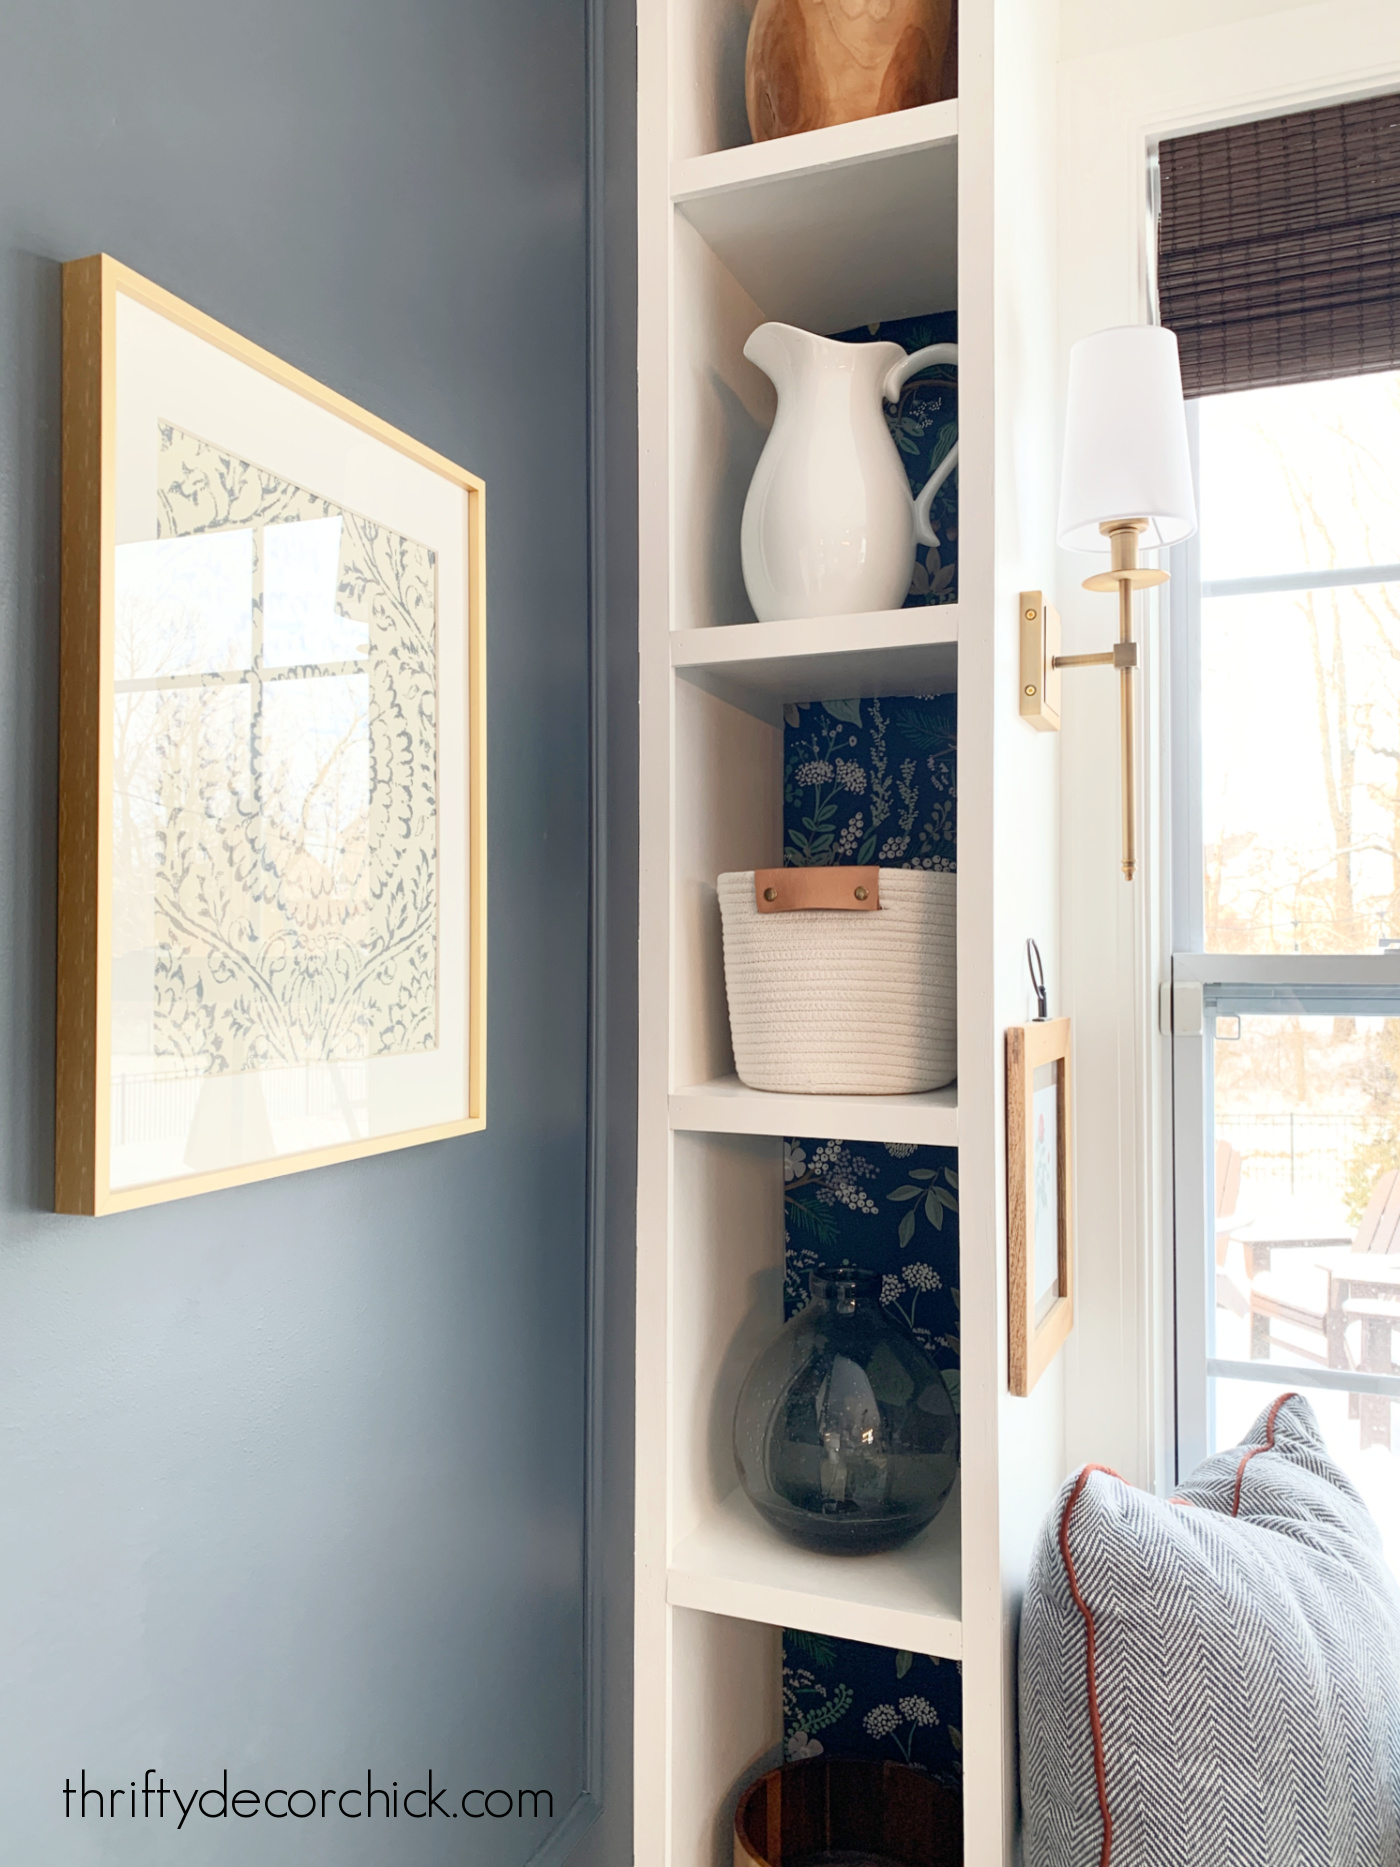
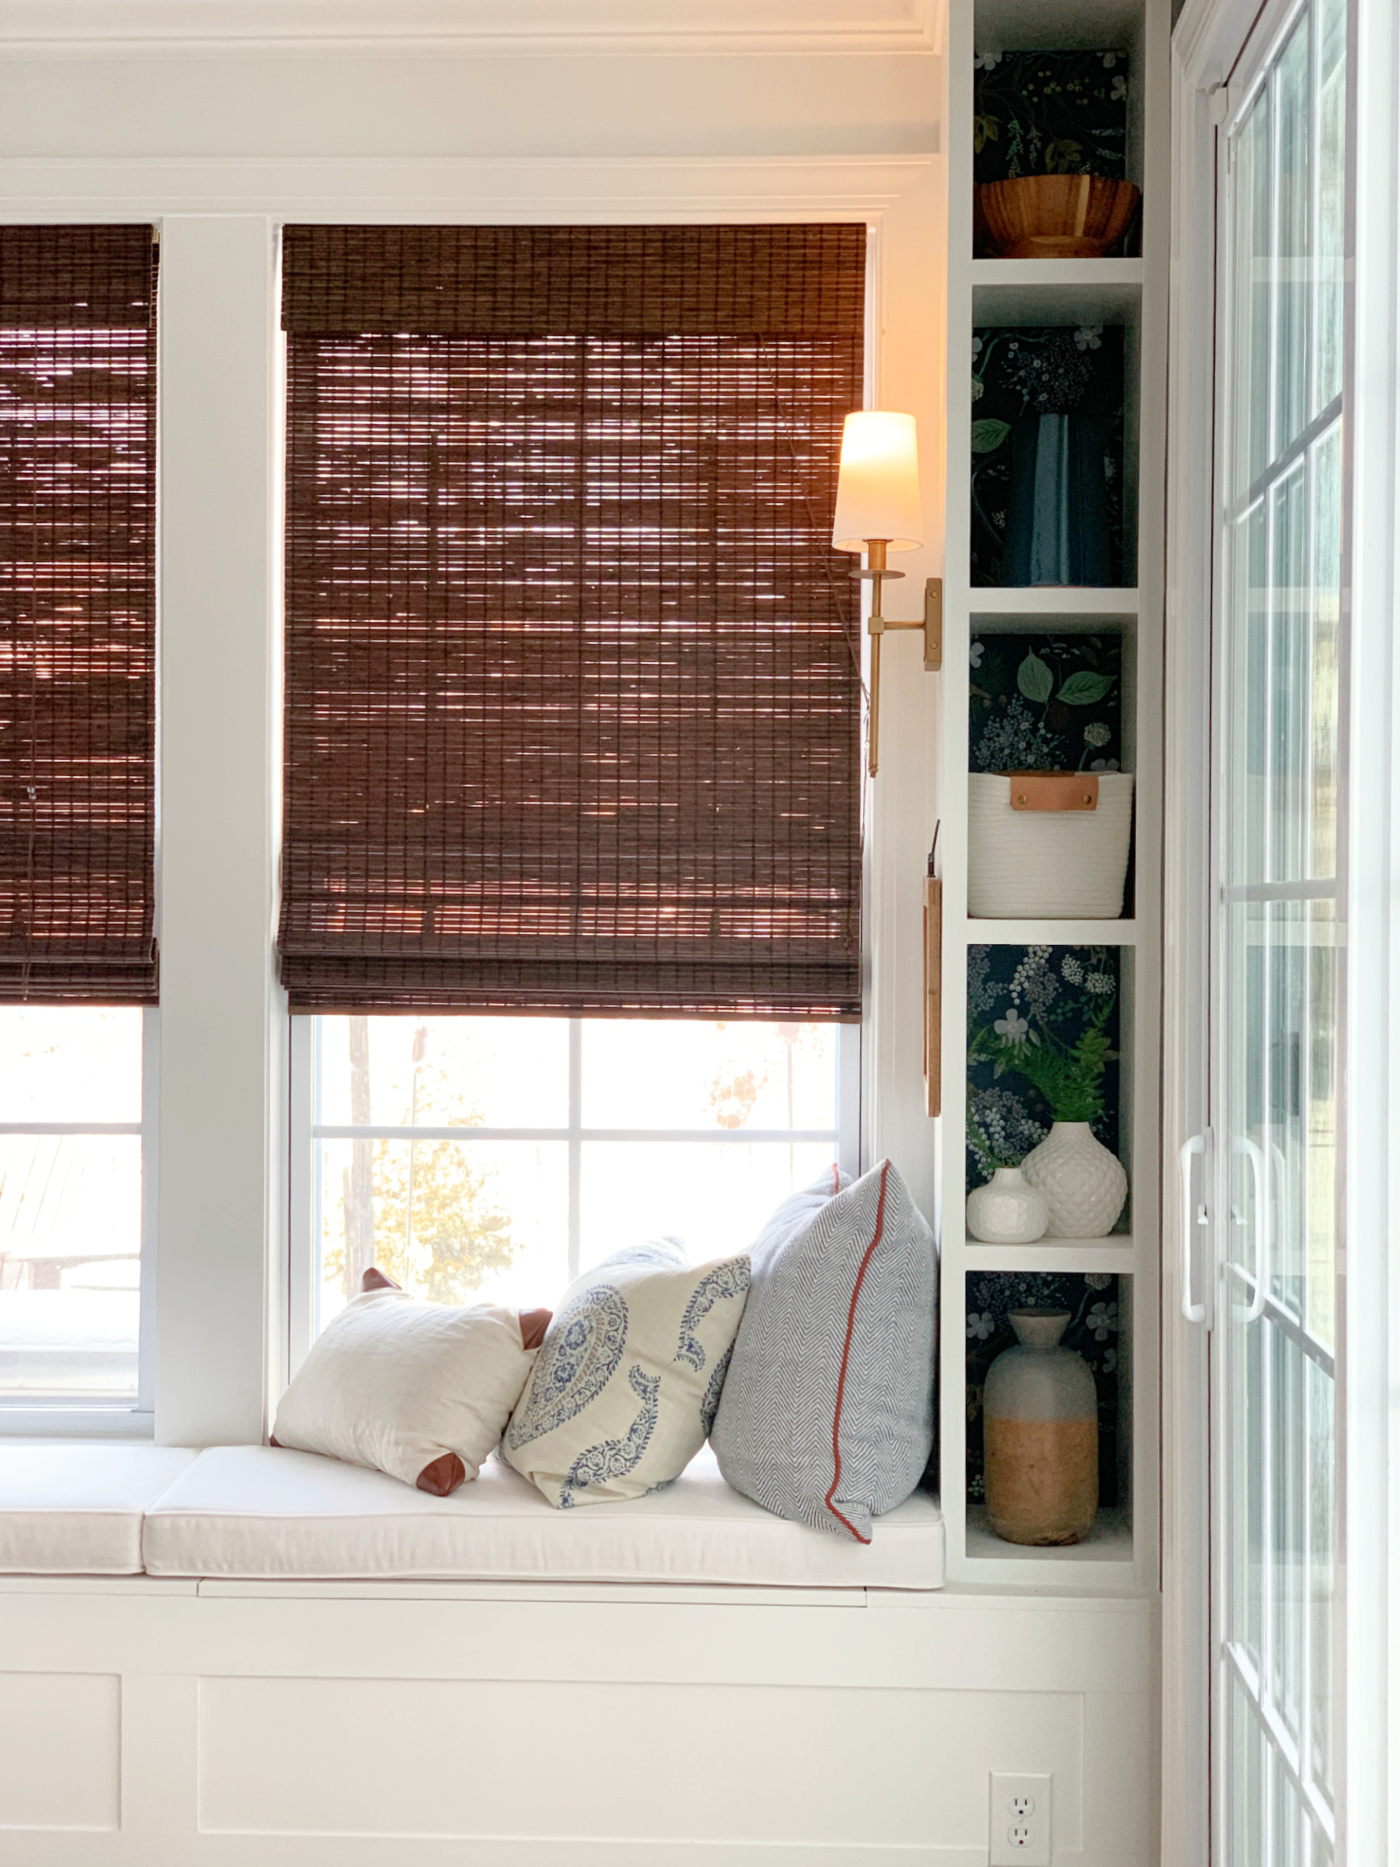
That blue and green wallpaper goes perfectly with the dark blue Cyberspace walls in here!
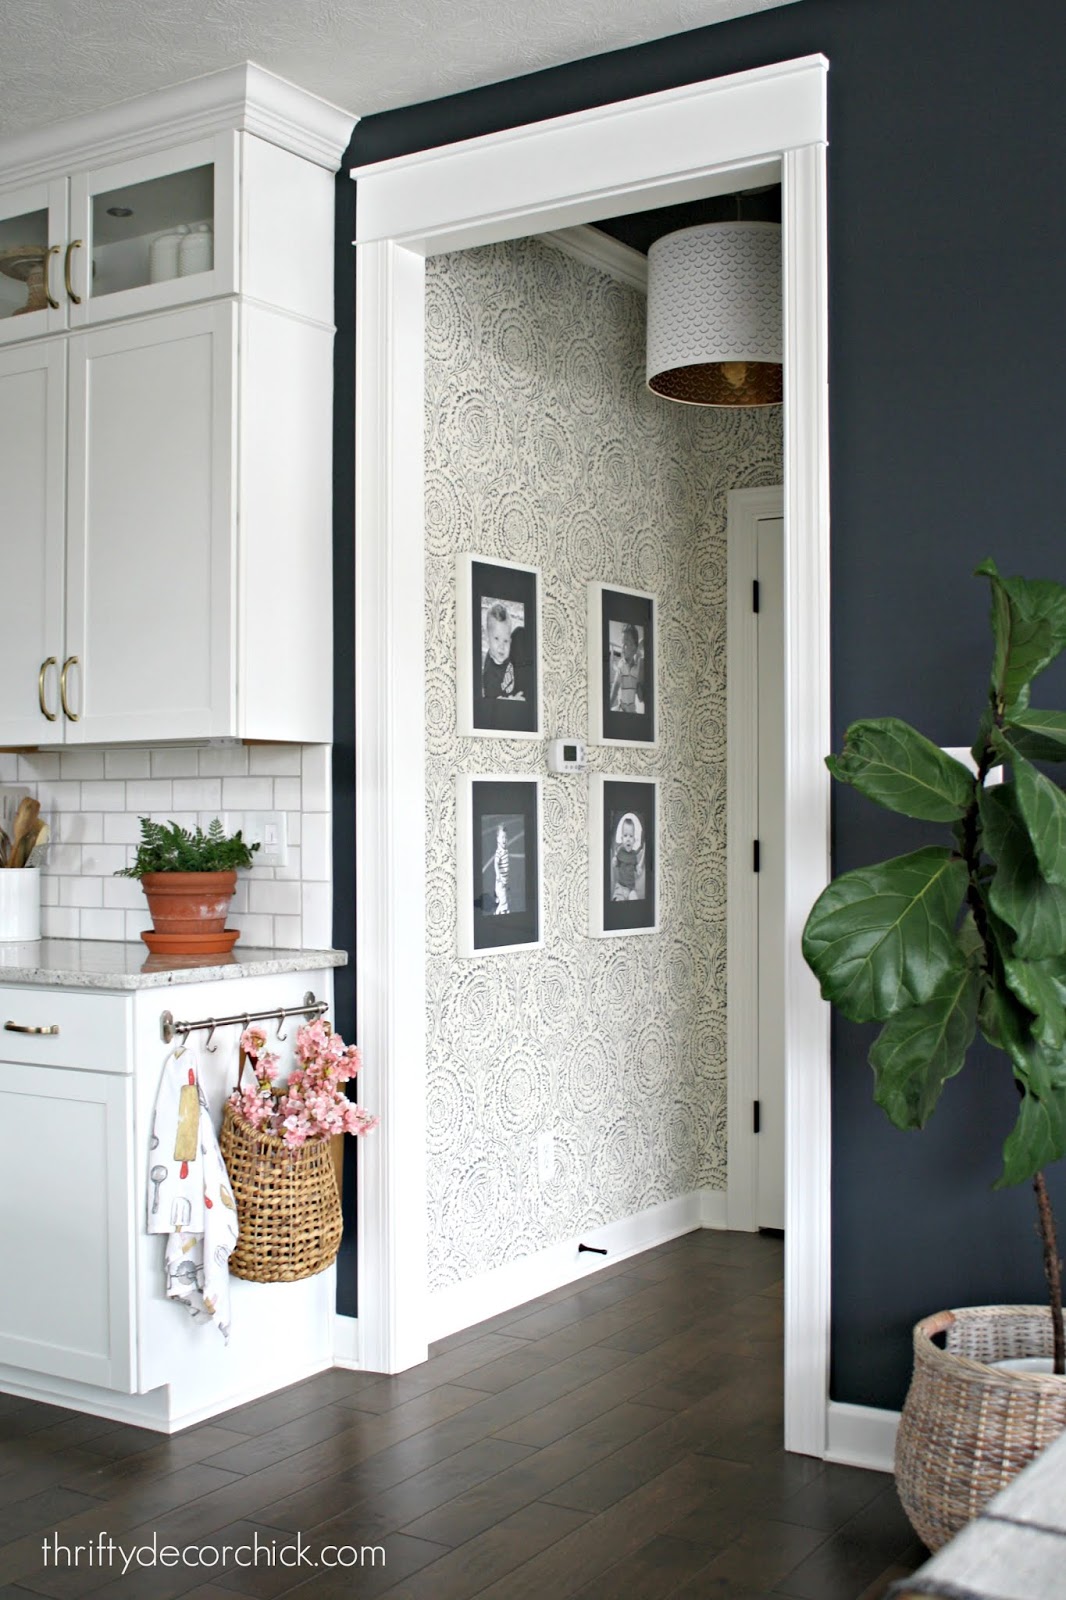
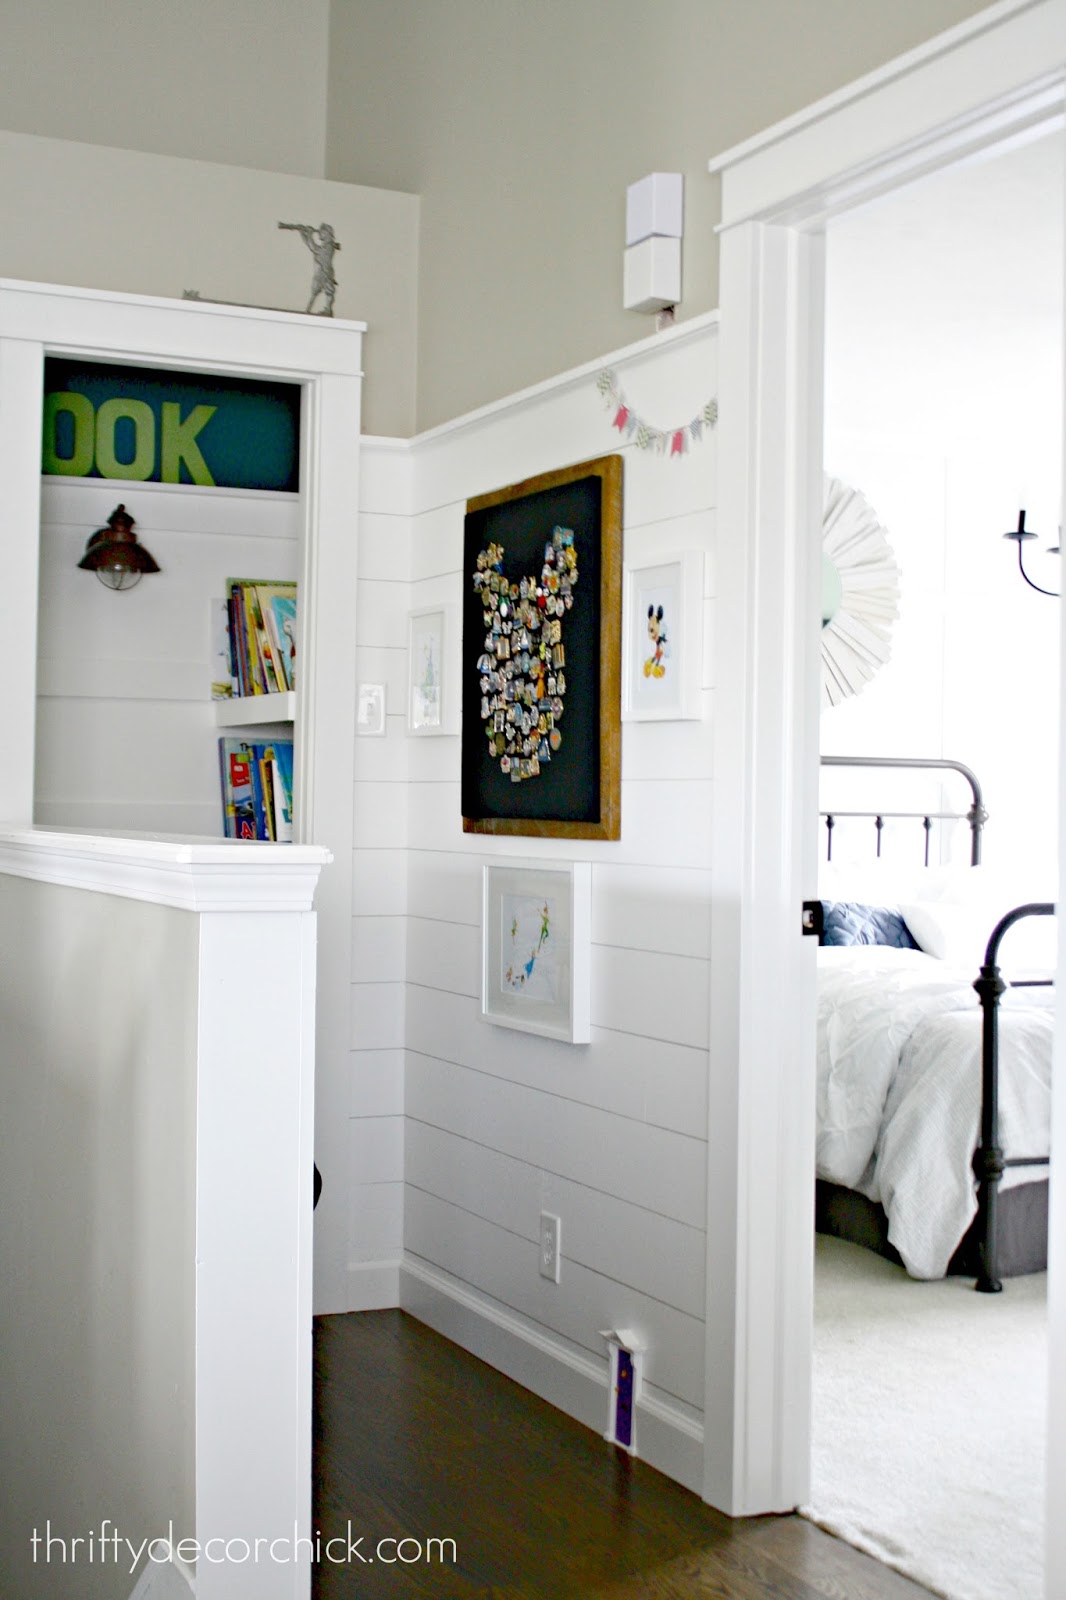
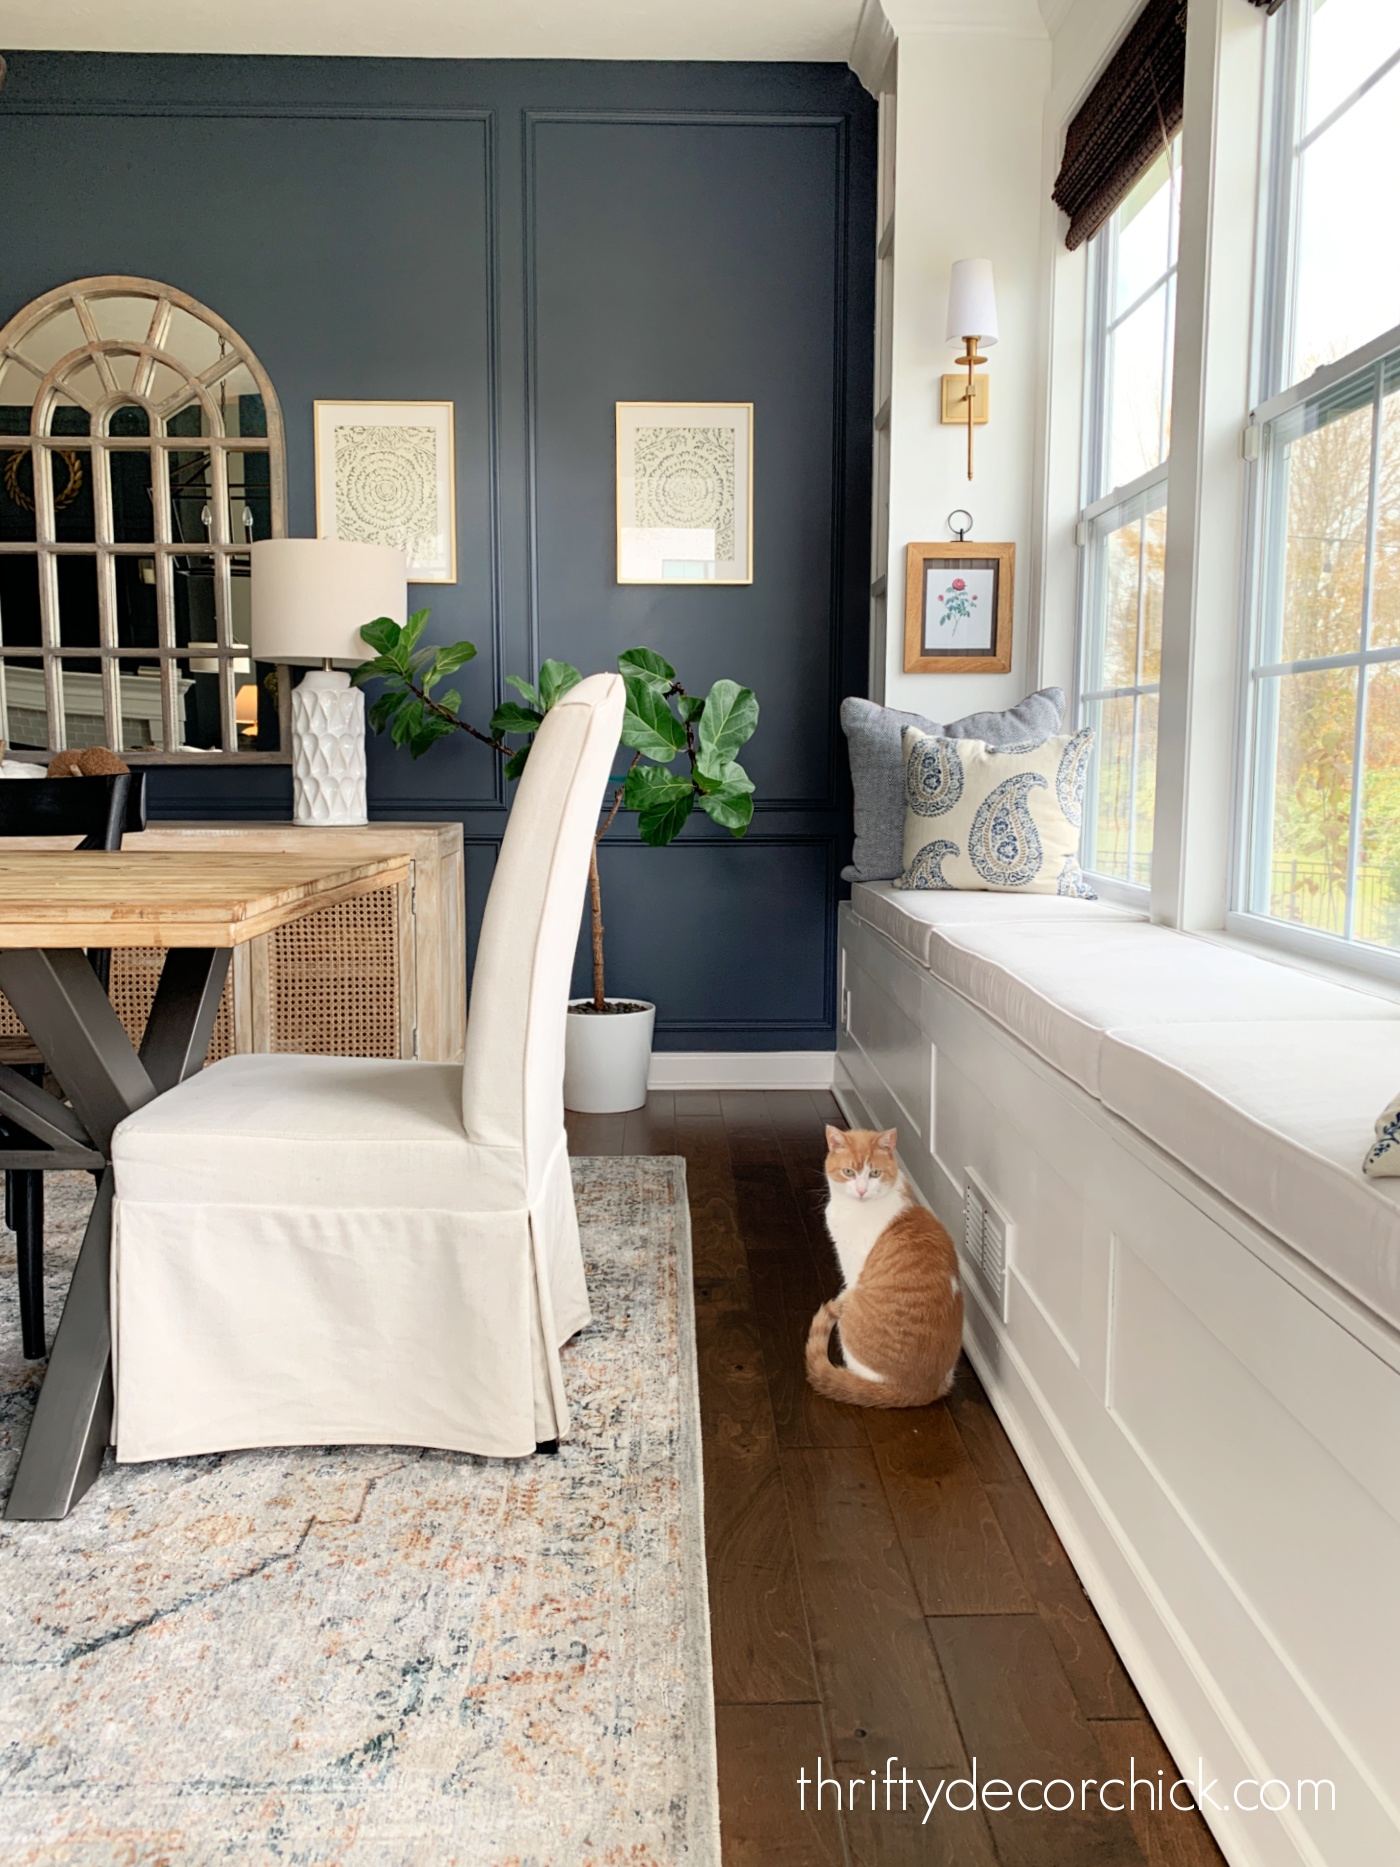
You may have noticed the other wallpaper art I have in this space. Years ago I added a gorgeous white and blue floral wallpaper to a little hallway near our kitchen:
Both papers are such pretty, understated touches that I love!:
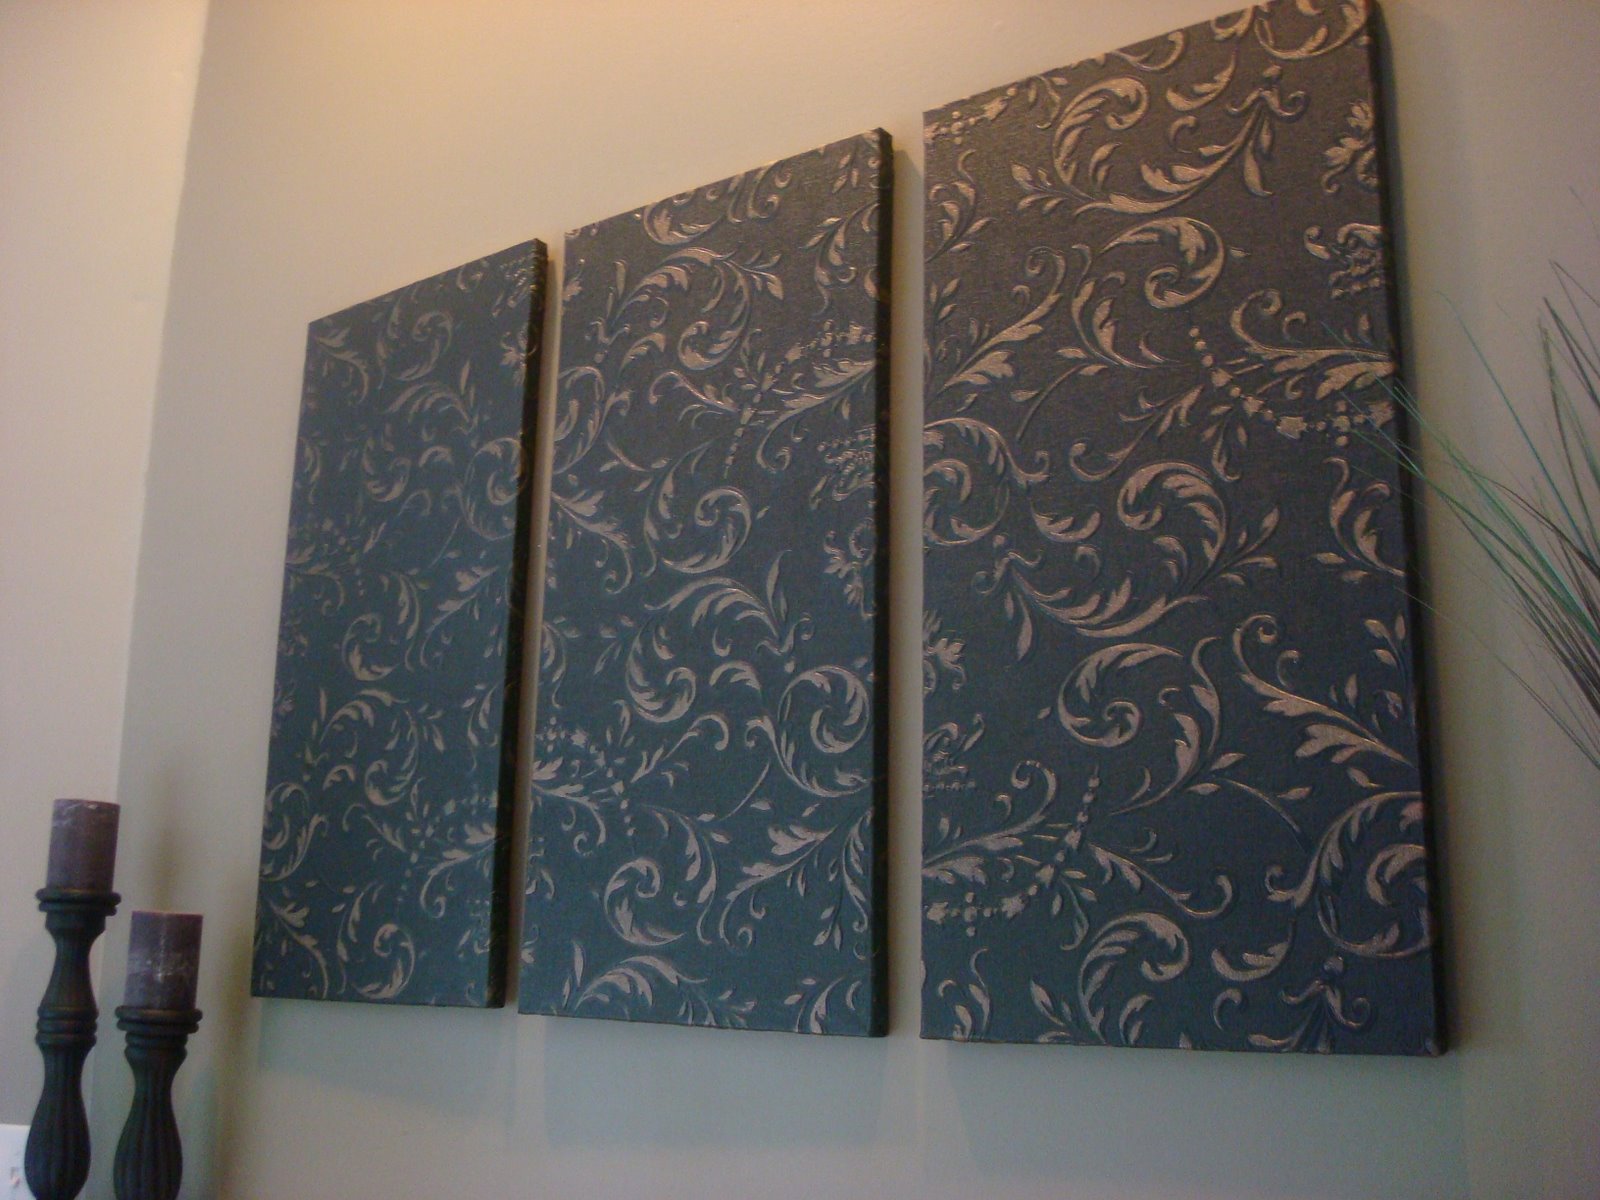
Way back in the day before I actually used wallpaper on the walls...I created this DIY wall art with wallpaper and canvases:
I've gathered some other fun and unexpected ways to use wallpaper scraps to share with you!
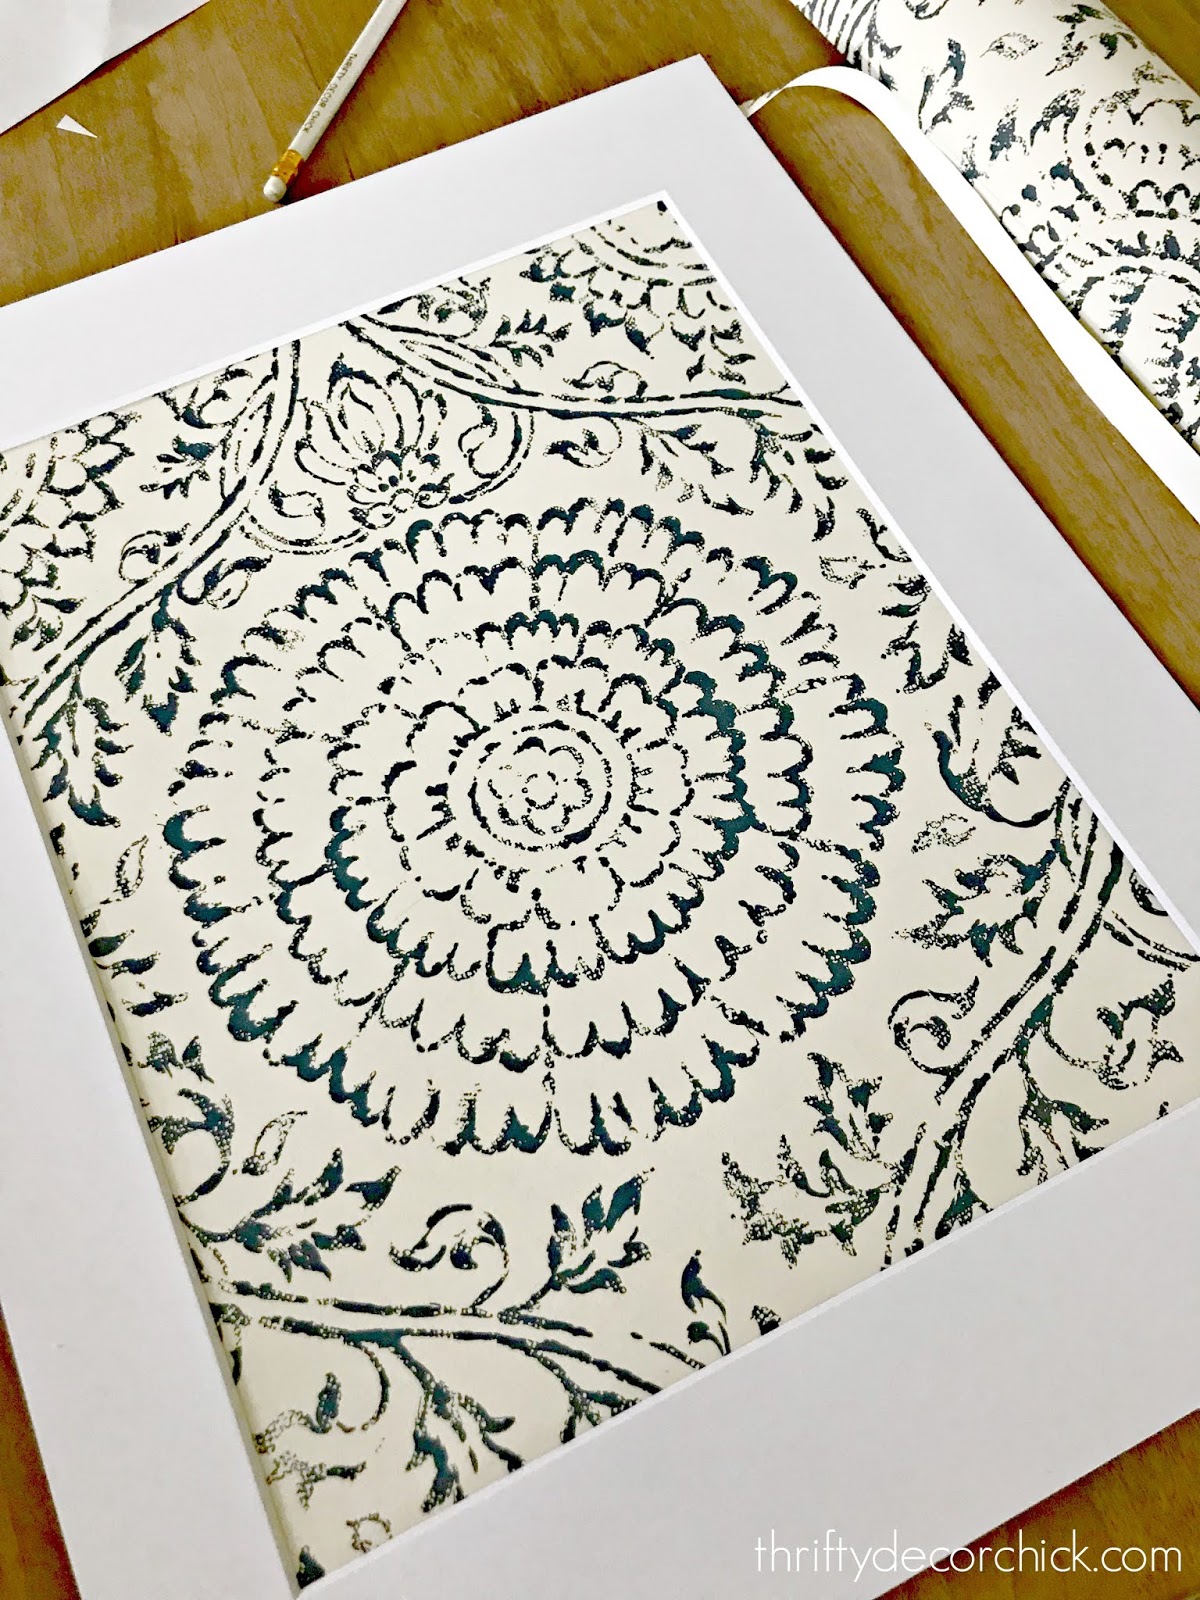
Angie did a similar project to my dining room art, but framed coordinating wallpaper samples instead:
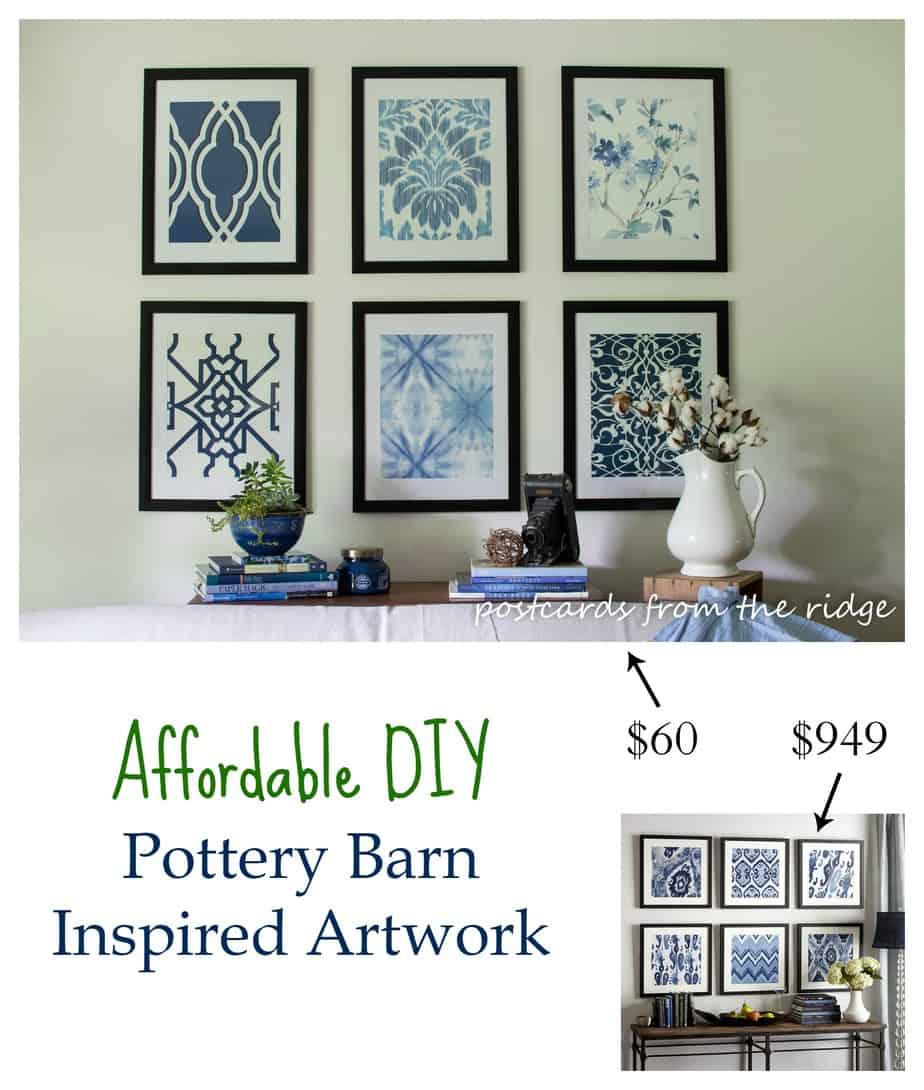
You can order samples from most online wallpaper shops for a few bucks each!
This gorgeous little girl's bedroom has a framed accent wall -- adding that trim makes it look giant art and I love it!:
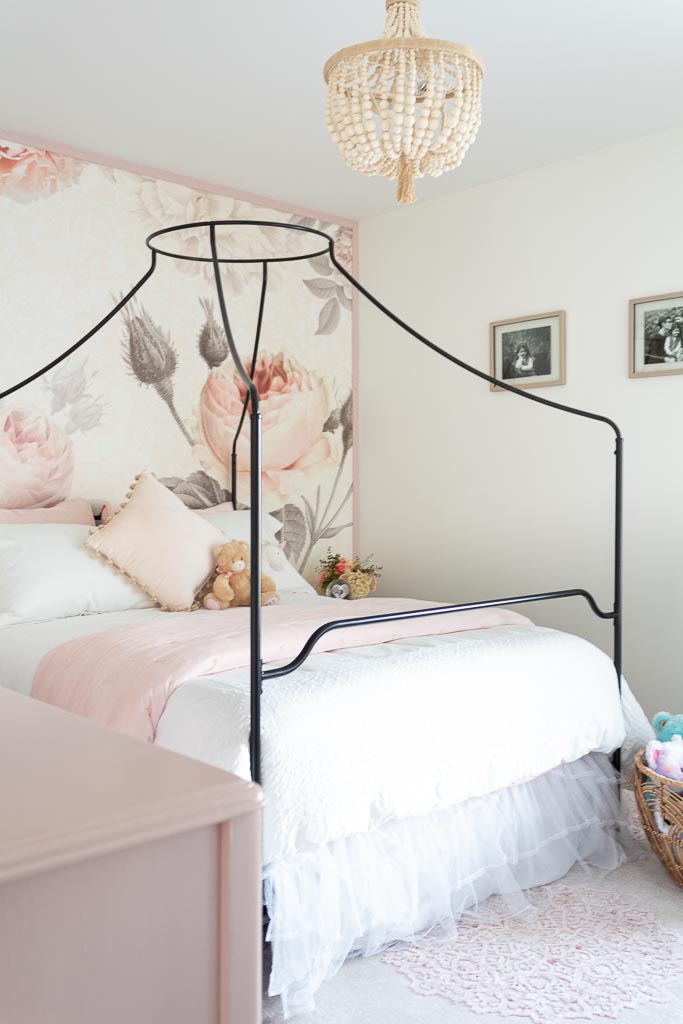
That wall uses more than scraps, but you could create a similar look on a smaller scale.
Framing it out with trim is the key!
I love how Marianne used wallpaper to line the insides of this beautiful wardrobe:

You could do this on a smaller scale by wallpapering the sides of your dresser drawers or make your own pretty drawer liners like Maria did:

I love using wallpaper in unexpected places, like the stair risers Cindy covered:

Or you can apply it to the back wall of a closet -- this is another spot that wouldn't have to match up perfectly since the shelves break it up:

You wouldn't need much leftover to do this cool wallpaper backsplash idea behind the stovetop:
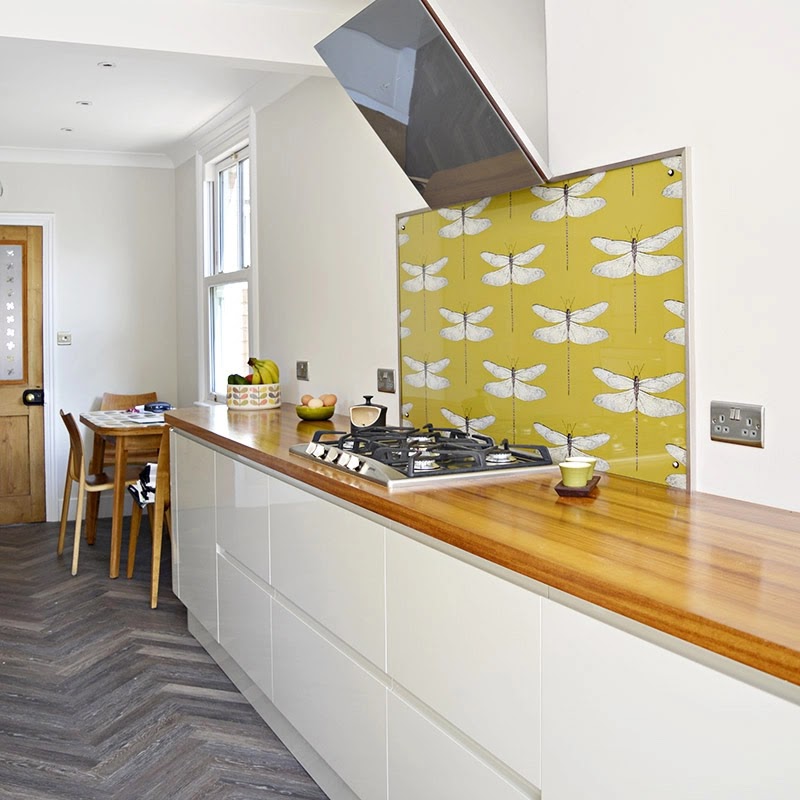
Either glass or acrylic on top makes it so it's easily cleaned!
This is the cutest pet idea I've seen in awhile! Not only is the built in dog crate awesome, but the adorable dog wallpaper inside is the perfect finishing touch:

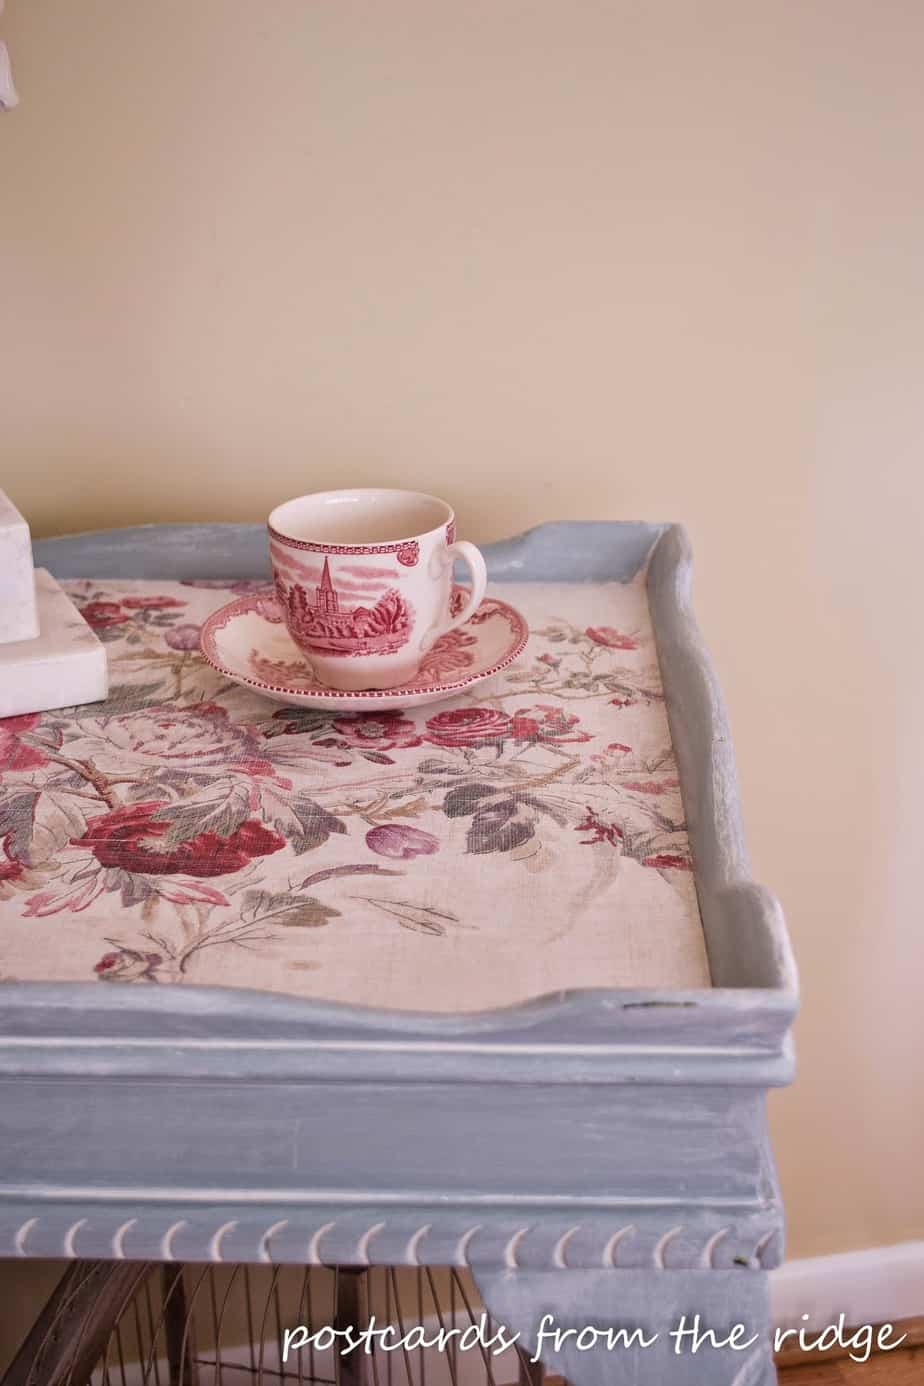
And if you use a decoupage medium on wallpaper, it will hold up to liquids and can be cleaned -- this floral wallpaper works beautifully on this table:
A few more fun ideas for using leftover scraps of wallpaper:

Have you tried any of these ideas with wallpaper remnants? This post actually gives me some ideas for future projects! :)
Never miss a post by signing up to get posts via email.
Via https://www.thriftydecorchick.com/2022/01/10-DIY-projects-with-leftover-wallpaper-scraps.html
0 Comments
Beautiful DIY powder room refresh with peel and stick wallpaper and simple changes.
Oh my...this may be my favorite room makeover in quite some time!
Never mind that it's the first room I've made over in quite some time...?
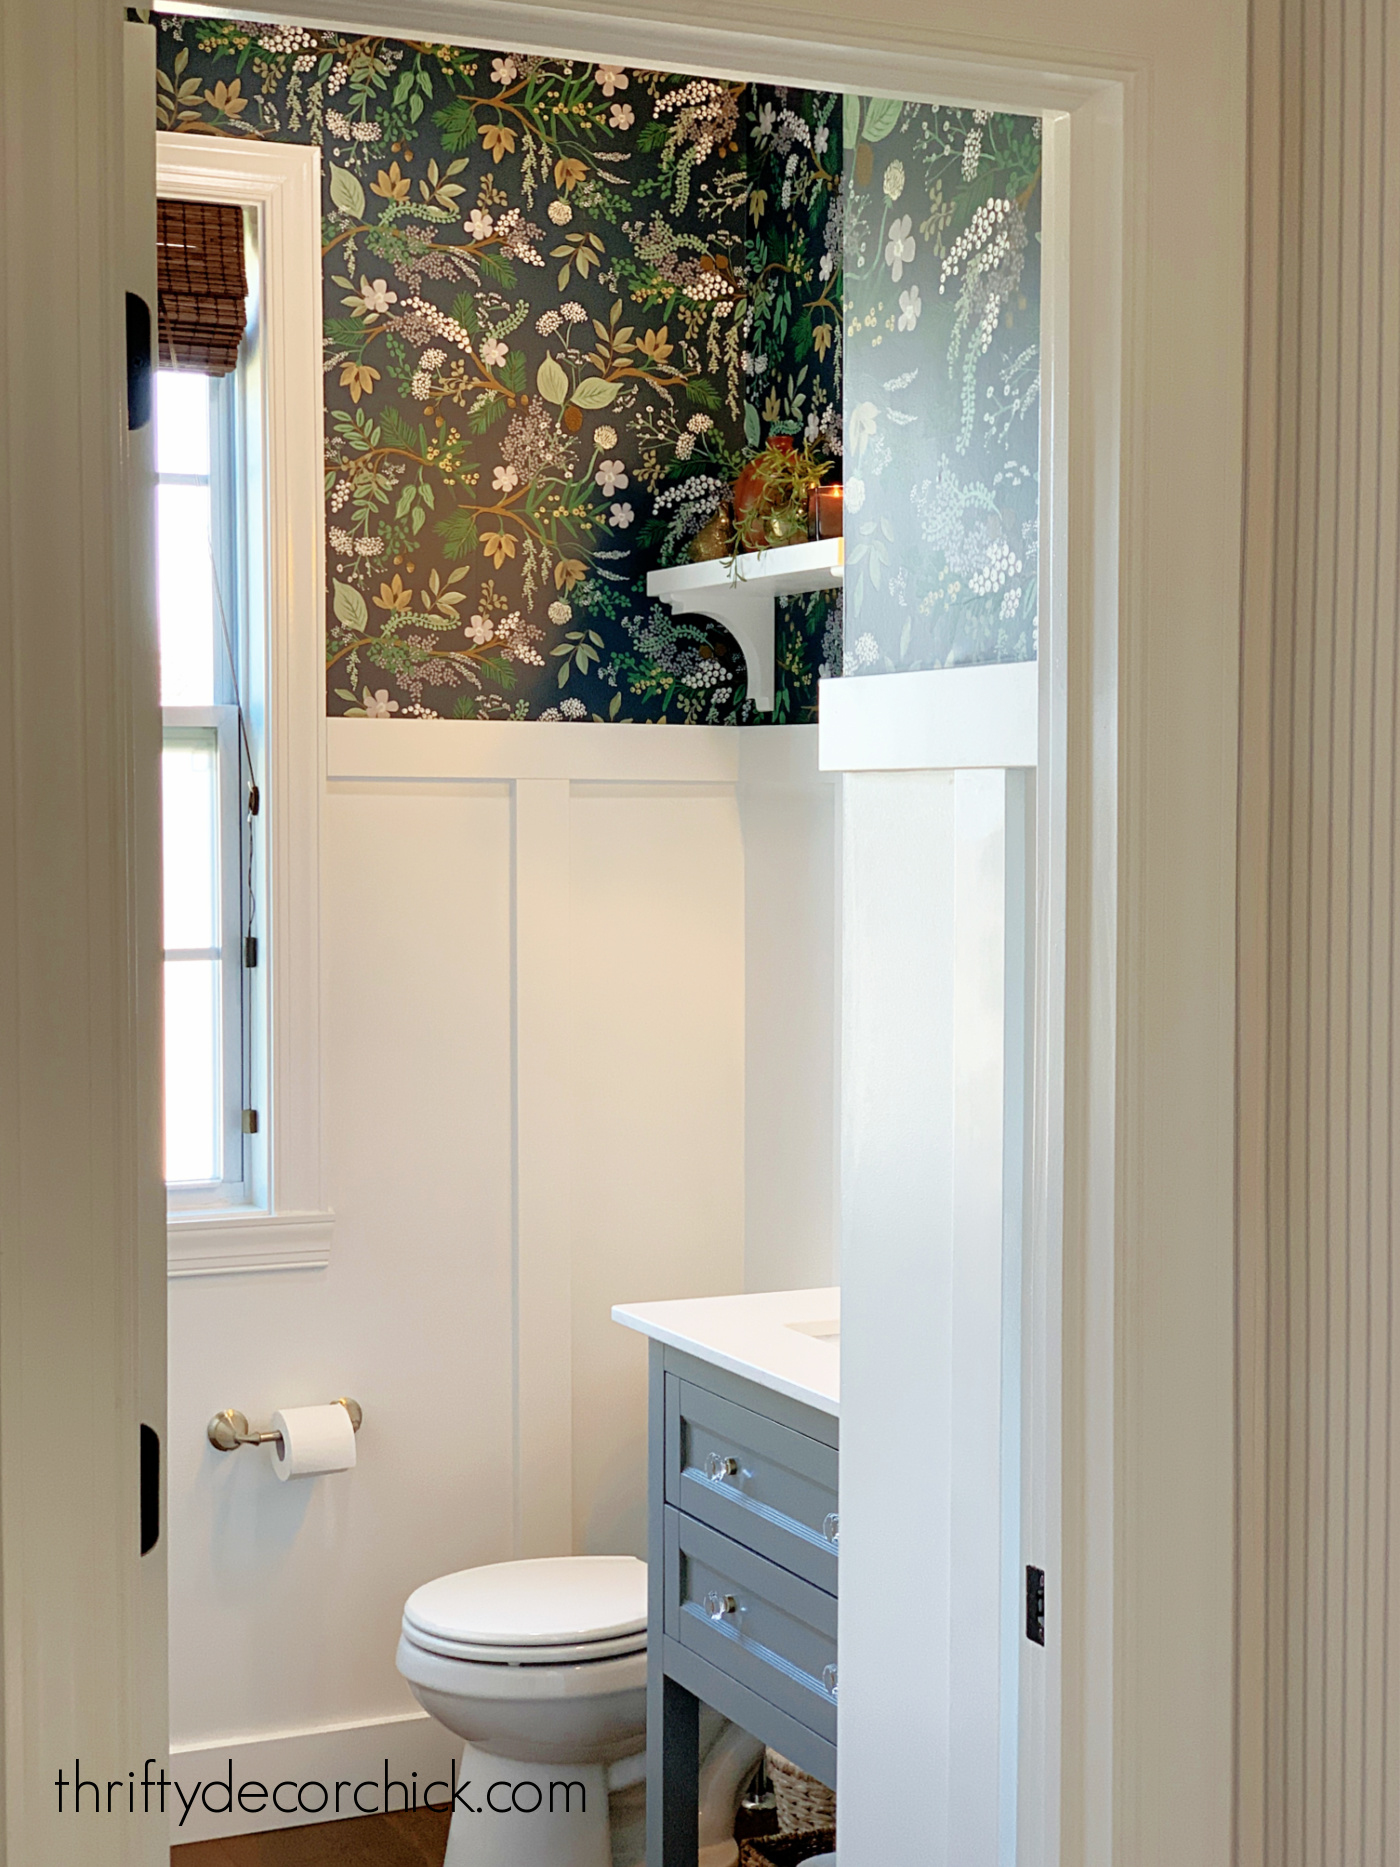
This bathroom makeover showcases the difference wallpaper makes in a space! I made a few other minor changes to this room that made it into a pretty little "jewel box." I just adore how it turned out!
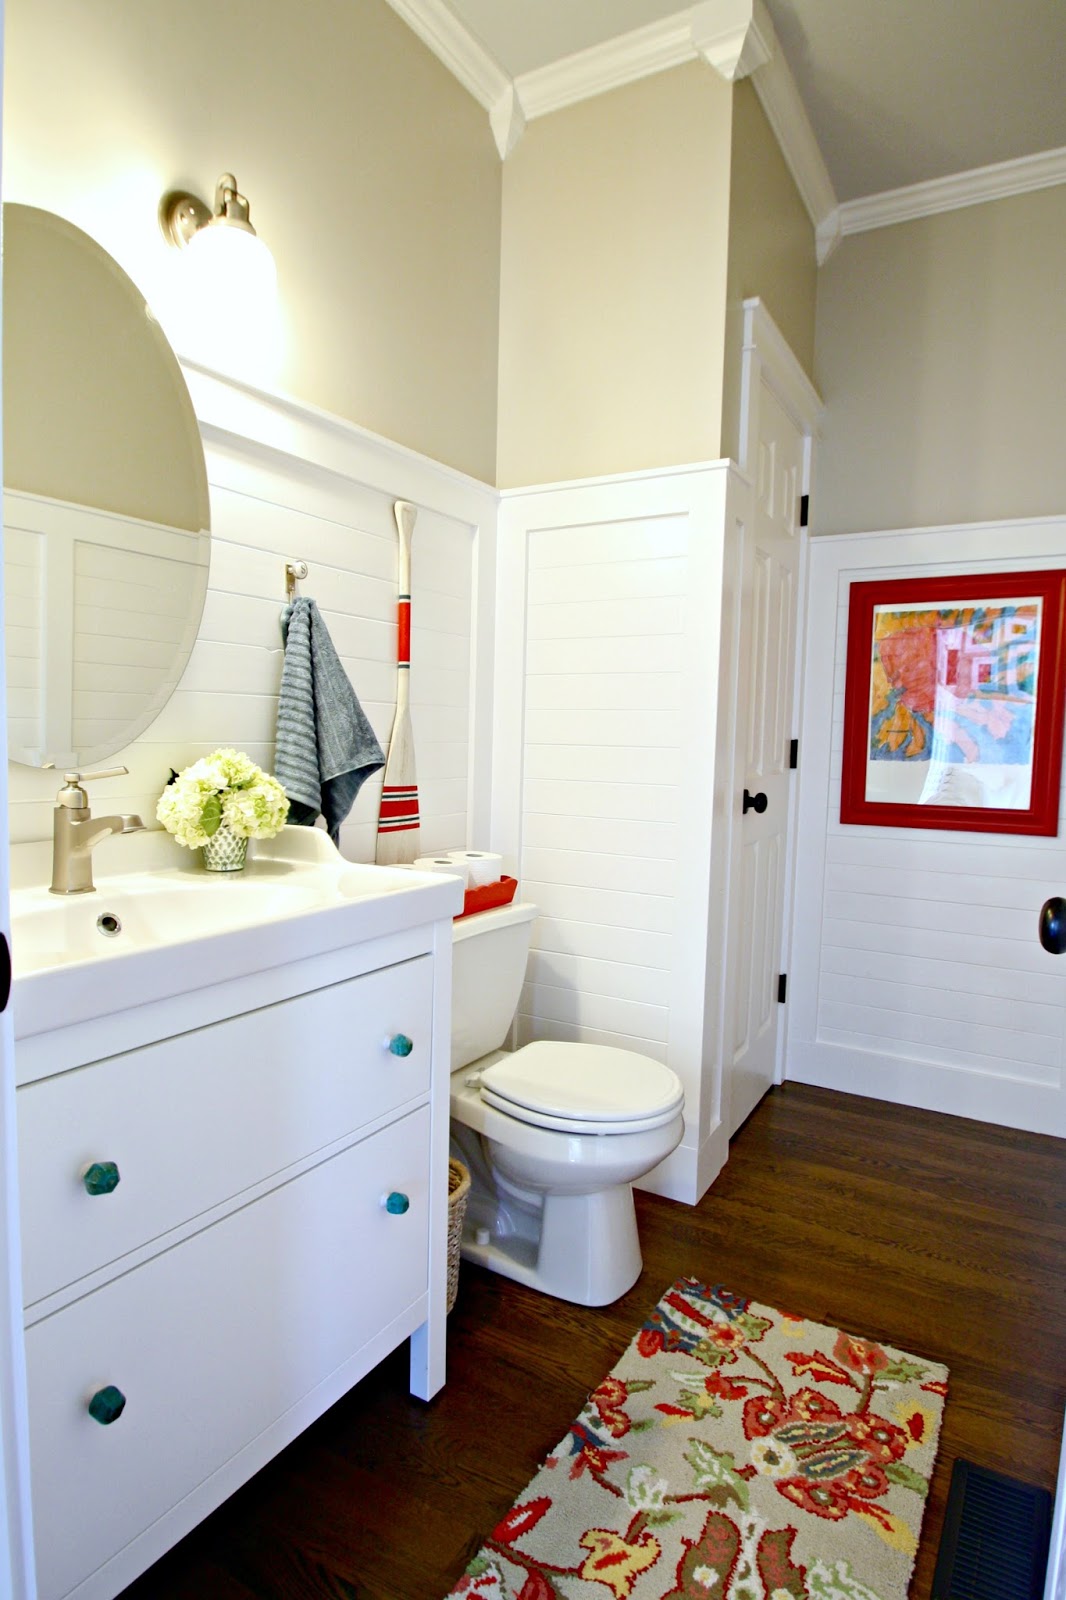
Our navy and white powder room was the first spot I tackled after moving in years ago.
I installed board and batten molding and also showed you how to hang peel and stick wallpaper on the walls.
I love the contrast that wallpaper created in the room, but you couldn't really appreciate the design on it unless you got up close:
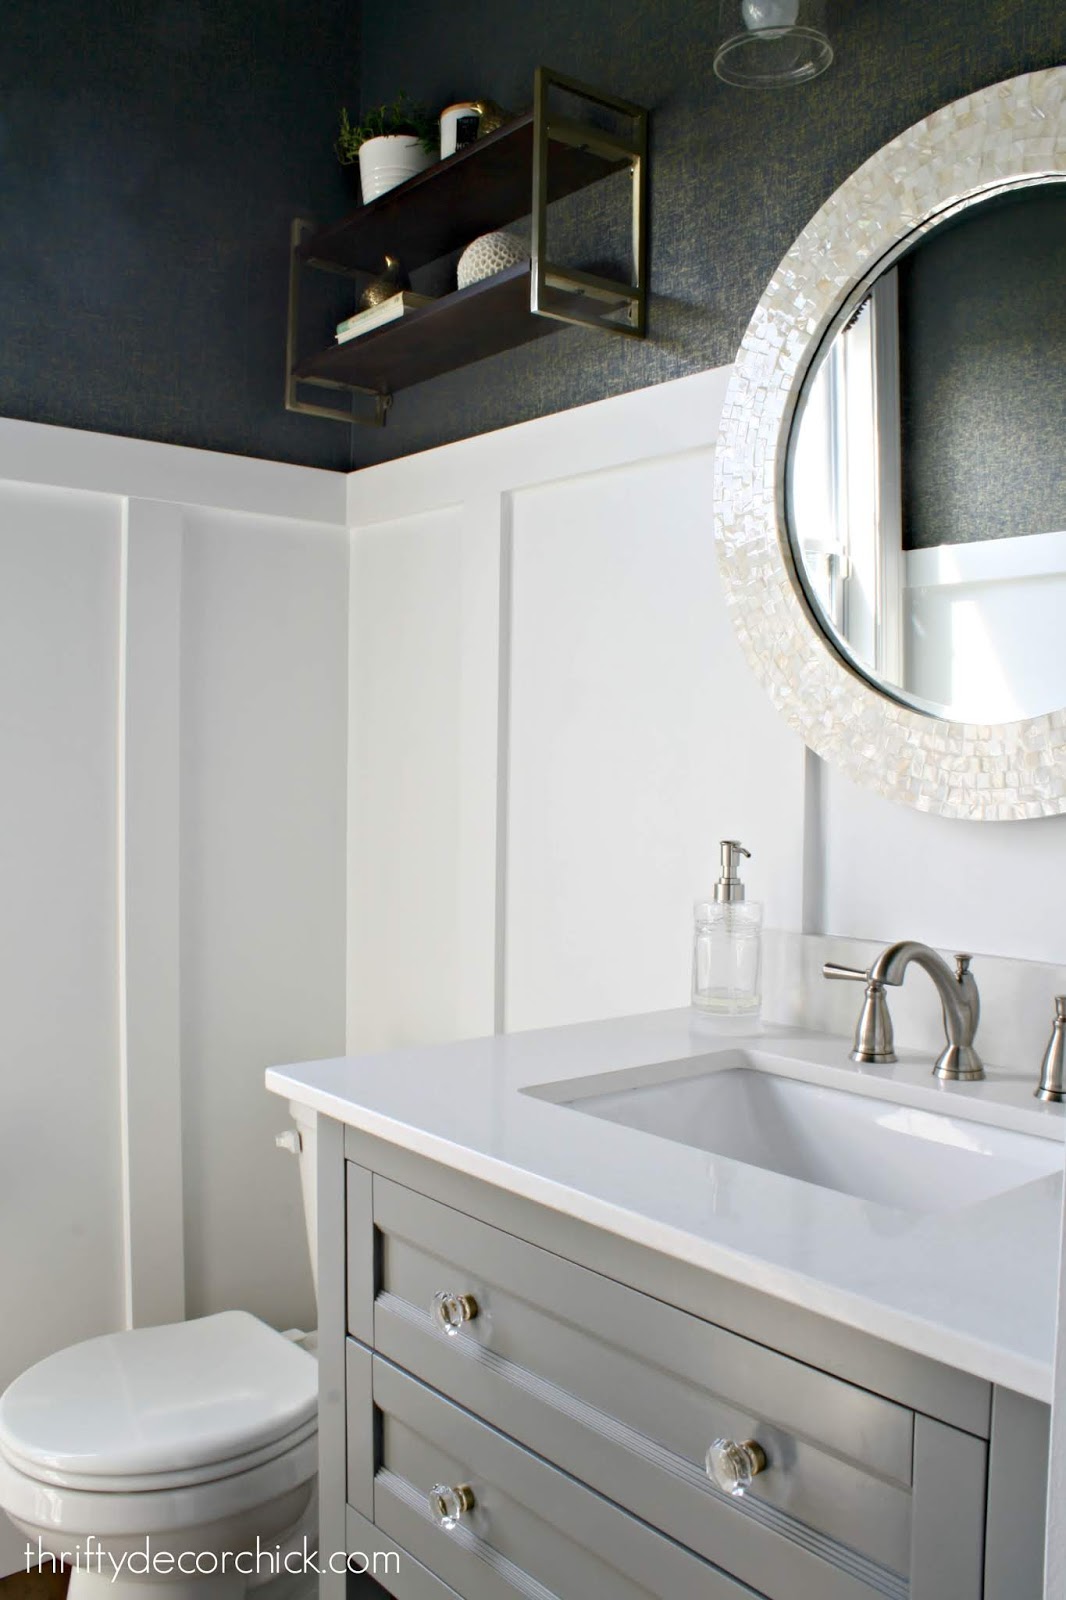
From far away it looked like navy blue paint.
We loved it though, and had no desire to change it out...until I saw THE ONE.
I wasn't even looking for something new...it I found it when I was searching for another project.
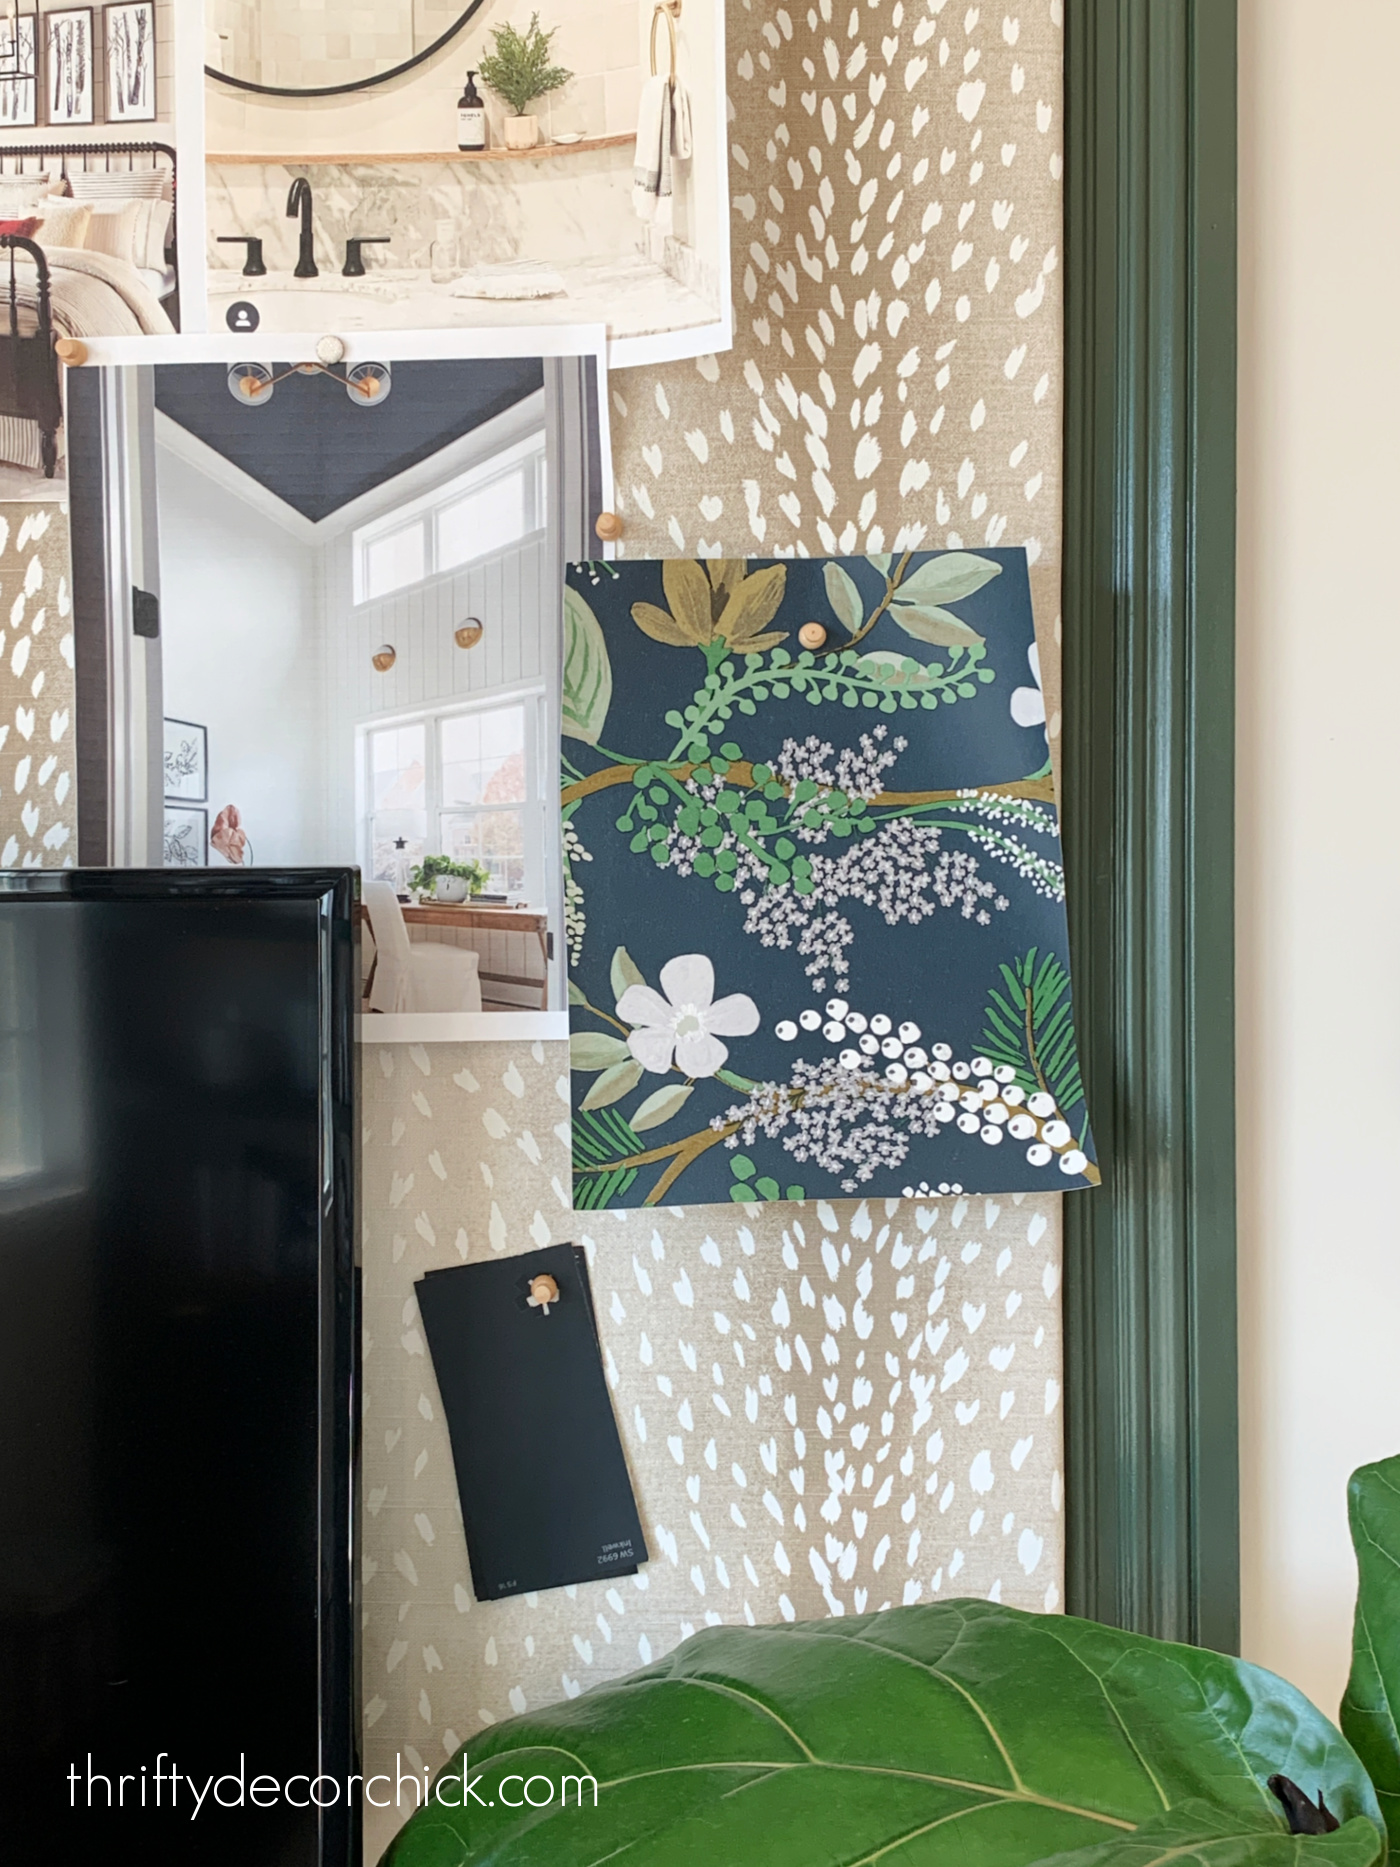
The sample hung on the big upholstered bulletin board in my office for a year:
This post may contain affiliate links for your convenience.
See my policies and disclosure page for more information.
I stared at it lovingly every day while I worked, waiting for when I'd have the time and budget to tackle this project.
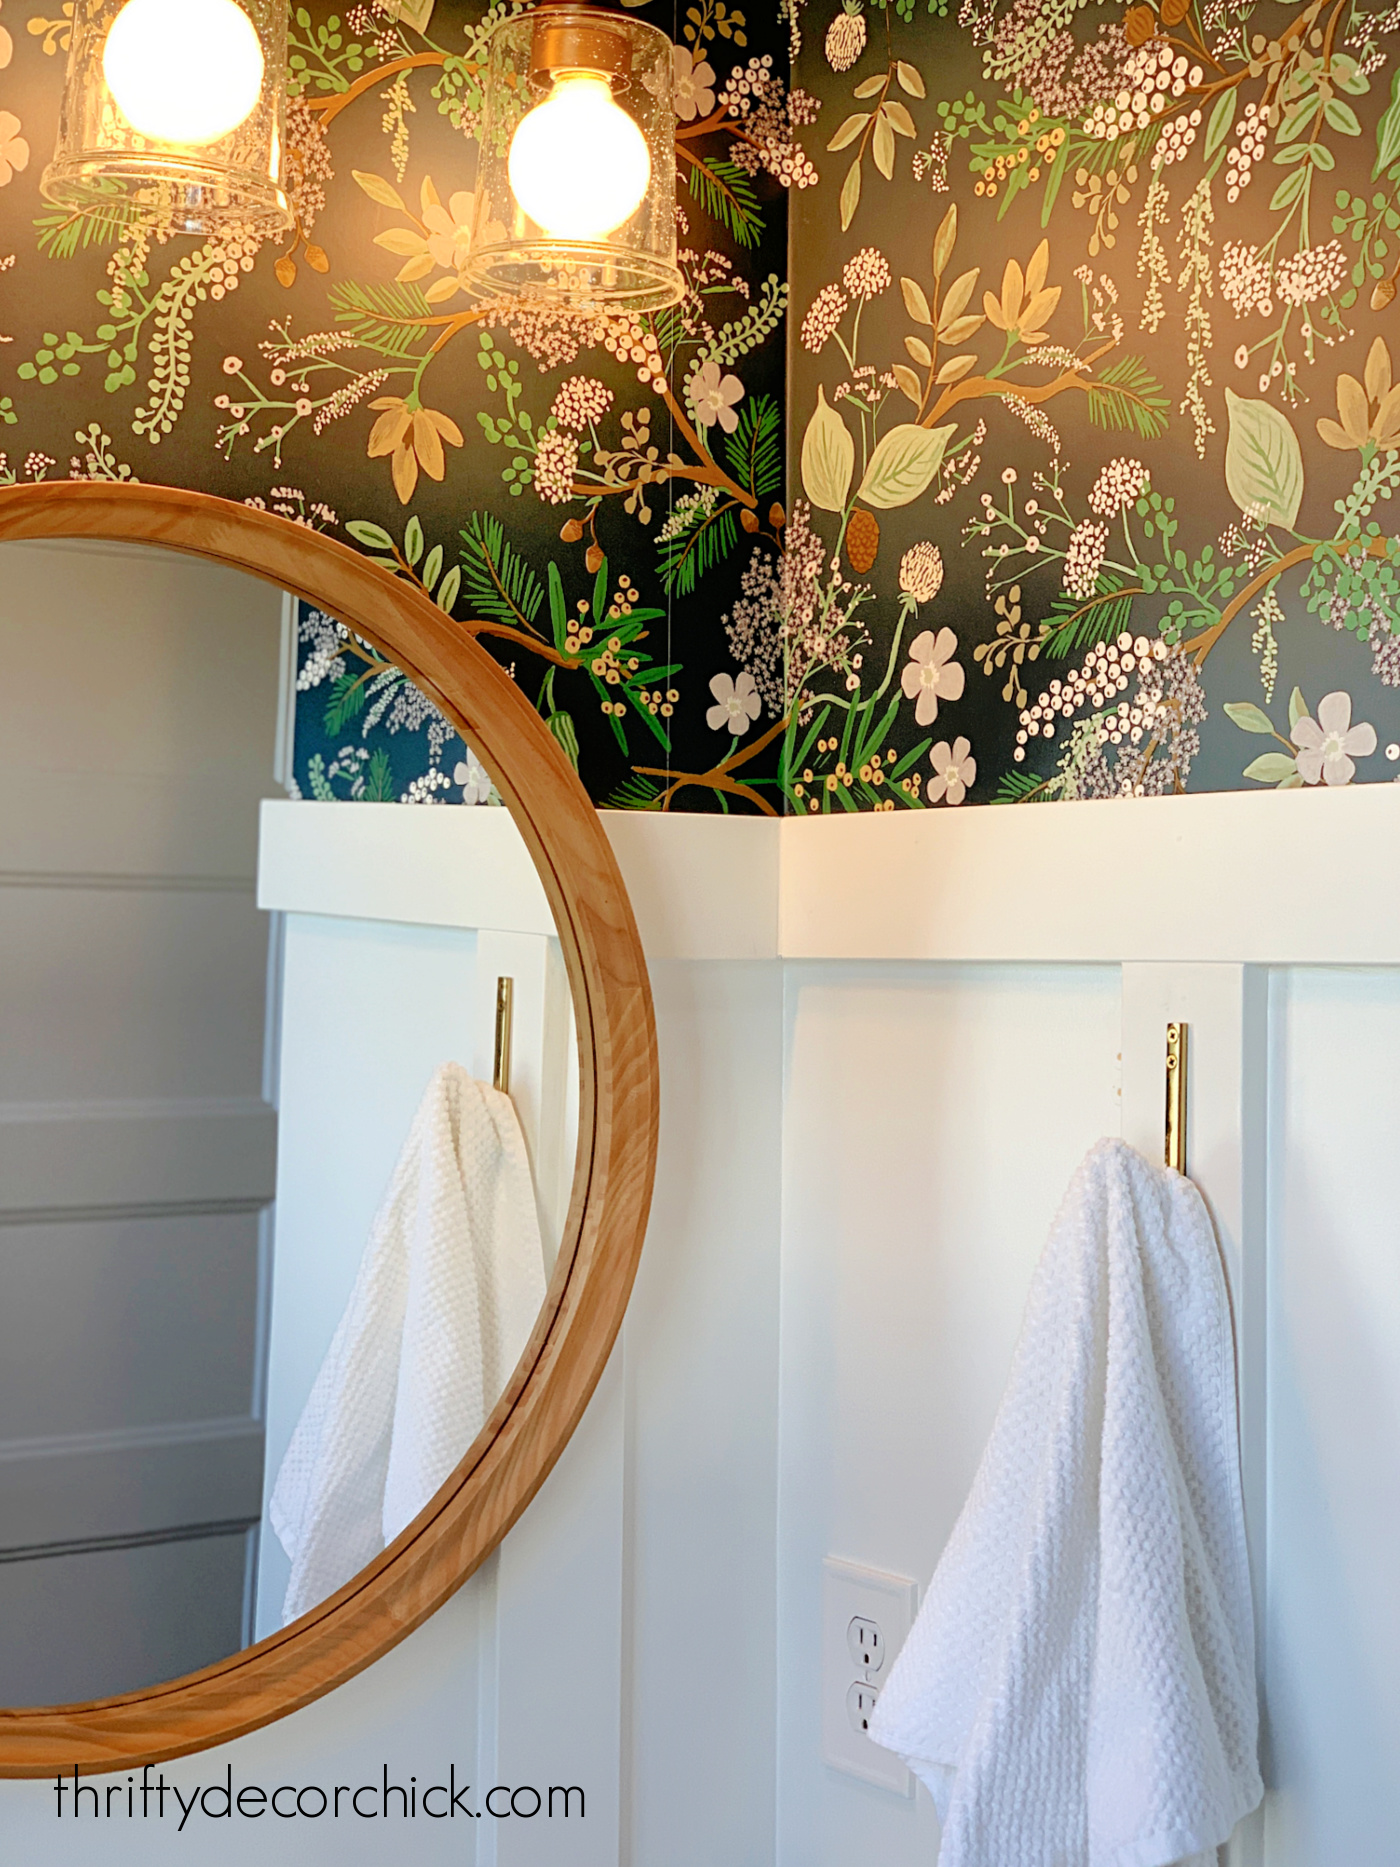
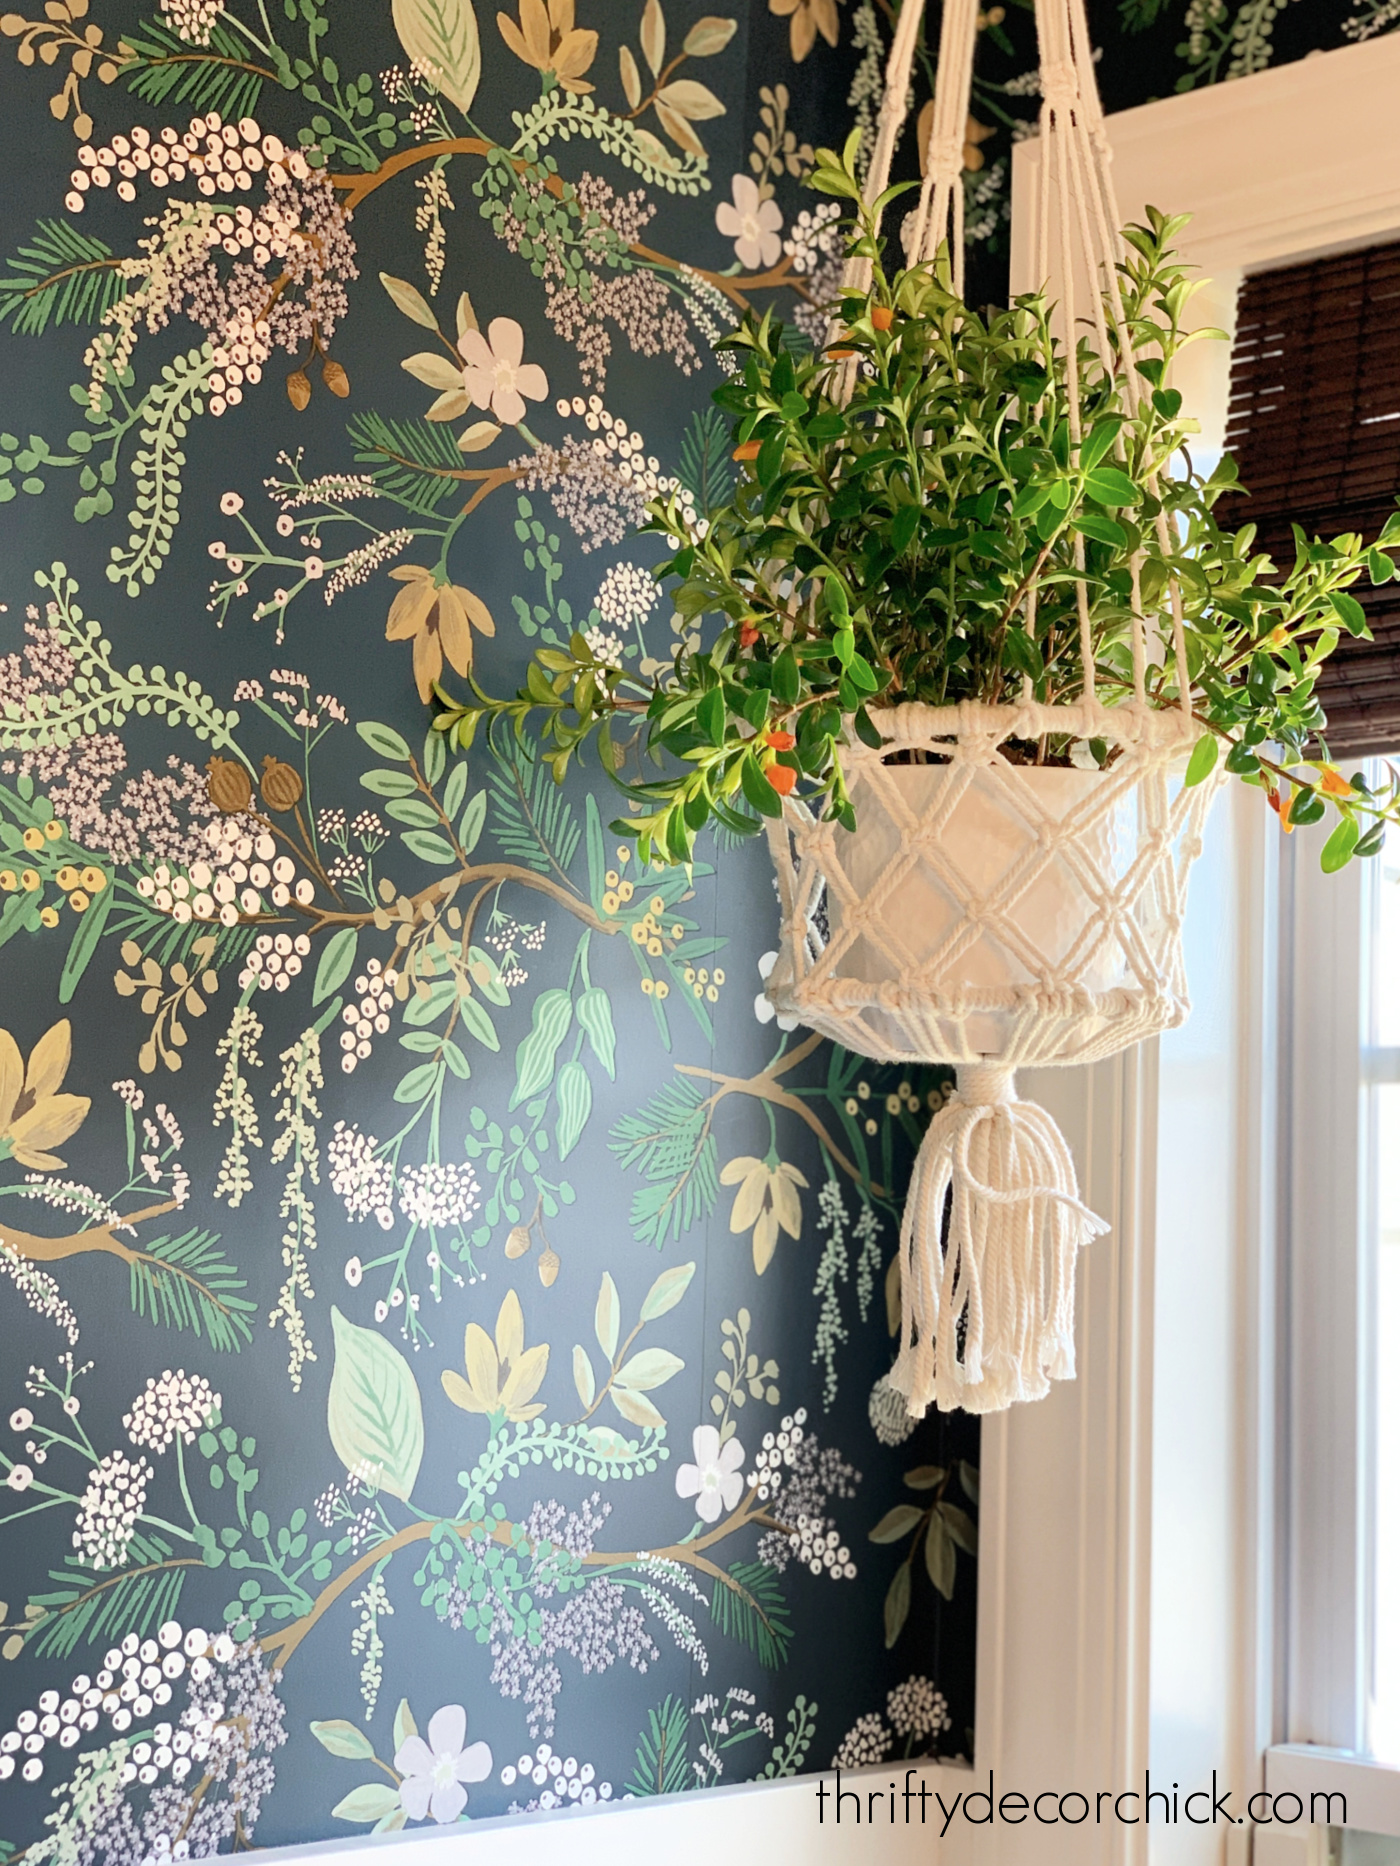
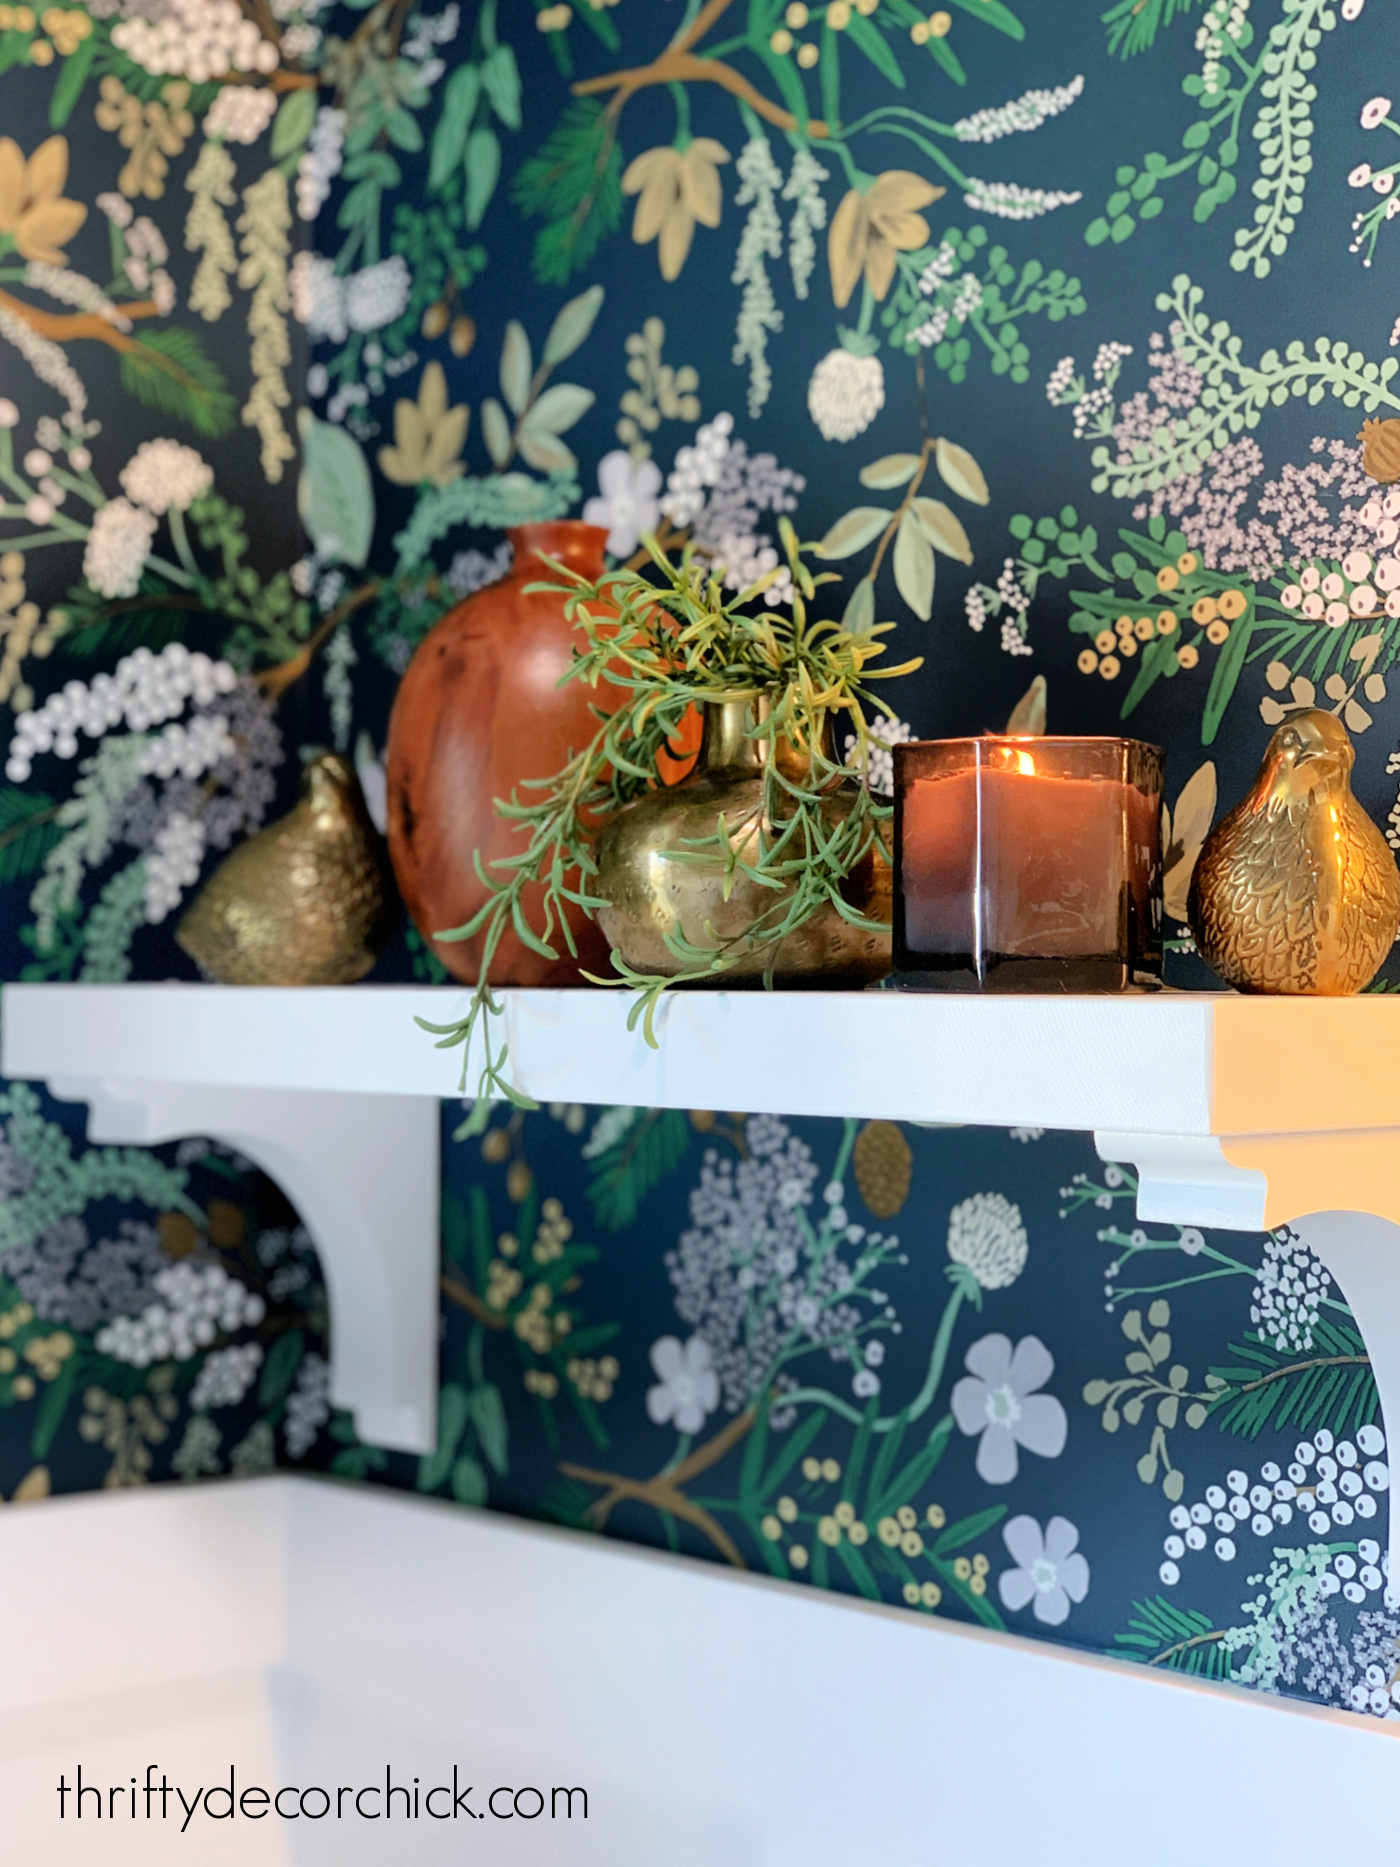
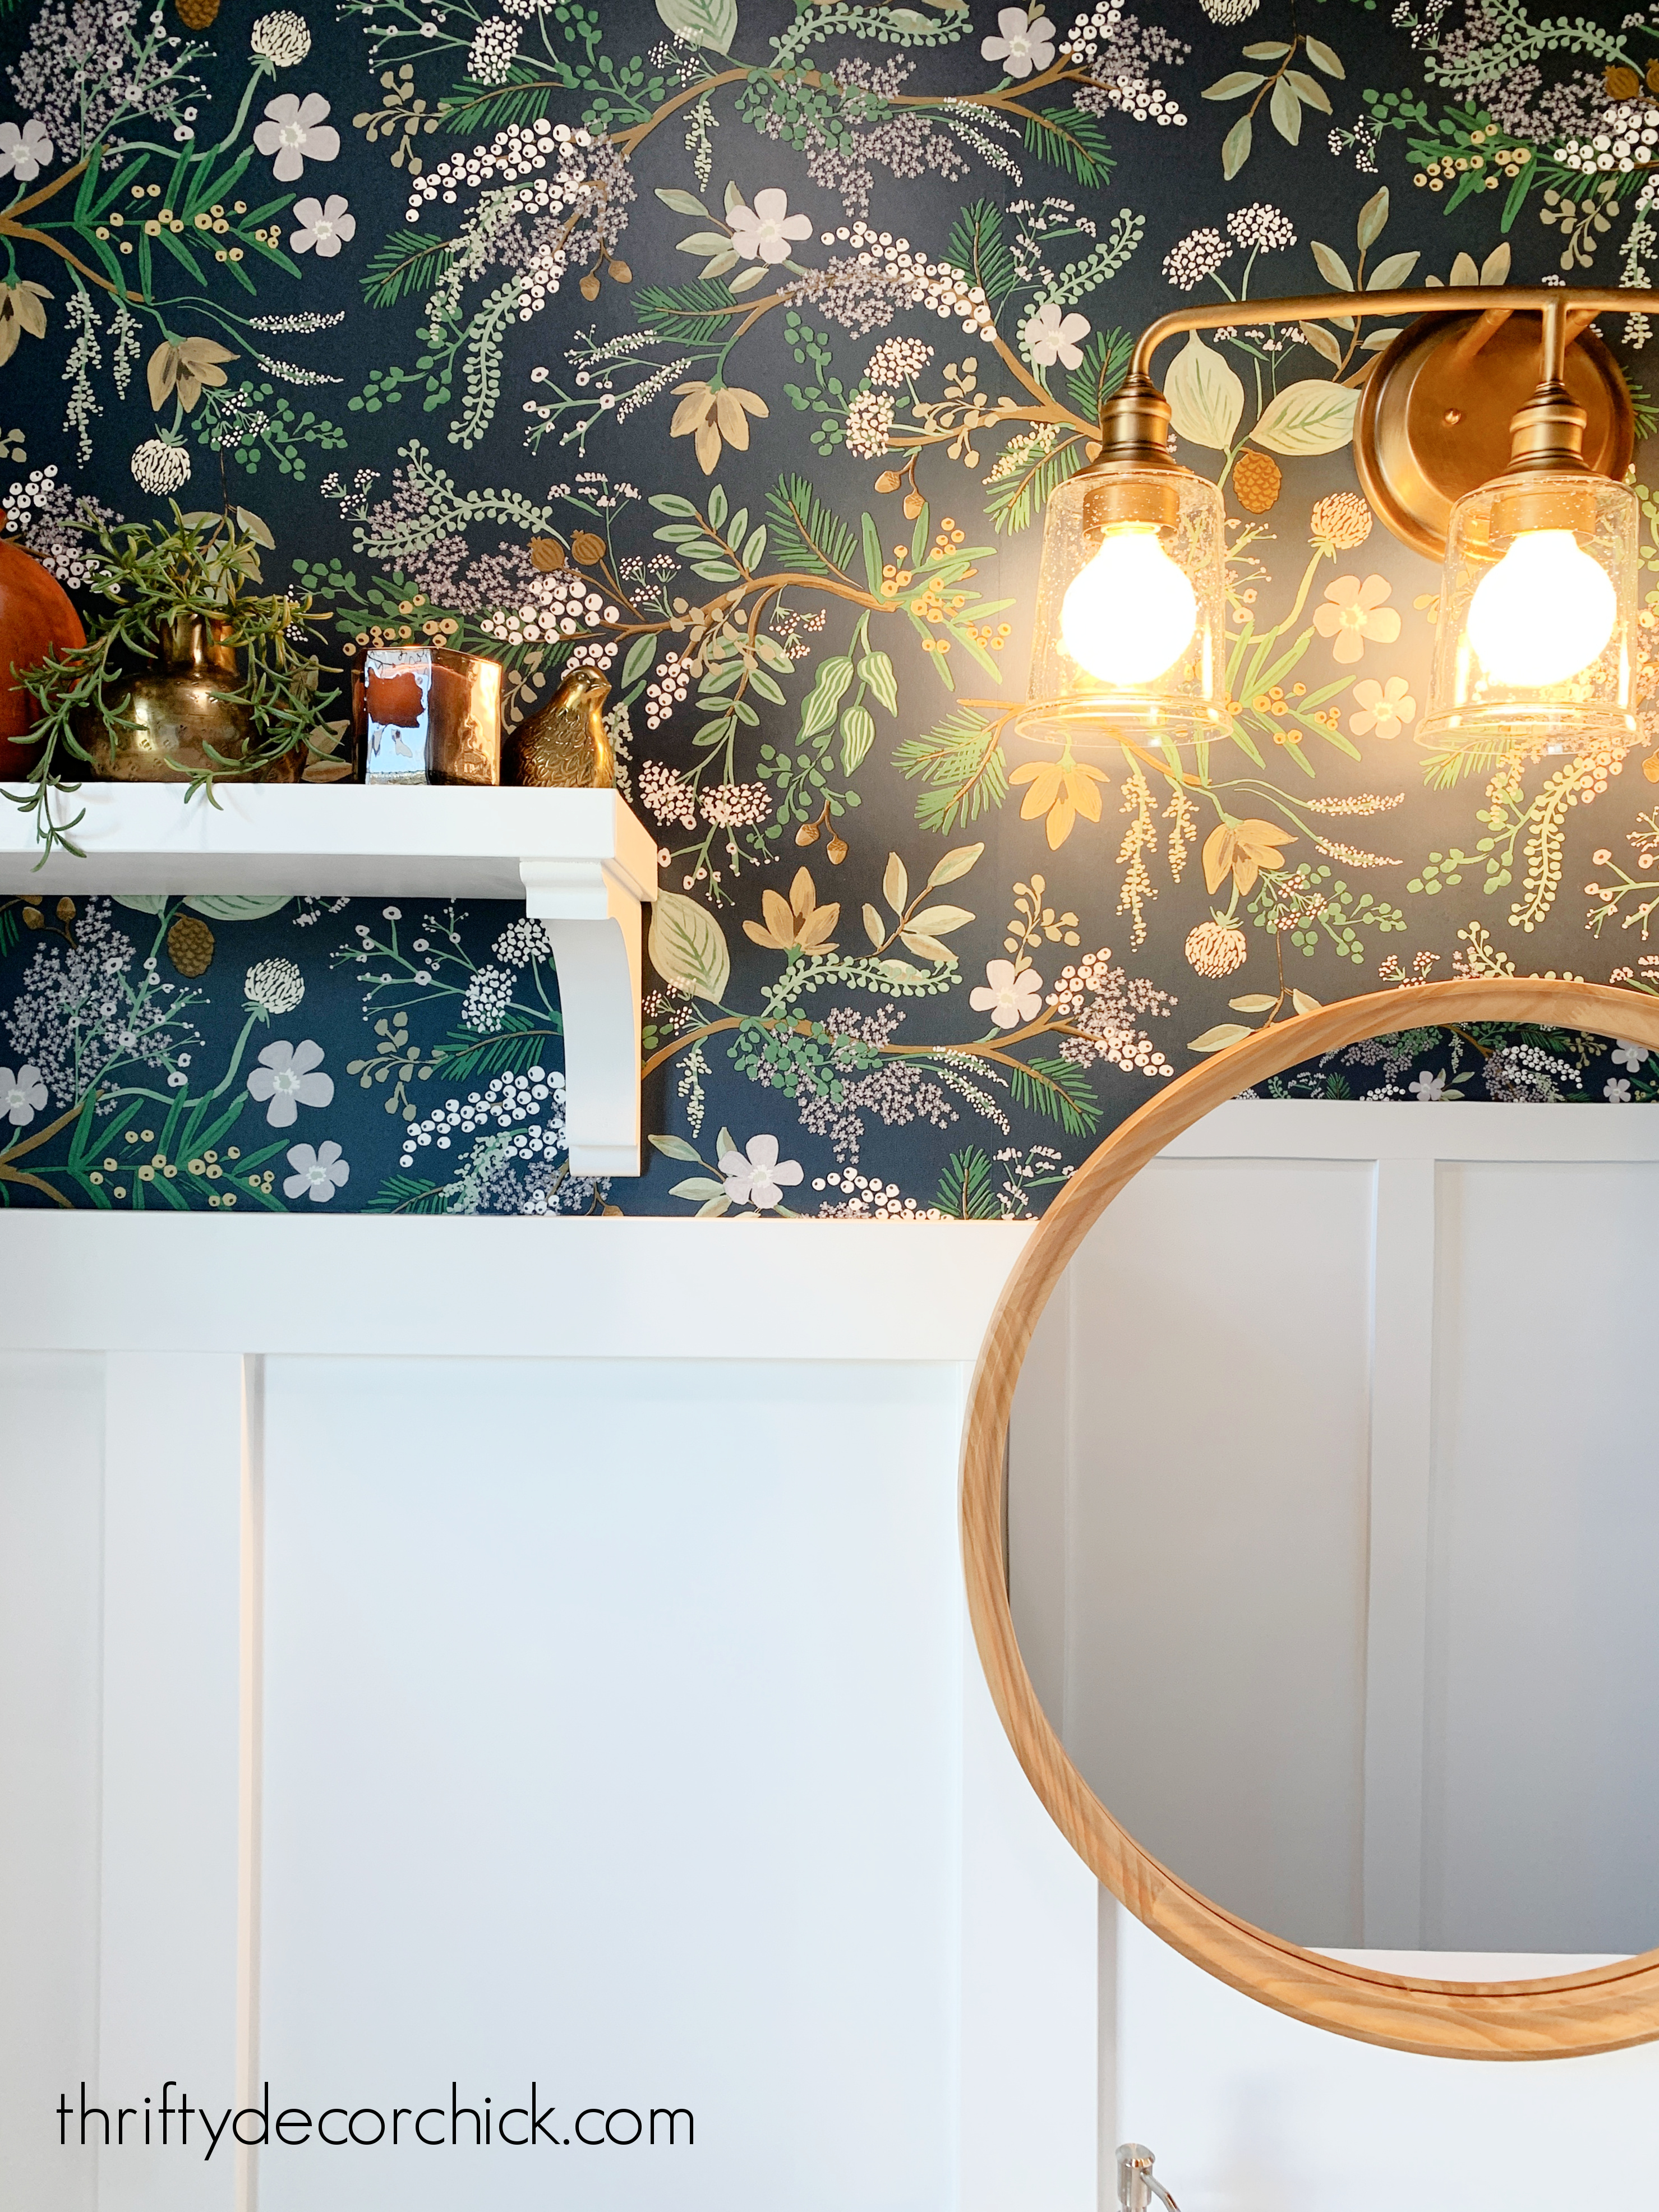
This wallpaper the Rifle Paper Juniper Forest peel and stick wallpaper in evergreen and it is a stunner!
After the busyness of the holidays passed, it was finally time!
I shared how I removed the peel and stick wallpaper that was up (and a few tips!) last week:
After that was down, I painted the crown molding (I never painted it years ago!). ? Without the wallpaper up it was easy to cut in along the bottom of the crown.
The new wallpaper is absolutely gorgeous...I smile every time I look at it! I loved the design, but the colors are what really attracted me to it.
It has different shades of green from light to dark, of course the deep navy blue background, gray, and even some light lavender accents:
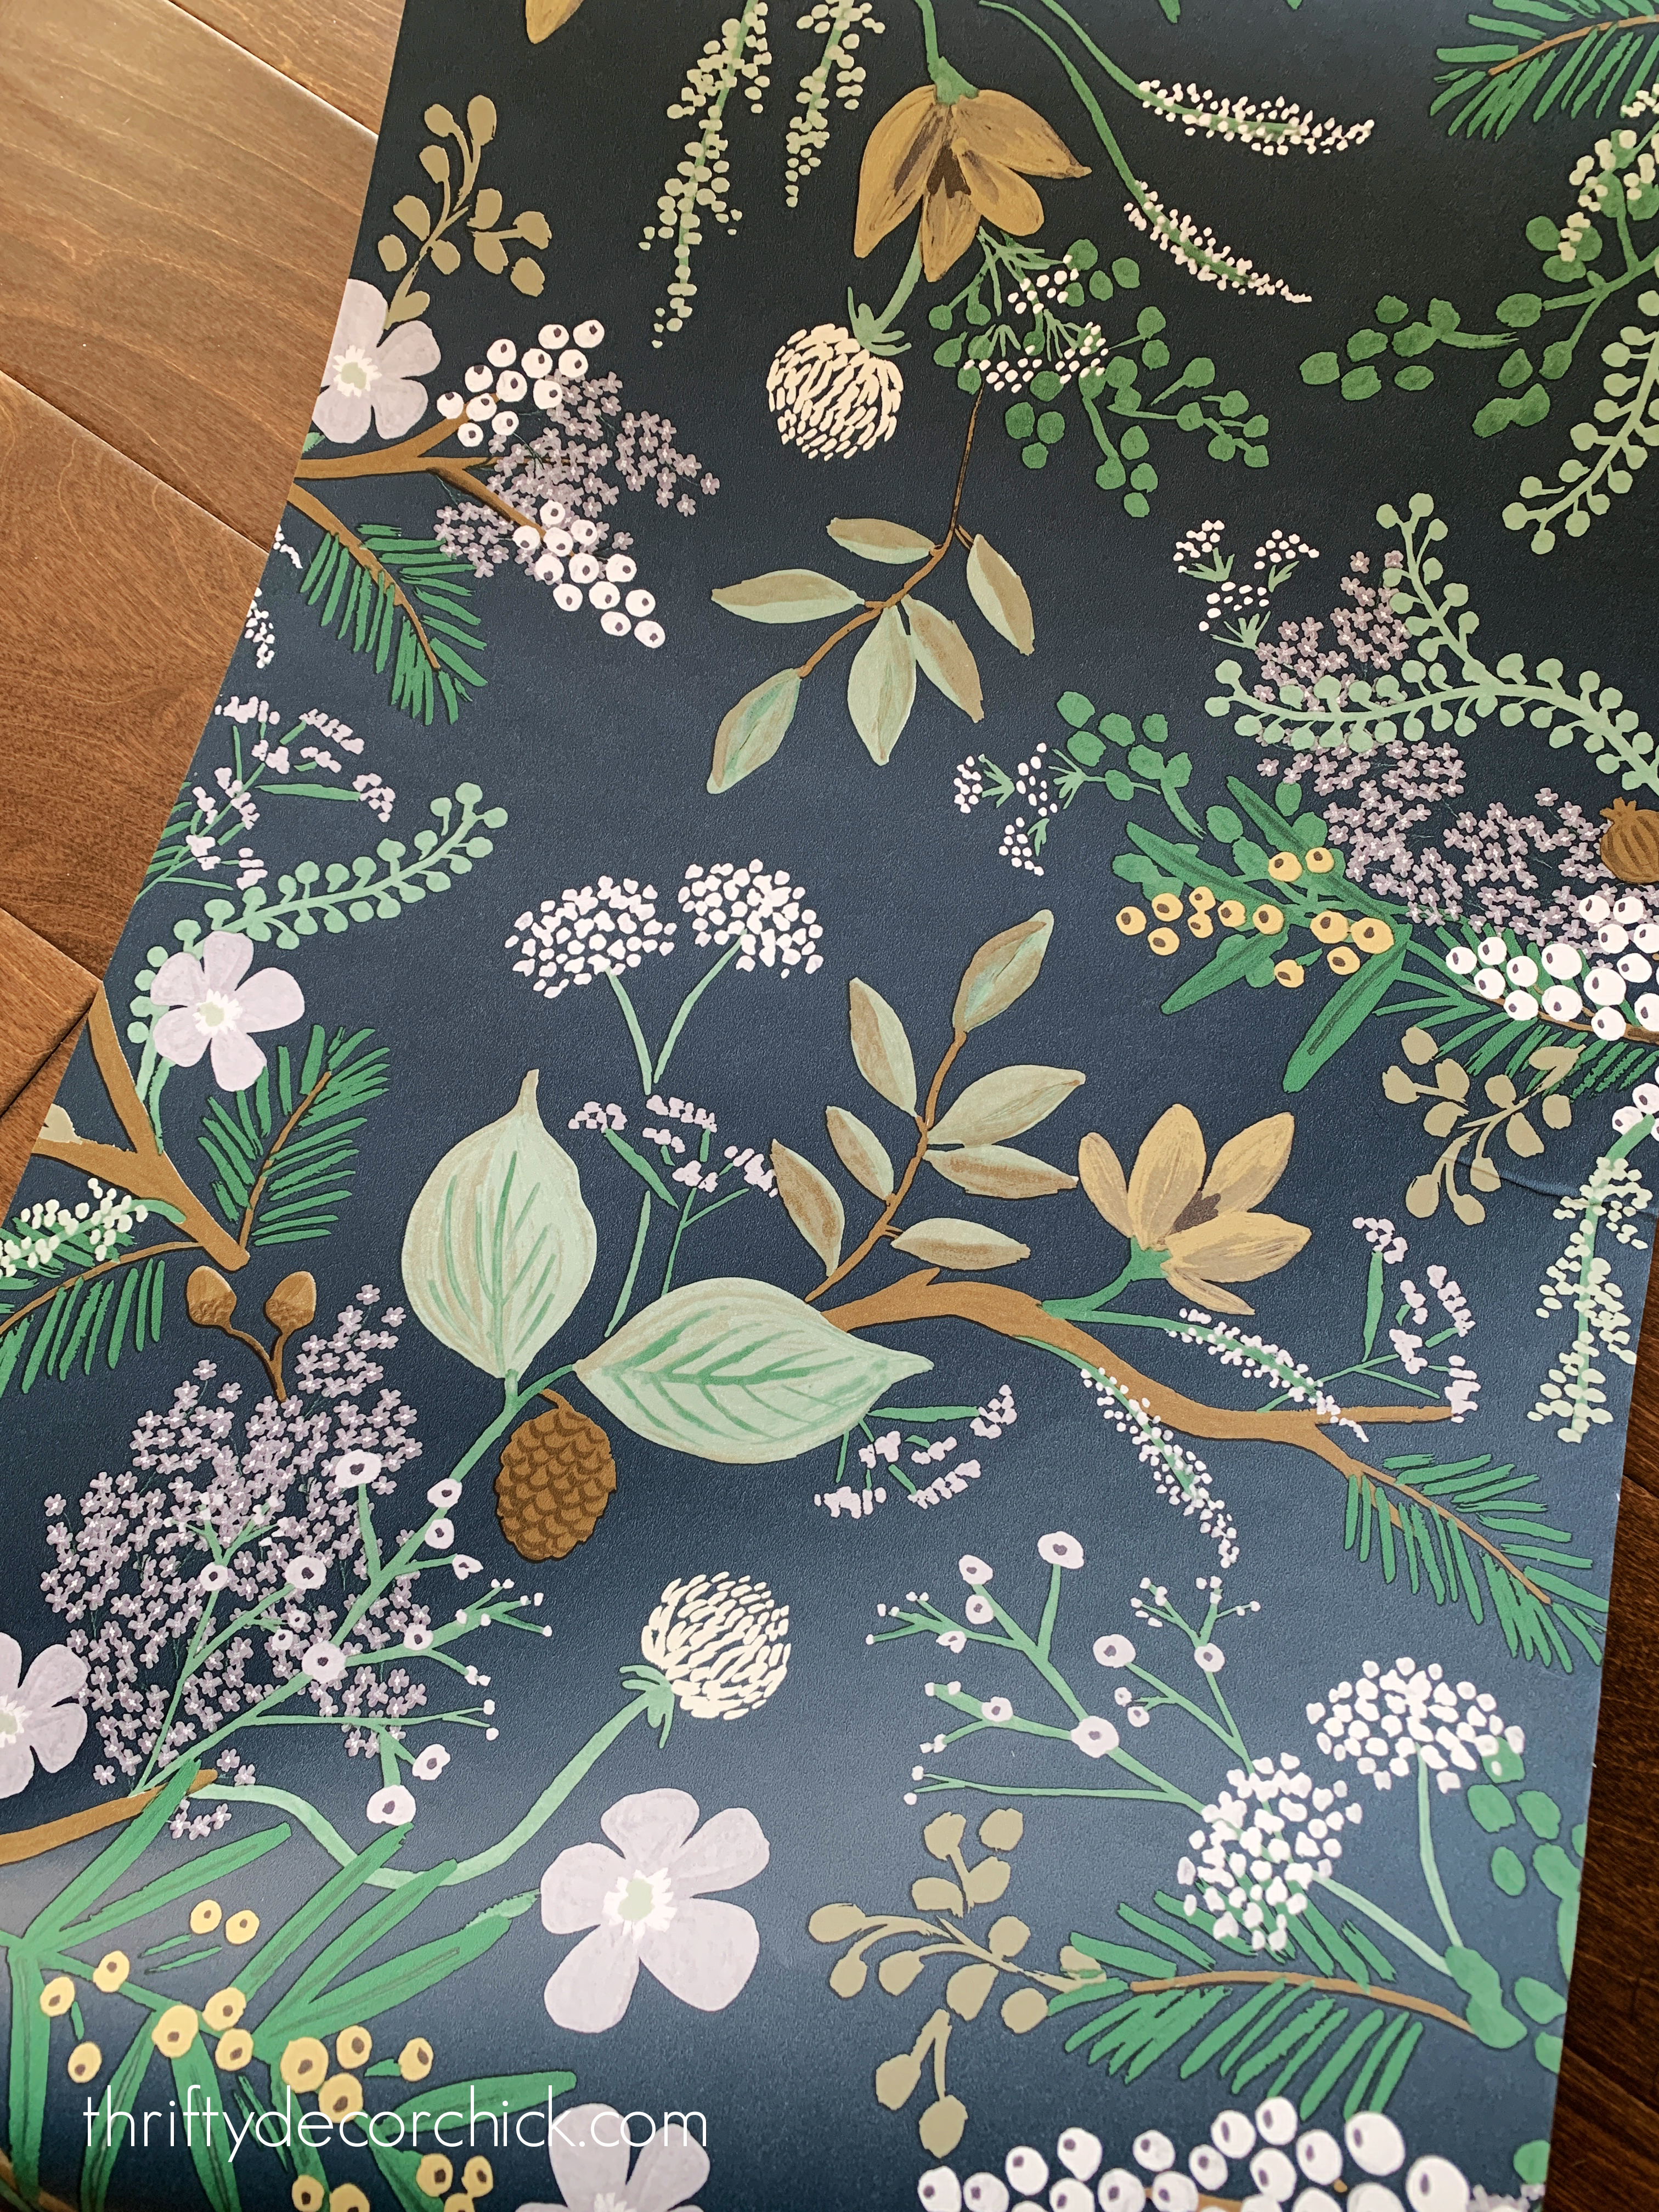
I liked the brown variations as well -- I feel like this wallpaper is our home in a nutshell.
It incorporates my love of those deep blue and green tones and brings in the stained wood I use a lot.
I just LOVE it!
This design is available in three different colorways -- this blue one and a black version with more red tones instead of the beige and brown. It also comes in a burgundy color, but that one is harder to find.
As always with wallpaper, the price varies greatly online! Search "juniper forest peel and stick wallpaper" to find a variety of suppliers and the best price.
I didn't buy much for this room as far as accessories, but I did replace the lighter existing mirror with a new wood one:
The old bathroom mirror went to our mud room.
The round wood version compliments the brown colors in the wallpaper so well and looks great with our brass vanity light.
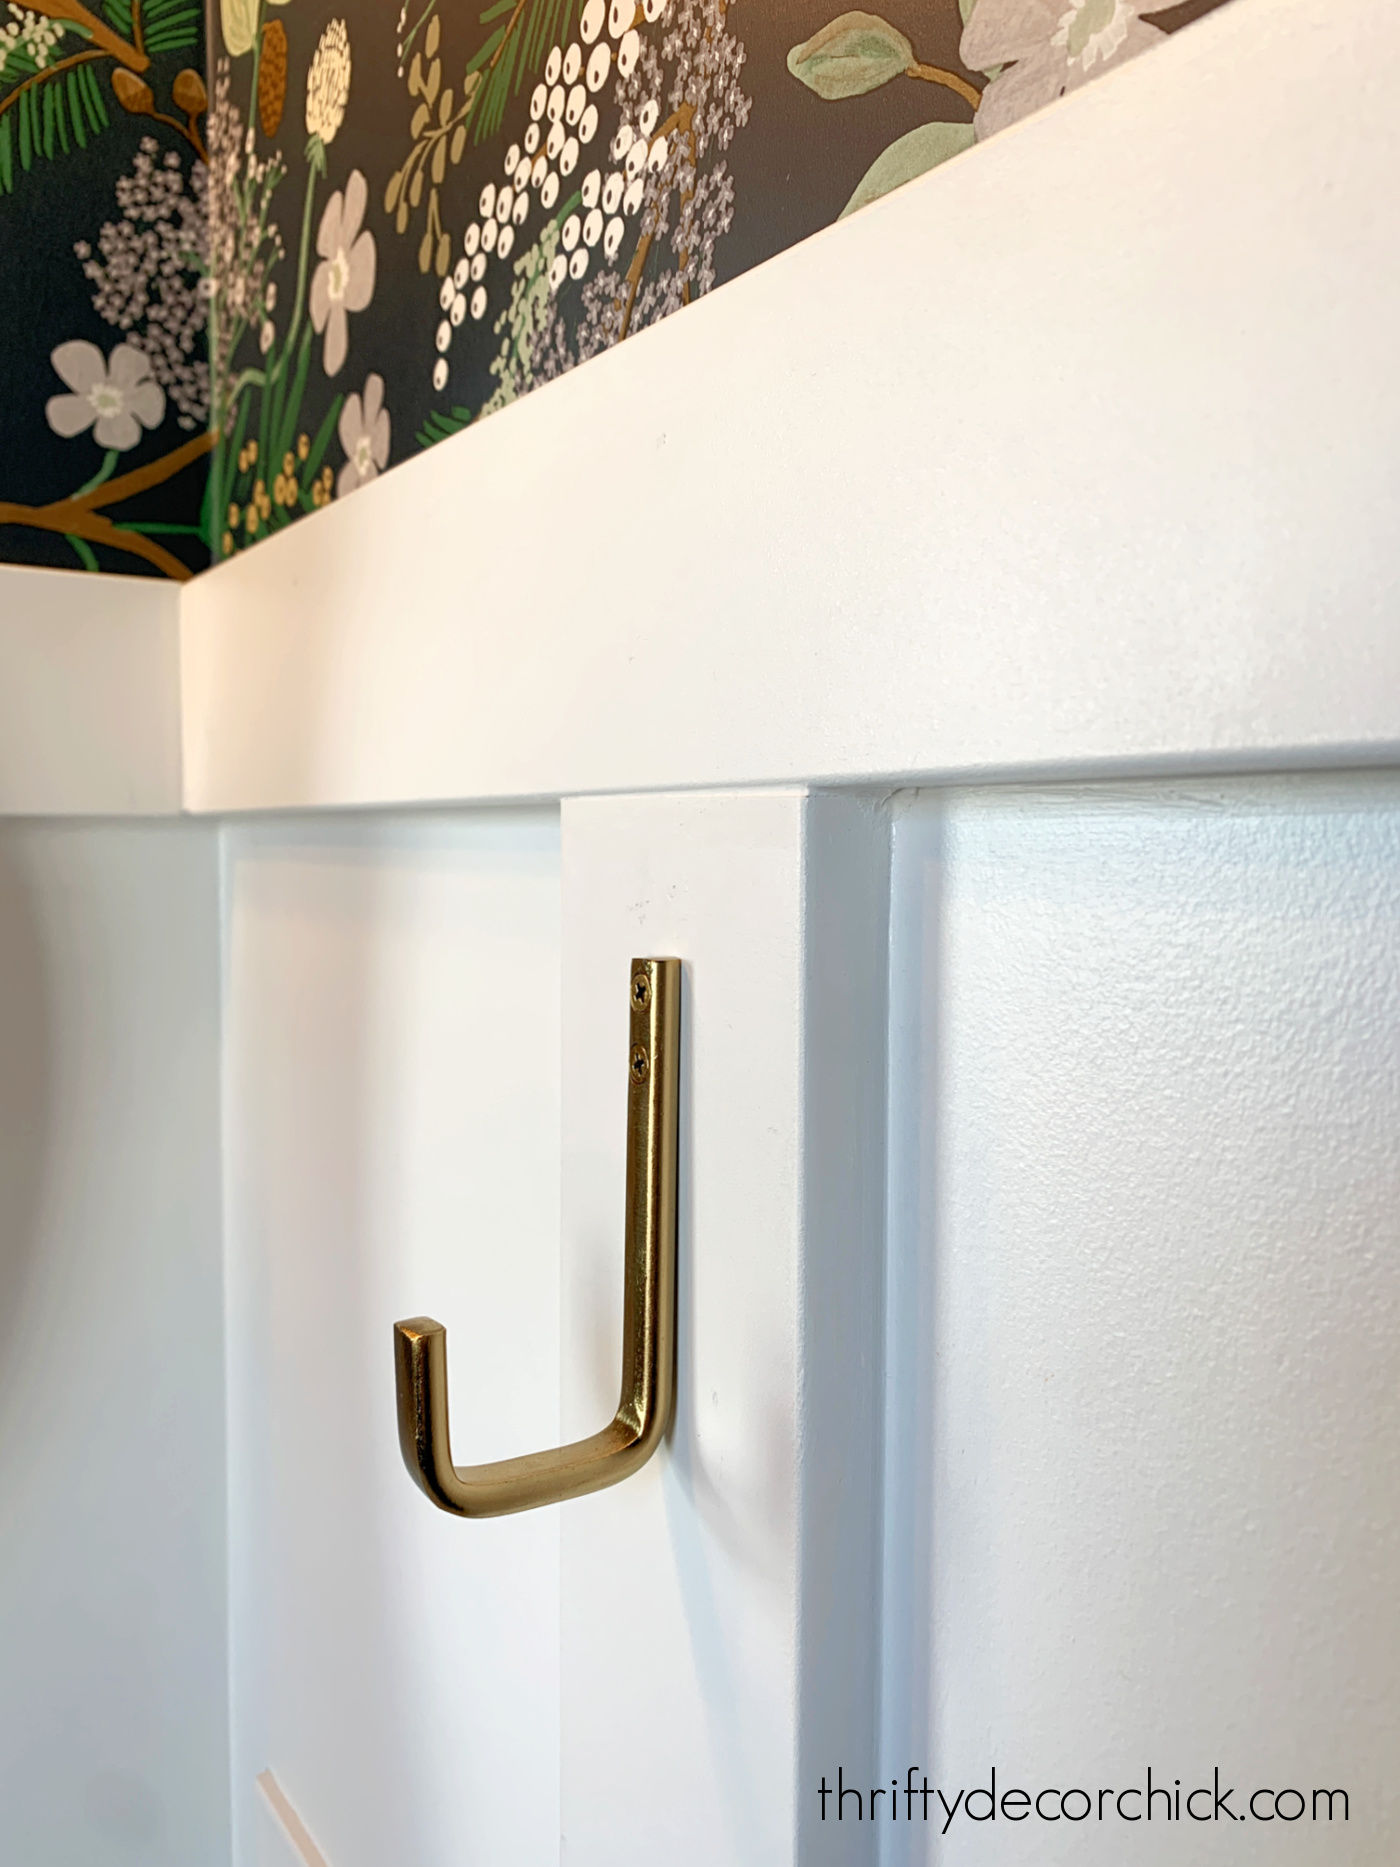
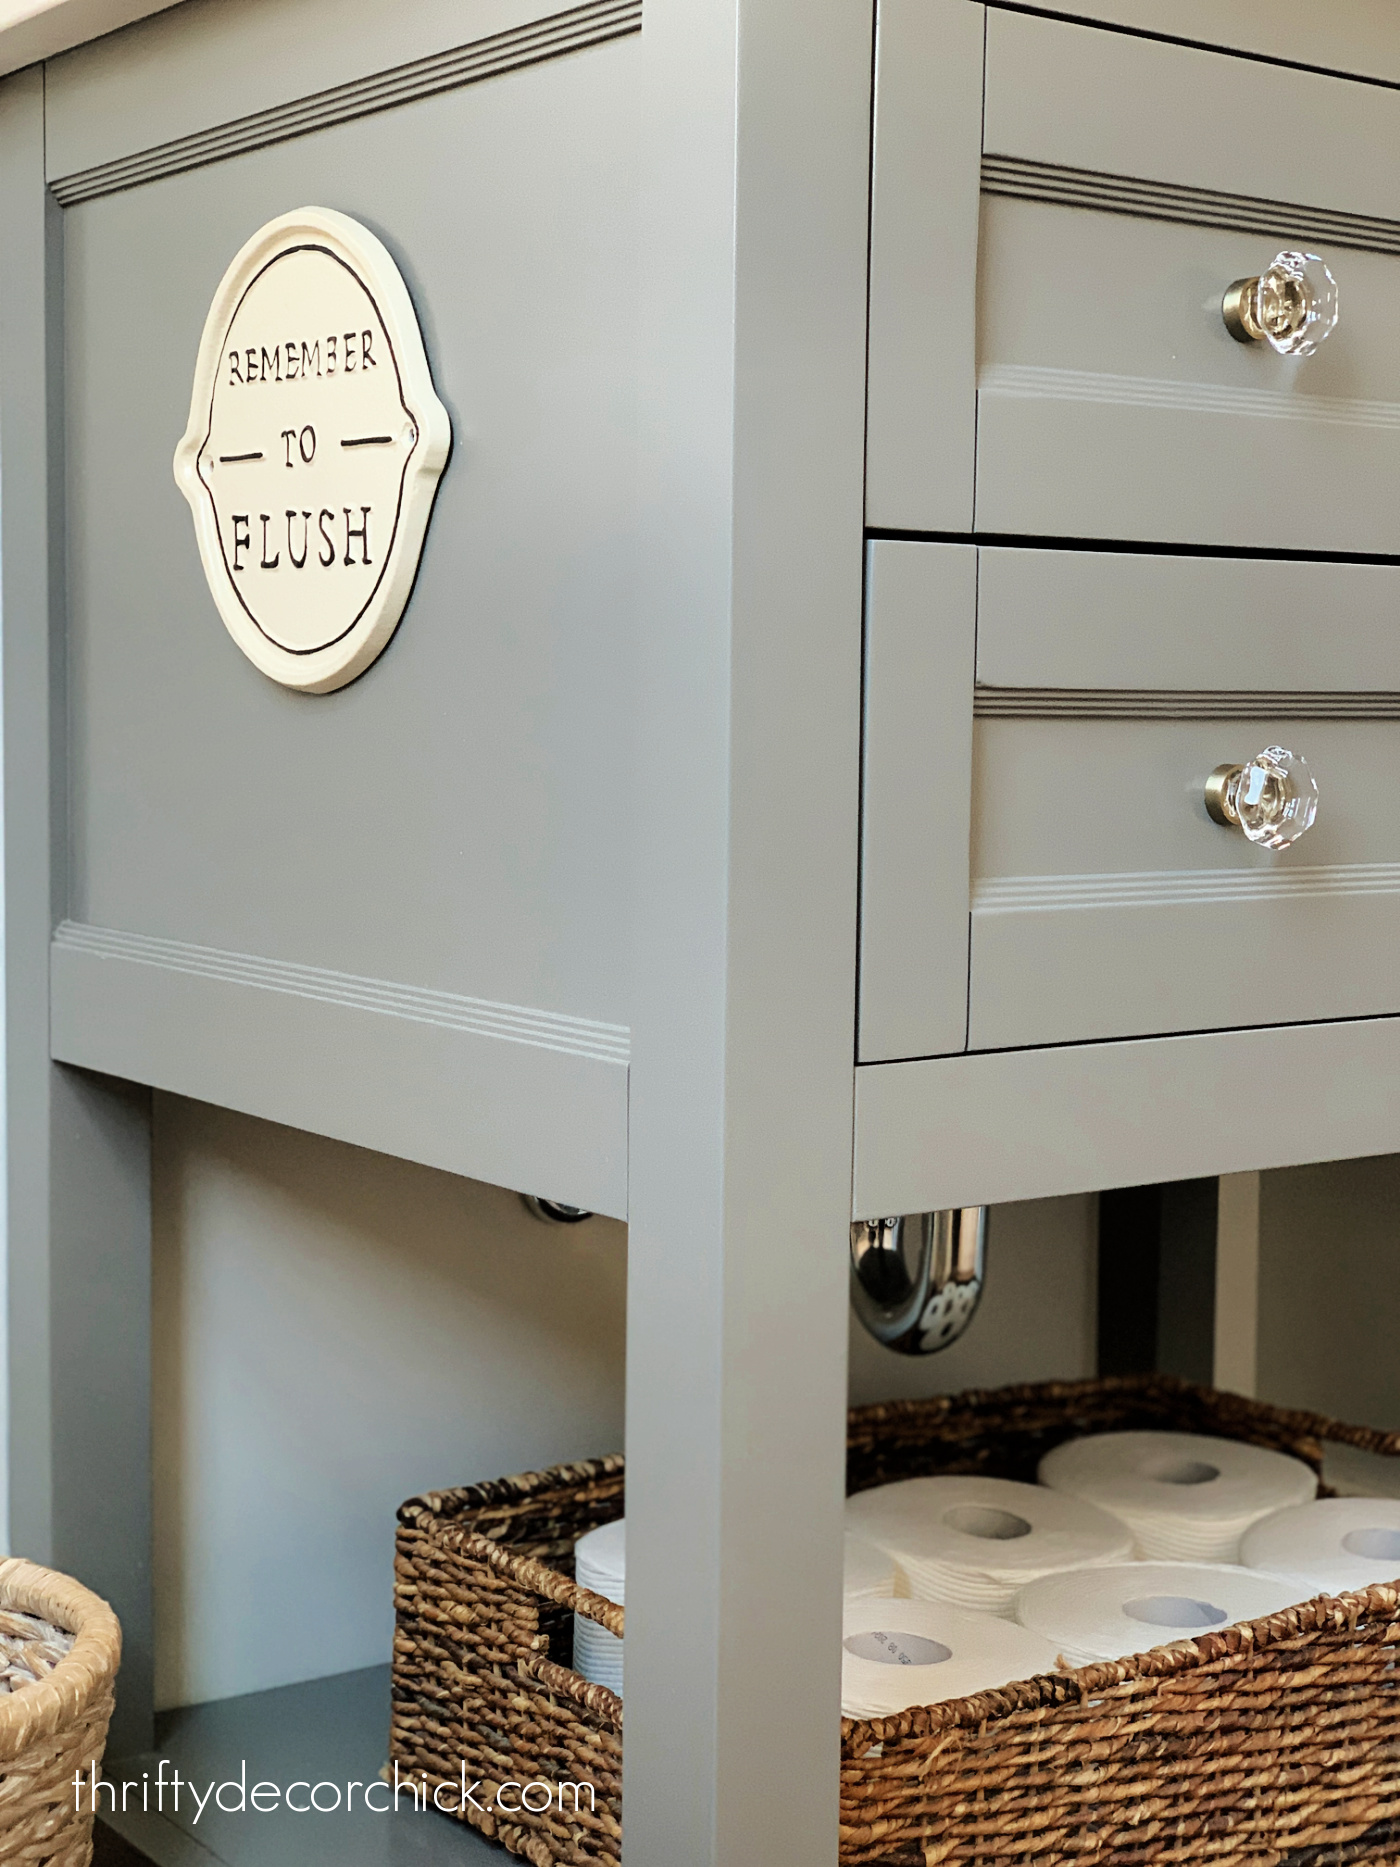
I got a new brass towel hanger too. I prefer using simple hooks instead of towel bars or rings -- the hooks are so much easier!:
And I've had this matte black toilet handle in the vanity drawer for about two years! It was finally time to install it:
I already had this cute plant hanger and knew it would be perfect in here:
I wanted a spot for a candle and to display a few other little decor items, but didn't want to spend much money.
I couldn't find the right shelf anywhere -- they were either too modern or too detailed for what I wanted.
But then I remembered I already had some corbels in the garage for another project! I rummaged through my wood scrap pile to see if I could find something that fit them.
Thankfully I kept the end piece of the butcher block counter for our pantry project. (This is why I keep so much scrap wood!)
It was the perfect size to go with the corbels:
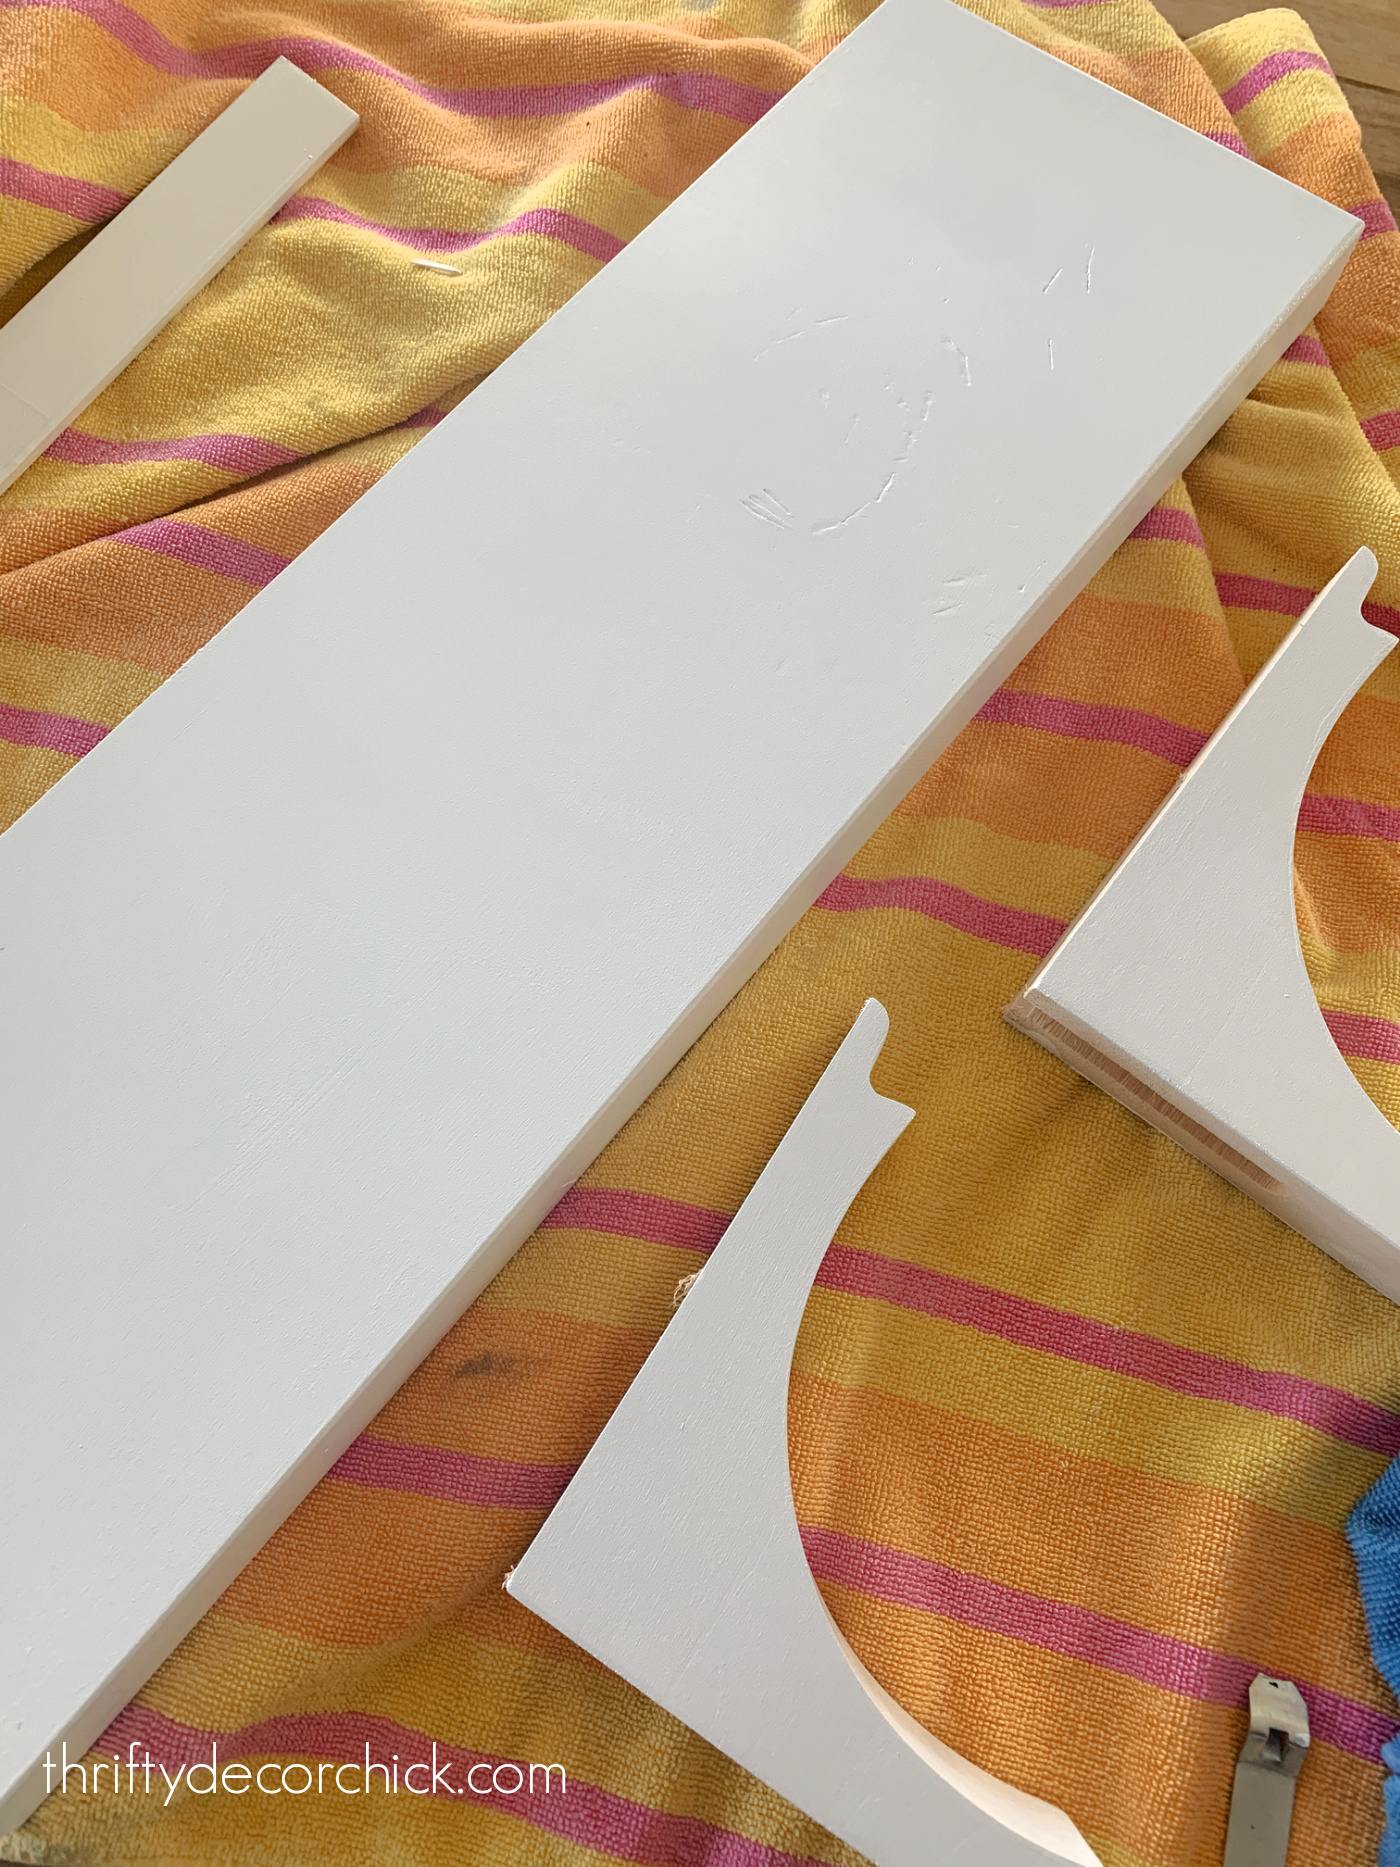
I painted them all in crisp white (Pure White by Sherwin-Williams to match the board and batten and crown molding in here) and then hung my cute little corbel shelf:

I love it!!
It has just enough detail but isn't too busy.
I wanted to keep things simple with this bold design on the walls.
I added some of my favorite vintage brass accents and a vase on top:
And now here's the full tour of this small powder bathroom!
I can't tell you how happy this little space makes me:
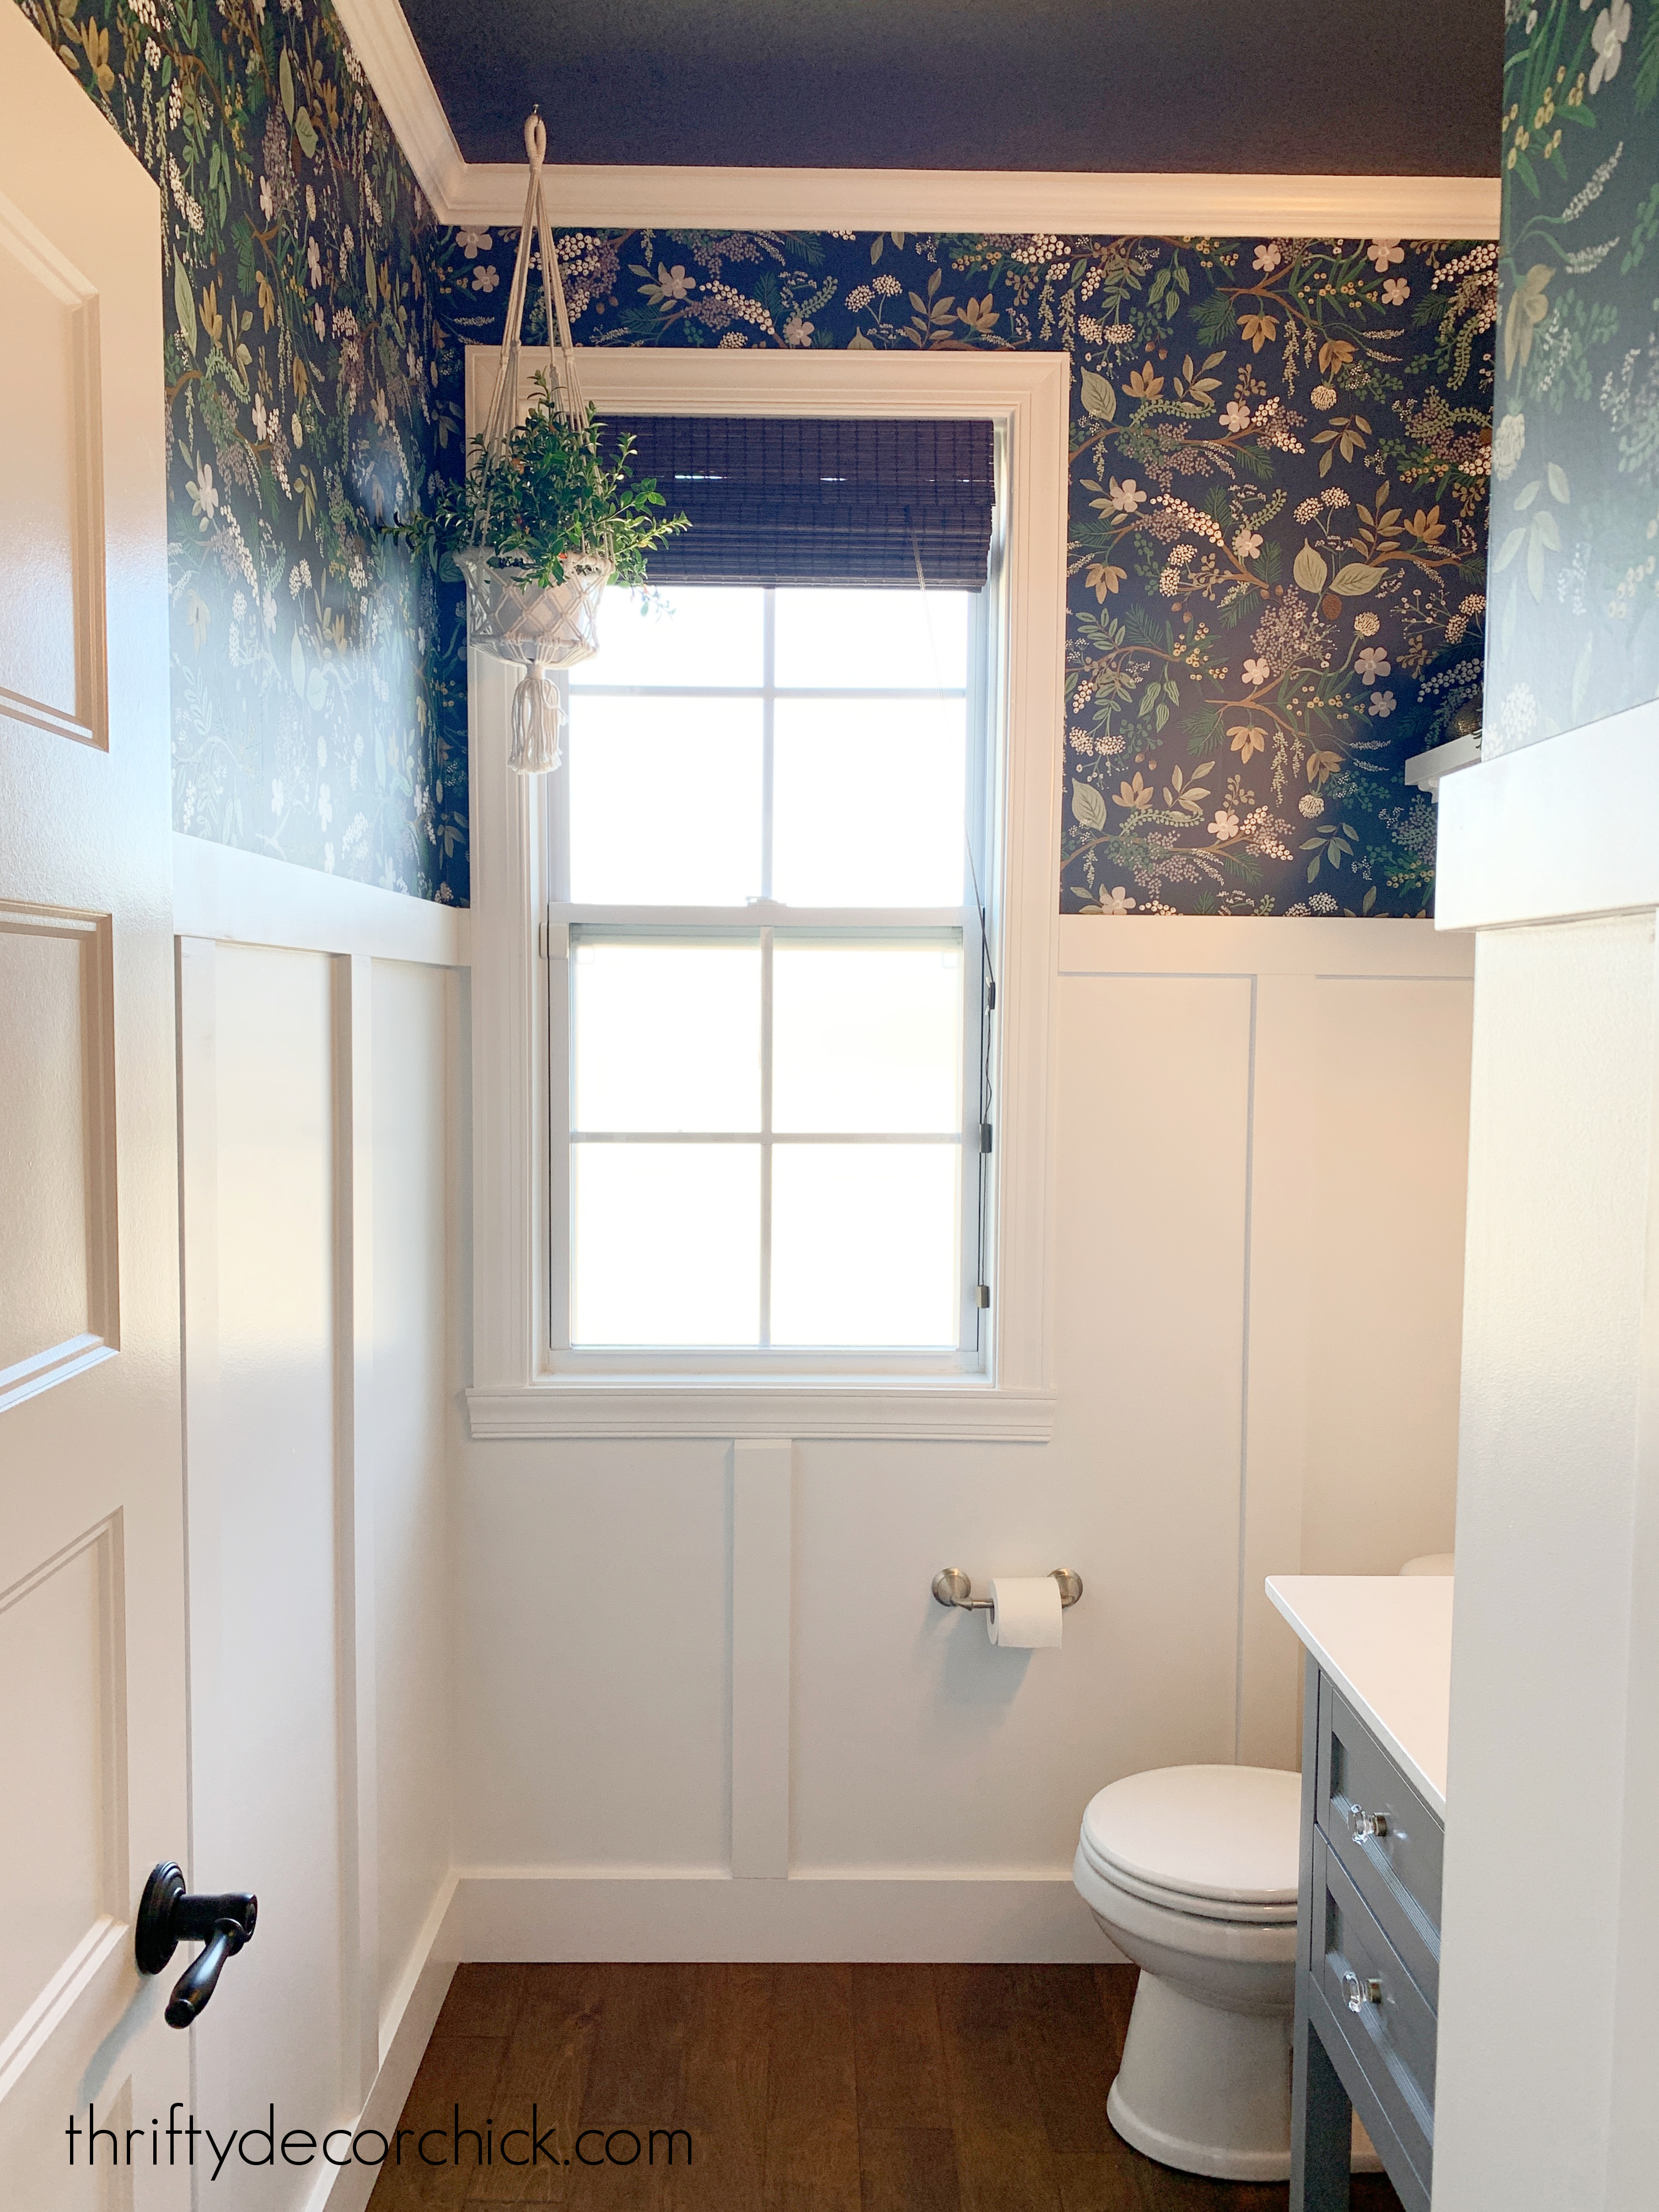
I shared how I love to paint ceilings here -- it's such an unexpected detail, and looks especially great in smaller rooms.
I encourage you to make the most of small spaces -- rooms like closets, laundry, mud rooms, and powder rooms are the perfect spot to be more bold than usual.
Especially bathrooms -- I mean...it's a boring space, right?
Why not have some fun with it?
I bought a new brass faucet that was going to be the perfect finishing touch, but the design of our vanity makes it super difficult to install:

I tried everything I could think of -- but I haven't given up just yet.
I love our vanity, but when you take the drawers out, there's a bottom underneath. The faucets are up inside, way behind sink so it's difficult to access the plumbing.
I don't know if it can happen without removing the countertop or pulling the vanity away from the wall:
The new faucet matches the pretty brass in the light fixture and I'm really hoping I can make it work someday!
Ah well, you win some, you lose some. The new wallpaper is enough of a win for me!
I could not love it more!
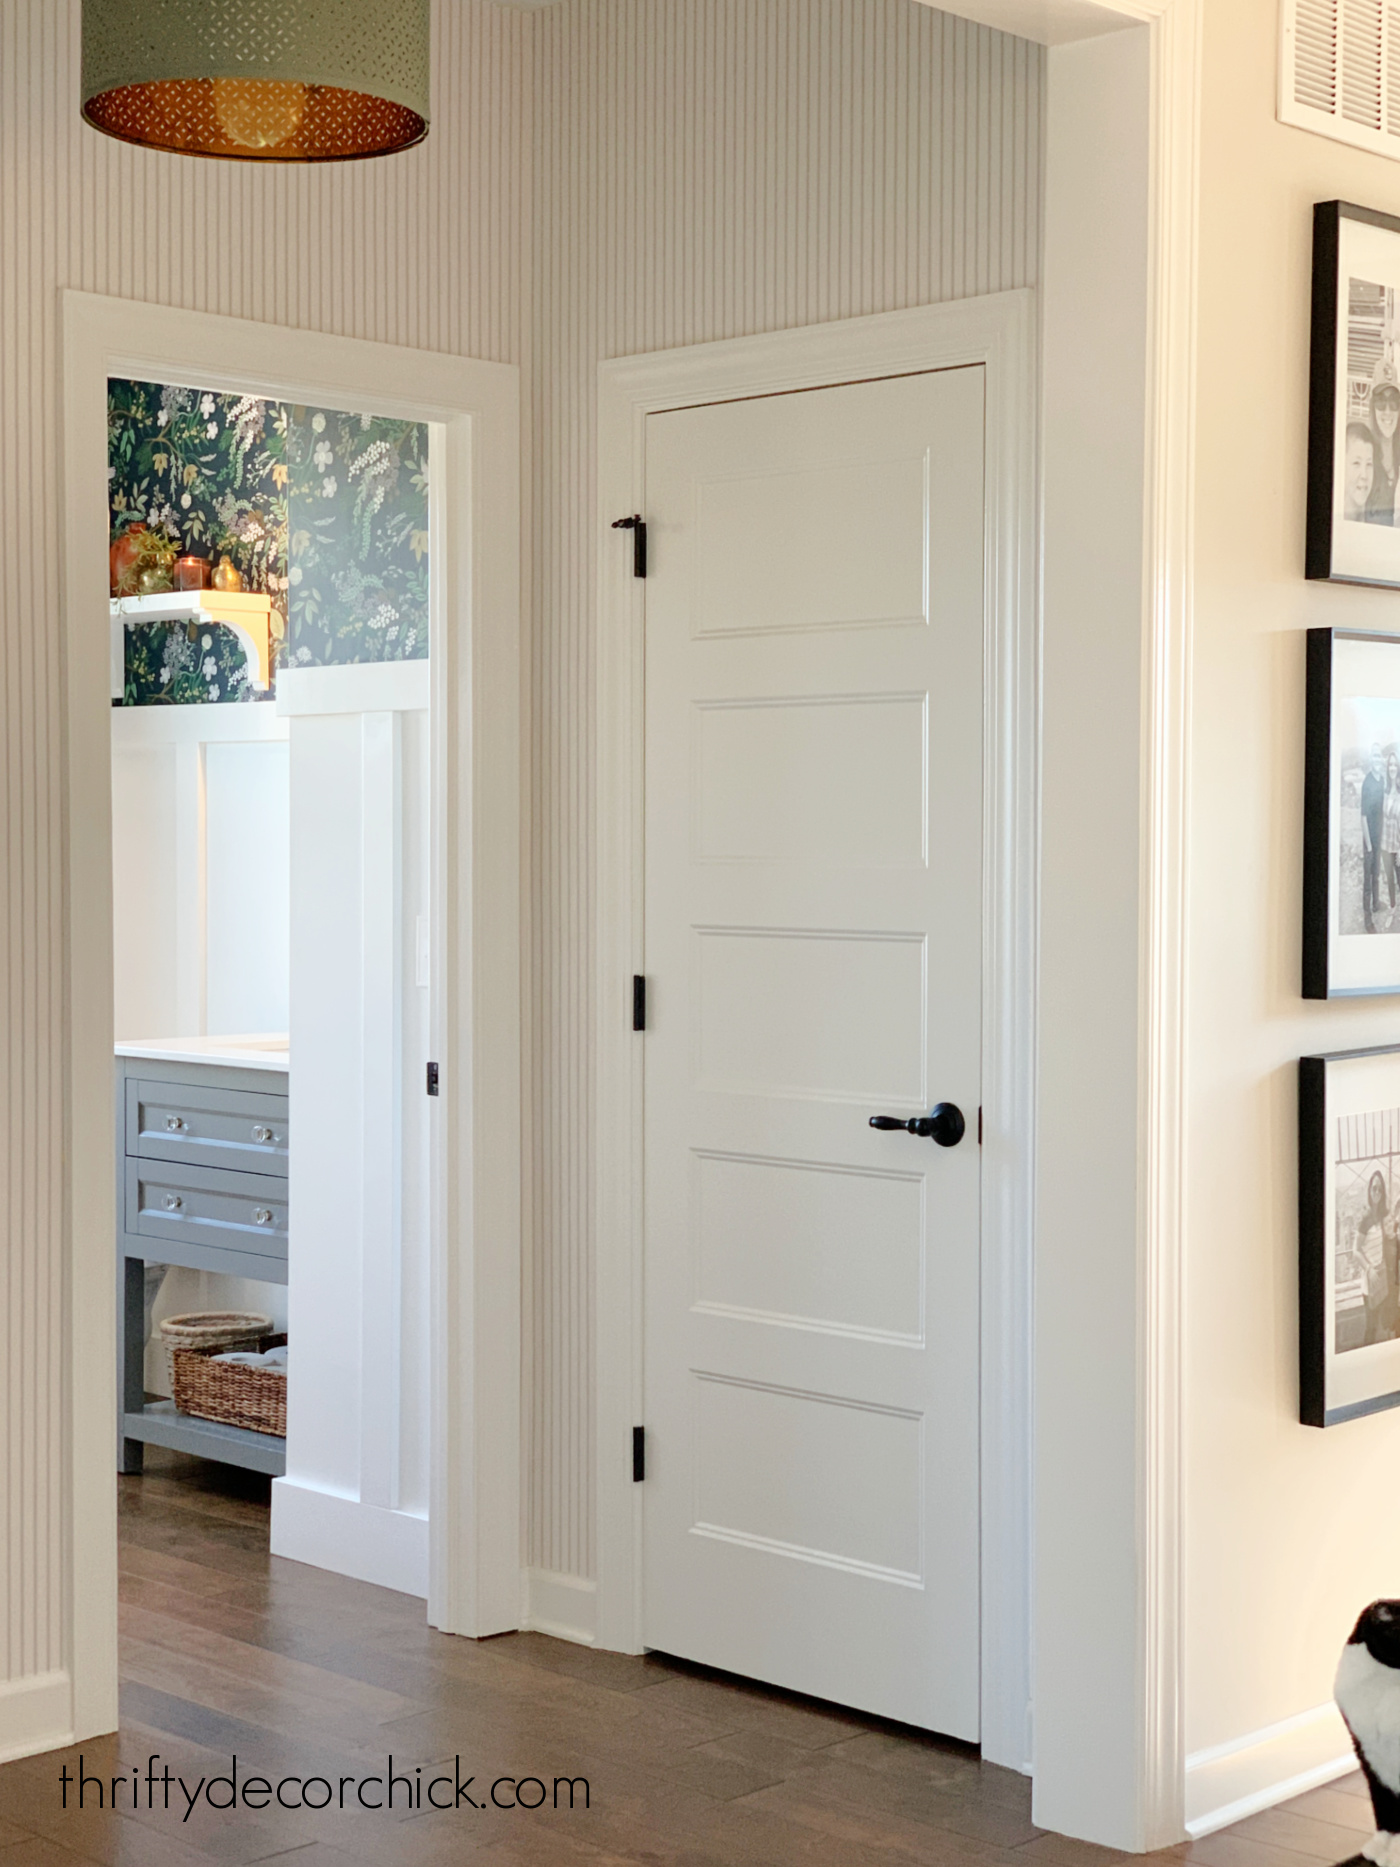
Here's a view into our foyer from the bathroom:
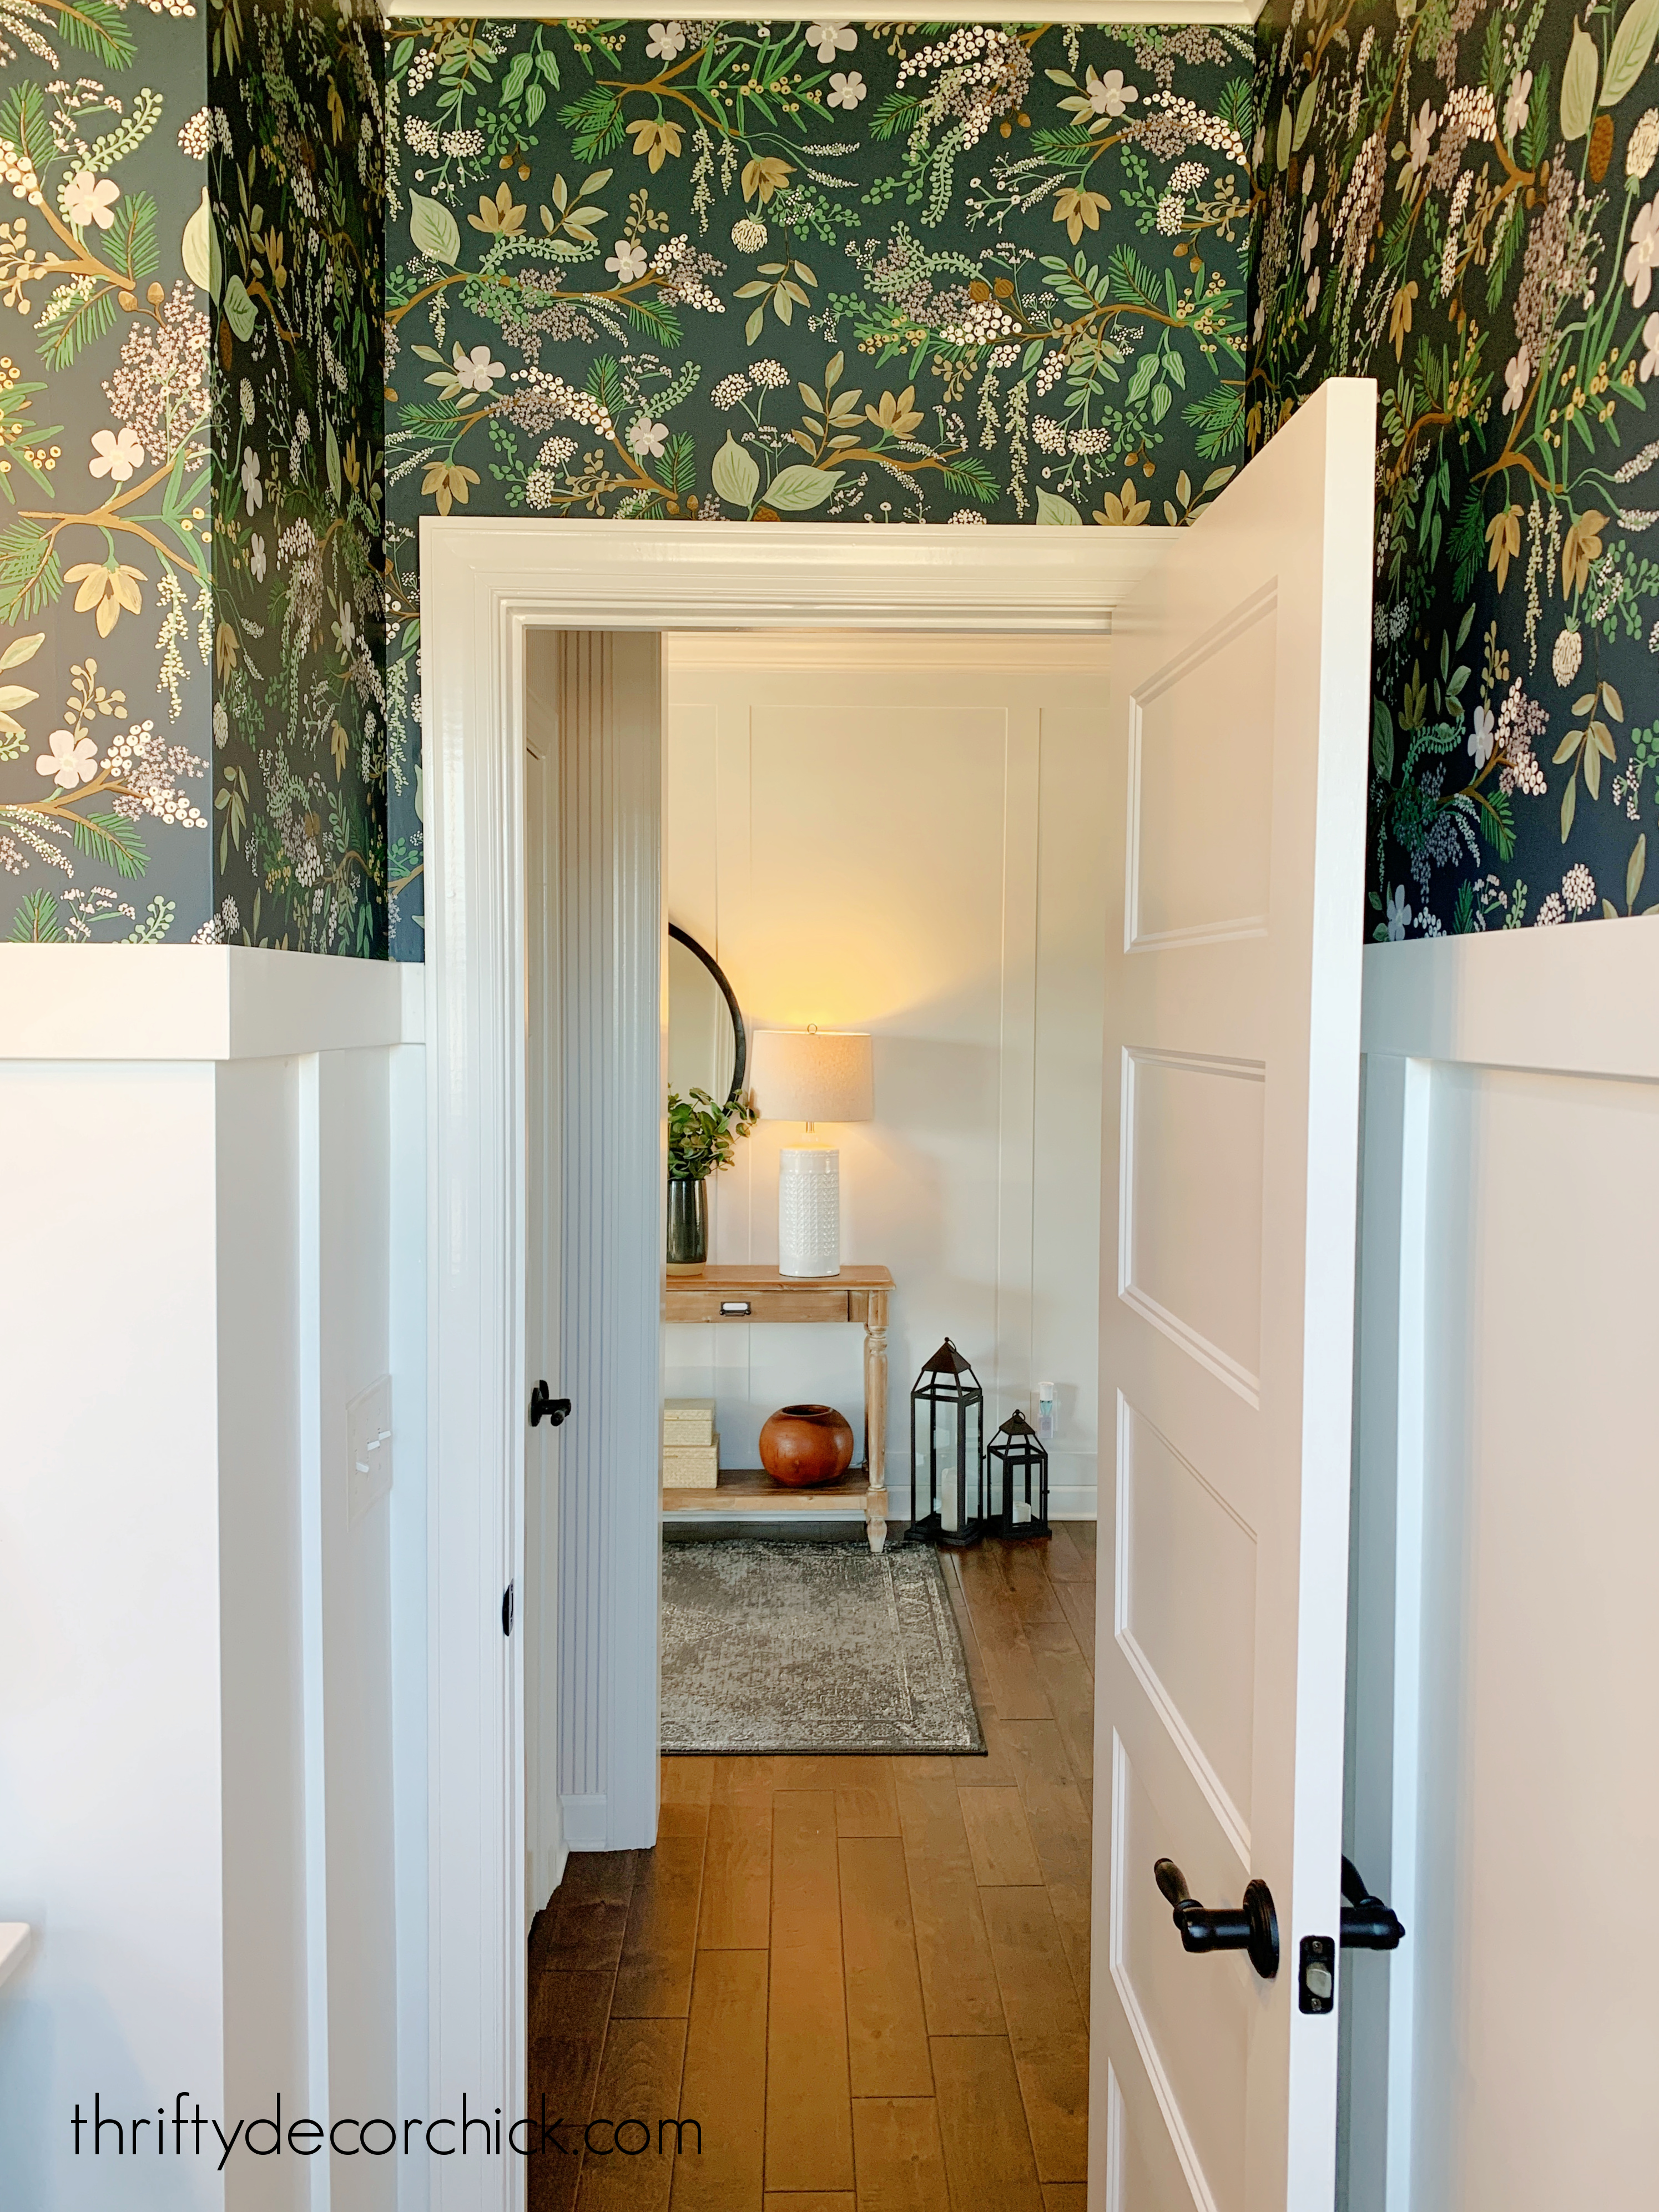
I hung that classic blue and white pinstriped wallpaper in our little vestibule area last year and it's so lovely.
I like that it is so subtle:
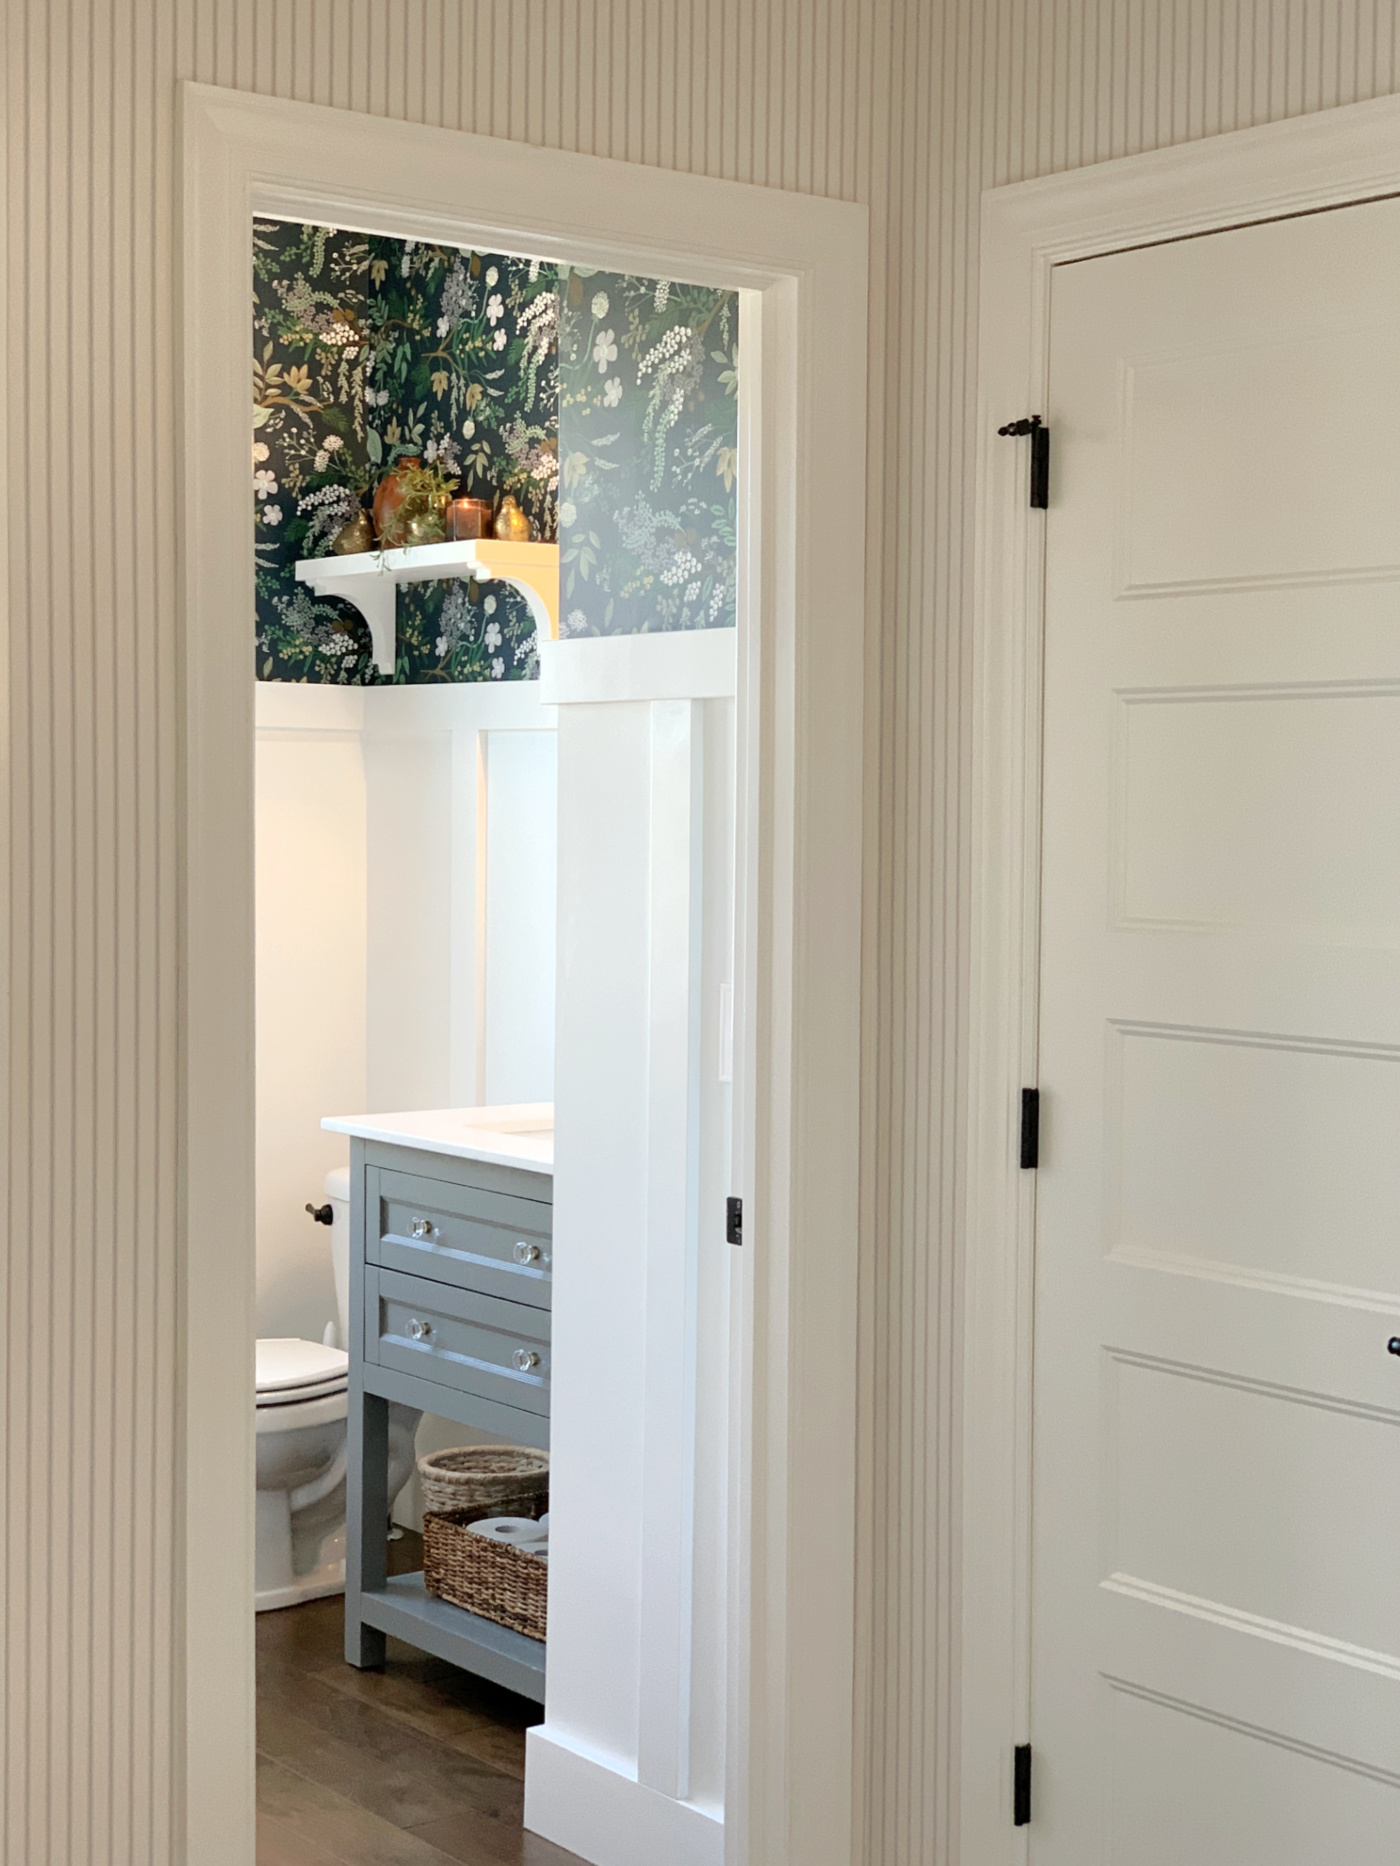
It tied in beautifully with this small bathroom makeover!
And I didn't notice until I was taking pictures that the green lamp shade (and the metallic liner) coordinates with the bathroom wallpaper as well:
That was a happy accident, but I shouldn't be surprised. That wallpaper incorporates ALL of the lovely colors in our home!
You can use color without your home feeling busy or overwhelming!
I'm SO happy color in our interiors is making a comeback.
If you're looking to update an outdated bathroom or just spruce yours up -- wallpaper and trim are a couple DIY bathroom ideas that will completely change your small space!
I spent less than $200 on this small bathroom makeover and I think it looks like a brand new room. :)
Have I convinced you to add wallpaper somewhere in your house? Now I just need to find a way to use all of my beautiful scrap pieces! (I can't bear throwing them away just yet.)
Never miss a post by signing up to get posts via email.
Via https://www.thriftydecorchick.com/2022/01/easy-DIY-bathroom-refresh-makeover.html How to make your own NO SEW bench seat cushion.
You don't have to know how to use a sewing machine to make a beautiful cushion for a bench seat!
Custom foam bench cushions and covers are not cheap -- this tutorial shows you how to make one in less than an hour for way less.
Whether for your mud room, the dining table or a window seat, it's really not hard to make your own. And you can customize in any color or fabric you want!
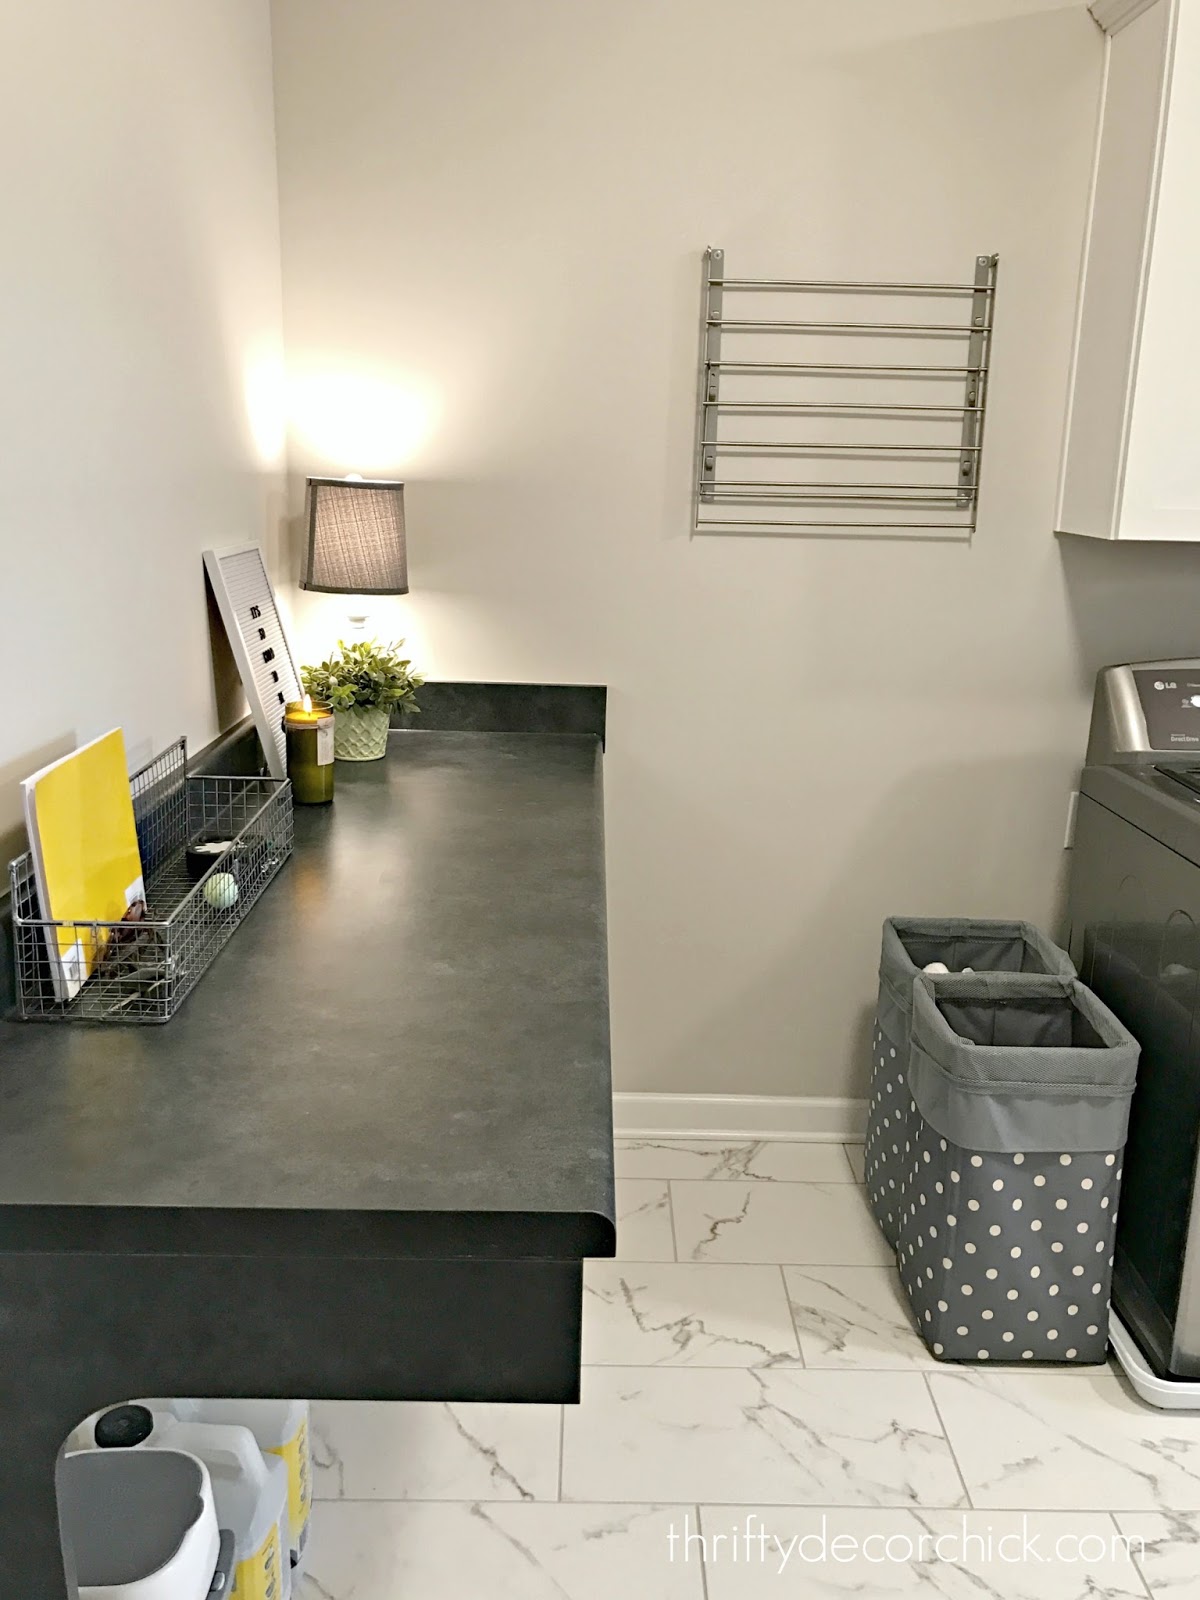
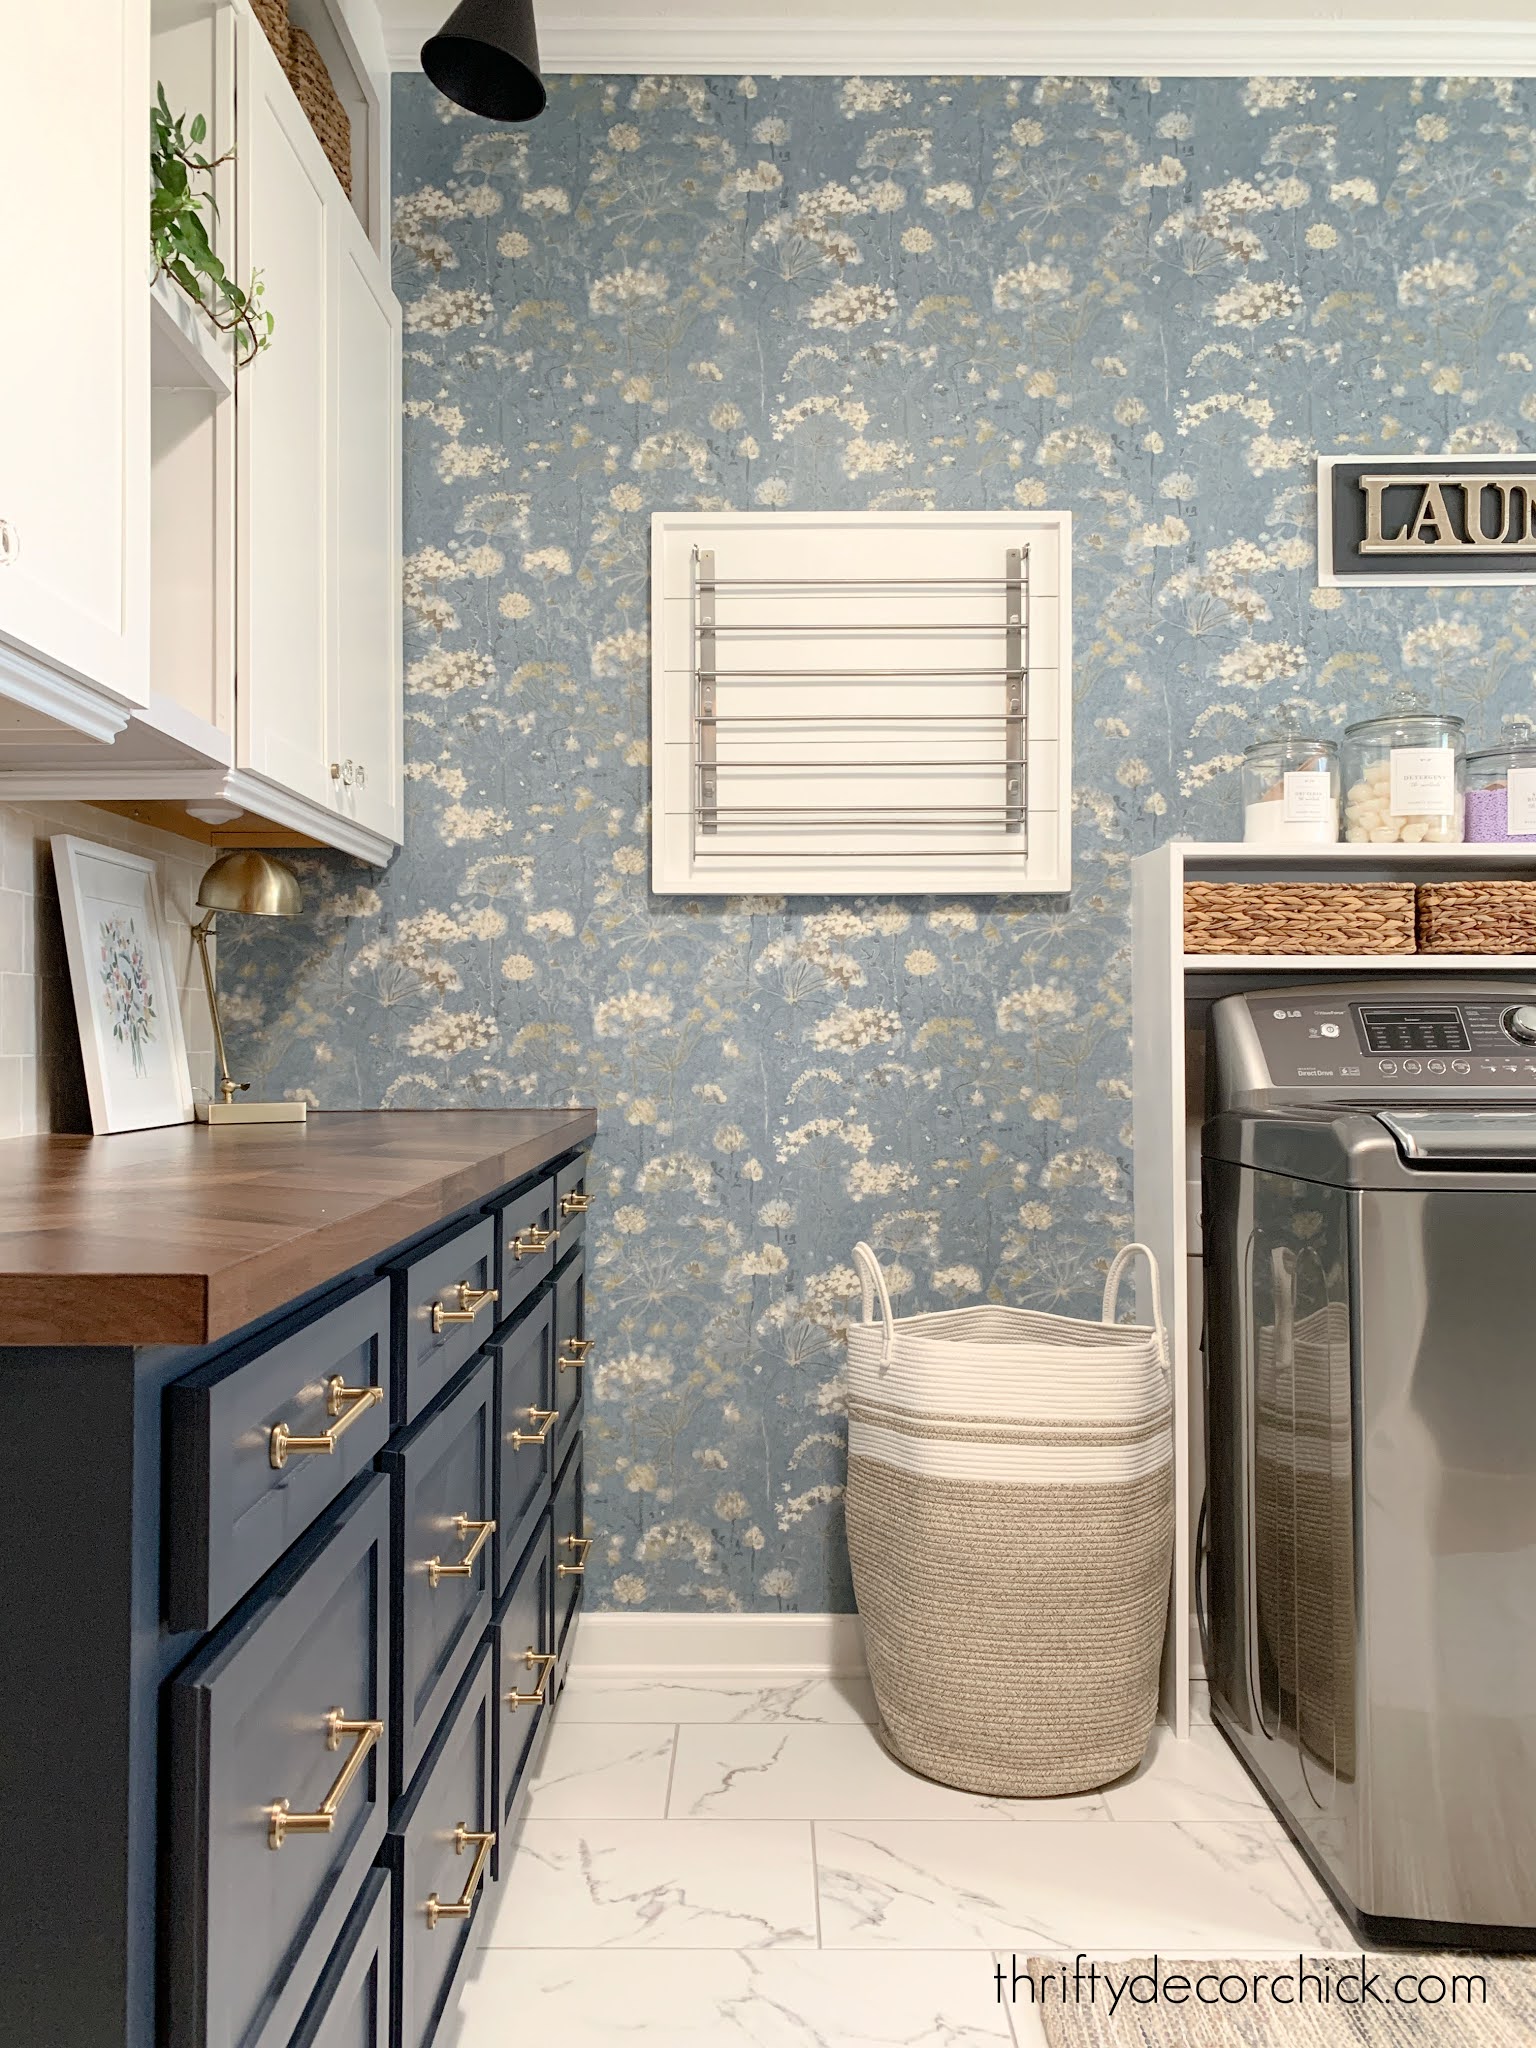
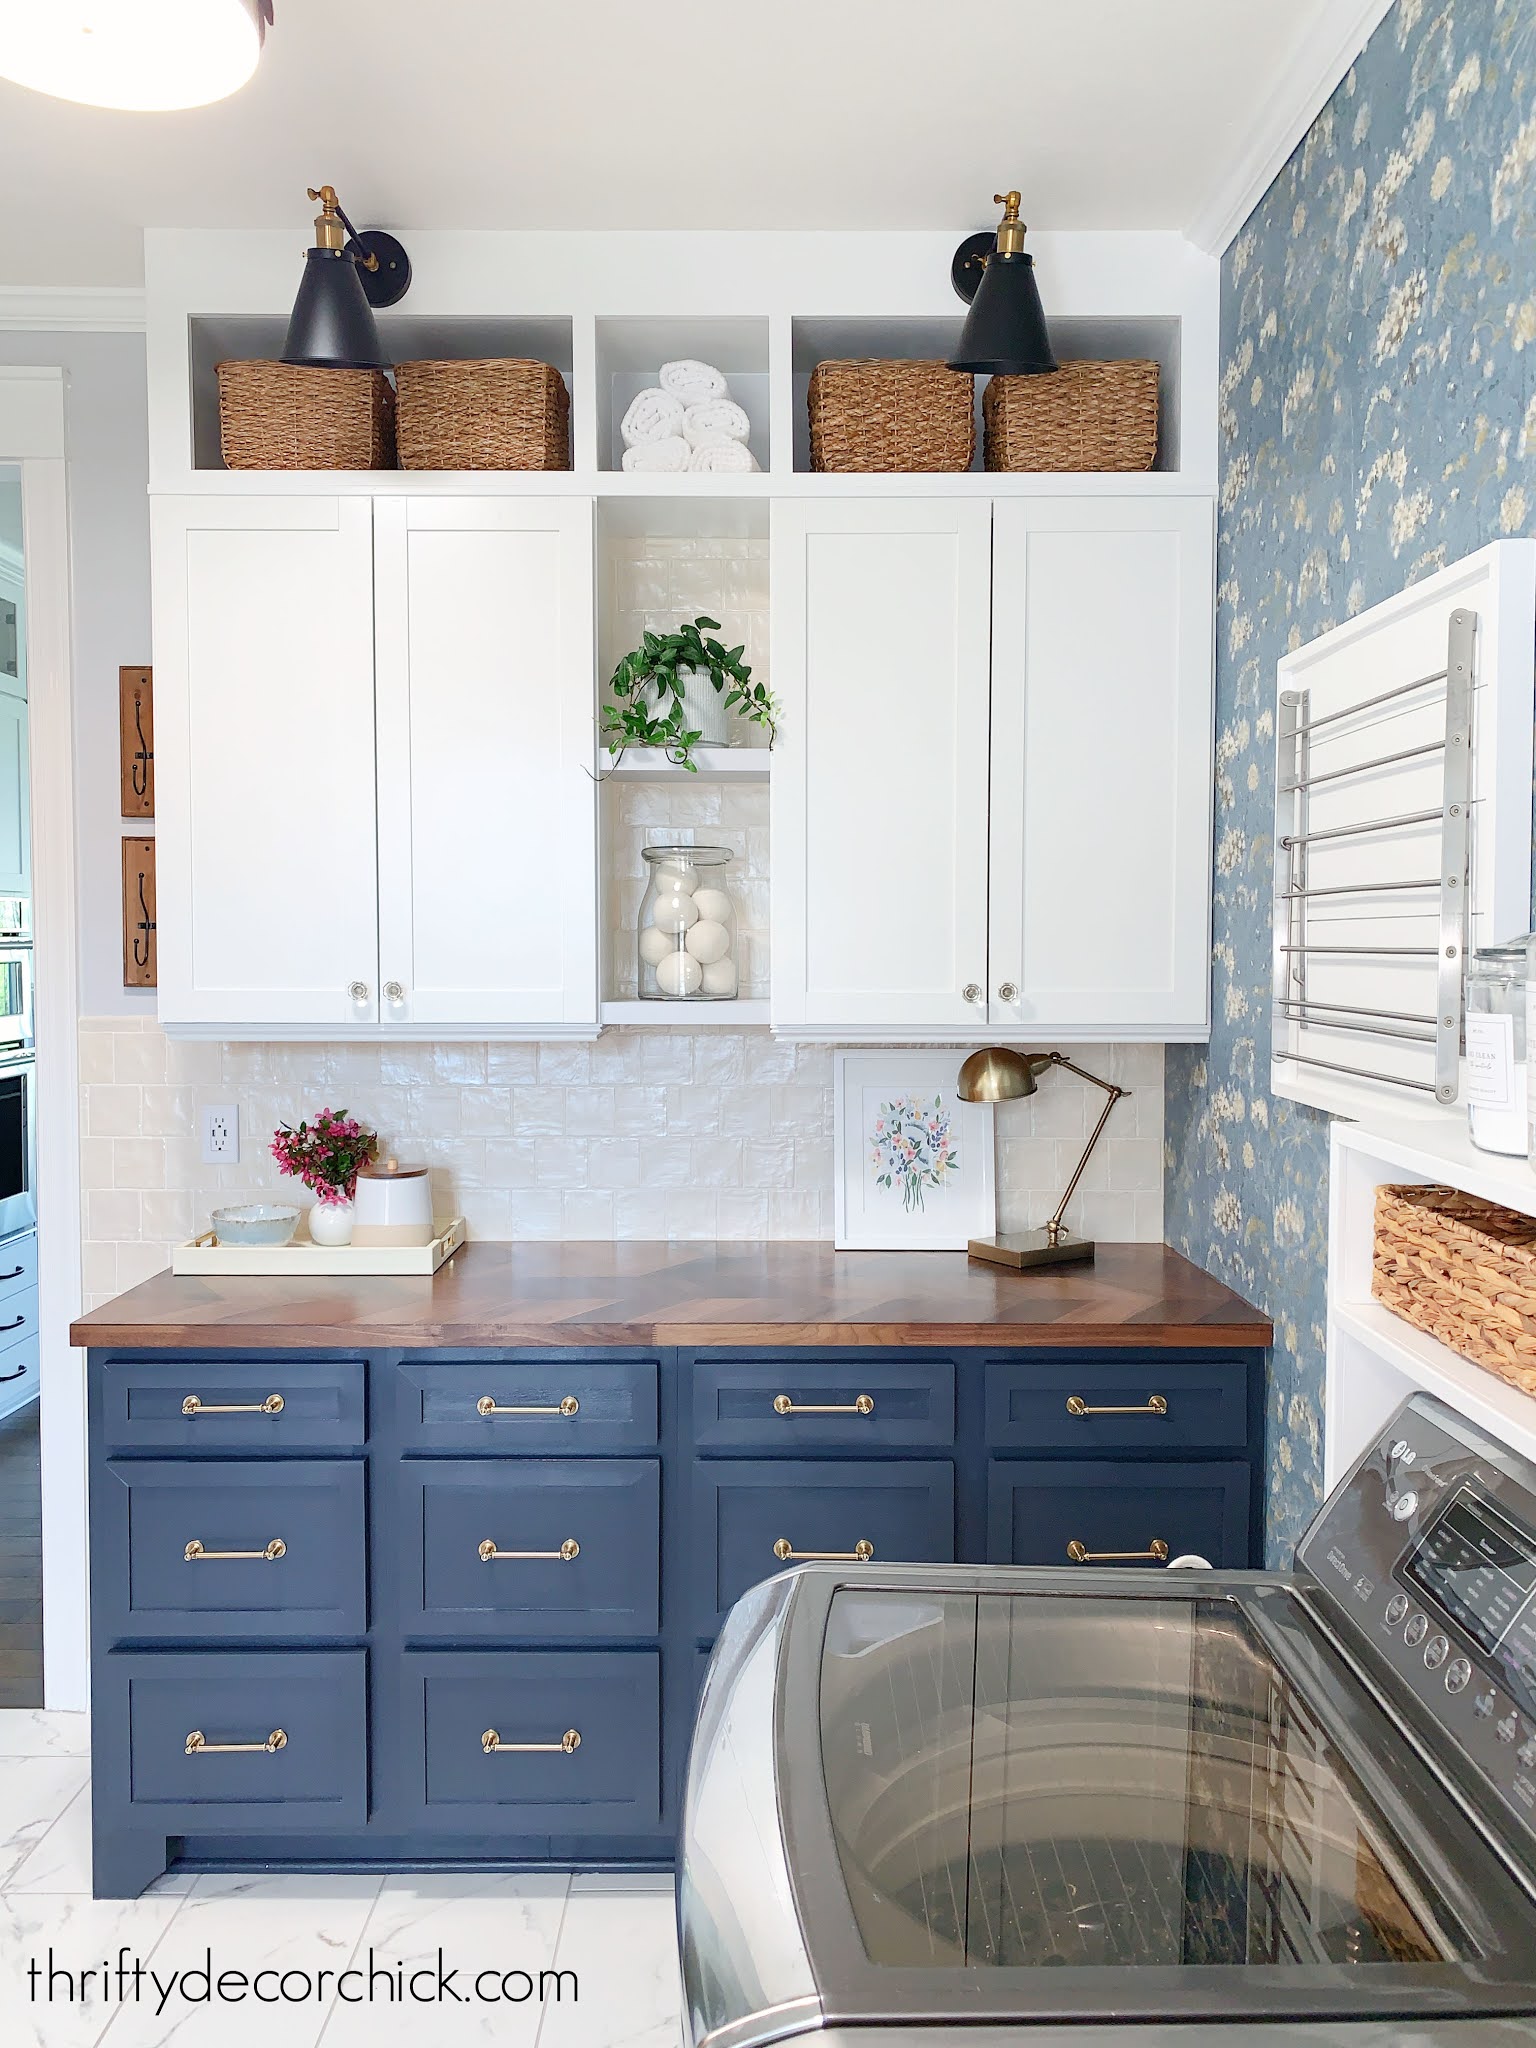
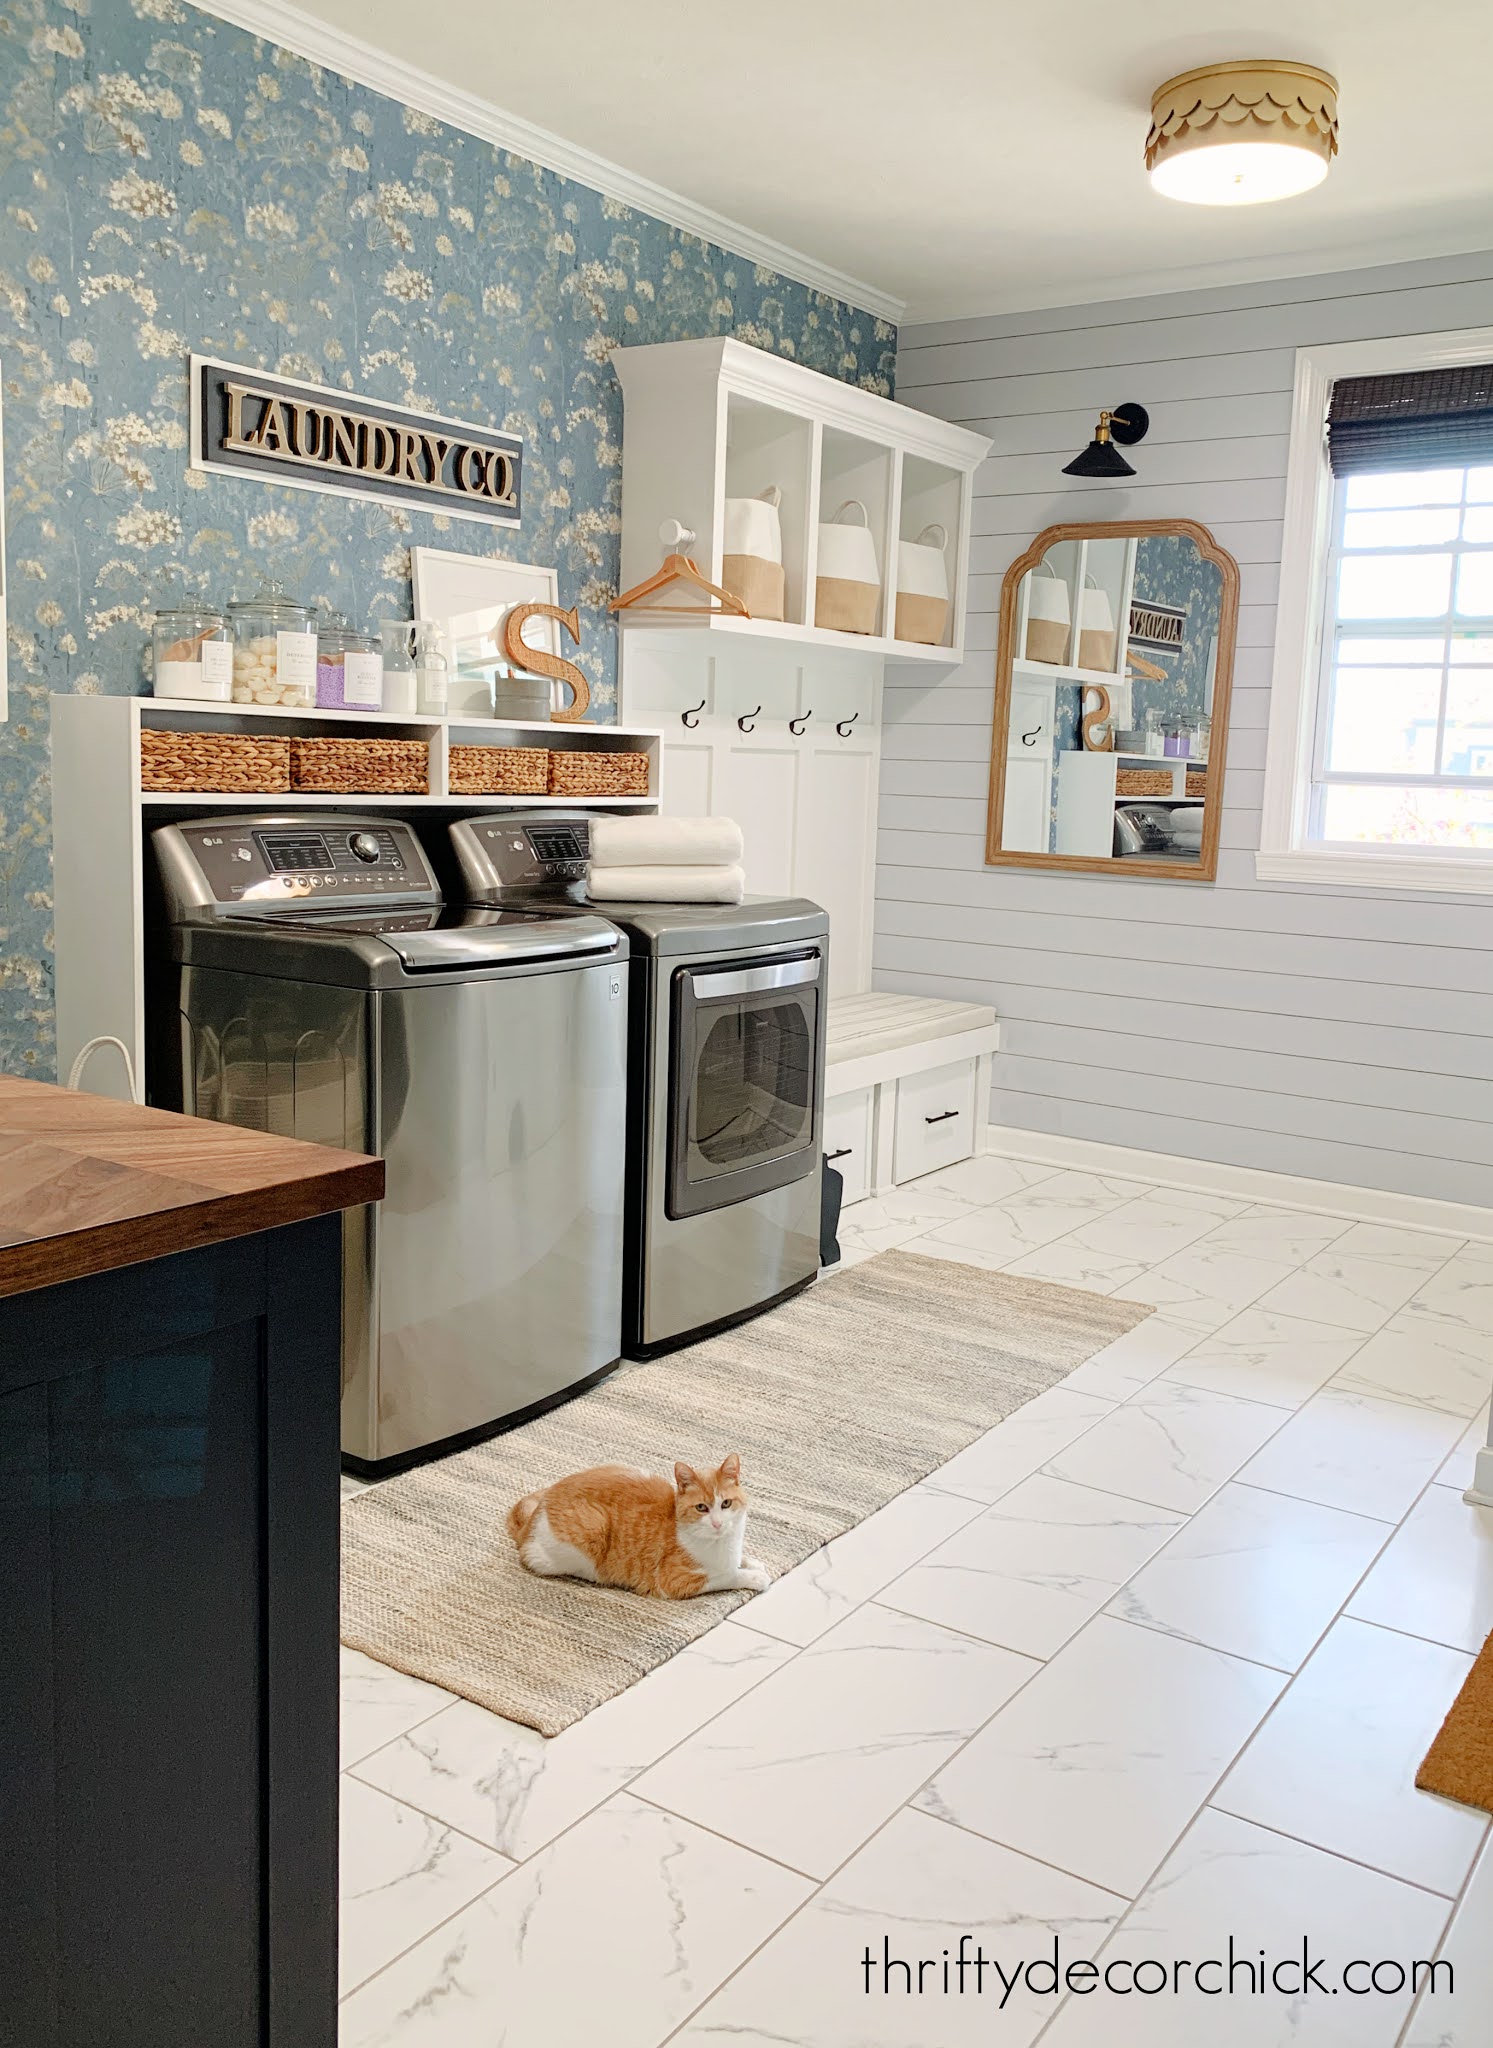
This quick project was an update in our laundry/mud room combo. I'm so happy with how it turned out!
It's been awhile since I've made a cushion for a bench, but it came right back to me.
Years ago I shared how to make a DIY bench cushion -- be sure to check that post out for detailed steps.
I found a couple upholstery fabrics I absolutely LOVED at Joann Fabrics:

The one on top was pricey but they were both half off and I had another 15 percent off of that. So not too bad! (And I didn't need much for my projects.)
I'm working with the lower fabric for this DIY cushion (the stripes look black in the photo above, but they are a lighter blue/gray).
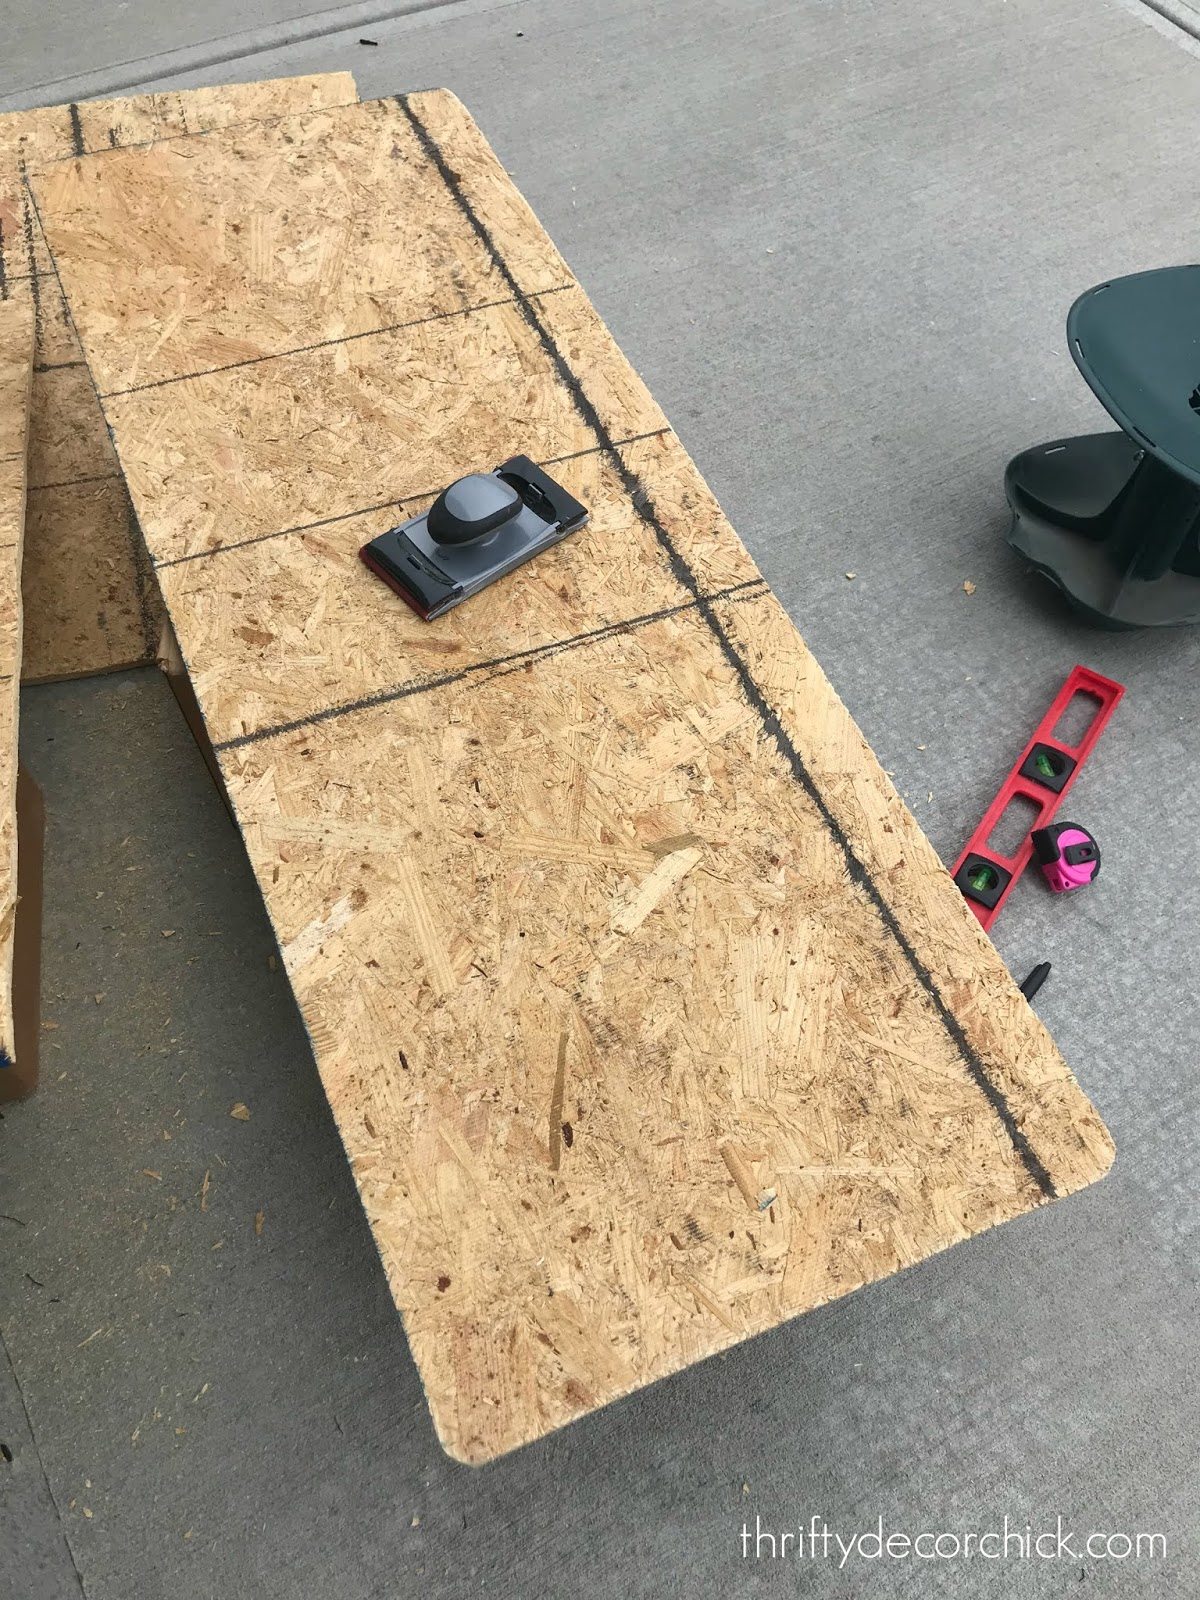
For this project you'll need a bottom piece of some kind to staple the fabric into.
I found the plywood I needed in my trusty scrap pile and cut it to the dimension of our mud bench top:
This post may contain affiliate links for your convenience.
See my policies and disclosure page for more information.
Via https://www.thriftydecorchick.com/2019/05/easy-diy-no-sew-bench-cushion.html How to remove peel and stick wallpaper with no wall damage.
Does adhesive wallpaper really come off the walls as easily as they say? See how well two versions I used came off the walls and my tips for easy removal!
I've hung peel and stick wallpaper many times over the past few years. I've become quite
You can see how I used a cherry blossom version in my office:

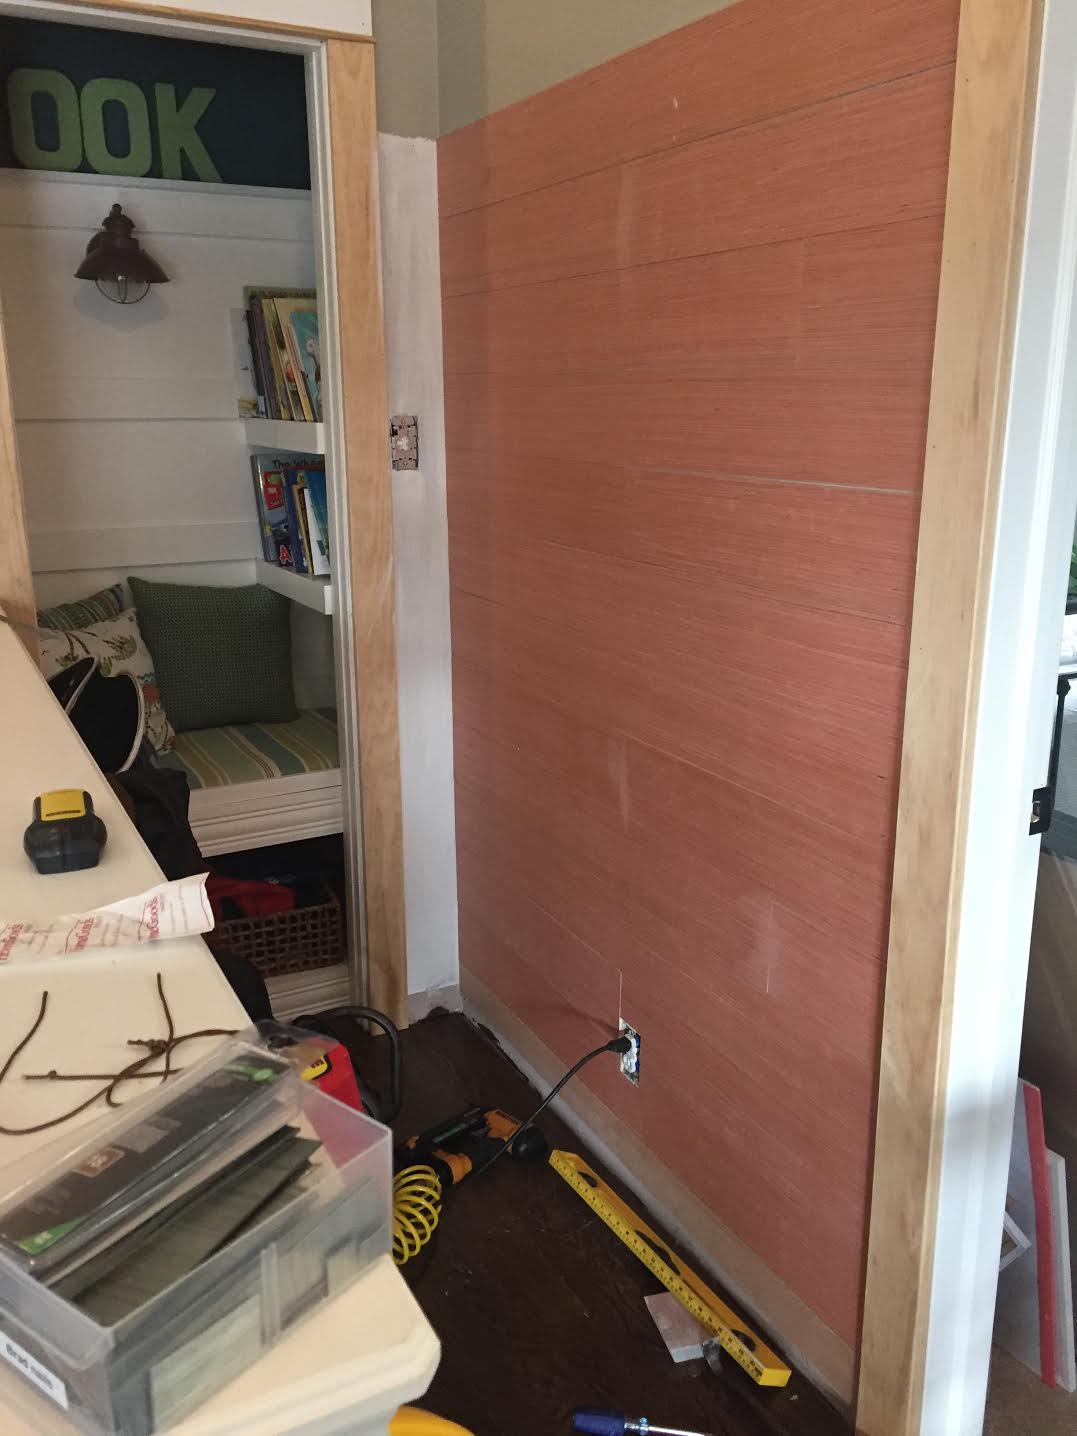
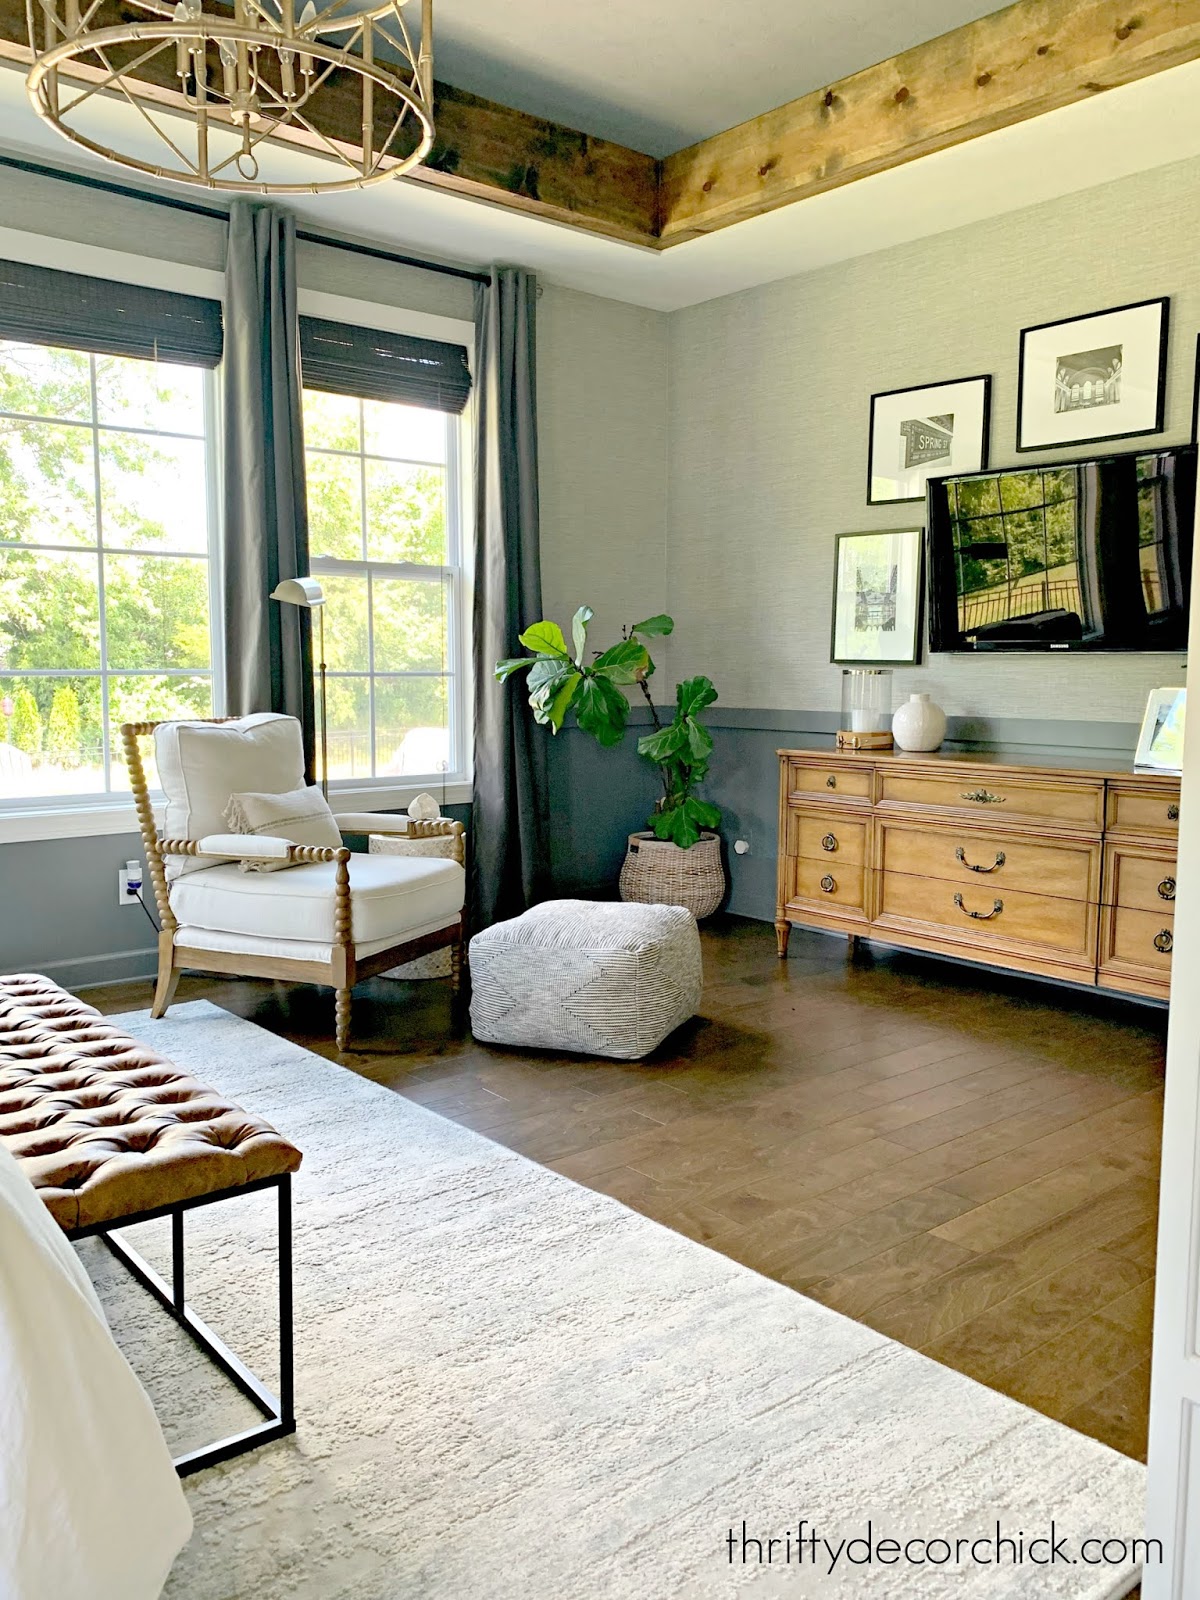
The textured gray grasscloth peel and stick in our bedroom:
The gorgeous blue and cream floral wallpaper in our mud/laundry room:

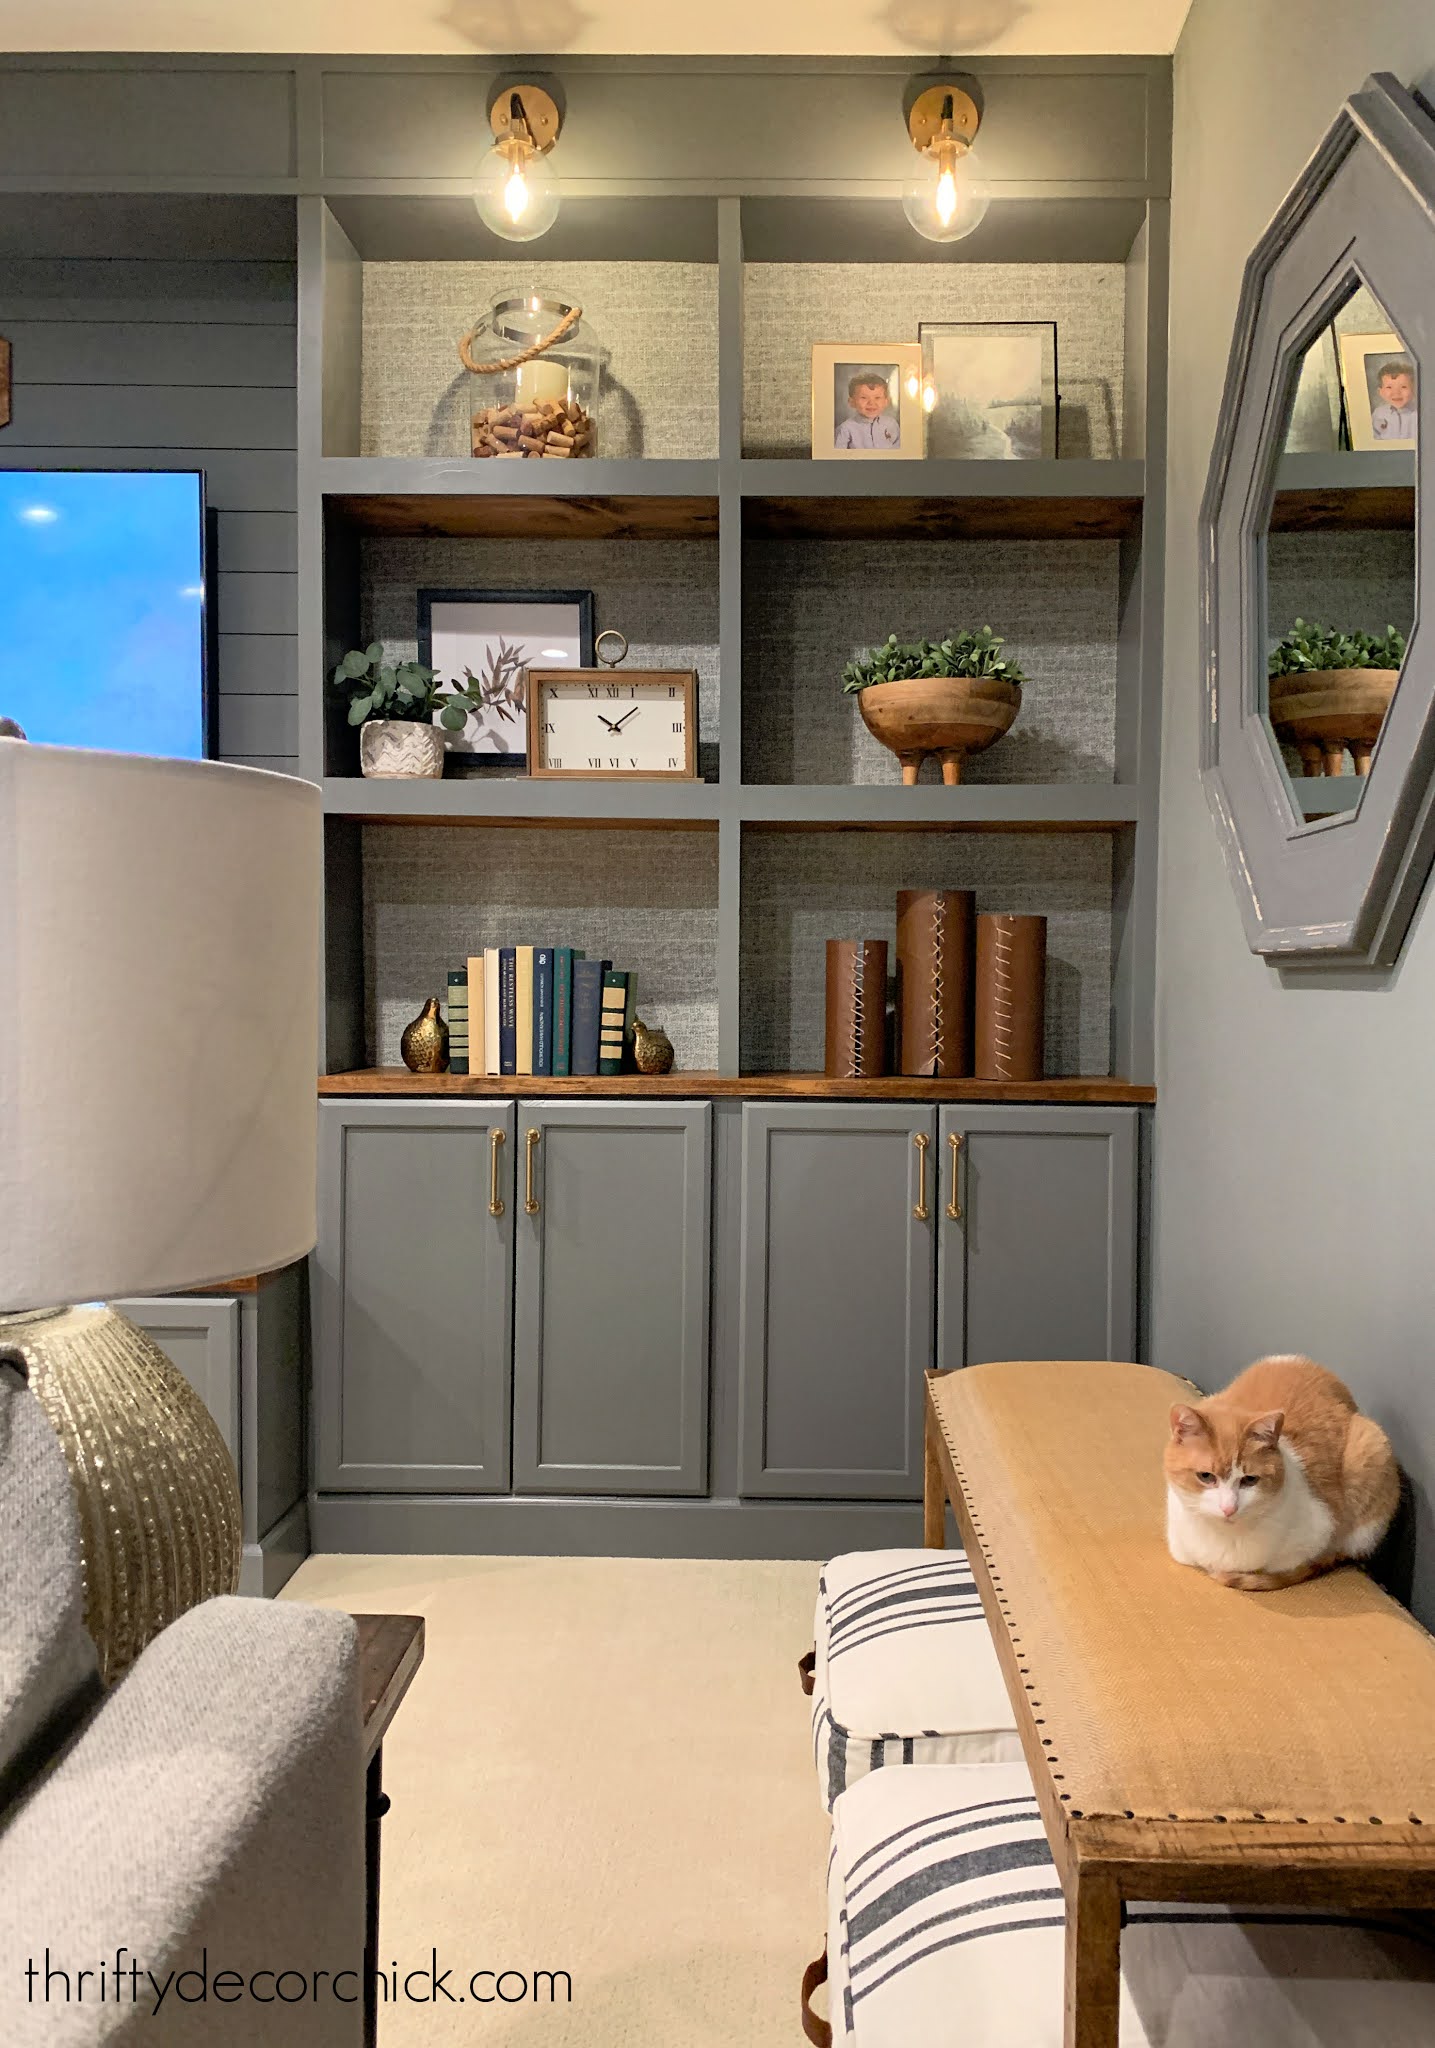
And the fun tweed fabric lookalike on the backs of the basement built ins:
This removable wallpaper is fairly new to the DIY world, and I shared a tutorial on how to install this peel and stick version a few years ago.
Unlike traditional wallpaper that uses wallpaper glue or paste to adhere, this vinyl wallpaper is supposed to be easily removed. I haven't had to remove any of it until recently.
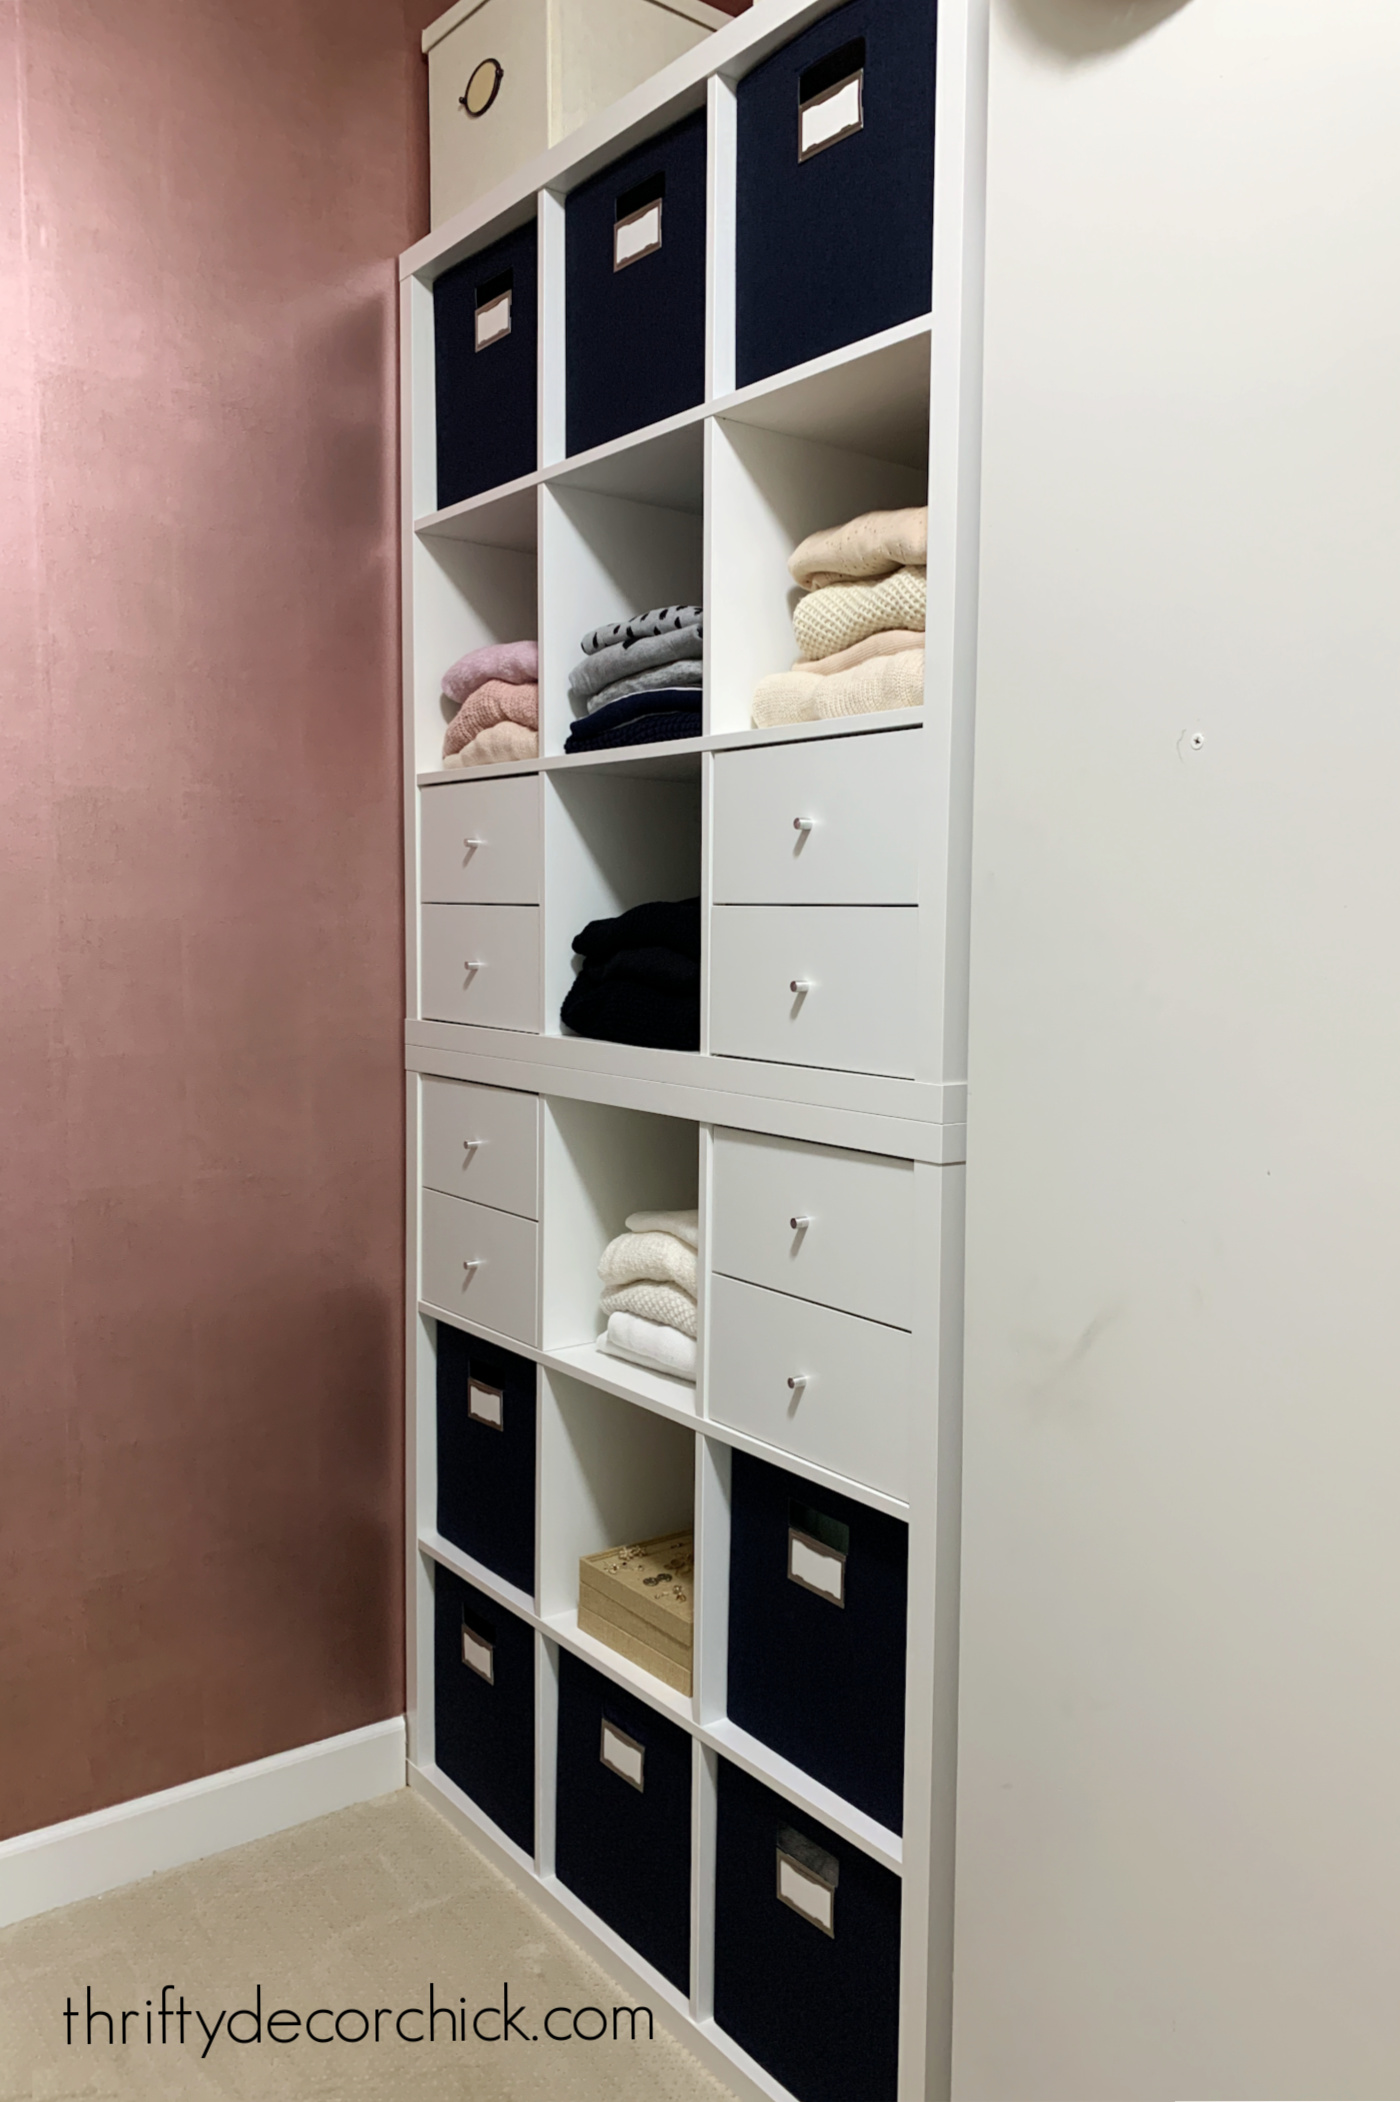
The first time was in my closet that I made over with the IKEA Pax system:

Initially I had covered that back wall with a pink wallpaper with a bit of a metallic sheen:
I liked it at first, but it began to feel too heavy pretty quickly. I knew I wanted something lighter in there (I'll share that with you soon!).
The bonus with this sticky wallpaper is that it's supposed be easily removed (and not damage the walls during the process).
It had only been on my closet walls for a short time, so I figured it would be easy!
Was it hard to remove? Nope. Did it damage the walls? Yep!:

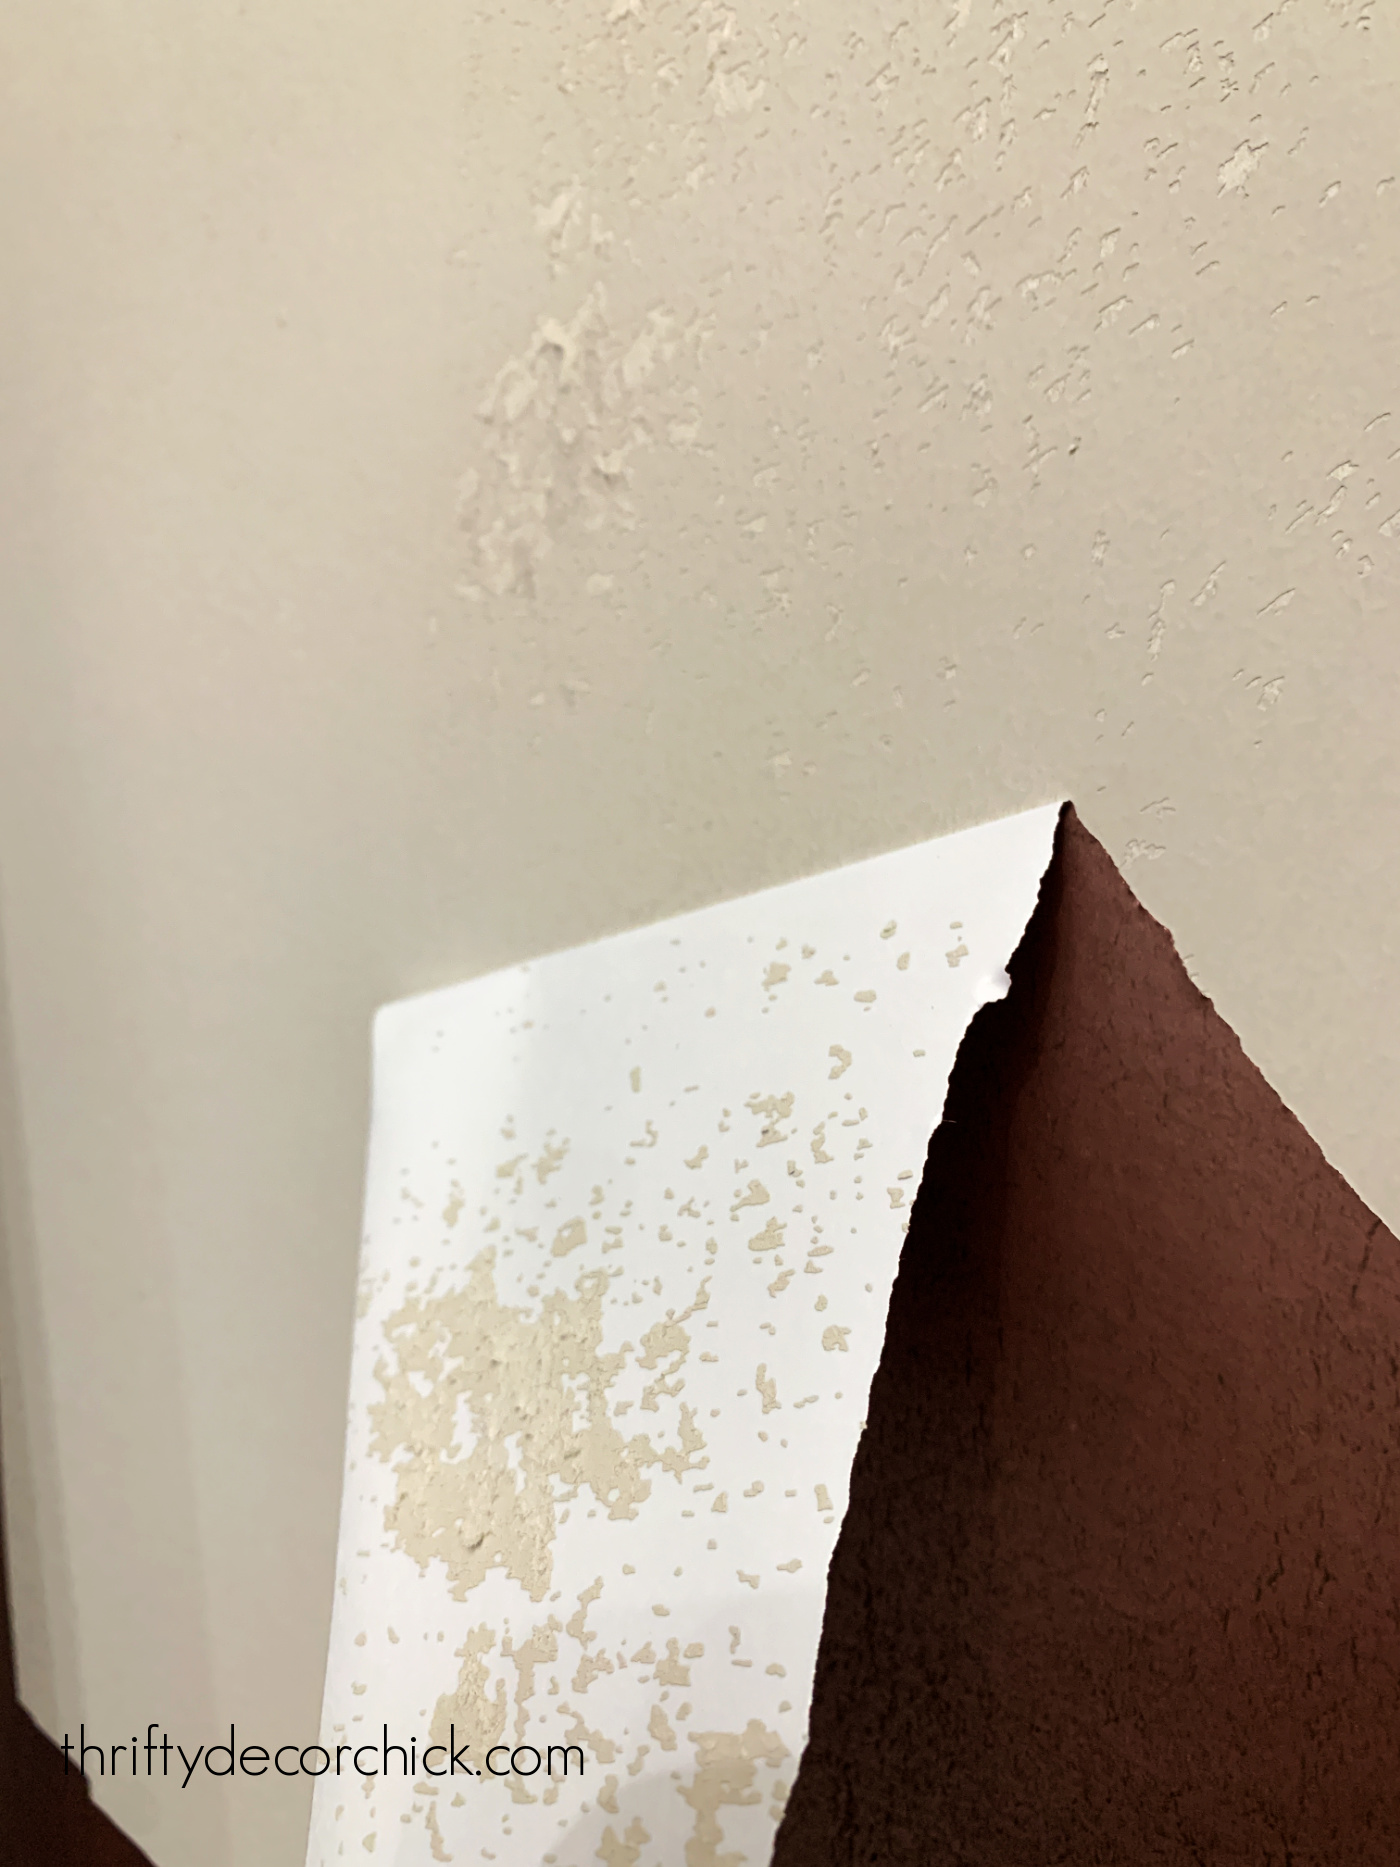
Yikes!
As I worked on this, I realized there are probably two reasons for this.
One...this particular brand (from Target) needs to be removed verrrrrry slowly. Painstakingly slow.
It made a HUGE difference in the removal and drywall damage when I took my time:

This post may contain affiliate links for your convenience.
See my policies and disclosure page for more information.
I also think the quality and thickness matters, because I had a completely different experience when I tried removing the wallpaper from another room.
This time it was in our small powder room:

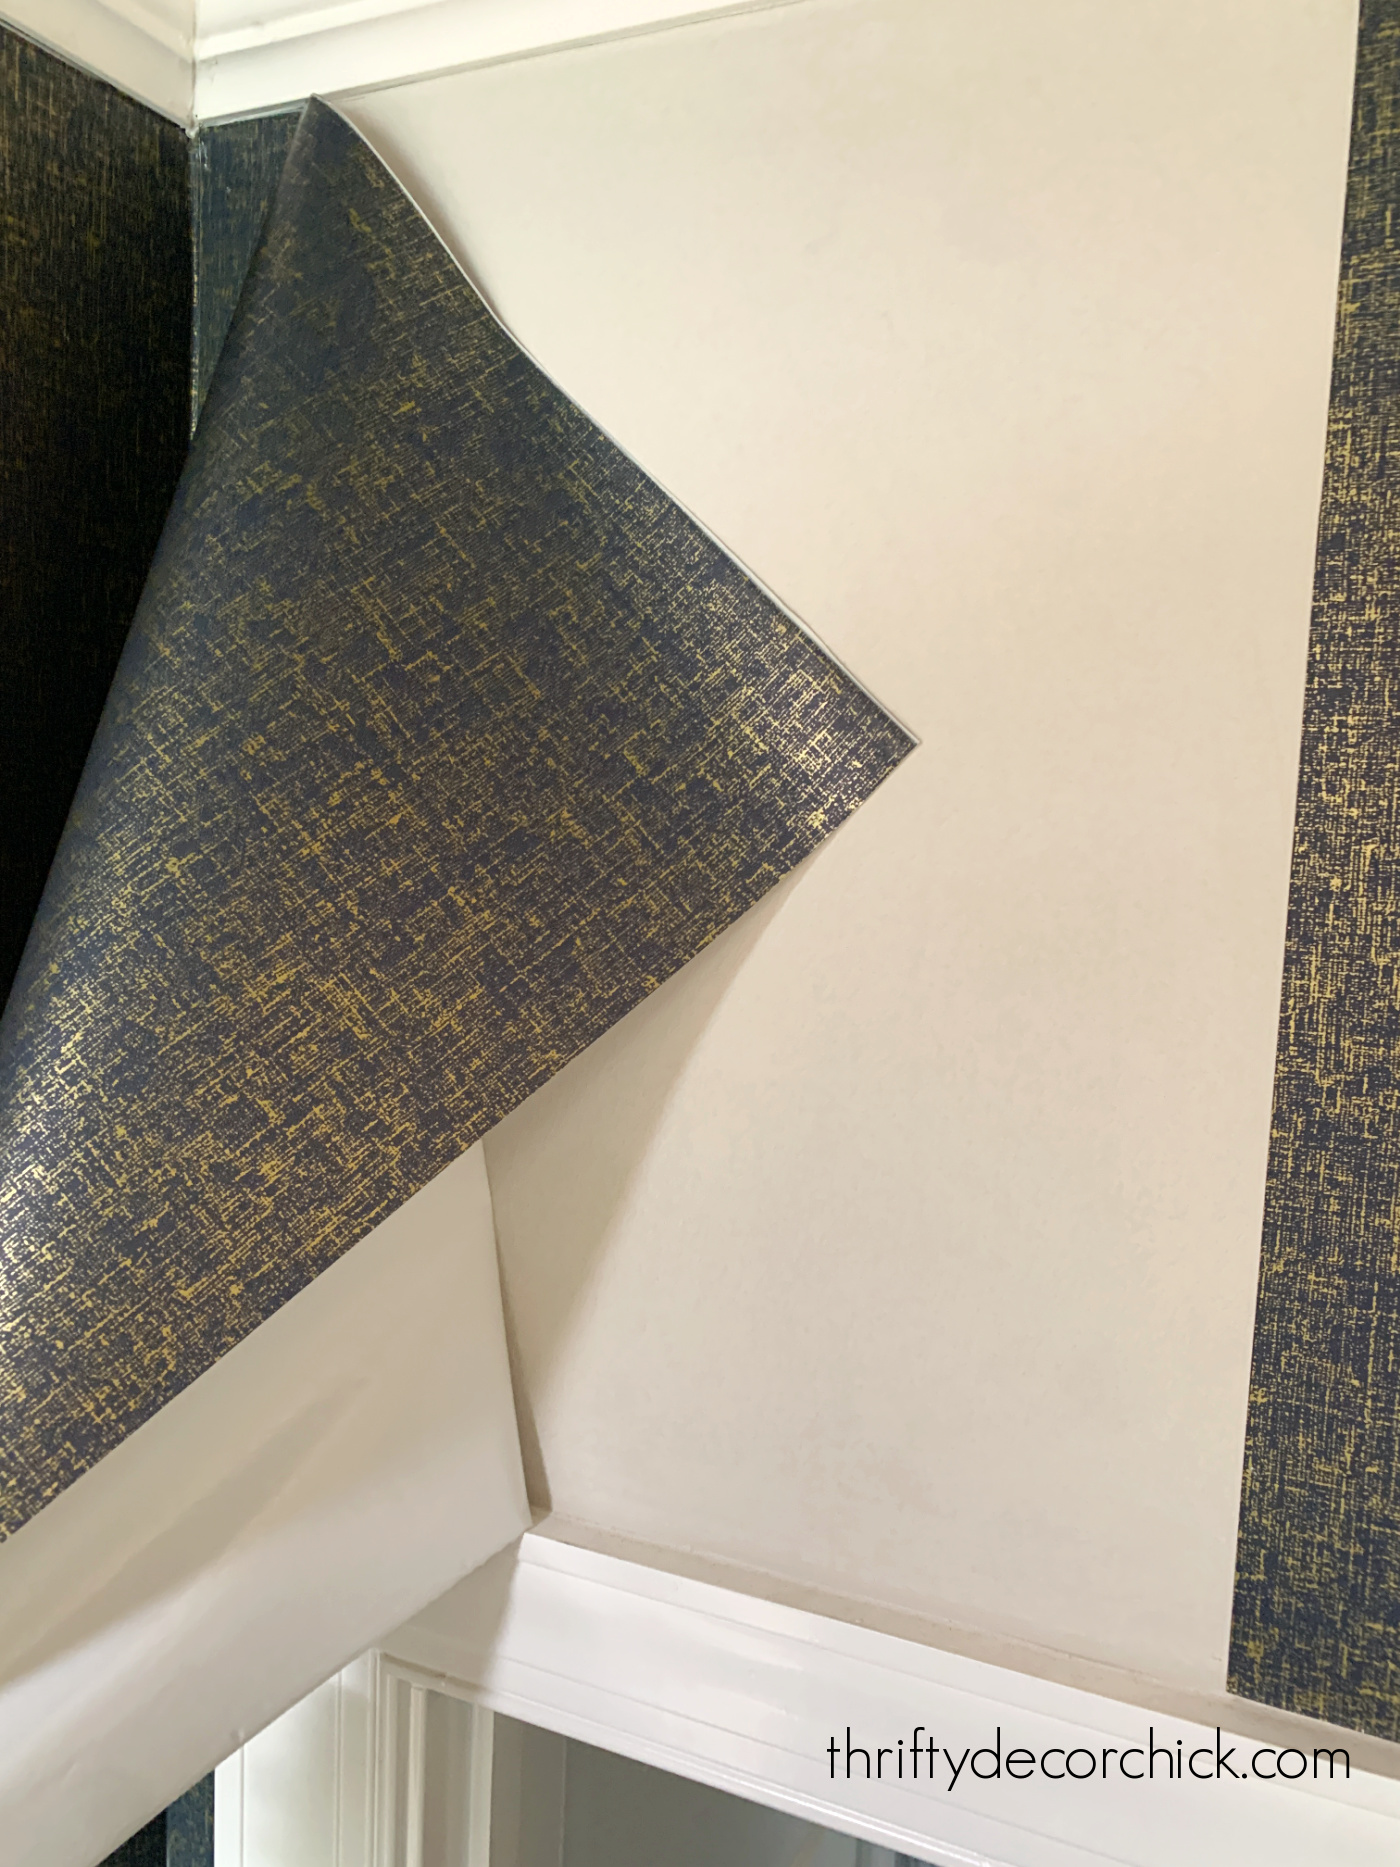
That gold and blue self-adhesive wallpaper was one of my very first DIY projects in this house more than four years ago!
It's served us well -- we've had absolutely zero issues. It still looked great!
But I feel head over heels for another design that incorporates more of the colors throughout our home (and even some gray to tie in our bathroom vanity).
I'll show you that soon, but before I could hang the new paper, this had to come down. I was nervous after the debacle in my closet, so I started out super slow.
When I applied this wallpaper years ago, I hung it before I installed the trim. I know many of you wondered why I would do that, but it just makes for easier installation.
I didn't have to worry about perfectly straight cuts because everything was covered.
I promised you then it would be easy to remove, even with the trim on top!
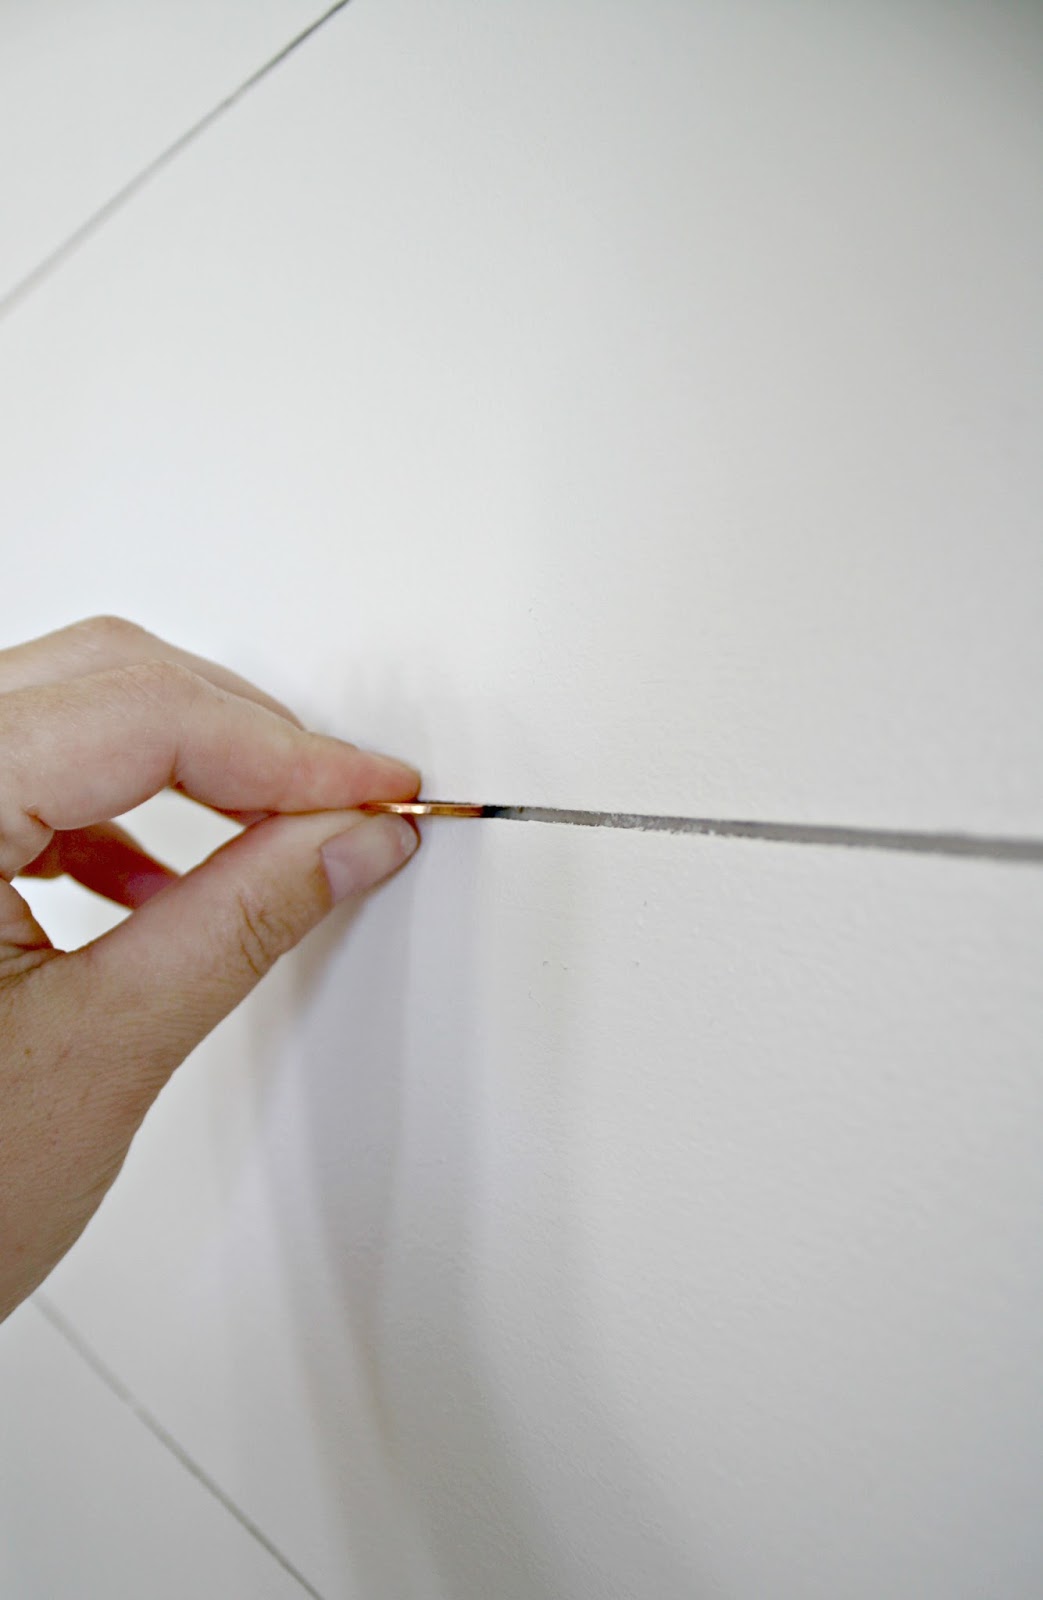
All you need is a VERY sharp (brand new) razor blade or craft knife to score the wallpaper at the top and bottom of the wall:
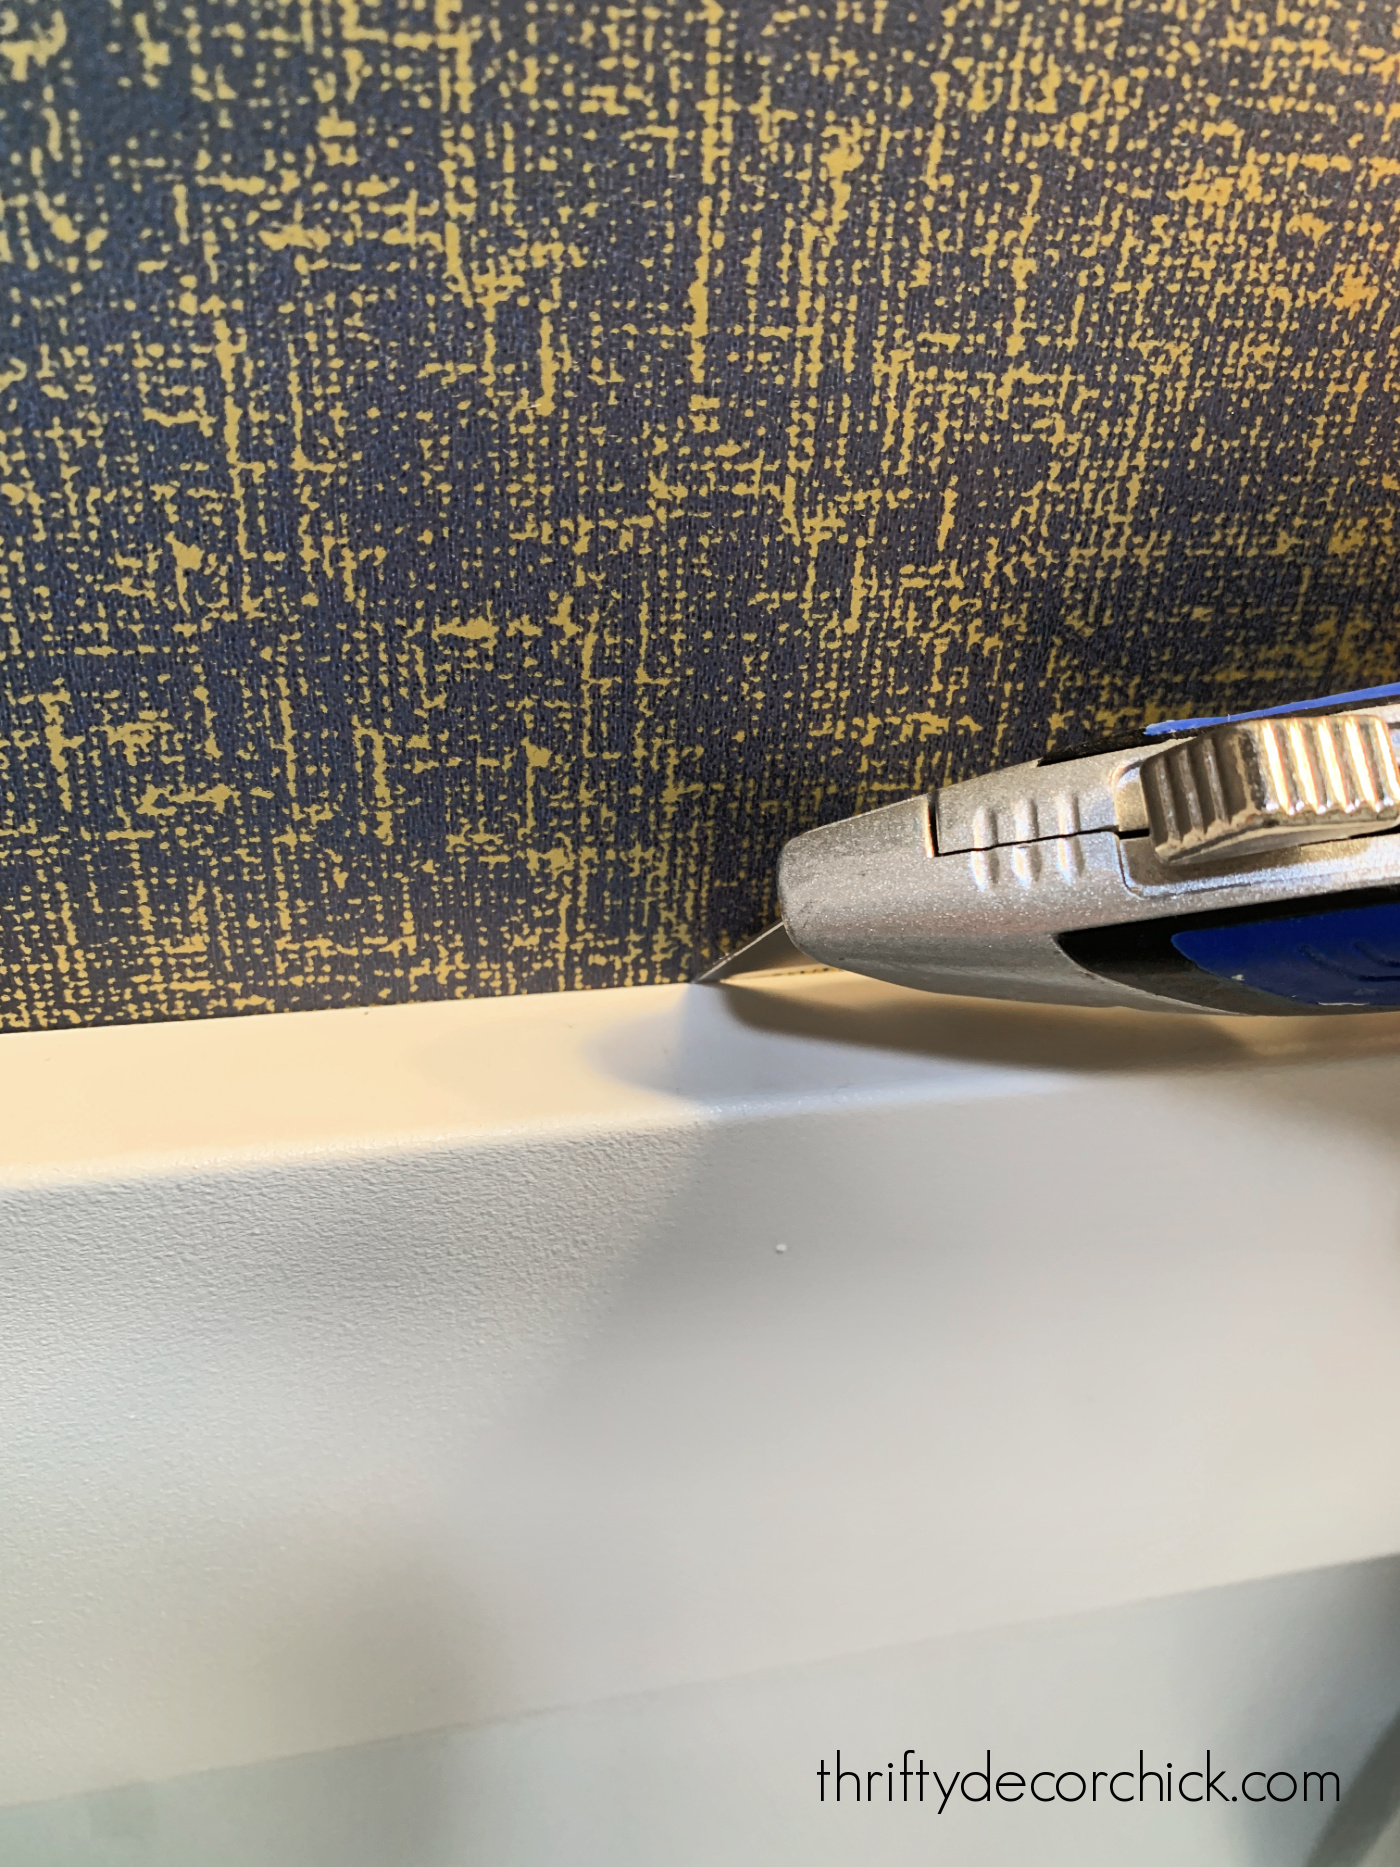
You can see there how I angled the blade down so it was scoring the paper slightly behind the trim.
Because this board and batten is up high, I didn't even caulk along there. If you have caulk on top of the wallpaper, it will need to be removed.
This removal process was so much easier and quicker than the other one! I was able to get entire panels down in one piece no problem:

And I didn't have to baby this one either -- I moved pretty quickly. I got all of it down in about 30 minutes!
There were a few stragglers that didn't score well at the ceiling or base:
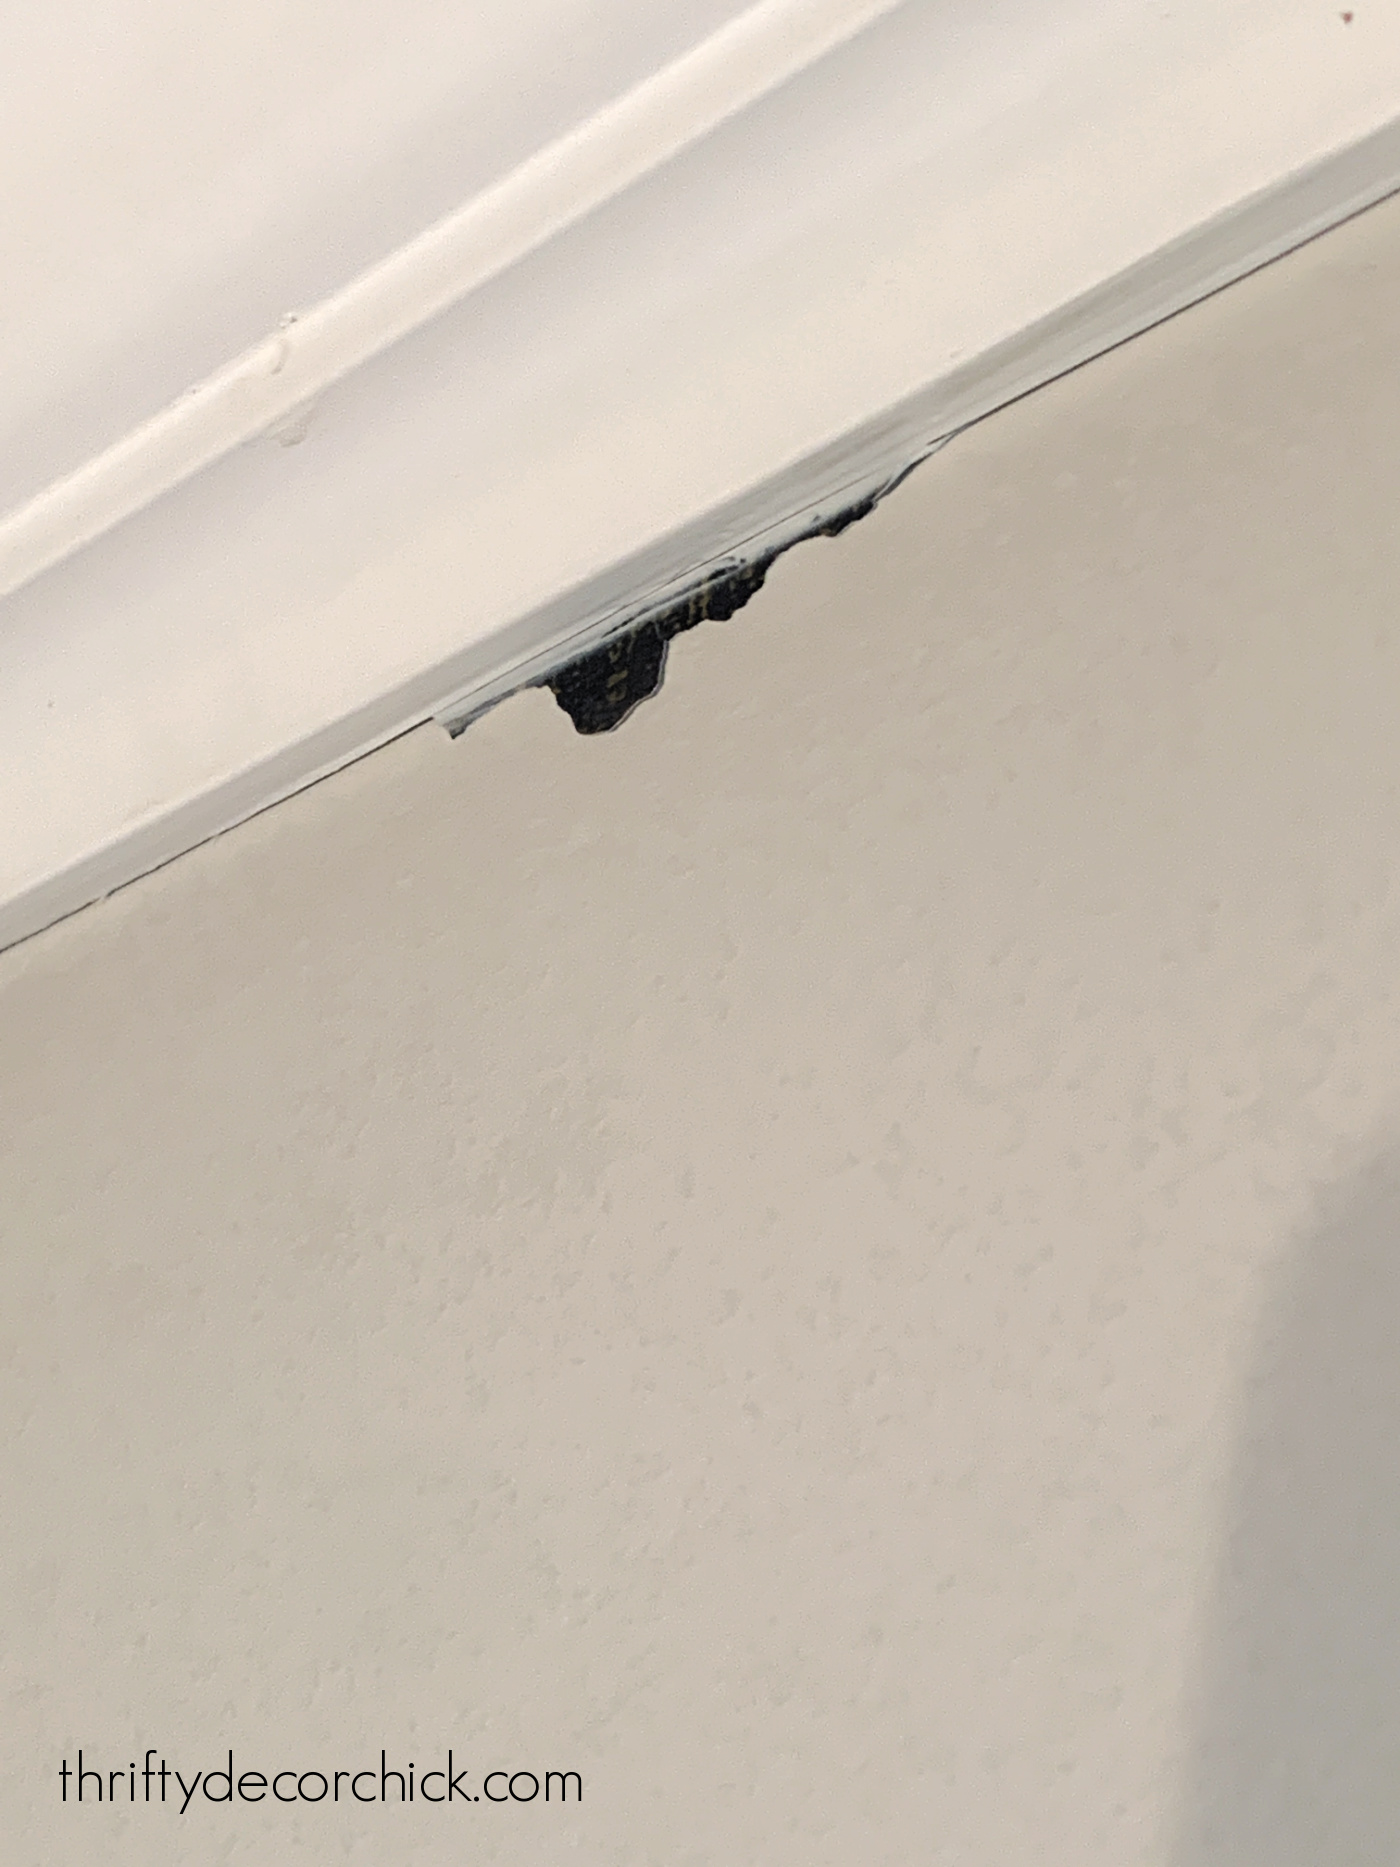
Just swipe again with the blade and then use it to grab the little piece from underneath:

There was only one spot on the wall with any damage -- I don't know why these random spots tore away from the drywall:

It's very minimal though, and not nearly as bad as in my closet!
Those small imperfections could be easily touched up, but I'm not worrying about it since I'm hanging new wallpaper. (Those minor spots won't be noticeable.)
Here's the thing though -- there was an odd residue left ALL over the walls:
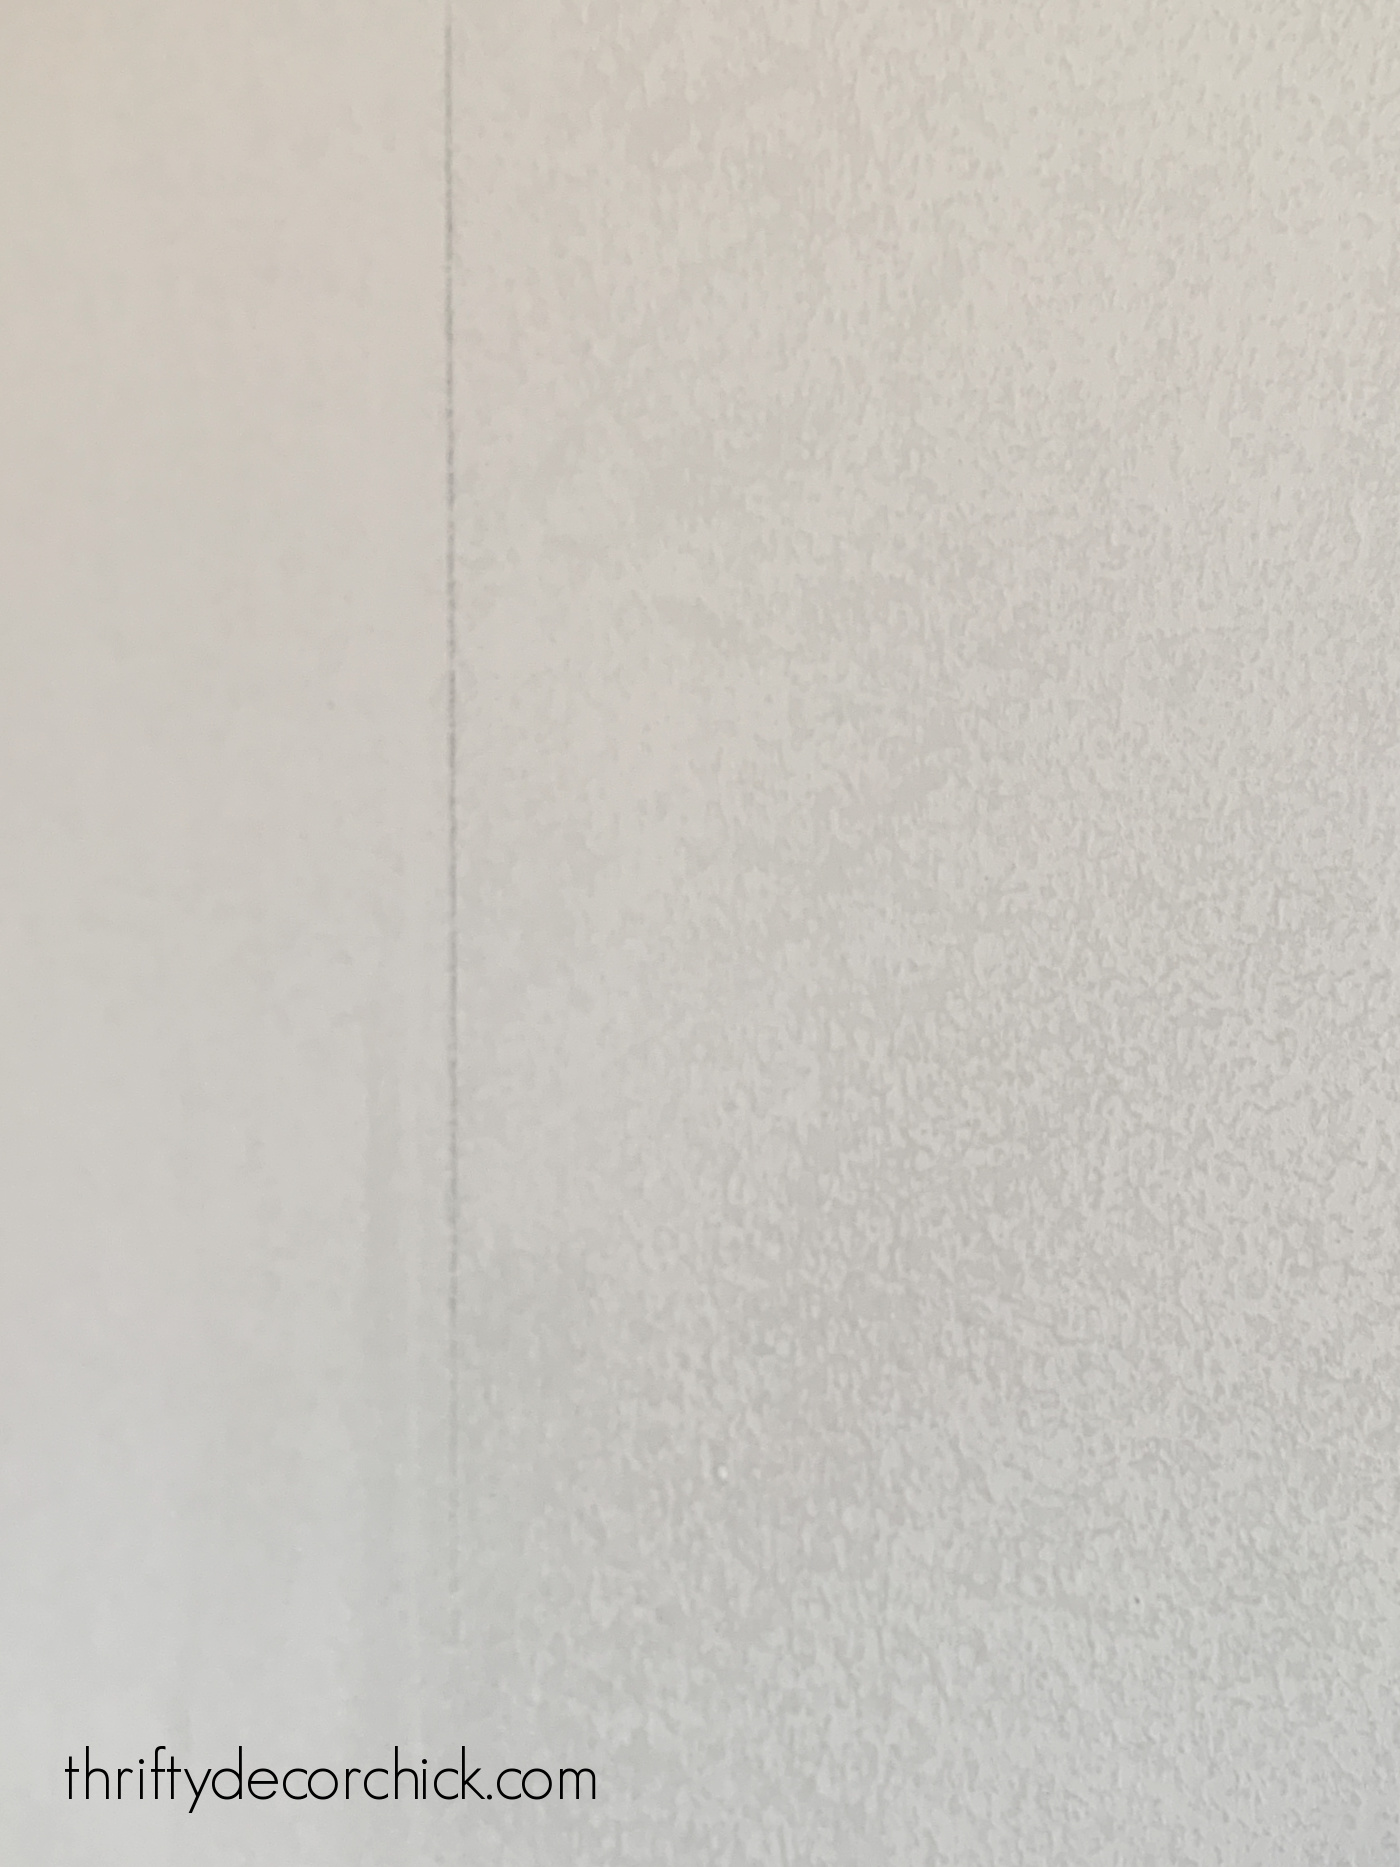
I guess I shouldn't say residue, because it's not tacky or sticky at all. But it looks dirty for sure. (The wallpaper is white on the sticky side so it's not color transfer.)
My only guess is that it is from rubbing the wallpaper to get the air bubbles out? I used my hands for the most part, but a smoothing tool may create the same look.
It's not super noticeable, but it's enough that I would want to repaint.
The bottom line is, you'll most likely need to repaint a wallpapered wall, even if there's no drywall damage.
I say this because you need to use those pencil lines (pictured above) to install the paper correctly. So you'll either be scrubbing that off or painting a fresh coat anyway.
Also, I like to paint the corners of the room the same color as the wallpaper, so again, I'd need to paint no matter what.
Both rooms where I removed the wallpaper had the exact same original paint, so the only difference I can figure is in the wallpaper.
And the room that had far more issues only recently had the wallpaper installed (it was only up for a few weeks). The bathroom paper has been up for years and was installed within months of the walls being painted.
The most important tip is to be patient as you start your wallpaper removal process! You'll be able to gauge how quickly you can move along as you work on it.
Even with the few minor issues, I still stand by this product -- it's such a GREAT way to add a custom touch for a space, for both renters and homeowners.
More on the replacements for these two wallpapers soon!
Have you removed any adhesive wallpaper in your home? I haven't tried to take down the pasted kind yet and hope I don't have to for a VERY long time! ?
Never miss a post by signing up to get posts via email.
Via https://www.thriftydecorchick.com/2022/01/how-to-remove-peel-and-stick-wallpaper.html How to build a modern DIY fireplace where there was none.
A step by step tutorial on how to build a shiplap electric fireplace on a blank and boring wall!
This is the second time we've created a custom focal point in a space by adding an electric fireplace insert.
Both times have been in our basement(s) and now I want to keep adding more of these modern fireplaces around the house! ?
The first time we did this makeover was in our last basement living room -- there was an alcove from our bay window upstairs that was the perfect spot:

We loved it so much, especially in the basement that wasn't quite as warm as the rest of the house.
We planned to do something similar in this house -- we were bummed when the insert we had in mind didn't fit between the bench and the TV on the entertainment wall I built:

I've been talking with the Touchstone electric fireplace insert company since that DIY project.
When that spot didn't work out I told them I was going to figure out a new place for the fireplace somewhere down there.
Touchstone offers both built in and wall mounted fireplaces in various sizes, so we had quite a few options!
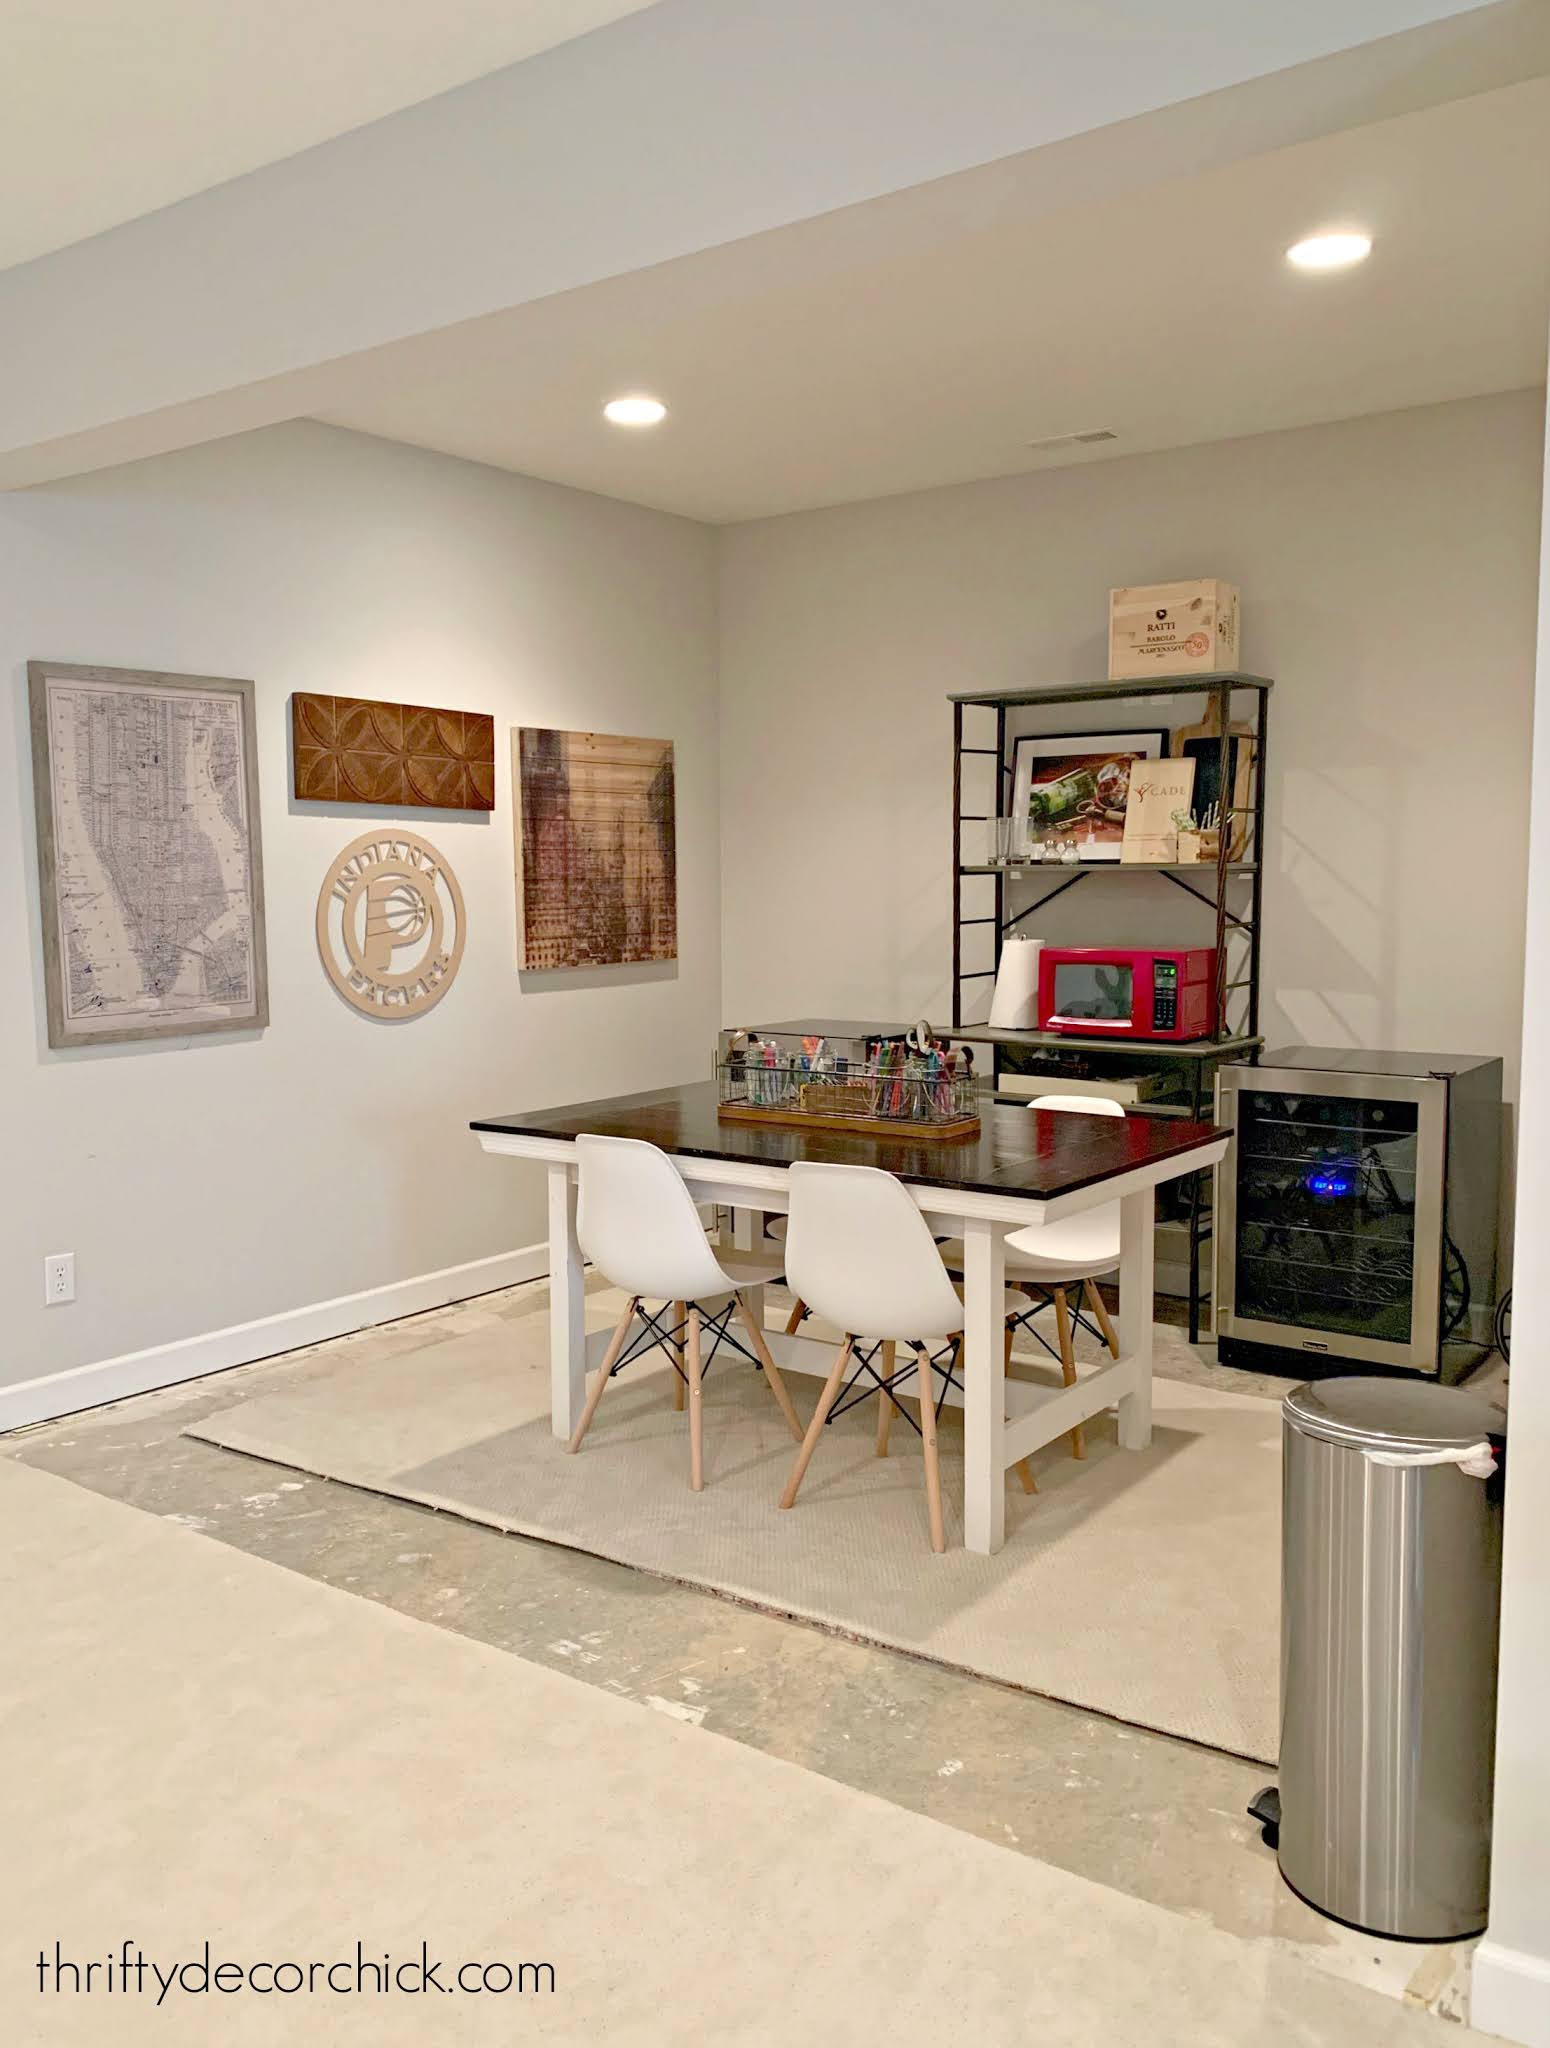
We played around with a few locations over the past year and finally decided on this game storage wall:

This post may contain affiliate links for your convenience.
See my policies and disclosure page for more information.
We used IKEA cubby units to store all of our games along that wall.
Because we have all the new storage on TV wall, we didn't need these cubbies anymore. Plus, as our son gets older he doesn't need all the toy storage, sniff. :(
I LOVED those long DIY wood picture ledges, but I came up with a solution to keep them and the fireplace!
After removing everything, the first step was to build out the wall the fireplace would be installed into.
Thankfully Touchstone has all of the specifications ("rough opening dimensions") for each fireplace online:
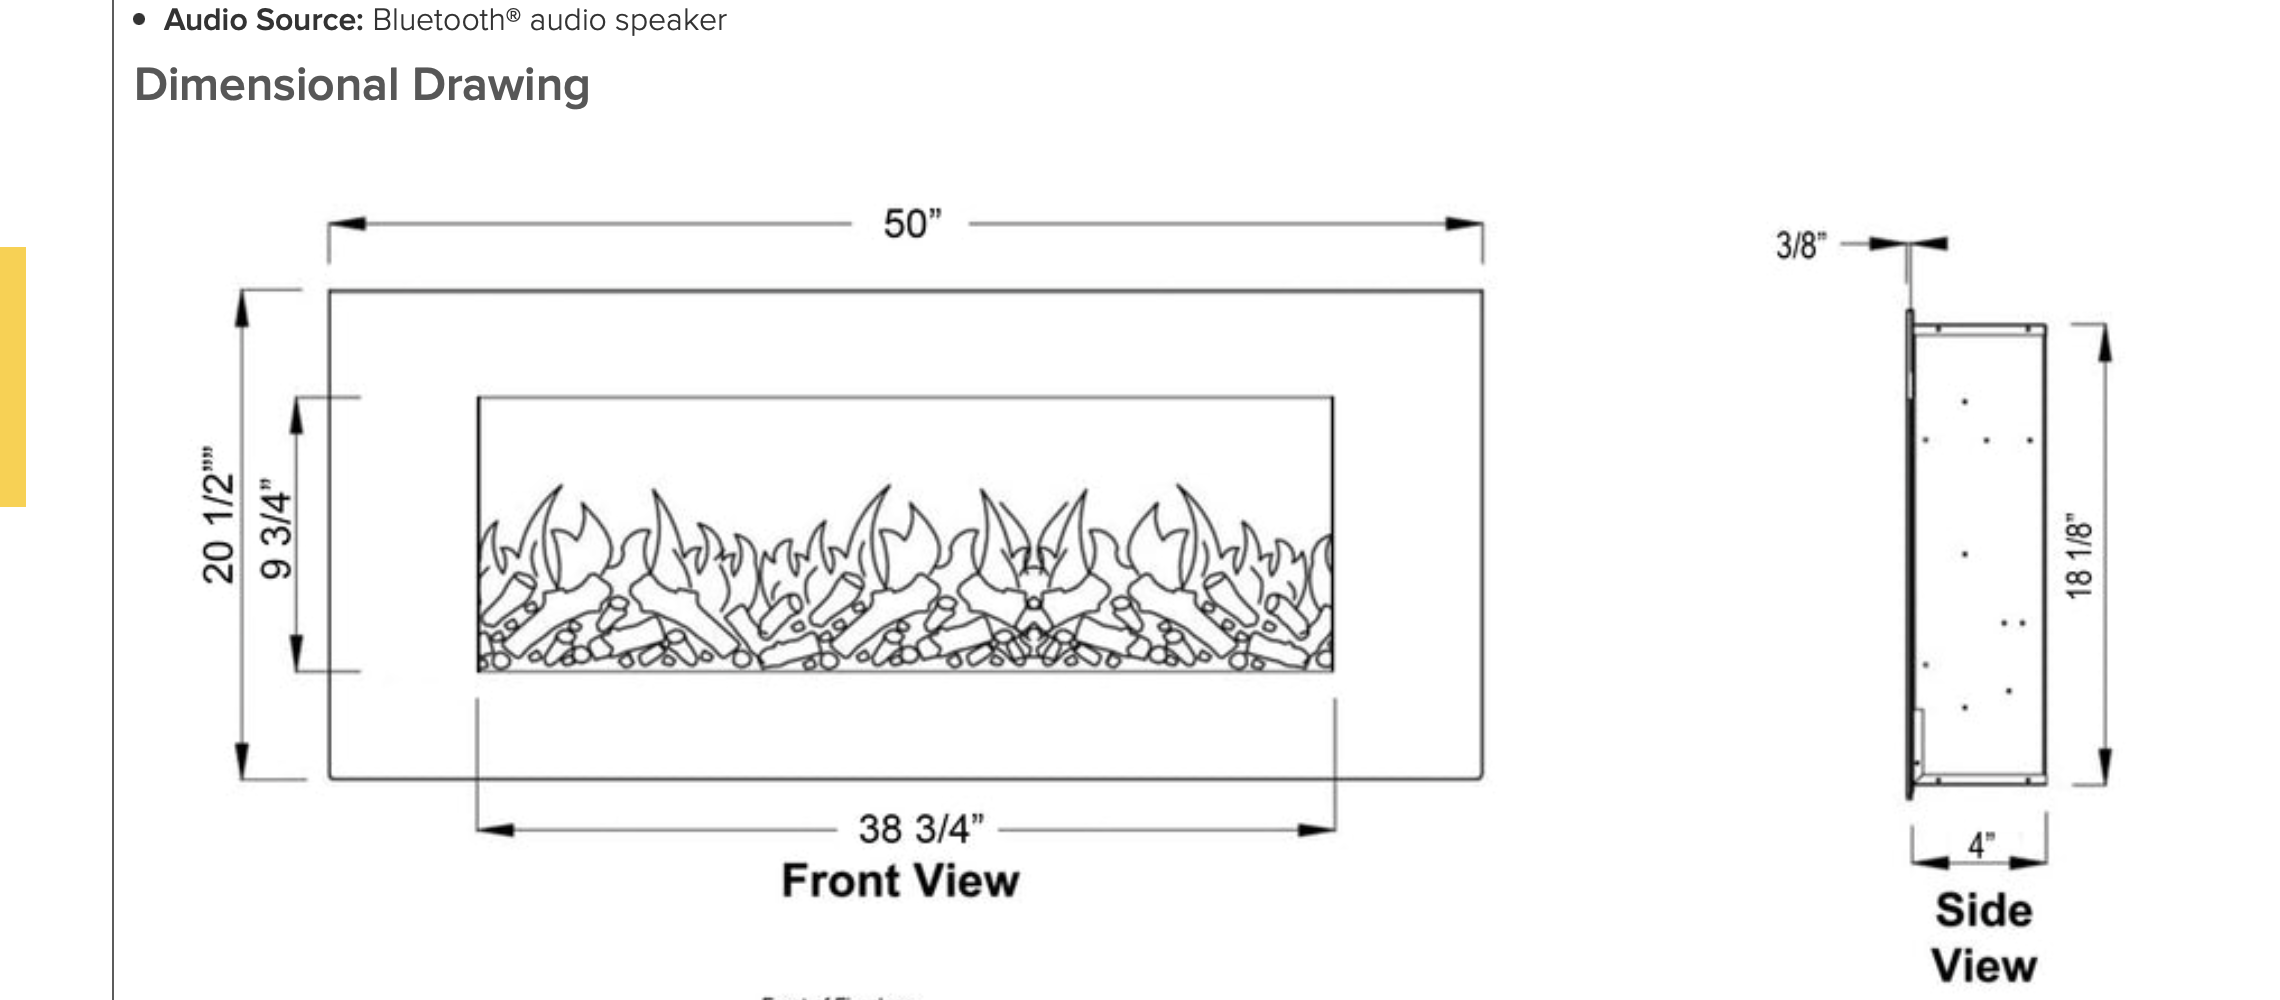
This was helpful because we scheduled the contractors last minute one day, when we didn't have the actual fireplace on hand.
I got help with the framing part of the build because this is in the basement and we needed to be able to secure the frames into the cement floor.
Because of the treatment I was doing on the exterior of the fireplace, I didn't have to mud or tape the drywall.
Major bonus!:

The depth of the fireplace wall is up to you -- because the heat comes from the front of the electric insert, you won't need a ton of room behind the unit.
Make sure the spot for your fireplace insert is framed out with 2x4s so it can support the fireplace securely.
There was already an outlet on the wall, but we had an electrician adding accent lighting so he placed an outlet on the side as well:

I wasn't sure if I was going to add a mantel, so I wanted to have an outlet for Christmas lights just in case. :)
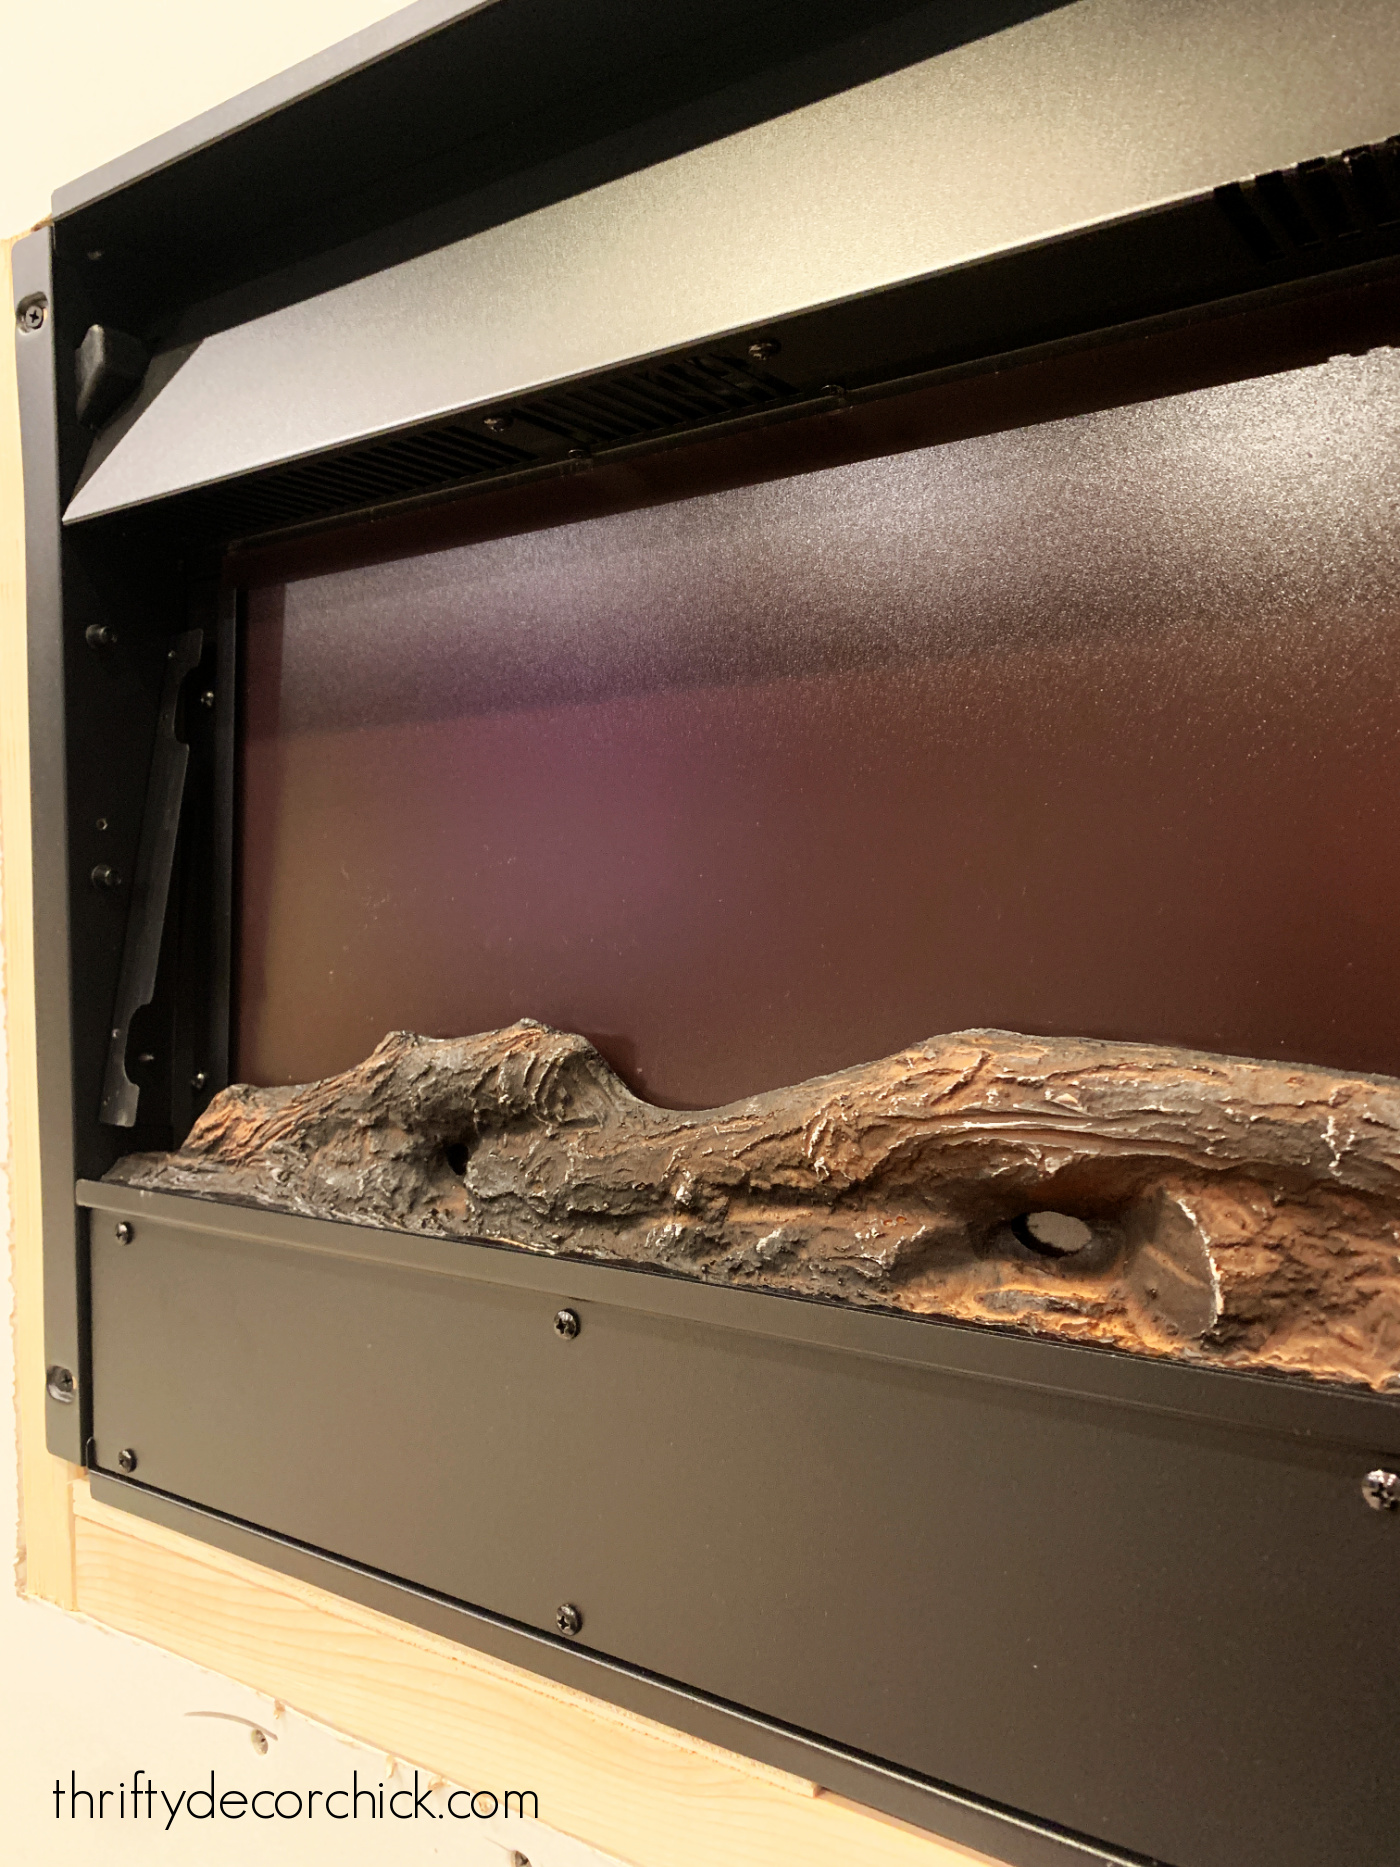
We picked the AudioFlare black glass electric fireplace because we loved the long, modern design:

It comes with both clear crystals and the more traditional "wood" option:

They are easy to switch out and the fireplace installation was incredibly fast!
We slid it in to the 2x4 frame and then secured it with screws through holes on the sides of the fireplace frame:
You can leave the fireplace in as you finish up, or take it back out. It's easy to remove and install again.
Next up was deciding on the design details. Because this fireplace unit is long and modern, I wanted to keep things as simple as possible.
My first plan was to do stained shiplap, but when I saw how expensive stain grade plywood was, I switched directions. :)
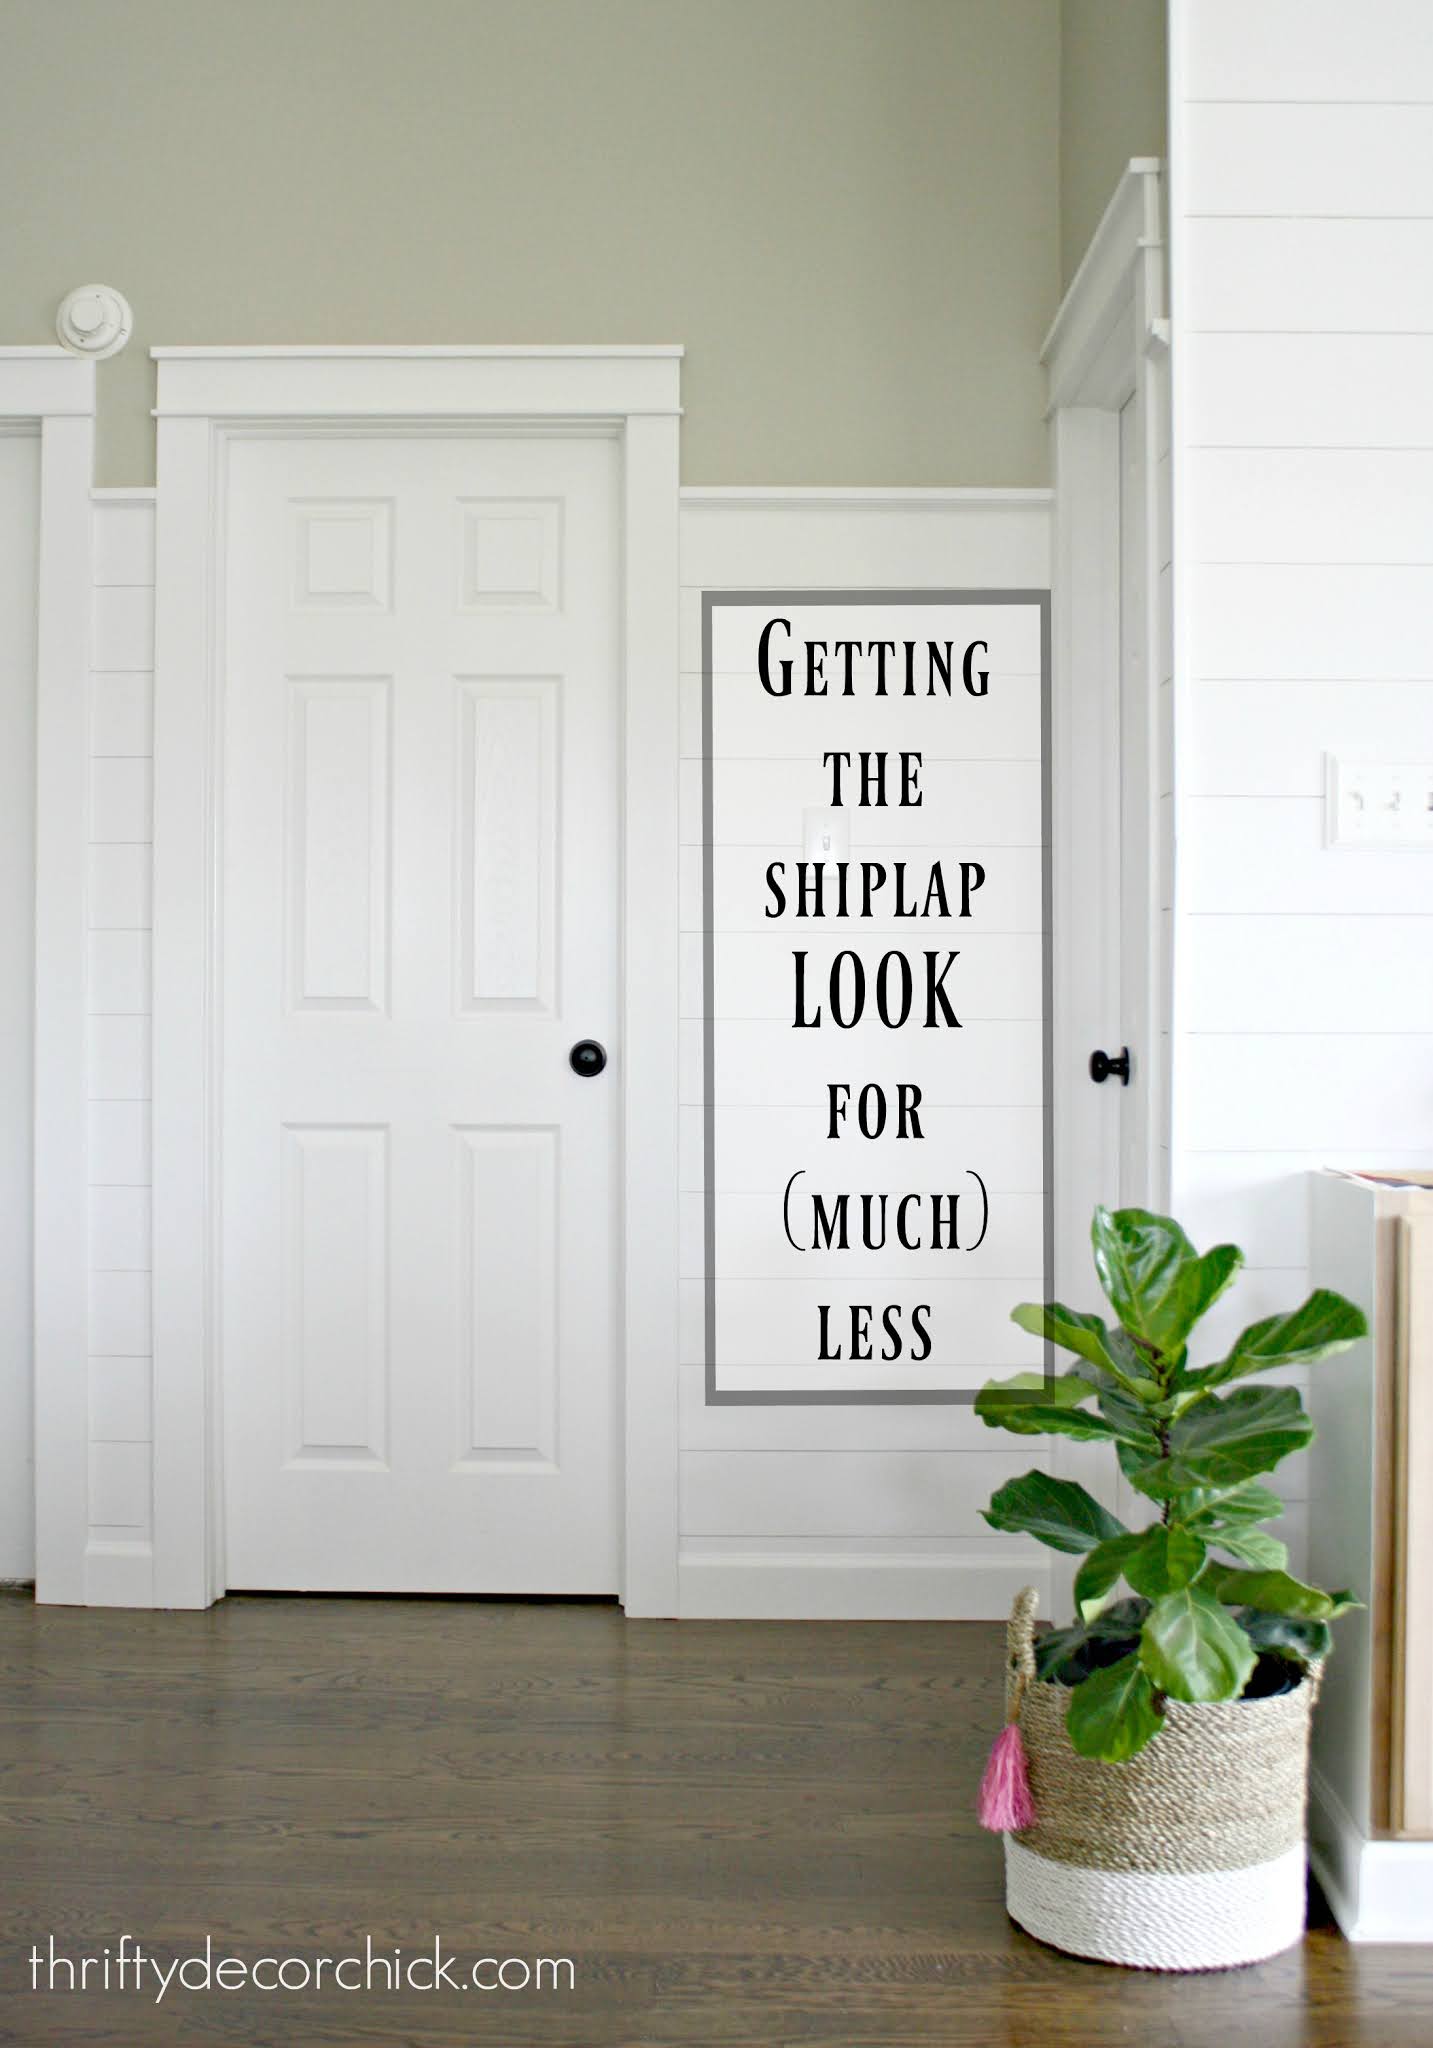
I went with my tried and true inexpensive shiplap option instead. I've used this for wall treatments SO many times over the years, and it always comes out looking great!
You can have the strips of luan cut down at the hardware store. I went thicker this time -- each one is about five inches wide.
I took a flat sanding sponge and wrapped it around the edges to knock down the splinters and rough spots:

After that it was time to decide on the paint color!
We have cozy, moody gray walls in the basement, but I didn't want to do more gray on the fireplace.
I was so taken with our green Christmas tree and decor against the gray down there this past holiday, and started thinking about that as an accent color.
I went with this lovely deep green called Jasper from Sherwin-Williams:
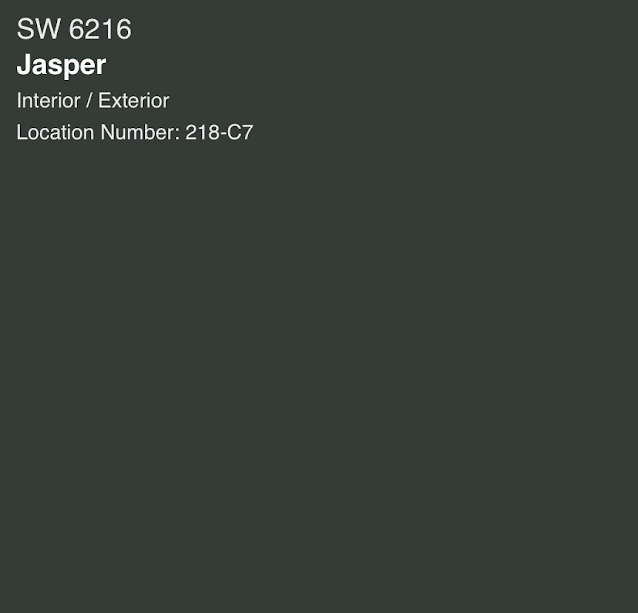
I am completely obsessed with it! It is a gorgeous dark green.
I had plenty of extra gray paint (called Westchester Gray) so I painted one coat directly onto the drywall. That base coat does not need to be perfect because you'll barely see it.
You want your wall color to be a similar tone as your shiplap color.
I usually don't paint my trim before installing, but with this thin luan I like to paint the edge with a foam roller before hanging it:

This way I could just roll the color on the front after I nailed in the shiplap boards.
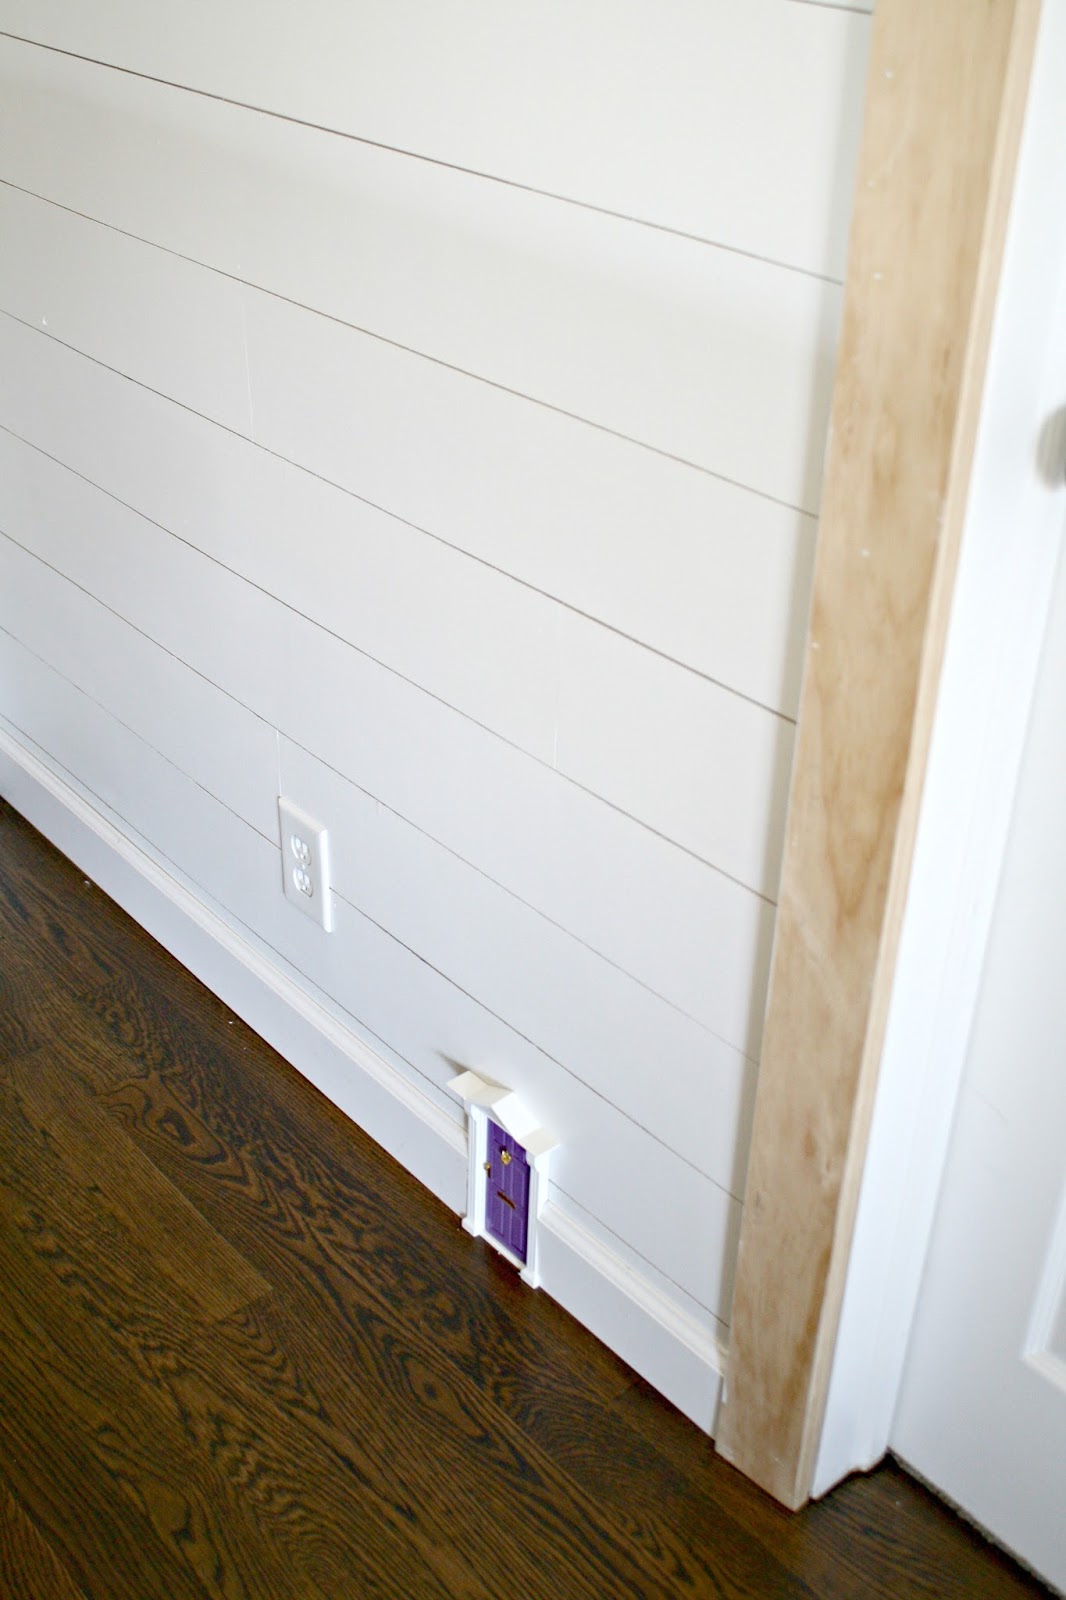
I always start my shiplap at the ceiling, knowing I can hide the bottom strip behind the baseboards.
My little trick for perfectly spacing out the planking is using a coin. All I could find in the basement was a plastic toy one and it worked great. ;)

I did continuous pieces across the width of the fireplace to keep the look modern and simple.
I use a nail gun to attach all shiplap and trim (into studs if possible).
These wood corner pieces are available at most hardware stores -- I painted them and then nailed one in on both corners to finish it off:

We LOVE how this spot turned out!
In the end I didn't add a fireplace mantel -- I felt like it was going to be too much and would give it more of a farmhouse look.
At least for now, it will stay simple with just this round brass mirror:

The Touchstone fireplace insert we got has a remote with a bunch of options!

There are five flame options for the "fire" -- from down low:

To brighter with higher flames:


Ours has three color options -- the traditional orange like above, and a modern blue:

And a combo of the two colors as well!
Want to know the coolest part of this electric fireplace? It has a Bluetooth speaker inside! How fun is that?:

You can play music or they suggest playing the sound of a crackling fire through it...so funny! We've done both. :)
Instead of building bookcases or cabinets, I cut my two long DIY ledges into three separate ones and hung them on each side of the fireplace:

They were a perfect fit!
We added small recessed lighting above each set of shelves:

My go-to is usually sconces, but we have enough of those around here already! :)
I wanted it to be simple, especially with the cool sconce and trim I installed around the corner:

I'm so glad I didn't go with stained shiplap -- with the table and the picture ledges it would have been way too much wood.
Whenever I share our basement I get comments on the green tones in the gray paint. I never really notice it until I share pictures here.
But the two really do complement each other well!

I love both colors with the warm wood of the ledges and the table.
This whole spot is such a "vibe" (as our son says) now -- it was so fun transform this spot from a basic wall into a centerpiece!
Here are a few more features of the electric fireplace we used:
Adding an electric fireplace insert is the perfect way to warm up your bedroom or living room during these colder months!
And even if you don't use the heat, it looks so cool!
The basement is a perfect spot for a little extra warmth:


Of course you can customize this DIY project however you want! There are so many sizes and colors available from Touchstone that will work with any design style.
Traditionalists can combine the inserts with a classic wood fireplace surround and bookcases, or if you're a modern lover, use our simple build out and install flat, sleek tile.
Thank you to Touchstone for providing our electric fireplace for this project!
Never miss a post by signing up to get posts via email.
Via https://www.thriftydecorchick.com/2022/01/how-to-build-diy-electric-fireplace.html A cozy and welcoming home tour with rich paint colors and warm decor touches.
It's been too long since I've shared a blogger or "Instagramer" that has caught my eye! I figured this is the perfect time of year to share Julie's Boston home, because it's SO incredibly cozy.
You can see a ton of other home tours here for even more inspiration!
I've been following Julie Ciampa on Instagram for some time. Every time one of her pictures comes up in my feed I find myself immediately studying all of the lovely details.
She is such a talented decorator whose winter decor makes me want to snuggle right up in just about every room of her house!
Let's take a little tour, shall we?
Julie does an incredible job of bringing in deep colors as accents, but her spaces still feel bright. I love the greenish gray color of her front door:

I love how she blends fabric colors and textures as well. It all adds up to a gorgeous home!
The simple touches of trim work on her walls are just enough that they complement the rooms perfectly:

I love the mix of warm wood and metallic accents throughout:

And of course all of the candlelight!:

Isn't that fireplace wall lovely?
Julie's home is the definition of "hygge" -- enjoying the little things like curling up in a soft blanket, with a fire and candles burning. I love it!

Her four poster bed and white linens in the bedroom are the perfect backdrop for more warm colors and fabrics:

Her decor in the warmer months is perfection as well. That floral arrangement is gorgeous:

Julie creates a brand new look by moving a few accessories around the house. I wish I was better at that -- I find the way I love something and tend to keep it like that forever!
As I'm writing this post I'm realizing that we share a love of the same deep, rich colors as accents in our homes.
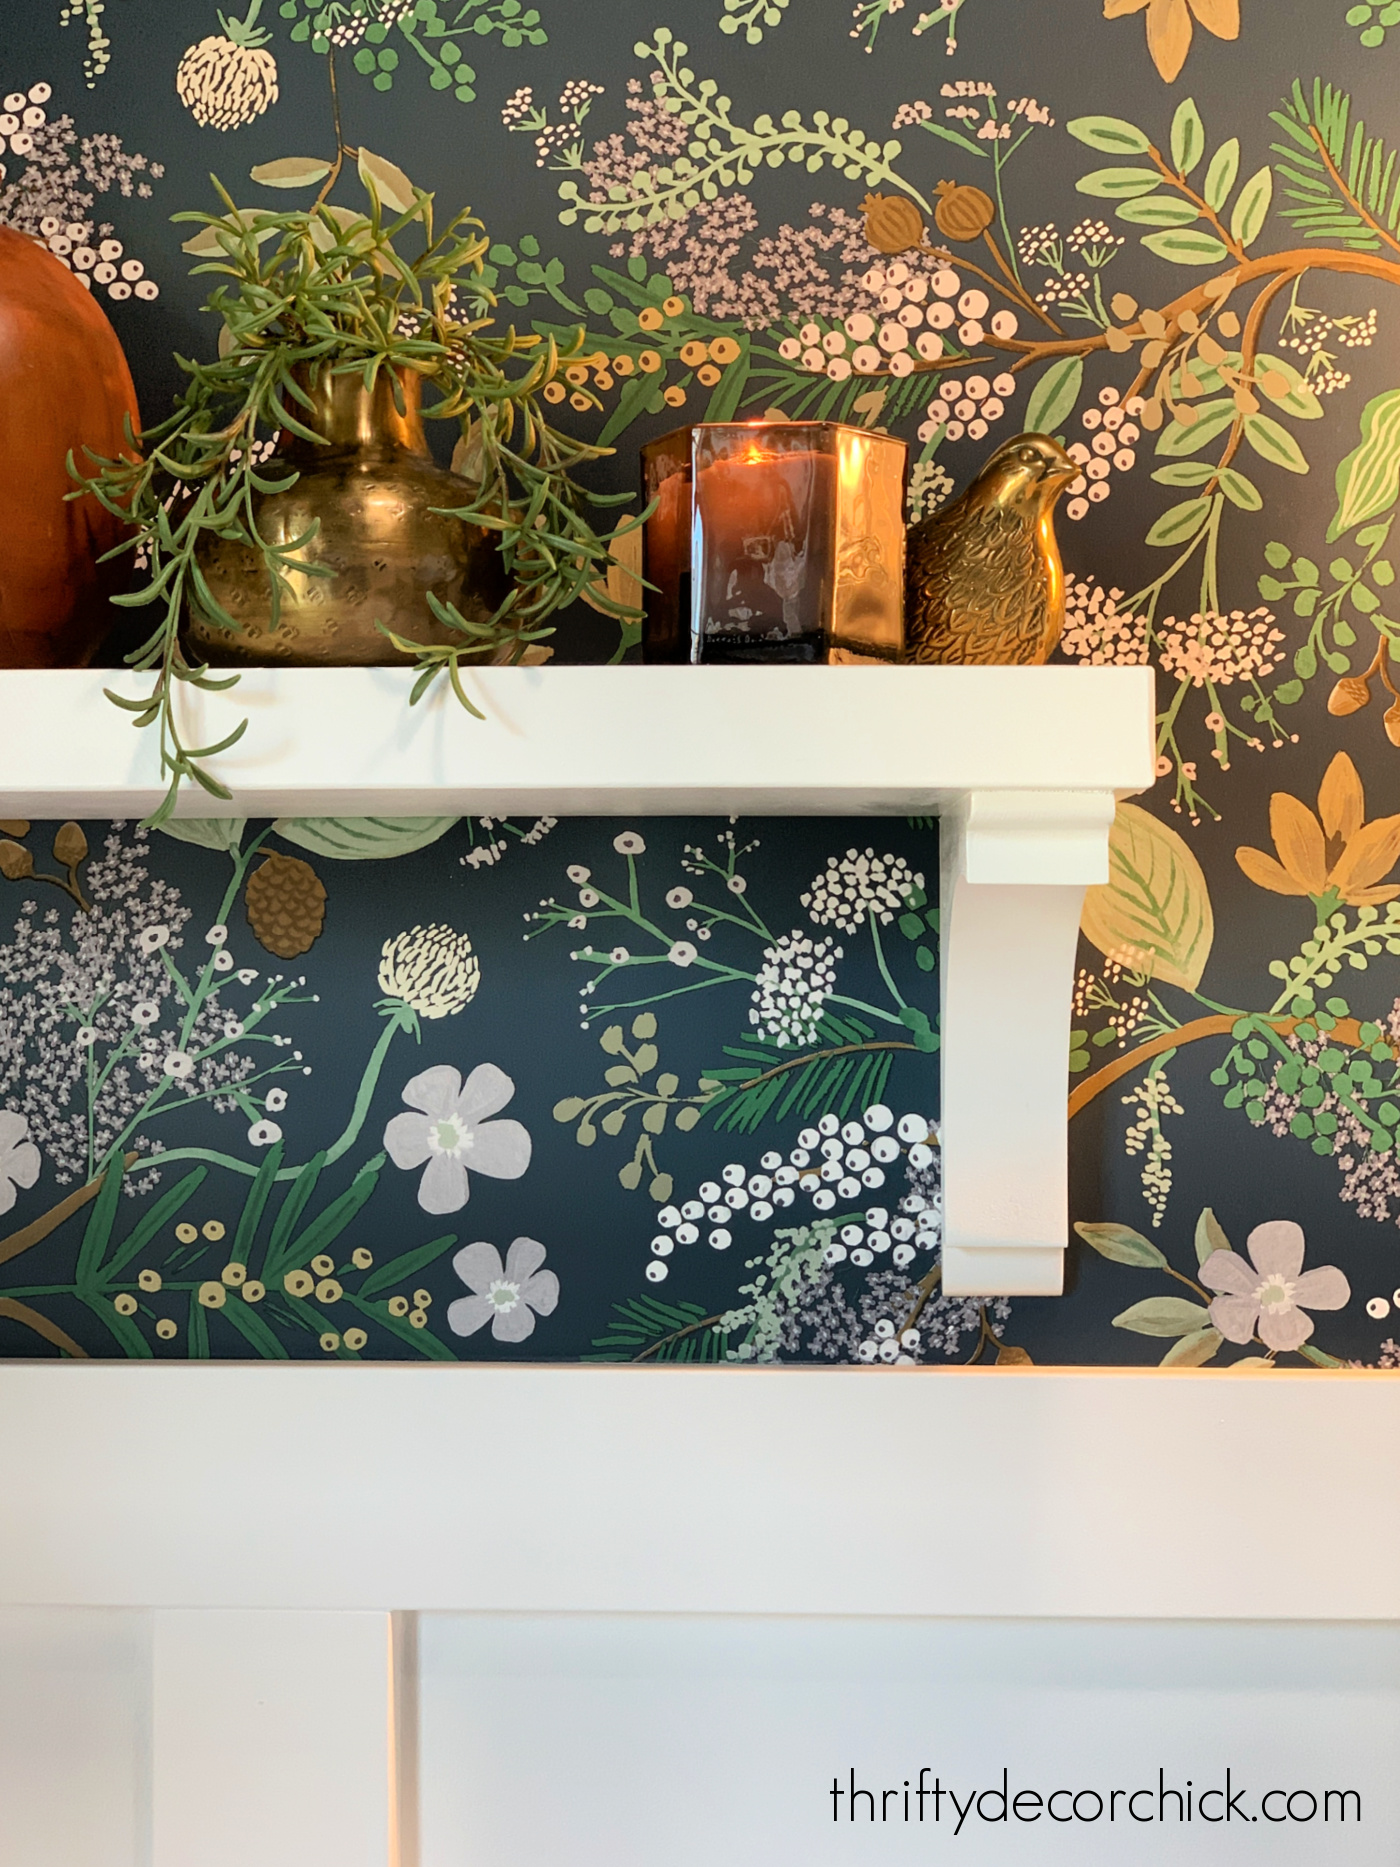
This dark blue bathroom vanity with the gold hardware is gorgeous:

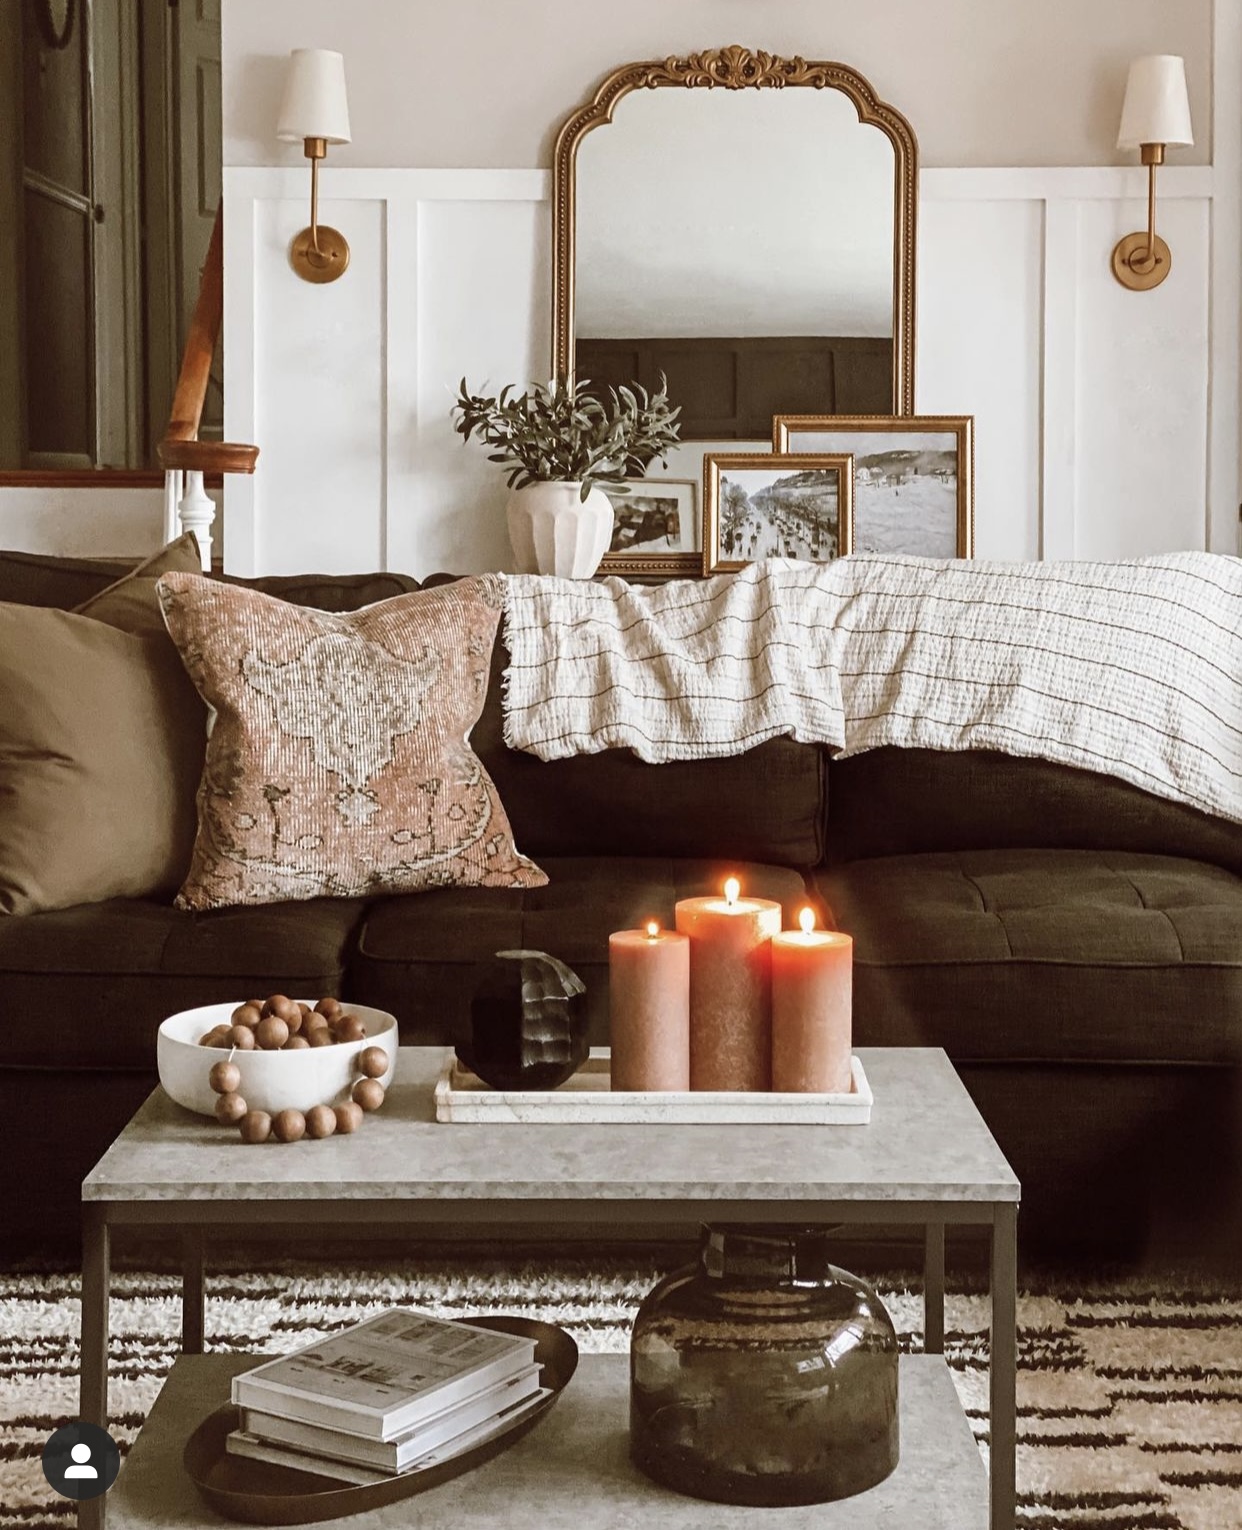
And I was swooning over the rich blue color on this bench wall:

I love that huge ledge with the corbels for displaying large pieces!
We share a love of moody trim accents for sure! I'm so drawn to Julie's home and I'm sure that's why. :)
You can find more of Julie's spaces on Instagram -- follow her there to get more inspiration!
Thank you so much for letting me share your beautiful home Julie! It is absolutely lovely.
Never miss a post by signing up to get posts via email.
Via https://www.thriftydecorchick.com/2022/01/a-warm-and-welcoming-hygge-home-tour.html A round up of my biggest and best DIY makeovers of 2021!
I love this time of the year! It's fun to look back at all that I accomplished in our home and plan for the next year!
I'm pretty sure I did more DIY makeovers this year than I ever have. As our son gets older, I'm able to tackle projects a bit quicker.
That is until marching band season hits in the fall! Ha! (If you know, you know.)
My DIY experience helps too -- large builds that used to take me months now only take a few weeks.
It also helps tremendously that I wait until I'm SURE of what I want to do. I find that I need to sit on projects for a bit to ensure I really love the plan.
I'm rounding up my biggest and best DIY makeovers of 2021 here, and then will touch on some I hope to tackle this year!
Remember while looking through these that this is my job and my passion! Don't compare my progress to that of a normal household! :)
See my round up from 2020 here!
Mud room and laundry combo makeover.
I never thought I'd love having a mud room space and laundry combined after our last home, but with all the space we have it's a winner for sure.
It just wasn't functioning well. And since so many of our guests come into the house this way, I wanted to make it a prettier entry.
The bones in this room were wonderful -- the faux marble ceramic tile and our mud room bench are great.
But I knew it could all look and function so much better:
This post may contain affiliate links for your convenience.
See my policies and disclosure page for more information.
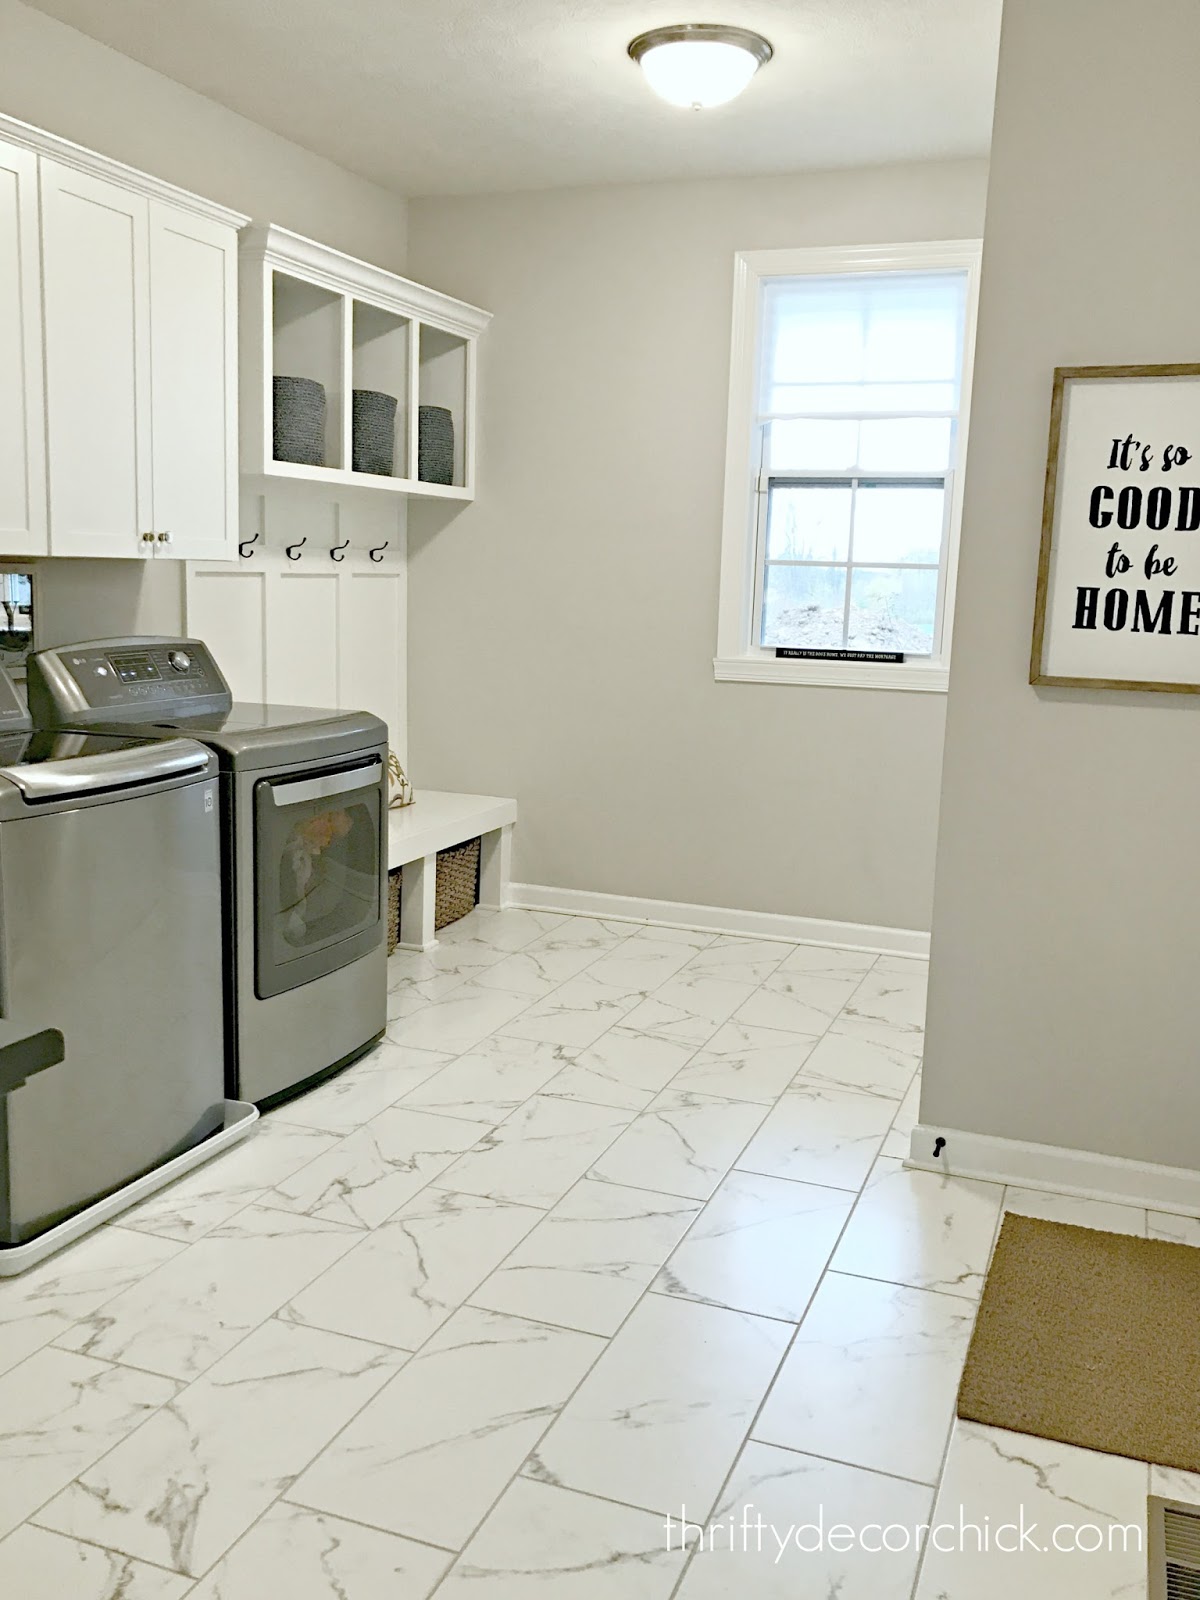
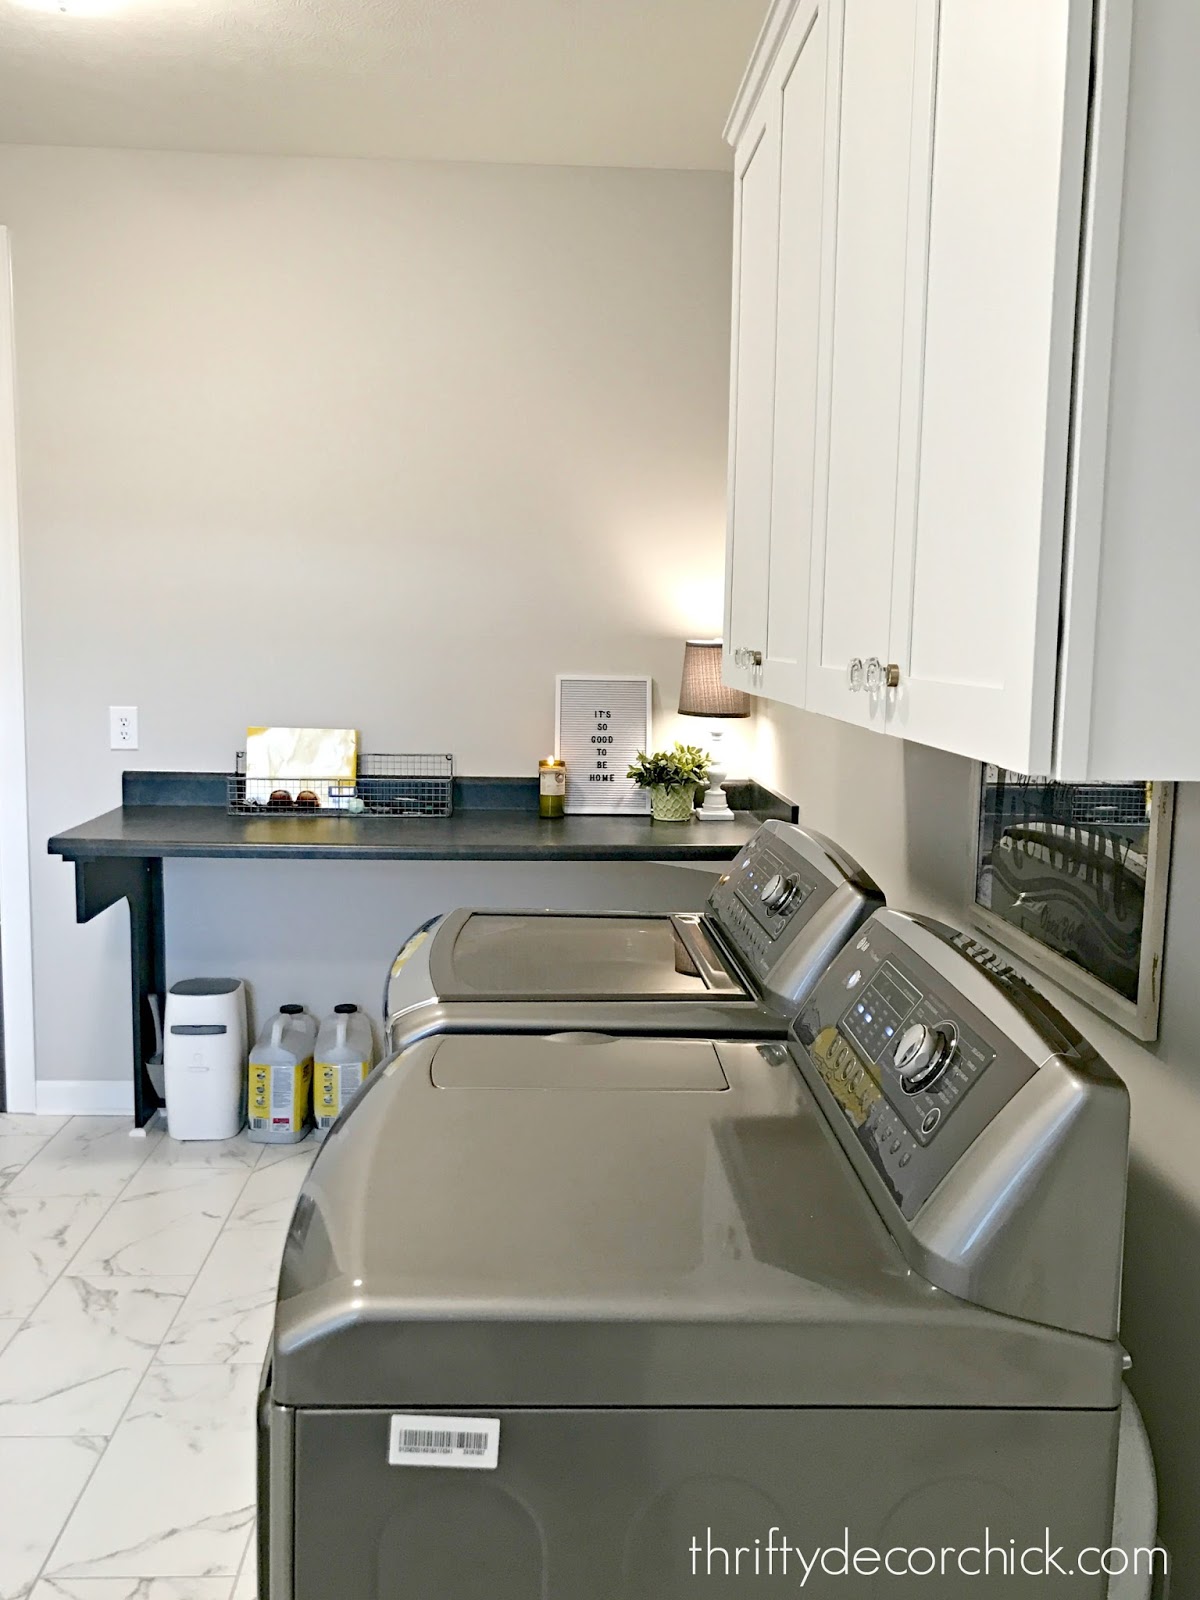
I moved the upper cabinets and added base cabinets (all drawers, which is AWESOME), so we have a great spot to hold all of our laundry and utility needs:
Our cats LOVE having a private spot and we love that we don't have to look at it every day. :)
The wallpaper in here is the star of the show, it's SO pretty. I adore this space and am so proud of how it turned out:
You can take the full tour of this laundry and mud room reveal here!
My IKEA closet makeover.
Function was really the name of my game this year. We've lived in our home for four years, and in that time I've figured out what works and what doesn't.
One space that wasn't working is my closet. I appreciated all of the space, but it was designed for only hanging clothes.
I needed storage for folded clothes more than anything.
So what sometimes looked like this:
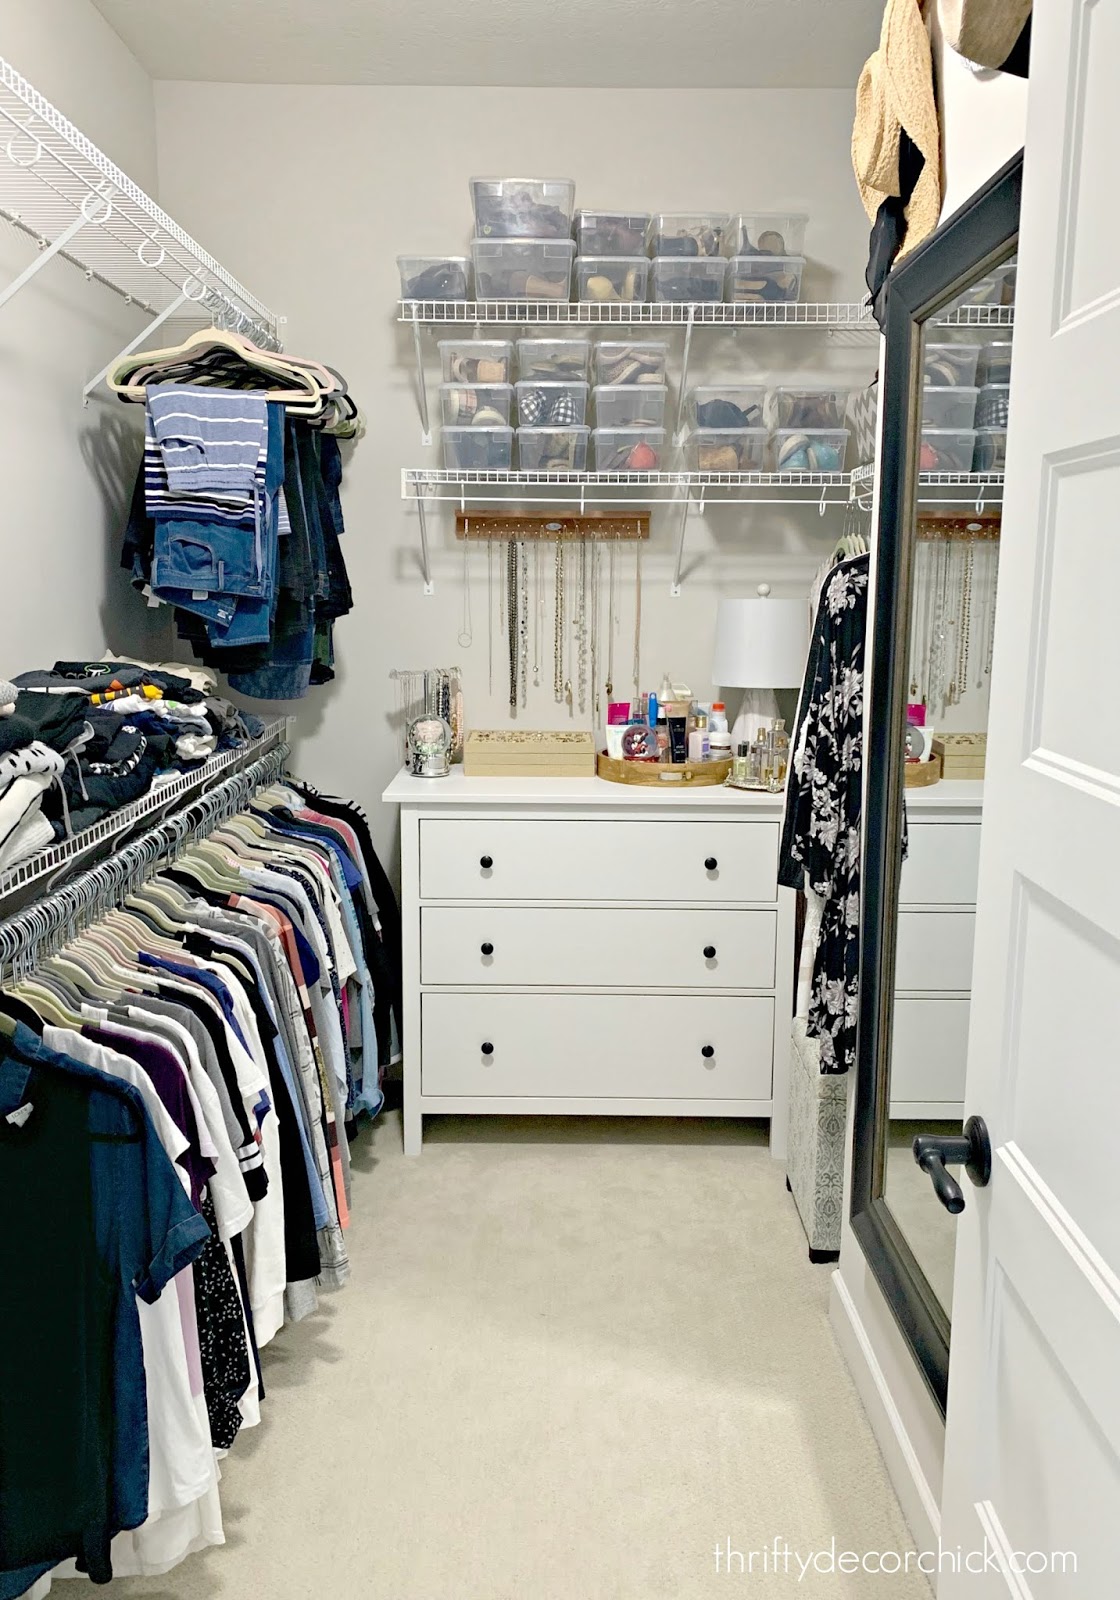
Usually looked like this:
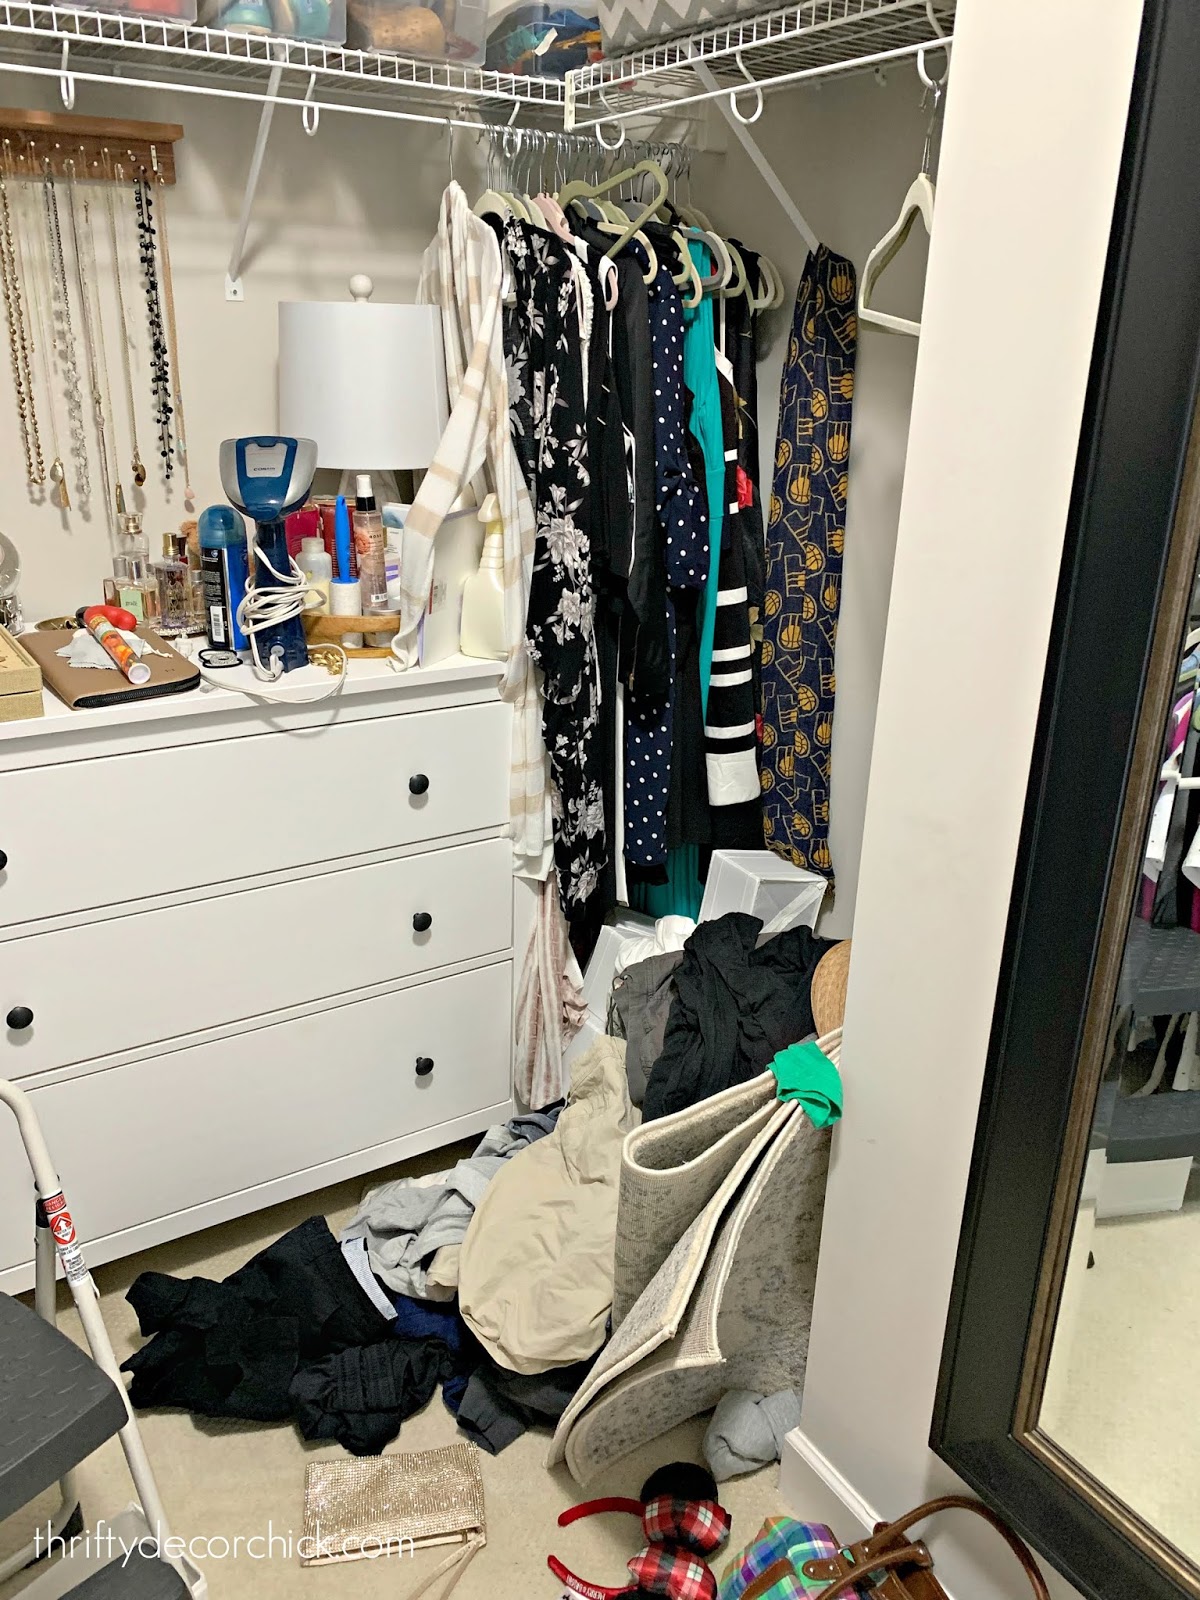
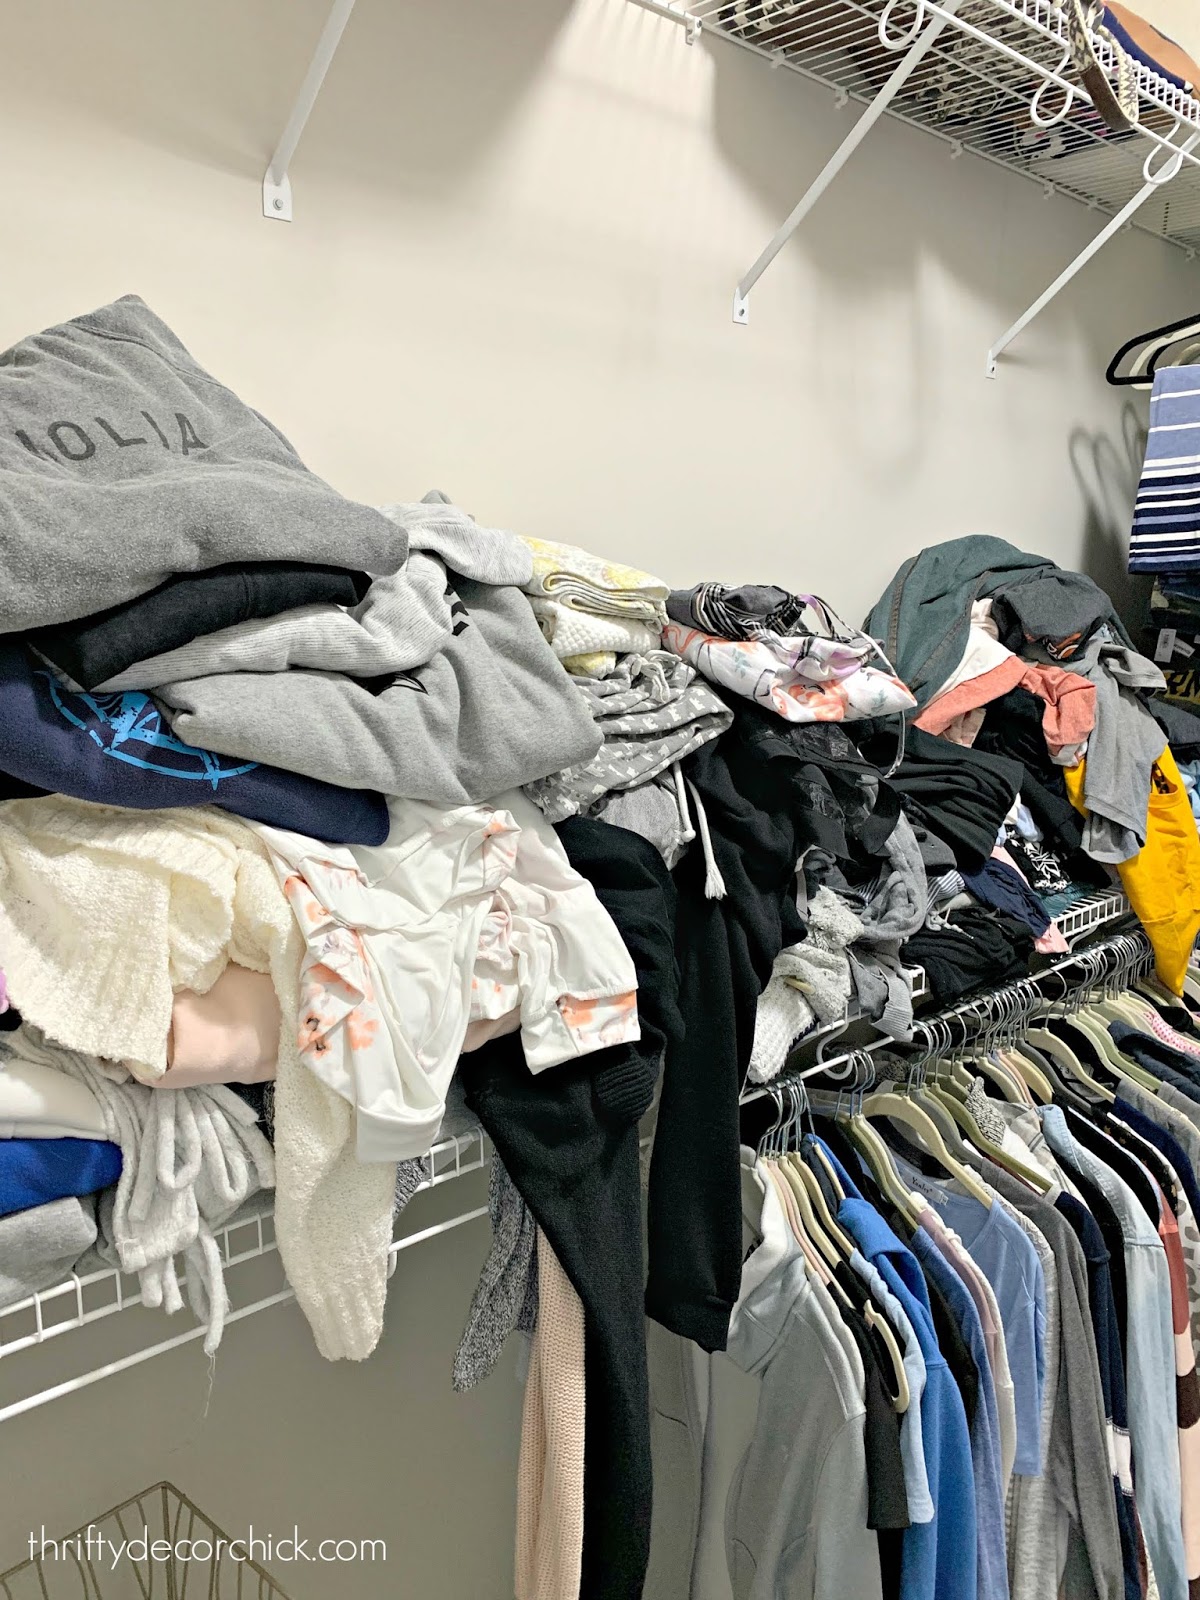
It's only been a few months since I finished this makeover and I already can barely even remember what a mess it used to be.
This is one of my all time favorite makeovers in terms of functionality for SURE.
If you can tackle ONE space this year, let it be your closet!
I can't even tell you what a difference this newly organized space makes in my days:
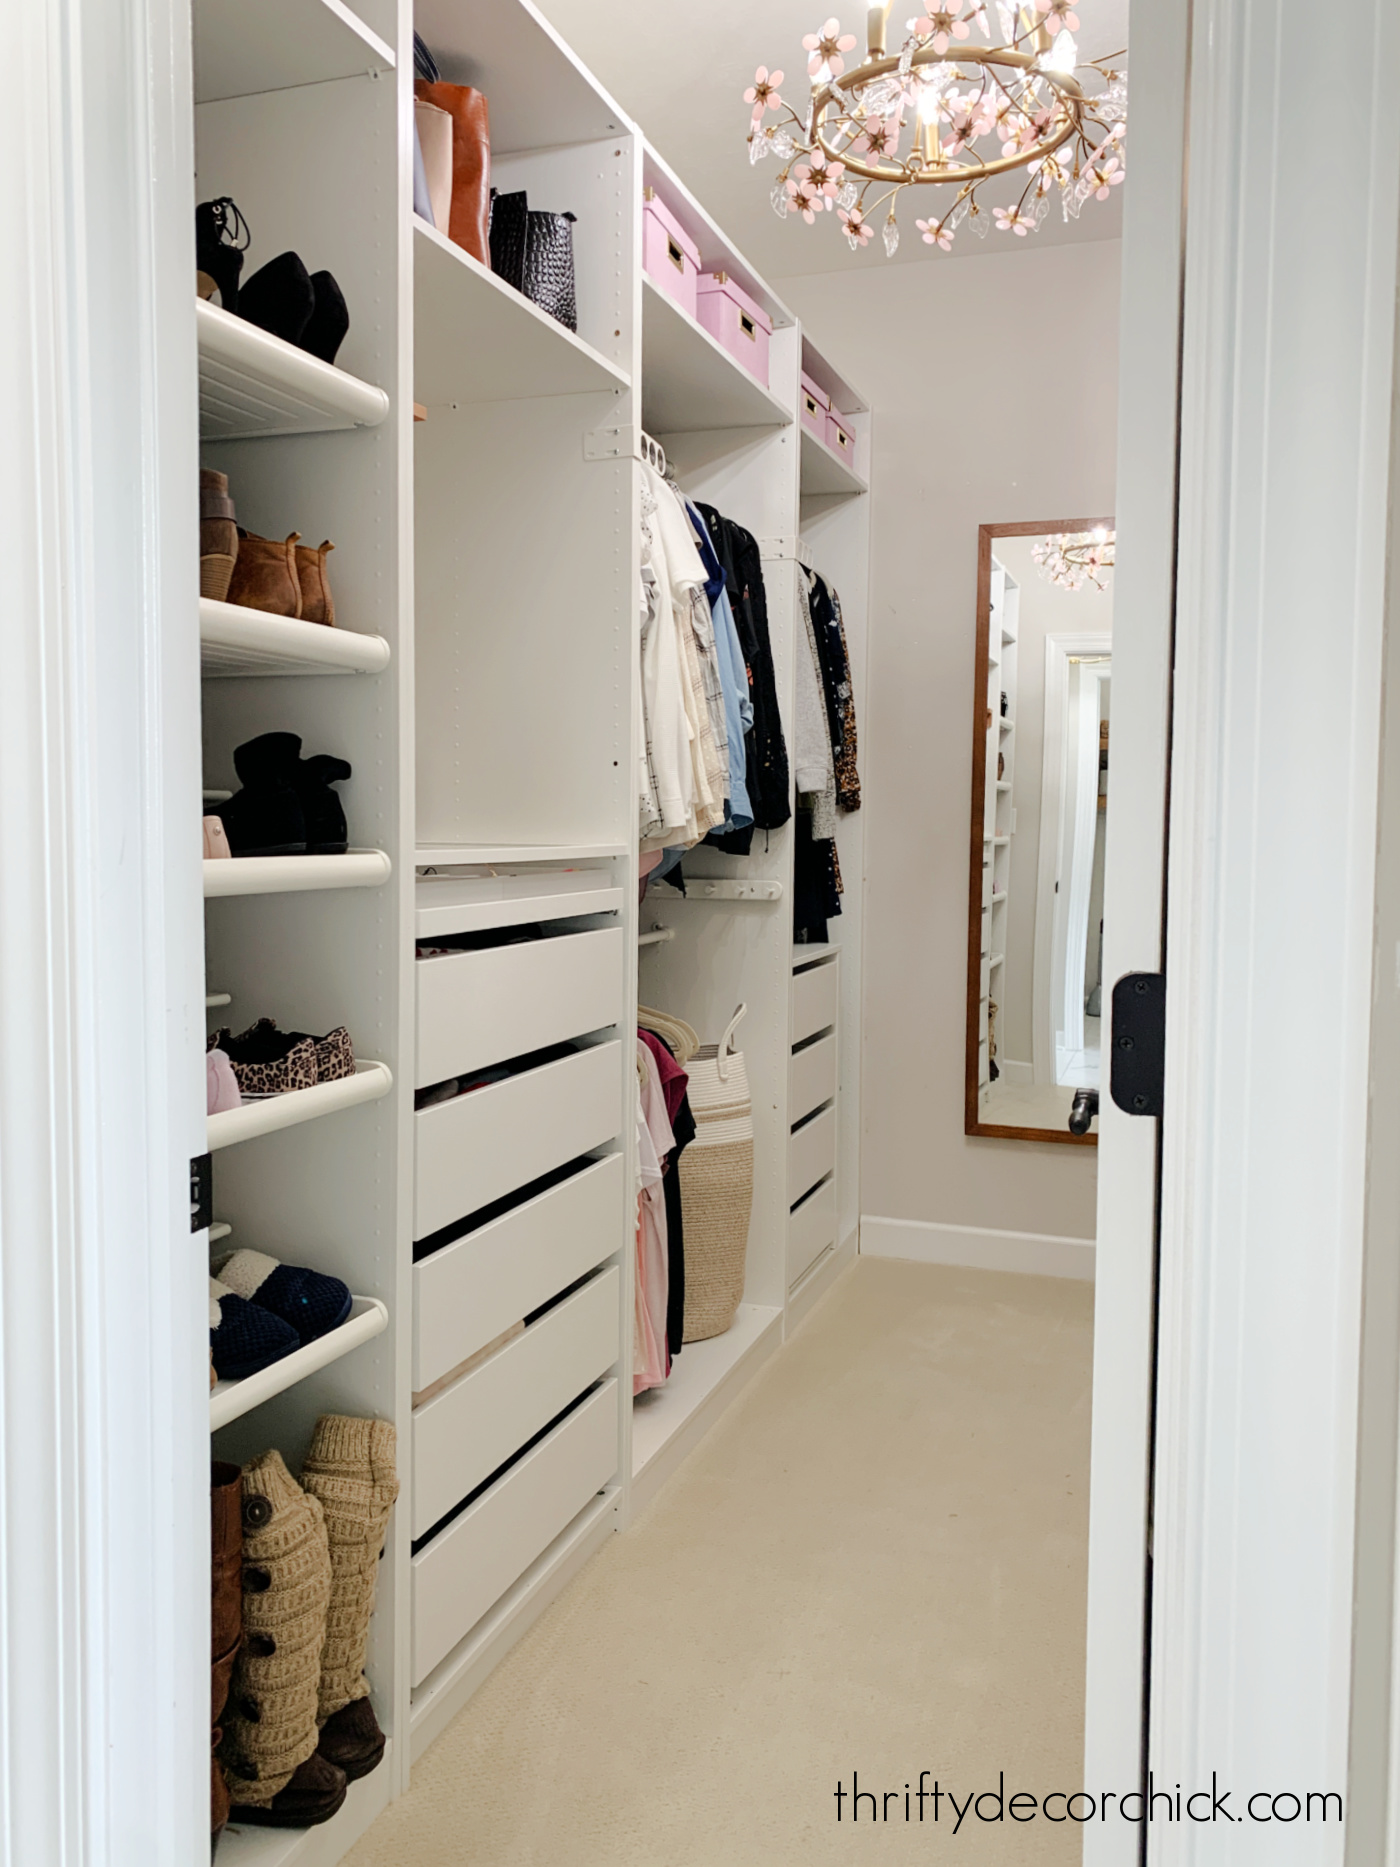
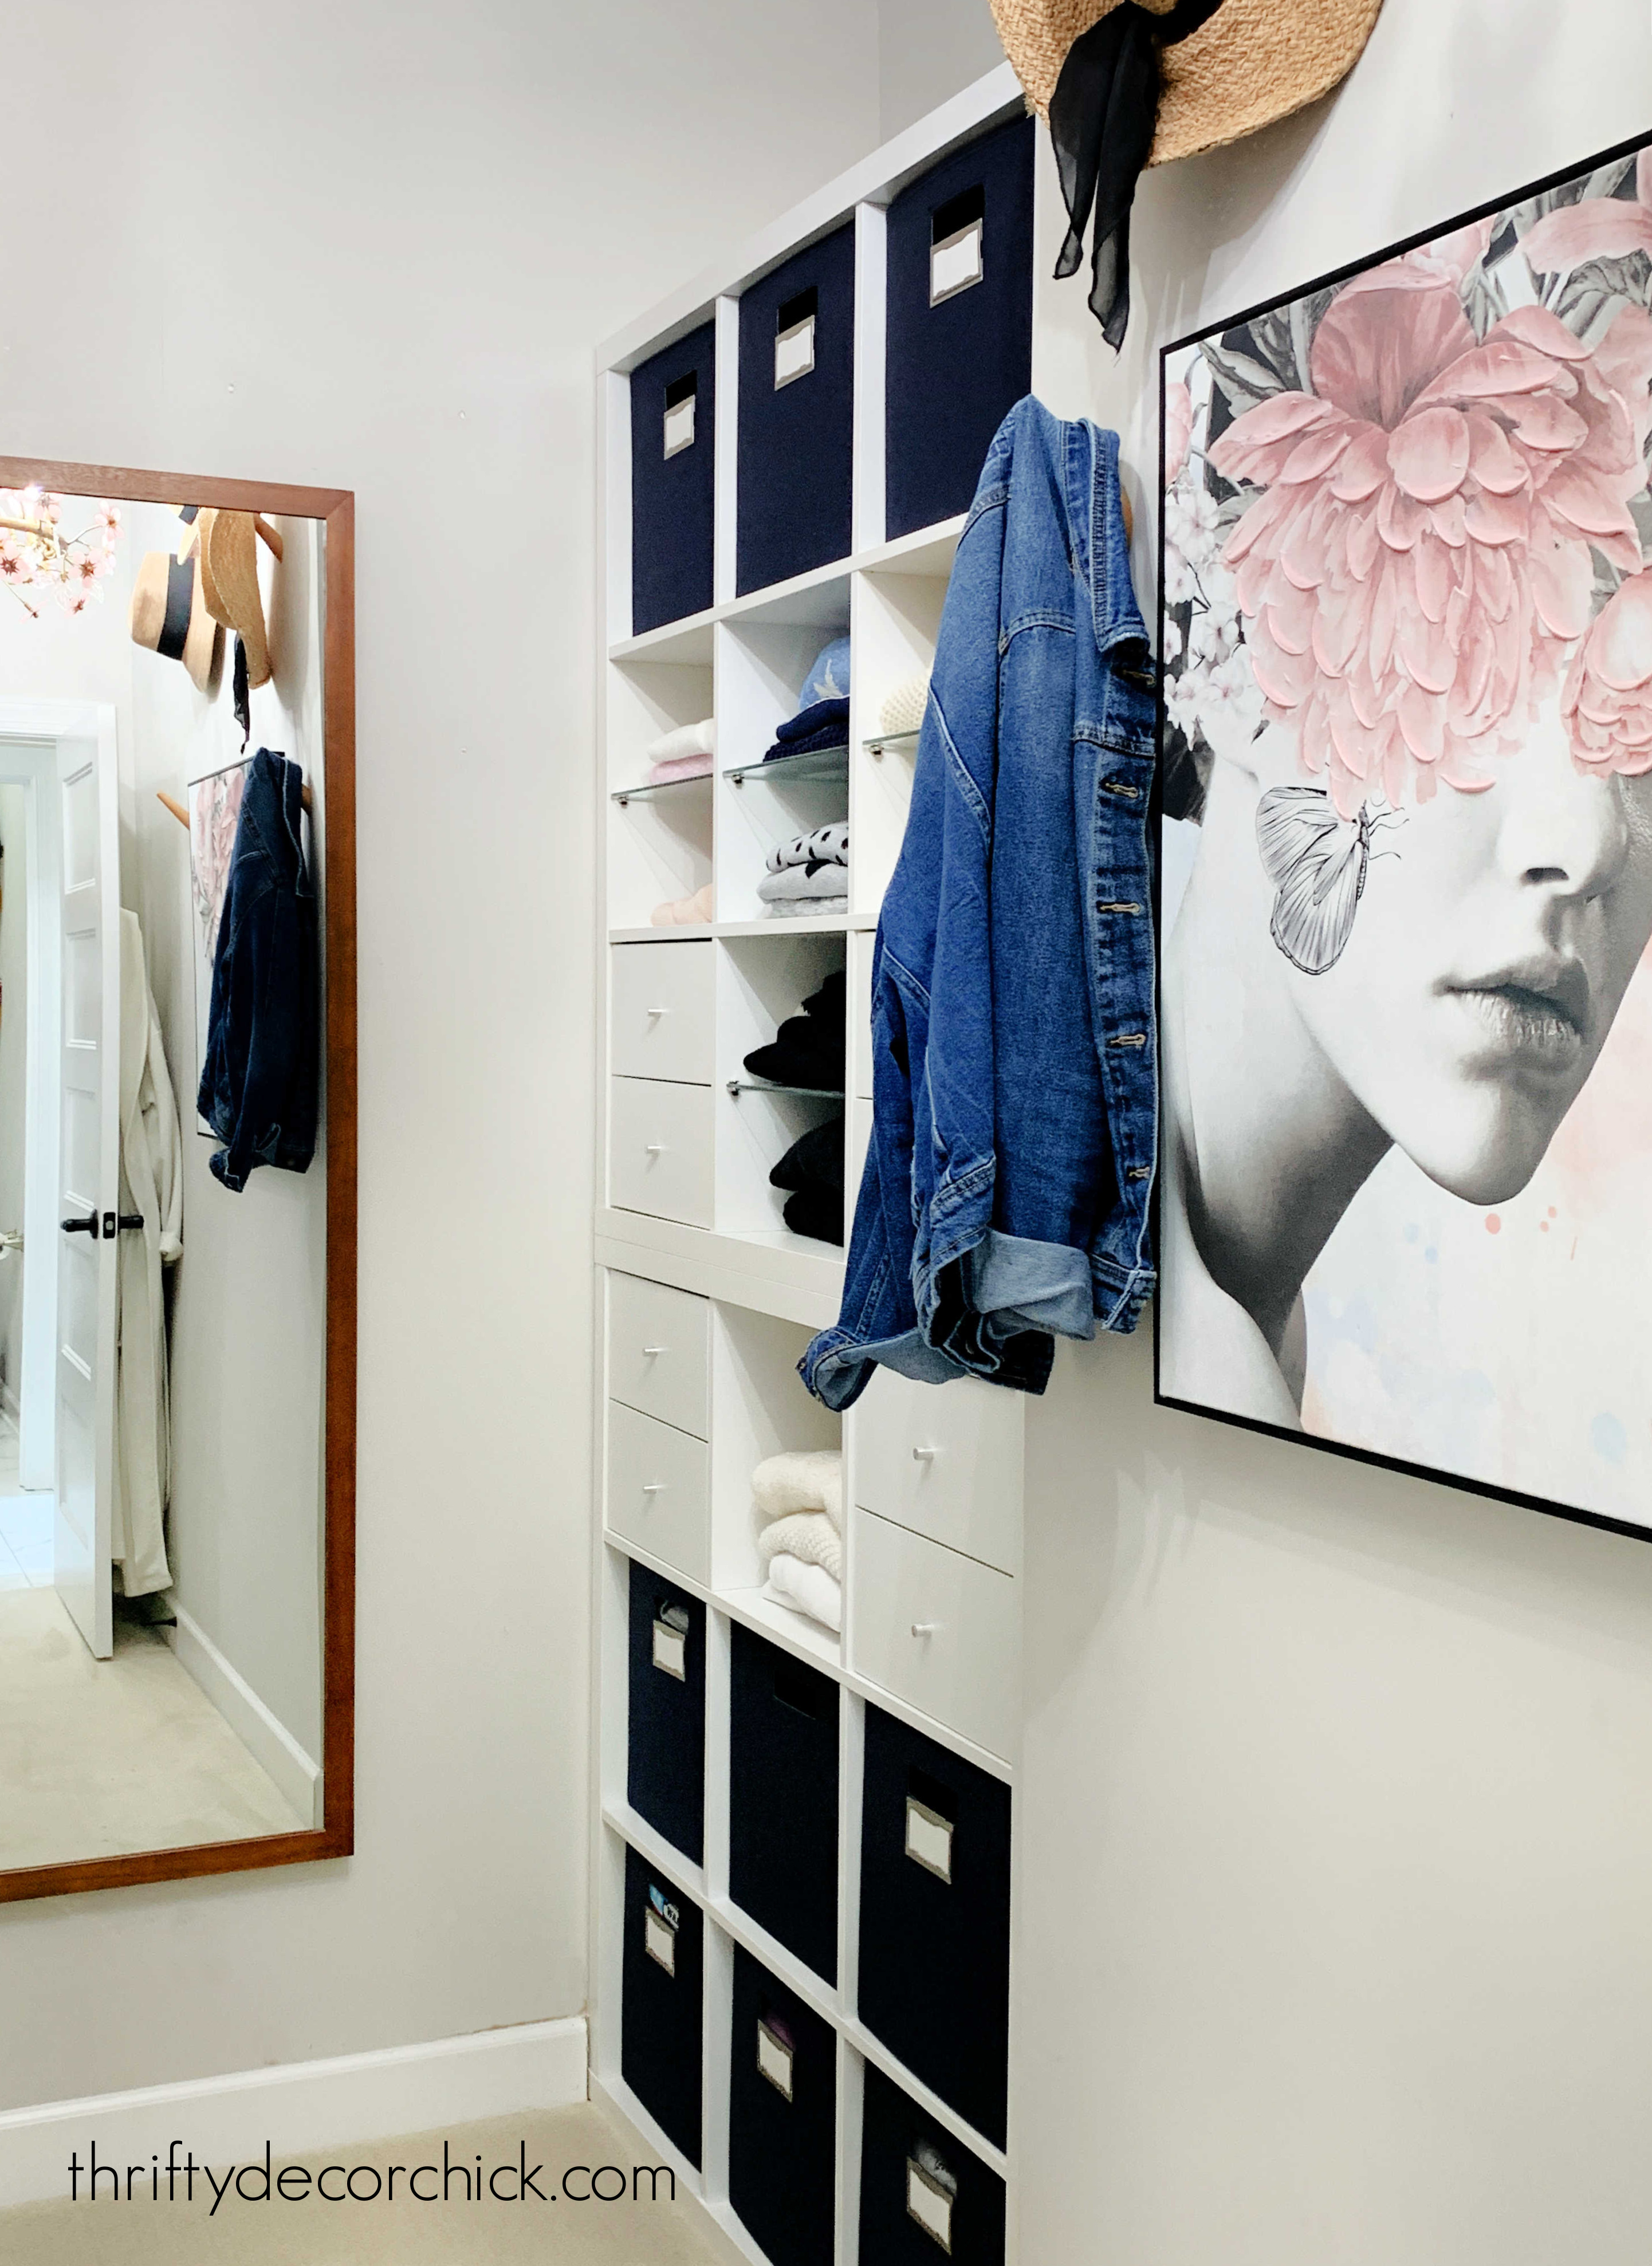
You can see the Kallax hack I used to create all of that folded clothing storage and then the full reveal of the IKEA Pax closet here.
I've started the process of prettying it up a bit more over the past couple of months. It's SO lovely! I'll be sharing more of that with you soon.
|