|
Hello there!! We are back from a trip of a lifetime -- a dream vacation to Italy. It has been on my list of places I'd love to visit for my whole adult life.
We are big wine lovers and take a trip to California every year with friends. We've always said someday we'd plan a trip to Tuscany instead. Our friends celebrated a big wedding anniversary this year so we decided to do it. I rarely blog about our trips, even when readers request that I do. I know many of you really enjoy them, but it makes me a little uncomfortable and all LOOK AT WHAT I GOT TO DO. ;) But this was truly a trip of a lifetime, so I'll be sharing a few posts about this one. I took too many photos for just one post. ;) Our friends planned the trip and they couldn't have done any better. Every bit of it was a dream! We are the kind of people that like to GO on vacation. We've done plenty of relaxing trips, but overall we prefer to explore and experience! This trip was just that -- we saw SO much in the short time we were there. In this post, I'm sharing the beauty of Tuscany. The vistas and the villages that truly took my breath away. The countryside is all rolling hills and mountains, with olive and cypress trees everywhere (my favorites!) and fields of sunflowers and grape vines. Ancient, small villages pop up at the top of the hills and mountains throughout. We stayed in an Airbnb in a very, very small village called Monticchiello. I nearly cried when we got there. I couldn't have imagined a more authentic place to stay. It was everything I had dreamed! 
It is not a big tourist spot, there were very few people visiting -- many of those who came in for dinner seemed to be from nearby. It was like we were back in time -- a true treasure! These steps went up to the second floor our little cottage: 
Even the front door and entrance was dreamy:


They make up for not having much land by adding flowers EVERYWHERE. They are on steps, tucked into corners, along the streets...all over. Gardens were plentiful too, but again, placed in any spot that would work.
The result was so lush and beautiful, even without a lot of green space:


Even though it was small, we were surprised at what was available there! There was a gorgeous church, a park, a few small shops, a bar and even an ATM machine. ;) There was a wine/gelato shop and two amazing restaurants. We ate at all of them and WOW. So good:

I really couldn't have imagined a better spot for our first trip! Even better than the little village was the view from the top. This is what I opened our shutters to every morning: 
And this was the view from the little village:

Speaking of the views, other than the food and wine, that was my favorite part. Endless rolling hills with the tall, skinny Cypress trees that you think of when you think Italy. Green space and trees are my THING...I'd take this kind of view over a beach any day.
Here's just a few shots I got during the trip:


If you have any questions on what I've shared so far, feel free to ask! If you're interested in where we stayed, you're welcome to email me. The cost of the whole trip wasn't nearly as bad as I thought it would be, and that's mostly due to us staying in the Airbnb instead of a hotel. It was incredibly affordable when split between us. I'll be back with more soon, but now it's back to DIY and house stuff! It's so good to be home!! See more of our home here. To shop items in our home, click here! Never miss a post by signing up to get posts via email. Via https://www.thriftydecorchick.com/2019/08/our-tuscan-adventure.html
0 Comments
I'm back with a plethora of fall decor inspiration! If you're not in the mood for crunchy leaves, hoodies and pumpkin spice just yet -- you will be by the end of this post! ;)
I shared the first round up of fall projects last week. I had so many to pick from, I had to break it up into a couple posts. These bloggers all shared beautiful and inexpensive autumn decor and most of them don't take much DIY knowledge at all!
You may get some ideas on decor to add to your own home. So without further adieu, let's check out their pretty inspiration! (Go to the link under each photo for the tutorial.)
Diane shares these simple book cover printables with a cute fall quote:

These wood block pumpkins are too cute! They would look great on a front porch:

I absolutely LOVE the velvet pumpkins I see in the stores ever fall -- I'm going to have to try this tutorial to make my own:

Monica's DIY chinoiserie pumpkins are so beautiful, I'd want to display them all year!:

These were a favorite -- what a fun way to use those inexpensive foam pumpkins!:

I love seeing all of the creativity when it comes to fall wreaths! This is a fun fabric version:

Now this pumpkin monogram takes some DIY knowledge for sure, but wow, how impressive is this?:

I love this DIY fabric runner laying over the edge of the mantel -- how pretty!:

You can find the free printable to make this cute "Hello Autumn" pillow at the link below:

A basket is the perfect way to hold those fall blankets. You'll be surprised to see what this DIY version was made of!:

I love these DIY pumpkin topiaries -- the addition of the grapevine and greenery is perfect!:

Carli shares how to fill your autumn window boxes for under $20:

Swags made of faux leaves look great on the front door, but on windows and interior doors as well:

I loved this cork wreath! The metallic paint would allow it to transition to Christmas easy:

This was such a cute DIY! I was surprised to see how she made those little pumpkins:

What a gorgeous centerpiece idea for Thanksgiving! Use faux and keep them year to year:

These inexpensive pumpkins covered in paper bags fit in perfectly with rustic decor:

Make your own pallet pumpkins for the porch (say that three times fast)!:

Jute is SO inexpensive and the perfect way to add a rustic touch for fall. I love these little vases:

And last but not least, easy fall art using scrapbook paper -- the possibilities are endless!:

There you go! Twenty cute and inexpensive fall crafts that you could do this weekend! If you missed the first round up, be sure to check that out here! When do you start pulling out your fall decor? Even if you wait I won't tell if you do a craft or two early. ;) See more of our home here. To shop items in our home, click here! Never miss a post by signing up to get posts via email. Via https://www.thriftydecorchick.com/2019/08/twenty-easy-fall-craft-and-decor-diys.html
Over the past few weeks I've been able to move so much around, purge some more, and get things where I want them for the first time since we moved in. It's been a lot of work, but I told my husband I finally feel completely settled after all that time.
There were certain things that had to happen to get things in their right spots. And some things that had to happen before I could purge what we had left from after our move. For example, getting my office built ins finished up allowed me to finally clean out the storage area in our basement: 
I've kept things in there for two years now knowing I'd want to use them on these shelves. I had all of my craft stuff down there too, and all of that is now organized nicely inside those cabinets.
I kept (and packed and moved! ?) a TON of books for these shelves, but when it came to filling them, I wanted to go much simpler than I have in the past. So most of those could go!
After I filled these shelves I was able to really purge what I had left. I had a HUGE garage sale for friends and sold almost every bit of it. It felt so good!!
Same goes for our garage -- we've had stuff in there for two years, waiting for a spot to put it outside. Now that we have the patio, I was really able to clear it out:

We had our grill, the potting bench and our large umbrella in the garage and I spent a couple days cleaning it up and organizing after we moved it all out. You can see why I'm feeling really settled now! It feels so great to have everything where it's supposed to be!
Overall, since I completed a huge purge years ago using the Konmari method, I've been able to keep up with the clutter in the house. It's just easy for me now after reading that book. I pass things along on a regular basis instead of waiting to do it once a year.
One spot that I wasn't keeping up with was my closet. When we moved in, it was one of those areas where I literally just threw stuff in and made it work. I've had plans to rework it a bit, but I wanted to do a big purge in here before doing that.
I shared some of the closet soon after we moved in. It functions OK, but I know it will be amazing someday! It has not been amazing lately though...

What a mess!! I was tired of trying to dig through clothes to find what I wanted. That shelf was ALWAYS a mess. As I mentioned, I have a plan for most of the clothes on this shelf, but before I focus on that, I wanted to purge big time.
This side doesn't usually look quite this bad ? -- I had tossed a few things on the floor (this was mid-way through the purging process), but this gives you an idea. It was still a mess!:

One of the tips I like most about the Konmari method is putting all like items together in ONE spot when you go through them. So you may have, say, glue sticks in a few spots in the house...but when you gather them all up (yes, it is a pain, but yes, it works), you truly see how MUCH you have of an item.
This post may contain affiliate links for your convenience.
See my policies and disclosure page for more information.
I put all of the hanging clothes on the bed. Seriously, if you use this method it is eye-opening -- it always feels a little overwhelming and that's the point. If you're overwhelmed, it's because you probably have too much stuff. ;)

I got rid of four trash bags of clothes, then another bag of random stuff like purses, jewelry, etc.
It felt sooooo good!! Gosh I just love it.
There is one major practice I don't follow when it comes to the Konmari method -- I don't fold as much as she suggests. I prefer to hang most clothes because it's just easier. And I certainly have the space!:

I actually ended up hanging more than I used to -- some tanks, even t-shirts. I had the hangers from all of the clothes I purged so why not!
For me it's just much cleaner and a better use of space. I may start folding more when I add more shelving and drawers in here:

I don't do any color coding just yet either -- maybe when I finish up the bigger organization project someday I will. ;)
For now I'm just thrilled I can see what I have and it's not all over the place. I can easily find what I'm looking for. My shoe bins are a favorite:

(You can find the larger size here for boots or men's shoes.) Someday I may put them on shelves, but I do love that they're protected in there. Some I only wear a few times a year and they get dusty sitting out.
My other favorite item is new -- I absolutely LOVE these jewelry organizers!:

I used to have everything inside the drawer and it was OK, but I had so much crammed into the bins, I couldn't see what I had. These are great because each bin only holds one or two sets of earrings or bracelets.
Plus it's pretty too! :) I got the ring holder for rings but mostly for smaller earrings. They stay in there nicely and look great. (I have the ring holder, the 24 grid for earrings and the 12 grid for larger earrings and bracelets.) I purged my jewelry and only kept what I loved.
Now everything is organized and now that I know exactly what I'm keeping, I can plan the little makeover with that in mind. I want to get those clothes off the wire shelving and address this corner a little more:

Getting rid of stuff is the BEST feeling, in my opinion. I feel like I can breathe in a space and I feel more in control of my surroundings. If you'd like to try the Konmari method I used, be sure to check out this post!
See more of our home here. To shop items in our home, click here! Never miss a post by signing up to get posts via email. Via https://www.thriftydecorchick.com/2019/08/master-closet-purge-and-organization.html
Hello hello! Thanks for the kind comments on the new patio! We just love that new space. It's a cooler day and we're hoping to light a fire tonight!
Now that school is back in session, whether we like it or not...fall is on the way! Who am I kidding? I always like it. ;) This has been one ofmy favorite summers in a while, so I would have been fine with a little more carefree days this year. But the heat is about on my last nerve...I've hit that point when I'm READY for all the goodness that fall brings!
I know many of you aren't back to school yet (I'm jealous) or are hanging onto summer for dear life. I get it. But I know many of you are just as excited about the upcoming season and like to figure out what projects you may want to tackle. So this post is for you!
I've gathered a few (15 to be exact) fall DIY crafts and projects to share with you today! I have more I'll share later, but I had to stop at some point. :) I'm throwing in a few of my favorite autumn projects as well. These are all super affordable -- many of them use dollar store supplies.
Check out the link to each one under the photos. This fall floral centerpiece is just stunning and is easier to create than you'd think!:

Love this cute lawn sign redo with supplies from the dollar store!:

This is another great dollar store hack and the design possibilities are endless!:

These DIY fall porch signs are a recent favorite of mine! I used scrap wood so they were super affordable:

My sweet little pumpkin wreath will go back on the door soon!
I love the simplicity of this corn husk wreath:

Fall wreaths are my favorite -- they're so easy to make and the designs are endless. This one is so sweet with the little sprigs and flowers:

This jute ribbon pumpkin is TOO cute!!:

I love the pretty mix of metallic, paint and prints on these dollar store pumpkins:

You know how much I love using table linens to make seasonal pillows!:

So of course I loved this hanging art project using the same! Brilliant!:

I've never seen tattoo paper, but it is so cool! What a fun way to craft some pretty pumpkins:

What a sweet idea -- loved this tart tin DIY that could be changed up for any season:

I think this candy corn bunting I made years ago is SO cute!:

If color is your jam, this is a fun way to add it to your autumn decor. How great would this look in a black and white check as well?:
Have you ever made your own candles? I haven't, but this simple tutorial has me wanting to try it out. There are so many fun options for the containers!:

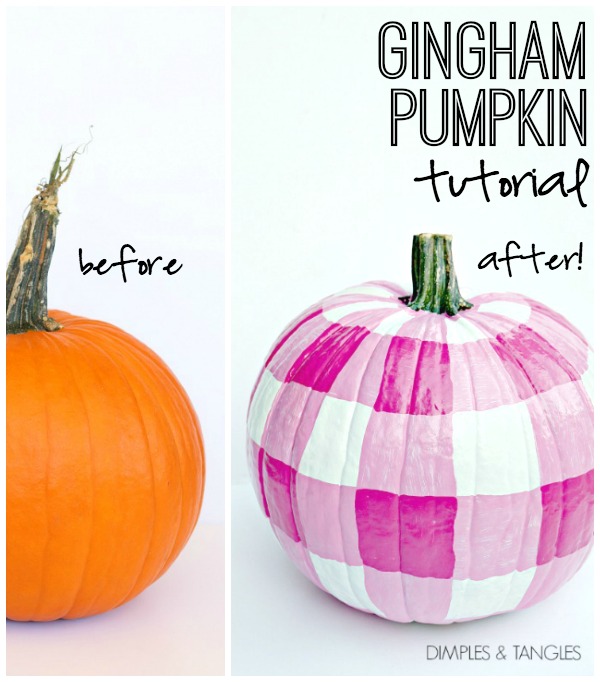
This sweet little gingham pumpkin art is SO cute and most of the materials were from the dollar store!:

If your decor is more industrial or modern, these cement pumpkins would fit it beautifully! (Hint: They aren't made of real cement though.):  I love this fall sign with the leaf cut out! This one would be so inexpensive to make!: 
Have a wonderful weekend my friends! See more of our home here. To shop items in our home, click here! Never miss a post by signing up to get posts via email. Via https://www.thriftydecorchick.com/2019/08/fifteen-fun-and-easy-fall-diy-projects.html 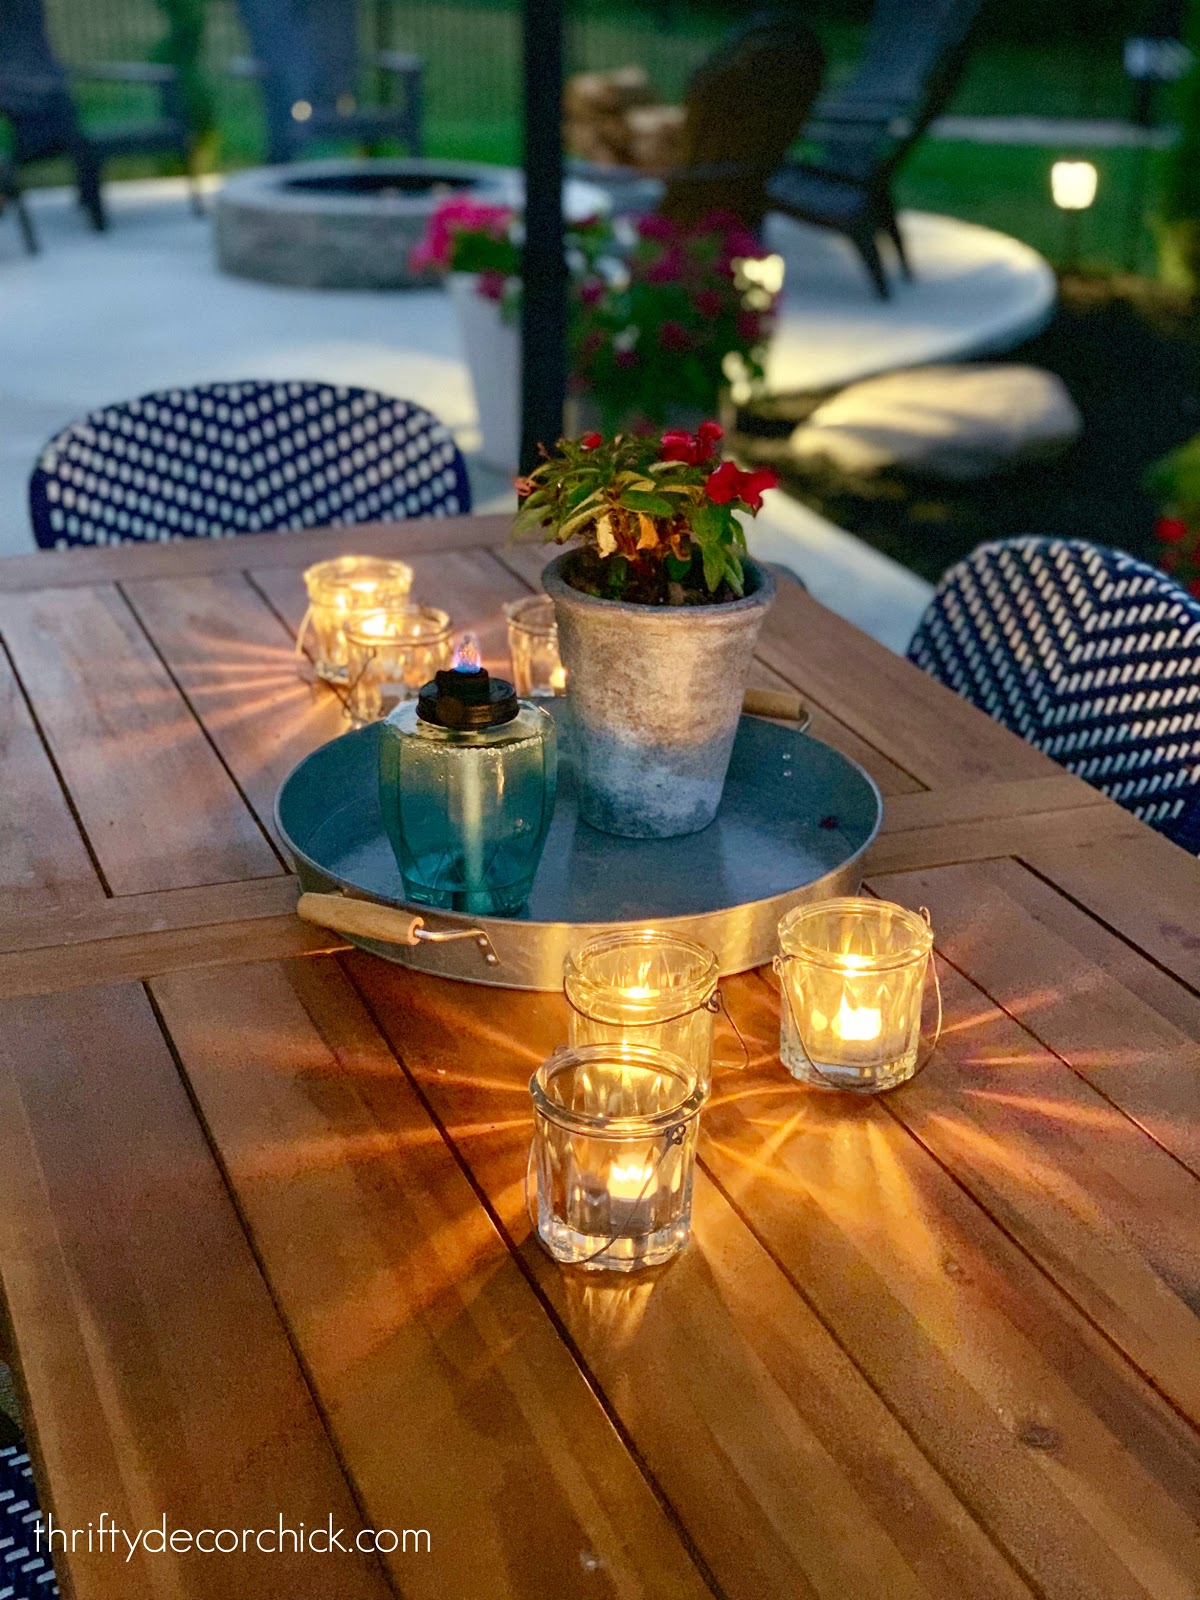
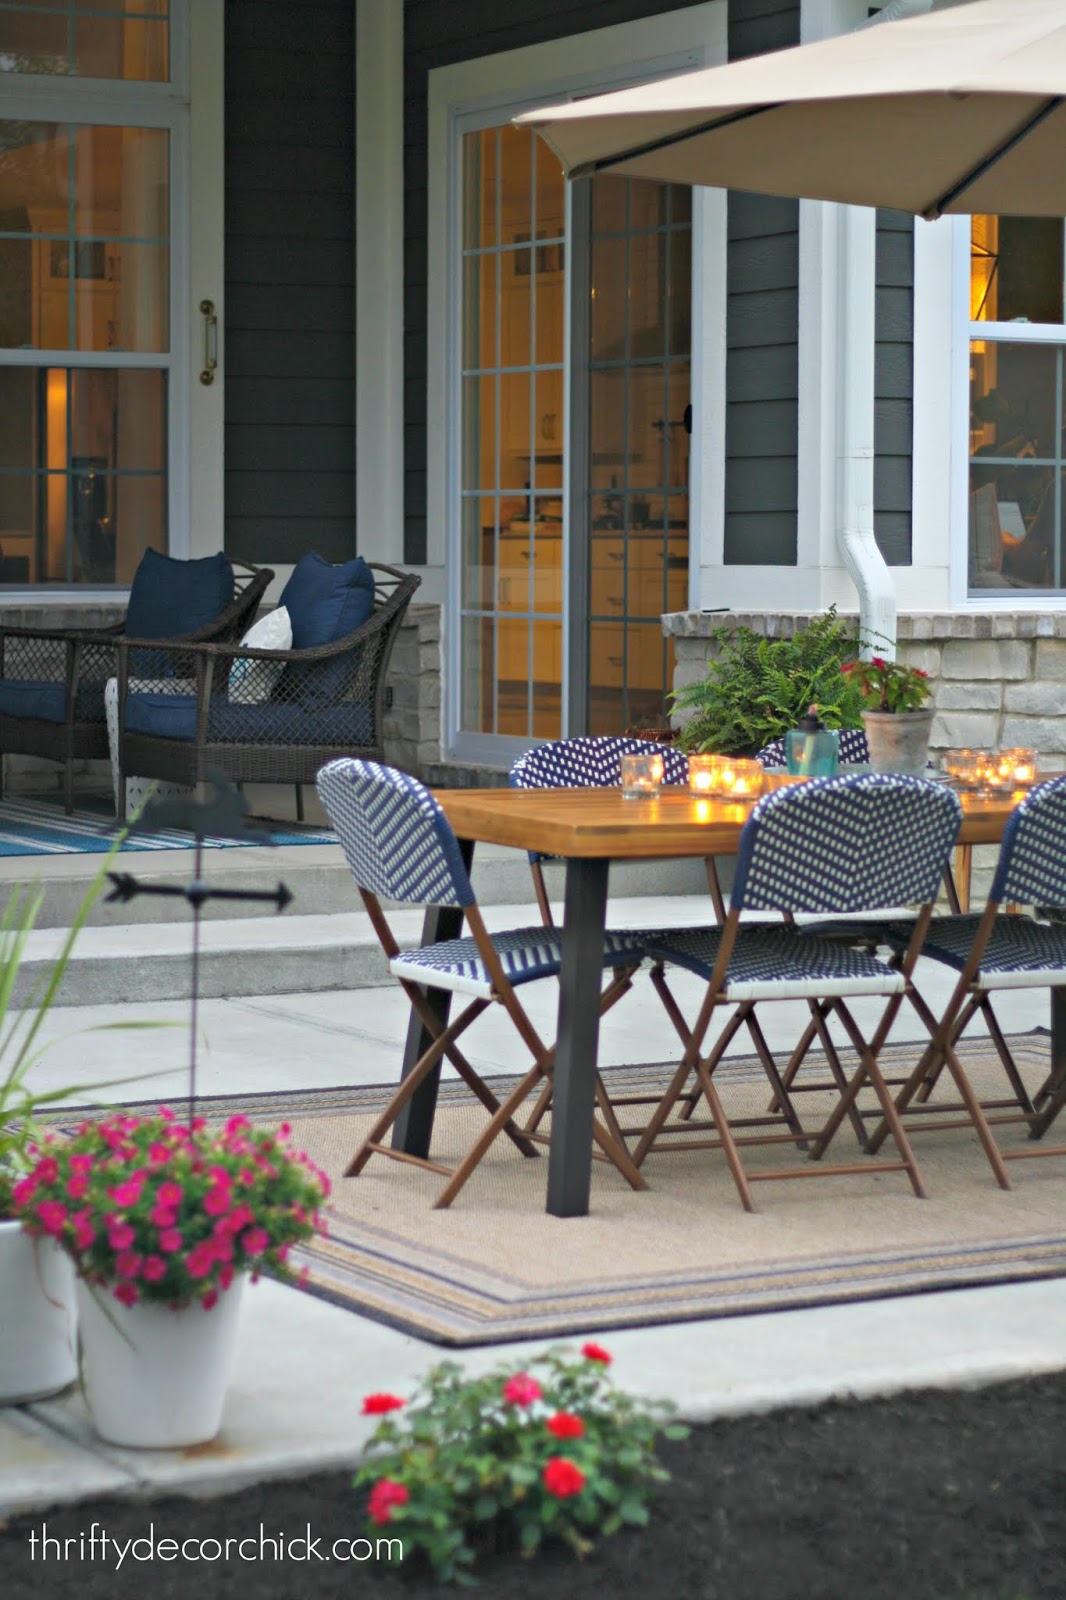
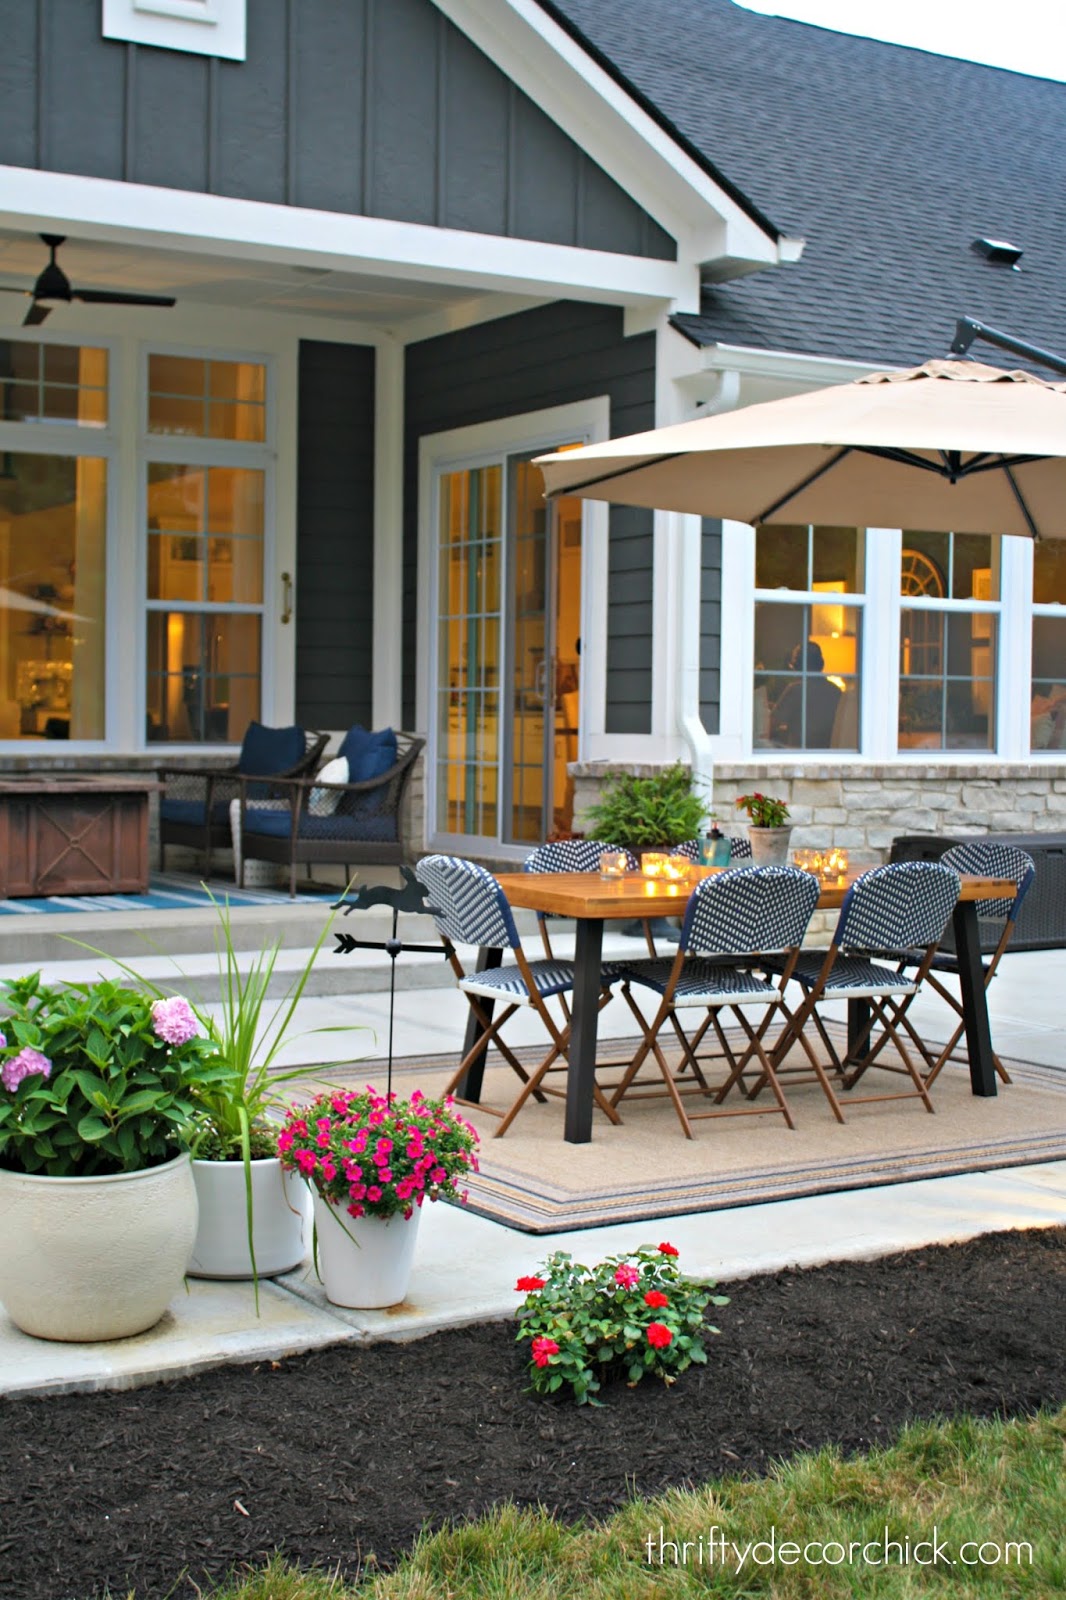
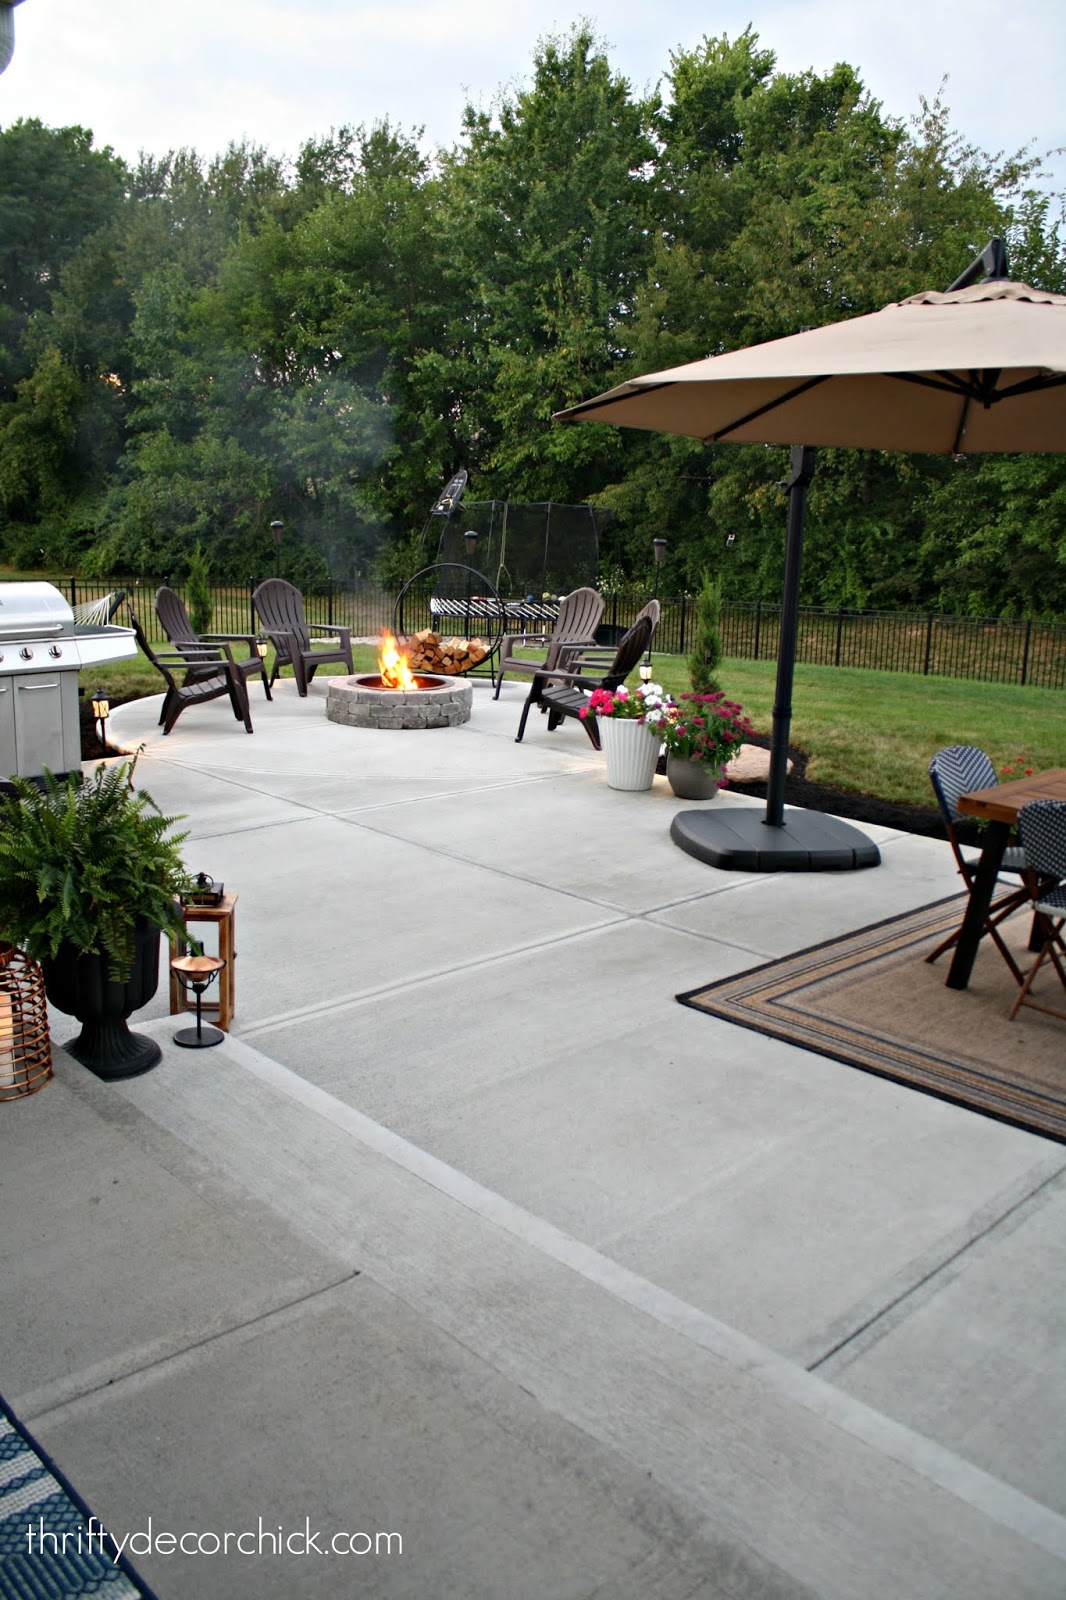
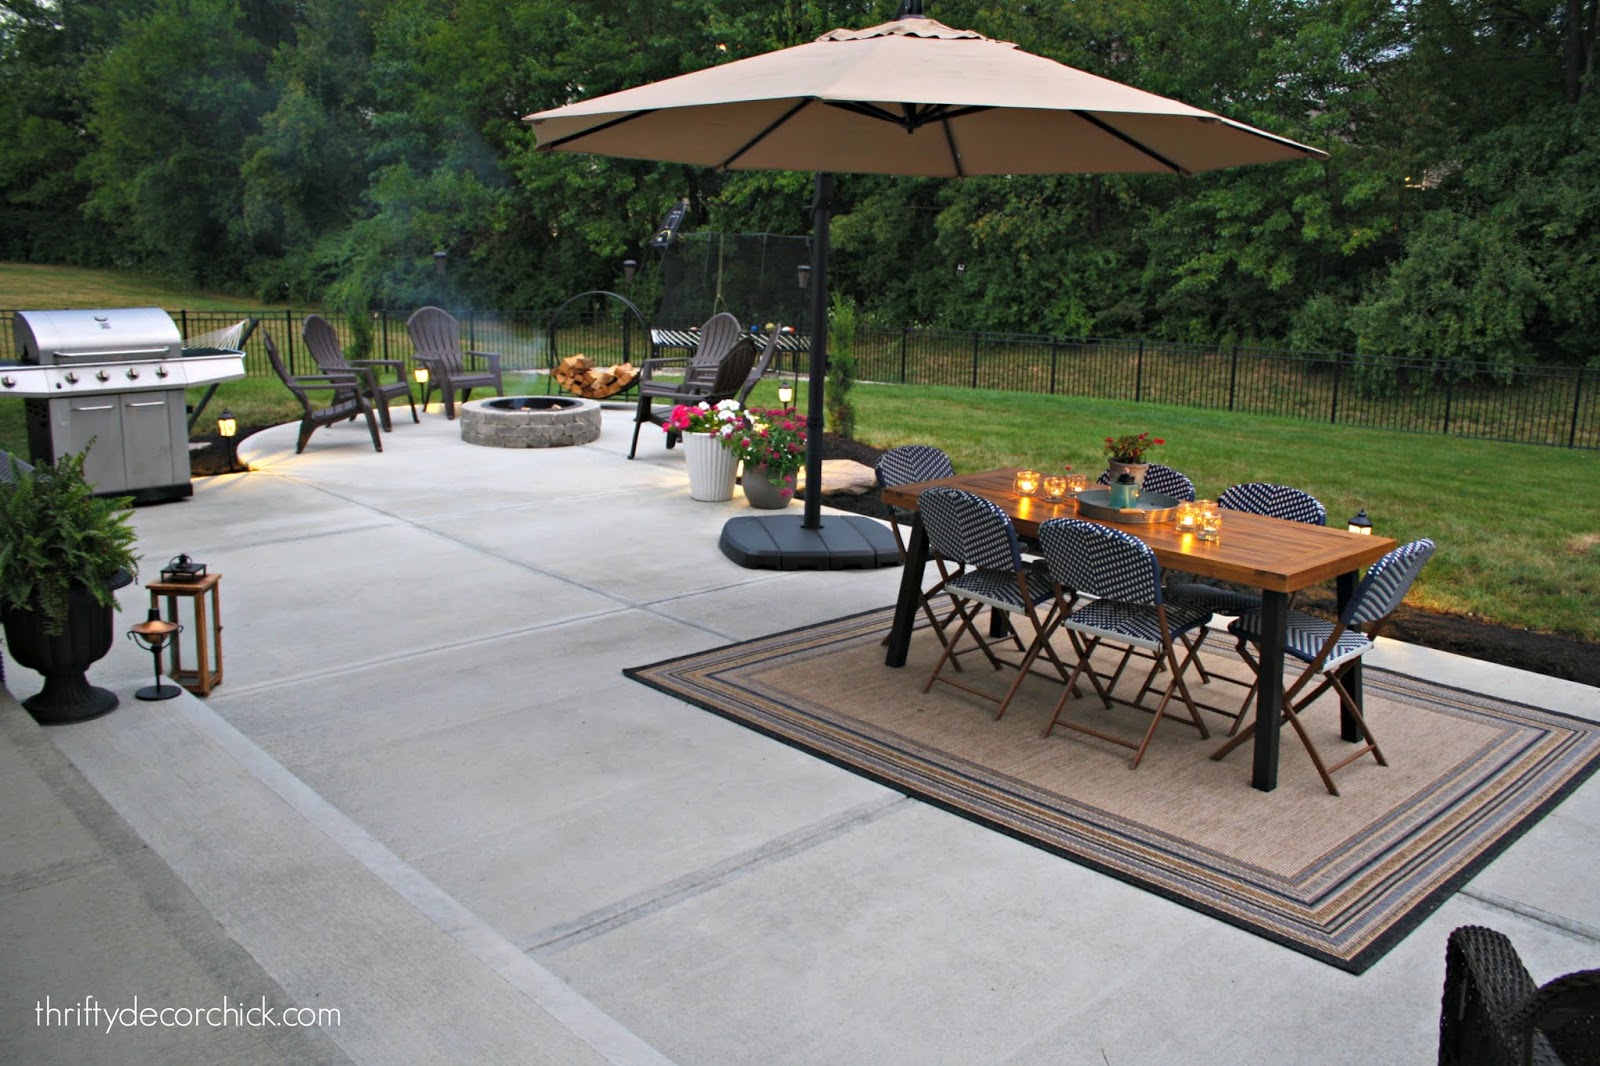
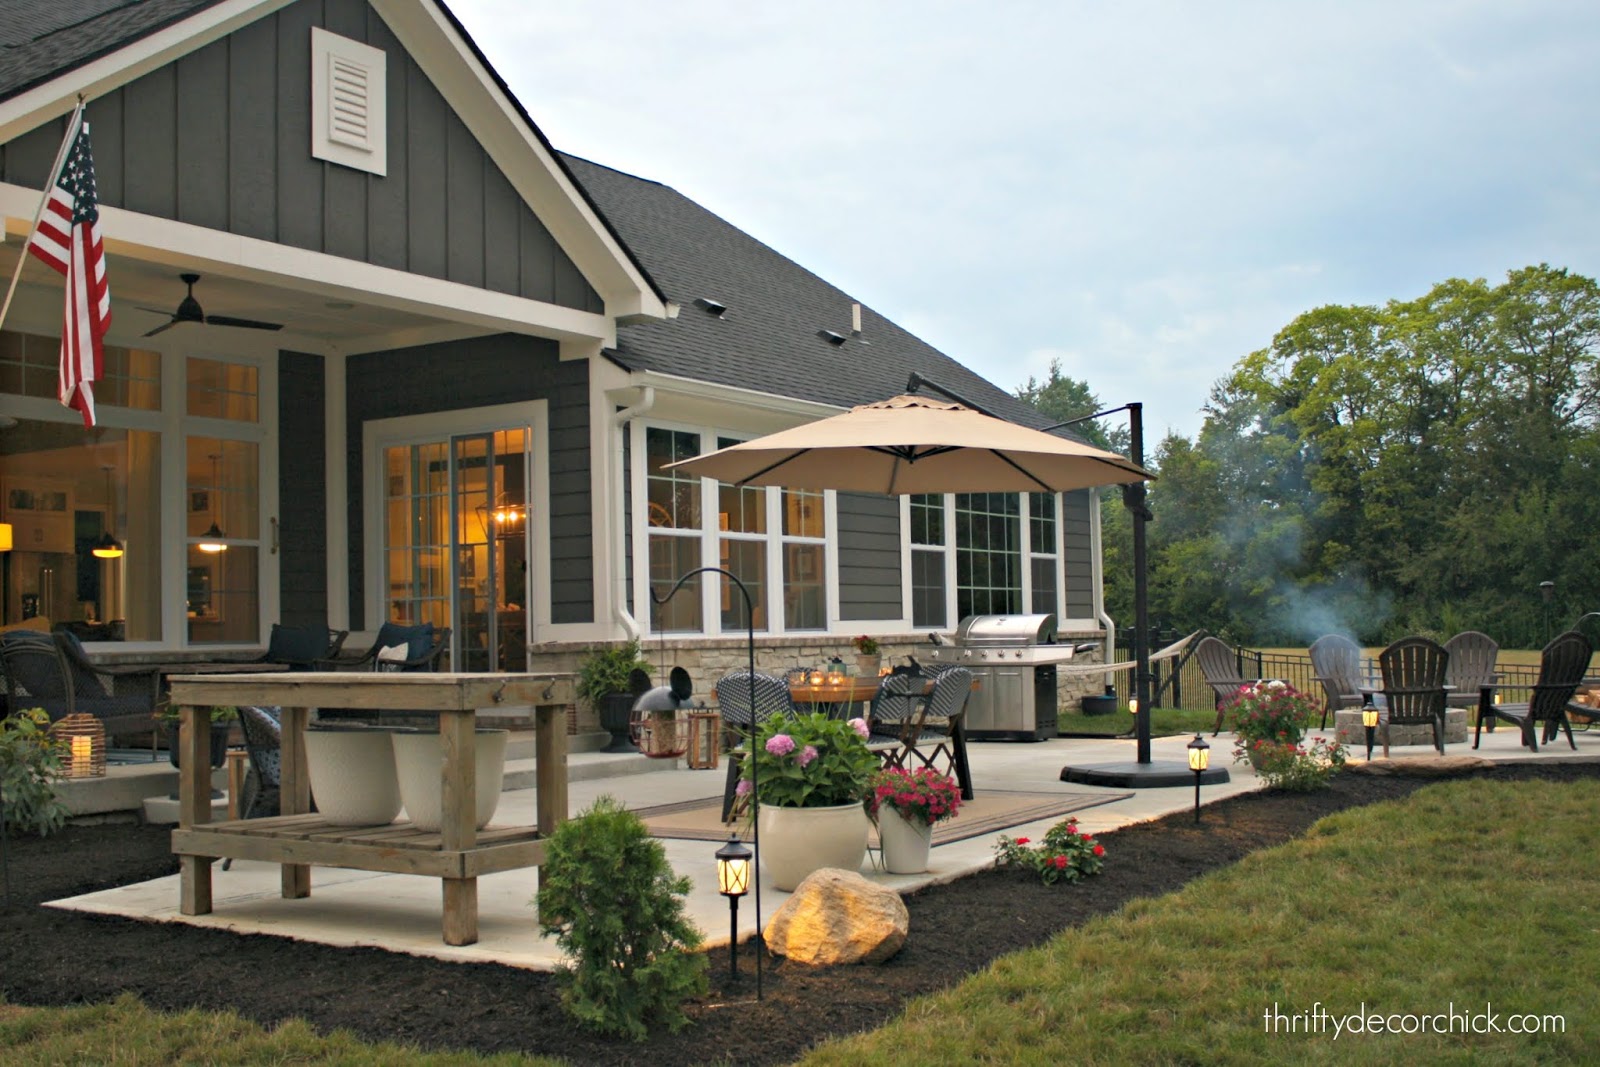
Hey there! It's patio reveal day! I've been working so hard on this outdoor space and I'm excited to share it with you!
There's still so much we want to do out here (most of it is landscaping -- TREES), but wow, we are in love with it!! We've had two friends say it looks/feels like it was always there to begin with, which is the ultimate compliment.
You can see the patio right after it was poured and all the reasons we went with plain, basic concrete here. We're already so happy with the upkeep, I can't even tell you how nice it is to just take the hose or broom and clear it off when we have company. Even that isn't even needed much. It's been a DREAM as far as maintenance so far! We did find out it should be sealed once a year, but compared to stamped, aggregate or wood, I'll take it!
OK, onto the pics! I took WAY way too many. Couldn't help it. I took all of the pics at my favorite time of day -- dusk. I love the moody feel of that time in the evening.
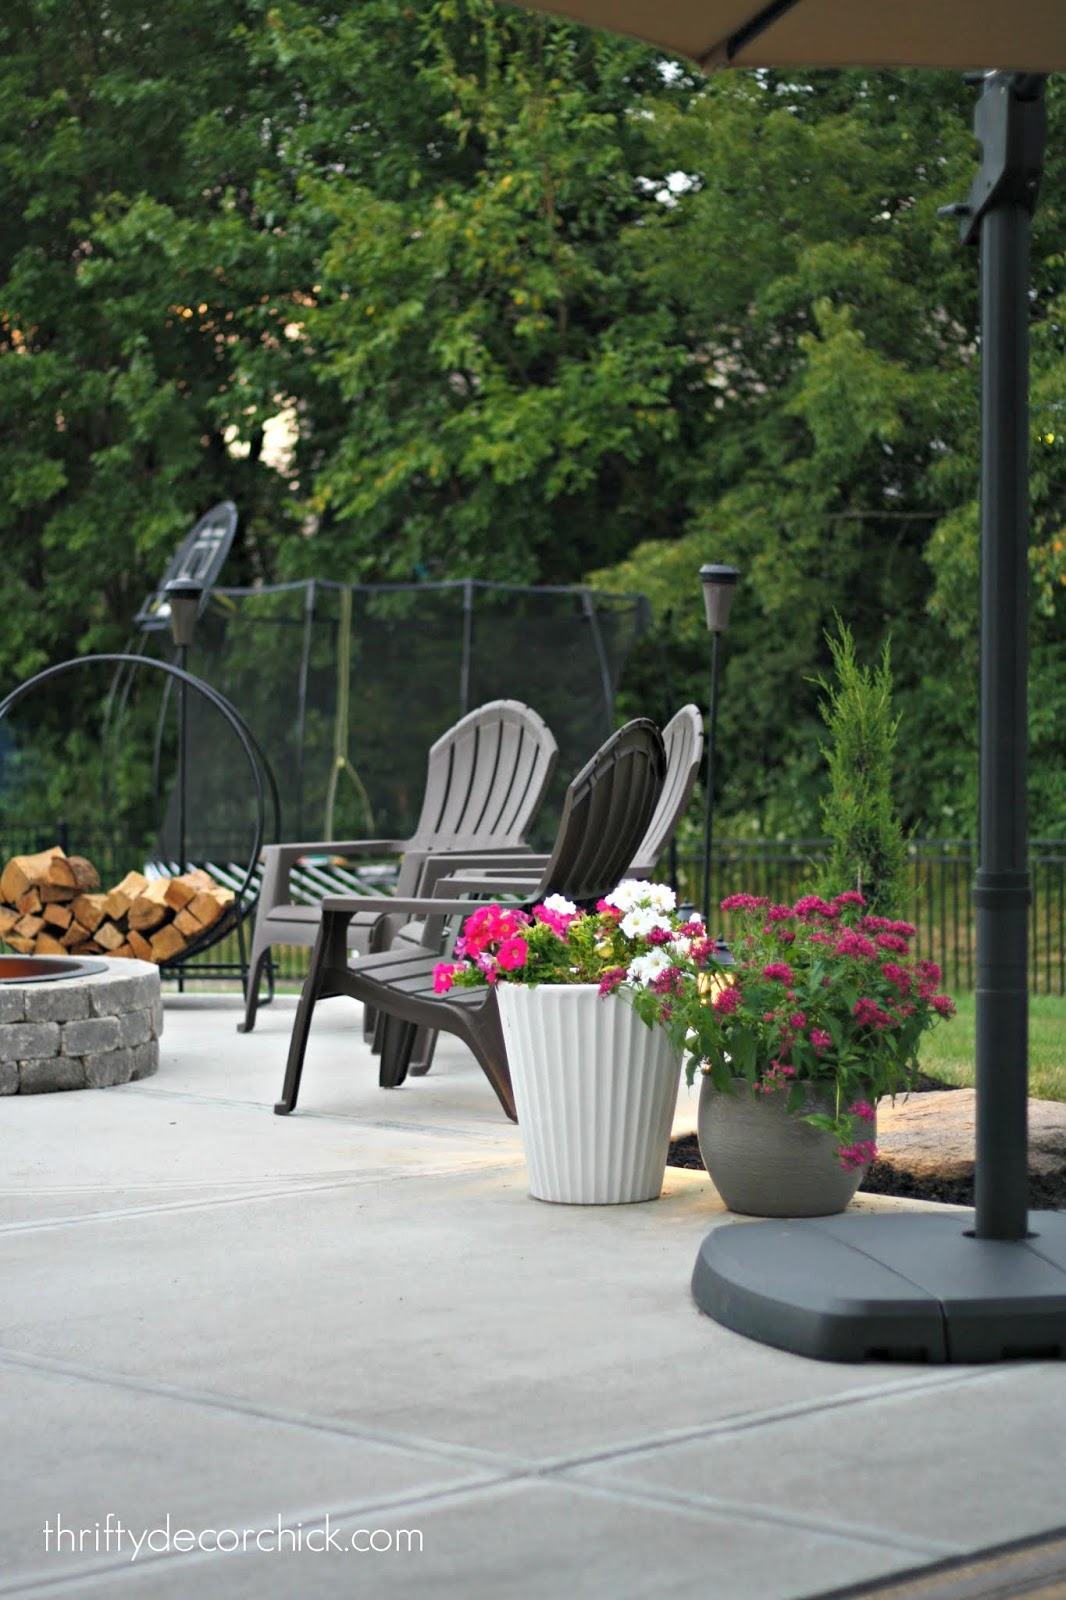
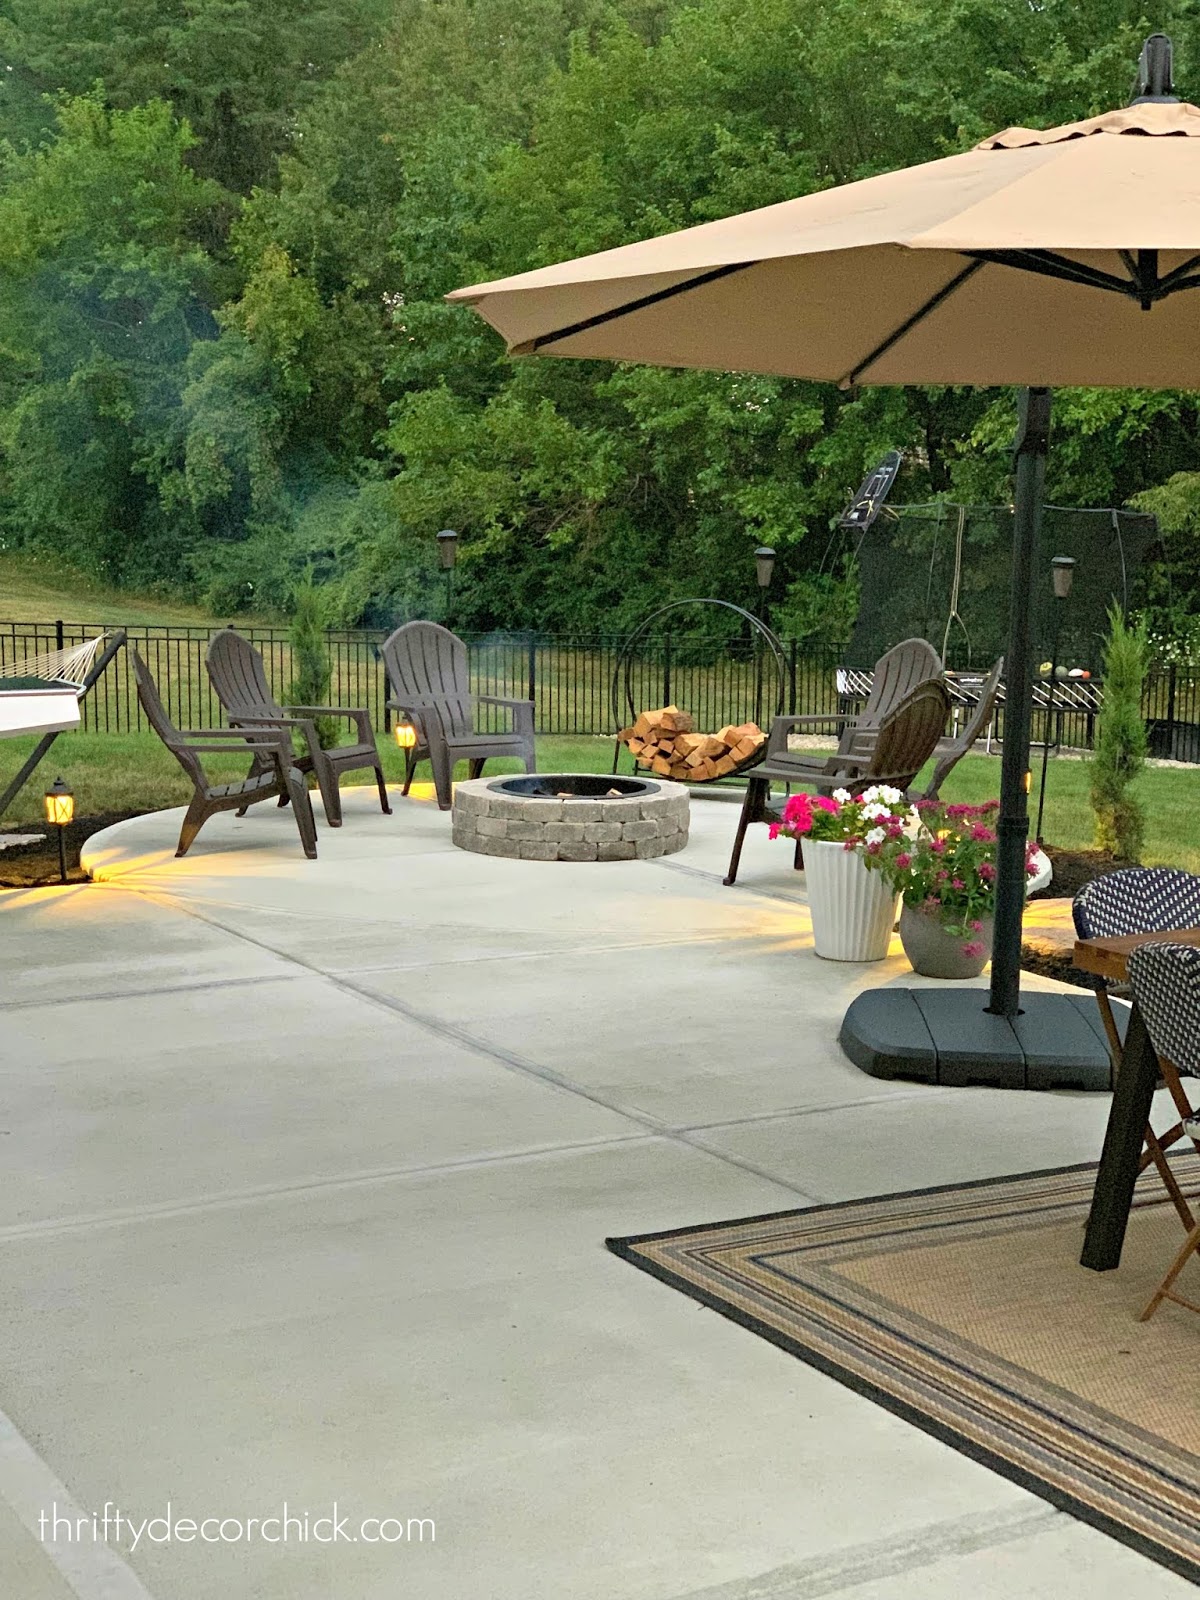
I think our favorite spot this fall will be the round fire pit area. I designed the patio so that spot felt separate, but still connected to the patio:
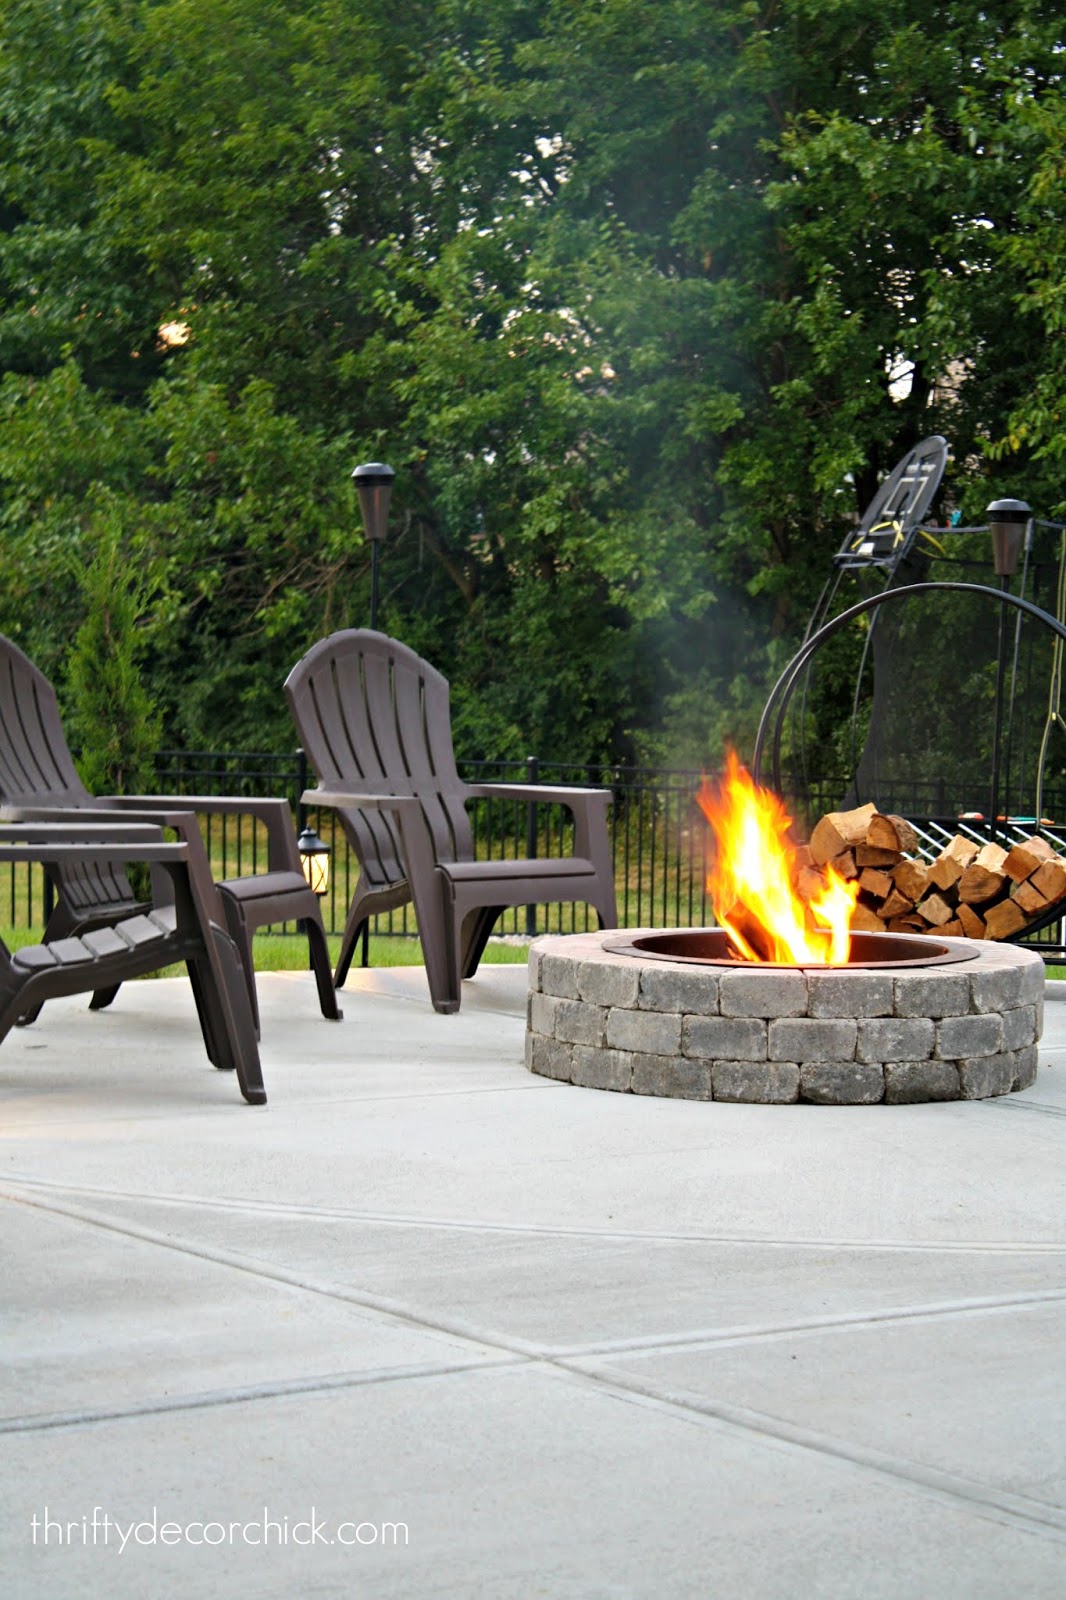
We haven't had a night around the fire yet -- we did this one for my photo shoot (and to test out our fire building skills since it had been awhile!). It got warmer and stickier at night right when I finished it, so we'll have to wait a few more days.
You can see how I built the fire pit here -- be sure to check that out for the things you need to add to make it safe.
I've always wanted one of these circular wood holders! I was so excited to finally get it:
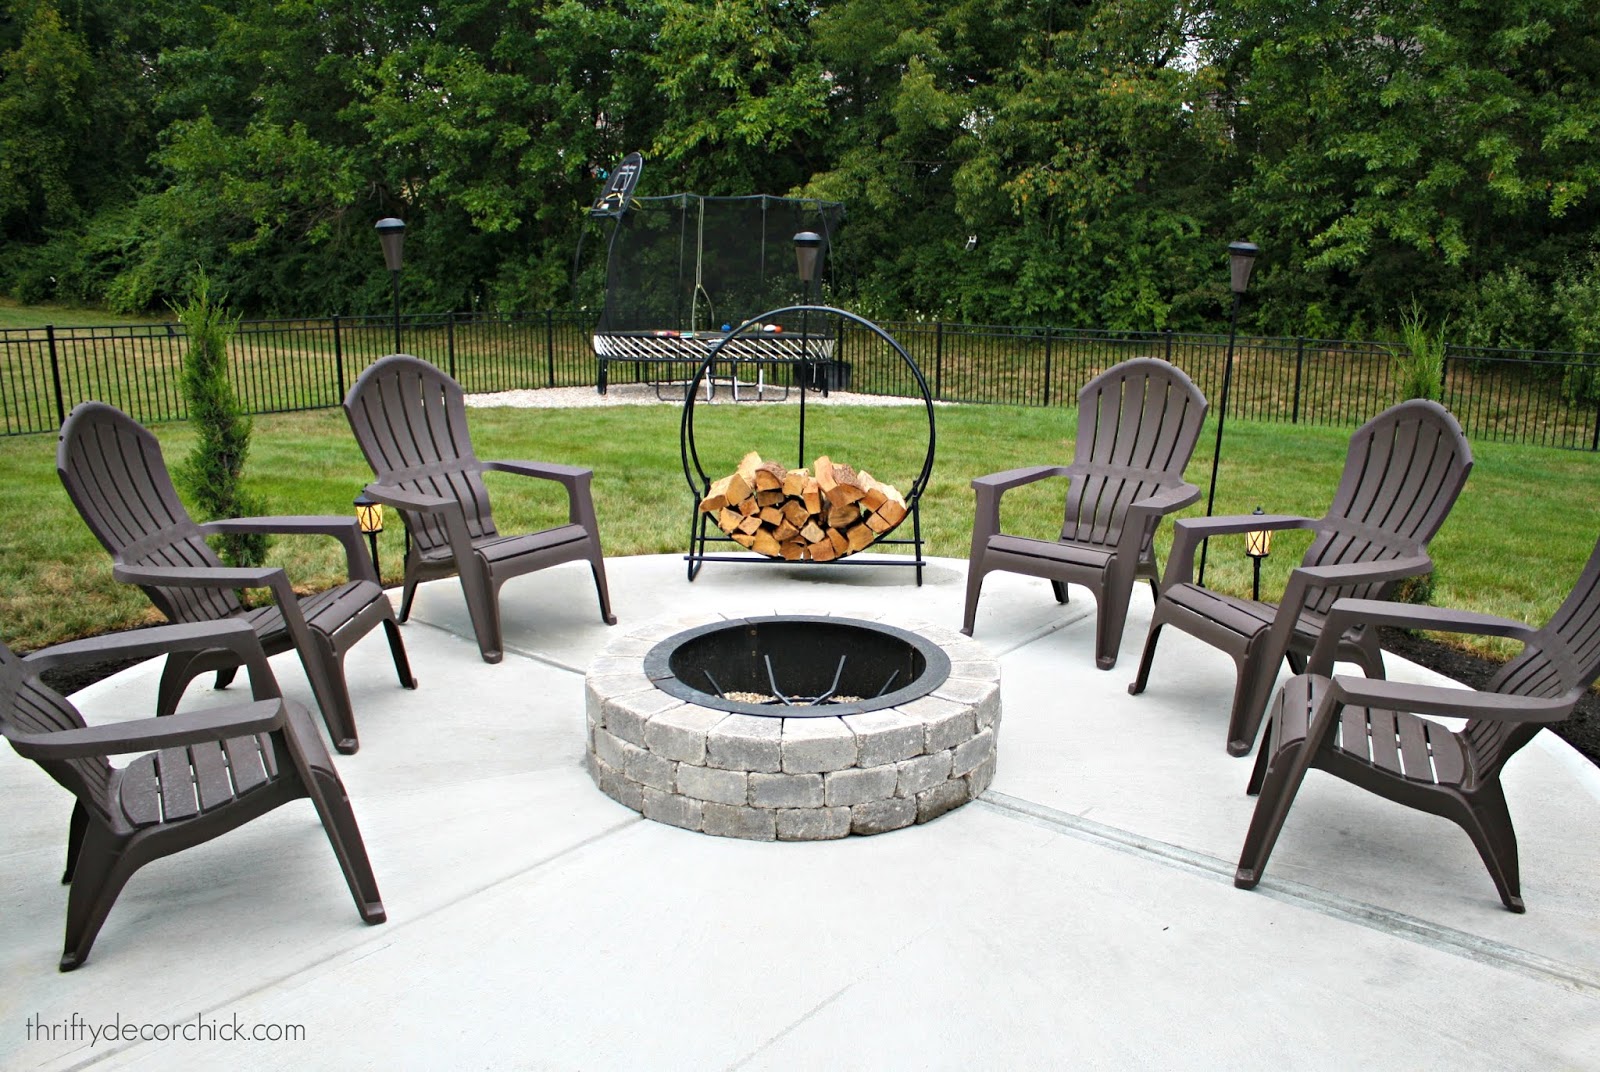
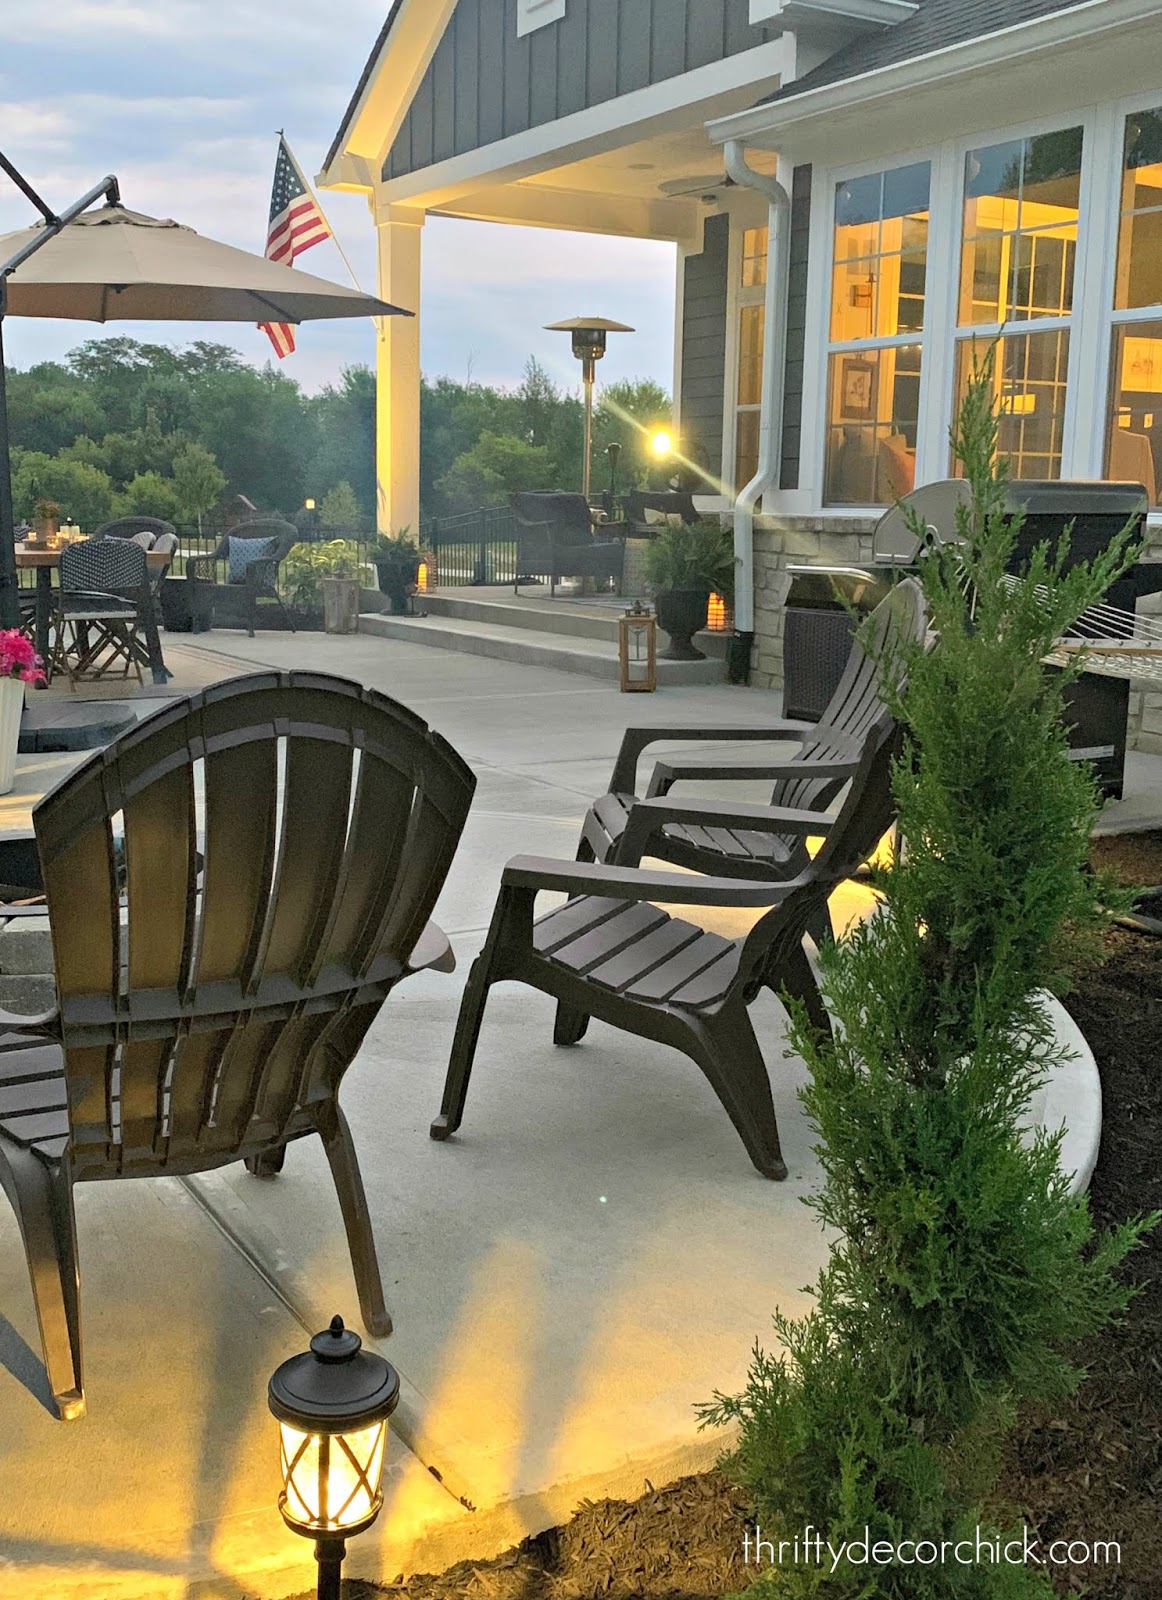
My vision for this spot has always been a circle of Adirondack chairs, but GOODNESS they are so expensive. Especially because we need so many. So for now, I found these plastic versions at Lowe's for half off: 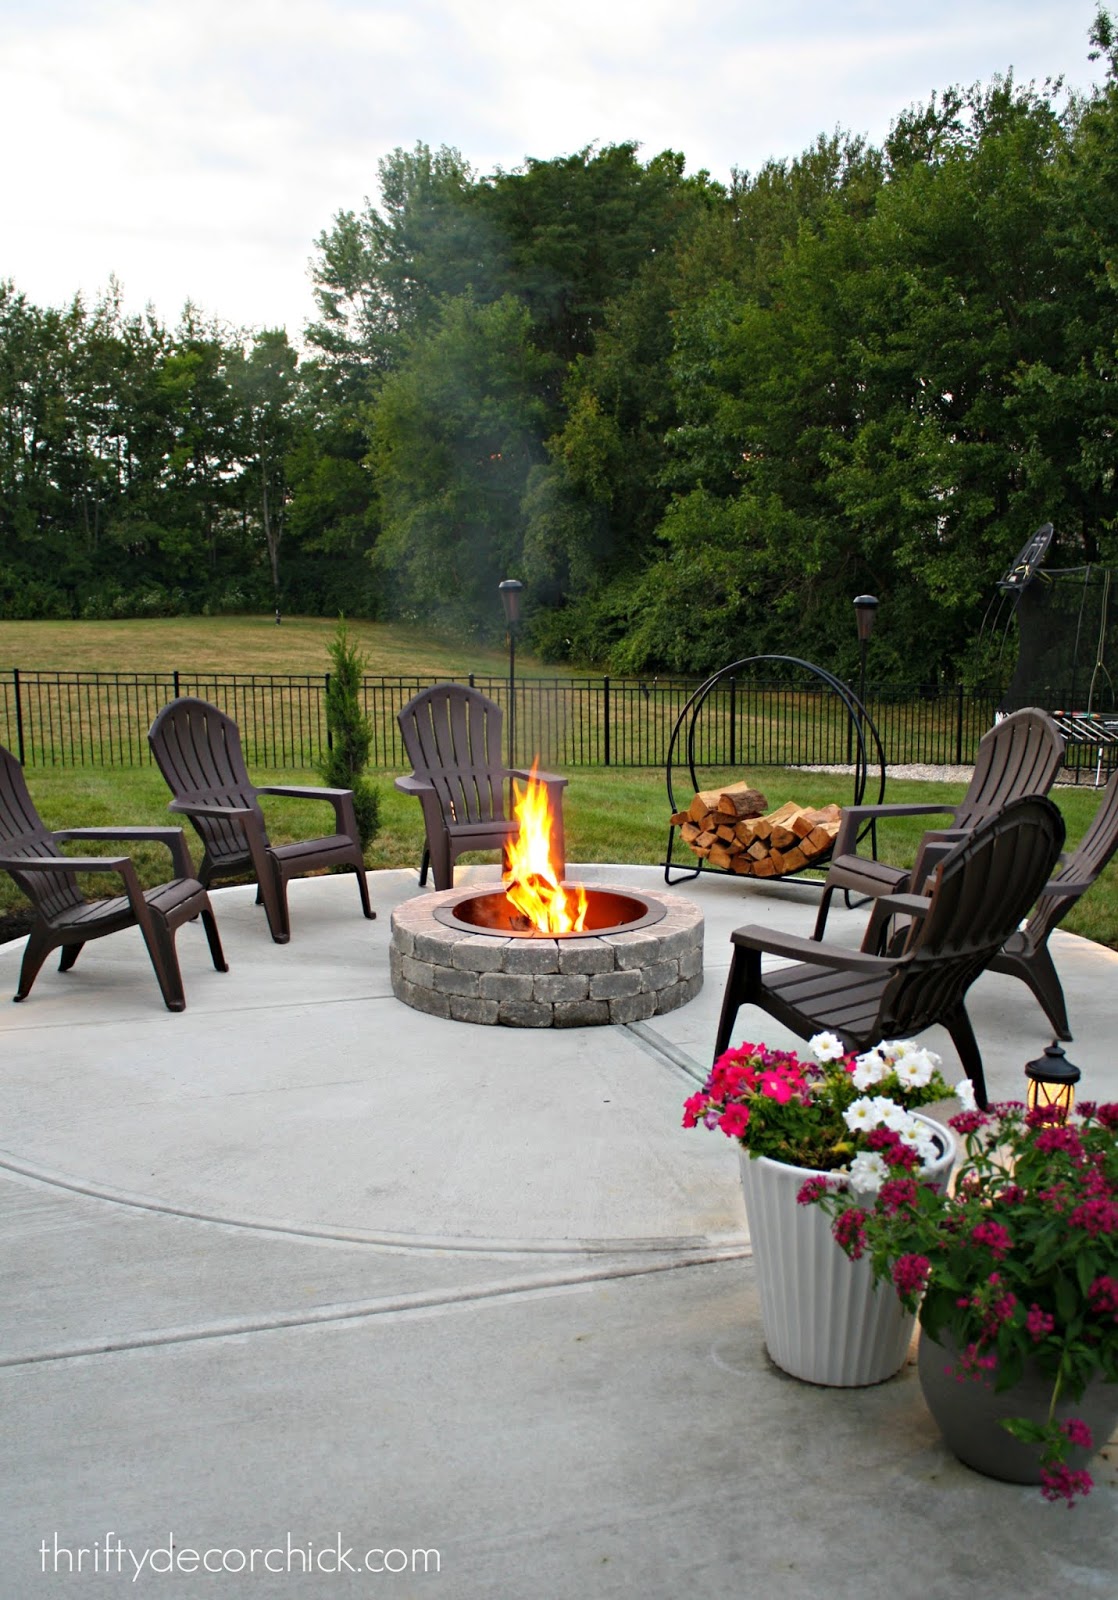
The timing was great as far as finishing up the patio -- so much was on clearance! I found all the planters weeks ago at At Home and HomeGoods for great prices. The Adirondack chairs were $12 each:
Someday we'll probably replace them with wood, but for now these work! And they're super easy to stack up and store for the winter:

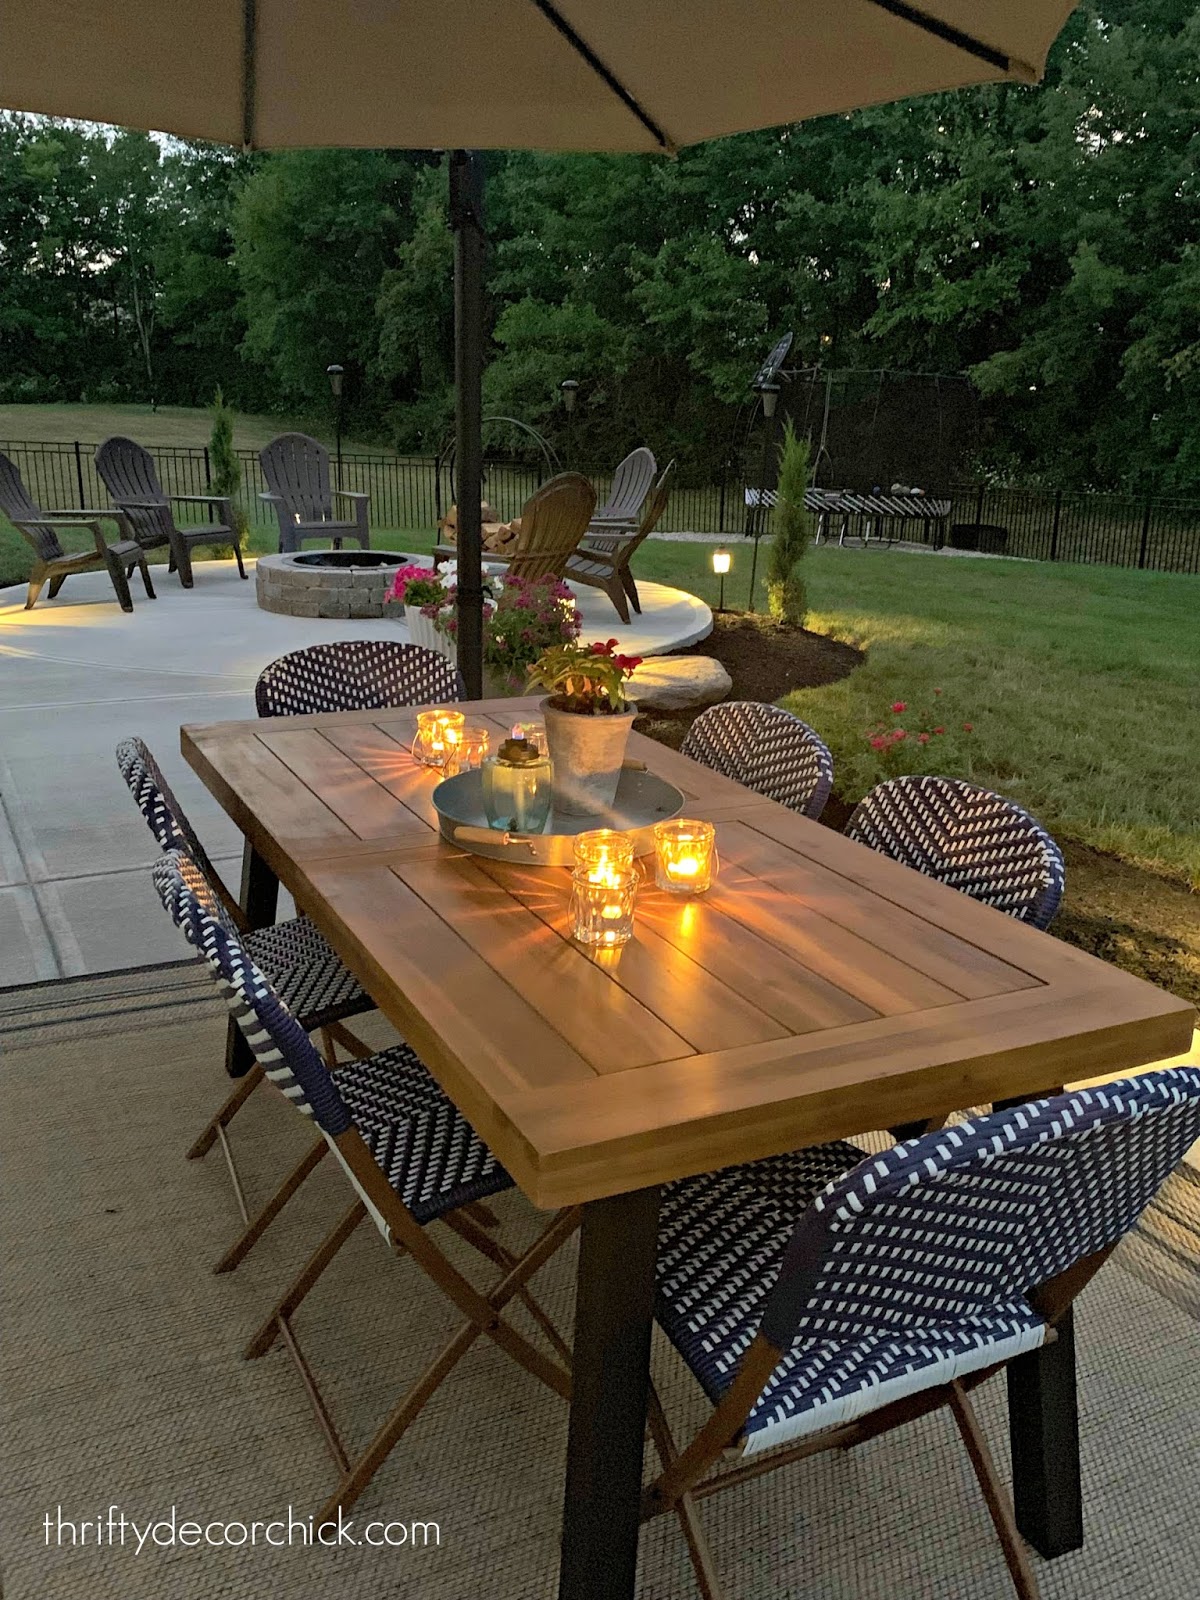
I placed the arching umbrella and table on the long part of the patio:
So far I'm thrilled with the outdoor table I picked! It was great price and looks great! I would totally use this table inside by the way.
Those chairs from Target were not cheap but I fell in love with them!:

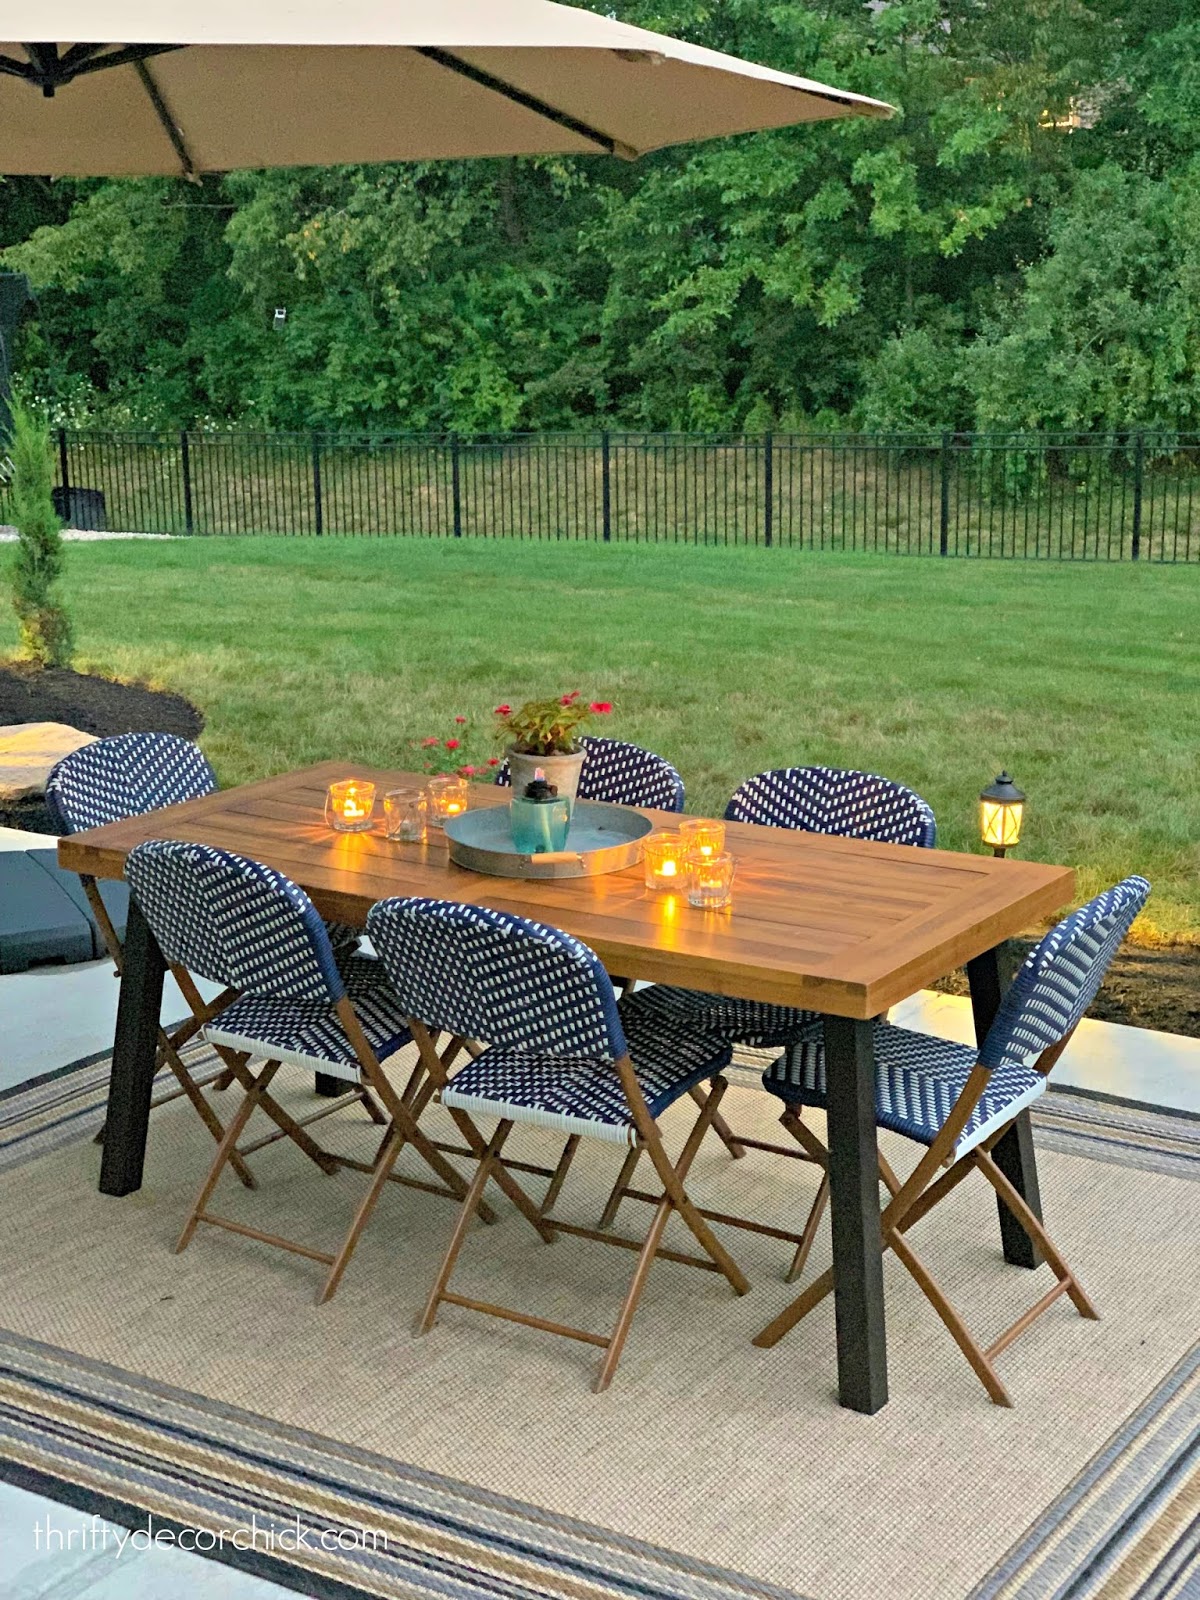
They were a splurge for sure but they are holding up great and again, will be so great because they fold up for winter storage.
This post may contain affiliate links for your convenience.
See my policies and disclosure page for more information.
The wood table will age with time I'm sure. I'll probably put a protective coat on it soon to preserve the pretty stain though. I'll let you know how it holds up over time!:
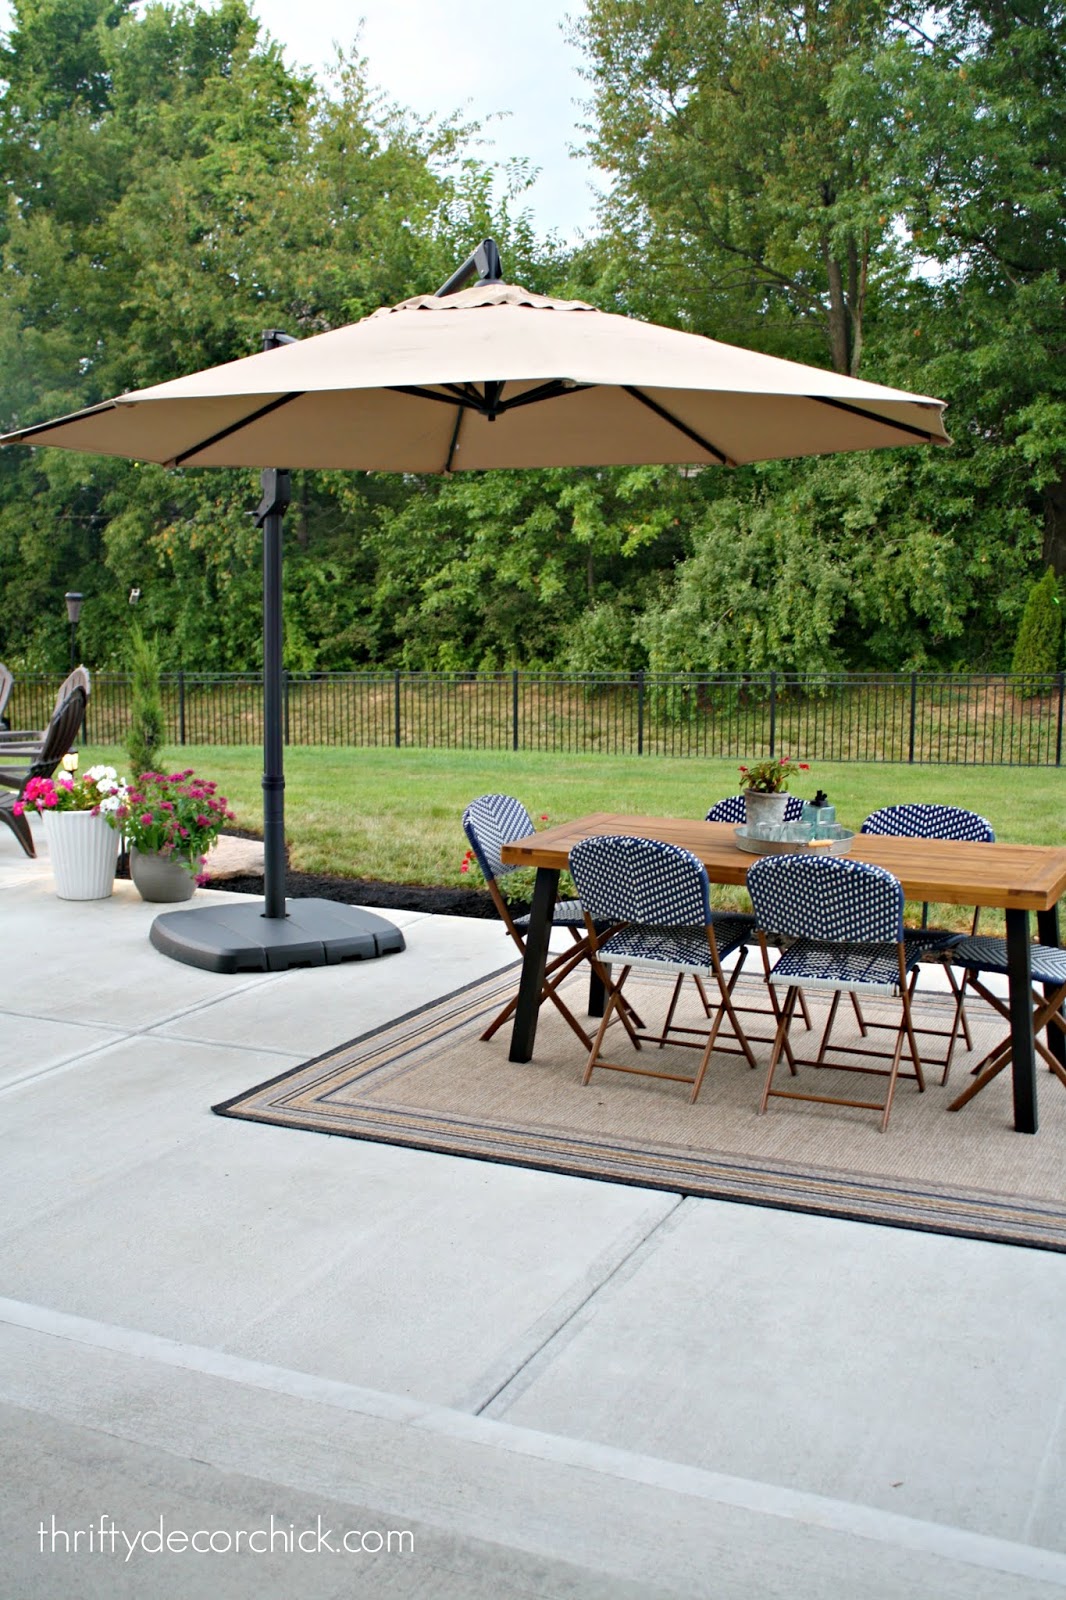
We got that large umbrella years ago at Lowe's (I'll link a similar one below) and we LOVE it. When we had a table with the umbrella in the middle it would always get scooted around in bad weather (even when down) and was always a mess.
We prefer this one because it's SO big! It was protected from a lot of wind on our old patio, so hopefully it will do well here. So far so good! It's already been through a couple storms out here:
One of my favorite things about the patio is the loooong step we had added off of the covered porch:
Just that simple detail makes it feel more grand. And it makes getting down to the new patio even easier:
It was SO nice to get the garage emptied out after two years! And fun to see items we've had put away for all that time. I'm so happy to have my DIY potting bench out on display again (I've been using it as my work bench in the garage since we moved in):

I built that with my Dad and it's one of my favorite pieces in our house! I have a couple fun little updates planned for it soon. :)
Some of you will notice we went with mulch instead of rocks. I planned to do rocks so we wouldn't have to redo the mulch so often (I hear it's more money upfront but you save big time over the years). A friend gave me an important warning about that though and I'm SO glad he did.
He said certain plants won't grow well (in our summer heat) because the rocks heat up so much. I didn't even think of that! One of my favorite plants are hydrangeas, and they are one that wouldn't do well in it on our hot days. Sooo we went with mulch instead. I do love the look of it!:
We'll extend the beds out in certain spots as we plant more trees. We plan to add a bunch more...mostly evergreens for privacy. I don't want it to get too disconnected from the rest of the yard though, so I want to take our time and do it right.
We already have some on order for behind the potting bench, but the rest will wait. I already found three small evergreens and two knock out rose bushes on MAJOR clearance and planted all of those. They are all small, but I only spent $70 for $350 worth of plants!:
All of the potted plants on the patio were the same -- I found them all on big time clearance!
Yesterday I finished up the landscape lighting -- for me no outdoor space is complete without it! I've shared how to do it a couple times, but this DIY landscaping tutorial should help the most!:
Once you've done it a couple times, it's even easier to do. I was able to get all of these laid out and connected in 30 minutes. (It sounds like a big DIY with major skills needed, but I promise you, it's not!) The most time/work goes into digging the wire into the mulch!
OK, I think I covered everything! If I didn't let me know!
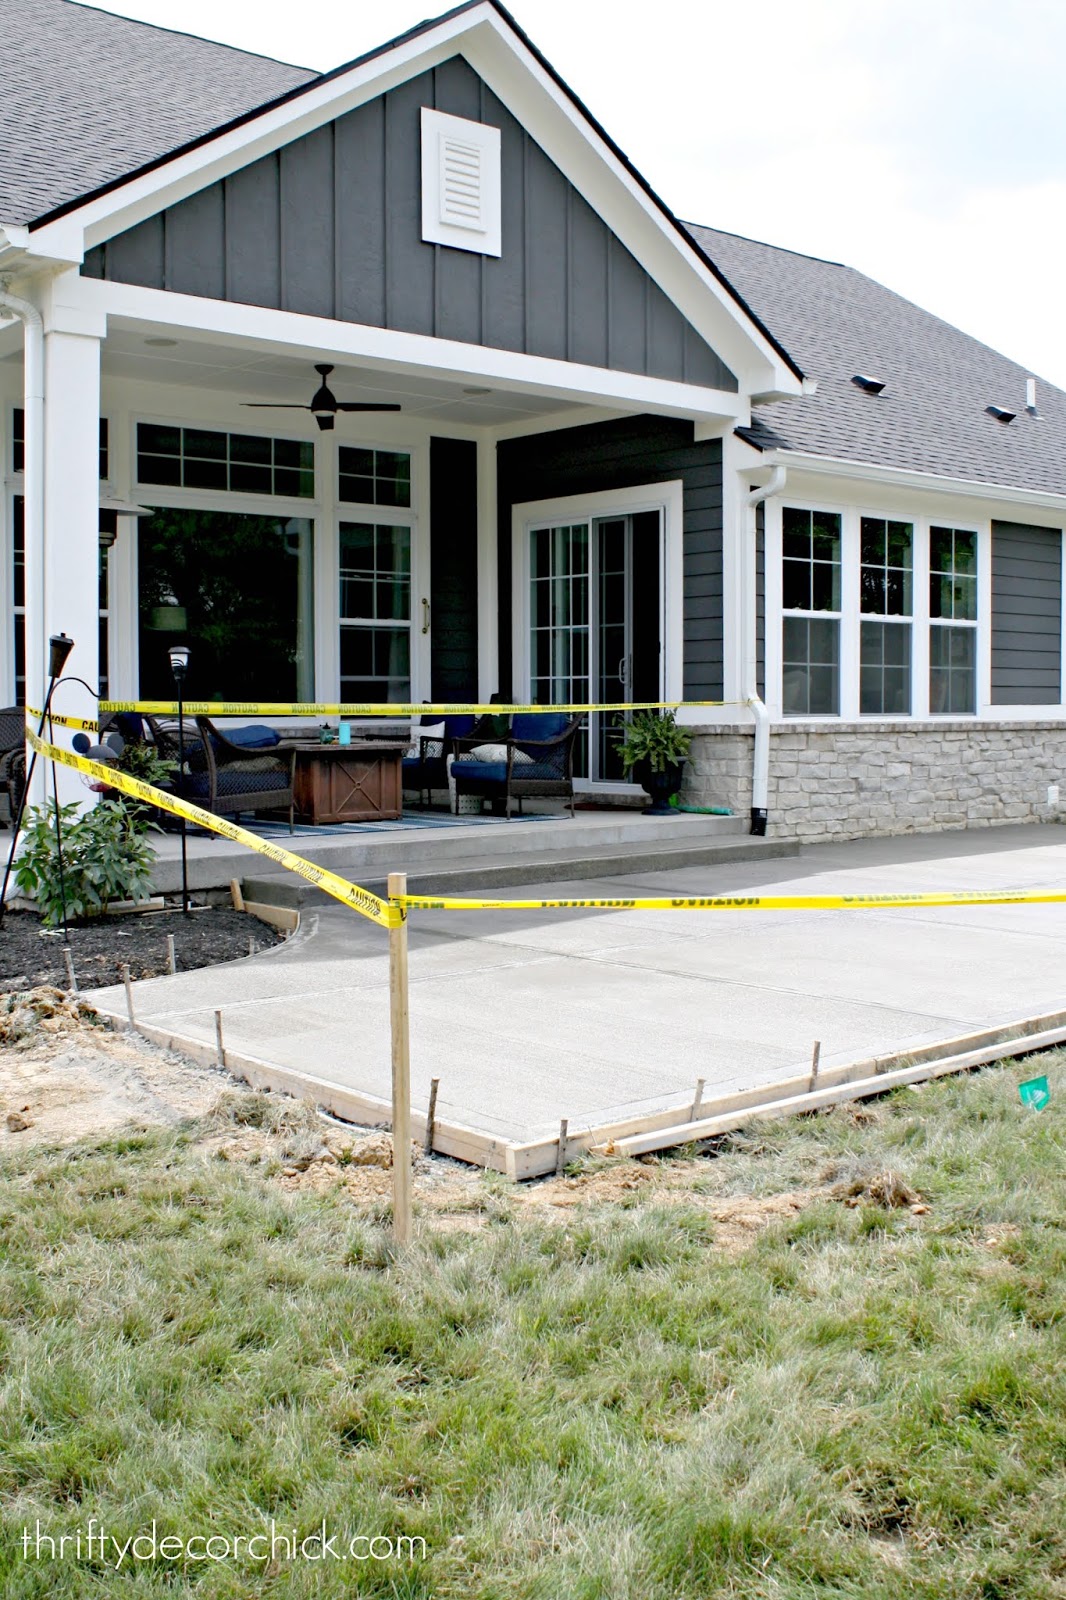
Here's a look at the patio a few weeks ago right after it was poured:
Next up are a few more trees and then stringing the outdoor lights like we had over our old patio. I can hardly wait! Source/project list: Wood outdoor dining table Fold up patio chairs Build your own potting bench Outdoor rug on covered patio Outdoor rug on patio, Lowe's Similar arching umbrella DIY landscape lighting tutorial Circular wood holder and cover Similar large deck box DIY firepit tutorial and sources Landscape lights -- Lowe's Similar galvanized tray (on major clearance right now!) See more of our home here. To shop items in our home, click here! Never miss a post by signing up to get posts via email. Via https://www.thriftydecorchick.com/2019/08/our-new-outdoor-living-space-patio.html
Hello hello! I was planning to share our patio with you today, but it turns out we're going to be able to have some landscaping done this weekend. It will look even better after that, so I'll be sharing next week!
Now that the office built ins are done and the patio is mostly finished (there are still a couple projects I'd like to do this fall), I'm turning to my plans for the rest of the year. I like to get my ideas in order well before the holidays for a few reasons -- 1. I'm notorious for getting to late November and thinking of all kinds of projects that would look SO GOOD with Christmas decor up...when its too late to tackle them. 2. I tend to forget (ha!) that Christmas comes at the same time every year, and get overwhelmed with everything that needs to be done. The past few years I've made a concentrated effort to plan out my projects way ahead. 3. Budget. We do everything in cash so I need to be able to budget it out, especially towards the end of the year, which is the most expensive of course! I shared my fall/early winter project plans in October last year, and got almost all of it done in a very short period of time. Looking back and pretty impressed I got all that done before the holidays. ? The only thing we didn't tackle was the kitchen cabinets I want to add because of time and cost. I still want to do those! But I think I'll wait till next year at this point. Onto this year's list! The first one should be pretty easy and go pretty quick. Remember when I added this inexpensive wall trim detail to our foyer?: 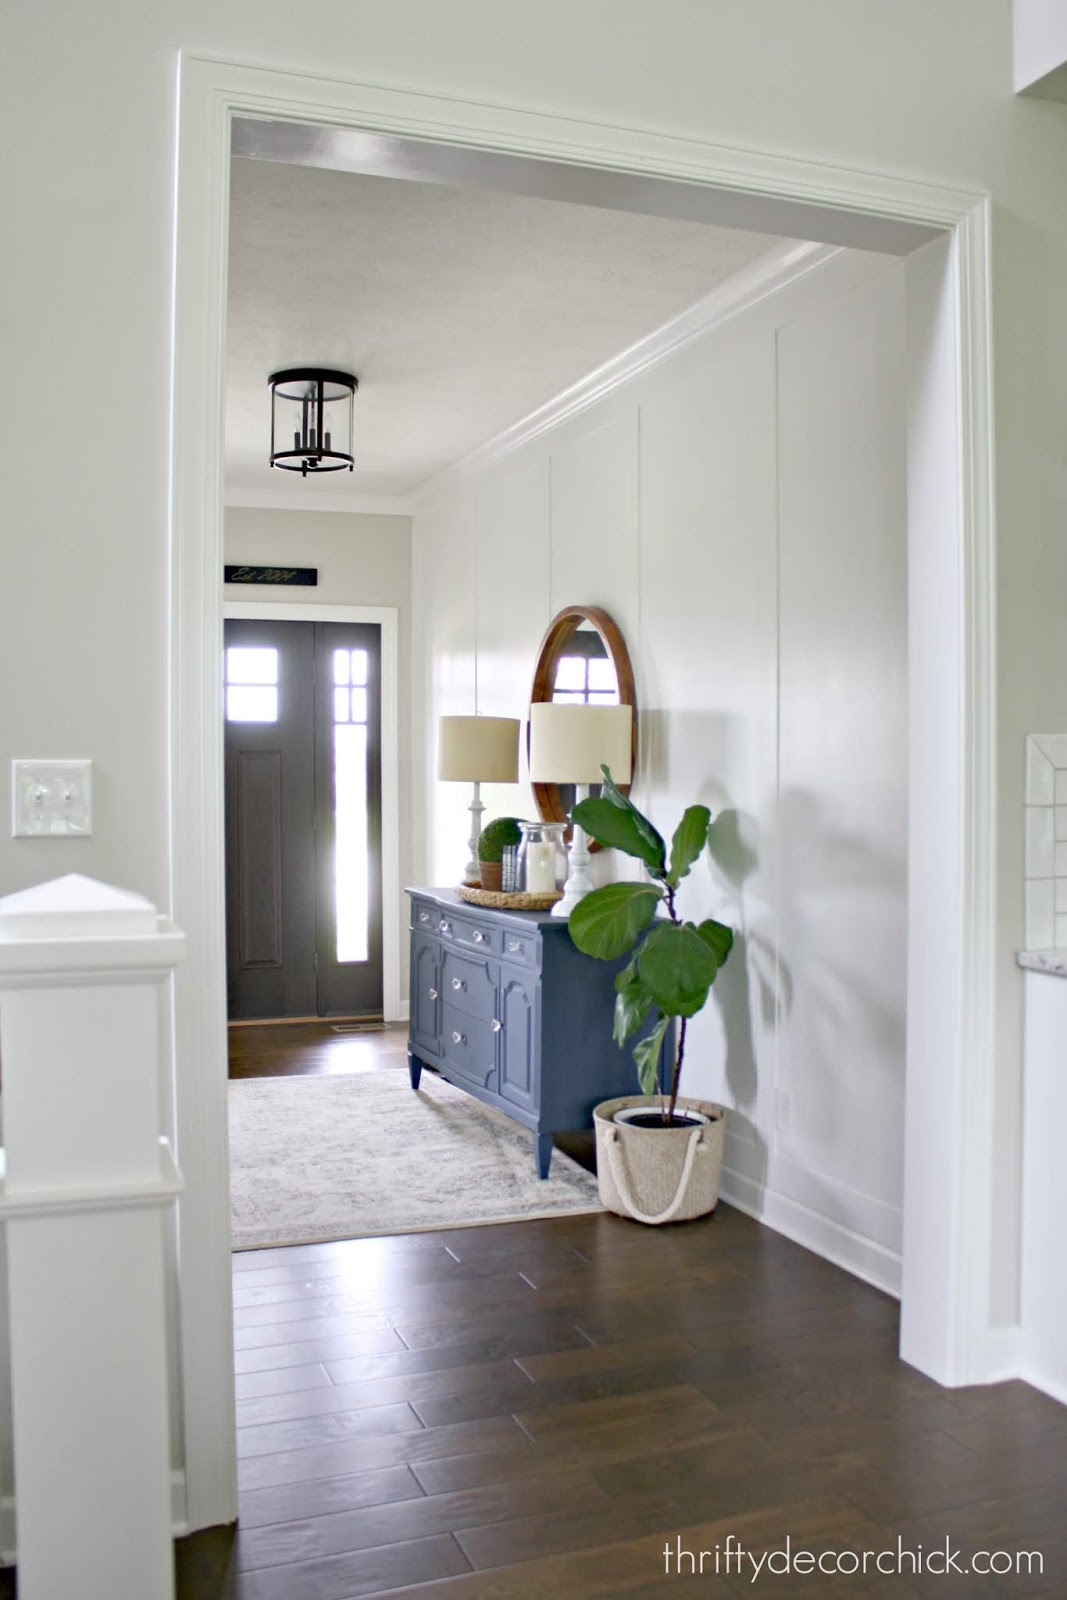
I went back and forth on continuing it through the foyer, and decided to wait. For awhile I was fine with the neutral paint color with the white wall. But now I'm ready to keep the white going.
I plan to add the same trim around the rest of the foyer (which isn't much because of doorways), and then paint everything out white.
But first up, I need to add this chunky Craftsman molding to the other side of this doorway:

I've planned to do it for some time, and now is the time! You can see the opening in this photo just a bit:

Again, this shouldn't be TOO bad. The door trim will take a day and then the rest of the trim and paint will take another day or two. I think having the foyer all white and bright will be lovely!
Next up is a bigger project that I'll need some help with, just because of the height. I don't do heights well...especially on a ladder. But I think I can do most of it myself!
I painted our tall fireplace early last year and have always planned to add some molding to it...cause that's just what I do ?:

I didn't want to commit to anything until I was 100 percent sure on what I wanted to do, but I've finally decided! It's not anything crazy, just a simple grid pattern like our old master bedroom, but with a little added detail. It's going to look fantastic!
There seems to be a trend in my list of projects...are you surprised? I've wanted to add some detail to our staircase walls for some time, and I'm finally going to start! I plan to start with the middle section with the doorway to the foyer:

I have a feeling I'll want to keep going with the rest of the walls, but I'm starting with the biggest wall for now. It will be a very simple design but I think it will make a big impact! And finally, one that I won't attempt myself...adding hardwood floors to our master bedroom: 
A few months back I explained my brief heart attack when I found out our hardwoods were discontinued. Thankfully we were able to get more for our office and the master (I pray it's enough!). I'm hoping the install won't take more than a couple days so we're not displaced too long. :)
It's a big list but I hope to have it all done (as well as some outdoor projects) before November. That way I can relax and enjoy the holiday decorating! I hope to get started on the foyer next week.
Do you keep mental list of things you want to get done before the end of the year? I've found it really does help me to focus so I can get more done. Have a great weekend friends!
See more of our home here. To shop items in our home, click here! Never miss a post by signing up to get posts via email. Via https://www.thriftydecorchick.com/2019/08/my-house-project-list-for-end-of-2019.html
Hello my friends! We are deep in the back to school trenches and I'm not happy about it. I've enjoyed this summer more than most and am not ready to see it end! I love the slower pace of summer days and will miss having our kiddo home all day.
Eventually I know I'll appreciate the schedule again, and of course I'm always super excited about the fall season! We're even more excited about cooler temps now that we have our new patio!
I shared how the patio looked the day of installation a couple weeks ago:
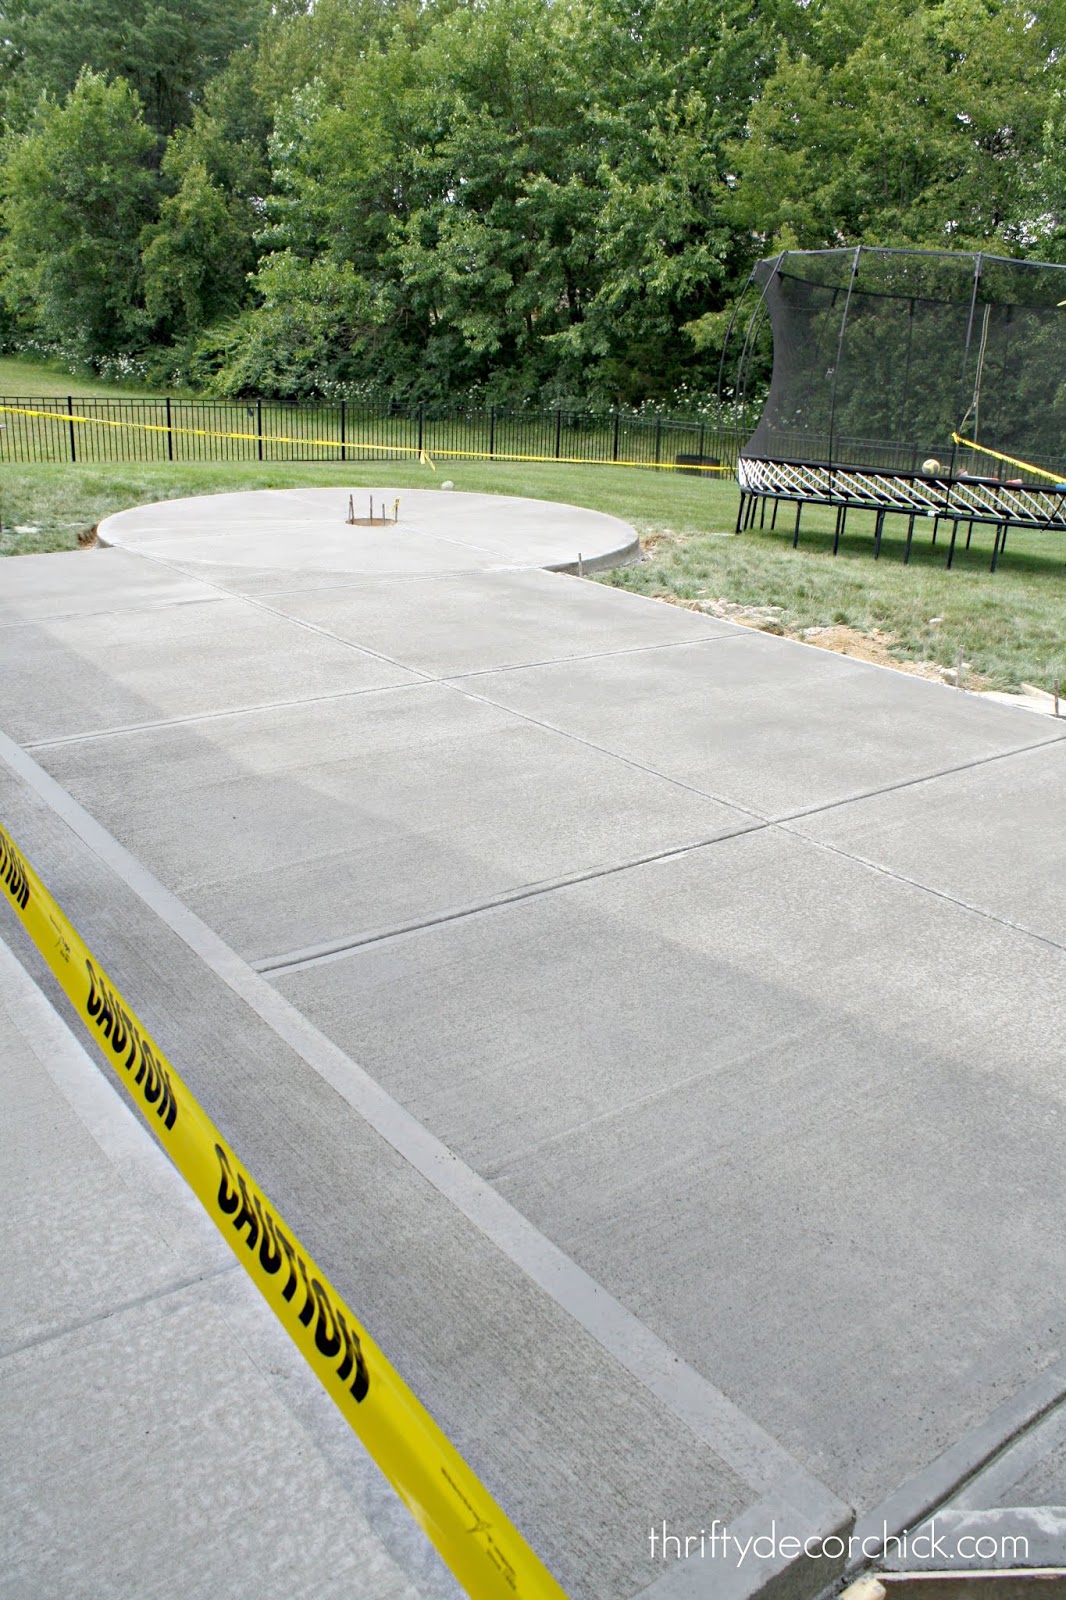
I've been working my tail off getting it set up -- we LOVE it and have already spent so much time out there.
One big project I had to hold off on was the DIY fire pit. They advised we wait a bit because it is so heavy. I could barely stand holding off because we had some really cool nights that would have been perfect for it! (And of course as soon as I got it done it got hot again.)
We got a quote for a small stone retaining wall around the circular fire pit area as well as a fire pit with stone that matched our house. The quote came back at almost DOUBLE what the PATIO cost. Lordt.
Soooo we decided to do it ourselves with a kit and it was crazy easy. It doesn't look custom, but it does the job -- burns wood. ;)
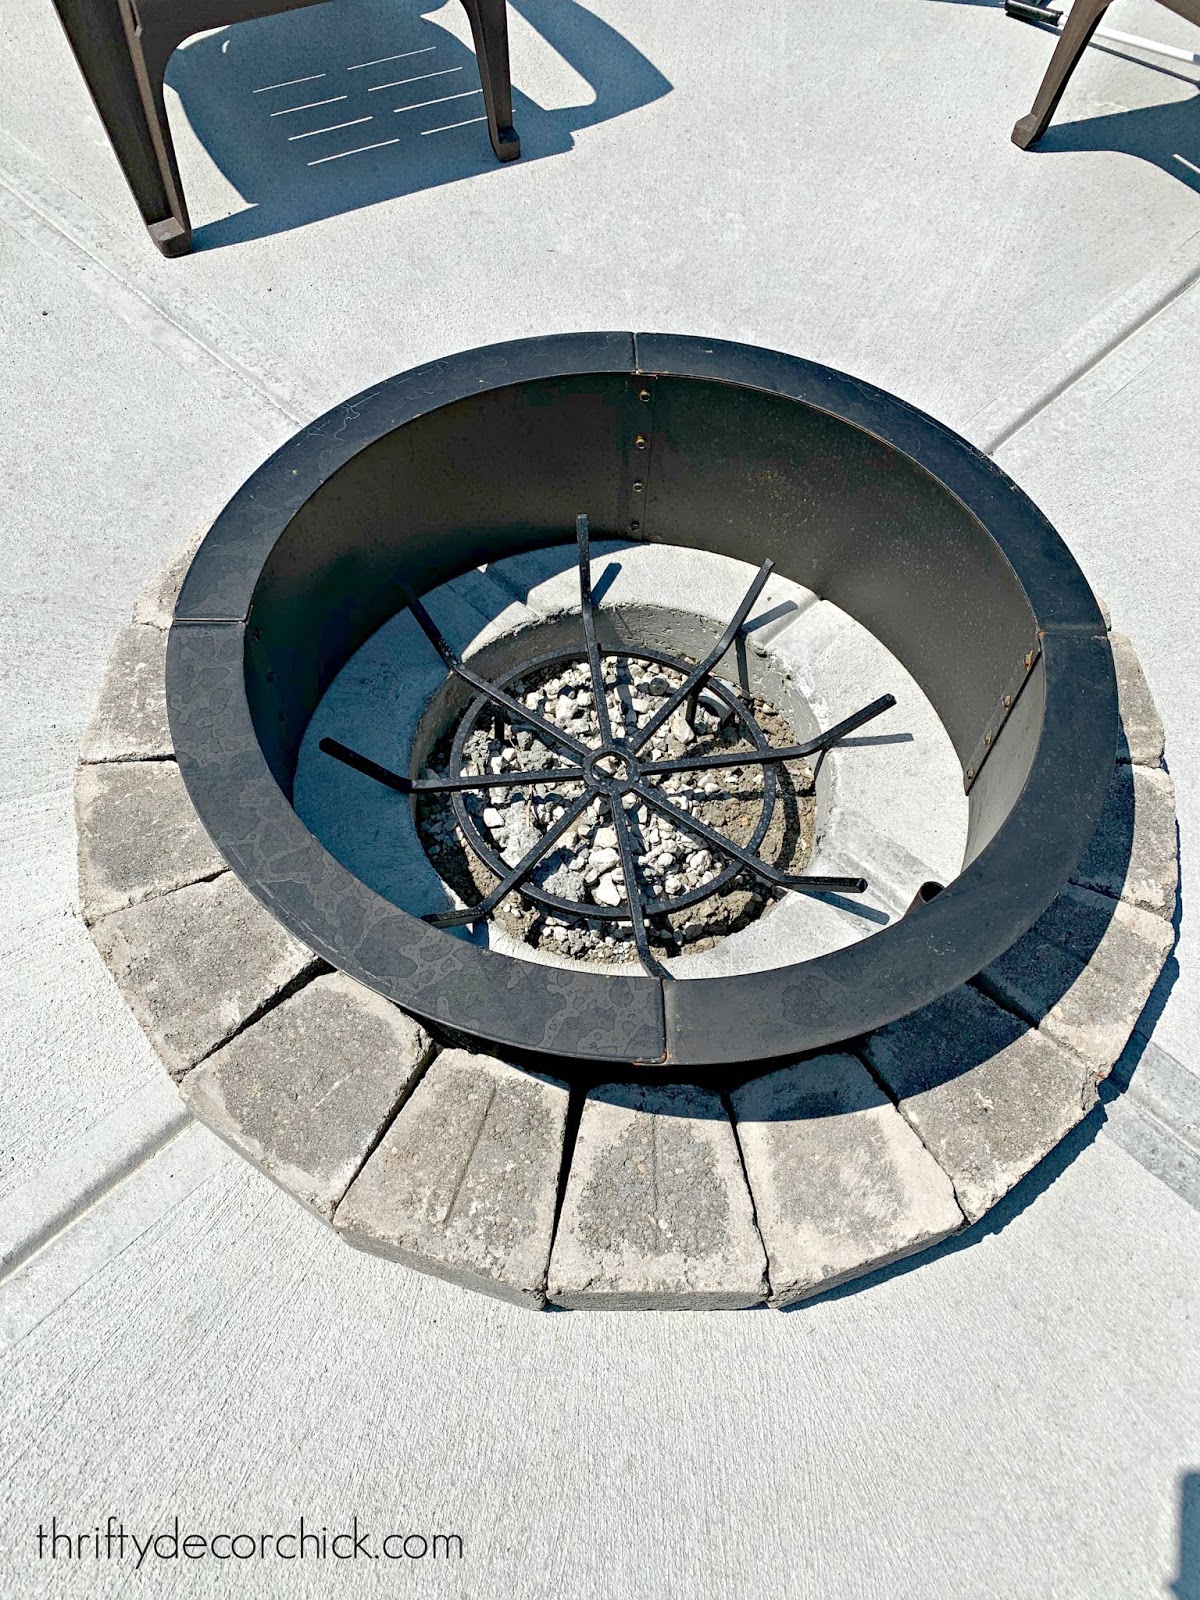
Here's the kit we got from Menards:

It is 3 1/2 feet wide and was only $150. WAY better! It comes with the stones, glue and the metal ring. I figured it would be easy to build, but it was even easier than I thought! I'll share some specific tips at the end of the post, but here are the basic steps.
This post may contain affiliate links for your convenience.
See my policies and disclosure page for more information.
I put the ring together first, and centered it on the hole the construction crew added for the pit:

I realized after I was done that it wasn't centered at all but OH WELL.
Our concrete company included that small hole so they could add a drainage pipe -- brilliant! Any water drains out to the back of the patio. If you are considering a patio with a fire pit, I highly recommend this!
The instructions called for 20 stone wedges on the first ring, but I only needed 19. If I had added one more I think it would have been too wide for the metal insert:
Quick tip -- when I started that base ring of stones, I was butting the sides up to each other completely, which made for too small of a ring. I had to pull them out quite a bit and only place the long ends against each other so it made the circle bigger. Hope that makes sense!
This kit only calls for three levels of stone -- the second level is centered over two stones so they are staggered instead of right on top of each other.
The final ring goes back to the same as the first:
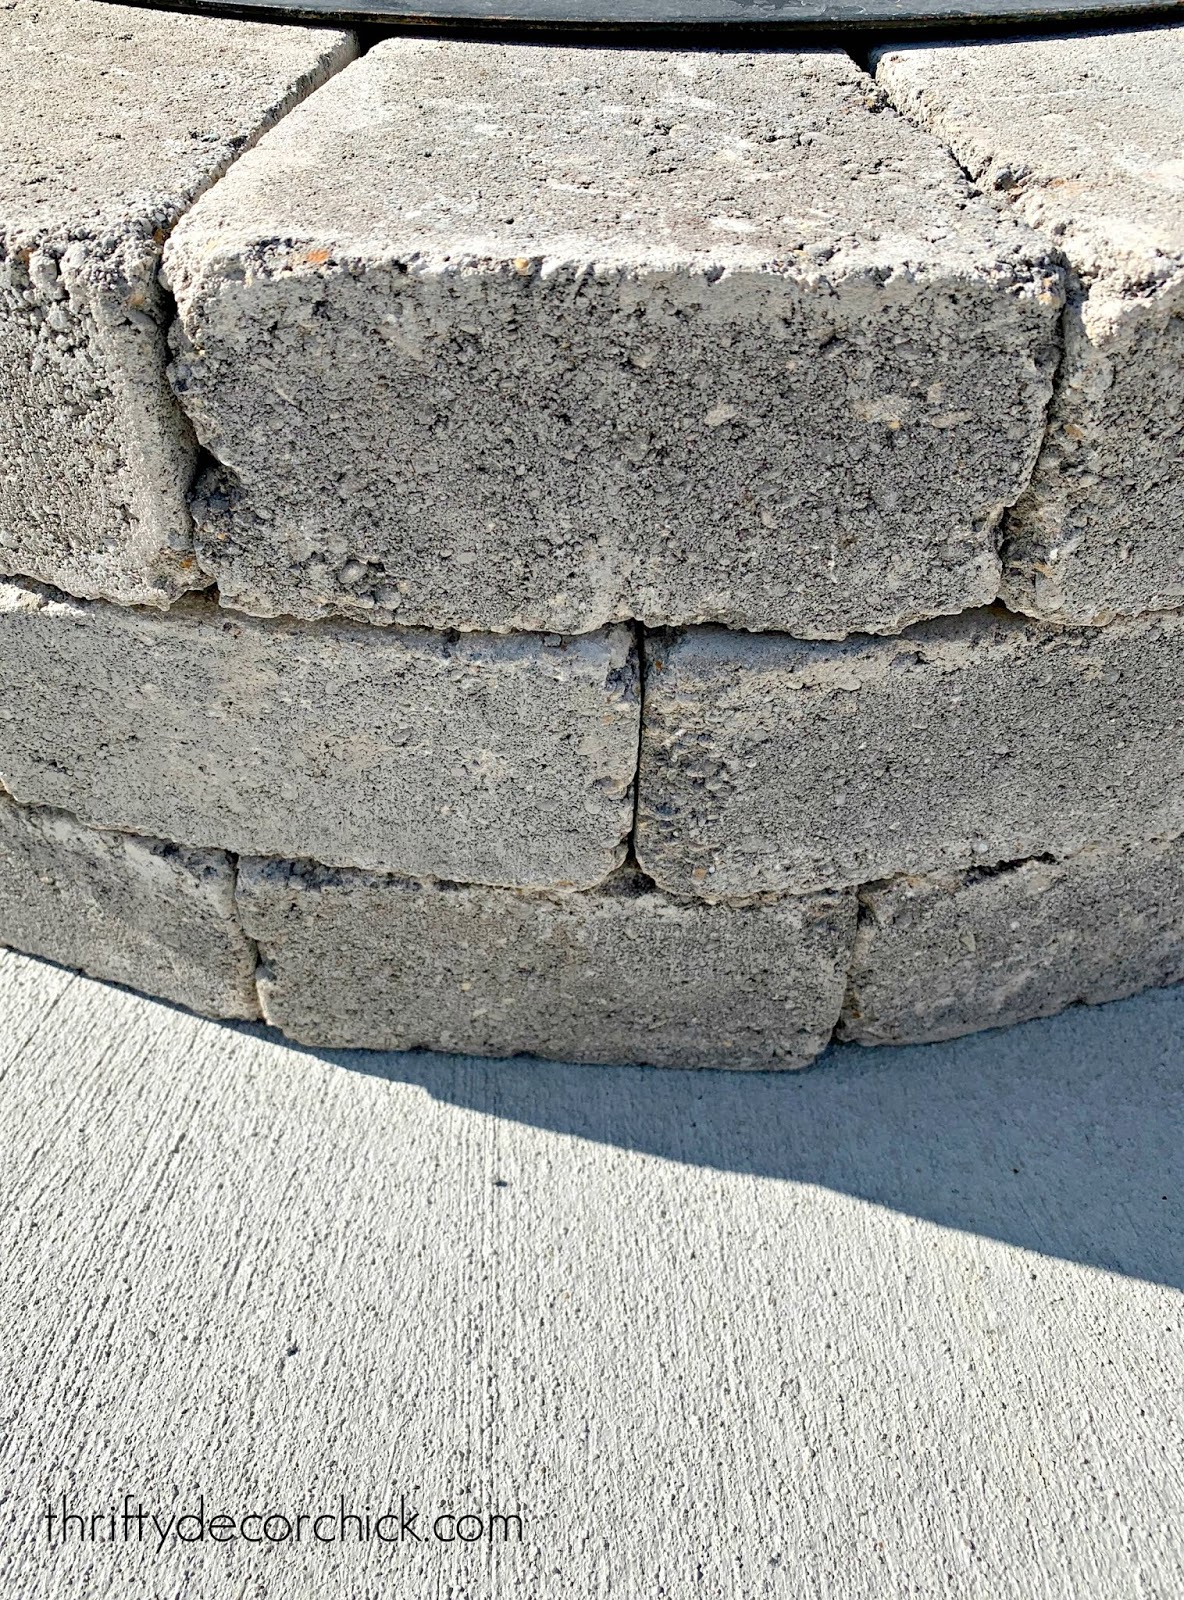
As you can see, I didn't get the centering just right. It's OK. :) After the third layer of stones, you add the metal ring back in and you're almost done!
We added three bags of pea gravel to fill in the hole in the concrete and then up to the bottom of the metal ring :
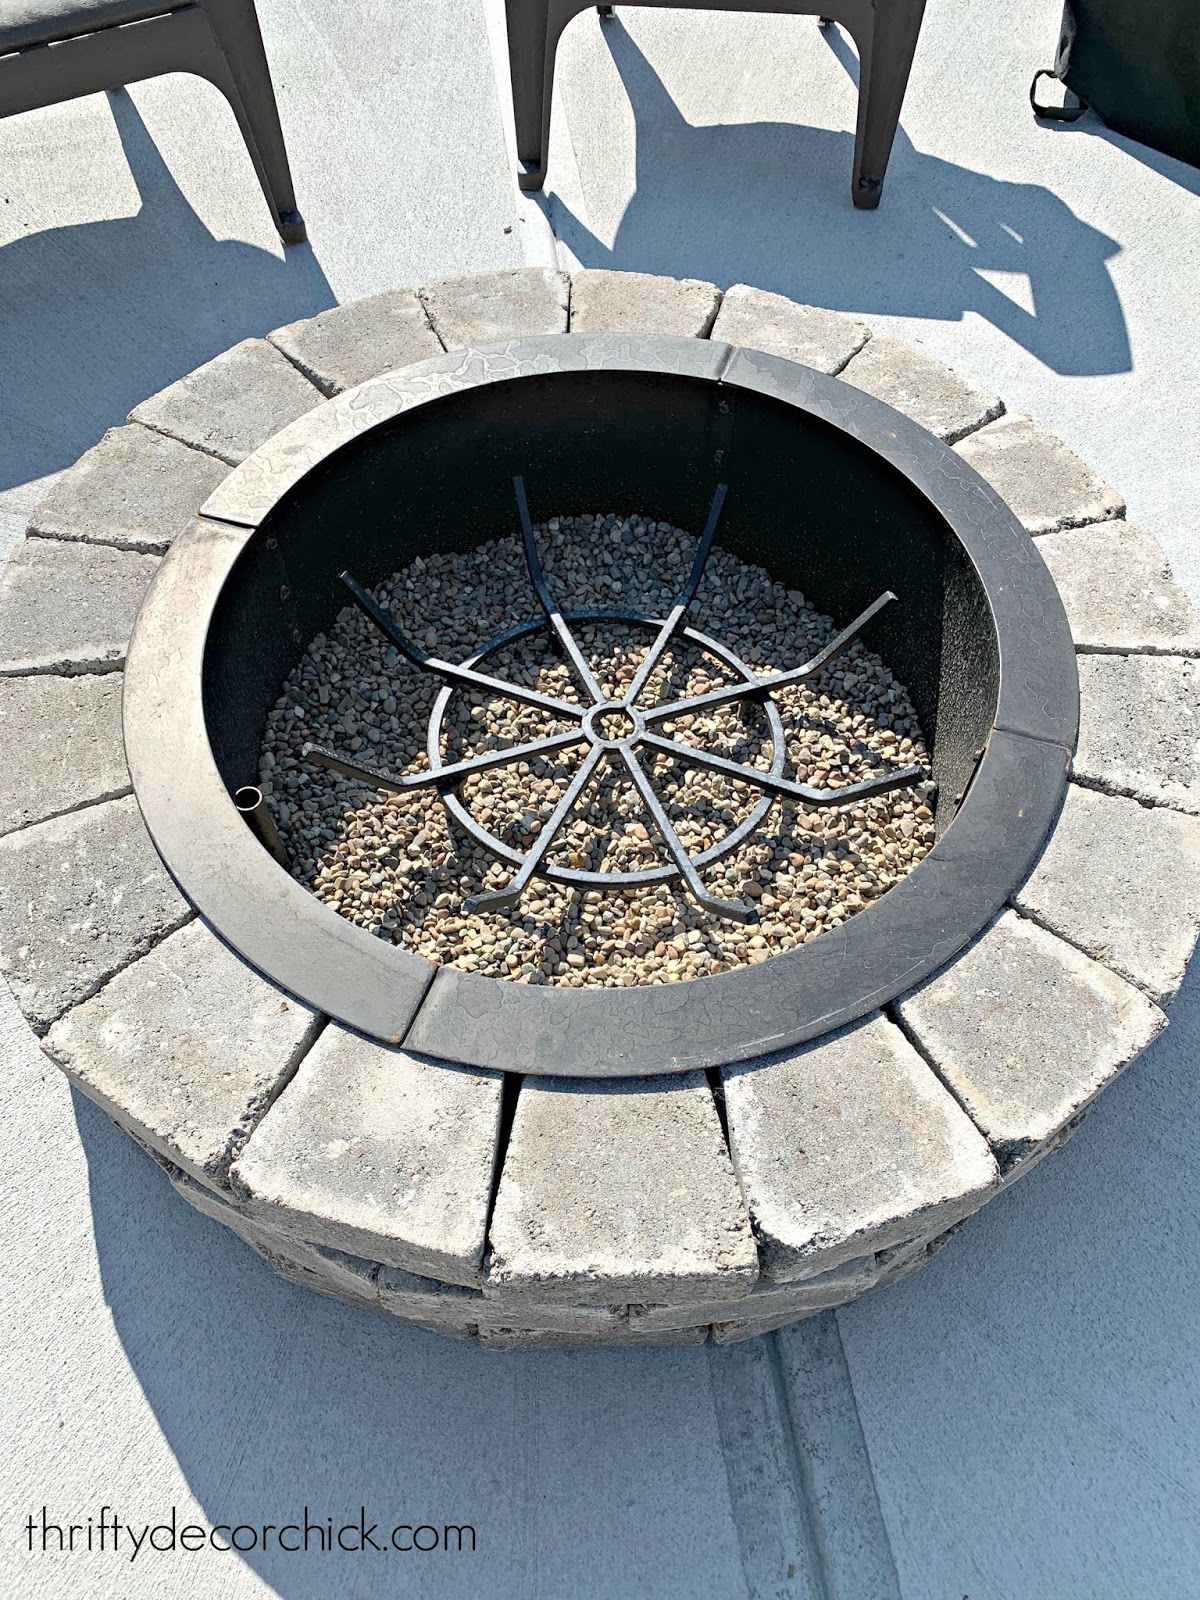
We bought the grate for the firewood here.
That's it! The total cost was $160 for the set and the gravel. It's plenty big, but if we find we want something grander in the future, we can just purchase a bigger metal ring and then add more stones to make it wider.
Have you built your own fire pit? Any fun treats or meals you make over the fire? This ring comes with an option for a grilling grate, so we may add that later on.
Here are a few tips if you want to try this project on your own!
See more of our home here. To shop items in our home, click here! Never miss a post by signing up to get posts via email. Via https://www.thriftydecorchick.com/2019/08/how-to-build-diy-fire-pit-safe-way.html
Hey there! Sorry for the silence here this week -- we are savoring every minute left of our summer! Our kiddo heads back to school soon and I'm really going to miss having him home all day. It's always a bittersweet time of year!
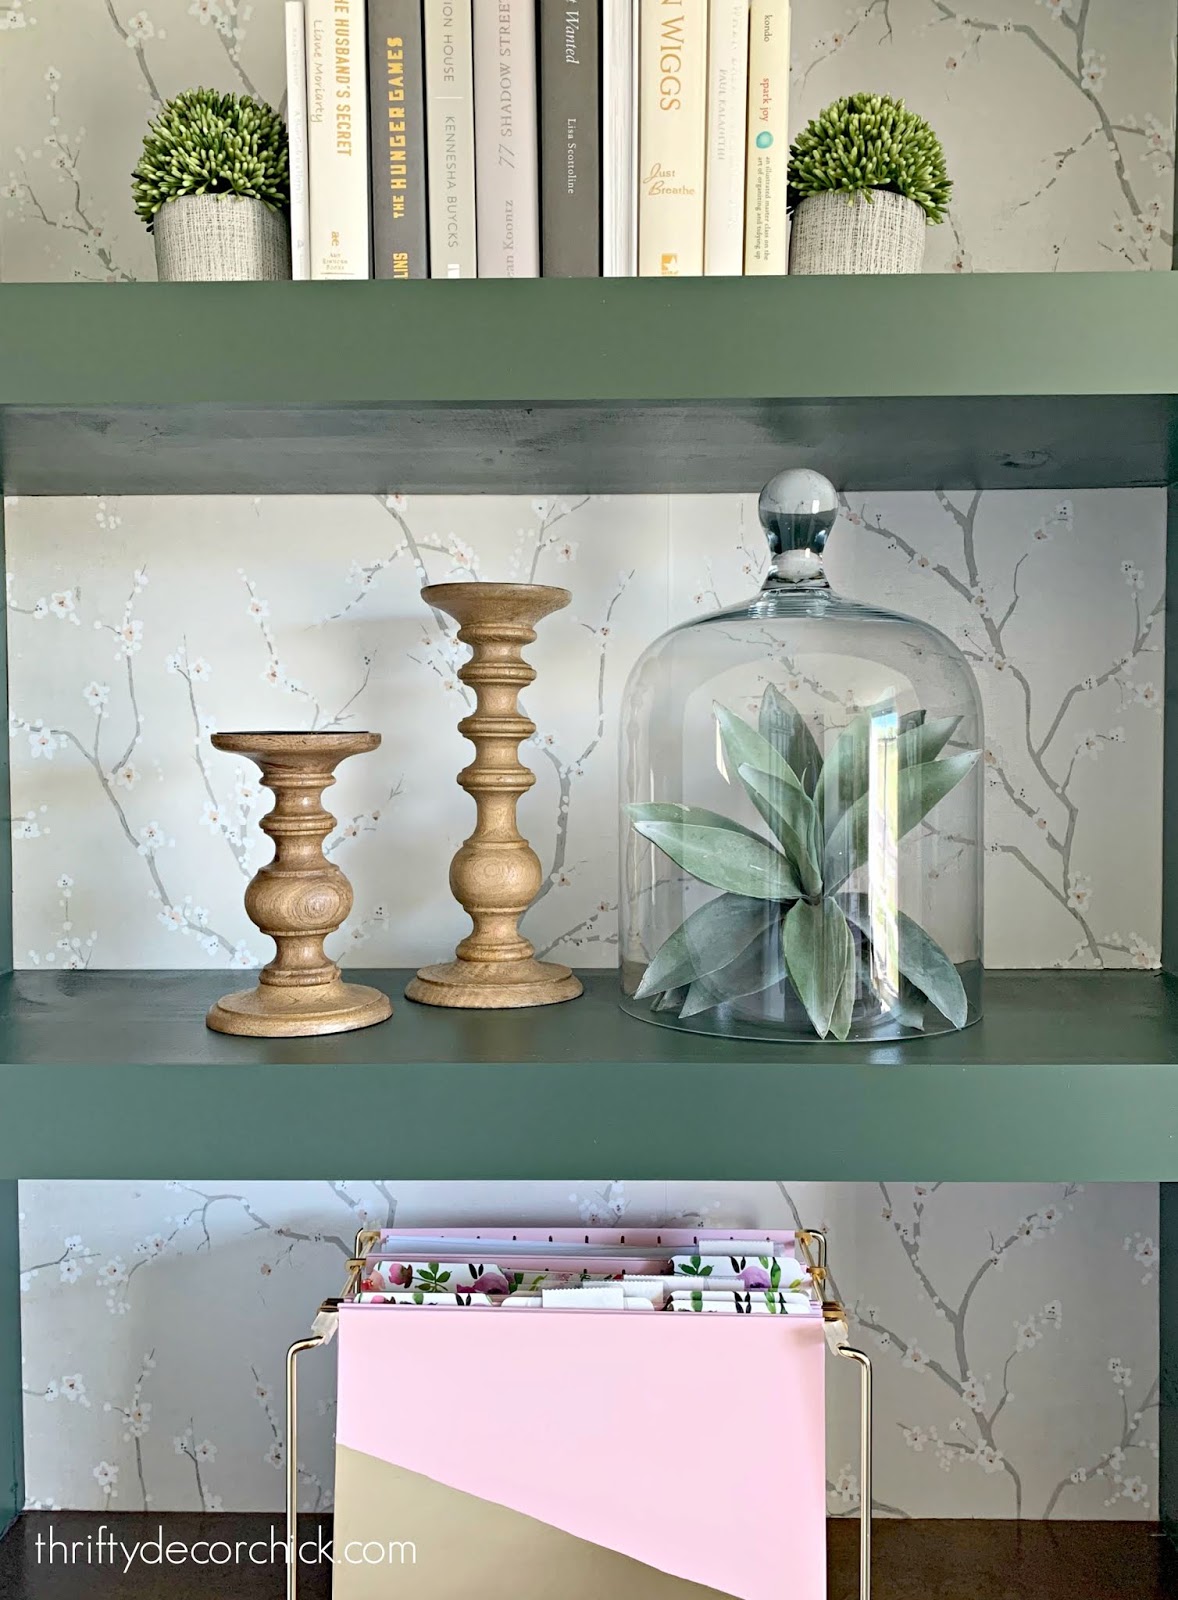
Last week I joined my friend Layla from The Lettered Cottage to do a fun little thing on Instagram. She does a weekly shopping trip on stories and shares fun little decorating tips while she's out and about. I joined in to share a few of my favorite decorating tips as well. I got such a great response, I thought I'd gather them together here too! These are super simple little touches I like to add to our decor that are easy to implement and don't cost much at all! Tip one: Put it under glass I like to add a bit of interest to faux greenery by putting it under glass: 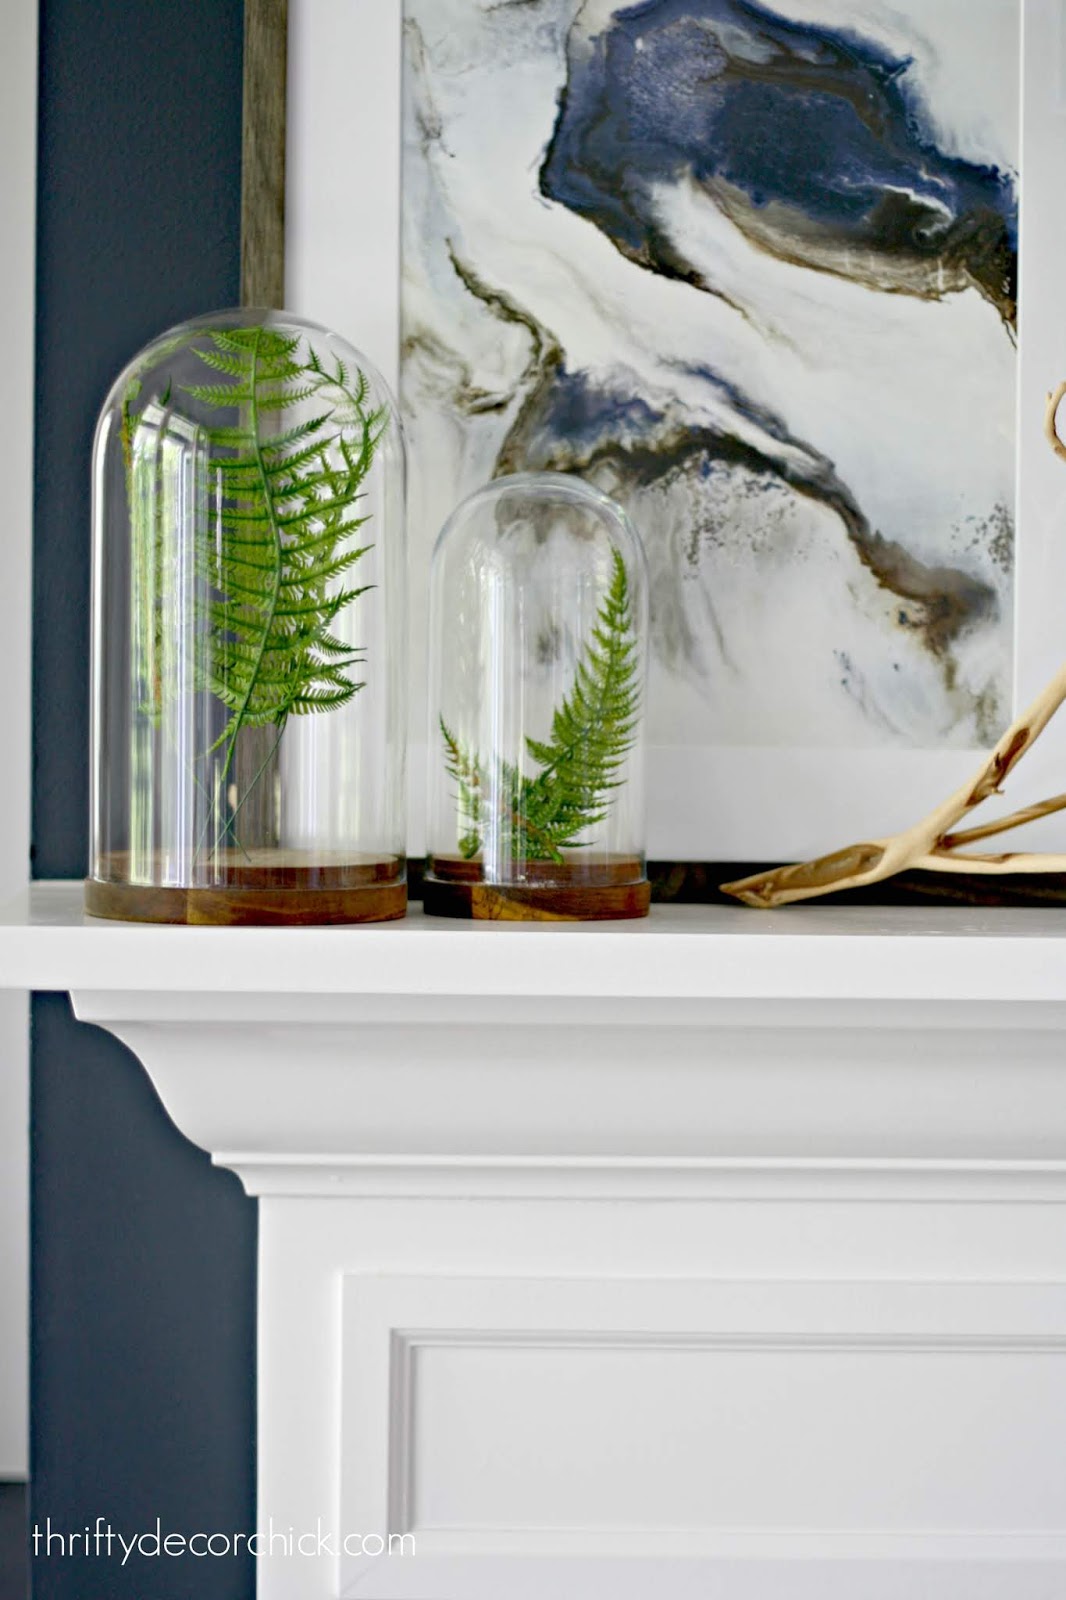
Those cloches are from IKEA and I just took a few fern sprigs off of a bundle I have. I love the look of them under the glass!
Sometimes little faux plants can look a little wimpy on their own, and adding the glass makes them feel a bit more substantial, but not busy.
I had a big fake succulent I loved for my new office bookcases, but it needed a little something. A large glass cloche made for a pretty display:
Tip two: Add knobs where there aren't any We have a few furniture pieces in our home that I love, but they are so affordable and versatile, a LOT of other people love them too. ;) I see them all over social media and on blogs.
This post may contain affiliate links for your convenience.
See my policies and disclosure page for more information.
Adding hardware is an inexpensive way to make them look just a bit different, and it's super easy to do: 
It's not a huge thing, but it adds a custom touch to a very popular piece. I shared where to find a HUGE selection of affordable knobs and handles here.
This console table seems to be in every blogger's home (it really is a great table!), but the cute label handles change it up just a bit so it doesn't look just like every other one:

And of course, just changing out the existing knobs on a piece of furniture can make a big difference! There are so many options -- they truly are like "jewelry":

I blogged about this years ago, but it's such a great little detail, it's worth mentioning again! I like to use knobs as hangers as well: 
Instead of nail or hook, they add a pretty detail that I love!
Be sure to check out this post on how to use knobs as hangers to see how to get them into the wall. If you need to hold a lot of weight you can use anchors too.
Sometimes I'll hang the actual item and then use the knob so it looks like it's hanging from it (this mirror is hung from the back, then I used the knob for the rope):

It's a fun little detail! This is our son's old room, but these "FLY" knobs are hanging in his new bedroom too:

When it comes to filling frames, you can do photos of course...but there are SO many pretty options that turn your frames into art! I used leftover wallpaper for these frames: 
You can use anything! There is some beautiful wrapping paper out there that would look awesome framed. Fabric looks great in a frame too.
I used scrapbook paper years ago for this big gallery wall:

For the holidays, I LOVE making art out of gift bags! It's SO easy and you'll get super inexpensive seasonal art of them:

So fun and SO cheap! Love it! These all little details that don't take a lot of DIY knowledge and they are quick to implement around the house! Hopefully they gave you some ideas for your home! Have you tried any of these? See more of our home here. To shop items in our home, click here! Never miss a post by signing up to get posts via email. Via https://www.thriftydecorchick.com/2019/08/four-easy-and-inexpensive-decorating.html |
