Tour our fall foyer with decor and DIY updates.
Our foyer is packed with simple DIY updates that have made such a big difference!
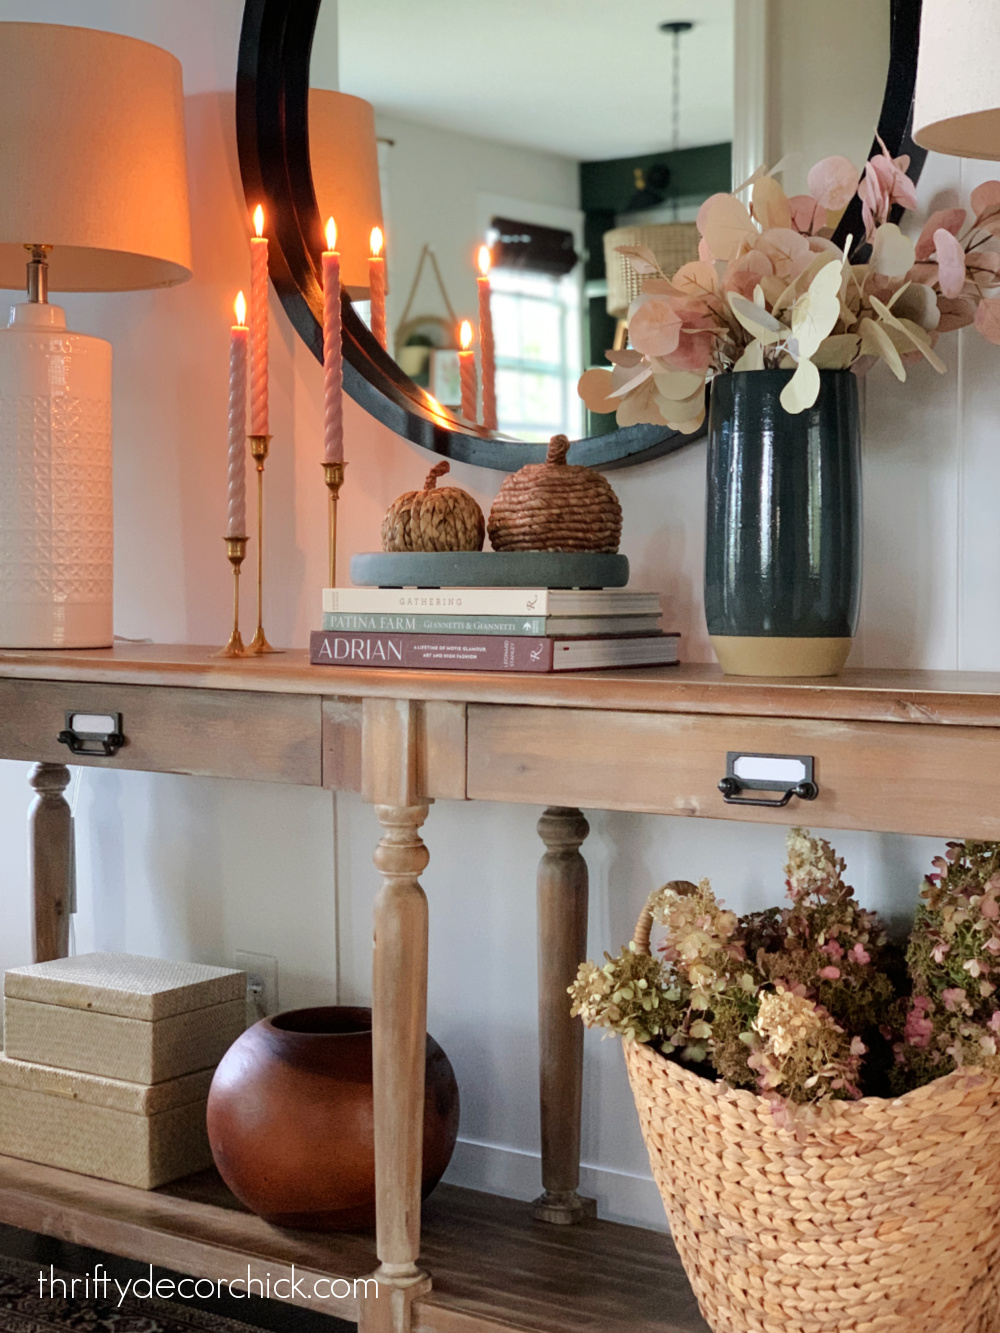
I recently worked on a couple of projects in that space and changed up some decor, so I thought I'd give you a tour! Our entry is looking extra pretty right now with the warm colors and fall touches.
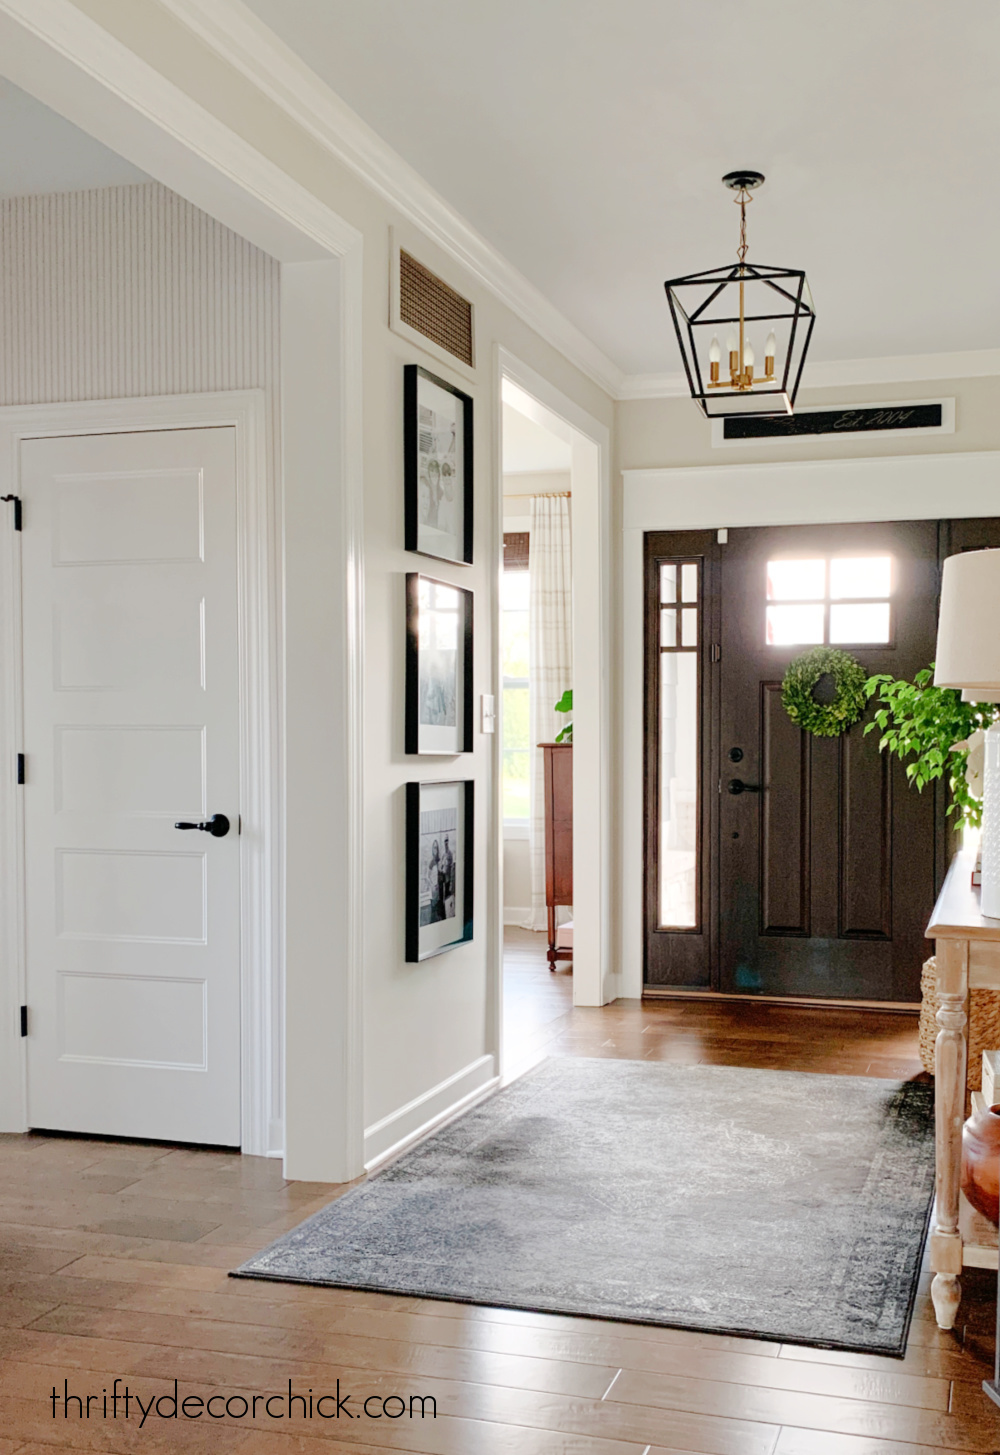
The large entryway in our home is one of the first things I loved about the layout when we walked through it at the beginning stages five years ago. I love how open it is, and all the character the doorways and little vestibule add.
I'll share all of the DIY projects in this space at the end of the post, but the most recent was the custom air vent I added to the wall above the trio of pictures:
This little project was one of my favorites I've done in awhile! I can't believe the difference this small vent cover made:

This post may contain affiliate links for your convenience.
I may earn a small commission when you make a purchase through links.
See my policies and disclosure page for more information.
Next up was another trim work project! I've planned on replacing the baseboards in here so they would match the chunkiness of the new door frames I installed years ago.
Via https://www.thriftydecorchick.com/2022/09/simple-DIY-foyer-updates-and-decor-tour.html
0 Comments
Where to find upholstered swivel chairs for the living room.
Our two round swivel chairs in the family room are two of my favorite furniture finds ever! I love the look and they are incredibly comfy.
Barrel chairs like these are so versatile -- they're great for conversation and entertaining. Our two swivel seats can be turned around so our guests can join conversations in the living room or the kitchen:

And what's better than being able to spin around in your chair?? Nothing.
Last Christmas we moved them over in front of the windows on either side of our giant tree:

This post may contain affiliate links for your convenience.
I may earn a small commission when you make a purchase through links.
See my policies and disclosure page for more information.
The fabric is a polyester and has held up beautifully! Stains come out easily and our new kitten has been scratching away on them and there is no wear or tear:

We love them, so I'm not surprised I get asked about them so often. The top two questions I get from readers are, what is that color on your fireplace?:
(It's called Cyberspace from Sherwin-Williams.)
And the second question...where did you find the two swivel chairs?
I found them at HomeGoods years ago, which is great for me because the price was GREAT. Unfortunately I know that can be frustrating for everyone looking for a similar chair. It's hard to find the same item twice at HomeGoods!
I finally did some digging around underneath the chairs the other day and found out they are from Stone and Leigh and this specific chair is called the Gayle.
Our chairs are about 30 inches high, 35 wide and 35 deep. I LOVE them.

If you search that name, there are a few of them around here and there online, but not a ton.
So I found some similar options to share with you that have a similar look!
It can be hard to pick out furniture online -- the two things I always look for are the depth and width of the chair. I like a deeper seat because I find they're more comfortable. You can pull your legs up and get comfy.
And the width is important so you and your guests don't feel like they're being squished. :)
Keep in mind you will want to be able to actually swivel these, so you'll need a little more space around them than what you need for other chairs.
This swivel chair with the rounded back from Overstock is the closest to ours I found:

It comes in three colors but this Indigo is super close to our blue chairs. It has that same rounded back that we have as well.
This cute swivel option from Amazon has a slipcovered look (it is removable but I'm not sure it's machine washable):

And this Pottery Barn version was (surprisingly) right in line with most of the pricing that I found:

I've purchased many chairs over the years (that we still have) from World Market and I've always been pleased with the quality and comfort. This swivel barrel chair has five star reviews and is on sale right now:

I love the round wood base on this one! It comes in five neutral color options:

I found a few more that don't have that rounded back, but still have clean lines and a transitional look that will stand the test of time.
This one is lovely and at 33 inches from front to back, it's nice and deep for a comfy seat:

This West Elm swivel in boucle is modern looking and priced well because it's on clearance:

And finally, another World Market option that looks SO comfy. This one is feather filled, the deepest seat I found and has great reviews:

It has a slightly more traditional look, but would fit in beautifully just about anywhere!
If you've been searching for the perfect swivel chair that isn't crazy expensive, I hope these options will help you out! They are great options for cozy seating and work well in so many spaces.
Never miss a post by signing up to get posts via email.
Via https://www.thriftydecorchick.com/2022/09/blog-post.html Update your plain air return covers with this easy DIY.
How to replace your basic metal wall grilles with custom versions that add architectural interest in your home!
We had a long air intake vent in our foyer that bugged me because it was one of the first things you see when walking in our front door.
This is the only noticeable wall vent that we have in the house...there's another in our bedroom but it's not nearly as big:

I'm guessing no one else notices it, but it's a spot that I knew I could make so much more attractive. Initially my plan was to try to paint the existing cover to match our walls, but then I had a better idea.
I've wanted to make this DIY vent cover for years, and I finally got to it! This is a fairly easy project that doesn't require major power tools.
You can buy these decorative covers online...but you'll save a TON by doing this yourself. :)
Pick out your supplies
You'll need decorative metal sheeting for this project. I've used this stuff many times over the years and it comes in so many beautiful designs:

This post may contain affiliate links for your convenience.
I may earn a small commission when you make a purchase through links.
See my policies and disclosure page for more information.
It's made for vent and radiator covers, but the possibilities are endless!
I used this pretty brass dot design to make inserts for the cabinet doors on our basement built ins:

This thin metal sheeting gives some privacy but also still allows for airflow (and remotes work through it!).
Via https://www.thriftydecorchick.com/2022/09/DIY-custom-decorative-air-vent-cover.html How to easily make your own scented candles for the fall season!
Reuse leftover wax and cute seasonal decor to make your own fall candles in just a few steps!
I was pleasantly surprised at how easy it was to upcycle and DIY a couple candles. This was my first try at making my own candles and I learned a few helpful tips along the way.
I decided to do this last minute, and ran into Dollar Tree to get a couple things. Otherwise I was winging it with items from home, but I'll share a couple suggestions later in this post that make this project even easier!
I've wanted to attempt this candle making process for awhile, and the broken glass jar on one of my favorite candles finally made it happen:
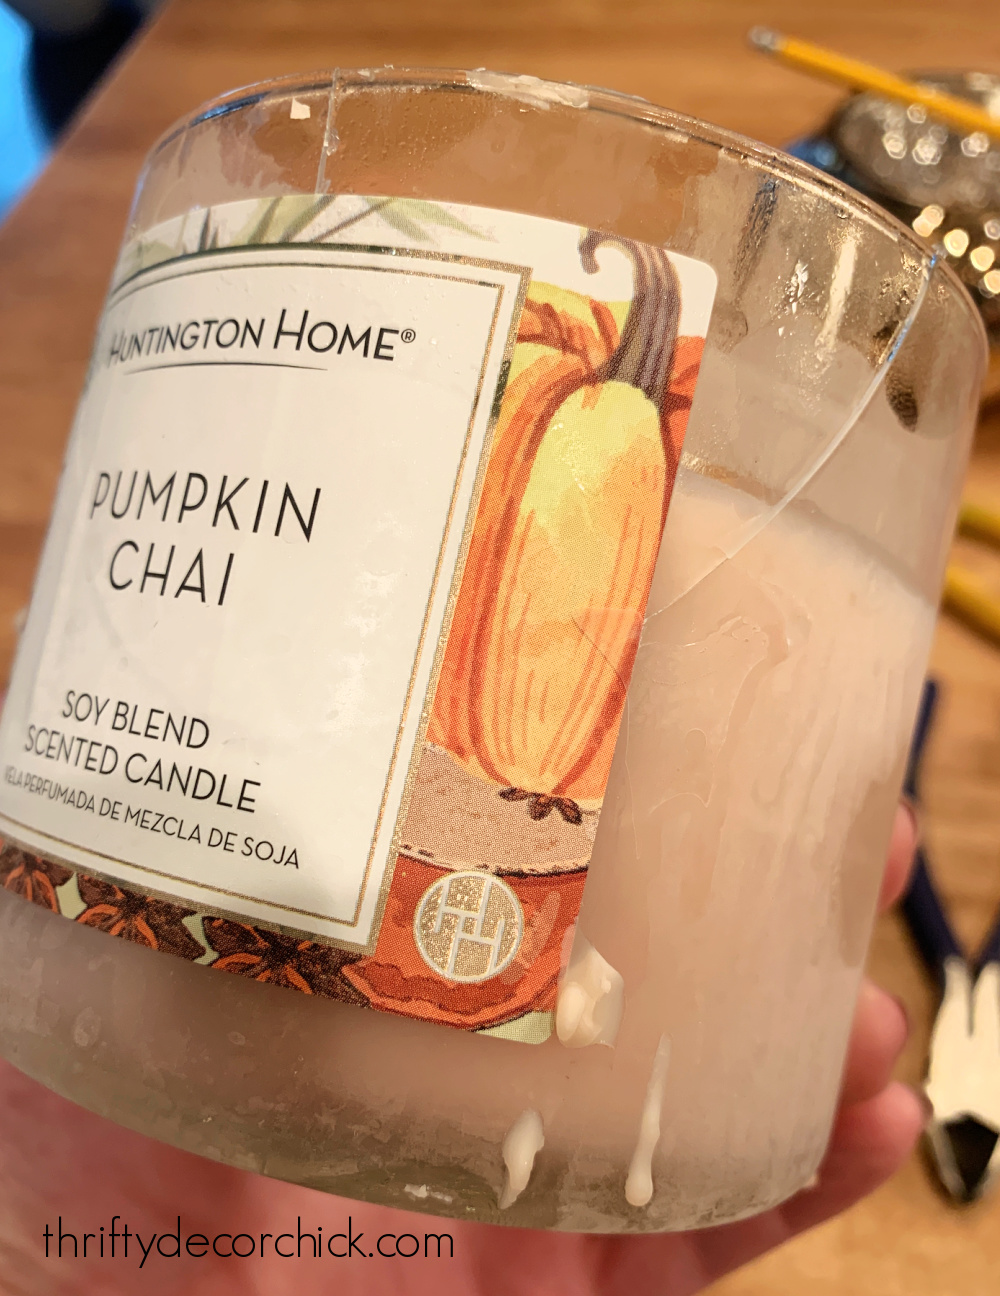
I LOVE this scent from Aldi so much, I got three of the candles when they came out (last year or the year before?). This is my last one and I didn't see a crack in the glass when I lit it the other night when some of the wax spilled out of the cracks.
Instead of throwing it away, I decided to reuse the leftover candle wax like I showed you here. After putting it in the freezer to loosen up the wax, it dawned on me I could finally try my hand at making my own fall candles!
I was trying to use what I had for the most part, and if you're able to do the same this project will won't cost you a dime! But if you want to avoid the first few steps I'll share an even easier way to do it at the end.
I had two pretty containers that I wanted to fill -- one was a candle we had used up last year and one was just pretty glass dish.
My favorite method for removing wax from an old candle is to place it in the freezer for at least a few hours. It will pop out easily and with little mess after freezing!
Assemble your wicks
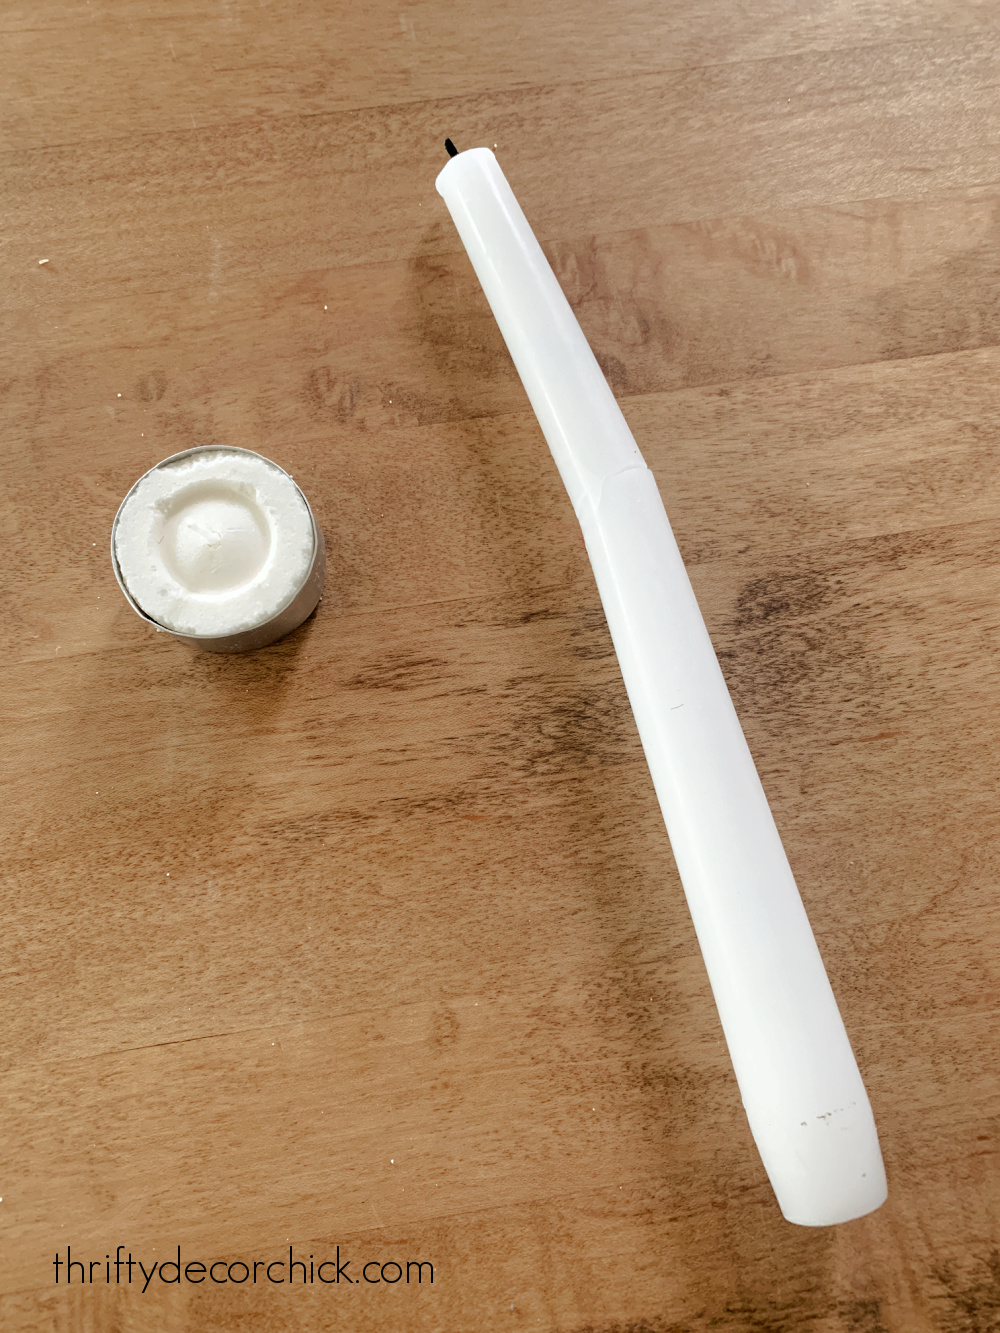
I had my containers and needed wicks for my two would-be candles. You can find them at craft stores, but I wanted to use what I had on hand.
I grabbed a votive and a long (broken) taper candle:
This post may contain affiliate links for your convenience.
I may earn a small commission when you make a purchase through links.
See my policies and disclosure page for more information.
Obviously the wick in the votive was too short, but I still needed that for the metal base. The taper candle was going to provide my long wick.
I put the taper in a plastic bag and pounded the wax till I could get the wick out:

It worked perfectly! I was able to get two out of the one candle.
I took the wick out of the votive to use the metal base:
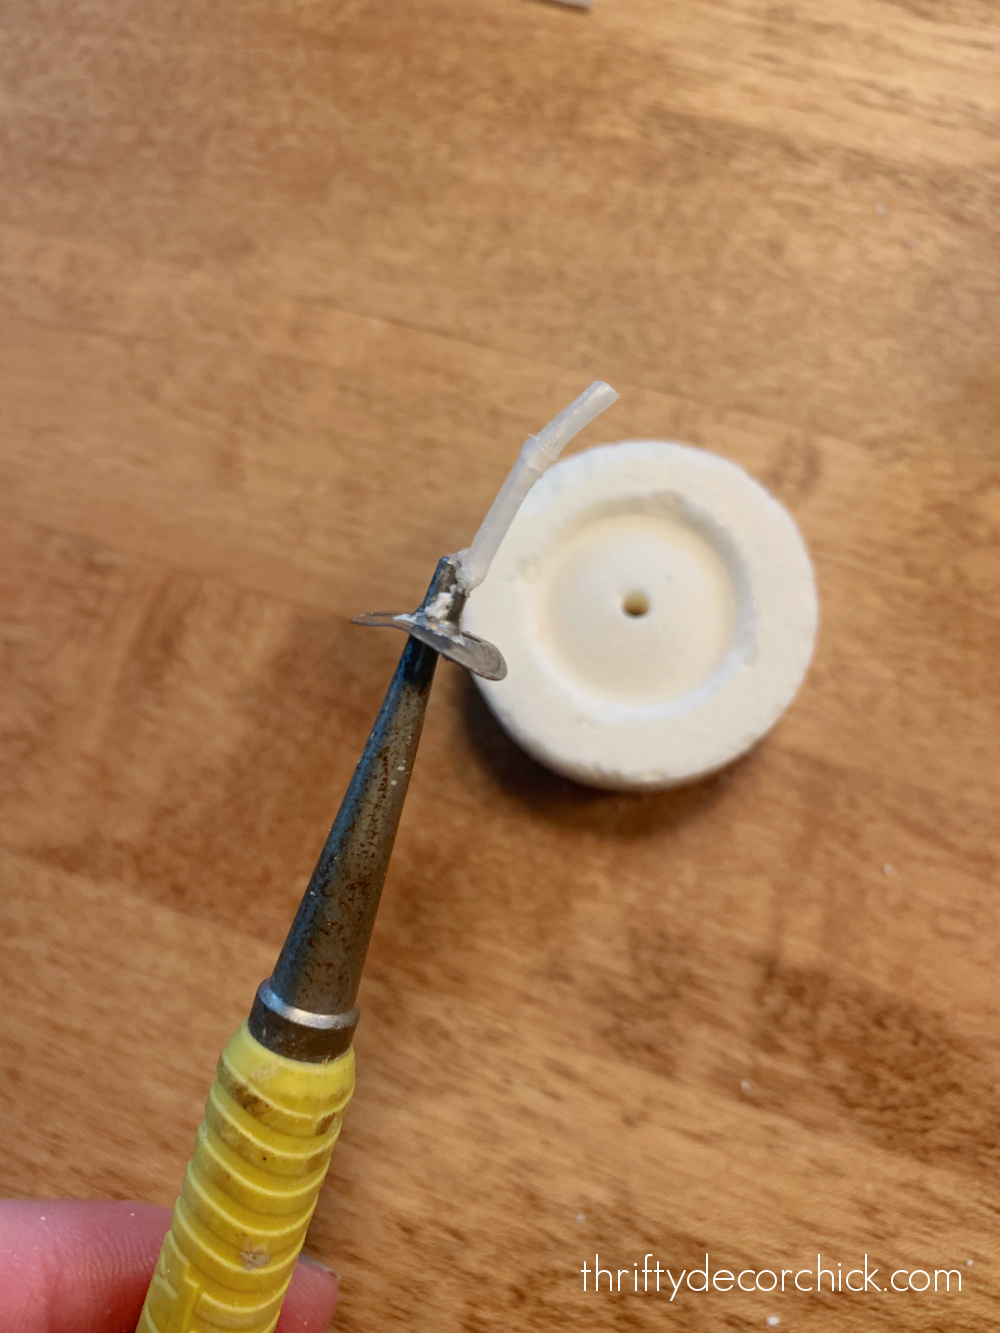
It came out with a slight tug and then I was able to push up from underneath with a nail driver. It fit perfectly inside to open up that small clamp a bit. If you have skinny pliers those will work as well.
I inserted the new wick and used pliers to clamp and secure the wick in the holder.
Adhere your wick to the container
I used a dab of high temp hot glue to attach the metal wick holder to the bottom of the jar:

The votive isn't necessary, I just figured I'd fill up some space in there since I had it on hand. :)
It's important to attach the metal base to the bottom of the container so it doesn't float around as the candle burns.
There are also sticky wick tabs you can use to attach them to the bottom as well!
As you can see, I used a pencil to keep the wick upright as I poured the wax. You can use just about anything -- as long as you don't care if it gets wax on it!
Melting the old wax
There are a few ways to melt your wax once it's out of the candle, but the easiest and safest way (in my opinion) is to warm it in the oven on low heat.
I used an inexpensive bread pan from the dollar store and heated my candle wax for about 25 minutes at 200 degrees. I wouldn't go much higher with the heat -- you don't want the wax to boil and make a mess.
I placed my pan on a metal sheet to protect the oven even further:

Extra bonus -- our house smelled amazing as I was doing this!
And no, the oven doesn't retain any of the wax scent. I made salmon ten minutes later and the fragrance didn't linger at all in the oven.
Check on the wax every five minutes or so to see how it's doing. I turned the oven off for the last five minutes to let the last of the pieces melt away.
Fill your new candle!
I placed my glass vessels on foil and a cutting board, then used a wide-mouth funnel to pour the melted wax into my two vessels:

I found a set of three funnels at the dollar store and the biggest one was perfect for this. You want the top to be wide so you don't have to worry about getting the wax into narrow area as you're pouring.
I thought this part would be a lot scarier than it was. :) It was quick, easy and I had zero mess.
If you're reusing an old candle like me, make sure not to let any of the debris from old wicks get into your new candle.
You can remove it with a spoon before pouring, but I found it wasn't necessary. Because those bits sat at the bottom of the melted wax as I poured there were no issues -- they stayed in the pan.
Make sure to go slow and have patience as you pour!
That's it! I let my new candles harden and dry overnight and then cut the wicks down:

I kept the excess wicks for future candles, because I'll definitely be doing this again!
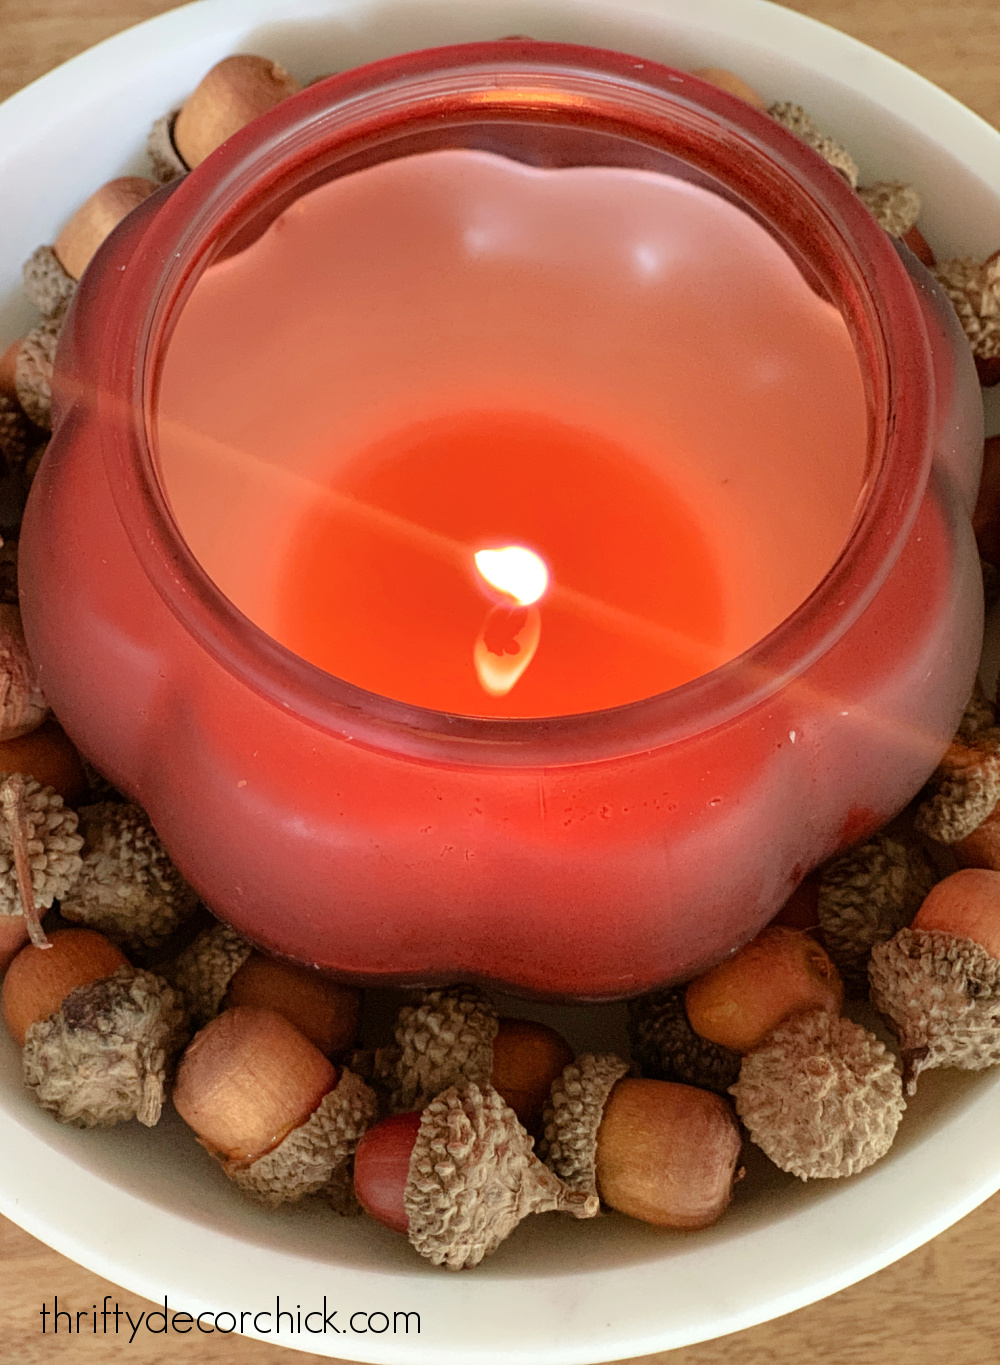
I love that I was able to use something that would have been thrown away otherwise (well, if I hadn't planned to use the wax for our warmer at least), and I was able to reuse some really cute vessels.
So many of the old jars from spent candles are too pretty to toss afterwards!:

I couldn't believe how easy this was! If you don't have an old broken candle around like me, you can use the following to make your own scented candles:
I like to use soy wax when possible, but if you're not particular, this whole project could be completed with items from the dollar store.
Try using scented votives or basic white candles with some essential oil fragrance. From what I've read, you'll need a good amount of oil to create enough fragrance.
For an 8 ounce candle you'll need 3-6 ounces of fragrance oil:

I loved this project so much, I've already purchased this candle making set to use in the future. It has the wicks and sticky pads, plus a pot you can warm the wax in double boiler style. (Use a large pan with boiling water and then place the pot in with the wax to melt it.)
If you have an old saucepan or pot already, this wick set will be all you need. Either of these will allow you to prep your container in just a couple minutes, so you can skip my recycling steps at the beginning of this tutorial. :)
I LOVE how these turned out and can't wait to make more!

Have you tried making your own scented candles? If so I'd love to hear your tips and suggestions!
Never miss a post by signing up to get posts via email.
Via https://www.thriftydecorchick.com/2022/09/make-DIY-scented-candles-with-leftover-wax.html  I share this post every year because it's important to me that we have a visual reminder of this day, now more than 20 years ago. Can you even believe it?
It's crazy to me that there is a whole generation that wasn't even alive when 9/11 occurred.
As many of you know, New York is near and dear to us. It's a city we love so very much. I always knew I'd love it, and when my husband took me on my first trip (just a few days before September 11, 2001) I found out I found out I was right. This photo always gives me chills. We're at the top of the Statue of Liberty and you can barely see the towers behind me: 
This was nine days before 9/11. Nine days later and the towers were gone. My husband was a band director at the time, and a few months after the attacks we were supposed to travel to Japan for a band trip.
He canceled that trip and instead we took the students to New York City. SO many New Yorkers stopped us numerous times and thanked the kids for visiting. Read the full post
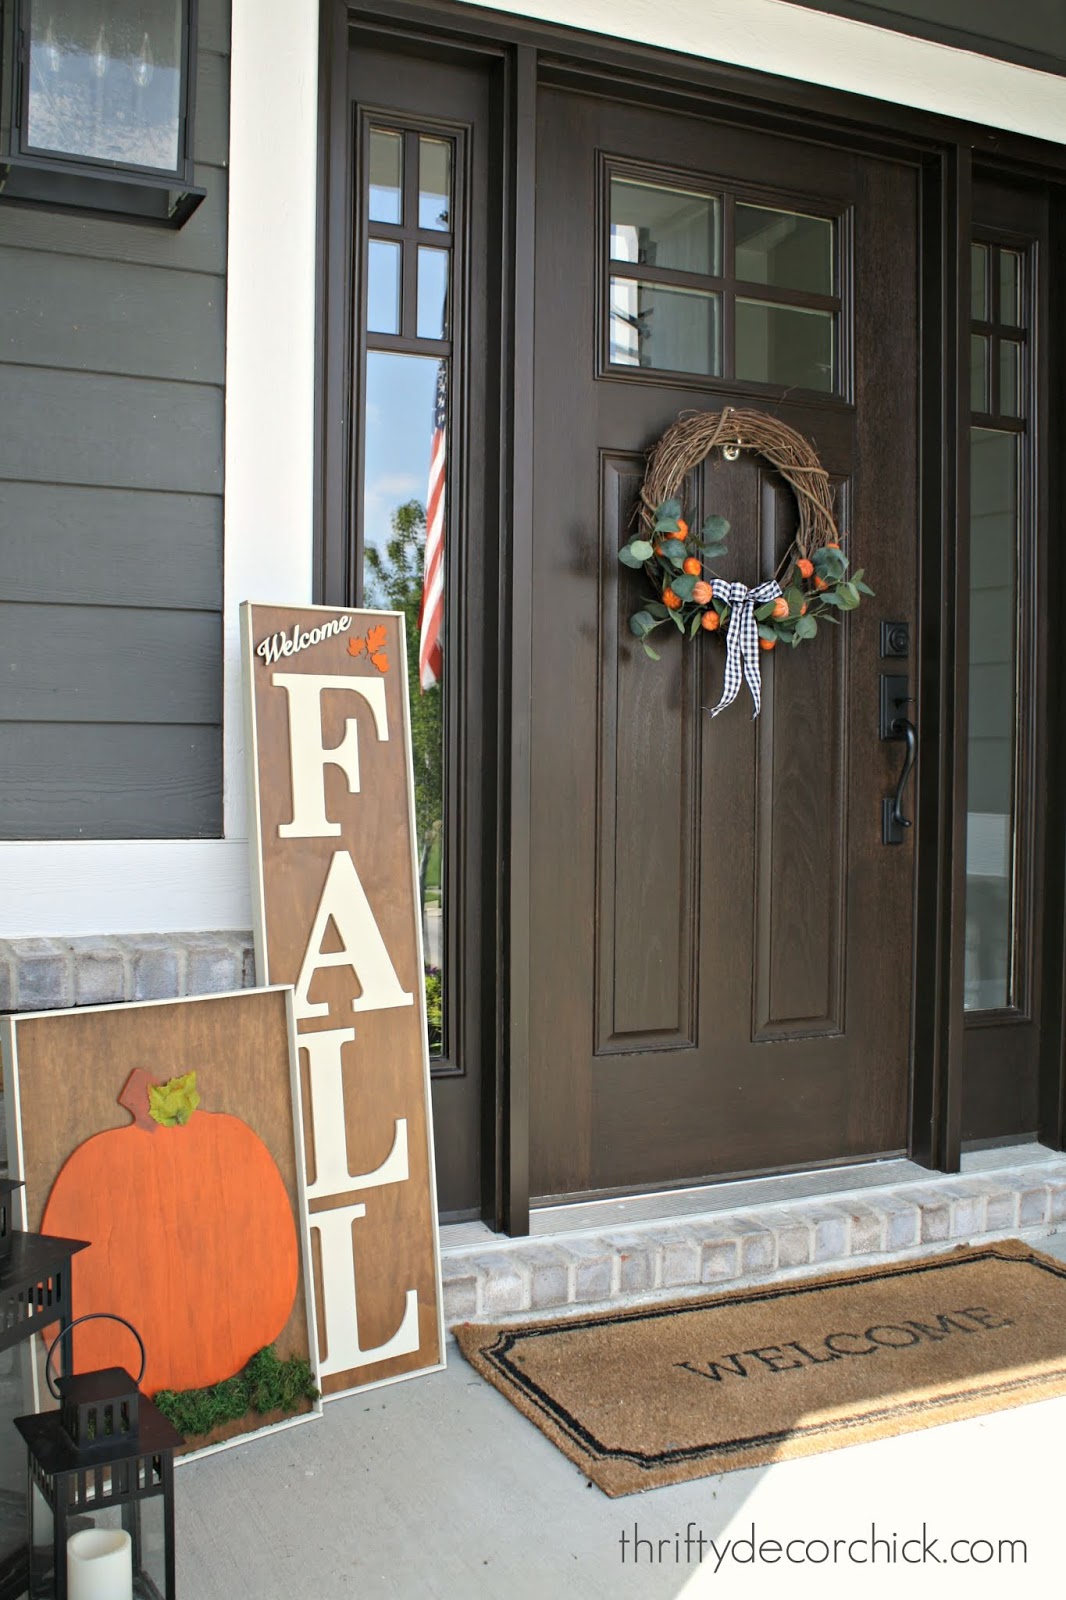
These first photos are from the Ground Zero Museum and tell the story of that day. This location is separate from the new museum — it used to be closer to Ground Zero but it looks like it’s moved to 14th street. If you visit the city I highly recommend visiting both. I let the photos do the talking (forgive the quality, all were taken with a phone over the years): Via https://www.thriftydecorchick.com/2019/09/eighteen.html How to make large DIY fall signs for the porch or inside!
You can make your own wood porch signs for way less than buying in the store...and you can customize the size and message to anything you want!
I got this DIY fall porch sign idea when my sister and I were out checking out fall decor in the stores a few weeks ago. We both love the season and love walking around getting ideas.
I saw a tall "fall" sign that was really cute, but I knew I could do it bigger and better myself. I envisioned it on the front porch -- I'm so excited to have a porch to decorate this season!
Luckily I keep extra wood from projects so I already had the boards I needed for these. I planned on only a tall skinny one at first, but then got an idea for a second sign too.
First up, I found a wood pumpkin at the craft store and painted it...well, pumpkin:

Then I got to work on the actual boards that would make the signs. I always start with a conditioner before staining. It's super easy to use and it really preps the surface well:

If you've ever tried to stain without a conditioner, you know that sometimes the stain doesn't go on consistently over the wood. This helps that big time! I never go without it now. You just wipe it on and then stain within two hours.
I've never used these staining clothes but thought this would be a good time to start:
Read the full post
Via https://www.thriftydecorchick.com/2018/08/how-to-make-large-fall-signs-for-front.html |