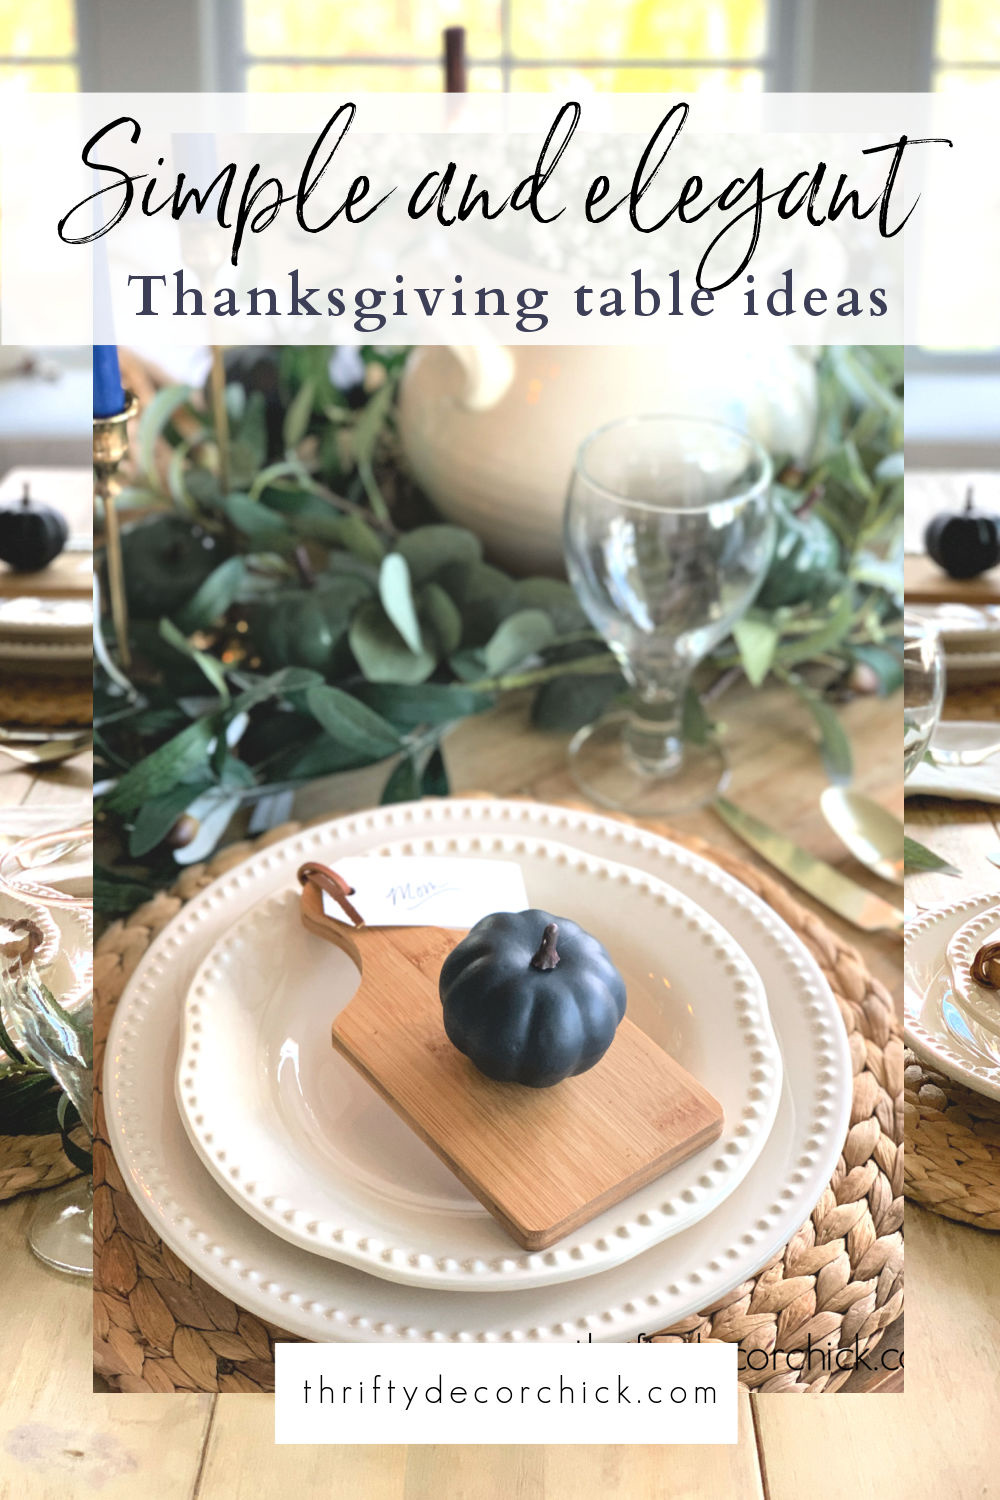
Simple Thanksgiving dinner tablescape ideas with pumpkins and candlelight!
Table settings for the holidays don't need to be fussy or hard to put together! I created two Thanksgiving table looks with a few small DIY touches to welcome your guests.
I absolutely love how they turned out! Both are simple Thanksgiving table setting ideas that could easily be changed up just a bit for Christmas as well.
We'll start with the colorful version -- I used a green and blue color palette that ties into our home decor, and then added some traditional fall colors to warm things up a bit.
This post may contain affiliate links for your convenience.
I may earn a small commission when you make a purchase through links.
See my policies and disclosure page for more information.
For the colorful look I started with this fall scarf draped over the table instead of a full plaid tablecloth:
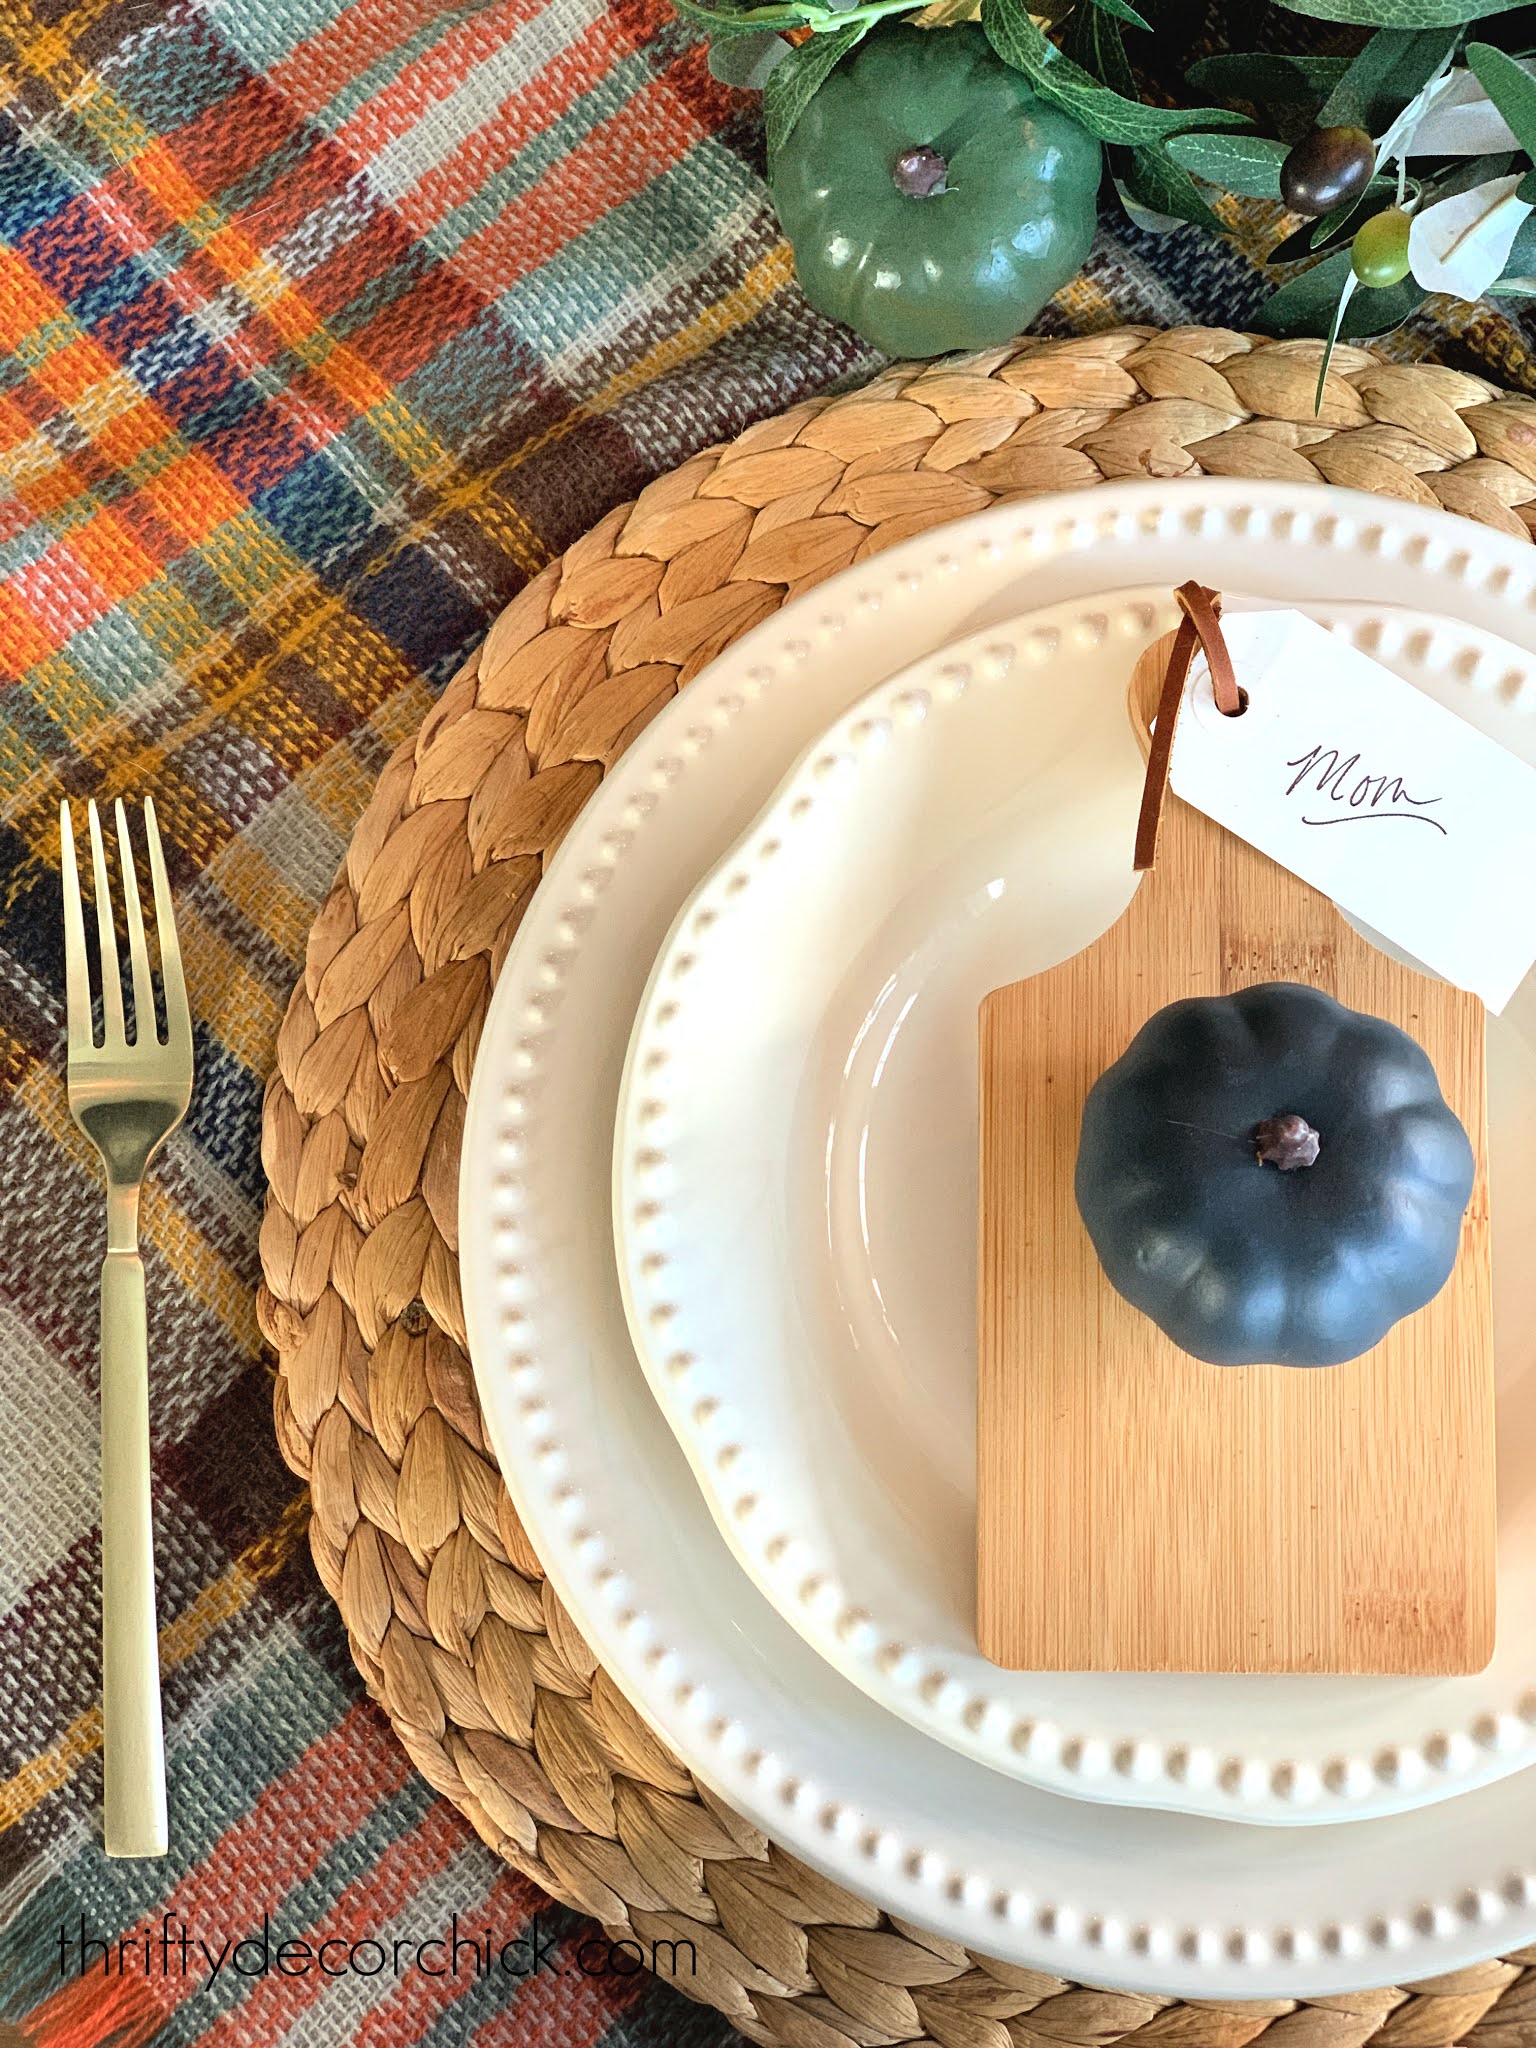
Remember, you don't have to use traditional linens like a table runner! Add some texture to the display with a thin blanket or seasonal scarf draped over the table instead.
I found those adorable little cutting boards at Hobby Lobby for $2 each, and decided to use them as place cards on top of the dishes. I had the paper tags in my craft stash, but you can find them here as well.
I grabbed this chalky Krylon spray paint in the color Anvil Gray to coat a few of the fake bright orange pumpkins I have in my stash:
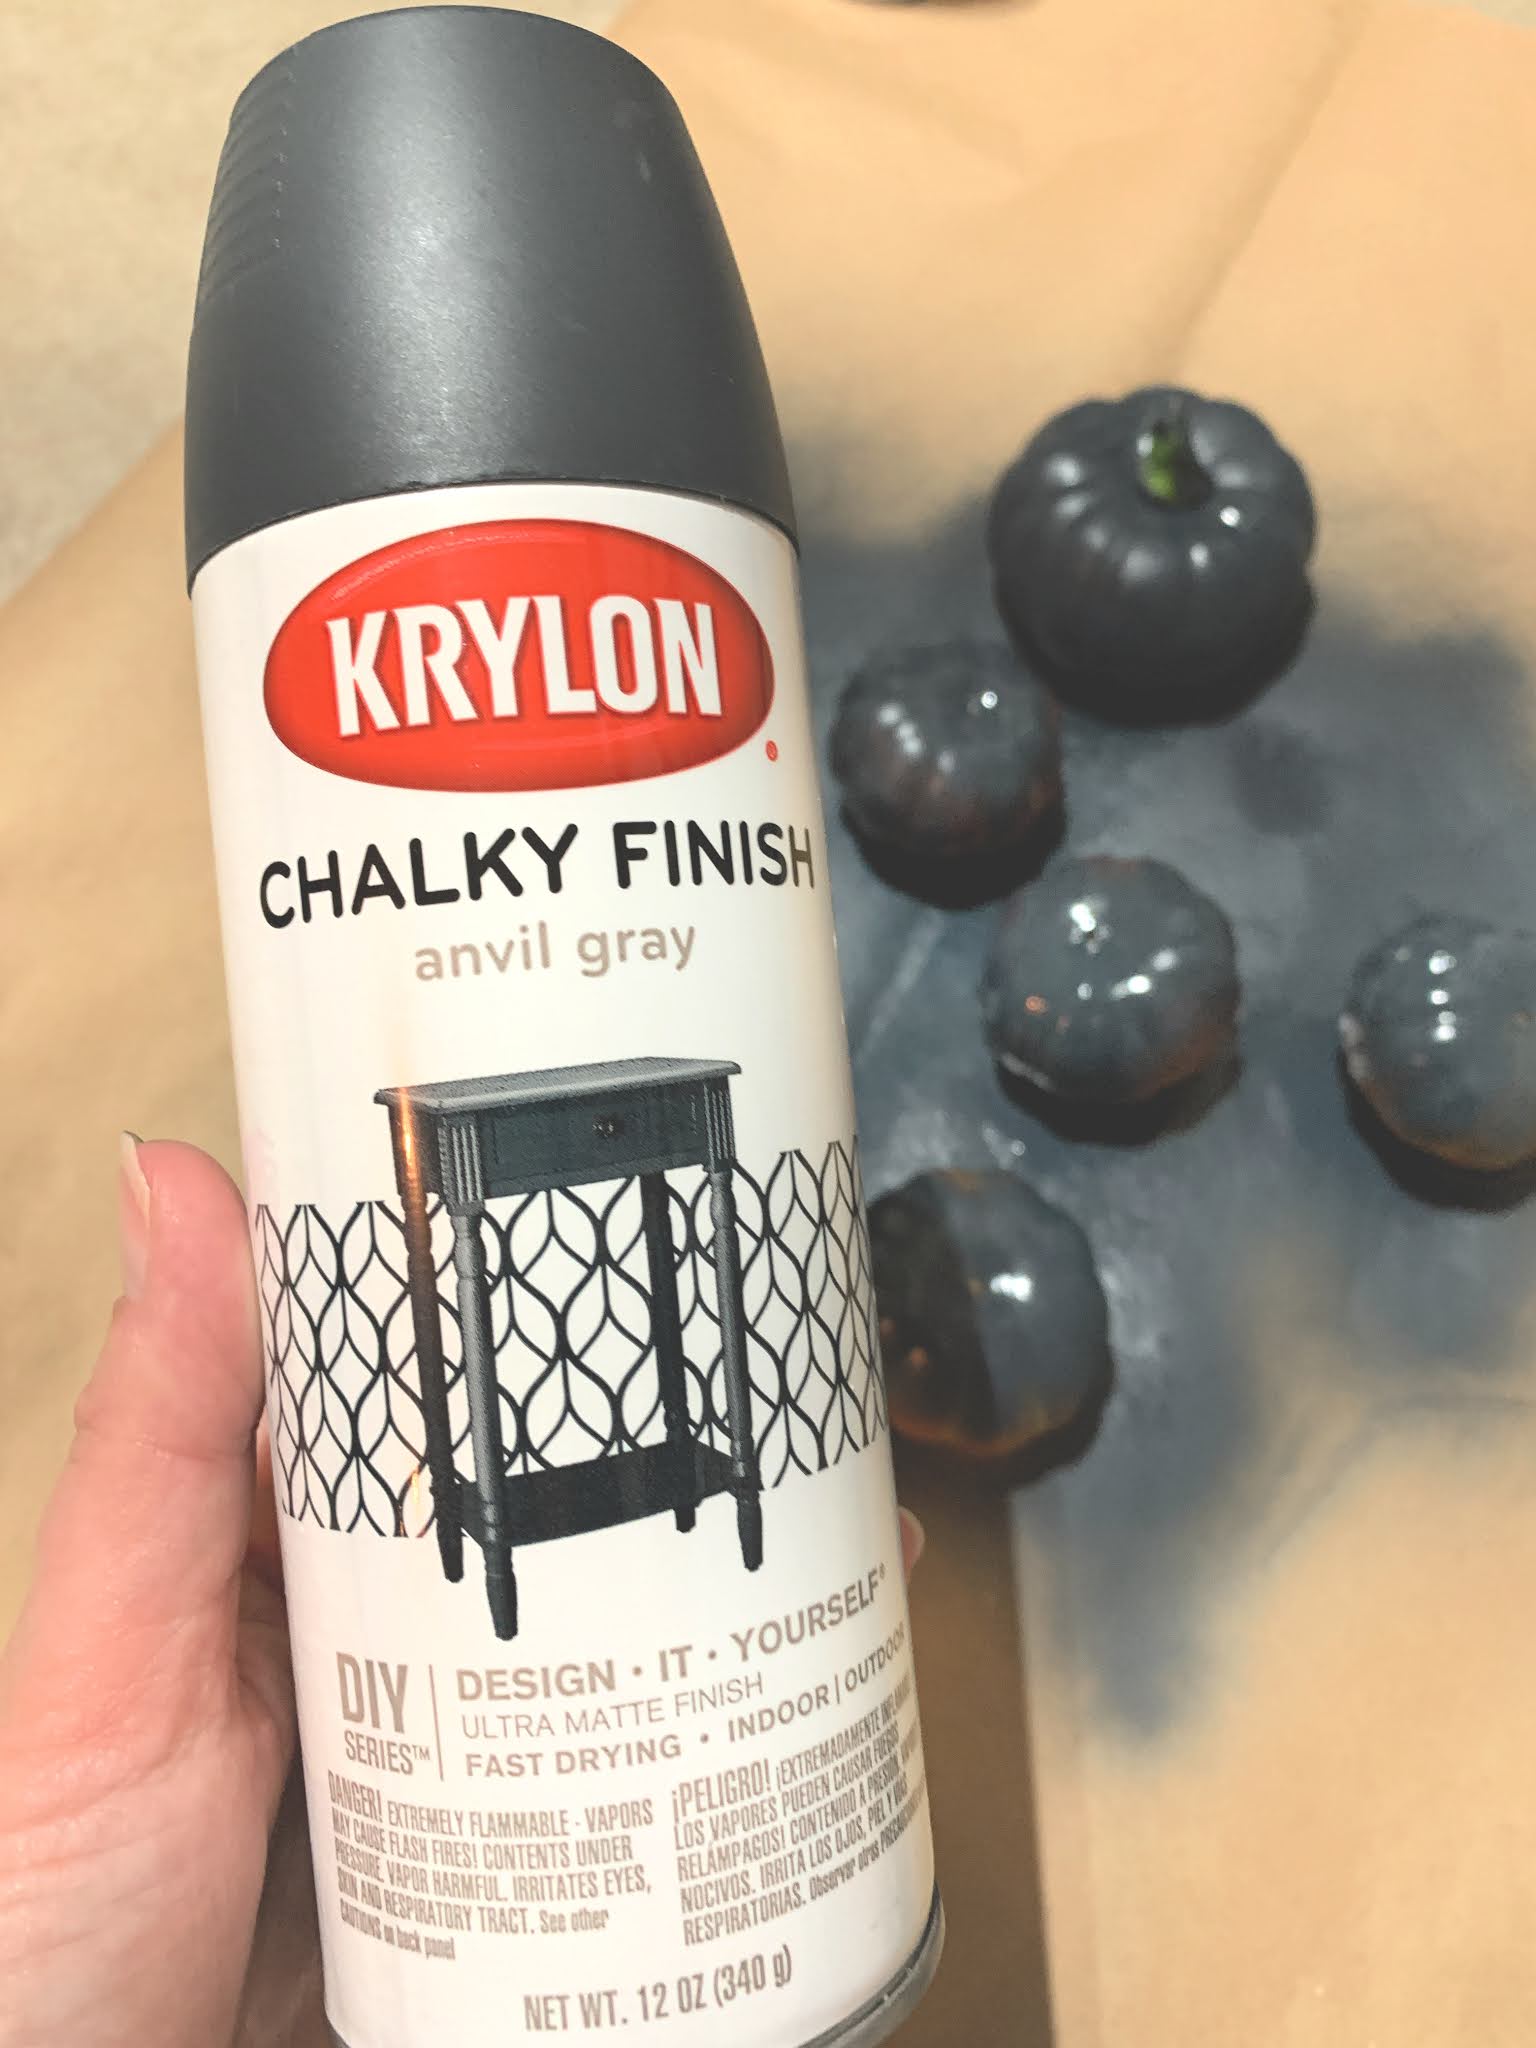
I LOVE this dusty blue color and am trying to figure out where else I can use it!
I layered up my favorite beaded dinnerware on top of the round hyacinth chargers at the place settings -- those woven placemats fit in so well in every season!:
Read the full post
Via https://www.thriftydecorchick.com/2020/11/simple-elegant-thanksgiving-tablescapes.html
0 Comments
Tour the Indy Home-a-Rama luxury homes with me!
Ohhh I love these home tour posts! So much decor and design inspiration!
Touring model homes is one of my favorite pastimes, so when I can visit a bunch in one spot, I'm in heaven. :)
I recently toured our local Indy Home-a-Rama homes and have some great pics to share with you. This year there was only one home that really stood out to me as far as my personal design taste, but all were absolutely beautiful!
You can see a list of the builders and designers for each home here.
I'm sharing the spaces that caught my attention most -- they're all mixed together so these are from all six of the homes in the tour.
Curves and arches have been trending big time over the past year or so, and I'm here for it! I love the soft curved accents I saw throughout these homes, from big to small.
This built in bench moment in a girl's room was so sweet, and I loved the little curved detail on the cane doors:

Here's the other side of this space -- I like that the trim was painted to match the built ins:
There were a lot of curved doorways and bookcases as well:

I think the arches help to soften the simple and clean look of all white walls.
You know I was drawn to this dark gray office/library!:

Now I'm wishing I had added that curved top to our basement built ins!:

I think there are two things every room needs -- black accents for some depth and contrast, and circles. Round tables, lamps or mirrors help to soften the hard lines in our homes.
This arched wall over a basement bar is exactly what I've had in mind for our basement kitchenette:

LOVE the vertical tile and shelves as well!
This basement tasting room was SO cool...the barreled ceiling makes this room with no windows feel less closed in:

The coved ceiling over this bathroom's vanities added a subtle custom touch:

The curve on the mirrors is a nice compliment to that accent wall!
Now, onto some of the other spaces I loved...with no arches. ?
This movie room was awesome, but the star ceiling is what really grabbed my attention!:

I was thinking about a DIY version and figured it couldn't be THAT hard...using 4x8 sheets of plywood, a drill bit and Christmas lights. How fun!!
This room was my favorite of the whole tour...the black windows and that fireplace were gorgeous:

I loved the whole feel of this space, but man...it was warm in there!! It was a beautiful, cool fall day outside too. I can't imagine how warm it would be in the summer.
This dining area was simple but so lovely. The black windows and stained wood ceiling added plenty of interest:

And this dusty blue butler's pantry was one of my favorites as well:

Things I loved: the rolling ladder, large hardware pulls, metal sheeting on the cabinet doors and that backsplash tile! ?
This breakfast nook was so cool -- the cane pendant was so unique:

This little architectural nook reminds me of the character you'd find in a much older home!
This green color was so pretty! I loved it paired with the brass details and that beautiful marble sink:

I thought the colorful NYC wallpaper was an odd touch with the very traditional design, but everything under that was perfection!
And finally, I always love a custom detail in an open space between kitchen cabinets:

The antiqued mirror backsplash added some character to this brand new kitchen.
I've been debating adding those brass hardware shelf details to the big shelves I built in our kitchen:

I hope these beautiful spaces inspired you! It's always fun for me to try to think of ways to recreate these expensive, custom touches on a much smaller budget. :)
Never miss a post by signing up to get posts via email.
Via https://www.thriftydecorchick.com/2022/10/favorite-home-a-rama-luxury-tours.html Come with me as I share some of my recent vintage and antique finds!
I love the character vintage decor adds to our home and I'm always on the lookout for hidden gems with a history.
It had been quite awhile since I'd visited any local antique or vintage shops, so recently I went to a few of my favorites to see what I could find.
Most of the older pieces in our home aren't truly antique, because technically an item needs to be really old to be considered antique.
Finds that are around 50 to 100 years old are considered vintage and anything older than 100 is an antique.
The vintage years can vary though -- a lot of people consider items more than 25 years to old enough. Which kind of blows my mind the older I get. ;)
So finding a true antique is a lot more difficult, but overall I prefer the look of vintage items more for our home anyway.
Keep in mind that at a lot of antique shops, you'll find a mix of both older one-of-a-kind finds and a some secondhand decor pieces thrown in here and there as well. So not everything is old, even if it looks like it.
Ask the staff if you have questions about the age or value of a piece!
I've found that most shop owners will note on the tag if an item is vintage or antique. If it doesn't say either, it's a safe bet the item is newer.
My first stop was The Mix Marketplace in Noblesville, Indiana. It's become a favorite -- I always find something I love there.
These green glass goblets caught my eye:

I love the color! I have a set of clear glass goblets from Goodwill that I use for our holiday dinners. The shape makes them feel a little fancier. :)
I LOVED this tall candleholder with it's wavy glass:
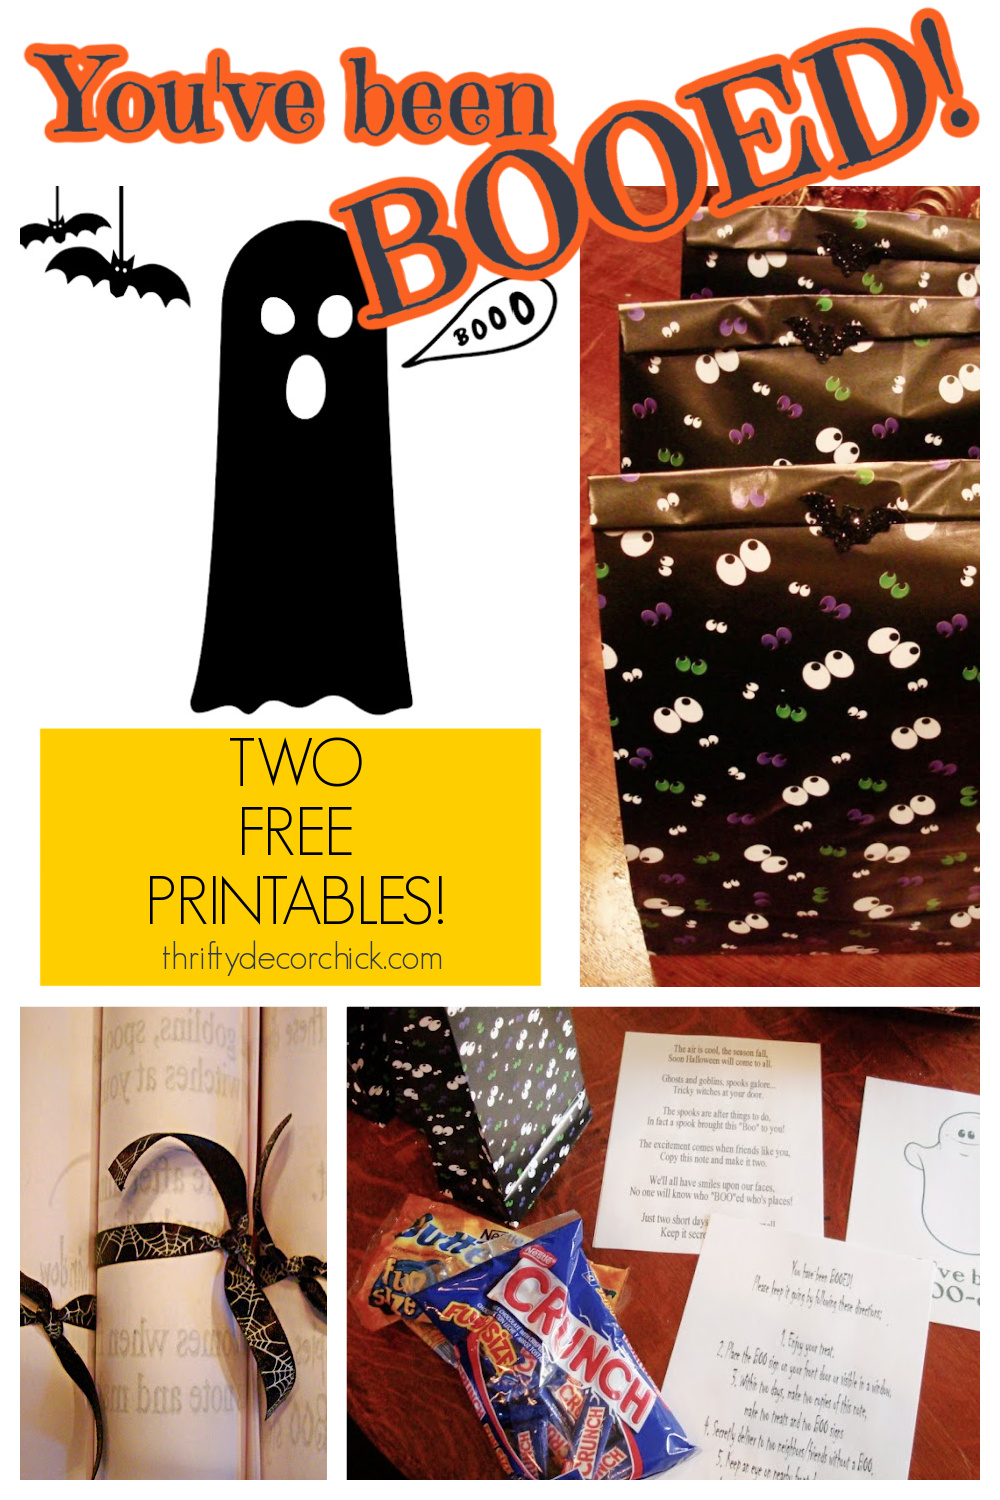
Via https://www.thriftydecorchick.com/2022/10/lets-go-antiquing-see-my-beautiful-finds.html How to "BOO" your friends and neighbors during the Halloween season.
Have you ever been boo'd?
Our neighborhood does this fun Halloween tradition every year -- "booing" each other is so fun, and it's one of those little things about the holidays that I love.
This fun idea is the Halloween version of Secret Santa!
We get some goodies from the dollar store and gather them up into cute bags to deliver to our friends and/or neighbors.
All you'll need are inexpensive gift bags or "boo" buckets, candy and/or small toys and your printer.
This post may contain affiliate links for your convenience.
I may earn a small commission when you make a purchase through links.
See my policies and disclosure page for more information.
1. Find your containers
Small baskets, buckets or jack-o-lanterns from the dollar store are perfect for this fun project.
I like to use Halloween themed gift bags like these paper Halloween bags (they even come with stickers!).
2. Gather the goodies
Here are some fun additions for your boo bag:
3. Print your BOO sign to share
I created two options for you to use! One boo printable is more suited for younger kids, the other will work great for adults.
YES, you can do an adult version of this boo tradition as well!
This "You've been booed" print has a cute ghost with instructions:

And this option has spooky pumpkins and a poem:

To save or print these printables, right click on them and then save them to your computer.
I usually include a few copies in case they don't have a printer at home.
Gather your Halloween treats and "boo" printables and put them in your Halloween bags:
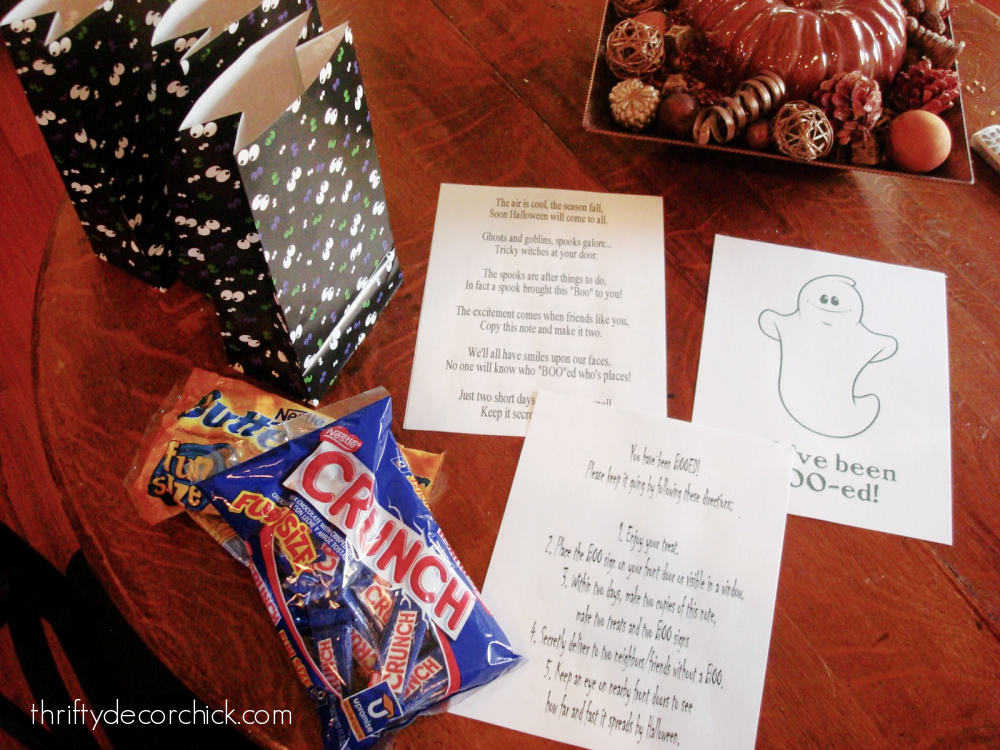
I rolled up the prints and tied them with cute Halloween ribbon:

Some fun sparkly stickers from the dollar store complete the goodie bags:
4. Drop your goodies at the front doorThen you sneak to the front porch of neighbors, ring the doorbell and leave the treat for them! Remember, don't let them see you, it's a secret! Of course this is a fun activity for any extracurricular or friend group -- it would be fun to surprise fellow band or choir members, a sports team and even coworkers at their offices too! It's a fun tradition to spread some Halloween cheer, and the kids LOVE it. Who doesn't love a fun surprise from a friend? :) Save this to Pinterest for later with this image!:
Never miss a post by signing up to get posts via email.
Via https://www.thriftydecorchick.com/2008/10/have-you-been-booed.html How to refinish a wood table with water stains and damage.
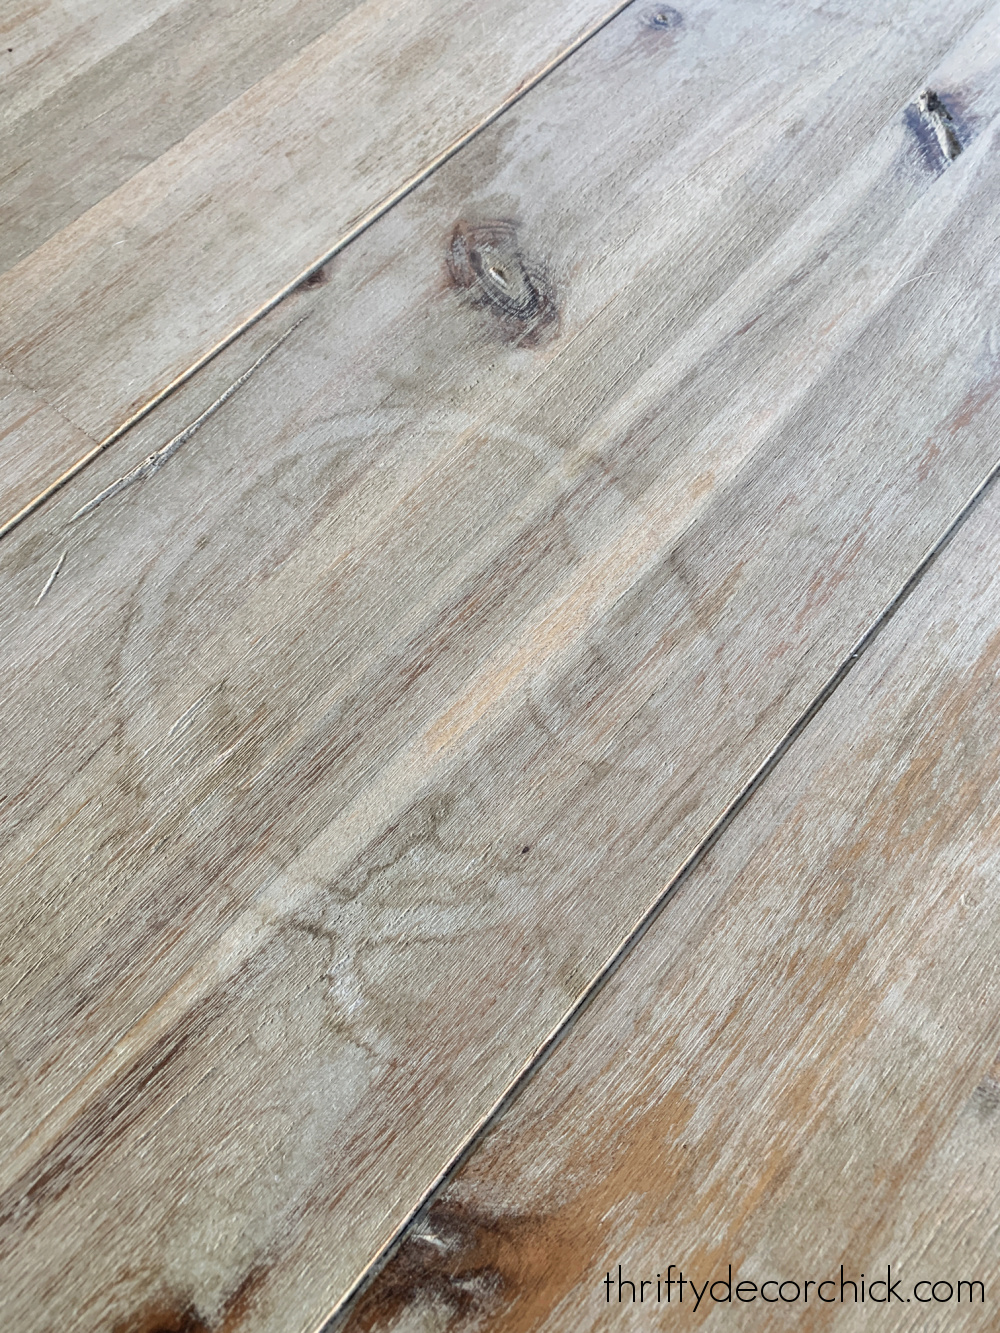
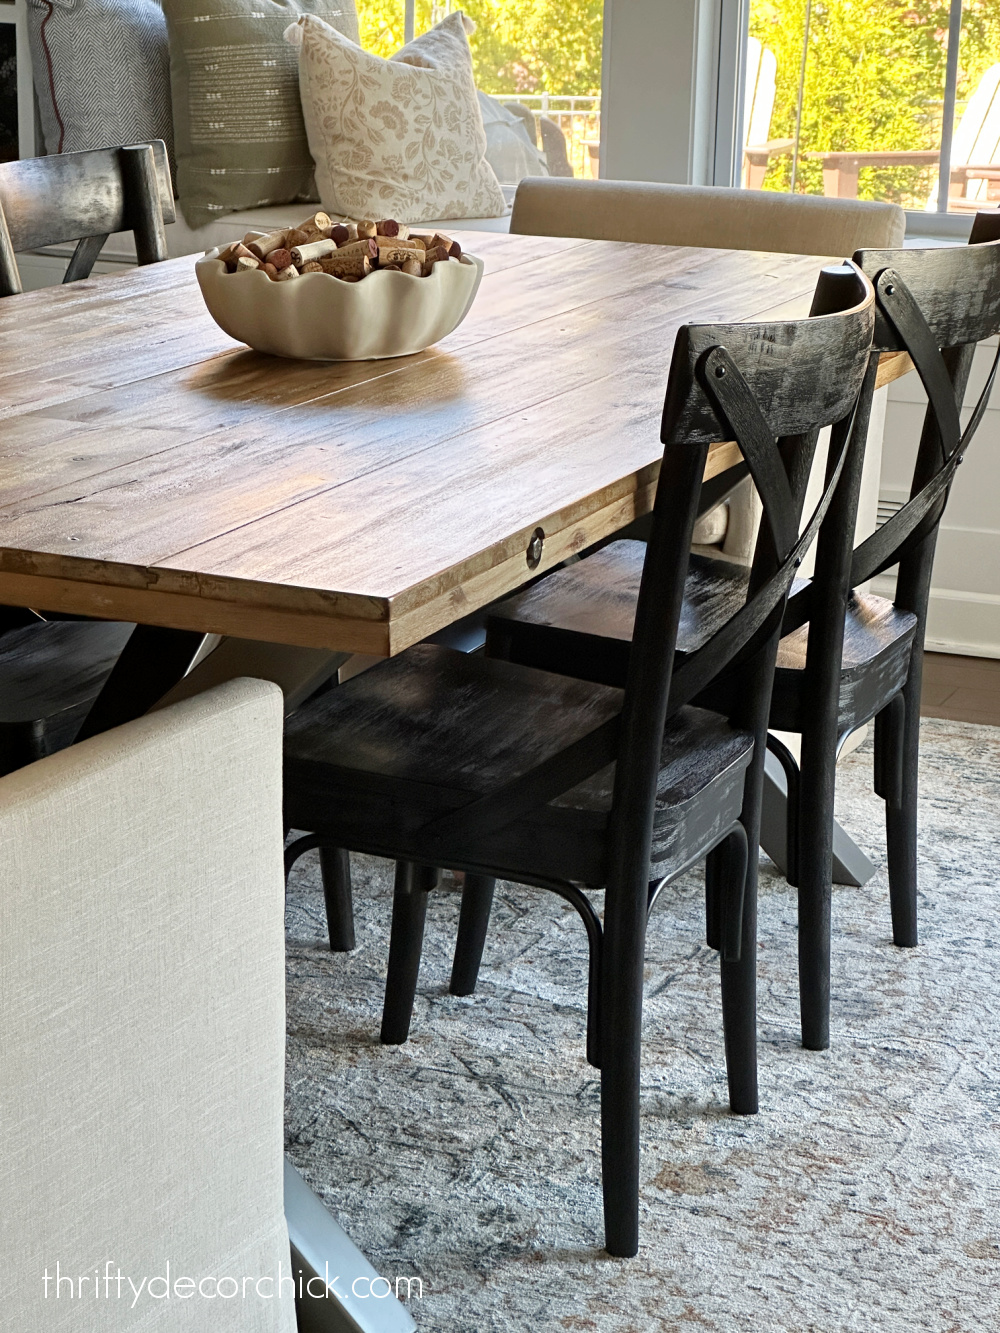
I turned our water-stained wood dining table into a gorgeous piece that is protected against food and liquid!
If you have a real wood piece of furniture that has stains from food and drinks, this tutorial will help you bring it back to life. I'm SO pleased at how this ended up!
We got our dining table years ago at a local store in Indy called Urban Underpriced. I loved that it had a solid wood top, not just veneer. The wood planks have all the knots and imperfections that I think gives furniture character.
Unfortunately, we quickly realized there was little to no protective coat on the tabletop. At first it didn't bother me much, but after five years the stains were all over:
This post may contain affiliate links for your convenience.
I may earn a small commission when you make a purchase through links.
See my policies and disclosure page for more information.
We also had wine stains, oil marks and even some nail polish remover:

It was a mess!
I finally got to it a few weeks ago and the refinishing process went so smoothly, I was kicking myself for waiting so long!
Why does a project go so easily when I think it will be time consuming, and take forever when I think it will be a few minutes?? Every. time.
1. Sand down imperfections and water spots
Before sanding, I wiped down the table well. You want to make sure there's no residue on the surface that might gum up the sanding pad.
If you have any stuck food, use a putty knife to remove it before sanding.
I used my cordless orbital sander for this job -- I've gone to battery-operated for almost all of my tools now, and they make DIY so much easier!:

The orbital sander has a round sanding area that speeds up the process.
I used to have problems with these sanders leaving skip marks -- it would drive me crazy! After all that work, seeing those little imperfections was so frustrating.
I figured out the cause of those skip marks were from pushing too hard on the sander. If you let it do it's job, the process is much quicker and easier!
Here are some basic tips for using an orbital sander:
I was pleasantly surprised at how little dust settled nearby. I had to wipe down a few things, but overall the collector attached to the sander does a great job.
That oil mark pictured above took a few more passes than the rest of the table, and I had to add a little pressure while working on that spot. I like to tilt the sander just a bit so I can use the edge of the pad on problem spots like this.
2. Clean your surface well after sanding
After you're done sanding, you'll want to do a good cleaning to remove all of the dust before staining or treating the wood surface.
I vacuumed first, focusing on the grooves between the planks:

A tack cloth is the best way to remove the remaining dust, because it's sticky surface grabs everything, but isn't wet.
I didn't have one handy, so I used a microfiber cloth instead:

If you're planning to stain the wood, using a slightly damp rag is OK. Getting the wood wet will open up the wood after sanding, which can help it accept the stain a little better.
But I prefer not to use anything wet, because it can make the imperfections pop up again. Sometimes it happens, sometimes it doesn't...but on more porous wood like this one I didn't want to take a chance.
3. Choose your protectant
I wanted to keep the natural look of the wood so I wasn't going to stain this piece. This is how the table looked after the sanding and cleaning:

My absolute favorite way to treat most wood projects is with Tung oil. I've shared how I've treated our butcher block counter with Tung oil and it's held up beautifully for years!
I use polyurethane on surfaces that don't get as much wear and tear -- like shelves or built ins. On tables and counters I much prefer the natural finish and look of Tung oil. It gives you the durability of other varnishes, but also really brings out the natural color of the wood.
Over the years, I've used both pure Tung oil and a "finish" version that has some additives, and both hold up beautifully. Pure Tung oil has no additives, but takes longer to dry.
There are SO many benefits of Tung oil:
4. Applying Tung oil
I use a foam brush when applying polyurethane coats, but Tung oil is even easier!
Just pour it on the surface and wipe it in with a lint free rag, with the wood's grain:

I recommend wearing gloves during the application!
Dry times can vary based on the humidity and product you use. Pure Tung oil can take two to three days to dry, but Tung oil finishes that are a blend only take 24 hours, sometimes less.
5. Add enough coats
The directions always call for numerous coats, but on some pieces I find that's not necessary. I only do one (maybe two) when I retouch our island every year or so, and that holds up great.
More porous wood (large pores in the wood) like our table soaks in whatever you apply, so more coats are necessary.
Our maple counters on the island are not as porous and only take one coat.
I can tell just by looking if I need to add more after the first coat. Use the light and look at the surface at an angle:

See the shinier parts? That's where the finish covered well. The matte areas are wood that absorbed the oil and still needs more coats.
In total I applied three coats and because I wasn't using pure Tung oil, it took less than a day to dry between coats.
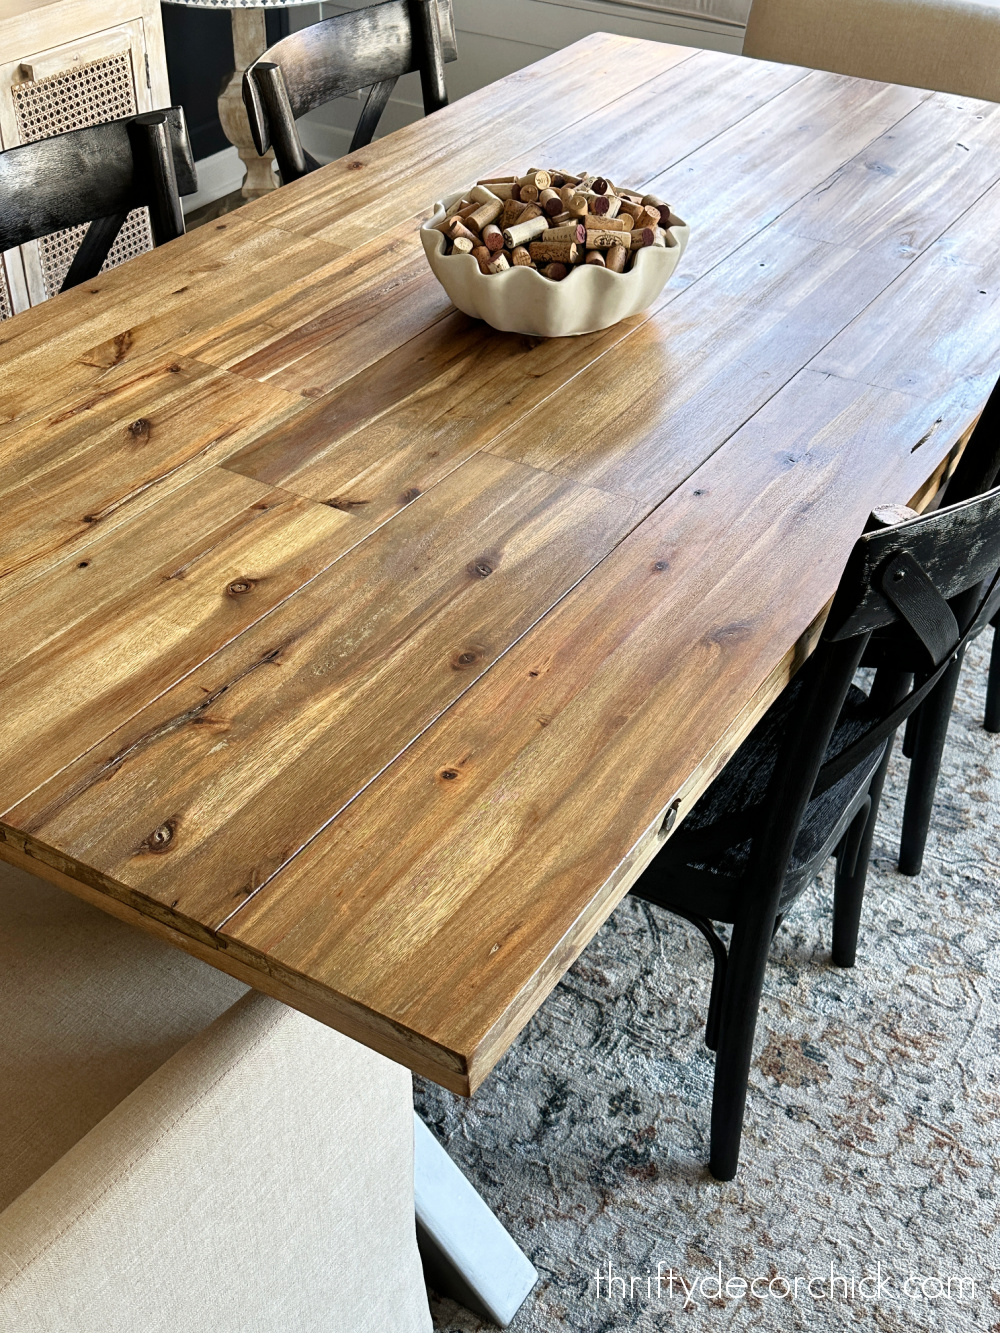
The result is a water resistant table with a gorgeous satin finish. Like most protective products, it enhances the look of the wood:

My final coat was pretty darn smooth, but as a finishing touch I like to go over it quickly with a piece of paper bag or kraft paper:

It's amazing how just that paper will knock down the tiniest imperfections and leave you with a perfectly smooth finish!
The best part is that the Tung oil doesn't allow moisture to penetrate the wood:

That's why I love it for the butcher block around our sink!
Our wood table is a richer tone now...you can really see the variations and warmth of the wood:
We LOVE it!
Here's a reminder of how it looked before:

All of the stains are gone and we now have a beautiful wood tabletop!
Our wood dining chairs used to be the same lighter wood as the table, but I spray painted them black a couple years ago. We love the contrast:
We replaced the tall parson's chairs at the ends with these lower upholstered dining chairs, also from World Market. The cats kept playing on the taller chairs and knocking them over. :)
The new chairs are SO comfy! I love the more causal look for this space:

Now the cats curl up together and cuddle in them instead of climbing all over! ;) Well...for the most part.

This refinishing tutorial will work for any wood furniture piece. It will get rid of the water spots and prevent them from coming back!
Have you used Tung oil on any wood surfaces in your home?
Never miss a post by signing up to get posts via email.
Via https://www.thriftydecorchick.com/2022/10/how-to-refinish-wood-table-with-tung-oil.html Ten fun Halloween decor ideas UNDER $10!Simple and cute Halloween decor ideas for your next Halloween party or just for fun! Since our Halloween decor doesn't stay out long inside, (we keep our outdoor stuff out longer), I don't like to spend a lot of money or time on the Halloween touches. Over the years I've figured out some fun ways to add some spooky that only take a few minutes. And ALL of these will cost you less than ten bucks to buy or DIY! 1. DOLLAR STORE CROWSSmaller decor always makes a bigger impact in numbers. These little crows I found at the dollar store are perfect perched on ledges or shelves:
This post may contain affiliate links for your convenience.
I may earn a small commission when you make a purchase through links.
See my policies and disclosure page for more information.
You can also find a set of six of these crows online if your dollar store doesn't carry them. 2. CONTACT PAPER AND FELT
Any contact paper will work for this ghost project. Even the "clear" versions have a bit of a haze to them.
I just free-handed a ghost design using a corner of the contact paper and then cut it out with scissors (while still attached to the backing):

You can put them on mirrors or windows...this is such a cute and easy Halloween project!
And yes, you can reuse them year to year! I just peel mine off and roll it up to store.
I used inexpensive black felt to cut out these fun Halloween shapes:

We just used a bit of tape to hang them, but a dot of hot glue would work as well. 3. WOOD/MDF CUT OUTSI made these letters years ago – they’re just MDF craft letters and I covered them in Halloween scrapbook paper:
So easy, so simple, so cheap!:

Sometimes I use a sanding block to lightly clean up any rough edges. You'll have cute Halloween decor for a few bucks!: 
4. CHEESECLOTH HALLOWEEN CRAFTSThis one uses both cardstock paper and cheesecloth. These little spooky eyeball votives are still one of my favorite Halloween projects:
You can make these on a bigger scale as well. Just plop a battery-operated LED candle inside for an adorable display. Again, less than $10 for all of them, easy! And these DIY cheesecloth ghosts are a really fun craft to do with the kids: 
5. USE THAT SPRAY PAINTYou can transform the most basic dollar store Halloween decor with spray paint! I found some sparkly spray paint and knew I had to use it somehow:
My skull head friend was an ugly plastic guy from the Dollar Tree before he got a couple coats of the Titanium:
A little silver paint and he was ready to go! I grabbed a bunch of secondhand frames and painted them black for a spooky Halloween mantel: 
6. Using paper Halloween cut outsI especially love paper Halloween decor at this time of year. It’s inexpensive and hardly takes up any storage space – bonus! I picked up these creepy paper hands on clearance last year:
They look smashing on our black interior doors. ;) We use paper bats everywhere and I usually like to put them in one spot for more impact:
There’s a few of them on the stairway, along with the infamous black stair mice:
You can also make your own at home with black cardstock and a craft cutting machine. We found some super cute downloads from the Silhouette site and used them to dress up the lamp shade a bit:
I adore these little guys and their spider webs! I just gave them a very light coat of spray adhesive and stuck them on the inside of the lampshade:
I love them so much! And how about snowmen for Christmas? Or snowflakes? You can also attach these to lanterns or tall glass candleholders and the webs and spiders will cast a fun shadow! 7. ADD GOOGLY EYESGoogly eyes are a fun way to add some light-hearted Halloween touches around the house. Especially helpful if you have young ones that don't like scary decor. These big dollar store googly eyes watch us from the toilet:
We giggle like little kids when I put those up every year. You can also use smaller googly eyes and stick them on family photos around the house -- they pop off easily after Halloween. (Although it is fun to leave them up and see who notices.) 8. DIY MUMMY DOOR
This is another favorite! I LOVED how this crepe paper mummy door tutorial turned out:

This is such an easy way to add some DIY Halloween decor to your front porch! When this paper is exposed to any humidity outside, it will droop a bit. Turns out it looks even better then! You can see both versions at that link above. 9. PRINTABLES AND STICKERS
Over the years I've learned you can turn just about anything into a sign!
I found these glittery "spooky" letters at HomeGoods:

And placed them on a scrap piece of wood painted black to make a Halloween sign:

If they don't stick well, use your trusty spray adhesive to glue them on.
If your sign will be outside, it's a good idea to protect it with a coat or two of polyurethane.
Grab some old glass bottles and print out these Halloween potion labels::

Spray the back with spray adhesive and then just place them on the glass jars.
Goodwill is a GREAT place to find glass containers for this! Drop some red or green food coloring in and you're done!:

These are great additions for a Halloween party display.
10. CANDY CORN CRAFTS
By far the least spooky of the group, but certainly just as cute! I share three candy corn craft and decor ideas that are easy to complete with the candy, a hot glue gun and yarn:

These are more great crafts you can tackle with the kids!
Do you decorate your home for Halloween? You can see all of my easy and inexpensive Halloween and fall decor through the years here. And check out my tips for throwing a fun and stress free pumpkin carving party: 
Never miss a post by signing up to get posts via email.
Via https://www.thriftydecorchick.com/2014/10/10-and-under-halloween.html My all time favorite Amazon home decor finds!
I've purchased some beautiful decor pieces from Amazon over the years, and because they're holding their first early access sale for Prime members today and tomorrow, I thought I'd round up my all time favorites in one spot.
I know so many of us like to "zhuzh up" our homes in anticipation of the upcoming holiday season. These touches all add a little warmth and interest that I've really enjoyed in our own house!
My list runs the gamut from pretty lighting options to decor items that are functional as well as nice to look at! :)
I'm pretty sure most of my absolute favorites from Amazon have all been in the lighting category. I've found so many beautiful options I've used throughout our home.
This post may contain affiliate links for your convenience.
I may earn a small commission when you make a purchase through links.
See my policies and disclosure page for more information.
PRETTY LIGHT FIXTURES
I shared this pretty rechargeable art light in our fall foyer a couple weeks ago:

This light is by far the most realistic looking one I've found, and there's zero electrical run to it! It easily slips off the bracket to be plugged in and recharged.
There's a small touch pad on the side that you use to turn this one on and off, so you'll need to be able to reach it to use this light.
I'm pleasantly surprised at how long the light lasts on one charge! We turn this one on at night and it lasted a week before I had to plug it in.
I liked that art light fixture so much, I ordered another one for our pantry. It's an interior room that doesn't get any natural light, so I love having low light options for the evenings:
Read the full post
Via https://www.thriftydecorchick.com/2022/10/my-all-time-favorite-amazon-home-decor.html A tour of our warm family room decorated for fall!
Welcome to our lovely family room full of deep colors and warm wood accents!
Our home was made for autumn...we love it all year of course, but it SHINES in the fall months. The dark paint colors I've added around the house make our whole home feel so cozy and welcoming, and even more so in our family room.
I've completed quite a few big DIY projects in here, including building the bookcases next to the fireplace and adding that grid trim work to the front of the fireplace wall:

The dark accents on the walls and rug make this room cozy, so I don't have to warm up this space for fall!
Over the last few years I've been leaning toward less traditional fall decor and more into adding texture and rich colors instead. I shared the ways I decorate without a ton of themed fall decor last year.
I love both ways! Believe me, our front porch is always decked out with fall signs and a stupid amount of pumpkins, but inside I prefer a softer approach. :)
I made some minor tweaks to the mantel decor. Just replaced the stems in a vase, added a wood frame, and a few brass candlesticks with more of those pretty twisted taper candles I also have in our foyer:

This post may contain affiliate links for your convenience.
I may earn a small commission when you make a purchase through links.
See my policies and disclosure page for more information.
Changing up textiles like throws and pillow covers will go a long way to adding a fall touch in a room! Switching out the pillows is one of the first things I do each season:
The Sherpa lumbar pillows are SO soft! Those plaid pillow covers are great quality (I've used them for a couple years now) and the faux leather covers are my favorites!
The pillows for the swivel chairs were Target finds earlier this year and they still fit right in:

I added the white vase filled with a few faux bundles from Michaels on the stool. They are so full! A few of them go a long way.
The peach art on our Frame TV doesn't scream fall, but the moody tones do. :) The colors are perfect:
Our coffee table didn't get many changes, just a large amber candle that smells amazing and a ceramic pumpkin full of treats that taste amazing:

Anyone else obsessed with those Cadbury chocolate candies? We can't get enough of them and my husband is going to be so excited they come in fall colors now! ;)
I recently shared how I built this huge, square coffee table...it's the perfect size and I did it for WAY less than anything I've found online!:
The warm wood is so nice with our dark blue fireplace wall and built ins.
The dark blue color is called Cyberspace and the lighter walls are Agreeable Gray, both by Sherwin-Williams. 
The tall green bookcase I made over earlier this year fits in perfectly with the autumn colors as well. You can see just a hint of color on the trees:

They are turning way later here this year! We had a warm end to our summer.
All together, these small touches make for a wonderfully comfortable and welcoming space. We love this room so much!:

YES, it is possible to make a room with high ceilings feel cozy! :)
This time of year is my absolute favorite! I'm sitting by the fire as I type and am so thankful we have this lovely space.
Never miss a post by signing up to get posts via email.
Via https://www.thriftydecorchick.com/2022/10/our-warm-and-cozy-fall-family-room-tour.html How to add a fun DIY "mummy" door Halloween decoration!
This super simple Halloween door craft almost turned into a fail…but we loved it even more in the end!
I saw this mummy door decoration and knew I wanted to try it out on our front porch. We put our own little spin on it and it turned out SO cute.
I did this at our last house but dug up this DIY to do it again!
It only takes a few craft supplies -- I used some white crepe paper from the dollar store (they came two to a pack and I ended up using both) and cut strips of it to wrap around the front door. I taped the streamers on the sides of the door and it was time consuming but easy. The hardest part of the whole thing was trying to keep all three animals from escaping while I had the door open. ;)
I didn't take pictures of this part because I was so focused on the escapees, but the instructions are pretty self explanatory:

This post may contain affiliate links for your convenience.
I may earn a small commission when you make a purchase through links.
See my policies and disclosure page for more information.
I traced the top of a bowl for the large circles and another for the smaller circles to make the black pupils. I hand drew a cute, wonky smile on black poster board and cut it out.
I hot glued the face parts directly to the white streamers. (Just watch so that the glue doesn't touch your door.)
You can use construction paper for the mummy eyes and mouth as well!
We left for the day after I finished and for some reason I had this urge to take a picture of it. Not sure why, I just thought to myself “just in case”: Via https://www.thriftydecorchick.com/2012/10/mummy-door.html |