|
I'm nearing the end of my latest room makeover and I'm SO happy with how it looks! Just one more big project and a few small ones to complete before the final reveal! You can read about all of the big changes to our mud/laundry room storage situation here.
Here's a reminder of what we started with on this wall:

We hid the kitty litter underneath and the top was supposed to be a folding table. Haha! There was rarely room to fold anything. As much as I have decluttered and organized in our home, we still needed a spot for many items around the house. A lot of them ended up on this counter!
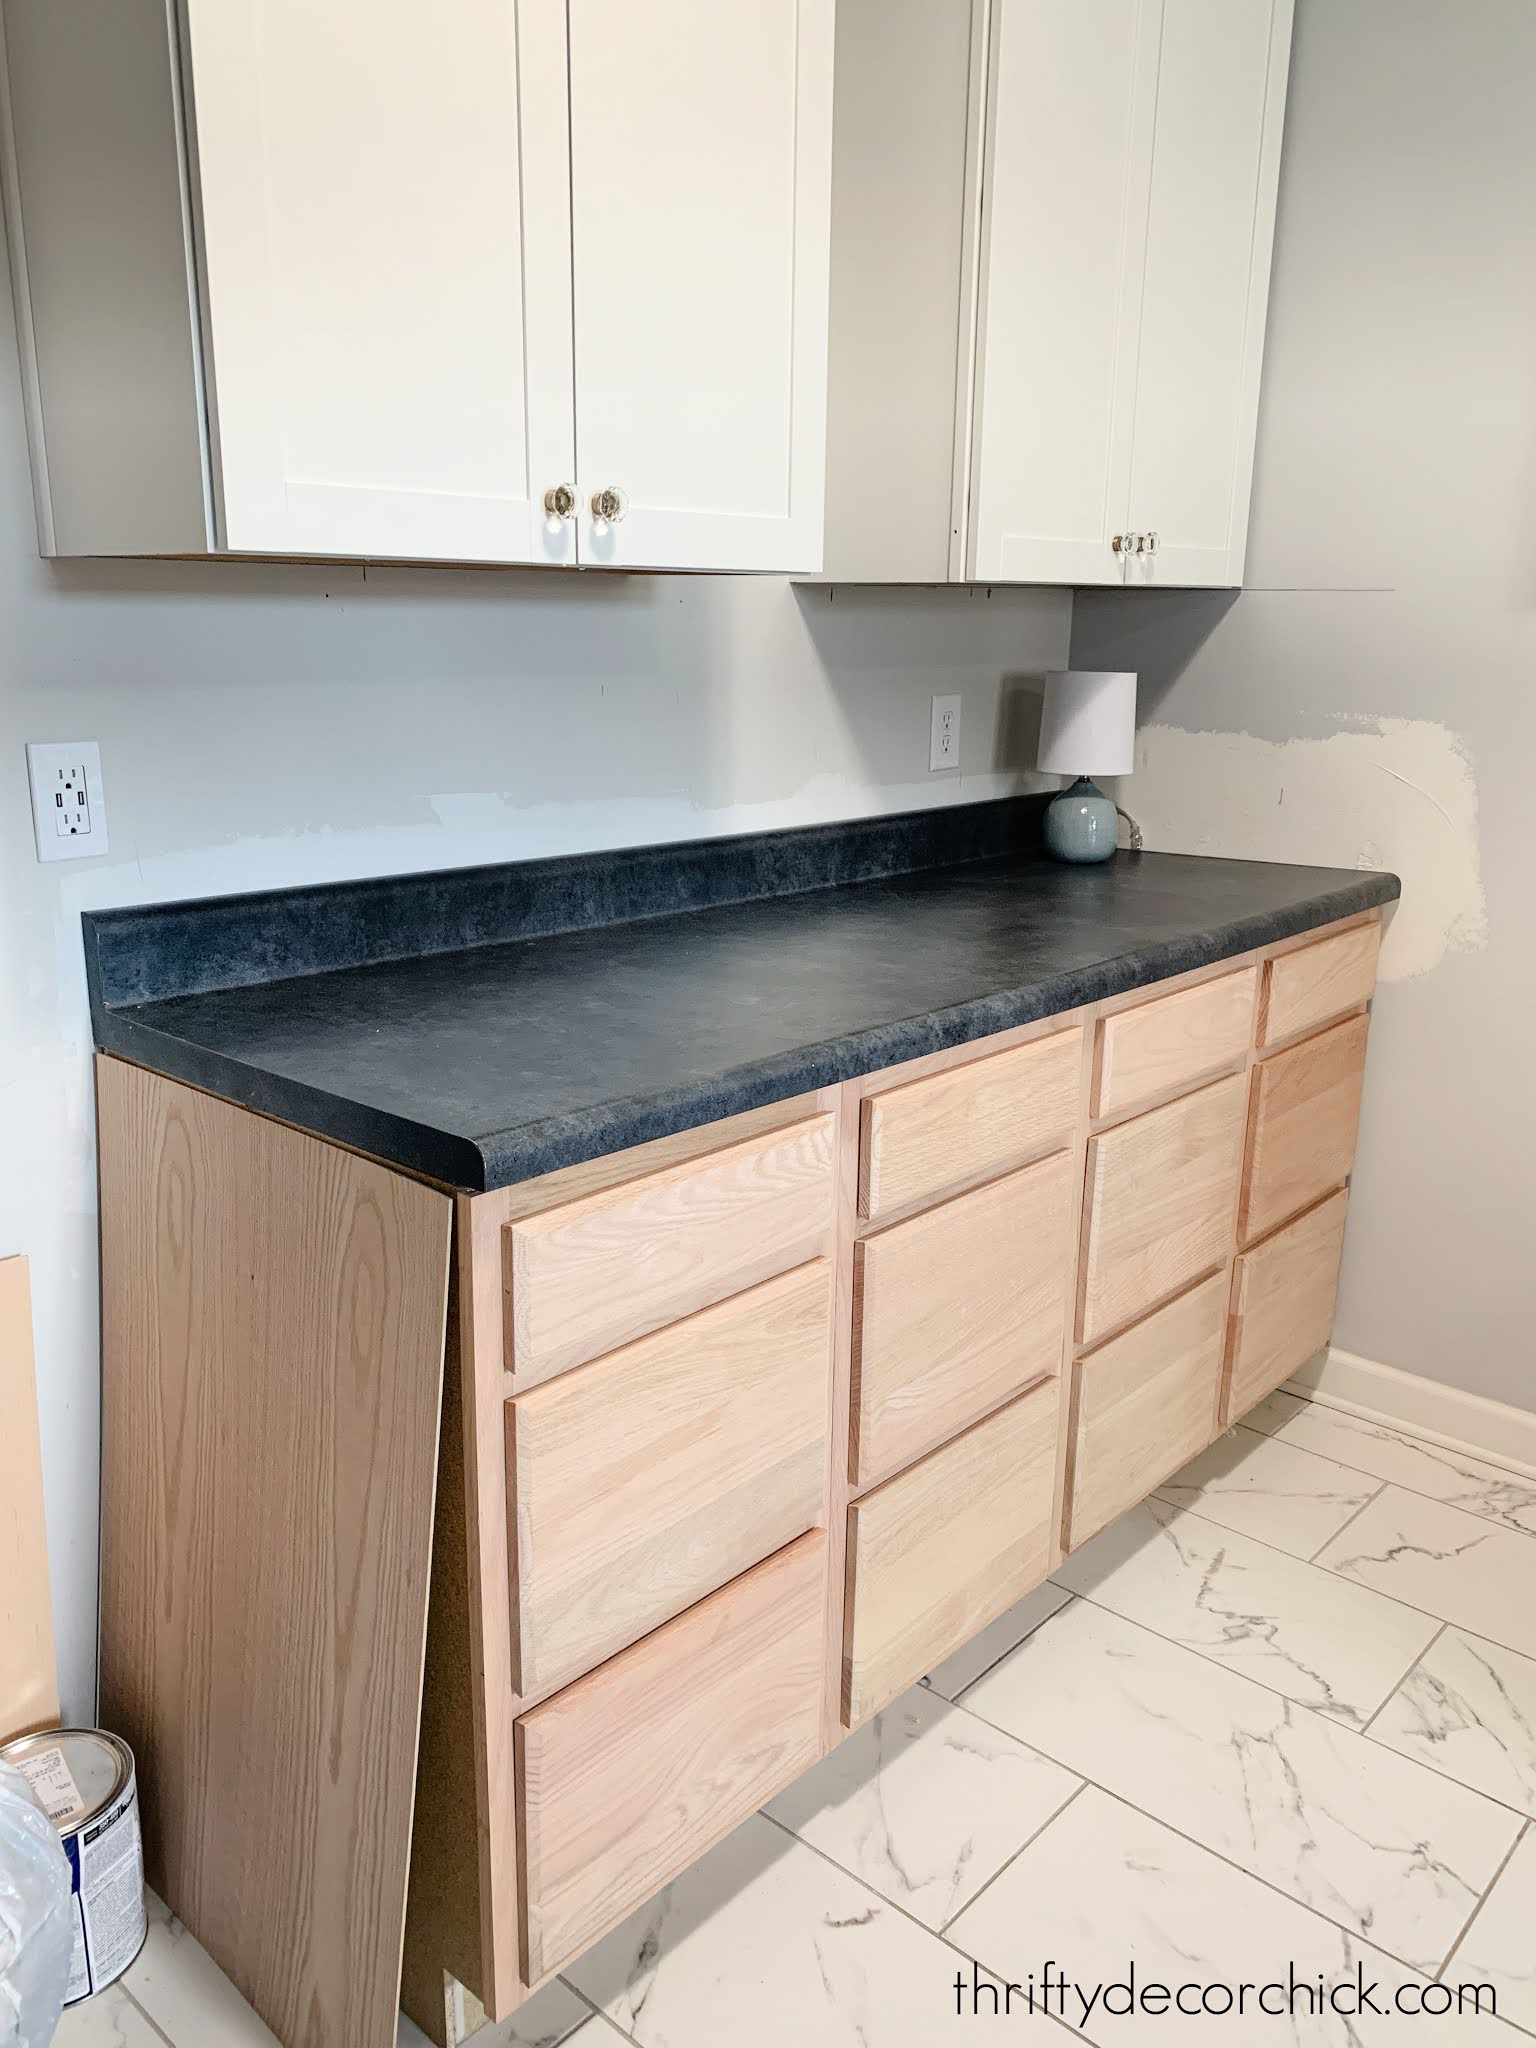
Then we had some upper cabinets moved from over the washer and dryer to this spot, and I installed four inexpensive drawer units on the bottom:

They are the basic unfinished cabinets you can find at any large hardware store.
I later added this gorgeous wood countertop I had been drooling over for years!:

This post may contain affiliate links for your convenience.
See my policies and disclosure page for more information.
After that it was time to change up those basic cabinets into something more custom. I had a plan to transform the drawer fronts to match the simple Shaker design of our uppers.
Online it looked like the drawer fronts were completely flat. But when I picked them up I realized they had a slight bevel to them:

With that bevel my plan wasn't going to work. I sat on it for a couple weeks to figure out what I wanted to do. I finally decided I would build new drawer fronts out of mdf and add the thin trim on the front.
But as I was looking at the drawers one day, I had an idea. I wondered if I could just turn them around and have the flat side facing out. I took one off, flipped it around...and really liked it! The bevel looked fine turned back against the cabinets, and the back side gave me a nice flat surface to work with. YES! This was going to be way less work and money.
Once I had that figured out, it was time to start painting. I took off each drawer front (there are screws inside the cabinet drawers) and laid them in order on the counter. Before I started painting, I used a drill bit to drill through the holes where the screws went so I could attach them back on in the exact same spots.
Just like my warning when installing cabinet hardware, be sure to drill straight through from the top of the drawer, not at an angle. If it's at an angle they won't attach the exactly the same and be level.
Then I filled the holes on the new "fronts" and started painting:

You can see my tips for painting cabinets by hand here.
You may recognize this color! I've used this Cyberspace paint color in our dining area and family room. I LOVE it! It's a beautiful navy/gray color.
After the drawers had two coats each (and a light sanding between), I started on my trim pieces. I wanted them to be as smooth as possible, so instead of the lattice I usually use for projects like this, I picked up some four foot poplar strips that had very little grain:

They are a quarter inch thick by two inches wide. At first, I made the mistake of starting to add these to the drawer fronts while they were off the cabinets. It was easier to work that way, but I found it was better to do install the trim while drawers were in place.
It's much easier to make sure the sides of each cabinet are exactly the same if you add them while they're installed. Otherwise even the slightest change in height or width from one drawer front to the other will be noticeable.
I glued and nailed each strip onto the drawer fronts:

I had already painted the frame of the cabinets with the drawer fronts gone -- that part goes very quickly.
It was as I was installing the fronts that I realized the paint sheen I had used (that was leftover) was satin. I wanted semi gloss -- so I gave everything one more coat in the semi-gloss instead. (I told you this room has giving me many fits!):

I found these awesome acrylic and brass handles online and really loved them:

But I kept hesitating on installing them, and finally decided they felt a little too modern for this room (or our house really).
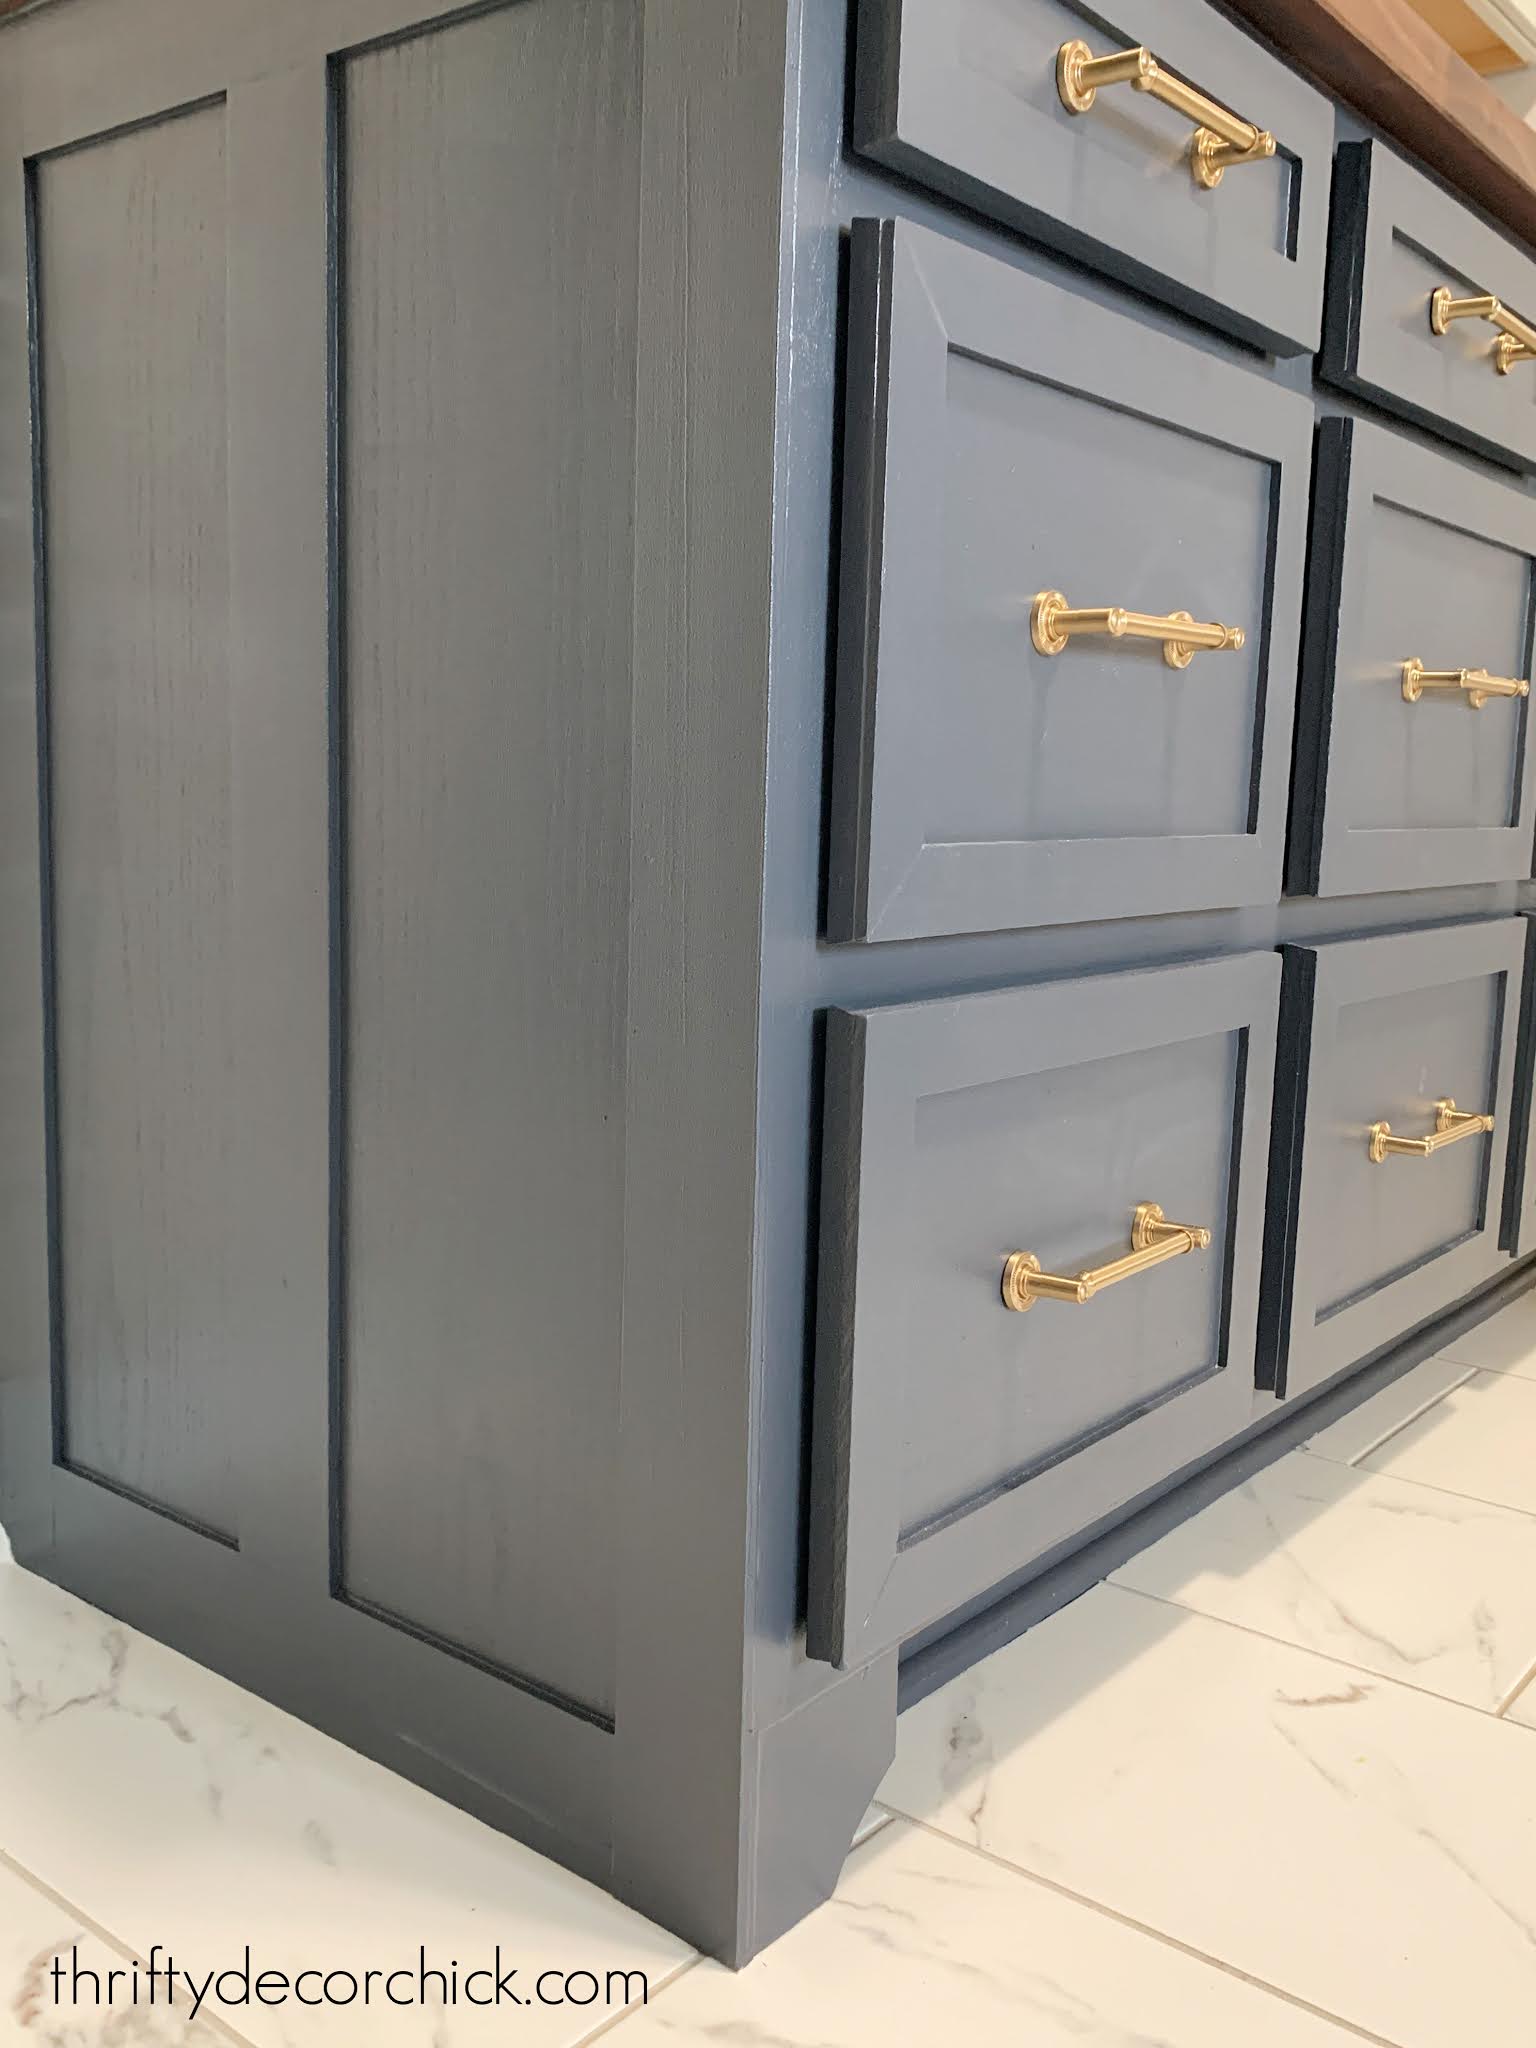
I ended up ordering the brass hardware I used in the basement instead and I'm SO glad I did:

They are more substantial and look SO good against the dark, dusty blue!
I also repeated a couple of other projects from our kitchen -- I added the custom trim to the end of the cabinet and then installed the cabinet "feet." They both add custom touches to the cabinets!:
I was careful with my photo angles because I'll be showing you the tile next, and it is SO pretty! :)
Here's where we started with this wall a few weeks ago:

Here it was with the upper and lower cabinets installed:
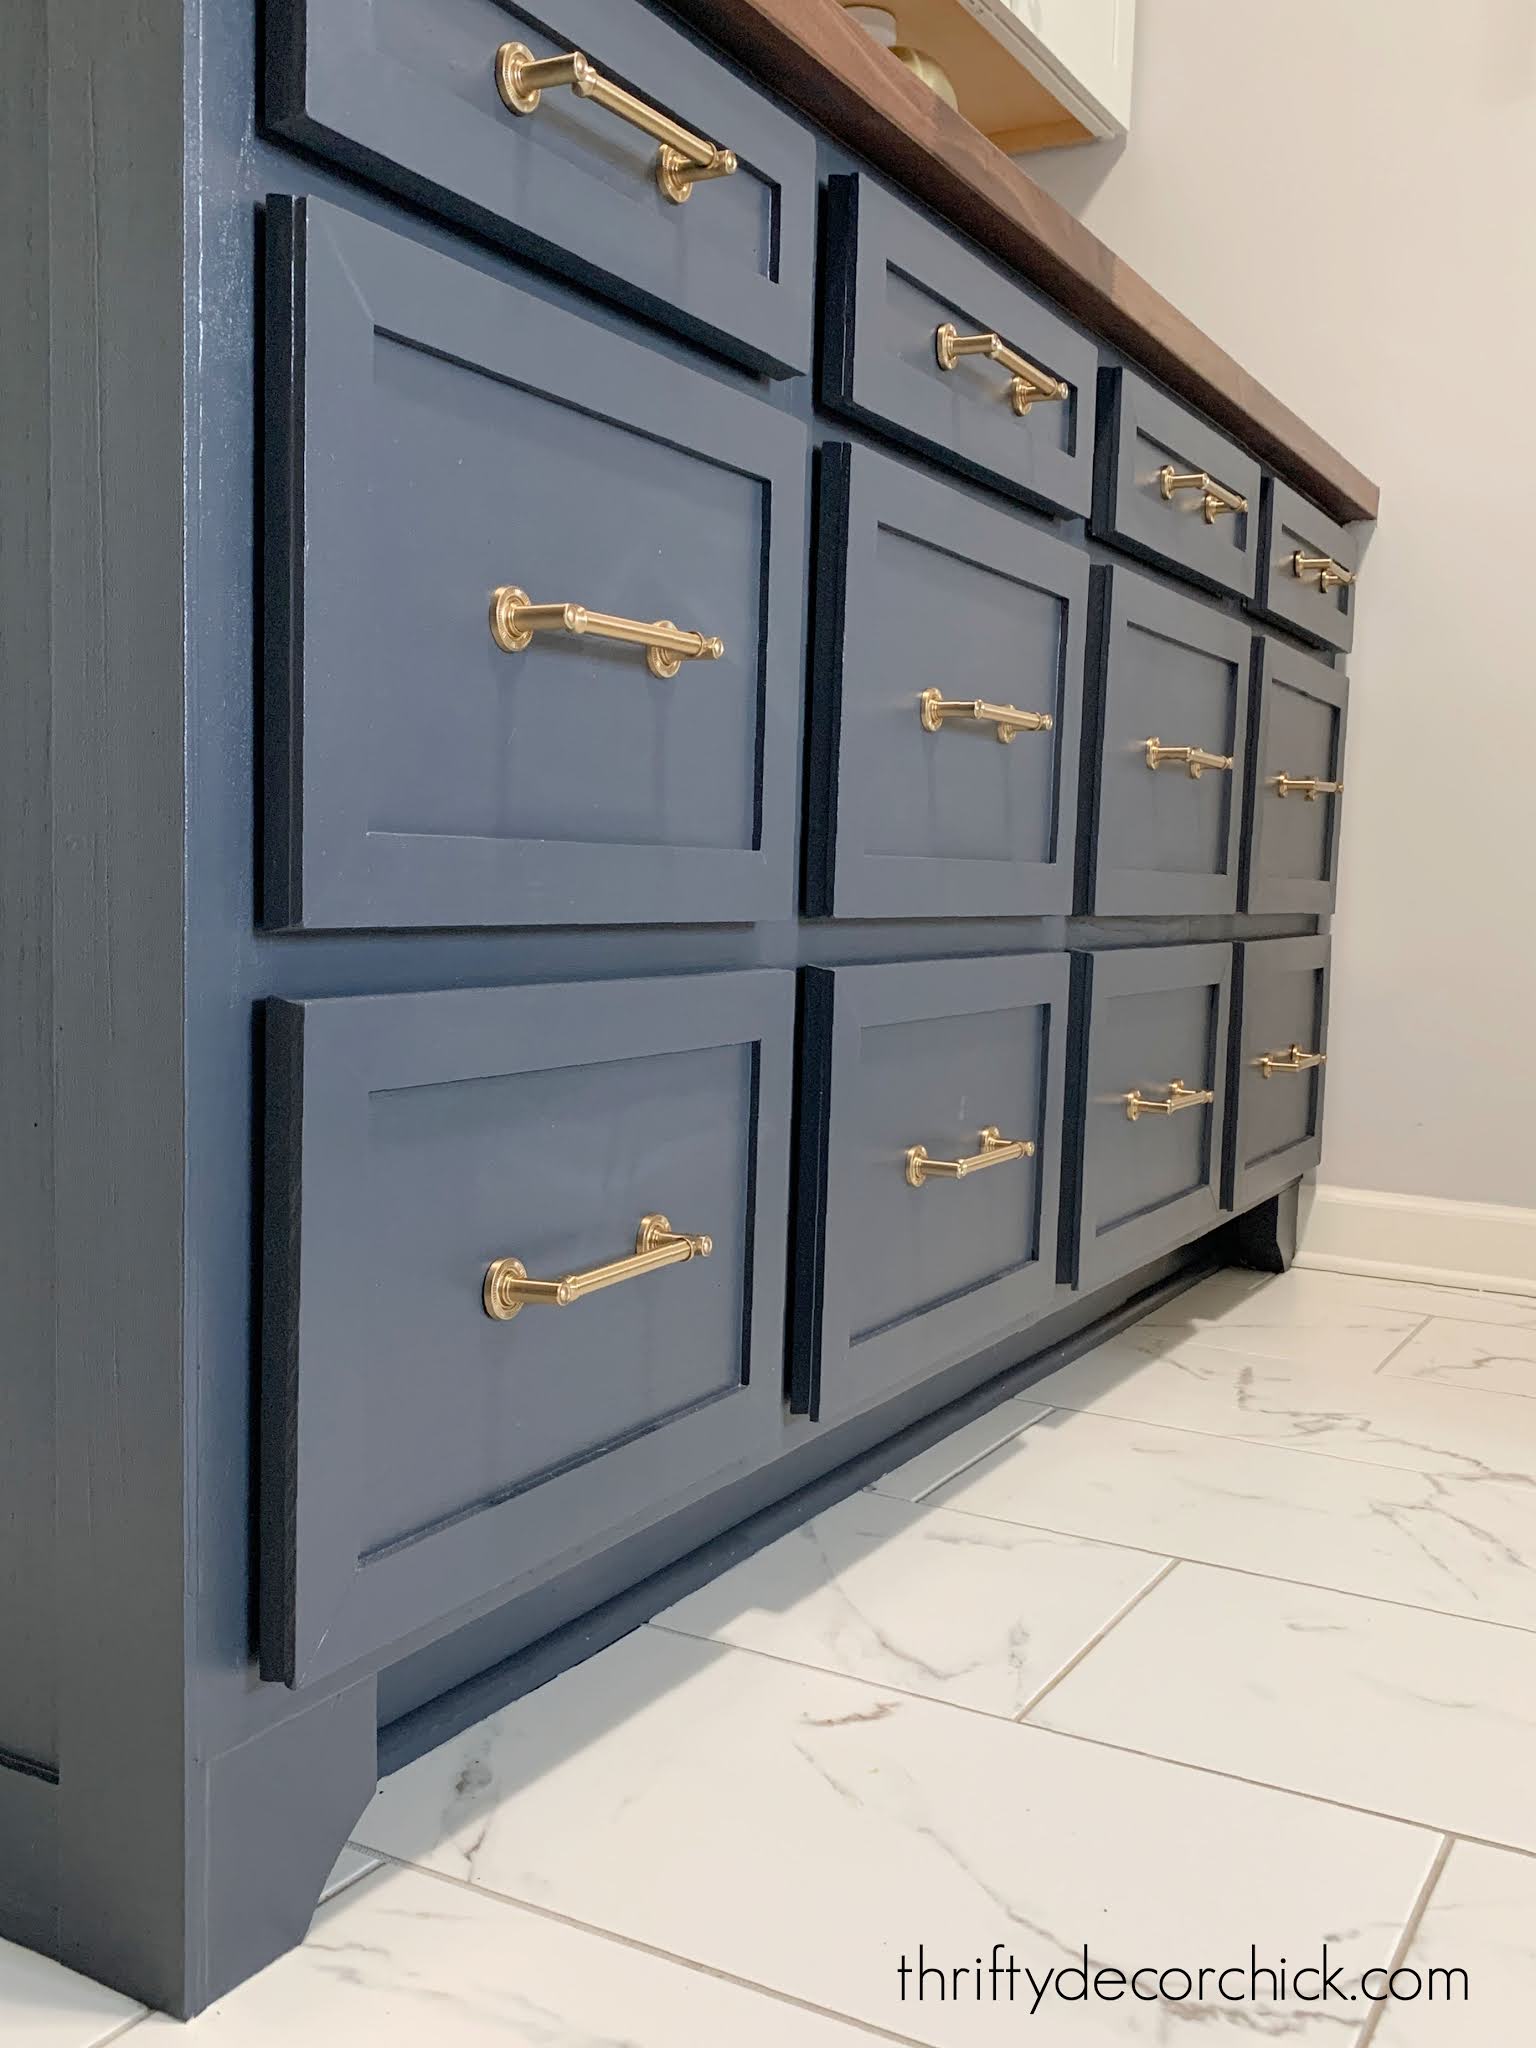
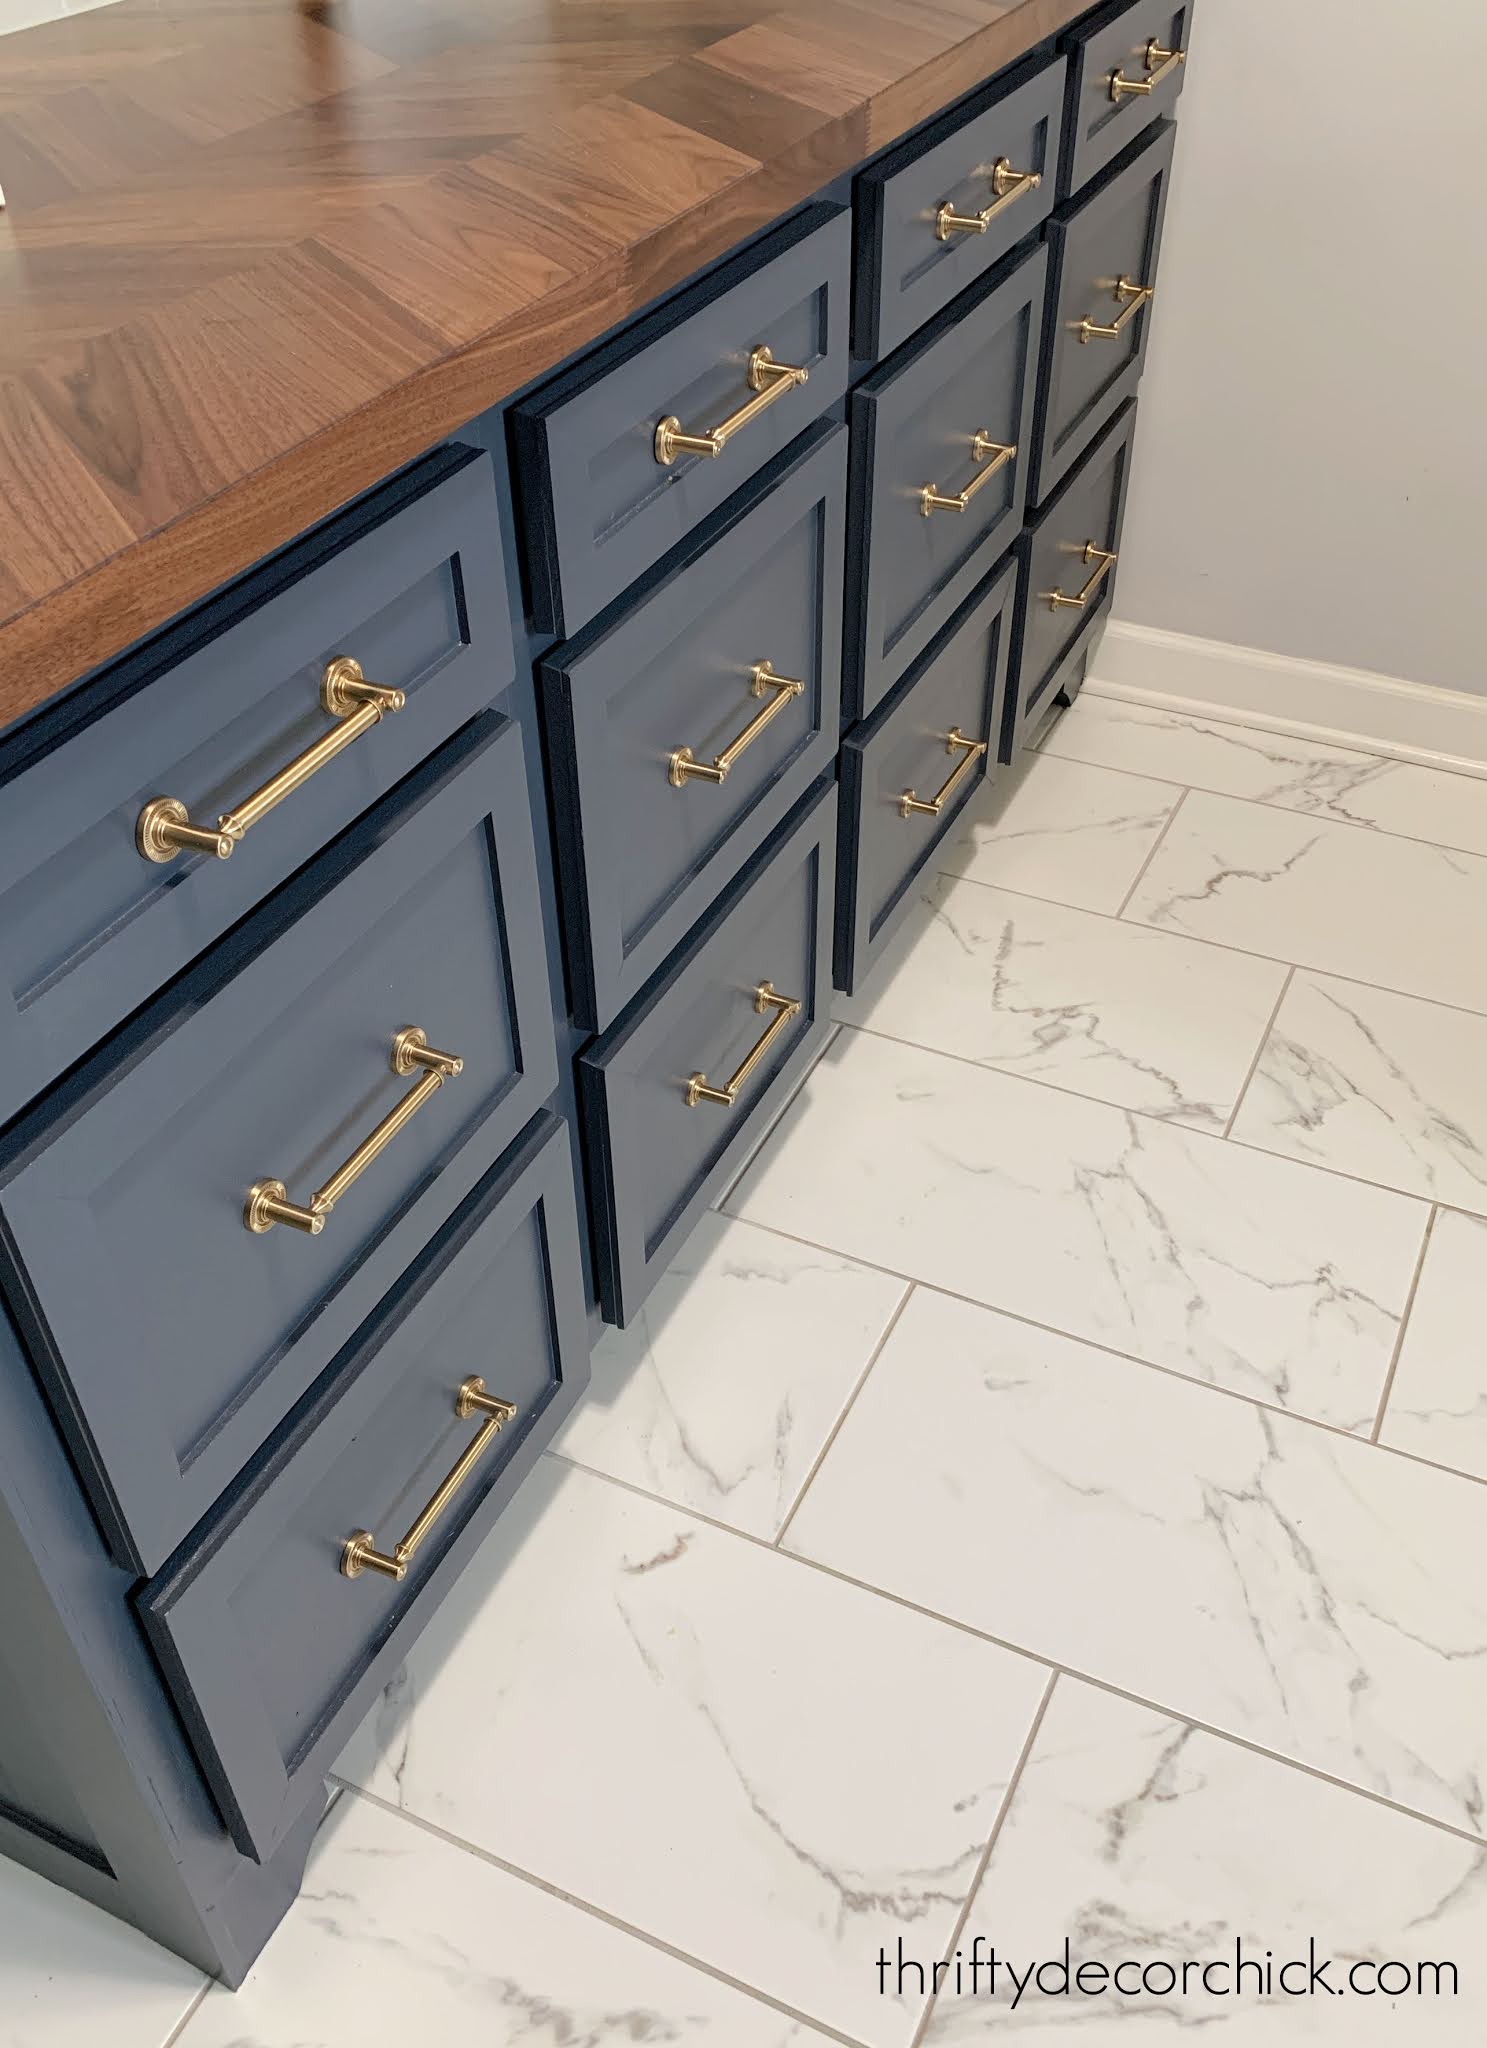
I just adore that dark wood, moody blue and brass combo. It looks like a piece of furniture, and I love that! Even though the DIY projects in here have given me problems, they've all been worth it! This has become the prettiest room in our home by far. ?
I'll be back this week to share the tile and install!
Here are links to products and DIY projects pictured in this post:
Brass hardware pulls I used
See more of our home here. To shop items in our home, click here! Never miss a post by signing up to get posts via email.
Via https://www.thriftydecorchick.com/2021/03/how-make-builder-cabinets-.html
0 Comments
Do you ever putt off attempting a DIY project (or any project!) because you've convinced yourself that it will be super difficult? I've had that happen many times over the years, but I find that if I do my research and just TRY...it's never as bad as I think it will be. Most of the time it's the projects that should be easy that give me fits. ;)
Cutting and installing crown molding was one project I put off for years. I mentioned years back that I didn't know how to cope or cut crown molding -- so I always used corner pieces like these when installing crown:
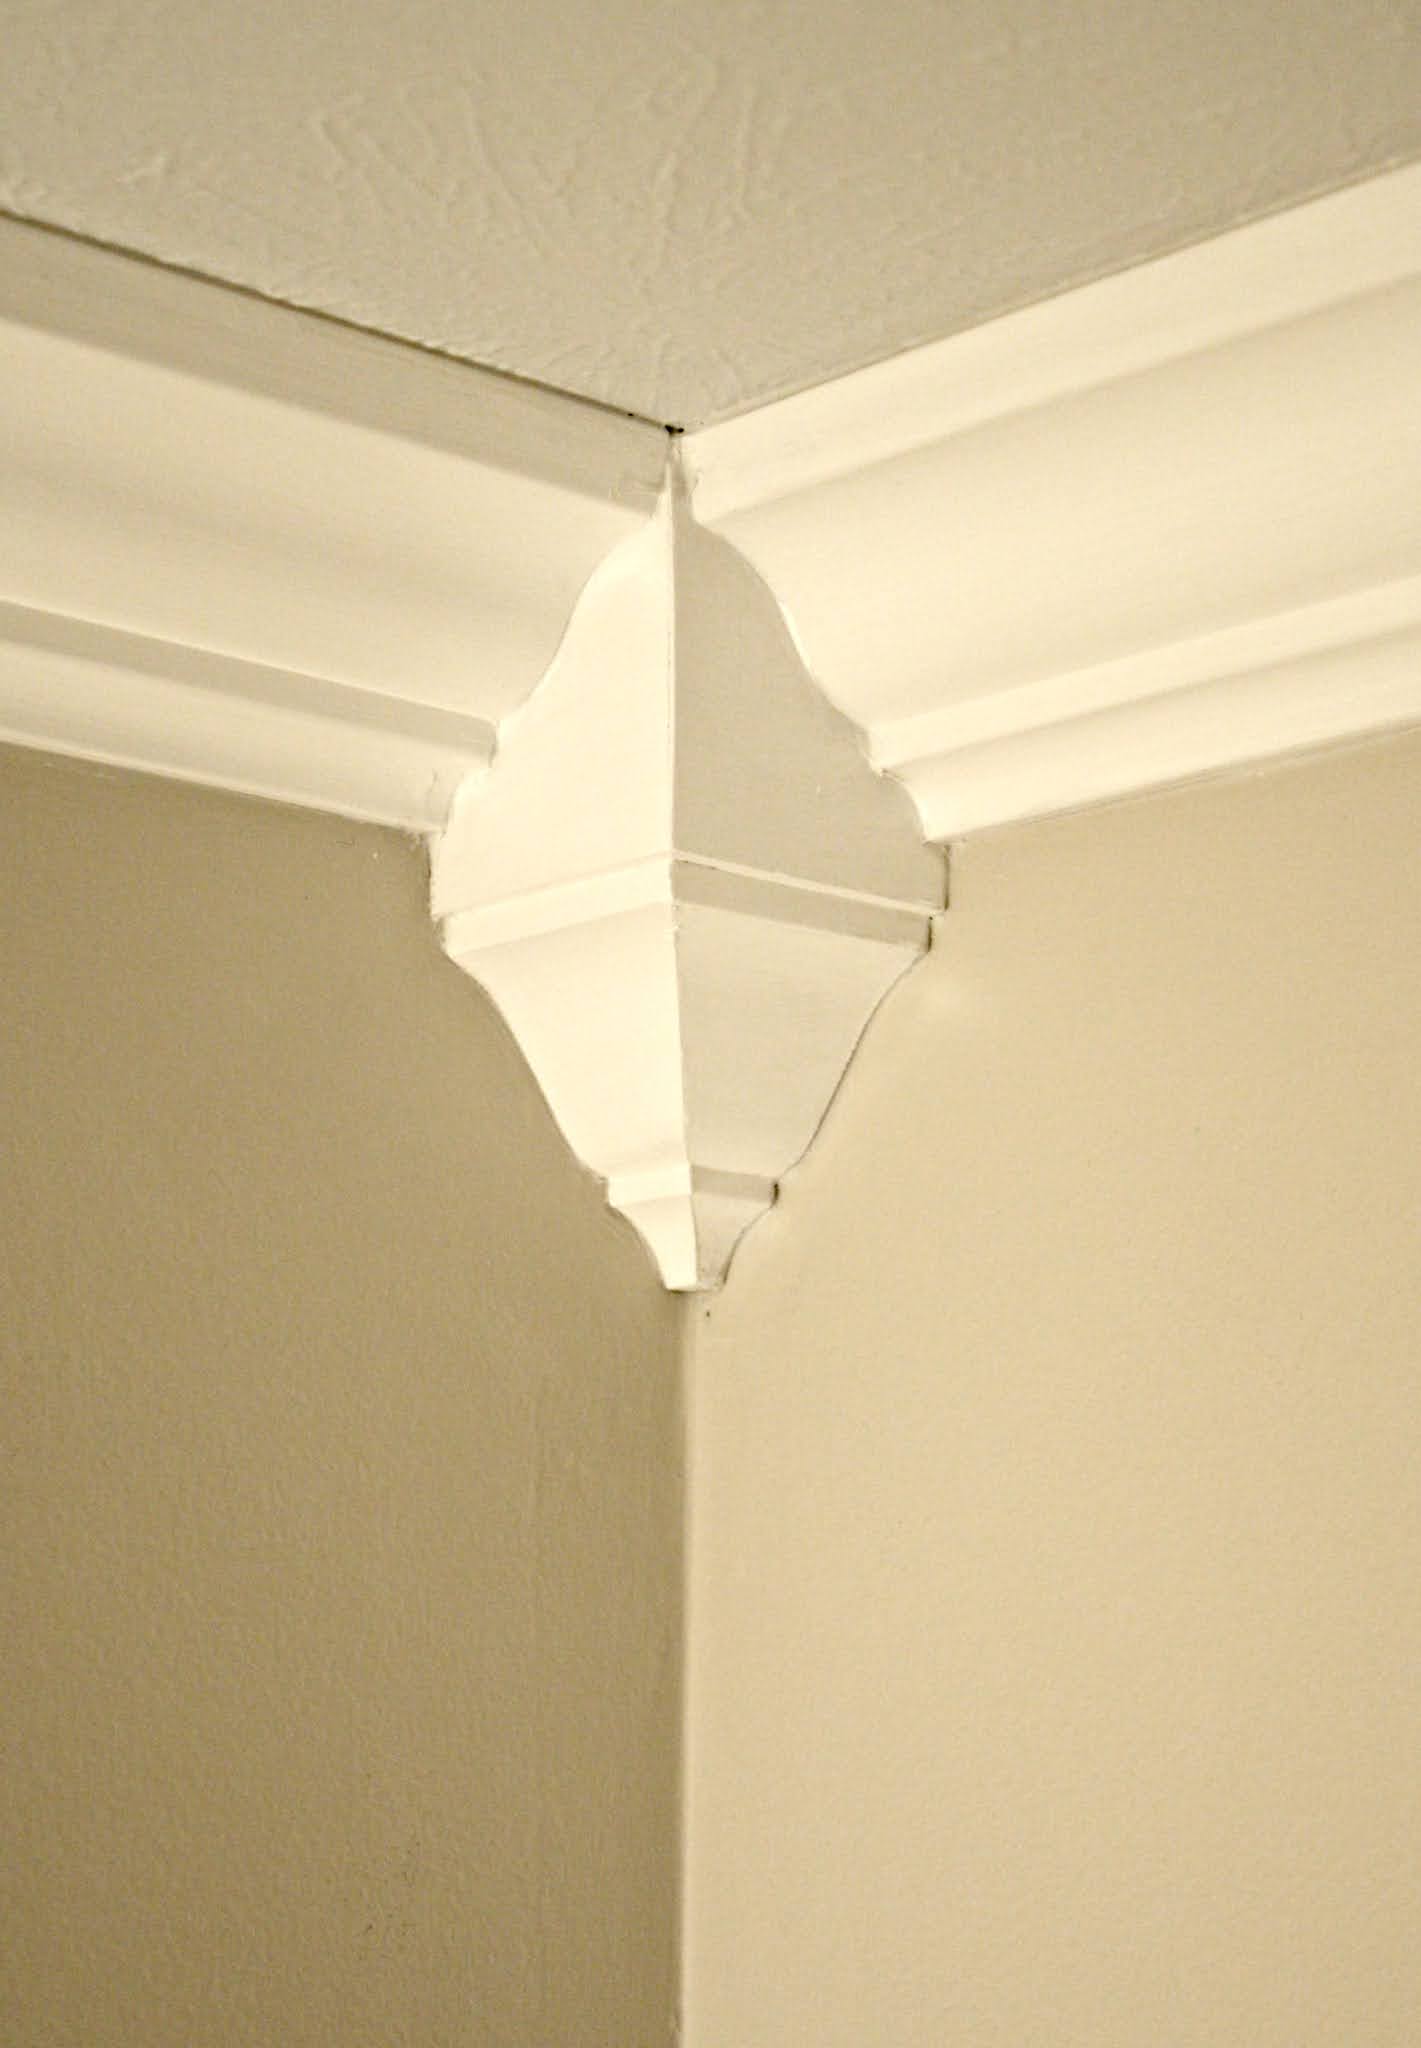

The only issue is the cost -- they aren’t cheap.
But eventually I wanted a more streamlined look...so I forced myself to learn how to install crown molding. When it comes to crown, you can cut it on a miter saw, or use a coping hand saw to cut out the shape of the molding so it fits snug into the other piece.
I do not cope well. :) I can do it on simpler trim like baseboards no problem, but crown is much harder to cope in my opinion. Cutting and installing crown molding really isn't that hard -- I promise. The key to doing it correctly all comes down to how you place it on the saw to be cut.
I've been slowly adding crown molding to the basement family room where I recently finished the huge entertainment center:

I STILL use the crown "jigs" I created for myself years ago!
I've figured out along the way that there are a few tricks to cutting and installing crown. First of all, it helps to have a compound miter saw. You don't have to have one -- a miter box and saw (like I used for years for my molding projects) will do just fine. It will just take more strength and endurance to cut. ;)
Because crown is installed at an angle, cutting it is different than regular trim. You need to position it a certain way on the saw when cutting it. Here are some pictures to help explain. (Stay tuned for examples of each cut I'm describing.) For an inside cut (an inside corner in a room), you want to make sure the front is facing into the saw. This molding is set up for a cut that will be on an inside left corner:  The front is facing into the saw, top on top, bottom on bottom. Here’s what it will look like on the saw:  For a standard (inside) corner, you’ll want it set to a 45 degree angle:  You do the same thing for the right side of the molding: 
I know it can get confusing, so here's a visual of how the inside cuts look:  Notice you can see the edges of the cut wood? You want to see that, so when they go together up in the corner, they’ll meet up like this:  That’s the only tricky part, getting that angle right as you’re working around the room.
You want the back of the molding to be the longer edge, not the front:
 Does that make sense? That part is huge! For outside cuts, you'll want to have the front facing you on the saw, but you'll need to flip it -- so a left angled cut will need to be flipped over so that the length of the crown is on the left side of the saw, not the right.
If your cuts are correct, installing crown isn't too bad at all -- you’ll just need someone to help you hold up the pieces as you nail them in. (I keep eyeing this gadget that allows you to hang long crown pieces by yourself.)
Here are a few more tips that make cutting crown go much easier! When you place your crown against the saw, make sure the edges are flat, like so:
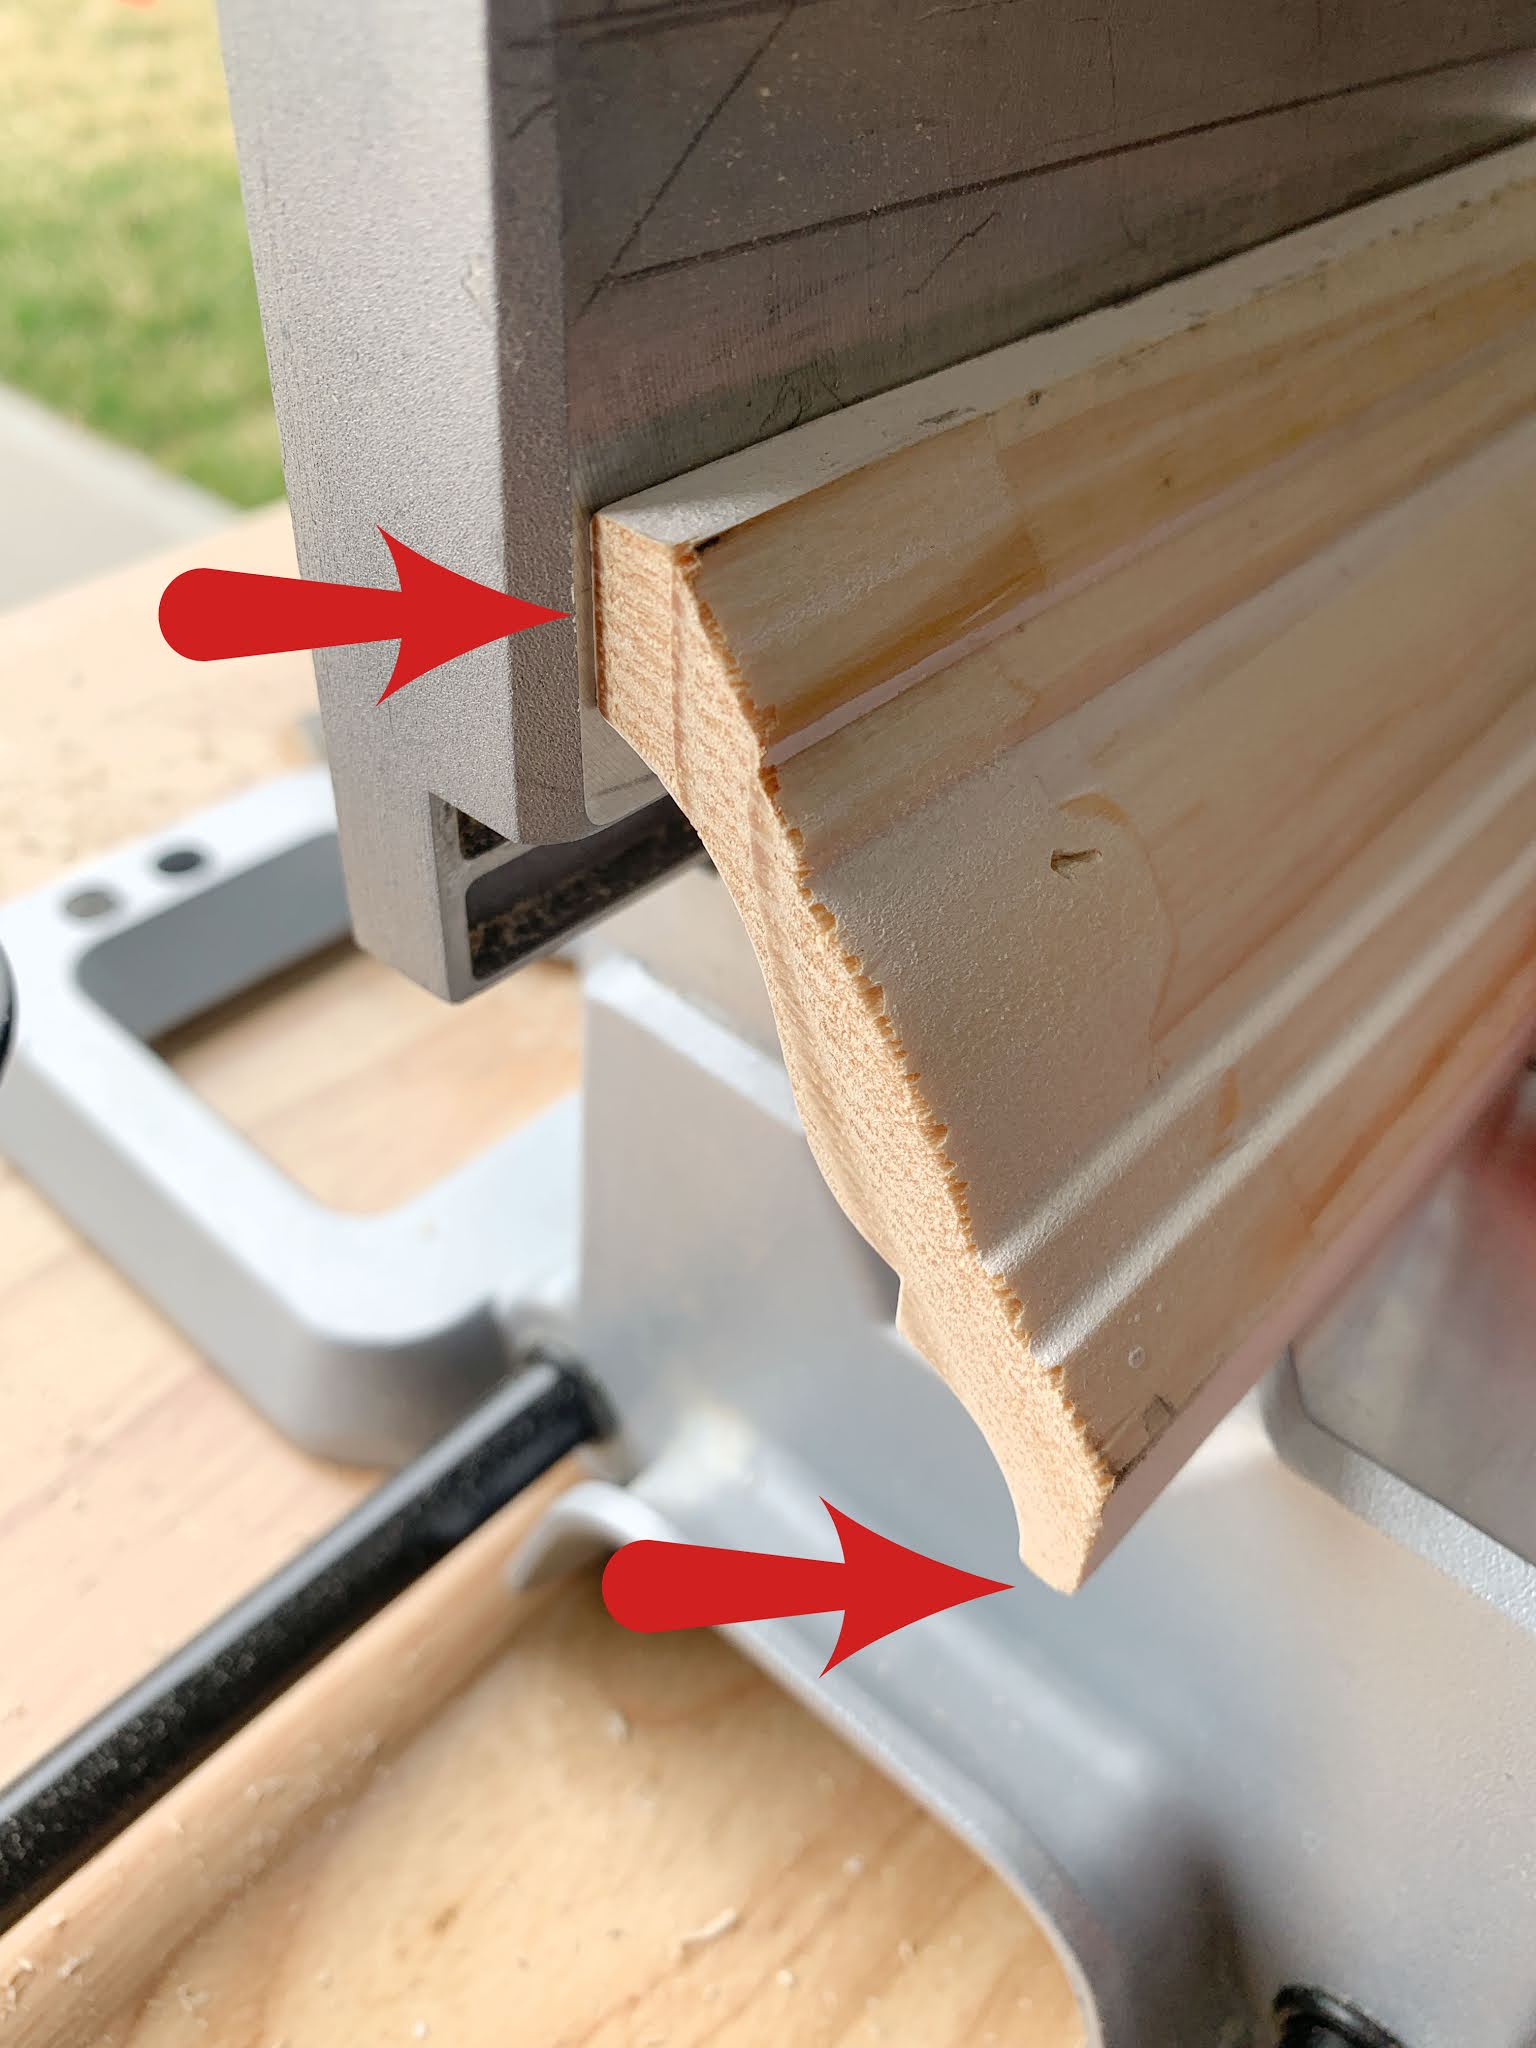
If those are not flush your cut will not match up in the corner.
Also, it's helpful to mark a line you can match for every piece of crown as you're working. I use a pencil to mark the height on the saw fence:
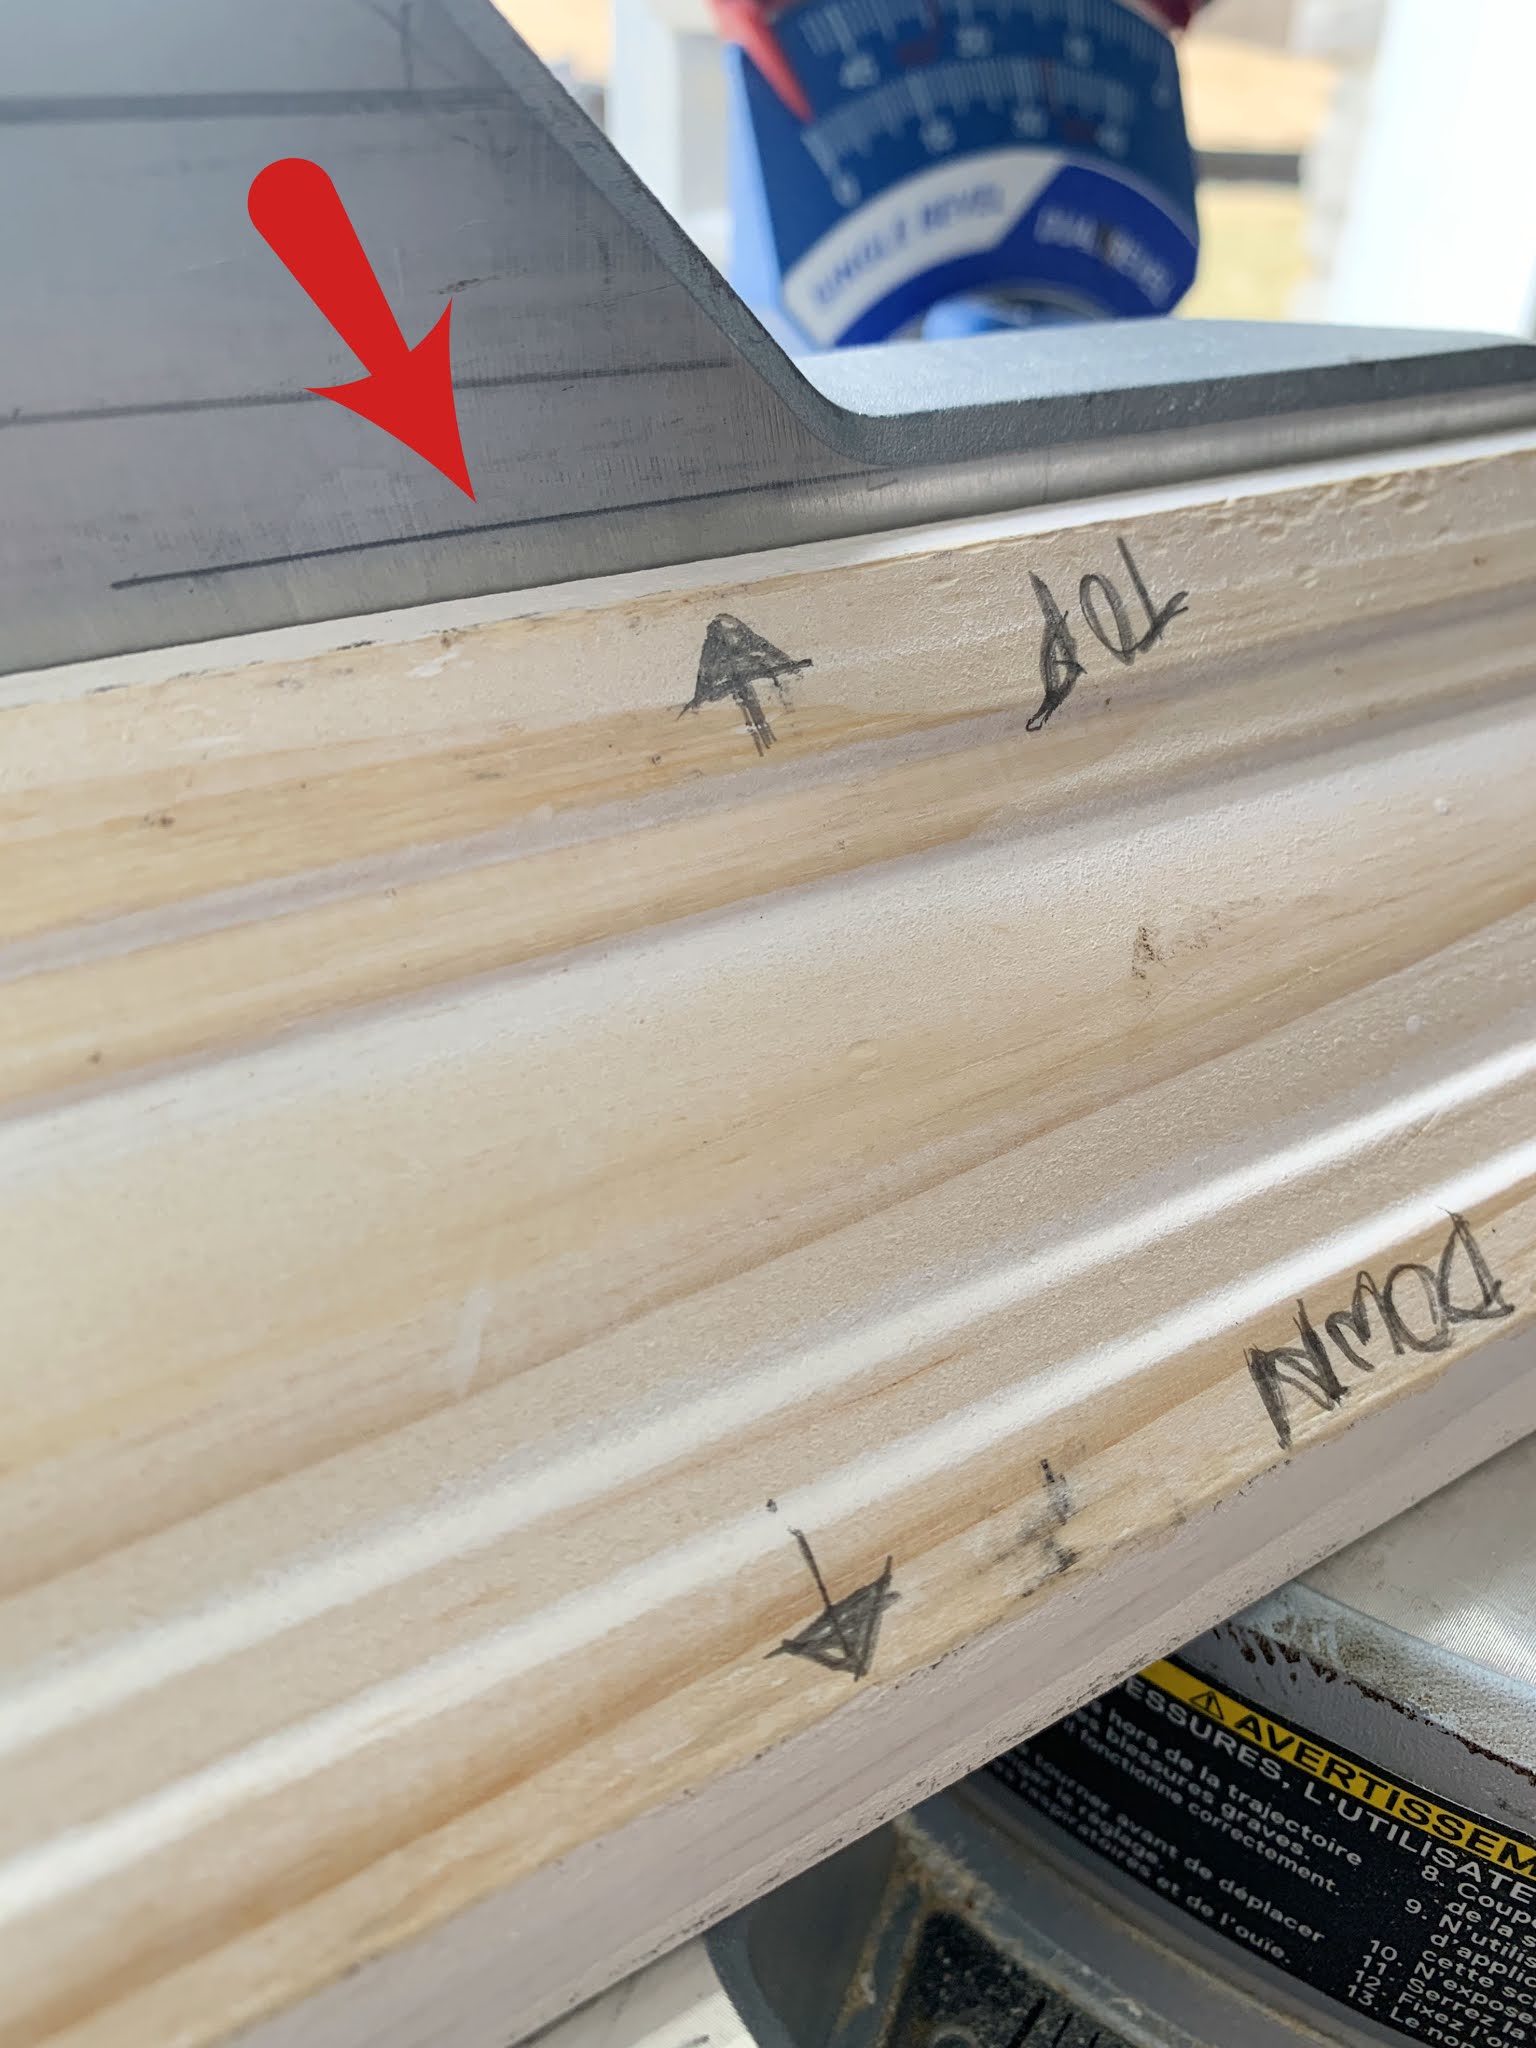
You can see here that I've labeled the back of my example pieces as well -- it can get confusing as you're cutting and these references really help me! I've marked heights for a few different sizes of crown, that's why there are a few lines on the fence.
I have kept my example pieces for years and pull them out to remind me how to set up the cuts. Or you can use this jig that places crown at the right angle on the saw for you.
If you have an angle different from the rest, you can use this angle finder tool to figure it out:

Most of the time they are a 22.5 angle which is already set on most saws:

Keep in mind that most walls are not built at exact 90 degree angles. You'll have some gaps most of the time -- but don't fret! This is why caulk is your BFF. It hides so many not-so-perfect spots. Here's the before:

And the after:

(I hadn't touched up the angled part where they meet up when I took his photo.)
Also, sometimes the trim will bow out from the wall a bit at the top or bottom:

If that bothers you, a line of caulk will make that disappear.
If your cuts are correct, installing crown isn't too bad at all -- you’ll just need someone to help you hold up the pieces as you nail them in. (I keep eyeing this gadget that allows you to hang long crown pieces by yourself.)
I find it helpful to mark where my crown hits on the wall and ceiling as I'm working around a room -- this ensures that I'm installing it at the exact same angle as I go. You want to make sure your last piece is at the same spot on the wall as your first place so when you finish up they fit together perfectly.
Crown molding can be intimidating, but the trick is all in how you cut it! Once you have that figured out, it will go more smoothly! The elegant touch crown adds will never go out of style! It's a little detail that makes a big difference in a space:
Via https://www.thriftydecorchick.com/2011/01/before-and-after-party-installing-crown.html
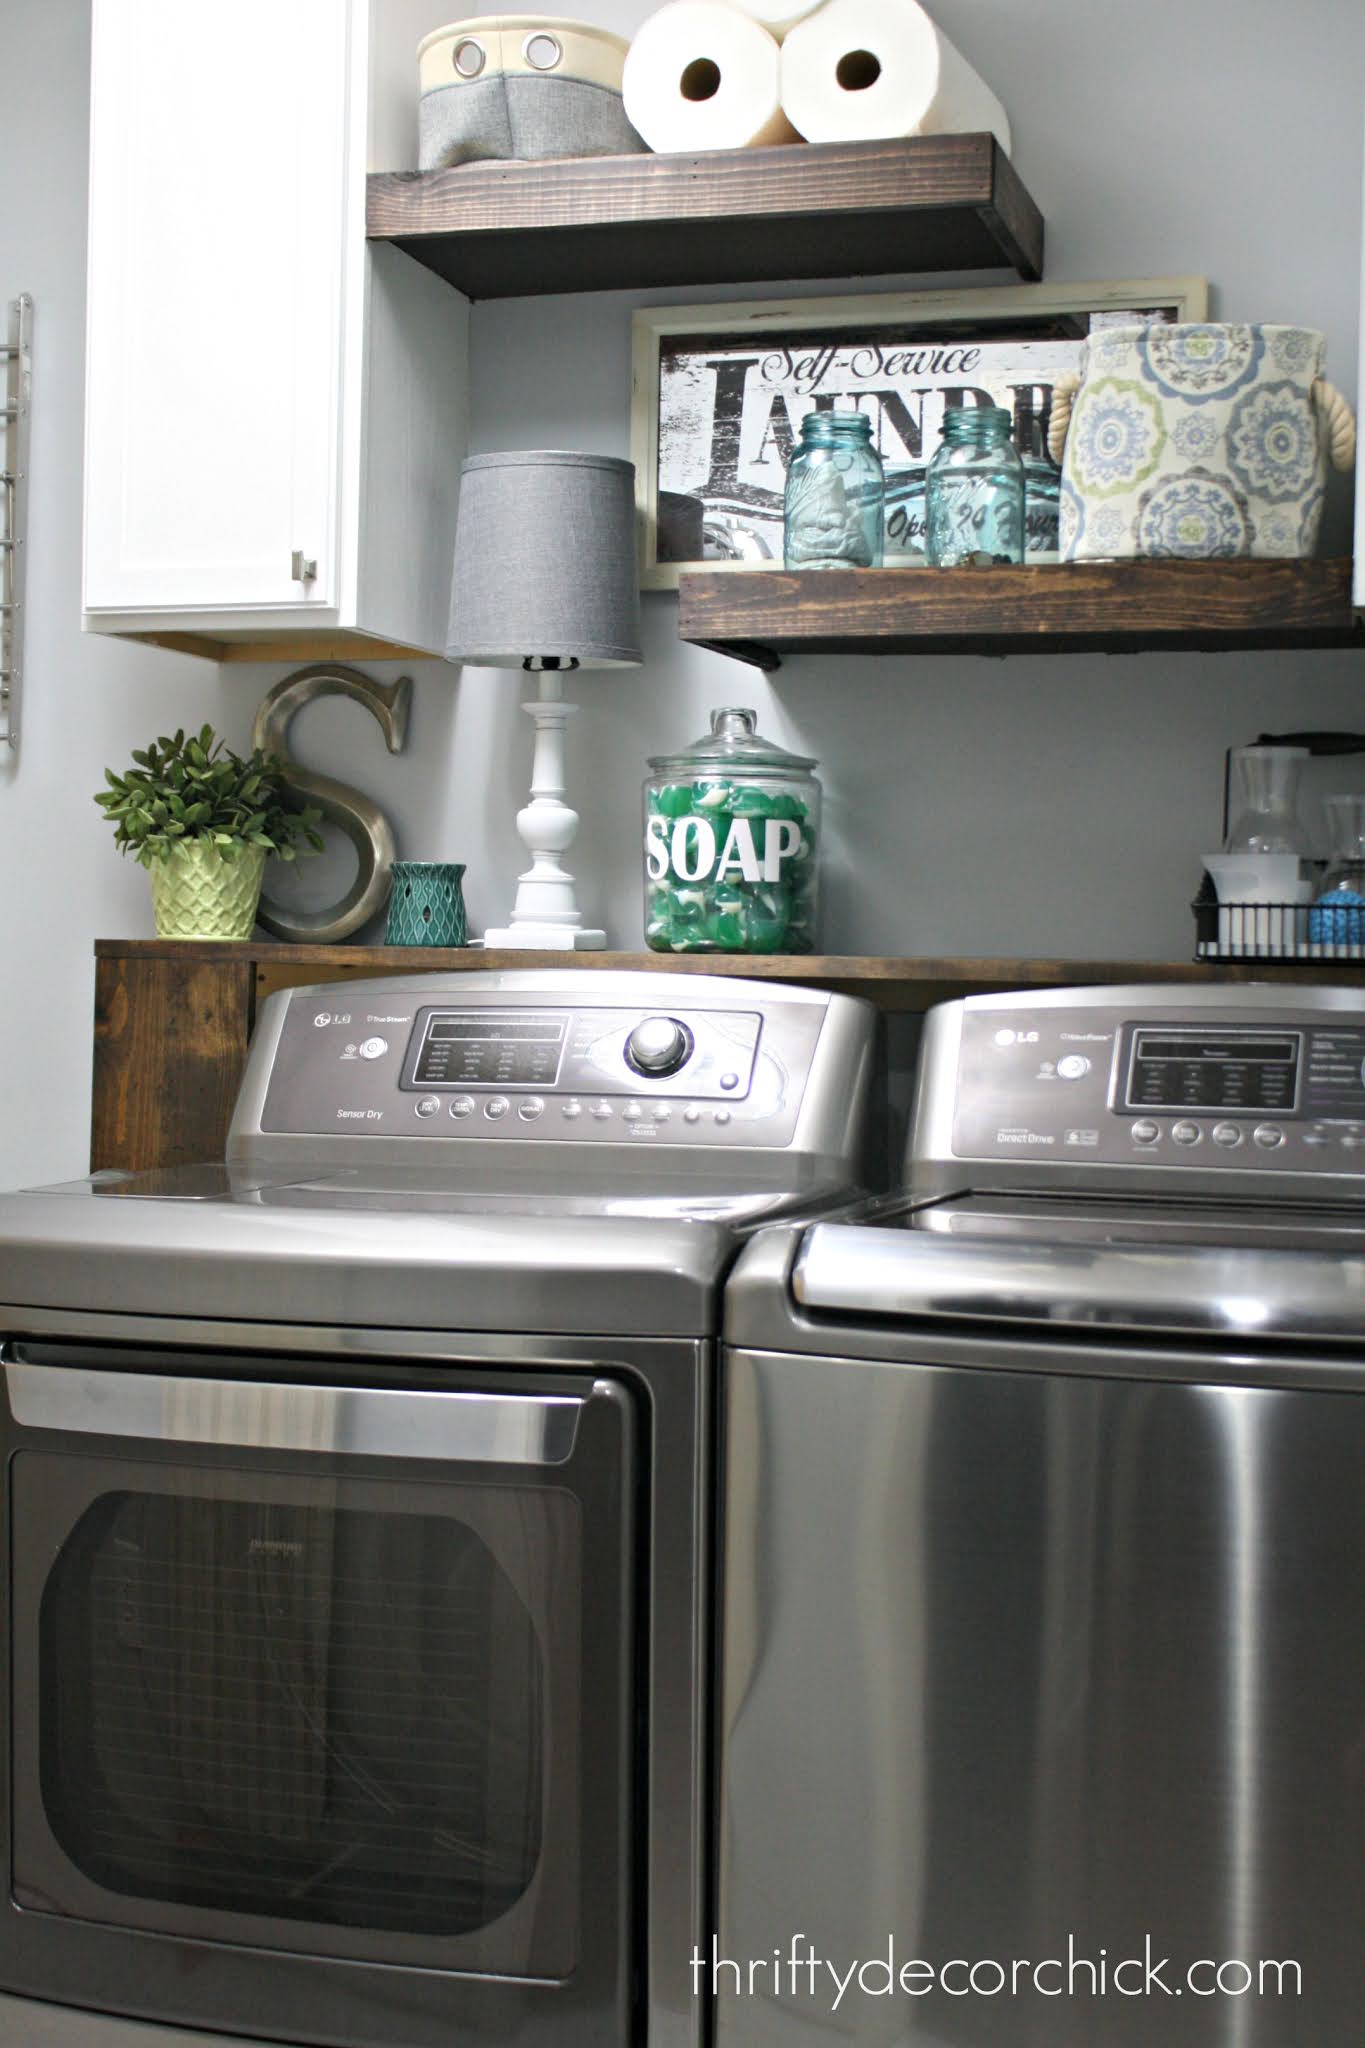
Well hello! The mud/laundry room changes continue, and this project is an oldie but goodie. This is the second time I've added a DIY shelf unit behind our top loader washer and dryer -- I love them!
This room is turning out so beautifully, but it has tested me! I've had problems with almost every DIY project I've worked on in here -- I had to tear half of this one out and do it again. So many of the items I've ordered for the room have been delayed, and items that did arrive on time were wrong or not enough for what I needed.
It's been SO much fun. ? I don't think I've ever had this many problems on a space before. And that's saying a lot considering I've been at this for nearly 20 years!
Thankfully all of them have been worth it in the end! This washer and dryer shelf was something I was really missing in here. As a reminder, this is what we had before:

Not bad at all! But the cabinets were hung at a height that seemed better suited for front loaders -- there was no room underneath to put a shelf, but it was difficult to reach over the washer and dryer and access the cabinets.
**I always get questions about that tray under the washer -- it catches small leaks. It was cracked so we had to replace it for now.
Part of my big plan for this space was to move those cabinets over to another wall in here, with drawer cabinets underneath. I knew as soon as we moved those that it was a great decision!
That created space for the shelf above the washer and dryer -- you can see how I built this shelf to hide the ugly stuff behind the washer and dryer at our old house:
This post may contain affiliate links for your convenience.
See my policies and disclosure page for more information.
It gave us better access to things we reach for most.
I did this one a little different so I could add some more storage space. I started by figuring out the middle spot between the two machines. I hung a piece of scrap wood and drilled it into studs:

This acts as a support for the bottom shelf -- I like to add a little extra security wherever I can!
Then I placed some supports at the sides as well -- I used these to secure my vertical boards (nailed into he side of the supports) as I was building:
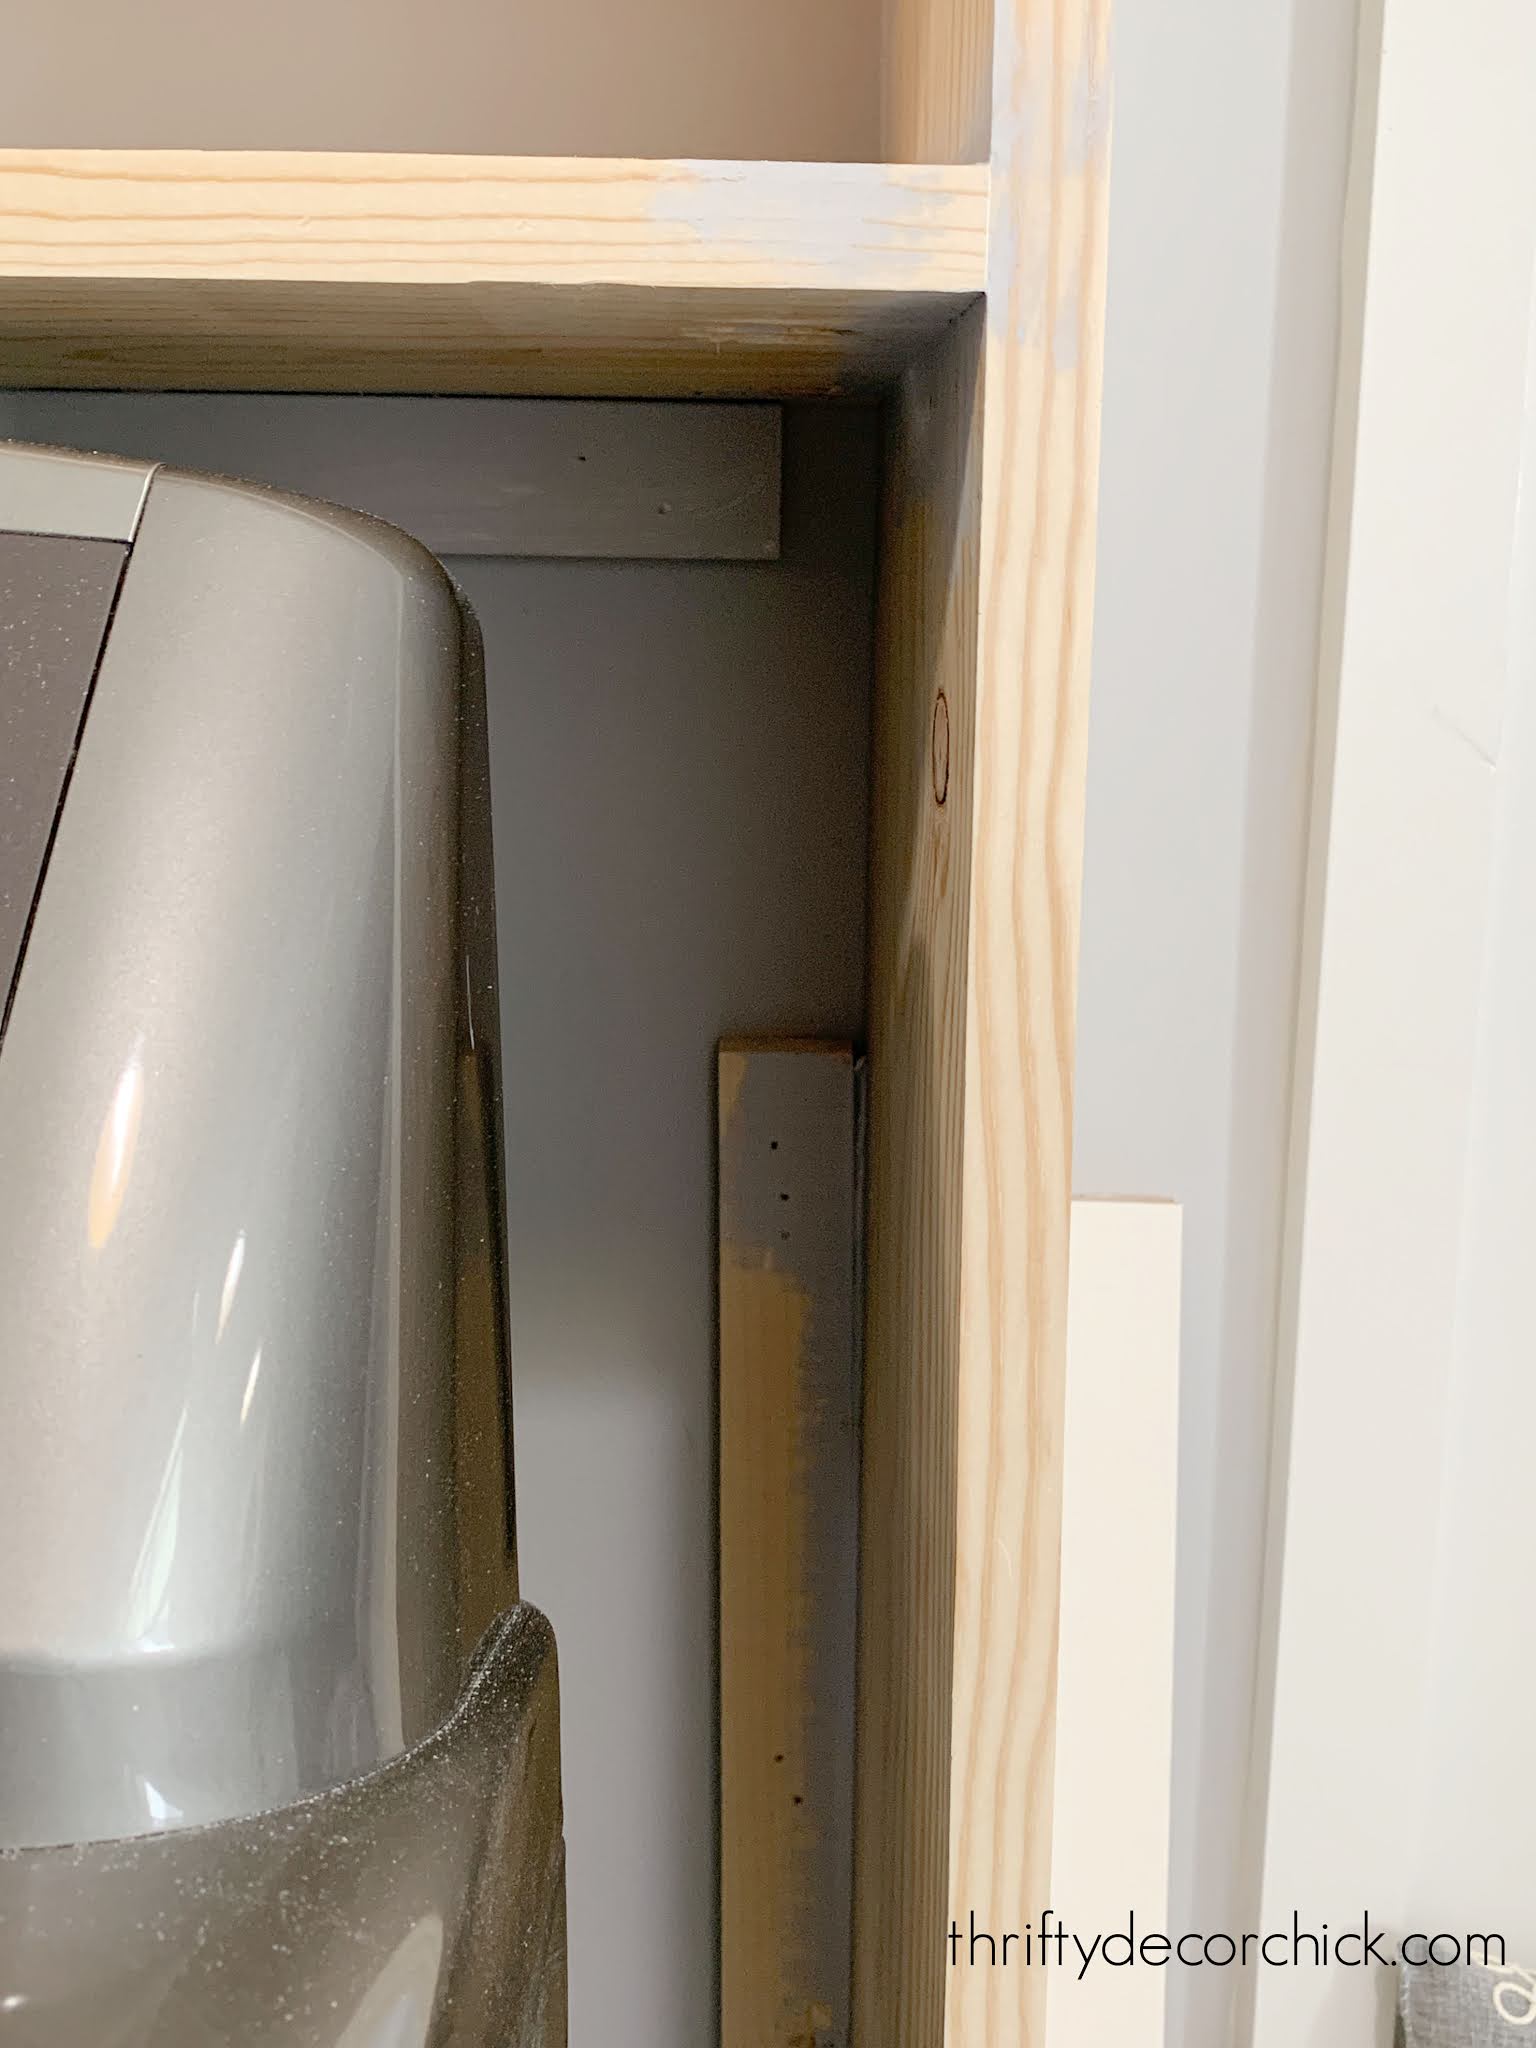
(Ignore that white scrap on the right, it was just leaning there.) They were purely for support at the beginning, but I'm keeping them there so the vertical pieces won't move around. You can't really see these when you're done.
By the way, you can also build this elsewhere and then bring it in and install. I prefer to build it in place so there are no issues with fit and size.
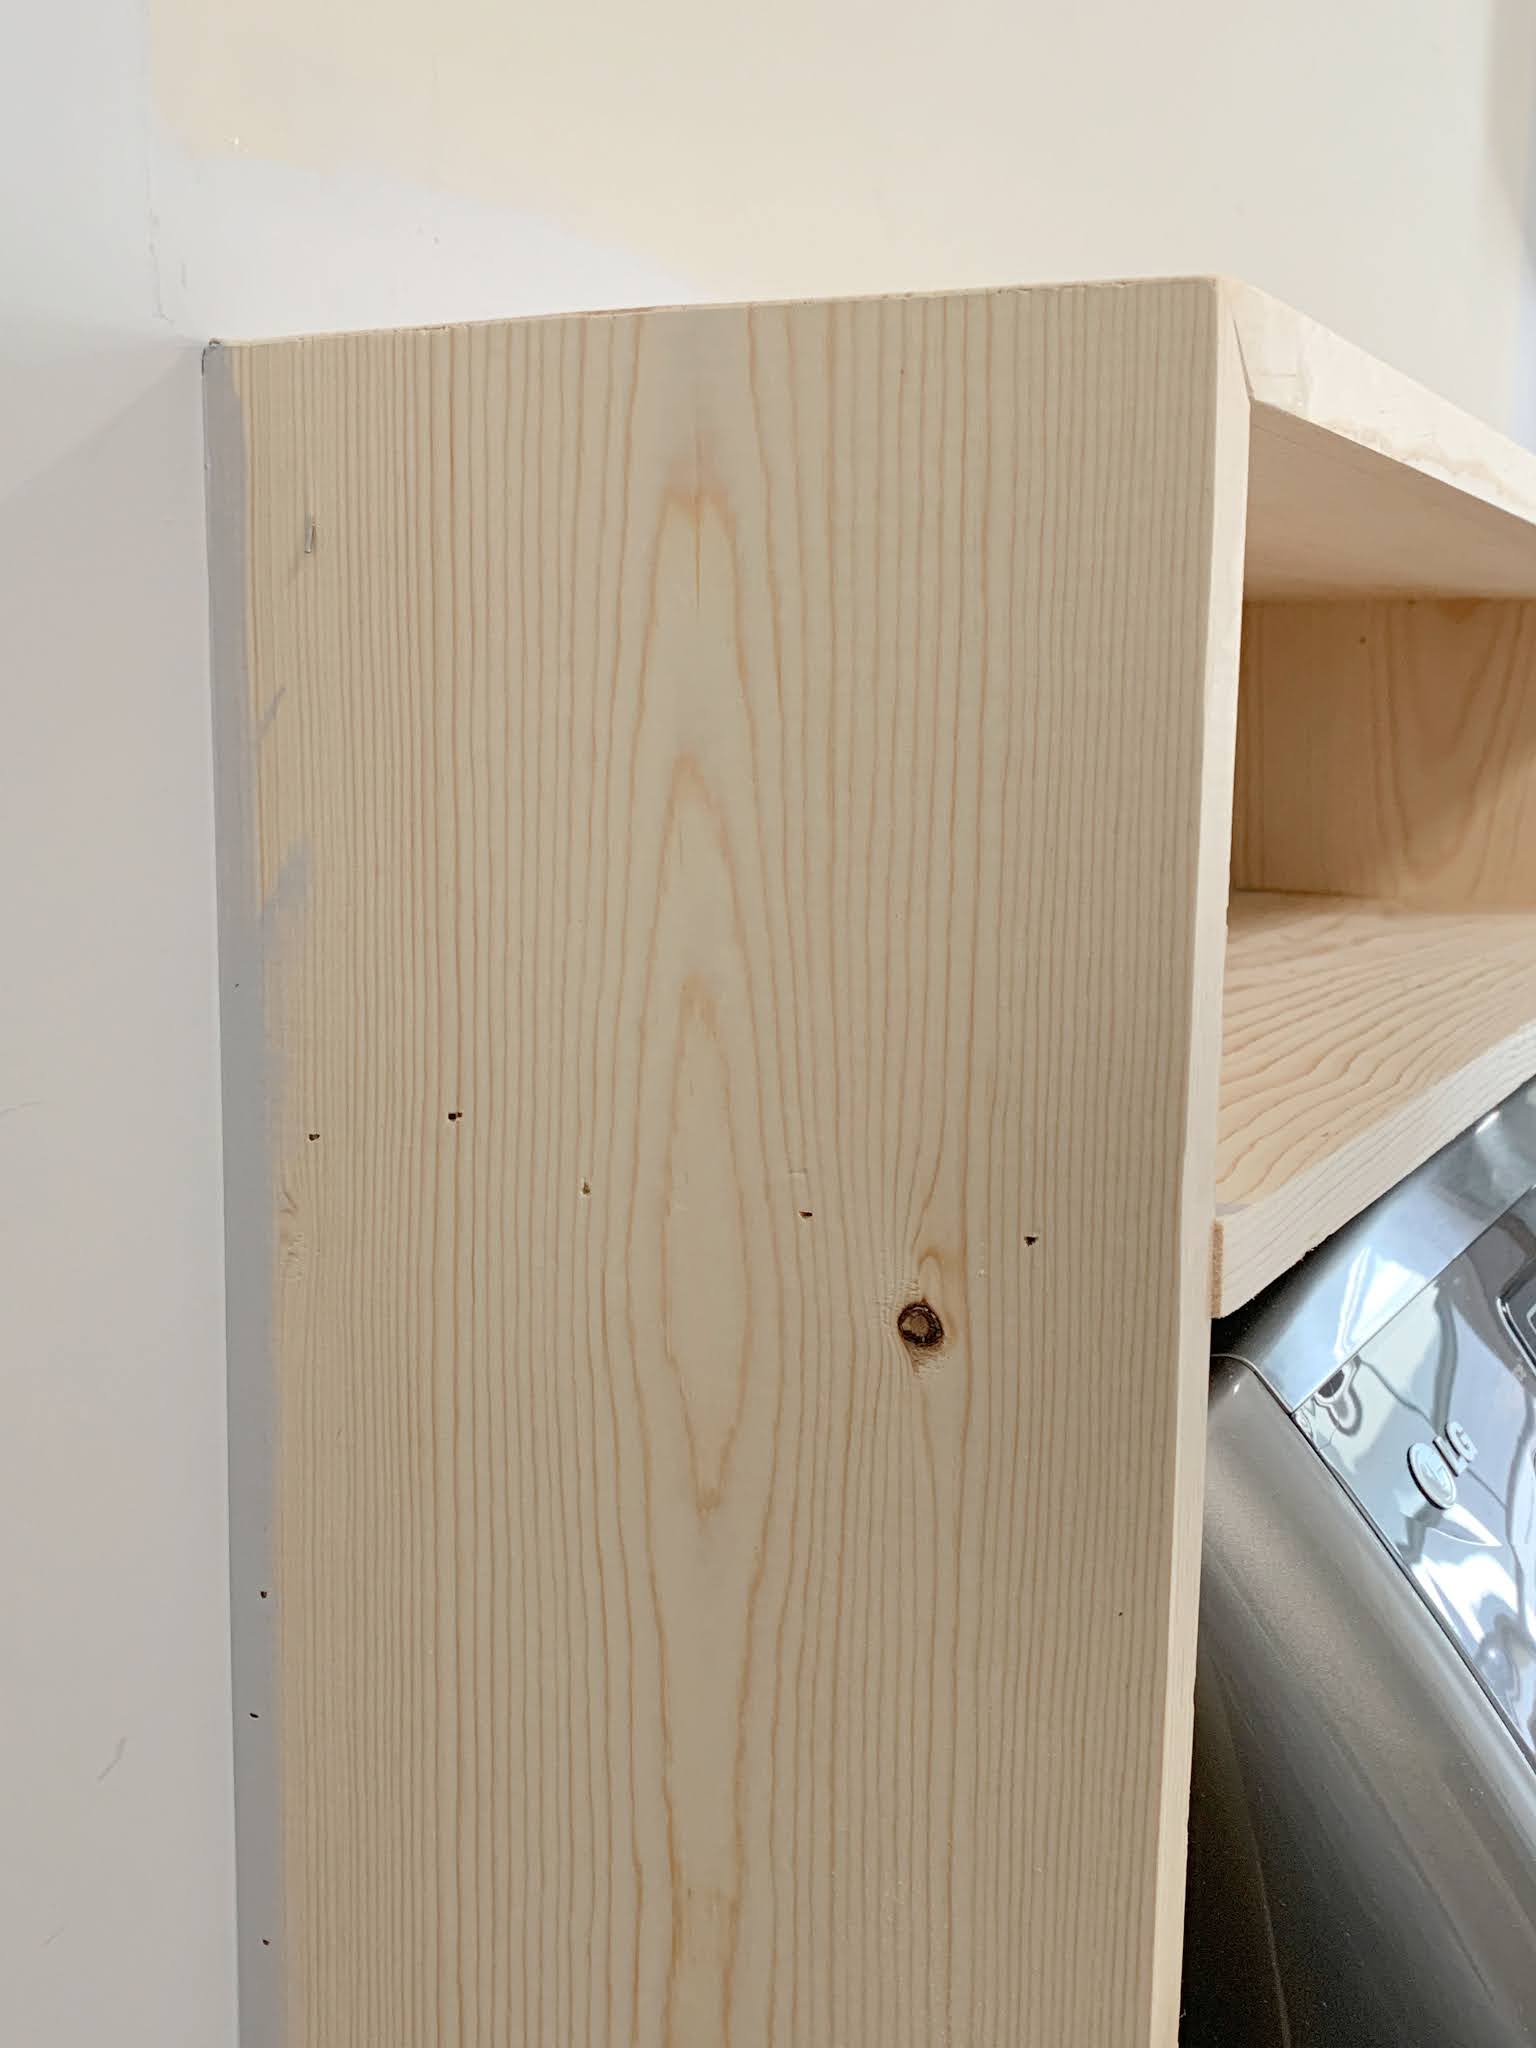
I suggest cutting away your baseboards so the side supports can go flush against the wall:

This makes everything more secure and looks more custom! I use this small oscillating saw and it works great!
The bottom shelf was next -- I attached it to the long horizontal support (the first piece I installed) and the side supports. I nailed it with my nail gun first:
And then secured it from underneath using screws. (I used a Kreg jig to make pocket holes underneath.)
You can also screw into the sides to support that shelf. Just be sure to use a drill bit to make a hole for the screw to go into first -- this will help prevent the wood from splitting. You'll also want to make sure you can cover the head of any screws with putty or trim.
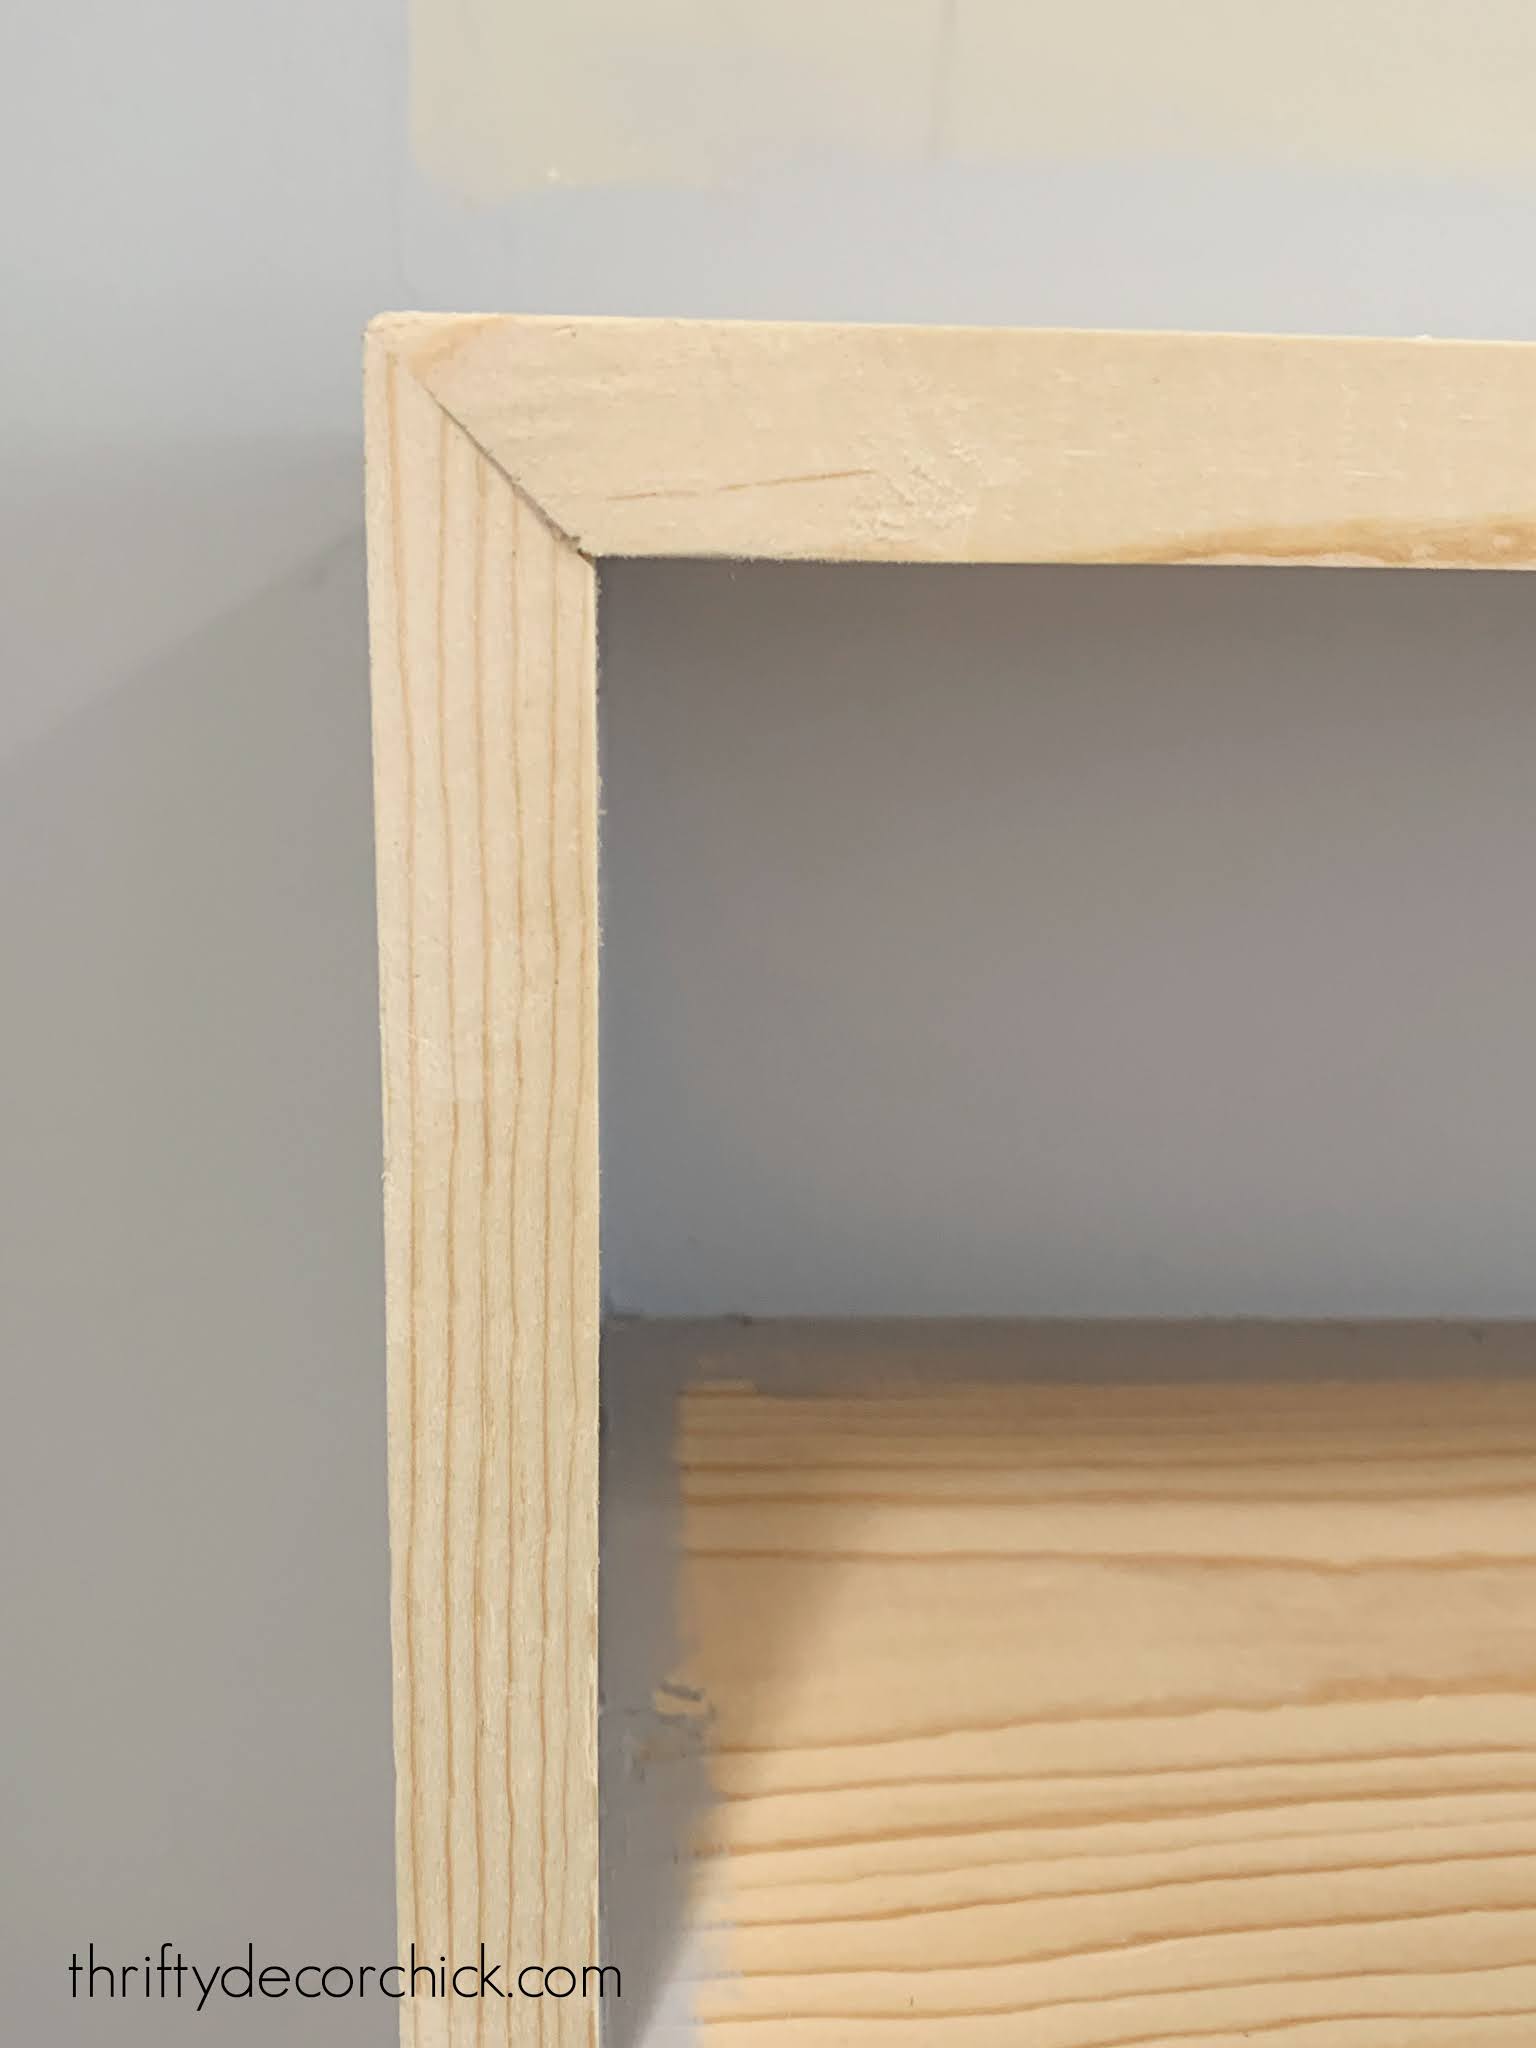
The top piece went on last and I mitered the ends so you don't see any rough edges on the side or top of the shelves:
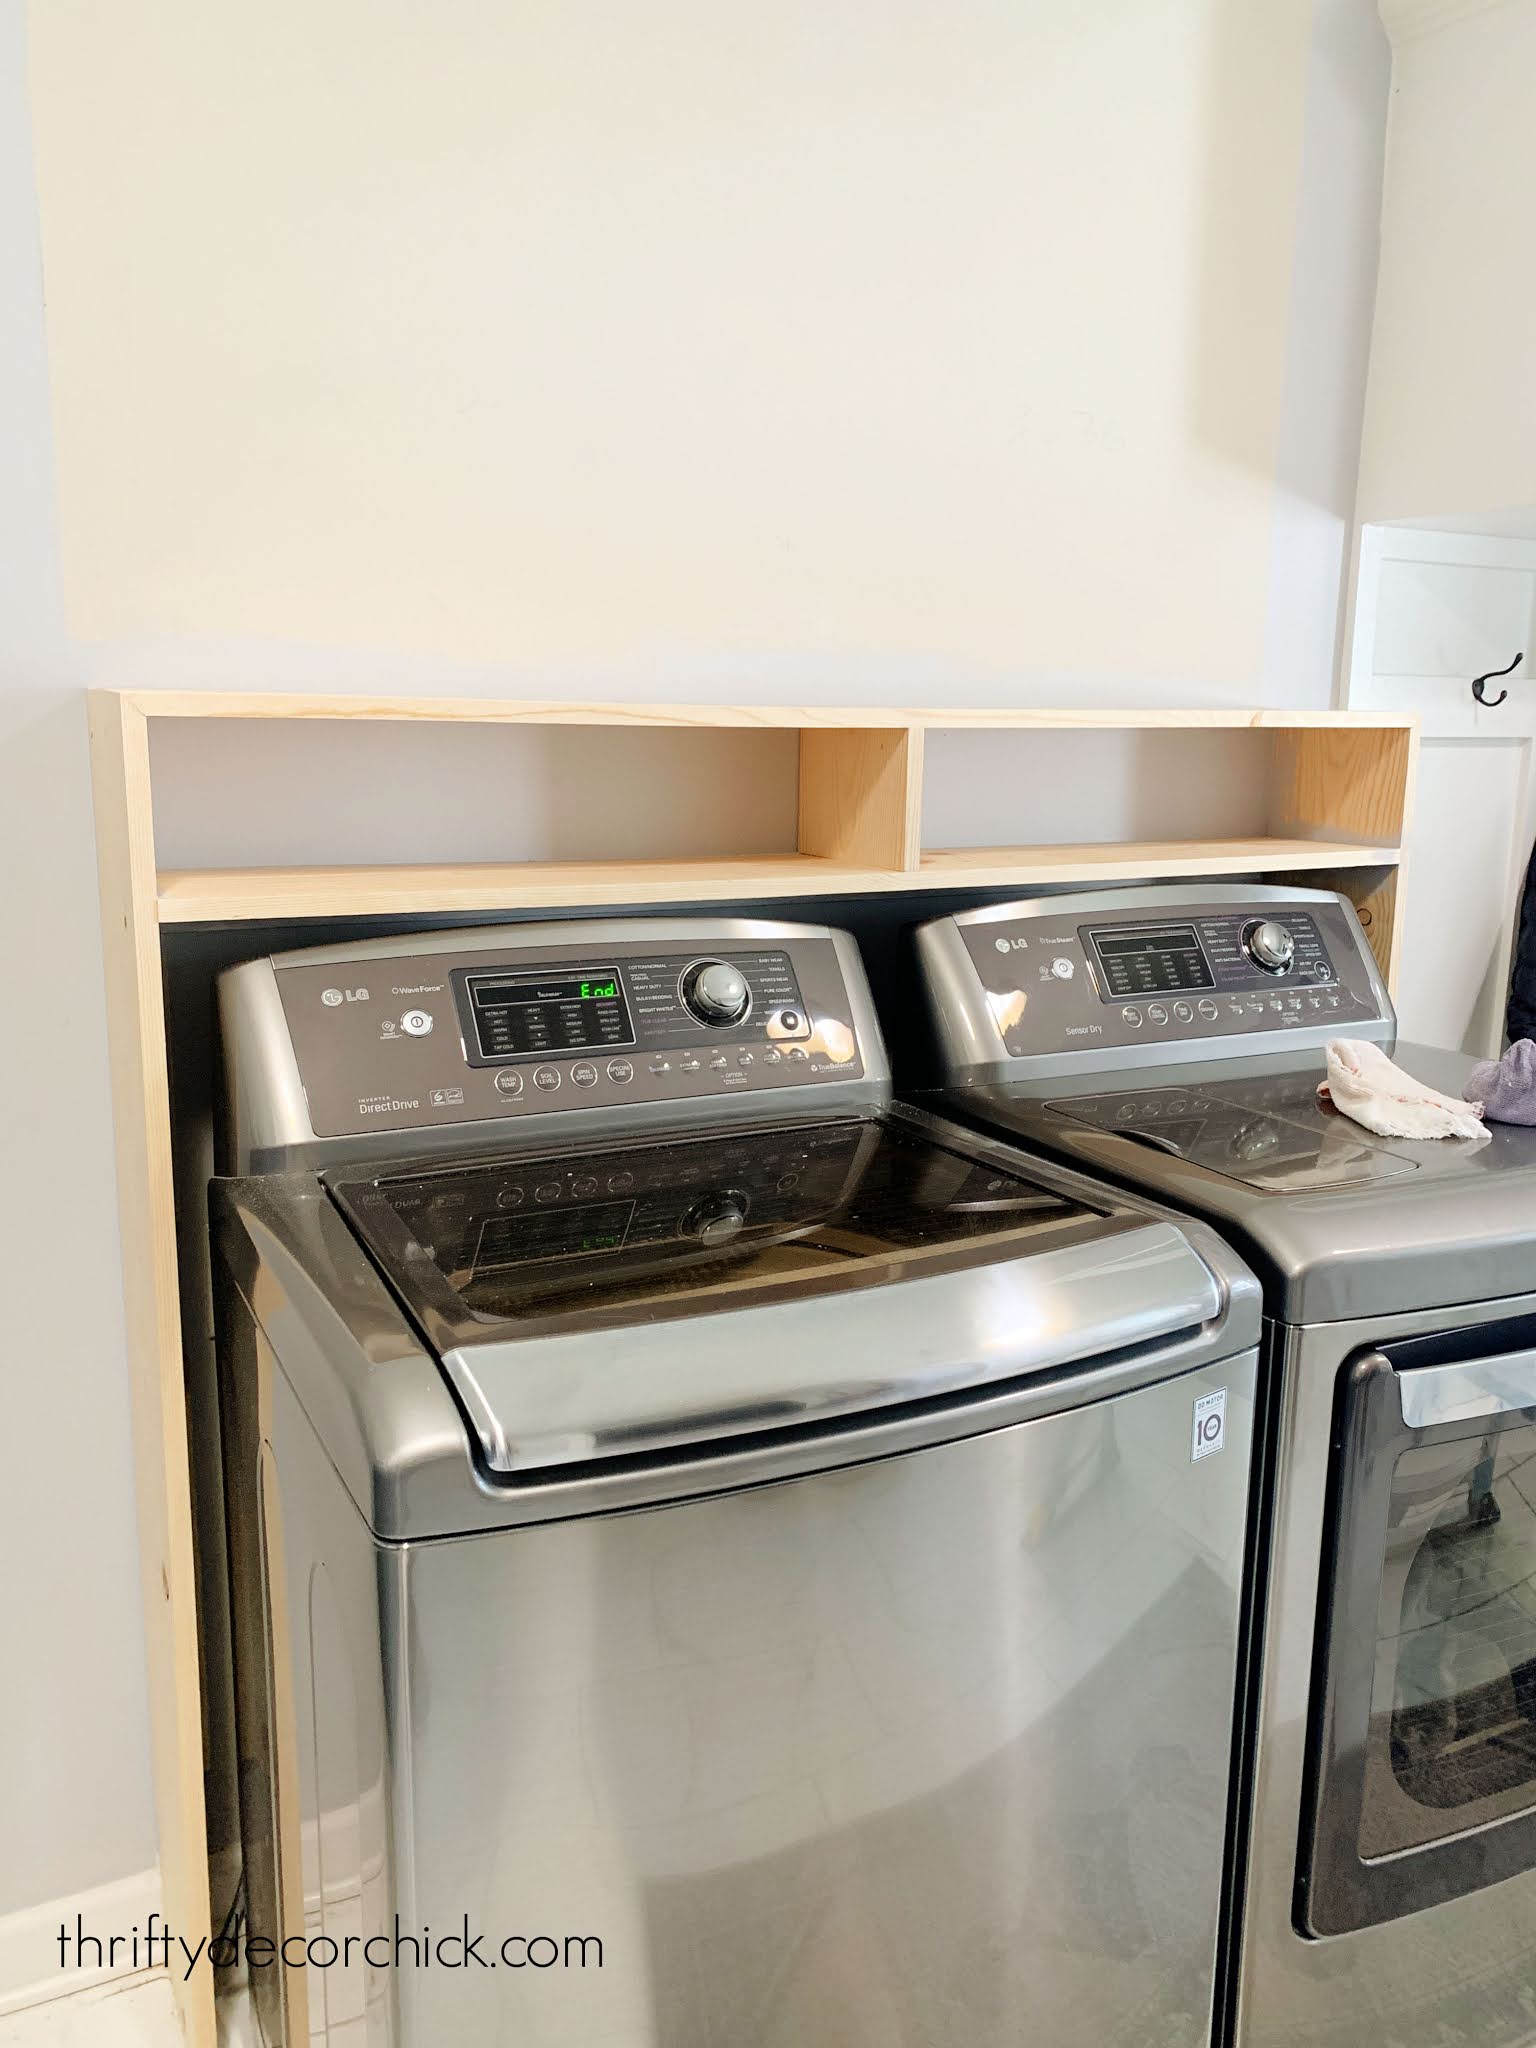
The whole thing was super secure, except for in the middle of the unit. It was bowing a bit with heavier items, so I added a support in the middle that created two sections:

I used common pine for this project -- the cheapest I could find! I was planning to paint instead of staining.
I knew stain would look great, but I wanted it to match the counters we put in here, so I didn't want to mess with trying to find a stain match. I also wanted to tie in into the mud room bench unit right next to it:
I caulked everything, then gave it a few coats of semi-gloss white paint. I ended up adding a simple MDF trim to the front to cover the irregular edges of the wood boards.
It turned out SO great! It's perfect!:
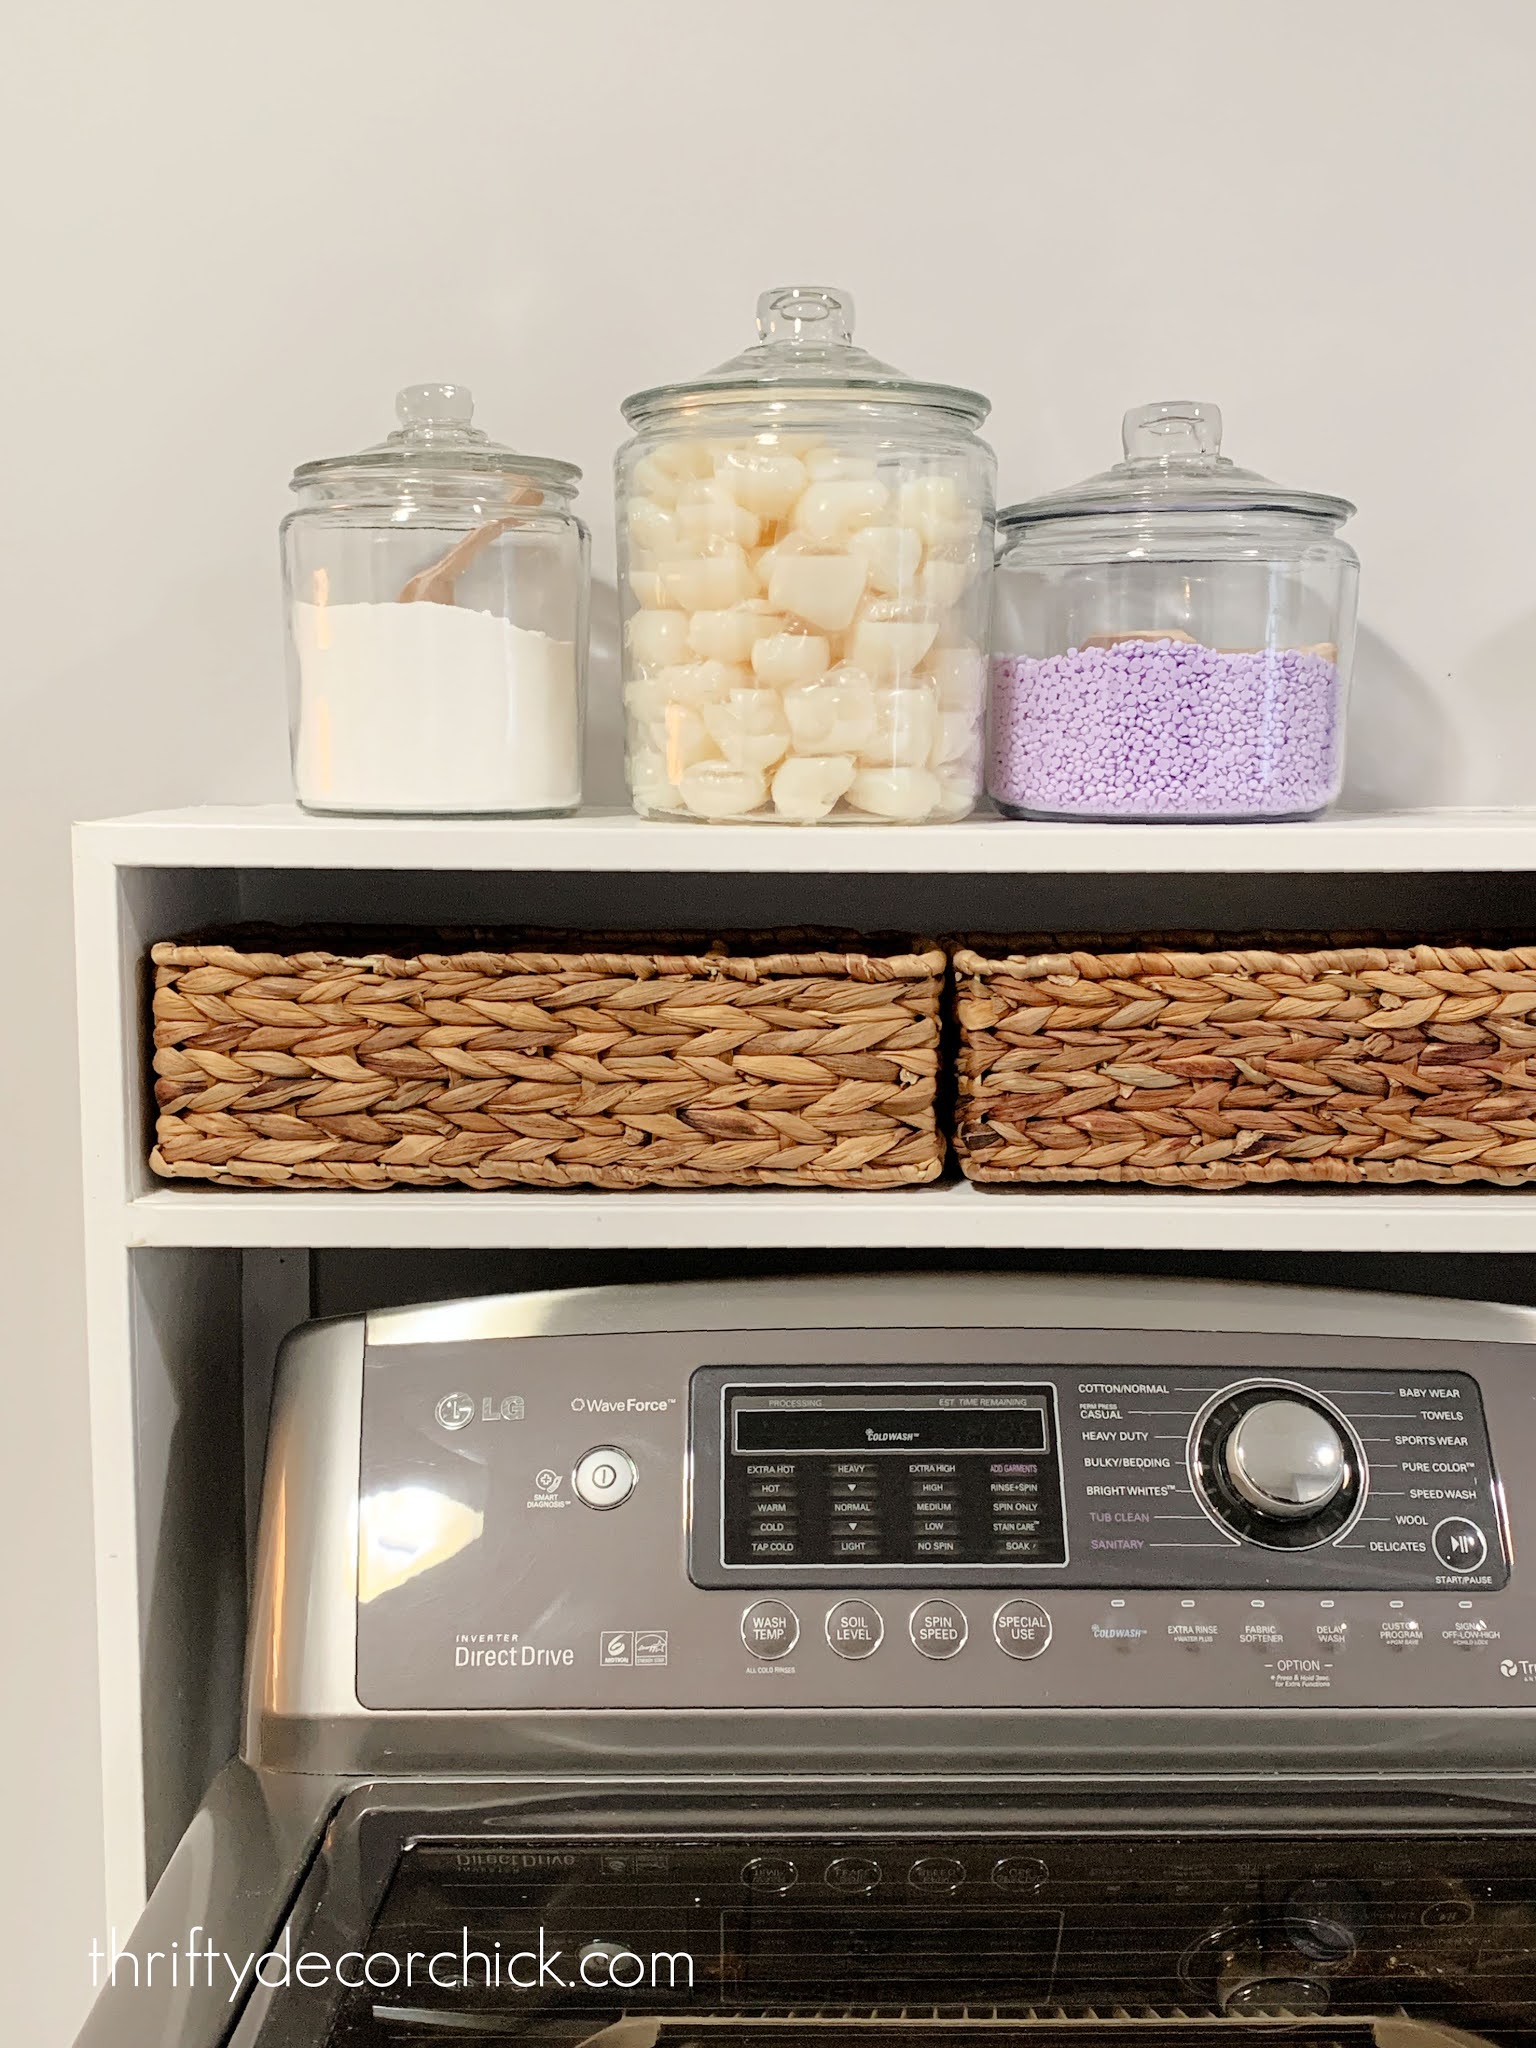
I'll share links to all the items on the shelves below.
I love having everything we need out and easy to access, but also looking really cute. ;) I lucked out and found those cute baskets that fit perfectly on the bottom shelf. I still have more organizing to do, but I just love it!:

I have BIG plans for that wall -- I cannot wait to get started on that! The item I need is on backorder but I'm SO excited about it!
Here's where we started:

And where we are now:
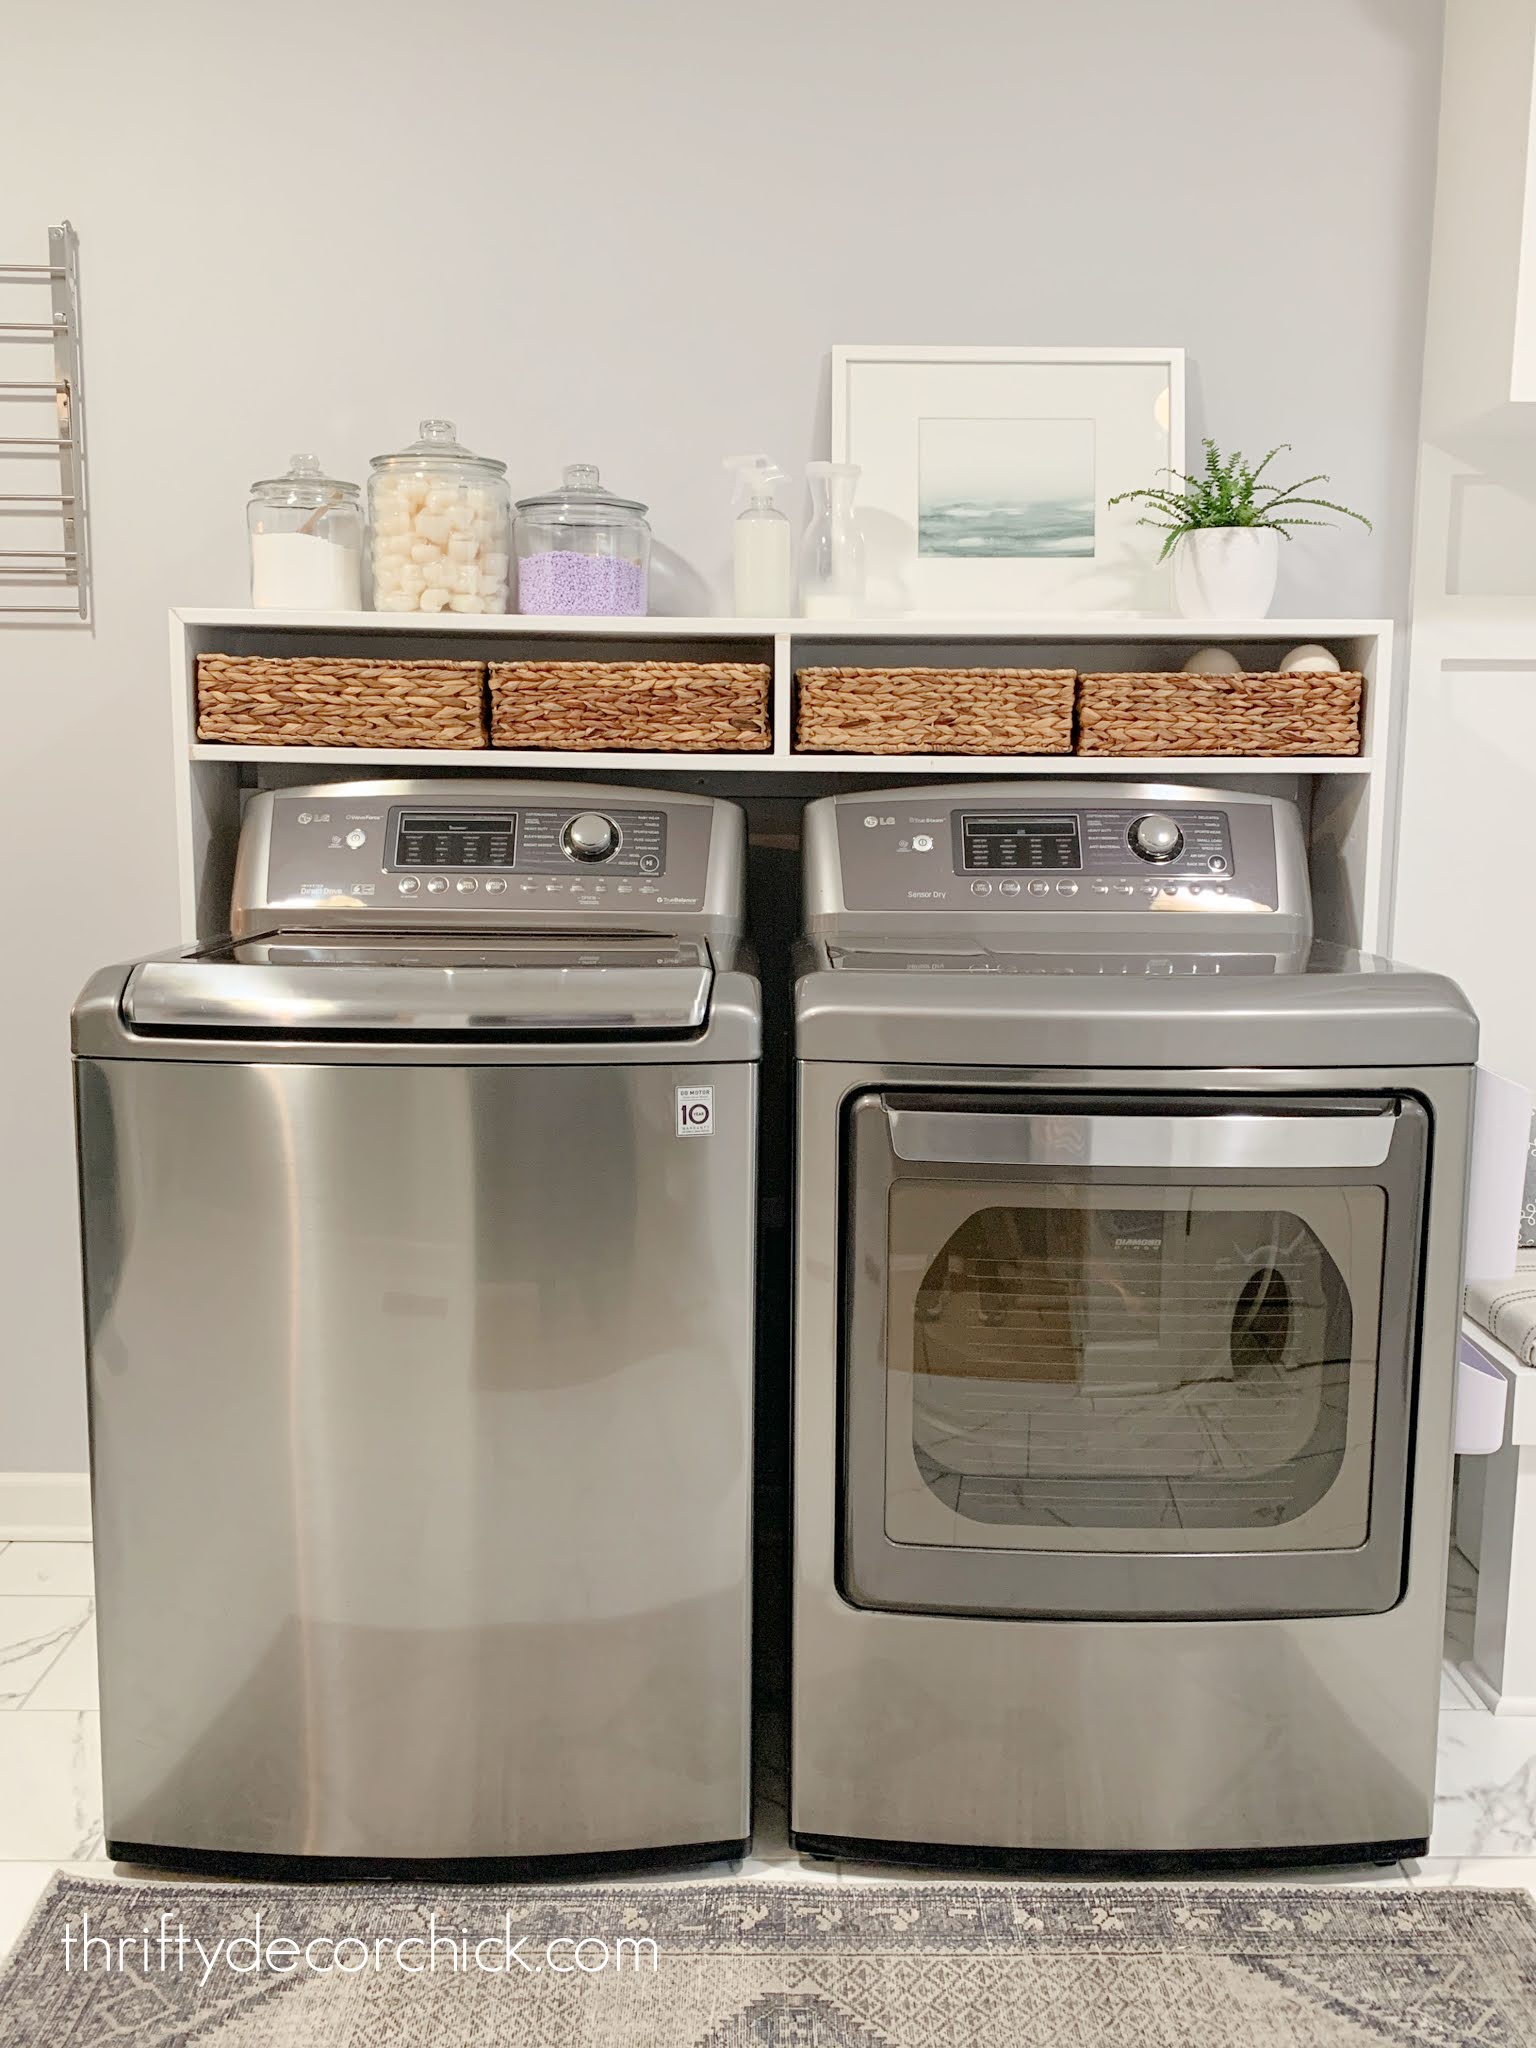
Both look great, but the shelf instead of cabinets (we couldn't reach) is functioning so much better for us! I also love how this unit hides the ugly stuff behind the washer and dryer.
Stay tuned for the final addition on this wall!
Here are sources for the items pictured:
Runner is from At Home
Glass spray bottle for stain spray
See more of our home here. To shop items in our home, click here! Never miss a post by signing up to get posts via email.
Via https://www.thriftydecorchick.com/2021/03/DIY-shelf-top-washer-dryer.html
If you've read this blog for any length of time, you know I'm a HUGE fan of wood counters, or butcher block as it's often called. I've used them in both of our houses in a number of rooms over the years. One of the most common questions I get is where I've purchased the wood counters I've used around our home. I'm sharing all of the places you can find them in stock (today!) at the end of this post.
I may be wrong, but I feel like it used to be much harder to find wood counters readily available for purchase. Maybe the farmhouse design trend increased the availability? Could be. Could be I was living under a rock all those years.
I know some shy away from using wood counters, especially in a kitchen, but they can absolutely hold up to just about anything (heat is the only thing we watch)...and if you treat them well they will hold up great even around a sink.
I shared how I (easily) treat our island butcher block to hold up to moisture here:

This post may contain affiliate links for your convenience.
See my policies and disclosure page for more information.
Wood counters look great stained or just finished with a protective coat -- either one is fine if you use the right products. **If you plan to use your wood counters as an actual chopping block, you'll want to use only food-safe products.
Of course, butcher block isn't just for kitchens. Their warmth contrasts so well against built in bookcases of any color:
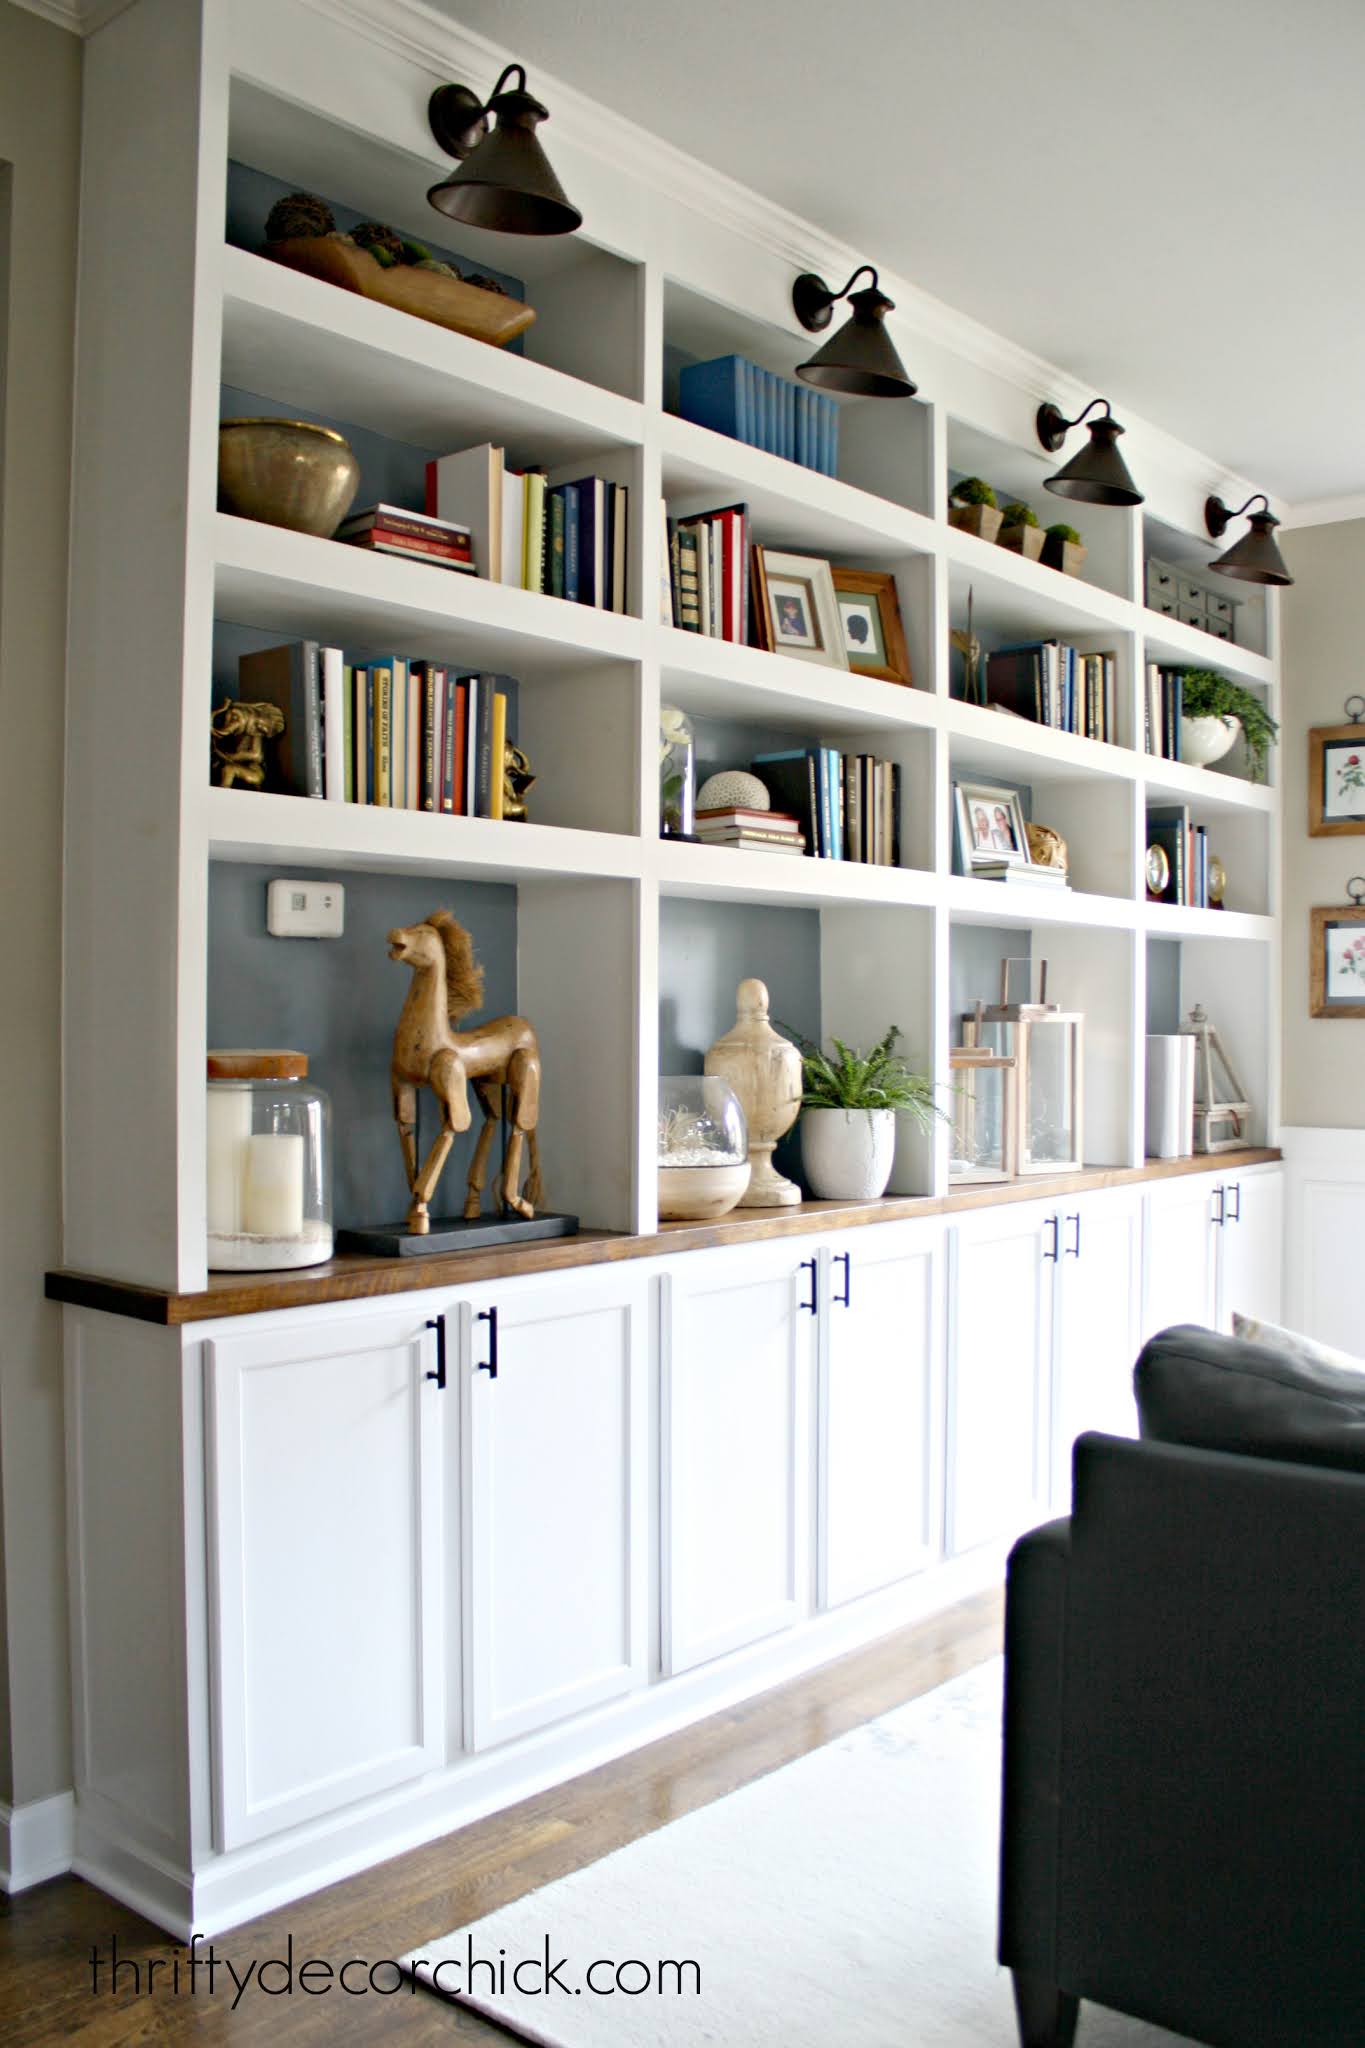
I would use wood counters in every room if I could! :)
If you need to fill a lot of counter space, these can get spendy. I recently shared how I get the look of butcher block counters for a lot less when I used them on our basement bookcase built ins:

I wouldn't use that option in a kitchen, but everywhere else it's a great dupe!
When I'm working on a project and want the warmth of a wood counter, I want it RIGHT THEN. Thankfully we now have so many places that carry butcher block in stock.
When I last showed you the new wall of cabinets in the mud room, I placed our old laminate counters back on until I could pick up the new countertop:

At first I was going to keep this one on there, but then I realized that the butcher I had been coveting for YEARS would be absolutely perfect in this spot.
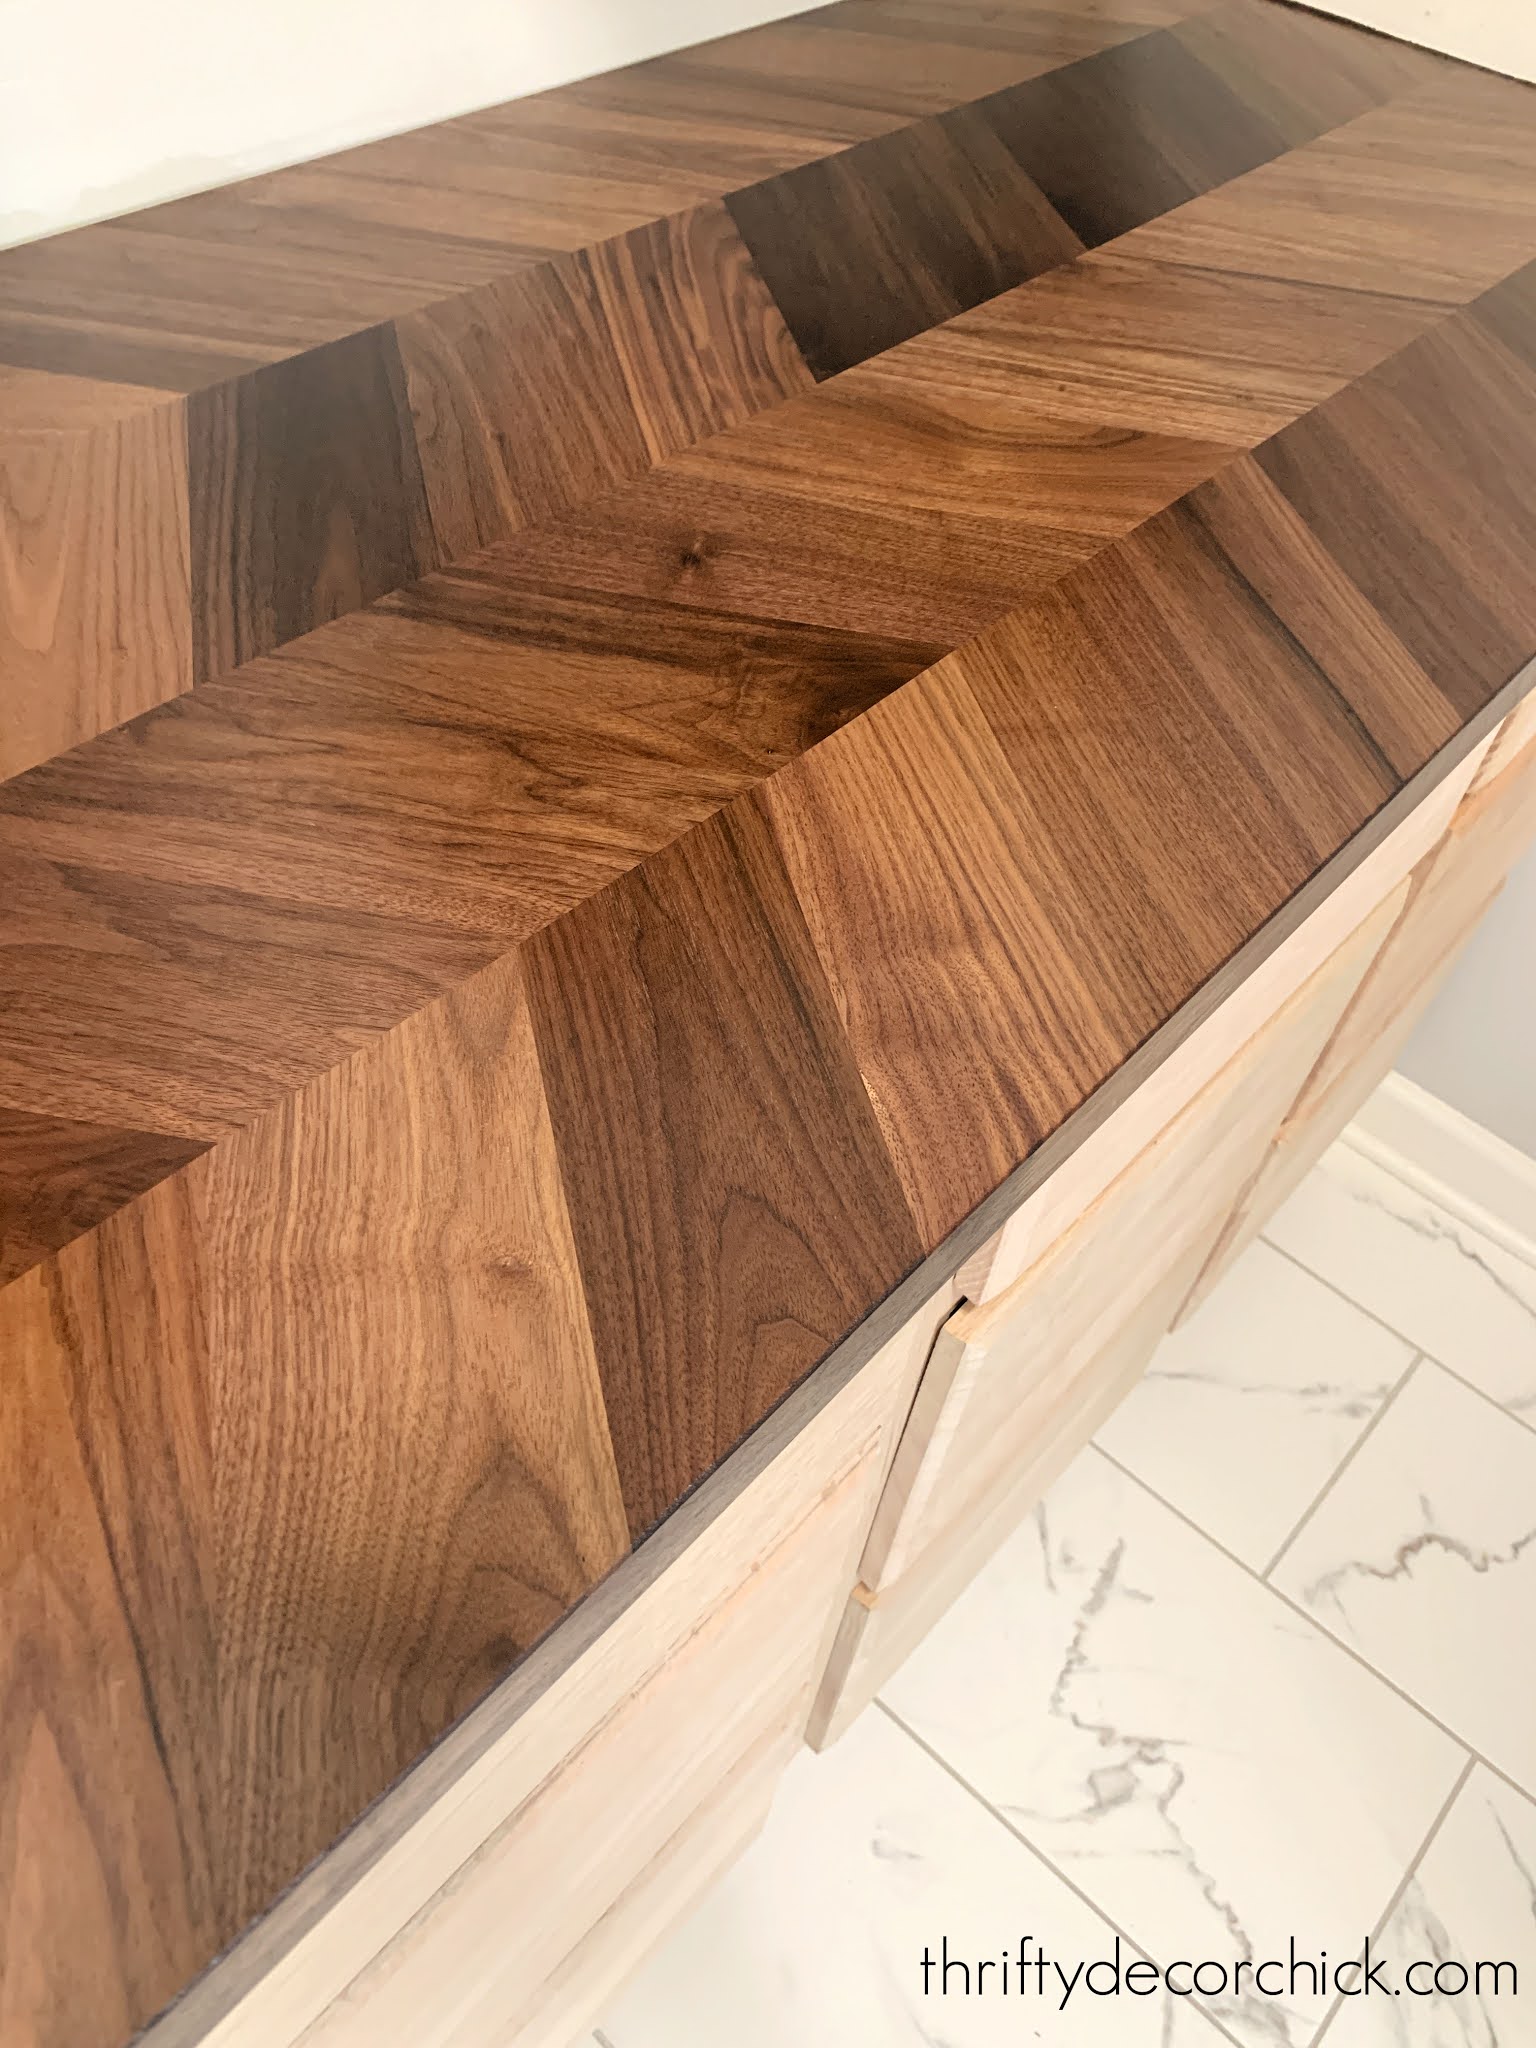
I shared a blogger years ago who installed a beautiful herringbone counter in a bar area and I loved it so much. I decided then that someday I'd use it in our home.
It's the BARKABODA counter from IKEA and it is SO lovely:

IKEA used to carry solid wood counters -- I used them in our previous house. Unfortunately they don't sell solid wood anymore, but the options they do carry have a wood veneer that can be sanded and/or treated just like butcher block (at least a few times).
It can also be cut just like a solid wood counter:

Side note -- that Kreg circular saw guide is the bomb! It made easy work of cutting this at home. Make sure to cut from the bottom of your piece if you're using a circular saw or jigsaw. Ikea provides end pieces for any exposed cuts, but I didn't need it since this side goes against the wall.
This counter isn't exactly cheap (less than most solid surface counters though). This spot was perfect because I only needed six feet, so it wasn't going to kill my budget.
After I got it installed I wasn't sure it even needed to be treated -- it was so beautiful on it's own. But I figured it would only enhance the look and protect it as well.
My go-to for treating wood counters is Tung oil:
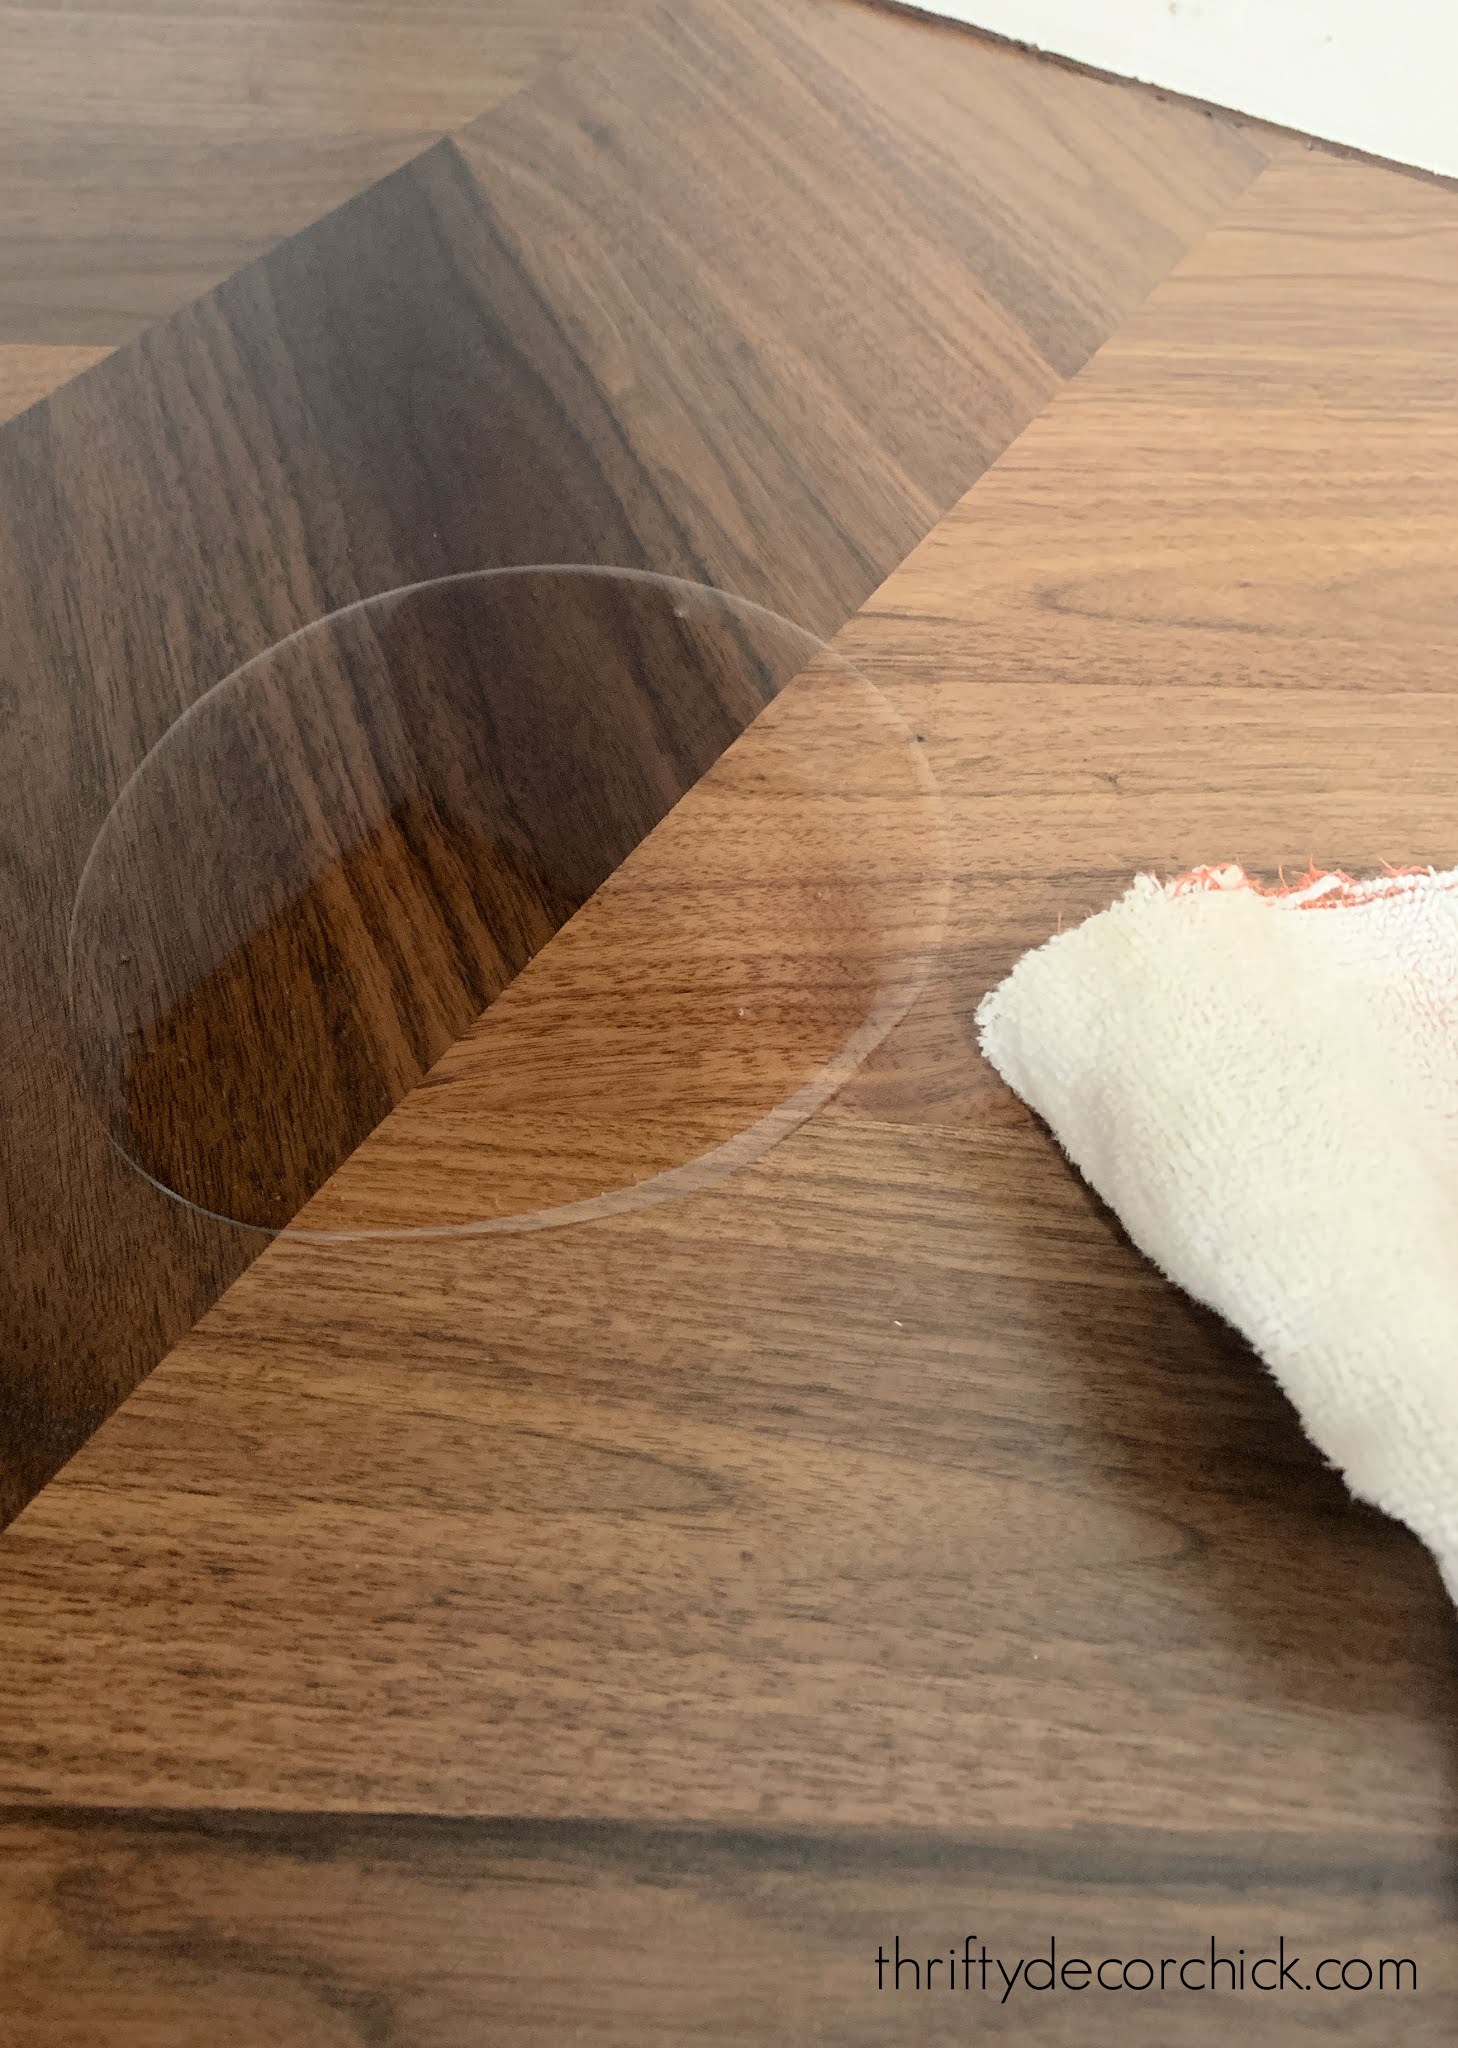
You can see how to apply Tung oil and why I use it for wood counters here. It's such a great option for treating wood -- low cost, easy application and protects against water and stains SO well. This is the Tung oil I used this time. (Formby's was the best, it is now under the Minwax name.)
It gives wood new life and makes it shine (literally):
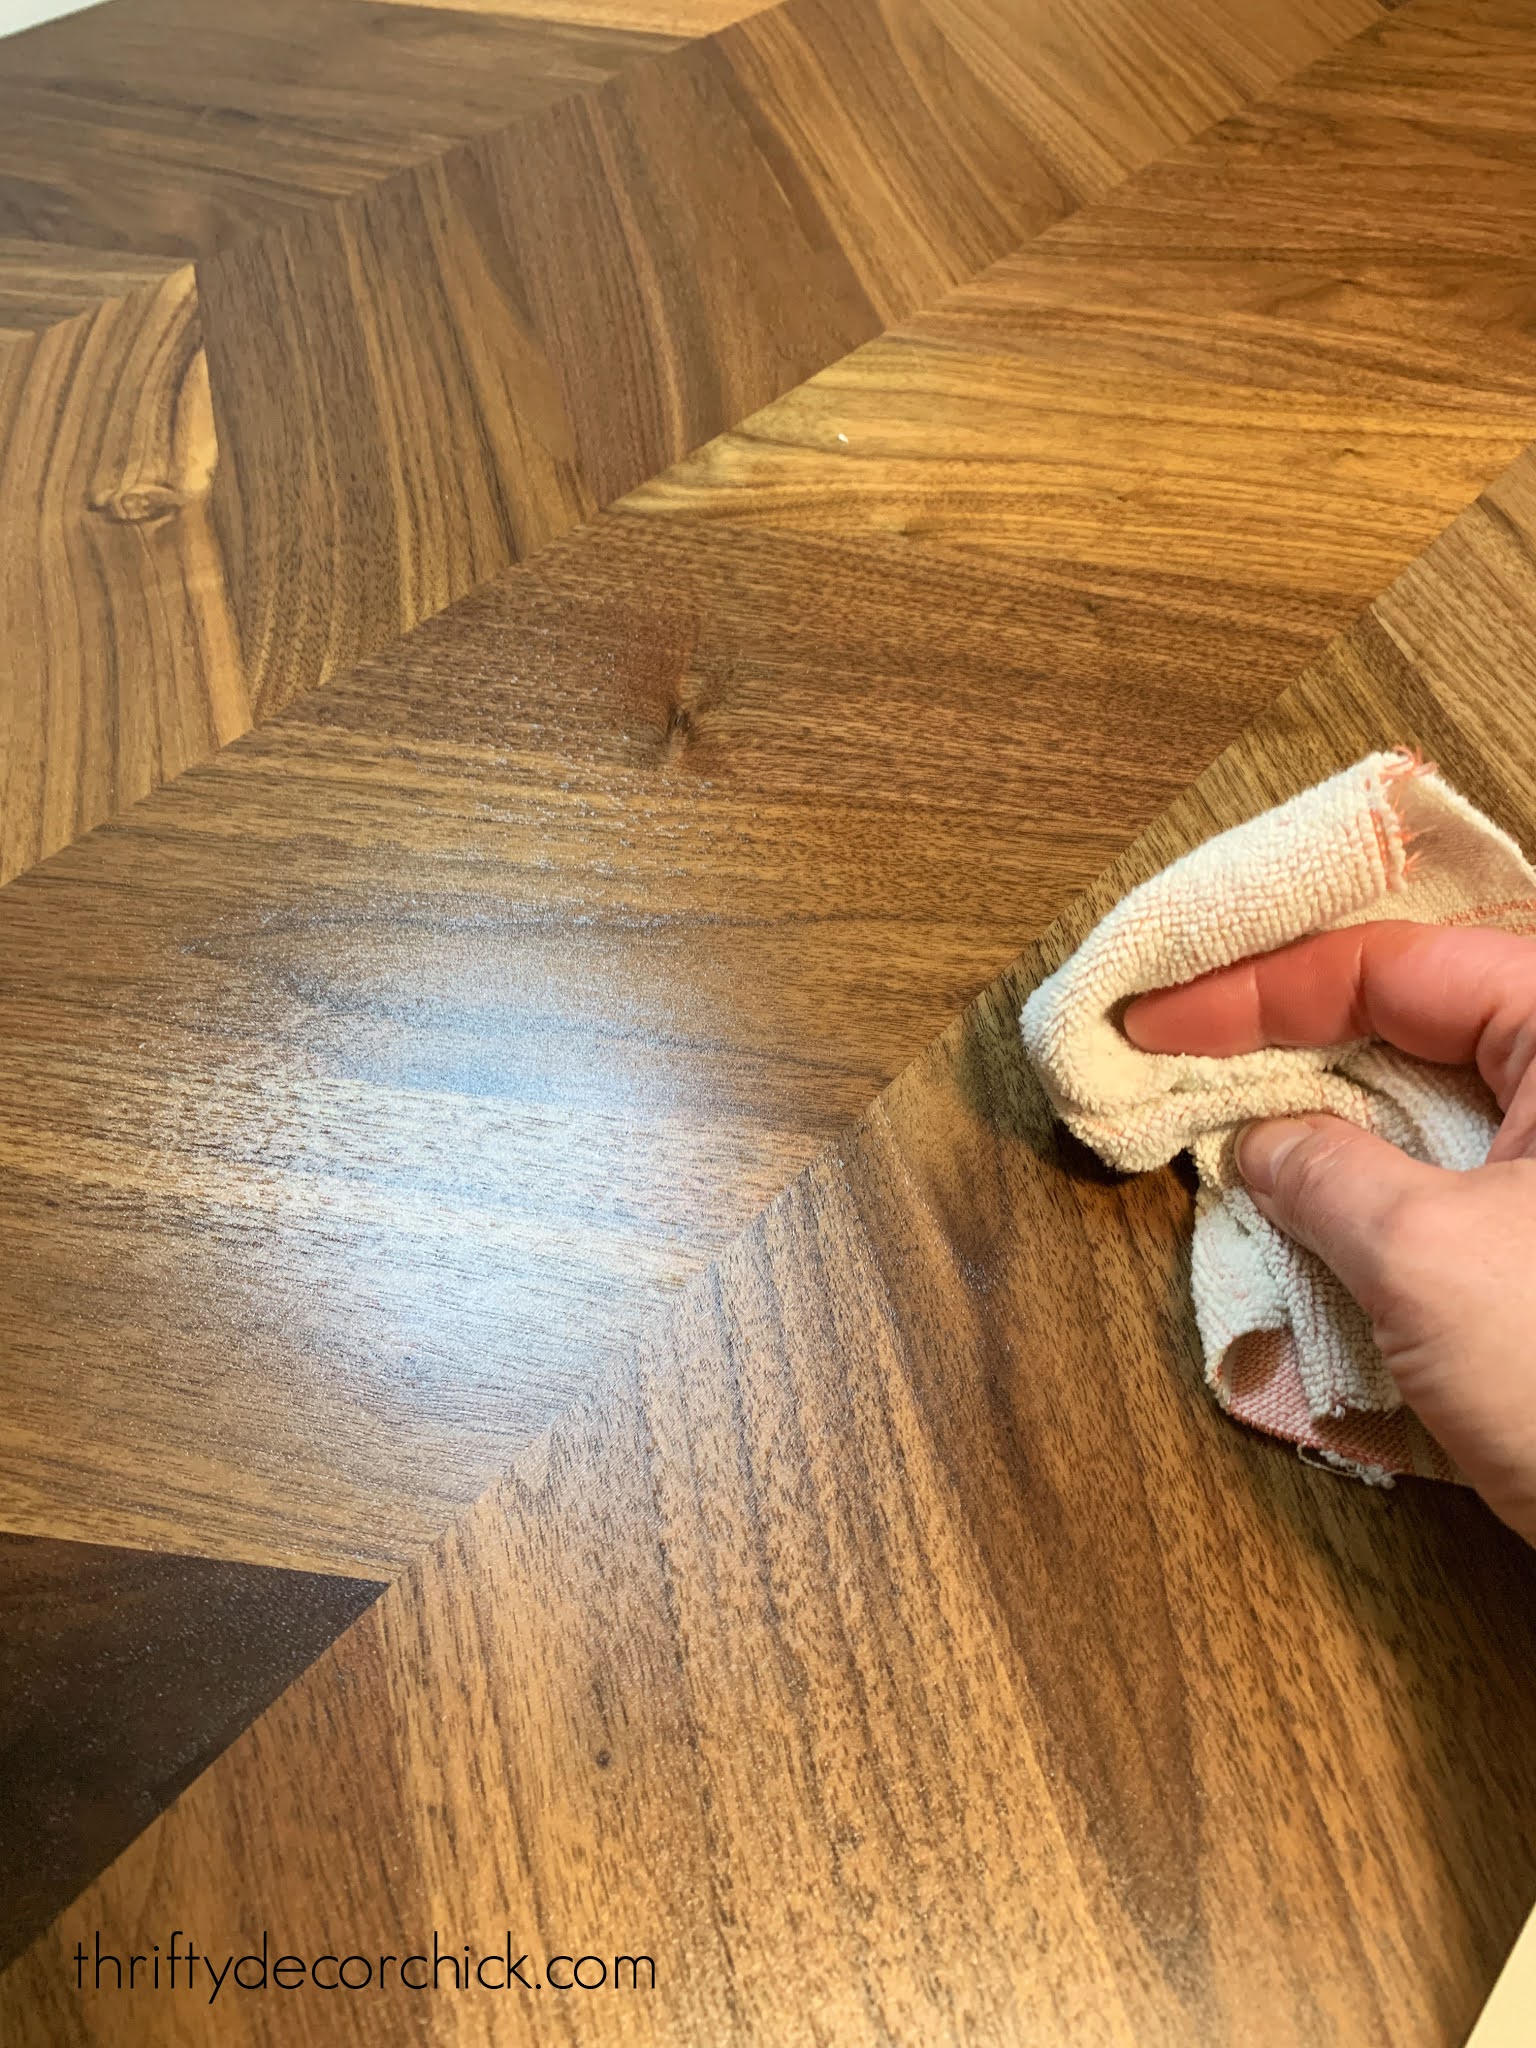
Geesh, I love it! I've tried other methods for protecting wood counters and this is the absolute best. My Dad is the one who told me to use it, and we all know Dads are always right! ?
Isn't she lovely? I love the dark walnut and the herringbone design:
Thankfully there are a BUNCH of places you can find butcher block wood counters to pick up today if you are working on a project. All of these links take you to the options available at each location. On some you'll need to toggle the option for "in your local store" to see what they have available to buy immediately.
Also -- all but the IKEA options are solid wood. Some butcher block is the more traditional look with different tones throughout, and some are more uniform and simple -- it just depends on the look you want.
Where to find butcher block you can take home today:
**Also, search for lumbar yards near you. I've purchased from local companies as well. They usually offer more variety and can also cut them to the size you'll need.
Am I forgetting any places you've found butcher block in stock? Have you used these beauties anywhere in your home?
See more of our home here. To shop items in our home, click here! Never miss a post by signing up to get posts via email.
Via https://www.thriftydecorchick.com/2021/03/where-to-buy-butcher-block-counters.html
I'm back with more progress on Project Add More Storage in our mud/laundry space! It's coming together so beautifully! I've been adding storage, changing up storage and moving things around to make this room function so much better for us.
Last I left you, I finished up the simple shelves at the end of the closet in that room:
I love this little trick for using that dead space in a closet!
Next up, I needed to add a little something to one of the closet doors MANY of you have been wondering where we were going to put our litter boxes. Shortly after we moved in I added a DIY "curtain" and hid the kitty litter under the folding table:
This post may contain affiliate links for your convenience.
See my policies and disclosure page for more information.
Since then we've installed drawer base cabinets here instead (you can see how to install cabinets here). I love them SO MUCH.
We knew we'd have to move the litter and had two options. One was in the basement storage room and one was still in this room, but in the closet pictured above instead. We knew it would be much easier to keep up with scooping if we had them closer to the main living area, so the mud room closet it was!
In order to do that, I needed to clean it out quite a bit. That's why I added the shelves along the side as well -- I wanted that to become a spot to keep ALL of the pet supplies.
In order to move the litter boxes in here, we needed a way for the cats to come and go. I found this adorable cat shaped kitty door and got to work installing it:

You definitely want to take the door down for this install. I did it in the mud room -- our doors are crazy heavy! (This is up on supports.)
Measure for the center of the door at the bottom:

They make it easy! The cat door comes with a template to cut out and trace onto the door:

My helper was there to assist like usual:
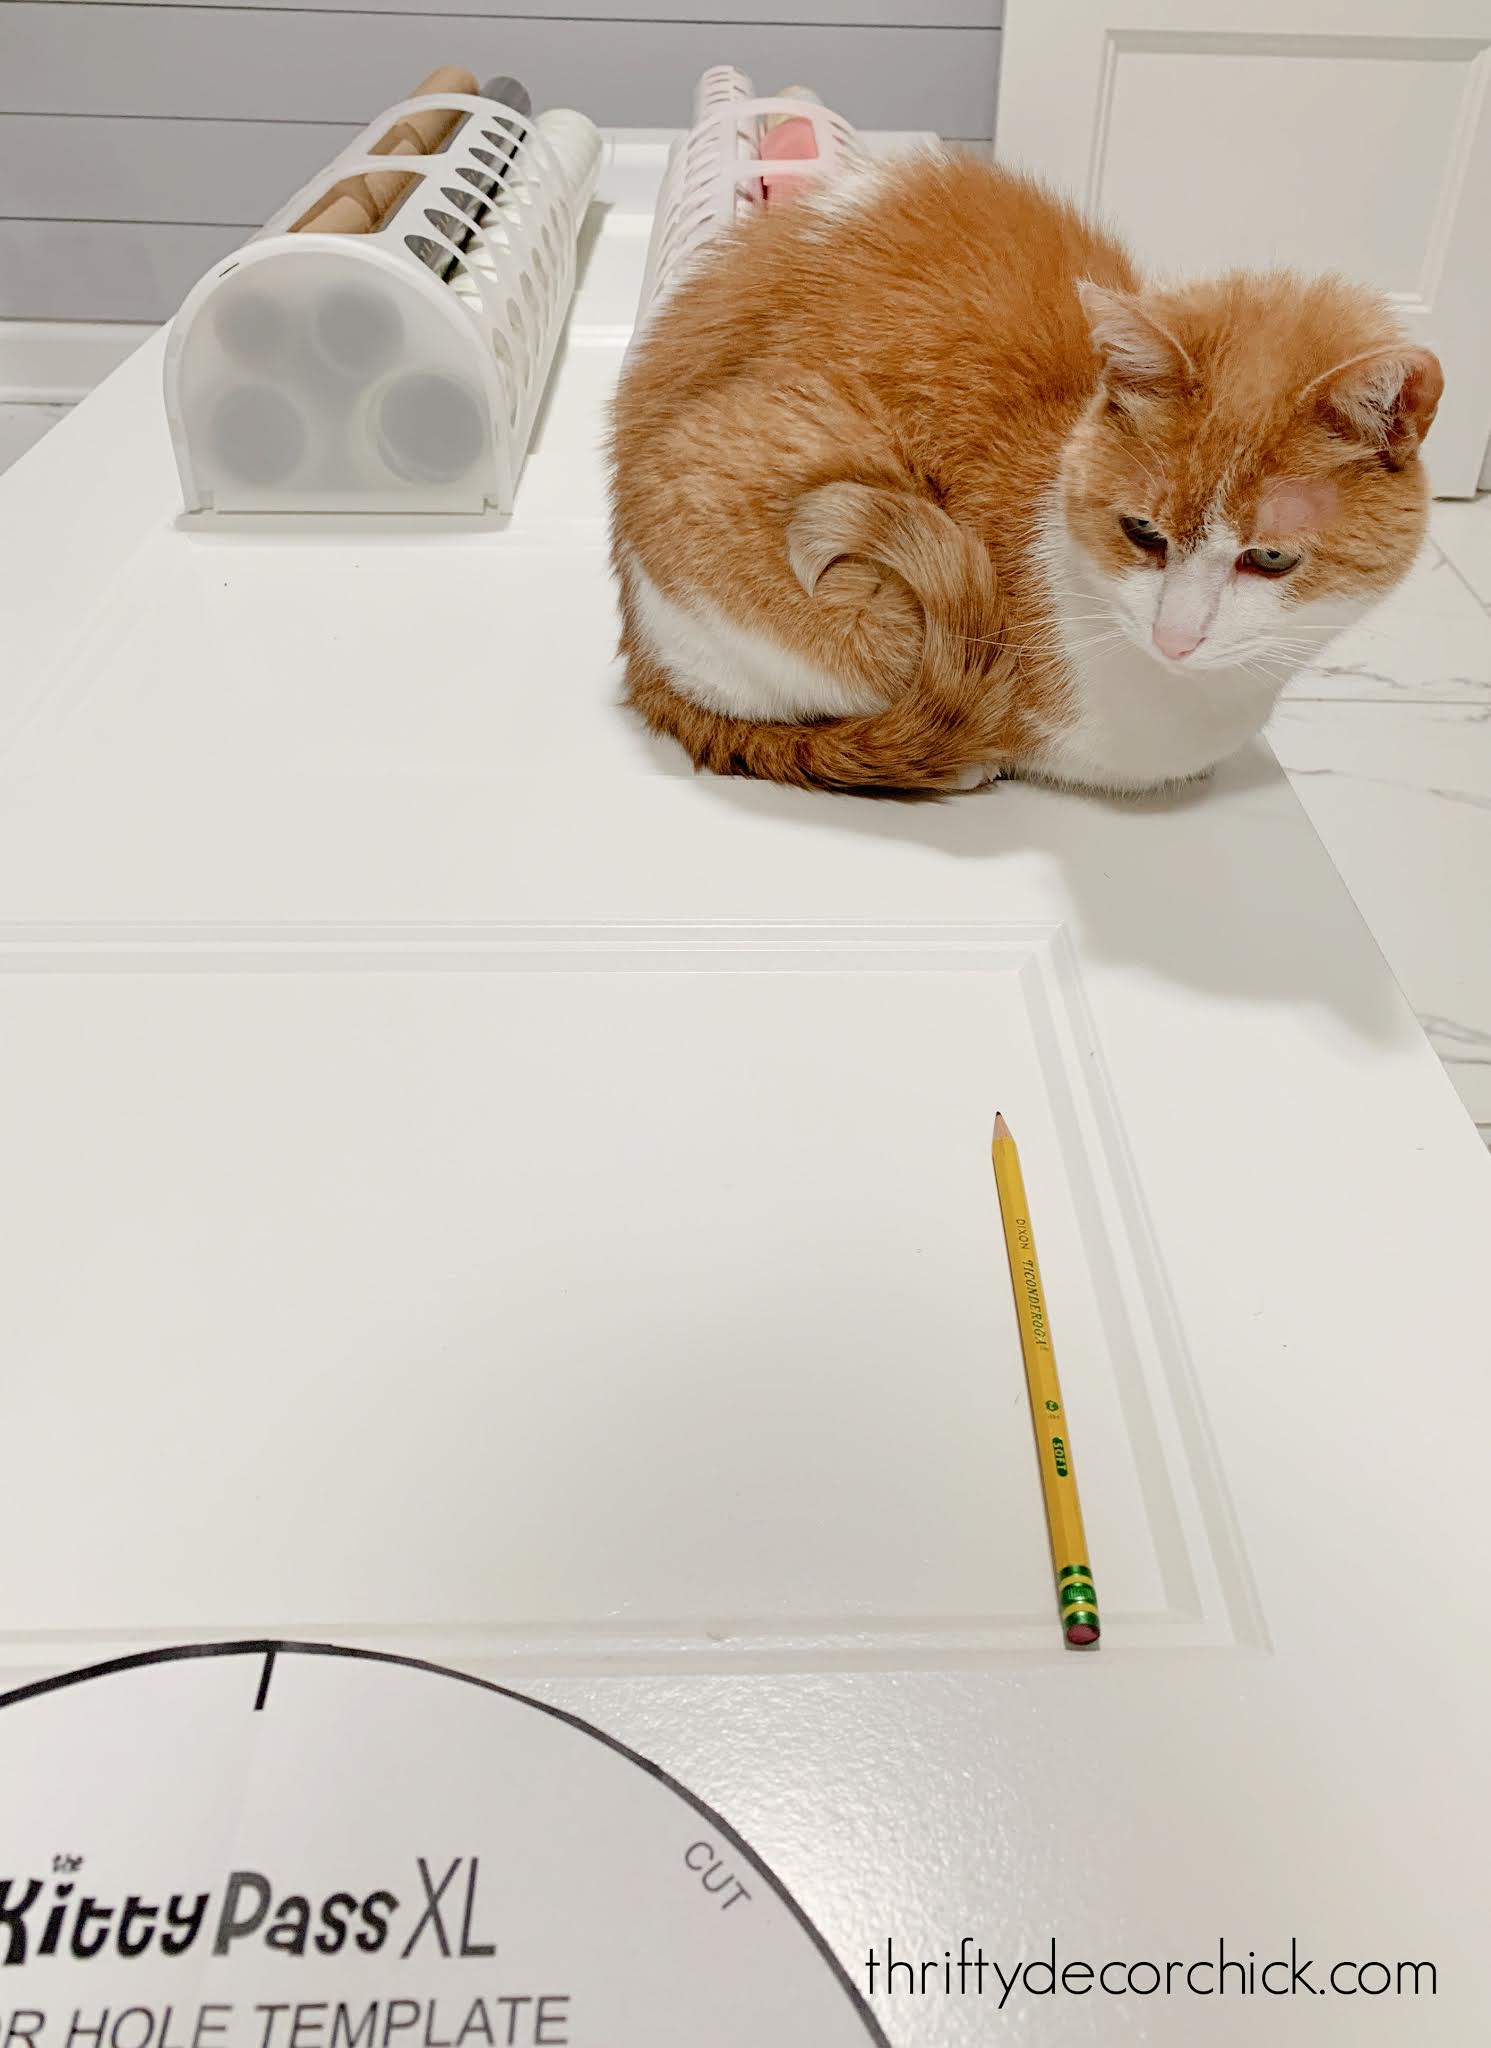
And then cut out your cat door! I used a jigsaw with a blade specifically for curved cuts:

It doesn't need to be purrfect (I had to. Sorry.) because your cat door will hide the cut.
It went much quicker than I thought it would:

If you have a hollow core door this will be even easier to cut!
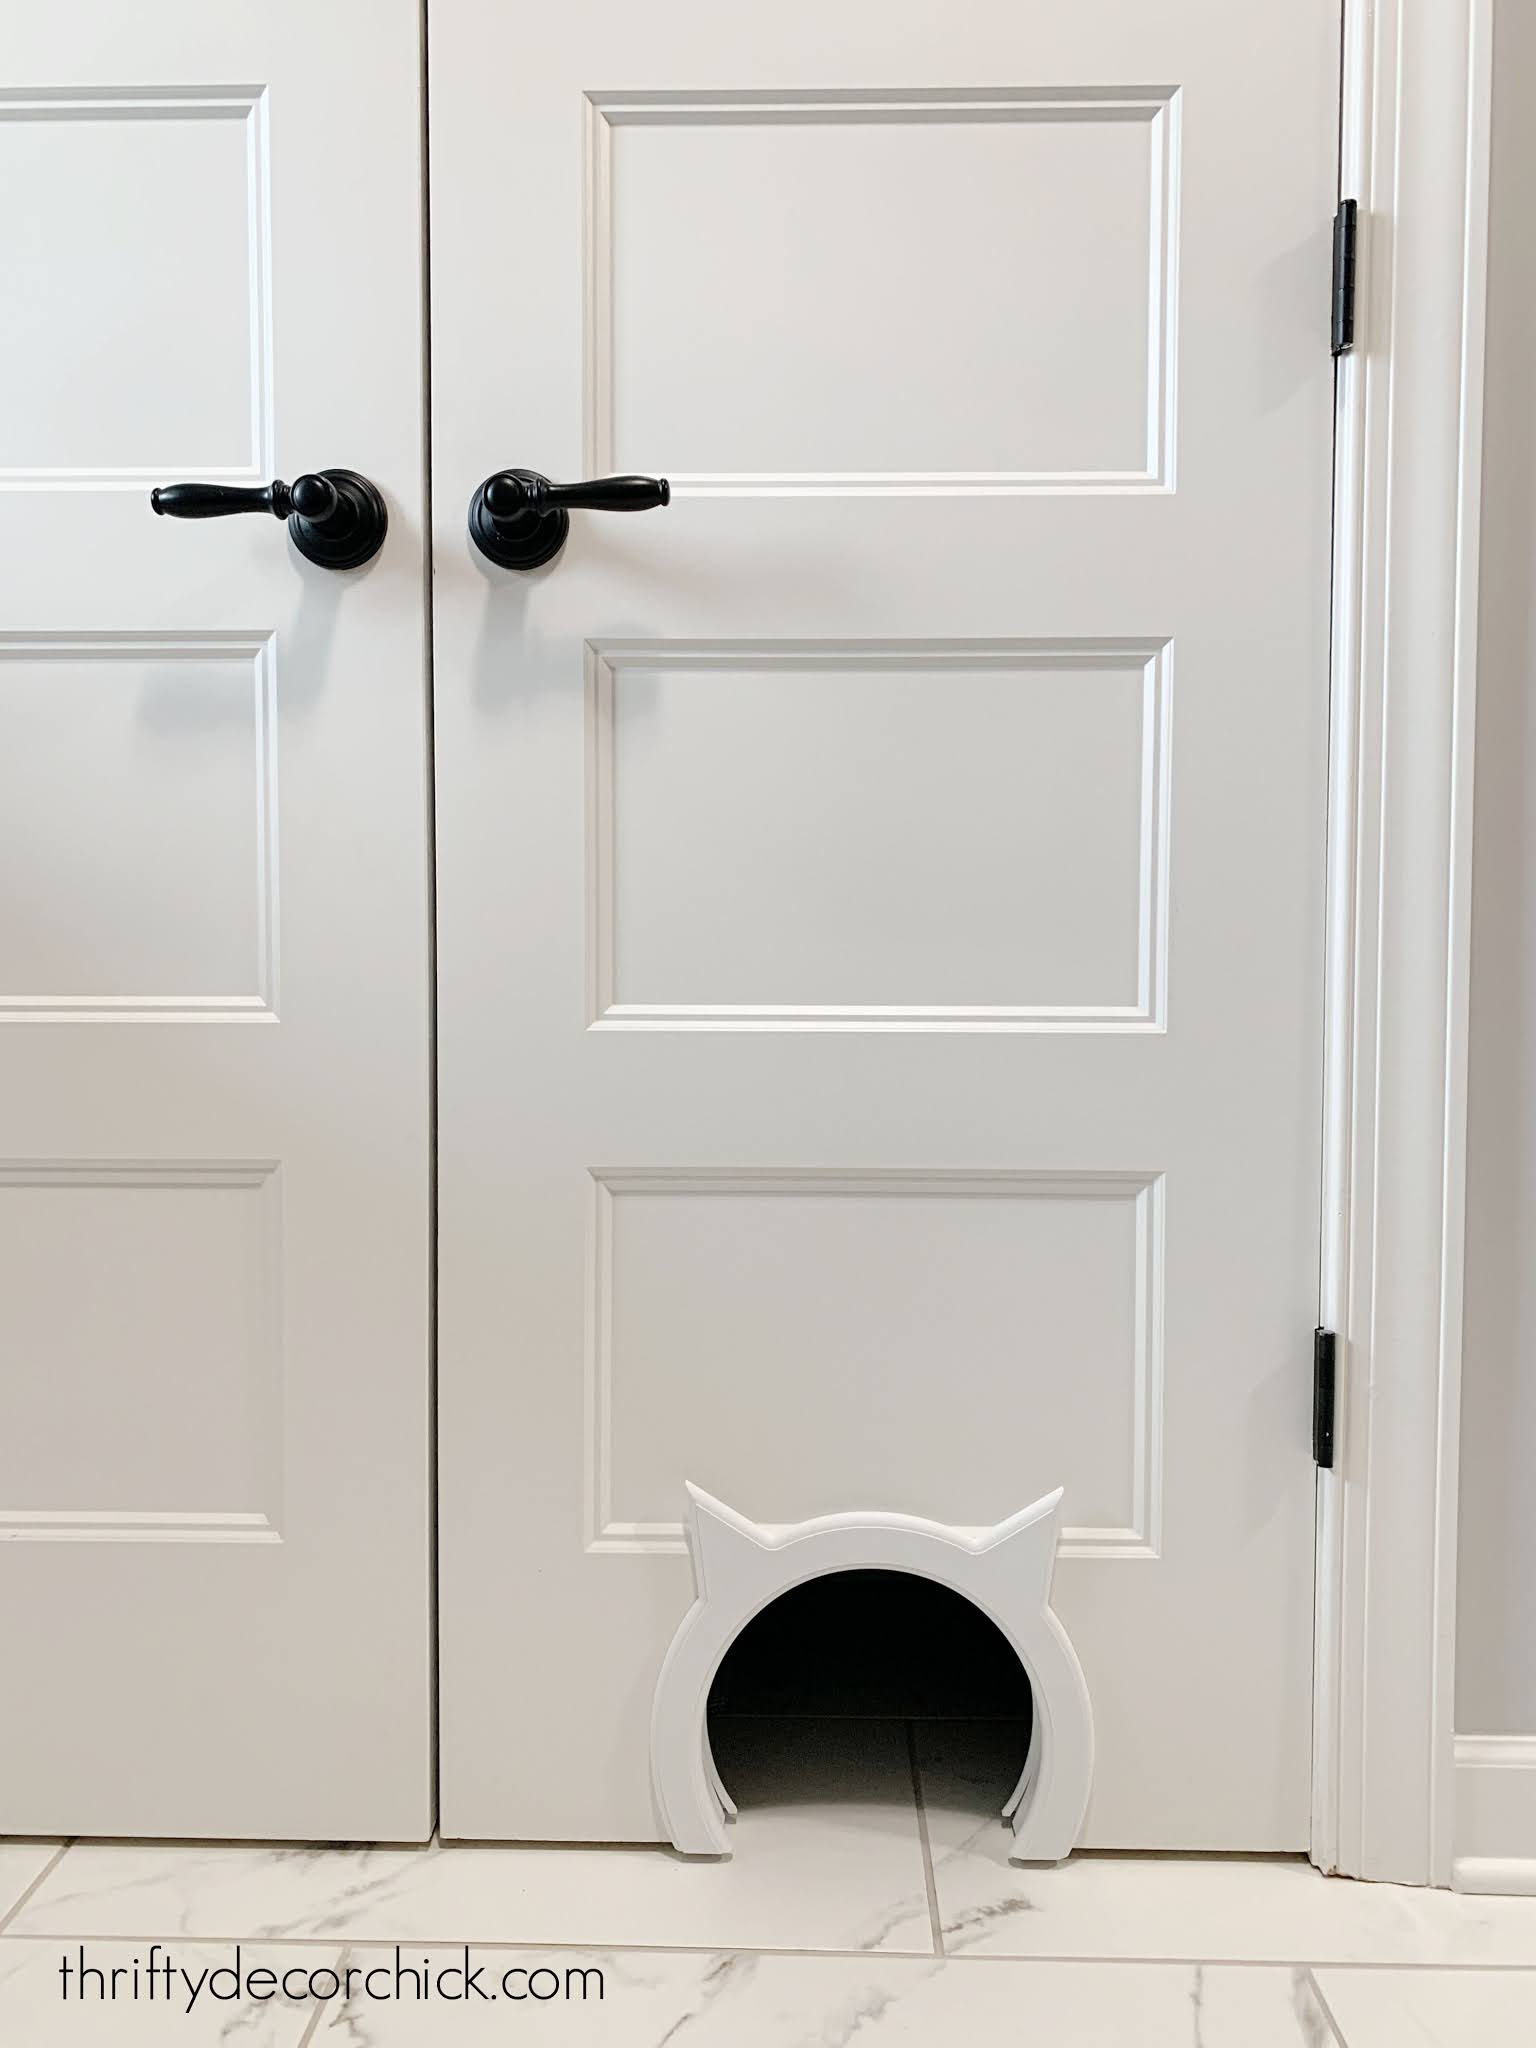
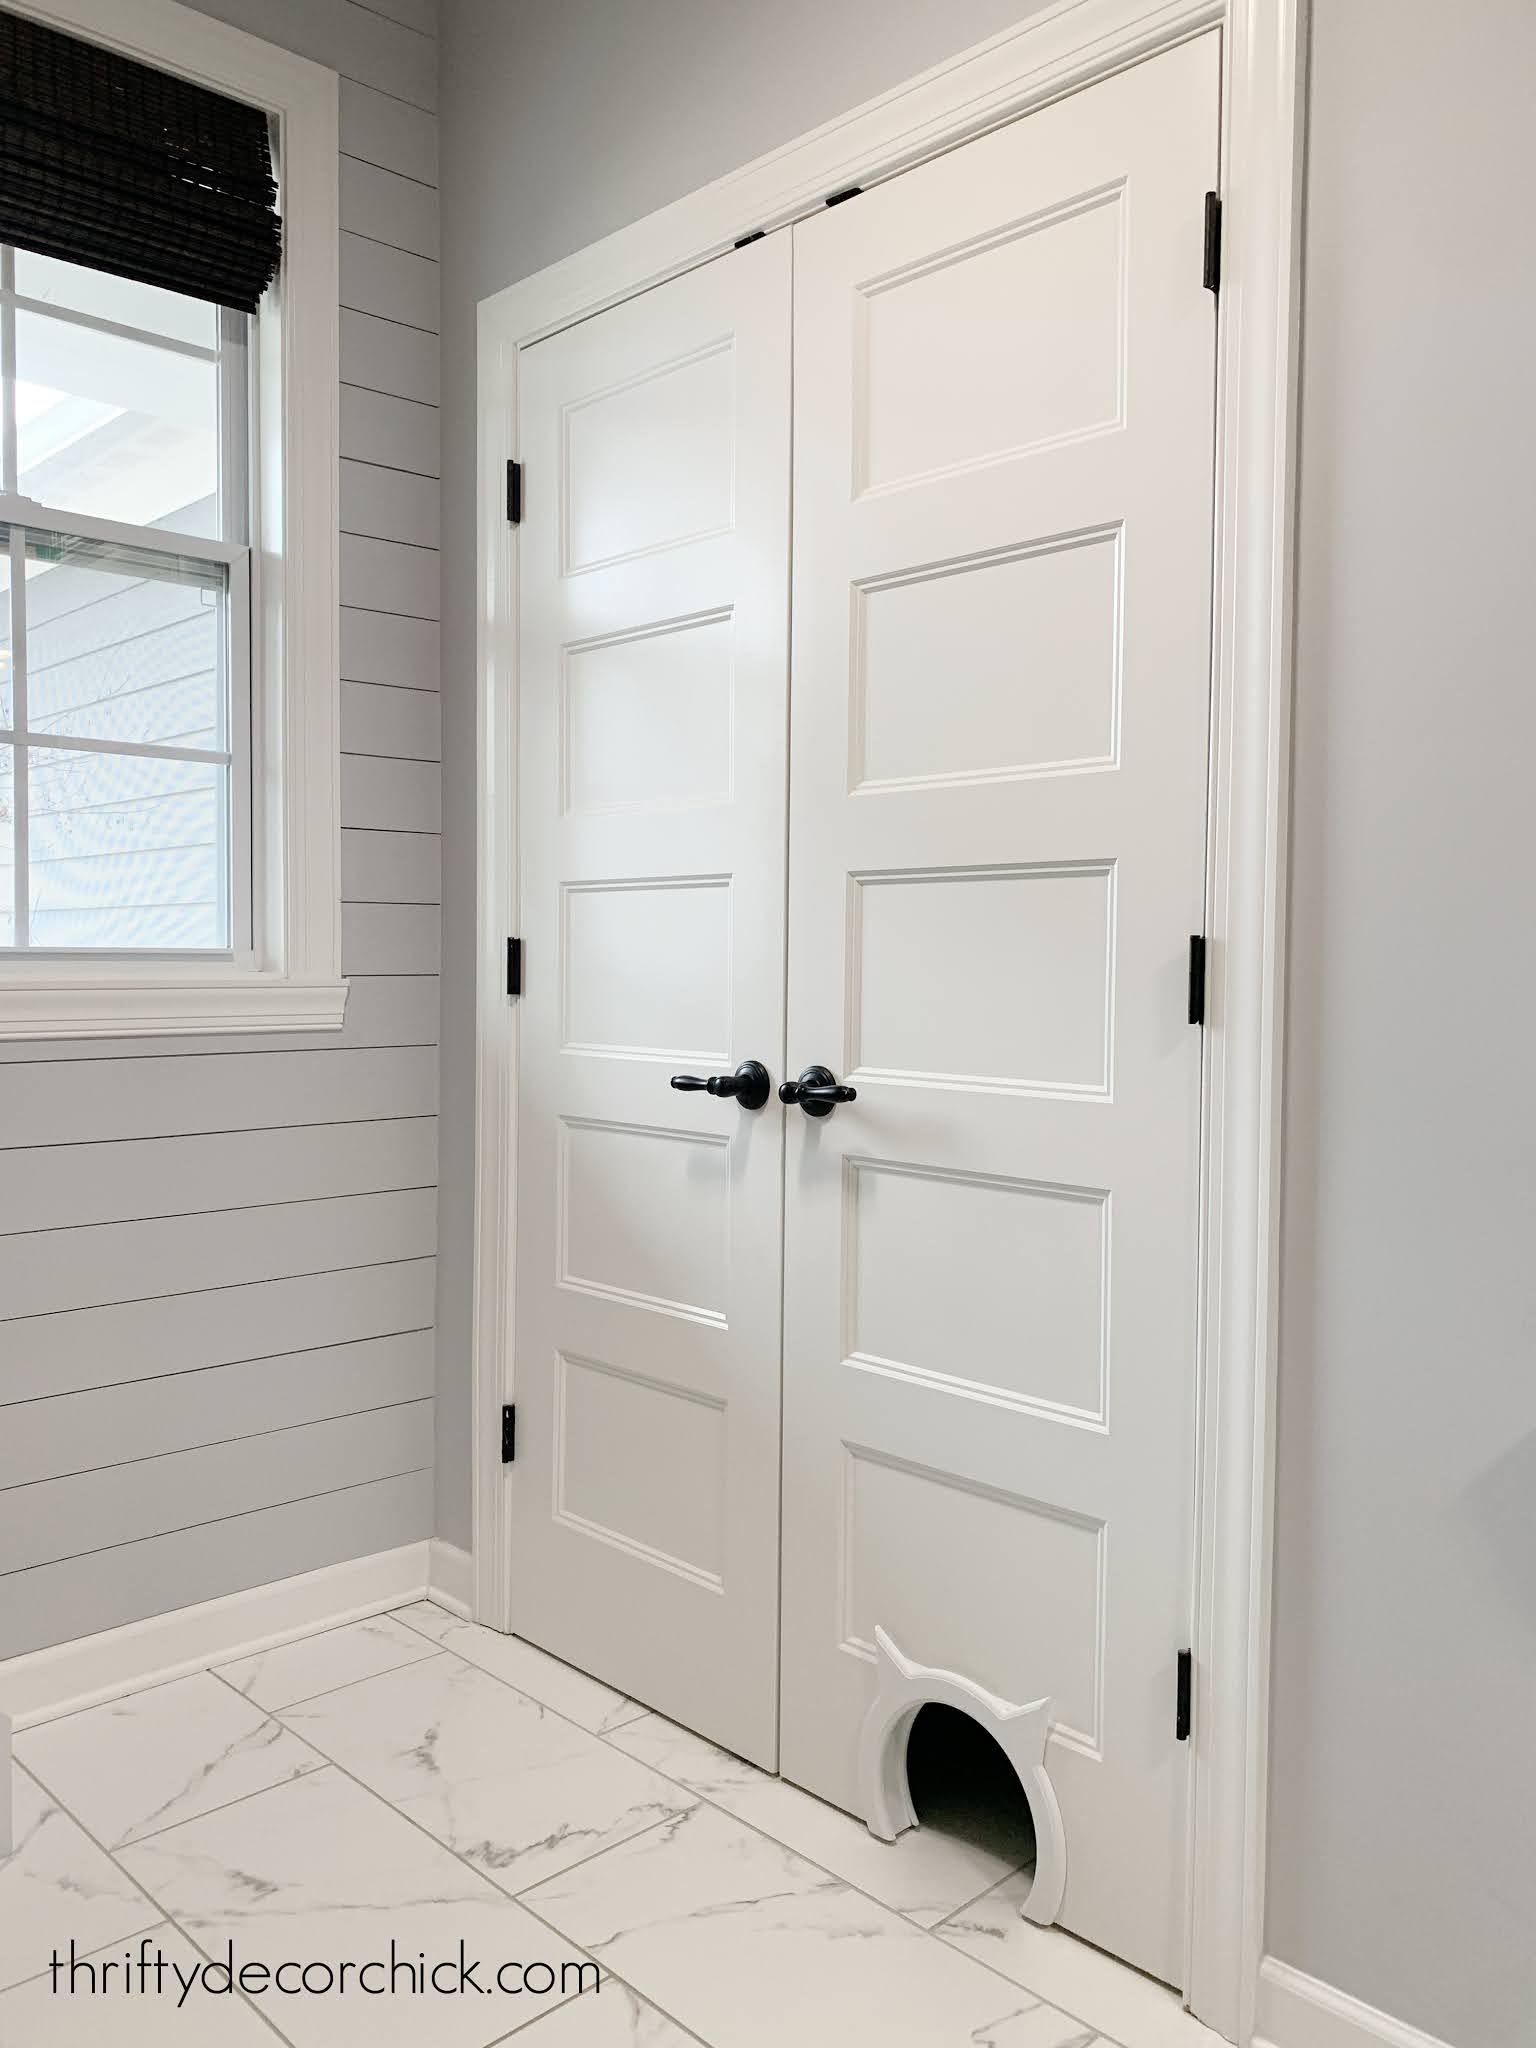
Then you just slide one side of the cat door on and then the back -- they have sticky pads that secure it to the door. Isn't it the cutest thing ever??:

Look at the back!:

I just love it! We all kept walking in the room to look at it and giggle. ?
I got an extra large size so the cats don't have to crouch get into the closet. I wanted it to be as easy as possible for them to come and go.
The cat door is paintable so you can match it to whatever color you need! It's so cute I considered painting it a different color so it stands out:
These "doors" are also a great option if you have dogs you want to keep out of the litter! It's only been a couple weeks but we are already LOVING this new set up. So are the cats. :)
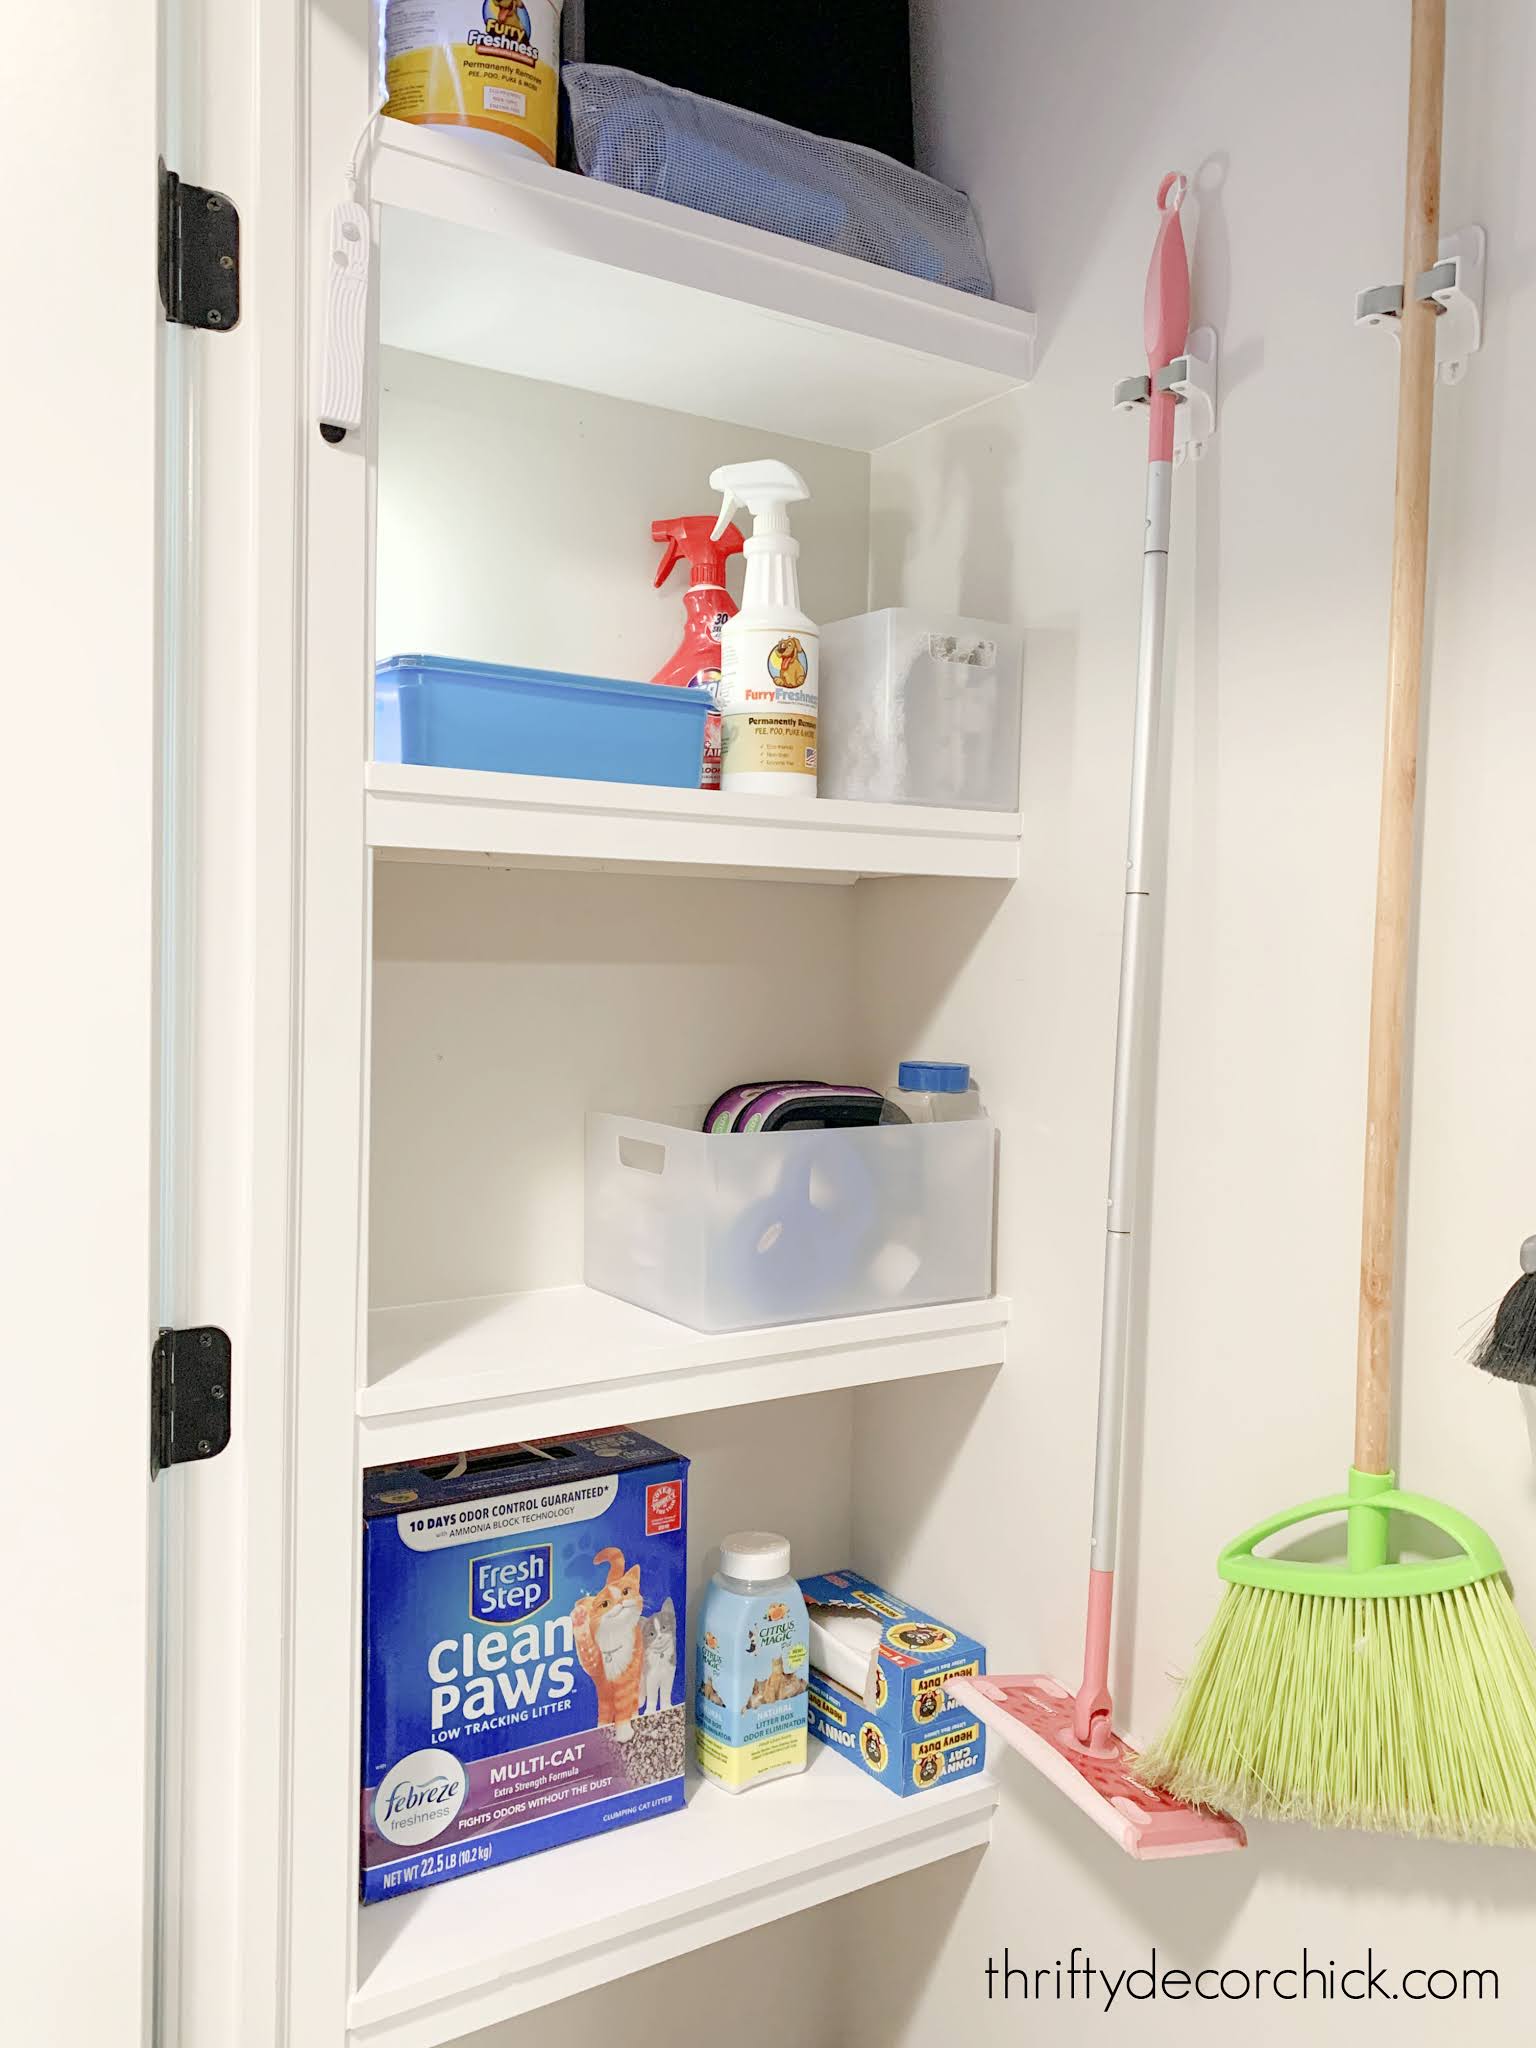
Now we have a dedicated spot for the pet supplies, litter, some cleaning supplies and more:
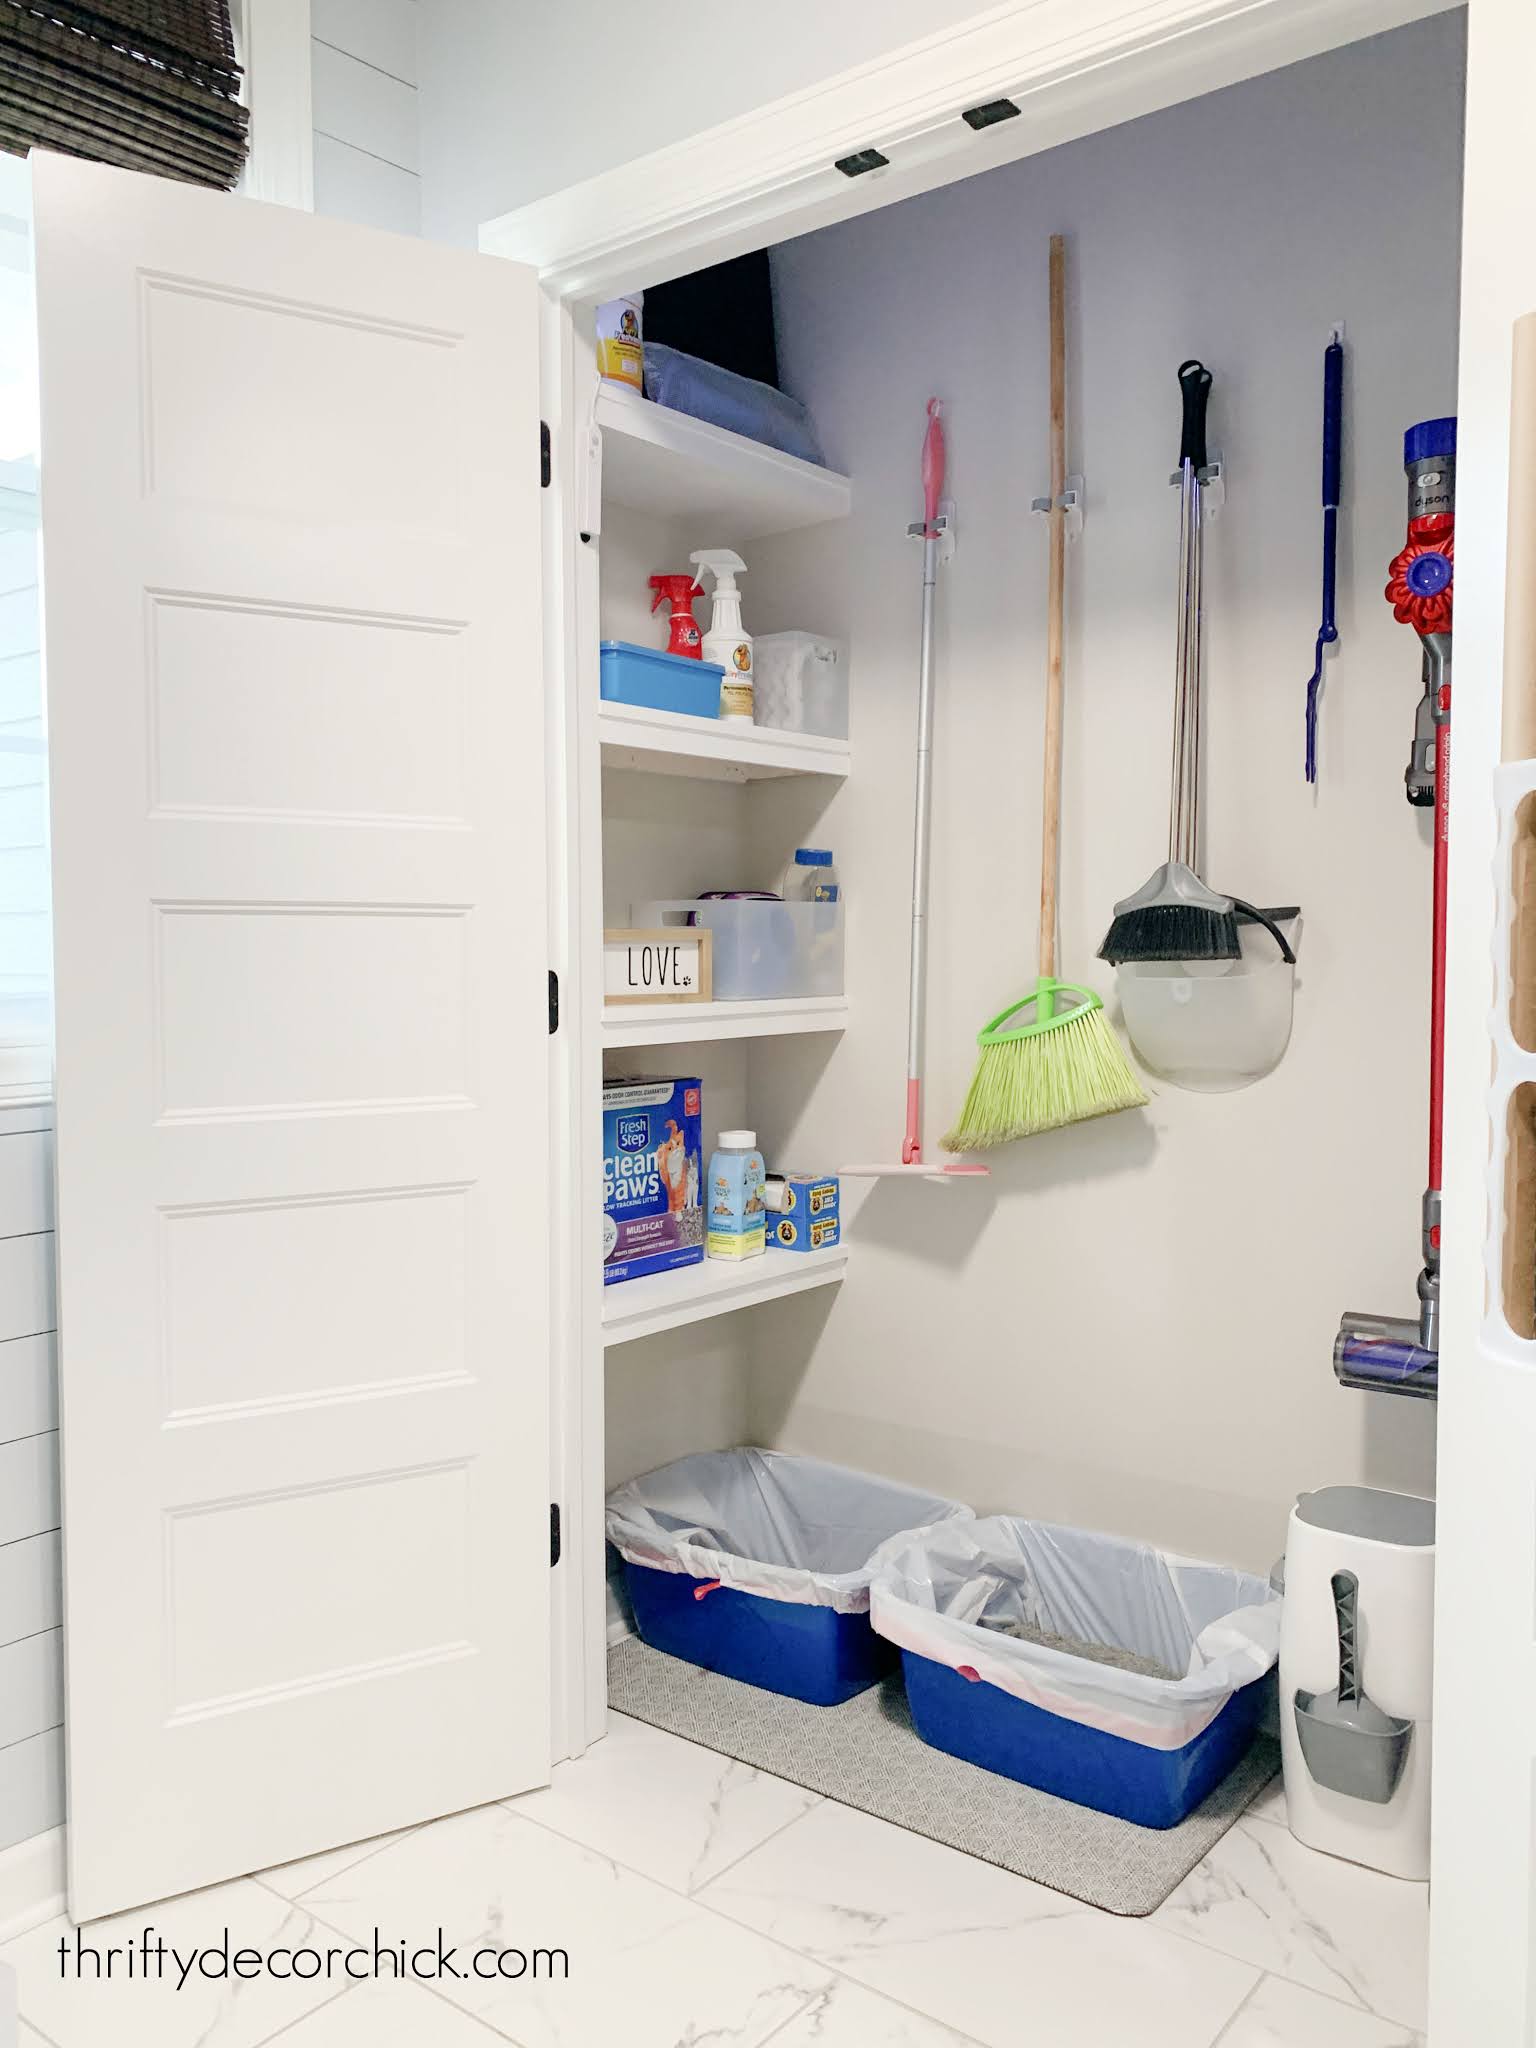
If you look closely you can see that I added clear contact paper along the wall behind the boxes. It goes down and covers the baseboards as well. It's rare, but sometimes our cats "miss" when urinating and it goes out side of the box. This will prevent anything from getting on the wall or the baseboards.
OH, and if you have cats the Litter Genie is awesome!! It's so easy to use and super convenient when scooping.
Here are some litter placement tips from this life-long kitty owner:
More super cute cat door options I found!:
Where do you keep your litter? Any innovative ideas you've heard of?
See more of our home here. To shop items in our home, click here! Never miss a post by signing up to get posts via email.
Via https://www.thriftydecorchick.com/2021/03/hiding-cat-litter-cat-door.html
Hey there! Now that the garage is all decluttered and organized, I've been focusing more on the changes in our mud/laundry room again.
I shared my plan for adding a ton more storage and other changes to make this room work even better for us a couple weeks ago. I'm so excited about these changes! They've already made a BIG difference in here.
I've moved things around a bunch -- including moving some things from the garage that just work better inside. I'll show you all of that soon! This week I've been focusing on the closet we have in here:
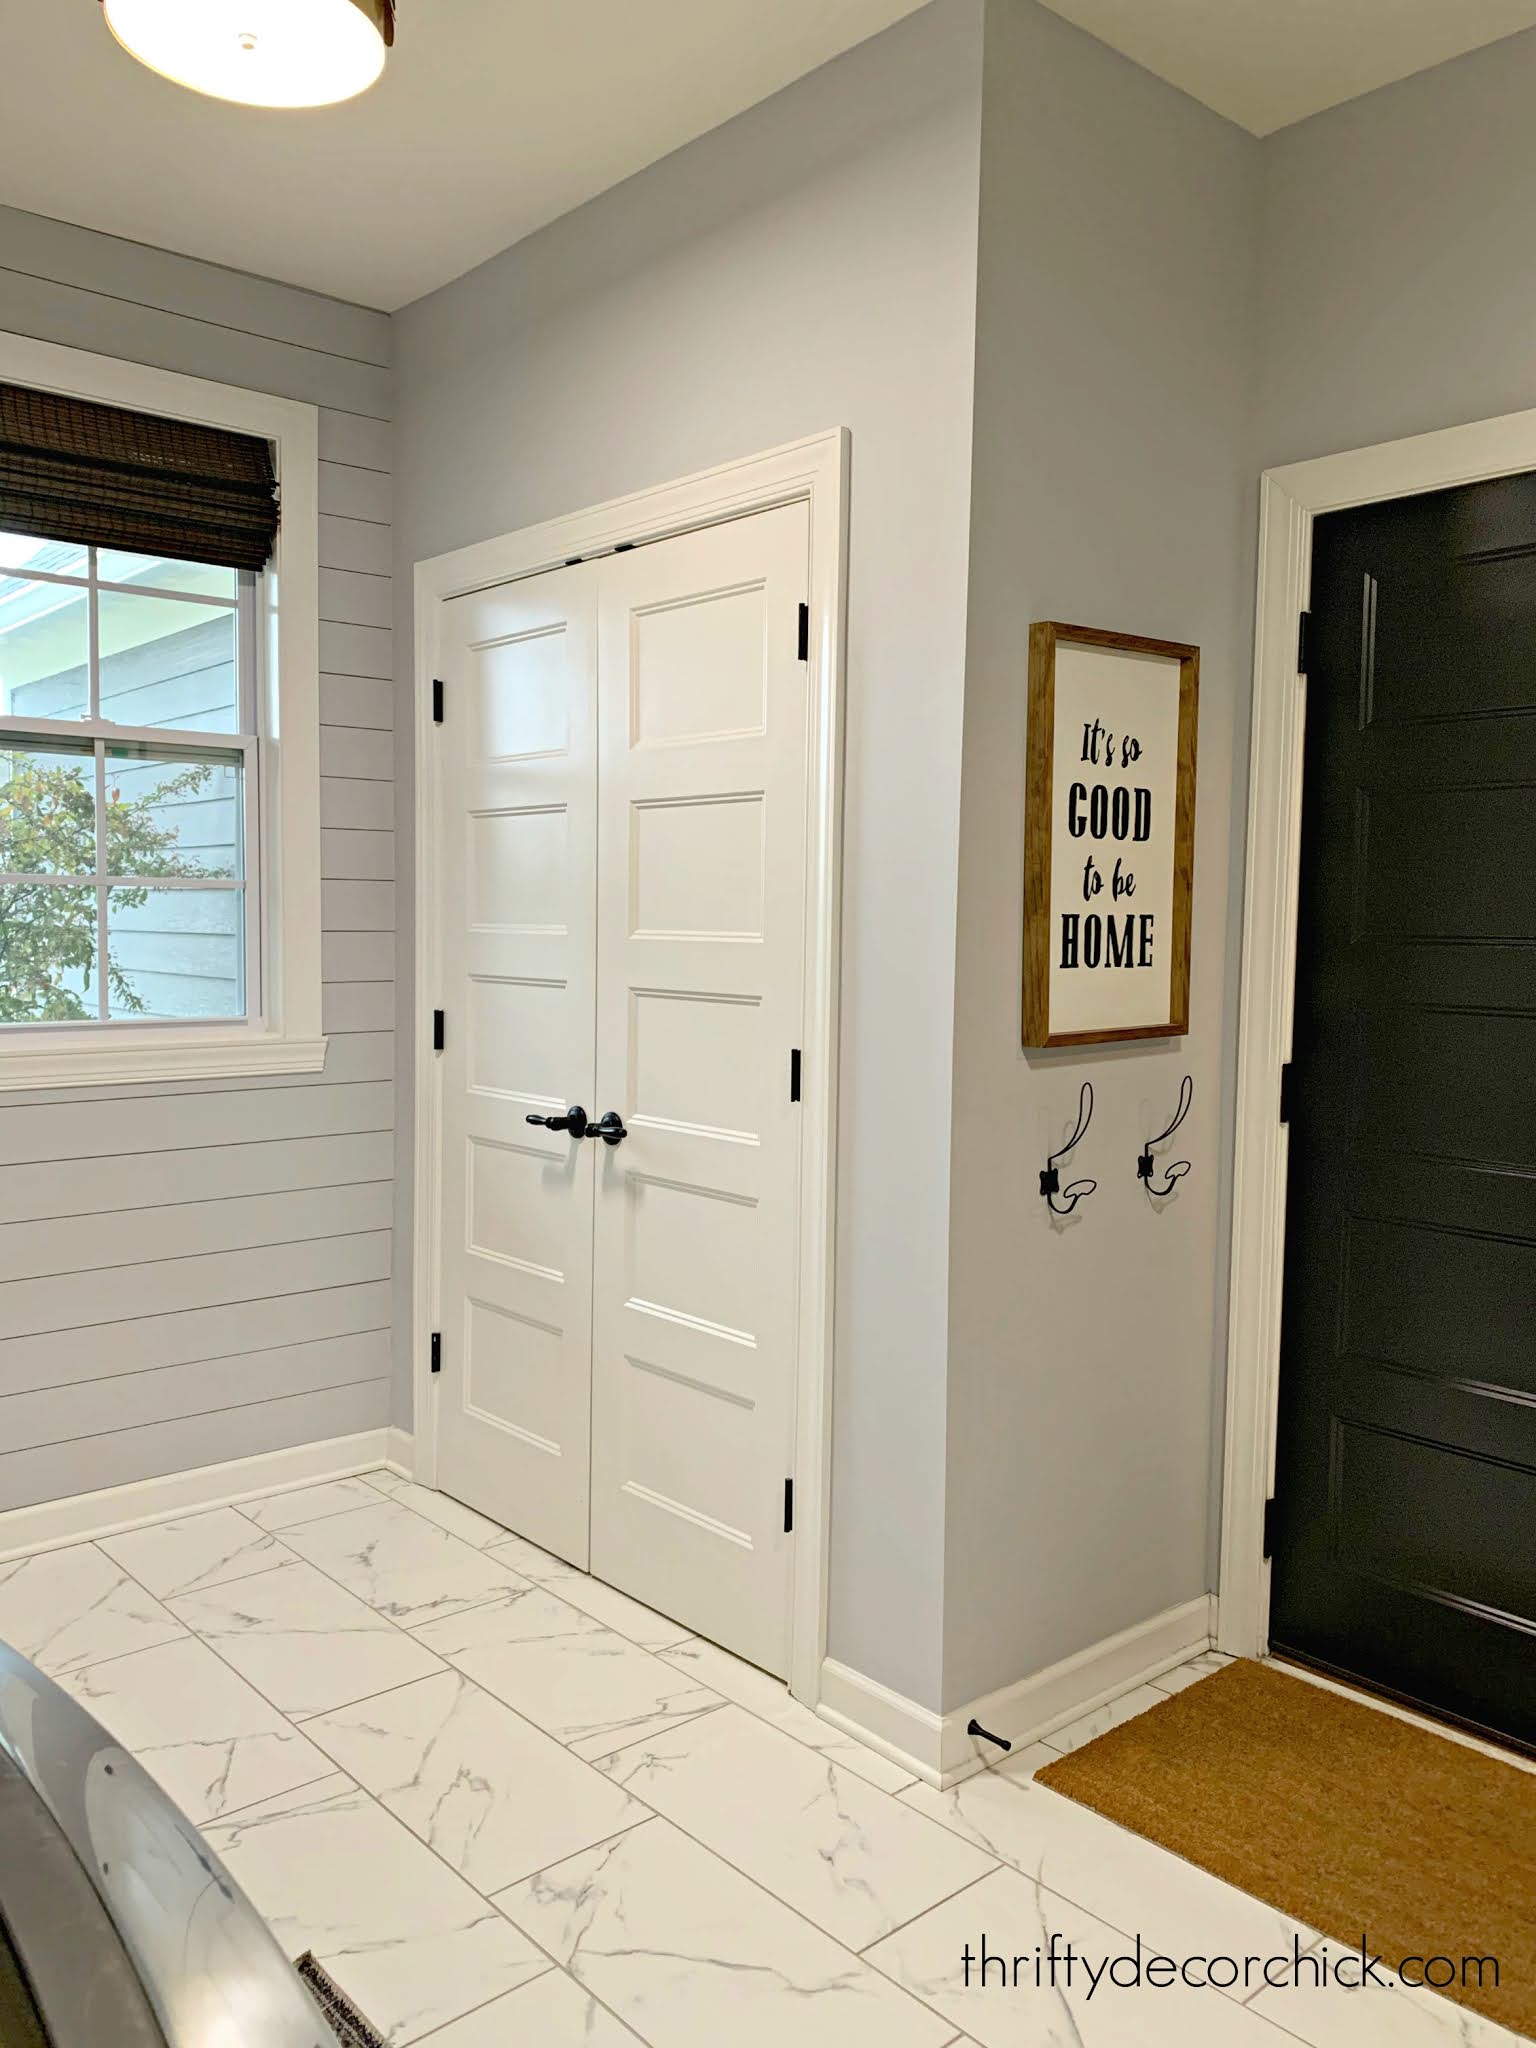
My dream was always to have a big closet in our mud room! When I saw how big this laundry/mud combo was going to be, I knew we'd have plenty of room for a closet. My favorite part is the OUTLET I had put inside. Game changer.
Anyway, when we moved in a few years ago I just started chucking things in there as we got settled:

Pretty!
A few months after moving in I went through it all and got it organized...much better:

This post may contain affiliate links for your convenience.
See my policies and disclosure page for more information.
I made this a spot for all kinds of things! Laundry items like the ironing boards, cleaning supplies, all the brooms and vacuums, and even gift wrap items like wrapping and bags. You can see the whole organized mud room closet here.
Now that I've been moving things around, I went through this closet again. It was still looking really good, but I knew I wanted to move the cleaning supplies into the upper cabinets instead. I also got rid of a few things we don't use anymore. Like that SpotBot carpet cleaner -- it was my BFF for years, but now we have so little carpet we just haven't used it. (And for any animal messes we have now, this cleaner is AMAZING!)
I knew I could make better use of the space in this closet! That dead space at the ends of closets like this has always bugged me. Unless you are filling it with clothes, it's usually an awkward spot that can be utilized MUCH better.
YEARS ago I realized I could add some shelves to that spot to make it work better for us. This is a great project if you're a beginner at do-it-yourself projects! There's not a lot to them, especially when they don't have to be perfectly finished like in other rooms. I've shared how to make these floating shelves many times over the years. (See how I added them in our bathroom at that link!)
You just need to secure your supports (a 1x2 is perfect) into studs or anchors on the back wall and sides, then nail a board into those. Before I started in here I removed the door trim on the inside of the closet so I could bring the front of the shelves right up to the edge:

This little tape trick is awesome when you're caulking on a painted wall! Tape it off first and then caulk -- remove the tape before the tape dries and you'll have a perfect line and no mess on your wall.
I was going to leave these pretty basic, but then I realized they'd look so much better with some trim on the front. So I added that. I planned to leave them unpainted...but then I realized how good they would look in white. And this super simple project turned into two day process. ?
After the first coat of paint, the underside of that top shelf was bugging me. Of course it was:
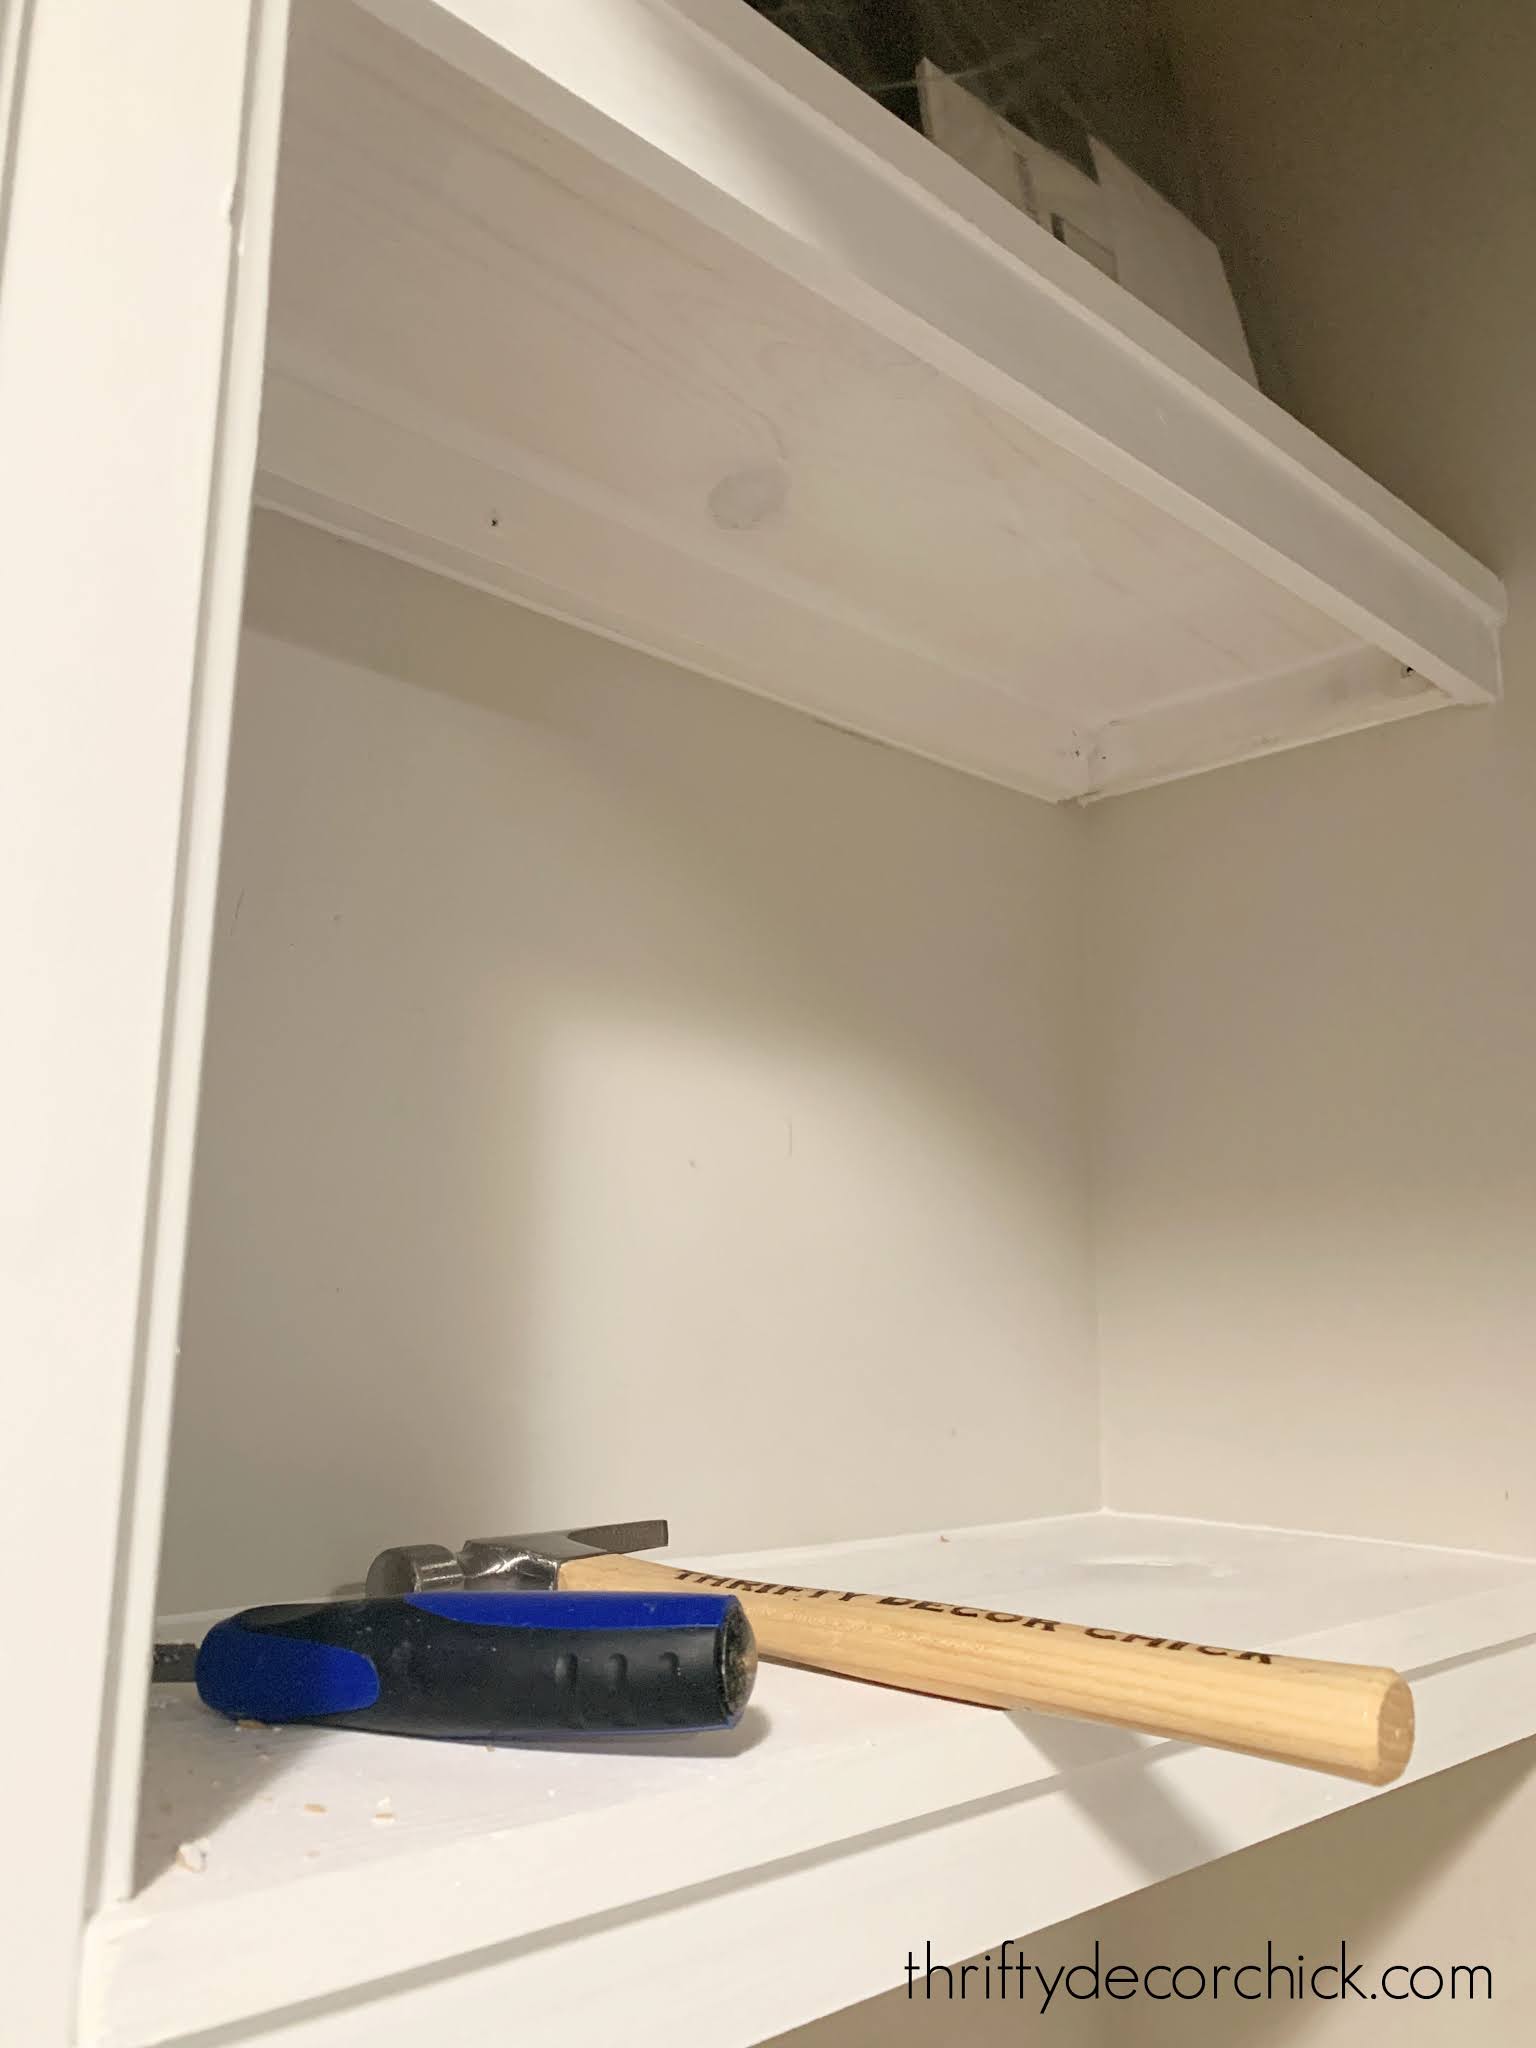
I ended up cutting a piece of luan to fit underneath to hide the supports.
I also cut down the door trim (that I had taken down) and put it back up in between each shelf. And then filled holes. Caulked everything. And finally did one more coat of paint. This is how you turn a 90 minute project into one that never ends.
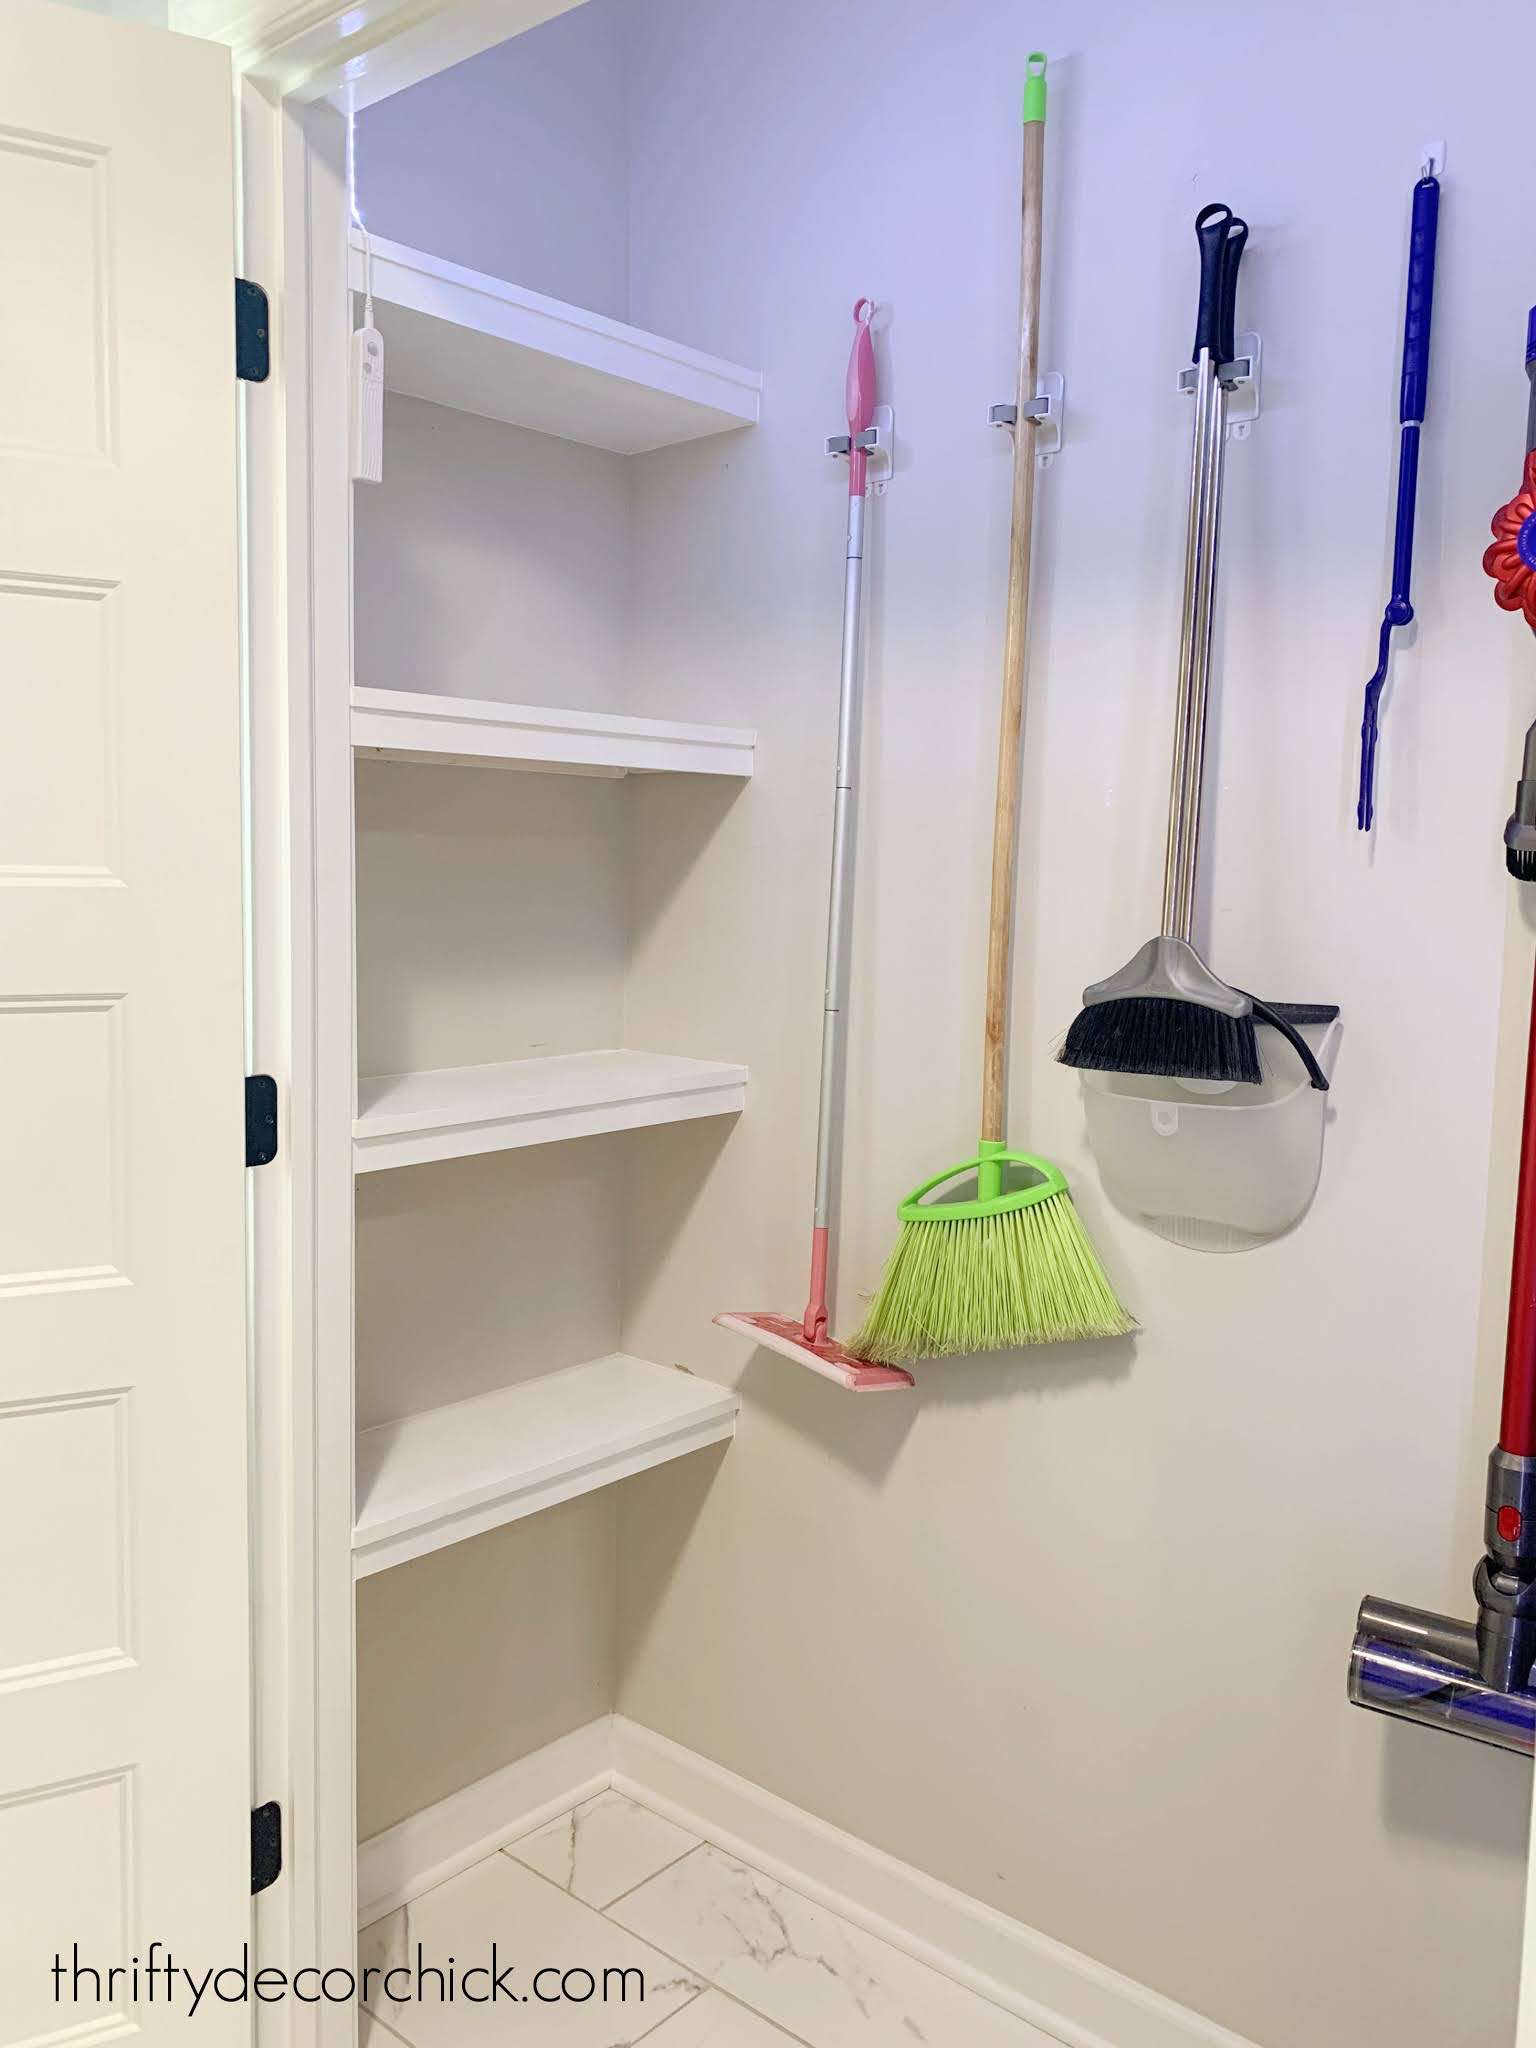
But it was worth it! They look really good:
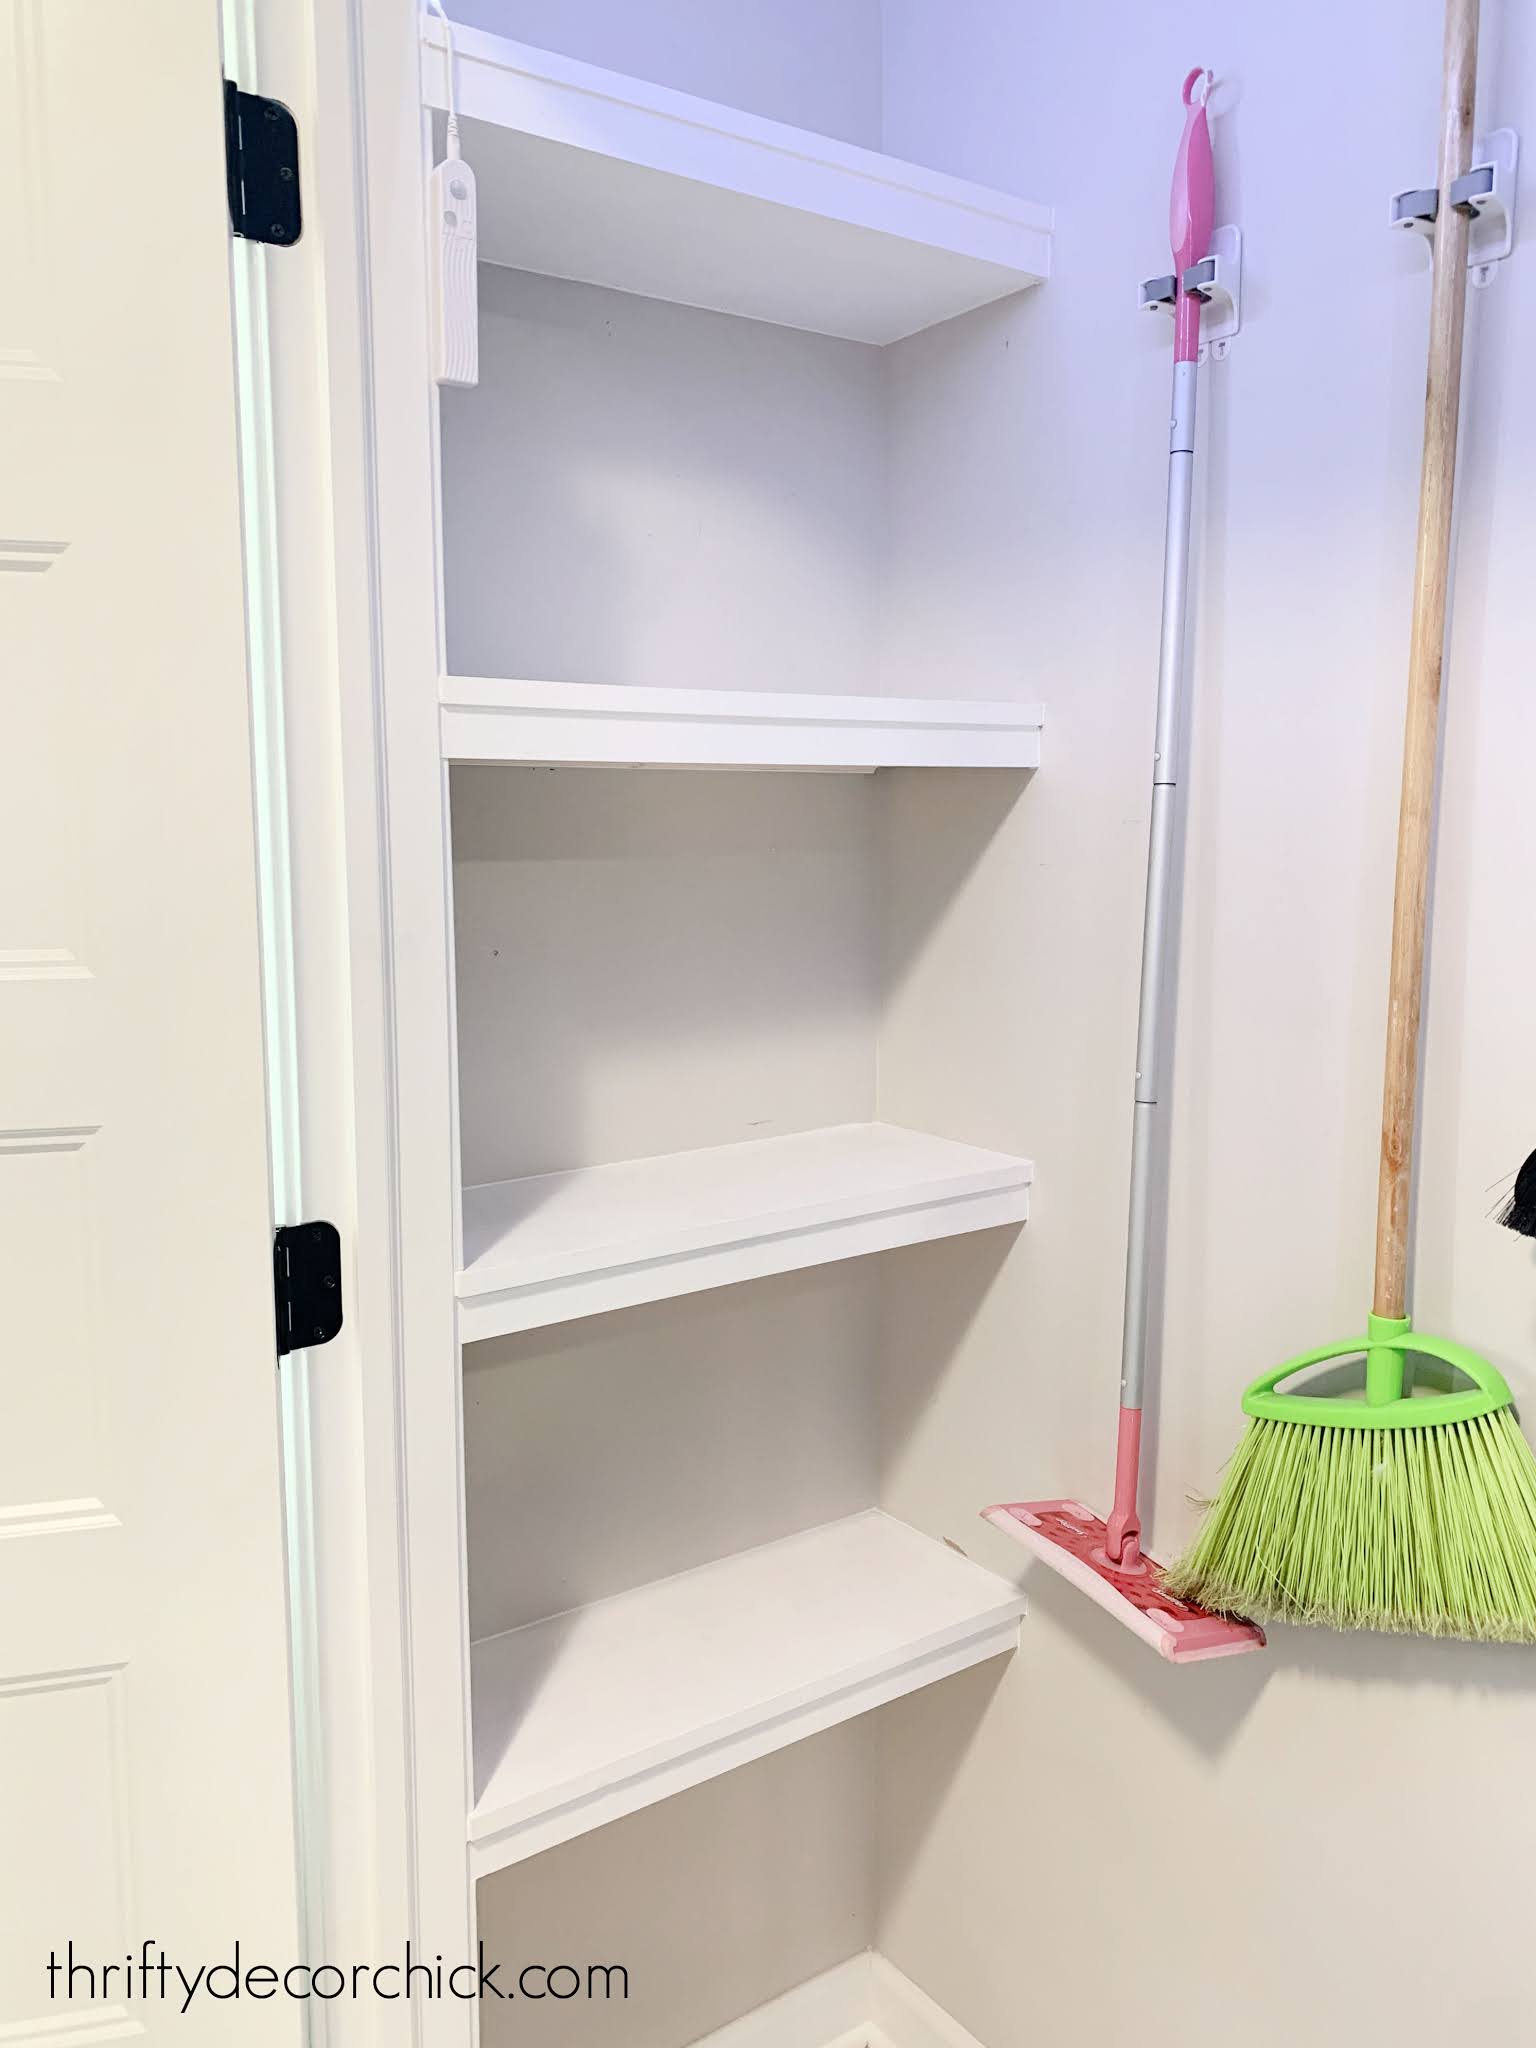
I didn't add bottoms to the other shelves since we can't see that part. These shelves are about nine inches by 24 and add a TON of storage! If you aren't using the ends of your closets I highly recommend this little project.
Remember how I organized so many garden tools and garage stuff by hanging it all on the wall? I did that here too! I hung everything I could:

Those Command broom holders are the bomb. We had one and I picked up a couple more. For everything else I used hooks we had.
I almost did another set of shelves on the right as well, but I needed a spot for a dryer rack and step stool I wanted to hang. It's SO nice and cleared out!
Oh, and I added some battery-operated motion sensor lights I found at HomeGoods the other day. I hung them around the inside door trim. I kick myself that I didn't have lights added to our closets! So far this light strip is working really well. (These motion sensor strip lights look to be the same thing.)
I can't wait to show you the last part of this little closet makeover -- I'll show you that next week!
Here's where we started in here a few years ago:

And this is what we have now:
I'll be back next week with more!
See more of our home here. To shop items in our home, click here! Never miss a post by signing up to get posts via email.
Via https://www.thriftydecorchick.com/2021/03/how-to-utilize-dead-end-space-in-closet.html
The day is finally here! I'm finally sharing our decluttered, clean and organized garage after working on it for weeks. I'm pretty sure I'm more excited about this than you will be...but hang in there. It looks pretty darn good!
We've never had our garage this organized...not even close. I tackled this space because I was SO tired of stepping over messes or pushing them out of the way while I was in here cutting wood or working on projects. Or not being able to find the tool I needed. As I was in and out building our basement entertainment center, I was thoroughly annoyed with myself that my work space was just not working.
It hit me that (at least part of) the garage is as much my work space as my office. I decided then and there to figure out better storage and a set up that functioned better. I definitely splurged on a few things! But I saved in a lot of other ways too. I'm SO glad that I spent on the items I did -- they were so worth it!
Let's take a tour of some of my favorite spots, shall we?
I shared our wood shelves with the organized holiday decor earlier this year:
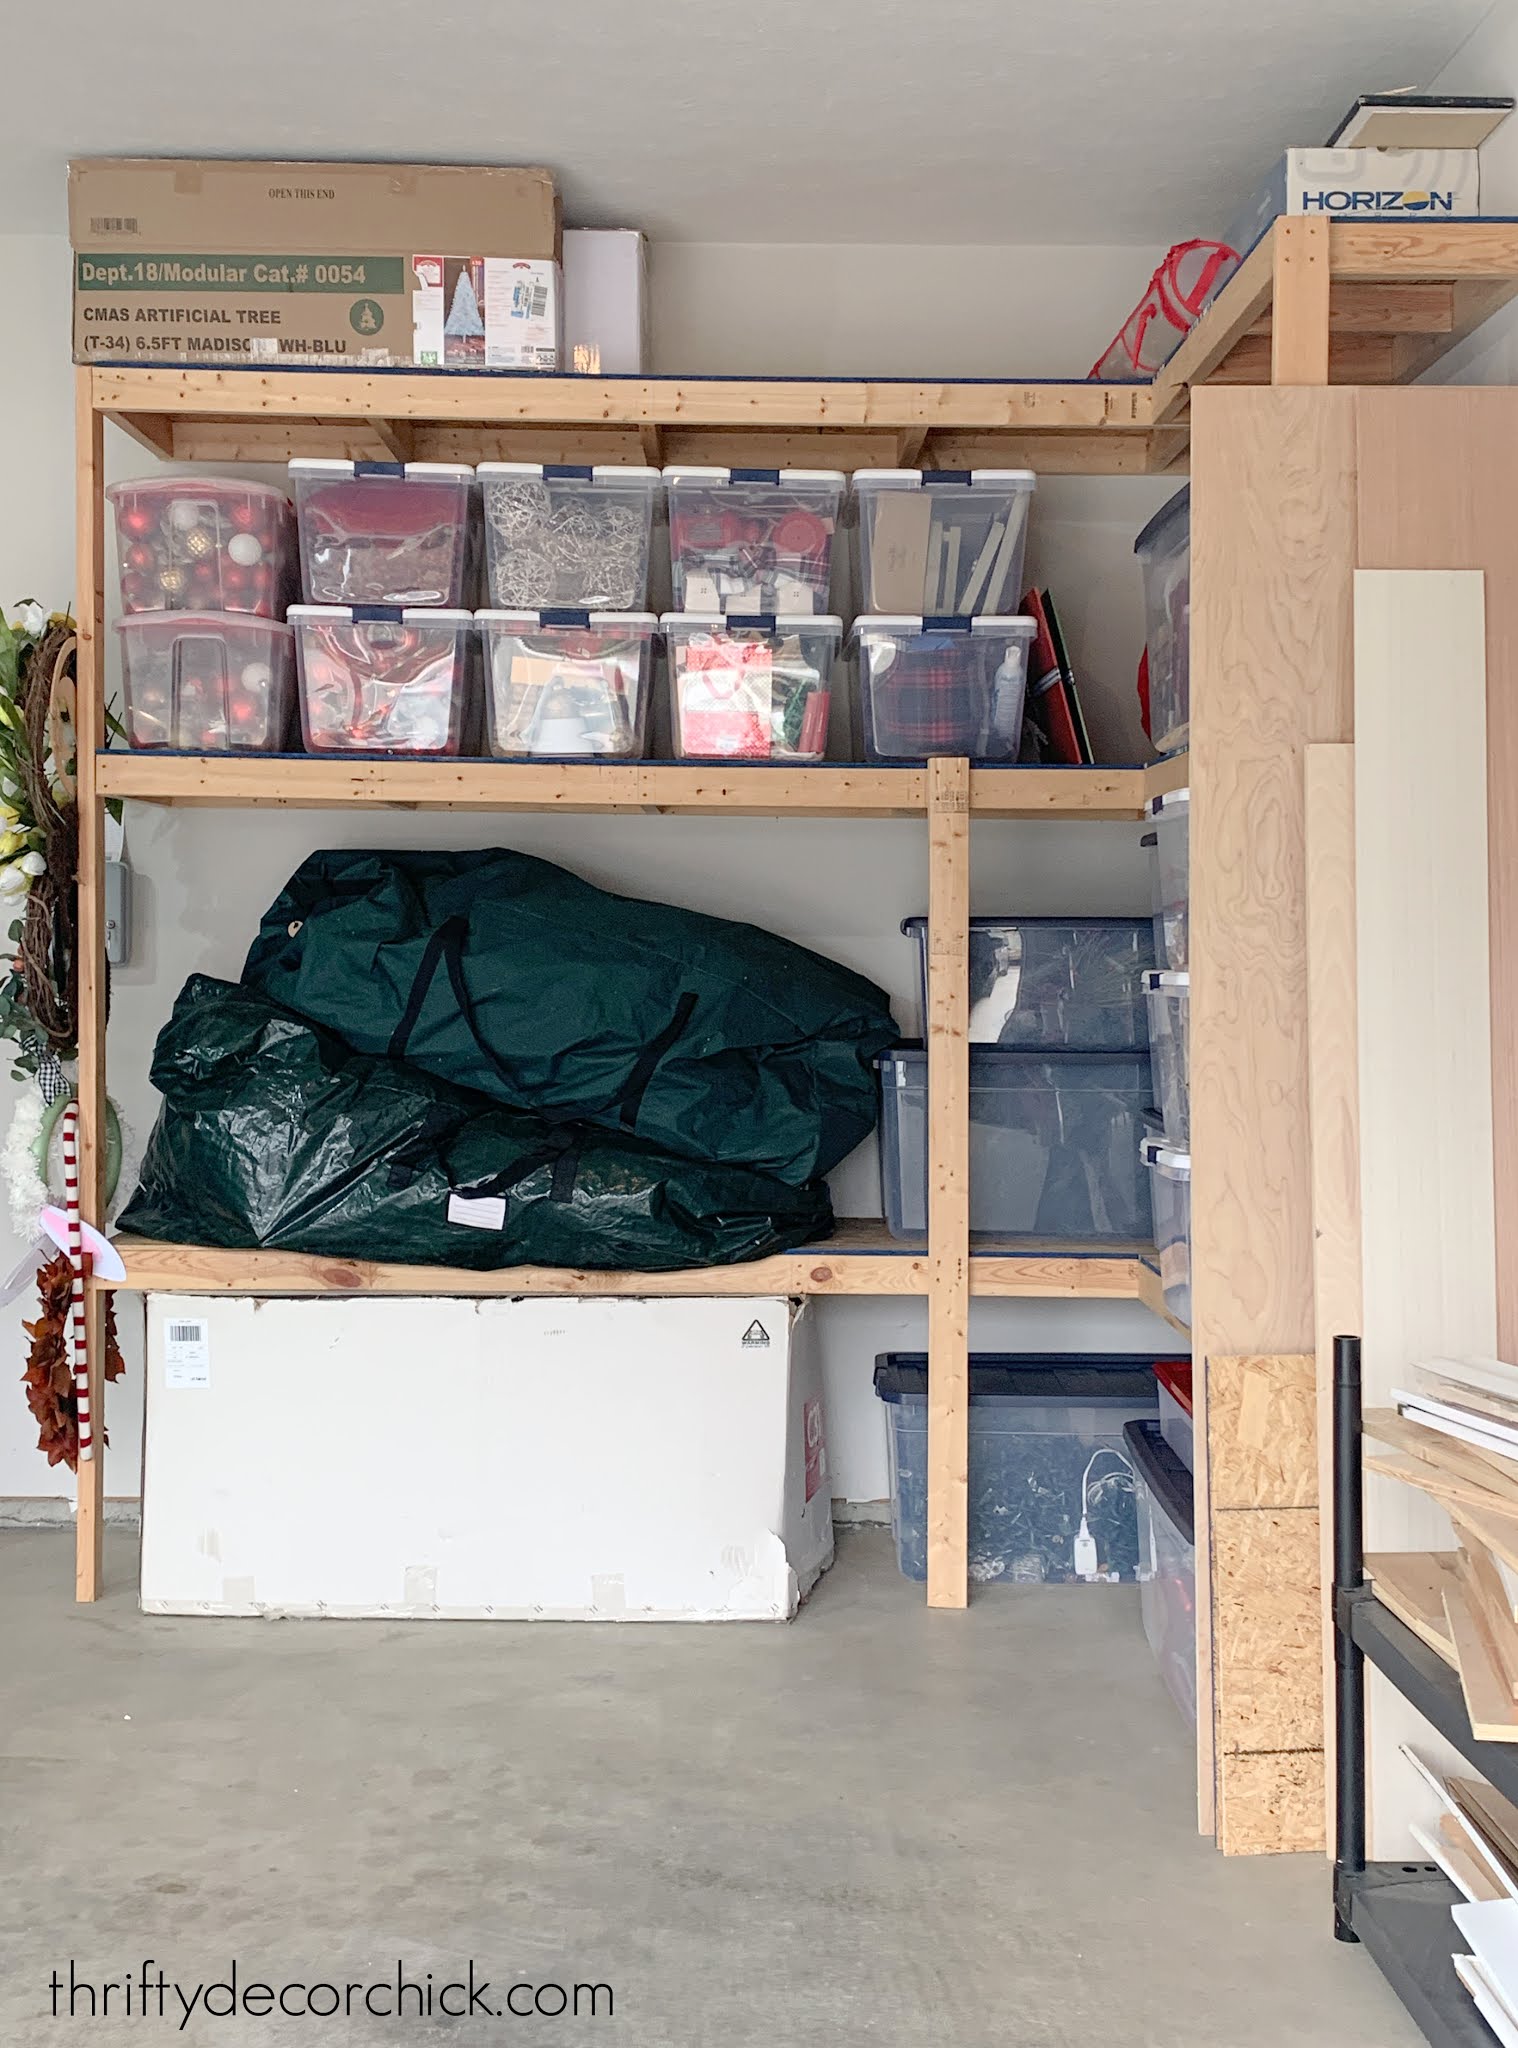
And I shared this beautiful organized corner last week:

Read all about how I got things off the floor and onto the garage walls here!
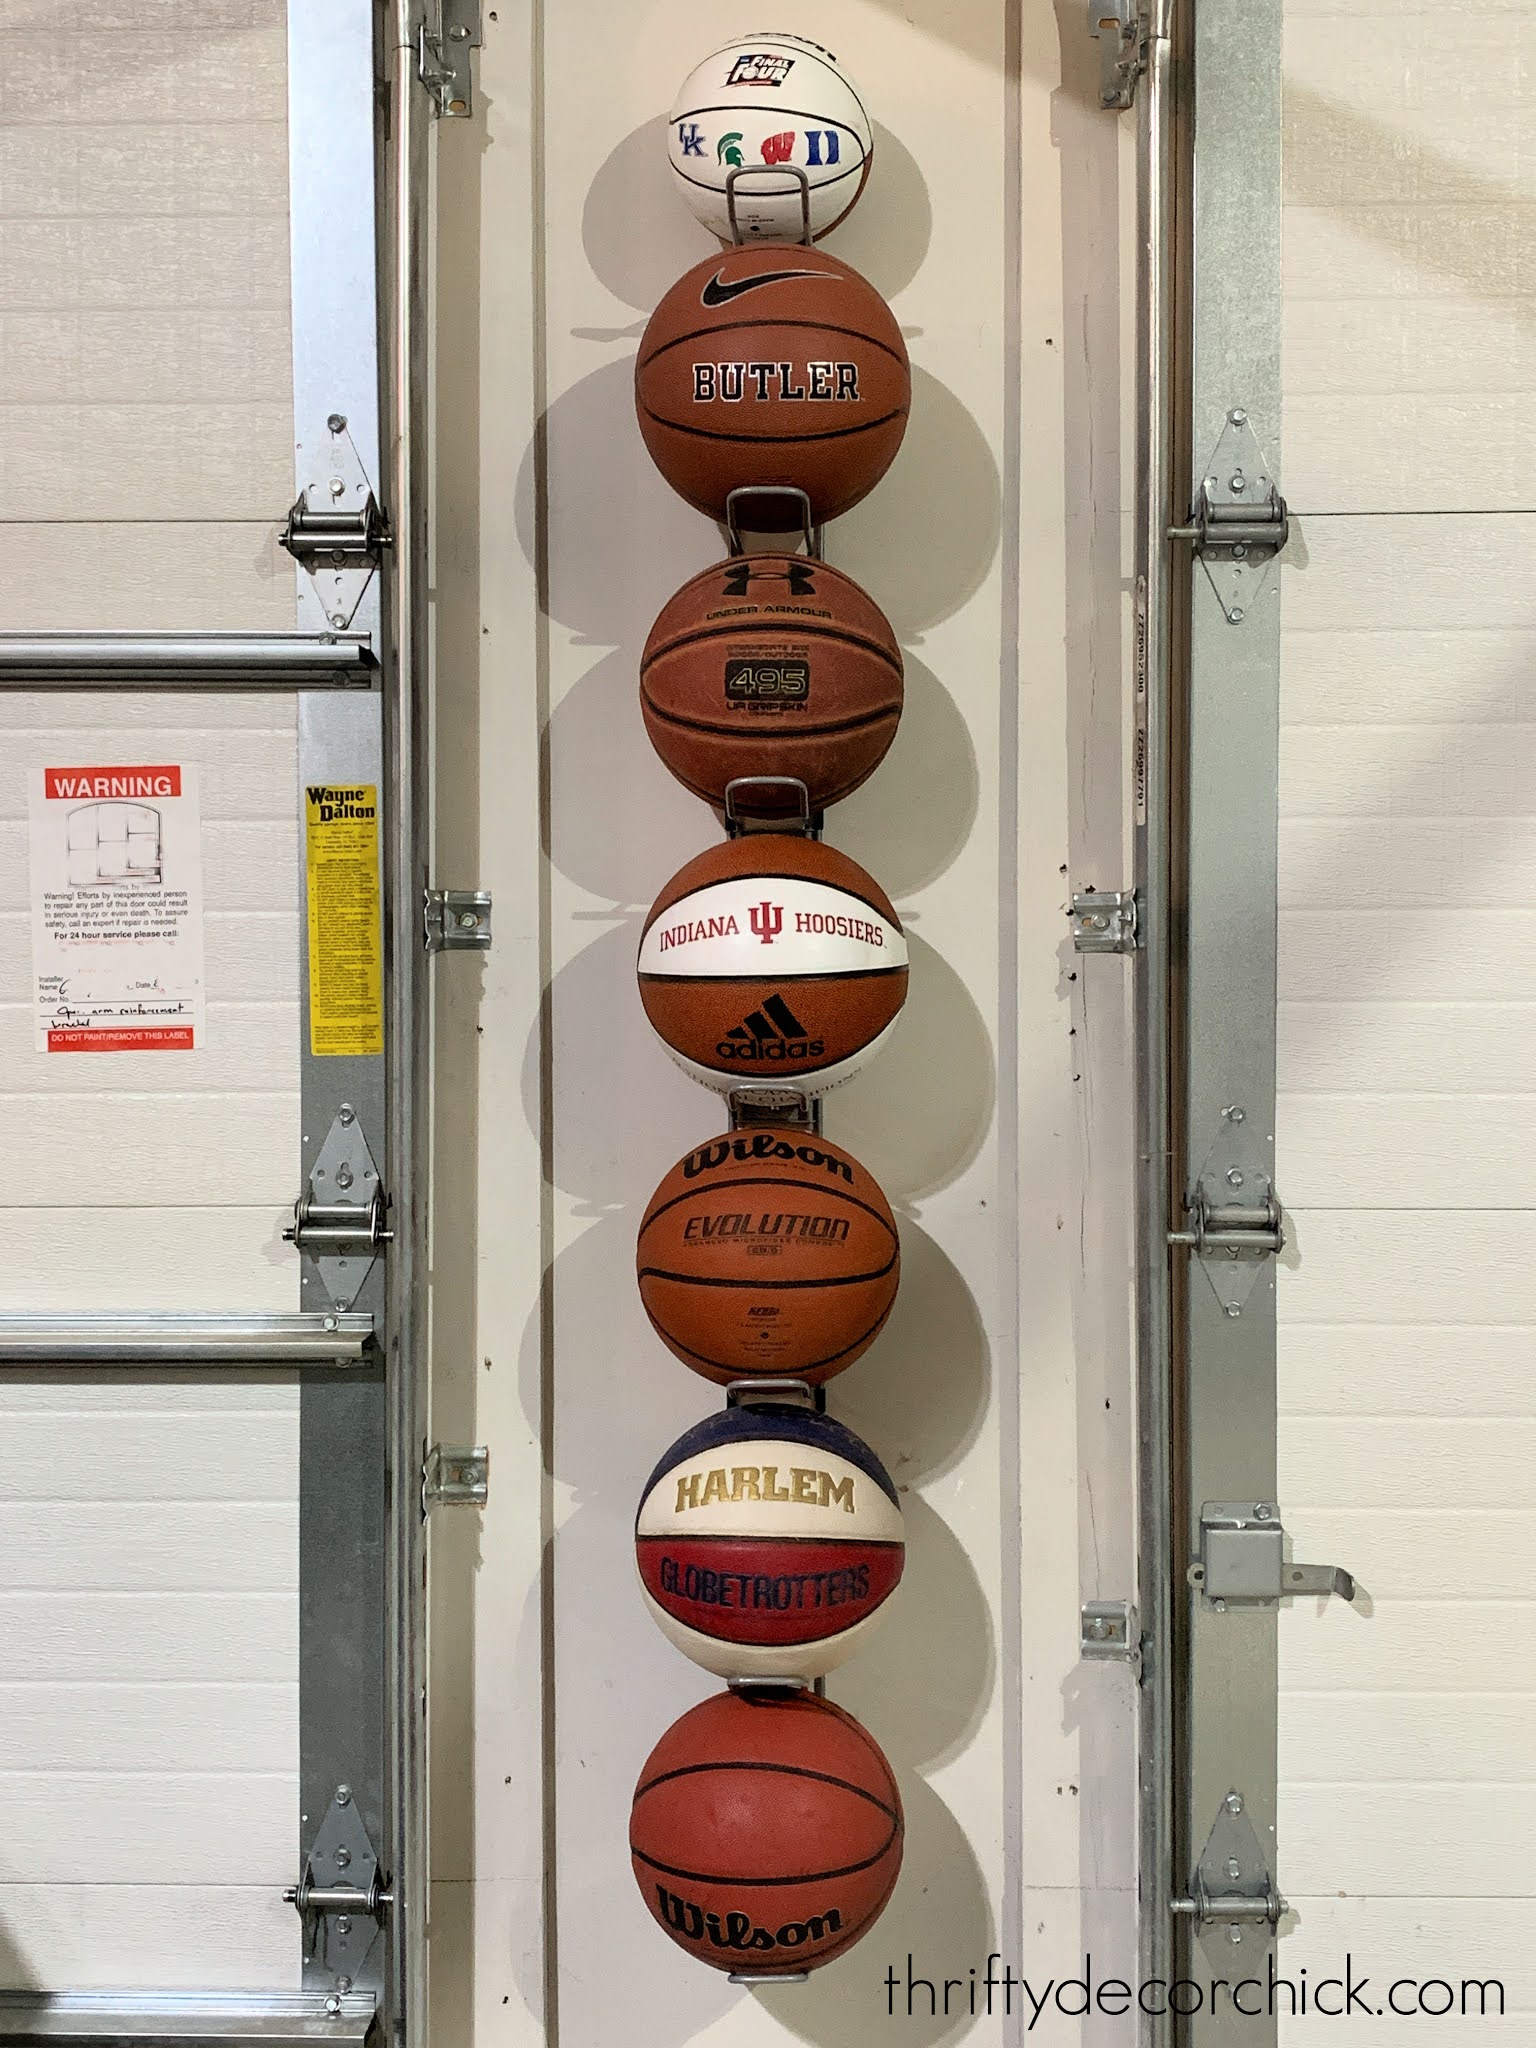
I also changed out a rolling basketball cart for this skinny ball holder that takes up WAY less space:
This post may contain affiliate links for your convenience.
See my policies and disclosure page for more information.
I'll share links to all of the items pictured at the end of this post!
Right down from that corner was where I used to keep my scrap wood:
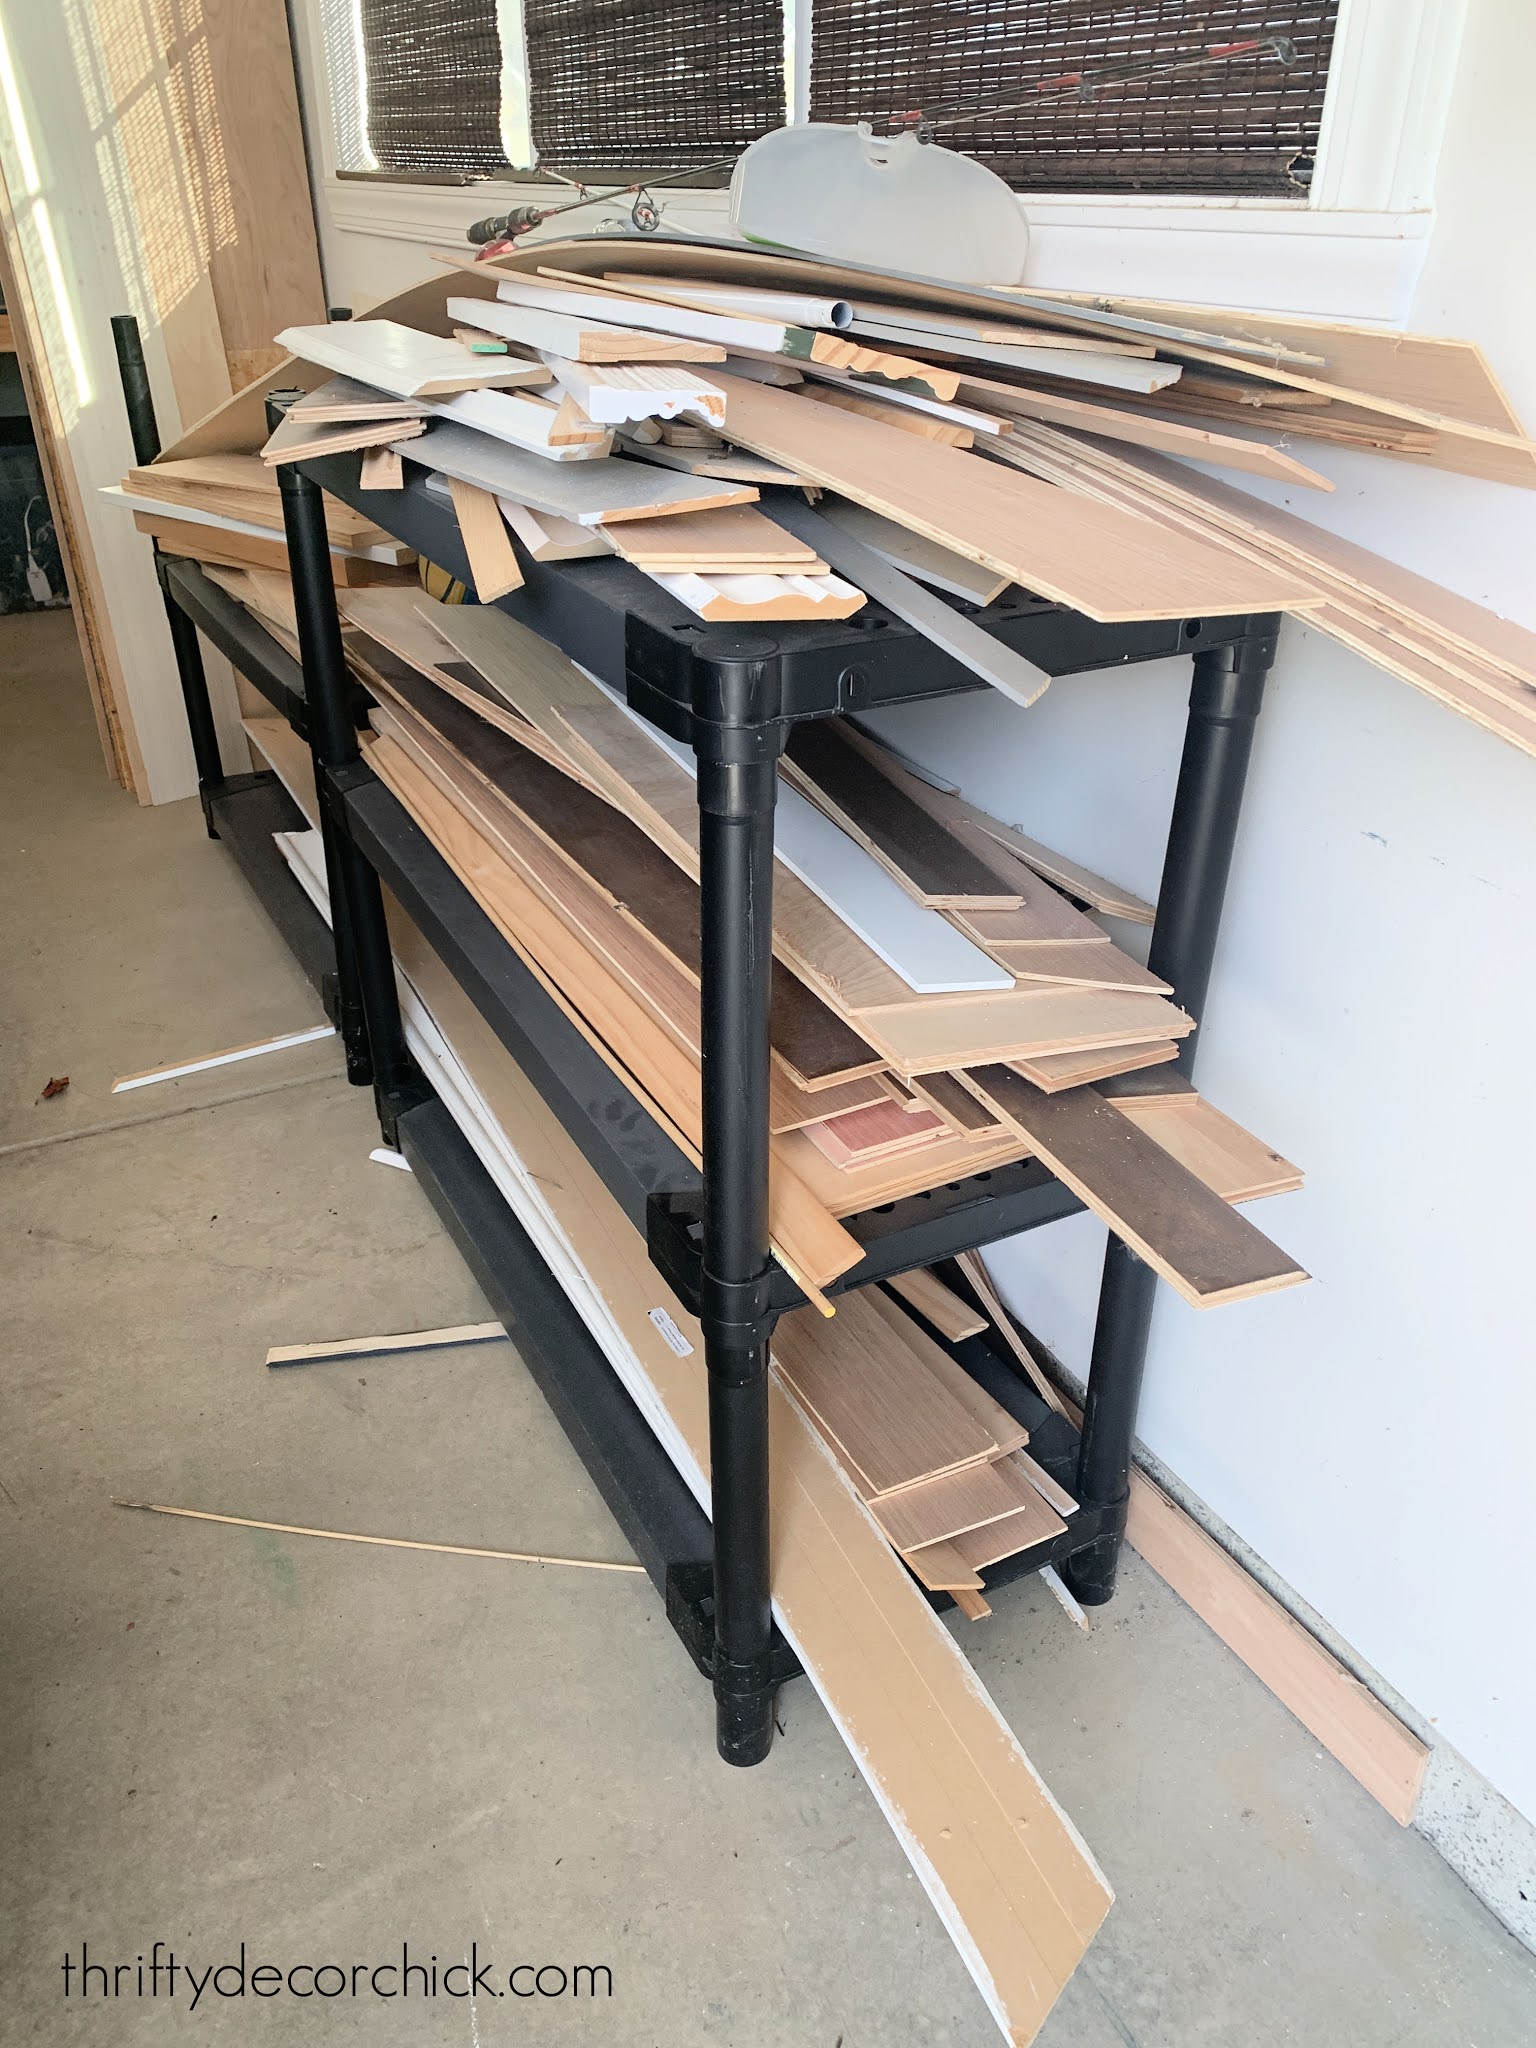
Don't look too close at the windows, so gross. #wherebugsgotodie
I thought this was such a brilliant idea for my scraps...at first. I quickly realized it wasn't working -- I couldn't get the longer pieces out because of all the stuff that used to sit on the ground (see the after pic above). There was also nothing to keep all the little pieces from falling off all. the. time.
Once I got my workshop side of the garage cleared out, I knew what I wanted to do for my scraps. I figured out the size of the largest pieces I had and used that as my back panel on the wall:

You don't have to have a piece against the wall, but it will protect the drywall.
I rarely have wood wider than three feet, since I have it cut down to fit into my car. I just kind of winged it while building this wood holder -- I used uhhhh...some scrap wood ? to start building compartments:

I could have used a jig to screw it together with hidden screws, but I didn't need it to be pretty. I just wanted it to be sturdy. I used 1x2s as brackets as I built to attach a new section.
My top section was the highest to hold the long pieces, the middle section was about two feet high, and the smallest about a foot. I also segmented some of those for smaller pieces that would have fallen over in the larger sections:

It works SO well and I've already utilized it a ton!
Next, it was time to sort through all of the items in here so I could organize them in a new storage cabinet. I had an obscene amount of spray paint from past projects and partnerships:
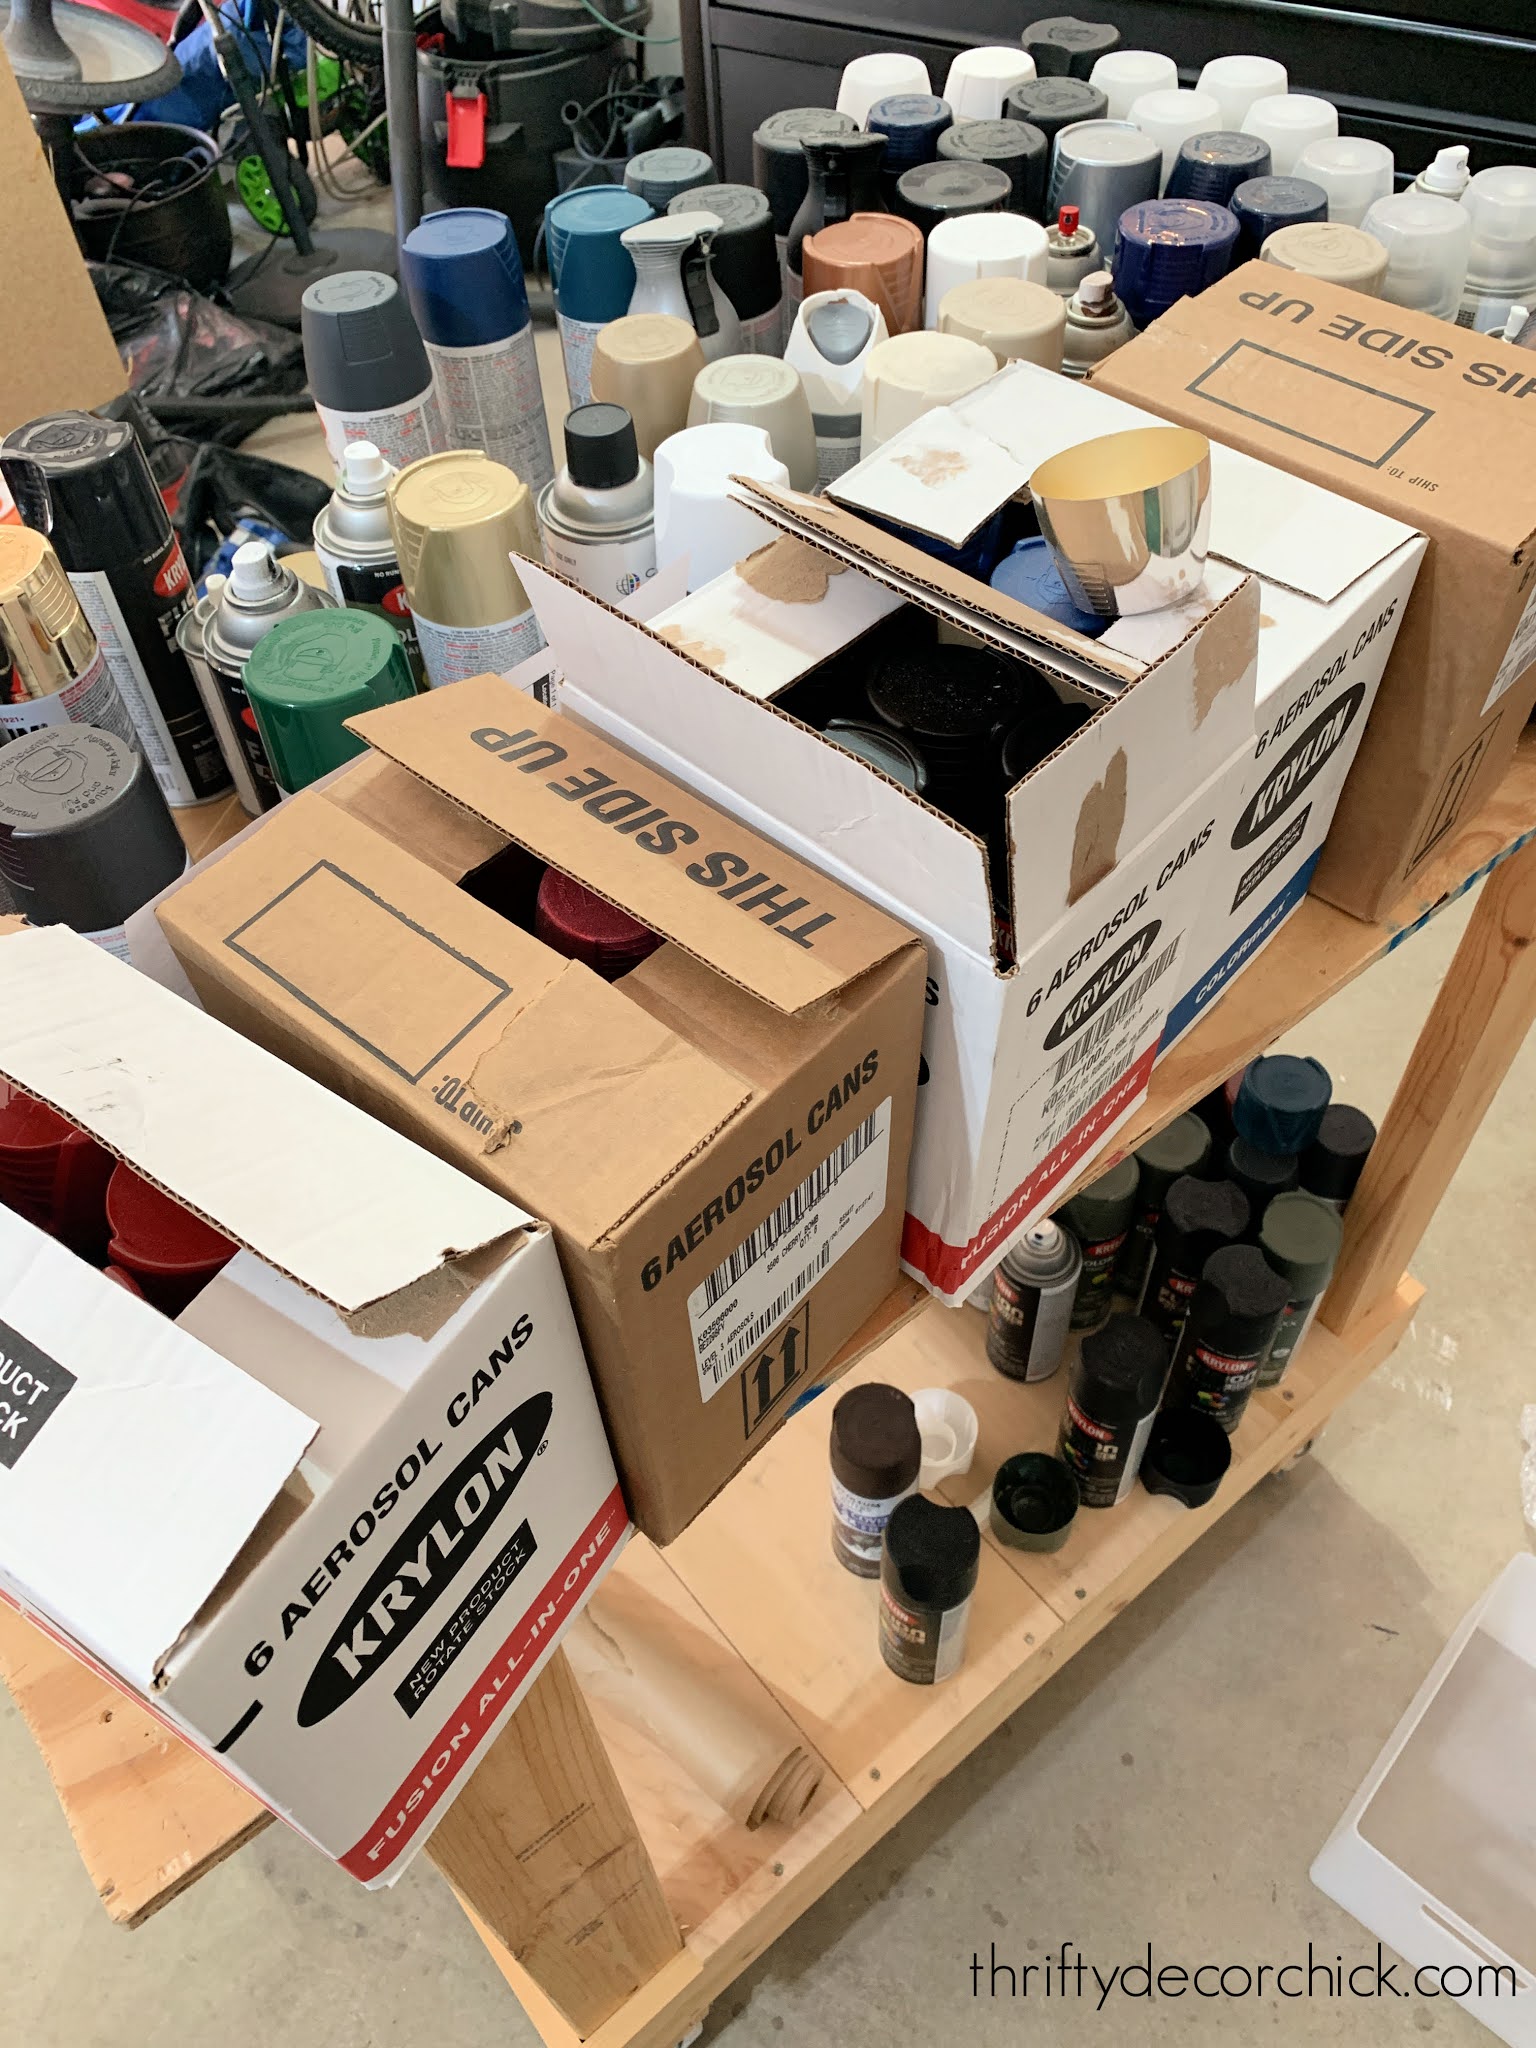
I think I counted at least 100 cans -- they were taking over the garage! I saved the colors I knew I would use and donated or gave the rest away to friends.
I purged our garden/outdoor stuff as well, and what had been in two tall plastic cabinets was downsized into this one metal cabinet:

I used my favorite plastic bins to organize everything into like items...with labels of course!:

These are easy to slide out and I like that we can see what's inside. Before we had everything out and stuffed in the shelves...this has already worked so much better for us!
I love that this cabinet has peg hooks on the doors for longer items too:

Before we had plastic cabinets that just didn't hold up to any kind of weight. The shelves sagged and the doors never shut completely. I spent almost the same on those as I did on this one unit that will hold up to just about anything!
My favorite part of this redo is my tool storage. I built a long workbench into the wall in our old garage, but knew I wanted something I could roll outside instead. (The sawdust gets out of control!) Shortly after we moved in I built this rolling work bench with scrap till I figured out what my permanent solution would be:
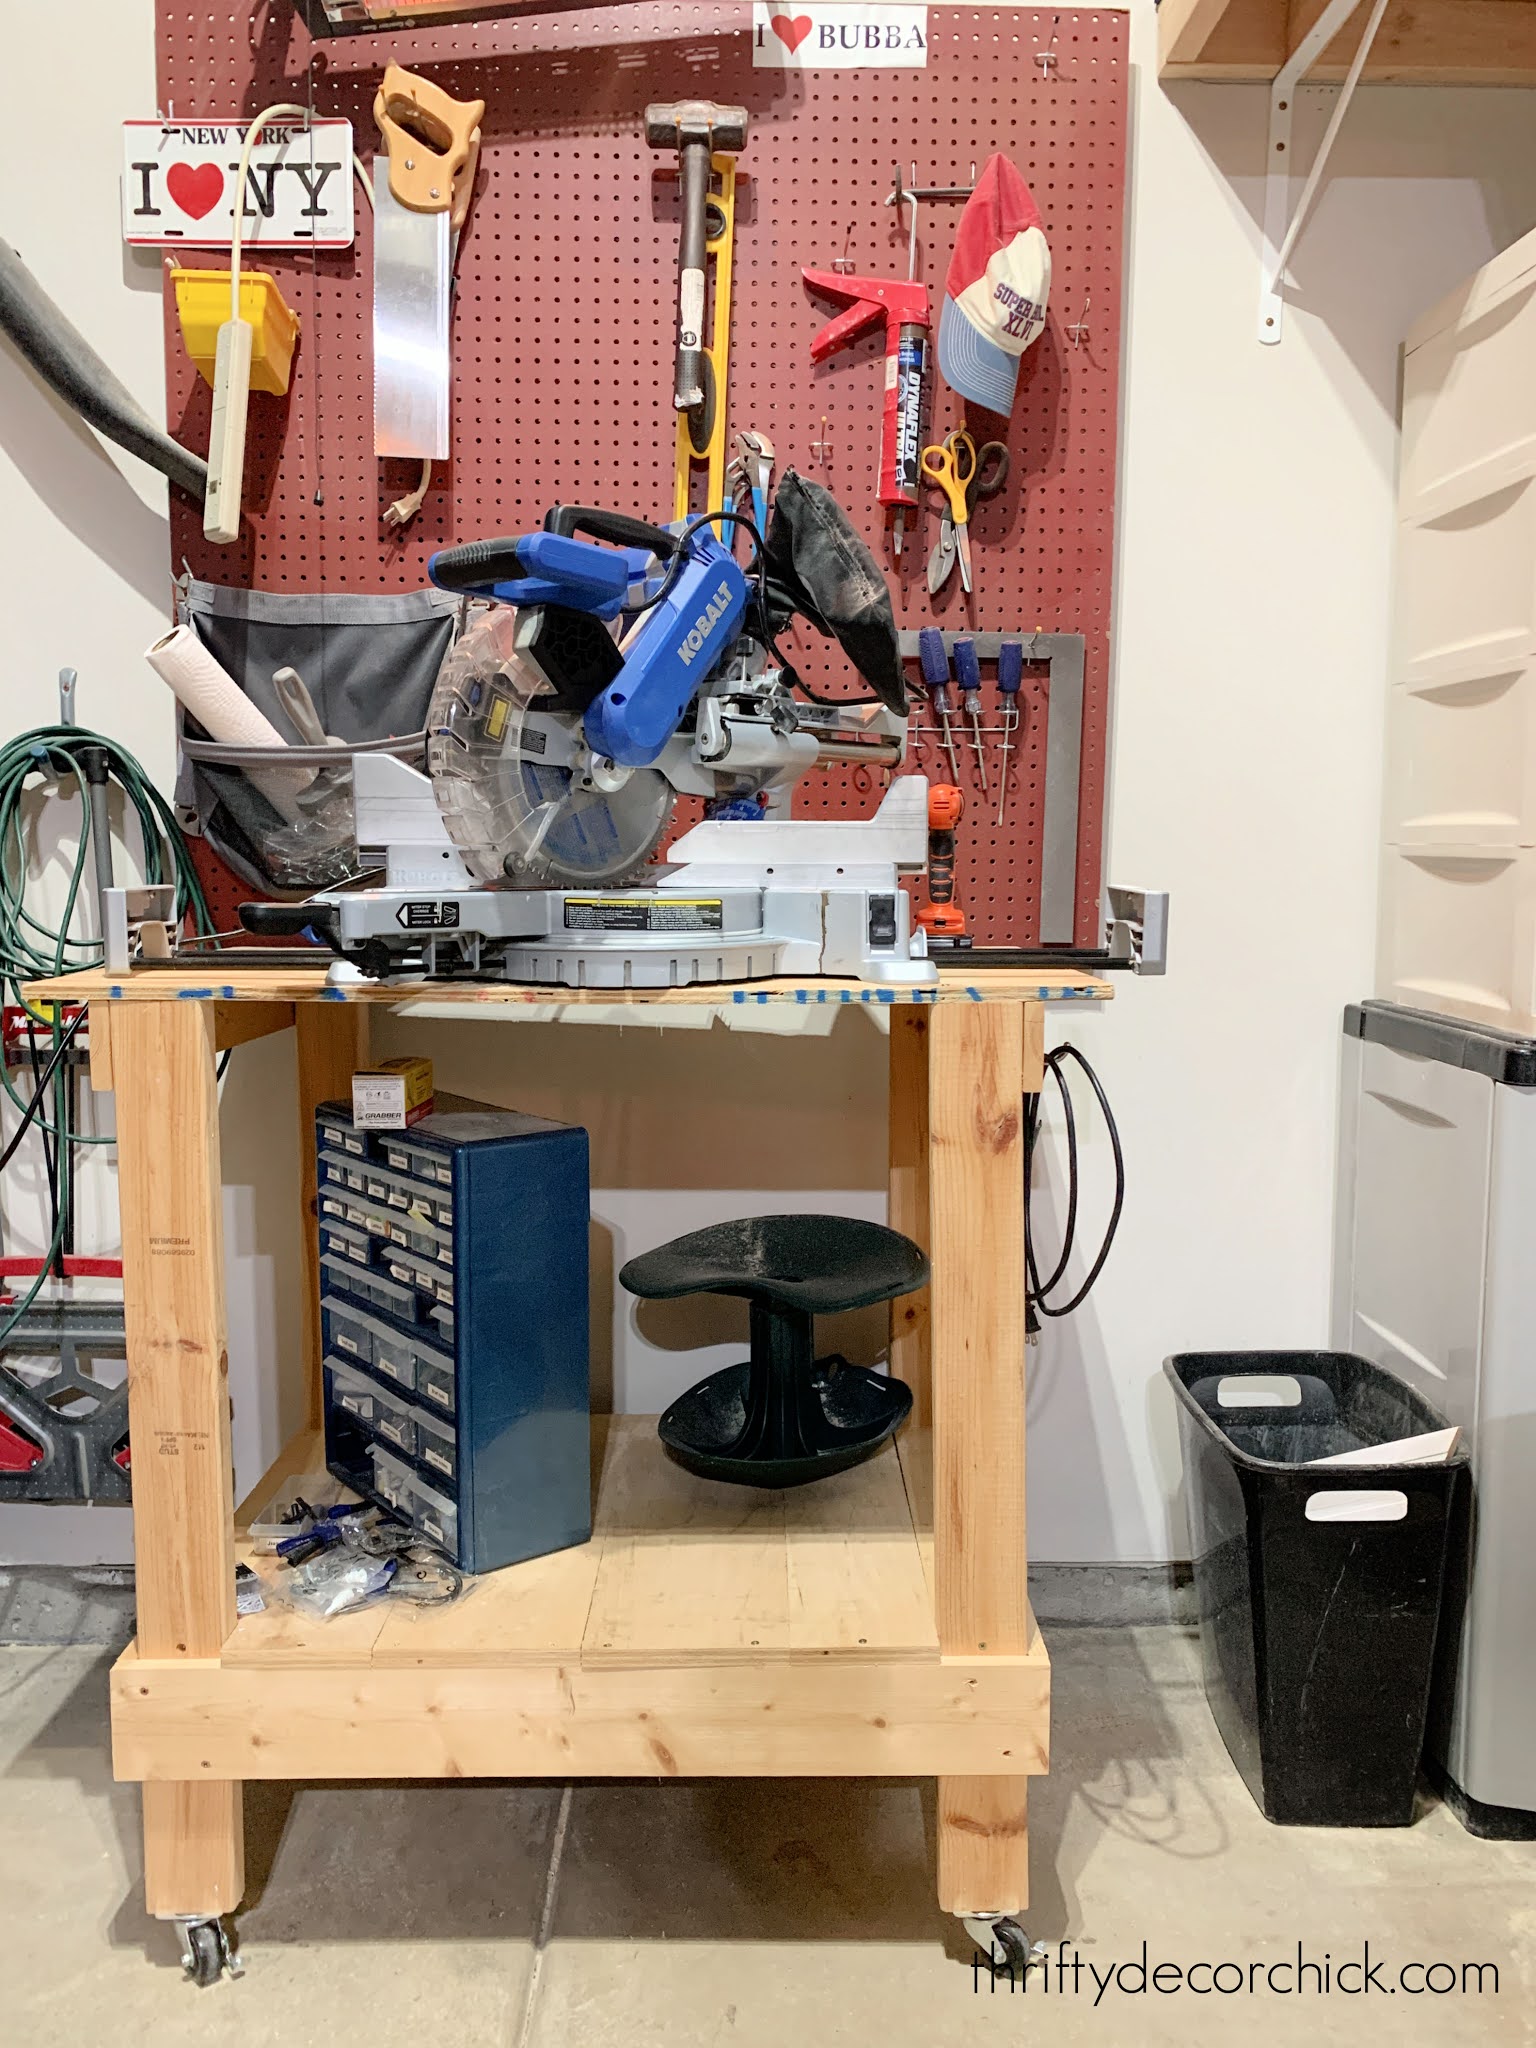
Those cabinets next to the cart were filled with my tools -- and no matter how much I tried to organize them, I could NEVER find what I needed.
So I looked into options for months and found what may be one of my favorite purchases EVER:
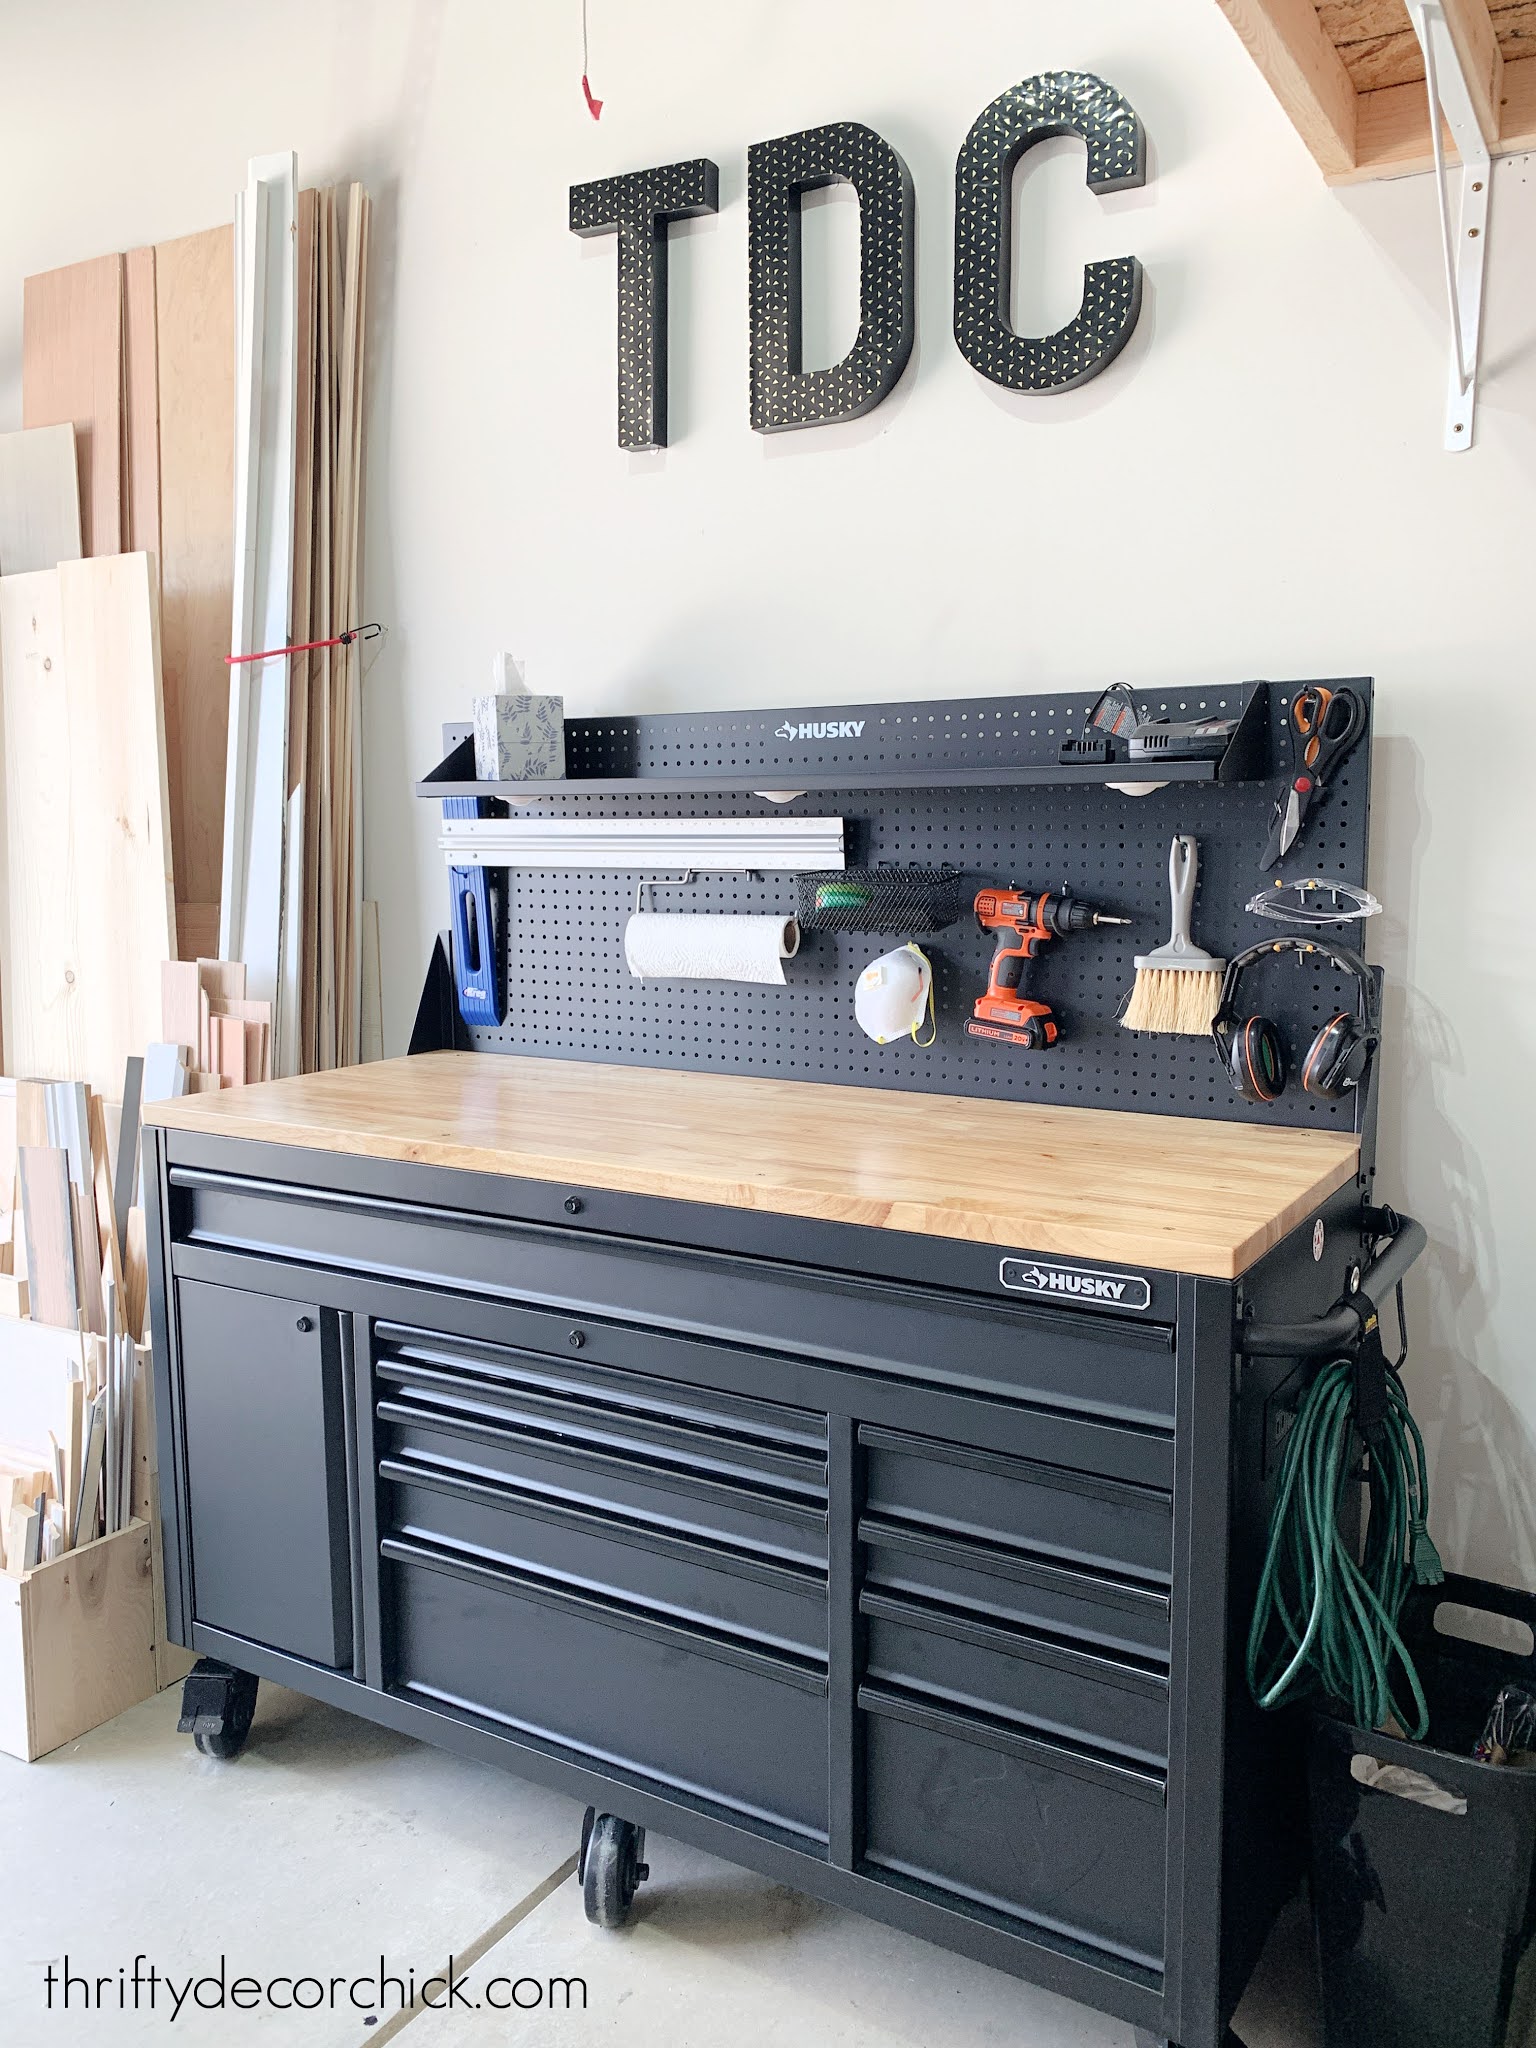
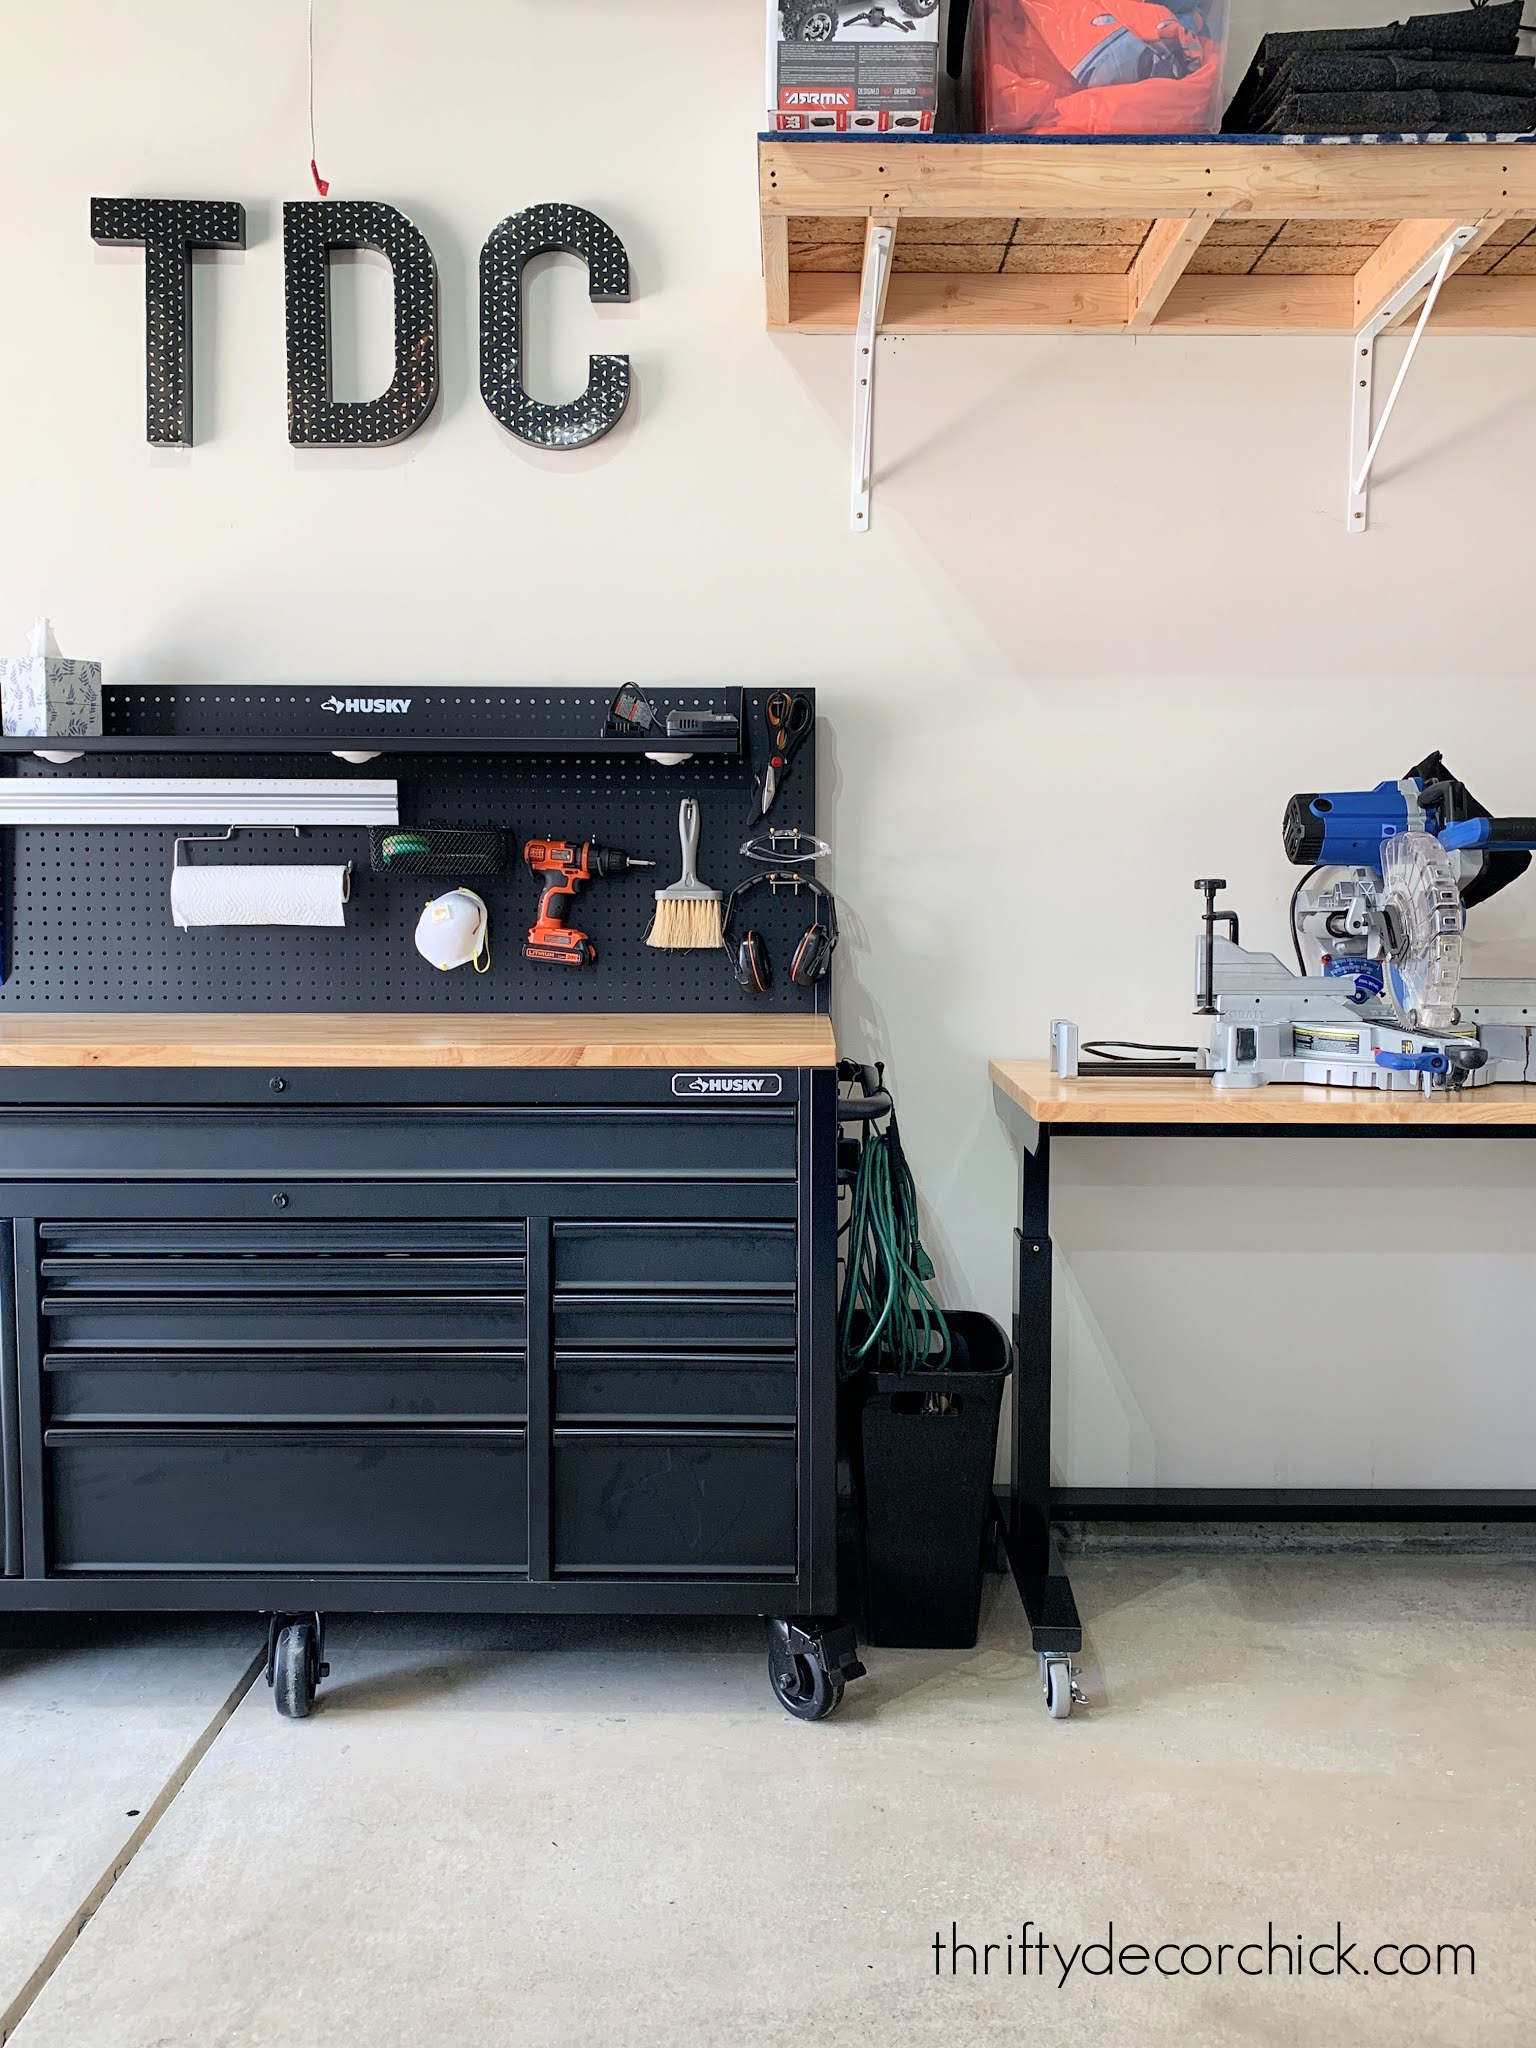
This is the Husky work bench and it is AWESOME.
The drawers fully extend, so you can see everything inside:


They are soft close too. The bench comes with those drawer mats so items don't scoot around when you open and close the drawers. **All of the black containers here are from the dollar store. Oh, and it has USB ports and outlets on the side for chargers or tools.
Gah. I love it so! I cannot believe after DIYing for 20+ years that I've never had anything like this. I feel so grown up and legit! ? Some of the options have all drawers, but I wanted something with a cabinet for my compressor and deeper drawers for the drills and saws.
I went through and sorted all of the little stuff like screws and nails and doodads. I had them all in that organizer you can see under the DIY workbench above, but it was always getting sawdust inside and some of them were stuffed full.
I wanted containers I could easily bring inside when needed as well. I shared these awesome (and super cheap!) small organizers for hardware here:
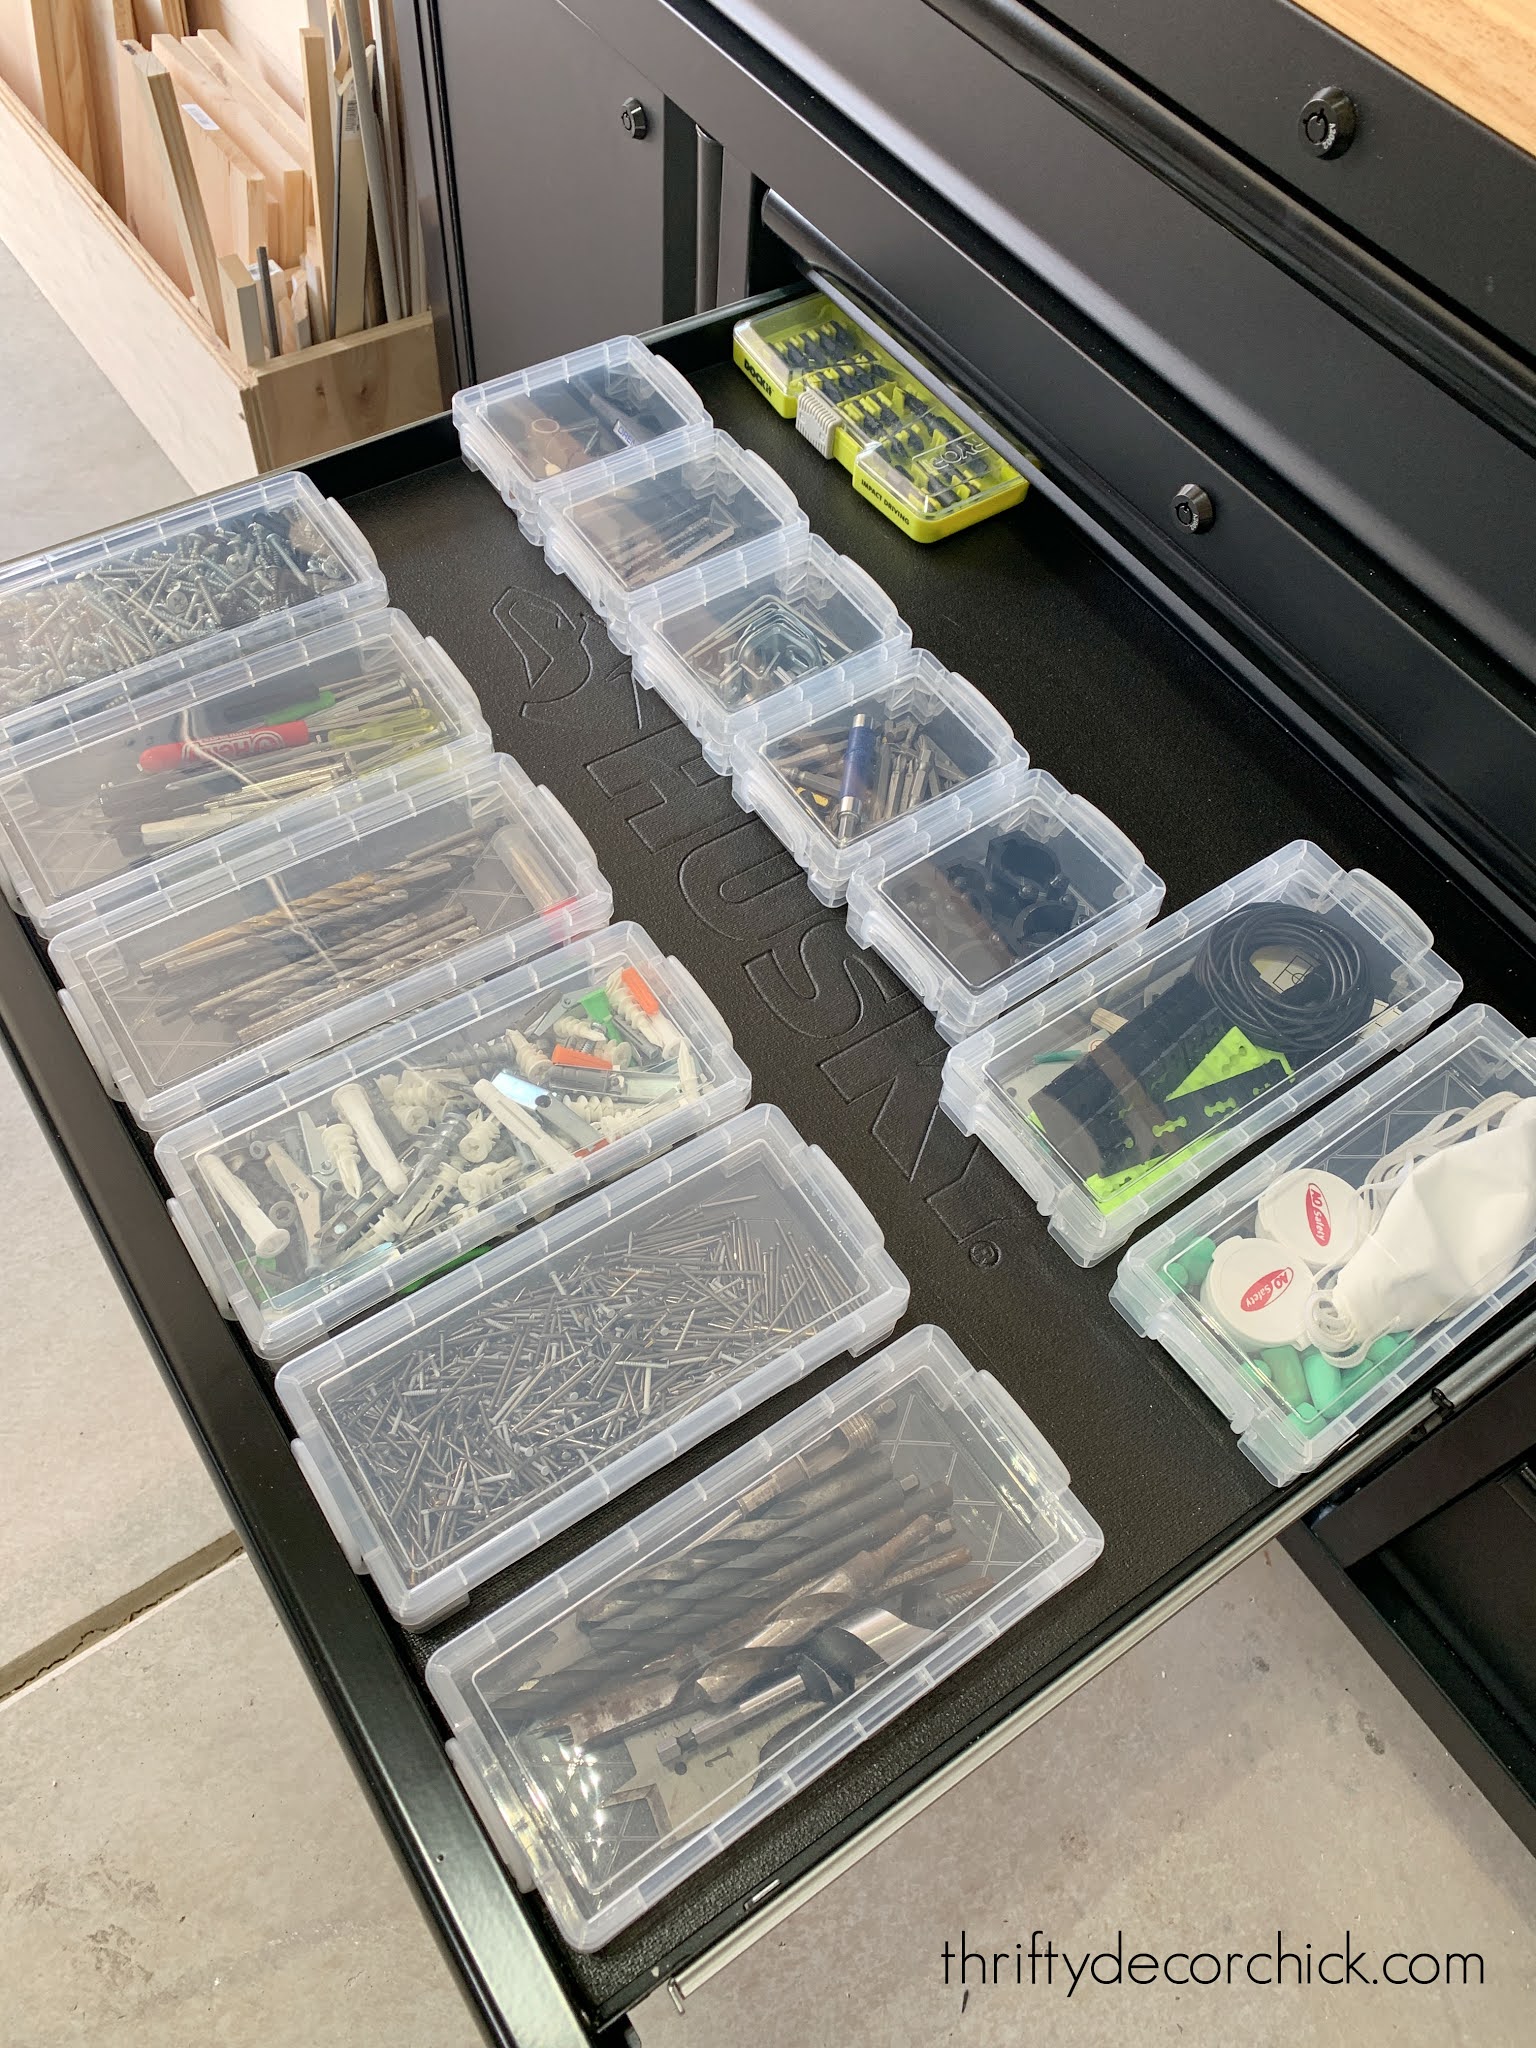

They are a game changer!
SO my last addition to this space was a rolling work bench just for my saw. It's lighter, smaller and easier to roll than the big one, but is the perfect size for my saw:

You can crank the height up or down, which is awesome when using a saw. Mine has always been up too high and I would get shoulder or arm pain when I used it too much. The length also works well.
I can roll it outside easily and the wheels lock so it won't go anywhere as I cut. The garage has already stayed SO much cleaner because of it!
I so wish I had taken more before pics of the whole space, but you can see some peeks of it in the photos above. It is really night and day!:

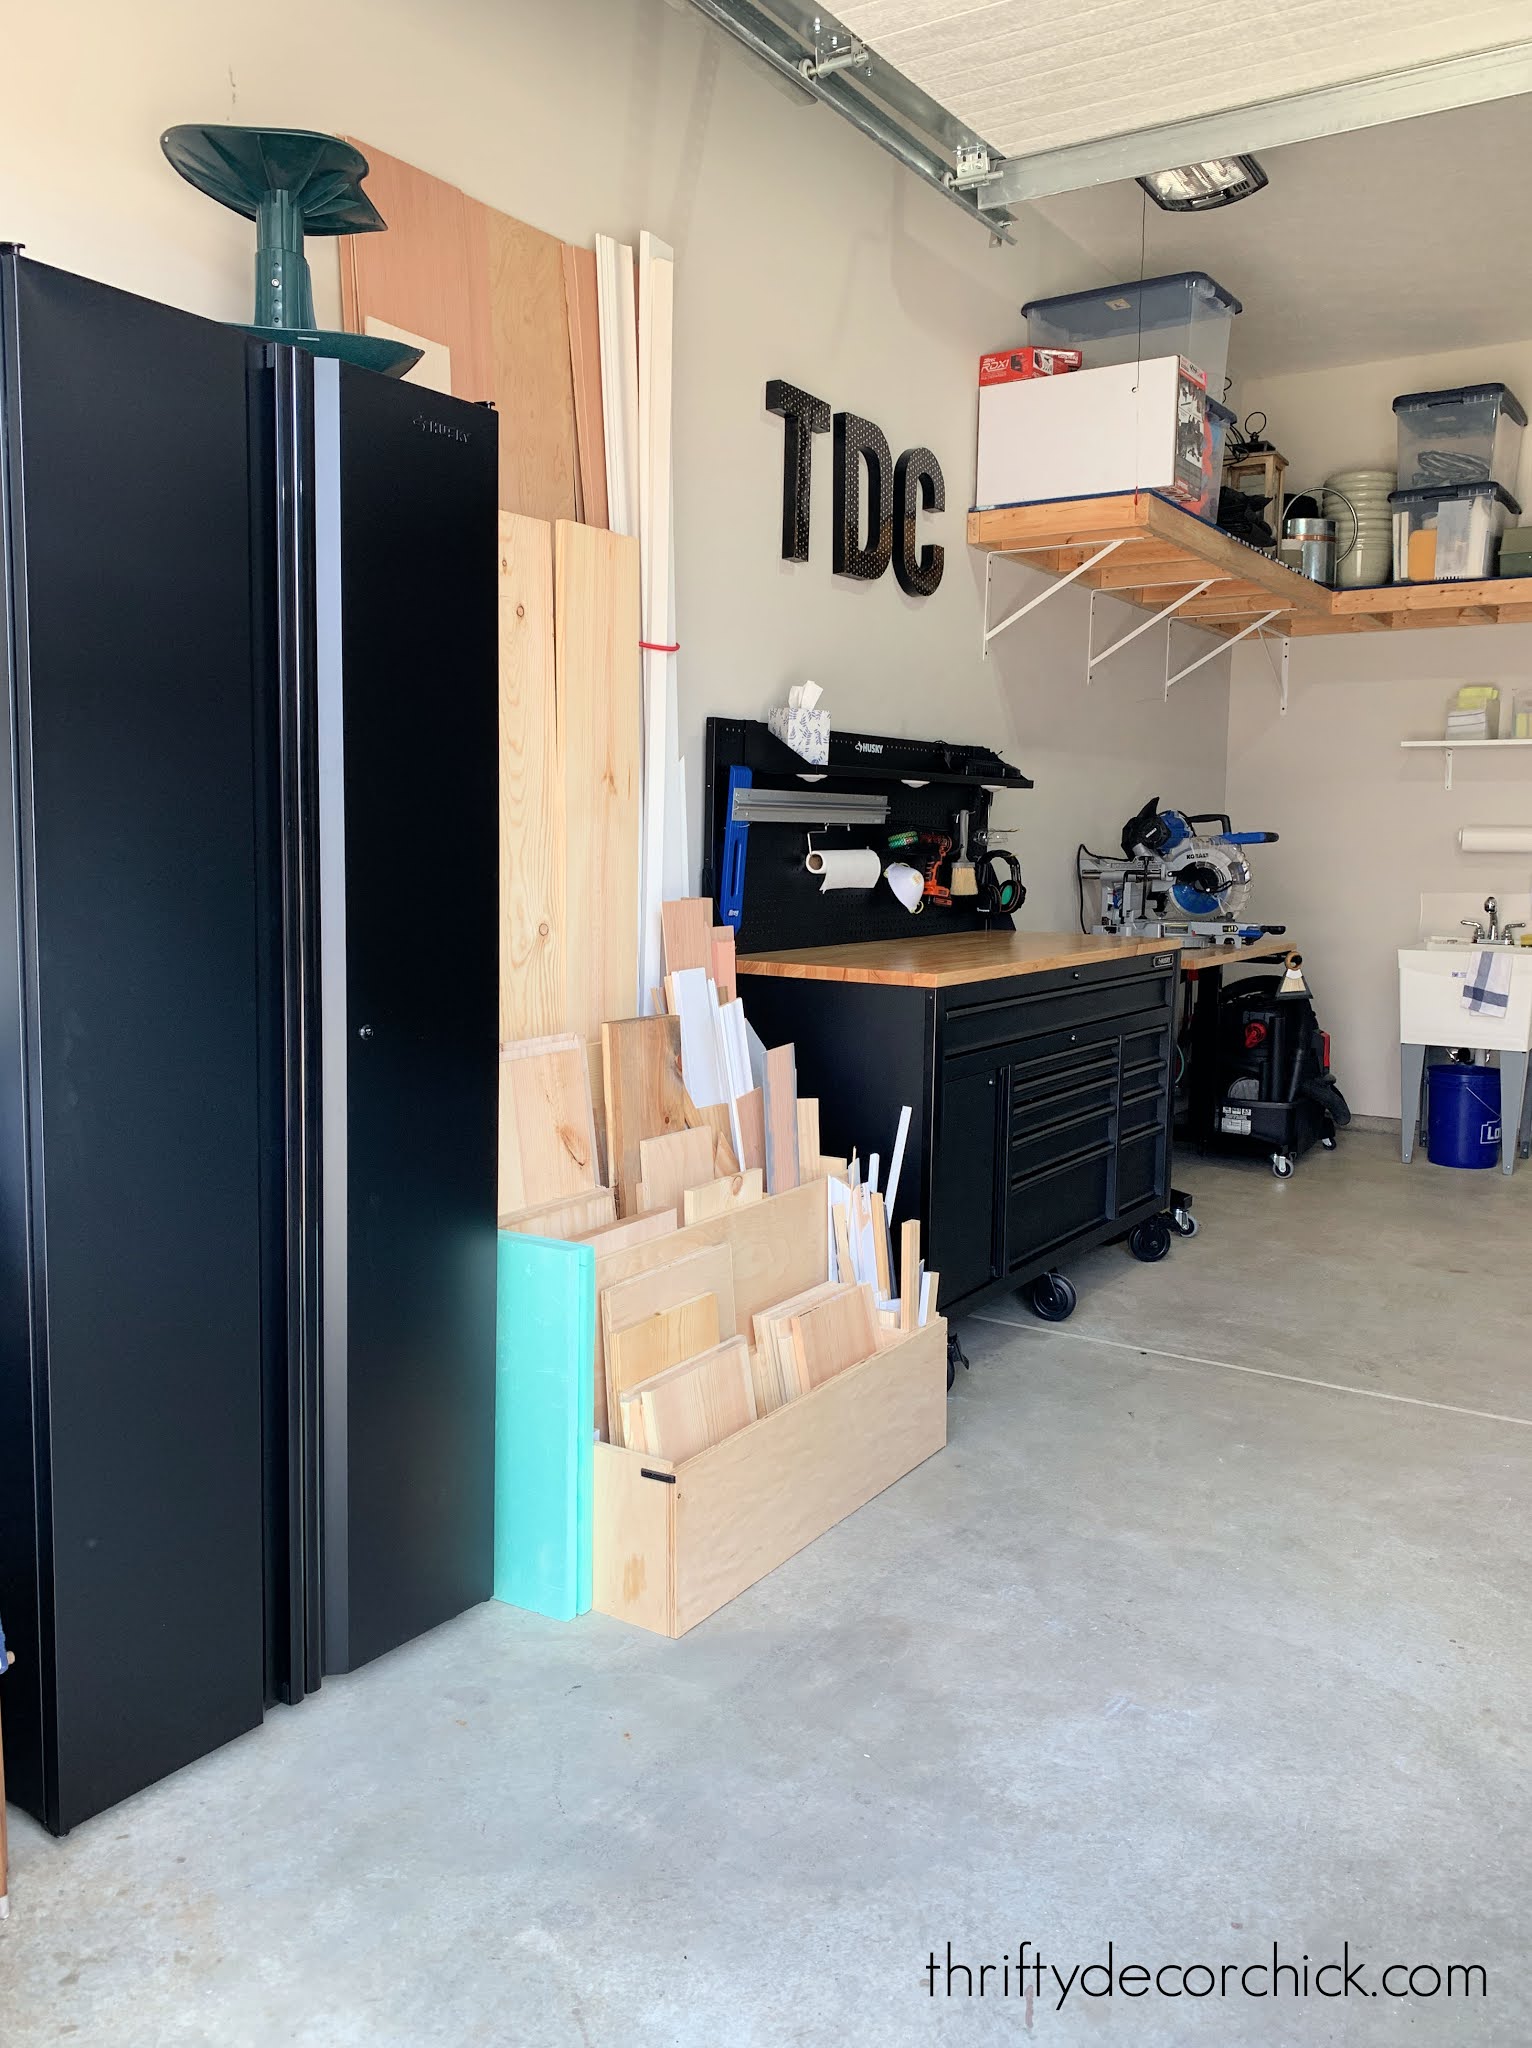
You know I had to add a fun little DIY project to this space with the TDC letters. ;) They are just big cardboard letters and I covered the front with black and gold wrapping paper:
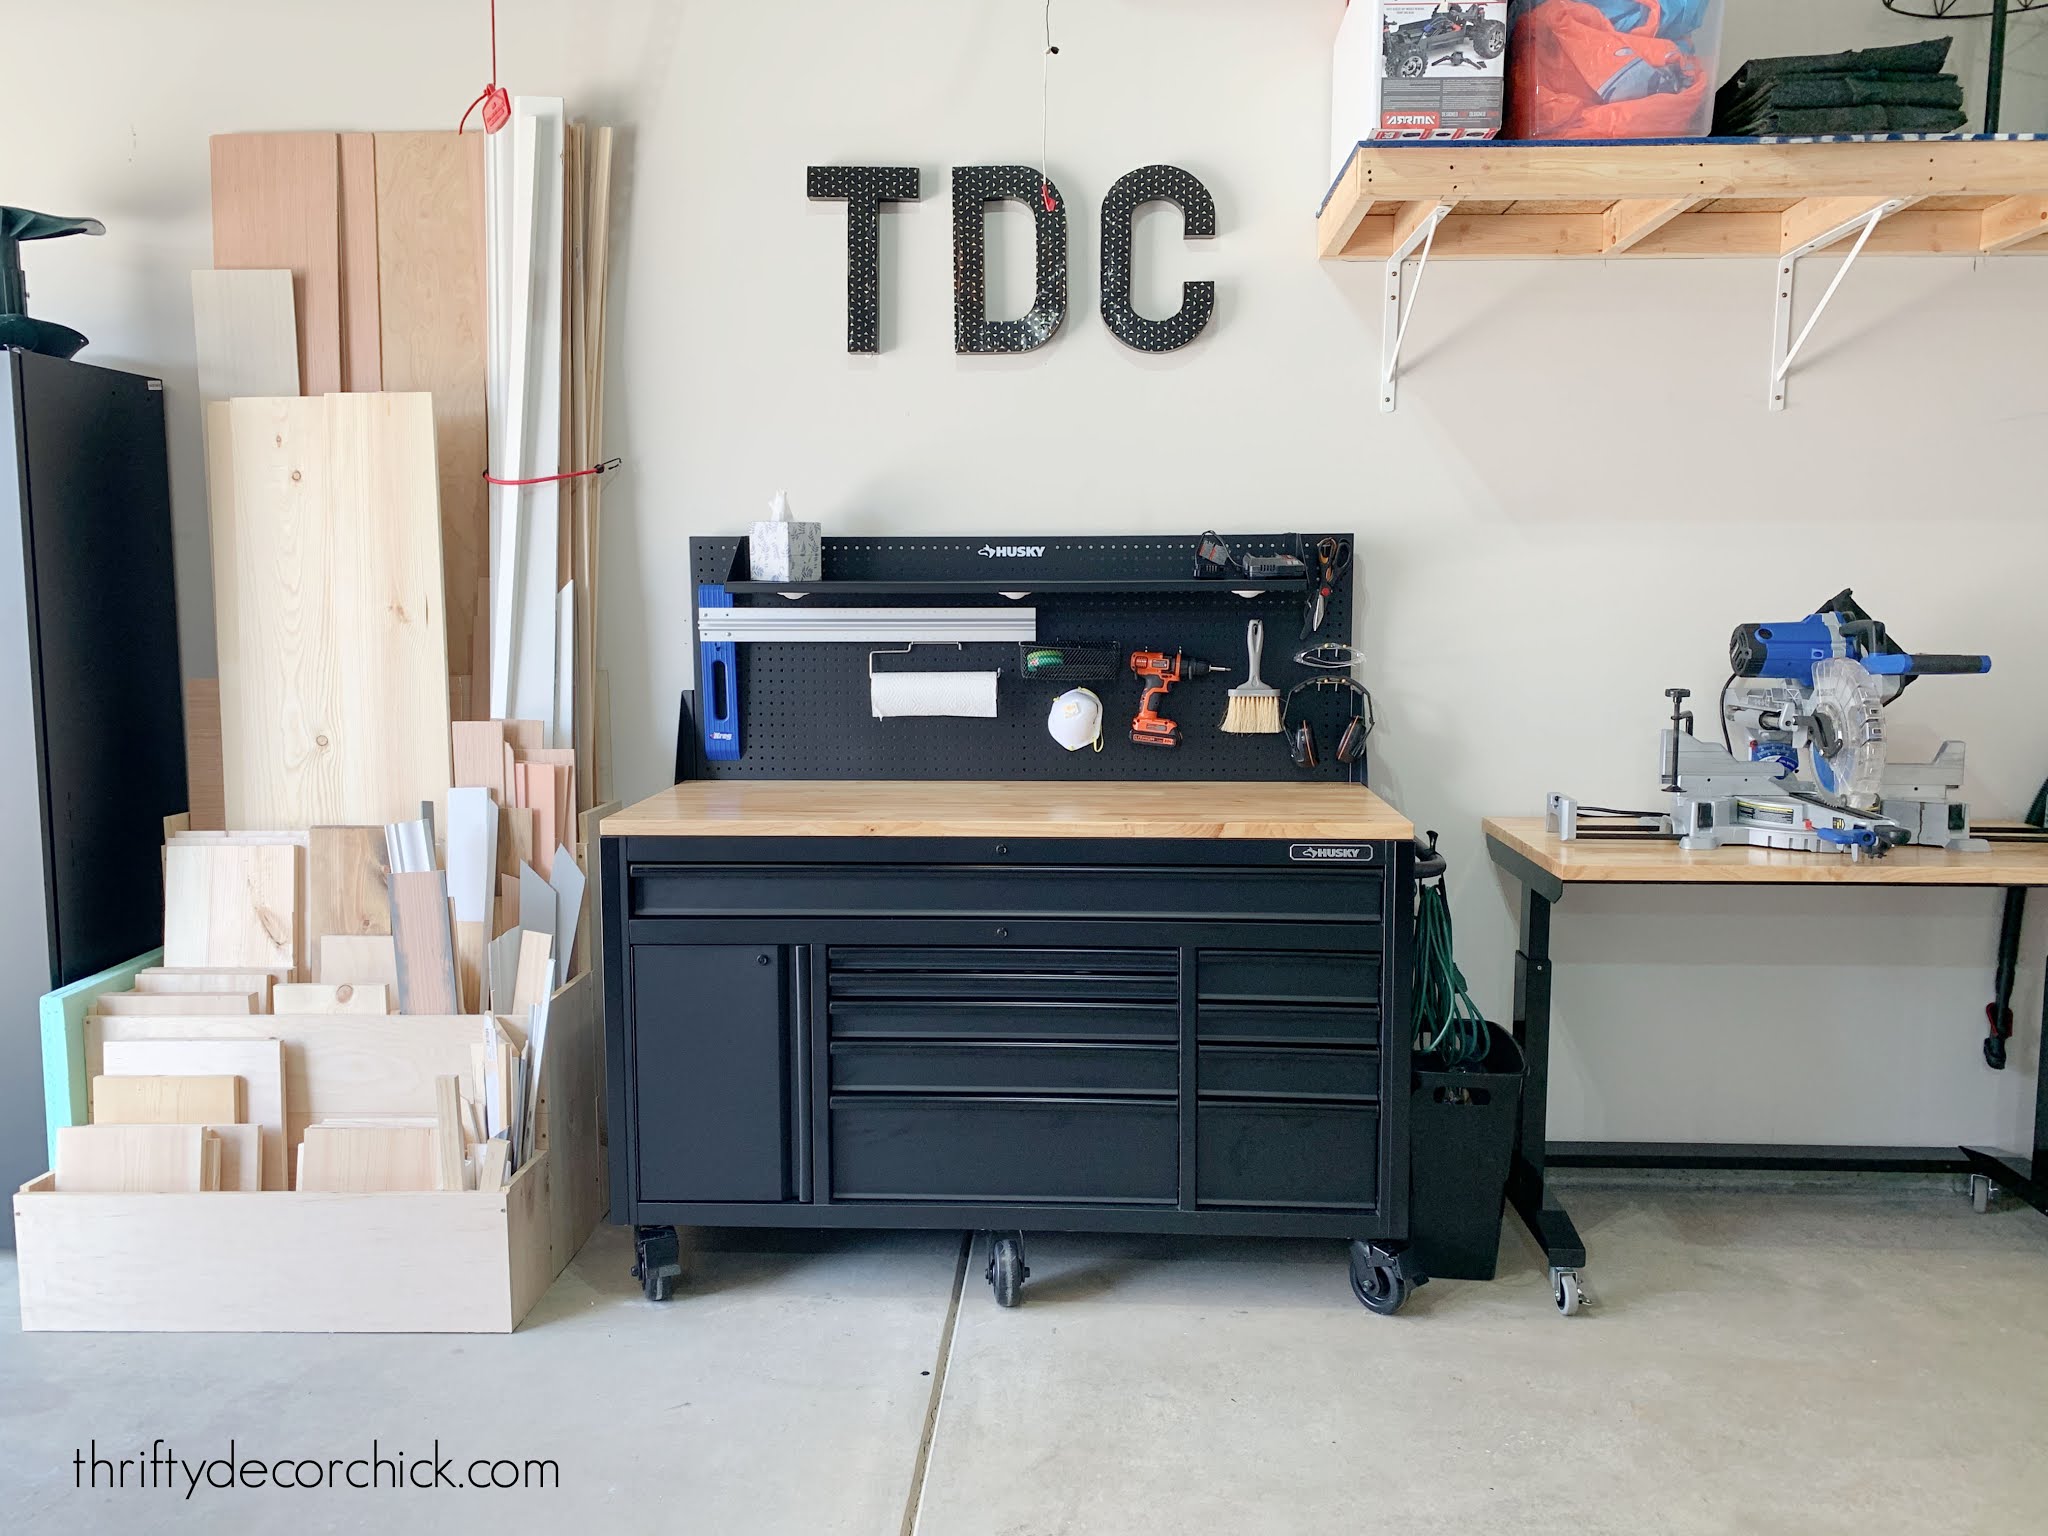

All of the larger items in here are the Husky brand from Home Depot (cabinet, rolling work table and rolling work bench). Thankfully I got all of them during a great sale, but I would buy them again in a heartbeat! They are perfect for our storage needs.
Here are some of my thoughts and tips when it comes to garage decluttering and organization:
If you are tackling your garage this spring I hope my ideas help you! If you have any tips for organizing the garage, I'd love to hear them!
You can find many of the items I used to organize our garage here:
Label maker for bins
Plastic storage bins for cabinets
Perfect small storage bins for hardware
Garden/project stool (I use this ALL the time and love it!) https://amzn.to/30EVVHv
LED garage lights (These make a HUGE difference in a garage/work space! SO much brighter.)
See more of our home here. To shop items in our home, click here! Never miss a post by signing up to get posts via email.
Via https://www.thriftydecorchick.com/2021/03/ideas-organized-garage-tool-storage.html
Hey there! The mud/laundry room storage makeover is underway! I didn't expect to get started right away, but we lucked out when the contractors we use were available sooner than I planned.
I can install base cabinets no problem, (I use them for built ins all the time) but I leave making sure the uppers are supported correctly to the professionals.
If you remember, I have big plans to make this part of the room work much better for us:

This post may contain affiliate links for your convenience.
See my policies and disclosure page for more information.
I've wanted to add cabinets under the folding table since we moved in. All along I planned to purchase the same cabinets our builder used so they would match the uppers in here. I didn't even consider looking into the big box stores to see what they have.
Well...the other day I finally did that and low and behold...they had cabinets in stock that matched ours almost exactly. The problem was they were only available in white or gray -- I was fine with the gray, but I wasn't sure the white would match our upper cabinets exactly.
And I decided awhile back that I want the base cabinets to be a deeper color, not gray. So I looked into my old go-to -- the inexpensive unfinished cabinets I use for my bookcase projects. I knew I could dress them up to look like our other cabinets with little extra work.
I wanted a TON of storage...so I ended up going with all drawers. And they are glorious. These are what I used:

If I could plan a kitchen all over again, I would do 90 percent drawers and hardly any cabinets with doors down below.
When the contractors said they could come by sooner than expected to hang the upper cabinets, I hurried to remove the current countertop so they didn't have to work around it:

They got them up in no time:

These are the cabinets that were over our washer and dryer, but they are only 30 inches wide and the spot below is six feet. I had them hung like this so I can add some small display shelves in between.
Now, onto how to install the base cabinets! I am NOT an expert when it comes to this, but I've learned a few things over the years that are helpful. And all of the cabinets I've installed are still standing, sooooo I'm fairly confident in my process. ?
Start by connecting the cabinets together first. Again, this works best on base cabinets obviously. :) Someone recommended this to me and it really does go so much smoother when you put them together first, then attach to the walls.
As you install, you'll need to look at two things -- that the cabinets are level from side to side and front to back as you put them together, and that they match up well at the front. This is what you want your cabinets to look like when connected:

You don't want any major gaps (small ones can be filled) and you want them to be flush. Connecting the cabinets together first definitely helps with this!
I used these cabinet screws for the first time for this set of cabinets, based on another recommendation:
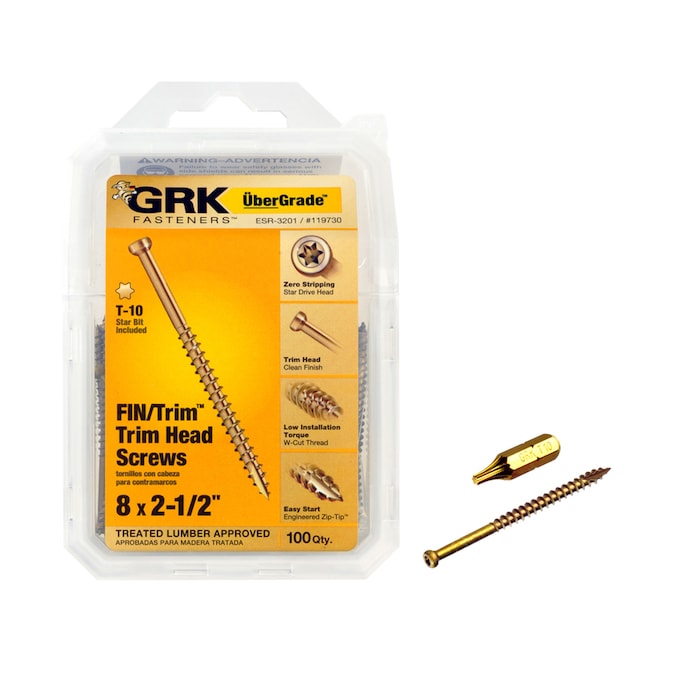
They worked really well -- you're not supposed to have to predrill your holes with these, but I did anyway.
They install and sink nicely into the wood so you don't see the screw head. I always use two to connect the cabinets -- one at the top and one at the bottom:

This is the BIG thing you need to know going in -- very few walls are actually perfectly straight. And very few corners are perfect 90 degree angles.
You'll need to adjust for those discrepancies with shims:

Another tip I find helpful -- add some scrap in between at the back of each cabinet set, so that they are installed the same distance from the back to the front. Otherwise the front of your cabinets may bow out a bit.
Before you connect two cabinets, check for level and see where you need to add a shim. You can place them under or behind the cabinets against the wall to even things out. Tap them in with a hammer until you are level:

You can see that mine was not PERFECTLY level, and in my experience that tiny bit does not matter. **It may matter more if you are having granite counters installed.
It's a process of checking for level, adjusting with shims and screwing the cabinets together one by one. Then checking to make sure all of them are level as you connect them.
Once they are together and are as flush and level as you can get them, you can install them into the walls. Use a stud finder to find your studs -- it's helpful for me to mark where they are on the wall.
For this part, these screws are awesome -- they have a built in "washer" that makes sure the screw isn't going to go through the cabinet back or sides:
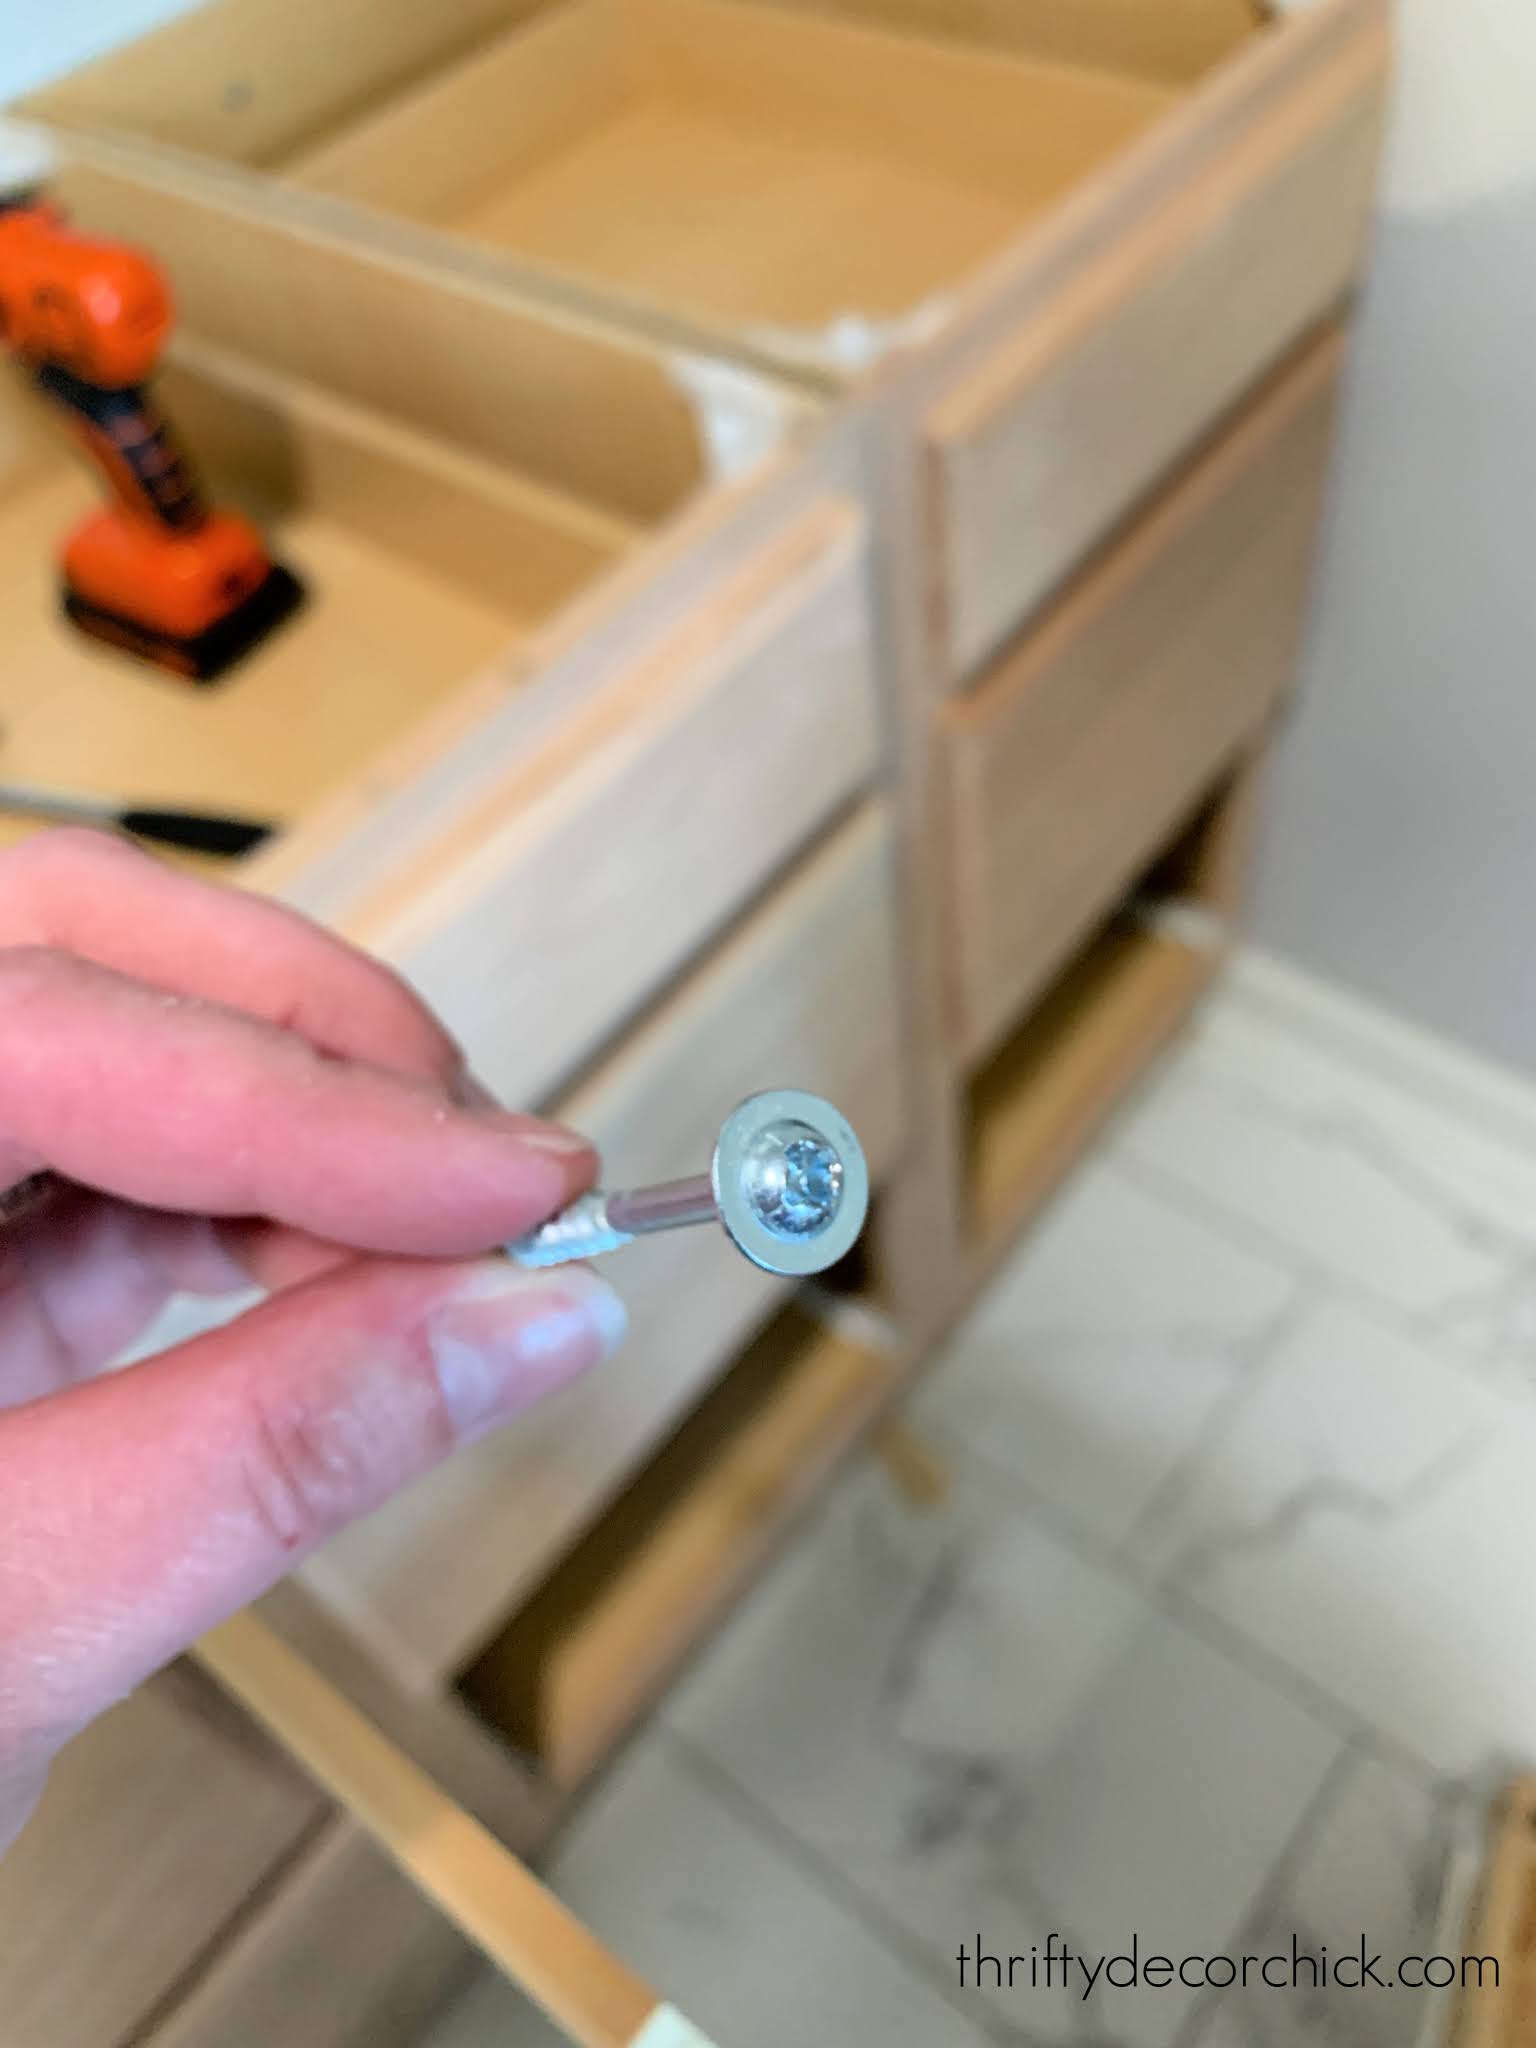
I usually put one at the top and bottom at the back of each cabinet and some on the sides into studs. Sometimes I find they don't need bottom screws on every single cabinet -- if you can shake them around at all you'll need one.
One more tip -- check any drawers as you install the cabinets to each other and into the wall. They can be a little finicky because they are on slides. If not installed properly, your drawers may catch or not operate well. Open and close them as you go.
When everything is attached to the walls, you can remove the shims on the floor by scoring them with a razor and then snapping them off:
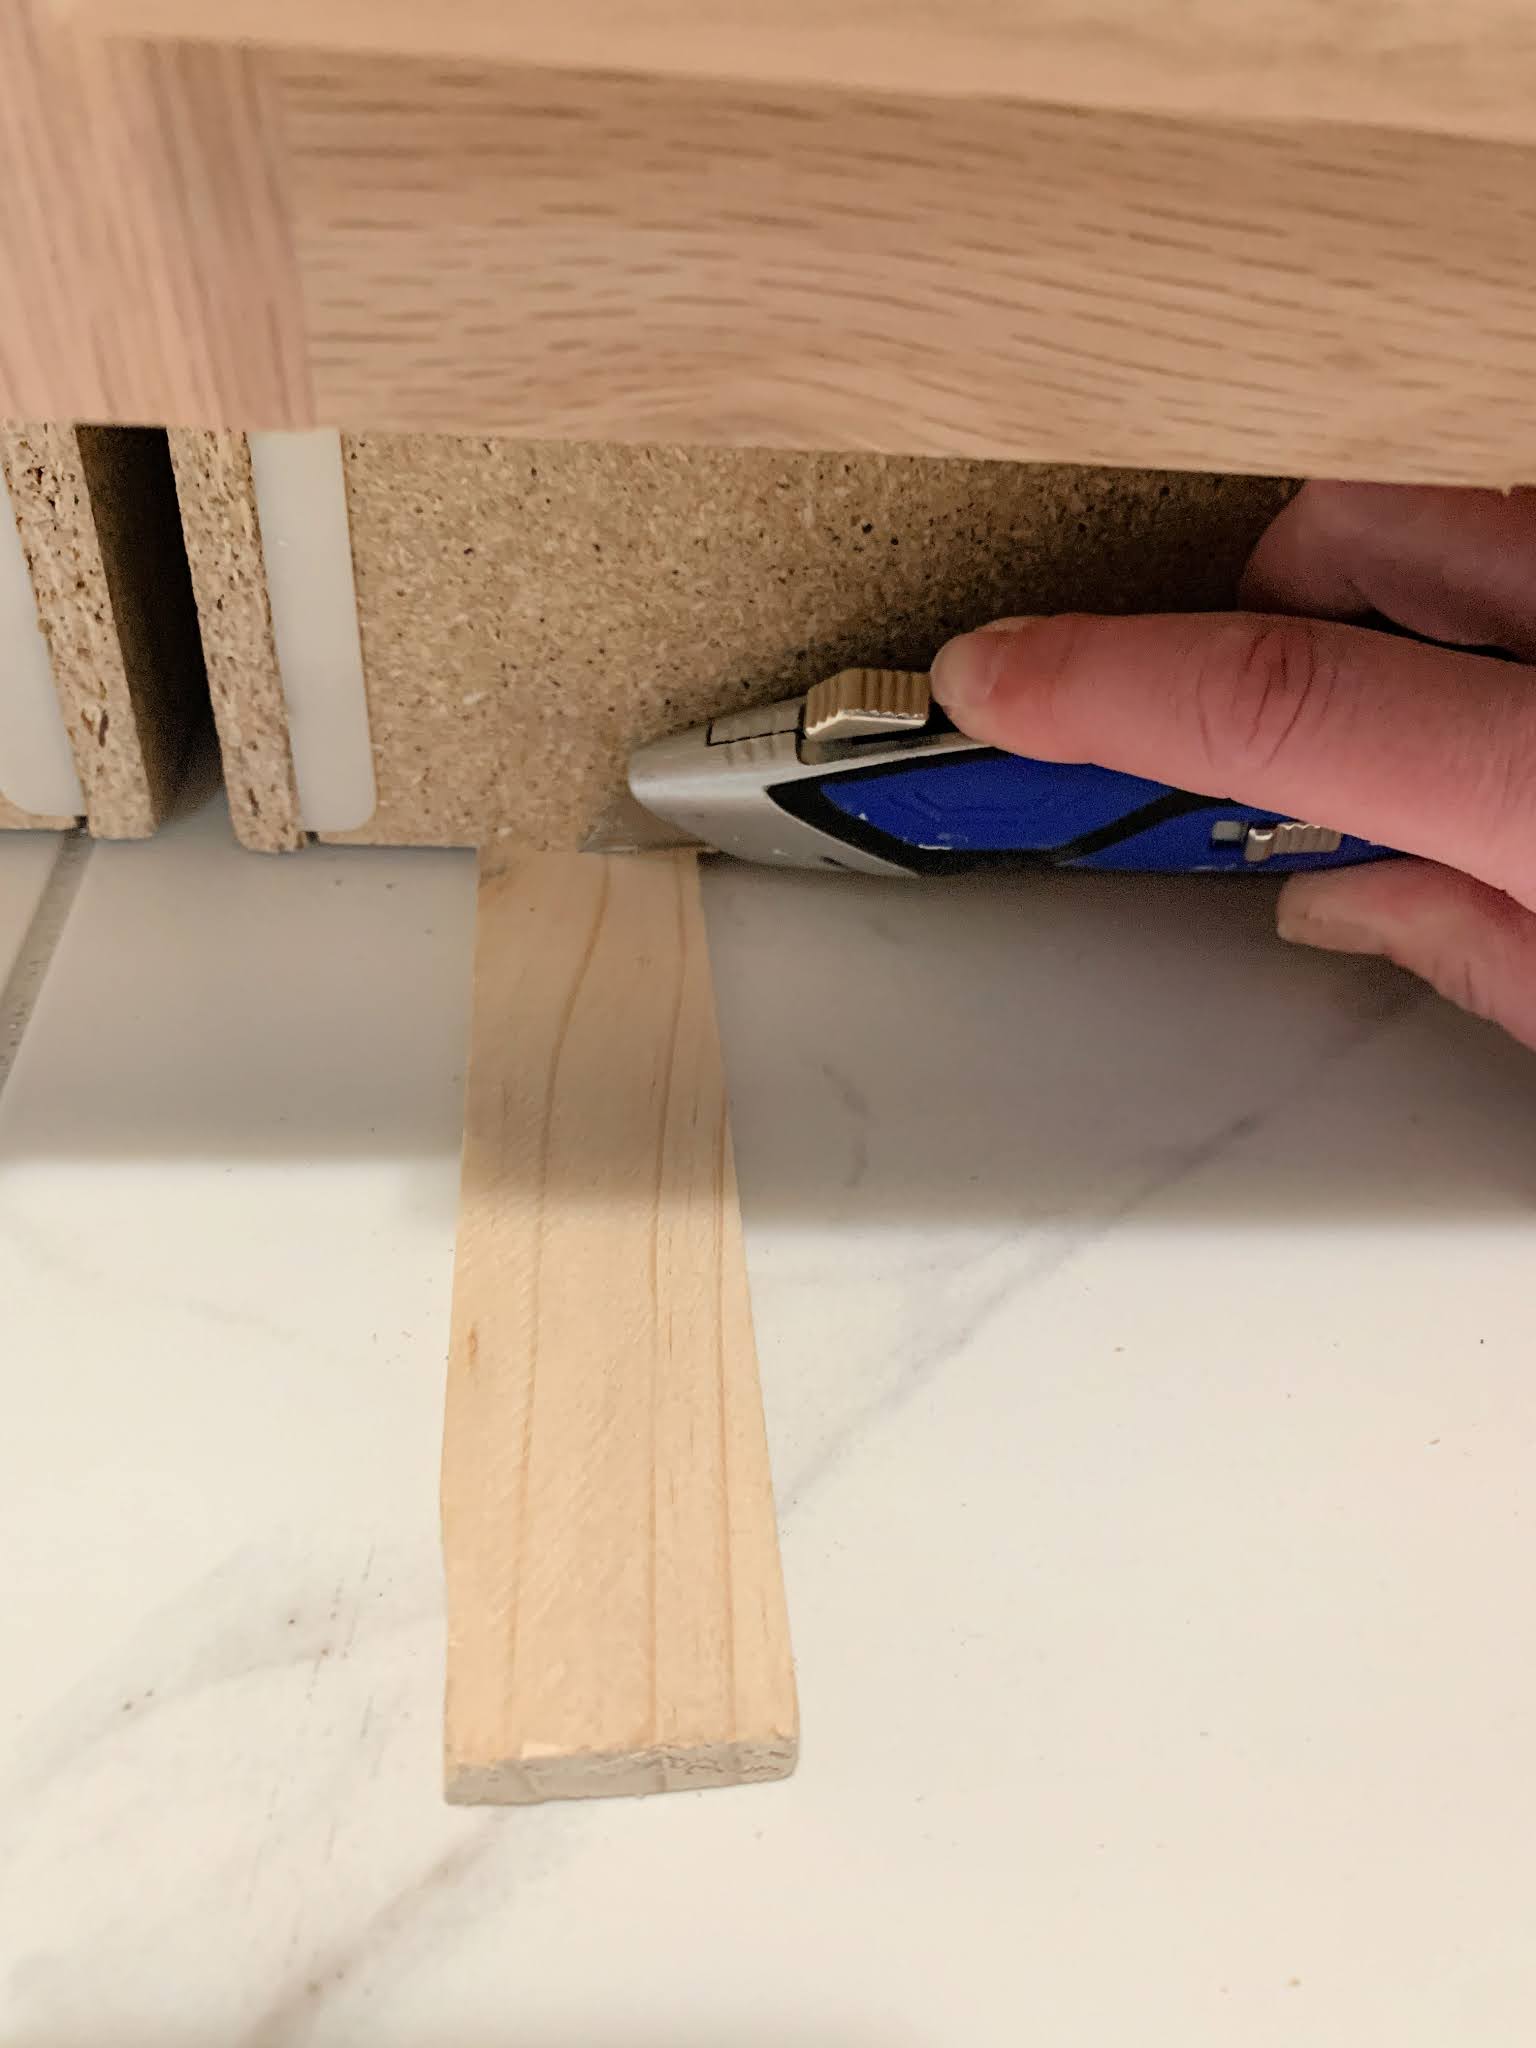
The portion under the cabinet will stay put.
I know this may sound like a lot, but as you get going it's not that bad. This is one of those DIY projects that can be intimidating, but it doesn't take long to get the hang of it.
I placed our countertop back on until we get the new one:

I'm splurging on two things in this room -- one is the countertop. It's a beautiful butcher block that I've been wanting to use for YEARS! I can't wait to show it to you.
Remember when I mentioned most walls aren't perfectly straight? When I removed the old counter I realized how much caulk they had to use on the back -- there's a good sized gap back there. Good times! I'll have to do the same with the new one.
These are not done yet though! I still have a list of changes I'll make to these unfinished cabinets to make them look more custom. I'll be updating the end of the cabinet for a prettier look like I showed you here.
I also plan to make new drawer fronts that will match our other cabinets much better. When I ordered these I thought they were perfectly flat, but they have a slight beveled edge so my original plan isn't going to work:

I'll share that process with you too. And then of course, paint and pretty hardware. :)
We can finally use all of the upper cabinets now! Before they were hard to reach because our washer and dryer stick out so far.
You know I've already filled half of those drawers! I can't believe it's taken me so long to put these in. It's already solved SO many storage issues for us! LOVE them. Remember how this spot usually looked?:

If you have any other cabinet install tips, I'm all ears! Feel free to share in the comments.
Here are the items I use for installation:
See more of our home here. To shop items in our home, click here! Never miss a post by signing up to get posts via email.
Via https://www.thriftydecorchick.com/2021/03/tips-for-installing-base-cabinets.html
The epic garage decluttering and organization continues...I'm so close to done! Just waiting on a few more items and I'll be finished. This process of purging and figuring out organization is fun to me. I'm sure many of you would rather poke your eyes out, but this stuff makes me HAPPY.
Figuring out a solution for a storage problem is like a puzzle to me -- I enjoy researching and figuring out what will work best for us. We have one corner in our garage that wasn't working at all. It was stuffed full of items that had no home, as well as poor storage for the items that did belong there.
I SO wish I had a before photo of this spot! I'm kicking myself because the after is SO beautiful. ? As beautiful as garage organization can get anyway. Let's go through some of the items I used, shall we?
This post may contain affiliate links for your convenience.
See my policies and disclosure page for more information.
Before I tackled this spot we had a long, rolling basketball holder that was taking up too much room -- it was way more than we needed. I knew if I could find a better solution for the basketballs, I could open up a lot of space in this spot. (We have a lot of basketballs!)
Enter this awesome skinny basketball holder that was perfect!:

It fits perfectly in between the garage doors -- it's SUCH a better use of space. The balls stay put when the doors open too.
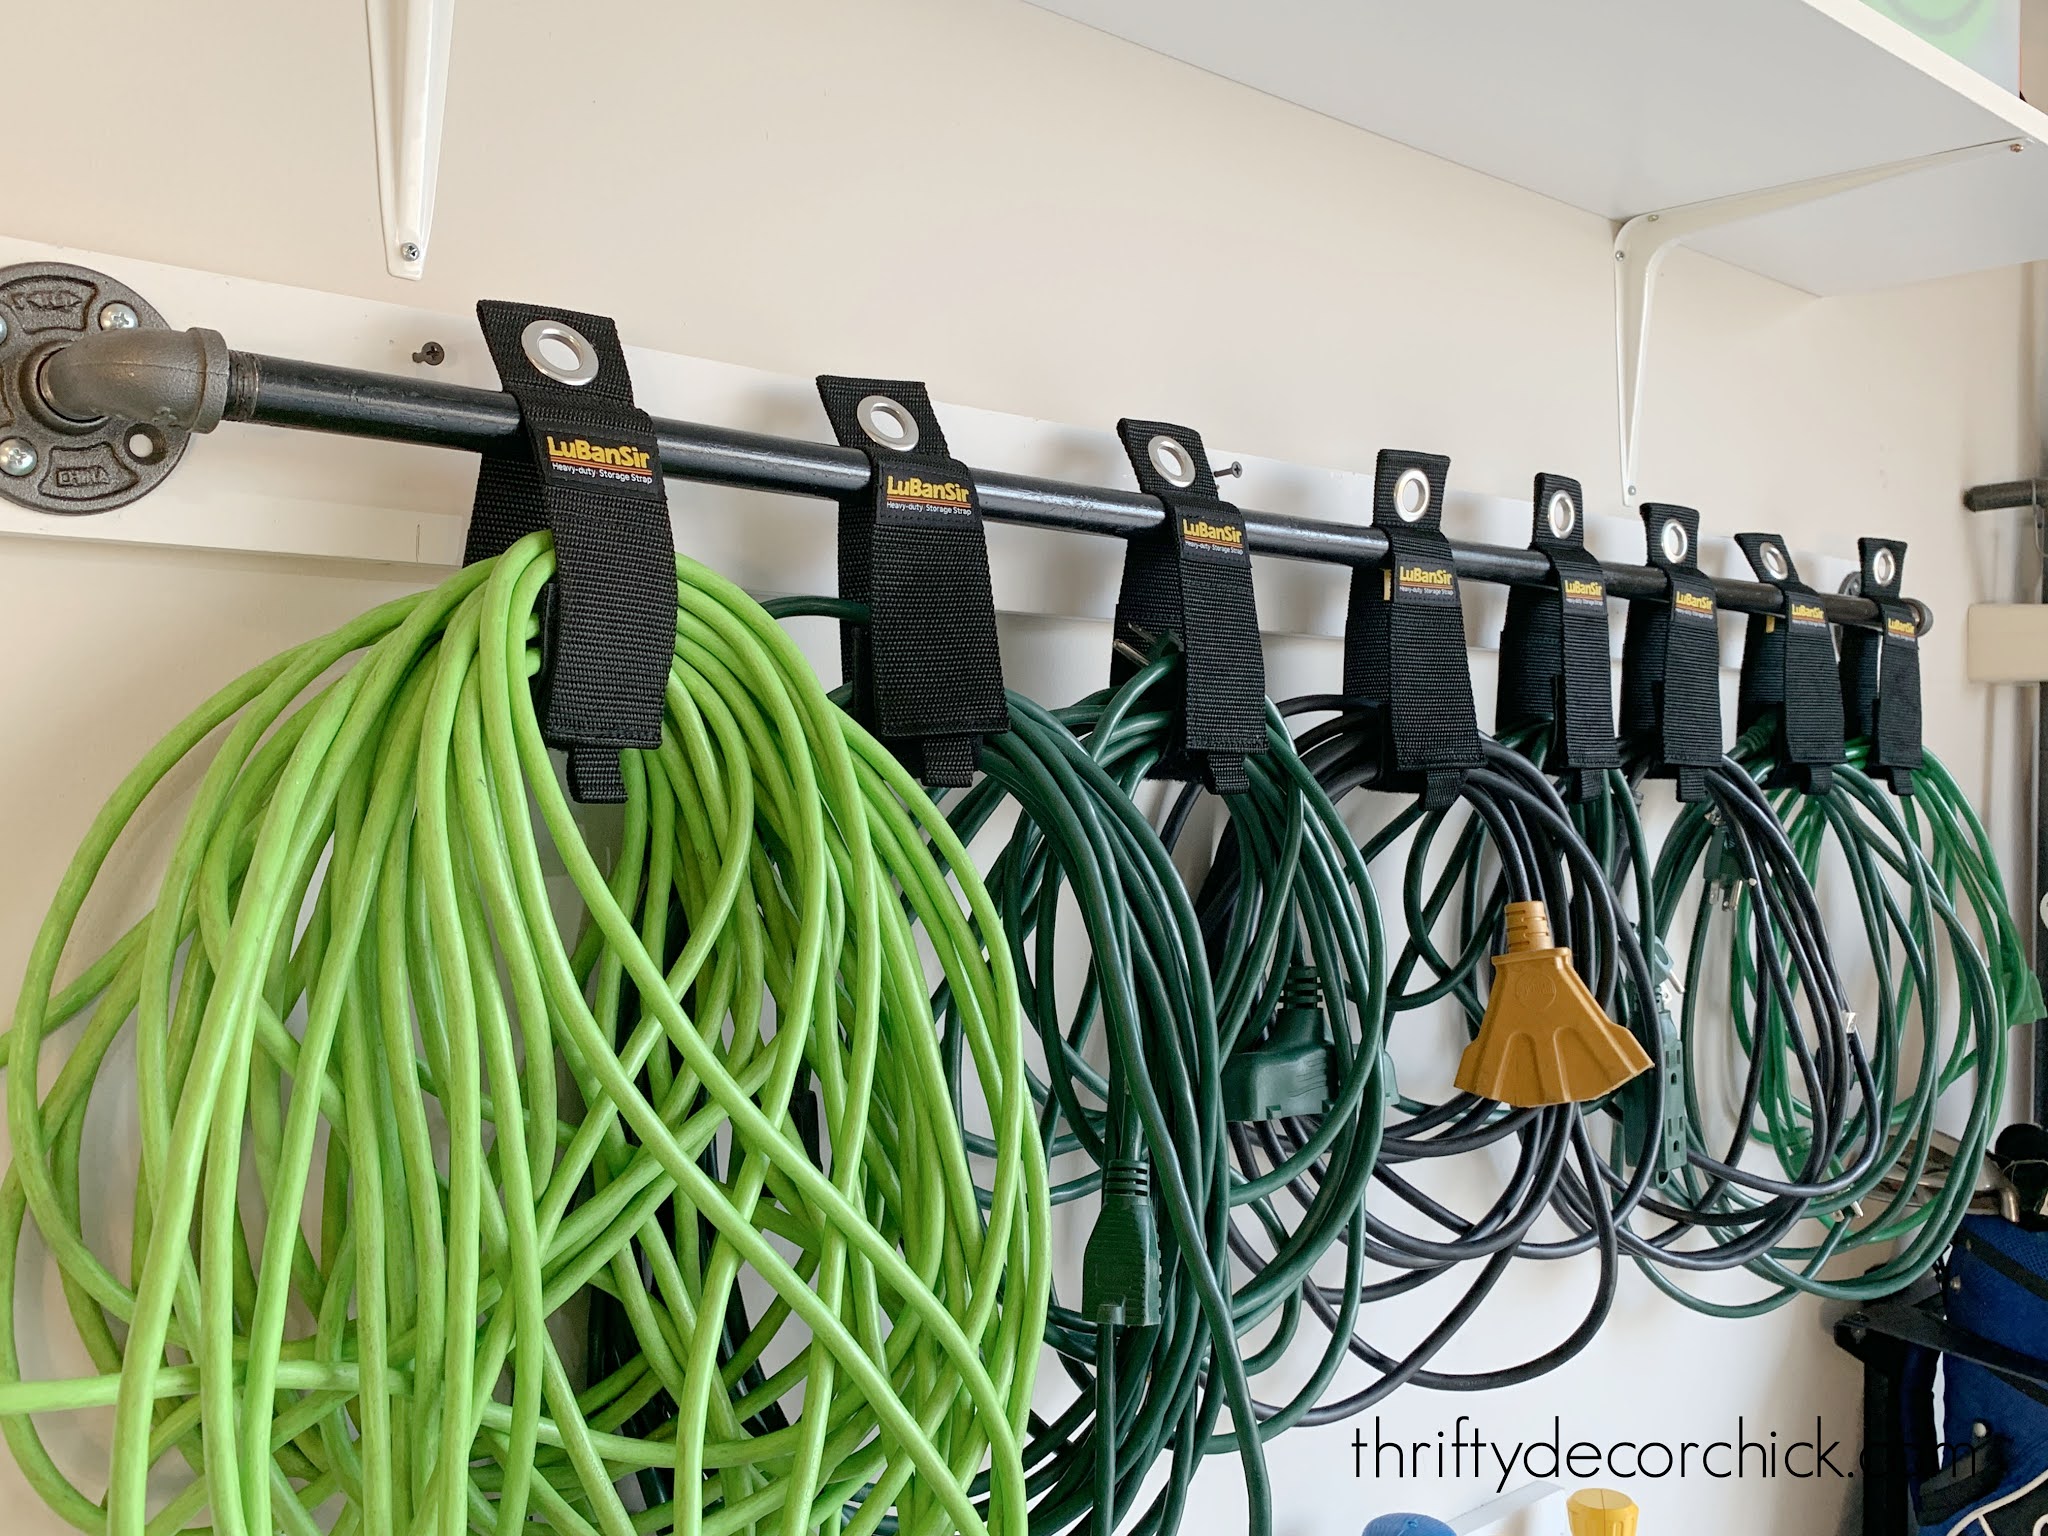
My DIY project for this garage corner is a great way to store outdoor extension cords. We had them all hung on individual hooks before, which was fine...but it looked messy and the wall they were on was full of other stuff too. So half the time they ended up on a hook with a bunch of other ones, just because it was the closest and easiest one.
We have a lot of these cords -- I use a lot during the holidays. I wanted them streamlined and hung all together. I did some research and found this great do-it-yourself extension cord holder and immediately ran out and got the supplies.
You'll need a pipe in whatever length you want -- I chose four feet. Get two elbow pieces and two flanges to mount it with:
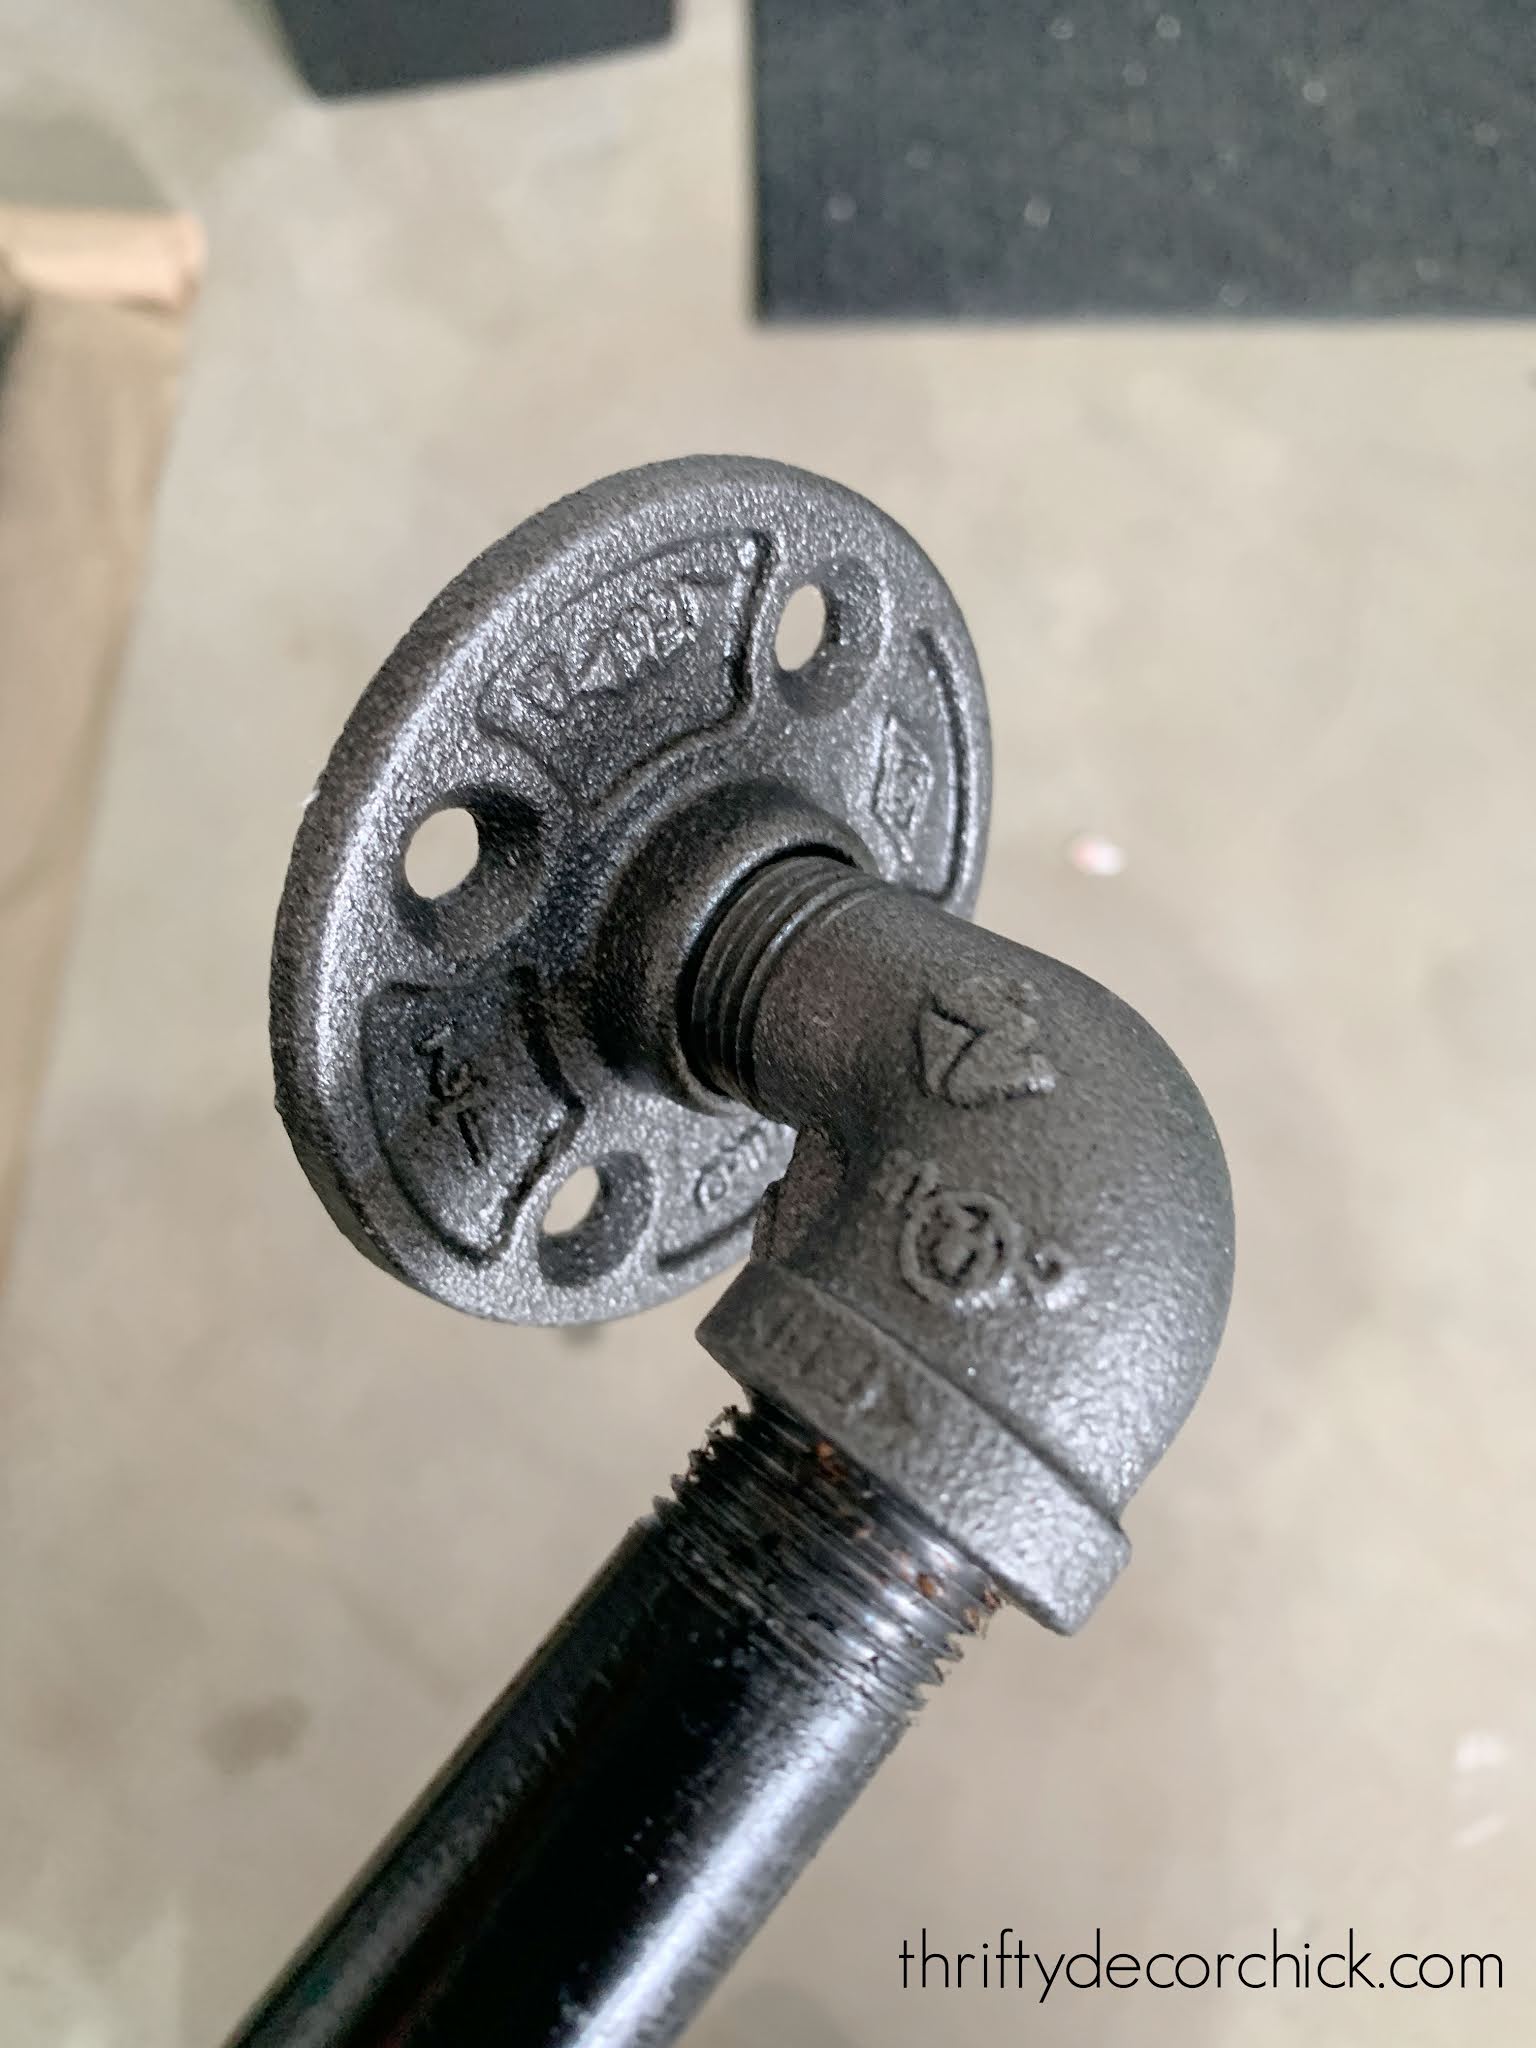
It only took a few minutes to screw them all together.
You can just attach the flanges to the wall with screws, but I wanted to make sure the whole thing was secured into studs, so I mounted the rod on a scrap piece of wood first:

And then hung that on the wall into studs.
You can use the pipe to hang your extension cords however you want -- "S" hooks will work, but I didn't want them flying off when we grabbed a cord. I found these velcro cord holders and decided to use those on the pipe instead:

It's perfect! The pipe parts cost me $15:
The bonus is that I hung this right above an outlet...so we can plug them in right there and use the cords. And it just looks GOOD!
All of the garden tools are hung using these units we've had forever:

They work great -- the garden tool handle catches and stays put so they don't fall, and you can hang things as high or low as you want. This garden tool holder is the same but also has small hooks on the front -- love it!
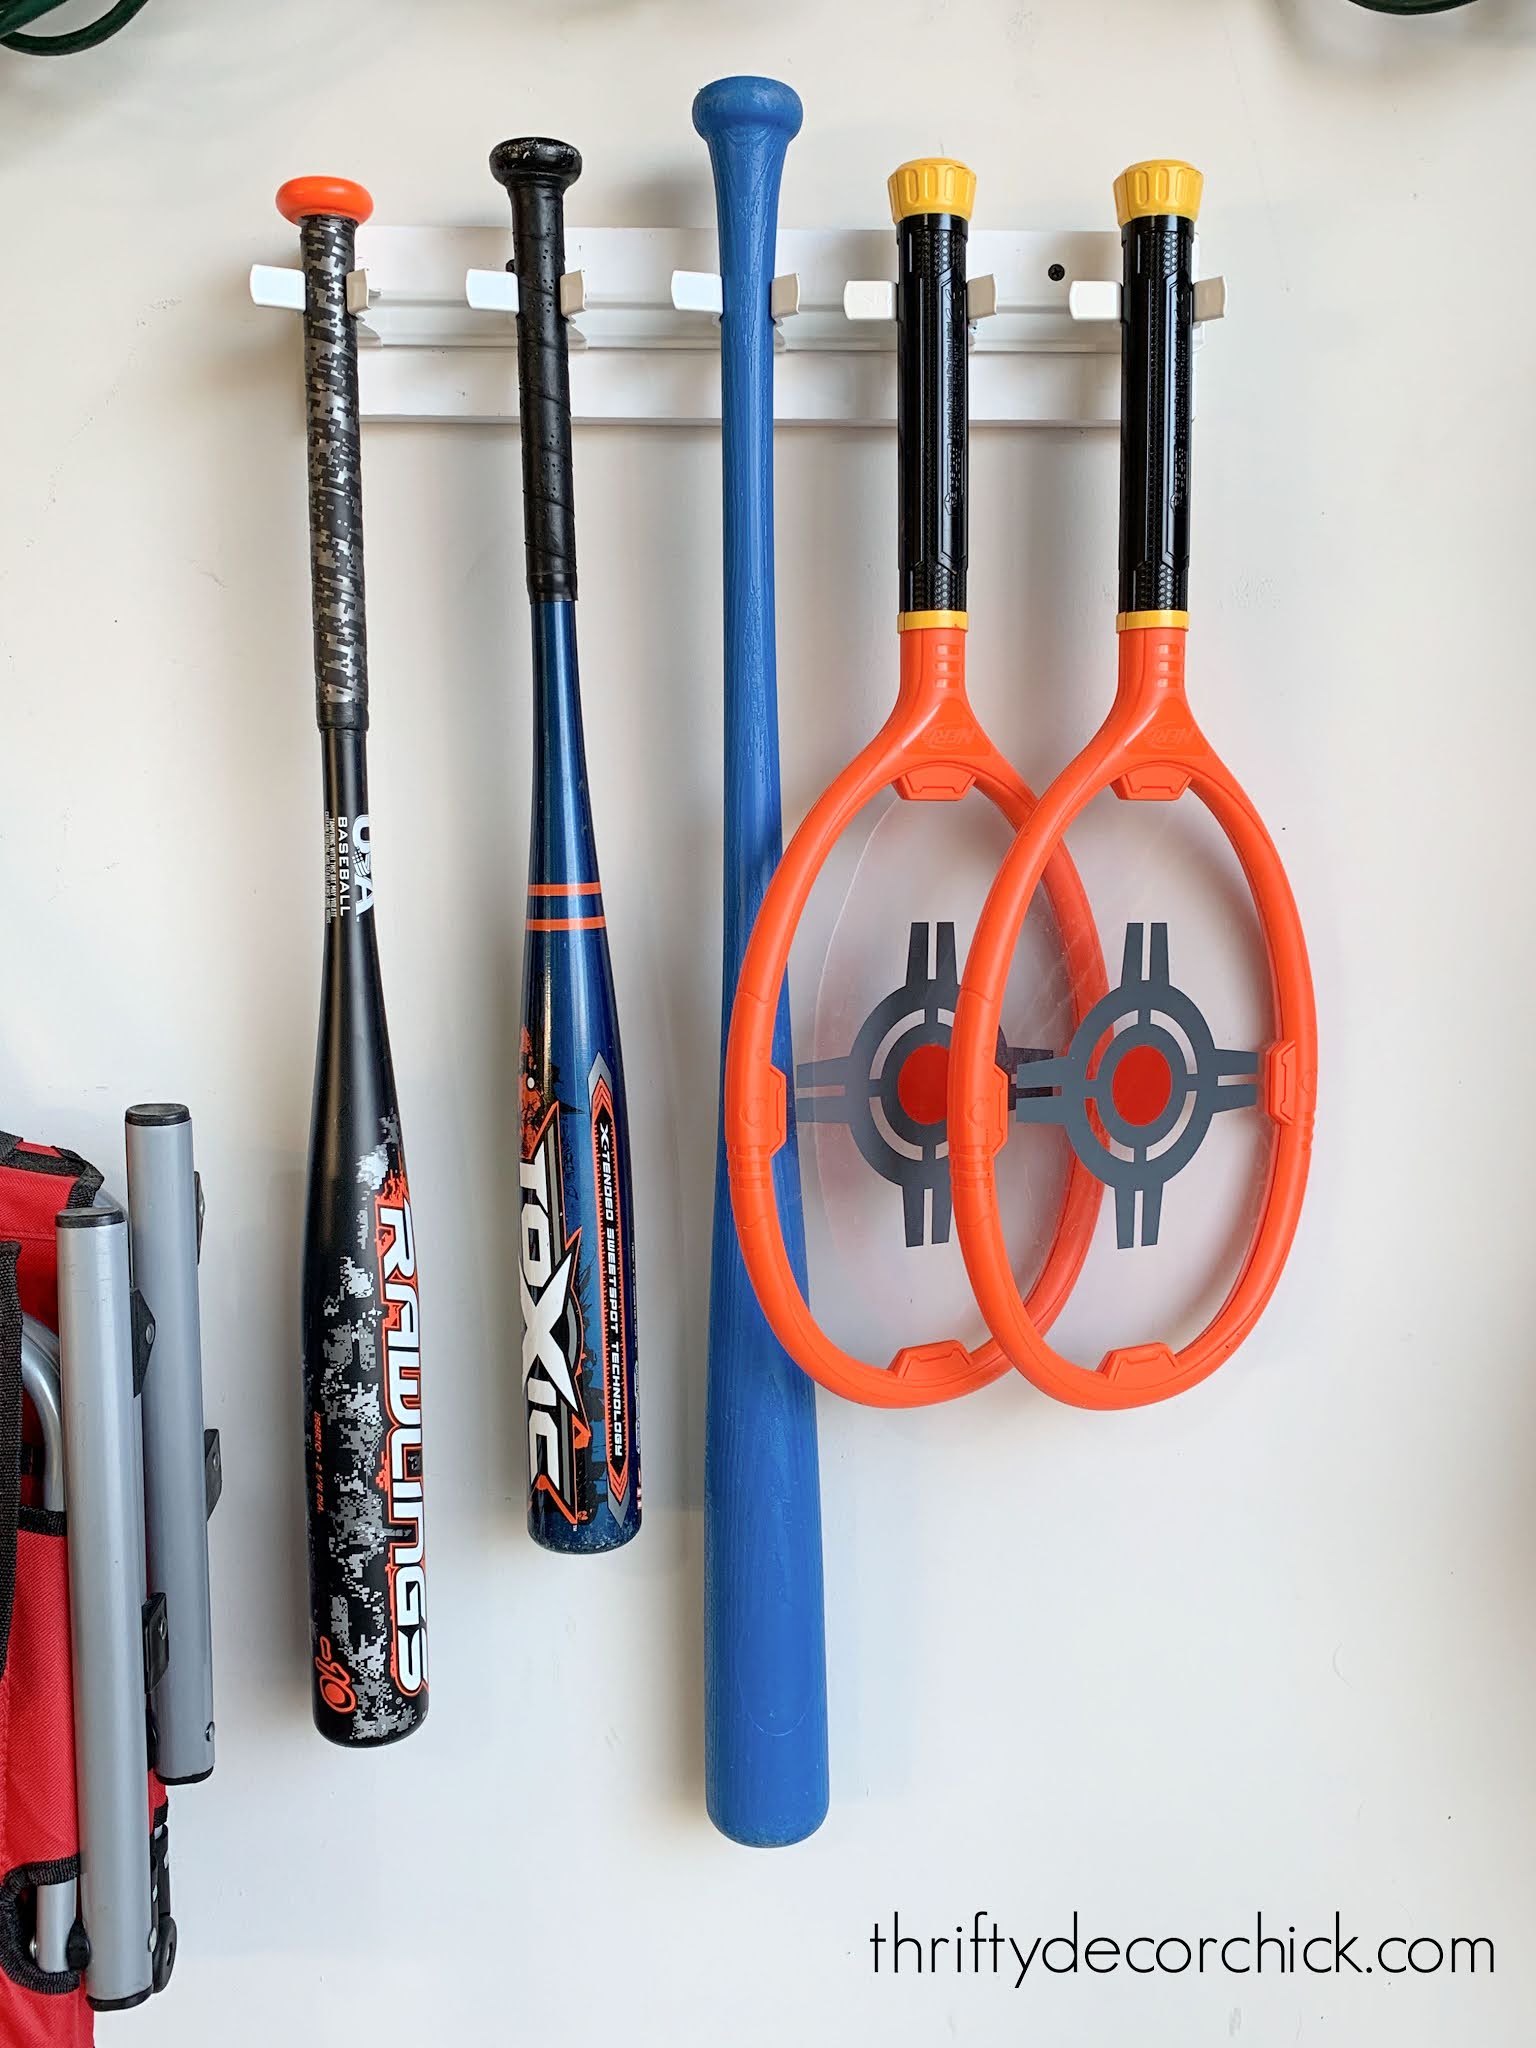
We have a few bats other toys that I wanted hung up and easily accessible. I realized after the fact that I could have used one of the tool holders above. Instead I came across metal garden tool holders at the hardware store and they work great!:
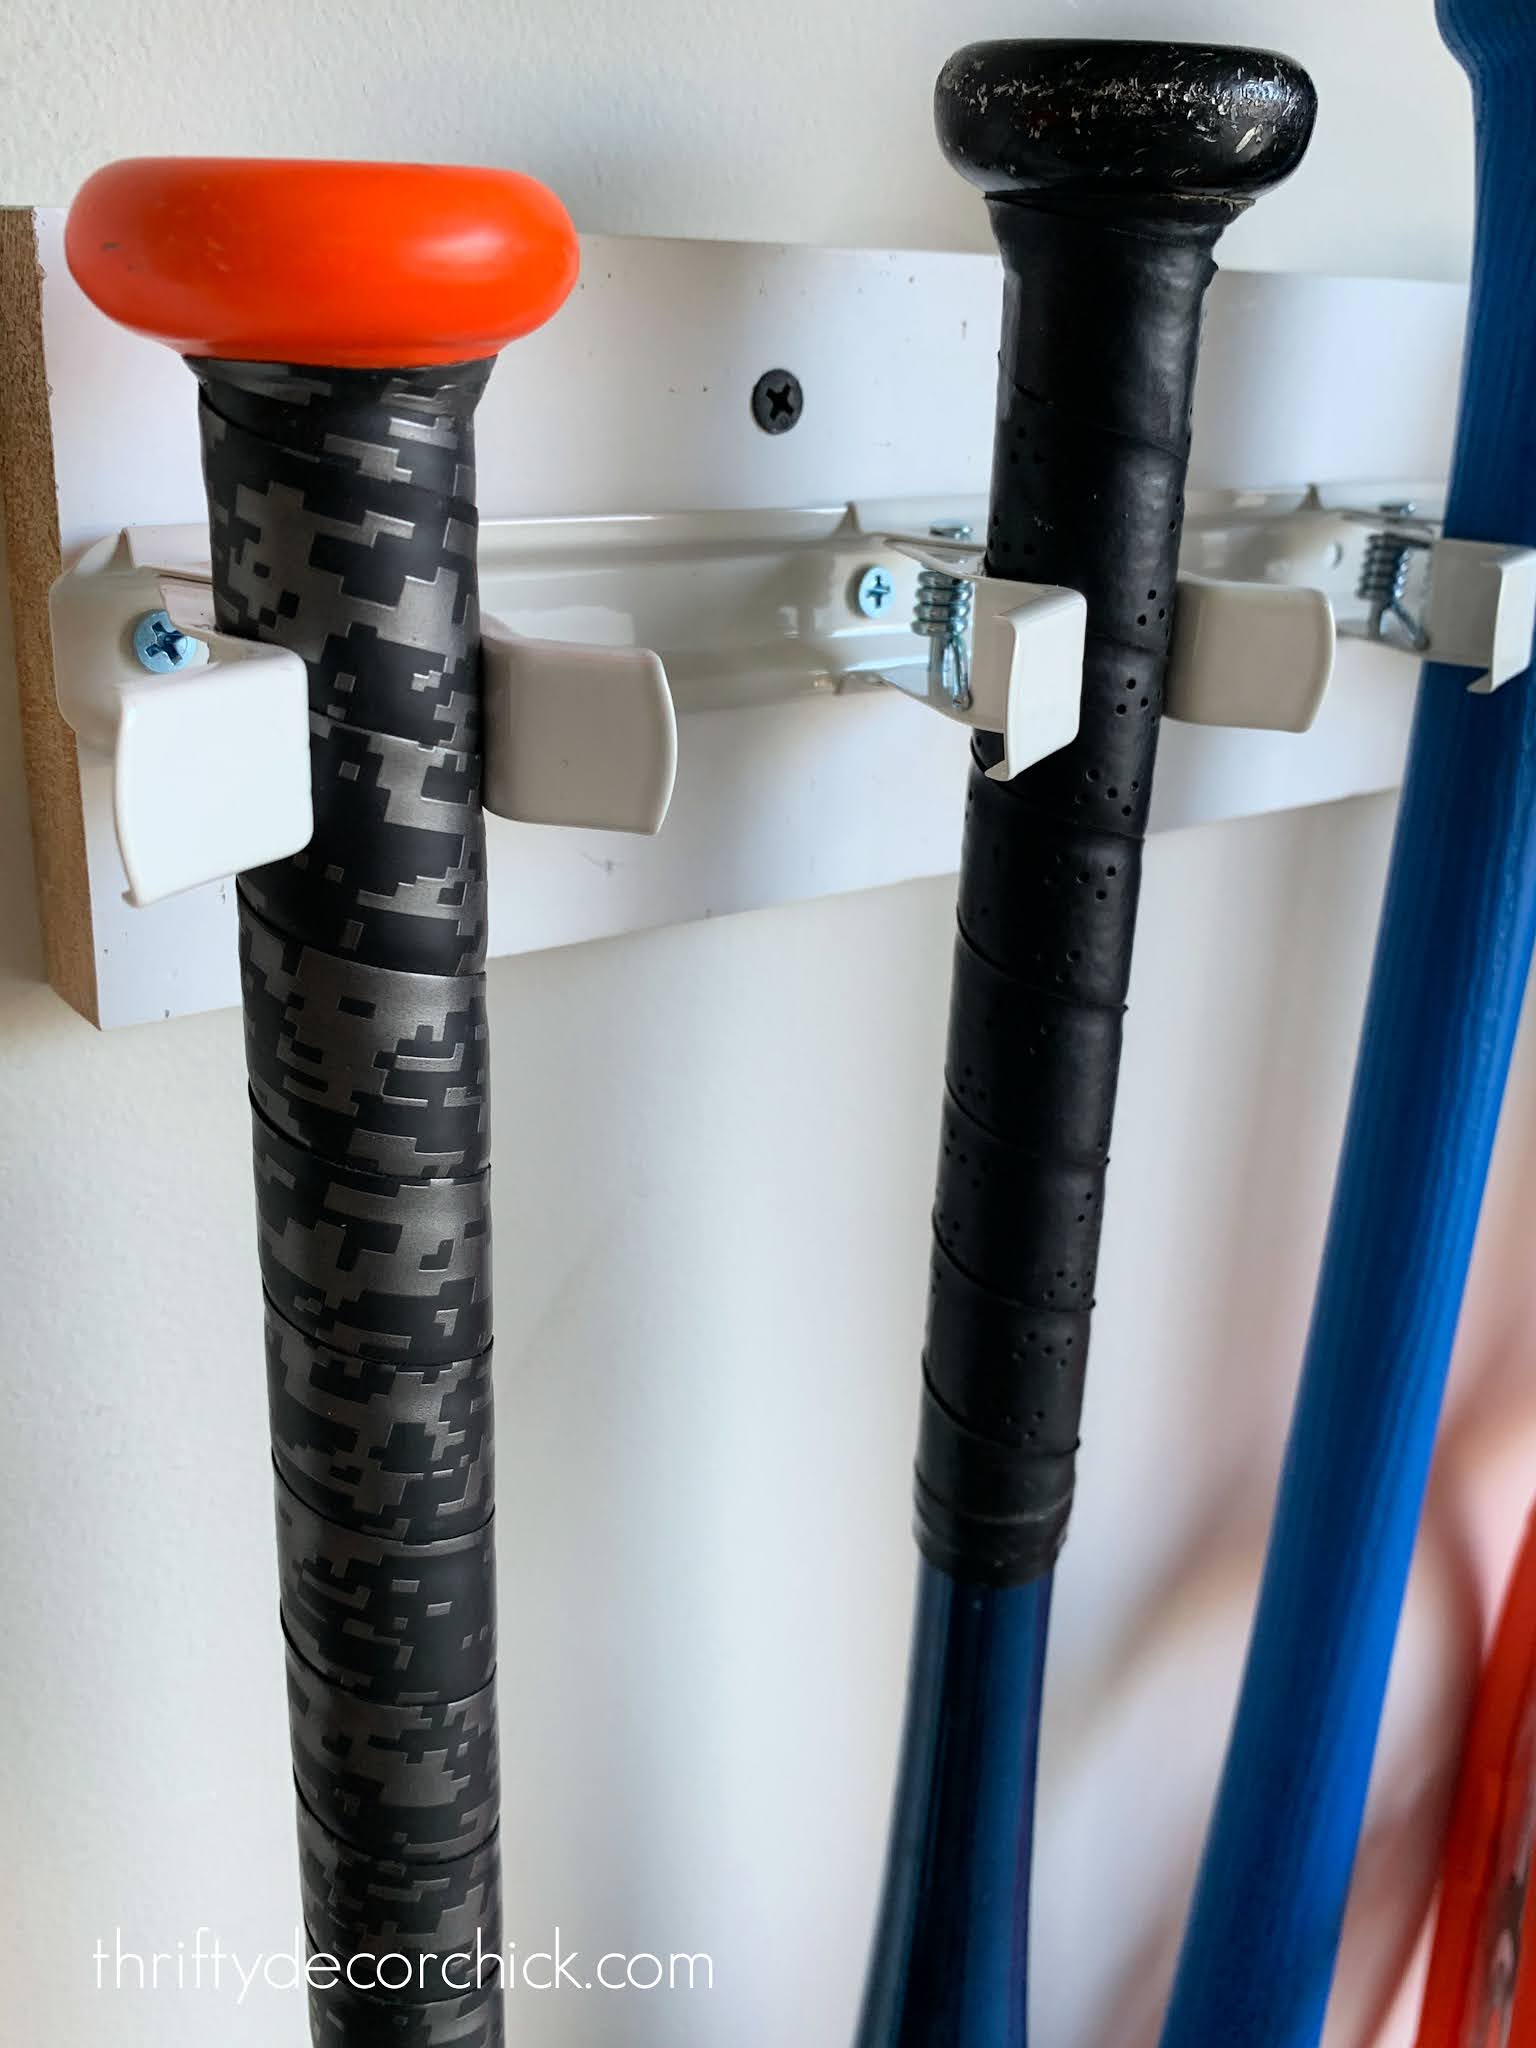
The clamps hold down on the handle perfectly (and even hold wider handles just fine):
I used the rest of that scrap wood to mount that one too!
We had random kid stuff like golf and softballs, bubbles and chalk that weren't organized well. I gathered everything in one spot and hung a shelf above the extension cord organizer:
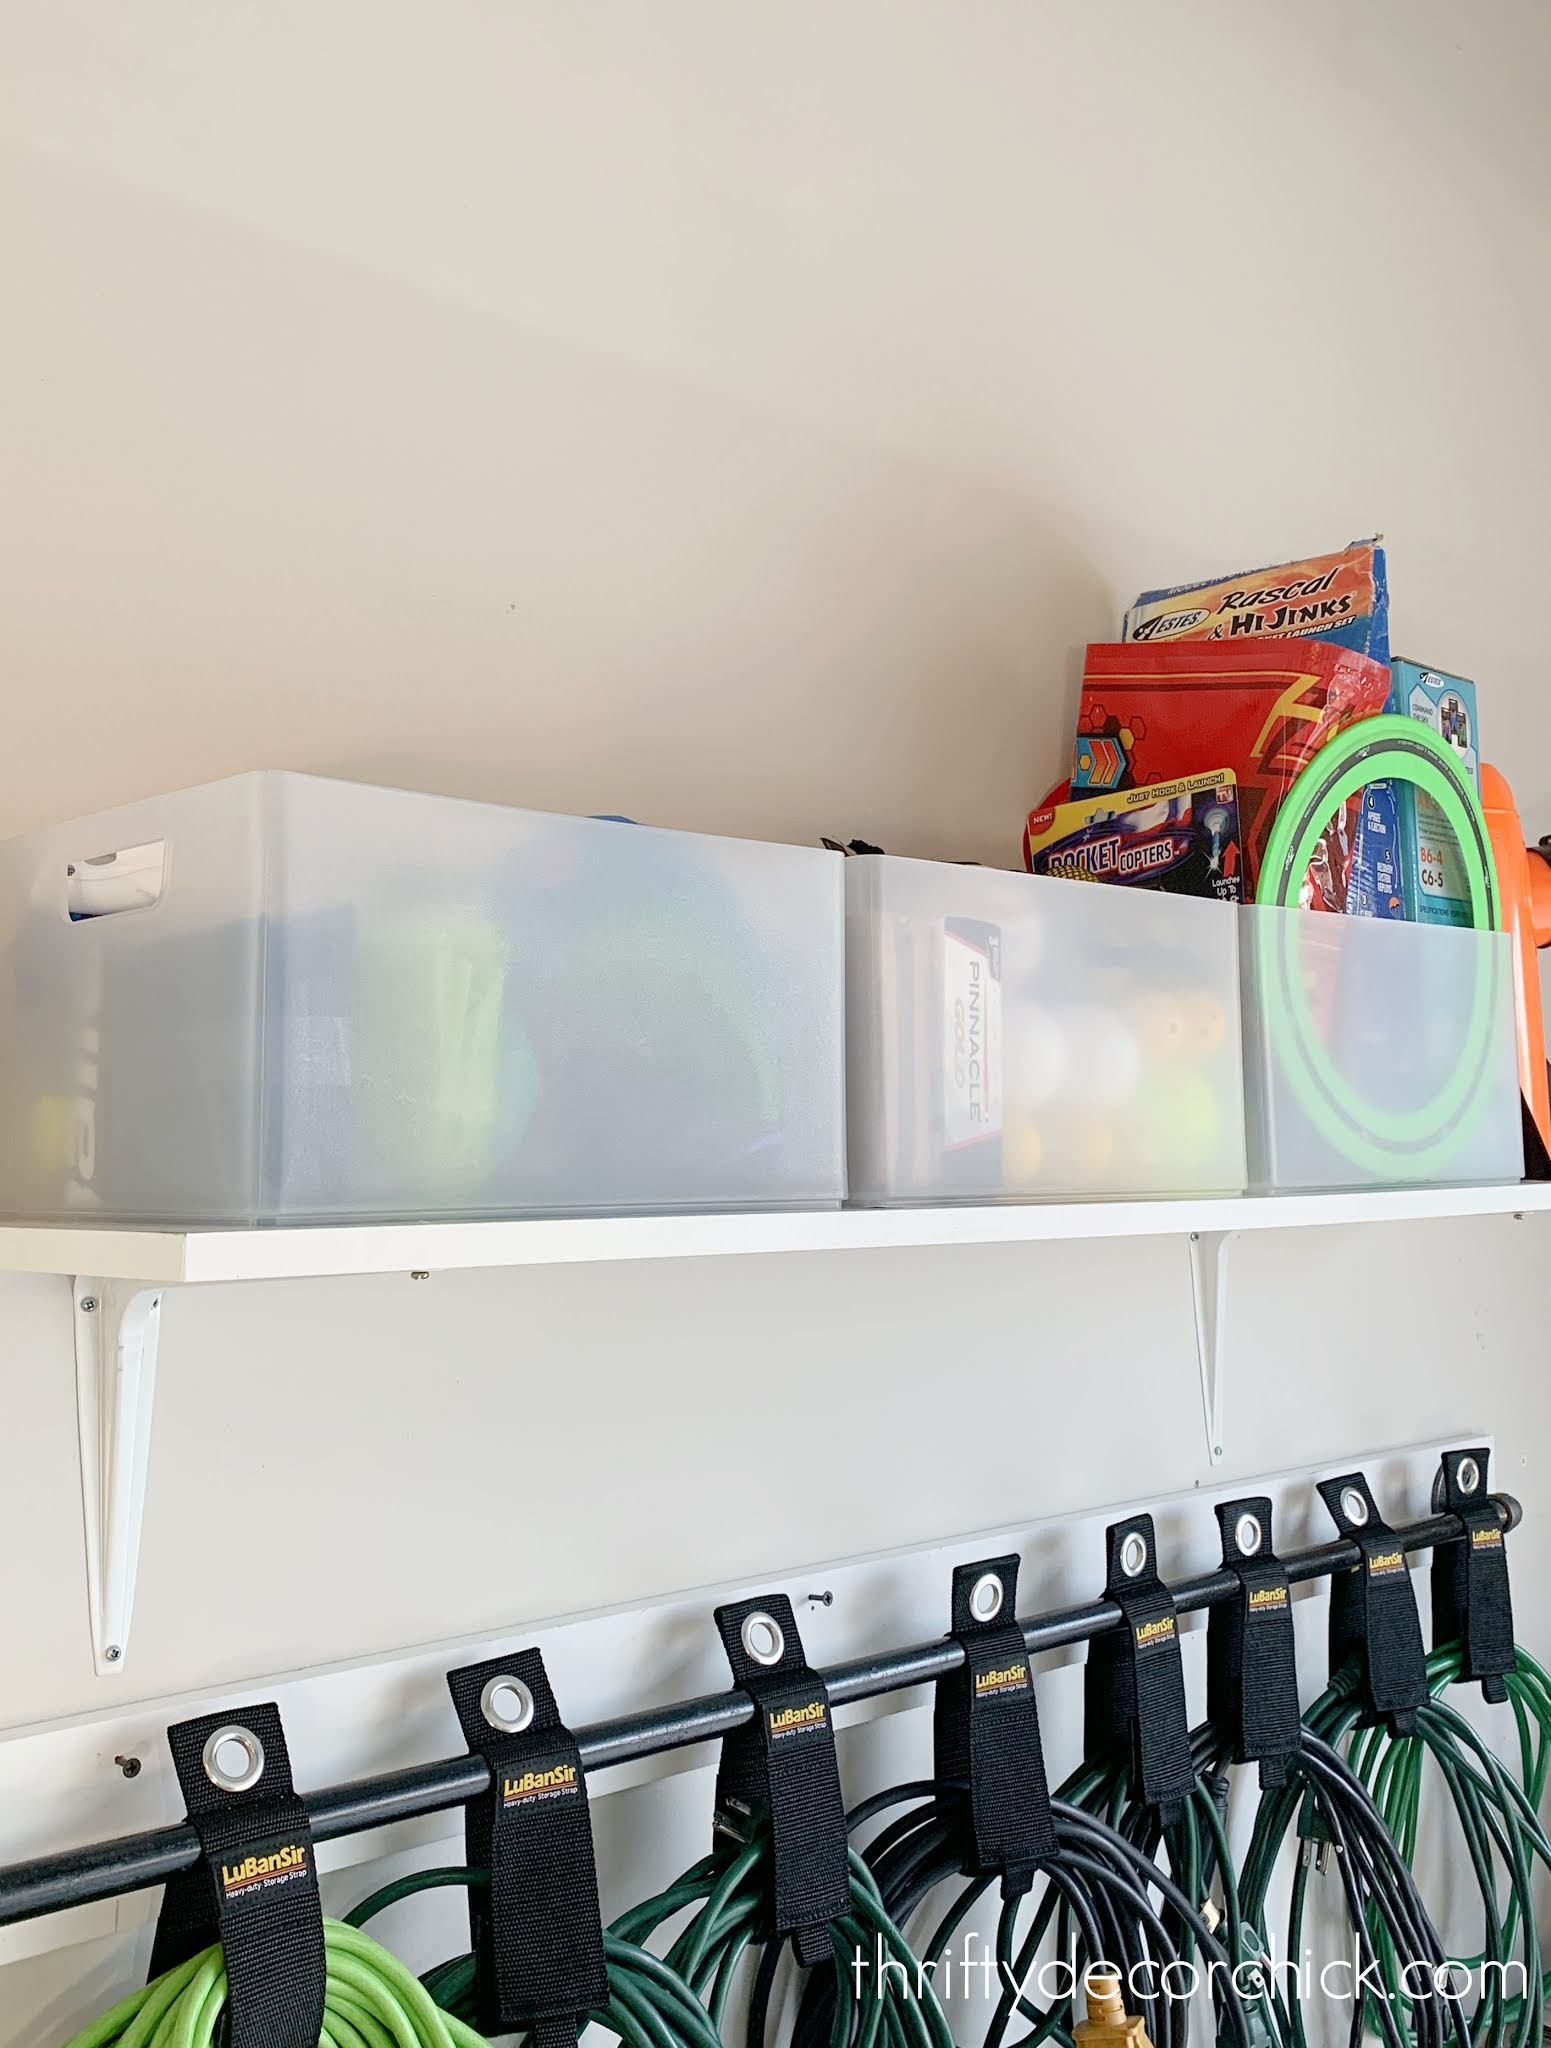
I used my favorite storage bins for those and the shelf and brackets were from Lowe's. It's high but we can all reach it just fine. If you have little ones who will need to reach these items it would be great down lower as well.
I thought a lot about items we need to grab on the way out the door, and where it would be best to hang them. I hung our bleacher seats in this corner as well so we can throw them in the trunk on the way out:
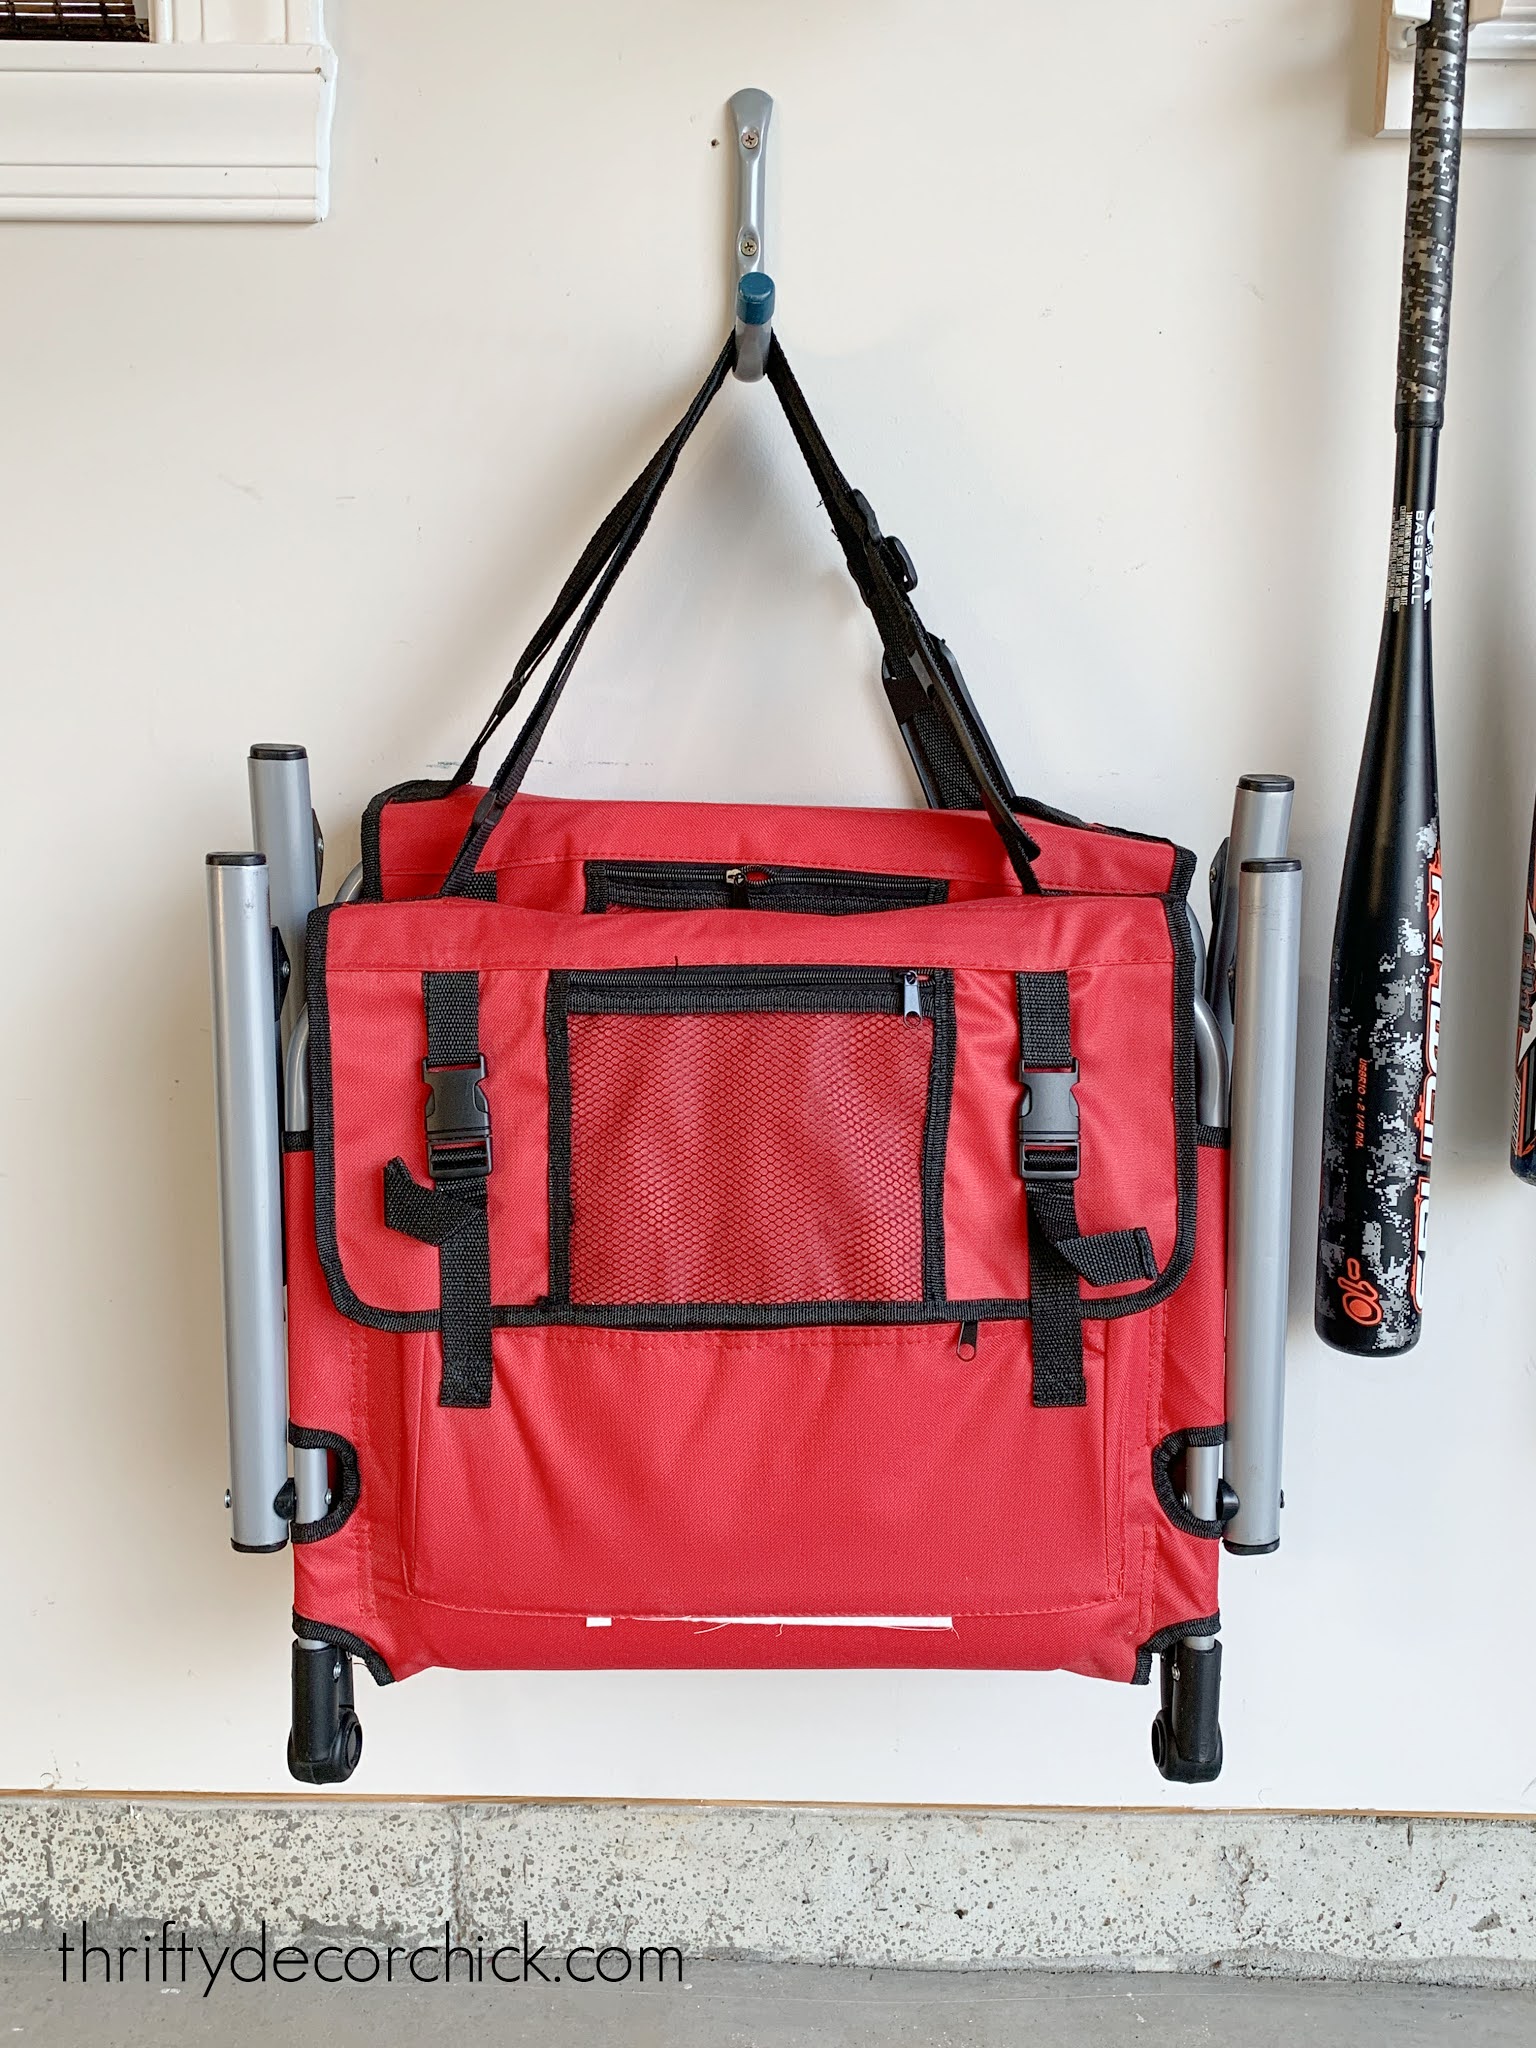
I use those metal hooks for all kinds of things in the garage! They're great for just about anything and are easy to hang.
My mission throughout this garage organization process has been to get things off the floor, but at in an efficient way. When we moved in a few years ago I just threw hooks up on the wall everywhere.
This time I thought carefully about what we use and where I should place them on the wall. The last item I wanted to hang here was my husband's golf bag. It had been on the floor for...well, forever -- and it was a mess.
This golf bag mount was a bit of a spurge but totally worth it! I love that it's up off the floor and super secure. This thing is awesome:
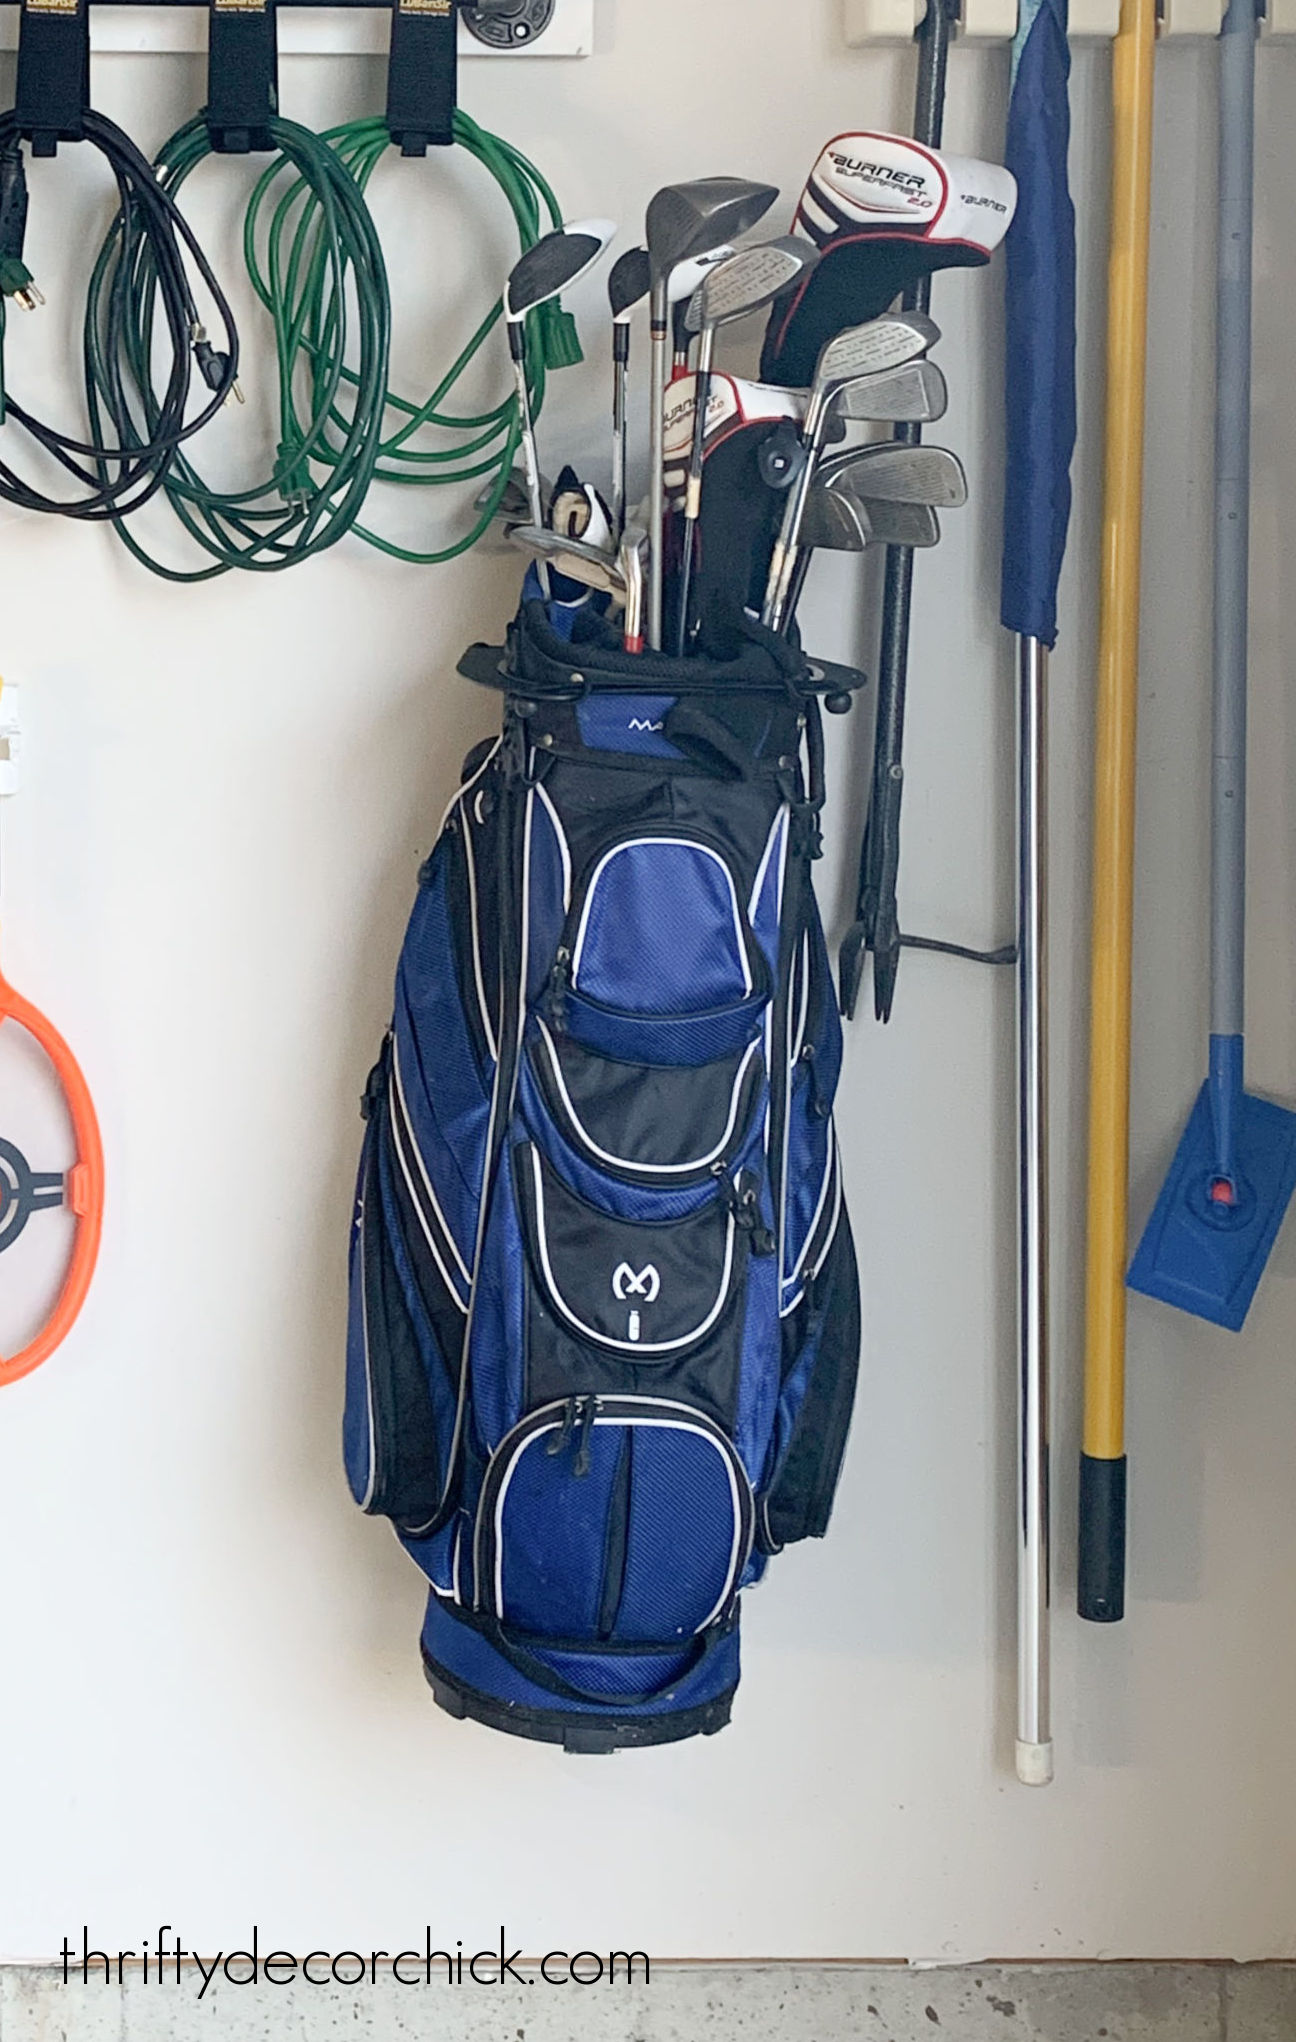
It was easy to install and the bag fits perfectly.
All of these add up to a perfectly organized corner that holds WAY more than it did before:
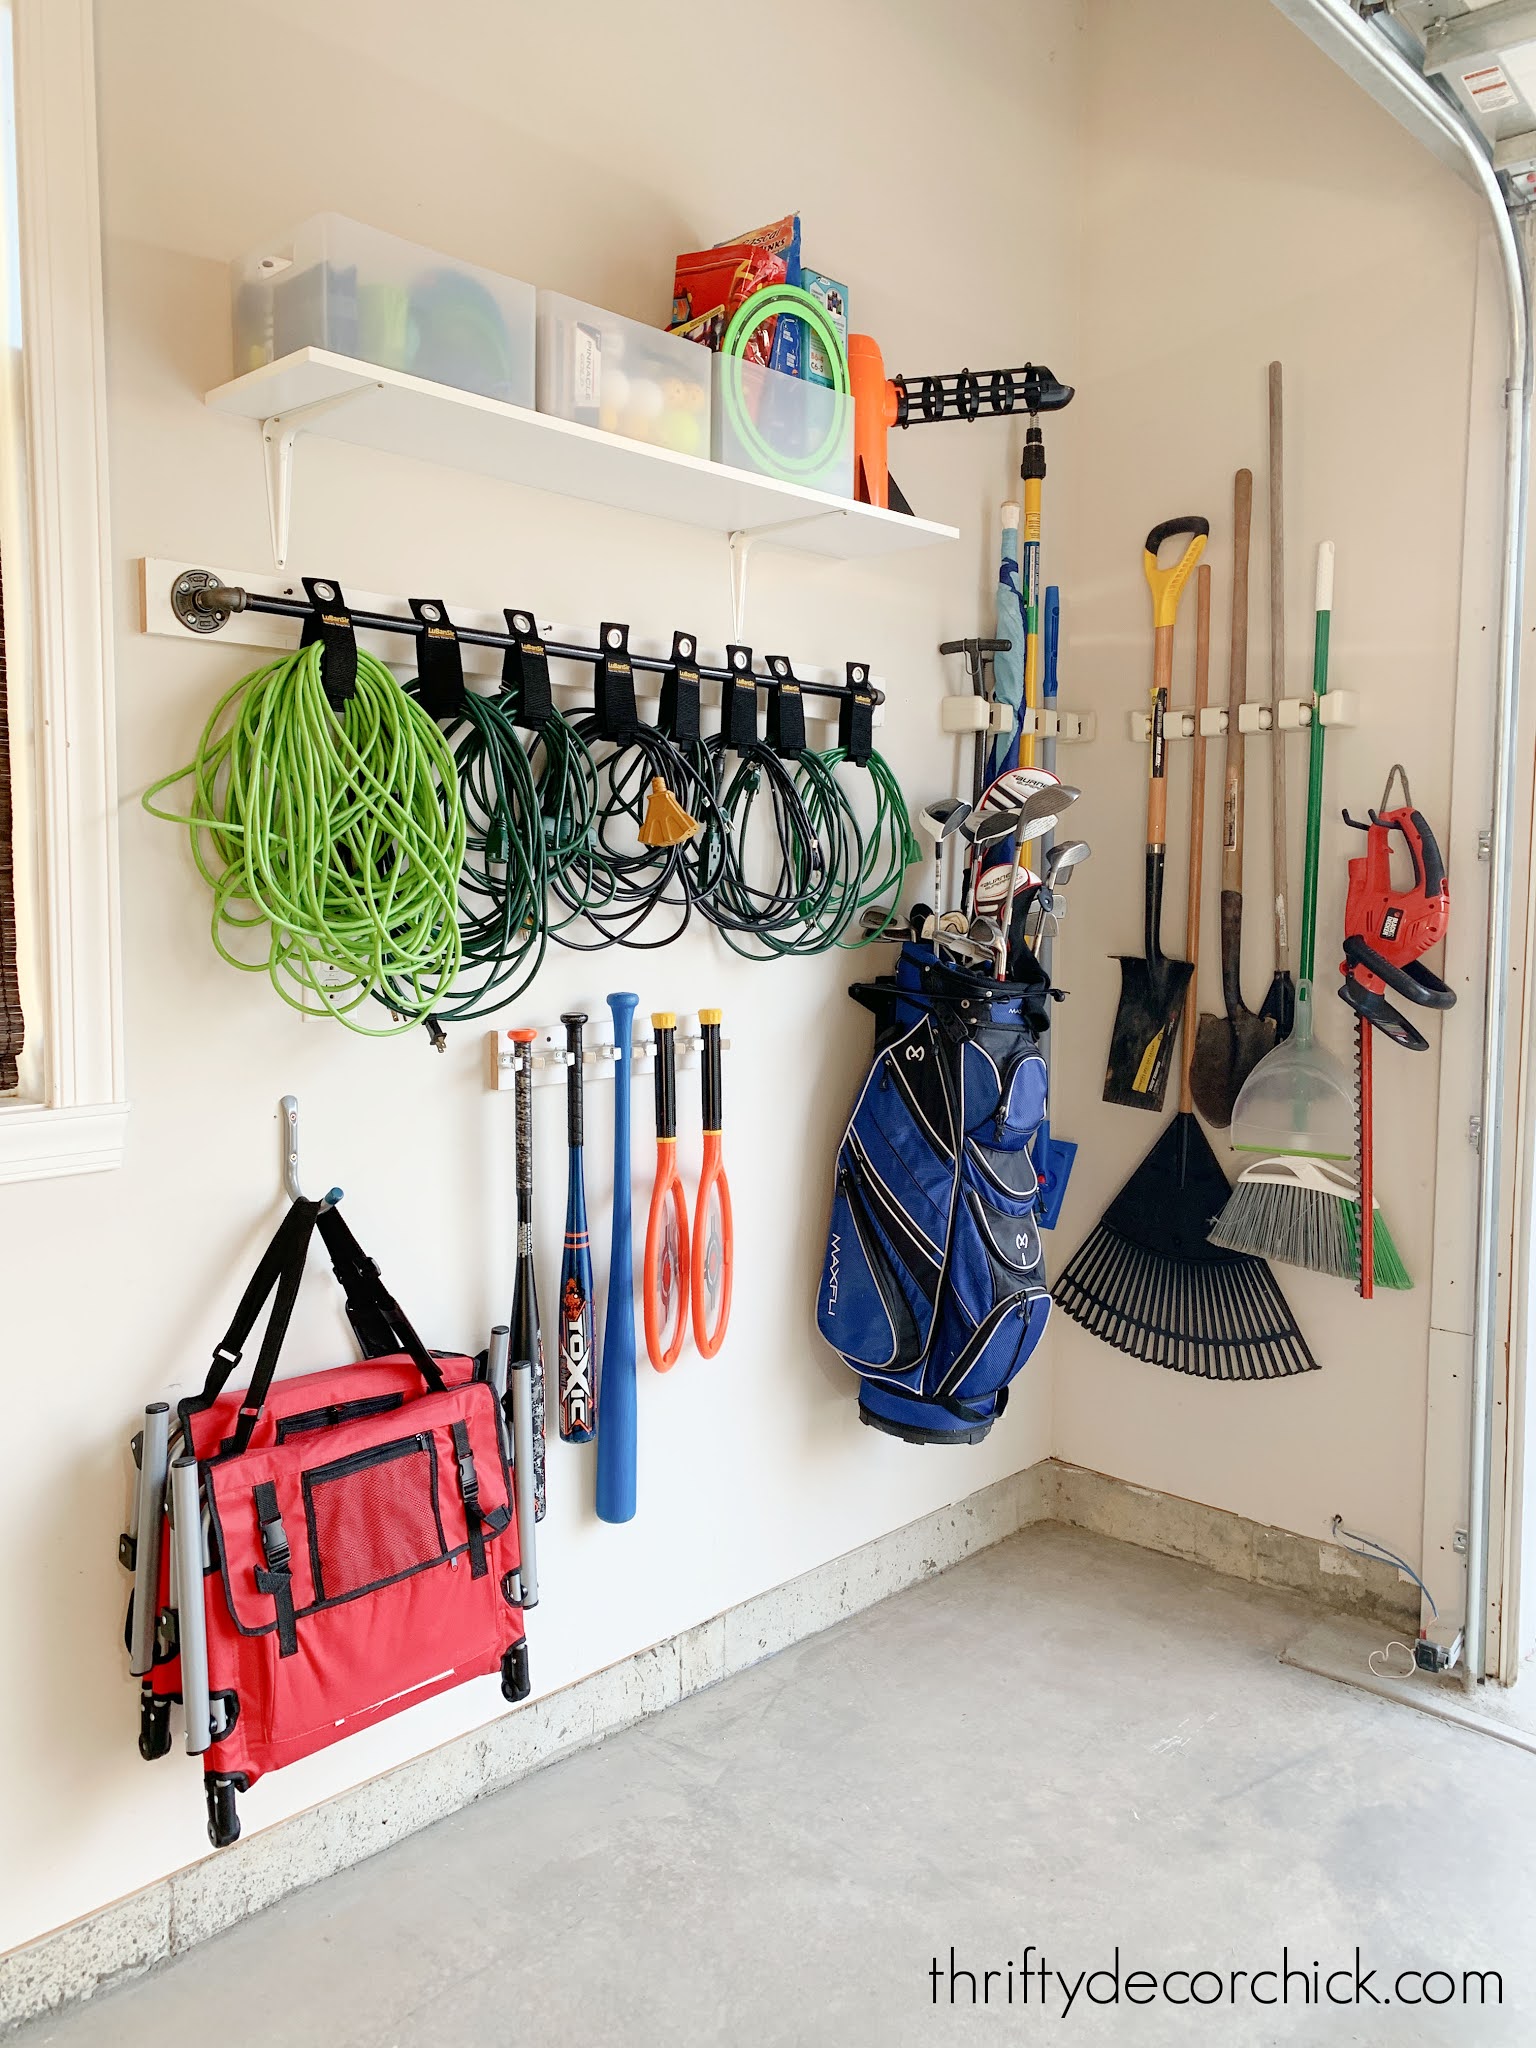
And it looks way better than it did before too!
This is where a before pic would be GREAT, darn it:

I can't believe how much I was able to fit over here! I love this corner! :)
Here are all of the items I shared in one spot if you are interested. I also linked the fishing rod brackets I still need to hang and the bike hanger we use -- it is a pulley system that hangs from the ceiling.
GARAGE ORGANIZATON ITEMS:
I hope to share the full garage makeover next week!
See more of our home here. To shop items in our home, click here! Never miss a post by signing up to get posts via email.
Via https://www.thriftydecorchick.com/2021/03/easy-garage-wall-storage-tips.html |


 The day is finally here! I'm finally sharing our decluttered, clean and organized garage after working on it for weeks. I'm pretty sure I'm more excited about this than you will be...but hang in there. It looks pretty darn good!
