Why are there ants on your peony flower buds? And how do you get rid of them?How to cut and enjoy these beautiful flowers inside, and why you shouldn't get rid of those tiny ants while the plant is blooming! It’s one of my favorite times of the year -- peony season. :) It’s a downright shame they only bloom for a week or so once a year! I recently shared how to arrange grocery store flowers to make beautiful arrangements, but sometimes I want a bouquet made up of just one type of flower. Bonus points if it's as fluffy and pretty as the peony! I picked up our state flower and planted my first bush a few years back. I saw them blooming at the nursery and thought they were lovely, but I didn’t fall head over heals until last year when the bigger plant really started producing:
Now? I’m obsessed. If they bloomed all summer I’d have them everywhere, but for now I stick with hydrangeas for season-long flowers. :) I'm pretty sure the variety above is the Hermione. The scent is heavy and absolutely intoxicating. I’ve never smelled a flower like it! There are a TON of peony varieties, probably in the thousands, in pink, hot pink, white, red and coral colors. I wrote a post sharing everything you need to know about growing peonies years back that is very helpful. They are actually quite easy to grow. The trick is to plant them correctly from the start!
Once open, the full blooms sometimes fall to the ground because they are so big and heavy. I love them! Why are there so many ants on peonies?These little critters can be a nuisance if you want to bring your beautiful blooms inside, (more on that in a bit), but you WANT them while the plant is blooming! Ants are beneficial insects and not harmful to your peony plants! Ants eat away at the nectar on the peony bud, and many say that this nibbling helps the unopened buds to bloom. I've always been told not to use any kind of insecticide near them for that reason. Some say that this is an old wives tale, but I choose to believe that the little critters are helping. ;) At the very least, they keep other insects from destroying the buds as they open up. (Ants are very territorial!) After the peony blooms, you shouldn't see nearly as many ants, but you will still have some small insects like on any garden flower. How to remove ants off of cut peony blooms.These gorgeous blooms should be enjoyed! If you want to cut them to enjoy inside, I have a few tips. The easiest way to remove them is to hold your cut stems upside down and give them a good shake -- sometimes I lightly smack them against each other. This should remove a lot of the ants or insects. You can also give them a light rinse in a bucket of water or with the garden hose to remove them. But I go a little further to ensure there are no bugs inside my cut flowers:
I give them a bath in some cool, soapy water. I went a little heavy on the soap in that pic above, you don’t need quite that much. But the soap will not harm the flower. Let them soak for a few minutes: 
At first the water will make them droop but don’t worry, they’ll bounce back and perk up after drying! Before I put any cut flower in a vase I cut off any leaves that would be in the water -- leaving them can turn the water gross fast. I rinsed the flowers very lightly (they look so delicate but are strong!) and then lightly tapped them against the side of the sink to get most of the water out. After drying they will puff up like crazy again!:
There are about six peony blossoms in this vase and it’s crazy full:
It’s always an internal struggle for me when my flowers bloom -- do I leave them outside and enjoy them there or bring them in? But of course I end up bringing them in so I can look at them all day. :) If you are in the right zone (the further north the better) these are incredibly easy plants to grow. I do next to nothing every year. Here are a few more tips on the peony:
Peonies are one of my all time favorite flowers!:
Have you tried this little trick for removing bugs from cut flowers? Please feel free to share your tips! Check out my tips for keeping cut flowers looking great way longer: 
Never miss a post by signing up to get posts via email.
Via https://www.thriftydecorchick.com/2014/06/the-peony-beauty-of-spring.html
0 Comments
Patio refresh and additional seating with a new outdoor sectional and pretty outdoor decor.
We had our spacious backyard patio installed a few years ago, and in the warmer months it is definitely our favorite place to be. (For me, when it's warmer but not too warm.) ?
I LOVE to entertain and having this area has been absolutely wonderful -- we've hosted quite a few large parties over the years.
We have our seating around the fire pit, but otherwise the only place to sit on the patio was at our outdoor dining table. Often we'll bring our indoor dining chairs out for additional seating, so we've been considering adding an outdoor sofa for some time.
I've been working with Big Lots to share some of their awesome home and organizational finds, and this was the perfect time to showcase some of their pretty outdoor decor!
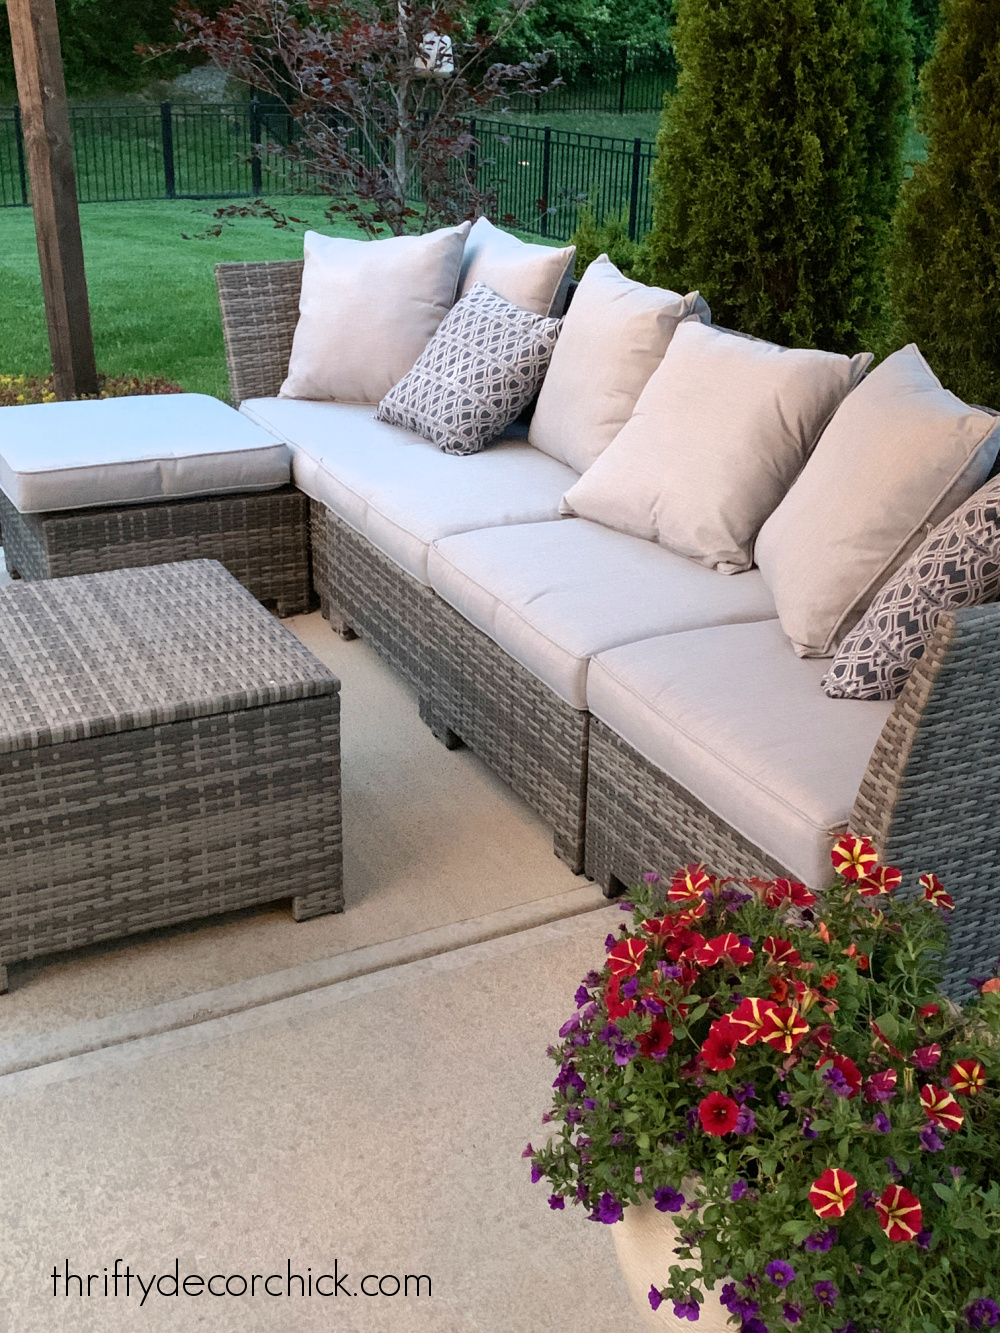
We budgeted for this purchase over the winter months, but ended up finding a small outdoor sectional that was way less than we expected! We decided on this all weather wicker set that comes with a storage coffee table:
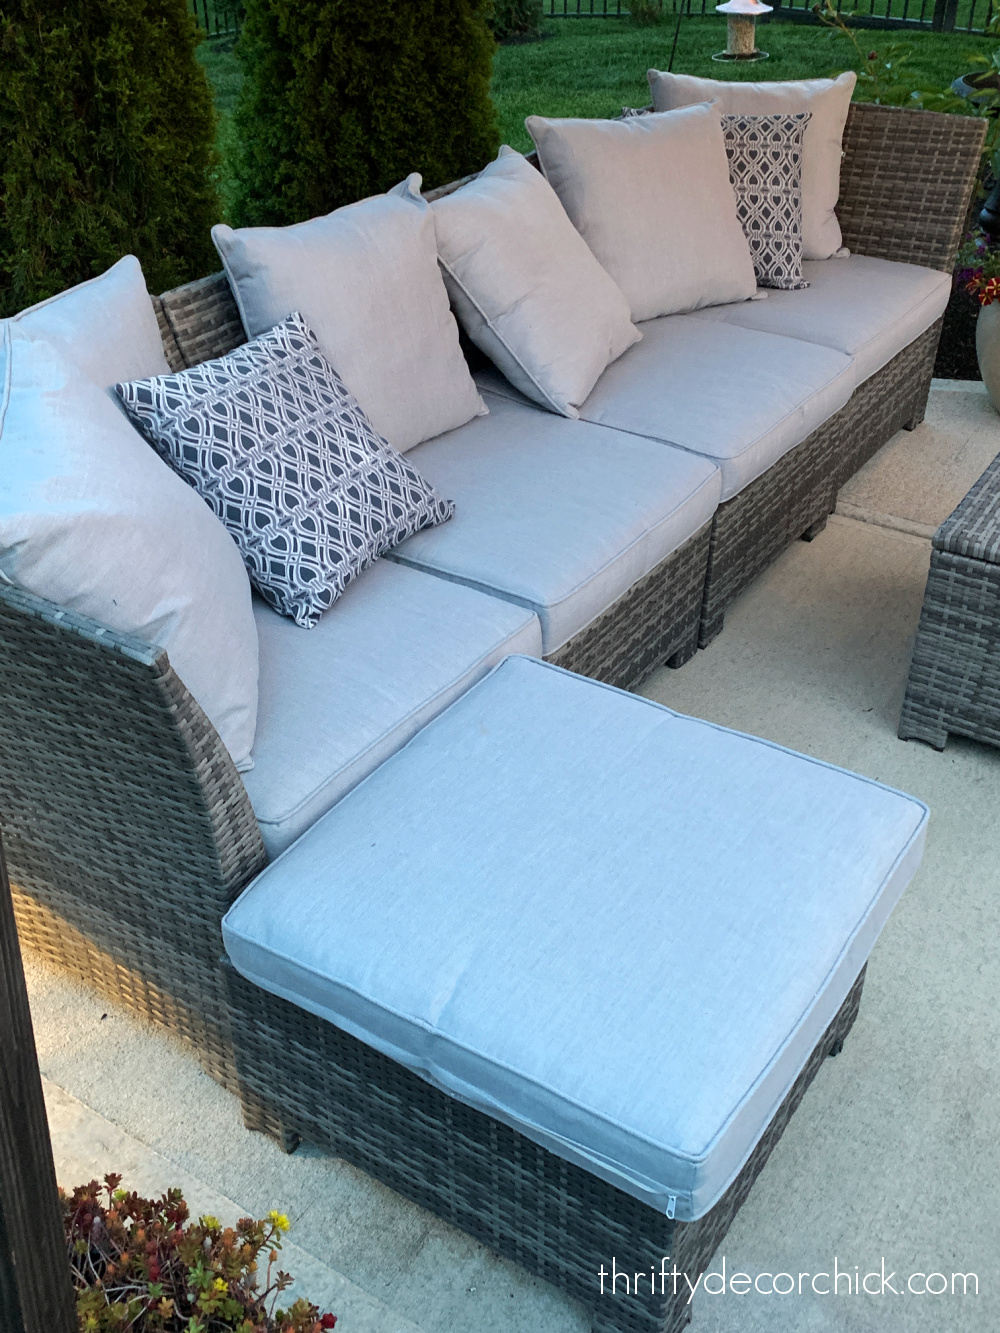
It comes with six pieces and all of the cushions and pillows (the two blue pillows were ones we've had for years).
We liked that it's modular, so we can change the configuration how we'd like. Now we have it set up as a long sofa, but it can be moved around to create a sectional set up as well.
I LOVE the coffee table -- it's great storage and for putting our feet up for a little outside cat nap:
Not only does this give us additional comfy seating, but it allows us a spot to lay back and relax on beautiful days.
But because it was fully exposed to the sun, it was getting a little TOO hot in the afternoons. So we did some rearranging and moved our large umbrella over to that spot:
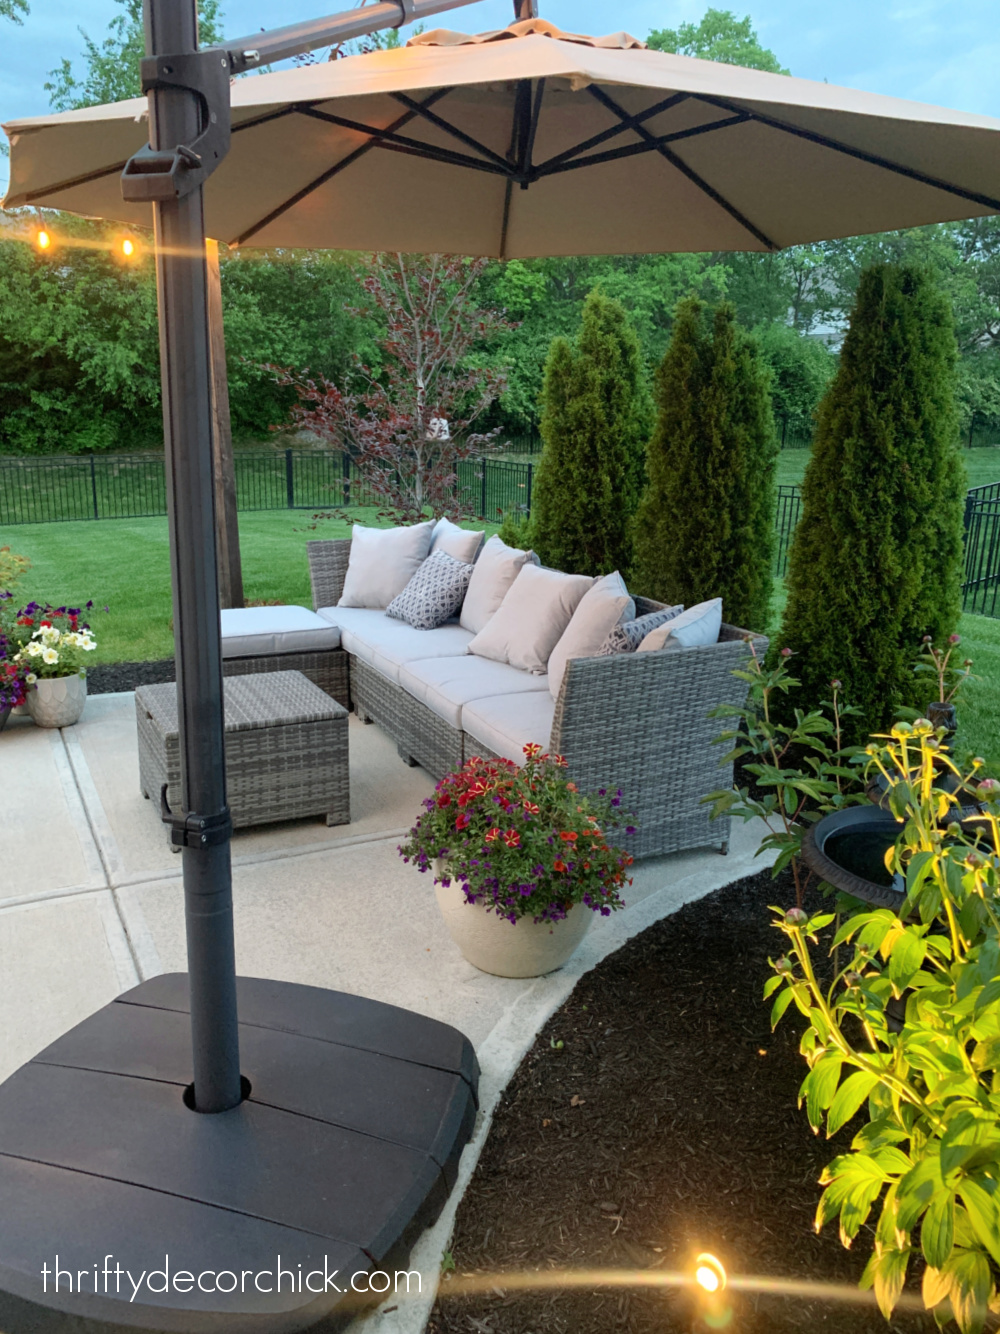
I had to adjust our DIY cafe patio lights by hanging them a bit higher, but that needed to be done anyway. Over time they stretch just a bit and need to be tightened up.
That left our dining table exposed, so I was on the hunt for a new umbrella over there. Those "hanging" umbrellas are a big investment, and I wanted to do something a little different anyway.
I was thrilled when I found this adorable scalloped umbrella at Big Lots:

Ack, I LOVE it!! It's huge too...nine feet so it gives us plenty of shade over the table.
I was so excited about how it was looking, I picked up some outdoor candles, serving ware and dishes to do a little photoshoot -- it's been forever since I've done a tablescape!
These gorgeous floral melamine plates and bowls go perfectly with the blue tones we have out there:

Aren't they so lovely? These round braided placemats are just like ours, and I used two of these inexpensive vinyl table runners across the table instead of lengthwise. They are SO easy to clean! Just wipe or wash in the sink.
I was tickled when I stepped back and saw how pretty it was...I wanted to call some friends for a last minute garden party. If I had garden parties that is:

I can't get over that umbrella -- it's just perfect. And...it tilts!:

I feel like I'm talking about a dress...and it has pockets! ;)
The Big Lots spring decor finds I shared a couple months ago looked lovely in the middle of the table:
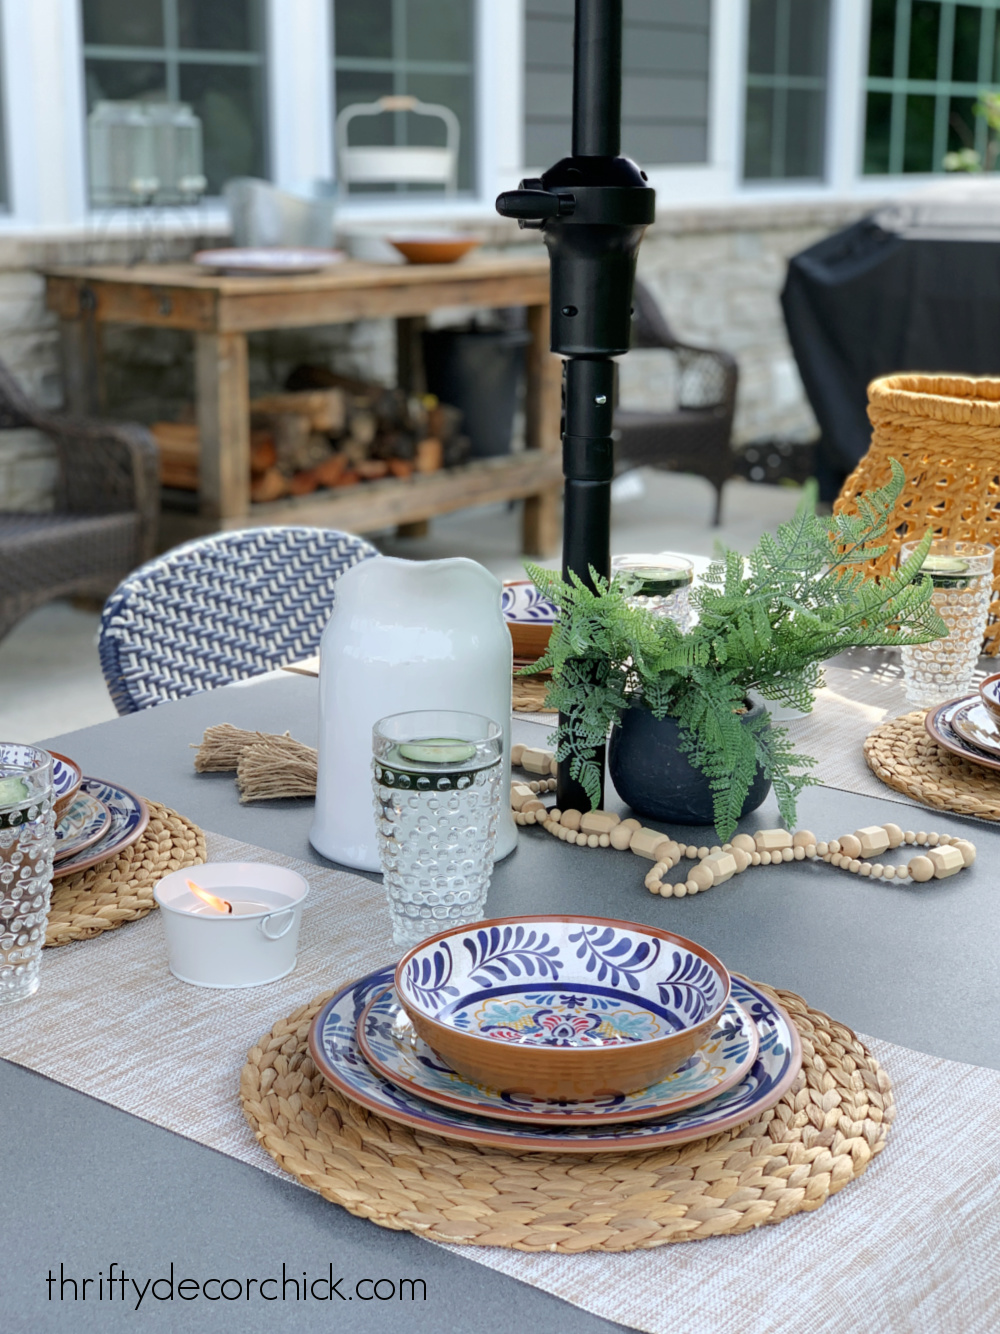
The beautiful pitcher is one of my favorite Big Lots finds ever:

Those hobnail cups were calling my name...I can't resist a good hobnail. They also have shorter cups in that design as well.
The pretty embroidered outdoor lumbar pillows fit perfectly on the end chairs, but also look great on the sofa!:

And those woven basket candles are battery operated -- I love the larger size!
I also picked up some serving items that we'll be putting to use all summer. The large galvanized bucket is only $13 right now!:

And that metal two tiered tray will be perfect for get togethers both inside and out! The large serving dishes are melamine and match the dishes on the table.
I shared how I restored our weathered cedar potting bench earlier this week -- you can see here how great it is for entertaining too:

This DIY bench used to be where the new sofa is, but having it under the eaves of the house will protect it a bit more. We like having it right next to our grill now too!
Every time we sit out here, one of us says how lucky we are to have this space. It is truly our little escape from the world...we absolutely love it:

Now we can enjoy all of our seating areas at night and in the middle of the day!

We saved a TON by going with the most basic poured concrete for this patio over doing stamped or aggregate cement.
I'm SO glad we saved there -- it gave us the opportunity to add the pretty decor and furniture, which is what I love more anyway! :)
It seems like it takes forever to get everything out of storage and set up each spring, but it's SO worth it!:

I hope our patio gives you some inspiration for your outdoor spaces! I still have a ton of ideas for our backyard...but we're taking our time and enjoying the small transformations year to year.
This post is sponsored by Big Lots, but all opinions are my own. I only work with companies and I know, love and would genuinely recommend to you.
Never miss a post by signing up to get posts via email.
Via https://www.thriftydecorchick.com/2022/05/blue-and-white-backyard-patio-summer-tour.html Tips on restoring and updating weathered outdoor furniture and decor.
Patio furniture and decor can be really expensive, so I'm always looking for ways to update or restore them and bring back some of the original finish.
The elements do a number on everything outside -- from fading in the sunlight to yucky grime from the elements, there are many simple ways to make them look (closer to) new again!
We're hosting a very special engagement party our on back patio in a few weeks, so we've been working on getting everything set up for the season. I've also been tackling some small projects out there to get things in ready for the party.
I had a list of drab looking outdoor items I wanted to clean and update. The first project was revitalizing our weathered cedar potting bench.
My Dad helped me build this DIY potting bench ten years ago and I absolutely cherish it! I'm thankful we spent more on cedar when we built it -- other than refinishing it a couple times now, it's held up beautifully.
Years ago I sanded and treated the cedar and it looked amazing!:
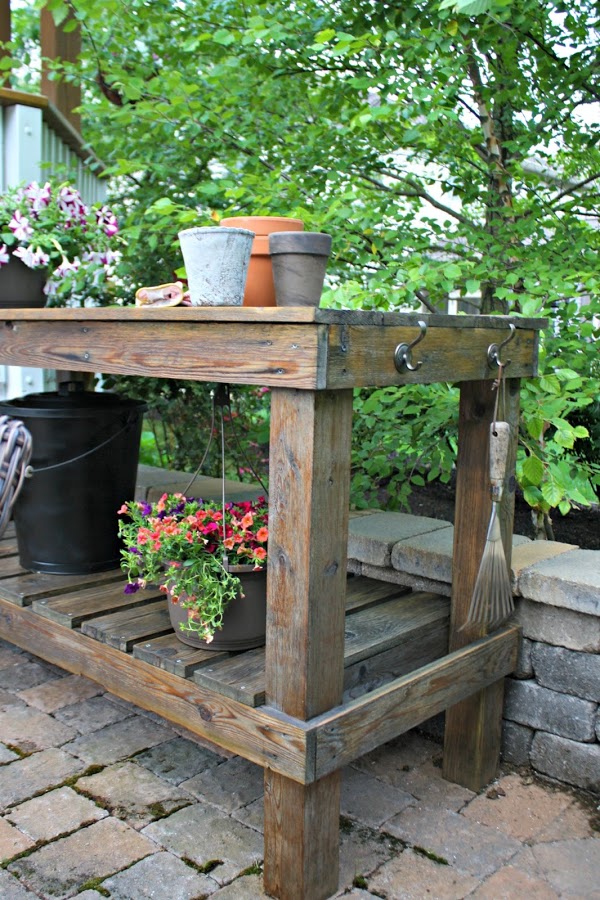
But after six years of direct sun and the elements, the cedar started to gray again. This is normal for this type of wood, especially when it's exposed like it was.
Last time I refinished this potting bench it was in much worse shape -- I had to sand like crazy to get all of the mildew off. This time I tried something new and I was shocked at how well it worked:

This post may contain affiliate links for your convenience.
See my policies and disclosure page for more information.
You can see how much cleaner the left side is after this easy treatment. (The gray all the way over on the right is how it looked before.)
All I did was add a few scoops of Oxiclean powder (and water) to a spray bottle and then sprayed it onto the wood. I let it sit for a few minutes and then used the hose to reveal the pretty wood finish:
Read the full post
Via https://www.thriftydecorchick.com/2022/05/how-to-restore-weathered-outdoor-furniture.html Tons of tips and ideas for decorating the wall around a TV.
The age old question -- how to make the big TVs of today work in the scheme of a room and not overpower it.
I've gathered a few of my favorite ideas on how to incorporate a TV into the design of your house, and even help it to disappear a little bit! Create a TV gallery wallMy favorite ideas involve gallery walls -- especially those with black frames. I think they work so well with the TV:
Source: Pottery Barn
This post may contain affiliate links for your convenience.
See my policies and disclosure page for more information.
What a beautiful room right? I think this TV wall is done so well. White frames and other colors work well too of course, I just think the black helps to make the TV stand out a little less.
I love the idea of incorporating big artwork to steal the focus:
Via https://www.thriftydecorchick.com/2016/01/tips-for-decorating-around-tv.html Testing the easiest ways to remove tarnish from vintage brass decor.
I always keep an eye out for solid brass items when I'm shopping second-hand or antique shops. My brass finds are some of my absolute favorite home decor pieces!

I didn't used to mind that look...it made it feel more vintage to me in a way. But now more often than not, the tarnish creates a dirty looking patina that I'm not particularly fond of:


I used to use a polish to remove tarnish -- it did a decent job and I was able to get to some of the beautiful original finish with it.
And then I discovered a product that blows even that out of the water! Before I shared that with you, I wanted to test some tarnish removal methods I've heard about over the years.
Before you start to clean any tarnished brass, check to make sure it's solid and not just brass plated. Use a magnet to check -- it will not stick to solid brass, but will attach to plated brass. If you rub or polish too much the plated brass will wear off over time.
Testing DIY tarnish removal methods
There are quite a few ways to remove dark tarnish and clean brass decor -- I tested the three easiest using household items we had on hand. I figured they would all be too good to be true.
Spoiler: They WERE. :)
I tried the following brass cleaning methods:
Read the full post
Via https://www.thriftydecorchick.com/2022/05/how-to-clean-and-restore-vintage-brass.html My ten top room makeovers over my 14 years as a DIY and decor blogger.
This month marks 14 years of blogging here at Thrifty Decor Chick!
I started this blog in 2008 to share my DIY and home projects with friends and family...I never DREAMED it would turn into what it has!
Blogging has become one of the biggest blessings in my life. I'm so thankful for it! I'm also so grateful to so many of you who come back month after month to read what I'm up to!
To celebrate TDC's 14th birthday, I thought it would be fun to gather my top ten biggest DIY room transformations over the past 14 years. I specifically chose rooms from our two houses that I did all or the majority of the work on.
The first one may be how many of you found me...
1. STAIRCASE MAKEOVER (Goodbye carpet!)
Ripping the carpet off our stairs and refinishing the wood was my first major DIY project and definitely one of the most physically demanding. The updates went on for years, but the first part was the hardest.
Twelve years ago I got a wild hair and decided to tear the carpet off our stairs:

This post may contain affiliate links for your convenience.
See my policies and disclosure page for more information.
I had the idea in mind for years, because I remembered when we were building that the treads (the actual steps) had a nice bullnose edge. I considered just having them stained and painted then!
When I went to peek under the carpet years later, I was thrilled that I remembered right! Because of the nice rounded edge, this project was easier than most step makeovers.
I didn't have to replace the treads or risers, just refinish them!
After pulling the carpet and staples, I sanded then painted and stained the stairs.
Later I added a simple board and batten look to the wall under the handrail, then painted a black accent wall:

You can see all of the steps I took on this stair renovation, and all of the projects on this staircase here!
2. TWO-TONED KITCHEN MAKEOVER
After living with our very dark kitchen in our last house for more than ten years, I decided to take on this HUGE project!
We picked out all of the finishes when we built the house, but the overwhelmingly dark details were feeling heavy. I wanted to update this room and brighten it up!
This is the space we started with:

It was an eat in kitchen, but the table area was VERY tight. Because of other changes we made in the house (that I'll share in a bit), I was able to change that area into a dreamy window seat.
This side of the room got a complete makeover as well...I took down cabinets, built the remaining cabinets up to the ceiling, extended the kitchen island to hold the microwave, painted all of the cabinets with a paint sprayer and SO much more:

The two-toned gray and white cabinets really made a beautiful statement! (You can see all of the paint colors in both houses here.)
This kitchen was transformed into a completely new space for WAY less than we would have paid a contractor to do it! I am still so proud of what I accomplished in that kitchen.
3. TOP TO BOTTOM PANTRY MAKEOVER
One of the areas I was most excited about in our current home was our large pantry. It was DREAMY after having a small pantry in the kitchen pictured above.
The melamine shelving was great at first, but we quickly discovered it didn't function well and we were wasting a ton of space:

Almost immediately I knew I'd want to customize this to fit our needs better. I had an idea in mind for years, and finally started tackling this redo last fall.
I took down all of the open shelving (that I kept to use later) and installed kitchen cabinets and open shelving instead:

Not only does it look so much cleaner, this space now holds just as much if not more because of the deeper and taller cabinets.
We were able to move all of our small appliances out of the kitchen and into this space, and because of all of these DIY pull out shelves, we can store a TON of food and supplies in this pantry now:

This small room took as long as much bigger projects because of the all of the DIY and decor details I added as well. You can read all about those and see the reveal of this huge pantry redo process here!
4. BOY BATHROOM REDO
Our son's "baby" to tween bathroom renovation was one of the most labor intensive projects I've ever tackled. It was also one of the most dramatic! We LOVED how this renovation turned out.
I hated that wall between the shower and sink area from the moment we moved in:

It made the back part of the bathroom feel so dark and cramped. I loathed that wall. ?
I did a ton of research and finally one day decided it was time...I knocked the wall down and started this HUGE renovation.
I tiled the floors and backsplash wall, built and stained the open wood vanity, installed new lighting and TONS more. The end result was a renovation I'm incredibly proud of:

Gosh, I loved that room!! I plan to repeat a few of these projects in our son's current bathroom.
5. DARK TO LIGHT LAUNDRY MAKEOVER
I talk all the time about how important it is to live with a room as is before deciding on a renovation. You'll really figure out how you want to make the room function for you and your family.
One of our problem spaces in our old house was the mud room and laundry combo. This small room was trying to be way too many things:

Over the years I dressed it up by adding a beadboard wall treatment around the room, but it didn't help the function much. :)
When we starting finishing the basement in that house we were able to create a new laundry room and move the washer and dryer down there. It was the HAPPIEST DAY!
Later I built some additional items in the mud room -- the upper cabinet for off season storage, a shoe storage bench with cabinets, and then completed the finishing touches like paint and decor. The difference after this mud room makeover was HUGE!:

That light blue and white combo is so classic and timeless. This room truly shined after those changes, and I got a great dedicated basement laundry room out of it too!
6. COZY BASEMENT MAKEOVER
I loved that our friends and family would ask how I was going to keep busy with a new and "finished" house when we moved into our current home. ;)
All I ever saw was a beautiful blank canvas to tweak and personalize just for us -- my favorite thing to do!
Our basement was just that, an empty space just waiting for some drama! We started with our cozy sectional on one side:

And the other side was a loooong empty wall that was just begging for some color and built ins:

Then early last year I built a HUGE entertainment center wall using my go-to (kitchen cabinets, duh) for the bases.
The TV hangs over a bench for electronic storage and I built bookcases over the side cabinets. It made such difference in this room!:

Yet again, doing this myself saved us a ton of money!
We keep all of our board games in the cabinets as well as our photo and art mementos that I organized earlier this year.
A couple years ago we added a dining/game table in an adjoining area. At first the wall in that spot was pretty boring:

Recently I added an electric fireplace and picture ledges and finished it off with this lovely green shiplap accent:

7. REMOVING A WALL IN THE FAMILY ROOM
The kitchen renovation I shared from our last house kicked off a bigger project in the adjoining family room. The corner fireplace in here made what was a good sized space feel cramped:

We tried a few furniture layouts to try to open up the space, but over time we craved a more open space to entertain and spread out in.
Problem was, adding onto the back of our house was WAY more than we wanted to spend. Just finding a contractor to give us quotes was daunting.
It was a reader who suggested taking down the wall between my office and this room to open up the space. We could place the fireplace flat against the wall and make the room almost twice as big. Her idea was brilliant and we started that process instead of adding to the house.
We made the fireplace the centerpiece of the room:
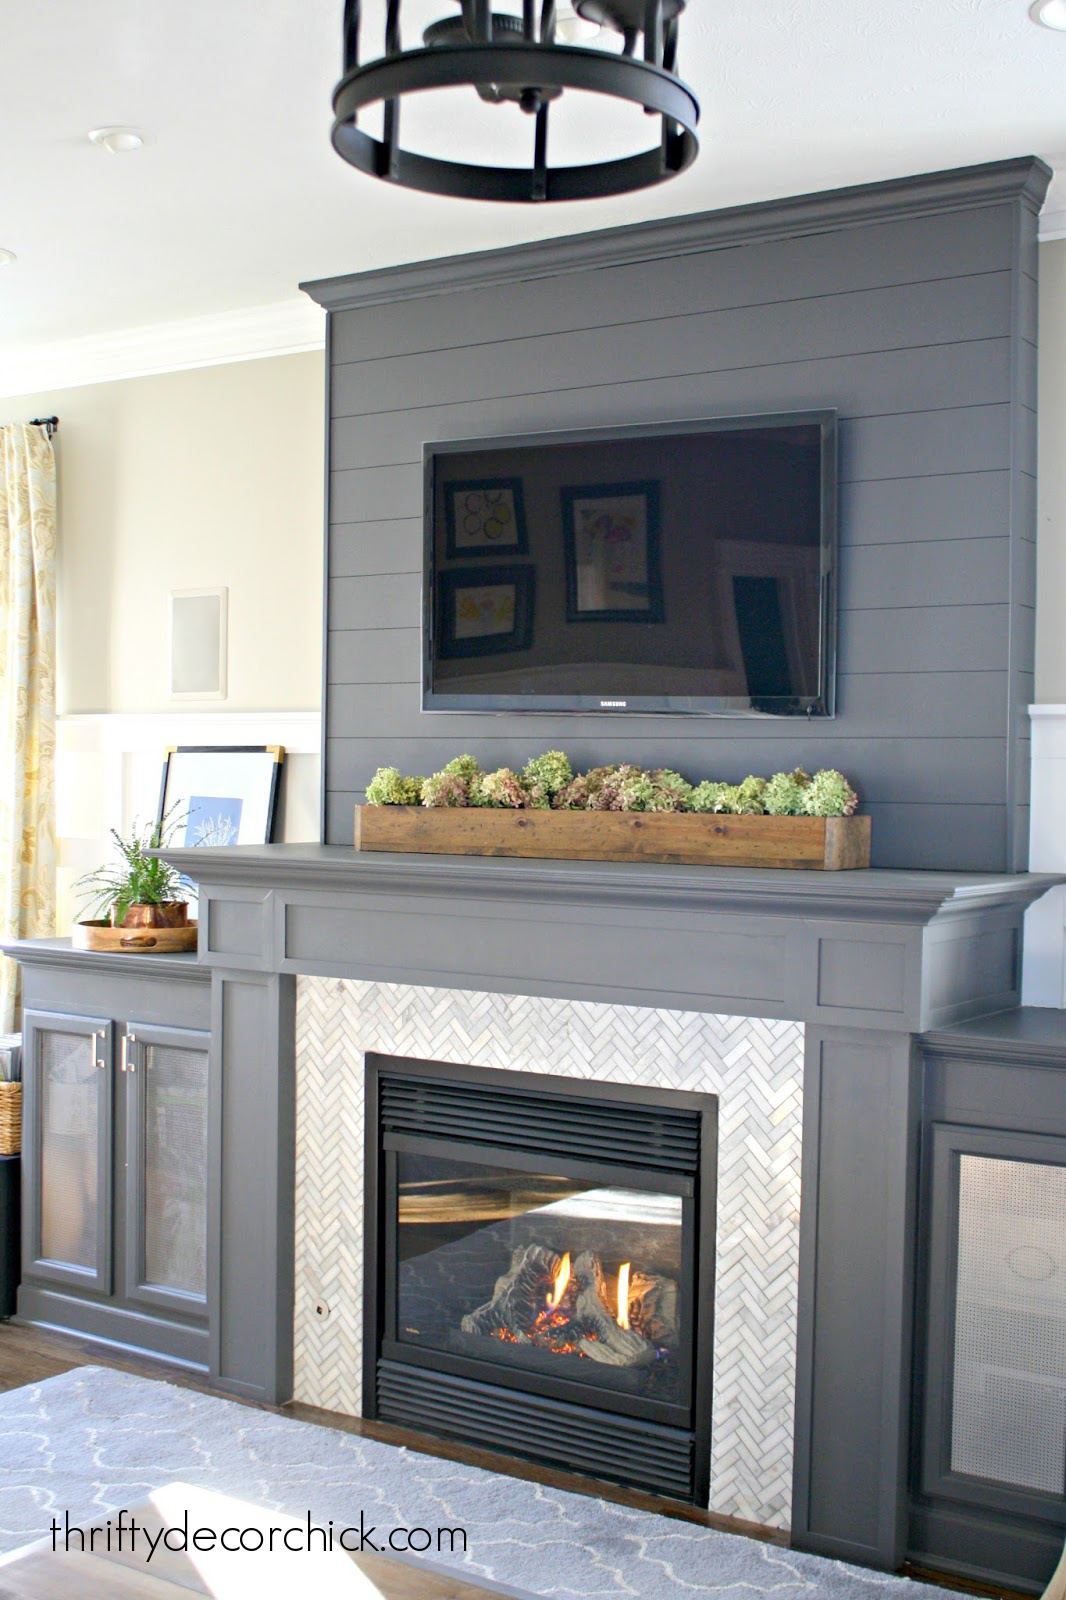
I finished off the fireplace TV wall, trim on the front and sides of the cabinets and fireplace, herringbone tile surround and paint (Peppercorn by Sherwin-Williams).We were able to move the furniture around and it functioned so much better: |


