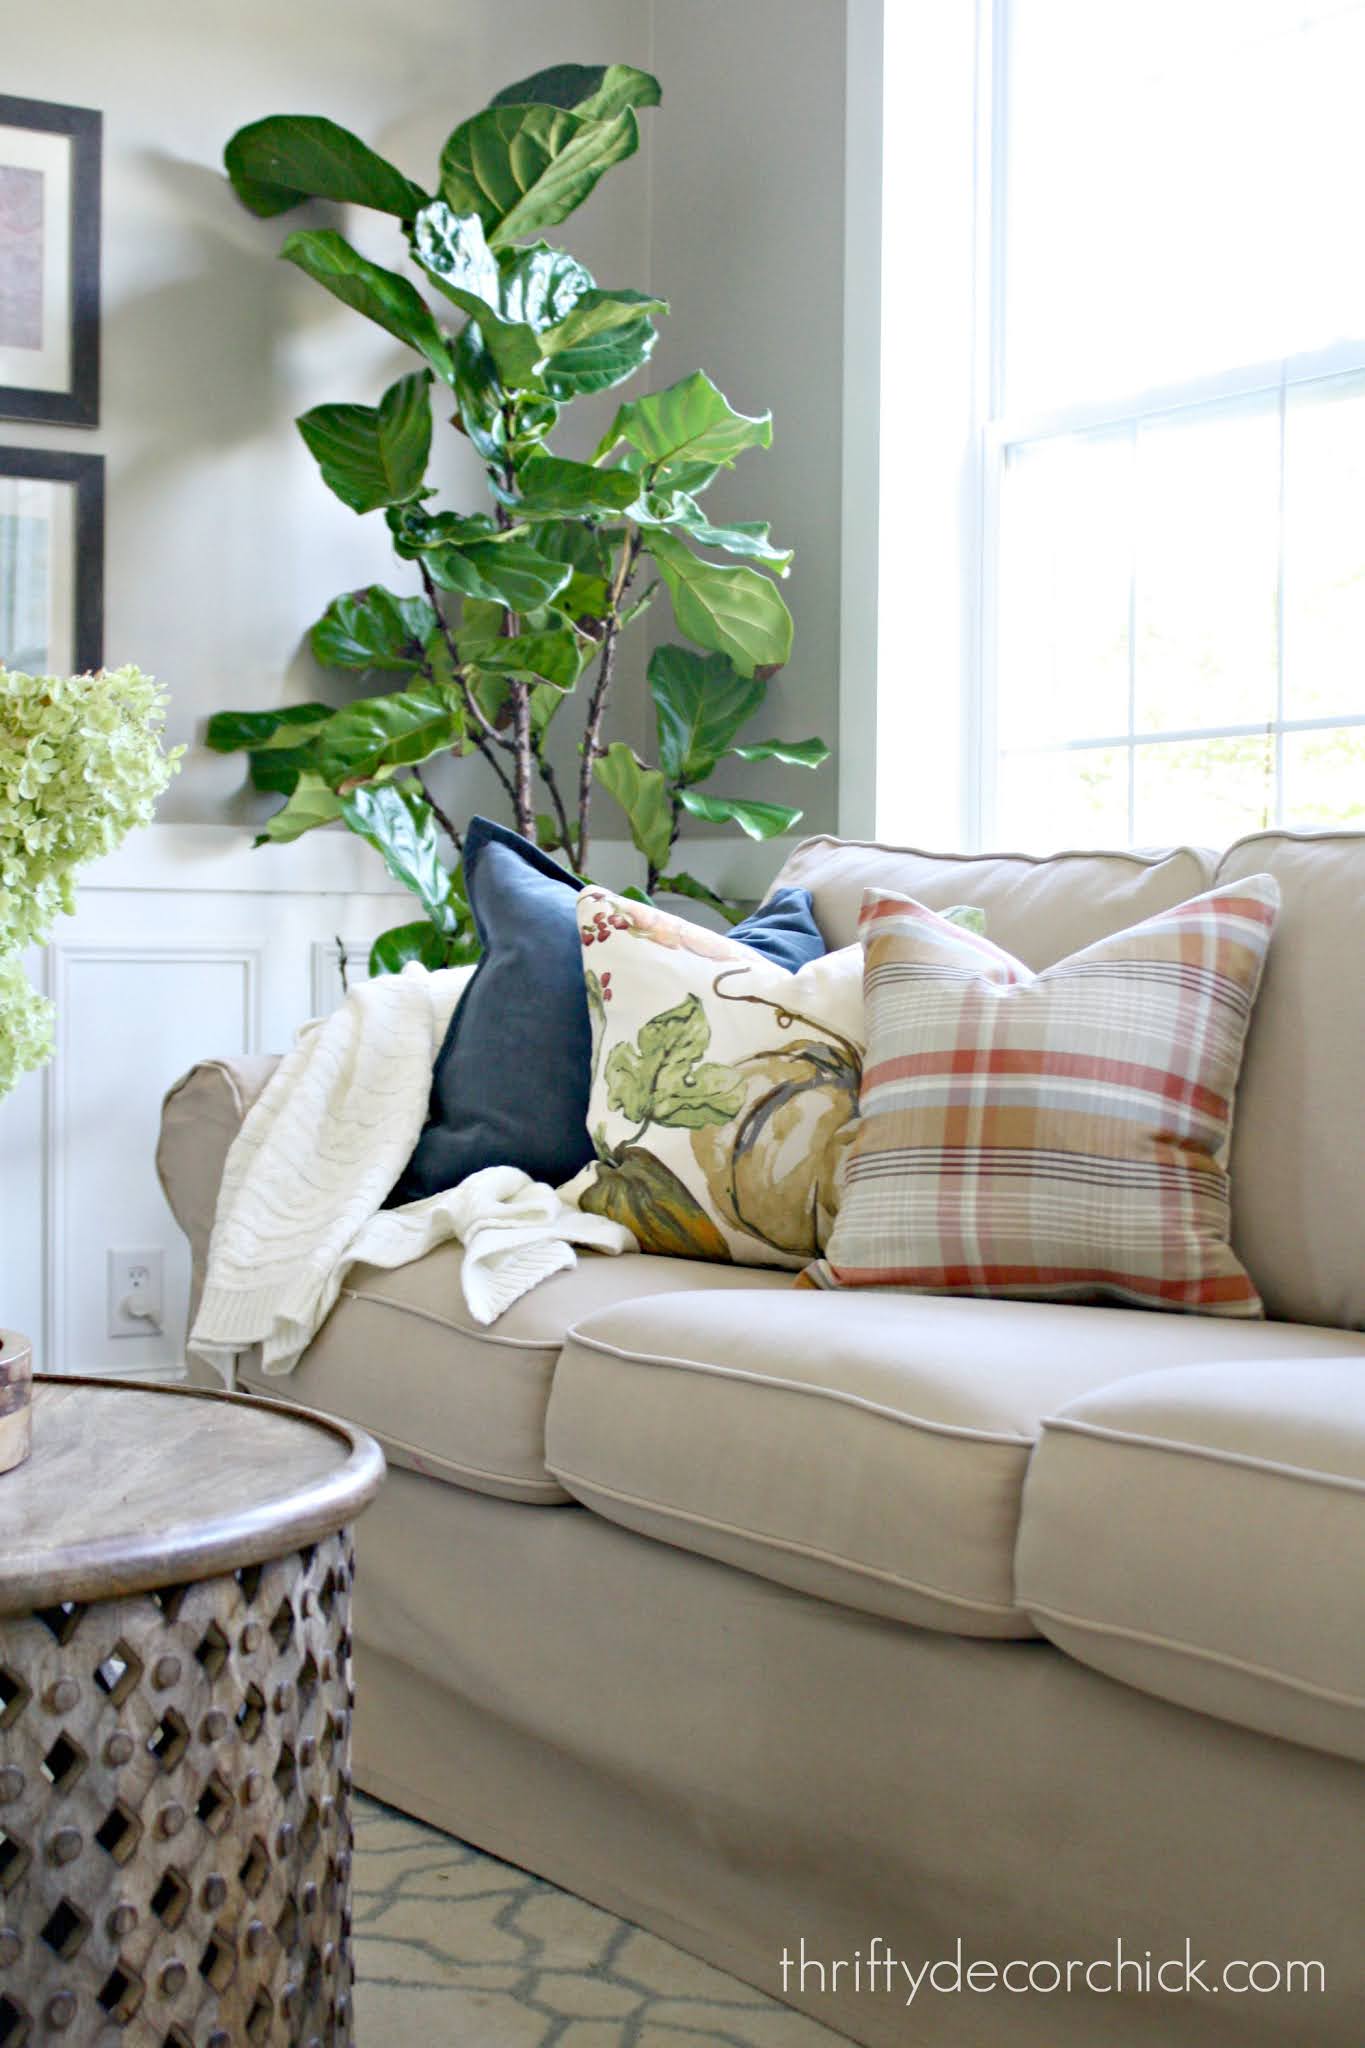
|
I'm always looking for easy exterior updates to make our home stand out from the rest. When you live in suburbia many of the houses can look similar -- but there are so many ways to add some character and beauty without spending a ton of money.
This easy garage door update does just that! I've done this a couple times over the years and I'm always surprised at how much it really changes up the doors.
I loved our garage doors with their gray and white paint and trim:
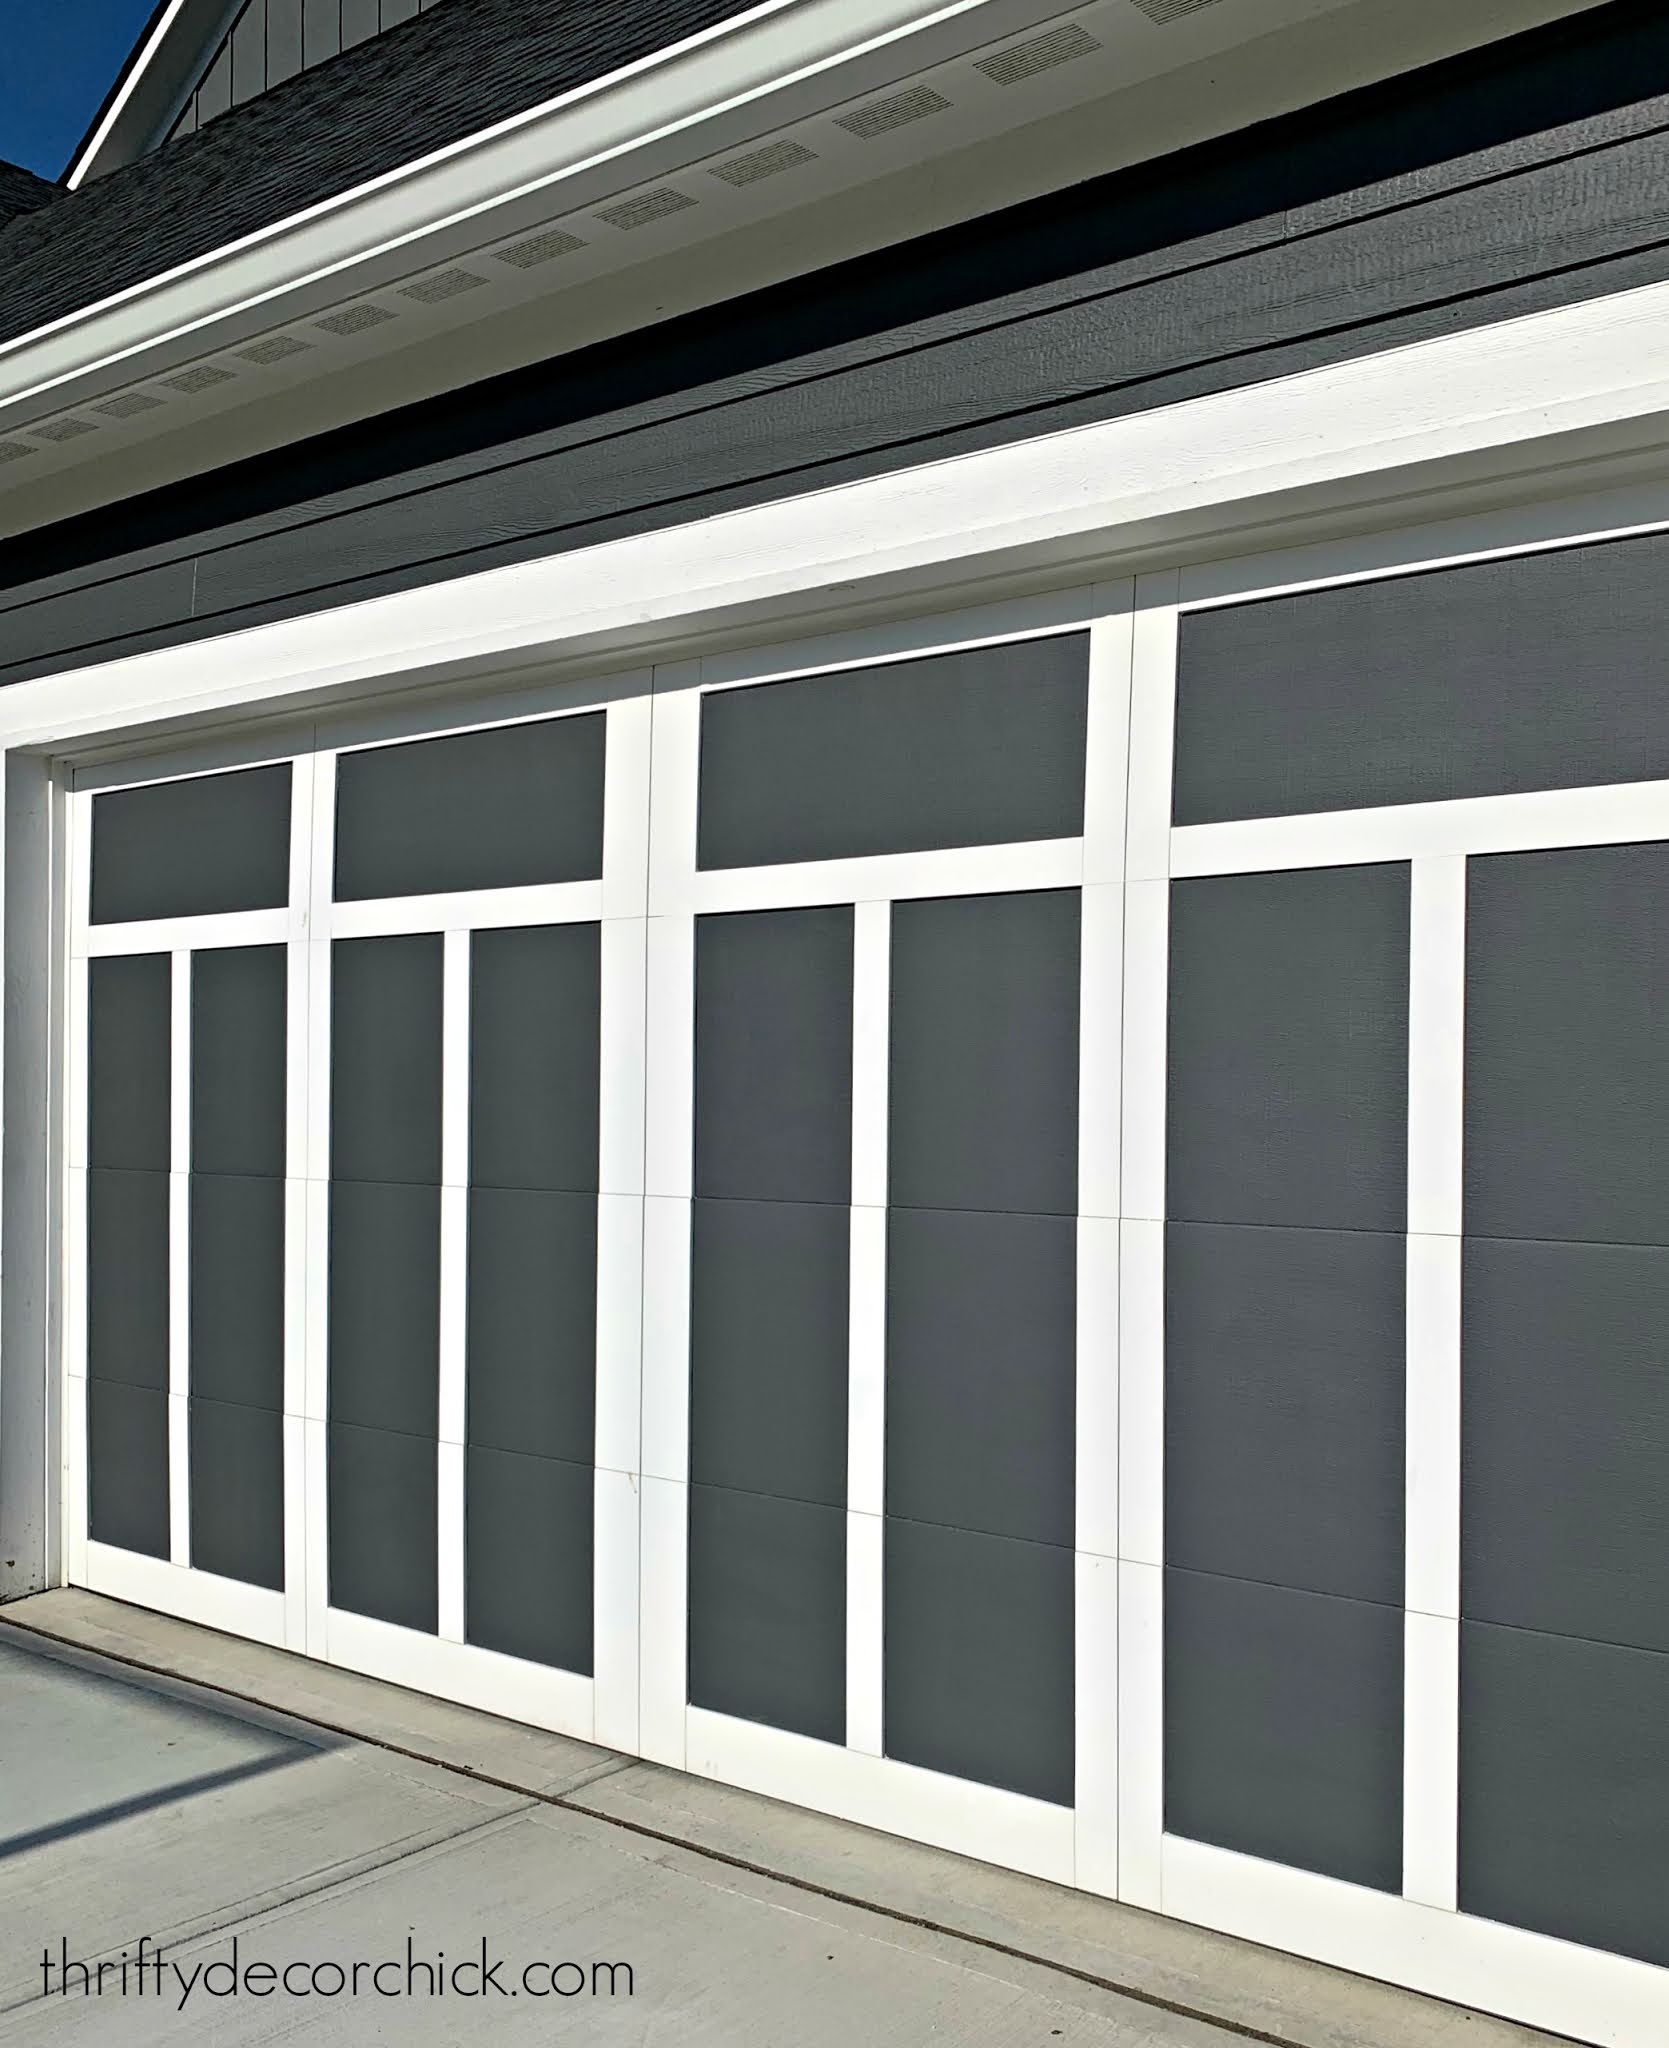
But I knew this easy addition would make them even more beautiful.
You can buy metal garage door accents that give it a Craftsman or carriage door look, and they are super easy to install! Our home has a modern Craftsman exterior so I knew they would fit in beautifully.
I had to use hardware you attach with screws on our doors:

This post may contain affiliate links for your convenience.
See my policies and disclosure page for more information.
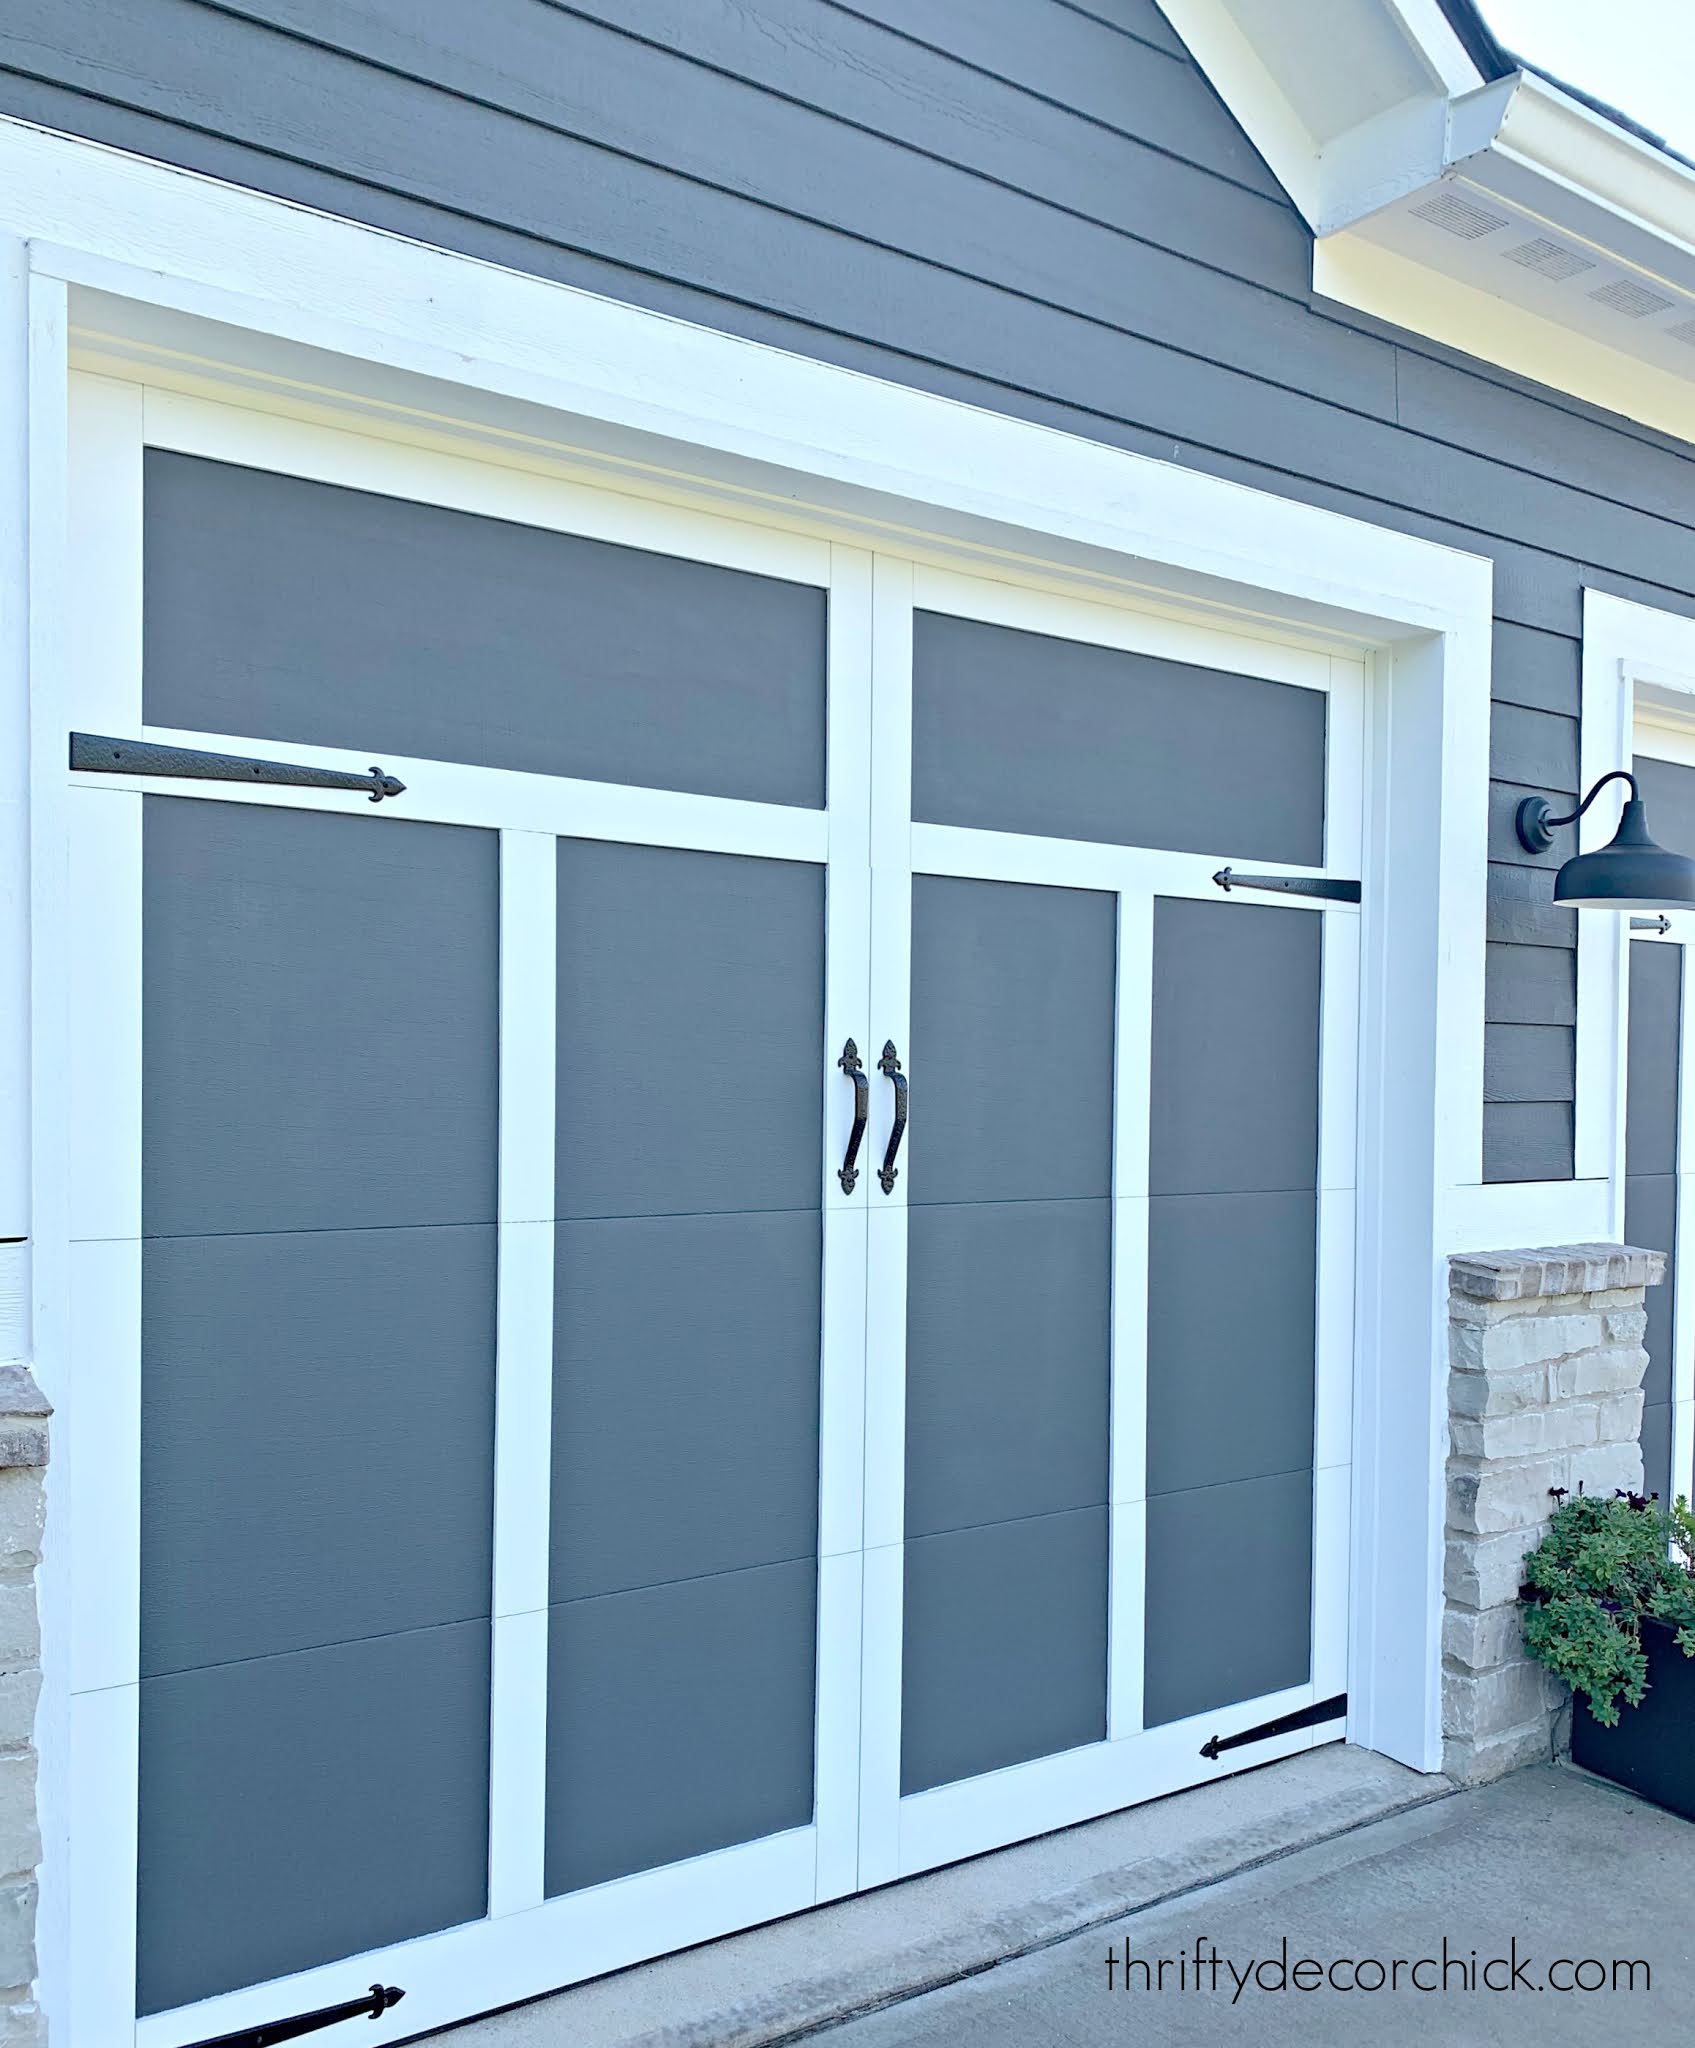
Most of the sets I've found come with two handles and four "hinges."
At first I only had one set of hinges up on the top trim, but I later added the set at the bottom and it really completed the look:
If you don't want to drill into your doors there are magnetic options that are even easier to install! I bought a set of magnetic garage door accents at first but realized that the trim on our doors is wood, not metal. Oops.
They don't interfere with the operation of the doors at all. Most have a rust resistant coating that holds up great outside. The set I put on our garage doors at the last house has been up for eight years and haven't rusted at all!
Here’s our garage door at the old house before the hardware detail:
 This is the set I found for only $10 at the hardware store:  That exterior had a cottage look and I knew this would look great! At first I was going to tape them up to see how I liked them, but the tape wasn’t holding, so I just drilled them in. That was stressful. But don't be afraid! It will be worth it! They are really good quality -- nice, heavy metal and I liked that the screws came with black heads to match:  I just love how these look!:  If you want to keep going, you can add another carriage door detail with faux windows on the panels across the top. I've seen people paint it on, or you can use these magnetic faux windows. When they’re on they really look like real windows! It’s not a huge change, but on a street of plain garage doors, yours will stand out!  I love a simple and inexpensive update! Have you tried changing up something on your garage door? Added hardware or painted it? Anyone tried those faux windows? Do tell! There are a ton of magnetic options! This one is only $12 and this magnetic hardware is $17.
This set isn't magnetic but it's enough for two garage doors.
Here is a set similar to ours for less than $20 that you drill in
Faux Craftsman windows for double garage door
This DIY landscape lighting tutorial is another exterior update that will make your house look way more expensive!:

See more of our home here.
To shop items in our home, click here!
Never miss a post by signing up to get posts via email.
Via https://www.thriftydecorchick.com/2013/06/diy-craftsman-garage-door.html
0 Comments
Well hello! We got out of town for a bit last weekend and it was great to get away for a few days! I was reminded when got home how much I love having our big, beautiful laundry room that I recently made over.
When we travel it's so nice to walk right in and empty the dirty clothes right out of the suitcases into the washer and hamper. This room works like a well oiled machine now that I've added so much storage!
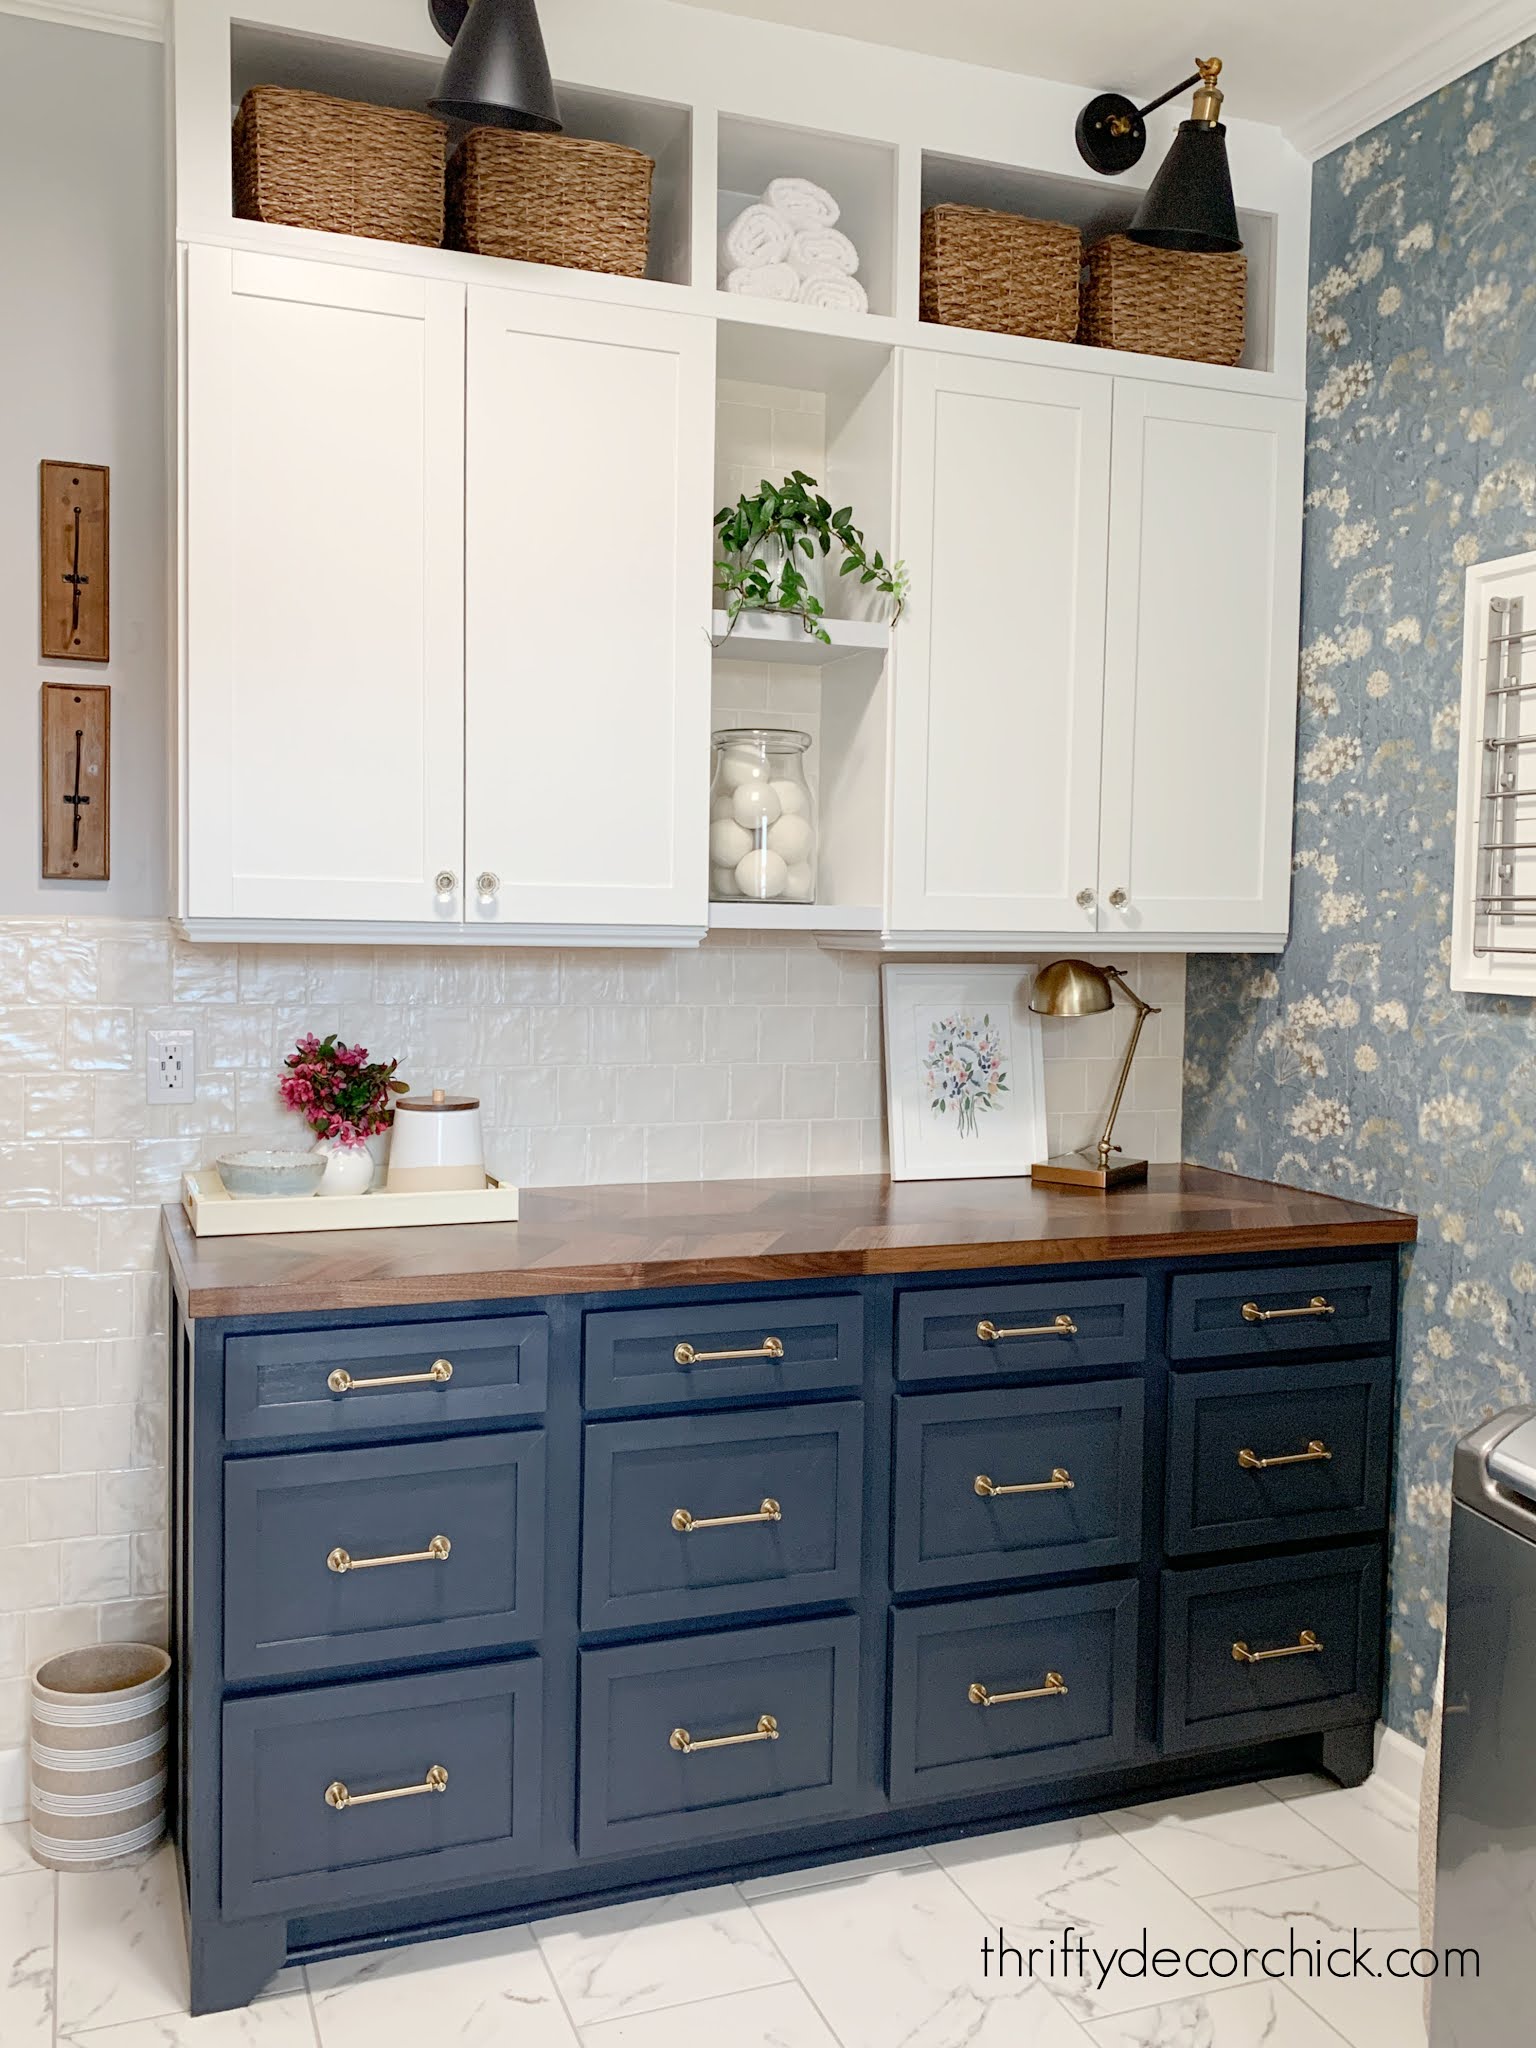
I wanted to show you how I've organized everything in the new cabinets on this wall:
As a reminder, here's how this spot started -- just a table for folding clothes:

This post may contain affiliate links for your convenience.
See my policies and disclosure page for more information.
Problem was, that surface was always covered with STUFF.
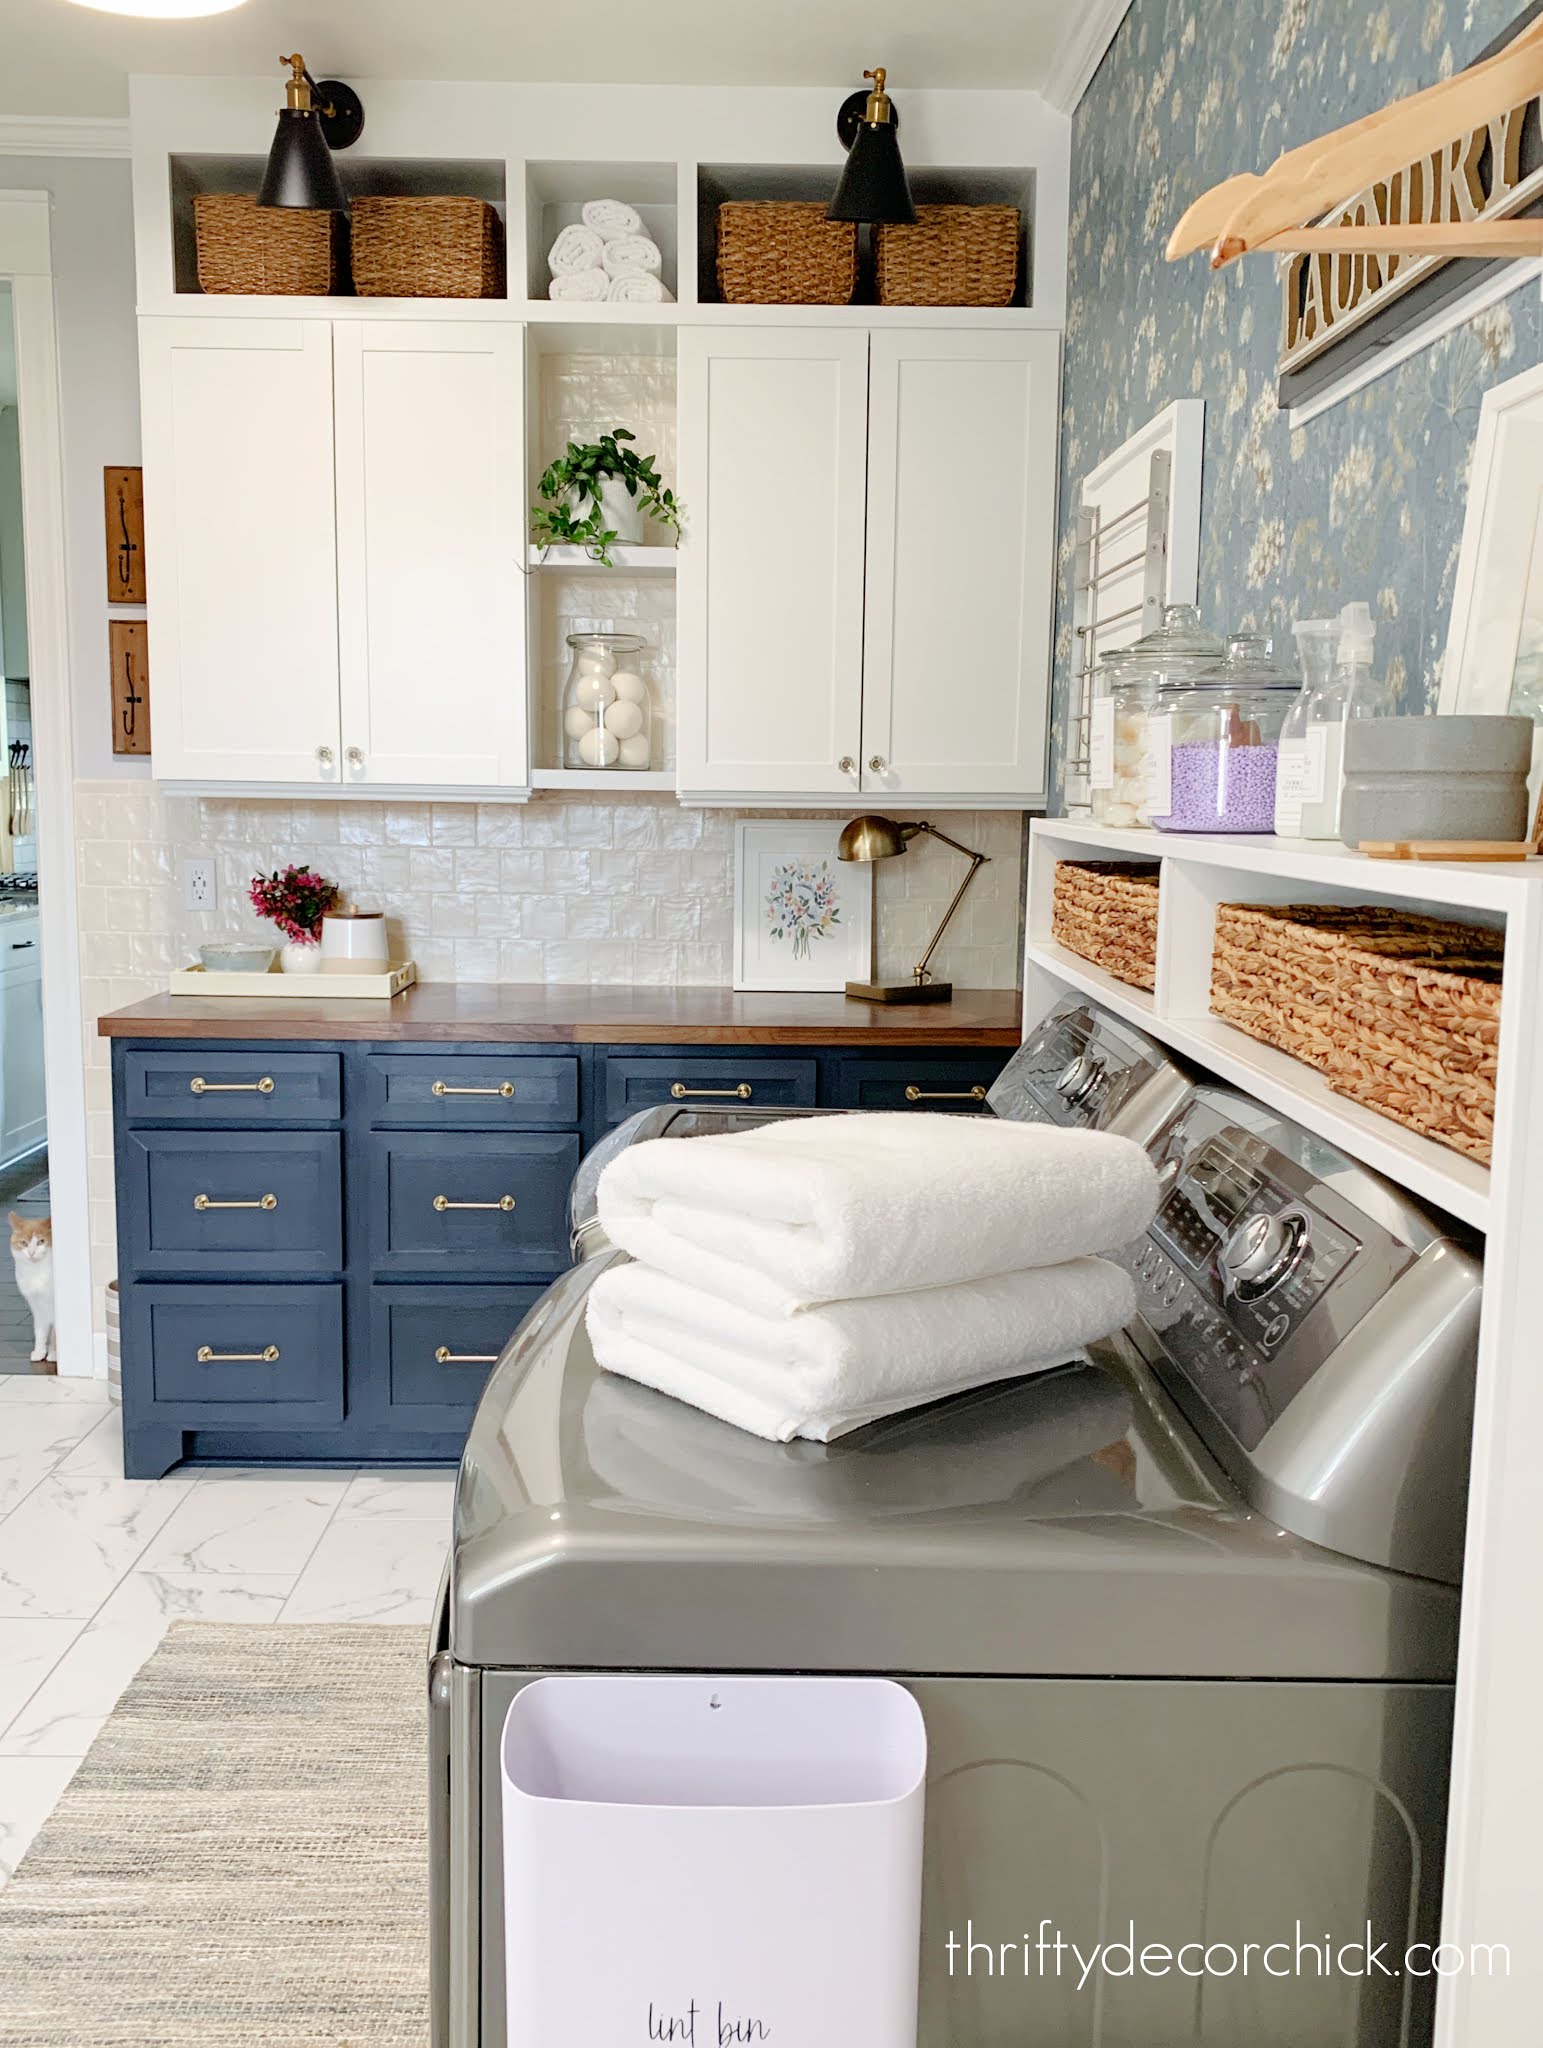
We moved the upper cabinets from over the washer and dryer to this corner instead. I keep our laundry items in one cabinet:
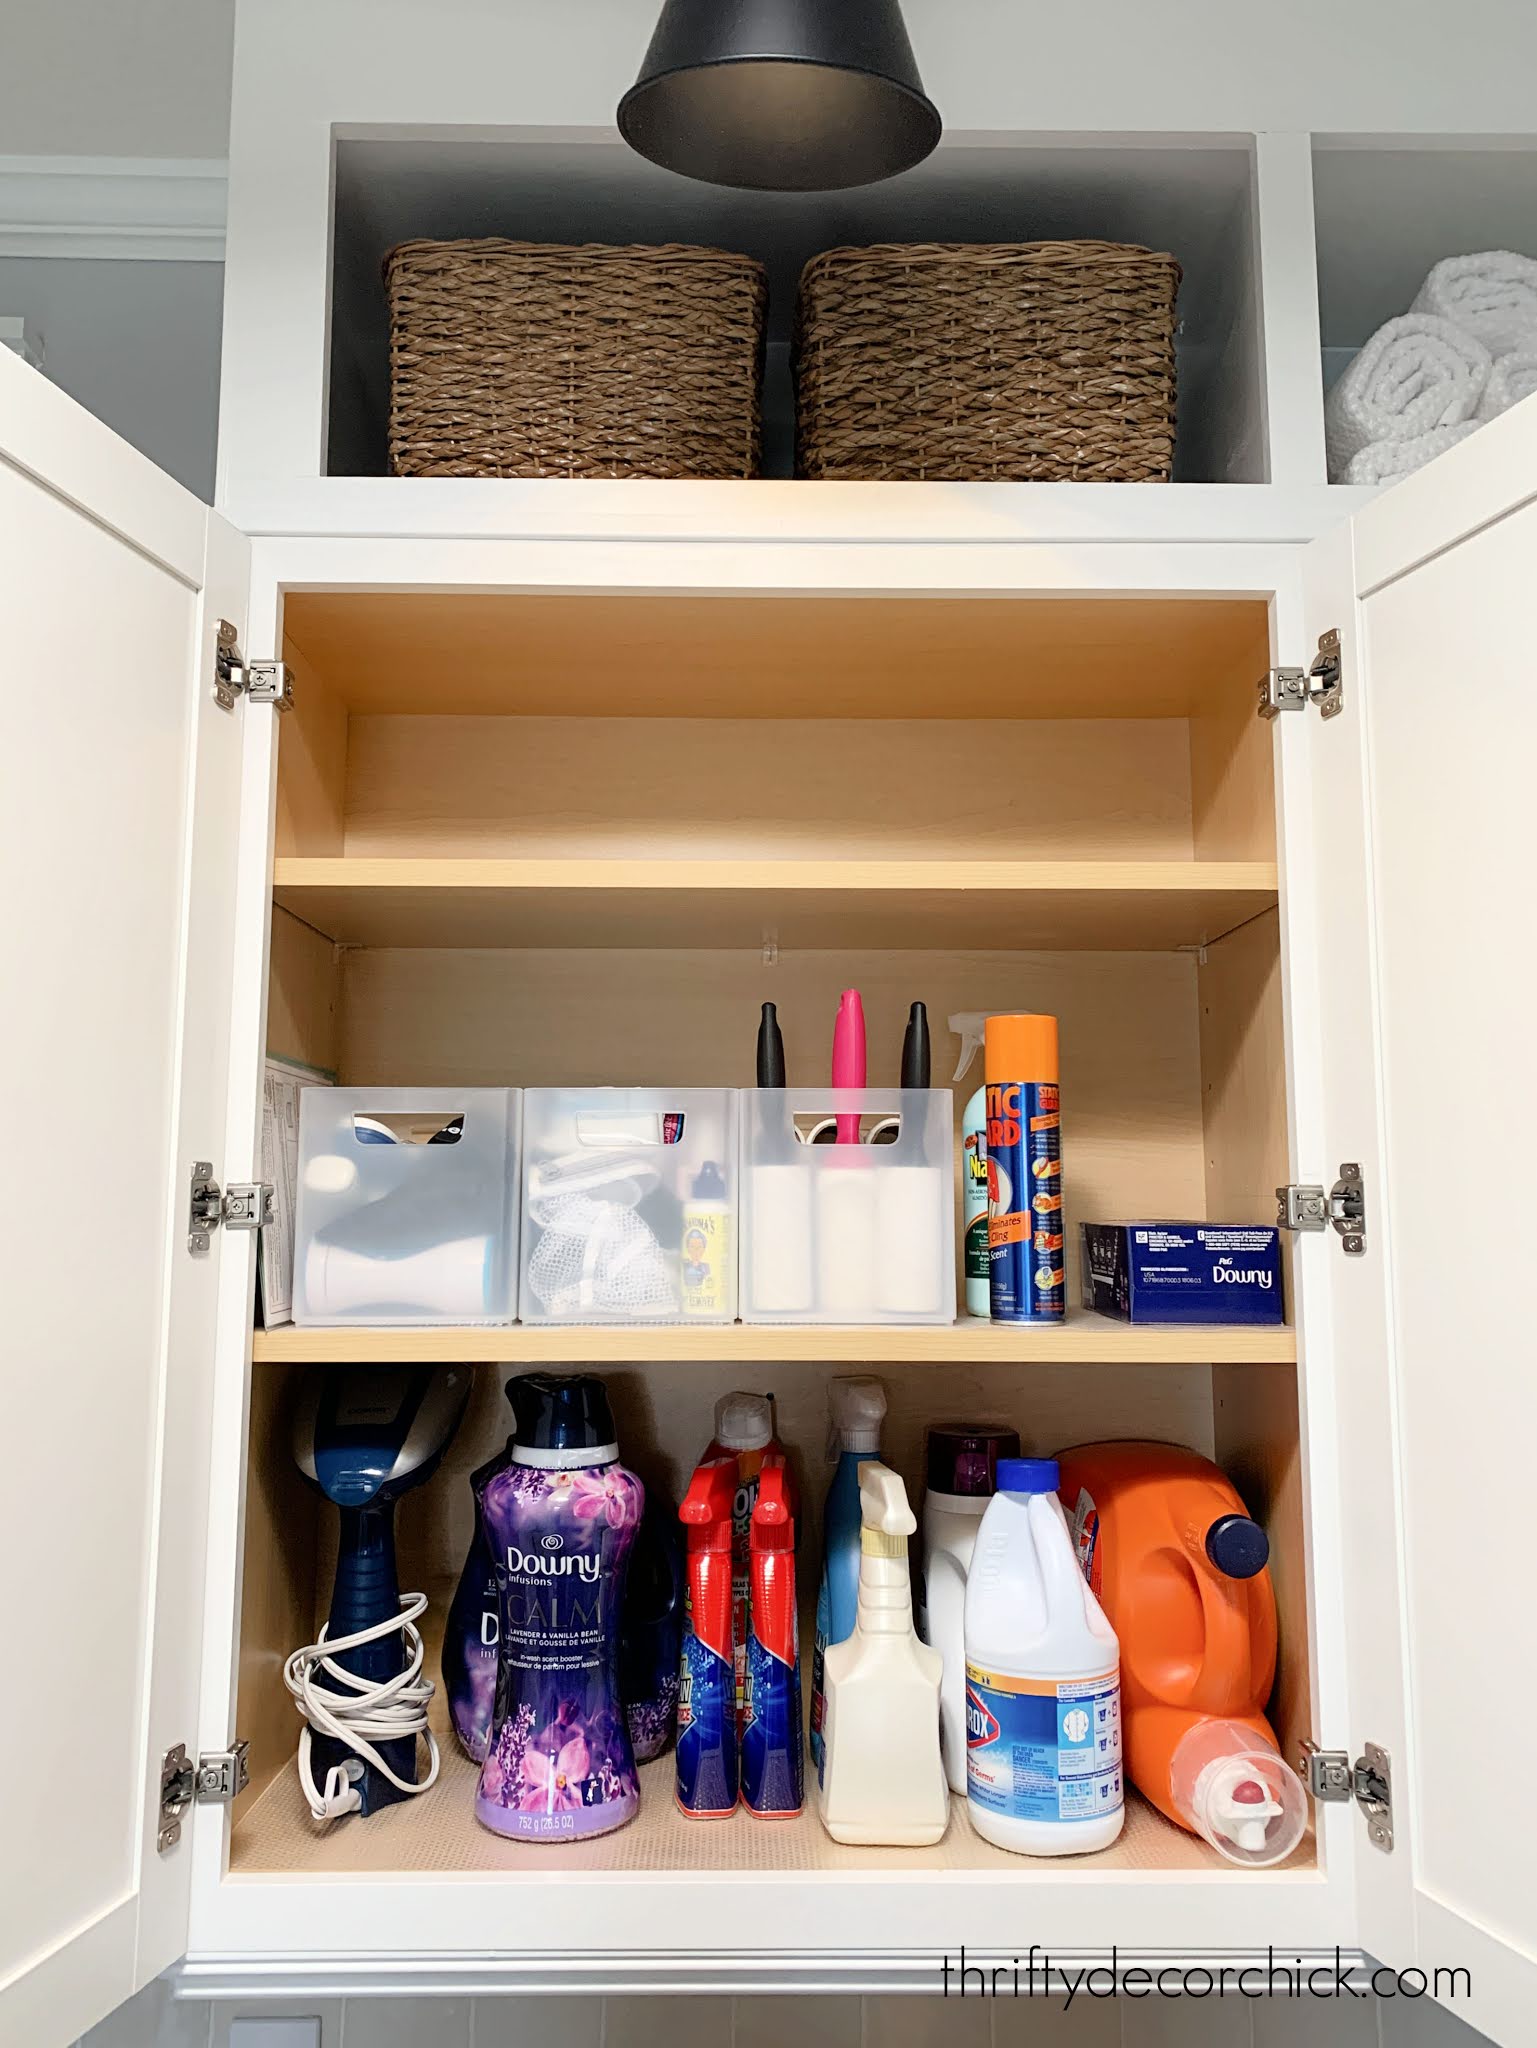
We have extra detergent, our fabric shavers, stain spray, etc. on these shelves. It's so nice to be able to reach these now!
On the other side I keep all of the cleaning supplies. These used to be in the new cat closet:
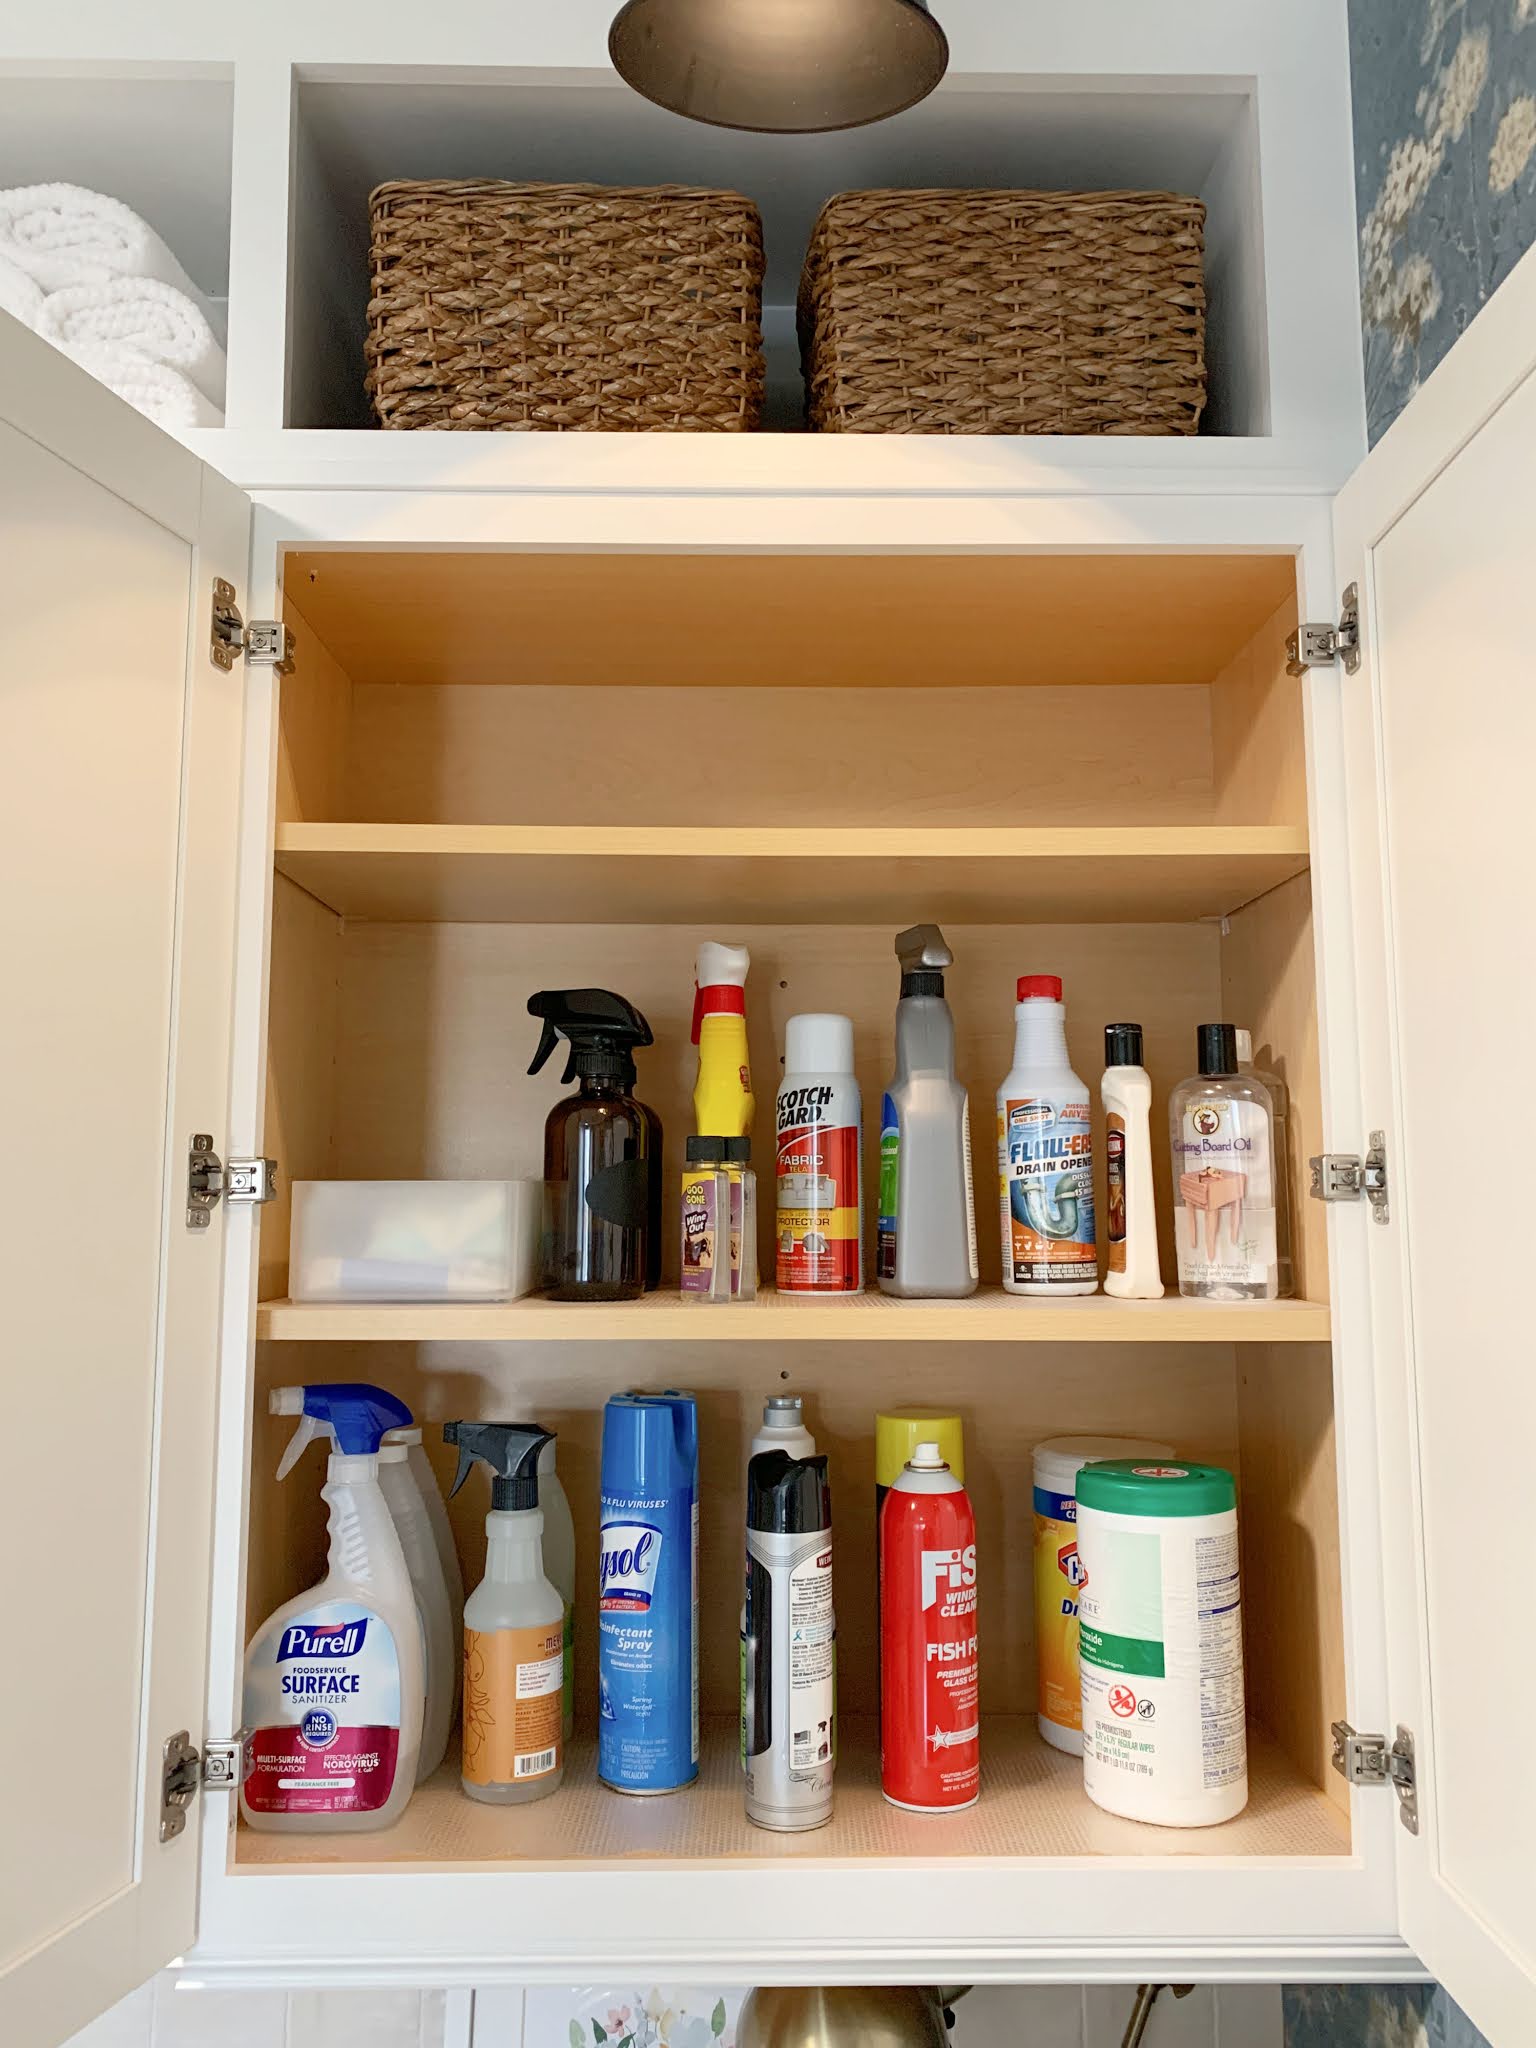
By the way, I used to keep some cleaning supplies in different areas -- for example, in an upstairs bathroom or in the basement. I've learned if I keep it all in one spot I can keep track of what we need much better.
Because I installed four 18 inch cabinets below, we had 12 drawers to fill and organize. Heaven! ? Here's a look inside a few of them.
The top drawers are shallow -- I organized those with flat drawer bins for charging cords (separated into those for phones and for other rechargeable items) and outlet chargers:
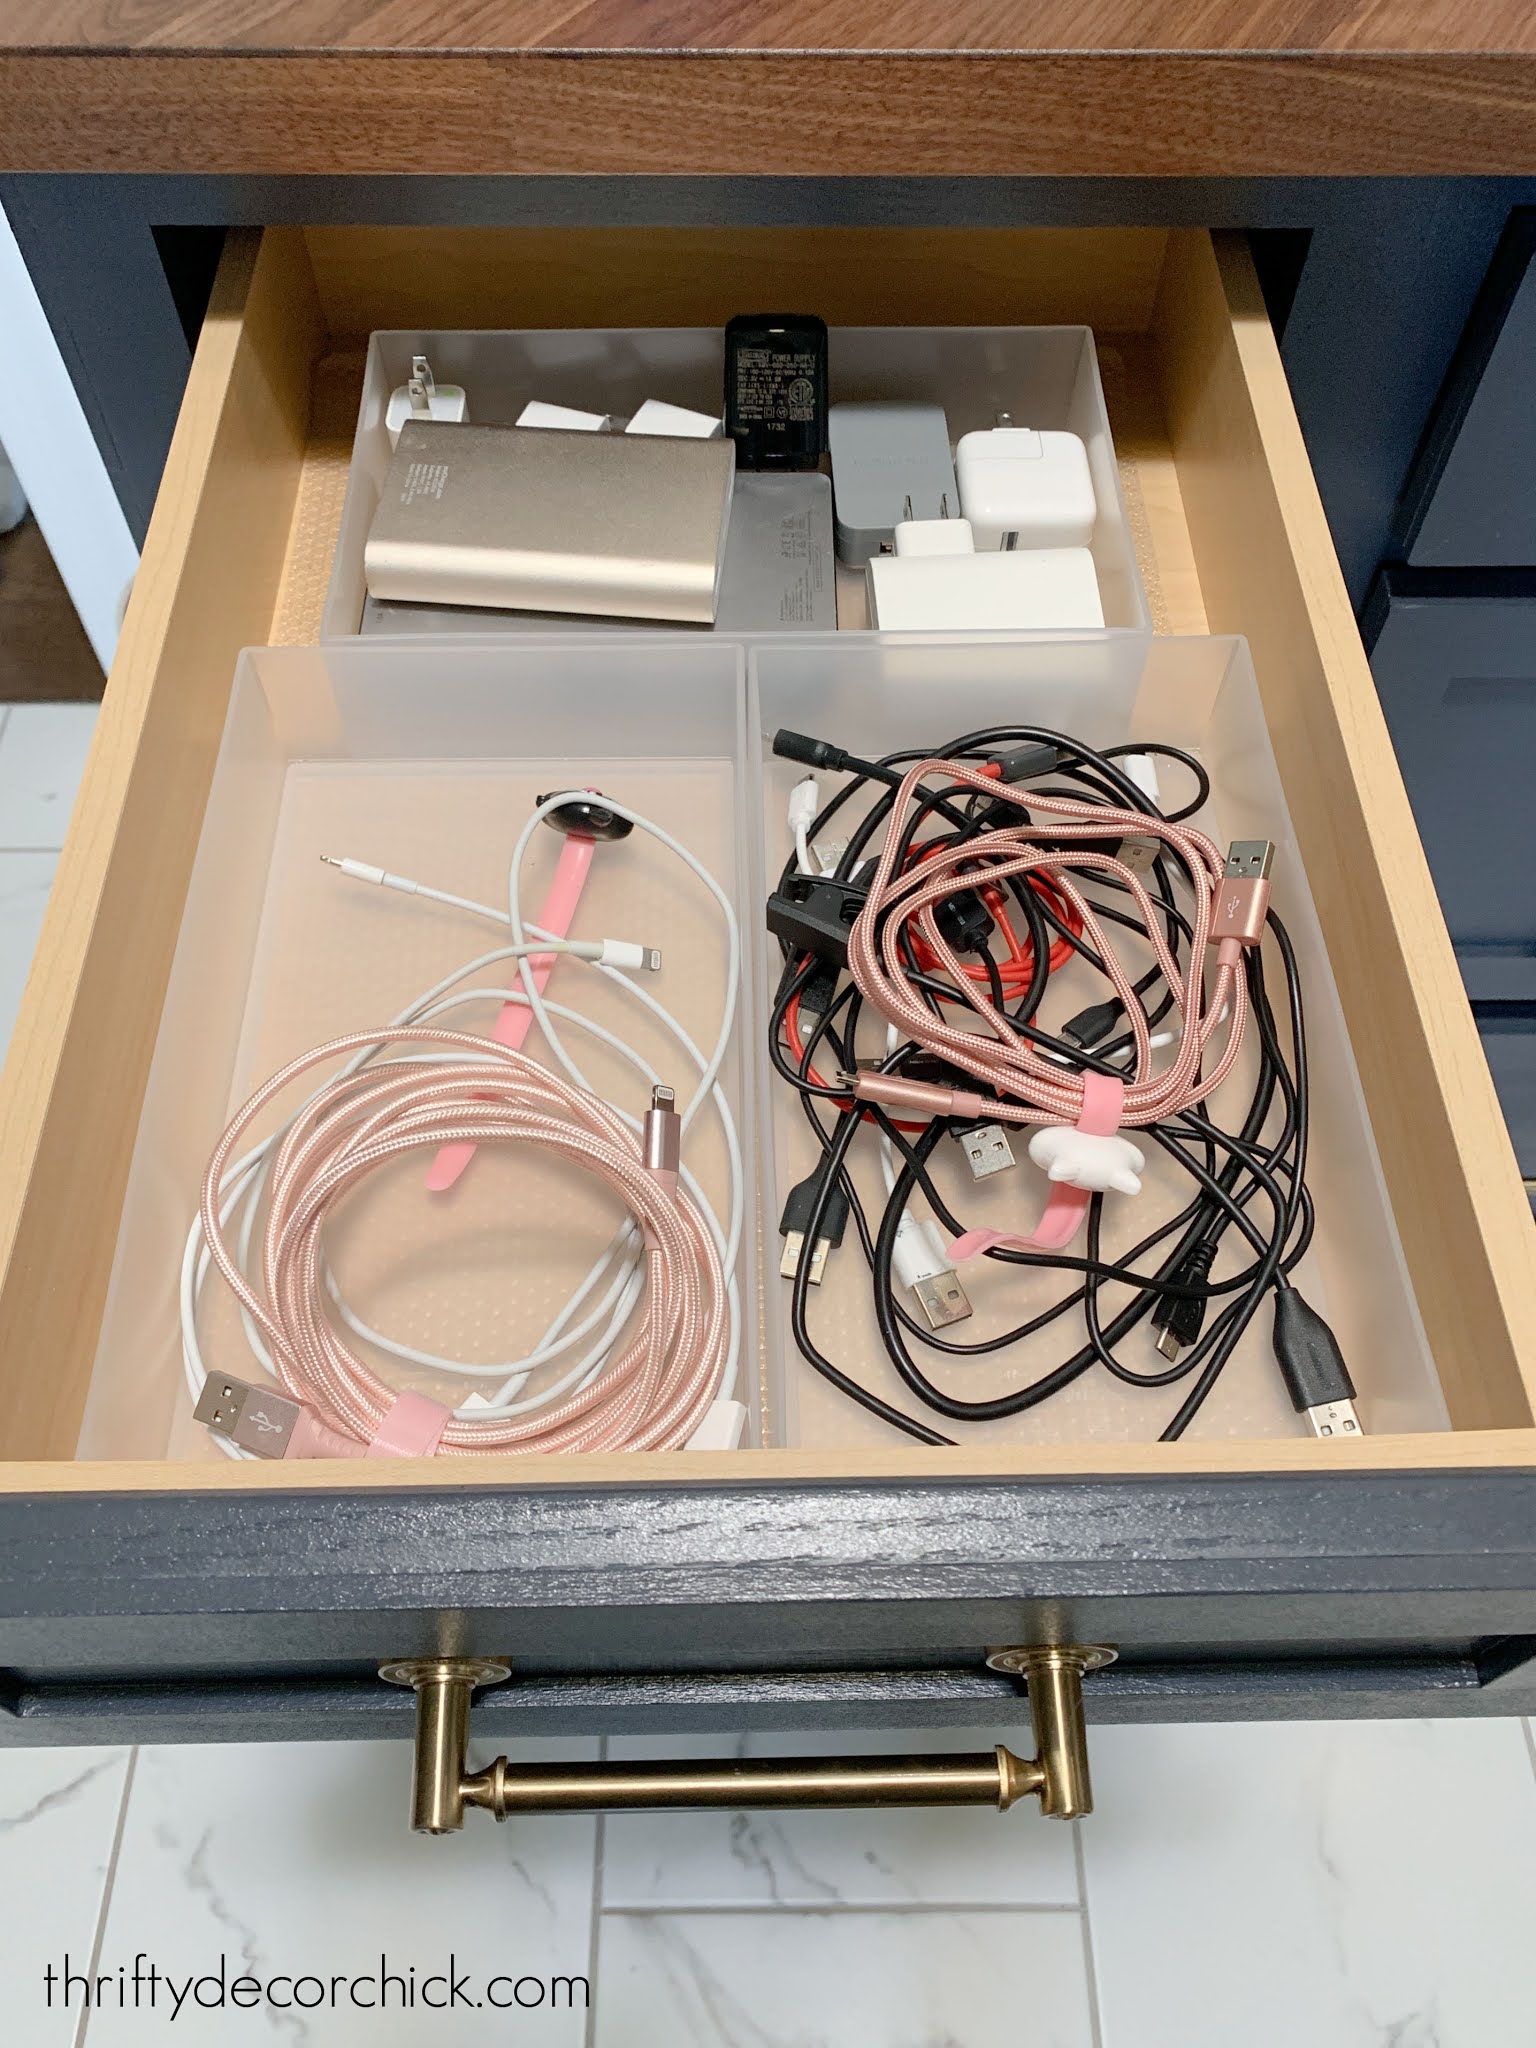
Those plastic drawer bins are my absolute favorite! So easy to stack or store right next to each other.
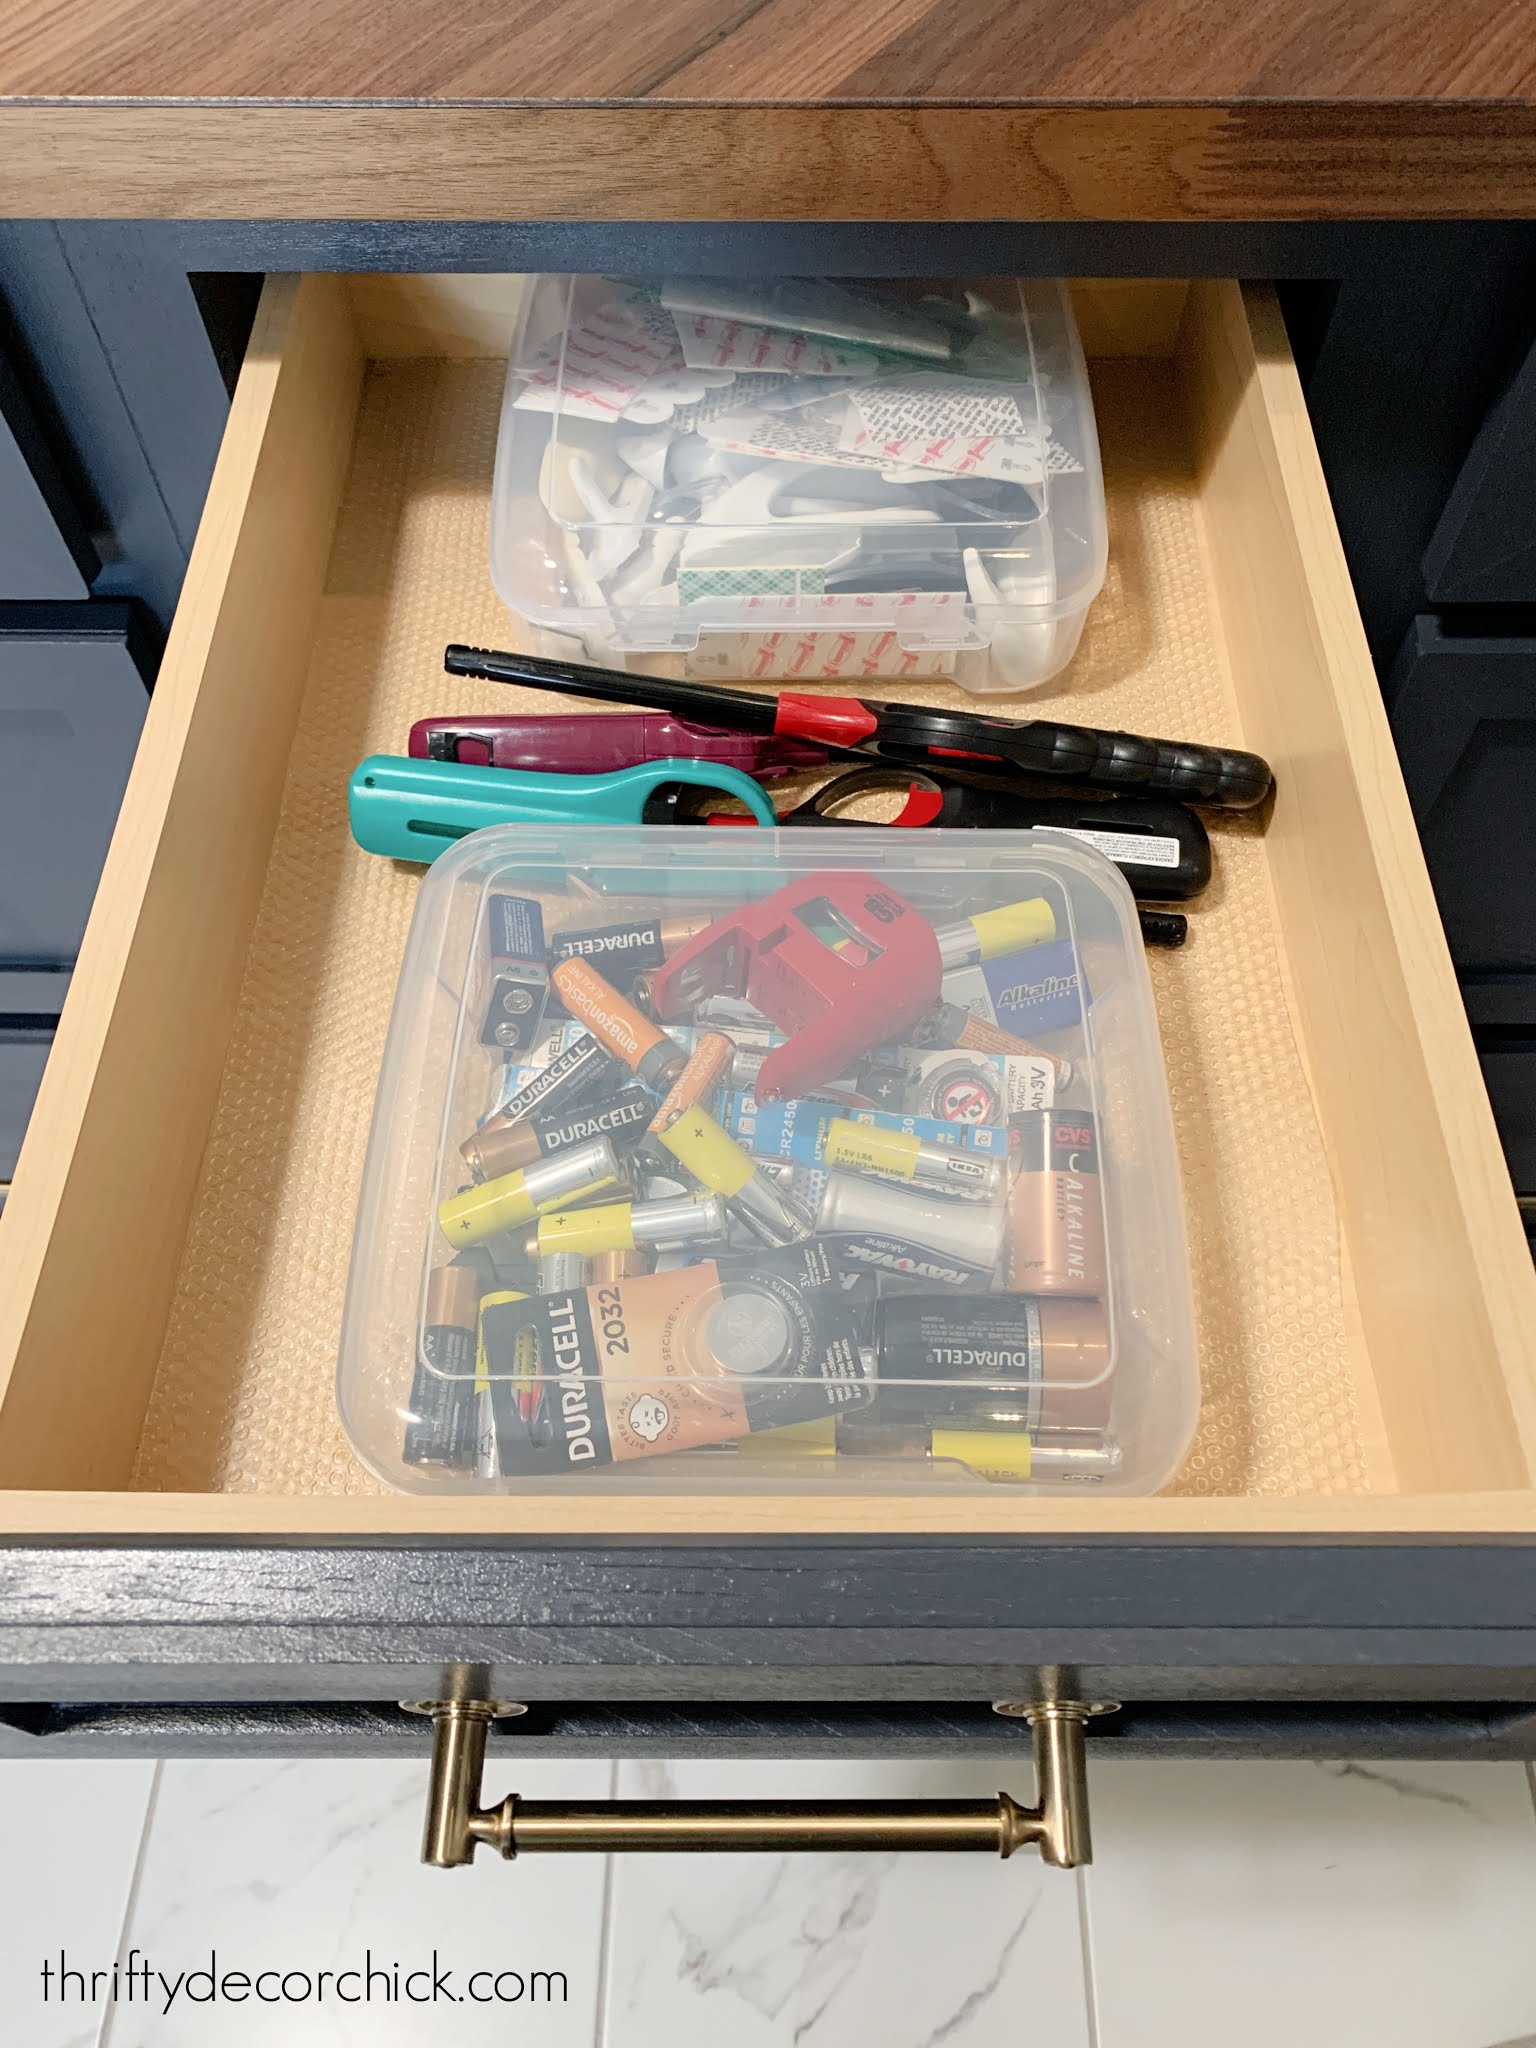
And I used these awesome plastic bins with lids for batteries and Command hooks/strips in this drawer:
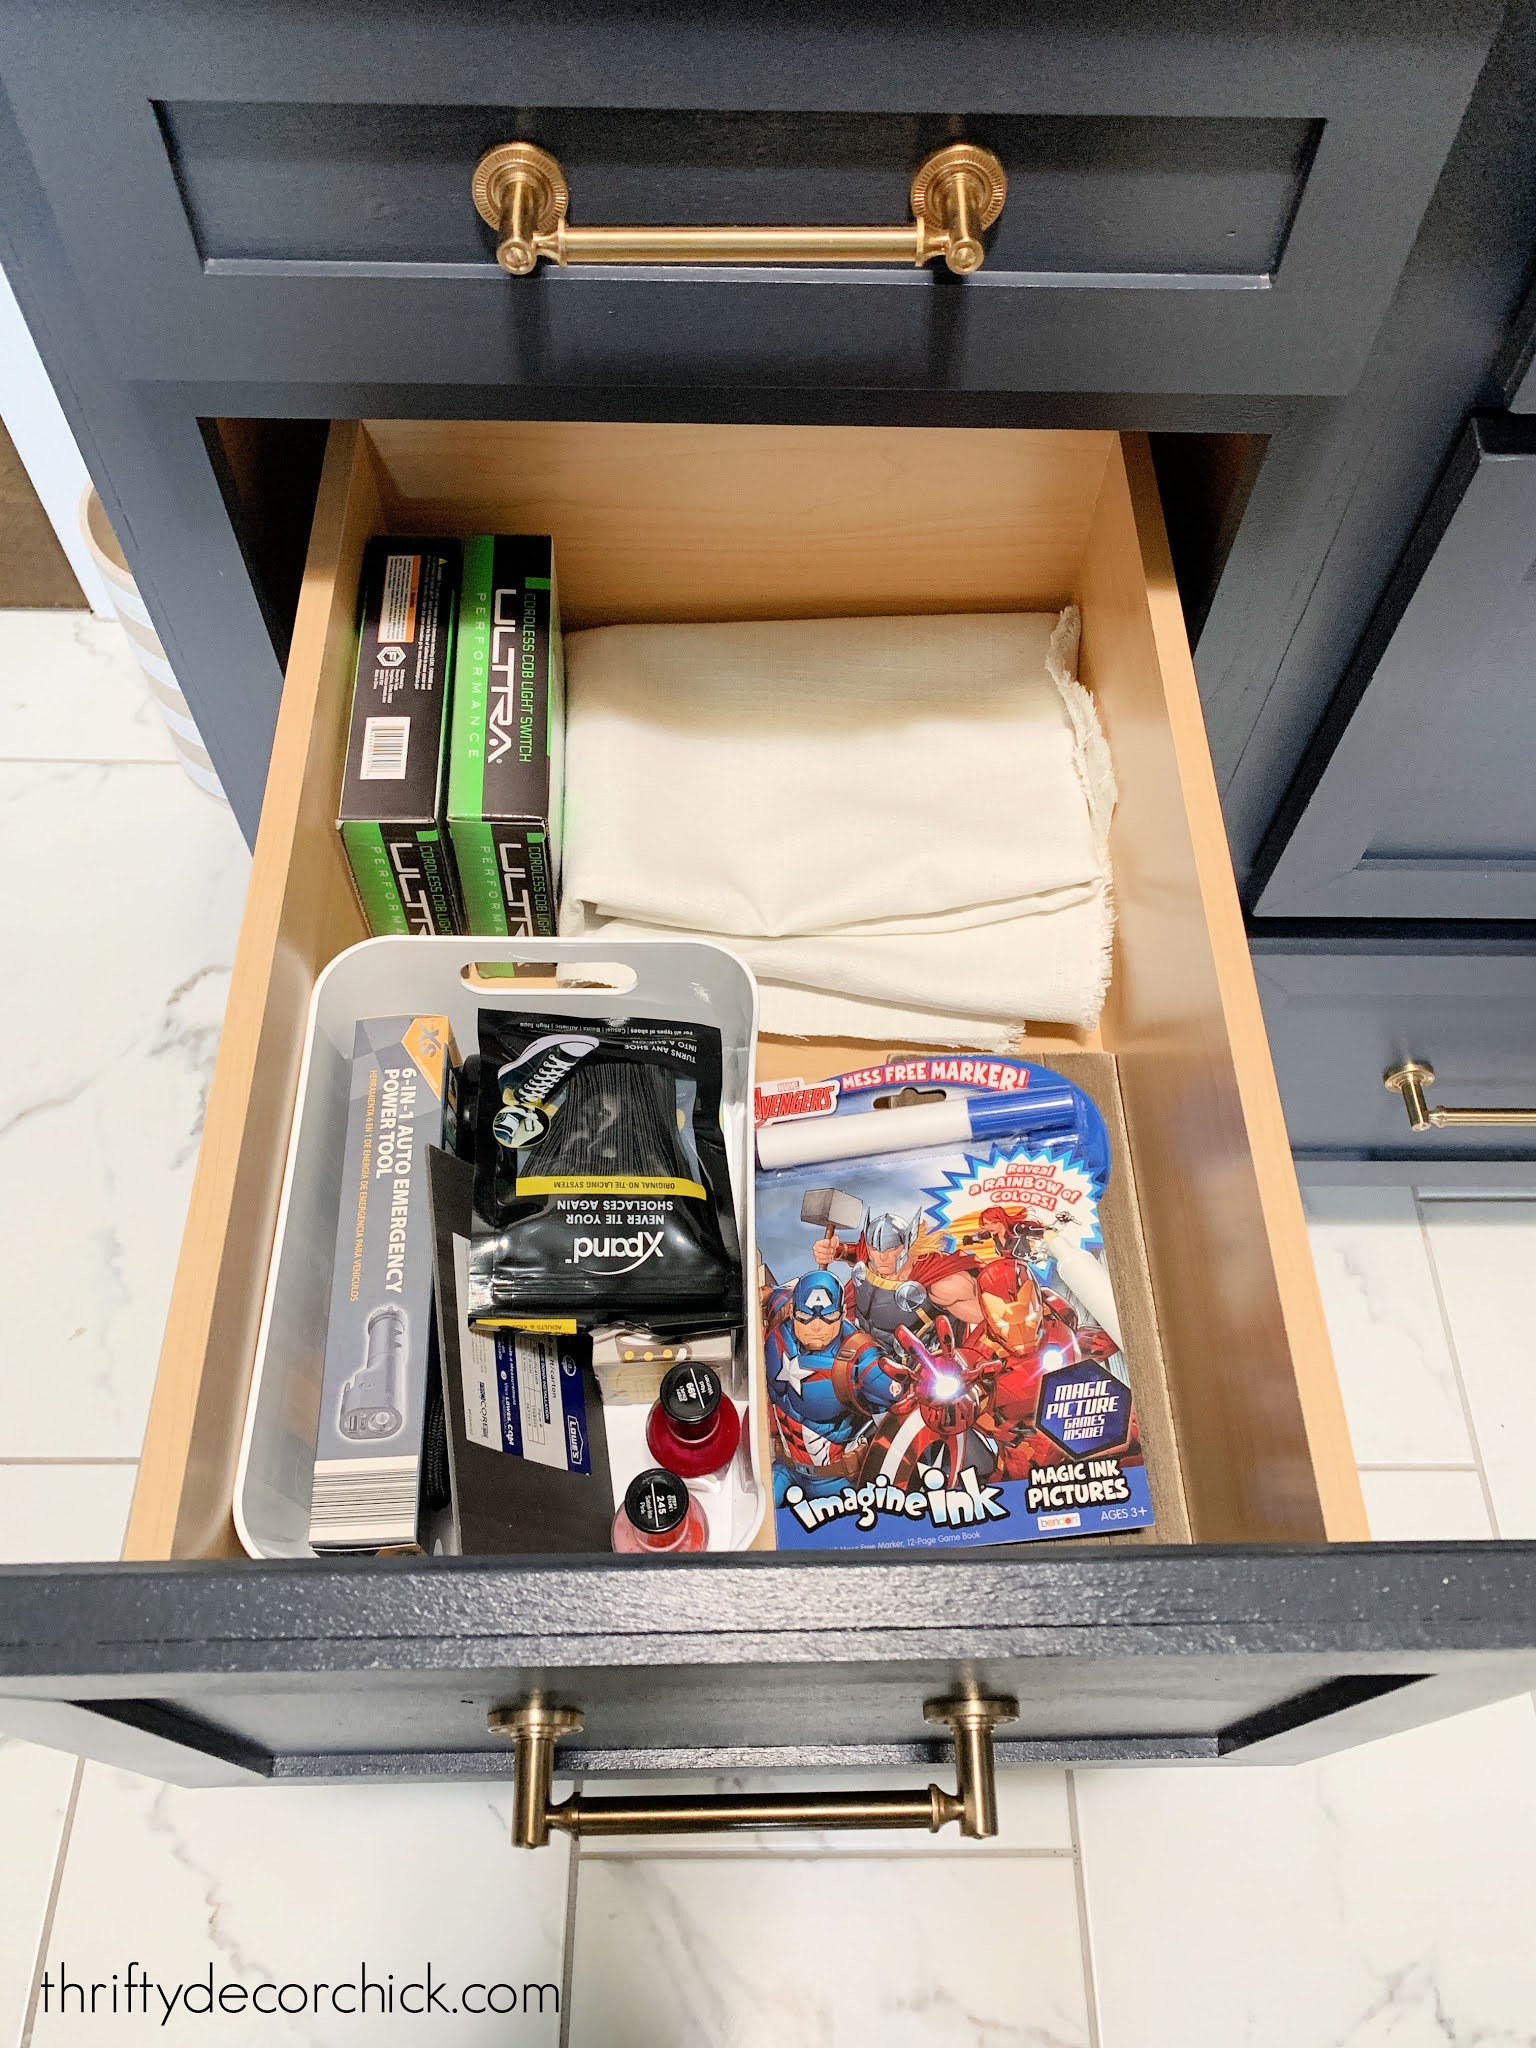
The other top drawers hold random stuff like sunglasses and pens and all of our mail that needs to be sorted. I LOVE having all of the mail out of sight!
The second and third rows are much deeper. This one is probably my favorite:
Is it weird to have a favorite drawer? :)
This one holds all the stuff I don't want to deal with at any given moment. Things I need to return, items that are "to do's" and little items I've picked for a future gift. I LOVE this drawer.
I put all of our extra office supplies into this one:

See all that tape? That's what happens when you don't keep like items together in your home. When I purged all of our stuff years ago I realized how many rolls of tape we had. ? We'll have tape, rubber bands, and paper clips till the day we die.
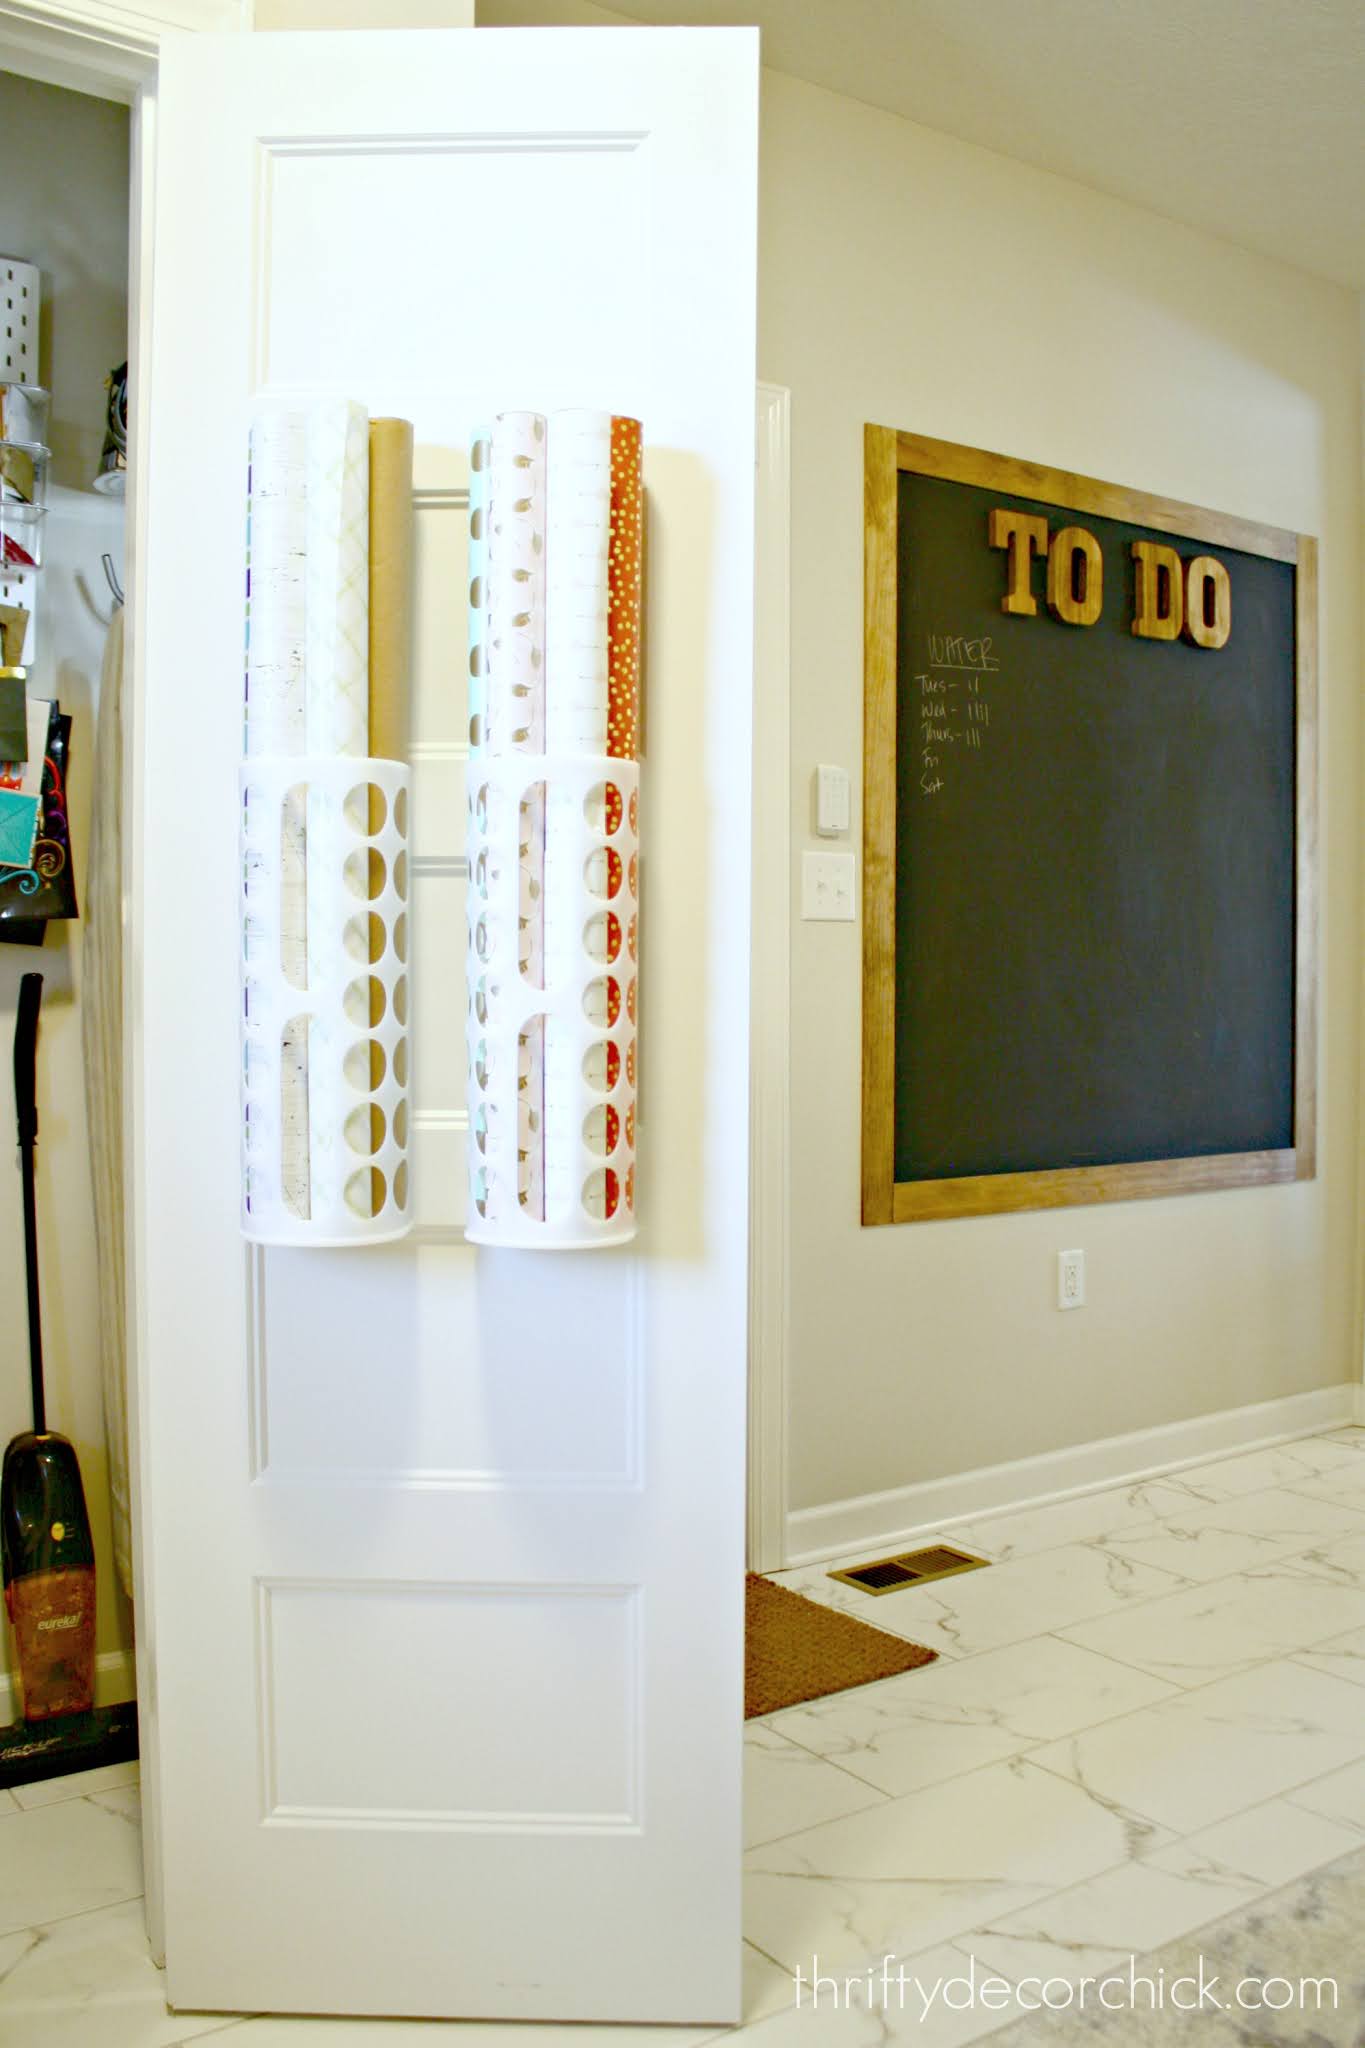
Most of our gift wrap supplies used to hang in the closet, but I condensed it down into this drawer:
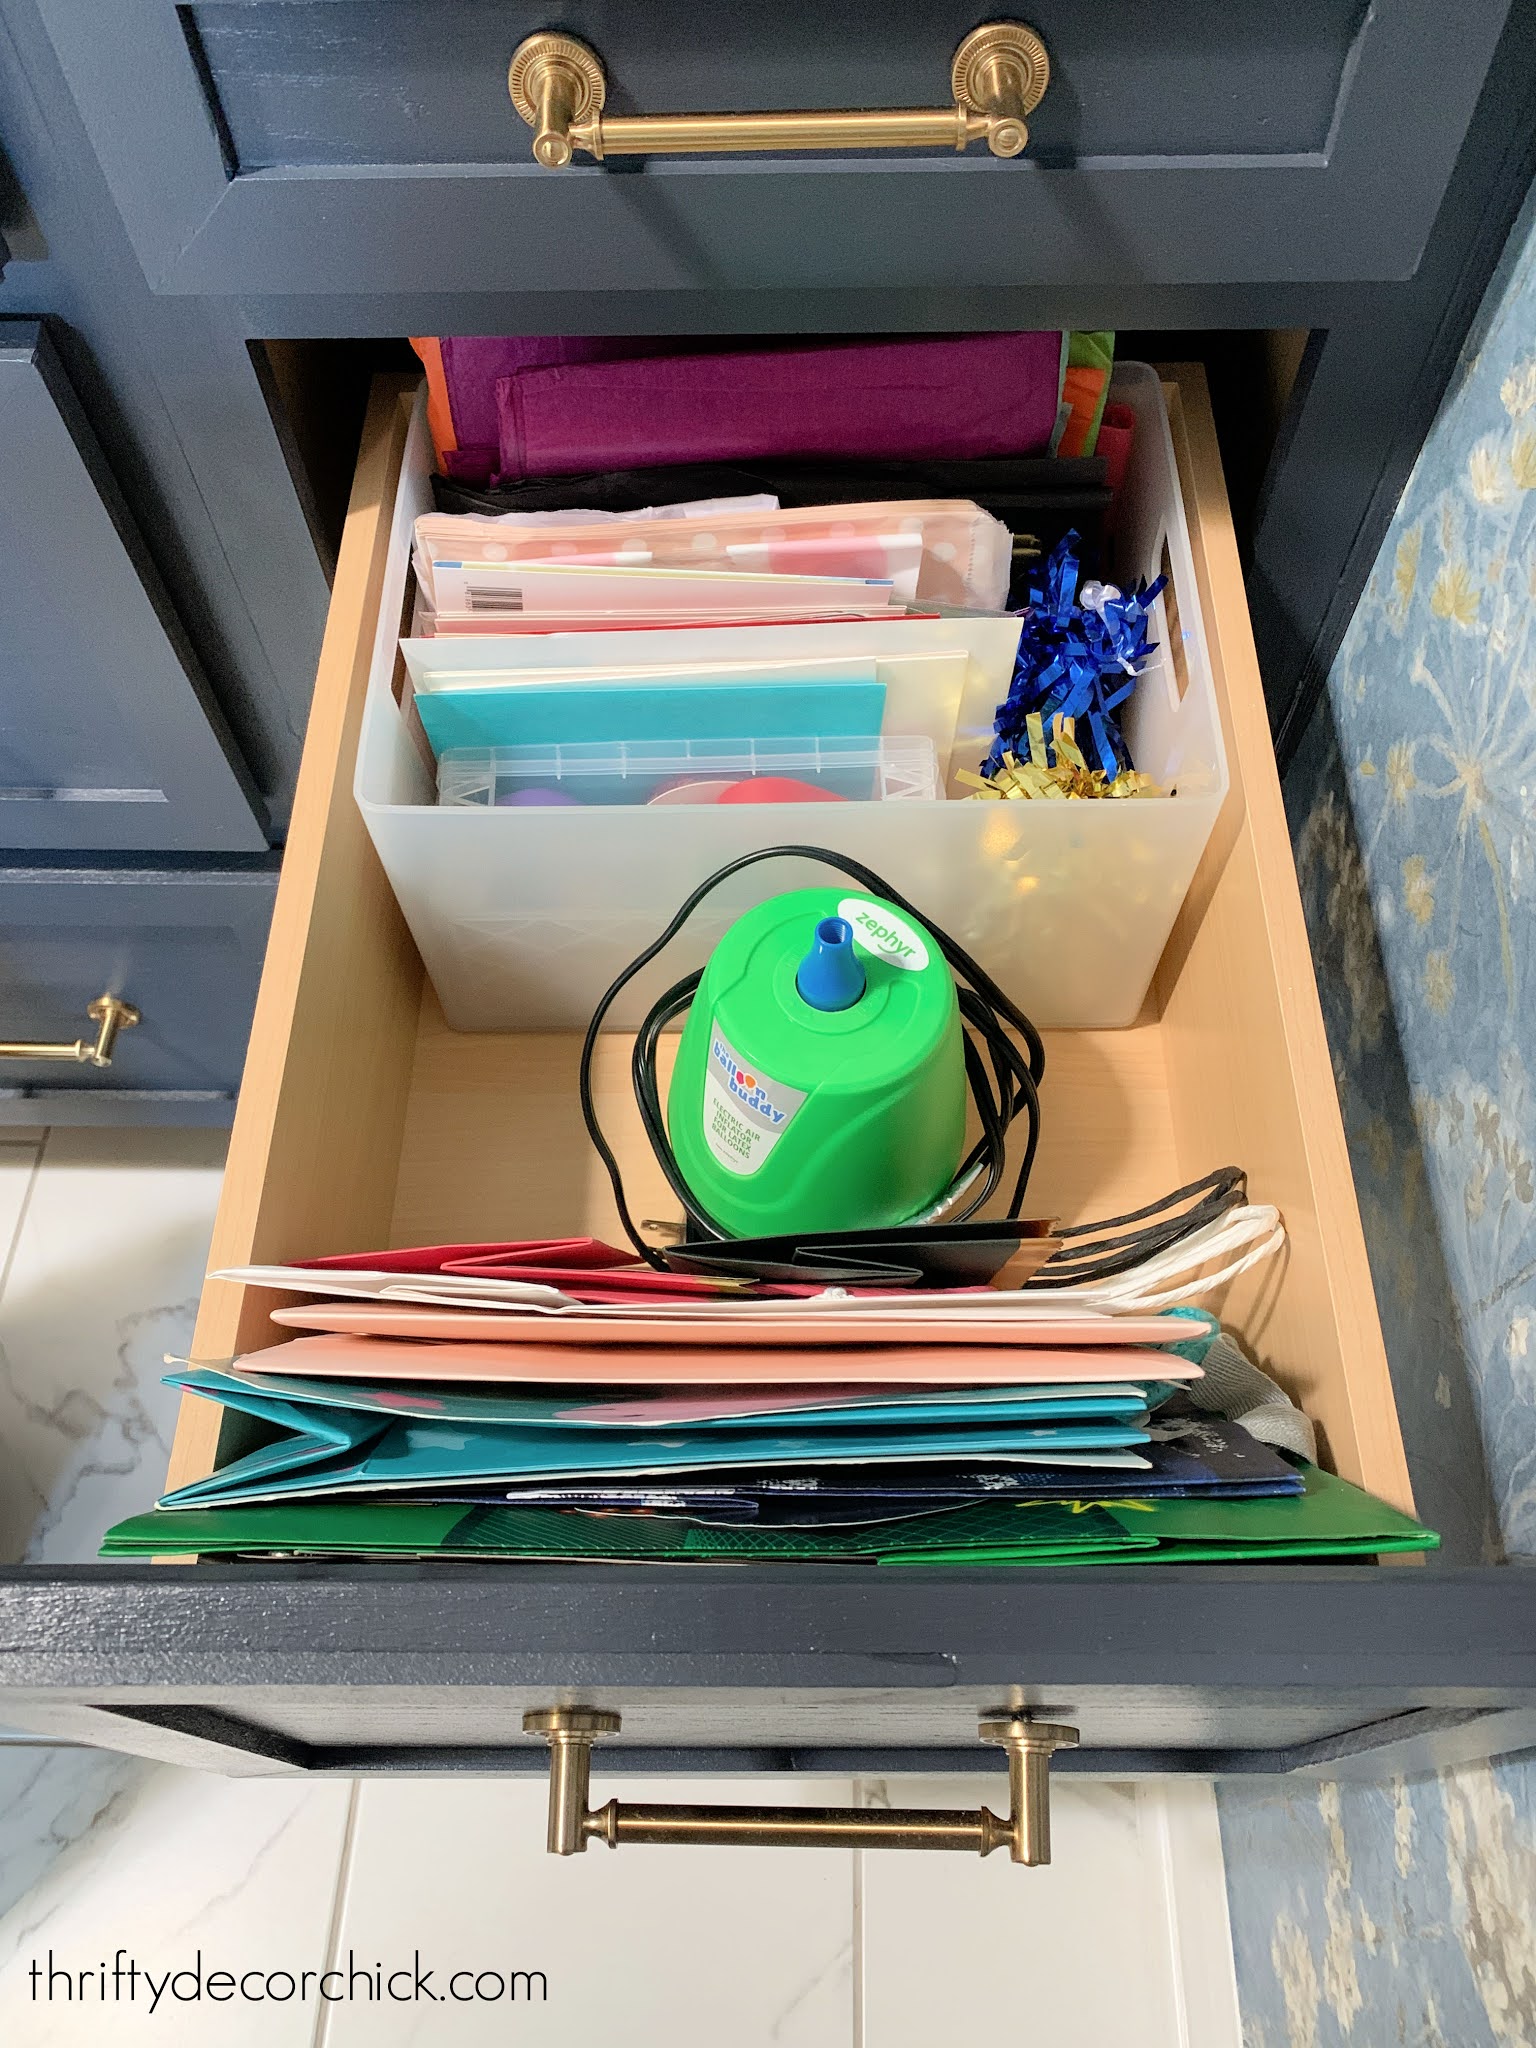
If you ever have to blow up a bunch of balloons, that electric balloon inflator is AWESOME! It makes it so easy and fast.
I still have our wrapping paper on the back of the mud room closet door:
And finally, the bottom set of drawers holds more utility items like extension cords and remote switches:
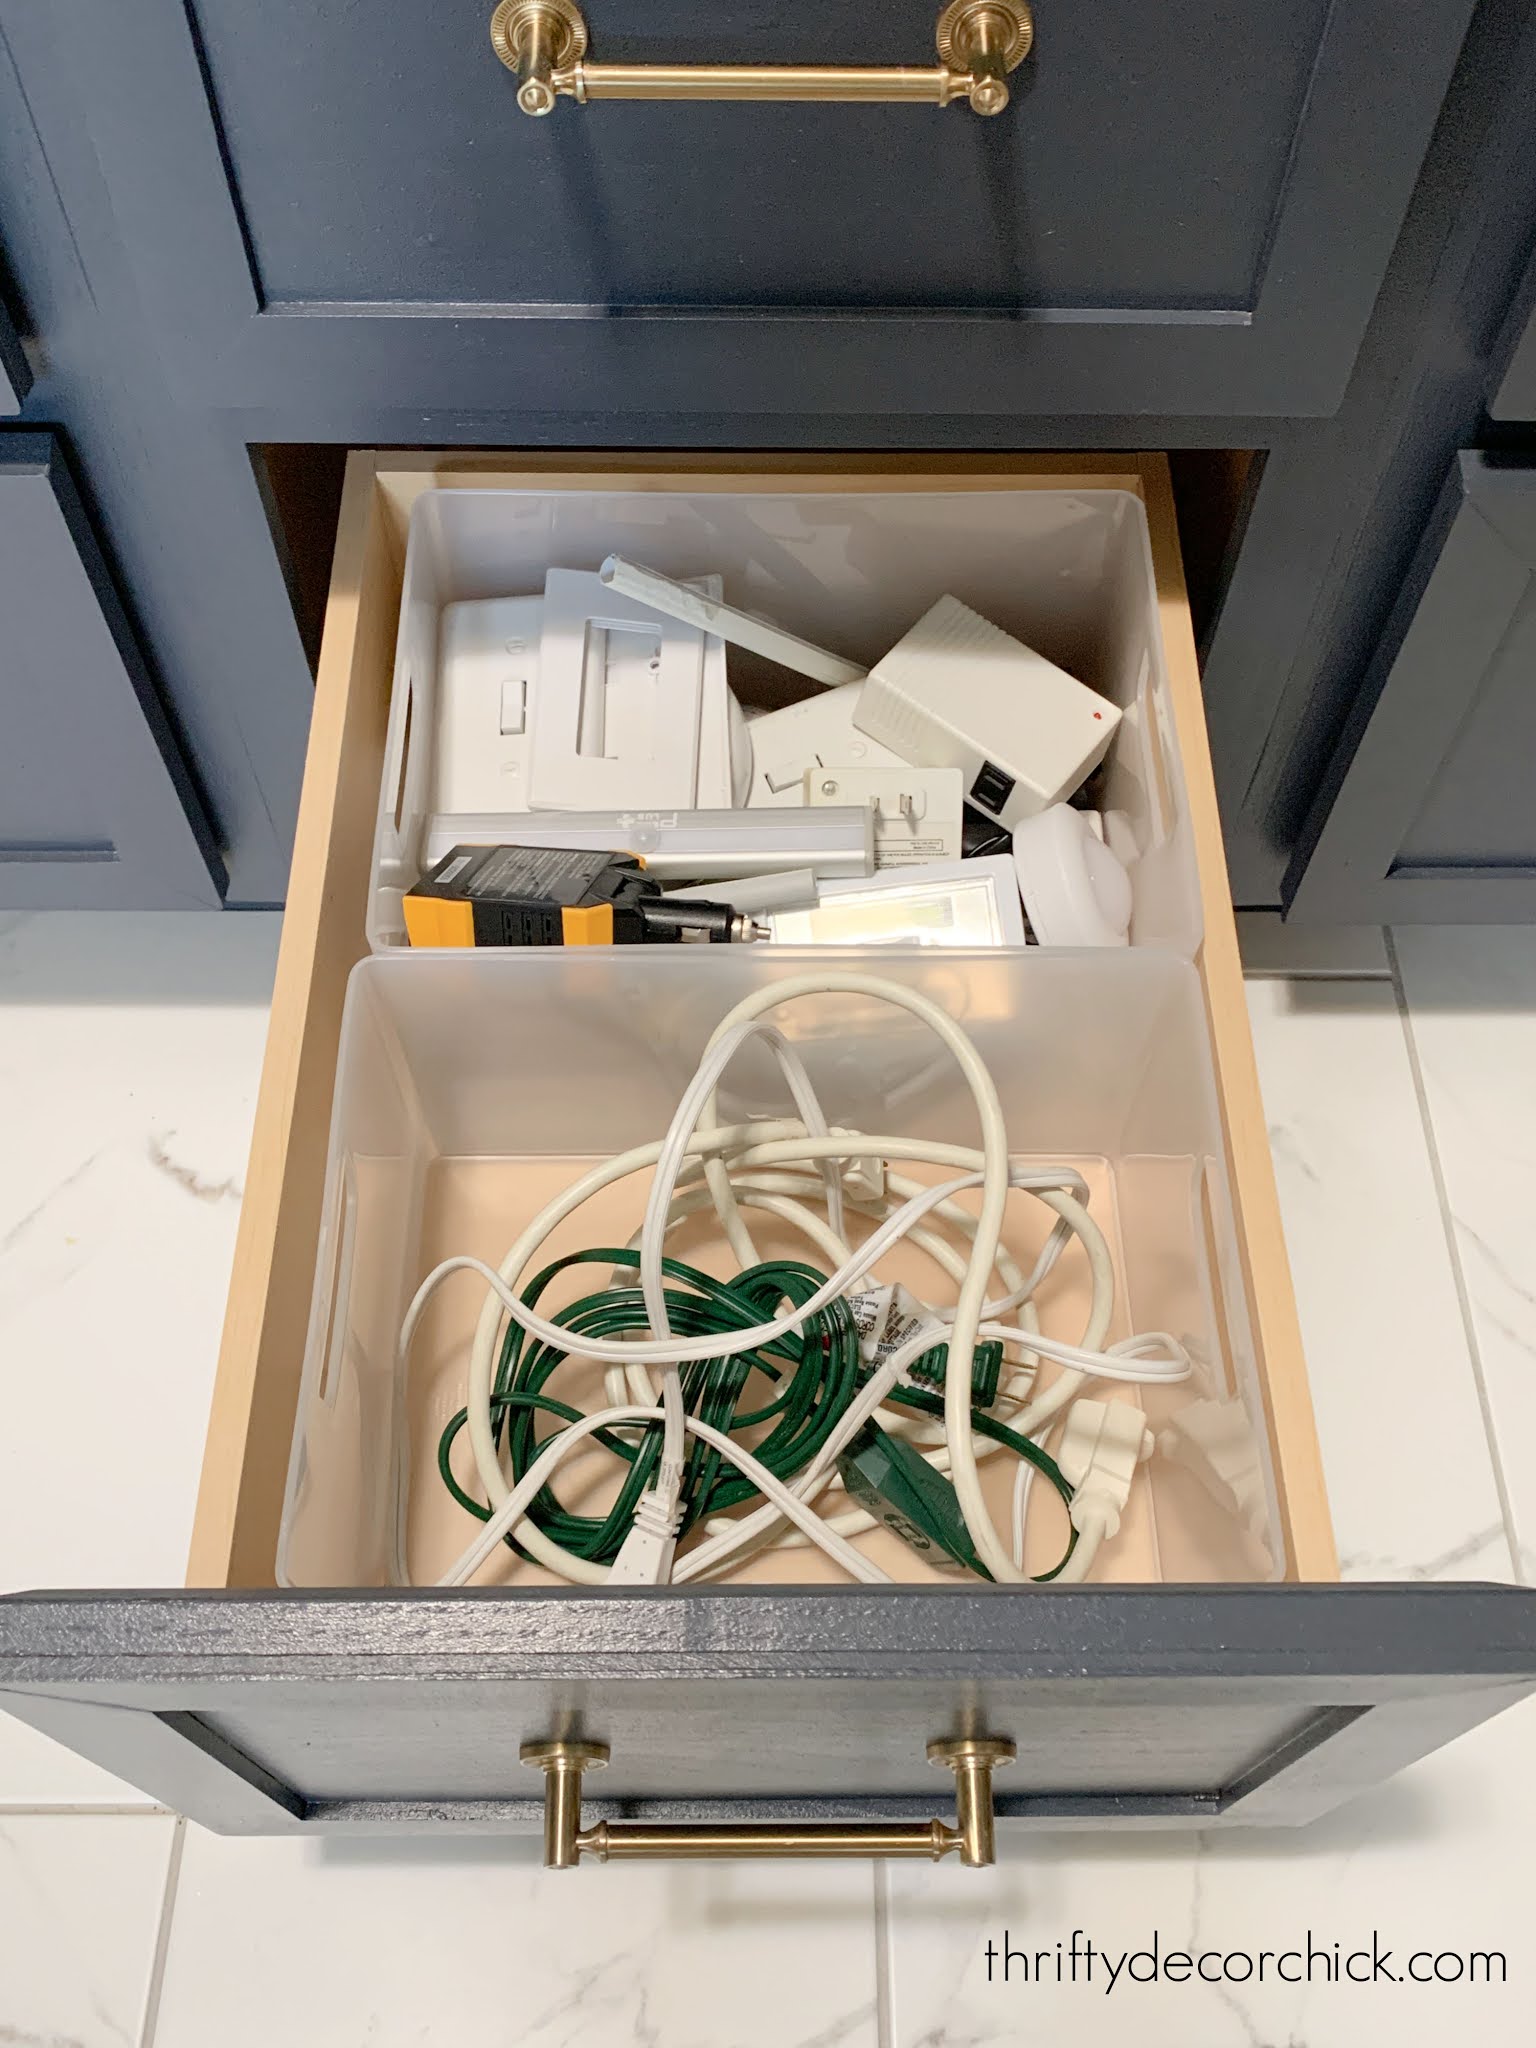
Most of these are only needed around the holidays, but I wanted easy access year-round.
And our light bulbs are super easy to reach now as well:

No idea why we have so many light bulbs. They seem to multiply. Now that we use mostly LED I may just donate the older ones.
Adding all of this storage has me one step closer to a place for everything and everything in its place! Some of these items were in the closet in here before now, some were in the garage and some just floated around the house till one of us dealt with them. Ha!
We even have an EMPTY drawer. As we use up some of the extras even more space will open up. It took a few weeks for me to remember which drawer was what -- my husband will be opening a few at a time for awhile though. ?
And of course, I had to have some pretty organization on display as well:

You can read more about that DIY laundry shelf and the pretty waterproof labels can be found here.
See my favorite plastic storage bins with the lids here and the open, stackable plastic bins as well!
See more of our home here. To shop items in our home, click here! Never miss a post by signing up to get posts via email.
Via https://www.thriftydecorchick.com/2021/04/ultimate-laundry-mud-room-organization-ideas.html
Hello my friends! I had such a great response to our cat litter solution a few weeks ago, I figured I'd round up a few more fun ideas for hiding the litter while still making kitty feel comfortable.
These are all DIY ideas, but I share some store bought products that look great at the end of the post too.
If you missed what we did, you can find our kitty litter closet reveal and the tutorial for installing a cat door here:
This is a large closet and with the addition of the shelves I installed at the end of the closet, we still have tons of storage space:
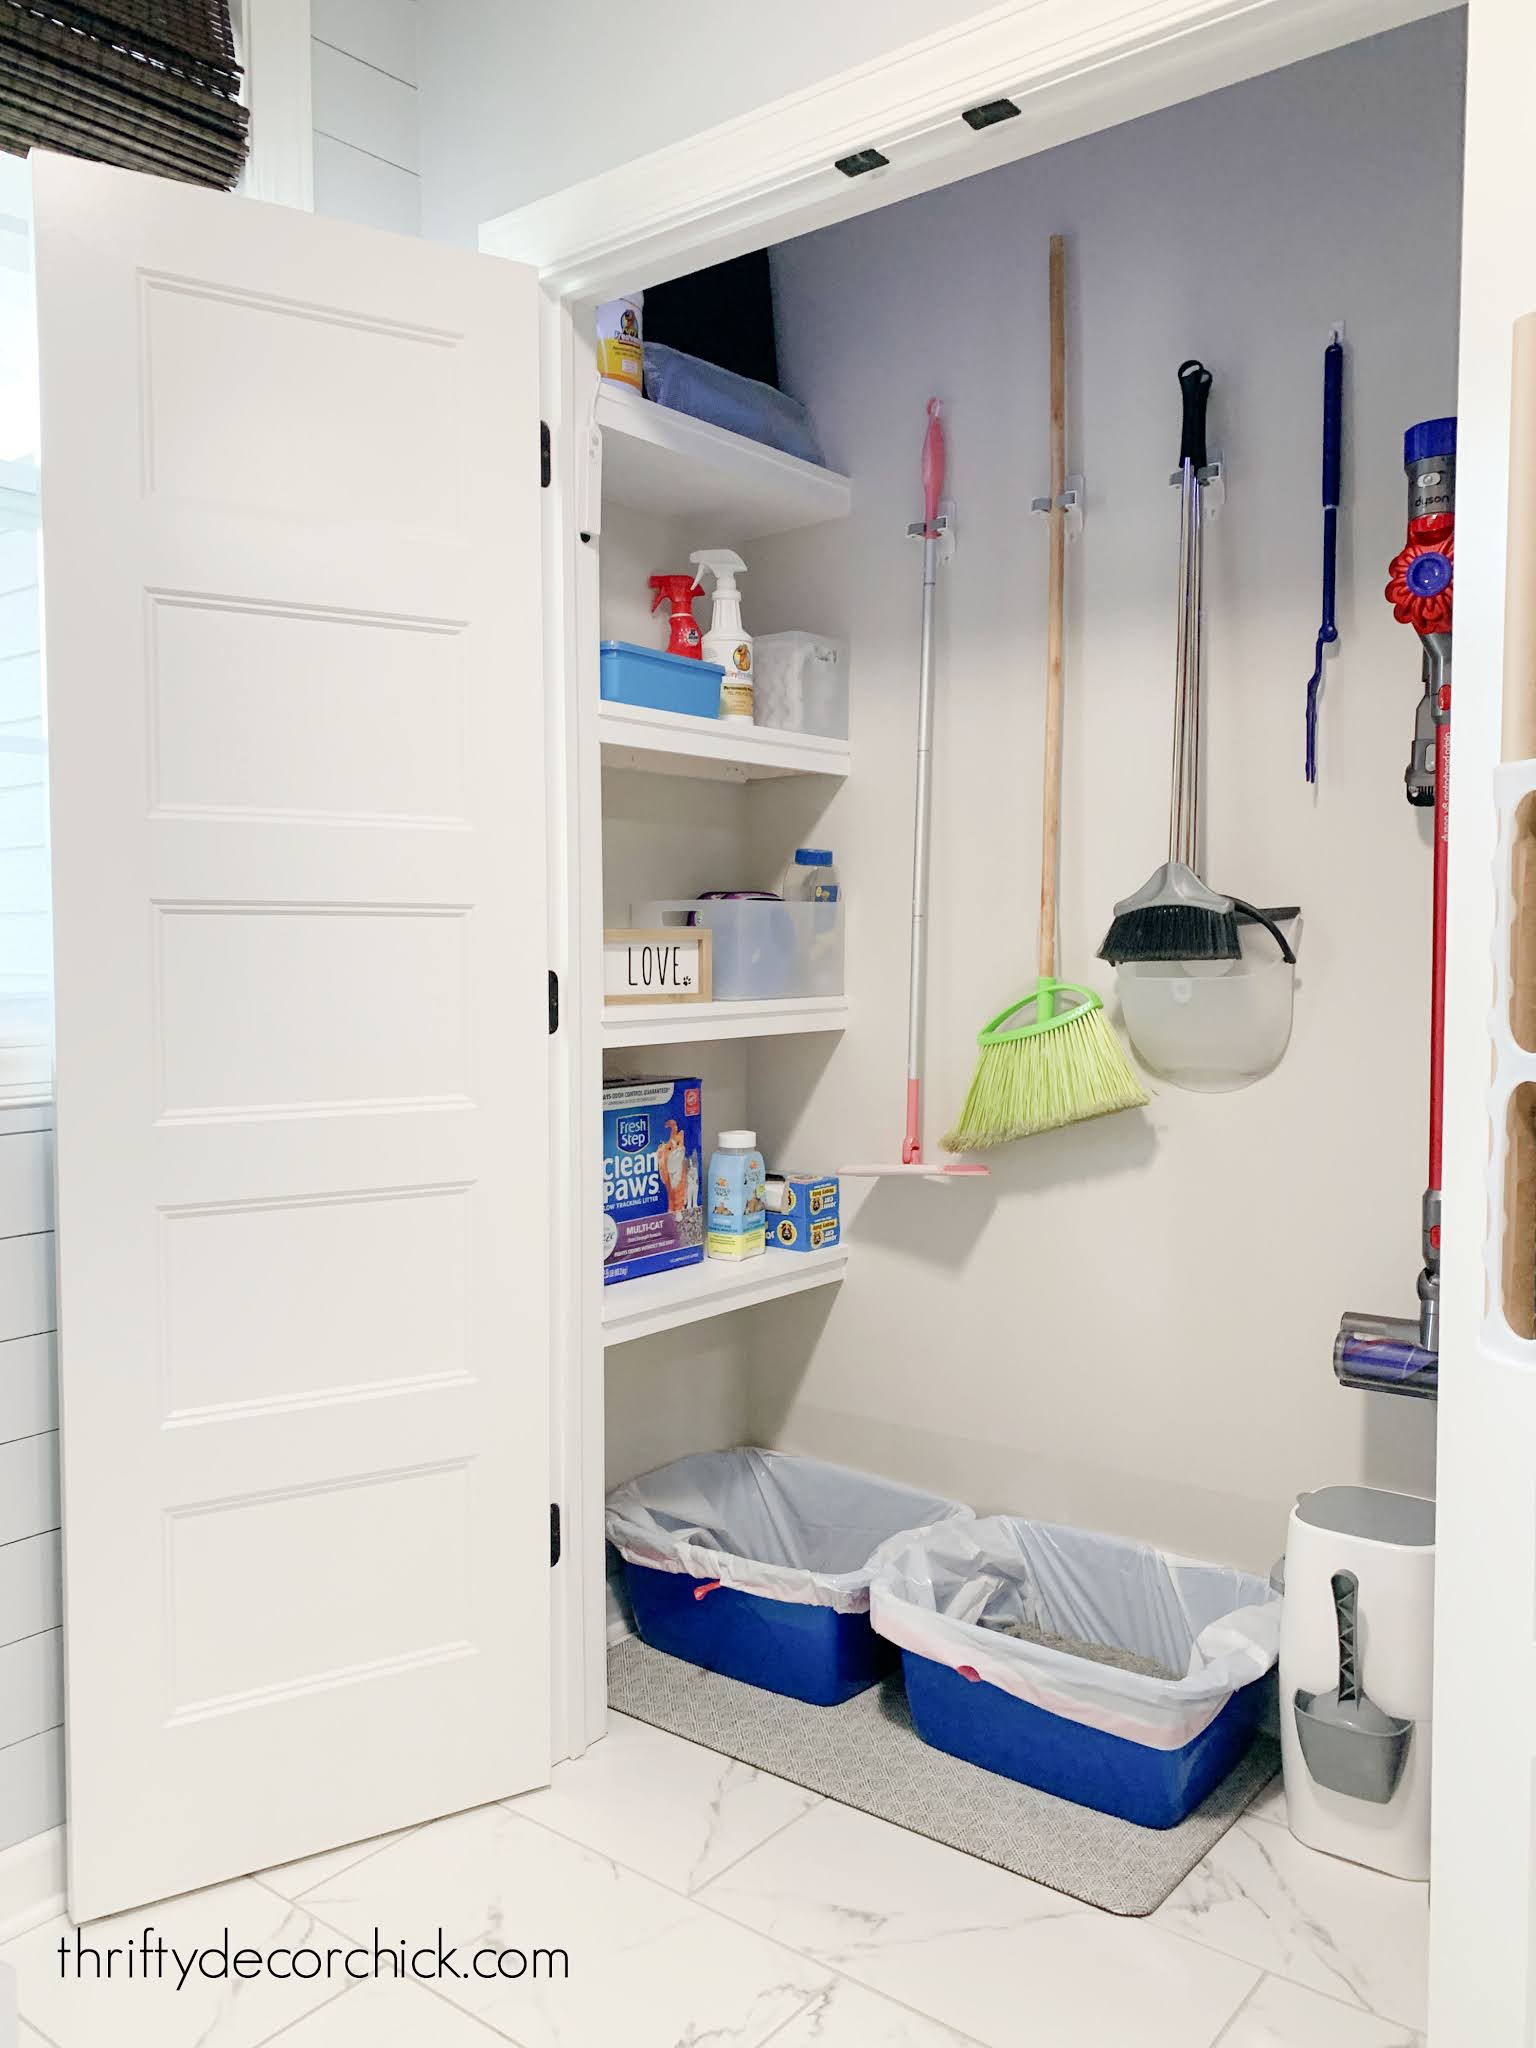
Our vacuum and some other items are on the right side as well.
This has worked out SO well for us and the cats seem to love it! It's been so easy to keep the mud room clean now too. Cat litter seems to track everywhere but most of it stays in the closet.
I know not everyone has a cleaning closet they can use for the litter so I gathered some other ideas as well. Most of these DIY cat litter solutions hardly take up any space and look GREAT! Click the link under each photo to get to the tutorial.
Love this! When it's closed you'd have no idea what's hiding inside.
Jennifer used a side table to create this adorable cat "cave" for their kitty!:

I like that you could personalize this with a fun paint color or fabric. We did something similar under our old folding table in the laundry and the cats did great going through the "curtains."
This post may contain affiliate links for your convenience.
See my policies and disclosure page for more information.

What a gorgeous kitty! Other than the cut out on the side, no one would ever know this is hiding cat litter.
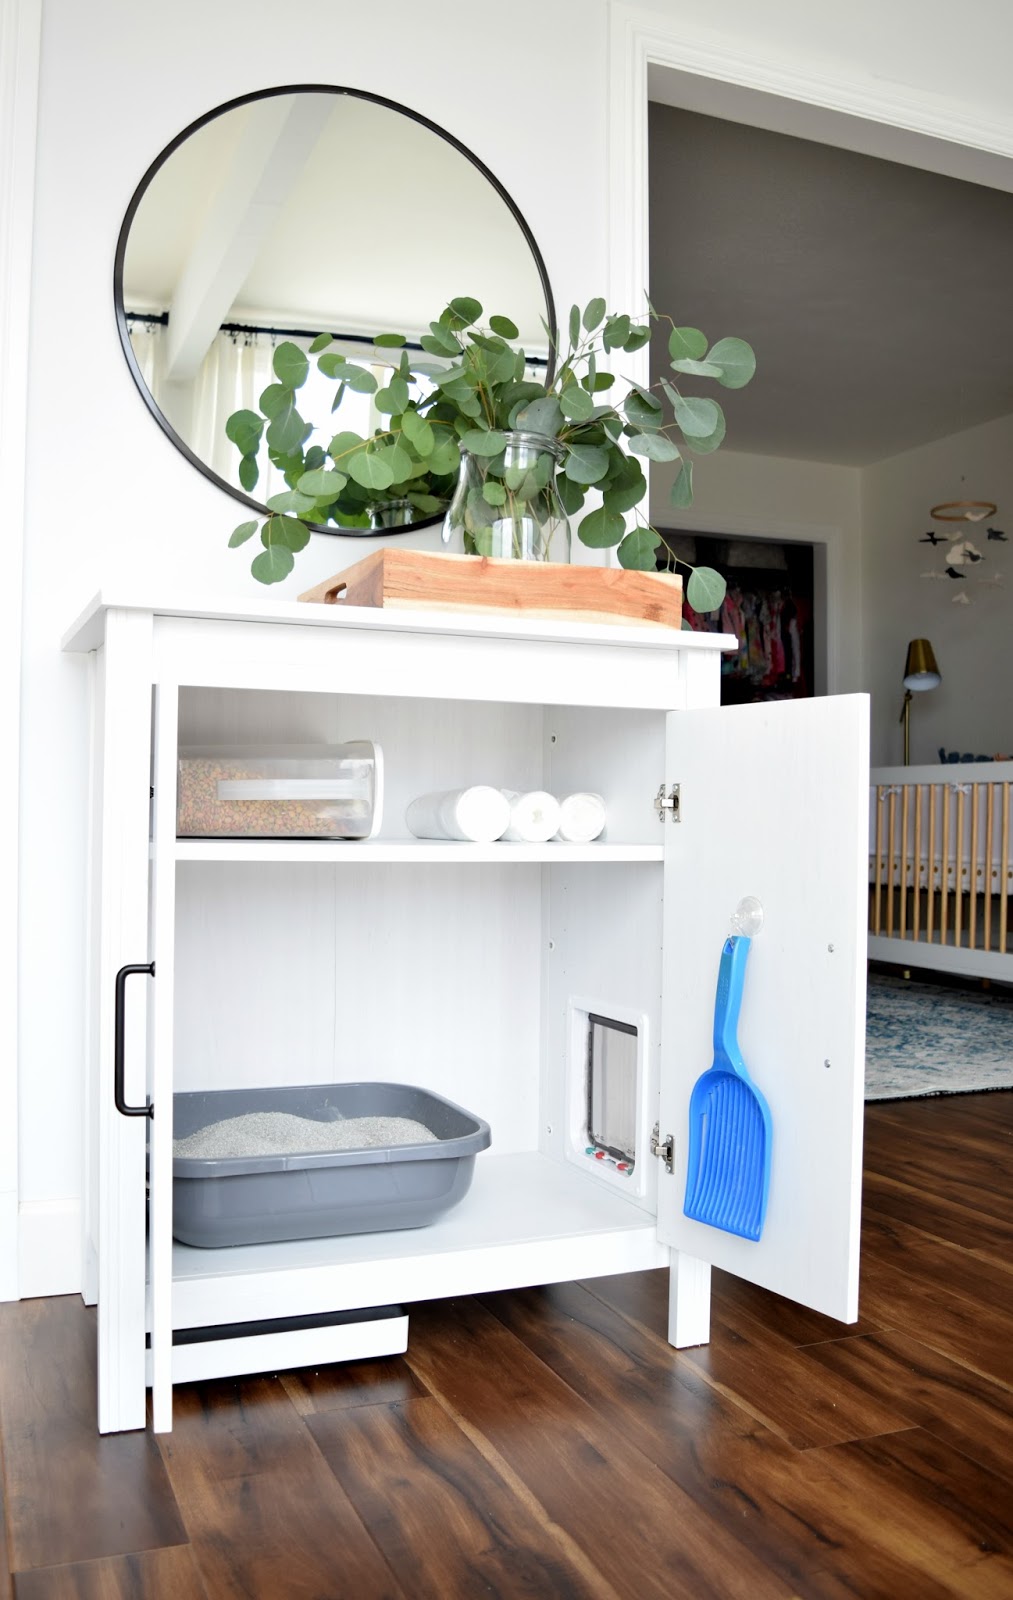
I saw this idea online and though it was so smart! I love how they used the small space under the sink to hide the cat litter:

There's not a ton of room for much down there anyway, so why not make it more functional?
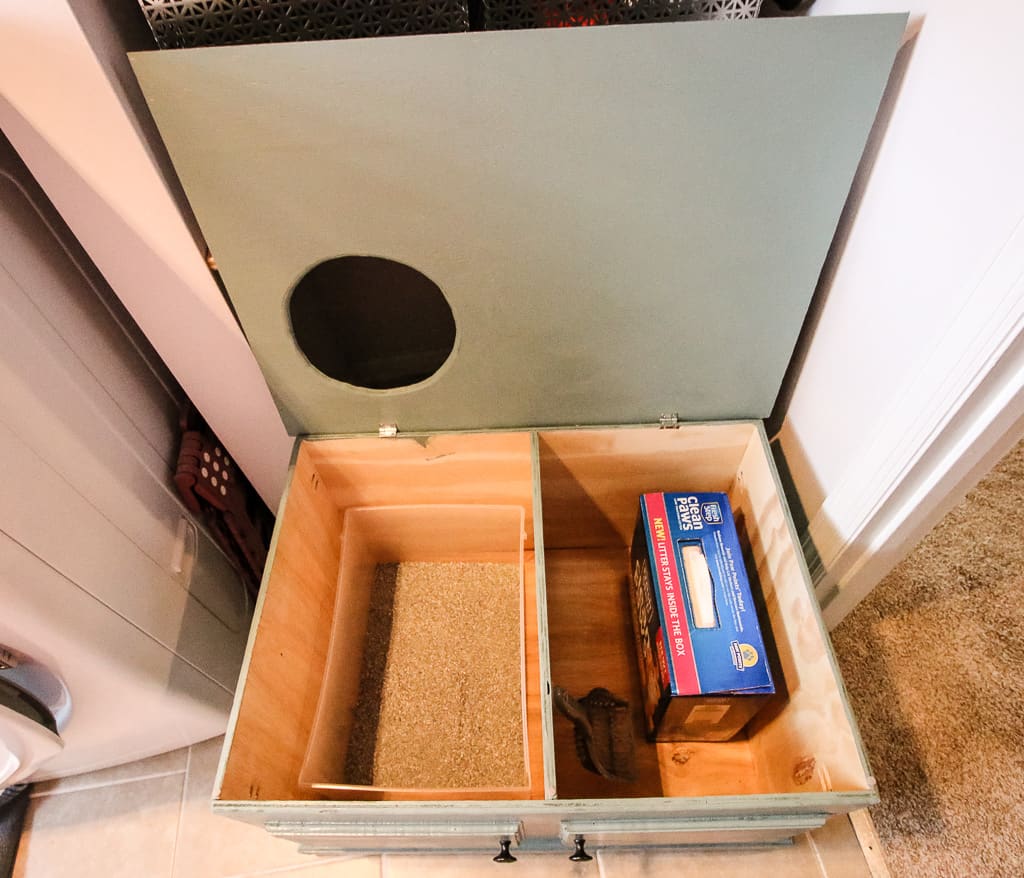
Zoe created a rustic cat litter box that would be a perfect bench for a mud room:

I like that the lid lifts up so it's easy to clean.
Scott transformed this old kitchen island into a beautiful decorative cabinet that also hides the litter:

He shares full plans to make your own! So many of us have a cabinet that could be changed up pretty easily to accommodate the litter.
Do you have a dog that you want to keep out of the cat litter? This option is a great solution because the top entry keeps the dogs out:
I like that this looks like a regular cabinet from the front!
This fun cat condo was made by repurposing two end tables:
The cat litter is at the bottom and there's storage on top. This pretty piece fits right into the decor!
And finally, one of my favorites -- this whole set up is like the penthouse of cat litter solutions. I love every bit of it!:

You have to see all of the details, including motion activated exhaust fans! SO cool. The steps and door are super cute too.
So many great ideas that marry both form and function. I have found our cats love having a private spot to do their business -- just as we do! ? Of course, if you don't want to DIY this, there are tons of ready-made options as well. The planter idea linked below is brilliant!
Buy these options ready-made:
Modern white and wood table
White farmhouse style litter cabinet with storage
Have you found a good solution that hides the cat litter?
See more of our home here.
To shop items in our home, click here!
Never miss a post by signing up to get posts via email.
Via https://www.thriftydecorchick.com/2021/04/10-creative-diy-ways-to-hide-cat-litter.html
After finishing up so many HUGE projects lately (the basement bookcase wall, garage makeover and mud/laundry makeover) I'm back to focusing on some smaller projects in our basement. I started one a couple months ago and left it in the dust when I focused on the garage clean up. Oh look, a butterfly! ?
Now I'm working to finish that up and a couple other smaller projects as well. This was a quick one thankfully, and looks great! I've shared how to add metal sheeting to cabinet doors before, (you can see the fireplace makeover at our old house there) but this time it was even simpler. I figured I'd share how I did it.
Why add metal sheeting you ask? Well when you like to have electronic components hidden away like me, it's best to give them some air flow. Otherwise they run hot and that wills shorten the life of the components. Also, your remotes won't work through a wood cabinet door, but will through metal sheeting.
You can also use an RF remote control system that allows you to keep your TV electronics in another room -- I'll add a link to that at the end of the post. We didn't want to use that because we use the voice controls often.
Here's a reminder of how this project ended up:
This is one of my favorite projects ever...I adore it.
I cut the back out of two of the bottom bench cabinets in preparation for the electronics to be added later. We knew we'd have a receiver down there at the very least, and I wanted to allow for more air flow and access from the backs of the cabinets.
A few weeks ago we had the first part of our sound system installed, and every time we turned on the TV we had to open the cabinet to get the remote to work. Then a cat or two would crawl back there...so I knew it was time to get those door fronts replaced.
I removed the cabinet doors from the hinges and used a large drill bit to make holes in the four corners of the front panel. This gives you a spot to insert your jigsaw blade:

This post may contain affiliate links for your convenience.
See my policies and disclosure page for more information.
I had plenty of spots that weren't perfectly flush:

I grabbed my favorite little sander and used a coarse grit pad to get those parts flush:

It worked really well! I cleaned all of that up and touched up the inside parts with the paint color, Westchester Gray by Sherwin-Williams.
Last time I did this I used a silver metal sheeting with a dark gray on our old fireplace built ins. This time I picked a brass/copper finish that matched our brass hardware. These sheets come in a few colors and designs.
Just figure out the size you'll need and then it can be cut with regular scissors. This sheeting is very thin!
I used my stapler to secure the metal to the back of the cabinet frame:
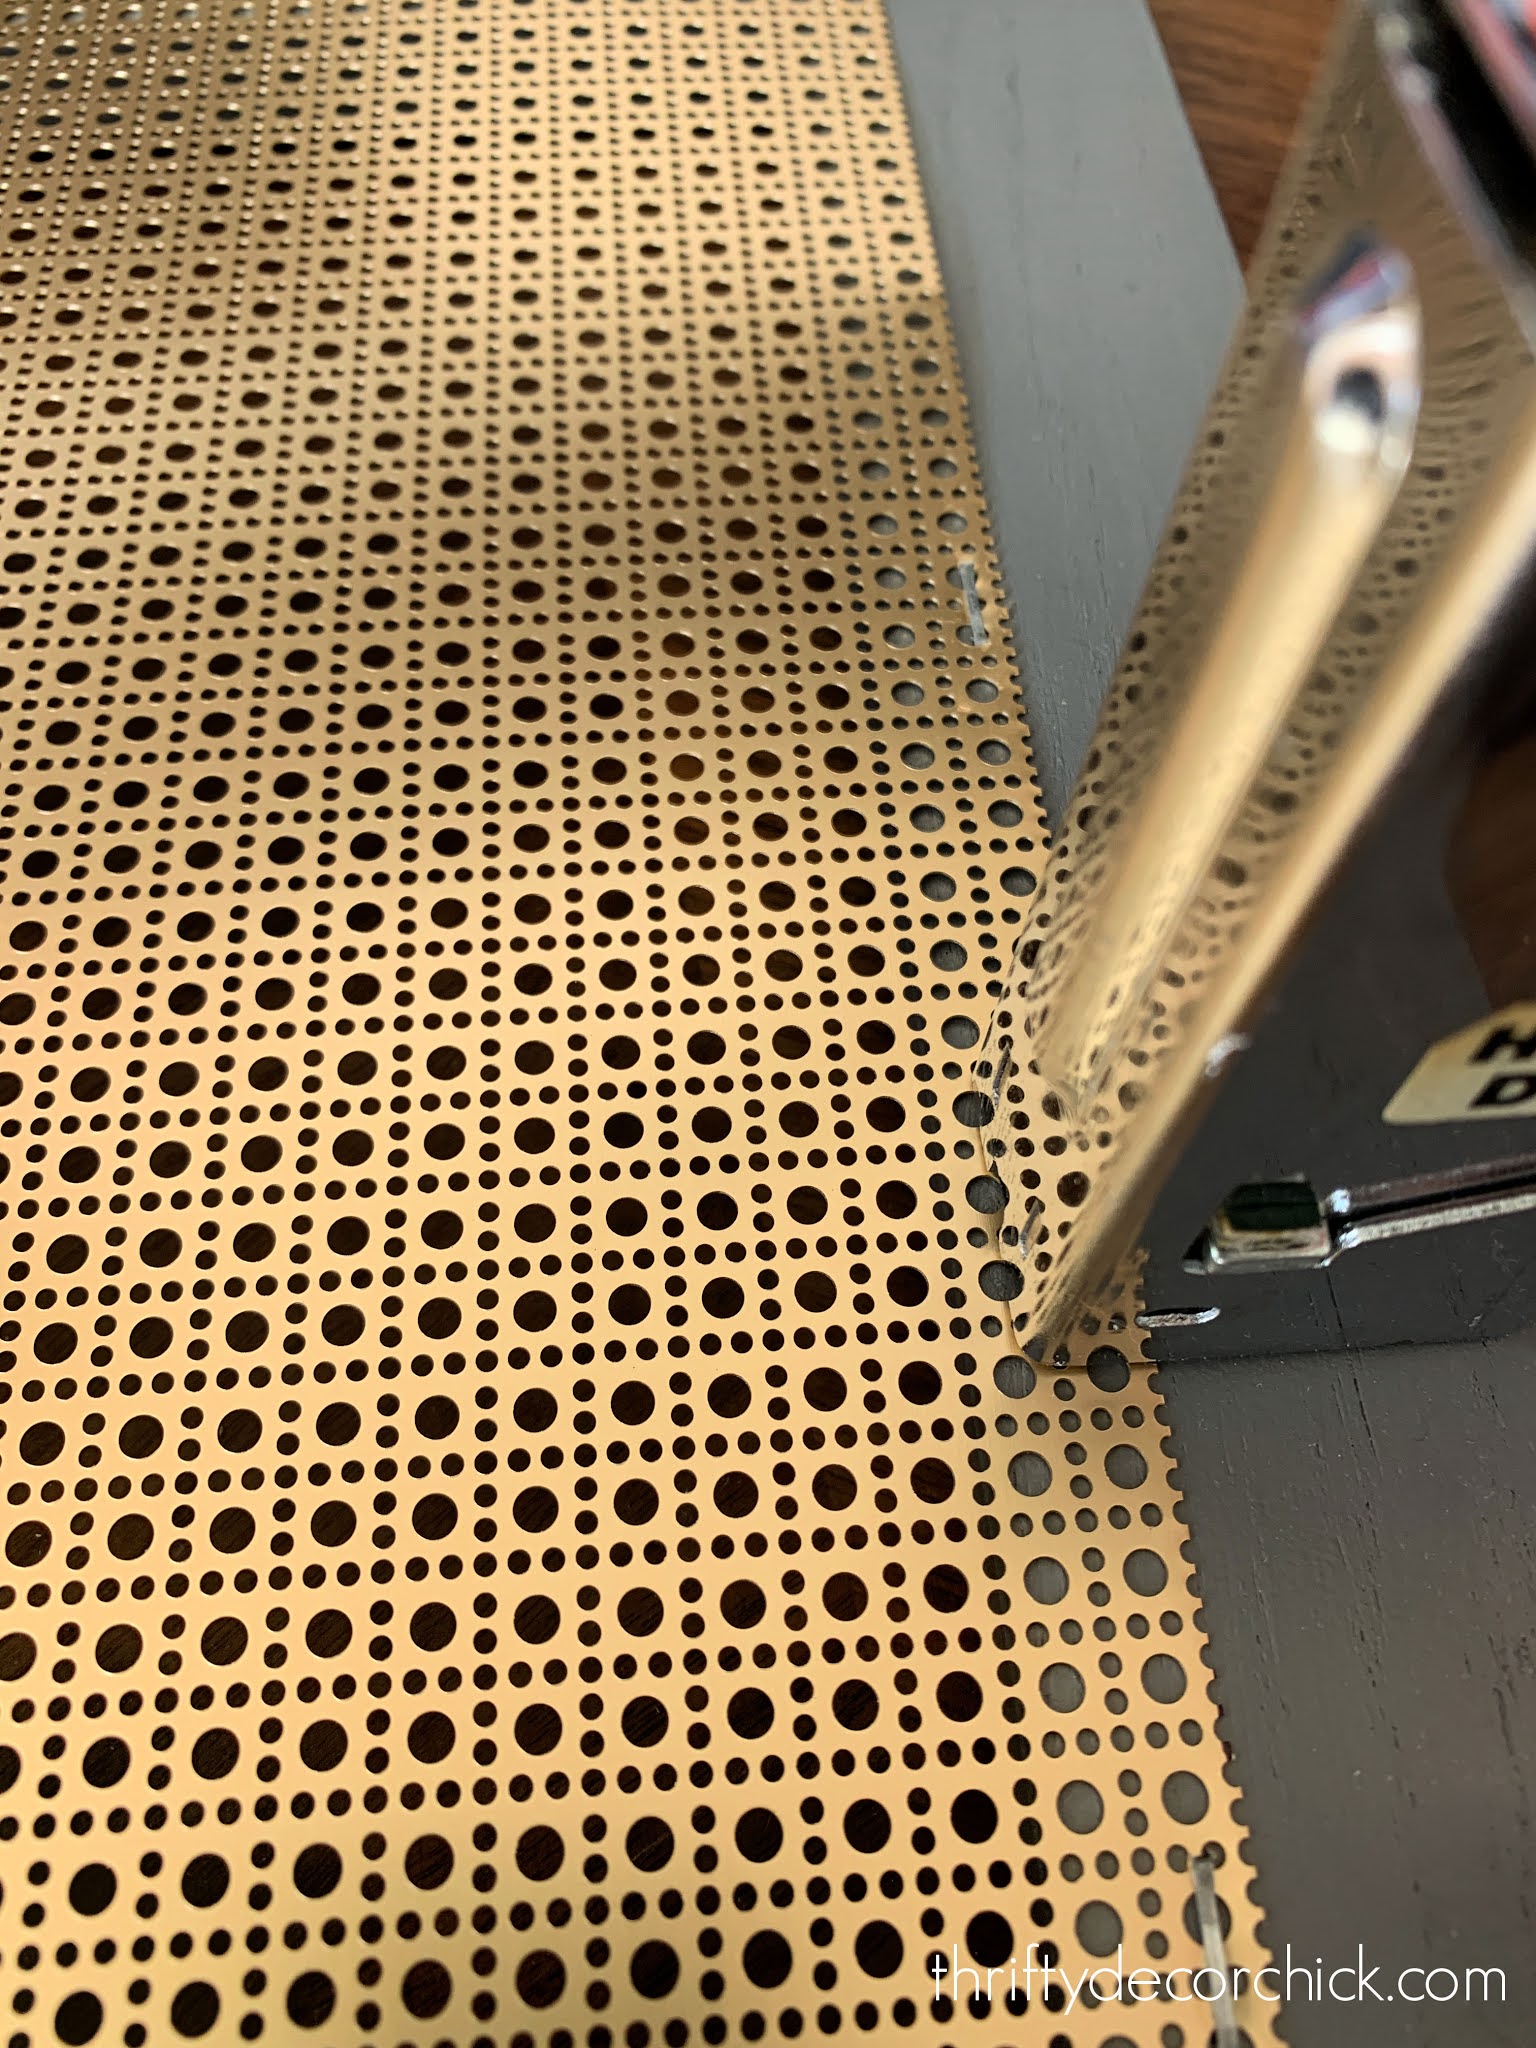
It went into the sheeting easily -- but you may have to pound the staples in so they're flush with the wood.
The rough edges of the sheeting aren't crazy sharp -- I wouldn't rub my fingers along them on purpose but they won't cut you just by touching it. You can add some small trim over the edges if you are worried about those.
It looked even better than I expected! LOVE it:
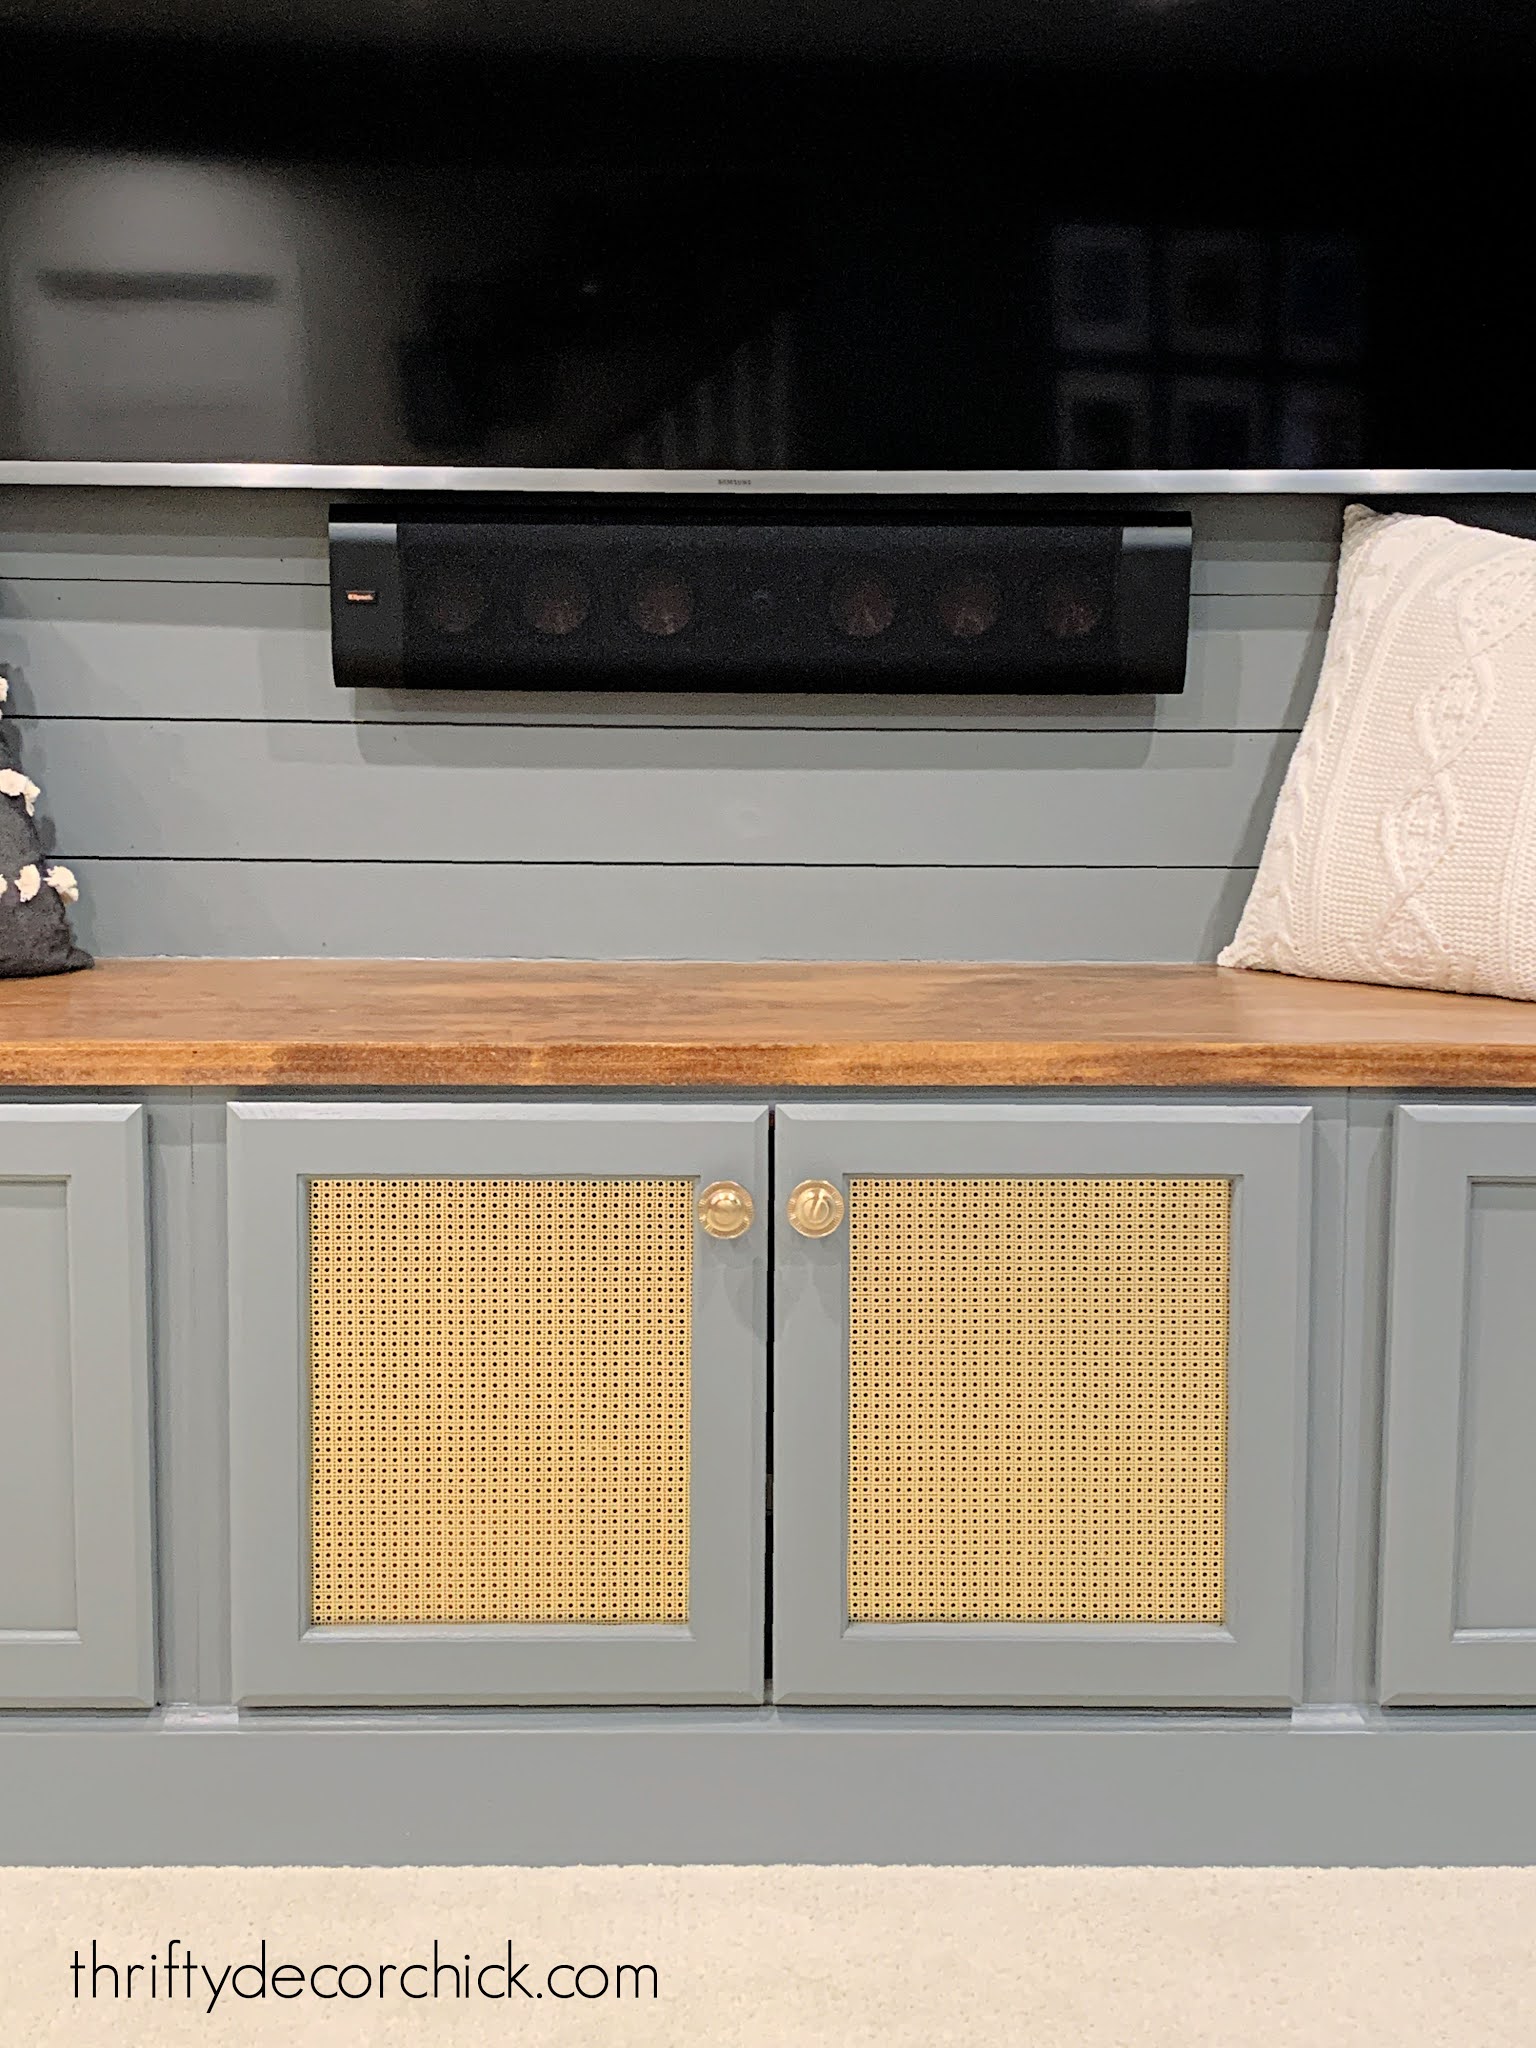
You can find links to the brass hardware I used here. I really like the design on these metal sheets -- it's called Lincane.
I know I say this all the time, but don't let anyone tell you you can have both form and function. It just takes some creativity (or an internet search!) to make it happen. :)
The remote works perfectly through the sheeting -- so no need to open the doors anymore:
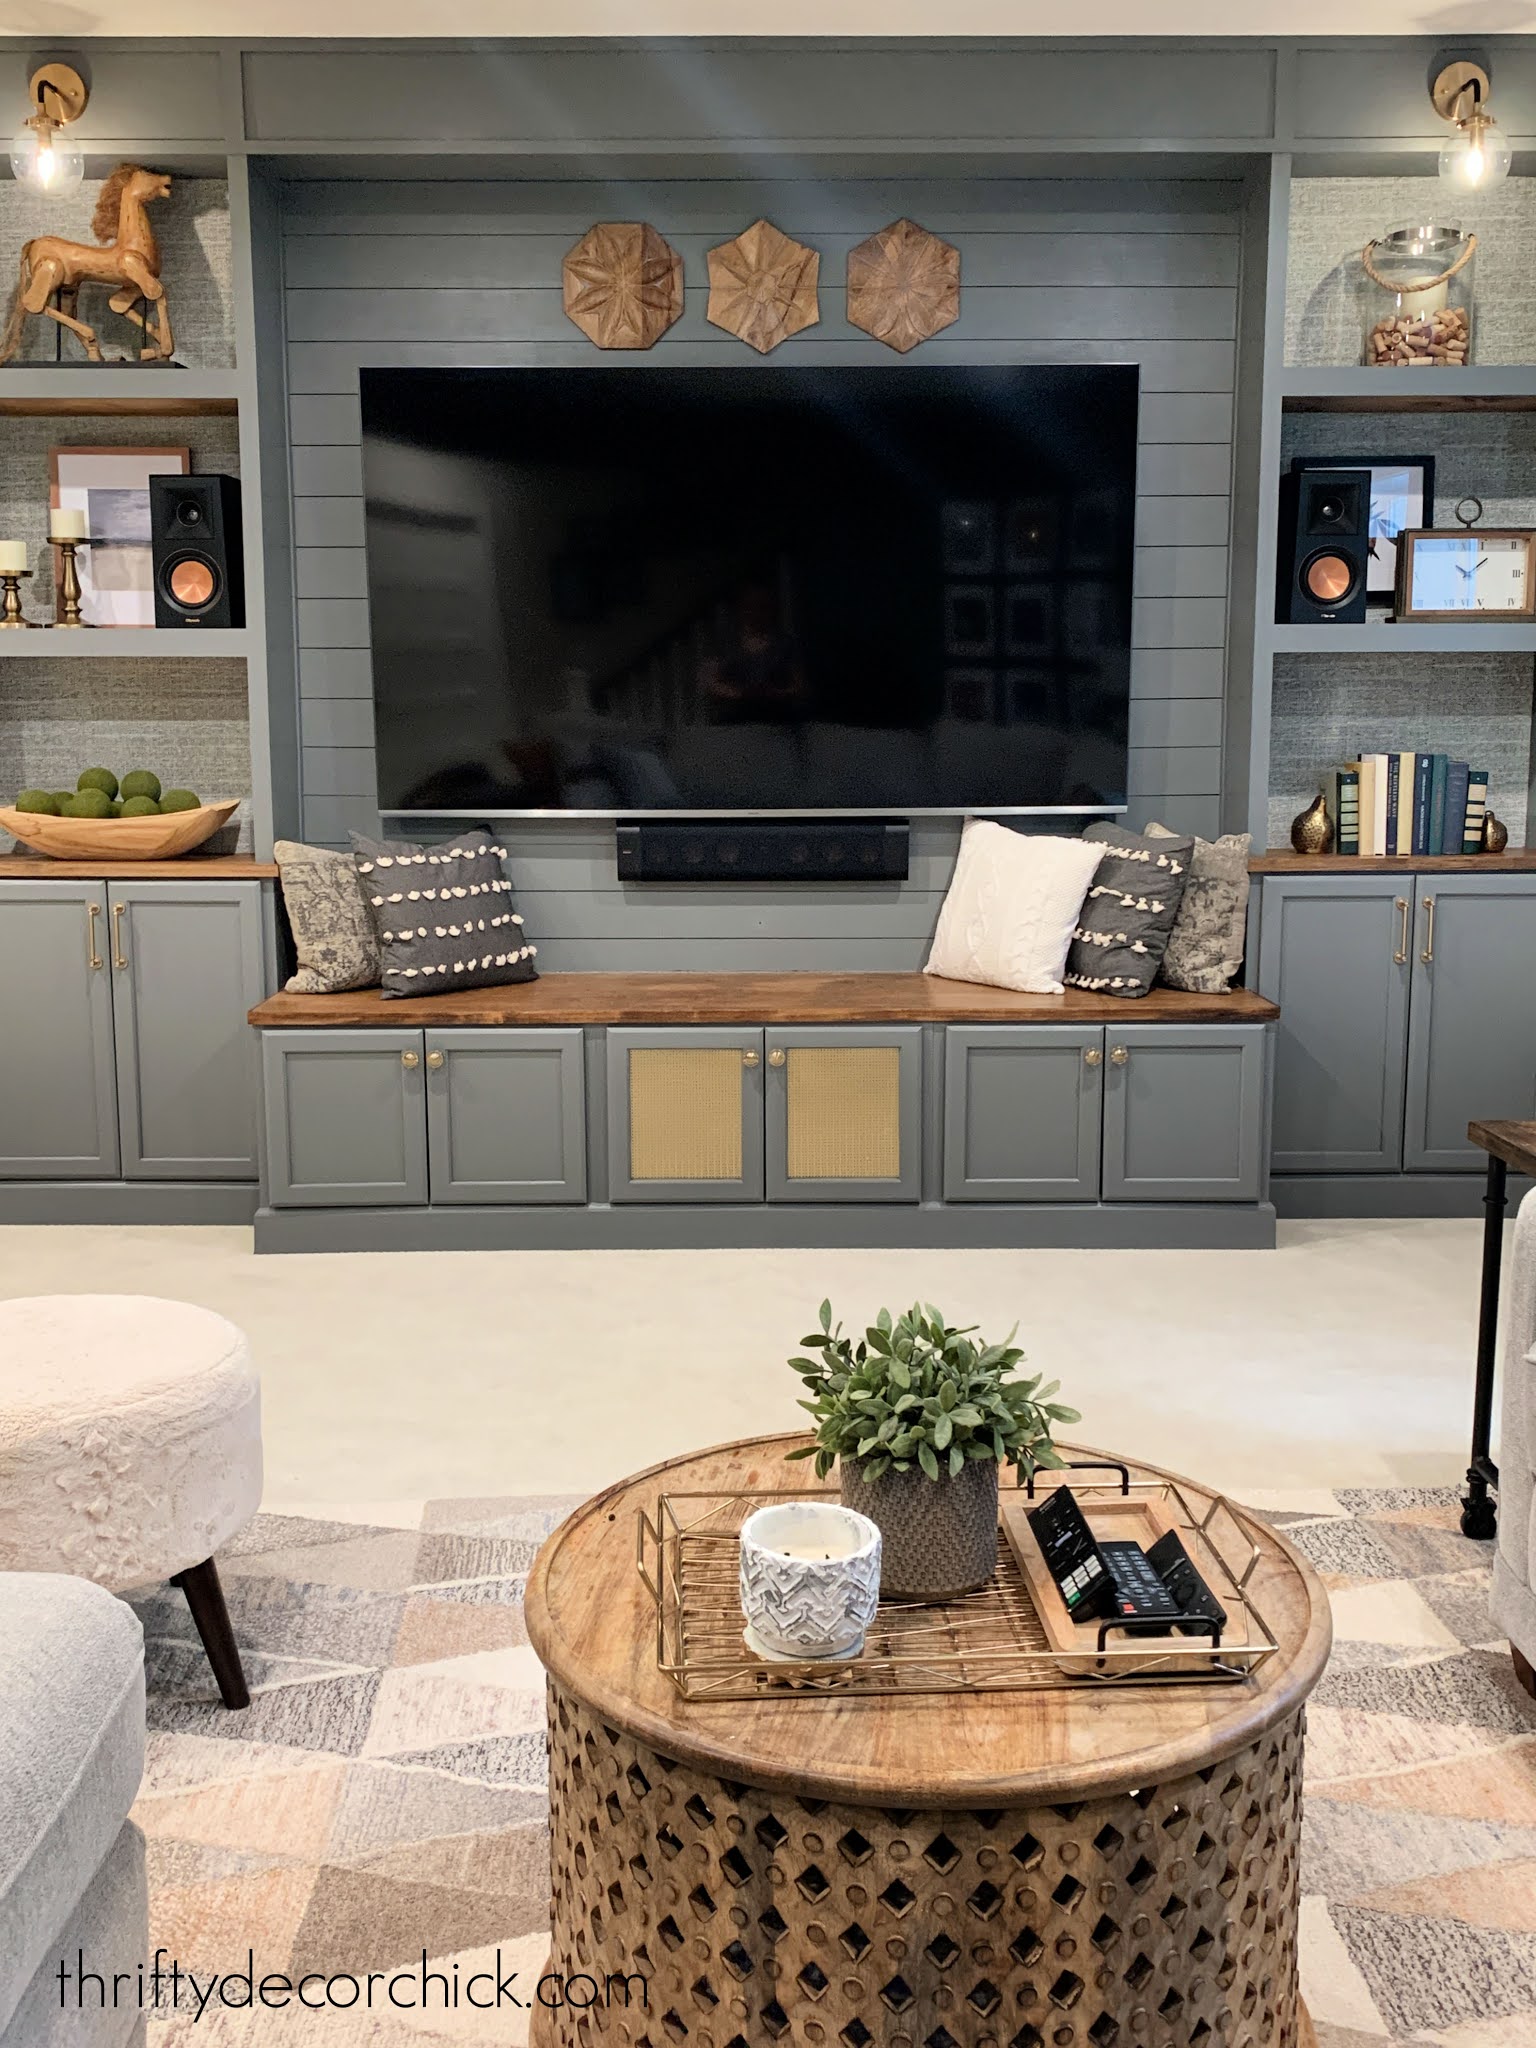
I'm considering adding it to all three lower cabinets, but I don't really want to spend more money when I like it as it is! This stuff isn't crazy expensive, but I can only get one door out of each sheet. You can find these at most hardware stores or I'll share some online sources below.
These sheets are a great option if you need remote control access in a built in unit, but they also just look great as a custom accent on any cabinet!
You can also use glass or cane if you'd rather not use the metal. Here are a few options!:
This metal mesh would give you a modern look
Use this roll of rattan cane for a traditional or transitional look
"Chainlink" metal design in copper
"Lincane" metal design like ours
Hide your devices out of sight with this RF remote control extender kit
See more of our home here. To shop items in our home, click here! Never miss a post by signing up to get posts via email.
Via https://www.thriftydecorchick.com/2021/04/hide-tv-components-use-remote.html
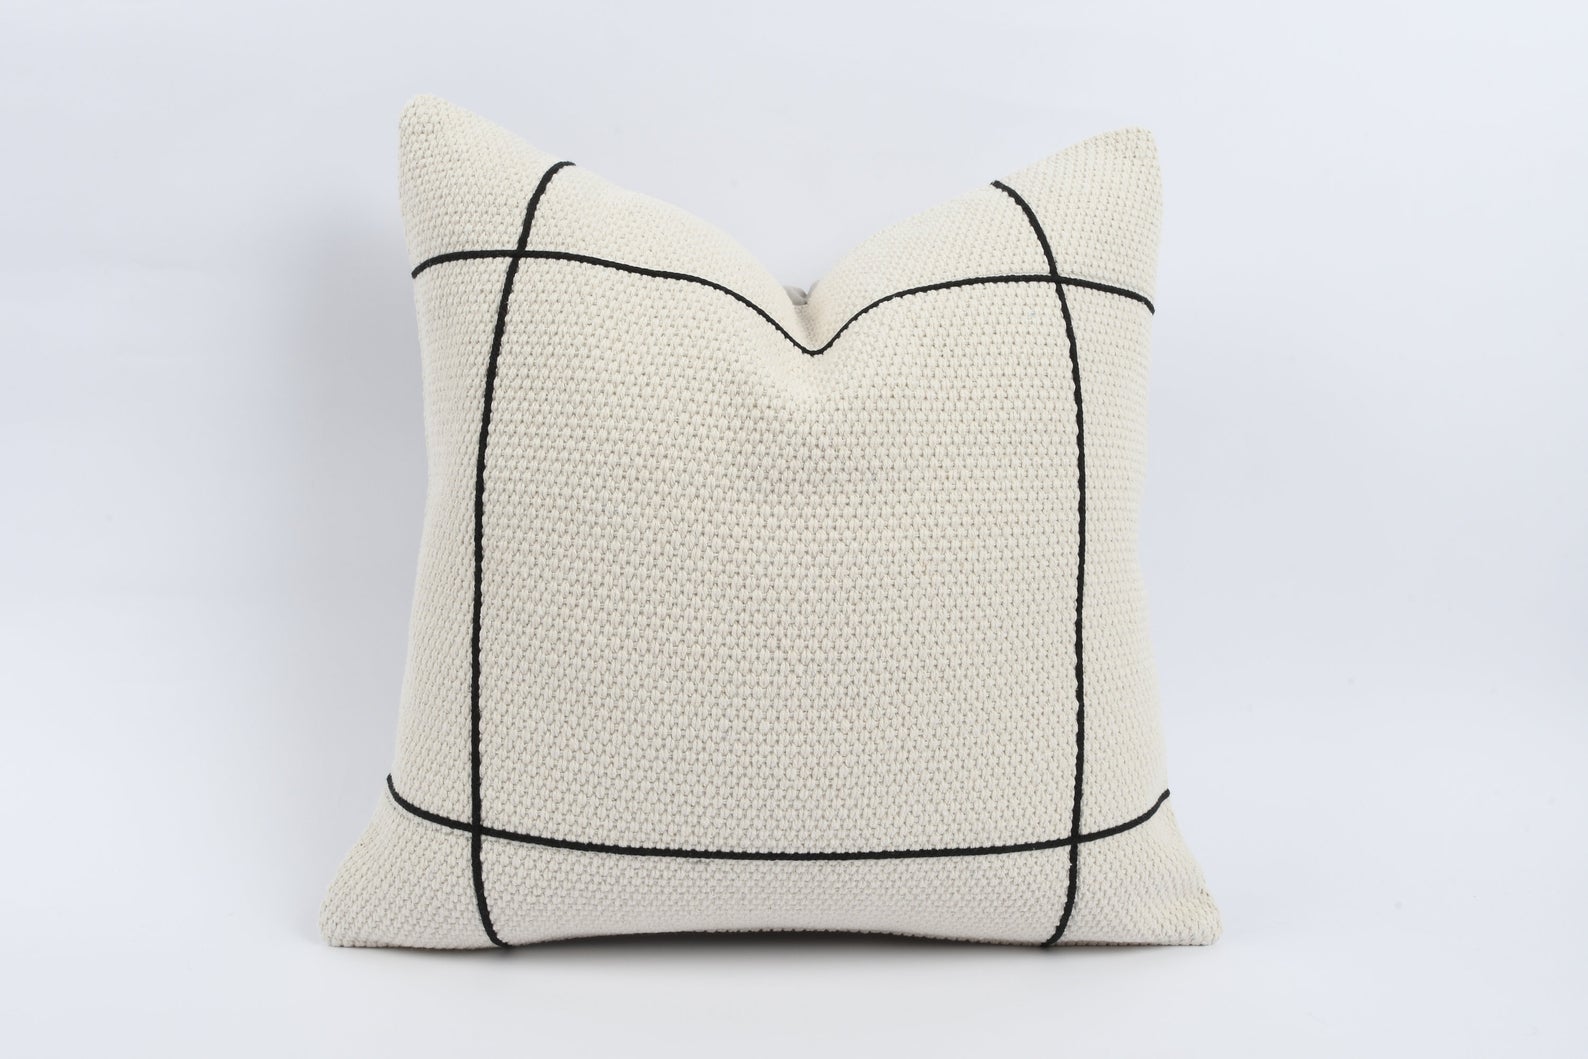
Thank you so much for the kind comments on my latest makeover! I always appreciate them! I'm back to share my favorite resources for inexpensive (and cute!) pillow covers. I love sharing where I find home decor at a great price.
Pillow covers are one of those things I change out more often than any other decor item. If you get them for a good price, they're an easy way to change up the accent colors in a room. I also like to use different textures and colors for the seasons.
Lately I've found some sources for throw pillow covers (and inserts) that I love -- and the prices are so good! ALL of the covers I'm sharing today are under $20, and most are well under that. When you purchase just the covers (and reuse your inserts) you'll save a lot. (I'll share my favorite fluffy inserts later in the post.)
1. Hobby Lobby
I showed you some of my Hobby Lobby pillow finds when I revealed the giant basement built in unit:

I had never paid much attention to the decorative pillow covers at Hobby Lobby until a few months ago. I happened to check them out while they were half off (as they are this week), and I couldn't believe the prices!
I'll link to these at the end of this post, but they have a HUGE selection of covers in tons of different styles. The most expensive one I got was only $9 and the other two were around $7 each (on sale):

This post may contain affiliate links for your convenience.
See my policies and disclosure page for more information.
I was surprised that their selection included such a wide range of styles -- from super traditional to farmhouse to boho/modern. It's hard to beat those prices! (Keep in mind they only come in 18x18 size covers.)
2. Amazon
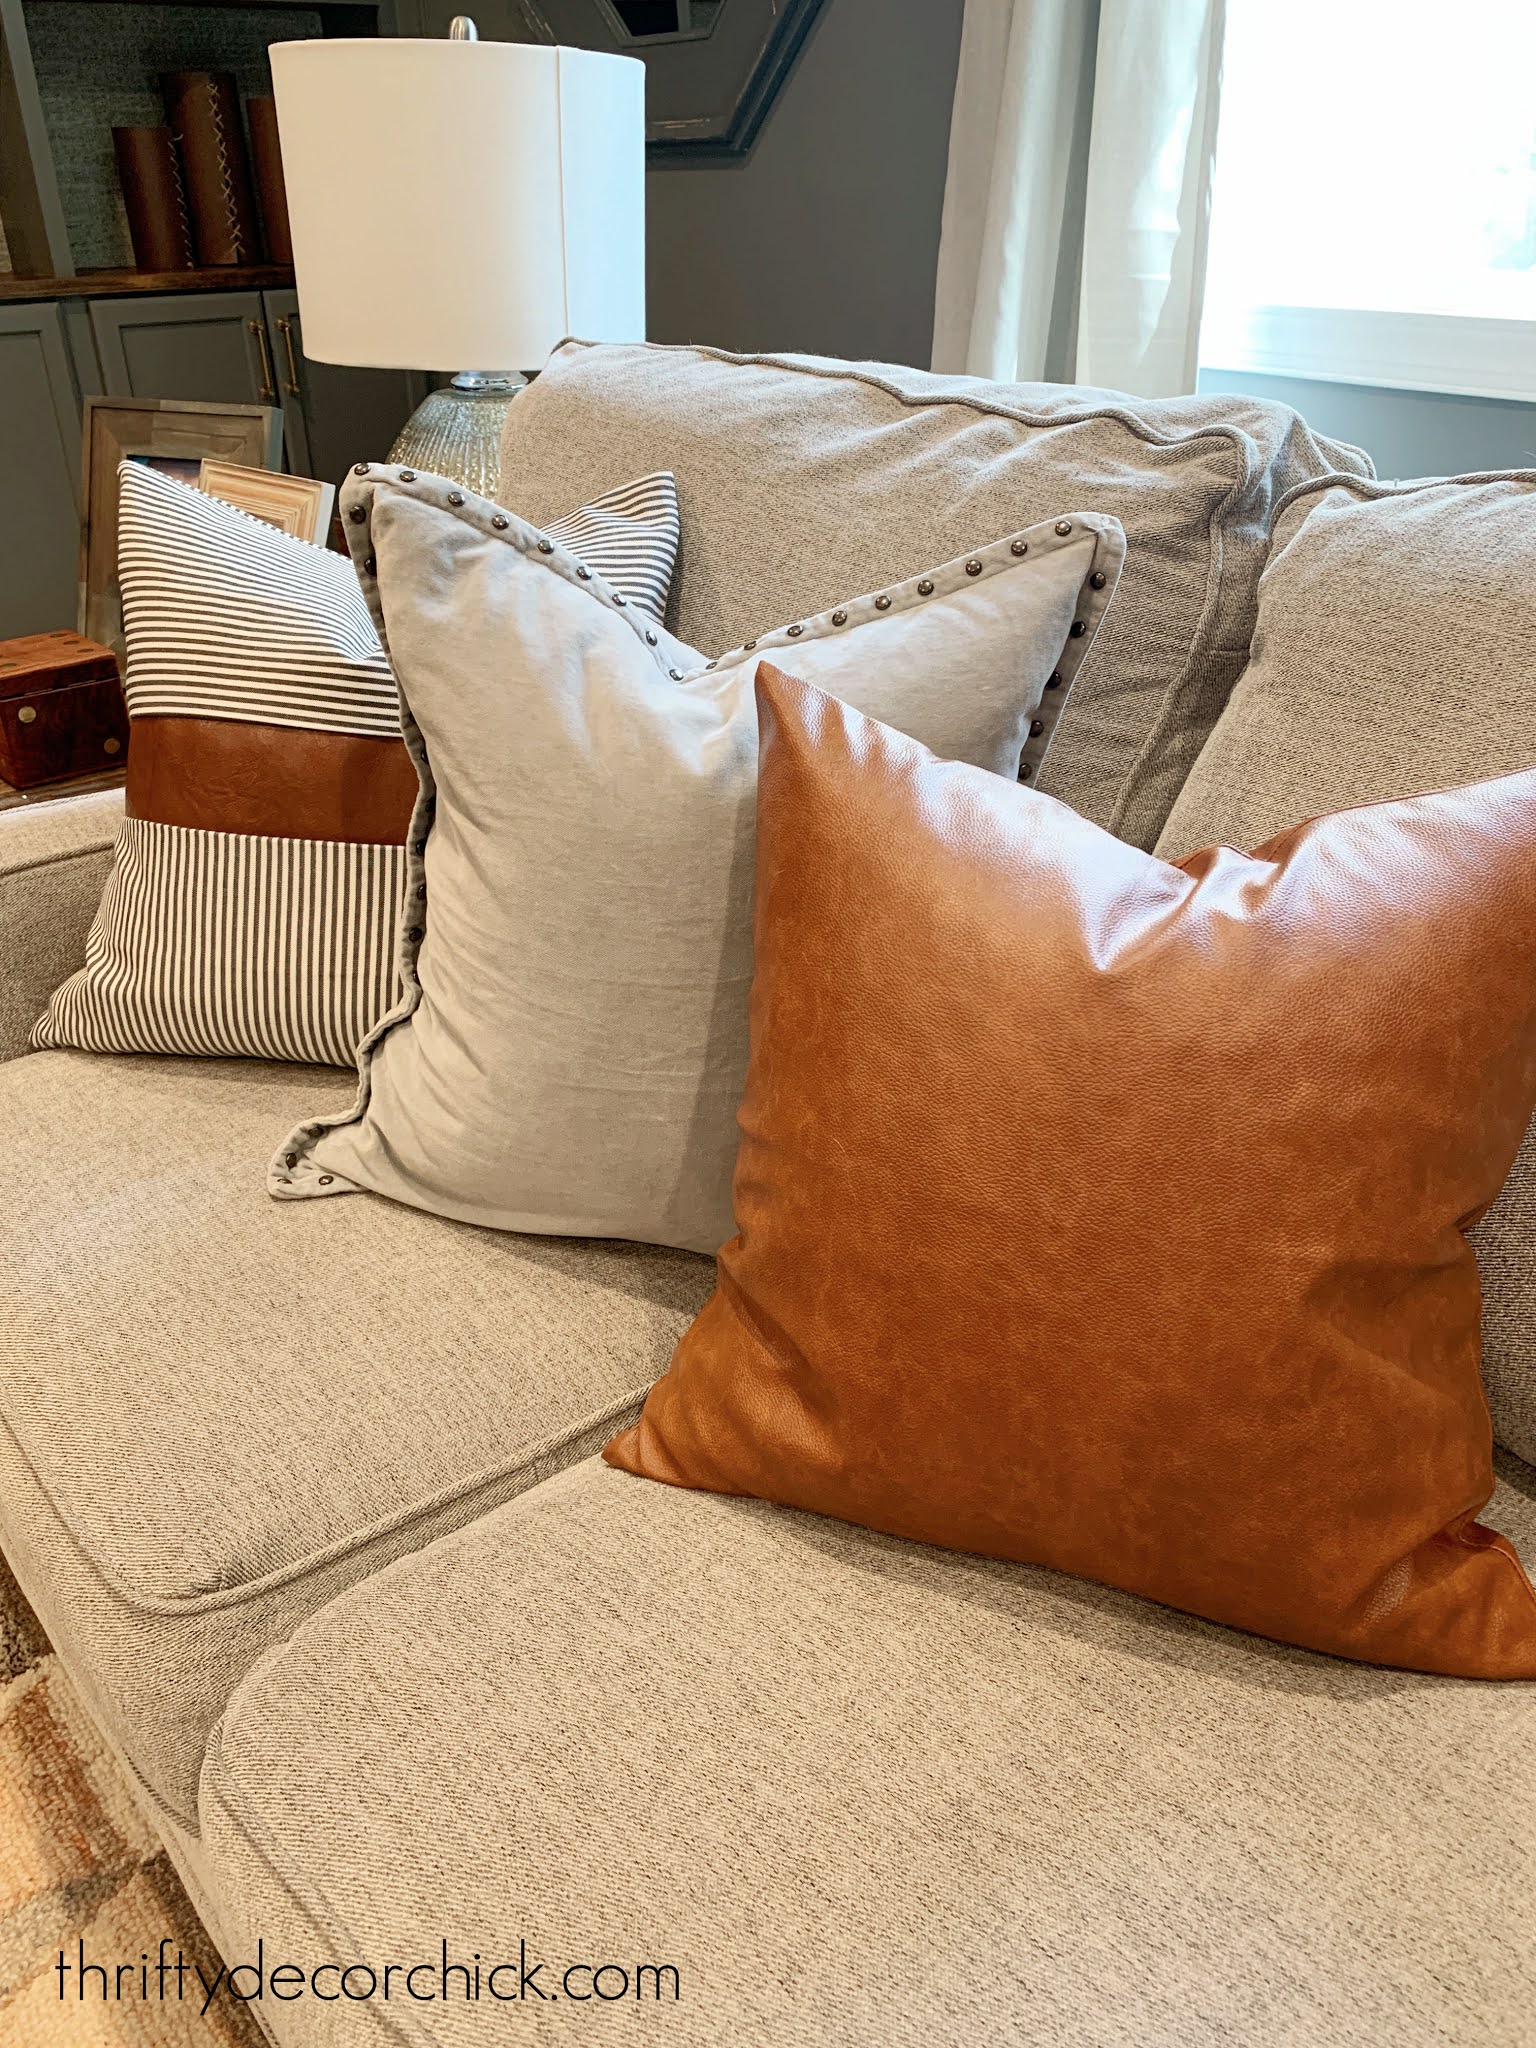
I've also found a great selection of pillow covers online. I still LOVE these faux leather covers I got a few months ago:
I liked them so much I ordered more for our basement.
I found more pillows that play nicely with that look for the basement sofa. I ordered a few -- this striped version, this color block version and this pillow cover with the faux leather and stripes:
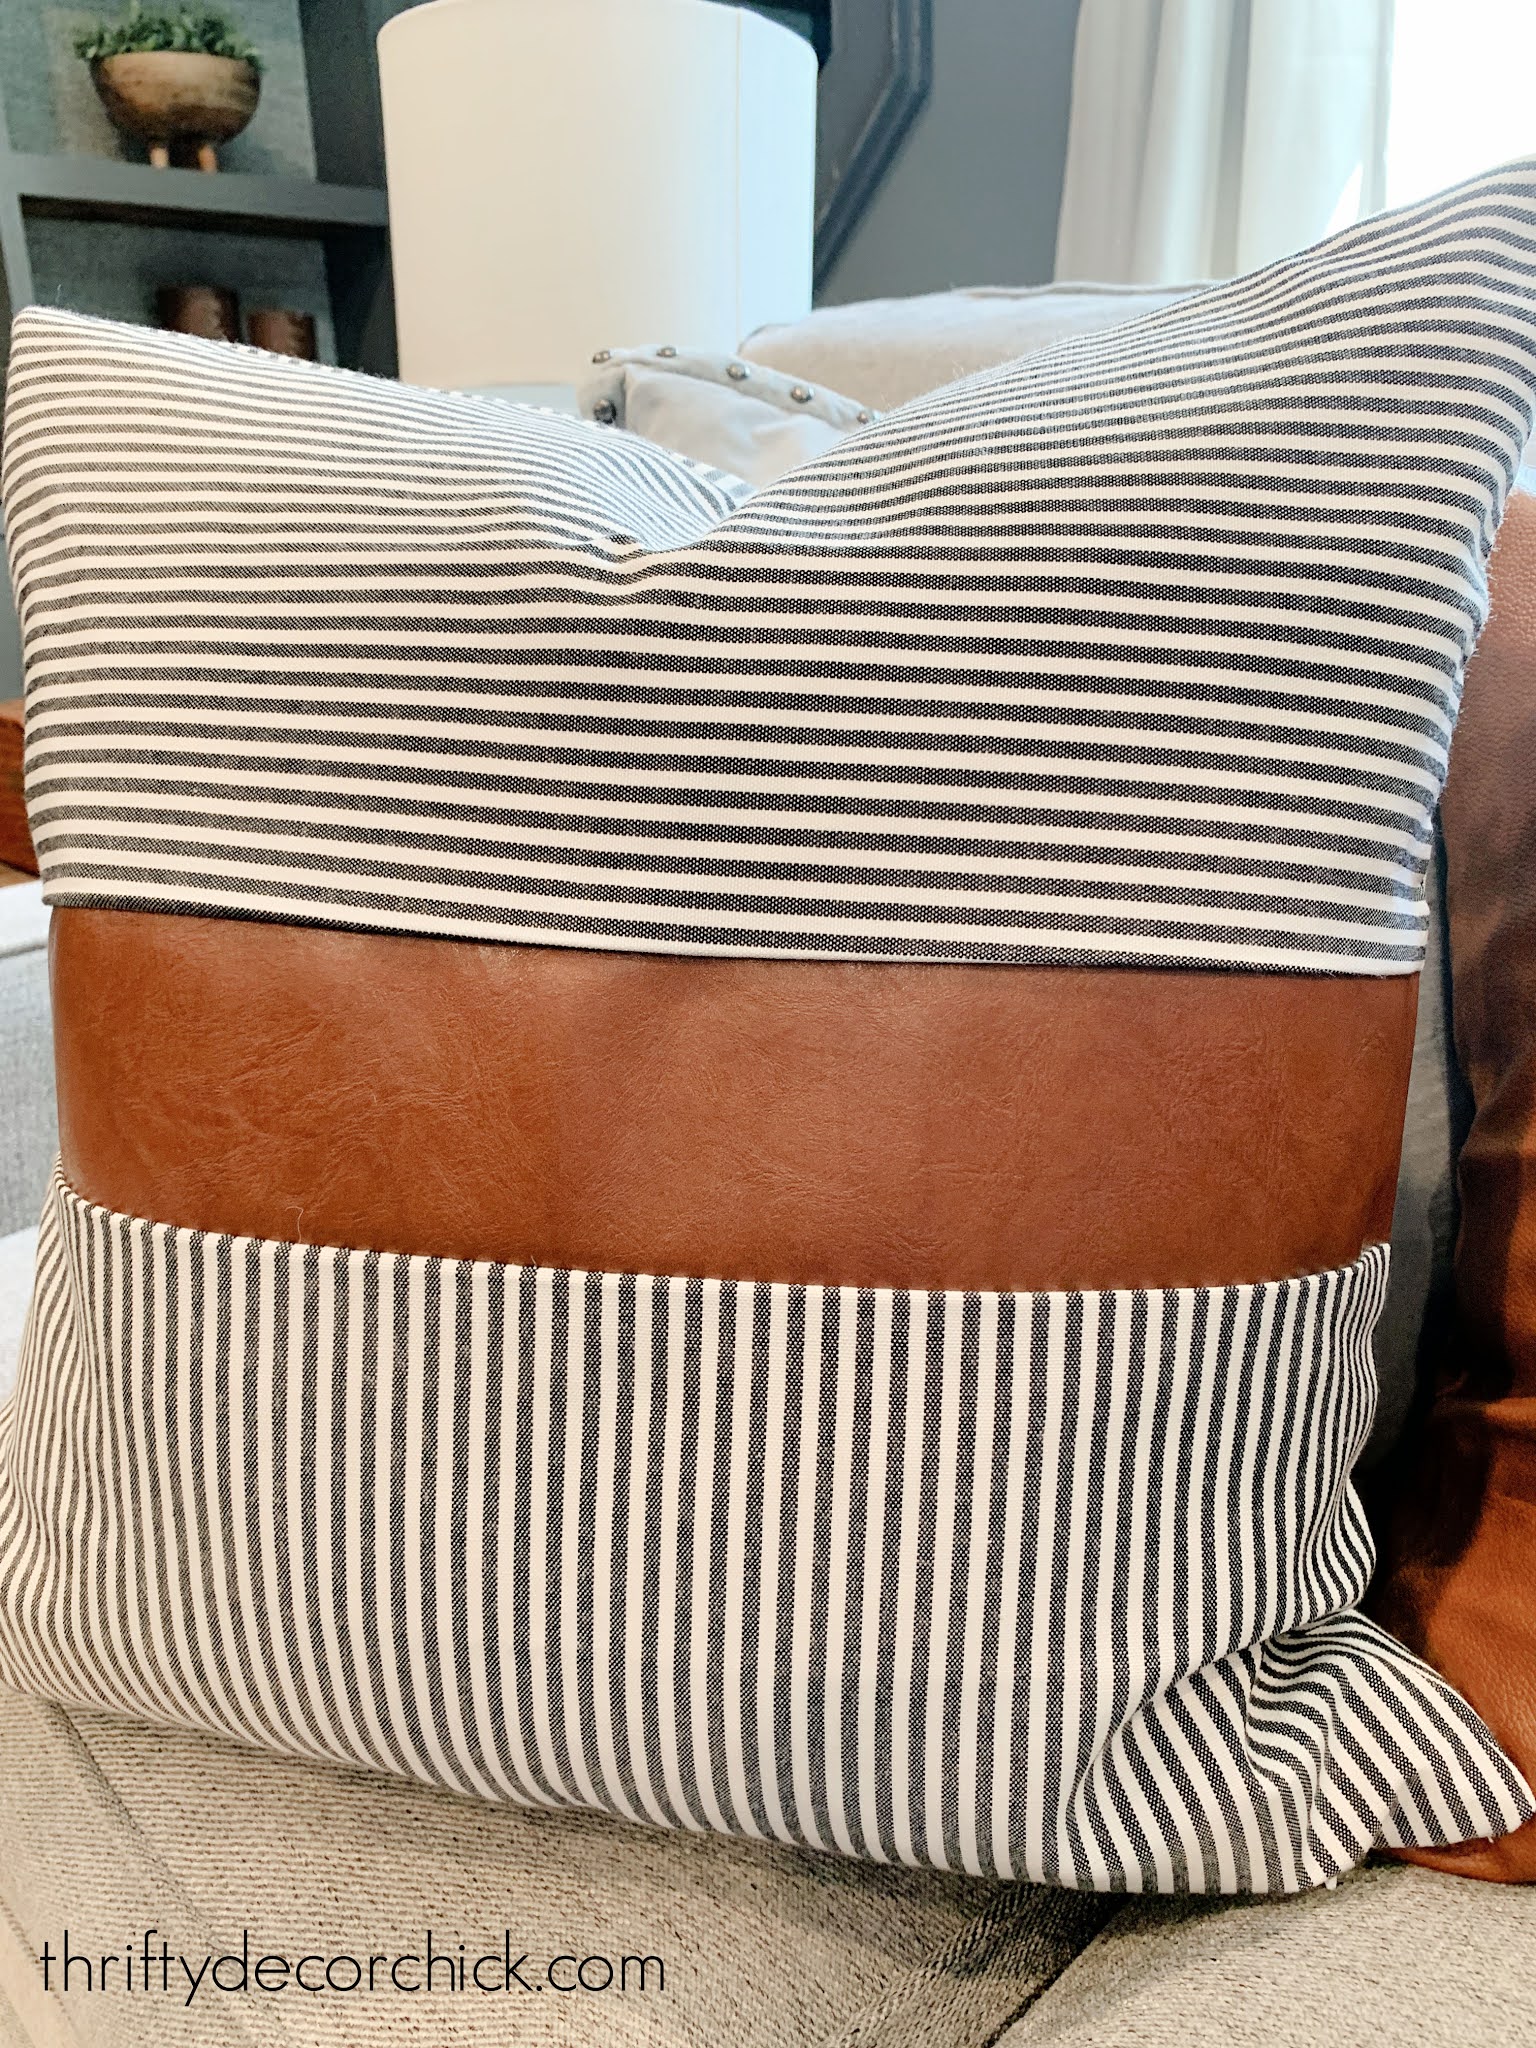
I loved all of them, especially that color blocked one! But this one looked the best with what I already had on the sofa.
They mix and match so well together!:
Amazon has a ton of throw pillow cover options under $20. These linen-looking covers come in a bunch of colors and are great quality:
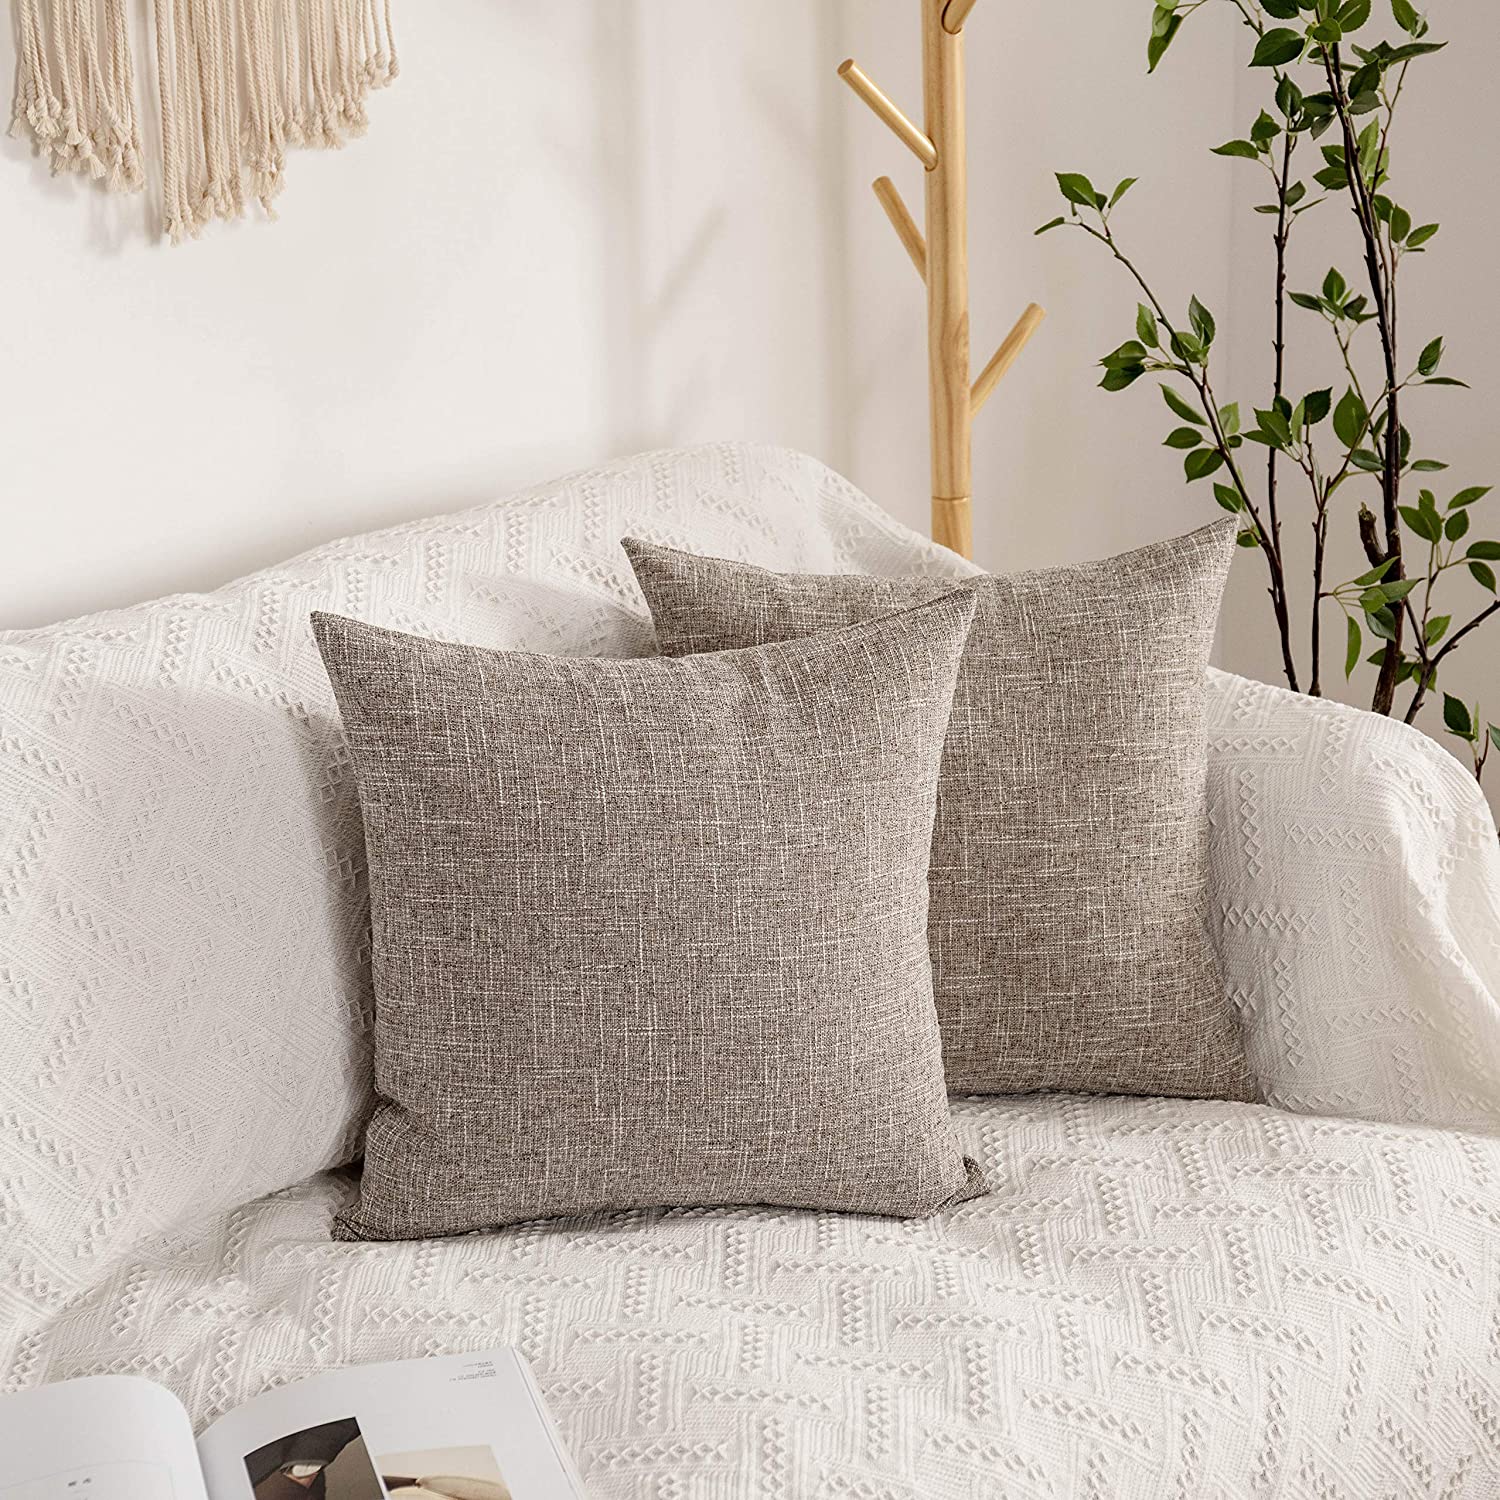
I ordered a pair (only $16 for two!) for another room and the color I got wasn't quite right -- but I really liked them.
This modern boho version comes in this lumbar cover or in a square shape:
Both of those option are under $16.
These pom pom covers are made of a velvety fabric and come in a TON of colors:
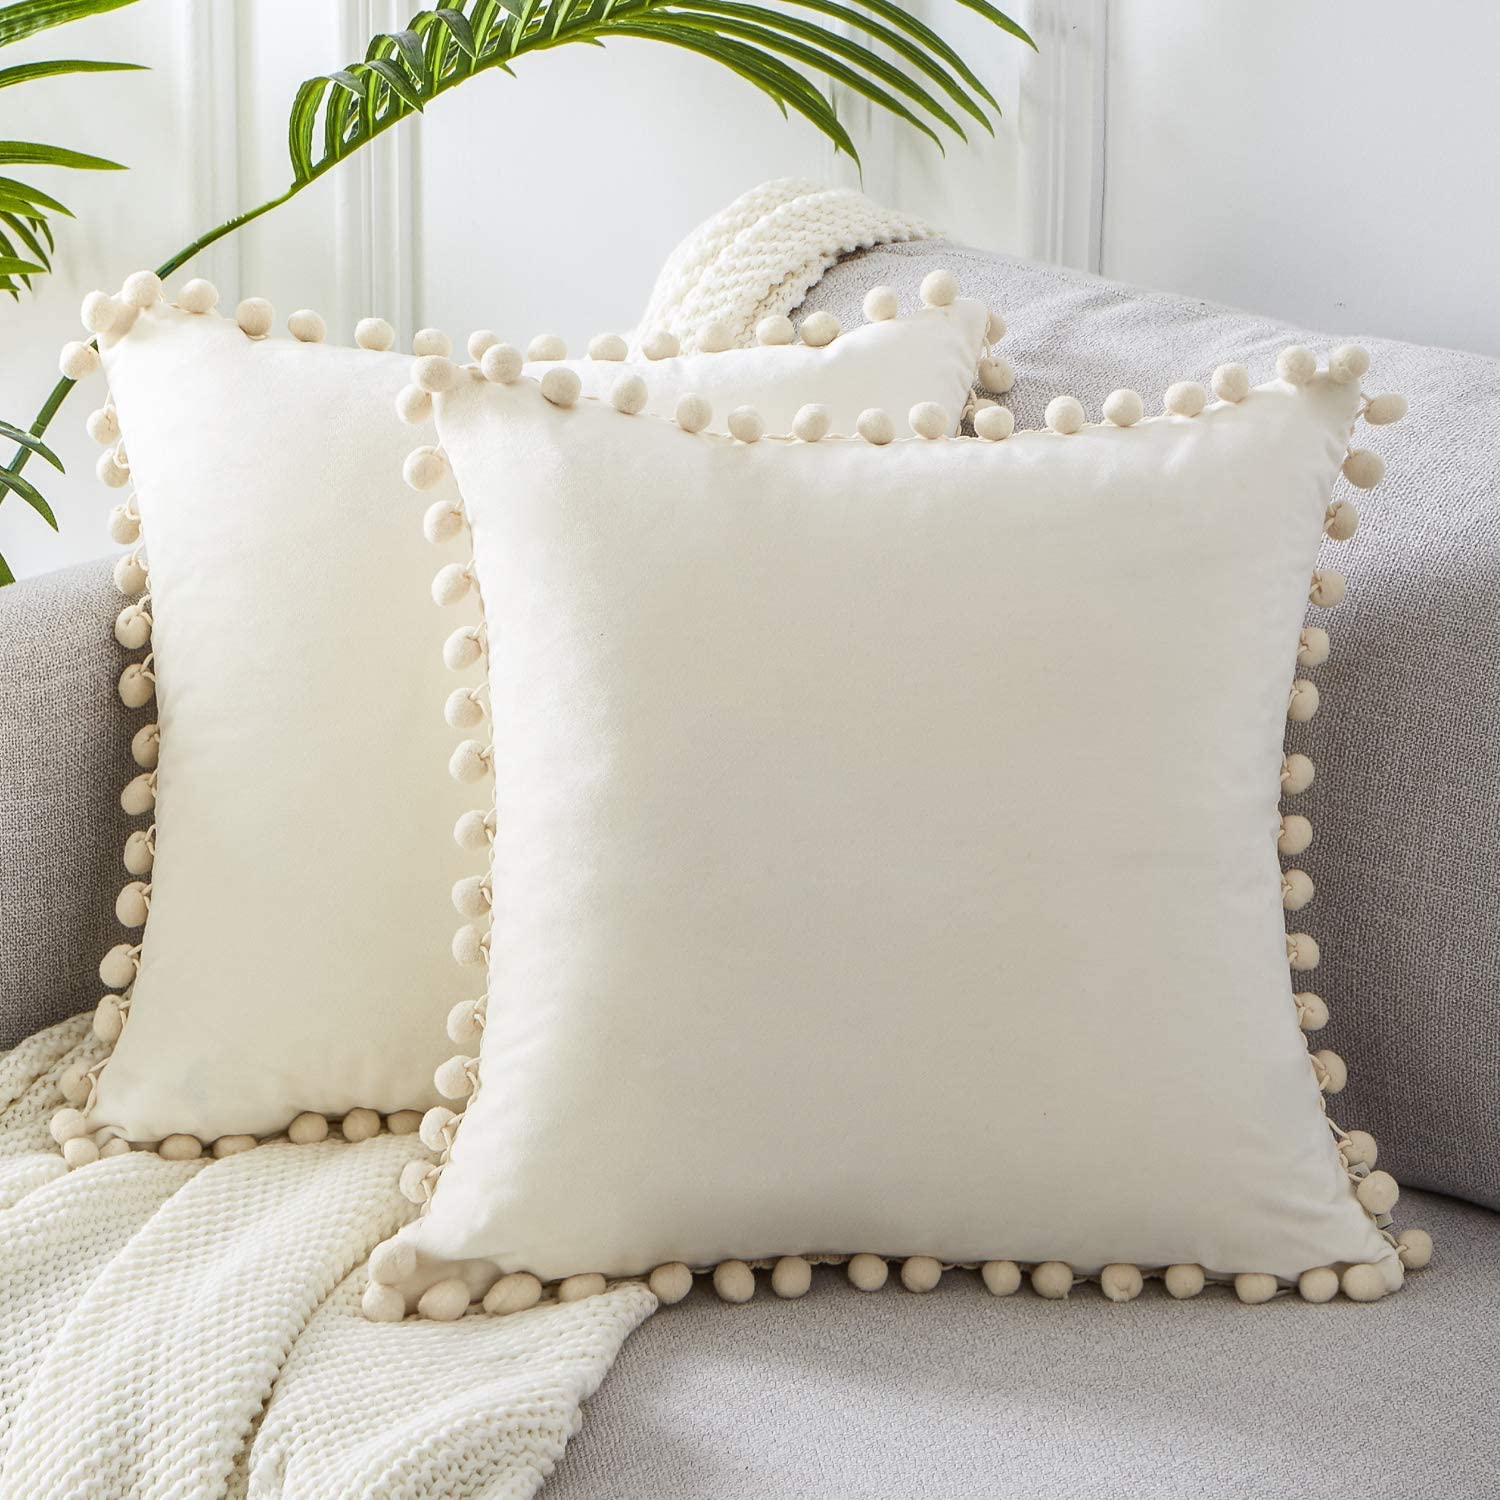
That one also comes with tassels instead of the pom pom fringe. Only $17 for two pillows!
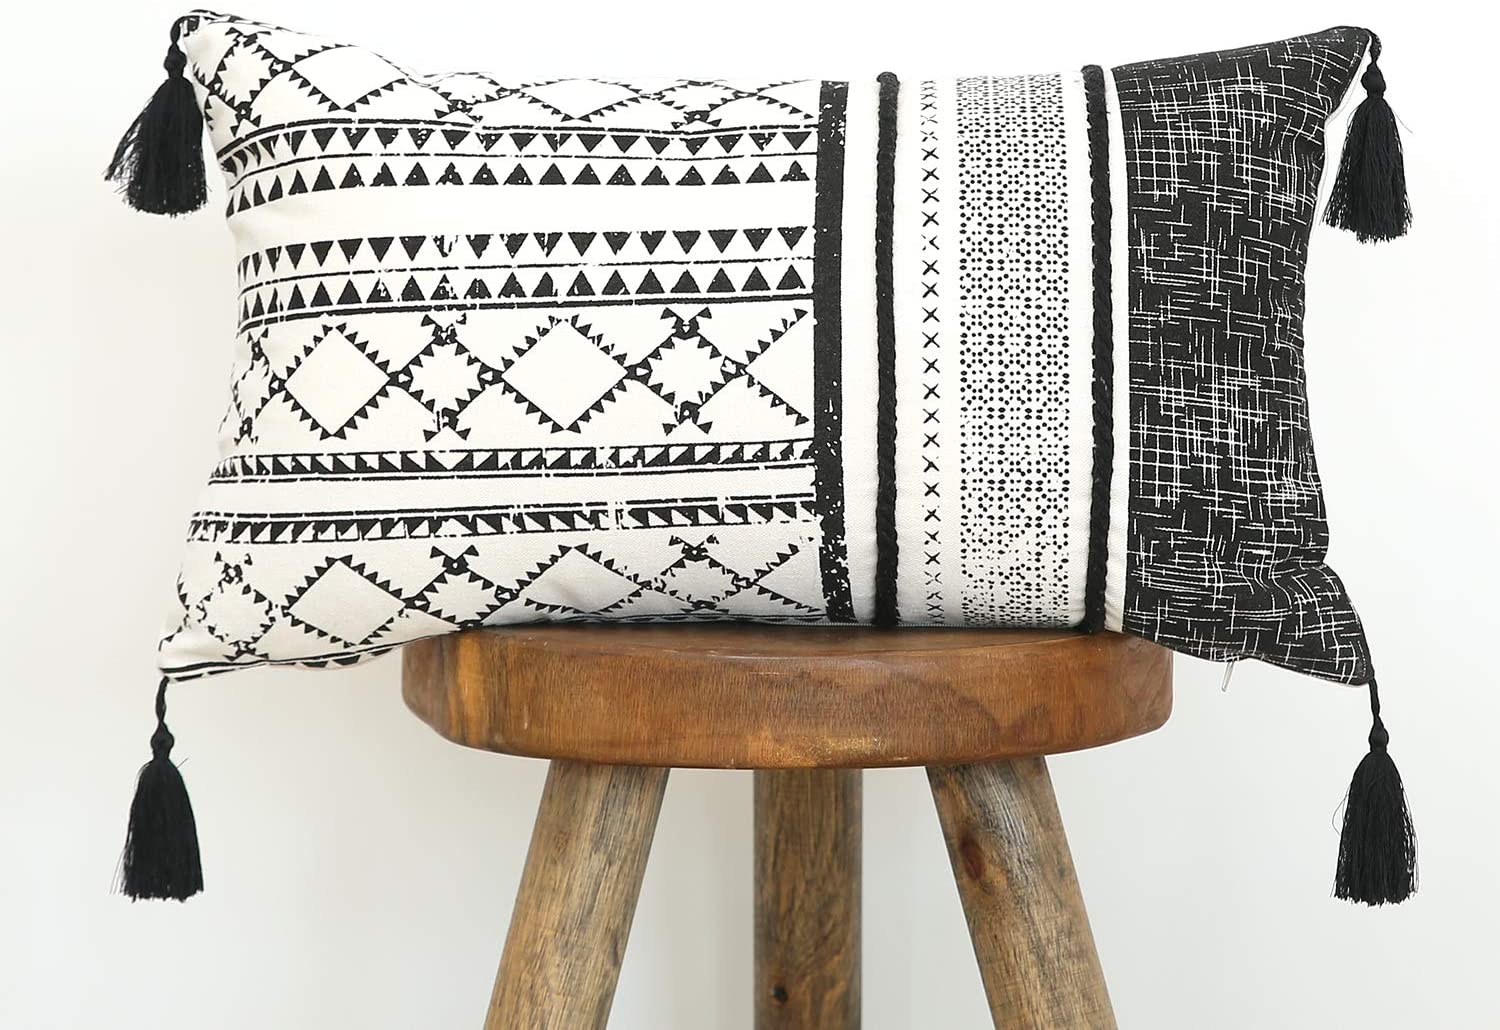
I loved the tassels on this black and white striped cover as well:
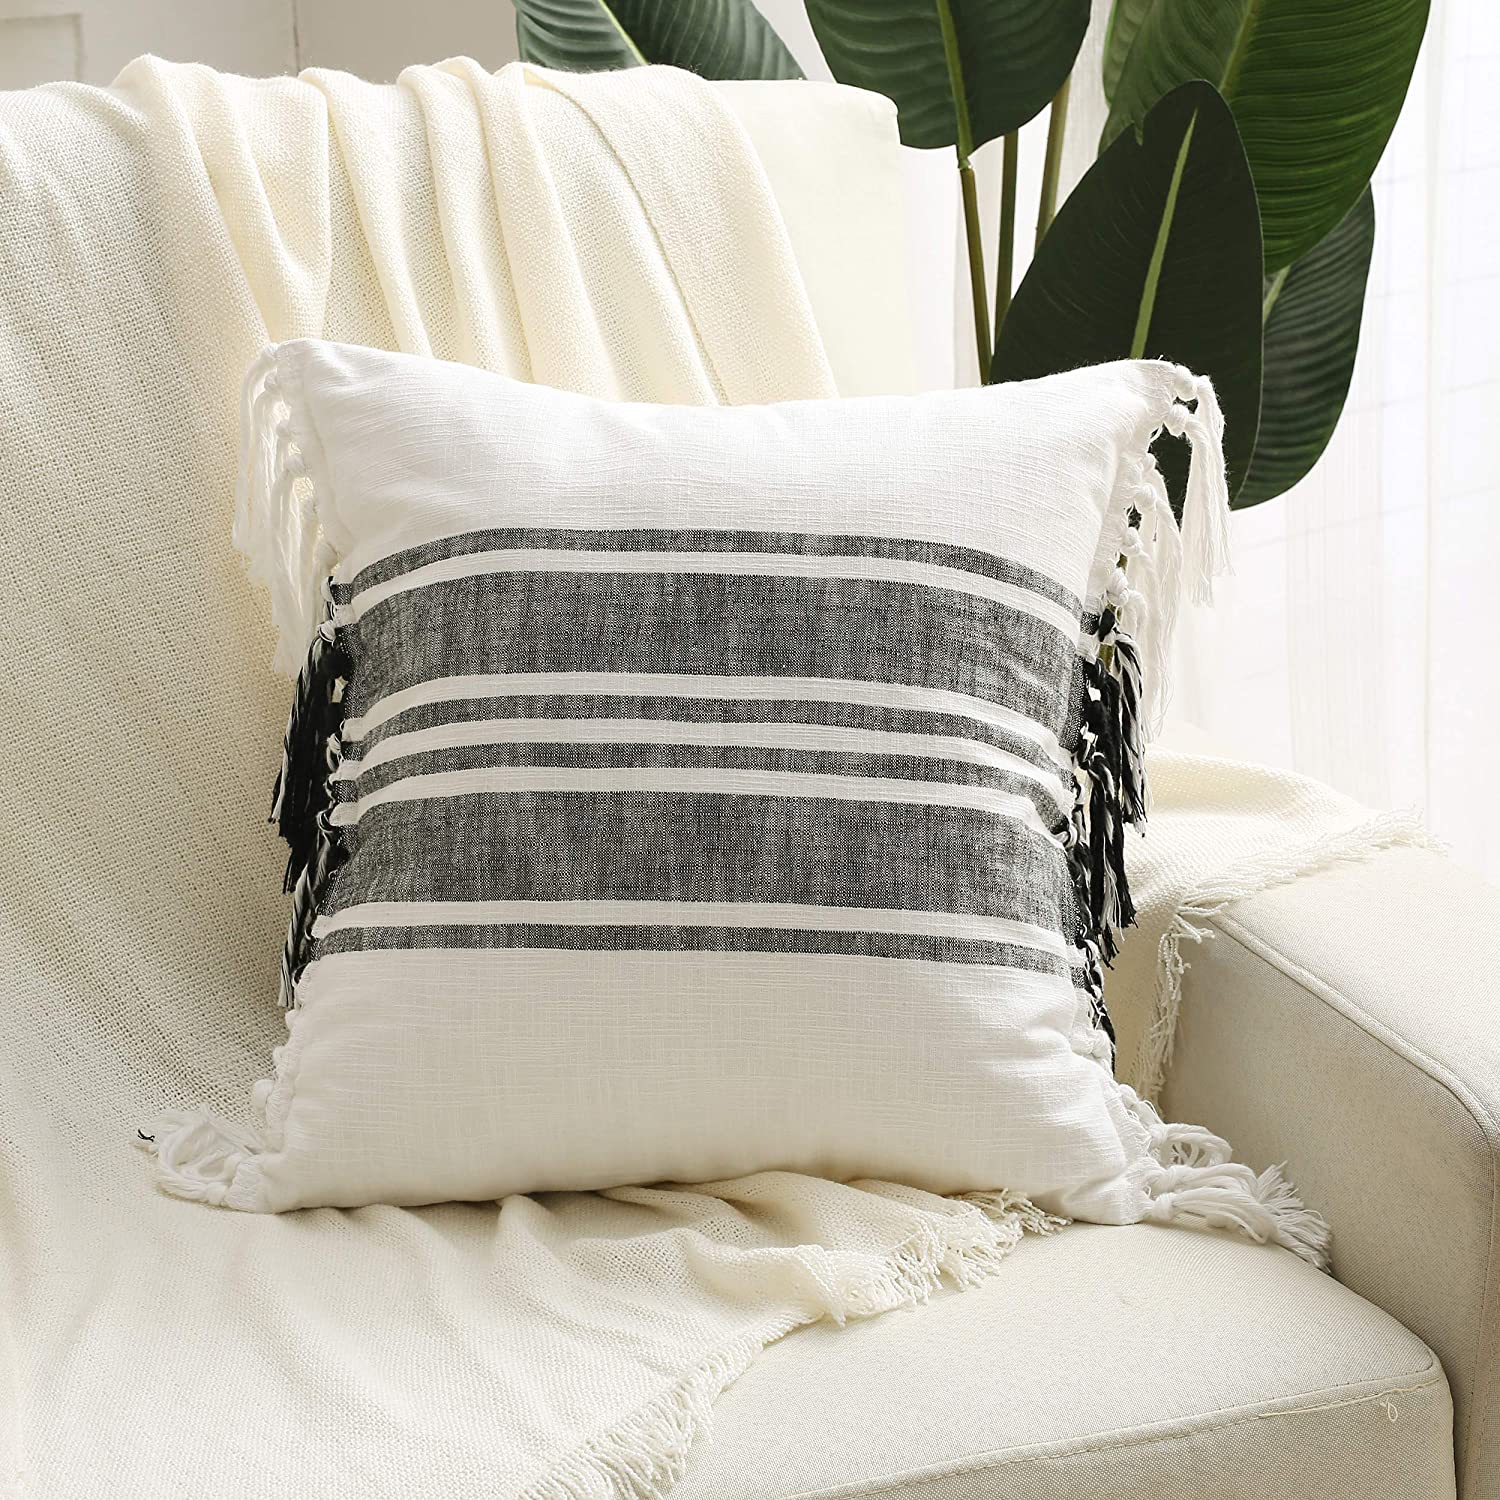
Any of these would look great on a sofa, chair or as accents on a bed.
3. Etsy
Another GREAT place to shop for inexpensive pillow covers is Etsy. You can find any style, color or price range.
These shops make all of their pillow covers from vintage Turkish kilim rugs:
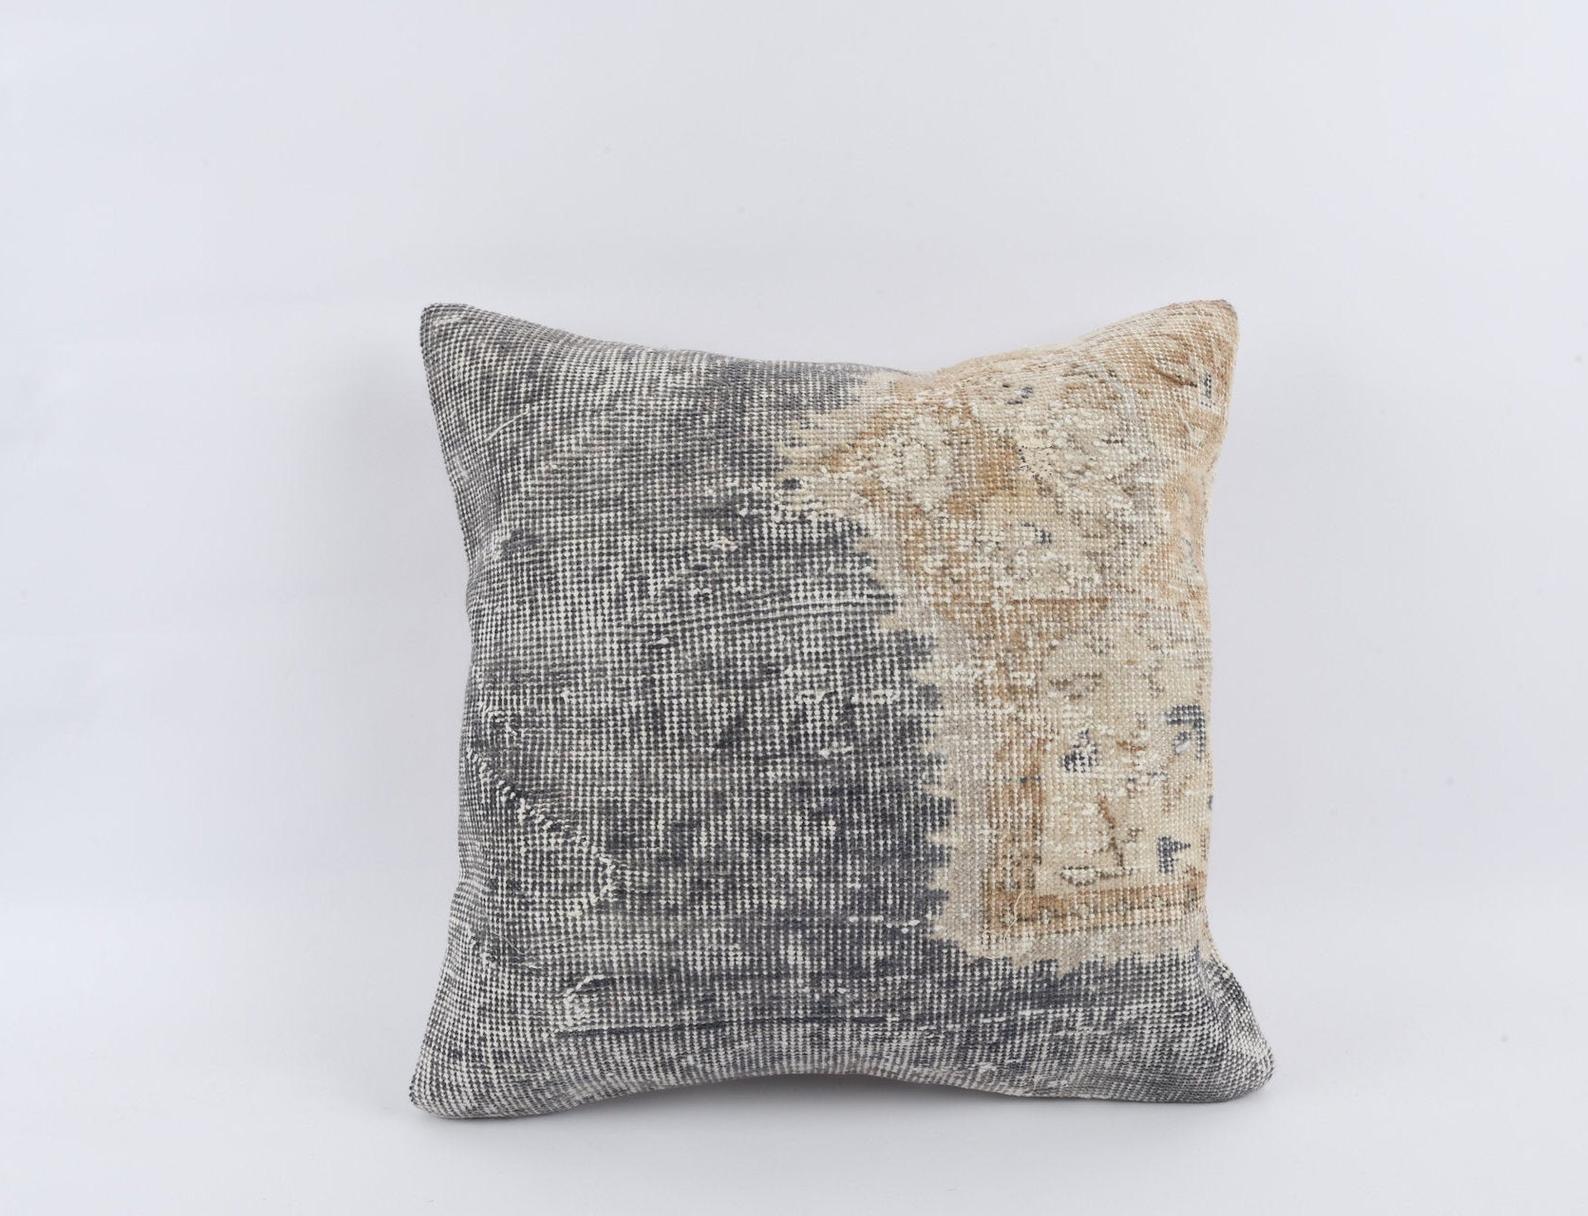
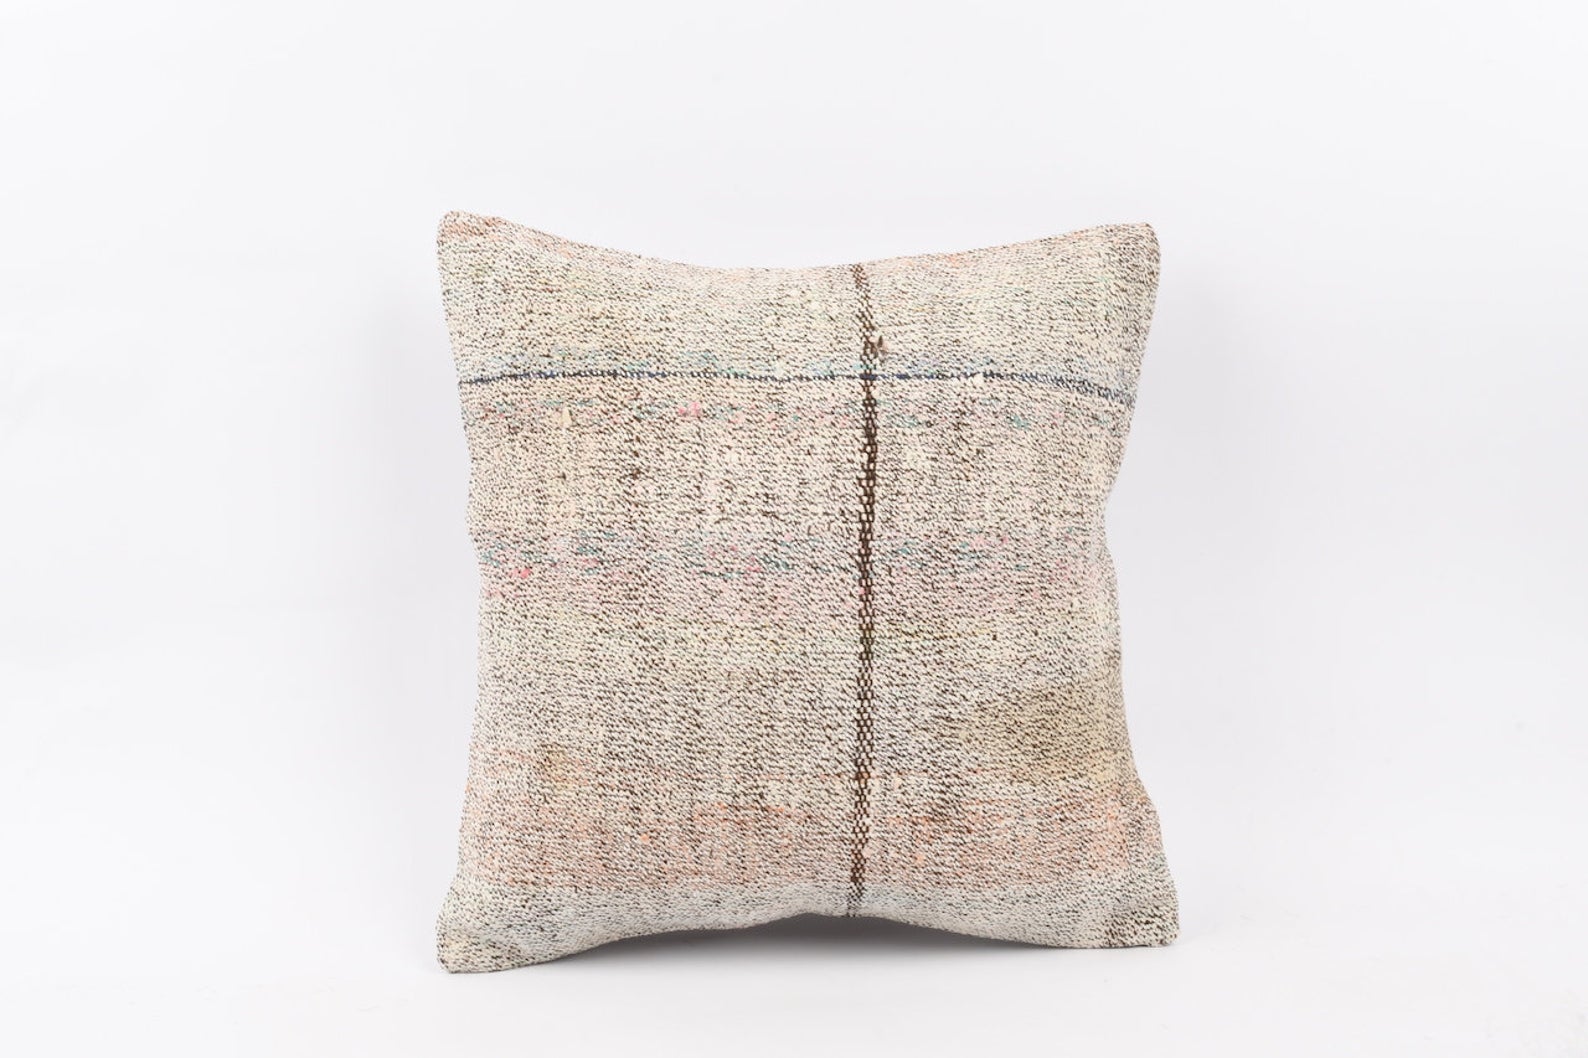
I bought the blue and cream one and can't wait to get it! I was shocked by the prices -- I'd expect to pay WAY more for these. They have amazing reviews and a TON of one-of-a-kind pillow covers. (I link to these and a bunch of other options below.)
Of course there are plenty of affordable covers in more traditional designs as well. I'd use any of these in our home:

I prefer using covers because if you like to change out throw pillows every few months like me, it cuts down on the storage space significantly. I just wash and then fold up the covers and reuse the inserts in the new cases.
I also like softer inserts than the traditional pillow stuffing. My favorite inexpensive feather-filled pillow inserts are at IKEA -- but they don't come in the 18x18 size. I've been using these lightweight down alternative pillow inserts because you can get them in SO many sizes. The prices are hard to beat!
**When you order your inserts, order one size larger than your pillow cover for a fuller look!
I've linked to all of the covers I shared here (and more) below...
Amazon pillow cover options under $20
Striped/leather covers in basement
Order this modern set of five black and white and leather covers and decorate a whole room!
This set of four modern boho covers does all the work of matching for you
Etsy pillows under $20
Hobby Lobby pillow covers in our basement
By the way, if you can sew a somewhat straight line, you can use this hack for making pillow covers for super cheap:
It's especially great for seasonal pillows! (See how to add a zipper here.)
See more of our home here. To shop items in our home, click here! Never miss a post by signing up to get posts via email.
Via https://www.thriftydecorchick.com/2021/04/where-to-buy-throw-pillows-under-20.html
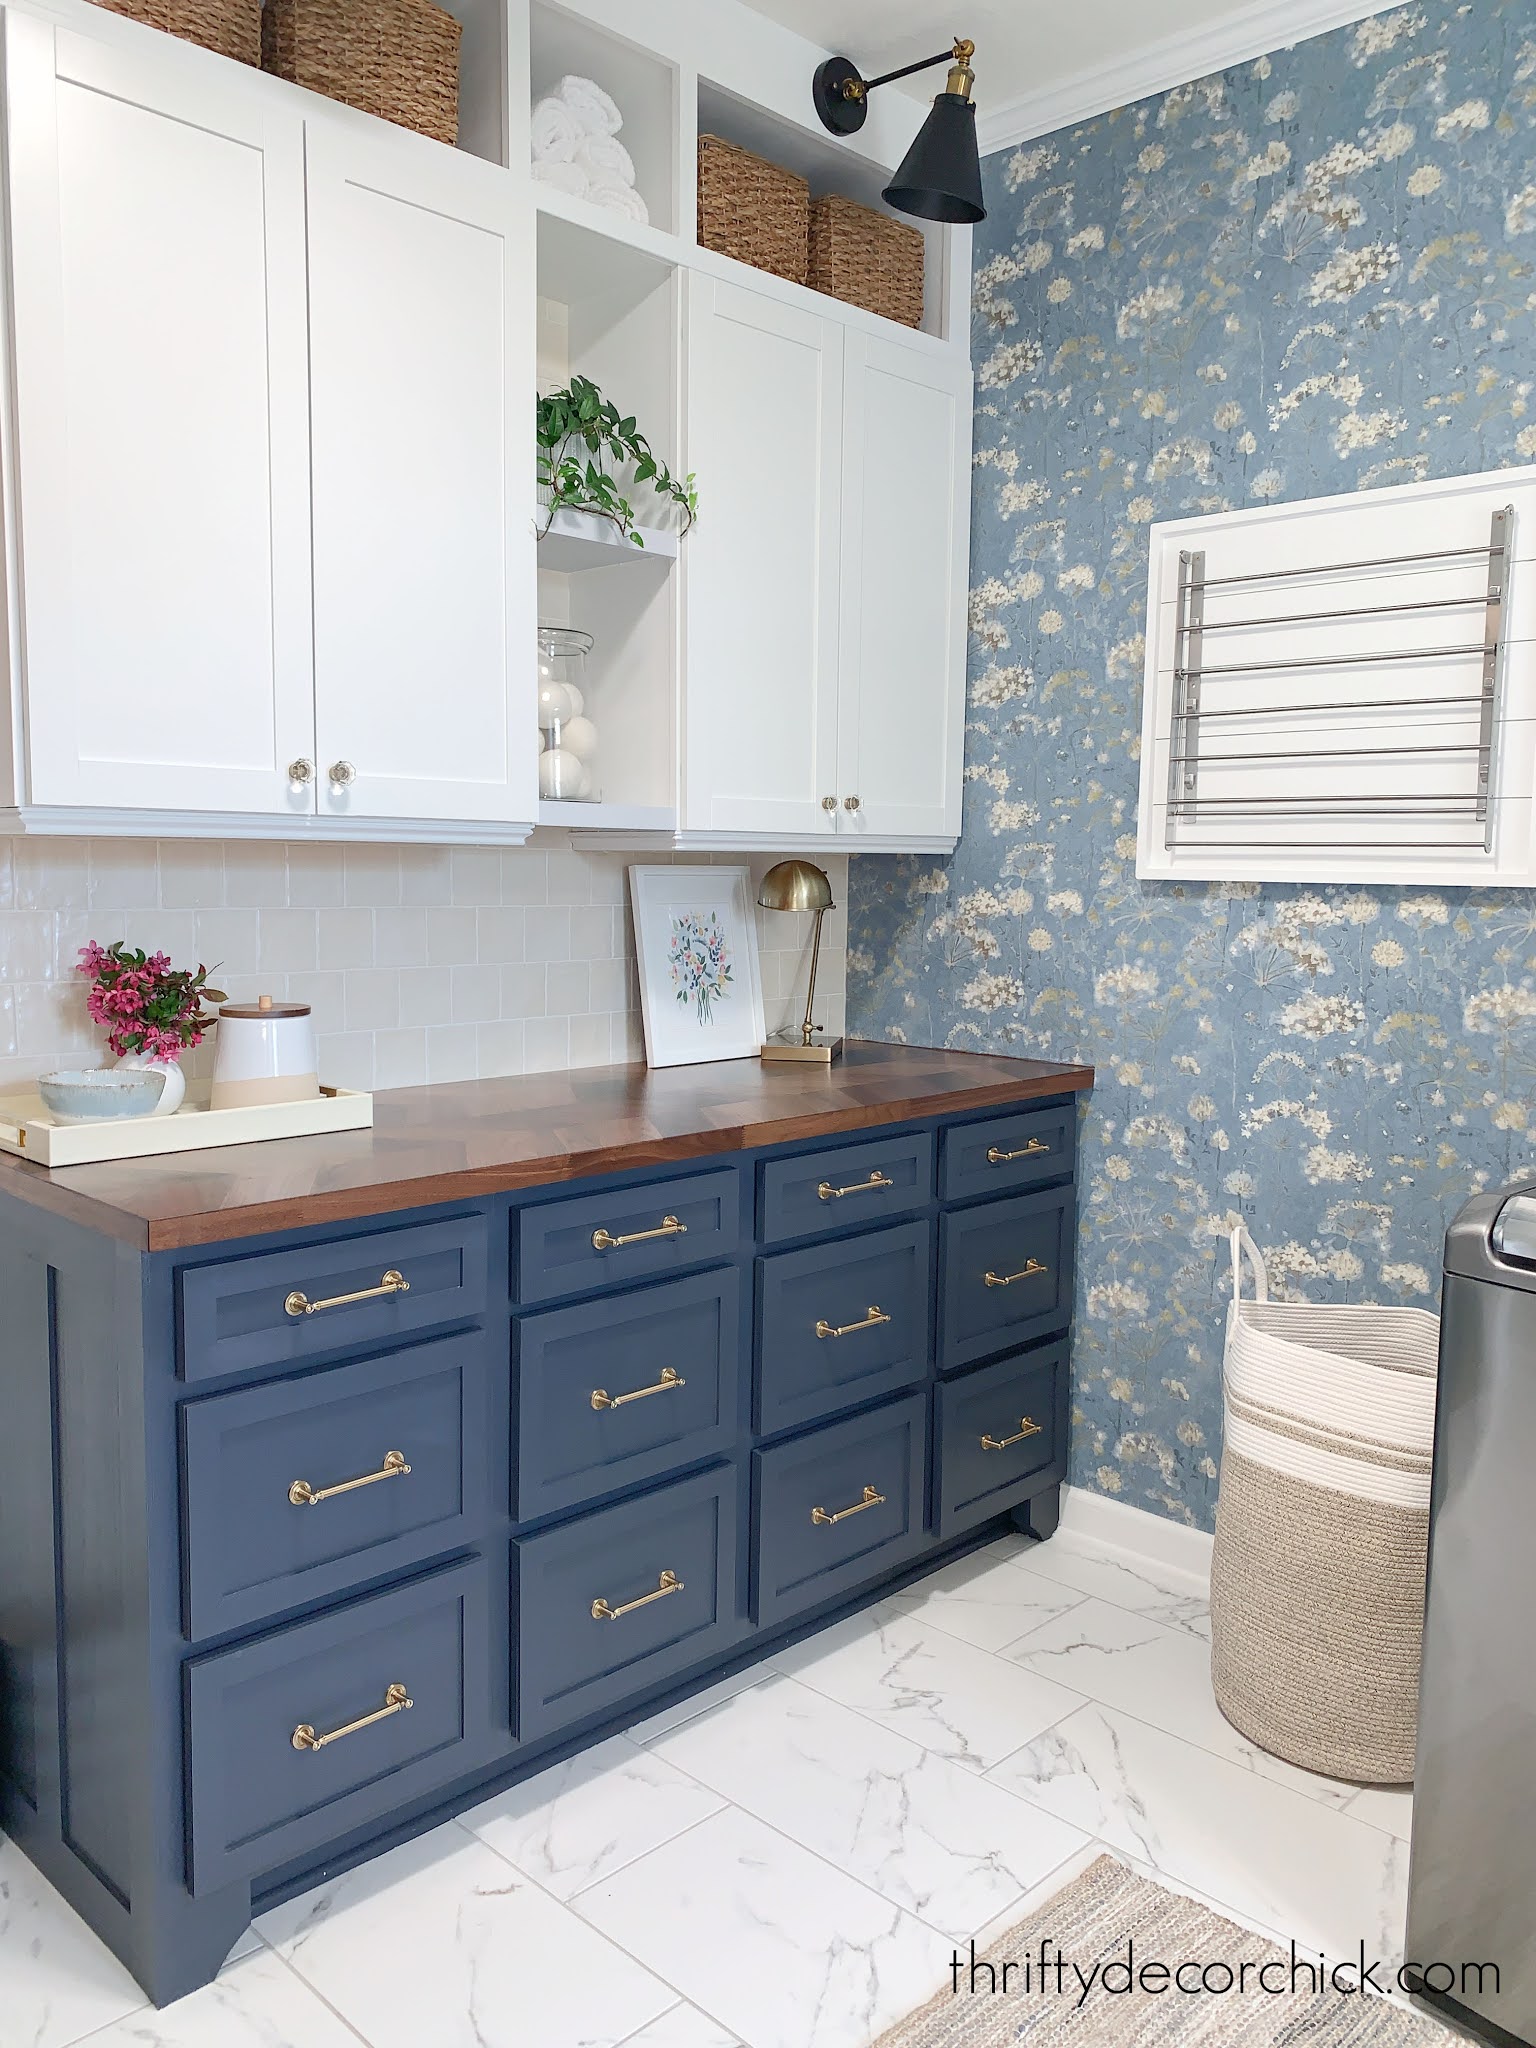
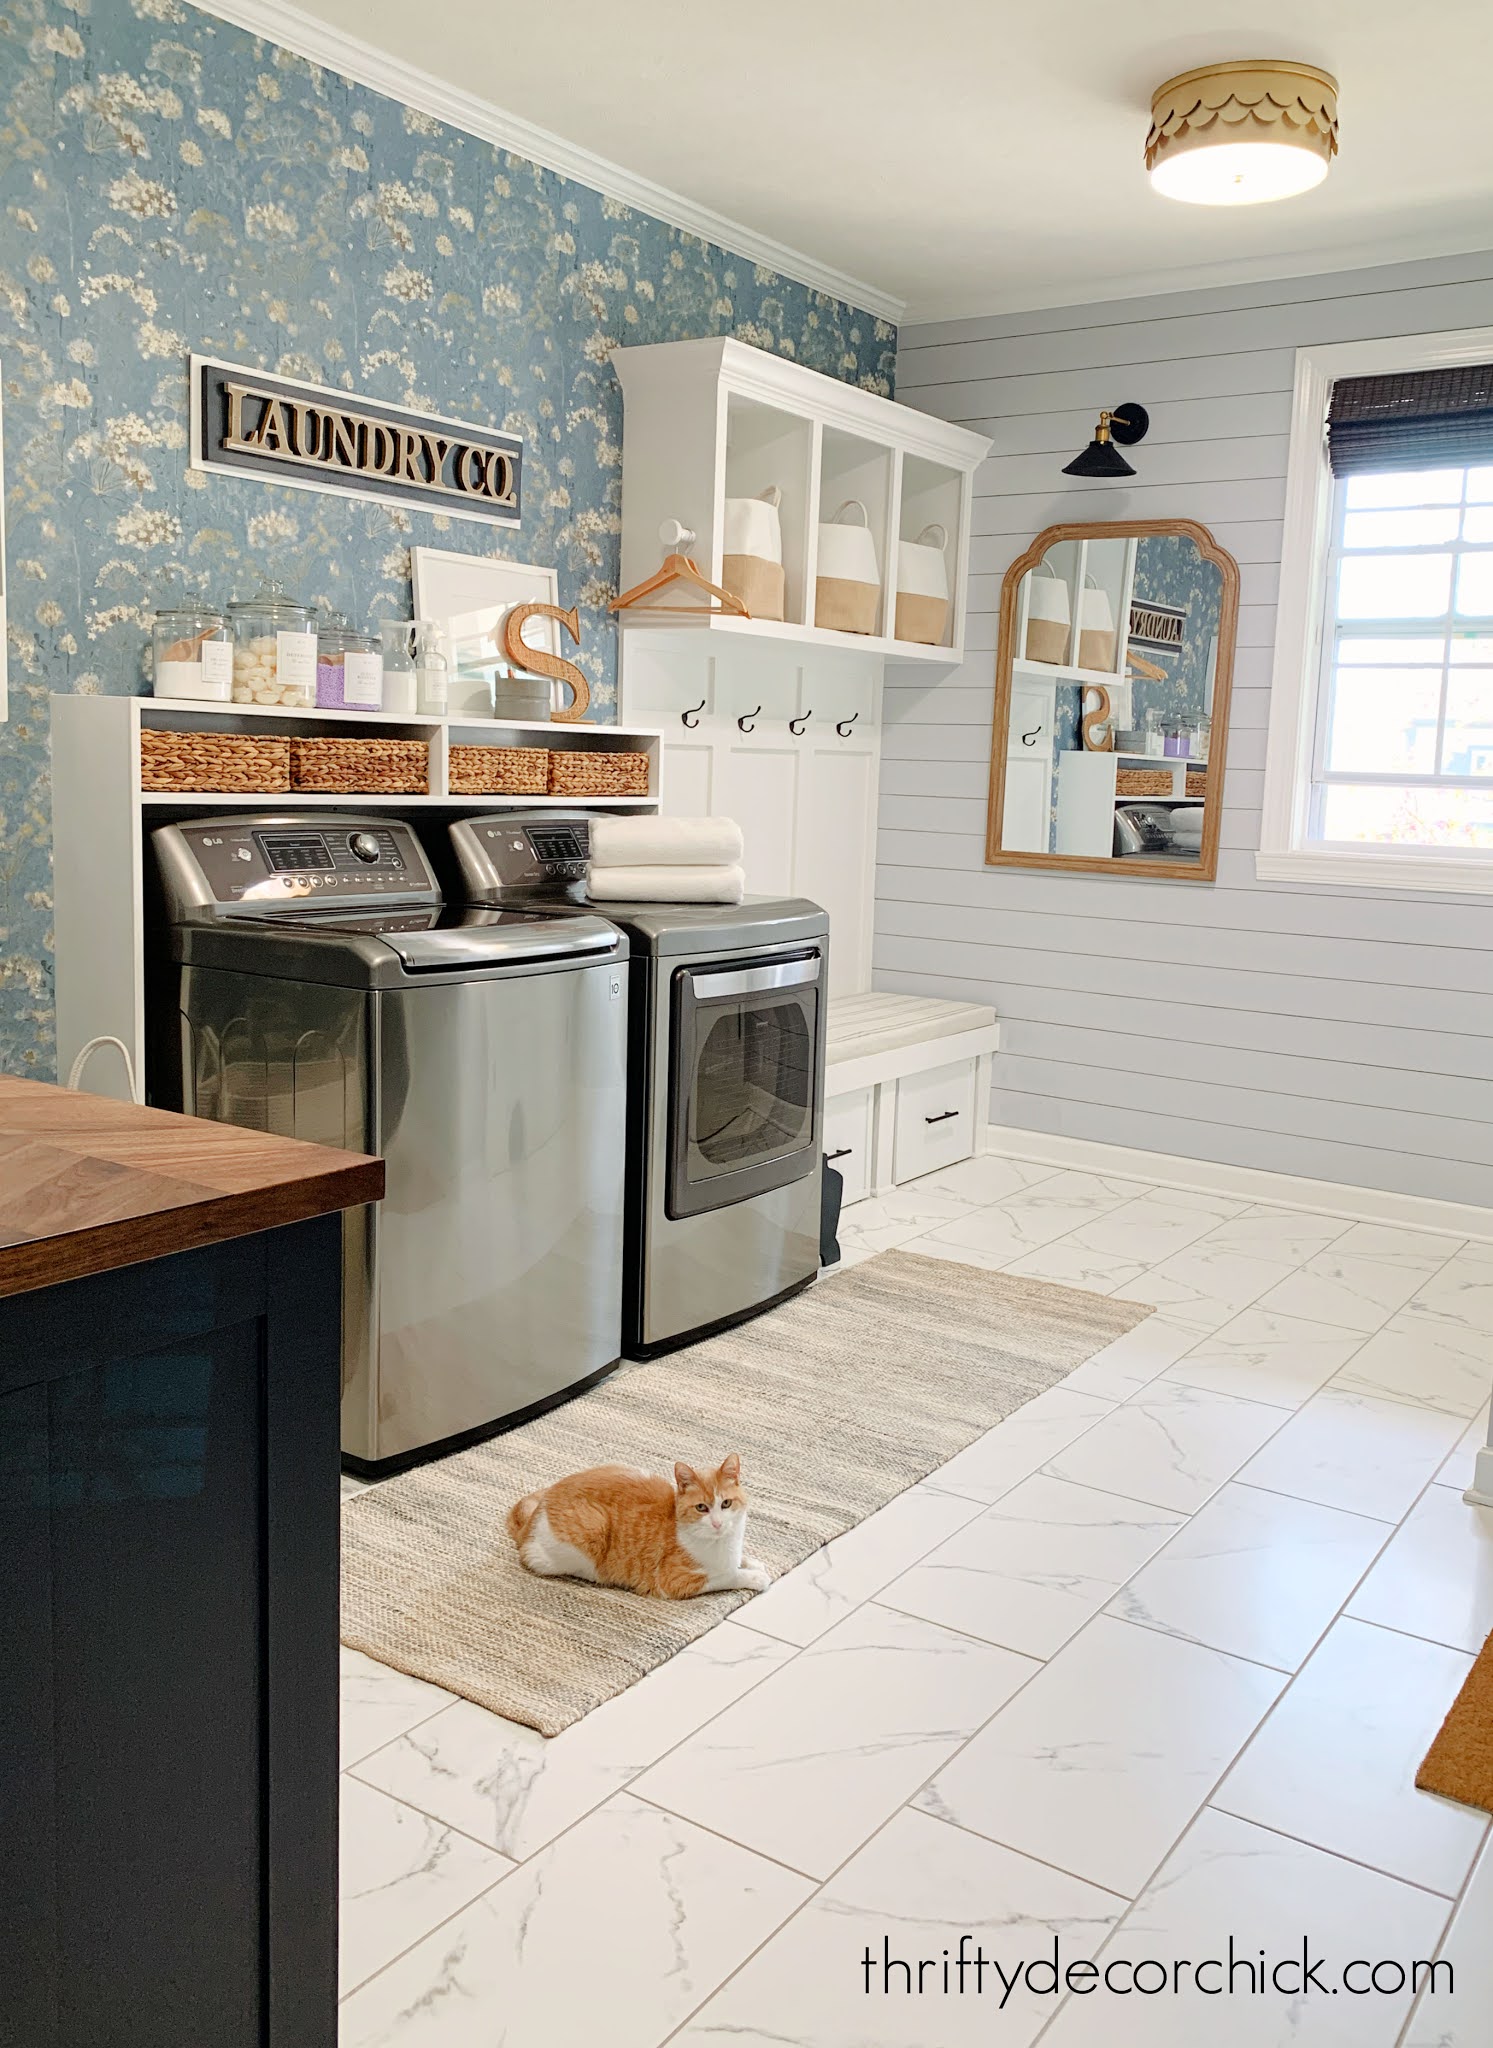
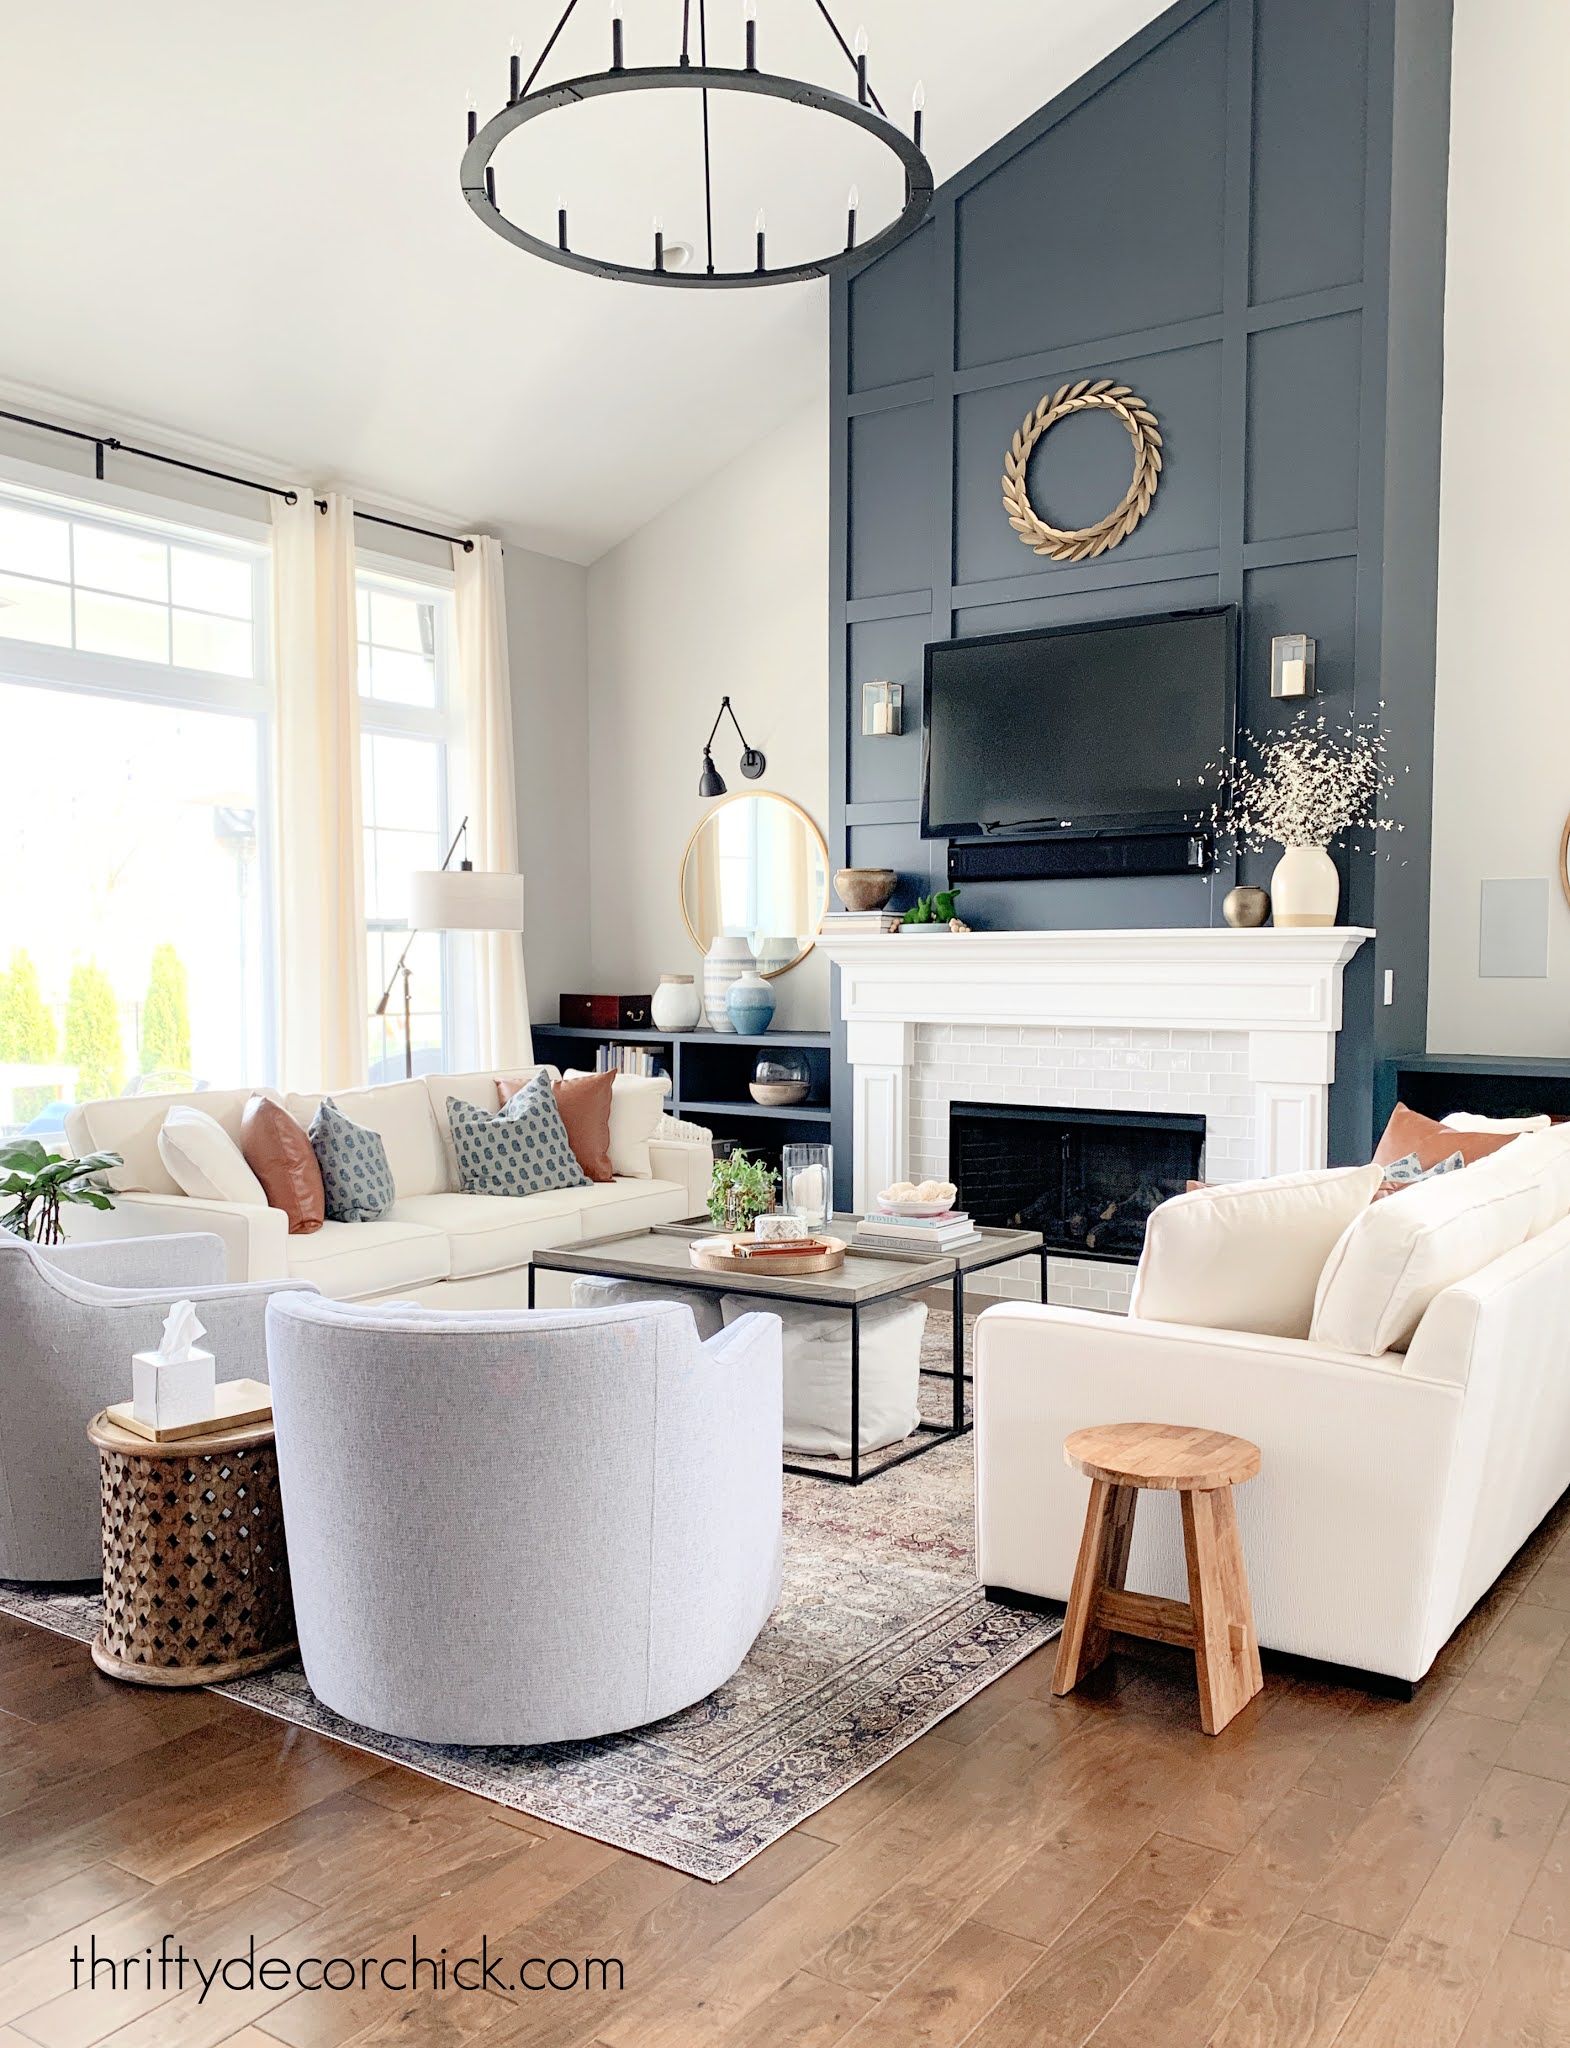
Whoohoo, the reveal day is here -- I'm done with the laundry and mud room makeover! The main goal of these updates was to add more functional storage, and I definitely accomplished that.
And even with all of that new storage, this has become the prettiest room in the house! It is so lovely! Marrying form and function is my favorite thing.
Before I share a million pictures, let's recap where we started and what I've added over the past couple of months. You can see my plan to add more storage to this mud/laundry room combo here.
This side of the room was where I focused most of my time:
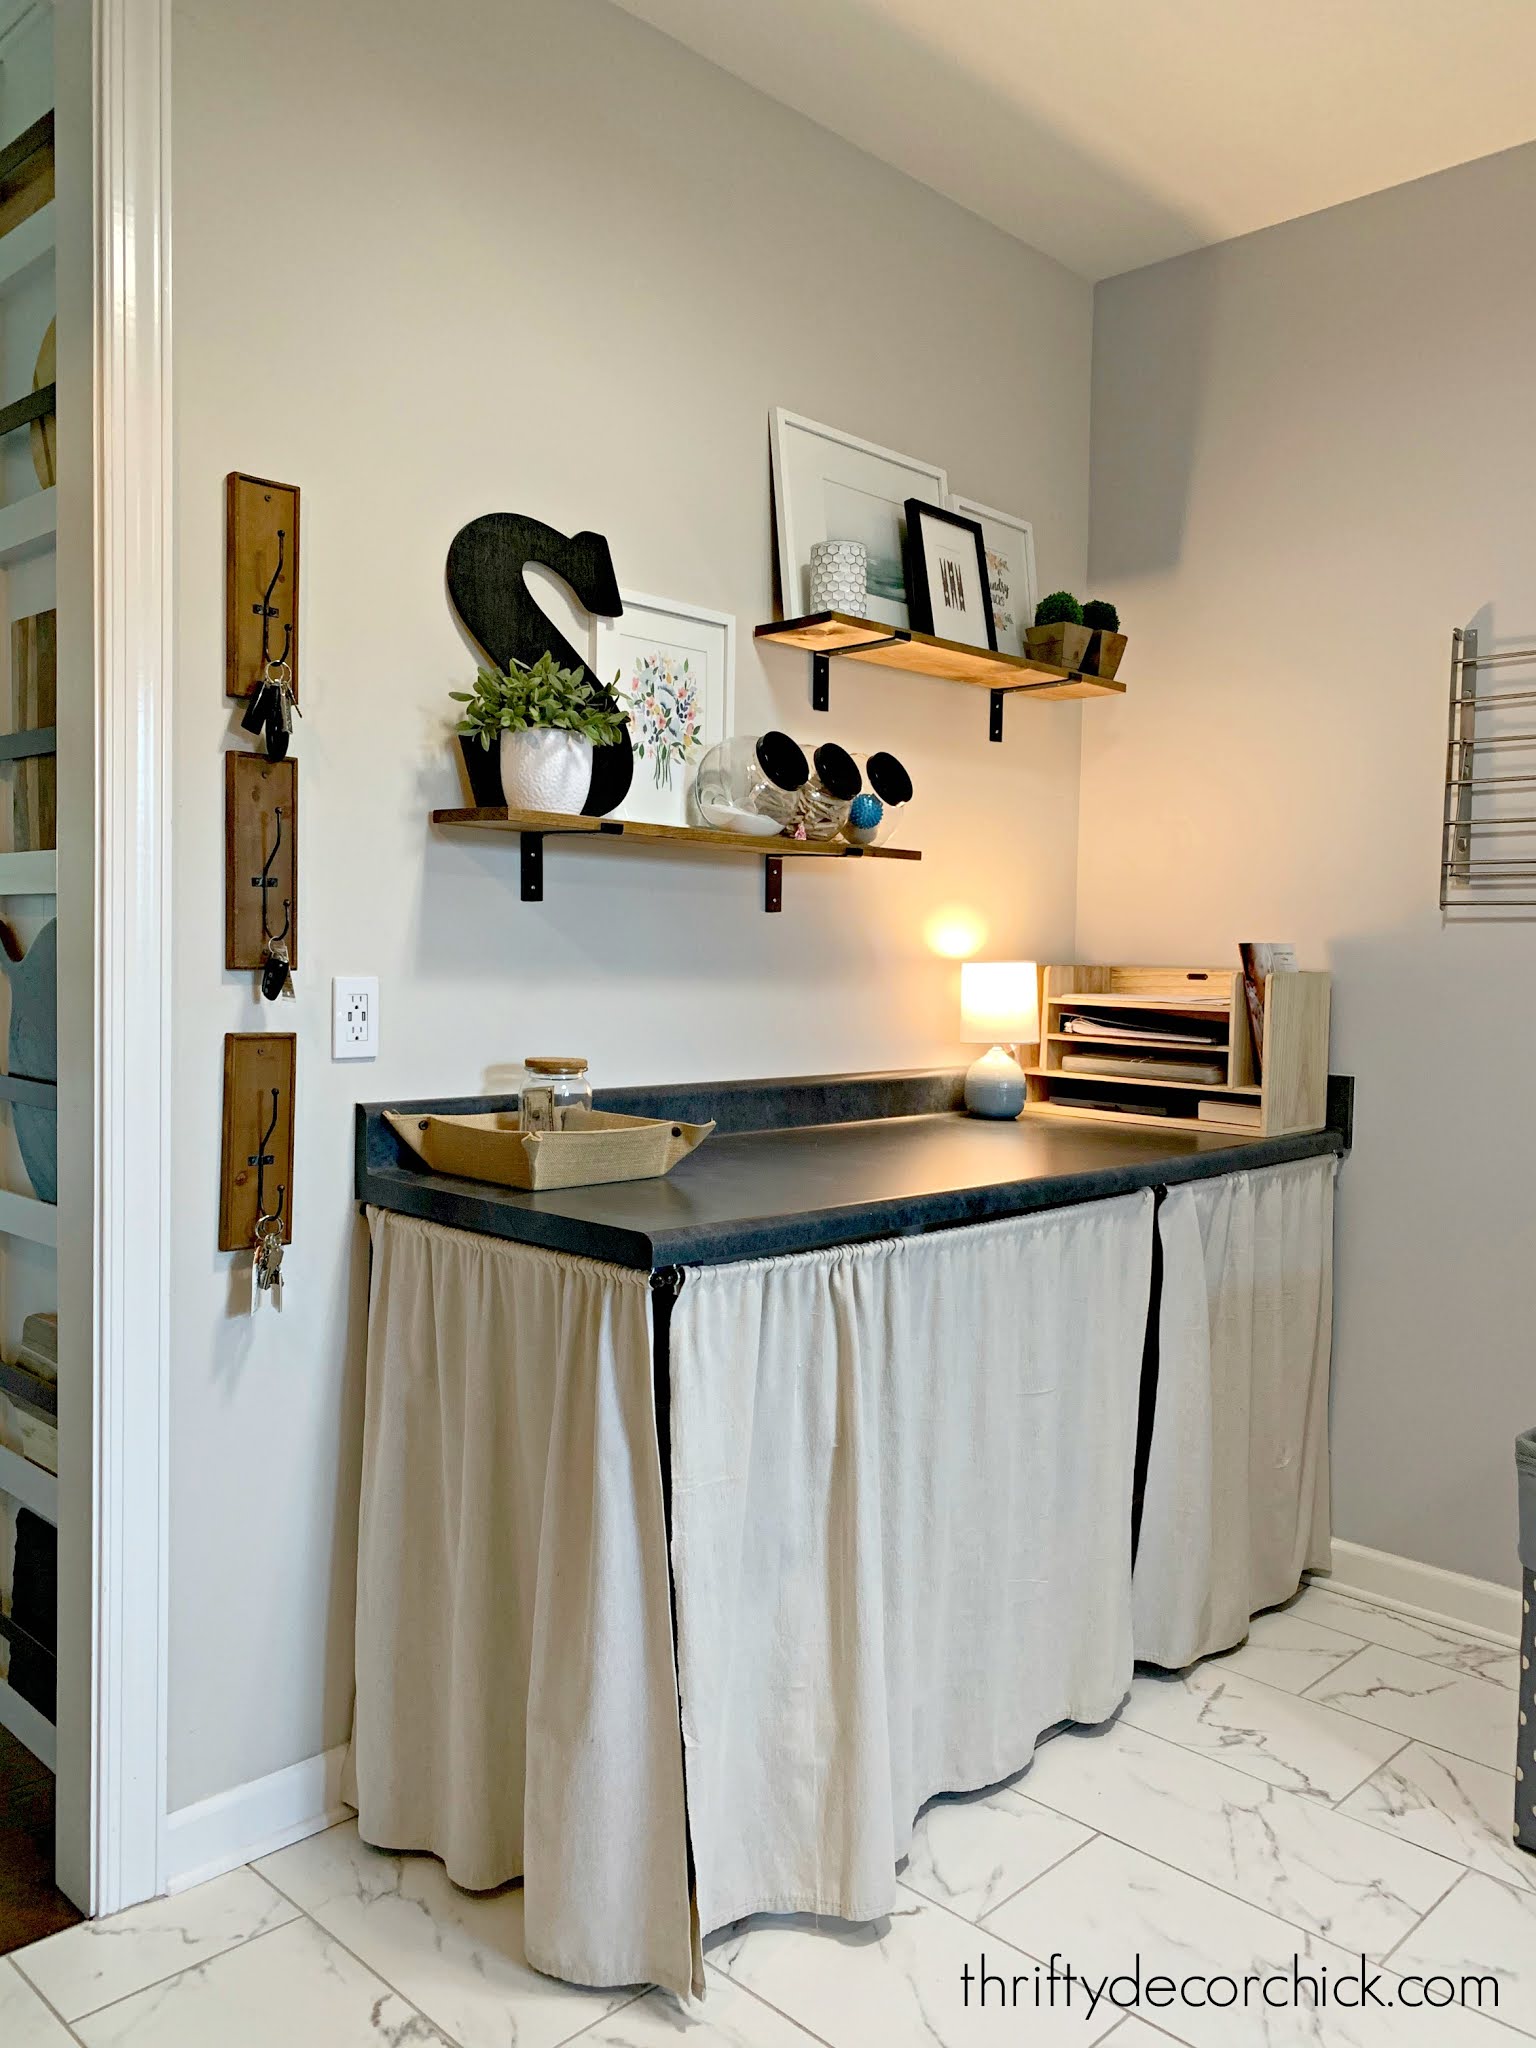
We had the countertop to start with, and I added a curtain around the bottom to hide the kitty litter.
Problem was, the counter was usually a MESS of stuff that didn't have a home or needed to go out to the garage:

This post may contain affiliate links for your convenience.
See my policies and disclosure page for more information.
So I had a couple of upper cabinets moved over to this spot, and I installed the four base cabinets with drawers:
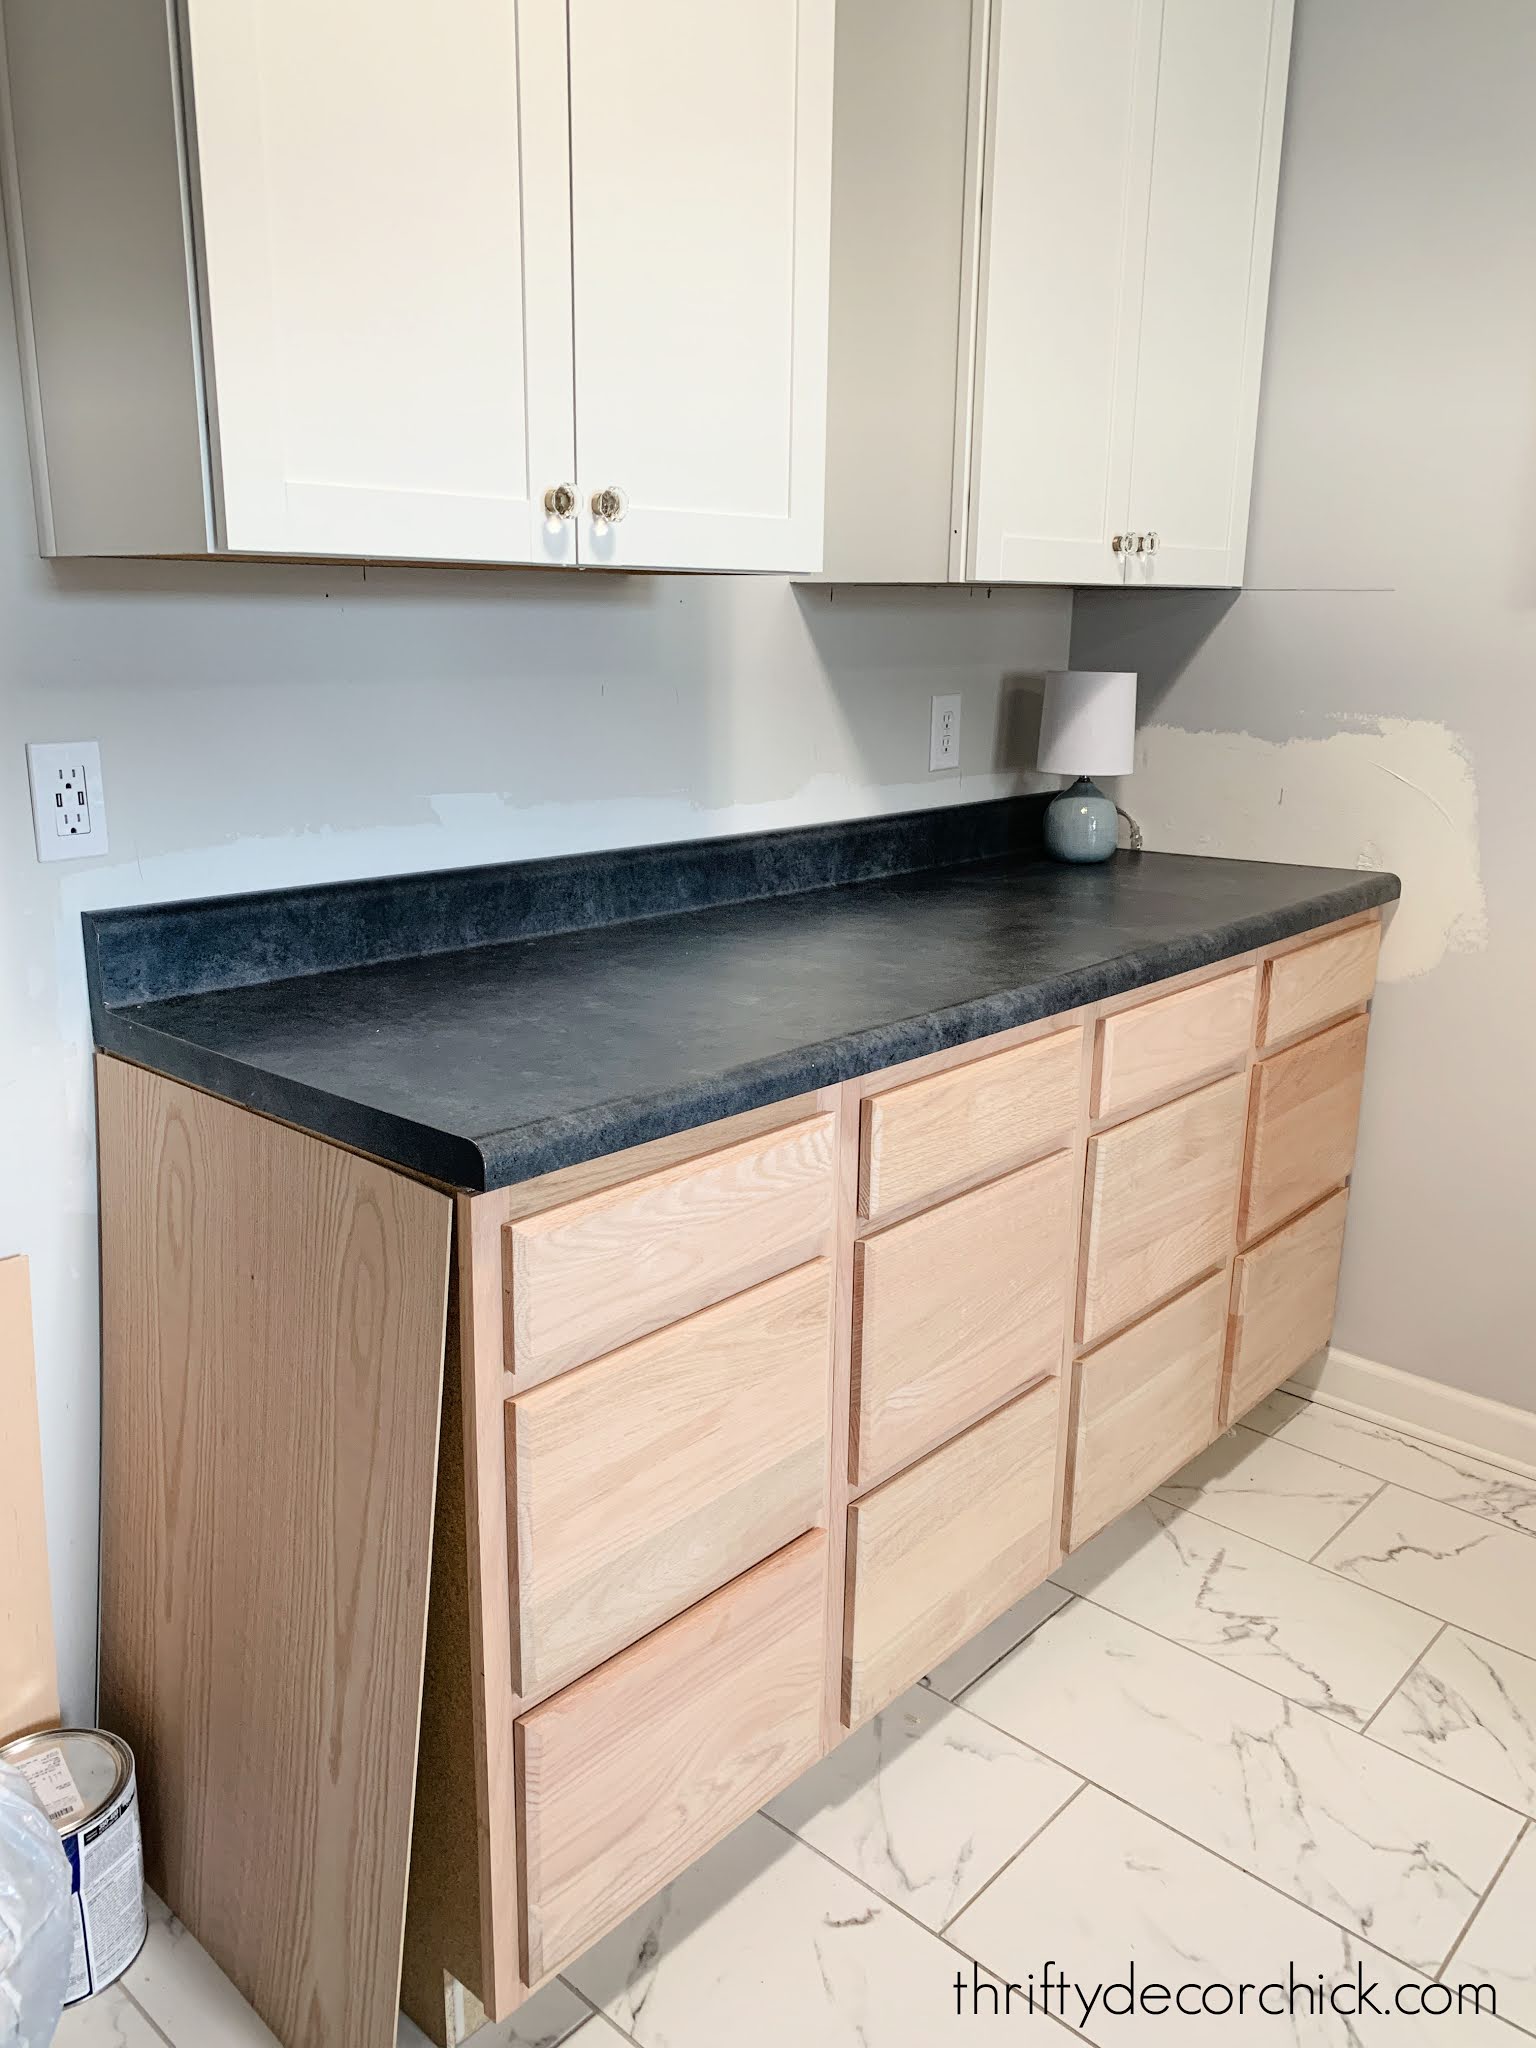
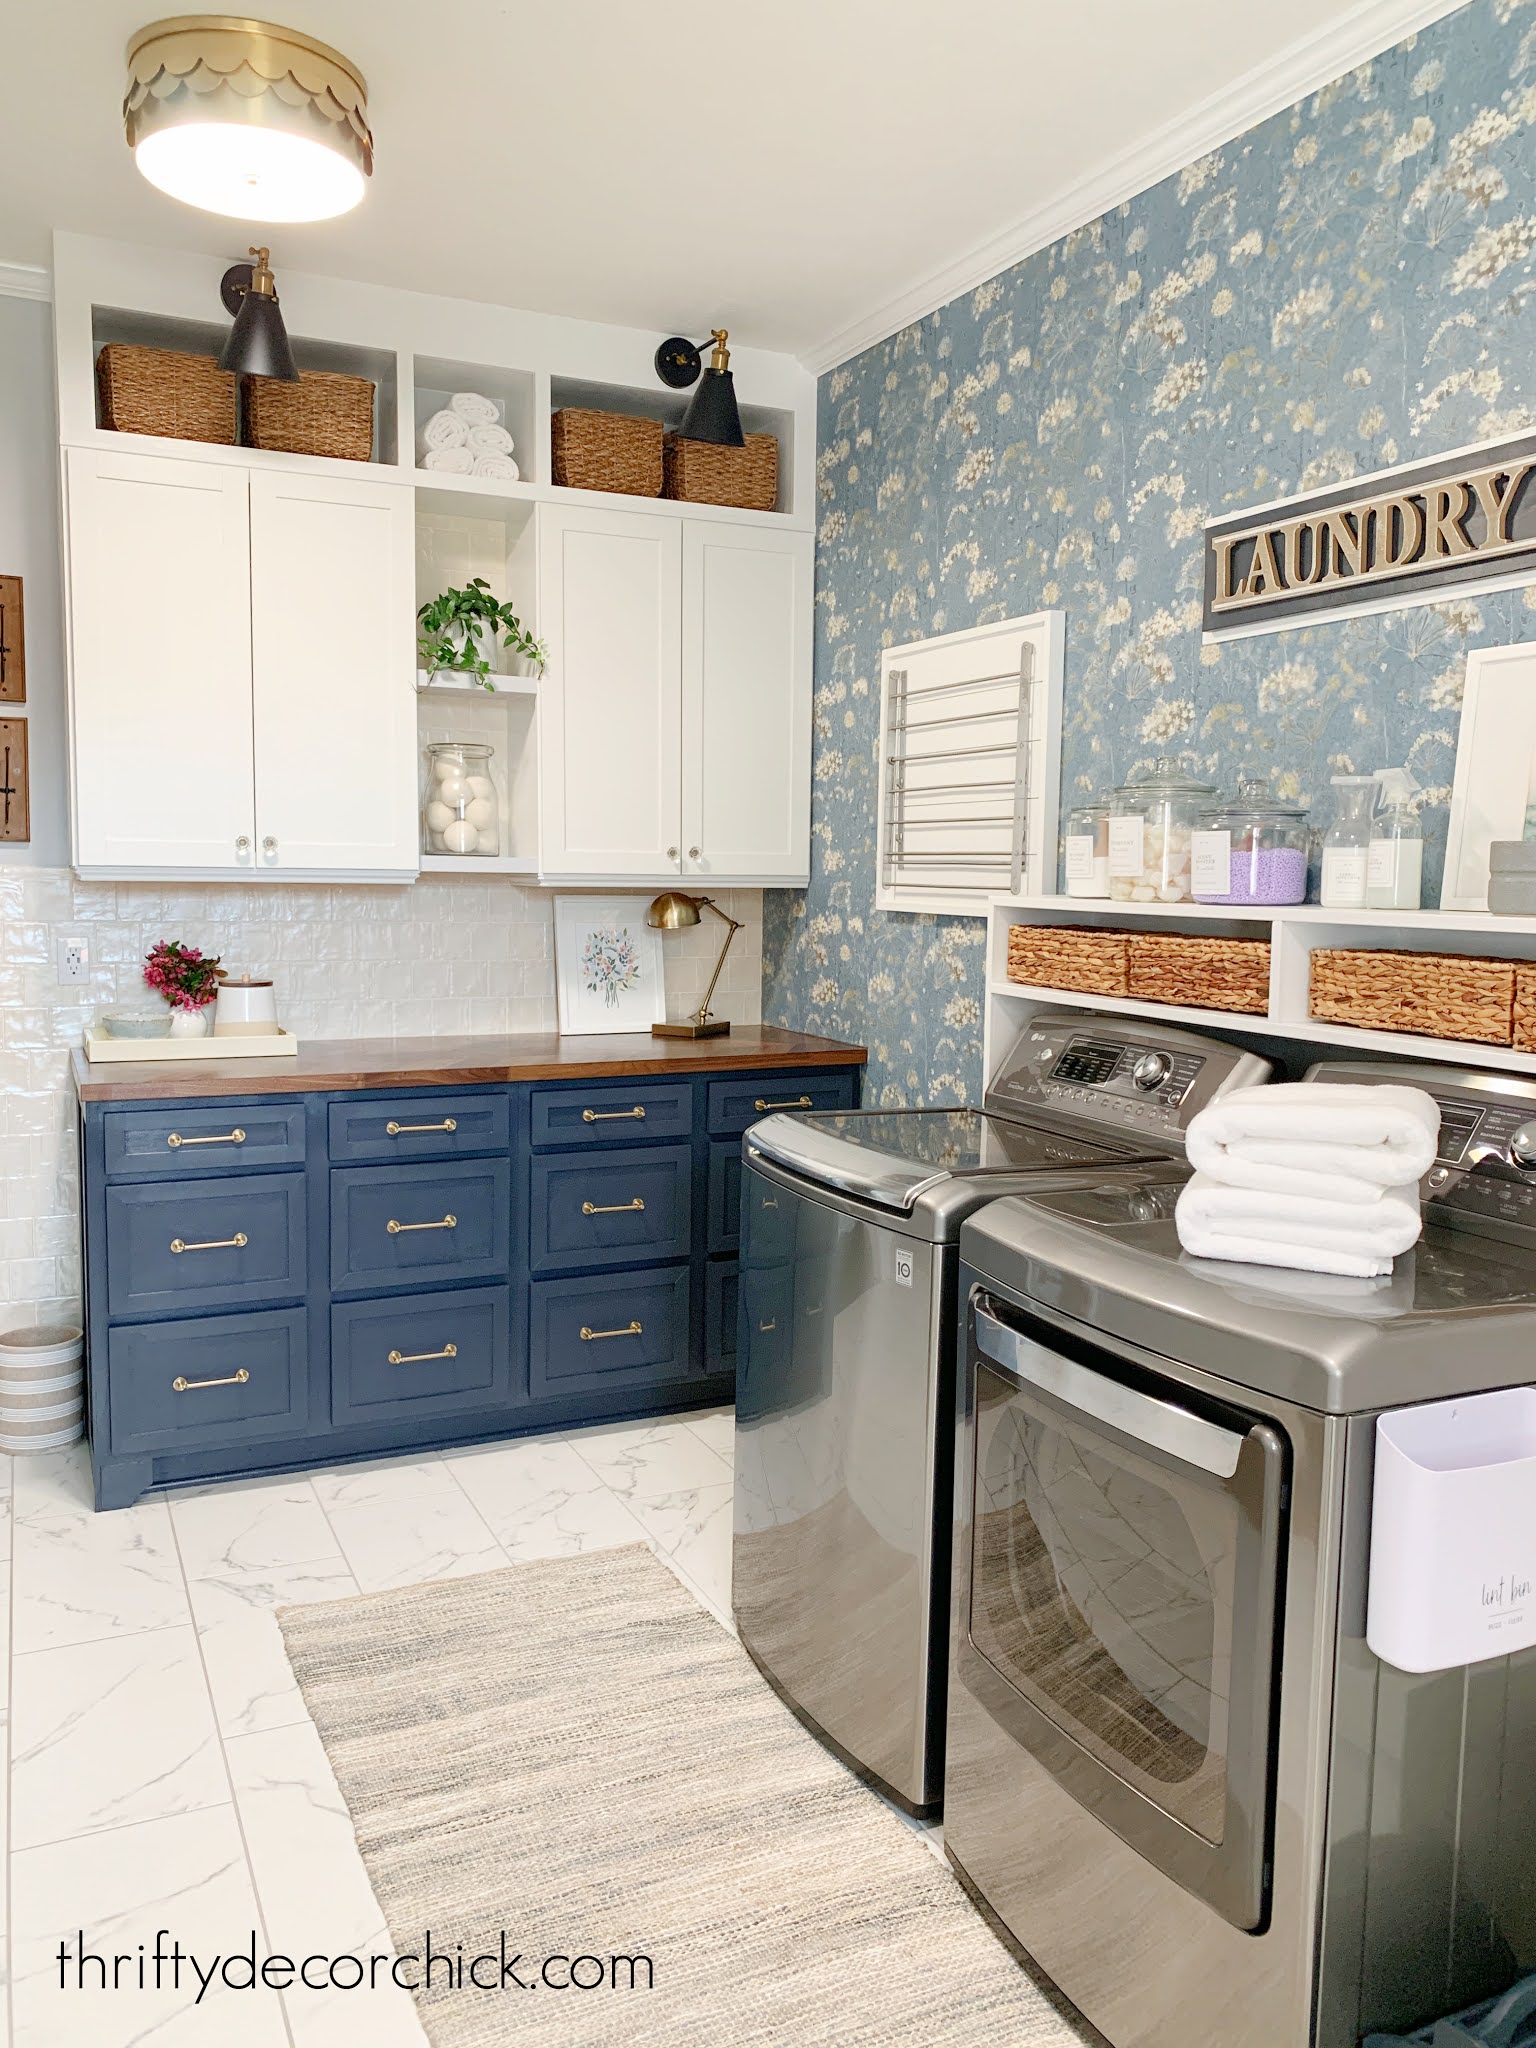
I later installed that gorgeous herringbone countertop, added some much needed character to the front of those cabinets, then installed the tile and shelves:

I decided early on that I would need to fill in that space above the cabinets. More on that in a bit!
These upper cabinets were the ones we moved to the other wall -- they didn't function well for us in this spot:

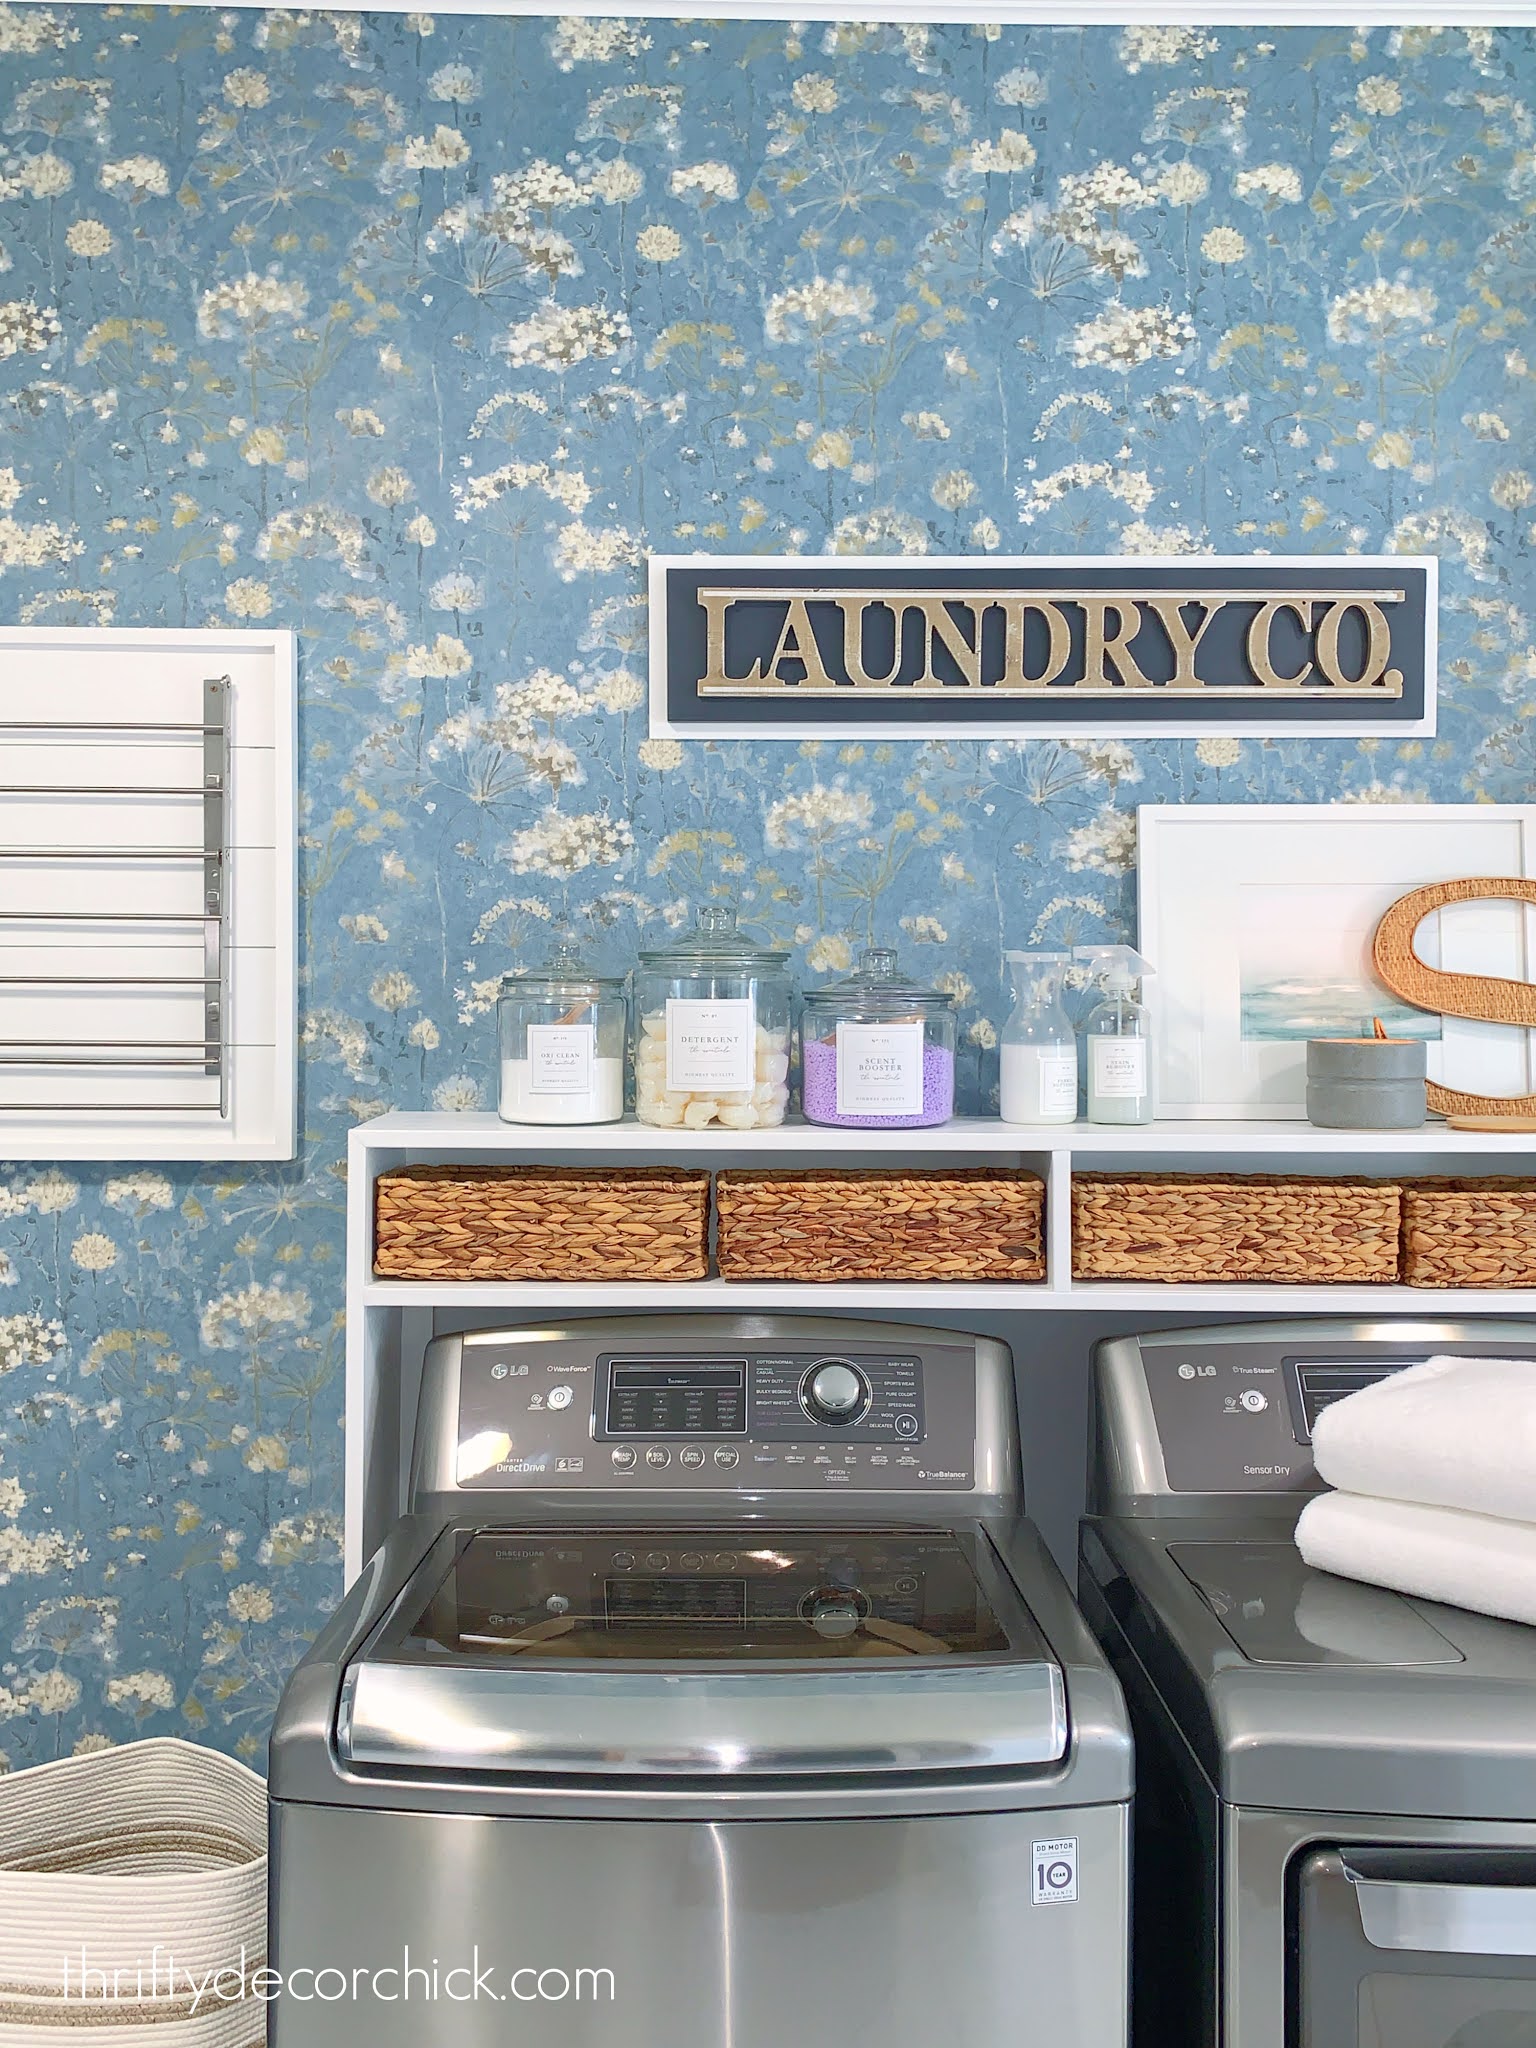
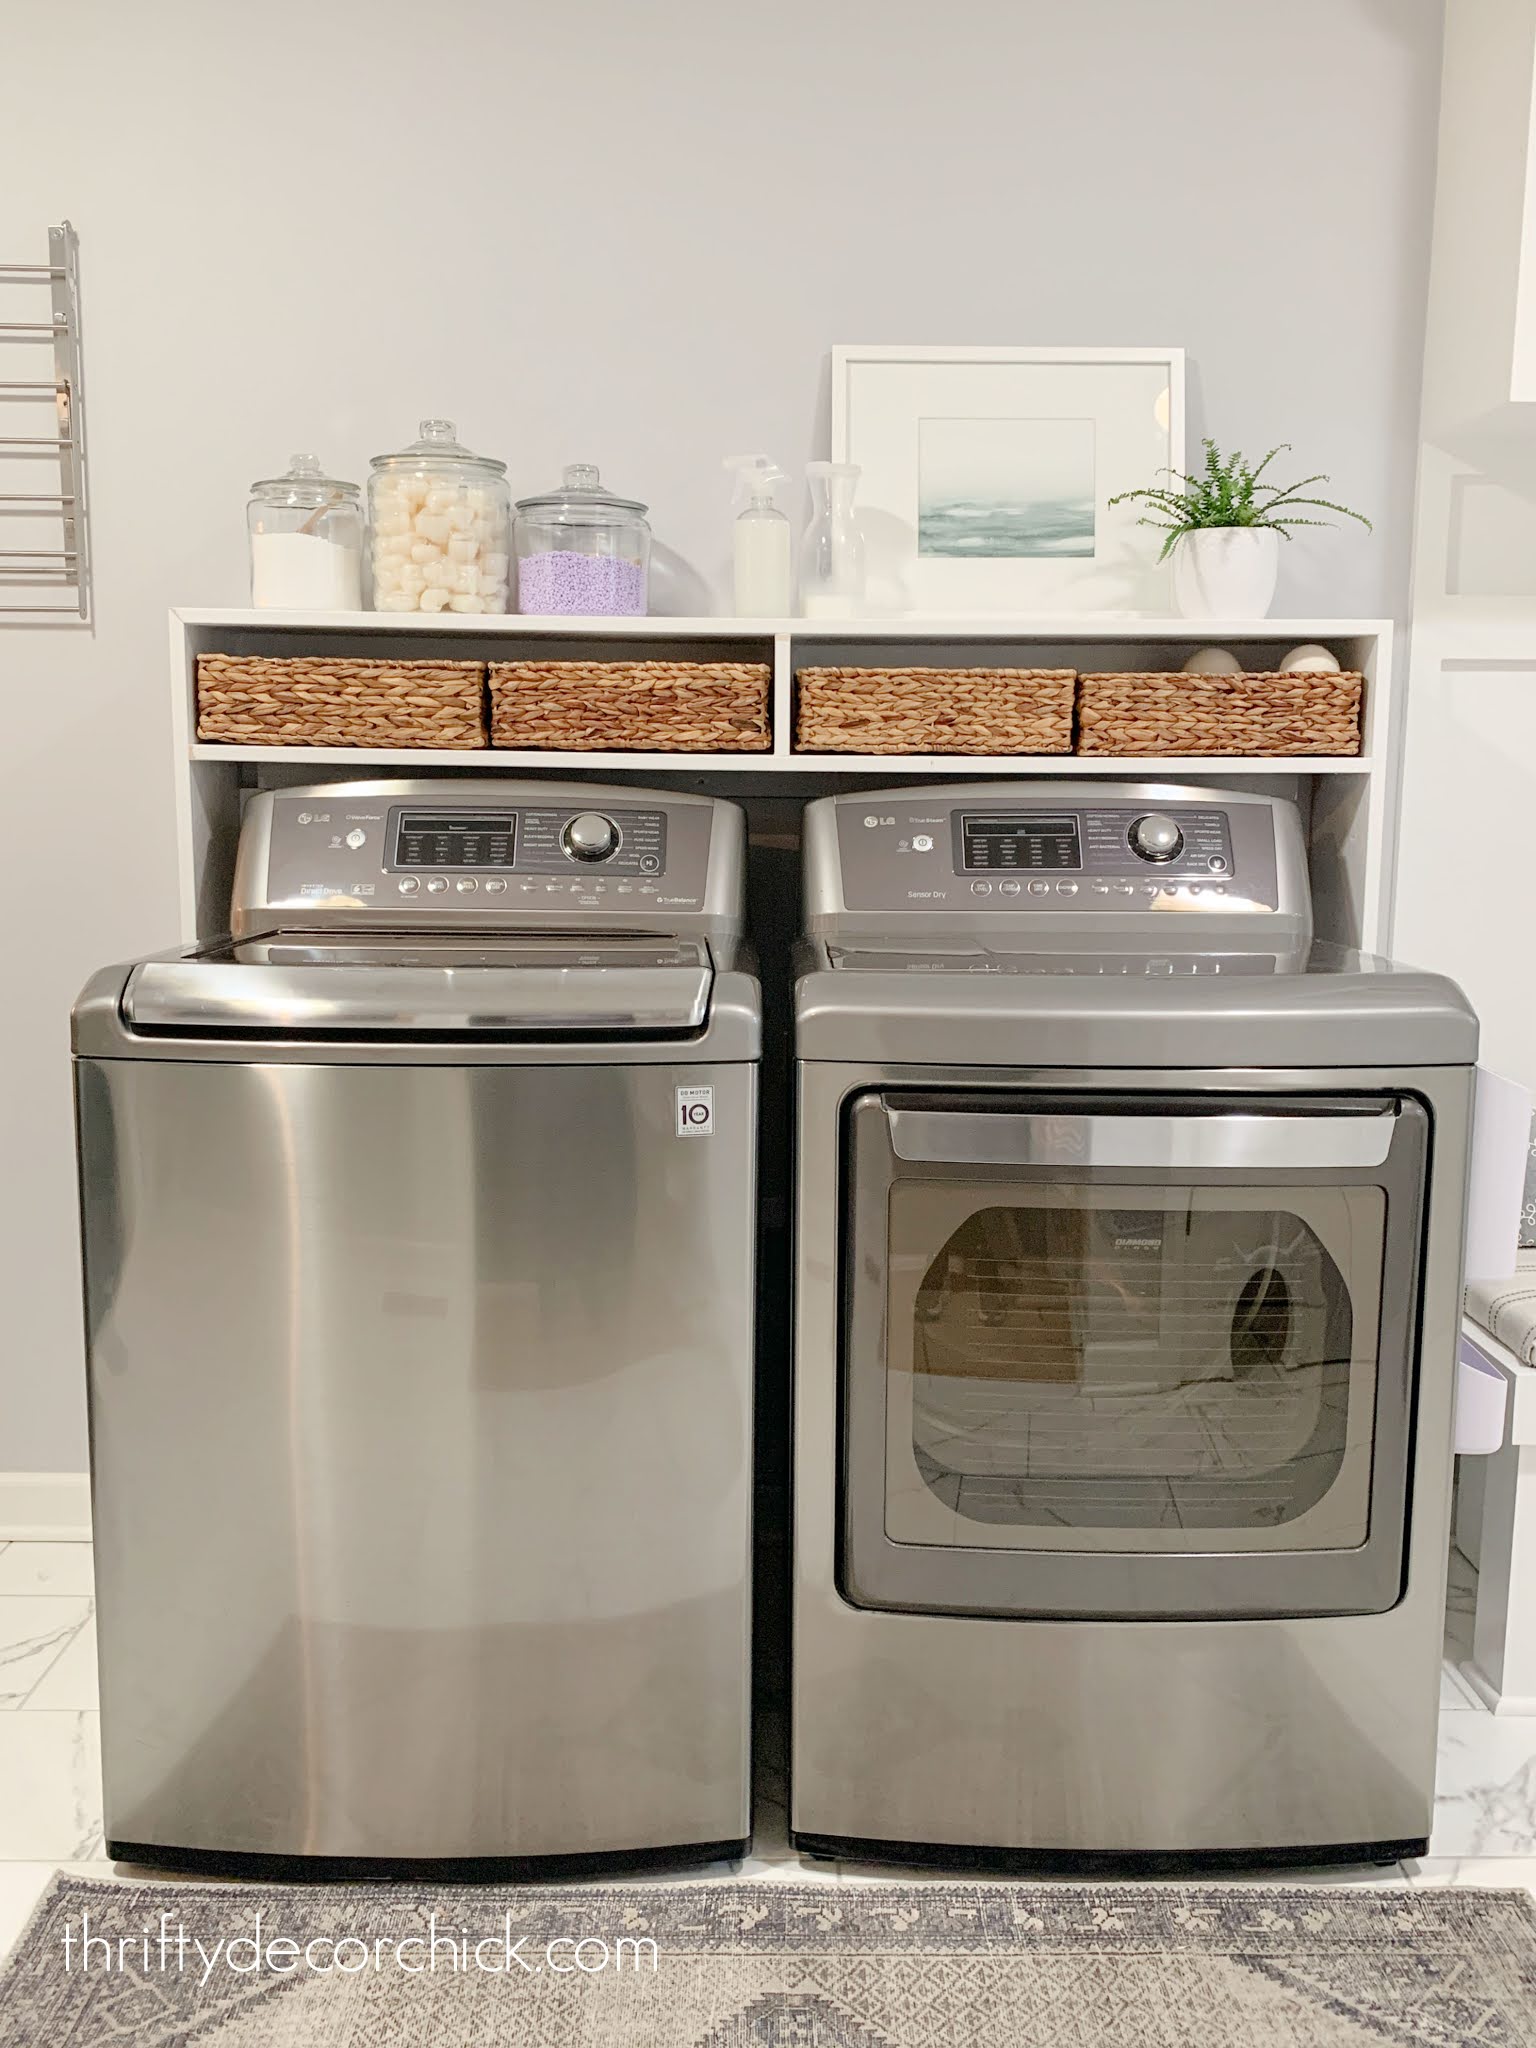
So instead I built this long shelf over our top loader washer and dryer:

It works SO much better for us! I also did this at our old house and we missed it.
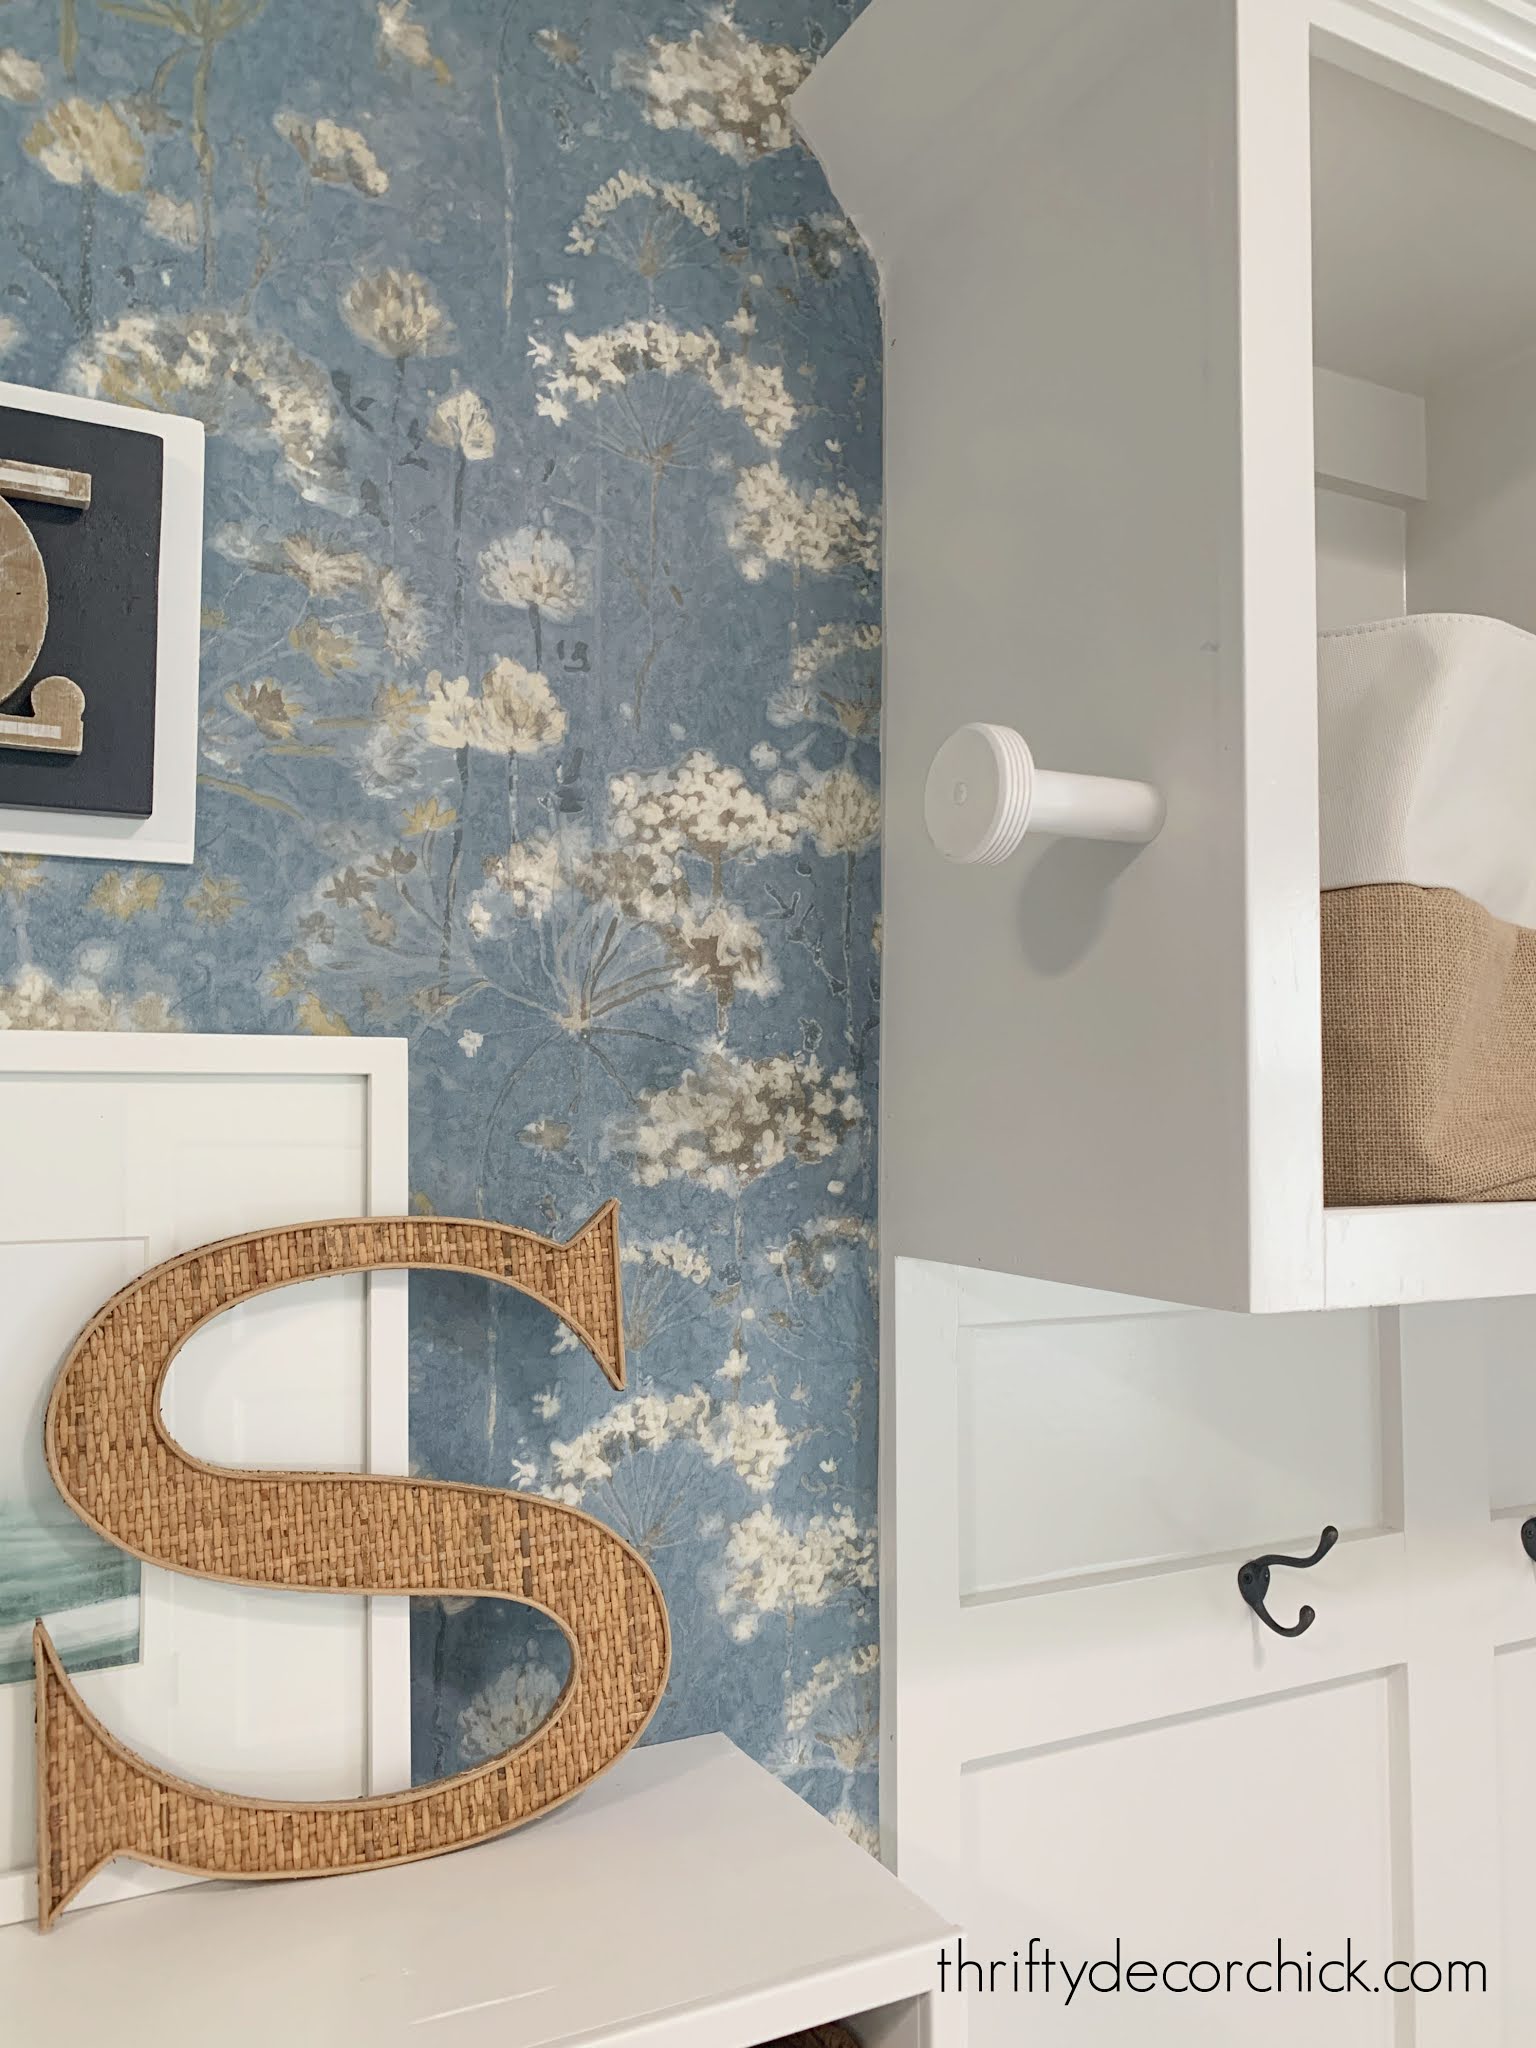
The final piece of this pretty puzzle was the blue and cream floral wallpaper I picked for the long wall in here:

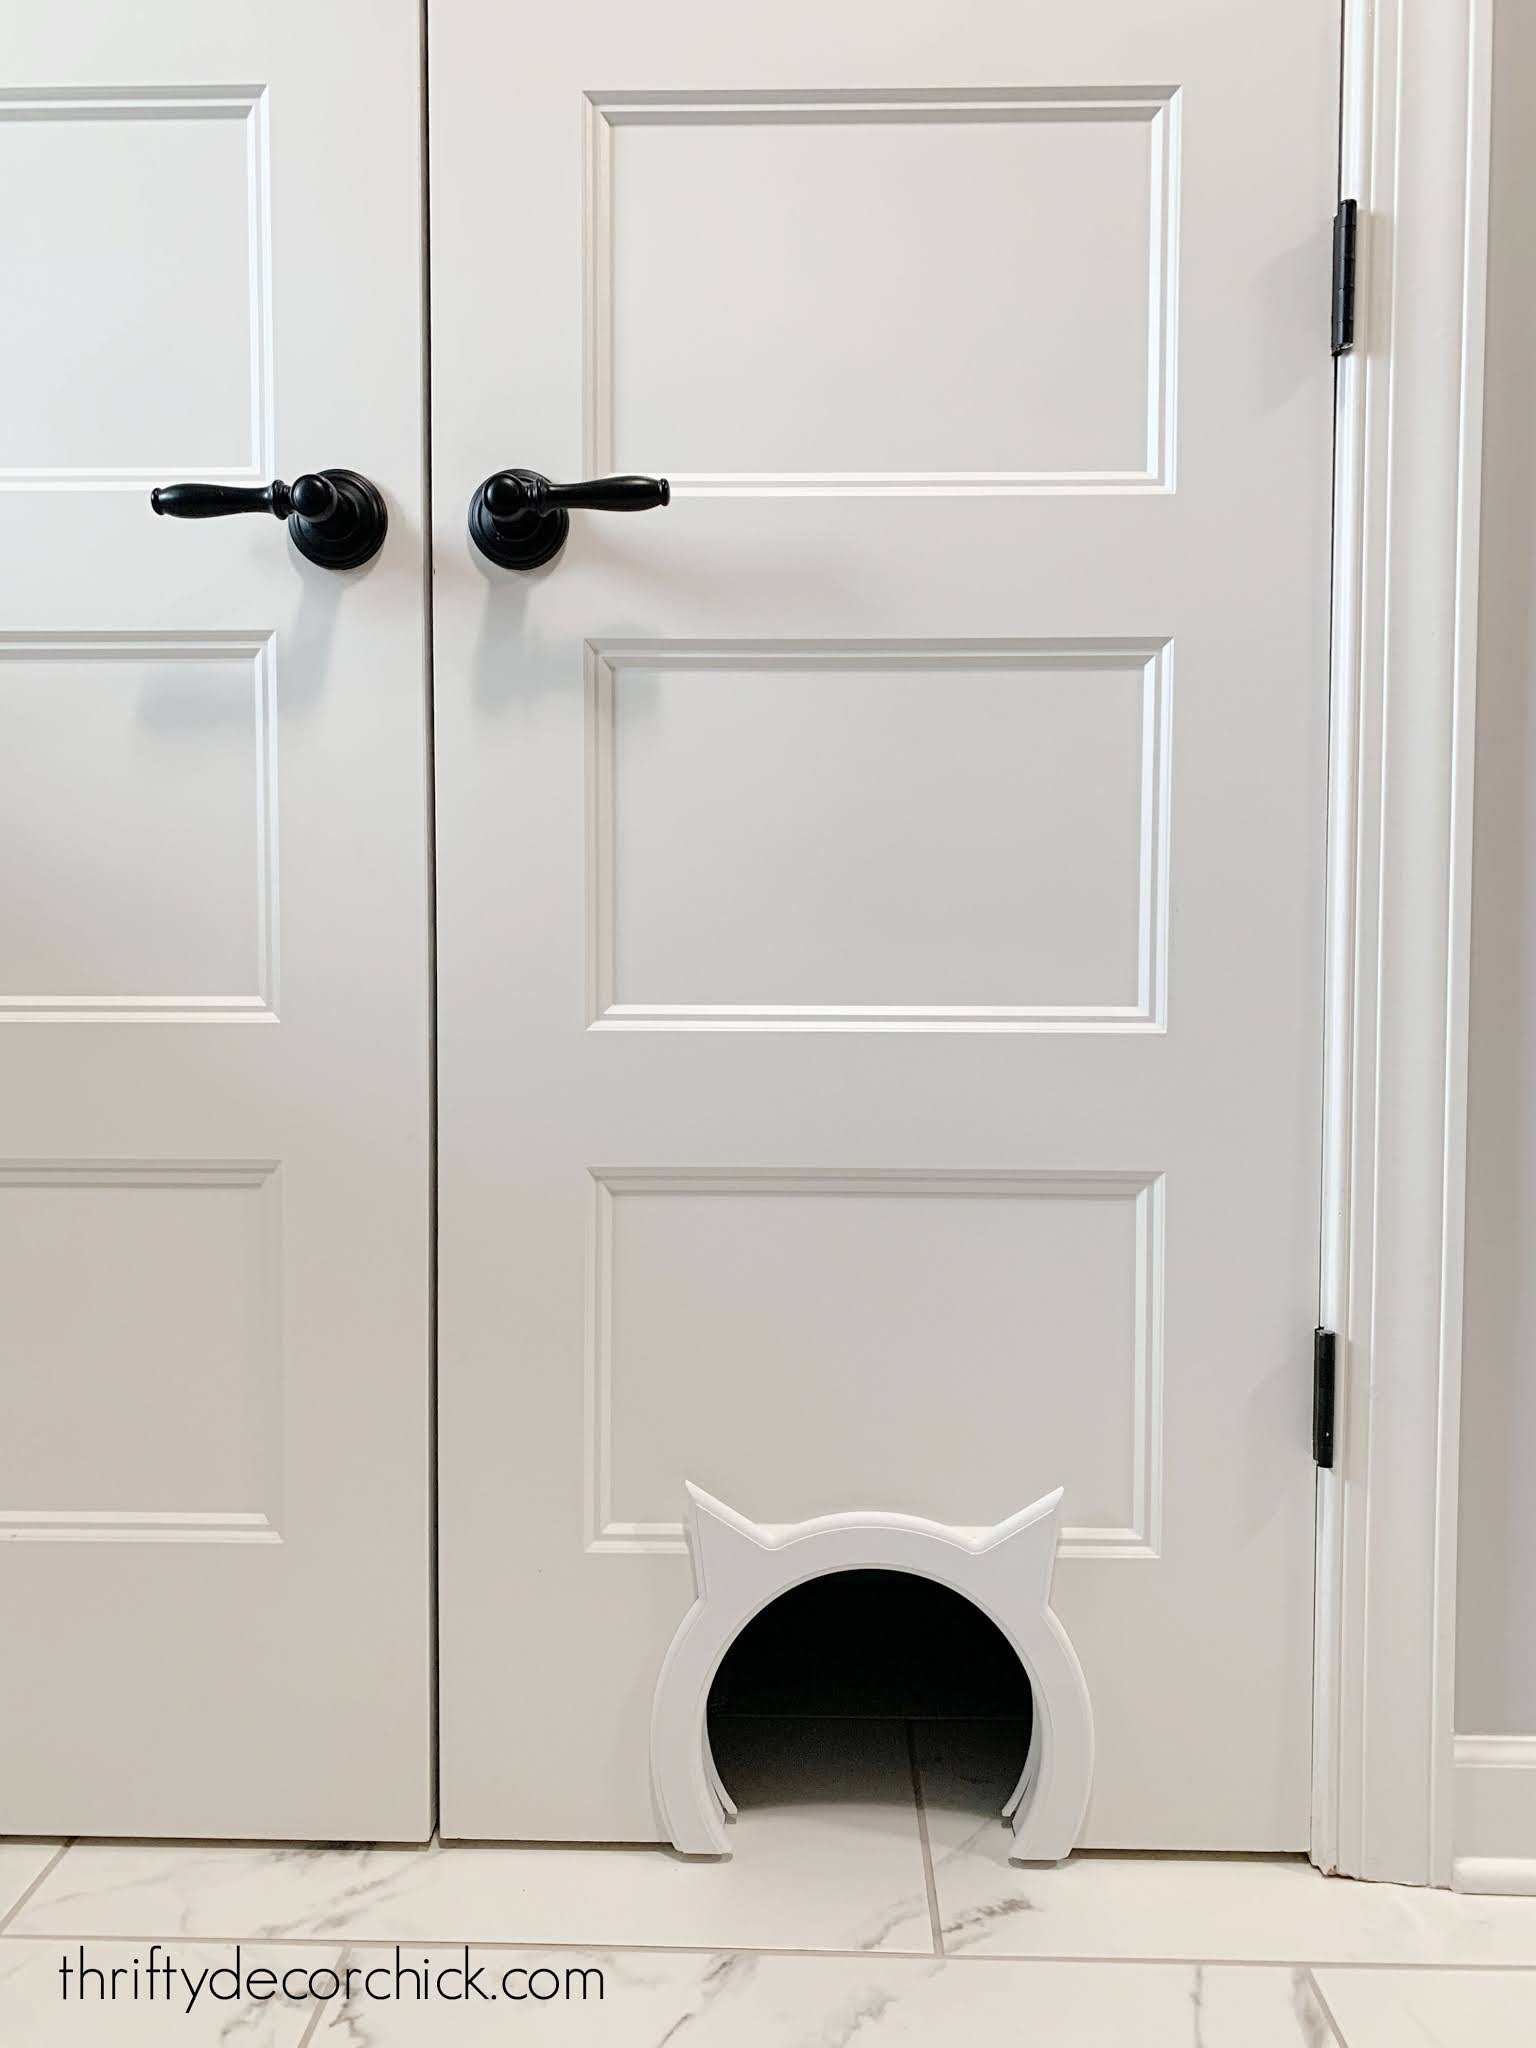
I can't forget the extra storage in this closet as well! I added those floating shelves in that dead space and moved the kitty litter into this closet:
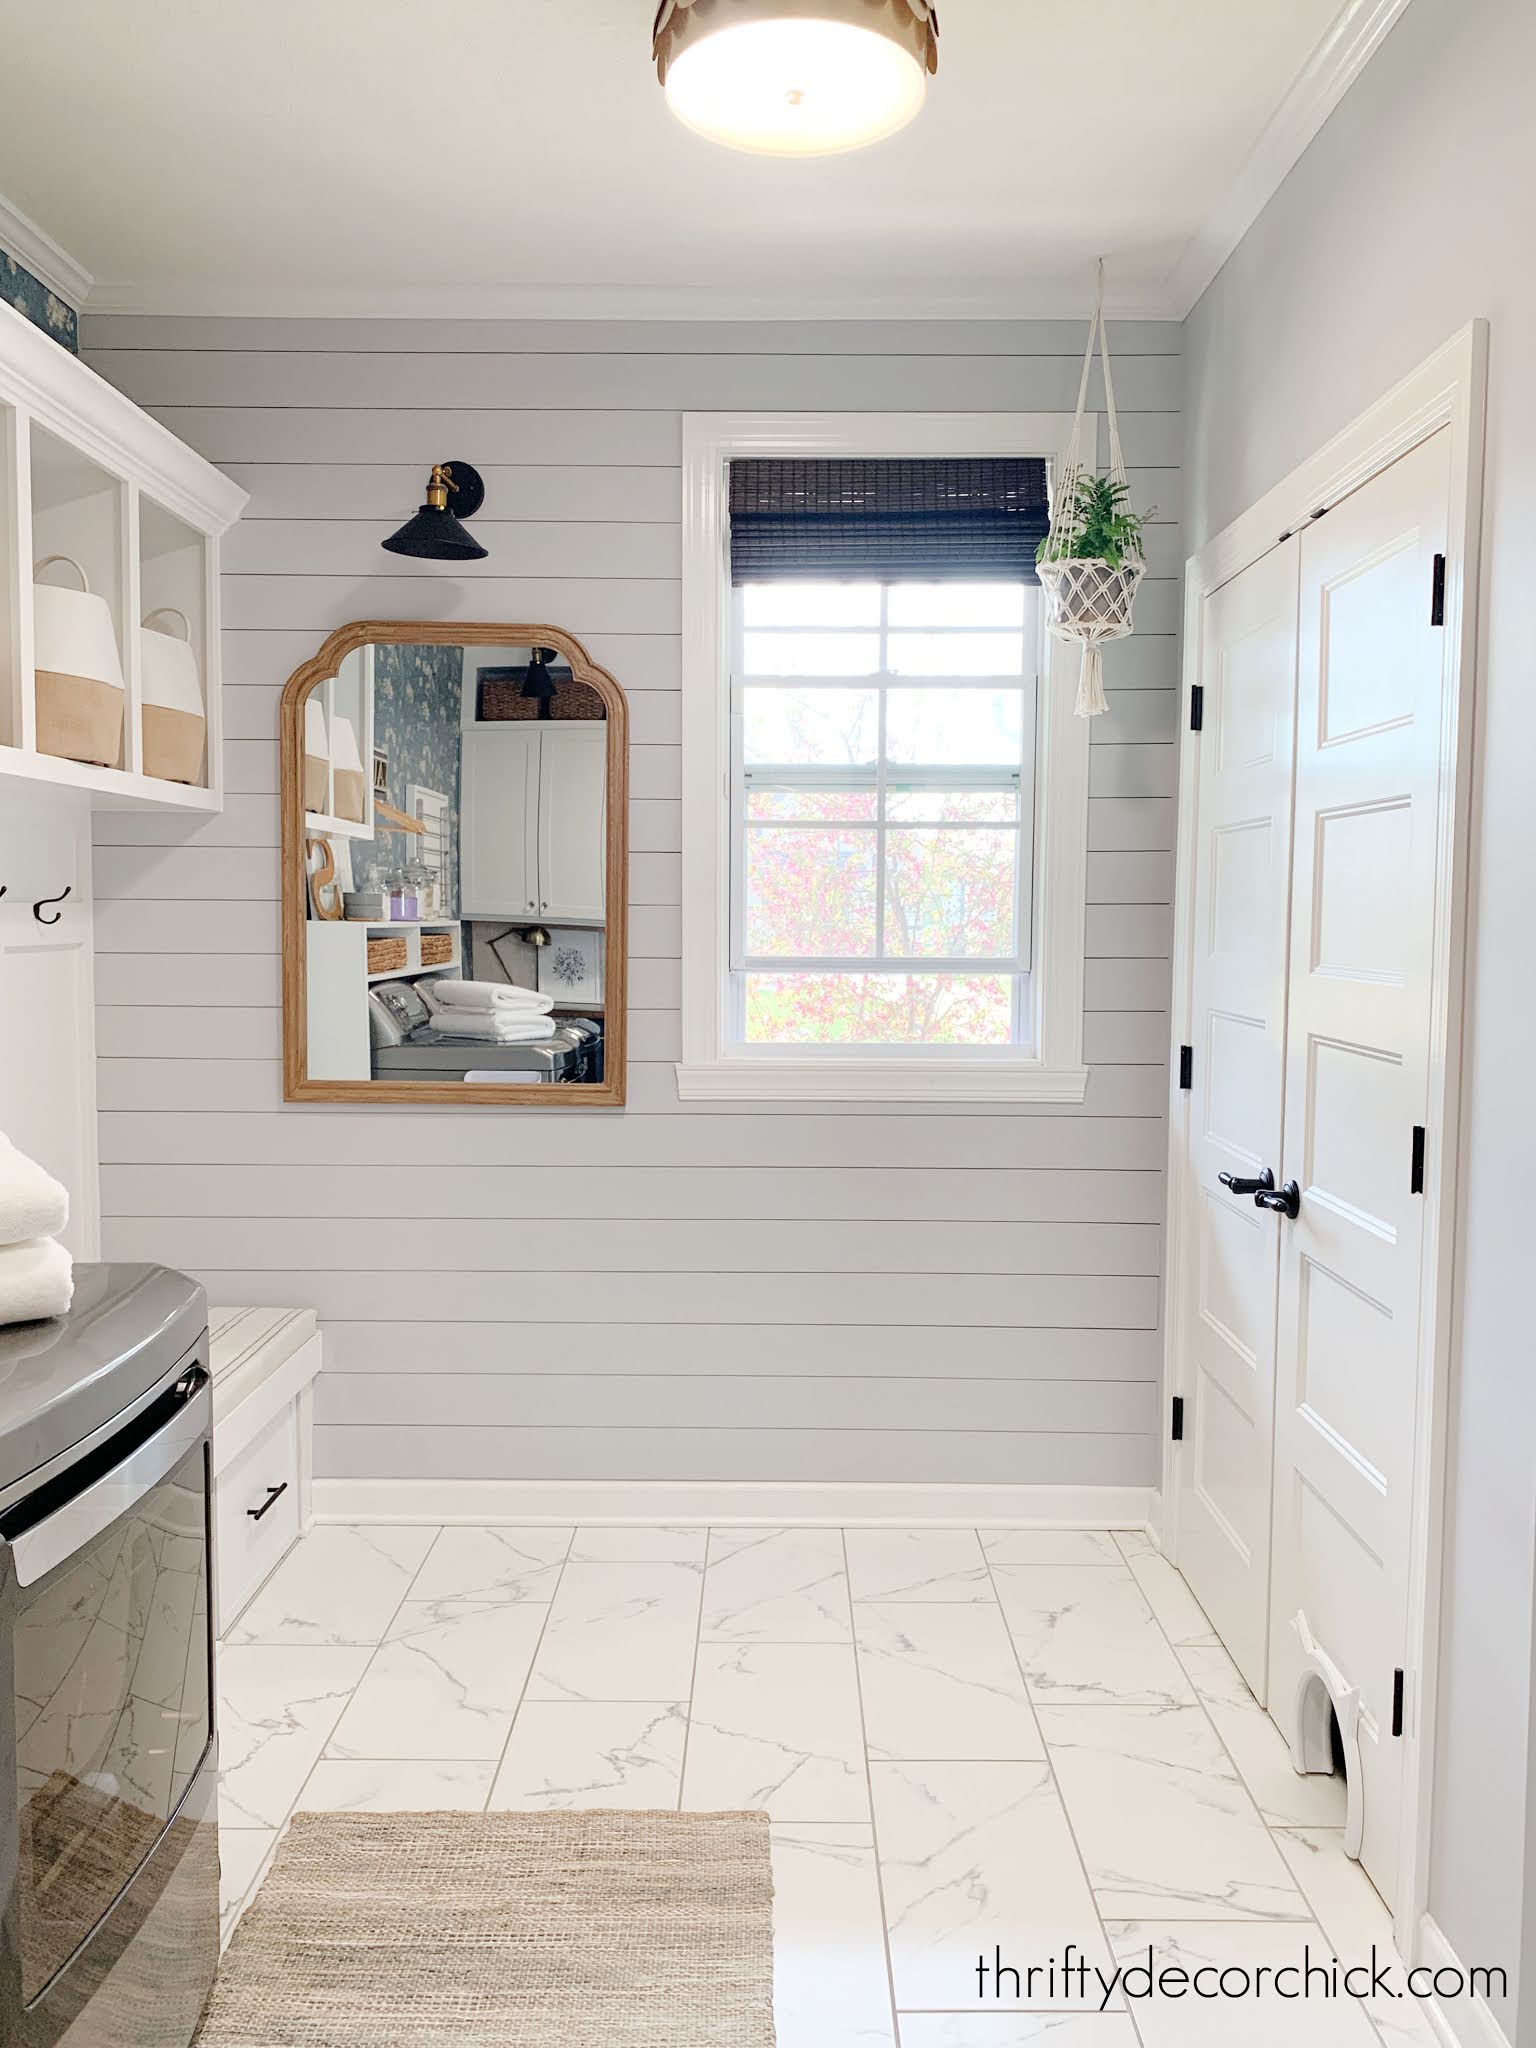
A few have asked where we keep coats and outdoor stuff. The coats go in a coat closet most of the year, and on the bench hooks during the winter. Most of our outdoor gear is in the cubbies above the bench.
Now for my favorite part -- the before and after pics! Here's the folding table wall before:
And this is how it looks now!:


I filled in that space above the cabinets just like I did in the kitchen at our last house. It's really just building a big box and trim to make it look built in. I secure it to the beams in the ceiling as well so the weight is not directly on the cabinets.
Here's a way back photo of how that wall looked after we moved in:

And after all the added storage and pretty touches!:

Do you see my creeper in the doorway? ?
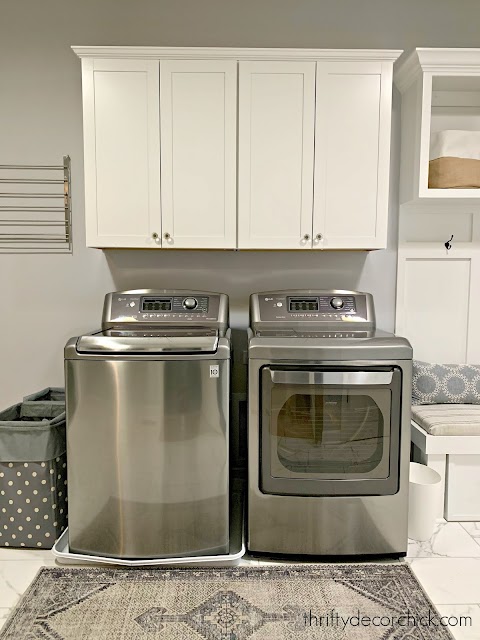
The washer and dryer on that long wall before:
And how this spot looks now, with the cabinets moved and the long shelf that creates easy access to our laundry supplies:

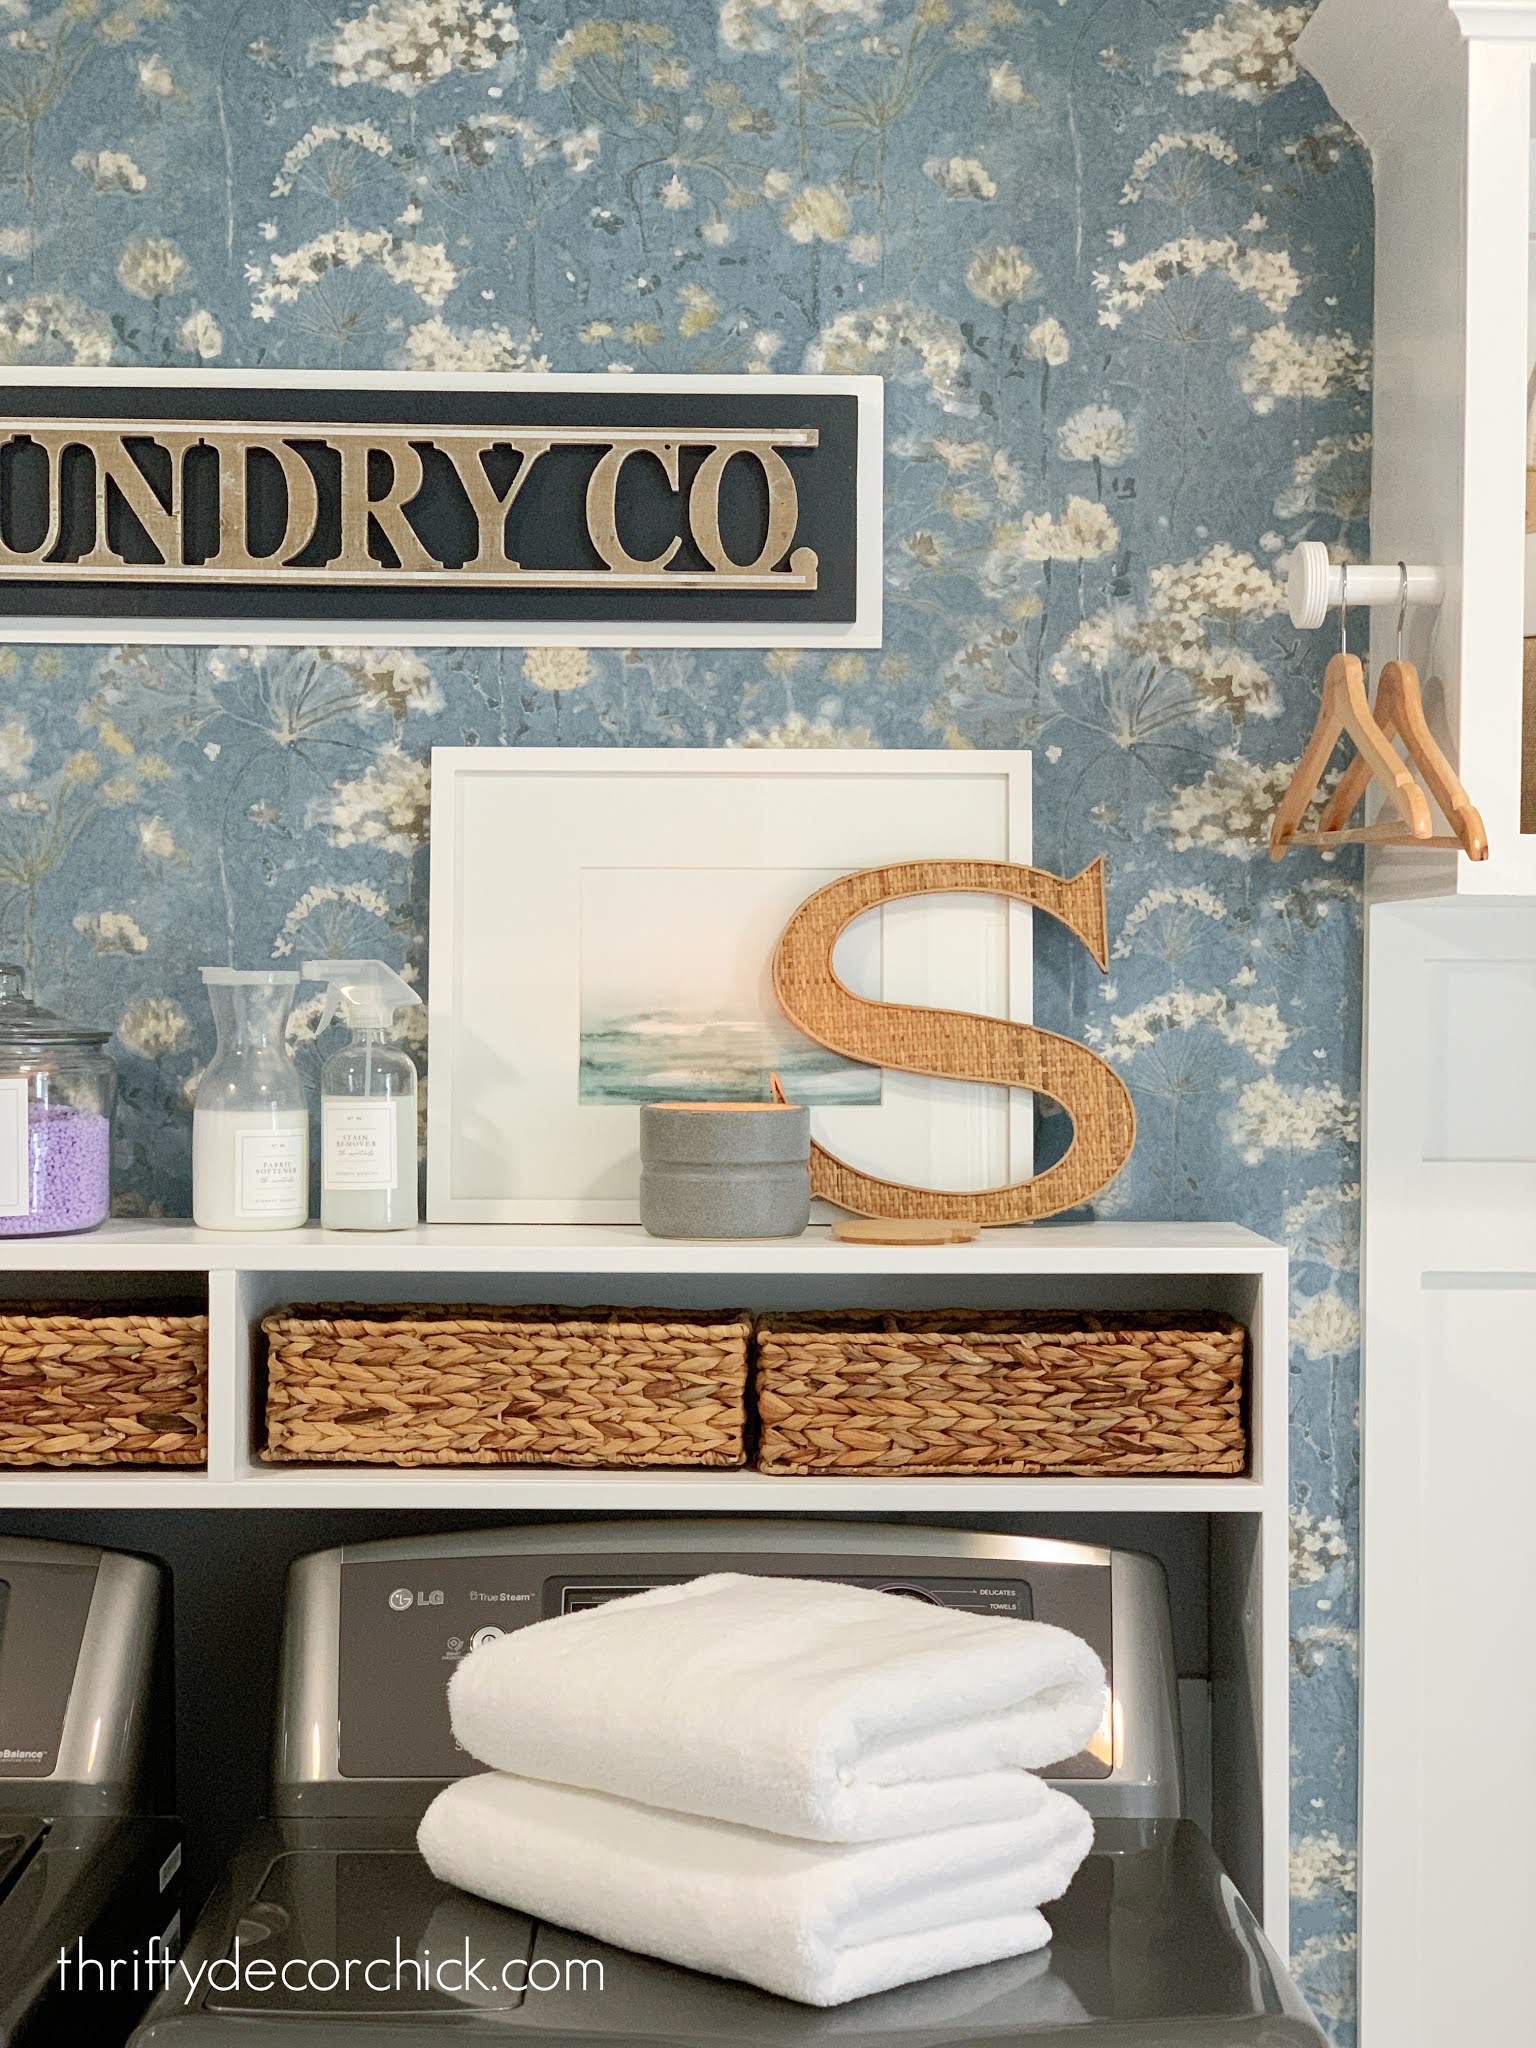


We've had that drying rack for years -- I just built a simple wood frame for it so it pops on the wallpaper background. I'll link all of the items in this room at the bottom of the post!
This is truly the laundry/mud room of my dreams now! I absolutely ADORE this space. Funny thing -- having a clean, organized (and yes, pretty) spot for laundry really does make a difference. I find it much more enjoyable to do laundry now:
As you can see, Colby followed me around as I took photos. He clearly thinks this is his room now:
Other than the cat door and crown molding, this part of the room didn't change much:

The changes weren't difficult, but they were a lot of work! If that makes sense. ;) I'm super proud of everything I did in here -- I don't think I could love it more.
As always, thank you for following along on my DIY journeys! I hope this room inspires you as well:
If you have any questions, feel free to ask in the comments!
You can find links to the projects and products below:
Decor in this space:
Brass lamp on counter
Light fixtures above cabinets (Using this method to light them!)
Find all of the glass jars I used here
Magnetic lint bin for dryer
DIY projects
Paint colors
Base cabinets in Cyberspace
Trim is Pure White
Walls are Whitestone
See more of our home here.
To shop items in our home, click here!
Never miss a post by signing up to get posts via email.
Via https://www.thriftydecorchick.com/2021/04/mud-laundry-combo-makeover-decor.html
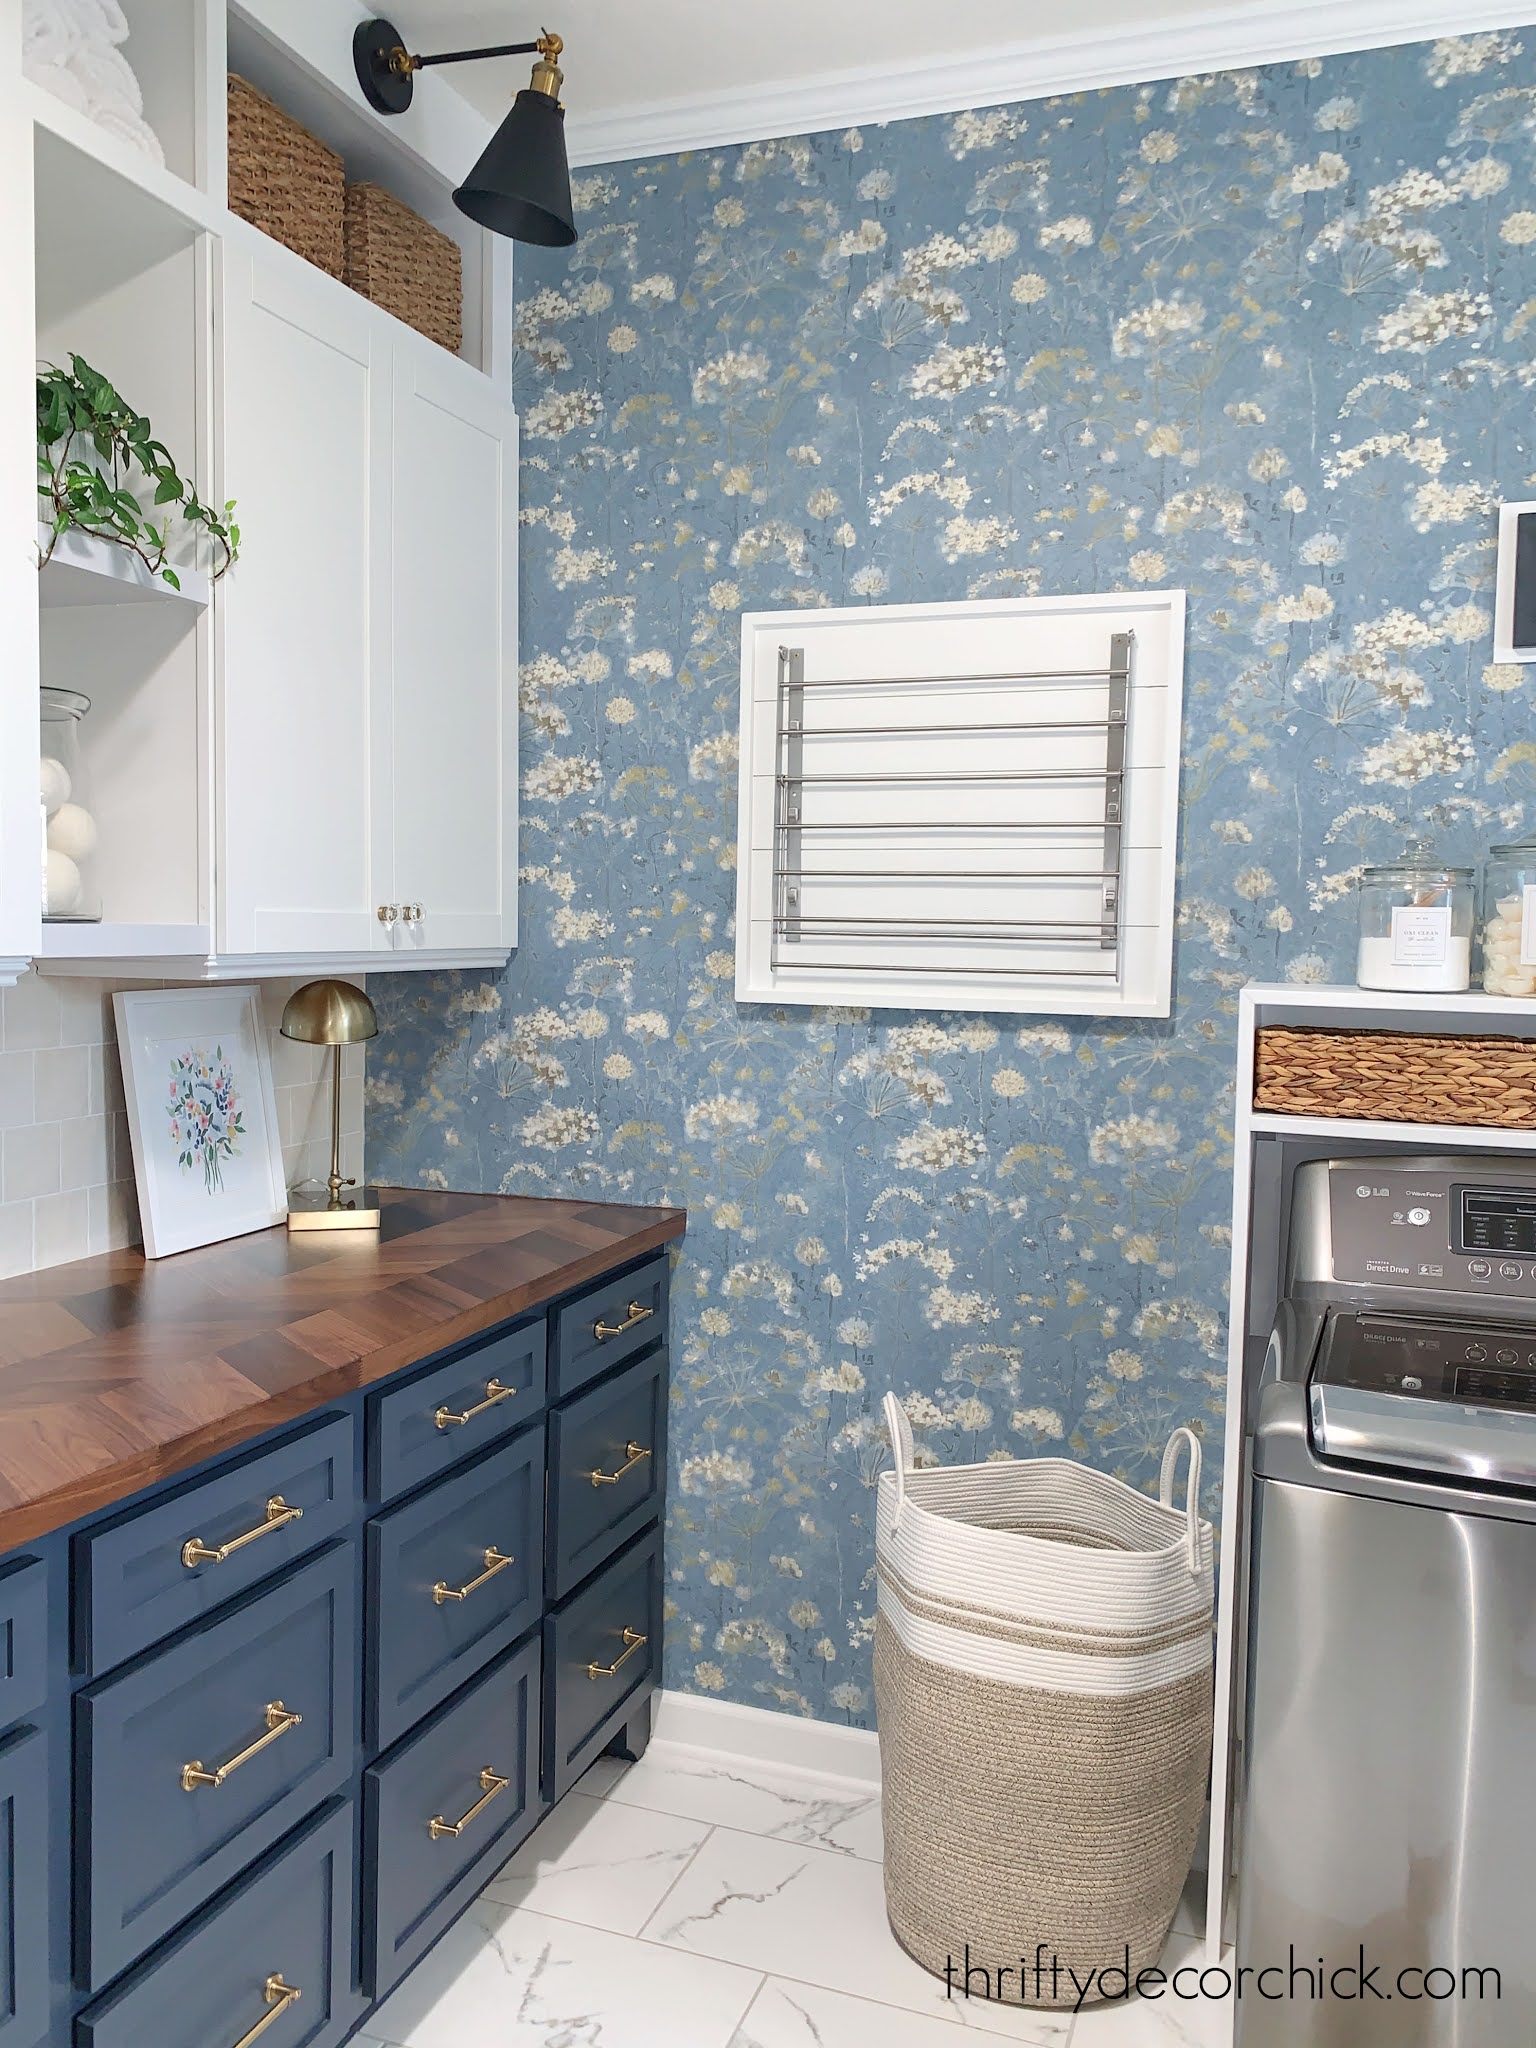
Hey there! I just have some minor tweaks to make in the laundry/mud room and I'm DONE! I'm hoping to share it with you next week. :) Whew, this one has worn me out, but I love it so very much. It's SO pretty. This latest addition on the big empty wall has made the whole space!
When we moved the upper cabinets, I knew this wall would feel pretty sparse. Even with the added DIY shelf over the washer and dryer, it still needed something:
This post may contain affiliate links for your convenience.
See my policies and disclosure page for more information.
I already knew what I wanted to do -- when I decided to tackle this room weeks ago I ordered some wallpaper samples to see how they looked in person. **Just like paint, I recommend seeing wallpaper in your space before ordering.
When you have a big wall that needs something...wallpaper is a great go-to! It creates a BIG statement for the money. Of course you can always do an accent color on the wall, or trim work. But wallpaper really fills the space visually and you won't need to do much else!
This one was the winner -- it was perfect! It's the York Candice Olson Botanical Fantasy peel and stick wallpaper in blue/beige:

It was love at first sight! I knew it would be perfect with the dark blue and white cabinets, creamy backsplash tile and other parts of the room that were already in place.
If you search for this online be sure to include the pattern number PSW1106RL. Use a wallpaper calculator to figure out how much you'll need -- you'll want to make sure your rolls all come from the same batch.
I've shared how to hang peel and stick wallpaper before and it's not bad at all! I've installed pasted wallpaper and this sticky stuff and they both have pros and cons. I usually prefer the peel and stick -- it just seems to lay better on the wall and I like that I can rearrange it a few times.
This stuff is absolutely gorgeous! I love it SO MUCH:

I've found it a bunch of places online so be sure to shop around! Right now the best prices I've found are here and here.
After I got it on the wall I added a couple little DIY projects on the wall. We already had that metal IKEA drying rack, but I wanted to give it more substance against the wallpaper.
I used scrap wood to create a horizontal planked back and framed it out with 1x2s. The rack isn't sold at IKEA anymore, but I found this metal laundry wall rack that seems to be very similar. I love ours -- it holds a lot, is strong enough to hold wet clothes and folds away to take up no space at all.
I wanted a spot to hang clothes on hangers but didn't want it to be crazy big -- so I cut a small piece of dowel rod and screwed one of these wood pieces onto the end:

I spray painted the whole thing white and then screwed it into the side of our bench cubbies:
It's perfect!
The only other art hanging on this wall is this laundry sign I reworked a bit:

I found the wood sign at Hobby Lobby but wanted it to be a little more substantial. I grabbed some scrap wood and painted it the dark blue like the base cabinets in this room, then painted some scrap luan in the bright white. I nailed them all together and now that small sign has a lot more impact!
This room is a mix of cream, white, gray and dark blue colors and all of those are in the wallpaper. It goes perfectly with the accents and colors I already had in here:

?? So lovely! Even my boys like the wallpaper in here -- my son was horrified when he first saw the sample, ha! But he admitted that it looked great once I got it up.
I love the design, the colors and that it makes such a HUGE impact in here! Whether you love or hate wallpaper, it's an addition that will set your home apart from others.
Here are resources for most of the items pictured!
Pretty washable laundry labels on jars
Fabric cubby bins and laundry sign are from Hobby Lobby
DIY laundry shelf over washer and dryer (baskets and jars are linked there as well)
To shop items in our home, click here!
Never miss a post by signing up to get posts via email.
Via https://www.thriftydecorchick.com/2021/04/feature-wall-with-wallpaper-instead-paint.html
Oh happy day!! I've been waiting for our latest delivery for nearly five months! When we moved into this house, I knew I wanted to do matching sofas set up across from each other in our family room. I LOVE symmetry.
I wanted them to be plain, regular sofas with no chaise or sectional set up, and we already had this sofa from our living room at the old house:
We got it for a GREAT deal, so I went back to the store where we found it (it's a local store called Urban Underpriced) and found one more -- pretty sure it was the last one they had.
I've loved this set up in our great room:

This post may contain affiliate links for your convenience.
See my policies and disclosure page for more information.
These sofas are SO comfy and large -- I'd say close to the size of a twin mattress. We loved how deep they are! I also really liked the modern, simple design.
But we quickly noticed the back cushions got smushed so easily. And I mean smashed -- I had to fluff them up daily and rearrange the fluff inside all the time. The fabric didn't hold up well with animals -- it pilled up and didn't clean up easily:


We didn't notice this with our first one in our old living room because we didn't use it nearly as much. Because they were so inexpensive and were comfy, we made due. I found some ways to make these worn out sofas look like new -- and those tricks definitely helped over the years!
I really should have known better. A few months before we decided to move (we had no plans to at the time), I had found THE ONE. The perfect sofa...finally!
It was the Radley sofa from Macy's:

I loved everything about it! It's super comfy -- the cushions were comfortable but still had structure. We loved how deep it was -- tons of room for the tush. It looks great too. I liked the simple, modern arms and clean design.
The best part was the fabric...it was super soft but easily cleaned! We even had sticky gold putty that got smashed into the fabric and came out. Other spills were easily cleaned up with just a cloth and water. It was perfect, I tell you!
The owners of that house are friends of ours and they bought it because it fit so well in the room. That sofa STILL looks great!
Last year I started watching pricing to see when they were on sale (they are the lowest price I've ever seen them right now!) and we decided to order two of the regular Radley sofas without the chaise.
It took almost five months...but they finally arrived! I'm never purchasing another brand again:

They have the look and feel of much more expensive couches for WAY less.
The cushions are SO comfy and the fabric is soft:

The biggie for me -- the back cushions hold their shape MUCH better:

Even though they're stuffed with fill like our old ones, they hold up so much better. I think it's because they are stuffed much firmer and the cushions are thinner. Our animals love to sit on the back cushions and these hold up way better than any other sofa we've had.
I am IN LOVE. I know the light color isn't right for every household, but we're used to it and these clean up so easily. I've already wiped chocolate milk drops off of them a couple times it comes off with just water:

The funny thing is, you'd never know we replaced our old couches if you look from far away! They are very similar from the side and back. Here's the old sofa:

Those went to live with one of my sisters by the way. :)
And the new ones!:

The regular Radley sofa is 39" deep by 86" wide. They are almost exactly the same dimensions as our old ones, just not quite as deep.
I'm so happy -- they were worth the wait! The BEST:

Our old Radley sectional was in the color Cinder Grey. Our current sofas are in the color Oyster and that color was special order when we bought them, but now it says they'll be in stock next month. Some colors are saying they'll take up to 25 weeks though. We were first told it would be 6-8 weeks and it ended up being 4 1/2 months.
**Something to note -- we paid for our sofas with our debit card. For some reason Macy's kept taking the money in and out of our bank account...over and over and OVER for months. It was crazy frustrating, because when we would call they'd say they were just making sure the money was still available for payment. I don't understand why they didn't just process the payment when we ordered and be done with it.
If you use a credit card that may not be an issue, but either way, if you order online and you'll have a long wait I would call immediately and ask about that. We didn't have that issue last time we bought this sofa with our debit card.
I'm so thrilled with them and I'll be sure to update this over the years to share how they hold up! Do you have a sofa brand that you love? It's a big purchase and I always find reviews to be so helpful.
Links to a few of the items/projects in our family room:
More about the rug and swivel chairs here
See more of our home here.
To shop items in our home, click here!
Never miss a post by signing up to get posts via email.
Via https://www.thriftydecorchick.com/2021/04/macys-radley-best-sofa-review.html
Whew, I'm almost done with my latest room update! I'll share links to all of the projects I've completed in our laundry/mud rom at the end of the post -- just in case you missed one. Can't have that. The tile project I'm sharing today is one of my favorites I've ever done -- first of all because it was SO easy (I'll share why in a minute) and because it is beautiful!
I fell hard last year for the square, slightly shimmery tile called zellige. Turns out it was very trendy a couple of years ago...as usual I'm way behind on the trends. (And I'm fine with that.) It has a wavy texture that makes it look handmade...and usually it is!
The real stuff is VERY expensive, but I really wanted to use it for the small backsplash in our laundry/mud room:

This post may contain affiliate links for your convenience.
See my policies and disclosure page for more information.
You can install in a straight stacked look like this for a more modern look, or in a brick pattern for a more traditional look.
The thing is, authentic Zellige tile is handmade from clay and has an imperfect look that I don't always love. Also, it's usually installed very close with small grout lines (which adds to the imperfect look). I've always preferred the more uniform versions I've seen, with a bit of contrast with the grout.
I did some research and found this ceramic version pictured above that still has the handmade look, but is very affordable! Plus each tile is uniform and the same size, but still has the pretty details that I loved about the real stuff. It went into my cart! I was even more pleased in person -- they were so lovely!
I had a couple hiccups in this tile process along the way (I told you this room has given me one problem after another), because I didn't order enough at first. I had to wait on backorders and then the second shipment was much shinier than the first. I was able to pick and choose out of the boxes to find some that matched better. (Buy all you need at one time so they are from the same lot!) But overall the install process was a breeze! I used a product that makes the tile installation SUPER quick and mess-free.
Before you start tiling, figure out the middle of the area you'll be working on. Since ours was the backsplash area, I marked the middle and centered a tile on that:

I then lined up the tiles each direction to make sure I wasn't going to have any tiny slivers at the ends.
When I was sure of my layout, I pulled out the item that made the process go so quickly. It's a tile setting mat that you use instead of mortar:
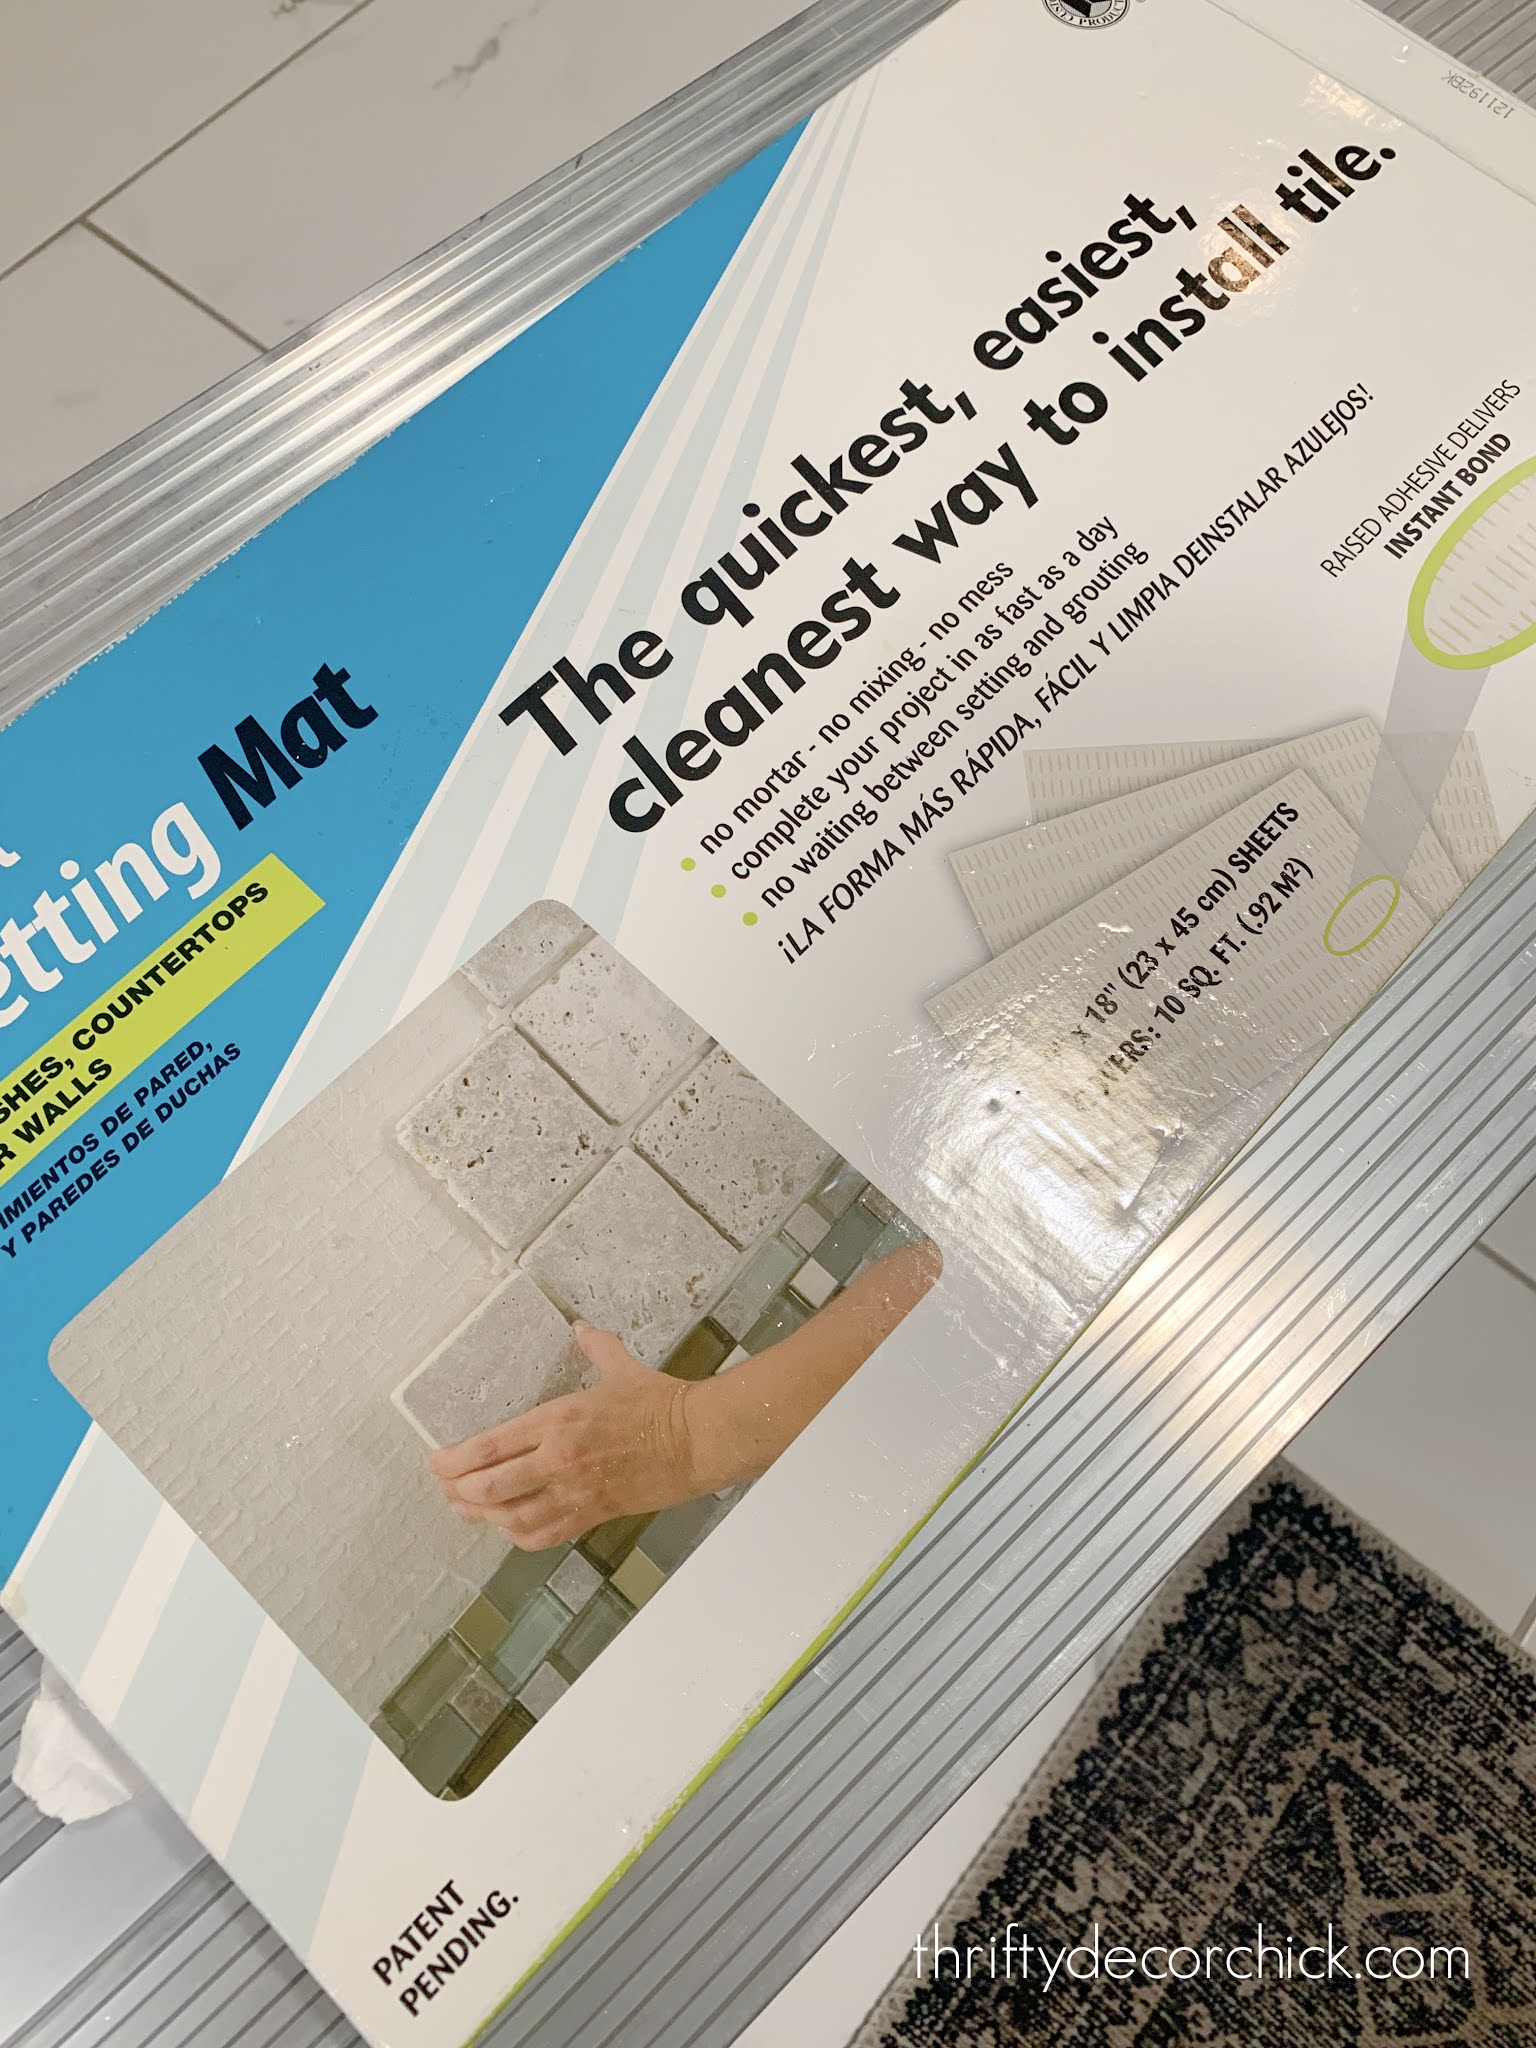
Funny thing is, I got these as a gift YEARS ago...I'm talking probably ten years back. I didn't have any need for them then, and tucked them away in the garage where they sat for years. I forgot about them till we moved.
I wasn't sure if they'd even still work, but I kept them hoping to try one day. Thankfully they worked SO well and were crazy easy to use! They have a sticky back that you put on the wall, and then a sticky side that grips the tiles on the front:

I used one and a half packages for the whole project. I'm really impressed with this product.
Look to your tile details to find out what size spacers and grout you'll need to use. This one suggested 1/16" grout lines. I thought about not using spacers at all, but decided in the end to use the them for a more uniform look.
My countertop was level, but I made sure to check the tile as I was going to make sure it was level as well:

I wanted a more traditional look, so I did a brick pattern -- this is also a bit more forgiving in my opinion. You have to be pretty meticulous so the lines match up perfectly with a straight stack layout:


Hold your tile mat up and trace where you'll need to cut before sticking it on the wall.
The mat is VERY sticky, but you can remove tile and rearrange it at first if needed. I'm not sure how that would work after it's been stuck for awhile.
I've always used a wet saw when cutting tile, but because these were so small (and it was COLD in the garage the day I was installing), I went with a tile cutter instead.
It is SO easy to use! You just line up your tile where the cut needs to be:
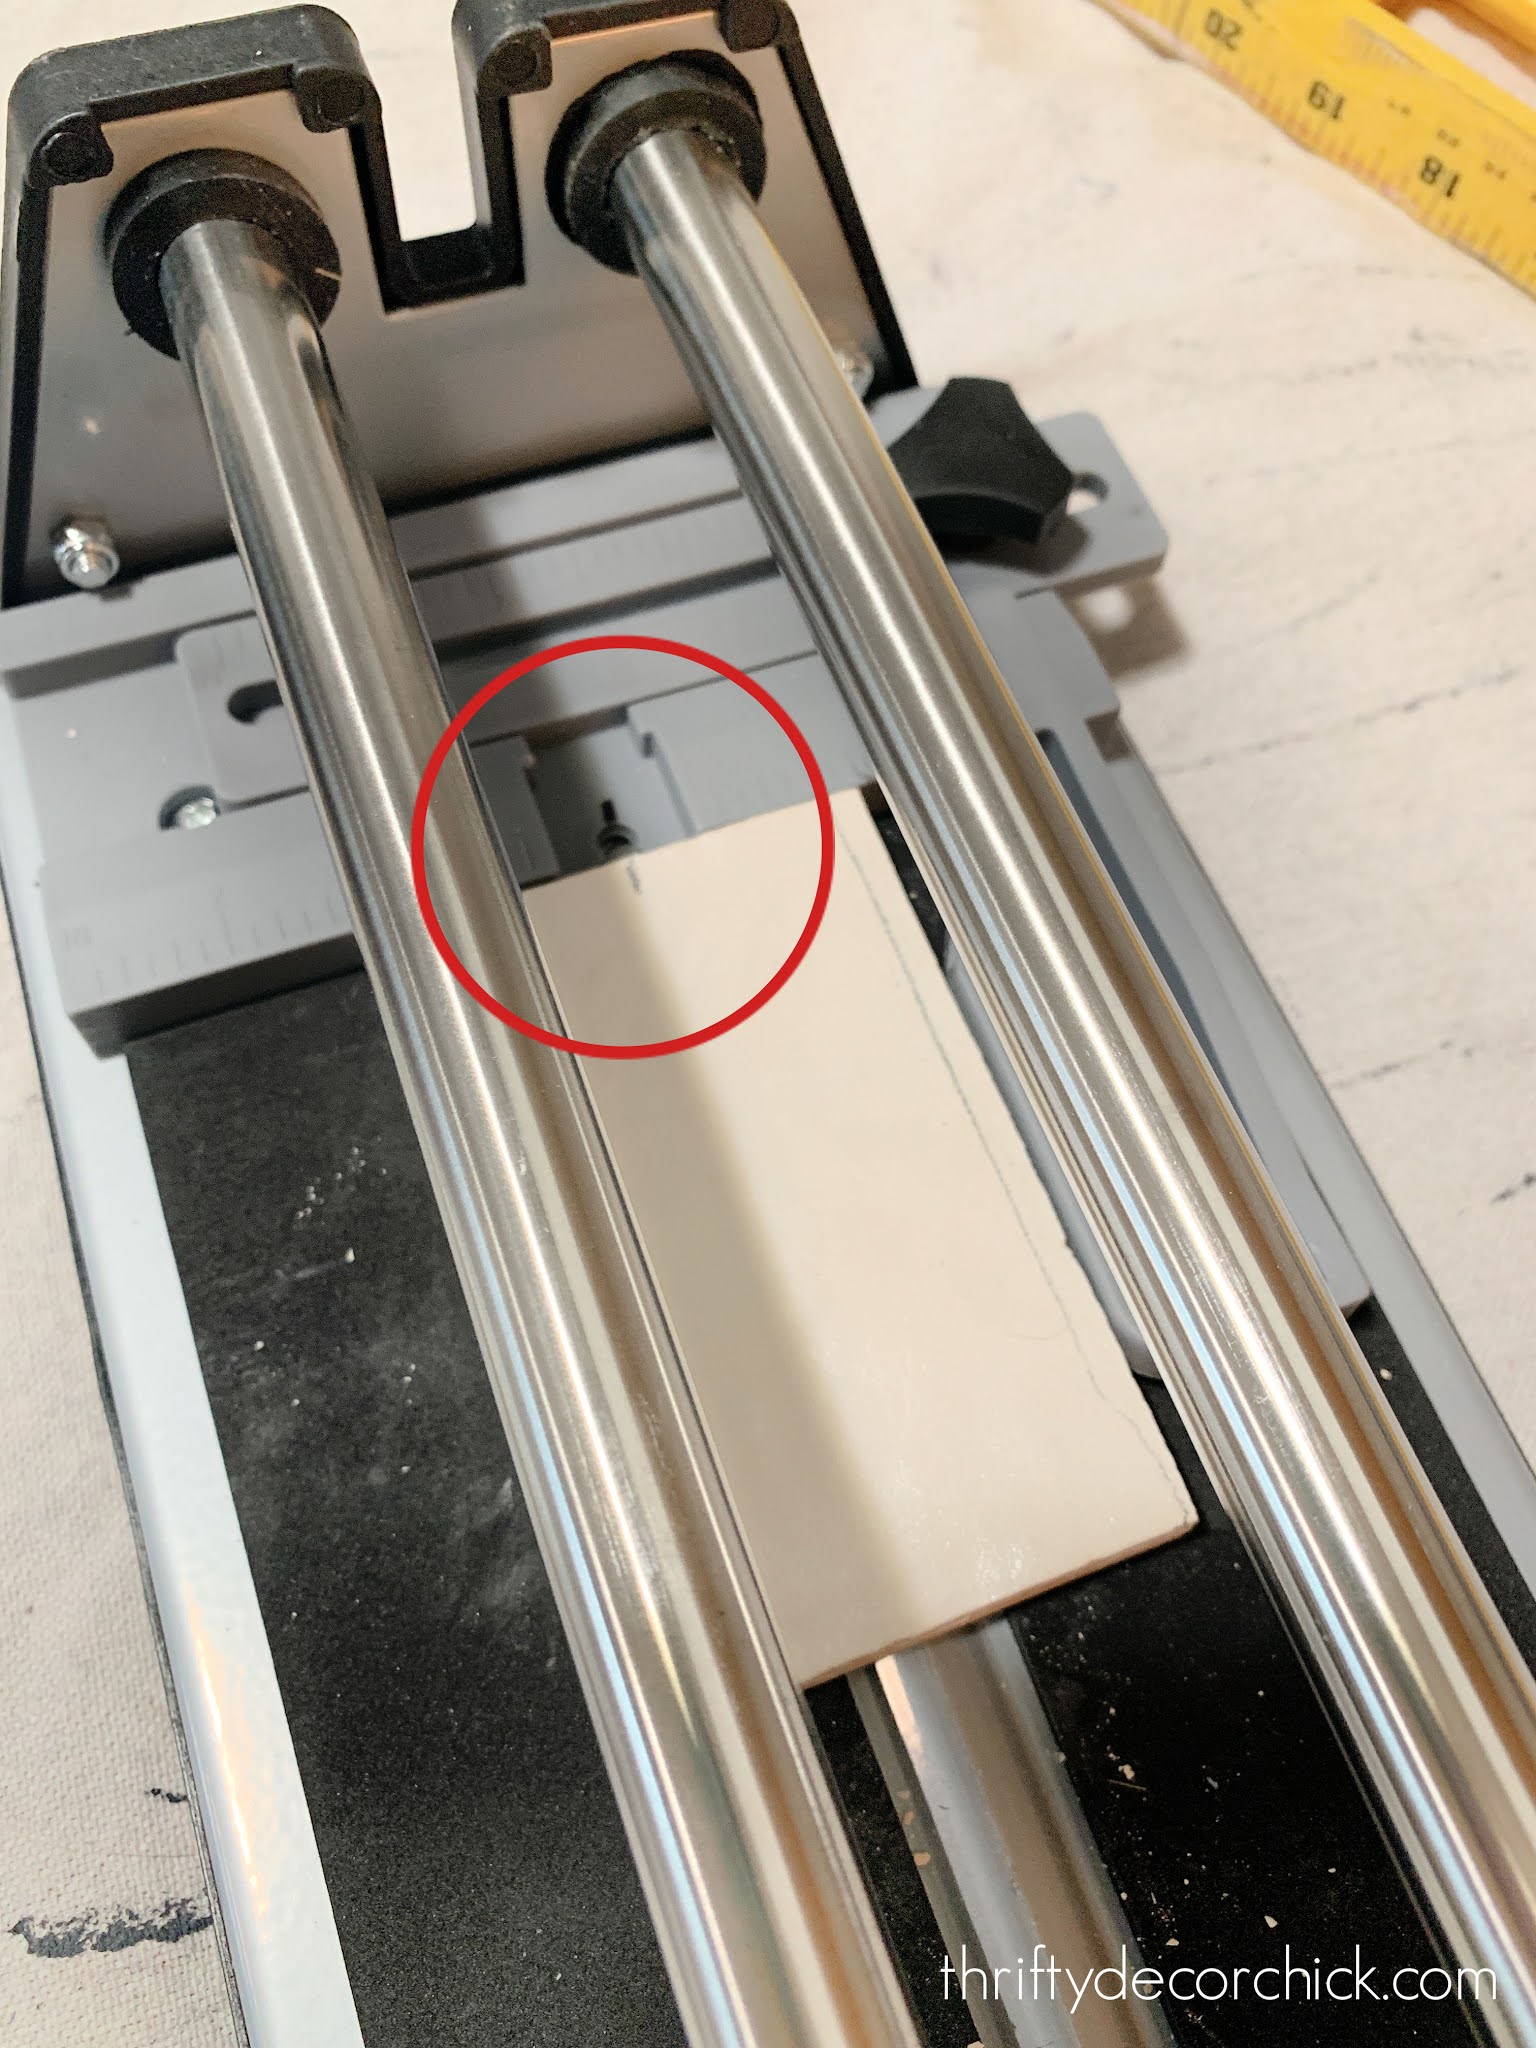
Then you roll the diamond blade along the tile with some pressure to score it. Make sure your pressure is consistent from start to finish.
Just push down and it snaps the tile in a clean line:

It works so well and super fast. You can use these for larger tiles too -- just make sure the cutter you get will work for your tile.
The only issue I had was cutting smaller slivers of tile. I found that if I scored it with the same pressure from the bottom to top, I could get pretty small cuts. **Always order about 10 percent more tile than you'll need!
My issue with not using the wet saw was cutting around outlets. With a tile saw you can tilt the tile toward the blade for complex cuts. There are other ways to do it too -- I was about to run out and buy a diamond blade for my Dremel tool when I noticed something as I was cutting with the tile cutter...
I realized the two pieces can be matched up perfectly again after being cut. I got an idea -- I measured where I needed to cut for the outlet, then used the tile cutter to make those.
Then I used some Gorilla Glue, matched them back up and clamped them together for at least an hour:

It worked! I wasn't sure it would hold and was pleasantly surprised.
It even worked when I had to cut the tile into three parts to work around an outlet:

I did baby them a bit as I installed -- making sure not to push to hard. But they look great and you would never be able to tell that I cut them apart! That may help you as well if you don't have access to a wet saw.
Another great thing about using the tile setting mats is you can grout immediately, unlike mortar. I used this premixed grout to finish up the wall:

Make sure to protect your surfaces before starting! I LOVE these pre-taped plastic sheets for projects like this -- you stick the painter's tape on and then pull the plastic out. It sticks to any surface easily:

Mortar and grout aren't the most fun to install on a vertical surface -- you'll lose a lot to the floor or counter.
I didn't have a grout floater (mine was a mess and I had tossed it months ago) so I just used a plastic putty knife -- and I think it was even easier to use:

Grouting isn't really hard -- just smush it in there. Fifteen to 30 minutes after, use a large sponge and a bucket of water and start wiping it off of the tile. If there are any spots you missed with the grout, you can usually move it around and fill in with the sponge.
You'll need to use clean water and wipe a few more times with the sponge to get any film off of the tile. Grout will lighten as it dries, so don't freak out if it doesn't look right at first! If you are tiling a floor or a backsplash where there will be food or drinks, you'll want to seal it afterwards so the grout doesn't stain.
Not too bad right? The install went pretty quickly! To finish up that part of the wall, I made some quick "floating" shelves to hang between the cabinets:

I used scrap luan and wood and then nailed them in from inside the cabinets. A little piece of trim across the front finished them off:

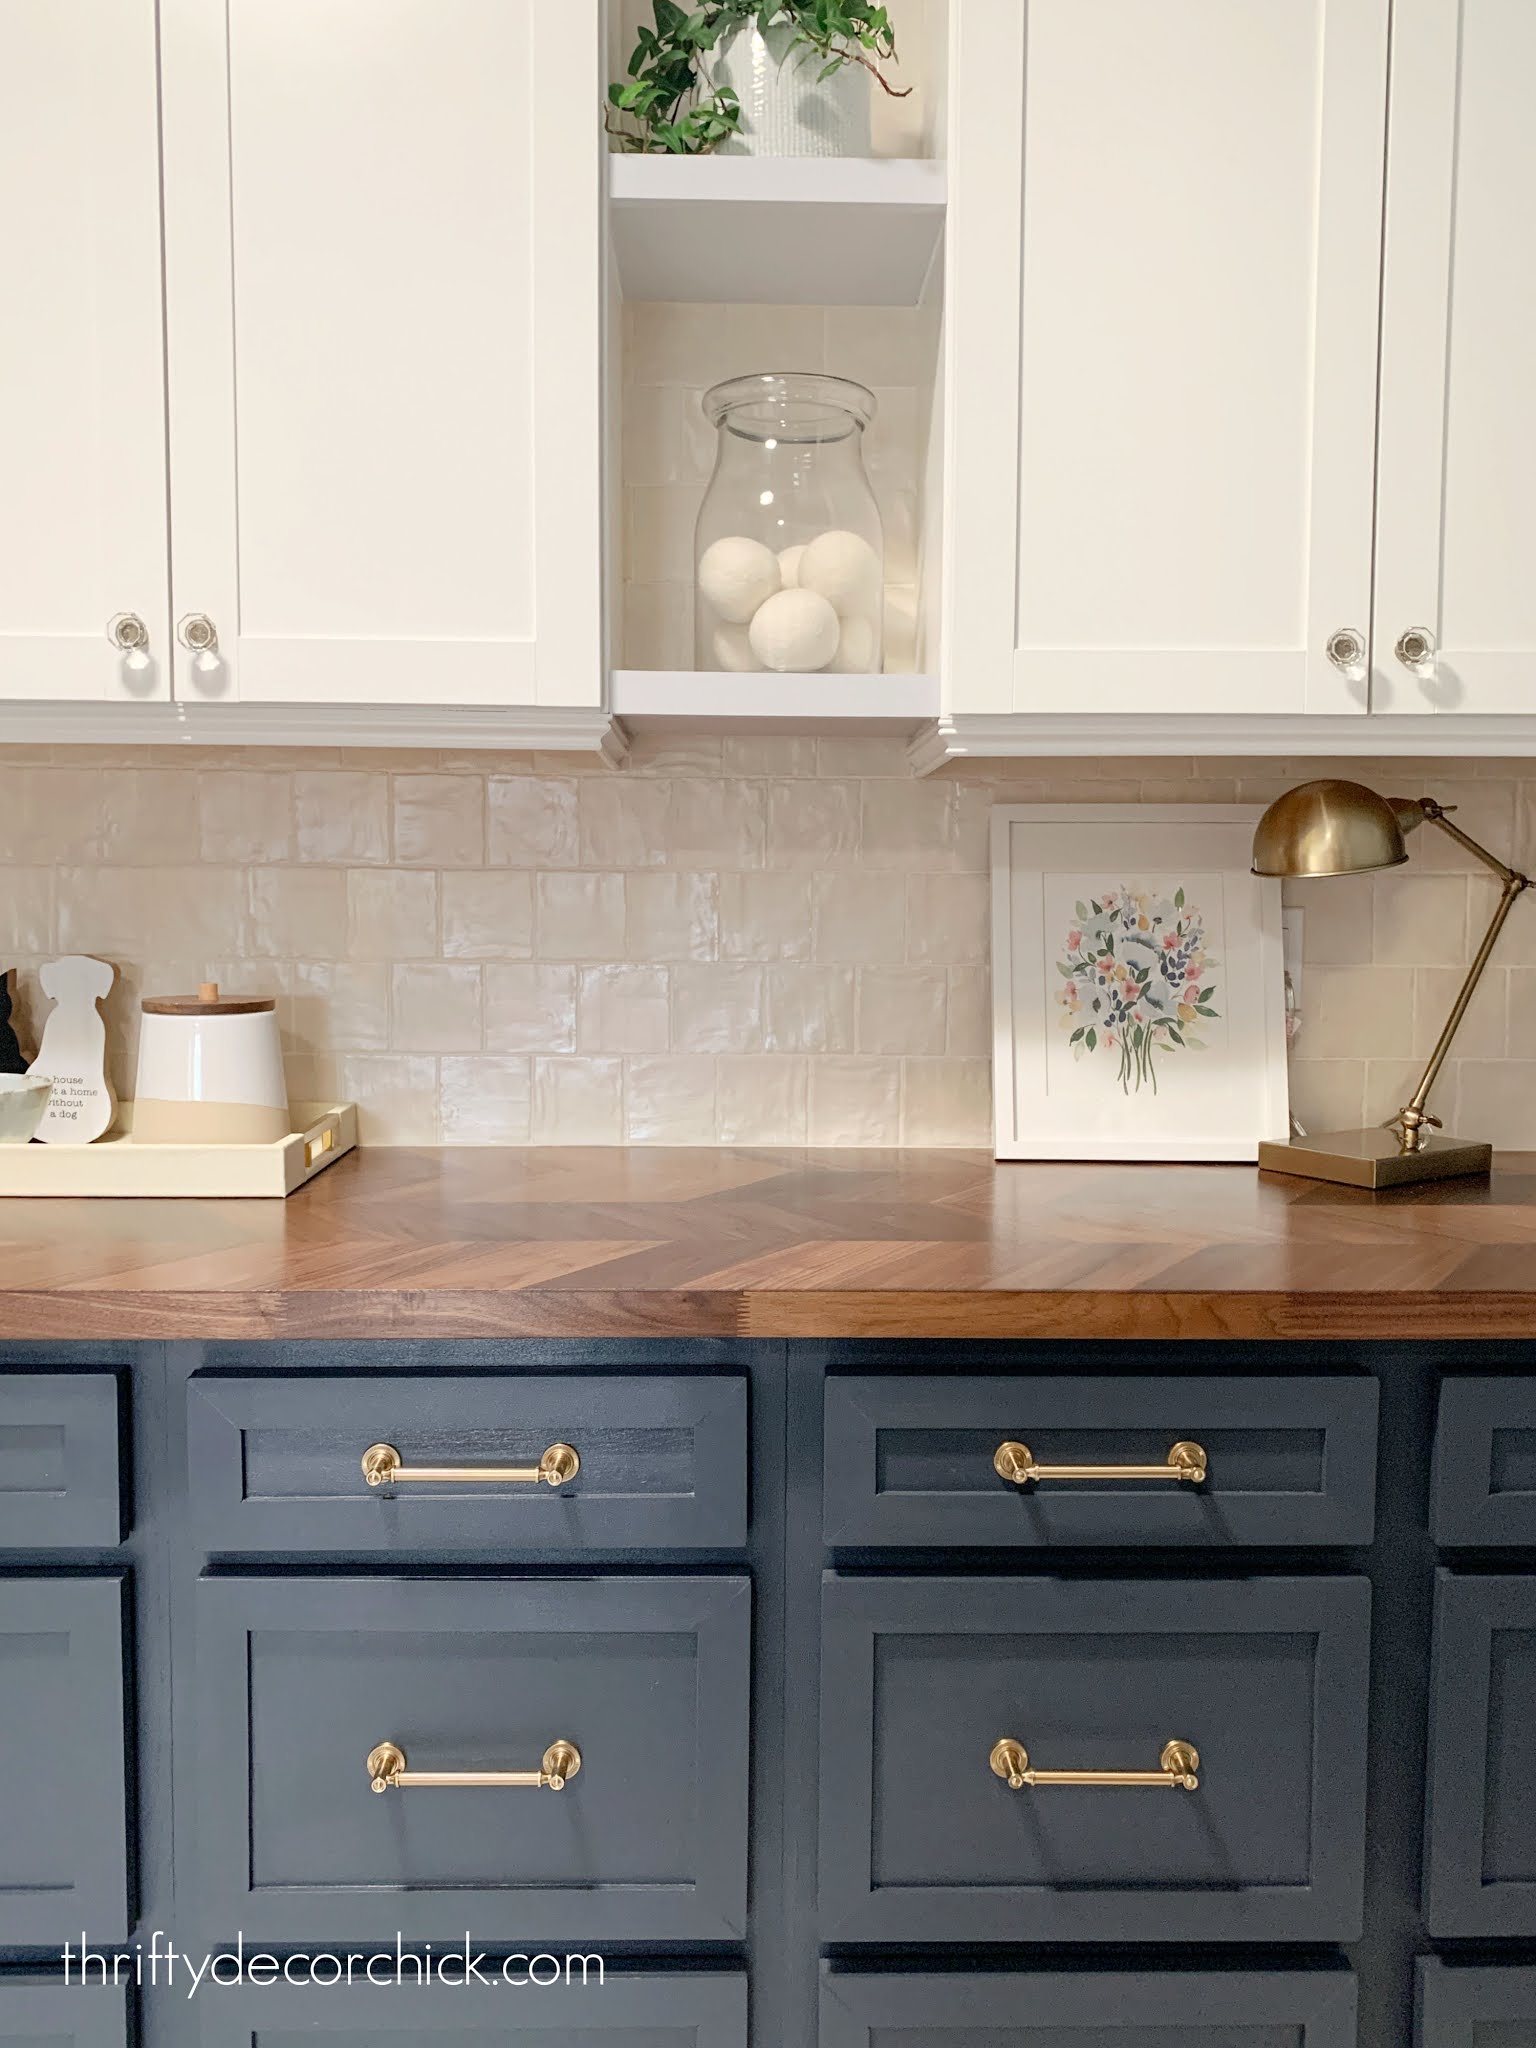
This tile is SO pretty!! It comes in cream, white, blue, gray and black. All are beautiful. I went with cream for many reasons, but mostly because our upper cabinets are not pure white. I worried the white tile would look off against them.
I love the warmth of the cream tile and the contrast with the dark blue paint on the cabinets:

By the way, if you have an outlet in an odd spot -- take your tile down the wall! It flows so much better than ending it awkwardly on the wall around an outlet.
I LOVE this room!:
Now it's time to address the area above the cabinets. That's for another day because this post is already crazy long! :)
Here's where I started with this area:

And this is how it looked with everything up to this point!:

Butcher block countertop and where to get it
Here are the items I used for this DIY tile project:
Tile setting mat instead of mortar
See more of our home here. To shop items in our home, click here! Never miss a post by signing up to get posts via email.
Via https://www.thriftydecorchick.com/2021/04/easy-way-tile-backsplash-no-mortar.html |


