|
I know I've been quiet over the past week! I planned to have this room makeover up last Friday, but the last minute touch ups took much longer than I expected. We've been dealing with a car accident a couple weeks ago (my car was hit and totaled) -- it's been crazy dealing with the insurance/collision center/car dealership and all that jazz.
Things are calming down now and all has been resolved...and I got this room done! The funny thing is I ended up quite a bit in here over the weekend, so I'm glad I didn't share it just yet! I'm SO HAPPY with the changes I made in here! Be prepared -- this is a picture heavy post.
First, a little reminder! This is how this dining area started out:

I shared that tour here.
I don't know what to call this room. :) It's not really a separate room -- it's open to our great room. I like to call it a morning room because it looks so pretty in the morning and it's a more relaxed space than a formal dining area. But no one knows what a morning room is (I'm sure it can be many things). ? So...I'm sticking with dining room. OK!
Later we purchased a couple pieces of furniture and I was already loving it more:
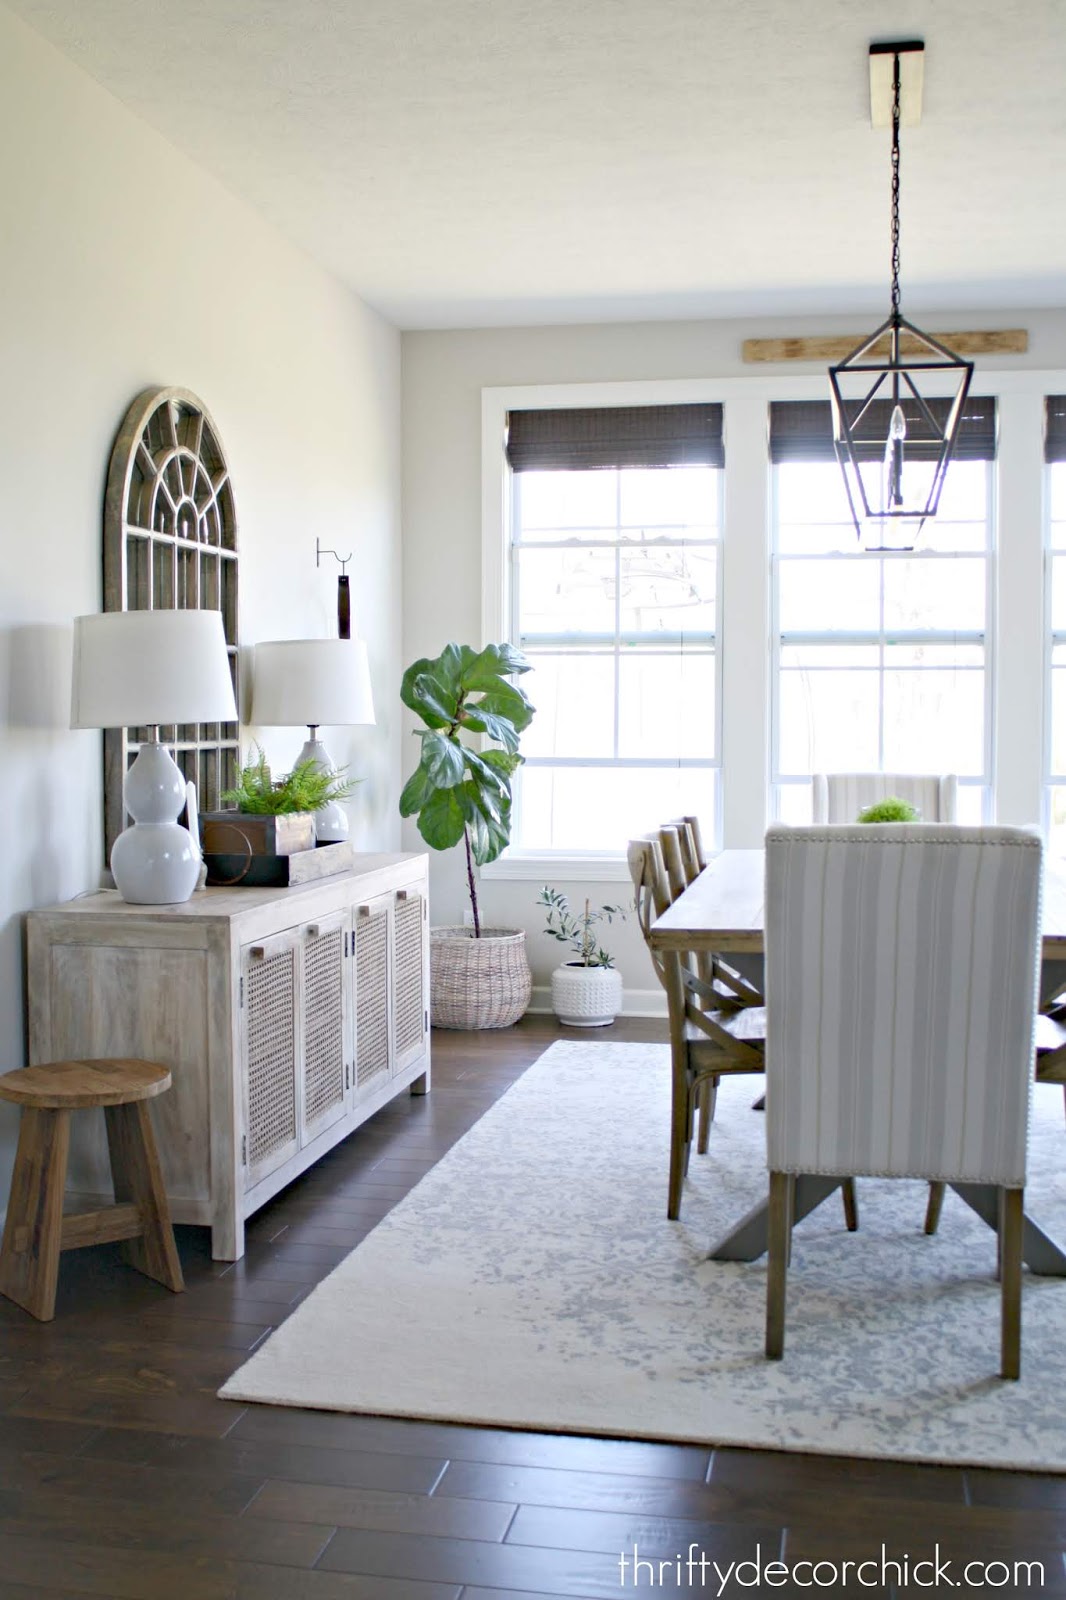
I always had a plan to add a window seat here. I knew I would want one in this house (like our old house!). I had the builder move the light over 17 inches over instead of directly centered in the room to accommodate for it: 
Last I left you, it was trimmed out but I hadn't painted it yet.
I've struggled with a looong wall we have in the room and it's perplexed me since we moved in. I shared my plan for the wall a couple weeks ago -- it included paint and trim.
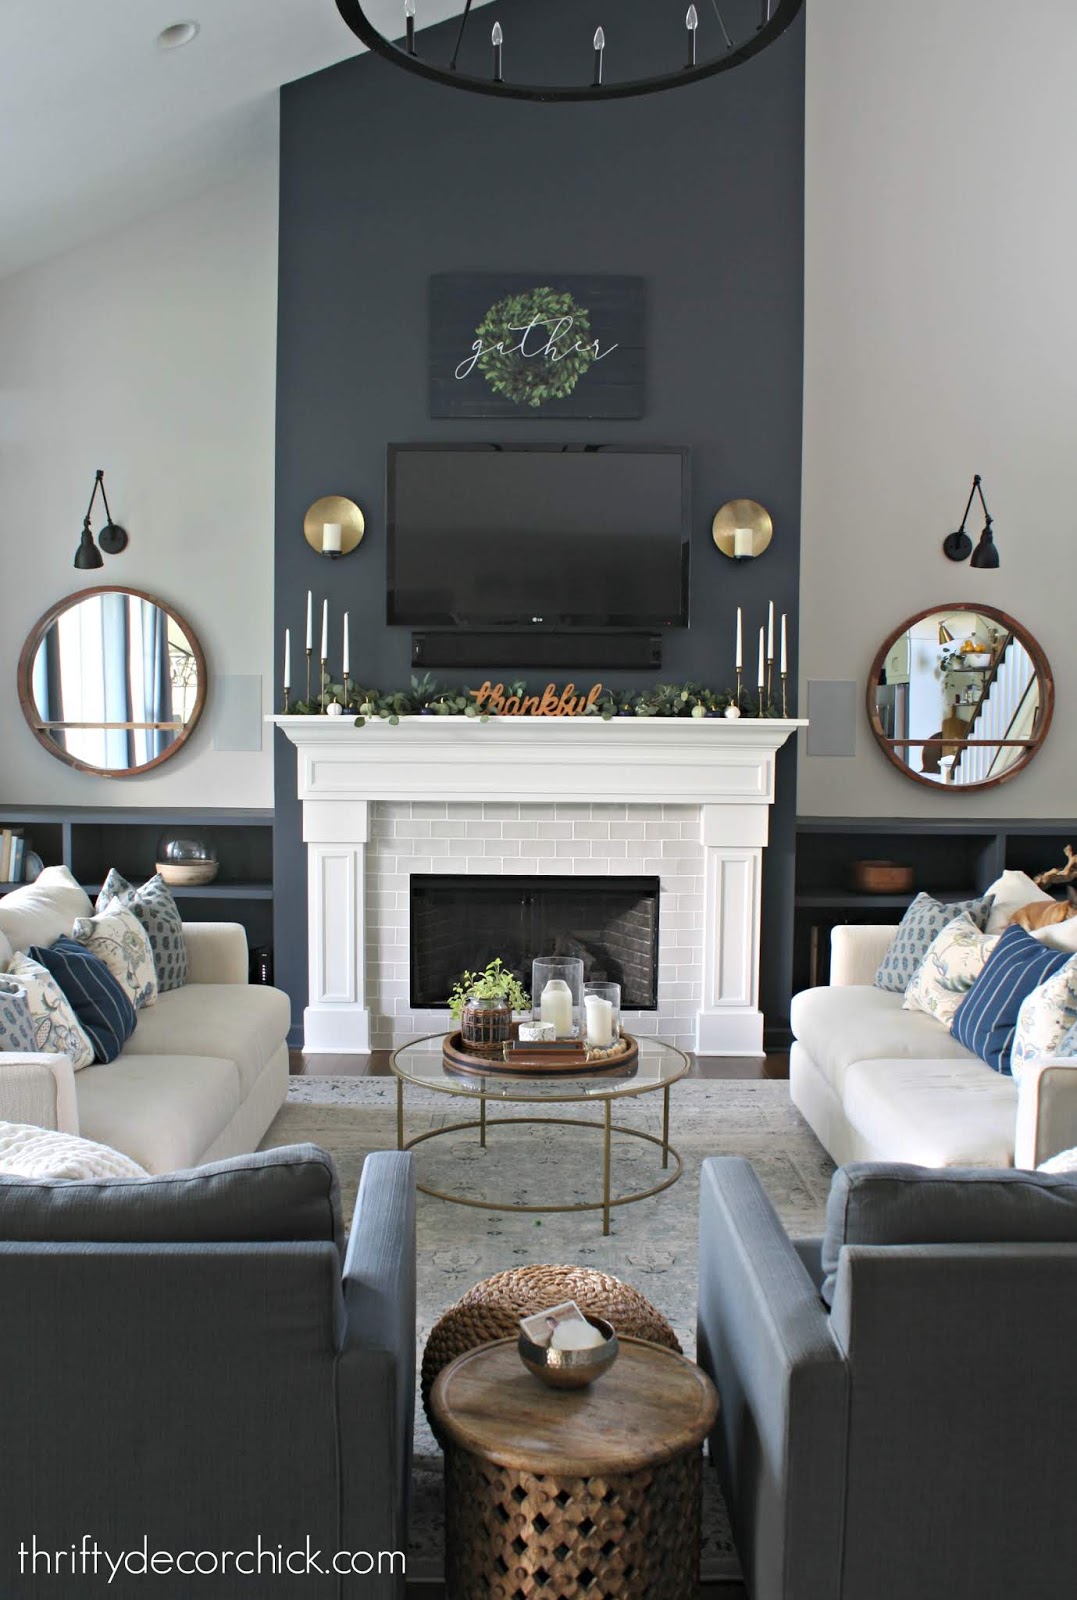
Well, I painted and we. LOVE. IT:

It's the same moody blue (Cyberspace by Sherwin-Williams) that I used in our family room on the fireplace and built ins.
It balances the whole space SO well -- I was so thrilled when I was done!:

The window seat went white...but something was nagging at me. I knew the window wall needed something else. I actually thought of this idea right after the seat was built, but I held off to see how the rest of the room came together.
I realized after everything was painted that the room definitely needed some character...my favorite! Right up my alley. :)
So I got busy building some built ins on either side of the windows. The window seat is about 17 inches deep and I had the wood cut to 14 inches in depth. It was just a personal preference that I didn't want them meet up with the front of the window seat.
I had two 4x8 boards cut down into 14 inch strips and then brought them home to cut them down to the lengths I needed (sides and shelves). Then I had to determine where I wanted my shelves. I used painter's tape on the wall to determine the distance between shelves.
When I figured it out, I used a level to make my measurements and then make a straight line across, where the shelves would go:

For the other side of the built in (I didn't have wood cut for the back -- if you caulk and paint well there's no need for additional wood on the back) I had to make sure the line was at the exact same spot for the shelf:

I simply stacked the two pieces (each side of the built in) and made sure they were lined up exactly. Then I marked where each shelf needed to go.
I have a jig to build without seeing the screws, but if you use the right screws and secure it well to the wall, I just don't find it's needed. I use screws that sink into the wood:

The line gives you a guide for where your shelves will go and where to screw in. You can see the shelf on the other side of the wood.
When I got all the shelves on, I secured this part into the wall:

I did plenty of checking to make sure my other side would fit perfectly between the window trim and the shelves:

When you're doing something like this keep in mind this wood is 3/4 of an inch. So for my shelves I had to deduct 1.5 inches total.
Once that was secure, I added the other side, screwing into the shelves at the lines I marked. As I did it, I check the shelves for level along the way.
These are my FAVORITE screws for this kind of project:

I got them at Lowe's. They catch easily, drill in well and sink perfectly so you can fill the hole.
I ended up adding a top (that I wrapped with a 1x4 to give a little header) and bottom "shelf" -- they both made it look more finished and built in. I used lattice wood trim to cover all the rough edges and finish it up. I was going to leave it like this to show you on Friday:

Two things were bugging me -- there was a gap at the top because I planned to add crown later on. I have been hiring it out because I just hate doing it myself. (I can do it...I just don't like it.)
And the strip above the window was really bugging me. I thought about adding a "header" of sorts across the top, but man, that was going to be a ton of work that would involve having more wood cut at the store.
So instead, I had an idea. I just painted that part white to match the rest of the built ins and then I went ahead and tried my hand at crown again. Surprisingly, it wasn't hard. At all! I did it!
The key to doing crown is having samples (I have them marked with inside and outside cuts) that you can refer to constantly. This is HUGE! Also, making sure they are at the exact same angle on your saw for every single cut -- I mark my saw with a pencil so I know just where to have them when I cut.
I shared a crown molding tutorial years ago you can check out. Also, there's a much easier way to do it that involves some additional pieces and I shared that cheater crown molding how-to here.
That simple change of painting the strip above the window and adding the crown made ALL the difference! And then after I was done with that, I realized I wanted the smaller wall across the room to be dark blue as well. It was odd having three difference colored walls in this space.
THEN I was done...mostly. ;) I have a couple other things I hope to do and I'll share those in a minute. I'm a little giddy about this room and how it came together:
The whole family loves it! Every day my husband comments on how much he loves it. You know a project is good when you step back and feel like the room should have always looked like this...like it's been there forever, but it hasn't!: 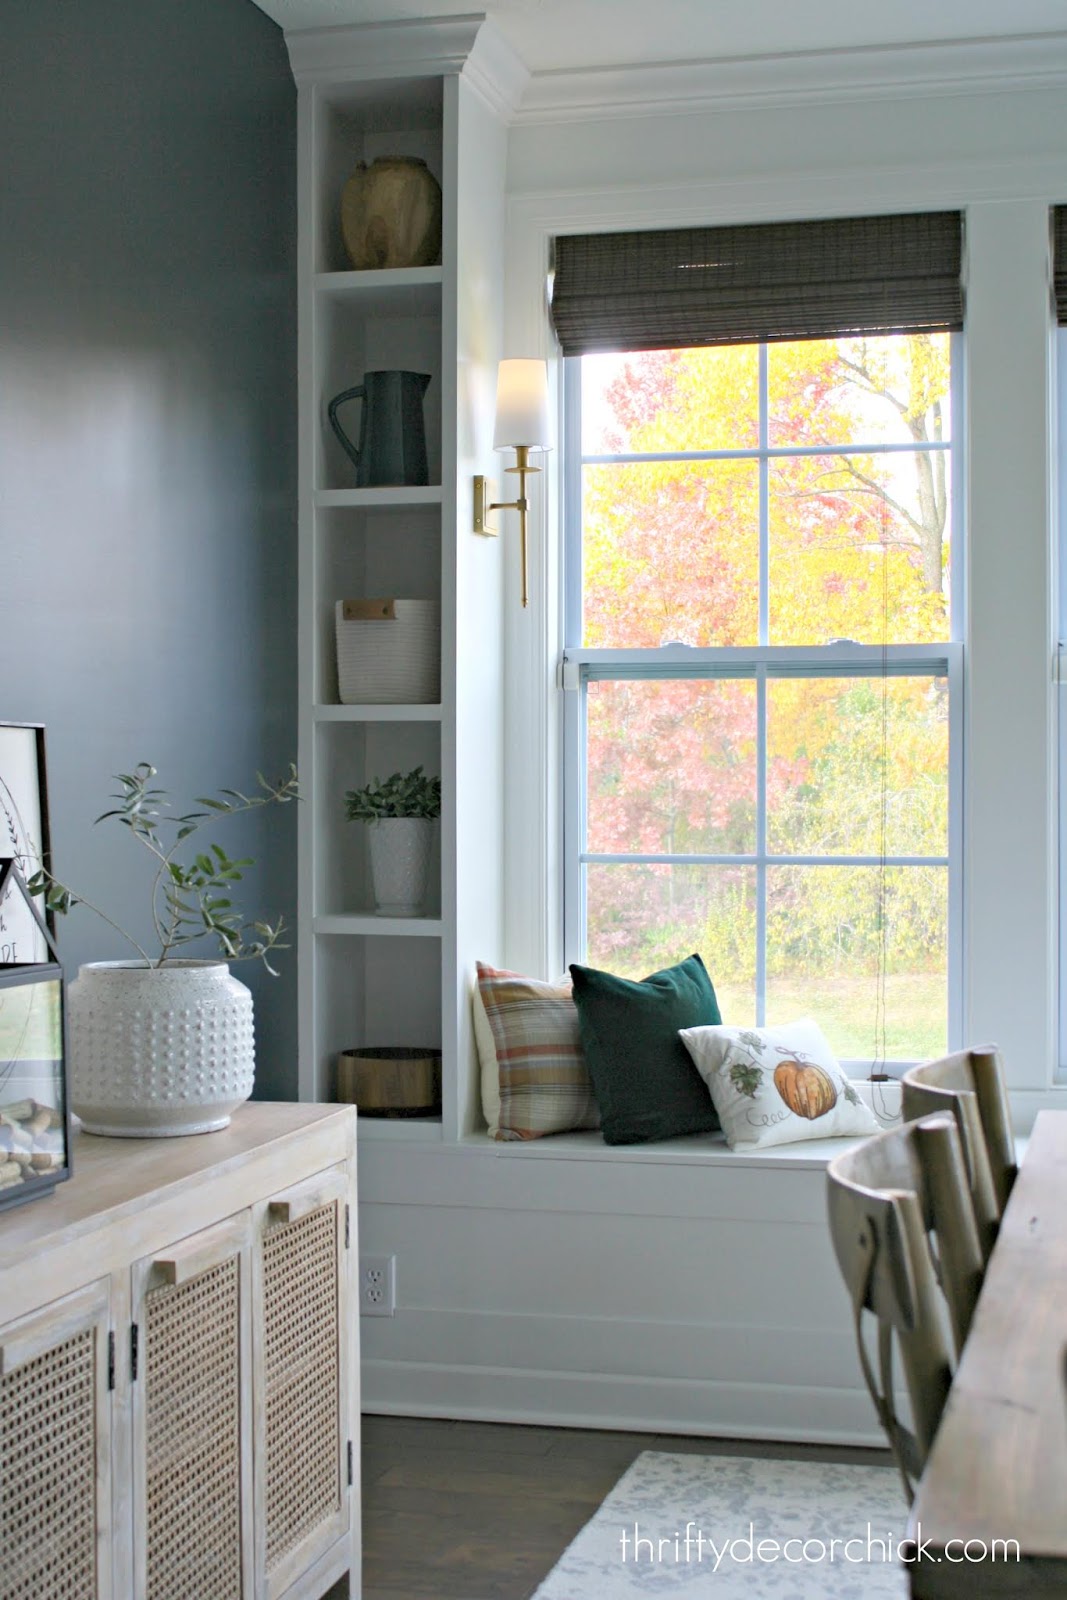
At first I planned to do crown around the whole room, but I'm so glad I didn't! Just adding it to this wall makes it really feel like a custom piece. If I decide to add it later it is easy to add it on without removing anything: 
My plan was to add flat and wide trim in a grid (square) pattern on this big wall: 
But now I'm not sold on it. I think it will get too busy. I'm not completely ruling it out, but I'll wait and see.
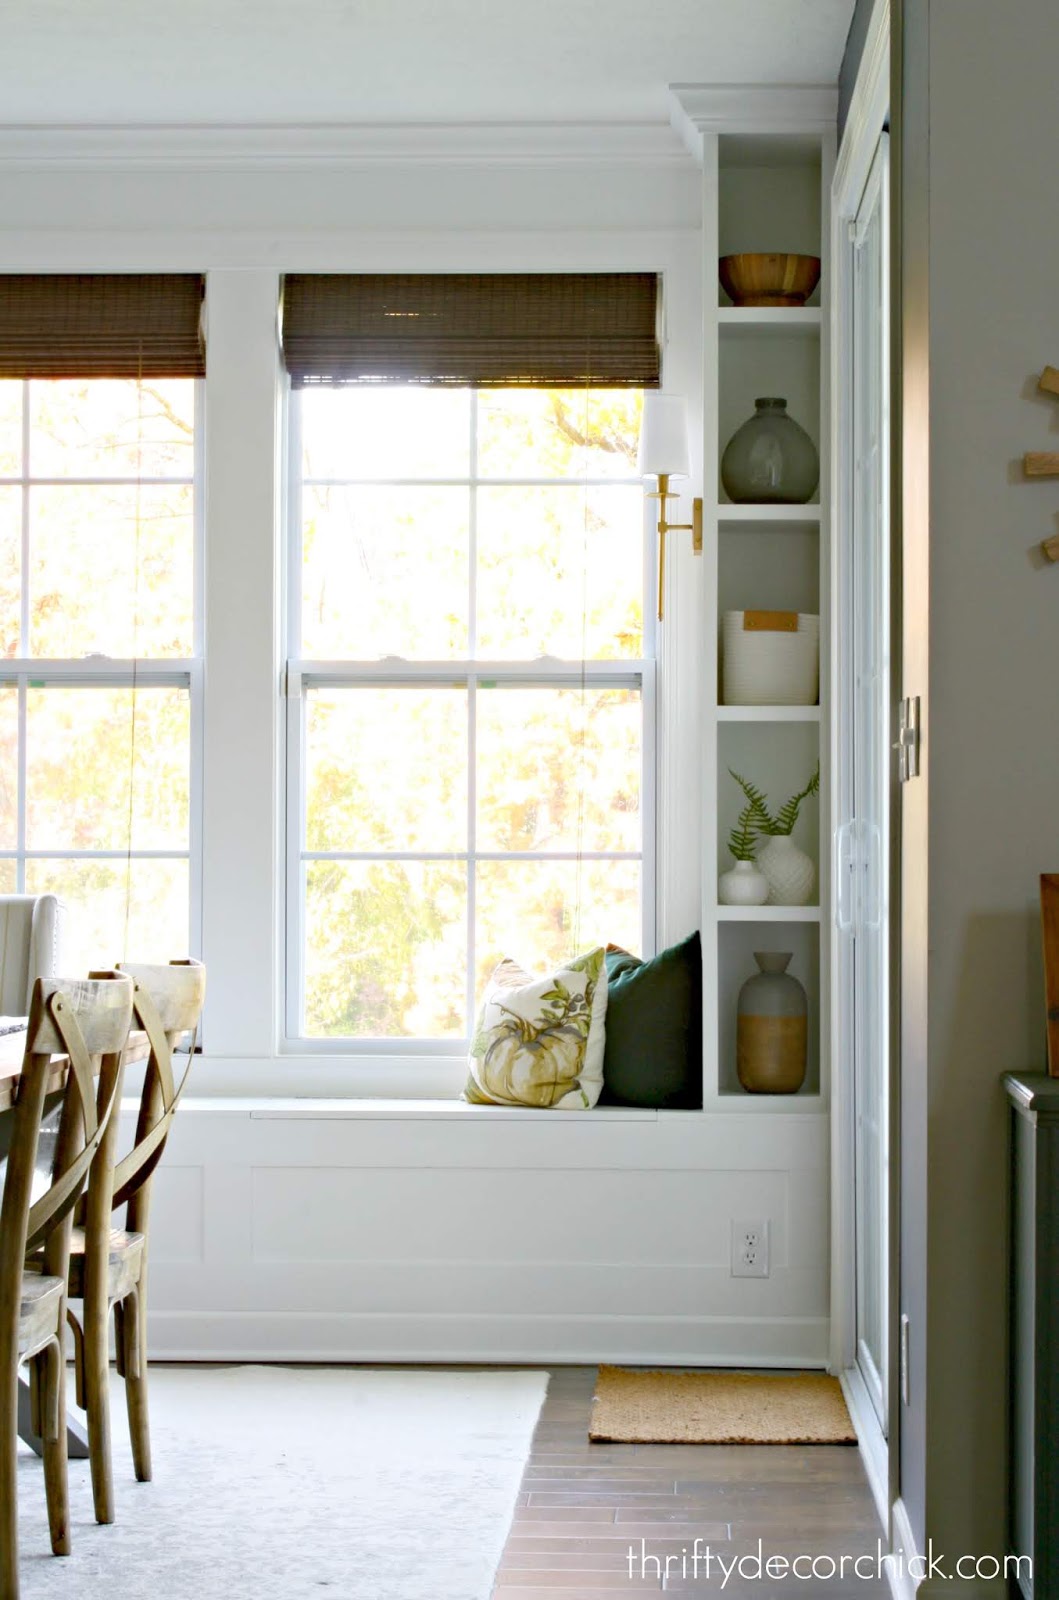
The addition of the seat and built ins shrunk the wall just a bit! And I have an idea for each side of the mirror, but I'll probably wait on that as well. It needs to breathe for awhile!:

The window seat has great storage inside and I'm thrilled because I have cushions coming soon! I cannot WAIT to see them on here. I'm already positive they will be the perfect finishing touch:

Here's a look at the door wall at the beginning:

And here it is now:

By the way, the walls on the sides of the windows weren't the exact same size. Which kind of burns me up. ? But it doesn't matter at all -- don't let that keep you from doing something like this!

Here's this spot with the new furniture earlier this year:

Here is is now!:

Goodness I can't wait to get those cushions on there!
A couple more befores -- that little hallway is getting a makeover next I'm SUPER excited and a little terrified. ;)


I still think the walls need something...and like I said, I have an idea in mind. But I'm going to live with them as is for awhile:


By the way, I loved the before too -- it was lovely. You know I have to add my touches though!:


OH! I almost forgot one of my favorite parts -- the lights on the built ins! I will be sharing all of the details on those later this week. You'll love that project!
I'll go ahead and link to them below:

Here's a list of the items in this room:
By the way...who needs art when you have this view? So pretty! ?:

I hope you enjoyed the project. We sure love it. Let me know if you have any questions! I've been sitting here for about four hours now...gotta sign off on this long post! :) Via https://www.thriftydecorchick.com/2018/10/dramatic-dining-room-makeover.html
0 Comments
Well hello! I've been hard at work on our dining area and I can't wait to show you that later this week! I was hoping to have it finished up for this post (because it's a fun one), but I have a few more details to work out.
We just hit a full year that we've been in our new house!! It's been SO fun and we fall more in love the longer we're here. We are still pinching ourselves that this is our home.
You know how much I love befores and afters, so this post is all about those! I'll share how the room looked before we moved in (if I have that shot), how it looked after I got it set up, and then how it looks now.
Hope you enjoy the tour! I'm not including every room, but these are some of my favorites. :) I'll link to the big projects in each space under the photos for each room.
I didn't change anything in the foyer except for the wall. All of this:
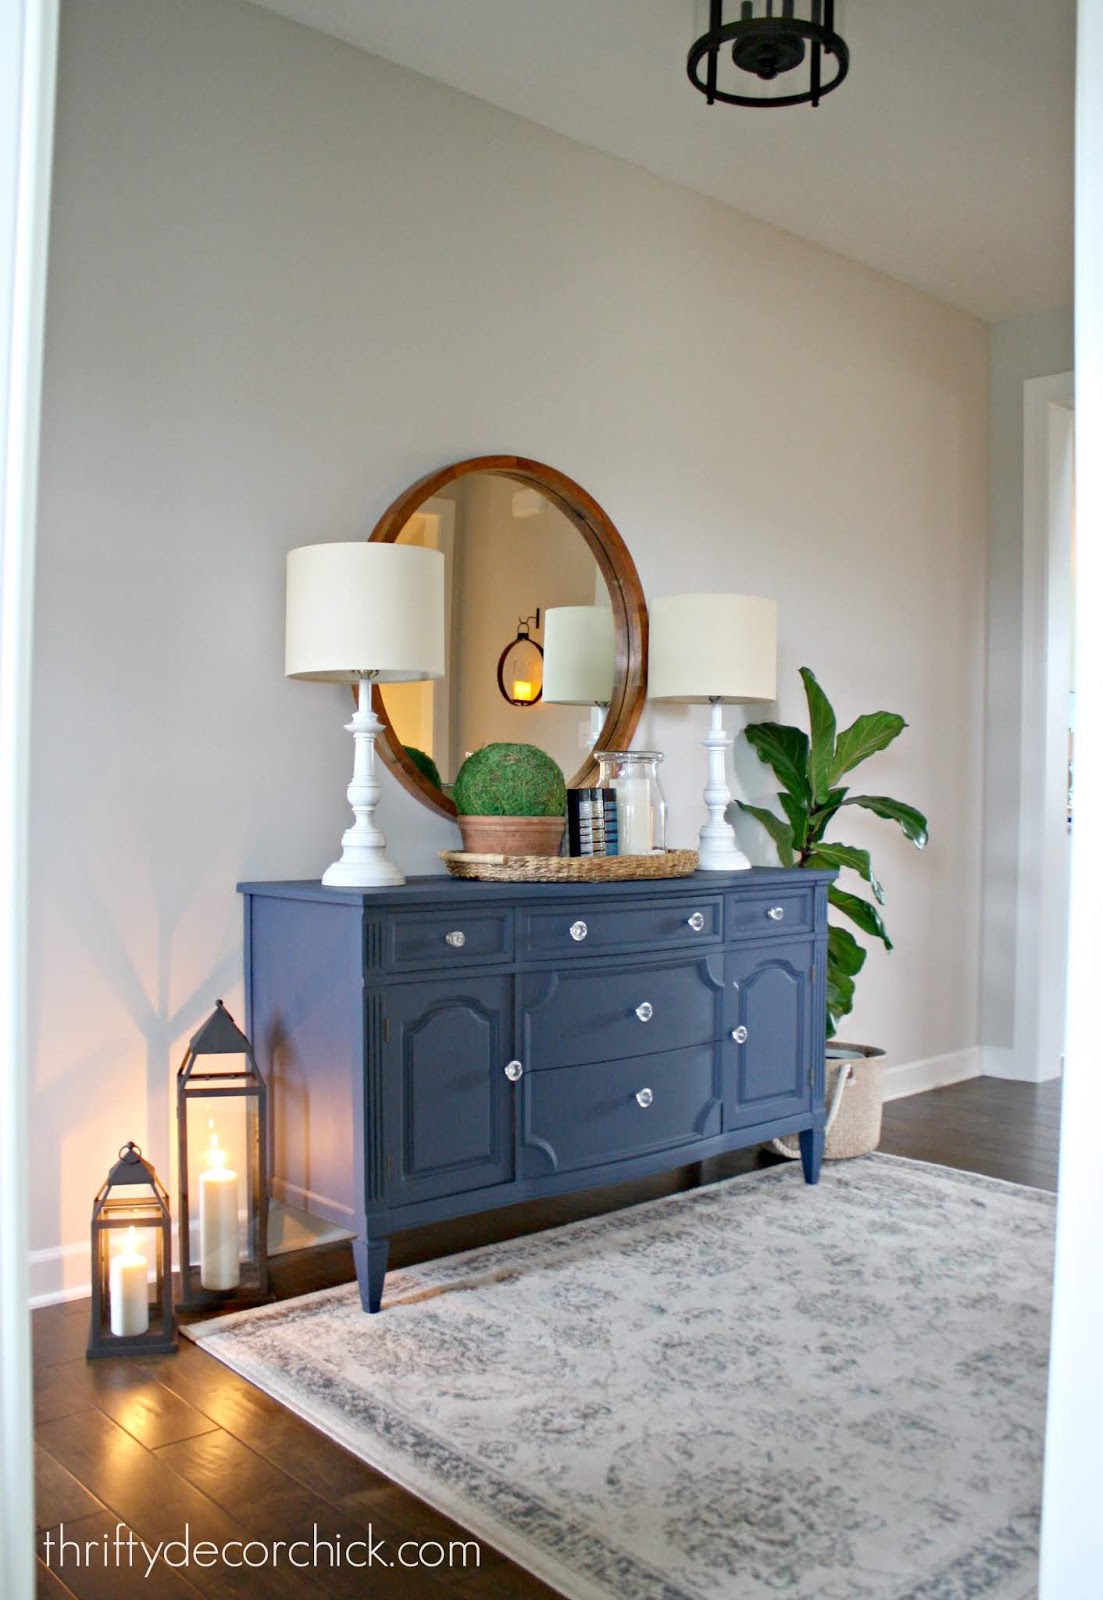
Stayed the same -- the wall was the only change.
But what a change it was!:

I never think I could do all white walls and then I do something like this and think...maybe? ;) This is already a bright spot but this lightened it even more. The simple detail on the wall makes all the difference!
The office hasn't seen many changes either, but the two that I added make it feel more finished to me. Here's how it looked for weeks after we moved in:

It was my dumping ground. ;)
Last time I showed you the space it looked like this:

I went with a cheap light to save money -- I knew I'd find something I liked later.
Since then I've added a light and I found a chair after months of looking. It's a rolling seat from HomeGoods and I love it!:

I have BIG plans for this room (I plan to add these built ins on the back wall) but it's already bright, pretty and functional.
The powder room looked like this when we moved in:

I gave you a tour of this little room later, but from this angle it doesn't look like I did much ?:

I found a pretty round mirror and added a few accessories. It wasn't much but it felt great to have one room pulled together! :)
This was the first full room makeover in our home and it was only about eight months in. Thinking back I realize that's pretty good!
This finished space really felt like ME...like I was making this house ours. (Even though we've felt at home from day one.)

It's hard to tell but that dark blue is actually pretty navy and gold wallpaper. I love it!!
I've added a few additions in our basement family room:

It was already a cozy spot but I was able to move some stuff around and added one of my favorite pieces to that back wall. I also did a huge gallery wall on the stairs:


What you don't see here is the finished wall on the landing. Here's how it looked when I started:

And here it is now with the warm wood planks!:

I've completed a few simple projects in the kitchen as well. Here's how it looked right before moving in:

What you can't tell there is the butcher block was not finished.
I later stained and protected that and added the open shelves:

And most recently added some detail to the end of the island for super cheap!:

I still have bigger plans in here that I told you about last week...and a smaller project that I think will make a big difference. :)
Our mud/laundry combo is one of my favorite rooms in the house. It's huge!! Here's how it looked before we moved in:

Shortly after, I was just so happy to have all of the boxes cleaned up!:


I later painted the back door, had electrical run for a sconce and added my huge chalkboard:


Added some lights I found at the Ballard Designs outlet store:

And did a simple project to hide the kitty litter from sight:

I have bigger plans in this room as well...I'm still formulating exactly how I want it to work/look.
The family room has gotten most of the attention since we moved in a year ago. This is what we started with:

This space is why we fell in love with the house! It's so big and spacious and is truly a great room that opens up to our eating area and kitchen. We love it!
At first I didn't think I wanted built ins next to the fireplace. I know, I know. I don't know who I was. ? The months before our move were incredibly stressful and busy, so I was probably just blocking out anything DIY:

Now it's a cozier spot with built ins, an accent wall and pretty accessories:

This is how the other side used to look:

And here it is after some inexpensive DIY photo ledges:

This room is definitely the heart of our home and I'm thrilled that it's so cozy for such a large and tall space. This is probably my favorite room in the house:

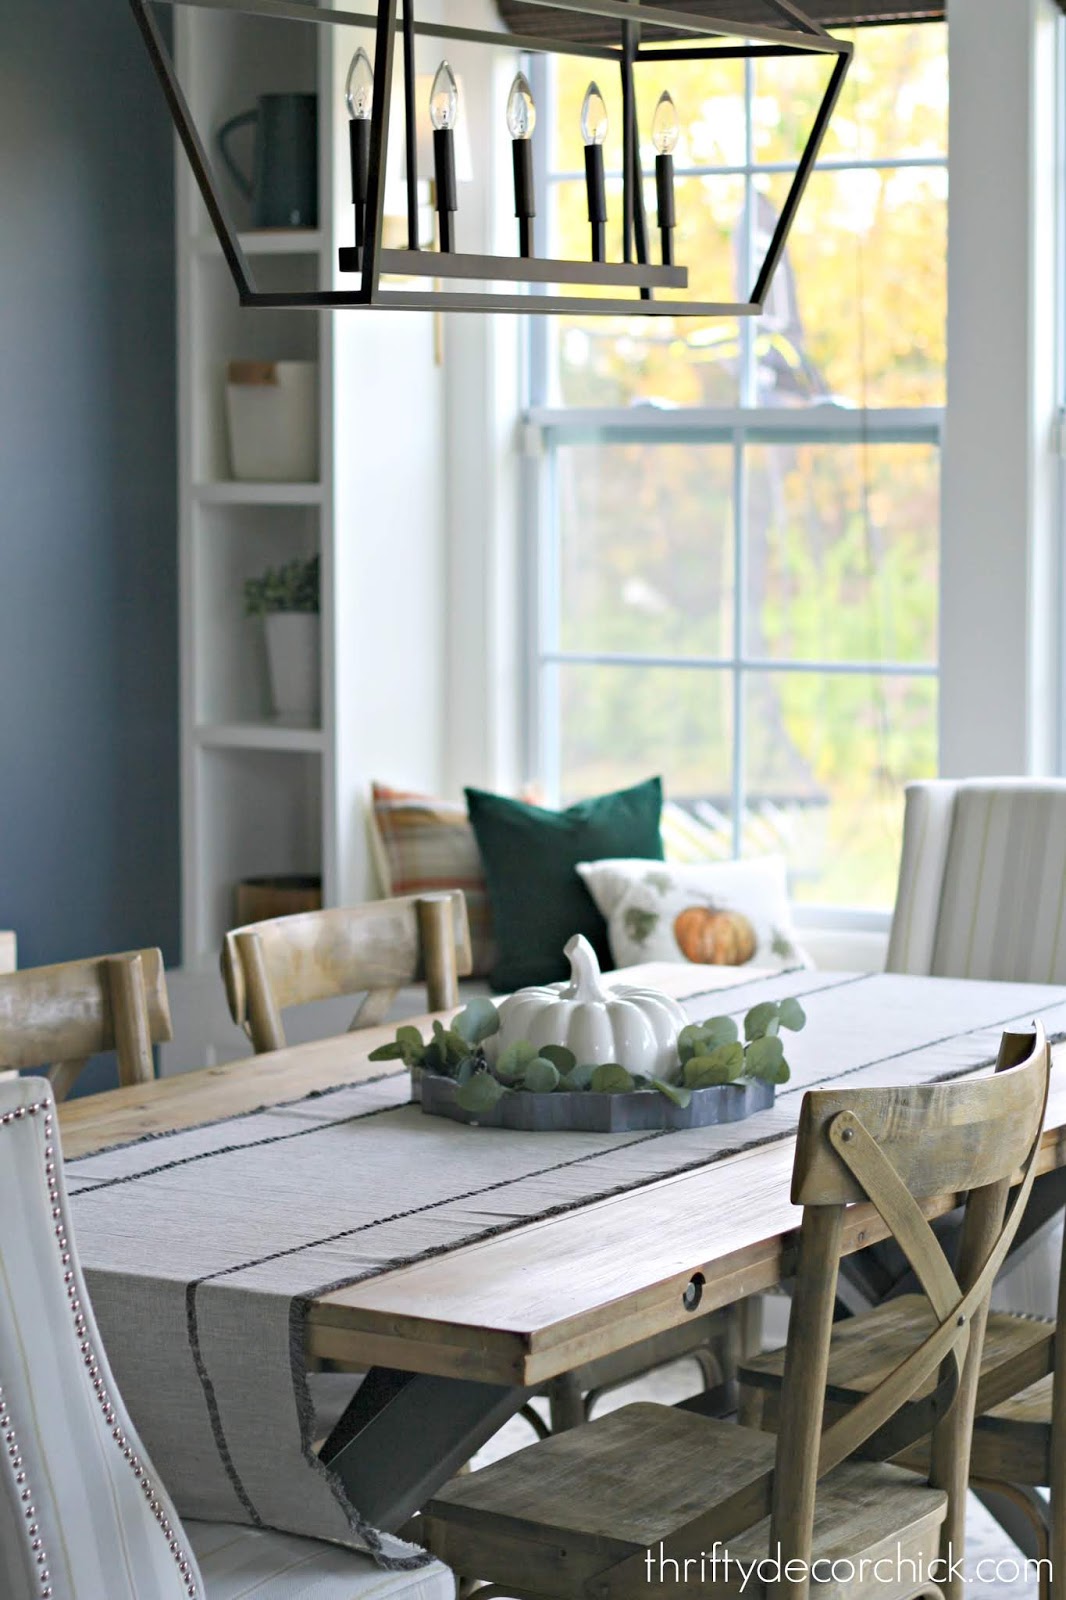
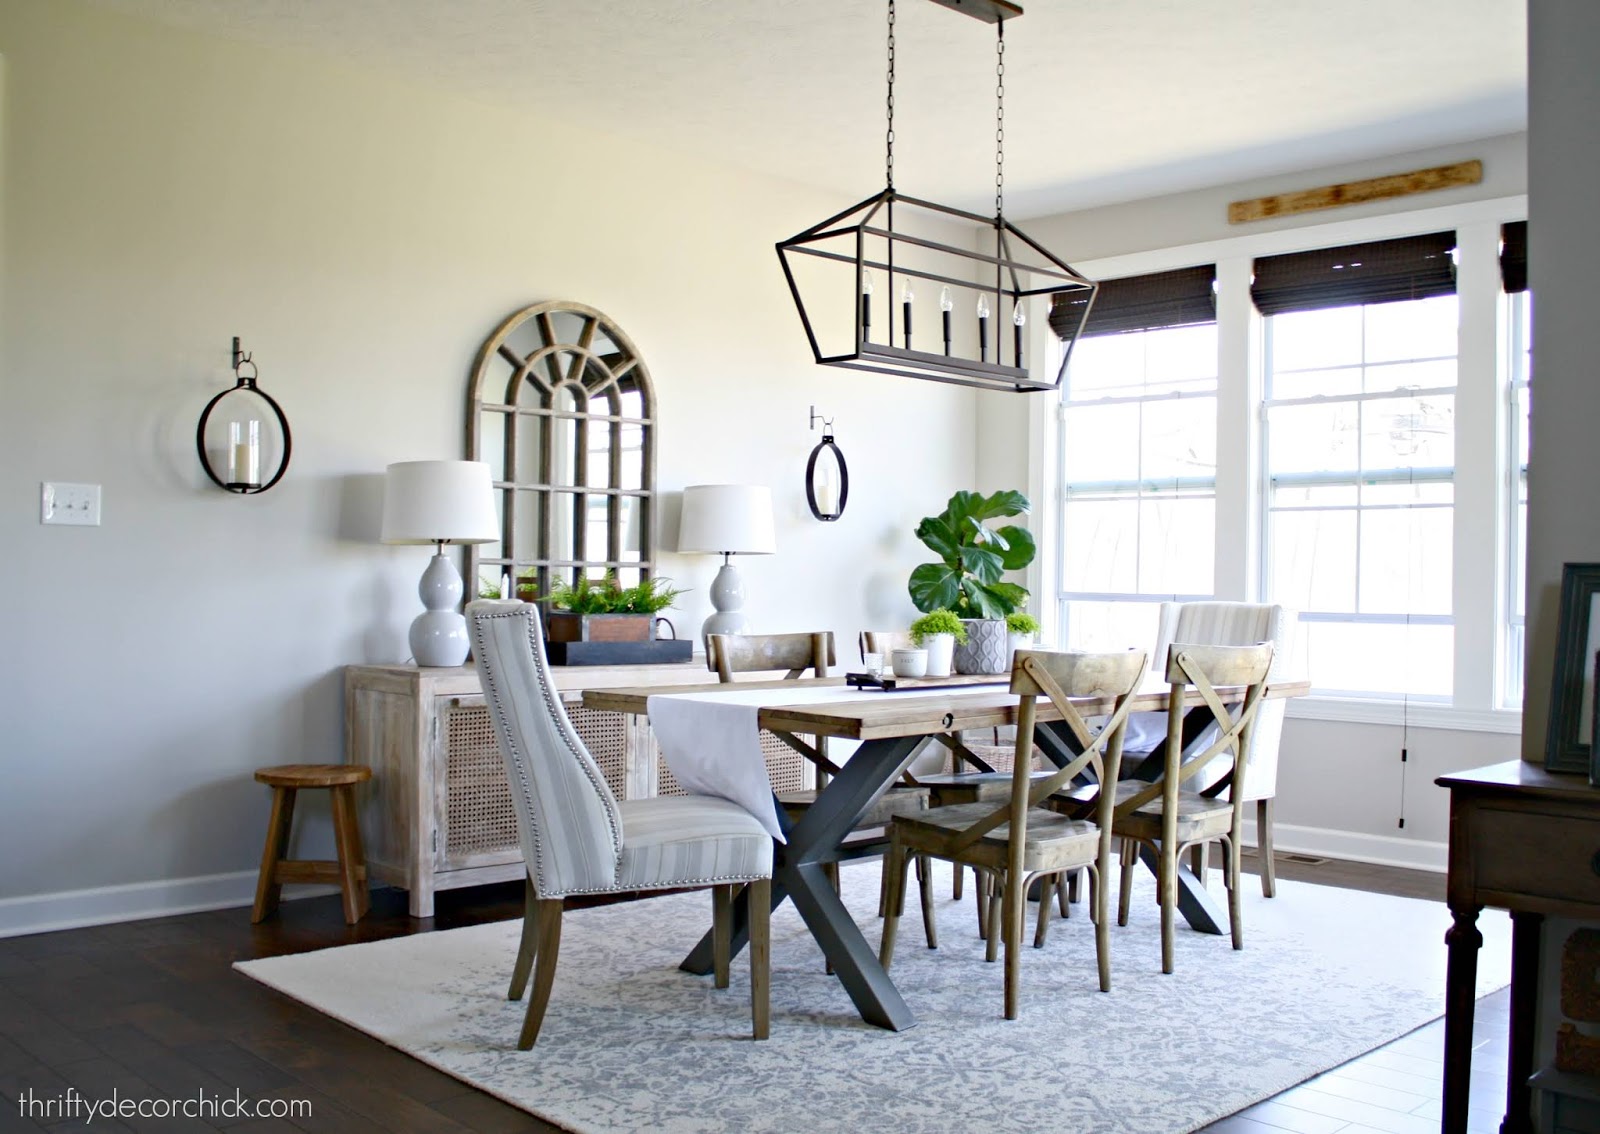
And finally, the dining area, which I like to call the morning room because it is FULL of light first thing in the morning. When we moved in I used what we had from the old house (we bought very little for this house):

I later found a console I loved at a friend's shop that holds all of our serving dishes. My husband HATED our old table (and he rarely cares) so we found this table at a local store in Indy:

I shared my plan for this space last week and I'm almost done. I added something to the list and I can't wait to show you later this week!
There you go -- this is just a bit of what I've accomplished in a year! I haven't included the smaller projects and all of the organizing. I'm thrilled with all I've done, especially considering the back injury I had late last year/early this year. It took months to heal and I'm so thankful to have my body back!
If you have questions about anything please let me know! Can't wait to see what the next year brings. :)
Via https://www.thriftydecorchick.com/2018/10/our-one-year-before-and-after-house-tour.html
This quick project goes to show how much money you can save when you DIY. Even I will buy rather than do it myself often, but this one there was just no question. I saved a ton, even comparing to less expensive options!
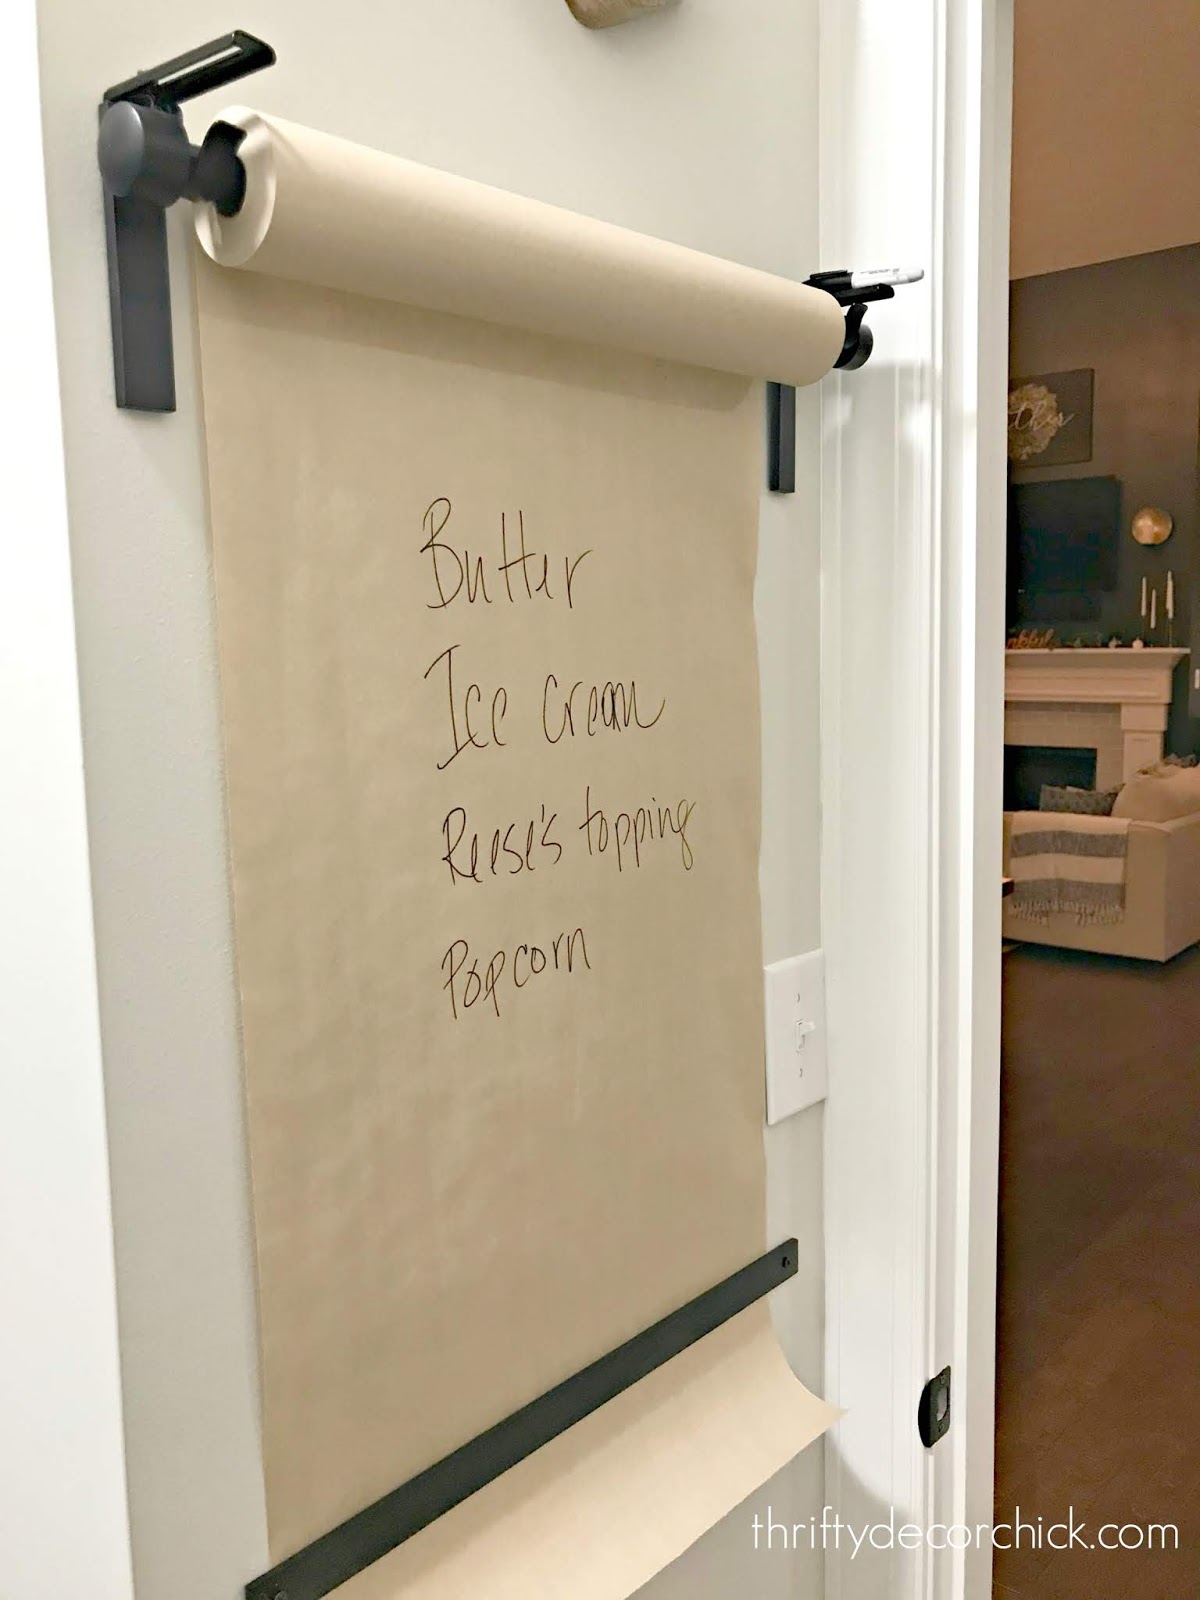
I know DIY scares some of you but this one is about a two on the do-it-yourself scale. ;) I was looking for one of those butcher paper holders that are so cute -- you can pull the paper down and write lists or meals for the week.
I wanted to hang it in our pantry:
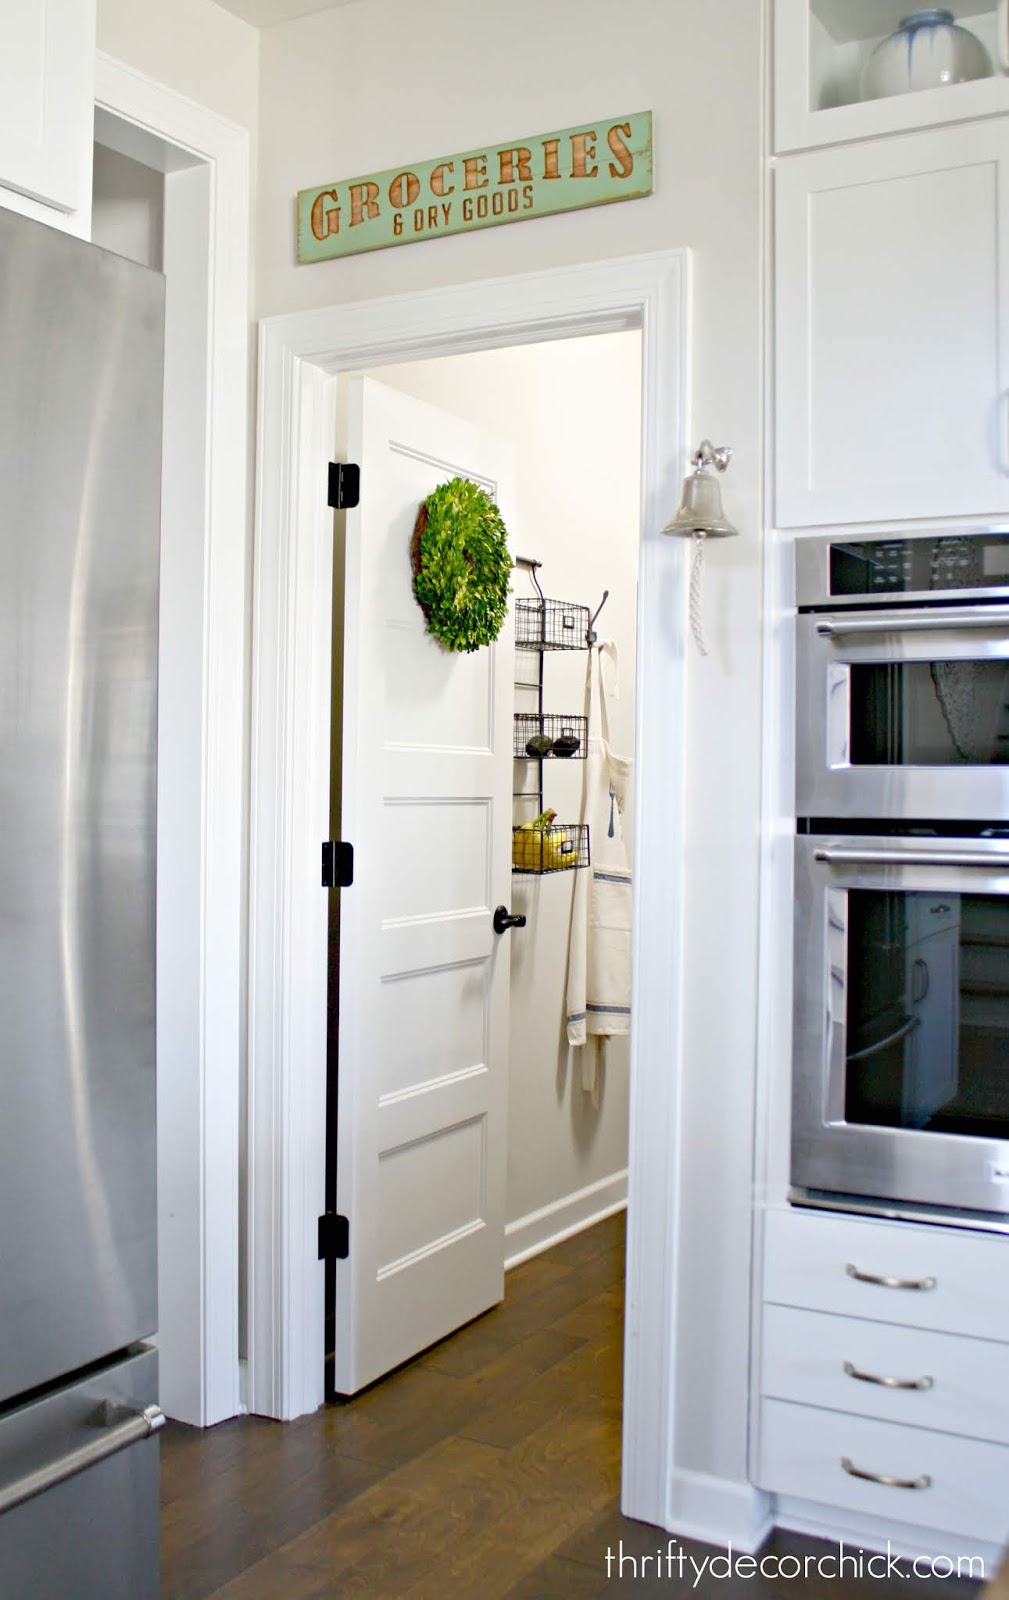
We have the big blackboard nearby in the mud room, but I wanted something I can tear off and take with me if needed. Scratching things off a list is my favorite. :)
I searched online for something to buy, and found one I LOVED...for $150. ONE HUNDRED and FIFTY. Nope. I kept searching and of course found others that were less, but they were all more than I wanted to spend. It's not a super complex thing!
I found this tutorial at A Little Bit OCD and followed it almost exactly. Brilliant! I gathered my supplies:
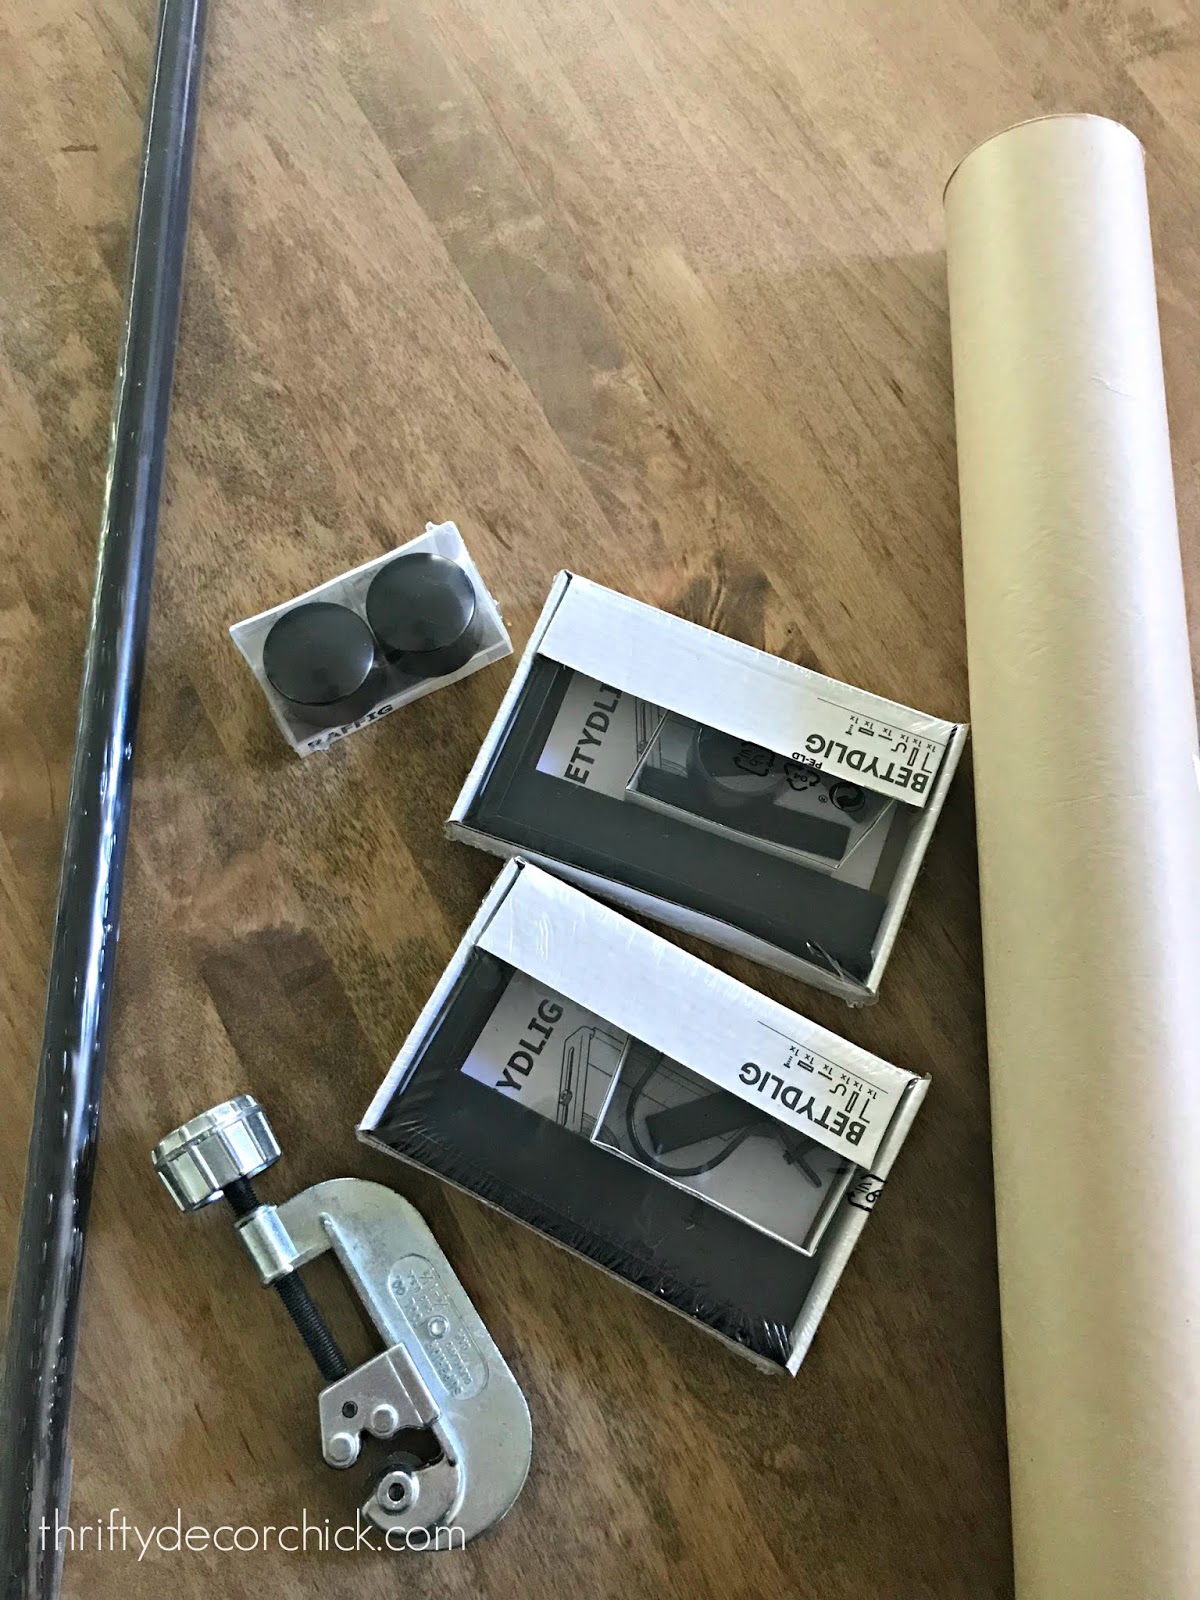
Most if it was from IKEA -- but if you don't have one nearby check out the bottom of this post!
I used the following:
Betydilg brackets, $3 total
Raffig finials, $2
Racka rod, $2
The brown paper is from the paint aisle at Lowe's and I believe it was $4.
To cut this down to size you will need a pipe cutter. I've had this for years and use it more than I ever thought I would! You can find small pipe cutters here (affiliate) or at the hardware store. You just tighten the cutter down on the pipe and then rotate it around:
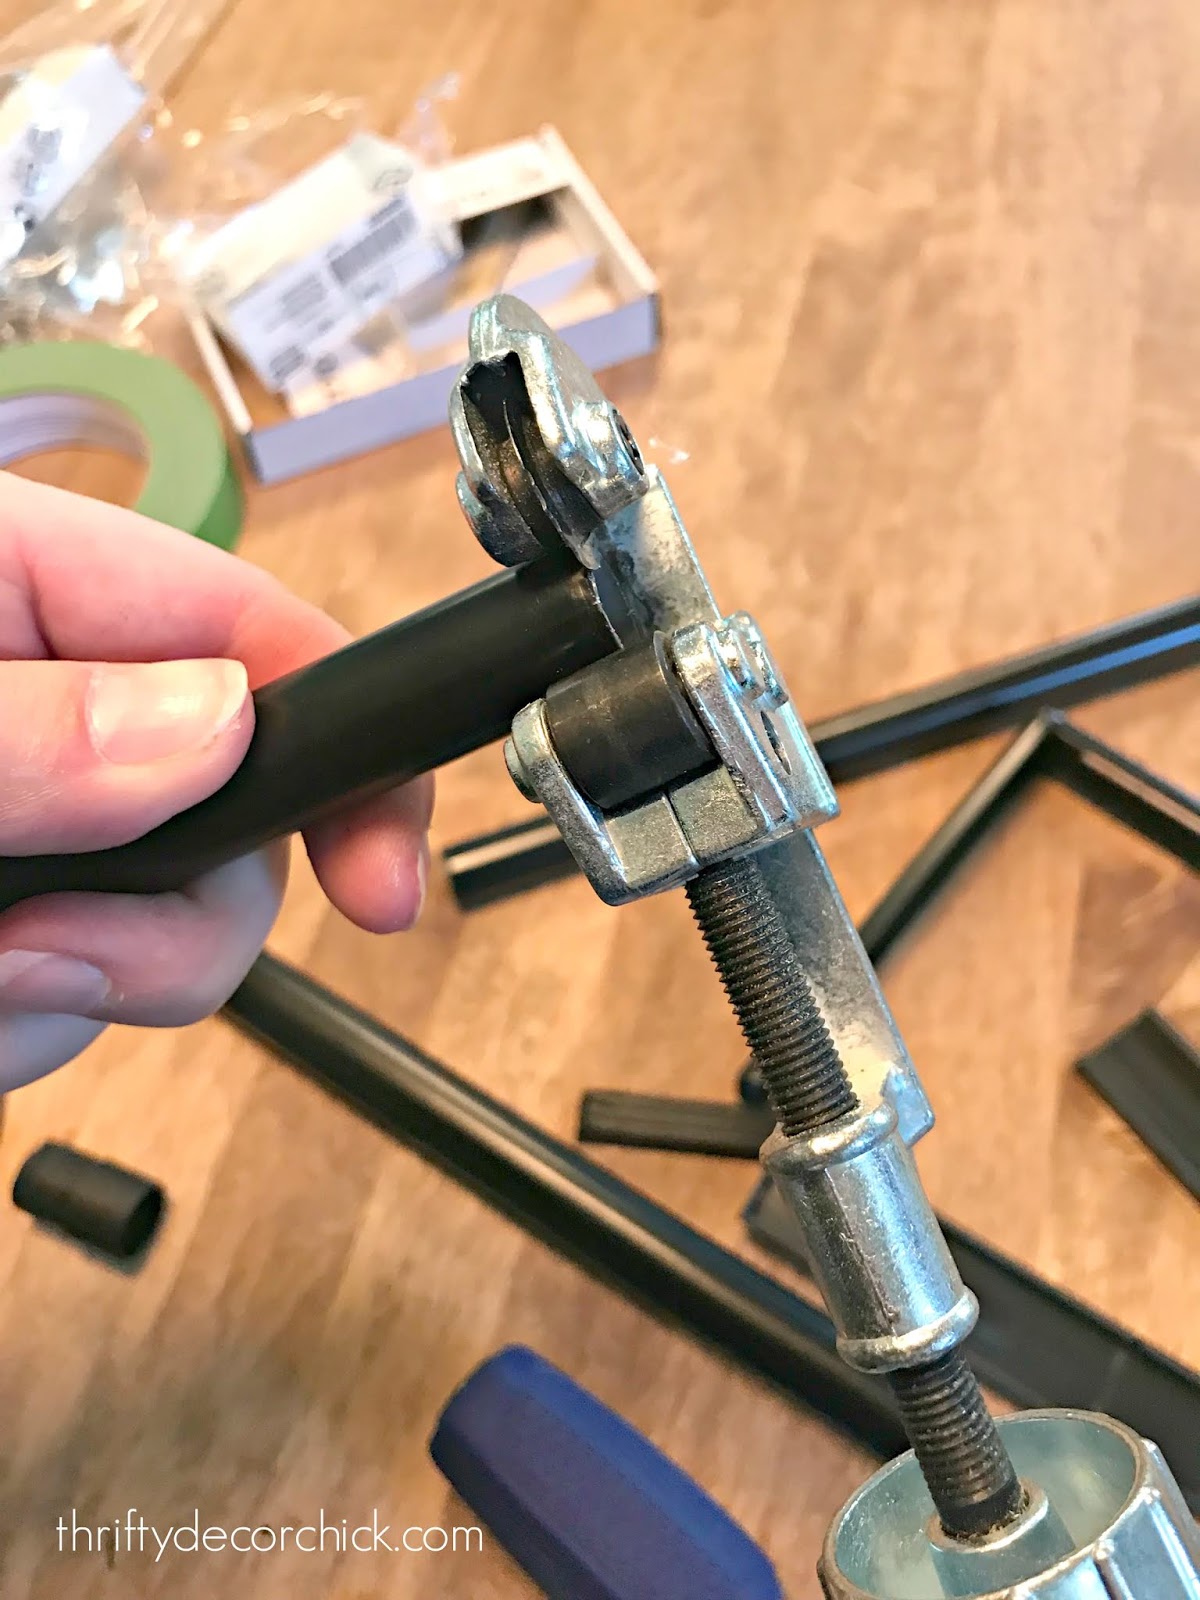
Every couple of turns you tighten it and it eventually cuts through the metal. Super easy! I showed you how else I've used it here.
I hung my brackets (using a level to make sure they were the same height) and hung my rod. Then screwed in the finials so the rod doesn't fly off:
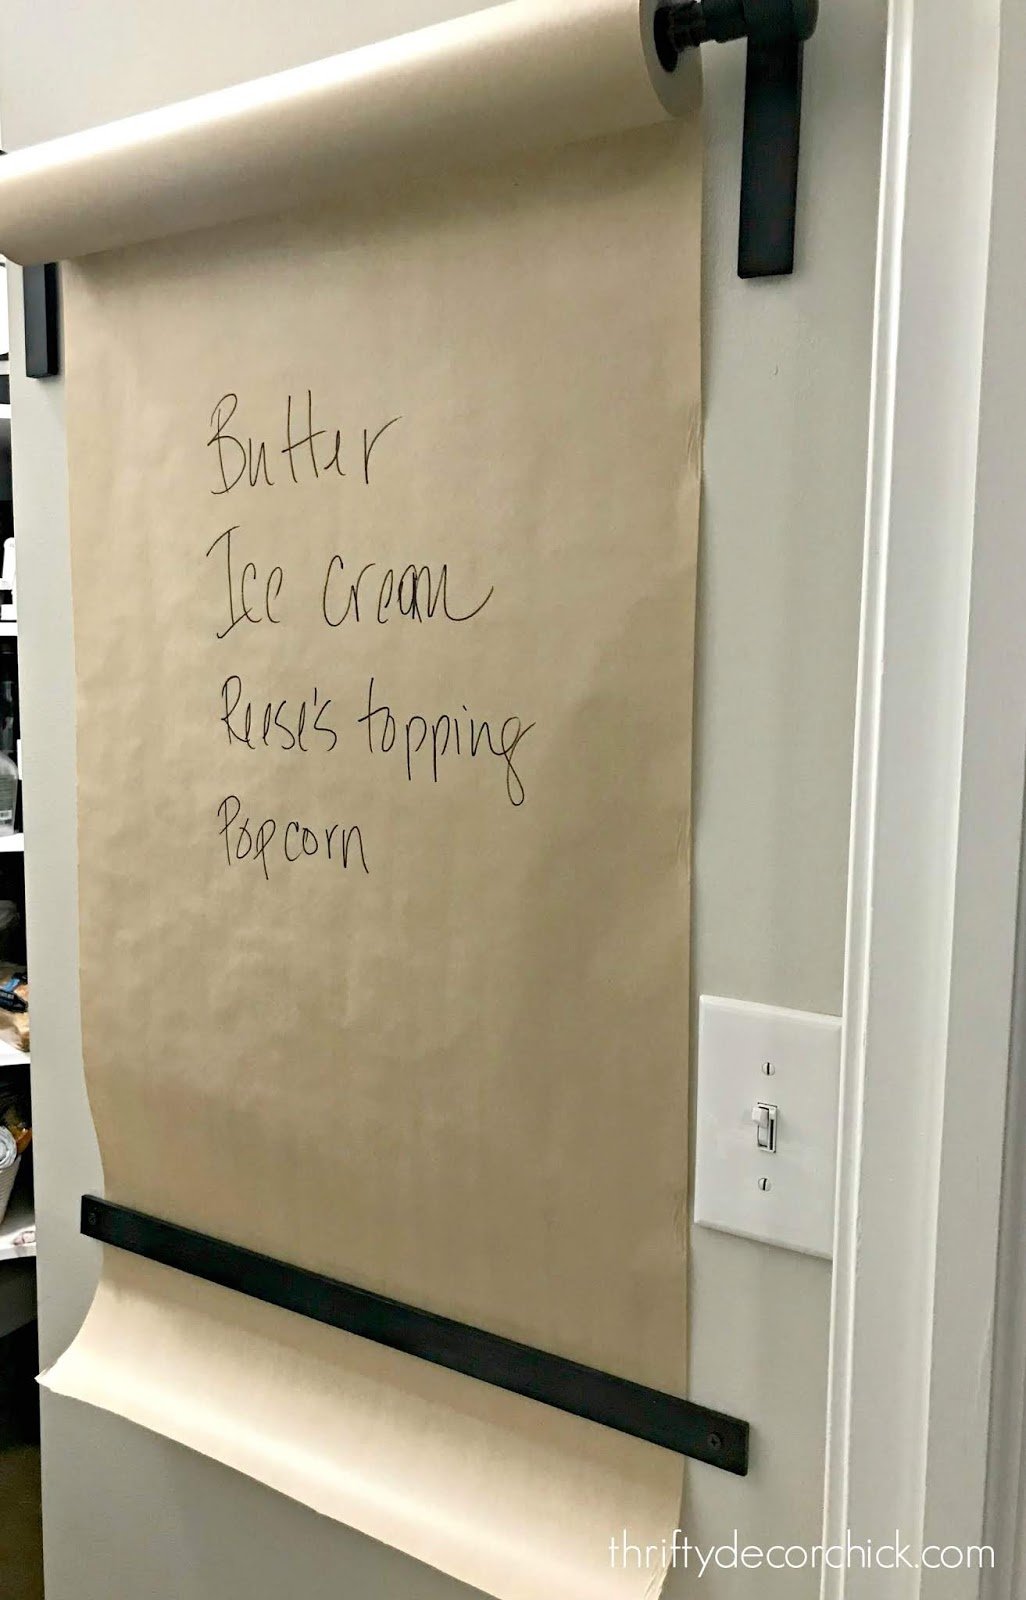
Cute right?? Not bad for $11! If you purchase from IKEA makes sure you get the smaller (diameter) Racka rod. Anything bigger wouldn't have fit through the paper roll. And I'm laughing at our list right now...I swear we eat real food. ?
The one thing I added that the original tutorial didn't have was a bar across the bottom to hold the paper against the wall. The expensive version I saw had a metal piece that you attach.
I just grabbed a scrap piece of wood, spray painted it black, then hung it on the wall:

What you don't see here is I put two washers behind the wood so it sits away from the wall just a bit. That allows the paper to move freely.
We have a Sharpie marker that I'm going to hang off one of the brackets so it's right there when we need it.
I'm able to just pull it off and it makes a clean cut. I LOVE it!!:
The best part is these brackets are adjustable so if I use a thicker roll I can move them away from the wall a bit. If you don't have an IKEA nearby just look for similar brackets that you can move. I found some here and here!
Cute right? Functional, easy and cheap too! My favorite combo. :) Have you tried making one of these wall mounted paper holders?
Some affiliate links included for your convenience!
Via https://www.thriftydecorchick.com/2018/10/easy-and-inexpensive-diy-butcher-paper.html
Well fall weather has hit and I want to do all. the. things. in our house. ALL OF THEM. I've told you before that warm weather makes me lazy. I would hibernate in the summer if that was allowed. Or possible. And not slightly weird.
The crisp weather we've had for the past week is a little crisper than I thought we'd have right now, but I'll take it. It invigorates me! I have four big projects in the works right now and I'm excited to share them with you. For now, can you see my vision? :)
See this looong wall in our morning room/dining area?
It's always perplexed me. Eventually I plan to add a more modern take on a barn door to the left of the picture. It leads to a small hallway.
But for now, I finally have my plan set for this wall. The long wall will be getting a dark accent color:

And then some trim on top of that (in the same color). My only decision now is if I should go with the more traditional board and batten look like I did in our old master:

Or the grid pattern like I did in the guest room:
I do know for sure that the walls will be trimmed out with thinner wood like in the guest room. That way I don't have to replace the baseboards. ?
I'm leaning toward the grid pattern, but that tall/short combo is a classic! We'll see what I decide!
I shared the built in window seat with you a few weeks back:

It is now done, other than cushions! Today I plan to tackle a little something on the sides of the windows. As soon as the seat was done I knew I wanted to add very simple "bookcases" on each side of them. It just needs something and I think it's going to be lovely! I'll share a post after they are done, but I'll probably share updates on my Instagram stories as well.
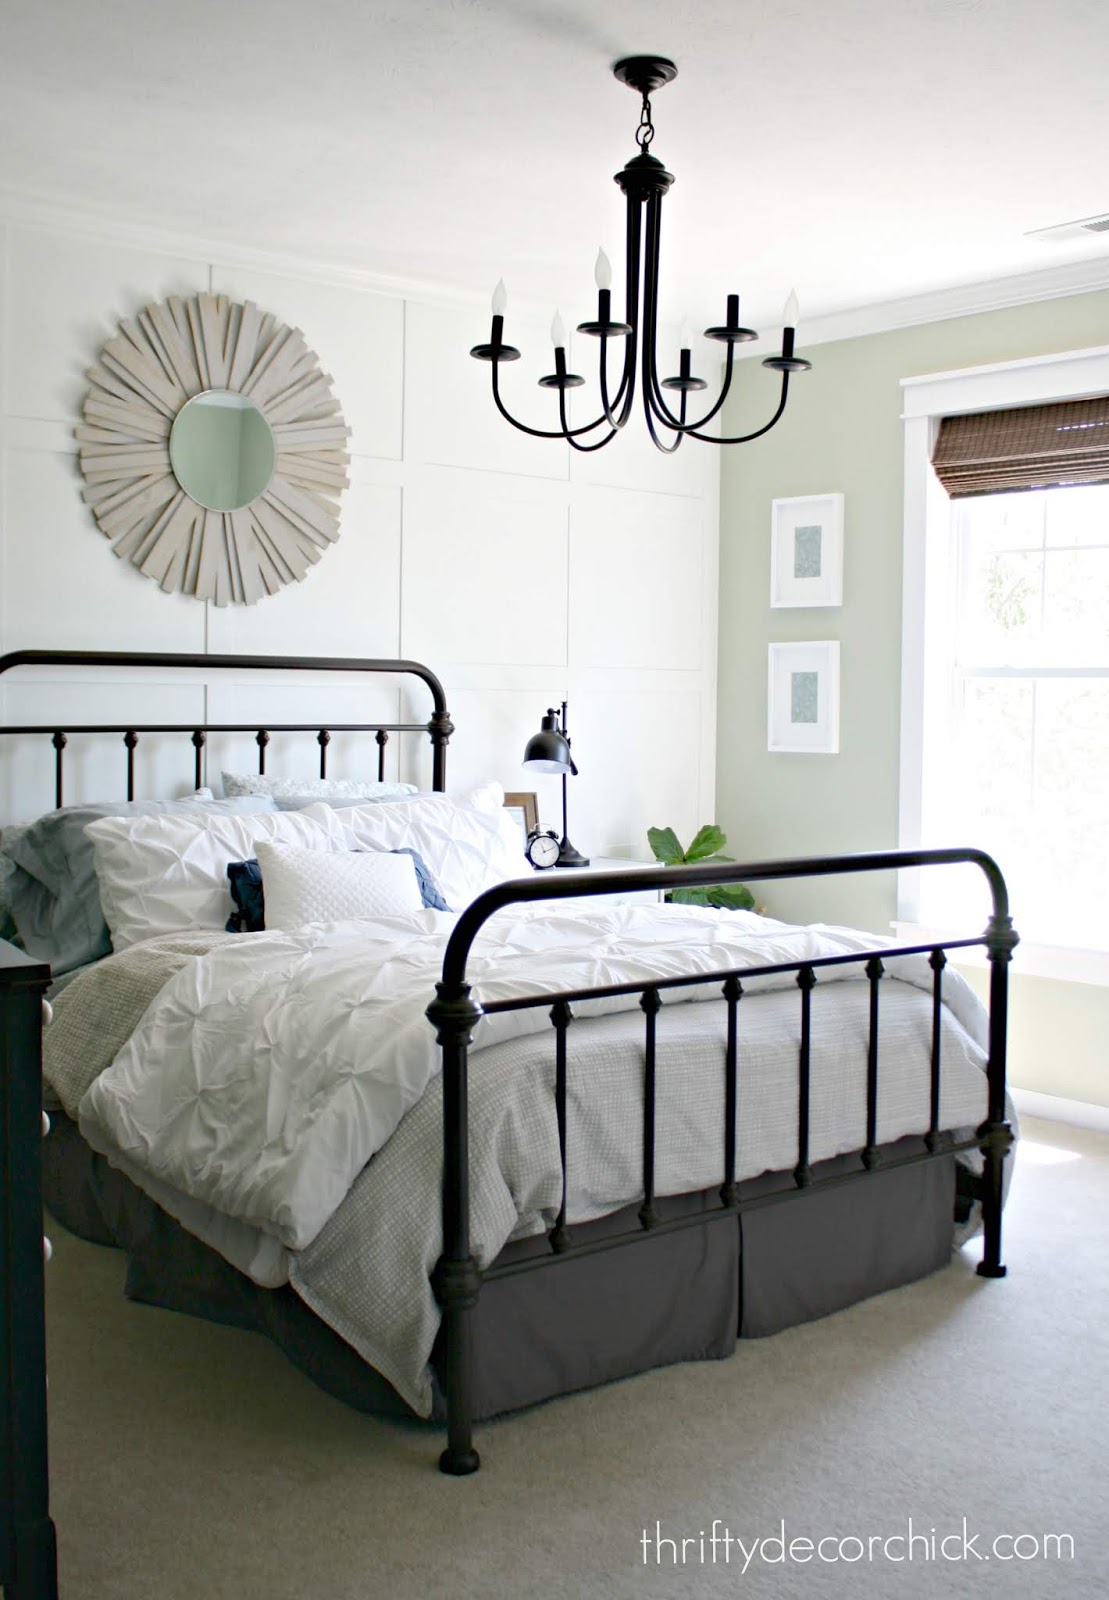
Next up, a plan for the tray ceiling in our master. I've actually had this project in mind since before we moved in:

The tray ceiling is large -- it spans almost the whole room. I want to do something to accentuate it but don't want to do the traditional crown molding around the inside.
So I came up with a plan to trim out the sides with wood and then the ceiling will be painted. The paint will be darker for sure, I'm just not sure what color yet:

I think it will look so lovely with the new chandelier in here!
All of these projects are going to be very pocketbook friendly...until we come to the final one. ;) Remember our open shelves in the kitchen?: 
Here's a more updated photo with the little detail I added to the side of the island:

Our kitchen plans called for a large cabinet to be hung there, but I took that out when we were building. I knew I wanted some open shelving.
Fast forward nearly a year and I have a new plan. :) I'm kicking myself that I didn't think of this during the build process -- but it's nearly impossible to think of everything.
I plan to add two tall cabinets, with glass fronts. They will have floating shelves in between. A friend of mine is building a (gorgeous) house and found this inspiration photo for her kitchen :

Isn't that beautiful? If you know of an original source let me know (I can't find the designer when I search online.)
I will continue the tile up the wall in between the cabinets, just like in this photo. We plan to use the cabinets for our wine glasses -- it will be a really pretty spot!
Of course that means adding the cabinets, having the glass installed on the doors, running electrical for the additional upper cabinet lighting...plus all the trim to match. It's not going to be cheap! I'd LOVE to have this one done before the holidays but I have a feeling it may have to wait.
We pay for all of my projects with cash so it's all about the budget. And time! Even though we'll hire out some of that, I will still do a lot of the work. I just know it will look lovely (the sconce in between will stay) so I'm itching to get it done!
That's my short list. ? And duh, I want to get ALL of this done before the first Christmas decoration comes out. We entertain a lot, but especially during the holidays. We'll see how much I can get done!
Do you have any big projects you're working on this fall? I remember when I worked at a decorating firm years ago that this time of year was killer -- everyone wants their homes ready for the holidays! It's a fun, exciting and exhausting time and I love it!
Via https://www.thriftydecorchick.com/2018/10/some-of-big-projects-i-am-working-on.html
Hey hey! I am a little behind this week because I took the day off yesterday to celebrate my birthday. :) I have fun little trip and quick project to tell you about today! This past weekend my boy and I set off on a little adventure to a suburb near Chicago.
Kilz paints and HGTV sponsored our trip to attend the Great Highwood Pumpkin Festival in Highwood, Il. I knew as soon as I saw the photos of past events that I wanted our son to come along with me.
We had a fun weekend visiting the festival and even squeezed some time in Chicago. If you haven't heard of this event, it is so cool! They construct these massive shelves that line the streets of the festival. Then they fill them with thousands and thousands of carved pumpkins. We went to see it the first night so we could see them lit up:

You can imagine how many pumpkins there are -- these big shelves are everywhere! I guess at some point they turn off the lights so all the pumpkins can glow. We got caught in a downpour within 15 minutes of arriving the first night, so we didn't get to see that. I'm pretty sure they were trying to beat a world record this year but I don't know if they made it or not.
The next day we explored the event a little more, then hung out at the HGTV/Kilz booth. It was SO cute! Kilz carries the Magnolia Home paint line and wow, the colors are just beautiful! They had all kinds of fun events for the kids:


They chose fall-themed colors to showcase at this event and I was swooning. I loved all of them:

That blueish black color is called Blackboard and you know it's one of my favorites! It's a really dark navy blue.
Here's a look at some of the warmer colors in the collection:

It was such a fun little trip with my young man -- we made some great memories!

I've been working on a little spot in the basement and wanted to try out the paints on something just to try them out. They sent me a bunch of beautiful colors! I'm trying to figure out where I can use some of the deeper tones, but for this project I went with a lighter color called Shiplap (how fitting is that name?).
I taped off a big stripe on one of our baskets:

I lightly brushed it on so that it didn't seep behind the tape.
It added some much needed contrast on this table that's the same color as the basket:

If you saw the vintage cabinet I painted and shared last week, that used to sit right here. This one (that used to be in the family room) fits much better here.
Today I hung the sconce (it's a plug in one I think I got from Home Depot -- I've had it forever) and decorated the table a bit with some items from the storage room. It looks soooo much better than before! So cozy:

The basket was just a quick little thing but I have my eye out for a bigger project with these pretty paints. Look at all of the beautiful colors:

Have you tried the Magnolia Home paint from Kilz? I am interested to hear how it does on walls. Did any of you attend the Highwood festival? It's such a cute area, I'd love to go back!
I was provided product and travel expenses in exchange for this sponsored post.
SaveSave Via https://www.thriftydecorchick.com/2018/10/magnolia-home-paint-by-kilz-and-cool.html
Hey there! Hope you had a great week! We have a fun weekend planned -- I'll tell you more about that next week. :)
I posted a photo of our basement to my Instagram page yesterday and it got me thinking...I have a lot of furniture from one store in particular!
I've shopped World Market for years and have always been happy with their products. I don't know if I've ever shared all of these goodies in one spot. It turns out they're having a big sale this weekend so the timing is perfect! (Check the bottom of the post for the discount code.)
Most of their furniture is super affordable (especially if you can catch it on sale) and I've been quite pleased with everything we've purchased from there. Is it amazing quality? No. But we've had good experiences so far. And I just love their style.
This is the photo I shared on Instagram this week -- I'll list the WM products under each photo so you can easily find them if you're interested:

I shared all of the sources for this room when I first showed it to you a few months ago, so if you're curious about anything be sure to check that out!
But I have a few things from World Market here and love them all! That coffee table is very similar to a much more expensive version from another store. I think they have different colors available too. The little table that slides under the sofa is one of my favorites because it's so convenient.
Behind the sofa is a long table you've probably seen all over blogland. I swear I see it in someone's house every time I log into Instagram. ? So if you're looking for an original piece, this isn't it. But I do love it!:

It's super long and not too deep, so it fits great as a console table or behind a sofa. I added the hardware when I got it, and that small detail does set it apart from the others just a bit. It looks like they now have a darker stained version and black as well!
I always admired this desk when I visited the store, but never had a need for it. (I built in a big desk in my office at the old house.) When we moved here I knew I'd need something and I wanted a desk that would be pretty floating in the middle of the room:

I love it! I love the design and the size -- it's plenty big for what I need. The sides have pull out shelves that I can use if needed too.
I added hardware to this one too:

The drawer was really hard to open and again, I just love the added detail. I also love that I can rest my feet on the wood that spans it underneath. It's the little things. ;)
- Campaign desk -
I loved that tribal coffee table so much, this matching end table came home with me years ago. Just a warning -- liquids will leave a mark on these. I keep meaning to put some kind of protective coat on the top of both of them because of that. But otherwise I've been very happy with them.
I bought those gray/blue chairs for the dining-room-turned-library in our old house:

And now they are a perfect fit in our family room! I have to tell you -- they are SO comfy. Nice and roomy too. I like the simple lines and the size is perfect.
I'm considering having them recovered...I like them that much! Again, they aren't incredible quality but they've held up really well.
I've found many decorative items from WM over the years too -- it's just a fun store to shop! They are having a 30 percent off sale through this Monday. If you order online you get the discount and then free shipping with code "famfriends30."
Do you have any of these pieces? If you have a store nearby they have many of their furniture items in the store, so you can buy them there. Most I think you have to order though. Have a great weekend my friends!
Affiliate links included for your convenience!
SaveSave SaveSaveSaveSave Via https://www.thriftydecorchick.com/2018/10/one-of-my-favorite-shopping-spots-and.html
Hey all! Sorry for the wonky posting this week -- we are finally coming out of the sickness fog and things are getting back to normal. Normal is GOOD. I had time to tackle a paint project I've had in mind for weeks and man do I love it!
I went way out of my comfort zone with this paint color and I'm so glad I did. Recently I did a little switcharoo with some furniture -- I found this little table earlier this year:
As you can see the drapes were kind of in the way. I later moved those over so they ended up clearing the table just fine, but then I decided this one would work better in a spot in our basement. The piece I'm sharing today was down there and was a bit small for the spot.
I bought this cabinet from a barn sale years ago. It's a vintage piece -- I realized while painting it that it may have been a sewing machine cabinet. The top has hinges and used to open up. If it isn't a sewing cabinet let me know -- I'm curious!:

I got it all those years ago for the basement at the old house. Yellow is not typically a color I use, but it worked well in that room -- I used a lot of green, blue and yellow in there for awhile.
Anywho...the switch worked out great. This piece is more substantial and looks better in the family room. But the color wasn't working for me. Plus this was painted with a two tone look (a blue under the yellow) and distressed quite a bit, which isn't my style anymore.
I knew all along I wanted to paint it, and as I mentioned, I wanted to do a different color than usual. I did not paint it blue! Or black! Can you believe it? ? I really wanted to do an earthy green to tie in some of the green accents we have in the great room.
This piece was painted in chalk paint and then a protective wax was applied on top. I really hate sanding -- I have a weird aversion to it. I'll do about anything to avoid it. Plus, with the detail on the front I knew it would be really difficult to get to all the nooks and crannies.
My favorite primer to the rescue! I've shared this BIN primer with you many times (most recently when I painted another door black). This stuff is great because it's super thin and goes on easily:

Another bonus is it dries crazy fast. Because it's so thin it was easy to get in the detailed areas:

I used a cheap brush to apply to those areas and then a foam roller for the flat parts:

By the way, this primer is usually white. I have it primed darker because I usually use it for black doors.
I did a ton of searching online to find the perfect olive green. I found four olive colors I liked -- dark olive, forest floor, tate olive and vintage vogue. They were a mix of Benjamin Moore and Sherwin-Williams colors I believe. I ended up going with the latter -- the vintage vogue color. I got it mixed at SW (they can mix BM colors!).
This color was out of my comfort zone but when I was done I fell. in. love. I'm obsessed with it!:

Now I want to paint everything green! :)
The hardware was silver before -- I sprayed it gold and it really pops now:

The piece has a lot of character and I'm so happy to have it where we will see it more often! I LOVE the detail on the doors. It has plenty of storage inside but we don't need much here. We keep a few card games and the dog leash in here.
I hung a mirror for now -- we have plenty of mirrors in this room already so it probably won't stay. This wall is hard because of those switches.
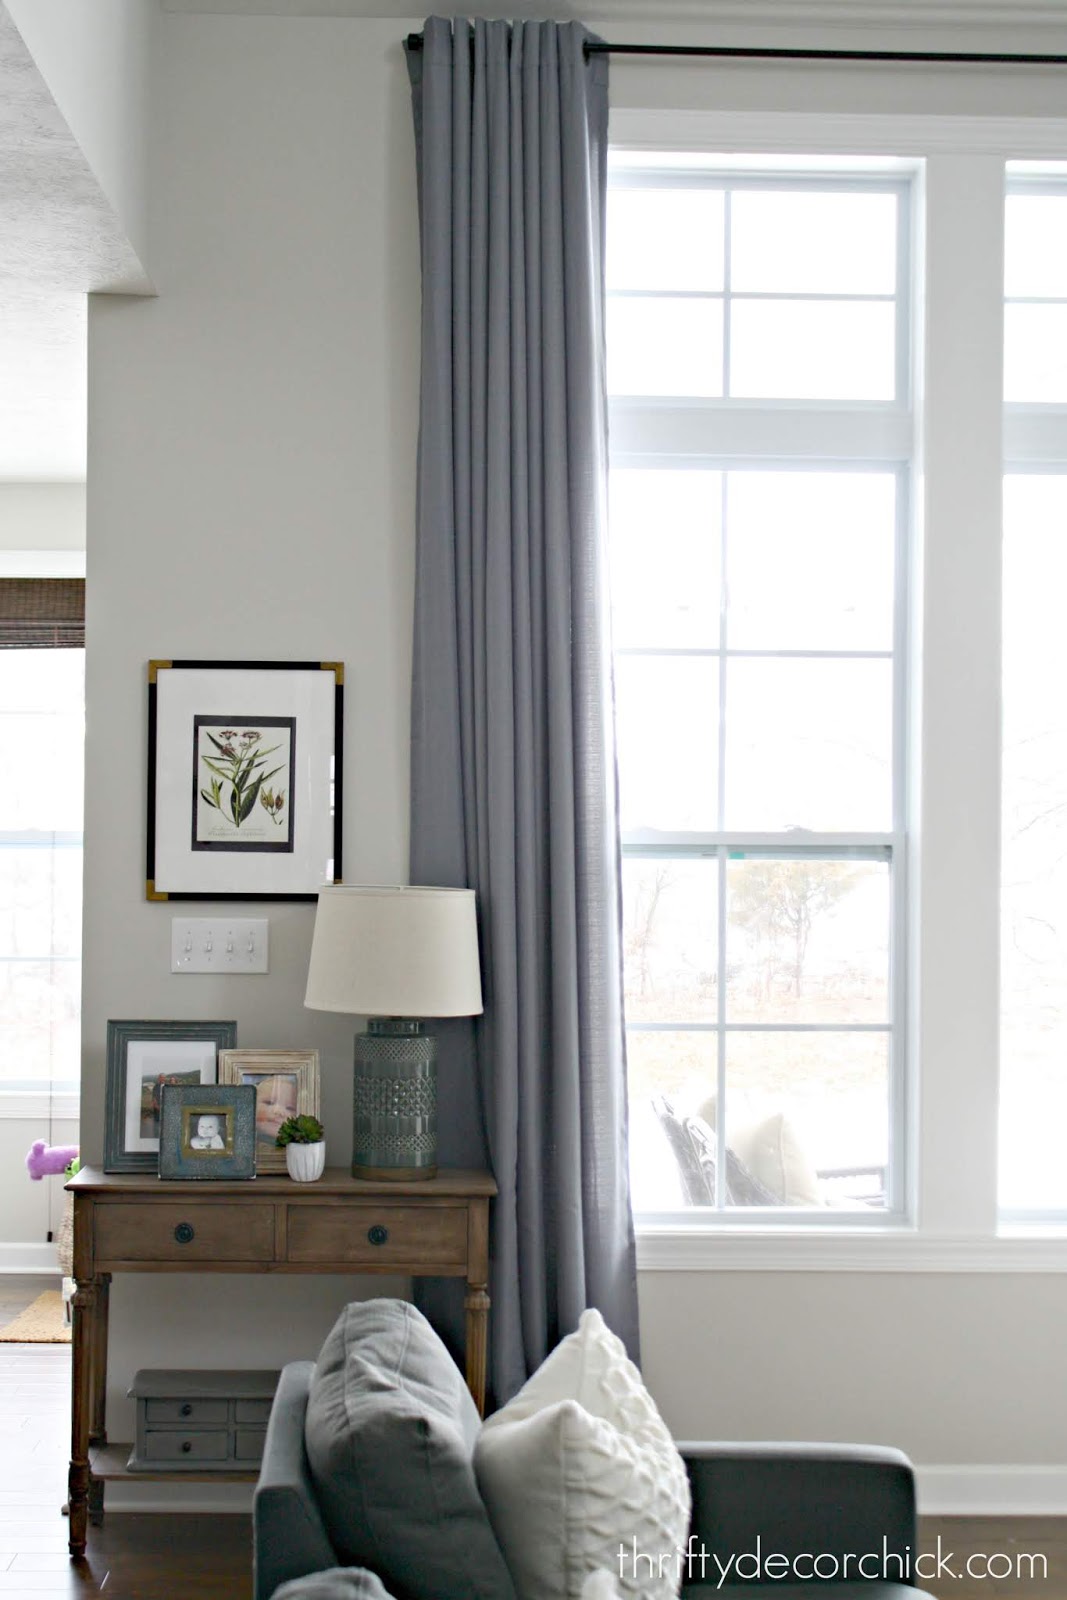
Our drapes have a purple tone in pictures -- drives me crazy. They are more of a blue gray. I'm thinking of moving these to another room and trying a lighter color in here. We'll see:

I'm SO glad I went with a color I wouldn't normally pick. I'm really digging greens lately and am considering going with a dark green in our basement kitchenette someday. Love it!
If you're looking for something similar, I've found a lot of vintage pieces like this on Craigslist over the years. You can't beat the detail and they add some character to our young house:

Have you ever used a paint color you were nervous about? Did you end up loving or hating it? Remember my orange (ahem...burnt orange) office back in the day? (Talk about a blast from the past!) That one didn't last too long. ;) Affiliate links used for your convenience! Via https://www.thriftydecorchick.com/2018/10/going-out-of-my-comfort-zone.html |
