|
Hello there! I'm still working on the garage purging and organization and I'm excited to show you the projects I've been working on in there! I have a lot left to do, but it's already SO MUCH better.
I wanted to share what I have planned in our mud/laundry space after the garage is finished -- I'm super excited about this too! If you've read the blog for awhile, you know I get my energy in the cooler months and in the summer I turn into a sloth. I think I'm opposite of most -- the cold temps invigorate me and the warm weather makes me want to take a nap. ?
We have a joint laundry and mud room and we LOVE it. I designed the space (as far as placement of everything) while we were building. This side of the room looks really good!:

As you can see, the bench is on the left and the closet I had added is on the right. One of the reasons I designed the room this way so that when we (or anyone visiting) looks into the room, this is the view we'd see.
I just knew this side would always be cleaner and more organized than what we have around the corner to the left. I know us. Ha!
This is our folding table -- we could have added cabinets underneath, but I didn't want to add that to the bottom line at the time. I also wanted to see how we used this space first:
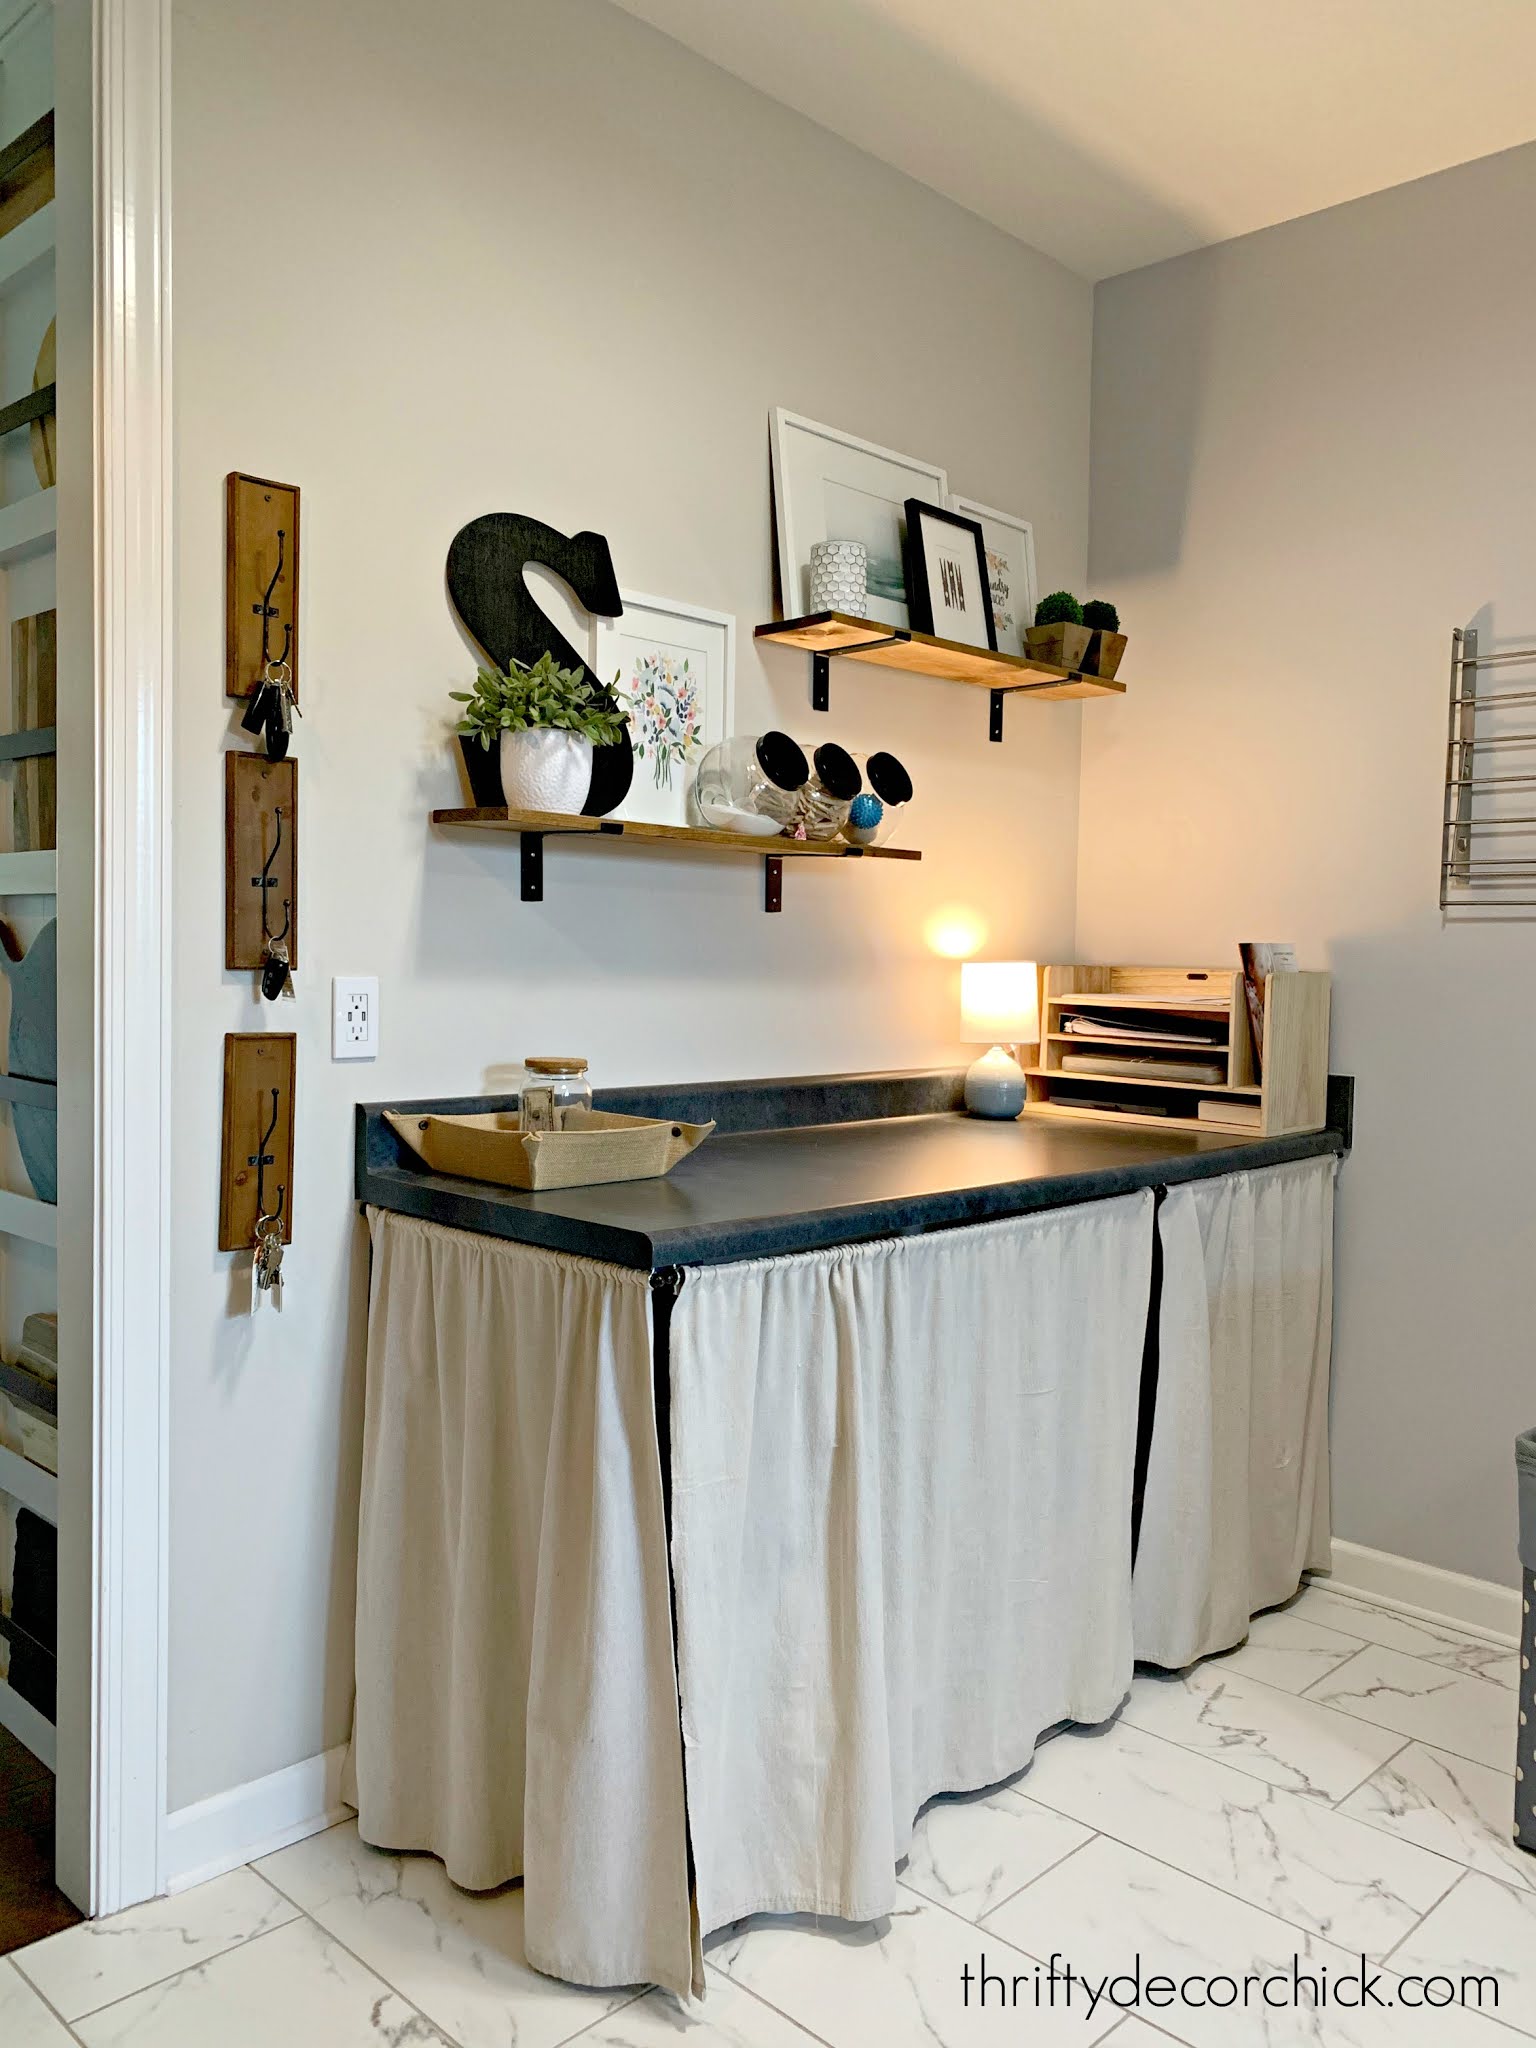
We knew we'd hide the kitty litter boxes under there, so holding off on base cabinets was best.
Well...now I'm ready. Because THIS is how that counter usually looks:
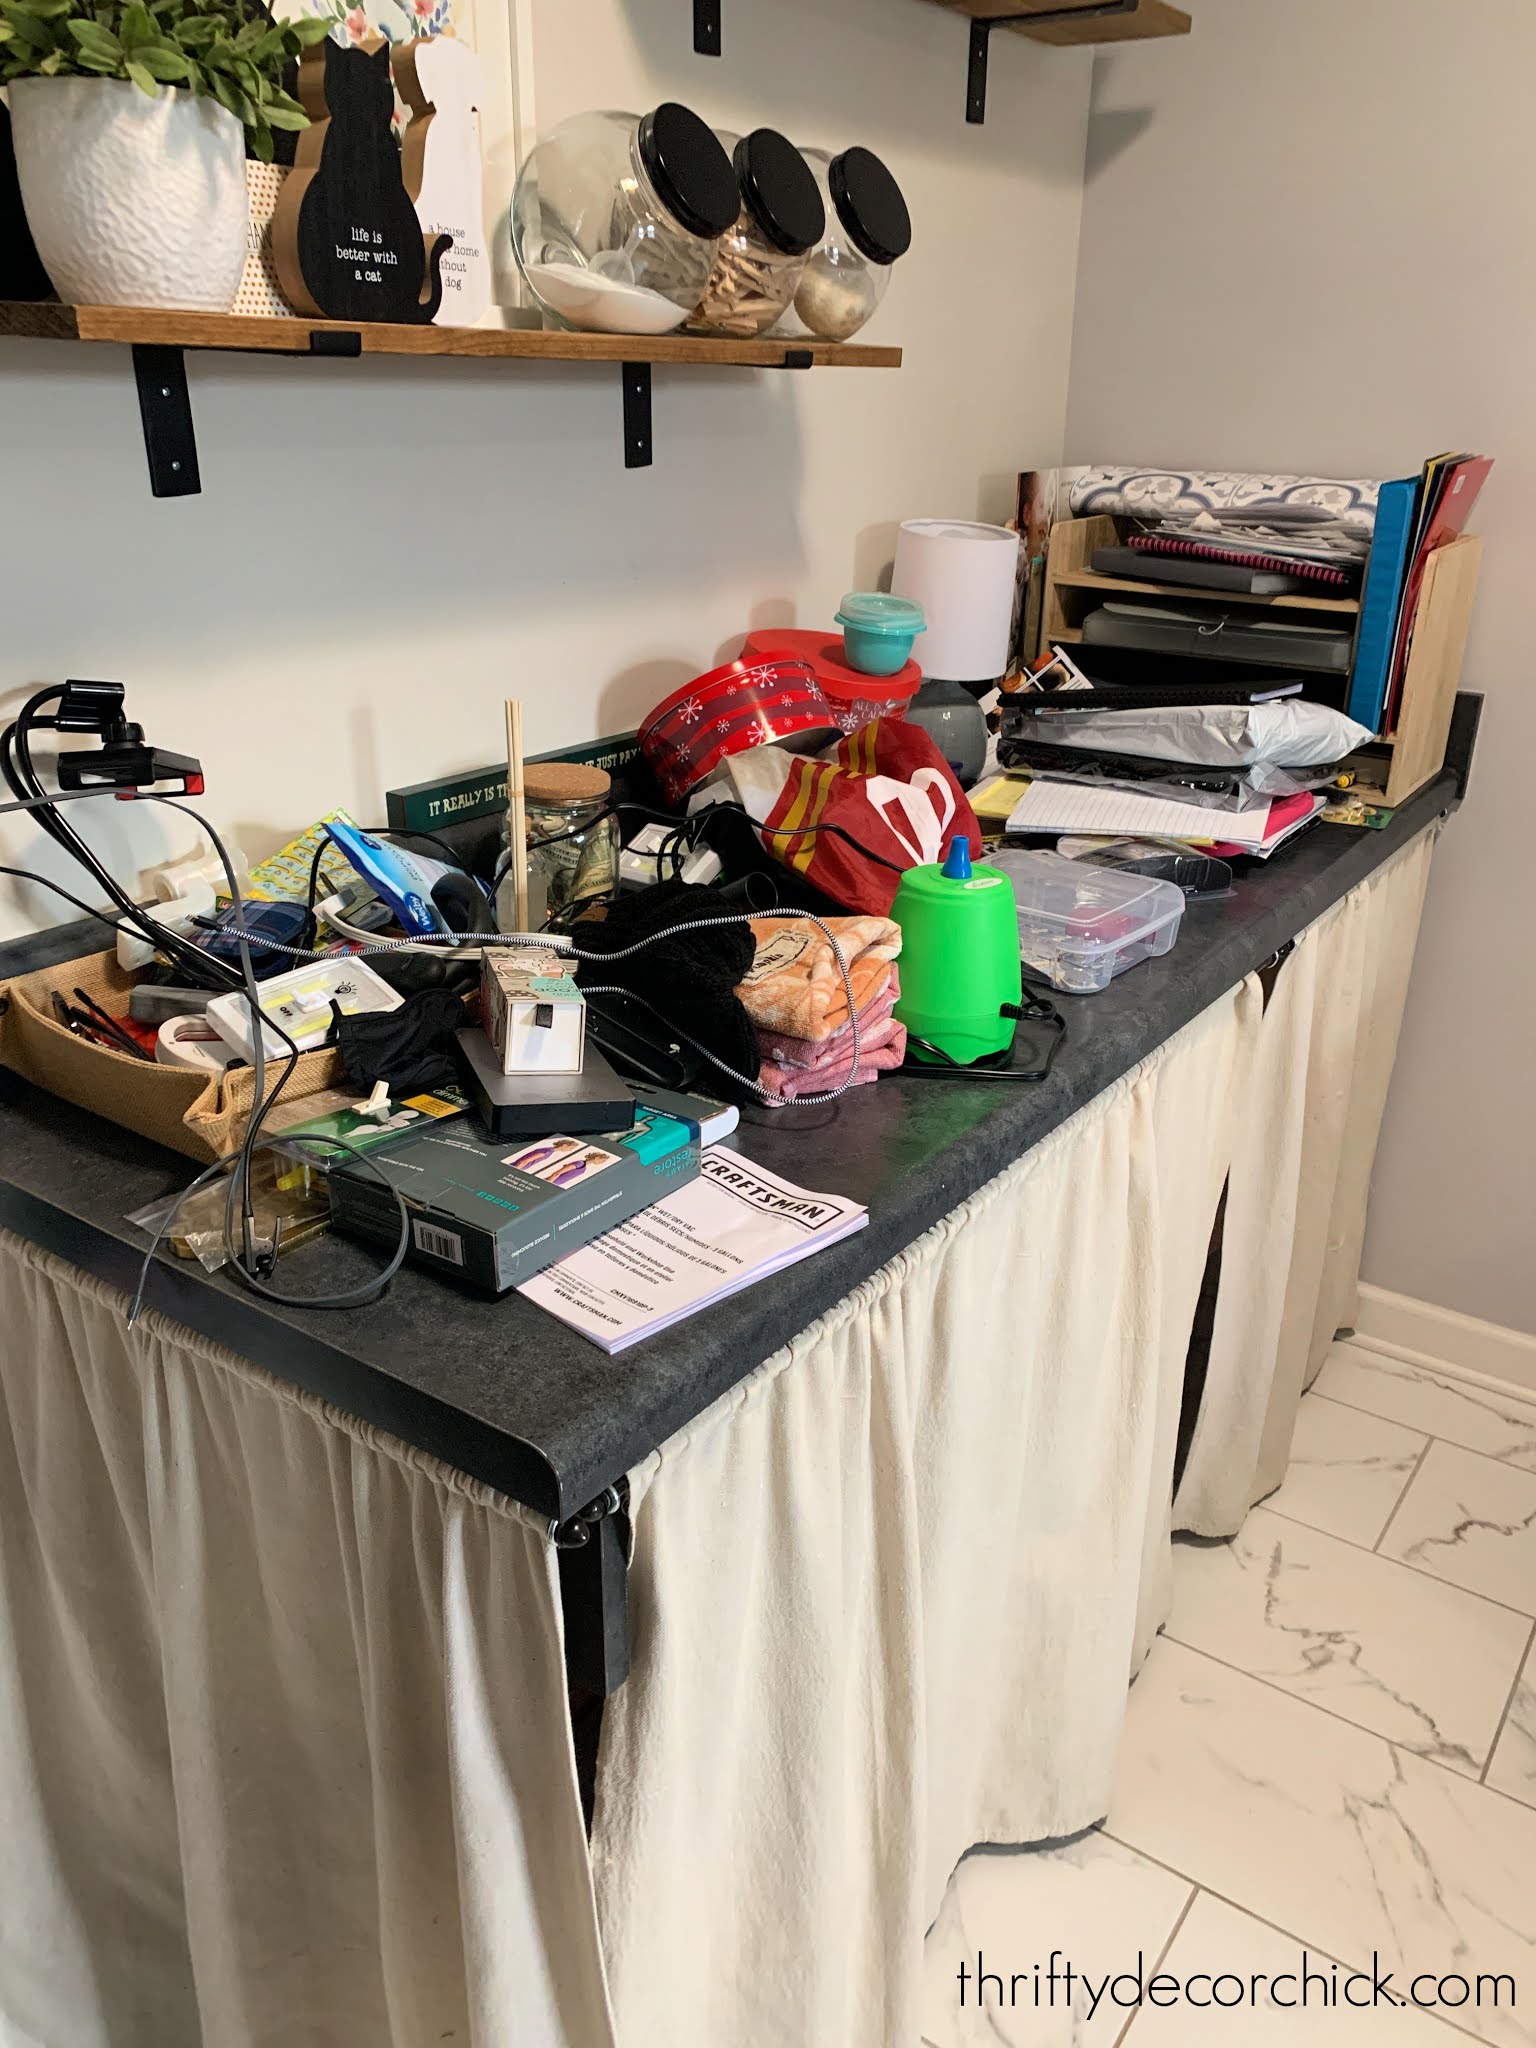
Ugh! OK, in my defense, it's not usually this bad. This is some residual holiday stuff, and a lot of things from the garage that I need to put away.
First up, I'll be adding new cabinets underneath that counter. I cannot WAIT! We may replace the countertop too, but I'm not sure about that just yet. I'm using unfinished cabinets again because they are so affordable (see how I used them on my recent entertainment center project here). I have some ideas to make them look more custom that I will share for sure.
My decision to get this part of the room working better started a list of additional projects! I'm SO excited about this because it will add a ton of storage in this space and will make it work so much better for us.
The easiest project involves the closet in this room:

I shared the mud room closet organization here -- I highly recommend a closet like this if you have the room! It's a game changer. (I also added an outlet in there.) This is my favorite closet in the house! (You don't have a favorite closet?)
Now that we've lived with it, I know I can make even better use of that space. I have a tricky little way to add more organization that I'll show you soon.
One of the big obstacles in here is where we would move the kitty litter -- we have two options in mind. One is the basement storage area, but the other is still in this mud/laundry room. I'll let you know what we end up doing!
One of the things I'm most excited about has to do with these cabinets:

So I'll be moving those over to above the folding table area -- so that whole wall will just be a ton of closed storage. YES!
With those gone I plan to do a version of this easy shelf above/behind the washer and dryer like I did at the old house:
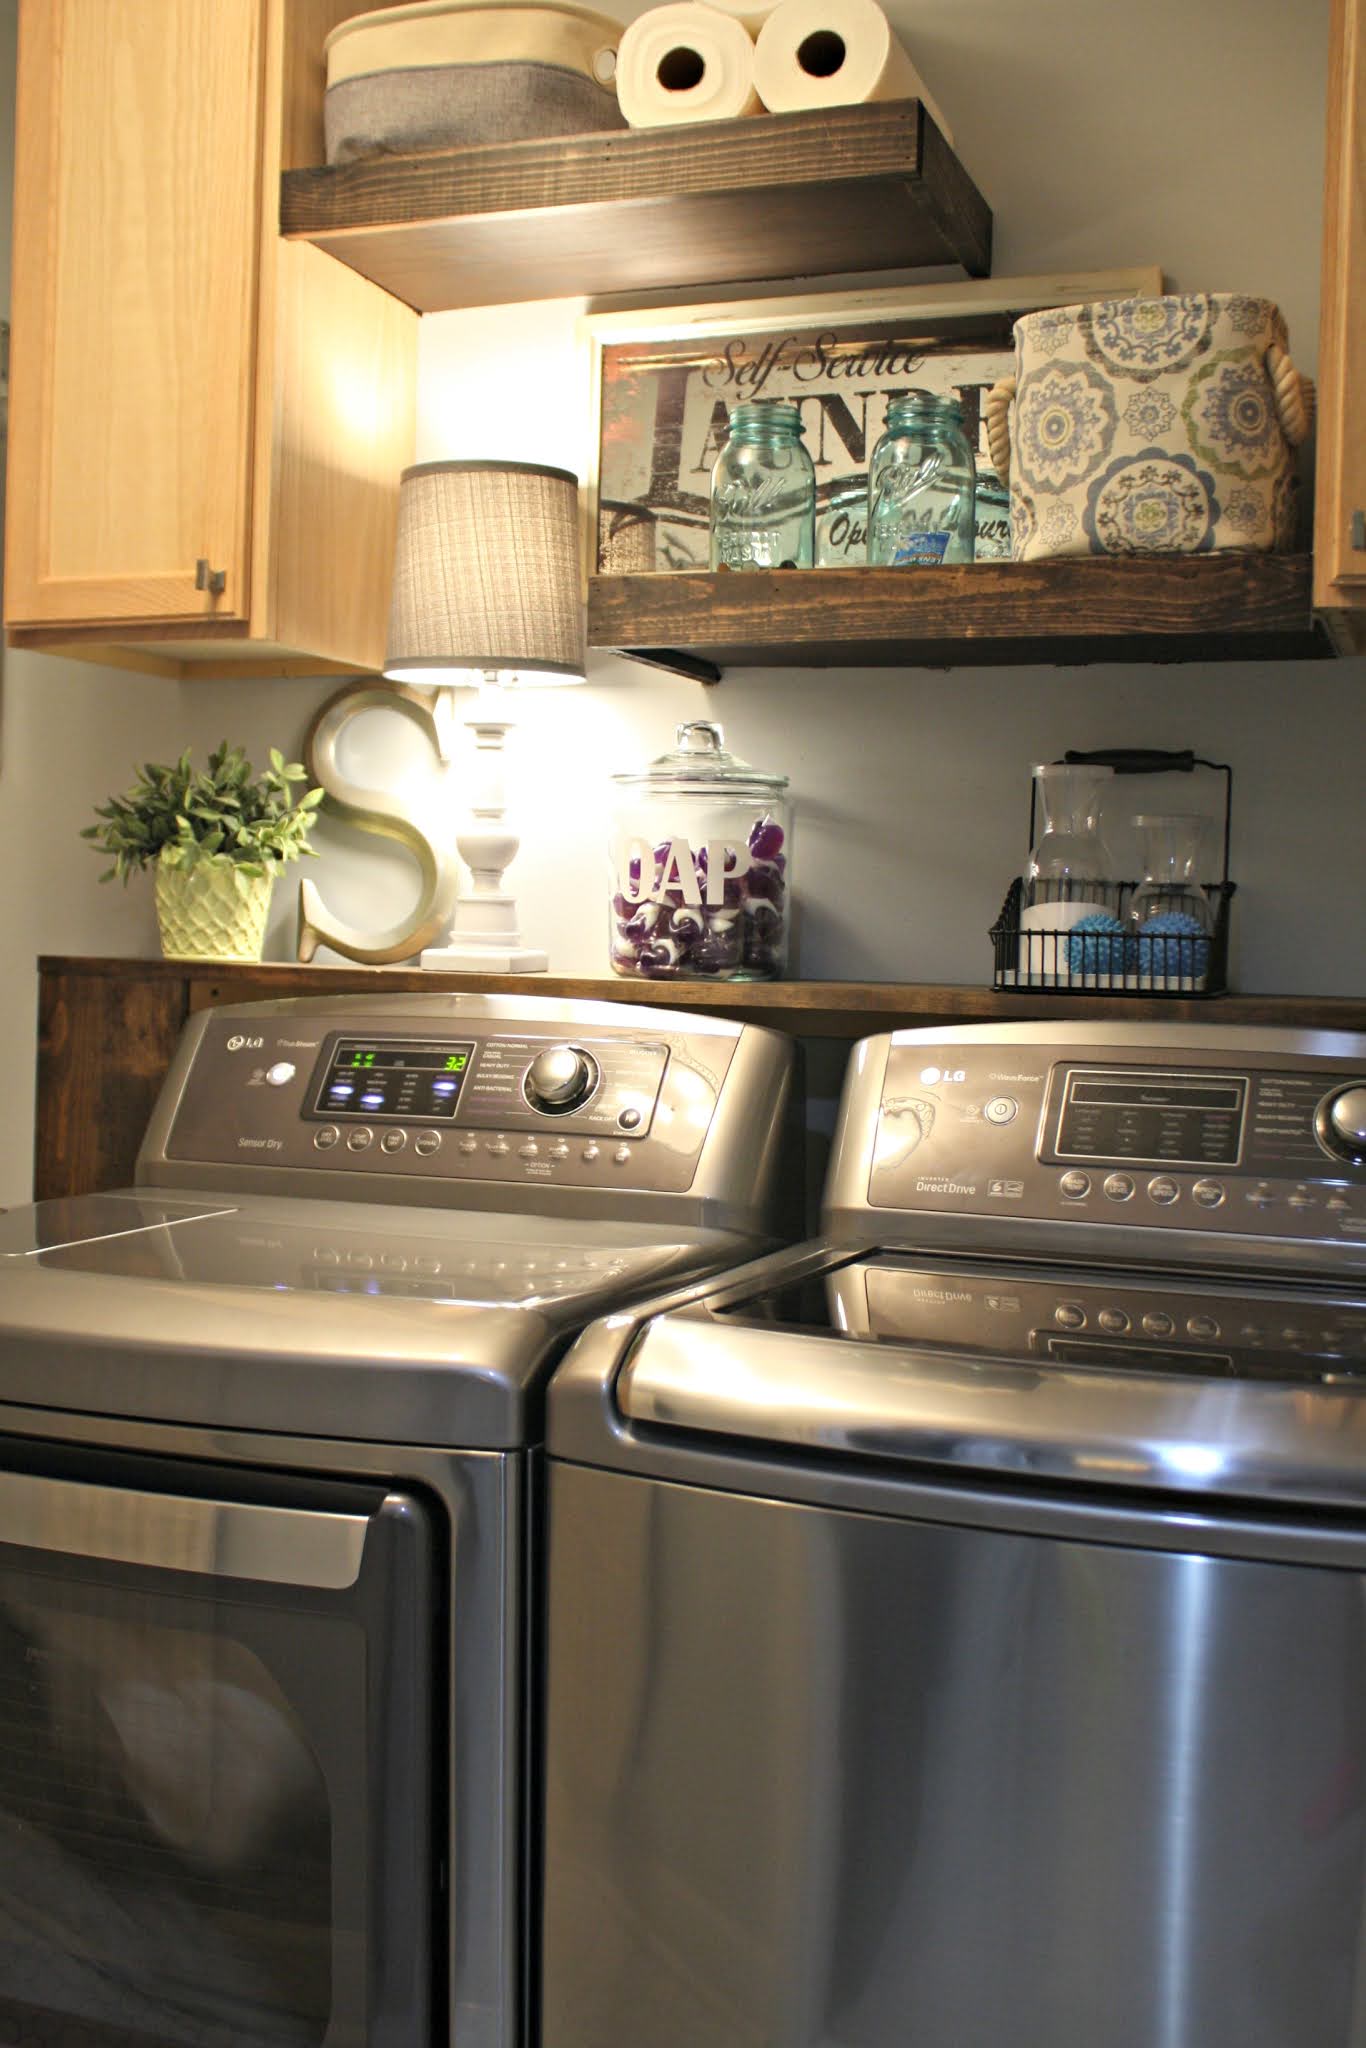
I've missed it so much! I thought about adding one a million times here but the cabinets are too low. I have some ideas to add a bar for hanging the clean clothes above the washer and dryer as well.
These changes are going to fix all of the little things about this space that haven't worked well for us. And the only big cost is in the base cabinets. I can hardly wait to get started on this one!
I'll be sharing more of that process soon -- but first the garage makeover and also another basement project I've been finishing up!
See more of our home here. To shop items in our home, click here! Never miss a post by signing up to get posts via email.
Via https://www.thriftydecorchick.com/2021/02/laundry-mud-room-combo-organization.html
0 Comments
Have you been purging and organizing in the new year? I recently decided to really tackle the garage for the first time since we moved in. I've gone through a few things here and there, but not really gotten down and dirty with the decluttering in there.
It seems my tolerance for extra stuff in our house has decreased every year -- so when I look through all of the items that I packed up and moved to this house 3 1/2 years ago, I'm surprised (and annoyed?) at how much I kept. It gets easier and easier to let go of things, that's for sure!
Getting rid of stuff and organizing what's left makes me giddy. (Especially the getting rid part.) I still have at least a week of work ahead of me, but I hope to share everything I've done soon!
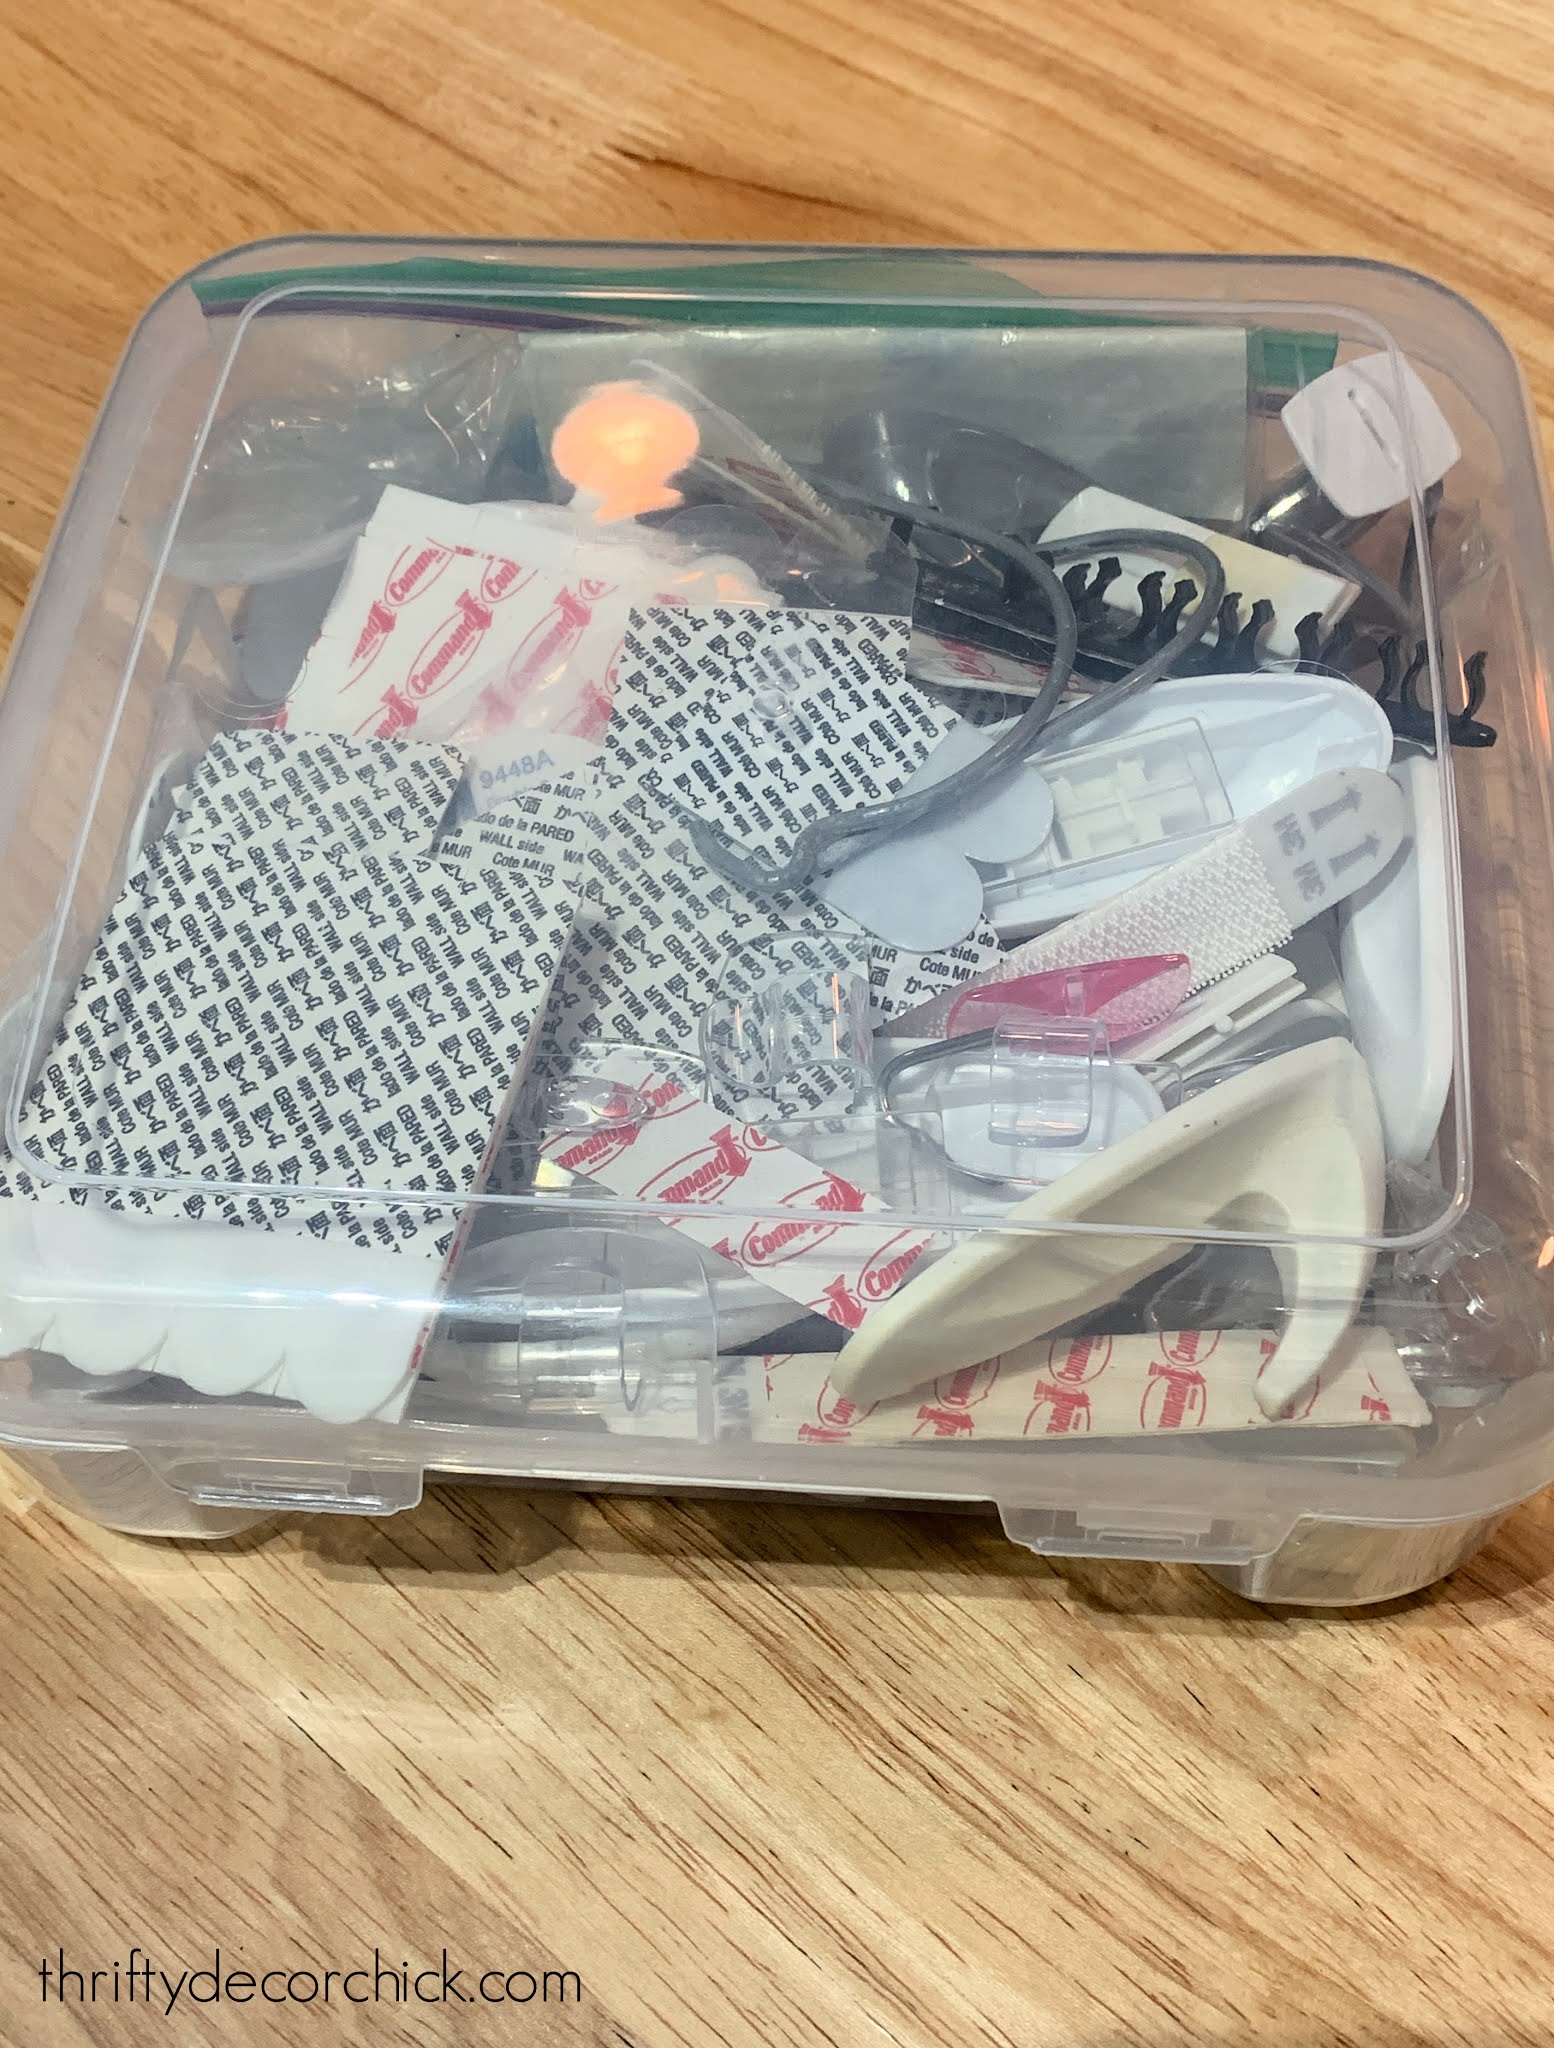
Till then, I had to share these small containers that I am LOVING. (You know you're into organizing when tiny storage bins make you that happy.) And then I figured I would recap some of my favorite ways to contain the STUFF -- I've found some great options in the past couple of years!
These are all basic storage, but they are a great price and function really well.
I started this garage organization journey a couple months ago when I reorganized all of our holiday decor into clear bins:

This post may contain affiliate links for your convenience.
See my policies and disclosure page for more information.
'Tis a beautiful thing!
The functionality is so much better, but it also looks so much cleaner and organized as well. (I still want to replace those two on the left with the matching bins...those are killing me inside. ?)
When I do anything, I need the function to work as well as the form looks. There is something to be said for the aesthetics of organization...a streamlined spot soothes me and makes me happy! That's what I've been working on on the other side of the garage.
But first, some of my other favorites! Working from big to small -- I shared my favorite storage bins for cabinets and drawers last fall:
Goodness, I love them! They come in two different colors and tons of sizes. They are really great for cabinet drawers -- but if you're using them in an upper cabinet they also stack nicely.
It's hard to beat those prices too! I recently bought a few more for the garage storage.
A couple years ago I found these tiny plastic containers that are perfect for craft items:
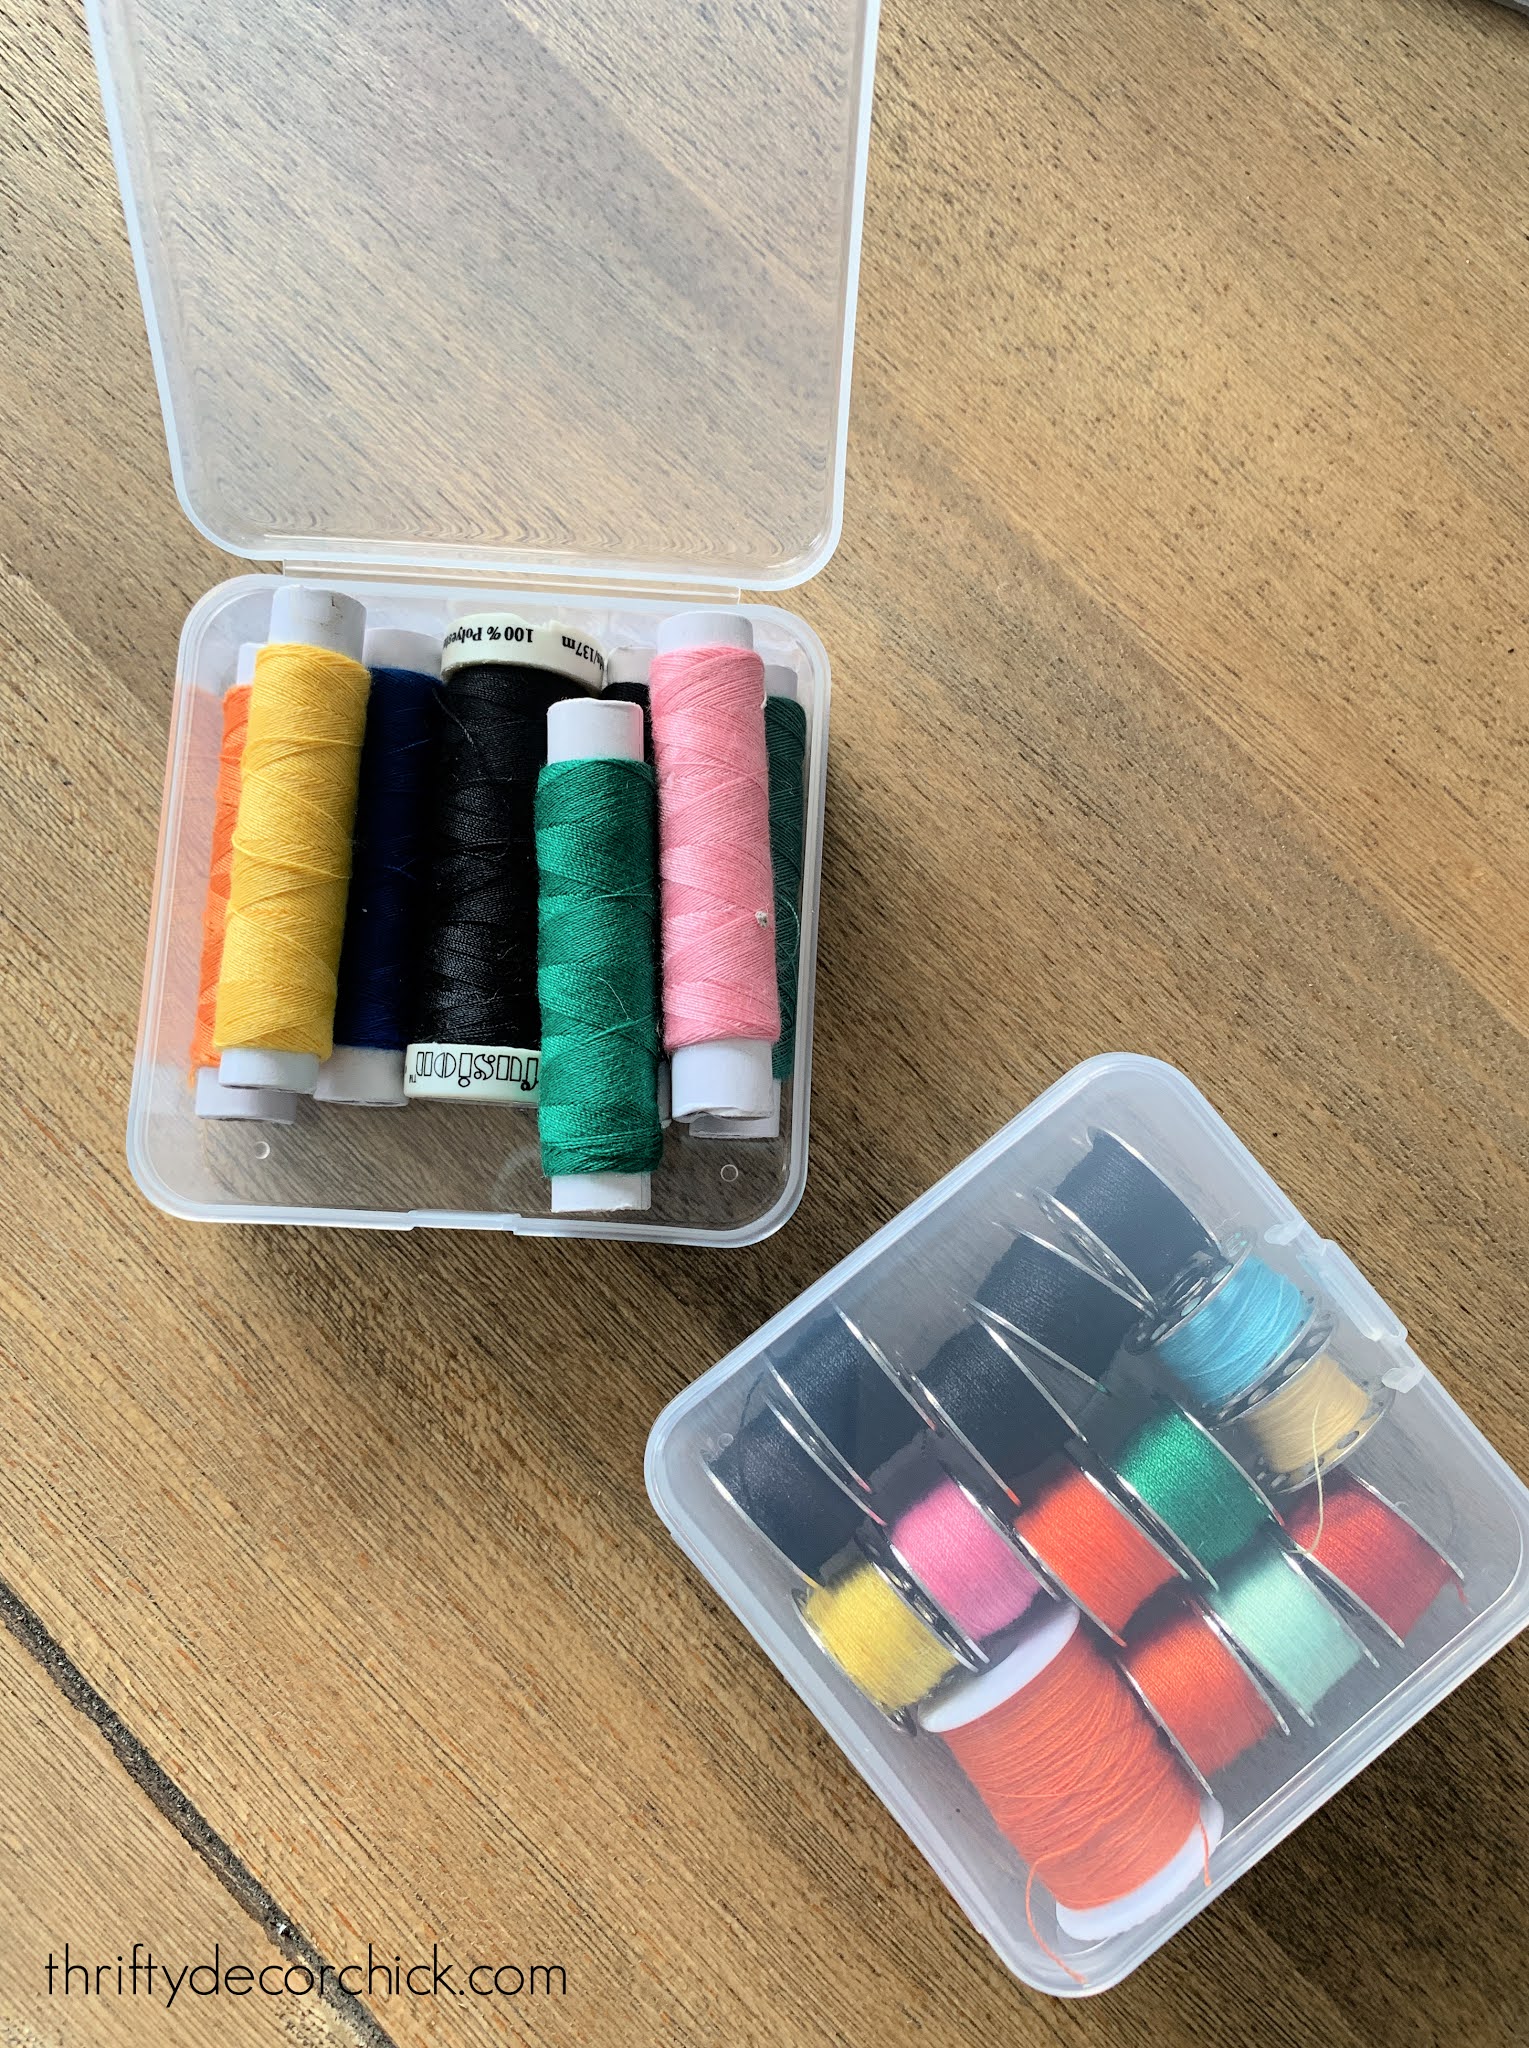
I use them for small craft supplies like beads and also for my sewing supplies. If you have small hardware like nails and screws that you'd like to group together, these are great!
My latest find is my favorite so far. ? You'll notice all of the options I've shared are clear. I've definitely become a fan of see-through storage in the past few years. For my smaller tools and hardware in the garage, I wanted something clear so I wasn't searching to find small items that I need.
I found these small containers at Michael's and fell. in. love:
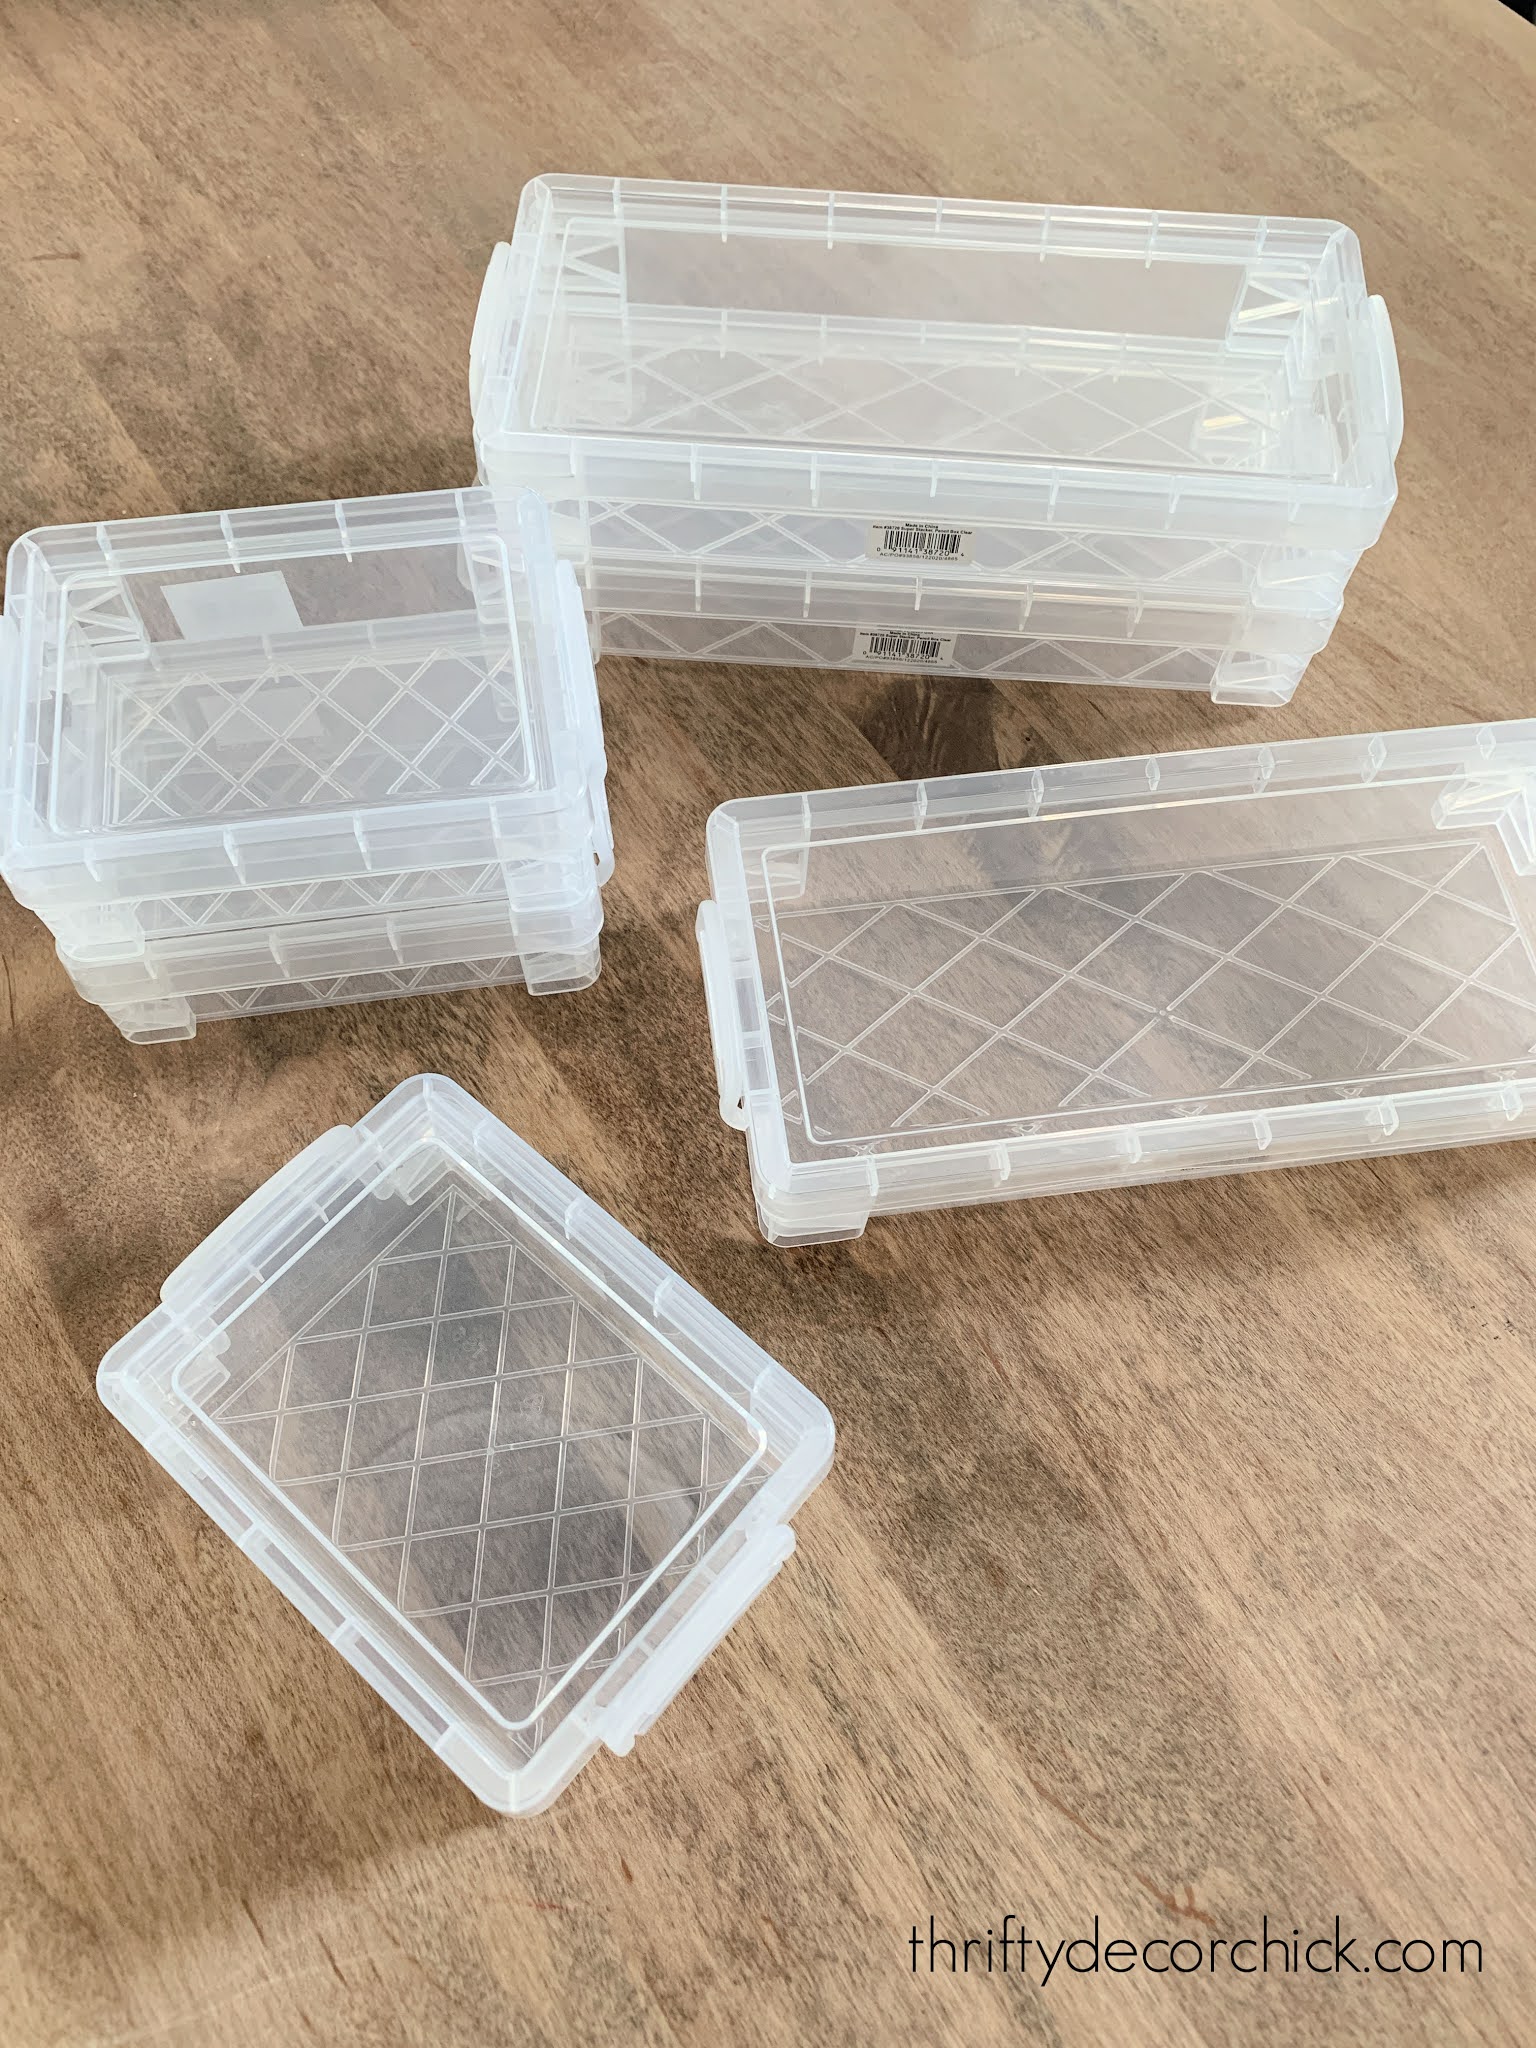
They have removable lids that snap on at the ends. I like that they fit perfectly snug up to each other when stored flat and are easily stackable as well:
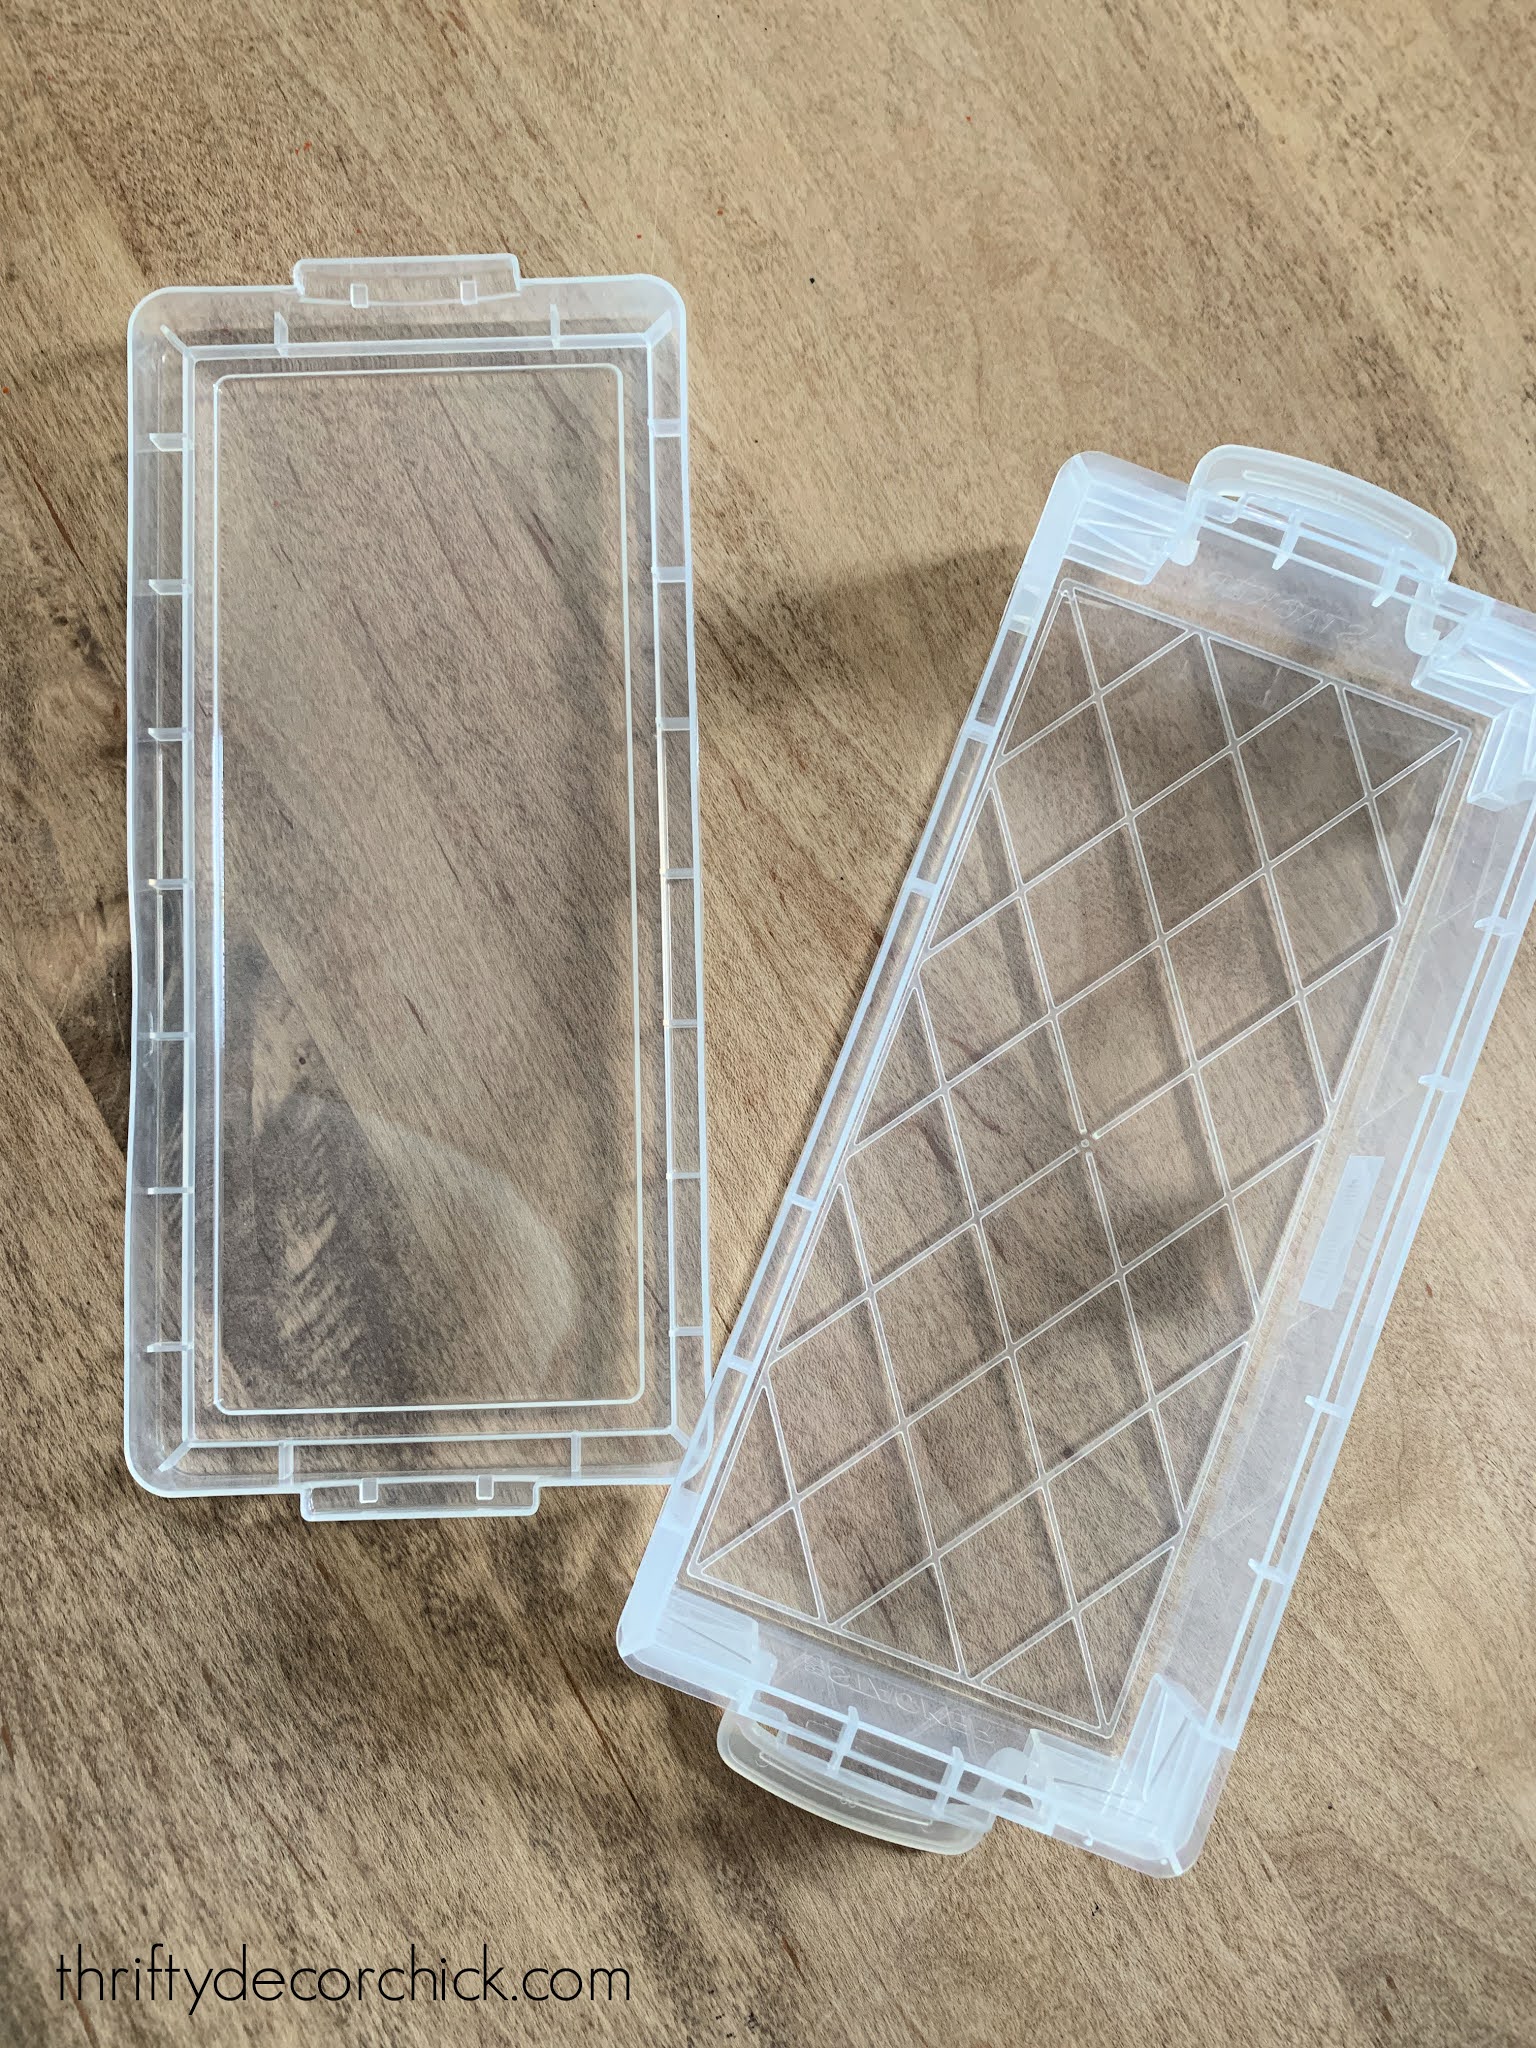
These are labeled as crayon and pencil cases, but the storage possibilities are endless!
I've used mine to store all kinds of little stuff in the garage. I needed something shallow and these were perfect!:
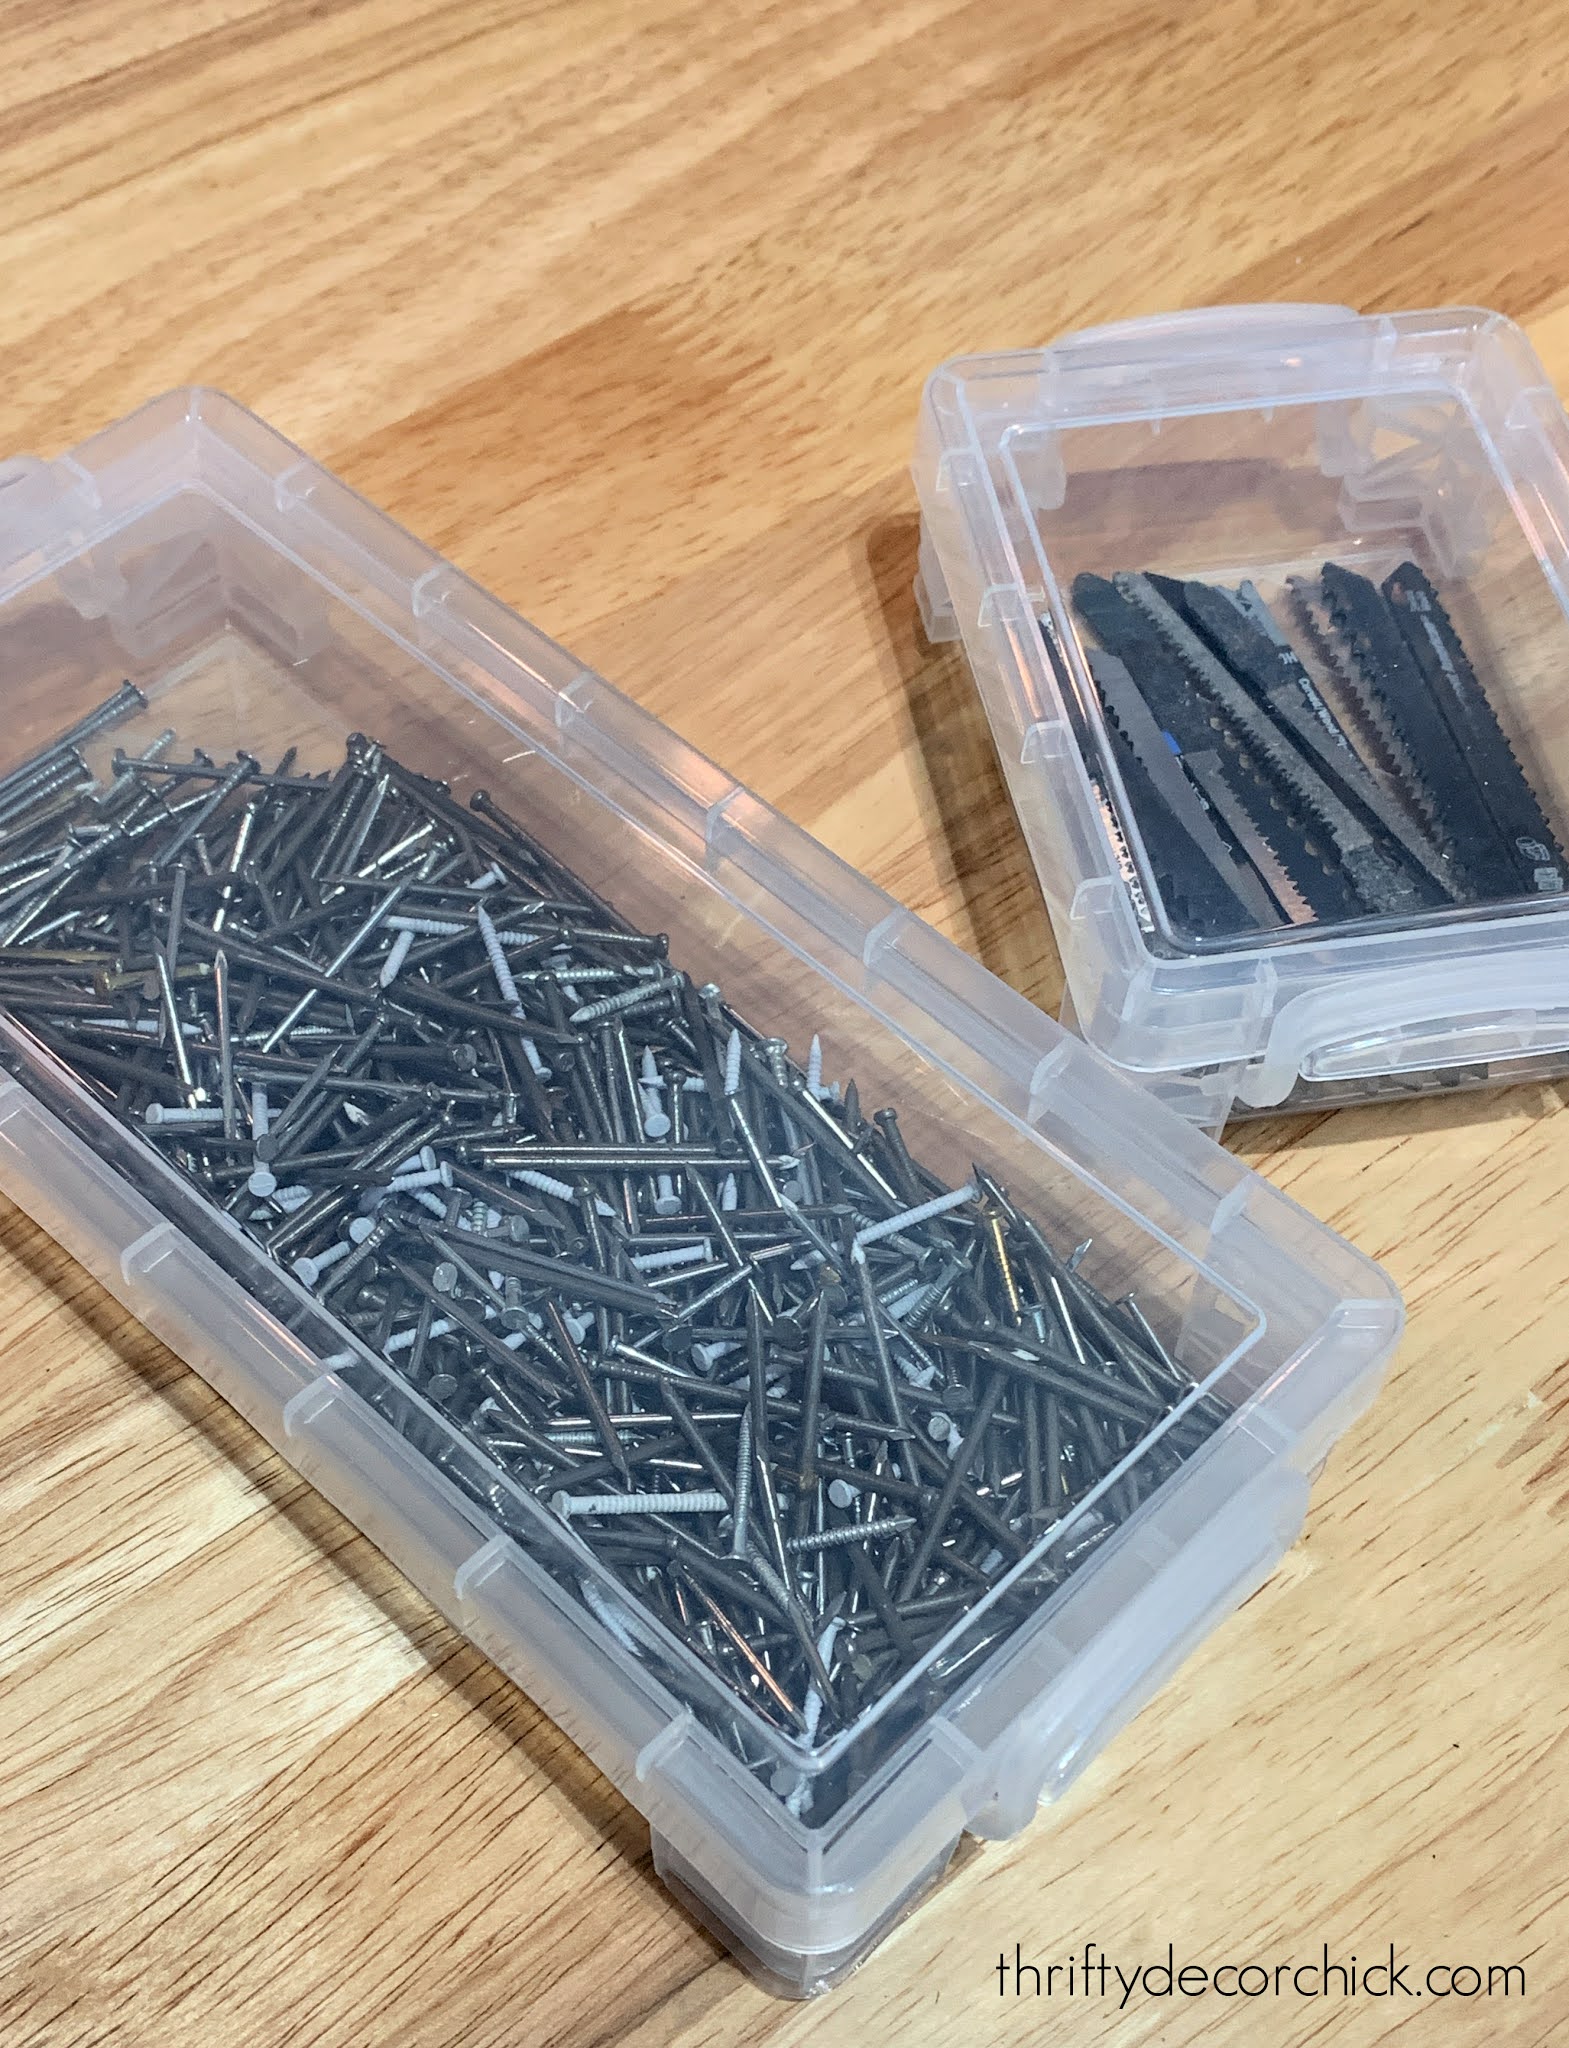
Is there anything better than finding the perfect way to store something? I think not.
BTW. Never need to buy another nail as long as I live. This is why I always say organization saves you money.
I also grabbed these square storage containers at Micheals for bigger like items:
They were all on sale (40 percent off), but the stackable bins were only $1 and $2 to start!
I can't wait to show you how different the garage is looking already! I love making a space work more efficiently. Do you love finding the perfect storage solution as much as I do?
You can find all of my new storage find options below:
I also found a taller stackable version here! (Would be great for card games!)
See more of our home here. To shop items in our home, click here! Never miss a post by signing up to get posts via email.
Via https://www.thriftydecorchick.com/2021/02/perfect-small-containers-small-items.html
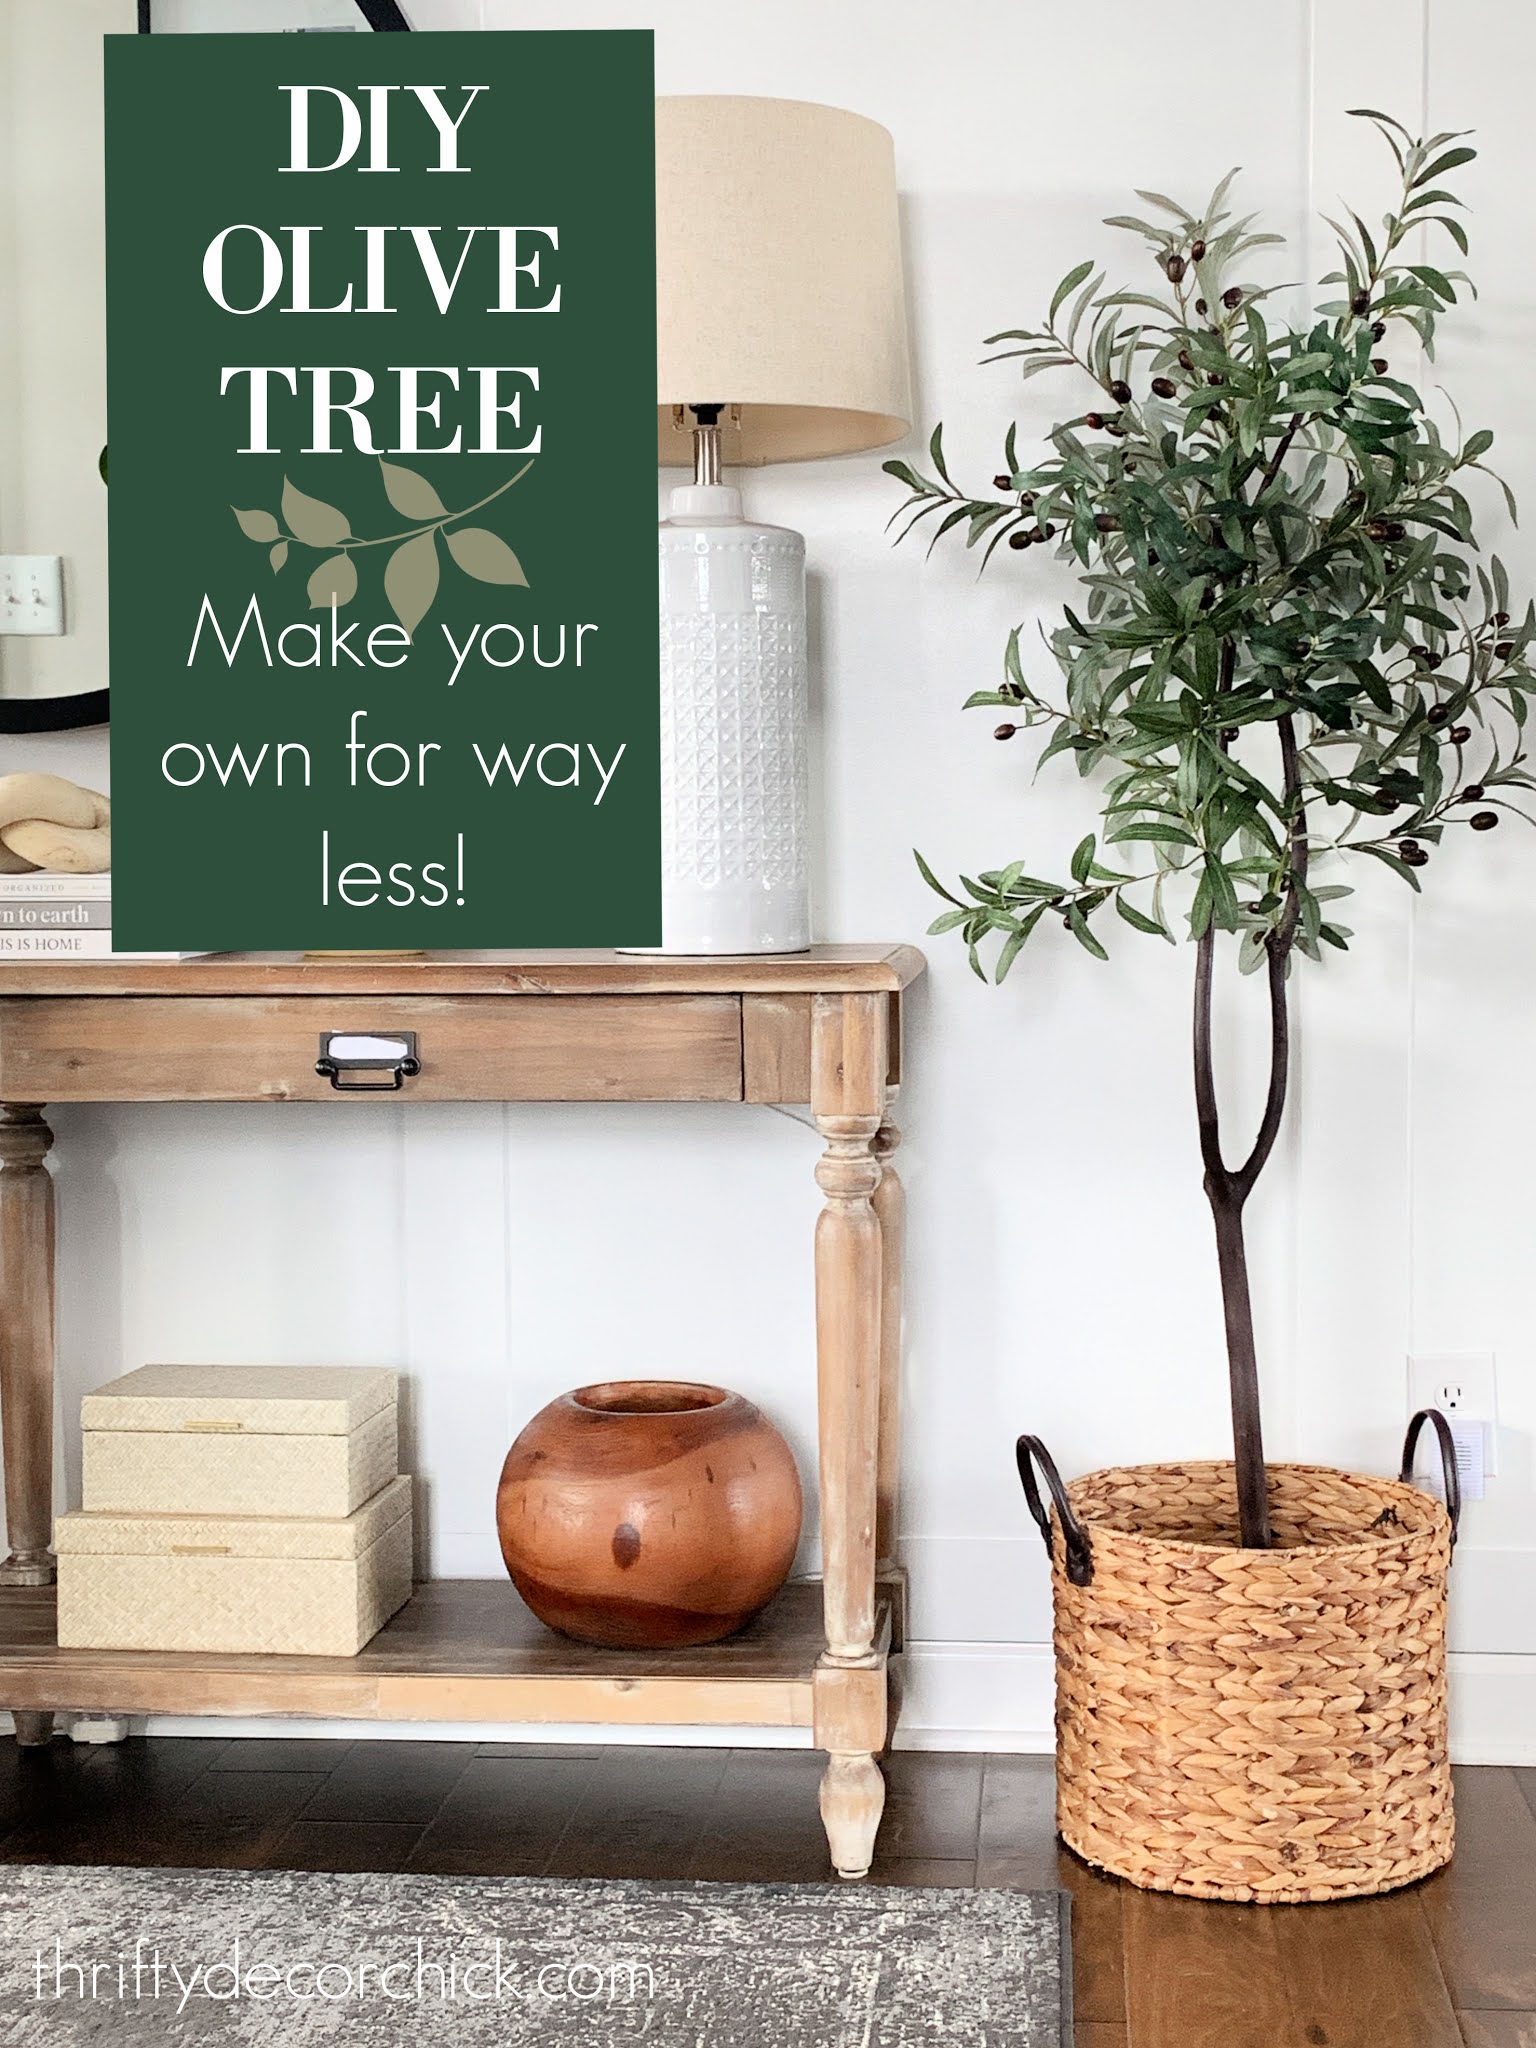
The faux plant trend is continuing this week (see some of my favorite spring florals here!) with a tutorial even I didn't think would turn out that great! ? I have wanted a tallish plant for the basement for sometime -- we do get a good amount of daylight down there, but not enough that I could keep something alive.
I have real fiddle leaf figs all over our house (see my tips for taking care of fiddles here) so I wanted something different. I started searching fake olive trees instead, but found they are pretty expensive. The best version (with good reviews) I found was $115.
As I was searching online, I came across tutorials for a fake, do-it-yourself olive tree. Huh. I never even considered it, but it got my mind going. I figured I would take one for the team and try it out -- not really expecting it to look that great.
But you have to try, right? I combined tips for this faux olive tree project from here and here -- they both had great tutorials that helped a ton. Keep in mind this DIY was REALLY worth it because I got all of my supplies at half the cost. Look for sales and use coupons!
Step one: Figure out your trunk
I started with the "trunk" of the tree. I could have easily gone and cut a thick branch off of a tree. I was going to do that, but then I realized how cold and snowy it was outside. I didn't want to get my boots on and go forage in the woods. Cold. Snow. Wah.
So instead I check out the "dried naturals" section at the craft store. They had actual (thin) wood trunks, which cracked me up that we can buy part of a tree at the store. But I wanted something that looked a little more natural and organic than just a straight branch.
I figured those white branches on the left would be perfect:

This post may contain affiliate links for your convenience.
See my policies and disclosure page for more information.
The package came with three branches (for MORE olive trees obvs) and I used the biggest one. I spray painted it brown...and was surprised when it looked real. You can use any brown paint -- craft paint even. I would suggest you use a matte finish for a realistic look.
Step two: Attach your olive stems
I already had olive stems that I use throughout the year in our decor, so I didn't want to use those. Instead I grabbed bundles of the olive branches instead:

This is a way better bang for your buck. You'll get a ton more stems to use for the price, compared to the single ones.
You'll need to cut each one off the bundle -- sometimes you can just pull down and break them off. But a wire cutter will make quick work of this and give you a blunt end that is helpful:

Then start adding them to your "tree" -- this was a lot easier than I thought!
I started with a few at the tips of the top branches. For these I attached the olive branches with brown floral tape. The brown blends into the tree branches really well:
I had to really search for them after I was done to take this picture! You won't need much of the tape -- I only added a few at the tips, but overall those did make for a more realistic look.
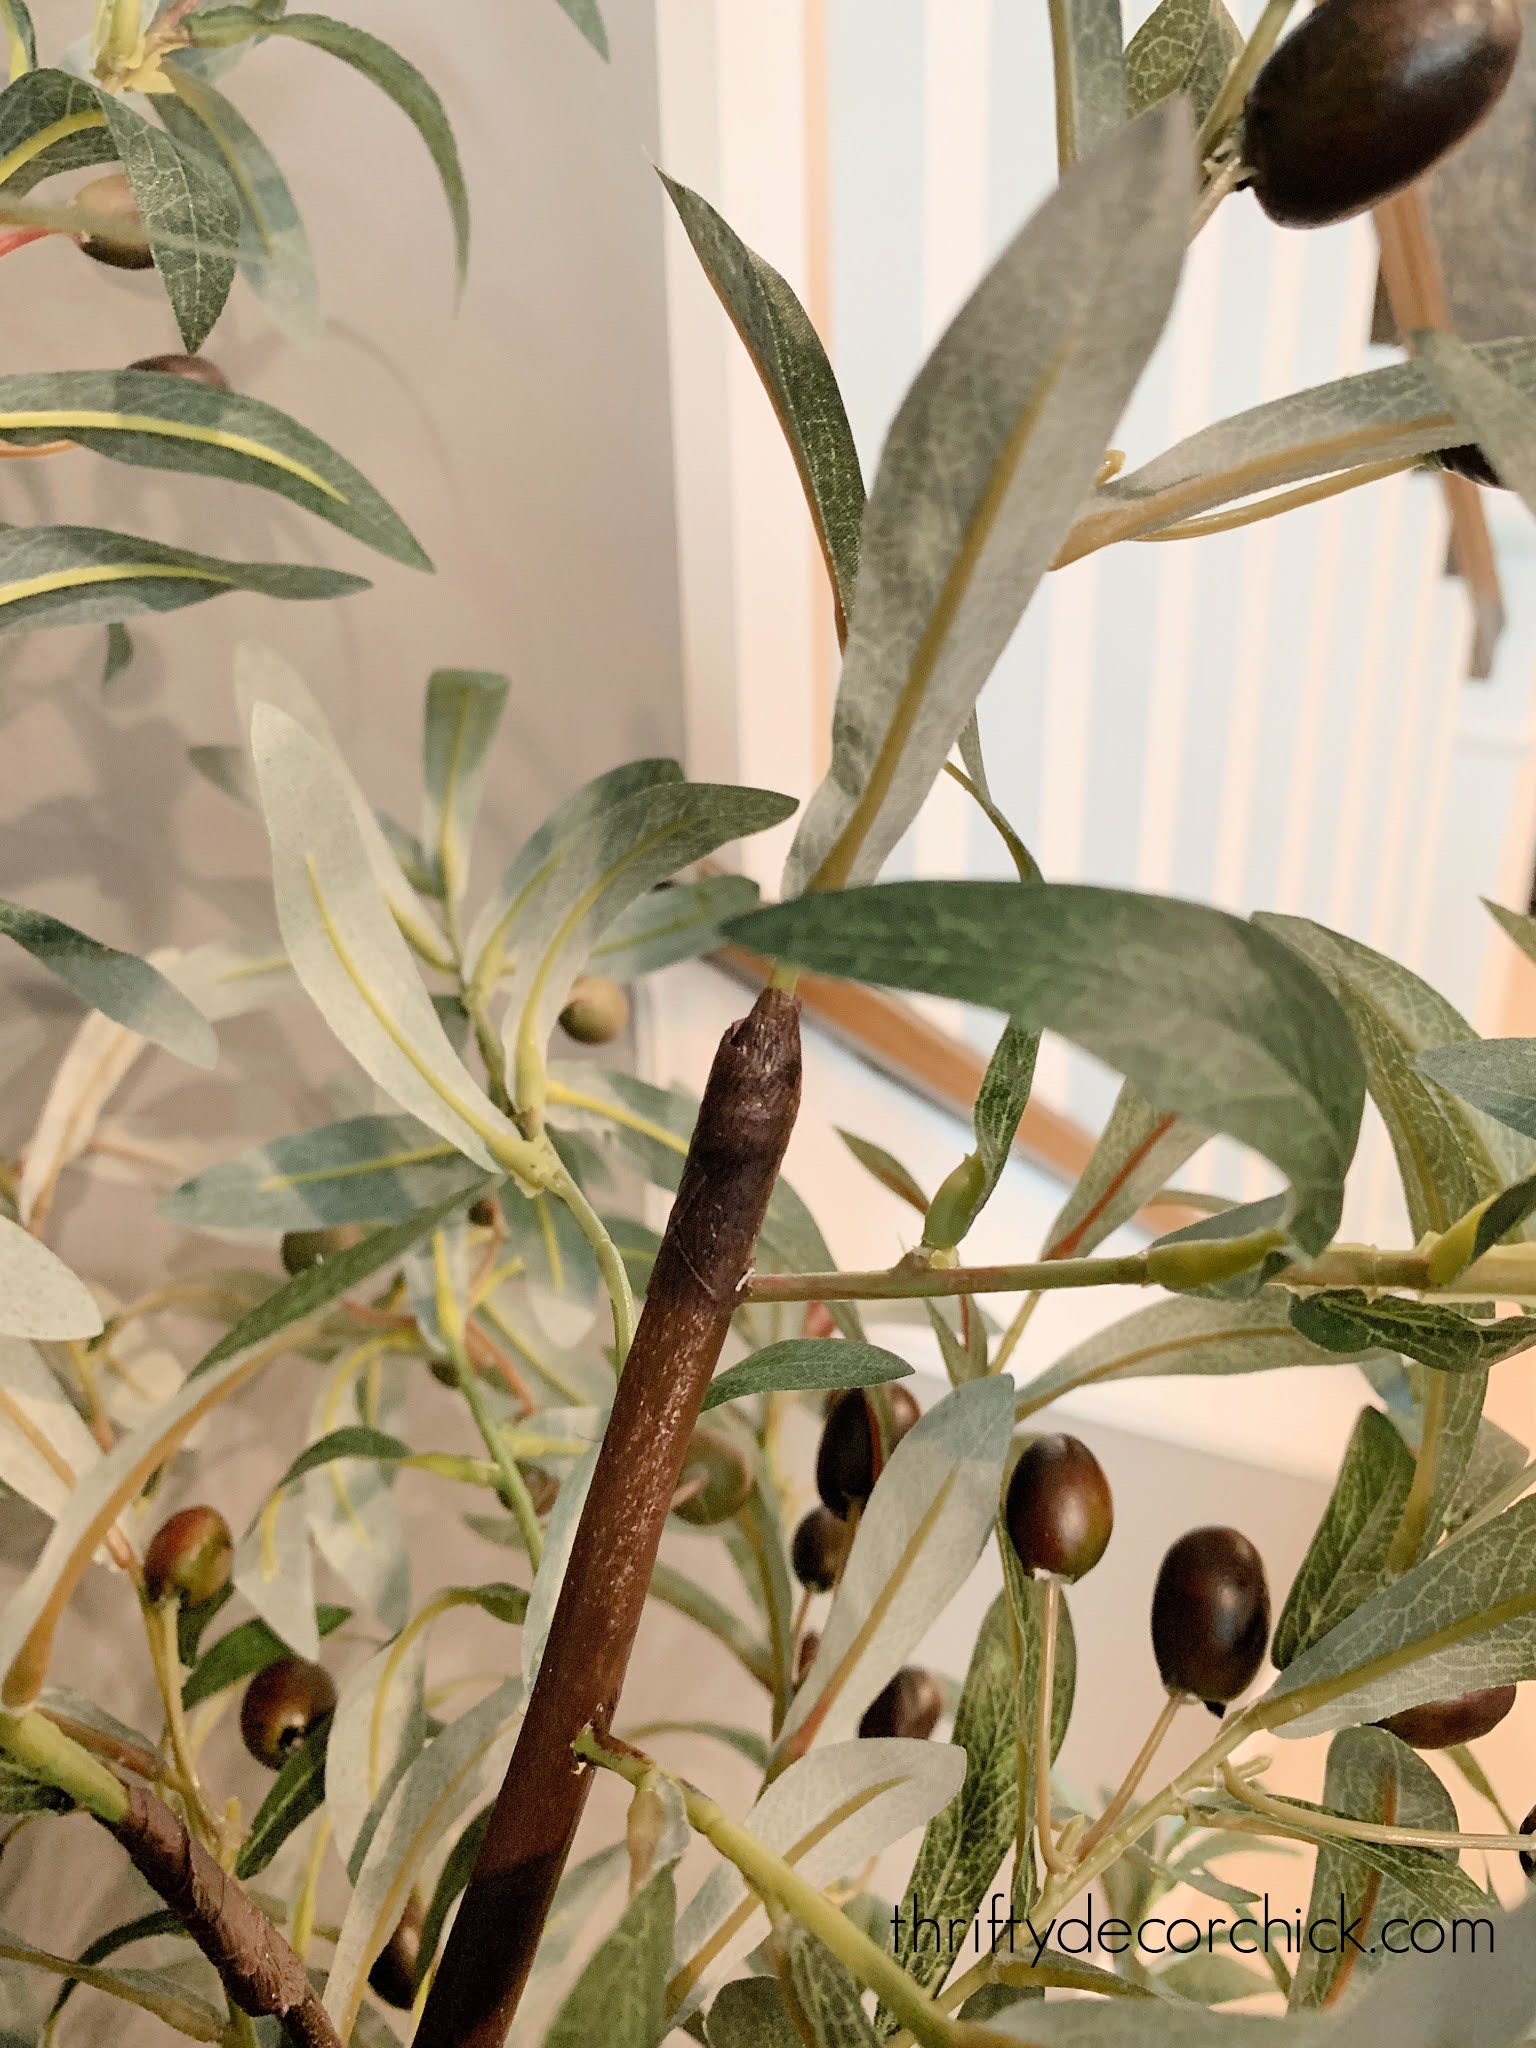
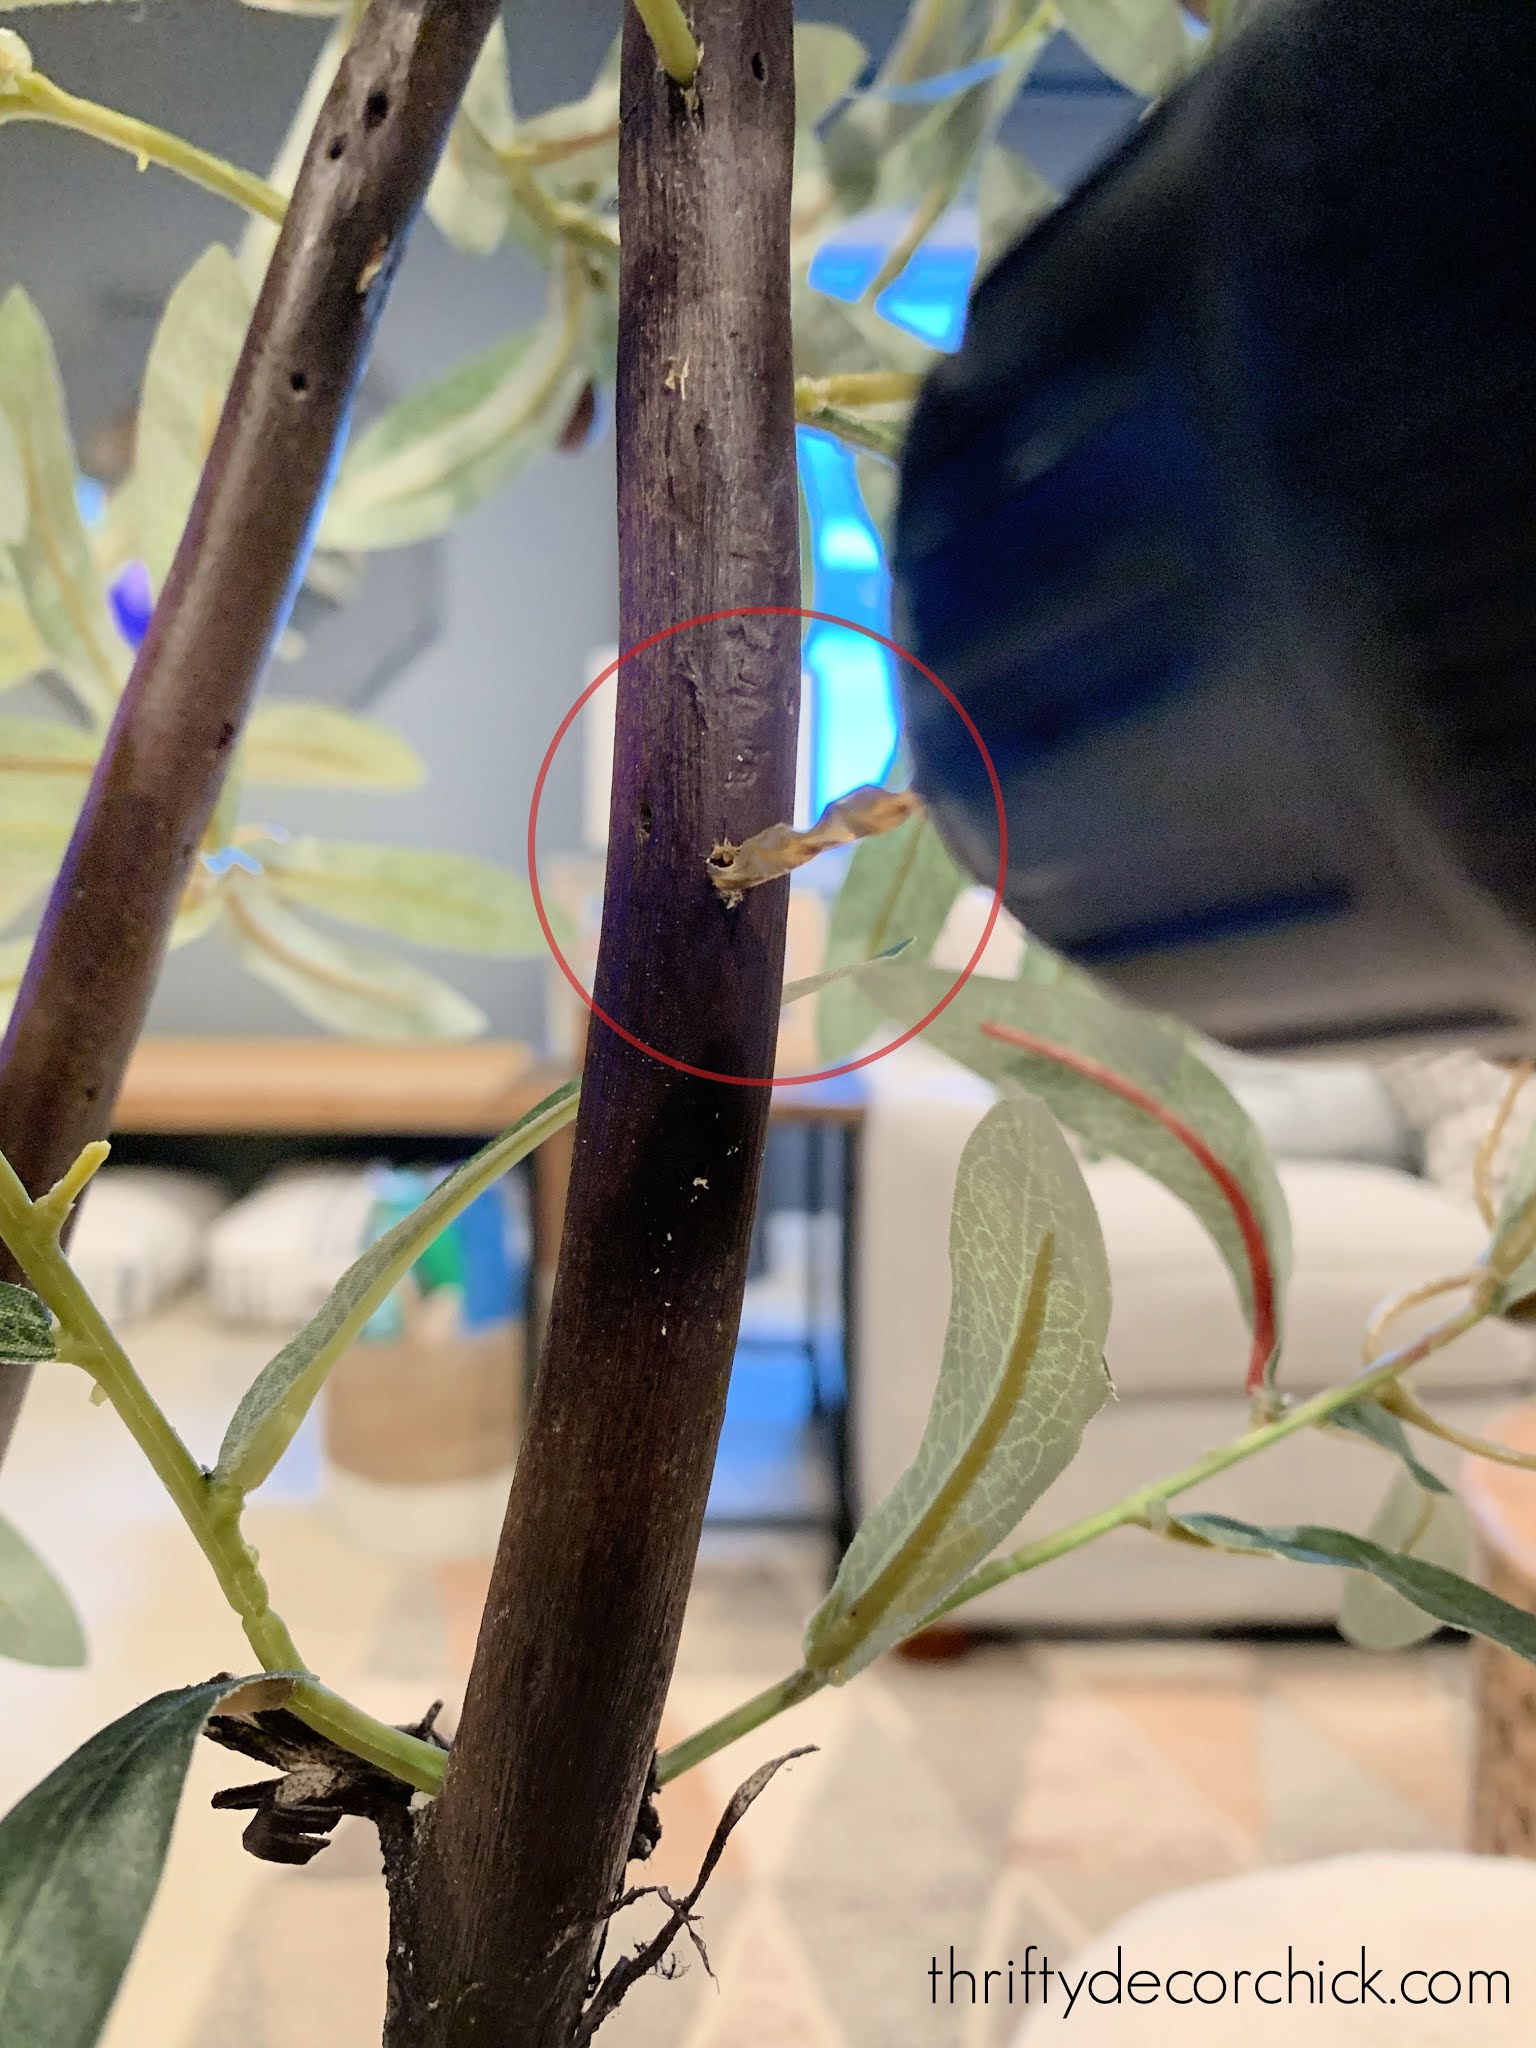
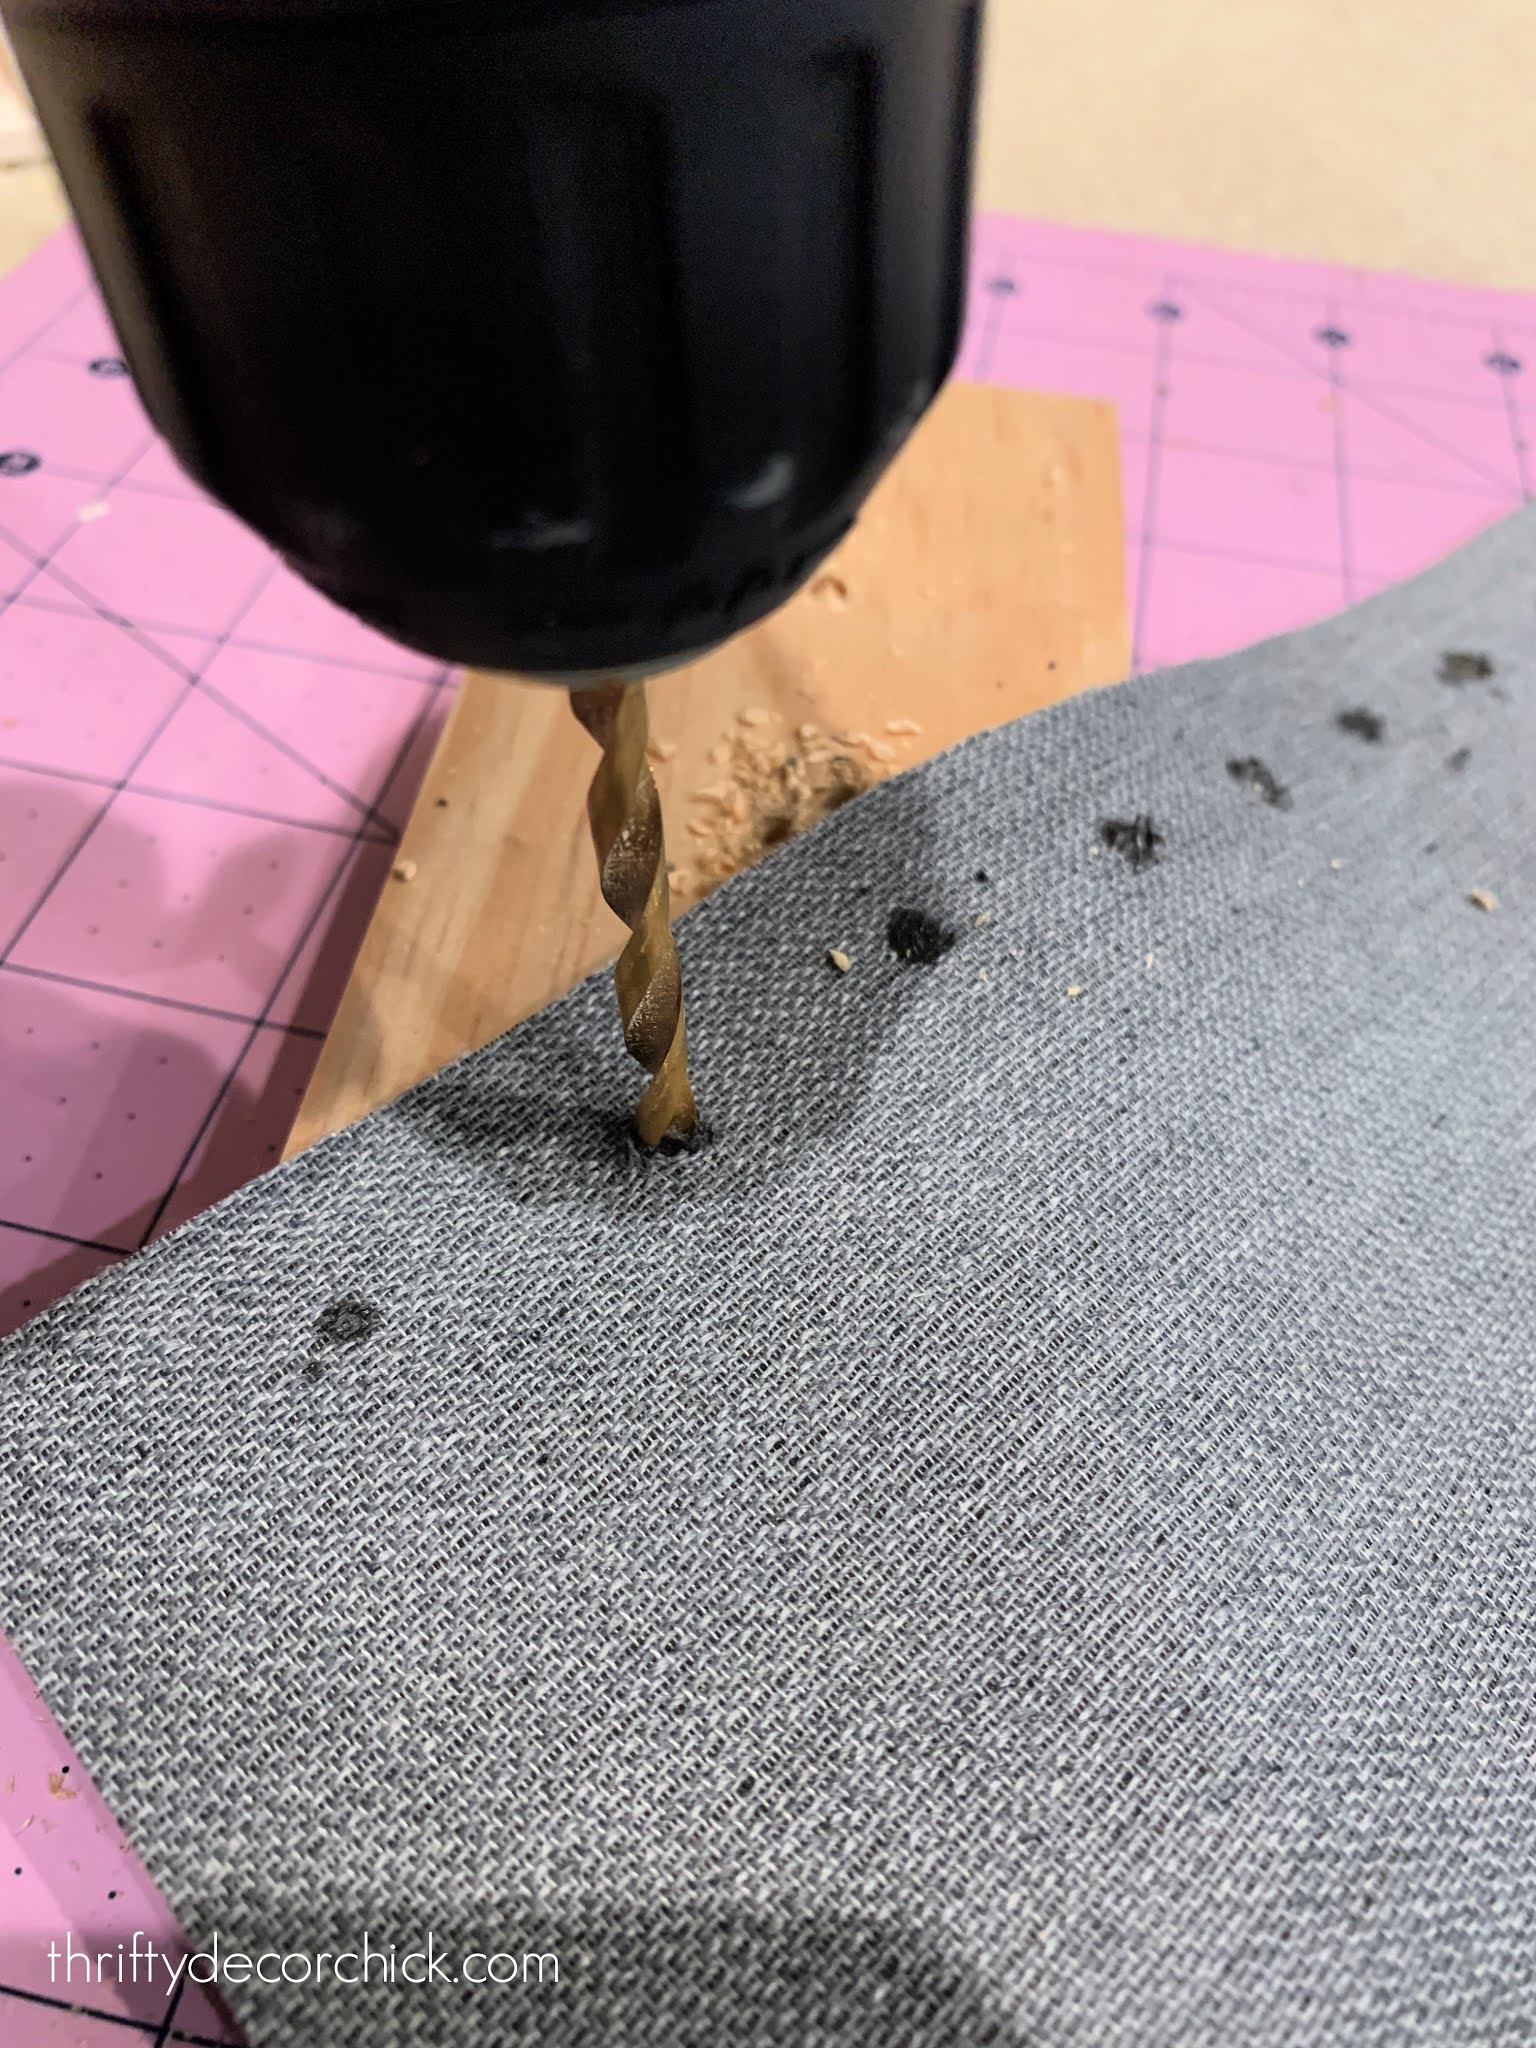
For the rest, I used a small drill bit and drilled tiny holes into the branches:
Then just stick your olive branch in! No glue or tape needed.
I would add a few, step back and see where it needed more, and then keep adding. There's no right or wrong -- just depends on the look you want.
I also added them where the branches met for a more realistic look:

Also, if the end of a branch was big enough, I drilled into those and stuck one in there. On those I found it helpful to add a bit of the floral tape so it blended a bit.
**Sometimes my drill bit went all the way through a branch -- I did try to avoid that on the thinner branches because I didn't want to weaken them. If you can, keep your holes shallow, just deep enough to stick the stem in.
I was a little shocked and kind of tickled with how good it looked as I was going. I kept telling my family -- "Look at my TREE!" It actually was turning out really well!
When I was done with the whole thing, I touched up any of the original white branch that showed when I drilled holes. I just sprayed the spray paint on a paper plate and used a q-tip to apply the small touch ups.
Step three: Plant your tree
When I was done I used a block of foam in a planter and stuck the branch in there:

You may need to make a starter hole for the branch -- don't break it trying to get it in! As you can see, I stuffed plastic bags into the sides to make sure it wouldn't wobble.
I covered everything with soft, green moss when it was in the planter:

Have I mentioned that I was shocked at how much I loved it?:

It looks more real to me than a lot of the fake olive trees I've seen in stores:
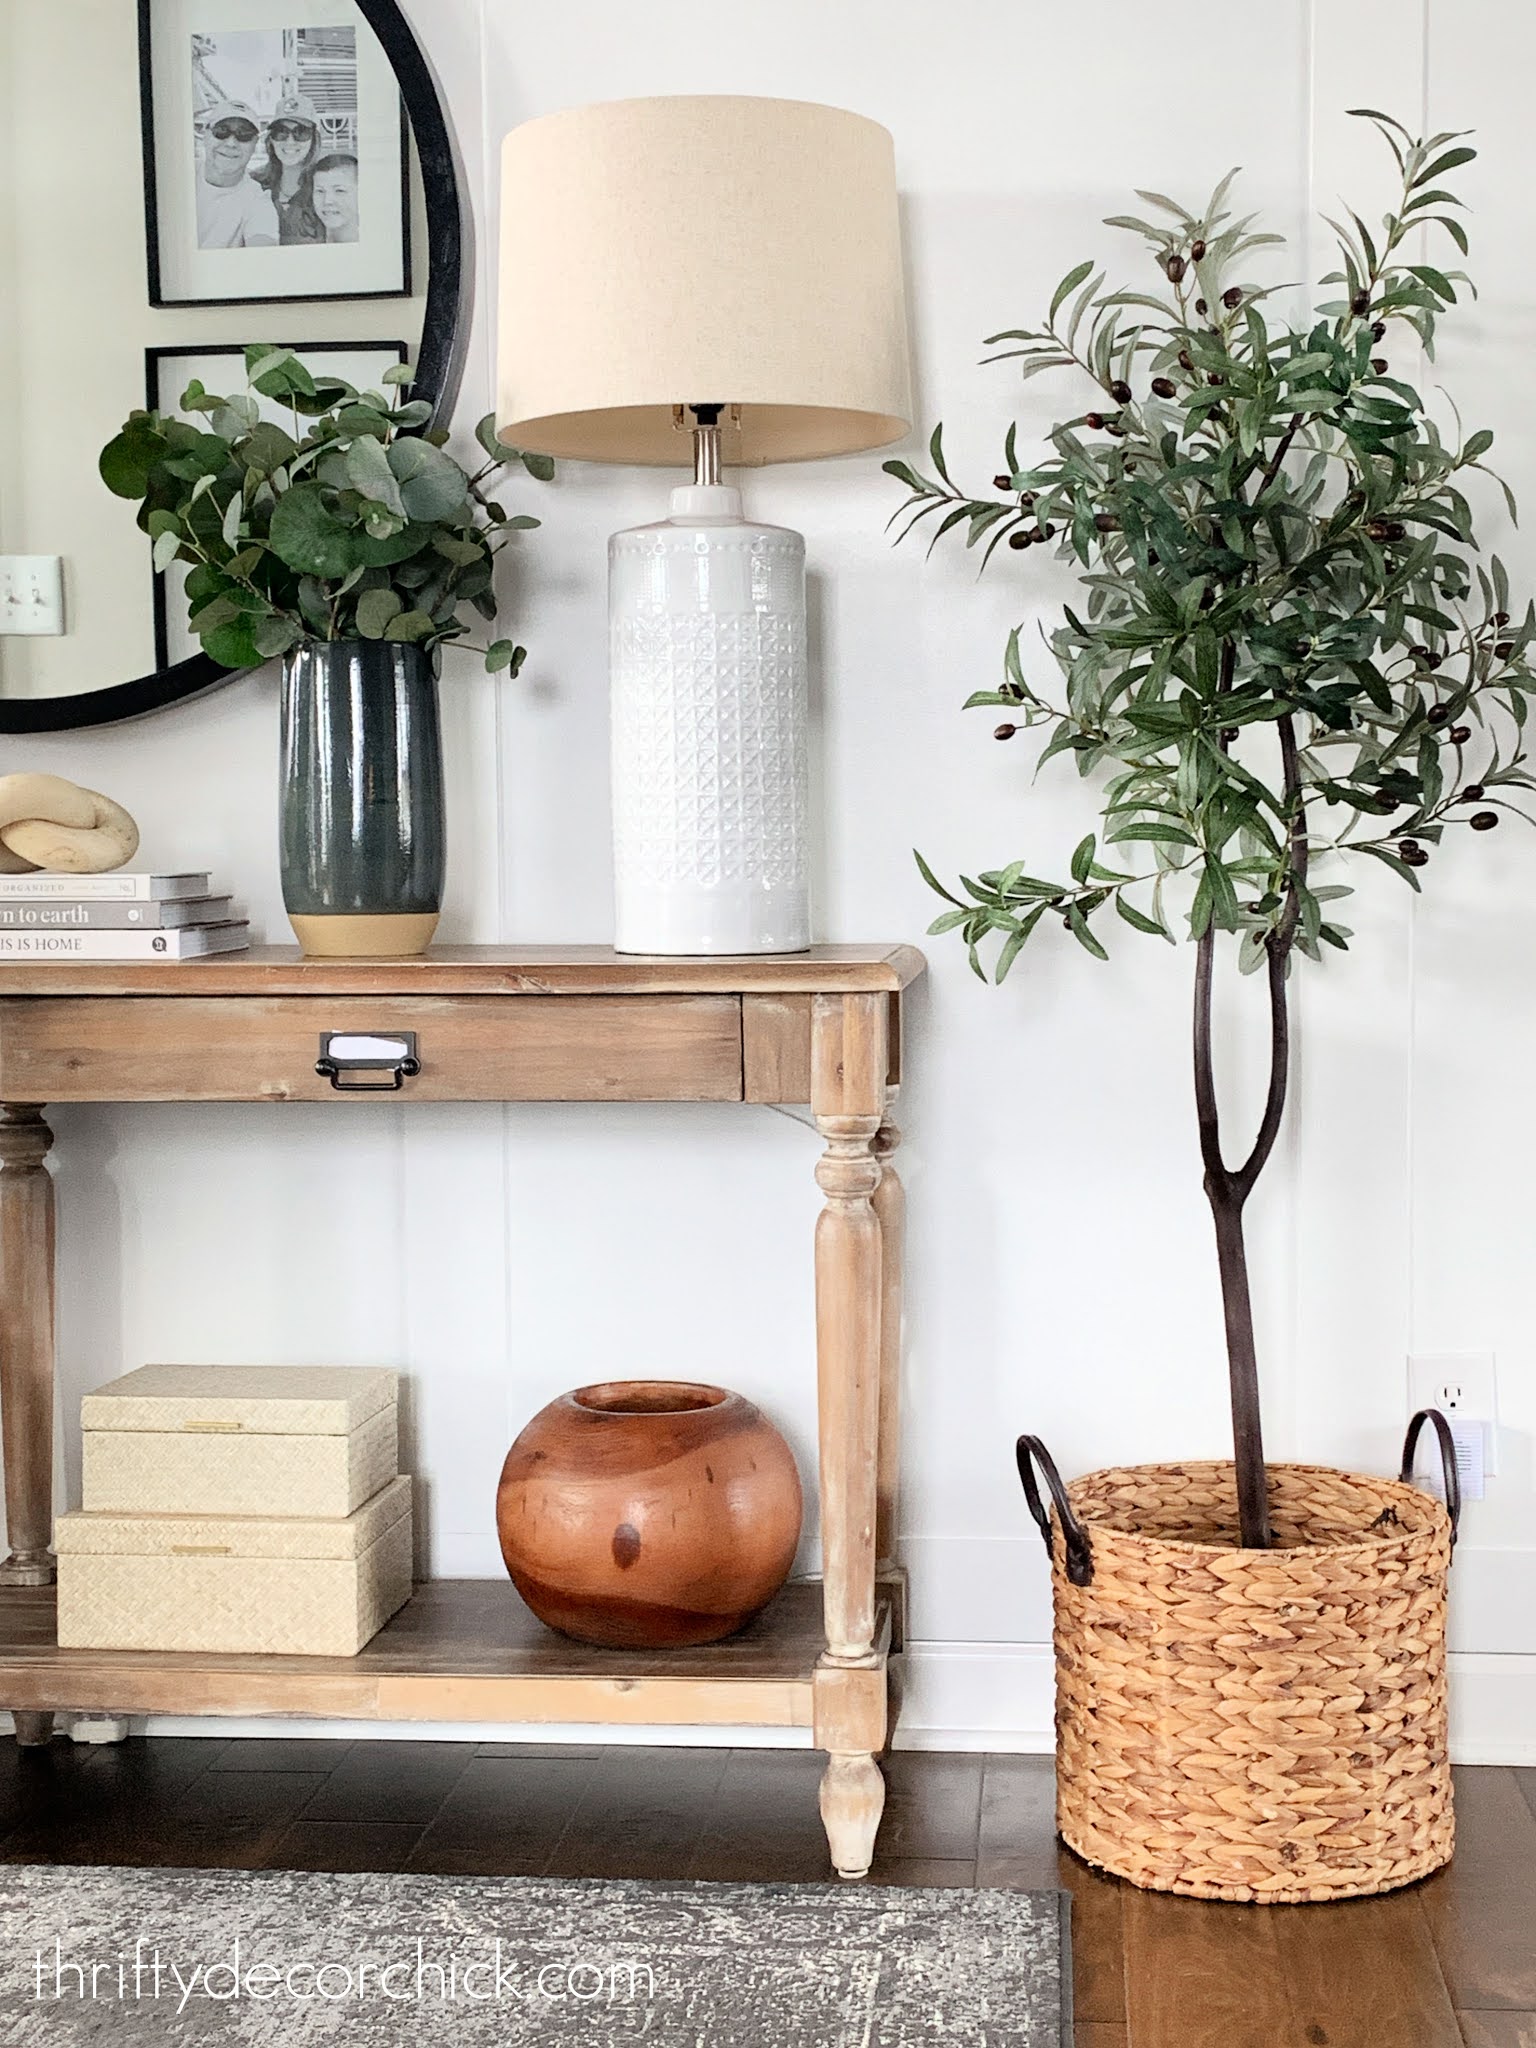
I don't know why I thought this wouldn't work that well. I guess I figured this would be too good to be true for the price. I was so wrong!:
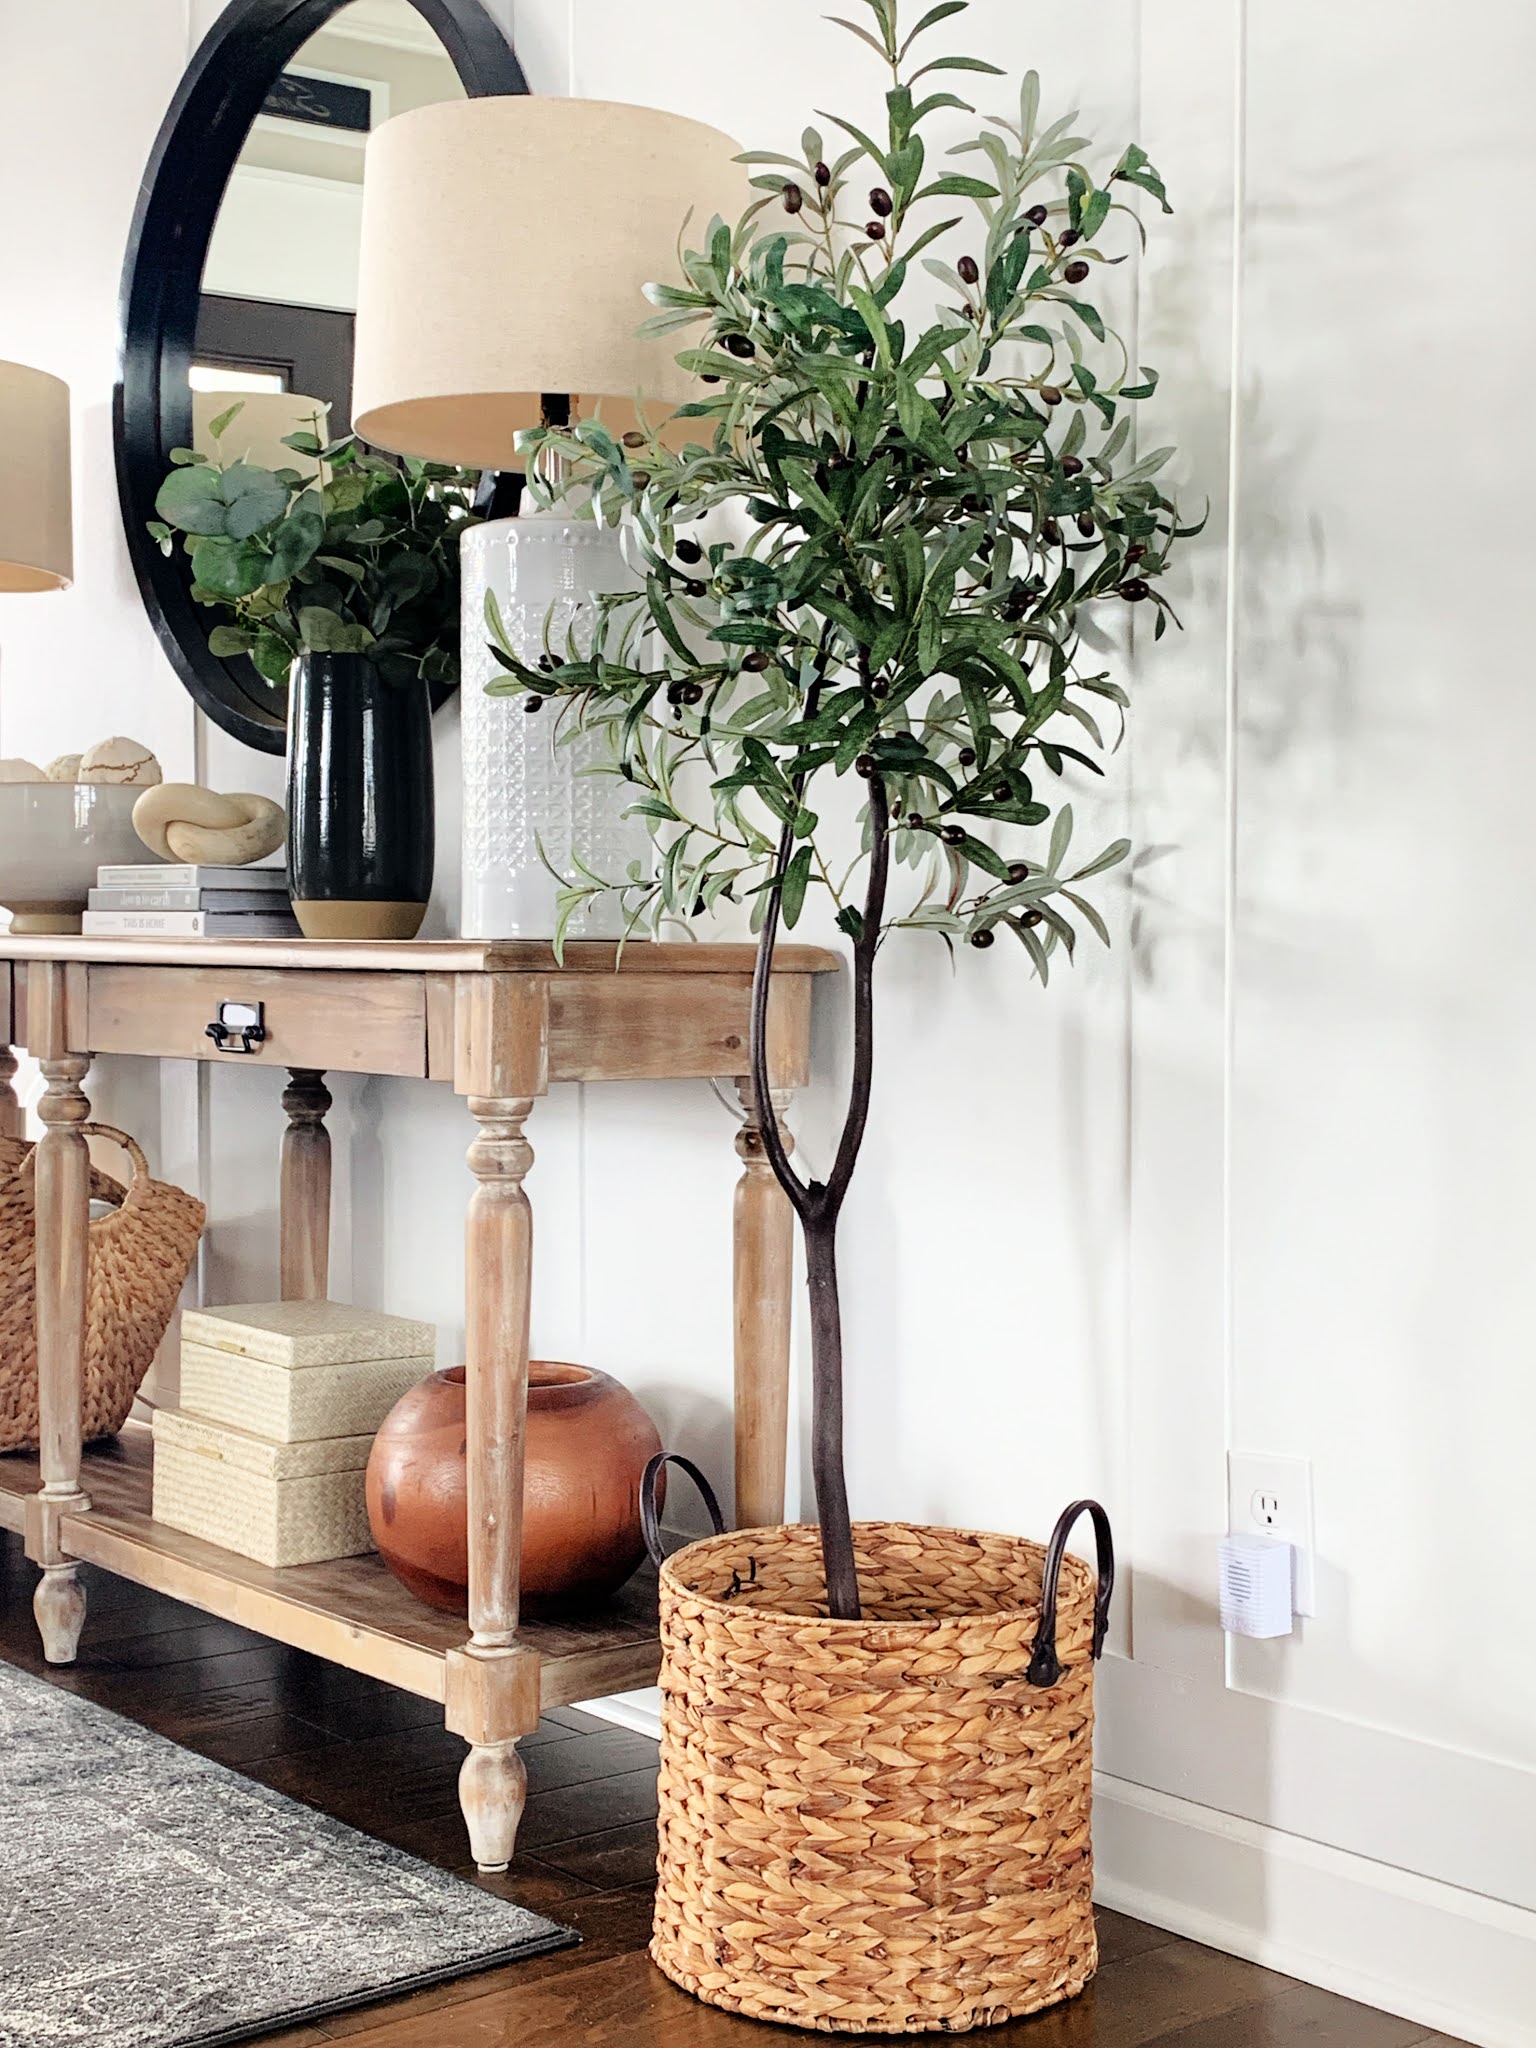
She's so pretty! I brought her upstairs for better lights for photos -- but I really like it here! May have to make another one. ;)
It will stay in the basement for now:

I'd like to find a bigger planter for it eventually. When it gets warmer out I'll make it permanent by pouring quick dry cement into whatever planter I ended up with.
Overall my tree cost me $33 and it is five feet tall. You'd spend at least $100 to buy that size. I had the planter, paint and moss already. I highly suggest gathering your supplies when they are on sale, but even if you pay full price it will be cheaper than buying.
Here's a list of the items in one spot in case you want to try this yourself!
DIY OLIVE TREE MATERIALS:
Natural branches -- either from outside or from the store (mine were half off of $16 and I have more for later)
Brown paint -- anything goes
Olive branches or bundles: These have a lot of branches and are great deal for three
Small drill bit and drill
Foam block or cement
Planter of some kind
Would you try this DIY olive tree instead of buying? It didn't take me long at all and was kind of fun. But I'm a little weird that way. :)
Pin this image and save this tutorial for later:
See more of our home here. To shop items in our home, click here! Never miss a post by signing up to get posts via email.
Via https://www.thriftydecorchick.com/2021/02/DIY-fake-olive-tree-for-less.html
Hello from the tundra! We're supposed to get a ton of snow -- maybe up to 13 inches in the next day or so. It sounds like a lot of us are in for some winter this week, so I thought I would share some beautiful faux spring florals. We can dream of warmer weather and blooming flowers together!
I found these delicate white flowers on brown stems at Hobby Lobby and they instantly brightened up the room and my mood! Just SO pretty:

Of course, I got them for half off!
I love a full floral display. When you use faux florals, make sure to take advantage of the wire stems and spread them out as much as possible.
The small white blooms look fantastic against our dark blue fireplace wall (Cyberspace):

This post may contain affiliate links for your convenience.
See my policies and disclosure page for more information.
You can find that large stoneware vase here.
I found similar options along with some additional pretty spring faux florals to share with you. I don't usually pull these out for another few weeks, but I'm glad I pulled them out early this year!
These are a great price and have similar white blooms:
Cherry blossoms are also perfect for the spring! I display mine in a hanging basket:

This pink option is very similar, as is this pink version.
If you prefer white cherry blossoms, this one is beautiful!
You can read more about that blue and white floral wallpaper here.
These faux peonies are more expensive but I hear they are VERY realistic looking:

Peony bunch (four stems/eight blooms)
Single faux peonies (pink is half off!)
If you're not a floral girl, these faux eucalyptus stems are the best I've found anywhere:

These stems have great reviews online
I display those all year -- they work beautifully no matter what the season.
Feeling the winter blues? Treat yourself to some pretty faux flowers! I promise they will brighten your day. :)
See more of our home here. To shop items in our home, click here! Never miss a post by signing up to get posts via email.
Via https://www.thriftydecorchick.com/2021/02/pretty-fake-flowers-that-look-real.html
Goodness, I am overwhelmed with your wonderful response to the huge bookcase wall I shared earlier this week! I'm so glad you love it. I'm so proud of how it turned out!
I love how the decor on the shelves came together. As you know, it takes me awhile to get things how I like them. If you try building your own bookcase unit, think about what you want to put on the shelves before you build that part.
Shorter shelves like in my office are a little easier to decorate:

These are also better if you have a lot of books you'd like to display.
I went with taller ones on the basement unit because I wanted a more open feel. Shorter shelves hold more but can feel busier. Since I had more height than usual, I needed to use bigger decor throughout:

This post may contain affiliate links for your convenience.
See my policies and disclosure page for more information.
See those tall vases on the bottom? I decided to tackle this DIY when I saw this leather wrapped vase a few weeks ago:

I figured it wouldn't be too hard to replicate this on my own! I have a bunch of glass cylinder candleholders I've used over the years. (I'll share all the different ways I've decorated them at the end of this post!)
They are super inexpensive and are on sale at craft stores all the time. I've gathered most of mine at thrift stores over the years.
As I started looking into these leather wrapped vases/candleholders, I found they can be crazy expensive. I'm assuming these are made with real leather, but this set is $75:

And this tall leather vase is $220!! Yowza:

You KNOW we can do this for cheaper! :)
I got half a yard of faux leather at the craft store for $12 (and another $5 off with a coupon!) -- they had a bunch of options, but I liked this simple brown version:

I used three glass cylinders for my project -- I found similar medium sized glass vases here and taller ones here. Lay the fabric out and roll your glass vases to figure out how much you'll need.
Since I knew I'd see most of the cuts, I marked my measurements and cut along a level instead of using scissors:

I can't cut a straight line to save my life. ? A level isn't necessary -- just use anything that is firm enough to cut against. Using the razor blade was quick and easy. (By the way, if you do any crafts, a cutting mat is an absolute must have!)
Next up was creating the holes. I marked them at every inch with a marker and then use a drill bit to make the holes:
Be sure to hold down each side of the fabric as you drill, otherwise it will bunch up as the bit spins.
For a couple of these I marked my holes on each side at the same spots and some I staggered:

Play around with your placement -- you can make them all the same or change it up a bit like I did.
You can use twine or string for this, but I wanted to mimic the look of the store versions and used some leather cording I had on hand:

I ran it through and then placed the wrap over the glass so it could be pulled tight before cutting and knotting the cord.
I had the cord from a previous project, and it's not expensive at all. You won't need a ton -- this leather string comes in four different colors. This brown version would look great as well.
If your holes are big enough, you can just feed the leather cording through. I found it much easier to use a needle -- I used a long one that I had from my tufted upholstered headboard projects. These needles have extra large eyes so it would be easy to thread that cord.
I love it! I haven't even put anything in ours -- I like how they look on their own:
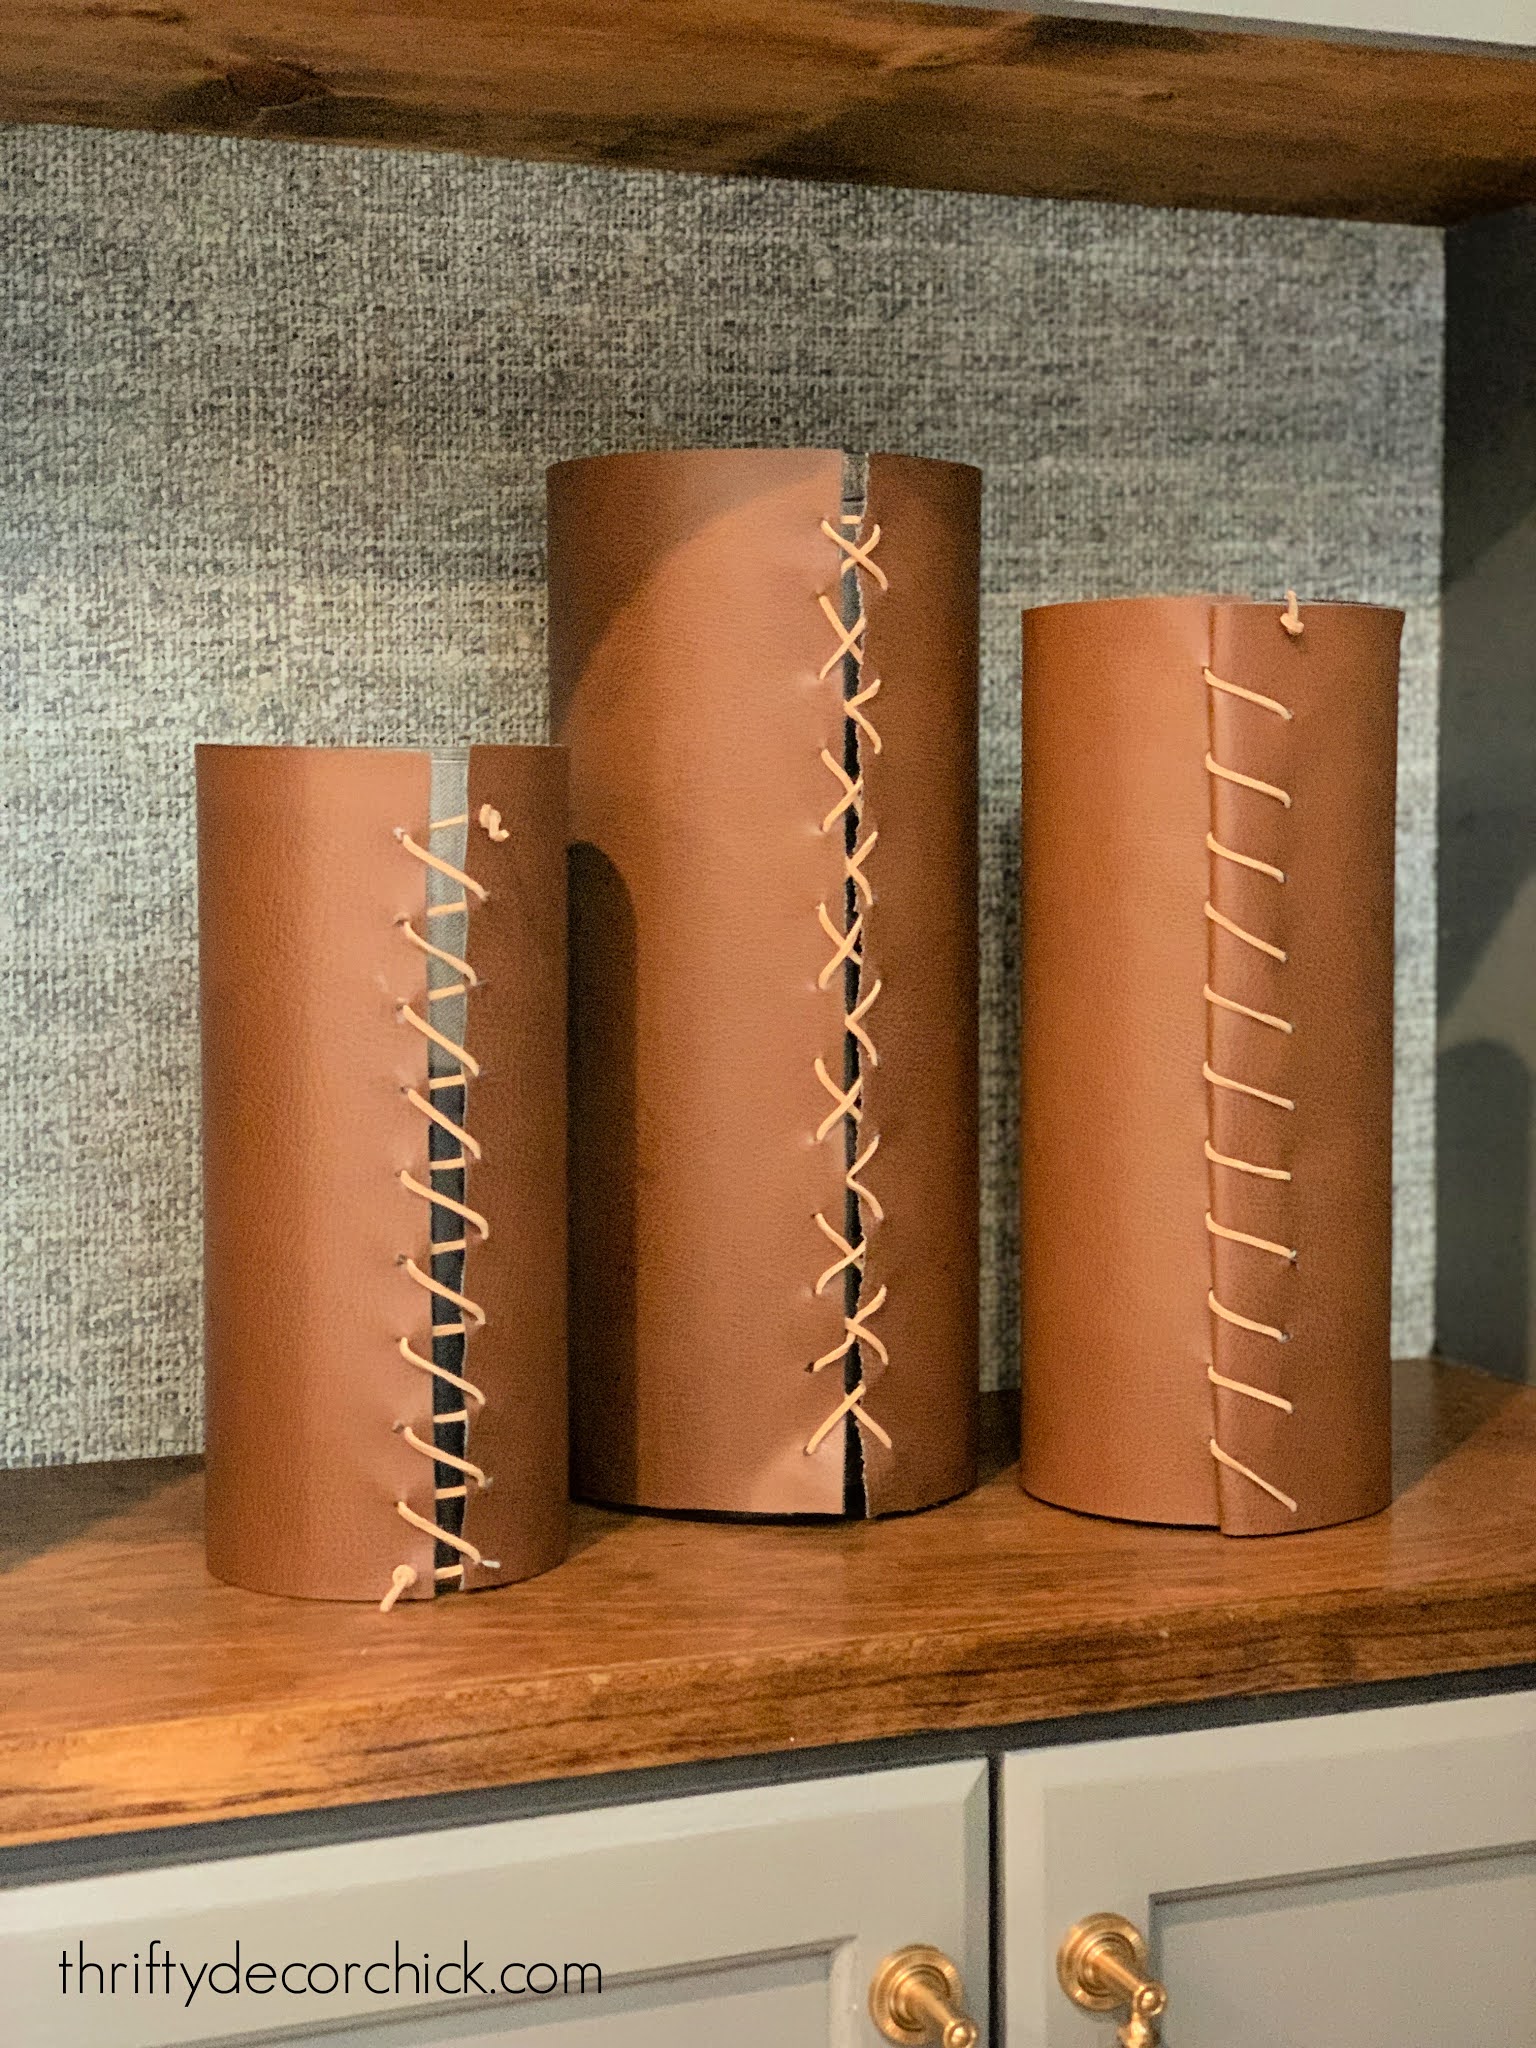
You can see how I changed up how I threaded the cord -- there are so many options!
They would make beautiful vases! I like them grouped together but one would stand alone just fine.

Mine were just as big as those pictured above and I only spent $7 on the faux leather. I call that a good knock off! If you were doing this I think you could make three for $40-$50. Well under if you use coupons or catch a sale!
I've decorated these glass holders so many ways over the years! Wrapped with old sweaters, cut out snowflakes or birch wrapping paper for winter looks, covered in gold and silver paper for a modern display, or wrapped in gold metal sheeting for a more traditional look.
These glass vases are a decorating staple!
See more of our home here. To shop items in our home, click here! Never miss a post by signing up to get posts via email.
Via https://www.thriftydecorchick.com/2021/02/DIY-leather-wrapped-candleholders-vases.html
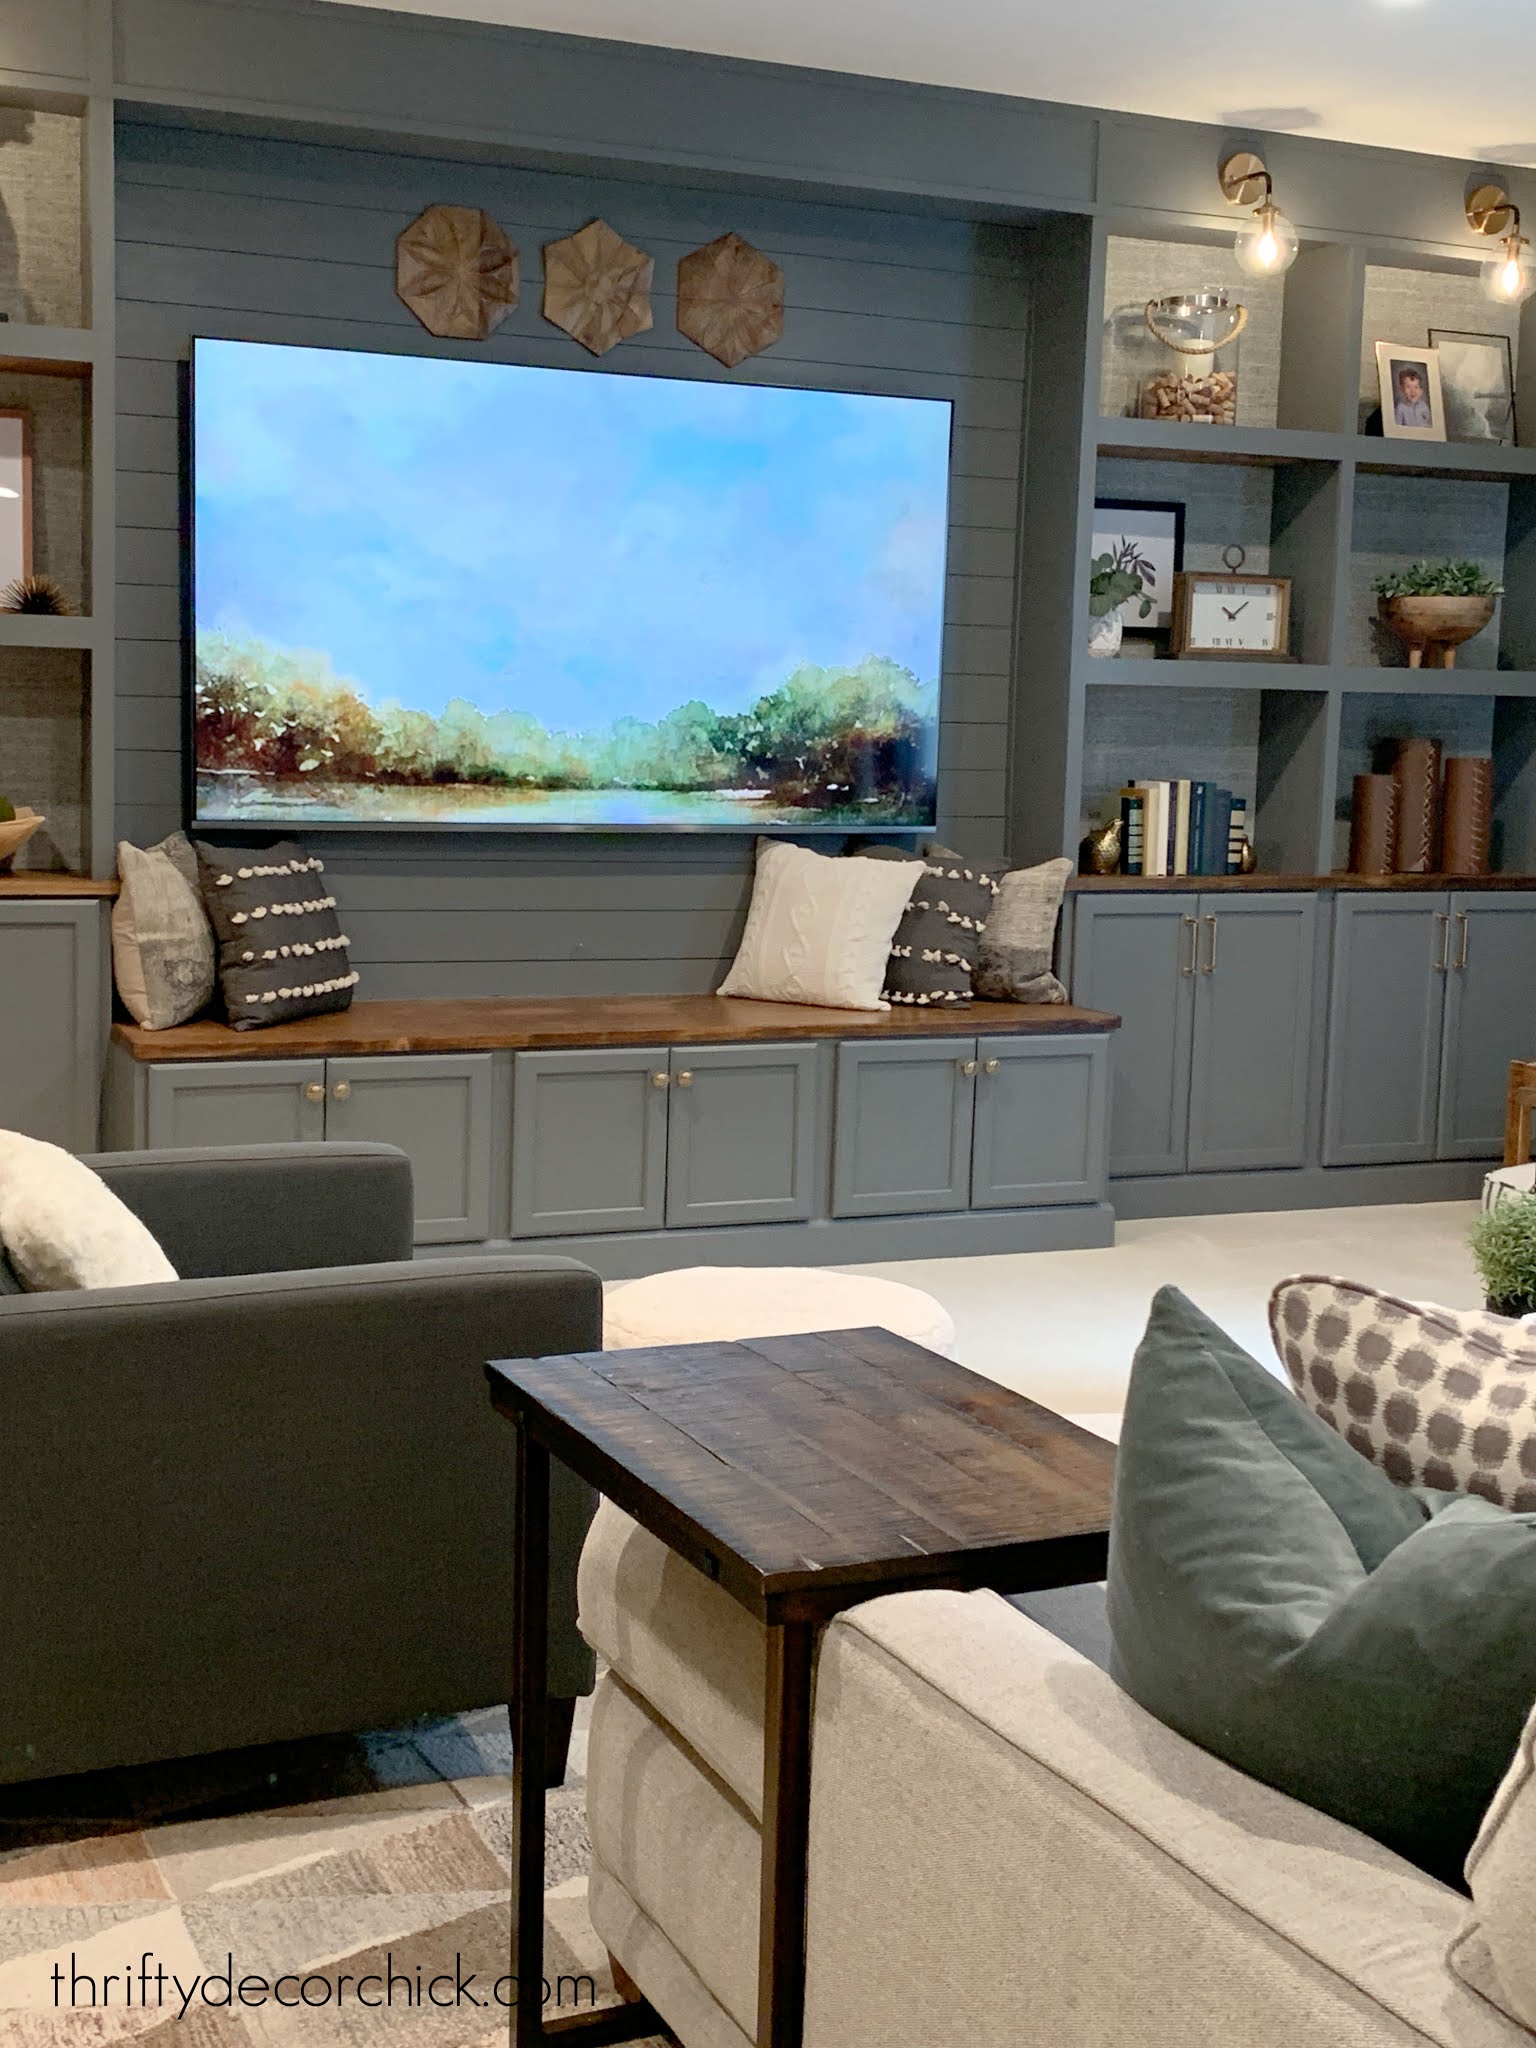
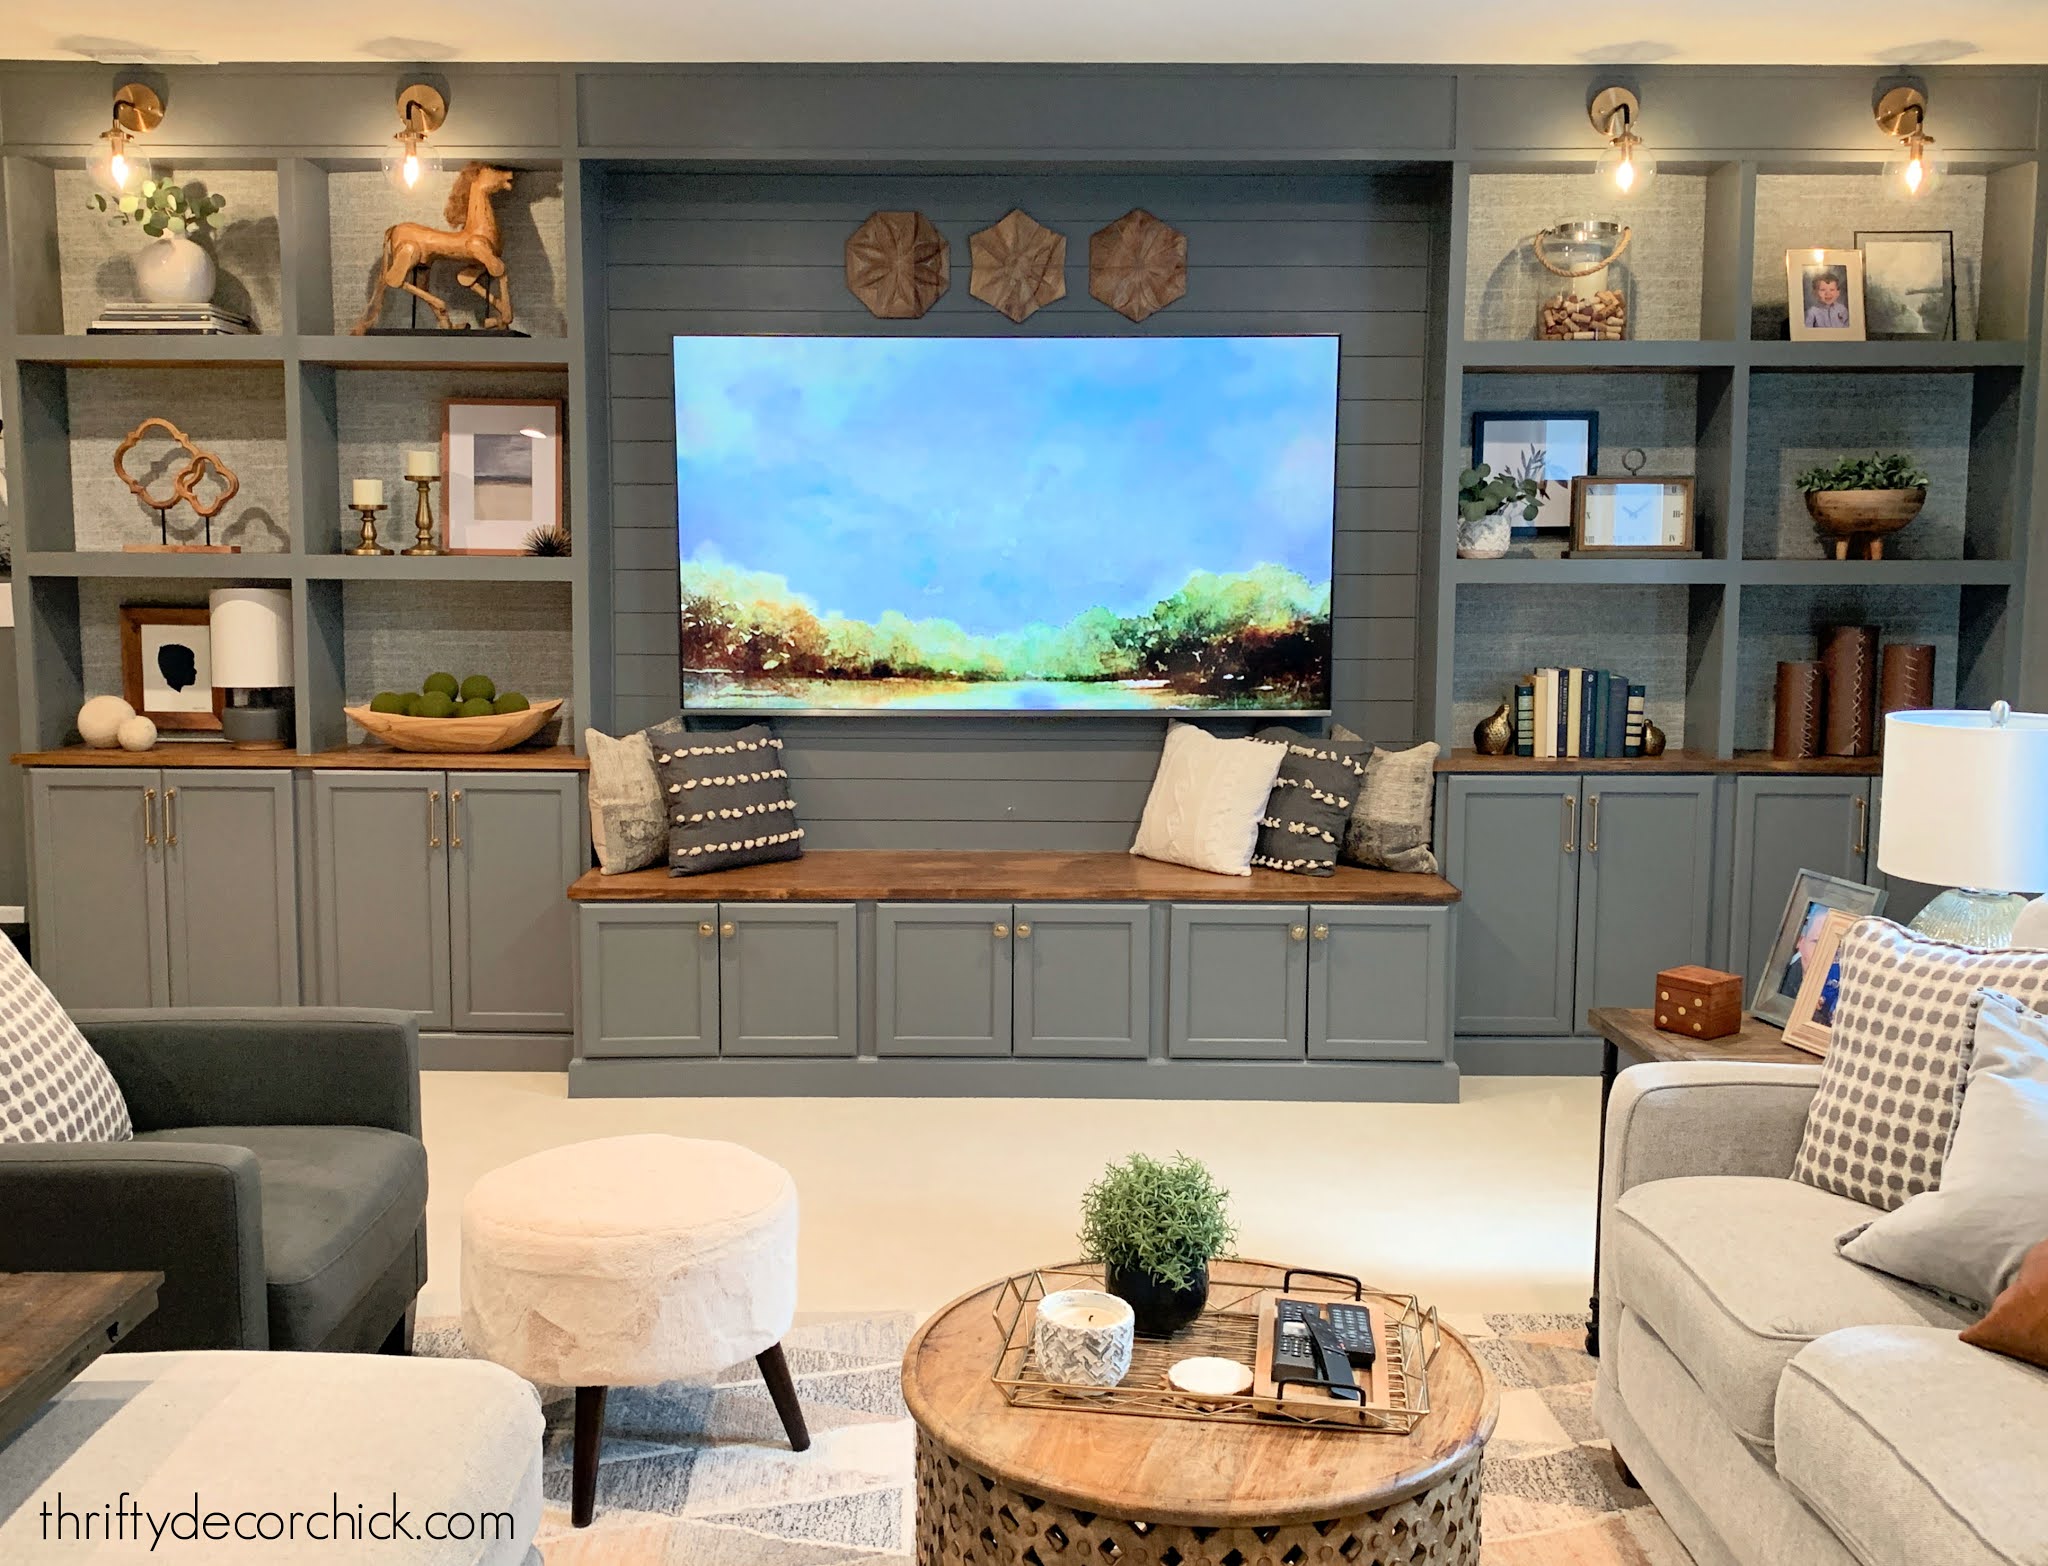
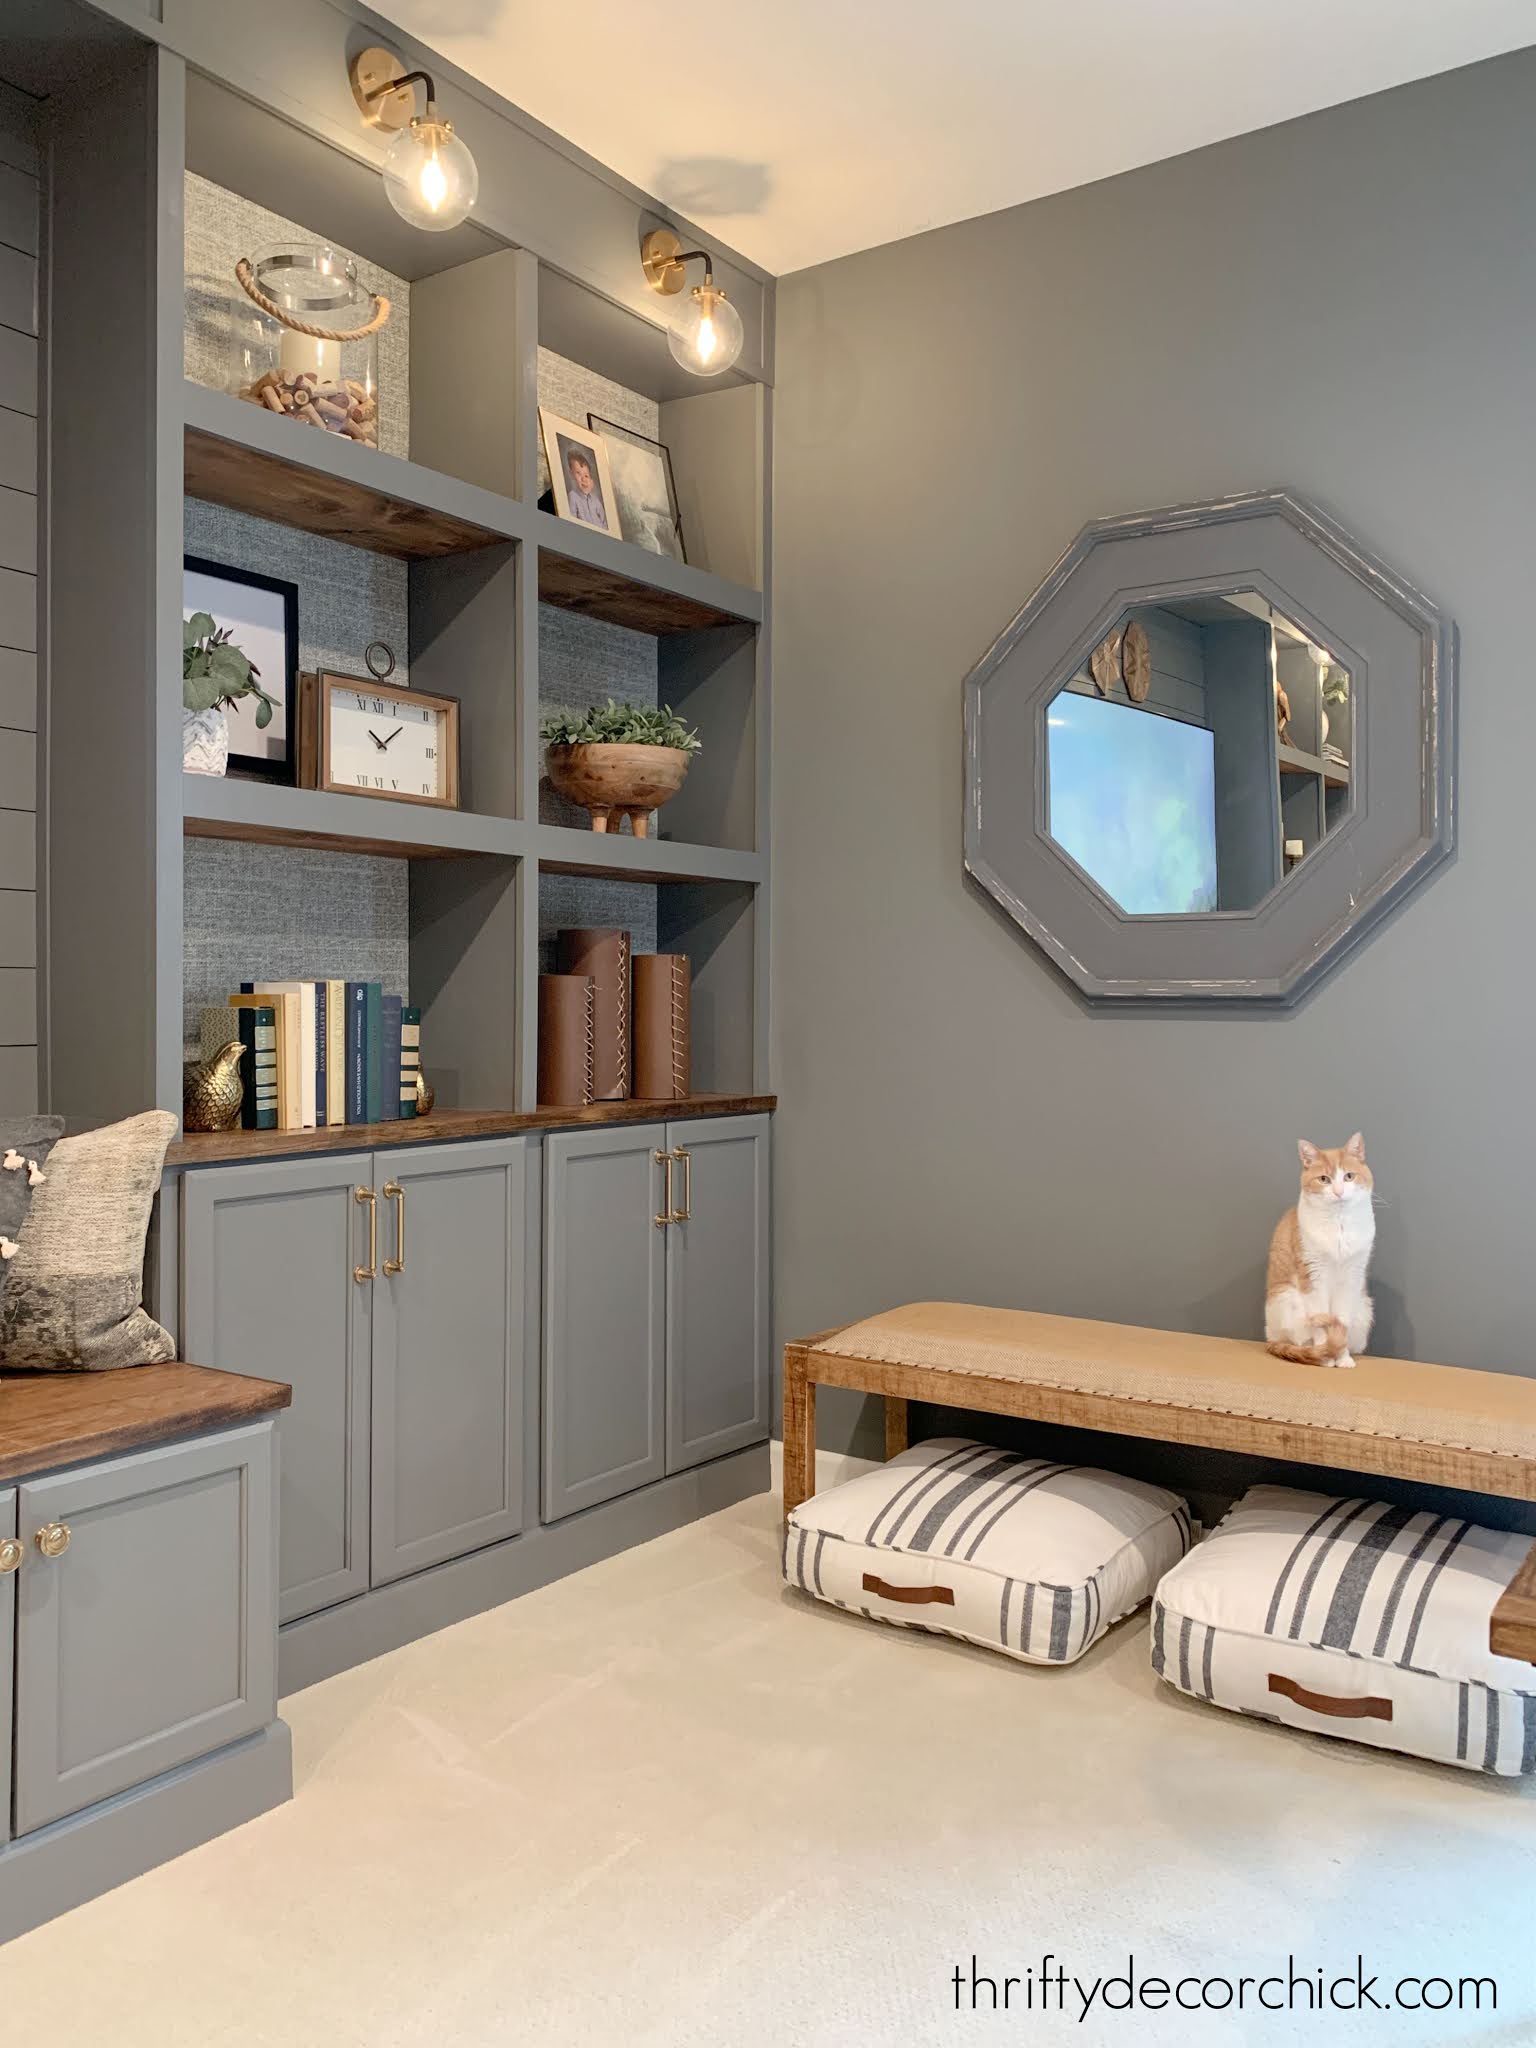
Hello there and welcome to the reveal of biggest bookcase build I've ever attempted! I shared a few weeks ago that I was going to start building a MASSIVE entertainment unit in our basement. I'll get you caught up on the process first and then will share the after pics.
This is the wall I tackled...I've had an idea in my head since we moved in for this spot:

The wall is a whopping 19 feet -- I was filling 18 of that.
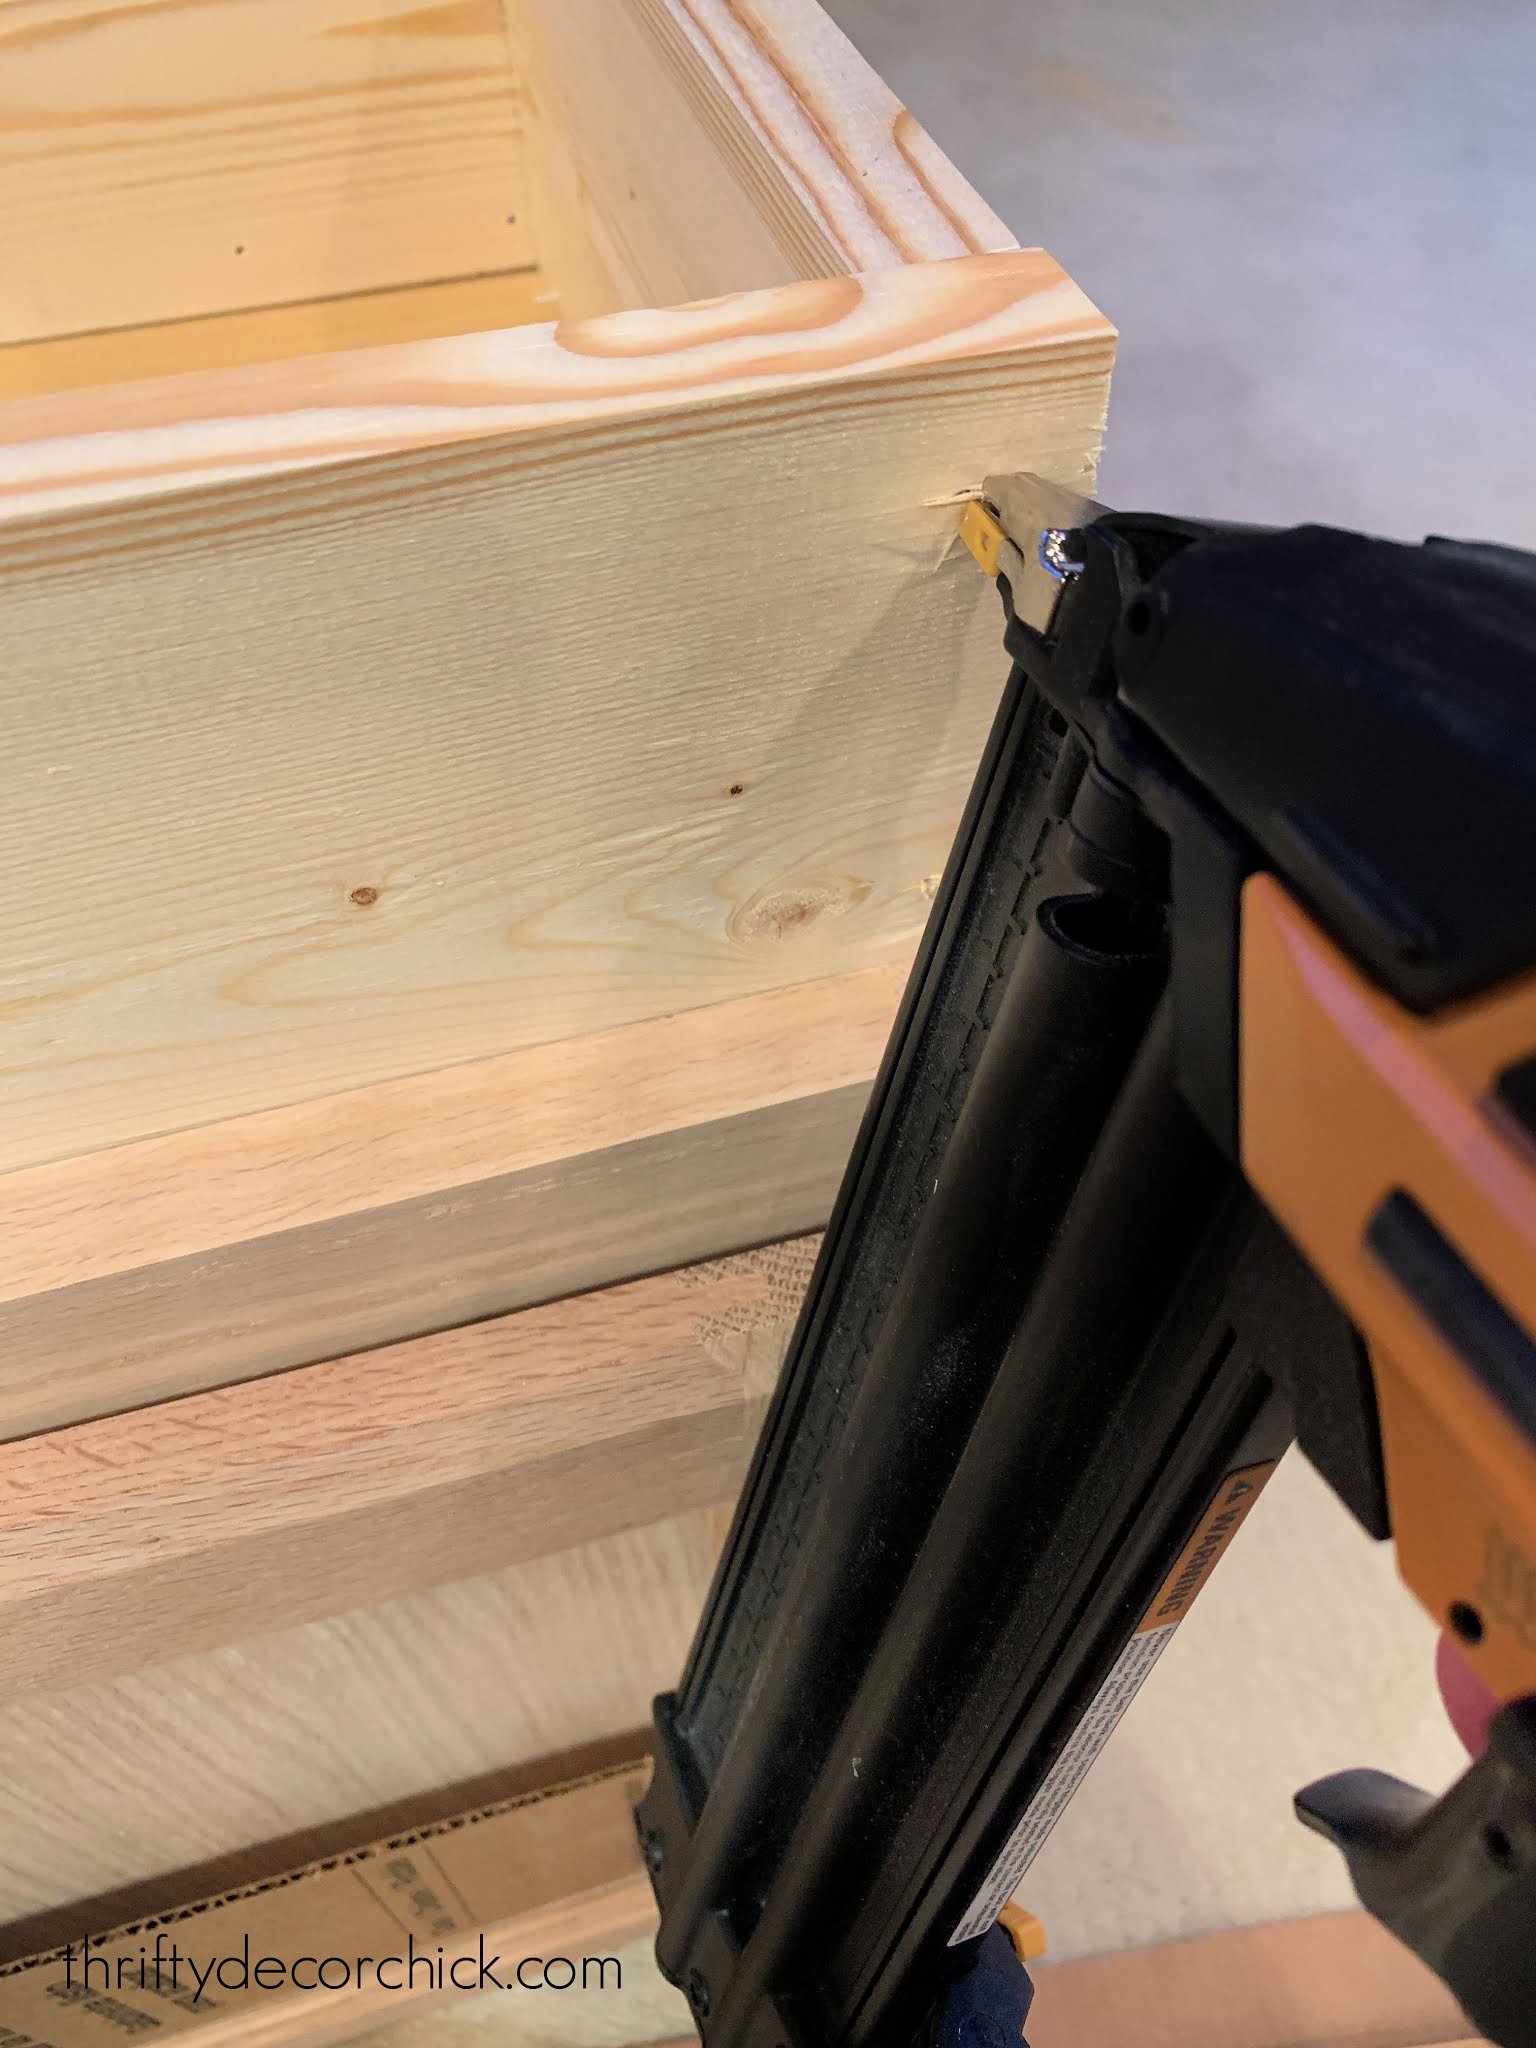
I always use kitchen cabinets for my built ins. It's way easier, cheaper and faster than building from scratch. I started by building up my cabinets so they would look more built in:

This post may contain affiliate links for your convenience.
See my policies and disclosure page for more information.
I'm kicking myself because I didn't get a pic of how I did the center bench part. I attached them to each other, and then added a support (into studs) behind them. Then I place supports that went from that to the backs of the cabinets, where I screwed them in.
This just gives the bench some added support on the back part. It also keeps it open back there so we can access sound system components underneath. I only screwed the top in, so if needed, we can take it off to access things even easier.
The center and left side bench cabinets are cut out in the back, so we can reach through. When we get our sound system in place, I'll have to cut the center of the doors out and replace that with something that will allow for the remotes to work. It also lets the electronics breath -- you can see how I did something similar and hid our TV electronics here.
I shared how I add the look of wood counters for way less a couple weeks ago. Butcher block isn't crazy expensive, but I knew we'd need a lot for this project. This is SO much more affordable and looks great!:

Oh! And I hung wallpaper behind the bookcase -- it's a gray tweed look in a peel and stick:
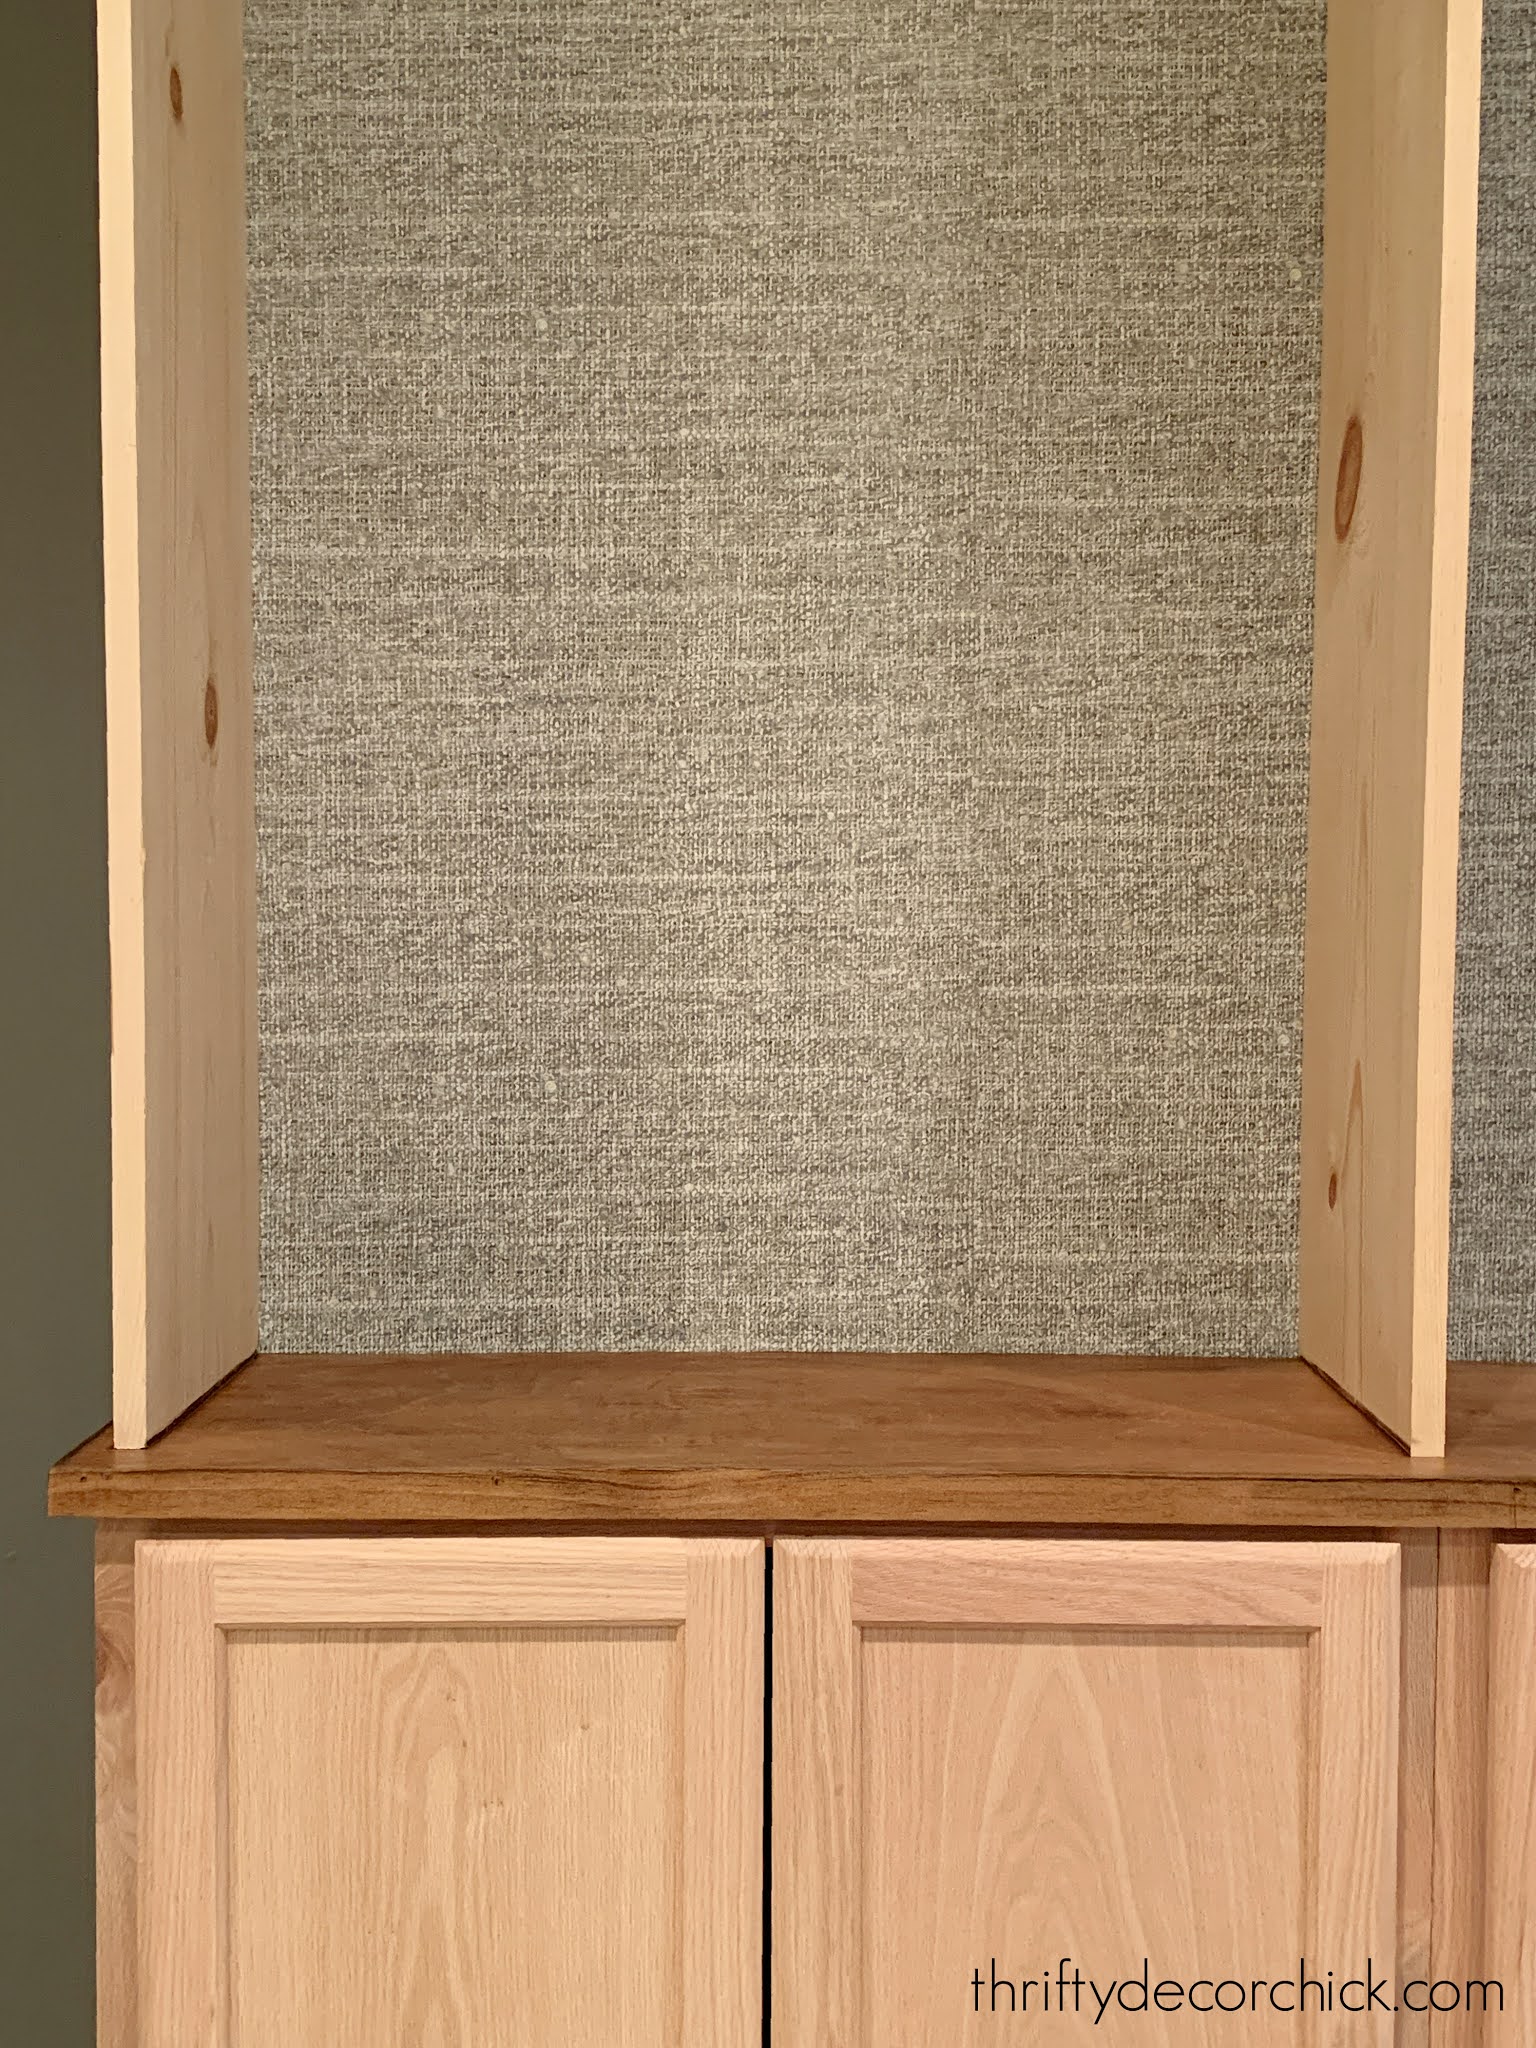
I find it much easier to hang this before I put my supports up. If I ever want to change it out, I can cut it away from the shelves.
I have found it's more manageable to paint as I go -- I used to wait until the whole thing was done and then start. Doing it in phases is SO much better! I painted the bases first, and then installed the pretty new hardware:

You can see my trick to easily install cabinet knobs and pulls here.
The rest of the project was done pretty much identically to how I built my office bookcases. You can see how I installed the supports for the bookcases here and the three steps for building built in shelves.
I knocked this whole project out in two weeks. I was on a mission! I spent hours a day working on it and had an absolute blast. It's like a puzzle for me -- I really enjoy it. The only hiccups I had were at the very end when I was building the shelves:

As you can see, I built the VERY LAST shelf and then stepped back and realized it was in the wrong spot. Argh! Story of my life.
I have loved the look of stained shelves against painted bookcases and wanted to incorporate that into this build. But pine is a finicky beast. Sometimes it stains up beautifully, sometimes it looks awful (even with conditioner). I'll go into more detail about that in an upcoming post.
This time, even with conditioner and using select pine, it stained horribly:

So I had to switch gears. I contemplated taking off the fronts and replacing them with a different wood, but I really didn't want to spend more money (or start all over again!).
So instead I decided to paint the fronts and leave the actual shelves (on top and bottom) the stained wood:

I absolutely LOVE how it looks!! It turned into a happy accident. Now the front ties in nicely with everything else, but you still see that wood tone on the shelves.
After that, I installed the sconces, added some trim to the headers and touched up holes and paint:

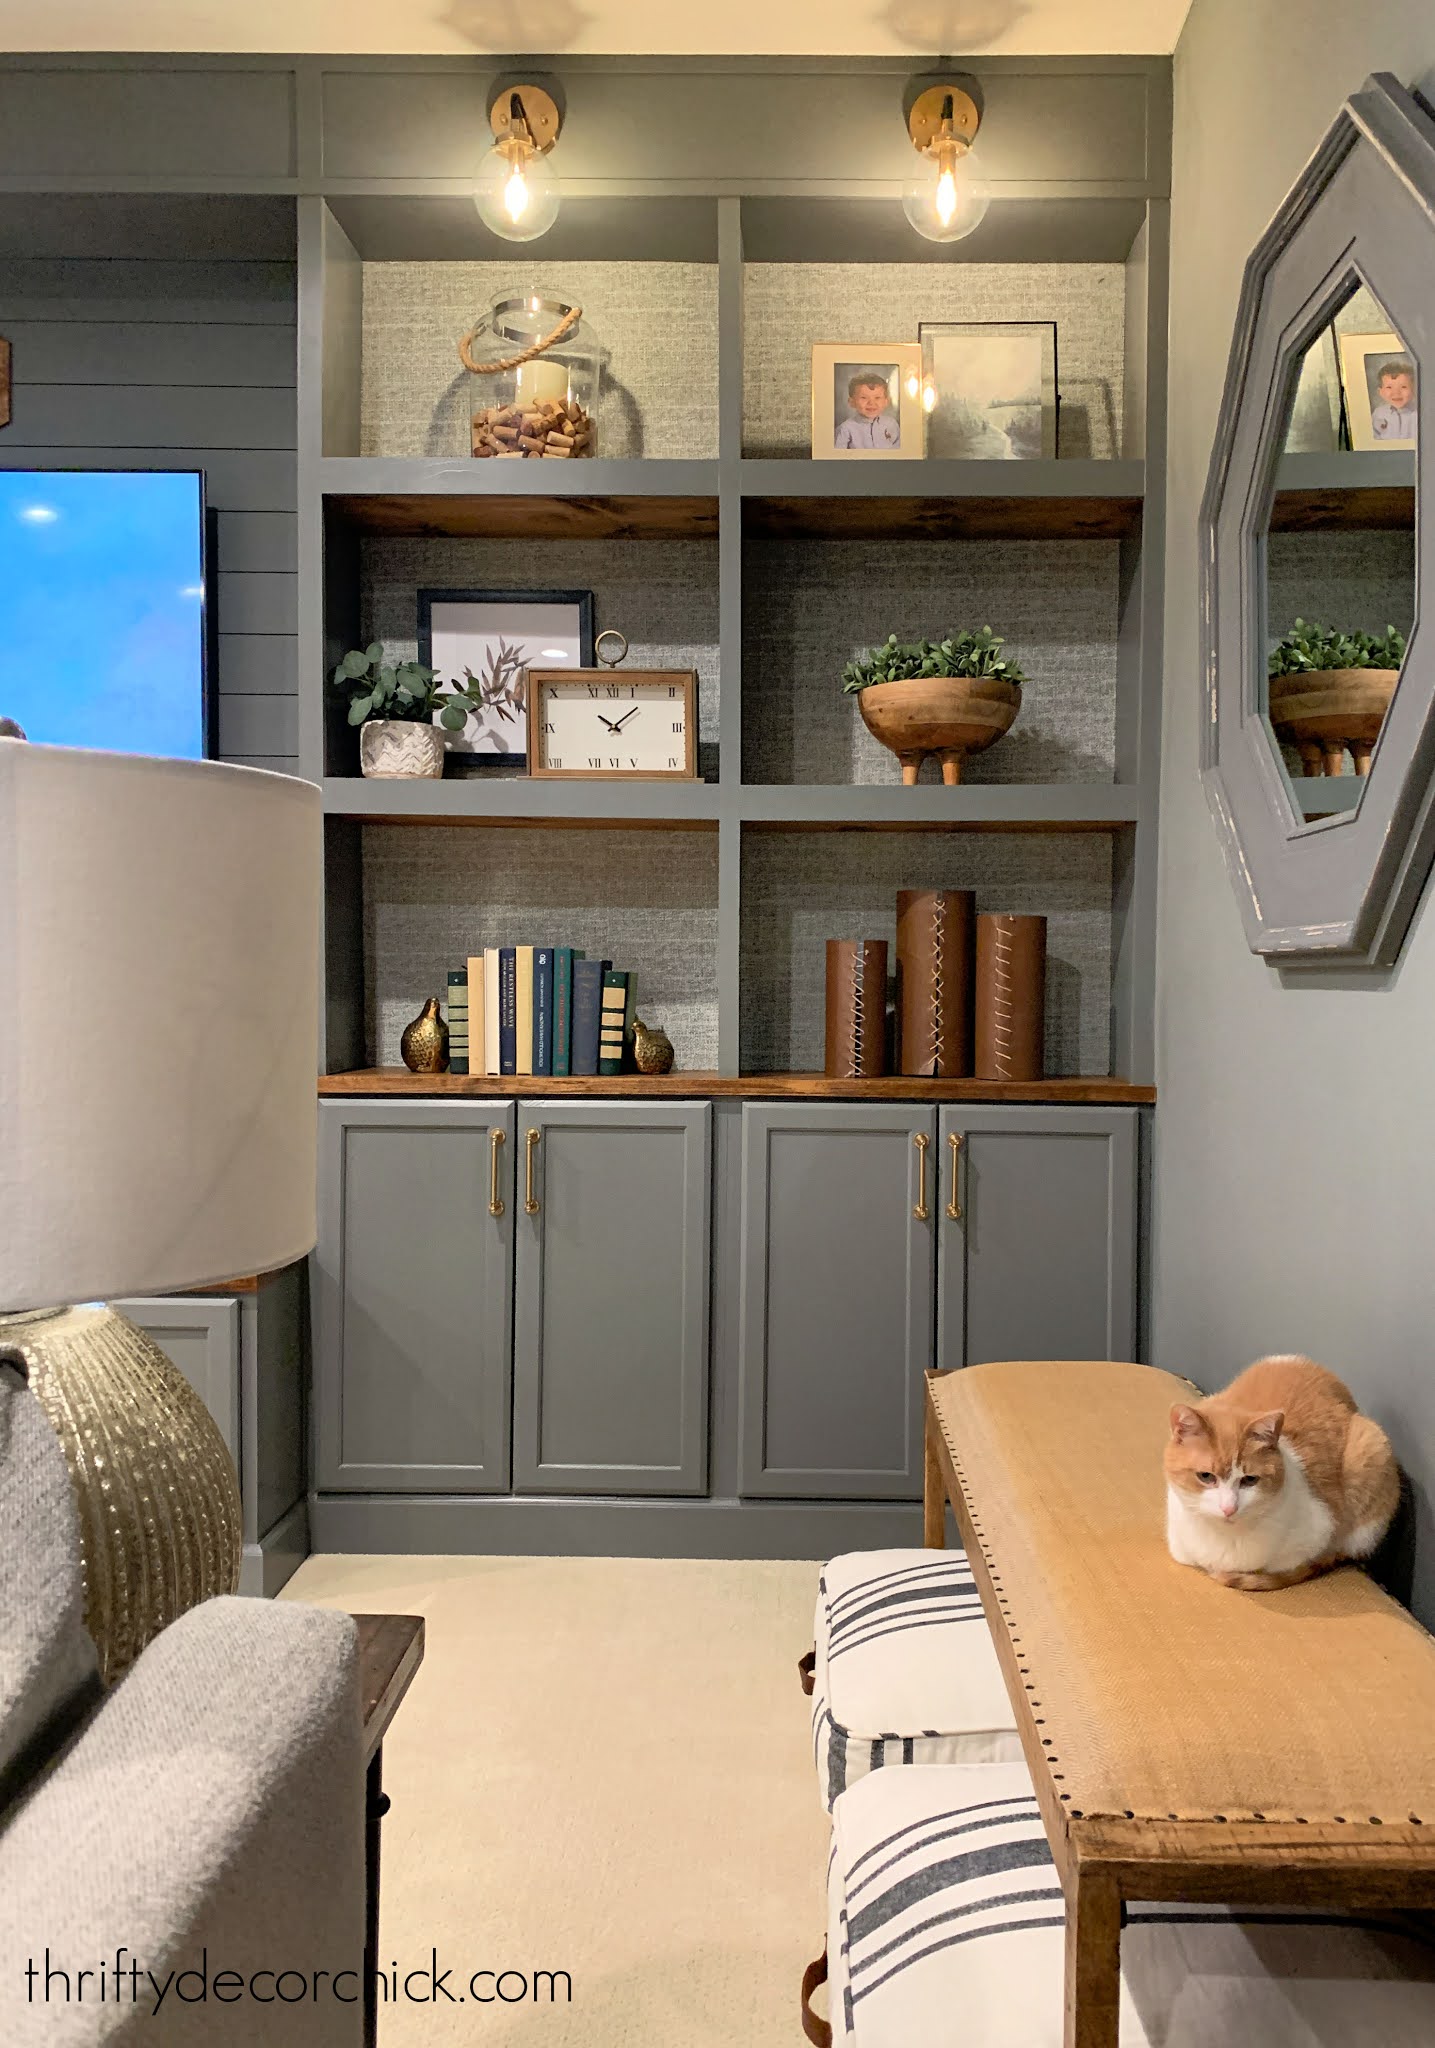
Then it was time to decorate! I swear this part took me longer than it did to build the bookcases! ? I had items in our storage room I've kept for years just for this wall. I shared my tips on decorating bookcases here -- I always incorporate those when I'm accessorizing a spot in our home.


A before shot from the front:

And now!:
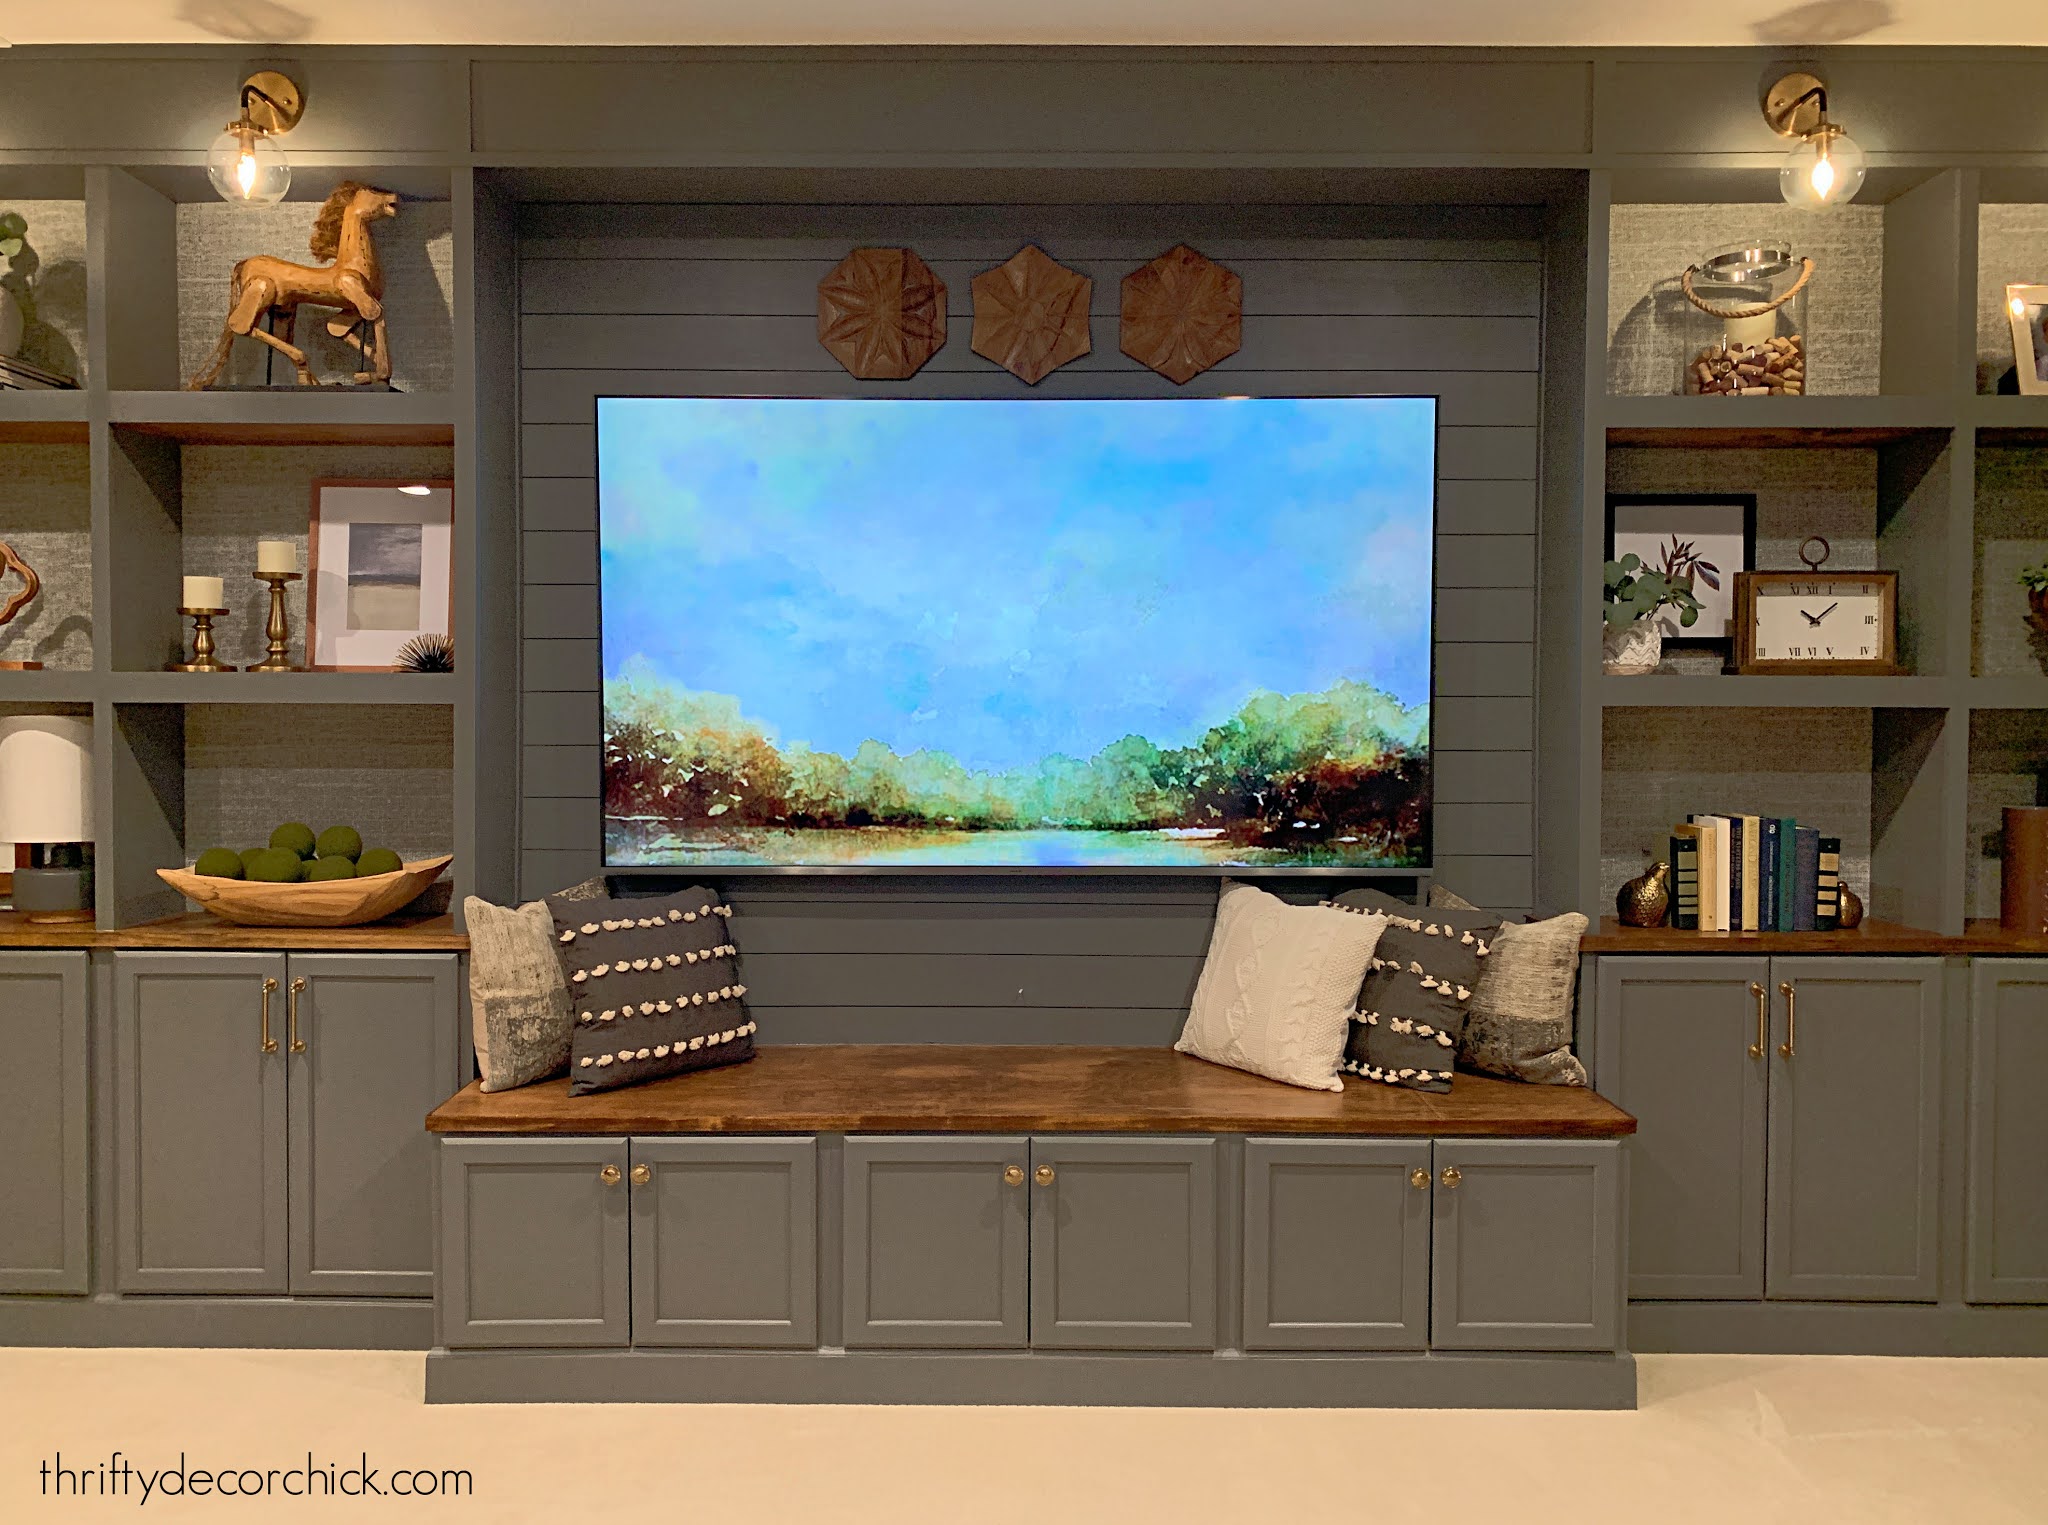
I had so much fun working on this project -- it came together so beautifully:

I think this may be my favorite project I've ever done. My kitchen and bathroom renovations at our last house are way up there too...I'm so proud of those! But this one...I don't know what it is. It's just so me and fits in perfectly in our home.
I'm super proud of this...I love all of the details and how the decor came together:

We had bookcase speakers wired as well...I've hidden those holes behind the art. :) Those will come when the budget allows.
I screwed the header in the middle section in (instead of nailing it) so I can easily take it down when we have the ceiling speakers installed. (Those are already wired.) I think we'll focus on the front speakers now and tackle that part later.
When I look at a project and think, "It should have always looked this" -- that's a sign it turned out really well! This fits perfectly in this room!:
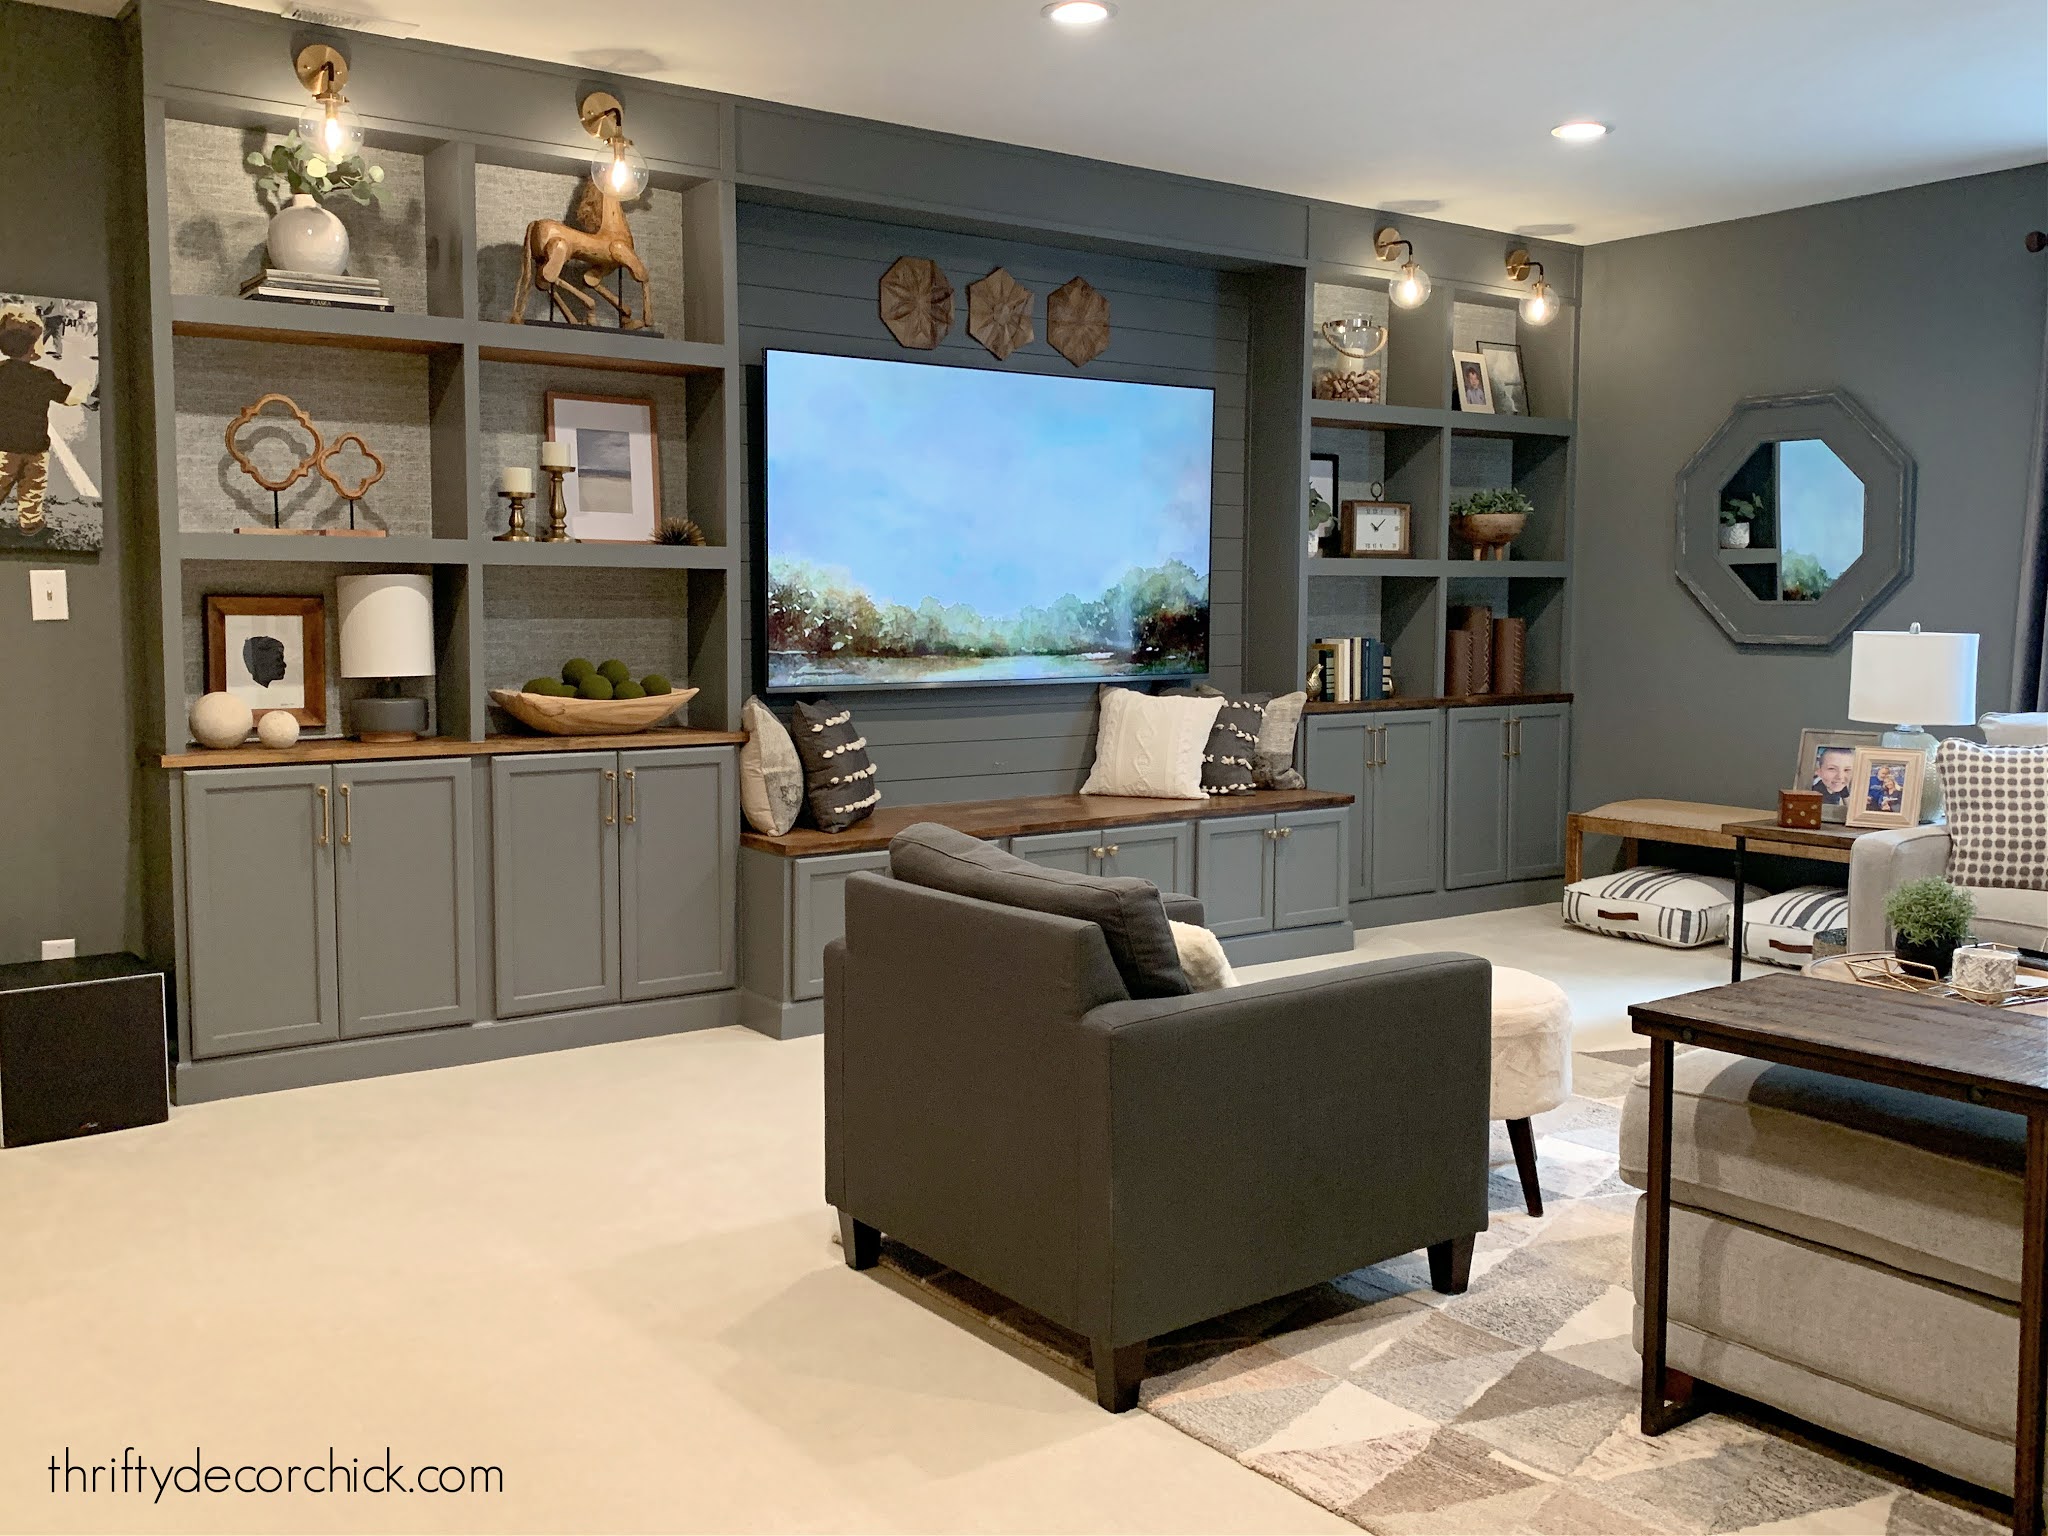
This spot is SO cozy and warm! We always spend a ton of time in the basement in the winter, but we've been down there more than ever lately. It's the best spot in the house right now!:
If you remember my drawing for this wall, you may remember we had planned to add a long, electric fireplace under the TV:

Turns out there wasn't enough room. Now I'm kinda glad we didn't try to fit in there! We're looking at a new spot for that instead.
The reality matches my sketch pretty well, right?:
The TV is just slightly off center and it should slide over, but it's not budging. We want to wait till we have another person to help us -- hopefully we can scoot it over a bit more.
The final cost for ALL materials -- wallpaper to stain to wood -- was around $1300. I would have paid at least three times that to have someone build this for us!
The walls in this space are getting a little detail soon as well!:
That mirror is from the old house and just happens to match -- but I'd prefer it didn't. I'm thinking about painting it...just have to decide what color!
You may notice that the lighting in here is MUCH better now. I'll share more about that soon.
I hope this project inspires you! If you have questions I didn't address here, please let me know.
SOURCES FOR THIS PROJECT
Wall and cabinet color -- Westchester Gray by Sherwin-Williams (flat and semi gloss)
Brass globe sconces (I got them at Home Depot but they priced even lower at that link!)
Pillows -- Hobby Lobby
More about our sectional here
Watercolor art on left shelves
I had most of the bookcase decor already. (They are a mix of thrifted and mostly HomeGoods items.)
See more of our home here. To shop items in our home, click here! Never miss a post by signing up to get posts via email.
Via https://www.thriftydecorchick.com/2021/02/Huge-DIY-built-in-bookcases-basement.html I'm DONE with the basement entertainment center build and I can't wait to show you (next week)! Now it's time to decorate the shelves -- which is the most fun but also the hardest. Fun but difficult -- is that a thing? Ha! I can build all day and I love it...but I sometimes struggle with the decor part. It will take me a few hours to get it right, and once I do it will stay the same for years. The thought of rearranging things that already look good seriously stresses me out. ? I have a few tried and true tips for decorating bookcases and shelves that always help! They're easy to follow and make for decor that is really pleasing to the eye. Tip #1: Decorate in odd numbers It's often said that things in threes are most appealing to our eyes. Actually, odd numbers in general are more pleasing. I add plenty of even numbers, but the "rule of threes" always seems to work even better: 
If you have a lot of space you can group things in threes as a little vignette and then add a singular item next to it. Mix and match -- the groupings don't have to be the same item!
Tip #2: Give your eye a place to "rest"
My style has changed over the years and is much simpler and less cluttered (you'll see that later in this post), so I've learned that singular items can be just as lovely. On bigger bookcases, I like to balance out the odd numbered groupings with a few that just have one statement.
Not every shelf needs to be completely filled!:

This post may contain affiliate links for your convenience.
See my policies and disclosure page for more information.

Using a longer or bigger item by itself allows the eye to rest -- especially on a large wall of bookshelves or in a room that already has a lot going on visually.
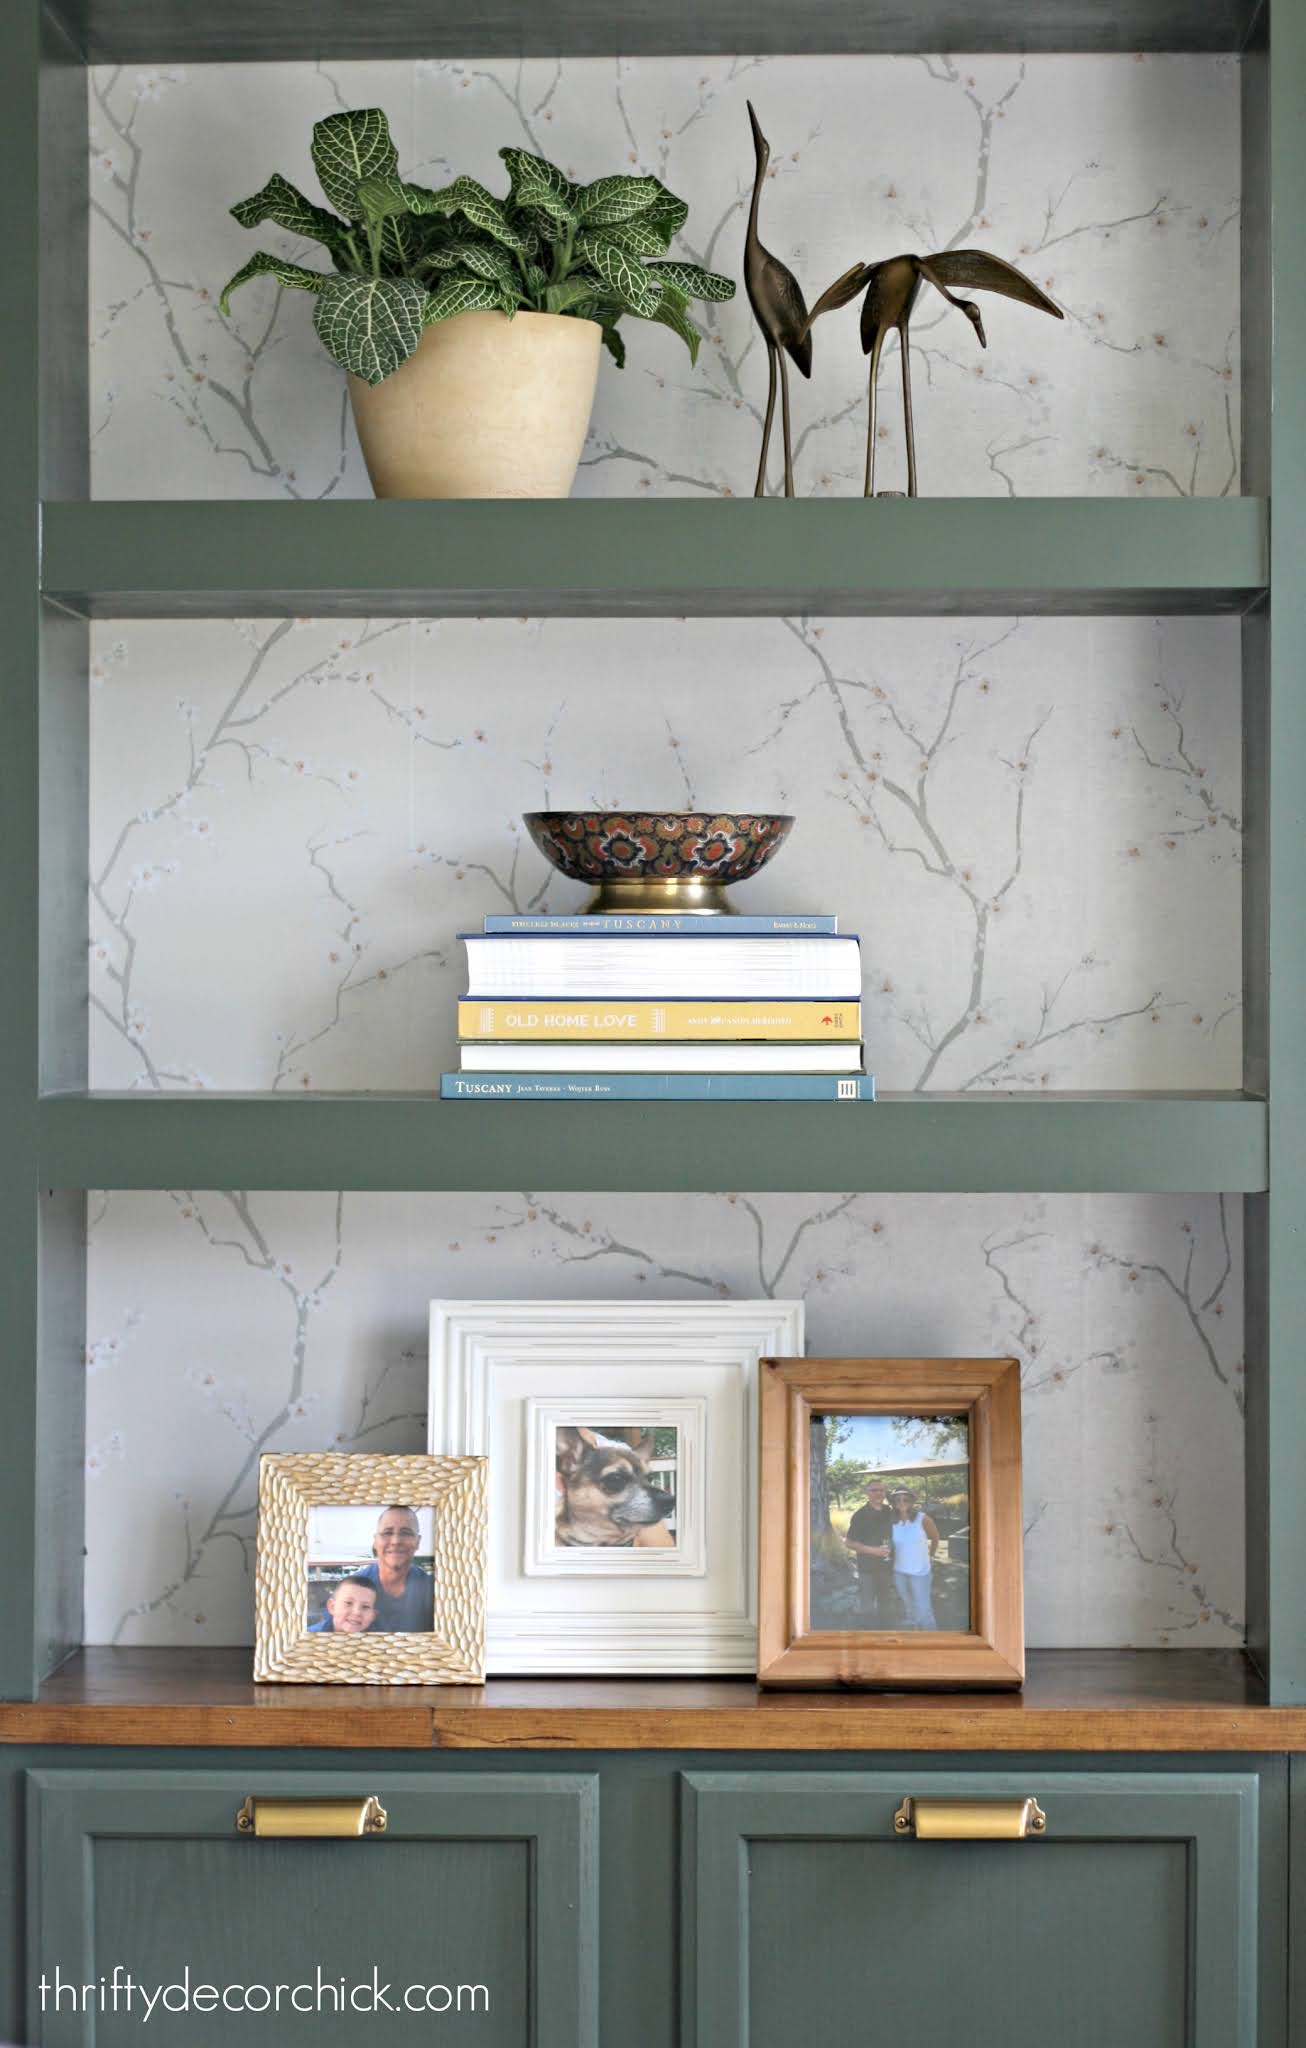
I like to flip flop things of the same color or texture when I can. So if I'm using plants, I'll place one on the left, then put another plant on the opposite side on a shelf or two down.
When you're using a lot of individual items, this trick subtly ties everything together!:
This also goes for shapes -- I like to flip and repeat round and square items.
This is a big one! It's so key to a beautifully decorated shelf. Everything at one height can get a little boring. Mixing taller and shorter items allows your eye to travel up and down.
This also allows for layering of items:

Our pretty DIY floating shelves in the bathroom incorporate all of these tips in one spot! The flip flop, the threes, the different heights are all happening. :)
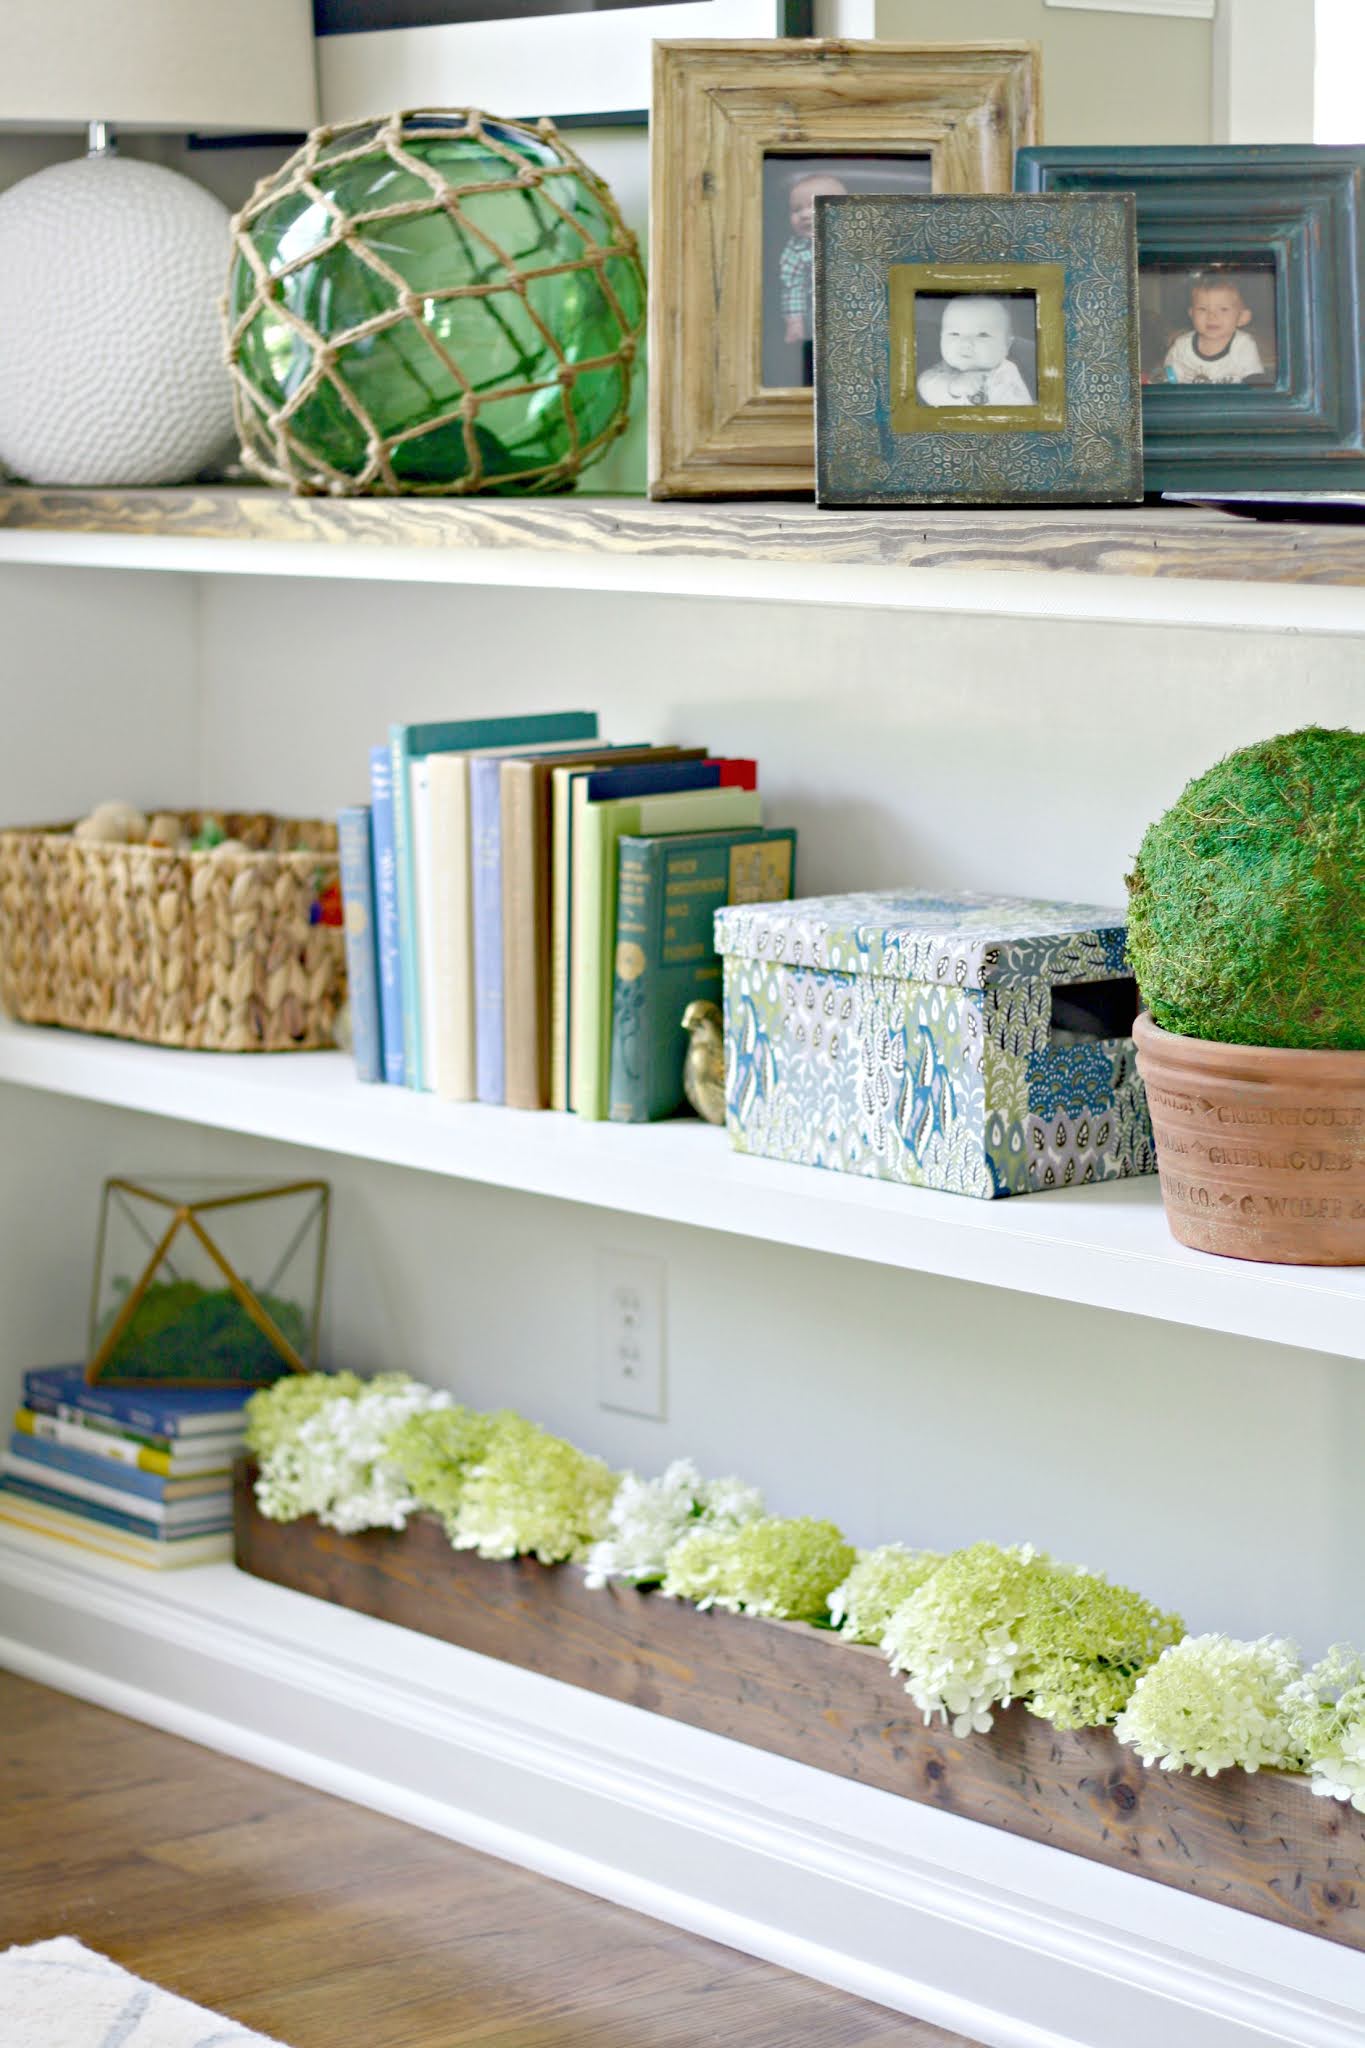
Tip #5: Use books!
You'd be surprised at how upset people get when you don't fill bookcases with...books. ;) People are passionate about them!
In our last house I used a LOT of books on the bookcases initially:

I later toned it down just a bit -- it was feeling busy. I pared down the decor and the books: 
If you have a bunch of books and want to display them, do it! When I see pictures of shelves full of books it gives me a warm fuzzy feeling. In our home I prefer a little less.
I like to take the covers off of our hardcover books -- I love the pretty spines and beautiful title fonts. But books are a very personal thing! You may not want some books on display for whatever reason. So I also turn some books around so you just see the pages.
That's the beauty of decorating your home -- you get to make it work for YOUR home. If it makes you happy -- do it!
I shared some of these tips years ago when I first decorated those dining room turned library bookcases I built. These incorporate some of what I've talked about! I repeated many items -- this one points out metal accessories I repeated throughout:
I repeated the green items too:
I even thought about which way to go with the books. I tried to switch back and forth -- starting on the right, then left, right, etc.:
Otherwise parts of the bookcases started to look “heavier” than others. And I also thought about what to center on the shelves and what not to:
The top and bottom items are all centered, and two of the shorter shelves in the middle are as well, on each end. Sometimes accessorizing falls right in to place, sometimes it’s agonizing. :) If decorating shelves feels like the latter for you, use these tips as your guide. I gathered some of my favorite decor items I've used on bookcases around our house here! You can click on each photo to get to the product online:  See more of our home here. To shop items in our home, click here! Never miss a post by signing up to get posts via email. Via https://www.thriftydecorchick.com/2012/11/how-to-accessorize-bookcases.html
Hello there! I'm SO close to finishing up the huge built ins in the basement! I have a few more details to add, and then the really fun part -- decorating it! I plan to share the whole thing with you next week. It looks SO great.
I think sofas are the hardest piece of furniture to shop for...well, as least the hardest to pick RIGHT. After we paid off all of our debt years ago, I splurged on a beautiful, expensive sectional for our home, and years later I absolutely hated that thing.
We had a number of problems with it -- from the fabric to the cushions. I shared my review of our Arhaus sectional here.
We later discovered this sofa from Macy's that is my absolute favorite couch ever -- you can see it in our old house here. (It was way cheaper.) We bought it right before we decided (very out of the blue) to move. Since I wanted matching sofas facing each other in our new family room, we sold that Macy's sofa to the buyers.
I have missed it since! I have a love/hate situation with our current sofas, and I'll talk more about that soon. They are crazy comfy and I LOVE how the look -- from far away. We'll call them the Mona Lisa sofas. ;)
I've had to come up with some ways to keep them looking decent over the past few years, so I'm sharing my tricks for making a sofa look (almost) brand new!
We got these from a local store in Indy called Urban Underpriced for a GREAT price.
First up, a trick I learned years ago that solved a problem that drove me batty -- couch cushions that slide out:
This post may contain affiliate links for your convenience.
See my policies and disclosure page for more information.
The soft looked so good back then!
The easy fix? A non-slip rug mat. It works SO well!:
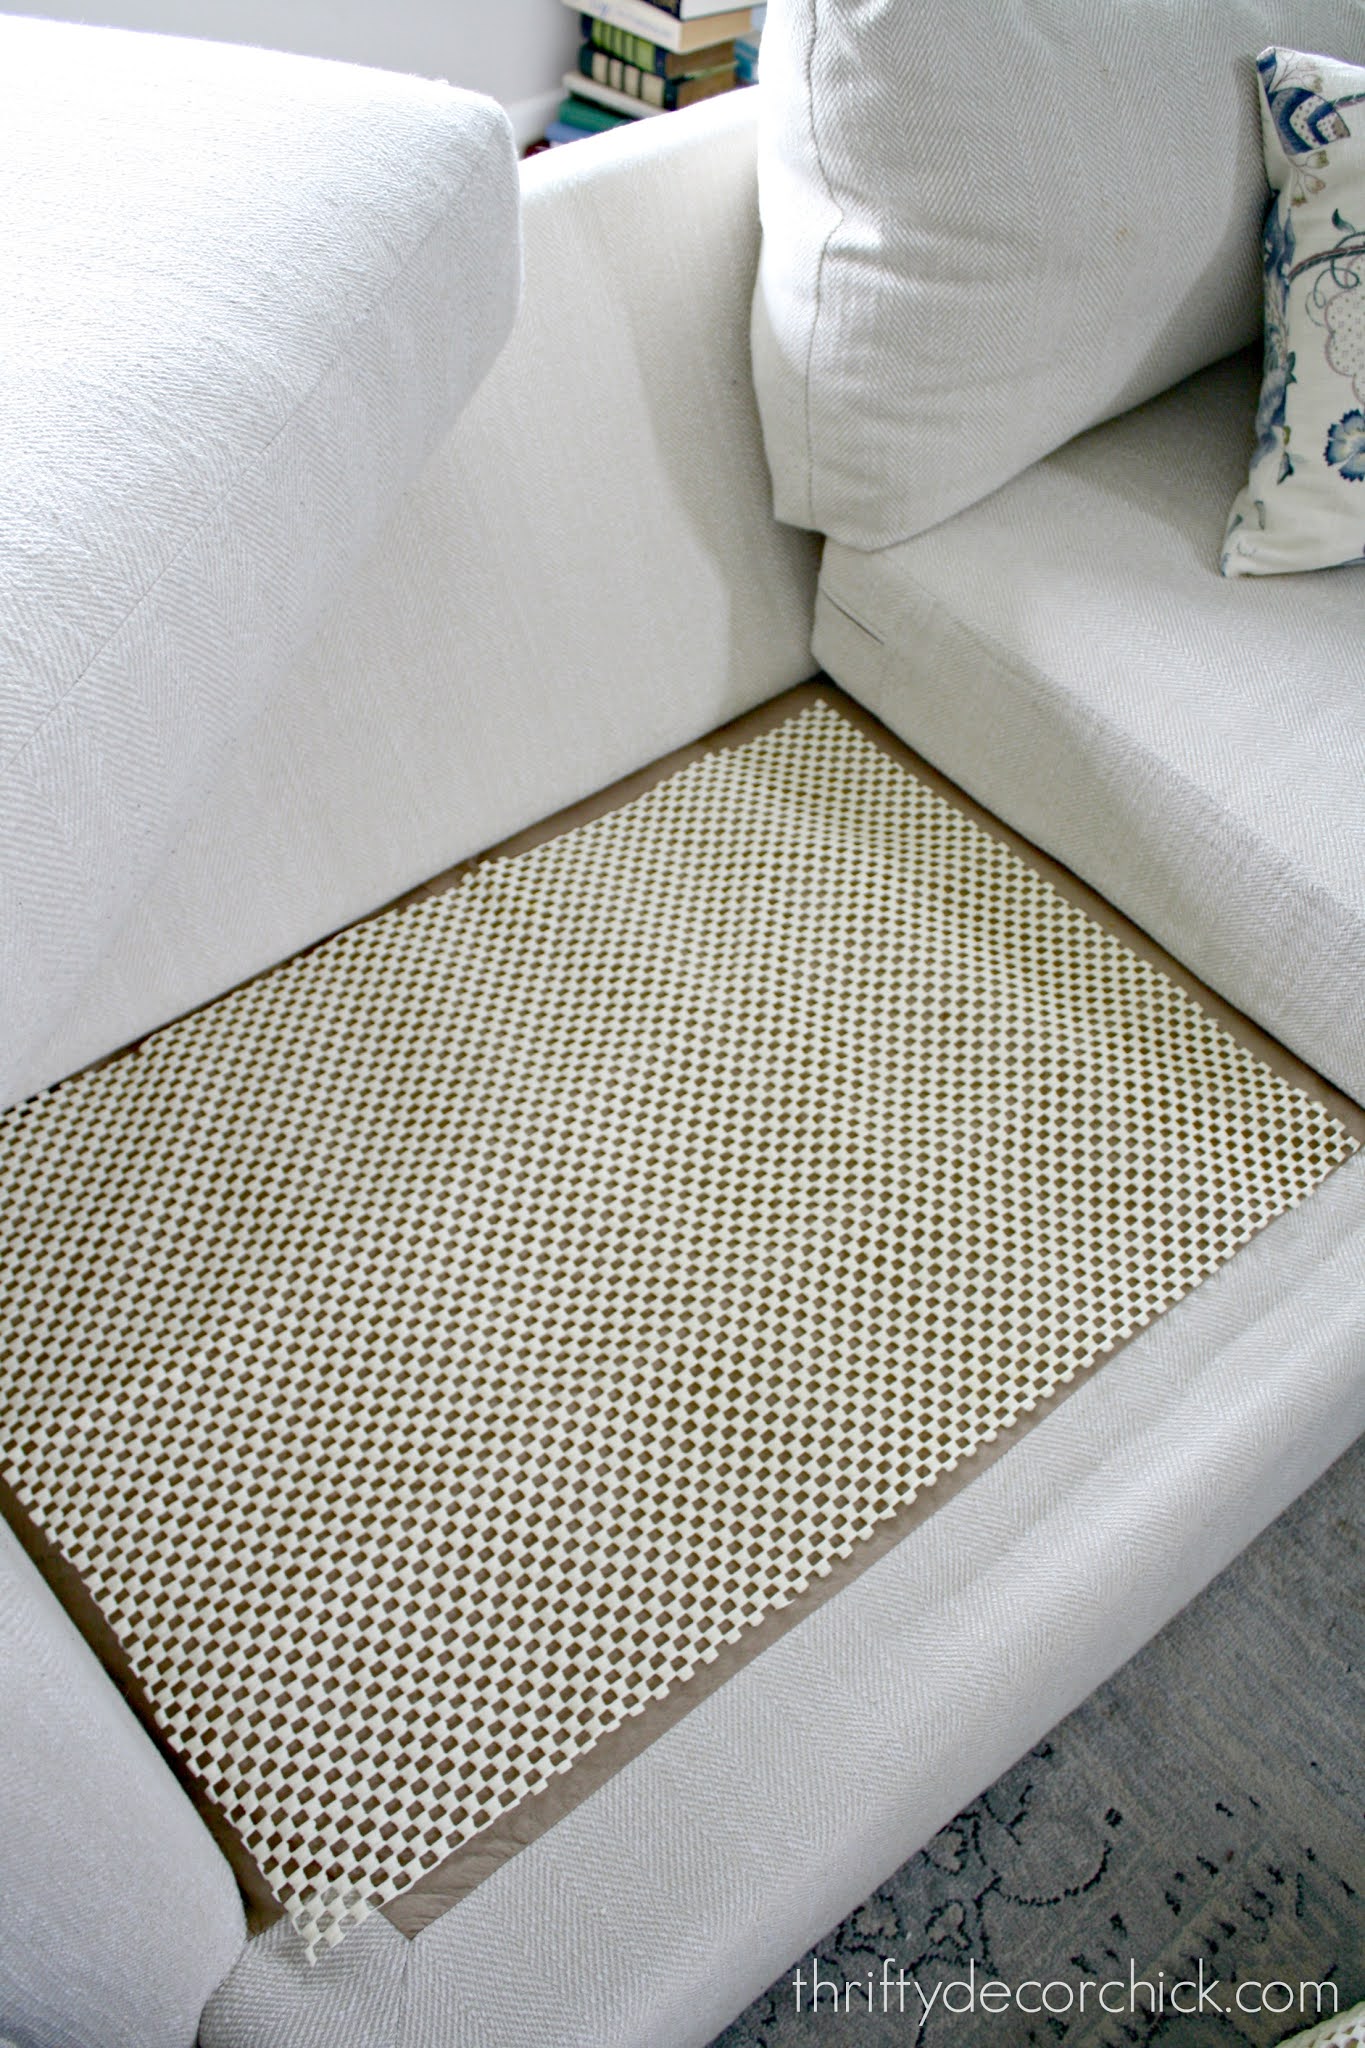
You can see more about fixing sliding cushions here!
That stopped them from moving around all the time, next up was fluffing up the back cushions.
Our dog perches on the back of each couch -- it's his spot to watch for everyone that is trying to kill us. ? I didn't look close enough when I bought these sofas and didn't realize the back cushions were just full of batting.
They get smashed so easily:
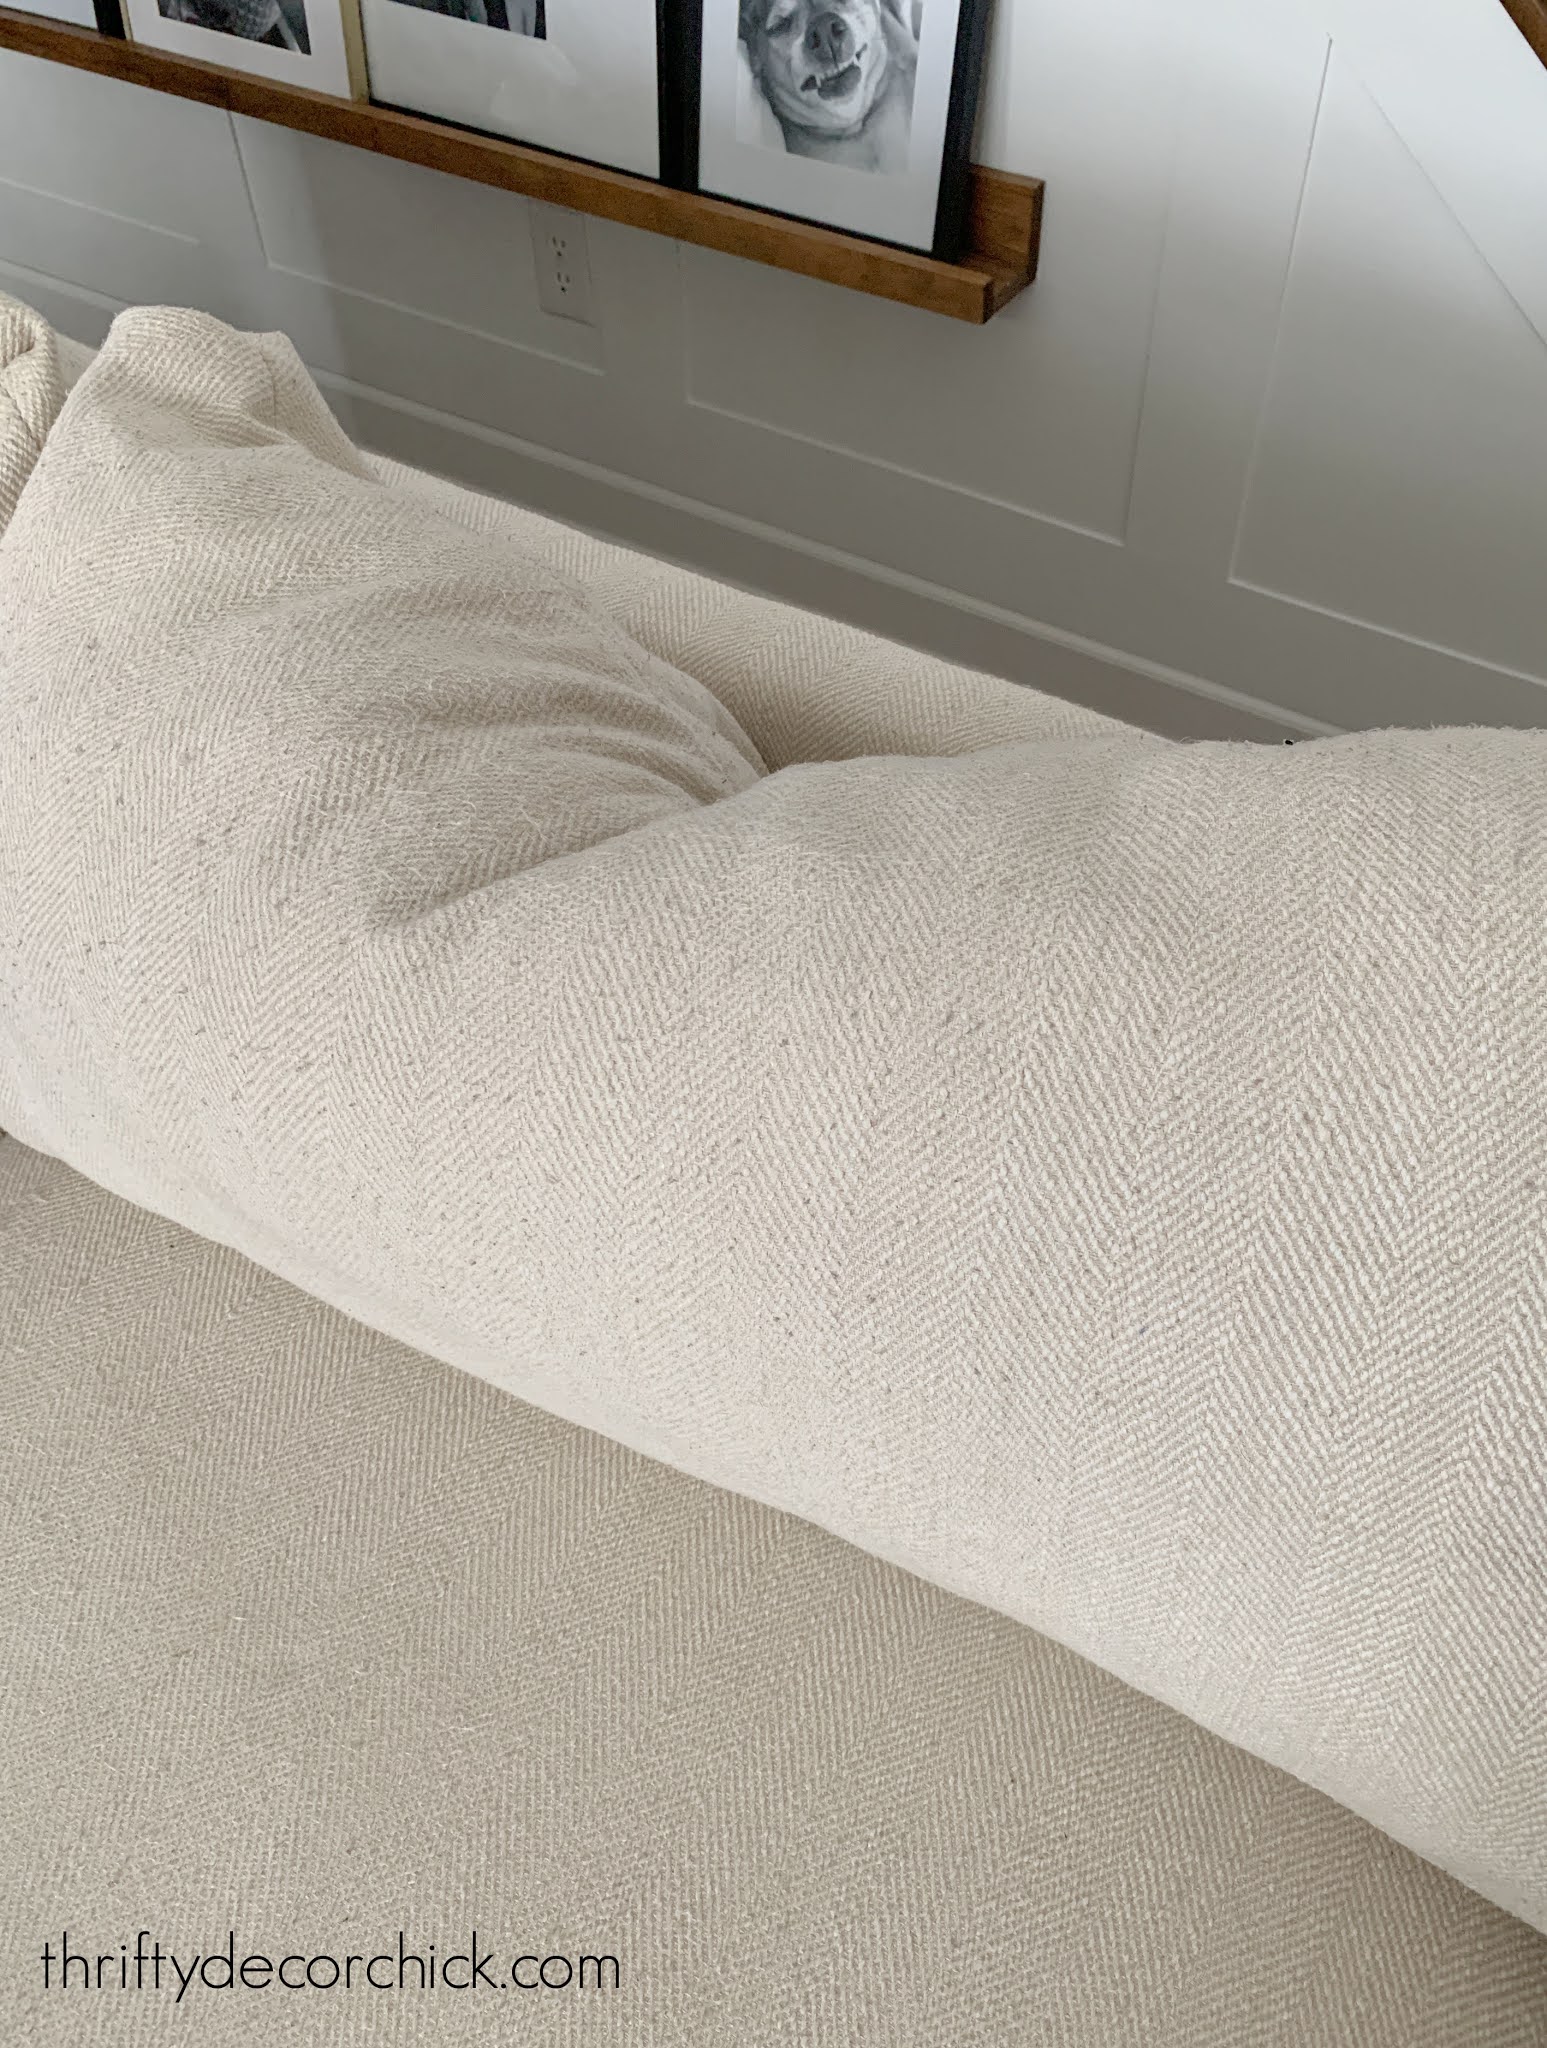
If you have the same you know how hard it is to keep them looking full and not smushed. My fix? Add more batting to fill them up! I've added at least a bag to each back cushion over the years:
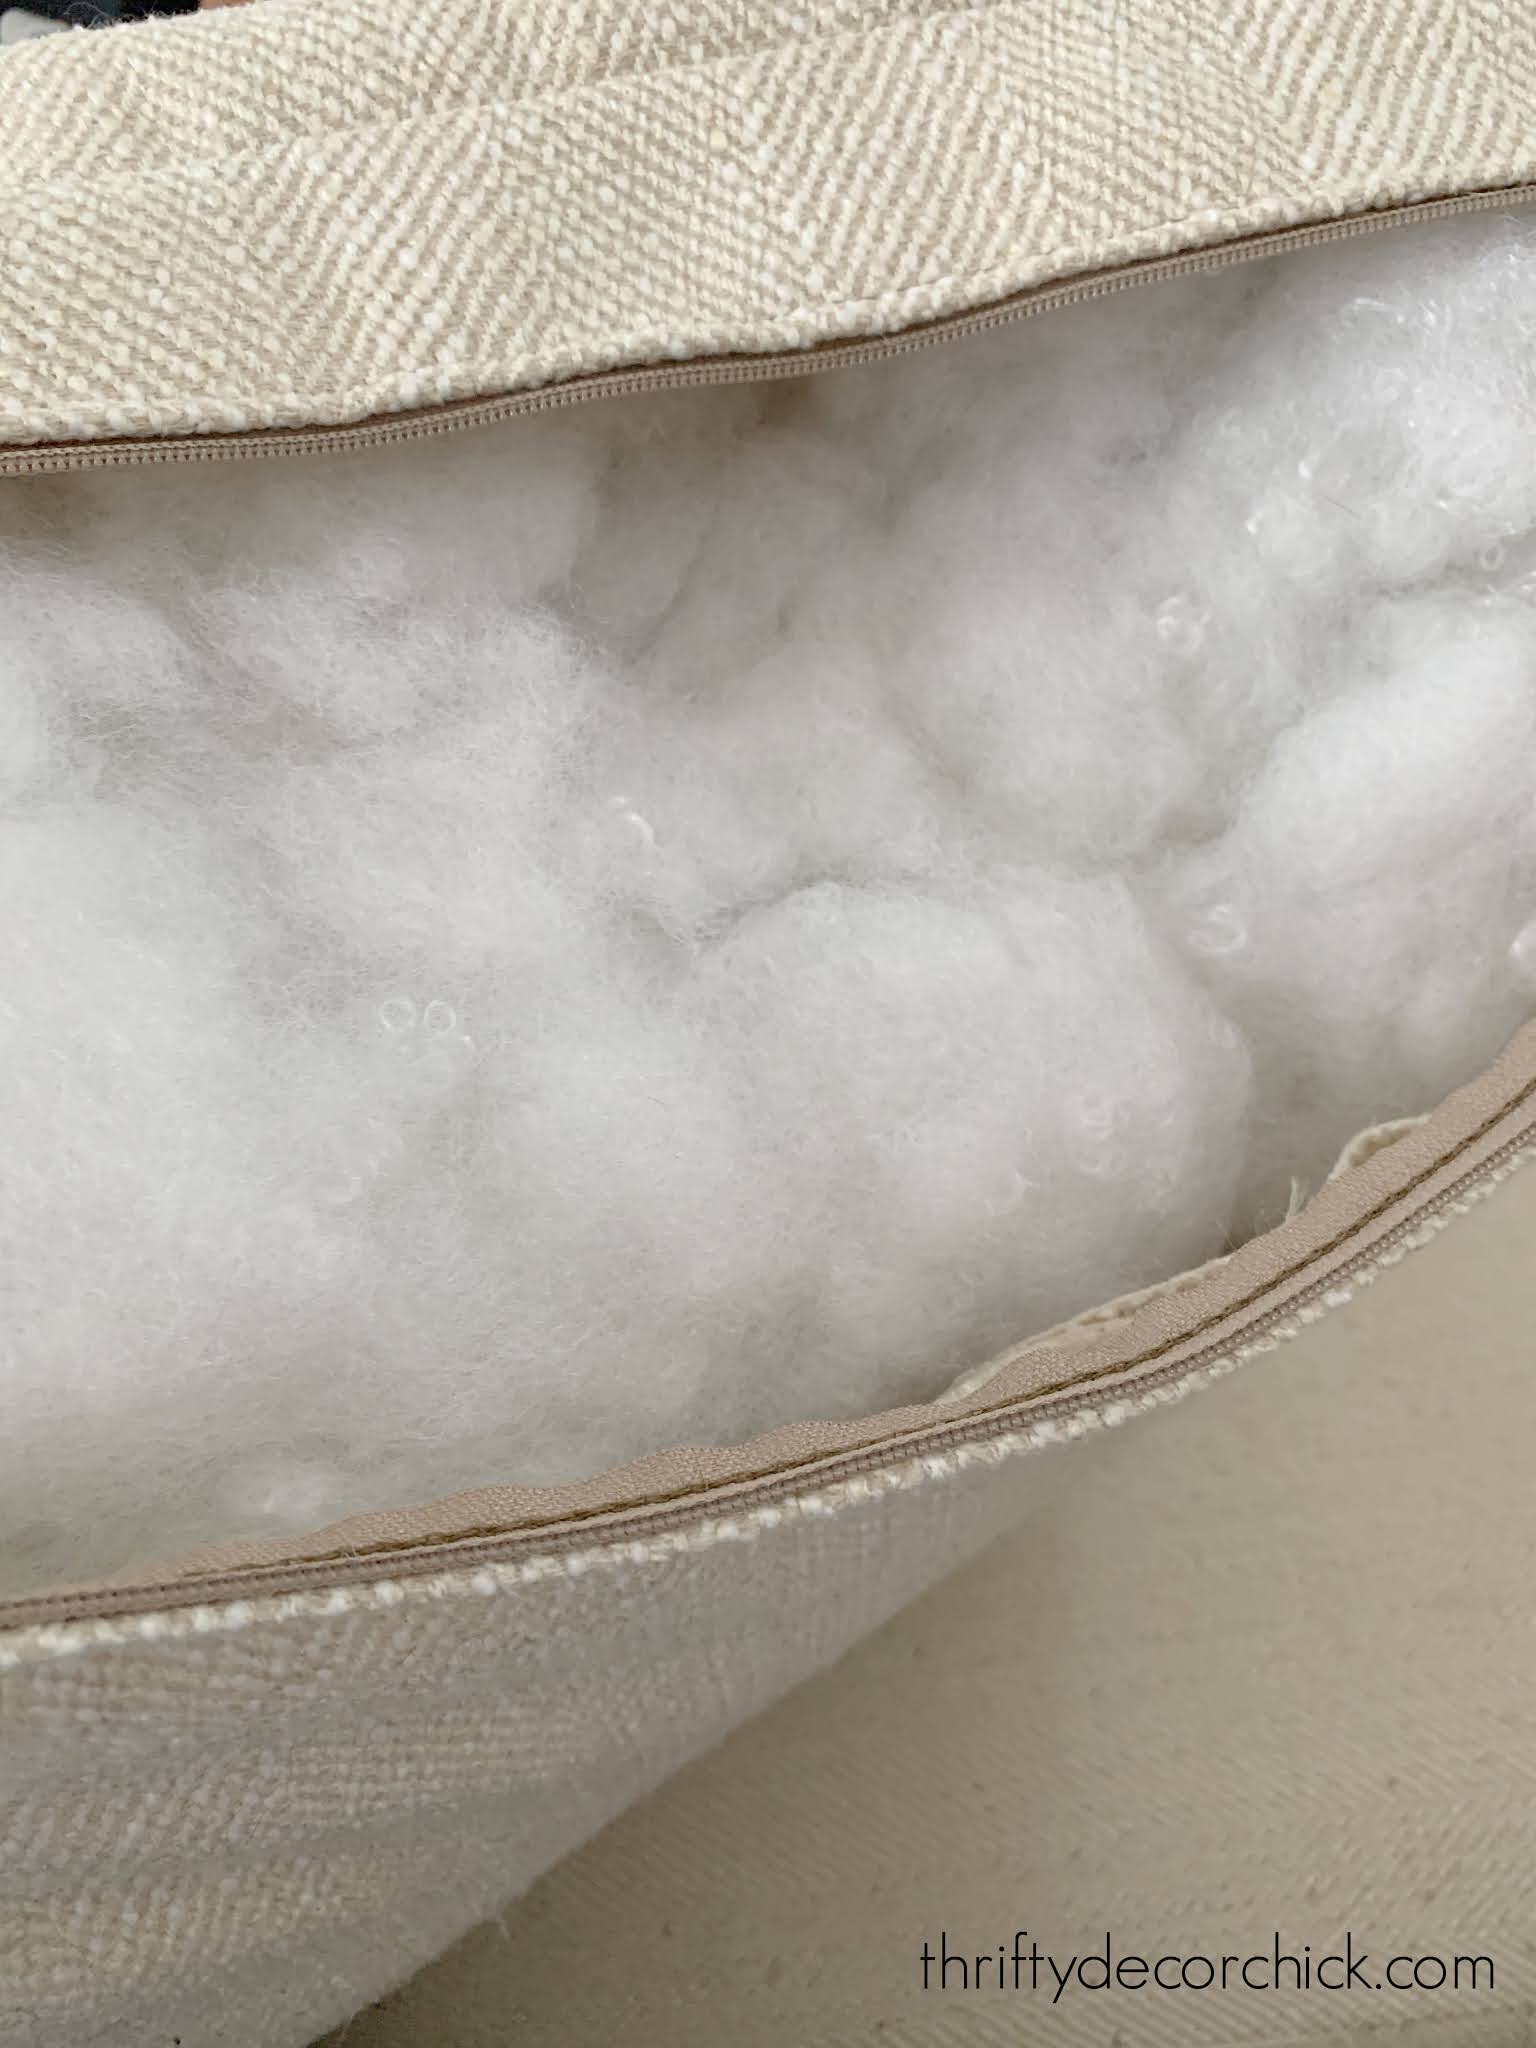
Another tip -- instead of trying to reshape the cushions from the outside -- I unzip and move the batting around inside. I usually have to push it back up to the top and into the corners.
What a difference!:
Till the dog smushes them again. :)
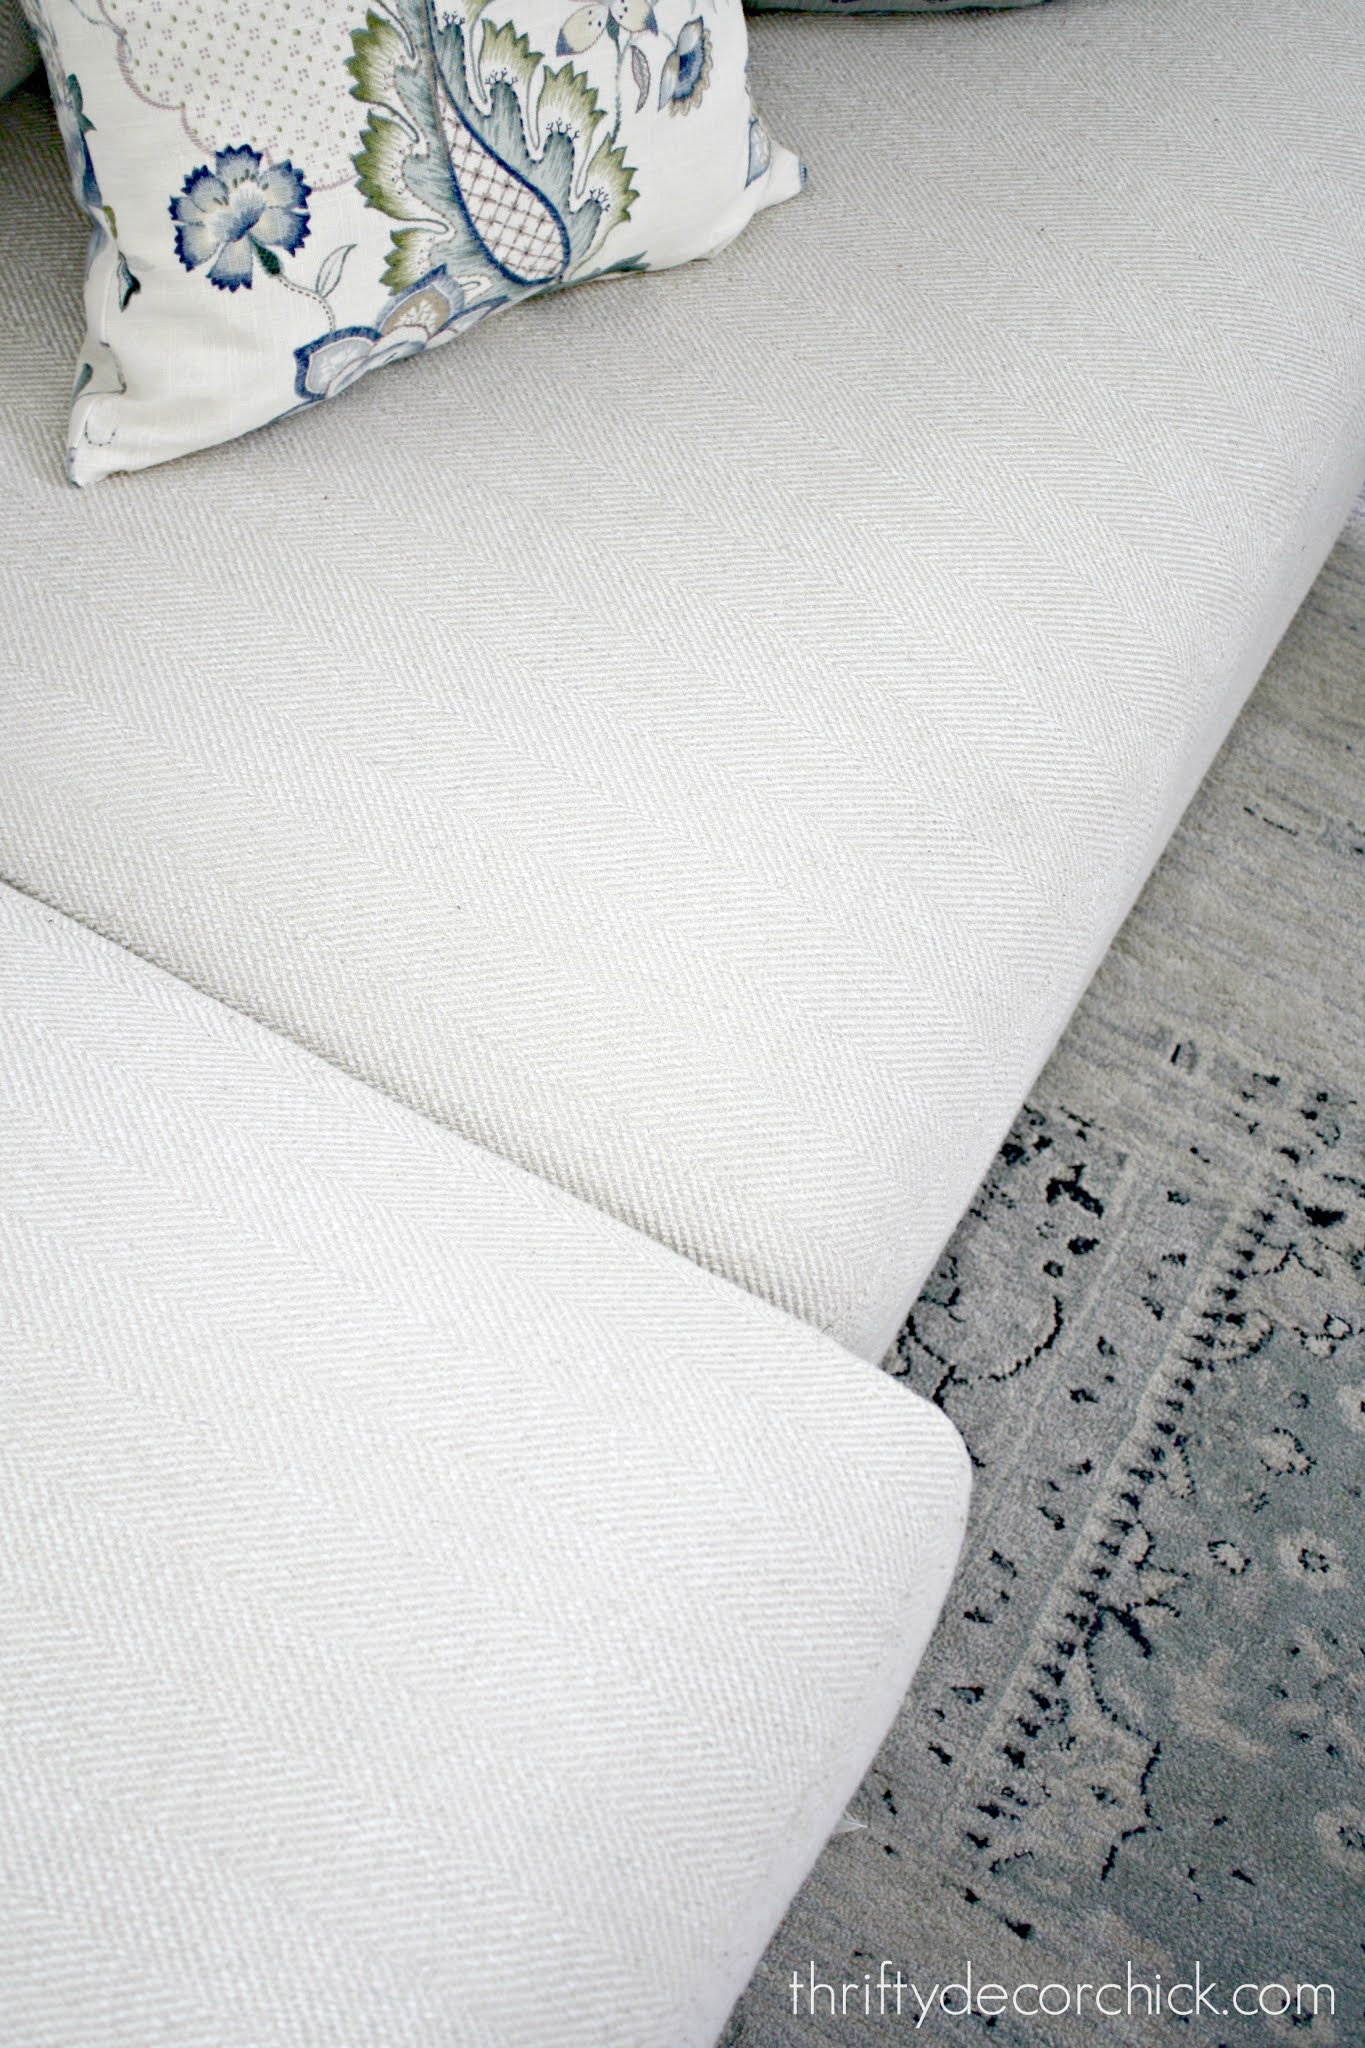
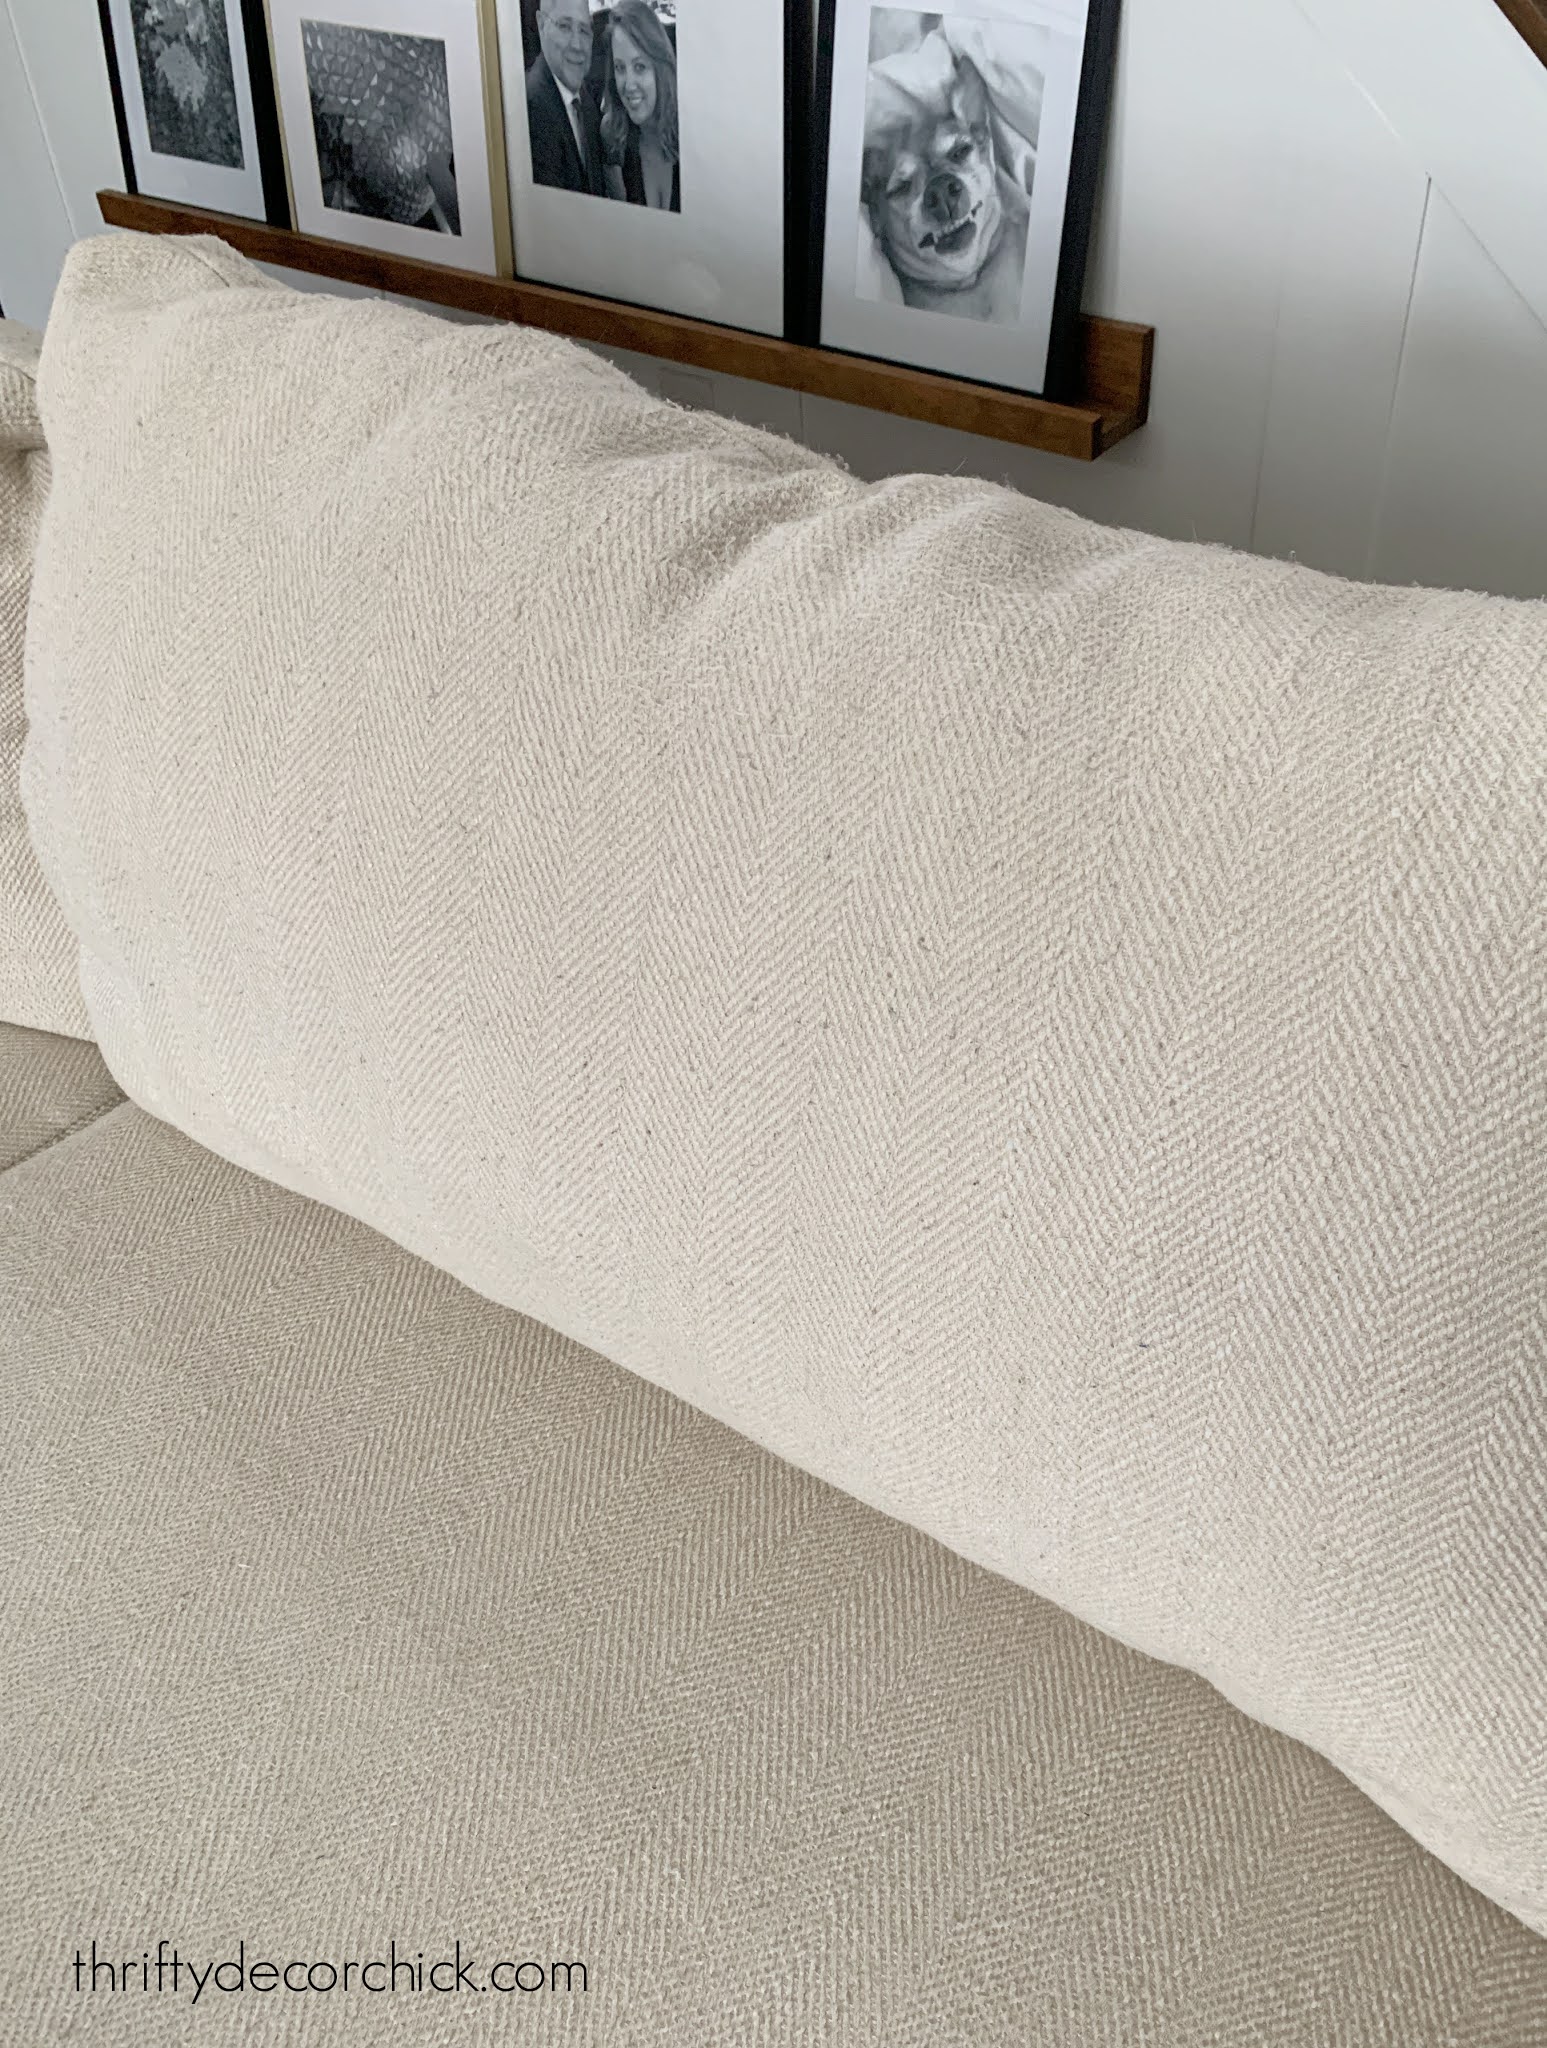
And my worst nemesis -- sofa fabric that pills up. Curses!! It happens all the time with ours:

There's an easy trick for this too!
Grab a fabric shaver -- they're supposed to be used to remove pilling off your clothes, but they work GREAT for upholstery too!:
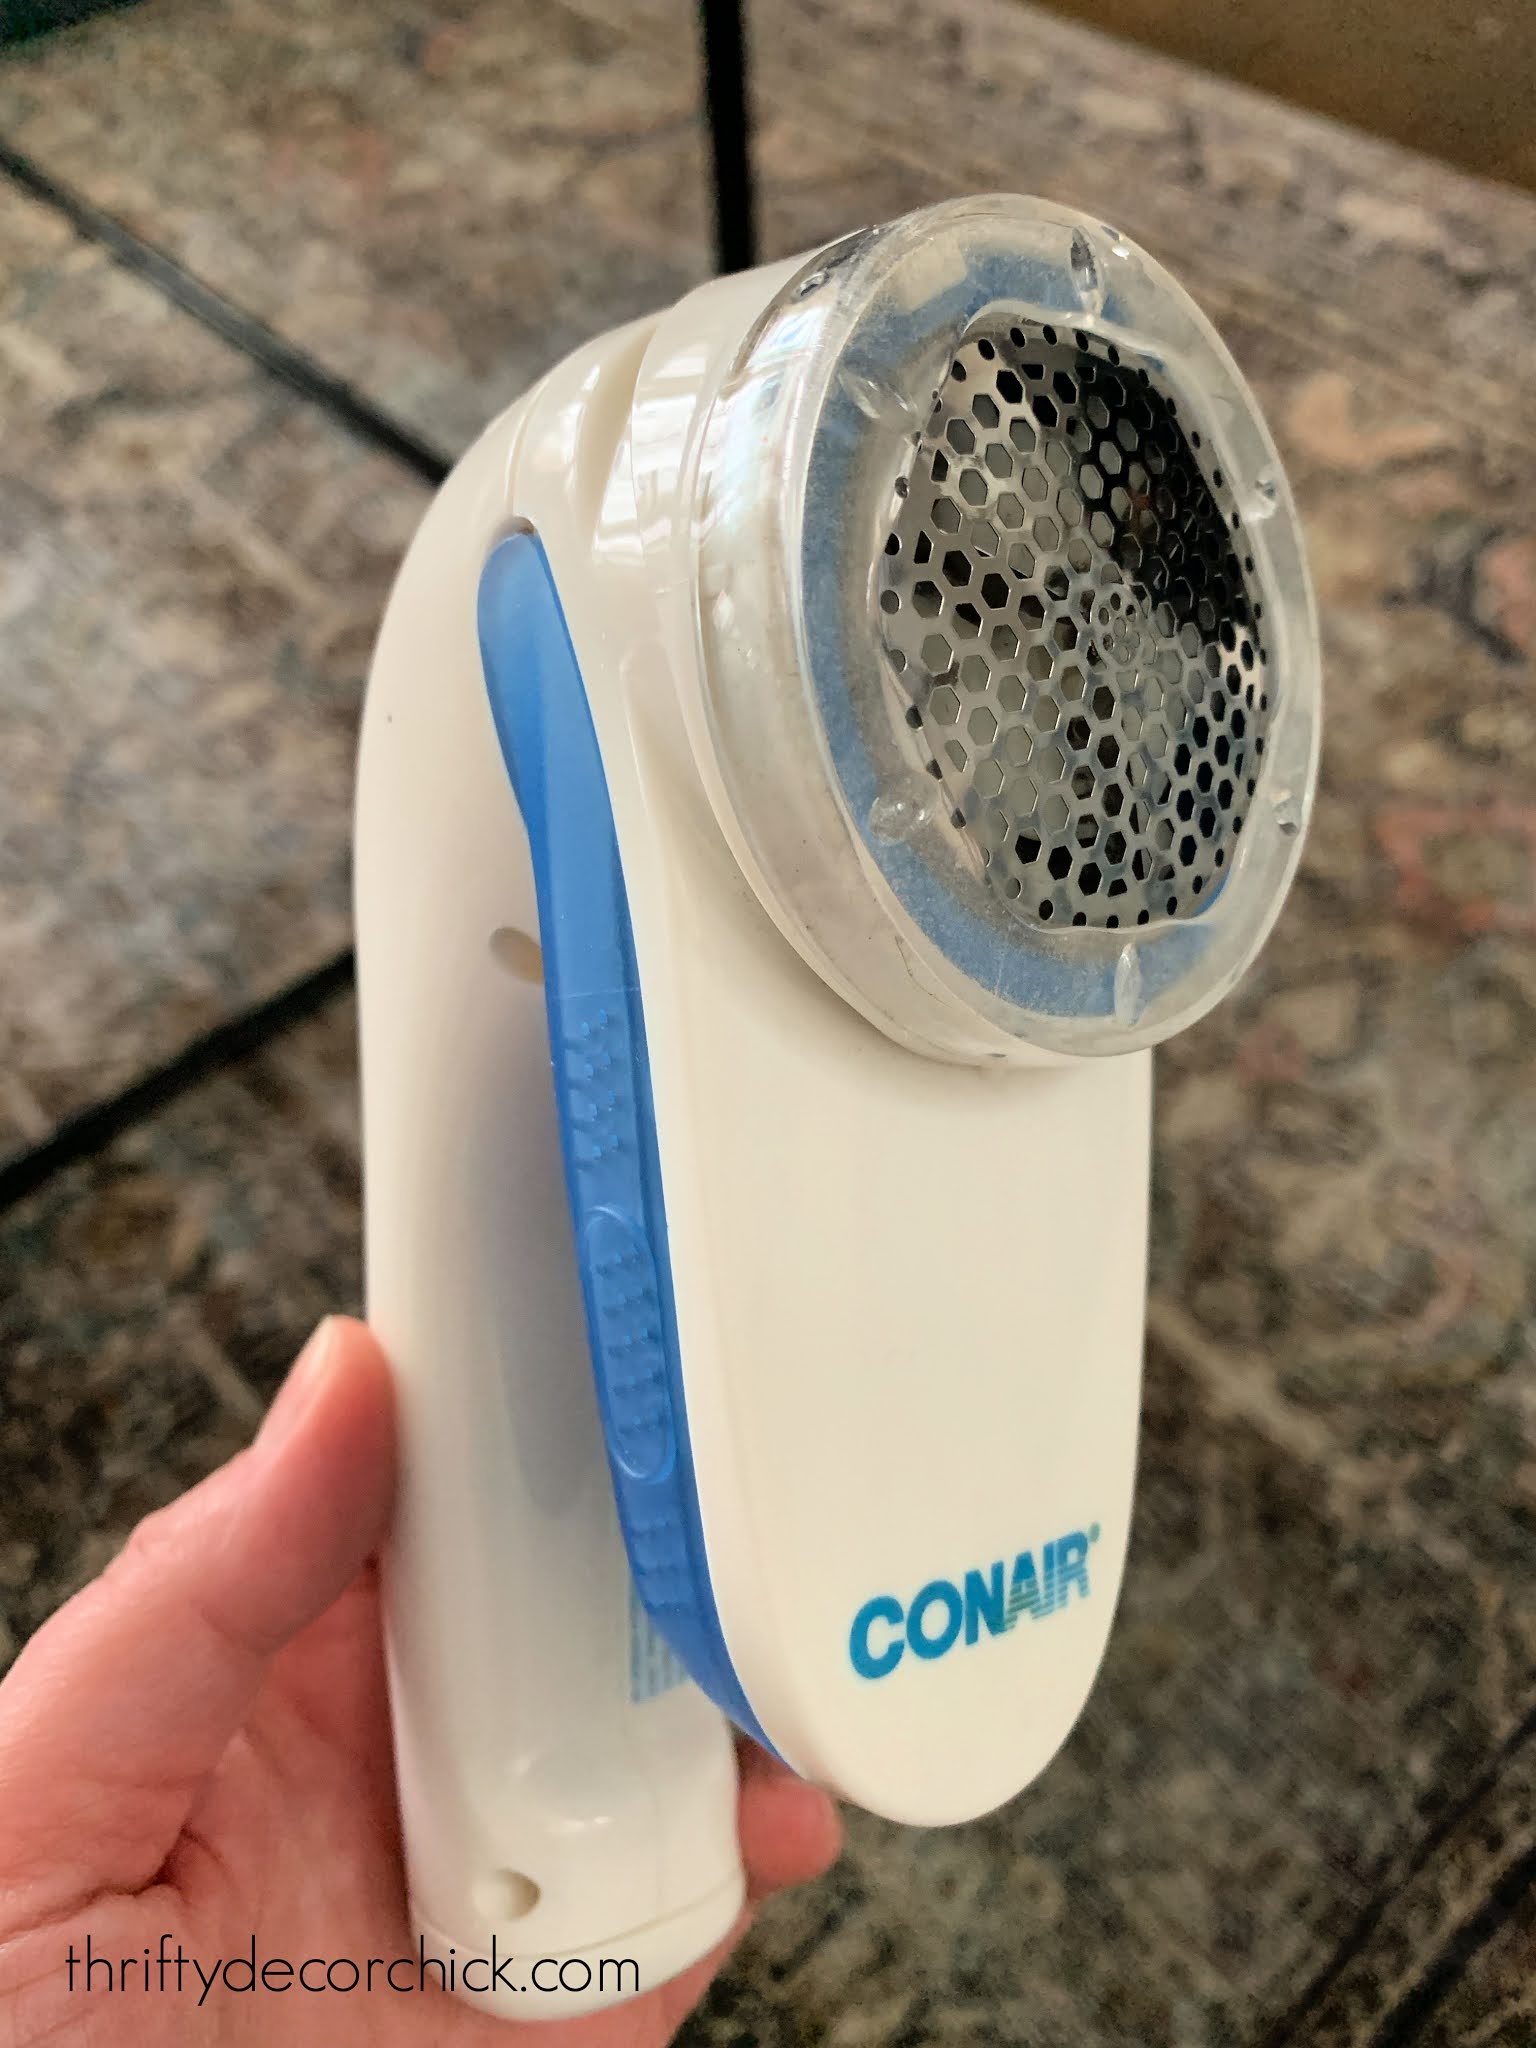
My only complaint is we need to change the batteries often, so I was thrilled to find this plug in version. I ordered it today!
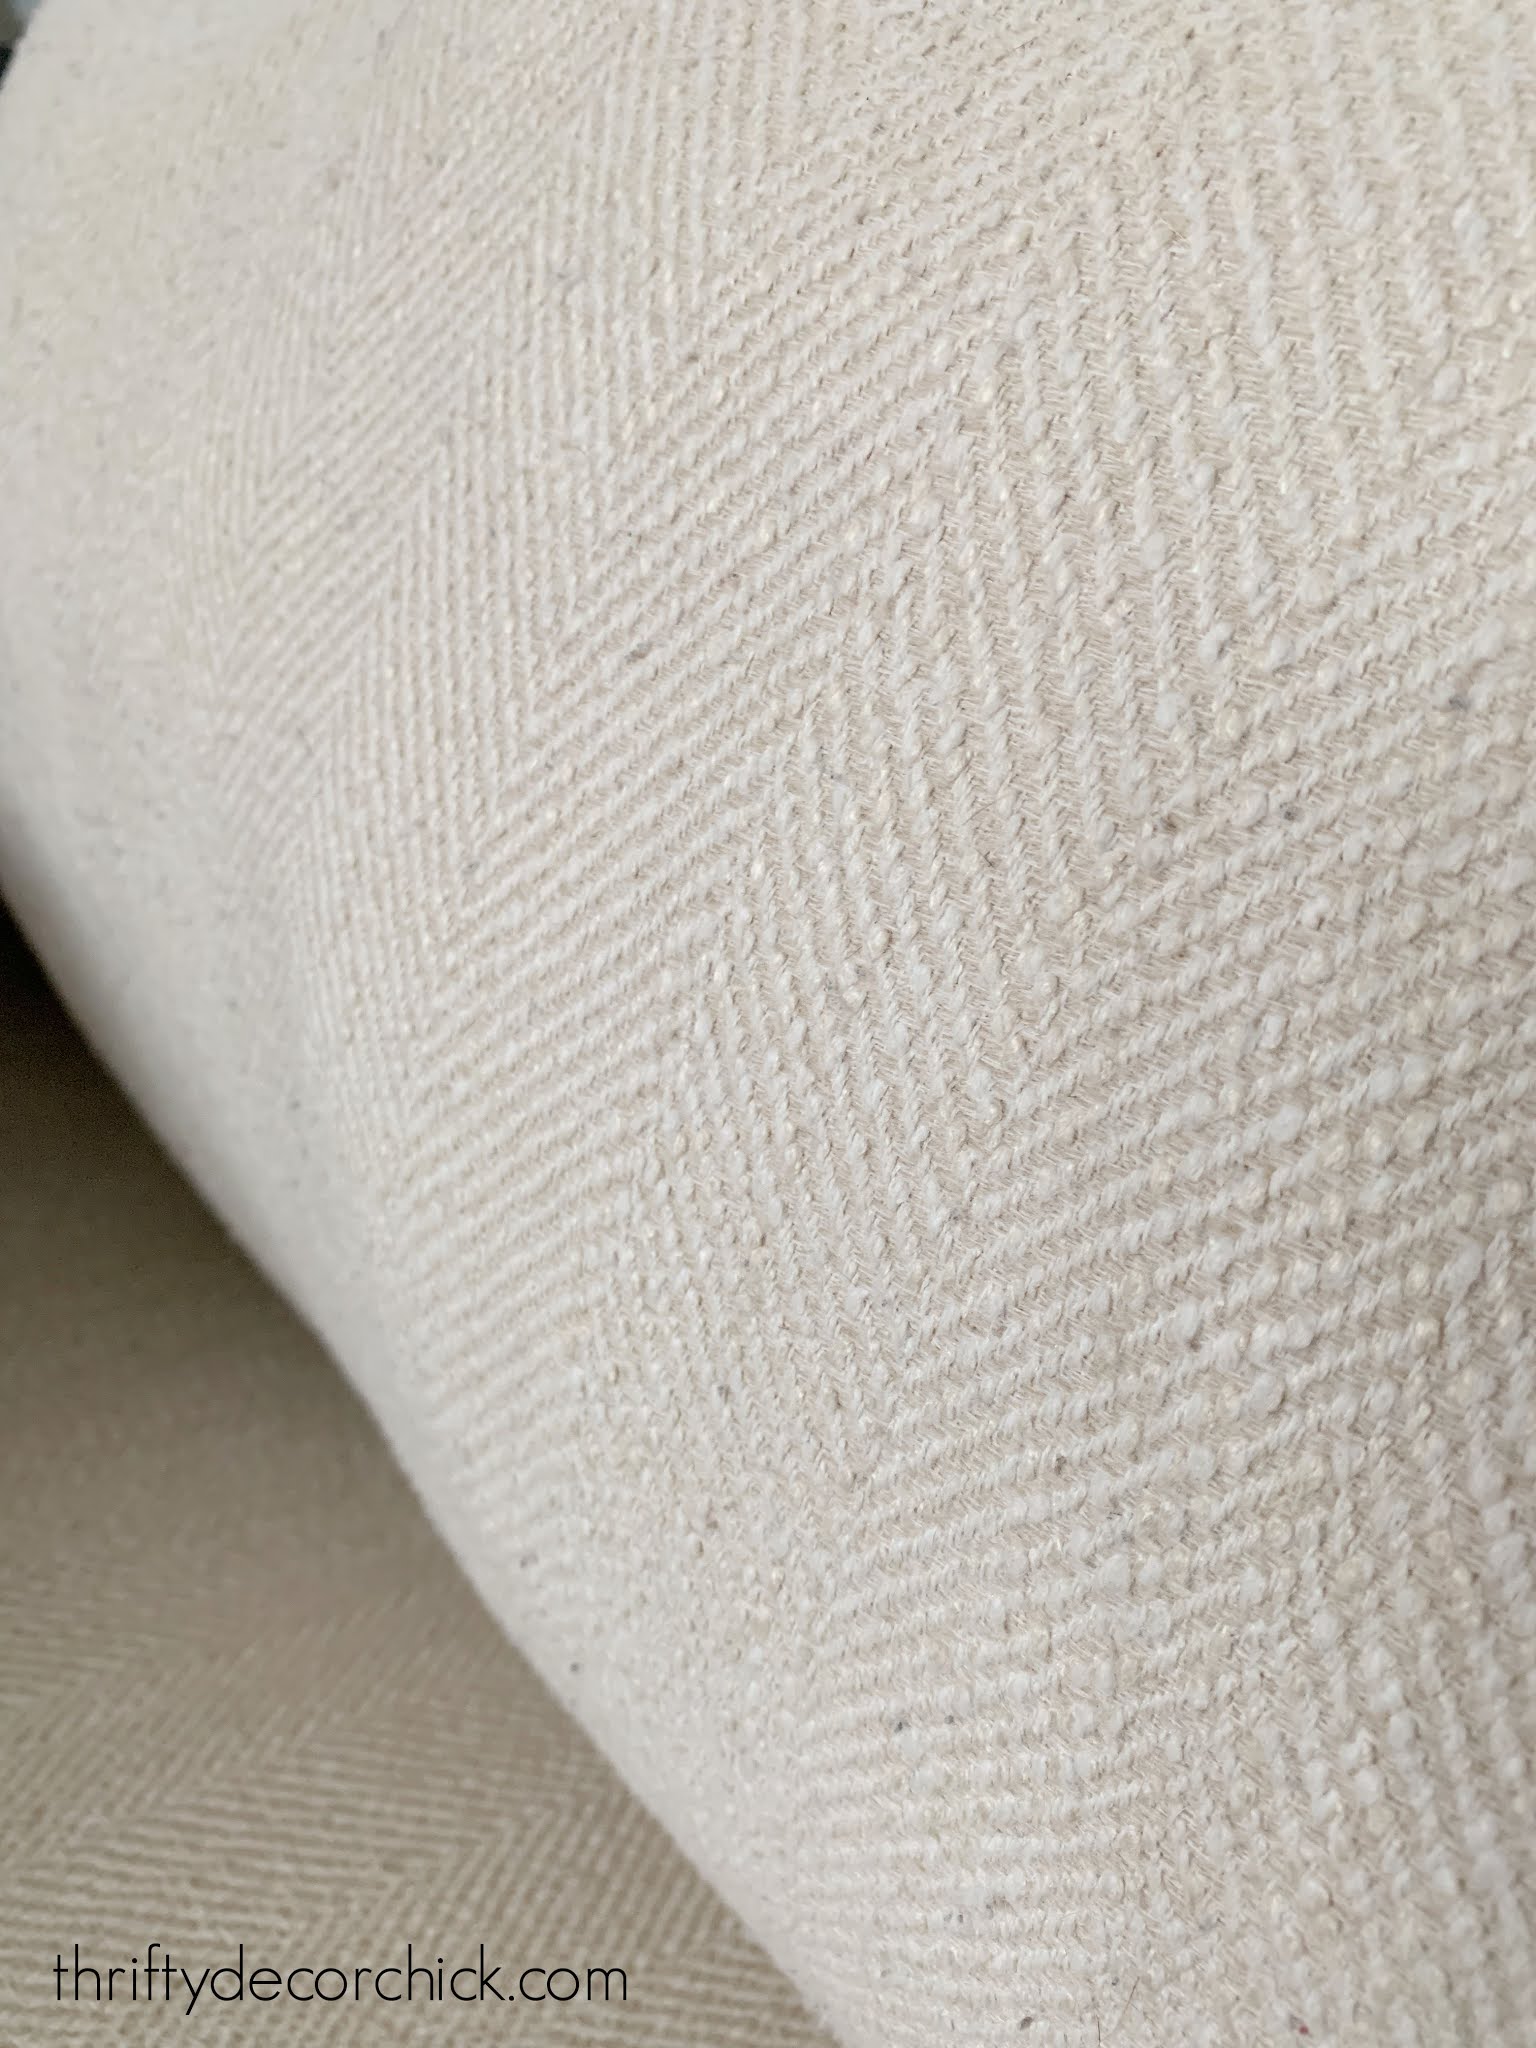
Here's another before of the sofa cushion:

And after using the fabric shaver:

Have you tried any of these tricks or do you have some of your own? I'd love to hear!
See more of our home here. To shop items in our home, click here! Never miss a post by signing up to get posts via email.
Via https://www.thriftydecorchick.com/2021/02/make-old-sofa-look-new-tips.html |


